
Fairy Godmother Stories 2: Dark Deal – The game’s walkthrough begins with you holidaying at your old friends and godchildren’s house, but suddenly you discover that something is wrong with your godson. Your playthrough then takes an interesting turn as you begin to pursue the mystery salesman and try to prevent him from awakening, and put an end to the chaos left behind. Grab your magic wand and become a real fairy godmother in this exciting adventure. If you can not pass any of the puzzles or do not know where the items are, on our site you can watch the walkthrough of the game Fairy Godmother Stories 2: Dark Deal, and stop the chaos that is happening in the magical world.
Fairy Godmother Stories 2: Dark Deal – Walkthrough
Here you can see the full walkthrough of Fairy Godmother Stories 2: Dark Deal game, namely for all chapters, including bonus chapter, in pictures.
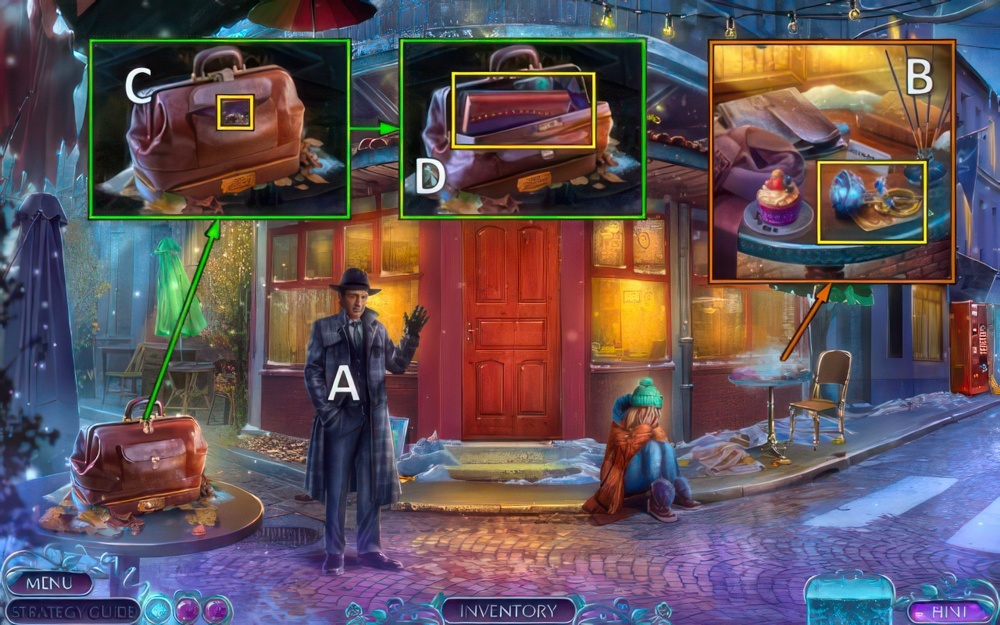
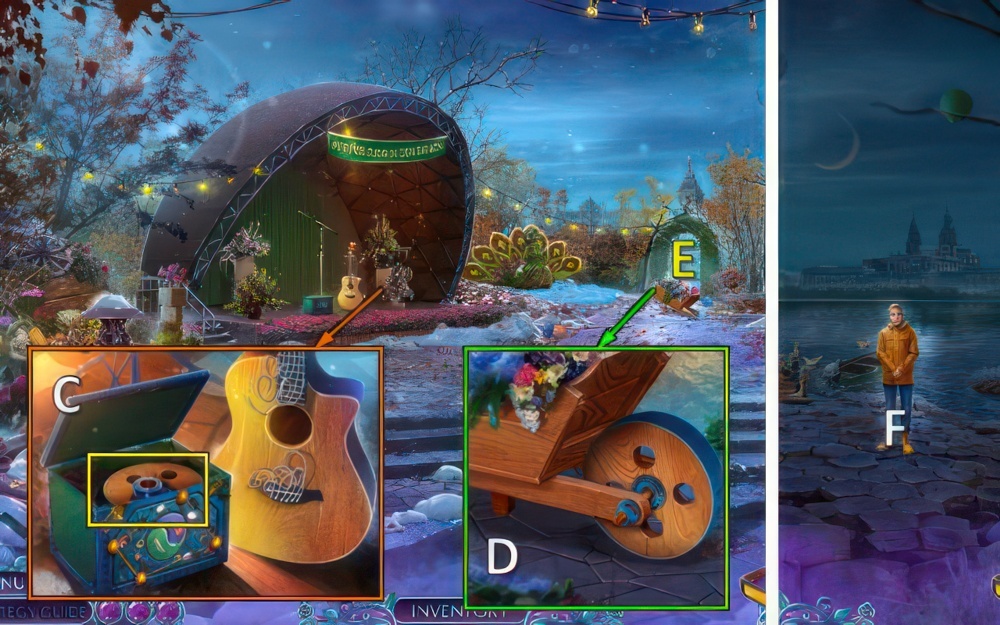
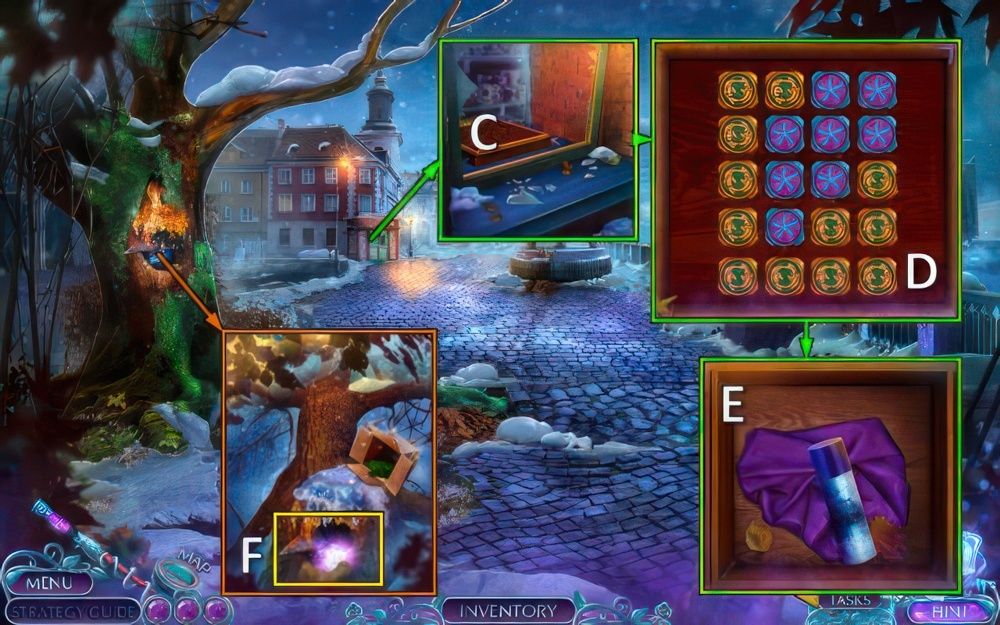
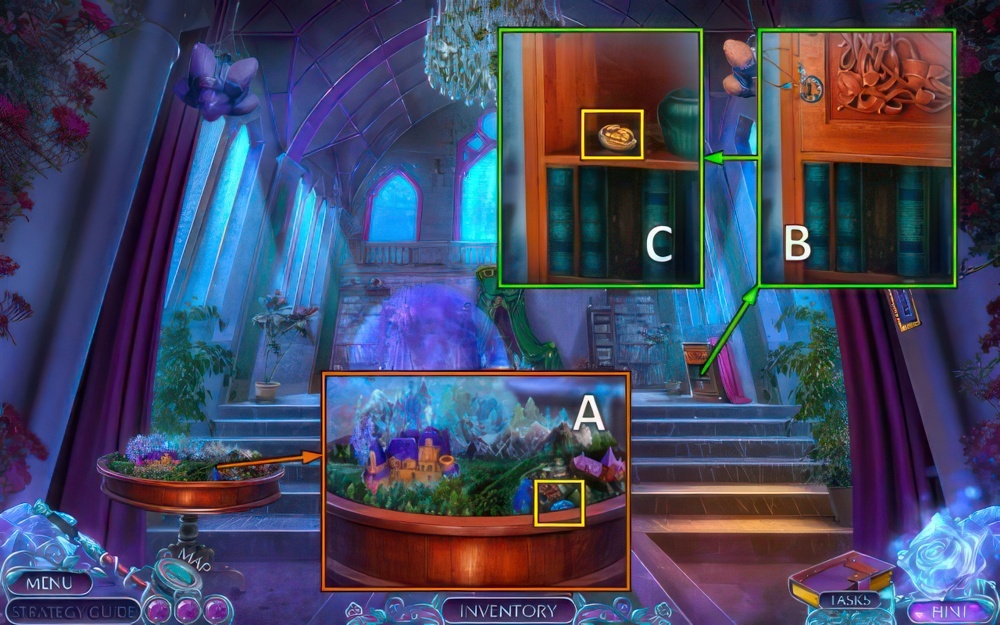
- Talk (A), receive GOODWIN’S HAT.
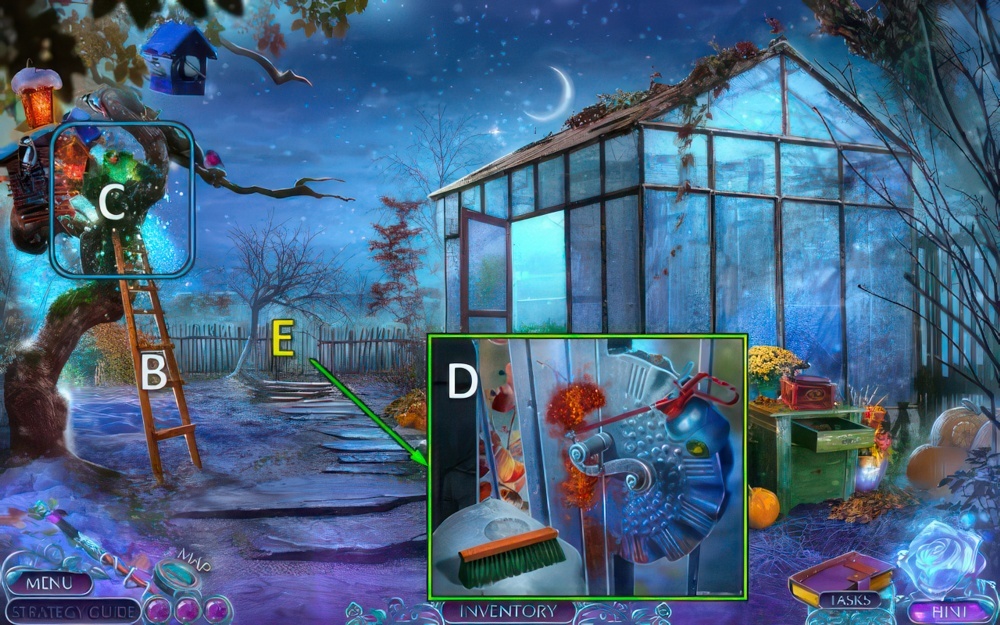
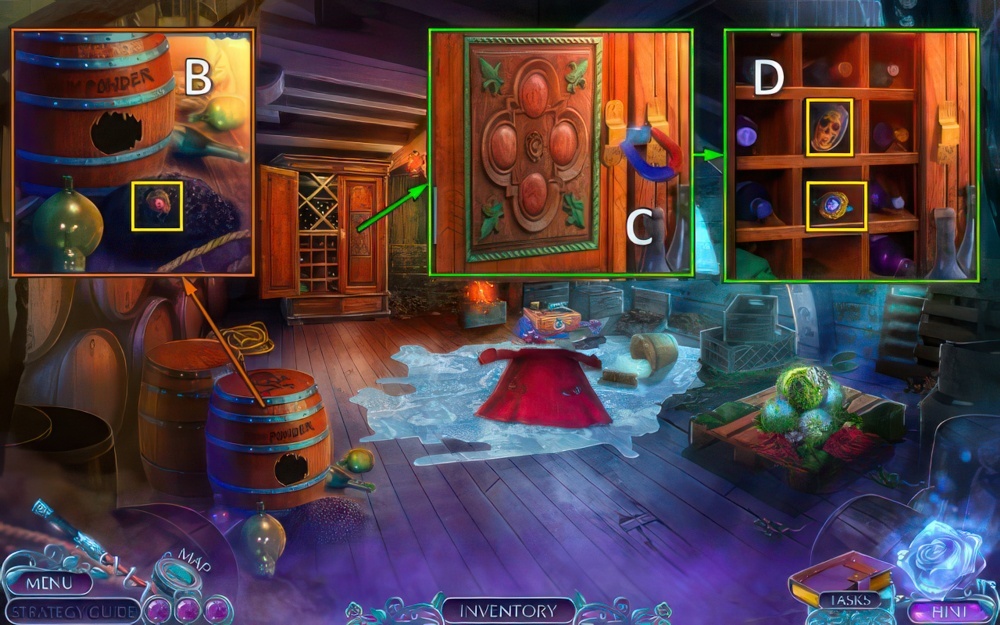
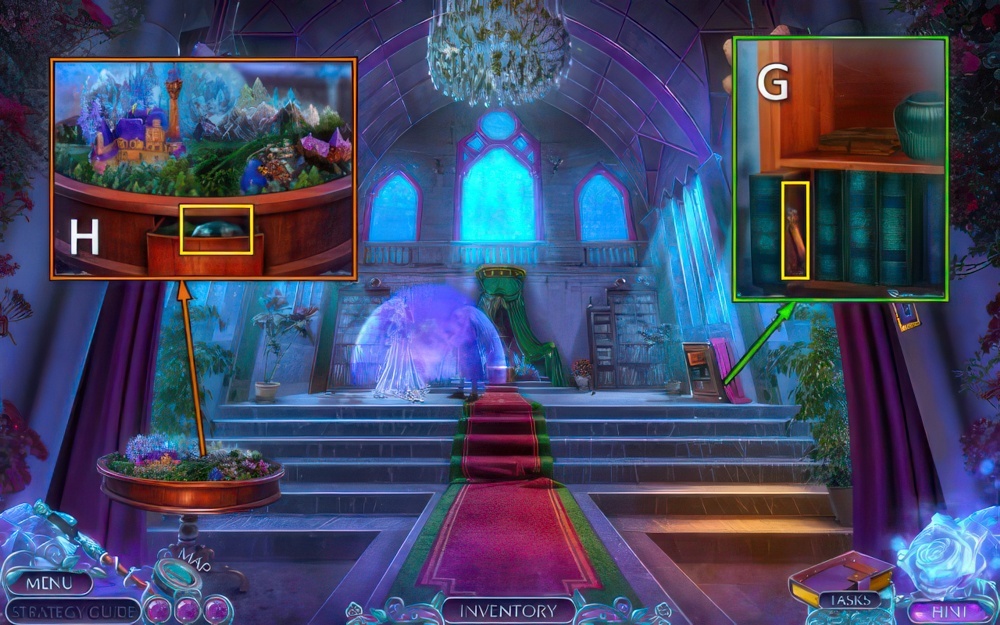
- Use GOODWIN’S HAT, take hint rose, BARRETTE and COUPONS 1/4 (B).
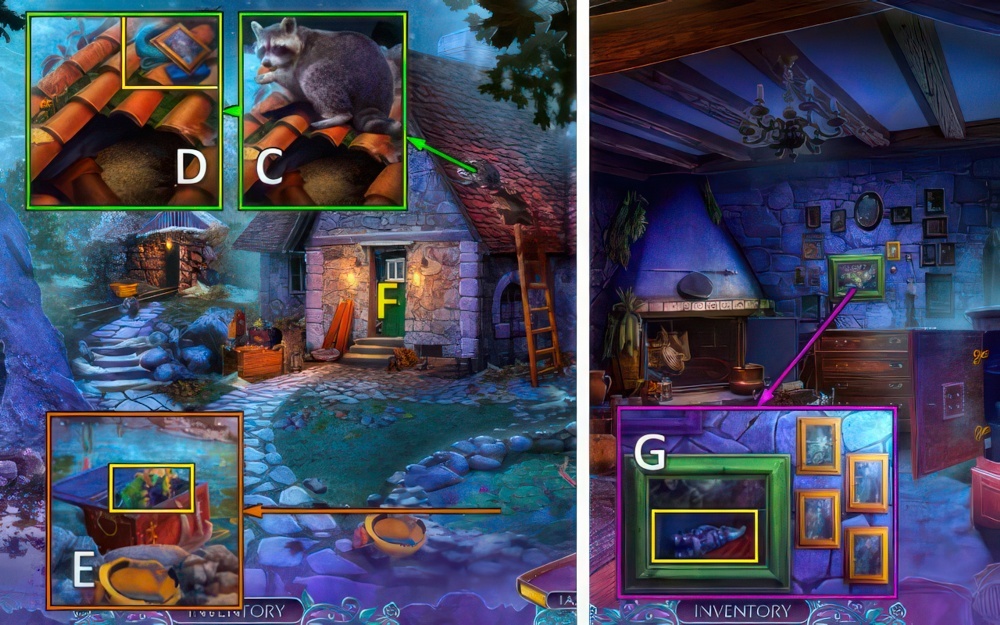
- Open, take DIAMOND RING (C).
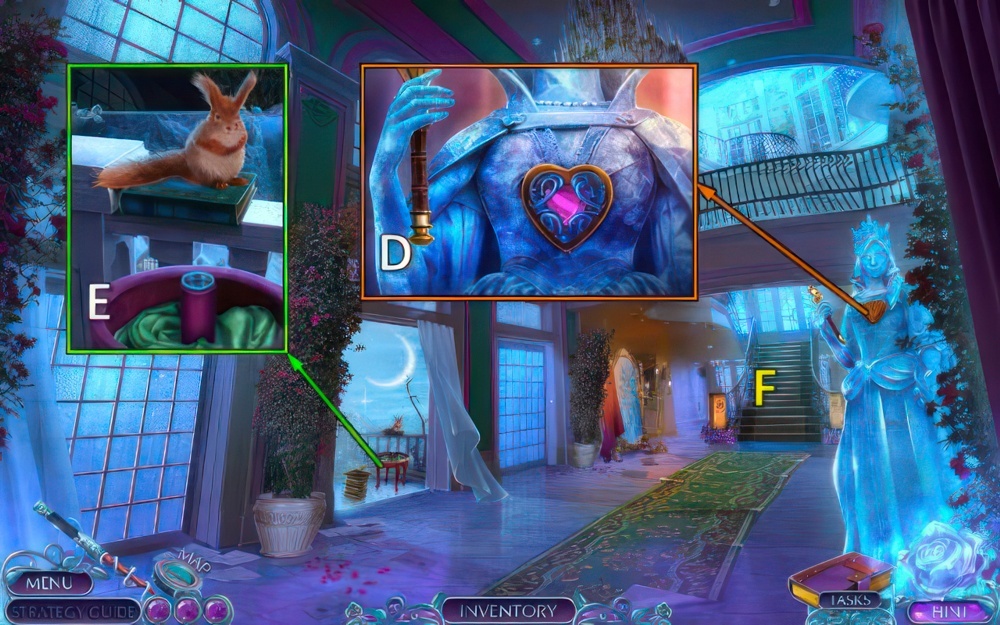
- Use BARRETTE, take task book, CLOSED CASE and MONEY 1/2 (D).
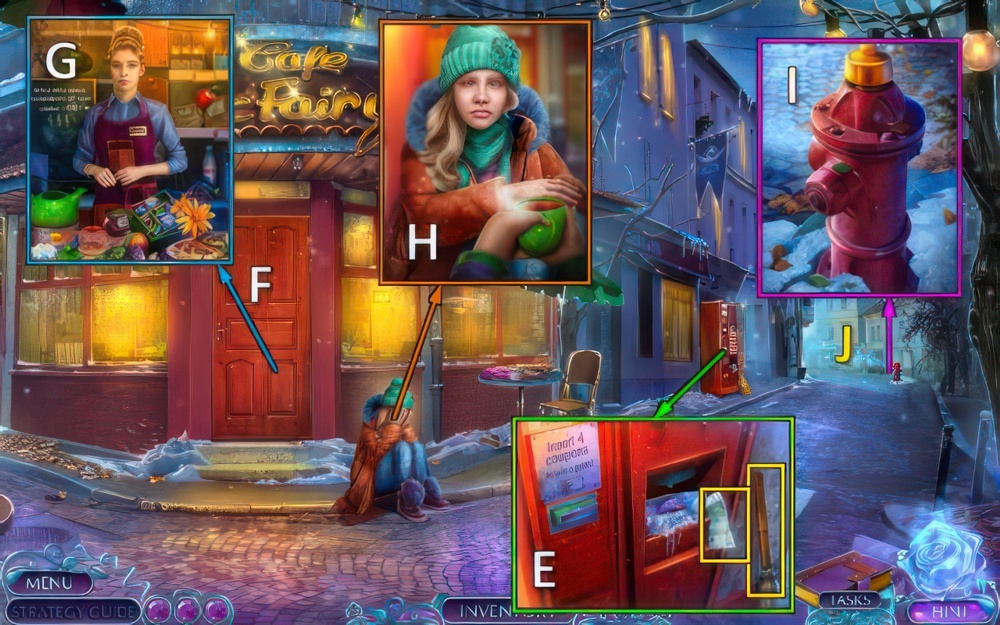
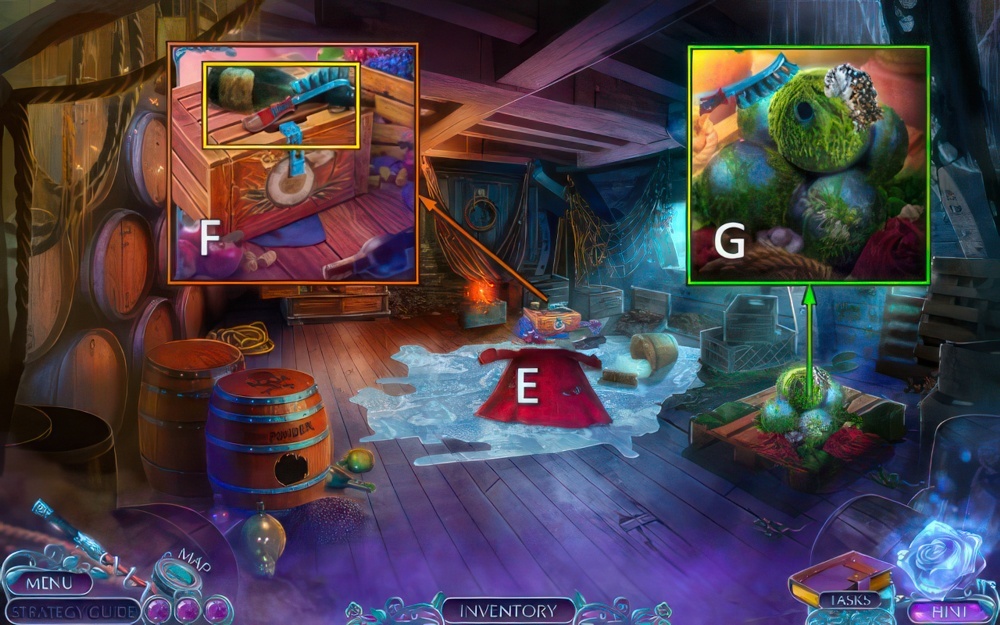
- Take MONEY 2/2 and BROOM (E).
- Open (F).
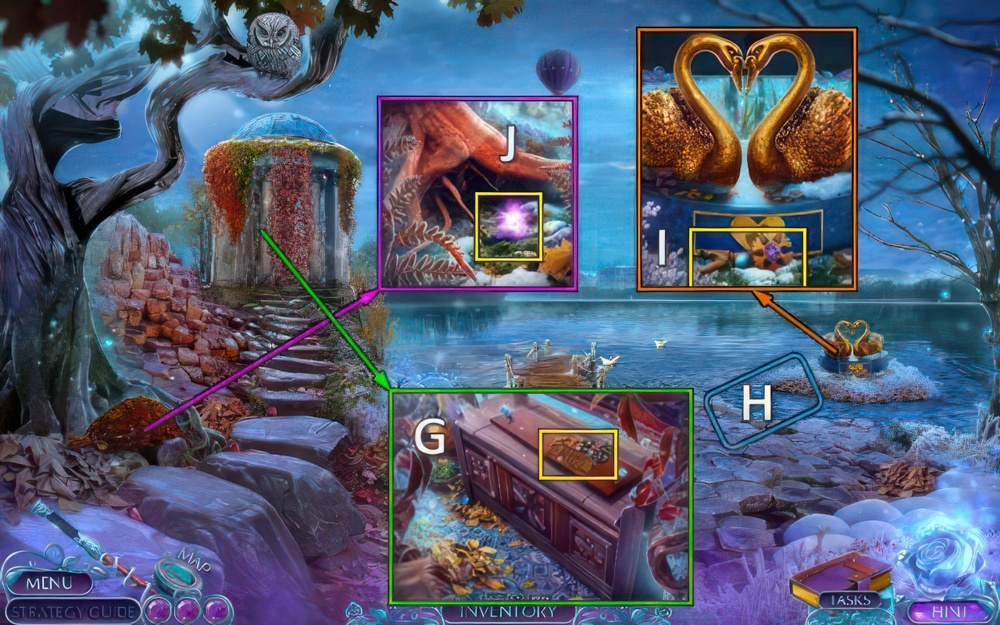
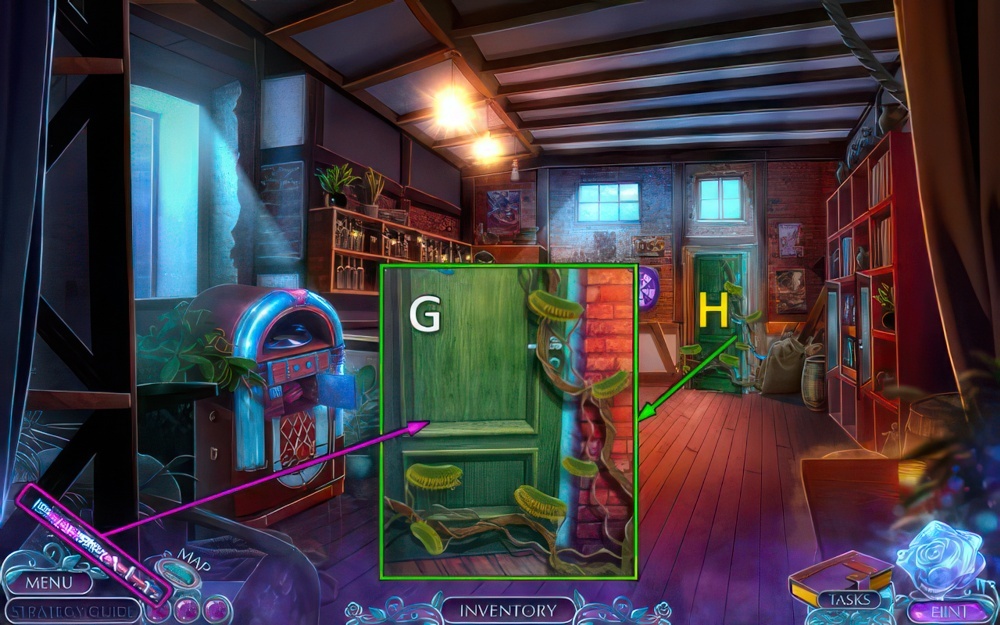
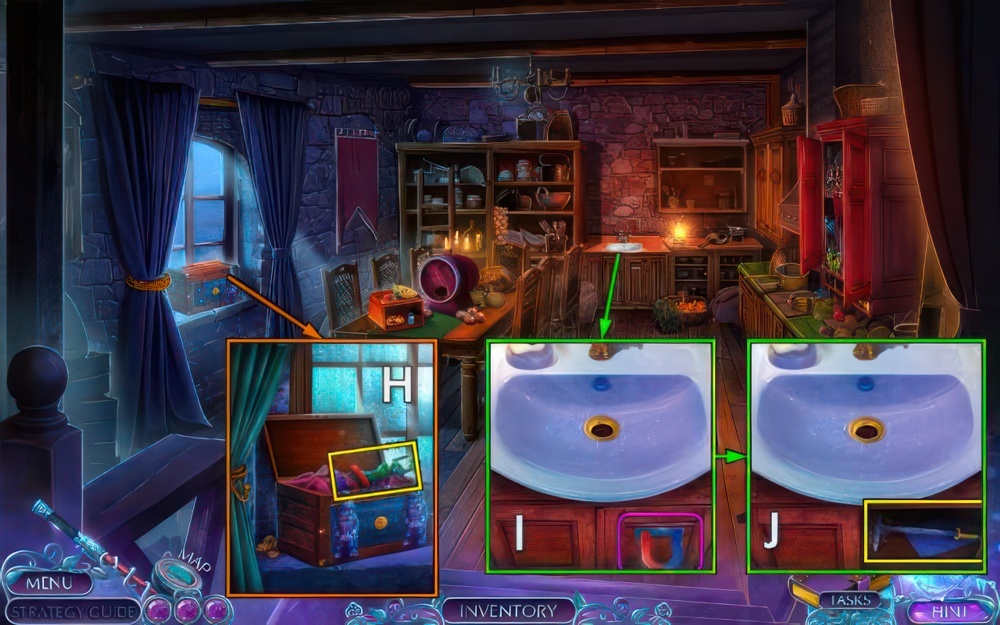
- Offer MONEY for puzzle (G), receive CALMING TEA.
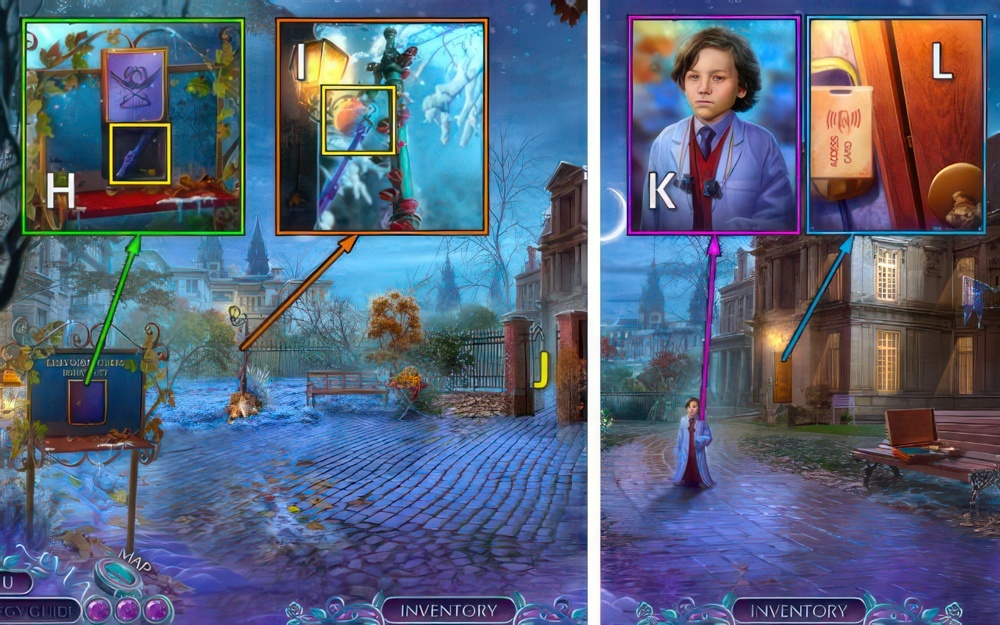
- Offer CALMING TEA (H), receive WRENCH.
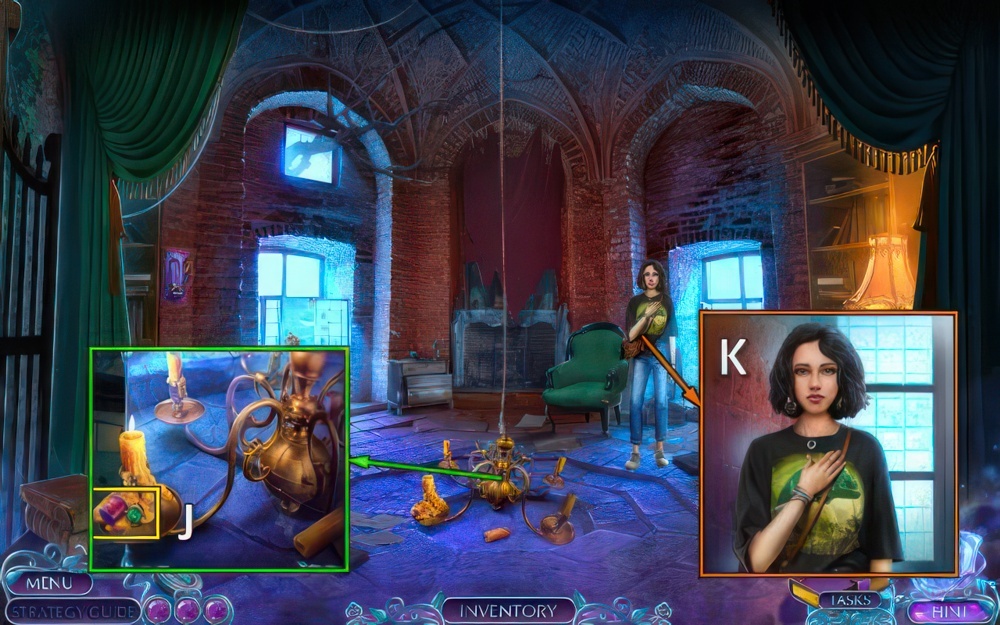
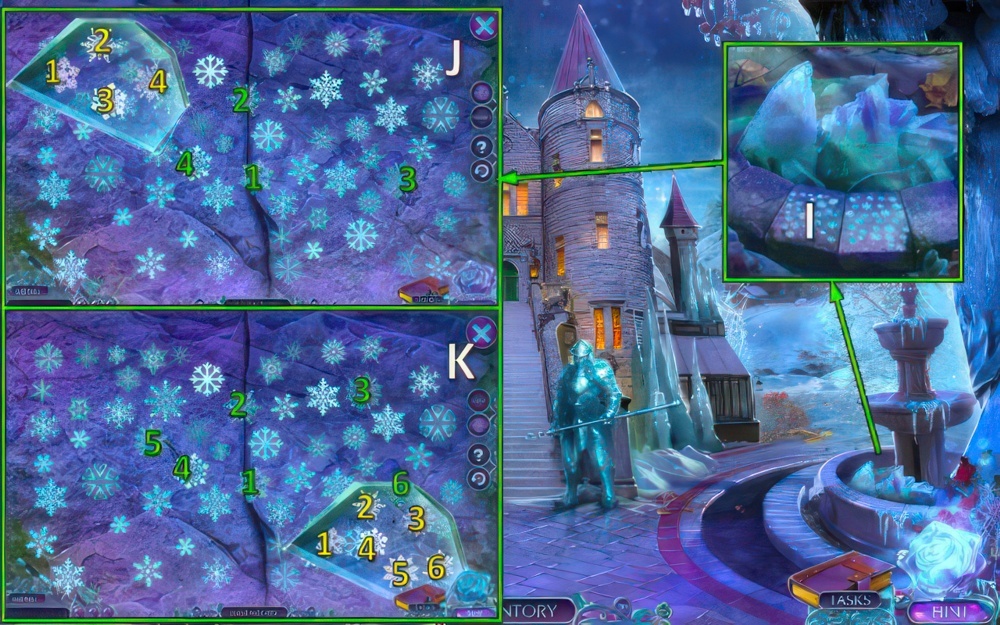
- Use WRENCH (I).
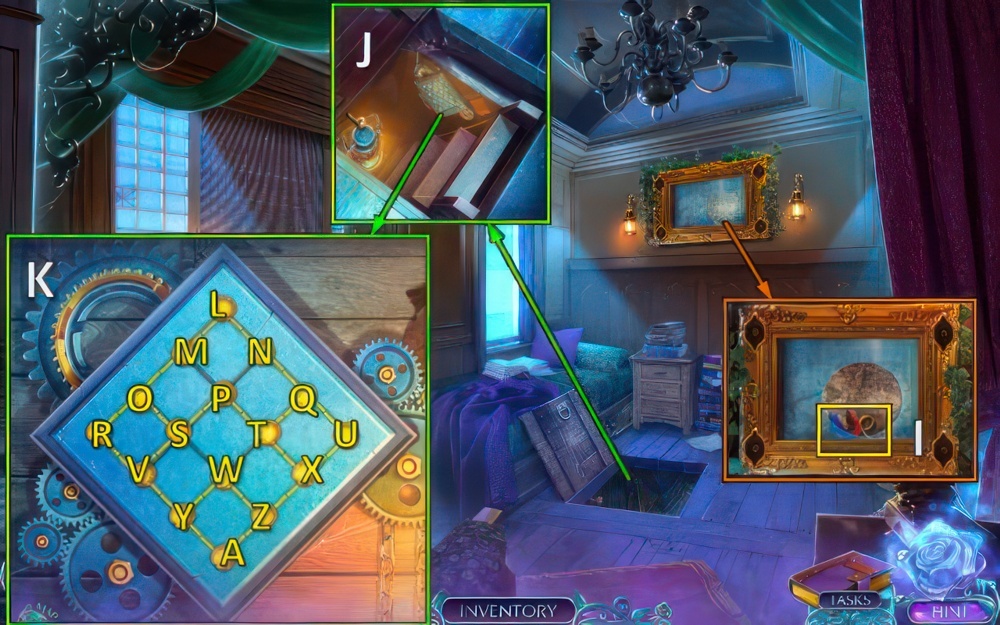
- Go (J).
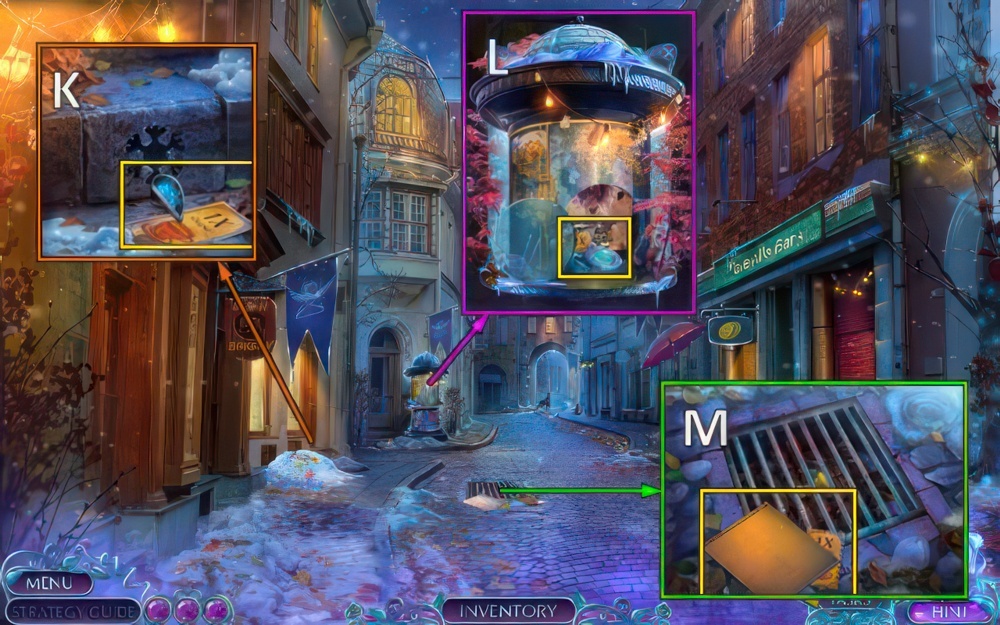
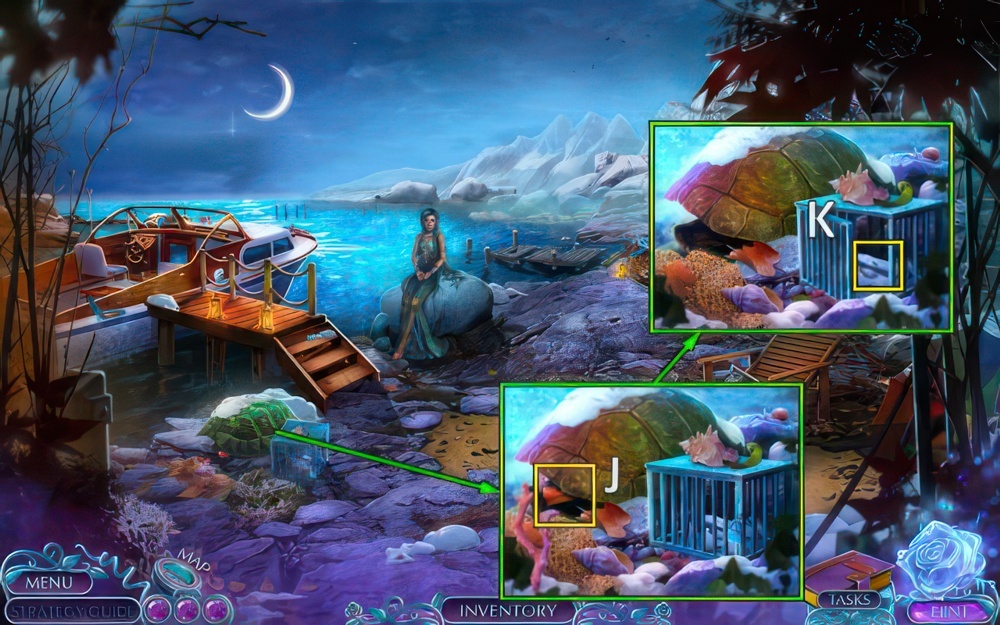
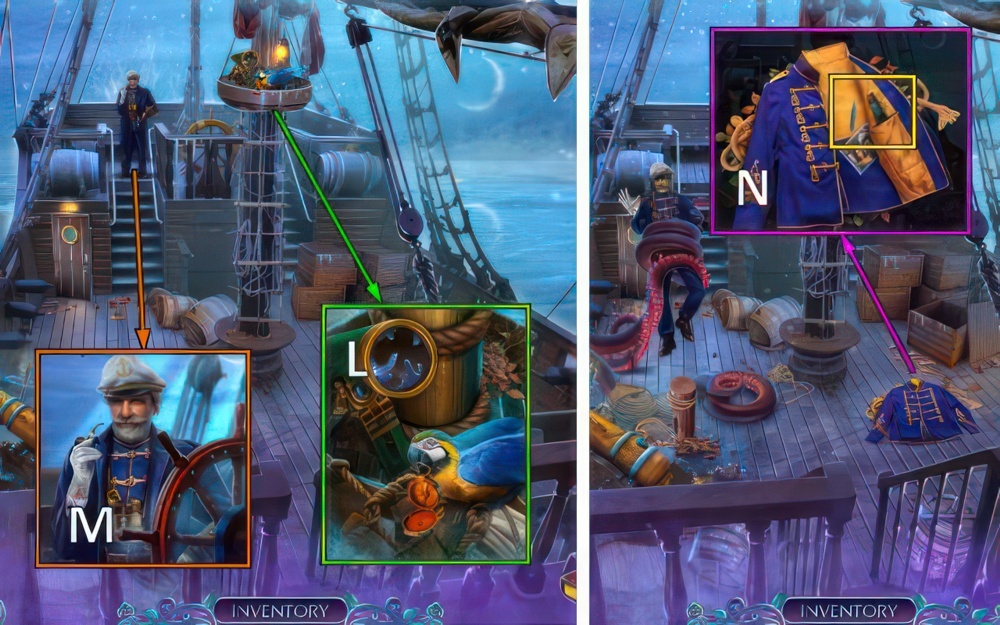
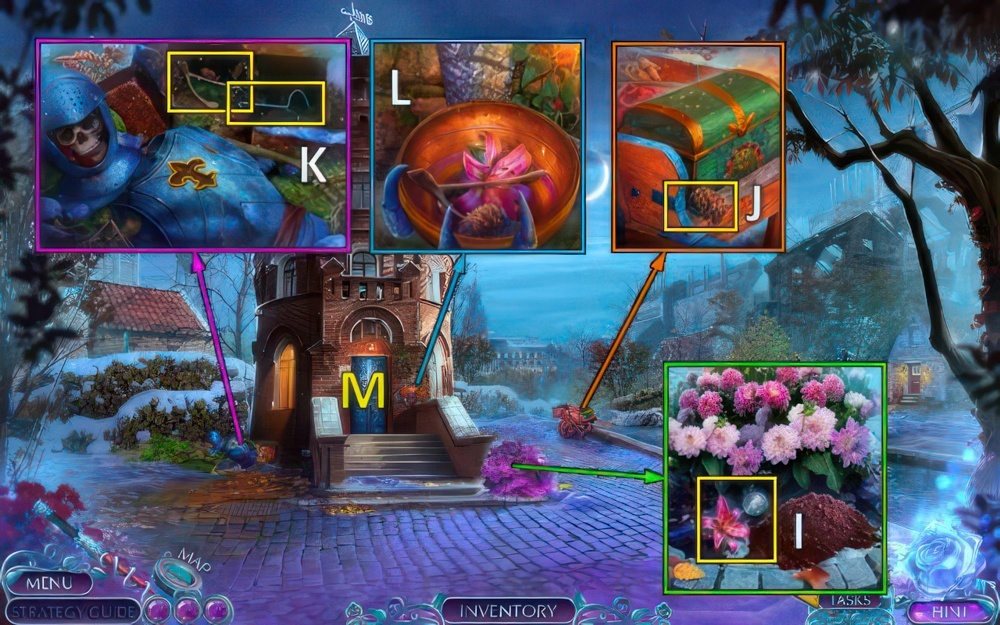
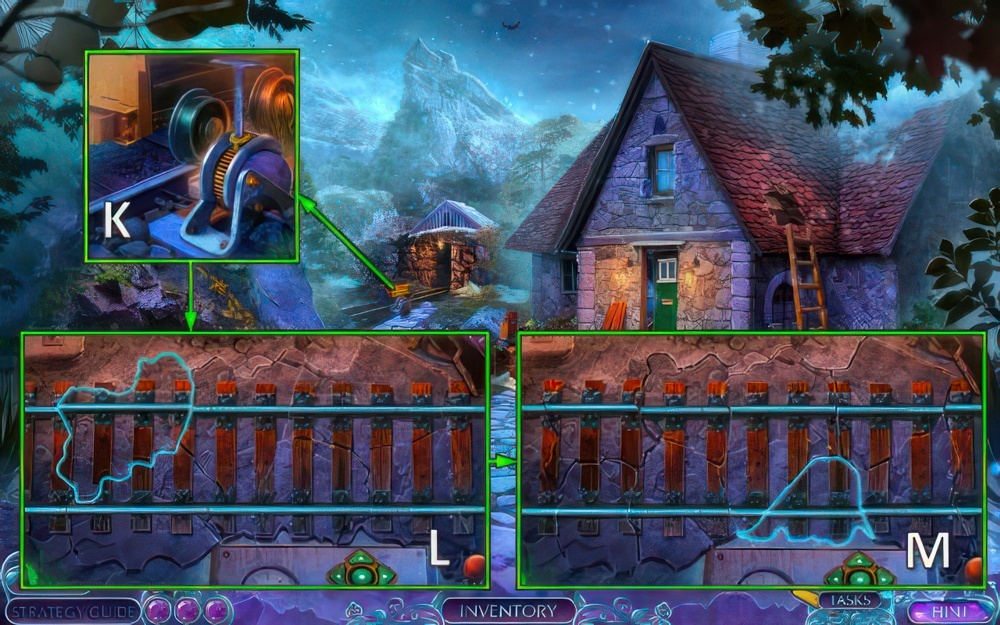
- Use BROOM, take HEART HALF INLAY 1/2 and COUPONS 2/4 (K).
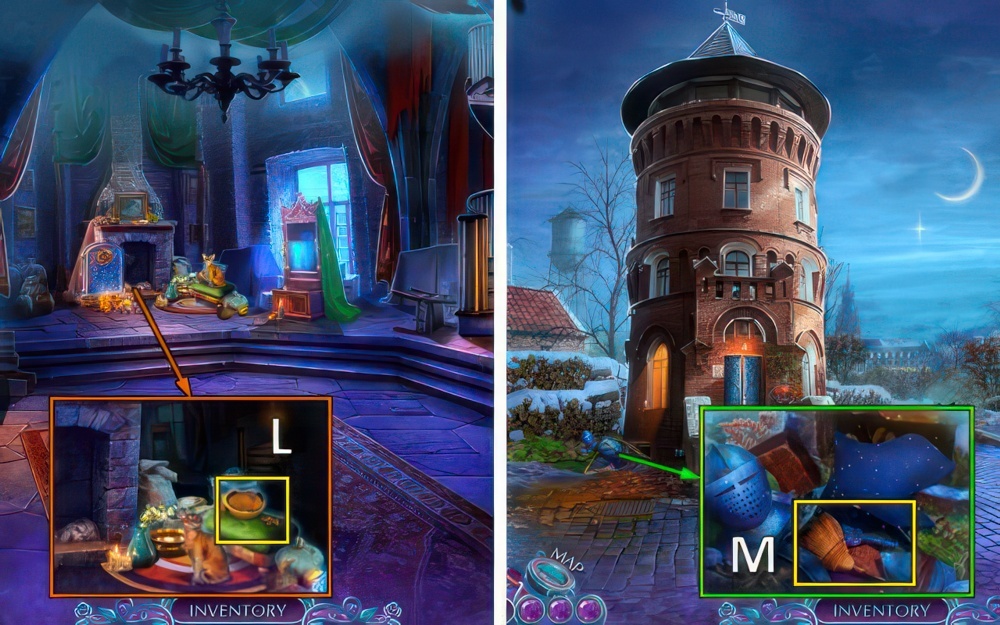
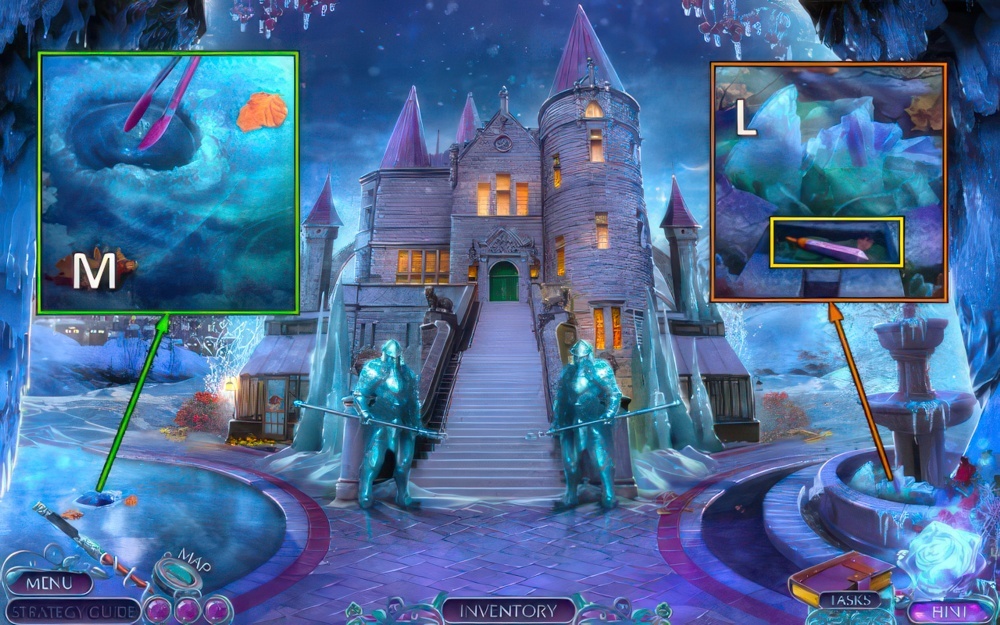
- Use DIAMOND RING, take map, NUT, COUPONS 3/4 and note (L).
- Take PAPER and COUPONS 4/4 (M).
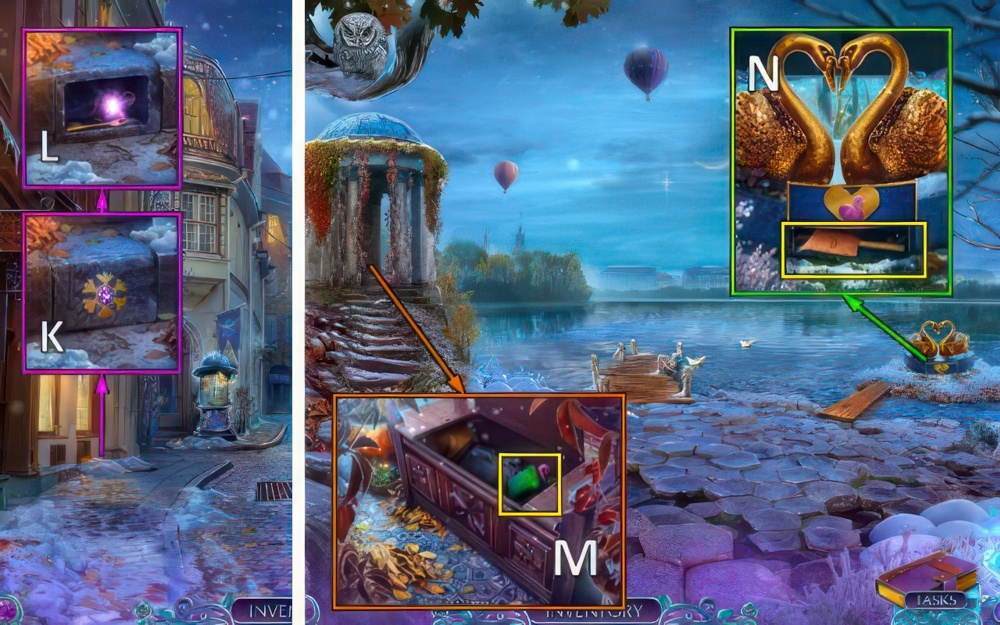
- Go down.
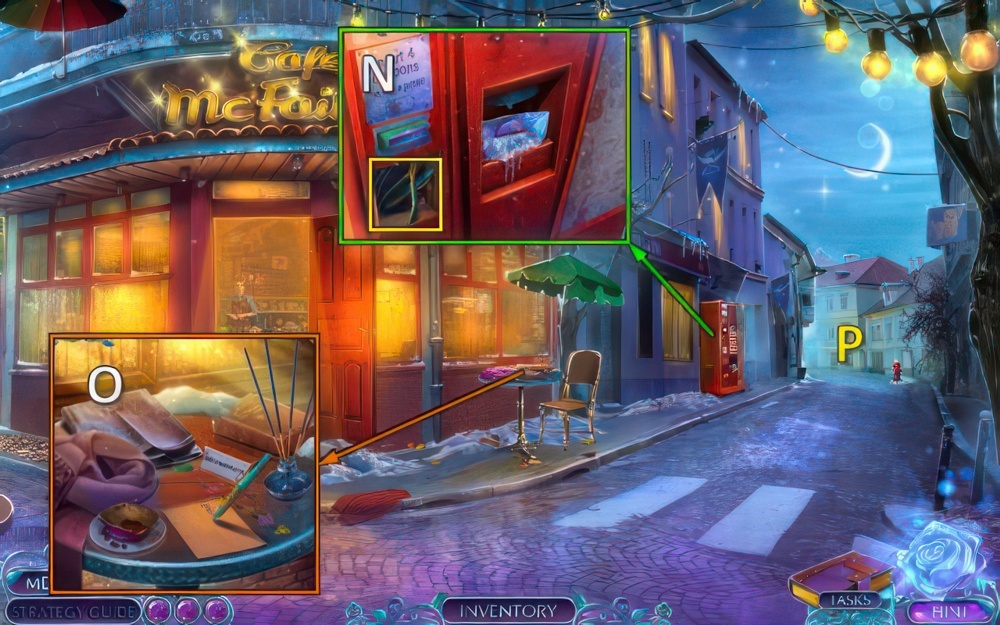
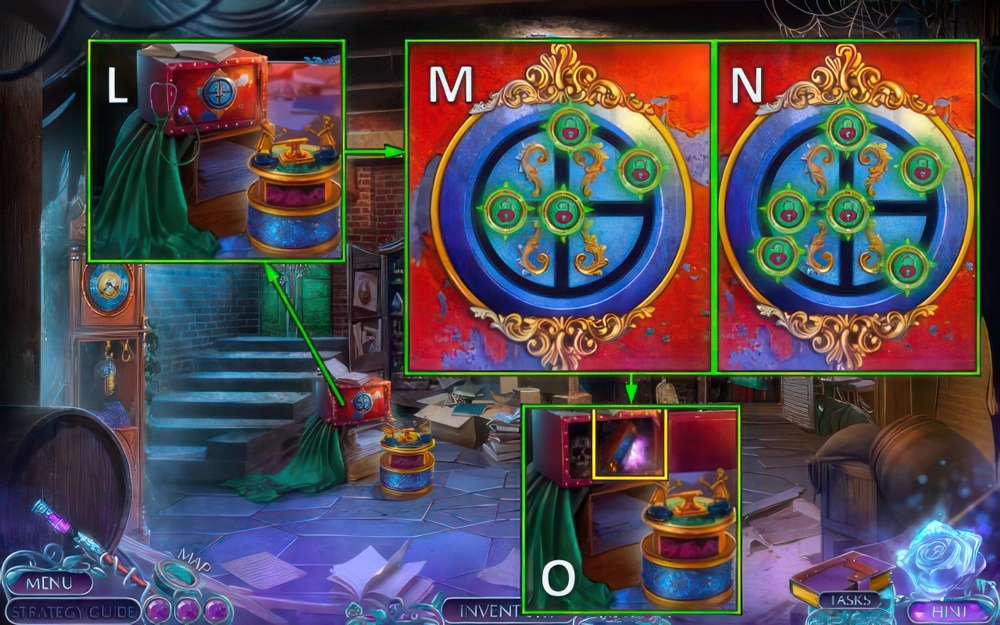
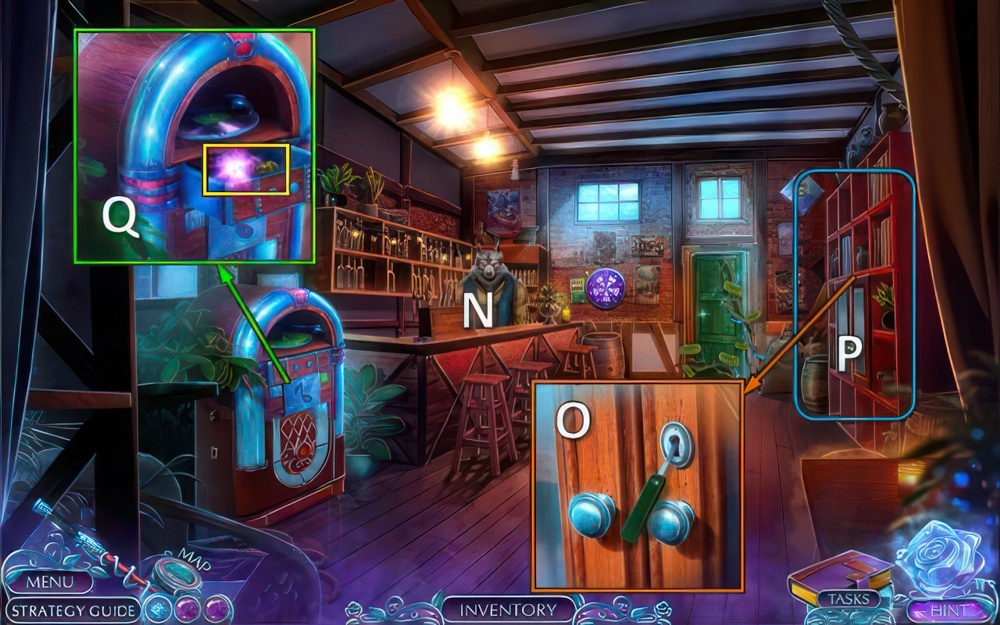
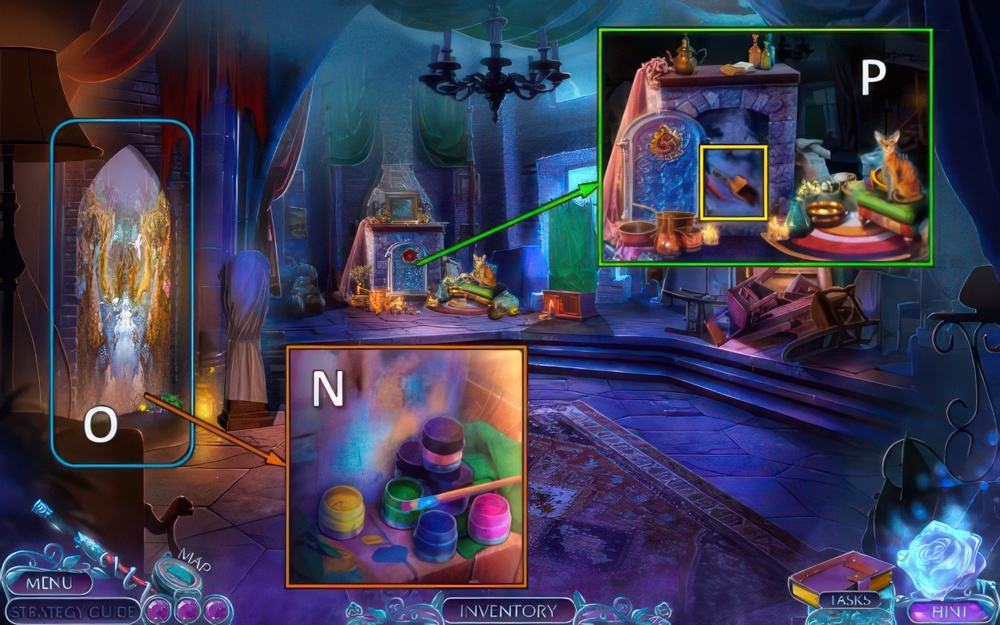
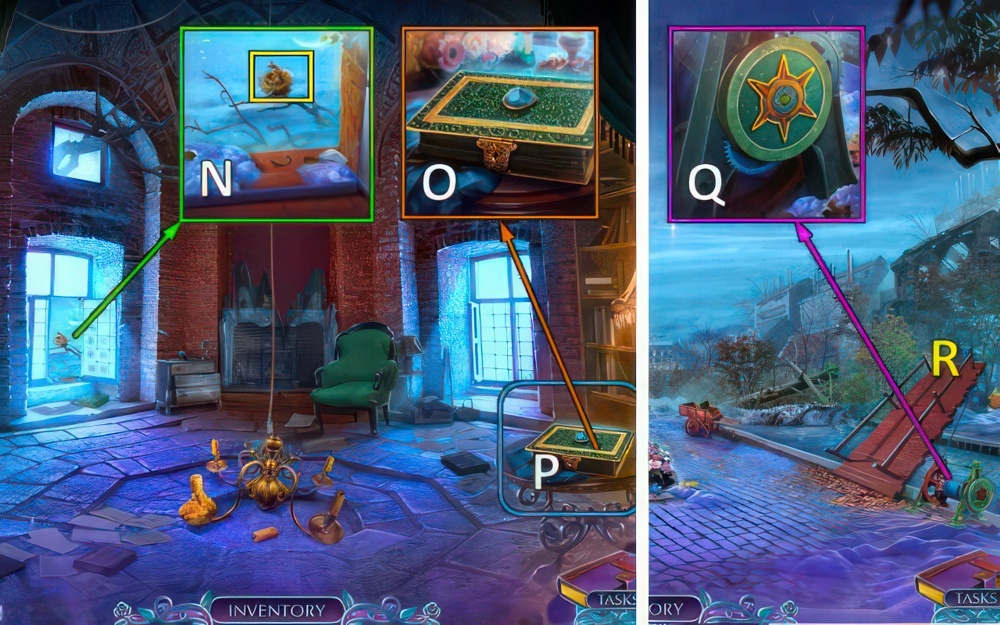
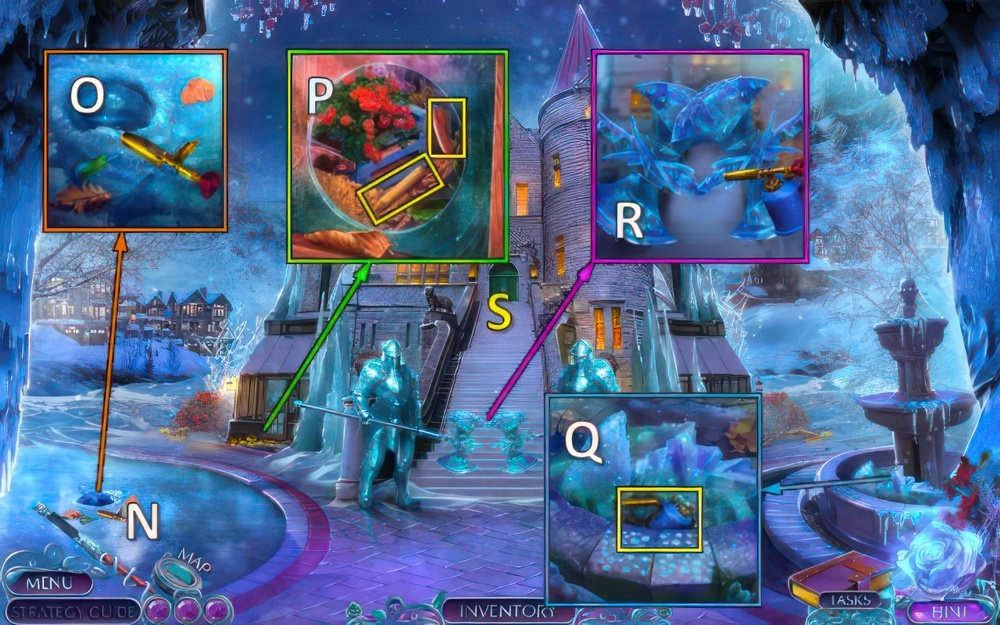
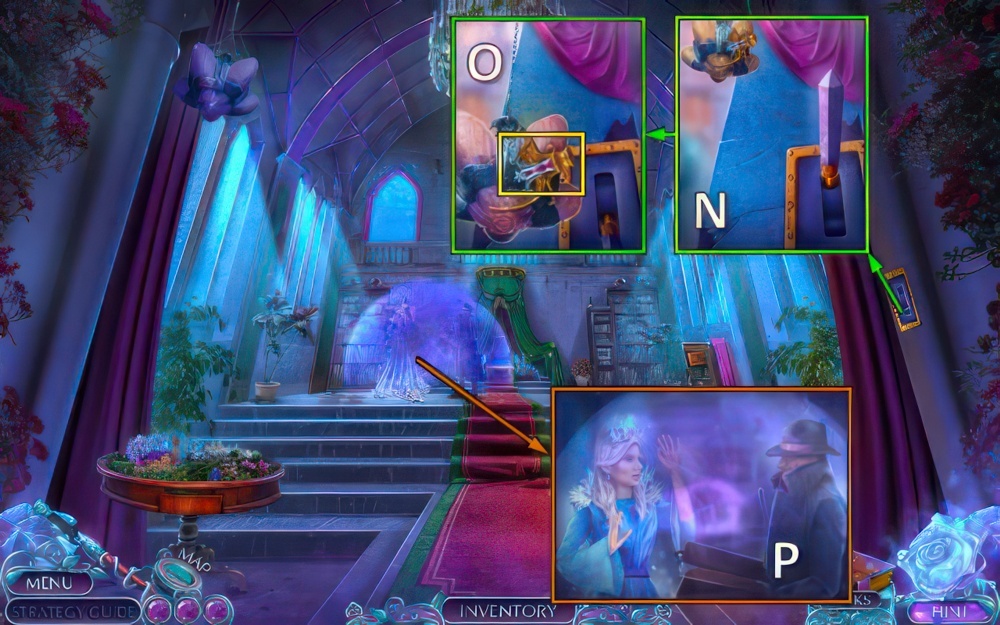
- Use COUPONS, take WIRE CUTTER and MULTICOLOR PEN (N).
- Use PAPER and MULTICOLOR PEN (O), receive LOST AND FOUND CODE.
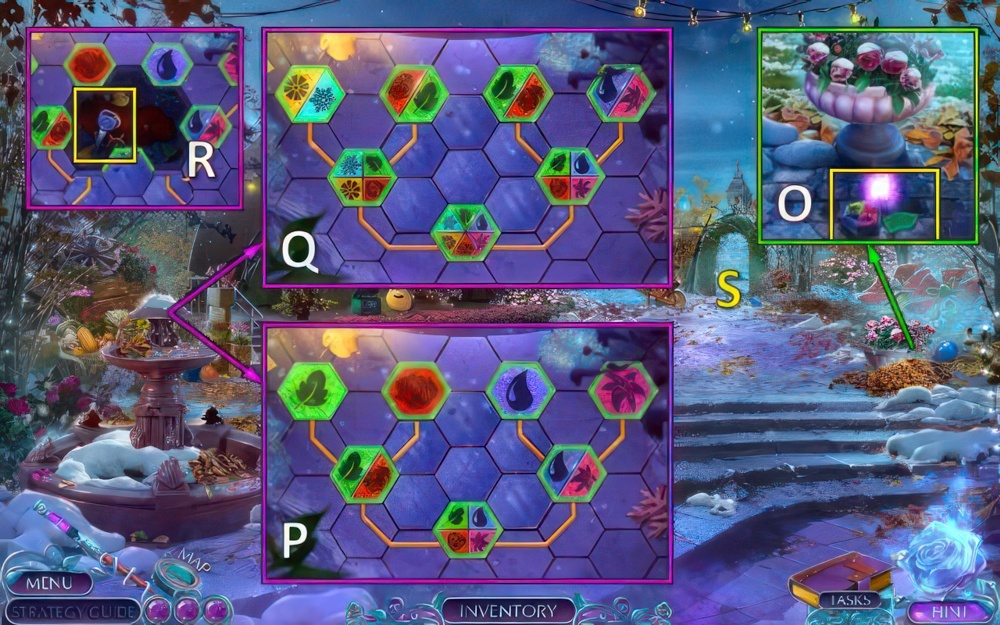
- Go (P).
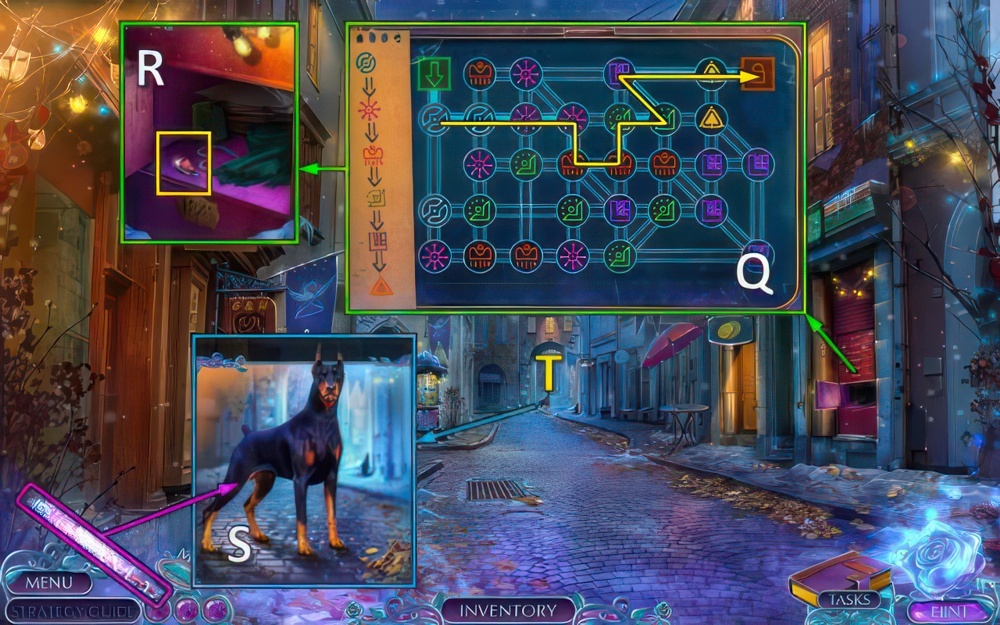
- Reach the end of the maze using the hint on the left.
- Select a tile to move it.
- You can only pass through each tile once.
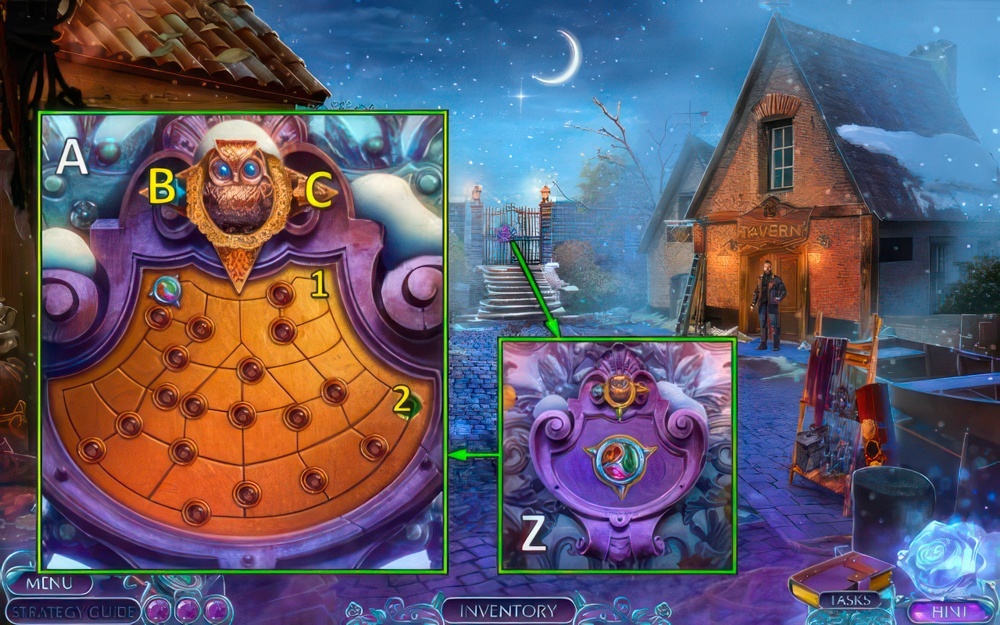
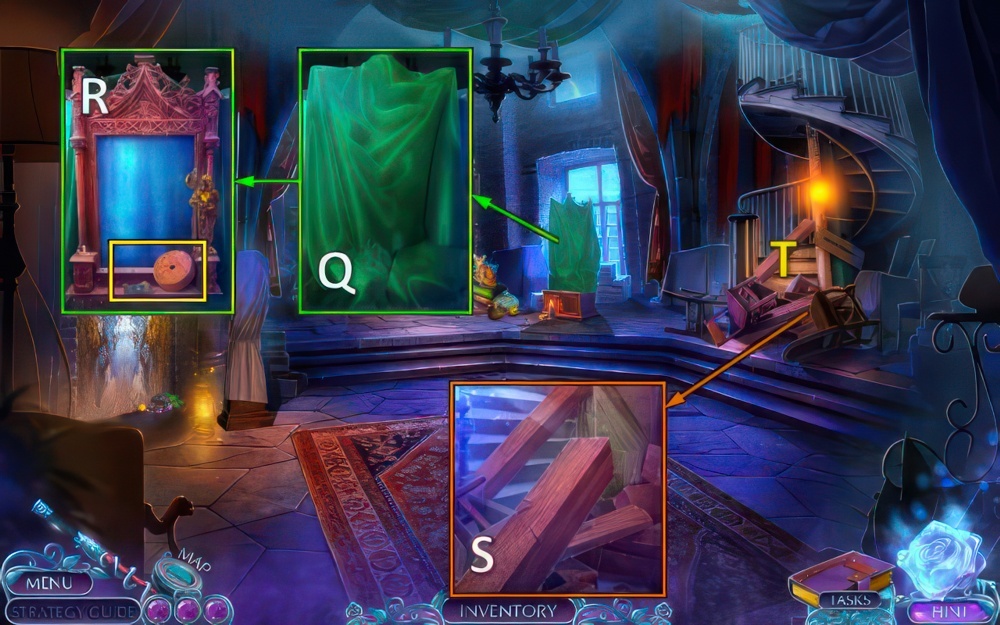
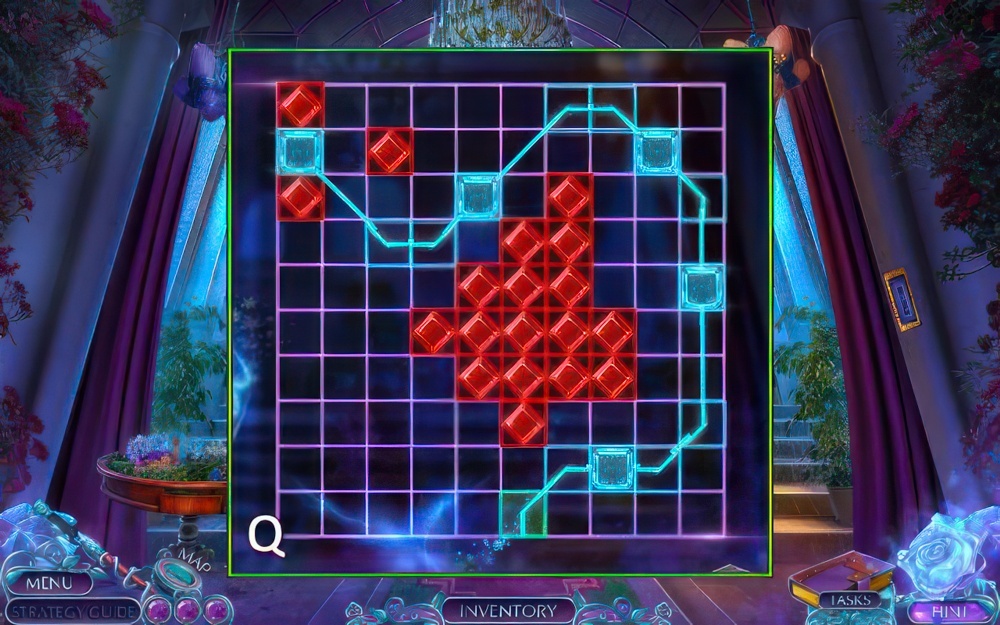
- Place LOST AND FOUND CODE, easy and hard walkthrough (Q).
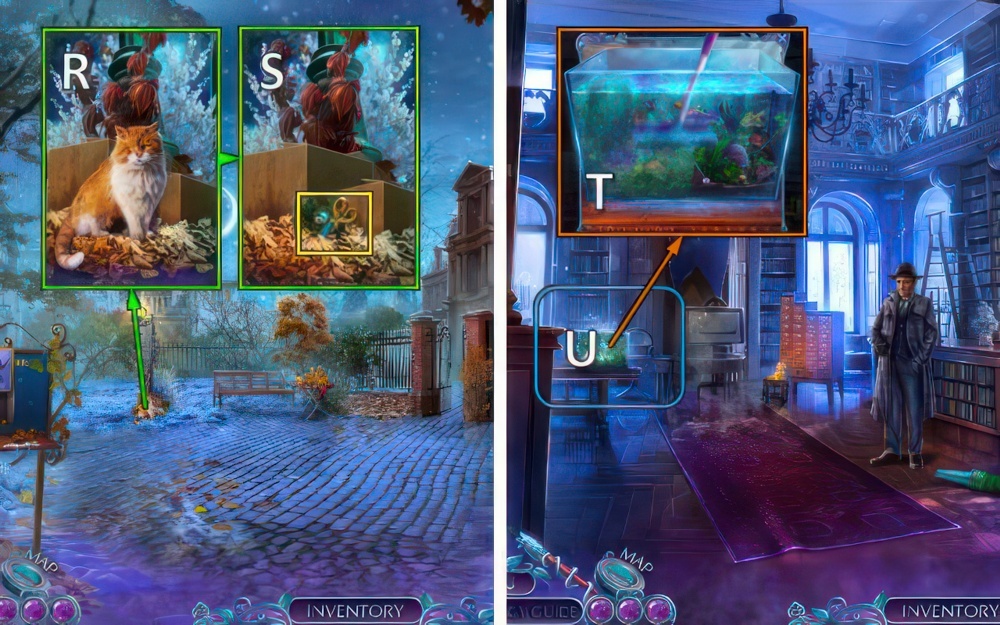
- Take HEART HALF INLAY 2/2 (R).
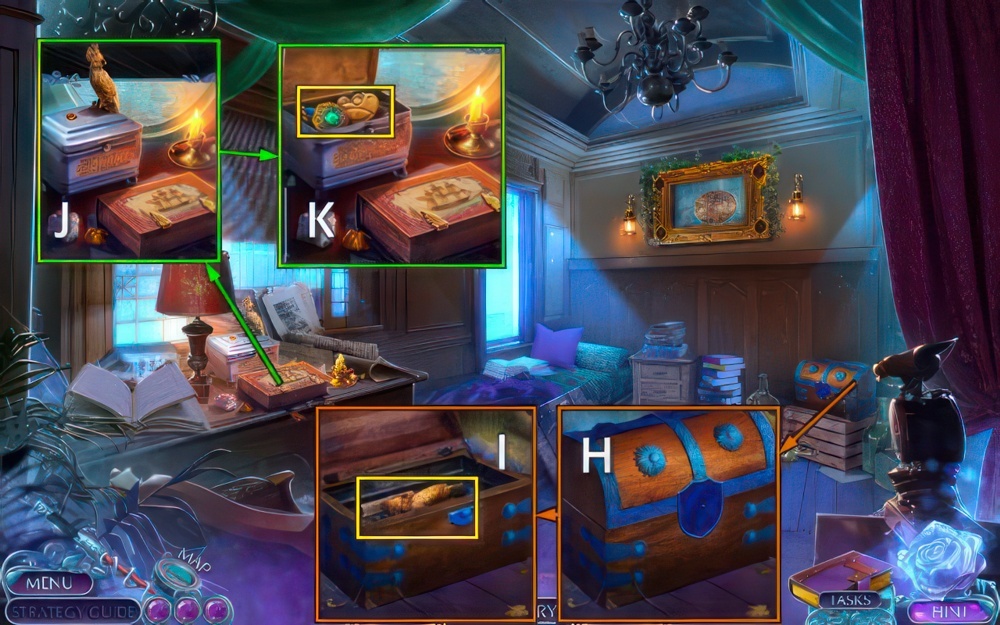
- HEART HALF INLAY on CLOSED CASE, take note, CHAIN and magic wand.
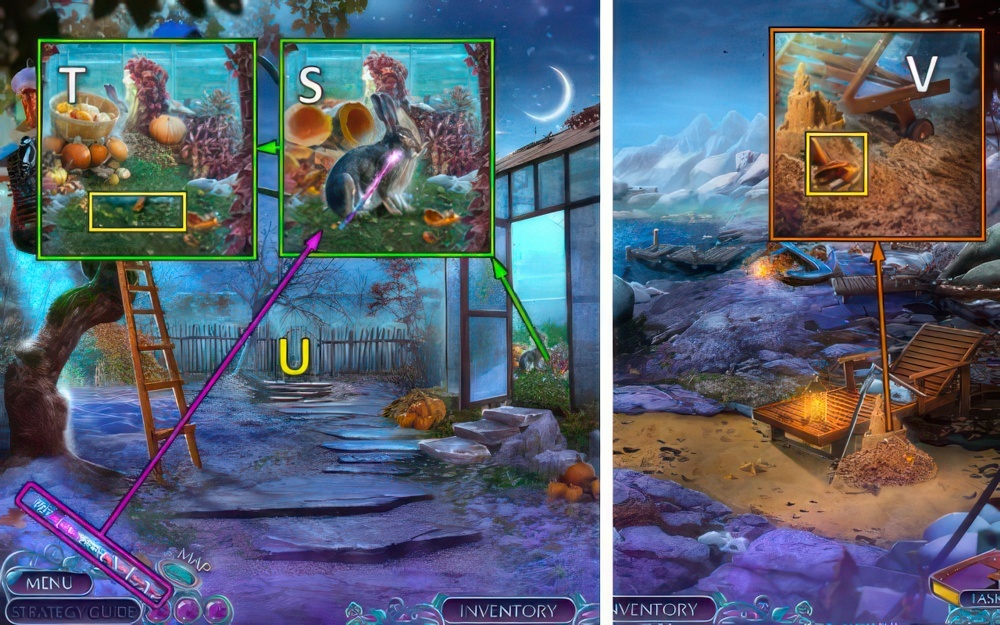
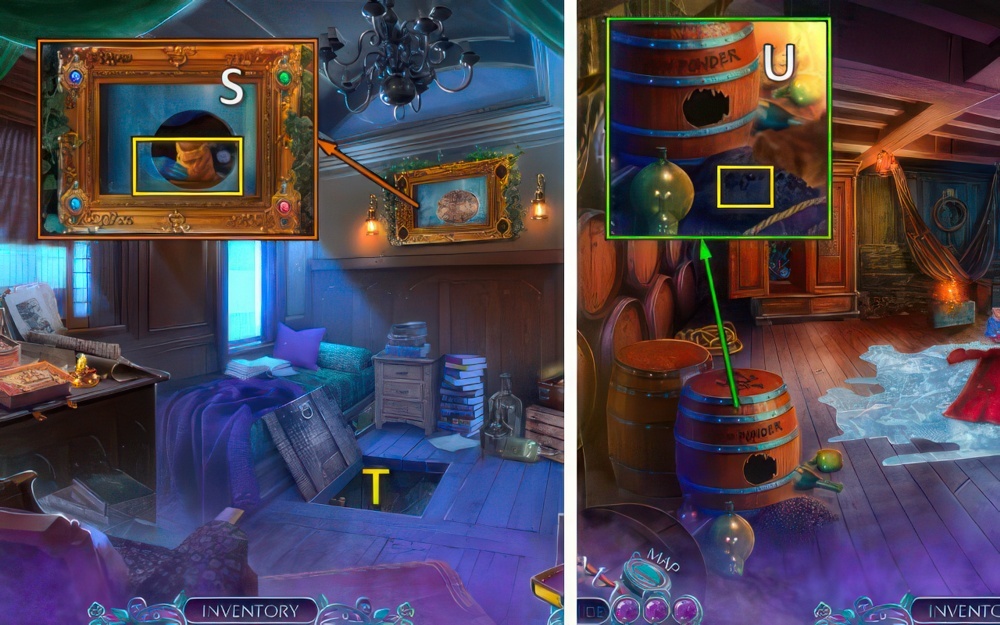
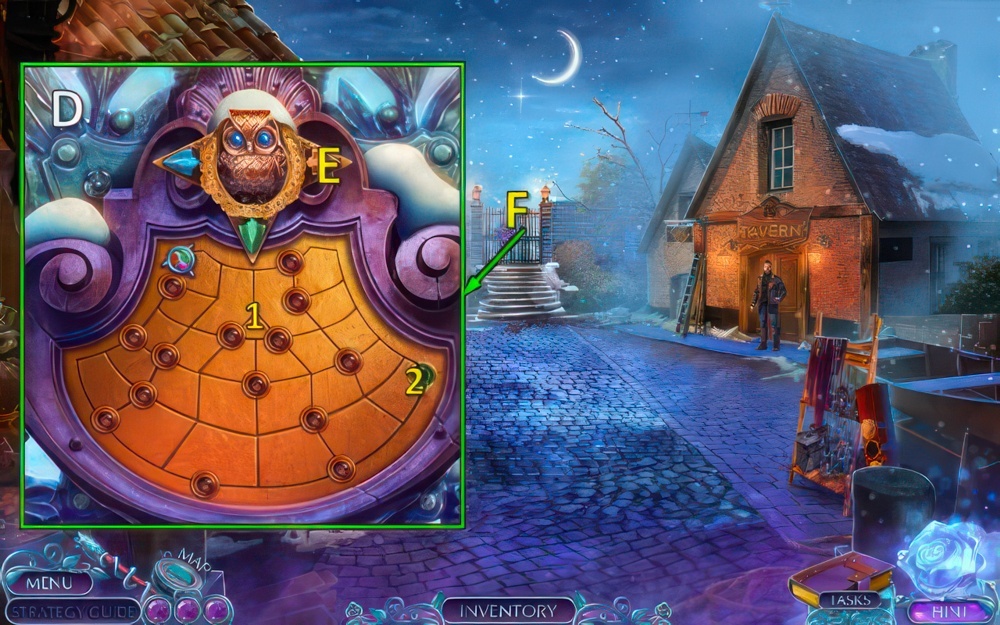
- Use magic wand (S).
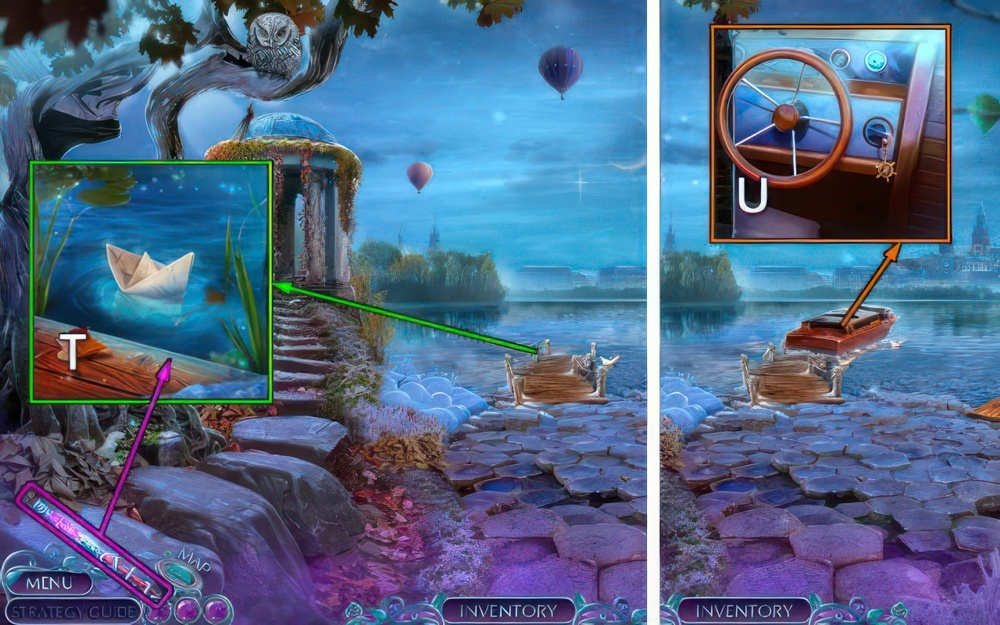
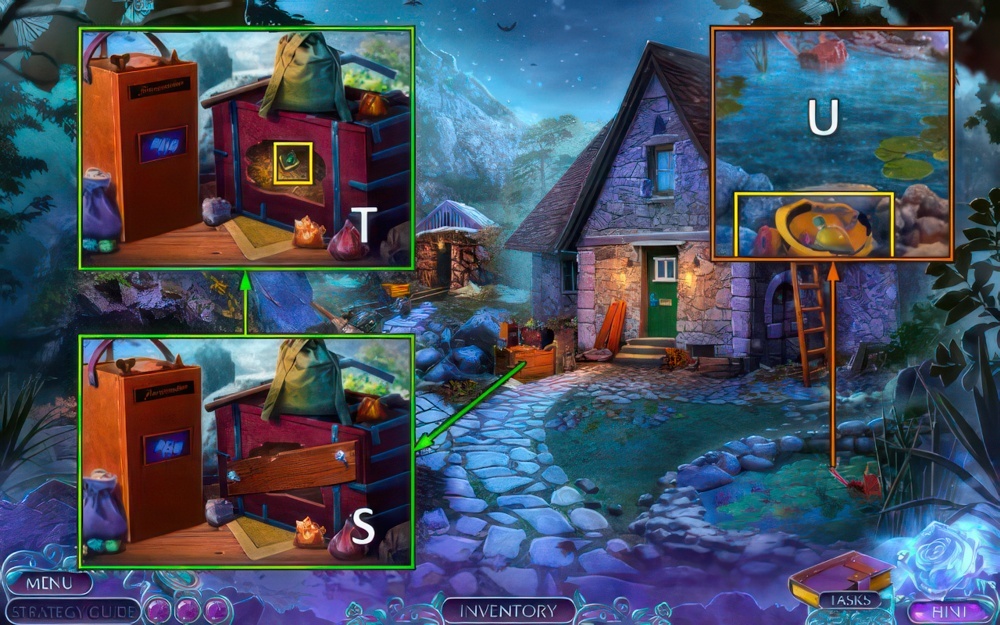
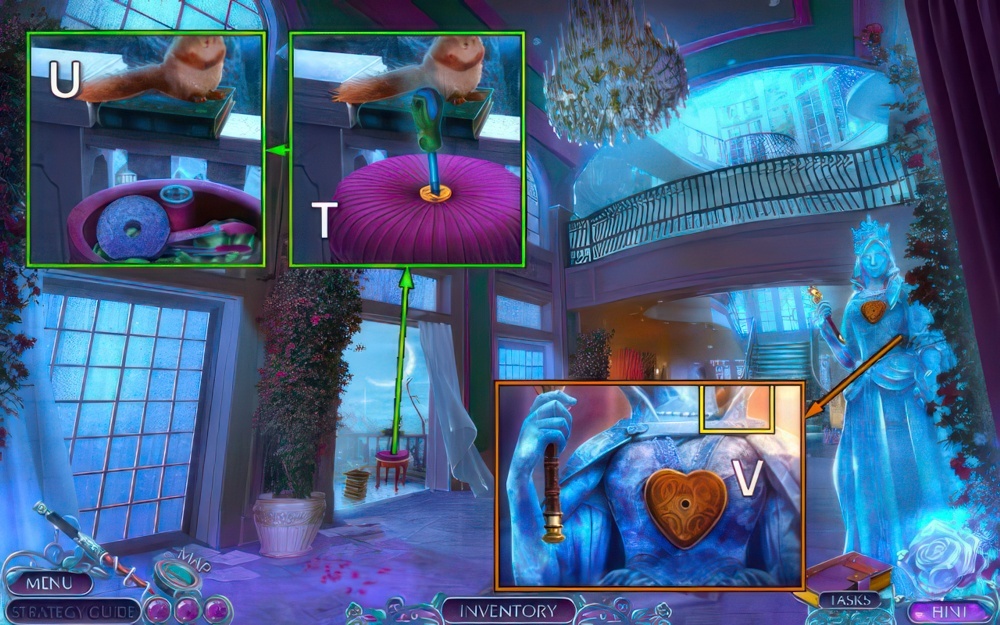
- Go (T).
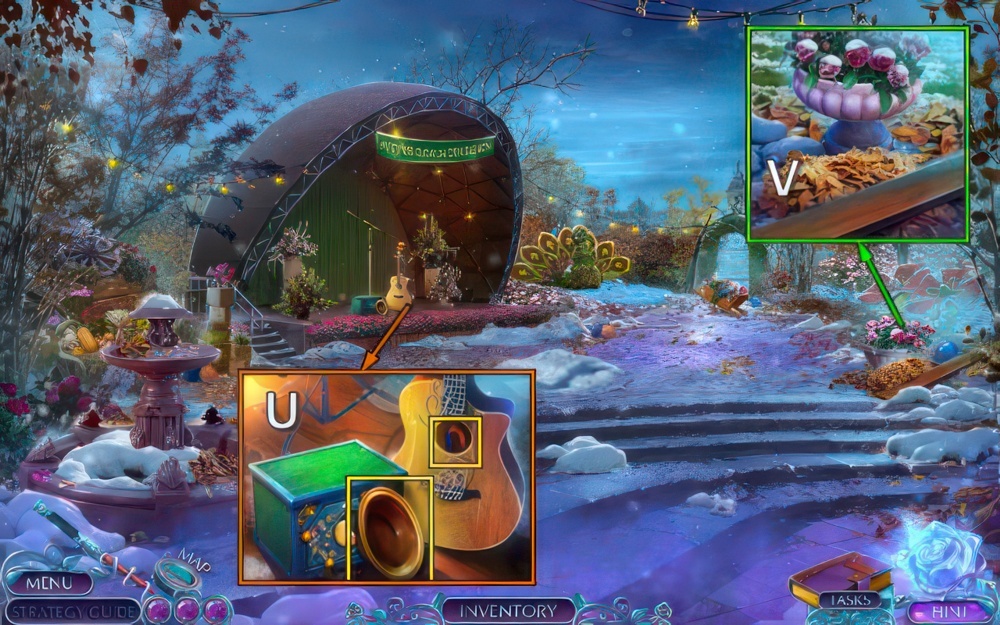
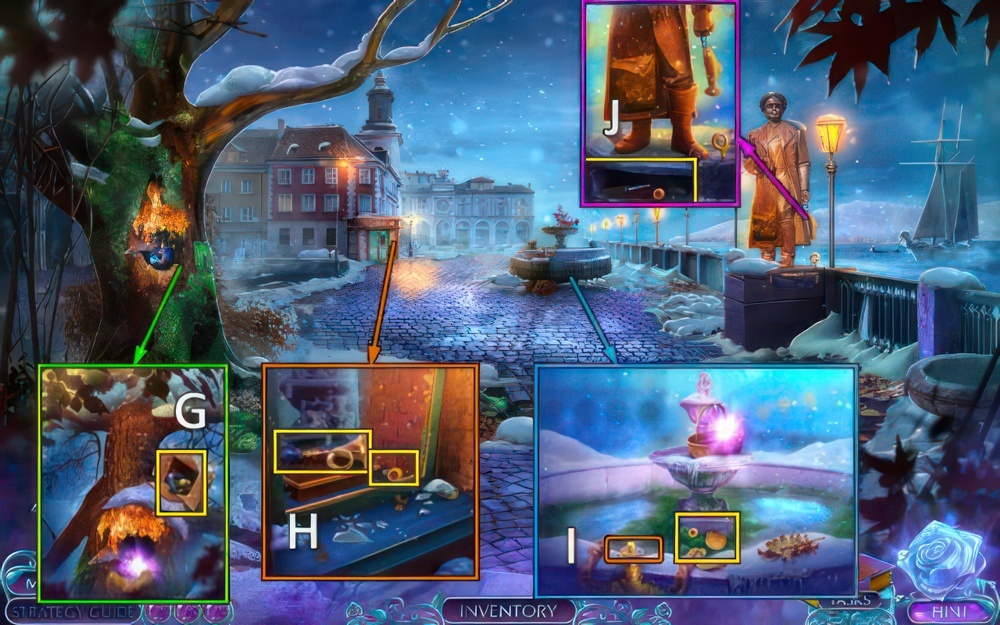
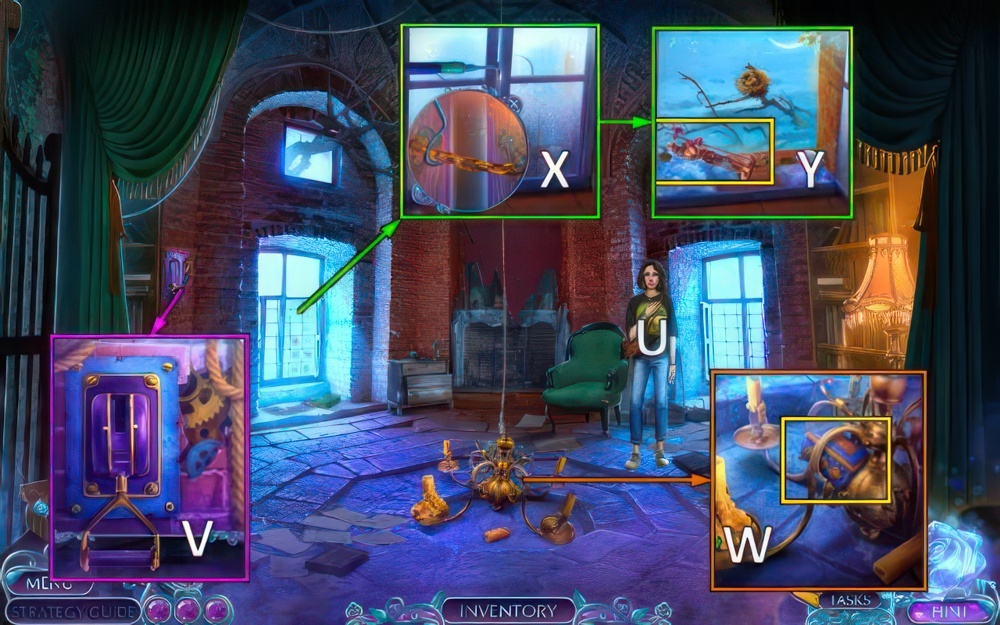
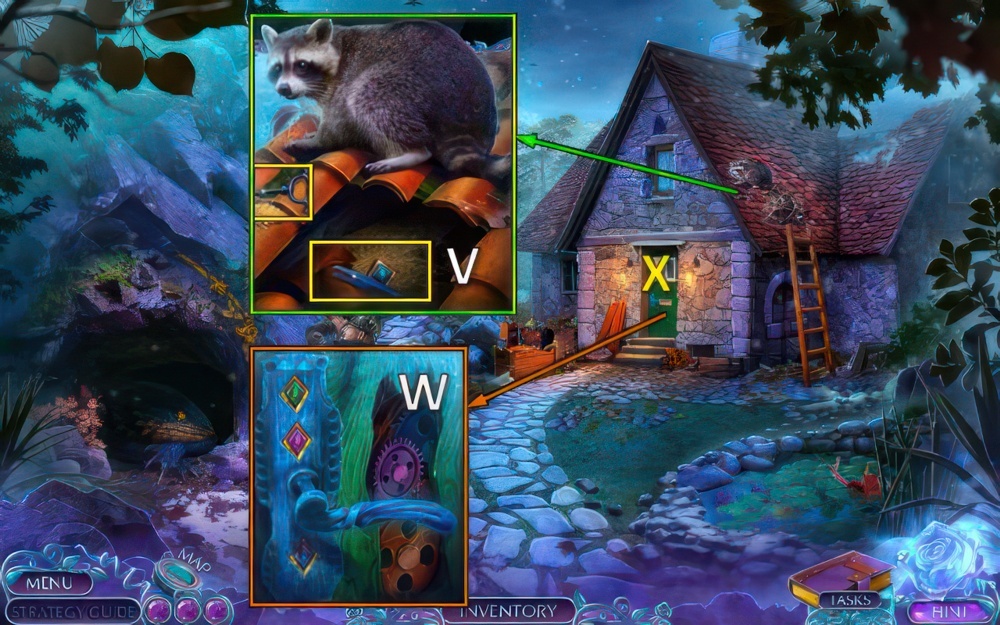
- Use WIRE CUTTER, take BOWL and MAGNET (U).
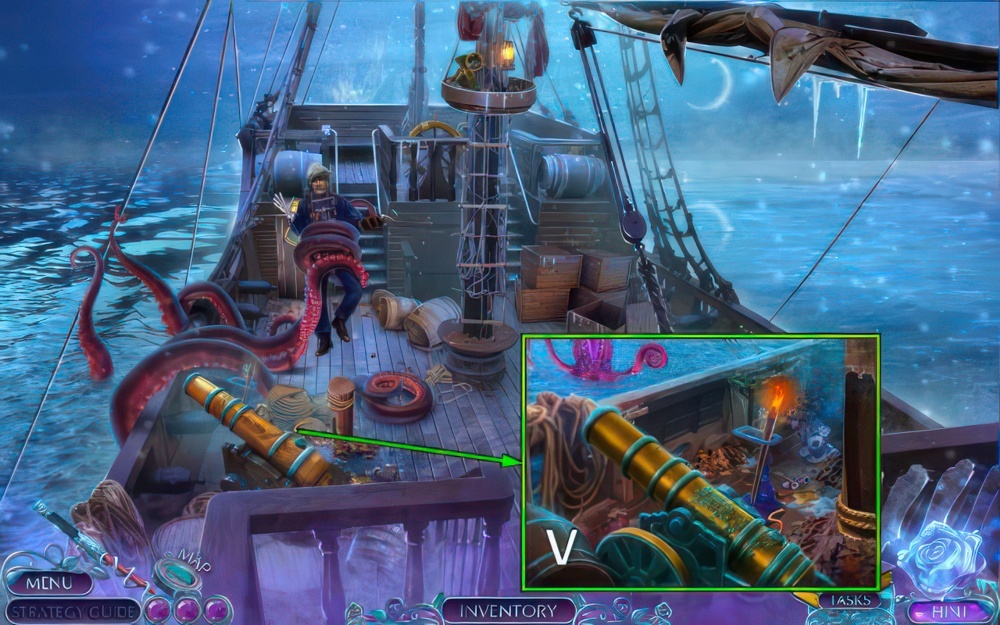
- Take BOARD (V).
- Go down.
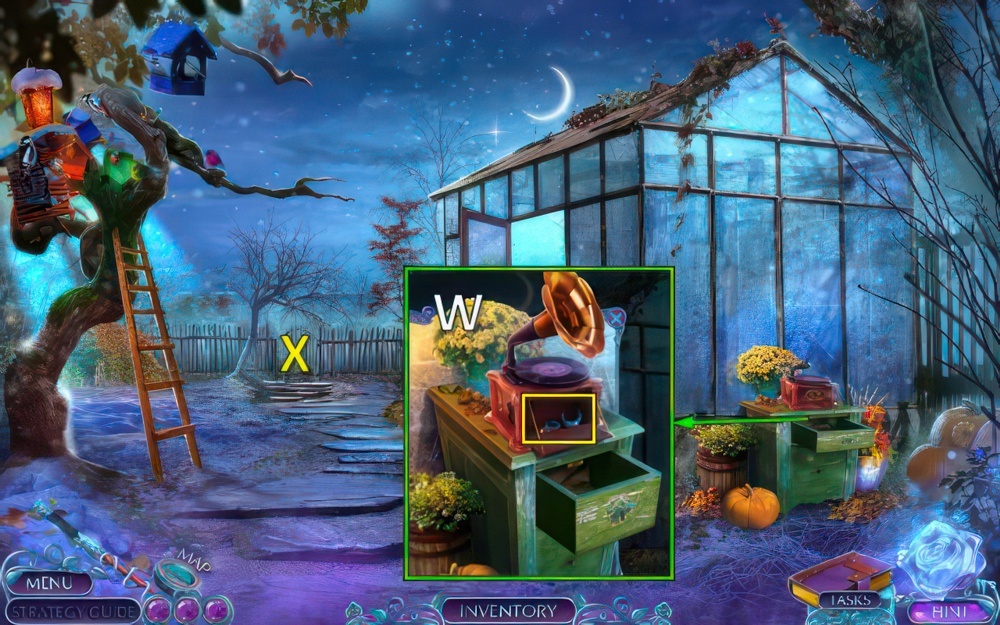
- CHAIN on MAGNET, receive MAGNET ON CHAIN.
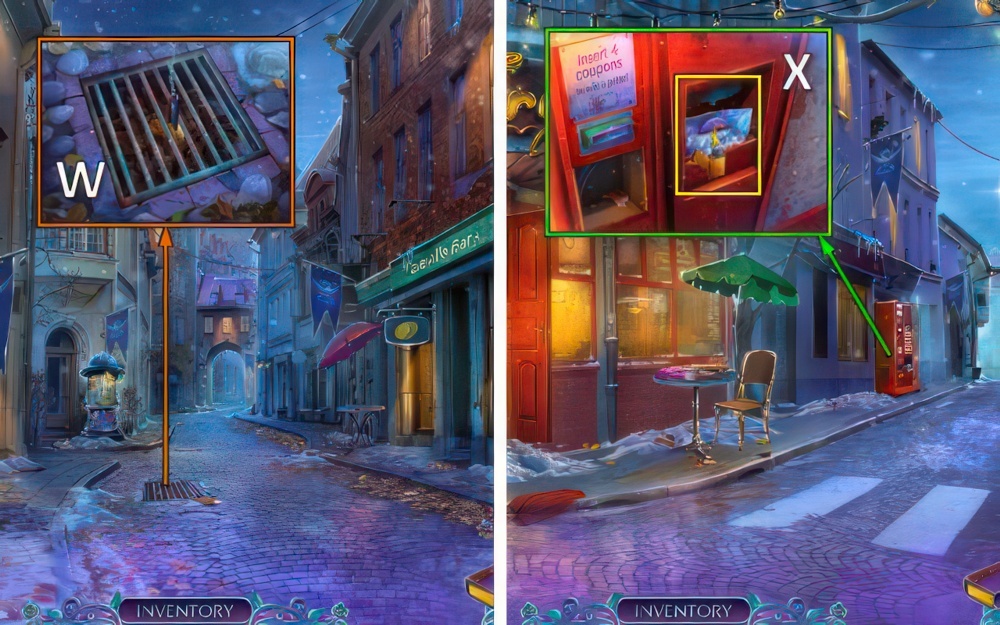
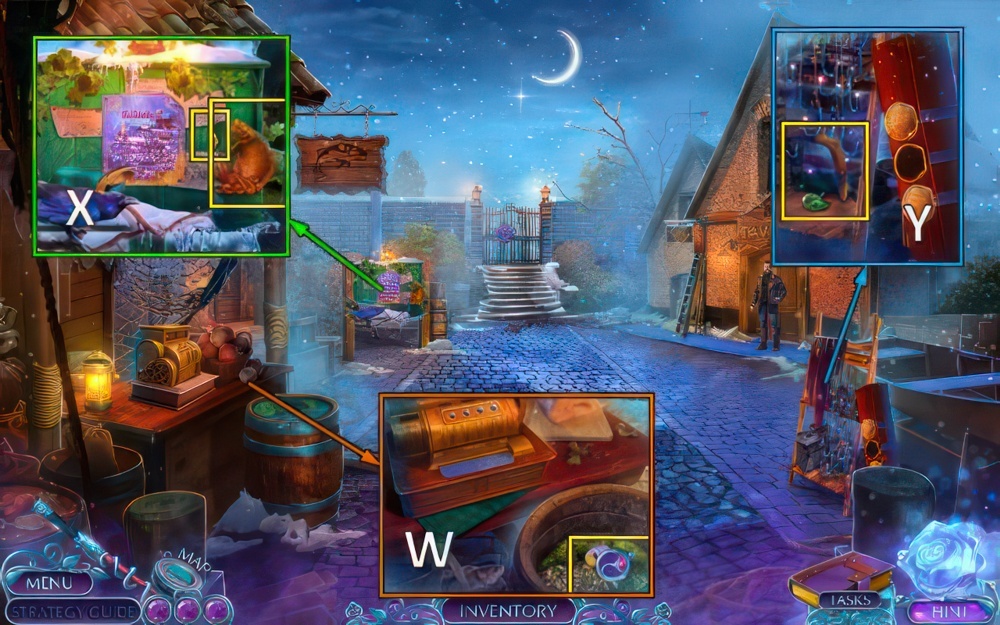
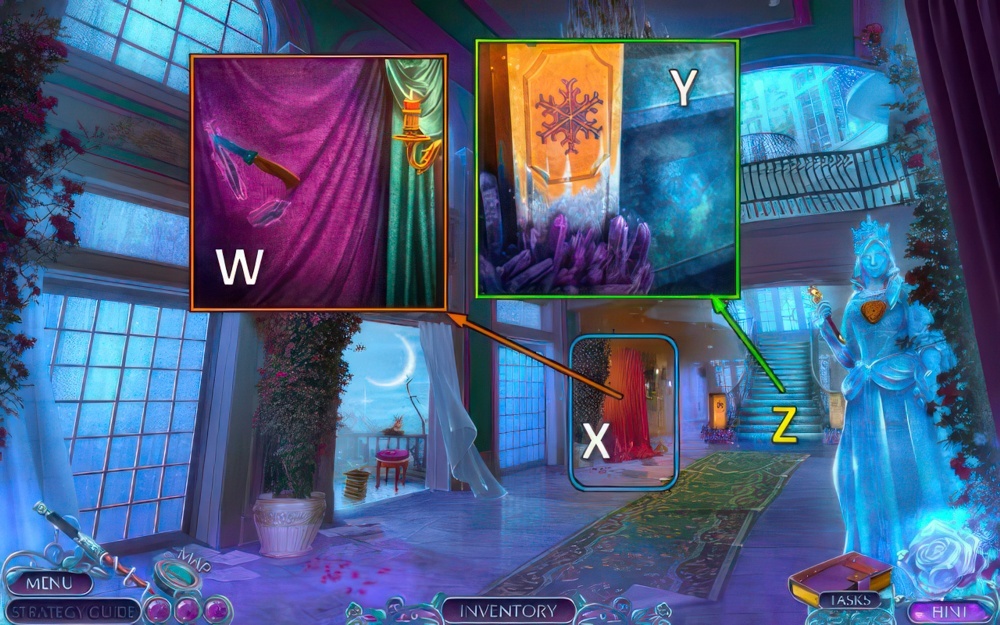
- Take LIGHTER with MAGNET ON CHAIN (W).
- Go down.
- Use LIGHTER, take BOX SYMBOL (X).
- Go to Flower Exhibition.
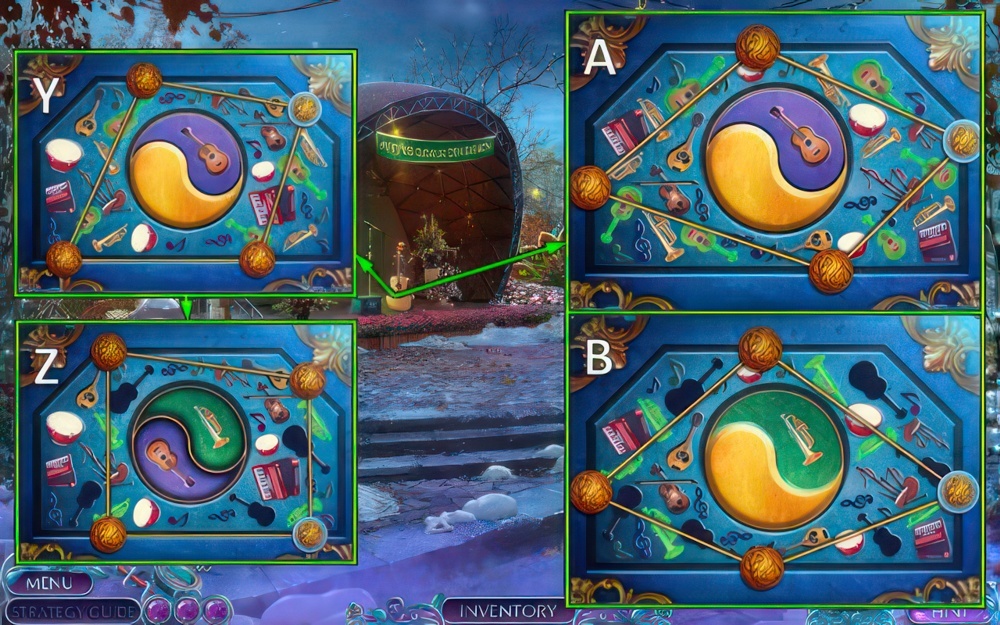
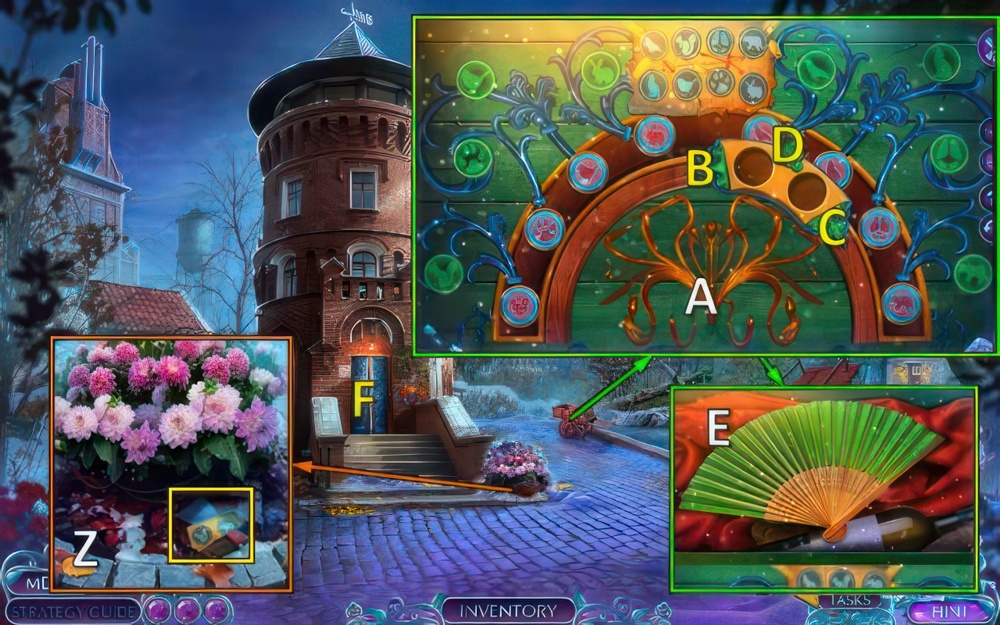
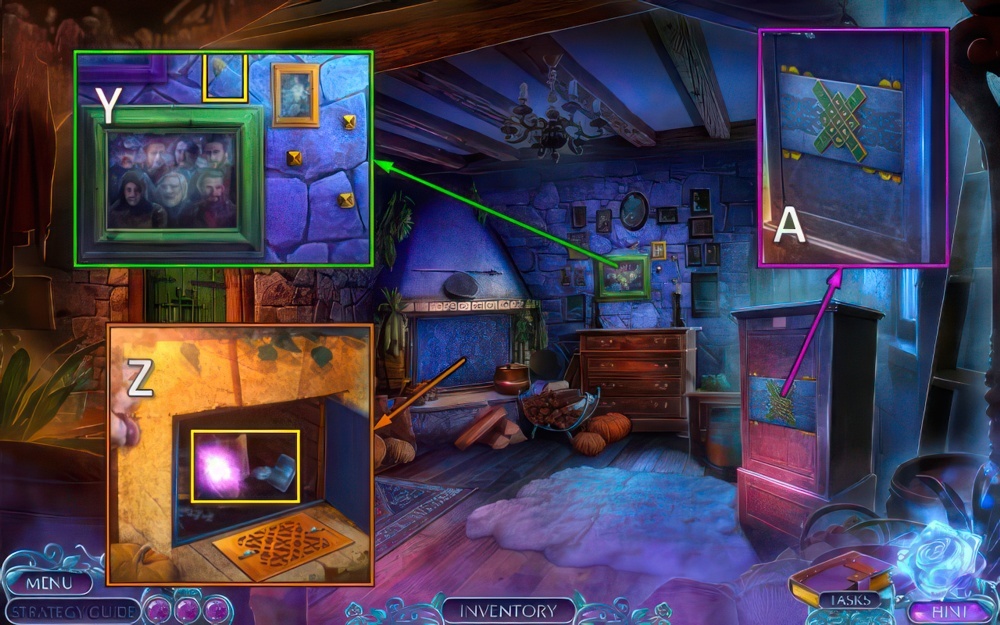
- Place BOX SYMBOL (Y).
- Move the strings to pass over the symbols matching the one on the purple half.
- Select and drag the tokens along the lines to move the strings.
- The correct symbols light up when a string hits them.
- Repeat the process with the green half.
- Easy walkthrough: Y-Z.
- Hard walkthrough: A-B.
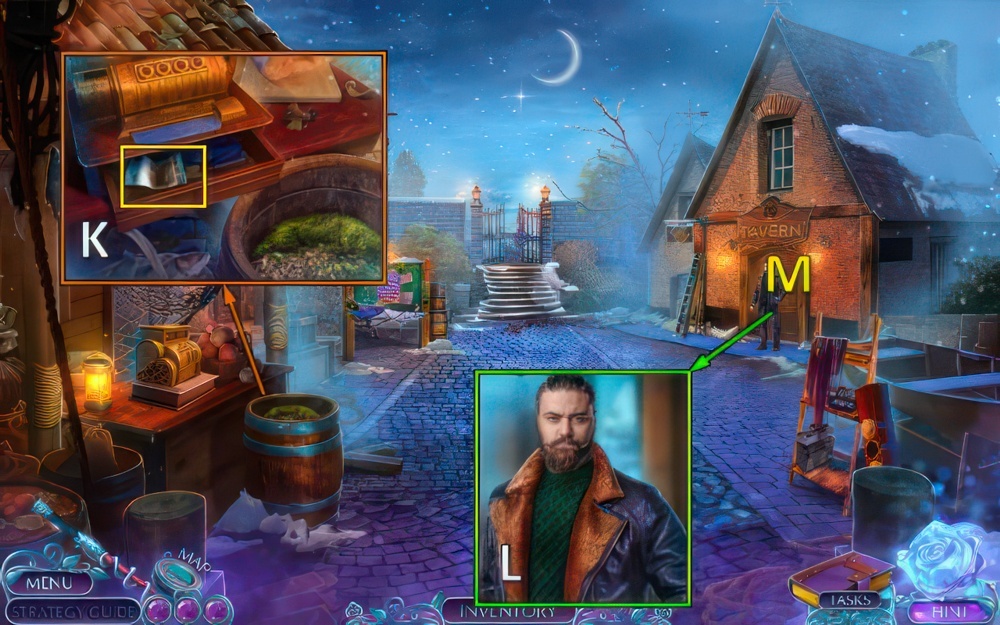
- Take TAPE and WHEEL (C).
- Place WHEEL and NUT (D).
- Go (E).
- Talk (F).
- Play puzzle.
- Receive ROPE.
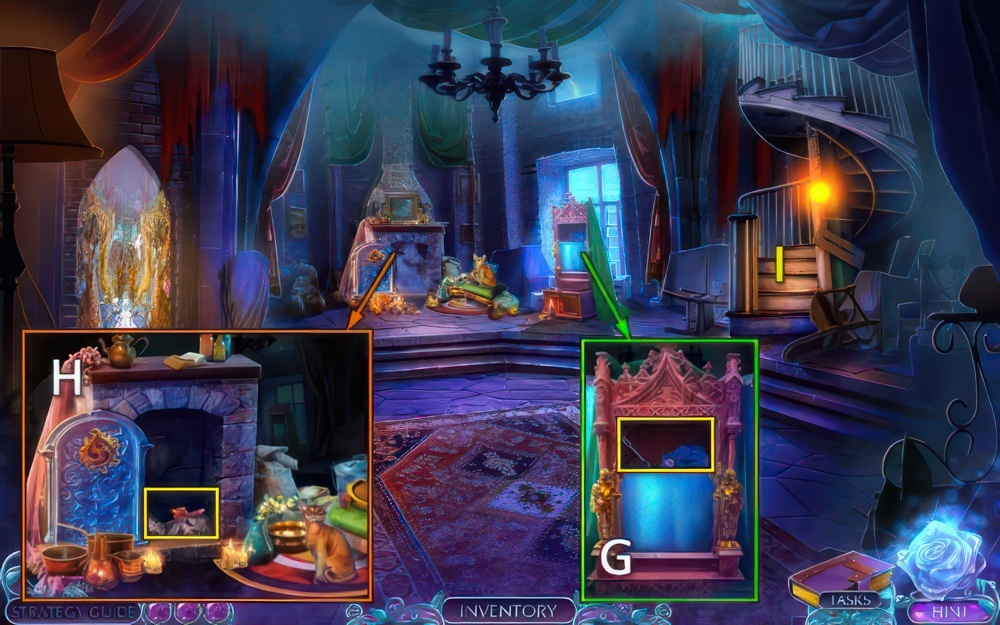
- Use ROPE, take COMB (G).
- Place BOARD (H).
- Take SLINGSHOT and SNOWFLAKE AMULET (I).
- Use BOWL, take WHEEL CUTTER and energy sphere 1 (J).
- Go down ×2.
- Place SNOWFLAKE AMULET (K).
- Take energy sphere 2 and FORK (L).
- Go to Lake.
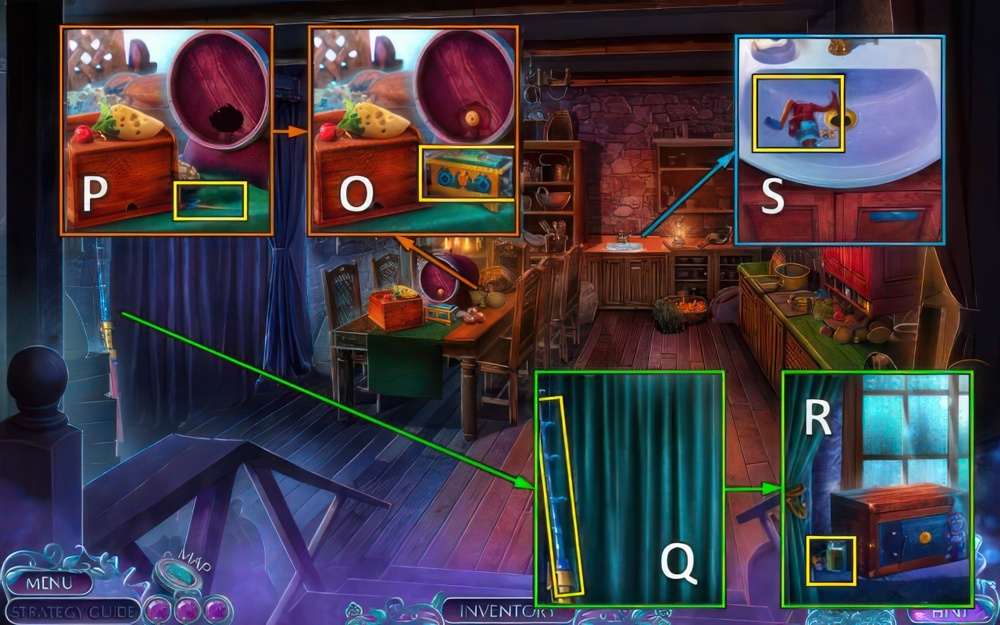
- Use FORK, take SPONGE and SWAN AMULET (M).
- Place SWAN AMULET, take EMPTY POUCH and STICK (N).
- Go down.
- STICK and TAPE on COMB, receive RAKE.
- Use RAKE, take SOAP, FOUNTAIN ELEMENT and energy sphere 3 (O).
- Place the tokens in the correct order.
- Select and drag a token to move it.
- A token will turn green when placed correctly.
- Place FOUNTAIN ELEMENT (P), easy walkthrough.
- Hard walkthrough (Q).
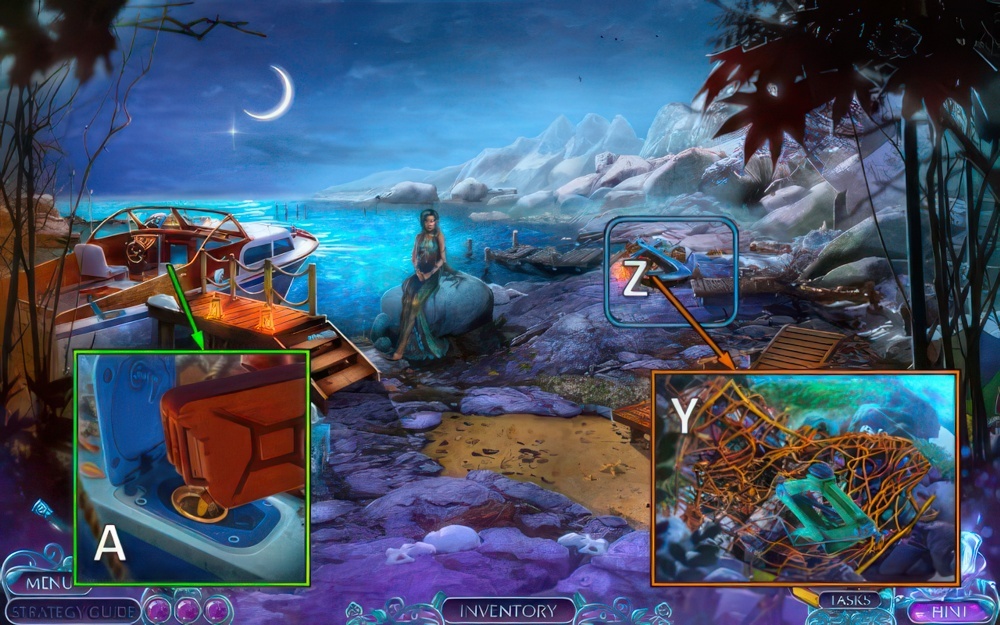
- Take BOAT KEY (R).
- Go (S).
- Use magic wand (T).
- Use BOAT KEY (U).
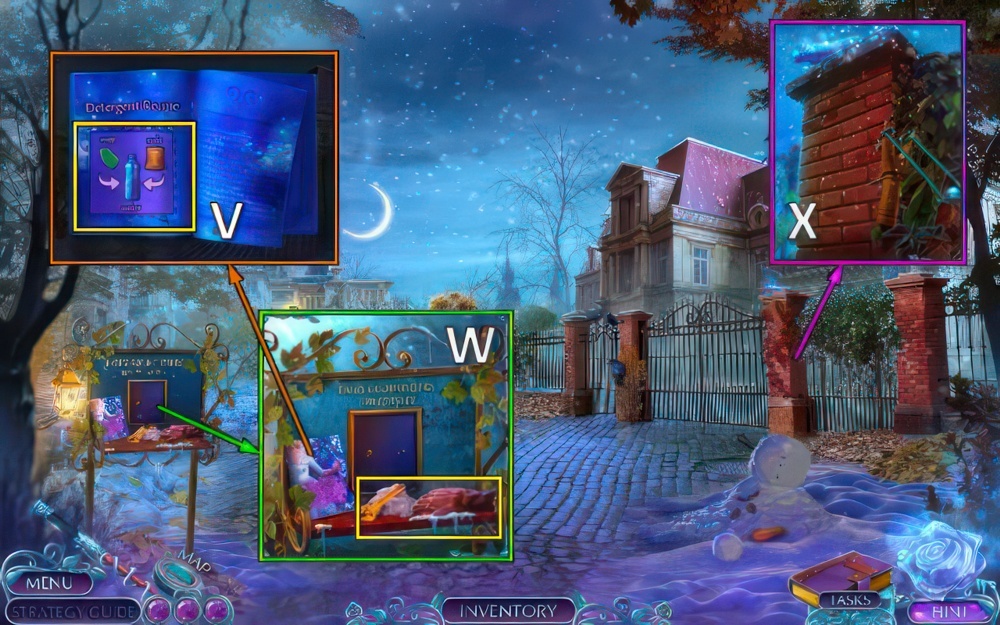
- Take DETERGENT RECIPE with WHEEL CUTTER (V).
- Take WRENCH and GLOVE, take WASHING SODA with EMPTY POUCH (W).
- Take WATER with SLINGSHOT (X).
- WATER, SOAP and WASHING SODA on DETERGENT RECIPE, receive DETERGENT.
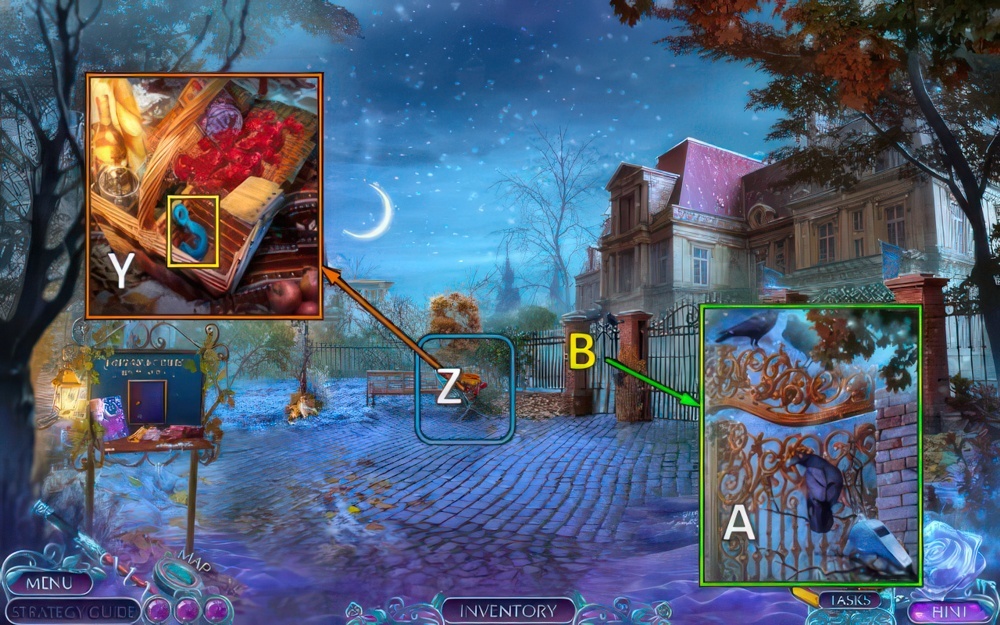
- Take HOOK and note and move jar, use SPONGE and DETERGENT (Y).
- Play puzzle (Z), receive WHISTLE.
- Use WHISTLE (A).
- Go (B).
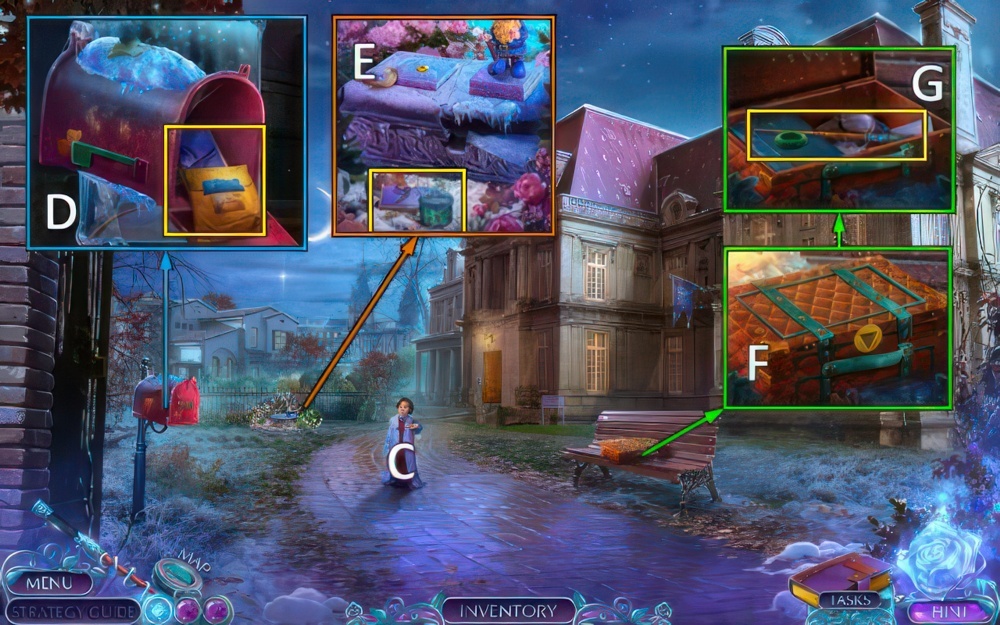
- Talk (C), receive MERLIN’S SIGNET.
- Use WRENCH, take PACKAGE and UNIVERSITY EMBLEM HALF 1/2 (D).
- Use GLOVE, take UNOPENED CAN and UNIVERSITY EMBLEM HALF 2/2 (E).
- Use MERLIN’S SIGNET (F).
- Take POINTING STICK and HAIR TIE (G).
- Go down.
- Place UNIVERSITY EMBLEM HALF, take SELFIE STICK (H).
- HOOK and HAIR TIE on SELFIE STICK, receive STICK WITH HOOK.
- Take GROWTH POTION with STICK WITH HOOK (I).
- Go (J).
- Offer GROWTH POTION (K), receive ACCESS CARD.
- Use ACCESS CARD (L).
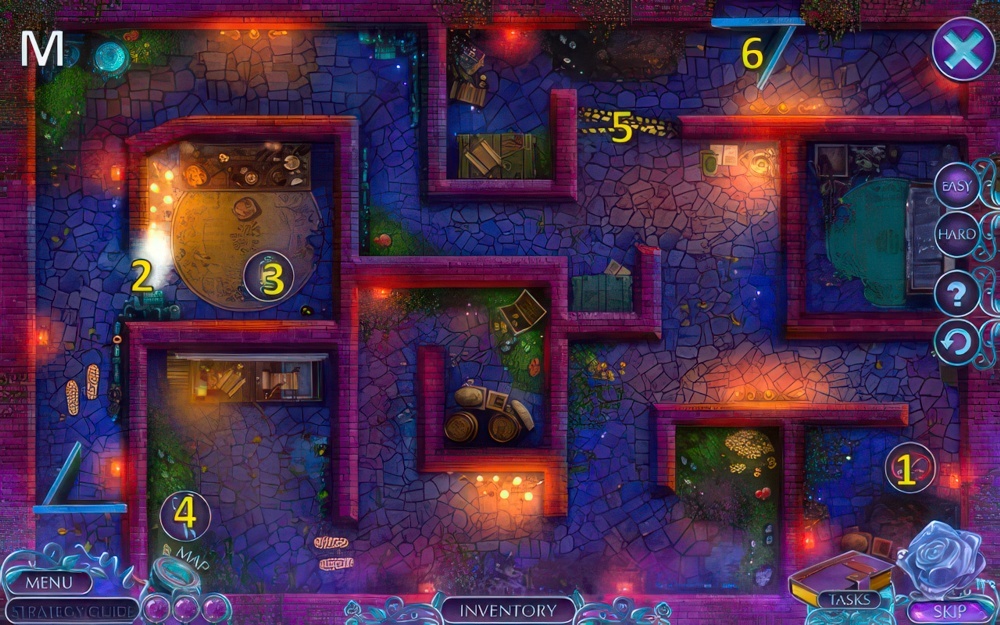
- Navigate the maze from the lower-left door to the upper-right door.
- Select and drag the footprints to move.
- Collect items to overcome the obstacles.
- Easy walkthrough (M): 1-6.
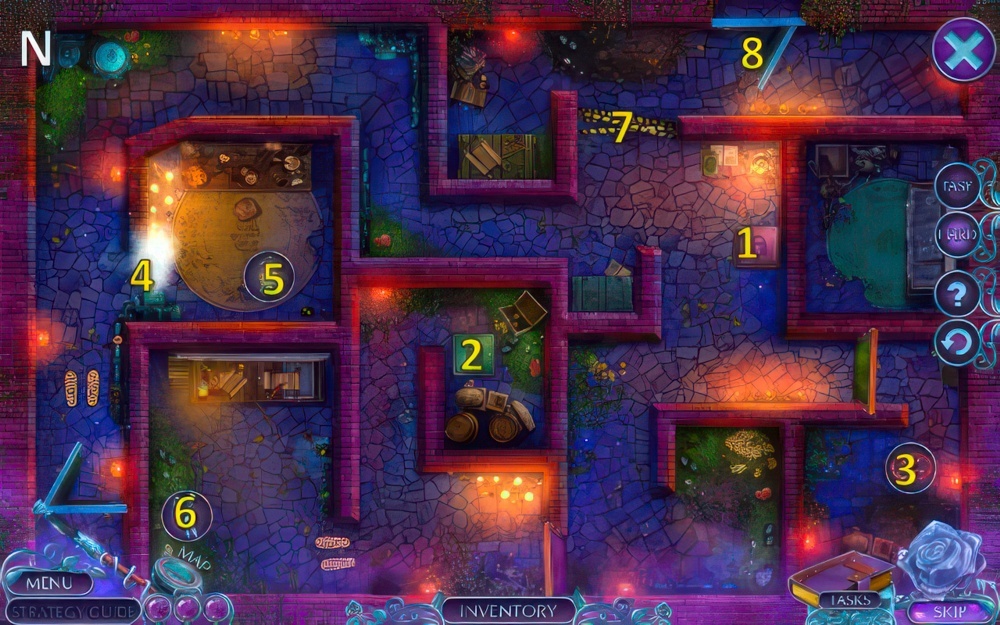
- Hard walkthrough (N): 1-8.
- Take CAN OPENER, use POINTING STICK (O).
- Take HAIRPIN and CABINET BUTTON (P).
- Take CORK, place CABINET BUTTON (Q).
- Go down ×2.
- CAN OPENER on UNOPENED CAN, receive CAT FOOD.
- Offer CAT FOOD (R).
- Take BOLT AND NUT and SCISSORS (S).
- Go to Archive.
- SCISSORS on PACKAGE, take AQUARIUM CLEANER and PEG.
- Use AQUARIUM CLEANER (T).
- Play puzzle (U), receive GNOME.
- Go down.
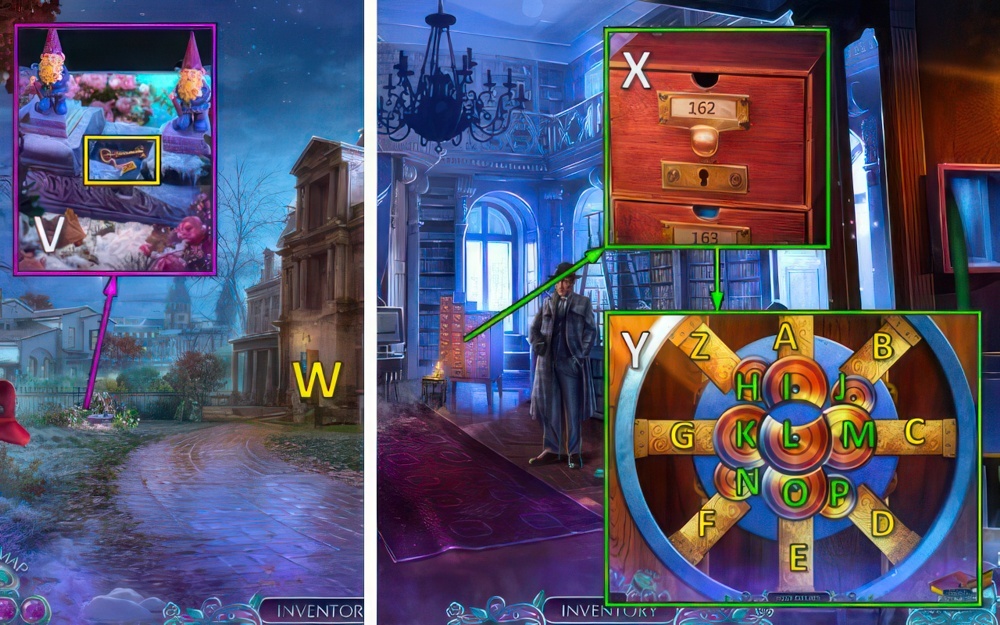
- Place GNOME, take FILE BOX KEY (V).
- Go (W).
- Use FILE BOX KEY (X).
- Rotate the lock parts to free the golden bars and open the lock.
- Select a lock part to rotate it, then select a freed bar to remove it.
- Easy walkthrough (Y): I-H×2-Z-H×2-I×3-L-M-J×2-B-J×2-M×3-L-O-P×2-D.
- P×2-O×3-L-K-N×2-F.
- Hard walkthrough (Y): I-H×2-Z-H×2-I-A-I×2-L-M-J×2-B-J×2-M-C-M×2-L.
- O-P×2-D-P×2-O-E-O×2-L-K×2-G-K×3-N×2-F.
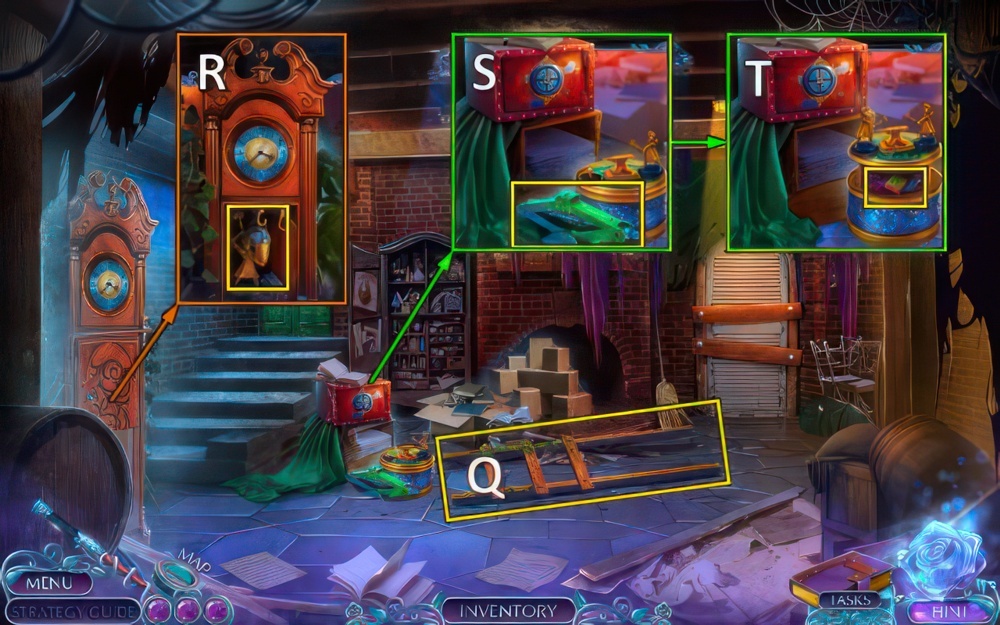
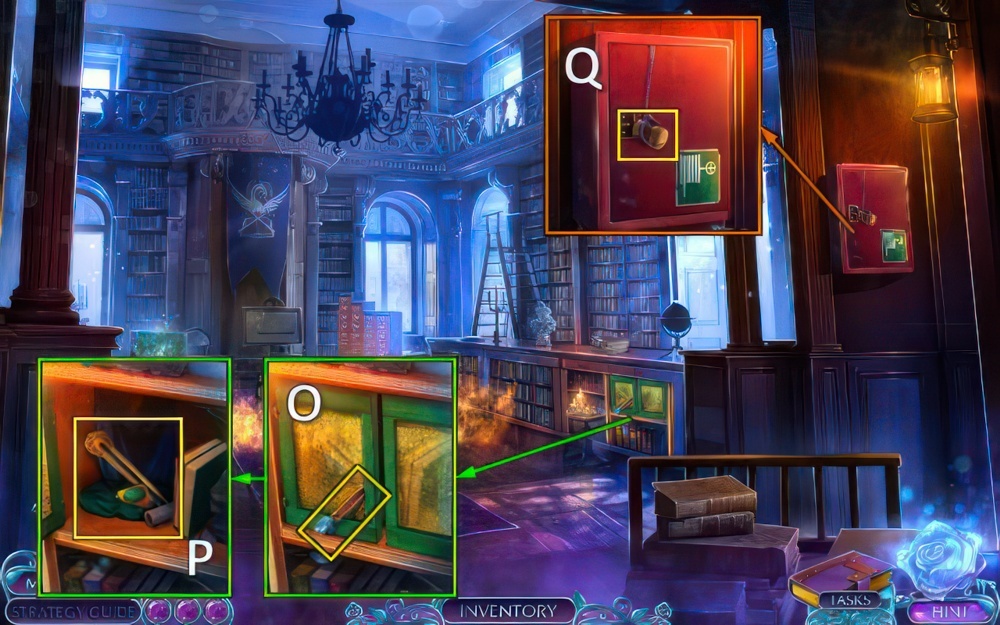
- Take BROKEN LADDER (Q).
- Use CORK, take BLACKSMITH STATUETTE (R).
- Take JACK (S).
- Place BLACKSMITH STATUETTE, take PLASTIC CARD and CUTTER HALF (T).
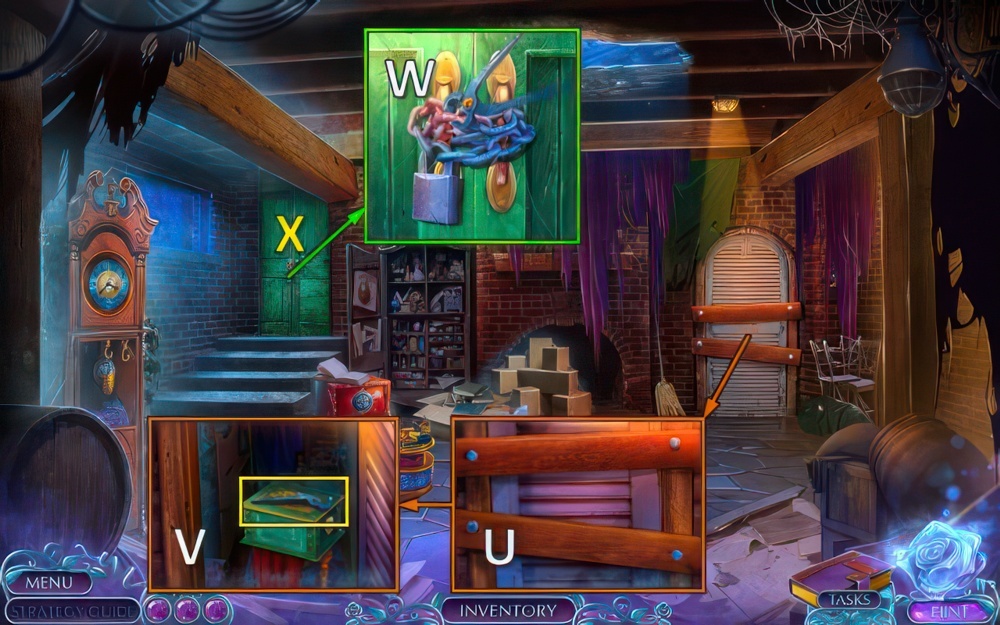
- Take NAILS with HAIRPIN (U).
- Take BROKEN BOLT CUTTER (V).
- CUTTER HALF and BOLT AND NUT on BROKEN BOLT CUTTER, receive BOLT CUTTER.
- Use BOLT CUTTER (W).
- Go (X).

- Take CRANK, use PEG (Y).
- Take LEAF AMULET and BOARDS (Z).
- Place LEAF AMULET, take HAMMER, BRUSH and energy sphere 1 (A).
- HAMMER, NAILS and BOARDS on BROKEN LADDER, receive LADDER.
- Place LADDER (B).
- Play puzzle (C), receive OILCAN.
- Use OILCAN and BRUSH (D).
- Go (E).

- Talk (F), receive CORAL.
- Use PLASTIC CARD (G).
- Take MATCHES and STETHOSCOPE (H).
- Place JACK, take DYNAMITE, BROKEN SHOVEL and energy sphere 2 (I).
- Take UMBRELLA HANDLE with CORAL (J).
- Place DYNAMITE and MATCHES, take CROWBAR and CRESCENT AMULETS 1/3 (K).
- Go down ×2.
- Place STETHOSCOPE (L).
- Open the safe.
- Select and drag the lock icon along the lock until it highlights green, then select the lock icon again to lift the spring.
- Easy walkthrough (M).
- Hard walkthrough (N).
- Take LOCKED CASE and energy sphere 3 (O).

- Place CRANK, take WEIGHT (P).
- Place WEIGHT, take CRESCENT AMULETS 2/3 and FEATHERS (Q).
- Go (R).
- Use magic wand (S).
- Take TWEEZERS and PEG (T).
- Go (U).
- UMBRELLA HANDLE and PEG on BROKEN SHOVEL, receive SHOVEL.
- Use SHOVEL, take PHONOGRAPH HORN (V).
- Go down.
- Place PHONOGRAPH HORN, take CRESCENT AMULETS 3/3 and DIAMOND RING (W).
- Go (X).
- CRESCENT AMULETS on LOCKED CASE, take KNIFE.
- Use KNIFE (Y).
- Play puzzle (Z), receive FUEL.
- Open, use FUEL (A).
- Use CROWBAR, take CABIN KEYS 1/2 and INCOMPLETE LAMP (B).
- Take FILE, take CABIN KEYS 2/2 with TWEEZERS (C).
- Use CABIN KEYS (D).
- Go (E).
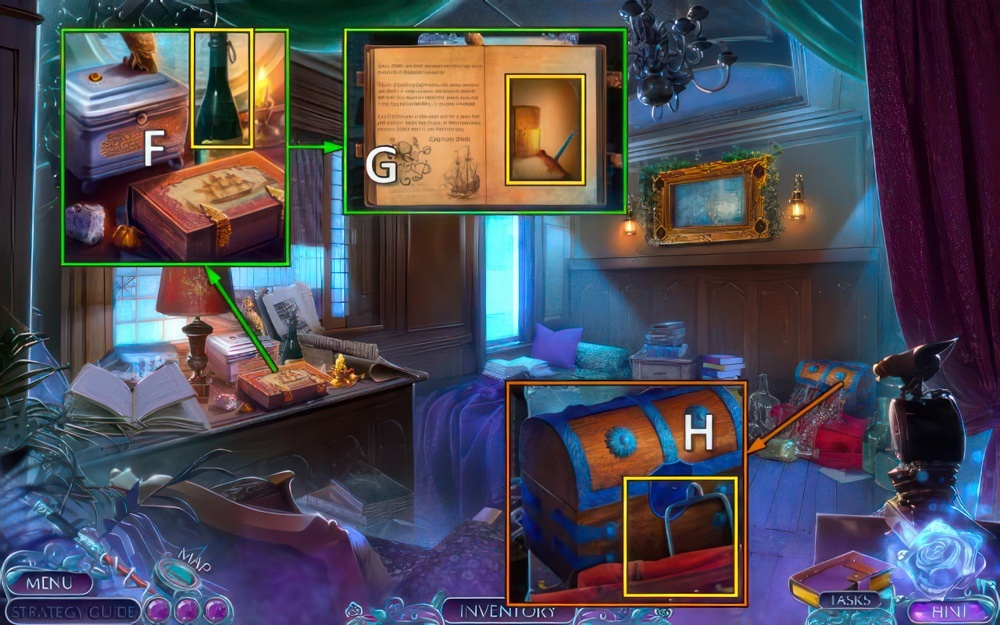
- Take WINE 1/3, use FILE (F).
- Take CORKSCREW and LIGHTER (G).
- Use FEATHERS, take CAPTAIN’S CLOAK and LAMP HANDLE (H).
- Use DIAMOND RING, take MAGNET and WICK (I).
- WICK, LAMP HANDLE and LIGHTER on INCOMPLETE LAMP, receive LIT LAMP.
- Place LIT LAMP (J).
- Recreate the lock pattern seen in the image on the right.
- Select a seashell to rotate the lines connected to it.
- Easy walkthrough (K): U×2-X×2-Z×3-T-X-T×2-X×2-U-X×3-U-T×2-Q-T×2-S-O×2-R×2-V-R-Y×3.
- Hard walkthrough (K): U×2-X×2-Z×3-T-X-T×2-X×2-U-X×3-U-T×2-Q-T×2-S-O×2-R×2-V-R-Y×3-A×2-N-L×3-M.
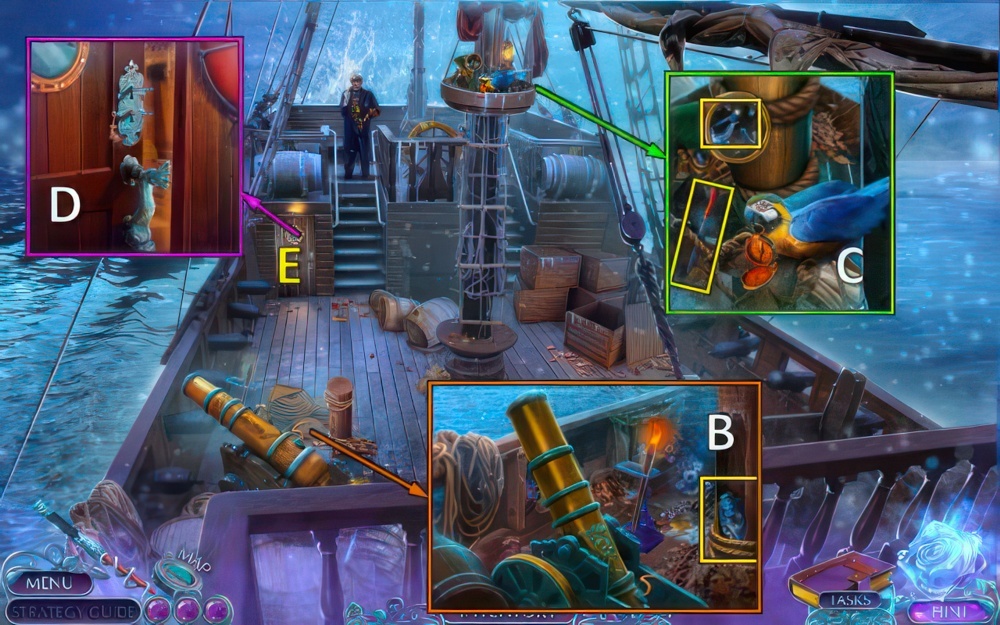
- Use CORKSCREW, take GEMS 1/4 (B).
- Use MAGNET (C).
- Take CHEST AMULET and GEMS 2/4 (D).
- Place CAPTAIN’S CLOAK (E).
- Take BRUSH and WINE 2/3 (F).
- Use BRUSH, take CANNONBALL (G).
- Go down.
- Place CHEST AMULET (H).
- Find items, take PARROT STATUETTE (I).
- Place PARROT STATUETTE (J).
- Take GEMS 3/4 and PARROT COOKIE (K).
- Go down.
- Offer PARROT COOKIE (L), receive CAPTAIN’S COMPASS.
- Offer CAPTAIN’S COMPASS (M).
- Take TWEEZERS and WINE 3/3 (N).
- Go to Wine Cellar.

- Place WINE (O).
- Play puzzle (P), receive GUN.
- Use GUN (Q).
- Take COCONUT and GEMS 4/4 (R).
- Go down.
- Place GEMS, take GLOVE, SPUR and EMPTY POUCH (S).
- Go (T).
- Take GUN POWDER with EMPTY POUCH (U).
- Go down ×2.
- Place GUN POWDER and CANNONBALL, use torch (V)
- Use COCONUT, take BROKEN AMULET and COIN (W).
- Take HEAVY STATUETTE, take AMBER GEMSTONE with TWEEZERS (X).
- Use GLOVE, take BOOMERANG and GREEN GEMSTONE (Y).
- AMBER GEMSTONE and GREEN GEMSTONE on BROKEN AMULET, receive COLORFUL AMULET.
- Place COLORFUL AMULET (Z).
- Drag the amulet to the green slot.
- Select the arrows at the top to alternate the layout of the labyrinth.
- Easy walkthrough (A): C, move to 1, B, move to 2.
- Hard walkthrough (D): move to 1, E×2, move to 2.
- Go (F).
- Use BOOMERANG, take CARABINER and CASHBOX BUTTONS 1/4 (G).
- Use HEAVY STATUETTE, take HORN and CASHBOX BUTTONS 2/4 (H).
- Use COIN, take SEASHELL and CASHBOX BUTTONS 3/4 (I).
- Use SPUR, take CASHBOX BUTTONS 4/4 and PICKLOCK (J).
- Go down.
- Place CASHBOX BUTTONS, take MONEY (K).
- Offer MONEY (L).
- Go (M).
- Talk (N), receive DARTS.
- Use PICKLOCK (O).
- Play puzzle (P), receive VINYL RECORD.
- Place VINYL RECORD, take energy sphere 1 and GAME PIECES 1/4 (Q).
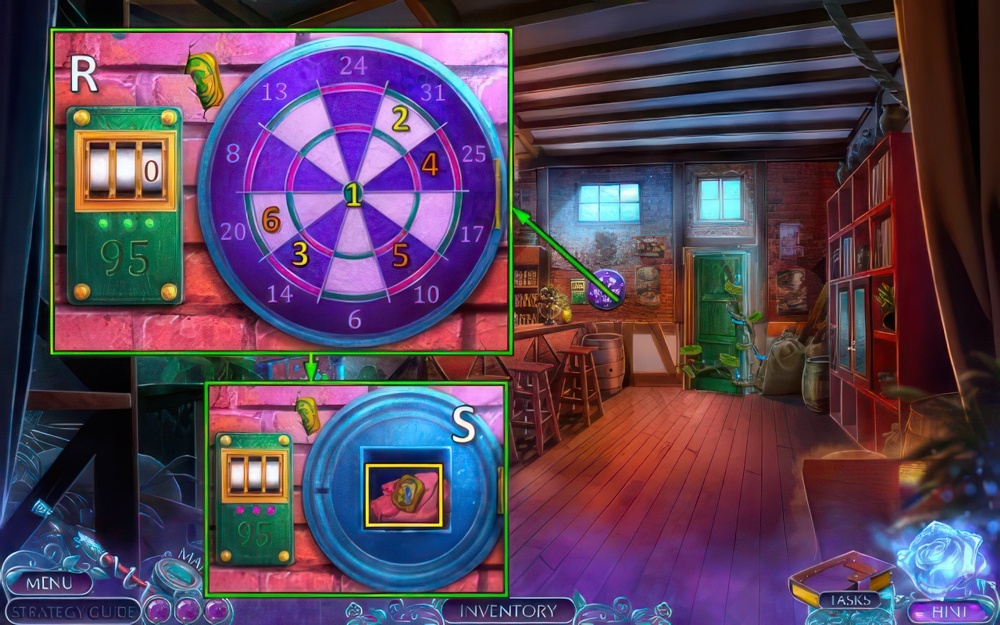
- Use DARTS (R).
- Score 95 or 105 points by hitting the correct numbers on the dartboard.
- Select a place to throw a dart.
- Hitting the center gives you 50.
- Easy walkthrough: hit 1-2-3.
- Hard walkthrough: hit 4-4-4-5-6.
- Take CHAIN and GAME PIECES 2/4 (S).
- Go down.
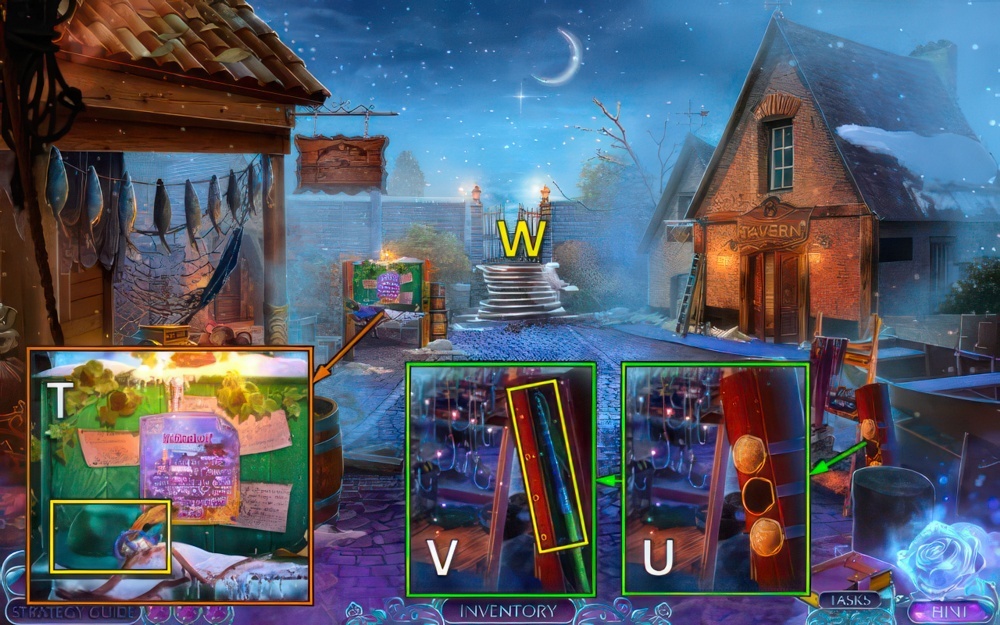
- Use HORN, take PIN and HAT (T).
- Place SEASHELL (U).
- Take FISHING ROD (V).
- Go (W).
- Place CARABINER and CHAIN, take MUSIC NOTE and TUBE (X).
- Use FISHING ROD, take energy sphere 2 and PAINTBRUSH (Y).
- Go to Inn.

- Take GAME PIECES 3/4 with PIN (Z).
- Place MUSIC NOTE (A).
- Take GAME PIECES 4/4 and SCISSORS (B).
- Go to Yellenhoff Square.
- Place GAME PIECES (C).
- Cover the board with green pieces.
- Press a game piece and then press a highlighted spot to move it.
- All adjacent pieces will turn to your color.
- Play random puzzle (D).
- Take COOLING SPRAY (E).
- Use COOLING SPRAY, take energy sphere 3 and AX BLADE (F).
- Go to Inn.
- Use magic wand (G).
- Go (H).
- Use HAT, take LILY and MIRROR (I).
- Take PINE CONE (J).
- Use TUBE, take WIRE HOOK and WISHBONE (K).
- Place WISHBONE, LILY and PINE CONE (L).
- Go (M).
- Place PAINTBRUSH (N).
- Play puzzle (O), receive FIRE AMULET.
- Place FIRE AMULET, take SCOOP and AX HANDLE (P).
- Use SCISSORS (Q).
- Take CHEST CODE 1/3 and GRINDSTONE (R).
- AX HANDLE and GRINDSTONE on AX BLADE, receive AX.
- Use AX (S).
- Go (T).
- Talk (U), receive CHANDELIER SWITCH.
- Place CHANDELIER SWITCH (V).
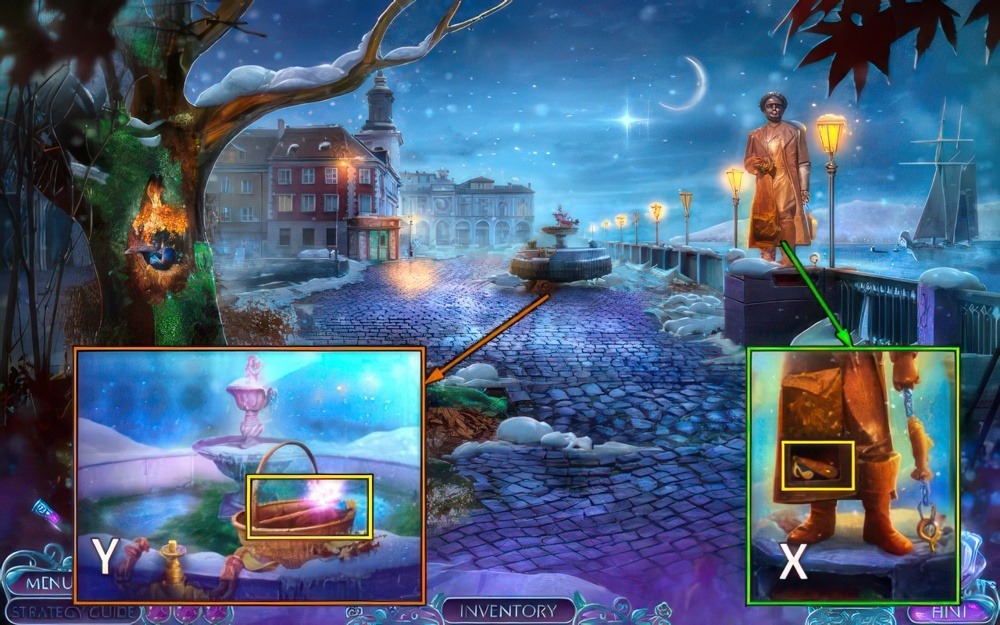
- Take RAPUNZEL’S BOX (W).
- Place MIRROR and WIRE HOOK (X).
- Take KNIGHT STATUETTE and CHEST CODE 2/3 (Y).
- Go down ×2.
- Use SCOOP, take CHEST CODE 3/3 and SCRAPER (Z).
- Place CHEST CODE (A).
- Place the animal tokens in the arc where their matching symbol in the tree corresponds.
- Select the right and left arrows to move the slider and select the up arrow to swap out the tokens above it.
- Easy walkthrough: D-B×2-D-C×2-D-B×2-D-C×3-D-B-D-B×2-D-B-D-C×2-D-B×2-D.
- Hard walkthrough: C×3-D-B×4-D-C-D-C×3-D-B×2-D-B×4-D-C-D-C×3-D.
- Take FAN and FLEUR-DE-LIS 1/2 (E).
- Go (F).
- Place KNIGHT STATUETTE, take TWO-PRONGED FORK and AMETHYST (G).
- Use FAN, take RUBY and STICK (H).
- Go (I).
- Use SCRAPER, take EMERALD and WIRE (J).
- EMERALD, AMETHYST and RUBY on RAPUNZEL’S BOX, take MAGIC COMB.
- Offer MAGIC COMB (K), receive YARN.
- Go down.
- Offer YARN, take HELMET and FLEUR-DE-LIS 2/2 (L).
- Go down.
- Place FLEUR-DE-LIS, take BROOM and HOOKED SPEAR (M).
- Go to First Floor.
- STICK and WIRE on HOOKED SPEAR, receive HARPOON.
- Take BOOK KEY with HARPOON (N).
- Use BOOK KEY (O).
- Play puzzle (P), receive SUN AMULET.
- Go down ×2.
- Place SUN AMULET (Q).
- Go (R).
- Use TWO-PRONGED FORK (S).
- Take BENT NAIL and GEMS 1/3 (T).
- Use HELMET, take GEMS 2/3 and LEMON JUICE (U).
- Use BROOM, take CORKSCREW, TWEEZERS and GEMS 3/3 (V).
- Place GEMS (W).
- Go (X).
- Take SAFE CODE with TWEEZERS (Y).
- Use BENT NAIL, take ROPE, energy sphere 1 and LIGHTER (Z).
- LEMON JUICE and LIGHTER on SAFE CODE.
- Place SAFE CODE (A).

- Move the arrows to point at the symbols.
- The number on the note shows how many arrows should point at a symbol.
- Correct numbers highlight.
- Easy walkthrough (B): as shown.
- Hard walkthrough (B): D×6-E×5-F×7-G×4-H×7-I×2-K×6.
- Take ACID and energy sphere 2 (L).
- Use ACID (M).
- Go (N).
- Take DWARVES’ BOX (O).
- Use CORKSCREW, take CHAINED PULLER (P).
- Take BROKEN FISHING ROD, place ROPE (Q).
- Take SALT AND PEPPER SHAKERS 1/2 and SIGNET (R).
- Use CHAINED PULLER, take REEL and SIGNET (S).
- Go down ×2.

- SIGNET ×2 on DWARVES’ BOX, take ACCESS CARD.
- Use ACCESS CARD (T).
- Take PORTRAITS 1/3 and energy sphere 3 (U).
- Use magic wand (V).
- Receive WIRE CUTTERS.
- Go (W).

- Use WIRE CUTTERS, take PENCIL (X).
- Go (Y).
- Use PENCIL, take SALT AND PEPPER SHAKERS 2/2 and DIAMOND RING (Z).
- Place SALT AND PEPPER SHAKERS (A).
- Play puzzle (B), receive COOKIE.
- Go down ×2.
- Offer COOKIE (C).
- Take PORTRAITS 2/3, PAPERWEIGHT and FISHING LINE (D).
- FISHING LINE and REEL on BROKEN FISHING ROD, receive FISHING ROD.
- Use FISHING ROD, take SKATES and PORTRAITS 3/3 (E).
- Go (F).
- Place PORTRAITS, take DWARF STATUETTE (G).
- Go to Dining Room.
- Place DWARF STATUETTE, take MAGNET and MONOPOD (H).
- Use MAGNET (I).
- Take LEVER (J).
- Go down ×2.
- Place LEVER (K).
- Restore the tracks.
- Select a part of the road, drag it to a suitable place and click
- Easy walkthrough (L).
- Hard walkthrough (M).
- Place SKATES (N).
- Take SCREWDRIVER and GAS NOZZLE (O).
- Use DIAMOND RING, take ROD and KNIFE HANDLE (P).
- Use ROD and PAPERWEIGHT, take BROKEN BURNER and PIN (Q).
- GAS NOZZLE on BROKEN BURNER, receive BURNER.
- Use BURNER (R).
- Go (S).
- Use SCREWDRIVER (T).
- Take GRINDSTONE and TONGS (U).
- Take AWL and DULL BLADE with MONOPOD (V).
- DULL BLADE and GRINDSTONE on KNIFE HANDLE, receive SHARP KNIFE.
- Use SHARP KNIFE (W).
- Play puzzle (X), receive SNOWFLAKE AMULET.
- Place SNOWFLAKE AMULET (Y).
- Go (Z).
- Take HEART AMULET with AWL (A).
- Use PIN (B).
- Take NUT (C).
- Go down.
- Place HEART AMULET, receive BROKEN SCEPTER (D).
- Offer NUT, take BOOK (E).
- Go (F).
- Place BOOK, take RAPUNZEL’S TOWER MODEL (G).
- Place RAPUNZEL’S TOWER MODEL, take FOUNTAIN COMBINATION (H).
- Go down ×2.
- Place FOUNTAIN COMBINATION (I).
- Find the matching snowflakes on the fountain.
- Select and drag the shard to move it.
- Easy walkthrough (J).
- Hard walkthrough (K).
- Take CHANDELIER LEVER (L).
- Take STONE OF COLD with TONGS (M).
- Go to Throne Room.
- Place CHANDELIER LEVER (N).
- Take SCEPTER TOP (O).
- SCEPTER TOP and STONE OF COLD on BROKEN SCEPTER, receive SNOW QUEEN’S SCEPTER.
- Use SNOW QUEEN’S SCEPTER (P).
- Drag a redirector onto a tile and rotate it to focus the signal.
- They should be connected in one unobstructed flow to the top left image.
- Easy and hard walkthrough (Q).
- Walkthrough Bonus Chapter, at the link below.


