Fairy Godmother Stories 3: Little Red Riding Hood – The walkthrough of the game starts with Red Riding Hood being kidnapped and demanding a ransom, everyone blames the evil wolf. But this time you are not sure if he is behind this terrible crime, so you set out to investigate. Soon you find out that not only the young girl is in danger, but the whole town. It is up to you to save, the girl and the town together with your fabulous new friends. If you can not pass any of the puzzles or do not know where the items are, on our site you can watch the walkthrough of the game Fairy Godmother Stories 3: Little Red Riding Hood, and save Little Red Riding Hood along with the magical land.
Fairy Godmother Stories 3: Little Red Riding Hood – Walkthrough
Here you can see full walkthrough of Fairy Godmother Stories 3: Little Red Riding Hood game, namely for all chapters, including bonus chapter, in pictures.
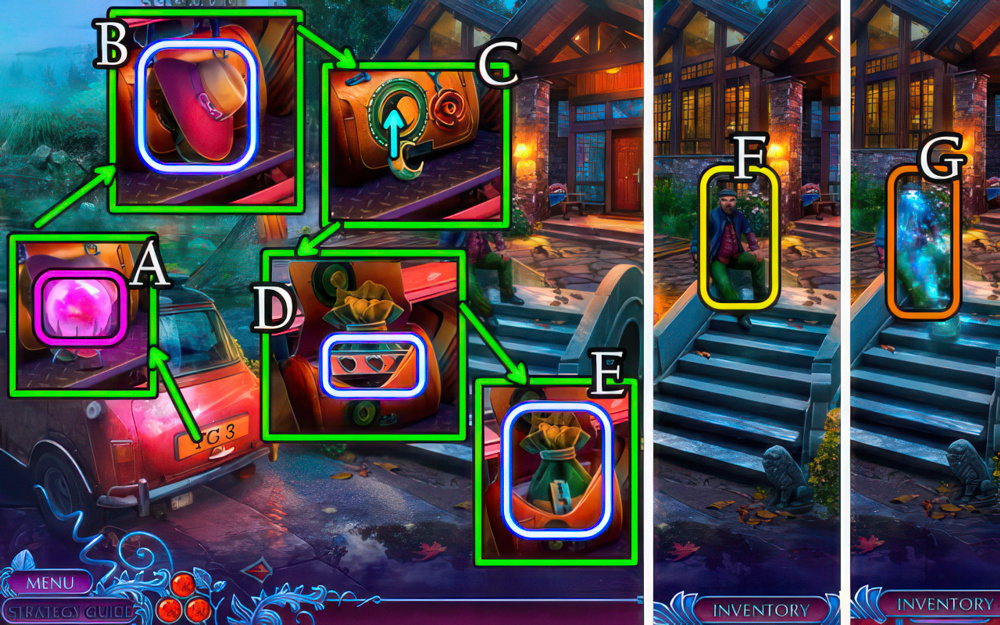
- Speak to character, open trunk, take Hint (A), HAT (B).
- Place moon (C).
- Take note, CLOSED CASE (D), RAZOR and COINS (E).
- Give COINS (F).
- Play puzzle (G), receive FISHING ROD.

- Take Tasks (H), SCREWDRIVER (I).
- Take RUBBER RAINCOAT (J), LION SEAL (K).
- Use FISHING ROD (L), uncover, take HOUSE KEY, CHAIN WITH HOOK (M).
- Use HOUSE KEY (N).
- Go forward.

- Use SCREWDRIVER (O).
- Take Map, BUTTON and WOLF SEAL, take 1/4 Clues (P).
- Open, use HAT (Q).
- Take BROKEN DRILL (R).
- Take 2/4 Clues, use RAZOR (S).
- Take CLAMP, OWL SEAL and book (T).
- LION SEAL, WOLF SEAL and OWL SEAL on CLOSED CASE, take scroll, select 3 sparkles to wand charge.
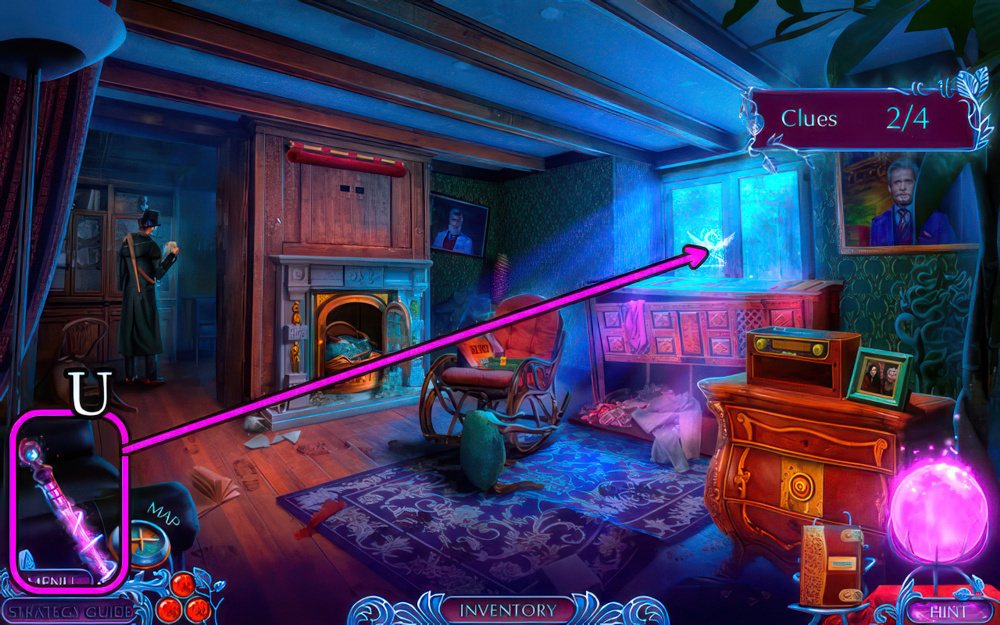
- Select, use Wand (U).

- Use the three colored buttons to fill in the spiral.
- Select a color to fill in the next spiral section.
- Note that adjacent spiral sections can’t be the same color.
- Easy walkthrough (V): A-B-A-C-A-B-C-B-C-A.
- Hard walkthrough (W): A-B-A-C-B-A-B-C-B-A-C-A-C-B-A-B-A-C.
- Go forward.

- Use RUBBER RAINCOAT, take BROKEN SHOVEL (X), CORKSCREW (Y).
- Use CHAIN WITH HOOK (Z).
- Take FAN BLADES, 1/3 GARDEN GNOMES and 3/4 Clues (A).
- BUTTON, FAN BLADES on BROKEN DRILL for FAN.
- Use FAN (B).
- Take NAIL CLIPPERS (C).
- Take 4/4 Clues (D).
- Go down.

- Speak to character, take MAILBOX FLAG (E).
- Use CORKSCREW (F).
- Take 2/3 GARDEN GNOMES (G).
- Go down.
- Place MAILBOX FLAG, take STEERING WHEEL, use NAIL CLIPPERS (H), take TONGS, 1/2 PURSE LOCK CODE (I).

- Place STEERING WHEEL, take SIGNET RING (J).
- Go forward.
- Use SIGNET RING (K).
- Take MAGNET, HANDLE (L).
- CLAMP, HANDLE on BROKEN SHOVEL for SHOVEL.
- Use SHOVEL (M).
- Take AXE, 3/3 GARDEN GNOMES (N).
- Go forward.

- Place 3/3 GARDEN GNOMES (O), for puzzle (P), receive WATER SPRAYER.
- Use WATER SPRAYER (Q).
- Take SUN EMBLEM (R), wand charge (S).
- Go down.

- Place SUN EMBLEM (T).
- Take LID HANDLE, 2/2 PURSE LOCK CODE (U) and wand charge (V).
- Go forward.
- Enter the code.
- Select a number to change it.
- Each symbol corresponds to a certain number.
- Place 2/2 PURSE LOCK CODE, enter 1-6-2-4 (W).
- Take NAIL FILE (X), wand charge (Y).
- Use Wand (Z).

- Complete the image.
- Find and select all the bird image pieces.
- Place them where they belong on the bird.
- Easy walkthrough (A1): 1-4, (A2) (A-A2)-(B-B2)-(C-C2)-(D-D2), (A3) E.

- Easy walkthrough (A4): 1-5, (A5) (A-A2)-(B-B2)-(C-C2)-(D-D2)-(E-E2), (A6) F.

- Easy walkthrough (A7): 1-7, (A8) (A-A2)-(B-B2)-(C-C2)-(D-D2)-(E-E2)-(F-F2)-(G-G2), (A9) H.

- Hard walkthrough (B1): 1-5, (B2) (A-A2)-(B-B2)-(C-C2)-(D-D2)-(E-E2), (B3) F.

- Hard walkthrough (B4): 1-7, (B5) (A-A2)-(B-B2)-(C-C2)-(D-D2)-(E-E2)-(F-F2)-(G-G2), (B6) H.

- Hard walkthrough (B7): 1-9, (B8) (A-A2)-(B-B2)-(C-C2)-(D-D2)-(E-E2)-(F-F2)-(G-G2)-(H-H2)-(I-I2), (B9) J.

- Use MAGNET (C).
- Take SULFUR (D), 1/4 CHESS PIECES (E).
- Use AXE (F), take ACID RECIPE, BOARDS (G).
- Take NAILS, use TONGS for WATER (H).
- SULFUR, WATER on ACID RECIPE for ACID.
- Use ACID (I).
- Go forward.
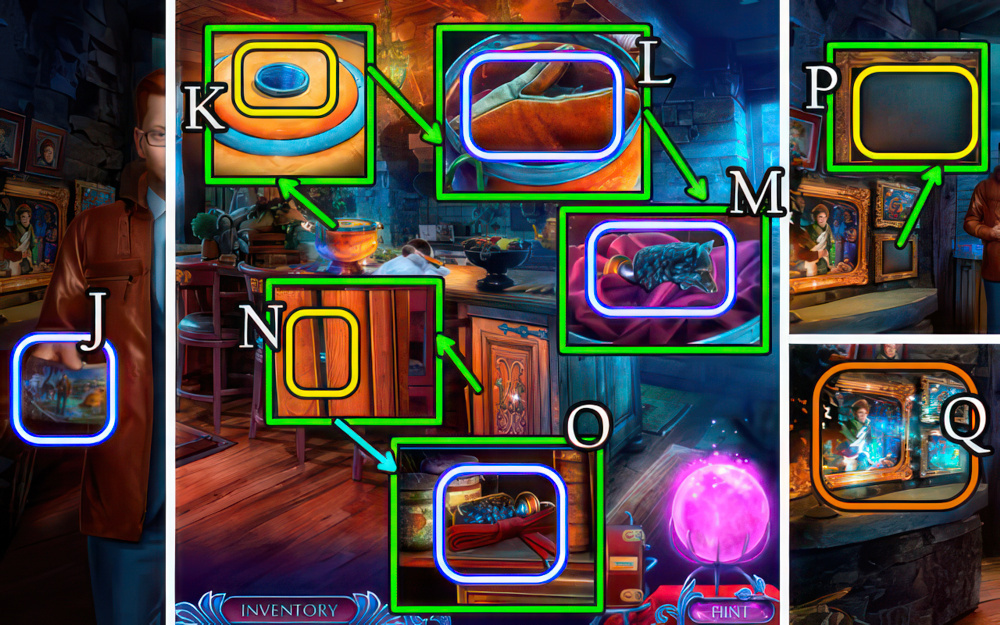
- Speak to character, take PRACTICAL’S PORTRAIT (J).
- Use LID HANDLE (K).
- Take OVEN MITT (L), 2/4 CHESS PIECES (M).
- Use NAIL FILE (N), take SHOELACE, 3/4 CHESS PIECES (O).
- Place PRACTICAL’S PORTRAIT (P).
- Play puzzle (Q), receive PUMPKIN EMBLEM.
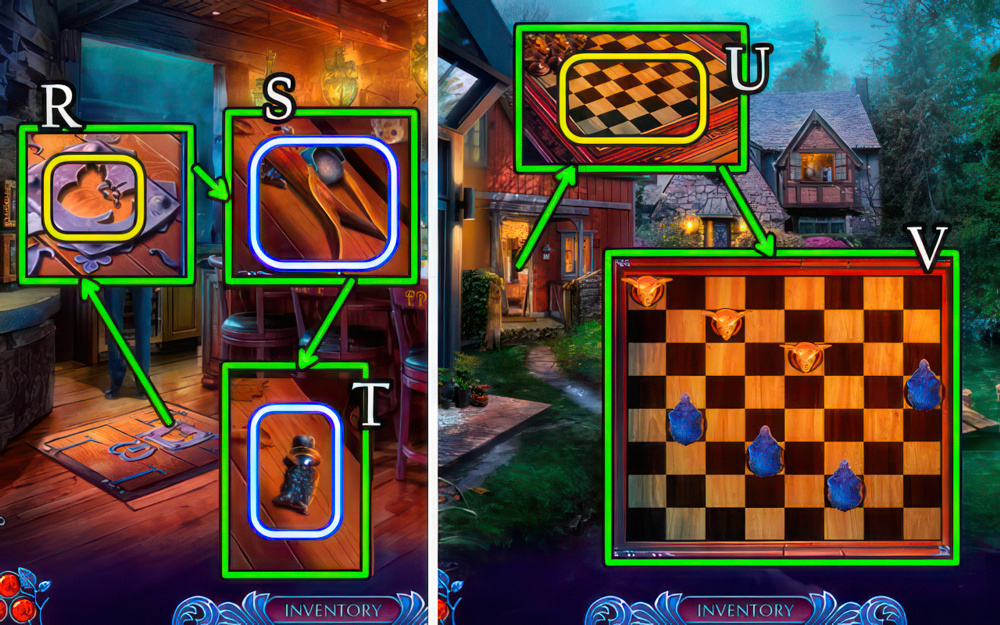
- Use PUMPKIN EMBLEM (R).
- Take SLINGSHOT (S), 4/4 CHESS PIECES (T).
- Go down.
- Place 4/4 CHESS PIECES (U).
- Arrange the wolf and sheep pieces so that none is in the same vertical, horizontal, or diagonal row.
- Select and drag a piece to move it.
- In the Hard mode, there’s no green clues for their arrangement.
- Easy and Hard walkthrough (V).
- Take TORCH BASE, HAMMER and wand charge.

- Use BOARDS, NAILS and HAMMER (W).
- Go (X).
- Take wand charge (Y).
- Use SLINGSHOT (Z).
- Take wand charge, HEAVY STATUETTE (A).
- Use Wand (B).
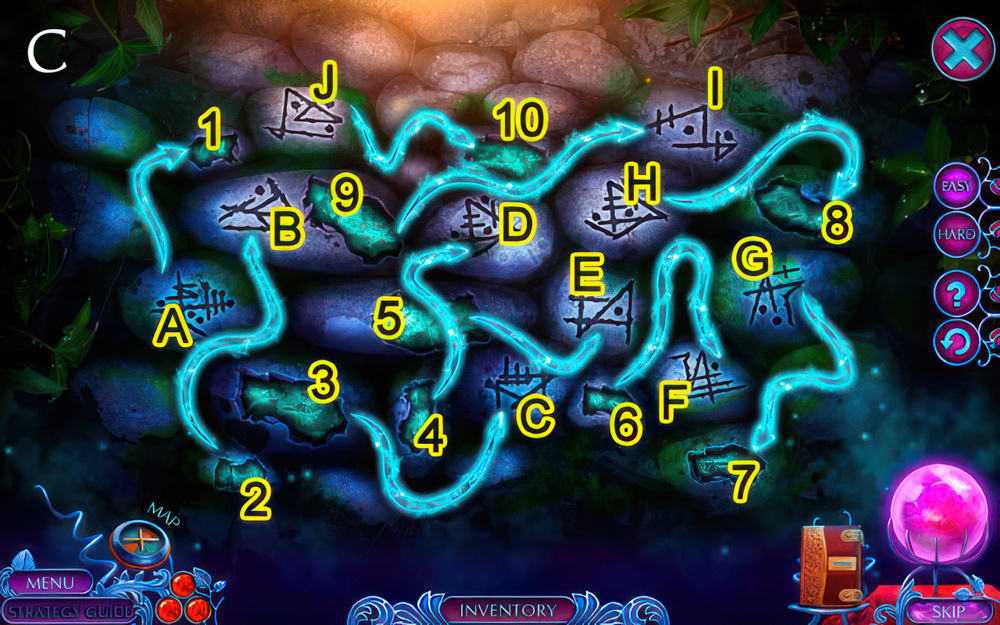
- Find a way for Fifer to climb out of the well.
- Select the eye stone to reveal the arrow hints.
- Easy walkthrough (C): (A-1)-(B-2)-(C-3)-(D-4)-(E-5)-(F-6)-(G-7)-(H-8)-(I-9)-(J-10).

- Hard walkthrough (D): (A-1)-(B-2)-(C-3)-(D-4)-(E-5)-(F-6)-(G-7)-(H-8)-(I-9)-(J-10).

- Speak to character, take SECRET PASSAGE CLUE (E).
- Place SECRET PASSAGE CLUE (F).
- Go forward.
- Use OVEN MITT (G).
- Take EMPTY POUCH, BANDAGE (H).
- Use SHOELACE, take KNIFE, note (I).
- Go down twice.

- Use KNIFE (J), play puzzle (K), receive KEROSENE.
- BANDAGE, KEROSENE on TORCH BASE for UNLIT TORCH.
- Place UNLIT TORCH (L) for FLAMING TORCH.
- Go to Park Area.
- Use FLAMING TORCH (M).
- Take GLOVE COMPARTMENT BUTTON, wand charge (N).
- Go forward.
- Use GLOVE COMPARTMENT BUTTON (O).
- Take BURNER (P), CHISEL (Q).

- Use CHISEL, HEAVY STATUETTE (R).
- Speak to character, take CHEESE (S).
- Go to Practical’s House.
- Give CHEESE (T) take TWO-PRONGED FORK (U).
- Go to Park Area.
- Use TWO-PRONGED FORK (V).
- Take SHAVING BRUSH, wand charge (W).
- Go to Practical’s House.
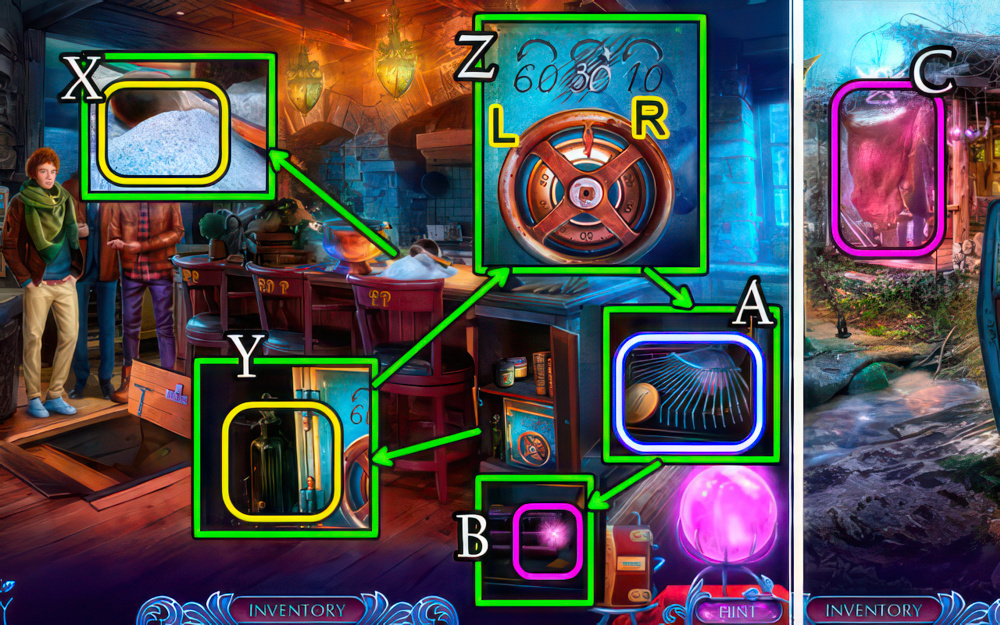
- Place EMPTY POUCH (X), receive POWDERED SUGAR.
- Place POWDERED SUGAR, SHAVING BRUSH (Y).
- Enter the code above.
- Drag the safe handle to rotate it as indicated.
- Numbers turn green when entered correctly.
- Walkthrough (Z): L-60, R-30, L-10.
- Take 1/2 COINS, RAKE (A), wand charge (B).
- Go to Outside the Wolf’s Lair.
- Use Wand (C).
- Win a fight against the Big Bad Wolf.
- Attack or defend yourself in the correct sequence based on his moves as shown at the top.
- Select the buttons below to create your sequence.
- You lives are indicated in the green tube.
- Easy and Hard walkthrough vary.

- Use BURNER (D), take LEVER (E).
- Take SHAFT (F).
- RAKE on SHAFT.
- Use RAKE (G).
- Take LIFE HAMMER, FISHING ROD (H).
- Use FISHING ROD (I), select for puzzle (J), receive FAUCET HANDLE.

- Place FAUCET HANDLE (K).
- Go forward.
- Take 2/2 COINS, CARPET, EMPTY BUCKET (L).
- Use 2/2 COINS, take T-SHIRT (M).

- Use T-SHIRT, receive SHARD (N).
- Use LIFE HAMMER (O).
- Take SCREWDRIVER (P).
- Go down.
- Use EMPTY BUCKET for SAND (Q).
- Use SCREWDRIVER (R), take CORK (S).
- Use SAND, place CARPET (T).
- Enter South Gates.

- Select (U), use CORK, receive METAL RULER.
- Take 1/2 EMBLEM PARTS (V).
- Use SHARD (W).
- Take TWO-PRONGED FORK (X).
- Take note, 1/2 DECORATIVE ELEMENTS, 2/2 EMBLEM PARTS (Y).
- Use LEVER (Z).
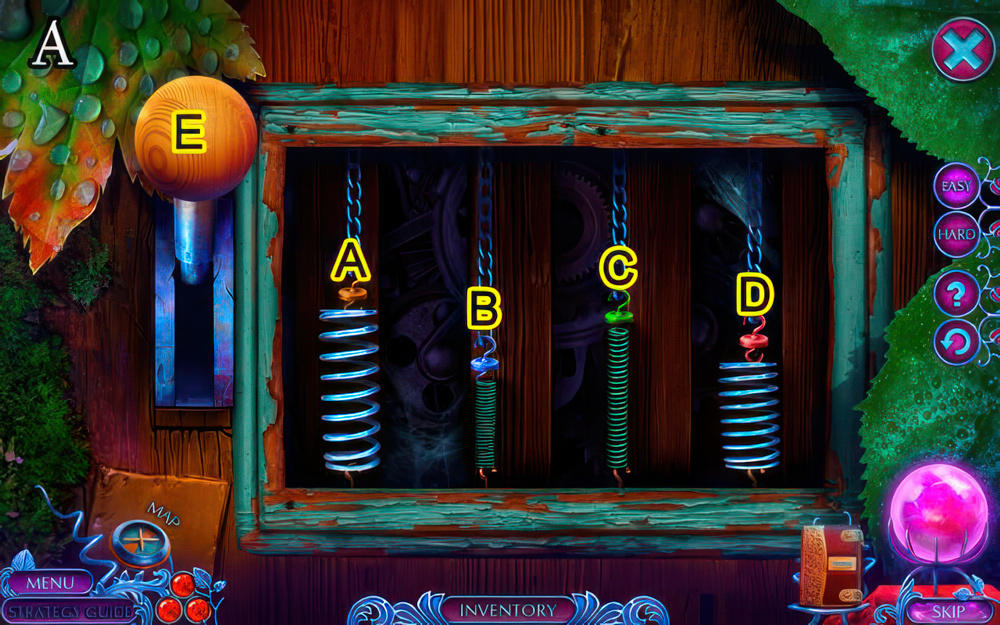
- Get all weights into the same line by arranging the different tension springs.
- Select two springs to swap their positions, then pull the lever to check your solution.
- Easy walkthrough (A): (A-D)-(A-C)-(B-C)-(E).

- Hard walkthrough (B): (A-F)-(A-B)-(A-E)-(A-D)-(G).
- Take FUEL.
- Go down.

- Place 2/2 EMBLEM PARTS (C).
- Put all the broken parts back together.
- Use the buttons to rotate the disk, then select a part, and put it in the right spot.
- Easy walkthrough (D): (B-B2)-(L)-(D-D2)-(L)-(E-E2)-(L×2)-(A-A2)-(L)-(C-C2).

- Hard walkthrough (E): (H-H2)-(L)-(A-A2)-(L)-(D-D2)-(L)-(F-F2)-(E-E2)-(G-G2)-(L)-(C-C2)-(L)-(B-B2).
- Take 2/2 DECORATIVE ELEMENTS, PENCIL.
- Go to South Gates.

- Place 2/2 DECORATIVE ELEMENTS (F).
- Go forward.
- Take note, TOY HAND (G).
- Use TOY HAND (H).
- Take JACK’S CASE, AMETHYST DUST (I).
- Go to Outside the Wall.
- Use METAL RULER (J), take WIRES (K).
- Use TWO-PRONGED FORK (L).
- Take METAL BRUSH (M).
- Go down.

- Use FUEL, WIRES, take SAUCER (N), KNIFE (O).
- Go to Outside the Wall.
- METAL BRUSH on JACK’S CASE, open, take CACHE KEY, 1/2 HANGER INLAY PARTS.
- Use CACHE KEY (P), play puzzle (Q), receive CLUE CODE.
- Place CLUE CODE (R).
- Enter the code according to the clue.
- The dots above the numbers indicate the order.
- Select 1-4, take PARCEL (S).
- Go to South Gates.
- Open PARCEL, AMETHYST DUST on PARCEL, take MAGIC BEANS.

- Place MAGIC BEANS (T), take MAKESHIFT JACK (U).
- Go forward.
- Use SAUCER, take LOCK PART, LOCK CODE (V).
- Place LOCK PART, LOCK CODE (W).
- Take EMPTY BASKET, use PENCIL (X).

- Use EMPTY BASKET, KNIFE (Y), receive DRIED FRUIT, take SUCTION CUP (Z).
- Use MAKESHIFT JACK, take 1/2 CROWN INLAY (A).
- Go down.
- Give DRIED FRUIT (B).
- Take RUBBER GLOVE (C), 2/2 CROWN INLAY (D).
- Go forward.

- Place 2/2 CROWN INLAY (E).
- Create a pathway to reach the castle.
- Select path discs to rotate them, then select the Arrow button to try out your path.
- You must collect all the keys along the path.
- Easy and Hard walkthrough (F).
- Speak to character.

- Use SUCTION CUP (G).
- Take PALETTE KNIFE, HACKSAW (H) and SCREW GUN BIT (I).
- Use RUBBER GLOVE, take BATTERY (J).
- Use HACKSAW (K), take BROKEN SCREW GUN (L).
- SCREW GUN BIT, BATTERY on BROKEN SCREW GUN for SCREW GUN.
- Use SCREW GUN (M).
- Take WRENCH (N), 2/2 HANGER INLAY PARTS and OWL EMBLEM (O).

- Place 2/2 HANGER INLAY PARTS (P).
- Play puzzle (Q), receive BOOMERANG.
- Use BOOMERANG (R), take AWL (S).
- Use AWL (T).
- Take UMBRELLA (U), RAVEN EMBLEM (V).
- Go down.

- Use OWL EMBLEM, RAVEN EMBLEM (W).
- Take REPAIR TOOLS (X), HOT WATER (Y).
- Go down.
- Use HOT WATER (Z), take OIL (A), SCREWS (B).
- Go forward.

- Place REPAIR TOOLS, SCREWS (C).
- Take RAVEN REINS (D).
- Go forward.
- Place RAVEN REINS (E).
- Fly to the witch.
- Select the arrow to guide your raven.
- Select the square to stop the bird.
- Avoid the hawks.
- Easy and Hard walkthrough vary.

- Take OWL WING (F).
- Use WRENCH (G).
- Take RUBY EYE (H).
- Use PALETTE KNIFE (I).
- Take OWL WING (J).
- Place RUBY EYE (K).
- Go forward.

- Take EMERALD HANDLE, note (L).
- Use OIL (M), take RUBY HANDLE (N).
- Use UMBRELLA (O), receive WIRE.
- Place EMERALD HANDLE, RUBY HANDLE (P).
- Go forward.

- Take BOOK EMBLEM (Q).
- Place 2 OWL WING (R).
- Take HERBICIDE, TREBLE CLEF KEY (S).
- Go down.
- Place BOOK EMBLEM (T).
- Play puzzle (U), receive MARGO’S COMB.
- Use MARGO’S COMB (V).
- Take SHARP BROKEN BOTTLE (W).
- Go down.

- Use HERBICIDE (X).
- Take KITCHEN TOWEL (Y).
- Use WIRE (Z).

- Restore the tube.
- Select a tile to move it to a vacant place.
- Also, choose a highlighted tile if there is more than one vacant place.
- Easy walkthrough (A): (E-D)-(D-C)-(B-E)-(E-D)-(I-E)-(E-B)-(H-I).
- (I-E)-(G-H)-(H-I)-(D-H)-(H-G)-(A-D)-(D-H).
- (E-D)-(D-A)-(I-E)-(E-D)-(M-I)-(I-E)-(L-M)-(M-I)-(K-L)-(L-M)-(H-L).
- (L-K)-(D-H)-(H-L)-(E-D)-(D-H)-(F-E)-(E-D)-(J-F)-(F-E)-(N-J)-(J-F).
- (I-J)-(J-N)-(H-I)-(I-J)-(D-H)-(E-I)-(A-D)-(B-E).
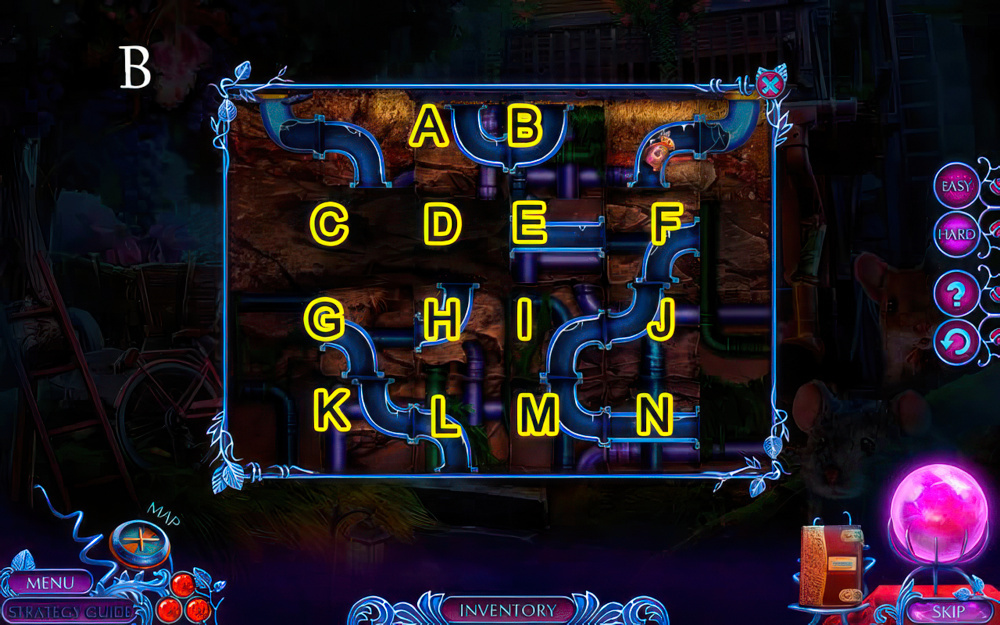
- Hard walkthrough (B): (A-D)-(D-C)-(H-D)-(D-A)-(G-H)-(H-D)-(K-G)-(L-H).
- (M-L)-(L-K)-(N-M)-(M-L)-(I-M)-(M-N)-(E-I)-(I-M)-(B-E)-(E-I)-(F-E)-(E-B)-(J-F).
- (F-E)-(N-J)-(J-F)-(I-J)-(J-N)-(F-J)-(E-F)-(H-I)-(I-E)-(J-I)-(F-J)-(E-F)-(D-E)-(G-H).
- (H-D)-(I-H)-(H-G)-(J-I)-(I-H)-(F-J)-(E-I)-(D-E)-(E-F)-(I-E)-(E-D)-(F-E)-(E-I)-(B-E).
- (A-B)-(D-A)-(E-D)-(B-E)-(E-F)-(D-E)-(A-D).
- Take photo, FAN.
- Go forward twice.

- Use SHARP BROKEN BOTTLE (C), receive ROPE.
- Use KITCHEN TOWEL (D).
- Take HOOK, SIM CARD EJECTOR (E).
- ROPE on HOOK for HOOK ON ROPE.
- Use HOOK ON ROPE (F).
- Go forward.
- Take TRIANGULAR HANDLE (G).
- Use FAN (H), take AMBER PIECE (I).

- Use TREBLE CLEF KEY (J).
- Take HEX WRENCH, ANTENNA (K).
- Go down twice.
- Use HEX WRENCH (L), place AMBER PIECE (M).
- Take TEMPERATURE CONTROL REGULATOR (N).
- Go forward.
- Place TEMPERATURE CONTROL REGULATOR (O).

- Starting from the red dots in the center, create the path to the snowflake.
- Connect the green dots by swapping the four regulators and rotating them, then connect them until the line is all red.
- Easy walkthrough (P1): D×5-C×6-A×2-B×4.

- Hard walkthrough (P2): (H-E)-(D×5)-(C×6)-(A×2)-(B×4).
- Take SAUSAGES.
- Go forward.

- Give SAUSAGES (Q), receive MARGO’S CAT.
- Go down thrice.
- Give MARGO’S CAT (R), receive WINDOW HANDLE.
- Go forward twice.
- Use WINDOW HANDLE (S).
- Enter Yard.
- Take PERFUME, GNOME’S CAP (T).

- Use SIM CARD EJECTOR (U).
- Take GEAR (V).
- Place GNOME’S CAP, take TEASPOON (W).
- Use PERFUME (X).
- Go forward.

- Take WIND-UP KEY (Y).
- Use TRIANGULAR HANDLE (Z), take CORKSCREW (A).
- Place ANTENNA, WIND-UP KEY and GEAR (B).
- Take GLOVE (C), BOX OF PAINTS (D).
- Use GLOVE, take BULB (E).

- Use TEASPOON (F), take MAGNET (G).
- Use MAGNET (H).
- Take BROKEN FLASHLIGHT, WHEEL (I).
- Go to Attic.
- Place WHEEL (J), take AIR BLOWER (K).

- Place BOX OF PAINTS (L), play puzzle (M), receive MUSIC BOX TOOTH.
- Place MUSIC BOX TOOTH (N), take BATTERY (O).
- Go to Yard.
- BULB, BATTERY on BROKEN FLASHLIGHT for FLASHLIGHT.
- Use FLASHLIGHT (P).
- Take DULL KNIFE (Q), LAWN MOWER PULL (R).

- Place LAWN MOWER PULL (S).
- Place the bundles of dynamite on the field.
- The numbers show how many bundles of dynamite need to be in a row and column.
- The number highlights green when the number of dynamite bundles is correct.
- Easy walkthrough (T).

- Hard walkthrough (U).
- Take FIRECRACKER.

- Use AIR BLOWER (V), take DIAMOND RING, MATCH (W).
- Use MATCH (X) for LIT MATCH.
- Go forward.
- Use FIRECRACKER, LIT MATCH (Y).
- Take BEETLE BOTTLE OPENER (Z).
- Use BEETLE BOTTLE OPENER (A), play puzzle (B).

- Use CORKSCREW (C).
- Take LOCKPICK (D).
- Take 1/2 MAP AND COMPASS (E).
- Use LOCKPICK (F).
- Go forward.

- Use DIAMOND RING (G), take DUSTER (H).
- Use DUSTER (I).
- Take 2/2 MAP AND COMPASS (J).
- Take note, HAT, KNITTING NEEDLE (K).

- Use KNITTING NEEDLE (L).
- Take ROASTING RACK (M).
- Go down.
- Place DULL KNIFE (N) for SHARP KNIFE.
- Place 2/2 MAP AND COMPASS (O).

- Find the route.
- The hints are indicated on the compass.
- Find these places on the map and plot your path from one point to another.
- If you select the wrong point, the game restarts.
- Walkthrough (P1-P3): A-P.
- Speak to character, receive WOLF’S LIGHTER.
- Go down.

- Use SHARP KNIFE (Q) for ROPE LADDER.
- Place ROPE LADDER (R).
- Take WOODCUTTER FIGURINE (S).
- Go to Hut.
- Use WOLF’S LIGHTER (T).
- Take FROZEN STEAK (U).
- Place WOODCUTTER FIGURINE (V).
- Play puzzle (W), receive SCORPION.

- Place SCORPION (X).
- Take PLIERS (Y).
- Go to Road to Castle.
- Use HAT for WHISTLE (Z).
- Place ROASTING RACK, FROZEN STEAK (A).
- Take STEAK (B).
- Use WHISTLE (C).
- Take BUTTON, CORK, give STEAK (D).
- Take SCREWDRIVER (E).

- Use PLIERS (F), receive FENCE.
- Go down.
- Use SCREWDRIVER, receive BOARD (G).
- Go to Road to Castle.
- Place FENCE, BOARD (H).

- Avoid crocodiles.
- Tap a space to move there.
- You can move up to two spaces per turn.
- Easy walkthrough (I): 1-7.

- Hard walkthrough (J): 1-13.
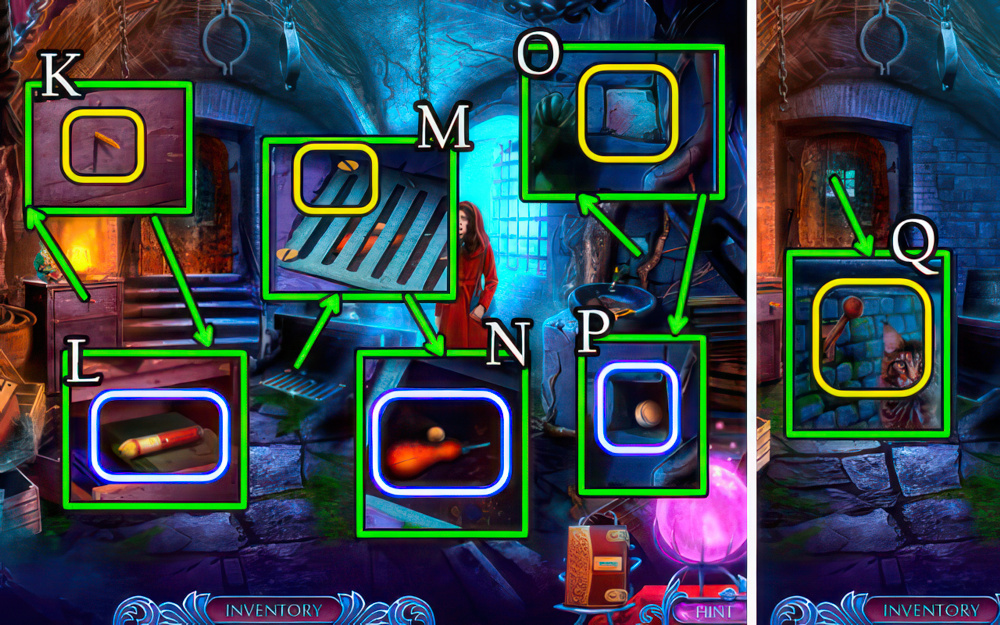
- Take note, use CORK (K).
- Take DEAD LASER POINTER (L).
- Use BUTTON (M), take AWL, 1/2 BATTERIES (N).
- Use AWL (O), take 2/2 BATTERIES (P).
- 2/2 BATTERIES on DEAD LASER POINTER for LASER POINTER.
- Use LASER POINTER (Q).
- Go forward.

- Take EMPTY LIGHTER, HEAVY SCEPTER, LIGHTER FUEL (R).
- LIGHTER FUEL on EMPTY LIGHTER for LIT LIGHTER.
- Use LIT LIGHTER (S), take ELEVATOR BUTTON (T).
- Place ELEVATOR BUTTON (U).
- Go forward.

- Take FAUCET HANDLE (V), 1/2 PLUME SCREWS (W).
- Use HEAVY SCEPTER (X), take 2/2 PLUME SCREWS, Wand (Y).
- Take note, 1/3 GEMS and CLOCK (Z).
- Go down twice.
- Use Wand (A), play puzzle (B), receive BRACELET.
- Go forward twice.

- Place BRACELET, take FENCING TROPHY (C).
- Place FENCING TROPHY (D), take PLUME (E).
- Place PLUME, 2/2 PLUME SCREWS (F).
- Take ICE PIECE, SHARP SEASHELL (G).
- Take note, place ICE PIECE (H), take NUT (I).
- Go down twice.

- Place FAUCET HANDLE, NUT, take SAW (J).
- Use SAW (K).
- Slide the tiles until you’ve made an opening large enough to pull out the hidden items.
- The tiles can only slide into empty slots.
- Walkthrough (L): D-E-H-G-D-E-B-C-F-I.
- Take EMERALD.
- Go forward.

- Place EMERALD, receive PIANO KEYS (M).
- Place PIANO KEYS (N).

- Press the keys according to the clue above.
- The notes highlight green in the book if pressed correctly.
- If you press a key incorrectly, the mini-game will reset.
- Easy walkthrough (O): A-D-B-D-C×2-A-E-C-E.

- Hard walkthrough (P): A-D-B-D-C×2-A-E-C-E-D×2-A-D-B-D.
- Take BRUSH.
- Go forward.

- Use BRUSH (Q), receive GLOWING POLLEN.
- Go down.
- GLOWING POLLEN on CLOCK for EMPTY COFFEE POT, TRANSFORMATION POTION.
- Give TRANSFORMATION POTION (R), speak to character, receive ROYAL EMBLEM.
- Place ROYAL EMBLEM (S).
- Enter Throne Room.
- Take note, use EMPTY COFFEE POT for WATER, take 2/3 GEMS, wand charge (T).

- Use WATER (U), take NET BASE (V).
- Use SHARP SEASHELL (W) for CROWN EMBLEM.
- Place CROWN EMBLEM (X).
- Take 3/3 GEMS, RIM (Y).
- Go to Aurora’s Chambers.
- Place 3/3 GEMS (Z), play puzzle (A), receive BREASTPLATE EMBLEM.

- Place BREASTPLATE EMBLEM (B).
- Take TOY MOUSE (C), wand charge (D).
- Go to Throne Room.
- Give TOY MOUSE (E), receive NET.
- RIM, NET on NET BASE for SCOOP NET.
- Use SCOOP NET, receive SMALL CHEST (F).
- SMALL CHEST for wand charge.
- Use Wand (G).

- Look for the symbols seen in the center sphere on the plate.
- Easy walkthrough (H): A-D-G-I-B-H-C-F-E.
- Hard walkthrough (I): A-H-G-I-B-D-C-J-E-F-K-L.
- Walkthrough Bonus Chapter, at the link below.

