
Fatal Evidence 1: The Cursed Island (Bonus Chapter) – In a new murder to be solved, Agatha Smith’s husband Chuck is accused of killing Dr. Sharon Jones while working on a revolutionary breakthrough drug. Below you can watch the walkthrough of the bonus chapter.
Bonus Chapter Walkthrough
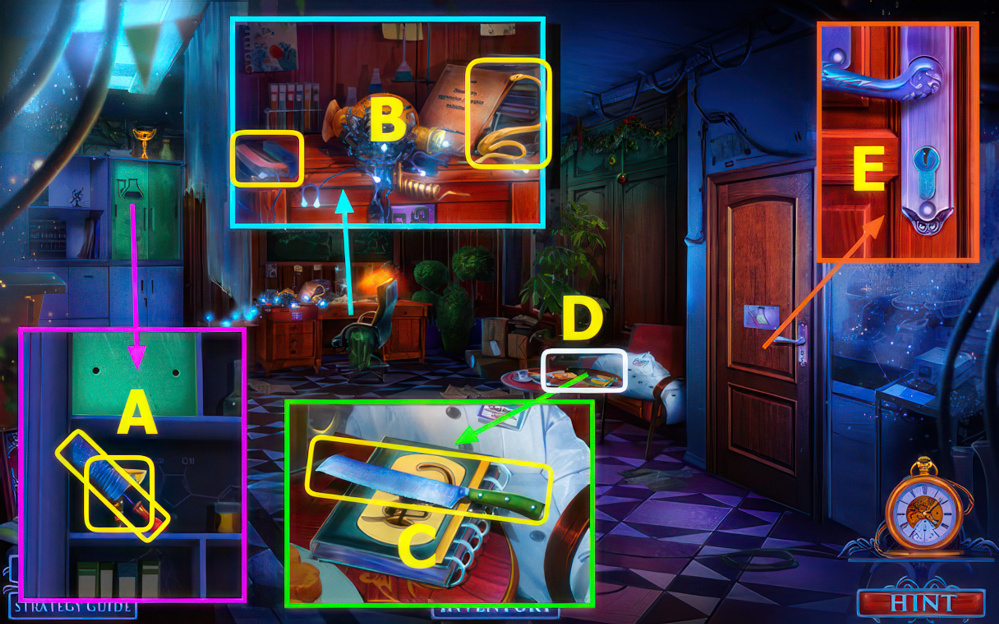
- Open door, take BRUSH and 1/2 DIARY INLAY (A).
- Take 2/2 DIARY INLAY and MAGNET (B).
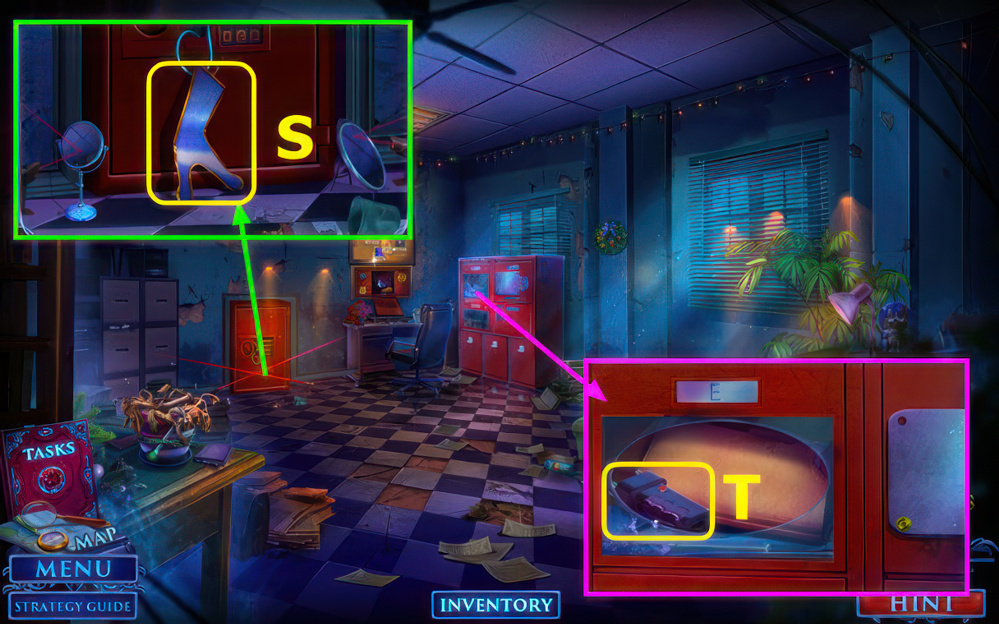
- Take BREAD KNIFE, place DIARY INLAY (C).
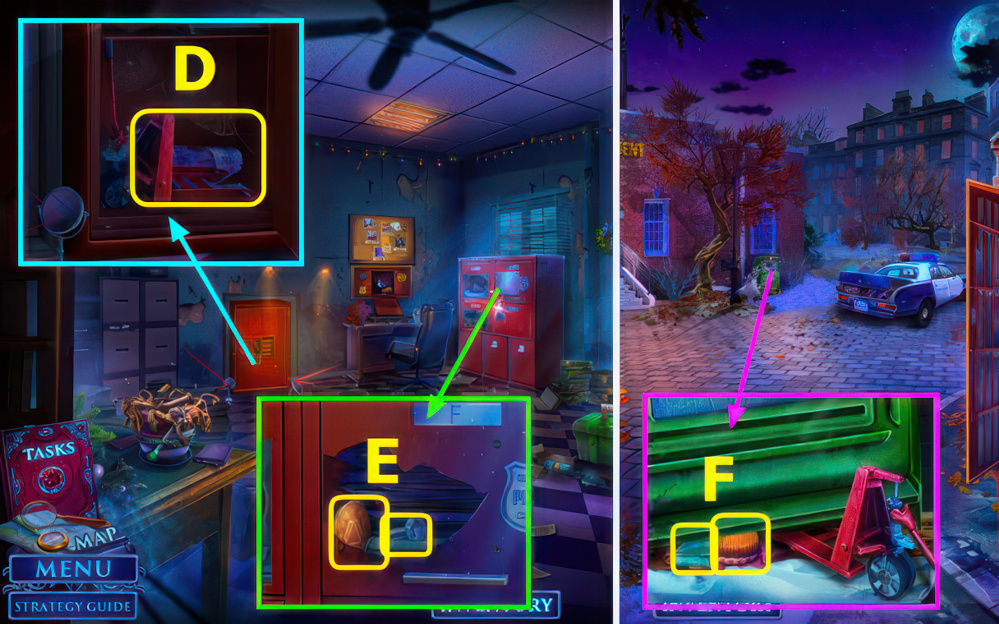
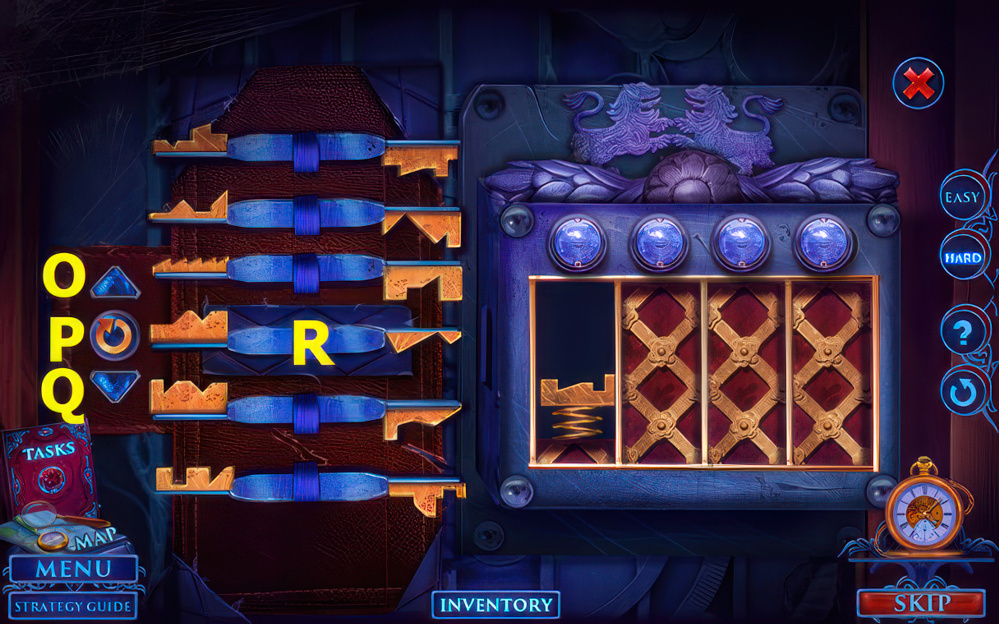
- Play puzzle, take DOOR KEY (D).
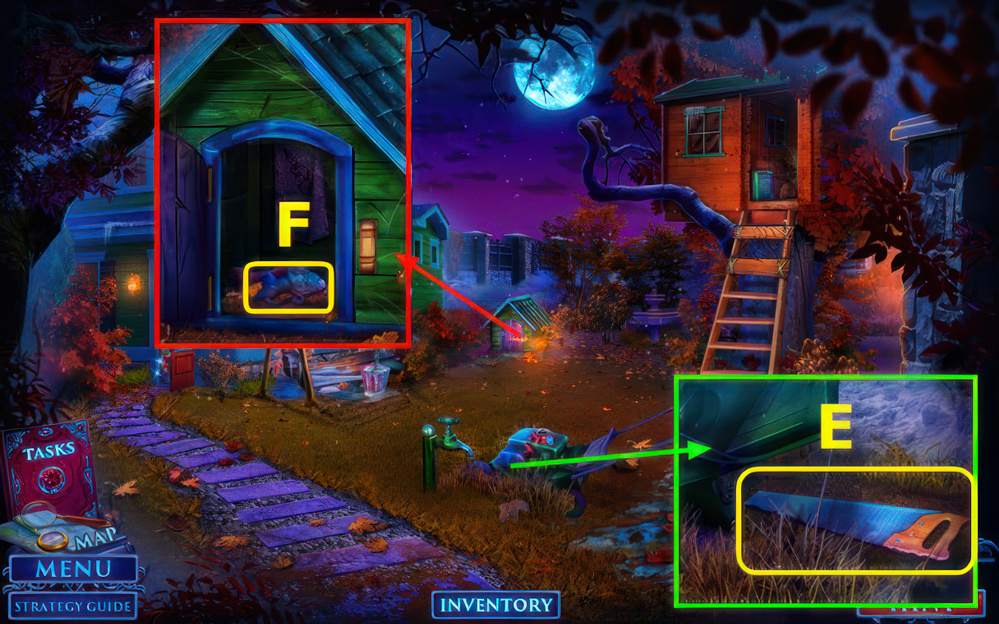
- Use DOOR KEY (E).
- Go right.
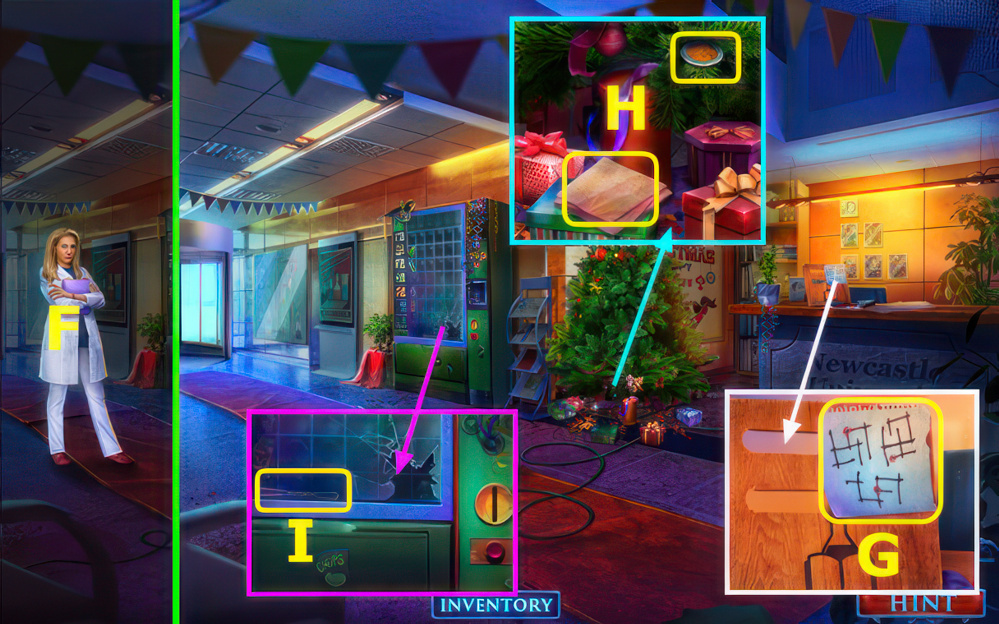
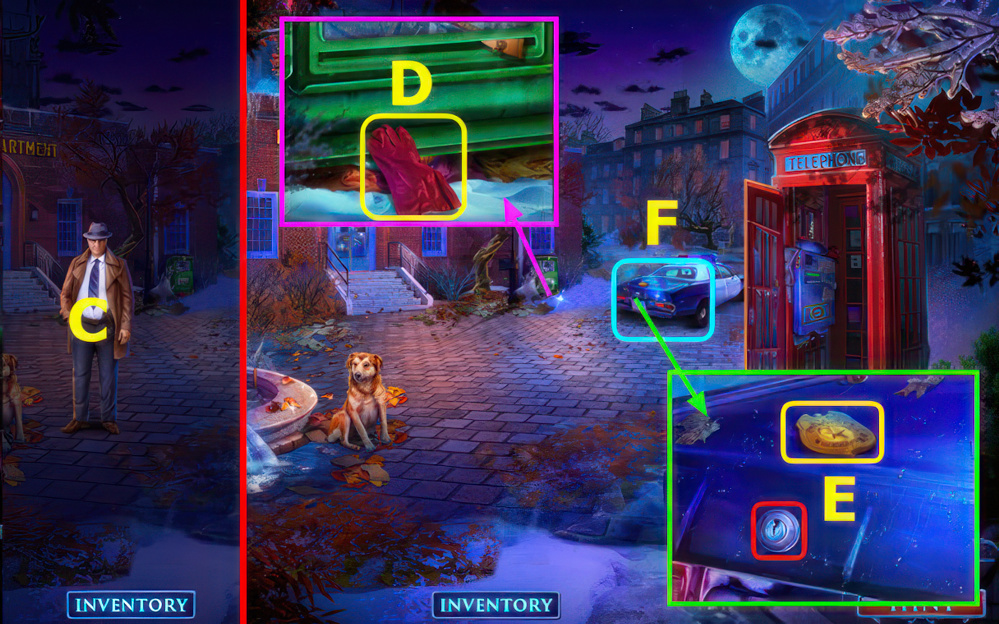
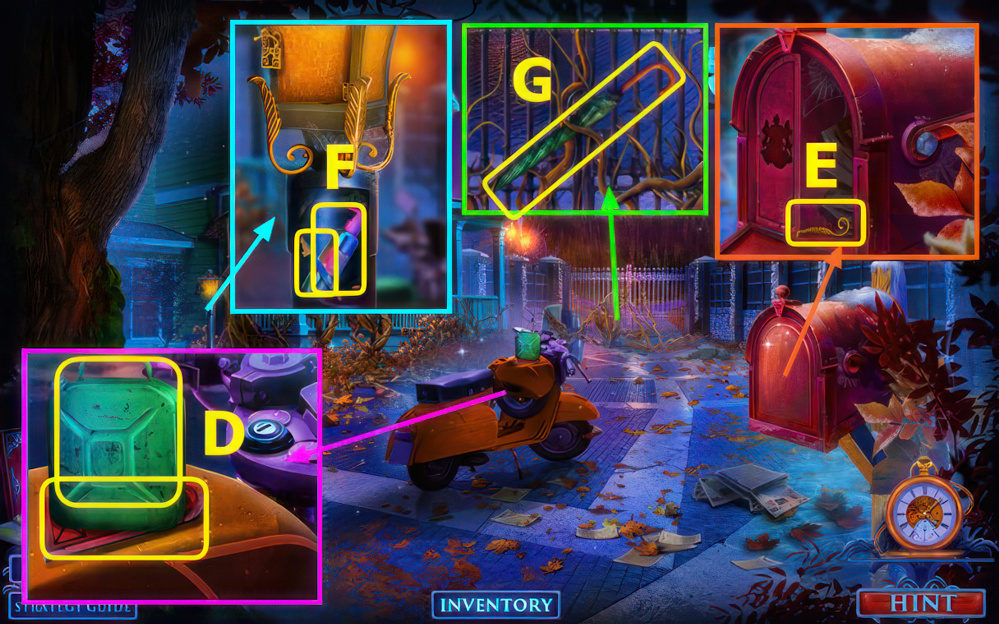
- Talk, earn DOCUMENTS (F).
- Read documents, take CLIP.
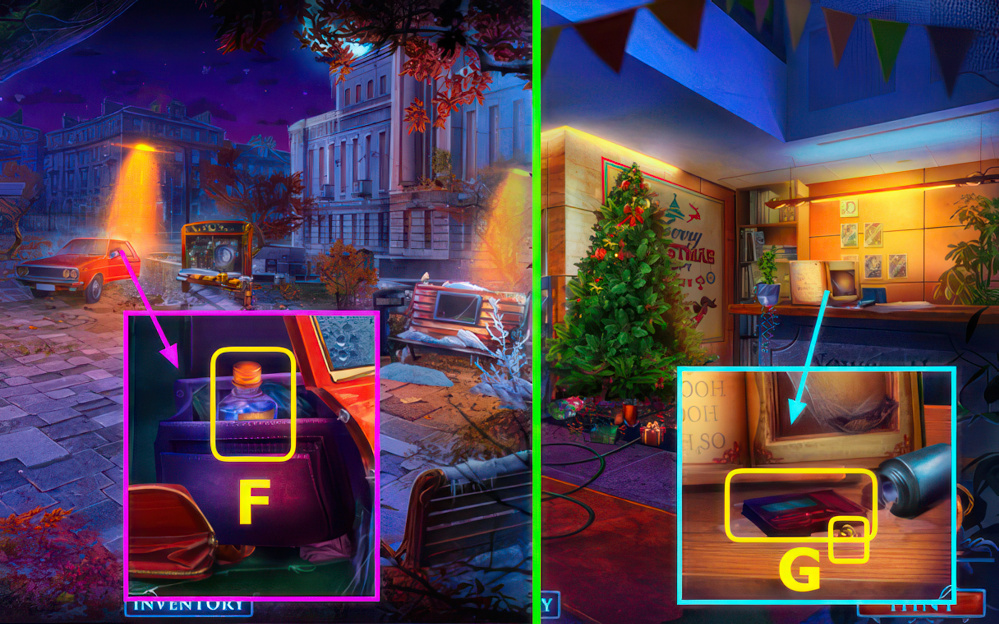
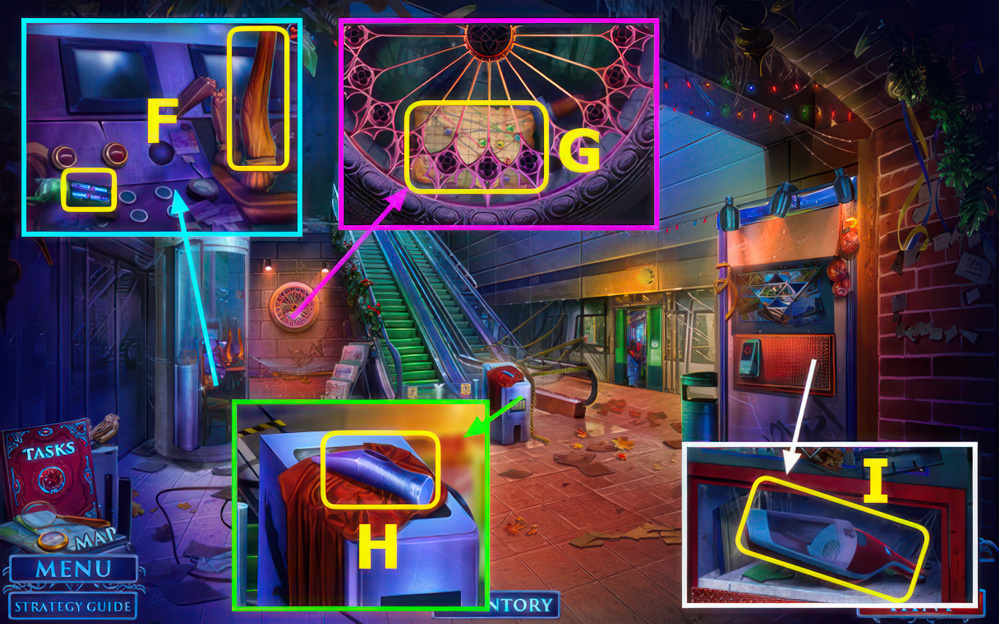
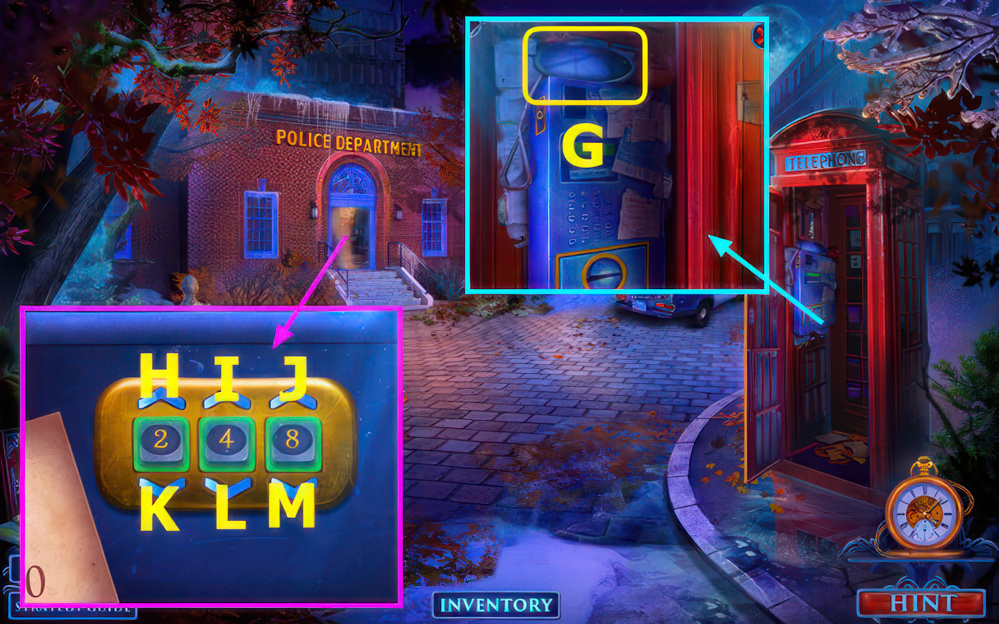
- Take DRAWER CODE (G).
- Select bow, take CLOTH and 1/3 COINS (H).
- Use MAGNET, earn HAIRPIN (I).
- Walk down.
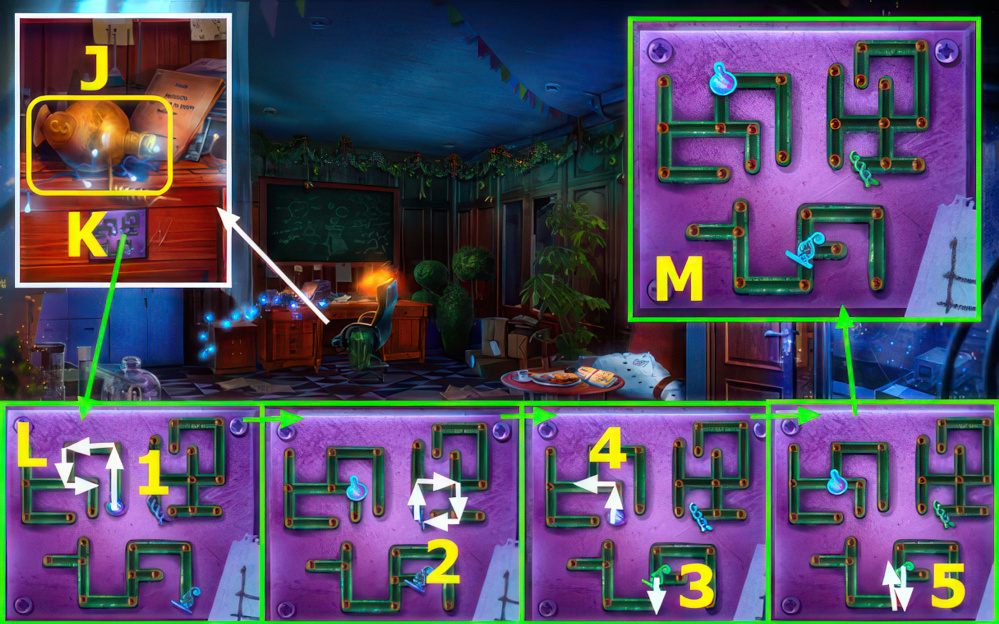
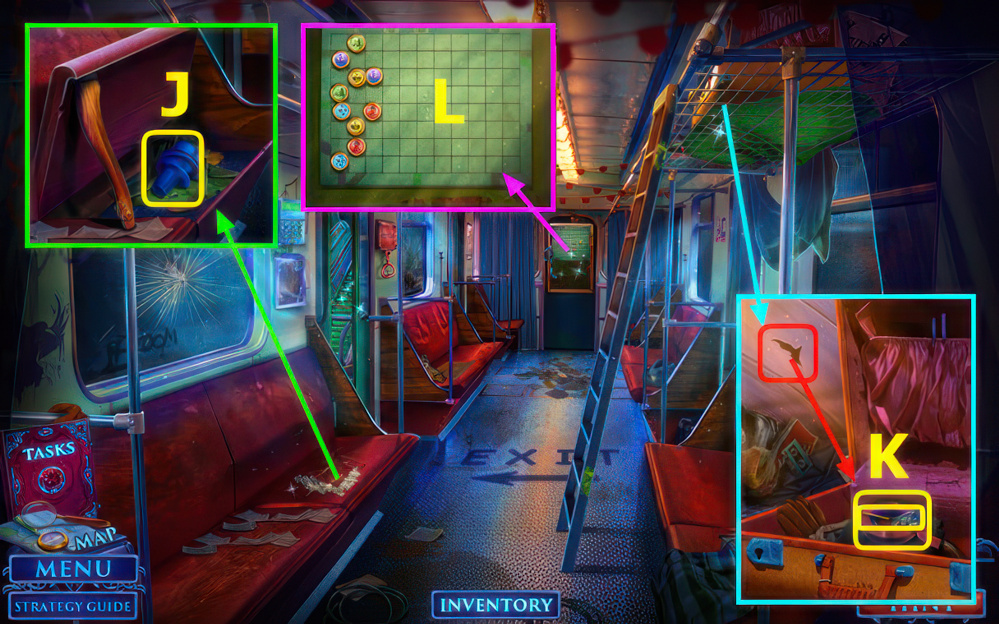
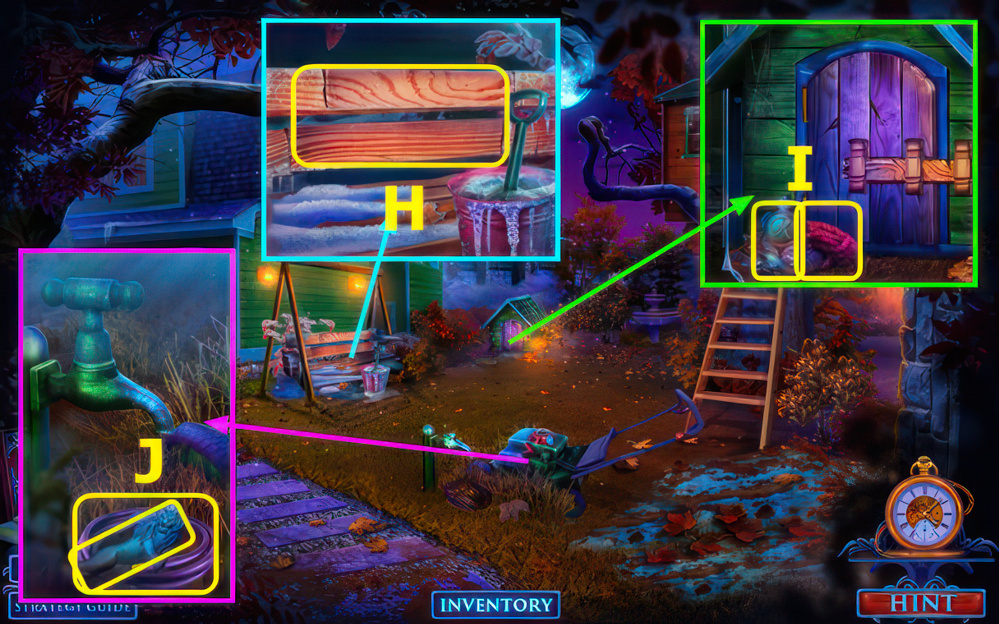
- Use CLOTH, take VIAL STATUETTE, read file and photo (J).
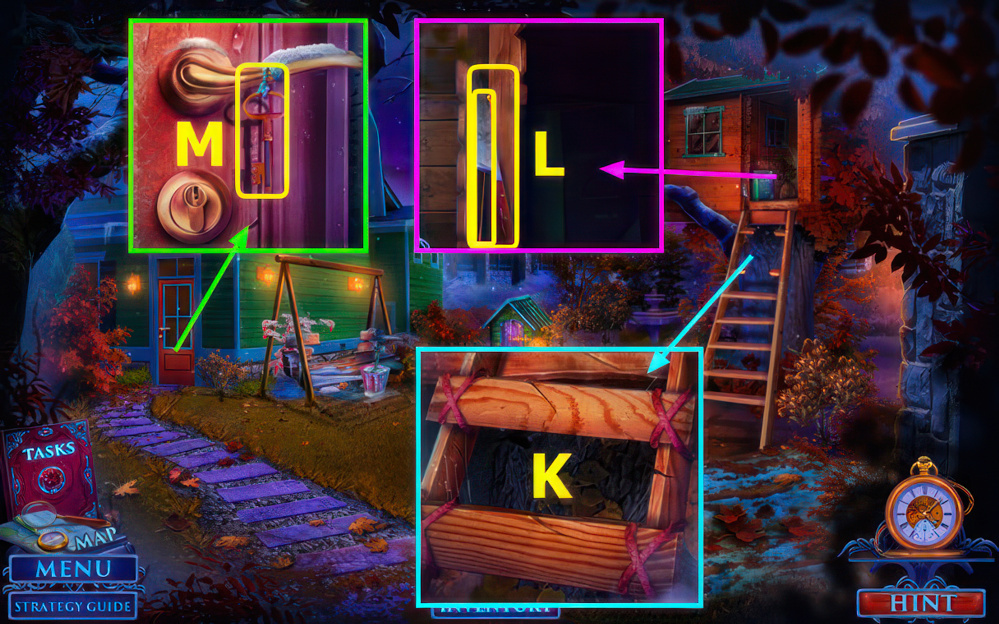
- Use DRAWER CODE (K).
- Easy solution 1-5 (L).
- Final position (M).

- Hard solution 1-6 (N).
- Final position (O).
- Take BOOK.
- Go right.
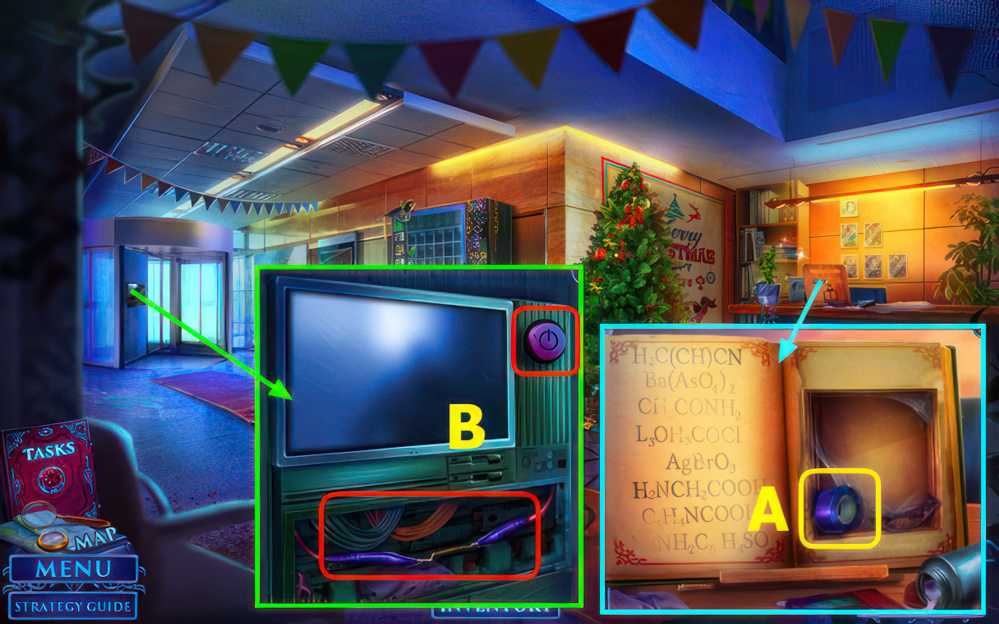
- Place and open BOOK, take ELECTRICAL TAPE (A).
- Open cover, use HAIRPIN and ELECTRICAL TAPE, push button (B).
- Go left.
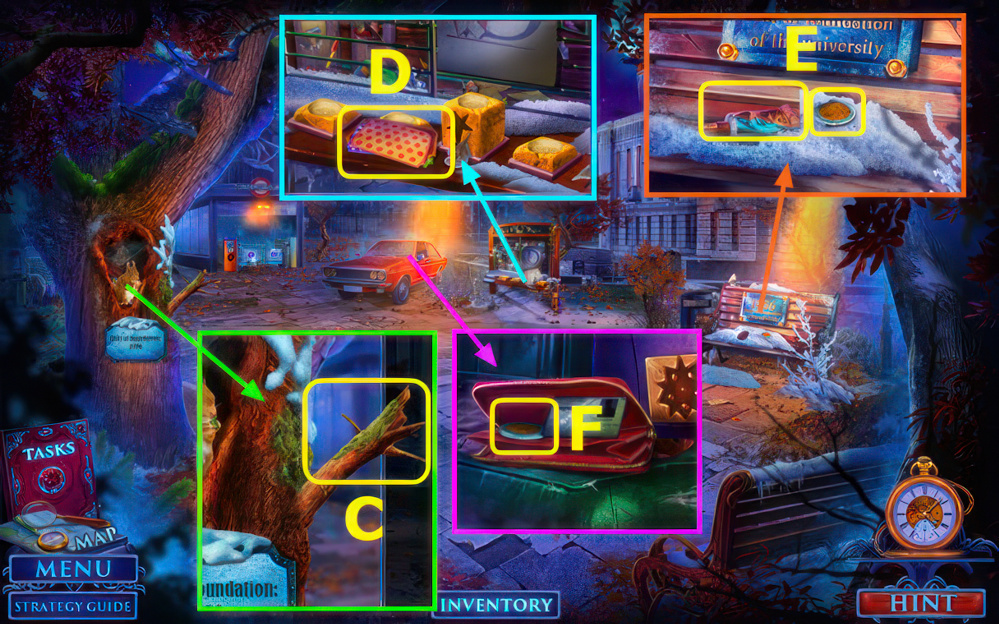
- Use BREAD KNIFE, earn STICK (C).
- Take GIFT TAGS (D).
- Take 2/3 COINS, use BRUSH, take GLUE (E).
- Open car door, use CLIP, take 3/3 COINS (F).
- Walk down.
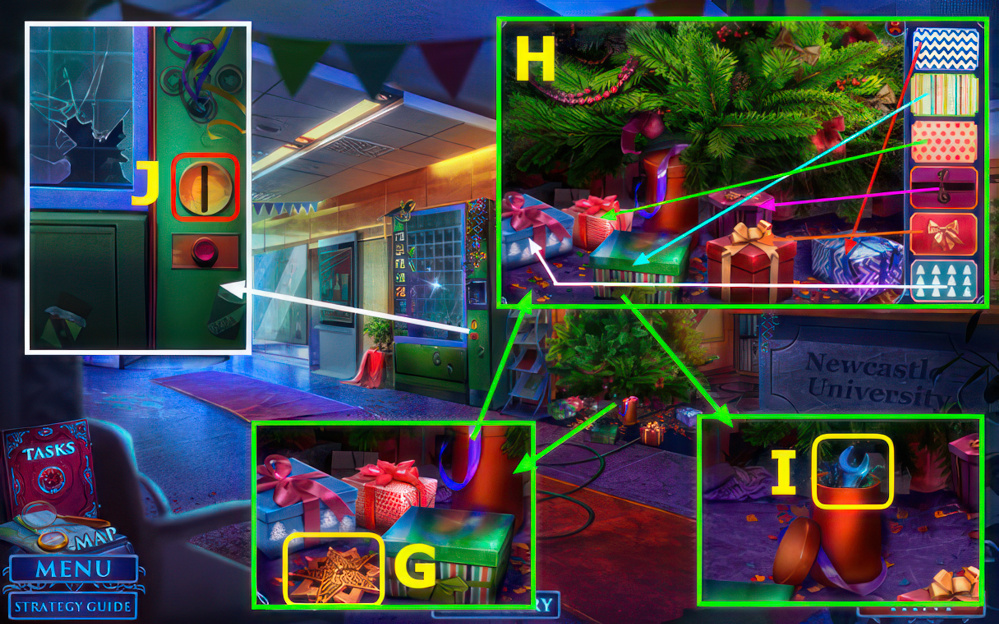
- Use GLUE, take PURSE STAR (G).
- Place GIFT TAGS, move to packages (H).
- Take WRENCH (I).
- Use COINS (J).
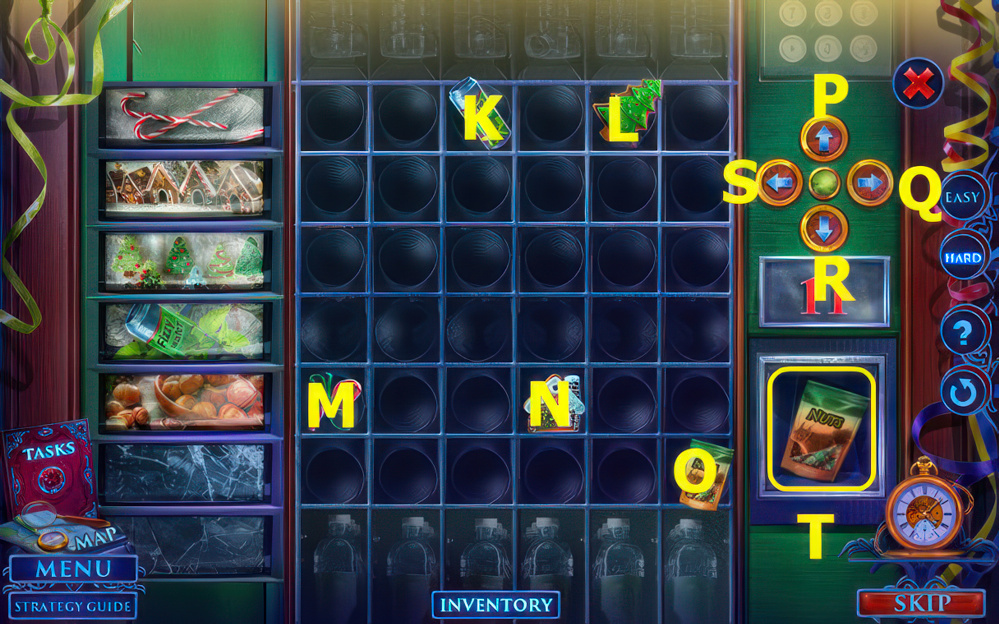
- Solution M-P-N-S-P-L-R-S-P-K-R-S-P-O-S-P.
- Take PACKAGE OF NUTS (T).
- Walk left.

- Use PACKAGE OF NUTS, take UTILITY KNIFE and HANDLE (A).
- Use WRENCH, take THUMBS-UP STATUETTE and PLIERS (B).
- Place PURSE STAR (C).

- Easy solution 1-5, select (D).
- Hard solution 1-8, select (E).
- Take NAIL POLISH REMOVER (F).
- Walk down.
- Use NAIL POLISH REMOVER, take DEAD PAGER and SCREW (G).
- Walk down.

- Use STICK, earn STAR TROPHY (H).
- Use HANDLE and SCREW, take DNA STATUETTE and ACCESS CARD (I).
- Go Yard.
- Place STAR TROPHY (J).
- VIAL STATUETTE (K).
- THUMBS-UP STATUETTE (L), and DNA STATUETTE (M).
- Play puzzle, earn SUBWAY PASS (N).
- Use SUBWAY PASS (O).

- Take PAPER AND PEN, use UTILITY KNIFE, take SPRING (A).
- Use SPRING, take CLOTH (B).
- Use CLOTH and PAPER AND PEN, earn NOTE (C).
- Take AXE, use NOTE (D).
- Go left.
- Use AXE, earn CHAIR LEG, take BATTERIES (F).
- BATTERIES in DEAD PAGER, earn SHARON’S PAGER.
- Use PLIERS, take SUBWAY MAP (G).
- Take HAMMER HEAD (H).
- Use ACCESS CARD.
- Take INCOMPLETE VACUUM CLEANER (I).
- Go right.
- Use CHAIR LEG, take FILTER (J).
- FILTER on INCOMPLETE VACUUM CLEANER, earn VACUUM CLEANER.
- Use VACUUM CLEANER, take BROOCH and ELECTRICAL TAPE (K).
- Place SUBWAY MAP (L).

- Easy solution (M).
- Hard solution (N).
- Take BUTTON (O).
- Go left.

- Place BUTTON, take 1/2 MIRRORS and HAMMER HANDLE (A).
- HAMMER HANDLE and ELECTRICAL TAPE on HAMMER HEAD, earn HAMMER.
- Use HAMMER, push button (B).
- Go forward.
- Give SHARON’S PAGER, earn BOX (C).
- Open BOX, take DIAMOND RING.
- Take GLOVES (D).
- Take POLICE BADGE, use BROOCH (E).
- Play puzzle, earn DOOR CODE (F).
- Take 2/2 MIRRORS (G).
- Use DOOR CODE, easy solution L-Mx4-Hx4.
- Hard solution Mx3-Kx2-Lx2-Ix4.
- Go left.

- Take 1/3 MOSAIC PIECE (P).
- Place POLICE BADGE, take 2/3 MOSAIC PIECE (Q).
- Take TWEEZERS (R).
- Place MIRRORS, take TELEPHONE HOOK (S).
- Use DIAMOND RING, read file, take STUN GUN (T).
- Walk down.

- Place TELEPHONE HOOK, take CLIPPERS (A).
- Use TWEEZERS, earn STRAP, read paper (B).
- Use GLOVES and STRAP, take SCREWDRIVER and 3/3 MOSAIC PIECE (C).
- Go forward.
- Use CLIPPERS, take JACK (D).
- Use SCREWDRIVER, take BOLT and 1/3 COINS (E).
- Walk down.
- Use JACK, take LIGHTER and BRUSH (F).
- Walk down.

- Use STUN GUN, take FLEA TREATMENT (G).
- BRUSH on FLEA TREATMENT.
- Place MOSAIC PIECE (H).

- Easy solution P-N-P-G-B-C-D-E-F-B-C-D-E-I-D-E-C-B-D-C-G.
- Hard solution H-L-O-Q-O-K-H-D-E-D-C-B-C-H-K-L-H.
- Take BUG REPELLANT (S).
- Go forward.
- Use FLEA TREATMENT.
- Take FAUCET KNOB, 2/3 COINS, and SCISSORS (T).
- Go forward.
- Use BUG REPELLANT and SCISSORS, take 3/3 COINS, 1/2 ROPE, and DROPPER (U).
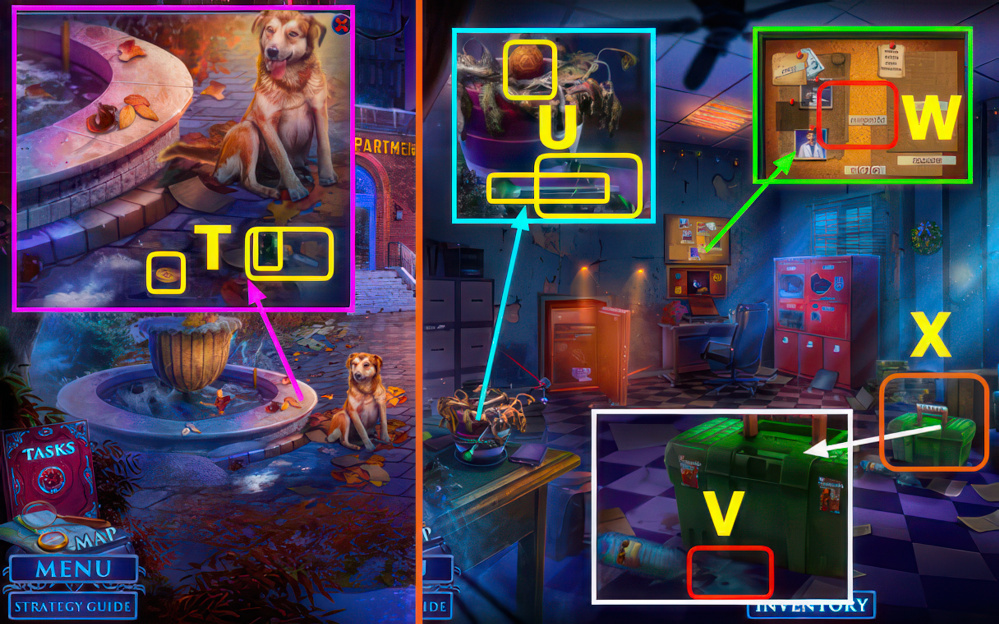
- Use DROPPER (V).
- Play puzzle, earn MELANIE’S PHOTO (X).
- Place MELANIE’S PHOTO (W).
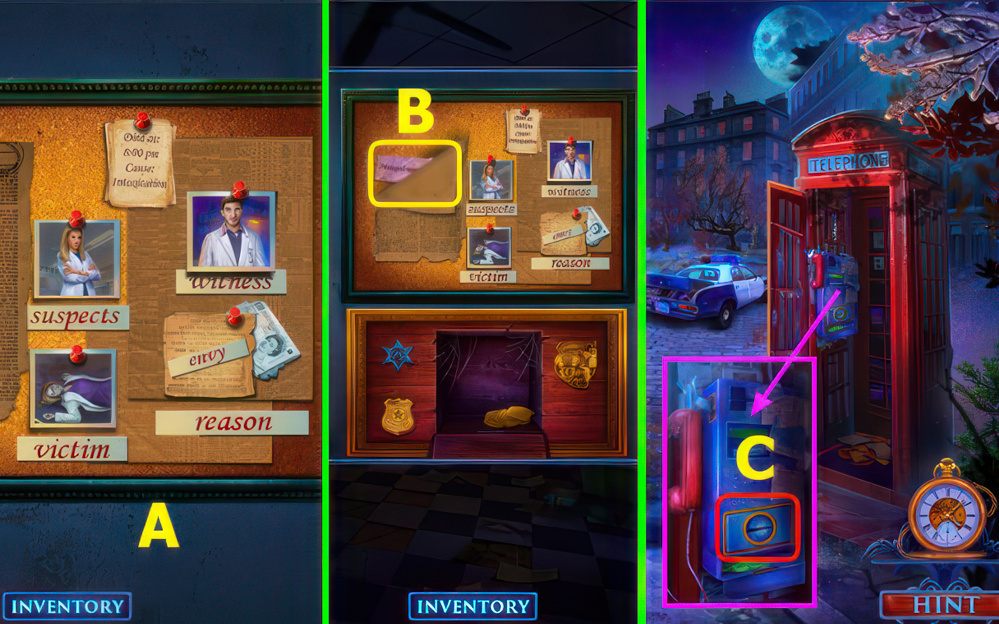
- Solution (A).
- Take MELANIE’S ADDRESS (B).
- Walk down.
- Use COINS and MELANIE’S ADDRESS (C).
- Take EMPTY CANNISTER and MAILBOX FLAG (D).
- Use MAILBOX FLAG and BOLT, read note, take LANTERN ORNAMENT (E).
- Place LANTERN ORNAMENT, take 1/2 LOCKPICK and HAIR SPRAY (F).
- HAIR SPRAY on LIGHTER, earn FLAMETHROWER.
- Take UMBRELLA, use FLAMETHROWER (G).
- Go forward.
- Use UMBRELLA, earn BOARDS (H).
- Take BROKEN MAILBOX EMBLEM and 2/2 ROPE (I).
- Use FAUCET KNOB, take 1st EMBLEM PART and HOSE (J).
- Use BOARDS and ROPE (K).
- Take DULL KNIFE and 2/2 LOCKPICK (L).
- Take LANTERN KEY, use LOCKPICK (M).
- Solution Qx3-R-Q-P-R-Qx3-R-Ox2-P-R.
- Go left.

- Take BROKEN FLASHLIGHT (A).
- Take CLOTH (B).
- Use DULL KNIFE, take GLUE (C).
- Use EMPTY CANNISTER and HOSE, earn FUEL (D).
- Walk down.
- Use FUEL, take SAW (E).
- Use SAW, take 2nd EMBLEM PART (F).
- 2 EMBLEM PARTS and GLUE on BROKEN MAILBOX EMBLEM, earn MAILBOX EMBLEM.
- Walk down.

- Place MAILBOX EMBLEM, take 1/3 BOOKS, BATTERIES, and SHOPPING LIST PART (G).
- Use LANTERN KEY, take GAS TORCH.
- Use CLOTH, earn BULB (H).
- BULB and BATTERIES on BROKEN FLASHLIGHT, earn FLASHLIGHT.
- Go forward.

- Use GAS TORCH, take SHOVEL (J).
- Use SHOVEL, take FUR and NOTEBOOK (K).
- Use FLASHLIGHT, take 2/3 BOOKS, use NOTEBOOK, earn SYMBOL COMBINATION (L).
- Go left.
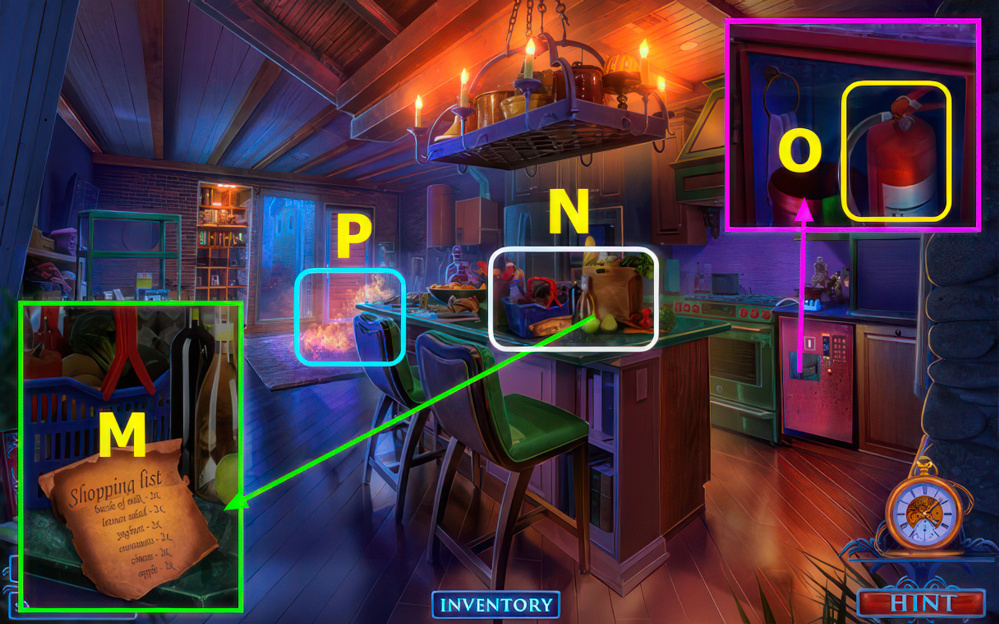
- Place SHOPPING LIST PART (M).
- Play puzzle, earn APPLE (N).
- Place APPLE, take FIRE EXTINGUISHER (O).
- Use FIRE EXTINGUISHER (P).
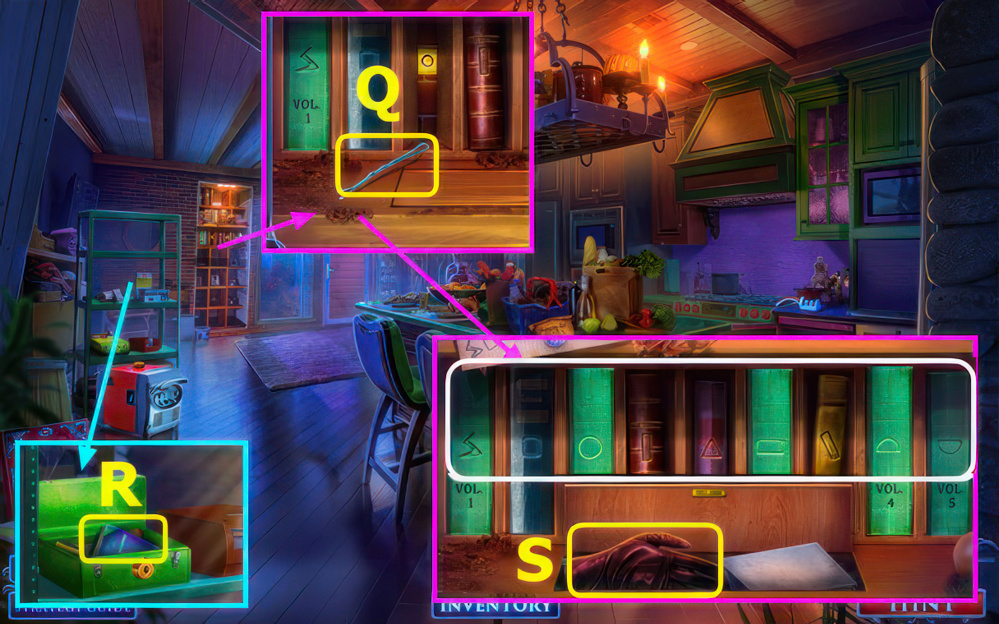
- Use FUR, take HAIRPIN (Q).
- Use HAIRPIN, take 3/3 BOOKS (R).
- Place 3 BOOKS and SYMBOL COMBINATION, solution, take GLOVE and read note (S).
- Go Melanie’s Front Yard.
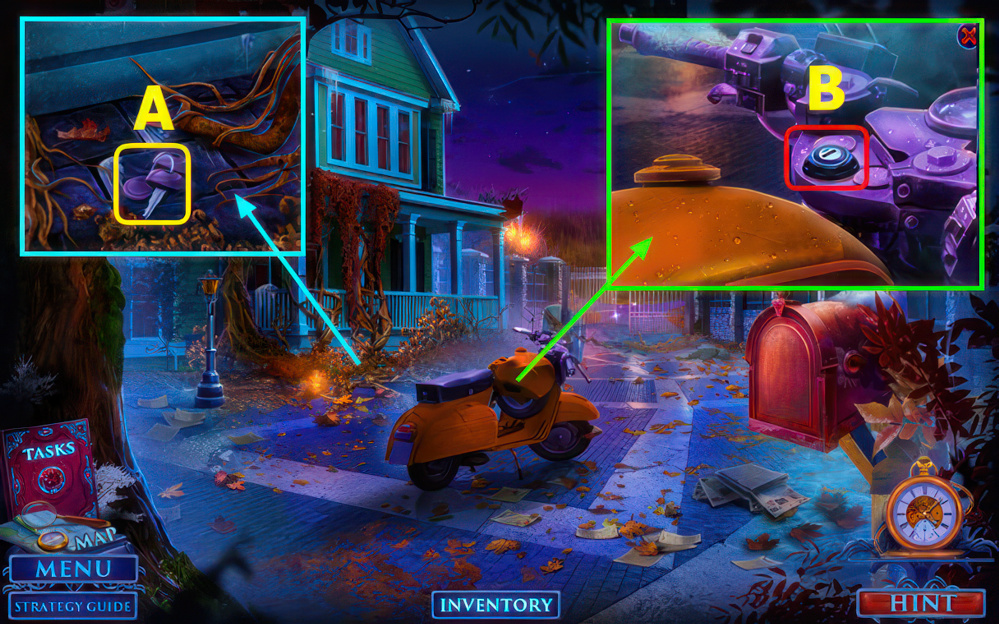
- Use GLOVE, take IGNITION KEY (A).
- Use IGNITION KEY (B).
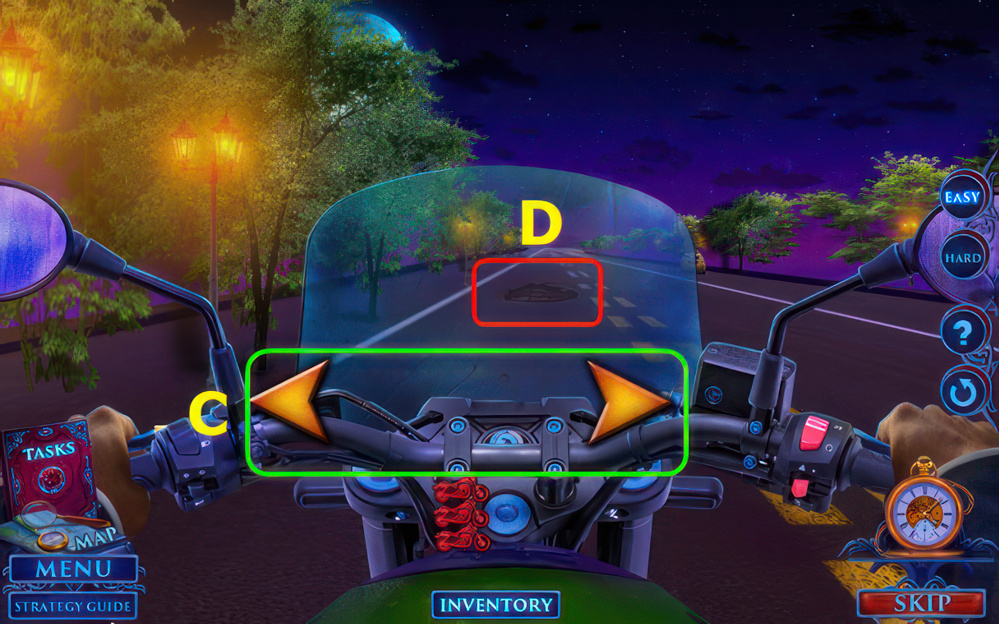
- This mini-game is randomly generated.
- Use the arrows (C) to avoid obstacles (D).
Congratulations! You have completed the game Fatal Evidence 1: The Cursed Island.


