
Fatal Evidence 3: Art of Murder (Bonus Chapter) – Another lunatic on the loose. He took over the local news channel with a gruesome video message warning that people will disappear and everyone will know that the police are not to be trusted.
Bonus Chapter Walkthrough

- Take DRAWER KEY, BELT and SAW (A).
- Use DRAWER KEY for puzzle (B), receive GLUE.
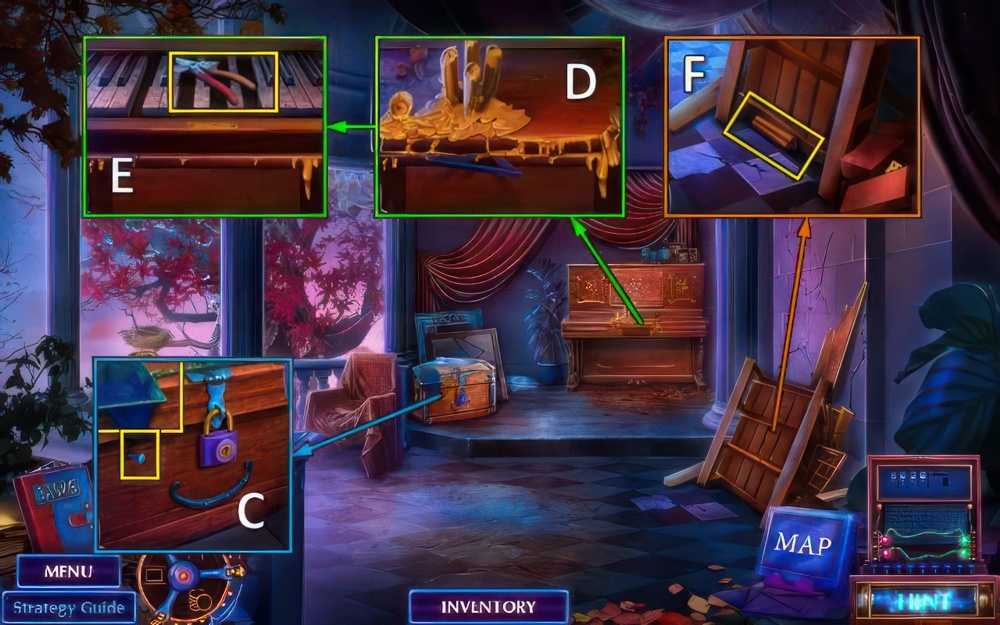
- Take BOTTLE OPENER (C).
- Break handle, use GLUE and move handle (D).
- Go (E).
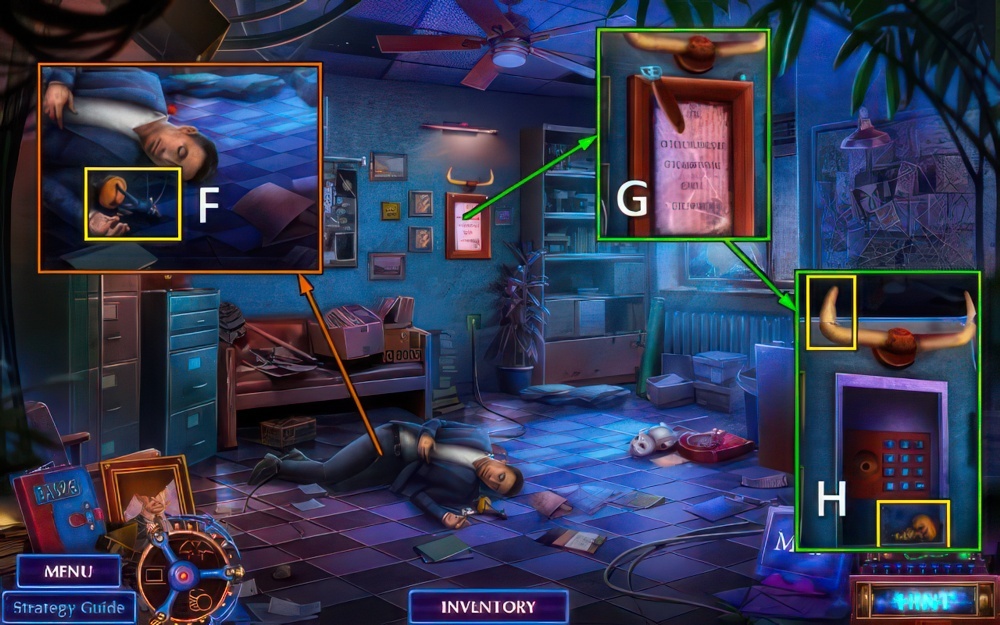
- Take POLICE OFFICER AND DOG 1/2 (F).
- Use BOTTLE OPENER (G).
- Take POLICE OFFICER AND DOG 2/2, take HORN with SAW (H).

- Take note and LIGHTER (I).
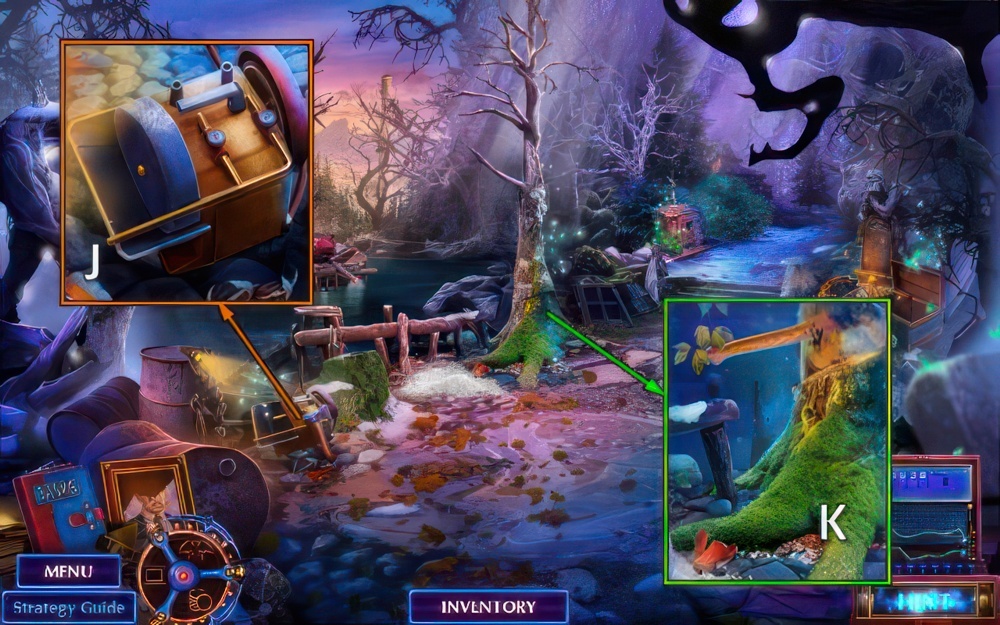
- Place POLICE OFFICER AND DOG, take GLOBE PARTS 1/2 and GLOVE (J).
- Use GLOVE (K).
- Go (L).

- Place HORN, take SHOVEL (M).
- Take PLUG, use SHOVEL (N).
- Take LOCKPICKS 1/2 (O).

- Take CAT PAW with BELT (P).
- Use LIGHTER, take GLOBE PARTS 2/2 and TWEEZERS (Q).
- Walk down twice.
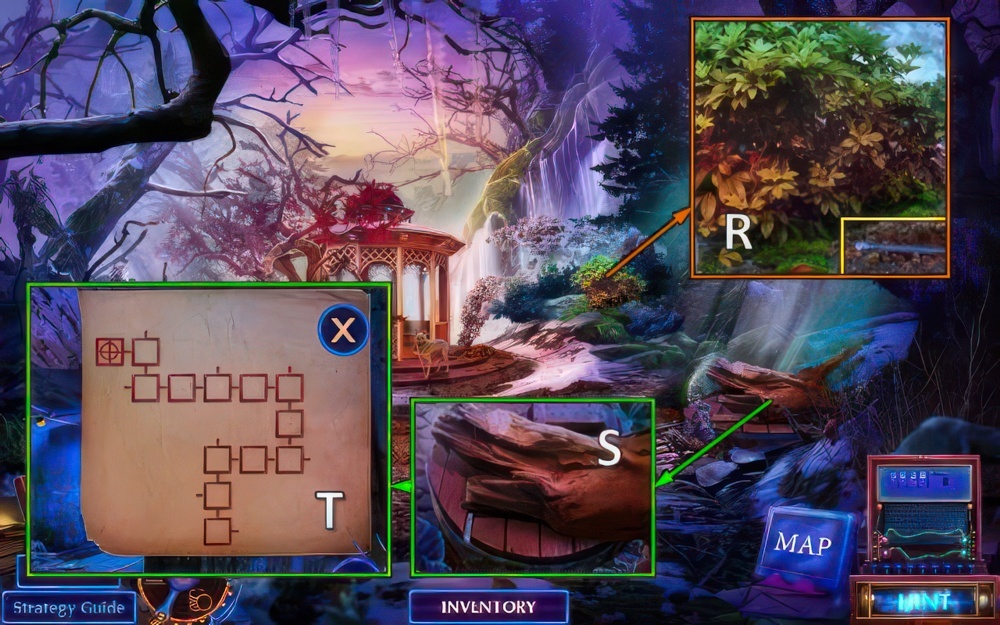
- Place GLOBE PARTS (R).
- Take TV REMOTE, BOX AMULET and FIRST-AID KIT (S).
- Go (T).

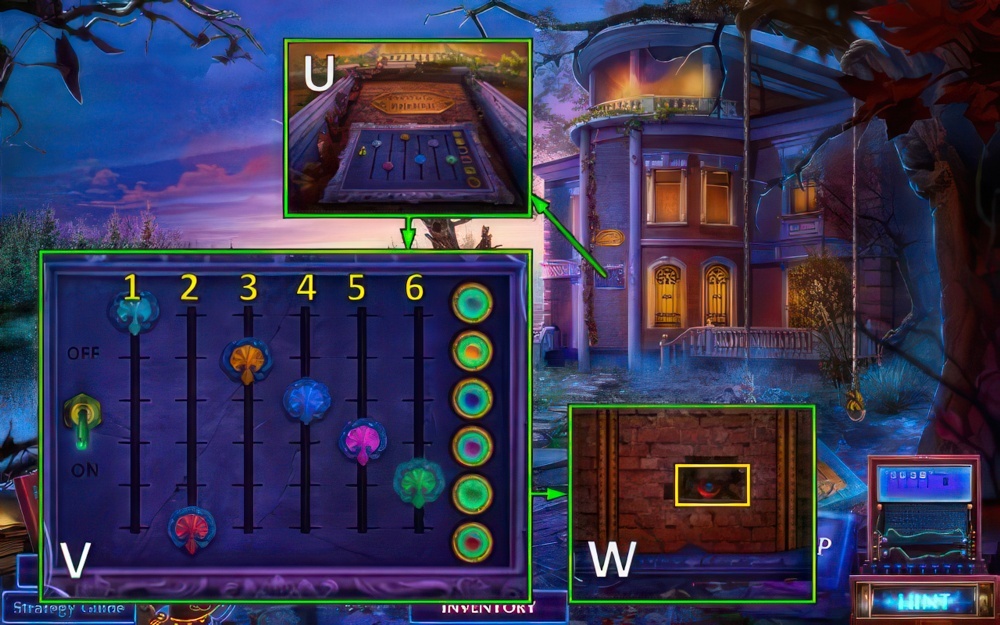
- Place and open FIRST-AID KIT (U).
- Solution (V): (Z-B)-(B-A)-(Z-B)-(B-A)-(Z-B)-(B-A)-(B-W).
- (Y-A)-(A-B)-(B-Y)-(A-B)-(B-Y)-(A-B)-(Y-A)-(A-B)-(A-W).
- (X-A)-(A-B)-(B-X)-(A-B)-(B-X)-(A-B)-(X-A)-(A-B).
- (B-X)-(A-B)-(B-X)-(A-B)-(X-A)-(A-B)-(A-W).

- Place CAT PAW, take SPEAKER.
- Take LOCKPICKS 2/2 with TWEEZERS (C).
- Use LOCKPICKS (D), take BATTERIES (E).
- Walk down.
- BATTERIES on TV REMOTE.

- Place PLUG, SPEAKER and TV REMOTE (F).
- Take BOX AMULET 2/2, SAFE REGULATOR and CLOCK HANDS 1/2 (G).
- Place BOX AMULET, take LASER POINTER (H).
- Go to Street.
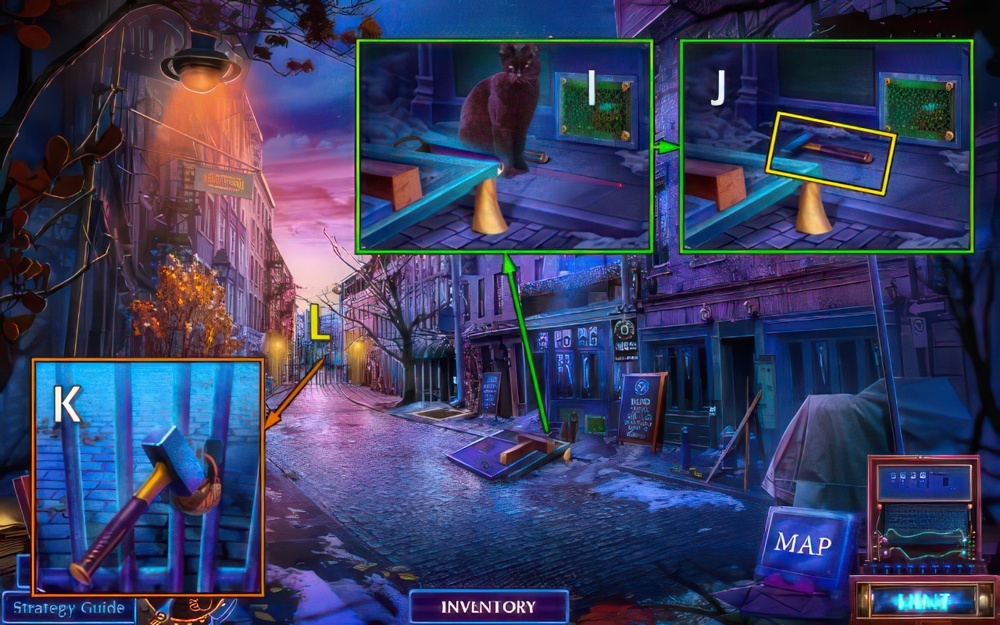
- Use LASER POINTER (I).
- Take SLEDGEHAMMER (J).
- Use SLEDGEHAMMER (K).
- Go (L).

- Talk (M), receive HANDKERCHIEF.
- Take LADDER (N).
- Use HANDKERCHIEF (O), take KNIFE (P).

- Use KNIFE (Q).
- Play puzzle (R), receive FAN REMOTE.
- Use FAN REMOTE, take CORK and CLOCK HANDS 2/2 (S).
- Walk down twice.

- Place CORK, take BLUE CABLE and PENCIL (T).
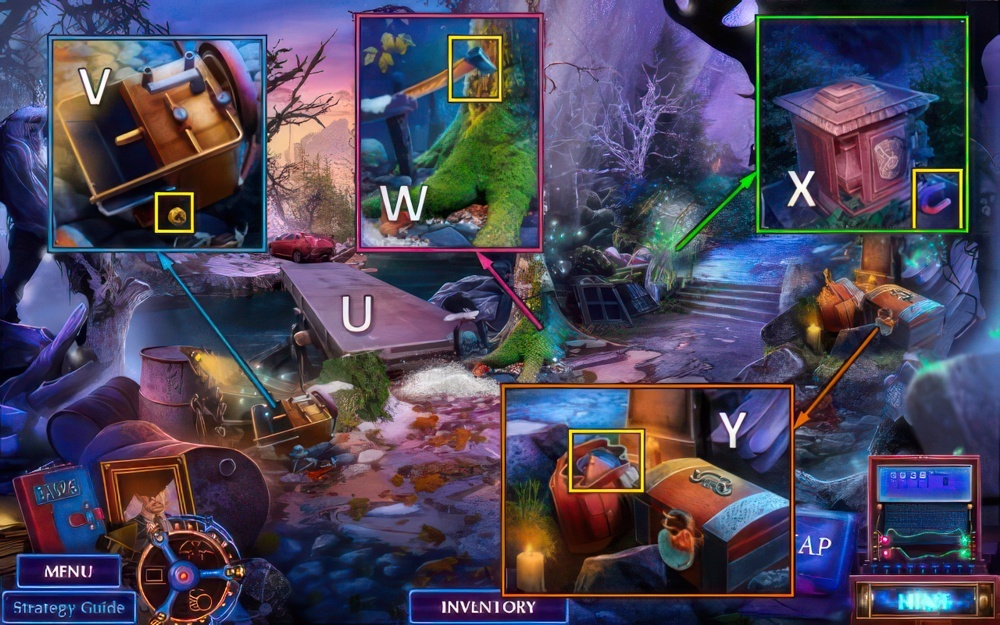
- Place CLOCK HANDS, take BOLTS and note (U).
- Use PENCIL (V), receive SAFE CODE.

- Place SAFE REGULATOR and SAFE CODE (W).
- Take BOX BUTTON and note (X).
- Go to Courtyard.

- Place BOX BUTTON, take FLASHLIGHT and BROKEN ANGLE GRINDER (Y).
- Place LADDER and BOLTS (Z).
- Take PAPER KNIFE, STICK and MAGNET ON ROPE (A).
- Place STICK, take SCREWDRIVER (B).
- Walk down.

- Use SCREWDRIVER, take ACCUMULATOR (C).
- Use MAGNET ON ROPE (D).
- Solution (E).
- Receive JACK LEVER.
- Go (F).

- Place JACK LEVER, take REBAR, RED CABLE and ANGLE GRINDER BLADE (G).
- Place BLUE CABLE, RED CABLE and ACCUMULATOR (H), receive CHARGED ACCUMULATOR.
- CHARGED ACCUMULATOR and ANGLE GRINDER BLADE on BROKEN ANGLE GRINDER, receive ANGLE GRINDER.
- Use ANGLE GRINDER (I).

- Use PAPER KNIFE (J).
- Talk (K).
- Receive DANCER FIGURINE.
- Place DANCER FIGURINE, take DIAMOND RING.
- Take SWITCHER with PAPER KNIFE (L).
- Take UNLOADED CROSSBOW (M).

- Use REBAR (N), take POWER INLAY 1/2 and LEVER BOOKS 1/2 (O).
- Place FLASHLIGHT (P).
- Play puzzle (Q), receive BASEMENT KEY.
- Use BASEMENT KEY (R).
- Go (S).

- Take SCOPE DISPLAY (T).
- Take FRAME PARTS 1/3 (U).
- Use DIAMOND RING, take POWER INLAY 2/2 and SCRAPER (V).
- Walk down.

- Open, place SWITCHER and POWER INLAY.
- Take DISK and CROWBAR (W).
- Use CROWBAR (X).
- Go (Y).

- Take NET and CHARGER (Z).
- Use NET (A).
- Take FRAME PARTS 2/3 (B).
- Use SCRAPER, take FUSE (C).
- Walk down.

- Place FUSE (D).
- Place DISK (E).
- Solution (F).
- Take LEVER BOOKS 2/2, FRAME PARTS 3/3(G).
- Go (H).

- Place FRAME PARTS (I).
- Solution (J): (7-3)-(7-8)-(8-13)-(7-8)-(7-16)-L-(10-15)-(11-6)-K-(20-16)-(18-17)-(17-16)-(16-15).
- (16-17)-(17-18)-L-(10-15)-K-(22-21)-(21-16)-M-(16-11)-(11-6)-K-(16-21)-(21-22).
- Take CARABINER (O).

- Place LEVER BOOKS, take TINY FORCEPS and ARROW (P).
- Take STRING with TINY FORCEPS (Q).
- Go to Garden.

- Place CARABINER, take BAS-RELIEF PART and TWO-PRONGED FORK (R).
- STRING and ARROW on UNLOADED CROSSBOW, receive LOADED CROSSBOW.
- Use LOADED CROSSBOW (S).
- Take RULER and FRET-SAW (T).
- Place BAS-RELIEF PART (U).
- Align 3-5-2-4-6 (V).
- Take LENS (W).
- Go to Basement.

- Take note, place SCOPE DISPLAY, CHARGER and LENS (X).
- Talk (Y).
- Walk down.
- Go to Garden.
- Receive GRAPPLING HOOK.

- Use GRAPPLING HOOK (Z).
- Go (A).
- Take ROPE (B).
- Take SCOOP NET, take NAIL with TWO-PRONGED FORK (C).
- Use RULER (D).
- Take SHEARS (E).
- Use FRET-SAW, take RUNGS (F).
- Walk down.

- RUNGS on ROPE, receive ROPE LADDER.
- Place ROPE LADDER for puzzle (G), receive HANDLE.
- Place HANDLE (H).
- Go (I).

- Use SCOOP NET, take UMBRELLA, PIANO KEYS 1/4 and note (J).
- Take LEAF BLOWER and PIANO KEYS 2/4 (K).
- Use SHEARS, take CAN OPENER (L).
- Use LEAF BLOWER, take AXE HANDLE, BROKEN SHOVEL and PIANO KEYS 3/4 (M).
- Go to Balcony.

- Use UMBRELLA, take SHOVEL HANDLE and PIANO KEYS 4/4 (N).
- Place PIANO KEYS (O).
- Solution (P): (1-3)-(4-6)-(5-6).
- Take note and GLOVES (Q).
- Go to Meadow.
- SHOVEL HANDLE and NAIL on BROKEN SHOVEL, receive SHOVEL.
- Use SHOVEL, take CROWBAR (R).
- Use CROWBAR, move lid (S).
- Go forward x2, right, forward, left, forward, left, forward x3, right, left (T).
- Inspect bridge (U).
- Take NUT (V).
- Take DULL AXE with AXE HANDLE (W).
- Use GLOVES, take MAGNET (X).
- Open, take note and CAN (Y).
- Go to Balcony.

- Take CHEST KEY with MAGNET (Z).
- Use CHEST KEY for puzzle (A), receive HAMMER.
- Use HAMMER, take SWORD (B).
- Go to Forest.

- Place SWORD, take ACID (C).
- Use ACID (D).
- Take WRENCH (E).
- Walk down.
- CAN OPENER on CAN, receive DOG FOOD.

- Offer DOG FOOD, take WHEEL (F).
- Place WHEEL, NUT and WRENCH (G).
- Take GRINDSTONE (H).
- Go (I).
- Place DULL AXE and GRINDSTONE (J), receive SHARP AXE.
- Use SHARP AXE (K).
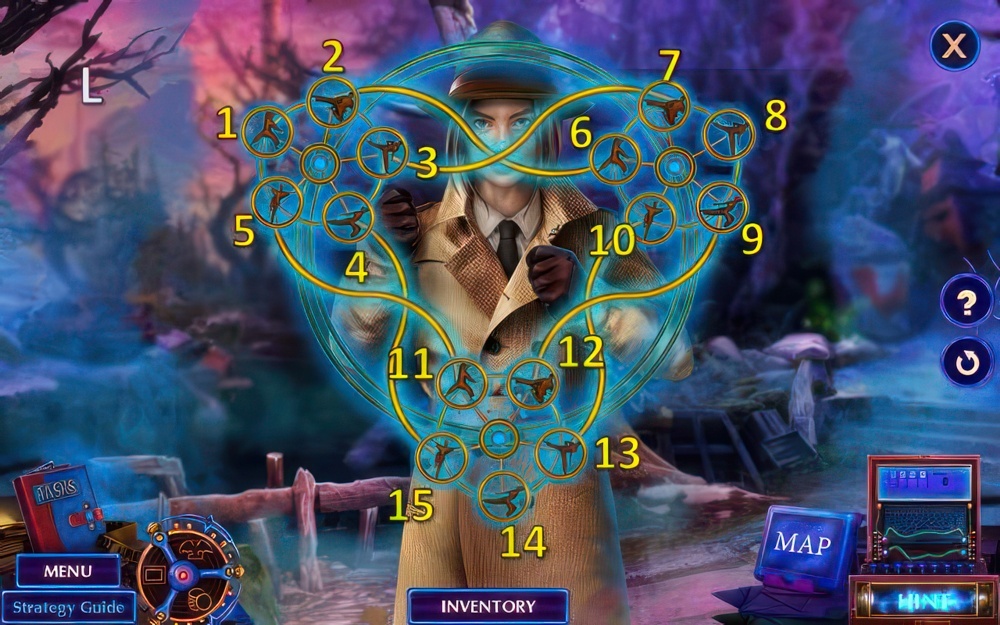
- Solution (L): (2-6)-(10-13)-(11-12)-(12-9)-(3-4)-(4-15).
Congratulations! You have completed the game Fatal Evidence 3: Art of Murder.


