
Fright Chasers 4: Thrills, Chills and Kills – The action takes place in a new amusement park where paranormal phenomena have begun to occur. The owner of the park, Hiram, and his team ask for help from the Fright Chasers, a team of professionals who specialize in investigating supernatural occurrences. Once you arrive on the scene, the situation spirals out of control. Frightening ghosts and monsters begin to prey not only on visitors, but also on you. As you explore the rides and hidden corners of the park, you’ll meet its employees, from engineer Doug to security chief Richards. Each of them in their own way helps you in your investigation, but you must decide who you can trust, because behind the beautiful facades of the park lurks dark secrets. Now it’s up to your team to find out what evil lurks behind all these horrors and find a way to stop it before it’s too late. Using your ghost hunting equipment, you’ll track paranormal phenomena, searching for clues and clues that will help uncover the source of the evil plaguing the place. If you can not pass any of the puzzles or do not know where the items are, on our site you can watch the walkthrough of the game Fright Chasers 4: Thrills, Chills and Kills, and defeat the mystical evil.
Fright Chasers 4: Thrills, Chills and Kills – Walkthrough
Here you can see the full walkthrough of Fright Chasers 4: Thrills, Chills and Kills, namely for all chapters, including bonus chapter, in pictures.
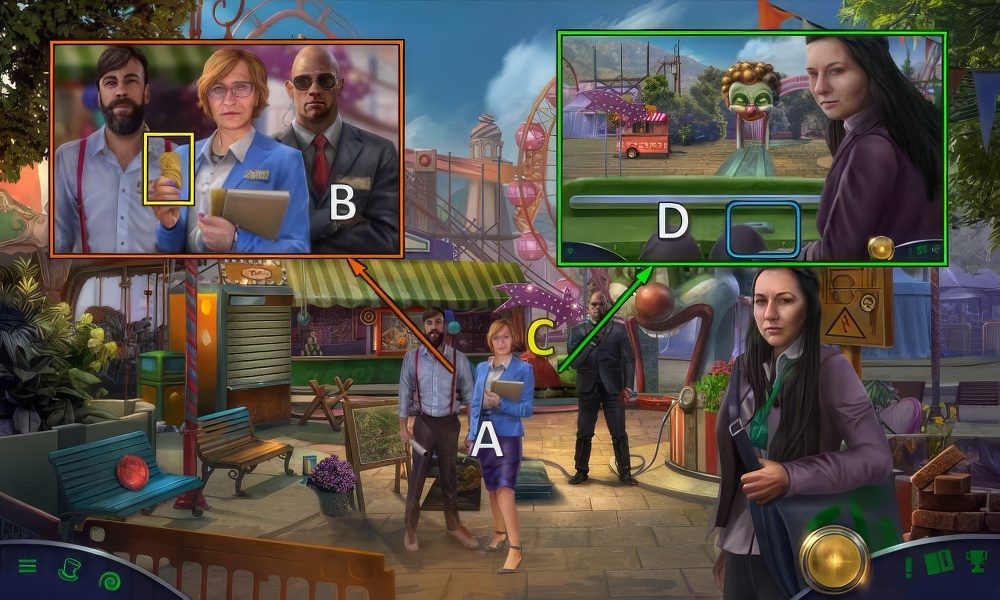
- Talk (A).
- Take TRAIN TICKET (B).
- Go (C).
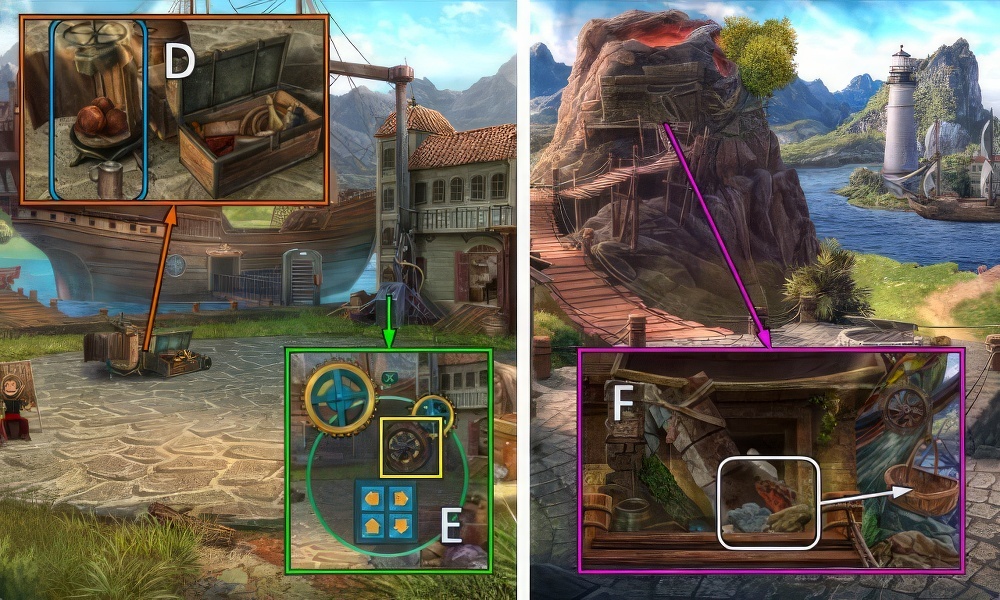
- Use TRAIN TICKET (D).

- Move bar (E).
- Take PICTURE TILE and TOOLBOX (F).
- PICTURE TILE on TOOLBOX.
- Arrange the tiles so they form a picture.
- Select two tiles to swap them.
- Walkthrough (G): (1-6)-(2-5)-(3-8)-(3-15)-(2-11).
- (9-15)-(11-12)-(12-13)-(13-14)-(14-15).
- Take DRAGON FIGURINE and WEIGHT (H).

- Take BUBBLEGUM (I).
- Take SMALL SHOVEL.
- Place BUBBLEGUM, turn faucet (J).
- Take map and BUNTING, use SMALL SHOVEL.
- Take IRON INSET 1/2 (K).

- Take HOOK (L).
- BUNTING and WEIGHT on HOOK, take HOOK ON FISHING LINE.
- Place HOOK ON FISHING LINE, take IRON INSET 2/2 (M).
- Place IRON INSET (L).
- Take TOY KEY (N).

- Use TOY KEY (O).
- Play puzzle (P), receive FUSE.
- Replace FUSE (Q).
- Rotate the tiles so that they connect the two lights.
- Select a tile to rotate it.
- Walkthrough: R×3-S×2-T×3-U-W×3-X×3-Y-Z×2.
- Go (A).

- Take MAGNET and JUMPSUIT (B).
- Take HAY (C).
- Take SHARP METAL PIECE and BOOTS, take METAL HANDLE with MAGNET (D).
- Use METAL HANDLE (B).
- Take MOP, COMBINATION PAPER and DUCT TAPE (E).

- Place COMBINATION PAPER, enter 2-1-8-4 (F).
- Take CANE and GLOVES (G).
- Inspect.
- Use CANE, take WATERMELON (H).
- SHARP METAL PIECE on MOP, take MOP FIBERS.
- HAY, BOOTS, DUCT TAPE, MOP FIBERS, GLOVES and WATERMELON on JUMPSUIT, take DECOY.
- Place DECOY (I).
- Go (J).
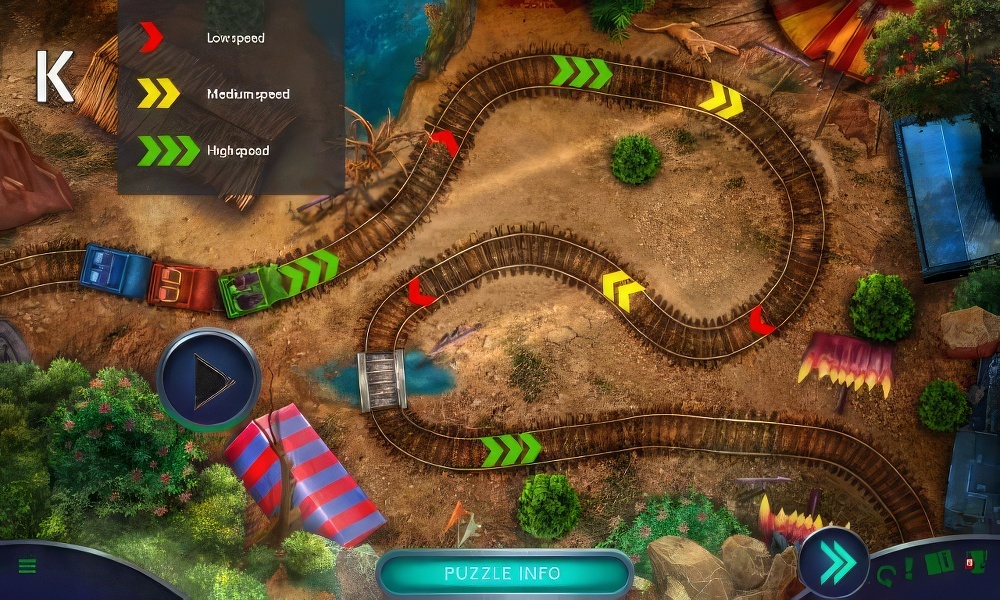
- Guide the train to its destination before the jaws close.
- Select the arrows to choose how quickly you move through each track part.
- Going too quickly will make you crash.
- Select the blue button to try your solution.
- Walkthrough (K).
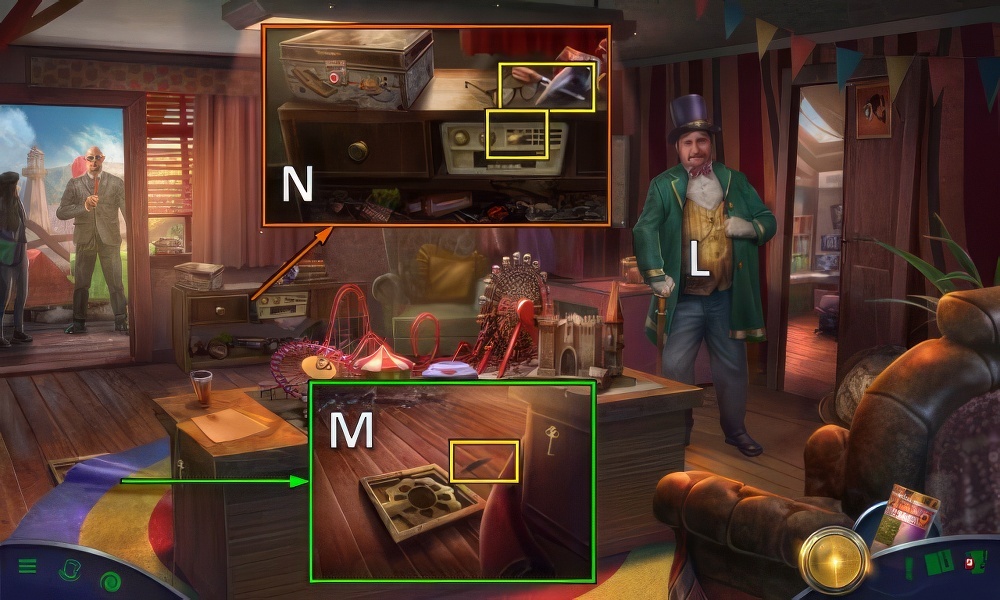
- Talk (L).
- Move rug, take TWEEZERS (M).
- Take FLOOR INSET 1/2 with TWEEZERS, take SCREWDRIVER (N).

- Open bag, take FLOOR INSETS 2/2, BROKEN PLIERS, CASTLE FIGURINE and BATTERY (O).
- Take DRAWER KEY with SCREWDRIVER, place FLOOR INSETS (P).
- Use DRAWER KEY, take FLASHLIGHT and KNIGHT FIGURINE (Q).
- BATTERY on FLASHLIGHT.
- Use FLASHLIGHT, take CLOWN HEAD FIGURINE (R).

- Place DRAGON FIGURINE, CASTLE FIGURINE, KNIGHT FIGURINE and CLOWN HEAD FIGURINE (S).
- Play puzzle (T), receive WINDING KEY.
- Use WINDING KEY, take TOY PUMP (U).
- Go (V).

- Answer phone (W).
- Take SHARP DIVIDER and CLUE (X).
- Place and use TOY PUMP 4 times, take PLIERS HALF and FIRE EXTINGUISHER (Y).
- Use SHARP DIVIDER, take SYMBOL TILE 1/2 (Z).

- PLIERS HALF on BROKEN PLIERS, take PLIERS.
- Use FIRE EXTINGUISHER, take SYMBOL TILE 2/2 with PLIERS (A).
- Place SYMBOL TILE (B).
- Put the tiles the correct slots to get the logical result.
- Select a tile and the hand to move it to a slot.
- Select a tile and the arrows to flip it.
- Walkthrough (C).
- Take ID CARD (D).
- Go down.

- Use ID CARD (E).
- Take DEFLATED SLIDE (F).
- Go (G).
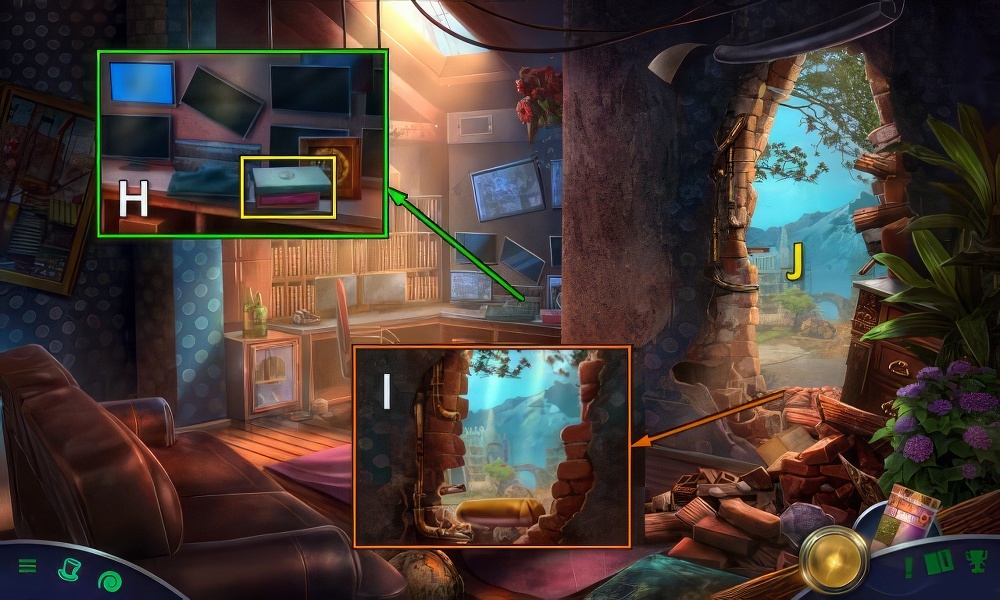
- Take LAPTOP and BOX WITH HEART (H).
- TOY PUMP on DEFLATED SLIDE.
- Use pump thrice.
- Take EVACUATION SLIDE.
- Place EVACUATION SLIDE (I).
- Go (J).

- Take DISH SOAP (K).
- Use DISH SOAP, take WEED KILLER and CLOCK HAND (L).
- Use WEED KILLER, take MECHANICAL WHEEL 1/2 and SHARP METAL BAR (M).

- Take BOARD with SHARP METAL BAR (N).
- Take HELM with BOARD (O).
- Place HELM, take TURNING ARM (P).
- Go (Q).

- Take DRAGON INSET (R).
- Use SHARP METAL BAR, take HEART INSET 1/2 (S).
- Go down twice.

- Place CLOCK HAND (T).
- Place CLUE, set clock to 3:15 (U).
- Take MECHANICAL WHEEL 2/2 (V).
- Go (W).

- Place MECHANICAL WHEEL twice and TURNING ARM (X).
- Take HEART PIECE 2/2 (Y).
- HEART PIECE on BOX WITH HEART, take HAIR PIN.
- Use HAIR PIN (Z).
- Change the arches on the hairpin so they make the lines on the lock pins even.
- Press an arch to change its shape.
- Select the lock pins to try your solution.
- Walkthrough (A): B-C×2-D×2.
- Go (E).

- Place DRAGON INSET, take CHEST KEY and BAKING SODA (F).
- Take SICKLE and COIN (G).
- Go (H).
- Use COIN and BAKING SODA, take CHAINS (I).
- Go to Castle.

- Place CHEST KEY (J).
- Take BATTERING RAM (K).
- Take RAG with SICKLE (L).
- Go to Medieval Village.
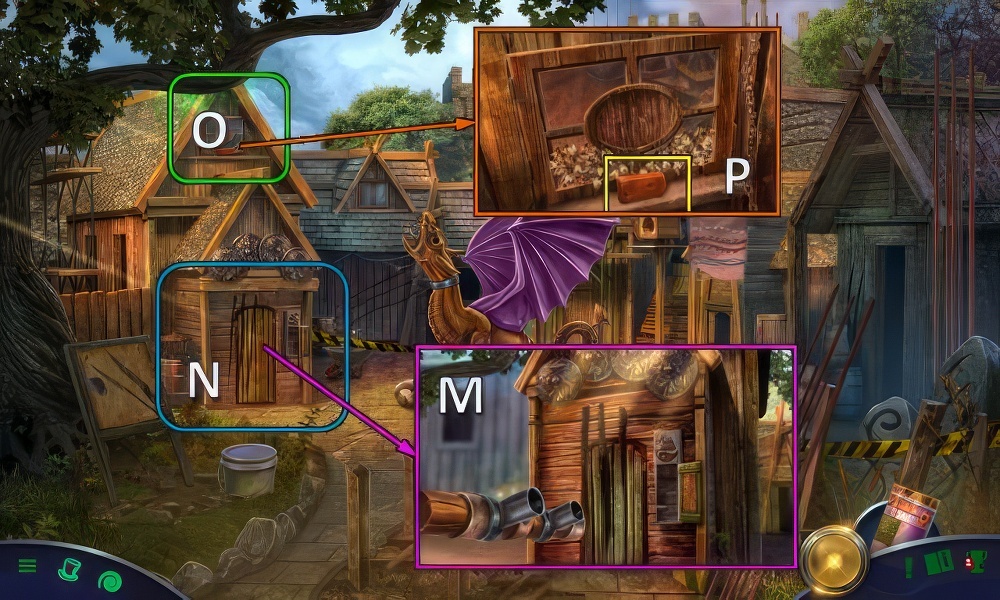
- Use BATTERING RAM (M).
- Play puzzle (N), receive GRAPPLING HOOK.
- GRAPPLING HOOK on CHAINS, take CLIMBING HOOK.
- Use CLIMBING HOOK (O).
- Take BRICK (P).

- Go (Q).
- Use BRICK, take DRAGON EYE (R).
- Go down.
- BOARD on RAG, take TORCH.
- Place DRAGON EYE, use TORCH (S).
- Receive SMOKING TORCH.
- Use SMOKING TORCH and SICKLE (T), take Hiram (U).
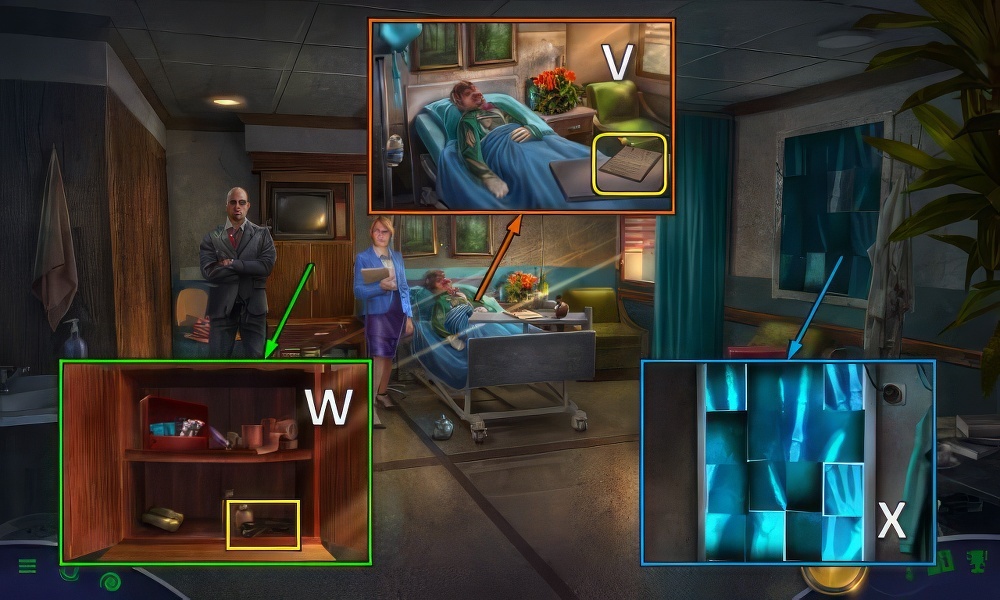
- Check notes (V).
- Open, take POWER CORD (W).
- Place POWER CORD (X).
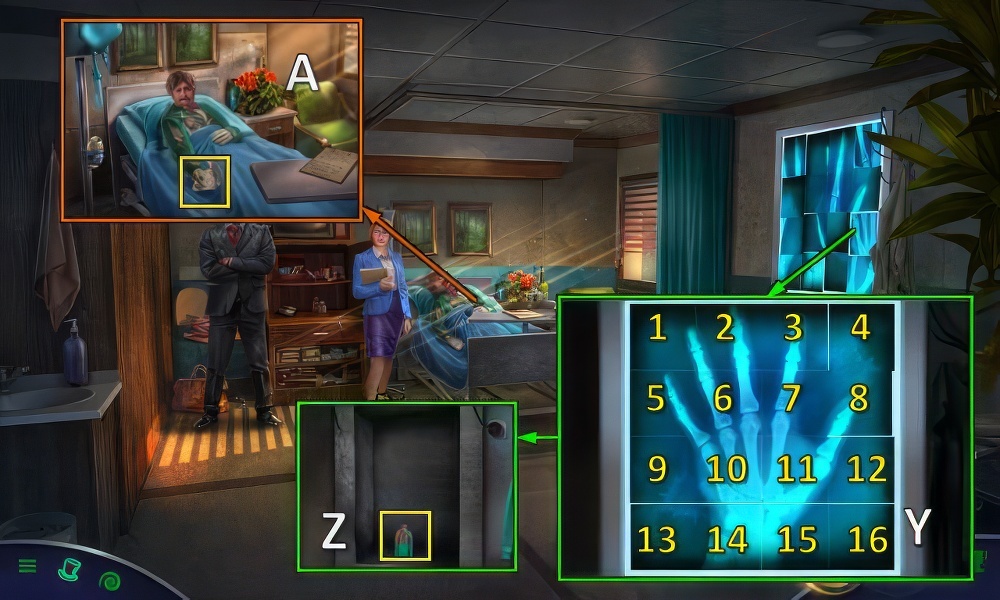
- Swap the pieces to complete the image.
- Select two pieces to swap them.
- Walkthrough (Y): 11-1-14-4-8-3-5-12-9-15-10-6-2-7-11.
- Take SMELLING SALTS (Z).
- Offer SMELLING SALTS, take BAG KEY (A).

- Use BAG KEY, read notes and take HIRAM’S NOTES (B).
- Offer HIRAM’S NOTES, take SECURITY CODE (C).
- SECURITY CODE on LAPTOP, enter 1-8-0-2-(D) enter (E).
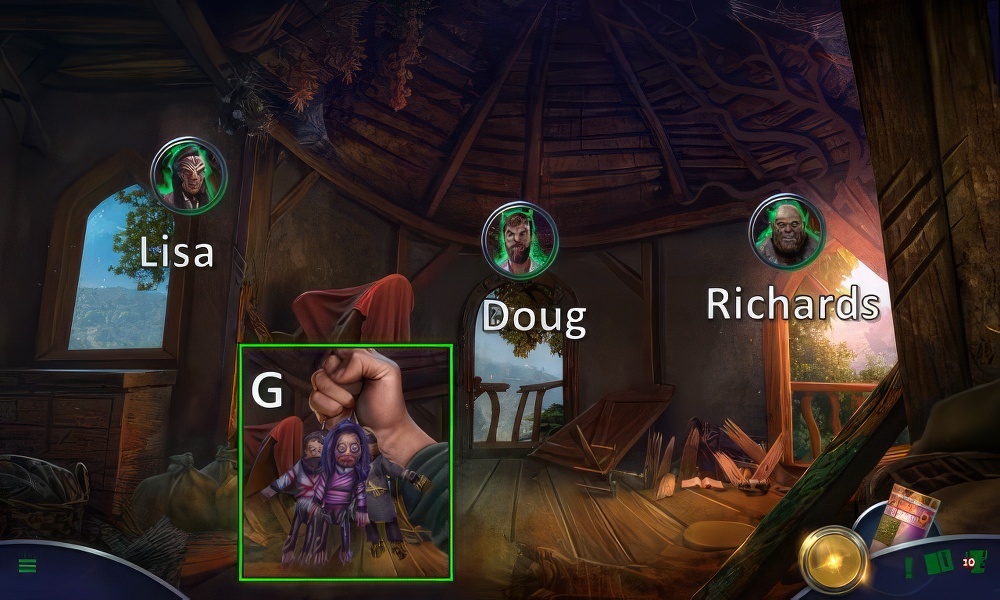
- Take DOLLS (G).
- The next three chapters can be played in any order.
- Choose Lisa, Doug or Richards.
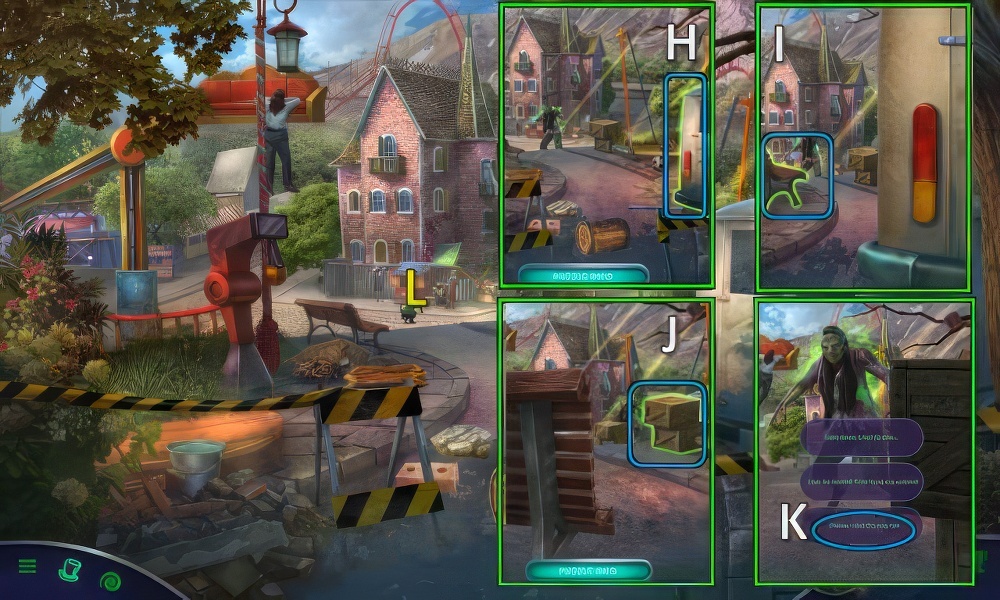
- Take cover in the scene, and then approach the monster.
- Move only when the monster is not throwing debris.
- Hide thrice (H-I-J).
- Choose K.
- Go (L).

- Take AIR GUN CANISTER (M).
- Take HEX KEY (N).
- Find darts ×6 (O).
- Place AIR GUN CANISTER (P).
- Take BAR CLUE 1/5 (Q).
- Take CONNECTING WIRES (R).
- Go down.
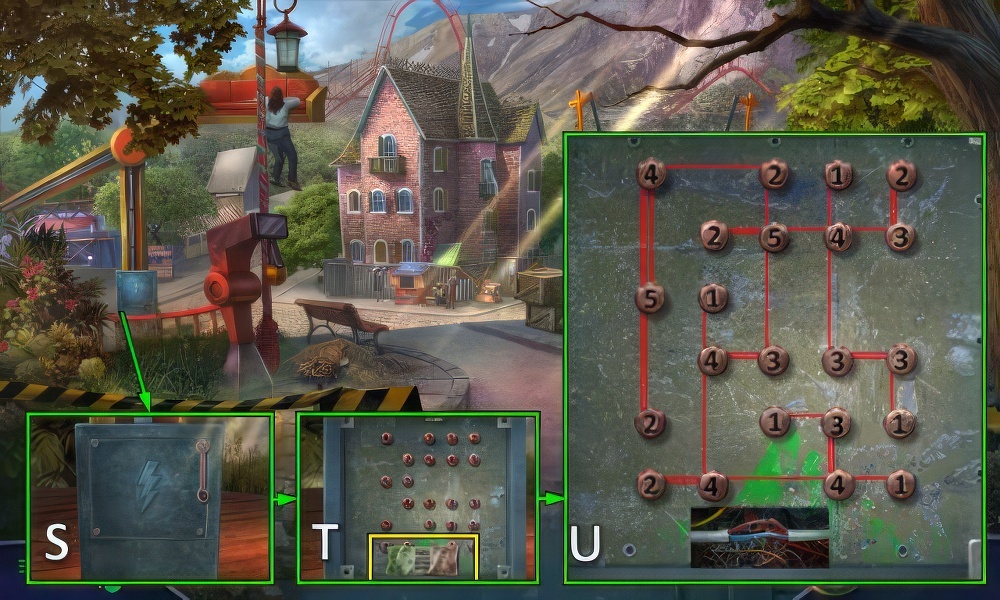
- Use HEX KEY (S).
- Take BAR CLUE 2/5, place CONNECTING WIRES (T).
- Connect all the nodes with each other the number of times shown on each node.
- Select each connection to cancel it.
- Walkthrough (U).
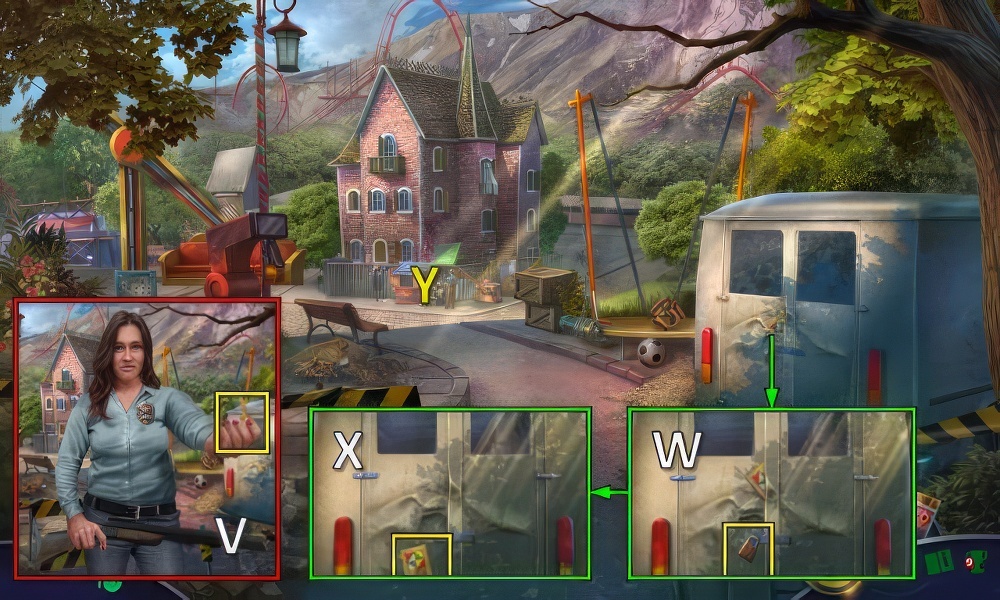
- Take VAN KEY (V).
- Take PADLOCK with VAN KEY (W).
- Take PADLOCK COMBINATION (X).
- Go (Y).

- Manipulate the lock sections until they look like the clue.
- Place PADLOCK COMBINATION, walkthrough (Z).
- Play puzzle (A), receive TOKENS.
- Place TOKENS, take LUNCH BOX (B).

- SEDATIVES from LUNCH BOX.
- Offer SEDATIVES (C).
- Take MULTI-TOOL (D).
- Turn (E), use MULTI-TOOL.
- Take OIL (F).

- Select the tiles to rotate them.
- Connect the battery with the light.
- All the tiles must be connected by the yellow line.
- Walkthrough (G): I×5-K-L×5-M-N×3-O-P×4-Q×5-S-T×5-U-V×4-W×3-X×5.
- Use TOKENS (Y), take BAR CLUE 3/5 (Z).
- Go down.

- Use PADLOCK and OIL, turn winch.
- Take BAR CLUE 4/5 (A).
- Move (B).
- Take BAR CLUE 5/5 (C).
- Go (D).

- Use BAR CLUE (E).
- Go (F).
- Go (G).

- Remove sheets (H).
- Go down.

- Take PAINTING 1/3 (I).
- Take PAINTING 2/3 (J).
- Take PAINTING 3/3 (K).
- Move items, take WINE BOTTLE (L).
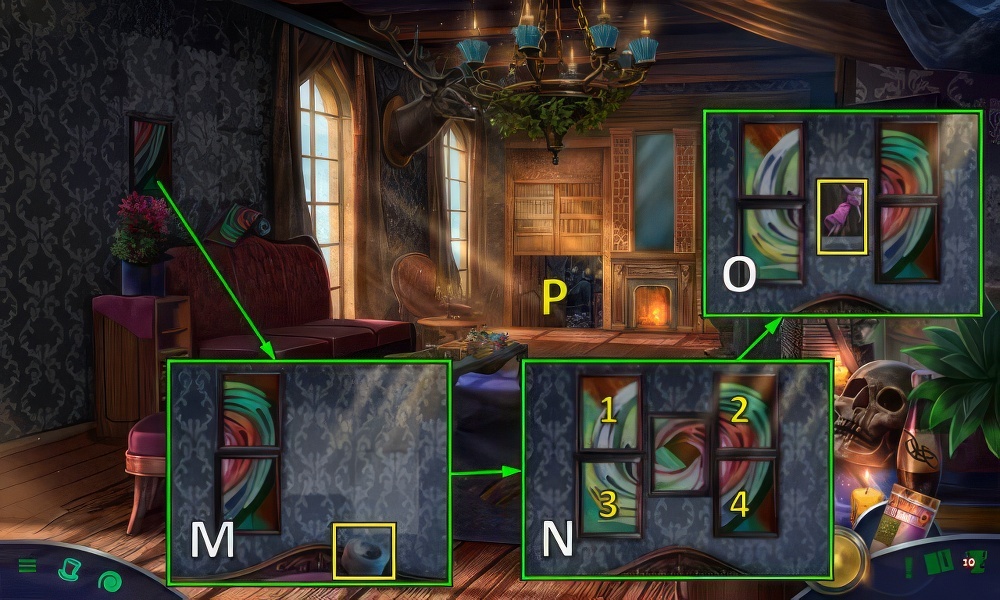
- Move painting, take INSULATION TAPE and place PAINTING (M).
- Hang the pictures on the wall in the correct order.
- Walkthrough 1-2, 3-4 (N).
- Take GIRL FIGURINE 1/2 (O).
- Go (P).
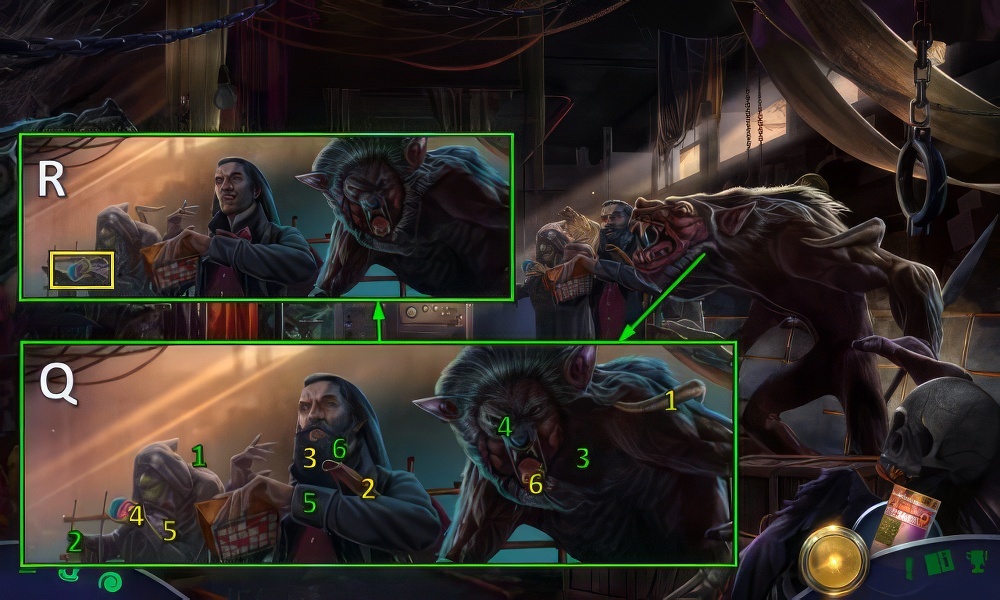
- Move yellow to green 1-6 (Q).
- Take BABY DOLL (R).

- Take FIGURINES 2/2 (S).
- Remove sheet, move and take ANTENNA.
- Place TOKENS, take GUMMY BEAR (T).
- Go down.

- Place FIGURINES (U).
- Take SCISSORS and ELECTRIC TILE 1/2 (V).
- Place GUMMY BEAR and WINE BOTTLE, press nose (W).
- Receive FAKE WINE.
- Use FAKE WINE, go (X).

- Take BLANK PAPER and LADLE (Y).
- INSULATION TAPE and LADLE on ANTENNA, take IMPROVISED GRABBER.
- Use IMPROVISED GRABBER, take CHARCOAL (Z).
- Go to Utilities.

- SCISSORS on BABY DOLL, receive ELECTRIC TILE 2/2.
- Take BRASS KEY with IMPROVISED GRABBER (A).
- Open, place ELECTRIC TILE (B).
- Swap the tiles so that the wires connect arrows of matching colors.
- Walkthrough (C): (2-4)-(4-6)-(3-7)-(3-5)-(6-9)-(8-9).
- Play puzzle (D), receive TORCHES.
- Go to Dungeon.
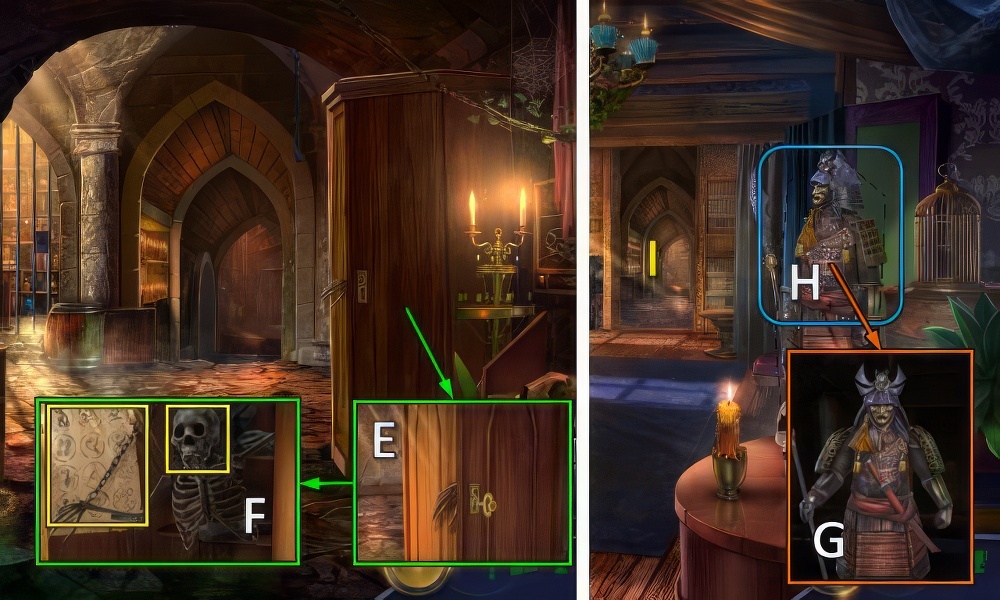
- Use BRASS KEY (E).
- Place BLANK PAPER and CHARCOAL, take SYMBOL CLUE and SKULL 1/2 (F).
- Go down.
- Place SYMBOL CLUE (G).
- Play puzzle (H), receive SKULL 2/2.
- Go (I).

- Move vials, place SKULL (J).
- Find pairs of symbols on the skulls.
- Walkthrough (K).
- Take BOX LID CLUE (L).
- Go to Utilities.
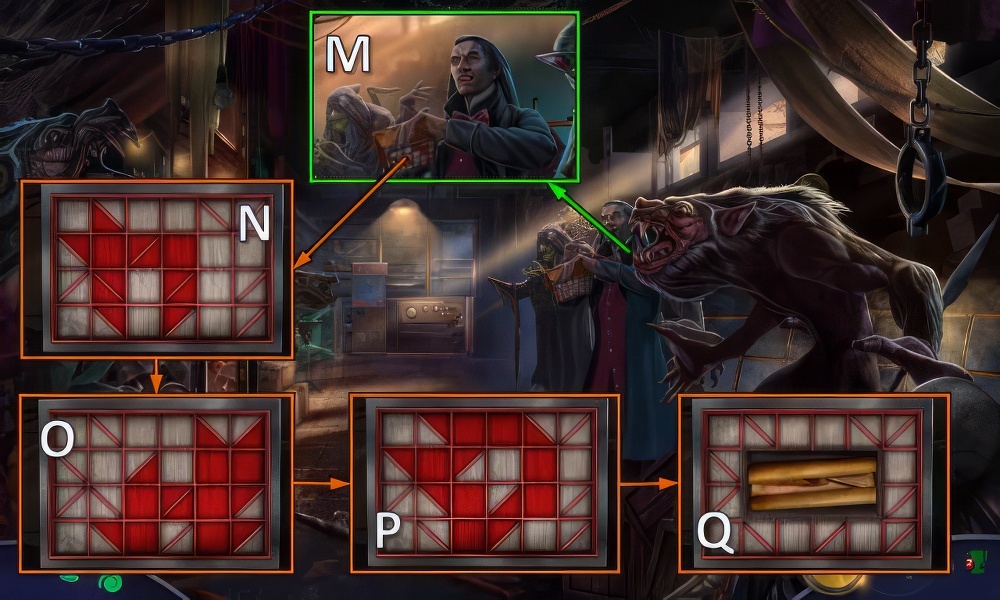
- Place BOX LID CLUE (M).
- Reproduce on the lid the images seen on the clue.
- Walkthrough (N-O-P).
- Take WRAPPING PAPER (Q).
- Go to Dungeon.
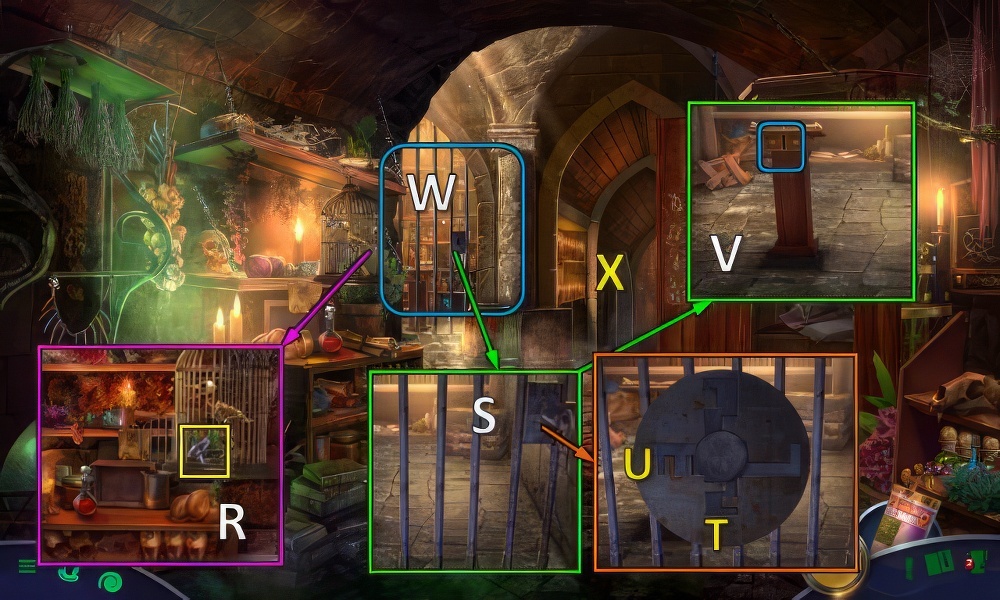
- GOLDEN KEY from WRAPPING PAPER.
- Use GOLDEN KEY, take IRON KEY (R).
- Use SCISSORS and IRON KEY (S).
- Select T-T-U.
- Use TOKENS (V).
- Play puzzle (W), receive DUNGEON MAP.
- TORCHES on DUNGEON MAP.
- Place DUNGEON MAP, go (X).

- Find your way through the maze.
- Use items n the special inventory as needed.
- Walkthrough (Y).

- Place the torches around the grid until Lisa is completely encoded.
- Walkthrough (Z).
- Use DOLLS (A).

- Go (@).
- Talk, take TWIG (B).
- Use TWIG, take AIRBAG, BILLIARD BALL and SUITCASE 1/2 (C).
- Use AIRBAG and BILLIARD BALL, take SUITCASE 2/2 (D).
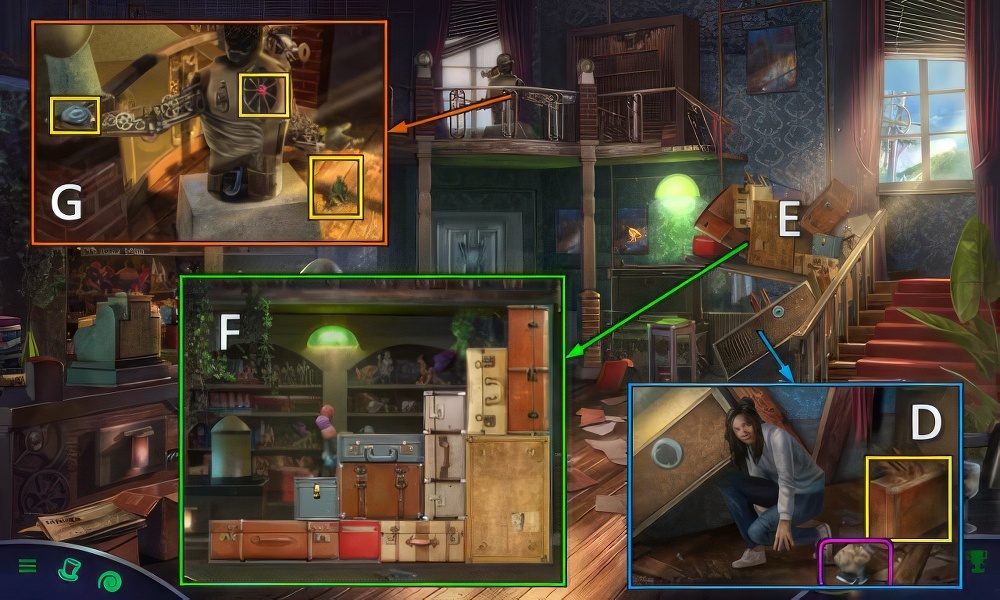
- Place SUITCASE (E).
- Fill the grid with suitcases.
- Select suitcases and place them on the grid until all fit.
- Walkthrough (F).
- Take ANCIENT RELIC, PLASTIC TOY and CRYSTAL (G).

- Place PLASTIC TOY, take PLASTIC INSET (H).
- Place PLASTIC INSET (I).
- Take SALOON INSET 1/2 and TOOTH (J).
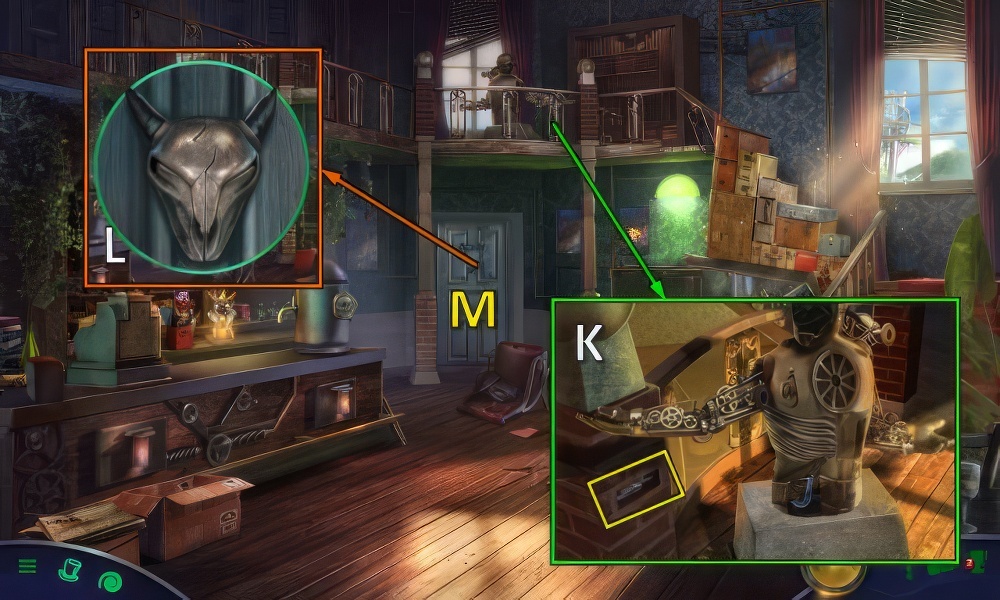
- Use TOOTH, take SALOON INSET 2/2 (K).
- CRYSTAL on ANCIENT RELIC.
- Place SALOON INSET (L).
- Go (M).

- Use ANCIENT RELIC (N).
- Take INFLATED TOY and MATCHES (O).
- Take STICKS (P).
- Use INFLATED TOY (Q), receive TILE.

- Place TILE (R).
- Create a path to connect the squares of the same color.
- The paths may not cross each other.
- Walkthrough (S).
- Take EMPTY OXYGEN TANK (T).
- Place EMPTY OXYGEN TANK, take OXYGEN TANK and MASK (U).
- Go down.

- Place MASK, take DIVING MASK and STRING (V).
- Go (W).

- OXYGEN TANK on DIVING MASK, take DIVING GEAR.
- Use DIVING GEAR (X).
- Play puzzle (Y), receive WEIGHT.
- Place WEIGHT, STICKS and STRING (Z).
- Use MATCHES (A).
- Go (B).
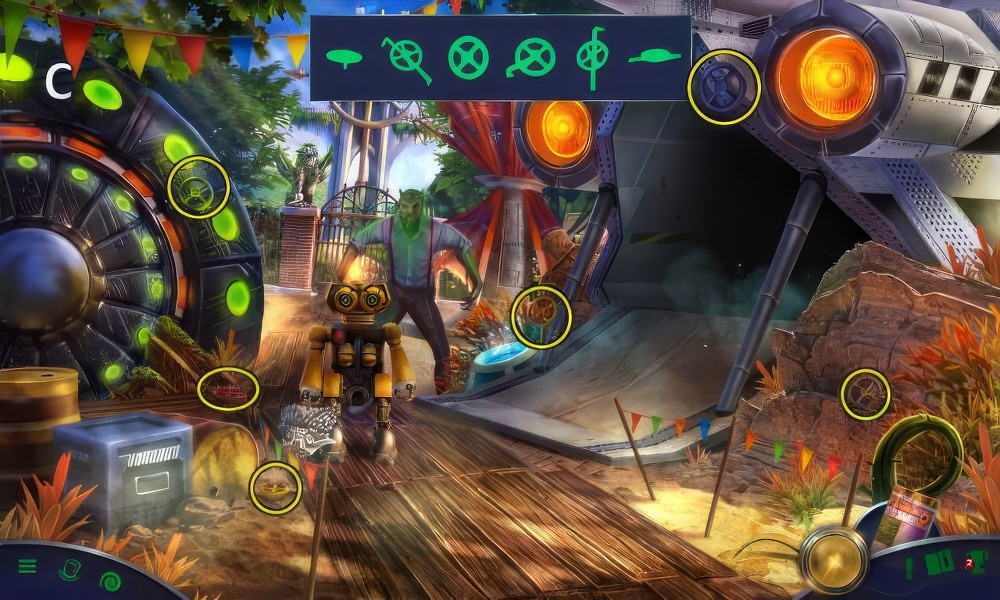
- Find wheels ×6 (C).

- Inspect (D), receive CARBONATED DRINK.
- Take LEATHER CAP (E).
- Use ANCIENT RELIC, push button (F).
- Use LEATHER CAP, take RUSTY LIGHT BULB (G) and ROBOT HAND (H).
- Go down.

- Use CARBONATED DRINK (I), receive OPEN CARBONATED DRINK.
- Use ROBOT HAND, take GRIFFIN HEAD (J).
- Go (K).
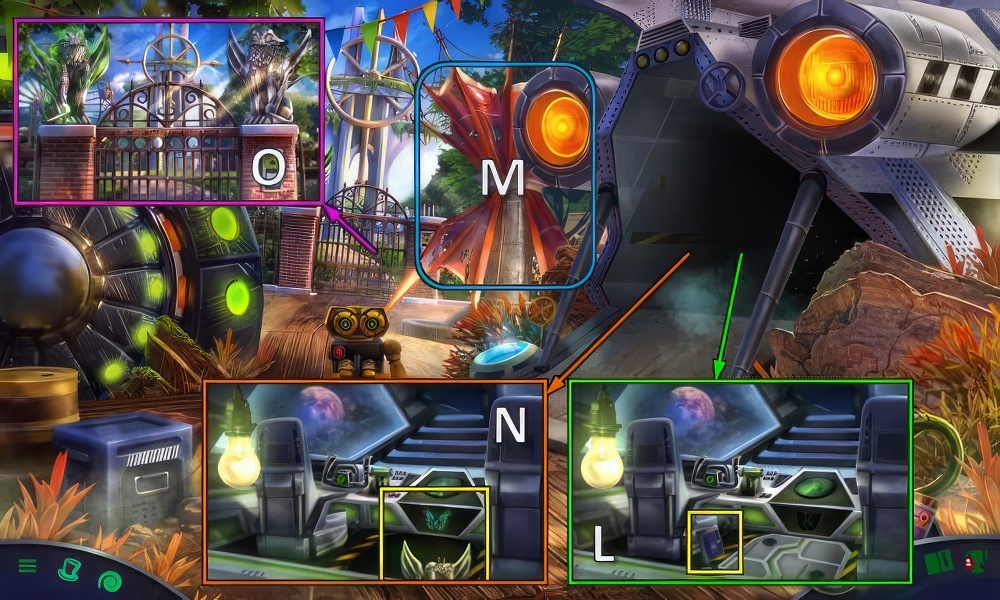
- OPEN CARBONATED DRINK on RUSTY LIGHT BULB, take LIGHT BULB.
- Place LIGHT BULB, take DICTIONARY (L).
- Use DICTIONARY, play puzzle (M).
- Receive SCREEN INSET.
- Place SCREEN INSET, take GRIFFIN BODY (N).
- GRIFFIN BODY on GRIFFIN HEAD, take GRIFFIN STATUE.
- Place GRIFFIN STATUE (O).

- Select the arrows to move left or right and avoid colliding with people running your way.
- Avoid people (P).
- Take EMPTY CARD (Q).
- Take LIGHTER and FIREWORKS 1/2 (R).
- Go down.
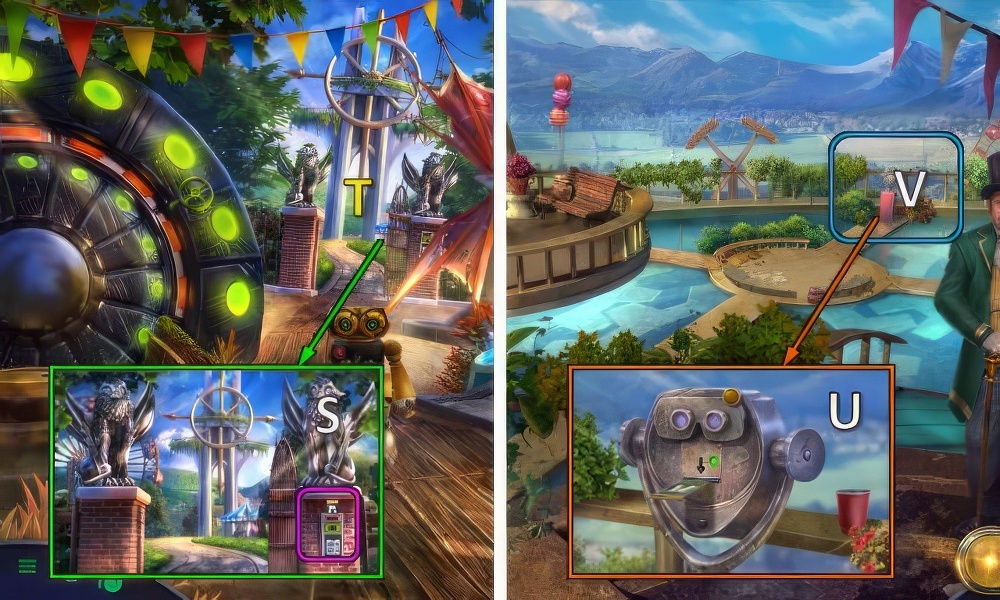
- Use EMPTY CARD, take VERIFIED CARD (S).
- Go (T).
- Place VERIFIED CARD (U).
- Play puzzle (V), receive SYMBOL CODE.
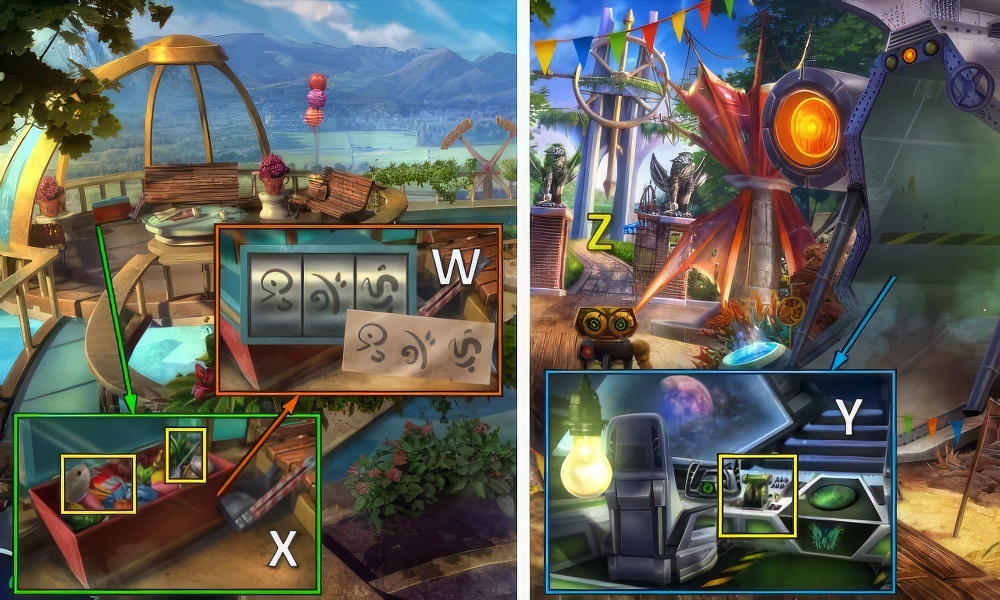
- Place and enter SYMBOL CODE (W).
- Take FIREWORKS 2/2 and SPOON (X).
- Go down.
- Use SPOON, take SHIFTER (Y).
- Go (Z).
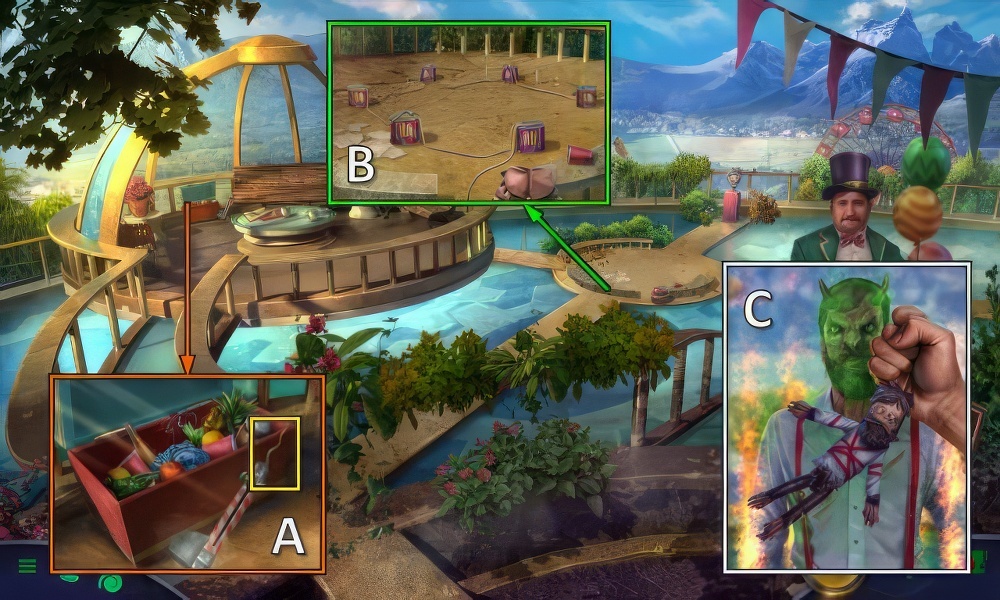
- Place SHIFTER, take FUSE (A).
- Place FUSE, FIREWORKS 2 times and LIGHTER (B).
- Use DOLLS (C).

- Take HAT (D).
- Take GRAPE SODA (E).
- Remove board, take CHEST KEY and BASKET (F).
- Go (G).

- Remove tarp, play puzzle (H).
- Receive ROPE.
- ENAMEL PIN from HAT.
- Place ENAMEL PIN (I), take PIN 1/5 (J).
- Use GRAPE SODA, receive TERMITE CAN.
- Take PIN 2/5 (K).
- Use CHEST KEY and open, take PIN 3/5 and FORK (L).
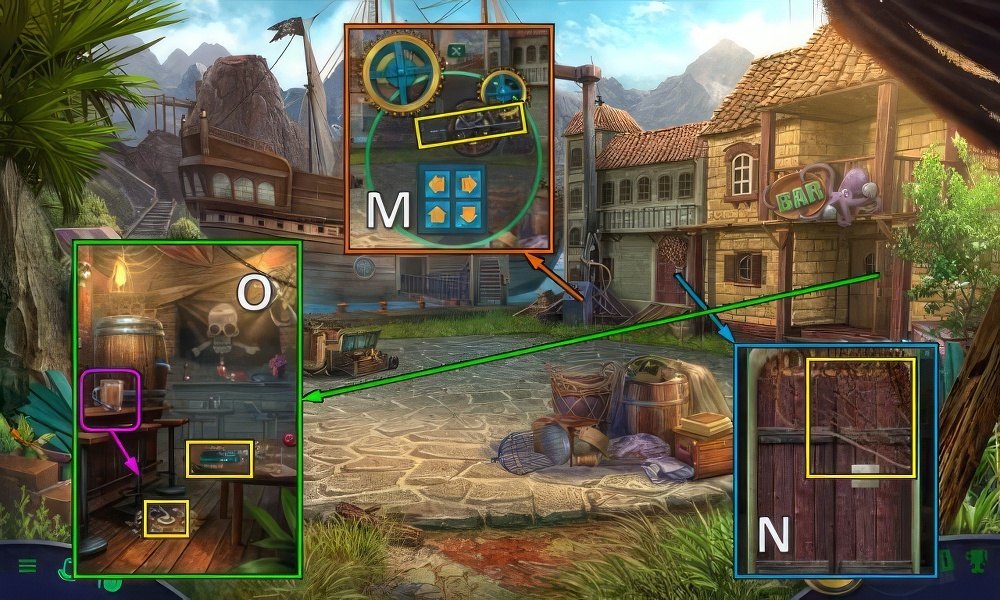
- Take PIN 4/5 (M).
- Take NET (N).
- Move glass, take GALLEY KEY and TAPE RECORDER (O).
- Go down.

- Use TERMITE CAN, take PRISM (P).
- Use FORK, take MUSEUM TICKET (Q).
- Go (R).

- Use MUSEUM TICKET (S).
- Take DUBLOONS and IMPROVISED SAW (T).
- Take DOLL CLUE (U).

- Place DUBLOONS (V).
- Select a hook and then throw a rope ring of the matching color on it.
- Play game (W).
- Use PRISM, take RATCHET and TANKARD (V).
- Go down.

- Use RATCHET, take PIN 5/5 (X).
- Take SLINGSHOT with IMPROVISED SAW (Y).
- Click on the poles to move them info a free hole to match the layout as in the picture.
- Place PIN and DOLL CLUE, place as shown (Z).

- Select part.
- Then make it bigger or smaller and rotate it using the arrow.
- All the heads must fit the shape they’re on.
- Walkthrough (A).
- Take COCONUTS (B).
- Go (C).
- Place COCONUTS and TANKARD, turn wheel.
- Take COCONUT OIL (D).
- Use COCONUT OIL, receive TANKARD.
- Take IRON WHEEL (E).
- Go down.
- Place IRON WHEEL, ROPE and BASKET.
- Move rocks 4 times (F).

- Take CAN OPENER (G).
- Push button, take SPARKWHEEL and MARBLES ×5 (H).
- Take ELASTIC BANDS.
- Use CAN OPENER, take MONKEY KEY (I).
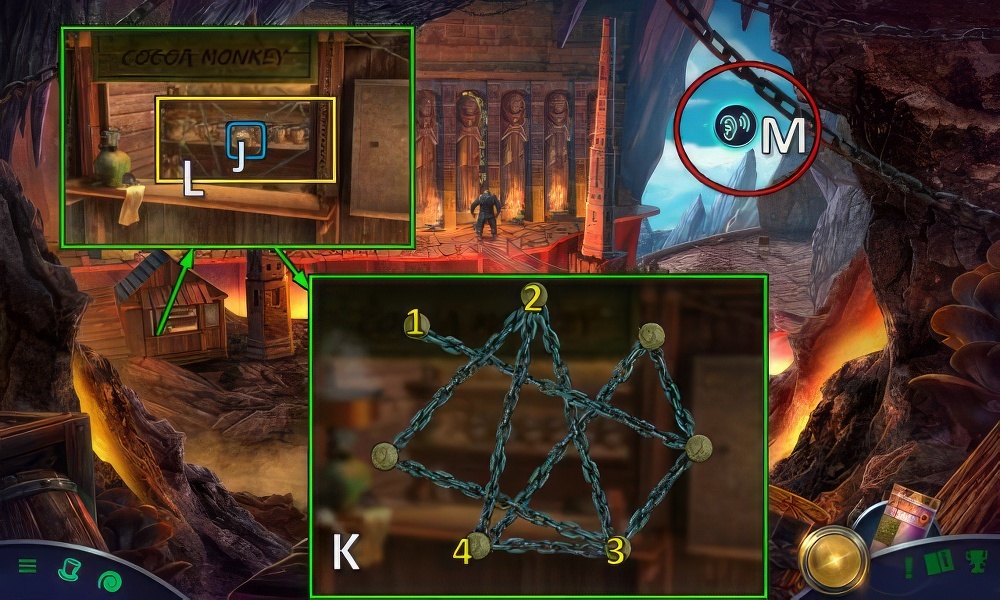
- Use MONKEY KEY (J).
- Select the circles to move them.
- Make sure that the chains don’t cross each other.
- Walkthrough (K): (1-2)-(3-2)-(2-4).
- Take MONKEY CUP and LONG CHAIN (L).
- ELASTIC BANDS, MONKEY CUP and MARBLES on SLINGSHOT.
- Use SLINGSHOT (M).
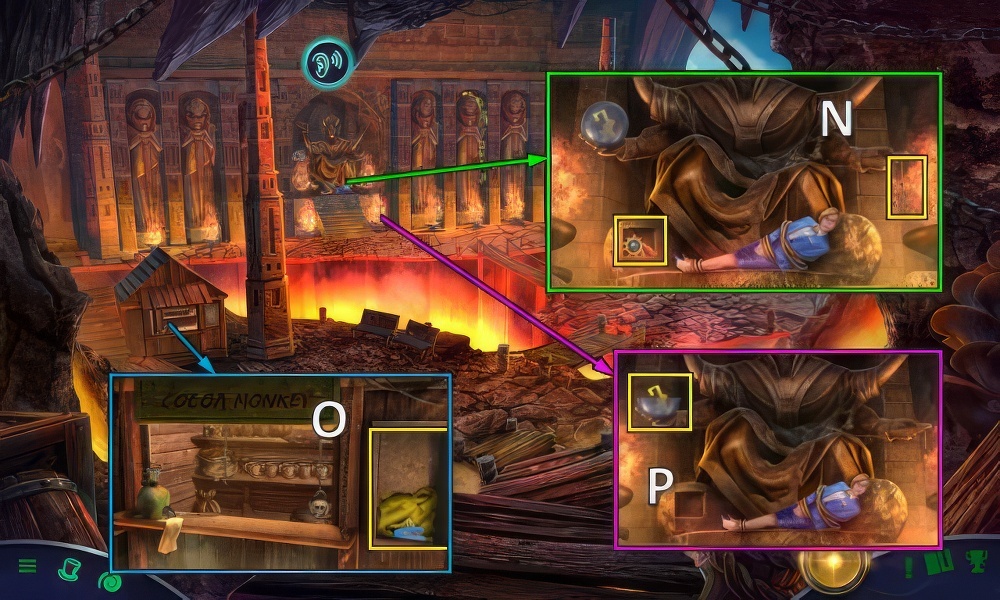
- Talk.
- Remove plate, take FISH HOOK, GEAR and EXPANDING PLIERS (N).
- Use FISH HOOK, take DIAMOND RING, OILSKIN and STAPLER (O).
- Use DIAMOND RING, take SLAT 1/2 (P).

- Take CHISEL (Q).
- Use CHISEL, take GAS BURNER (R).
- Use SLINGSHOT (S).

- Take SLAT 2/2 with EXPANDING PLIERS (T).
- Use SLINGSHOT (U).
- Place SLAT (V).
- Assemble the slats into a finished image.
- Walkthrough: (14-1)-(5-2)-(4-3)-(9-5)-(14-6)-(11-7)-(11-8)-(14-9)-(12-10)-(13-11)-(13-12).
- Place LONG CHAIN (V).
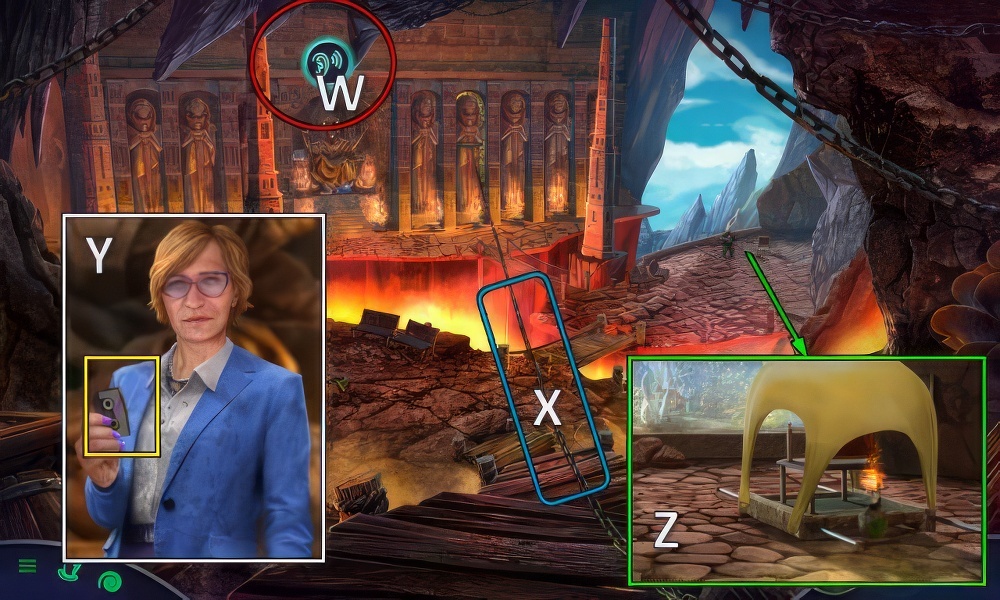
- Use SLINGSHOT (W).
- Pull chain (X).
- Take JULIE’S TAPE (Y).
- Place OILSKIN, STAPLER, GAS BURNER and SPARKWHEEL (Z).
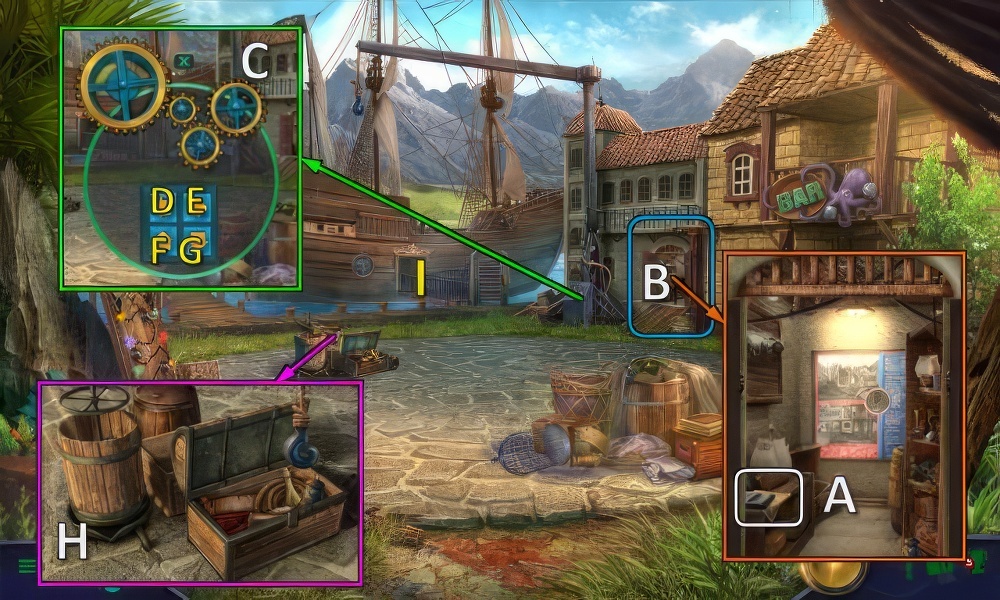
- Place JULIE’S TAPE (A).
- Play puzzle (B), receive LETTER OPENER.
- Place GEAR (C), press G.
- Place NET (H).
- Push F-E-G.
- Go (I).
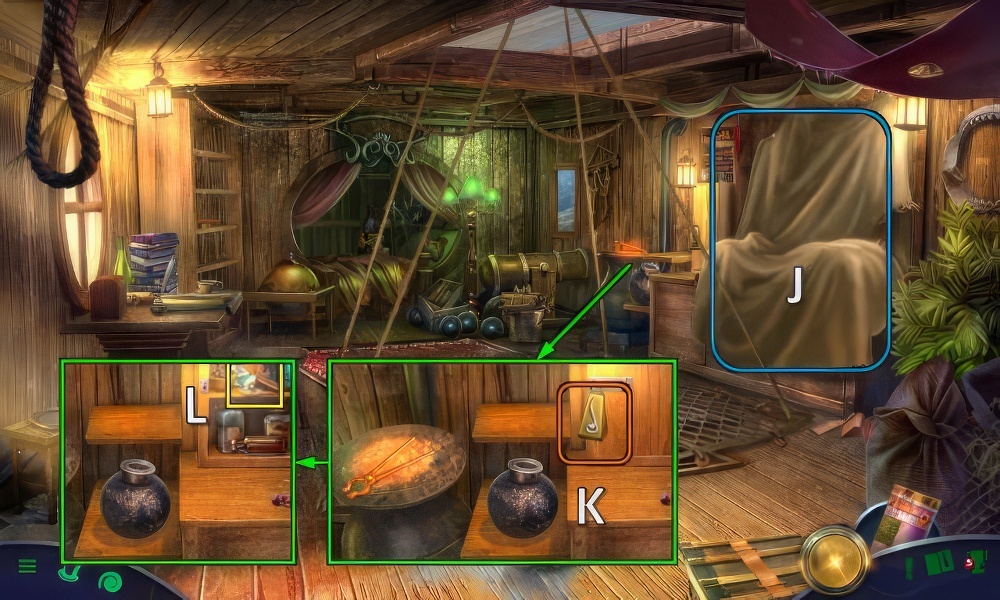
- Remove tarp (J), play puzzle.
- Receive WOODEN TILE.
- Place GALLEY KEY (K).
- Move tile and take PIZZA CUTTER (L).
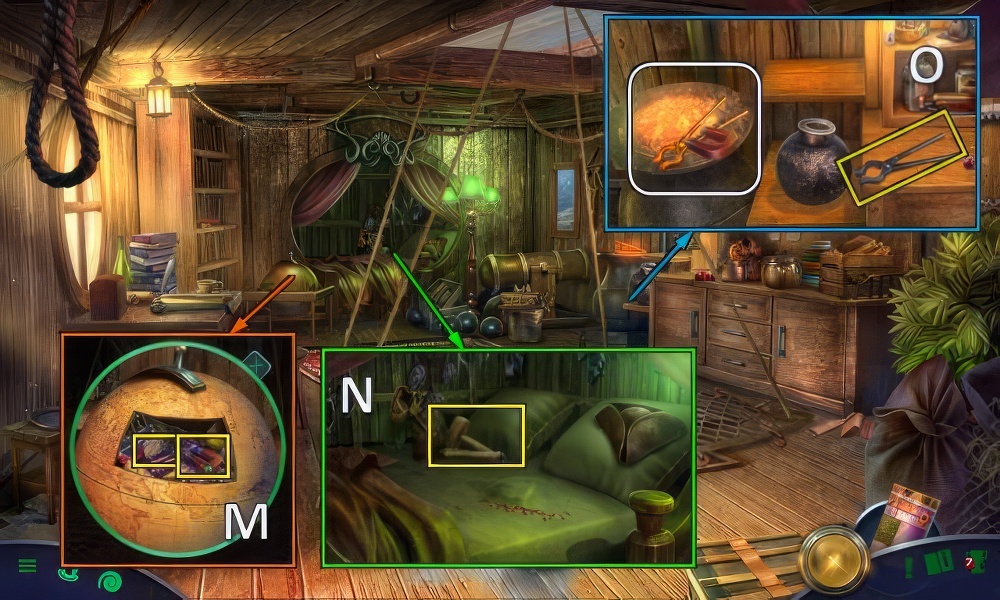
- Use PIZZA CUTTER, take MAGNET and PLAYING CARD (M).
- Move sheet, take MALLET (N).
- Use MAGNET, take TONGS (O).
- Go down.

- Use TONGS, TANKARD and MALLET (P), receive BEER.
- Place PLAYING CARD (Q).
- Place all the dominoes around the board.
- The ends of all the dominoes must match.
- Rotate a domino by placing it on the rotating platform.
- Walkthrough, take BATTERY 1/2 (R).
- Go (S).

- Use BEER, take WOODEN TILE 2/2 (T).
- Use LETTER OPENER, place WOODEN TILE (U).
- Slide the tiles into a coherent image.
- Walkthrough (V): 4-1-2-5-4-1-2-3-6-5-2-3-6-9-8-5-6.
- 9-8-7-4-5-6-9-8-5-6-9-8-7-4-5-8-9.
- Take BATTERY 2/2 (U).
- Go down.
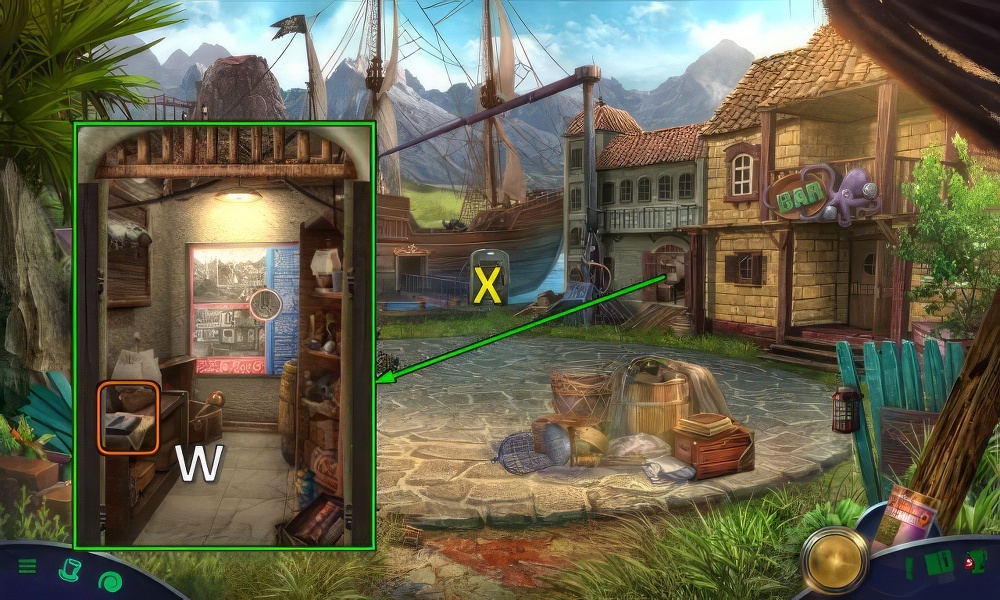
- BATTERY on TAPE RECORDER.
- Take TAPE RECORDING with TAPE RECORDER (W).
- Go (X).

- Place TAPE RECORDING (Y).
- Use DOLLS (Z).
- Talk (A).
- Walkthrough Bonus Chapter, at the link below.


