Gloomy Tales 1: Horrific Show – The walkthrough of the game begins with the famous traveling circus coming to the city of Siel for Halloween. There will be real monsters on stage, and your sister Annabelle really wants to see them. Your sister is in the same disappearance show. But suddenly the circus tent catches fire, you get stuck in it, and find yourself in a world of nightmares where the owner of the circus does not want to let you go. If you can’t complete any of the puzzles or don’t know where the items are, you can watch the walkthrough of the game Gloomy Tales 1: Horrific Show, on our website and save your sister.
Gloomy Tales 1: Horrific Show – Walkthrough
Here you can watch the complete walkthrough of the game Gloomy Tales 1: Horrific Show, namely, all the chapters, including the bonus one, in pictures.

- Take CANDLE (A) and Notebook. Read.
- Open (B).
- Take MATCHES, PUMP, BASEBALL BAT and Hint glass. Read.

- Use BASEBALL BAT (C), hit quickly until piñata falls.
- Take HANDKERCHIEF, PLASTIC SHOVEL and METAL ARCH.
- Use Knife (D), add CANDLE, MATCHES and METAL ARCH.
- Take JACK-O’-LANTERN.

- Hang JACK-O’-LANTERN (E).
- Play puzzle (F), take BAT SHAPED HAIRPIN.

- Attempt (G), use BAT SHAPED HAIRPIN, take Map and WALLET.

- Give WALLET (H).

- Examine (I), add PUMP.
- Take SKULL KNOCKERS 1/2 (J) and BUTTON.
- Use PLASTIC SHOVEL, take WATER.

- Take HOOK (K) and INSULATING TAPE.
- Use HANDKERCHIEF and WATER, take VALVE and SKULL KNOCKERS 2/2.
- Add SKULL KNOCKERS (L).

- Solution: (M) Easy.

- Solution: (N) Hard.
- Go to Amusement Park.

- Talk (O). Take BOW.
- Choose (P).

- Take TAROT CARDS 1/4 (Q), FERRIS WHEEL FIGURINE and PENNANT GARLAND.
- PENNANT GARLAND on HOOK, receive HOOK ON ROPE.
- Add HOOK ON ROPE (R), take CLOWN FIGURINE. Add BOW.

- Solution: (S) Easy.
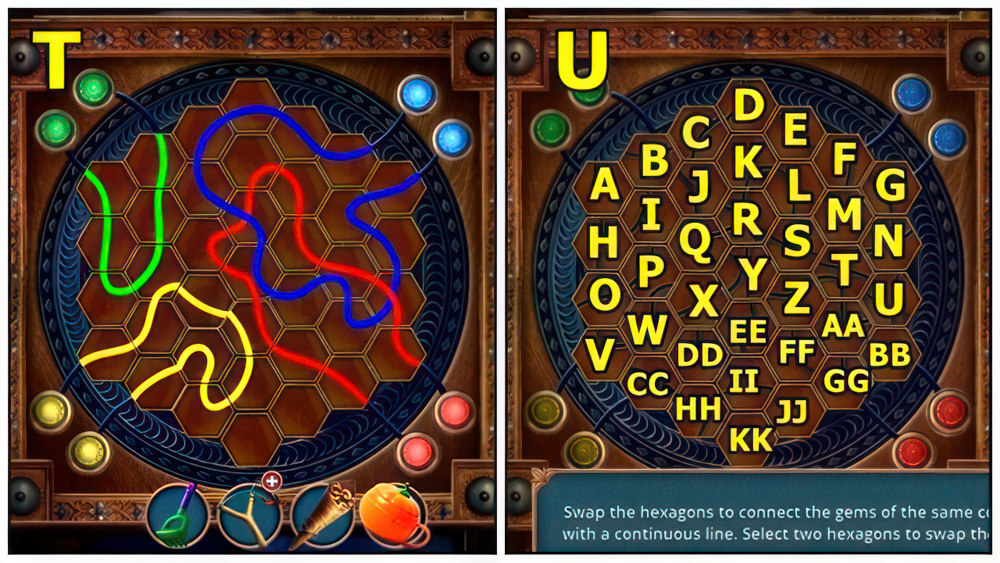
- Solution: (T) Hard.

- Take CLOCKWORK MOUSE (U).
- Go to Festival Square.
- Read (V).
- Use CLOCKWORK MOUSE, take SIGNBOARD.
- Move forward.

- Move (W), add SIGNBOARD.
- Take DRIED MARKER PEN and TAROT CARDS 2/4.
- Use BUTTON, take CIRCUS TENT FIGURINE.
- Go to Festival Square.

- Read (X). Add FERRIS WHEEL FIGURINE, CLOWN FIGURINE and CIRCUS TENT FIGURINE.
- Take TAROT CARDS 3/4, TOY SYRINGE and WIRE.
- Move forward.

- Examine (Y). Use INSULATING TAPE and WIRE.
- Solution: (Z) Easy Cx2-Bx3-C-Dx2-Ax2-B-Ax2-Bx4.
- Cx4-Dx3-Ax4-Dx4-Cx2-D-C.
- Dx2-A-Bx2-Ax2-D-Cx3-Bx2-C-Bx2.
- Solution: (A) Hard C-B-D-A-B-C-A-D-C-B-C-D-C-A-D.
- C-B-A-D-C-D-C-B-C-D-A-D-A.
- D-A-D-C-B-C-B-A-B-A-B-C-D.

- Take SKELETON CHOPSTICKS (B) and TAROT CARDS 4/4.
- Read (C), add TAROT CARDS.

- Play puzzle (D), take TICKETS.
- Offer TICKETS (E).
- Enter Circus Tent.

- Take FIRE HOSE (F).
- Open (G), take GLUE.
- Add VALVE and FIRE HOSE.

- Use Hose (H).
- Receive FLASHLIGHT.

- Use FLASHLIGHT (I).

- Press (J).
- Throw items (K).
- Receive CANNONBALLS.

- Take CORKSCREW (L) and ALCOHOL.
- TOY SYRINGE and ALCOHOL on DRIED MARKER PEN, receive MARKER PEN AND STICKER.
- Use MARKER PEN AND STICKER (M), take CODE.
- Add CODE (N).

- Solution: (O).
- Take BROKEN MASK AMULET and LONG WICK.
- Go to Circus Tent.

- Add LONG WICK (P) and CANNONBALLS.

- Solution: (Q) solution is random, screenshot shows target for various cannonballs.

- Take WHEEL OF FORTUNE (R).
- Go to Halloween Fair.
- Take TOKENS 1/4 (S) and LEATHER BRACELETE.

- Add WHEEL OF FORTUNE (T), take TOKENS 2/4 and MASK AMULET PART.
- Add LEATHER BRACELETE, take COGWHEEL.
- Return to Dressing Room.

- Read (U). Add COGWHEEL, take CRYSTAL BALL and BROKEN STAPLE REMOVER.
- Examine, use SKELETON CHOPSTICKS, receive MASK AMULET PIECE.

- GLUE, MASK AMULET PART and MASK AMULET PIECE on BROKEN MASK AMULET, receive MASK AMULET.
- Insert MASK AMULET (V).

- Play puzzle (W), take MONSTER PAW GLOVES.
- Use MONSTER PAW GLOVES (X), take TOKENS 3/4 and MAGNET.
- Go to Circus Tent.

- Open (Y), use MAGNET.
- Take THROWING STAR, insert CORKSCREW.
- Take MAGICIAN’S HAT and BOLT.
- BOLT on BROKEN STAPLE REMOVER, receive STAPLE REMOVER.

- Use STAPLE REMOVER (Z), take HAIRPIN and TOKENS 4/4.
- Go to Halloween Fair.
- Add TOKENS (A).

- Solution: (B) Easy.

- Solution: (C) Hard.
- Receive PARTY POPPER.

- Use PARTY POPPER (D), take PLIERS.
- Go to Circus Tent.

- Use PLIERS (E), receive MONSTER’S FANG.
- Add CRYSTAL BALL (F) and MONSTER’S FANG, take PLASTIC RAKE and CANE.
- Enter Dressing Room.

- Insert CANE (G).
- Take SLINGSHOT, insert HAIRPIN.
- Examine, open, take PICTURE OF ANNABELLE.
- Go to Halloween Fair.

- Add PICTURE OF ANNABELLE (H).
- Play puzzle (I), take KEYS.

- Insert KEYS (J).

- Solution: (K) Easy.
- Solution: (L) Hard.
- Enter Circus Carriage.

- Use THROWING STAR (M).
- Use MAGICIAN’S HAT (N), take CORK.

- Open (O), read, take NUTS and EMPTY LIGHTER.
- Open (P).
- Add CORK, take PUMPKIN CUP and GAS.
- GAS on EMPTY LIGHTER, receive LIGHTER.

- Use LIGHTER (Q), take GEM.

- Add GEM (R).

- Solution: (S) C-A-B-D.
- Solution: (T) Easy.
- Solution: (U) Hard (D-II)-(B-F)-(A-J)-(I-W)-(O-V)-(DD-HH).
- (HH-N)-(N-X)-(G-N)-(HH-G)-(Y-U)-(BB-GG)-(FF-S)-(HH-CC)-(X-HH).

- Take BROKEN SAW (V), use PLASTIC RAKE, take BRUSH and GLASS EYE.
- GLASS EYE on SLINGSHOT, receive SLINGSHOT WITH BALL.

- Use SLINGSHOT WITH BALL (W), take PADLOCK.
- Offer NUTS, take BUTTON.
- Add BUTTON (X), take BAT FIGURINE.

- Take PUMPKIN FIGURINE (Y).
- Add PUMPKIN FIGURINE (Z) and BAT FIGURINE.

- Play puzzle (A), take SEPTUM RING.
- Add SEPTUM RING (B).
- Enter Toy Shop.

- Talk.
- Take CHAIN (C) and DOLLS 1/2.
- Use PUMPKIN CUP, take NUT.
- NUT on BROKEN SAW, receive SAW.
- Use SAW (D).
- Enter Toy Shop Warehouse.

- Take MINERAL WATER (E).
- Take LOCKPICKS 1/2 (F).
- Add BRUSH and MINERAL WATER, take BELT.
- Add BELT (G).
- Enter Garage.

- Choose (H). Receive ROSHAR’S BOOK.
- Take FLASHLIGHT WITHOUT BATTERIES (I) and BUTTON.
- Remove, add CHAIN and PADLOCK.

- Solution: (J) Easy O-N-Mx2-Lx2-Kx2-Hx2-G-Fx2-E-Cx2-B-Ax2.

- Solution: (K) Hard Ax2-Bx2-Cx2-E-O-Nx2-Mx2-Ix2-J-Hx2-P.
- Take PUMP.

- Use PUMP (L), take JACK’S LEVER.
- Add ROSHAR’S BOOK (M).
- Enter Roshar’s Room.

- Take PENDANT (N) and FLAG GARLAND.
- Add FLAG GARLAND (O).

- Solution: (P) Easy and Hard.
- Take NEEDLE AND THREADS and HEART’S HALVES 1/2.

- Add NEEDLE AND THREADS (Q), receive TEDDY BEAR.
- Return to Toy Shop Warehouse.

- Add JACK’S LEVER (R), receive JACK.
- Give TEDDY BEAR (S), take TWEEZERS.
- Add JACK (T), take PENCIL and DOLLS 2/2.
- Go to Toy Shop.

- Add DOLLS (U).
- Solution: (V) Easy E-F-C-A-D-H-C-A-D-I-C-A-D-J-C-A-D-G-C-A-B.

- Solution: (W) Hard E-F-C-A-D-H-C-A-D-G-C-A-D-B-I-J-C-B-D-E-C-A-B.
- Take GLOVE (X), use TWEEZERS, receive RUBY.

- Read (Y). Use GLOVE.
- Play puzzle (Z), take CYMBALS.
- Add CYMBALS (A), take GLUE and LOCKPICKS 2/2.
- Return to Roshar’s Room.

- RUBY on PENDANT, take WINDING KEY.
- Add WINDING KEY (B), take HEART’S HALVES 2/2.
- Add HEART’S HALVES (C).

- Play puzzle (D).
- Return to Garage.
- Add LOCKPICKS (E).
- Read, take SIGNET RING.
- Add SIGNET RING (F), take MYSTICAL POWDER and SCRATCHER.
- Go to Toy Shop Warehouse.

- Use SCRATCHER (G), take HOOK.
- Use BUTTON, take BATTERIES.
- Remove panel from FLASHLIGHT WITHOUT BATTERIES, add BATTERIES, receive FLASHLIGHT.

- Use FLASHLIGHT (H).

- Solution: (I) Easy and Hard, solution is random, screenshot shows examples.
- Take WIRE and CLOCK HANDS.
- Go to Toy Shop.

- Add CLOCK HANDS (J), take PATCH and DIARY AMULET.
- Go to Garage.

- Read (K). Add DIARY AMULET, add PENCIL. Take SPELL.
- Add MYSTICAL POWDER (L) and SPELL.

- Throw items (M).

- Take BELT (N) and CARDBOARD FIGURINES.
- Add CARDBOARD FIGURINES (O) and GLUE.

- Play puzzle (P), take BEAR HEAD FIGURINE.
- Add BEAR HEAD FIGURINE (Q).
- Go to By The Tent.

- Take PITCHFORK (R).
- Take PAINTED PEBBLES 1/2 (S).
- Use PITCHFORK, take WEATHERVANE.
- Add HOOK (T) and WEATHERVANE, take WATER.
- Use WATER (U).
- Enter Roshar’s Tent.

- Add WIRE (V) and PATCH, take GEMS 1/2 and TWO-PRONGED FORK.
- Take INVISIBLE MAP (W) and SIEVE.
- Use TWO-PRONGED FORK, take WAND.
- Go to By The Tent.

- Add BELT (X) and WAND.
- Solution: (Y) Easy A-Bx2-Ax2-B-C.
- Solution: (Z) Hard B-Ax3-Bx3-A-C.

- Take NAIL CLIPPER (A) and PAINTED PEBBLES 2/2.
- Add PAINTED PEBBLES (B), take LID.
- Go to Monster’s Camp.

- Add LID (C), take WHEEL.
- Add WHEEL (D), take MAGNET.
- Return to Roshar’s Tent.

- Use MAGNET (E).

- Solution: (F) Easy.

- Solution: (G) Easy.

- Solution: (H) Easy.

- Solution: (I) Hard.

- Solution: (J) Hard.

- Solution: (K) Hard.
- Take SCRAPER and TOXIN.

- Use TOXIN (L), take HEAVY STATUETTE.
- Use NAIL CLIPPER, receive HORSESHOE.
- Go to By the Tent.

- Add HORSESHOE (M), take INSECTICIDE.
- Add SIEVE, take GEMS 2/2.
- Enter Roshar’s Tent.

- Add GEMS (N).
- Play puzzle (O), take FLASHLIGHT AMULET.

- Add FLASHLIGHT AMULET (P), take BOTTLE OPENER and CANDLE.
- Return to Monster’s Camp.
- CANDLE on INVISIBLE MAP, receive MAP.
- Use MAP (Q).

- Take PLANKS 1/2 (R) and RAG.
- Use SCRAPER, take AXE.
- Use AXE (S).
- Go to By The Lake.

- Take TONGS (T) and PLANKS 2/2.
- Use BOTTLE OPENER (U), receive NAILS.
- Add PLANKS (V), NAILS and HEAVY STATUETTE.

- Solution: (W) Easy.
- Solution: (X) Hard.
- Go to By The Maze.

- Use INSECTICIDE (Y), take AMMONIA, FISH AMULETS 1/2 and CORKSCREW.
- Add AMMONIA (Z) and RAG.
- Receive AMULET.
- Return to Forest Edge.

- Add AMULET (A).

- Solution: (B) Easy.
- Solution: (C) Hard.

- Take VALVE (D).
- Add VALVE (E), take BOLT and LASSO.
- Go to By The Lake.

- Use LASSO (F), take SHARP SEASHELL.
- Use SHARP SEASHELL (G), receive NET.
- Go to By The Maze.

- Examine (H), add NET, use Net, take MAGIC GLASSES.
- Use CORKSCREW, read, take CORK.

- Add CORK (I), take PHEASANT’S FEATHER.
- Use TONGS, receive GATEHOUSE KEY.
- Return to Forest Edge.

- Insert GATEHOUSE KEY (J).
- Play puzzle (K), take LOUDSPEAKER.
- Use LOUDSPEAKER (L), take CANE and FISH AMULETS 2/2.
- Go to By The Lake.

- Add FISH AMULETS (M), take SPOON and STUD EARRING.
- Add STUD EARRING (N), take PARCHMENT and WIRE.
- Go to By The Maze.

- Use SPOON (O)
- Take SEALED BOTTLE OF ACID and LENSES.
- BOLT, LENSES and WIRE on MAGIC GLASSES.
- Use MAGIC GLASSES (P).

- Solution: (Q) Easy.

- Solution: (R) Easy.

- Solution: (S) Hard.

- Solution: (T) Hard.

- Solution: (U) Hard.

- Choose (V). Receive SMALL RAKE and ROSHAR’S SACK.
- Take MOSAIC FRAGMENTS 1/3 (W) and SCREWDRIVER.
- Use SMALL RAKE, take PALLET JACK.

- Open ROSHAR’S SACK, take BASEMENT KEY.
- Insert BASEMENT KEY (X).
- Solution: (Y) Easy Bx4-(C-E)-Bx3-(C-F)-Bx4-(C-G)-Bx2-(C-H)-Bx2-(C-I)-Bx4.
- Solution: (Z) Hard Bx4-(C-E)-Bx3-(C-F)-Bx4-(C-G)-Bx2-(C-H)-Bx2-(C-I)-Bx2-
- (C-J)-Bx4-(C-K)-B.

- Enter Basement.
- Take DIAMOND RING (A) and GIRL DOLL.
- Use DIAMOND RING (B), take MAGIC BLACK ROSE.
- Add GIRL DOLL (C) and MAGIC BLACK ROSE, take SEALED PAINTS 1/2 and NAIL CLIPPER.
- Go to Manor Courtyard.

- Add JACK PALLET (D).
- Enter Main Hall.
- Examine (E).

- Take GOBLIN FIGURINE (F).
- Use PHEASANT’S FEATHER, receive INK AND QUILL 1/2.
- Take INK AND QUILL 2/2 (G).

- Use CANE (H).
- Take NEEDLE AND THREADS and COGWHEELS.
- Add INK AND QUILL and PARCHMENT, receive CODE.
- Add GOBLIN FIGURINE (I) and CODE. Press B-A-C-B-C.
- Enter Laboratory.

- Take BROKEN BELLOWS (J) and WHEEL.
- Add WHEEL (K).
- Take PAPERWEIGHT.
- Add SEALED BOTTLE OF ACID, take SCREWS and MOSAIC FRAGMENTS 2/3.

- Add SCREWS (L) and SCREWDRIVER.
- Add Handle, take PHOTO OF MANNEQUIN and MOSAIC FRAGMENTS 3/3.
- Go to Manor Courtyard.

- Add MOSAIC FRAGMENTS (M).
- Play puzzle (N), take GIGLI SAW.

- Use GIGLI SAW (O), take CHARGER WIRE and NOZZLE.
- Use NAIL CLIPPER, take KNOB.
- Enter Basement.

- Add KNOB (P), take SEALED PAINTS 2/2.
- Add SEALED PAINTS (Q).

- Solution: (R) Easy and Hard.
- Take RESIN and STAR-SHAPED AMULET.
- Return to Laboratory.

- NEEDLE AND THREADS and NOZZLE on BROKEN BELLOWS, receive BELLOWS.
- Use BELLOWS (T), take COGWHEELS 2/3 and LIGHTNING AMULET.
- Insert LIGHTNING AMULET (U), read.
- Receive ANCHOR PENDANT.

- Use ANCHOR PENDANT (V), take BRUSH and WRENCH.
- Insert STAR-SHAPED AMULET, take HANDLE.
- Go to Main Hall.

- Remove (W), use WRENCH, take COGWHEELS 3/3.
- Add COGWHEELS (X).

- Solution: (Y) Easy and Hard
- Take ORGAN KEYS 1/3 and ICE PICK.
- Go to Manor Courtyard.

- Add PAPER WEIGHT (A) and ICE PICK, take SOLVENT and MAGNET.
- Use MAGNET (B), take MANNEQUIN’S ARM.
- Enter Basement.

- Add RESIN (C) and HANDLE.
- Play puzzle (D).
- Return to Main Hall.

- Add PHOTO OF MANNEQUIN (E) and MANNEQUIN’S ARM. Arrange mannequin.
- Take BRACELET and SPECULUM.
- Use SPECULUM (F), take WOODEN PLATES, VOODOO DOLL and FLINT AND STEEL.
- Enter Laboratory.

- Add FLINT AND STEEL (G).
- Play puzzle (H), take CYLINDER FOR LIGHTNING.

- Add CHARGER WIRE (I) and CYLINDER FOR LIGHTNING, press button. Take LIGHTNING.
- Read (J), add BRACELET, VOODOO DOLL and LIGHTNING.

- Take ORGAN KEYS 2/3 (K).
- Take MOUSE BRACELET (L).
- Add SOLVENT and BRUSH, take COAT HANGER and MIRROR.
- Add MIRROR (M).
- Enter Bedroom.

- Take SAFE KNOB (N) and ORGAN KEYS 3/3.
- Take MONSTER ANIMAL FIGURINES 1/4 (O).
- Add ORGAN KEYS (P).

- Solution: (Q) Easy B-G-D-F-C-H-E-A.

- Solution: (R) Hard G-B-C-F-H-J-A-D-I-E.
- Read. Take ROPE PIECE and WIRE PIECE.
- Return to Library.

- Examine WIRE PIECE, receive LOCKPICK.
- Use LOCKPICK (S), take FISHING ROD.
- Use FISHING ROD (T).
- Enter Felix’s Tower.

- Take MONSTER ANIMAL FIGURINES 2/4 (U).
- Add WOODEN PLATES and ROPE PIECE, receive SPATULA.
- Use SPATULA (V), take DENTAL FORCEPS, use COAT HANGER.
- Read, take MONSTER ANIMAL FIGURINES 3/4.
- Return to Bedroom.

- Use DENTAL FORCEPS (W).
- Play puzzle (X), take RUBY.
- Add RUBY (Y), take SNAKE BRACELET.
- Return to Felix’s Tower.

- Add MOUSE BRACELET (Z) and SNAKE BRACELET, take STETHOSCOPE.
- Add SAFE KNOB (A) and STETHOSCOPE.

- Solution: (B) Easy.

- Solution: (C) Hard D-Ex3-Bx3-Cx3-Ax4
- Take WOODEN CAKE STAND, OILER and WINDING KEY.
- Return to Library.

- Insert WINDING KEY (D), take PENCIL and MONSTER ANIMAL FIGURINES 4/4.
- Add MONSTER ANIMAL FIGURINES (E).

- Solution: (F) Ax2-B-Ax4-B-Ax2-Bx2-Ax5.
- Take FILE, LONG TWEEZERS and SCOOP.

- Open (G), use SCOOP, take ELECTRIC RAY FOOD.
- Enter Bedroom.

- Add WOODEN CAKE STAND (H), take TOY CLOWN.
- Use LONG TWEEZERS, receive RUBBER GLOVE.
- Add RUBBER GLOVE (I) and ELECTRIC RAY FOOD.

- Solution (J): (A-G)-(C-G)-(D-H)-(B-H)-(D-I)-(F-I)

- Take FOLIO AMULET (L).
- Return to Felix’s Tower.
- Add FOLIO AMULET (M), take FOLIO.
- Add FOLIO (N).

- Play puzzle (O), take MAGIC DUST.
- Add MAGIC DUST (P).

- Use OILER (Q), receive FLAG ON HANDLE.
- Add FLAG ON HANDLE (R), take METAL PLATE.
- Take KEY PIECE (S).
- FILE, PENCIL and METAL PLATE on BROKEN KEY, receive KEY TO BELLA’S BAG.

- Insert KEY TO BELLA’S BAG (T), take MAGIC DAGGER.
- Add MAGIC DAGGER (U).

- Solution: (V) Easy and Hard, solution is random, screenshot shows an example on how to solve puzzle.

- Solution: (W).

- Solution: (X).

- Solution: (Y).
- Walkthrough Bonus Chapter, at the link below.


