
Gloomy Tales 3: Hotel Frightsylvania – In this Halloween story, you will be plunged into the gloomy atmosphere of an ancient castle located in the Carpathian Mountains. You’ve been invited by a mysterious benefactor to a private party, and you’re excited to head to Romania. But be on your guard, the Freitsylvania Hotel hides many secrets and dangers. Explore the gloomy corridors and huge halls of the castle, solve puzzles and search for hidden objects to uncover the secrets of this spooky place. Vampires may lurk around every corner, and underground tunnels will be haunted by frightening visions. Don’t forget to bring your Halloween costume, because this event promises to be unforgettable. If you can not pass any of the puzzles or do not know where the items are, on our site you can watch the walkthrough of Gloomy Tales 3: Hotel Frightsylvania, and learn all the secrets that hide the castle.
Gloomy Tales 3: Hotel Frightsylvania – Walkthrough
Here you can see the full walkthrough of Gloomy Tales 3: Hotel Frightsylvania, namely for all chapters, including bonus chapter, in pictures.

- Take map, take and read the postcard, take BOTTLE and CREDIT CARD (A).
- Open the door (B).
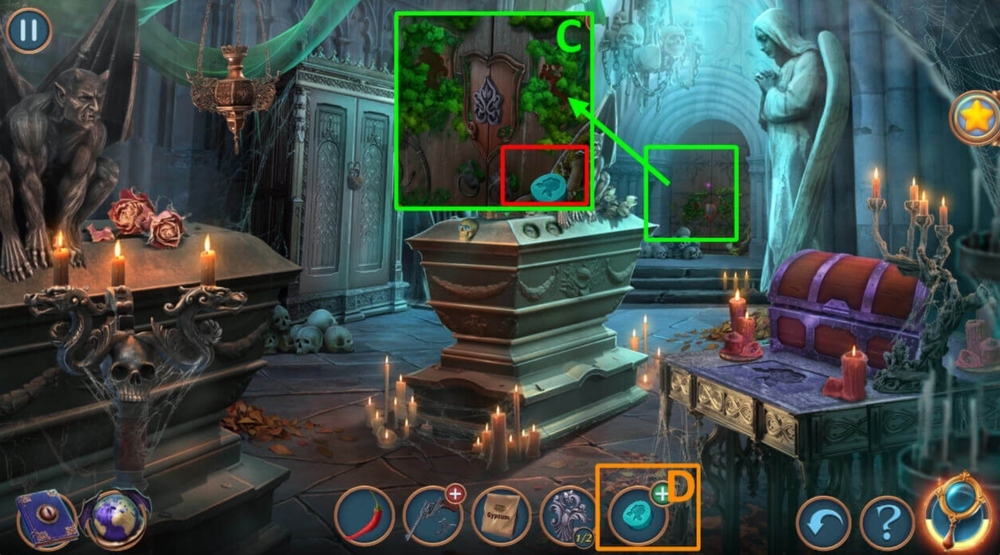
- Take TASK BOOK, take INK (C).
- Use CREDIT CARD on the medicine cabinet’s door, take DIVIDERS, DISASSEMBLED TRIPOD, and SCREWDRIVER (D).

- Take TRIPOD LEG, use INK on the printer, click on the computer mouse, use SCREWDRIVER on the mouse, click on the computer mouse, take BATTERIES (E).
- Use TRIPOD LEG on DISASSEMBLED TRIPOD (F).
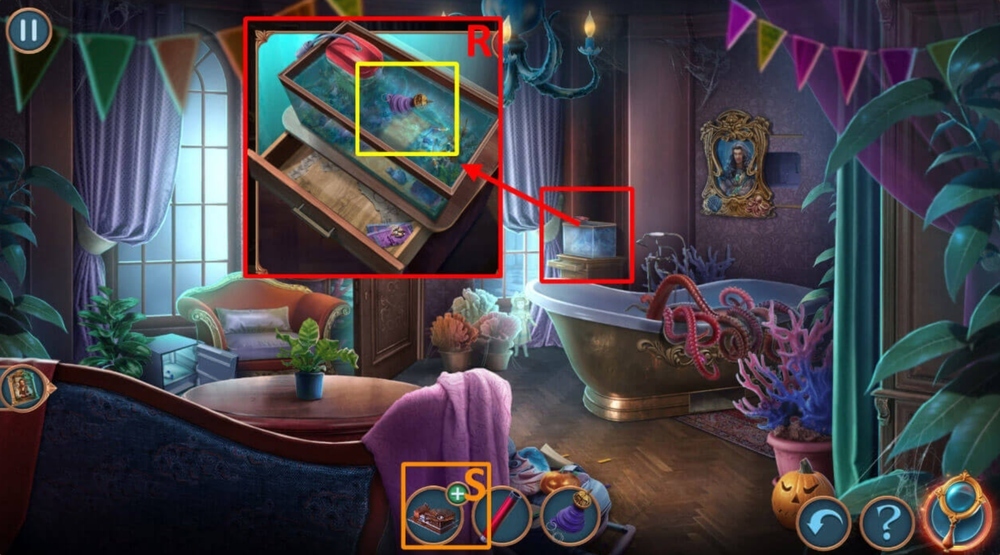
- Use BATTERIES and BOTTLE on the soap dispenser, earn SOAP (G).

- Use SOAP on the suitcase zipper, take LAPTOP CABLE, PAN HEAD LOCK, and COSTUME PHOTOS (H).
- Use PAN HEAD LOCK on DISASSEMBLED TRIPOD, earn TRIPOD (I).
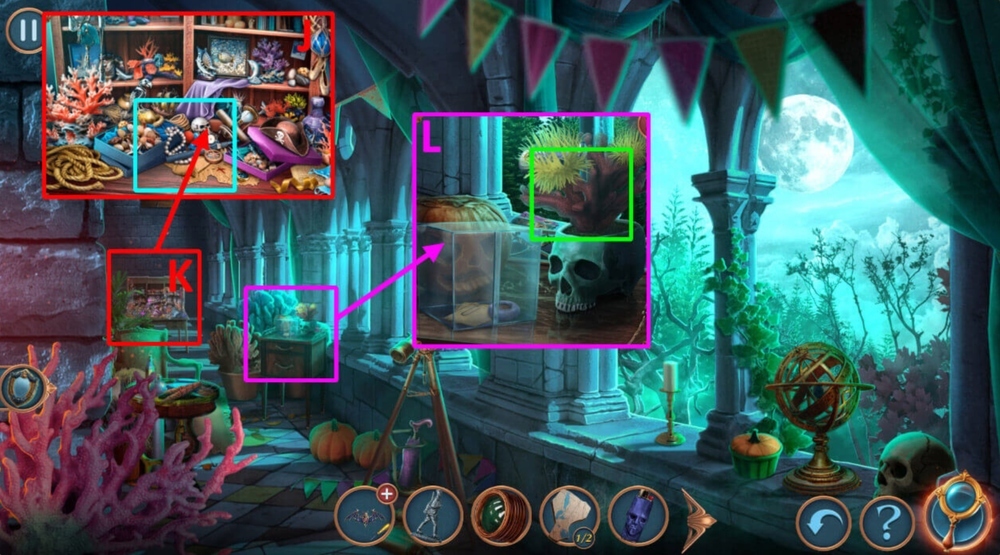
- Use COSTUME PHOTOS on the shelves, find the whole costume according to the hint, earn COSTUME (J).
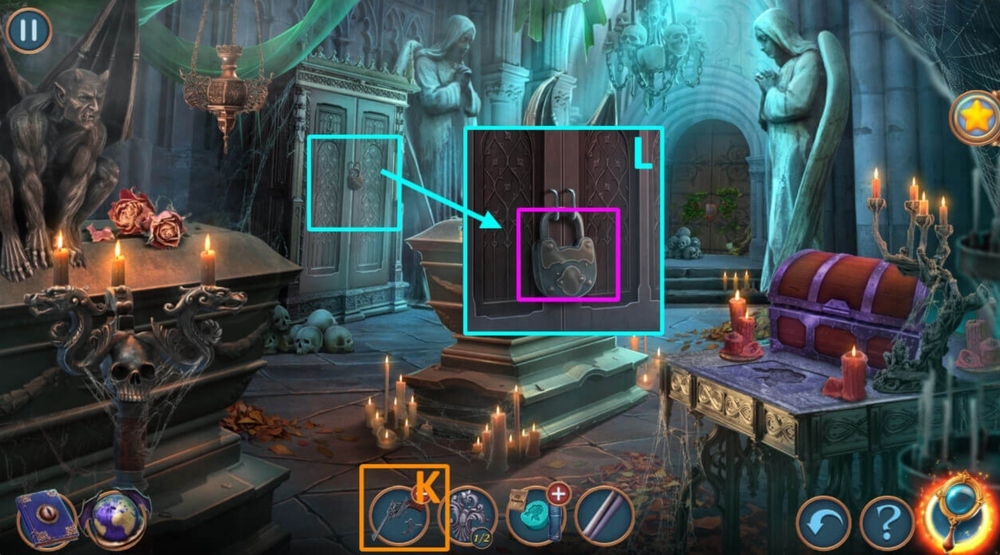
- Use COSTUME on the suitcase (K).

- Use LAPTOP CABLE on the laptop (L).
- Easy solution: Enter this sequence (Ax9-1)-(Bx5-4-4)-(Cx6-5-5-5).
- Move the fragments with the slider.
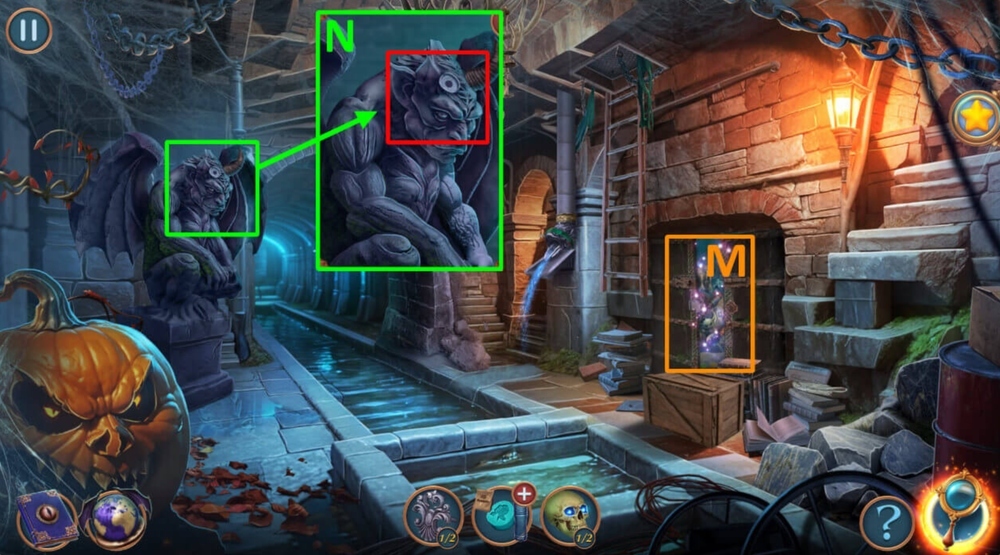
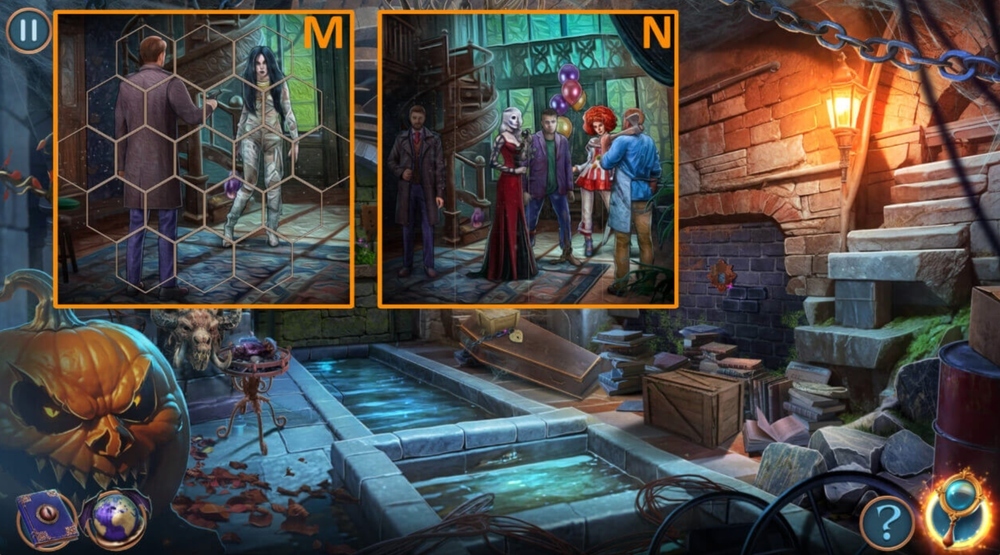
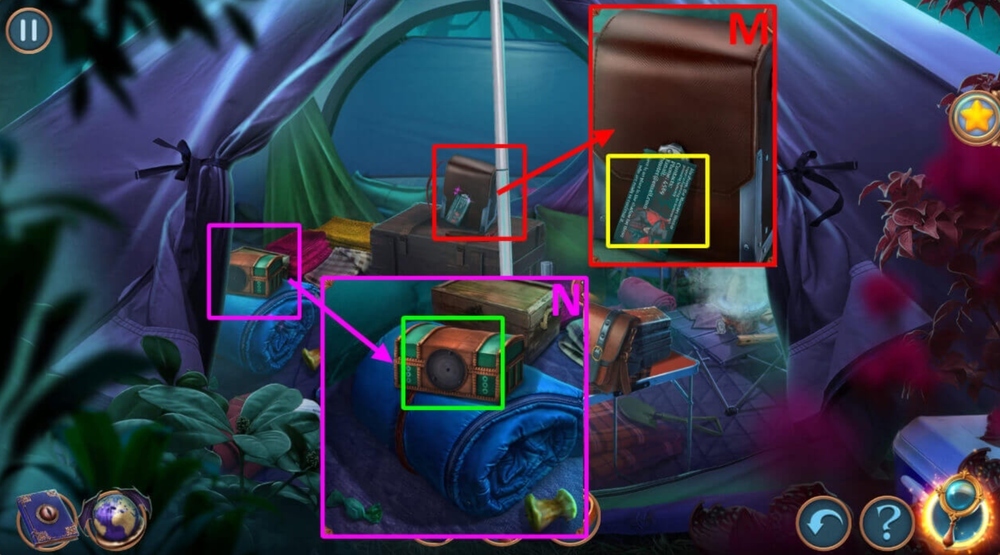
- Fragments will be highlighted in the correct position (M).
- Hard solution: Enter this sequence (Ax9-1)-(Bx5-4-4)-(Cx6-5-5-5)-(Dx5-8-8).
- Move the fragments with the slider.
- Fragments will be highlighted in the correct position (N).

- Click on the laptop to print the ticket, take PLANE TICKET (O).
- Use PLANE TICKET on the suitcase (P).

- Take BOLT (Q).
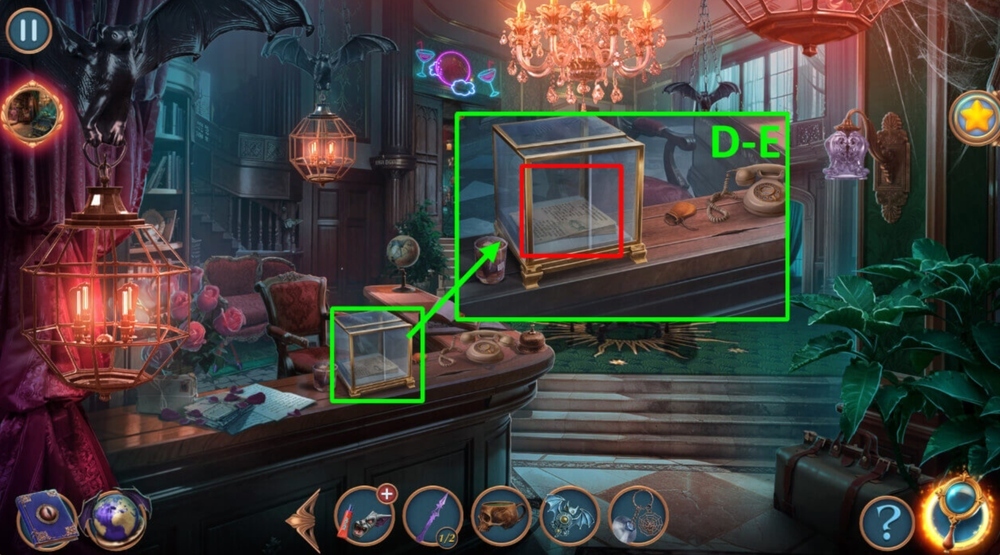
- Take and read the postcard, use DIVIDERS on the gap in the counter, earn CARDS 1/2 (R).
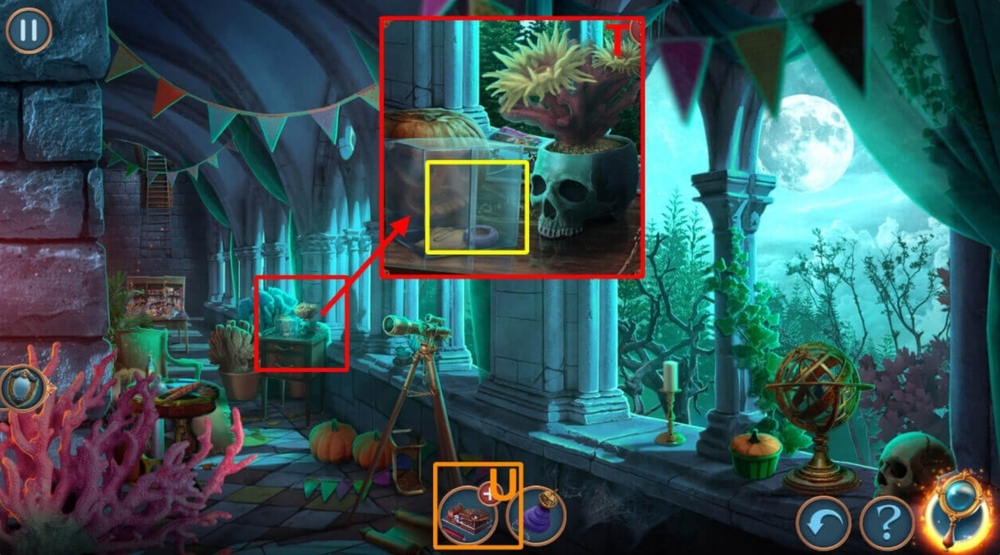
- Use TRIPOD on the sofa, take SKULL MUG, BONE, and CARDS 2/2 (S).

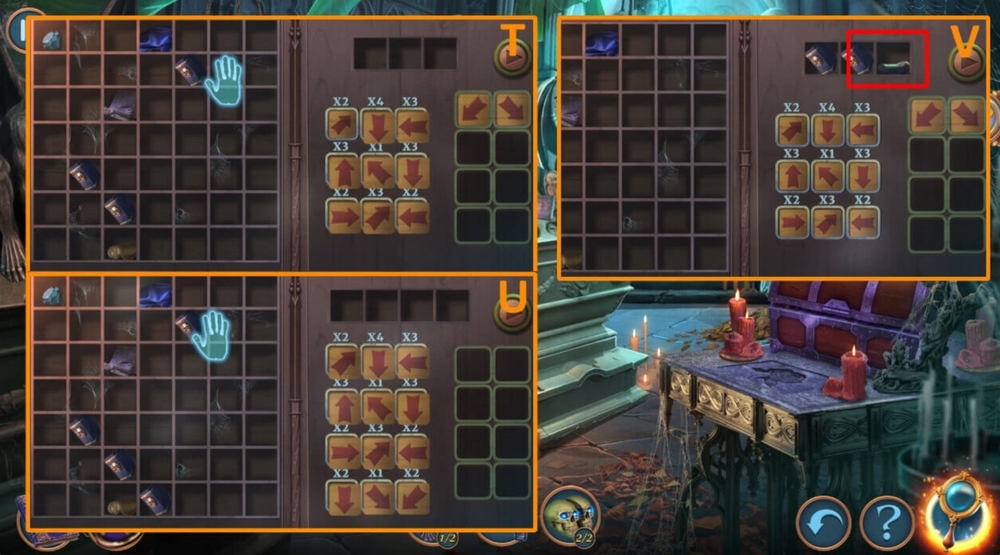
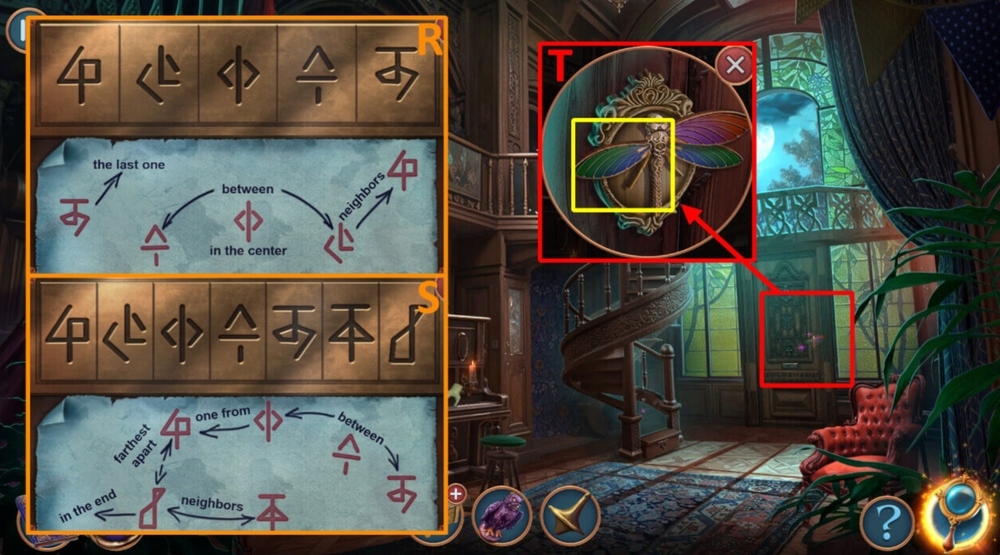
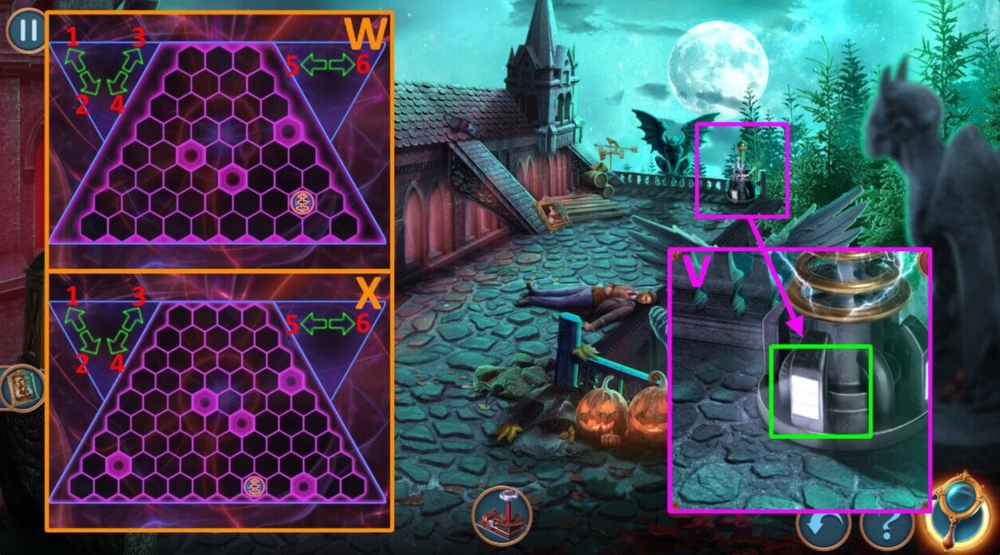
- Use CARDS 2/2 on the games’ table (T).
- Easy solution: Use the picture as a hint.
- Click on the play button (U).
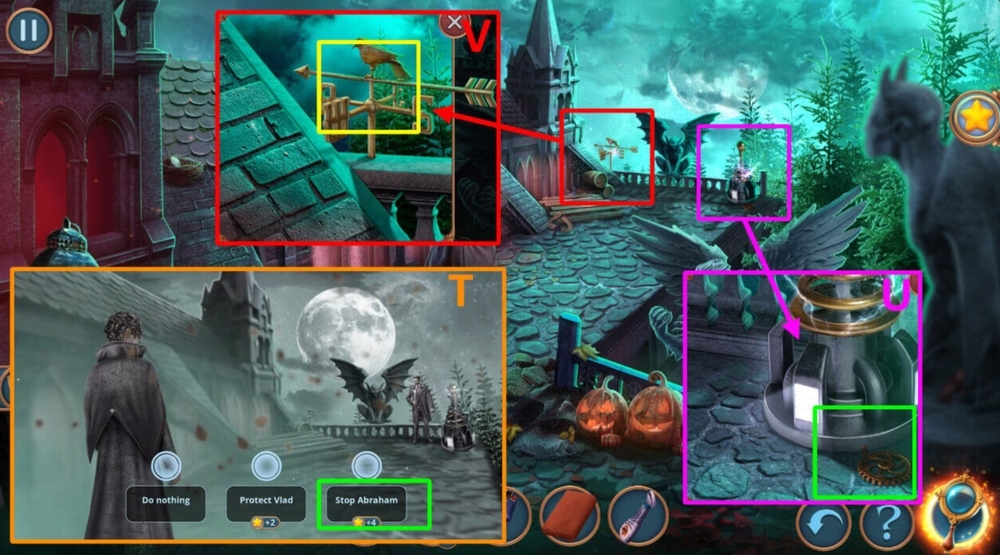
- Hard solution: Use the picture as a hint.
- Click on the play button (V).
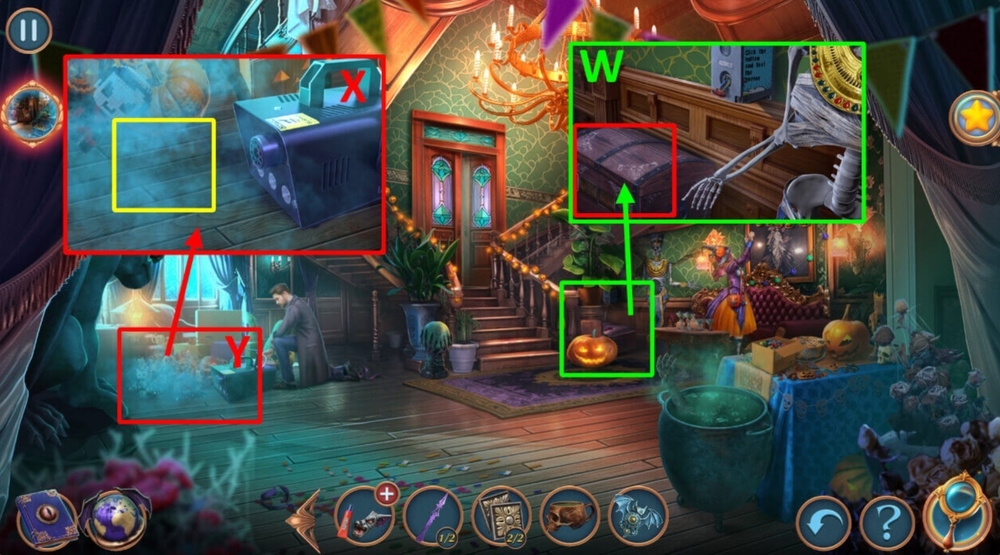
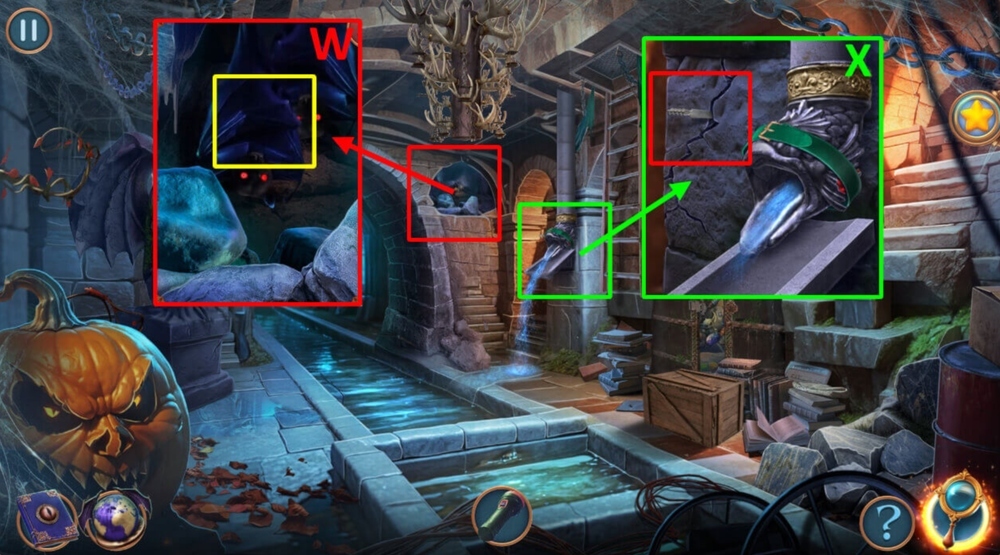
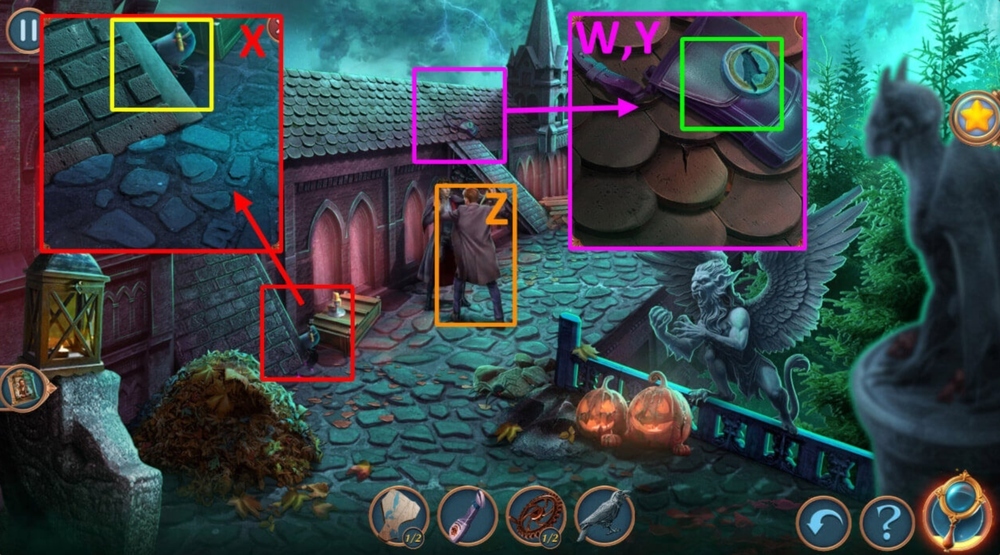
- Take BAR PASS (W).

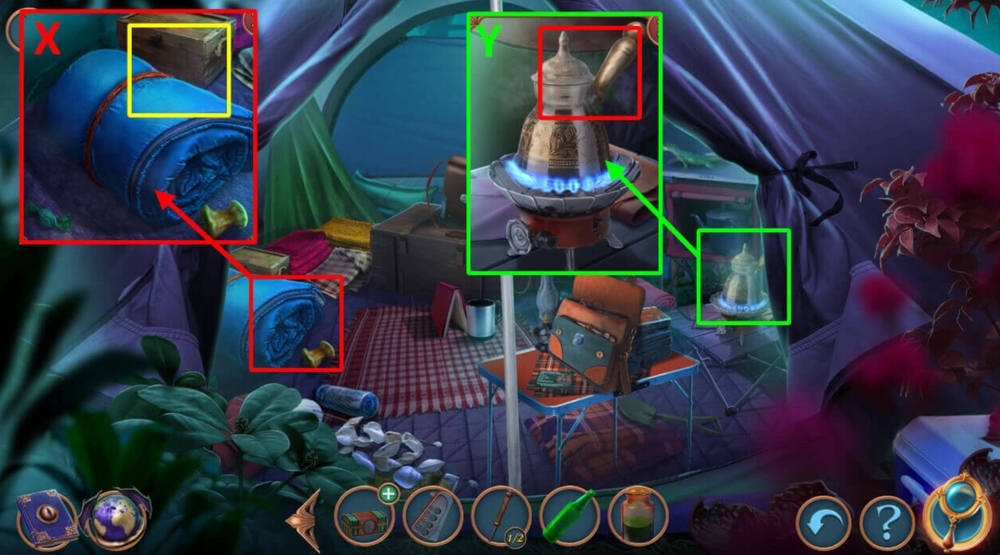
- Use BAR PASS on the skeleton’s hand (X).
- Solution: Assemble as shown in the picture (Y).
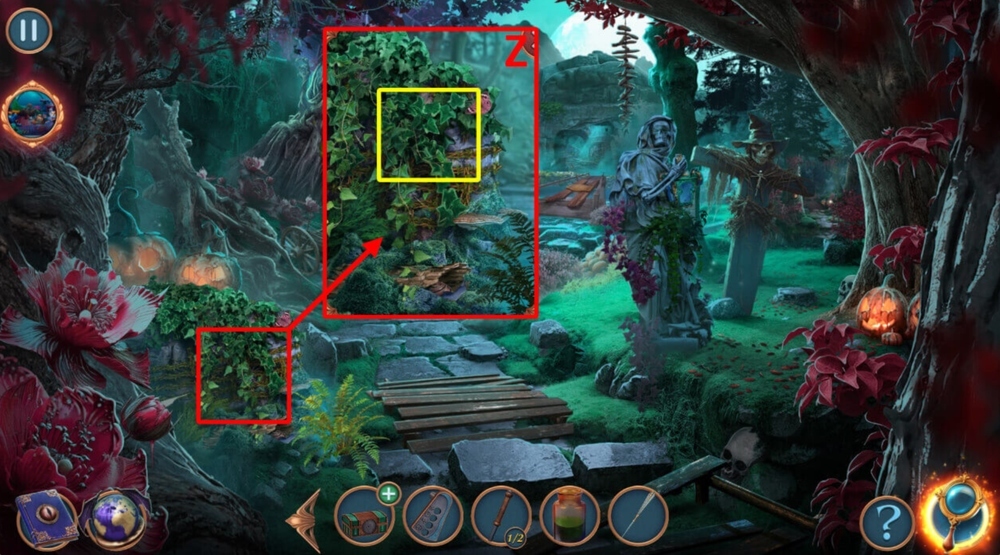
- Solution: Assemble as shown in the picture (Z).
- Go to Blood Moon Bar.

- Select this option (A).
- Take NAPKIN and COLD REGULATOR (B).
- Use COLD REGULATOR on the fridge (C).
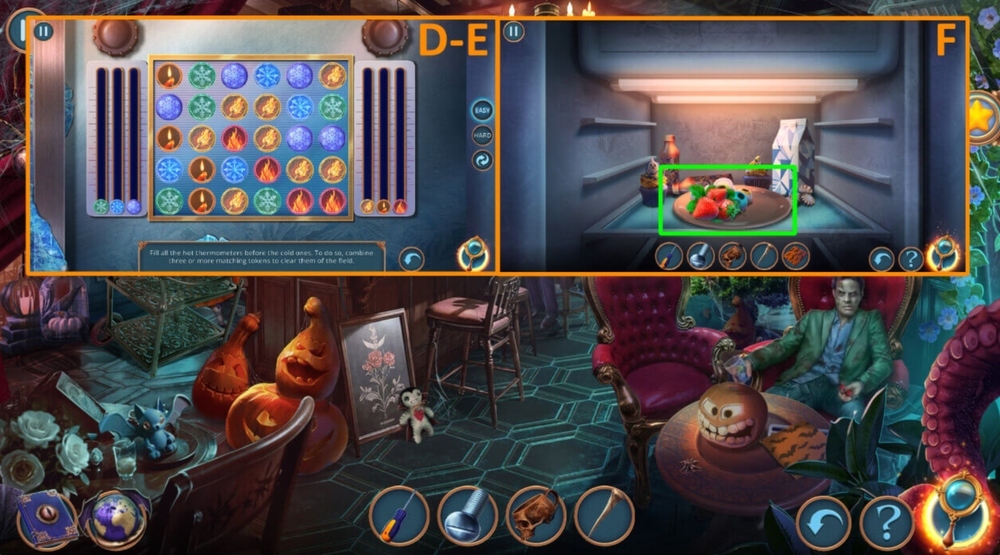
- Easy solution: Combine three or more matching tokens to clear them from the field (D).
- Hard solution: Combine three or more matching tokens to clear them from the field (E).
- Take STRAWBERRY and JELLY EYE (F).

- Use NAPKIN on the green stain, use STRAWBERRY on the cocktail glass (G).
- Use JELLY EYE on the skull, take BLADE, take and read the Halloween menu (H).
- Use BLADE on the prickly plant, take BROKEN MASK and WHEEL (I).
- Use SCREWDRIVER, BOLT, and WHEEL on the cart (J).
- Go to Ballroom.

- Select this option (K).
- Go to Museum.
- Take COLD SPRAY (L).
- Take CLOCK HANDS 1/2 and HEAVY FIGURINE (M).

- Use COLD SPRAY and HEAVY FIGURINE on the lock on the box, take PAINTING FRAGMENTS (N).
- Use PAINTING FRAGMENTS on the painting, take CUTTERS (O).
- Go back.

- Take ADHESIVE and TILES 1/2 (P).
- Use SKULL MUG on the boiling cauldron, earn POTION (Q).
- Use ADHESIVE on BROKEN MASK (R).
- Go back.

- Use CUTTERS on the chained axe, earn POLEAXE, use POTION on the green stain (S).
- Earn POTION, take TILES 2/2 (T).
- Go to Museum.

- Use POLEAXE on the weapons stand, take HANDLES (U).
- Use HANDLES on the drawers, take BAT AMULET (V).
- Go back.
- Use TILES on the chest, press on the tiles, take WITCH’S HAT (W).
- Use WITCH’S HAT on the smoke (X).
- Play HOP, earn PUMPKIN LANTERNS (Y).

- Use PUMPKIN LANTERNS on Annabelle (Z).
- Earn COIN.
- Go back.

- Use COIN on the jukebox (A).
- Solution: 3-A-2-A-1-1-A (B).
- Take SUCTION CUP (C).
- Go back.
- Use SUCTION CUP on the glass, take and read the newspaper, earn FRESH NEWSPAPER (D).
- Use BAT AMULET on the bat shape slot in the box, take CLOCK HANDS 2/2 (E).
- Go to Museum.

- Use CLOCK HANDS on the clock face (F).

- Easy solution: Bx3-C-Bx2-C-Bx3-C-Bx5-C-Ax2-C-Ax2 -C-Bx2-C-Bx3-C-Ax2-C-Bx2-C-B-C-B (G).
- Hard solution: Bx5-C-Bx7-C-Ax2-C-Ax2-C-B-C-B-C-Bx2-C-B-C-B-B-B (H).
- Remove the cloth, take a look at the portrait (I).
- Go to Hotel Hall.

- Use FRESH NEWSPAPER on the door, use BONE on the keyhole (J).
- Take the key and put it in the keyhole (K).
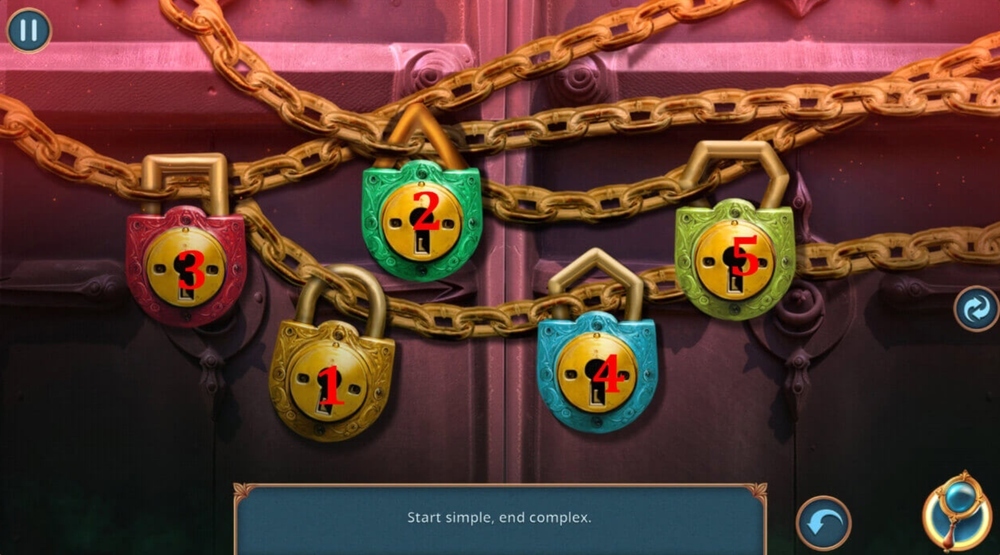
- Easy solution: 6-2-7-4-2-A-8-5 (L).
- Hard solution: 6-2-7-4-2-A-8-5-2-8 (M).
- Go to Vlad’s Study.

- Click on the moving carpet (N).
- Use POTION on the fire (O).
- Take RAVEN FEATHER, PYROTECHNICS, and MASK PART (P).
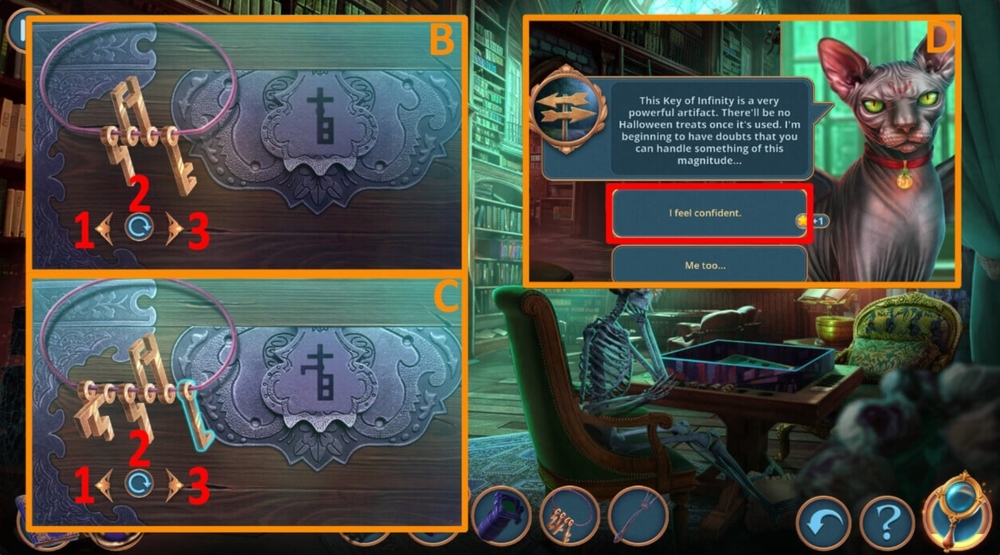
- Use RAVEN FEATHER on the safe (Q).

- Use MASK PART on BROKEN MASK, earn GARGOYLE MASK (R).
- Use GARGOYLE MASK on the wall (S).

- Easy solution: Use the picture as a hint (T).
- Hard solution: Use the picture as a hint (U).
- Take SCARF (V).

- Use SCARF on the fireplace, take VAMPIRE FANGS (W).
- Use VAMPIRE FANGS on the holes in the desk, take SODA and FIRST AID KIT (X).
- Go to Blood Moon Bar.

- Use SODA on the cocktail glass (Y).
- Go to Ballroom.

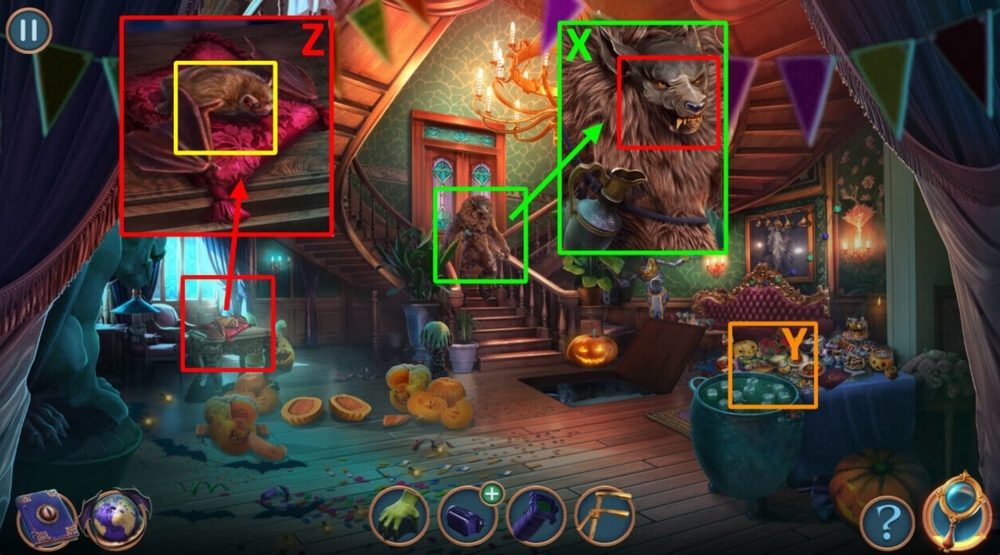
- Use FIRST AID KIT on Annabelle (Z).
- Select this option (A).
- Play HOP, earn LIGHTER (B).
- Use PYROTECHNICS and LIGHTER on the flying pumpkins, take HEART (C).
- Go to Vlad’s Study.

- Use HEART on the gargoyle, take TALC (D).
- Use TALC on the safe (E).
- Easy solution: Enter the code using the hint (F).
- Hard solution: Enter the code using the hint (G).
- Take PLASTIC BAG, GUM, and PHARAOH’S STUFF (H).
- Go to Ballroom.
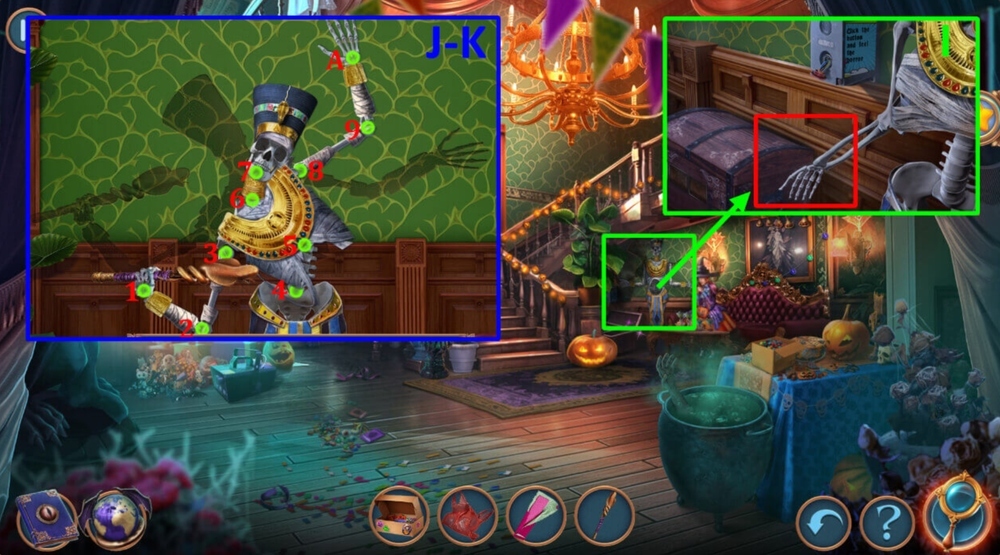
- Use GUM on the falling out button, use PHARAOH’S STUFF on the skeleton’s hand (I).
- Solution: 4×3-5×3-6×4-7×3-3×2-2×4-1×2-8×2-9×2-Ax2 (J).
- Earn MUMMY’S HAND (K).
- Go to Hotel Hall.

- Use MUMMY’S HAND to reach under the sofa, open the bag, take BELT, HOT PEPPER, and PEPPERMINT (L).
- Go to Blood Moon Bar.

- Use PEPPERMINT on the glass, click on the strawberry, peppermint, and soda, take ZOMBIE SHAKE (M).
- Use ZOMBIE SHAKE on the zombie, take BASEMENT KEY from the table (N).
- Go to Vlad’s Study.

- Use BASEMENT KEY on the trap door (O).
- Easy solution: 1) 1-2-3-4 down, 2) A left, 3) 6-8 up, 4) C left, 5) 7 down 2 up 6 down 1 up, 6) Left B (P).
- Hard solution: 1) 1-2-3-4 down, 2) А left, 3) 1-2-3-4 up, 4) 5-6-7-8 down, 5) Right B, 6) 5-6-7-8 up, 7) 9-10-11-12 down, 8) C left, 9) 9-10-11-12 up, 10) D right, (Q).
- Go to Tunnels.

- Select this option (R).
- Take OLD REVOLVER (S).
- Take TRIGGER and GYPSUM, use PLASTIC BAG and BELT on the hole in the pipe (T).

- Take LOCK PARTS 1/2 and HAIRPIN (U).
- Use TRIGGER on OLD REVOLVER (V).
- Use HAIRPIN on the door lock (W).

- Play HOP, earn MATCHBOX (X).
- Use PYROTECHNICS and MATCHBOX on the rubble (Y).
- Select this option (Z).

- Easy solution: 6-4-2-3 (A).
- Hard solution: 6-4-2-3 (B).
- Take CAST (C).
- Use GYPSUM on CAST (D).

- Click on the chest, use HOT PEPPER on the chest, earn WATER BOTTLE and PUZZLE HINT (E).
- Use WATER BOTTLE on CAST (F).

- Use PUZZLE HINT on the puzzle box (G).
- Easy solution: (4×3)-(3×3)-(4)-(1×3)-(2×4)-(1×4)-(4×2)-(1)-(4)-(1×2)-(2×3)-(3) -(4×3)-(1×2)-(3×3).
- (4)-(3×2)-(2×2)-(3×4)-(4×4)-(1) (H).
- Hard solution: (4)-(3)-(1)-(2)-(3)-(4)-(2)-(1)-(4)-(3)-(4)-(1)-(4)-(1)-(2)-(1)-(4) -(3)-(2)-(1)-(4)-(1).
- (4)-(3)-(4)-(1)-(2)-(1)-(2)-(1)-(2)-(1)- (4)-(3)-(4)-(3)-(2)-(3)-(2)-(3)-(4)-(1) (I).
- Take BULLET (J).
- Use BULLET on OLD REVOLVER, earn REVOLVER (K).
- Use REVOLVER on the pad lock, take SKULLS 1/2 (L).
- Go back.
- Play HOP, earn STATUE PART (M).
- Use STATUE PART on the gargoyle, take SKULLS 2/2 (N).
- Go to Underground Crypt.

- Use SKULLS on the round niches, solution: select paper, take FAN (O).
- Use FAN on CAST, earn ROSE AMULET (P).
- Use ROSE AMULET on the pedestal, take LOCK PARTS 2/2 and ANCIENT FOLIO (Q).

- Click on the hands, use LOCK PARTS on the lock on the door (R).
- Use ANCIENT FOLIO on the shelves (S).
- Easy solution: Place the arrows as shown in the picture.
- Click on the play button (T).
- Hard solution: Place the arrows as shown in the picture.
- Click on the play button (U).
- Take FLASHLIGHT (V).
- Go back.
- Use FLASHLIGHT on the bats, take CORK (W).
- Use CORK on the handless blade stuck in the wall, take CHISEL (X).
- Go to Underground Crypt.

- Use CHISEL on the moss, press on the symbols (Y).

- Solution: Move to the left room (1) and take the key for the door (2), Open the door by clicking on the locks in the sequence shown in the picture, Go forward, Move to the right room (3) and take the key for the door (4), Open the door by clicking on the locks in the sequence shown in the picture, Go forward.

- Move to the front room (5) and take the key for the door (6).
- Get out of the maze by solving the last riddle (the correct sequence is shown in the picture).

- Take HEAVY FIGURINE and KEY (A).
- Use HEAVY FIGURINE on the loose bricks (B).
- Take BOX and TILES 1/2, use KEY on the lock, take RAKE (C).

- Use RAKE on the moss, take EYE (D).
- Use EYE on the head, get HORN (E).
- Use HORN on the loose bricks, take BREASTPLATE PART (F).

- Use BREASTPLATE PART on the armor, press red, green, yellow, purple, blue, take CANDLESTICK (G).
- Use CANDLESTICK on the mount, take LIGHTER (H).

- Use LIGHTER on the coals, take SPINNING TOP and TILES 2/2 (I).
- Use TILES on the plate (J).

- Easy solution: Place fragments as shown in the picture (K).
- Hard solution: Place fragments as shown in the picture (L).
- Go forward.
- Solution: Assemble as shown in the picture (M).
- Solution: Assemble as shown in the picture (N).

- Take STEPS and CODE (O).
- Use HEAVY FIGURINE, STEPS on the stairs (P).
- Use CODE on the case (Q).
- Easy solution: Follow the instructions in the image (R).
- Hard solution: Follow the instructions in the image (S).
- Take INSECT’S WING.
- Use INSECT’S WING on the door (T).

- Easy solution: Follow the instructions in the image (U).
- Hard solution: Follow the instructions in the image (V).
- Go forward.

- Click on the pumpkin, take NUMERALS 1/3 and MENU (W).
- Use MENU on the table (X).
- Play HOP, earn CHOPSTICKS (Y).

- Use CHOPSTICKS on the jar, get BASEMENT KEY (Z).
- Use BASEMENT KEY on the hatch (A).
- Select this option (B).
- Take HAND and KEYS (C).
- Go back.

- Use KEYS on the piano (D).
- Easy solution: 4-7-2-3-5-1-8-6 (E).
- Hard solution: 5-6-2-10-4-9-8-7-1-3 (F).
- Take ANTI-STAPLER.
- Use ANTI-STAPLER on BOX, move stuff away, take WATER and SWORD (G).
- Go to Ballroom.
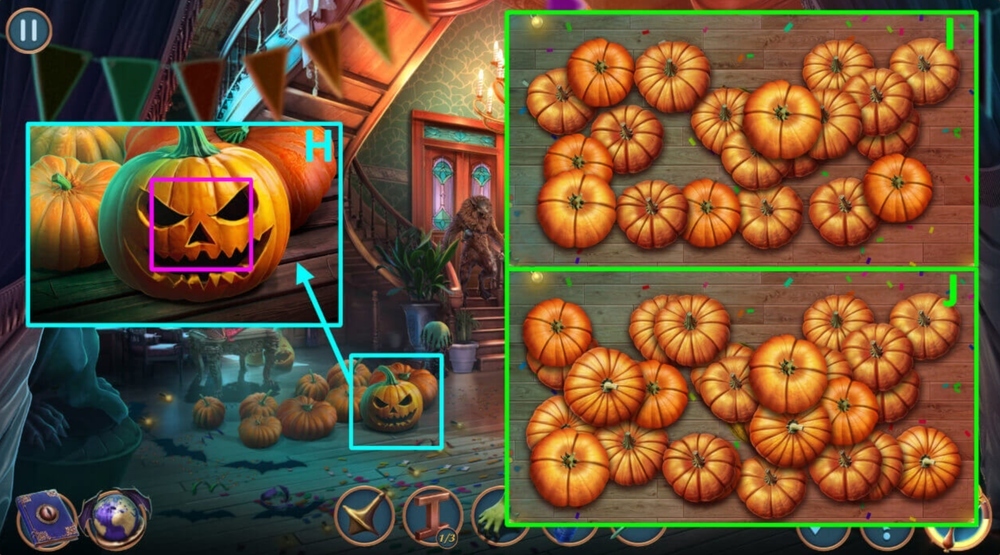
- Use SWORD on the pumpkin (H).
- Easy solution: Move 10 pairs of pumpkins (I).
- Hard solution: Move 14 pairs of pumpkins (J).
- Take NEEDLE and NAILS.
- Go back.

- Use NAILS on the stairs (K).
- Use NEEDLE on the toy (L).
- Go to Library.

- Talk to the cat, select this option (M).

- Take CAMERA and NUMERALS 2/3 (N).
- Use SPINNING TOP on the ladder, take NUMERALS 3/3 (O).
- Use NUMERALS on the books (P).
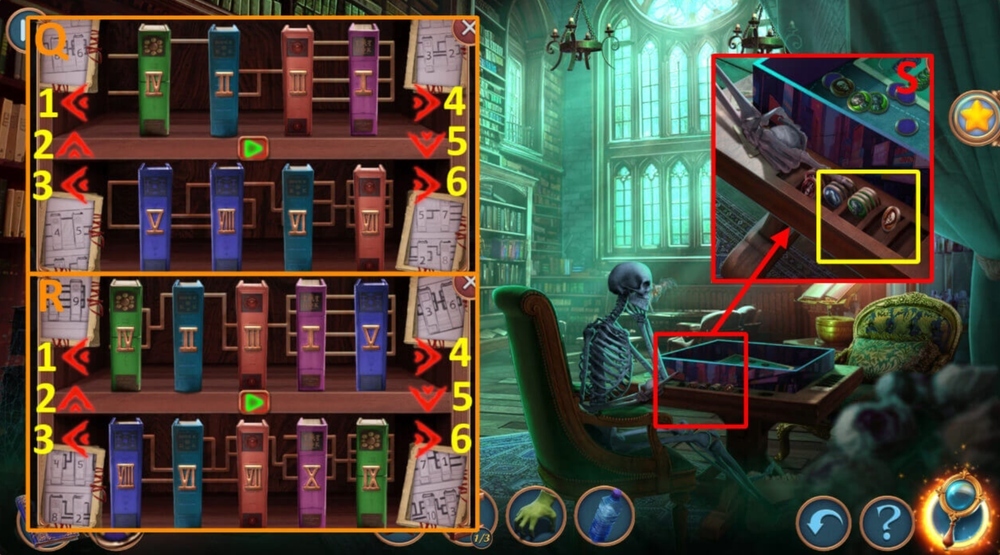
- Easy solution: 4-5-4-3-5-4-4-6-6.
- Click on the play button (Q).
- Hard solution: 5-6-1-2-3-3-3-1-2-4-4-6-2-3-3-2-6-6-2-5-6-5-3-5-6-6.
- Click on the play button (R).
- Read the book, take NIGHT VISION LENS and PLAYING CHIPS.
- Use PLAYING CHIPS on the table (S).

- Solution: Follow the instructions (T).
- Take SPIDER THREADS.
- Go back.

- Use SPIDER THREADS on the toy, take BRUSH (U).
- Go to Library.

- Use WATER and BRUSH on the knight, take KNIGHT (V).
- Use KNIGHT on the cupboard, take RIB SPREADER (W).
- Go to Ballroom.
- Use RIB SPREADER on the werewolf, take KEYCHAIN (X).
- Play HOP, earn CUPCAKE (Y).
- Use CUPCAKE on the bat, take BENT FORK (Z).
- Go to Library.

- Use BENT FORK on the wooden panel, use KEYCHAIN on the box (A).
- Easy solution: 2×2-3-2×2-3-2-3-2×2 (B).
- Hard solution: 2×2-3-2×2-3-2×2-3-2×2-3-2-3-2×2 (C).
- Read the note.
- Select this option (D).

- Take EMPTY VIAL (E).
- Take SLINGSHOT, move the bush (F).
- Use HAND on the tree, take WEED CONTROL and BATTERY (G).
- Use NIGHT VISION LENS and BATTERY on CAMERA, get CAMERA (H).
- Use CAMERA on the trail (I).

- Play HOP, earn SIGN (J).
- Use SIGN on the bridge (K).
- Go forward.
- Select this option (L).
- Go forward.
- Read and take ABRAHAM’S CARD (M).
- Take BOX (N).

- Use ABRAHAM’S CARD on the bag’s lock, enter 4589, read the note, take HINT and LID (O).
- Use LID on the fog, take CLOTHESPIN (P).
- Go back.

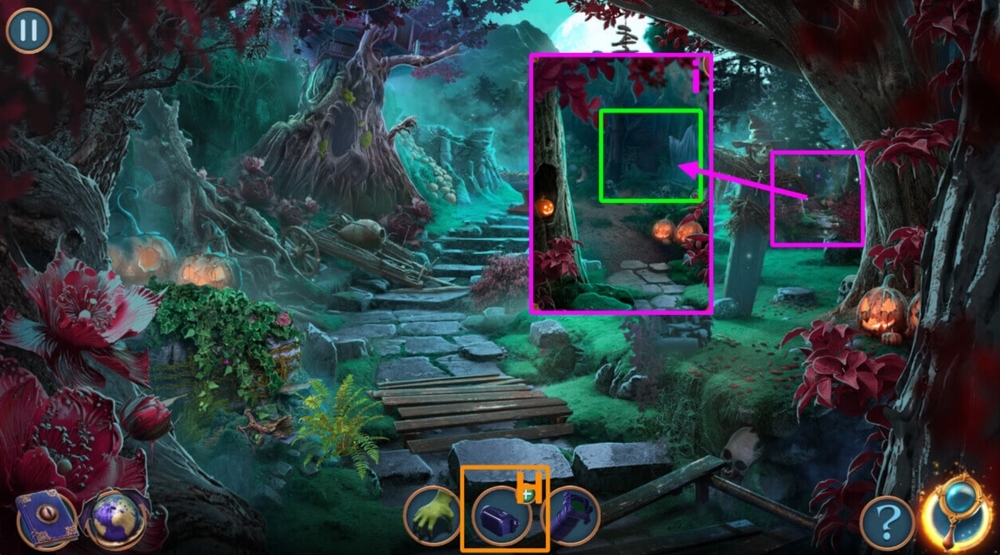
- Take DREAMCATCHERS 1/2 (Q).
- Take DREAMCATCHERS 2/2 (R).
- Use DREAMCATCHERS on the branch (S).

- Easy solution: A-B-B-C-C-D-E-E (T).
- Hard solution: B-B-C-D-D-E-G-A-C-E-F (U).
- Take ROPE AND HOOK.
- Go back.

- Use ROPE AND HOOK on the branch, use CLOTHESPIN on the broken key, take BOTTLE, LEVERS 1/2, and VINEGAR (V).
- Use WEED CONTROL and VINEGAR on EMPTY VIAL, get MAKESHIFT WEED CONTROL (W).
- Go to Abraham’s Tent.
- Use BOTTLE on the sleeping bag, take GLOVE (X).
- Use GLOVE on the cezve, take KNITTING NEEDLE (Y).
- Go to Mountain Path.
- Use MAKESHIFT WEED CONTROL on the bush (Z).

- Easy solution: 1) 1-2×2-4×2-6×2-D, 2) 1-3-4×2-5-6-E, 3) 1-3-4×2-5-6-A, 4) 1-3-4×2-5-6-B, 5) 1-3-4×2-5-6-C (A).
- Hard solution: 1 )1-2×2-4×3-5×3-6×2-D, 2) 1-3-4×2-5×3-6×4-E, 3) 1-3-4×2-5×3-6×4-A, 4) 1-3-4×2-5×3-6×4-B, 5) 1-3-4×2-5×3-6×4-C (B).
- Take GEARS 1/2 and HANDLE.
- Go to Mountain Cave.
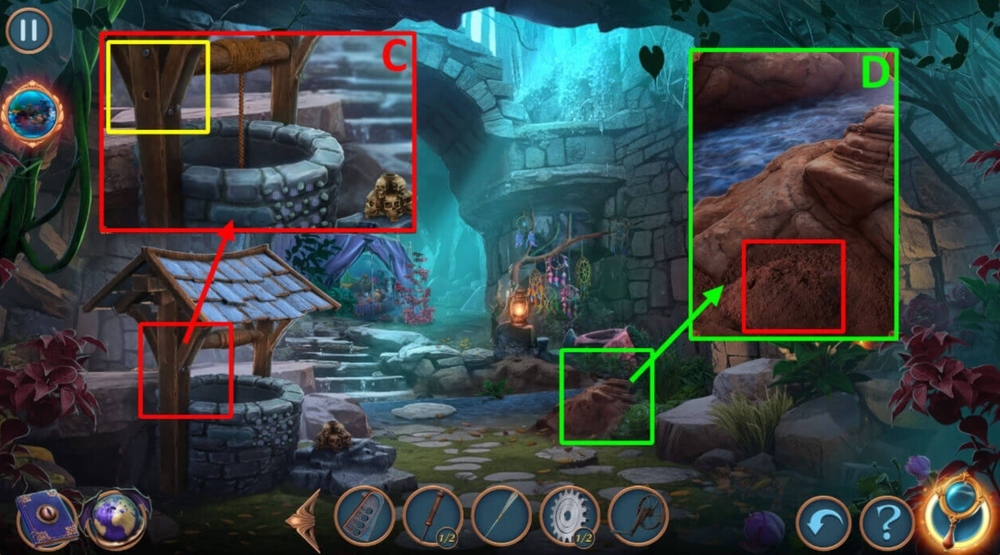
- Use HANDLE on the well post, take PUMPKIN BOMB and SCOOP (C).
- Use SCOOP on the dirt, open the chest, click on the contents, take BATTERY and STRONG SPIRIT, use KNITTING NEEDLE on the bottom, take SKULL KEY (D).
- Go to Abraham’s Tent.

- Use SKULL KEY on the bag, take MECHANISM PART (E).
- Use HINT and MECHANISM PART on BOX (F).

- Easy solution: Follow the instructions (G).
- Hard solution: Follow the instructions (H).

- Take the book, open it, play HOP (I).
- Use SLINGSHOT and STRONG SPIRITS on PUMPKIN BOMB, get PUMPKIN BOMB (J).
- Go back.
- Use PUMPKIN BOMB on the wall (K).
- Go forward.
- Select this option (L).
- Take BRUSH, use BATTERY on the fountain (M).
- Use BRUSH on the shards, take TILES, read the note (N).
- Use TILES on the puzzle (O).

- Easy solution: Follow the instructions on the image (P).
- Hard solution: Follow the instructions on the image (Q).
- Take MAGNET.
- Examine the drawer, use MAGNET on the gap, take SCREWDRIVER (R).
- Go to Mountain Path.

- Use SCREWDRIVER on the box, take HOSE (S).
- Play HOP, earn BROOCH (T).
- Use BROOCH on the statue, take GEARS 2/2 (U).
- Go to Secret Alcove.

- Use GEARS on the mechanism inside the desk, take PUMP (V).
- Use the Hose and Pump on the fountain, take CODE (W).
- Go back.

- Use CODE on the skulls (X).
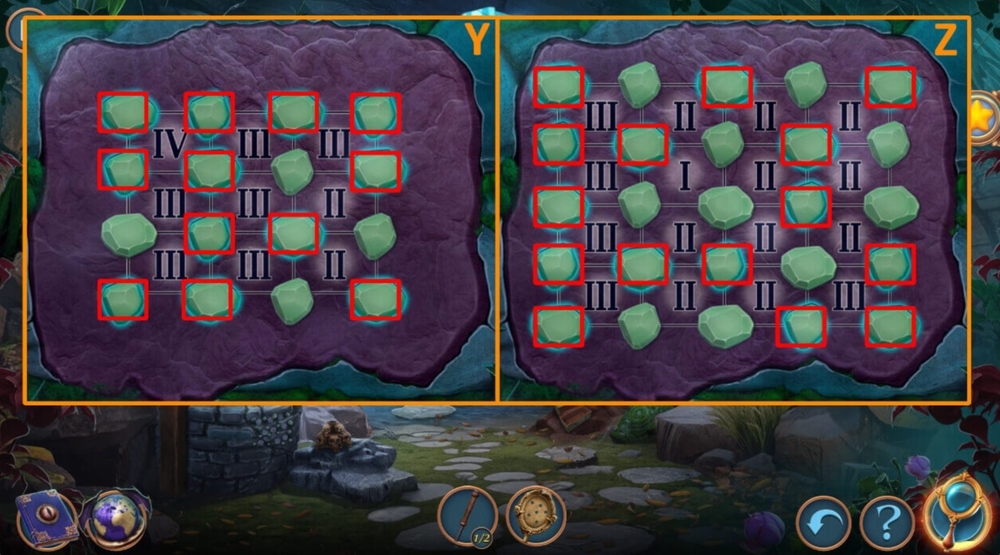
- Easy solution: Click on the highlighted stones (Y).
- Hard solution: Click on the highlighted stones (Z).
- Take LEVERS 2/2.
- Go to Secret Alcove.
- Use LEVERS on the wall, take MUSKET (A).

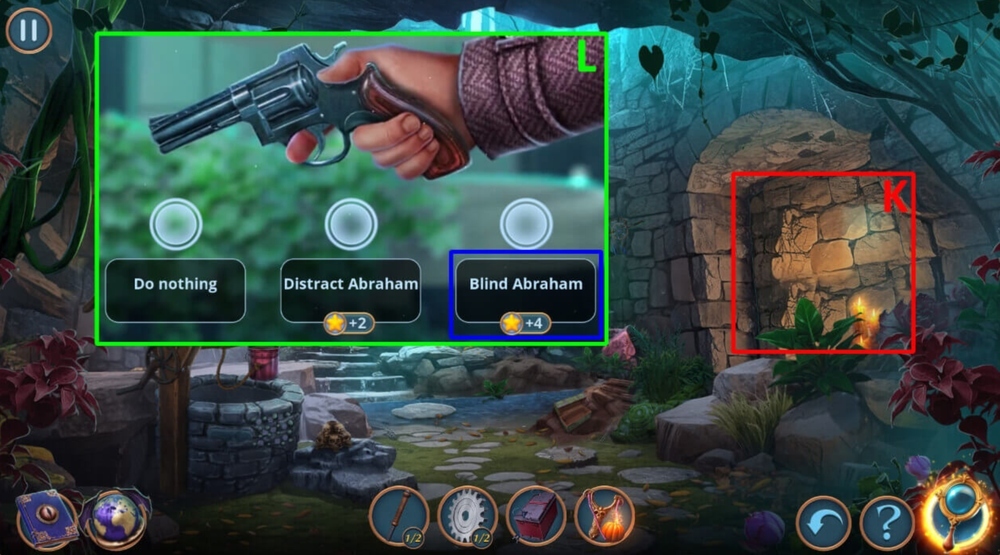
- Use MUSKET on the person (B).

- Solution: Follow the instructions in the images (C-E).

- Open the bag and take BENGAL FIRE, SELFIE STICK, VINYL RECORD, and BELT (A).
- Use BELT on the broken window, take LADLE, SHOE, and COMB (B).
- Use COMB on nails, take NAILS (C).
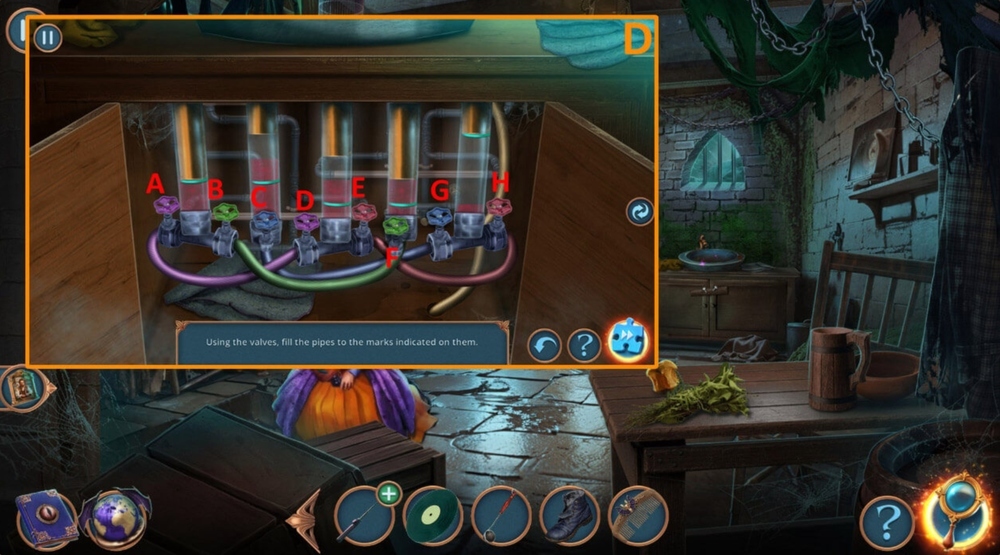
- Solution: E-C-G-H-A-F-E-C-H-B-D-C-G-E-A-F-E-H-C-B-D-A-F-B-D-G-E-A-F-A-B-D-C (D).

- Earn SCRUNCHIE (E).
- Use LADLE and SCRUNCHIE on SELFIE STICK, earn IMPROVISED GRABBER (F).
- Use IMPROVISED GRABBER on the hole in the wall, take HACKSAW (G).
- Use HACKSAW on the bars of a cell door (H).
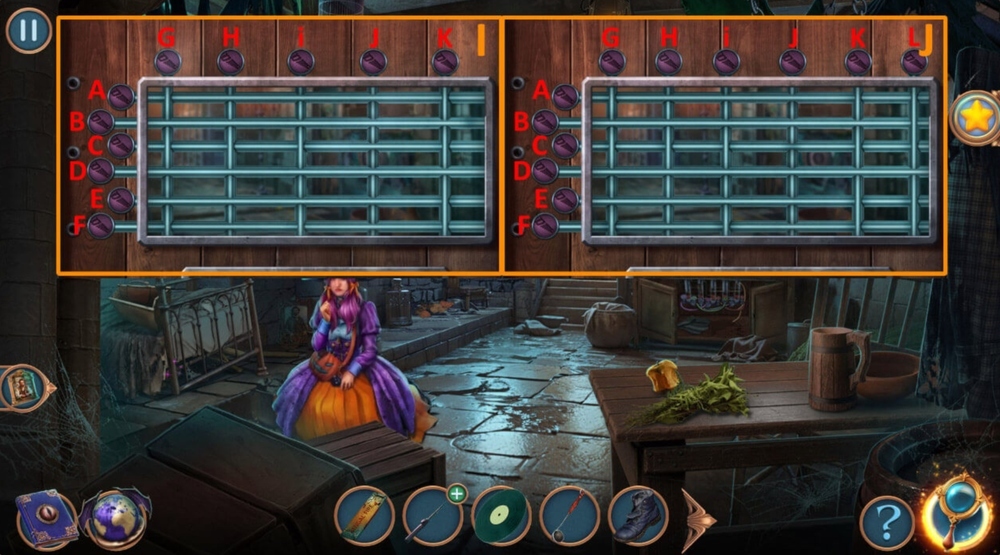
- Easy solution: J-C-H-F-i-A-G-E-K-B-D (I).
- Hard solution: J-C-H-F-i-A-G-E-K-B-L-D (J).
- Go forward.

- Use SHOE on the stone block (K).
- Use BENGAL FIRE on the candlestick, take VILE OF BLOOD (L).
- Take CLOSED MYSTERY AMULET (M).

- Use VILE OF BLOOD on CLOSED MYSTERY AMULET, click on each of the 4 gems to open the amulet, earn MYSTERY AMULET (N).
- Use MYSTERY AMULET on the hole in the mural (O).

- Easy solution: Place 2 and 6, press R, place 1, press Rx2, place 3, press R, place 7, 4, 8, press R, place 5 (P).
- Hard solution: Place 2, press R, place 4 and 7, press R, place 3, 6, 8, press R, place 10, press R, place 1, press R, place 9, press Rx2, place 5 (Q).
- Take and read the note, take GORGON HEAD IN GLASSES and PAINTED HEADSCARF (R).

- Use PAINTED HEADSCARF on the gas pipe (S).
- Click on the door, click on Vlad (T).
- Solution: Assemble as shown in the picture (U).
- Solution: Assemble as shown in the picture (V).
- Solution: Assemble as shown in the picture (W).
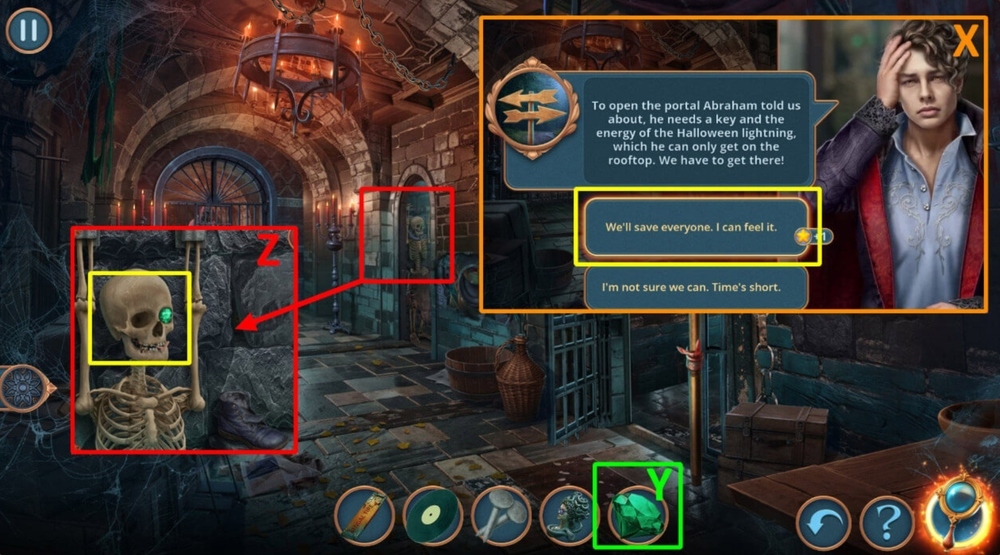
- Select this option (X).
- Earn GEM (Y).
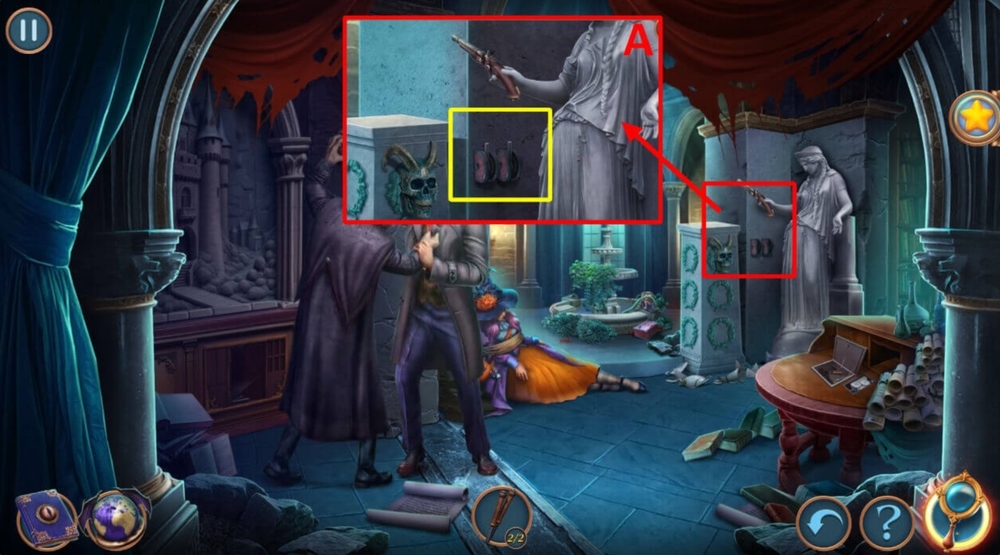
- Use GEM on the skeleton, take KEY (Z).
- Go back.

- Use KEY on the backpack on the floor, take ASPEN STAKE (A).
- Go forward.

- Use ASPEN STAKE on the stone block, take WRENCH (B).
- Use WRENCH on the candlestick, earn CANDLESTICK (C).
- Go back.

- Use CANDLESTICK on the bed frame, take SIGNET RING (D).
- Go forward.

- Use SIGNET RING on the door lock, use GORGON HEAD IN GLASSES on on the stone knight (E).
- Solution: Follow the instructions on the image (F).
- Select this option (G).
- Take LOCK PARTS 1/2, STUFFED SCARY BUNNY, and CLAMP WITH NEEDLE (H).
- Use VINYL RECORD and CLAMP WITH NEEDLE on the turntable, take HARP TUNING KEY and LOCK PARTS 2/2 (I).
- Use LOCK PARTS 2/2 on the lock (J).

- Play HOP, earn THERMOS WITH TEA (K).
- Use THERMOS WITH TEA on the electronic lock (L).
- Go forward.

- Click on the carpet (M).
- Take and read the note (N).
- Take DISABLED DEFIBRILLATOR, use HARP TUNING KEY on the harp (O).
- Easy solution: (1-4)-(3-4)-(5-4) press A (P).
- Hard solution: (2-3)-(7-5)-(4-6) press B (Q).
- Take KNIFE (R).

- Use SHOE and NAILS on the floor (S).
- Use KNIFE on STUFFED SCARY BUNNY, click on the fur, take DEFIBRILLATOR PADS 1/2 and FORK (T).
- Use FORK on the suitcase (U).

- Easy solution: The correct position is shown in the picture (V).
- Hard solution: The correct position is shown in the picture (W).
- Take PAINTING PARTS 1/2 and CELLAR HANDLE (X).

- Use CELLAR HANDLE on the cellar hatch, take BROKEN BAT FIGURINE and DEFIBRILLATOR PADS 2/2 (Y).
- Use DEFIBRILLATOR PADS 2/2 on DISABLED DEFIBRILLATOR (Z).
- Go back.

- Play HOP, earn DEFIBRILLATOR BUTTON (A).
- Use DEFIBRILLATOR BUTTON on DISABLED DEFIBRILLATOR, earn DEFIBRILLATOR (B).
- Go forward.
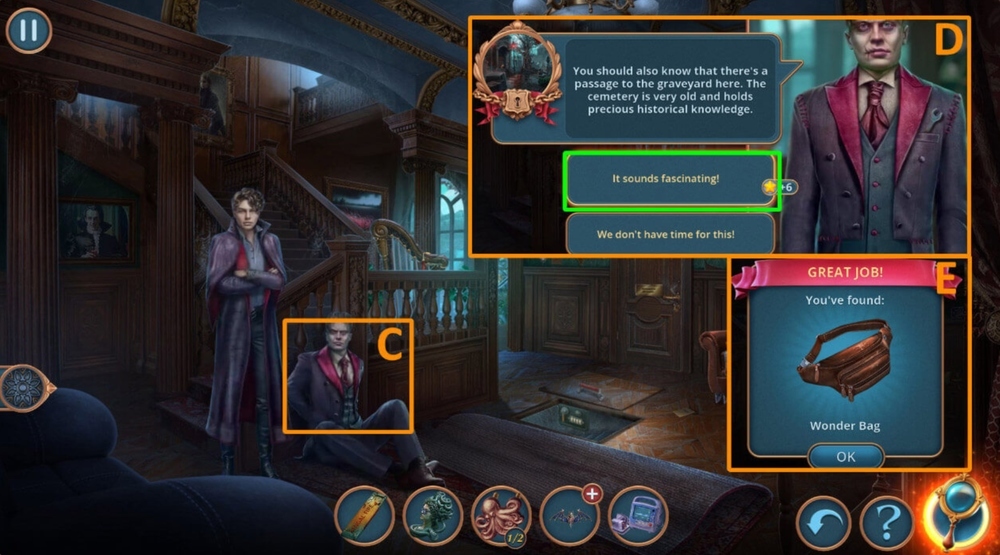
- Use DEFIBRILLATOR on Igor (C).
- Select this option (D).
- Earn WONDER BAG (E).
- Go forward.

- Take HAND FAN and HOSE (F).
- Open WONDER BAG, take SCREWDRIVER and FLASHLIGHT (G).
- Use GORGON HEAD IN GLASSES on the statue, take CUP (H).

- Use CUP on the pile of dirt, take HANGER (I).
- Use SCREWDRIVER on BROKEN BAT FIGURINE (J).
- Use HOSE and HANGER on the rope ladder, take SKELETON HAND (K).
- Use SKELETON HAND on the tomb door, click on each hand, take PIRATE HOOK, use HAND FAN on the chest (L).
- Go back.

- Use FLASHLIGHT on the spiders, use BENGAL FIRE on the lock (M).
- Go to Hotel Room.

- Take BULLET, MATCHES, and TEMP SENSOR (N).
- Use MATCHES on the lock (O).
- Use TEMP SENSOR on the fridge (P).
- Easy solution: Place the stones as shown in the image (Q).
- Hard solution: 1-2-3-4-5-6-1-2-3-4 (R).
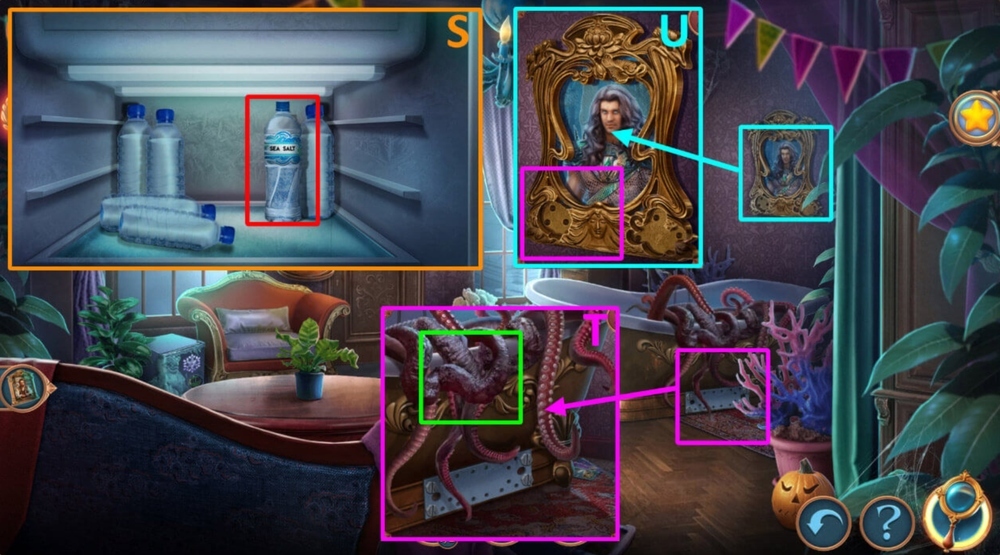
- Take BOTTLE OF SEAWATER (S).
- Use BOTTLE OF SEAWATER on the tentacles, take PAINTING PARTS 2/2 (T).
- Use PAINTING PARTS 2/2 on the painting, take PAPER WICK and MONSTER PORTRAIT, use PIRATE HOOK on the star, take STAR (U).
- Go to the Cemetery.

- Use STAR on the coffin, take CANDIES (V).
- Use CANDIES on the raccoon, take AXE SHAFT (W).
- Go to the Hallway.

- Use MONSTER PORTRAIT on the wall (X).
- Easy solution: 4-2-7-8-1-6-5-3 (Y).
- Hard solution: 6-10-8-2-1-9-3-4-7-5 (Z).

- Take TIN SOLDIER, LENS, and NUTCRACKER (A).
- Use NUTCRACKER on BULLET, earn BULLET WITH GUNPOWDER (B).
- Go to Hotel Room.

- Use PAPER WICK and BULLET WITH GUNPOWDER on the lock (C).
- Go forward.

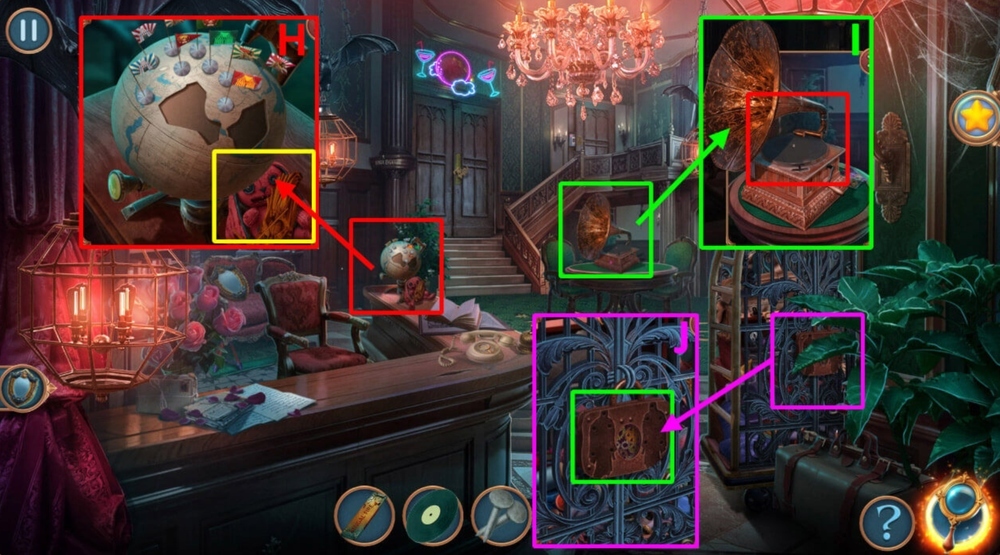
- Use AXE SHAFT on the axe blade, earn LITTLE AXE, take GLOBE PARTS 1/2, LIGHTER, WET CLAY, and SEA ENCYCLOPEDIA (D).
- Go to the Cemetery.

- Use LITTLE AXE on the tree branches, take MAGNET (E).
- Use a magnet on the chest (F).

- Easy solution: 1 lvl: 1×3-6-7-1-6-3.
- 2 lvl: 1-7-3-8-1×2.
- 3 lvl: 1×3-3×3-1-3 (G).
- Hard solution: 1 lvl: 1×3-8-5-1-8-3.
- 2 lvl: 1×3-3×2-5-1.
- 3 lvl: 1-1-1-3-3-3-1-3 (H).
- Take the book, play HOP (I).
- Go to the Balcony.
- Use SEA ENCYCLOPEDIA on the box of shells, open the book (J).
- Play HOP, earn SAND SHELL (K).
- Use SAND SHELL on the coral, take ANTI-RUST and INSTRUCTIONS (L).

- Use LENS on the telescope (M).
- Use INSTRUCTIONS on BROKEN BAT FIGURINE (N).
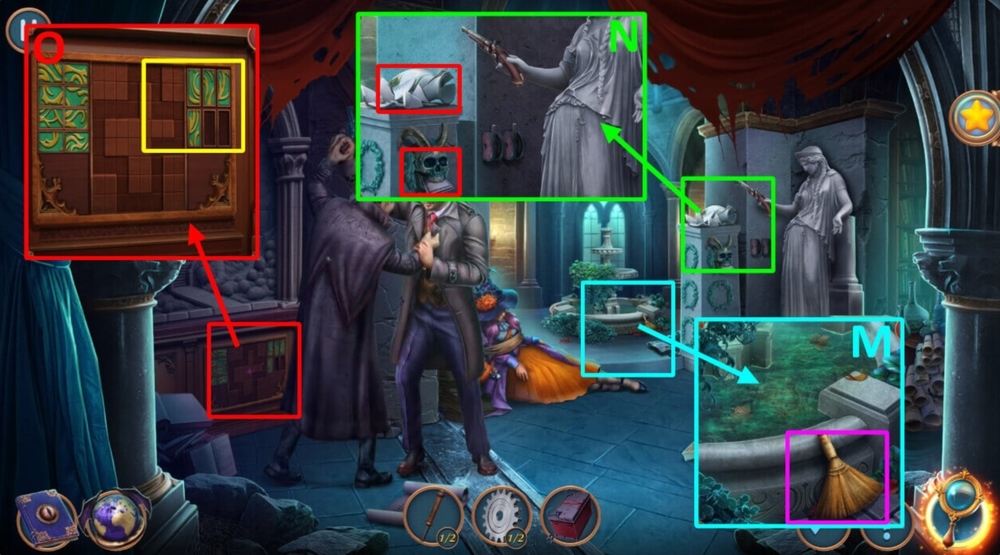
- Solution: Assemble as shown in the picture (O).

- Earn BAT FIGURINE (P).
- Use BAT FIGURINE on the umbrella, earn FOLDING UMBRELLA (R).
- Use FOLDING UMBRELLA on the ladder (S).
- Go forward.
- Select this option (T).
- Take GEAR 1/2 (U).
- Use WET CLAY on the bird on the weather vane, use TIN SOLDIER and LIGHTER on the clay with the bird print, take TIN RAVEN AMULET (V).
- Use TIN RAVEN AMULET on the bag, take FILTER TUBE and BUN (W).
- Use BUN on the pigeon, click on the small capsule and take ANTENNA (X).
- Use ANTENNA in the cracked tile, take DAGGER (Y).
- Use DAGGER on Abraham (Z).

- Easy solution: Connect all the lines as shown in the picture (A).
- Hard solution: Connect all the lines as shown in the picture (B).

- Read the messages from Annabelle (C).
- Select this option (D).
- Earn CODE (E).
- Go to the Hotel Room.

- Use FILTER TUBE on the fish tank (F).
- Go back.

- Use CODE on the safe, enter the code from the note by clicking on the numbers, take DISASSEMBLED TESLA COIL and GLOBE PARTS 2/2 (G).
- Go back.

- Use GLOBE PARTS 2/2 on the globe (H).
- Easy solution: Place all the flags as shown in the picture (I).
- Hard solution: Place all the flags as shown in the picture (J).
- Take GEAR 2/2 (K).
- Go to the Balcony.

- Play HOP, earn TELESCOPE HANDLE (L).
- Use GEAR 2/2 and TELESCOPE HANDLE on the telescope, take COIN (M).
- Go back.

- Use COIN on the screws, use ANTI-RUST on the coil, take SECOND COIL and AQUARIUM FILTER (N).
- Use AQUARIUM FILTER on the fish tank (O).

- Easy solution: (2)-(1×2)-(4-1-2)-(1×2)-(4×3)-(3-4)-(3×2)-(2)-(1×2)-(3-4)-(3×3)-(2)-(1×3)-(3-1)-(2×2).
- (3-2)-(1×2)-(3-4-1)-(3×2)-(4×2)-3(-4)-(1×2)-(3-2)-(2×3)-(3×2)-(4)-(1×3)-(3-4×2)-(3)-(2×2)-(3-2)-(1×3) (P).
- Hard solution: (4-1×2)-(2×4-4×3)-(3×3-2×2)-(1-4-3)-(4×2-1×2)-(2-3-4-3-2)-(1×3-2×3)-(1)-(2×2)-(3).
- (4×4-1×2)-(4×2-3×3)-(2-3)-(2×4)-(1-3)-(4×4)-(1-4)-(1×3-2×2)-(3×2)-(2-3-1-2-1)-(2×2)-(3-4)-(3×2-4×2).
- (1×2)-(2-1-2-3)-(4×3-1×2)-(4×2-3×2)-(2×4-4×3)-(3×3)-(4)-(1×3-2×3)-(3×2)-(4-2)-(1×2-4×3)-(3×3)-(2-1).
- (2×2)-(3-4)-(2)-(1×2)-(1-4)-(1×2-4×2)-(3×4-2×3)-(1×2)-(2-1)-(2×2)-(3)-(4×5)-(2)-(1×2-4×2)-(3×3)-(1).
- (2×3-3×2)-(2×2)-(1-3)-(4×2-1×2)-(2-1)-(2×2)-(3)-(4×5)-(2)-(1×2)-(4×2)-(3×2) (Q).
- Take SMALL PLUNGER (R).
- Use SECOND COIL on DISASSEMBLED TESLA COIL (S).
- Go forward.
- Use SMALL PLUNGER on the glass box, take COIL PART (T).
- Use COIL PART on DISASSEMBLED TESLA COIL, earn TESLA COIL (U).
- Go forward.
- Use TESLA COIL on the lightning rod (V).
- Easy solution: 4-6-1-4-5-3-6-2-4-6-4-5-3-6-2-5-4-6-4-5 (W).
- Hard solution: 5-3-6-4-2-3-2-4-6-2-5-1-5-2-4-1-4-5-1-3-6-4-6-1-5 (X).
- Walkthrough Bonus Chapter, at the link below.


