
Grim Tales 20: Trace in Time – Anna Grey once again faces mysteries that intertwine past and present. After a sudden cardiac arrest, Anna finds herself in intensive care where she receives a donor organ transplant. However, with the new heart comes to her strange memories associated with the life of its previous owner. These images do not let Anna go until she begins to unravel the chain of events. In an attempt to understand what caused her condition, Anna turns to the past of her father, Richard Gray, and her unique ability to alter the passage of time. Her research leads her to meet Jasper, a man who asks for help in saving his daughter, Aubrey, who has the gift of seeing danger. But the forces of evil hunting Anna and her new ally do their best to get in the way. You will have to find answers to many questions, from the mystery of the heart donor to the plans of the enigmatic Omen. If you can not pass any of the puzzles or do not know where the items are, on our site you can watch the walkthrough of the game Grim Tales 20: Trace in Time, and prevent new tragedies.
Grim Tales 20: Trace in Time – Walkthrough
Here you can see the full walkthrough of Grim Tales 20: Trace in Time game, namely for all chapters, including bonus chapter, in pictures.
- Receive LOCKED BAG.
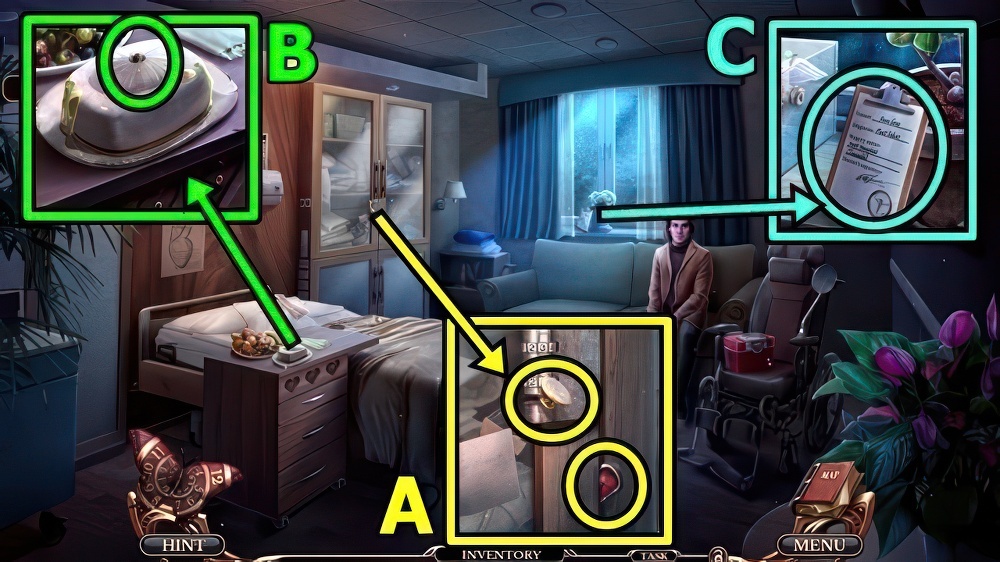
- Take DISH HANDLE (A) and HEART EMBLEM 1/3.
- Add DISH HANDLE (B), take BUTTER and SPOON.
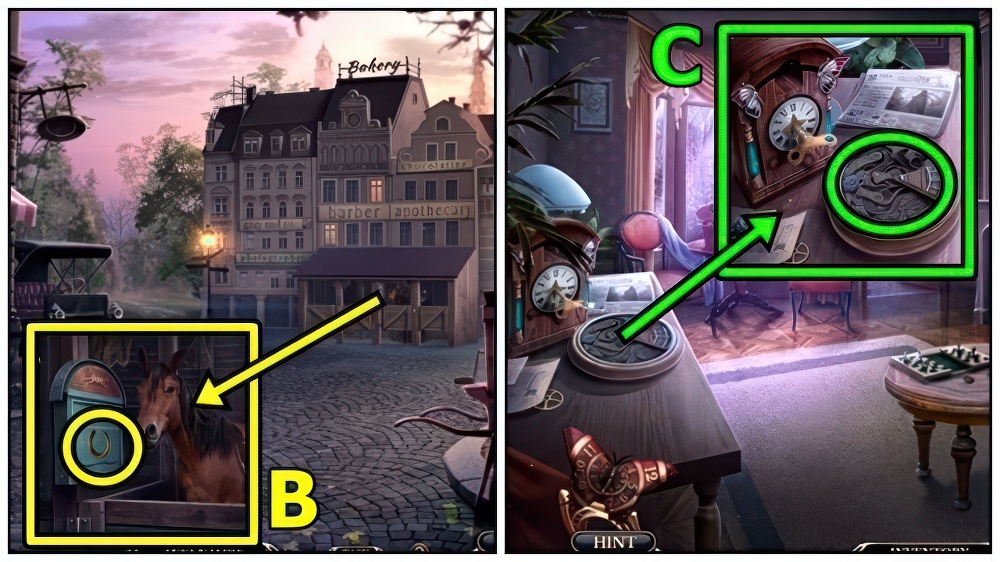
- Examine (C).

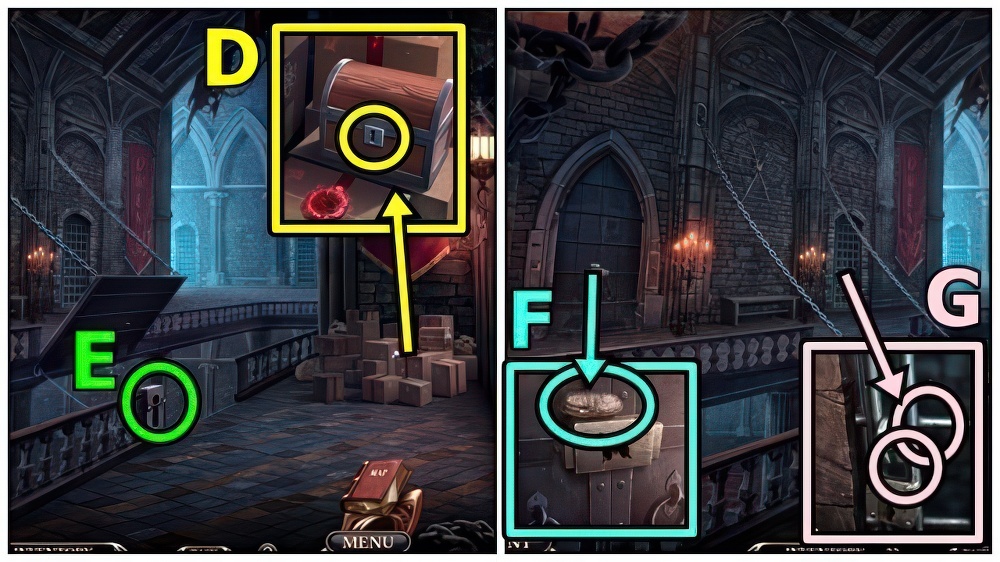
- Take LOCK REEL (D).
- Use SPOON, take HEX WRENCH and HEART EMBLEM 2/3.
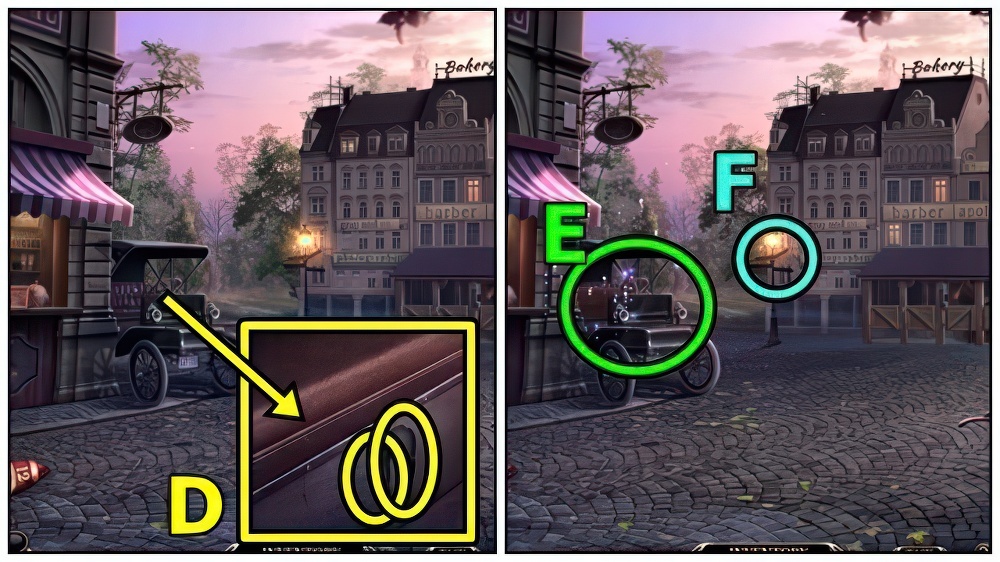
- Add BUTTER (E), then HEX WRENCH.
- Receive MIRROR.
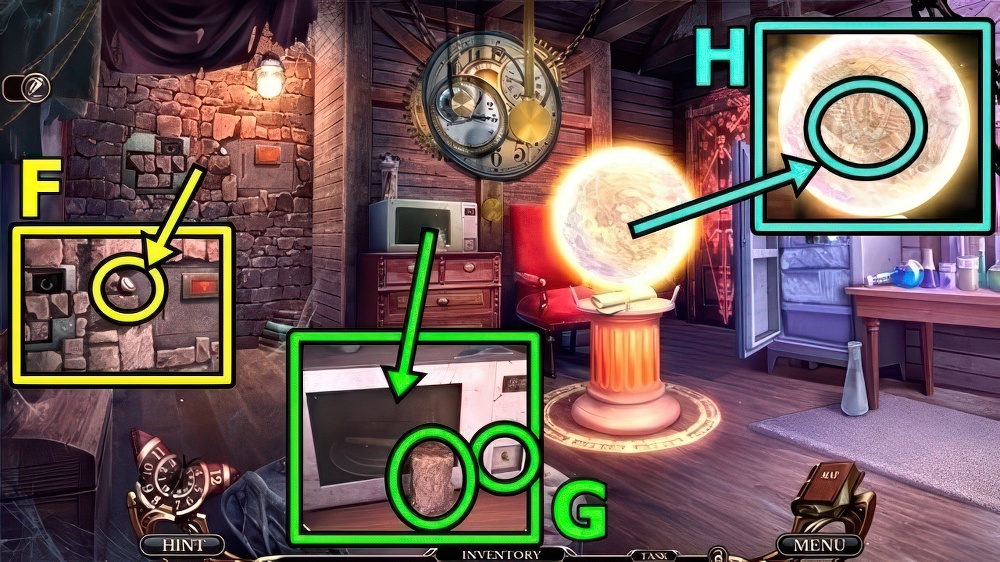
- Add LOCK REEL (F), then MIRROR.
- Adjust dials: 2-3-5-1.
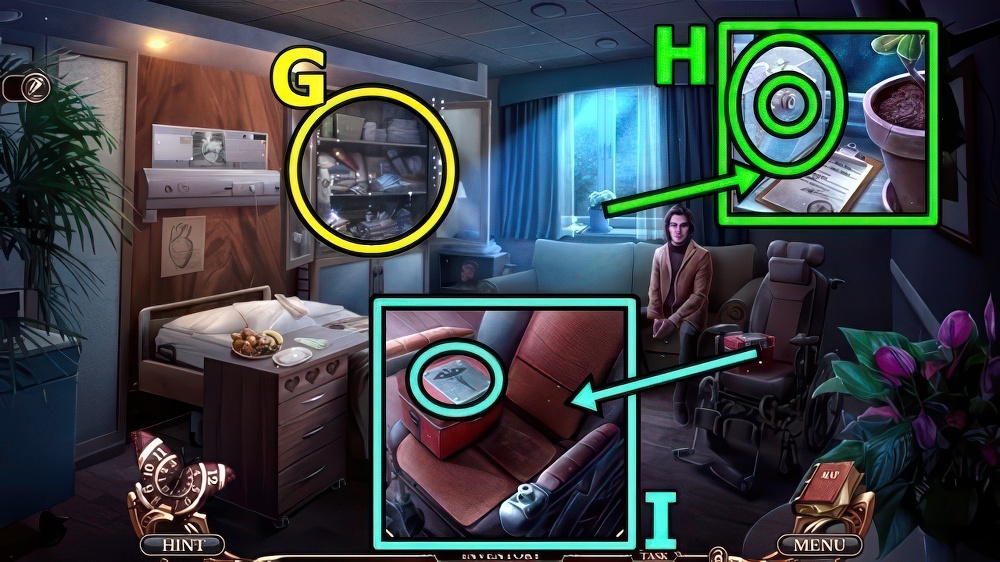
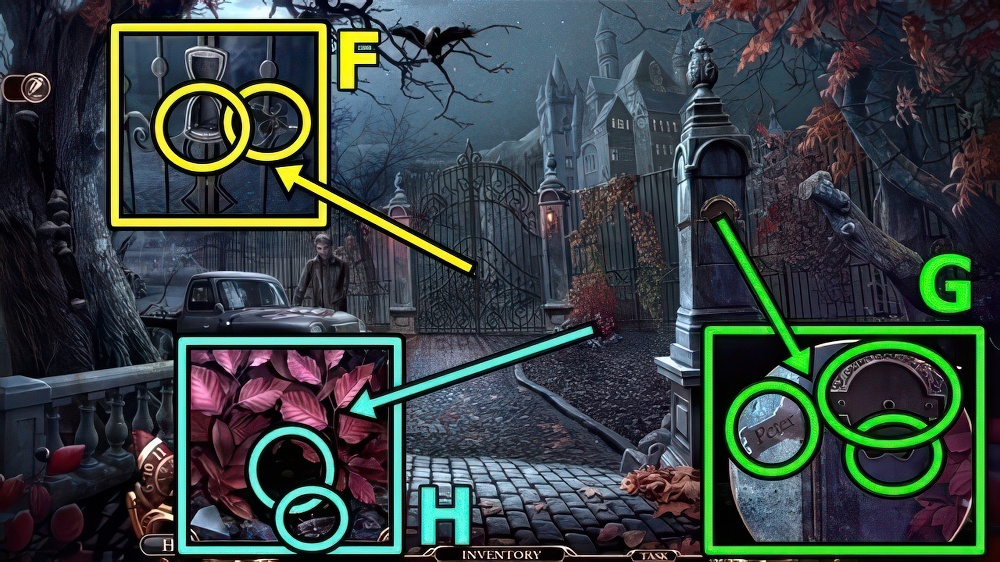
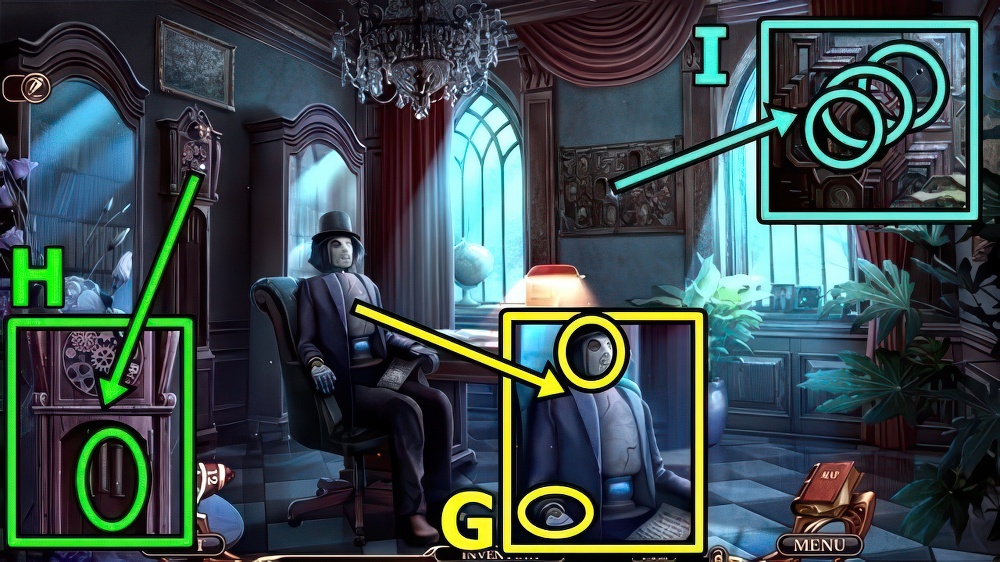
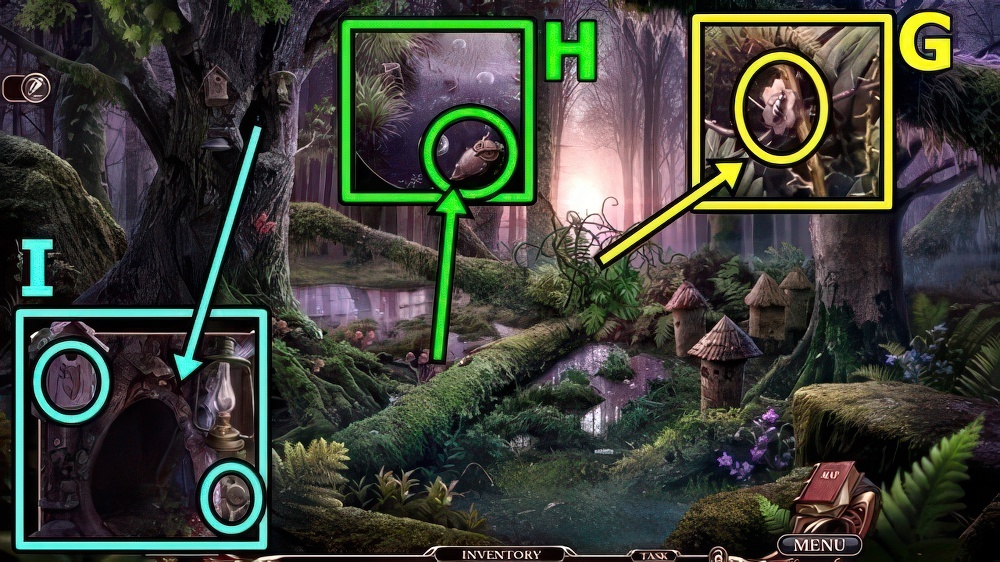
- Play puzzle (G), receive PURSE DECORATION.
- PURSE DECORATION on LOCKED BAG.
- Take COIN and PIN.
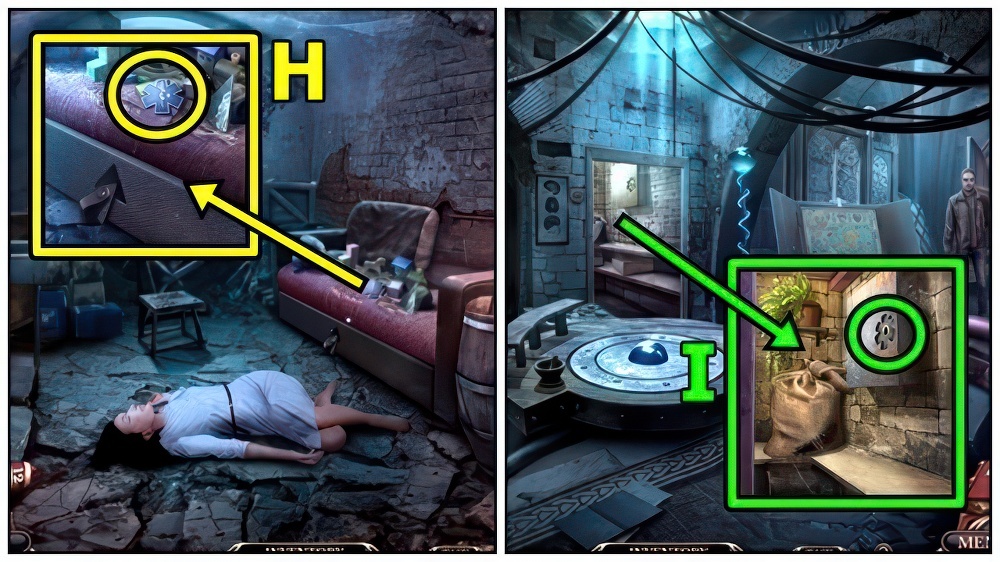
- Use PIN (H), take CADUCEUS.
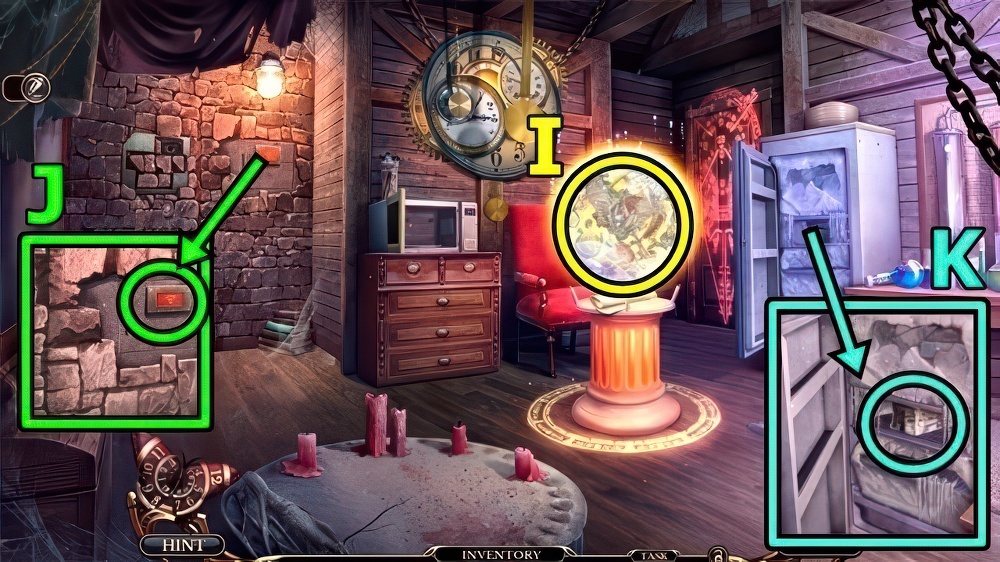
- Add CADUCEUS (I), take BELT and HEART EMBLEM 3/3.
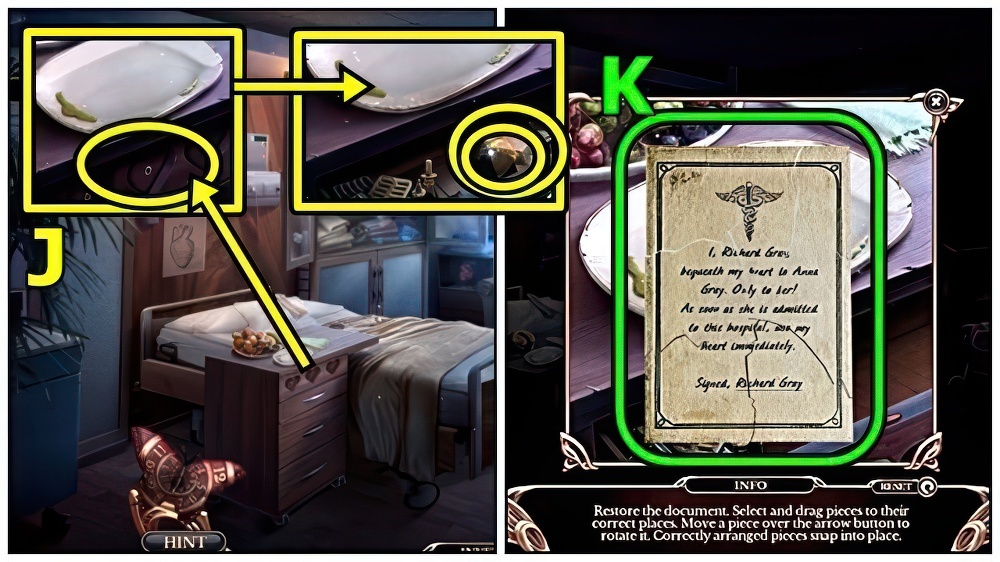
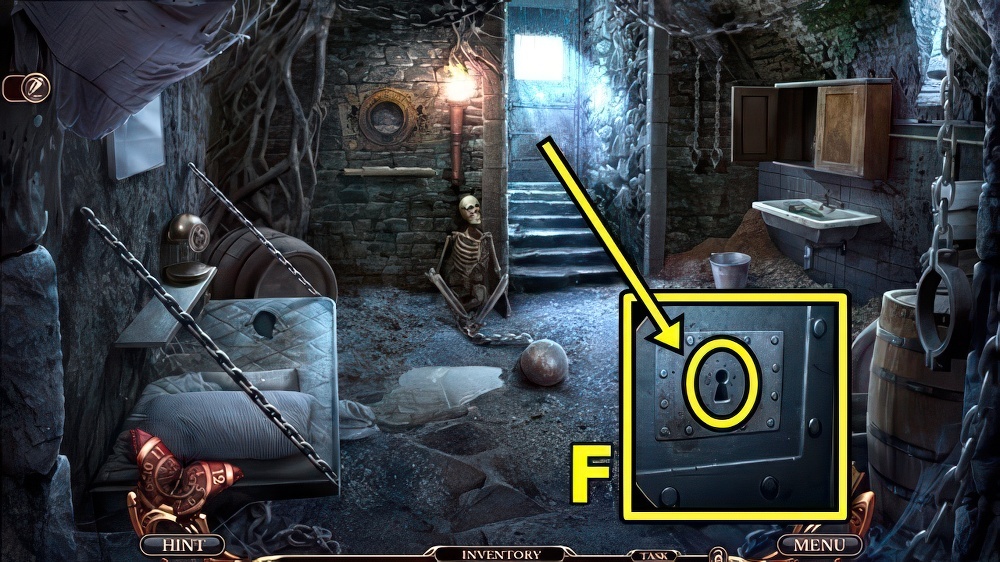
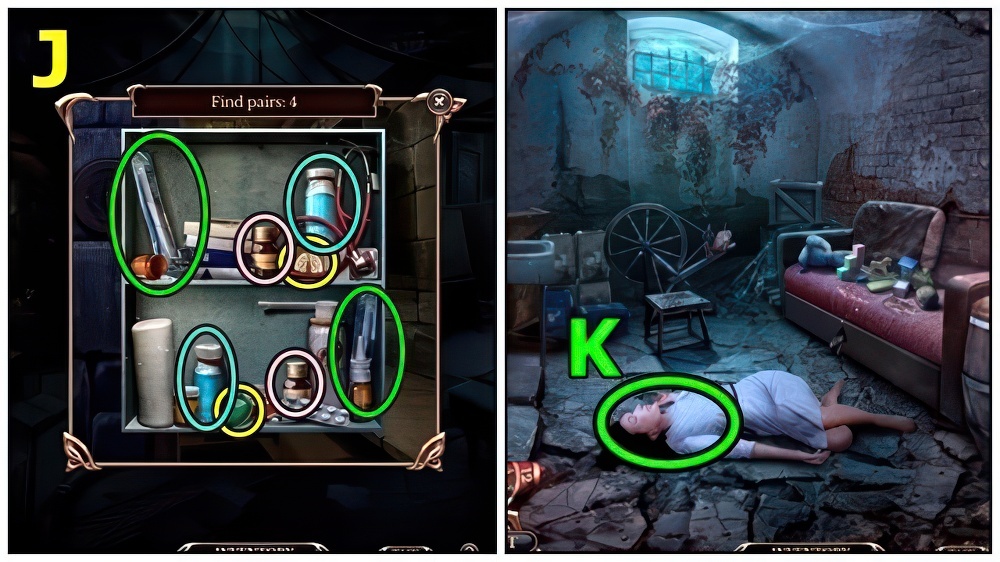
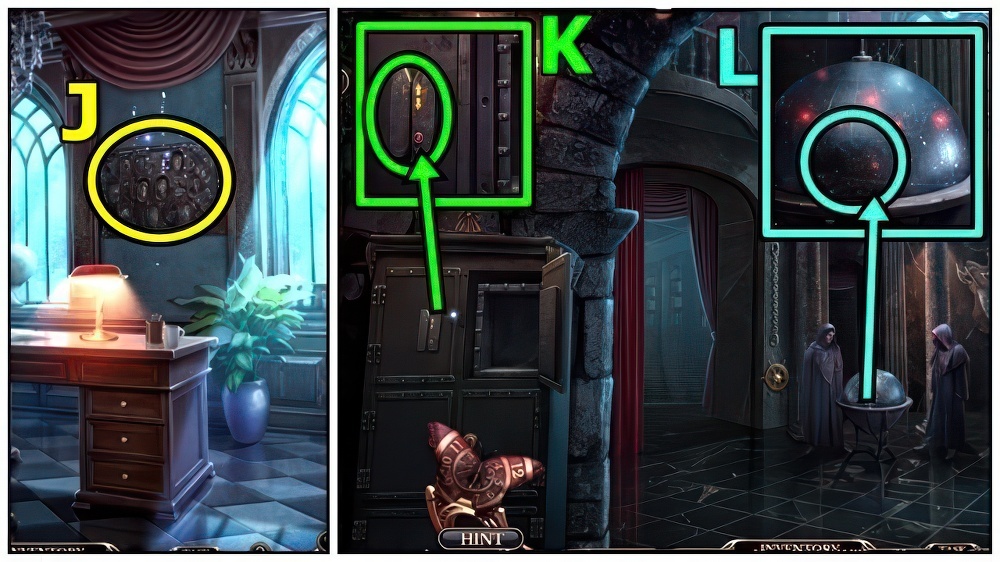
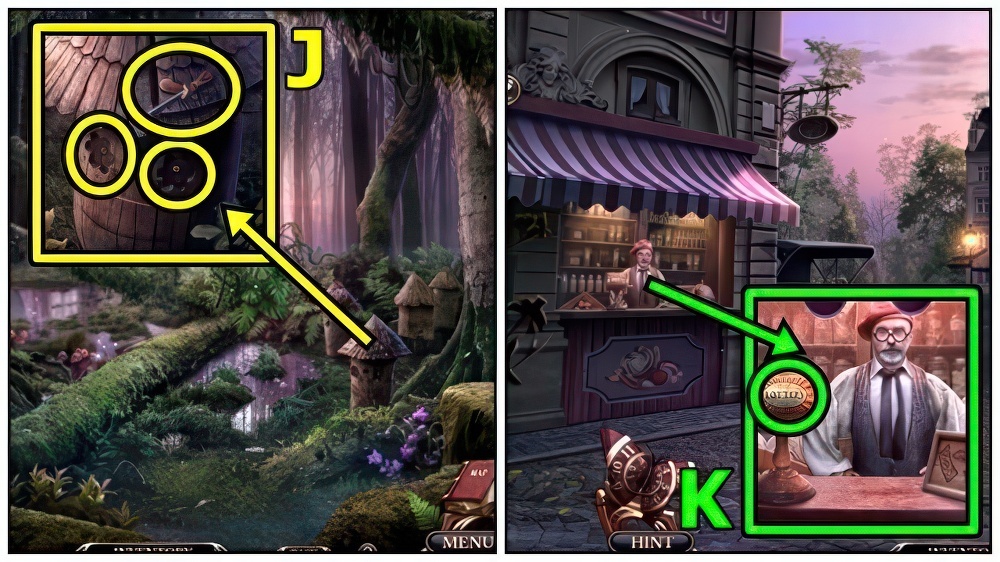
- Insert HEART EMBLEM (J), take ICOSAHEDRON.
- Examine.
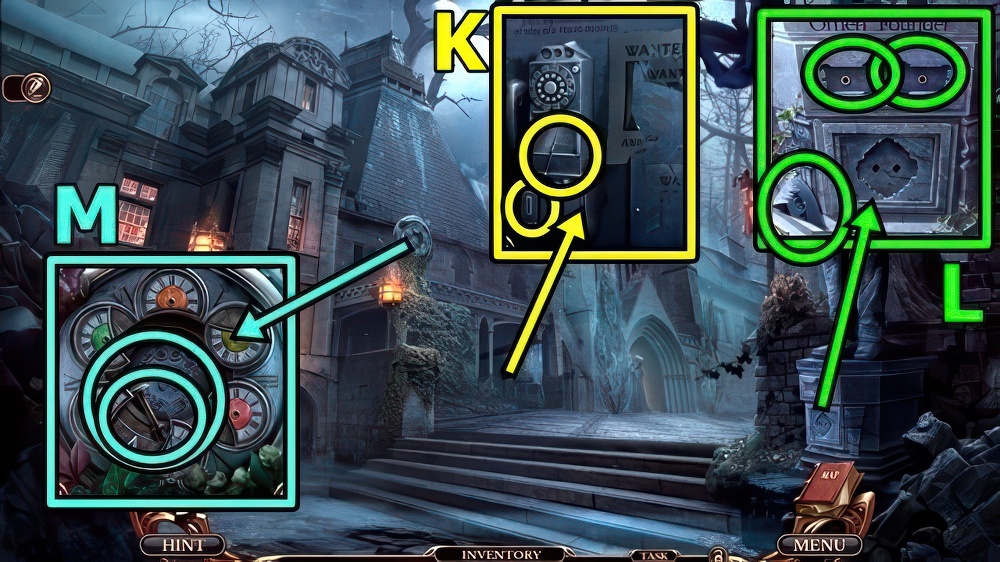
- Solution: (K).
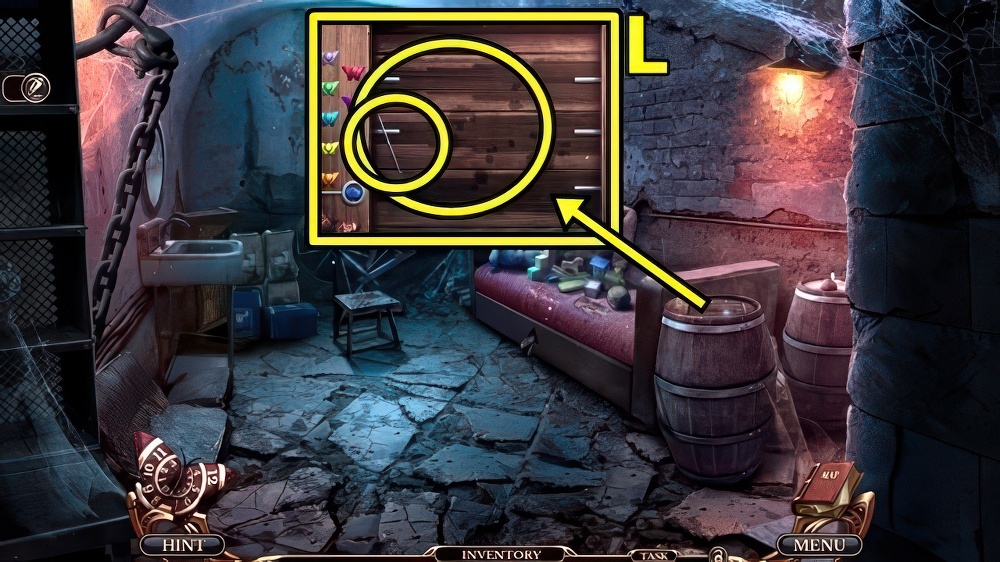
- Examine.
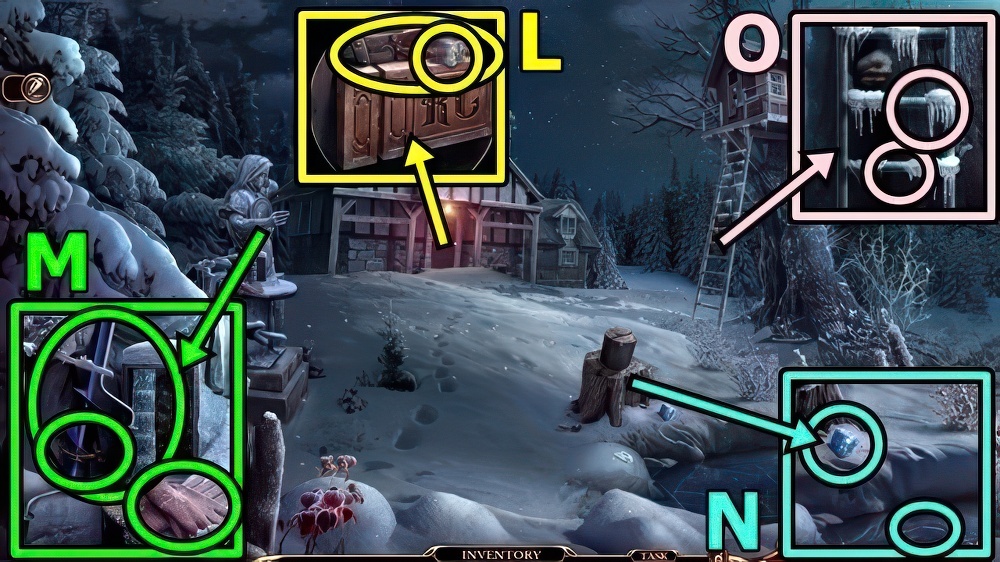
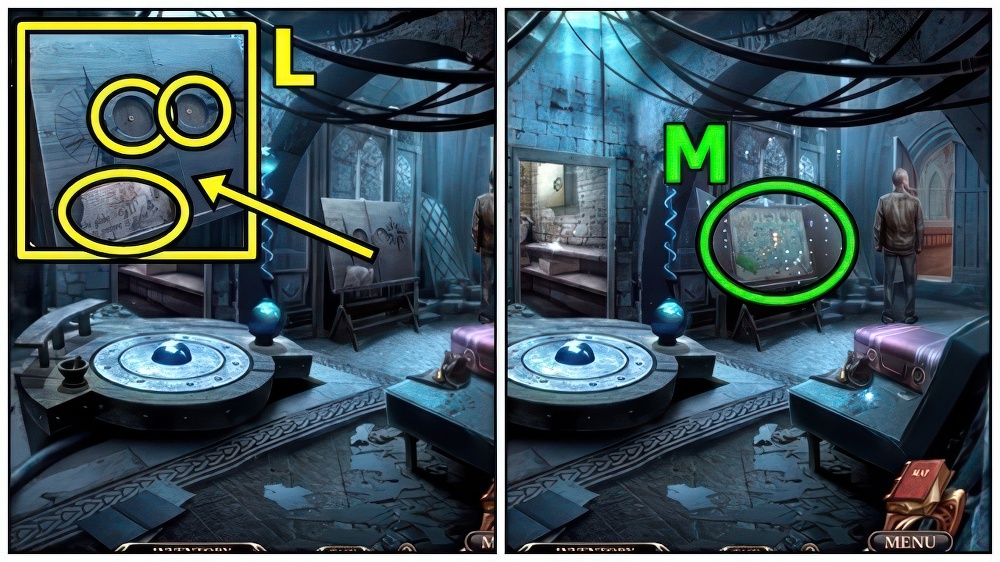
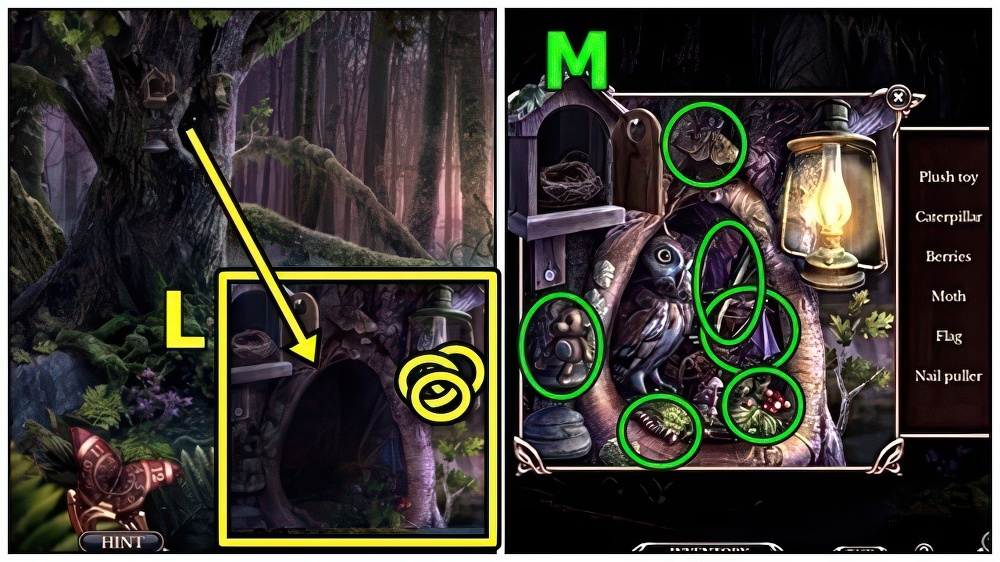
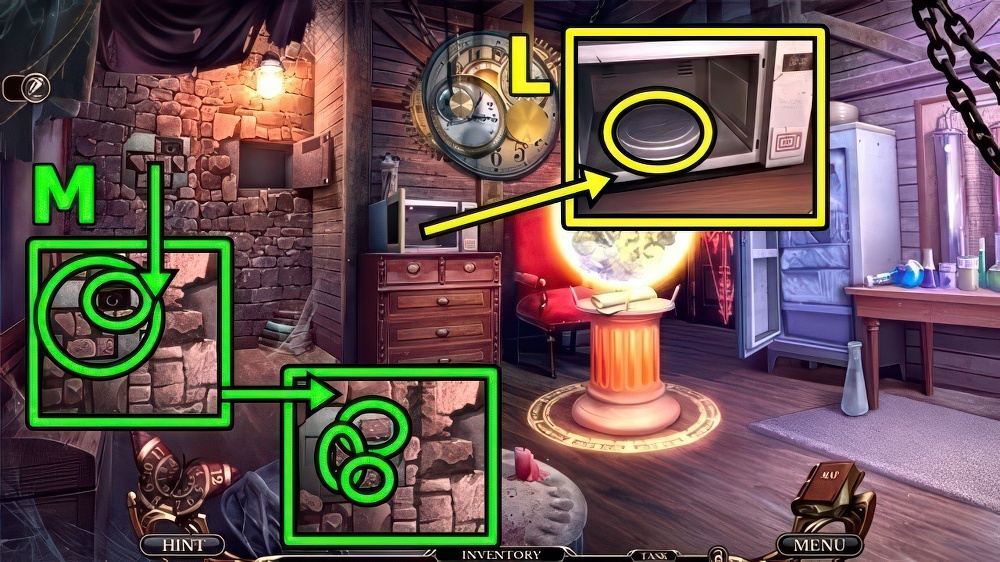
- Take ICE CUBE 1/4 (L) and BOLT CUTTER.
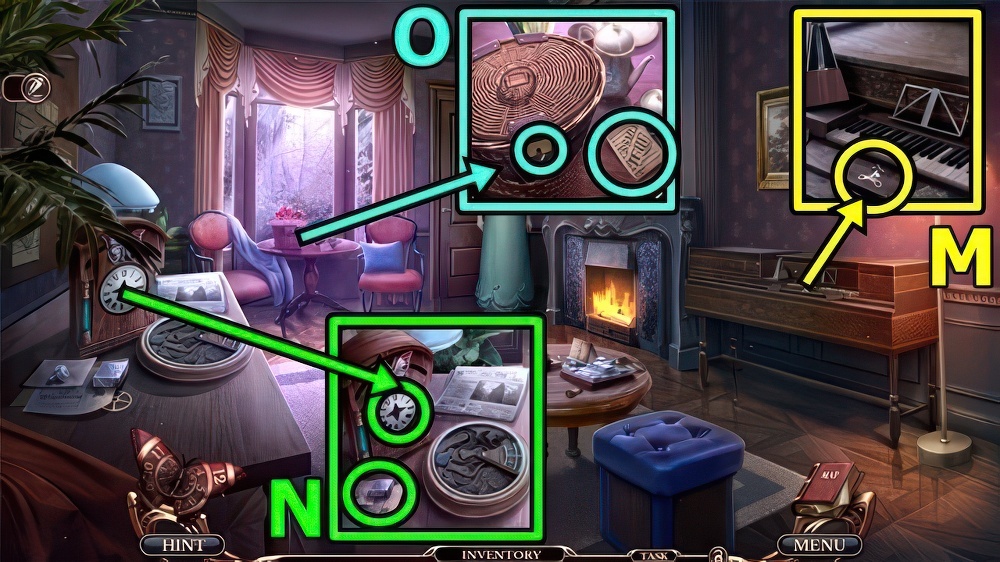
- Take GLOVES (M).
- Use BOLT CUTTER, take ICE DRILL.
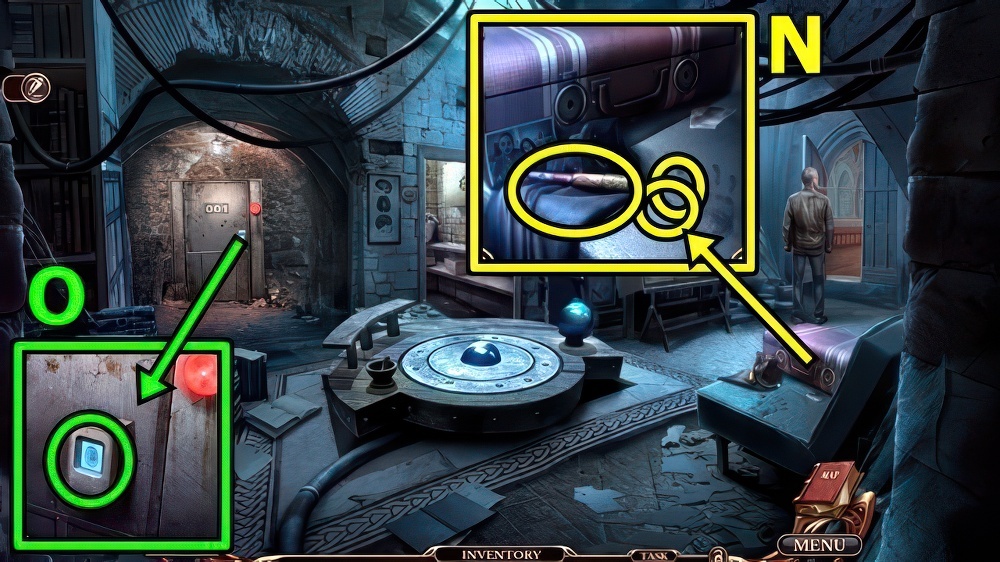
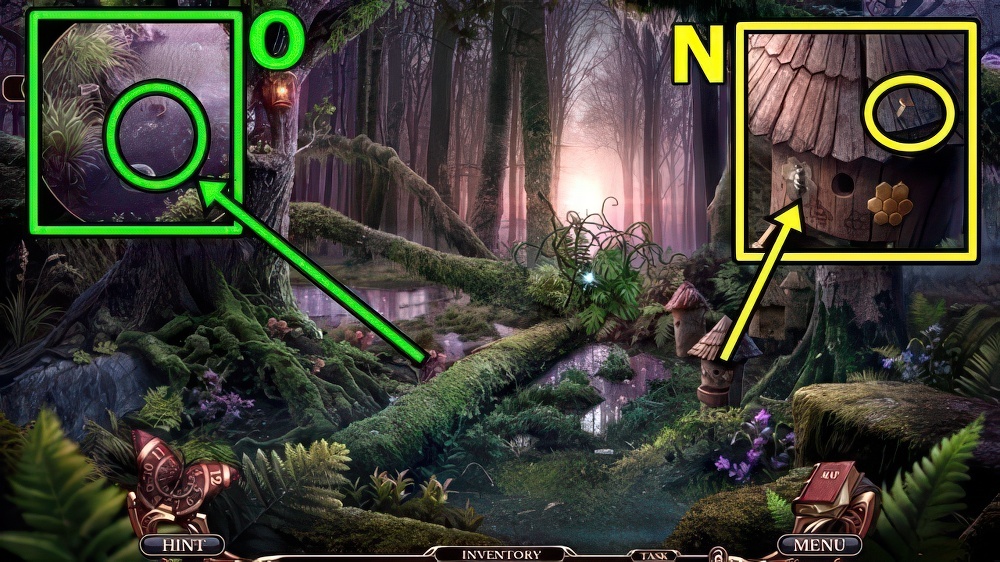
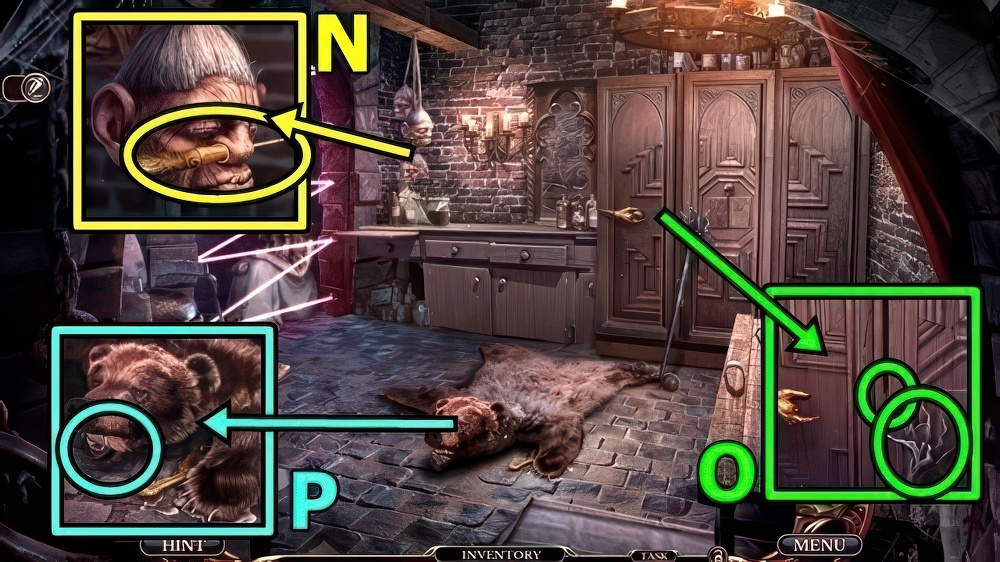
- Take ICE CUBE 2/4 (N).
- Use ICE DRILL, take MONOGRAM R and CARABINER.
- CARABINER on BELT, take SAFETY EQUIPMENT.
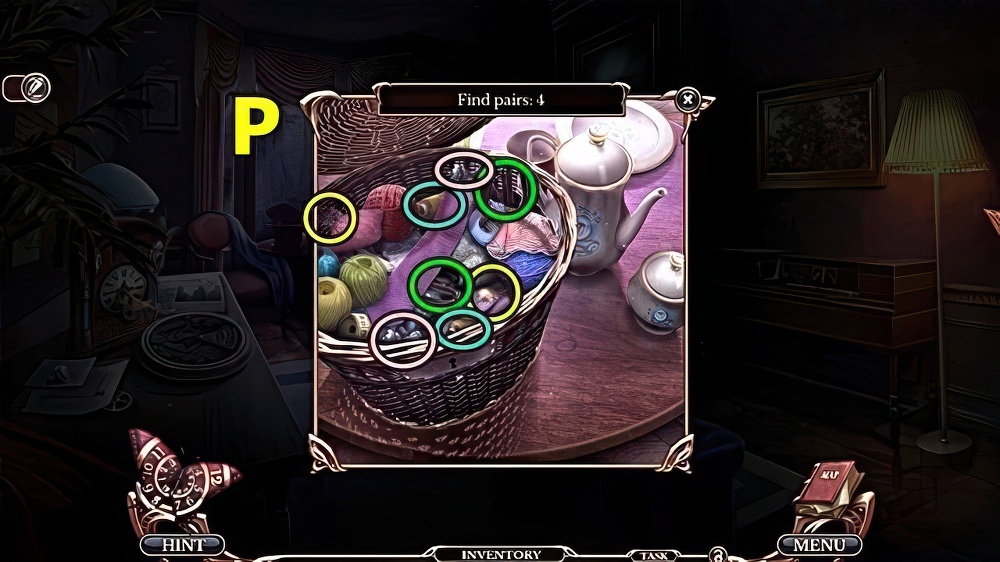
- Add SAFETY EQUIPMENT (O) and GLOVES.
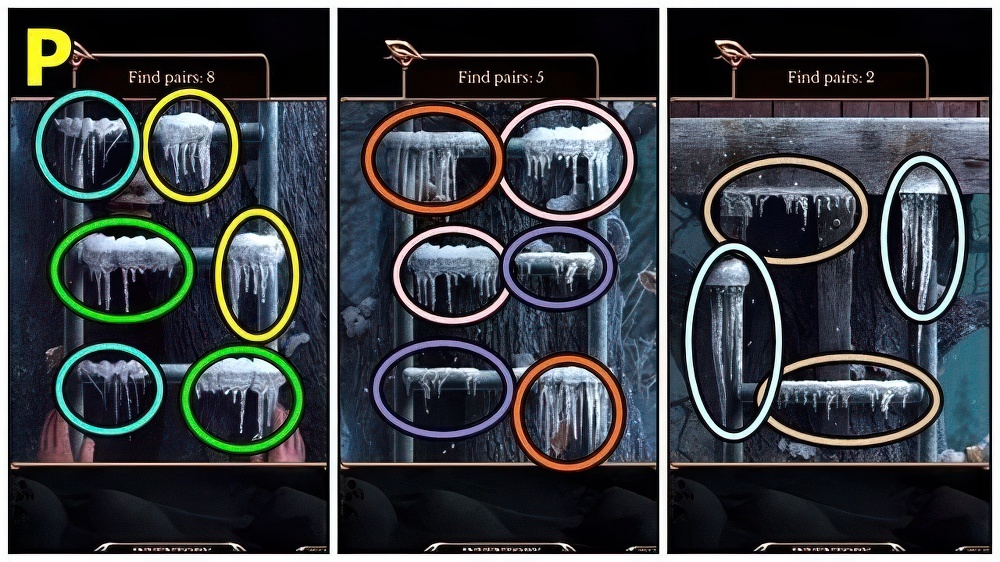
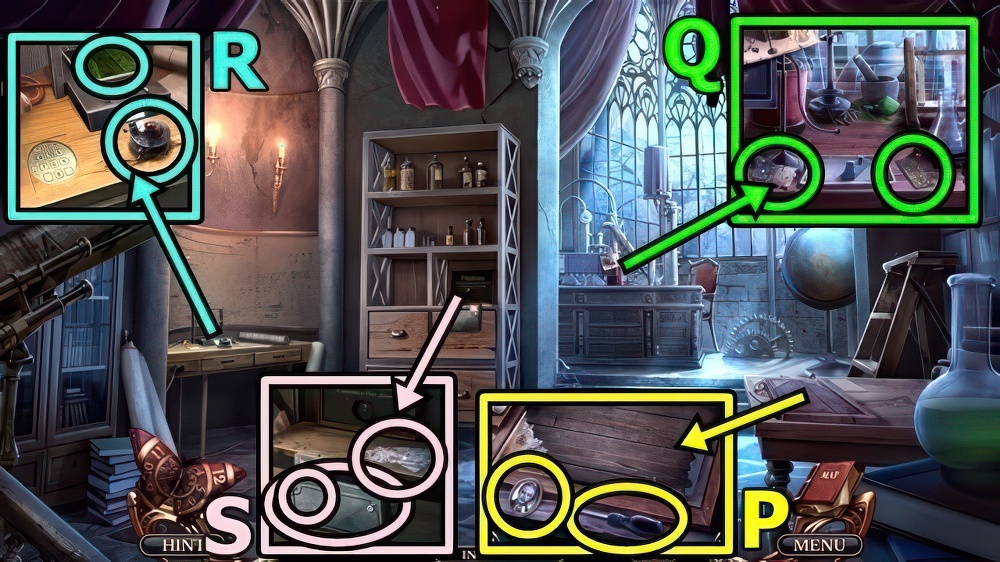
- Solution: (P).
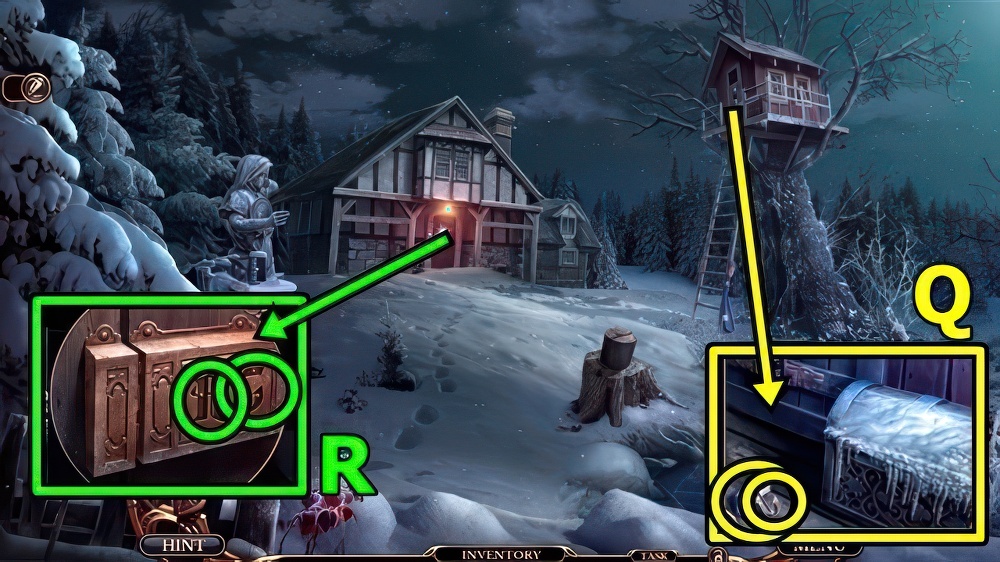
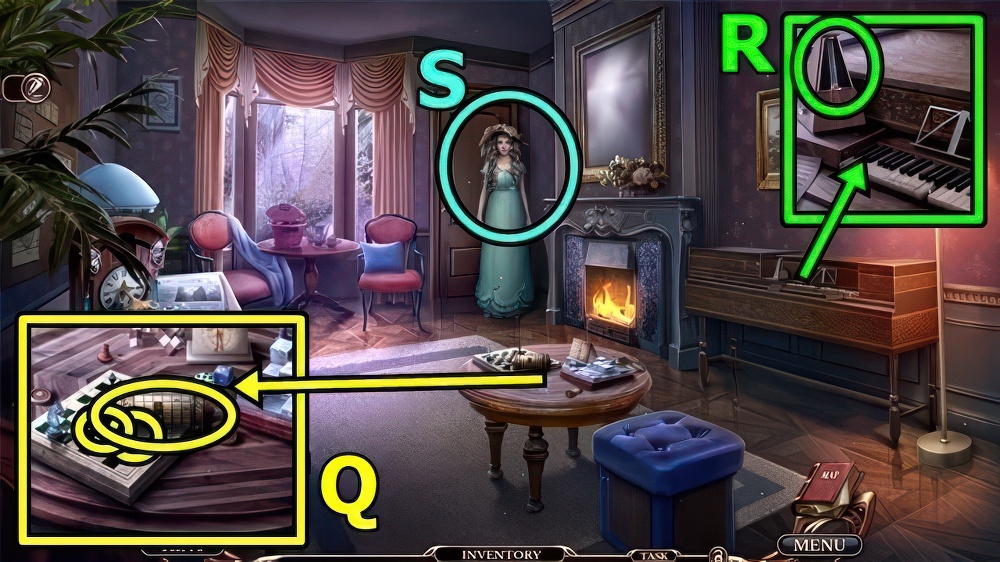
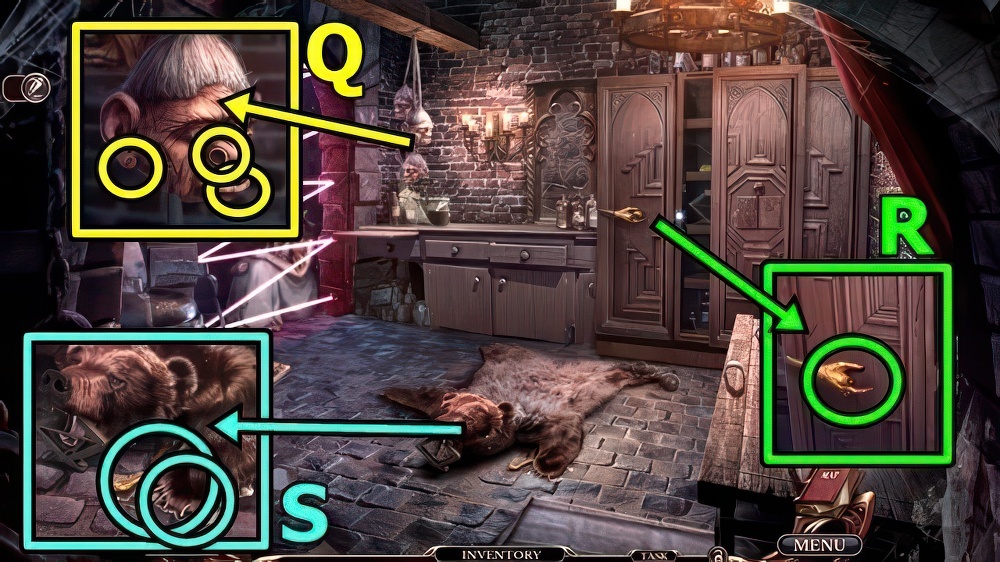
- Take MONOGRAM G (Q) and ICE CUBE 3/4.
- Add MONOGRAM R (R) and MONOGRAM G.
- Enter Richard’s House.

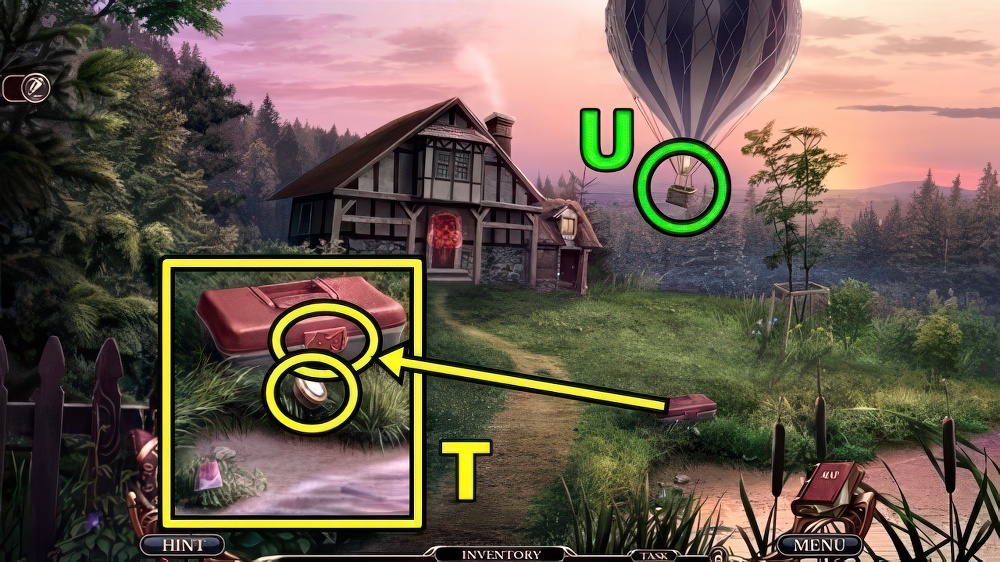
- Take SNOWFLAKE (S).
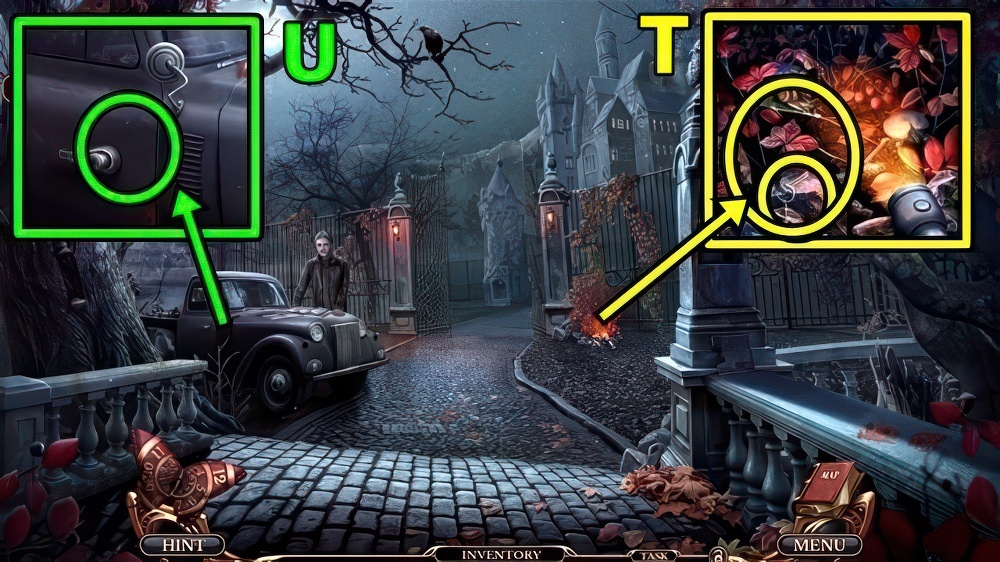
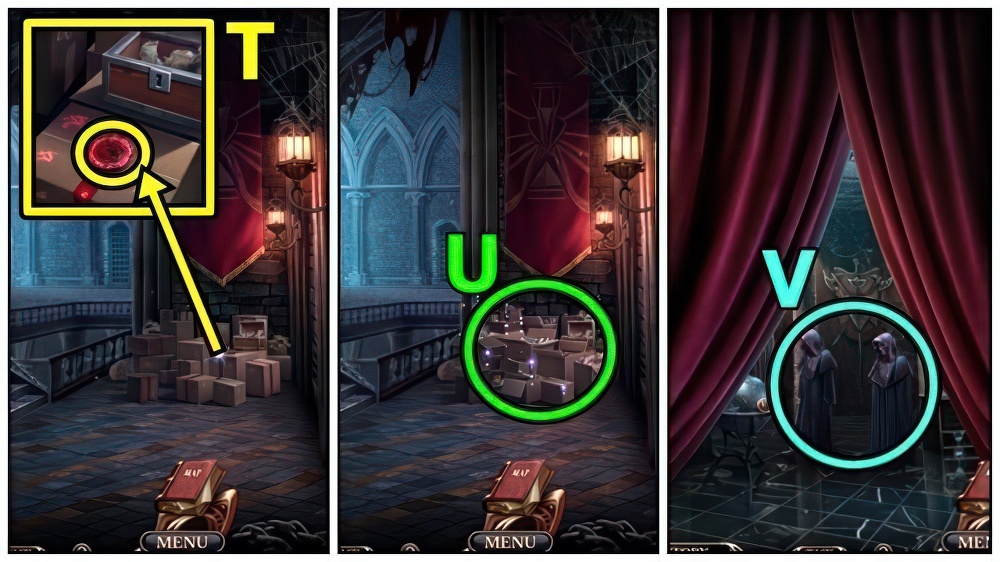
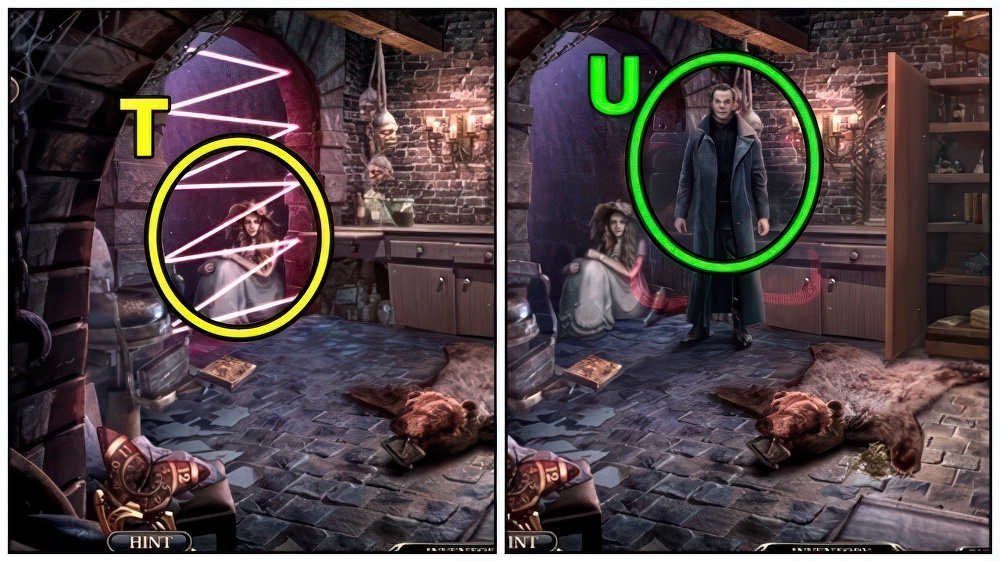
- Add SNOWFLAKE (T).
- Take CHICKEN FOOT and ICE CUBE 4/4.
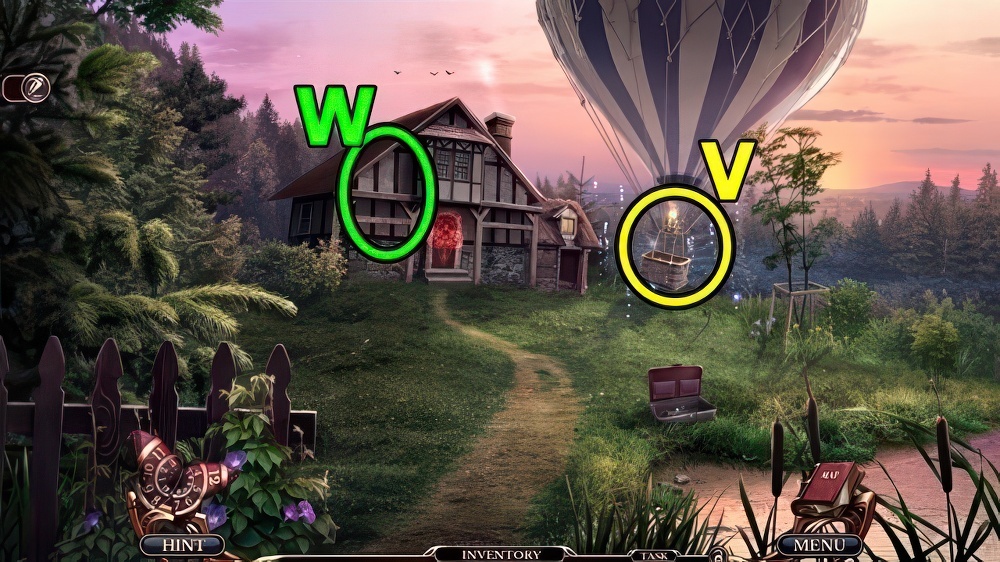
- Move down.
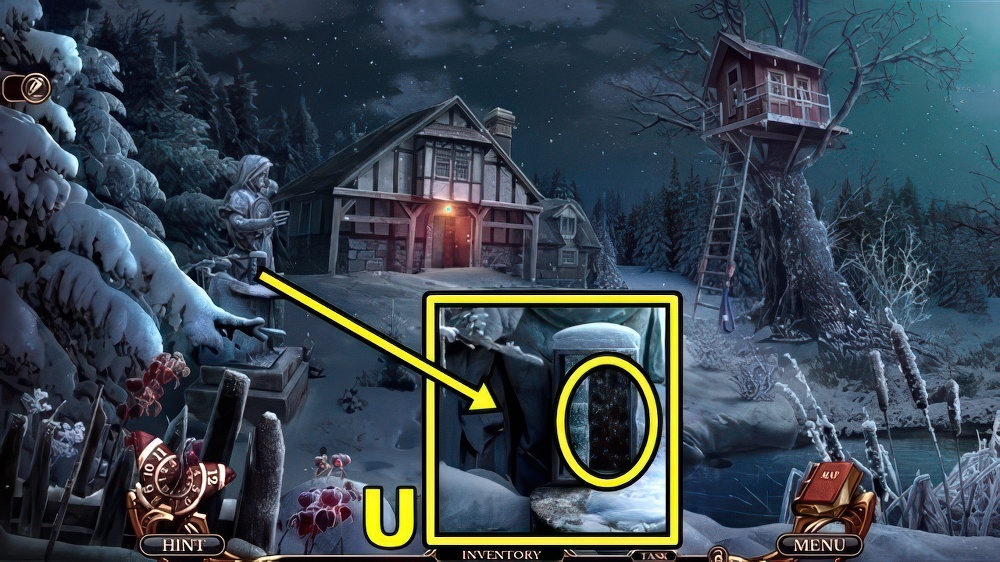
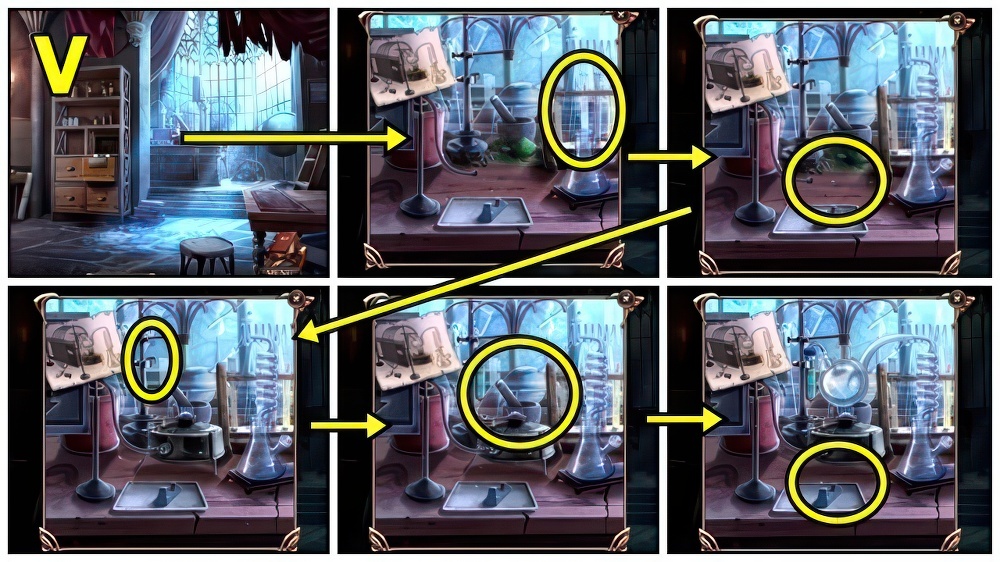
- Add ICE CUBE (U).
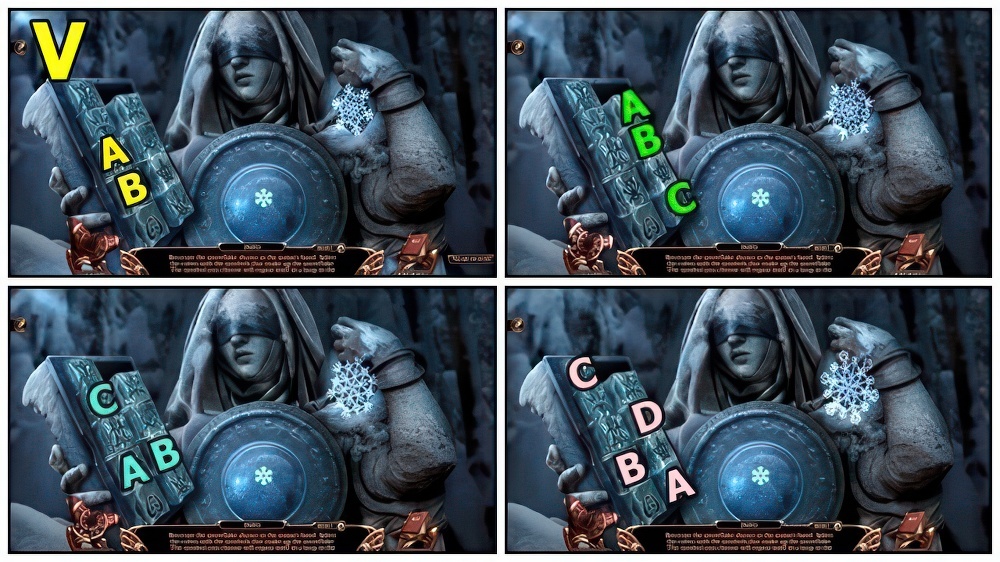
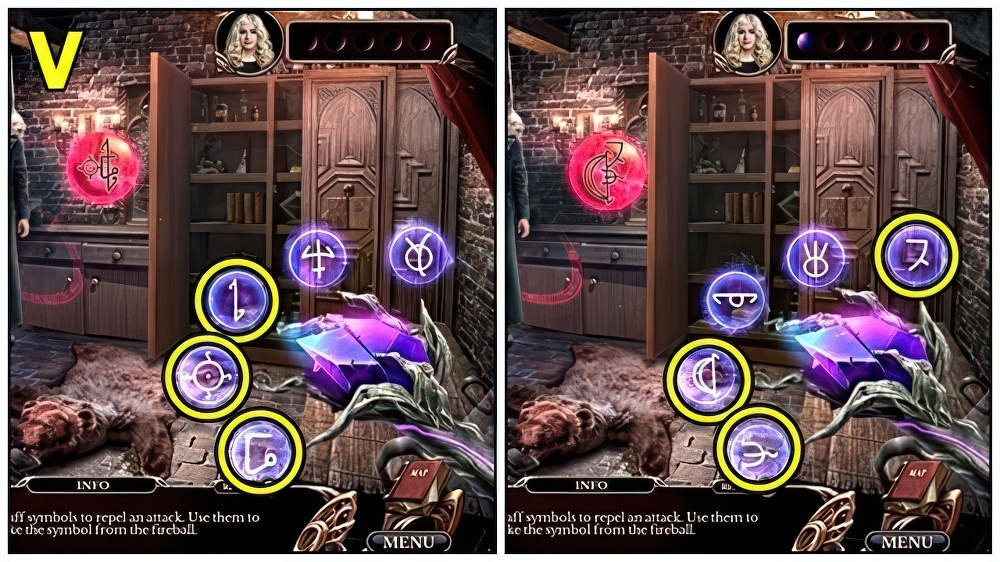
- Solution: (V) A-B, A-B-C, A-B-C, A-B-C-D.
- Take MATCHES and ROOTS.
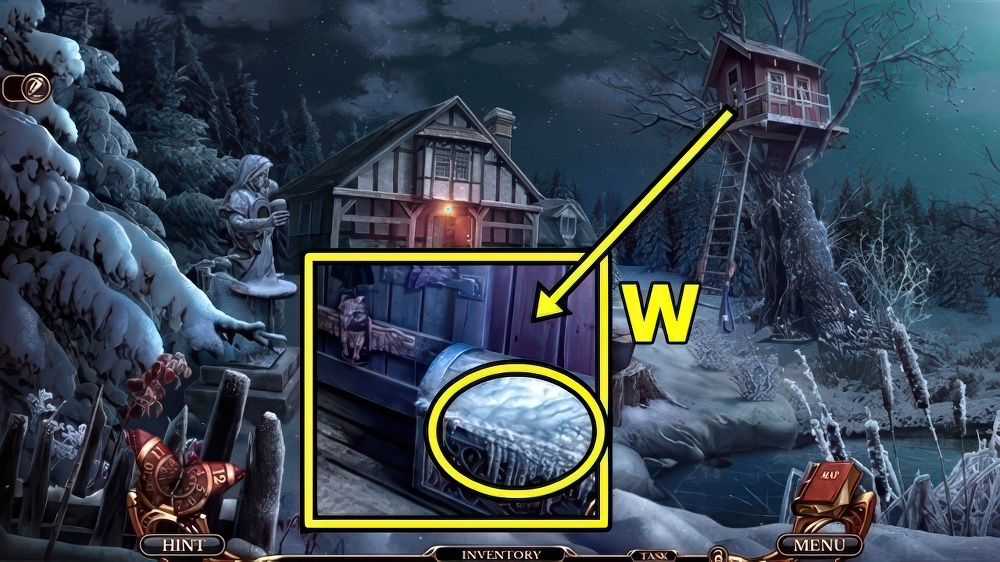
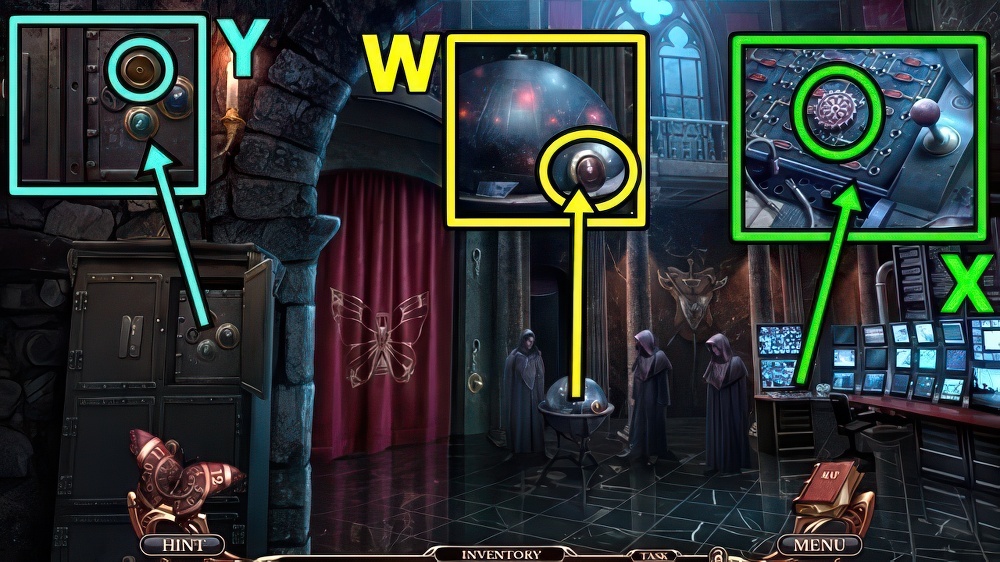
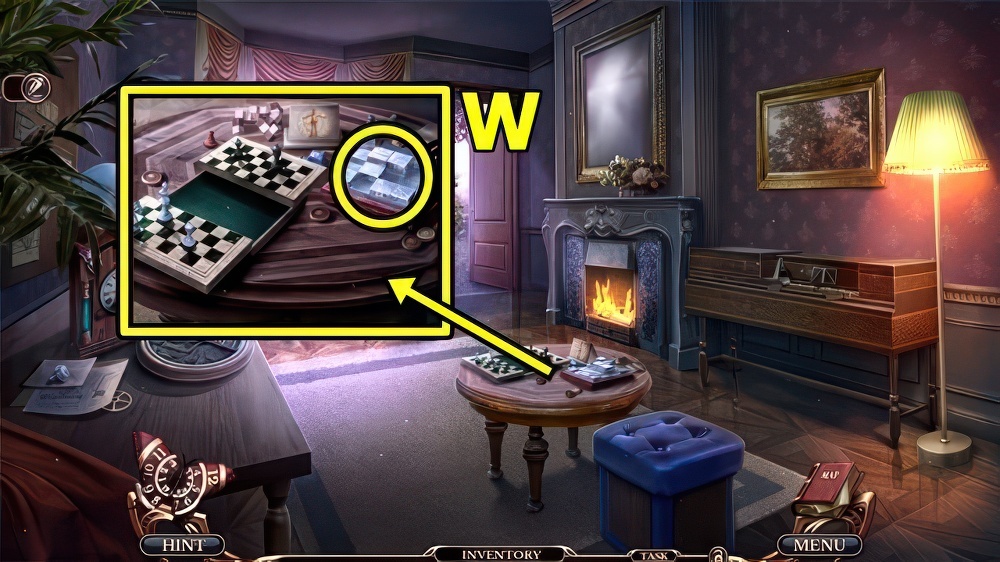
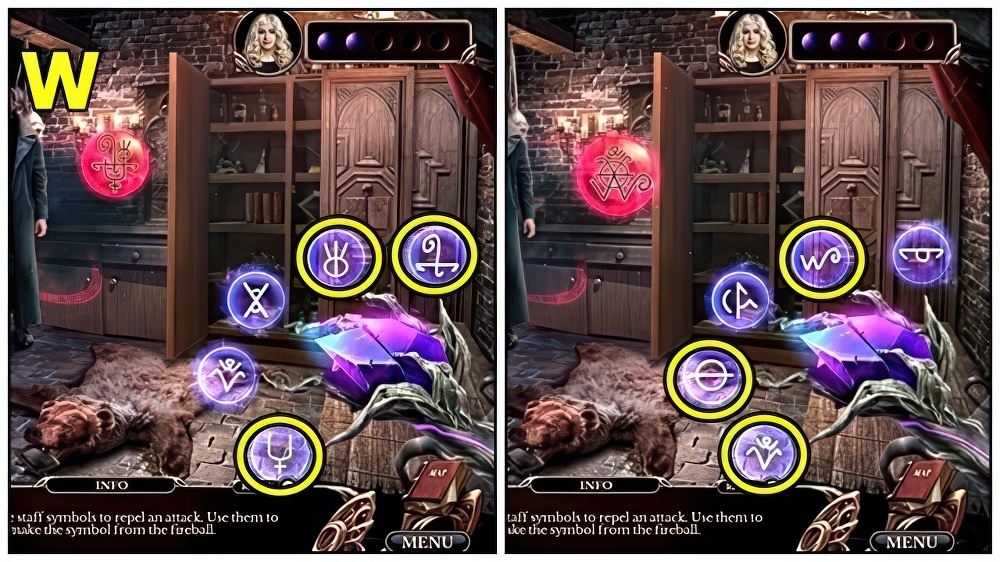
- Use MATCHES (W).
- Take LIGHTBULB and BLACK SEAL.
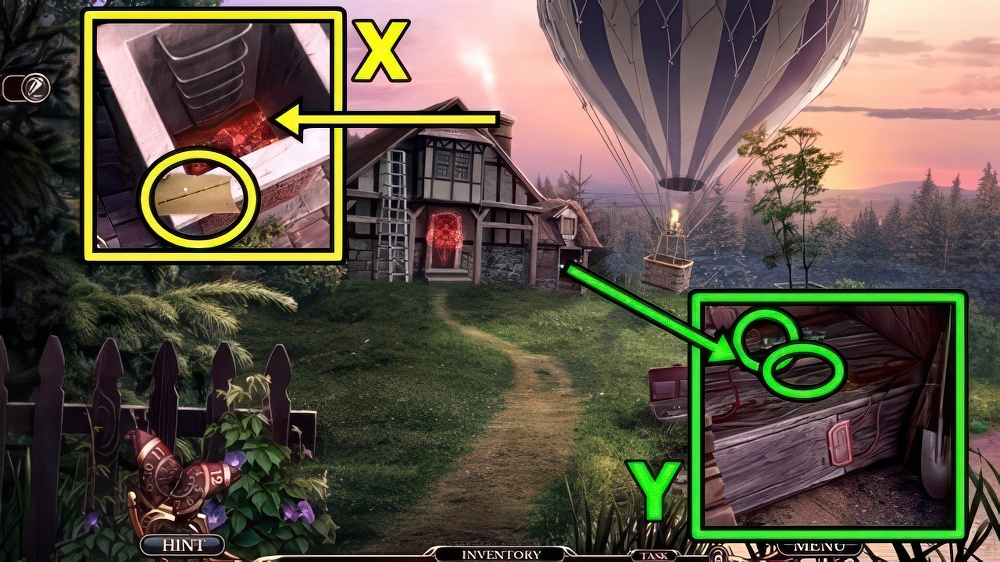
- Enter Richard’s House.
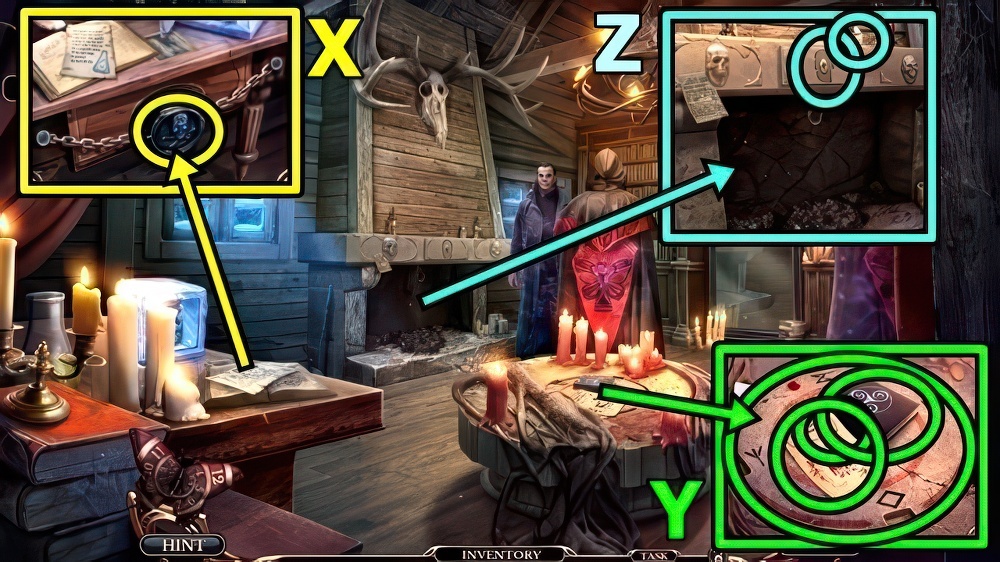
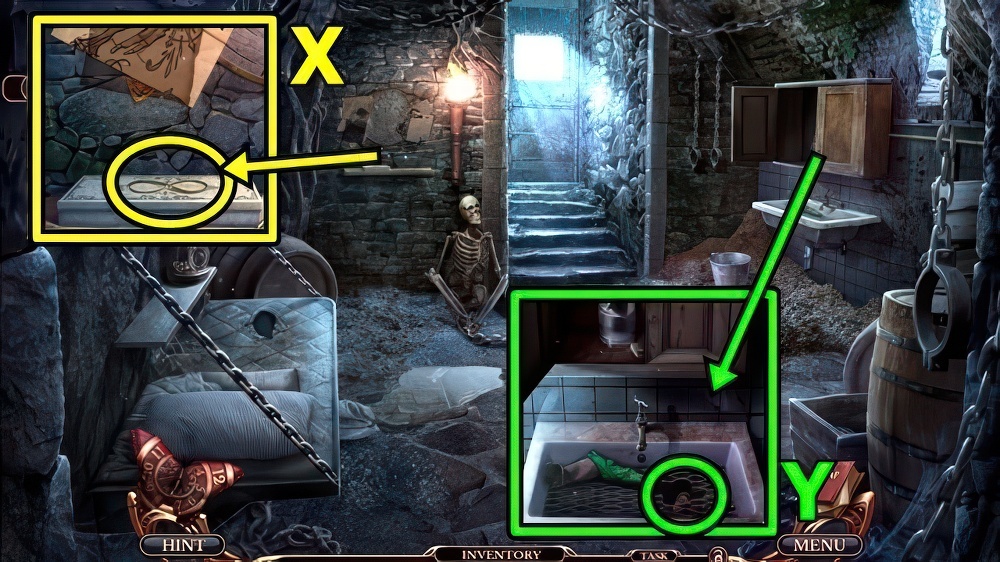
- Add BLACK SEAL (X), take RUNES and CAULDRON.
- Take POTION RECIPE (Y).
- Read.
- Insert RUNES and ICOSAHEDRON.
- Take AXE BLADE and SKULL.
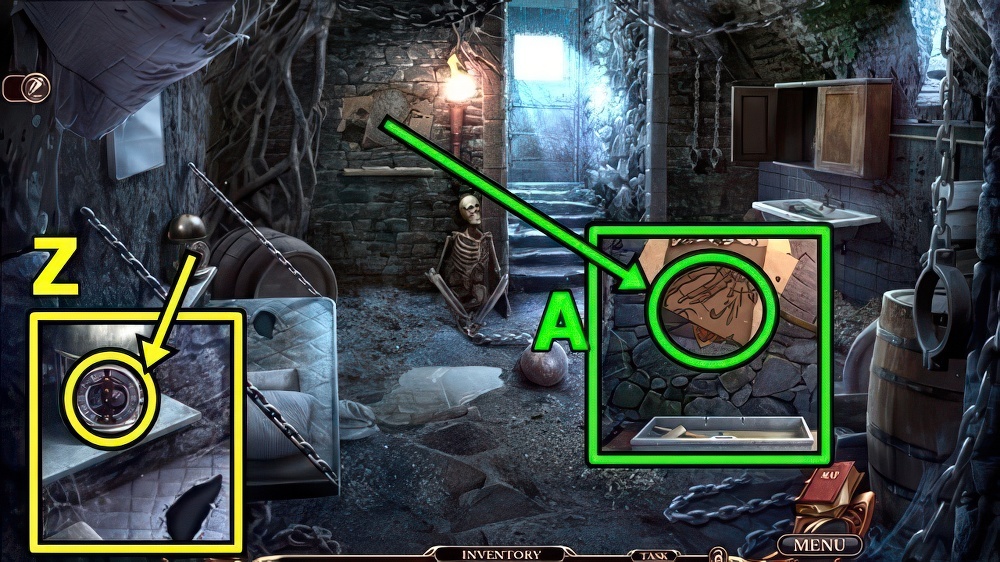
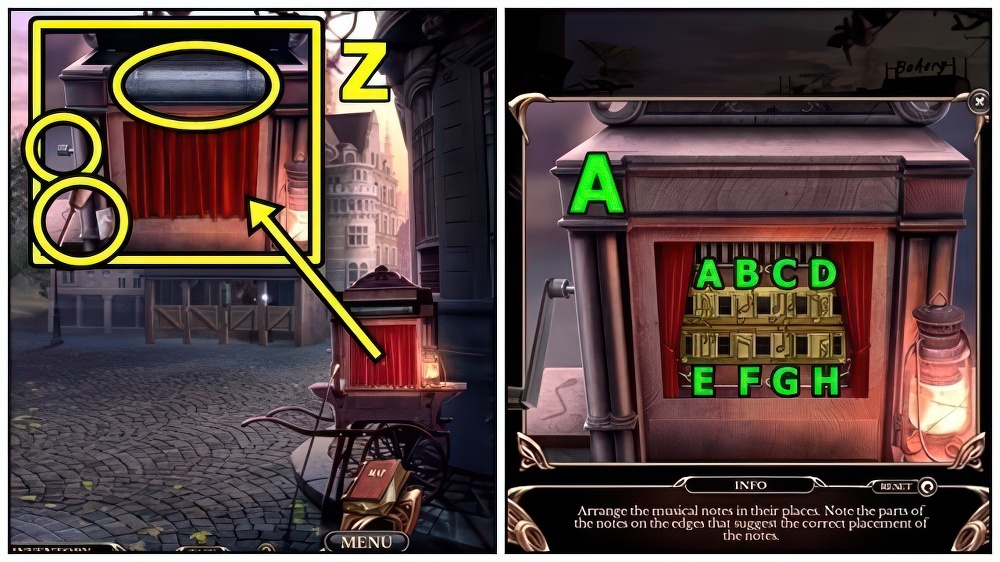
- Take FLASK (Z).
- Add SKULL, take WOLF TOTEM and SHARPENING STONE.
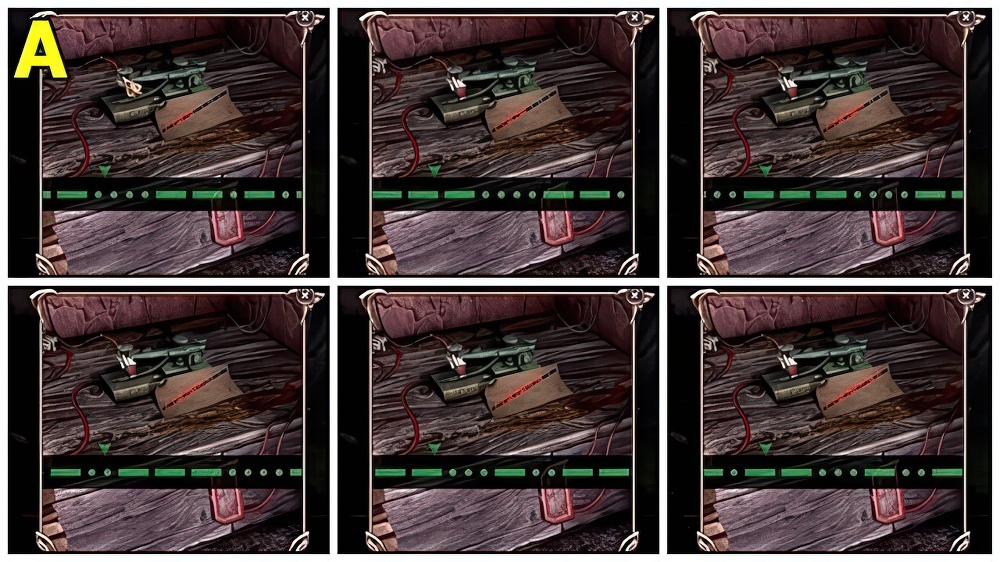
- Move down.
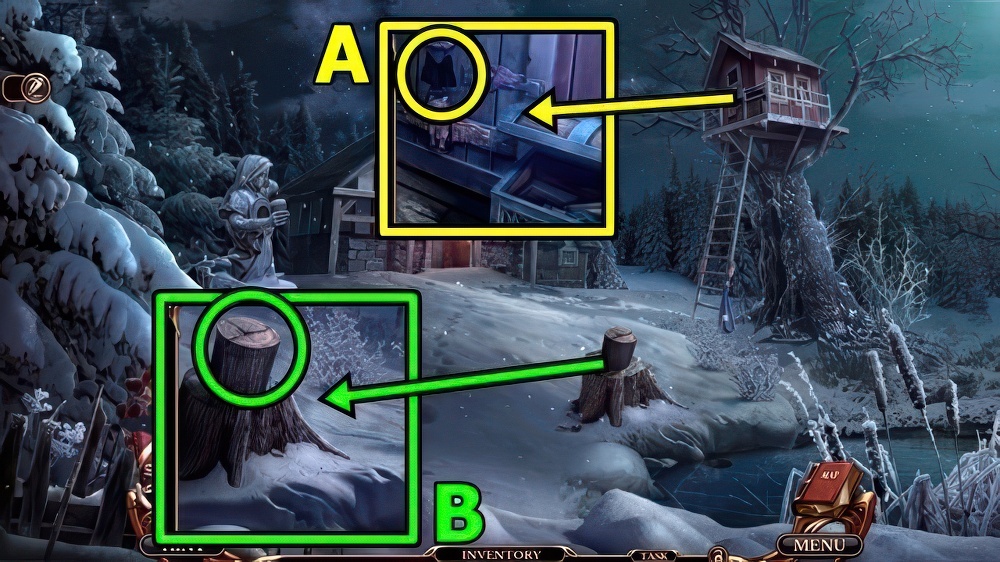
- Add WOLF TOTEM (A), take AXE HANDLE and THISTLE.
- AXE HANDLE, then SHARPENING STONE on AXE BLADE.
- Take AXE.
- Use AXE (B), take FIREWOOD.
- Enter Richard’s House.
- CAULDRON, then CHICKEN FOOT, ROOTS and THISTLE to POTION RECIPE.
- Take POTION INGREDIENTS.
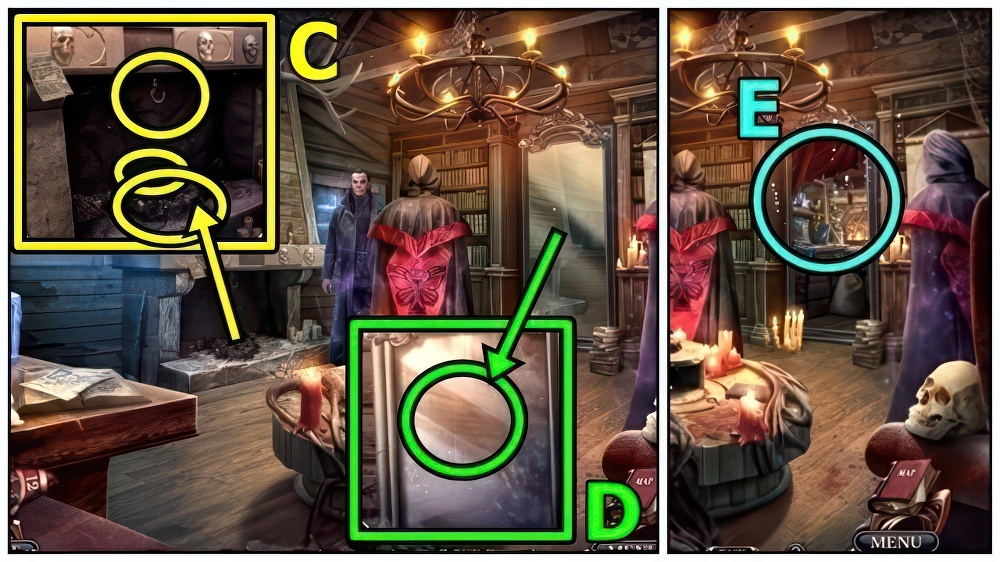
- Add FIREWOOD (C), MATCHES then POTION INGREDIENTS.
- Add FLASK, receive MIRROR POTION.
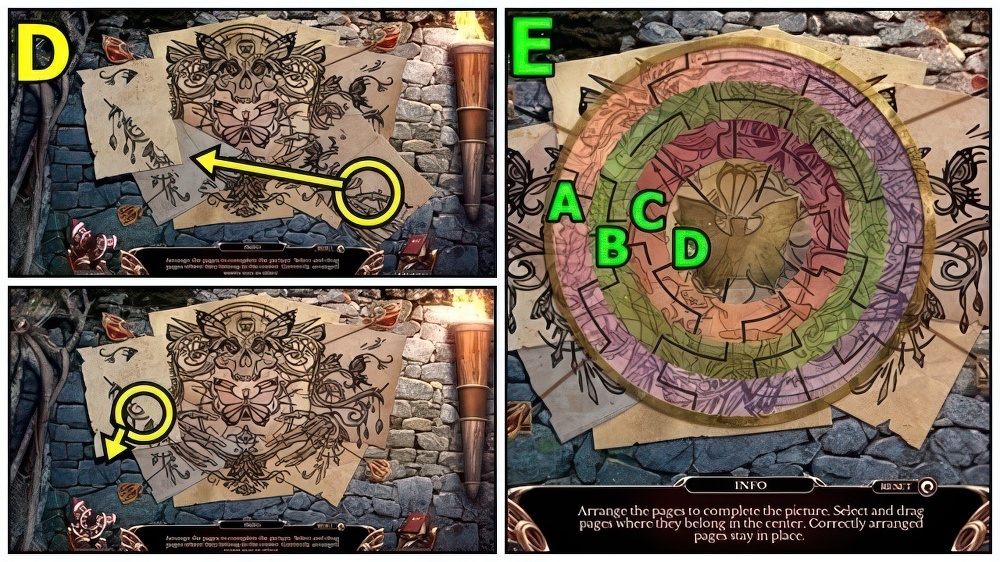
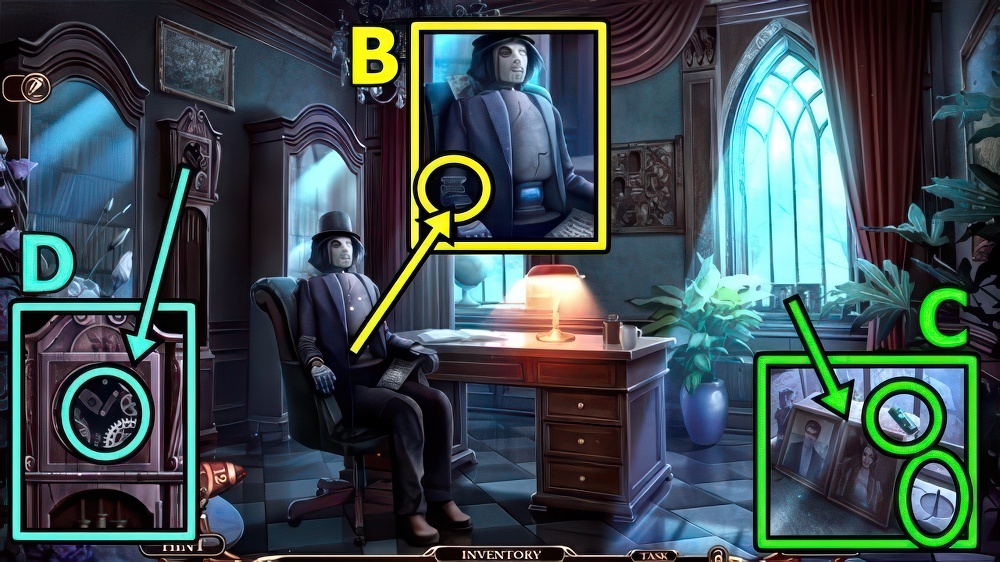
- Add MIRROR POTION (D).
- Play puzzle (E), take OMEN EMBLEM.
- Receive BROKEN FLASHLIGHT.
- Take CLOCK HANDS 1/5 (F) and BUTTERFLY MEDAL.
- Take PLAQUE HALF (G).
- Add OMEN EMBLEM and BUTTERFLY MEDAL.
- Take BATTERIES and CLOCK HANDS 2/5.
- LIGHTBULB on BROKEN FLASHLIGHT.
- Remove panel, add BATTERIES.
- Take FLASHLIGHT.
- Take CLOCK HANDS 3/5 (H).
- Use FLASHLIGHT.
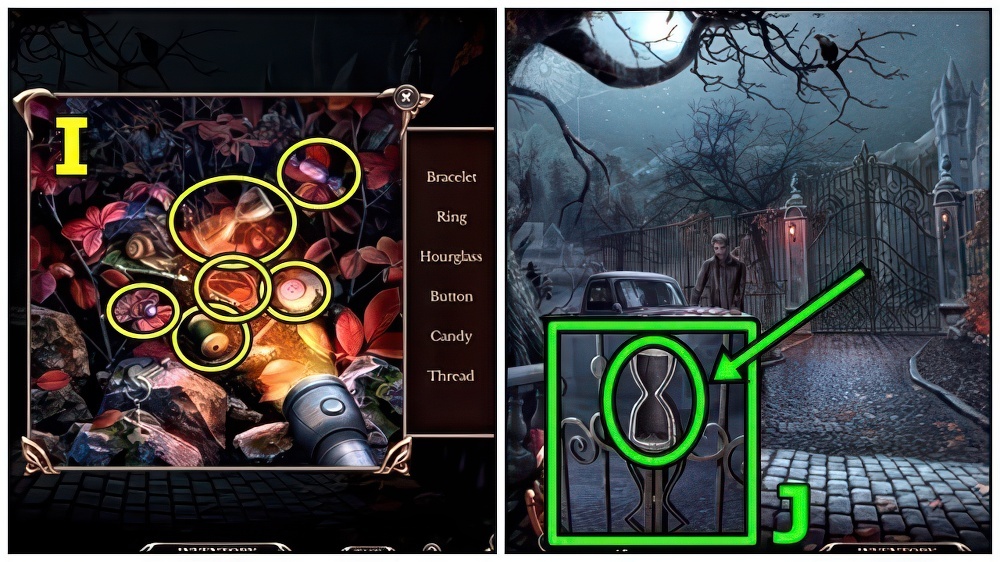
- Find items (I), receive HOURGLASS.
- Add HOURGLASS (J).
- Go to Outside Omen Mansion.
- Take CLOCK HANDS 4/5 (K).
- Insert COIN, take PLAQUE HALF.
- Take POSTER PART 1/3 (L).
- Add two PLAQUE HALVES, take CLOCK HANDS 5/5 and BROKEN SPRAYER.
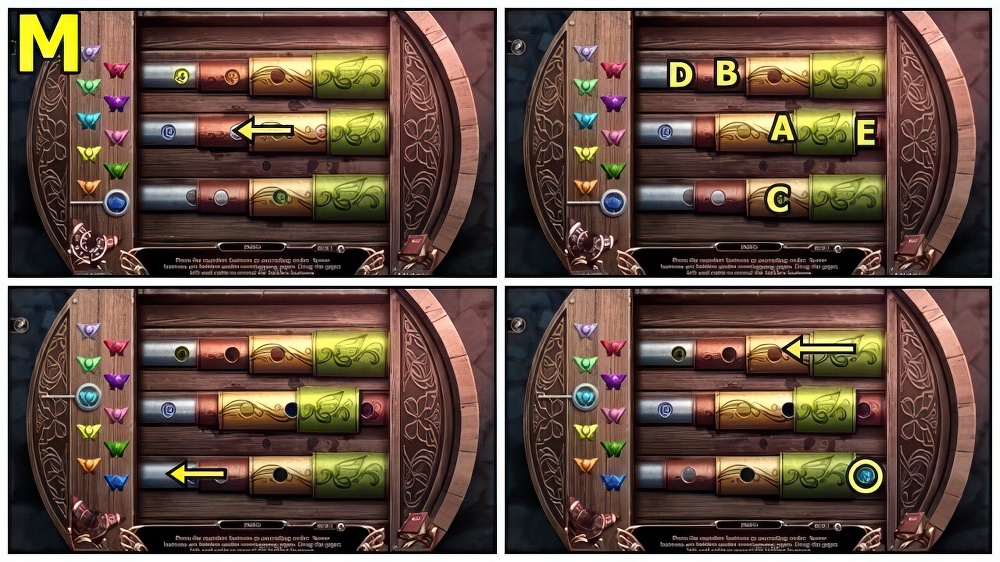
- Take SPRAYER BUTTON (M).
- Add CLOCK HANDS.
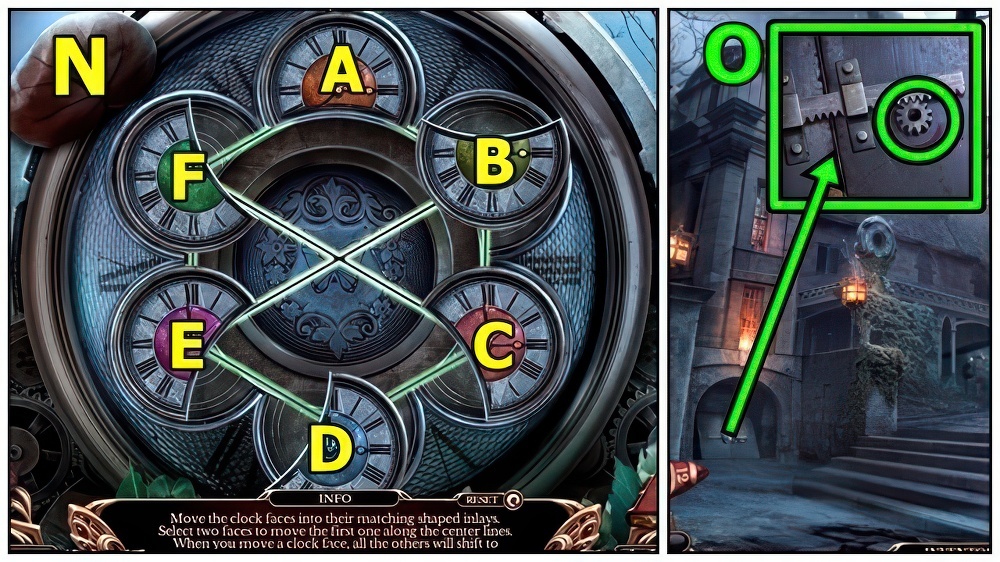
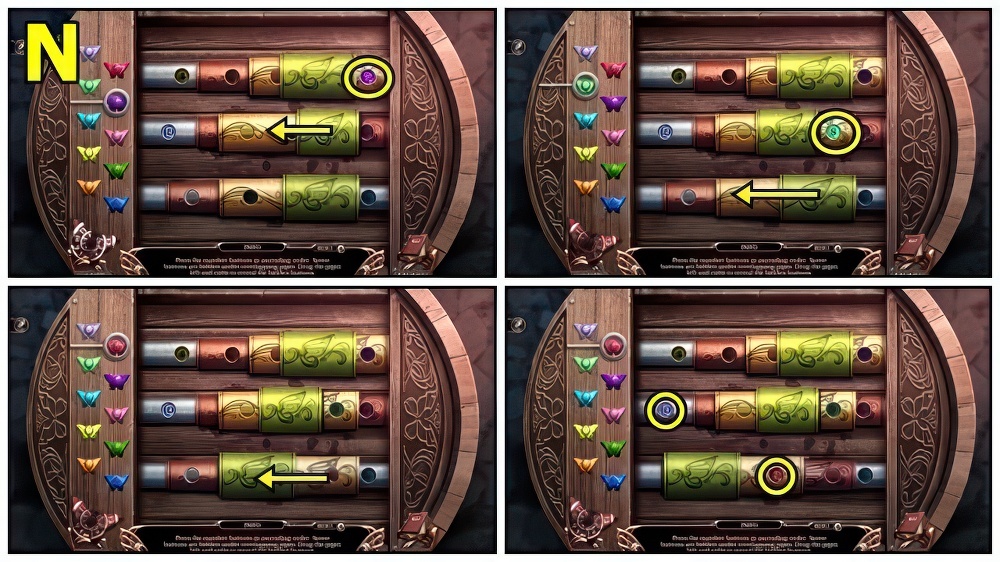
- Solution: (N) (F-C)-(B-E)-(B-E).
- Take WIND ROSE and VALVE.
- Add VALVE (O).
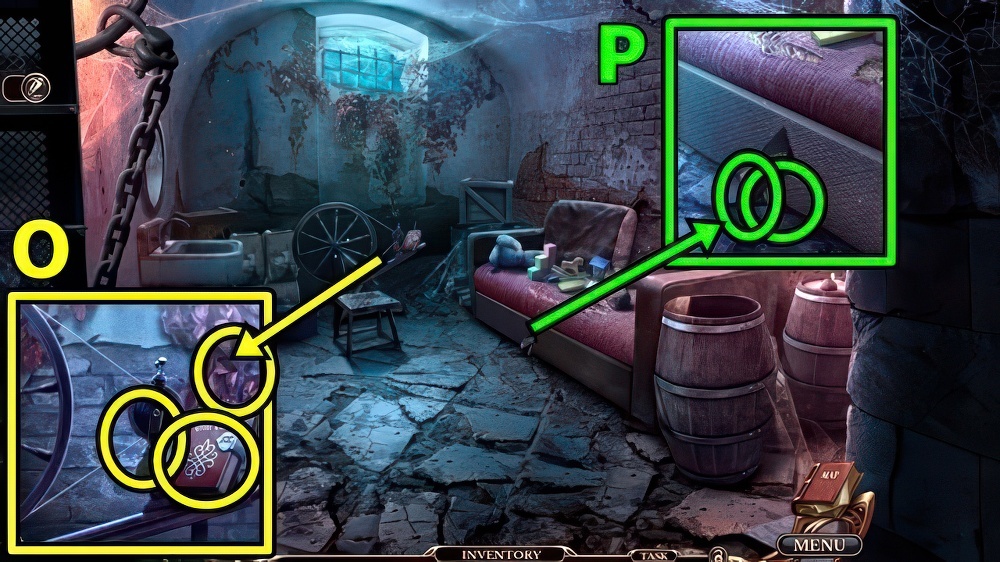
- Enter Cell.
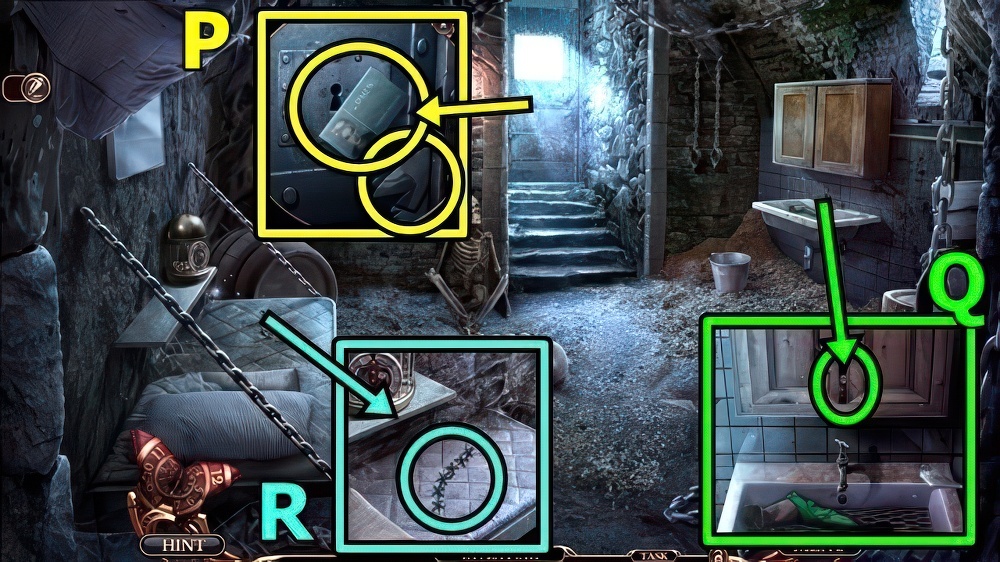
- Take ID CARD (P) and POSTER PART 2/3.
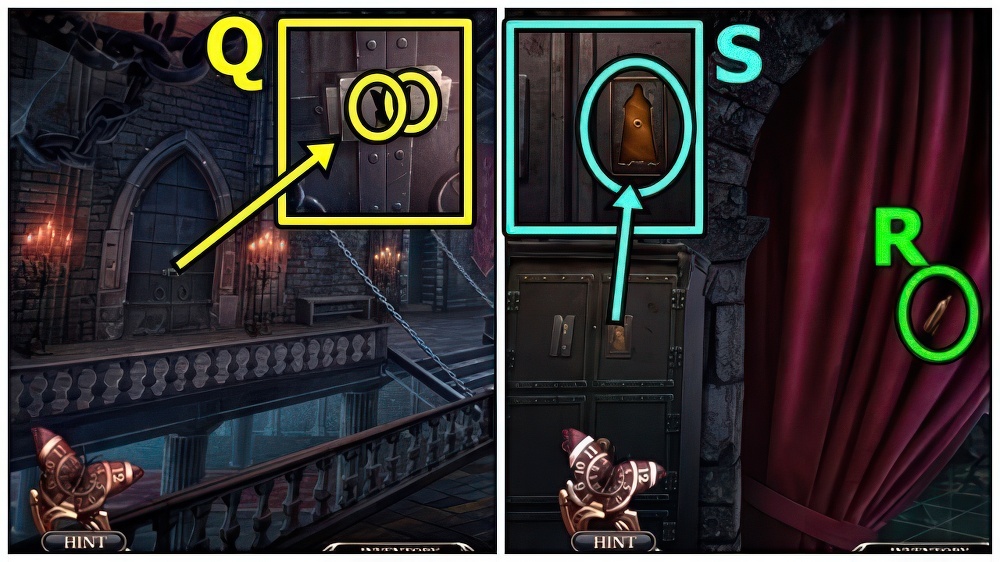
- Use ID CARD (Q), take GLASS SHARD and BROKEN FIGURINE.
- Use GLASS SHARD (R), take FIGURINE ARMS and POSTER PART 3/3.
- Move down.
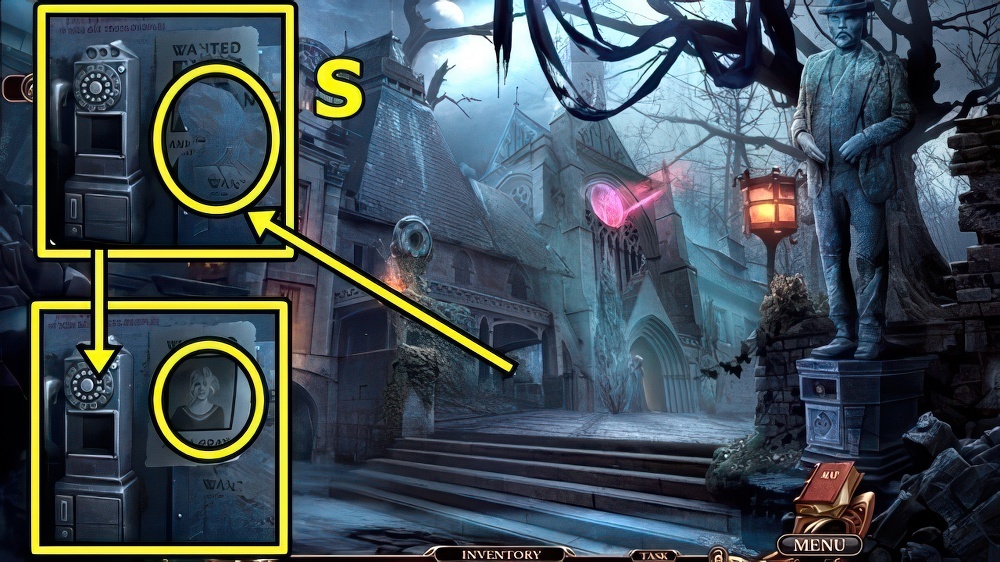
- Add POSTER PART (S).
- Examine, take SPRAYER NOZZLE.
- Move down.
- SPRAYER BUTTON and SPRAYER NOZZLE on BROKEN SPRAYER.
- Take INSECT REPELLENT.
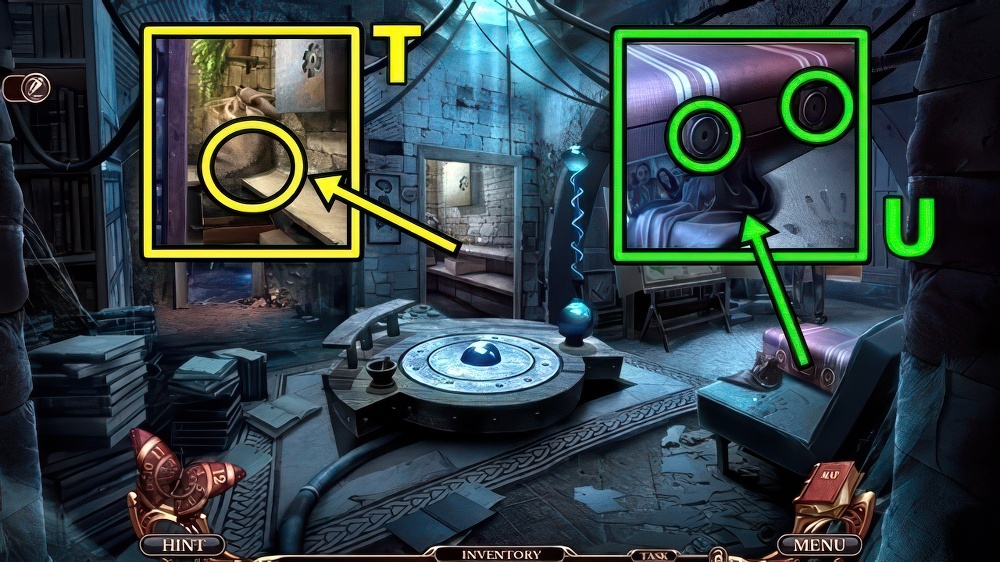
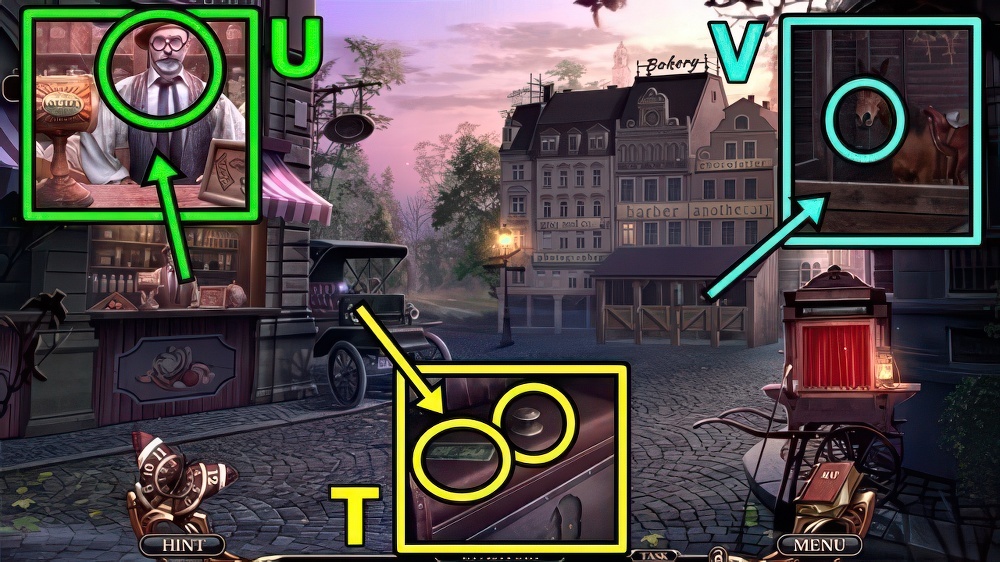
- Use INSECT REPELLENT (T), take CAR KEY.
- Insert CAR KEY (U).
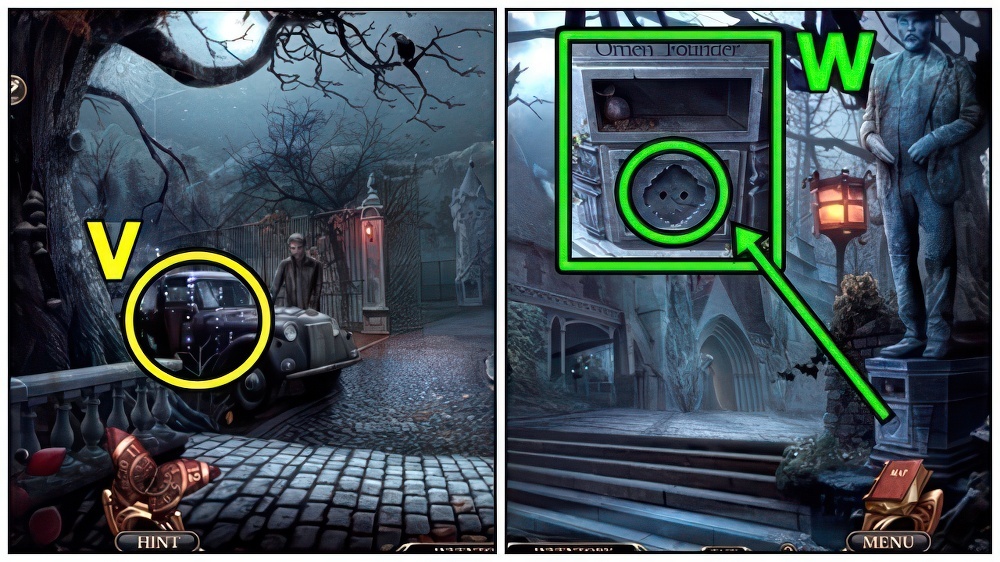
- Play puzzle (V), receive PETER’S CAMEO.
- Move forward.
- Add PETER’S CAMEO (W), take INFINITY EMBLEM and GLUE.
- Enter Cell.
- Insert INFINITY EMBLEM (X), take MARKER and TONGS.
- Use TONGS (Y), take FIGURINE HEAD.
- FIGURINE HEAD, FIGURINE ARMS and GLUE on BROKEN FIGURINE.
- Take TIME TRAVELER FIGURINE.
- Add TIME TRAVELER FIGURINE (Z), take KALEIDOSCOPE 1/3 and RECORD PAGE.
- Add RECORD PAGE (A).
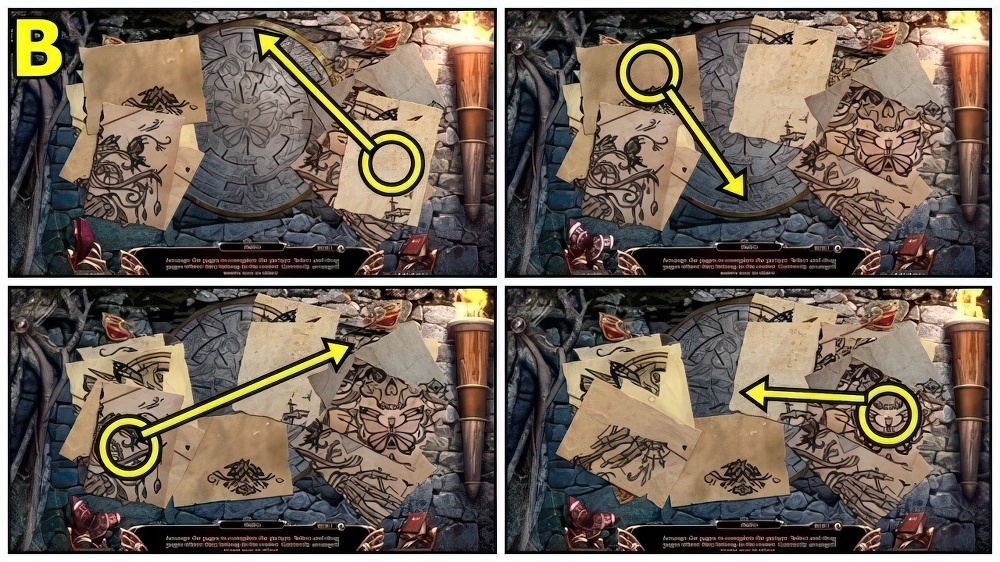
- Solution: (B).
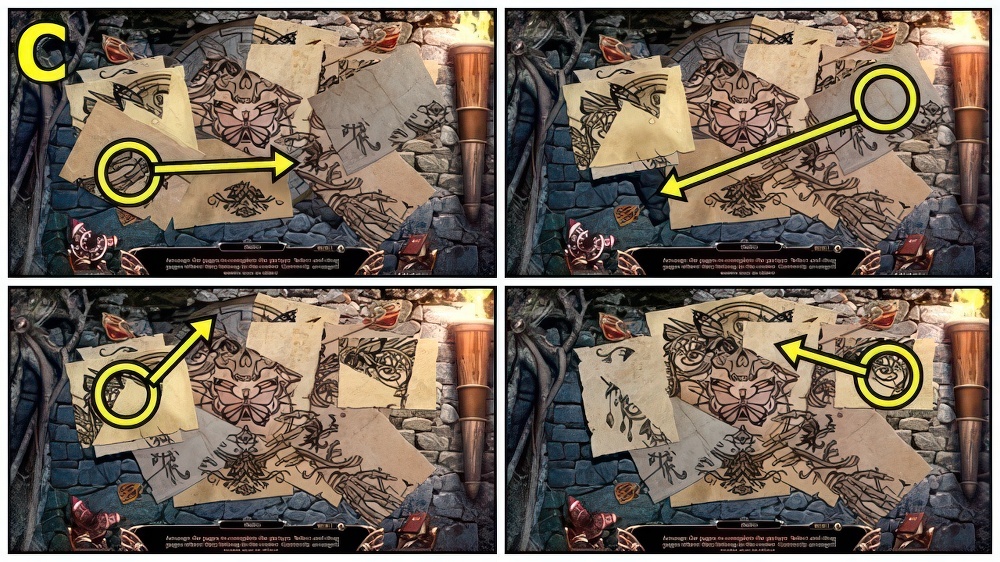
- Solution: (C).
- Solution: (D).
- Solution: (E) Ax2-Bx3-Cx5-Dx3.
- Take UNLOADED WEAPON and LOCKPICK.
- Use LOCKPICK (F).
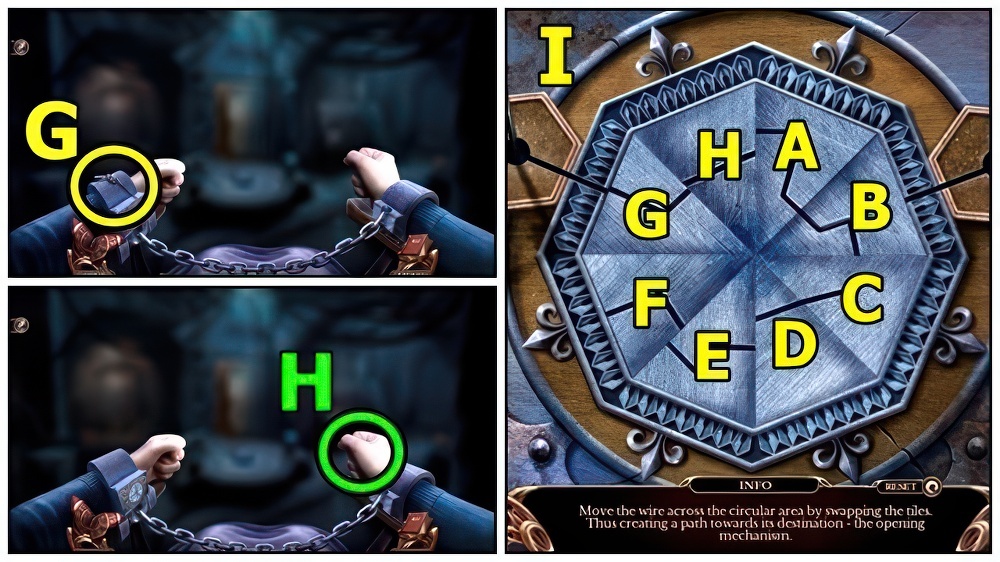
- Take WIRE (G).
- Give WIRE (H).
- Solution: (I) (G-F)-(F-H)-(B-E)-(D-A)-(B-C)-(B-H).
- Receive TRIGGER.
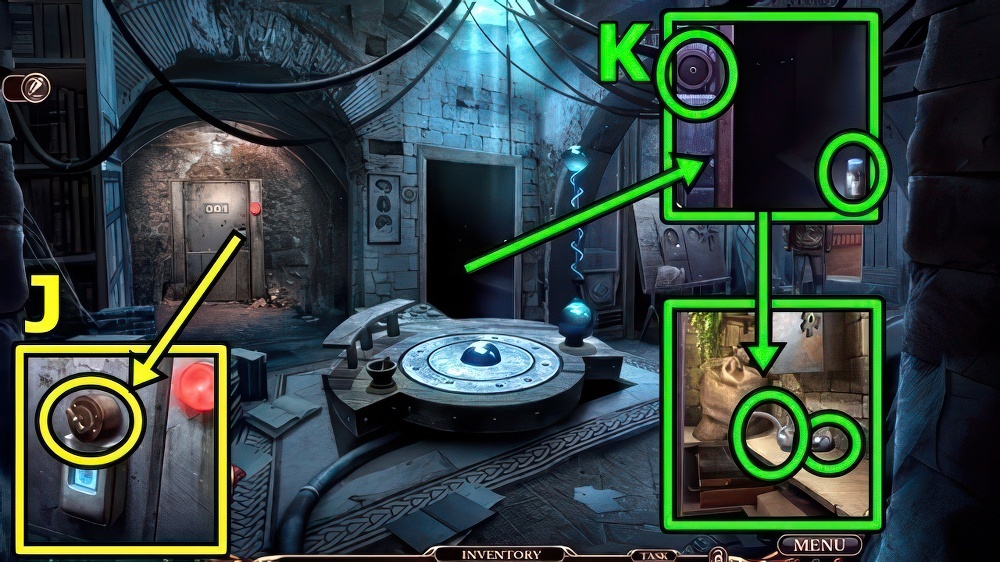
- Take SWITCH (J).
- Take MAGNETIC POWDER (K).
- Add SWITCH, take FLASK and COMPASS.
- Take RECORD FRAGMENT 1/4 (L).
- Add WIND ROSE and COMPASS.
- Play puzzle (M), take ADHESIVE TAPE.
- Take KALEIDOSCOPE 2/3 (N).
- Add MAGNETIC POWDER and ADHESIVE TAPE, receive FINGERPRINT.
- Add FINGERPRINT (O).
- Enter Invention Room.
- Take JASPER CAMEO (P) and SCREWDRIVER.
- Take RECORD FRAGMENT 2/4 (Q) and BLANK BOARD.
- Take BURNER (R).
- Add BLANK BOARD, take ELECTRONIC BOARD.
- Take RECORD FRAGMENT 3/4 (S).
- Use SCREWDRIVER, remove board.
- Add ELECTRONIC BOARD.
- Take TEST TUBE and RAZOR BLADE.
- Move down.
- Use RAZOR BLADE (T), take AUBREY CAMEO and SPIRAL TUBE.
- Add JASPER CAMEO and AUBREY CAMEO (U), take BROKEN HAIR DRYER and EMPTY DART.
- Enter Invention Room.
- Add SPIRAL TUBE (V), BURNER, TEST TUBE, FLASK and EMPTY DART.
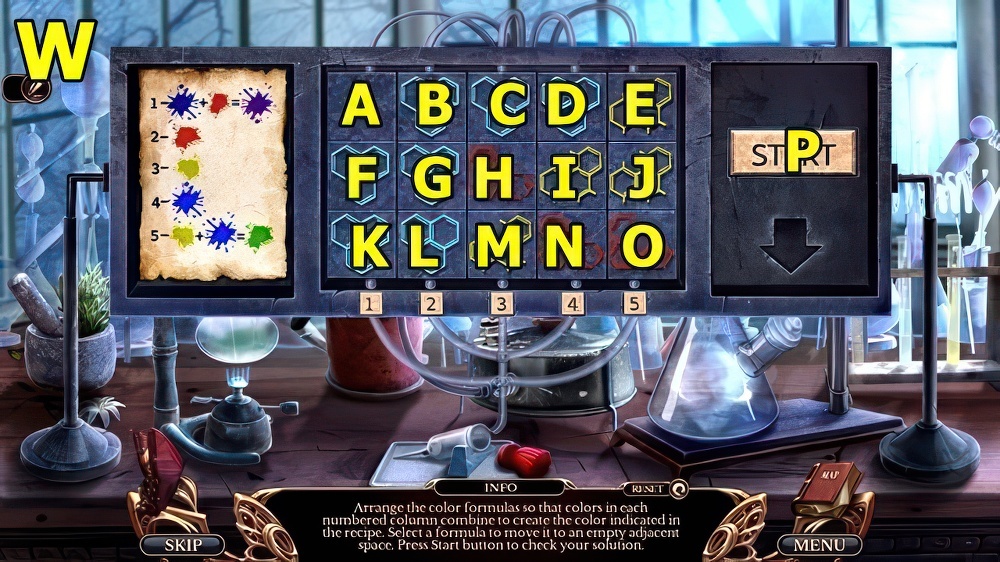
- Solution: (W) F-G-H-C-B-A-F-G-L-M-N-O-J-E-D-C-B-G-L-M-N-I-D-C-B-G-L-M-N-O-J-E-D-C-H-M-N-I-D-C-B-P.
- Receive TRANQUILIZING DART.
- Move down.

- Open barrel on TRANQUILIZER GUN, add TRANQUILIZING DART and TRIGGER, take LOADED WEAPON.
- Use LOADED WEAPON (X).
- Receive CHISEL.
- Enter Corridor.
- Take RECORD FRAGMENT 4/4 (Y).
- Return to Invention Room.
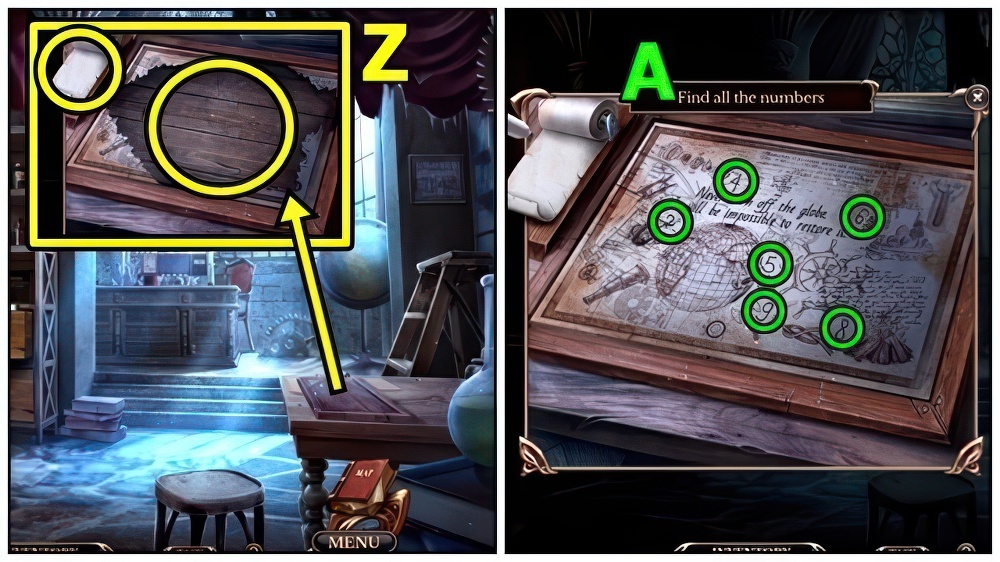
- Add RECORD FRAGMENT (Z), then MARKER.
- Find numbers (A), receive CODE.
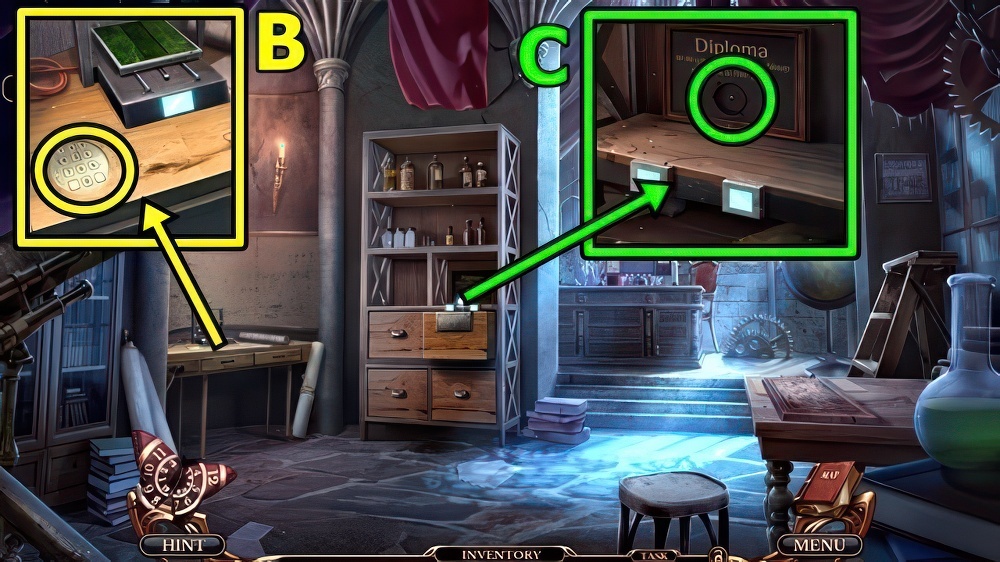
- Add CODE (B), take HAIR DRYER BUTTON and DIPLOMA DECORATION.
- Add DIPLOMA DECORATION (C), take SUPPLY KEY.
- Return to Corridor.
- Insert SUPPLY KEY (D).
- Open, take LEVER and WOOL.
- Insert LEVER (E).
- Take COBBLESTONE (F).
- Use CHISEL (G) and COBBLESTONE.
- Enter Aubrey’s Cell.
- Receive PETER’S PORTRAIT.
- Take SYMBOL OF LIFE (H).
- Return to Device Room.
- Add SYMBOL OF LIFE (I).
- Find items (J), receive SAL AMMONIAC.
- Return to Aubrey’s Cell.
- Use SAL AMMONIAC (K).
- Receive KEY HALF and KALEIDOSCOPE 3/3.
- Take NEEDLE (L).
- Add KALEIDOSCOPE.
- Solution: (M).
- Solution: (N).
- Take COIL and CHAIN.
- Take LOCKED BOOK (O).
- Add WOOL and COIL.
- Receive THREAD.
- Add NEEDLE (P) and THREAD.
- Take KEY HALF.
- Move down.
- Insert two KEY HALVES (Q).
- Enter Signal Tower.
- Take GUARD’S MARK (R).
- Add GUARD’S MARK (S), take OMEN SIGNET RING.
- Move down.
- Use OMEN SIGNET RING (T).
- Play puzzle (U), receive OMEN ROBE.
- Enter Signal Tower.
- Use OMEN ROBE (V).
- Take DIAL (W).
- Take GEARS 1/3 (X).
- Add DIAL (Y).

- Solution: (Z) Bx5-Ax4-Cx5.
- Take INGRID’S PORTRAIT and SHIP WHEEL.
- Add SHIP WHEEL (A) and CHAIN.
- Enter Study.
- Take TYPEWRITER AMULET (B).
- TYPEWRITER AMULET on LOCKED BOOK, take GIRL FIGURINE and GEARS 2/3.
- Take HEAT-SHRINK TUBING (C).
- Add GIRL FIGURINE, take WRISTWATCH and GEARS 3/3.
- Add GEARS (D), take BATTERY.
- Move down.

- HAIR DRYER BUTTON on BROKEN HAIR DRYER, remove panel, add BATTERY.
- Take HAIR DRYER.
- Add HEAT-SHRINK TUBING (E), use HAIR DRYER.
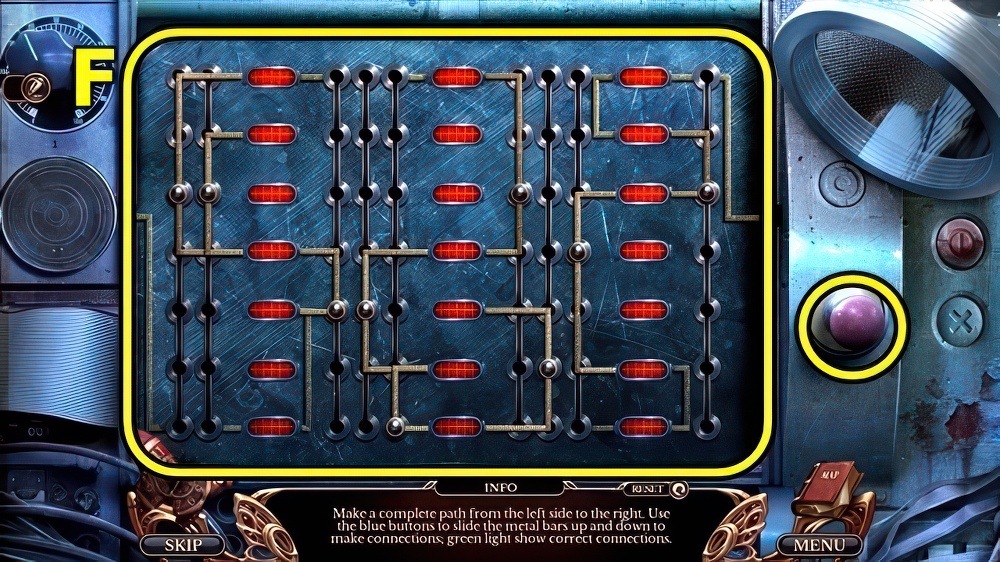
- Solution: (F).
- Take MONOCLE and MUFFLER BODY.
- Enter Study.
- Add WRISTWATCH (G) and MONOCLE.
- Take CLOCK PENDULUM and GUIDING NOZZLE.
- Add CLOCK PENDULUM (H).
- Take POWER CONTROLLER and MARTHA’S PORTRAIT.
- Add PETER’S PORTRAIT (I), INGRID’S PORTRAIT and MARTHA’S PORTRAIT.
- Play puzzle (J), receive ACCESS CARD.
- Move down.
- Use ACCESS CARD (K), take INTERFERENCE GENERATOR.
- INTERFERENCE GENERATOR, POWER CONTROLLER and GUIDING NOZZLE on MUFFLER BODY.
- Take WAVE MUFFLER.
- Add WAVE MUFFLER (L).
- Receive ARTIFACT HOURGLASS and PUZZLE TILE 1/4.
- Take WINDING KEY (M).
- Take PUZZLE TILE 2/4 (N).
- Insert WINDING KEY, take KING and CLOCK TOOL.
- Take MUSICAL NOTES (O).
- Use CLOCK TOOL.
- Find items (P), receive QUEEN.
- Take CRYPTEX (Q).
- Add KING and QUEEN, take DIAL PART 1/5 and ARROW.
- Add ARROW (R), take PUZZLE TILE 3/4 and TO-DO LIST.
- Offer TO-DO LIST (S).
- Go to Town Square.
- Take MONEY (T) and SIGNAL BUTTON.
- Receive DIAL PART 2/5 (U).
- Offer MONEY, take APPLE and SNUFFBOX.
- Offer APPLE (V), take PUZZLE TILE 4/4 and HANDLE.
- Move down.
- Add PUZZLE TILE (W).

- Solution: (X) (M-C)-(F-M)-(I-G)-(P-I)-(N-M)-(E-N)-(J-E)-(B-M)-(P-B)-(A-B)-(O-P)-(C-M).
- (C-K)-(M-C)-(O-C)-(O-C)-(D-O)-(A-C)-(D-A)-(C-D)-(J-D)-(H-F)-(G-H)-(M-H)-(M-J).
- (G-J)-(C-G)-(L-M)-(L-G)-(M-G)-(J-L).
- Take DIAL PART 3/5 and CRYPTEX TILES.

- CRYPTEX TILES on CRYPTEX, take DIAL PART 4/5 and KEY.
- Add MUSICAL NOTES (Y) and KEY.
- Press A-B-C-D-E.
- Take TICKET HALF and MUSICAL PUNCHCARD.
- Go to Town Square.
- Take CANE (Z).
- Add MUSICAL PUNCHCARD and HANDLE.
- Solution: (A) C-F-C, A-D-H-B-A, E-G-E.
- Take TICKET HALF and HORSESHOE AMULET.
- Add HORSESHOE AMULET (B), take RUBY and HARNESS.
- Move down.
- RUBY on SNUFFBOX, take SORCERER’S FACE HALF and DIAL PART 5/5.
- Add DIAL PART (C), take SKULL HALF.
- Return to Town Square.
- Add SORCERER’S FACE HALF (D) and SKULL HALF.
- Play puzzle (E), take MAP.
- Add MAP (F).
- Enter Woods.
- Take BEE EMBLEM (G).
- Take WOODEN OWL (H).
- Take TOKEN 1/3 (I).
- Add WOODEN OWL, take WICK and HONEYCOMB.
- Take FLINT (J).
- Add BEE EMBLEM and HONEYCOMB.
- Take BROKEN PRUNERS and HONEY.
- Move down.
- Attach TICKET HALVES, add HONEY.
- Take LOTTERY TICKET.
- Offer LOTTERY TICKET (K), take TOKEN 2/3 and KEROSENE.
- Enter Woods.
- Add KEROSENE (L), then WICK and FLINT.
- Find items (M), receive NAIL PULLER.
- Use NAIL PULLER (N), take BEEKEEPER’S HAT and SCREW.
- BEEKEEPER’S HAT and HARNESS on CANE, take IMPROVISED SCOOP NET.
- Use IMPROVISED SCOOP NET (O).
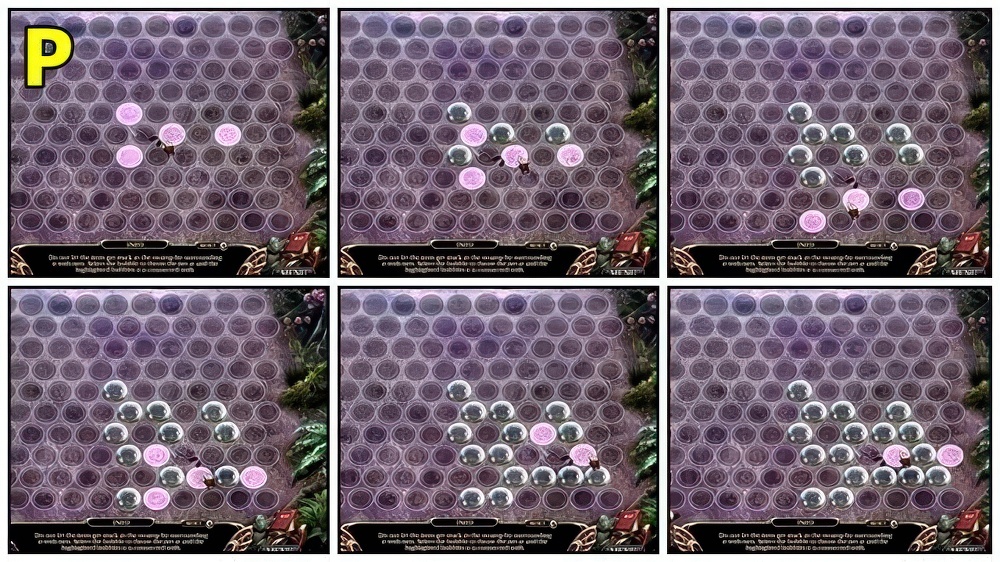
- Solution: (P) Puzzle solution is random, screenshots show a possible solution.
- Receive PRUNER PART.
- PRUNER PART and SCREW on BROKEN PRUNERS, take GARDEN PRUNERS.
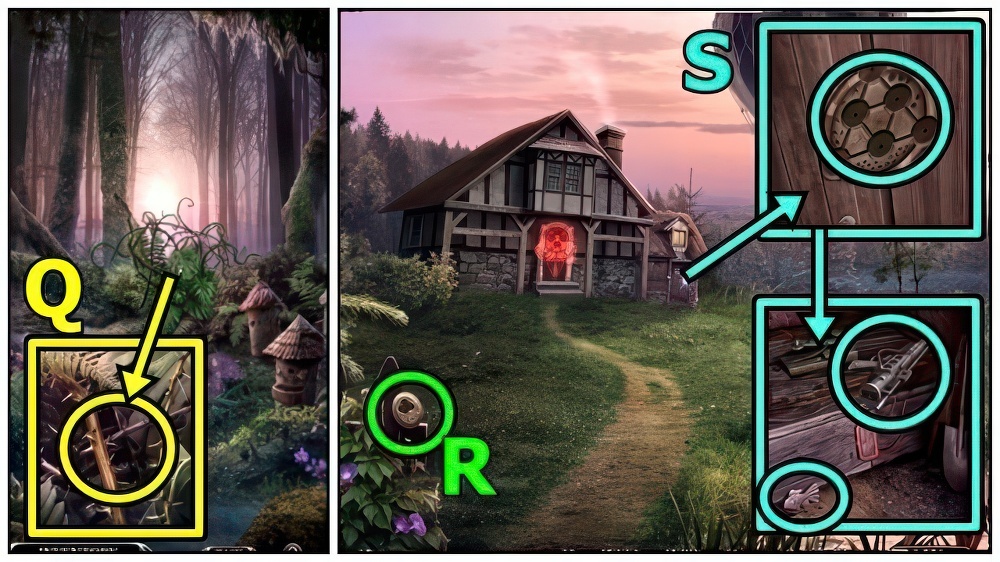
- Use GARDEN PRUNERS (Q).
- Move forward.
- Take TOKEN 3/3 (R).
- Add TOKEN (S).
- Take FISH AMULET and BROKEN DEVICE.
- Take TIME DEVICE PART 1/5 (T).
- Add FISH AMULET, take FISHING ROD and FASTENER.
- Use FISHING ROD (U).
- Play puzzle (V), receive LADDER.
- Use LADDER (W).
- Take MORSE CODE (X).
- Add MORSE CODE (Y) and SIGNAL BUTTON.

- Solution: (Z).
- Solution: (A).
- Take BUCKET and TIME DEVICE PART 2/5.

- Add BUCKET (B), receive WATER and REFRIGERATOR HANDLE.
- Add WATER (C).
- Enter Sorcerer’s Hut (D).

- Take MODEL FINGERS 1/3 (E).
- Add FASTENER, then REFRIGERATOR HANDLE.
- Take MICROWAVE BUTTON and TIME DEVICE PART 3/5.
- Take TIME DEVICE PART 4/5 (F).
- Take STONE (G).
- Add MICROWAVE BUTTON, take BONE DECORATION and TIME DEVICE PART 5/5.
- TIME DEVICE PART and ARTIFACT HOURGLASS on BROKEN DEVICE, take ANTI-TIME DEVICE.
- Use ANTI-TIME DEVICE (H).
- Play puzzle (I), receive REMOTE CONTROL.
- Use REMOTE CONTROL (J), take MODEL FINGERS 2/3 and GLOVES.
- Use GLOVES (K), receive ICE BLOCK.
- Add ICE BLOCK (L), take WALL STENCIL.
- Add STONE (M), then WALL STENCIL.
- Press.
- Enter Dungeon.
- Take AWL (N).
- Take STAFF (O).
- Use AWL, take SMALL JACK.
- Add SMALL JACK (P), take FEATHER EARRINGS.
- Add FEATHER EARRINGS (Q) and BONE DECORATION.
- Take MODEL FINGERS 3/3.
- Add MODEL FINGERS (R), take SCRAPER.
- Use SCRAPER (S), take MIRROR.
- Use MIRROR (T).
- Receive STONE OF POWER.
- STONE OF POWER on STAFF, take MAGICAL STAFF.
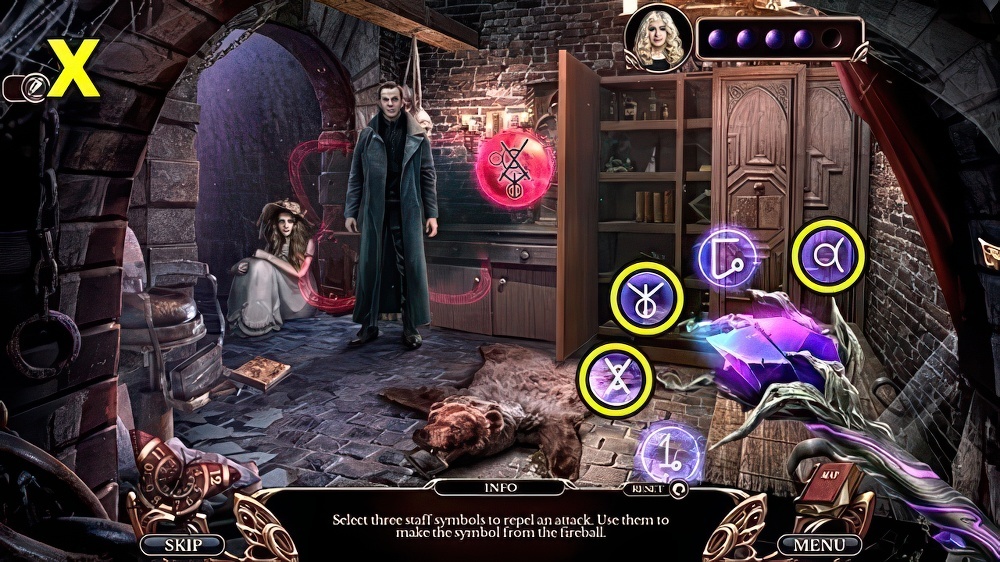
- Use MAGICAL STAFF (U).
- Solution: (V) Screenshots show which symbols to choose but may appear in a different position.
- Solution: (W).
- Solution: (X).
- Walkthrough Bonus Chapter, at the link below.


