Grim Tales 21: Echo Of The Past – The game’s walkthrough begins with Anna Grey and her adult daughter Alice sorting through old things in the attic together. They find a note that says my sister was 13 years old the last time I saw her. We were about to go to bed. Our father disappeared under strange circumstances, but I had no choice. I left Louise with a nanny and left school myself. Years passed. On the day of our coming of age, my twin sister, the innocent and naive Louise, was about to be married. Further into things they find a magic doll she looks a lot like Alice, and the enchanted doll kidnaps her. It’s up to Anna to find out if this is connected to her mum Anastasia’s past and save her daughter. If you can not pass any of the puzzles or do not know where the items are, on our site you can watch the walkthrough of the game Grim Tales 21: Echo Of The Past, and how this doll is connected to the family.
Grim Tales 21: Echo Of The Past – Walkthrough
Here you can see the full walkthrough of Grim Tales 21: Echo Of The Past game, namely for all chapters, including bonus chapter, in pictures.
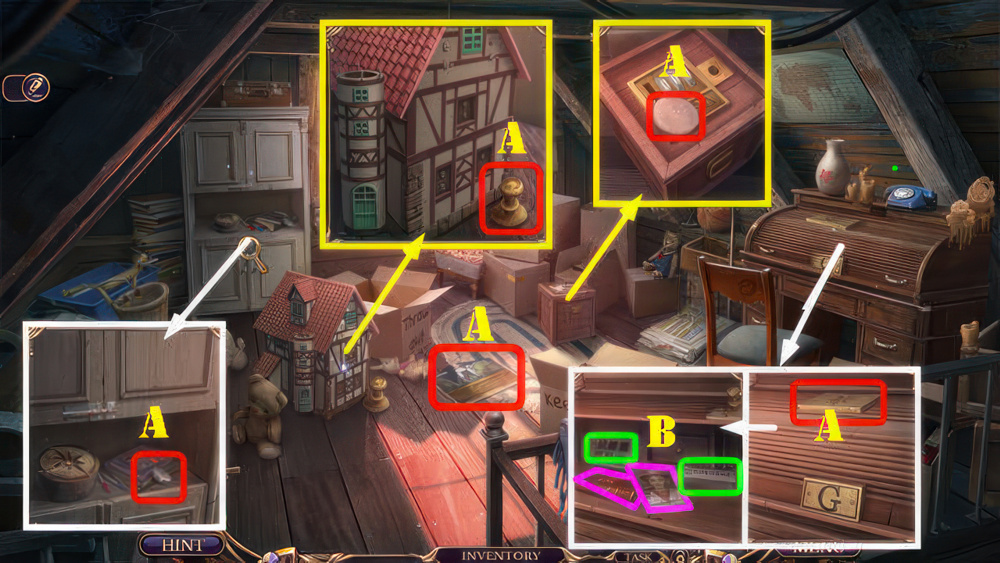
- Sort out the stuff in the attic.
- Take WOODEN BLOCK, LOCK REEL, G KEY, PUFF, and POSTER FRAGMENT (A).
- Use G KEY, take VINEGAR and WINDOWS 1/3 (B).
- Look at book and photo (purple).
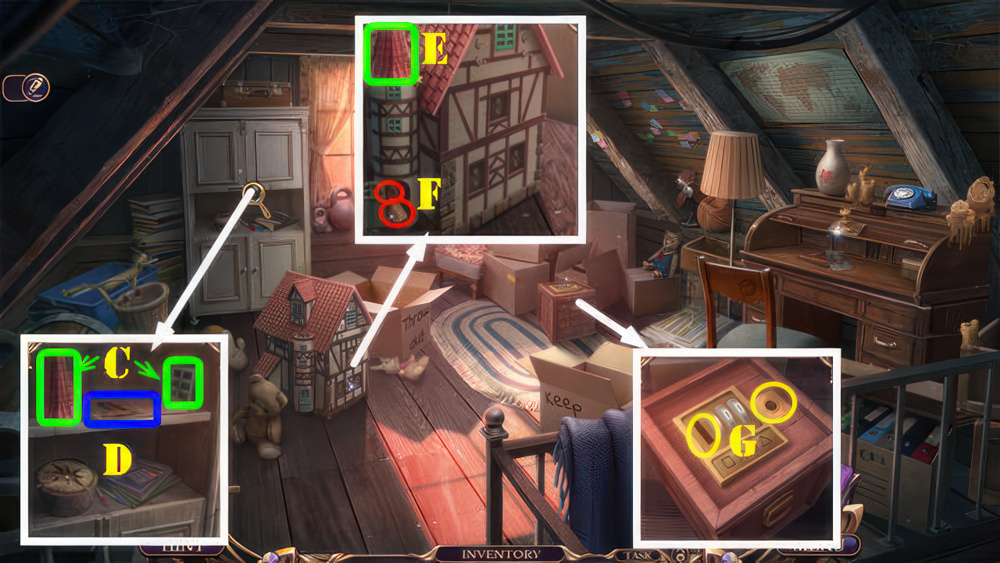
- Use VINEGAR on latch and select, take WINDOWS 2/3 and TOWER (C).
- Look at newspaper (D).
- Place TOWER (E).
- Take CHISEL and KNOB (F).
- Place LOCK REEL and KNOB (G).
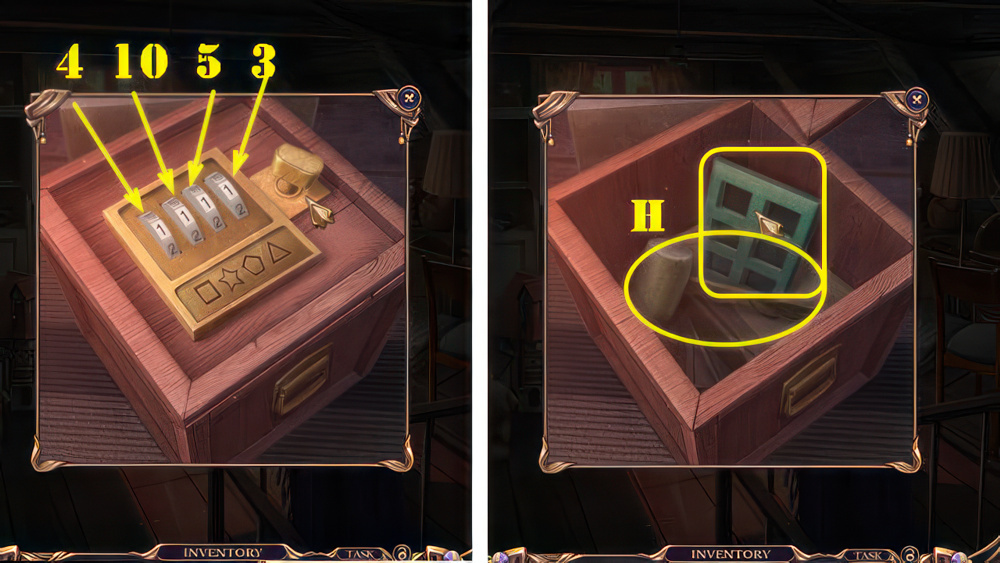
- Walkthrough: count the number of sides on each shape: (4-10-5-3).
- Take MALLET and WINDOWS 3/3 (H).
- CHISEL and MALLET on WOODEN BLOCK, take WIND ROSE.
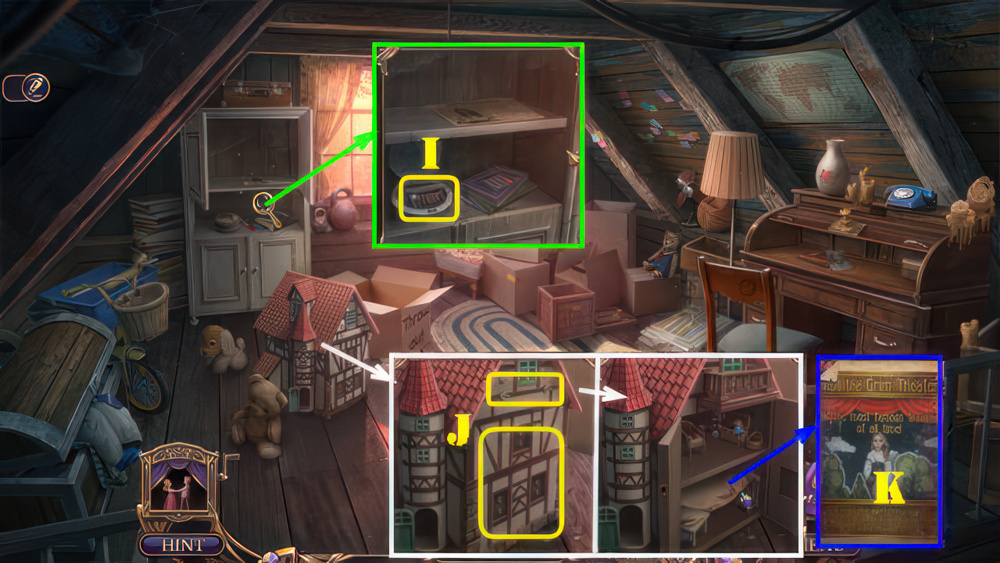
- Place WIND ROSE, take BALCONY (I).
- Place BALCONY and WINDOWS 3/3 (J).
- Play puzzle, receive SMOKER BODY.
- Select fragment, place POSTER FRAGMENT and select (K).
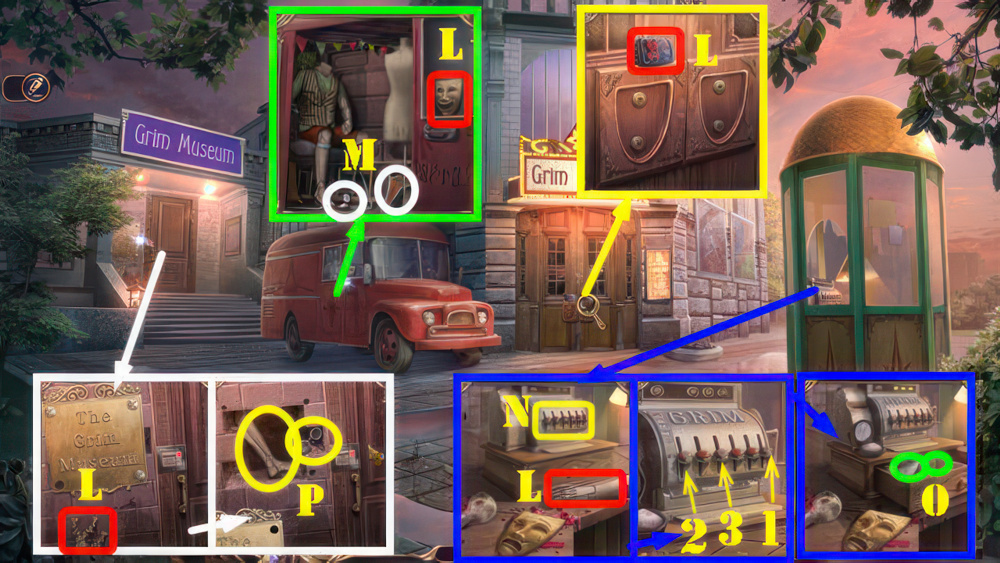
- Take MECHANICAL ARM, REMOTE, MASK OF JOY, and ARTEMISIA (L).
- Use REMOTE, take POWDER and BELLOWS (M).
- Use POWDER and PUFF (N), select 1-2-3.
- Take LID and COIN (O).
- Use COIN, take MECHANICAL LEG and GLASSES (P).
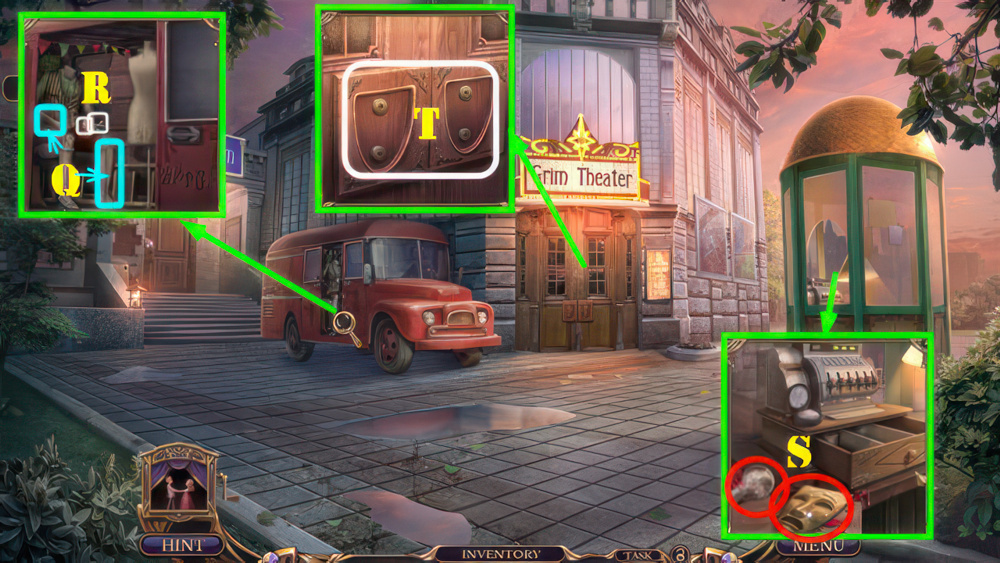
- Place MECHANICAL LEG and MECHANICAL ARM (Q).
- Take FLINT AND STONE and MAKEUP (R).
- ARTEMISIA, LID, BELLOWS, and FLINT AND STONE on SMOKER BODY, take SMOKER.
- Use SMOKER, take SAD MASK and LIGHTBULB 1/4 (S).
- Place SAD MASK and MASK OF JOY (T).

- Select the animal shadow on the left that matches the shape created by the hands.
- Bottom buttons turn green when you select correctly.
- Walkthrough (1-8).
- Enter (U).
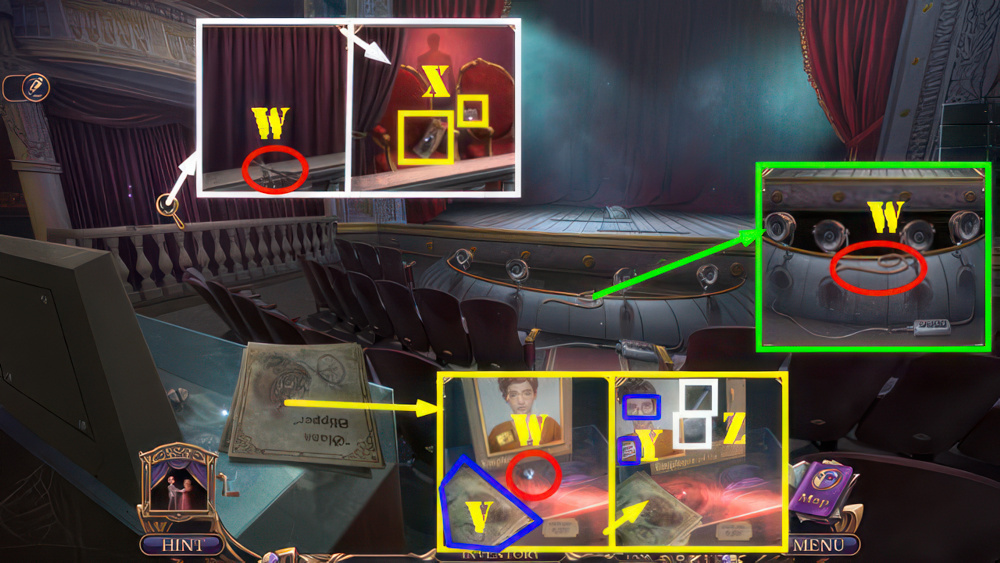
- Select papers (V).
- Take SCREW, BROKEN SCISSORS, and CORD (W).
- Use CORD, take BADGE and STICKER (X).
- Place GLASSES and BADGE (Y).
- Take LIGHTBULB 2/4 and LEVER (Z).
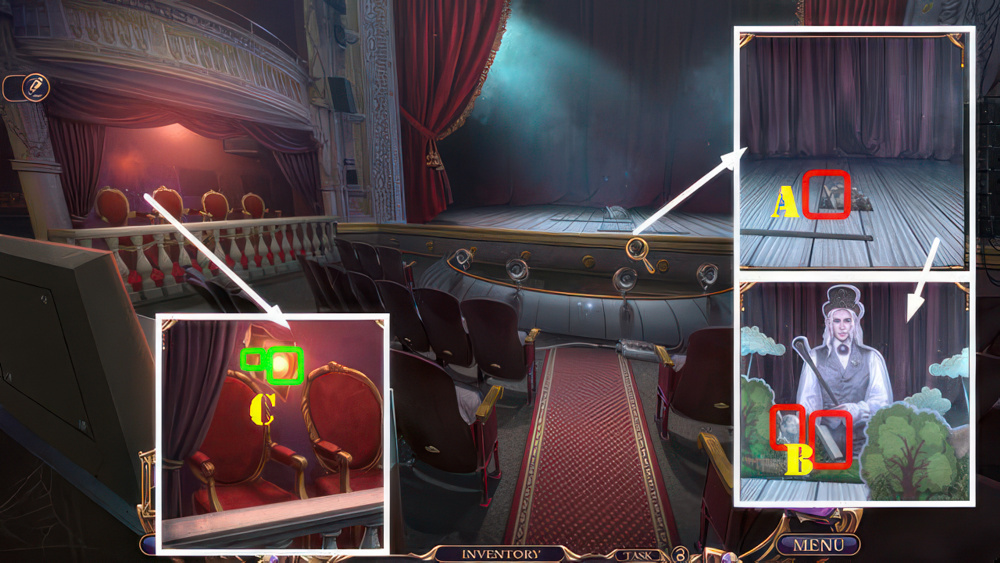
- Place LEVER (A), take GRINDSTONE and LIGHTBULB 3/4 (B).
- Remove rusty screw on BROKEN SCISSORS, replace with SCREW and use GRINDSTONE, take SCISSORS.
- Use SCISSORS, take POWER BUTTON and LIGHTBULB 4/4 (C).

- Place LIGHTBULB 4/4 and STICKER (D).
- Play puzzle, receive CANE.
- Receive PASS.
- Walk down.
- Use PASS (E).
- Enter (F).
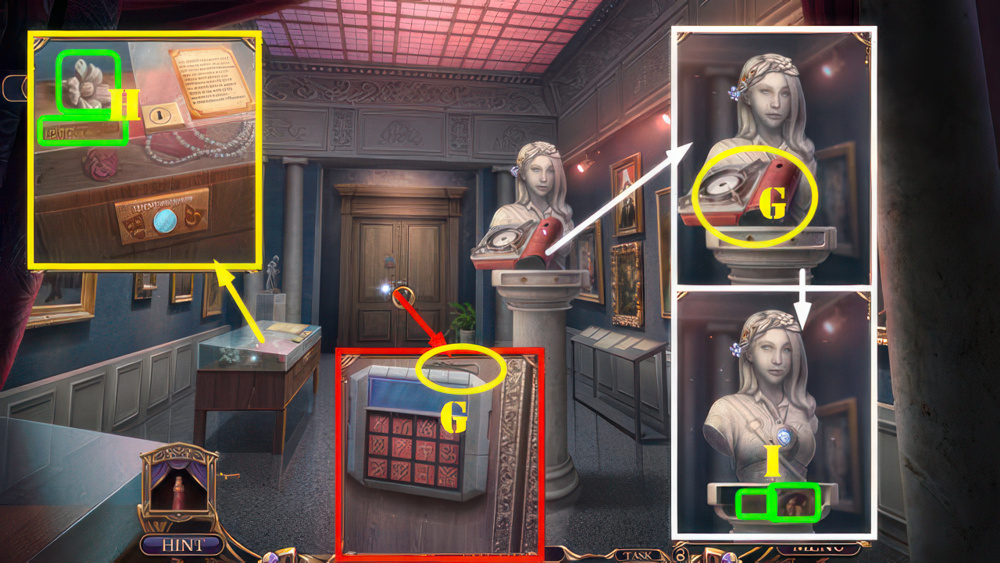
- Take HAIRPIN and PORTABLE STOVE (G).
- Use HAIRPIN, take STONE FLOWER and NAMEPLATE (H).
- Place NAMEPLATE, take GLAZED PRETZEL 1/4 and PARCHMENT (I).
- Walk down.
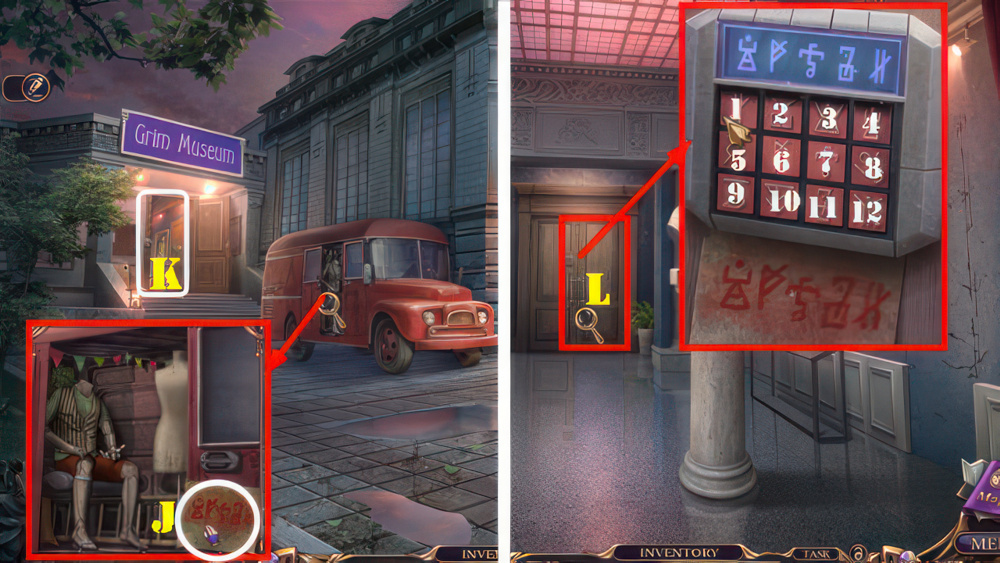
- Use PARCHMENT and MAKEUP, rub the makeup over the parchment, take CODE (J).
- Go (K).
- Place CODE, enter 4-6-7-11-1.
- Enter (L).
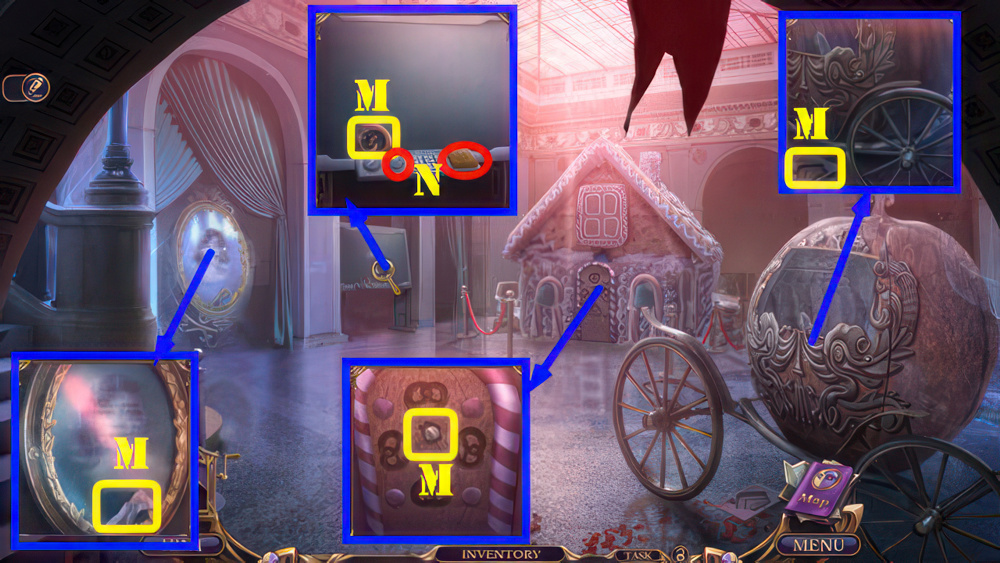
- Take GLAZED PRETZEL 2/4, PICTURE PART, MOLD, and ADJUSTING KNOB (M).
- Place ADJUSTING KNOB and POWER BUTTON (N).
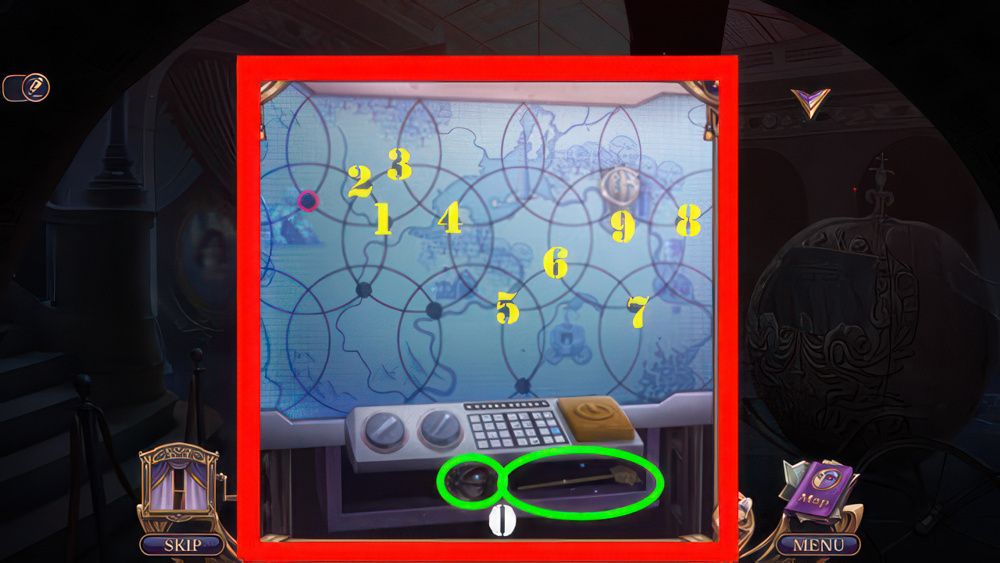
- Move the hot air balloon along the circles to the green dot.
- Select a yellow dot to move the balloon to that location.
- Walkthrough: (1-9).
- Take PUMPKIN HANDLE and LOLLIPOP STICK (O).

- Place PUMPKIN HANDLE, take GLAZED PRETZEL 3/4 and DIAMOND SHOE (P).
- Go to Theater Hall.
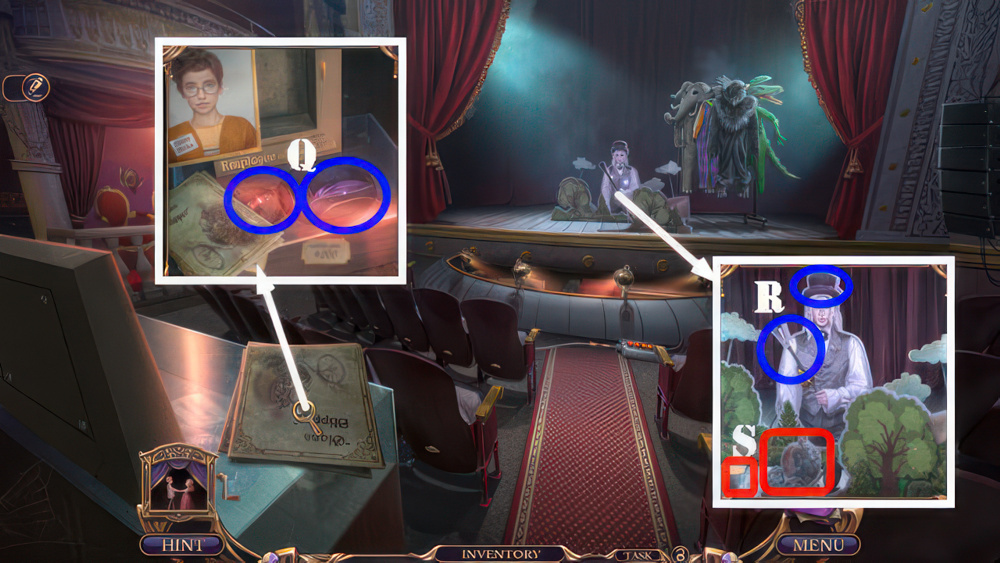
- Use DIAMOND SHOE, take GLAZED PRETZEL 4/4 and TOP HAT (Q).
- Place CANE and TOP HAT (R).
- Take SUGAR and CARRIAGE TOKEN (S).
- Go to Hall of Feats.
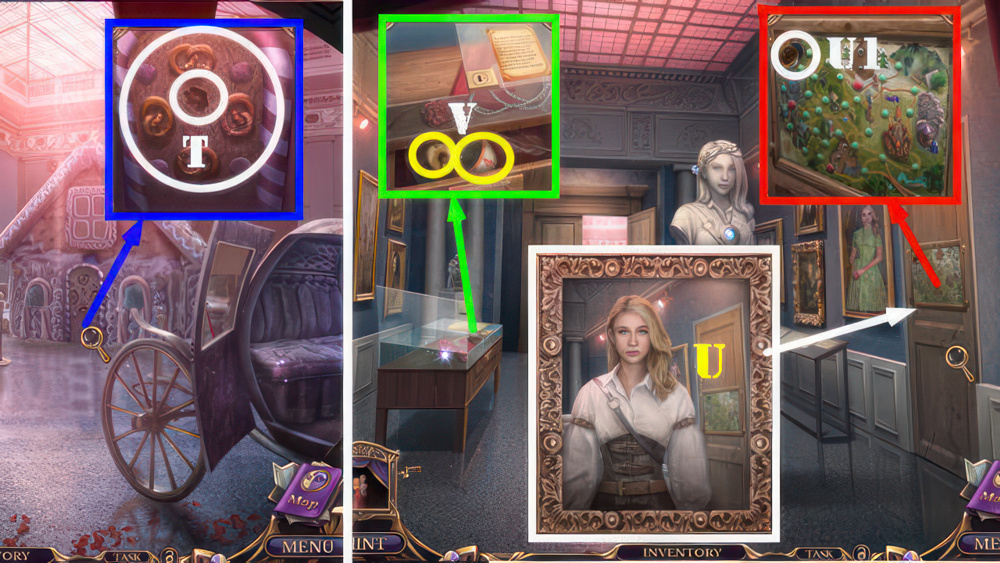
- MOLD, LOLLIPOP STICK, and SUGAR on PORTABLE STOVE.
- Select red button, take HOUSE LOLLIPOP.
- Place GLAZED PRETZEL 4/4 and HOUSE LOLLIPOP (T).
- Play puzzle, receive ALEXANDRA’S PORTRAIT.
- Walk down.
- Place ALEXANDRA’S PORTRAIT (U).
- Take MAGNET KEY (U1).
- Use MAGNET KEY, take MUG 1/3 and PRECIOUS APPLE (V).
- Go to Hall of Feats.
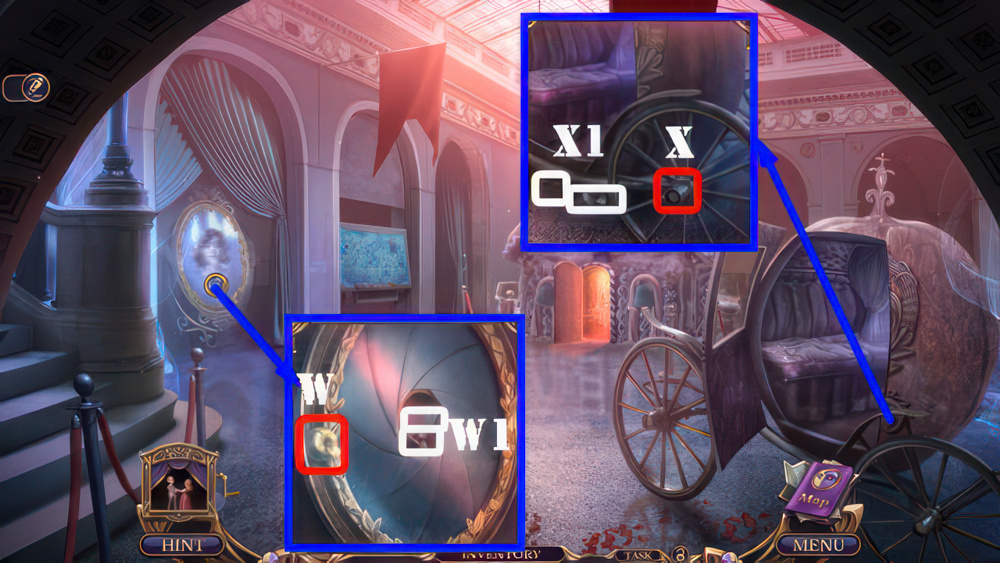
- Place PRECIOUS APPLE (W).
- Take LUG WRENCH and MIRROR SHARD (W1).
- Use LUG WRENCH (X).
- Take CRYSTAL FLOWER and IMAGE CARD 1/4 (X1).
- Walk down.
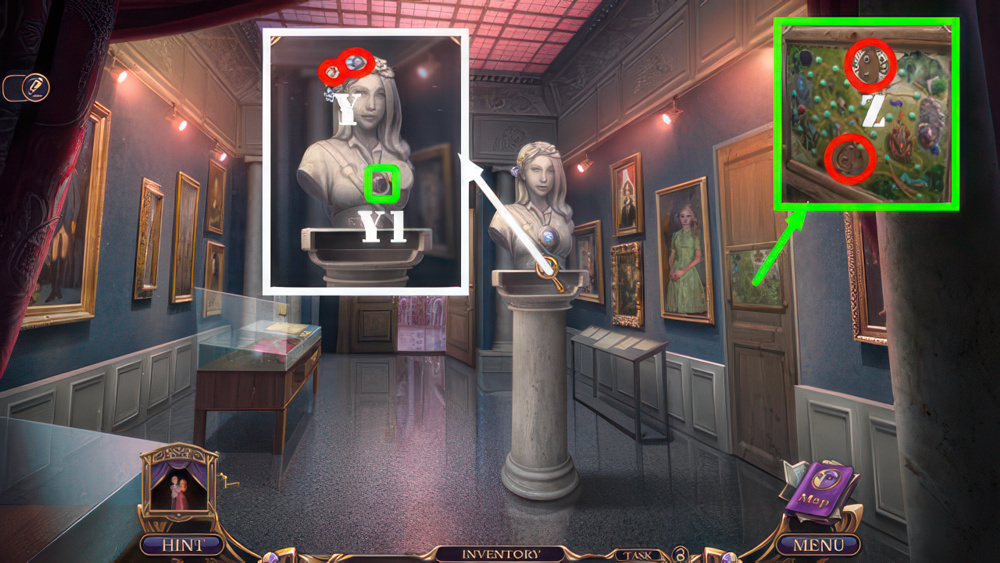
- Place STONE FLOWER and CRYSTAL FLOWER (Y).
- Take HOUSE TOKEN (Y1).
- Place CARRIAGE TOKEN and HOUSE TOKEN (Z).
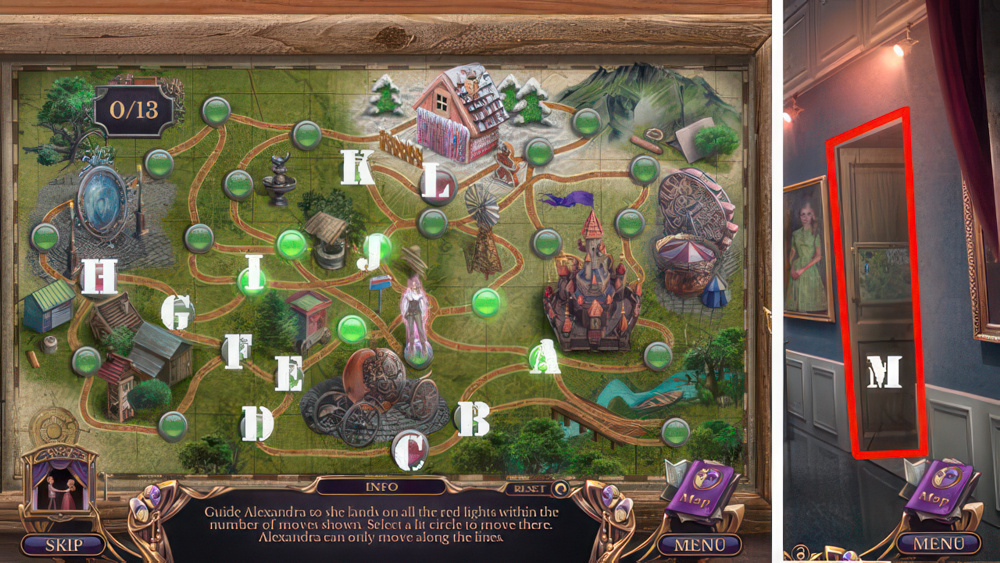
- Guide Alexandra so she lands on all the red lights within the number of moves shown.
- Select a lit circle to move there.
- Alexandra can only move along the lines.
- Walkthrough: (A-B-C-D-E-F-G-H-G-I-J-K-L).
- Enter (M).
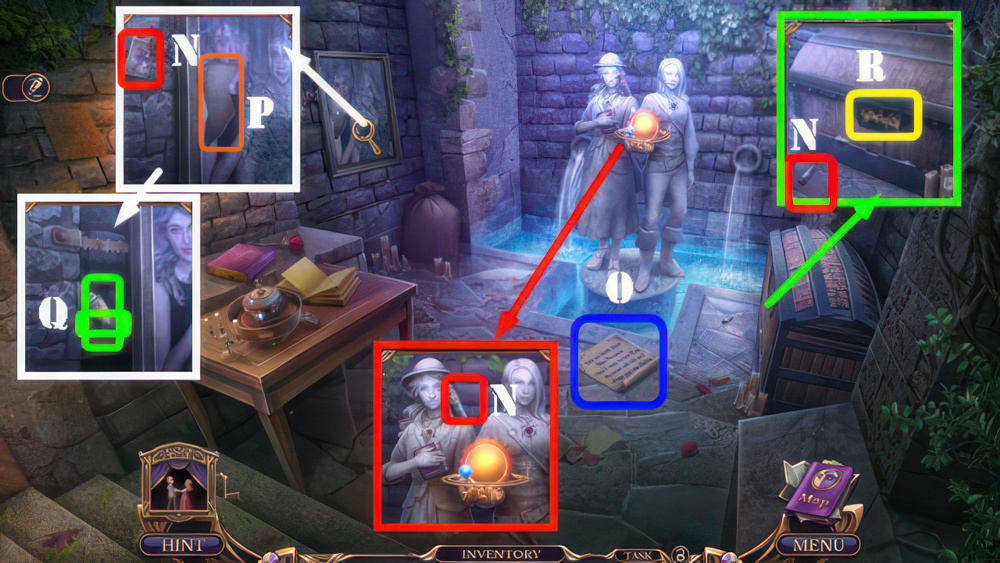
- Take IMAGE CARD 2/4, NOZZLE, and RESTORATION SPRAY (N).
- Look at note (O).
- Place PICTURE PART and use RESTORATION SPRAY (P).
- Take GAS CYLINDER and FORGED GRIM (Q).
- Place FORGED GRIM (R).
- Play puzzle, receive PLANET.
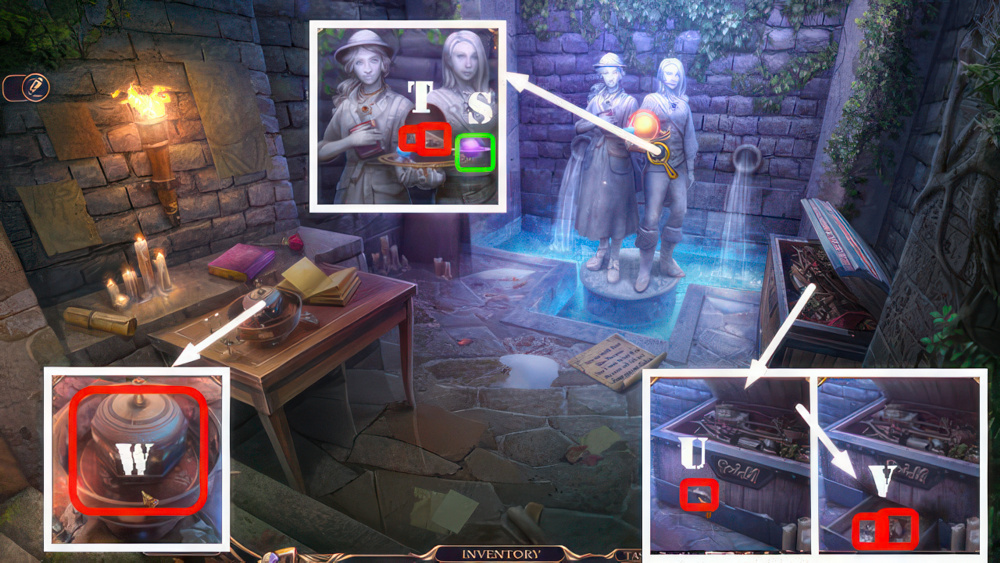
- Place PLANET (S).
- Take IMAGE CARD 3/4 and TRIGGER (T).
- NOZZLE and TRIGGER on GAS CYLINDER, take GAS CUTTER.
- Use GAS CUTTER (U).
- Take ANASTASIA’S FIGURINE and IMAGE CARD 4/4 (V).
- Place IMAGE CARD 4/4 and MIRROR SHARD (W).
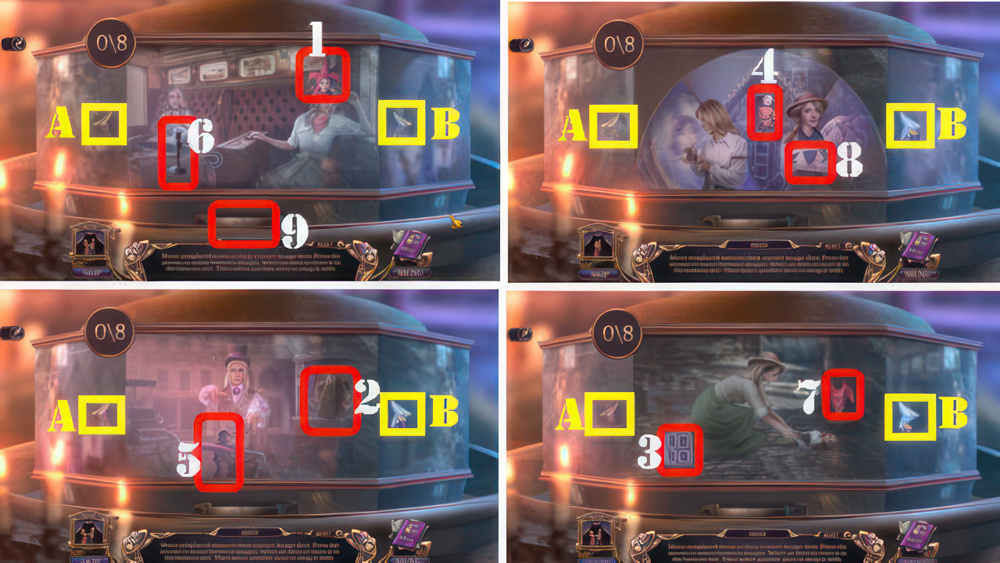
- Move misplaced items to their correct image slots.
- Press the arrows to move between images.
- Select an item to store it in the bottom slot.
- Then select another item to swap it with.
- Walkthrough (1-B×2-2)-(B-3)-(B×2-4)-(B-5)-(A×2-6)-(A-7)-(B×2-8)-(A-9).
- Take BROKEN LANTERN and PAIRED LOCKET.
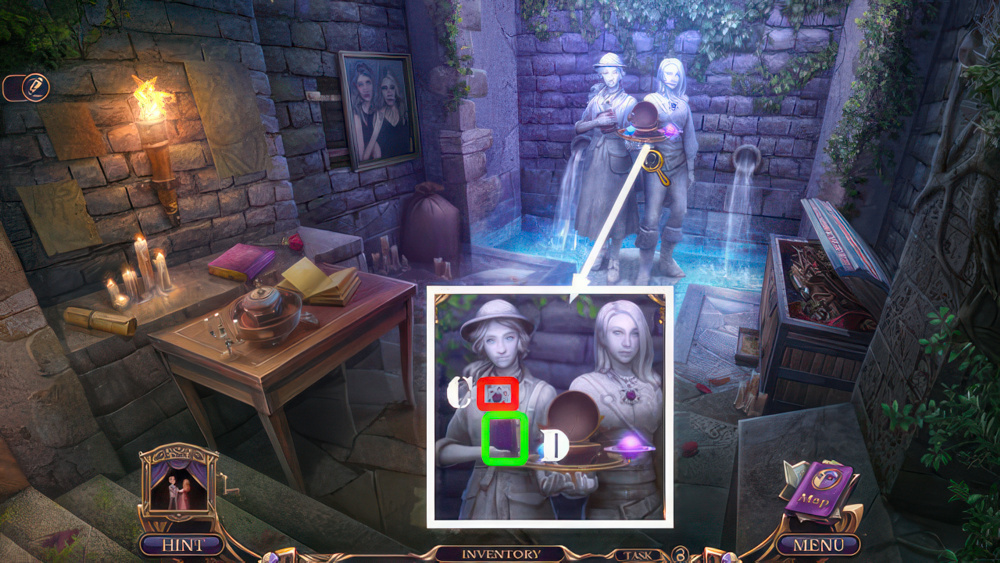
- Place PAIRED LOCKET (C).
- Look at book (D).
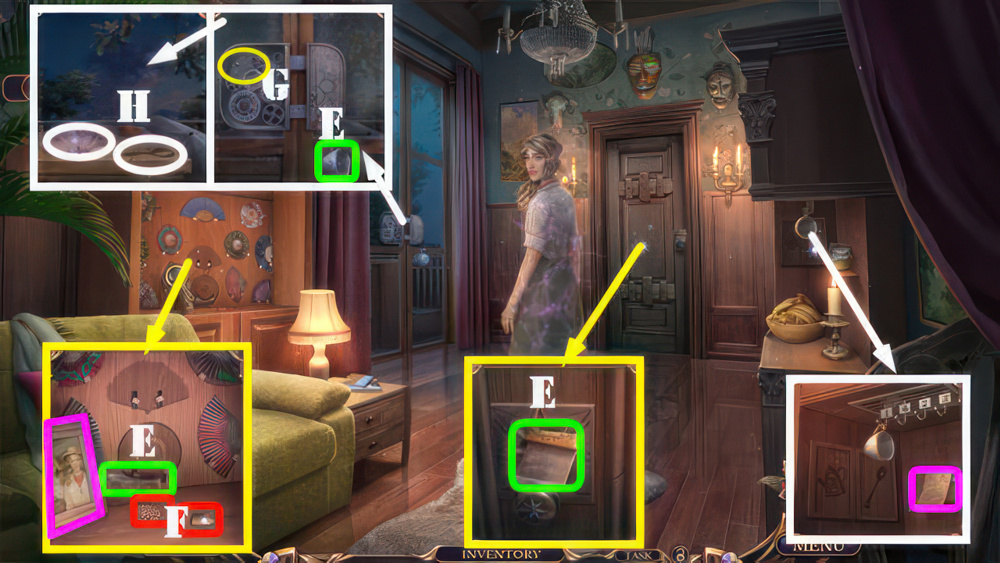
- Look at note and photo (purple).
- Take SCRAPER, MUG 2/3, and GLASS DOME (E).
- Use SCRAPER, take GEAR and TEAPOT TILE (F).
- Place GEAR (G).
- Take FEATHER FAN and SPOON TILE (H).
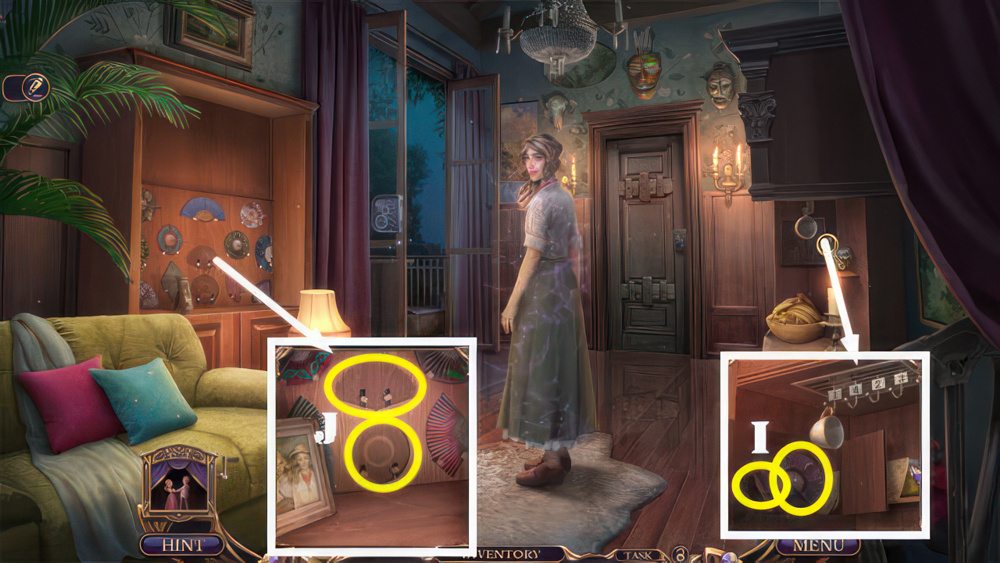
- Place SPOON TILE and TEAPOT TILE, take ROUND FAN and CORKSCREW (I).
- Place FEATHER FAN and ROUND FAN (J).
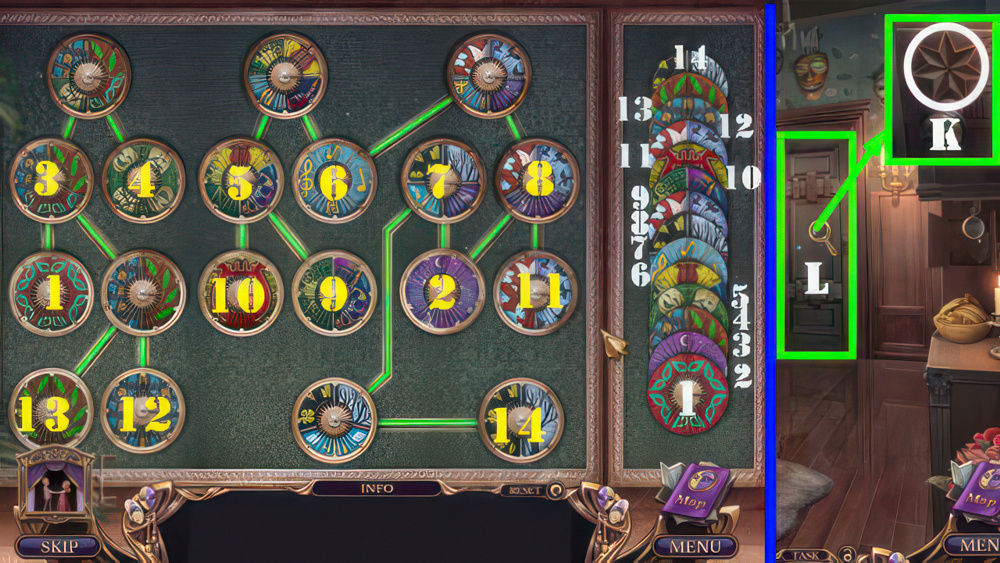
- Place the fans so that the image on the bottom panel matches the images on the top panels.
- Once the fans are connected correctly, the connection between them lights up.
- Walkthrough (1-14).
- Take SEVEN-POINTED STAR.
- Place SEVEN-POINTED STAR (K).
- Go (L).
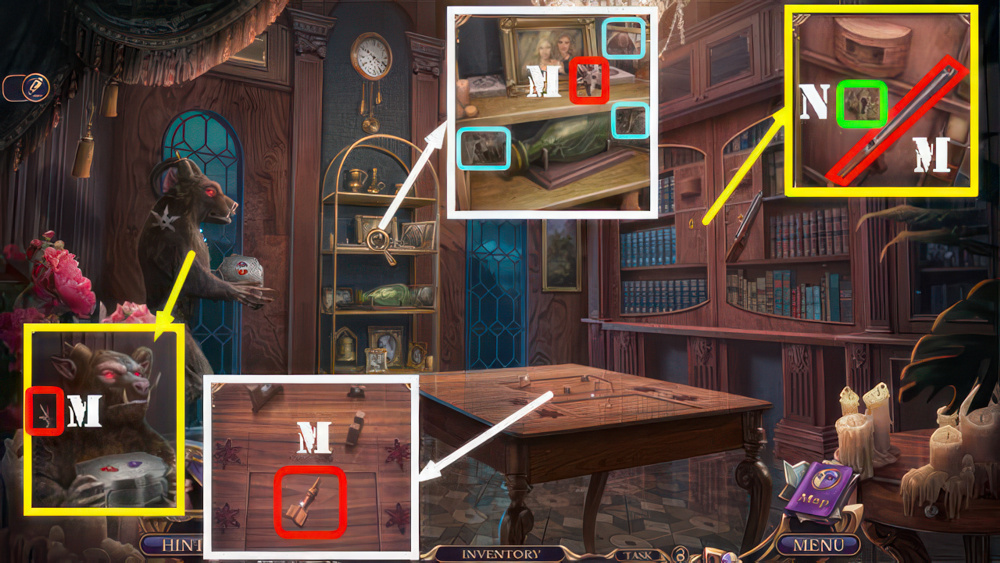
- Take SHURIKEN 1/4, SHURIKEN 2/4, BOOK KEY, and DISASSEMBLED CROSSBOW (M).
- Look at three photos (light blue).
- Use BOOK KEY (N).
- Play puzzle, receive HORN.
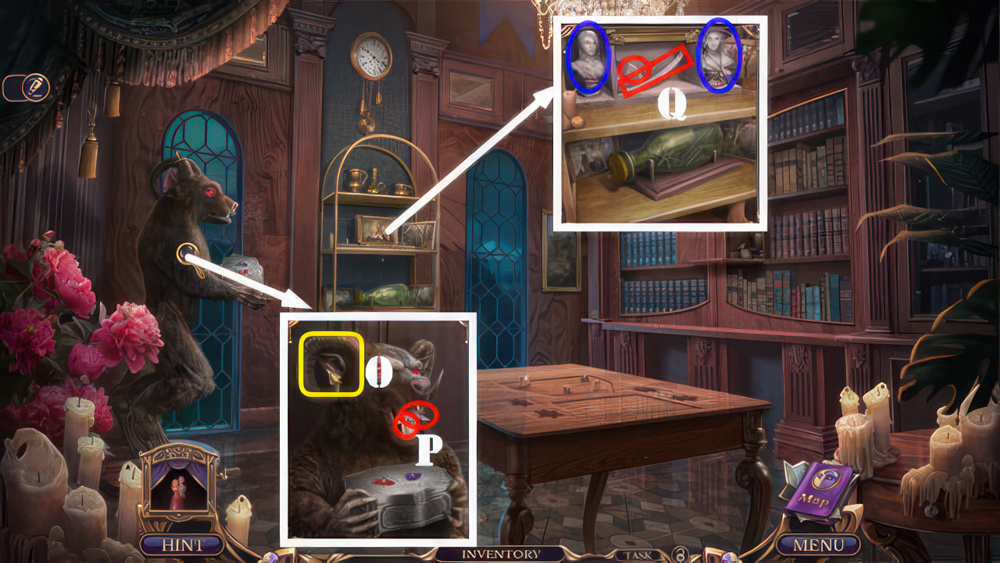
- Place HORN (O).
- Take ALEXANDRA’S FIGURINE and SHURIKEN 3/4 (P).
- Place ANASTASIA’S FIGURINE and ALEXANDRA’S FIGURINE (dark blue), take BOW and MUG 3/3 (Q).
- Walk down.
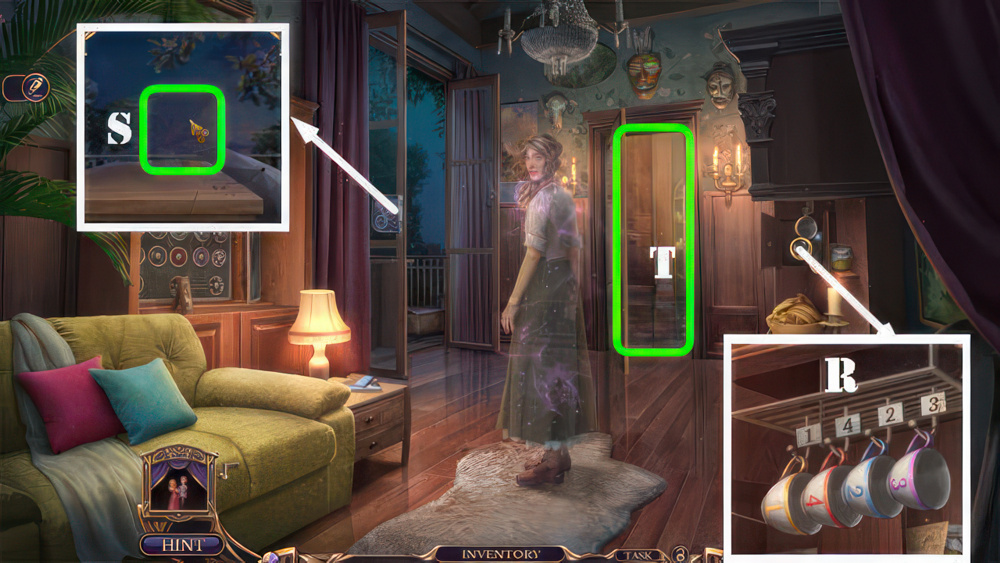
- Place MUG 3/3, arrange cups as shown (R), receive MATCHES and ARROW.
- MATCHES and GLASS DOME on BROKEN LANTERN, take LANTERN.
- Place LANTERN (S).
- Play puzzle, receive GRIMS’ BOOK OF FAIRY TALES.
- Go (T).

- Place GRIMS’ BOOK OF FAIRY TALES, take TWEEZERS and RED EYE (U).
- Use CORKSCREW (V) and TWEEZERS (W), take SHURIKEN 4/4 and TRIGGER (X).
- BOW, TRIGGER, and ARROW on DISASSEMBLED CROSSBOW, take CROSSBOW.
- Place CROSSBOW and SHURIKEN 4/4 (Y).
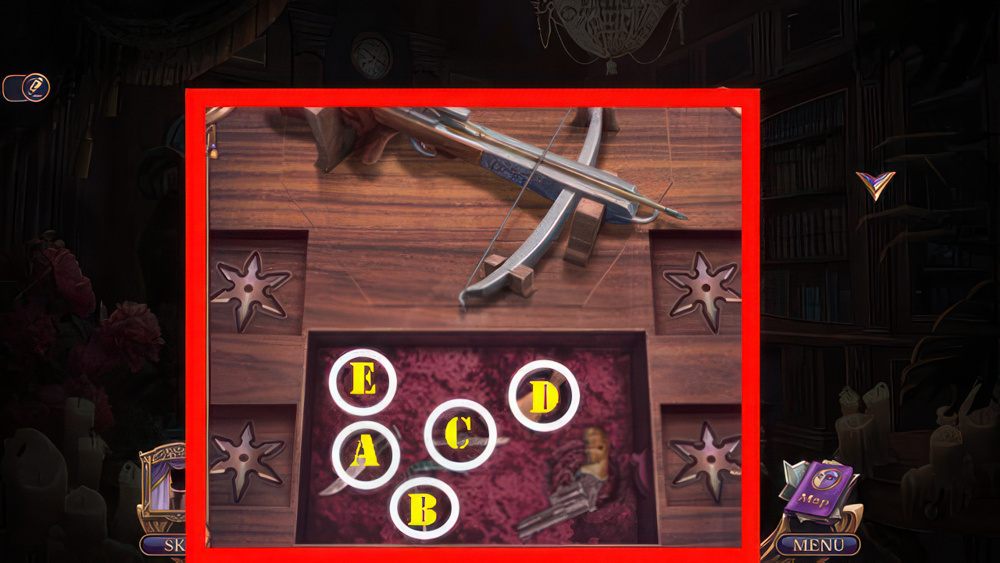
- Select and place the weapons into the correct slots to start a rotating chain reaction.
- Then turn the trigger to unlock the compartment.
- Walkthrough: (A-D-C-B-A-E).
- Take PURPLE EYE.
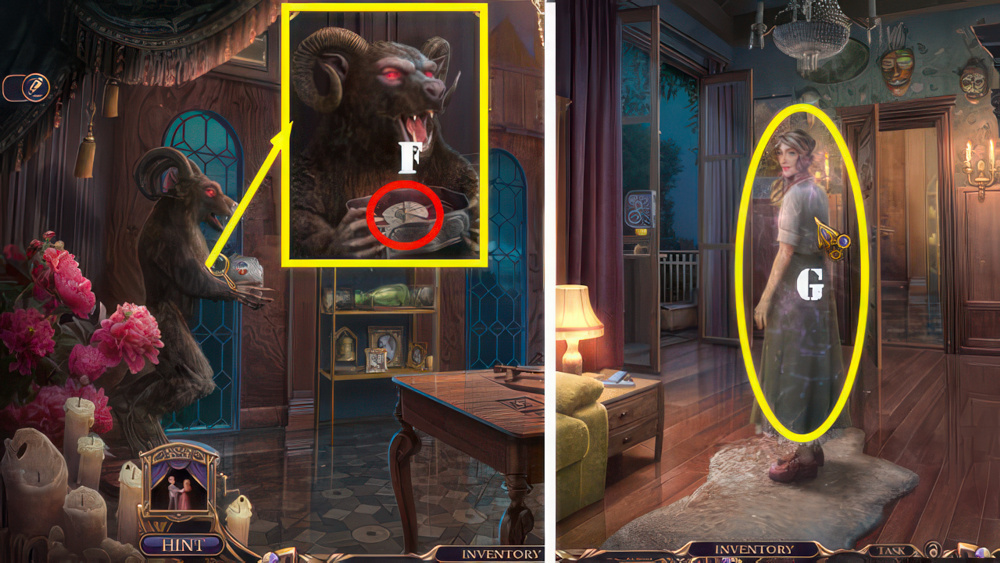
- Place PURPLE EYE and RED EYE, take TIMELESS PENDANT (F).
- Walk down.
- Use TIMELESS PENDANT (G).
- Receive CREAM and TICKET 1/2.
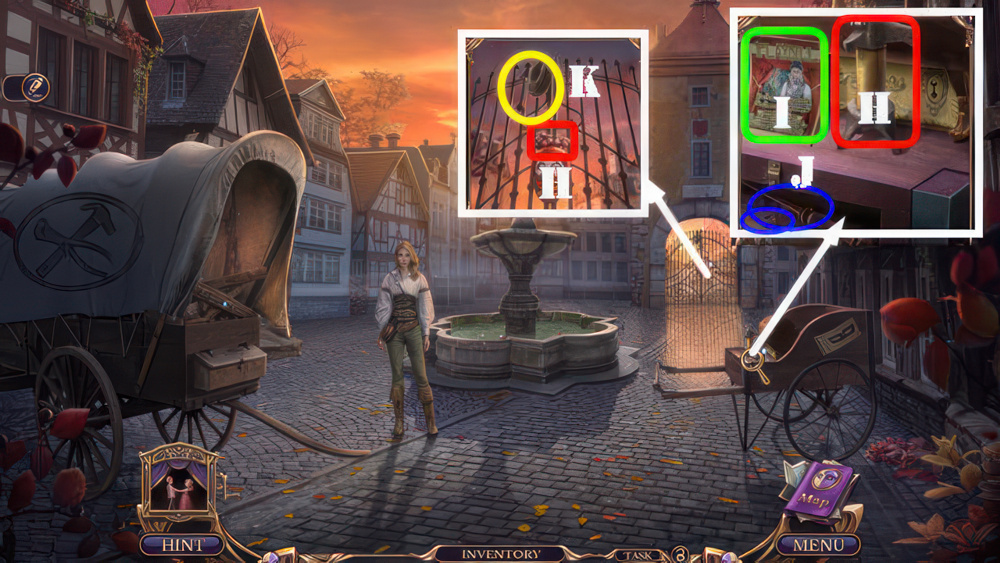
- Take PUMP and BERRIES (H).
- Look at playbill (I).
- Use CREAM, take FOLDING POINTER and DECORATION 1/3 (J).
- Use FOLDING POINTER (K), receive NAIL PULLER and HOSE.
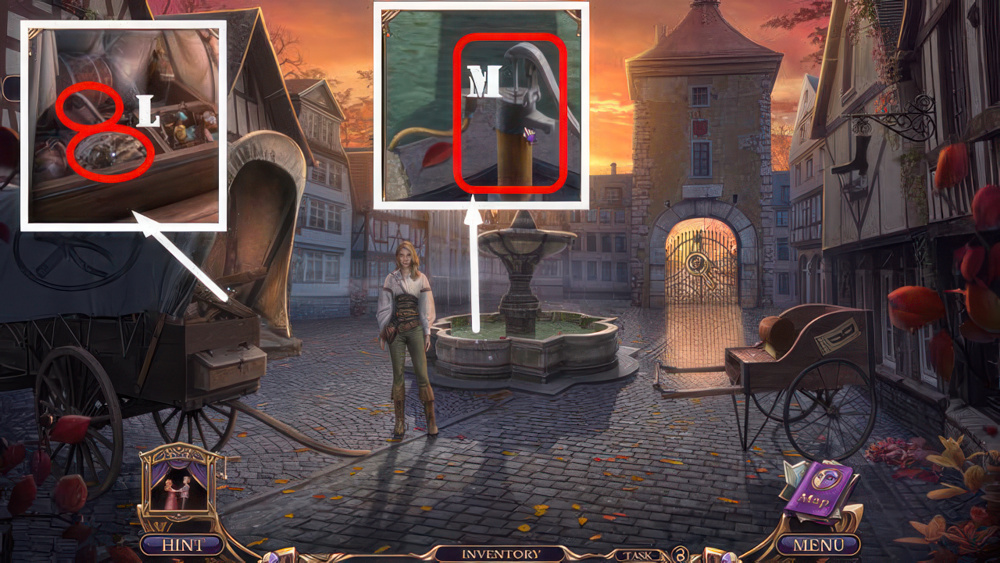
- Use NAIL PULLER, take STONE BLOCK and INFLATOR HANDLE (L).
- HOSE and INFLATOR HANDLE on PUMP, take WATER PUMP.
- Use WATER PUMP and select (M).
- Play puzzle, receive LOCKPICK SET.
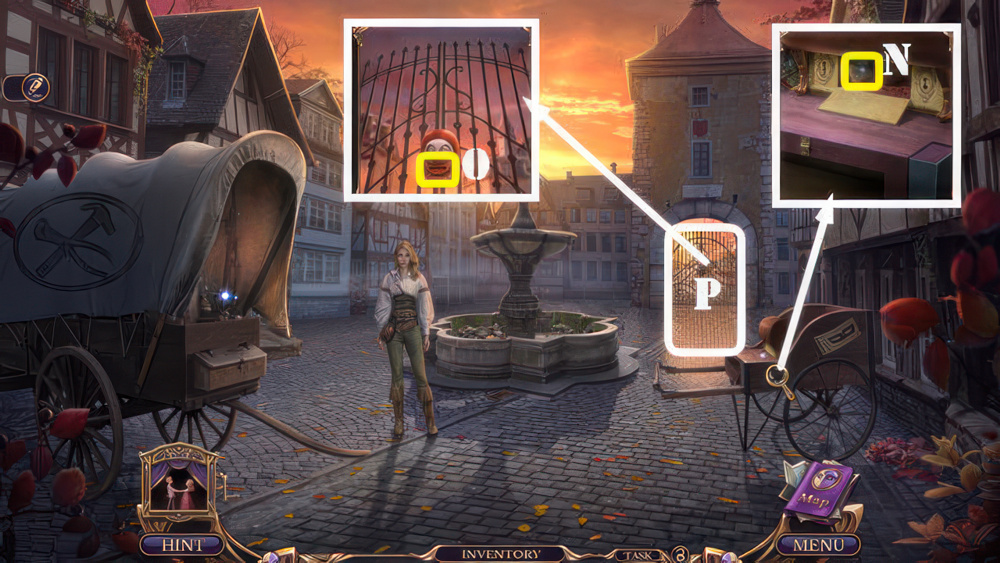
- Use LOCKPICK SET, take TICKET 2/2 (N).
- Insert TICKET 2/2 (O).
- Go (P).
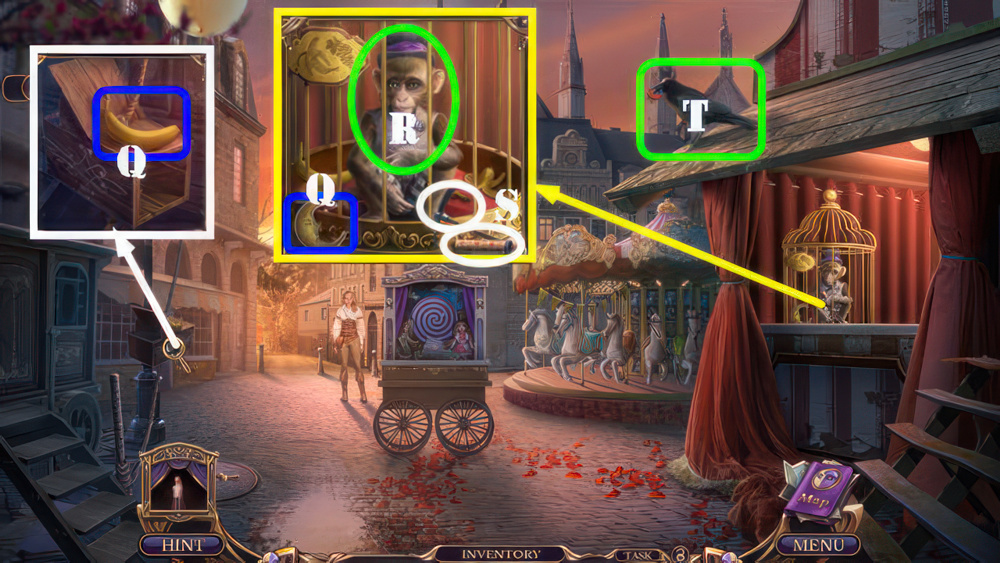
- Receive PAPER.
- Take DECORATION 2/3 and BANANA (Q).
- Give BANANA and BERRIES (R).
- Take PICKAXE and CRACKER (S).
- Use CRACKER (T), receive MAGNET.
- Walk down.
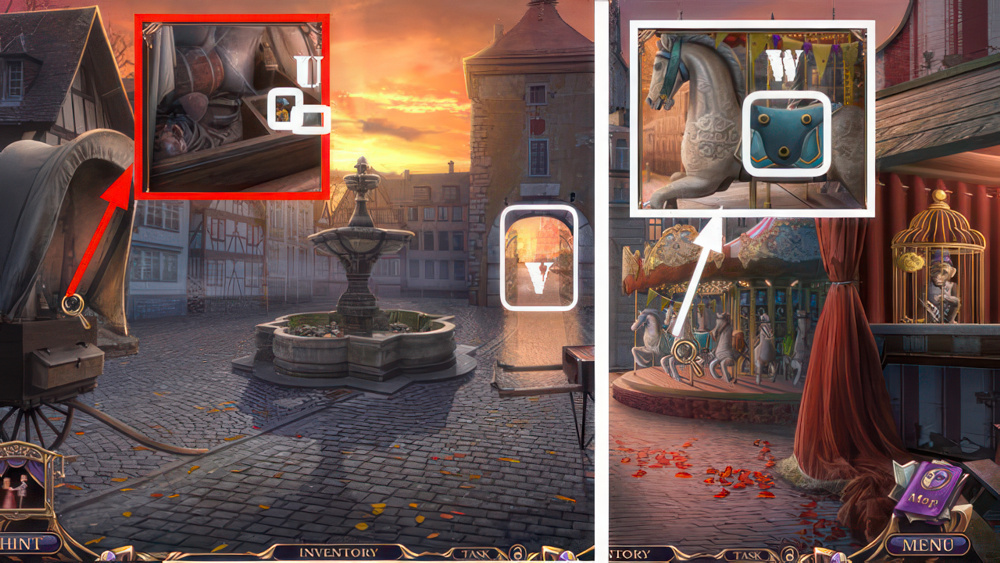
- Use MAGNET, take SADDLE and RUBBER PATCH (U).
- Go (V).
- Place SADDLE (W).
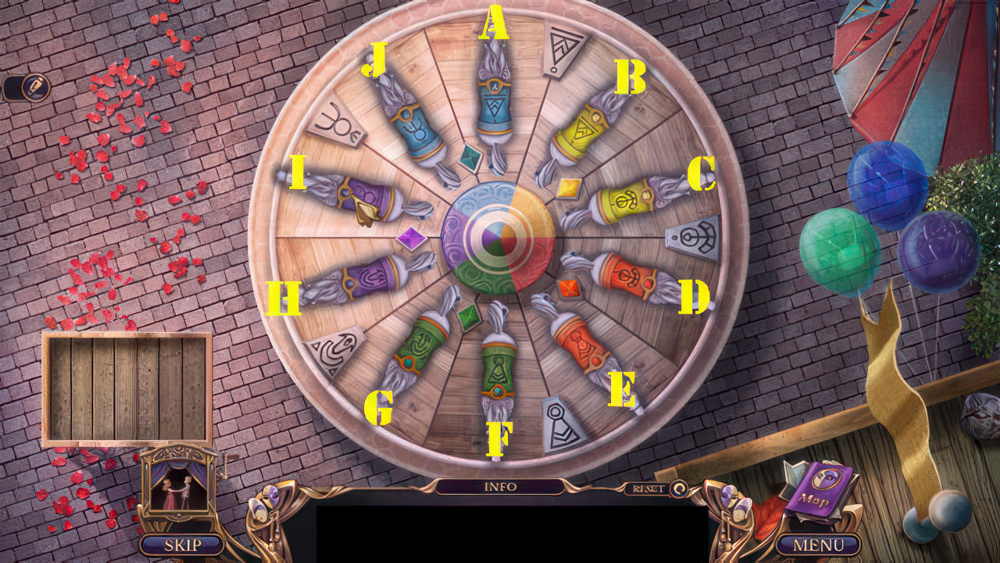
- Put the horses in the right places.
- Select a horse to pick it up or put it down.
- Walkthrough: (A-D-G-B-J-E-C-A-I-F-H-I).
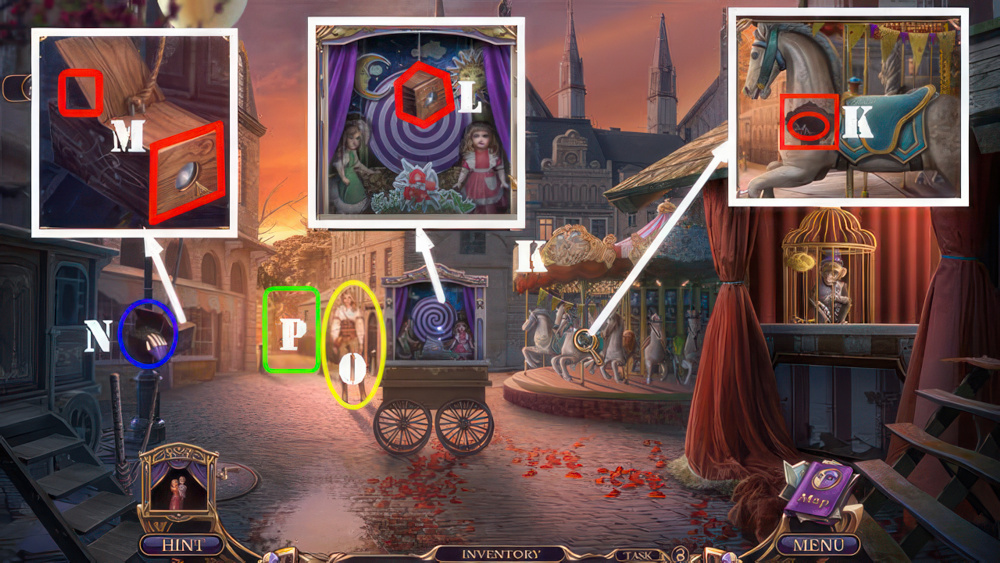
- Take DECORATION 3/3 and HOLEY BUCKET (K).
- Place DECORATION 3/3, take LID WITH HOLE (L).
- Place LID WITH HOLE and PAPER (M).
- Take FOREST MAP (N).
- Give FOREST MAP (O).
- Go (P).
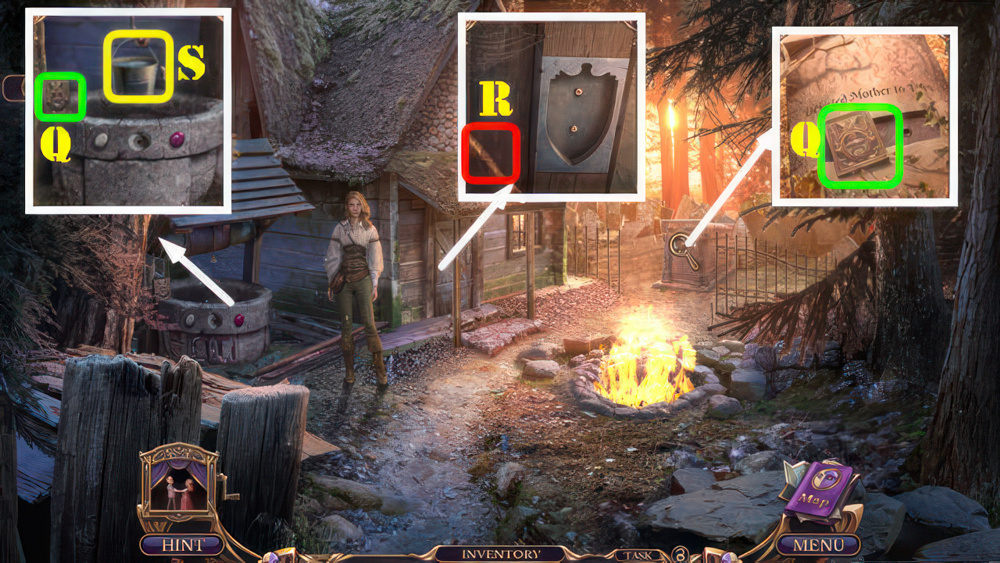
- Receive TILE 1/4 and BRUSH.
- Take TILE 2/4 and TILE 3/4 (Q).
- Use BRUSH (R), receive RESIN.
- RESIN and RUBBER PATCH on HOLEY BUCKET, take BUCKET.
- Place BUCKET, take WATER and CROWN (S).
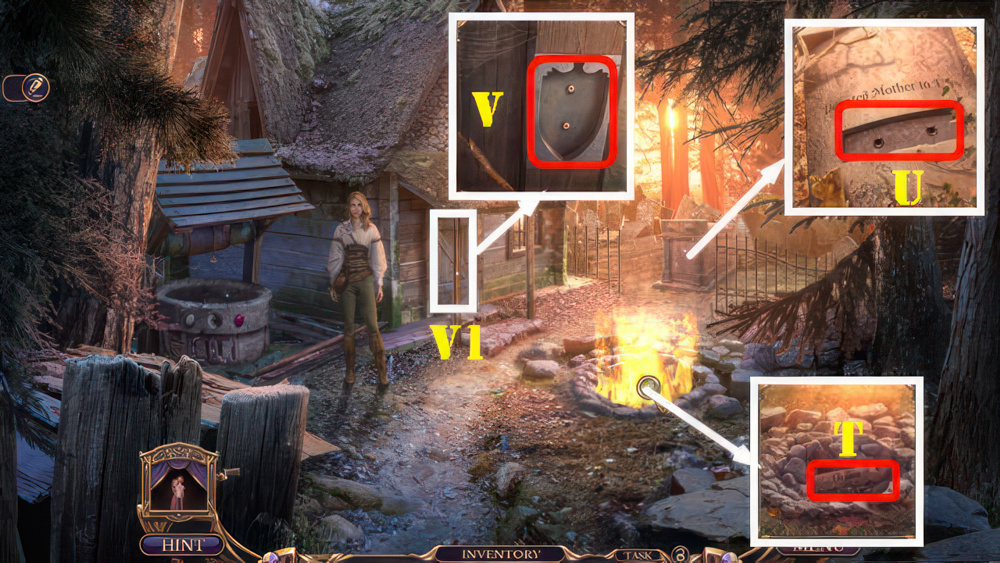
- Use WATER, take TOMBSTONE PLAQUE (T).
- Place TOMBSTONE PLAQUE (U).
- Play puzzle, receive FAMILY CREST.
- Place FAMILY CREST (V).
- Enter (V1).

- Receive SWORD.
- Take WIG and FABRIC (W).
- Look at photos and note (W1).
- Place CROWN and SWORD (X1).
- Take MODELING TOOL and SNAP BUTTON (X2).
- Place SNAP BUTTON, take PUPPET 1/3 and SANDPAPER (Y).
- Walk down.
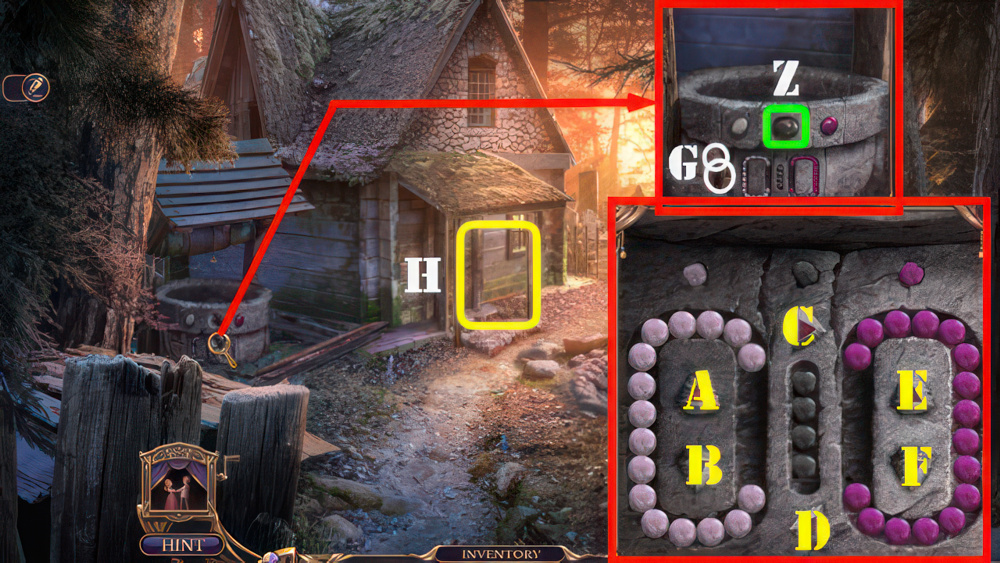
- PICKAXE and SANDPAPER on STONE BLOCK, take BLACK ONYX.
- Place BLACK ONYX (Z).
- To open the lock, place the gems according to color in the right hatches.
- Use arrows to move gems between hatches.
- Walkthrough: (D-A-C×2-F×9-D×2-B×8-C×2)-(E-D×2-A×9-C×2-F-D×2-A-C×2).
- (E-D×2-A×3-C×2-E-D×2-A-C×2)-(E-D×2-A-C×2-E×3-D×2-A-C×2).
- (E×3-D×2-A×2-C×2-E×2-D×2-A×8)-(C×2-E×4-D×2-B×2-C×2-E×2).
- (D×2-A-C×2-E×3-D×2-A-C×2-F×9-D).
- Take JACK PLANE and PUPPET 2/3 (G).
- Go (H).
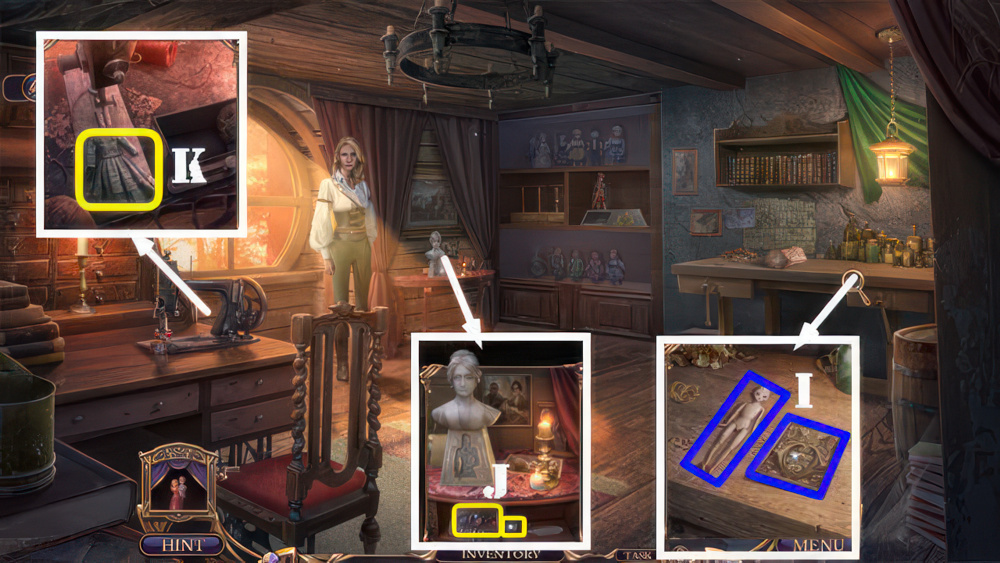
- Use JACK PLANE and MODELING TOOL, take TILE 4/4 and DUMMY (I).
- Place TILE 4/4, take LOCKED SPELLBOOK and THREAD (J).
- Place THREAD and FABRIC, take OUTFIT (K).
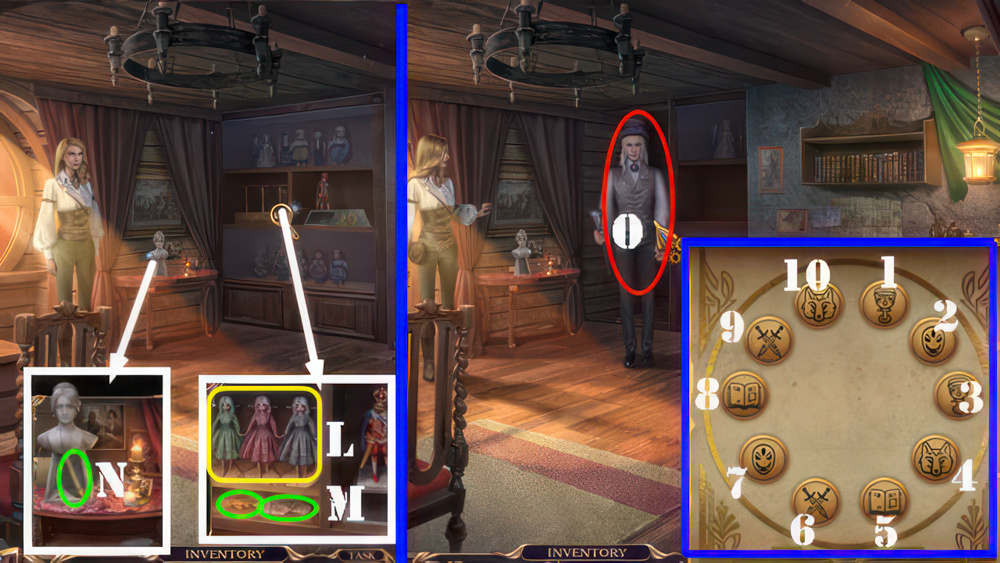
- WIG and OUTFIT on DUMMY, take PUPPET 3/3.
- Place PUPPET 3/3 (L).
- Take PUPPETEER’S FIGURINE and LEAF 1/4 (M).
- Place PUPPETEER’S FIGURINE, take MAGICAL SCROLL (N).
- Give MAGICAL SCROLL (O).
- Find matching pairs of symbols to guide your helper’s attacks.
- Choose two buttons to view the symbols beneath them.
- Walkthrough: (3-5)-(4-8)-(3-8)-(4-7)-(5-8).
- Receive ARTIFACT.
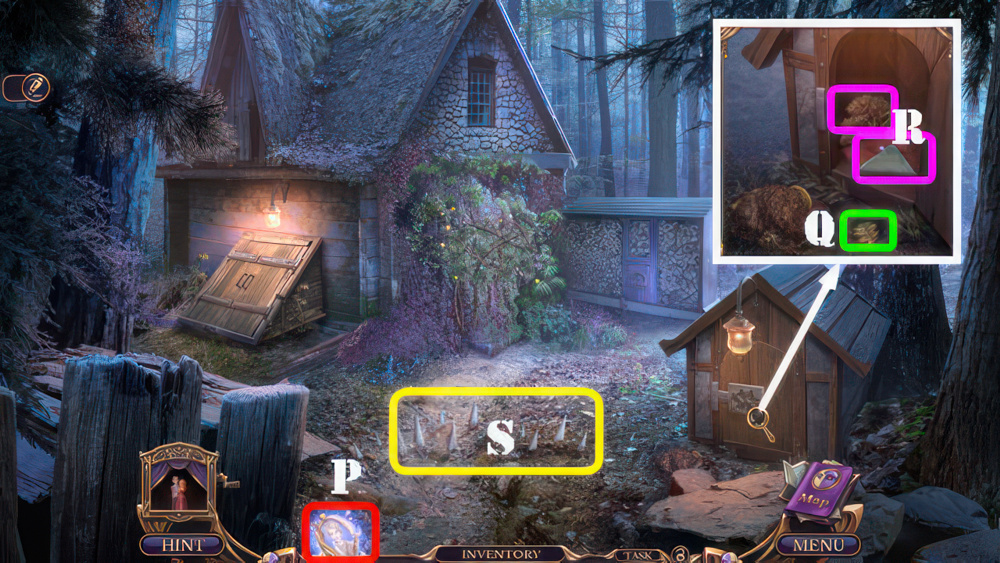
- Select cameo (P), receive PAW PRINT.
- Take LEAF 2/4 (Q).
- Place PAW PRINT, take FORGED TREE CROWN and BEDDING (R).
- Place BEDDING (S).
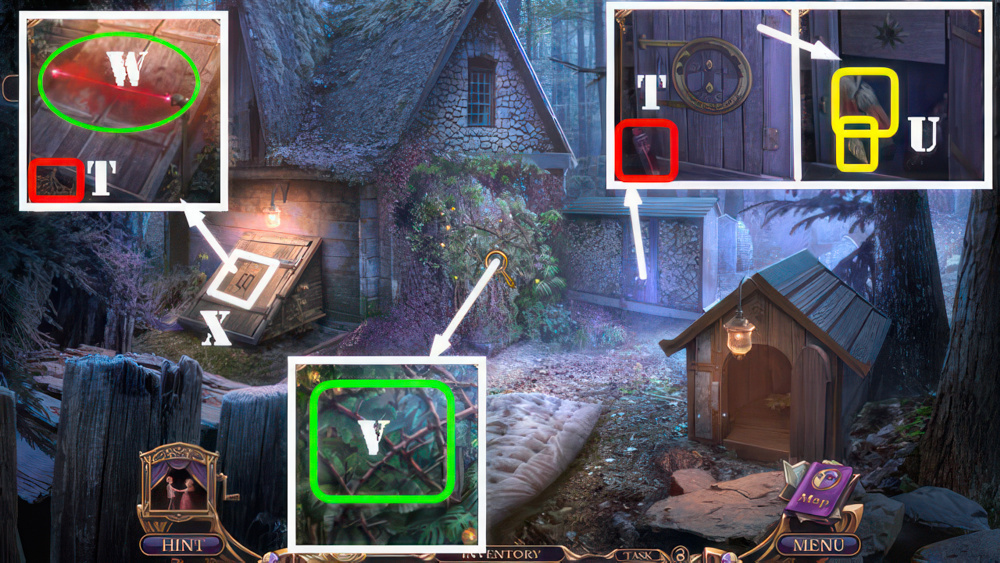
- Take METAL TREE TRUNK and DEVELOPING SPRAY (T).
- Place FORGED TREE CROWN and METAL TREE TRUNK, take PROTECTIVE GLOVES and LEAF 3/4 (U).
- Use PROTECTIVE GLOVES (V).
- Play puzzle, receive MIRROR TRAY.
- Use DEVELOPING SPRAY and MIRROR TRAY (W).
- Go (X).
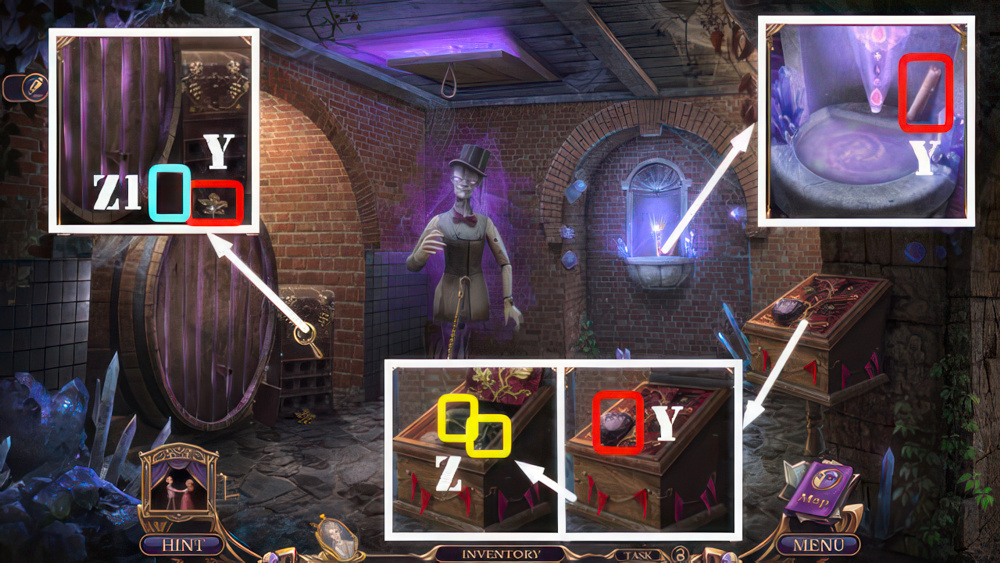
- Take LEAF 4/4, CANDLE 1/3, and AMETHYST HEART (Y).
- Place LEAF 4/4, take ANCIENT GOBLET and SUN KEY (Z).
- Look at book (Z1).
- Walk down.
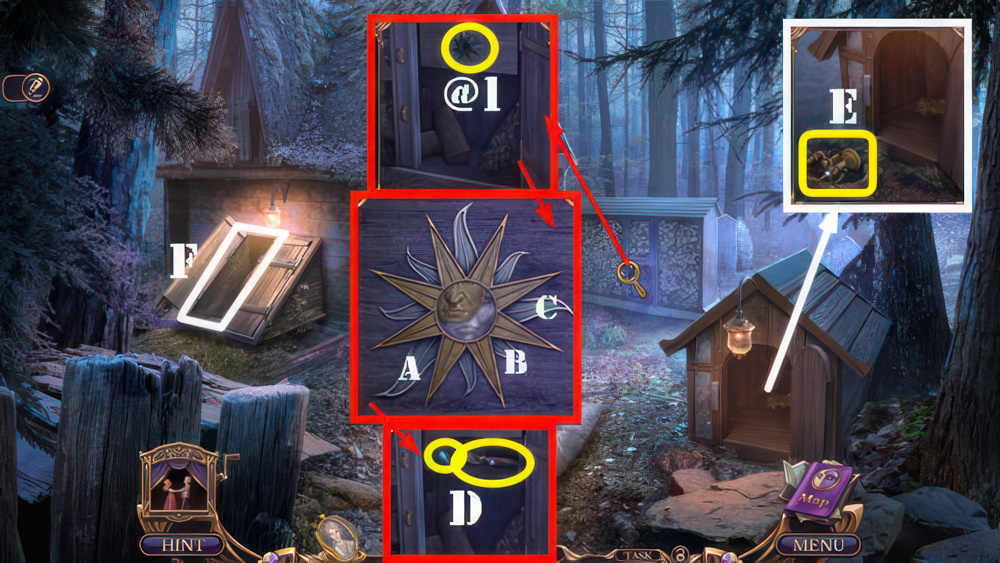
- Place SUN KEY (@1).
- Walkthrough: (A-B-C).
- Take TROWEL and SAPPHIRE EYE (D).
- Use TROWEL, take CANDELABRA BASE and WOODEN FAUCET (E).
- Go (F).
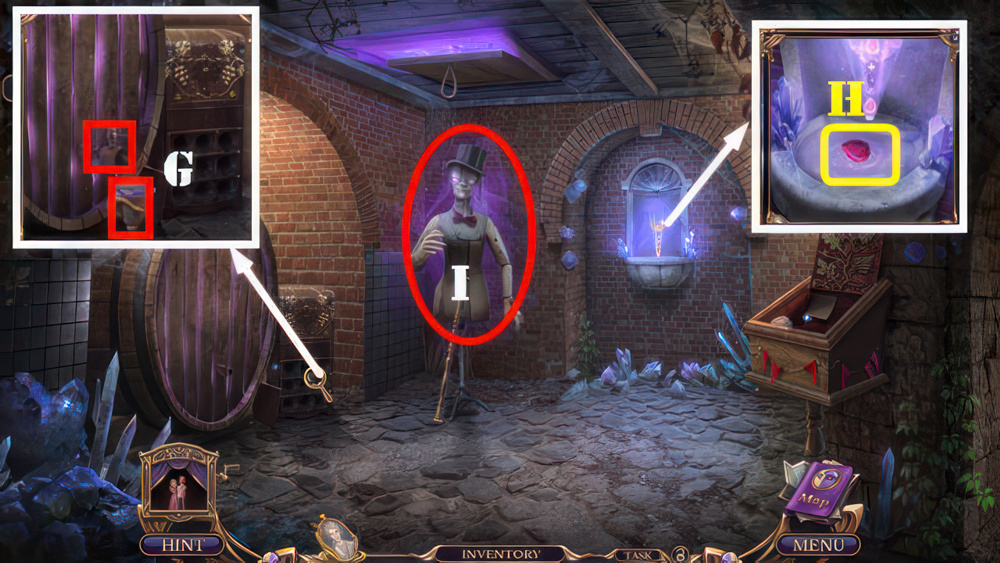
- Place WOODEN FAUCET and ANCIENT GOBLET (G), take ELIXIR OF MATERIALIZATION.
- Use ELIXIR OF MATERIALIZATION, take RUBY DROP (H).
- SAPPHIRE EYE, AMETHYST HEART, and RUBY DROP on LOCKED SPELLBOOK, take POWERFUL SPELL.
- Use POWERFUL SPELL (I).
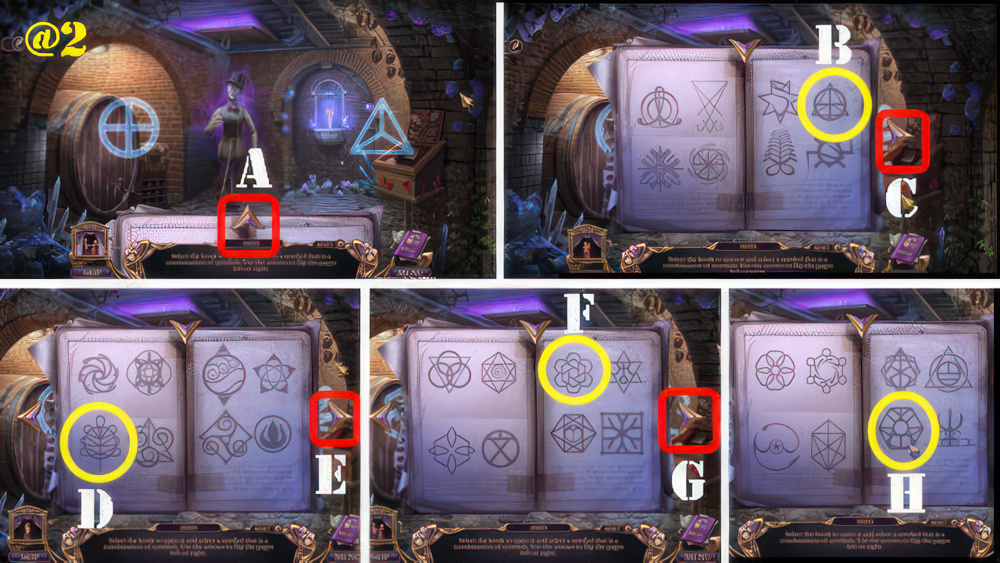
- Select the book to open it and select a symbol that is a combination of displayed symbols.
- Use the arrows to flip the pages left or right.
- Walkthrough (@2): (A-B)-(A-C-D)-(A-E-F)-(A-G-H).
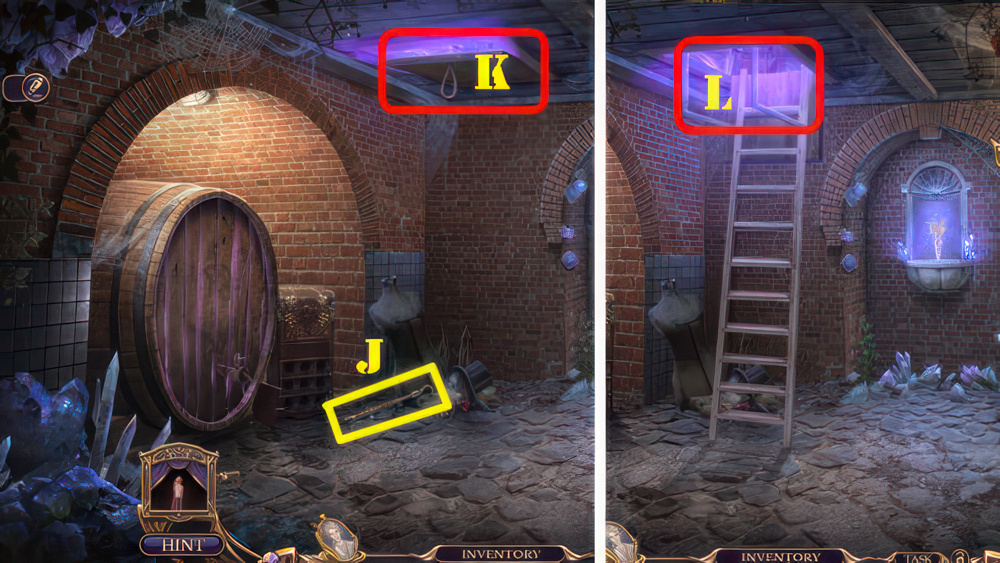
- Take LONG METAL HOOK (J).
- Use LONG METAL HOOK (K).
- Go (L).
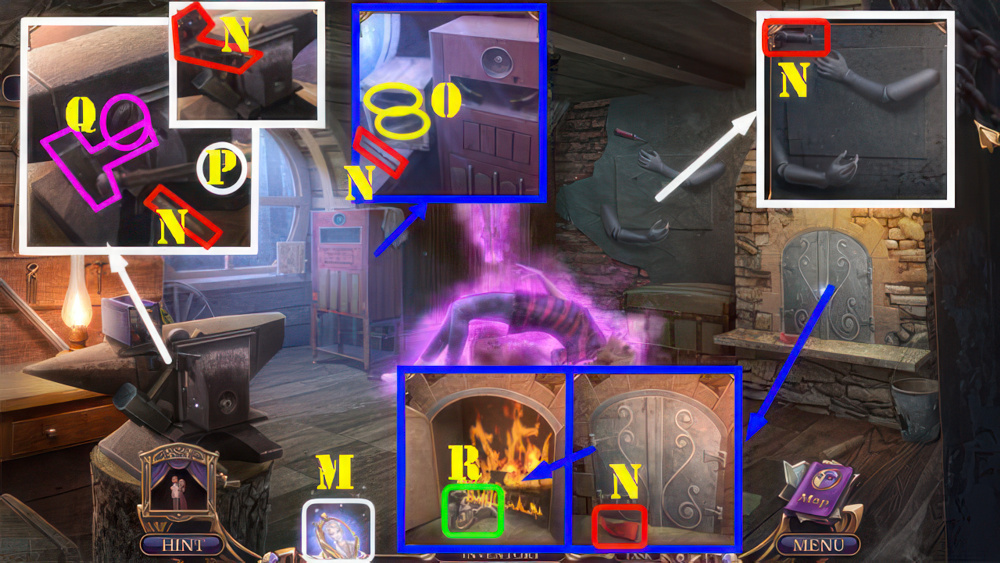
- Select cameo (M), receive FIRE SPHERE.
- Take WELDING MACHINE, CHISEL, CANDLE 2/3, SCREWDRIVER, and RED PENNANT (N).
- Use SCREWDRIVER, take CLAMPING DEVICE and CANDLE 3/3 (O).
- Place CLAMPING DEVICE (P).
- Take SLEDGEHAMMER and TUNING CONTROL (Q).
- Open doors, use FIRE SPHERE, LONG METAL HOOK, CHISEL, and SLEDGEHAMMER, take CANDELABRA PART (R).

- CANDELABRA PART and WELDING MACHINE on CANDELABRA BASE, place CANDLE 3/3 and use FIRE SPHERE.
- Take CANDELABRA.
- Place CANDELABRA (S).
- Play puzzle, receive DISPLAY CONTROL.
- Place DISPLAY CONTROL and TUNING CONTROL (T).
- Select control ×3, take SHELL PART 1/5 and BUNCH OF GRAPES (U).
- Walk down.
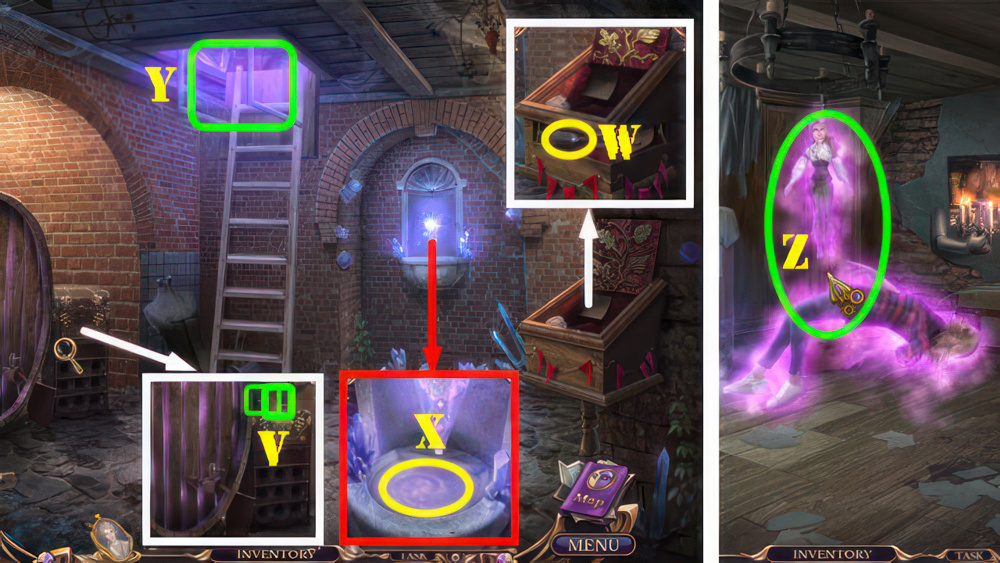
- Place BUNCH OF GRAPES, take BROKEN STATUE and PURPLE PENNANT (V).
- Place RED PENNANT and PURPLE PENNANT, take LIVING WATER (W).
- Use LIVING WATER and ARTIFACT (X).
- Play puzzle, receive AMULET OF LIFE.
- Go (Y).
- Use AMULET OF LIFE (Z), receive STONE HEART.
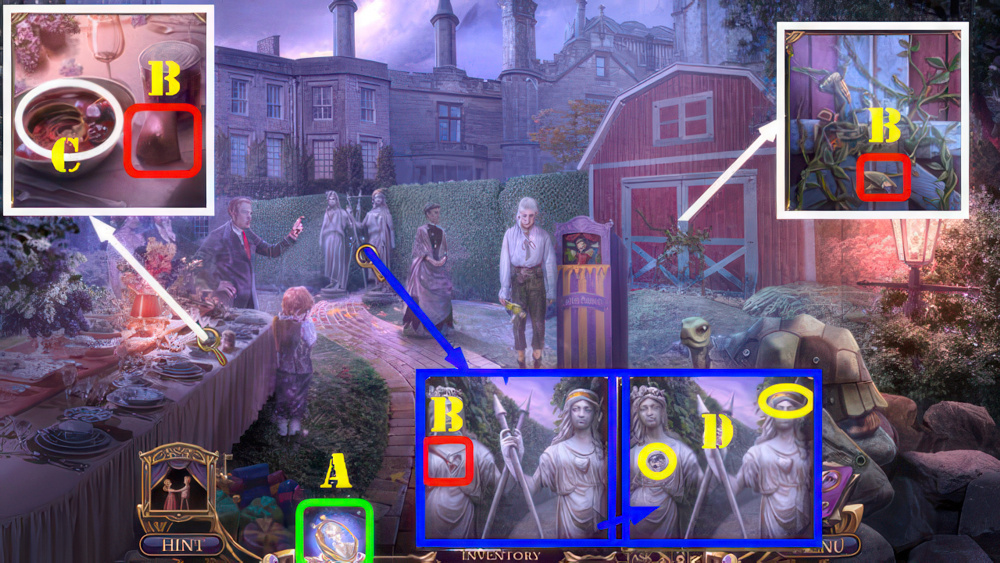
- Select cameo (A), receive SKIMMER.
- Take SHELL PART 2/5, SHELL PART 3/5, and HONEY SPOON (B).
- Use SKIMMER (C), receive BLACK HORSE and FLOWER WREATH.
- Place STONE HEART and FLOWER WREATH (D).
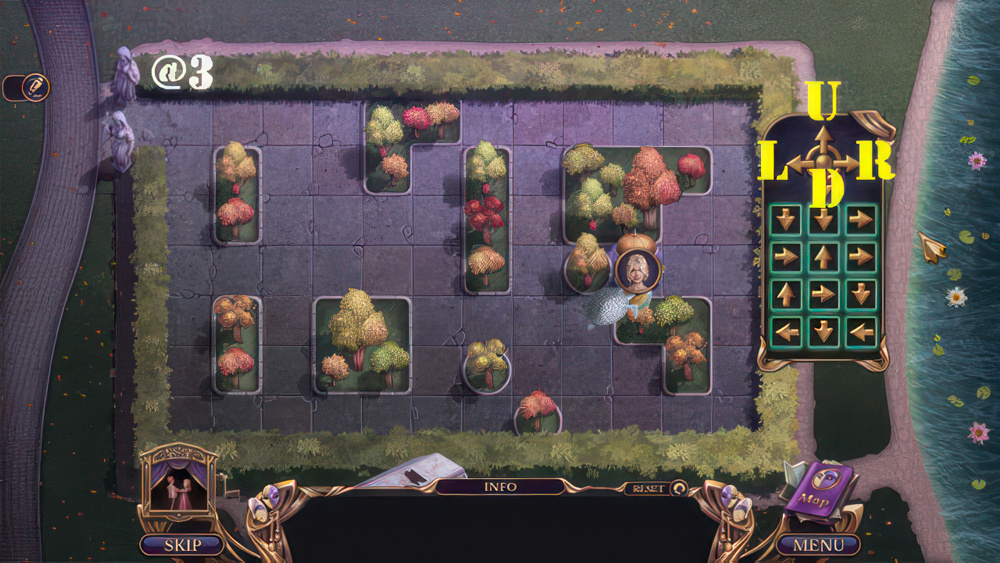
- Using the arrows on the right, make a way to the end of the labyrinth.
- Walkthrough (@3): (D×2-R×2-U-R-U-R-D-L-D-L).
- Receive SILVER TURTLE and PESTICIDE.
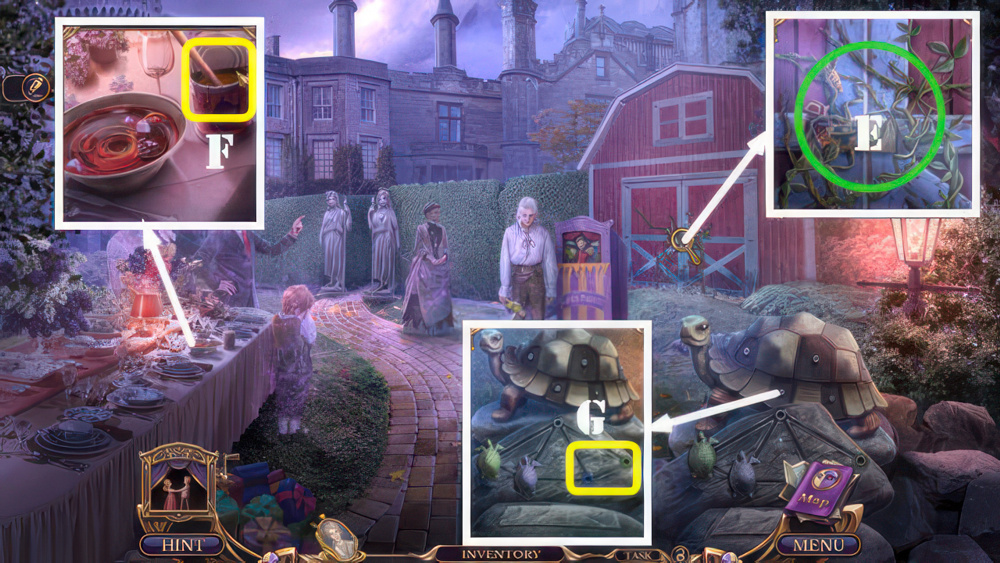
- Use PESTICIDE (E), receive OPENER and GOLDEN FRAGMENTS.
- Use OPENER and HONEY SPOON (F), receive MOLASSES.
- GOLDEN FRAGMENTS and MOLASSES on BROKEN STATUE, take GOLD TURTLE.
- Place SILVER TURTLE and GOLD TURTLE (G).
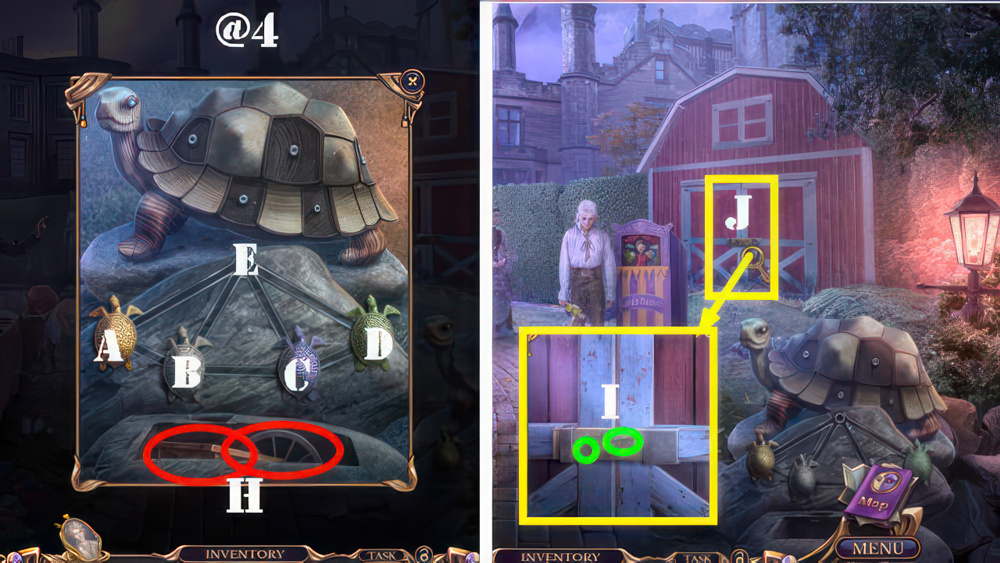
- Place the turtles in their matching colored slots.
- Select a turtle to move it to an empty adjacent slot.
- Walkthrough (@4): (A-B-C-D-E-A-B-C-E).
- Take CARRIAGE WHEEL and STEP (H).
- Place CARRIAGE WHEEL and BLACK HORSE (I).
- Enter (J).
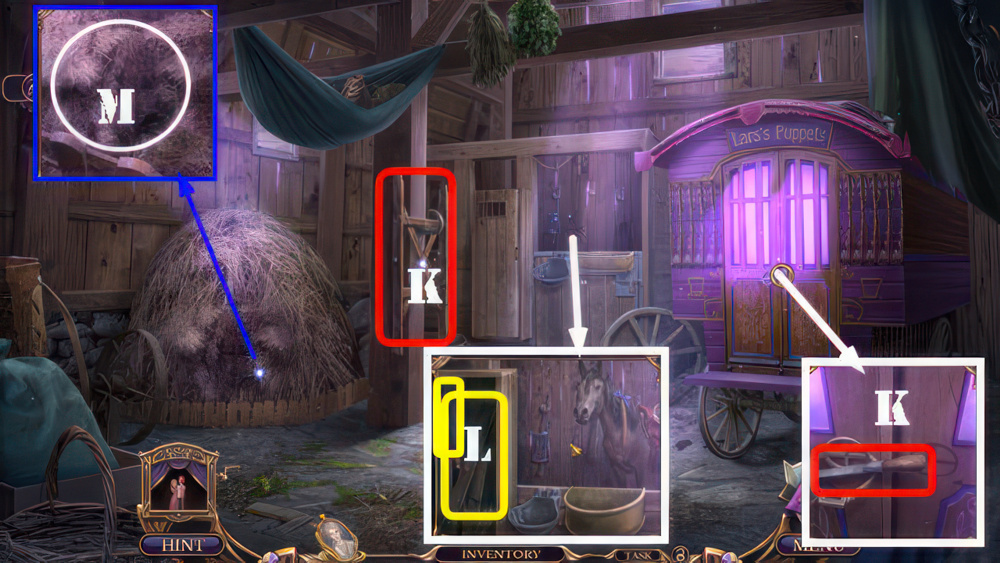
- Take FILE and LADDER FRAME (K).
- Use FILE, take PITCHFORK and PLANKS (L).
- Use PITCHFORK (M), receive HAY.
- Play puzzle, receive CHAIN.
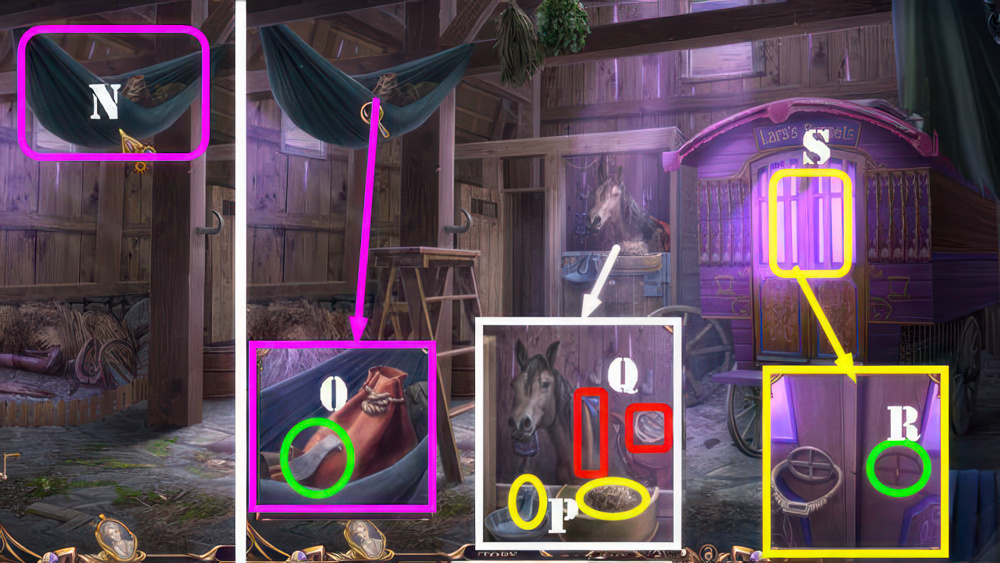
- PLANKS, CHAIN, and STEP on LADDER FRAME, take LADDER.
- Place LADDER (N).
- Take WATER LEVER (O).
- Place WATER LEVER and HAY (P).
- Take HORSE TAIL and STIRRUP (Q).
- Place STIRRUP (R).
- Go (S).
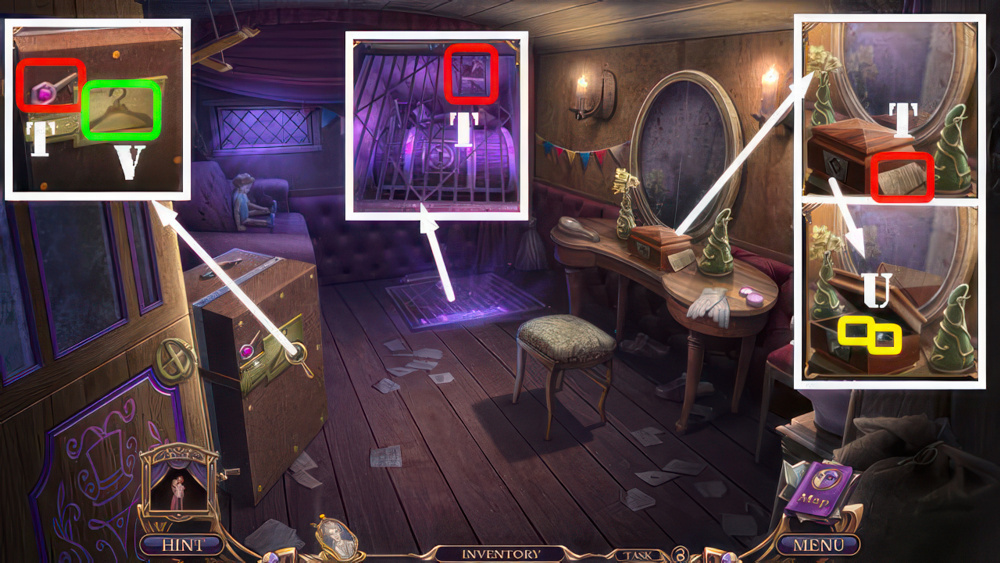
- Take SHELL PART 4/5, PURPLE GOLD KEY, and CUFFLINK (T).
- Use CUFFLINK, take AMULET HANGER and HAIRPIN (U).
- Place AMULET HANGER (V).
- Play puzzle, receive MAGNET.
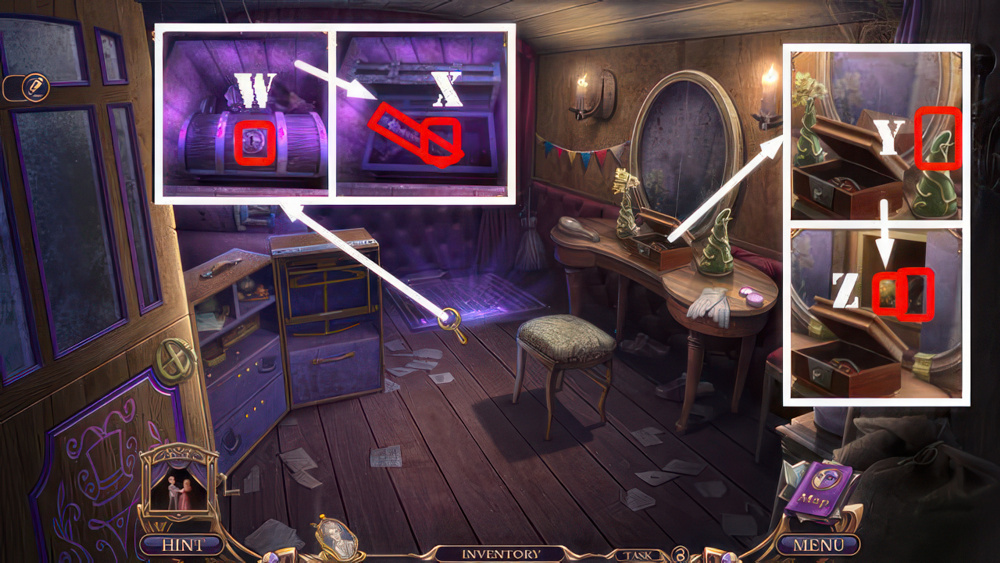
- HAIRPIN and MAGNET on HORSE TAIL, take ROPE WITH MAGNET.
- Use ROPE WITH MAGNET and PURPLE GOLD KEY (W).
- Take MAGIC CANE and BUNCH OF DAFFODILS (X).
- Place BUNCH OF DAFFODILS (Y).
- Take SPUR and STONE OF TALENT (Z).
- Walk down.
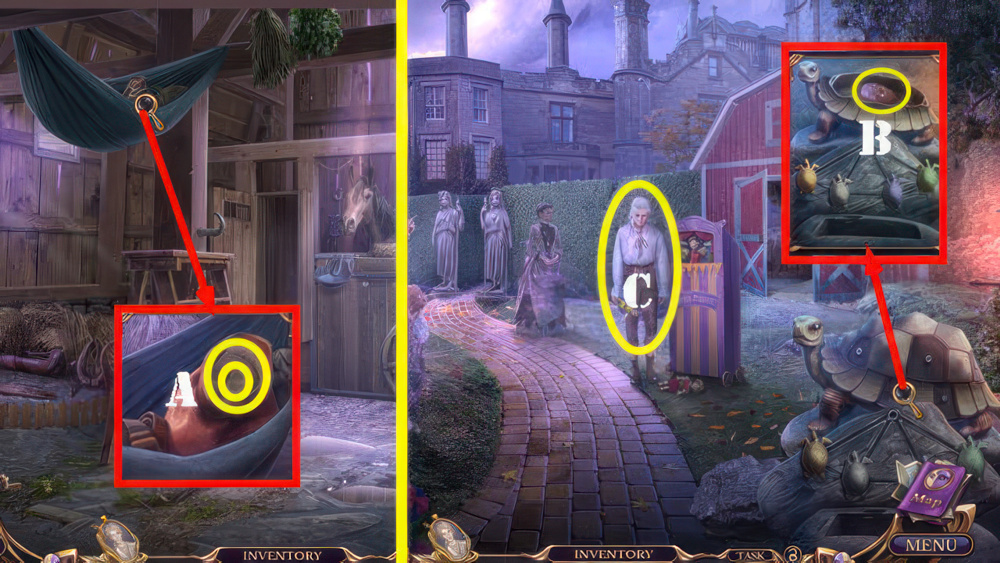
- Use SPUR, take SHELL PART 5/5 and look at note (A).
- Walk down.
- Place SHELL PART 5/5, take STONE OF GOOD (B).
- Select MAGIC CANE and place STONE OF TALENT and STONE OF GOOD, take CANE OF TALENTED GOOD.
- Use CANE OF TALENTED GOOD (C).
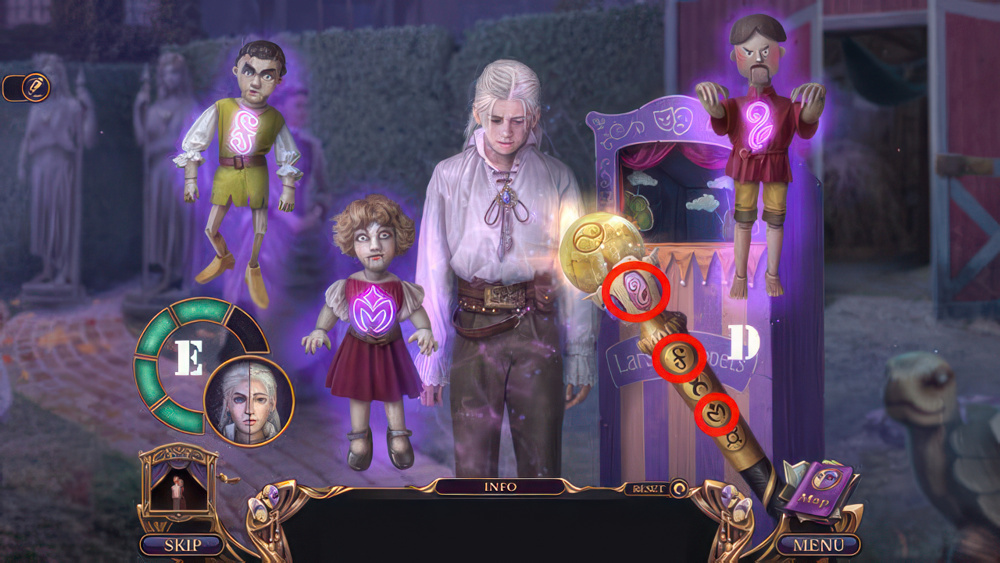
- Open Lars’s heart.
- Quickly select symbols matching the images on the protective puppets and magic cane.
- Lars will become kind when the magic counter is full.
- The solution is random.
- Screenshot shows a random solution for the stage shown (D).
- Complete 5 stages in a row to complete the puzzle (E).
- Walkthrough Bonus Chapter, at the link below.


