
Grim Tales 22: Horizon Of Wishes – The game’s walkthrough begins with a strange signal appearing in Richard’s skull. Especially considering his long absence. You need to somehow use the cameo to find Anna’s father in the past. You will have to abandon your daily routine and go on an adventure to different places and encounter unexpected plot twists and locations. If you can not pass any of the puzzles or do not know where the items are, on our site you can watch the walkthrough of the game Grim Tales 22: Horizon Of Wishes, and find out what Anna’s father is involved in this time.
Grim Tales 22: Horizon Of Wishes – Walkthrough
Here you can see the full walkthrough of Grim Tales 22: Horizon Of Wishes, including all chapters, including bonus chapter, in pictures.

- Move sheet, take Cameo (A).
- Receive GRIM FAMILY CREST.
- Select skull (B).

- Look at 3 photos (C).
- Take RUNE POUCH, BONES 1/3, SKULL WRENCH, and QUILL (D).
- Look at two Notes (D1).

- Use SKULL WRENCH, take GRAY FAMILY CREST and FIRST COORDINATES (E).
- Place GRIM FAMILY CREST and GRAY FAMILY CREST (F).
- Take BONES 2/3, CORK, and OBSIDIAN DAGGER (G).
- OBSIDIAN DAGGER on RUNE POUCH, take RUNES and BONES 3/3.
- Place BONES 3/3 (H).
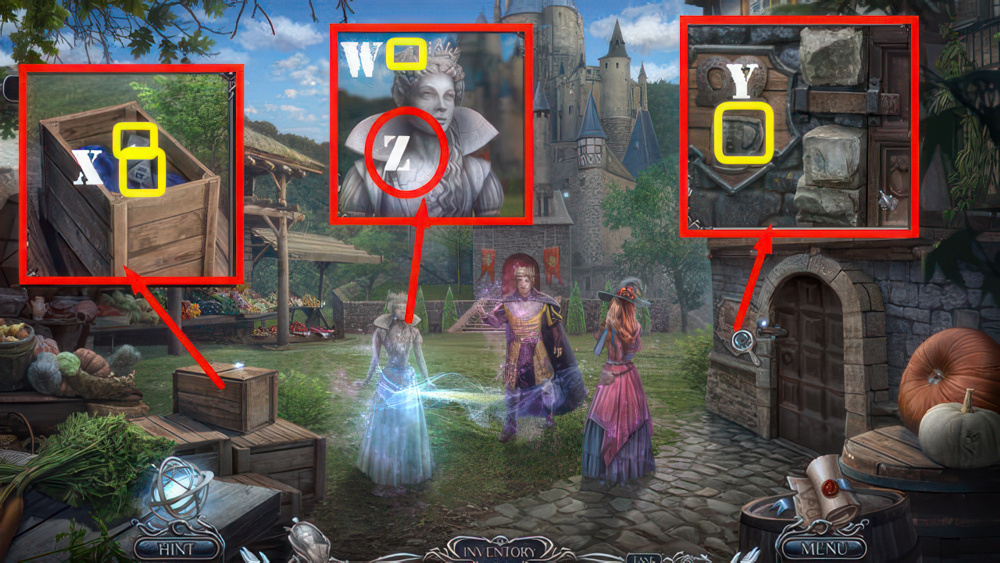
- Take COIN and HAT SYMBOL (I).

- Place HAT SYMBOL (J).
- Play puzzle, receive MAGICAL INK.
- Place RUNES, QUILL, MAGICAL INK, and FIRST COORDINATES (K).
- Select Cameo (L), receive Map.
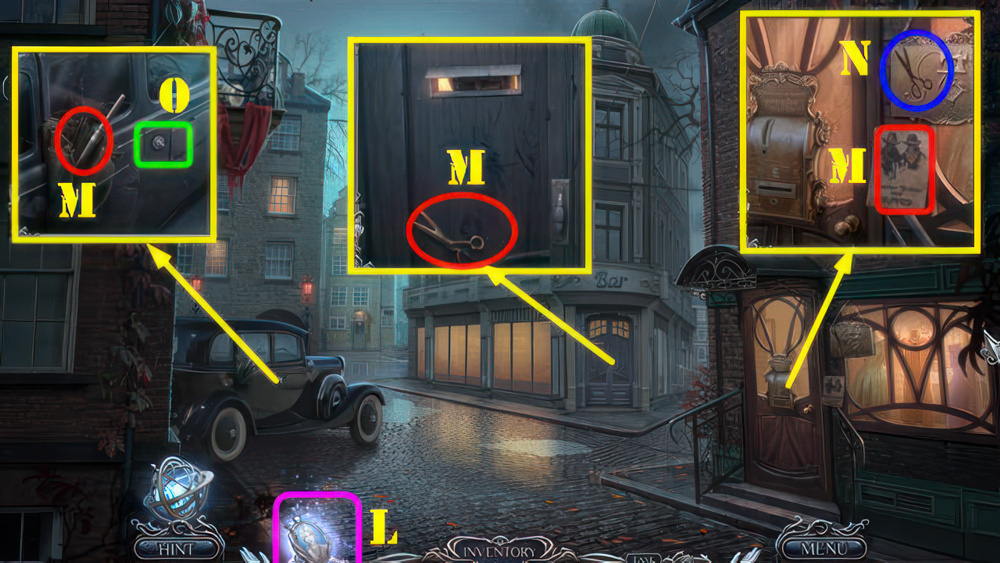
- Take UMBRELLA HANDLE, WANTED POSTER and SCISSORS AMULET (M).
- Place SCISSORS AMULET (N), receive POKER CHIP 1/4 and DOOR HANDLE.
- Place DOOR HANDLE (O).

- Remove the latches to open the lock.
- Select a latch and use the arrows at the bottom to move it left or right.
- Select a boll to toggle it up or down.
- Blocked latches appear red when selected.
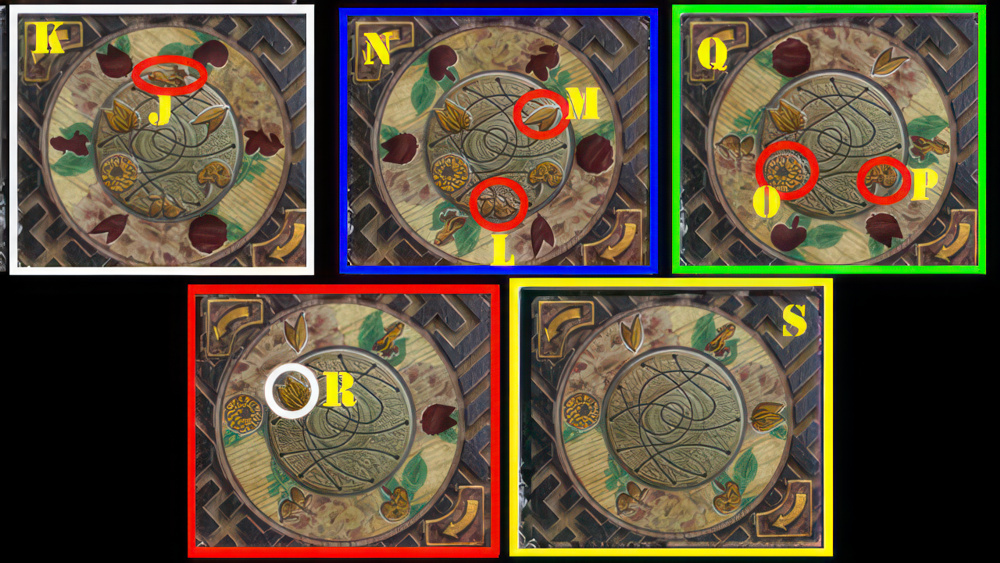
- Walkthrough: (6-R-T)-(7-9-S-T)-(7-8-9-R-U)-(5-6-Q-T).
- (1-P-U)-(3-Q-T)-(2-3-P-U)-(1-2-Q-T)-(4-5-6-R-U).
- Take SWITCH and PASS (V).
- Give PASS (W).
- Enter (W1).

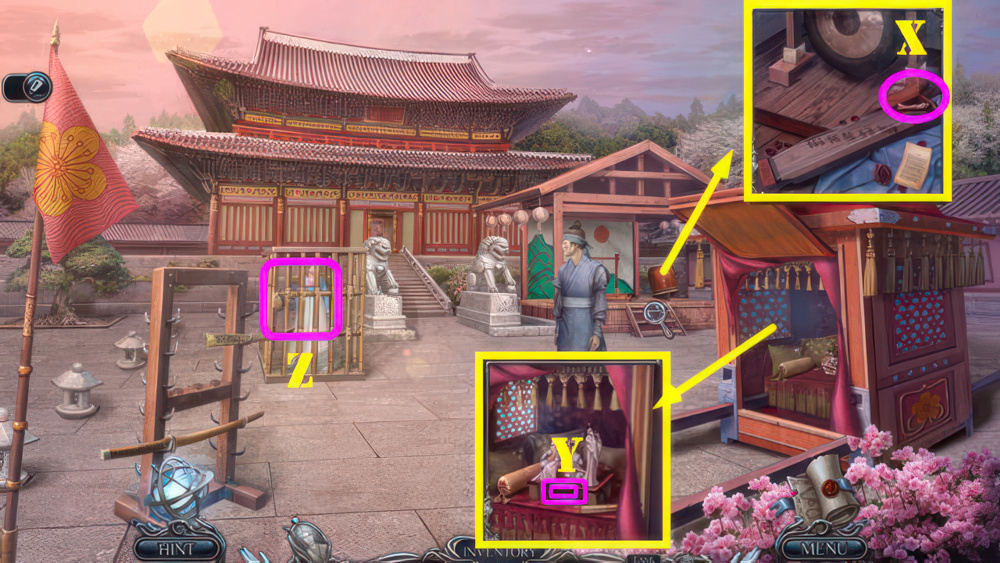
- Move column, newspaper, and glass (X-Y-Z), receive PAPER MONEY.
- Walk down.
- Use COIN and PAPER MONEY (A).
- Play puzzle, receive MAKE-UP BRUSH.
- Go (B).

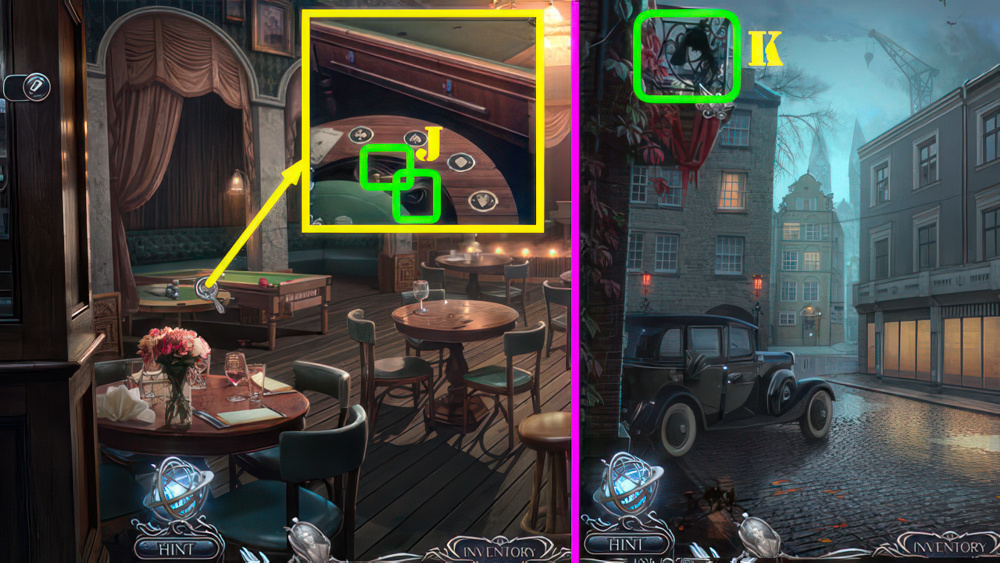
- Take BAR KEY, POKER CHIP 2/4, PLANK, and TREBLE CLEF (C).
- Use BAR KEY, take BOX OF BULBS and POKER CHIP 3/4 (D).
- Use SWITCH and BOX OF BULBS (orange), take JACK and HAND PLANE (E).
- Use JACK (F).
- Take AGENCY BUSINESS CARD and WEIGHT (F1).
- Walk down.

- Use AGENCY BUSINESS CARD (G).
- Take POKER CHIP 4/4 (H).
- Go (I).
- Place POKER CHIP 4/4, take VALVE and ROPE (J).
- Walk down.
- WEIGHT and ROPE on UMBRELLA HANDLE, take CLIMBING HOOK.
- Use CLIMBING HOOK (K).

- Remove bricks to climb the wall.
- Select two matching symbols to remove bricks.
- Walkthrough: (L-M-N).
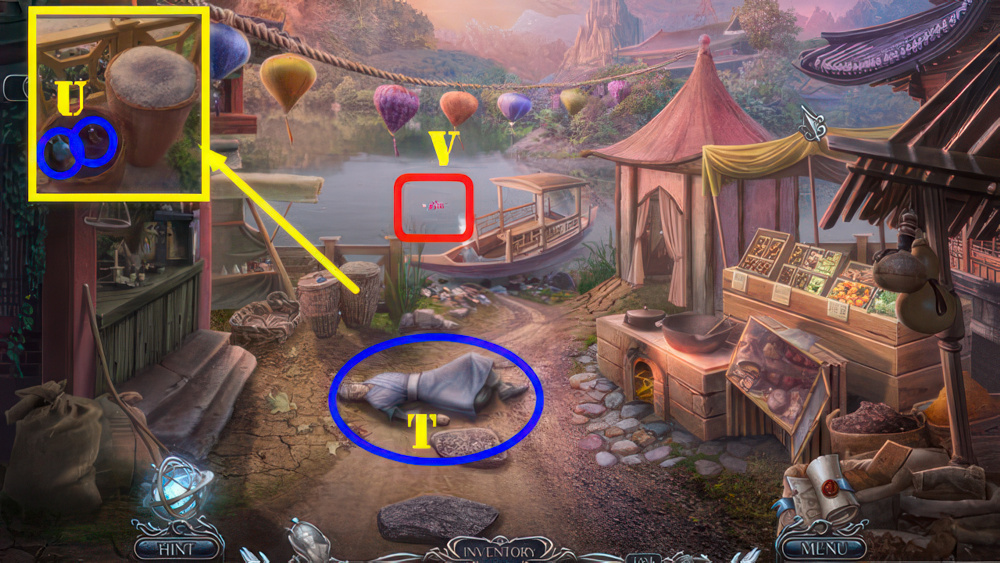
- Take WIRE CUTTER and WAX (O).

- Use WIRE CUTTER (P), receive UMBRELLA WIRE.
- Use WANTED POSTER (Q) and UMBRELLA WIRE (R).
- Select key (Q).
- Enter (R1).
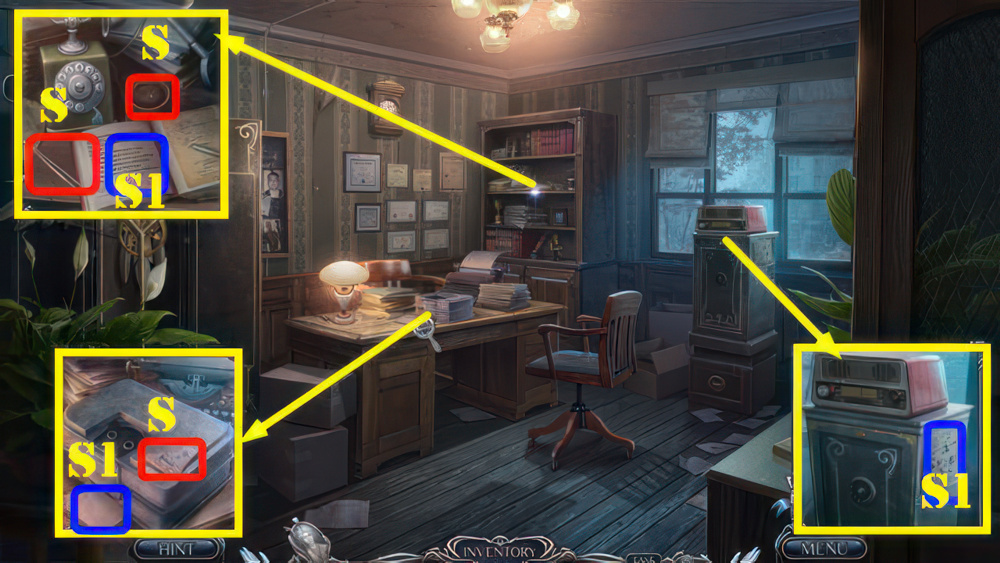
- Take TWEEZERS, FORENSIC POWDER, and RICHARD’S LETTER FRAGMENT (S).
- Look at three notes (S1).
- Return to Bar.

- Use TWEEZERS (T), receive BASS CLEF and BULLET CASING.
- Place TREBLE CLEF and BASS CLEF, take RADIO KNOB and CODE (U).
- Return to Detective Agency.

- Place RADIO KNOB (V).
- Take LUNCH BADGE (W).
- Place LUNCH BADGE (X).
- Play puzzle, receive BUTTER KNIFE.
- Use BUTTER KNIFE (Y), receive NUMBER DIAL.
- Place NUMBER DIAL and CODE, take RAW EGG (Z).
- Look at the contract and then take THE ELUSIVE GANG SYMBOL (Z1).

- Select Cameo (A), receive MECHANICAL WING.
- Place MECHANICAL WING (B).
- Take CHALK (C).
- Look at Note (C1).
- Return to Bar.
- HAND PLANE, WAX, and CHALK on PLANK, take CUE.
- Use CUE (D).

- Sink the cue ball in the hole three times.
- Use the arrows to set the angle of your strike, then choose the Hit button.
- Each success increases the difficulty of the next shot.
- Walkthrough: (E-F)-(G×6-H)-(I×15-J).
- Take LETTER FRAGMENT 1/4 and TURKISH CEZVE (K).

- Place VALVE (L) and TURKISH CEZVE (M).
- Place RAW EGG (N) and select, take BOILED EGG (N1).
- Use FORENSIC POWDER, MAKE-UP BRUSH, and BOILED EGG (O), receive FINGERPRINT.
- Return to the Detective Agency.

- Place BULLET CASING and FINGERPRINT (P).
- Play puzzle, receive BARRY CARSON’S ADDRESS.
- Walk down.
- Use BARRY CARSON’S ADDRESS (Q).

- Take MONOGRAM C, LETTER FRAGMENT 2/4, and BROKEN TOY (R).
- Place MONOGRAM C, take PATTERN TILE and BROWN PLANE (S).
- Place PATTERN TILE, take GREEN PLANE and WHEEL (T).

- Place BROWN PLANE and GREEN PLANE (U), receive CARDBOARD SURFACE and BRONZE HANDLE.
- Place BRONZE HANDLE (V).
- Play puzzle, receive SHAWL.
- Use SHAWL, take DARTS and MINER (W).

- MINER and WHEEL on BROKEN TOY, take TOY RAILCAR.
- Place TOY RAILCAR (X).
- Take LOCOMOTIVE and BOOK KEY (Y).
- Use BOOK KEY and THE ELUSIVE GANG SYMBOL (Z).
- Open book and take LETTER FRAGMENT 3/4 (Z1).

- Take MAGNET (A).
- Use MAGNET (B).
- Throw DARTS (C).
- Aim and shoot (D).

- Take GLUE and COAL POKER (E).
- Use COAL POKER, take ZOISITE CRYSTAL and RAILS (F).
- Place RAILS and LOCOMOTIVE (G).

- Guide the train to the tunnel on the upper right.
- Select the green track sections to direct the train.
- Select the train to make it move.
- Walkthrough: (H-I-K-J-K).
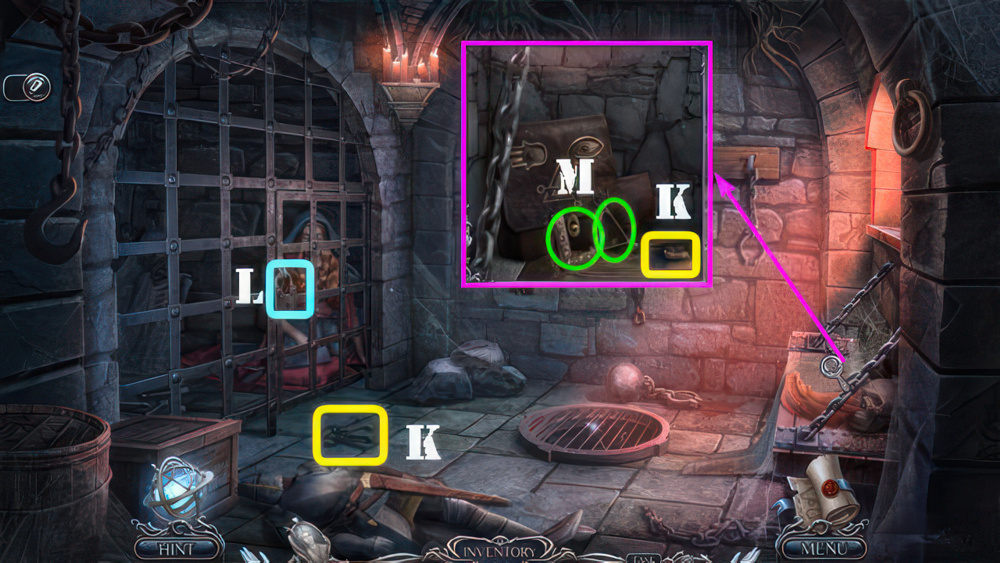
- Take CARSON LOCKET.

- Place CARSON LOCKET (L).
- Take WITCH HAT and LETTER FRAGMENT 4/4 (M1).
- Look at Note (M).
- LETTER FRAGMENT 4/4, GLUE, and CARDBOARD SURFACE on RICHARD’S LETTER FRAGMENT.
- Take RICHARD’S LETTER.
- Give RICHARD’S LETTER (N), receive FAMILY PORTRAIT.

- Select men (O).
- Place FAMILY PORTRAIT, take DOOR RING and HANDLE (P).
- Look at Note (Q).
- Place DOOR RING (R).
- Play puzzle, receive TRAPS.
- Use TRAPS (S).

- Place WITCH HAT (T).
- Play puzzle, receive STAFF OF POWER.
- Place STAFF OF POWER (U).
- Take POCKET WIND and SECOND COORDINATES (V).
- Use POCKET WIND, take MEDIEVAL COSTUME (W).
- Place SECOND COORDINATES and MEDIEVAL COSTUME (X).

- Select Cameo (A), receive LAUREL CROWN.
- Take BELLOWS, CORKSCREW, and WEDGE (B).
- Look at Note (C).

- Use CORKSCREW (D), receive KNOCKER.
- Use KNOCKER, take TONGS and WOODEN SCREW (E).
- Use WOODEN SCREW (F).
- Take METALLIC BASE and STRAP (G).

- Use BELLOWS (H) and place METALLIC BASE (I).
- Select mold (J).
- Use TONGS (I), receive ROYAL CREST.
- Place ROYAL CREST and LAUREL CROWN (K).

- First, select a section to paint and then choose the bottle next to it to paint the area.
- The area you paint must be adjacent to the bottle.
- Replicate the image shown on the solution.
- Walkthrough.
- Select highlighted pieces (L) and then green paint (M).
- Select highlighted pieces (N) and then red paint (O).
- Select highlighted pieces (P) and then blue paint (Q).
- Please note: do not click on the four forks or the witch in the center.
- Even though they appear highlighted, they are not.
- Select highlighted pieces (R) and then yellow paint (S).

- Select highlighted pieces (T) and then blue paint (U).
- Go (V).

- Look at scroll (W).
- Take PICTURESQUE CANVAS 1/4, HELMET, SWORD, and GARNET (X).
- Place ZOISITE CRYSTAL and GARNET (orange), take HORN and SCEPTER (Y).
- Place HORN (Z).
- Play puzzle, receive PENNANT.

- Place SCEPTER and PENNANT (A).
- Take PICTURESQUE CANVAS 2/4 and ROYAL SEAL (B).
- Place ROYAL SEAL (C), take GAVEL (D).
- Use WEDGE and GAVEL (E).
- Go (F).

- Select Cameo (G), receive SHIELD.
- SHIELD and HELMET on SWORD, take MILITARY EQUIPMENT.
- Place MILITARY EQUIPMENT (H).

- Select all the symbols shown on the panel.
- Note the indicator pointing how long it takes you to attack or defend.
- Fill three points, collecting the required symbols to complete the action.
- The solution is random.
- Select symbols on the field (green) that match the ones on the box (I).
- Complete three times before time runs out (J) to solve the puzzle.
- Take PICTURESQUE CANVAS 3/4 and DUNGEON KEYS (K).
- Use DUNGEON KEYS (L), receive BROOM.
- Use BROOM, take FRAME PART and DENTAL EXPANDER (M).
- Walk down twice.

- Use DENTAL EXPANDER (O), receive BLADE and AMULET EYE.
- BLADE and STRAP on HANDLE, take AXE.
- Use AXE (P), receive BRANCH.
- Use BRANCH (Q), receive BURNING BRANCH.
- Return to Dungeon.

- Use BURNING BRANCH (R).
- Play puzzle, receive PICTURESQUE CANVAS 4/4.
- Walk down.

- Place PICTURESQUE CANVAS 4/4 and FRAME PART, take PRINCESS’S NECKLACE (S).
- Place PRINCESS’S NECKLACE (T).
- Take AMULET PALM and HAIR NET (U).
- Return to Dungeon.

- Place AMULET PALM and AMULET EYE, take FILE and GLOVE (V).
- Look at Note (V1).
- Use FILE, take WITCH’S MAP and HOLDER (W).
- Walk down twice.
- Place WITCH’S MAP (W1).

- Fold the map to see where it leads.
- Select a horizontal line on the grid to fold it horizontally.
- Select a vertical line to fold it vertically.
- Note the visual clues on the map.
- Use the arrow button to go back a move.
- Walkthrough: (X-Y-Z).

- Take MILL DISK, BASKET, and HORSESHOE (A).
- Use HORSESHOE, take PROP CROWN and PAINTBRUSH (B).
- Use PAINTBRUSH (C), receive RESIN.
- HAIR NET, PROP CROWN, and RESIN on HOLDER, take FRUIT PICKER.
- Use FRUIT PICKER and BASKET (D).

- Find matching pairs of leaves to remove the vines.
- Walkthrough: select matching pairs (1-6).
- Receive GIFTS and SHARP STONE.

- Use SHARP STONE and GLOVE (E), receive POISONOUS MUSHROOM.
- Walk down.
- Place POISONOUS MUSHROOM and MILL DISK, select (F).
- Take SLEEPING POWDER (G).
- Go (H).

- SLEEPING POWDER on GIFTS, take POISONOUS FRUIT.
- Give POISONOUS FRUIT (I).
- Take IRON BRUSH (J).
- Use IRON BRUSH and open, take HEALING INGREDIENTS 1/3 and MAGIC KEY (K).
- Use MAGIC KEY (L).
- Enter (M).

- Receive HEALING INGREDIENTS 2/3.
- Take SKULL, MAGIC GEM, and EMPTY BOTTLE (N).
- Place SKULL (O).
- Take KING FIGURINE and STRETCHER (P).
- Look at note (Q).
- Return to Dungeon.
- Use STRETCHER (R).

- Receive GLOWING CHALK and WITCH FIGURINE.
- Place KING FIGURINE and WITCH FIGURINE, take ARTIFACT SHELL and CORRECT SCHEME (S).
- Place CORRECT SCHEME and GLOWING CHALK (T).
- Play puzzle, receive HEALING INGREDIENTS 3/3.
- Use HEALING INGREDIENTS 3/3 and EMPTY BOTTLE (U), receive HEALING POTION.
- Use HEALING POTION (V), receive FAN and PRINCESS’S HANDKERCHIEF.
- Take COMB (W).
- Use COMB, take IMPERIAL HAT and AMULET MUG (X).
- Use PRINCESS’S HANDKERCHIEF, place AMULET MUG (Y).
- Play puzzle, receive CASKET.
- MAGIC GEM on CASKET, take WITCHCRAFT CANCELLATION POWDER.
- Use WITCHCRAFT CANCELLATION POWDER (Z).

- Place IMPERIAL HAT (Z1).
- Play puzzle, receive THIRD COORDINATES.
- Place THIRD COORDINATES (Z2).

- Select Cameo (A), receive VARI-COLORED FLOWERS 1/3.
- Look at Note (A1).
- Take SIEVE FRAME, KNIFE, PESTLE, and BROKEN MORTAR (B).
- Use KNIFE (C).
- Take COOLING BALM and VARI-COLORED FLOWERS 2/3 (D).

- Use FAN and COOLING BALM (E).
- Play puzzle, receive CORD.
- Use CORD, take ARTEMESIA SIGN and CANE UMBRELLA (F).
- Use CANE UMBRELLA (G), receive BAMBOO STRIPS and ARROW.
- BAMBOO STRIPS and KNIFE on SIEVE FRAME, receive BAMBOO SIEVE.

- Use BAMBOO SIEVE (H), receive GINSENG SIGN and CERAMIC SHARDS.
- Place ARTEMESIA SIGN and GINSENG SIGN (I).
- Place each sign in its place to open the lock.
- Select the arrows to rotate the ring.
- Walkthrough: (J-K)-(L-M-N×2)-(O-P-Q)-(R).
- Solved image (S).
- Take SET OF REMEDIES and RICE.
- Use SET OF REMEDIES (T), receive CORN KEY and BOW.
- Use CORN KEY, take GLASS JUG and MINIATURE BOOTS (U).
- Use GLASS JUG (V), receive WATER and VARI-COLORED FLOWERS 3/3.

- Use WATER and RICE (W), receive RICE GLUE.
- CERAMIC SHARDS, RICE GLUE, PESTLE, and VARI-COLORED FLOWERS 3/3 on BROKEN MORTAR, take PAINTS.
- Use PAINTS (X).
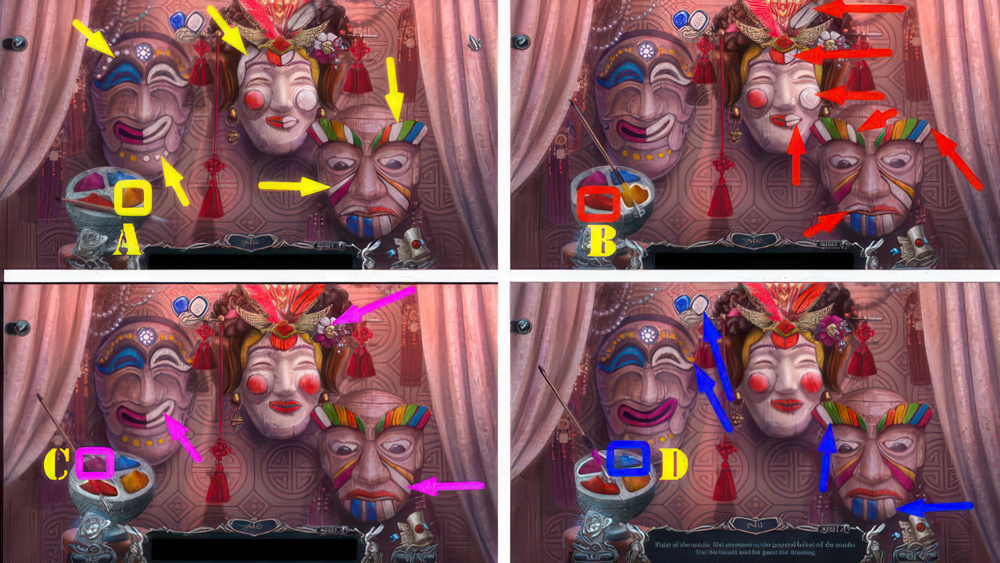
- Paint all the masks. Pay attention to the painted halves of the masks.
- Select paintbrush and then the paint color you wish to use.
- Paint in the areas shown by the arrows for each color.
- Walkthrough: (A-D).
- Take RESIN PATCH.

- Use RESIN PATCH (E).

- Take LEVER and GOLDEN DISCUS (F).
- Place LEVER (G), receive CHAIN.
- Take MINIATURE HELMET (H).
- ARROW and CHAIN on BOW, take BOARDING BOW.
- Use BOARDING BOW (I).
- Take CRANE HANDLE (J) and look at Note (K).

- Use CRANE HANDLE, take STENCIL and BERGAMOT (L).
- Use STENCIL and then select all 4 stones (M).
- Take MUSIC PLAYER FIGURINE and MINIATURE SPEAR (N).
- Place MINIATURE SPEAR.
- MINIATURE HELMET, and MINIATURE BOOTS (O).

- Dress the figurine doll to match the sample.
- Walkthrough: (1-2)-(3-4)-(5-6)-(7-8)-(9-10)-(11-12)-(13-14).
- (15-16)-(17-18)-(19-20)-(21-22)-(23-24)-(25-26)-(27-28).
- (29-30)-(31-32)-(33-34)-(35-36)-(37-38)-(39-40).

- (41-42)-(43-44)-(45-46)-(47-48).
- Take EMPEROR’S HIBISCUS.

- Place GOLDEN DISCUS and EMPEROR’S HIBISCUS (P).
- Go (Q).

- Take PLANKS 1/3, STONE SLAB, and GOLDEN INSCRIPTION (R).
- Place GOLDEN INSCRIPTION, take STRINGS and HWANDO SWORD (S).
- Use HWANDO SWORD, take TONGS and CHISEL (T).
- Look at Note (T1).

- Use TONGS, take HAMMER (U).
- HAMMER and CHISEL on STONE SLAB, take STONE LIONESS.
- Place STONE LIONESS (V).
- Play puzzle, receive BRUSH.
- Use BERGAMOT and BRUSH, take MUSIC NOTES and TRIPLE SPEAR (W).
- Use STRINGS and MUSIC NOTES, take MUSIC PLAYER FIGURINE (X).
- Place two MUSIC PLAYER FIGURINES, take STONE ELEMENT 1/4 and CAGE KEY (Y).
- Use CAGE KEY (Z), receive MOON.

- Talk (A), receive HORSE FASTENER.
- Use HORSE FASTENER, take AREA MAP and PLANKS 2/3 (B).
- Place AREA MAP (C).
- Go (D).

- Take MITTENS and SUN (E).
- Place MOON and SUN (F).

- Starting from the top sun disc, rearrange the gate tokens according to the times of day they show.
- Select two tokens to swap them.
- Use the triangle button to check your solution.
- Walkthrough (@1): (L-E-J-F-L)-(A-K-A)-(B-H-C-I-B).
- Take CLAY DRAGON and STONE ELEMENT 2/4.

- Place CLAY DRAGON (M).
- Take FLOWER COOKIE and LOOFAH SPONGE (N).
- Give FLOWER COOKIE, take BUSHY BRANCH and PLANKS 3/3 (O).
- Place PLANKS 3/3 (P).
- Use BUSHY BRANCH and LOOFAH SPONGE (Q), receive NET.
- Use TRIPLE SPEAR and NET (R).

- Place all the leaves on the net.
- All the leaves must fit into the net.
- Pay attention to die shape of die leaves.
- Walkthrough: (1-2)-(3-4)-(5-6)-(7-8)-(9-10)-(11-12).
- (13-14)-(15-16)-(17-18)-(19-20).
- Take ORNAMENT and STONE ELEMENT 3/4.

- Place ORNAMENT (S).
- Take GRINDING STONE and STONE ELEMENT 4/4 (T).
- Place STONE ELEMENT 4/4 (U).
- Go (V).

- Receive FIRM BELT and MAGIC SPORES.
- Take BRUSH (W).
- Use FAN, take COUNTING RODS and MAGIC CRYSTAL (W1).
- Place MAGIC CRYSTAL (X).
- Place MAGIC SPORES, take FLUORESCENT MUSHROOMS (X1).
- Use MITTENS and FLUORESCENT MUSHROOMS (Y).
- Play puzzle, receive PICKAX.
- Use PICKAX (Z), take STALACTITE (Z1).
- GRINDING STONE and FIRM BELT on STALACTITE, take OLD MAN’S CANE.

- Give OLD MAN’S CANE (A), receive FLINT and INCENSE.
- Take EMPEROR’S ORDER (B).
- Open EMPEROR’S ORDER.

- Select scroll (C).
- Take MASCARA and ALCOHOL (D).
- Place COUNTING RODS, take METAL PLATE and STONE EYES (E).

- Use INCENSE STICKS, METAL PLATE, and FLINT (F).
- Play puzzle, receive COTTON.
- ALCOHOL, COTTON, MASCARA, and BRUSH on EMPEROR’S ORDER, take CORRECTED ORDER.
- Give CORRECTED ORDER (G).

- Select Cameo (H), receive FLASK.
- Place STONE EYES (I) and FLASK (J), receive RESTORING ELIXIR.
- Use RESTORING ELIXIR.
- Take STONES OF MORNING PETALS (K).
- STONES OF MORNING PETALS on ARTIFACT SHELL, take ARTIFACT OF WISHES.
- Give ARTIFACT OF WISHES (L).
- Walkthrough Bonus Chapter, at the link below.


