Grim Tales 23: Dual Disposition – The games walkthrough begins when a gift shop was recently robbed and evidence against you was found at the scene. The police accuse you, except for your policeman friend named Chris Lewis. He’s known you for a long time and doesn’t believe you’re involved. The file says an unidentified masked man broke into an exotic gift shop at night and made a mess. The camera didn’t capture the theft, but the mess makes it hard to tell if anything was missing. Blood samples found at the crime scene match the eight markers of Anna Grey, which is you. It is up to you to uncover the identity of the villain and bring justice. If you can not pass any of the puzzles or do not know where the items are, on our site you can watch the walkthrough of the game Grim Tales 23: Dual Disposition, and catch the real culprit.
Grim Tales 23: Dual Disposition – Walkthrough
Here you can see full walkthrough of Grim Tales 23: Dual Disposition game, namely for all chapters, including bonus chapter, in pictures.
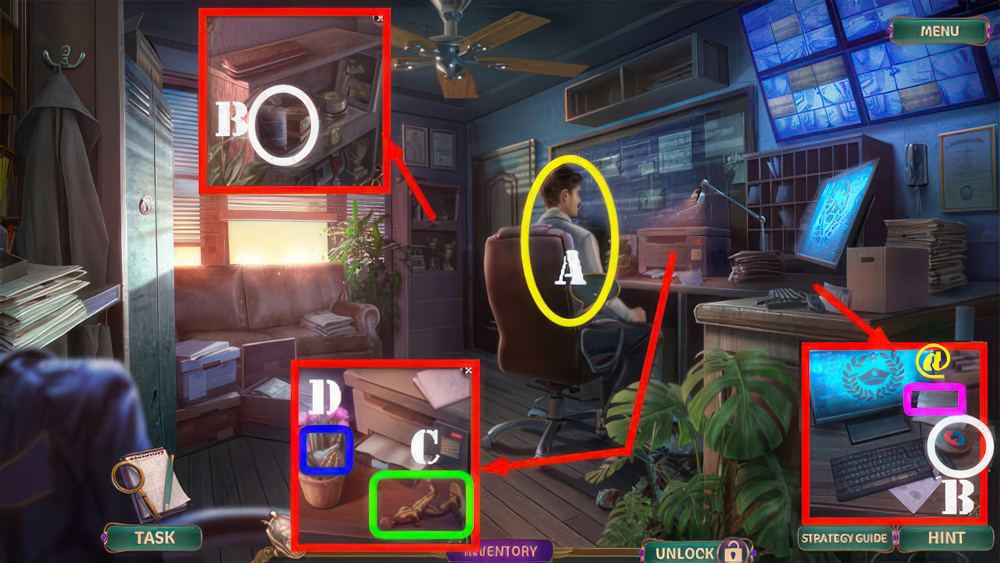
- Talk (A).
- Look at note (@).
- Take CLEANING WIPES and MAGNET (B).
- Look at note, take INSTRUCTOR FIGURINE (C).
- Use MAGNET (D), receive LOCKER KEY.
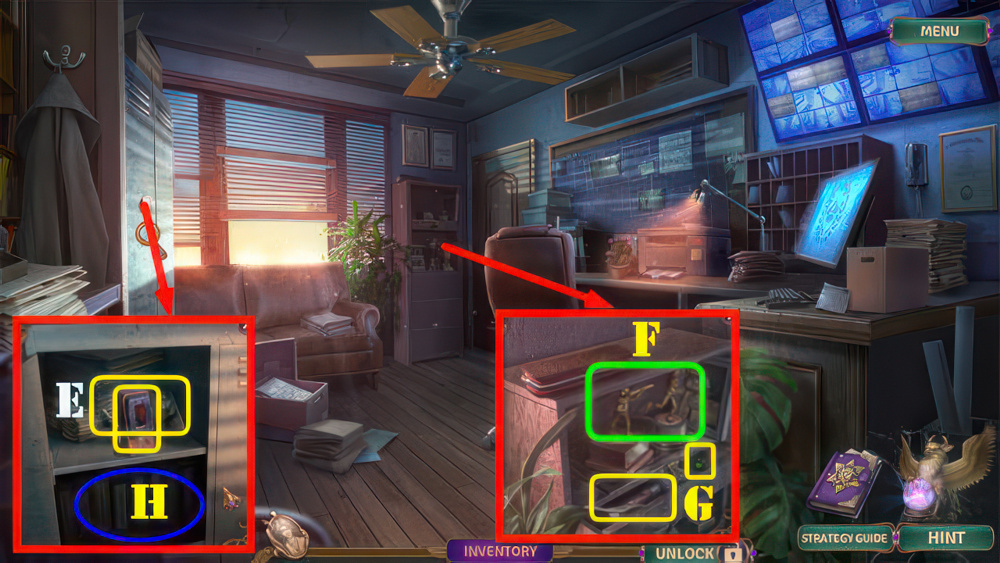
- Use LOCKER KEY, take BROKEN SCANNER and OFFICER FIGURINE (E).
- Place OFFICER FIGURINE and INSTRUCTOR FIGURINE (F).
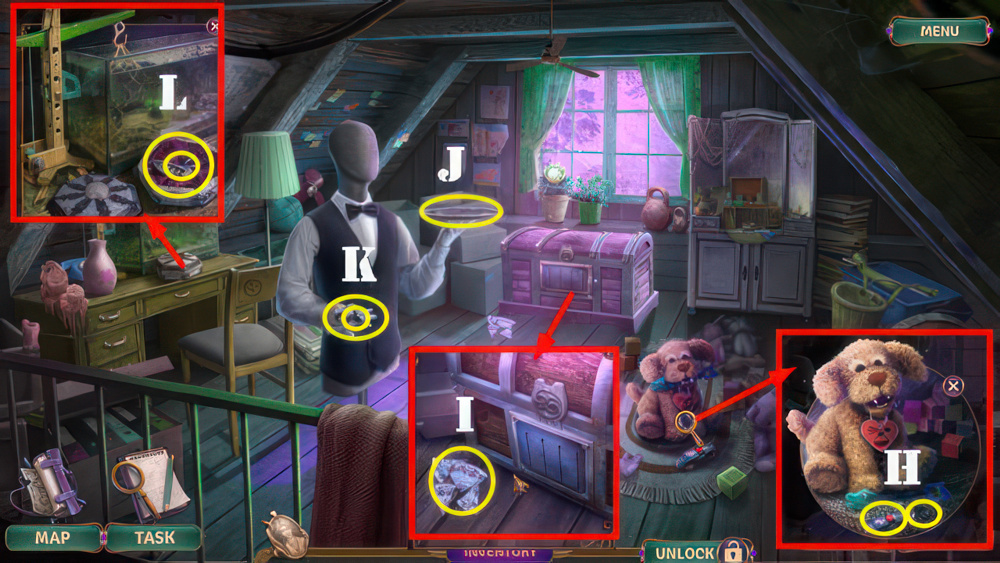
- take FLASHLIGHT and SCANNER BUTTONS 1/2 (G).
- Use FLASHLIGHT (H).
- Play puzzle, receive Map.
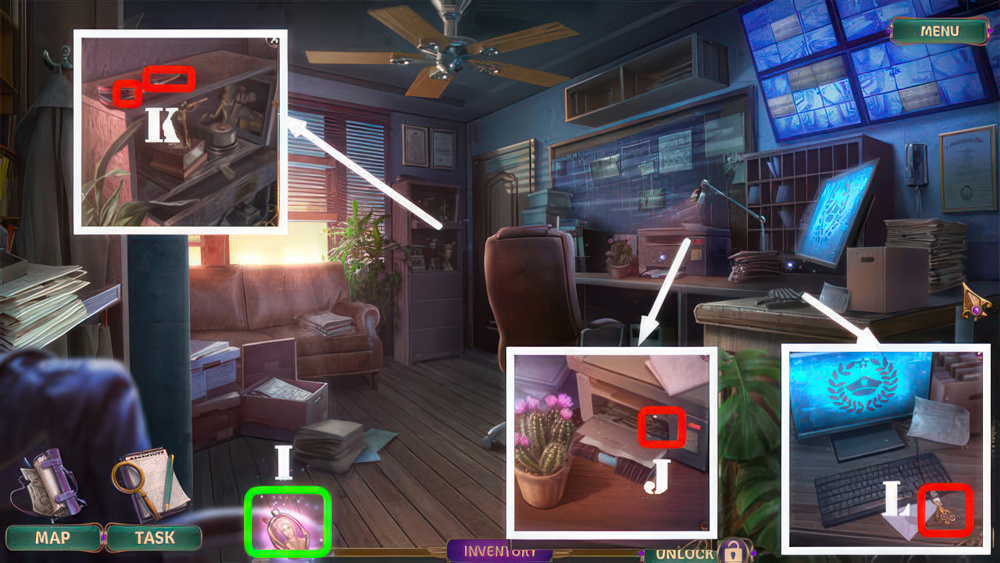
- Select cameo (I), receive LETTER OPENER.
- Use LETTER OPENER, take PAPER CLIP (J).
- Use PAPER CLIP, take TWEEZERS and SCANNER BUTTONS 2/2 (K).
- SCANNER BUTTONS 2/2 and CLEANING WIPES on BROKEN SCANNER, take SCANNER.
- Attach SCANNER (L).
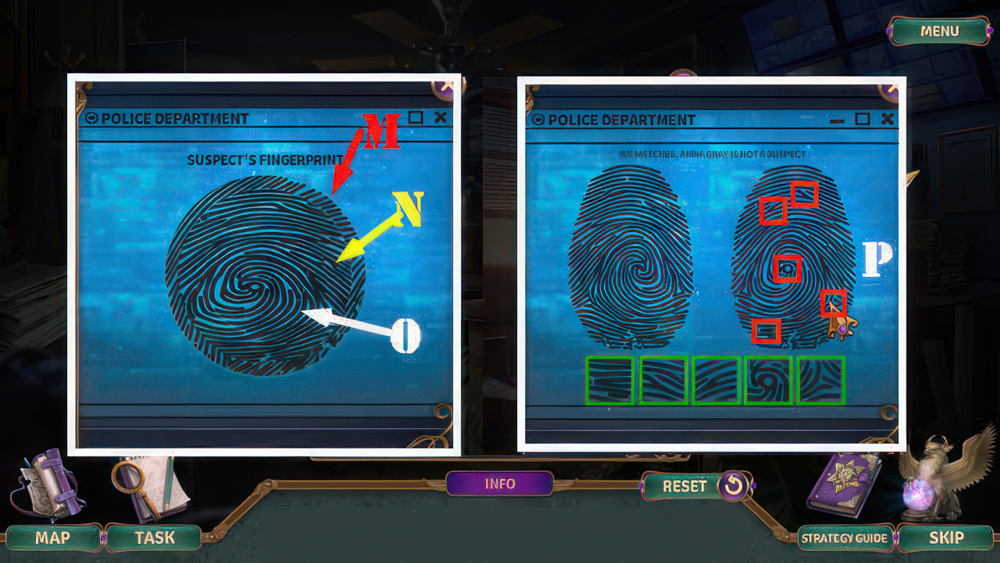
- Reconstruct the suspect’s fingerprint pattern.
- Select a ring to rotate it.
- Walkthrough: (M×5-N×7-O×5).
- Find and select the patterns shown below on the fingerprint on the right.
- Patterns light up when selected correctly.
- Walkthrough: (P).
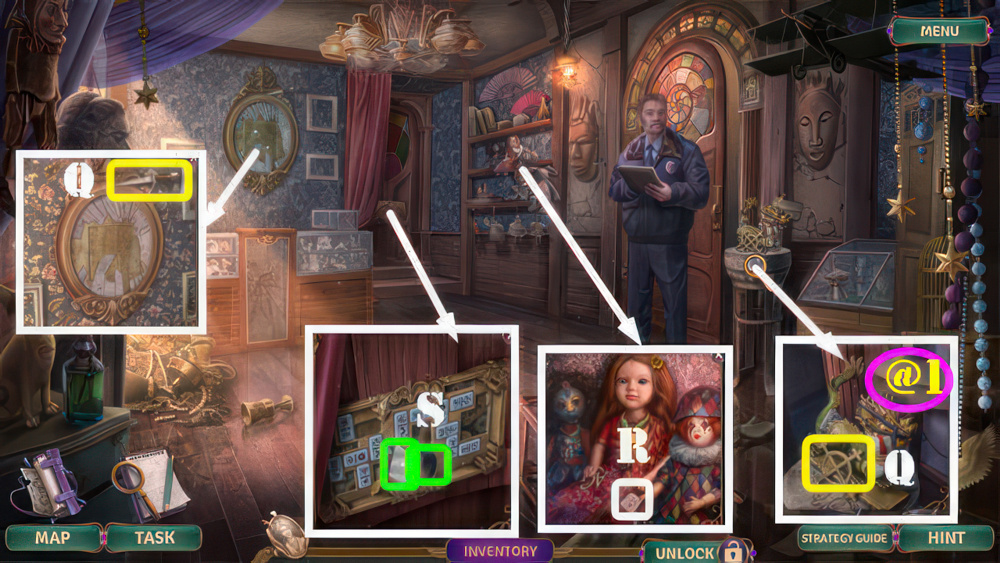
- Look at note (@1).
- Take DAGGER and SYMBOL INLAY (Q).
- Move doll, take DOMINO TILE 1/2 (R).
- Place SYMBOL INLAY, take CAGE MIRROR and ELECTRICAL TAPE (S).
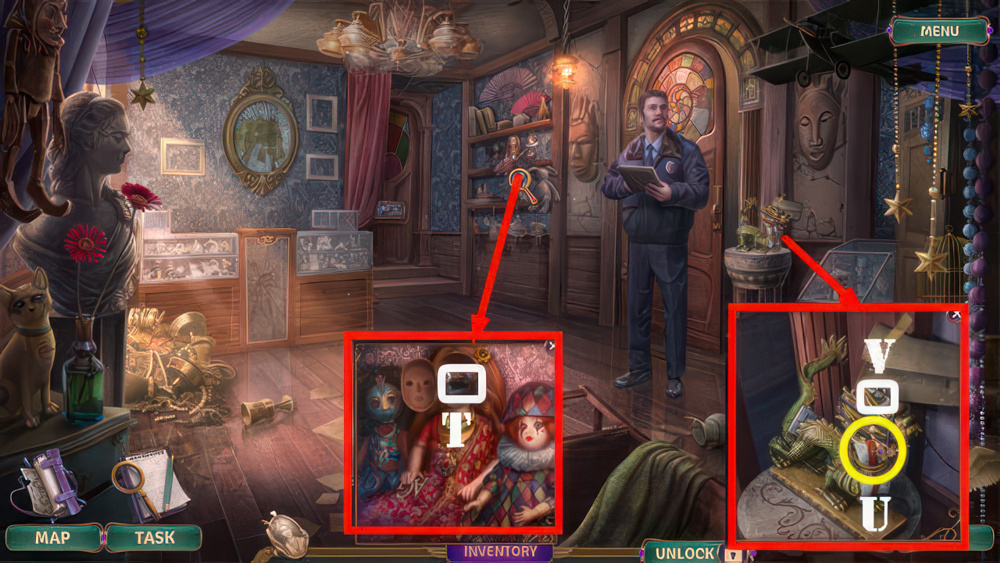
- Use DAGGER, take SPY CAMERA (T).
- Use DAGGER (U), receive DOLL BELT and COLORED WIRES.
- Use TWEEZERS (V), receive HANDKERCHIEF.
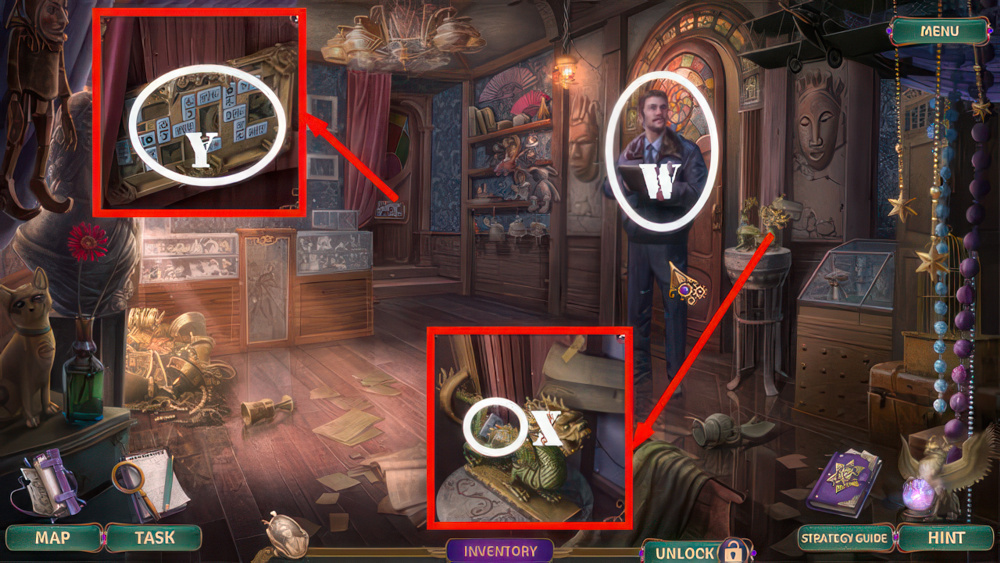
- COLORED WIRES and ELECTRIC TAPE on SPY CAMERA.
- Select camera and take PROOF.
- Give PROOF (W).
- Take DOMINO TILE 2/2 (X).
- Place DOMINO TILE 2/2 (Y).
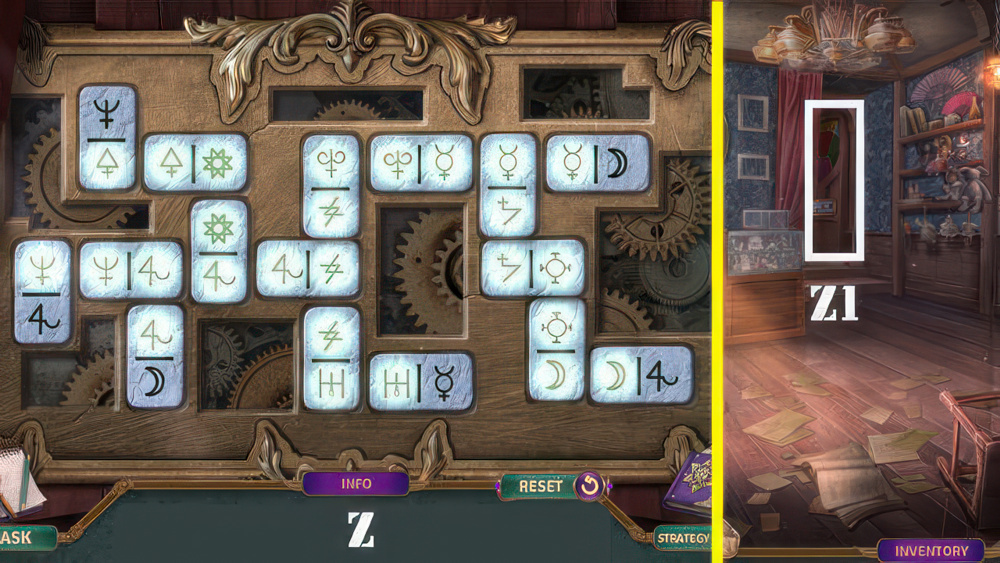
- Arrange the tiles so that matching symbols are next to each other.
- Select two tiles to swap them.
- Symbols light up when next to their match.
- Walkthrough (Z).
- Go (Z1).
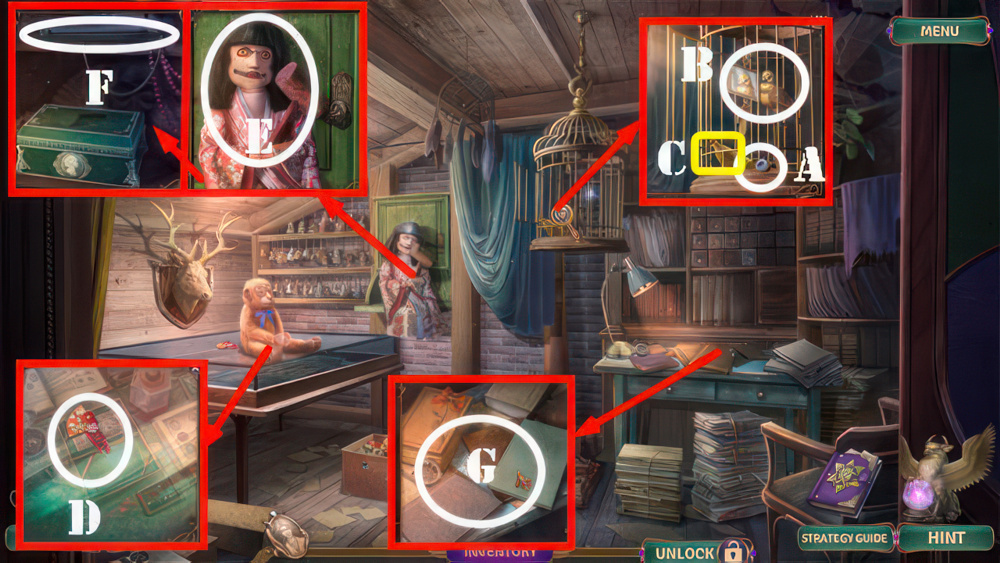
- Take DOLL EYE (A).
- Hang CAGE MIRROR (B), take PLUSH BANANA (C).
- Use PLUSH BANANA, take DOLL HAIRPIN (D).
- Place DOLL HAIRPIN and DOLL BELT (E), receive HAMMER.
- Select handle, take UV LAMP (F).
- Use UV LAMP (G), play puzzle, receive COMMEMORATIVE COIN.
- Walk down.
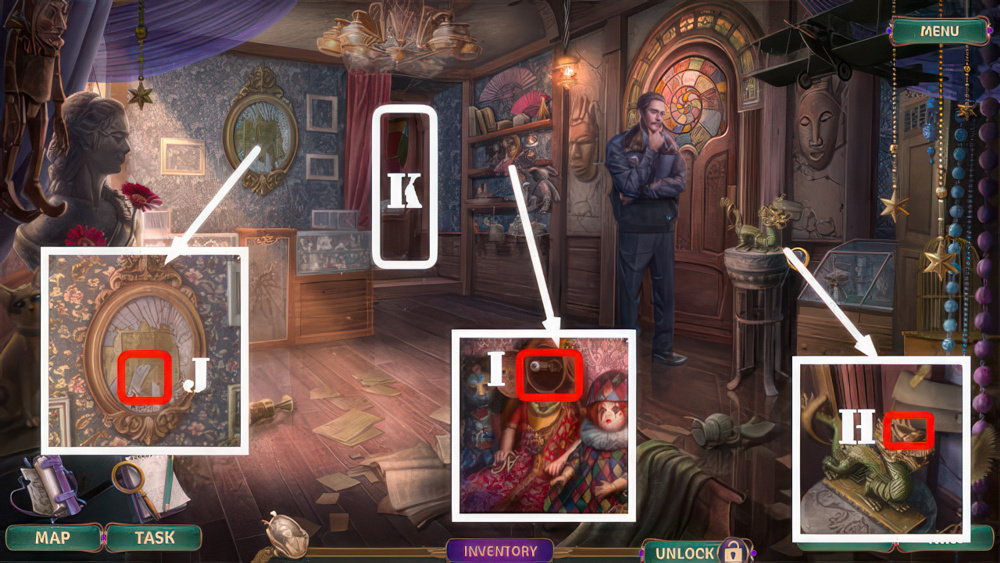
- Insert COMMEMORATIVE COIN (H), receive SUSPECT’S BAG.
- Place DOLL EYE (I), receive BUCKLE INLAY.
- Use HANDKERCHIEF (J), receive GLASS SHARD.
- BUCKLE INLAY and GLASS SHARD on SUSPECT’S BAG, take MIRRORED BILL.
- Receive STAR RING.
- Go (K).
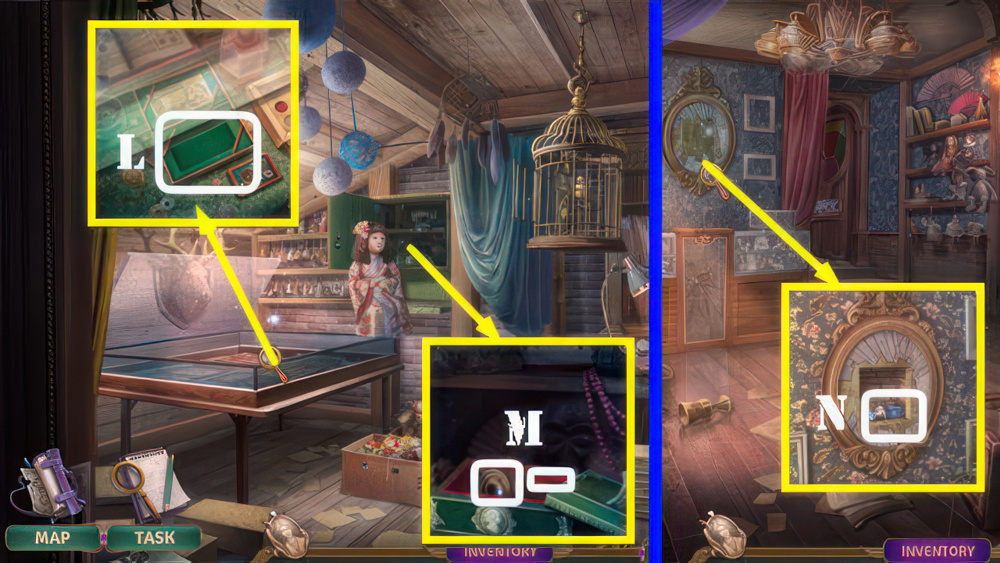
- Open case and place MIRRORED BILL (L).
- Play puzzle, receive BOX FIGURINE.
- Use BOX FIGURINE, take BROKEN COMPASS and CHISEL (M).
- Walk down.
- Use CHISEL and HAMMER, take MAGICAL ESSENCE (N).
- MAGICAL ESSENCE on BROKEN COMPASS, take EMPTY VIAL.
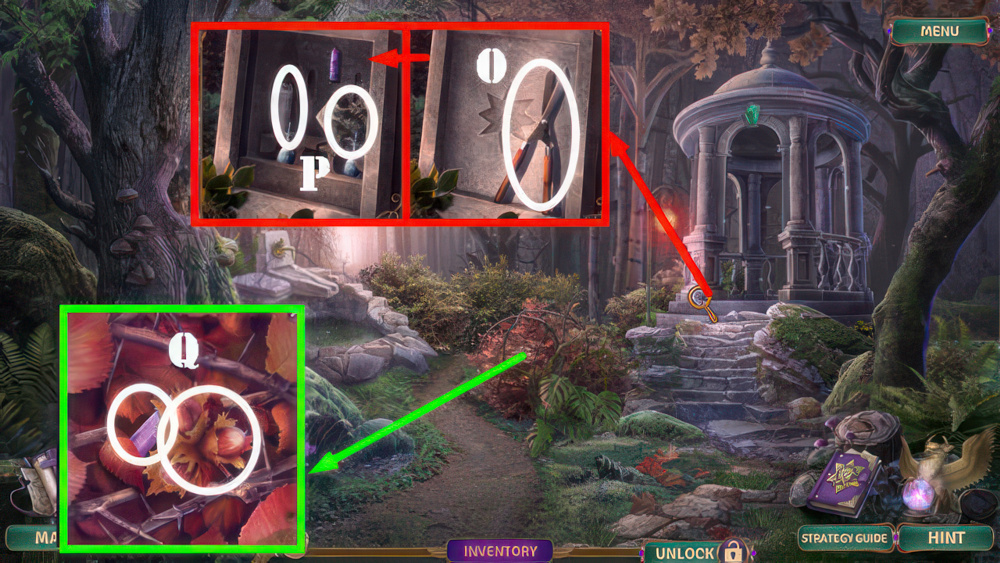
- Take GARDEN SHEARS (O).
- Use STAR RING, take CHIMERA STATUE and CANDLE (P).
- Use GARDEN SHEARS, take ACORNS and
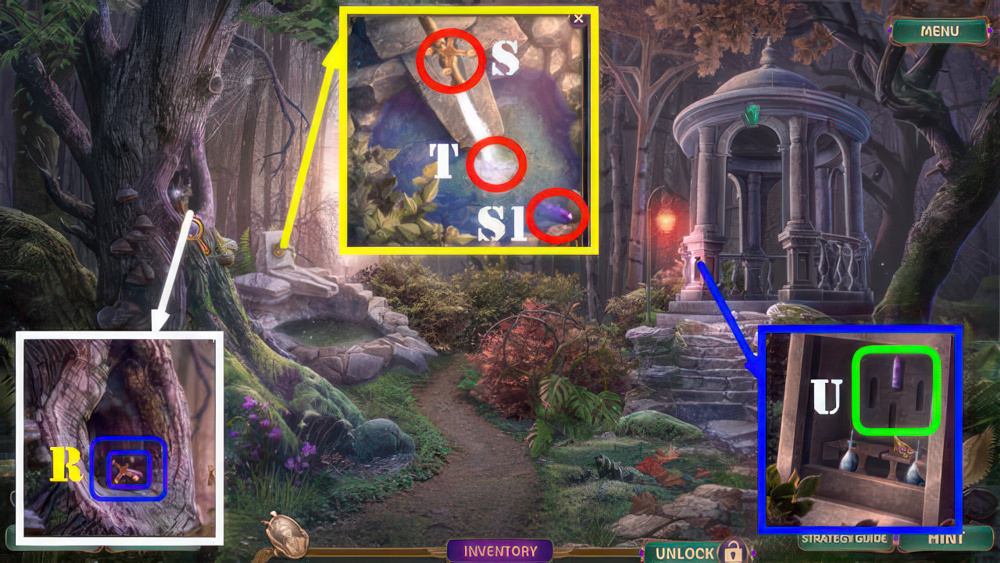
- Use ACORNS, take COPPER VALVE and CRYSTAL 2/3 (R).
- Place COPPER VALVE (S).
- Take CRYSTAL 3/3 (S1).
- Use EMPTY VIAL (T), receive CLEAN WATER.
- Place CRYSTAL 3/3 (U).
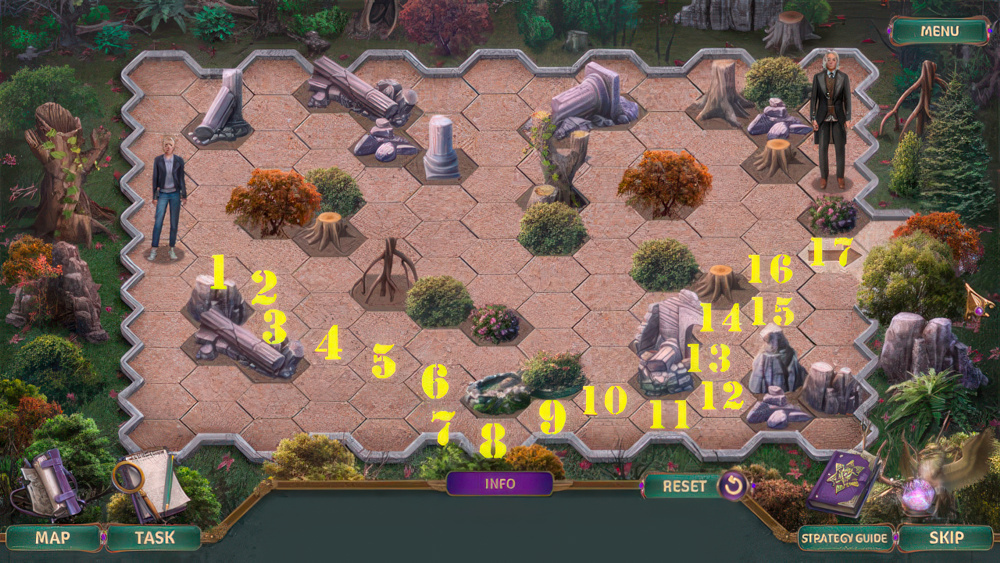
- Move Anna to the arrow exit without being caught.
- Press a space to move there.
- Anna and the Keeper can each move one space per turn, but the Keeper can move two spaces if next to Anna.
- Walkthrough: (1-17).
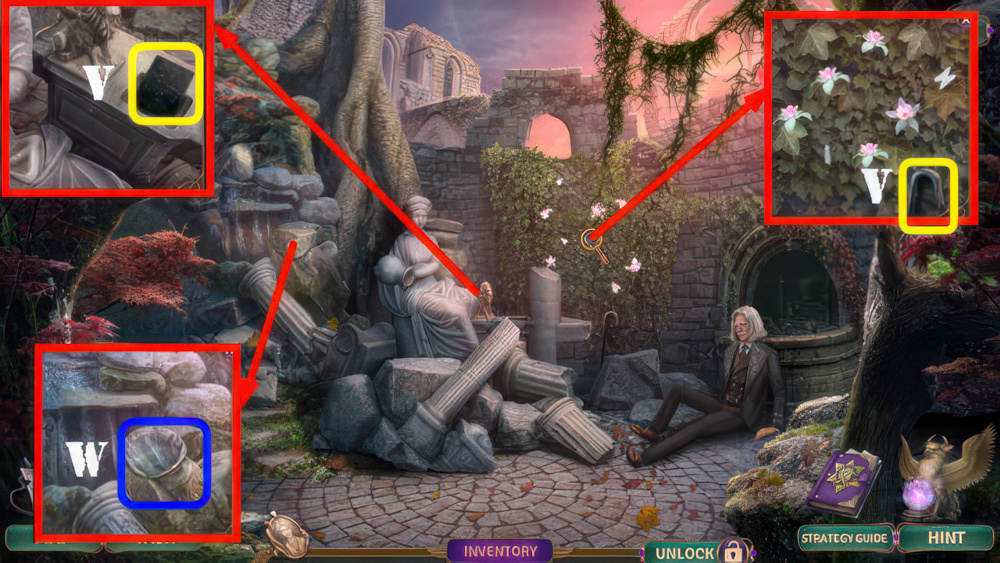
- Receive ROUND LIGHTER.
- Take PHOTOGRAPHY GLASS and CROWBAR (V).
- Use CROWBAR, take NET PIECE (W).
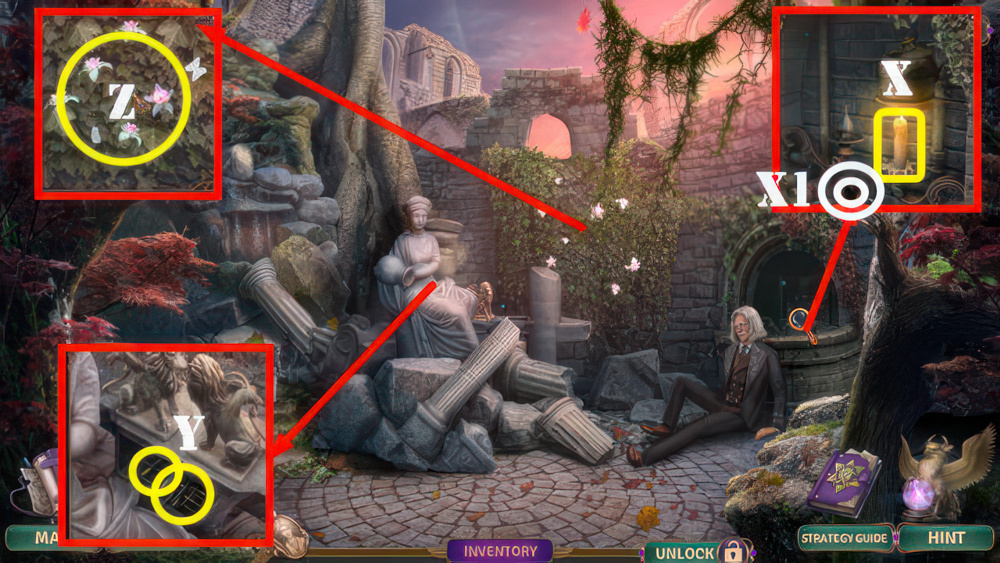
- Place CANDLE and use ROUND LIGHTER (X).
- Take GLASS PLATE and MORTAR AND PESTLE (X1).
- Place CHIMERA STATUE, take COILED PIPE and SCOOP NET FRAME (Y).
- NET PIECE on SCOOP NET FRAME, take SCOOP NET.
- Use SCOOP NET (Z).
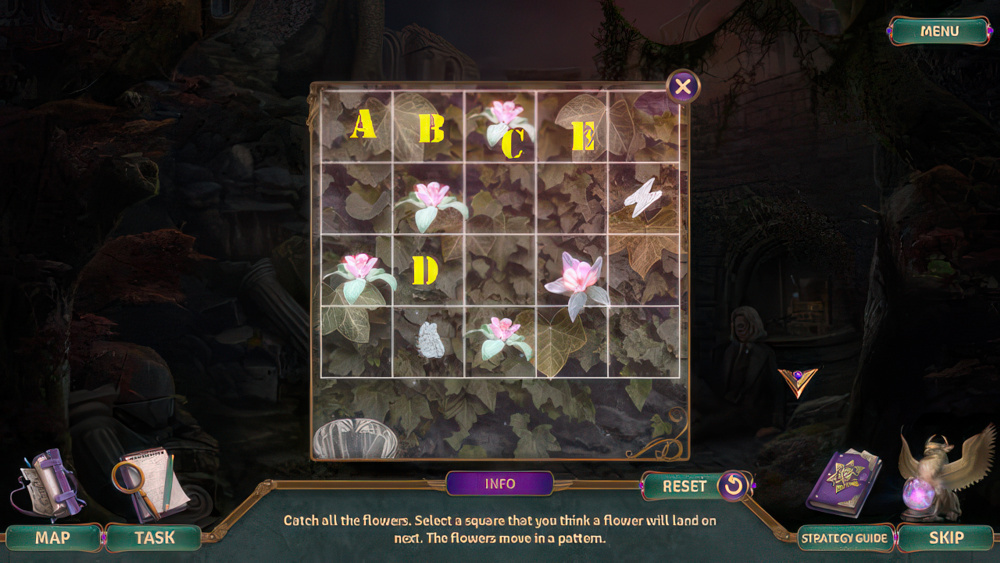
- Catch all the flowers.
- Select a square that you think a flower will land on next.
- The flowers move in a pattern.
- Walkthrough: (A-B-C-D-E).
- Receive MAGIC PETALS.
- MAGIC PETALS and CLEAN WATER in MORTAR AND PESTLE, take ESSENCE.

- Use ESSENCE and COILED PIPE (F).
- Take ESSENCE VESSEL (G).
- Walk down.
- Place ESSENCE VESSEL (H).
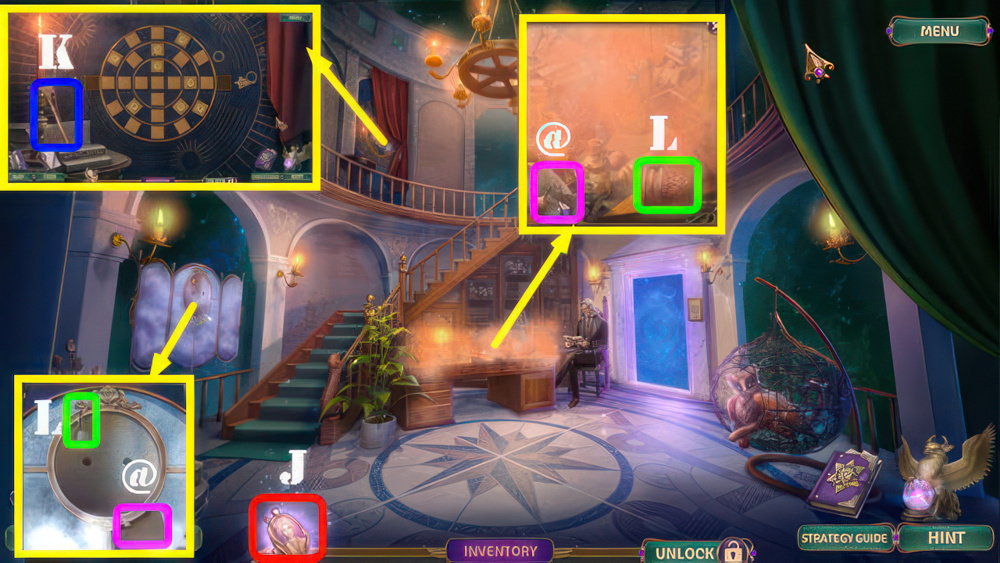
- Select cameo (J), receive MAGIC DUST.
- Look at 2 notes (@).
- Look at note, take MAGIC QUILL (K).
- Take VINTAGE JAR and HOOK (L).
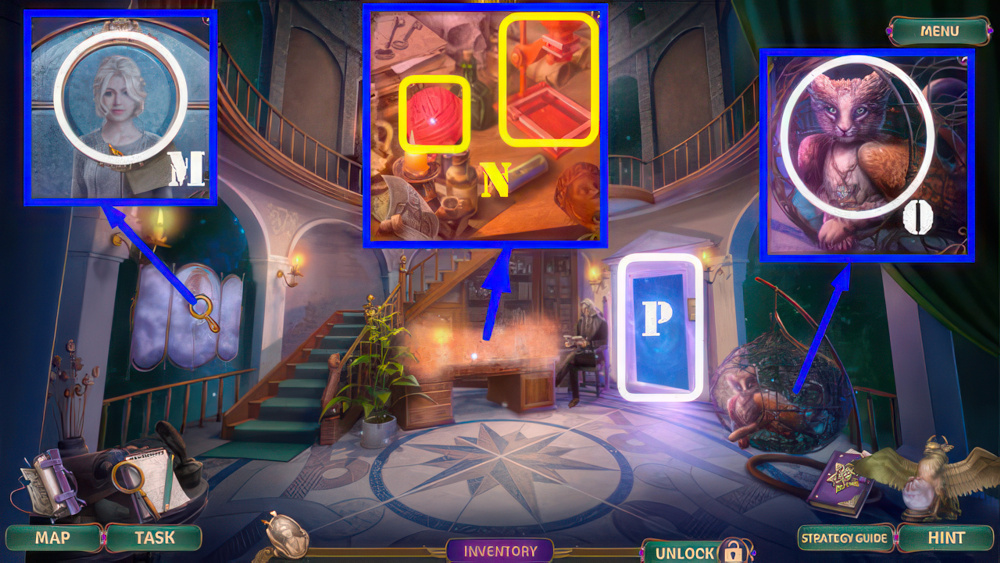
- Place GLASS PLATE and MAGIC DUST (M).
- Play puzzle, receive MAGIC GLASSES.
- Use MAGIC GLASSES and move the items out of the way, take YARN and DEVELOPER (N).
- Give YARN (O).
- Go (P).
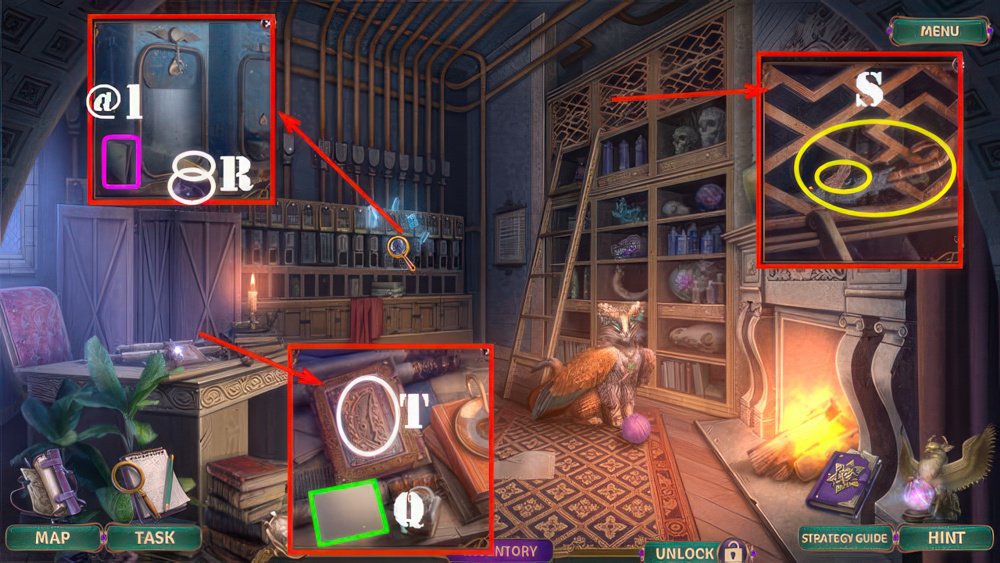
- Look at note (@1).
- Take THICK PAPER (Q).
- Use HOOK, take HANDKERCHIEF and APPLE SLICE (R).
- Use APPLE SLICE and VINTAGE JAR, take UMBRELLA and FEATHER INLAY (S).
- Use FEATHER INLAY and MAGIC QUILL (T).
- Play puzzle, receive SMALL TUBE.
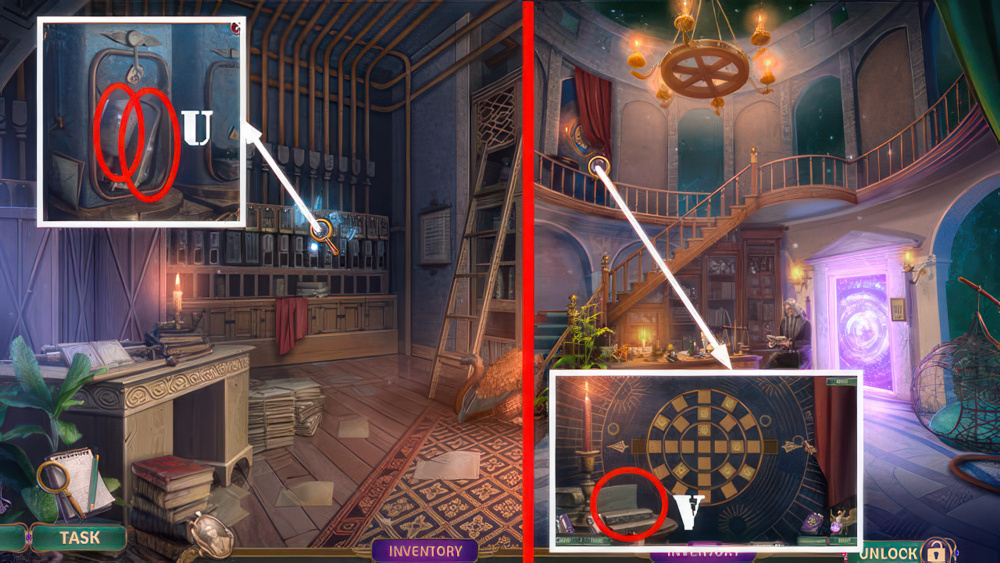
- DEVELOPER, THICK PAPER, and SMALL TUBE on PHOTOGRAPHY GLASS, take ARCHIVE REQUEST.
- Place ARCHIVE REQUEST, take COORDINATES PLATE and BROKEN HACKSAW (U).
- Walk down.
- Place COORDINATES PLATE (V).
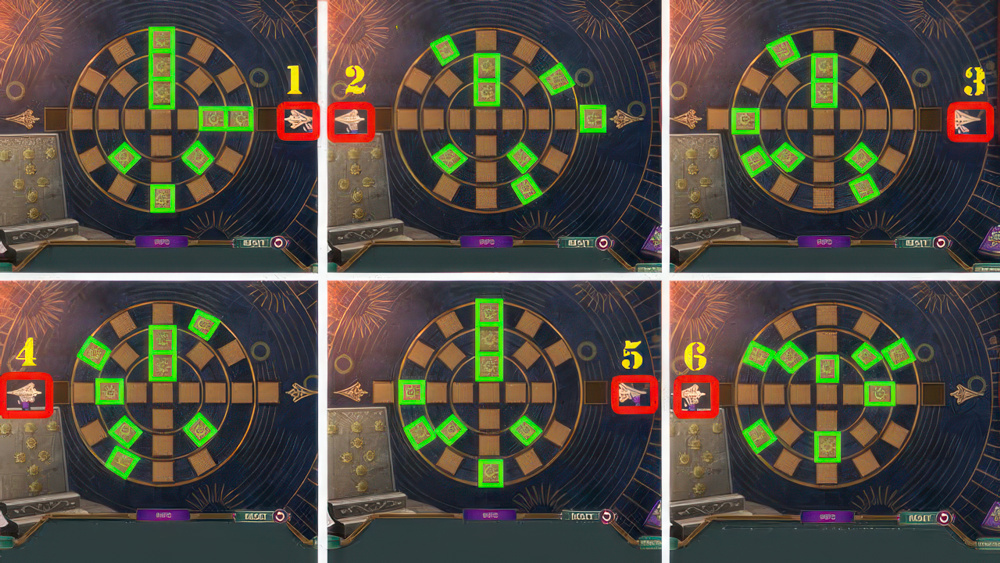
- Recreate the pattern as shown on the left plate.
- Select and drag rings to rotate them.
- Use the arrows to move tiles in and out of the side slots and rearrange them.
- Walkthrough: for each image, position as shown, and then select the numbered arrows in chronological order (1-6).
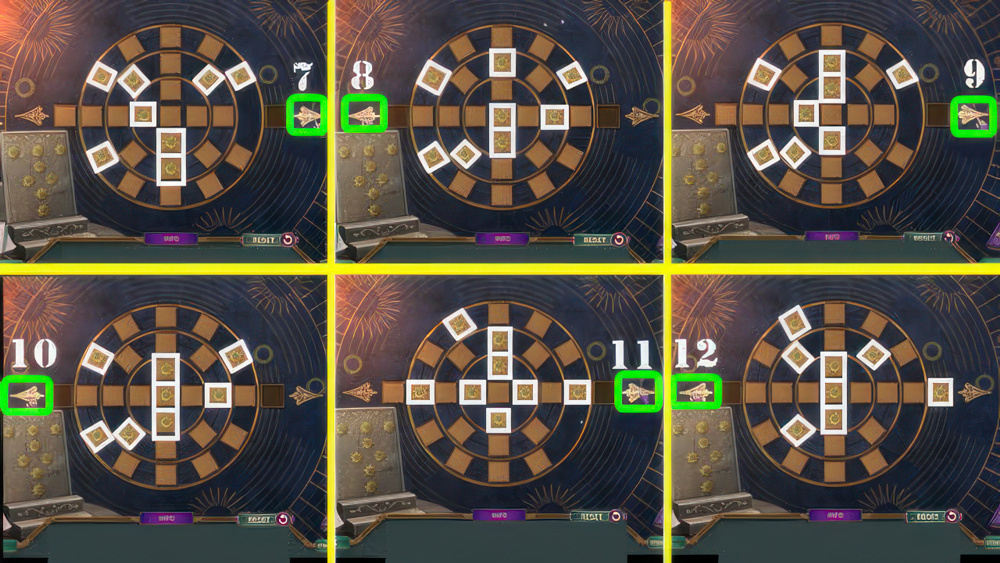
- Walkthrough (7-12).
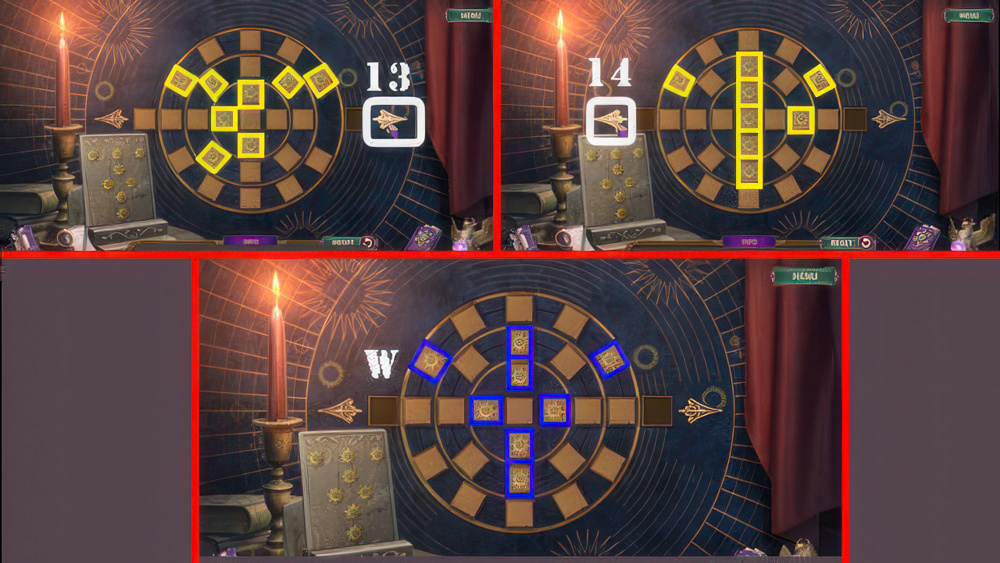
- Walkthrough (13-14).
- Solved Image (W).
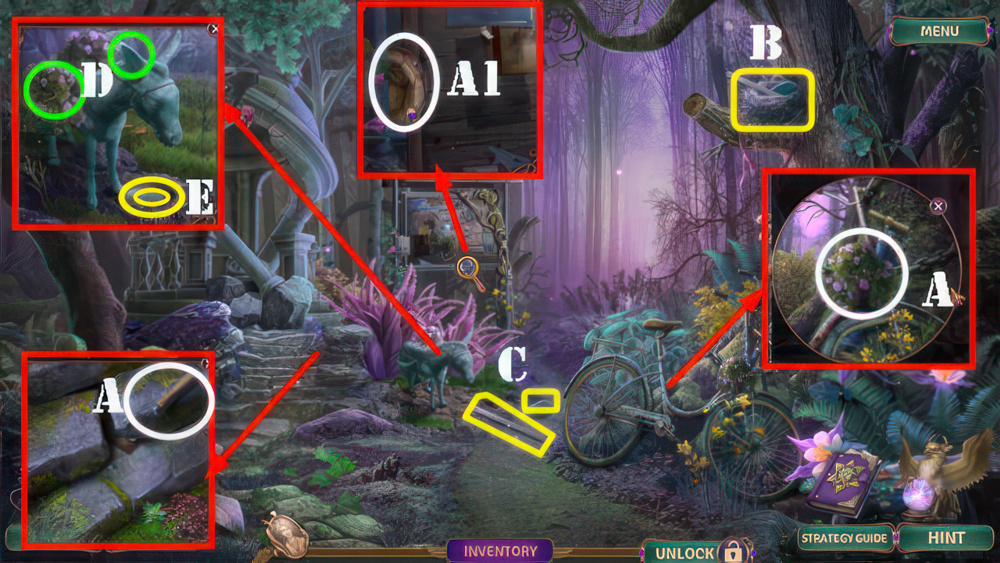
- Take HACKSAW HANDLE and FLOWERPOT (A).
- Remove note, take DEFLATED BALL (A1).
- Use UMBRELLA (B).
- Take STONE EAR and HACKSAW BLADE (C).
- Place STONE EAR and FLOWERPOT (D).
- Take SILVER MIRROR 1/2 and WING NUT (E).
- HACKSAW BLADE, HACKSAW HANDLE, and WING NUT on BROKEN HACKSAW, take METAL HACKSAW.
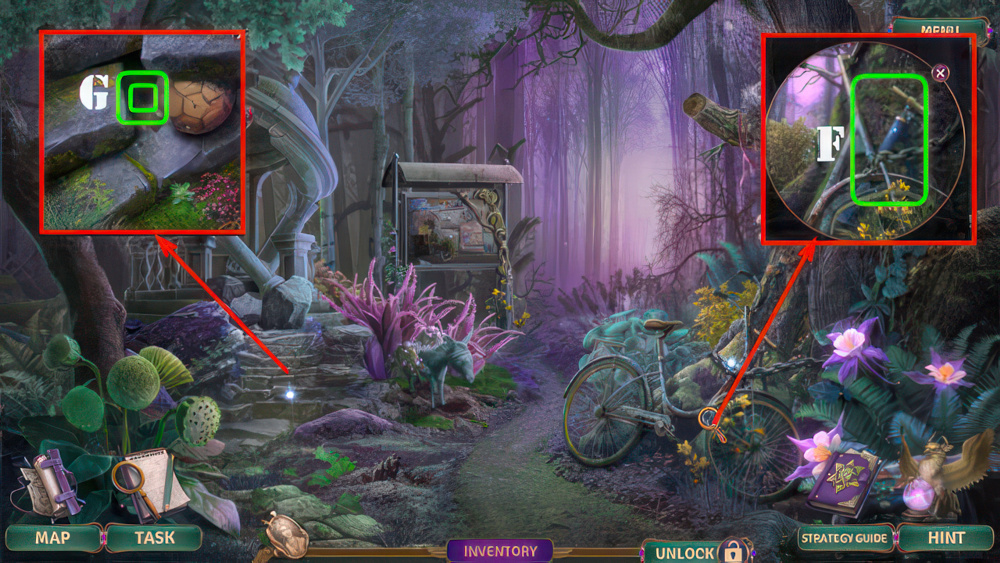
- Use METAL HACKSAW, take AIR PUMP (F).
- Use AIR PUMP and DEFLATED BALL, take DISASSEMBLED PHONE and AD LEAFLET (G).
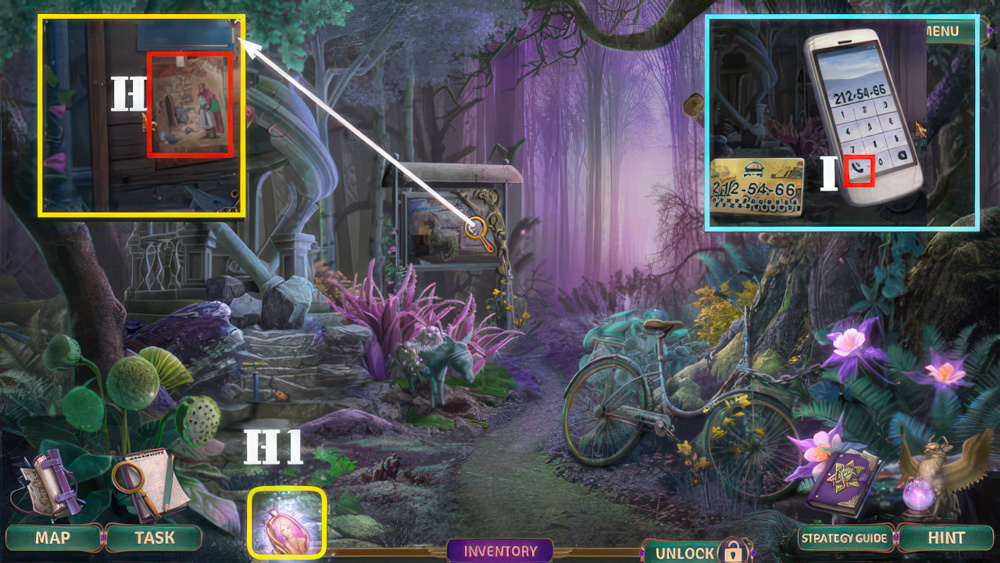
- Place AD LEAFLET (H).
- Play puzzle, receive PHONE BATTERY.
- Select cameo (H1), receive LADY A’S PICTURE and TAXI NUMBER.
- PHONE BATTERY and TAXI NUMBER on DISASSEMBLED PHONE, press 2125466 and dial (I).
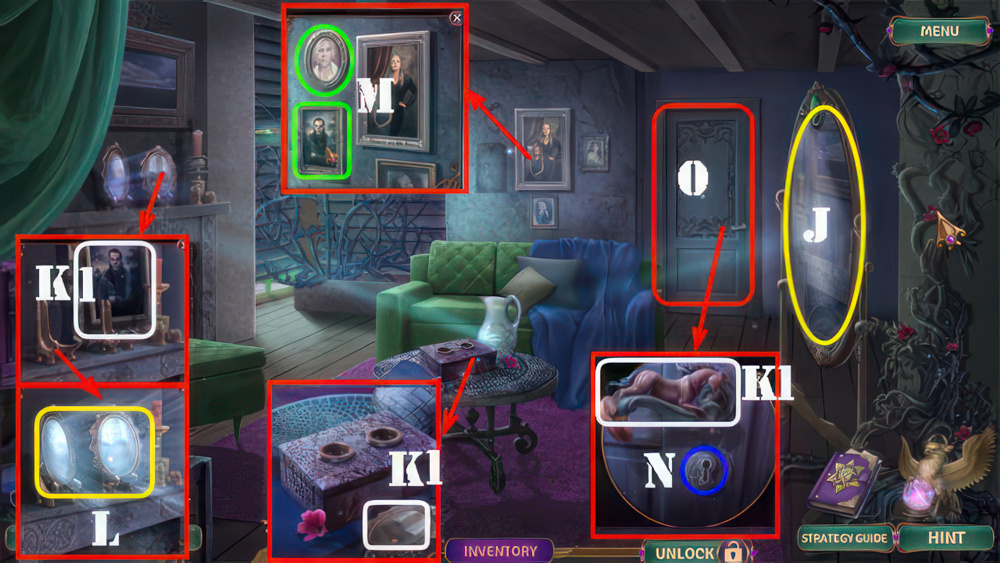
- Use HANDKERCHIEF (J).
- Take HORSE FIGURINE, RICHARD’S PICTURE, and SILVER MIRROR 2/2 (K1).
- Place SILVER MIRROR 2/2 (L).
- Place RICHARD’S PICTURE and LADY A’S PICTURE (M).
- Play puzzle, receive ATTIC KEY and EMPTY ATOMIZER.
- Use ATTIC KEY (N).
- Go (O).
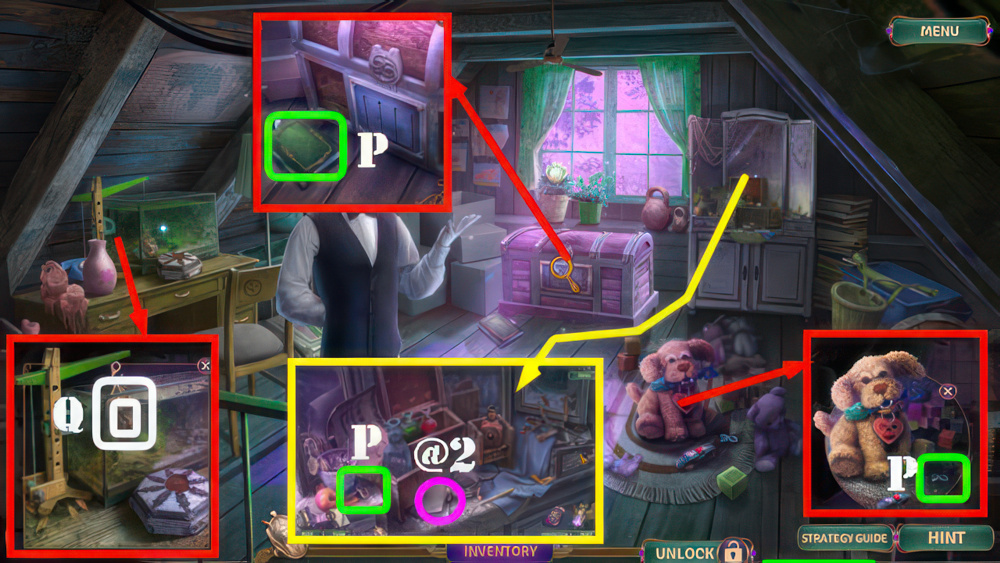
- Look at note (@2).
- Take BOOK WITH DECORATED SPINE, BRONZE HOOK, and CHEST SLIDER 1/4 (P).
- Use BRONZE HOOK, take SHATTERED SAUCER and COWBOY FIGURINE (Q).
- Walk down.
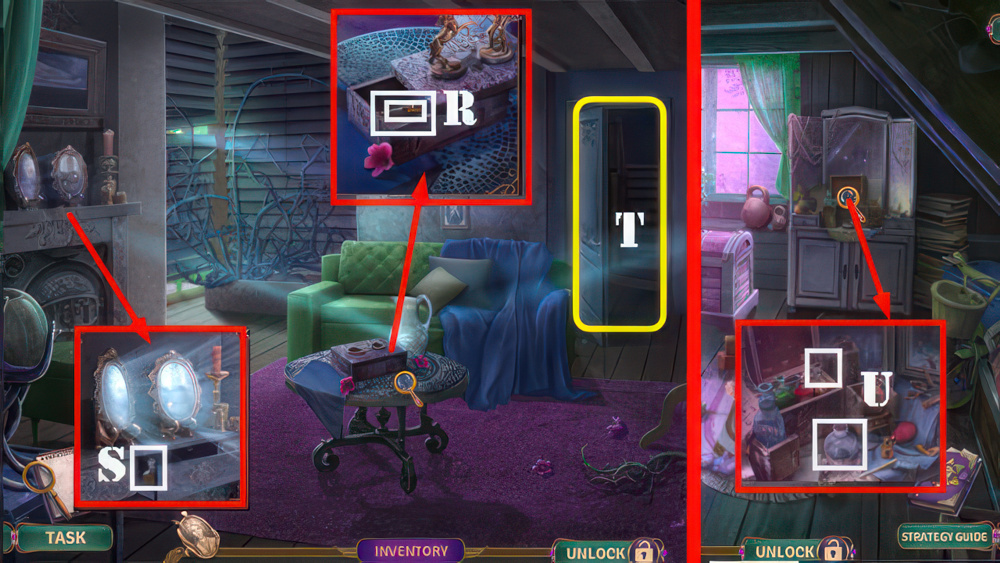
- Place HORSE FIGURINE and COWBOY FIGURINE, take GLUE and STONE PATTERN (R).
- Place STONE PATTERN, take SCENT (S).
- Go (T).
- Place EMPTY ATOMIZER and SCENT (U).
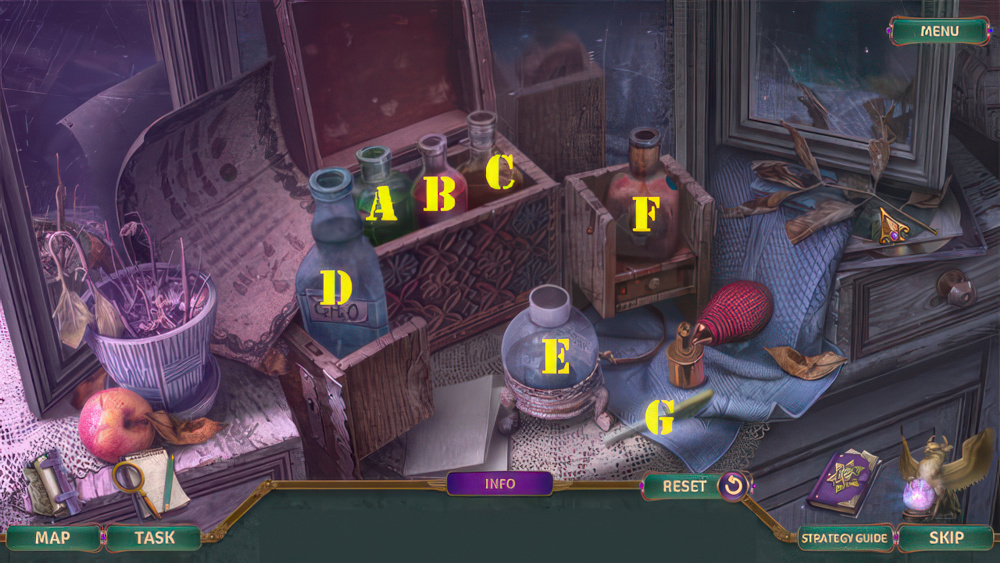
- Recreate Lady A’s perfume according to the recipe using the perfumer’s kit.
- Mix different ingredients using the dropper to measure and the flask as a receptacle.
- Walkthrough: (G-B-E)-(G-C-E)-(G-B-E).
- (G-A-E)-(G-C-E)-(G-B-E)-(F-E)-(D-E).
- (G-B-E)-(G-A-E)-(G-A-E).
- Take LADY A’S PERFUME (E).
- Use LADY A’S PERFUME, take GRASPER TOY and CHEST SLIDER 2/4 (H).
- Use GRASPER TOY (I), receive SAUCER SHARDS.
- SAUCER SHARDS and GLUE on SHATTERED SAUCER, take SAUCER.
- Place SAUCER (J).
- Take CHEST SLIDER 3/4 and SHELL (K).
- Place SHELL, take TOY BOAT and CHEST SLIDER 4/4 (L).
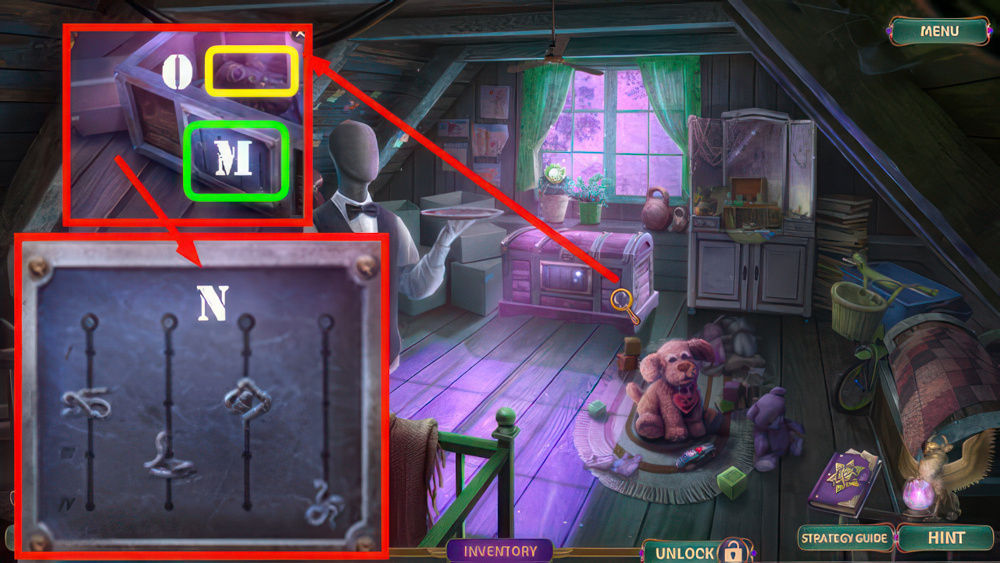
- Place CHEST SLIDER 4/4 (M).
- Count the number of snakes of each type on the chest and set the sliders with their image to the mark with the number corresponding to the number of snakes found.
- Walkthrough (N).
- Take WATERPROOF GLOVES (O).
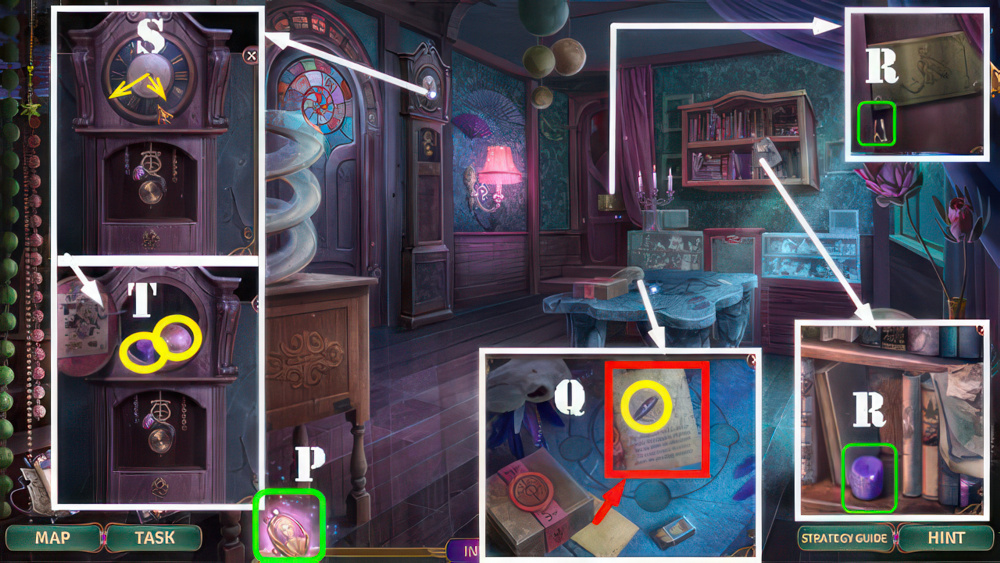
- Select cameo (P), receive NUMBER 4.
- Look at note and flip corner, take CLOCK WEIGHT (Q).
- Take NUMBER 11 and RITUAL CANDLE 1/5 (R).
- Place NUMBER 4 and NUMBER 11, set the clock to 5:40 (S).
- Take MARBLE BALL and RITUAL CANDLE 2/5 (T).
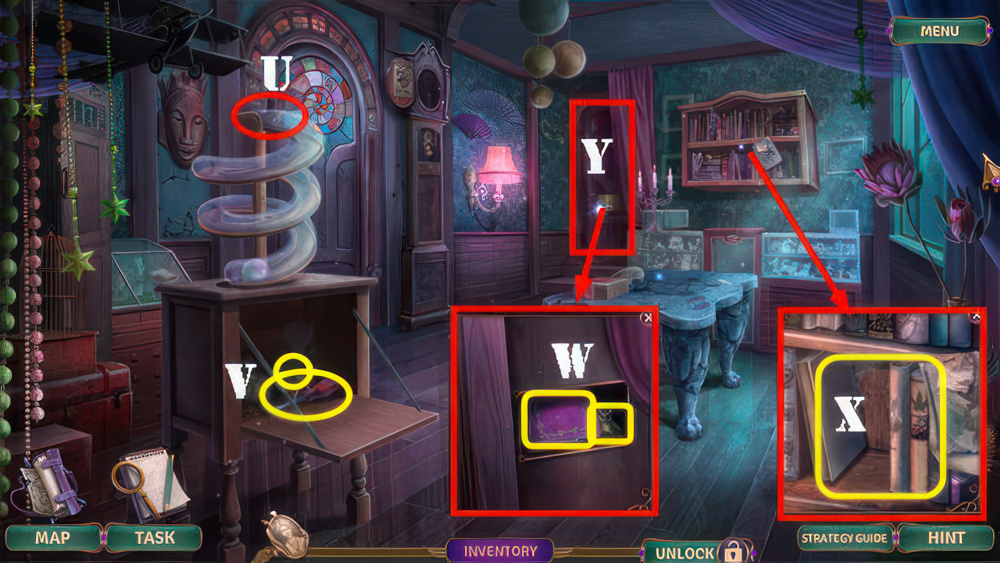
- Place MARBLE BALL (U).
- Take TOY STEERING WHEEL and SCREWDRIVER (V).
- Use SCREWDRIVER, take BOOK WITH DECORATED SPINE and OWL STATUETTE (W).
- Place two BOOKS WITH DECORATED SPINES (X).
- Play puzzle.
- Go (Y).
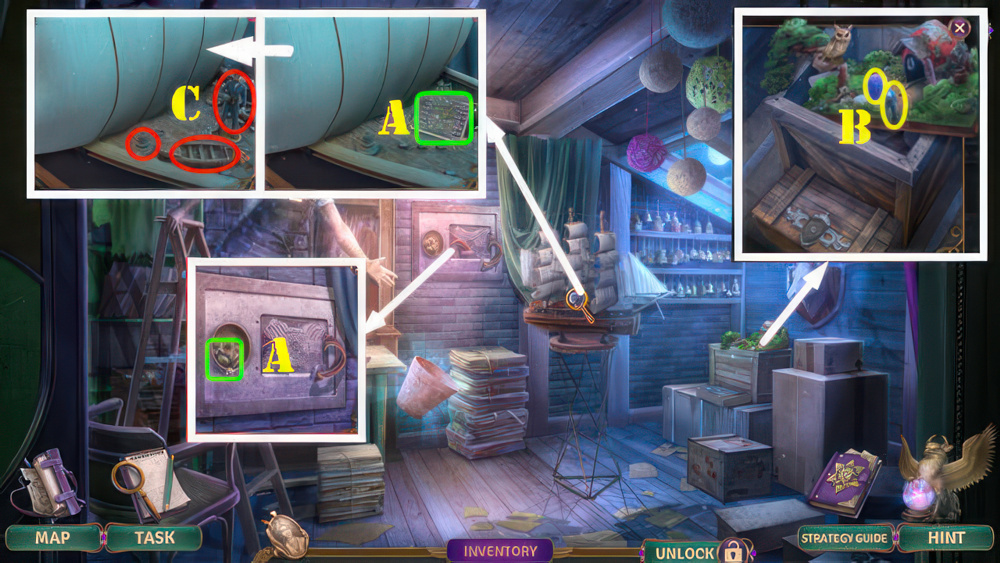
- Take MOUSE STATUETTE and CIRCUIT BOARD (A).
- Place OWL STATUETTE and MOUSE STATUETTE, take RITUAL CANDLE 3/5 and TOY NAVIGATOR (B).
- Place TOY BOAT, TOY NAVIGATOR, and TOY STEERING WHEEL (C).
- Play puzzle, receive CLOCK WEIGHT.
- Walk down.
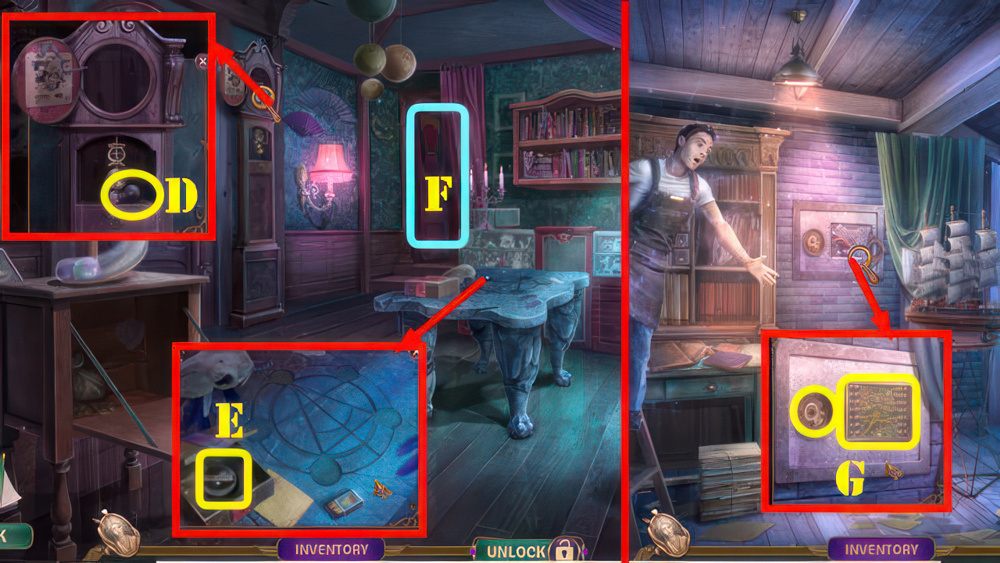
- Place two CLOCK WEIGHTS, take ANCIENT SEAL (D).
- Use ANCIENT SEAL, take SAFE HANDLE (E).
- Go (F).
- Place CIRCUIT BOARD and SAFE HANDLE (G).
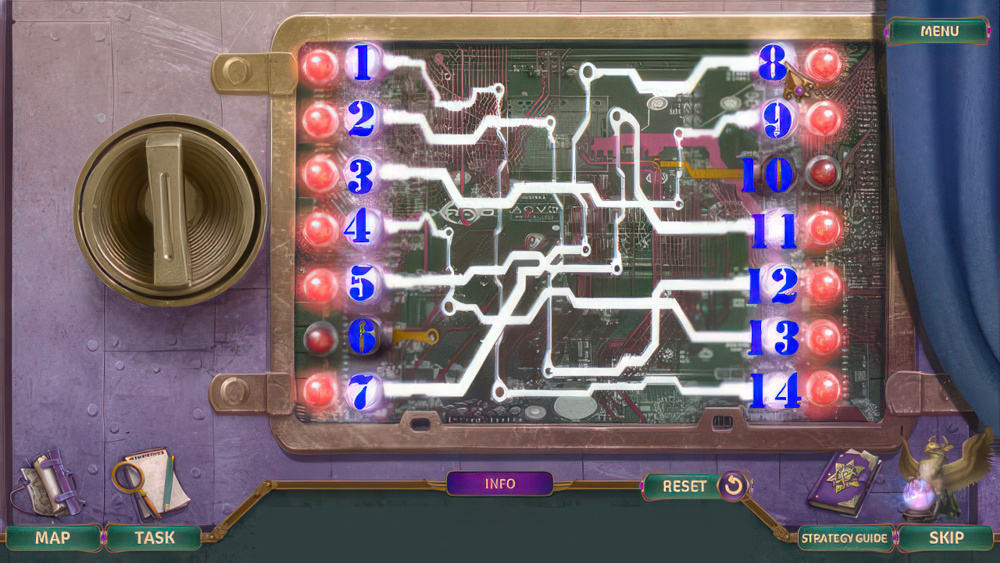
- Activate electrical circuits by pressing on the two matching connectors.
- Walkthrough (1-14)-(2-12)-(3-9)-(4-13)-(5-11)-(7-8).
- Take SHIELD AMULET and RITUAL CANDLE 4/5.
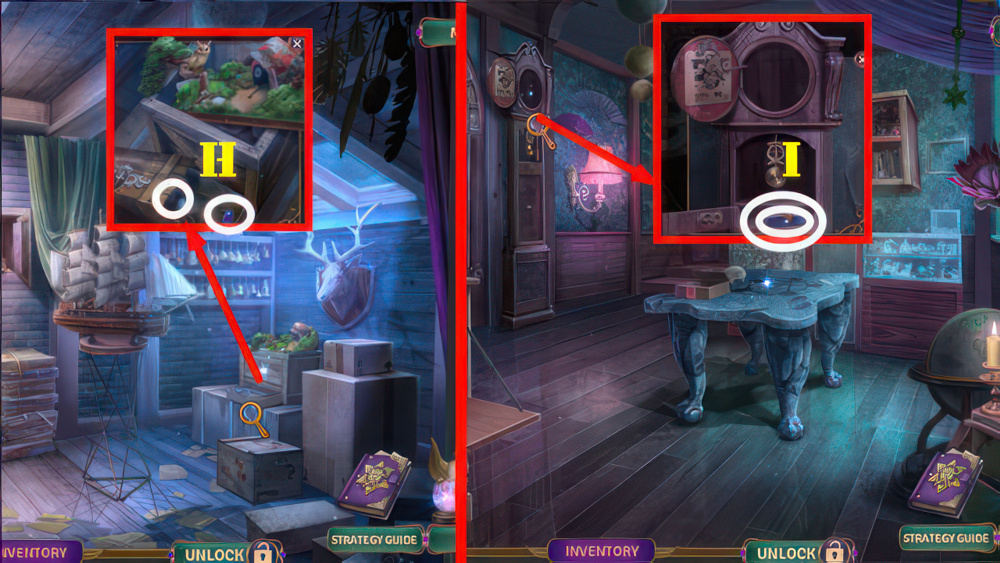
- Place SHIELD AMULET, take CLOCK KEY and MAGIC INK (H).
- Walk down.
- Use CLOCK KEY, take FIRST AID KIT and RITUAL CANDLE 5/5 (I).
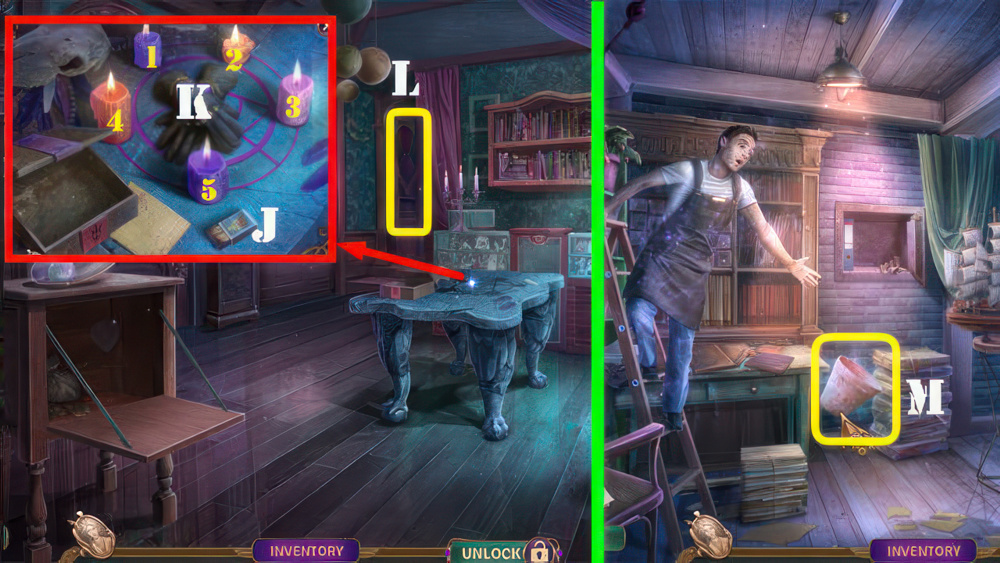
- Place MAGIC INK, RITUAL CANDLE 5/5, and WATERPROOF GLOVES.
- Use matches (J) on candles (1-5).
- Receive BOX OF MATCHES.
- Take ENCHANTED GLOVES (K).
- Go (L).
- Use ENCHANTED GLOVES (M).
- Receive PORCELAIN GOBLET.
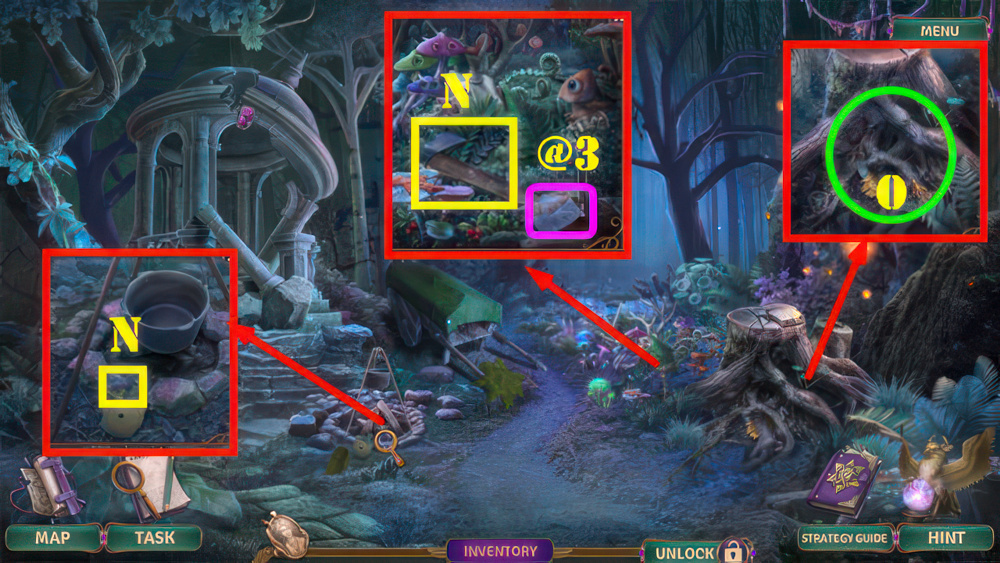
- Look at note (@3).
- Take BOWL SYMBOL and HATCHET (N).
- Use HATCHET (O).
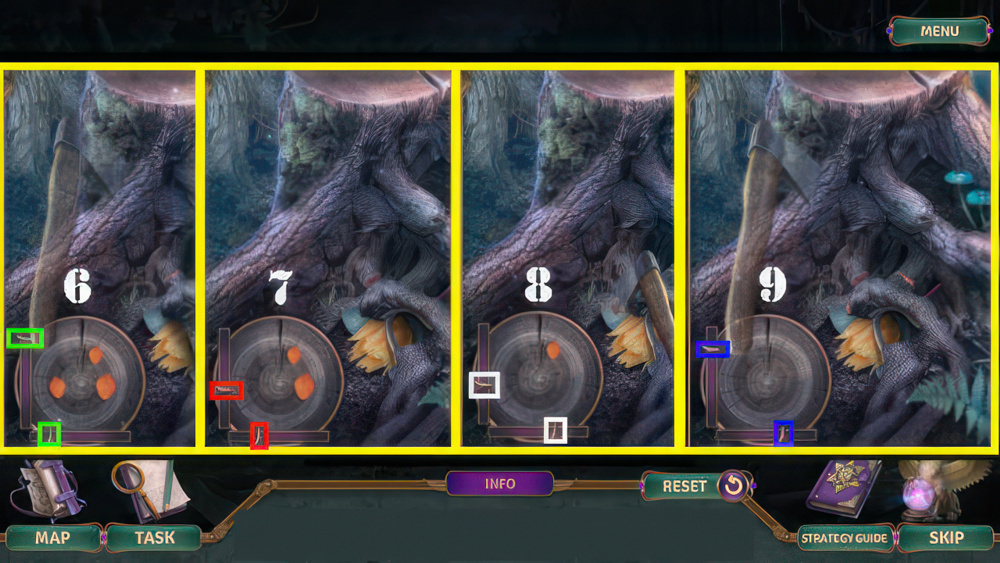
- To chop with the hatchet, match the running sliders so their crossline converges at the center of each leaf.
- Walkthrough: (6-9).
- Take SNAKE SYMBOL and YELLOW FLOWER.
- BOWL SYMBOL and SNAKE SYMBOL on FIRST AID KIT, take SYRINGE and SCALPEL.
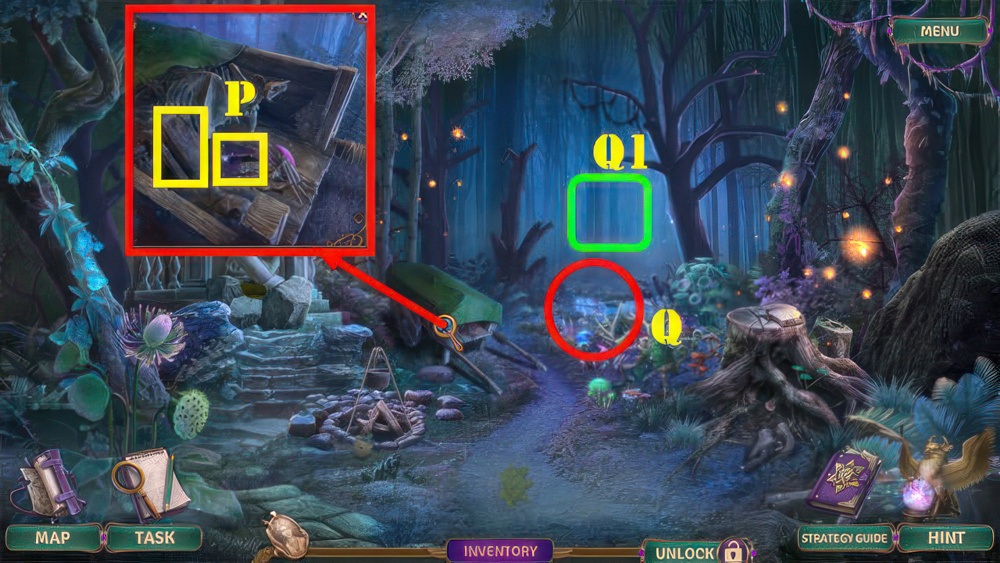
- Use SCALPEL, take SQUARE CAP and PLANKS (P).
- Place PLANKS (Q).
- Go (Q1).
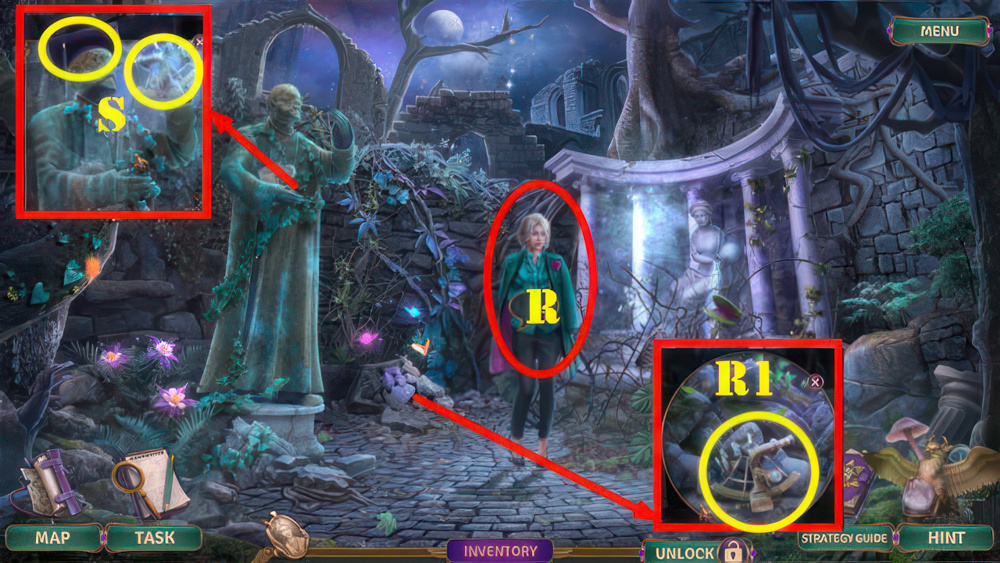
- Talk (R), receive LADY A’S BRACELET.
- Select stones, take SEXTANT (R1).
- Place SQUARE CAP and SEXTANT (S), receive MAGNIFYING GLASS and PESTICIDE RECIPE.
- Walk down.
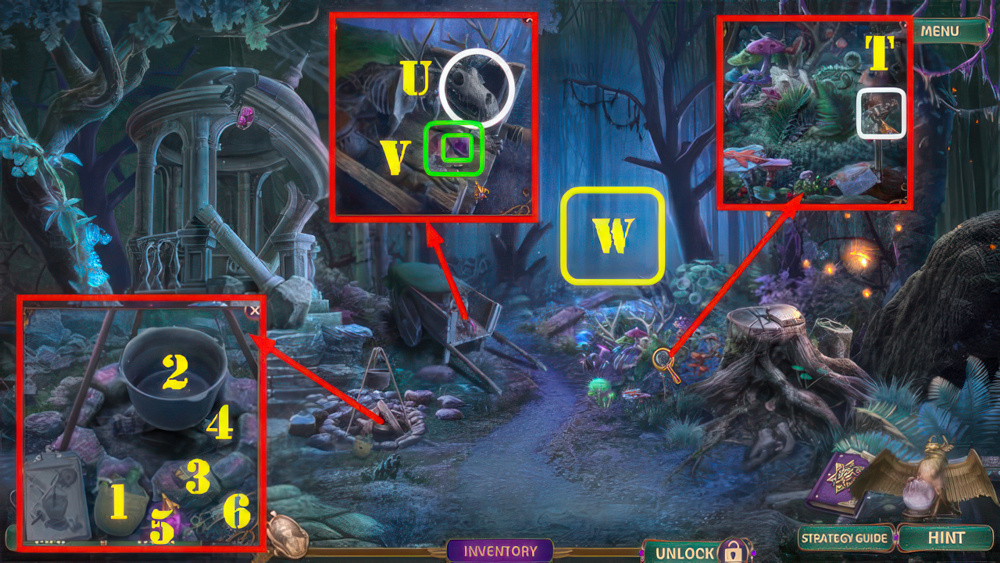
- Use MAGNIFYING GLASS (T).
- Play puzzle, receive ANIMAL SKULL.
- Place ANIMAL SKULL (U), take PURPLE MUSHROOM and RETICULE (V).
- Use BOX OF MATCHES, PURPLE MUSHROOM, PESTICIDE RECIPE, and SYRINGE.
- Use flask (1) in cauldron (2).
- Use matches (3) on logs (4).
- Use mushroom (5) and syringe (6) in cauldron (2).
- Receive POISONED SYRINGE.
- Go (W).
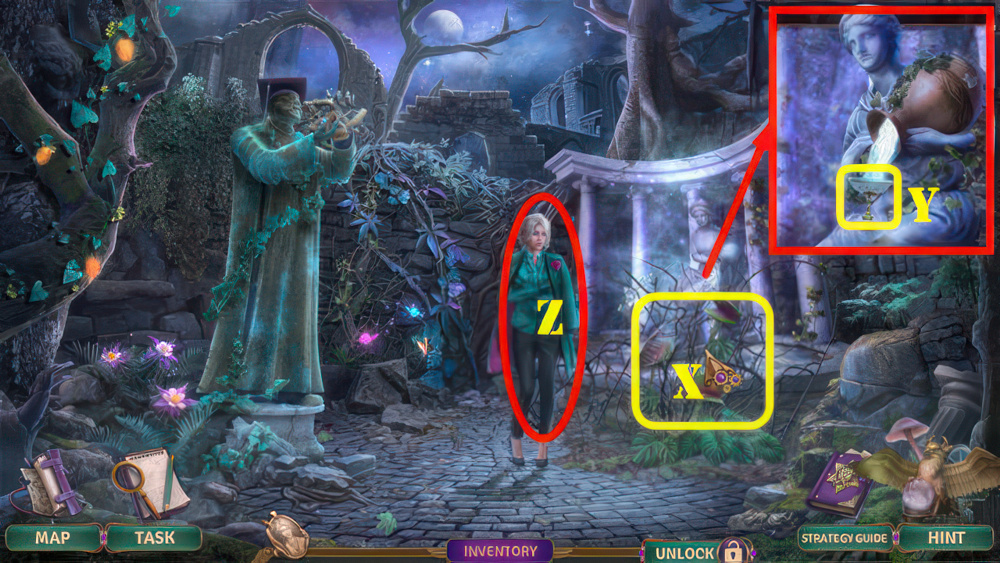
- Use POISONED SYRINGE (X).
- Use PORCELAIN GOBLET (Y), receive GOBLET WITH ESSENCE.
- Give GOBLET WITH ESSENCE (Z).
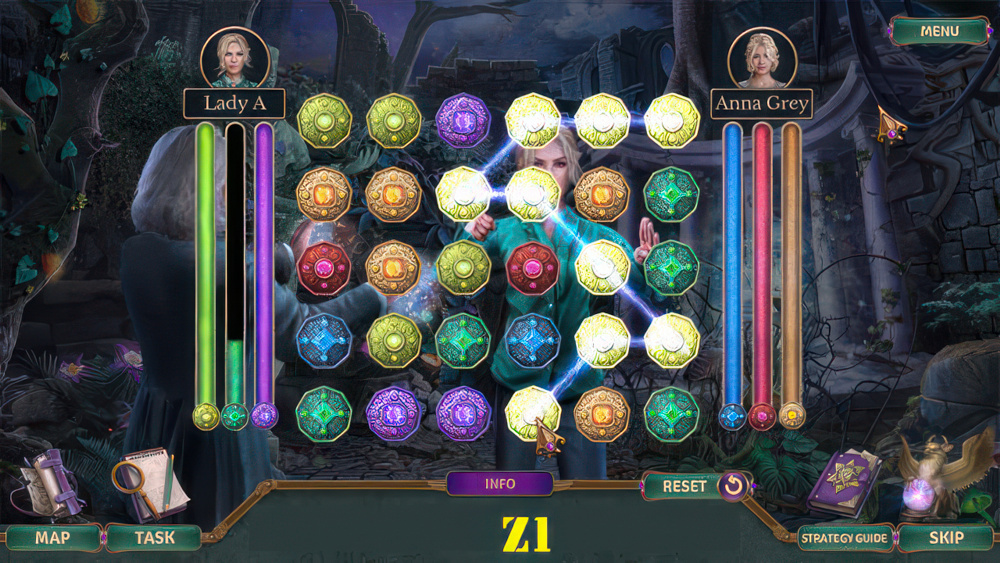
- Collect amulets of three or more of the right color to completely fill the colored columns.
- The solution is random.
- Please look at screenshot for a random solution (Z1).
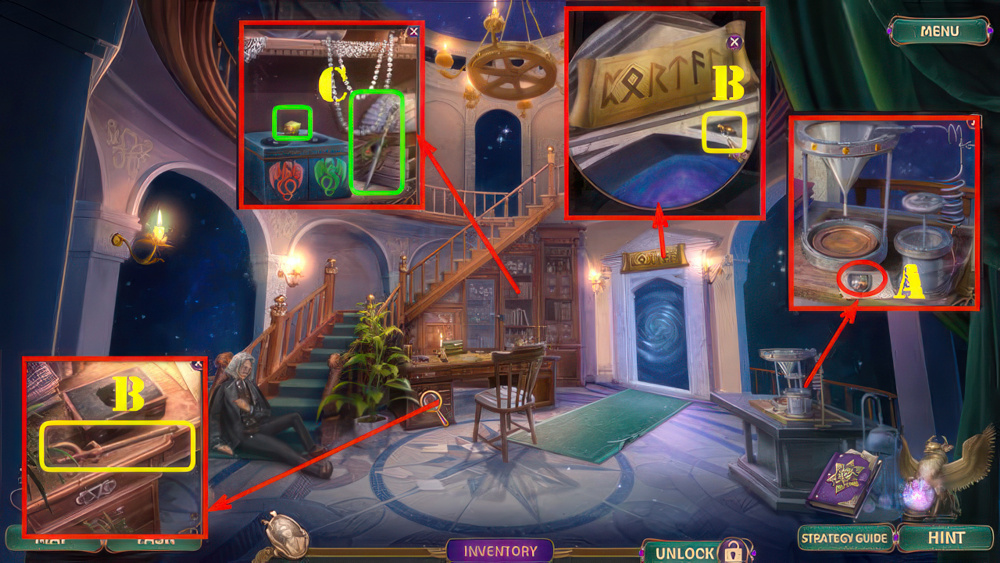
- Take STORAGE EMBLEM and look at note (A).
- Take BROKEN TRIDENT and YELLOW CRYSTAL SHARD 1/3 (B).
- Place STORAGE EMBLEM, take LETTER OPENER and YELLOW CRYSTAL SHARD 2/3 (C).
- LETTER OPENER on RETICULE, take OTHALA RUNE and TRIANGULAR KEY.
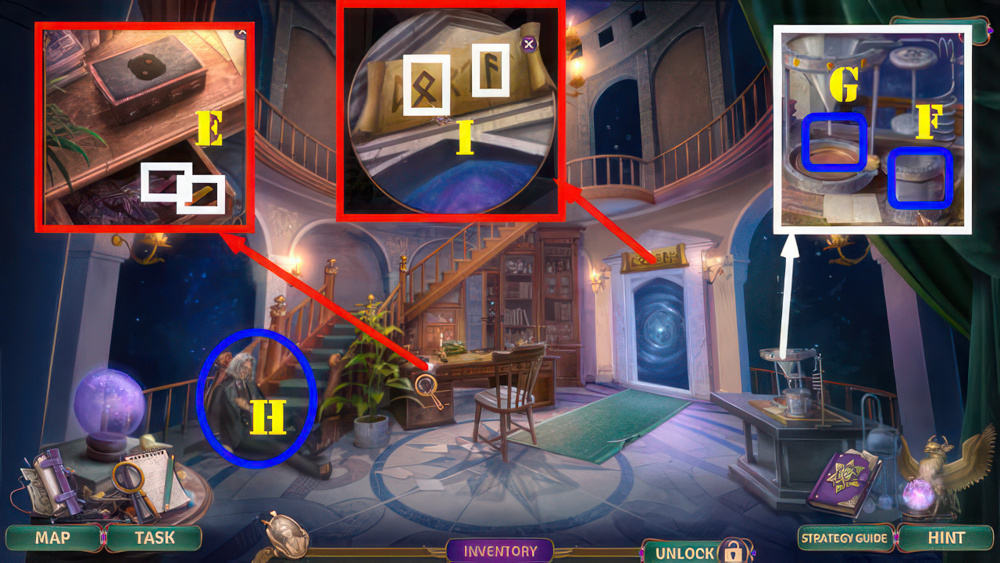
- Use TRIANGULAR KEY, take YELLOW CRYSTAL SHARD 3/3 and HORSESHOE MAGNET (E).
- Place YELLOW FLOWER (F).
- Place YELLOW CRYSTAL SHARD 3/3, take HEALING CRYSTAL (G).
- Use HEALING CRYSTAL (H).
- Play puzzle, receive ANSUZ RUNE.
- Place OTHALA RUNE and ANSUZ RUNE (I).
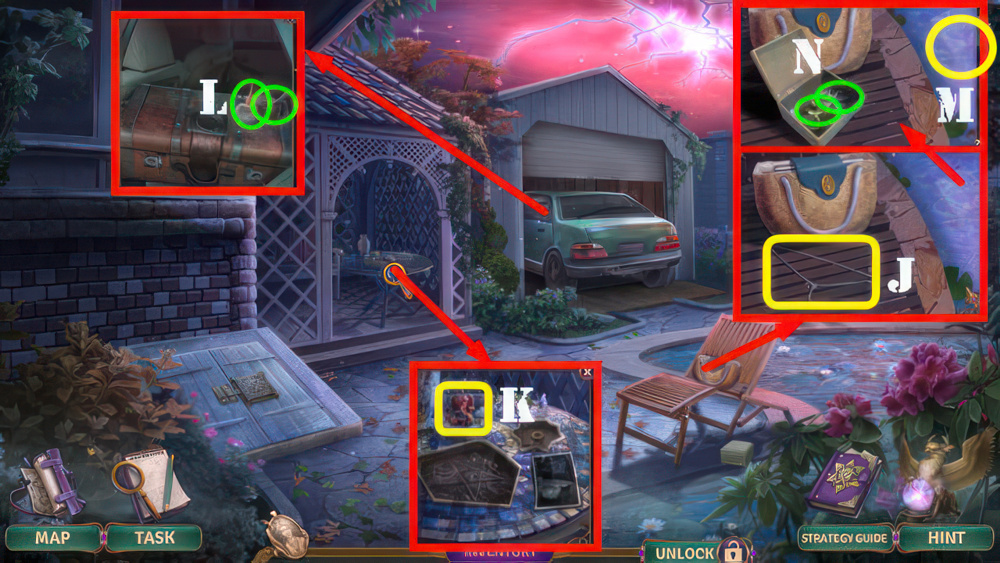
- Take METAL HANGER (J).
- Look at note, take RED DRAGON FIGURINE (K).
- Use METAL HANGER, take ANNA’S BELT and OIL FLASK (L).
- HORSESHOE MAGNET and ANNA’S BELT on BROKEN TRIDENT, take MAGNET TRIDENT.
- Use MAGNET TRIDENT (M).
- Take GREEN DRAGON FIGURINE and STAR CARVING (N).
- Walk down.
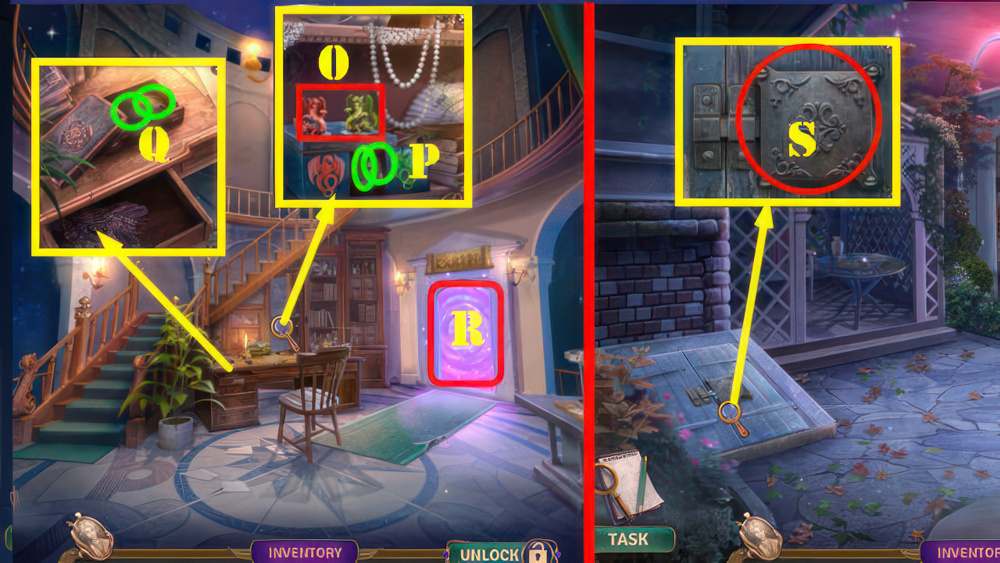
- Place RED DRAGON FIGURINE and GREEN DRAGON FIGURINE (O).
- Take KEEPER’S AMULET and PORTAL FRAGMENT 1/4 (P).
- Use KEEPER’S AMULET, take EVERMOORE TOKEN and PORTAL FRAGMENT 2/4 (Q).
- Go (R).
- Use EVERMOORE TOKEN (S).
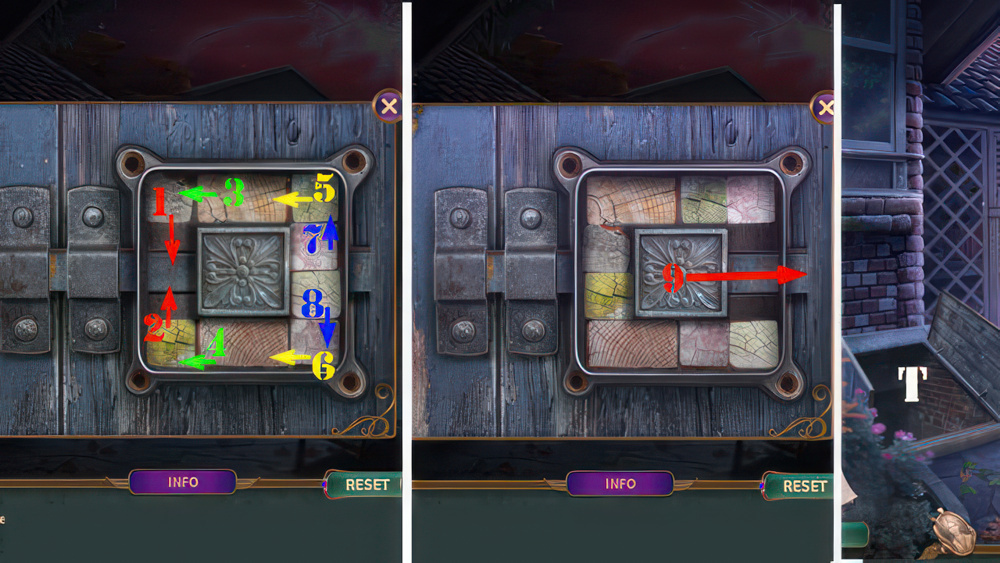
- Move the blocks and get the latch from the left to the right so it doesn’t interfere with the opening of the doors.
- Walkthrough: (1-9).
- Go (T).

- Take CHEST OF DRAWERS HANDLE, STEEL SPONGE, and WINE CORKSCREW (U).
- Use WINE CORKSCREW, take LOCK COMBINATION and PORTAL FRAGMENT 3/4 (V).
- Use STEEL SPONGE, LOCK COMBINATION, and OIL FLASK, change combination from top to bottom to: (234)-(123)-(451).
- Play puzzle, receive ANNA’S LOCKET.
- Go (W).
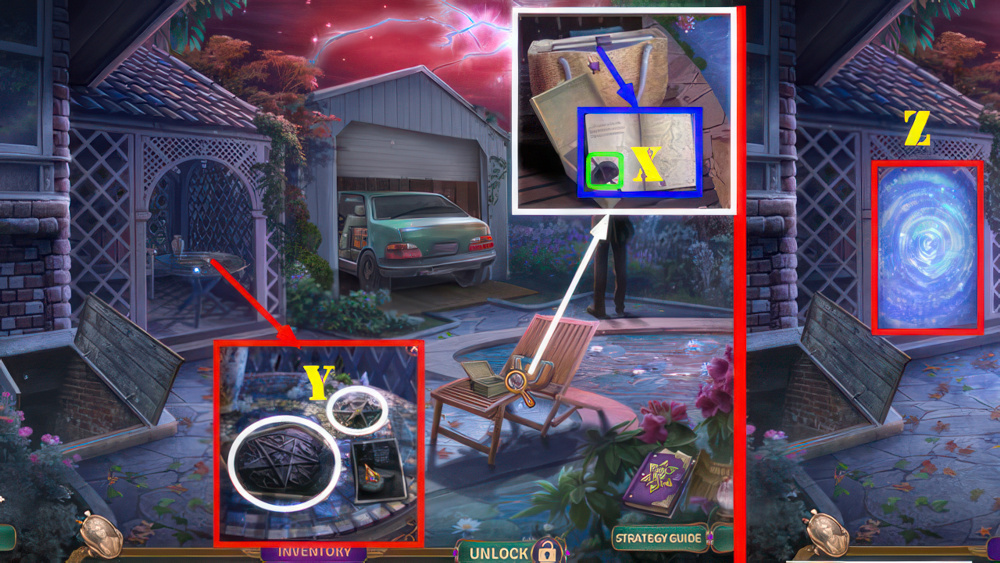
- Use ANNA’S LOCKET and select journal, take PORTAL FRAGMENT 4/4 (X).
- Place STAR CARVING and PORTAL FRAGMENT 4/4 (Y).
- Go (Z).
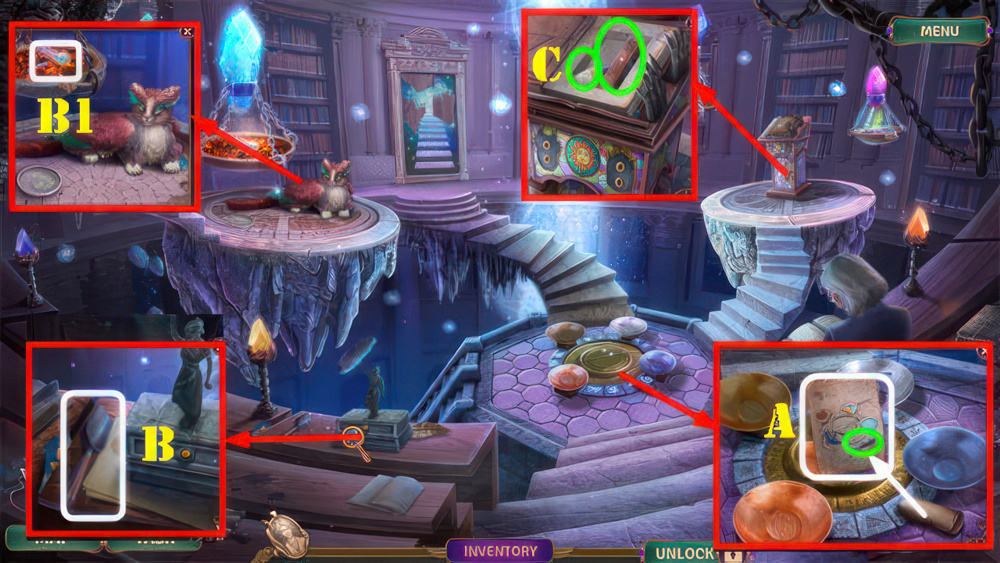
- Receive CLAY TREE AMULET.
- Open note, take BONY FINGER 1/2 (A).
- Take COAL SHOVEL (B).
- Use COAL SHOVEL (B1), receive BONY FINGER 2/2 and AMPHORA OF FIRE.
- Place BONY FINGER 2/2, take STUDENT’S PENCIL CASE and GLUE (C).
- Return to House Basement.
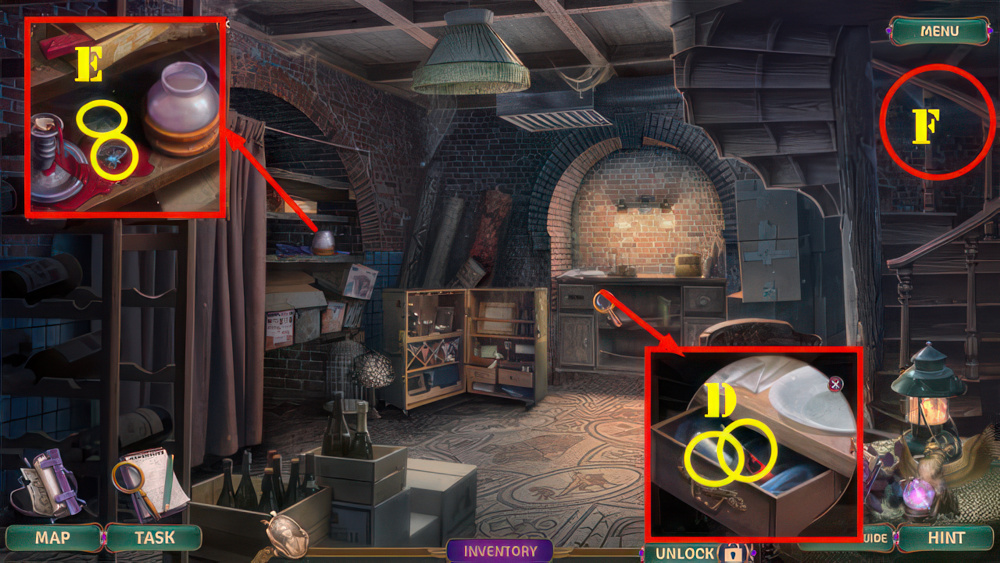
- Place CHEST OF DRAWERS HANDLE and GLUE.
- Take KITCHEN LIGHTER and BOTTLE FOR WATER (D).
- Use KITCHEN LIGHTER, take STAR RING and TRAVELER’S AMULET (E).
- Go (F).
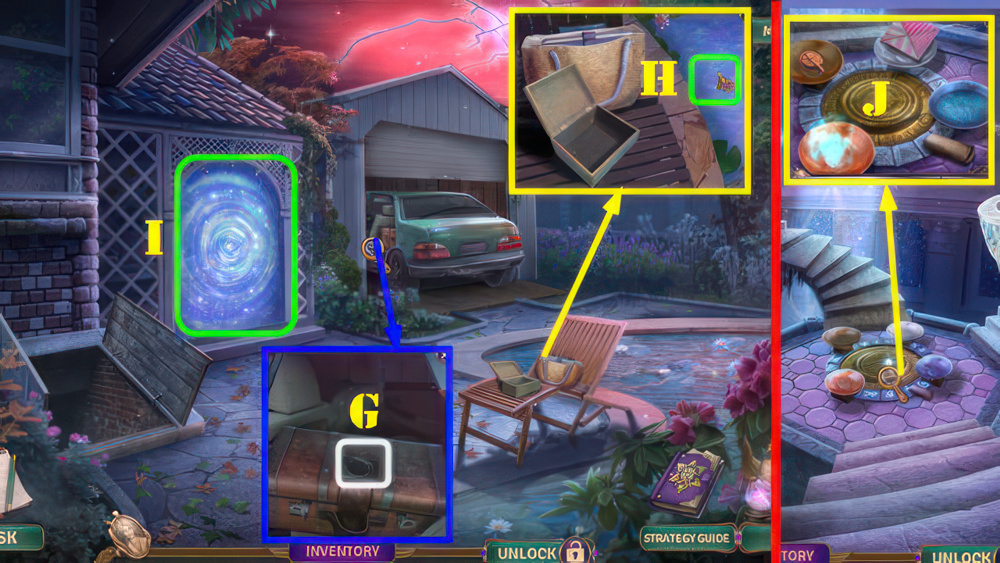
- Place TRAVELER’S AMULET (G).
- Play puzzle, receive KITE.
- Use BOTTLE FOR WATER (H), receive BOTTLE WITH WATER.
- Go (I).
- Place KITE, BOTTLE WITH WATER, AMPHORA OF FIRE, and CLAY TREE AMULET (J).
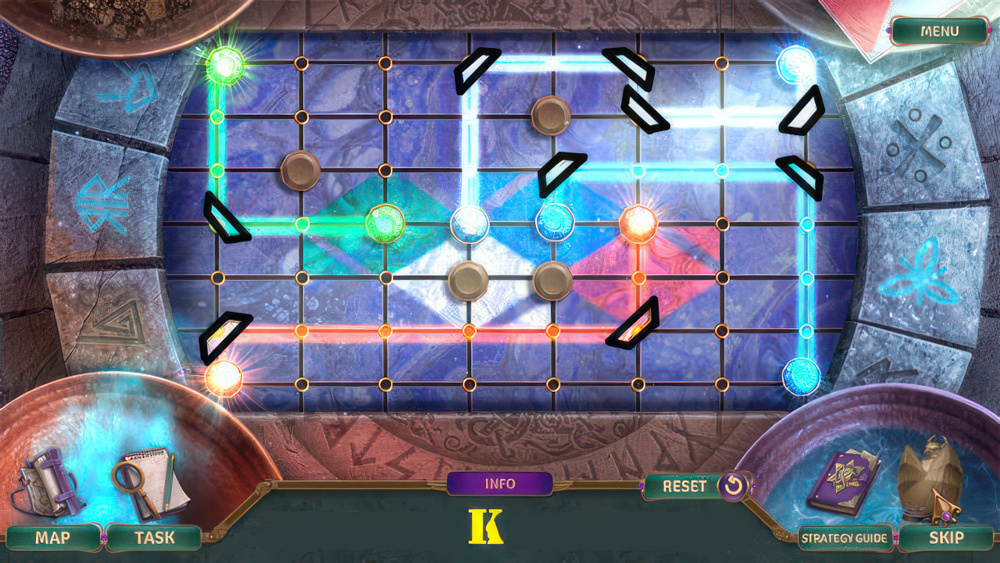
- Use the mirrors to reflect the rays of light from the bowls of elements so they reach the central circles, color to color.
- Walkthrough (K).
- Take ELEMENT RING and RITUAL SCROLL.
- STAR RING and ELEMENT RING on STUDENT’S PENCIL CASE, take STAR CHART 1/3 and RULER.
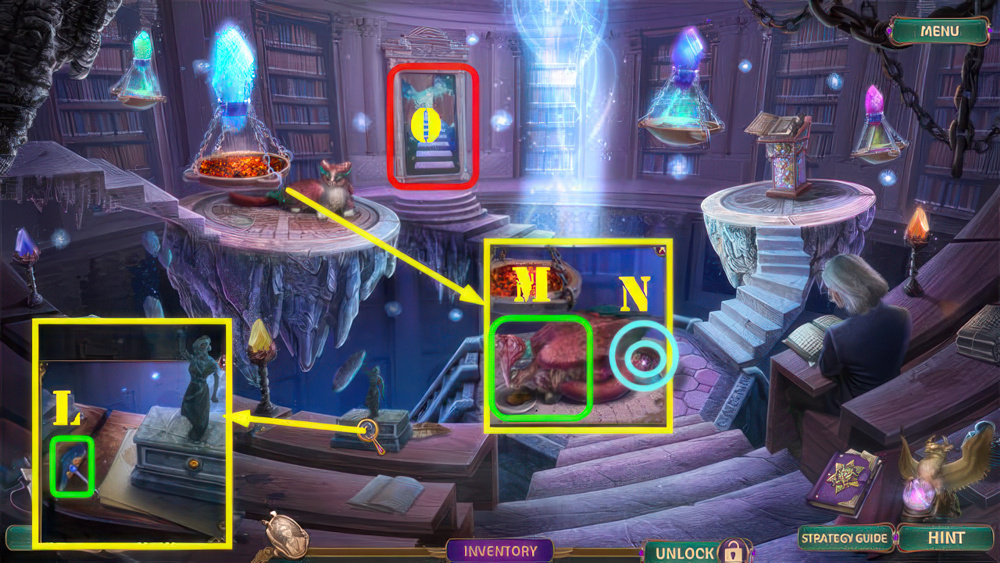
- Use RULER (L), take CAT’S FOOD and STAR CHART 2/3.
- Place CAT’S FOOD (M), take STAINED GLASS MASK and STAR CHART 3/3 (N).
- Place STAR CHART 3/3 and go (O).
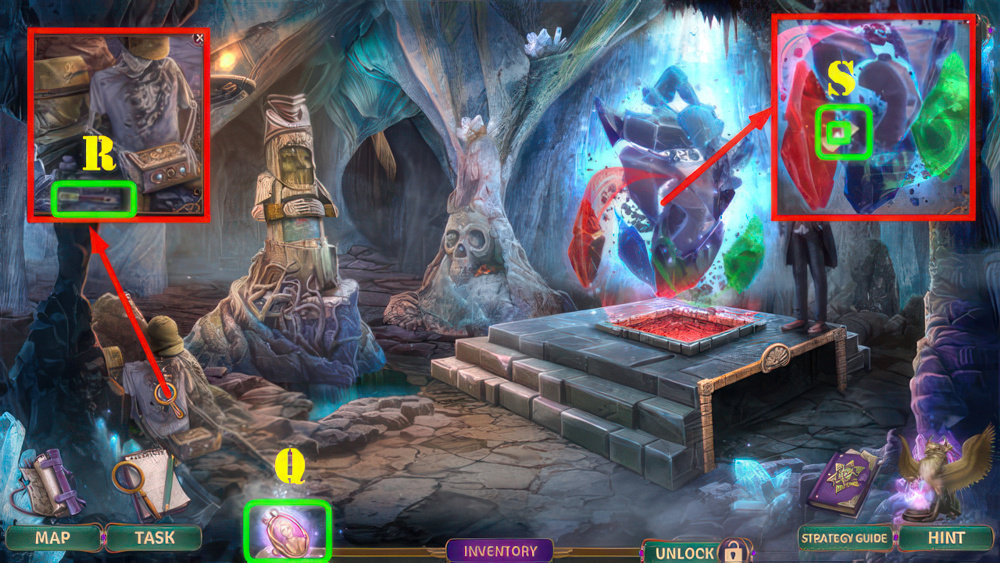
- Select cameo (Q), receive CRYSTAL OF ORDER.
- Take ARCHAEOLOGIST’S BRUSH (R).
- Take SUN PENDANT and look at note (S).

- Use ARCHAEOLOGIST’S BRUSH, take BLIND DEITY MASK and SUN BRACELETS (T).
- Place SUN BRACELETS and SUN PENDANT.
- Take CRYSTAL OF CHAOS and SCALES OF JUSTICE (U).
- Place CRYSTAL OF CHAOS, CRYSTAL OF ORDER, and RITUAL SCROLL (V).
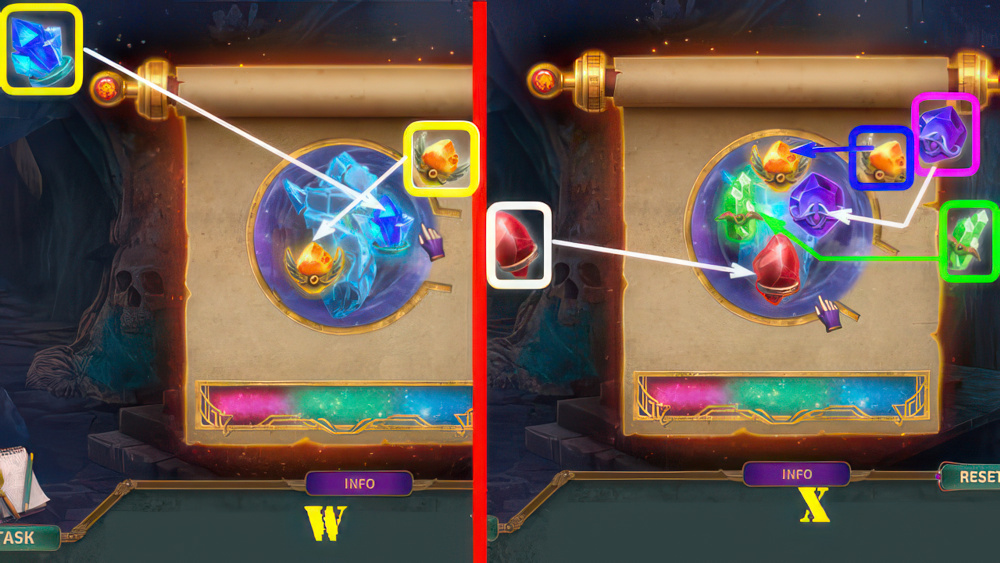
- Press on the ring in the middle and rotate it.
- Only allow through the ring’s opening those crystals that are shown in the source’s heart.
- Walkthrough part one: (W).
- Walkthrough part two: (X).
- Receive STAFF BODY and SWORD OF JUSTICE.
- Walk down.
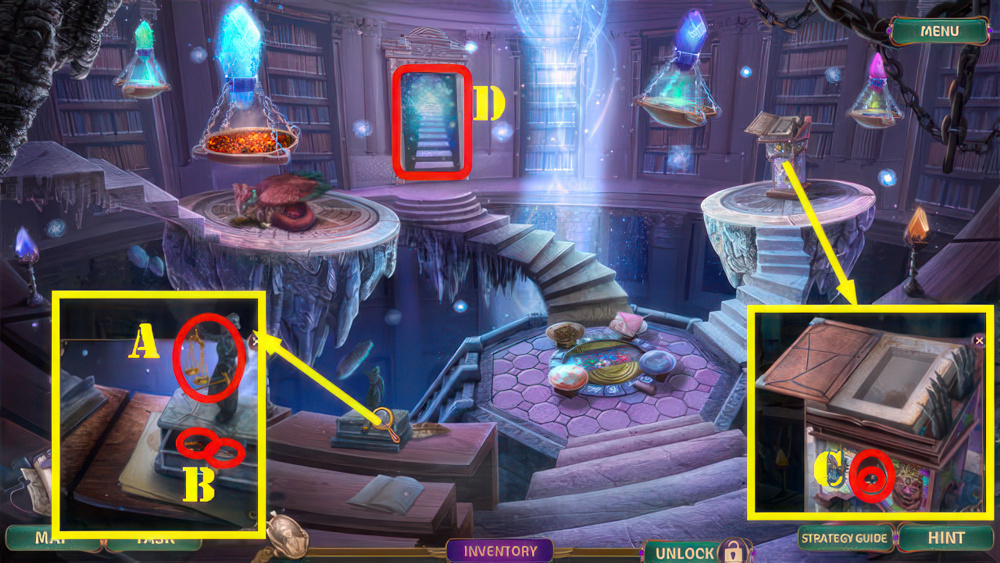
- Place SWORD OF JUSTICE and SCALES OF JUSTICE (A).
- Take STAINED GLASS DEITY and GOLDEN FANGS (B).
- Place STAINED GLASS MASK and STAINED GLASS DEITY, take EMERALD EYES and FLASHLIGHT (C).
- Go (D).
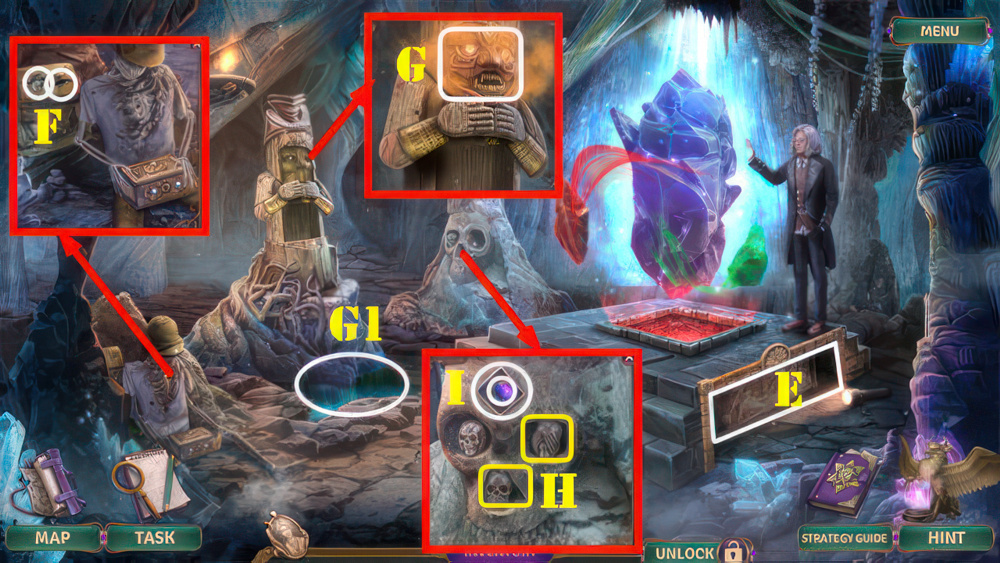
- Use FLASHLIGHT (E).
- Play puzzle, receive SCISSORS.
- Use SCISSORS, take TIARA WITH CRESCENT and DUMB’S SKULL (F).
- EMERALD EYES, GOLDEN FANGS, and TIARA WITH CRESCENT on BLIND DEITY MASK.
- Take SIGHTED DEITY MASK.
- Place SIGHTED DEITY MASK (G).
- Play puzzle (G1), receive BLIND’S SKULL.
- Place BLIND’S SKULL and DUMB’S SKULL (H), take SPHERE OF ABSORPTION and ARCHAEOLOGIST’S KEY (I).
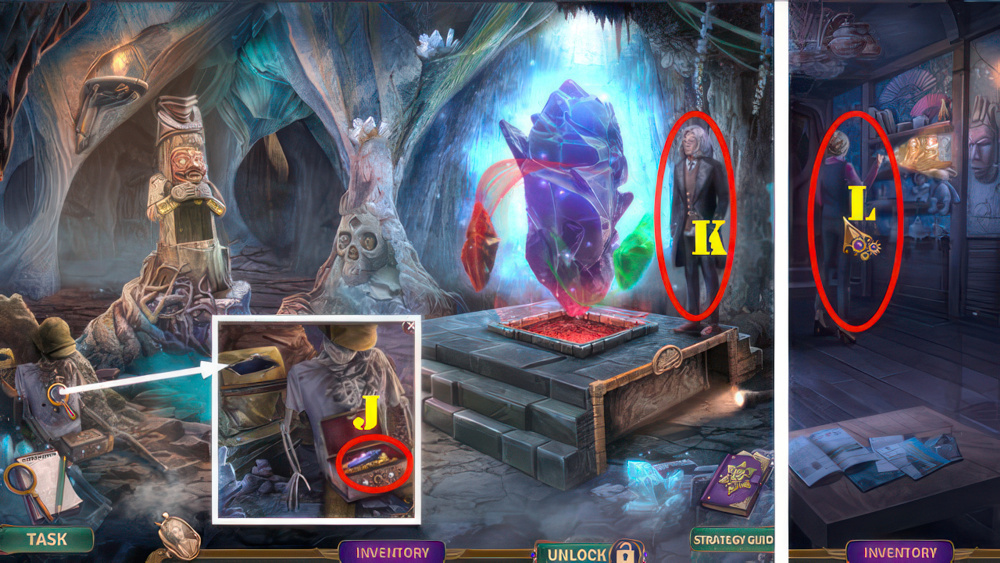
- Use ARCHAEOLOGIST’S KEY, take STAFF TIP (J).
- STAFF TIP, SPHERE OF ABSORPTION, and LADY A’S BRACELET on STAFF BODY, take DISCHARGED STAFF.
- Give DISCHARGED STAFF (K), receive STAFF OF ABSORPTION.
- Use STAFF OF ABSORPTION (L).
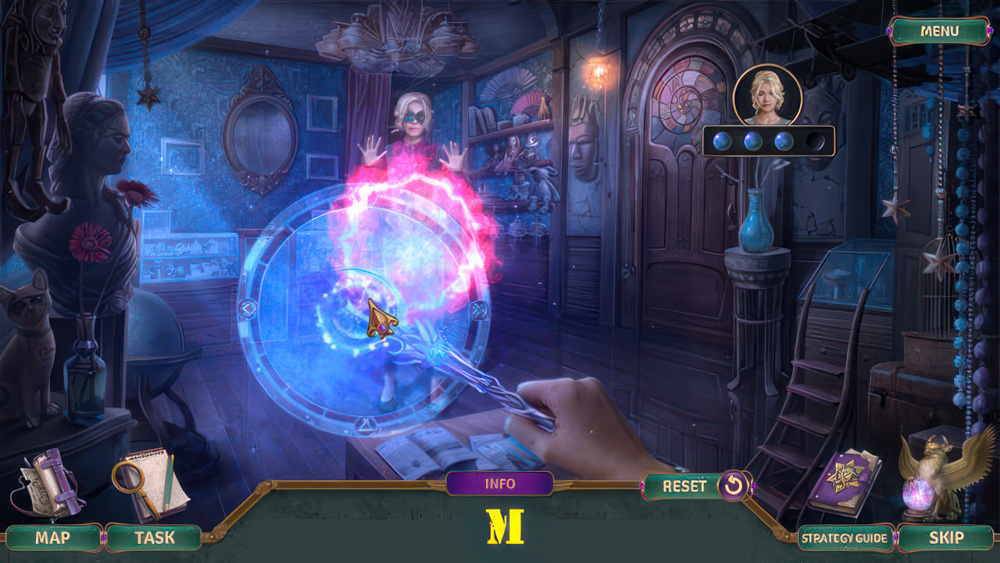
- Move the staff to catch Lady A’s magical attacks and fill Anna’s power bar.
- Walkthrough part one: the solution is random, use the staff to block Lady A’s attacks (M).

- Rotate the tiles to create a permanent glowing line from the staff to each part of Lady A.
- When the energy flows, the line will highlight.
- Walkthrough part two (N).
- Walkthrough Bonus Chapter, at the link below.


