
Haunted Hotel 20: A Past Redeemed (Bonus Chapter) – Learn the story of a young ghost, help him find peace, solve puzzles, explore unusual locations. An exciting story awaits you, which will appeal to fans of unsolved mysteries.
Bonus Chapter Walkthrough

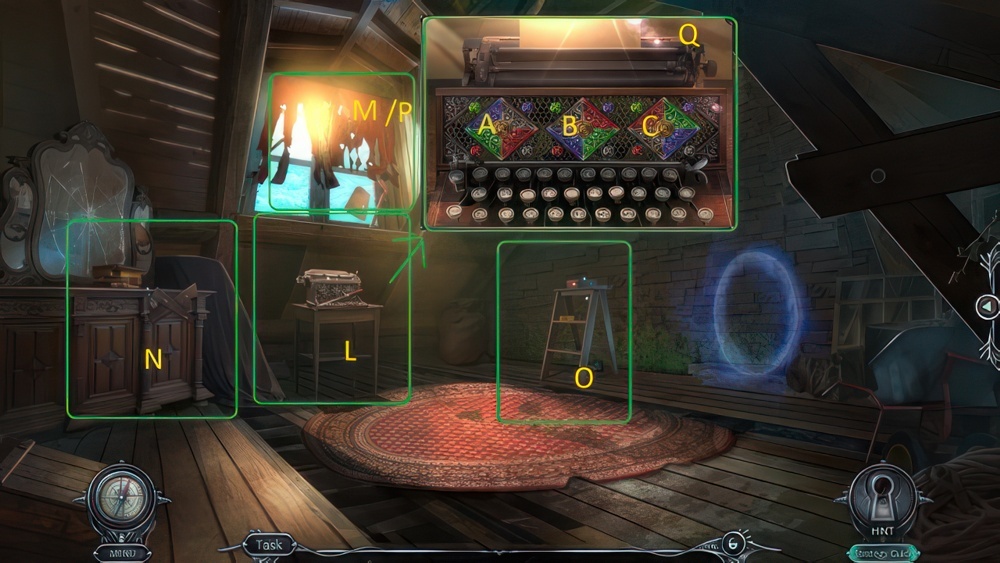
- Take PAPER CLIP (A).
- Use PAPER CLIP, take BLANK DOG TAG and KEY (B).
- Use KEY, take ENGRAVING TOOL, RED CRYSTAL, TRACING PAPER(C).
- Use TRACING PAPER get SKETCH (D).
- Select BLANK DOG TAG, use ENGRAVING TOOL and SKETCH, get DOG TAG (E).
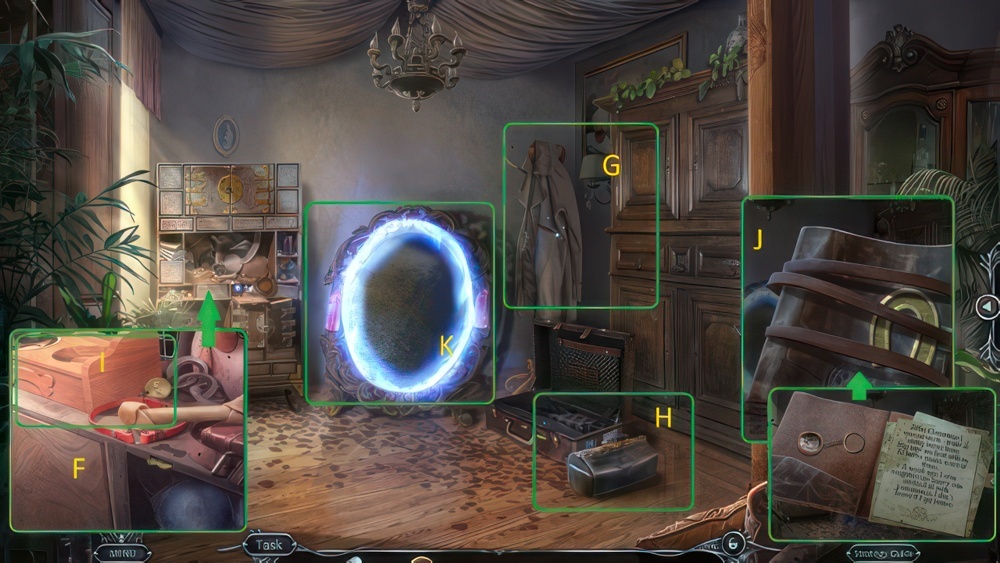
- Use DOG TAG, get MAGNIFYING GLASS and SHARP SLAB (F).
- Use SHARP SLAB, get RUST REMOVER (G).
- Use RUST REMOVER, get BOWL and FOLDER (H).
- Use BOWL, play puzzle, get HORSESHOE (I).
- Select FOLDER, use SHARP SLAB and HORSESHOE, get MEMORY TRINKET (J).
- Use MEMORY TRINKET and RED CRYSTAL, go forward (K).
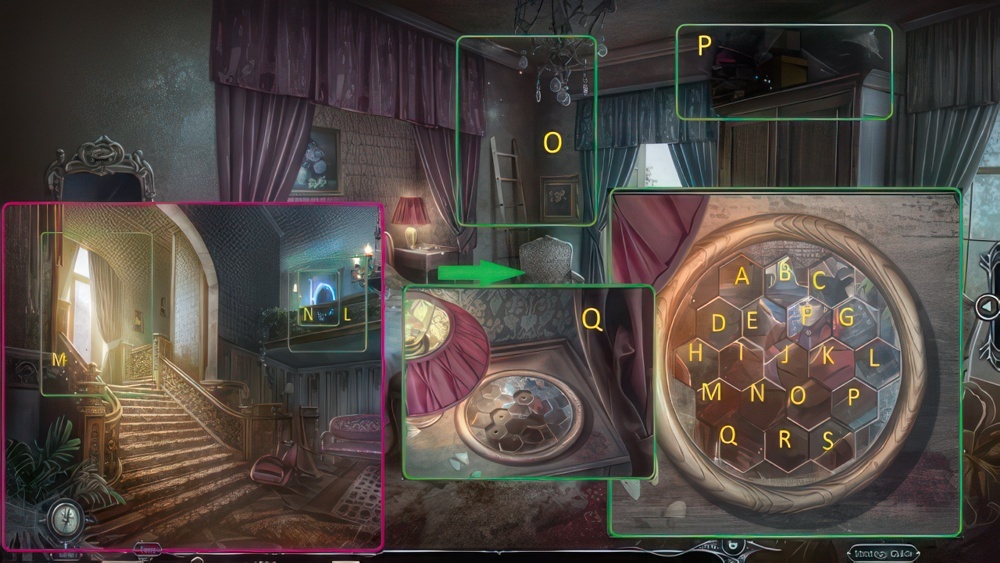
- Take VASE (L).
- Take JAMES’S BUTTON, use VASE and MAGNIFYING GLASS, get ORANGE CRYSTAL and PICTURE TILE 1/3 (M).
- Use ORANGE CRYSTAL and JAMES’S BUTTON, move forward (N).
- Get PICTURE TILE 2/3 (O).
- Get PICTURE TILE 3/3 and GLUE (P).
- Use PICTURE TILE 3/3 (Q).
- Rotate the tiles to restore the image.
- Walkthrough: A×3, B×3, C×4, D×1, E×5, G×1, H×2, I×1, J×5, K×1, L×1, M×1, N×1, O×4, P×1, Q×5, R×5, S×4, get BROKEN VASE and STETHOSCOPE.

- Select BROKEN VASE, take NET, WIRE and HARPIN’S PHOTO (R).
- Get VASE PART and HAMMER, use NET, play puzzle, get WOODEN HANDLE (S).
- Select BROKEN VASE, use VASE PART and GLUE (T).
- Use STETHOSCOPE and HAMMER, take HOOK and MATCHES (U).
- Select HOOK, use WOODEN HANDLE and WIRE, get IMPROVISED GRABBER (V).
- Use IMPROVISED GRABBER and MATCHES, take GREEN CRYSTAL and KALEIDOSCOPE (W).
- Go back.

- Use HARPIN’S PHOTO and KALEIDOSCOPE (X).
- Recreate the image, get HARPIN’S TRINKET (Y).
- Use GREEN CRYSTAL and HARPIN’S TRINKET, go forward (Z).
- Use VASE get TOY MOUSE (A).
- Take WIND UP KEY (B).

- Select the butterfly, find POWDER (C.)
- Use TOY MOUSE and WIND UP KEY, get HOOK, PHOSPHORUS and CODE COMBINATION (D).
- Use HOOK, get STAINER (E).
- Use POWDER, PHOSPHERSOUS and STAINER, get MAGIC WATER, EMERALD and GRASSHOPPER (F).
- Use CODE COMBINATION and GRASSHOPPER (G).

- Select a grasshopper and leap over the other grasshoppers to eliminate them.
- The game will end when only one grasshopper remains.
- Walkthrough: The sequence of steps is shown in the picture.

- Continuation of the walkthrough.
- Get SPRAYER.

- Use SPRAYER and MAGIC WATER, get RUBY (H).
- Use RUBY and EMERALD, get BROKEN SPYGLASS (I).
- Select (J).

- Take INSTANT CAMERA and GEM (K).
- Take JAR and SCISSORS (L).
- Take MAP and LID (M).
- Take EYE PIECE (N).
- Select BROKEN SPYGLASS, use EYE PIECE, and GEM, get SPYGLASSS (O).
- Use JAR and LID, get FIREFLIES (P).
- Use FIREFLIES and SCISSORS, take GRASS BLADE and FILE (Q).
- Use FILE and SPYGLASS, walkthrough: A×2, B×11, C×4, D×8, take COMPASS (R).
- Use MAP and COMPASS, play puzzle, get SWEET FLOWER (S).
- Use SWEET FLOWER and GRASS BLADE, take TWIG and MEDICINE (T).
- Select MEDICINE.

- Take HOT WATER (U).
- Take WEATHERVANE and NOTEPAD (V).
- Take PINCERS, use HOT WATER and INSTANT CAMERA, get SYMBOL PHOTO (W).
- Use PINCERS, get BAR, use WEATHERVANE and SYMBOL PHOTO, get JAMES’S STATUE and MAGIC STONE (X).
- Use JAMES’S STATUE, play puzzle, get SPIRIT BURNER (Y).
- Use MAGIC STONE, use BAR, take BASKET and HOLDER (Z).
- Select TWIG, use HOLDER and SPIRIT BURNER, get CHARRED TWIG.
- Use CHARRED TWIG and NOTEPAD, take NOTE (A).

- Use NOTE, take MAGIC POCKET WATCH and JAMES’S ADDRESS (B).
- Use JAMES’S ADDRESS (C).
- Walkthrough: A-A-B-B-A-A-B-B-A-A-C-A-C-C-B-C-C-B-B-C-B-B-C-C-C-C-C.
- Move forward.
- Use MAGIC POCKET WATCH, take BROKEN KNIFE (D).
- Take KNITTING NEEDLE (E).
- Take TUNING FORK, use KNITTING NEEDLE, take KNIFE HANDLE and TYPEWRITER KEY 1/3 (F).
- Take CAKE and TRAY, use TUNING FORK, take INVISIBLE DOORKNOB(G).
- Use BASKET and move apples, use CAKE, take SHARPENER (H).
- Select BROKEN KNIFE, use KNIFE HANDLE and SHARPENER, take KNIFE.
- Use KNIFE, play puzzle, get LIGHT STICK (I).
- Use TRAY and LIGHT STICK, take INVISIBLE KEY (J).
- Use INVISIBLE DOORKNOB and INVISIBLE KEY (K).
- Move forward.
- Take HACKSAW (L).
- Take NAIL PULLER and TYPEWRITER KEY 2/3 (M).
- Use NAIL PULLER, use HACKSAW, take TYPEWRITER KEY 3/3 and CHEST AMULET (N).
- Take WET SPONGE, use CHEST AMULET, take TYPEWRITER CARRIAGE (O).
- Use WET SPONGE, get PAPER (P).
- Use TYPEWRITER CARRIAGE, PAPER and TYPEWRITER KEY 3/3 (L)
- Walkthrough: A-B-B.
- Take NOTE FOR JAMES (Q).

- Use NOTE FOR JAMES, take MAGIC GOBLET (R).
- Use MAGIC GOBLET (S).
- Press and hold until the electrical discharge reaches the crystal.
Congratulations! You have completed the game Haunted Hotel 20: A Past Redeemed.


