
Hidden Motives 1: The Diamond Rush – Walkthrough of the game begins with the fact that you are the daughter of the sheriff, or at least play her role. However, when you get into the reality of the film, you understand that there is no time for acting. You play the lead role in the film, the director gives you a mysterious ring that takes you back to the times of the wild west. The town of Redsand has been overrun by bandits, and the diamond ghost is blamed for a recent spate of murders. The number of accidents in which miners die is growing every day. Yes, and your friend Baxter disappeared somewhere. You go looking for him and witness a quarrel between him and the vile bandit Stanley Harrison. As we investigate the cause of the death of the mayor of the city, which we witnessed, we stumble upon Wild Jack, a criminal who threatens all the locals. You will need to play your part perfectly to uncover the truth and return home before it’s too late. If you can’t complete any of the puzzles or don’t know where the items are, you can watch the Hidden Motives 1: The Diamond Rush, walkthrough on our website and prevent the criminal from getting away with his crime.
Hidden Motives 1: The Diamond Rush – Walkthrough
Here you can watch the full walkthrough of the game Hidden Motives 1: The Diamond Rush, namely, all the chapters, including the bonus one, in pictures.
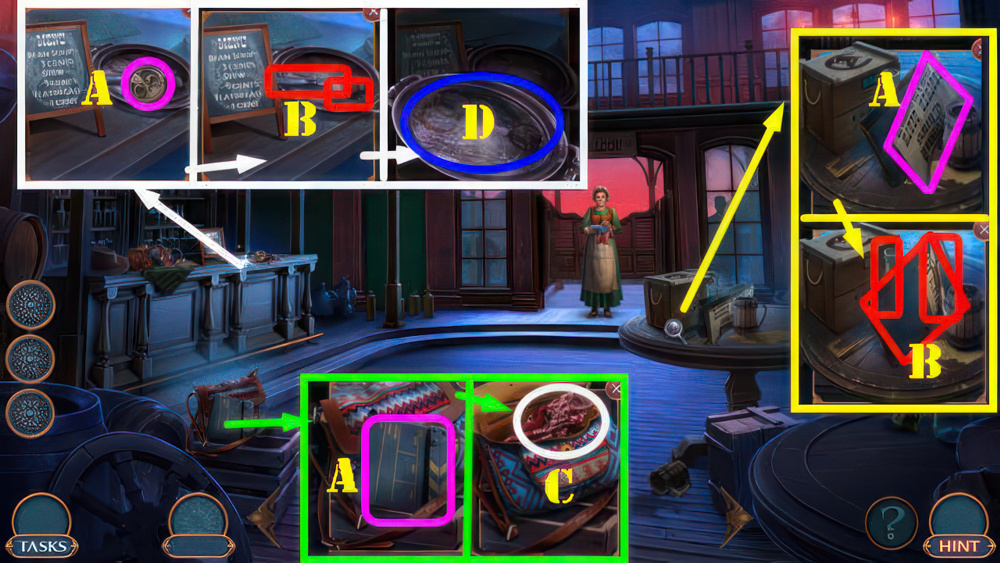
- Take Compass, Clapboard, and Newspaper (A).
- Take TWO-PRONGED FORK, Tasks Book, ALCOHOL, CORK, and KNIFE (B).
- Open bag and select folder twice, take BANDANA (C).
- Select tray, place BANDANA and ALCOHOL (D).
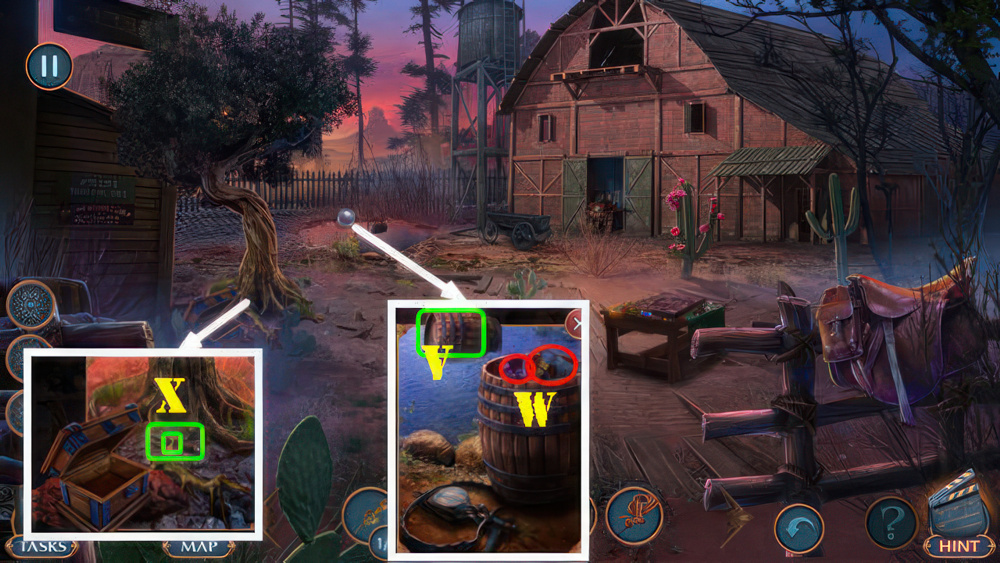
- Play puzzle, receive HORSESHOE.

- Place HORSESHOE (E), take MAGNIFYING GLASS (F).
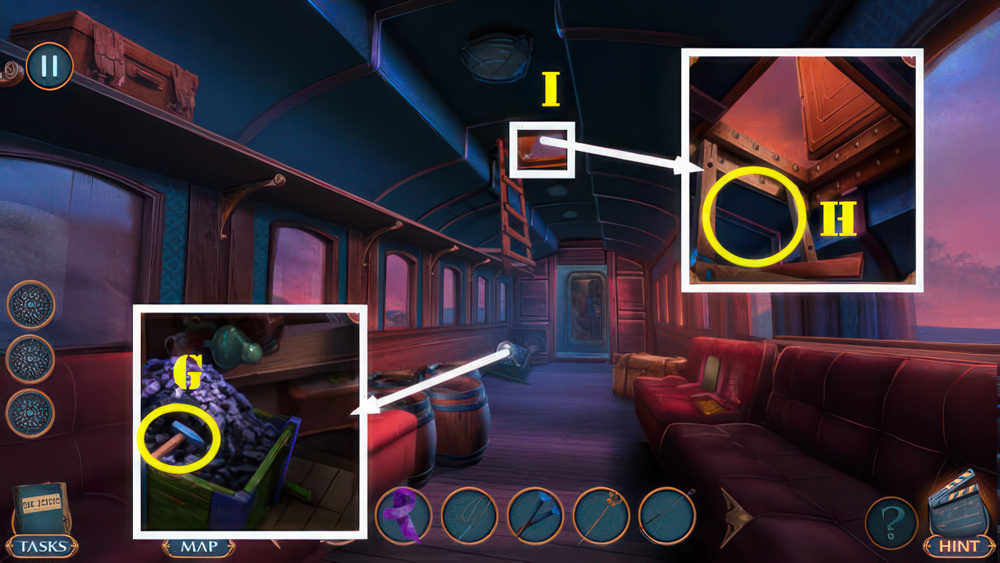
- Move items aside.
- Find 3 notes (orange).
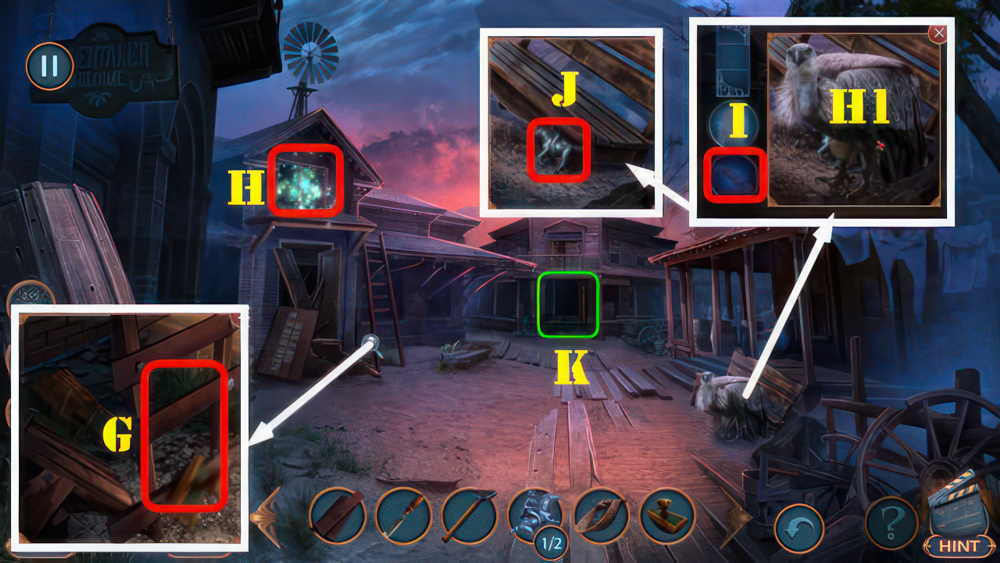
- Select glass and use MAGNIFYING GLASS (G).
- Go (H).
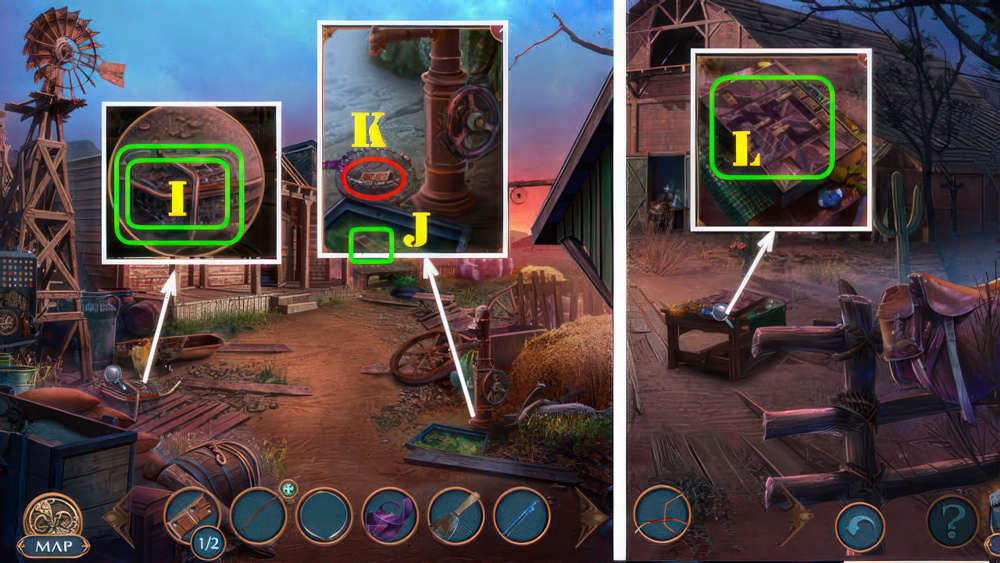
- Talk to crowd (I).

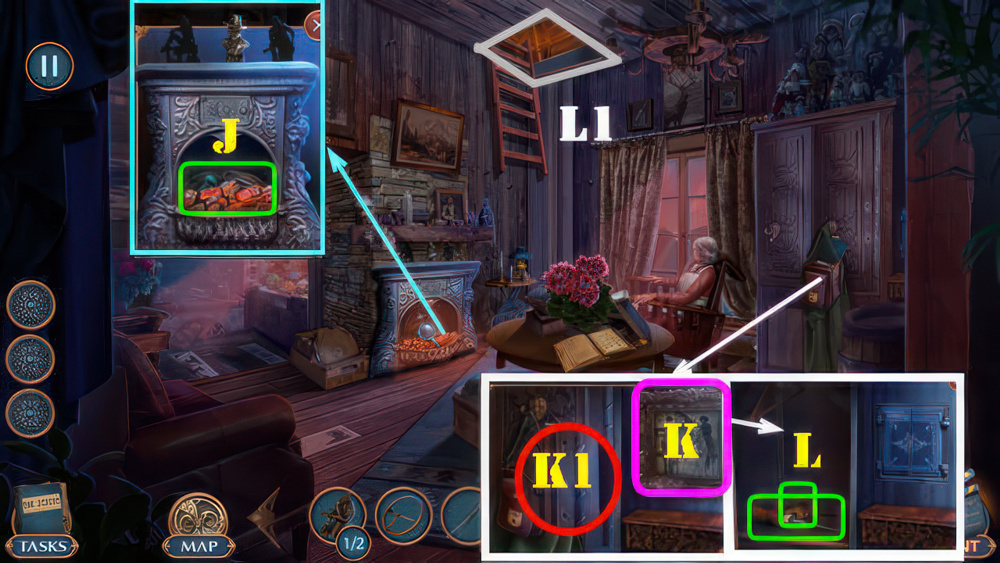
- Look at 2 Notes (J).
- Take NAILS and BROKEN PITCHFORK (K).
- Use TWO-PRONGED FORK on book, take REDSAND GUIDE (L).
- Place REDSAND GUIDE (M).

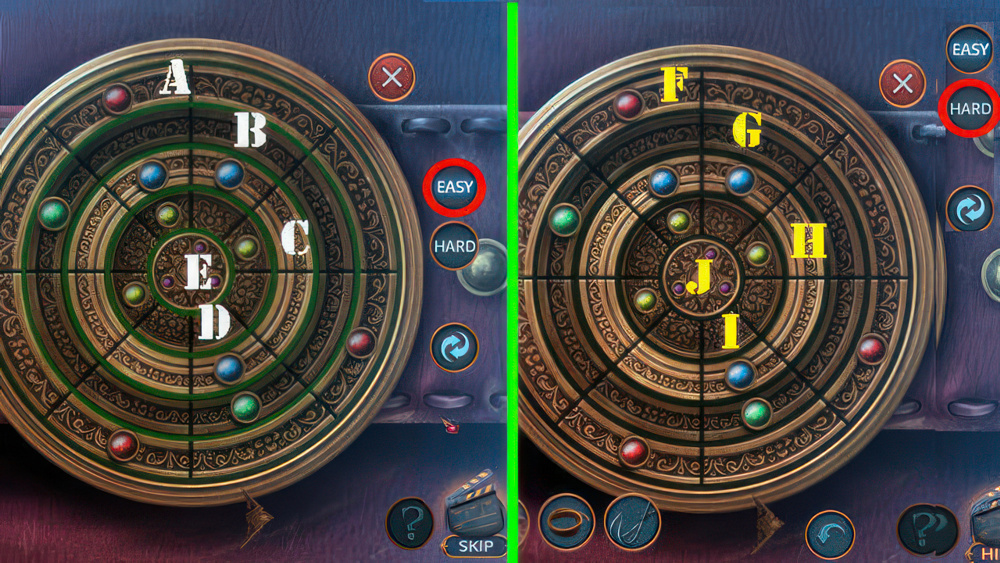
- Easy and Hard Solutions are basically the same.
- The only difference is that you must rotate the pieces in the hard solution before you can place them.
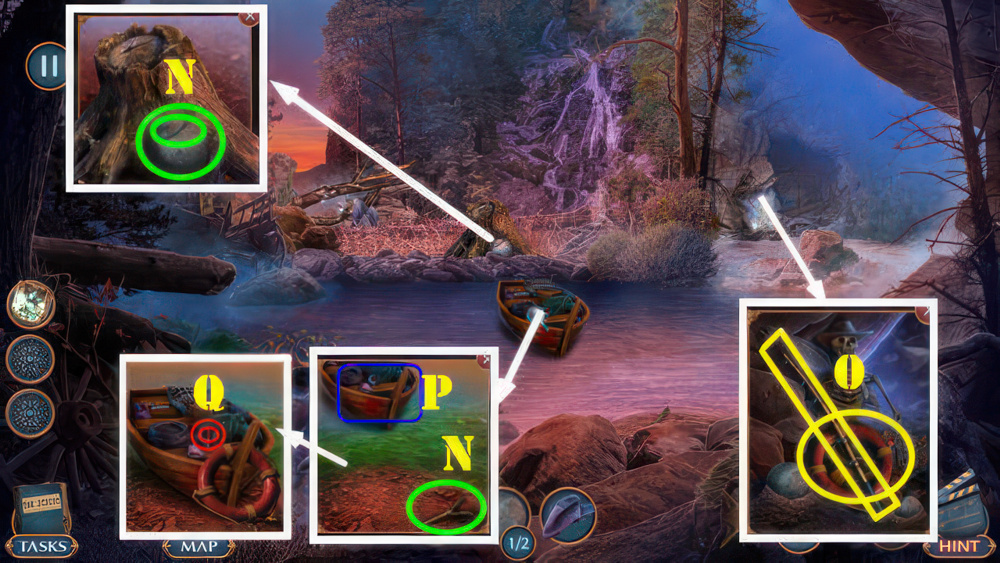
- Easy Solution: place the pieces as shown (N-O-P).
- Hard Solution part one (N): (Sx2)-(Rx11) and place.
- Hard Solution part two (O), (Qx2)-(Rx8) and place.
- Hard Solution part three (P): (Qx5)-(Rx8) and place.

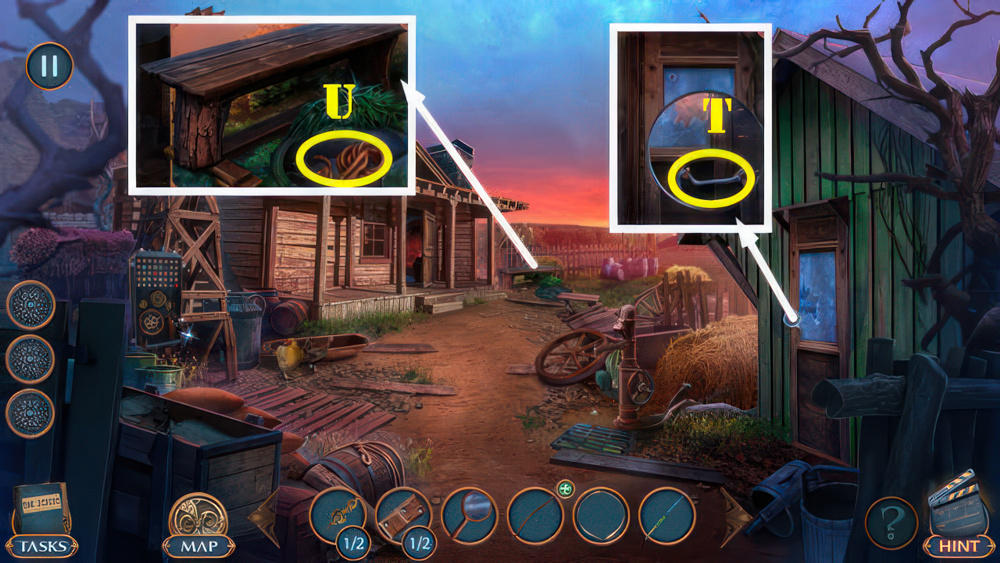
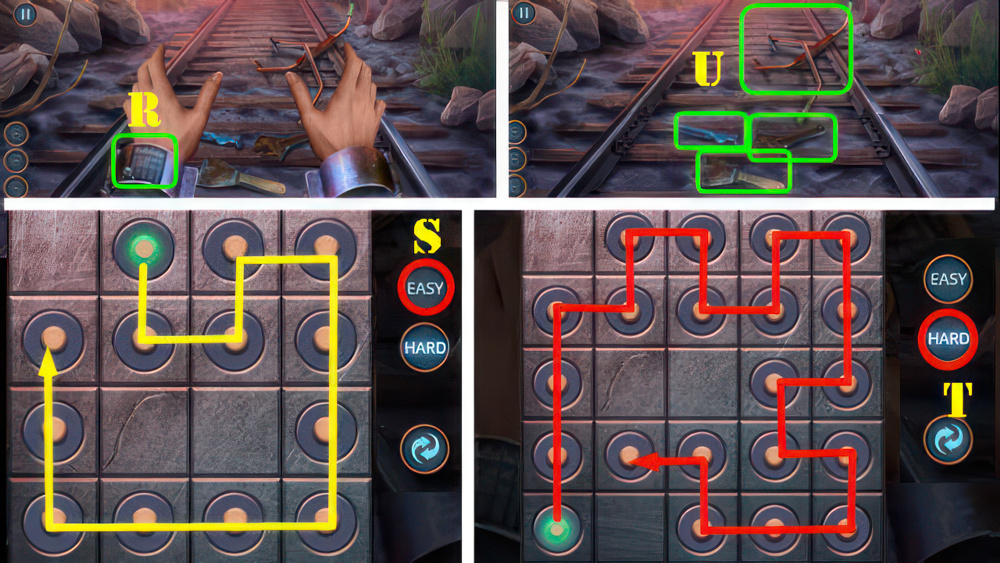
- Take BOARDS and CHISEL (T).
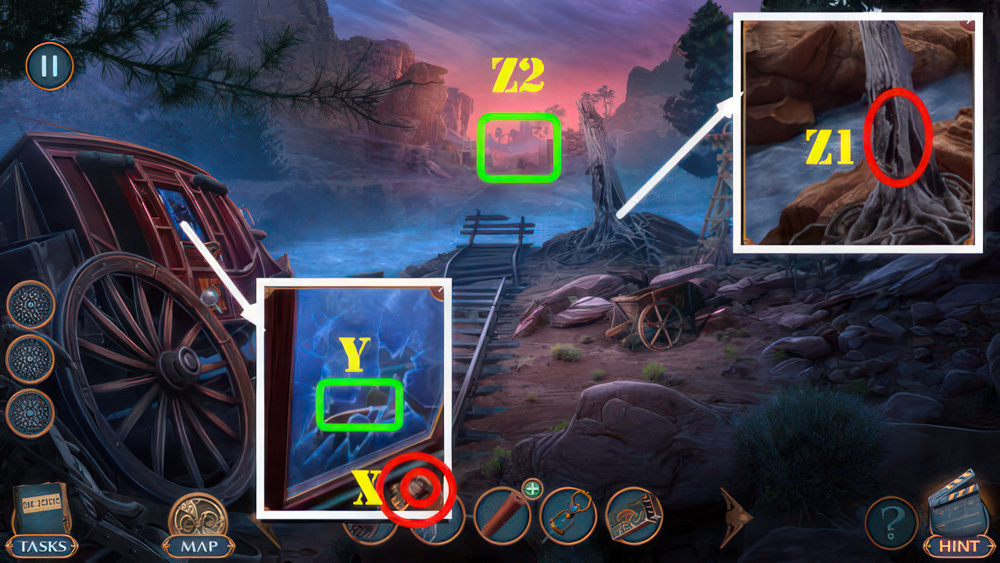
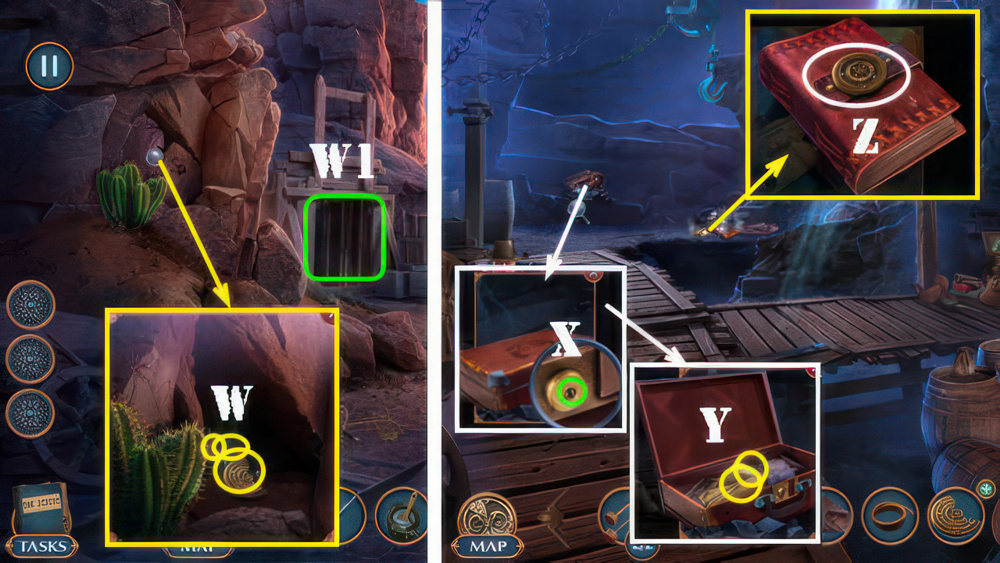
- Place CORK (U), dip the bucket in water (V), take WATER.
- Use WATER (W).

- Easy Solution (X): (1-9).
- Hard Solution: (Y): (1-13).
- Go forward to House.

- Take POLE and WARDROBE TOKEN 1/2 (A).
- Open book, take SAFE HANDLE and look at photo (B).
- Use KNIFE, take SAFE CODE (C).

- Place SAFE HANDLE and SAFE CODE (D).
- Drag the arrow (E) counter-clockwise to 3, counter-clockwise to 5, clockwise to 1, and counter-clockwise to 0.
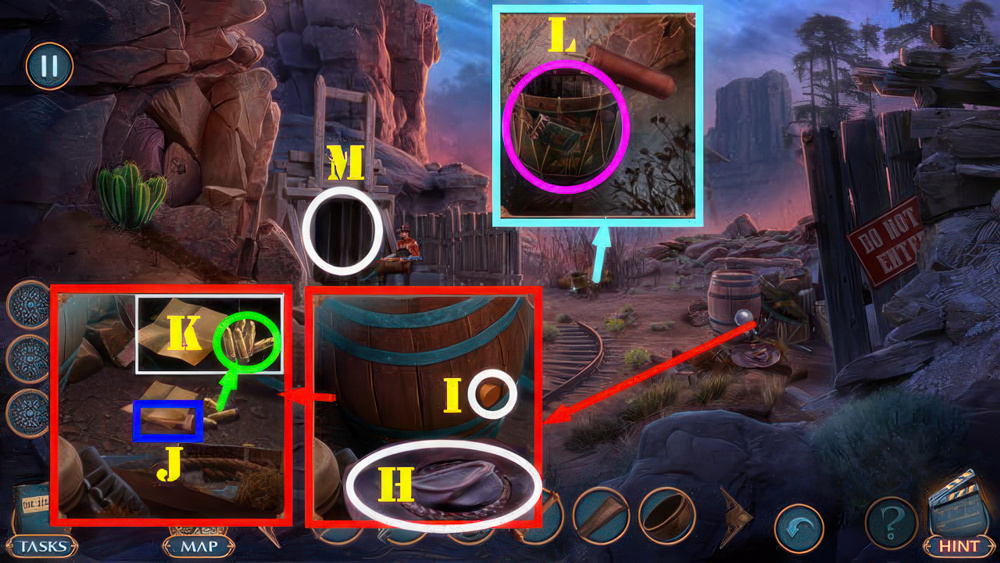
- Look at note, take ASHTRAY and PAPERWEIGHT (F).
- Walk down.
- Place BOARDS and NAILS, use PAPERWEIGHT (G).
- Play puzzle (H), receive SHERIFF’S WHISTLE.
- Use SHERIFF’S WHISTLE (H1) and select whistle (I), take WARDROBE TOKEN 2/2 (J).
- Go (K).

- Place WARDROBE TOKEN 2/2, take FEATHERS and RIDING GEAR 1/2 (L).
- Use FEATHERS, take WOODCUTTER FIGURINE (M).
- Walk down twice.

- Place WOODCUTTER FIGURINE, take GLOVE and NUT AND BOLT (N).
- POLE and NUT AND BOLT on BROKEN PITCHFORK, receive PITCHFORK.
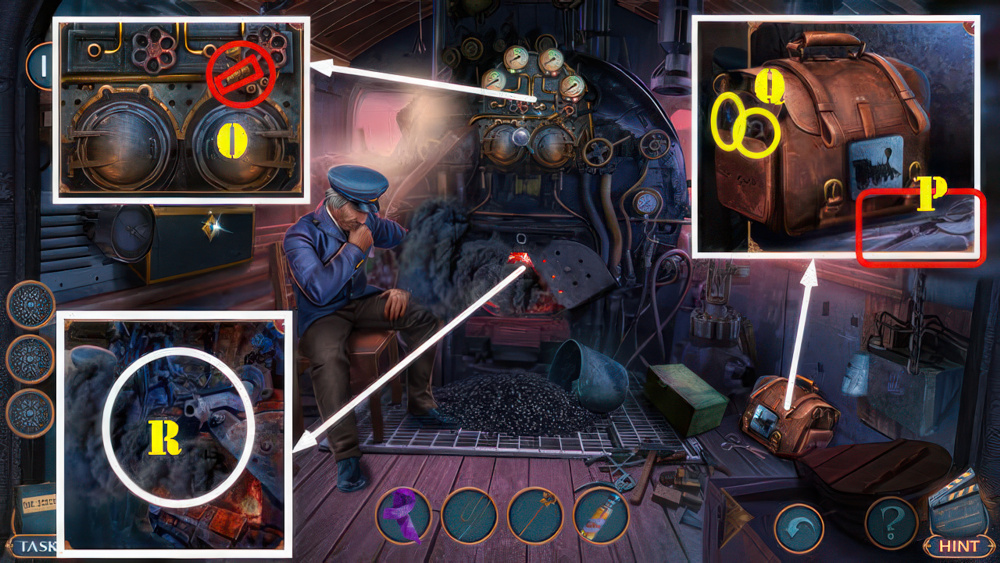
- Use PITCHFORK, take TWEEZERS (O).
- Use CHISEL, take GEM (P).
- Go to House.
- Place GEM (Q).

- Easy Solution (@1)(1-9).

- Hard Solution (@2): place gem on button (R) to rotate it.
- Place Gems 2, 4, and 7, as shown, without rotating.
- Rotate (1) twice, (3) twice, (5) 4x, place them.
- Rotate (6) twice, (8) twice, and (9) 5x, place them.
- Take BAG TOKEN.

- Place BAG TOKEN, take CANDLESTICK (S).
- Walk down.
- Use CANDLESTICK, take TUBE and CORKSCREW (T).
- Use ASHTRAY, take SHERIFF’S BADGE (U).
- Walk down.

- Place SHERIFF’S BADGE, take MATCHES and RIDING GEAR 2/2 (V).
- Place RIDING GEAR 2/2 (W).
- Take WICK and CLAMP (X).
- Use GLOVE (Y).
- Play puzzle, receive AXE.
- Use AXE (Z1).
- Go (Z2).

- Take EMPTY LANTERN, PESTLE, and NUTCRACKER (A).
- Use TWEEZERS (B), receive HAIR COMB.
- Use HAIR COMB (C), receive TARP.
- Walk down.

- Use CLAMP and TARP (D), take PEG and BOARD (E).
- Use PEG on wheel, take BOWL (F).
- Go (G).
- Use BOWL, take COWBOY HAT (H).
- Use CORKSCREW (I), take LOCKPICKS 1/2 (J).
- Use NUTCRACKER (K), receive GUNPOWDER.
- Select TUBE and look at note, place WICK and GUNPOWDER, receive EXPLOSIVE.
- Place MATCHES and EXPLOSIVE (L).
- Select (M).

- Select all parts to form a pickaxe (N).
- Use pickaxe (O).
- Select all boards (P).
- Place boards (Q).
- Use saw on each board (1-3).

- Take GLUE, KNOCKER, and BANDAGE (R1).
- Use COWBOY HAT, take AWL (R2).
- Look at note (S1).
- Select flower (S2) and use PESTLE (S3), take OINTMENT (S3).
- Use OINTMENT, BANDAGE, and BOARD (S4), receive FATHER’S BAG.

- Look at note (T).
- Open FATHER’S BAG, take EMPTY POUCH and KEROSENE.
- KEROSENE on EMPTY LANTERN, receive LANTERN.
- Use LANTERN (U).
- Play puzzle, receive MIRROR.
- Use MIRROR, take ROPE and HEAVY BOOT (V).
- Walk down.
- Use AWL and HEAVY BOOT, take HOOKS, BROKEN TOKEN, and LOCKPICKS 2/2 (W).
- Go (W1).
- Use LOCKPICK 2/2 (X) and look at note, take CLUE and TOKEN PART (Y).
- GLUE and TOKEN PART on BROKEN TOKEN, receive JOURNAL TOKEN.
- Place CLUE and JOURNAL TOKEN (Z).
- Easy Solution: Ex5-Bx4-Dx1-Ax4-Cx3.
- Hard Solution: Jx5-Ix3-Hx2-Gx4-Fx4-Hx2.

- Take BOARDS 1/2, BROKEN LADDER, NIPPERS HALF, and HAND RAKE (A).
- Place KNOCKER, open bag and look at note, take BROKEN NIPPERS and SCOOP (B).
- Use EMPTY POUCH and SCOOP (C), receive BAG OF GRAIN.
- Use BAG OF GRAIN (D), take SOFT BRUSH and BOARDS 2/2 (E).
- BOARDS 2/2, HOOK, and ROPE on BROKEN LADDER, receive LADDER.

- Place LADDER and play puzzle (F), receive SICKLE.
- Use SICKLE (G).

- Take POTHOLDER and EARRING (H).
- Use HAND RAKE, take SPRING (I).
- NIPPERS HALF and SPRING on BROKEN NIPPERS, receive NIPPERS.
- Look at sign (J).
- Use NIPPERS, take INSECT REPELLENT (K).

- Use INSECT REPELLENT, take STICK and DOOR KNOCKER (L).
- Place DOOR KNOCKER (M).
- Enter (N).

- Talk (O), receive MILDRED’S JEWELRY BOX.
- Take CHAIN (P).
- Open MILDRED’S JEWELRY BOX, take NEEDLE AND THREAD and FAMILY KNIFE.
- Use POTHOLDER (Q), receive IRON.

- Open bag and look at note, take BLUNT PENCIL (R).
- Use EARRING, SOFT BRUSH, FAMILY KNIFE and BLUNT PENCIL on book (S), receive DRUG RECIPE.
- Place DRUG RECIPE (T).
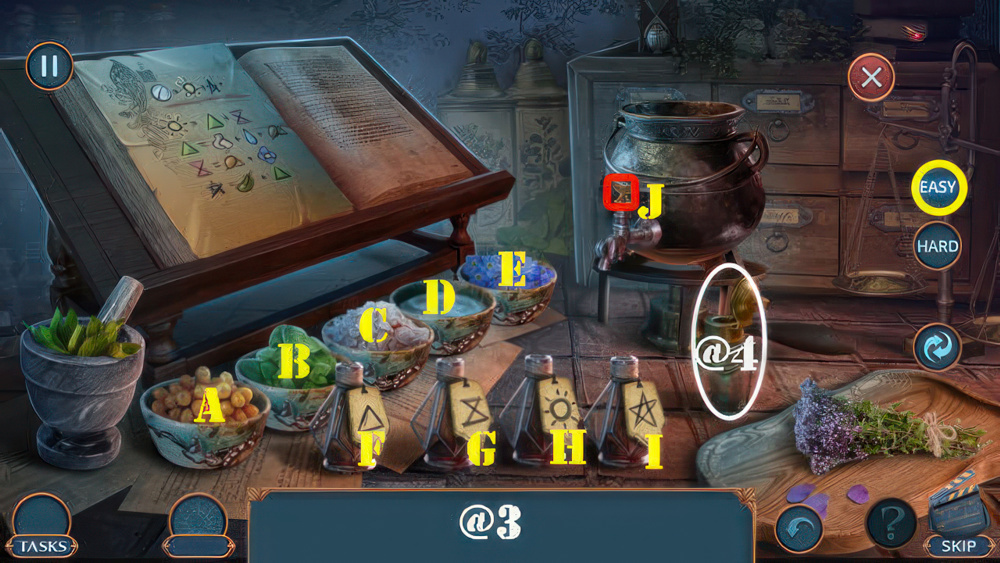
- Easy Solution (@3): A-C-D-J (take yellow bottle)-A-E-J (take purple bottle).
- F-G-J (take orange bottle)-F-B-J (take blue bottle)-H-I-J.
- Take DRUG (@4).

- Hard Solution (@5): K-M-N-U (select bluish-green bottle)-K-O-U (select purple bottle)-L-P-U (select blue bottle).
- P-Q-U (select orange bottle)-Q-N-L-U (select green bottle)-R-S-T-U.
- Take DRUG (@6).
- Give DRUG (V), receive CANE.
- Use CANE (W).
- Go (X).

- Take COWBOY FIGURES 1/2 and BELT BUCKLE (A).
- Use IRON (B), take WHEEL (C).
- Place STICK, WHEEL, and NEEDLE AND THREAD (D), receive GLOVE.
- Use GLOVE, take TONGS and CARABINER (E).
- Walk down twice.

- Place CHAIN and CARABINER (F), take SCREWS and BUCKET (G).
- Use BUCKET, receive BUCKET OF SAND and take BROKEN WHEEL (H).
- Go (I).
- Use TONGS and BUCKET OF SAND (J), receive METAL HANDLE and BOLT.
- Remove painting (K).
- Use BELT BUCKLE, SCREWS, and METAL HANDLE (K1), take AWL and CAT TOY (L).
- Go (L1).

- Give CAT TOY (M).
- Open chest (N) and play puzzle, receive BIRD TOKEN.
- Place BIRD TOKEN (O), take RULER (P).
- Walk down.

- Use RULER, take BELT and COWBOY FIGURES 2/2 (Q).
- Place COWBOY FIGURES 2/2 (R), take ARROWHEAD and KEY (S).
- Go (T).

- Use KEY, take SCARF (U).
- Use AWL, take CODE (V).
- Select suitcase and place CODE (W).

- Easy Solution (X).
- Hard Solution (Y).
- Follow white line first and red last.
- Take NUT and HOOK.
- Walk down twice.

- Use HOOK (A), take FISHING LINE, LIGHTER, and WHEEL HALF (B).
- BELT and WHEEL HALF on BROKEN WHEEL, receive WHEEL.
- Use BOLT, NUT, and WHEEL (C).

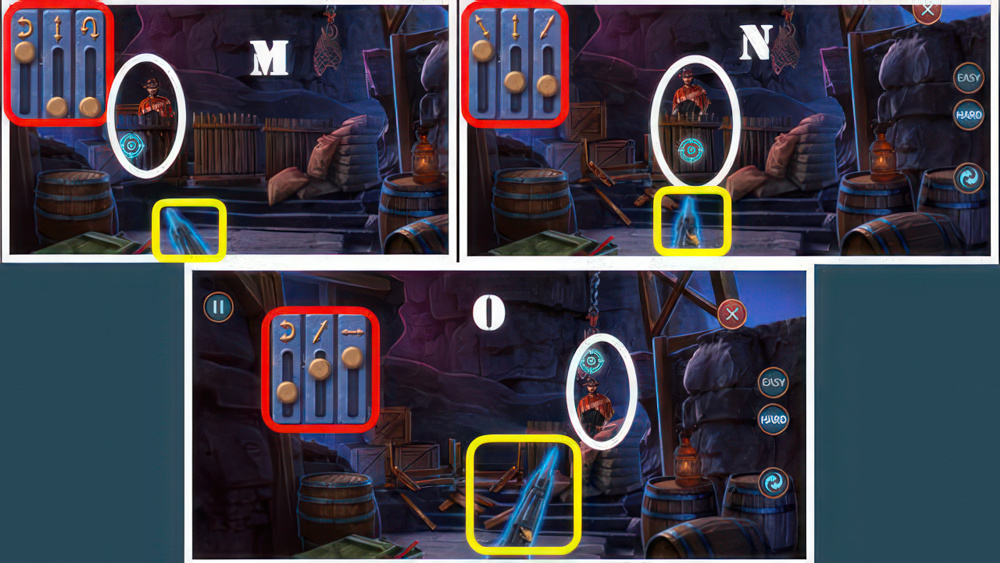
- Easy Solution: select the middle arrow (D) when the highlighted bandit (E) reaches the spot shown.

- Hard Solution: select the middle arrow (F) when the highlighted bandit (G) turns back around in the area shown.

- Take STONE BALL 1/2 (H).
- Take RAG, look at poster, and take TOWEL (I).
- Use ARROWHEAD, take LIGHTER FLUID (J).
- LIGHTER FLUID on LIGHTER, receive REFUELED LIGHTER.

- Use REFUELED LIGHTER, take SHEET (K).
- TOWEL and SHEET on SCARF, receive RAG ROPE.
- Use RAG ROPE (L).
- Go (M).
- Take HOOK, STONE BALL 2/2, and SLINGSHOT (N).
- Use STONE BALL 2/2, take FISHING ROD and LIFEBUOY ON ROPE (O).
- Use LIFEBUOY ON ROPE (P), take AWL and REEL (Q).
- FISHING LINE, REEL, and HOOK on FISHING ROD.

- Use FISHING ROD (R).
- Play puzzle, receive SAW.
- Use SAW (R1).
- Go (S).

- Take STONES and MINER’S HELMET (T).
- Use MINER’S HELMET, take SOLVENT (U).
- Use RAG and SOLVENT and open bag (V), take HORSE STATUE and PIN (W).
- Walk down.

- Place PIN (X), take BRUSH, FLAG, and LEVER (X1).
- Use LEVER, take GLUE and RUBBER (Y).
- Walk down.
- AWL, STONES, and RUBBER on SLINGSHOT.
- Use SLINGSHOT (Z).

- Easy Solution: Select the screen when slider is in the green zones (A-B).
- You must complete this puzzle once.
- Hard Solution: Select the screen when slider is in the green zones (A-B).
- You must complete this puzzle 3 times (C).
- Receive FAN.
- Use FAN, take FLAG HALF (D).
- Go to Road in the Desert.
- GLUE and FLAG HALF on FLAG, receive MAILBOX FLAG.

- Place MAILBOX FLAG (E), take NUT and KNITTING NEEDLE (E1).
- Use KNITTING NEEDLE (F), select pouch, take SPOON (G).
- Walk down twice.

- Use SPOON, take MIRROR and CHISEL (H).
- Use CHISEL and HORSE STATUE, take WOODEN BLOCK and TALCUM POWDER (I).
- Go to Diamond Waters Waterfall.
- Use BRUSH and TALCUM POWDER (J).

- Easy Solution (K): (1-8).
- Hard Solution: the hard solution is random.
- Take MAGNET and KUKRI KNIFE.

- Use KUKRI KNIFE, take WIRE (L).
- Go (M).
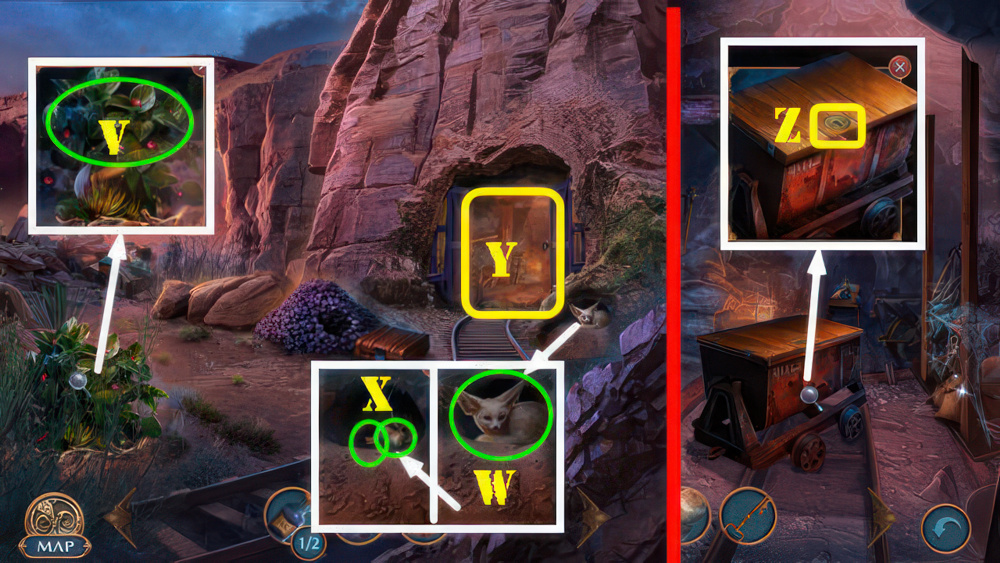
- Use MIRROR (N) and WIRE (O).
- Play puzzle, receive CARROT.
- Give CARROT (P).

- Take LOCKPICKS 1/2 (A).
- Use WOODEN BLOCK (B), take FAUCET HANDLE and FISHING ROD (C).
- Use FISHING ROD, take DEEP BOWL and WOODEN BUCKET (D).

- Place NUT, FAUCET HANDLE, and WOODEN BUCKET, take WATER (E).
- Use WATER (F).
- Go (G).

- Look at note, take ROCK (H).
- Take CLOCK HANDS 1/2 (I).
- Use MAGNET, take LOCKPICKS 2/2 (J).
- Use LOCKPICKS 2/2 (K).

- Easy Solution (@7): B-Dx2-E-F-Hx2-K.
- Hard Solution (@7): B-Dx2-E-F-Hx2-K.
- Take AMMONIA.

- Use AMMONIA (L), receive BARRETTE.
- Select key, use BARRETTE (M).
- Go (N).

- Take MIRROR and DOMINOES 1/2 (O).
- Use DEEP BOWL, take BRANCH (P).
- Use ROCK, take RIB SPREADER (Q).
- Use RIB SPREADER (R), receive NECKLACE and CORKSCREW.
- Use CORKSCREW, take KNITTING YARN (S).
- Walk down twice.
- Use MIRROR and KNITTING YARN (T).
- Play puzzle, receive HORSESHOE.
- Use HORSESHOE, take ROPE WITH HOOK (U).
- Go to Backyard.
- Use ROPE WITH HOOK (V), take RIBBON and AXE (W).
- Use AXE, take CLOCK HANDS 2/2 and LEVER (X).
- Walk down.

- Place CLOCK HANDS 2/2 (A), take CRANK HANDLE (B).
- Place CRANK HANDLE (C), take SPATULA, SCREWDRIVER, and BELT (D).
- Walk down.
- Use SCREWDRIVER, take TUNING FORK (E).
- Place LEVER and BELT (F).
- Pull lever.

- Easy Solution: (G).
- Hard Solution: (H).
- Take METAL LEVER and NET PIECE (I).
- NECKLACE, RIBBON, and NET PIECE on BRANCH, receive SCOOP NET.
- Use SCOOP NET (J), take DOMINOES 2/2 (K).
- Go to Backyard.
- Place DOMINOES 2/2 (L).

- Easy Solution (M): (1-9).

- Hard Solution (N): (1-12).
- Take BROKEN COMB.

- Use BROKEN COMB, take DRAWING TUBE and PIPE (O).
- Walk down.
- Use PIPE, take WRENCH and STUD EARRING (P).
- STUD EARRING on DRAWING TUBE, receive OLD MINE DRAWINGS.
- Give OLD MINE DRAWINGS (Q).
- Select (R).
- Easy Solution (S).
- Hard Solution (T).
- Take SPATULA, TUNING FORK, WRENCH, and METAL LEVER (U).

- Look at note (V).
- Take GEARS 1/3 and WHEEL (W).
- Use SPATULA and METAL LEVER, take MINER’S BAG (X).
- TUNING FORK on MINER’S BAG, take ROPE LADDER.

- Place ROPE LADDER (Y).
- Play puzzle, receive TONGS.
- Use TONGS (Z1), receive BOARDS 1/2 and take LEATHER GLOVES (Z2).
- Use LEATHER GLOVES (A), receive BOARDS 2/2, RAIL PART, and LEATHER PATCH.
- Place WRENCH, WHEEL, and RAIL PART (B).
- Take bolt from box and place it (C).

- Take GEARS 2/3, RAZOR, BANDANA, and NEEDLE AND THREAD (D).
- Use RAZOR, take NAILS, GEARS 3/3, and HAIRPIN (E).
- Place GEARS 3/3 (F).

- Easy Solution (@8): (U-L-D-R-U-R)-(U-R-D-L-D-L-D-R)-(U-L-D-R-U).
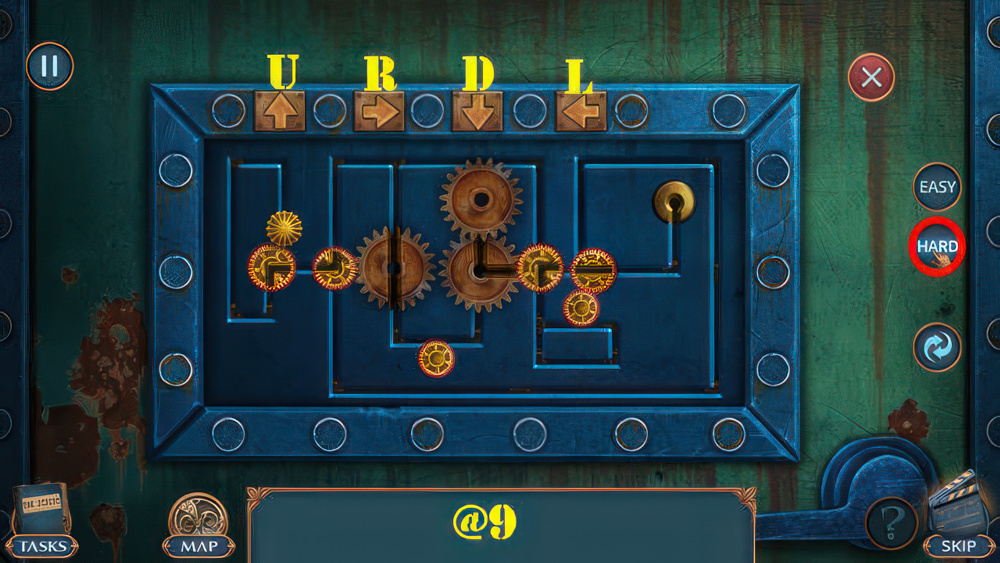
- Hard Solution (@9): (U-L-D-R-U-R)-(U-R-D-R-U-R-D)-(R-D-L-U-R-D)-(L-U-R-D-L-Ux2)-(Rx2-U).
- Take OLD POKER.
- Remove tarp and use OLD POKER, take HAMMER (G).
- Place BOARDS 2/2 and NAILS, use HAMMER (H).
- Go (I).

- Take YOKE and GLUE AND BRUSH (J).
- Place LEATHER PATCH and YOKE (K), take ROPE (L).
- Use ROPE (M).
- Go (N).
- Take BROKEN TOKEN and SHARPENING STONE (O).
- Select scissors and use SHARPENING STONE (P).
- Use scissors, take VALVES 1/2 and HANDLE (Q).
- Use BANDANA AND HANDLE (R), receive KEY.
- Walk down.

- Use KEY (S).
- Play puzzle, receive HAIR COMB.
- Use HAIR COMB, take TINY BAG, CLEANING PRODUCT, and LEATHER PIECE (T).
- Walk down.

- Use NEEDLE AND THREAD and LEATHER PIECE, take SMALL TUBE and CLAY POT (U).
- Use CLAY POT (V), take MATCHES (W).
- Use HAIRPIN (X), take CRANK HANDLE (X1).
- Go to Cabin of Train Driver.

- Use CRANK HANDLE, take NITRATE and TOKEN PART (Y).
- GLUE AND BRUSH and TOKEN PART on BROKEN TOKEN, take TRAIN AMULET.
- Place TRAIN AMULET, take NECKERCHIEF (Y1).
- Walk down.

- Use NECKERCHIEF, take FUSE and CLEANING BRUSH (Z1).
- Use CLEANING PRODUCT and CLEANING BRUSH, take CHISEL and VALVES 2/2 (Z2).
- Go (Z3).
- Place VALVES 2/2 (Z4).

- Easy Solution: A-Bx2-Cx2-Dx3.
- Hard Solution: A-C-Dx3-Ax3-C-Bx2.
- Take STICK.

- Use STICK (E), receive RAKE PART, WEDGE, and CORKSCREW.
- Walk down twice.
- Use CORKSCREW and TINY BAG (F), receive GUNPOWDER BAG.
- NITRATE, FUSE, and GUNPOWDER BAG on SMALL TUBE, receive DYNAMITE STICK.
- Use MATCHES and DYNAMITE STICK (G).

- Take SPYGLASS, NEWSPAPER, and RAKE HANDLE (H).
- WEDGE and RAKE HANDLE on RAKE PART, receive RAKE.
- Use RAKE, take ROPE and KNIFE (I).
- Use KNIFE (J).
- Play puzzle, receive SHOVEL.

- Use SHOVEL, take SHARP NAIL (K).
- Use NEWSPAPER (L) and SHARP NAIL (M).
- Select newspaper and take key (orange).
- Place key in lock (M).
- Go (N).

- Take TORN POUCH (O).
- Use CHISEL, take UNLOADED REVOLVER (P).
- Give UNLOADED REVOLVER (Q), receive AUGER HANDLE.
- Place AUGER HANDLE (R).
- Go (S).

- Take PATCH and QUILL PEN AND INK 1/2 (T).
- Use SPYGLASS and ROPE, take NEEDLE AND THREAD and KETTLEBELL (U).
- Walk down twice.
- NEEDLE AND THREAD and PATCH on TORN POUCH, receive POUCH.
- Use POUCH (V), receive BERRIES.
- Give BERRIES (W), take CORK and TROLLEY KEY (X).
- Go (Y).
- Use TROLLEY KEY (Z).

- Easy Solution: (C-F-Kx2-A)-(E-F-Kx2-H)-(J-F-K-D).
- Hard Solution: (G-F-K-A)-(E-H)-(J-F-Kx2-D).
- Take SHIRT.

- Use SHIRT, take HEAVY SACKS and QUILL PEN AND INK 2/2 (L).
- Go (M).
- Place KETTLEBELL and HEAVY SACKS (N), take OLD ENVELOPE, ARROW, and LIGHTER (O).
- Use QUILL PEN AND INK 2/2 and OLD ENVELOPE (P), receive CODE.
- Walk down twice.

- Place ARROW (Q).
- Place CODE, solution 703 (R).
- Take RAG and SHEARS (S).
- Use SHEARS, take DAGGER (T).
- Go (U).

- Use DAGGER, take UNLOADED GUN and AUGER HANDLE (V).
- Place AUGER HANDLE (W), receive AUGER.
- Go (X).

- Use AUGER (Y).
- Play puzzle, receive WINCH HANDLE.
- Place WINCH HANDLE (Z).
- Go (A).

- Take TORCH BASE and CLAMP (B).
- Use CORK and CLAMP (C), take HAMMER (D).
- Use HAMMER (E), take GASOLINE (F).
- RAG, LIGHTER, and GASOLINE on TORCH BASE, receive TORCH.

- Use TORCH, take EMBLEM (G).
- Place EMBLEM, take BULLET and look at note (H).
- BULLET in UNLOADED GUN, receive GUN.
- Use GUN (I).

- Set the sliders as shown and then select the gun.
- Easy Solution: (J-K-L).
- Hard Solution: (M-N-O).
- Walkthrough Bonus Chapter, at the link below.


Couldnt of finished this without your walkthrough. Thank you.