
Hospital Escape: Chapter 2 – This time in the game you will study the patient: Undergraduate, former employee of Jianghan Bank, has been treated in Wuren Psychiatric Center for 2 years and has not improved. Difficulty communicating, hurting people and destroying things, and almost lost the desire to survive.
Hospital Escape: Chapter 2 – Walkthrough
Below you can watch the complete walkthrough of the Chapter 2, in the game Hospital Escape.
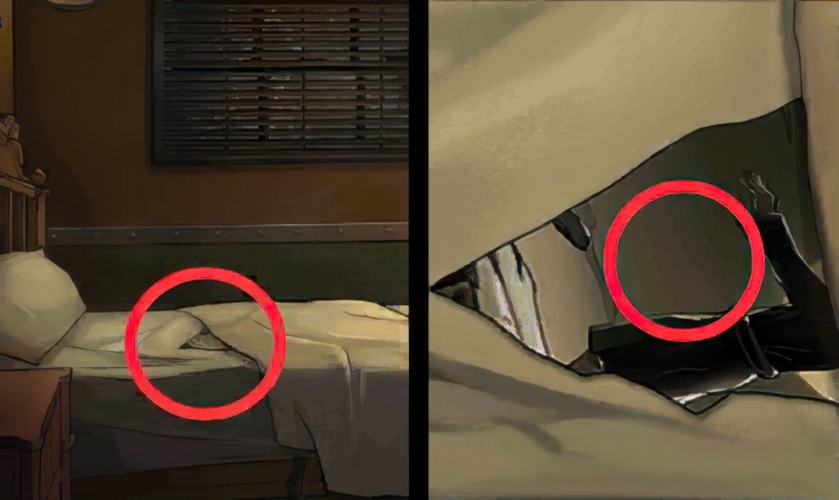
1. Check the hospital bed and pick up the painting fragments on the bed.

2. Check the shutters, and after pulling up the shutters, pick up the painting fragments on the windows.

3. Check the frame at the head of the bed, and put the two pieces of painting in the frame to form a complete picture.

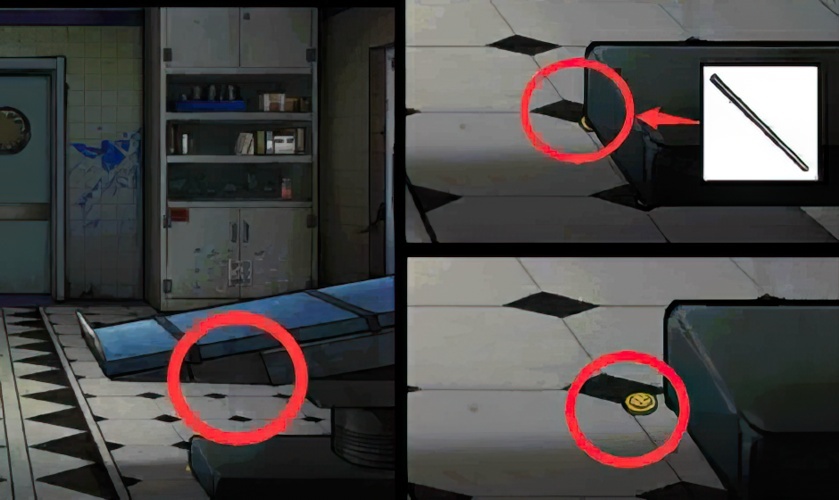
4. Check the box on the ground, enter the password 3257 according to the number that appears on the picture frame, and pick up the rotary valve in the box.

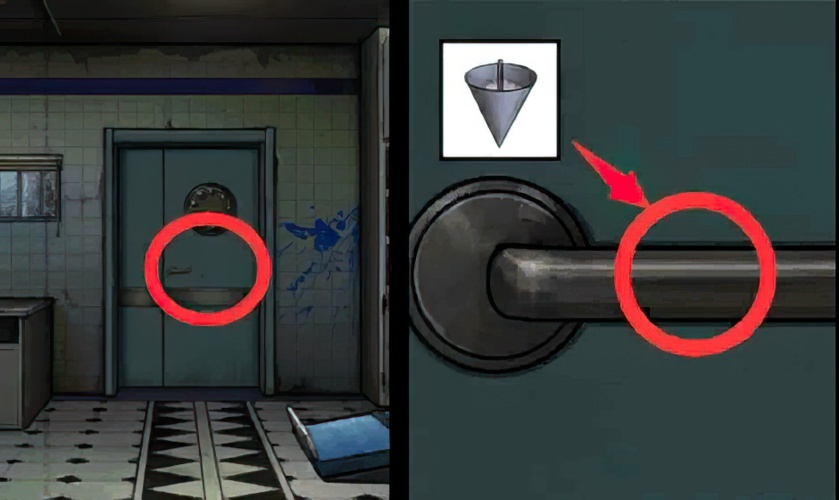
5. Look at the iron door on the right, insert the rotary valve into the round hole, turn the valve and enter the open iron door.
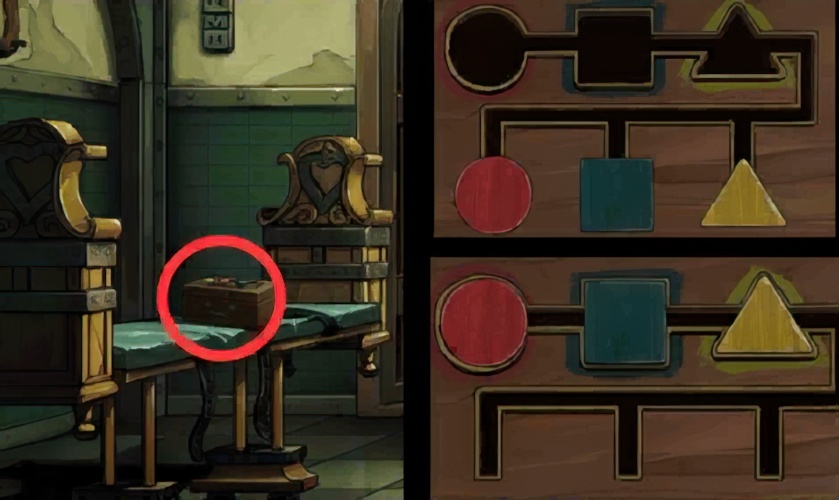
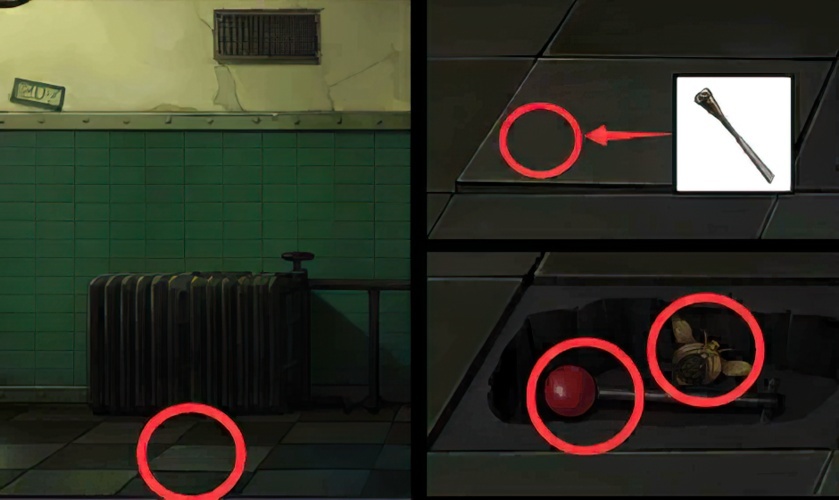
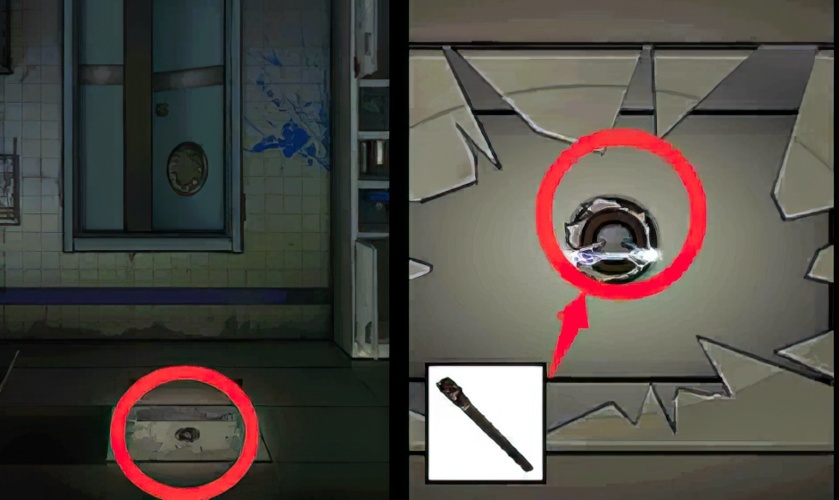
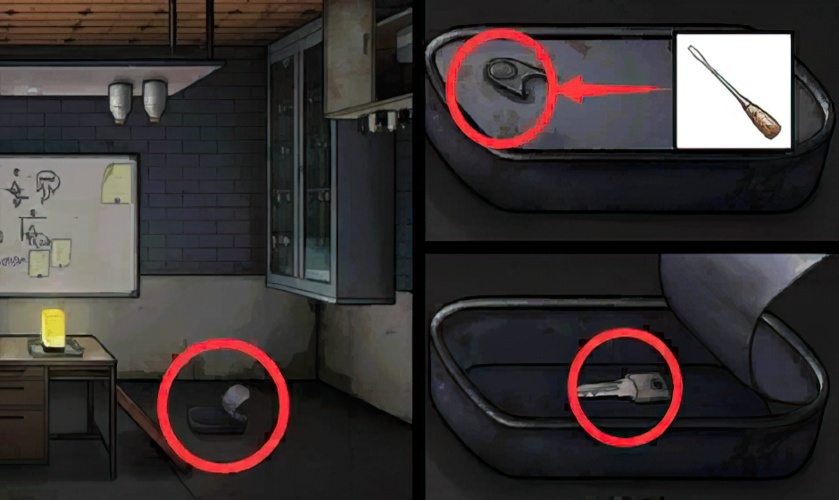
6. Check the box on the bed on the left side of the “corridor”, complete the box mechanism, and pick up the screwdriver handle.

7. Look at the trash can on the right side of the “corridor”, remove the trash bag, and pick up the wooden planks.
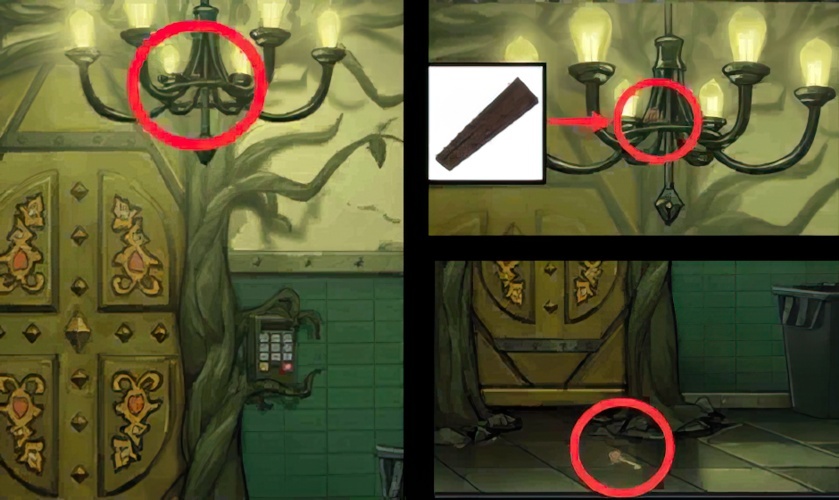
8. Look at the chandelier on the right side of the “corridor”, move the chandelier with a wooden board, and pick up the key that has fallen on the ground.
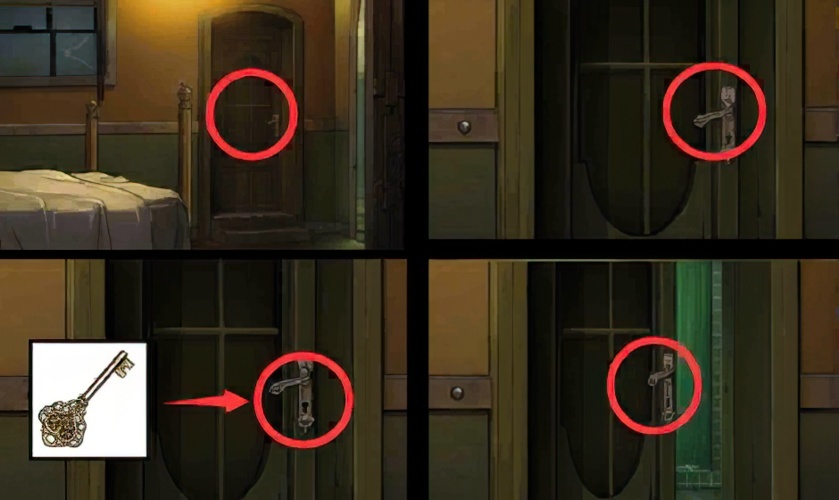
9. Use the key to open the door to the window inside the “ward”, turn the door handle and enter the opened door.
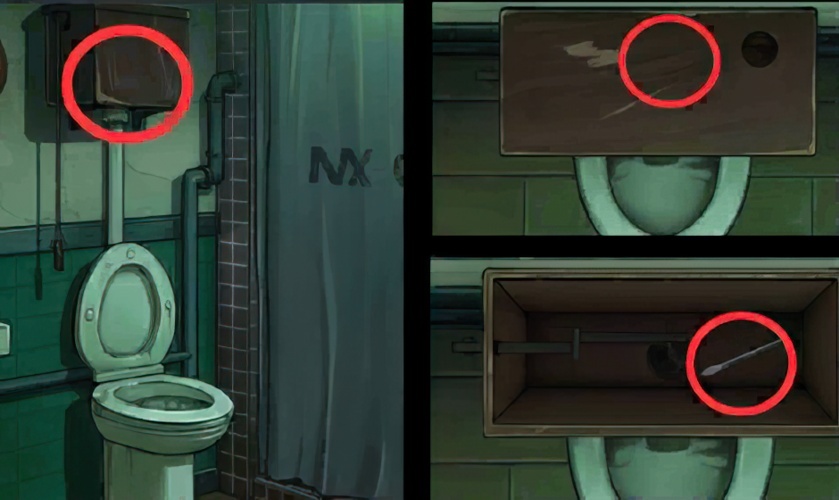
10. Check the reservoir of the toilet in the “toilet”, remove the reservoir cover, and pick up the screwdriver bit.
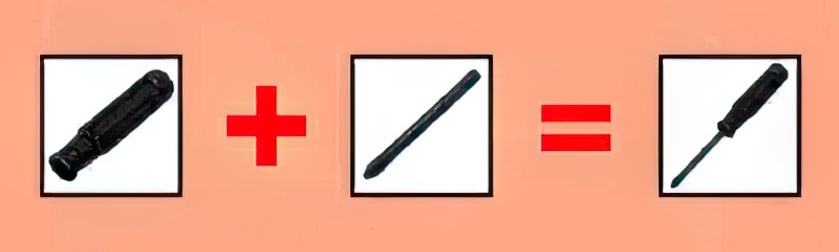
11. Combine the screwdriver handle and the screwdriver head into a complete screwdriver.
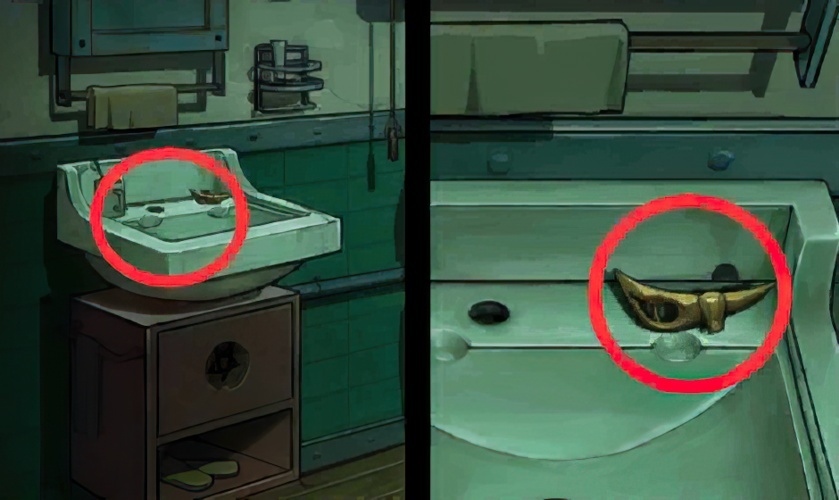
12. Check the sink in the “toilet” and pick up the copper fragments on the sink.
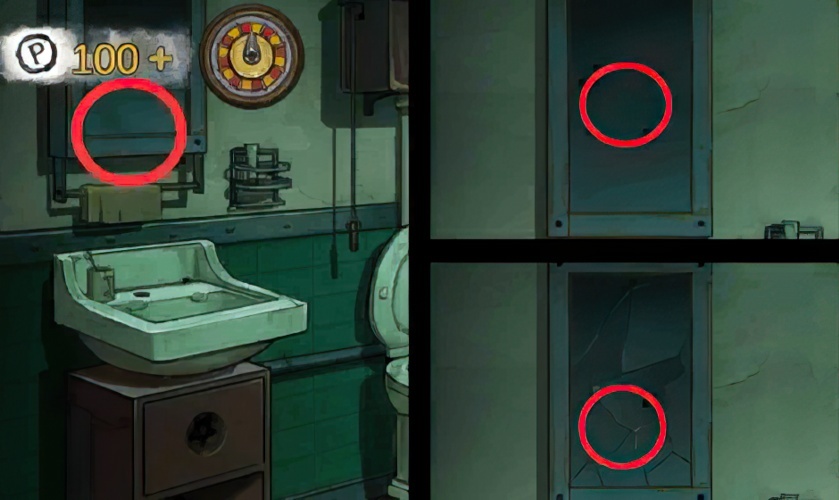
13. Check the mirror of the “toilet”, break the mirror and pick up the glass shards.
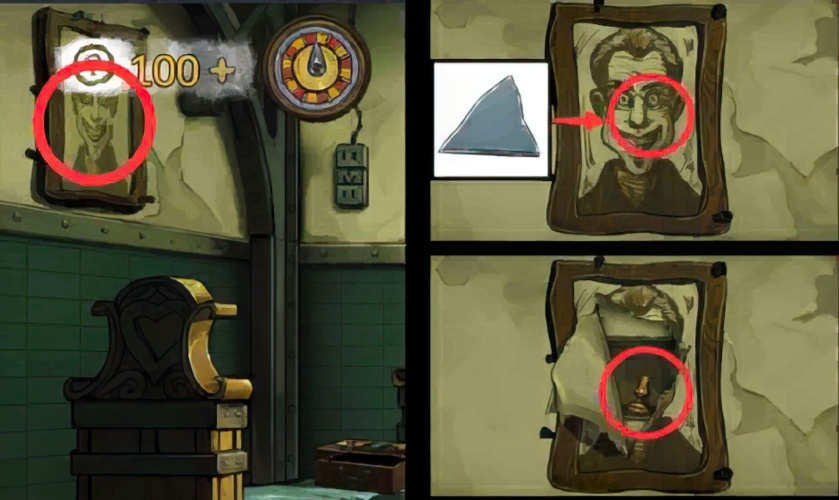
14. Look at the painting on the left wall of the “corridor”, scratch the canvas with glass shards, and get the copper shards.

15. Combine 2 copper fragments into a complete copper mask.

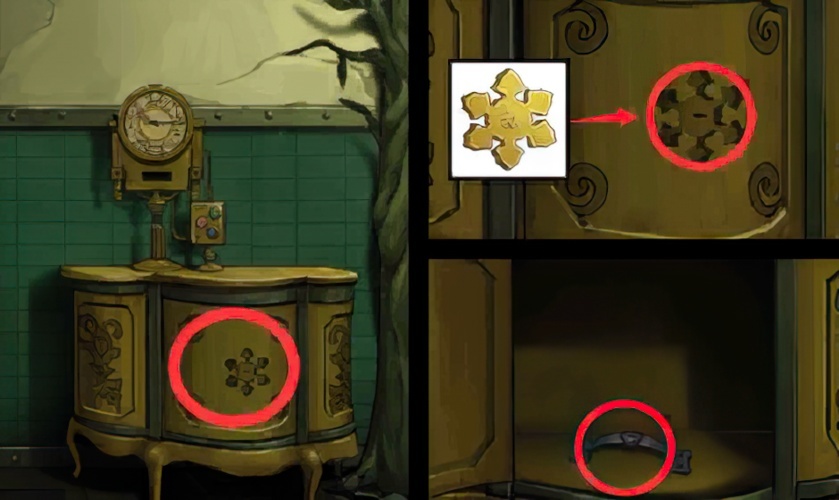
16. Check the bedside table of the “ward”, place the copper mask in the groove of the left drawer, and get the blue pointer.

17. Look at the radiator in the “corridor” and pick the button in the radiator.

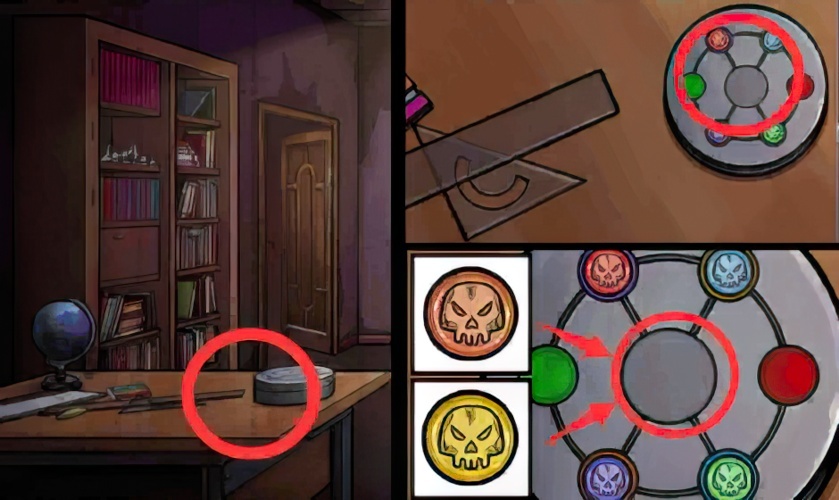
18. Check the clock on the cabinet in the “corridor”, place the blue pointer on the dial, and place the button in the groove on the lower right.
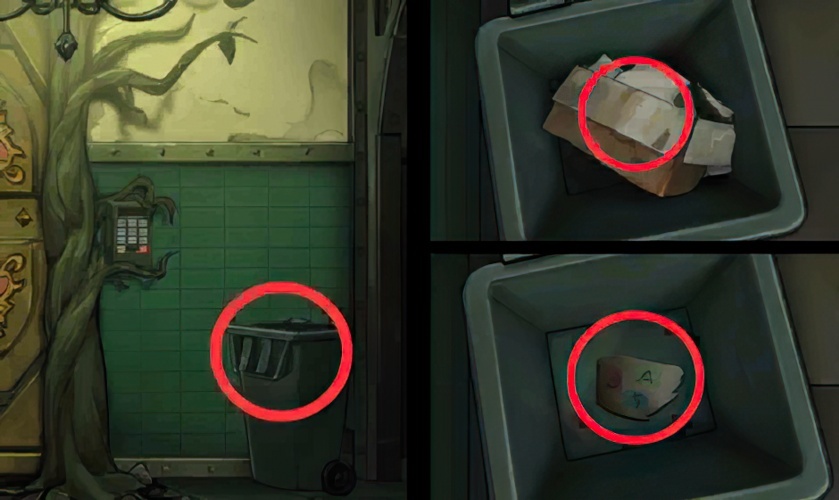
19. Look at the trash can on the right side of the “corridor”, remove the carton, and get the paper inside.

20. According to the pattern on the paper, press the button on the “corridor” clock to rotate the pointers of different colors to the corresponding symbols.

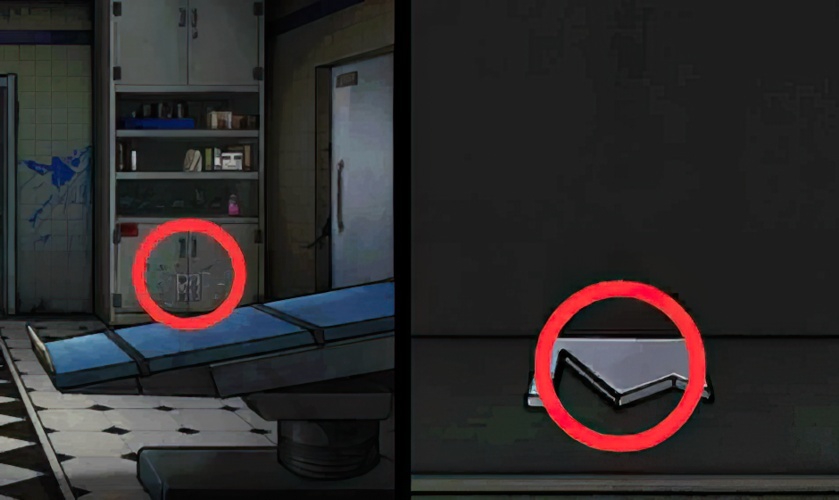
21. Check the code lock on the right door of the “corridor” and use a screwdriver to remove the cover of the code lock.

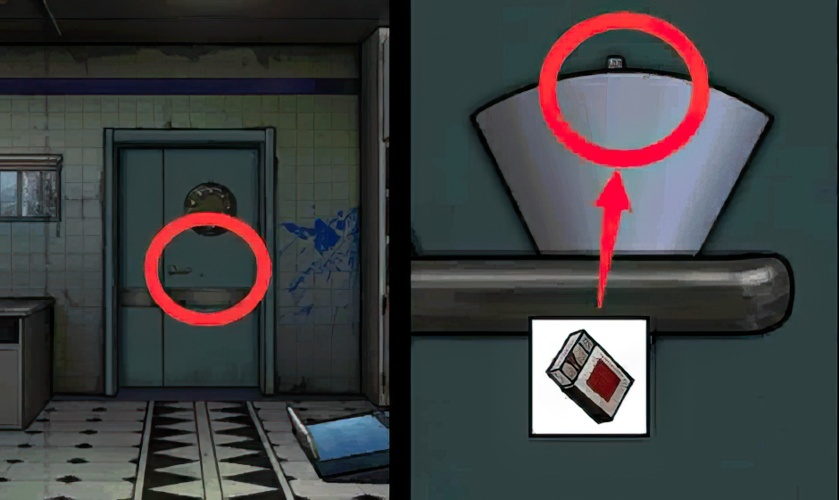
22. Put the battery into the battery slot of the code lock on the right door back to the “corridor”.
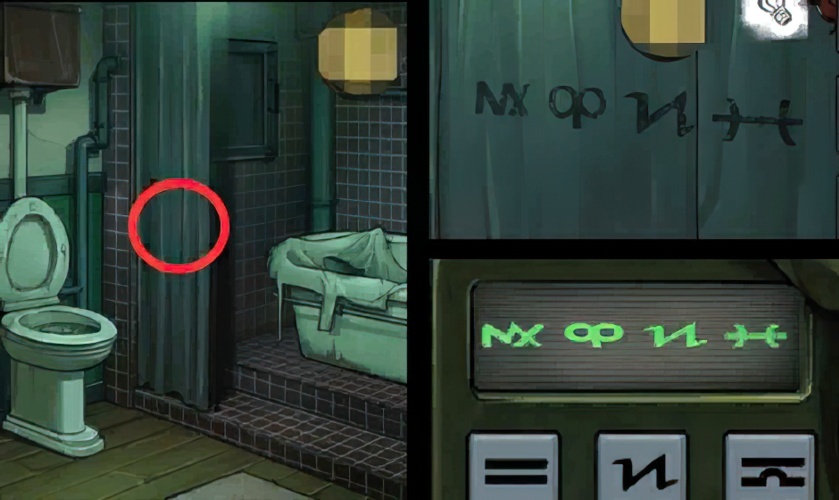
23. Pull up the curtain to return to the “toilet”, check the pattern on the curtain, and enter the symbols on the curtain one by one on the code lock on the right side of the “corridor” to enter the opened door.

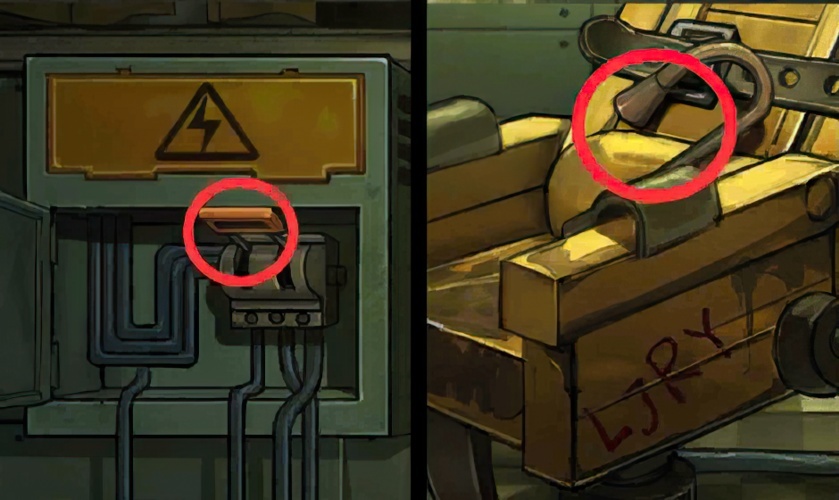
24. Look at the machine on the left side of the “treatment room” and pick up the wrench on the floor.

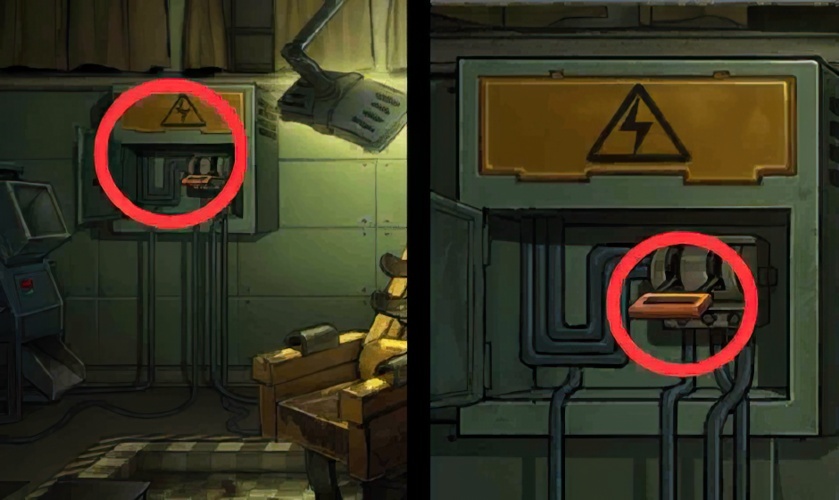
25. Use a wrench to open the distribution box of the “treatment room”, pick up the wooden block and close the switch.
26. Turn off the switch that returns to the distribution box of the “treatment room” and pick up the faucet on the electric chair.
27. Check the cabinet in the “corridor”, put the wooden block into the groove of the cabinet door, and pick up the handle inside the cabinet.

28. Remove the carpet in the “treatment room” and place your hand on the cellar door.

29. Put the screw in the screw hole of the cellar door handle of the “treatment room”.
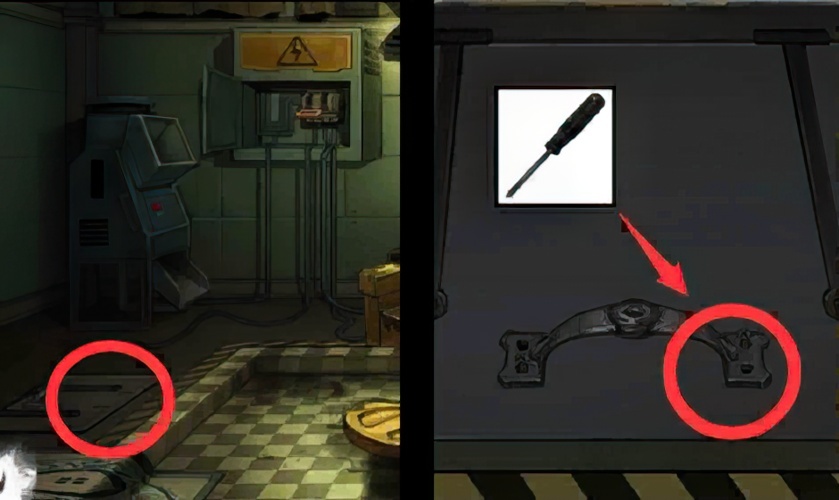
30. Use a screwdriver to tighten the screws on the cellar door handle of the “treatment room”.

31. Open the cellar door of the “treatment room” and get the syringe inside.
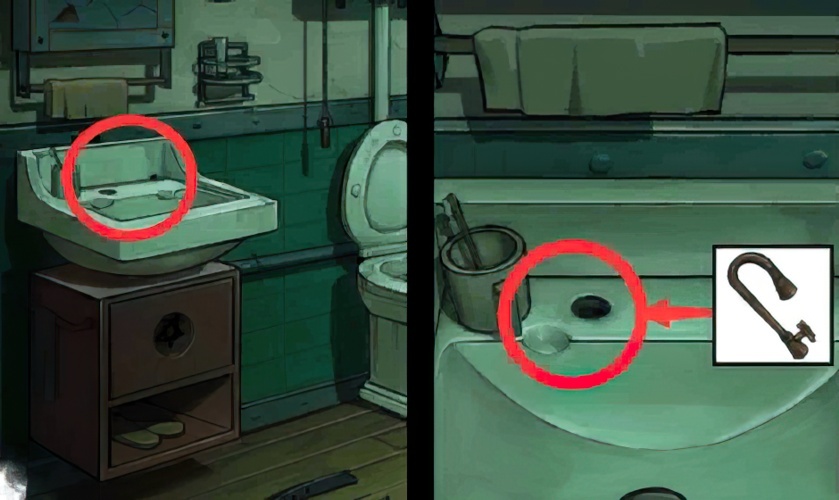
32. Insert the faucet into the groove of the sink in the “toilet”.

33. Pull open the curtain of the “toilet”, look at the iron door on the wall, and use a wrench to unscrew the bolts on the iron door.

34. Complete the mechanism behind the iron door of the “toilet” and repair the broken pipe.

35. Turn on the faucet on the sink of the “toilet” to release green water.

36. Use a syringe to draw water from the sink of the “toilet”.
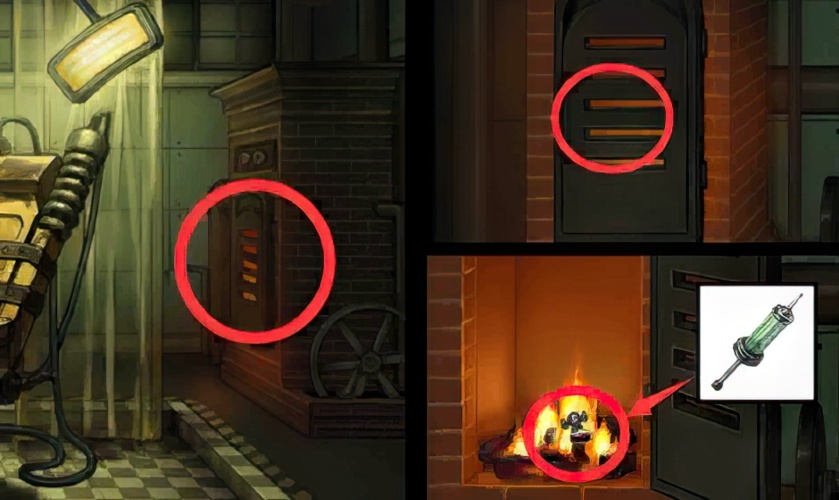
37. Open the iron door of the boiler on the right side of the “treatment room” and use a syringe filled with water to extinguish the fire inside.
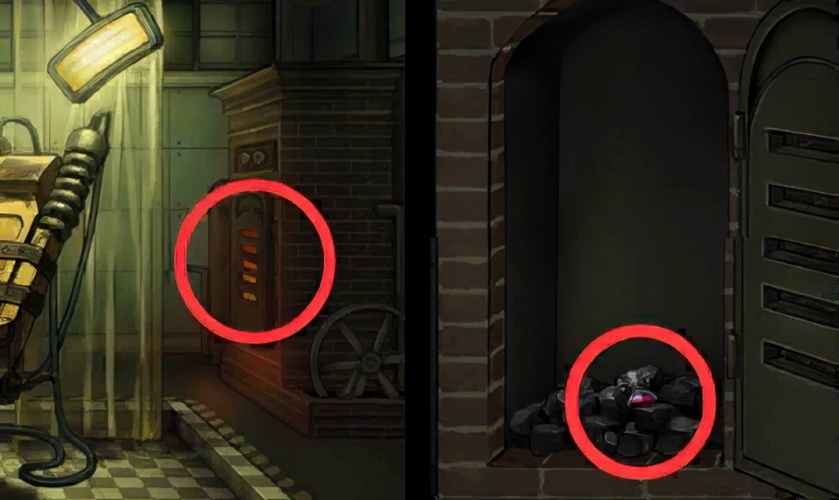
38. Pick up the purple liquid in the boiler on the right side of the “treatment room”.
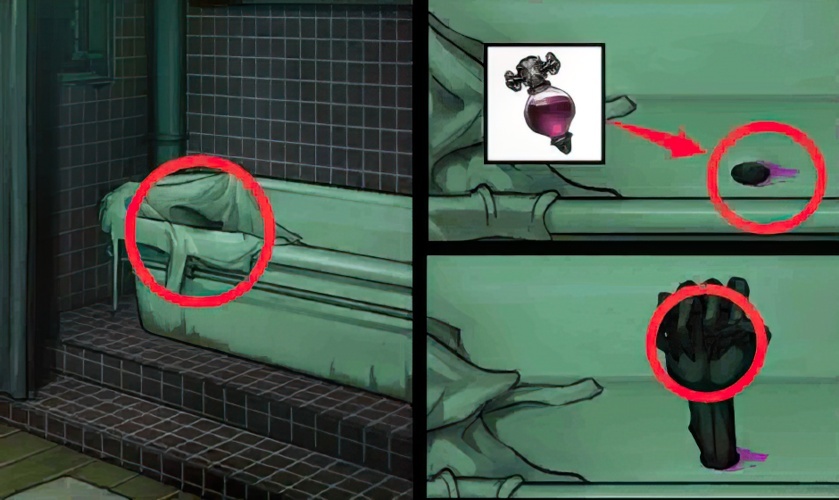
39. Pour the purple-red liquid into the bathtub in the “toilet”, open the outstretched hand, and take the energy block in the hand.
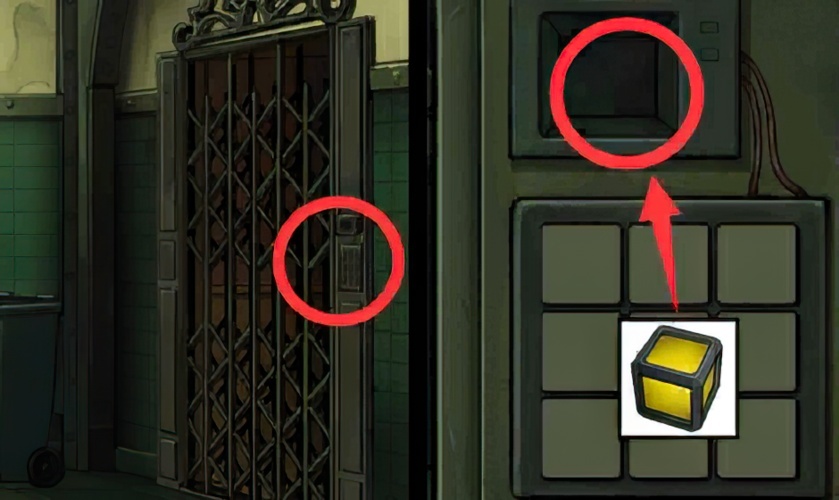
40. Look at the code lock on the fence door on the right side of the “corridor” and place the energy block in the upper groove.
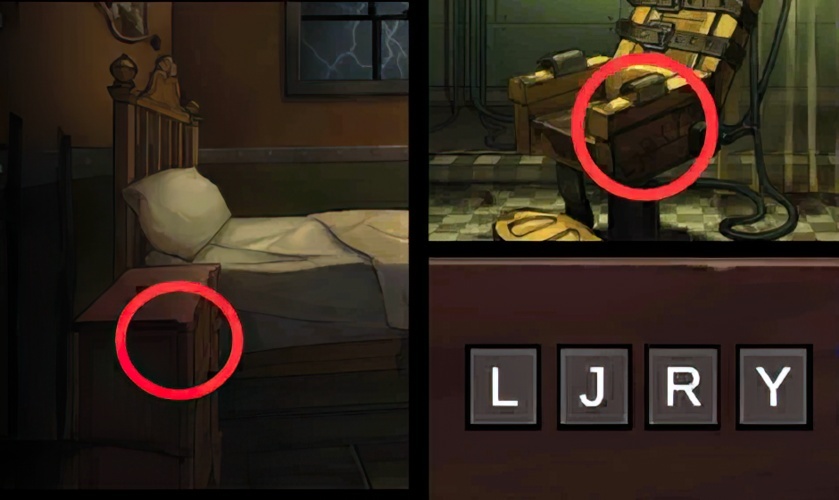
41. According to the letters on the electric chair of the “treatment room”, enter the password LJRY on the right drawer of the bedside table of the “ward”, and get the chisel in the drawer.
42. Check the upturned floor tiles on the floor of the “corridor”, pry loose the floor tiles with a chisel, and get the tie rods and metal decorations.
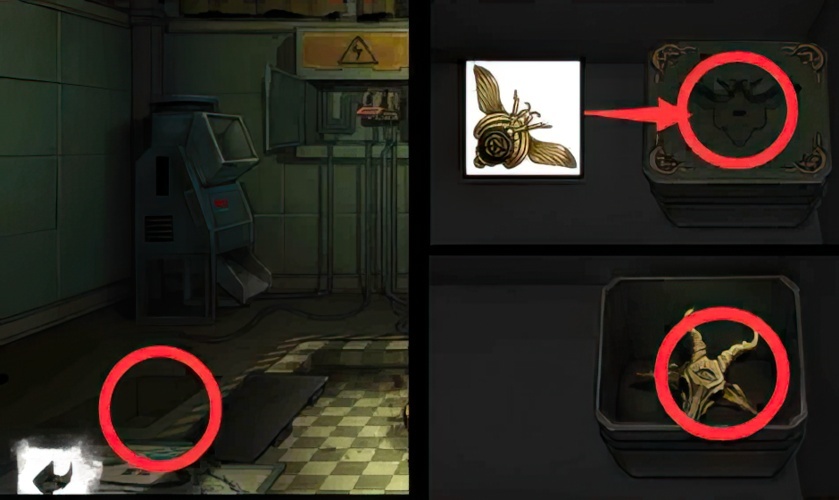
43. Put the metal decoration on the box in the cellar of the “treatment room” and pick up the sheep’s head decoration in the box.

44. Attach the lever to the machine on the left side of the “treatment room”.
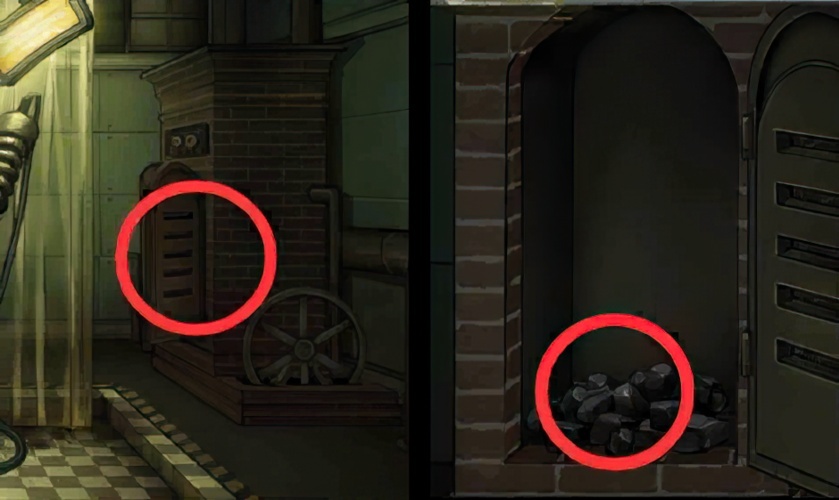
45. Pick up the coal in the boiler on the right side of the “treatment room”.
46. Push up the switch in the distribution box to start the power supply.

47. After opening the switch of the distribution box, pull down the control lever of the machine in the “treatment room” and put coal in, and pick up the coal ash from the machine’s discharge port.

48. Put the sheep’s head decoration on the cabinet under the sink of the “toilet” and get the brush in the cabinet.

49. Combine the soot and the brush into a soot-coated brush.

50. Use a brush moistened with coal ash on the code lock on the fence door on the right side of the “corridor”, press the fingerprint-sticked button, turn it into purple, and enter the elevator.

51. Look at the chairs in the “library” and pick up the tabs on the chairs.

52. Look at the table at the window of the “library”, put the tab into the groove of the table drawer, and open the drawer to get the picks inside.

53. Look at the notebook on the table in the “library”, open the notebook, and pick up the pieces of paper inside.

54. Look at the table on the left side of the “library” and pick up the card issued on the table.

55. Look at the iron box on the bookshelf on the right side of the “library”, use a hairpin to pry open the lock of the iron box, and get the pick inside.

56. Check the lock on the door of the “library” and put the 2 picks into the groove of the door lock.

57. According to the pattern on the paper, flip the pick on the door lock to open the door and enter the “laboratory” through the door.

58. Pick up and return to the “laboratory” the iron rod resting on the table.
59. Check the bed in the “laboratory”, pry up the corner of the bed with an iron rod, and get the grimace under the bed.

60. Check the blinds of the “Lab”, pull the rope on the right side to pull up the curtains, and pick up the grimace on the window sill.
61. Go back to the “library” and place 2 grimacing faces on the round box on the left table.

62. Look at the table on the left side of the “library” and pick the round block in the round box.

63. Return to the “laboratory” and put the round block on the door of the cabinet under the “laboratory”.
64. Return to the “laboratory”, complete the mechanism on the cabinet below, and pick up the metal fragments in the cabinet.
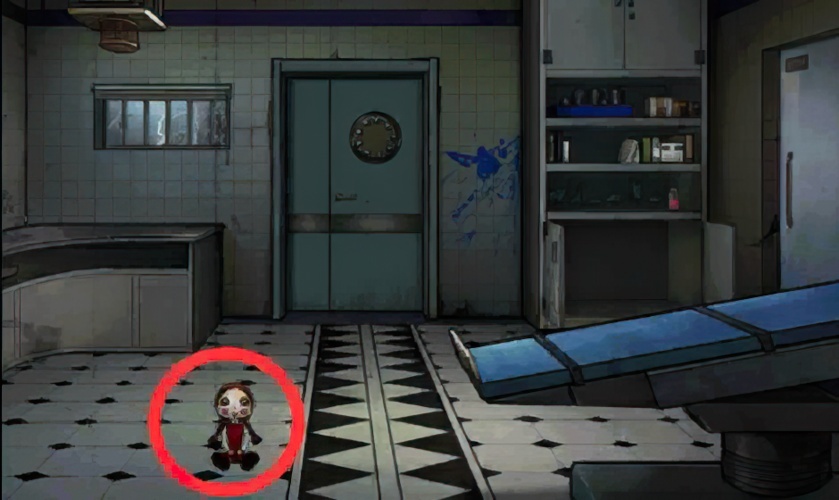
65. Return to the “laboratory” and pick up the puppets on the ground.
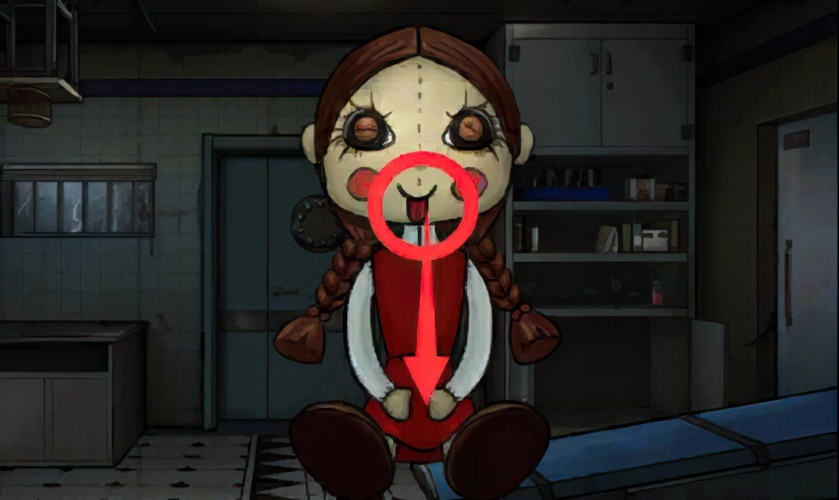
66. Check the puppet in the inventory and pull the tongue of the puppet to the end.

67. Return to the “Lab”. Invert the scene to the ceiling, break the lampshade on the ceiling with an iron rod, and pick up the saw bow and the iron box that lack the saw blade in the lampshade.

68. Go back to the “library”. Invert the scene to the ceiling, puncture the balloon on the ceiling, and get the magnet inside.

69. Go back to the “library”. Invert the scene to the ground, use a magnet to suck out the saw blade in the crack in the ground.

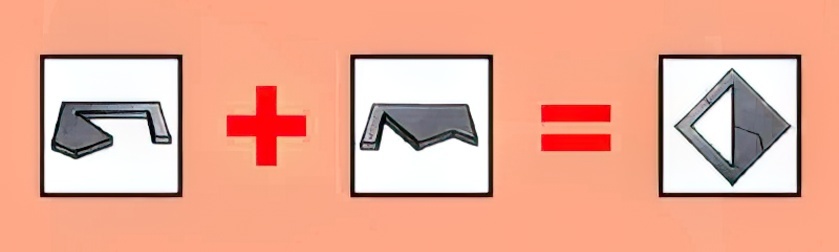
70. Combine the saw bow with the saw blade and the saw blade into a complete saw.

71. Return to the “Lab”. Invert the scene to the ceiling, check the wooden cage on the stool, use a saw to cut the wooden cage to get the metal fragments inside.
72. Combine 2 metal fragments into a complete metal block.

73. Check the iron box in the prop bar, put the metal block on the groove of the iron box, and get the pass inside.

74. Return to the “Lab”. Invert the scene to the ground, use the pass to the card reader on the right wall, and enter the “Pharmacy Room” through the open iron door.
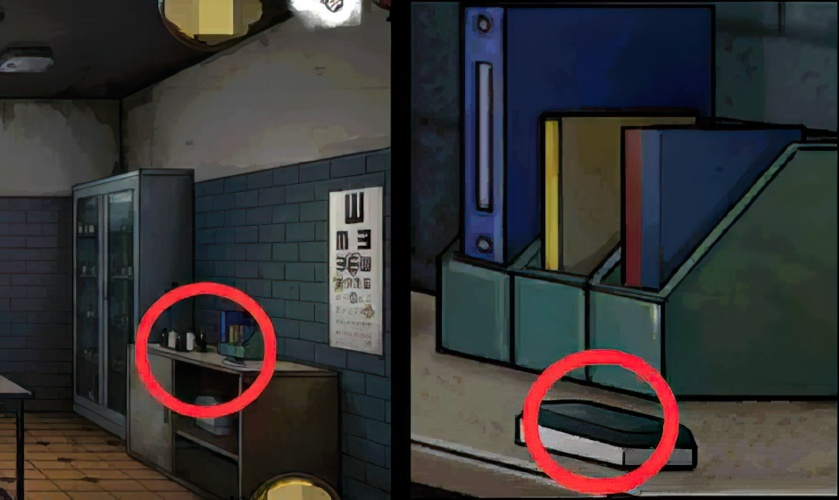
75. Return to the “pharmacy room”. Invert the scene to the ground, look at the table on the right, and pick up the blackboard eraser on the table.

76. Return to the “pharmacy room”, check the blackboard on the wall, and use the blackboard eraser to erase the graffiti on the blackboard.

77. Go back to the “pharmacy room” and check the eye chart on the wall on the right.

78. Go back to the “library”, reverse the scene to the ceiling, check the box on the ceiling, and rotate the pattern on the box to the corresponding position according to the pattern on the eye chart of the “pharmacy room”. Get the potassium chlorate in the box.

79. Go back to the “pharmacy room”. Invert the scene to the ground, look at the table on the right, and pick up the book on the table.

80. Go back to the “Lab”. Invert the scene to the ground, check the shelf on the cabinet on the right, and pick up the jar on the shelf.

81. Go back to the “Library”, look at the bookshelf on the left, and swap the positions of the books on the top bookshelf, so that the lines on the spine connect into a complete graphic.

82. Return to the “library”, look at the bookshelf on the left, and swap the positions of the statues on the bookshelf according to the pattern on the shelf back to the “lab”.

83. Go back to the “library”, look at the bookshelf on the left, and put the book in the bottom groove of the bookshelf.
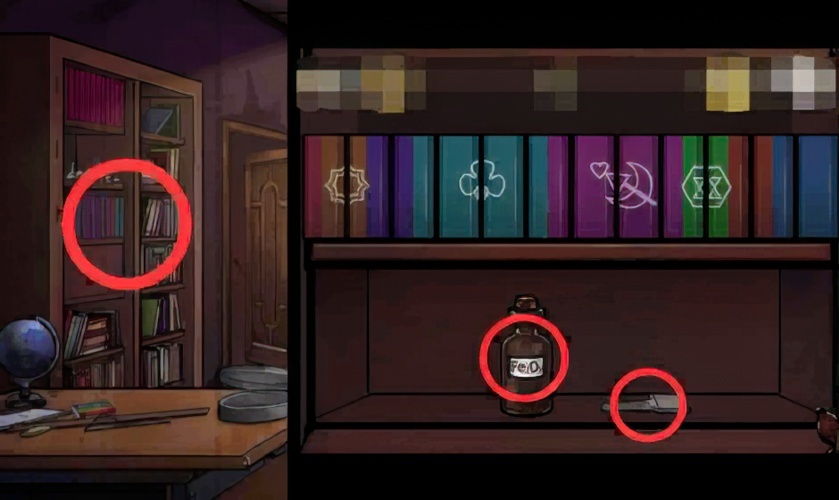
84. Return to the “library” and swap the positions of the bottom books on the bookshelf so that all two adjacent books have the same color and form a complete pattern. Pick up the iron oxide and the key in the storage compartment.
85. Return to the “Lab”. Invert the scene to the ceiling, use the key to open the door of the cabinet below, and pick up the pestle and aluminum powder in the cabinet.

86. Go back to the “pharmacy room”. Invert the scene to the ground, check the paper on the table.
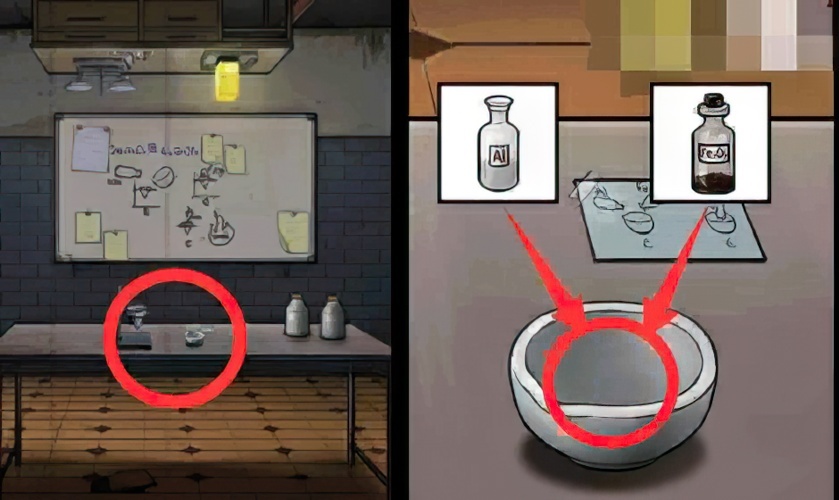
87. Return to the “pharmacy room”. Invert the scene to the ground, pour the aluminum powder and iron oxide into the mortar according to the pattern of the paper on the table.

88. Return to the “pharmacy room”. Invert the scene to the ground, according to the pattern of the paper on the table, smash the medicine in the mortar with a pestle, and then pick up the thermite.

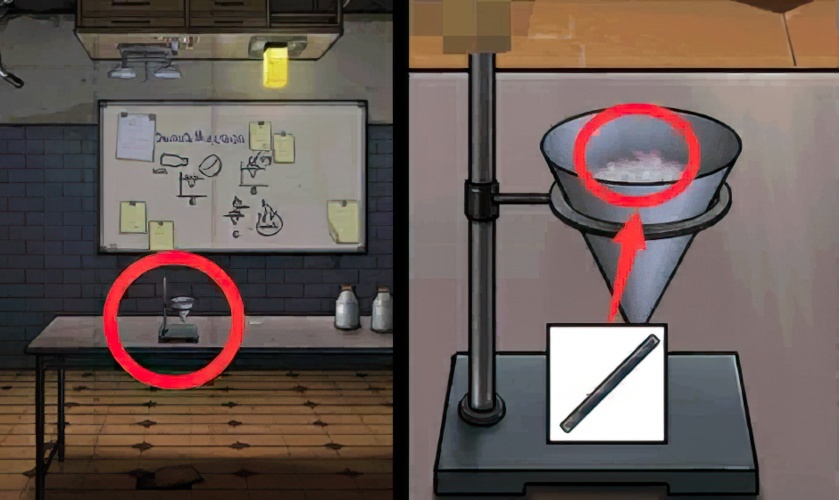
89. Return to the “pharmacy room”. Invert the scene to the ground, according to the pattern on the blackboard, pour the thermite and potassium chlorate into the funnel on the table.

90. Go back to the “pharmacy room”. Invert the scene to the ceiling, check the wheelchair on the ceiling, and pick up the matches and gauze on the wheelchair.
91. Return to the “pharmacy room”. Invert the scene to the ceiling, check the balance on the ceiling table, and pick up the magnesium bar next to the balance.
92. Return to the “pharmacy room”. Invert the scene to the ground, according to the pattern on the blackboard, insert the magnesium bar into the funnel, and pick up the thermite reaction device.
93. Return to the “Lab”. Invert the scene to the ground, place the thermite reactor on the door handle of the green iron door.
94. Return to the “Lab”. Invert the scene to the ground, use a match to light the thermite reaction device on the green iron door.

95. Return to the “laboratory”, open the green iron gate, and enter the “cemetery” through the iron gate.

96. Enter the “cemetery” to disperse the illusion fragments and restore reality.
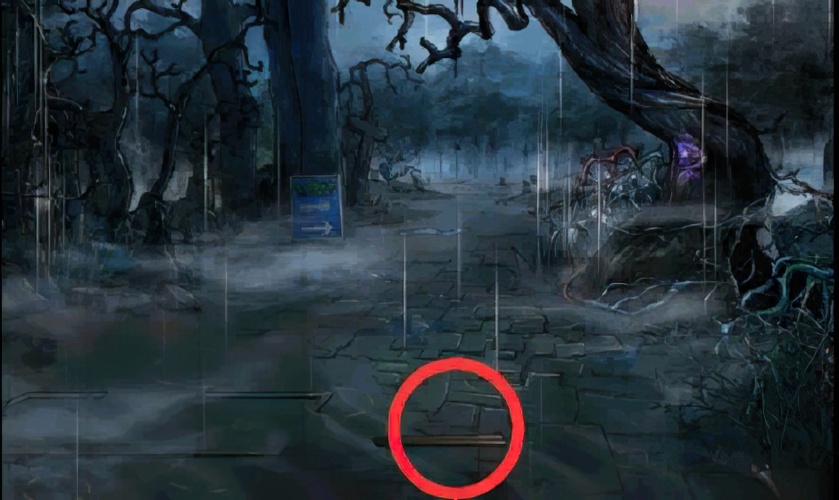
97. Return to the “cemetery” and pick up the sticks on the ground.

98. Return to the “cemetery”, look at the thorns on the right, use a wooden stick to remove the thorns, and get the gasoline barrel inside.
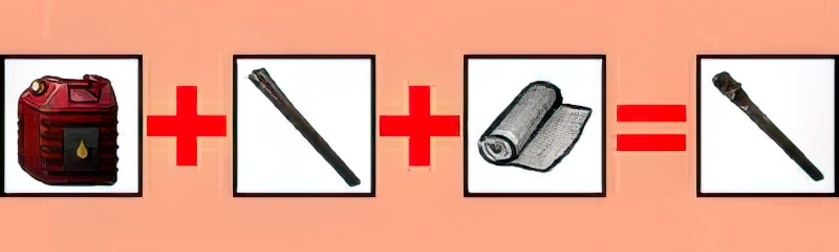
99. Combine the gasoline barrel, wooden stick and gauze into an unlit torch.
100. Return to the “Lab”. Invert the scene to the ceiling, place the torch on the spark in the lampshade and light the torch.
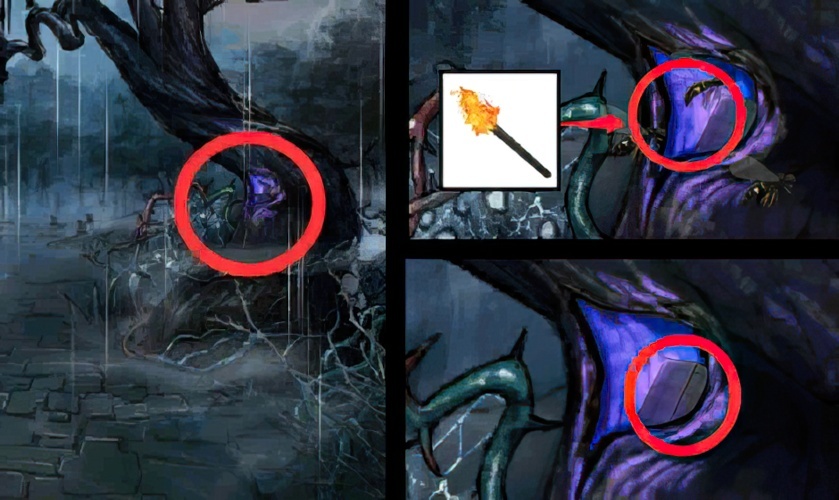
101. Return to the “cemetery”, look at the tree hole on the right, use a torch to destroy the wasps in the tree hole, and pick up the pencil case in the tree hole.
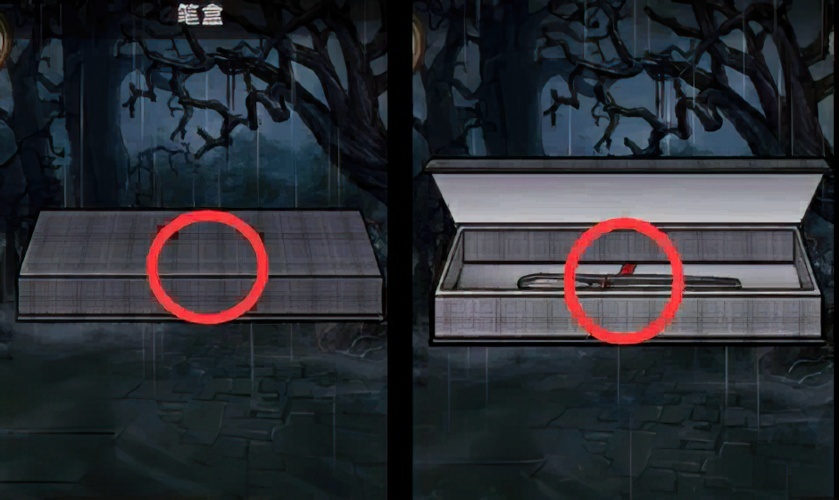
102. Check the pen box in the inventory, open the pen box, and pick up the pen with no ink in it.
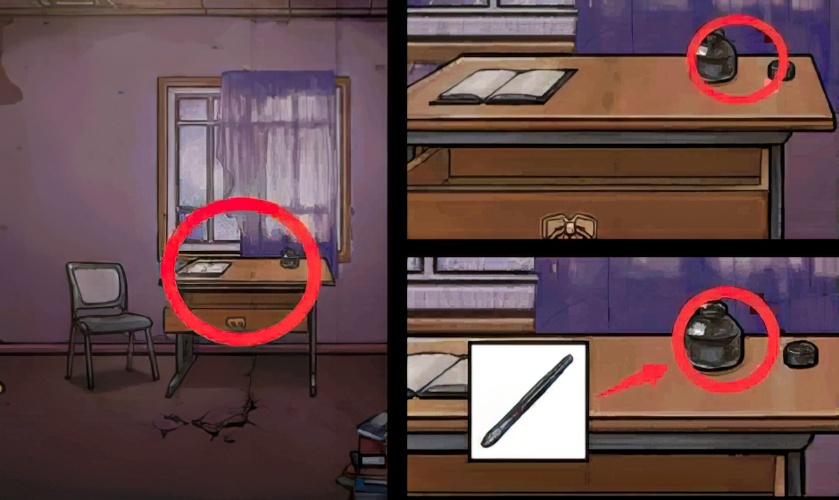
103. Go back to the “library”. Invert the scene to the ground, open the lid of the ink bottle on the table by the window, and draw the ink with a pen without ink.
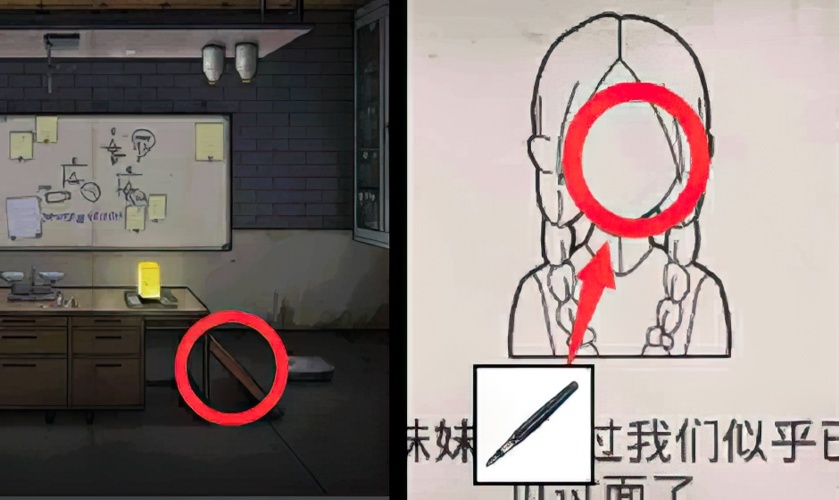
104. Go back to the “pharmacy room”. Invert the scene to the ceiling, check the drawing board on the ceiling, and color the little girl with a pen filled with ink.

105. Go back to the “pharmacy room”. Invert the scene to the ceiling, check the drawing board on the ceiling, and color the little girl with a pen filled with ink.

106. Go back to the “pharmacy room”. Invert the scene to the ceiling, check the drawing board on the ceiling, and color the man with a pen filled with ink.

107. Go back to the “pharmacy room”. Invert the scene to the ceiling, check the drawing board on the ceiling, color the disc with a pen filled with ink, and pick up the magnetic needle that appears.

108. Go back to the “cemetery”, look at the tombstone on the left, and pick up the mask placed on the tombstone.

109. Go back to the “Library”. Invert the scene to the ceiling, check the hidden grid on the ceiling, place the mask on the groove of the hidden grid, and get the stones in the hidden grid.
110. Return to the “pharmacy room”. Invert the scene to the ceiling, put the objects on the ceiling table on the balance to keep the balance in balance, and get the stones in the storage compartment of the balance.
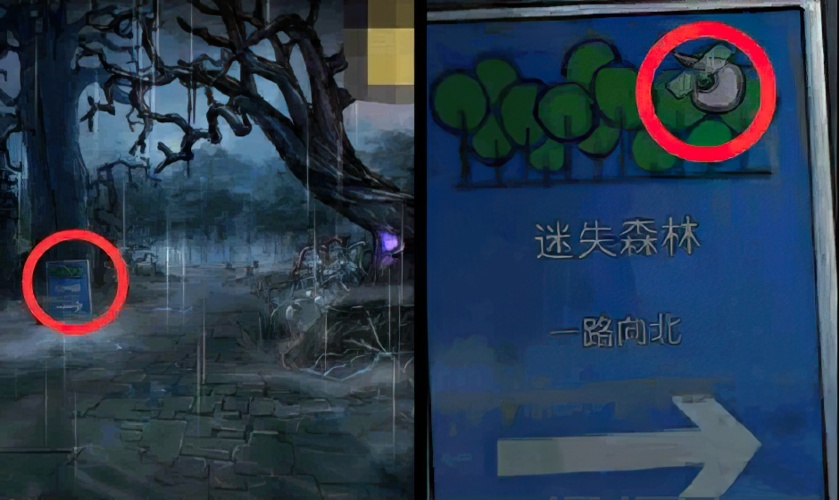
111. Go back to the “cemetery”, check the sign at the intersection, and get the stone on the sign.

112. Return to the “cemetery” and put 3 stones into the groove of the tombstone.
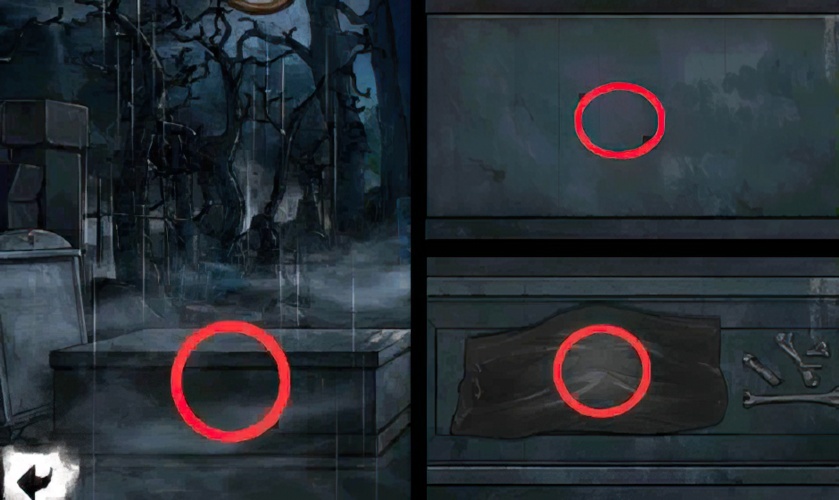
113. Return to the “cemetery”, push open the lid of the coffin, and lift the plastic sheet inside the coffin.

114. Return to the “cemetery” and look at the head of the doll in the coffin.

115. Return to the “cemetery”, press down all the teeth in the mouth of the doll’s head, and get the screwdriver that spit out from the mouth.

116. Return to the “Lab”. Invert the scene to the ceiling, use a screwdriver to open the ventilation duct on the left side of the wall, and pick up the compass that lacks a magnetic needle in the duct.

117. The compass that lacks the magnetic needle and the magnetic needle are combined into a complete compass.
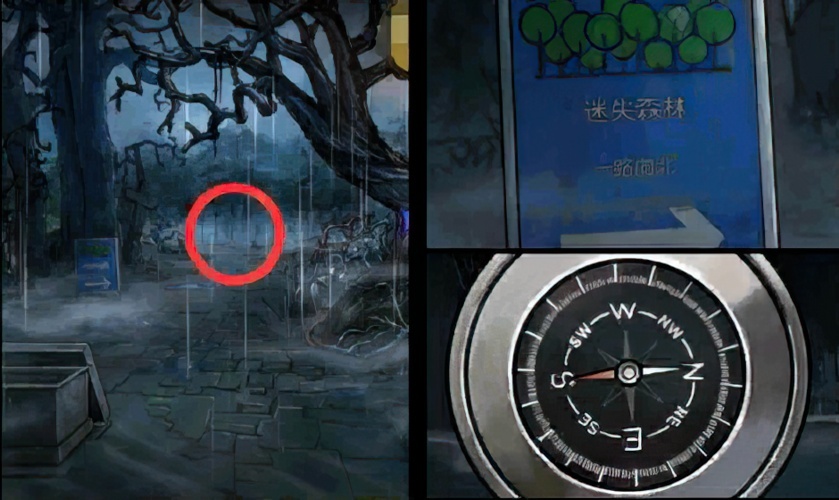
118. Return to the “cemetery”, enter the fork in the forest, look at the compass in the inventory according to the text on the sign, and enter the direction pointed by the red end of the magnetic needle at each fork.

119. Return to “Outside the Wooden House”, open the red door of the “Wooden House” and enter the “Wooden House”.

120. Return to the “Wooden House”, look at the flower pot on the right, and pick up the thawing agent on the flower pot.

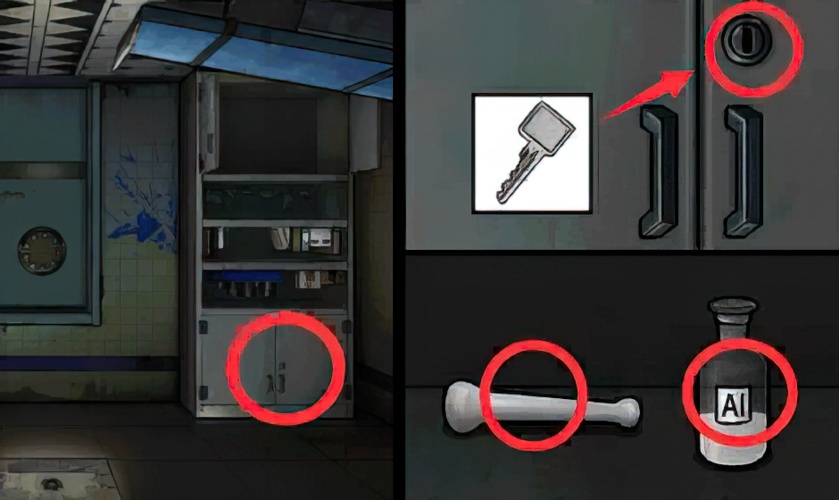
121. Return to the “pharmacy room”, look at the cabinet on the left, melt the ice on the cabinet door with thawing agent, open the cabinet and get the three-necked flask inside.
122. Return to the “pharmacy room”. Invert the scene to the ceiling, check the can on the ceiling, pry open the can with a screwdriver, and get the key inside.

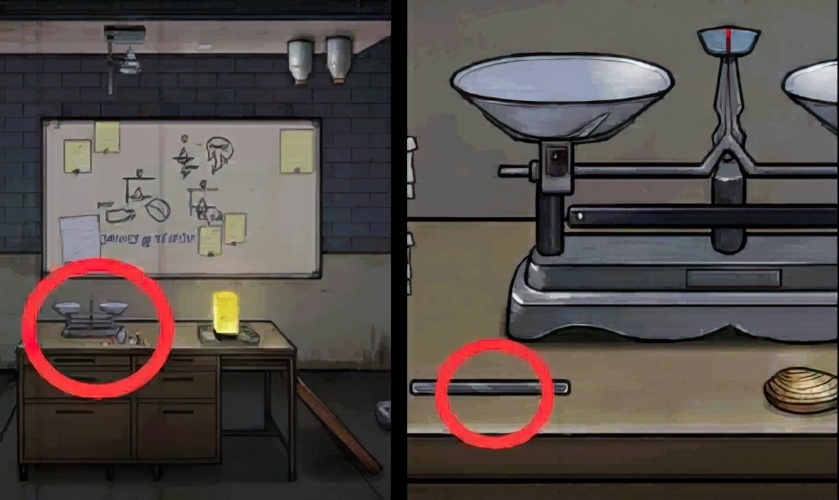
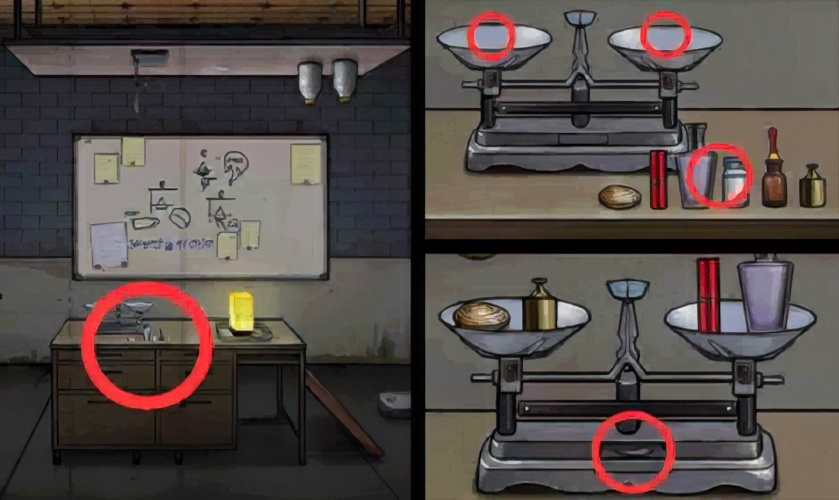
123. Return to the “Wooden House”, use the key to open the cabinet on the left, and get the conical flask in the cabinet.
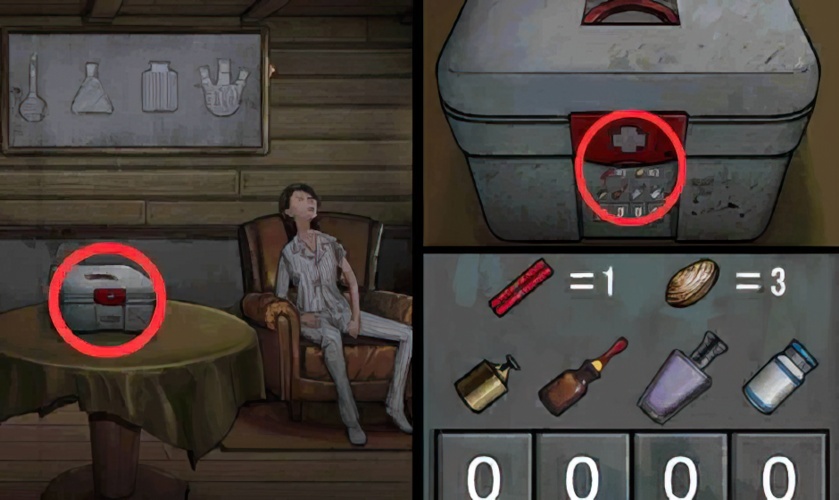
124. Return to the “Wooden House”, check the first aid kit on the table, and check the pattern on the first aid kit lock.

125. According to the pattern on the “Wooden House” first aid box, weigh the weight of each item on the scale in the “Pharmacy Room”, enter 6485 on the first aid box lock, and get the volumetric flask in the box.

126. Go back to the “Wooden House” and look at the paintings on the walls.
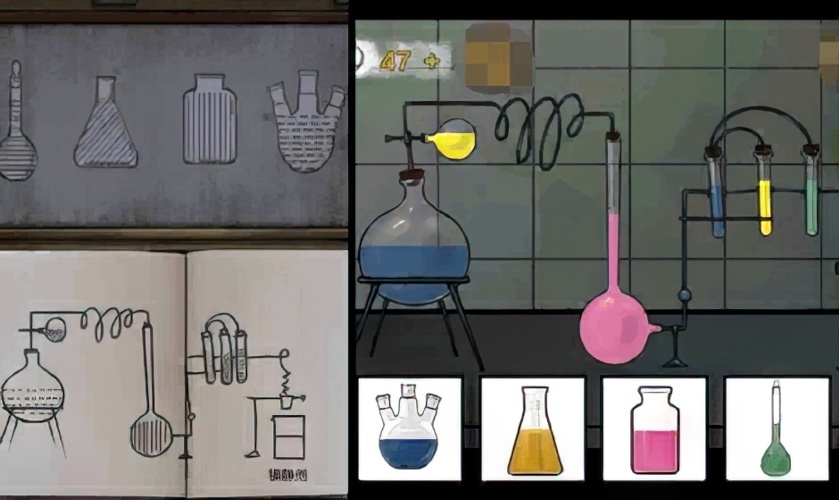
127. Go back to the “Lab” Invert the scene to the ground, pour the 4 colors of liquid into the corresponding equipment according to the paintings of the “Wooden House” and the patterns in the “Library” book to obtain a tranquilizer.
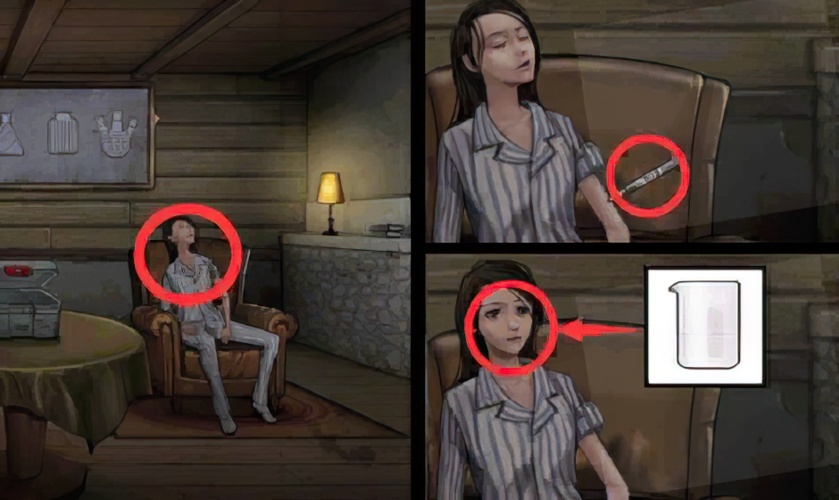
128. Return to the “wood house”, unplug the syringe from the patient’s arm, give the patient a sedative, and have a conversation with him.


