Hospital Escape: Chapter 4 – This time in the game you will study the patient: Operations Manager. He has complete self-awareness, but behaves strangely. Recently, he has become increasingly pessimistic and misanthropic, and is extremely emotionally unstable.
Hospital Escape: Chapter 4 – Walkthrough
Below you can watch the complete walkthrough of the Chapter 4, in the game Hospital Escape.

1. Check the barbecue stall and pick up the copper block.
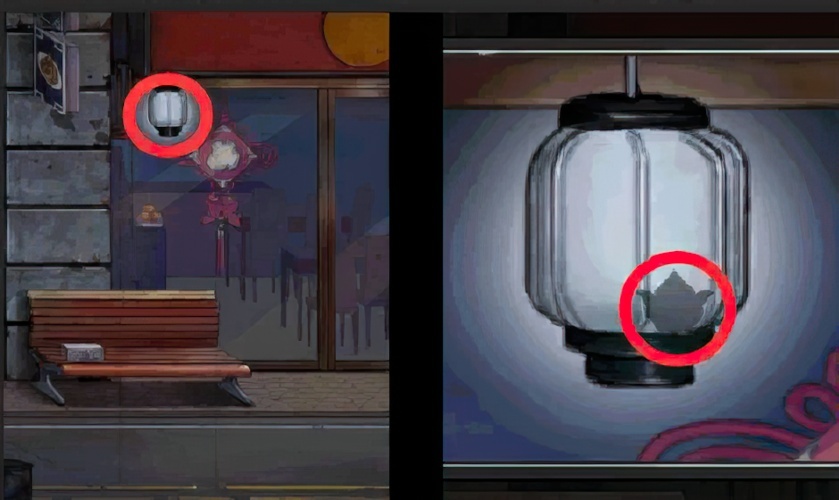
2. To view the white lantern, click on the white lantern to obtain the copper block.
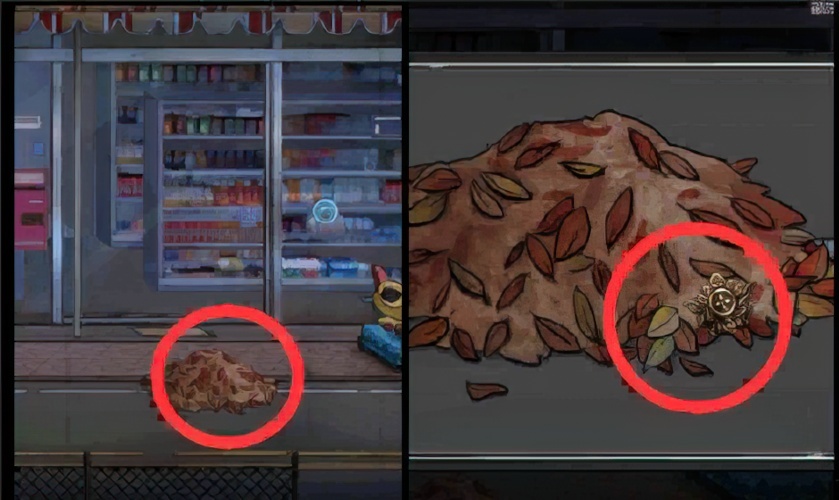
3. Check the rubbish pile, remove the rubbish and pick up the copper block.
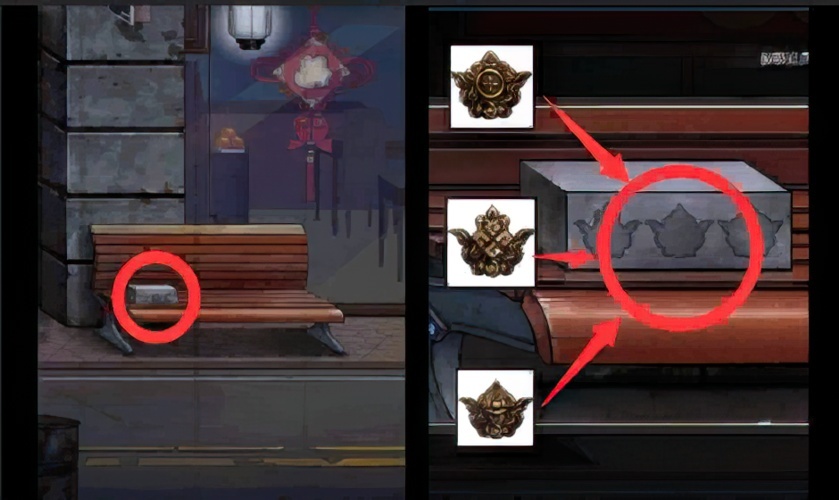
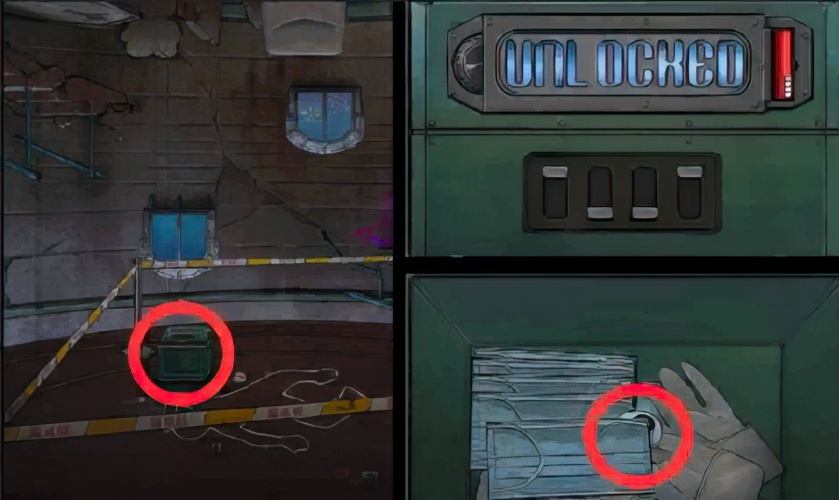
4. Look at the box on the bench, three copper blocks to the groove, and pick up the door card inside the box.
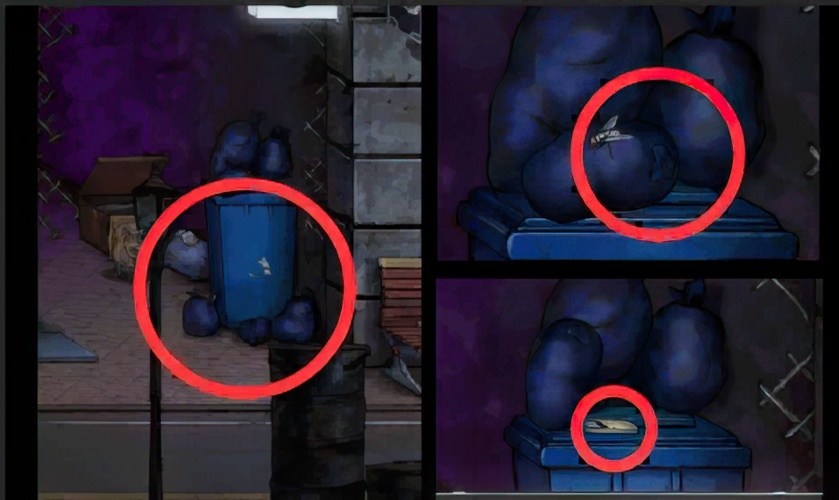
5. Go back to the “street”, check the trash can, open the trash to pick up the remote control of the air conditioner.
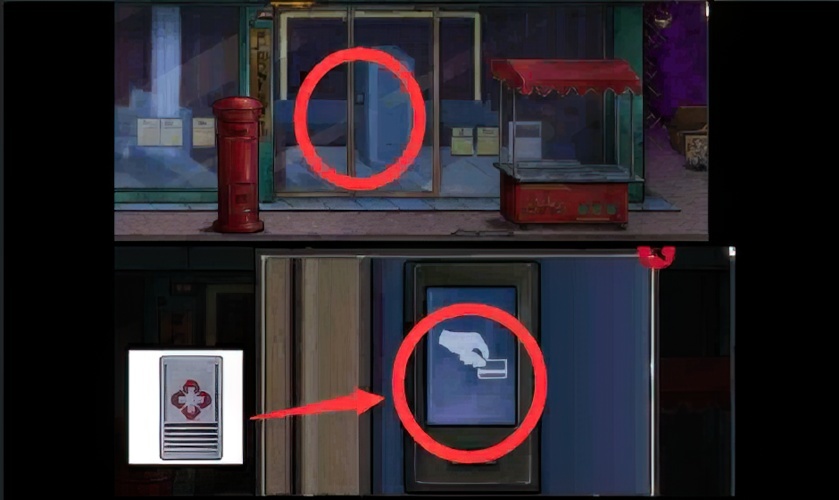
6. Check the door to return to the “Pharmacy Store”, use the key card to unlock the door, and enter the “Pharmacy Store”.
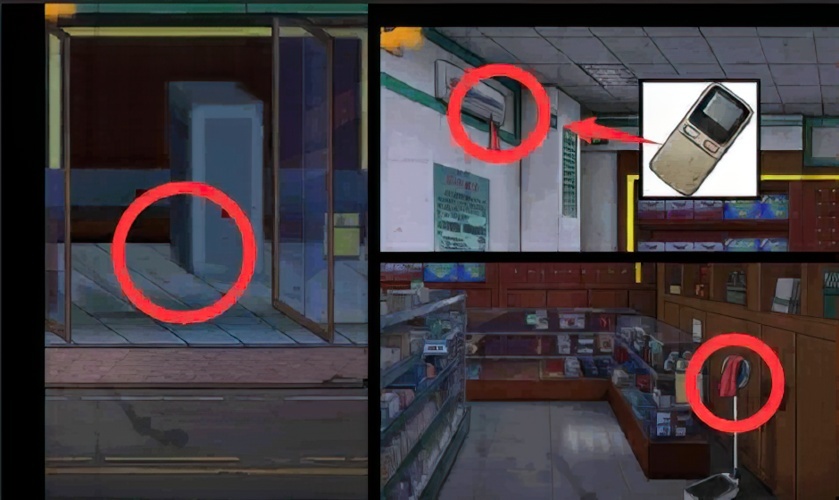
7. Enter the “pharmacy”, turn on the air conditioner by the remote control of the air conditioner, and pick up the red cloth reminder.

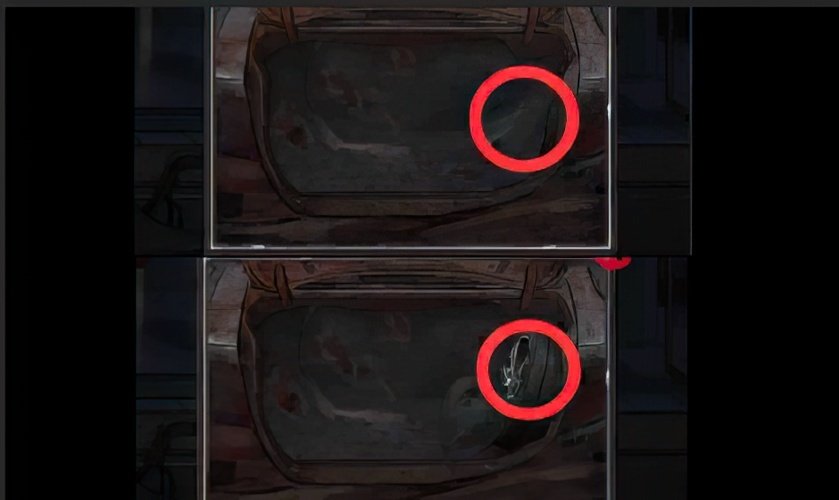
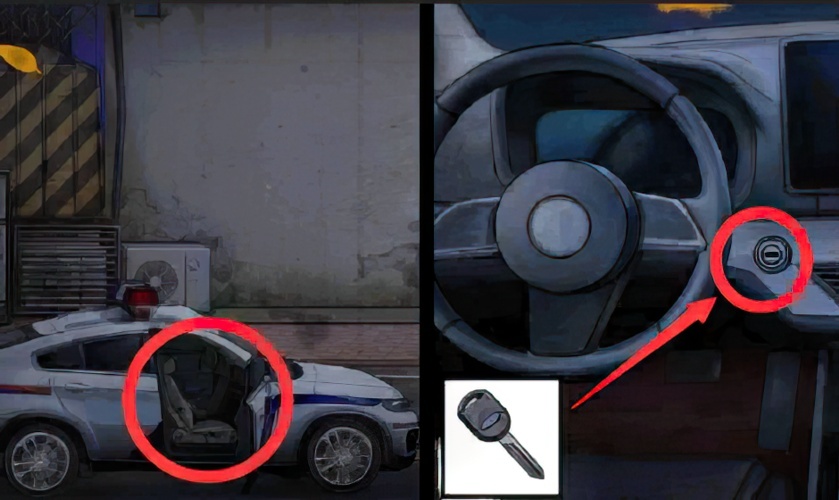
8. Go back to the “pharmacy”, check the car, and open the door.
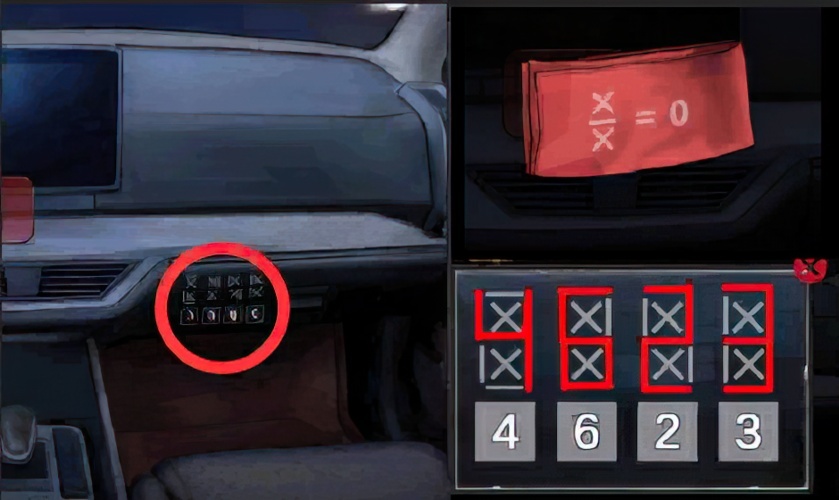
9. Return to the “street”, enter the car, according to the number pattern on the red cloth, enter the password 4623, unlock the co-driver’s trunk, and get the drum.
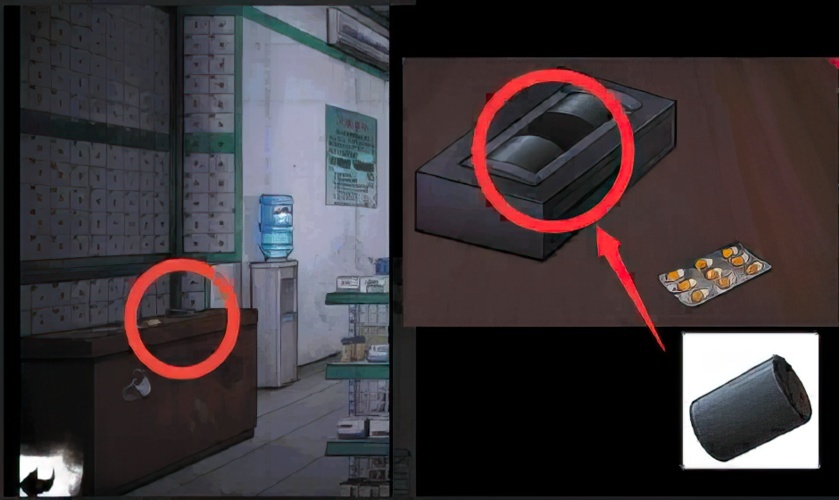
10. Return to the “pharmacy”, look at the counter on the left, and insert the roller into the vacancy of the puzzle-solving device.

11. Go back to the “pharmacy”, check the counter on the left, complete the mini game, and get the key.

12. Go back to the “street”, check the door of the “restaurant”, open the lock of the “restaurant” with the key, and enter the “restaurant”.
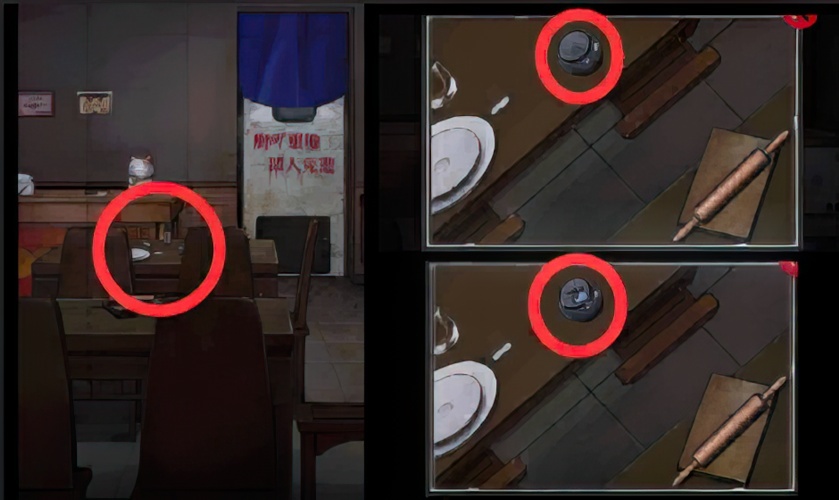
13. Return to the “restaurant”, check the desktop, smash the can, and pick up the knob.

14. Return to the “street” and pick up the red transparent card in the car.
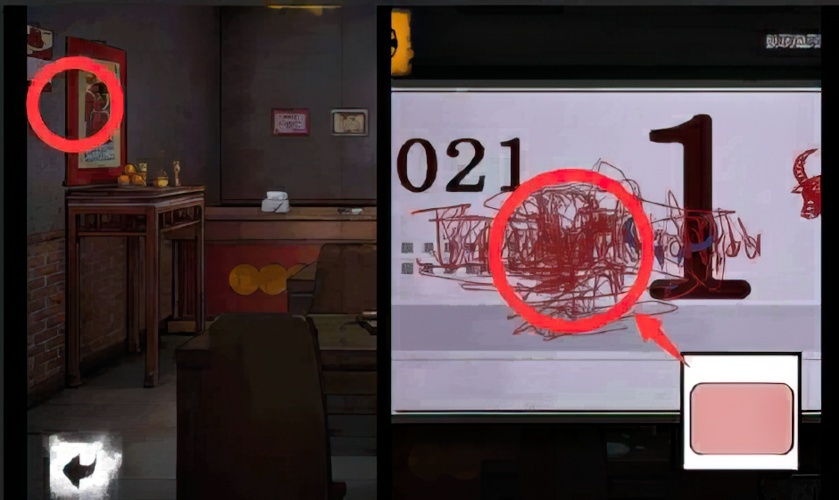
15. Go back to the “restaurant”, look at the wall on the left, cover the calendar with a red transparent card, and get the password.
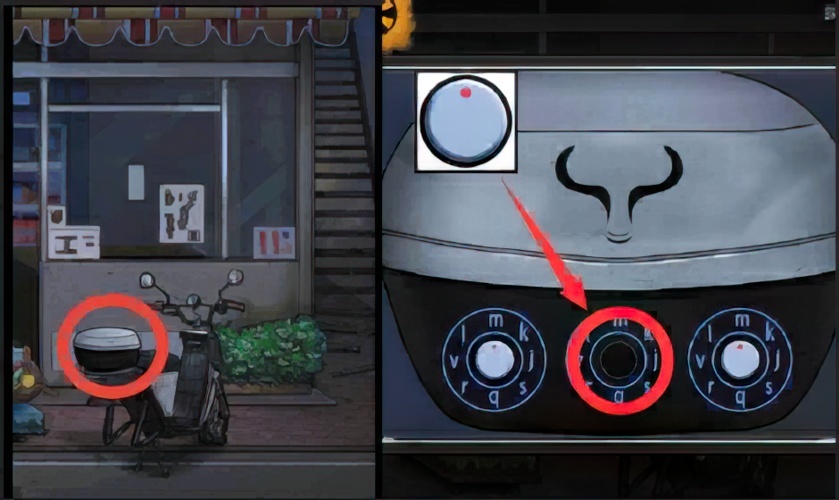
16. Return to “street”, check the rear box of the battery car, and put the knob to the vacant position.
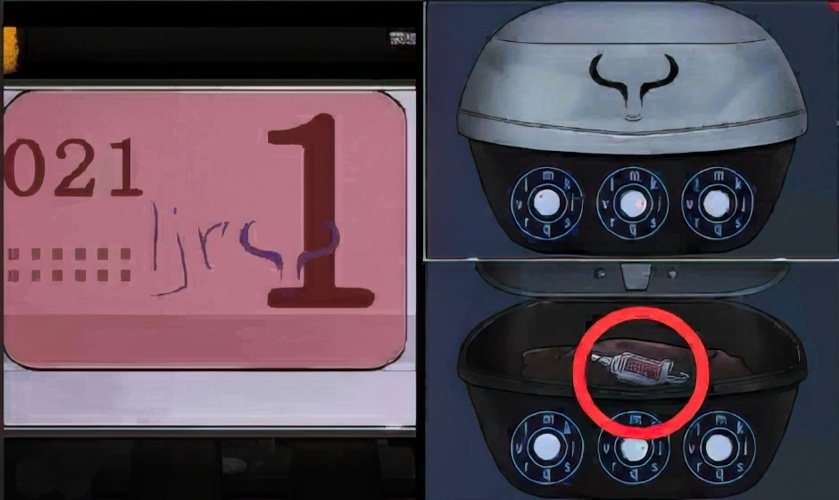
17. Go back to “Street”, and according to the password on the calendar, turn the knob to ljr to obtain the syringe inlay in the back box.
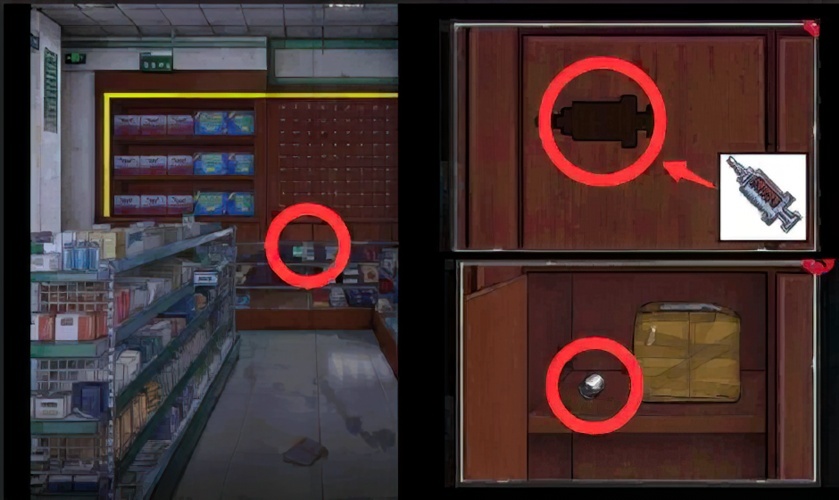
18. Go back to the “pharmacy”, check the cabinet of the “pharmacy”, insert the syringe inlay into the cabinet, and pick up the sleeve.
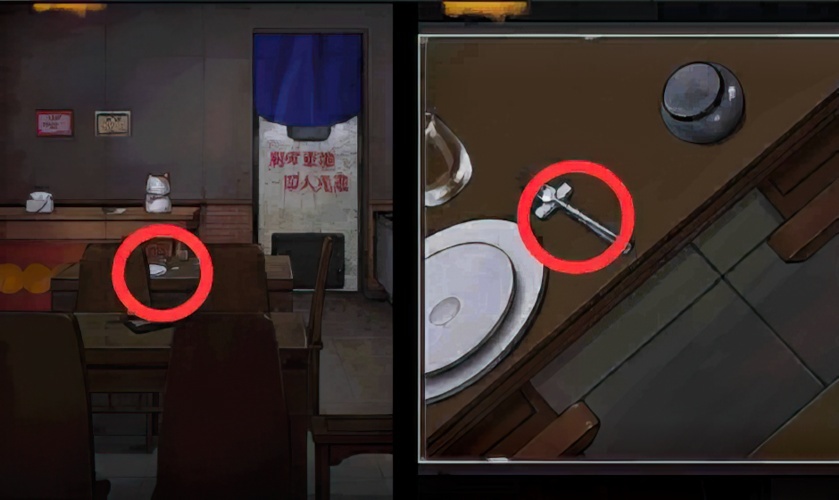
19. Go back to the “restaurant”, check the desktop, and pick up the fork.

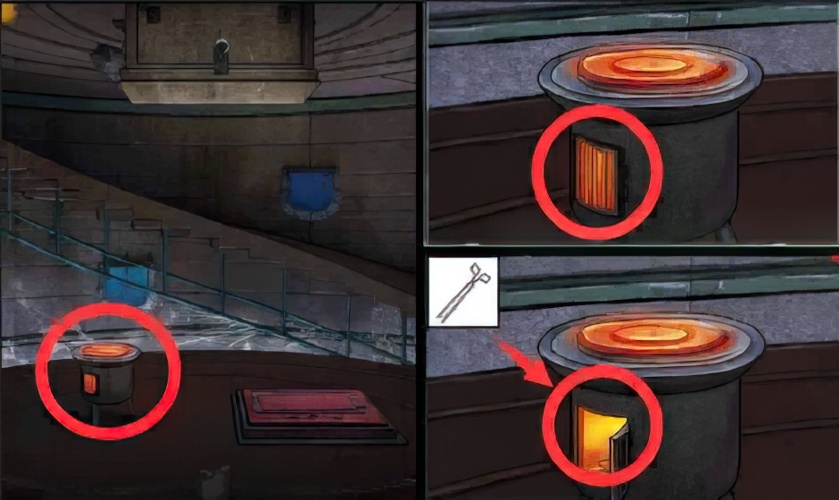
20. Return to the “pharmacy”, use a fork to open the package, and pick up the charcoal in the package.
21. Go back to the “pharmacy”, check the medicine cabinet, remove the box in front, open the box inside, and pick up the cuff.
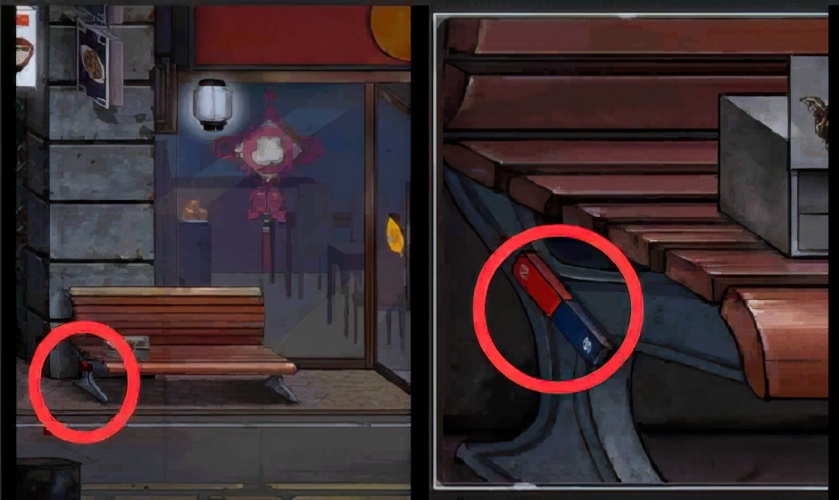
22. Go back to the “street”, look at the bench, and pick up the tiles on the side of the bench.
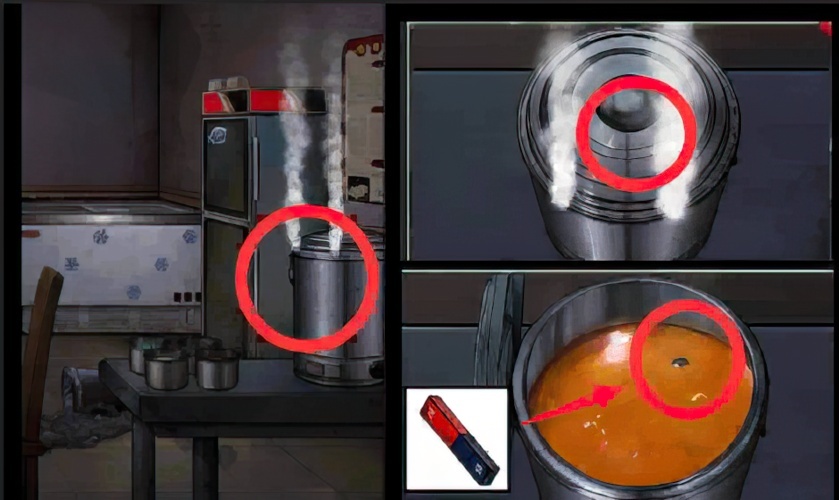
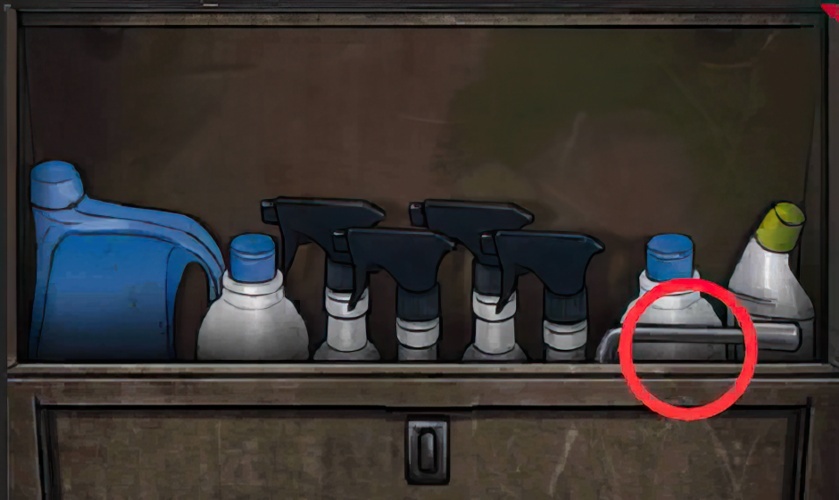
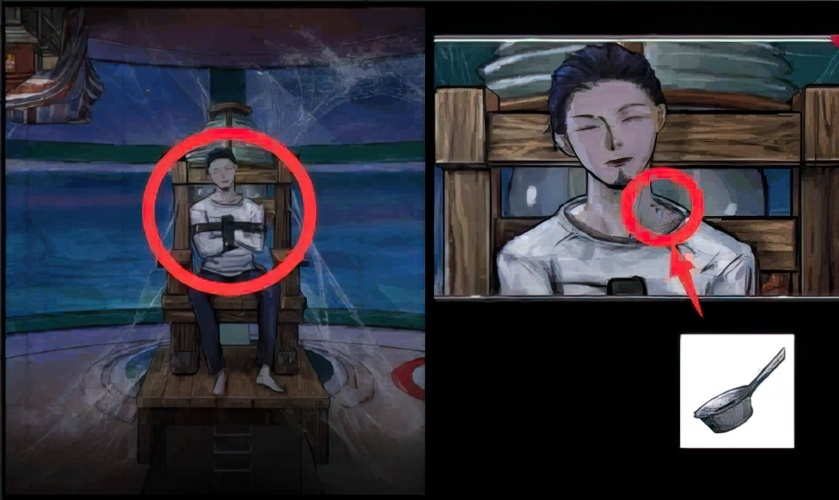
23. Go back to the “restaurant”, check the boiling pot, open the pot and use a magnet to get a spoon.
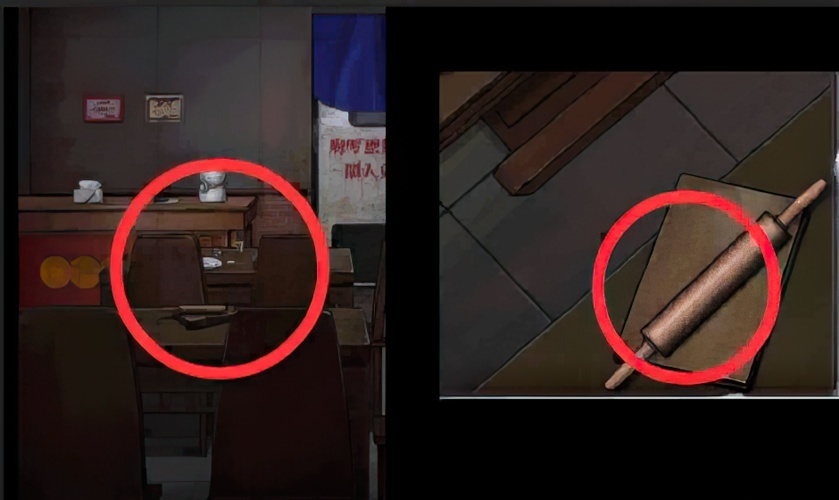
24. Go back to the “restaurant”, check the desktop, and pick up the rolling pin.

25. Combine the rolling pin, the cuff and the soup spoon into a rolling pin tied with a spoon.
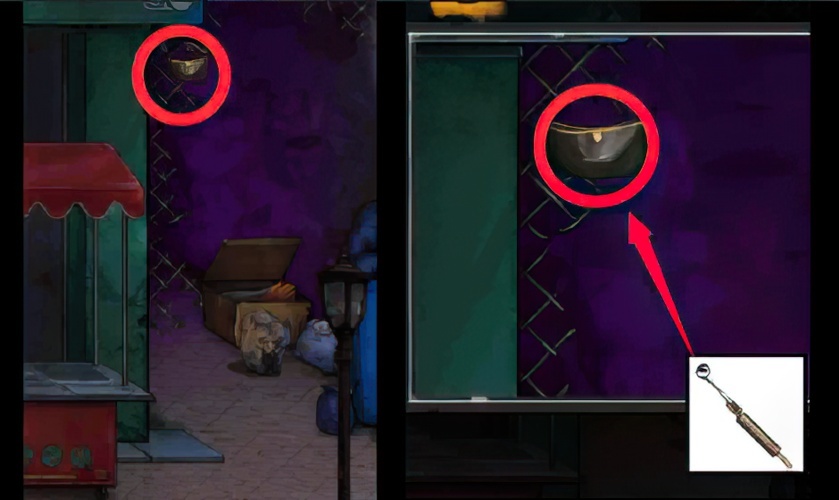
26. Return to the “street”, check the barbed wire fence of the bad road, and use a rolling pin with a spoon to hook the bag closed on the barbed wire fence to obtain the bag.

27. Go back to the “restaurant”, look at the altar on the left, and pick up the candles on the altar.

28. Return to the “street”, check the bag, open the zipper, and after the zipper is stuck, wax the zipper with a candle, open the bag and pick up the Lucky Cat arm and slider 1 in the bag.
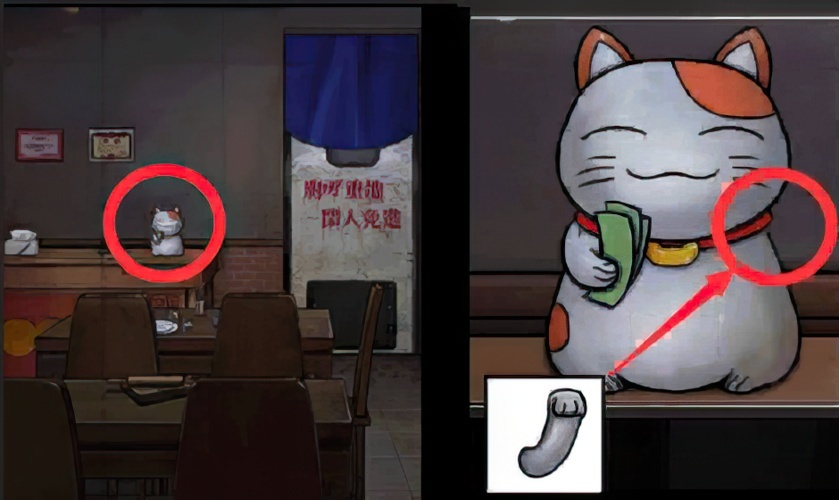
29. Go back to the “restaurant”, check the lucky cat, and install the lucky cat arm on the lucky cat.

30. Return to the “restaurant”, shake the hand of the lucky cat, open the mechanism, and pick up the capsule model and lighter.

31. Go back to the “pharmacy”, look at the counter on the left, and pick up the medicine board.

32. Return to the “pharmacy”, check the cabinet on the right, and place the capsule model at the decryption agency.
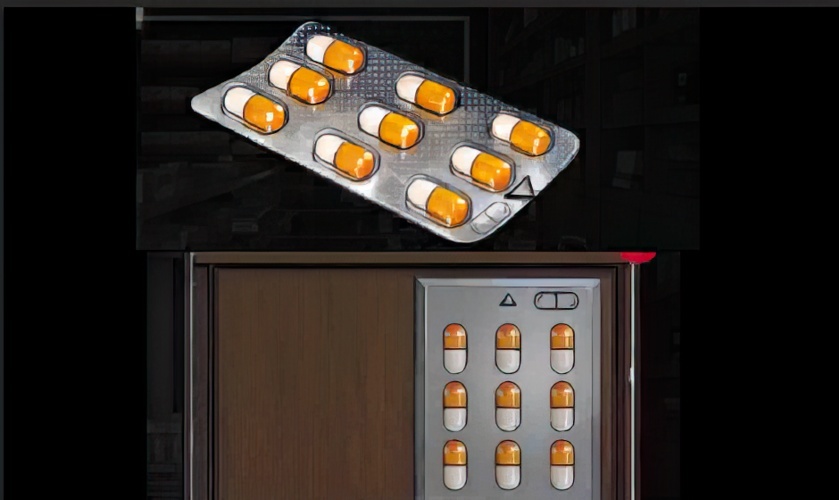
33. Return to the “pharmacy”, and according to the pattern of the medicine board and the orientation of the capsule, open the lock of the cabinet on the right side of the “pharmacy” and get the alcohol in the cabinet.

34. Go back to “Street”, check the trash can, and place slider 1 in the vacancy.

35. Unlock the puzzle-solving mechanism in the trash can and pick up the bamboo sticks in the box.

36. Enter the “restaurant”, check the freezer, open the freezer door, and pick up raw ingredients.
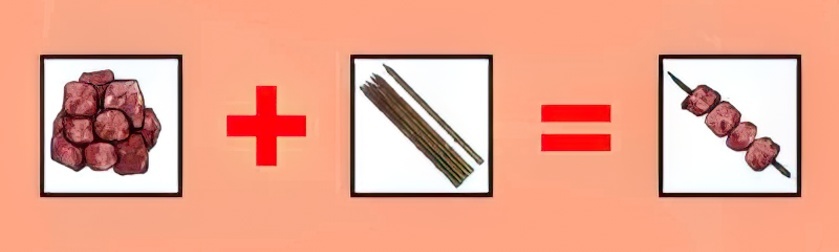
37. Combine raw ingredients and bamboo skewers into raw meat skewers.
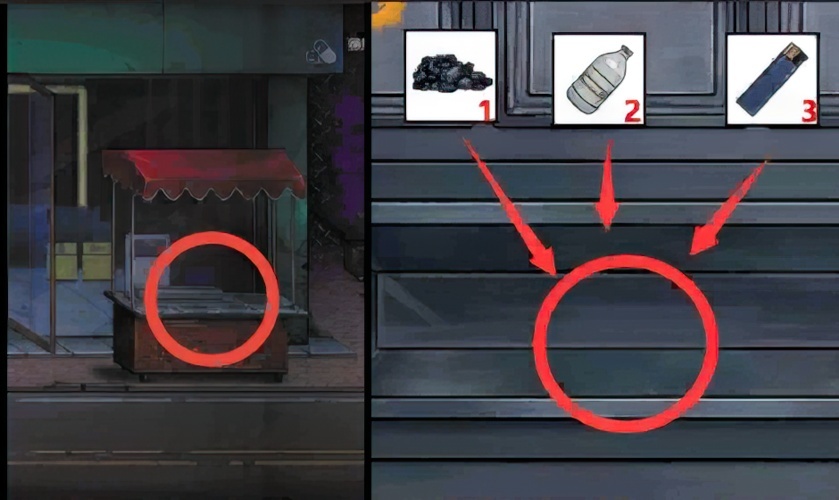
38. Go back to the “street” and check the barbecue stall. First put charcoal in, then pour alcohol, and use a lighter to make a fire.

39. Return to the “street”, check the barbecue stalls, put raw meat skewers, start a barbecue mini game, and get cooked meat skewers after completion.

40. Return to the “street”, hand the cooked meat skewers to the tramp, and get the map.

41. Check the pattern in the upper left corner of the map, return to the “street”, check the “convenience store” door, unlock the “convenience store” door according to the pattern sequence on the map, and enter the “convenience store”.

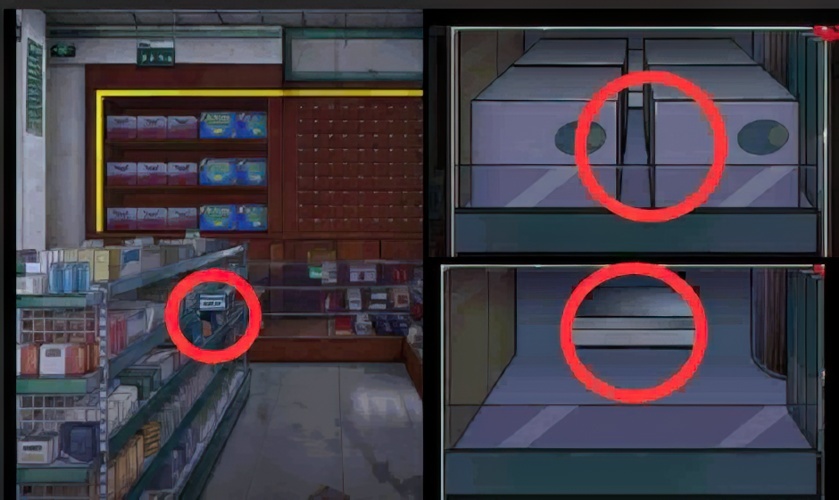
42. Return to the “convenience store”, look at the freezer at the back, and pick up the crowbar.

43. Return to the “street”, check the abandoned cars, pry open the trunk with a crowbar, and pick up the jack handle and arm.
44. Return to the “street”, open the trunk mat of the abandoned car, and pick up the spare tire.

45. Enter the “convenience store”, check the shelves, and remove the cover in front of the shelves.

46. Return to the “convenience store”, check the shelves, check the puzzle solving device, complete the decryption mini game, and get the chisel and inlay in the box.
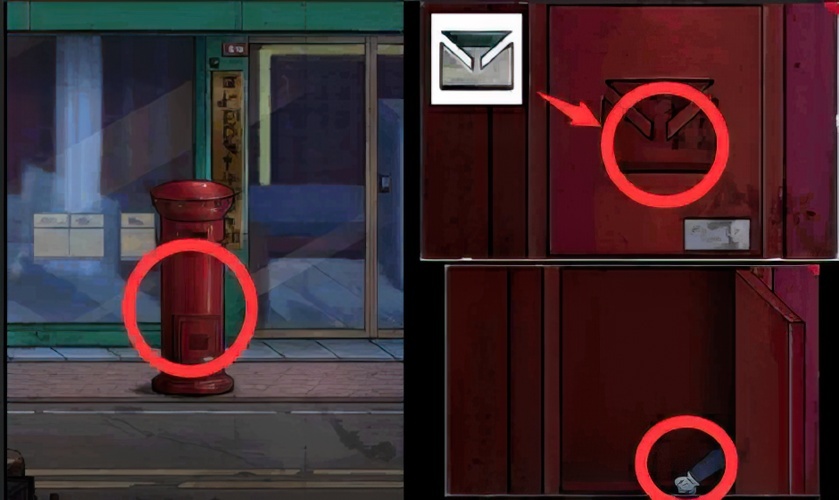
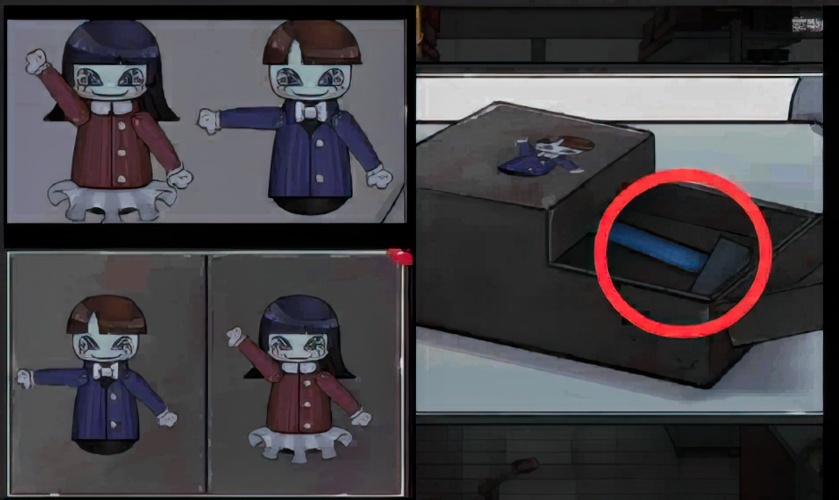
47. Go back to the “street”, check the post box, put the inlay into the groove, and pick up the arm.

48. Go back to the “street”, check the trunk, and get the doll’s pattern.

49. Return to the “convenience store”, check the box on the counter, and put the two prop hands into the vacancies.
50. Return to the “convenience store”, swing the doll’s hand to the same position according to the direction of the hand in the doll pattern on the tree trunk, open the box, and pick up the hammer.

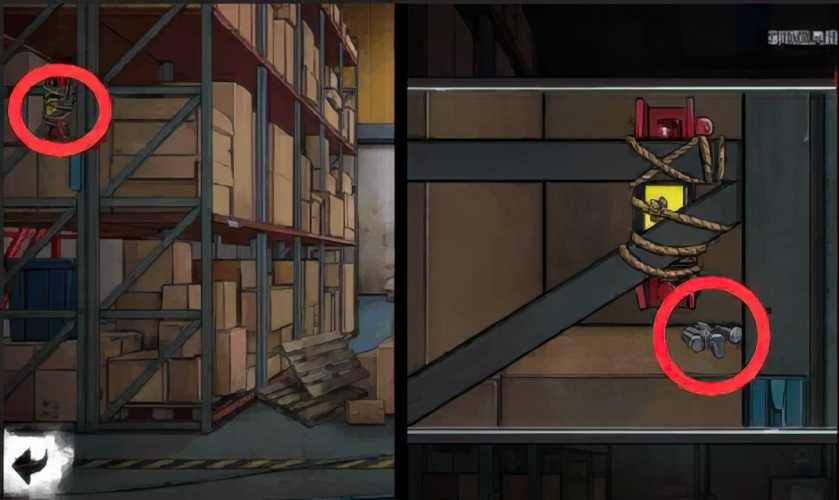
51. Return to the “warehouse”, check the warehouse door, use a chisel to jam the lock, use a hammer to smash the lock, and enter the “warehouse”.
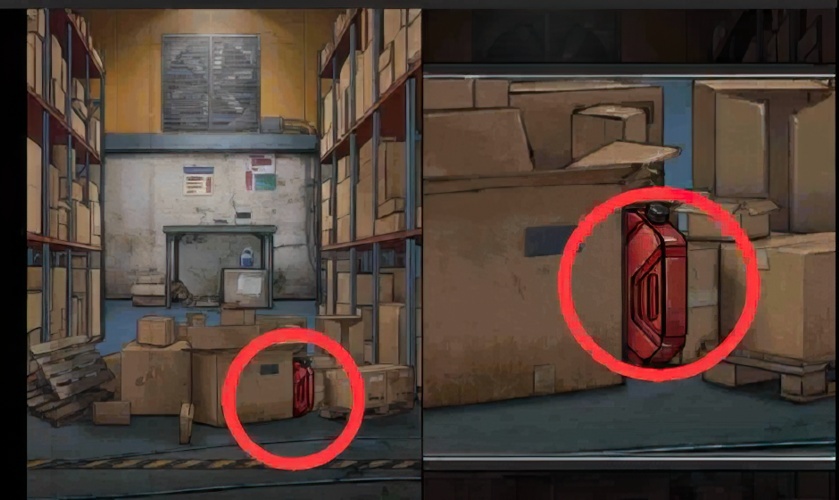
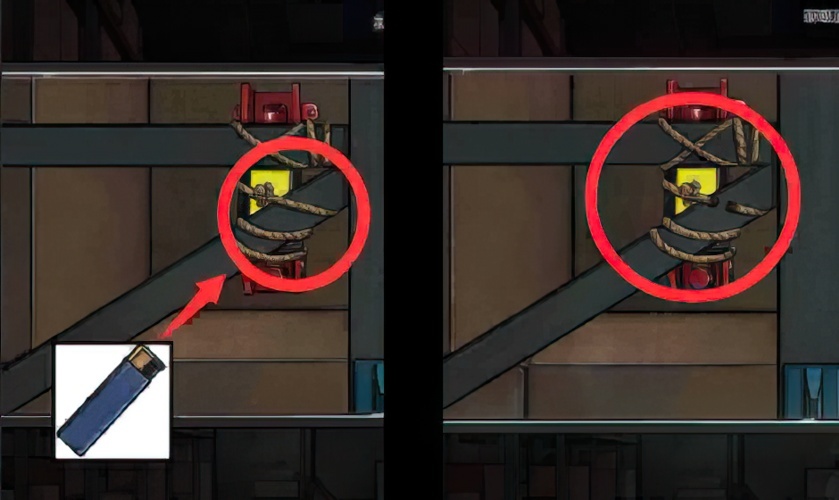
52. Go back to the “warehouse”, pick up and check the pile of cartons, and pick up gasoline.
53. Return to the “warehouse”, check the left shelf, and pick up the hexagonal screws.
54. Return to the “warehouse”, check the shelf on the left, burn the rope that binds the jack with a lighter, and pick up the jack that lacks a handle.

55. Combine the jack that lacks a handle and the jack handle to form a complete jack.

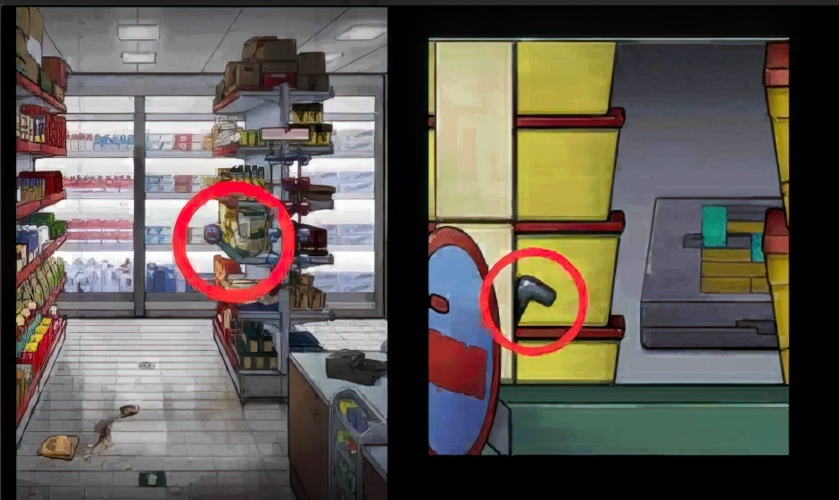
56. Return to the “convenience store”, look at the freezer on the left, open the door of the freezer, and pick up the ball of yarn.

57. Return to the “street”, check the wild cats, use a ball of yarn to attract the wild cats, and pick up the rubber gloves in the box.
58. Return to the “convenience store”, check the shelf, and pick up the horseshoe nails on the shelf.

59. Return to the “street”, look at the telephone pole, insert the horseshoe nail into the space, and reinforce it with a hammer.
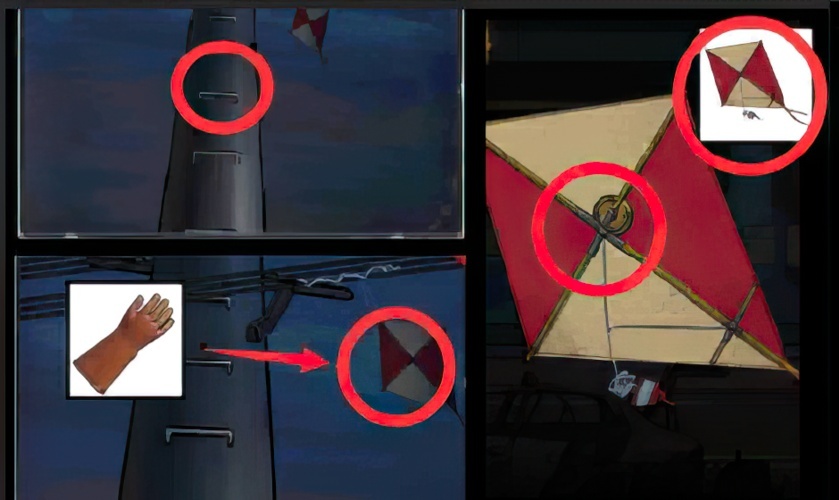
60. Return to the “street”, climb up the telephone pole, pick up the kite with rubber gloves, and pick up the coins in the kite.
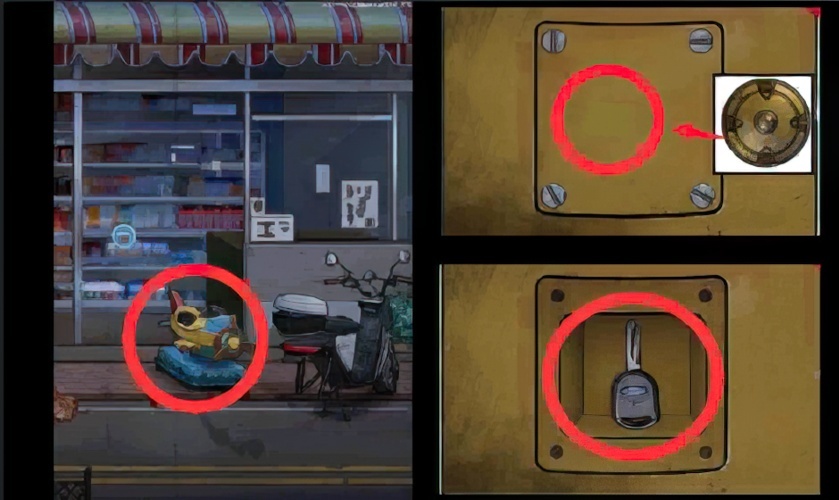
61. Go back to the “street”, check the rocking car, unscrew the screw with a coin, and pick up the car key.
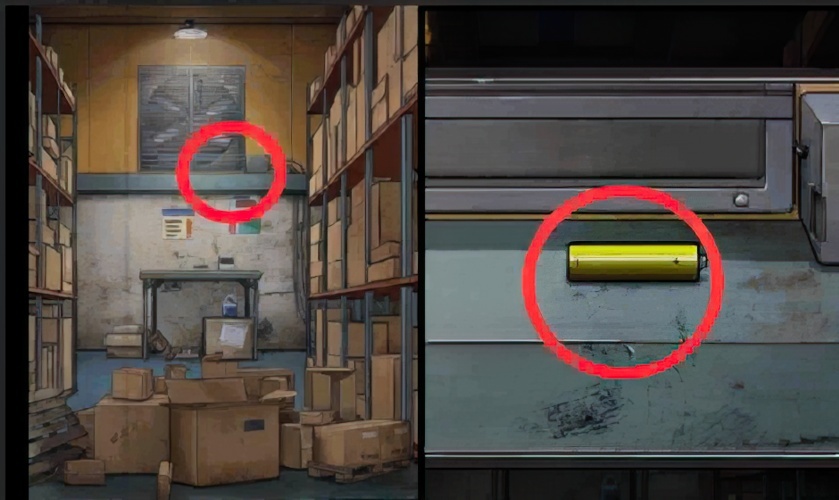
62. Go back to the “warehouse”, check the fan, and pick up the battery.

63. Return to the “convenience store” and pick up the statue under the counter.

64. Return to the “pharmacy”, check the scale, install the battery, and check the original number on the display.
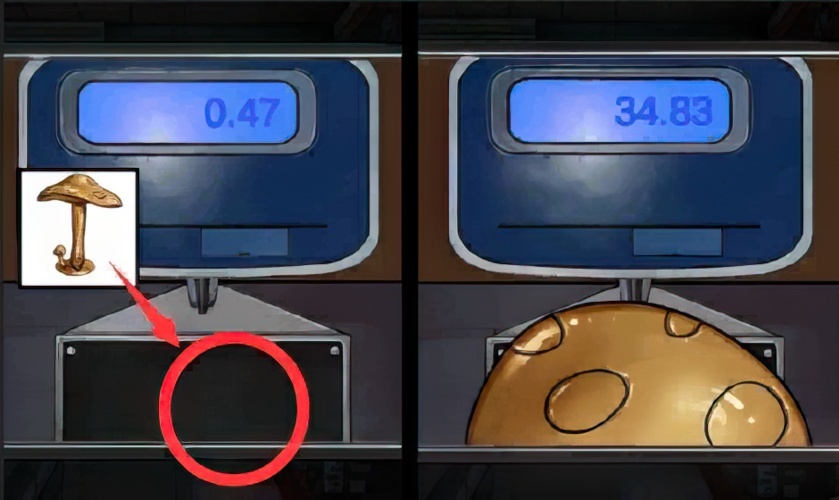
65. Return to the “pharmacy”, place the statue on the weighing machine, and get the weighing number.

66. Return to the “Warehouse”, and enter the weight of the statue on the right password box according to the number displayed before and after the statue is placed on the electronic scale. 3436, open the box and get the sleeve handle.

67. Combine the socket and socket handle into a complete socket wrench.

68. Return to the “street”, check the car’s fuel tank, open the fuel tank cap, and use a gasoline drum to fill the car with fuel.
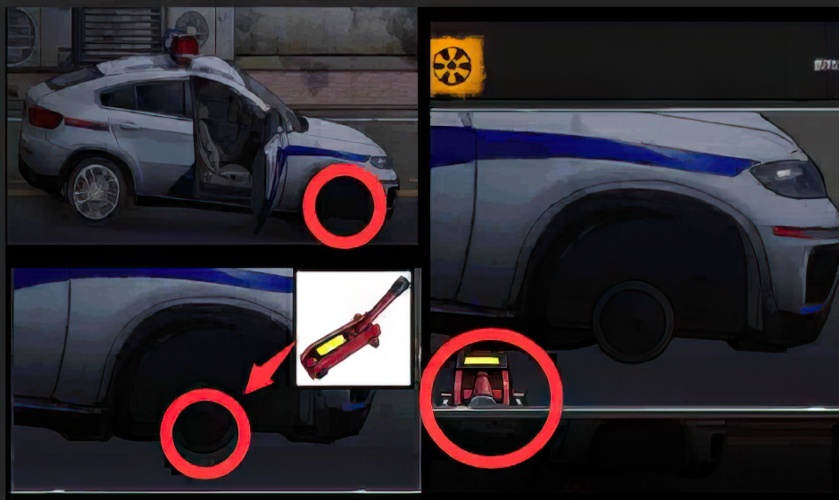
69. Return to the “street”, check the front wheels of the car, and lift the car with a jack.

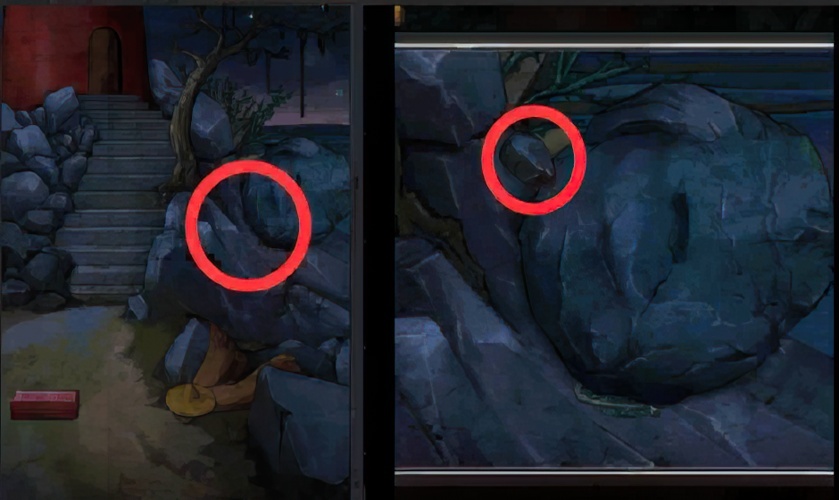
70. Return to the “street”, first install the spare tire on the car, then insert the hexagonal screw in the hole, and finally tighten the screw with a socket wrench.
71. Return to the “street”, enter the car, insert the car key, and start the car.
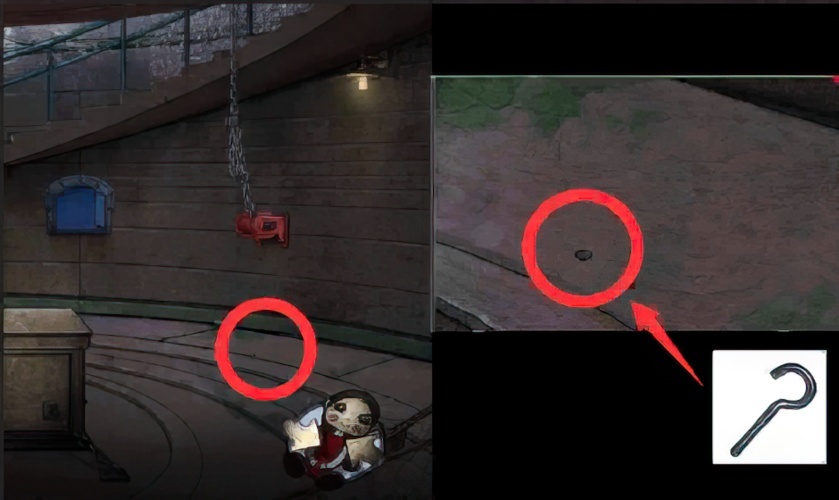
72. Look at the boulder on the right and pick up the stone.

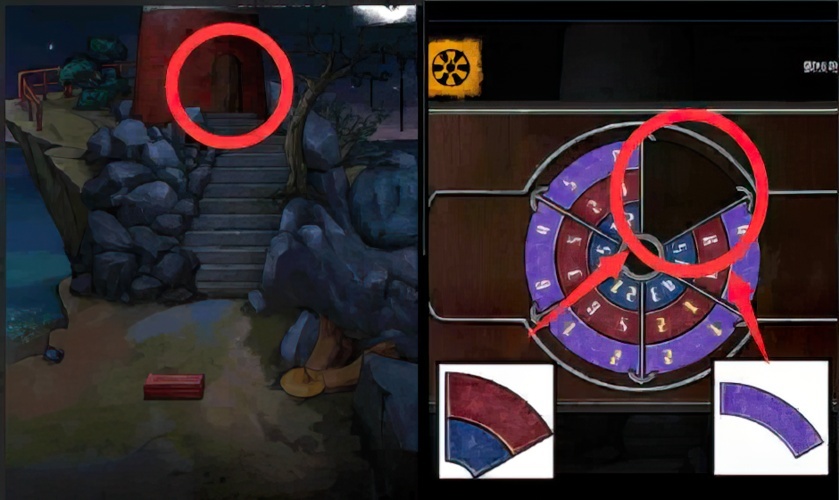
73. Look at the wooden boat on the left, smash the lock with a rock, and pick up the fragments in the box.

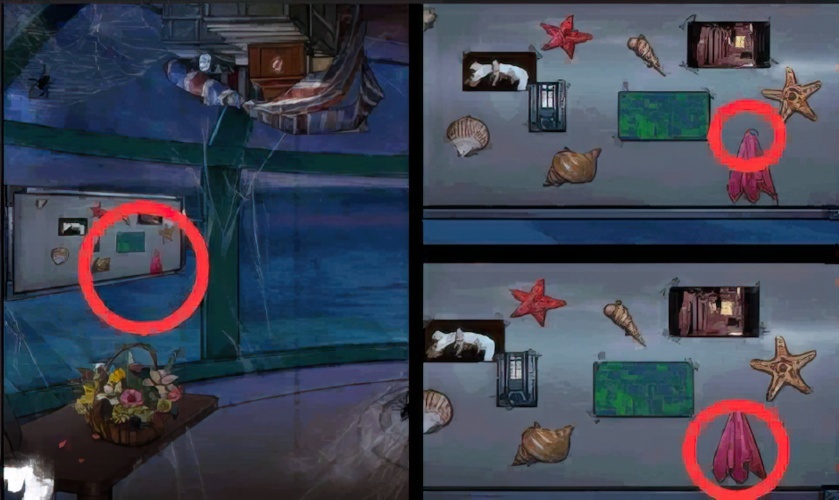
74. Check the fur clothes and hats on the ground, remove them and pick up the fragments.
75. Look at the lighthouse gate and place the two fragments in the gate’s mechanism.

76. Unlock the mechanism on the gate and enter the “Lighthouse 1st Floor”.

77. Go back to the first floor of the lighthouse, look at the cabinet on the right, and pick up the key handle.

78. Go to the first floor of the lighthouse, check the desktop, and pick up the cross.

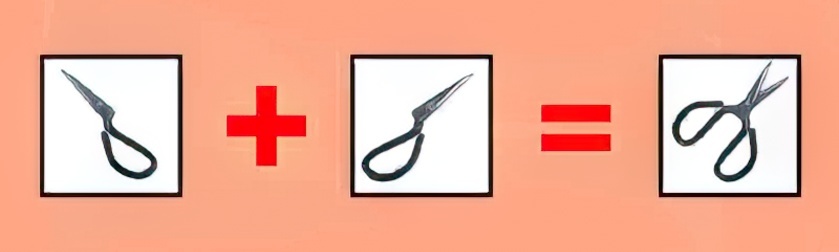
79. Go to the first floor of the lighthouse, check the coffin, insert the inlay into the coffin, and pick up half of the scissors on the chest.

80. Go back to the first floor of the lighthouse, check the ground, and pick up half a pair of scissors.
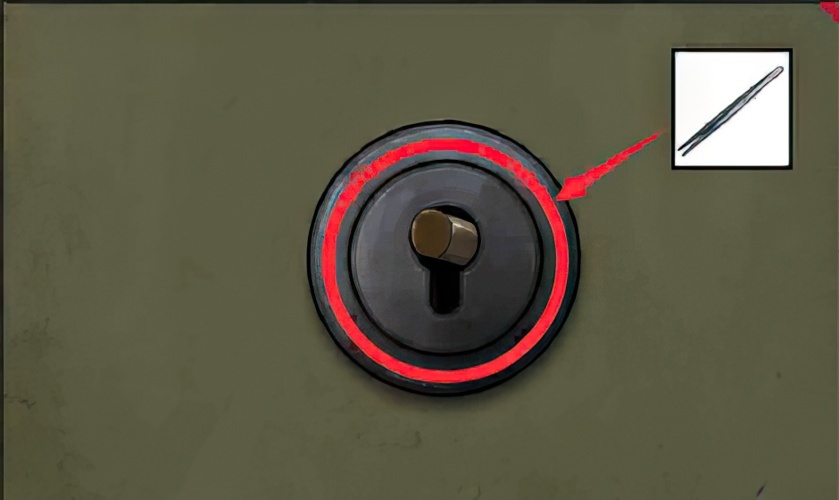
81. Combine two halves of scissors into a complete pair of scissors.

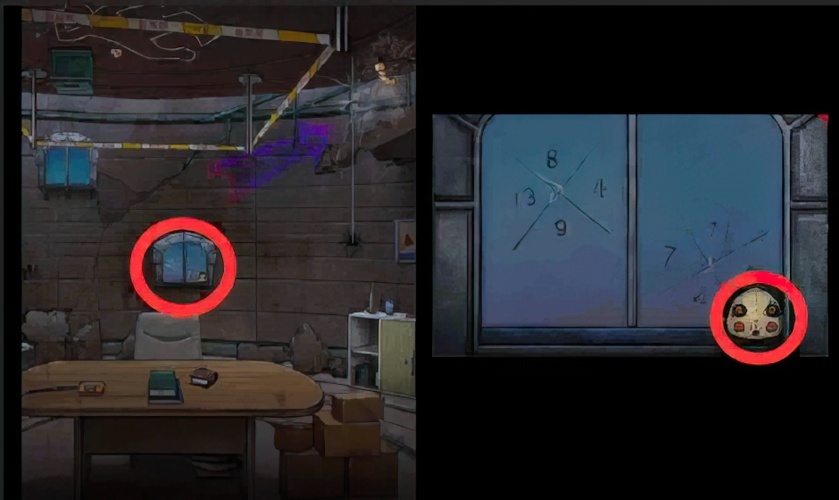
82. Return to the “coast”, check the wooden boat, cut the fishing net with scissors, and pick up the tweezers.
83. Go back to the first floor of the lighthouse, look at the cabinet on the right, and use tweezers to clamp out the key head.
84. Go back to the first floor of the lighthouse, look at the window, and pick up the puppet head on the window.

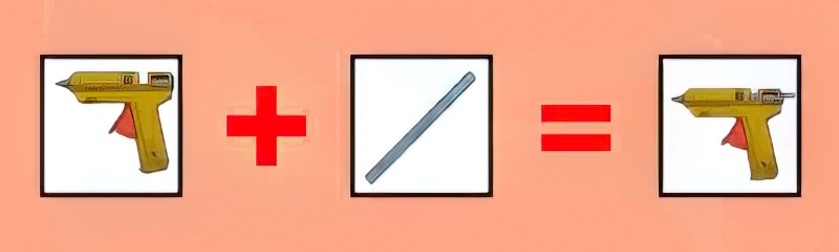
85. Go back to “Coast”, and enter the password 827 to open the box on the ground according to the number pattern on the window of the first floor of the lighthouse, and pick up the hot melt glue gun and needle that lack glue sticks.

86. Go back to the first floor of the lighthouse, look at the coat rack on the right, and pick up the glue stick on the coat rack.
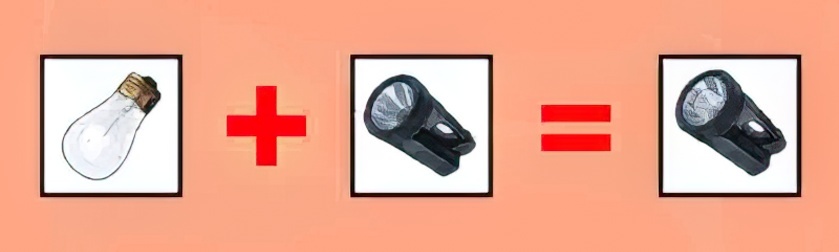
87. Combine the glue stick and the hot melt glue gun lacking the glue stick into a hot melt glue gun.

88. Use glue stick, key handle and key head to synthesize a complete key.
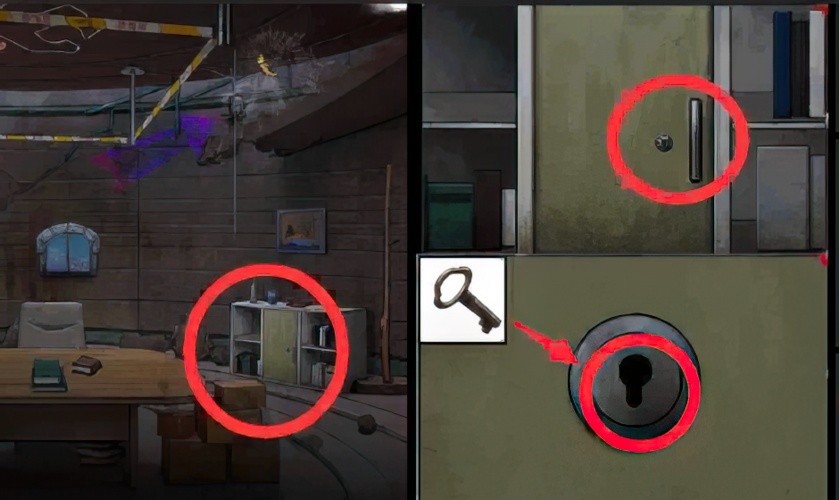
89. Go back to the first floor of the lighthouse, check the cabinet on the right, and use the key to open the cabinet.

90. Return to the first floor of the lighthouse, check the coffin, and cut the hair with scissors.
91. Combine hair strands and needles into needlework.

92. Go back to the first floor of the lighthouse, look at the cabinet on the right, place the doll’s head on the doll, stitch it with a needle and thread, and gain the ability to reverse the scene.

93. Go back to the first floor of the lighthouse, Invert the scene to the ceiling, check the spider web on the right, and pick up the broken inlay.

94. Go back to “Lighthouse 1st Floor”. Invert the scene to the ceiling, enter the “Lighthouse 2nd Floor” from the upper stairway.

95. Go back to the second floor of the lighthouse, Invert the scene to the ground, look at the cabinet on the left, and pick the threaded hook behind the cup.
96. Go back to the second floor of the lighthouse, Invert the scene to the ground, look at the floor on the right, and insert the threaded hook into the floor on the right.

97. Go back to the first floor of the lighthouse, Invert the scene to the ceiling, and pick up the trash folder.
98. Go back to the second floor of the lighthouse, Invert the scene to the ceiling, check the stove, and use the trash clip to clip the red-hot iron chain in the stove.

99. Return to the second floor of the lighthouse, Invert the scene to the ceiling, and pick up the mallet at the feet of the crow on the left.

100. Go back to the first floor of the lighthouse, Invert the scene to the ceiling, check the cracks in the wall, and use a mallet to break the cracks.

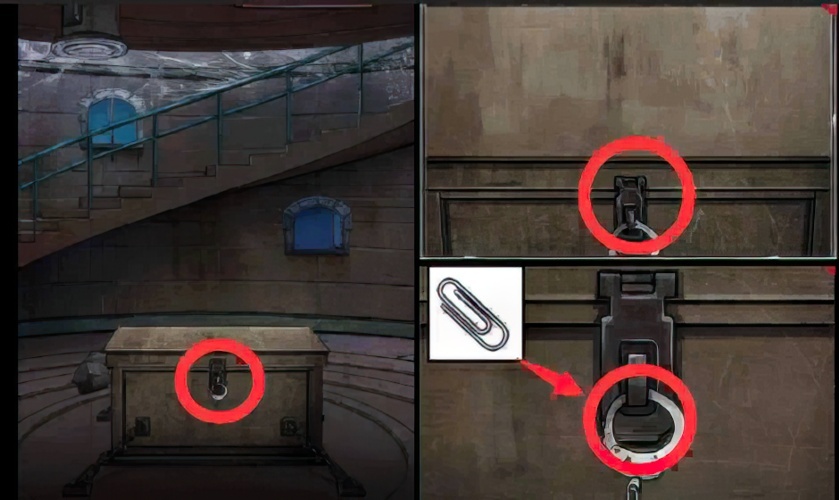
101. Return to “Lighthouse Level 1”. Invert the scene to the ceiling, check the gear decryption game in the crack, complete the puzzle solving mechanism, and pick up the sails in the mechanism.

102. Go back to the second floor of the lighthouse, Invert the scene to the ground, check the cabinet on the left, insert the sails into the ship model on the right, and unlock the cabinet.

103. Go back to the second floor of the lighthouse, Invert the scene to the ground, check the photos in the cabinet, and pick up the paper clips on the photos.
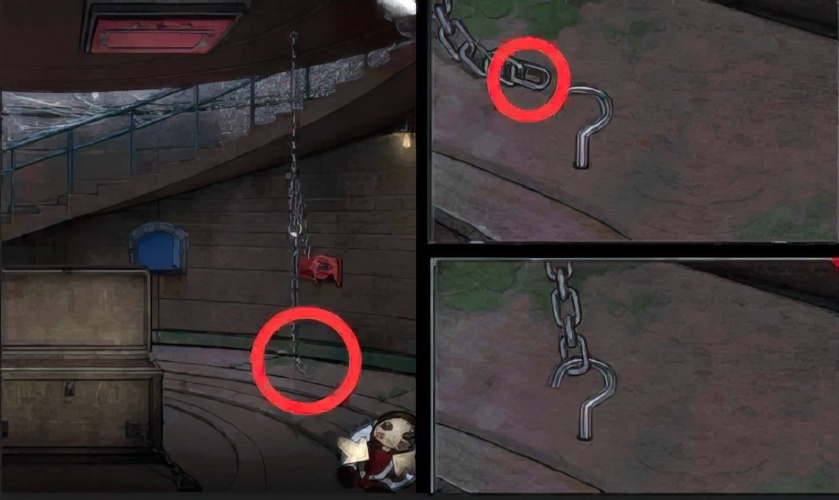
104. Return to the second floor of the lighthouse, Invert the scene to the ground, check the big wooden box, use a paperclip to pry open the handcuffs on the wooden box, and open the wooden box.
105. Return to the second floor of the lighthouse, Invert the scene to the ground, open the wooden box, and pick up the crank in the wooden box.

106. Go back to the “coast”, check the beach, put the red iron chain into the sea to obtain the iron chain.

107. Go back to the second floor of the lighthouse, Invert the scene to the ground, look at the iron chain hanging in the air, handcuffs to the original iron chain, and then fix the iron chain to the handcuffs .
108. Return to the second floor of the lighthouse, Invert the scene to the ground, check the floor, and fix the iron chain on the iron hook.
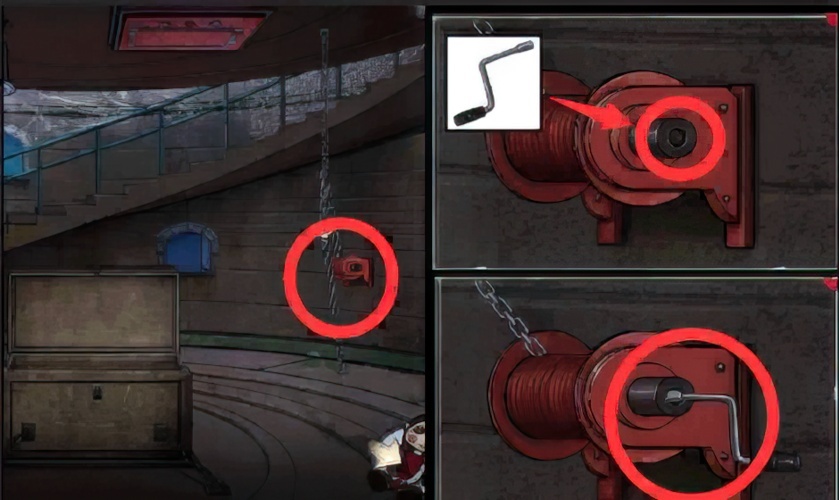
109. Return to the second floor of the lighthouse, Invert the scene to the ground, check the winch, install the crank at the corresponding position, and shake the crank.

110. Return to the second floor of the lighthouse, Invert the scene to the ground, look at the stone slab on the right, and pick up the charger.

111. Go back to “Lighthouse 2nd Floor”. Invert the scene to the ground, check the open slate, and pick up the tape and buttons in the slate.

112. Return to the “coast”, check the wooden boat, and pick up the battery.
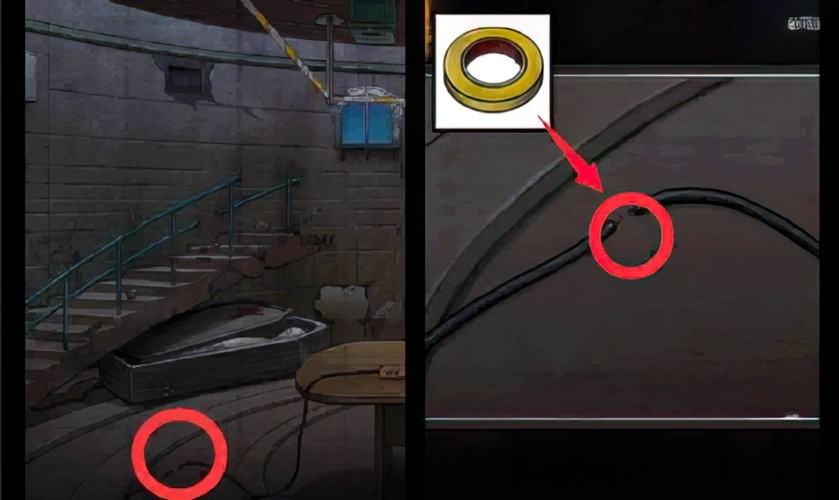
113. Go back to the first floor of the lighthouse, Invert the scene to the ground, check the wires on the ground, and wrap the wires with tape.

114. Go back to the first floor of the lighthouse, Invert the scene to the ground, check the table, insert the charger into the power strip, and put the battery in.

115. Go back to the first floor of the lighthouse, Invert the scene to the ground, wait for the battery to be fully charged, and pick up the fully charged battery.

116. Go back to the first floor of the lighthouse, Invert the scene to the ceiling, check the box on the ground, and put the battery in the box.
117. Go back to the first floor of the lighthouse, Invert the scene to the ceiling, unlock the mechanism of the box, and pick up the fake eyes in the box.

118. Go back to the second floor of the lighthouse, Invert the scene to the ceiling, look at the crow on the left, place the fake eye on the crow, and pick up the small purple lamp in the crow’s mouth.

119. Go back to the second floor of the lighthouse, Invert the scene to the ceiling, look at the red door in the middle, and put in the button and the small purple light.

120. Go back to “Lighthouse 2nd Floor”. Invert the scene to the ceiling, complete the mechanism on the door, and enter “Lighthouse 3rd Floor”.
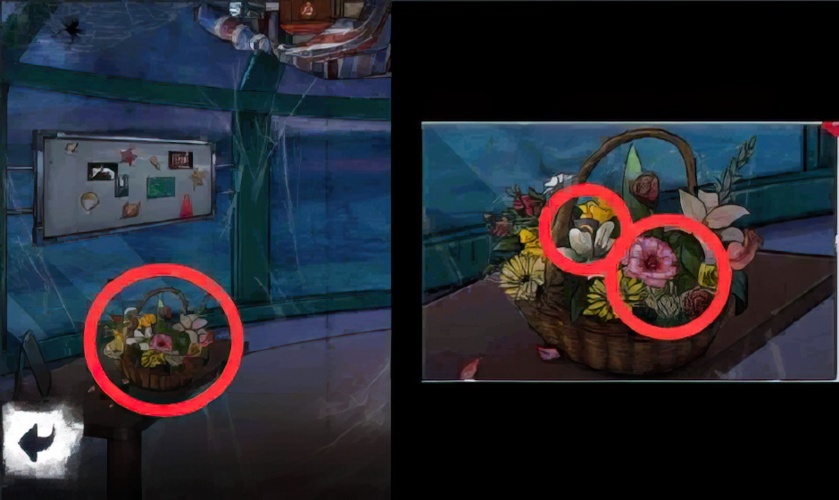
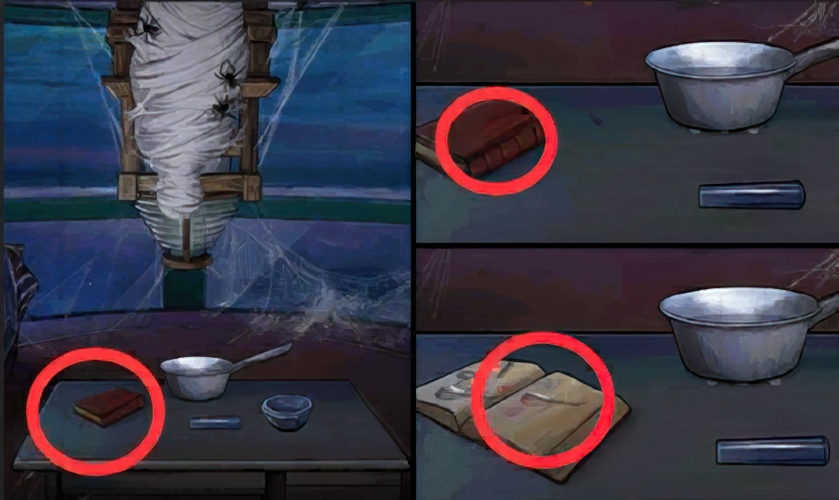
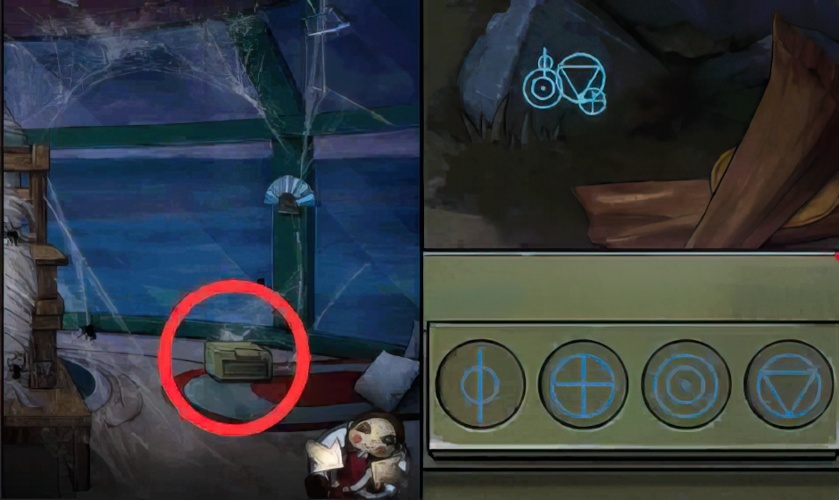
121. Enter the “lighthouse 3rd floor”. Invert the scene to the ground, look at the flower basket on the left, and pick up the knob and flowers.

122. Return to “Lighthouse 3rd Floor”. Invert the scene to the ground, check the broken broom on the right side, and pick up the broom handle and pattern block.
123. Go back to the third floor of the lighthouse, Invert the scene to the ceiling, check the desktop, open the book, and check the formula of the antidote to poison.

124. Go back to “Lighthouse 3rd Floor”. Invert the scene to the ceiling, check open the woven bag, check the box, and pick up the searchlight on the left side of the box that lacks a bulb.
125. Go back to “Lighthouse 3rd Floor”. Invert the scene to the ceiling, check the box, and put the knob and pattern block into the empty space.
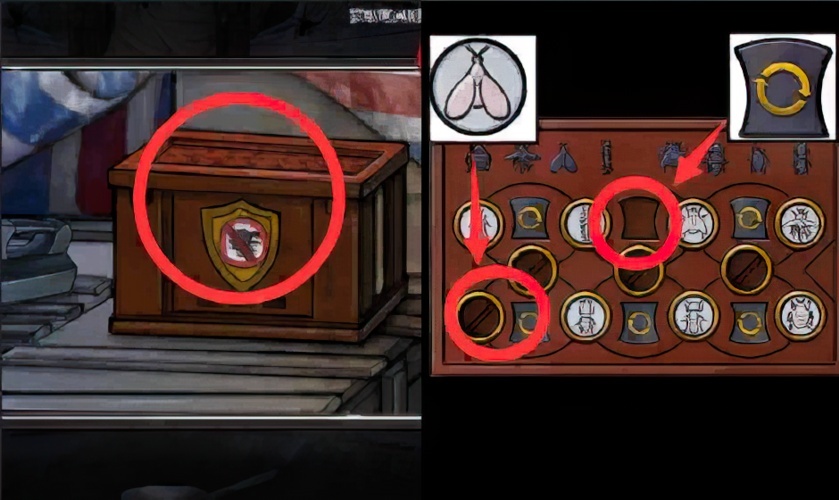
126. Go back to “Lighthouse 3rd Floor”. Invert the scene to the ceiling, check the box, complete the mechanism, and pick up the insecticide.

127. Go back to the third floor of the lighthouse, Invert the scene to the ceiling, check the box, and pick up the scraper under the insecticide.

128. Return to the third floor of the lighthouse, Invert the scene to the ground, use insecticide to destroy the spider, and scrape the spider’s cocoon with a scraper.

129. Go back to “Lighthouse 3rd Floor”. Invert the scene to the ground, look at the whiteboard on the left, use a spatula to pry open the shells, and pick up the pearls.
130. Go back to “Lighthouse 3rd Floor”. Invert the scene to the ground, remove the pushpin, and pick up the red cloth on the whiteboard.

131. Go back to the second floor of the lighthouse, Invert the scene to the ceiling, check the light on the right, unscrew the hot light with a red cloth, and pick up the bulb.
132. Combine the bulb and the searchlight that lacks the bulb into a searchlight.

133. Go back to the “coast”, look at the stone in the clothes, and use a spatula to scrape away the stains on the stone to show the pattern.
134. Go back to the “Lighthouse 3rd Floor”. Invert the scene to the ground, according to the pattern on the stone, enter the password in order from small to large, open the box on the right, and pick up the incomplete inlay body.

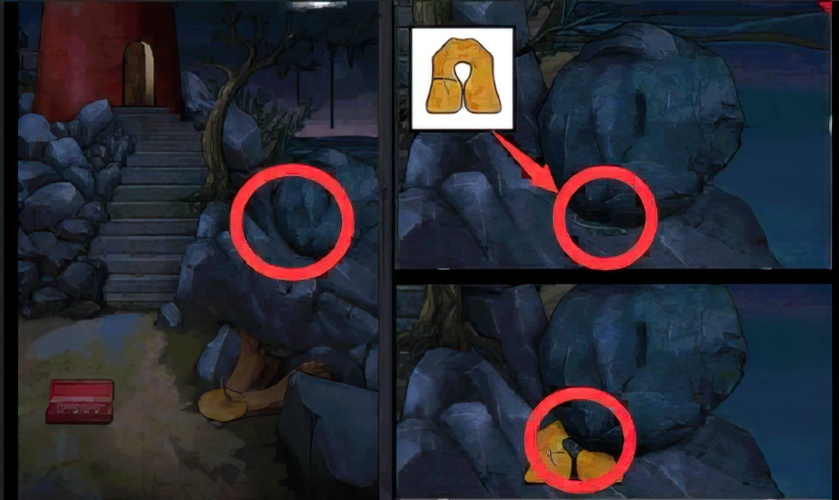
135. Combine the two half inlays into a complete U-shaped inlay.

136. Go back to the first floor of the lighthouse, Invert the scene to the ceiling, look at the cabinet on the left, insert the U-shaped inlay into the groove, open the box to get a life jacket.
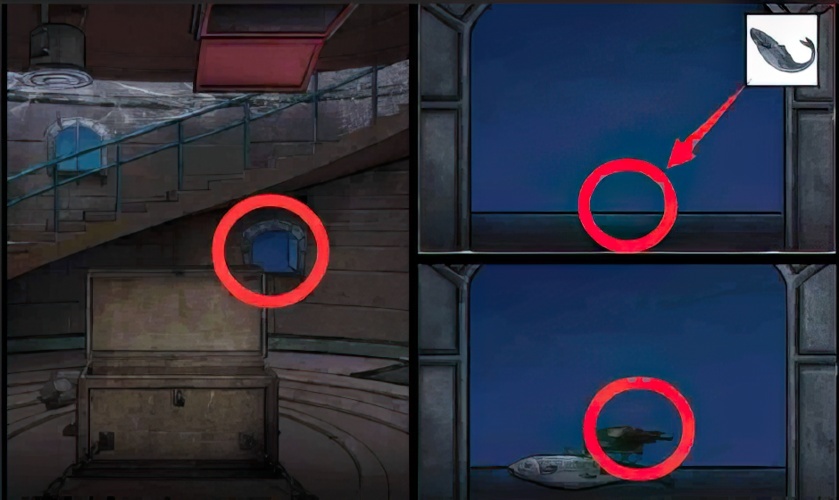
137. Return to the “coast”, check the boulder, put the life jacket under the boulder, inflate the life jacket, the boulder rolls down, and pick up the net head.

138. Combine the net head, tape and broom handle into a complete dip net.

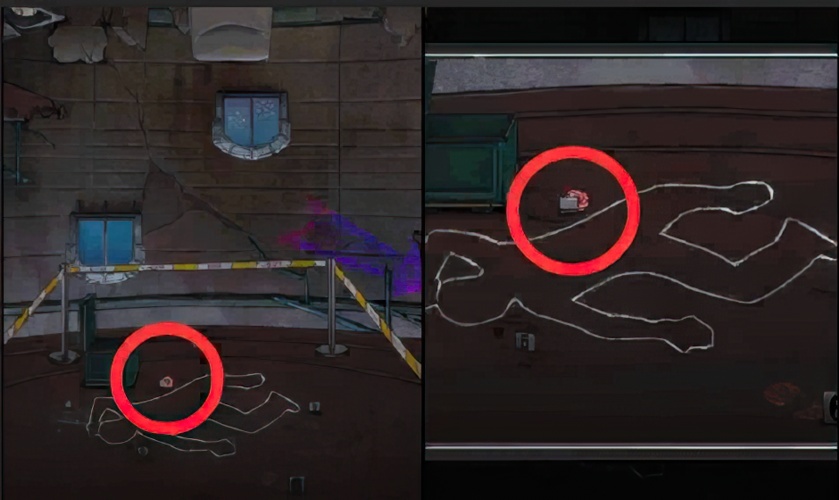
139. Return to the “coast”, look at the sea, shine a searchlight on the sea, fish with a fishing net, and get fish.
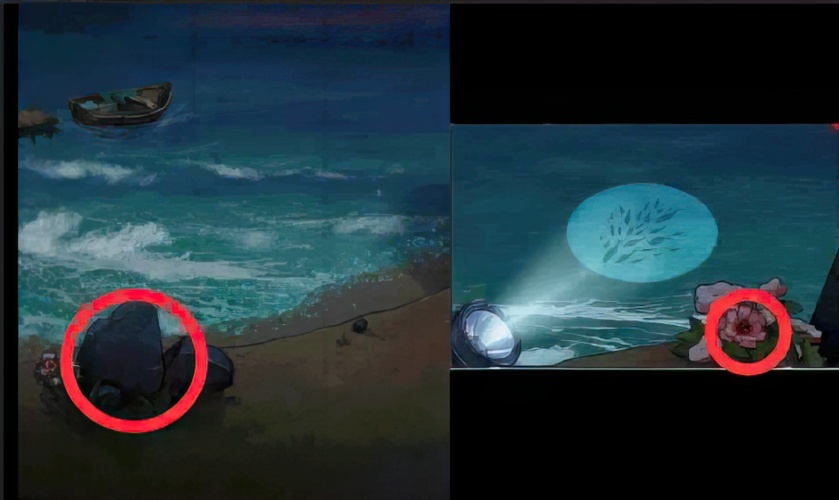
140. Return to the second floor of the lighthouse, Invert the scene to the ground, check the window, place the fish on the window, wait for the crow to arrive, and pick up the feathers from the crow.
141. Go back to the first floor of the lighthouse, Invert the scene to the ceiling, check the crime scene, and pick up the flowers.
142. Go back to the “coast”, check the rocks on the beach, and pick up flowers.
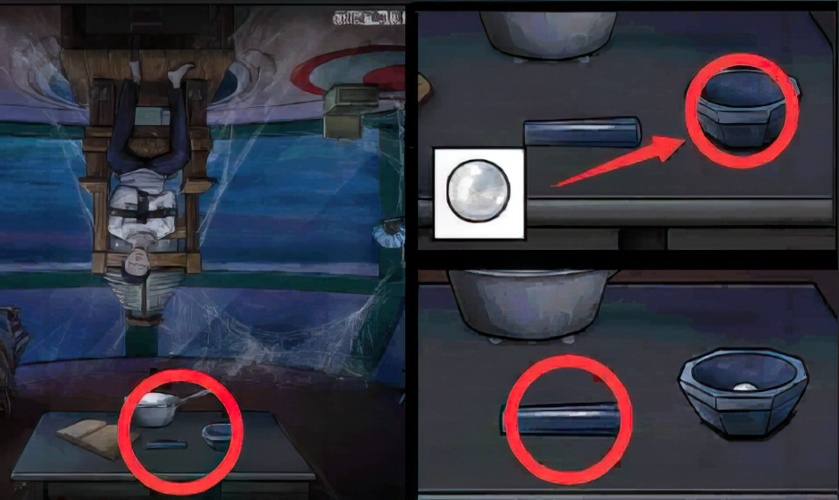
143. Go back to the third floor of the lighthouse, Invert the scene to the ceiling, check the facilities on the table, and put the pearls in the mashing dish.

144. Go back to the third floor of the lighthouse, Invert the scene to the ceiling, check the facilities on the table, smash the pearls, and add them to the iron scoop.

145. Go back to “Lighthouse 3rd Floor”. Invert the scene to the ceiling, add the mashed pearls to the pot, and then add three flowers to the iron scoop.
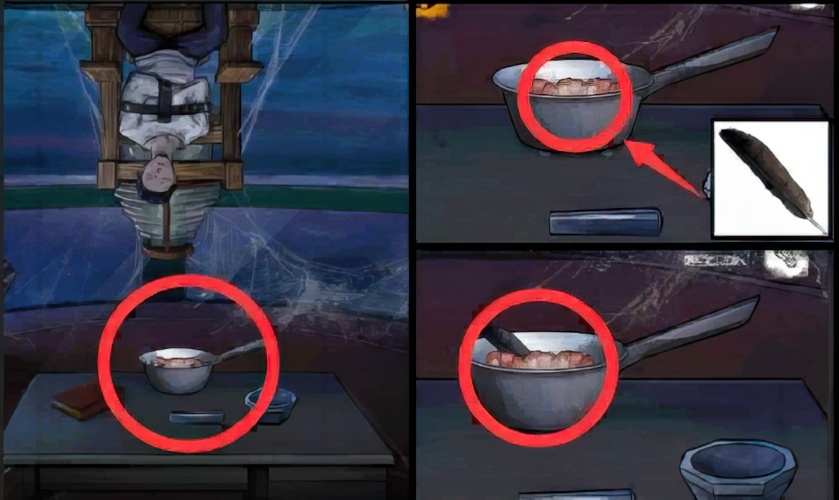
146. Go back to the third floor of the lighthouse, Invert the scene to the ceiling, put feathers in the pot, and pick up the iron scoop containing the ingredients.
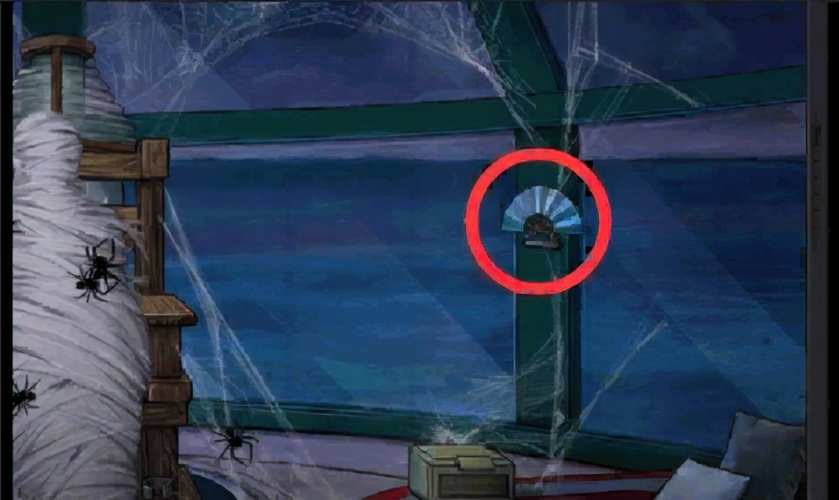
147. Go back to “the third floor of the lighthouse” and pick up the folding fan on the right wall.

148. Go back to the second floor of the lighthouse, Invert the scene to the ceiling, check the stove, and use the folding fan to raise the fire in the stove.
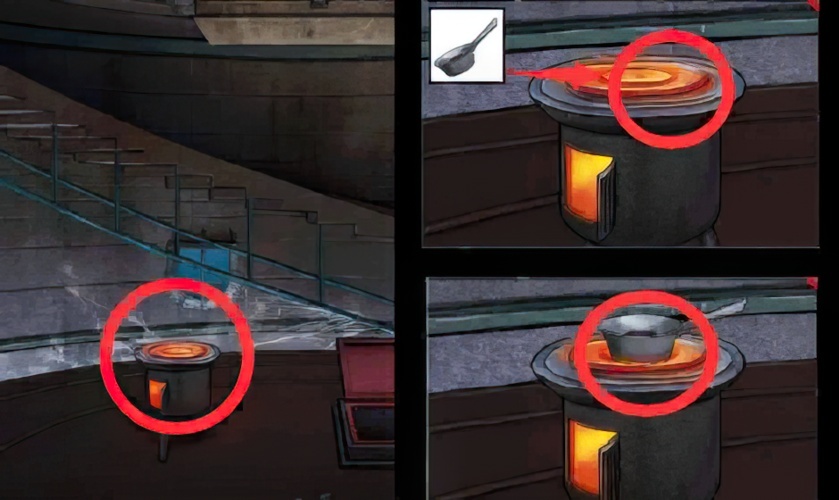
149. Go back to the second floor of the lighthouse, Invert the scene to the ceiling, check the stove, put the iron scoop filled with raw materials on the stove to heat, and pick up the antidote to poison.
150. Return to the third floor of the lighthouse, Invert the scene to the ground, check the patient, apply the antidote to the wound, and talk to the patient when he wakes up.


