Hospital Escape: Chapter 5 – This time in the game you will study the patient: A primary school student in Wuyoulu suffers from various diseases such as asthma, diabetes, and rickets. In the past two months, she has frequently lost consciousness.
Hospital Escape: Chapter 5 – Walkthrough
Below you can watch the complete walkthrough of the Chapter 5, in the game Hospital Escape.
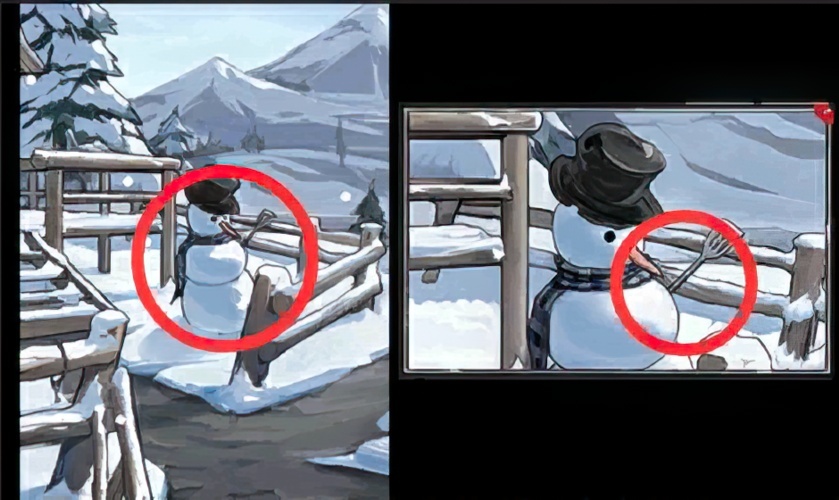
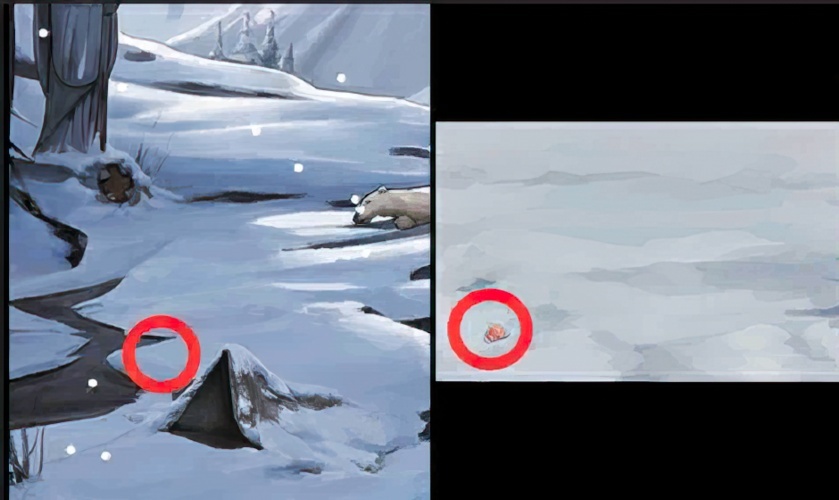
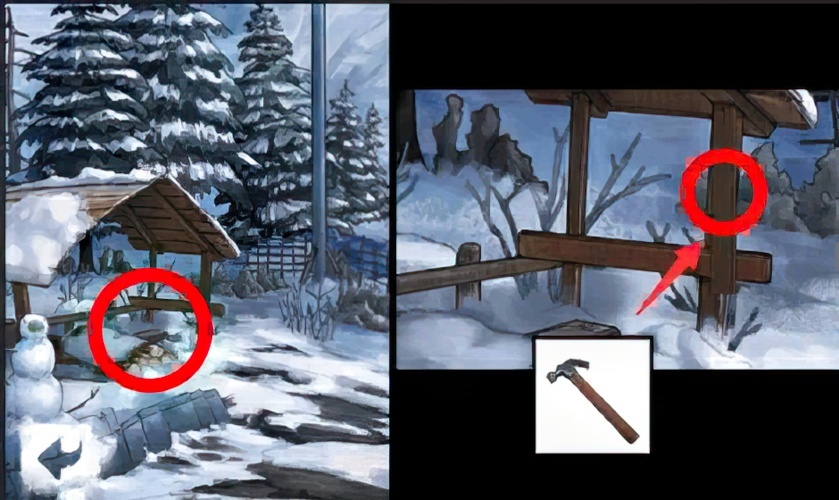
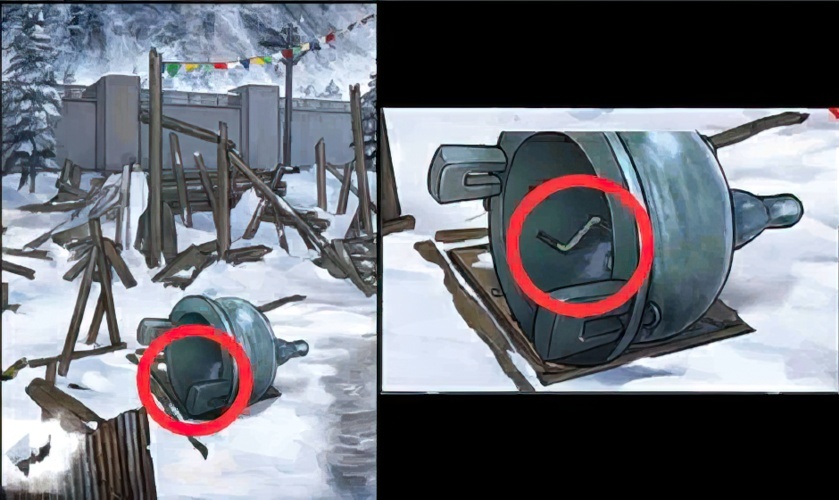
1. Look at the snowman and pick up the spatula.
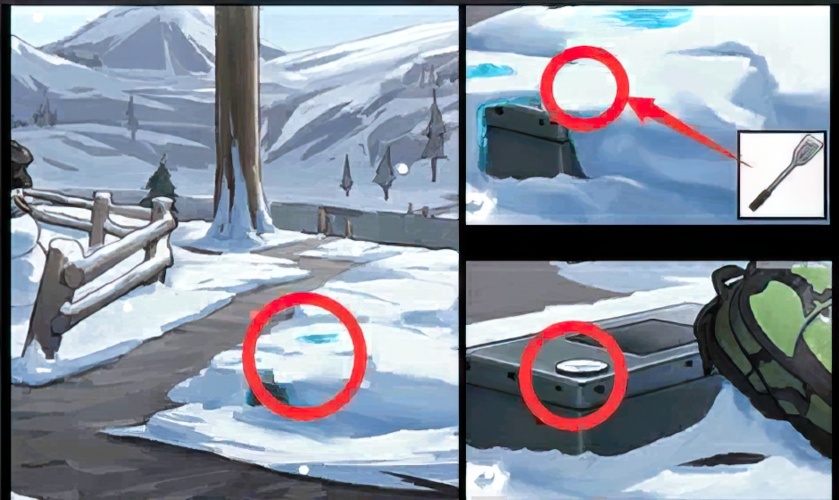
2. Check the snow surface, use a spatula to take out the snow like it, and pick up the mirror fragments on the box.
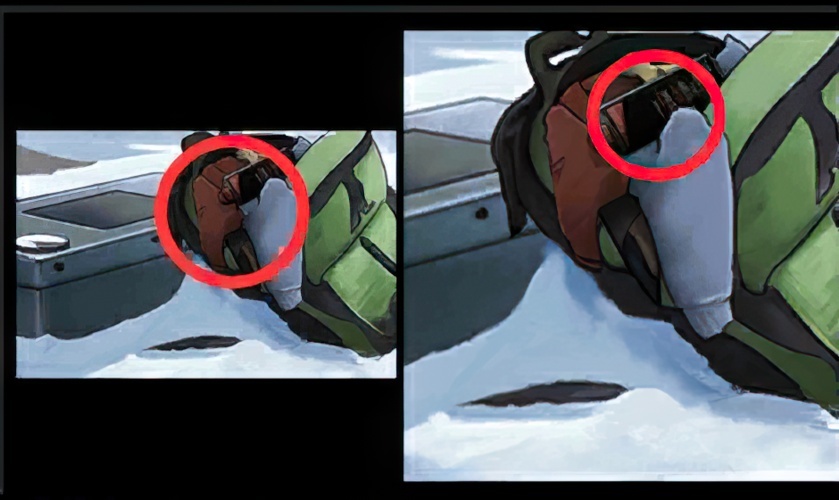
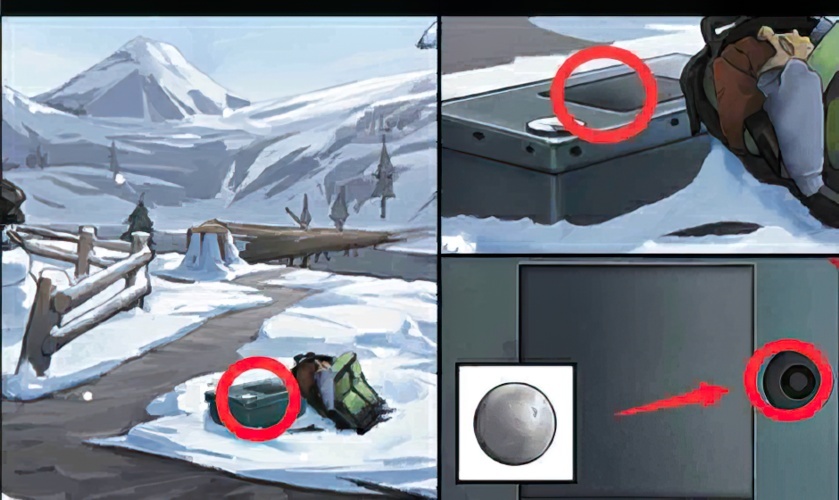
3. Check and open the backpack on the ground, and pick up the kerosene in the bag.
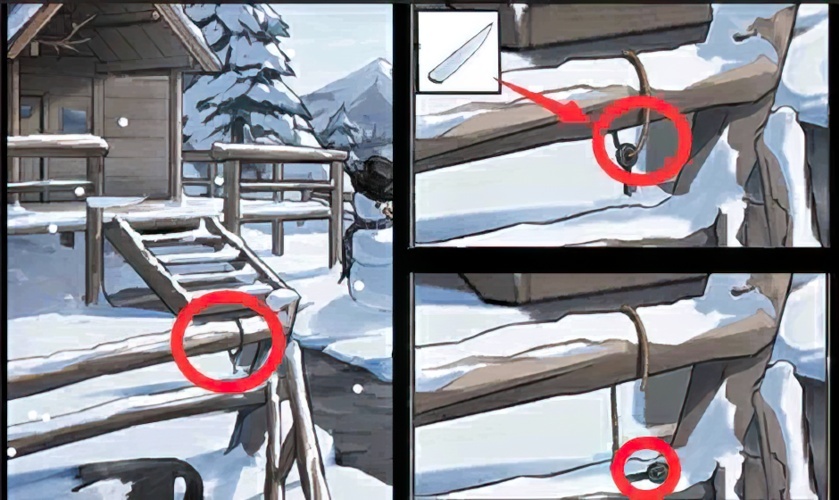
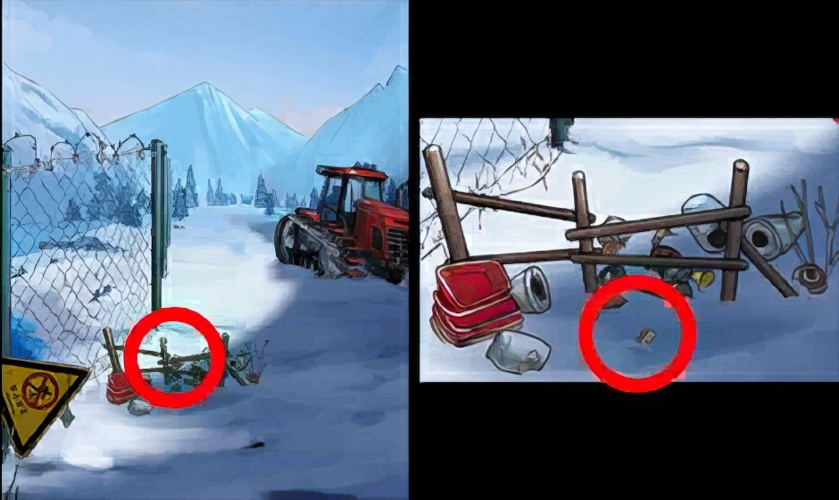
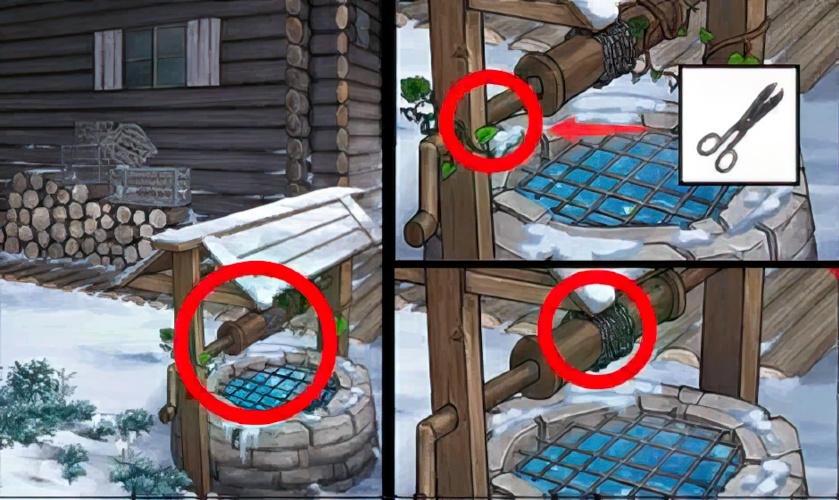
4. Check the railing, cut the rope with the mirror shards, and pick up the fallen key.

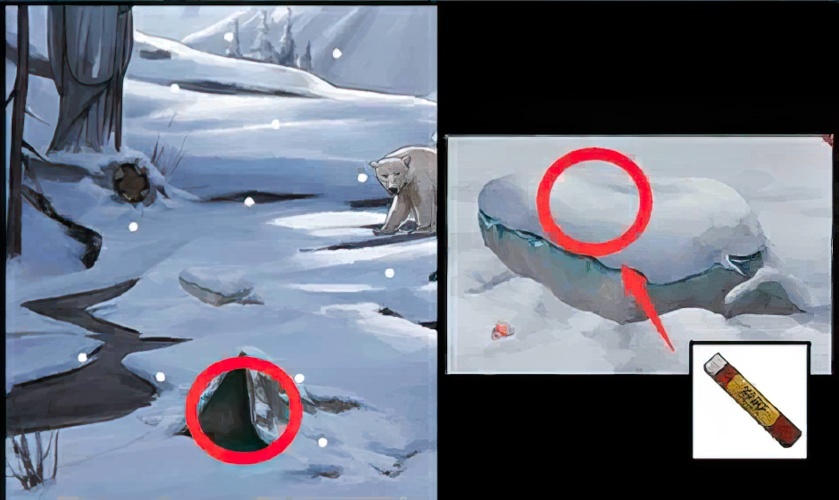
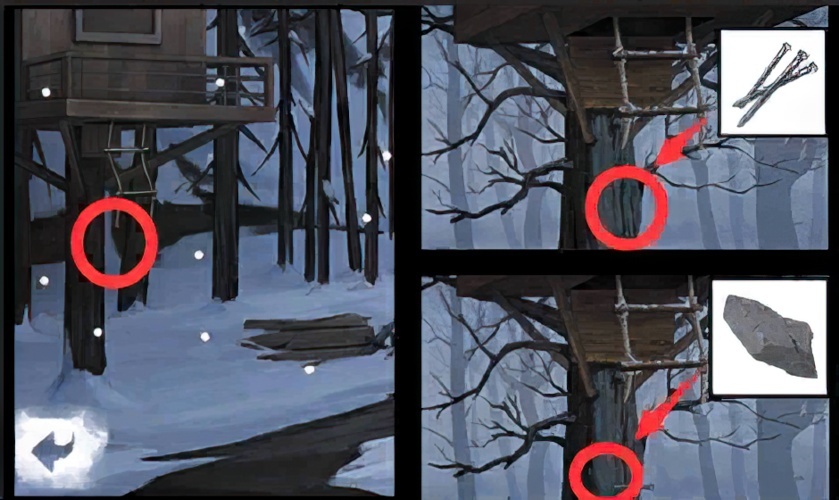
5. Look at the big tree, remove the snow covering the roots of the big tree, and pick up the lighter.

6. Use kerosene and a lighter to synthesize an oiled lighter.
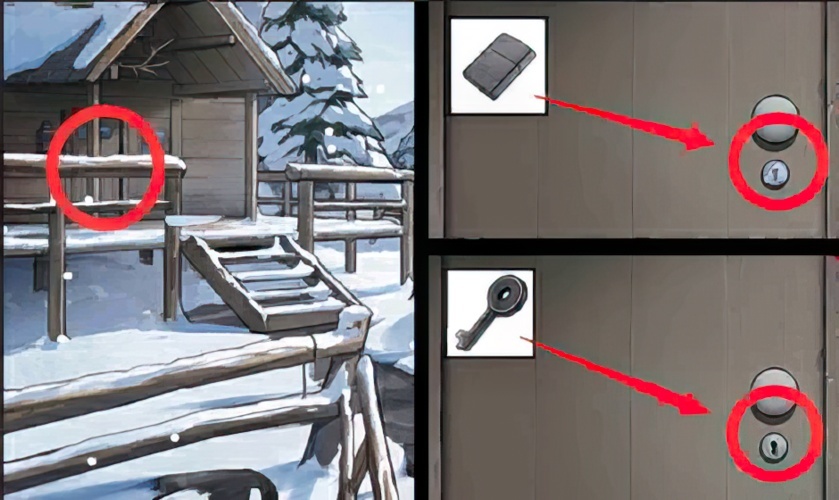
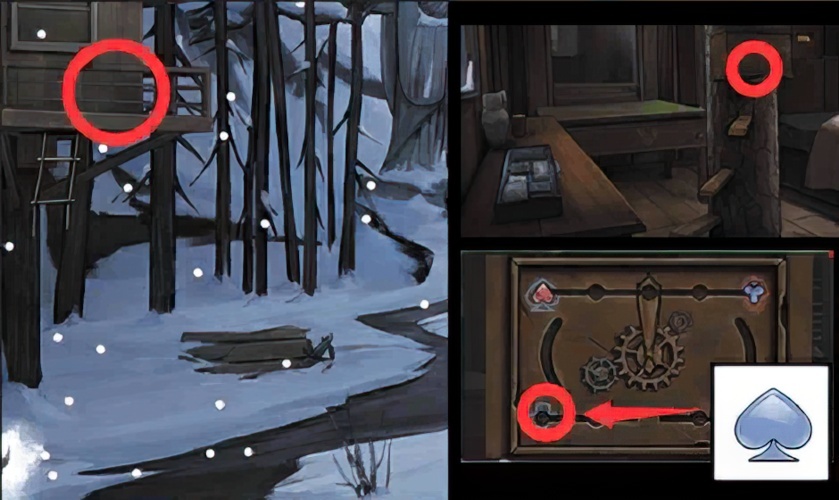
7. Check the wooden door, use an oil lighter to melt the ice on the keyhole, insert the key to open the door, and enter the “house”.

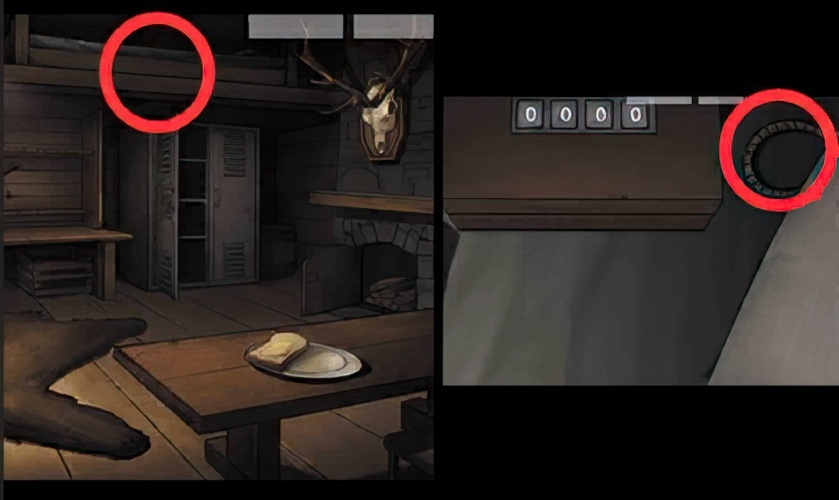
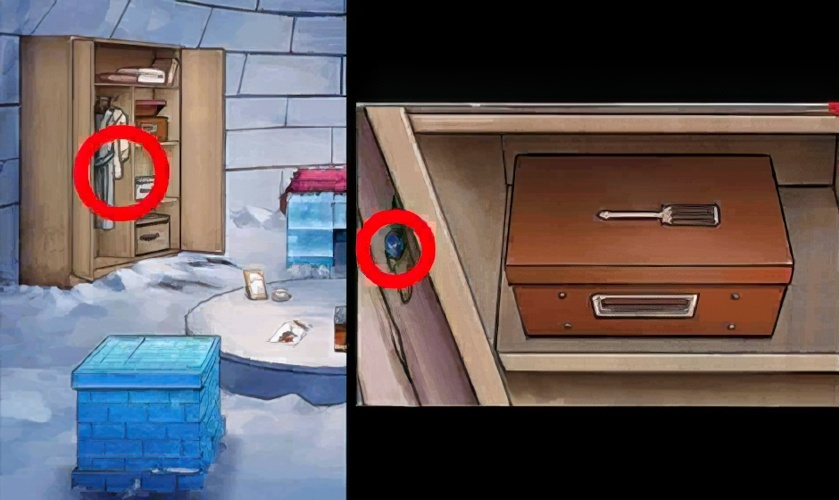
8. Enter the “house”, check the table top, and pick up the butter knife on the table.
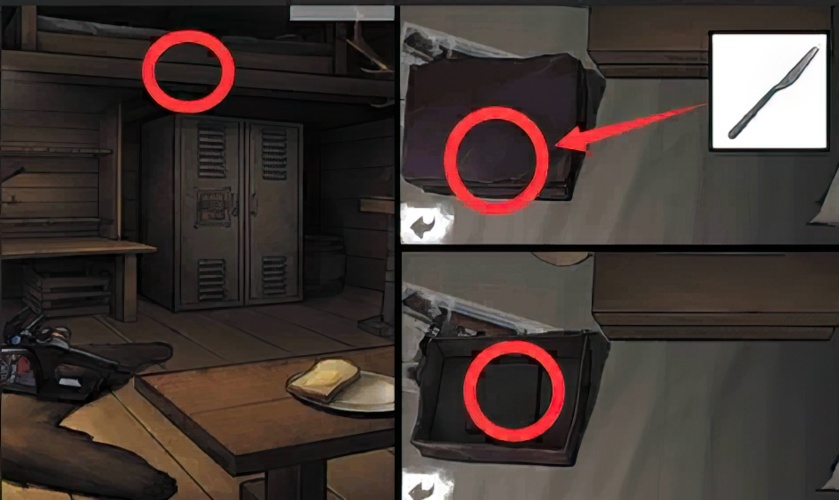
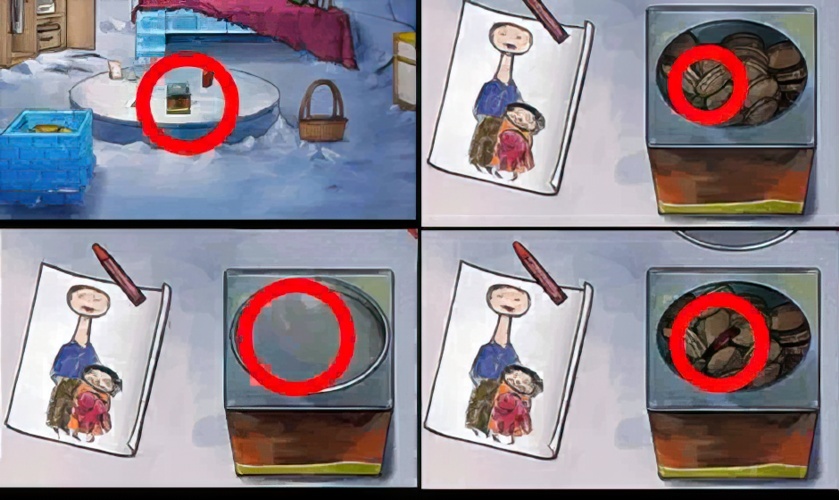
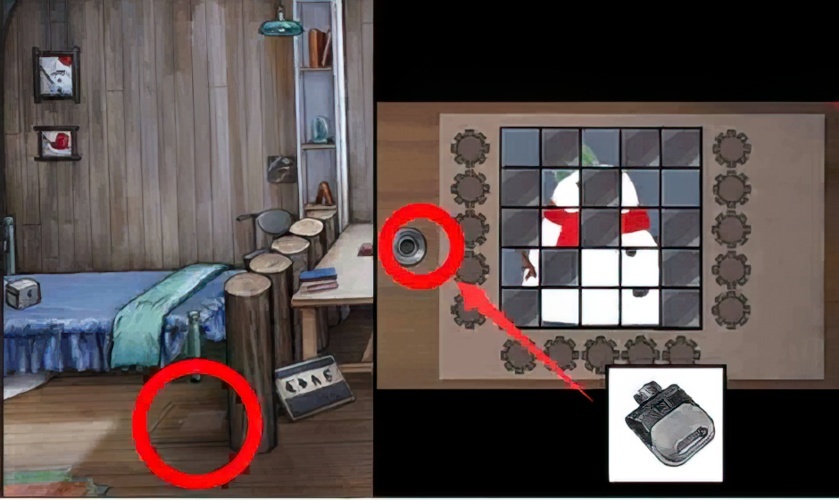
9. Return to the “house”, check the second floor, open the box with a butter knife, and pick up the blue square fragments.

10. Return to the “house”, check the iron cabinet on the first floor, put the blue square pieces into the gap in the mechanism, unlock the mechanism, and pick up the guide plate.

11. Return to the “house”, check the chainsaw on the ground, and place the guide plate on the chainsaw.
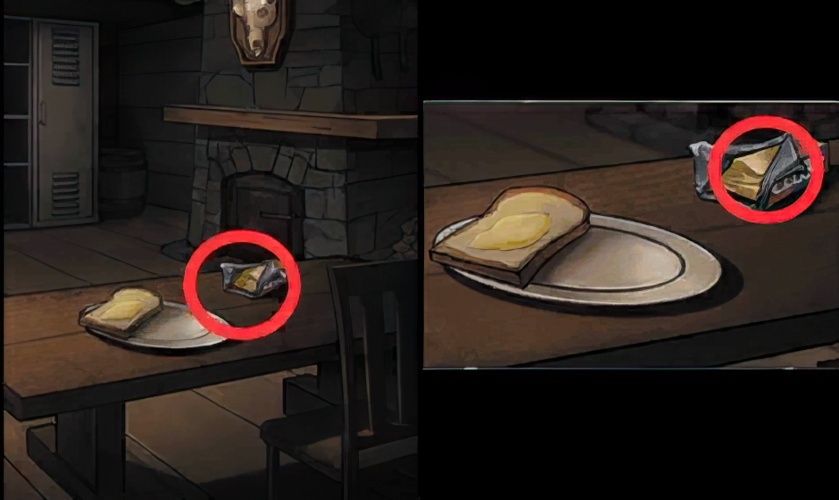
12. Put it back into the “house”, check the desktop, and pick up the butter on the desktop.
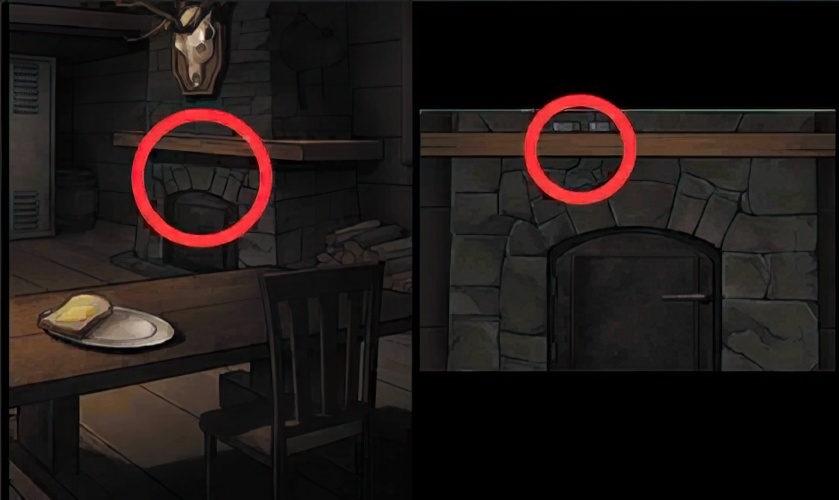
13. Go back to the “house”, look at the fireplace, and pick up the nuts on the fireplace.
14. Go back to the “house”, check the fireplace, grease the rusty door of the fireplace with butter, and open the door of the fireplace.

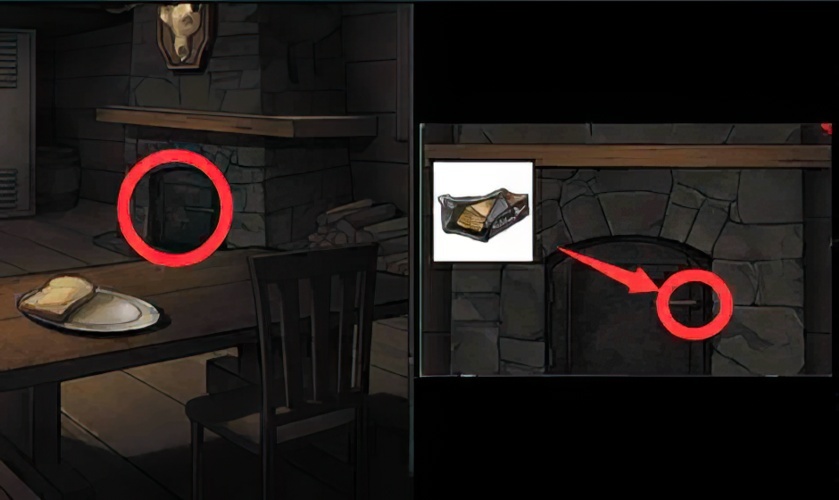
15. Return to the “house”, pick up the chain in the fireplace, check the chainsaw on the ground, and place the chain on it.
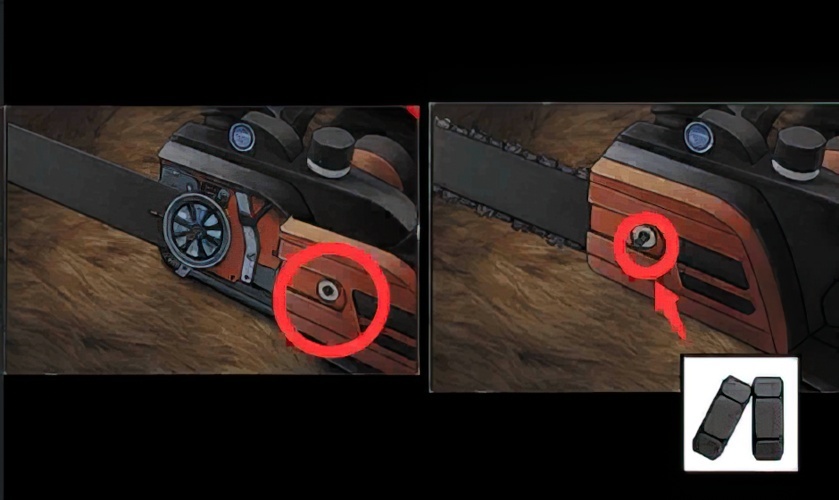
16. Return to the “house”, check the chainsaw on the ground, close the cover of the saw, and fix the cover on the saw with a nut.
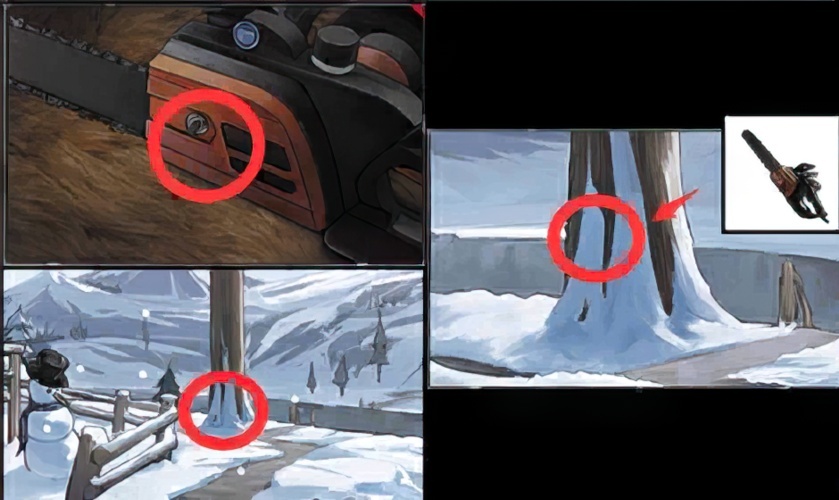
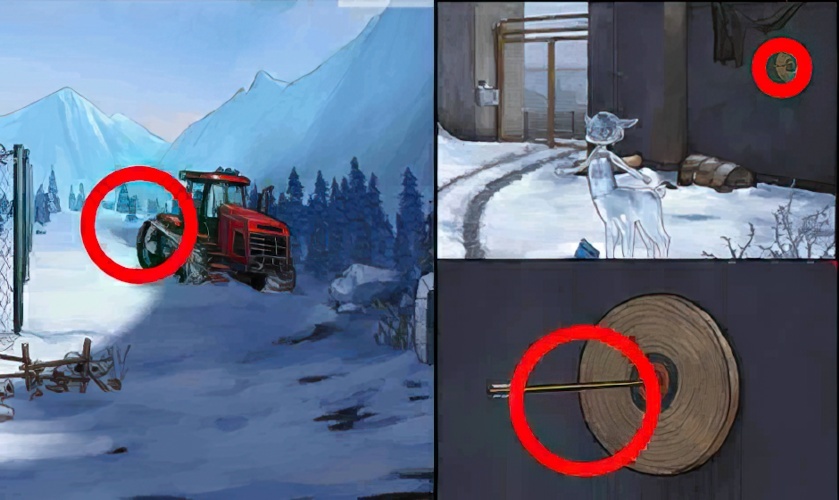
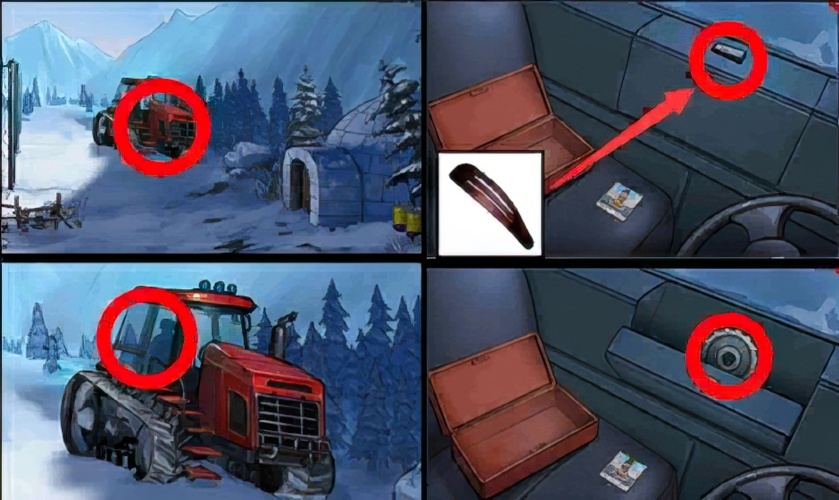
17. Go back to the “house”, pick up the chainsaw on the ground, go back to the “snow”, and use the chainsaw to cut the tree trunk.
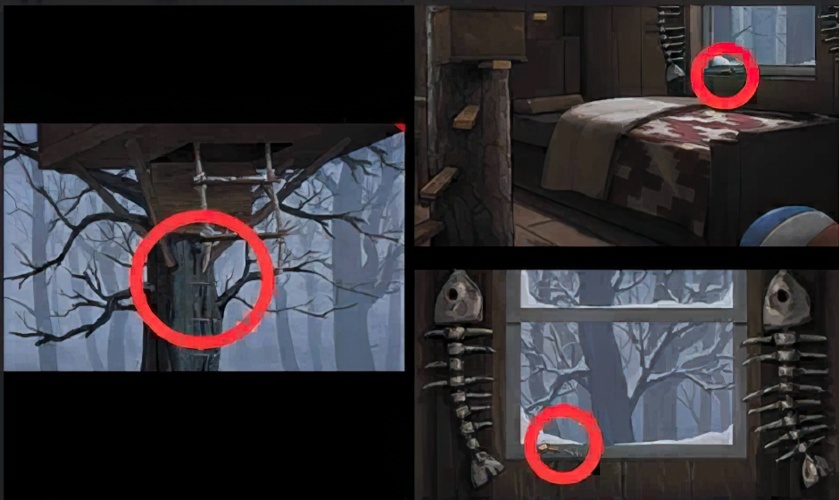
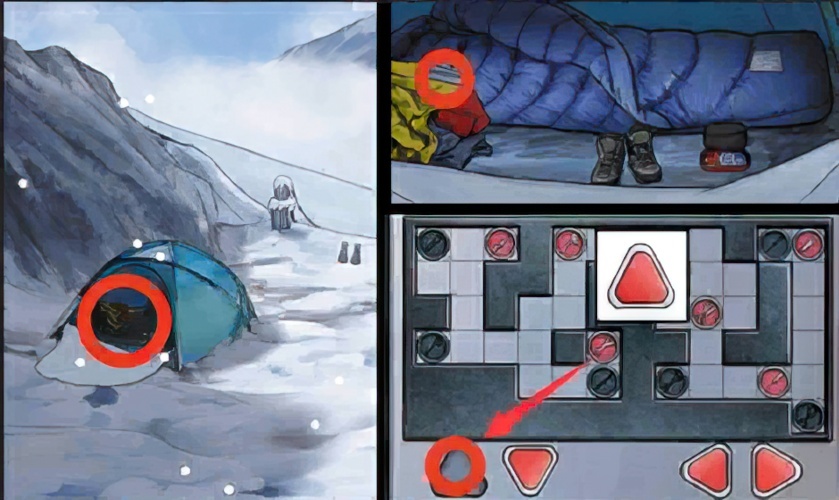
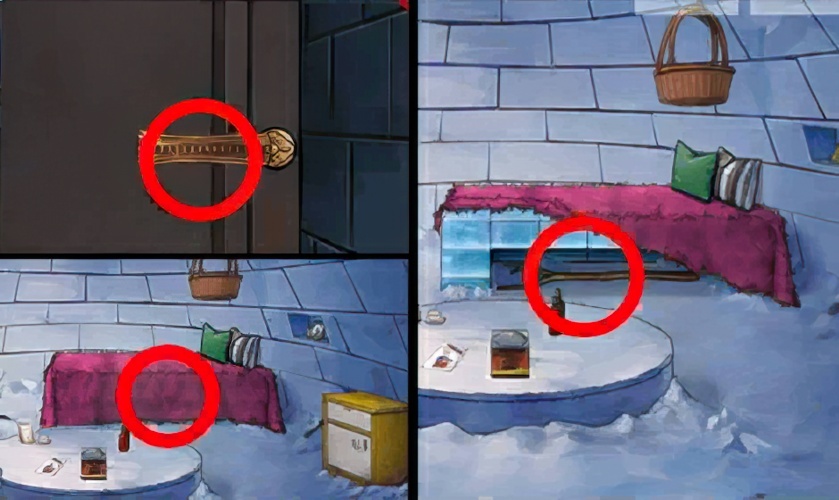
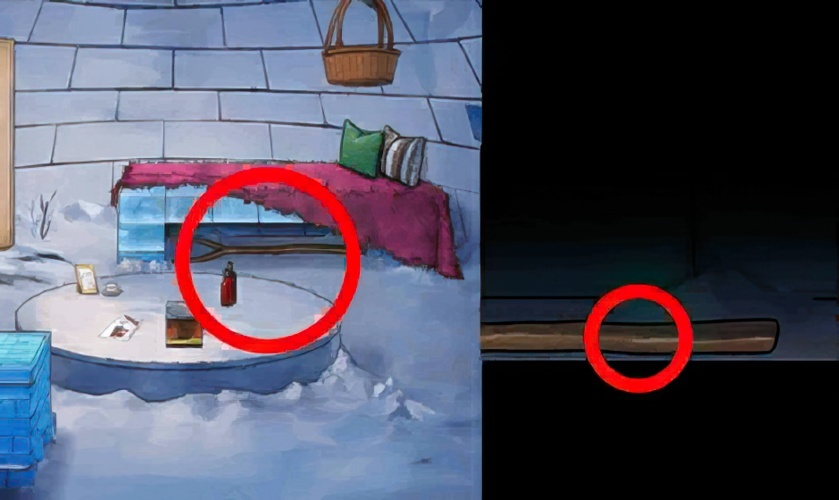
18. Go back to the “house”, check the bed on the second floor, and pick up the lasso on the bed.
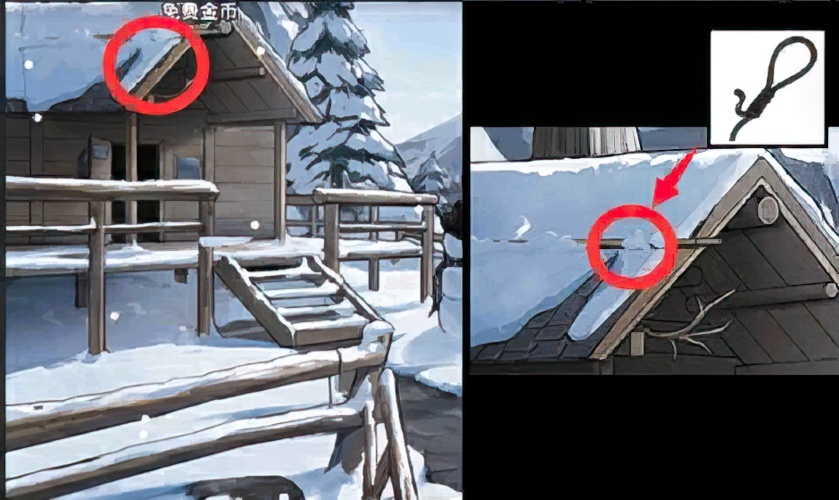
19. Go back to the “snow”, check the roof, and use a lasso to put the bamboo poles down.
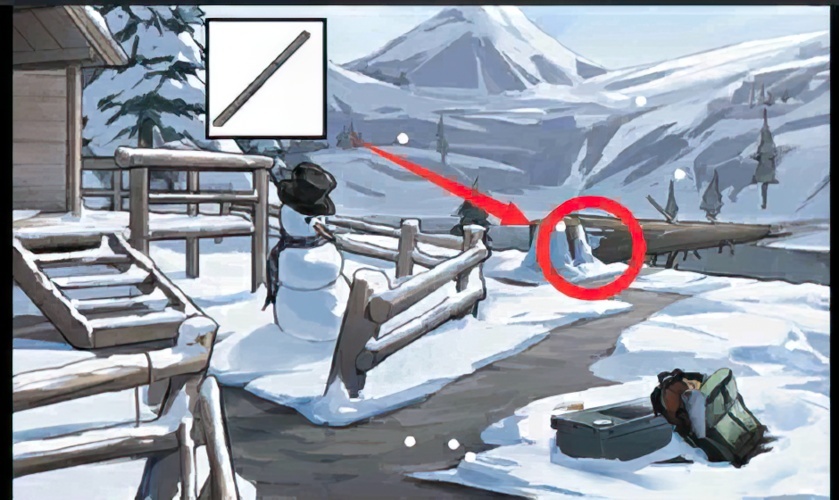
20. Return to the snow, use bamboo poles to help cross the single-plank bridge, and enter “Snow 2”.
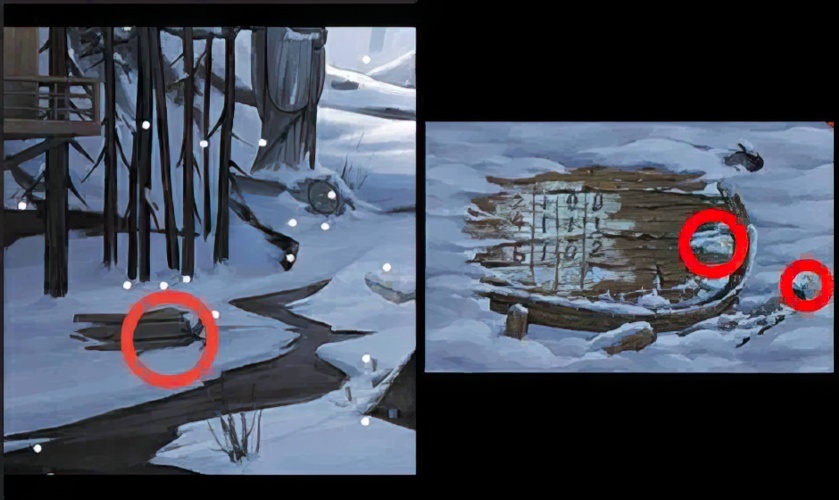
21. Go back to “Snowfield 2”, check the sleds on the ground, and pick up the hooks and broken inlays.

22. Check the tent of “Snowfield 3” and pick up the patterned squares in the tent.

23. Go back to “Snowfield 2”, check the tent, pull out the ground nail with the hook, and get the ground nail.
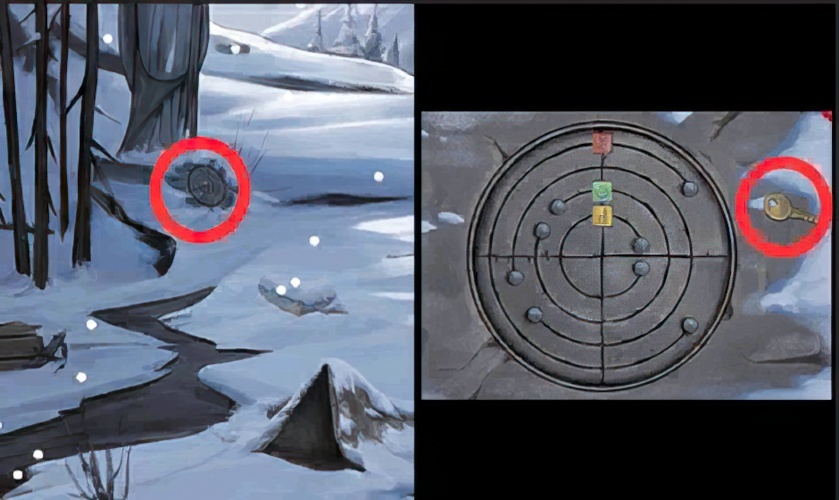
24. Go back to “Snowfield 2”, check the base of the stone statue, and pick up the key.
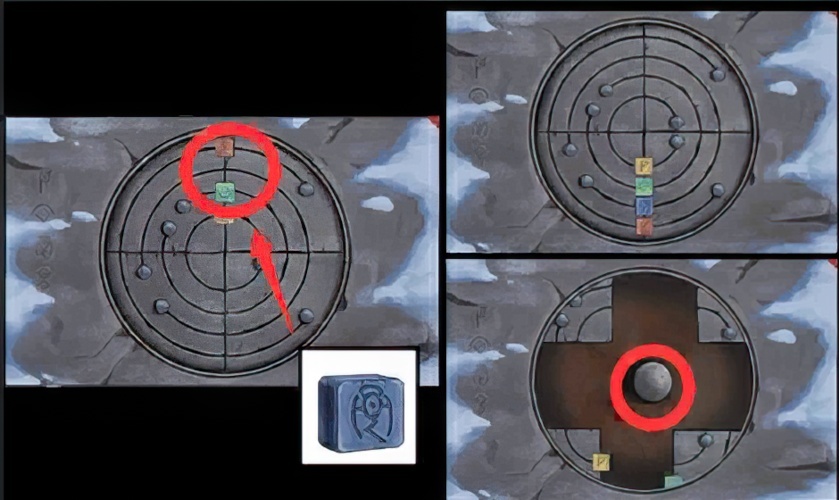
25. Go back to “Snow 2”, check the base of the stone statue, put the patterned block into the mechanism tray, unlock the mechanism, and pick up the round button.
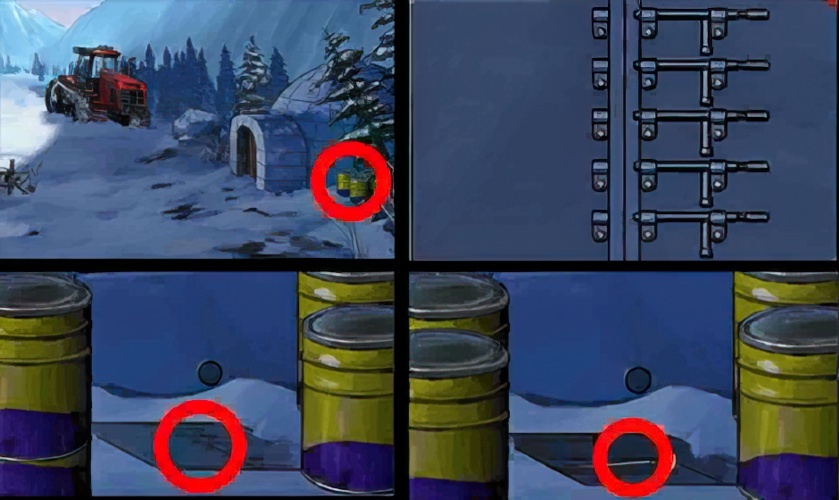
26. Go back to “Snow”, check the trap box on the ground, and put the round button in the trap.

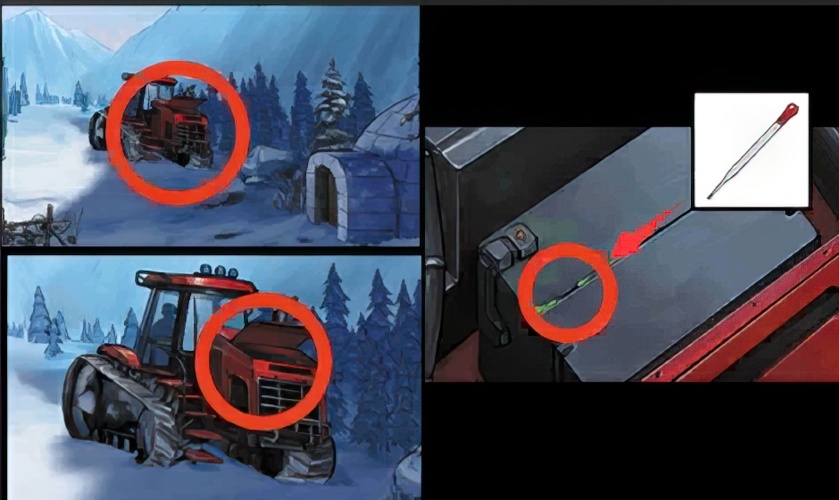
27. Return to the snow, click the button, unlock the mechanism, and pick up the hairspray in the mechanism box.
28. Go back to “Snow Field 2”, check the snow field, and spray the ice on the ground with hair spray.

29. Return to the snow, light the hairspray with an oil lighter, melt the ice on the stone, and pick up the stone.
30. Check the pillars of the “tree house”, insert the ground nails into the pillars, and fix the ground nails with stones.
31. Enter the “tree house”, look at the window, and pick up the corkscrew.

32. Return to the “tree house”, check the ball on the ground, remove the ball from the ground, and insert the corkscrew into the hole.

33. Go back to the “tree house”, open the hidden door on the floor, and pick up the sucker sword.
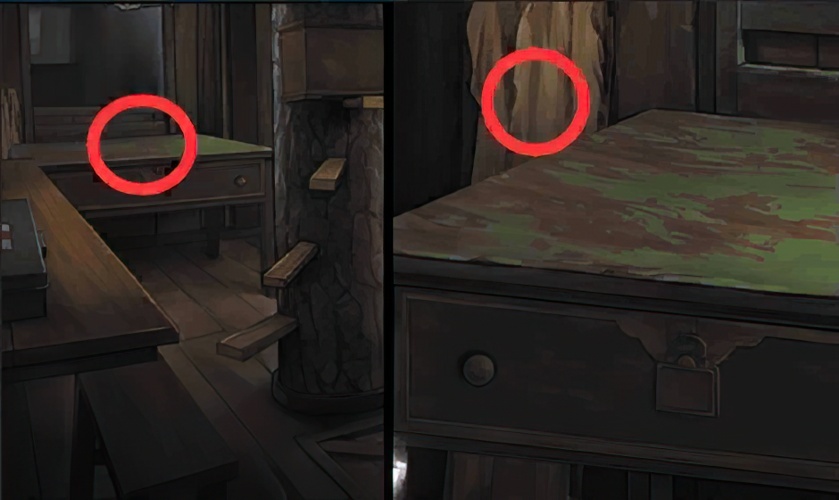
34. Go back to the “tree house”, check the dressing table, and pick up the planks.

35. Return to the “tree house”, look at the head of the bed, and pick up the wooden pillow.

36. Return to the “tree house”, put the wooden pillows in front of the bed, lift up the wooden bed with wooden boards, and pick up the broken inlays.
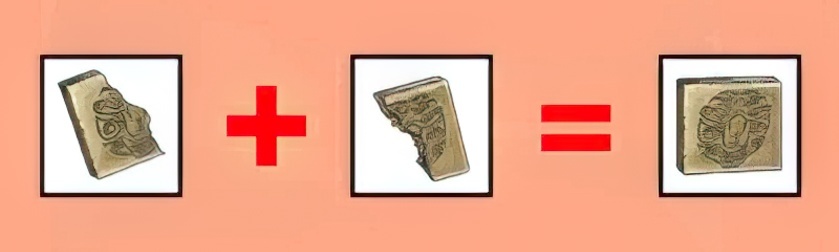
37. Return to the “tree house” and combine the two incomplete inlays into a square inlay.

38. Return to the “tree house”, check the dressing table, insert the dressing table with a square inlay, and open the drawer of the dressing table.
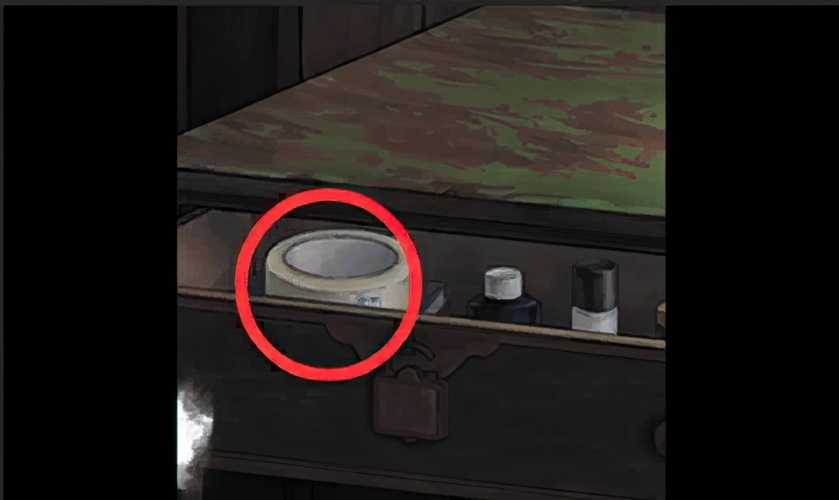
39. Return to the “tree house” and pick up the tape in the drawer of the dressing table.

40. Go back to the “tree house”, check the first aid box on the left, check the keyhole, and open the first aid box with the key.

41. Return to the “tree house”, pick up the tweezers in the first aid kit, check the dressing table, check the mezzanine behind the dressing table, and pick up the twine with tweezers.

42. Go back to “House”, check the second floor, according to the number of fish bones, enter the password 3678.
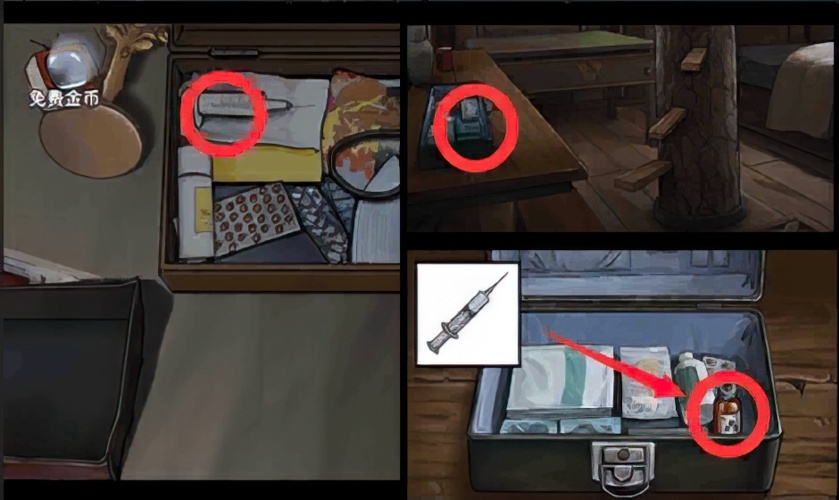
43. Return to the “house”, pick up the syringe in the box, go back to the “tree house”, insert the syringe into the anesthetic inhalation syringe, and obtain a syringe filled with anesthetic.
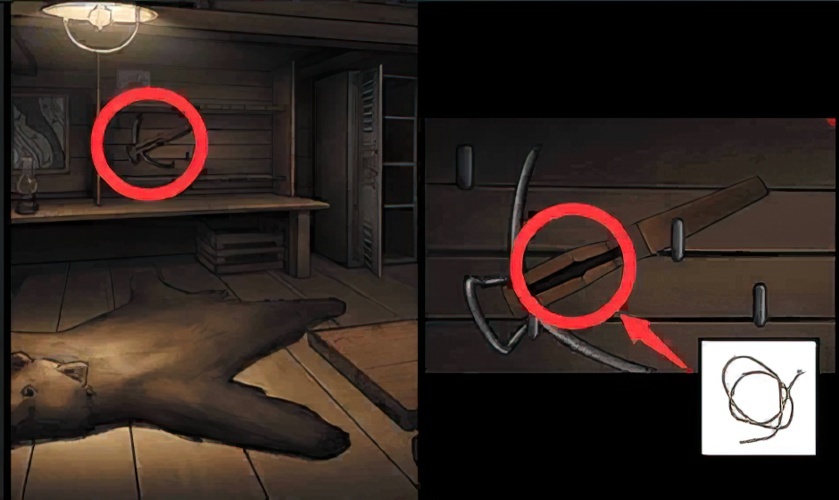
44. Go back to the “house”, check the crossbow on the wall, and put the hemp rope into the crossbow.
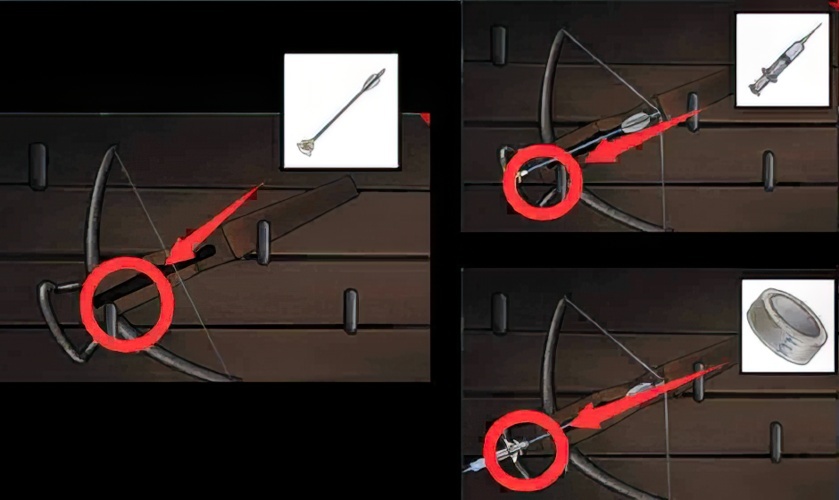
45. Go back to the “house”, put the suction cup arrow into the crossbow, and then put the syringe filled with anesthetic into the suction cup arrow, and finally fix it with tape.

46. Go back to the “house”, pick up the crossbow with the anesthetic needle, return to “Snow 2”, shoot out the anesthetic needle like a polar bear, and enter “Snow 3”.

47. Enter “Snowfield 3”, check the package, and get the symbol information on the package.
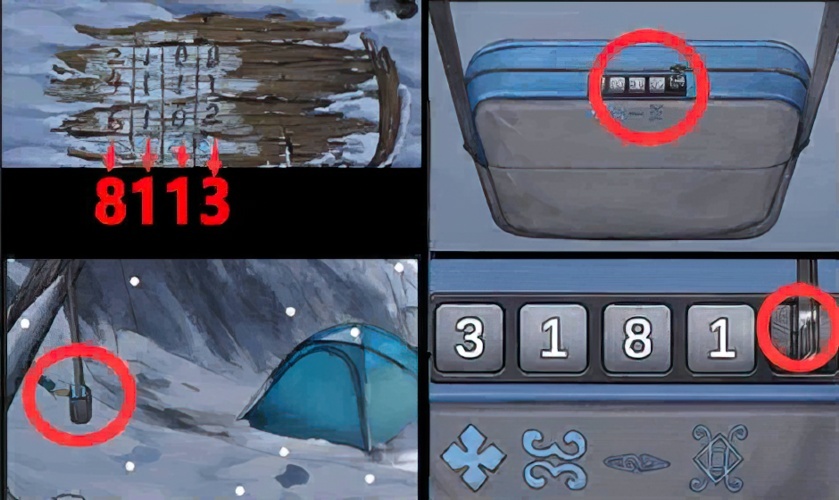
48. Go back to “Snowfield 3”, enter the password 3181 according to the snowfield prompt, and open the bag.
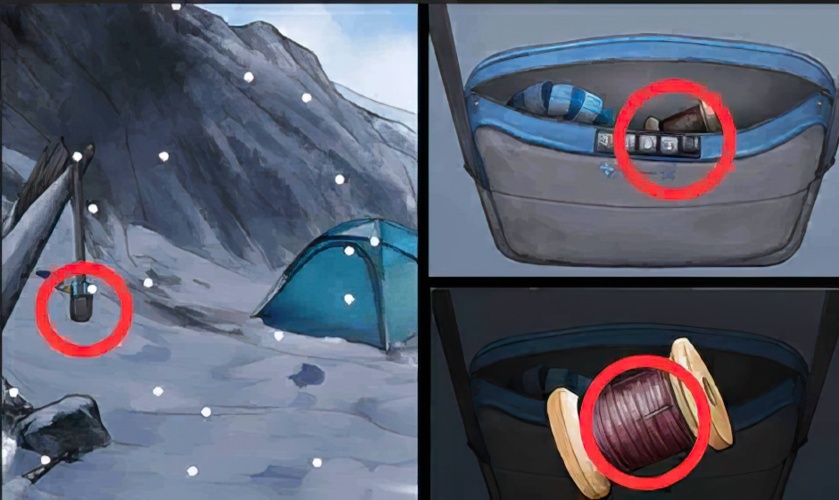
49. Go back to “Snowfield 3”, check the bag, and pick up the thread and needles in the bag.
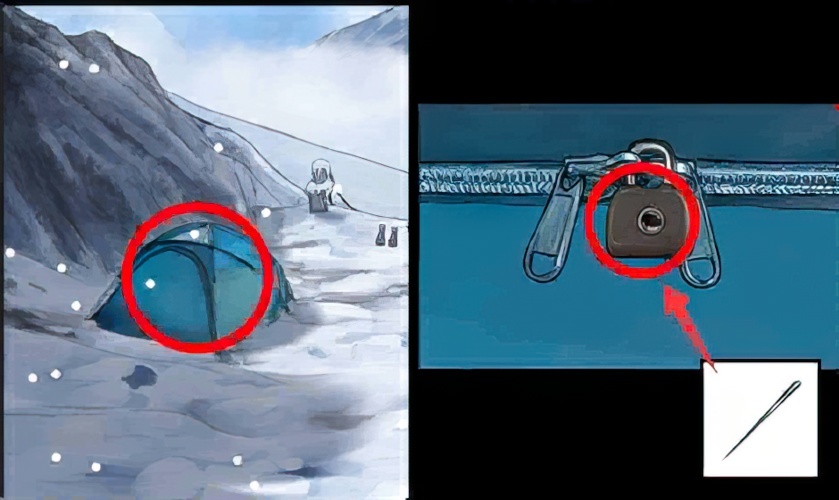
50. Go back to “Snowfield 3”, check the tent, and use a needle to pry the lock.

51. Return to “Snowfield 3”, open the lock, enter the tent, and pick up the wooden fork.

52. Return to “Snow 3”, open the first aid kit, and pick up the cuff in the first aid kit.

53. Go back to “Snowfield 3”, check the stone base on the ground, and pick up the gravel.

54. Return to “Snow 3”, combine the wooden fork, cuff, and gravel into a slingshot.
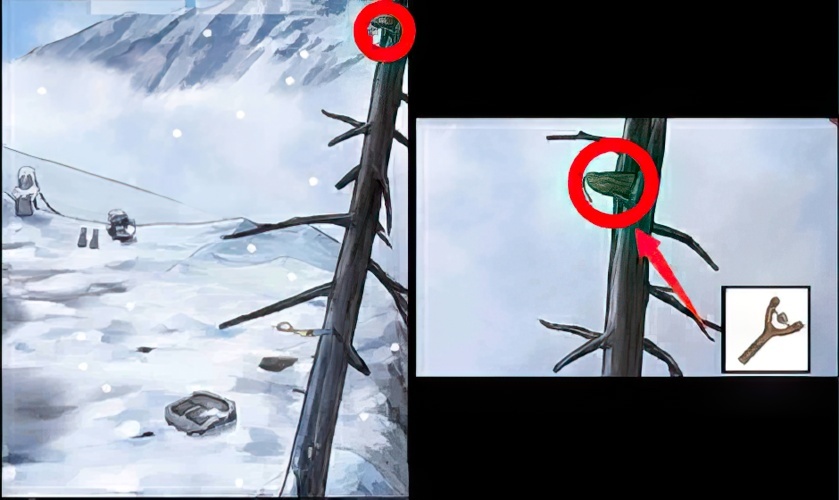
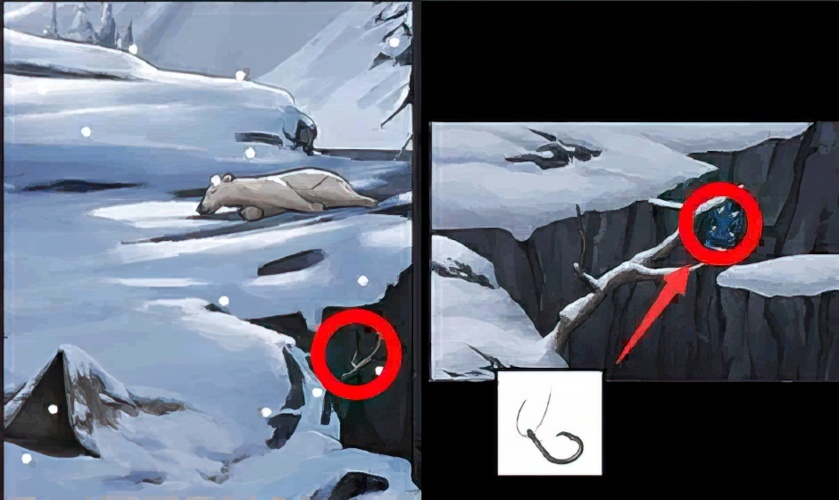
55. Go back to “Snowfield 3” and use a slingshot to knock down the bird’s nest on the book and get a fish hook.

56. Combine the hook and the thread into a hook with the thread.
57. Go back to “Snowfield 2”, check the cliff branches, and use the hooks tied to the line to catch the holder.
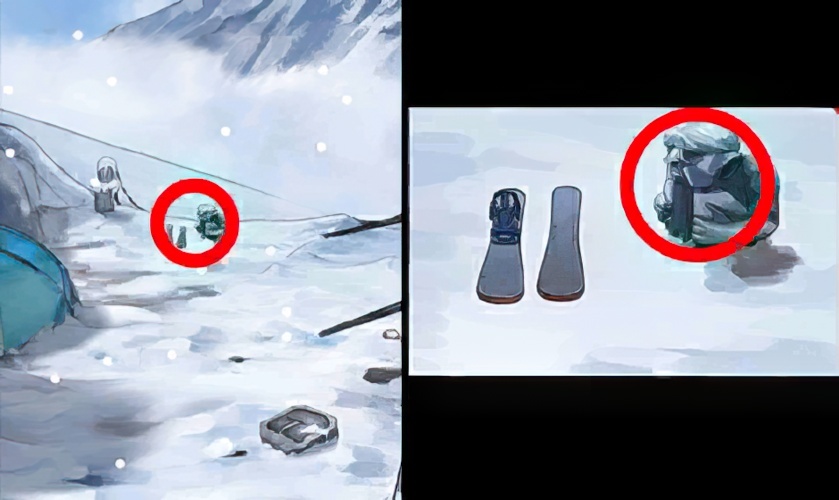
58. Go back to “Snowfield 3”, check the snowboard, and pick up the stone statue.
59. Go back to “Snow 3”, check the snowboard, and place the holder on the snowboard.

60. Go back to “Snow 3”, check the stone base, place the stone statue in the groove, and pick up the slider.
61. Go back to the “tree house”, check the trap box on the stairs, and insert the slider into the vacancy.

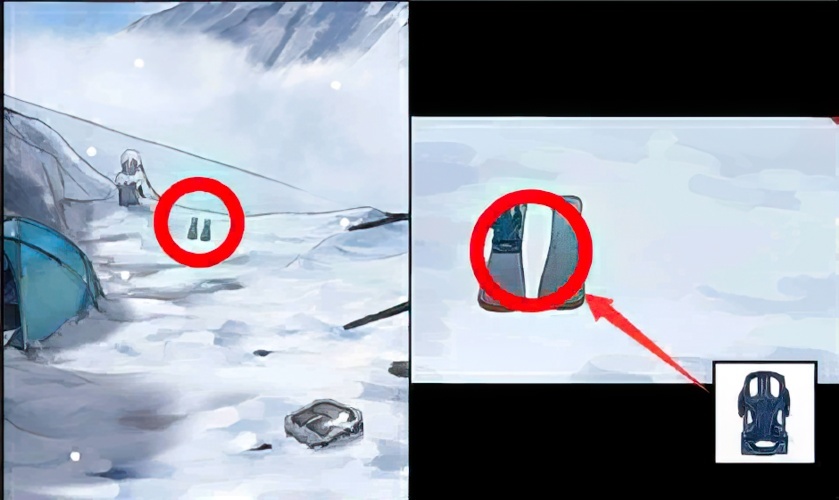
62. Go back to “Snowfield 3”, complete the decryption device of the trap box, and pick up the snowshoes.

63. Go back to “Snowfield 3”, check the snowboard, and fix the snowshoes on the snowboard.

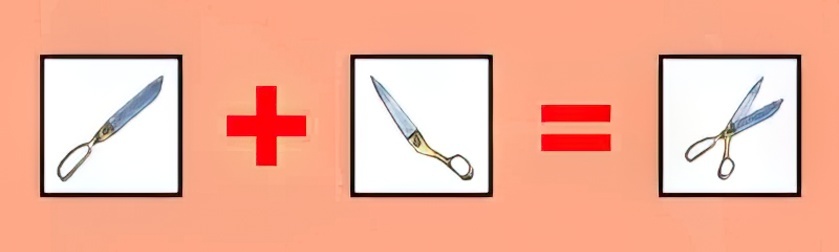
64. Go back to “Snowfield 3” and pick up half of the scissors b from the trunk.
65. Go back to “Snow 2”, check the ground, and pick the direction button.
66. Go back to “Snow 3”, check the tent, check the decryption box, and place the direction buttons on the vacancy of the puzzle solving organ.

67. Go back to “Snowfield 3”, check the decryption box of the tent, complete the puzzle game, and pick up half a pair of scissors a.
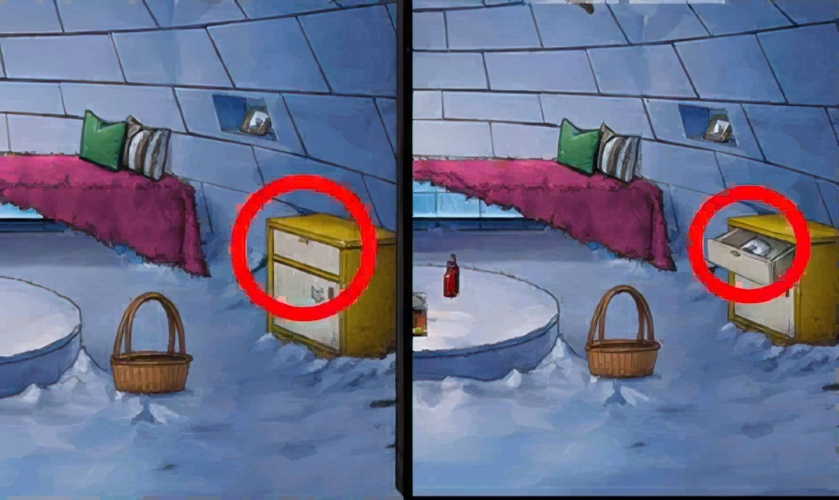
68. Combine half a pair of scissors a and half a pair of scissors b into a complete pair of scissors.

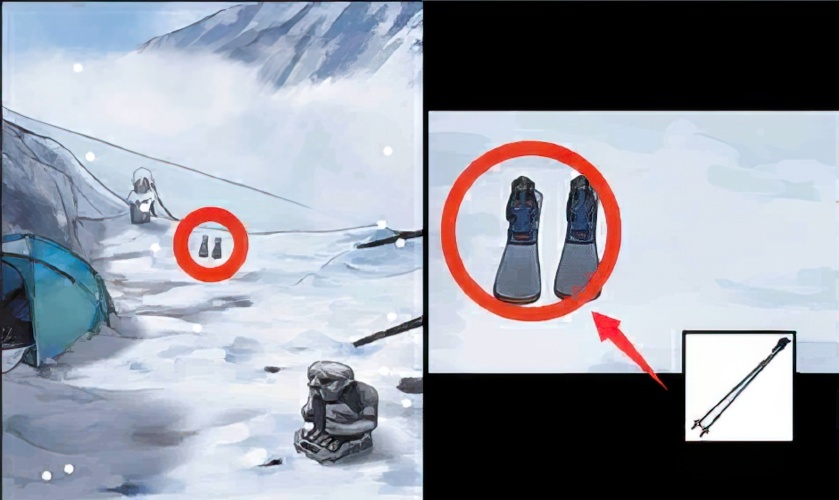
69. Go back to the “tree house”, check the box on the stairs, cut the cloth bag with scissors, and pick up the inlay 2.
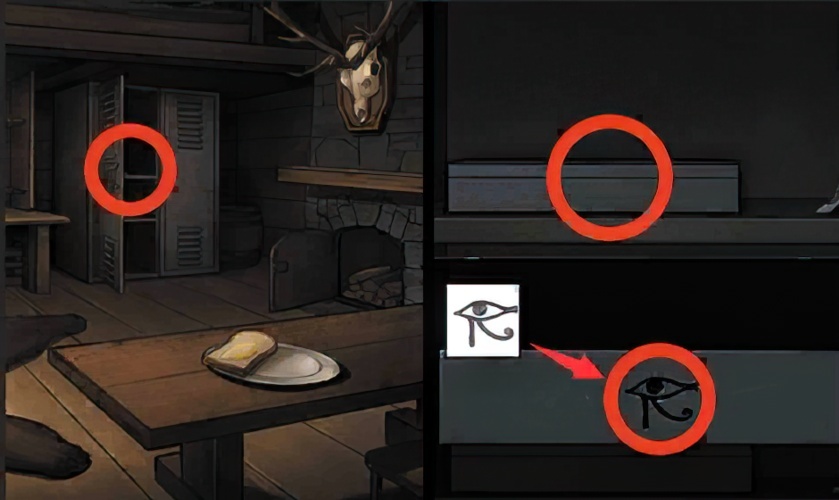
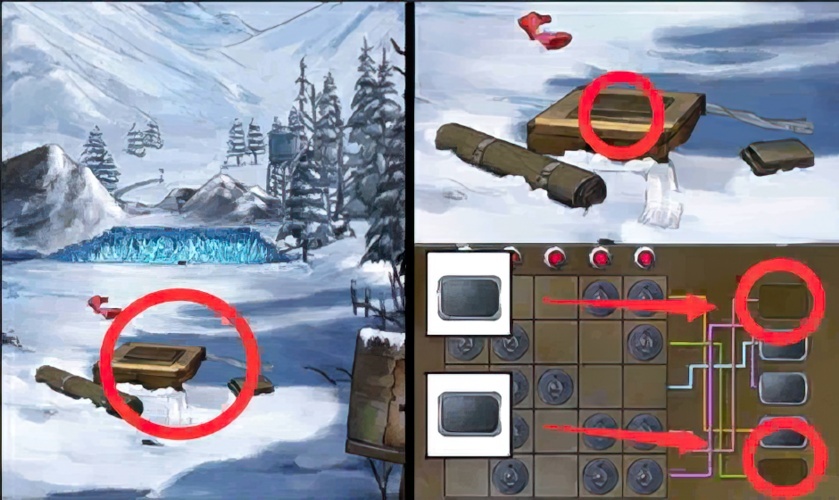
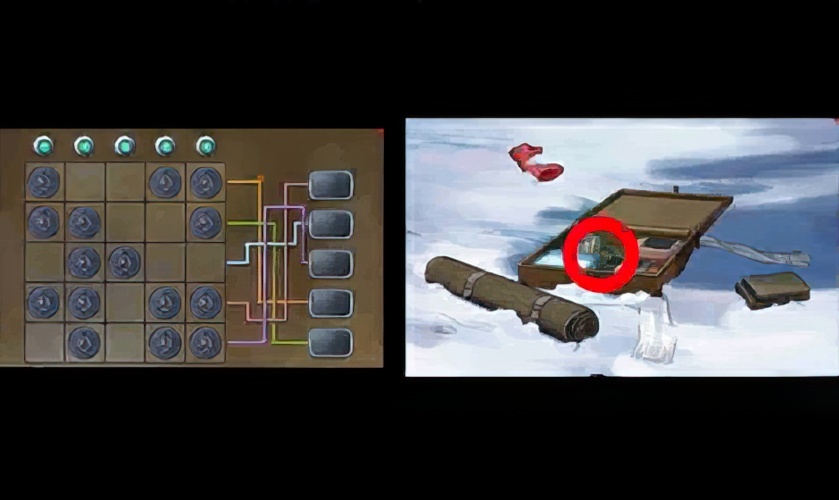
70. Back to “house”. Check the metal cabinet, check the box, and place the inlay 2 in the groove.

71. Go back to the “house”, check the metal cabinet, check the box, and pick up the ski poles in the box.
72. Go back to “Snowfield 3”, check the snowboard, use the ski pole to act on the snowboard, start the ski game, and enter the “woods”.

73. Look at the shed on the left and pick the rectangular button.
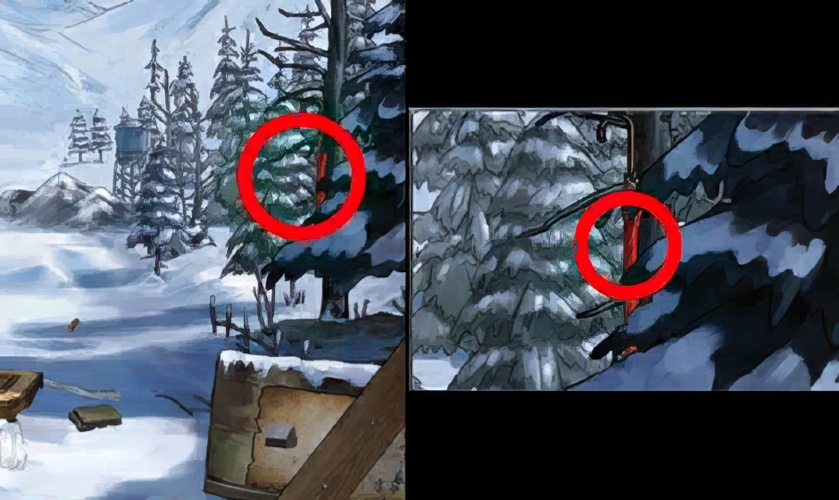
74. Look at the trunk on the right and pick up the umbrella.

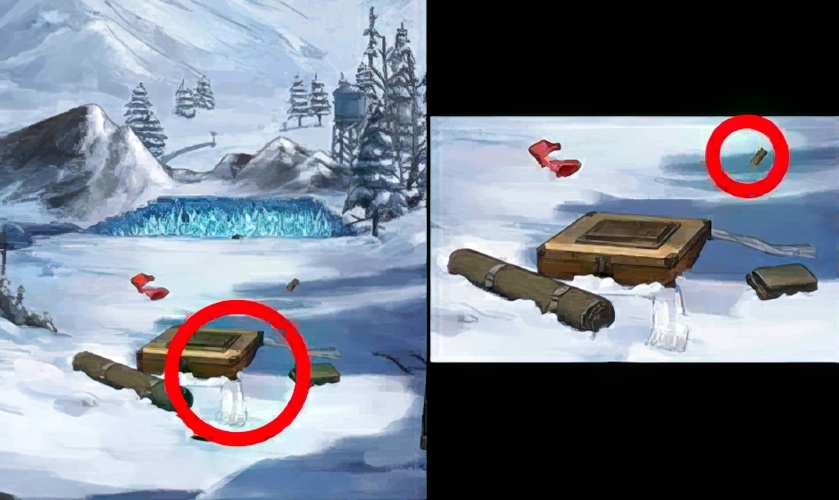
75. Checking the snow, found that there is an ice thorn trap, hook up the backpack with an umbrella.

76. Open the backpack, pick up the rectangular button and the claw hammer.
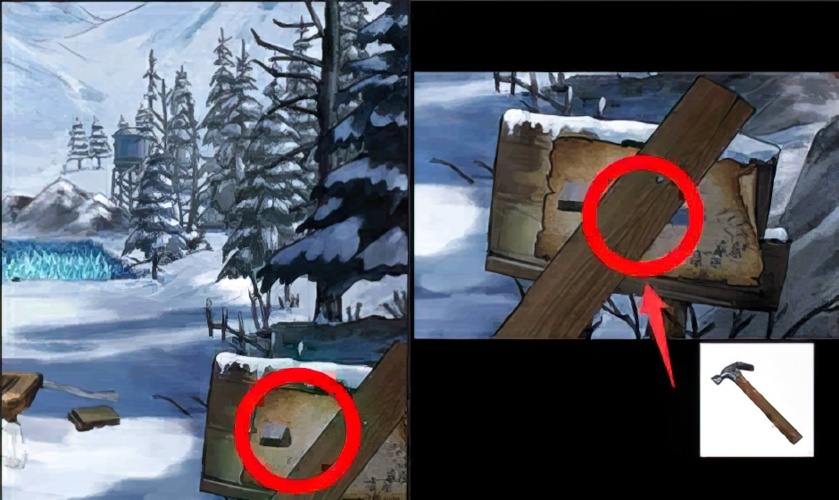
77. Check the debris on the ground and pick up the short wooden handle.

78. Combine the claw hammer head and the short wooden handle into a complete claw hammer.
79. Look at the sign on the right, remove the nail with a claw hammer, and pick up the narrow plank.
80. Look at the shed on the left and use a claw hammer to remove the narrow plank.
81. Check the debris on the ground, check the suitcase, and put the two rectangular buttons into the puzzle-solving mechanism.
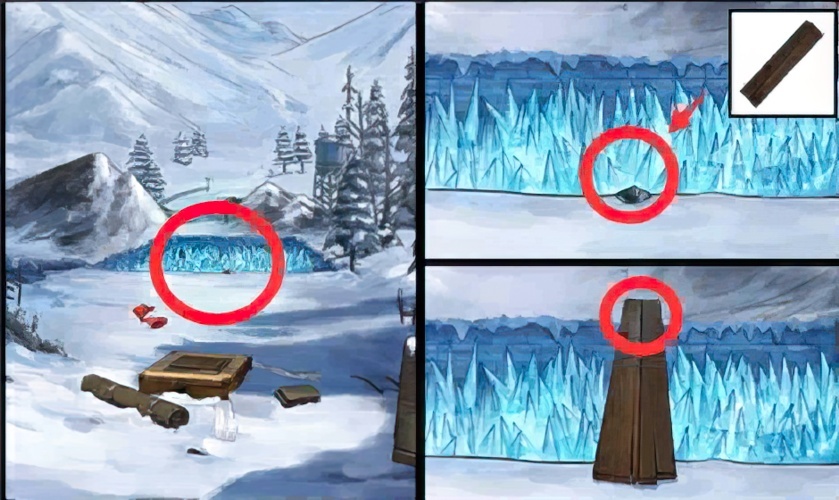
82. Unlock the puzzle mechanism and pick up the power cord in the suitcase.

83. Combine two narrow boards and wires into wooden pedals.
84. Check the ice thorn traps on the ground, spread the wooden pedals on it, and enter the “lakeside”.
85. Go back to the “lakeside”, check the garbage dump on the ground, and pick up the relief fragments.
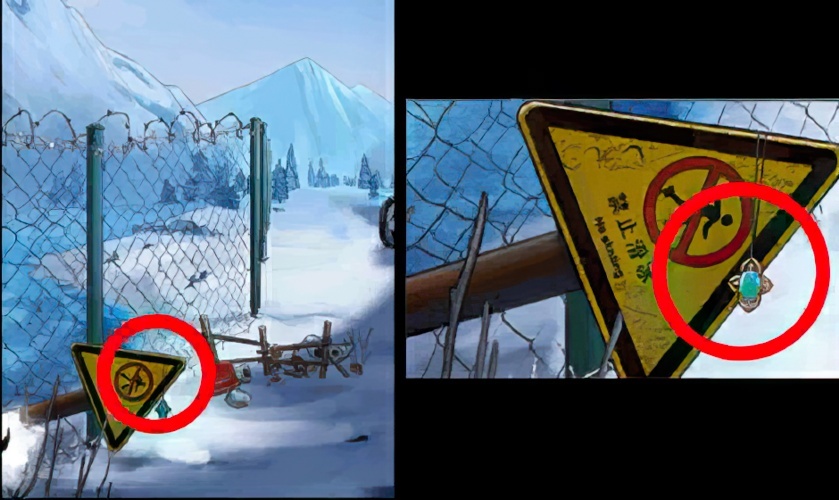
86. Go back to the “lakeside”, enter the “outside the wall”, check the target on the wall, and pick up arrows.

87. Go back to the “lakeside”, look at the oil drum on the right, move the oil drum away, and pull out the key with an arrow.
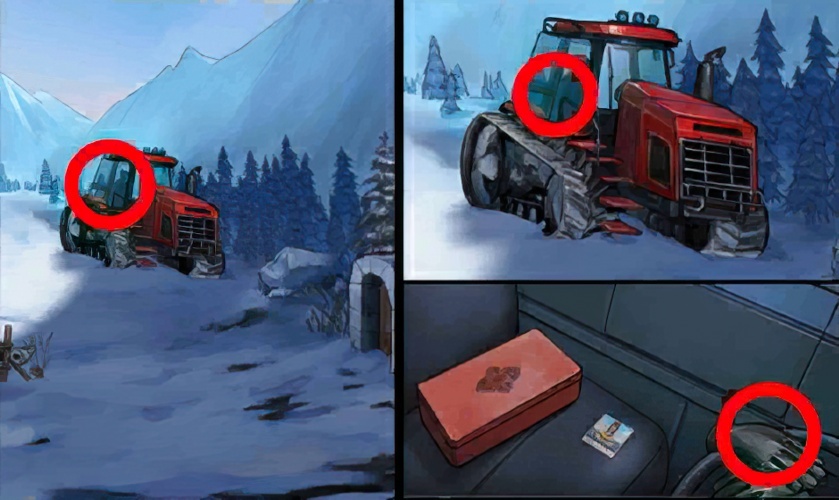
88. Go back to “Lakeside”, look at the sign on the left, and pick up the pendant on the sign.

89. Go back to the “lakeside”, check the door of the snowmobile, and open the door with the key.
90. Go back to the “lakeside”, enter the snowmobile, and pick up the leather gloves on the steering wheel.
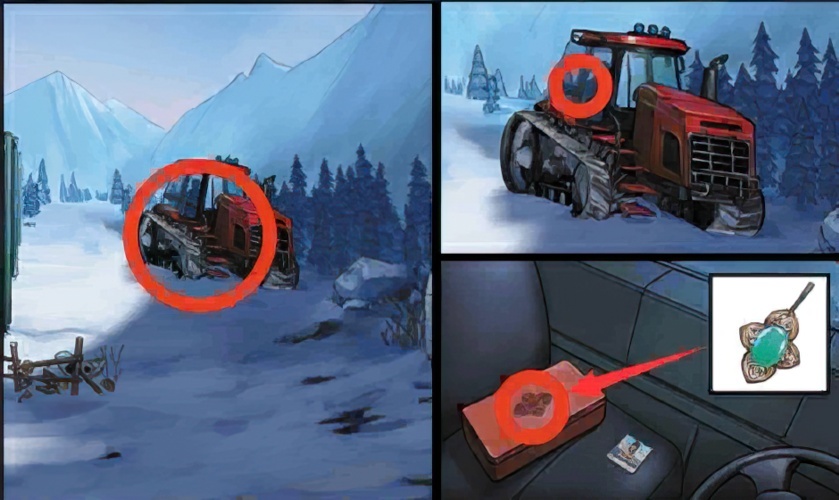
91. Go back to the “lakeside”, enter the snowmobile, put the pendant into the groove, and pick up half a pair of pliers.

92. Go back to “outside the wall”, look at the thorns on the right, use leather gloves to poke the thorns away, and pick up half a pair of pliers.
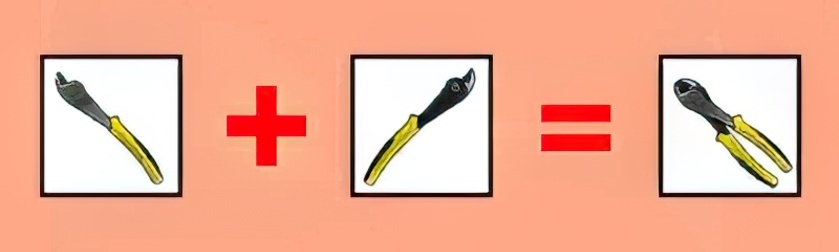
93. Put two halves of the pliers, and make a complete pliers.

94. Go back to “Lakeside”, look at the barbed wire on the left, and cut the barbed wire with pliers.
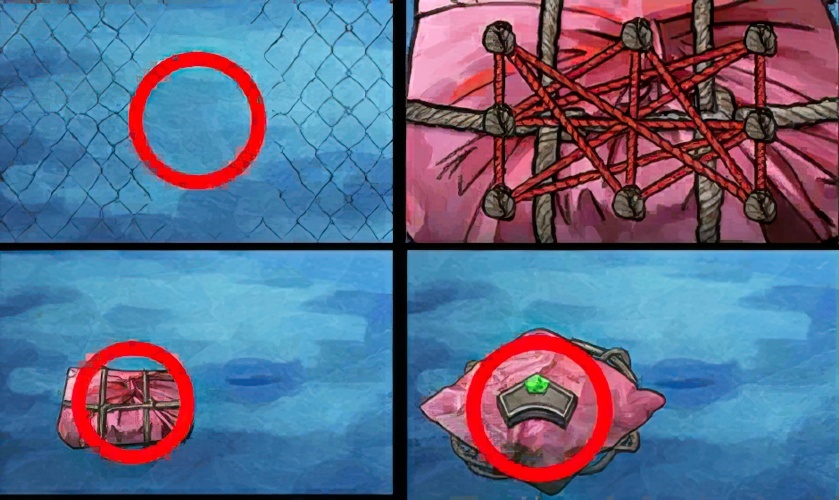
95. Back to the “lakeside”, enter the lake, check the baggage, complete the knot game, and pick up the relief fragments.

96. Go back to “outside the wall”, look at the big stone, and pick up the relief fragments.
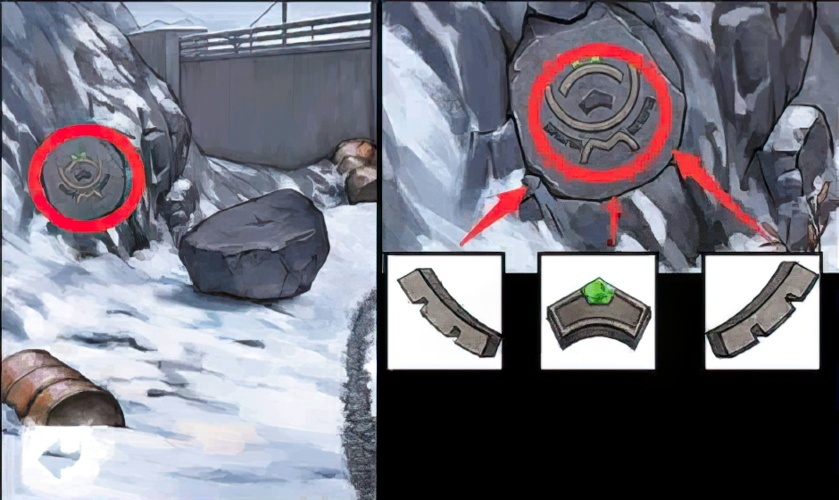
97. Go back to “outside the wall”, look at the relief on the left, insert three pieces of relief into the groove, and open the stone gate.

98. Go back to “outside the wall”, check the hole in the stone, and pick up the doorknob.

99. Go back to the “lakeside” and use the door handle to put it on the door of the “Igloo”.
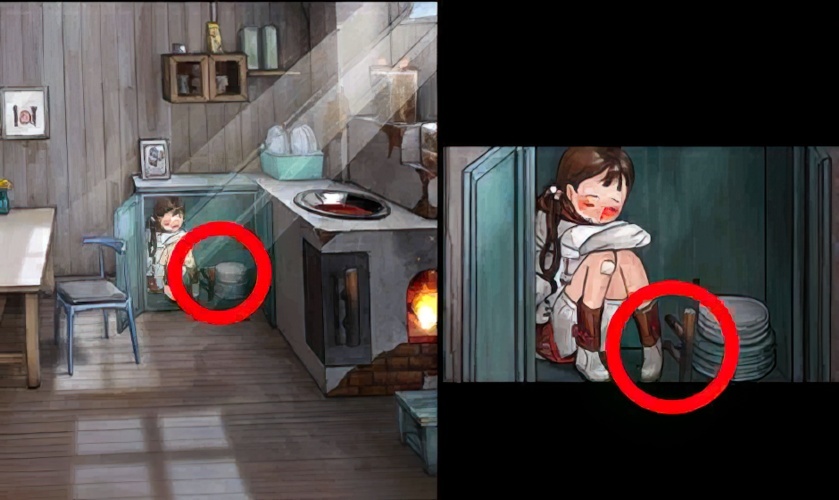
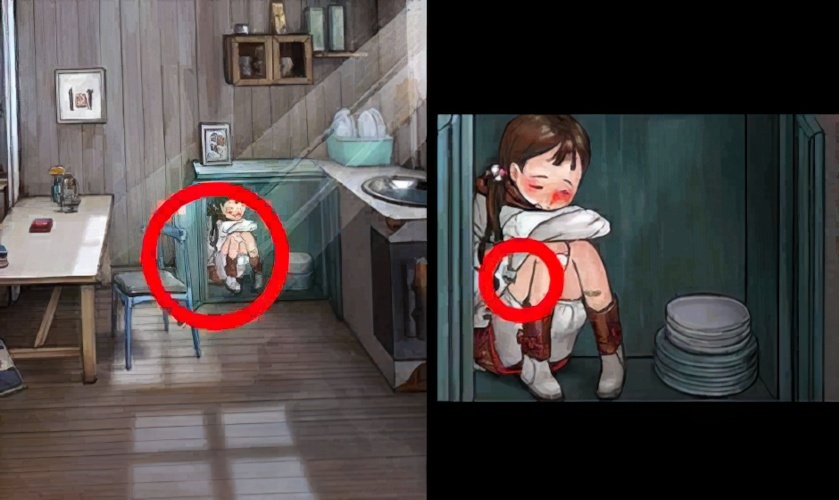
100. Check the door of the “Igloo”, open the door handle, enter the “Igloo”, check the bed and lift the sheets.
101. Go back to the “Igloo”, look at the bottom of the bed, and pick up the branches.

102. Go back to the “Igloo”, use the tree branches to remove the basket, check the basket and open the furoshiki of the basket.

103. Go back to the “Igloo”, check the basket, pick up the joystick and fork, check the wall on the left, use the fork to remove the bricks, and pick up the red slider.
104. Go back to the “Igloo”, check the drawer above the cabinet on the right, and pick up the salt.

105. Go back to “outside the wall”, check the ice sculpture, melt the ice sculpture with salt, and pick up the blue arrow.
106. Go back to the “Igloo”, check the cabinet, put the blue arrow into the groove on the cabinet, complete the puzzle game, and open the cabinet.
107. Go back to the “Igloo”, check the cabinet, and pick up the circular arrow.

108. Go back to the “Igloo”, check the freezer, place the red slider and the circular arrow on the puzzle mechanism, complete the mini game, and pick up the metal badge and hex wrench.

109. Go back to the “Igloo”, check the cabinet on the right, put the metal badge in the groove, and pick up the screwdriver.
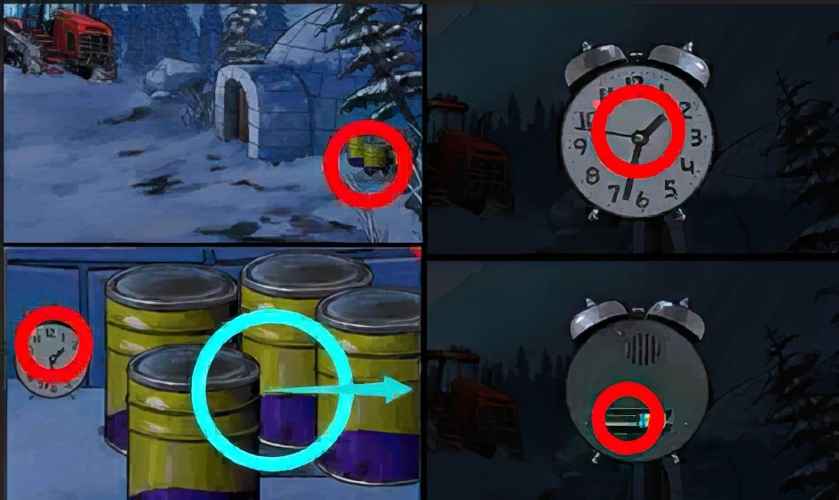
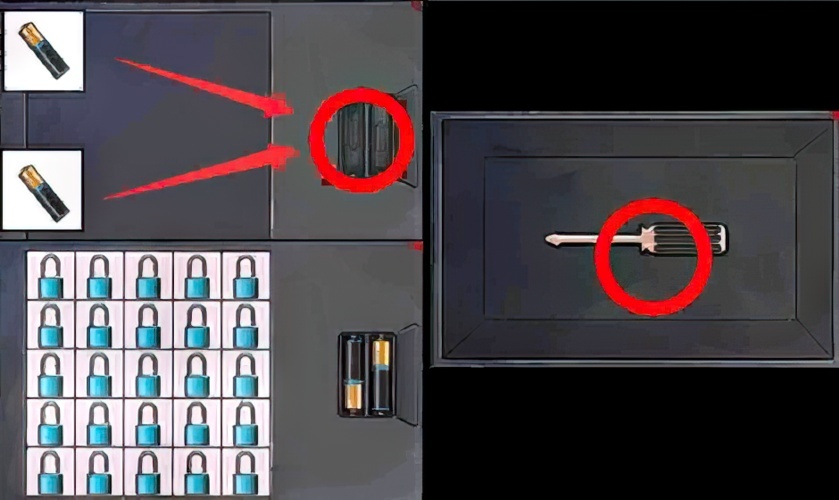
110. Go back to “Lakeside”, look at the oil drum on the right, pick up the alarm clock, turn the alarm clock over to open the battery box, and pick up the battery.

111. Go back to “outside the wall”, check the hole in the wall, check the radio, turn the radio over and open the battery box with a screwdriver to pick up the battery.
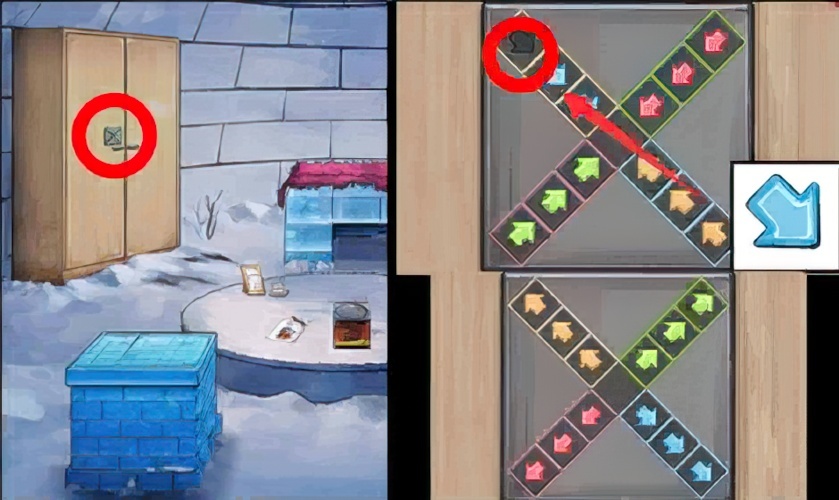
112. Go back to the “wood”, check the shed, check the box on the ground, and open the battery box above.
113. Go back to the “wood”, check the box on the shed floor, put two batteries in, complete the mini game, and pick up the inlay.

114. Go back to the “Igloo”, look at the wardrobe on the left, put the inlay into the groove, and pick up the gear.
115. Go back to the “Igloo”, look at the table in the middle, open the cookie box, remove the cookie to pick up the card.
116. Go back to the “lakeside”, enter the snowmobile, use the card issuing button to open the card owner’s button, open the hand trunk, and pick up the gear.
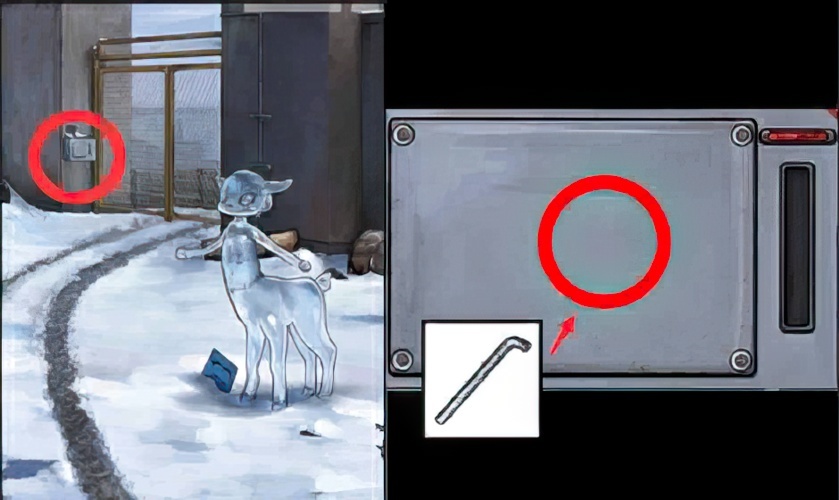
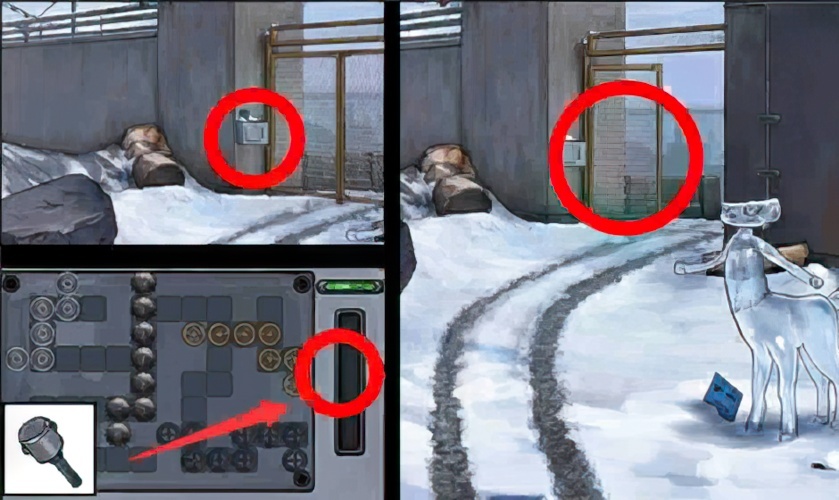
117. Go back to “outside the wall” and use a hex wrench to remove the door cover.

118. Go back to “outside the wall”, check the access control, and install the two gears in the device.

119. Go back to “outside the wall”, check the door, and unlock the puzzle of the door.
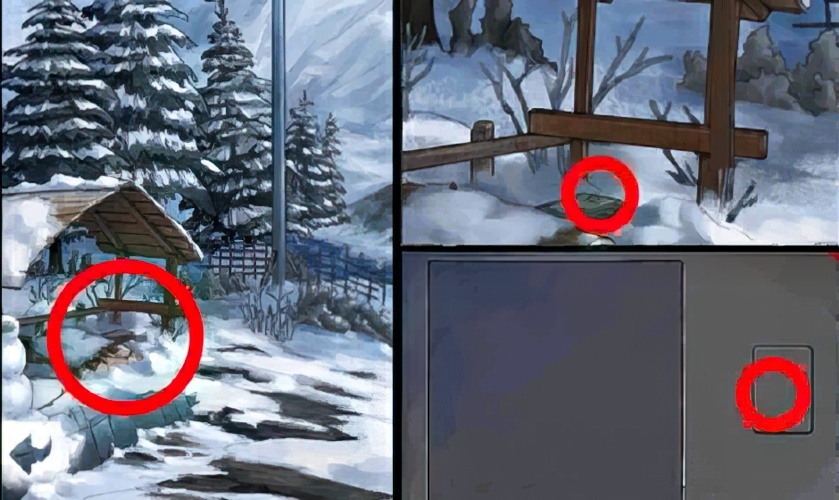
120. Go back to “outside the wall”, check the access control, click the joystick, open the door, and enter the “camp”.
121. Go back to the “simple hut”, check the floor, and unlock the device with the activation key.
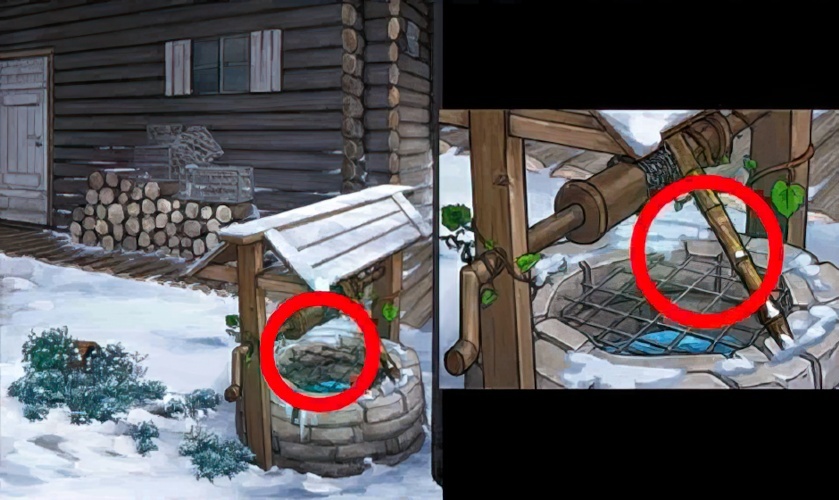
122. Go back to the “camp”, look at the well on the right, and pick up the pole.
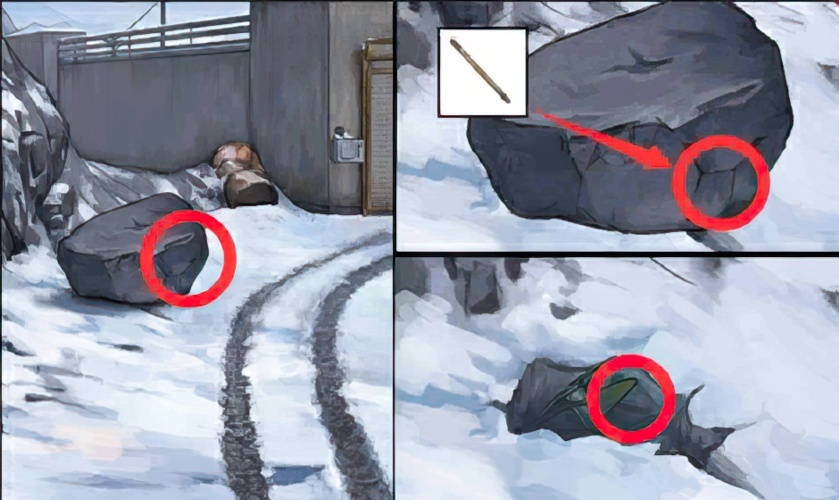
123. Go back to “outside the wall”, look at the big rock, pry the big rock open with a pole, and pick up the ice drill that lacks a crank.

124. Combine the rocker and the ice auger that lacks the rocker into a complete ice auger.

125. Go back to the “camp”, check the ground, and pick up the bucket.

126. Go back to the “lakeside”, enter the lake, drill a hole in the ice with an ice drill, and fill the bucket with water.
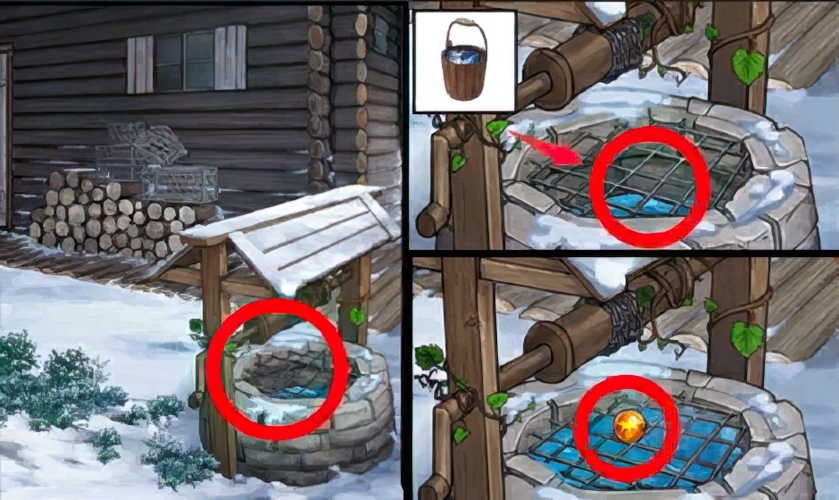
127. Go back to the “camp”, pour the bucket full of water into the well, and pick up the yellow ball.

128. Go back to the “camp”, check the pile of broken planks, and move the planks away one by one.

129. Go back to the “camp”, check the box on the ground, put the yellow ball into the mechanism, complete the mini game, and pick up the broken tweezers and whetstone.

130. Go back to the “camp”, check the door, and pick up the blunt scissors.

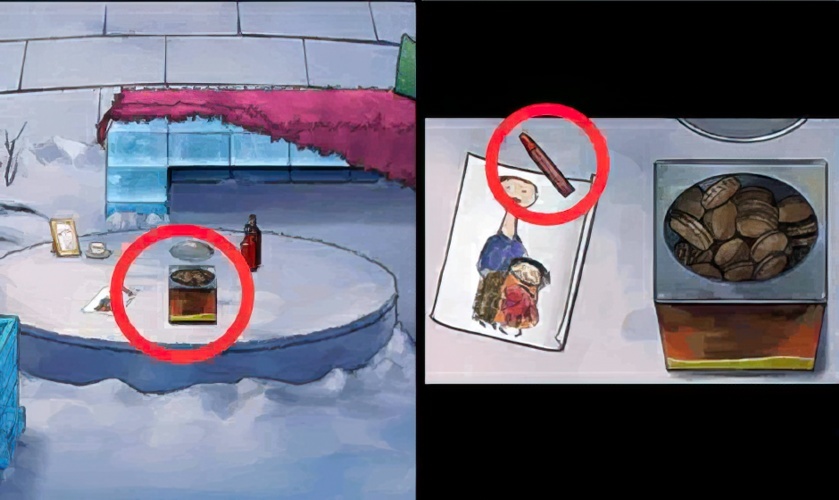
131. Combine the whetstone and blunt scissors into scissors.
132. Go back to the “camp” to check the well, cut the wooden rattan in the well with scissors, and pull out the chain.
133. Go back to the “Igloo”, look at the table in the middle, and pick up the crayons.

134. Go back to “Lakeside”, check the sign, paint the crayons on the sign, and display the letters.

135. Go back to the “camp”, check the cage, enter the letters cheat, and unlock the lock.
136. Go back to the “camp”, pick up the lock, check the tripod on the ground, and connect the lock to the tripod and the chain.

137. Go back to the “camp”, check the well, shake the handle, take the tripod out, check and open the cellar, and pick up the vinegar.

138. Go back to the “camp”, check the cage, open the cage and pick up the wire brush.
139. Go back to the “lakeside”, look at the oil drum on the right, look at the ground, and use vinegar and a wire brush to remove the rust stains on the ground bolts.
140. Go back to the “lakeside”, check the post box, check the ground, complete the mini game, open and pick up the hairpin.

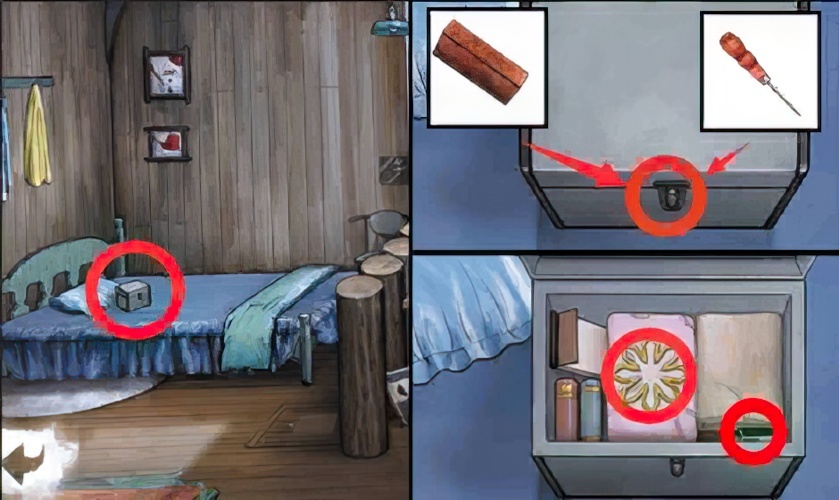
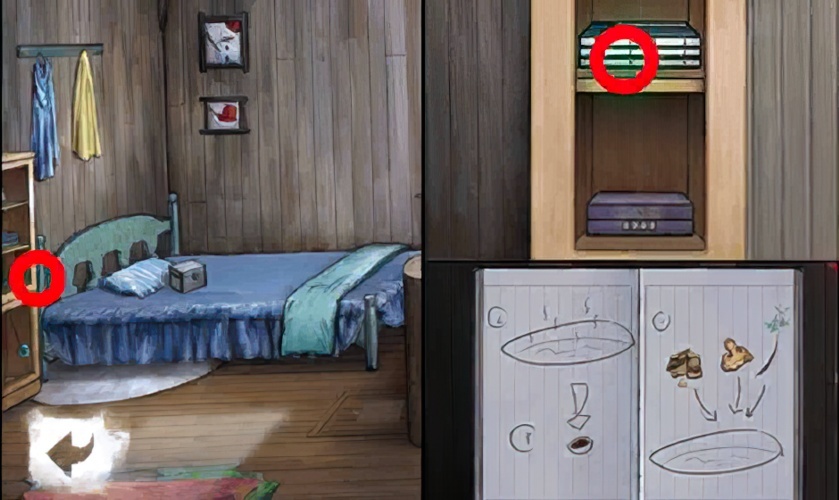
141. Go back to the “camp”, check the door, and insert the broken tweezers and hairpin into the keyhole.

142. Go back to the “camp”, check the door lock, complete the mini game, and enter the “simple hut”.
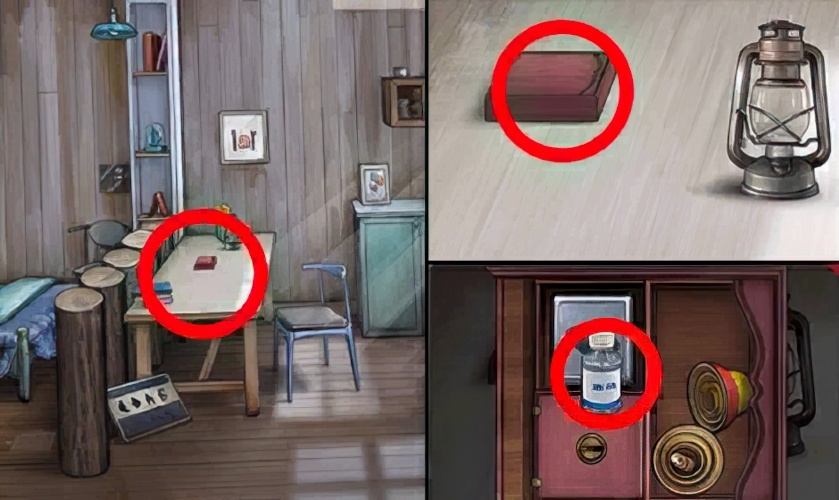
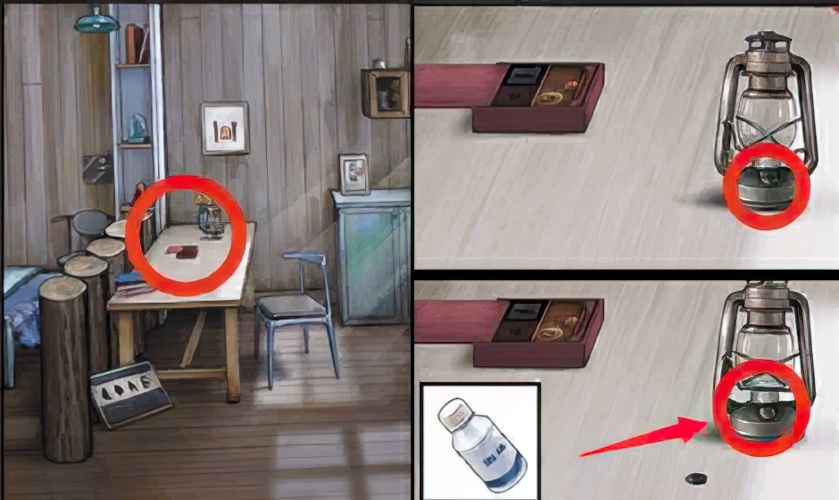
143. Go back to the “simple hut”, check the desktop, open the small box, and pick up the alcohol.

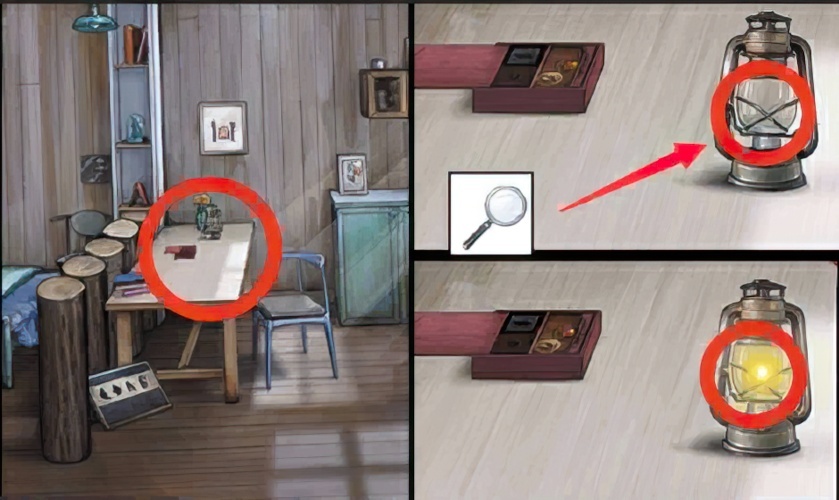
144. Go back to the “simple hut”, check the bed, and pick up the magnifying glass under the pillow.
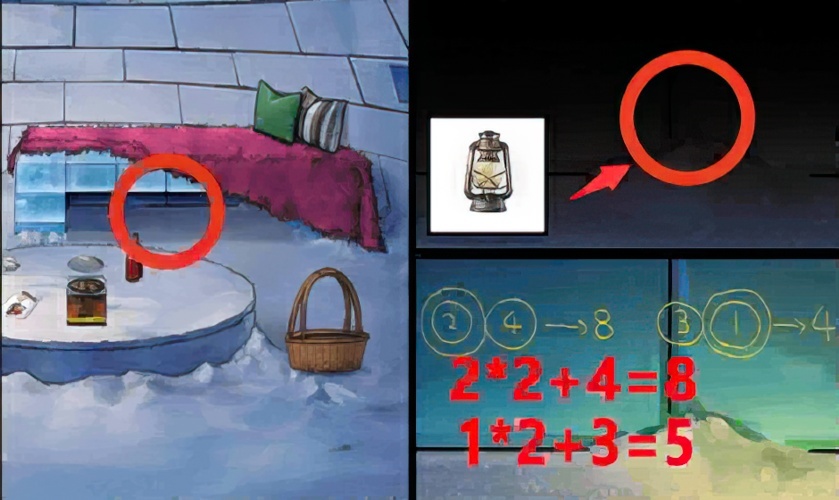
145. Go back to the “simple hut”, check the desktop, open the lid of the kerosene lamp, and pour alcohol into the kerosene lamp.
146. Go back to the “simple hut”, check the desktop, light it with a magnifying glass, and pick up the kerosene lamp.
147. Go back to the “Igloo”, check the bottom of the bed, illuminate the kerosene lamp under the bed, and check the prompts.

148. Go back to the “simple hut”, check the cabinet on the left, check the code box, there is a prompt to enter the code 6879, pick up the awl.

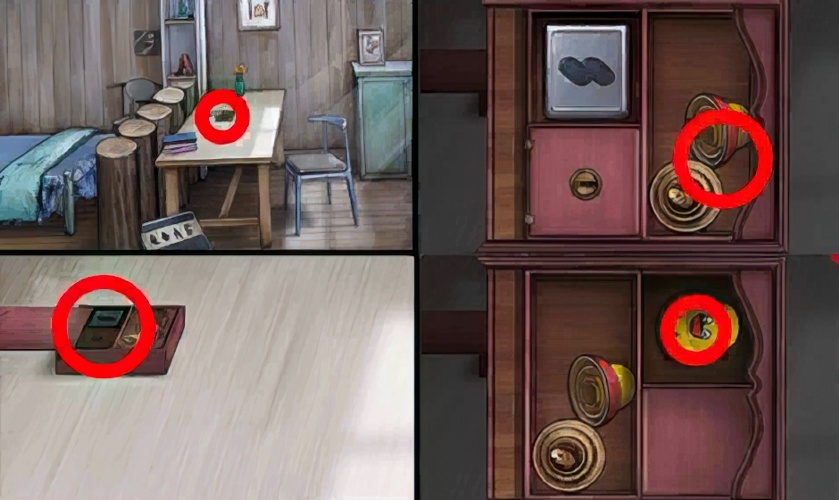
149. Go back to the “simple hut”, check the stove, and pick up the bricks.
150. Go back to the “simple hut”, check the bed, open the box with bricks and awls, and pick up hollow wood carvings and matches.
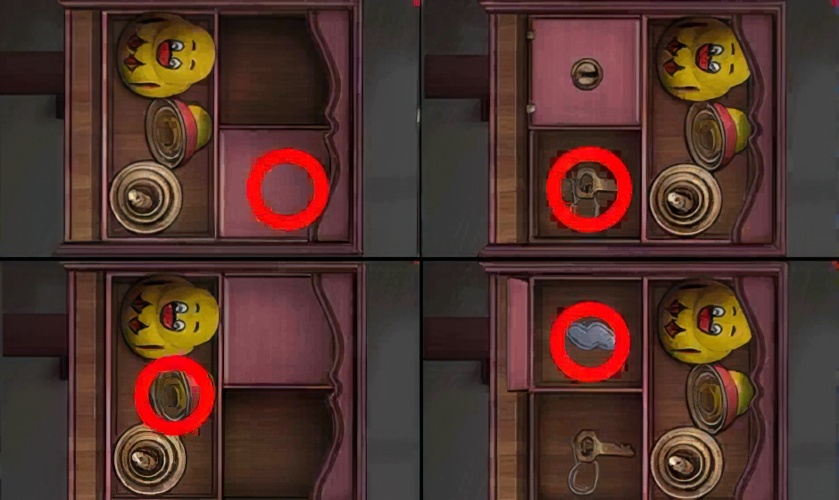
151. Go back to the “simple hut”, check the desktop box, move the grid on the right to the left, and place the little yellow duck on the grid.
152. Check the box on the desktop, move the bottom right grid to the top, and then move the left grid to the right, open the lock with the key, and pick up the block.

153. Check the box on the table, move the grid on the right to the left, then move the grid on the upper right to the bottom right, and move the grid on the left to the right. Use the insert to open the box and pick up the dropper.

154. Go back to the “woods”, check the wooden sign, tear off the paper on the wooden sign, put the hollow wooden sculpture into the groove, and pick up the crowbar.

155. Go back to the “lakeside”, check the front of the snowmobile, and use a crowbar to pry the front of the car.
156. Go back to the “lakeside”, check the front of the snowmobile, and pick up the acidic corrosive liquid with a dropper.

157. Go back to “outside the wall”, check the hole in the wall, and pick up the dog’s tail grass.

158. Return to the “simple cabin”, check the cabinet, dissolve the plug of the cabinet with an acidic corrosive liquid, and open the cabinet.
159. Return to the “simple hut”, check the cabinet, and pick up the handle of the bellows.

160. Go back to the “simple hut”, check the bellows, and insert the handle of the bellows into the stove.
161. Go back to the “simple hut”, check the cabinet on the left, check the book, and get the recipe.
162. Go back to the “simple hut”, check the cabinet, and pick up the activation key.
163. Go back to the “simple hut”, check the floor, and use the activation key to turn on the switch on the ground.

164. Go back to the “simple hut”, check the floor, complete the decryption mini-game, and pick up firewood and aconite.

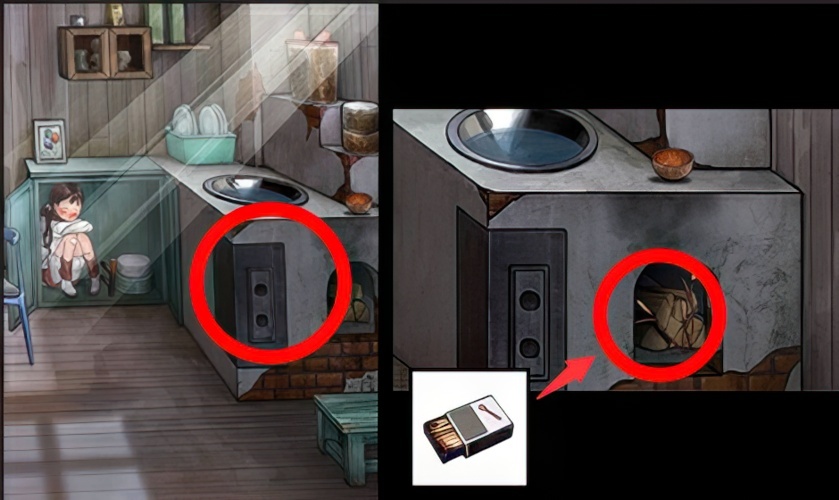
165. Go back to the “camp”, check the ground, and loot licorice.

166. Go back to the “simple hut”, check the stove and pick up dried ginger.

167. Go back to the “simple hut”, check the stove, and put the firewood and dog’s tail grass into the hole.
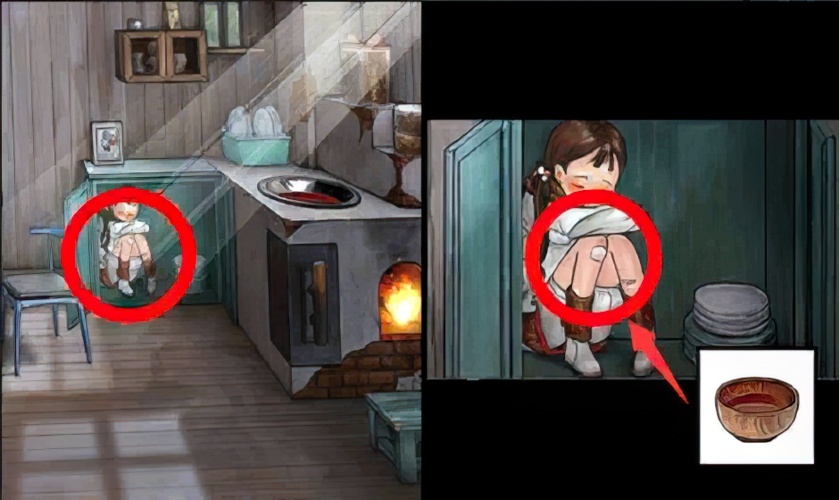
168. Go back to the “simple hut”, check the stove, and light the stove with a match.

169. Go back to the “simple hut”, check the stove, and pull the bellows.

170. Go back to the “simple hut”, check the stove, put aconite, dried ginger, and licorice into the pot.

171. Go back to the “simple hut”, check the stove, and use a bowl to make Sini soup.
172. Go back to the “simple hut”, check the cabinet, feed Sini soup to the little girl, and start negotiations.


