Hospital Escape: Chapter 6 – This time in the game you will study the patient: Ling’an Middle School students suddenly fell into a coma due to excessive stress. After investigation, there has been a large change in weight recently and fluctuating and unstable.
Hospital Escape: Chapter 6 – Walkthrough
Below you can watch the complete walkthrough of the Chapter 6, in the game Hospital Escape.
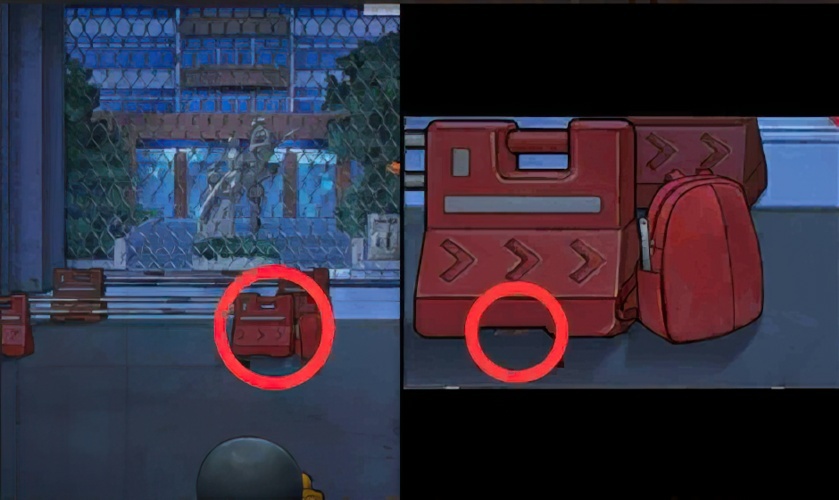
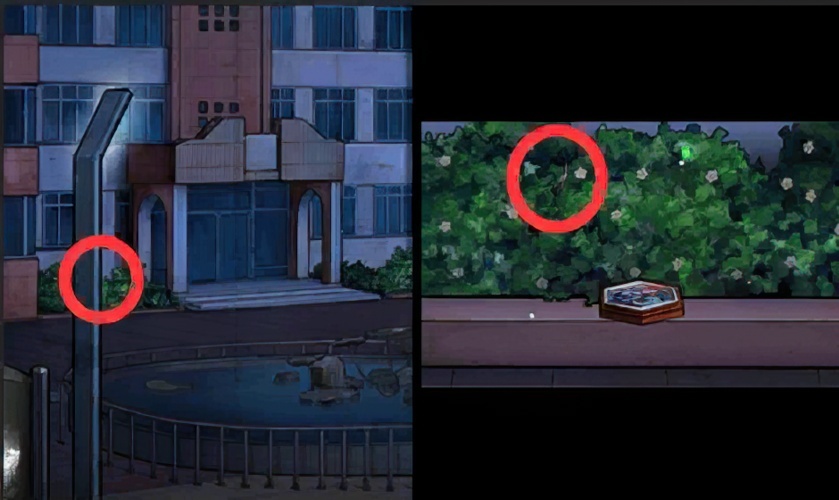
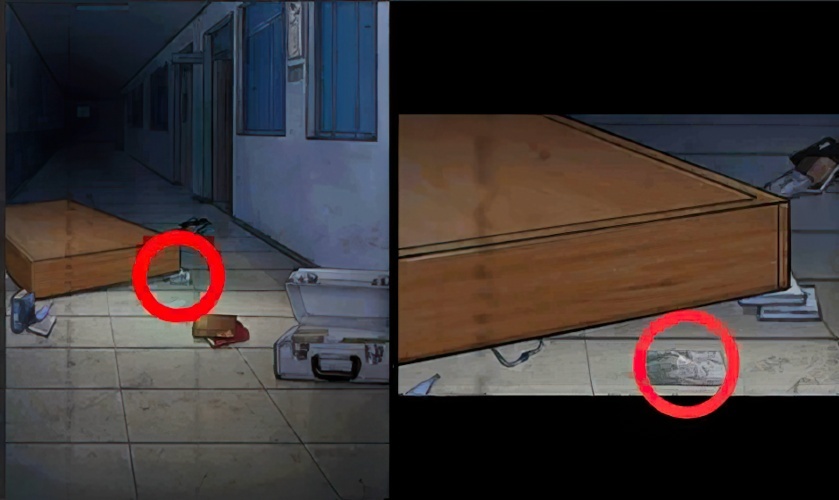
1. Look at the roadblock and pick up the photo fragments under the roadblock.

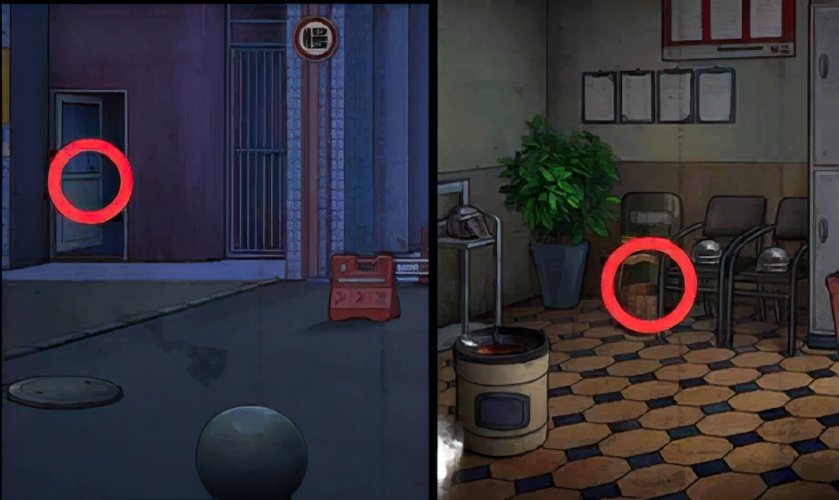
2. Check the trash can and pick up the photo fragments under the trash can.

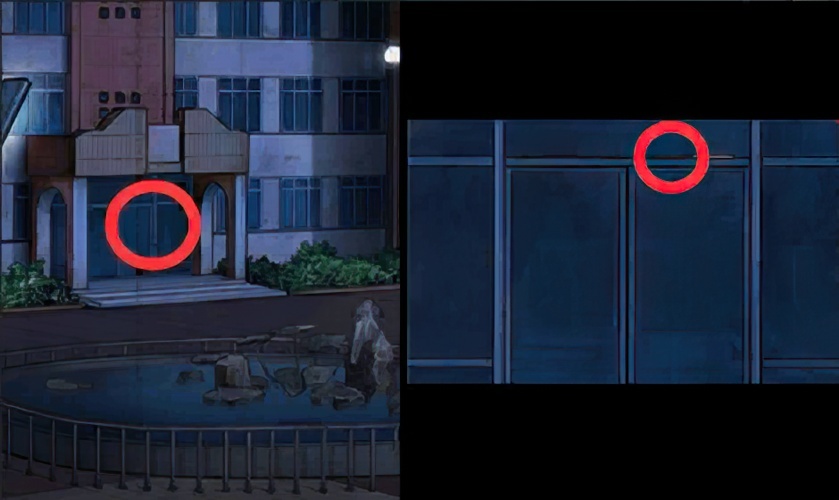
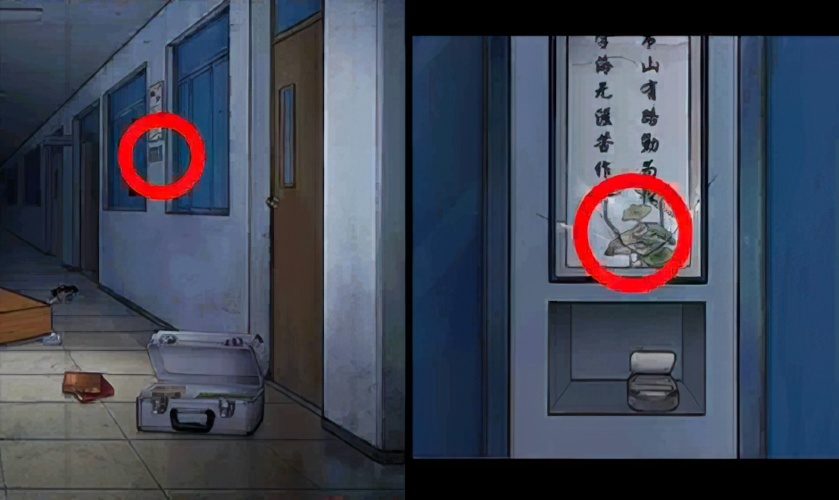
3. Check the door of the “Guardian’s Room” and pick up the photo fragments on the door.
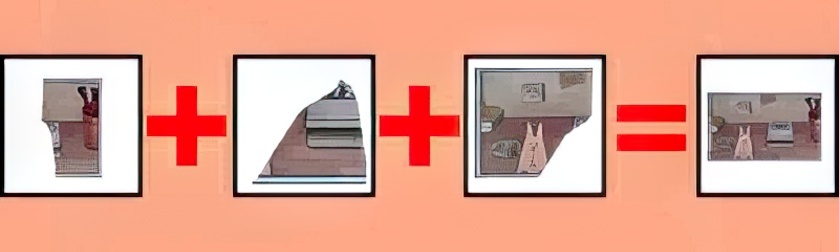
4. Combine three photo fragments into a complete photo.
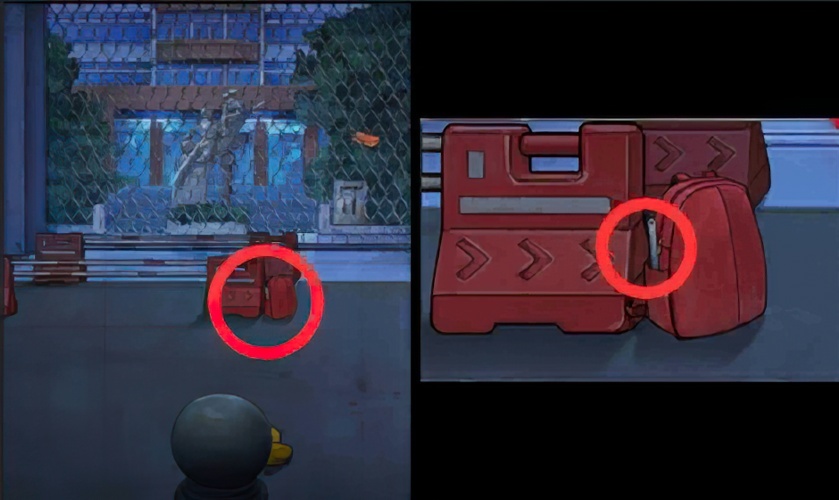
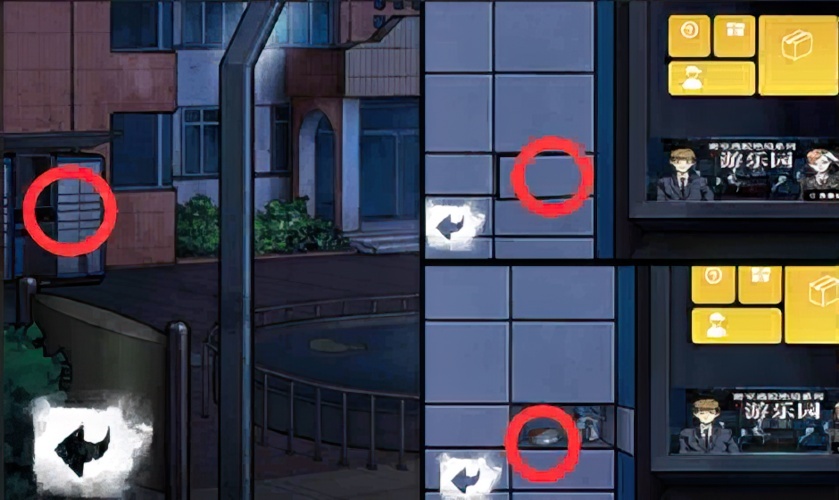
5. Look at the roadblock and pick up the steel ruler on the school bag.
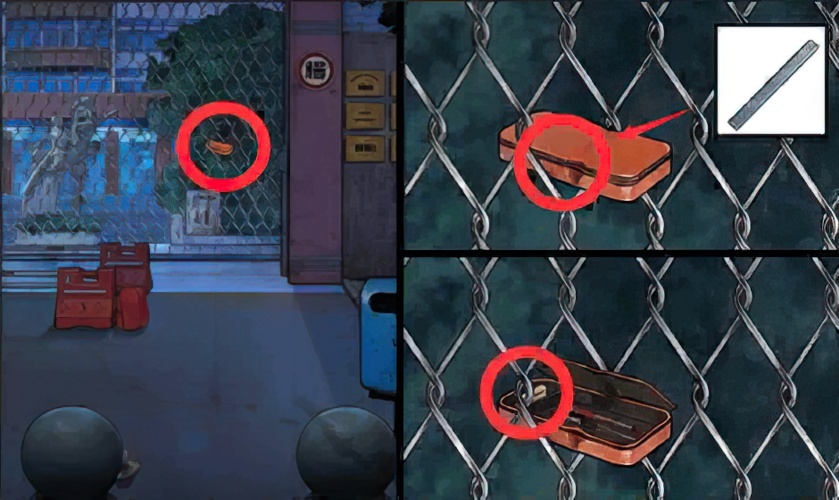
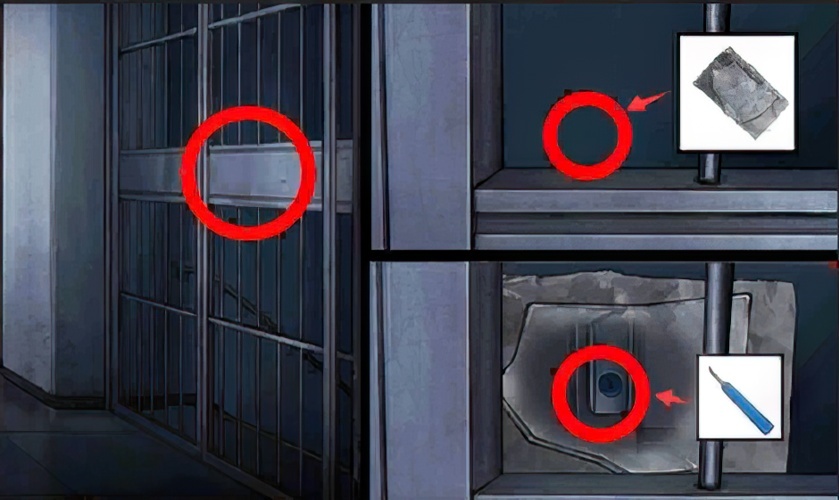
6. Check the iron fence at the front entrance, use a steel ruler to pry open the stationery box, and pick up the eraser in the stationery box.

7. View the photo, use an eraser to wipe off the dirt in the photo, and view the password 6729 in the photo.

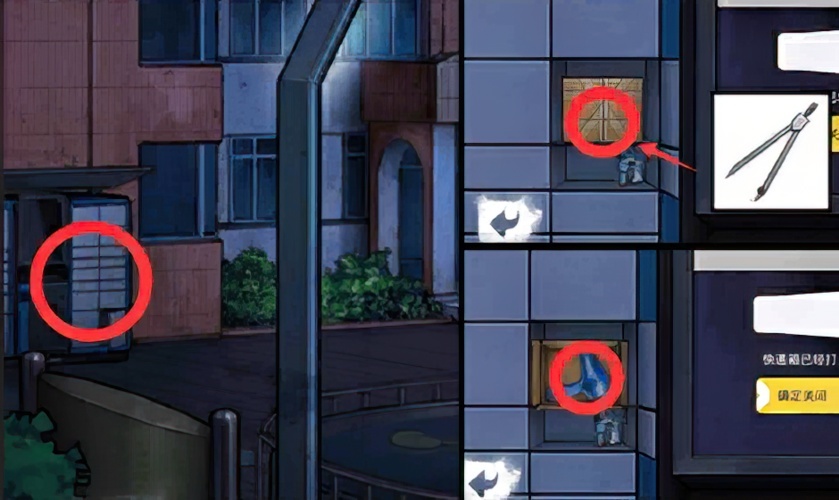
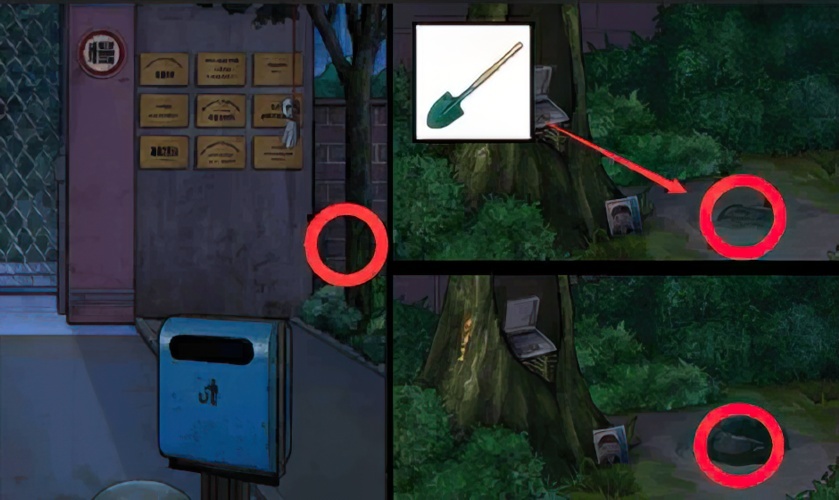
8. Check the trees and open the value in the tree hole.
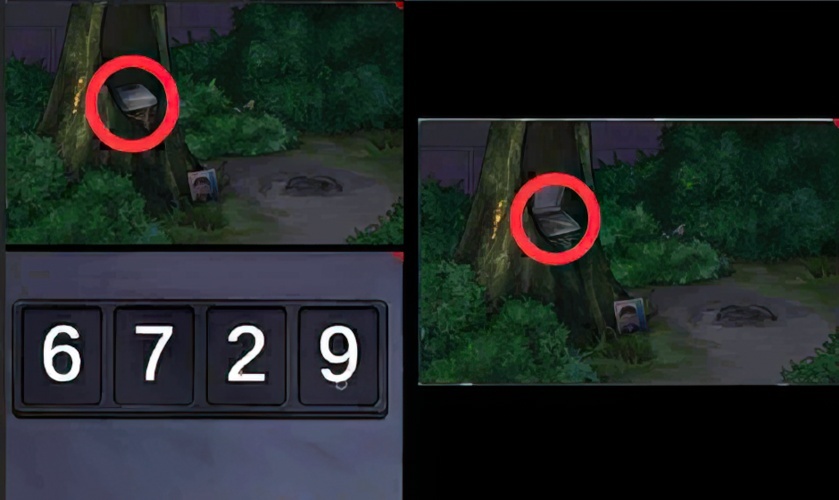
9. Check the box in the tree hole, enter the code 6729, open the box, and pick up the glass cutter.
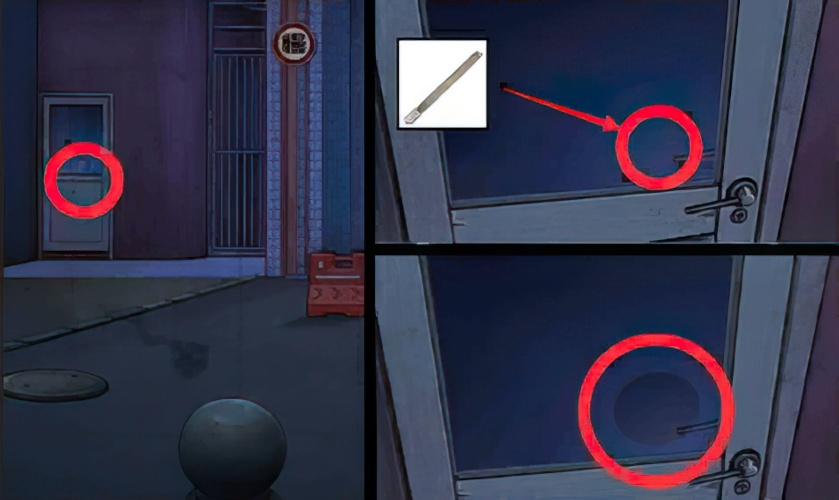
10. Check the door of the “Guardian’s Room”, cut the glass with a glass knife, open the door and enter the “Guardian’s Room”.
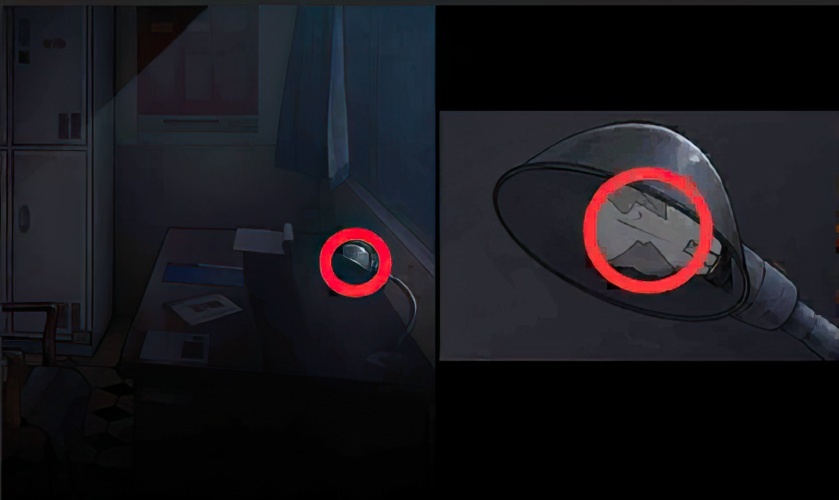
11. Enter the “guard’s room”, check the lamp, and remove the broken bulb.

12. Go back to the “school gate”, check the trees, and pick up the bulbs in the bushes.

13. Go back to the “guard’s room” and place the light bulb on the lamp.
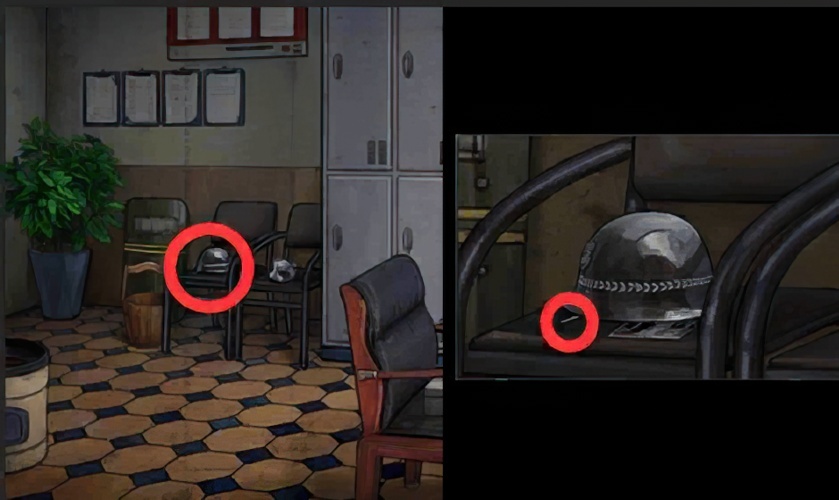
14. Go back to the “Guardian’s Room”, check the helmet, and pick up the screwdriver under the helmet.

15. Go back to the “guard room”, check the ventilation fan, and use a screwdriver to remove the net on the ventilation fan.

16. Go back to the “Guardian’s Room”, check the desktop, remove the newspaper, and pick up the bottle opener.

17. Go back to the “school gate”, check the manhole cover, and pull out the cork with a corkscrew.
18. Go back to the “guard room” and pick up the wooden barrels on the ground.

19. Go back to the “Guardian’s Room” and pick up the lid on the stove.

20. Go back to the “school gate”, check the trees, and use the cup lid to catch the resin that flows down.

21. Combine the resin-filled lid, the hole in the barrel and the cork into a complete barrel.

22. Go back to the “guard room”, check and drag the manhole cover away, and fetch water with a wooden bucket.
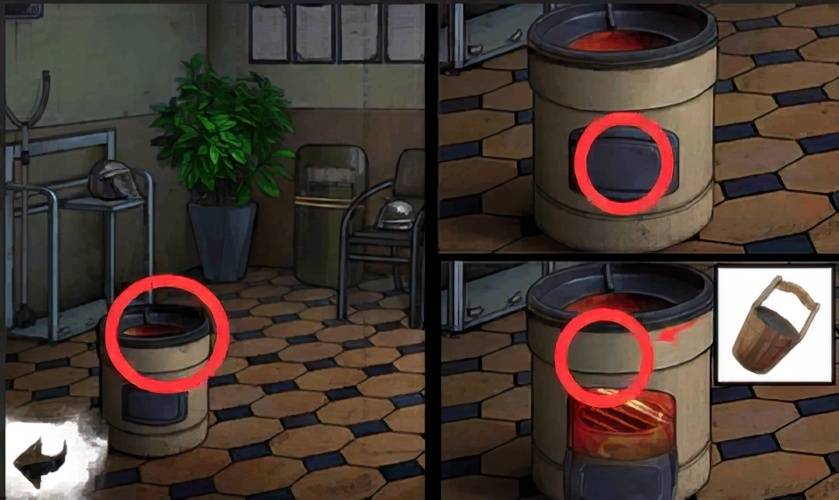
23. Go back to the “guard room”, open the lid of the stove, and pour the fire in the stove with a wooden bucket.
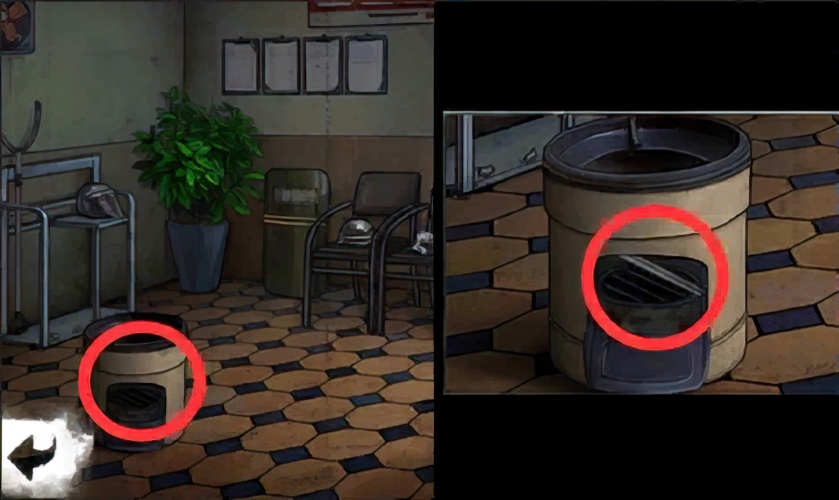
24. Go back to the “Guardian’s Room”, check the stove, and take out the iron rod from the stove.

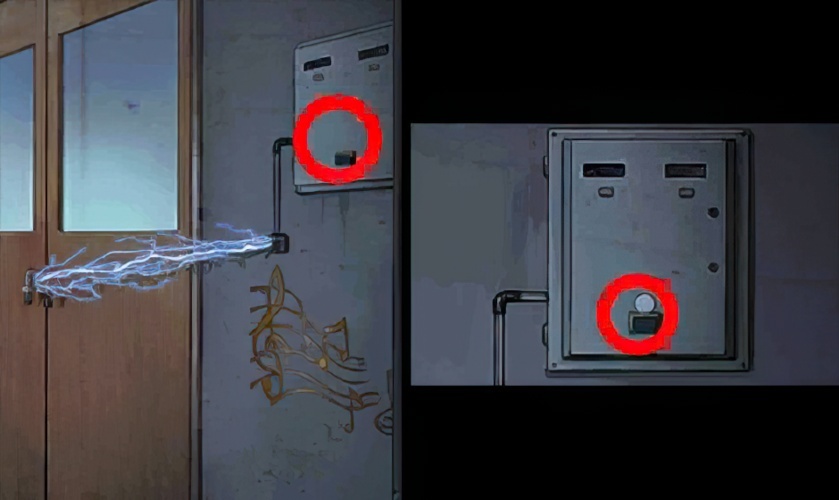
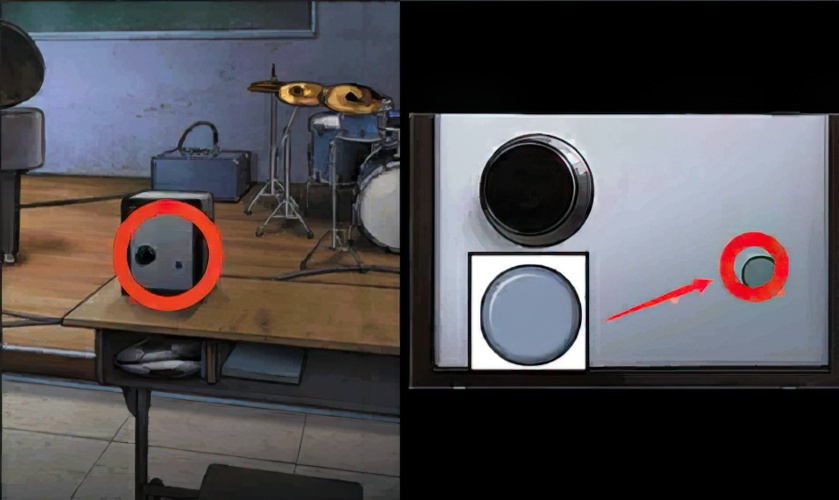
25. Go back to the “guard room” and check the ventilation fan. The fan blades of the ventilation fan are stopped with an iron rod and pick the button.
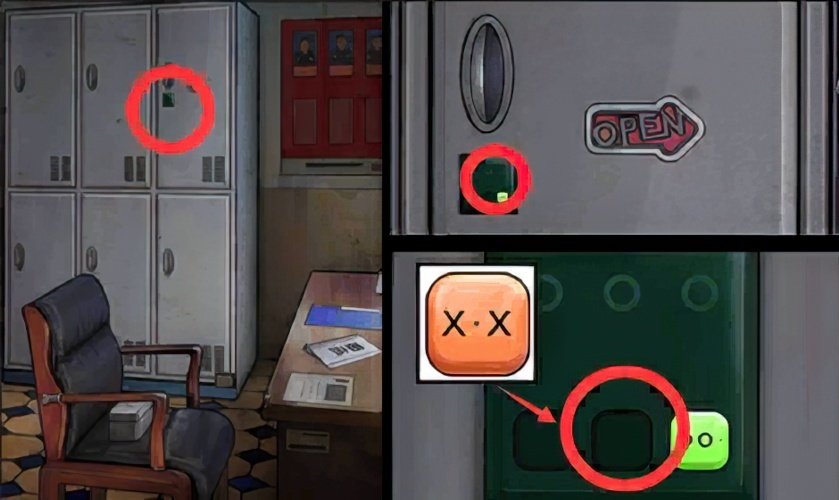
26. Go back to the “guard room”, check the file cabinet, check the lock on the door, and place the button in the groove.
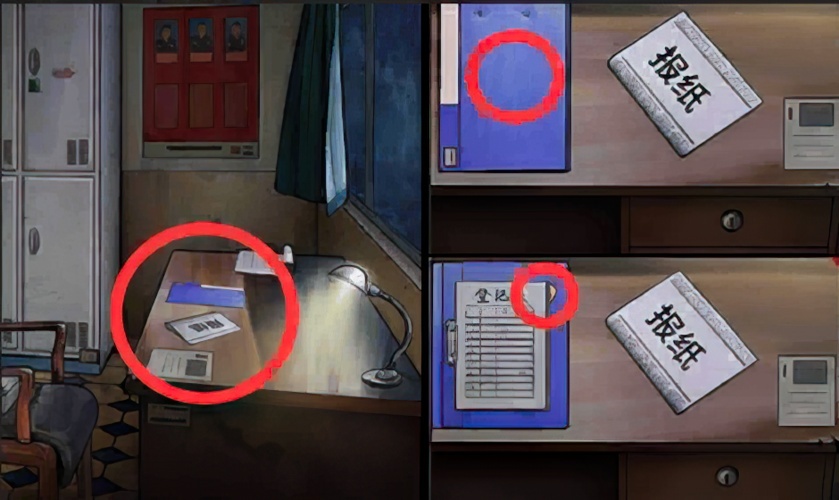
27. Go back to the “Guardian’s Room”, check the desktop, open the folder, and pick the button.
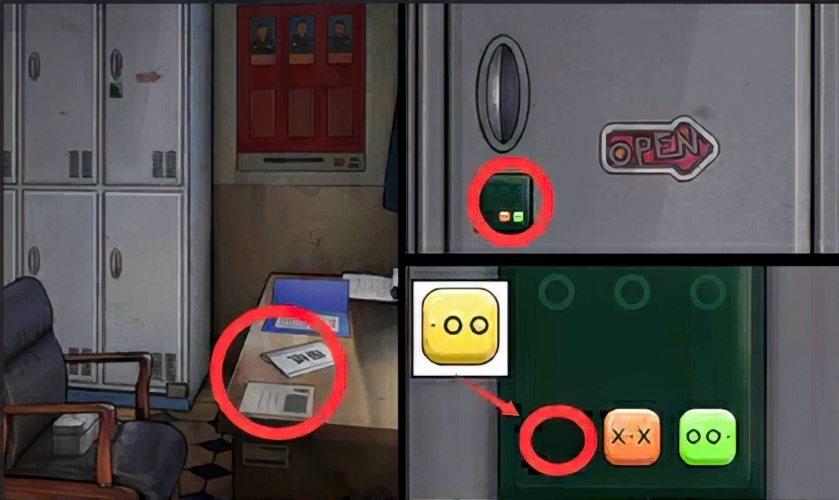
28. Go back to the “guard room”, check the file cabinet, check the lock on the door, and place the button in the groove.

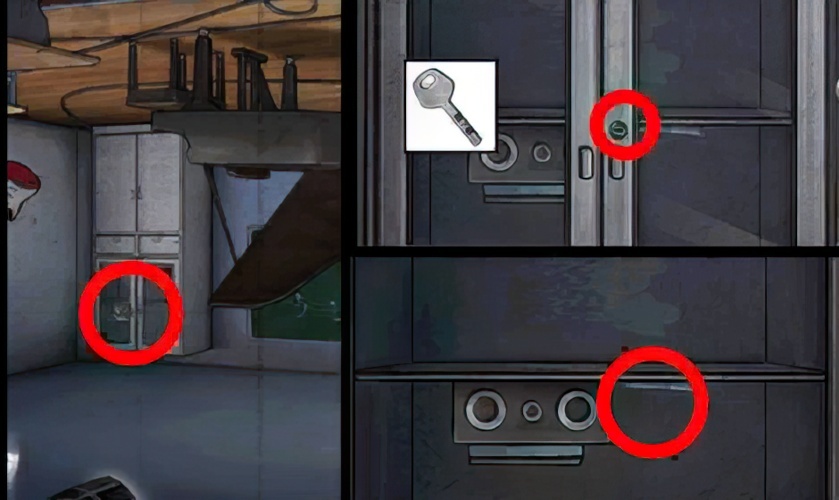
29. Go back to the “guard room”, check the file cabinet, check the lock on the door, unlock the mechanism, open the door and pick up the key.
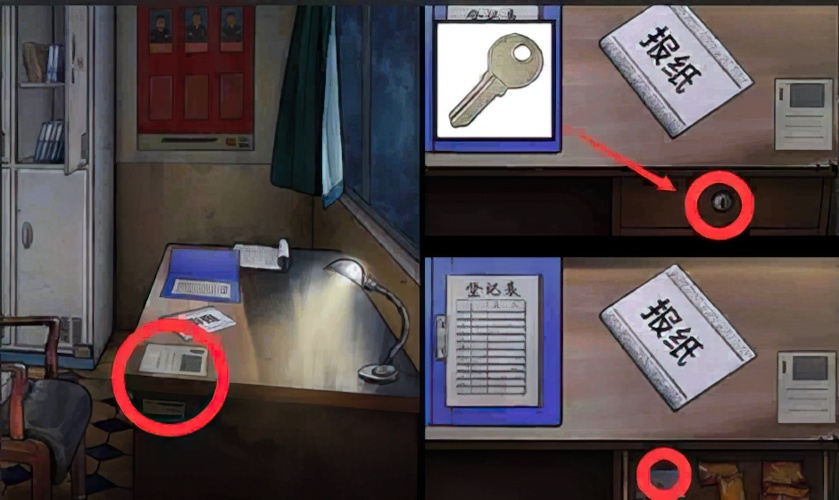
30. Go back to the “guard room”, check the desktop, use the key to open the lock of the drawer, and pick up the access card.

31. Go back to the “school gate”, check the iron gate, use the access card, open the iron gate to enter the school.
32. Go to “outside the school building”, check the bushes, and pick up the metal inlay.
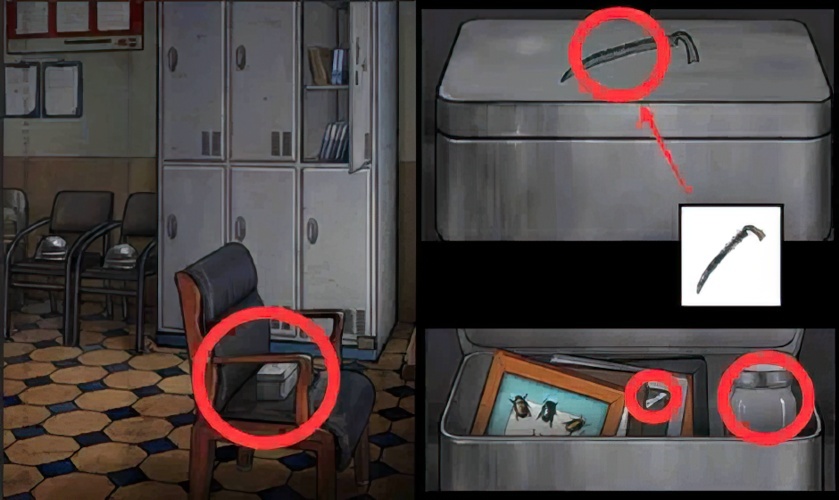
33. Go back to the “guard room”, check the chair, insert the metal inlay into the groove, open the box, and pick up the key and the transparent jar.

34. Go back to “outside the teaching building”, check the freezer, and open the freezer with the key.

35. Go back to “outside the teaching building”, check the freezer, and pick up the knob.

36. Go back to “outside the school building”, check the bushes, and pick up the trap box.
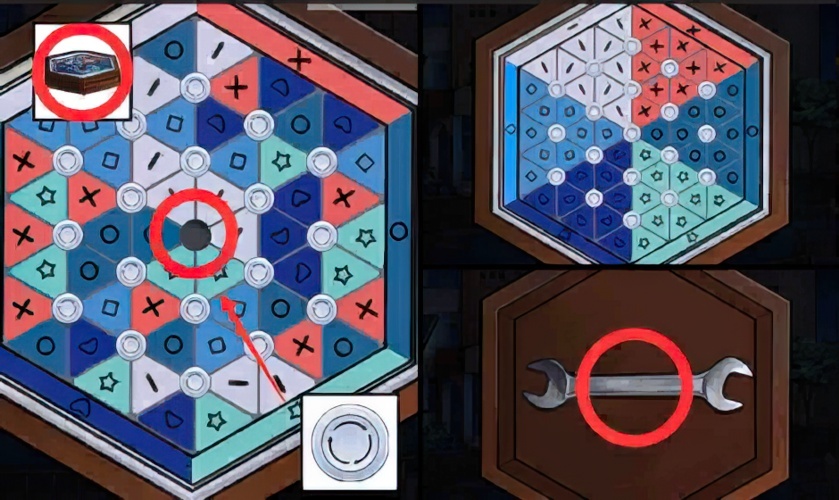
37. Open the trap box, put the knob into the groove, unlock the trap box, and pick up the wrench.
38. Go back to “outside the teaching building”, check the door of the teaching building, and pick up the fishing rod that lacks hooks and lines.
39. Go back to “outside the teaching building”, check the express cabinet, open the hidden door, and pick up the fishing line.
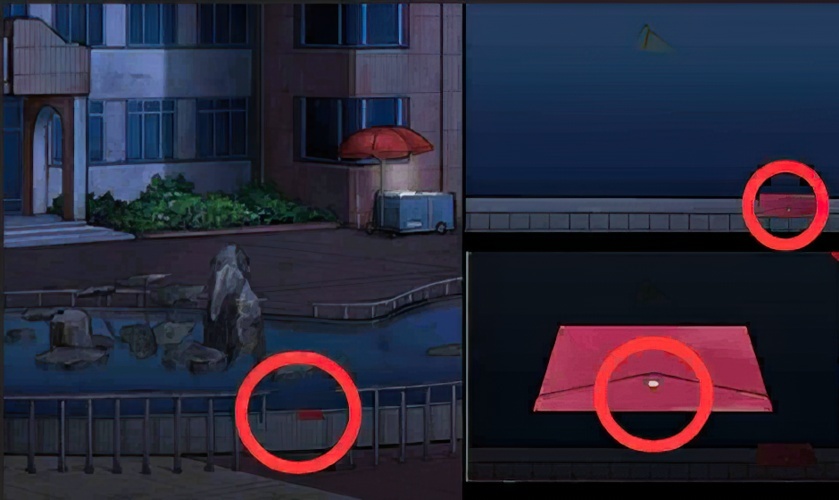
40. Go back to “outside the teaching building”, check the pool, the large folder, and pick up the compasses inside.

41. Go back to the “school gate”, check the bag, lubricate the bag with the pencil on the compass, and open the bag.
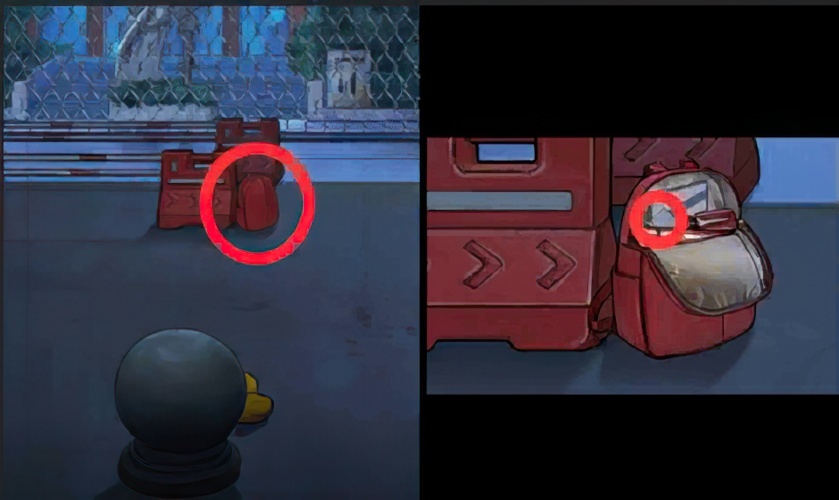
42. Go back to the “school gate”, check the bag, and pick up the note.

43. Go back to “outside the teaching building”, check the express cabinet, click on the button, and enter the password 5q3gEa according to the content on the note.
44. Go back to “outside the teaching building”, check the express cabinet, open the express package with a circular plan, and pick up the hair dryer.

45. Go back to “outside the teaching building”, check the freezer, use a hair dryer to melt the frost on the freezer, and pick up the fish hook.
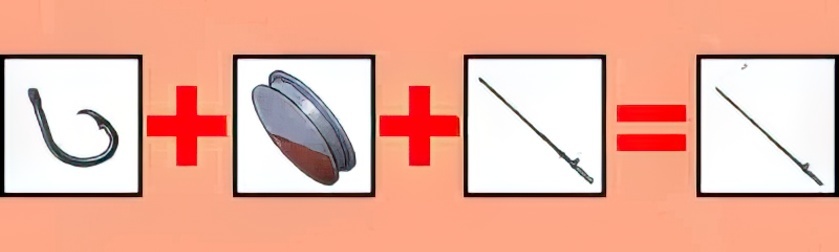
46. Combine the hook, the fishing line and the rod without the hook and line into a complete fishing rod.

47. Go back to “outside the teaching building”, check the pool, and use the hook to catch the insect net.

48. Go back to the “outside the teaching building”, catch the fireflies with transparent jars and insect nets, and pick up the jars with fireflies.
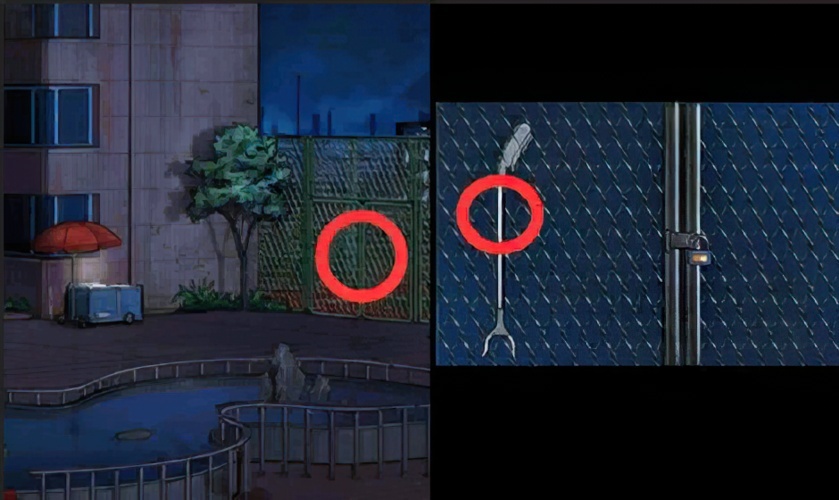
49. Go back to “outside the teaching building”, check the iron net door, and pick up the clip hanging on it.
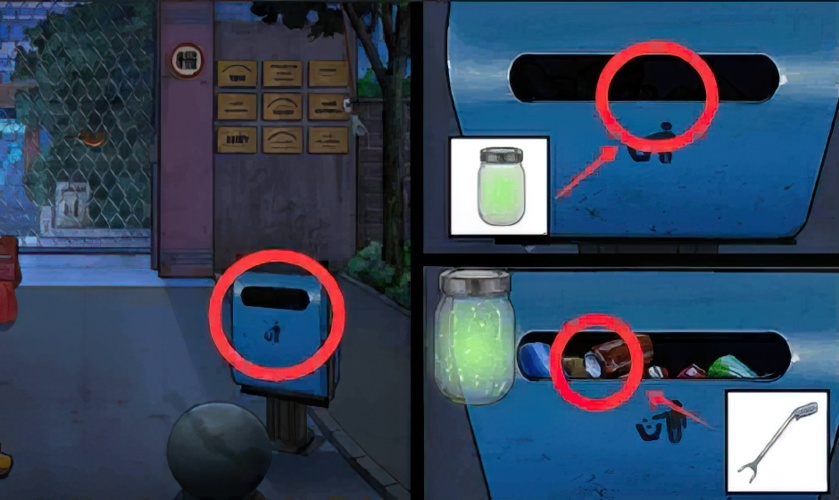
50. Go back to the “school gate”, check the trash can, use a can of fireflies to illuminate it, and then use a clamp to pull out the wrench.

51. Go back to the “outside the teaching building”, help the two wrenches to fix the lock and break it, open the door, and enter the “basketball court”.

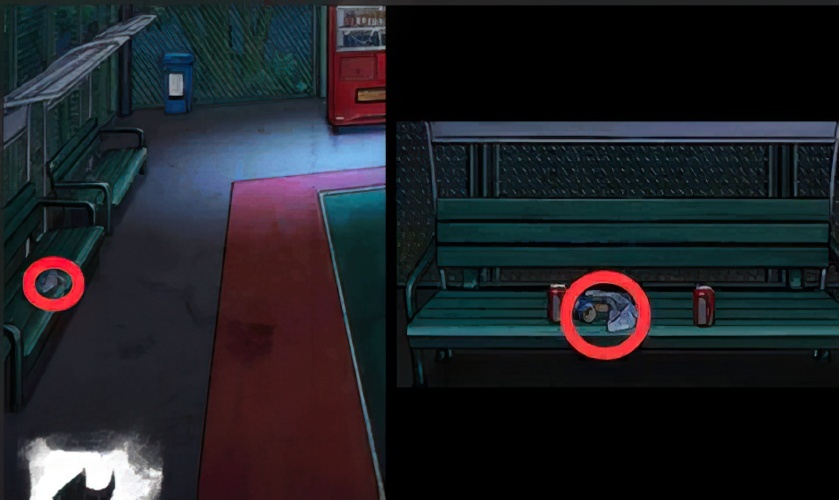
52. Enter the “basketball court”, check the bench, and pick up the cigarette butts under the bench.

53. Go back to the “basketball court”, check the basketball hoop, and burn the strap on it with a cigarette butt.

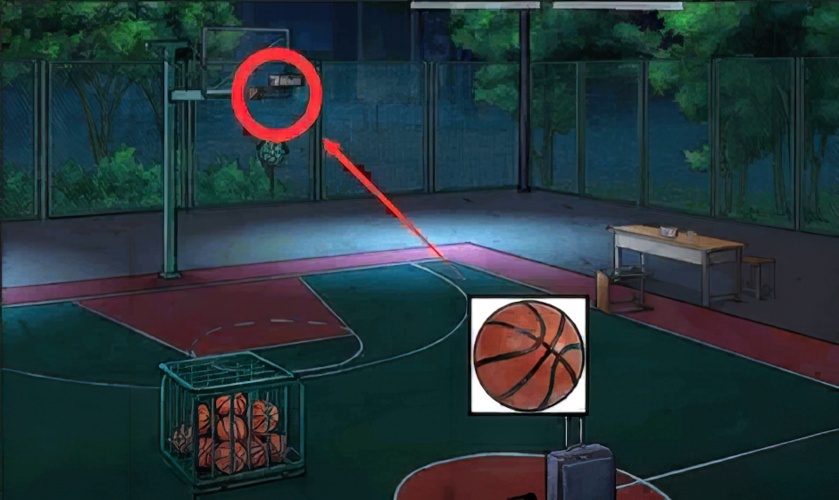
54. Go back to the “basketball court”, check the basketball hoop, hit the basketball hoop, pick up the basketball and the wooden handle.
55. Go back to the “basketball court” and smash the trap box on the basket with a basketball.
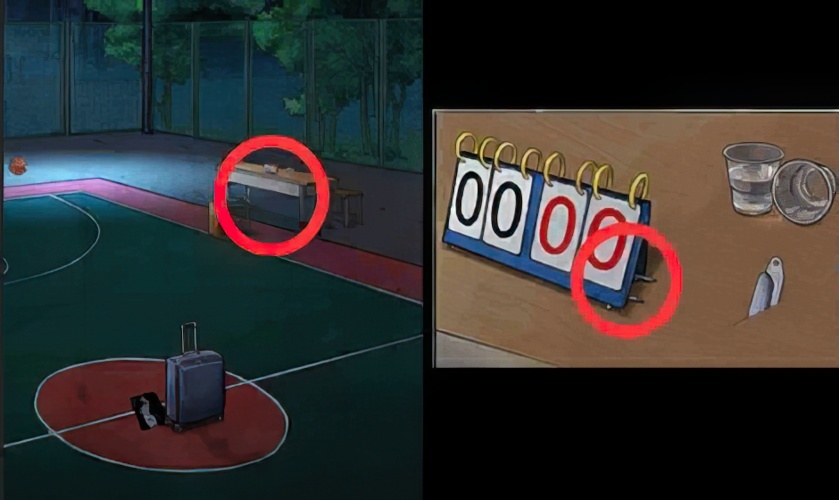
56. Go back to the “basketball court”, look at the referee’s table, and pick up the broken inlay under the scoreboard.
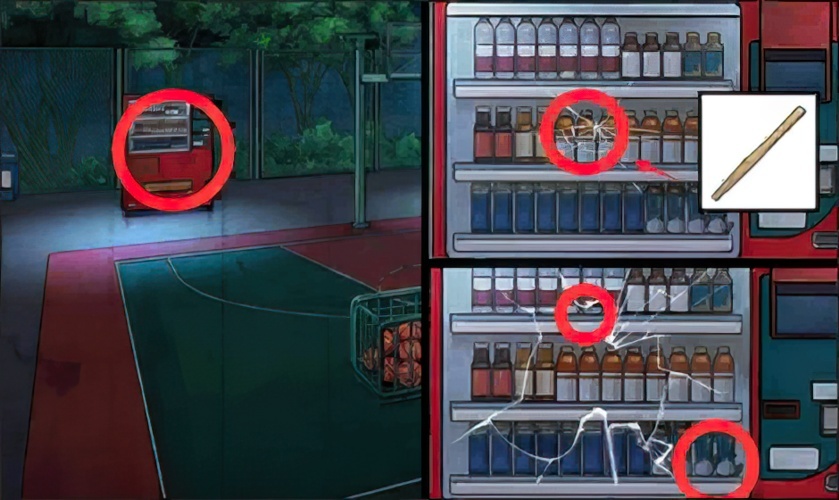
57. Go back to the “basketball court”, check the automatic water dispenser, smash the glass on it with a wooden handle, and pick up the broken inlays and screws.

58. Go back to the “guard room”, check the file cabinet, insert the two incomplete inlays into the grooves of the cabinet, and pick up needle-nose pliers.

59. Go back to the “basketball court”, check the suitcase, check the lock, and use needle-nose pliers to break the zipper on it.
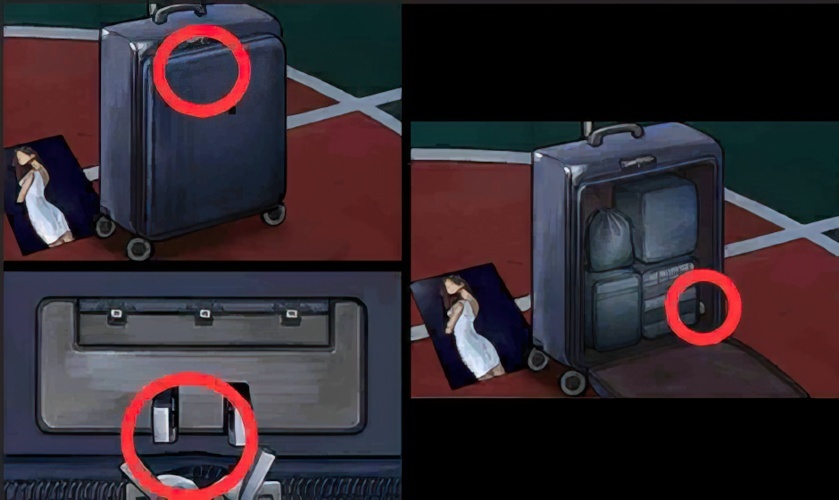
60. Go back to the “basketball court”, check the suitcase, open the zipper, and pick the button.
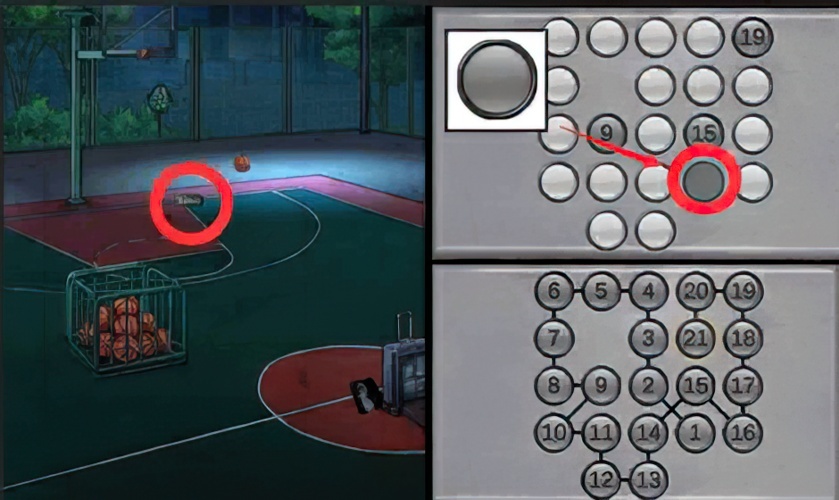
61. Go back to the “basketball court”, check the trap box on the ground, put the button in the groove, after solving the puzzle trap, pick up the rope and the shovel head.
62. Go back to the “basketball court”, check the benches, and pick up the knife handles in the garbage dump.
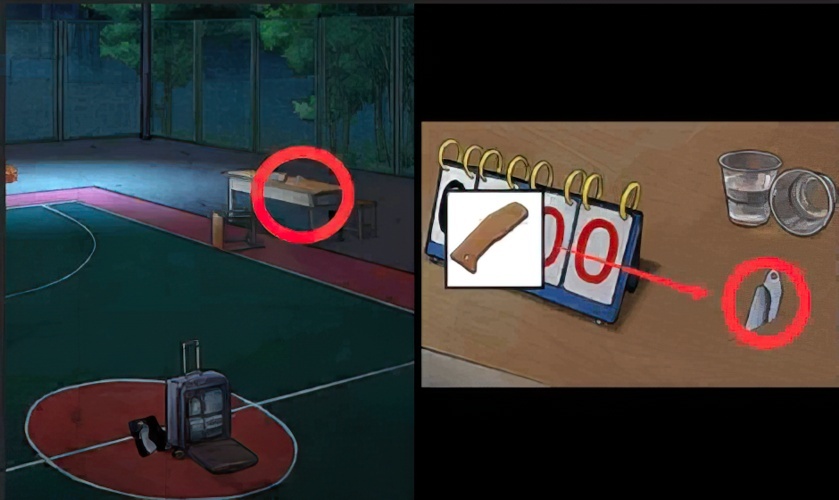
63. Go back to the “basketball court”, check the referee’s table, and place the knife handle on the blade.
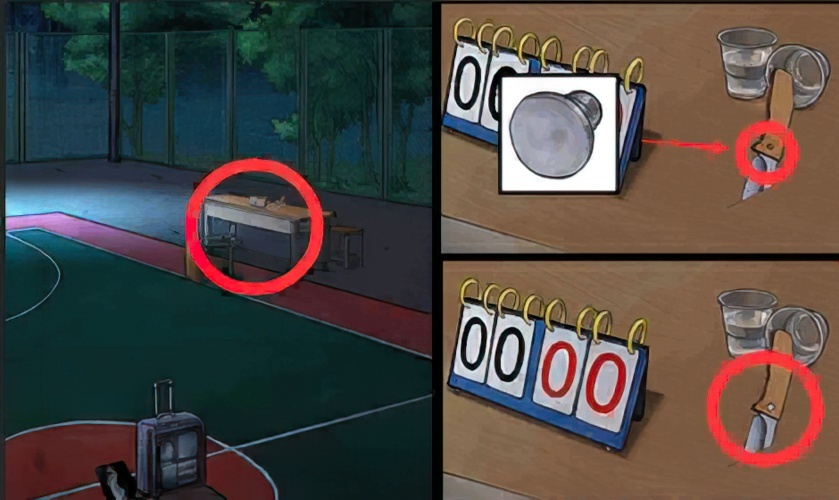
64. Go back to the “basketball court”, check the referee’s table, fix the screw to the handle, and pull out the knife.
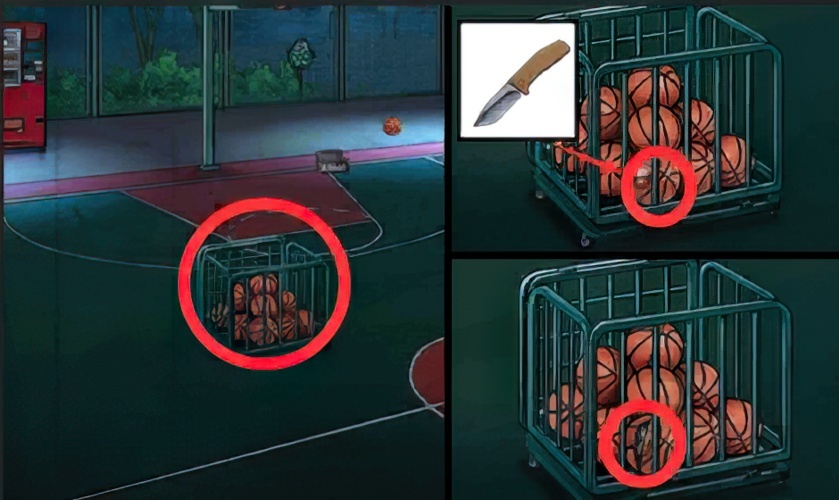
65. Go back to the “basketball court”, check the basket, cut the basketball with a knife, and pick up the hook.

66. Use the shovel head and wooden handle to make a complete shovel.
67. Go back to the “school gate”, check the trees, dig up the soil with a shovel, and pick up the grapple gun that lacks accessories.

68. Combine the iron hook, rope and the grappling gun with missing parts into a complete grappling gun.
69. Go back to the “outside the teaching building”, check the window, fire it with a grappling hook and fix it next to the window, and enter the classroom.

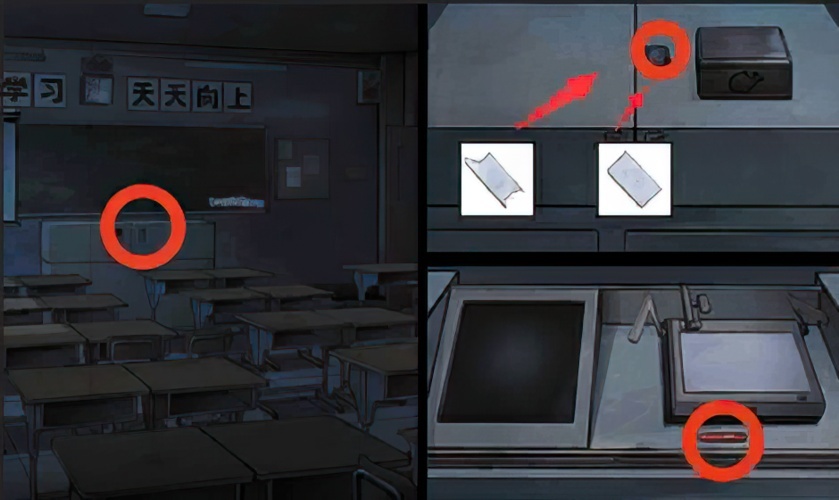
70. Look at the podium and pick up the coil on the podium.

71. Check the door and remove the thumbtack with a wire coil.
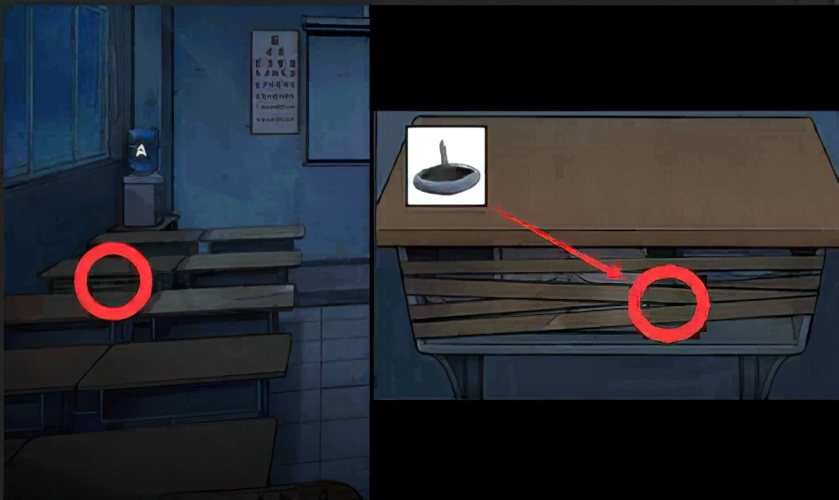
72. Check the table hole and use a push pin to cut the tape.
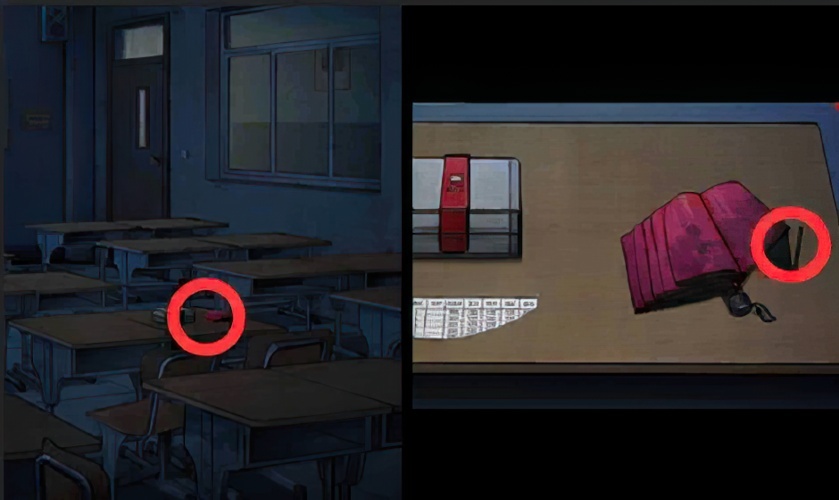
73. Look at the desktop and pick up the ribs next to the folding umbrella.

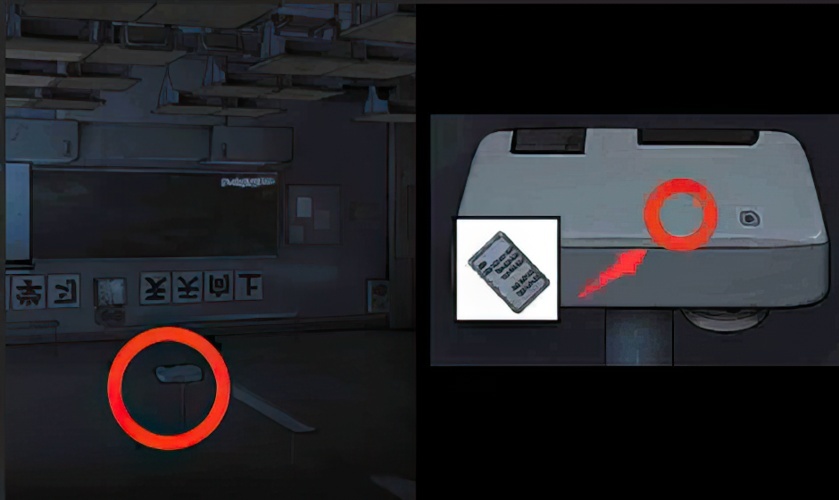
74. Check the door and use the umbrella rib to remove the metal piece in the door gap.

75. Check the table hole, insert a metal sheet into the groove, and open the box to pick up the button.

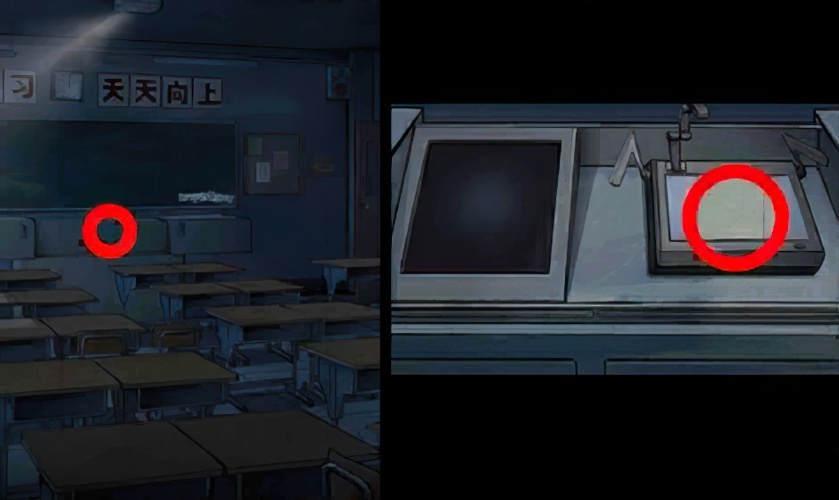
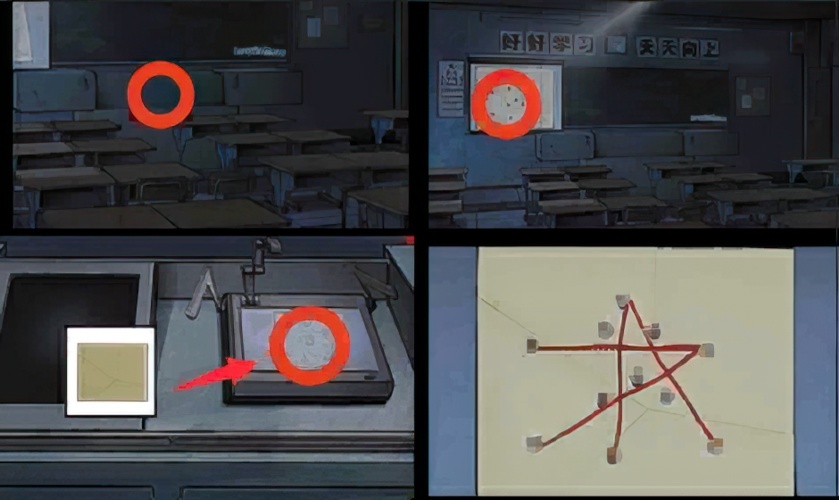
76. Look at the blackboard and pick the button on the blackboard slot.
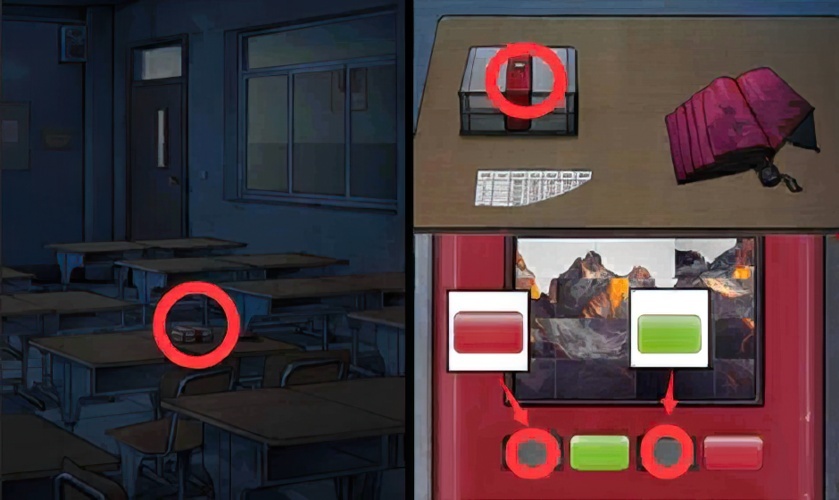
77. Check the desktop, check the trap box, and insert the two buttons into the vacancy.

78. Check the desktop, check the trap box, unlock the trap box, and pick up the key.
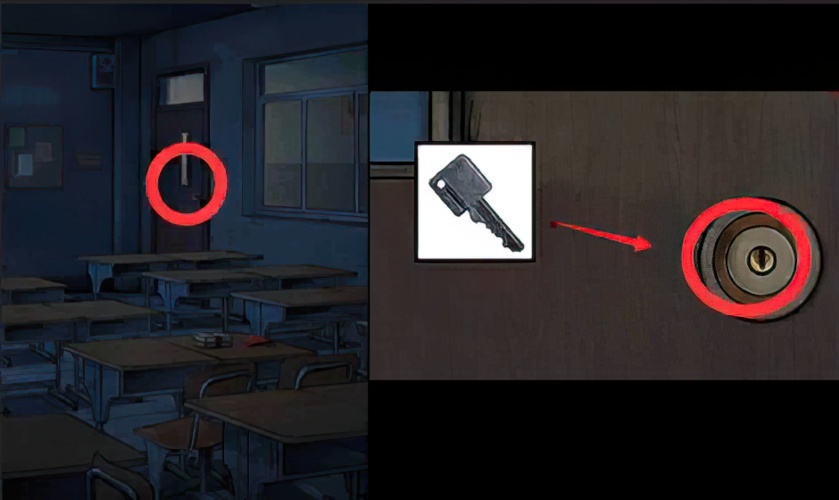
79. Check the door and use the key to open the door.

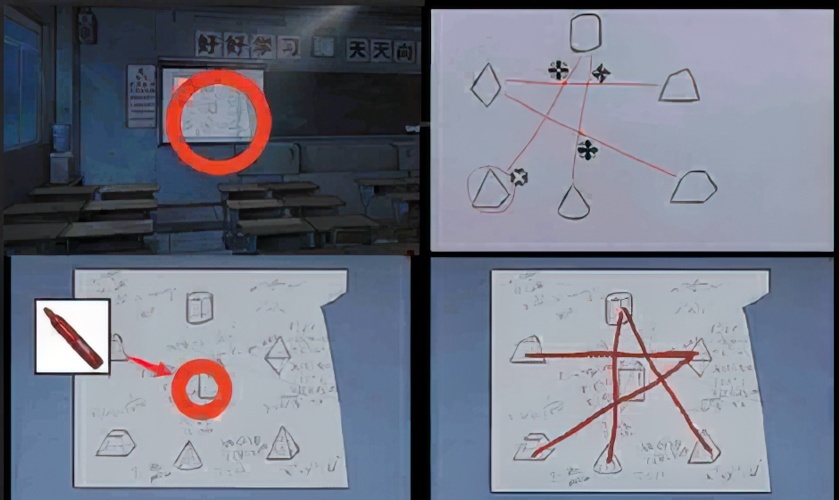
80. Enter the “corridor on the third floor”, check the painting on the wall, push the painting to the corresponding position, and pick up the glass decoration.

81. Go back to the “third floor corridor”, check the iron gate, and pick up sandpaper.
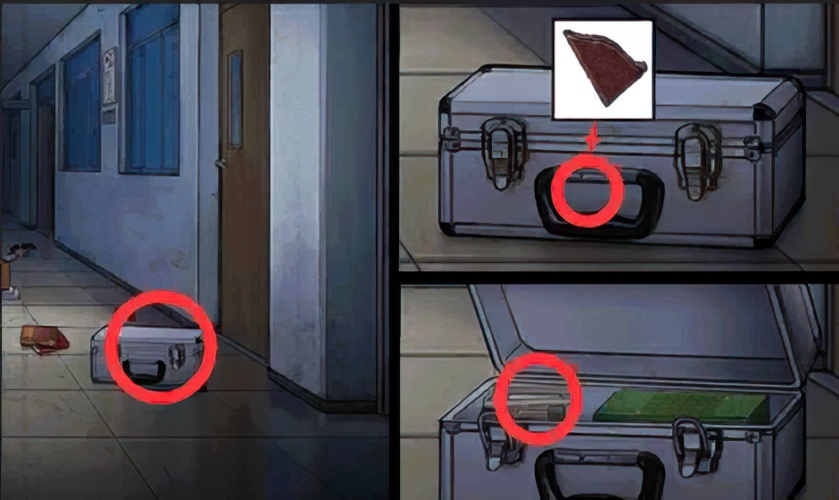
82. Go back to the “corridor on the third floor” and check the iron box. After sanding the lock with sandpaper, open the box and pick up the chalk.

83. Go back to the “classroom”, look at the blackboard, and paint the blackboard with chalk.
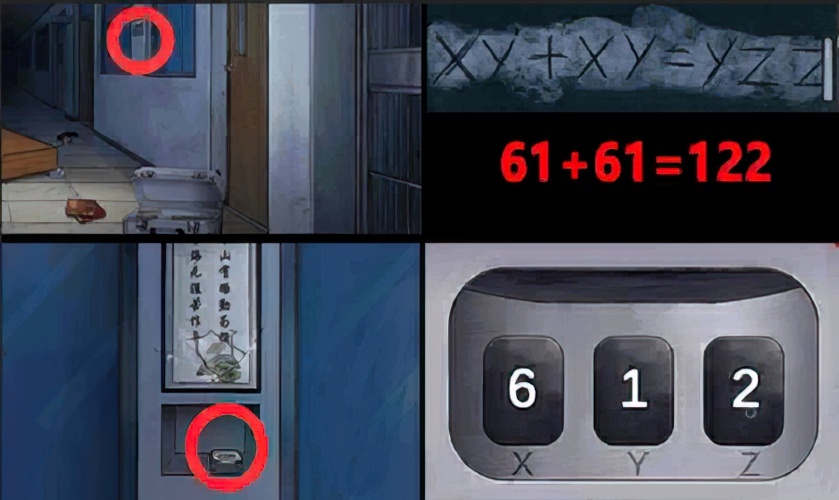
84. Go back to the “corridor on the third floor”, check the picture, check the password box, and follow the instructions on the blackboard to unlock the password 612 and pick up the chip inside.

85. Go back to the “corridor on the third floor”, check the iron box, check the green mechanism, and insert the chip into the corresponding position.

86. Go back to the “corridor on the third floor”, check the green mechanism, unlock the mechanism, and pick up the lock opener.
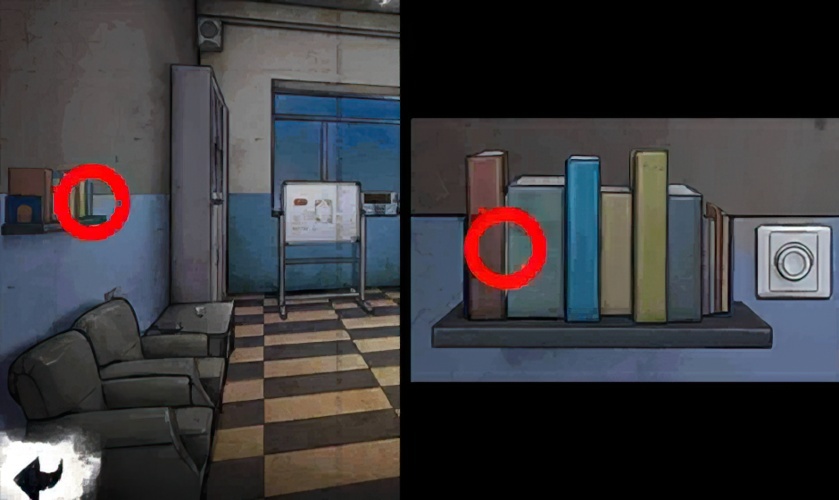
87. Go back to the “third floor corridor”, check the fallen bookcase, and pick up the tin foil.
88. Go back to the “corridor on the third floor”, check the paintings on the wall, and pick up the glass pieces.

89. Combine glass sheets and tin foil into a handmade mirror.
90. Go back to the “corridor on the third floor”, check the iron gate, put the hand-made mirror behind the door, use the lock opener to unlock the iron gate and enter the “corridor on the second floor”.

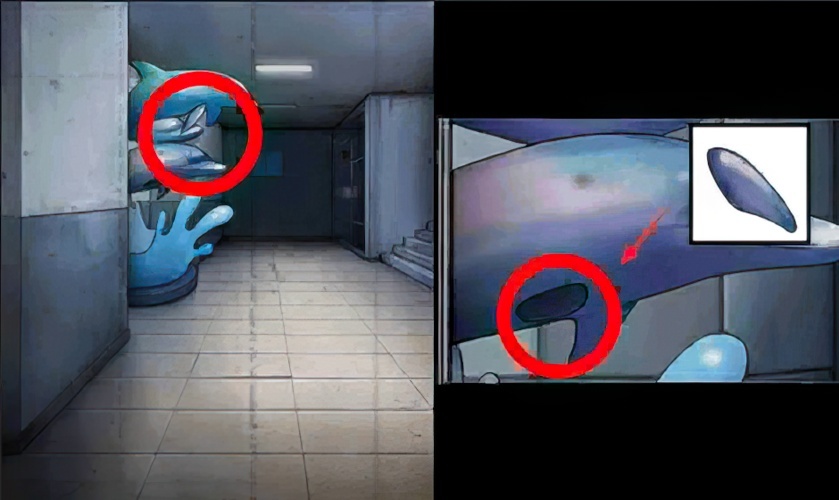
91. Enter the “corridor on the second floor”, look at the door on the left, and pick up the glass dolphins.

92. Go back to the “classroom”, check the podium, put the glass decoration and glass dolphin into the groove, open the box and pick up the statue quickly.
93. Go back to the “corridor on the second floor”, check the statue, and quickly put the statue into the statue.

94. Go back to the “second floor corridor”, check the statue, and pick up the round block.
95. Go back to the “corridor on the second floor”, check the distribution box, and pick up the round block.

96. Go back to the “corridor on the second floor”, check the hidden grid on the wall, and insert two round blocks into the vacancy.

97. Go back to the “corridor on the second floor”, check the Ange on the wall, decrypt the mechanism, and pick up the door card.
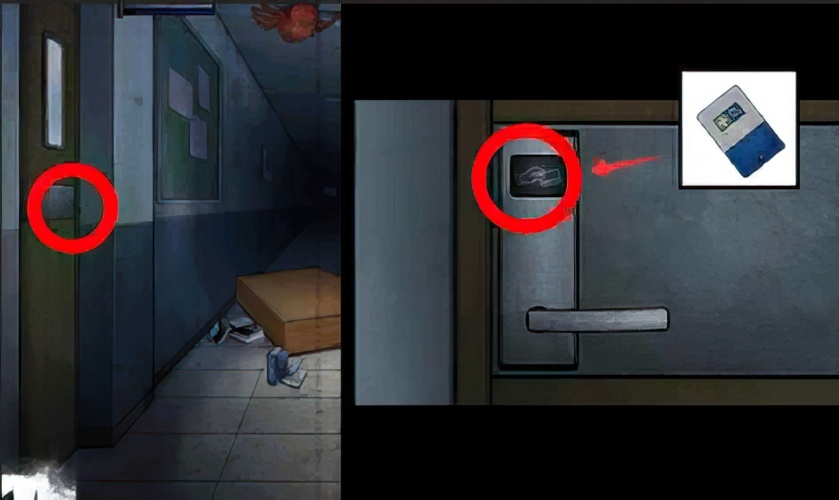
98. Go back to the “corridor on the third floor”, check the door of the “infirmary”, use the key card to open the door and enter the “infirmary”.

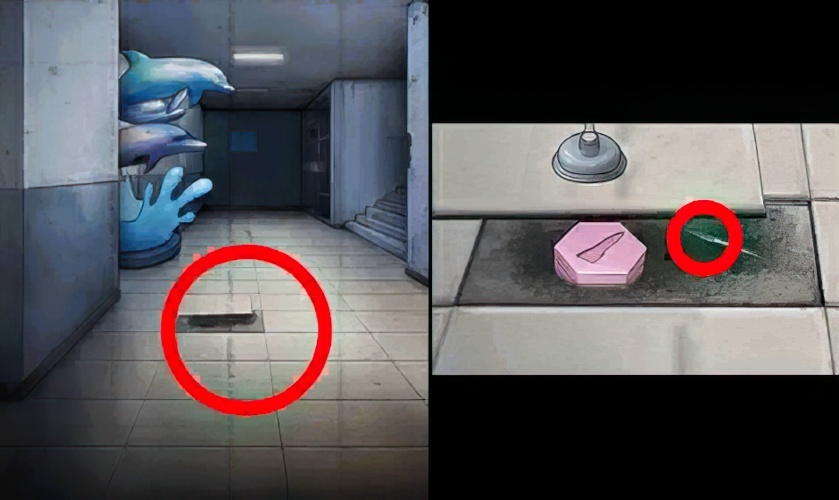
99. Enter the “Infirmary”, check the trash can, and pick up the broken scissors.
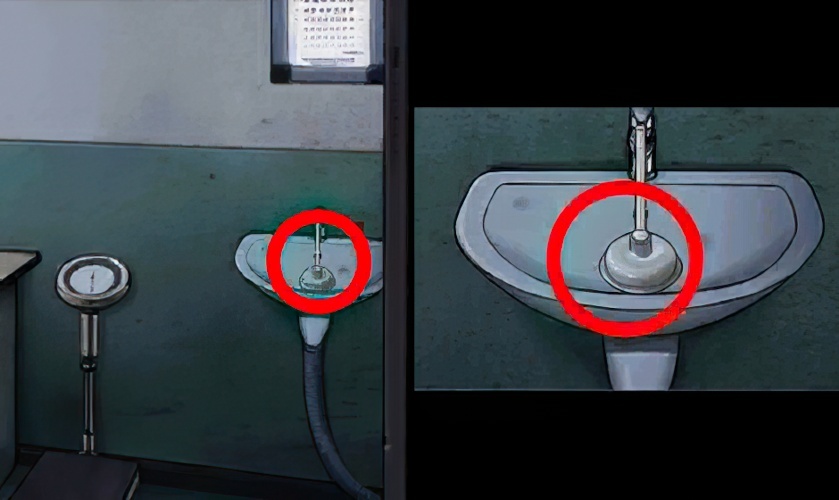
100. Go back to the “Infirmary” and pick up the Pi Scraper on the sink.
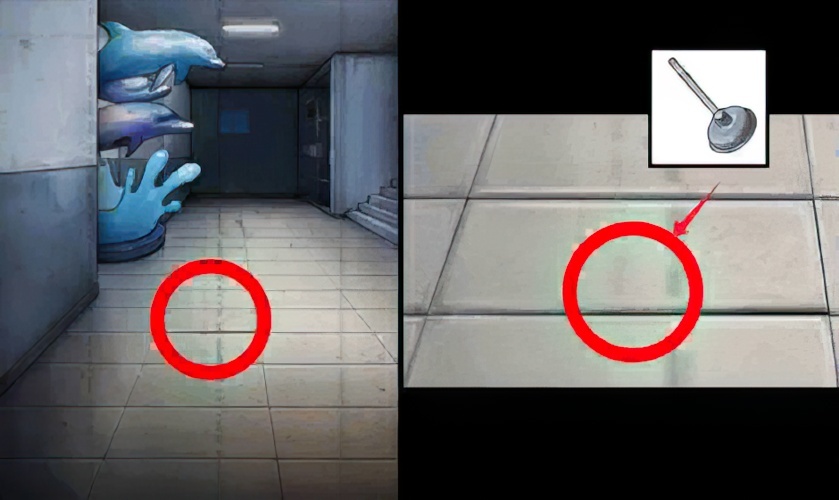
101. Go back to the “second-floor corridor”, check the floor, and use the leather squeegee to suck up the floor.
102. Go back to the “second floor corridor”, check the floor, and pick up the broken iron scissors.
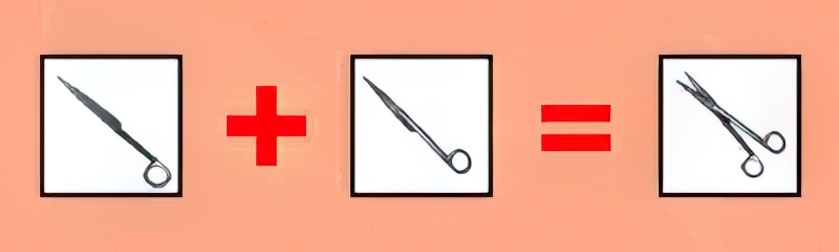
103. Combine two broken iron scissors into a complete iron scissors.
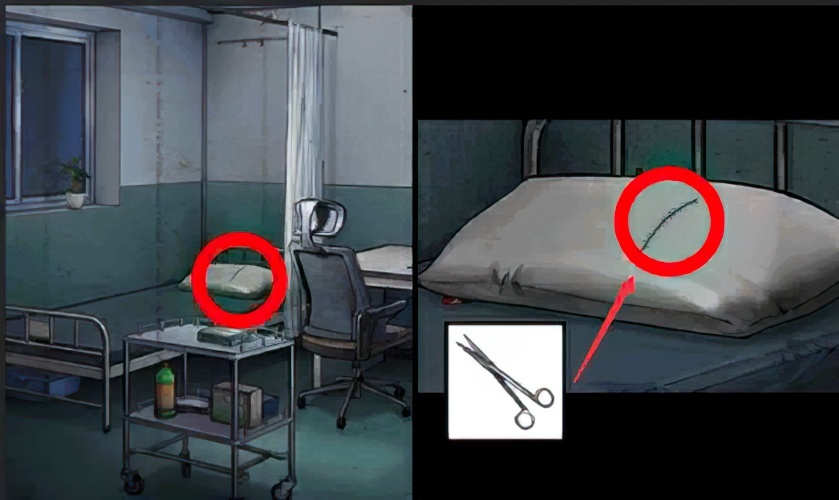
104. Go back to the “infirmary” and cut open the pillow with scissors.
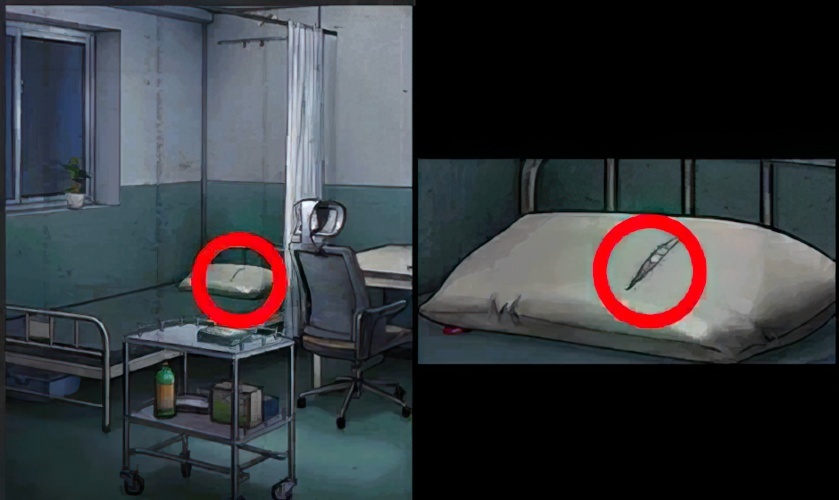
105. Go back to the “Infirmary”, check the pillow, and pick up the lamp.
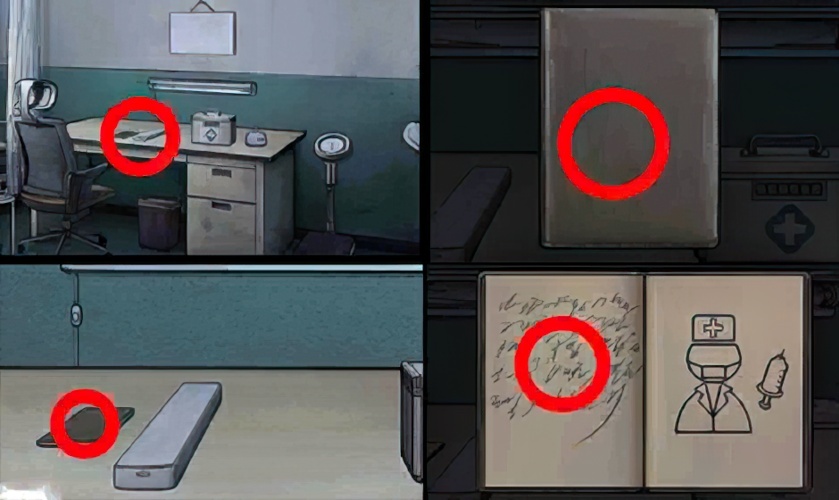
106. Go back to the “Infirmary”, check the desktop, open the notebook, and check the contents of the notes on the left.
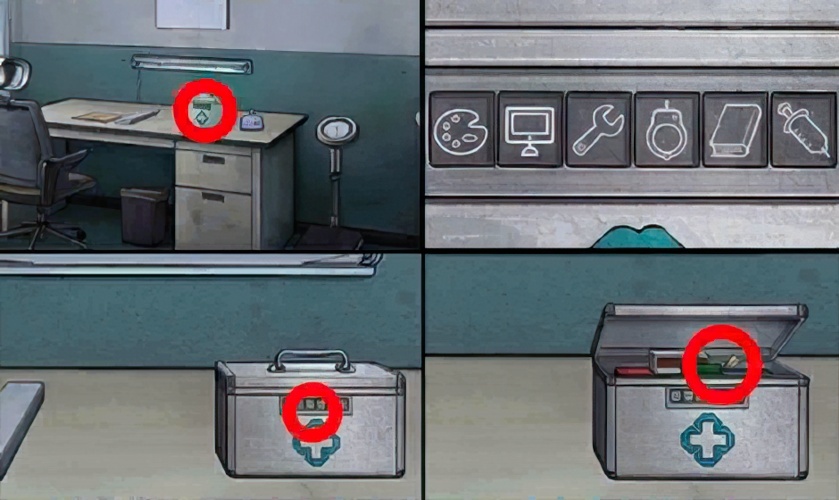
107. Go back to the “Infirmary”, check the desktop, check the medicine box, unlock the medicine box according to the instructions of the notebook, and pick up the lipstick base.
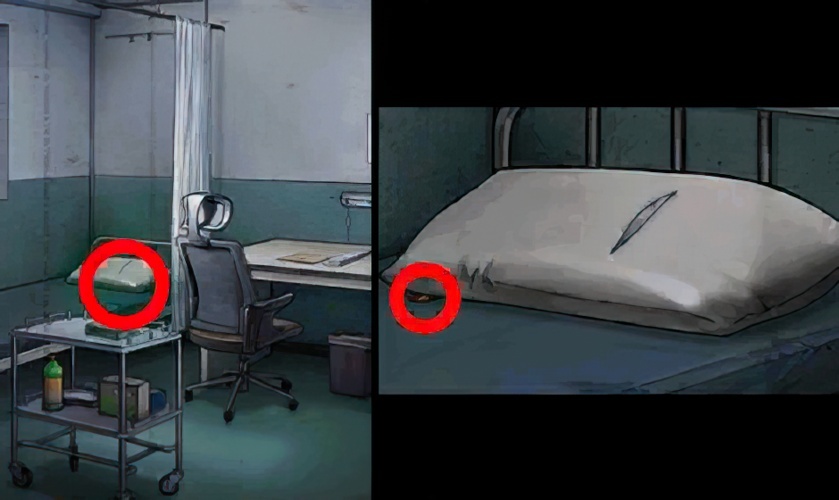
108. Go back to the “Infirmary”, check the pillow, and pick up the pattern block under the pillow.
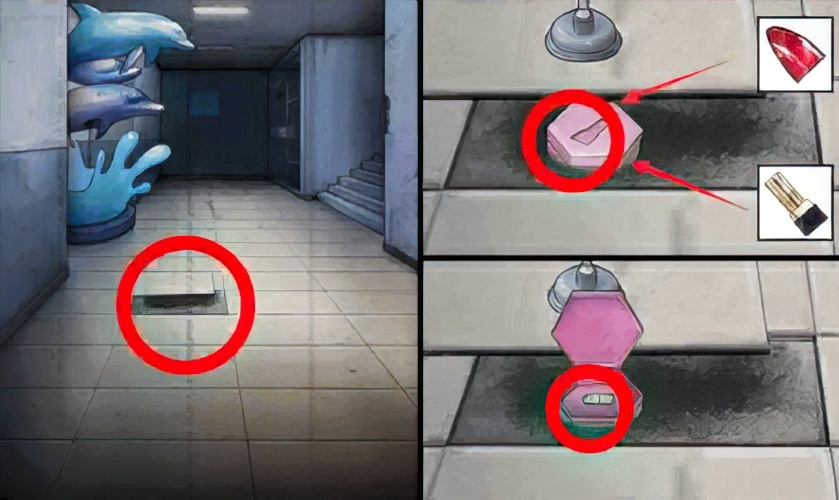
109. Go back to the “corridor on the second floor”, check the floor, insert the pattern block and lipstick base into the groove, and pick up the light.

110. Go back to the “Infirmary”, check the medicine cabinet, put the two lights into the groove, complete the puzzle-solving mechanism, and pick up the handle and switch.

111. Go back to the “Infirmary”, check the desktop, and locate the switch in the groove of the blood pressure monitor.
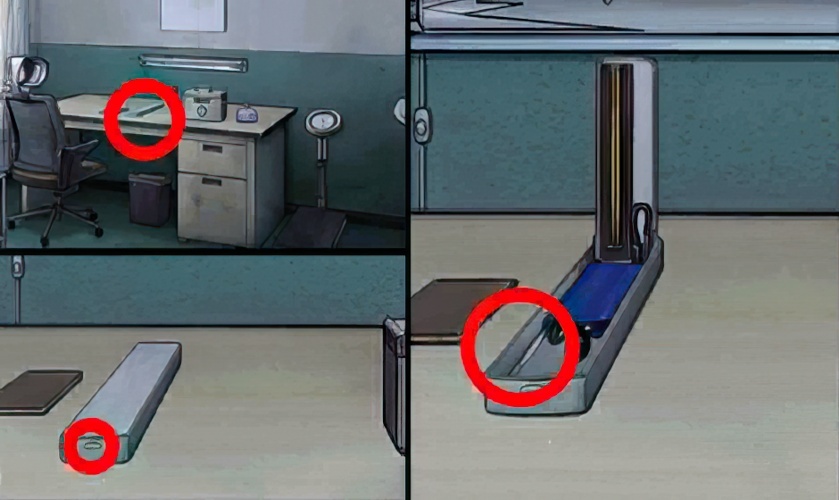
112. Go back to the “Infirmary”, check the desktop, turn on the sphygmomanometer, and pick up the tweezers.
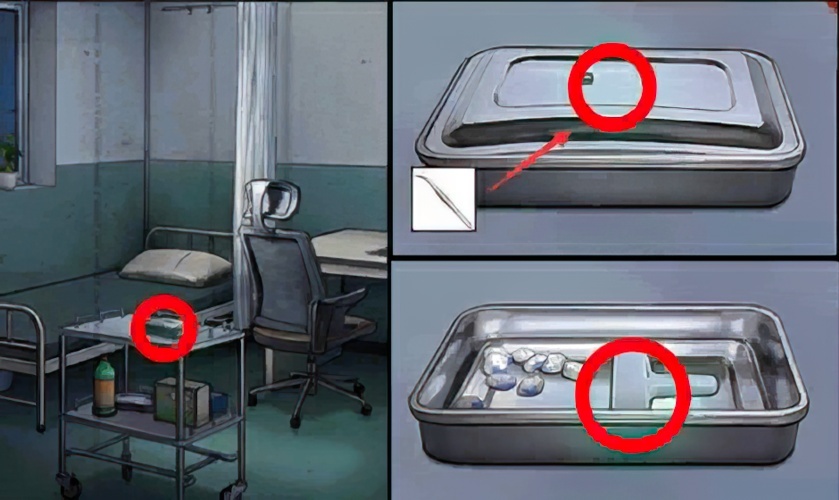
113. Go back to the “Infirmary”, check the cart, open the box with tweezers, and pick up the knife.
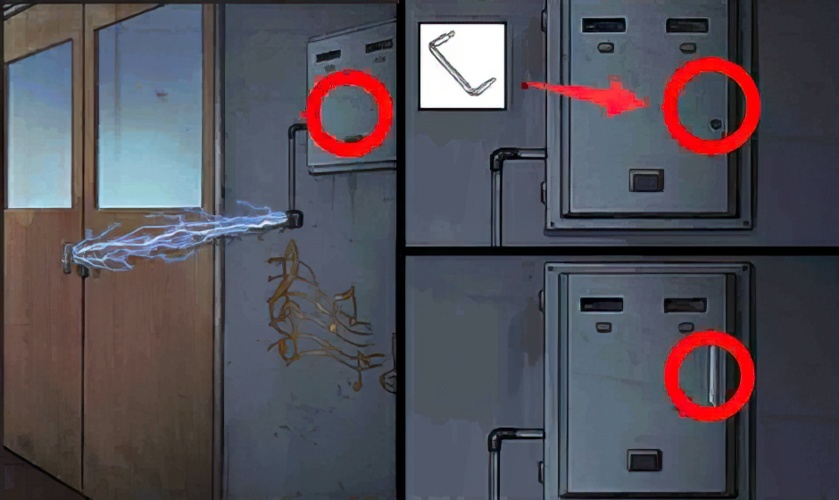
114. Go back to the “corridor on the second floor”, check the distribution box, and use the handle to open the door of the distribution box.
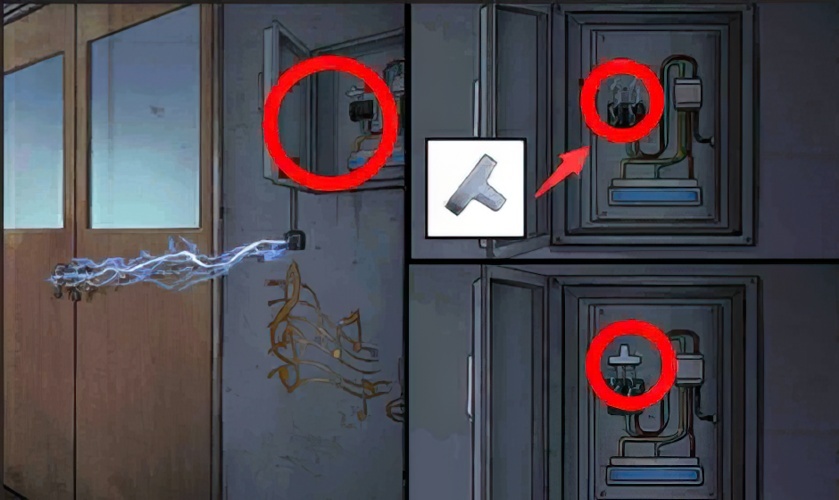
115. Go back to the “corridor on the second floor”, check the distribution box, insert a knife into the switch, and pull down the switch.

116. Go back to the “second floor corridor”, check the door of the “music room”, cut the wire with iron scissors, and enter the “music room”.

117. Enter the “Music Room”, check the piano, and pick up the shelf.

118. Enter the “music room”, check the cabinet, and use the shelf to assist in opening the cabinet.
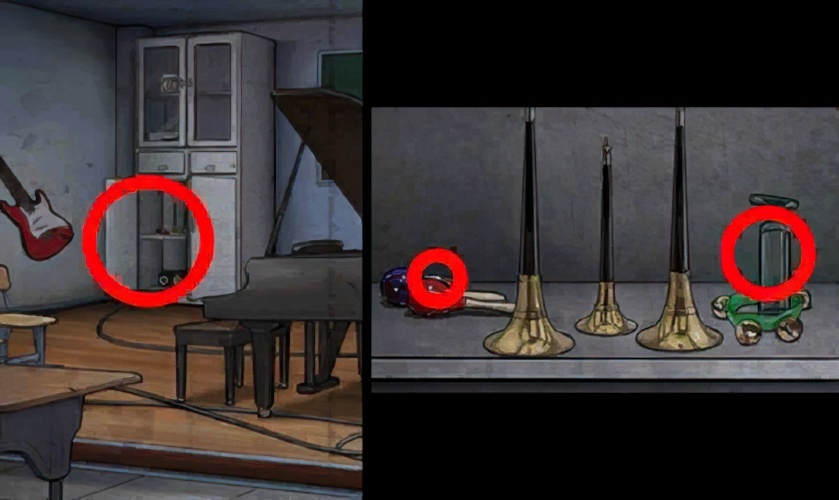
119. Go back to the “Music Room”, check the cabinet, and pick up the folding knife and the pump that lacks a gas needle.

120. Go back to the “Music Room”, check the drum set, cut the drum surface with a folding knife, and pick up the doll.

121. Go back to the “Music Room”, check the table hole, and pick up the dull football.

122. Back to music, look at the guitar and pick up the hex screwdriver in the guitar.

123. Go back to the “music room”, check the drum kit, use a hexagonal screwdriver to remove the fixing screw of the hi-hat, lift up the hi-hat, and pick up the air needle.
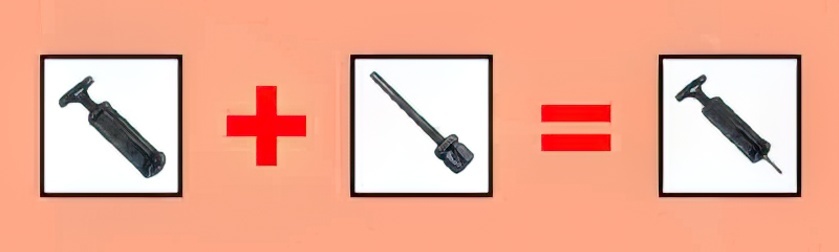
124. Combine the missing device pump and the air needle into a complete pump.

125. Go back to the “corridor on the third floor”, check the fallen bookcase, place the dead football under the wooden cabinet, use a pump to inflate, and pick up the stethoscope.
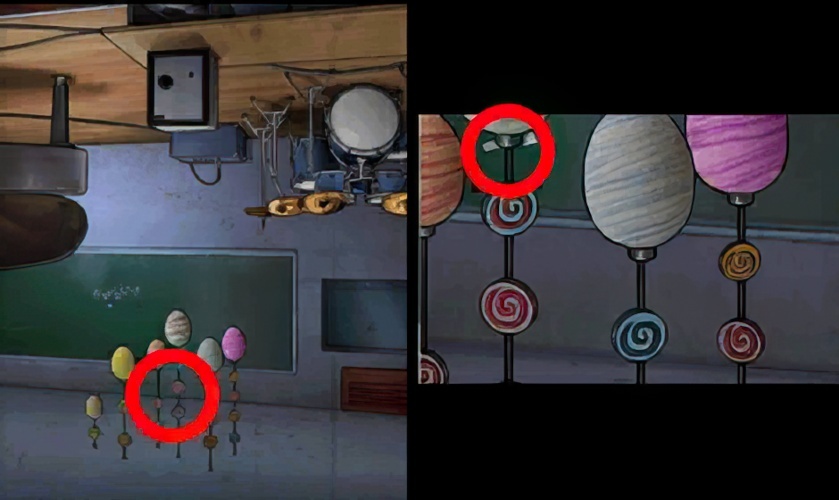
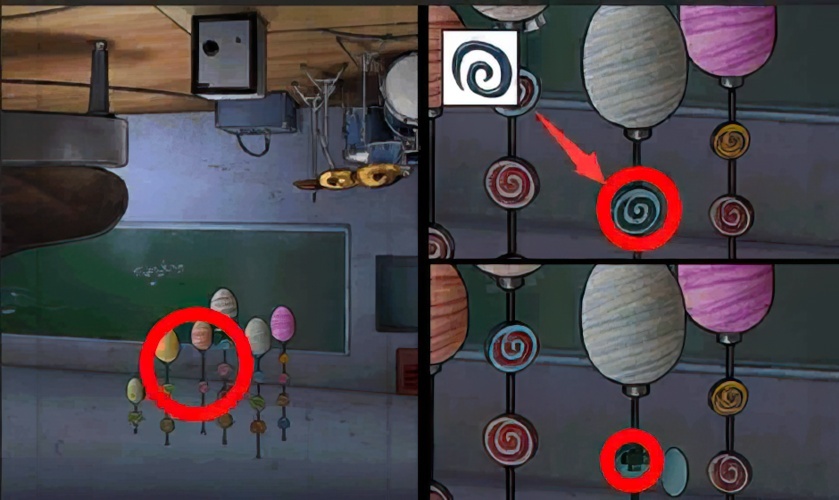
126. Go back to the “Music Room”. Invert the scene to the ceiling, check the decorations, and pick up the keys on the decorative bottle.

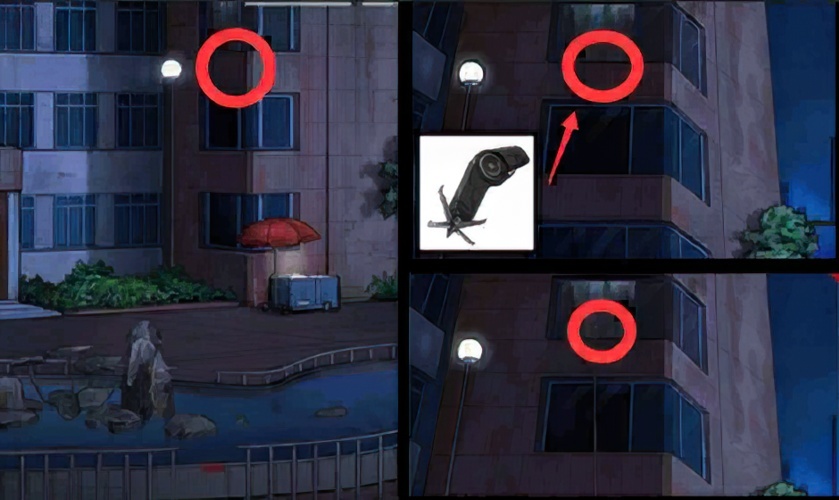
127. Go back to the “corridor on the second floor”. Invert the scene to the ceiling, check the monitor, and pick up the keys.

128. Go back to the “Infirmary”. Invert the scene to the ceiling, check the curtains, and pick up the keys.

129. Go back to the “Music Room”. Invert the scene to the ground, check the piano, and place the three keys in the corresponding positions.

130. Go back to the “Music Room”, check the blackboard to get the score, and follow the prompts from the camera to play the score on the piano, CCGGAAGFFEEDDC, and pick up the mask.
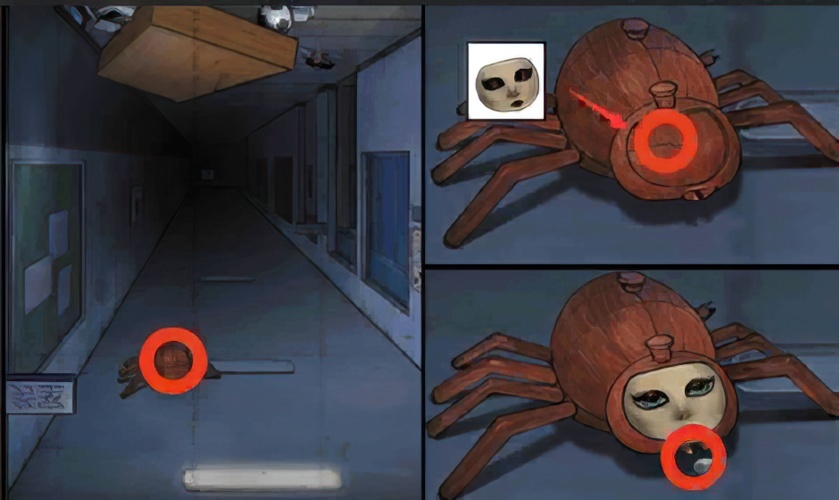
131. Go back to the “corridor on the third floor”. Invert the scene to the ceiling, check the spider, place the mask in the groove, and pick the button.
132. Go back to the “Music Room”. Invert the scene to the ground, check the safe, and install the button in the groove.

133. Go back to the “Music Room”. Invert the scene to the ground, check the safe, use the stethoscope, unlock the mini game, and pick up the angle grinder that lacks accessories.

134. Go back to the “classroom”. Invert the scene to the ceiling, check the projector, and pick up the pressure plate.

135. Go back to the “classroom”. Invert the scene to the ceiling, check the clock, and pick up the cut piece.

136. Go back to the “Music Room”. Invert the scene to the ground, check the blackboard, and pick up the tiles.

137. Go back to the “Music Room”. Invert the scene to the ceiling, check the ventilation duct, and use a magnet to suck out the key.
138. Go back to the “Music Room”. Invert the scene to the ceiling, check the cabinet, open the cabinet with the key, and pick up the toothed wrench.
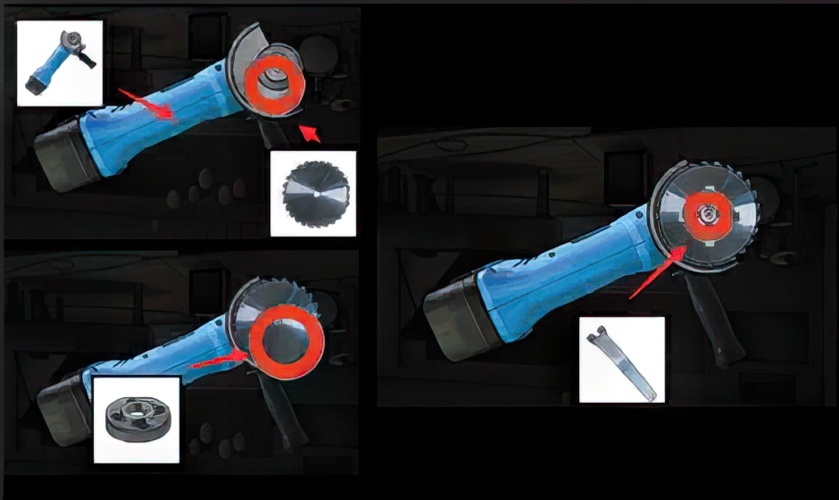
139. Check the angle grinder that lacks accessories, install the cutting disc on the head of the angle grinder, use the pressure plate to fix the cutting disc, and finally fix it with a toothed wrench.

140. Go back to the “Music Room”. Invert the scene to the ceiling, check the ventilation duct, and cut the fence of the duct with an angle grinder.

141. Go back to the “Music Room”. Invert the scene to the ceiling, enter the ventilation duct, avoid the attention of the security guard, and enter the “Office”.

142. Enter the “office”, check the time bomb, and successfully detonate the time bomb.

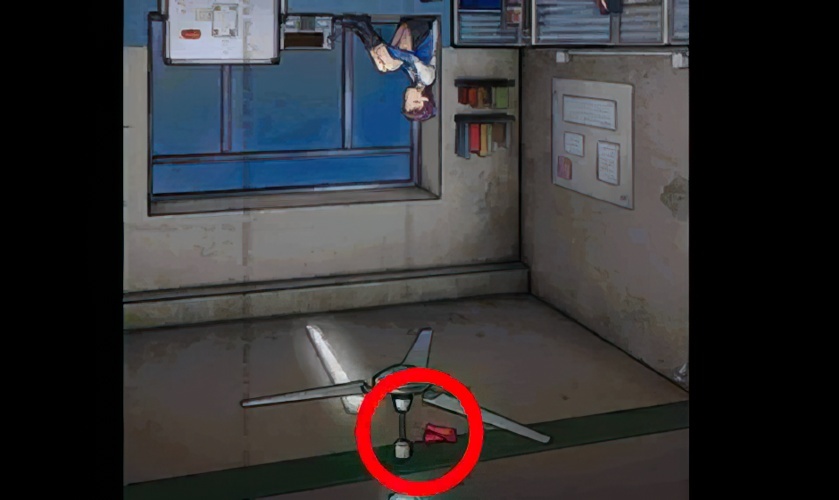
143. Go back to the “office”. Invert the scene to the ground, look at the flower pot on the right, and pick up mint.
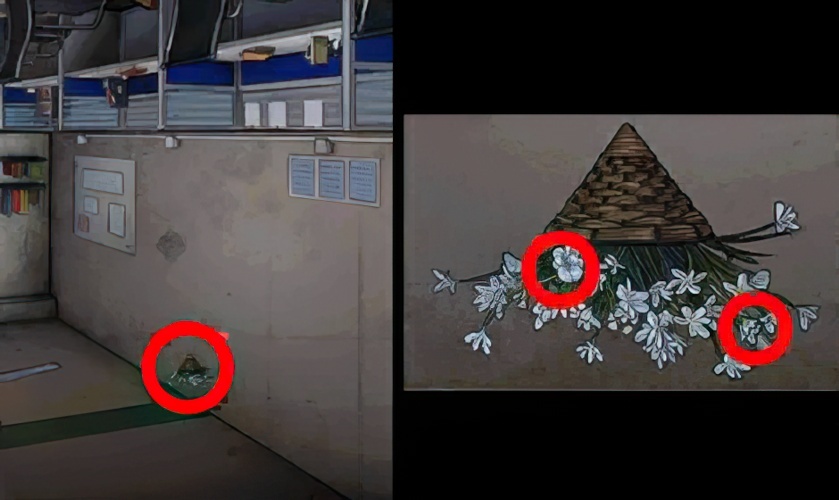
144. Go back to the “office”. Invert the scene to the ceiling, check the flower basket, and pick up the flowers and light tubes.
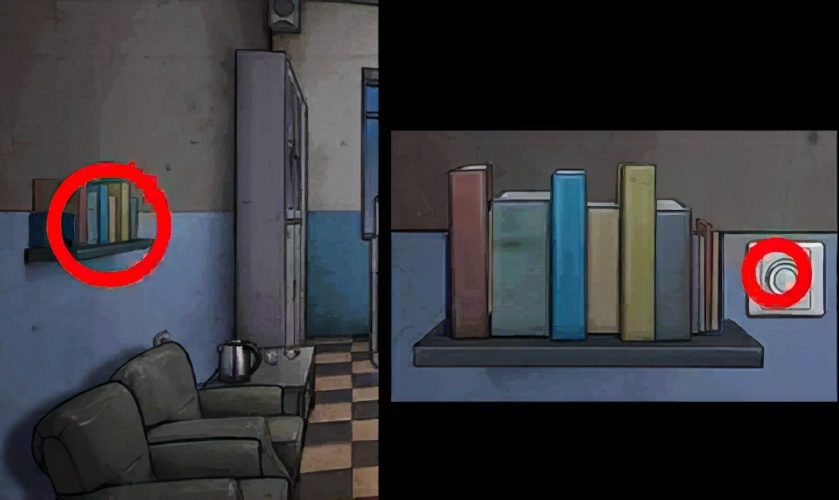
145. Go back to the “office”. Invert the scene to the ground, check the bookshelf on the left, and turn off the rotary switch.
146. Go back to the “office”. Invert the scene to the ceiling, pick up the gloves under the fan.
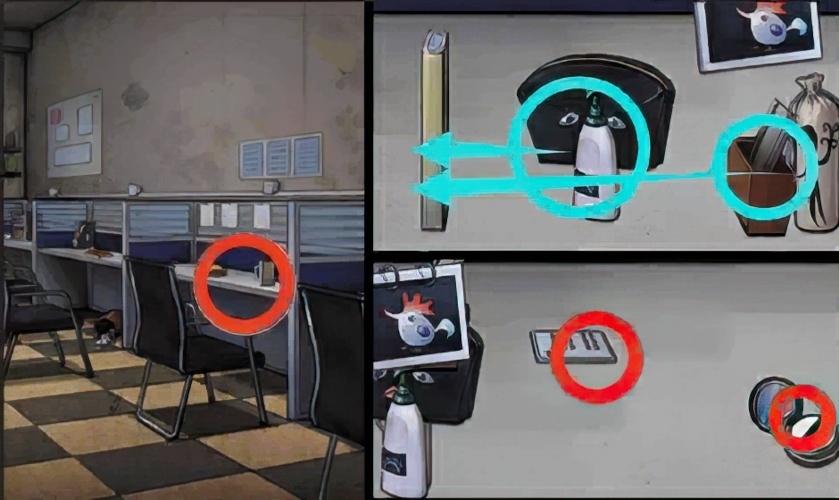
147. Go back to the “office”. Invert the scene to the ground, check the second desk on the right, remove everything on the desk, and pick up the air cushion and remote control.
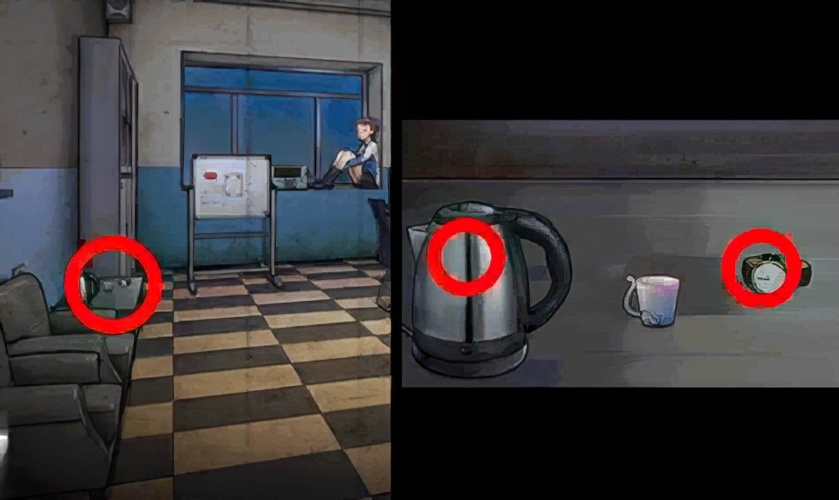
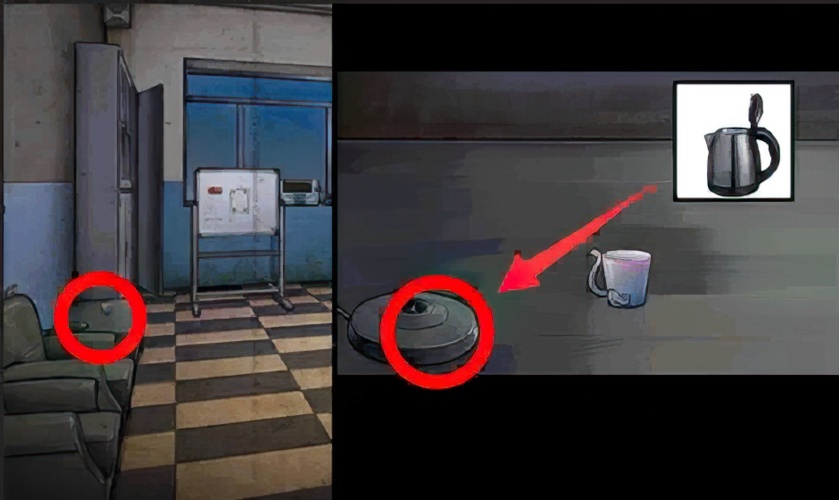
148. Go back to the “office”. Invert the scene to the ground, check the coffee table on the left, and pick up the empty kettle and watch.

149. Go back to the “office”. Invert the scene to the ground, check the third desk on the right, and pick up the thermos cup.

150. Go back to the “office”. Invert the scene to the ground, check the trash can, and pick up the tape.

151. Go back to the “Infirmary”. Invert the scene to the ground, check the table, and remove the broken lamp with gloves.

152. Go back to the “Infirmary”. Invert the scene to the ground, check the desktop, place the light tube in the vacancy, and turn on the switch.

153. Go back to the “Infirmary”. Invert the scene to the ground, check the desktop, and put the thermos cup and watch on the desktop.

154. Go back to the “Infirmary”. Invert the scene to the ground, check the desktop, and use the air cushion to powder the watch and the thermos cup.

155. Go back to the “Infirmary”. Invert the scene to the ground, check the desktop, and use tape to collect the fingerprints of the thermos cup of the watch box.
156. Go back to the “classroom”. Invert the scene to the ground, check the podium, use two fingerprints to unlock the podium, and pick up the red pen.
157. Go back to the “Classroom”. Invert the scene to the ceiling, check the projector, and turn on the projector with the remote control.
158. Go back to the “office”, Turn the scene upside down to the ground, look at the bookshelf on the left, and pick up small pieces of paper.

159. Go back to the “office”. Invert the scene to the ground, check the podium, and turn on the projector.

160. Go back to the “office”, Turn the scene upside down to the ground, check the whiteboard, and pick up a piece of paper with a small pattern.
161. Go back to the “classroom”. Invert the scene to the ground, look at the podium, and place a small piece of paper on the projector.
162. Go back to the “classroom”. Invert the scene to the ground, check the projection cloth, and use a red pen to doodle on the screen according to the pattern of the “office” whiteboard.
163. Go back to the “classroom”. Invert the scene to the ground, check the podium, and place a small piece of paper on the projector to obtain the corresponding digital image.
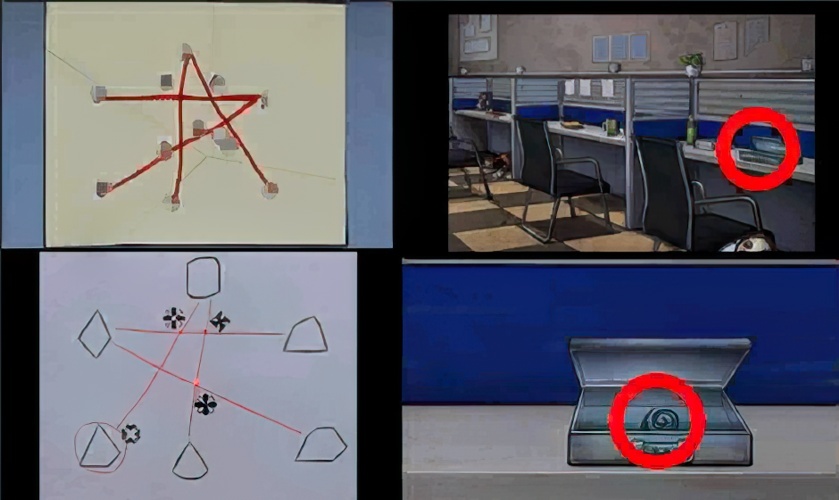
164. Go back to the “office”. Invert the scene to the ground, check the desk, unlock the box code according to the screen number and whiteboard symbol, and pick up the circle parts.
165. Go back to the “Music Room”. Invert the scene to the ceiling, check the decorations, place the circle parts in the groove, and pick up the arrow keys.

166. Go back to the “office”. Invert the scene to the ground, check the bookcase, place the arrow keys in the groove, unlock the mechanism, open the cabinet, and pick up ammonia.

167. Go back to the “Infirmary”. Invert the scene to the ground, check the sink, turn on the faucet, and use an empty kettle to collect water.
168. Go back to the “office”. Invert the scene to the ground, look at the coffee table on the left, and put the kettle with water on the socket.

169. Go back to the “office”. Invert the scene to the ground, look at the coffee table on the left, and put mint, flowers, and ammonia into the kettle.

170. Go back to the “office”. Invert the scene to the ground, look at the coffee table on the left, turn on the kettle switch, put the smelling salt into the water cup, and pick up the smelling salt.

171. Back to the “office”. Invert the scene to the ground, check the windowsill, apply the smelling salt to the little girl, and start the negotiation.


