Hospital Escape: Chapter 8 – This time in the game you will study the patient: The detective working in the police station was sent by a mysterious woman for treatment. The specific circumstances and the cause of the coma are still unknown.
Hospital Escape: Chapter 8 – Walkthrough
Below you can watch the complete walkthrough of the Chapter 8, in the game Hospital Escape.

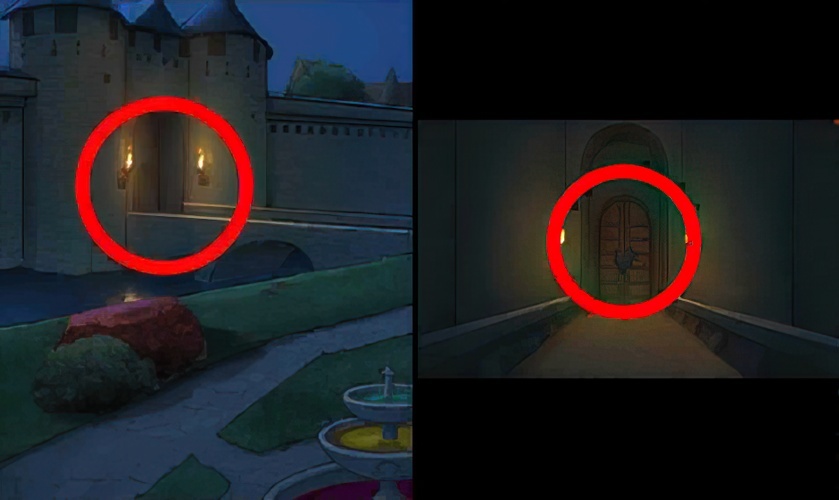
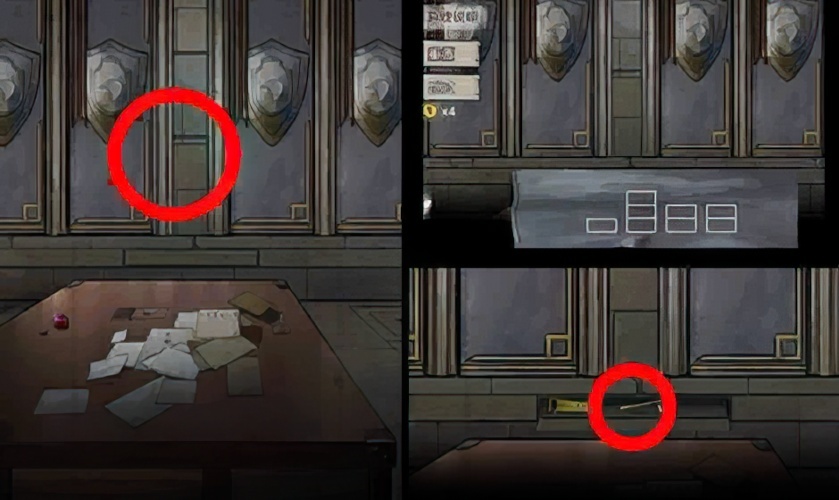
1. Check the fruit stand, move the lemon to the side, and pick up the note.
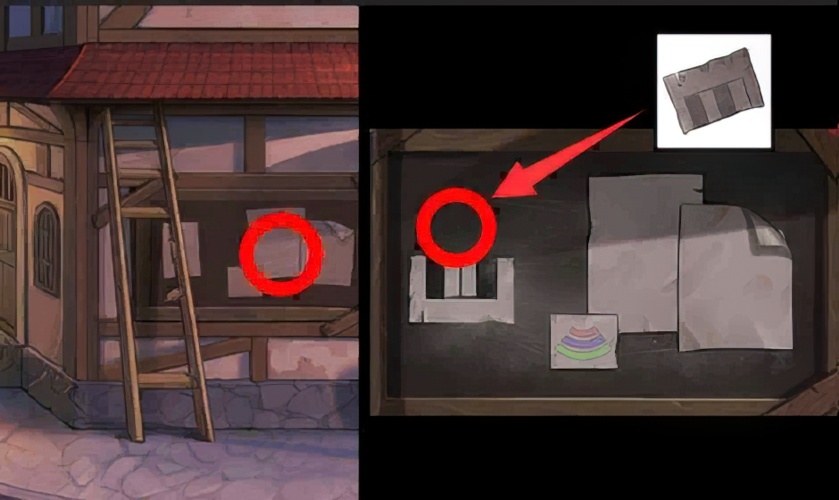
2. Check the bulletin board and apply the note to the bulletin board.

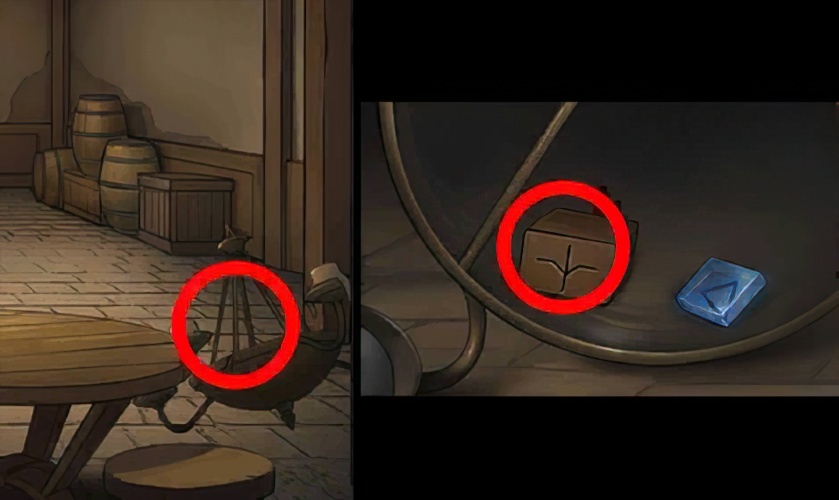
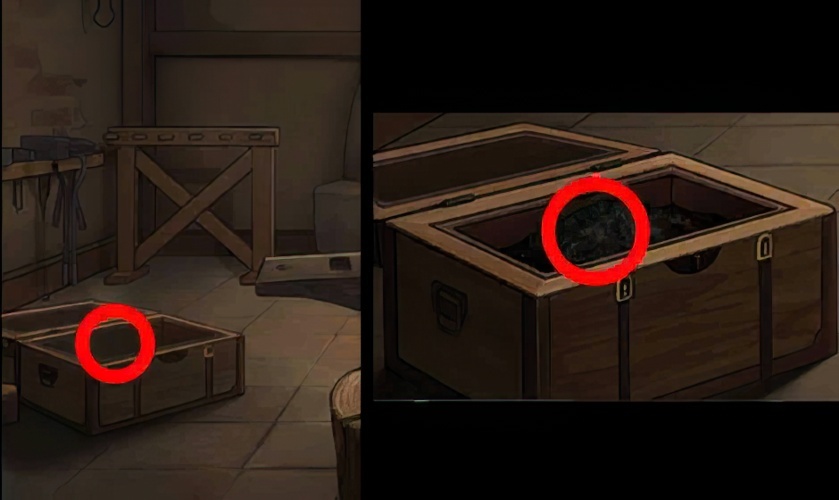
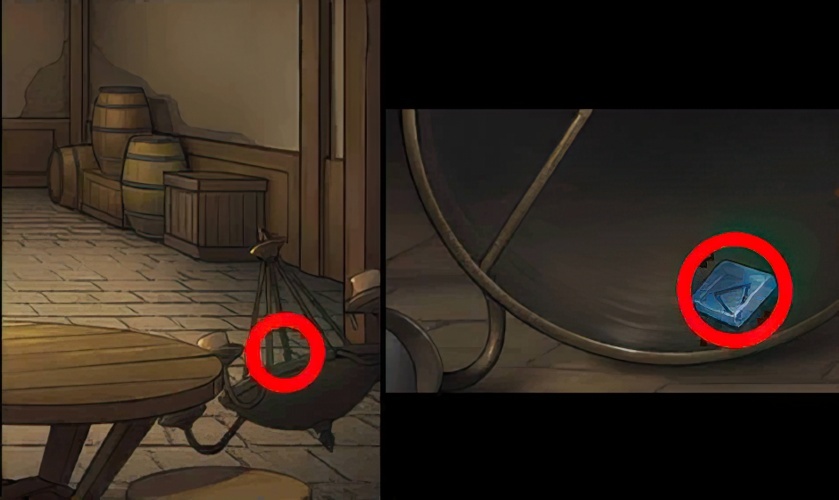
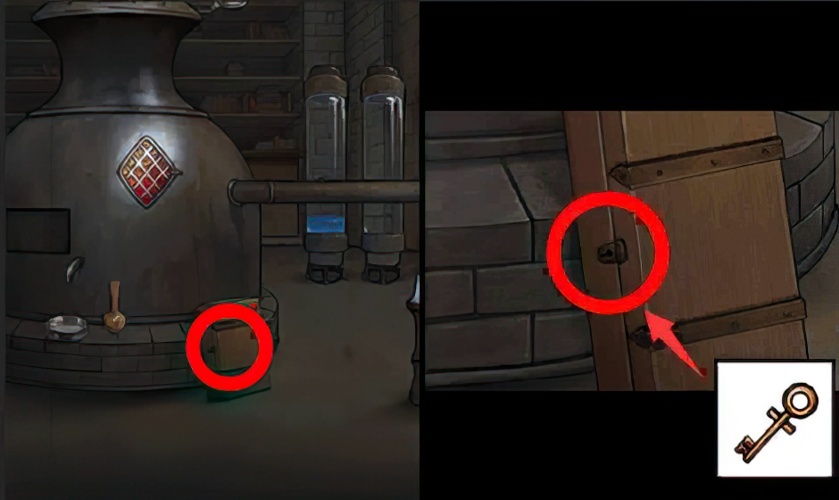
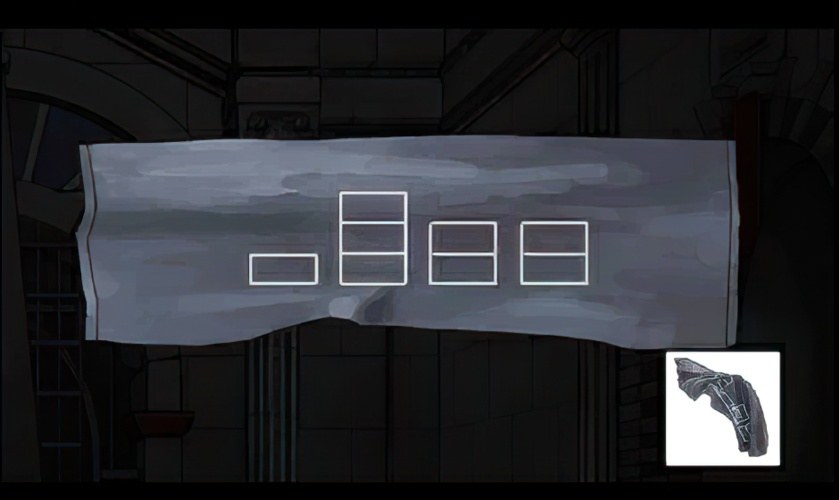
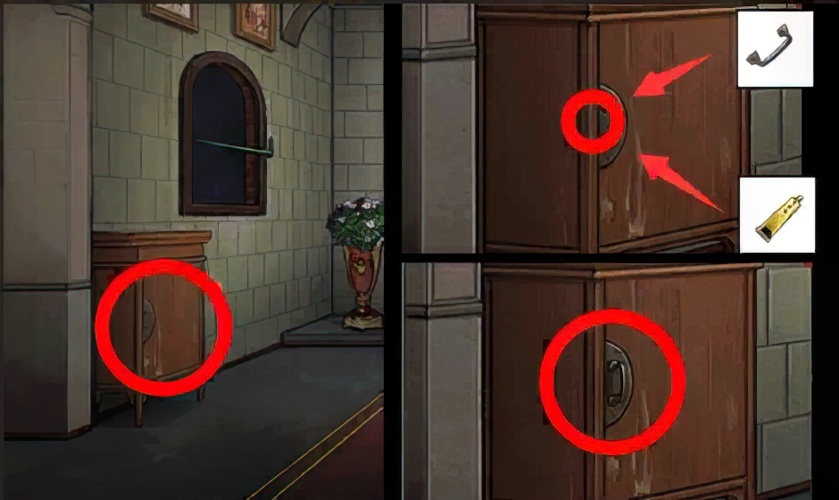
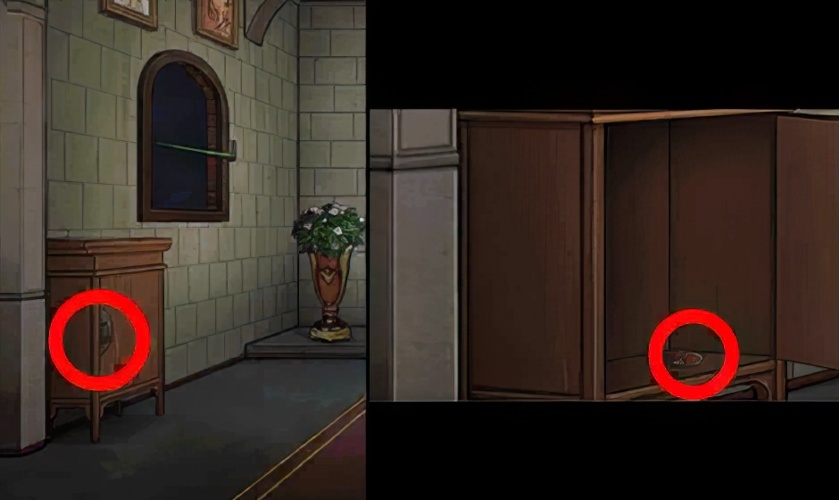
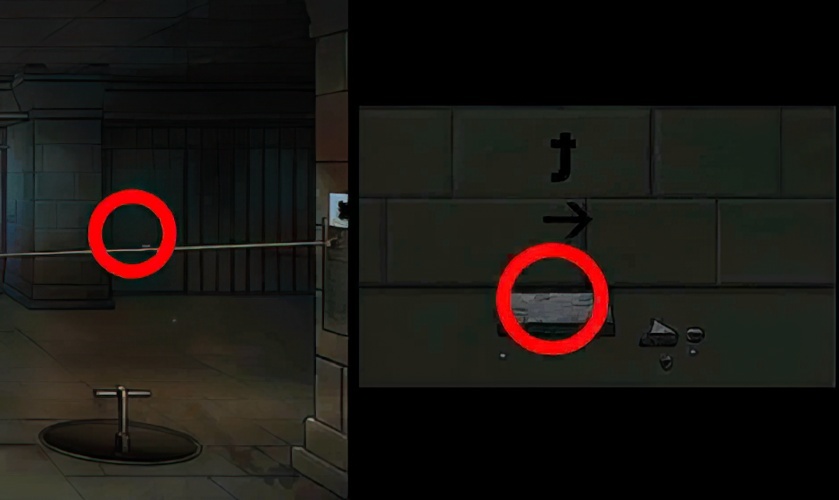
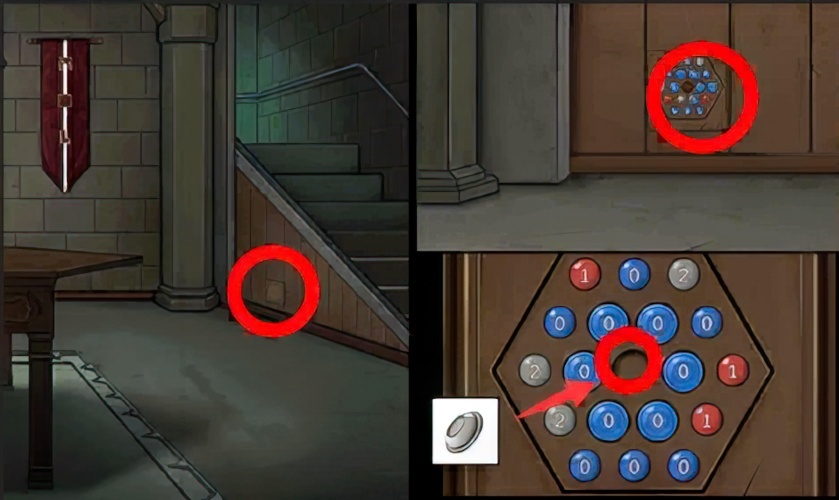
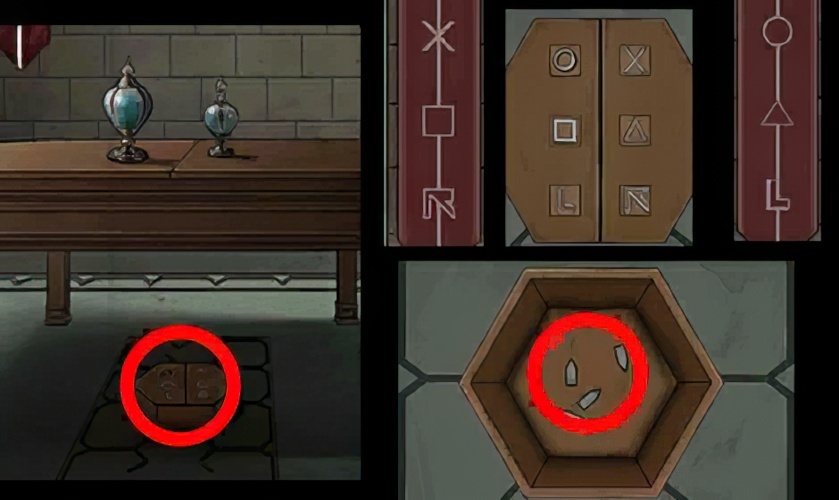
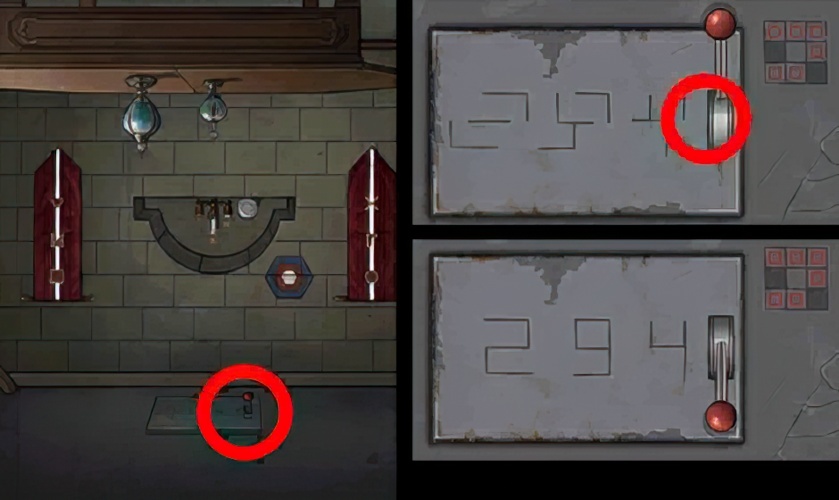
3. Check the small square box on the ground, follow the prompts to unlock the small square box mechanism, and pick up the key.
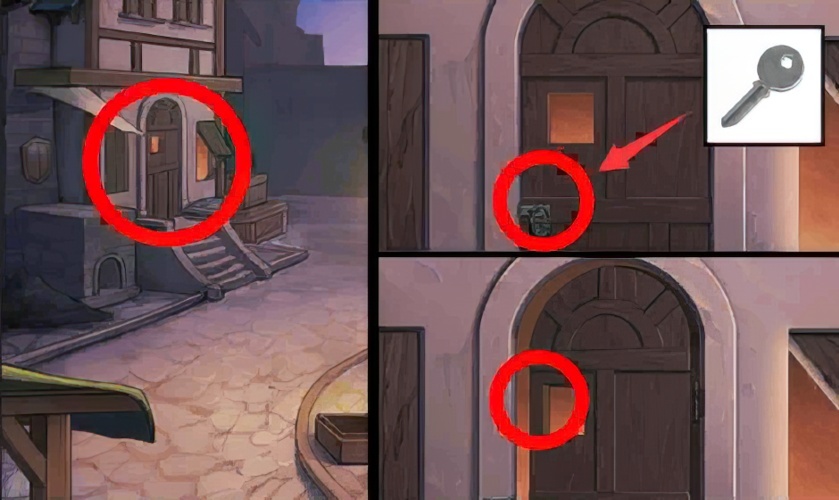
4. Check the door of the “Blacksmith’s Shop”, unlock the lock with the key, and enter the “Blacksmith’s Shop”.
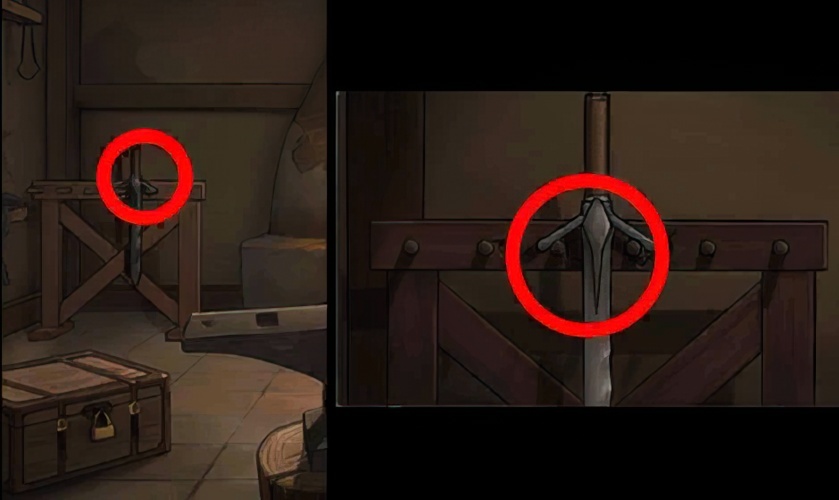
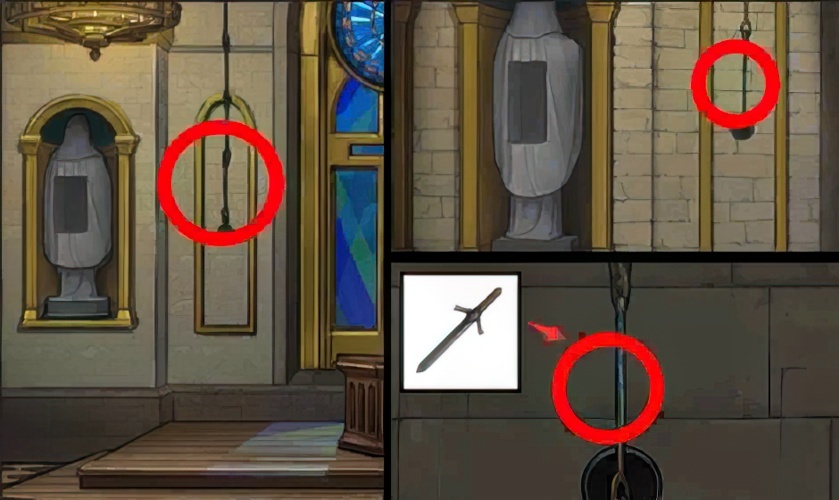
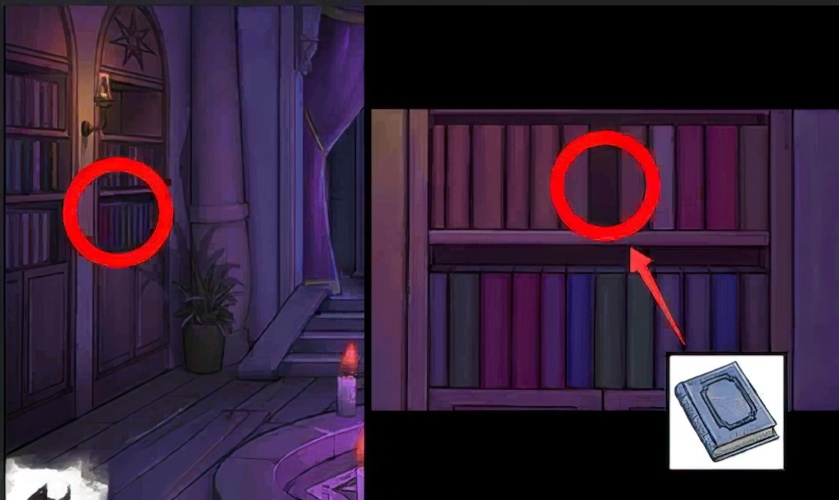
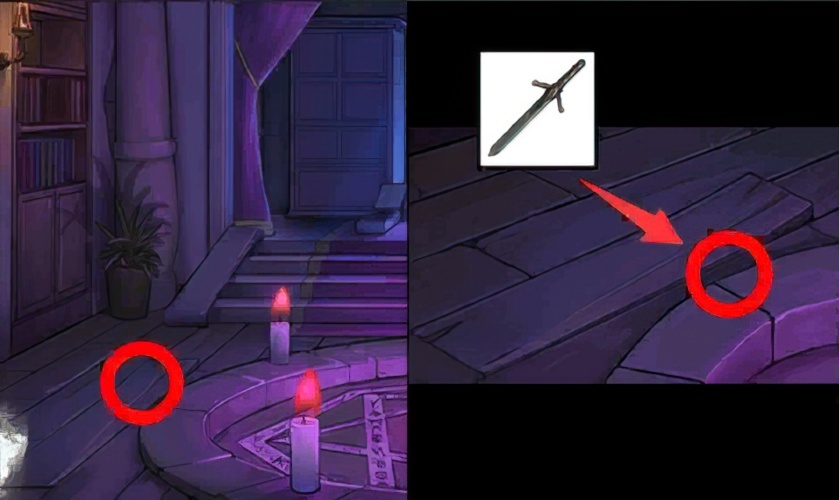
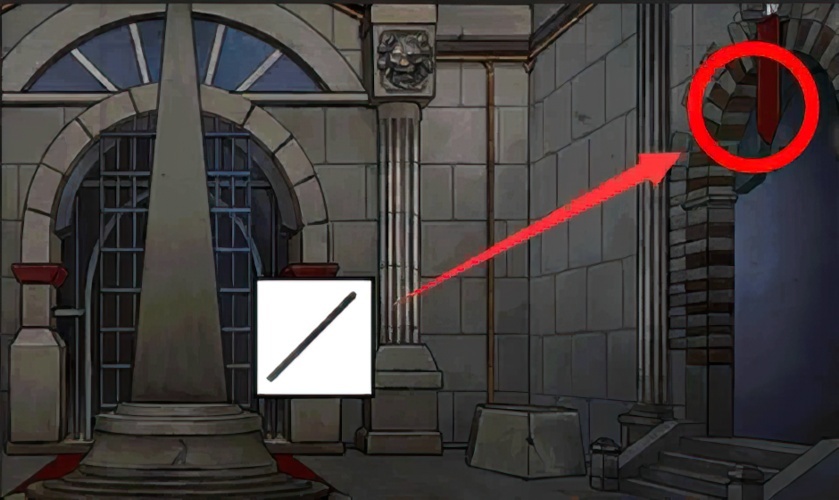
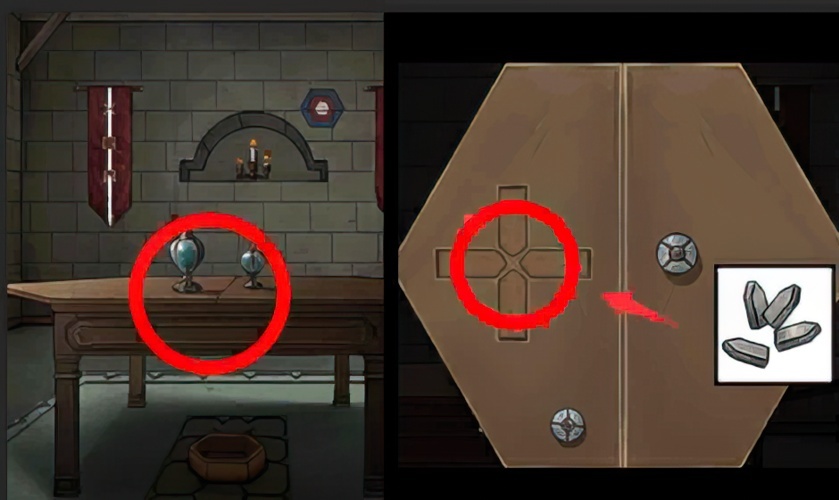
5. Enter the “Blacksmith’s Shop”, check the weapon rack, and pick up the bladed sword.
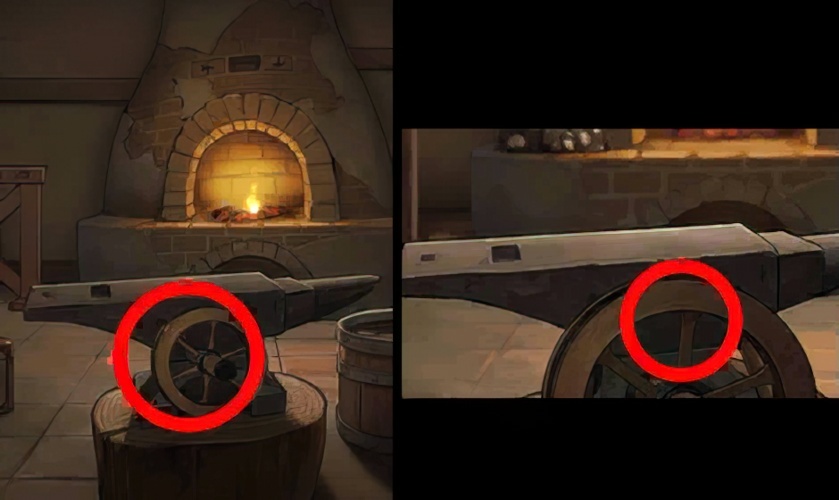
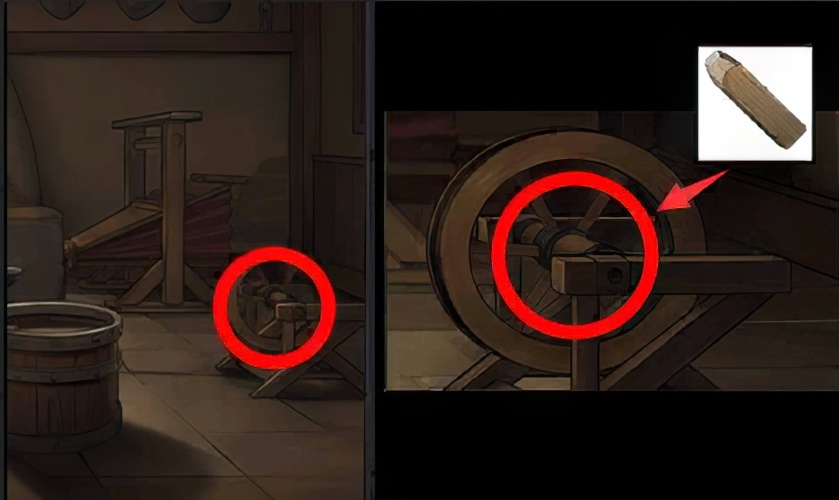
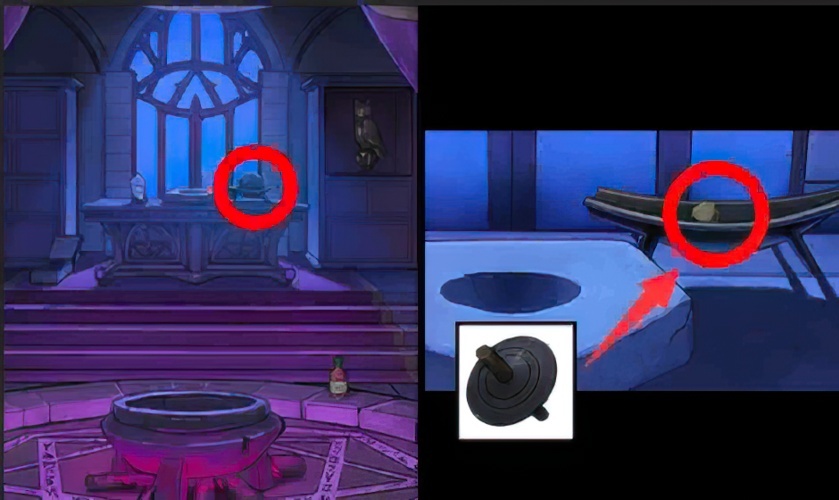
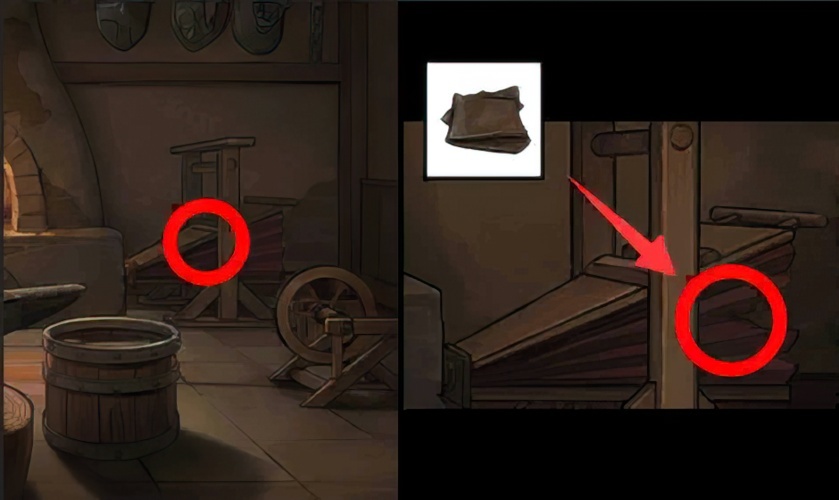
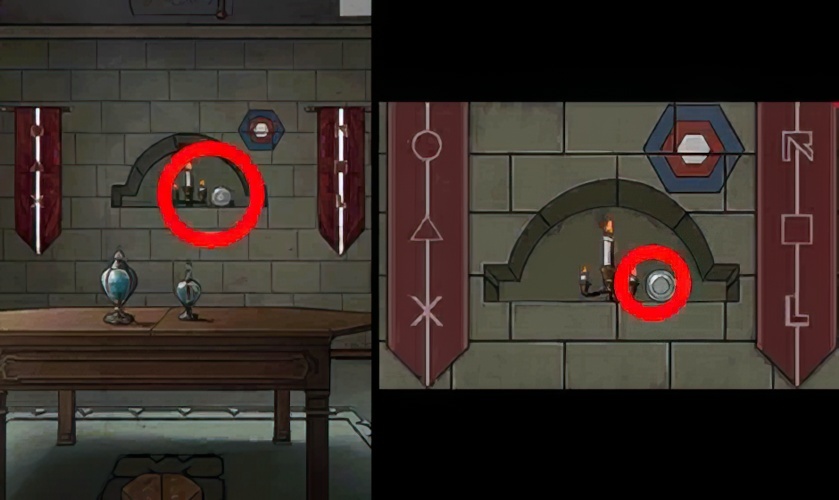
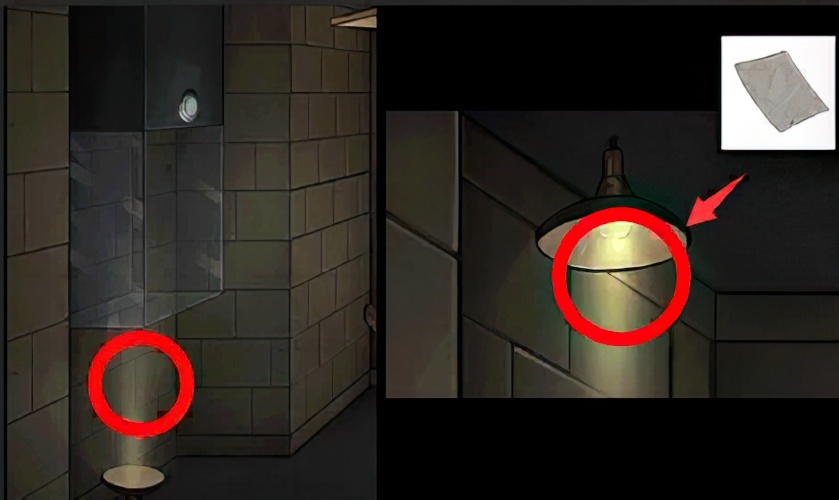
6. Go back to the “Blacksmith’s Shop”, check the iron felt, and pick up the sharpening disc.

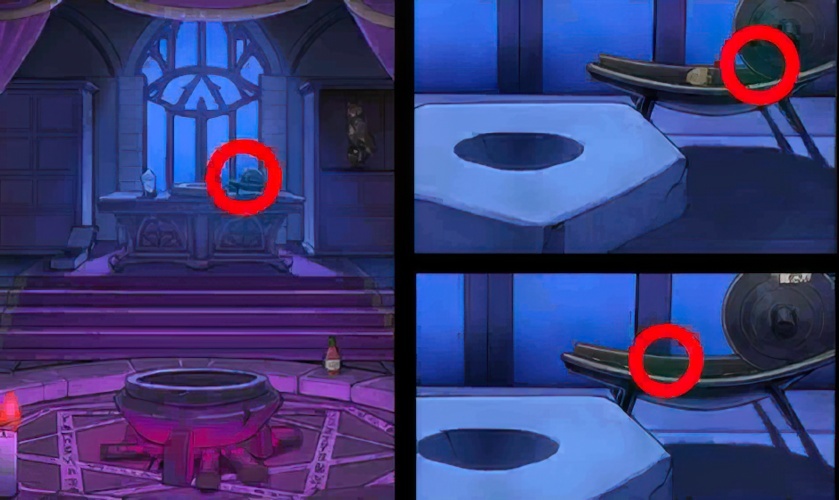
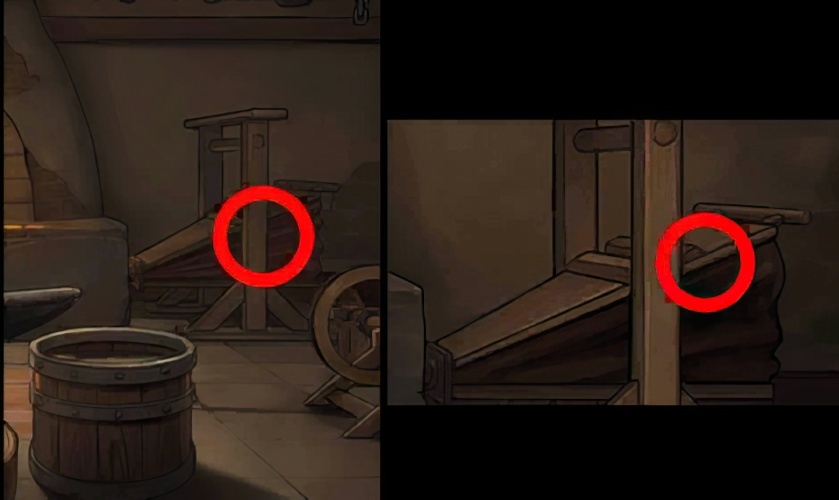
7. Go back to the “Blacksmith’s Shop”, check the wooden shelf on the right, and place the sharpener on the wooden shelf.
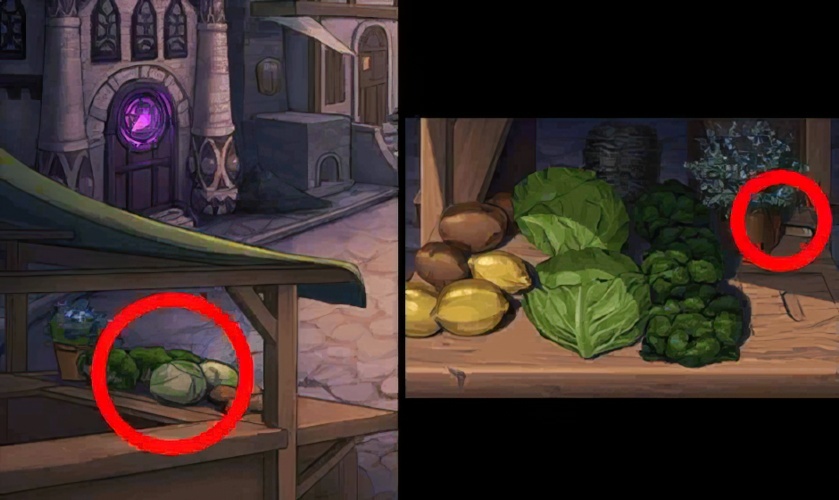
8. Go back to the “square”, check the fruit stand, and pick up the wooden awl.
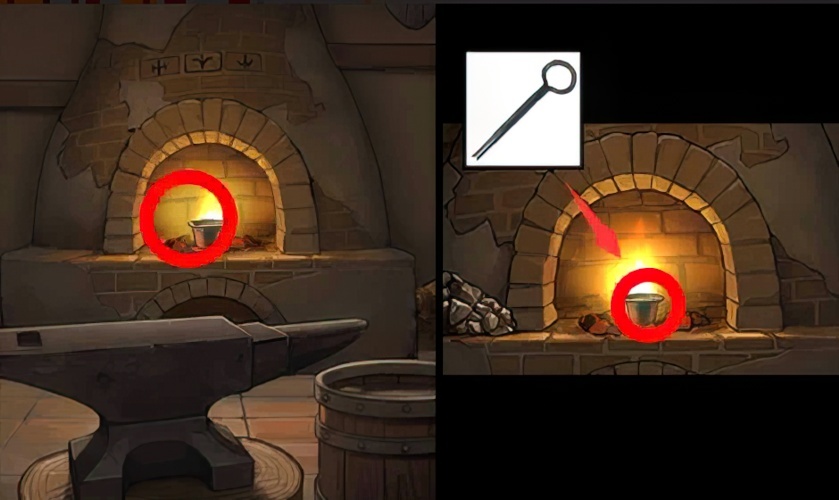
9. Go back to the “Blacksmith’s Shop”, check the sharpening disc on the right, and fix the wooden awl to the sharpening disc.
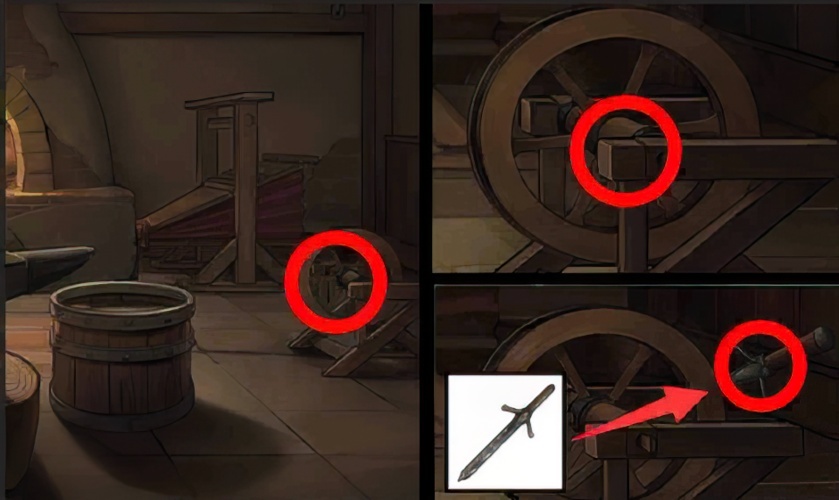
10. Go back to the “Blacksmith’s Shop”, check the sharpening disc, turn the sharpening disc, and sharpen the curly-edged sword into a sharp sword.

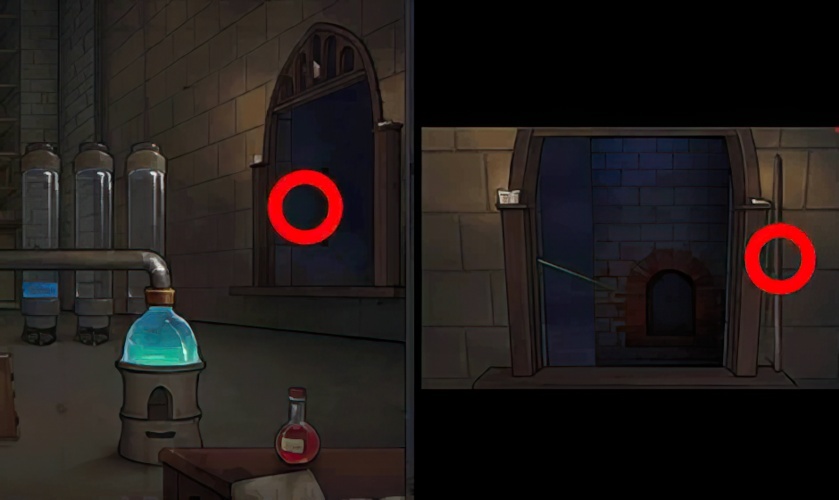
11. Enter “in front of the city gate”, check the relief, insert a sharp sword into the mouth of the relief, and pick up the cat’s eyes.

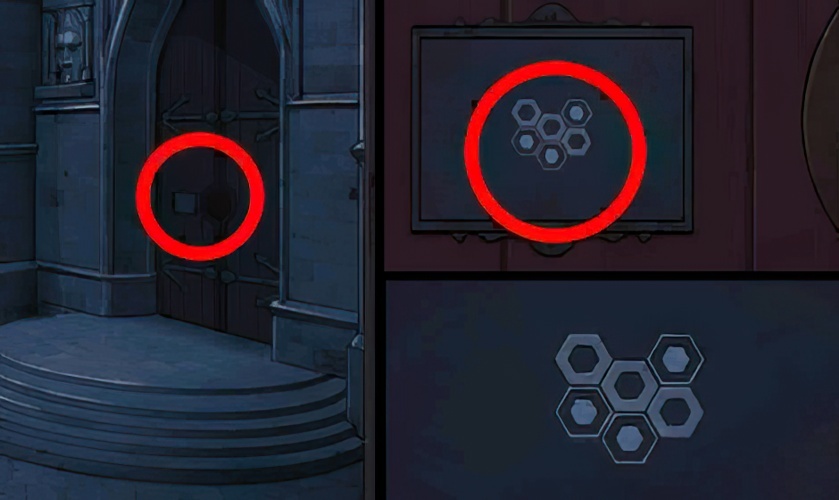
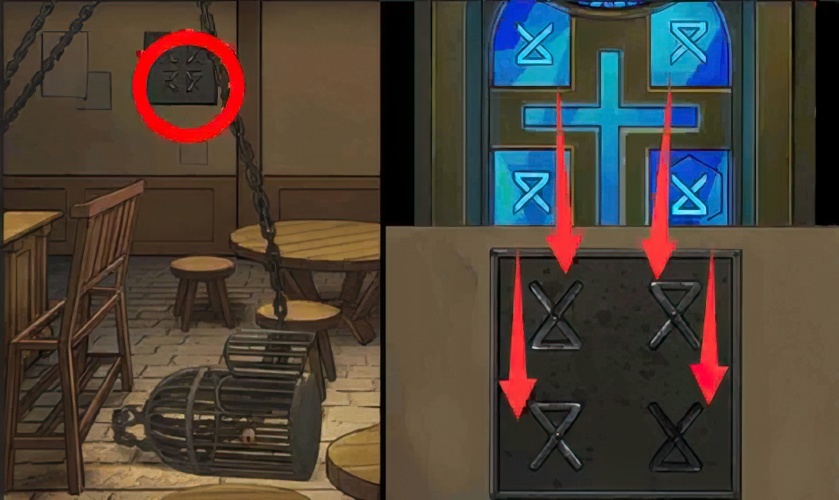
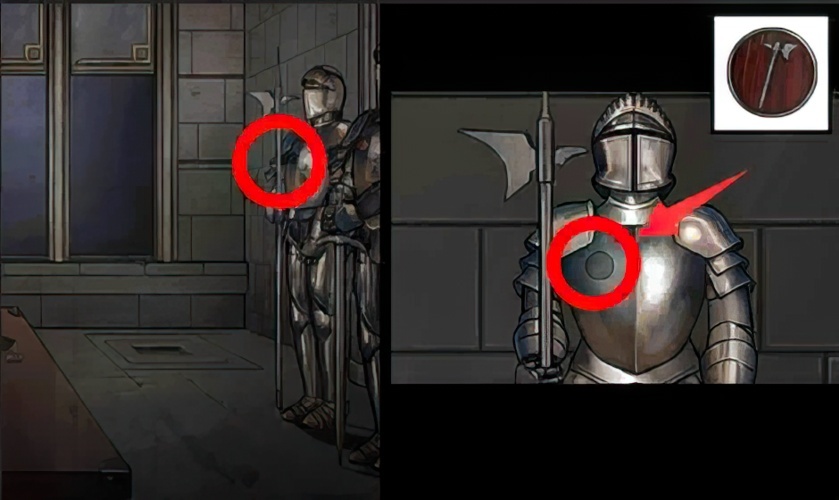
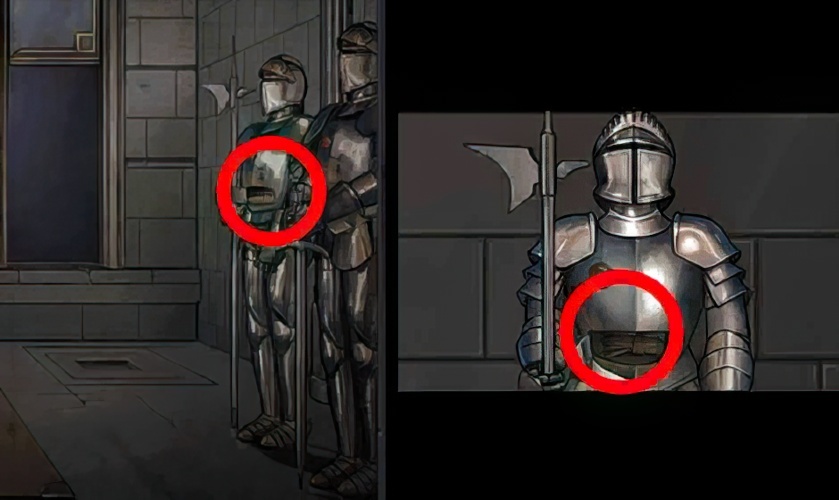
12. Go back to the “square”, check the door of the “magic house”, arrange the symbols in the correct position according to the prompts on the weapon rack, and enter the “magic house”.
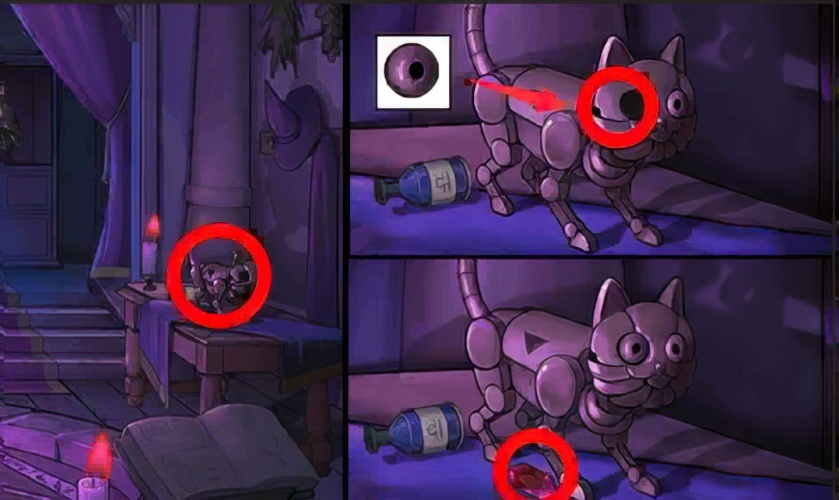
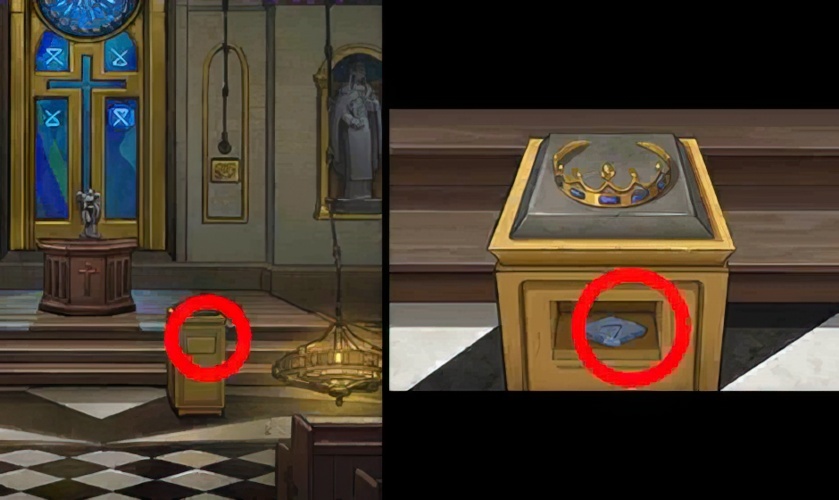
13. Enter the “magic house”, check the cat crafts on the right, place the cat’s eye in the vacancy, and pick up gems.

14. Go back to the “square”, check the “smith shop”, put the gem in the groove, open the groove to pick up the herbicide.

15. Go back to “in front of the city gate” and check the thorns. The herbicide acts on the thorns.
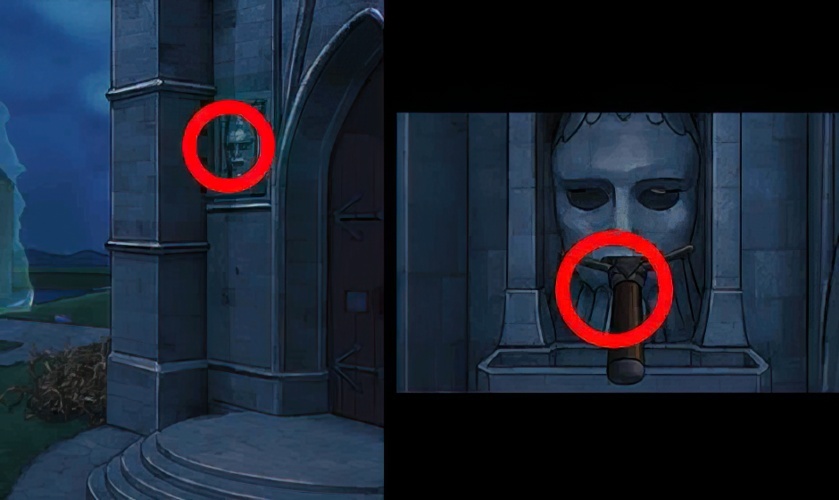
16. Go back to “in front of the city gate”, check the relief, and take out the sword in the mouth of the relief.
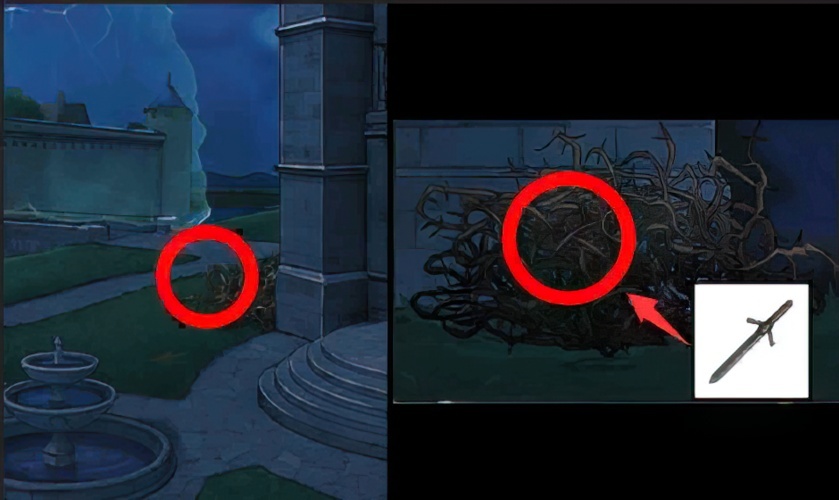
17. Go back to “in front of the city gate”, check the thorns, and chop the withered thorns with a sharp sword.

18. Go back to “in front of the city gate”, check the thorns, and pick up the tiles.

19. Go back to “in front of the city gate”, check the relief, and use a magnet to suck out the coin on the right eye of the relief.
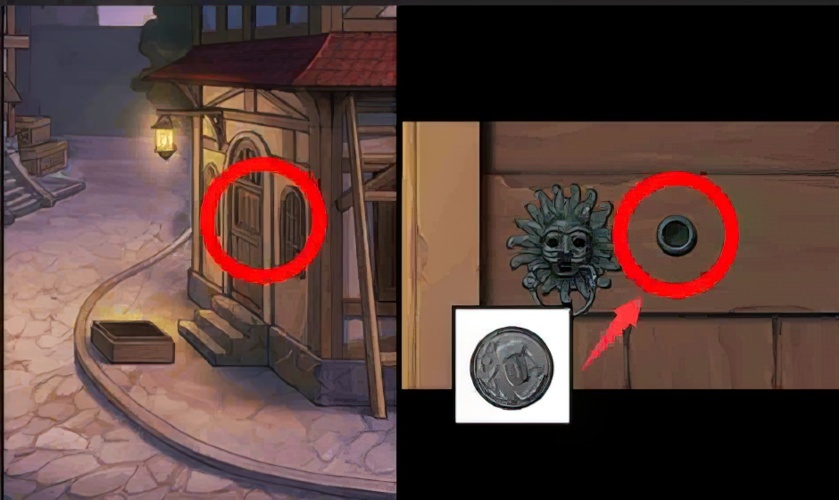
20. Go back to the “square”, look at the door of the “pub”, and put the coin into the groove.

21. Go back to the “square”, check the bulletin board, cut off the paper, and check the prompts on the board.

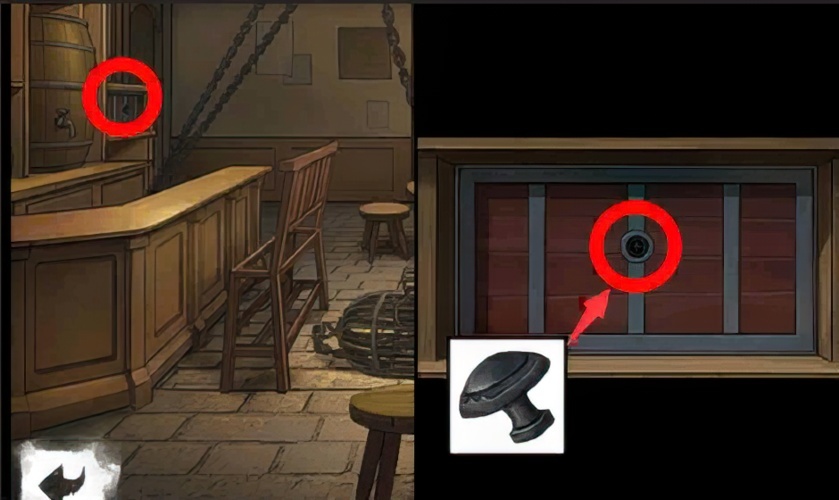
22. Go back to the “square” and check the door of the “pub”. According to the prompt to wait for two seconds and then knock twice after knocking once, pull the handle on the door and open the door of the “pub” to enter the “pub”.

23. Enter the “Tavern”, check the barrels, and split the barrels with a sharp sword.
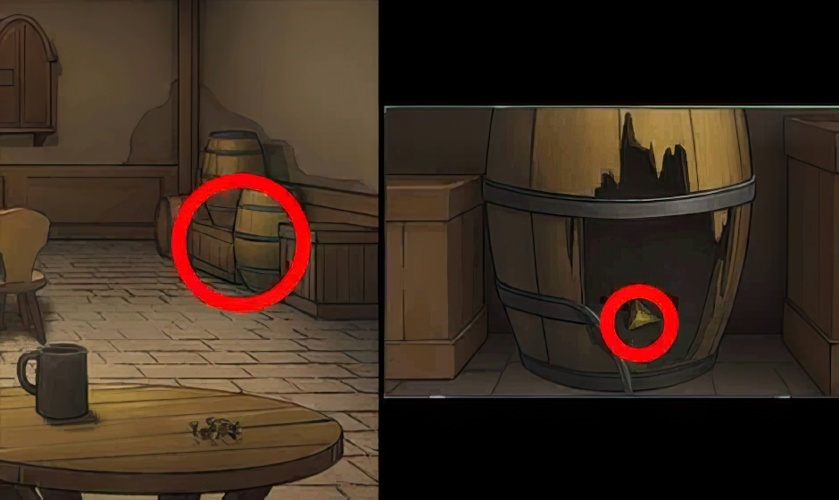
24. Go back to the “Tavern”, check the barrel, and pick up the triangle block.

25. Go back to the “Magic House” and look at the cat crafts on the right. Use triangles to act on the grooves on the cat’s body.

26. Go back to the “magic house”, look at the cat crafts on the right, and pick up the key in the abdominal cavity.

27. Go back to the “magic house”, check the enchantment table, and pick up the badge.

28. Go back to the “pub”, check the counter, and put the badge in the groove.

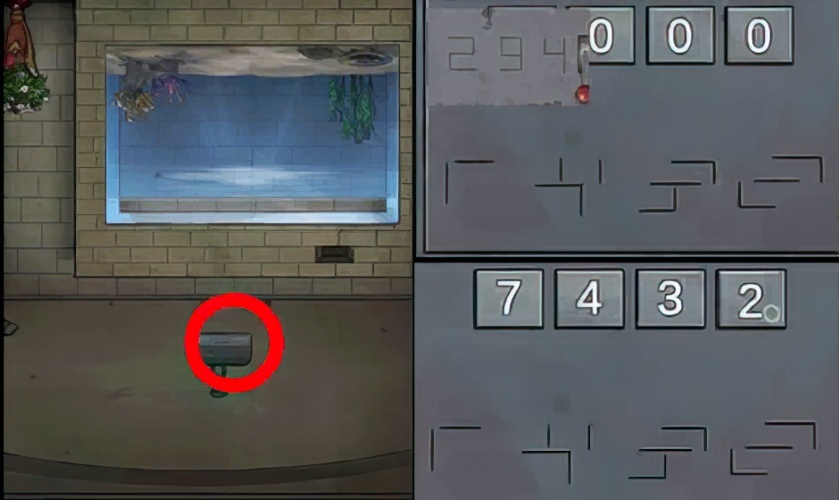
29. Go back to the “Magic House”, check the box on the ground, complete the puzzle solving mechanism, and pick up the joystick.

30. Go back to the “pub”, check the counter, and put the rocker into the groove.

31. Go back to the “Tavern”, check the counter, and cut the rope with a sharp sword.
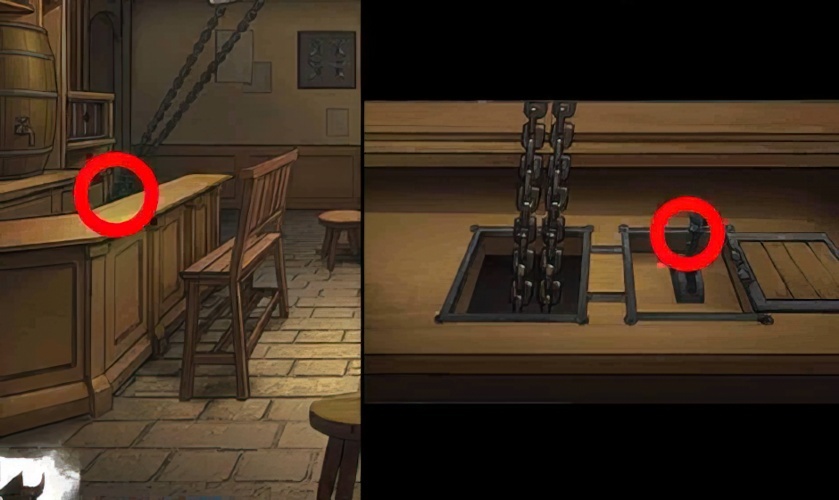
32. Go back to the “pub”, check the counter, move the rocker, and the pendant and lamp drop to the ground.
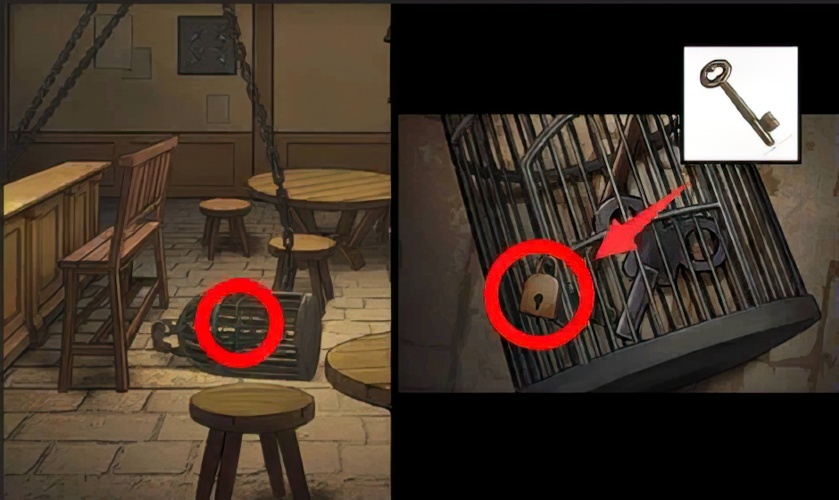
33. Go back to the “Tavern”, check the pendants on the floor, and use the key to open the lock.

34. Go back to the “Tavern”, check the pendants on the ground, and pick up the clockwork.

35. Go back to the “magic house” and check the owl. The clockwork acts on the owl.
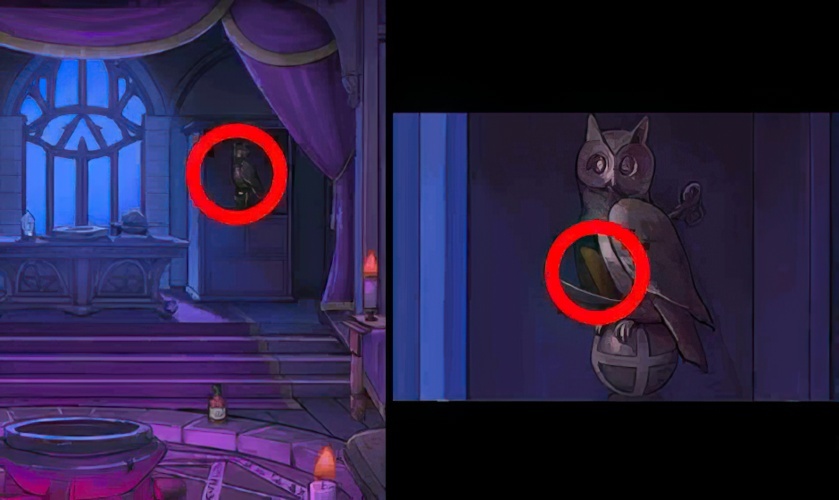
36. Go back to the “magic house”, check the owl, and pick up the debris in the belly.

37. Go back to the “Tavern”, check the charm, and loot the claw hammer.
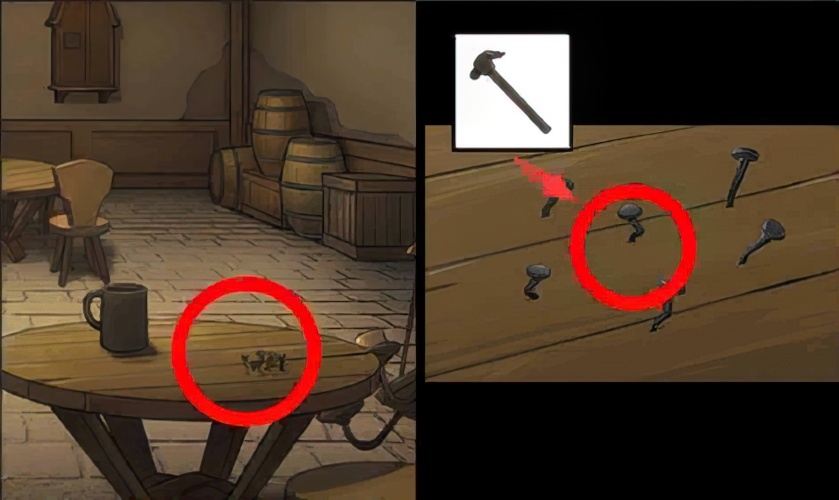
38. Go back to the “pub”, check the table, and use a claw hammer to hook the crooked nail.
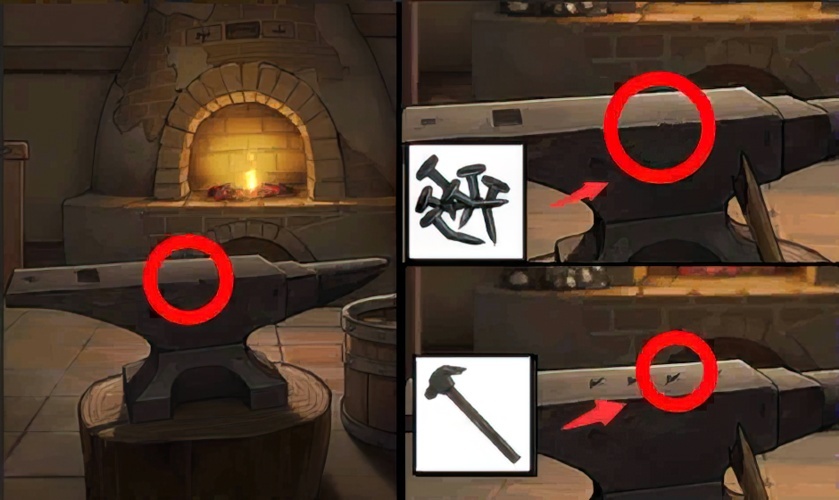
39. Go back to the “Blacksmith’s Shop”, check the iron felt, place the bent nail on the iron felt, and use a claw hammer to straighten the nail.
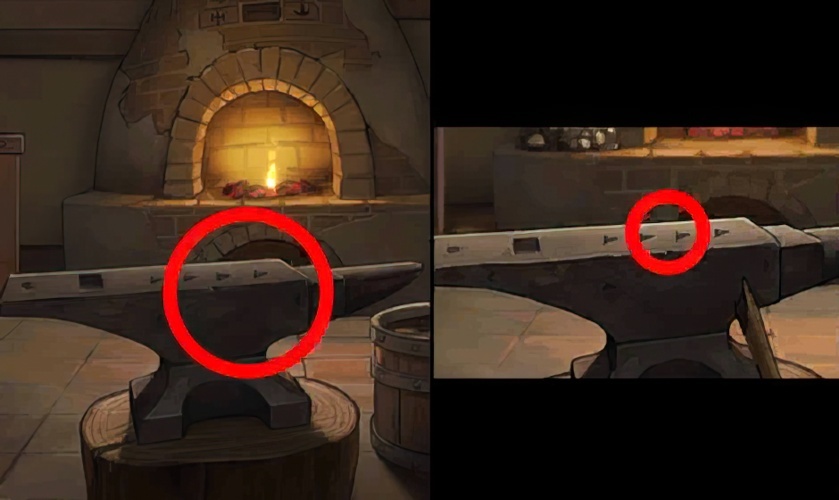
40. Go back to the “Blacksmith’s Shop”, check the iron felt, and pick up the vertical nails.

41. Go back to the “Tavern”, check the stool, and pick up the wooden planks on the stool.

42. Back to the “square”, the wooden board acts on the vacancy of the ladder.

43. Go back to the “square” and look at the ladder. The vertical nail is acting on the ladder, and the claw hammer is used to fix it.
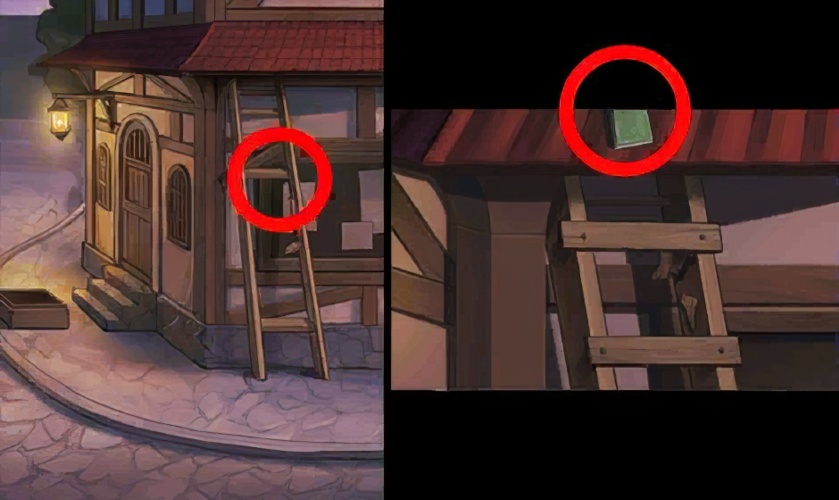
44. Go back to the “square”, check the ladder, climb the ladder, and pick up the notebook.
45. Go back to the “magic house”, check the enchantment table, and loot the charcoal bar.
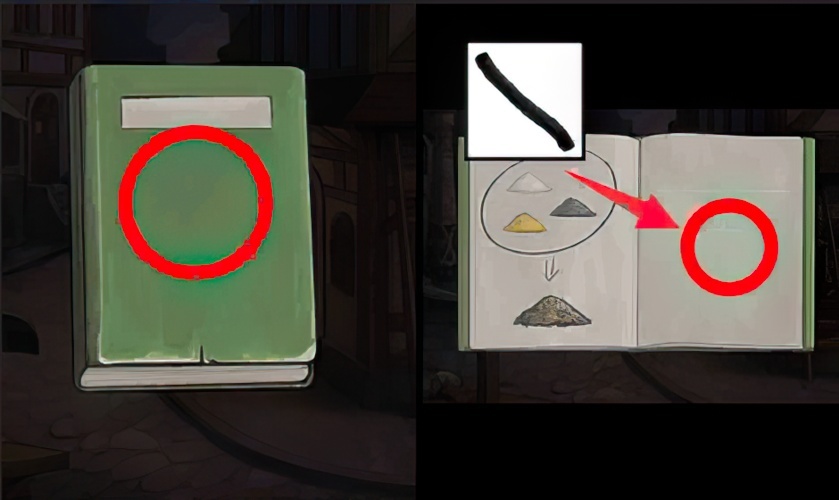
46. Open the notebook, the charcoal strip acts on the blank page on the right, and check the prompt after smearing.
47. Go back to the “pub”, check the chandeliers on the ground, and pick up small stones.

48. Go back to the “Blacksmith’s Shop”, look at the top of the furnace, and put the small stones in the grooves.
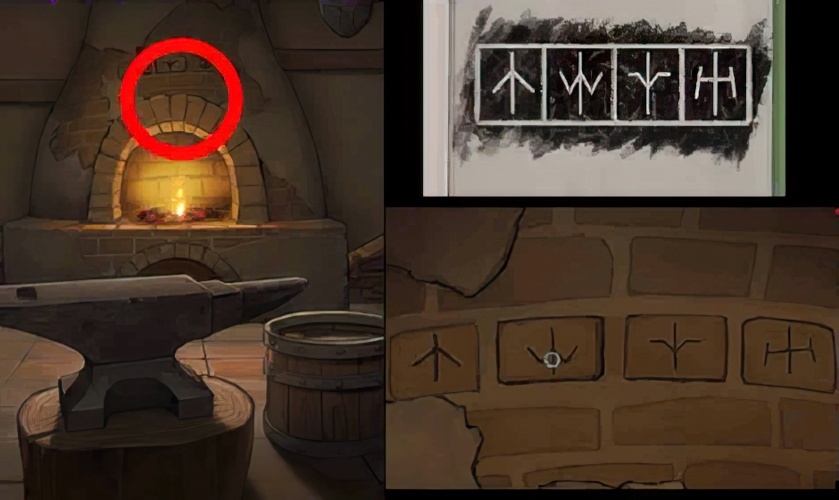
49. Go back to the “Blacksmith’s Shop”, look at the top of the furnace, and follow the instructions in the notebook to arrange the small stones correctly.
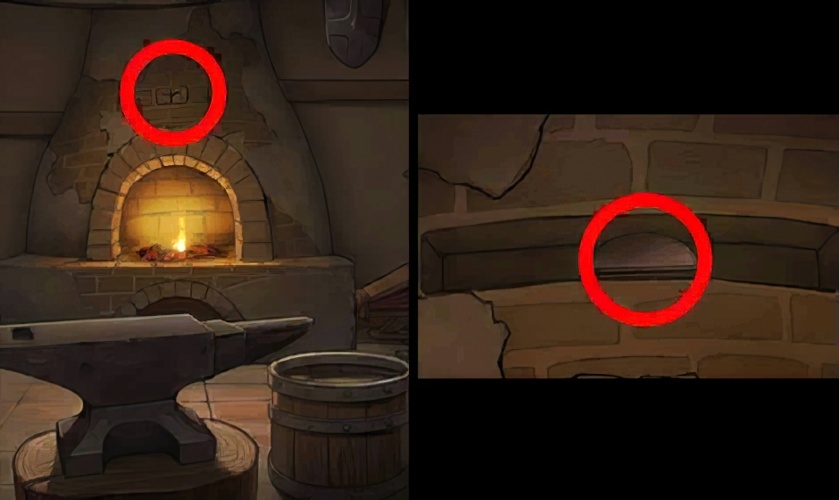
50. Go back to the “Blacksmith’s Shop”, look at the top of the furnace, and pick up the fragments.
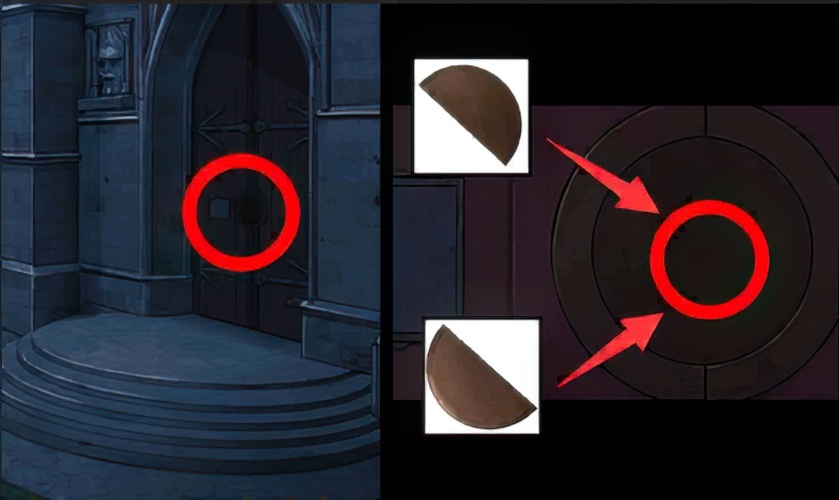
51. Go back to the “City Gate”, check the “Church” door, and put the two fragments into the groove.
52. Go back to the “City Gate”, check the “Church” door, check the mechanism on the left, unlock the mechanism, and enter the “Church”.
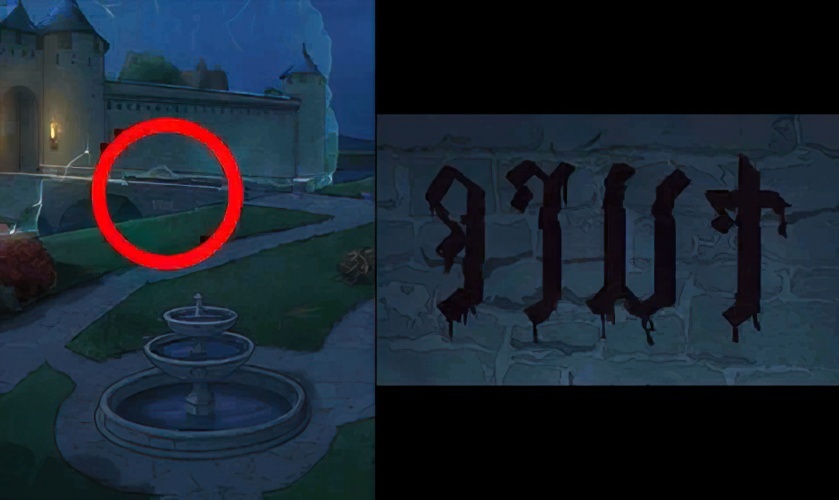
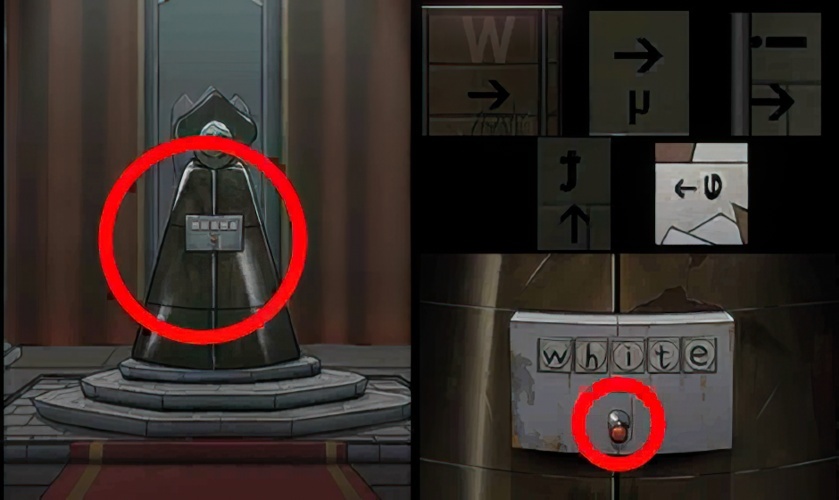
53. Go back to “in front of the city gate”, check the bridge body, check the prompts on the bridge body.
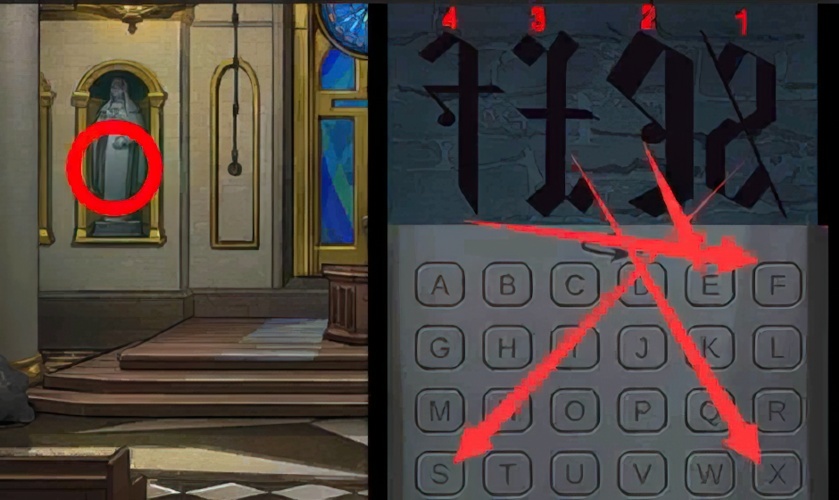
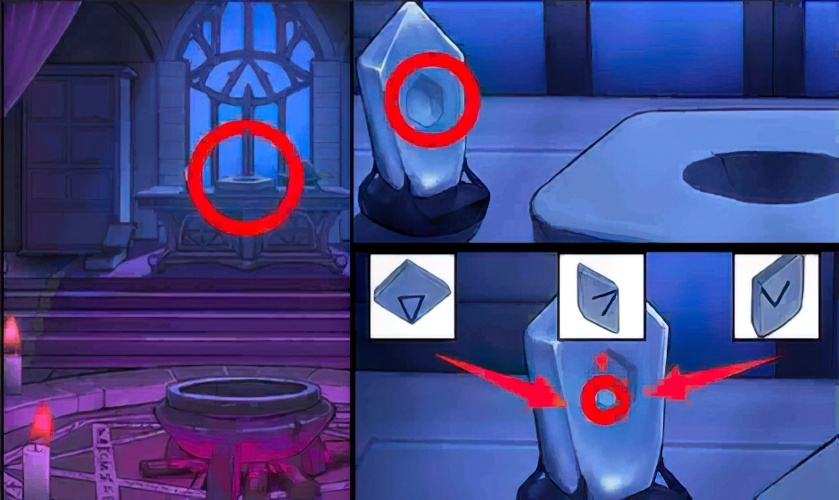
54. Go back to the “church”, look at the statue on the left, and enter the correct password according to the prompt on the bridge.

55. Go back to the “church”, look at the back of the statue, and pick up the gold cup and flint and steel.

56. Go back to “in front of the city gate”, check the reliefs, fill the water in the pool with a gold cup, and pick up the gray water.

57. Go back to the “magic house”, check the cauldron, and pour the grey water into the cauldron.

58. Go back to the “magic house”, check the cauldron, and loot the nitrate.
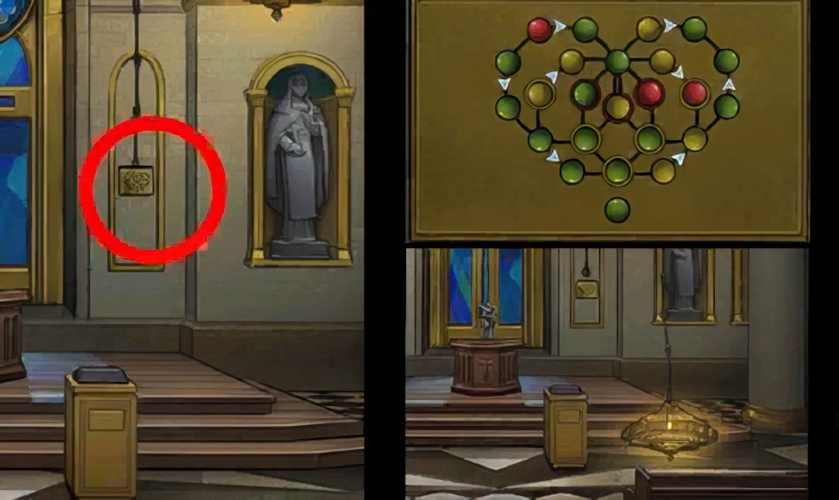
59. Go back to the “church”, check the chain mechanism on the right, unlock the mechanism, and lower the chandelier on the right.
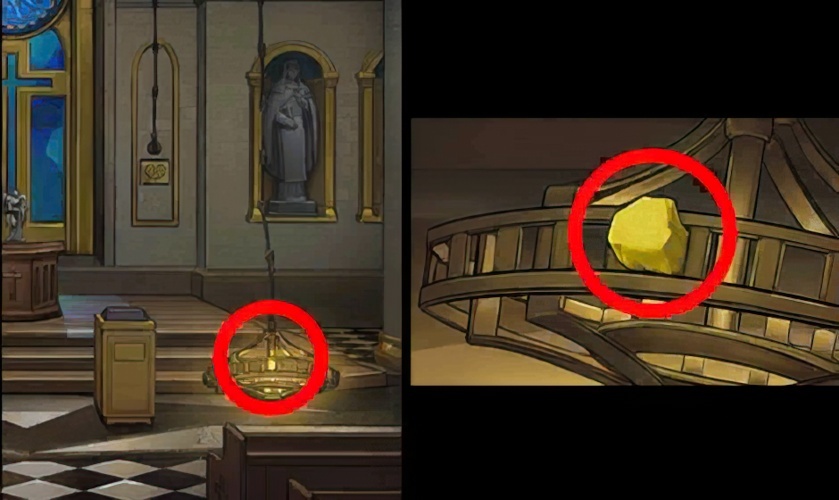
60. Go back to the “church”, look at the chandelier on the right, and pick up the sulfur block.

61. Go back to the “church”, check the stool on the left, and check the hint.
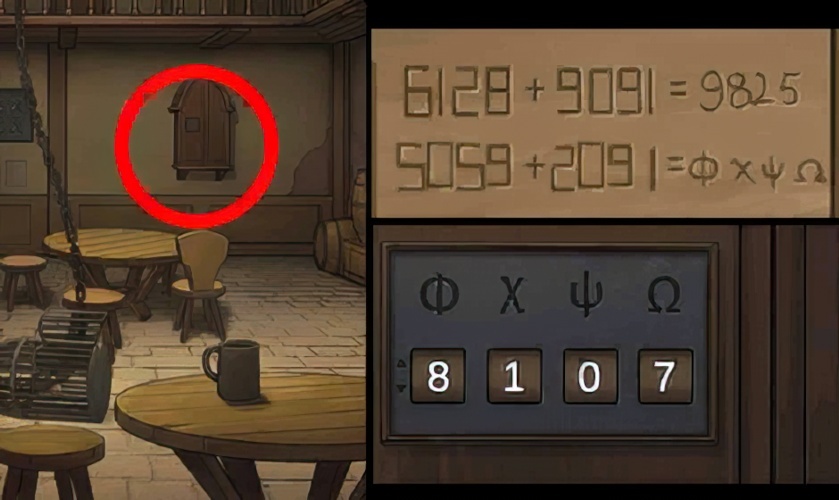
62. Go back to the “Tavern”, check the locker, flip the formula according to the prompts, get the answer to the corresponding symbol, and unlock the password.

63. Go back to “Tavern”, check the locker, and loot the stone mill.

64. Go back to the “magic house”, check the enchanting table, put sulfur on the grinding table.
65. Go back to the “Magic Room” and check the enchanting table. The stone mill acts on the grinding table.
66. Go back to the “Magic Room”, check the enchantment table, grind the sulfur block with a stone, and then pick up the sulfur powder.

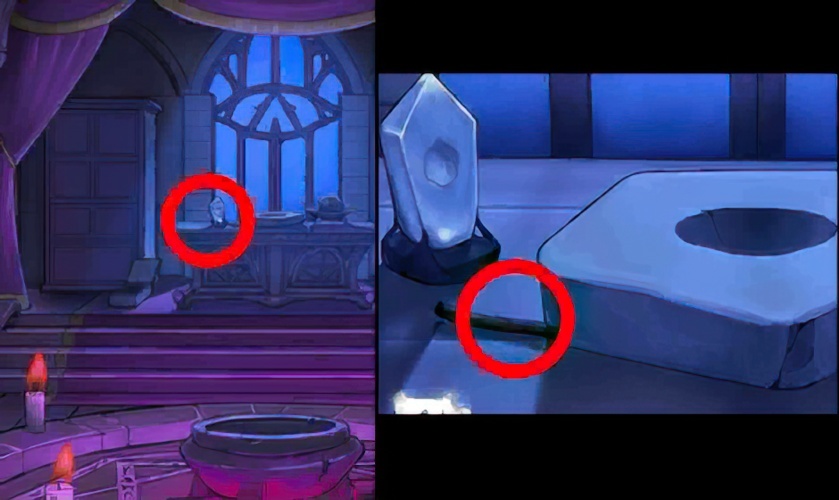
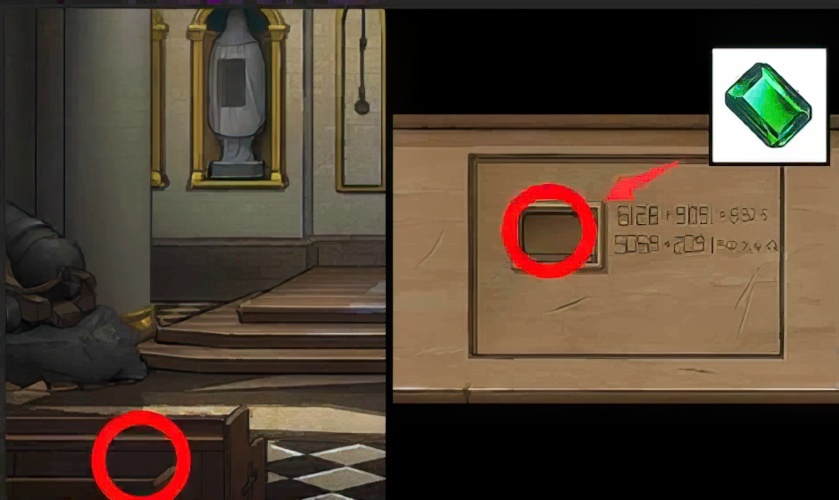
67. Go back to the “Tavern”, check the locker, and loot the emerald.
68. Go back to the “church” and place the emerald into the groove of the chair on the left.

69. Go back to the “church”, check the toilet chair, and pick up the key.
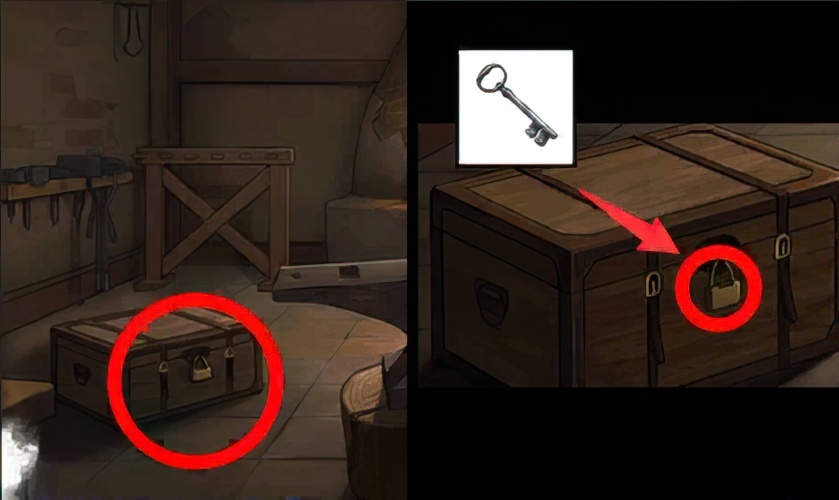
70. Go back to the “Blacksmith’s Shop”, check the box on the ground, and use the key to open the lock on the box.
71. Go back to the “Blacksmith’s Shop”, check the boxes on the ground, and pick up the charcoal powder inside.

72. Synthesize nitrate, sulfur powder and charcoal powder into black powder.
73. Go back to the “church”, check the chain on the left wall, and cut the chain with a sharp sword.
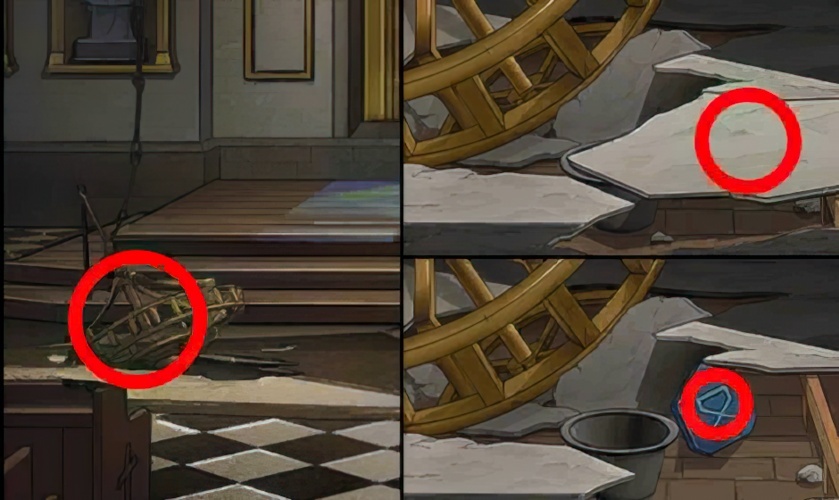
74. Go back to the “church”, check the floor smashed by the lamp, remove the broken floor, and pick up the hexagonal stained glass.
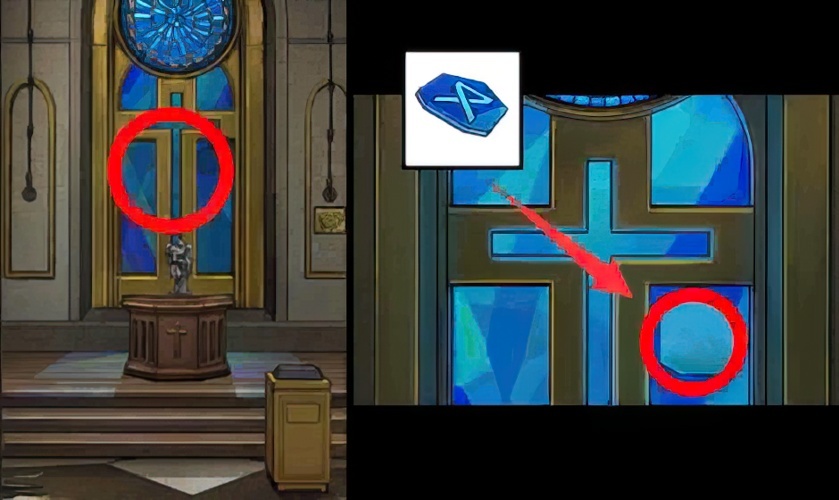
75. Go back to the “church”, check the window grilles, put the stained glass in the vacant position, and check the window grilles.
76. Go back to the “Tavern”, check the ornaments, and place the ornaments on the corresponding graphics according to the window grill prompts.

77. Go back to the “Tavern”, check the ornaments, and pick up the mold.
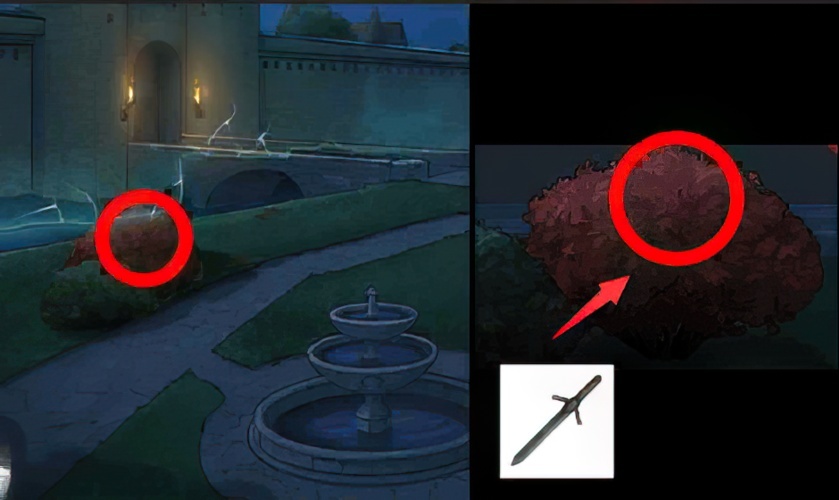
78. Go back to “in front of the city gate”, check the bushes, and cut the bushes with a sharp sword.

79. Go back to “in front of the city gate”, check the bushes, and pick up the mold.

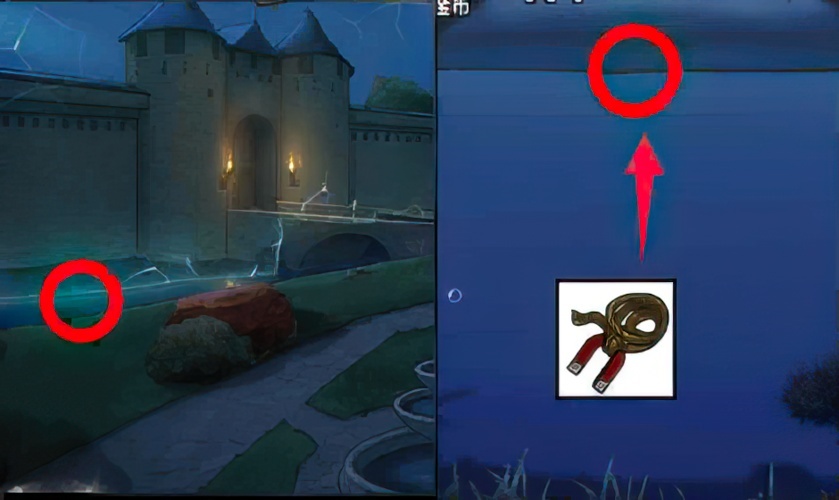
80. Combine the rope and the magnet to form a magnet sling.
81. Go back to “in front of the city gate”, check the moat, use the magnet sling to act on the river water, and start the puzzle-solving game.

82. Go back to “in front of the city gate”, check the moat, and use a magnet sling to lift the iron ingot at the bottom of the river.

83. Go back to the “church”, check the smashed floor, and pick up the iron smelting container.

84. Go back to the “Blacksmith’s Shop”, check the furnace, and place the iron vessel on the furnace.

85. Go back to the “Blacksmith’s Shop”, check the furnace, place the iron in the container,.
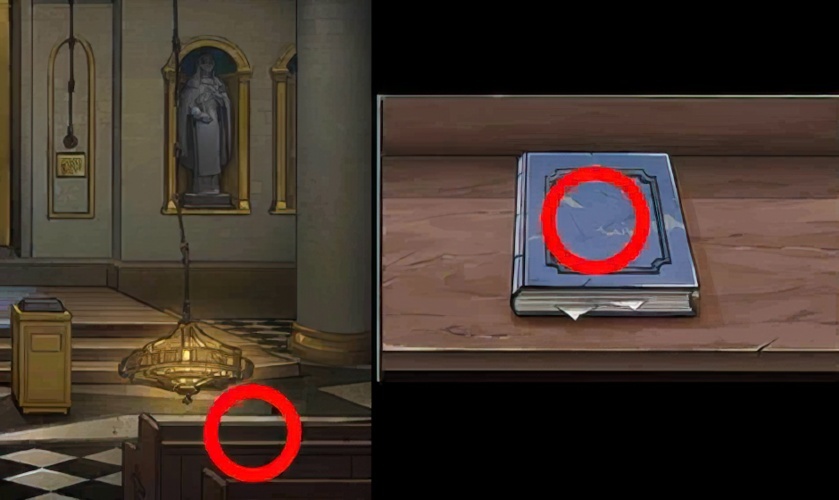
86. Go back to the “church”, check the chair on the right, and pick up the book.
87. Go back to the “magic house”, check the bookcase, and insert the book in the vacancy of the bookcase.

88. Go back to the “magic house”, check the bookcase, and pick up the leather.
89. Go back to the “Blacksmith’s Shop”, check the blower, and repair the blower with leather.
90. Go back to the “Blacksmith’s Shop”, check the blower, and pull the blower.

91. Go back to the “Blacksmith’s Shop”, look at the tool rack on the left, and pick up the crucible tongs.
92. Go back to the “Blacksmith’s Shop”, check the furnace, and use the crucible tongs to clamp out the container.

93. Go back to the “Blacksmith’s Shop”, check the iron felt, and place two molds on the iron felt.

94. Go back to the “Blacksmith’s Shop”, check the iron felt, and pour the molten iron into the mold.

95. Go back to the “Blacksmith’s Shop” and use crucible tongs to clamp out the mold.

96. Go back to the “Blacksmith’s Shop”, check the bucket, put the cast mold in the bucket for quenching, and pick up the shells.
97. Go back to “Tavern”, look at the chandelier on the right side of “Tavern”, and pick up rune fragments.

98. Go back to the “Tavern”, check the ornaments, and pick up the handle.
99. Go back to the “pub”, check the wine cabinet, and put the handle on the drawer.

100. Go back to the “Tavern”, check the wine cabinet, open the grid, and pick up the gold crown.

101. Go back to the “church”, check the display stand, and place the golden crown on the display stand.
102. Go back to the “church”, check the display stand, and pick up the rune fragments.
103. Go back to the “magic house”, check the raised floor, and use a sharp sword to pry open the floor.
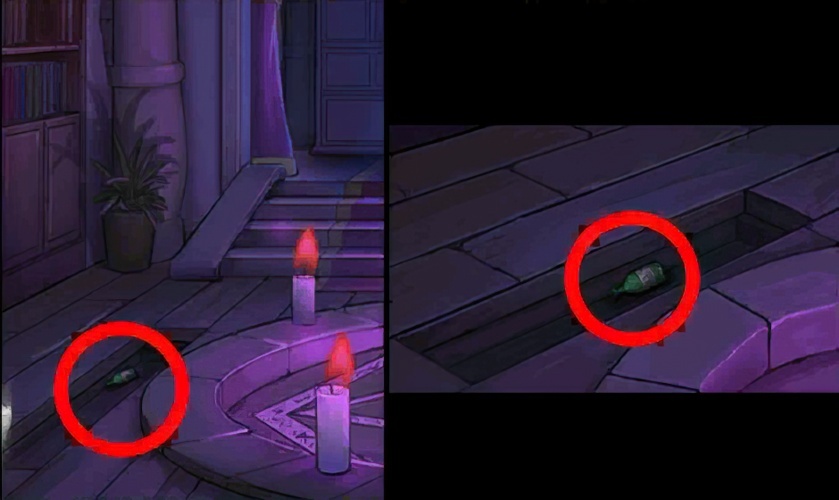
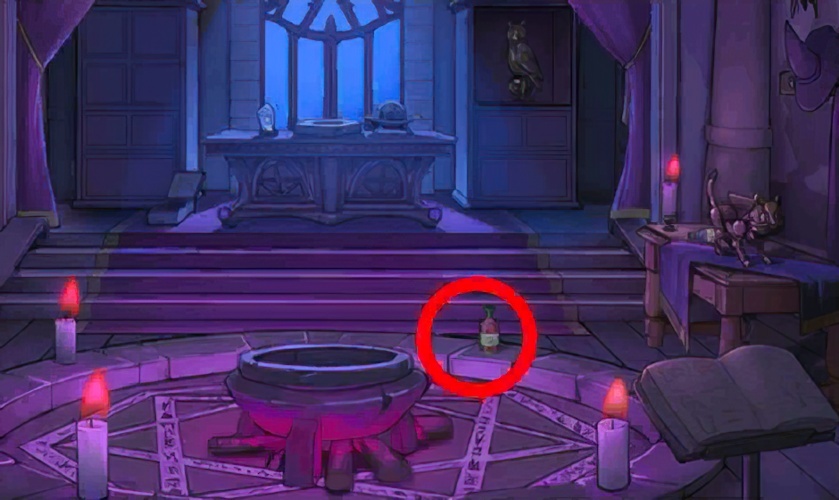
104. Go back to the “magic house”, check the floor, and loot the green potion.
105. Go back to the “magic house” and loot the red potion on the ground.

106. Go back to the “magic house”, check the cat crafts, and loot the blue potion.

107. Go back to the “City Gate”, check the fountain, and pour the corresponding potion into the corresponding fountain grid according to the heel of the statue and the prompts on the bulletin board, and the cross will rise.
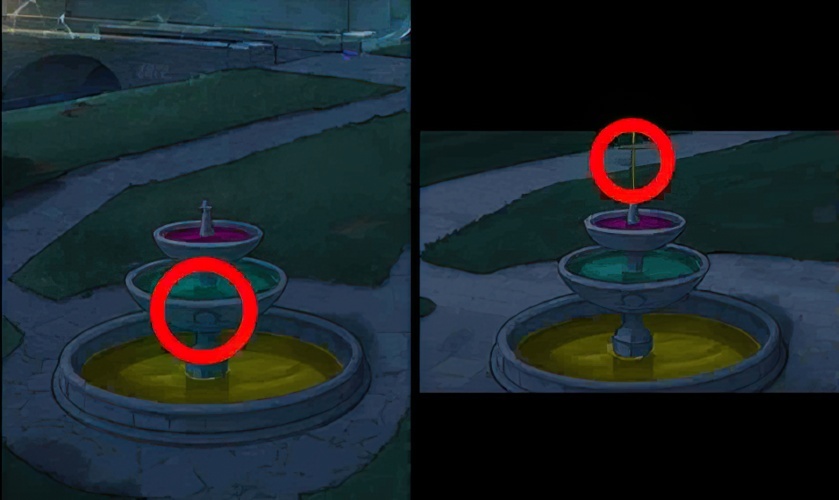
108. Go back to “in front of the city gate”, check the fountain, and pick up the golden cross.

109. Go back to the “church”, check the statue on the preaching stage, and place the golden cross on the statue’s hand.

110. Go back to the “church”, check the preaching platform, and pick up the rune fragments.
111. Go back to the “magic house”, check the enchantment table, and place the rune fragments in the groove of the crystal.

112. Go back to the “Magic House”, check the enchantment table, place the cannonball in the groove, and pick up the enchanted cannonball.
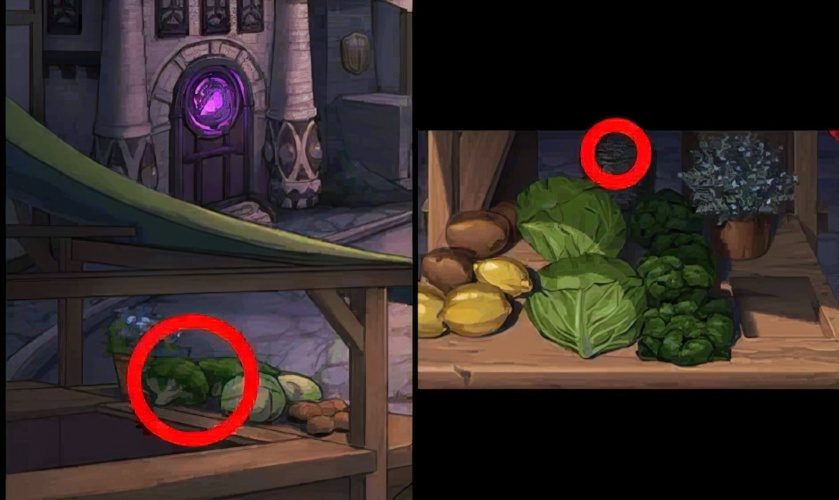
113. Go back to the “square”, check the fruit stand, and pick up the wood brush.
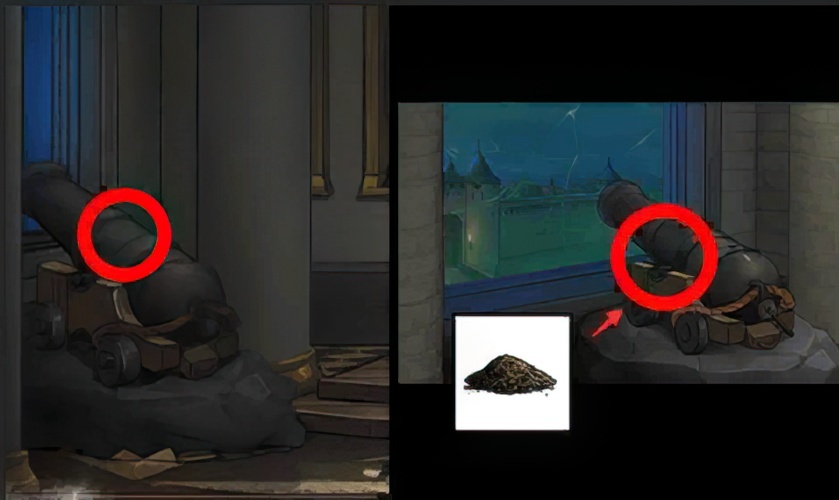
114. Go back to the “church”, check the artillery, and pour the black powder into the artillery.
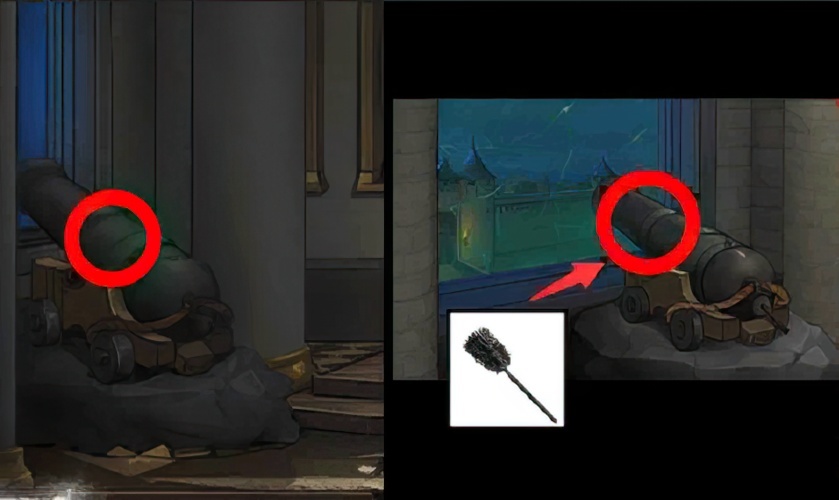
115. Go back to the “church”, check the artillery, and compact the gunpowder with a wooden brush.

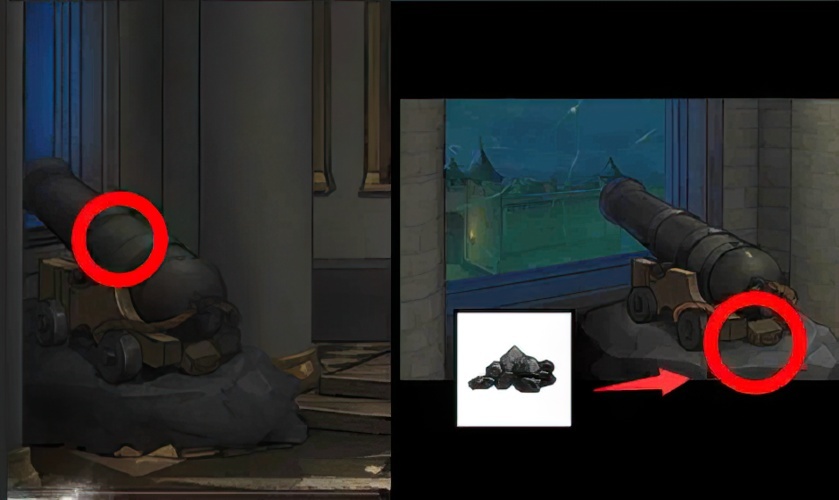
116. Go back to the “church”, check the artillery, and put in the enchanted cannonball.
117. Go back to the “church”, check the artillery, and put flint on the fuze.

118. Go back to the “church”, check the artillery, see the sparks with a sharp sword, ignite the fuse, and fire the cannonball.
119. Go back to “in front of the city gate”, check the city gate, and enter the castle.

120. Check the ground and pick up the stone pieces.

121. Check the ground fixture and insert the stone piece into the groove.

122. Check the ground device, complete the agency decryption, and check the shield prompt.
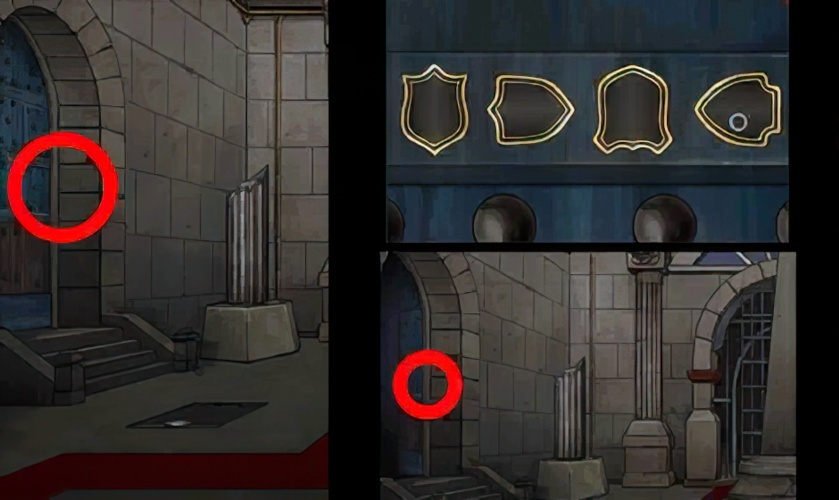
123. Look at the door of the “Assembly Hall” on the left, and follow the shield prompts to place the shield on the door according to the shape, and open the door to enter the “Assembly Hall”.

124. Go to the “Assembly Hall”, check the desktop, and pick up the quill pen.

125. Go back to the “Assembly Hall”, check the desktop, insert the quill pen into the red ink on the left, and pick up the quill pen dipped in ink.

126. Go back to the “Atrium”, check the floor in the middle, insert the feather pen into the hole, and pick up the sword emblem.

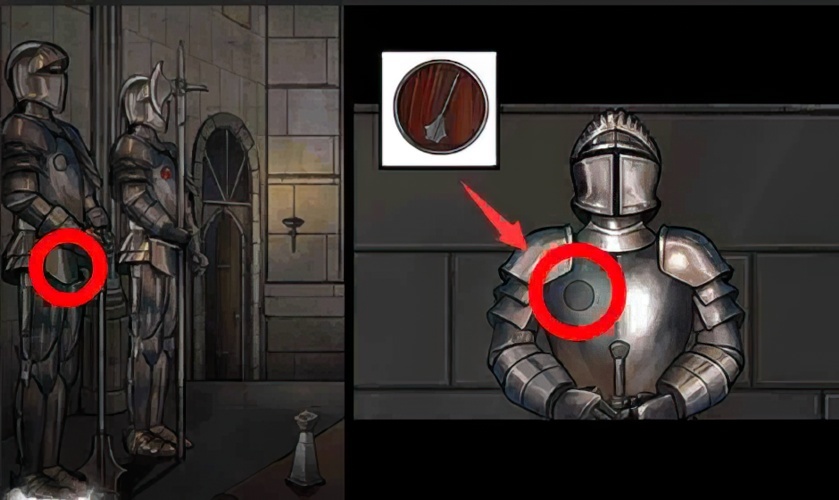
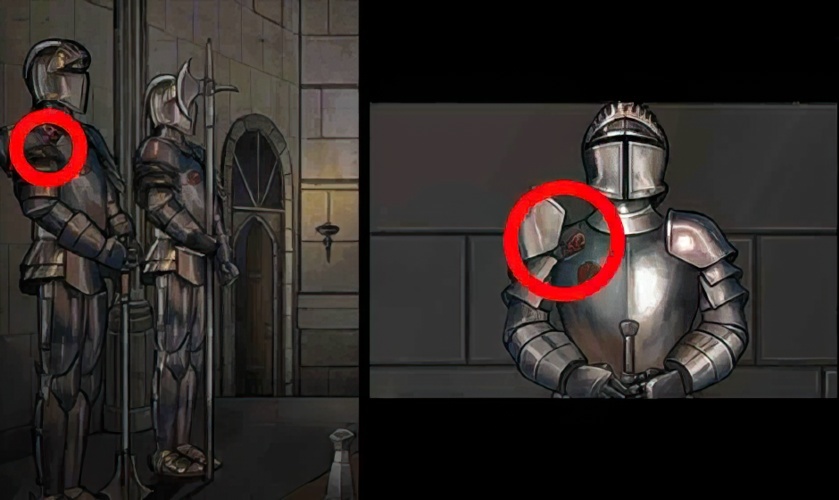
127. Go back to the “Assembly Hall”, check the armor holding the sword, and put the sword badge in the groove.

128. Go back to the “Assembly Hall”, check the sword and armor, and pick up the hexagonal awl.

129. Go back to the “Congress Hall”, check the desktop, put the hexagonal awl into the groove, and pick up the key.

130. Go back to the “Atrium”, look at the door of the “Alchemy House” on the right, insert the key, and open the door to enter the “Alchemy House”.

131. Enter the “Alchemy Room”, check the device in the middle, and pick up the stones.

132. Go back to the “Atrium”, look at the stone mechanism on the right, and insert the stone into the mechanism.
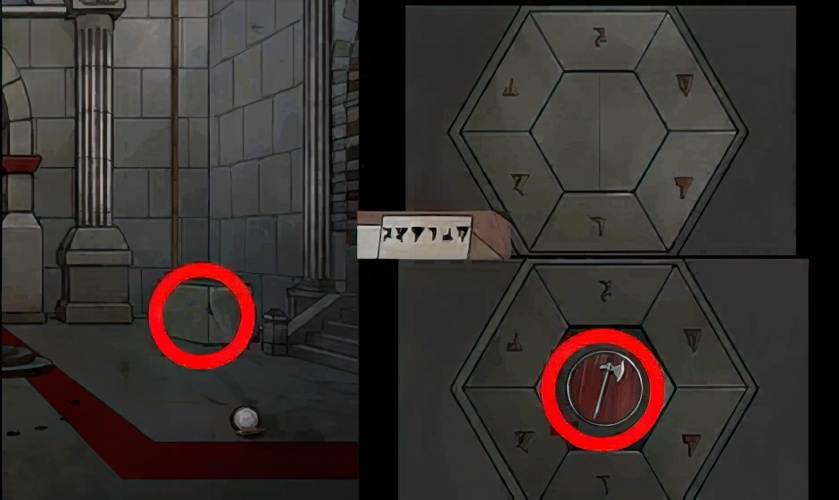
133. Go back to the “Atrium” and check the mechanism. According to the prompts on the desktop of the “Assembly Hall”, press the stones of the mechanism in order, open the mechanism and pick up the axe badge.

134. Go back to the “Assembly Hall”, check the axe armor, and place the badge in the groove.

135. Go back to the “Council Hall”, check the axe armor, and pick up the key.
136. Go back to the “Alchemy Room”, check the parts box, and use the key to open the parts box.

137. Go back to the “Alchemy Room”, check the parts and, pick up the key and crowbar.

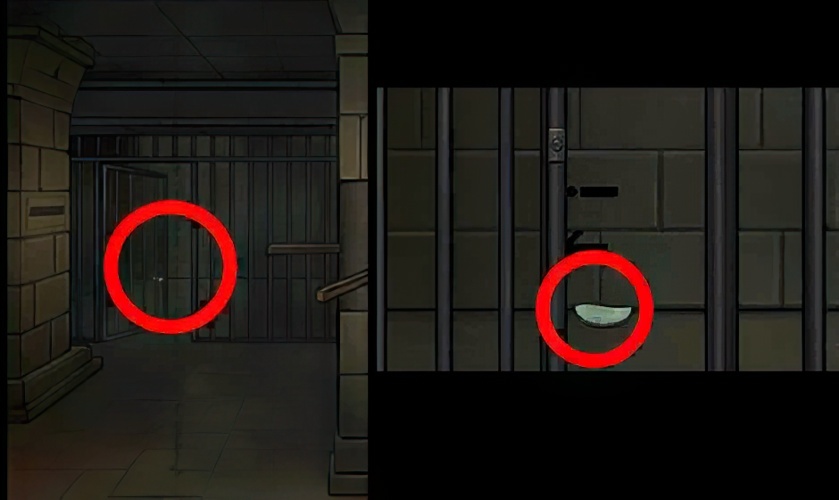
138. Go back to the “Assembly Hall”, check the “cell” door, open the door with the key, and enter the “cell”.

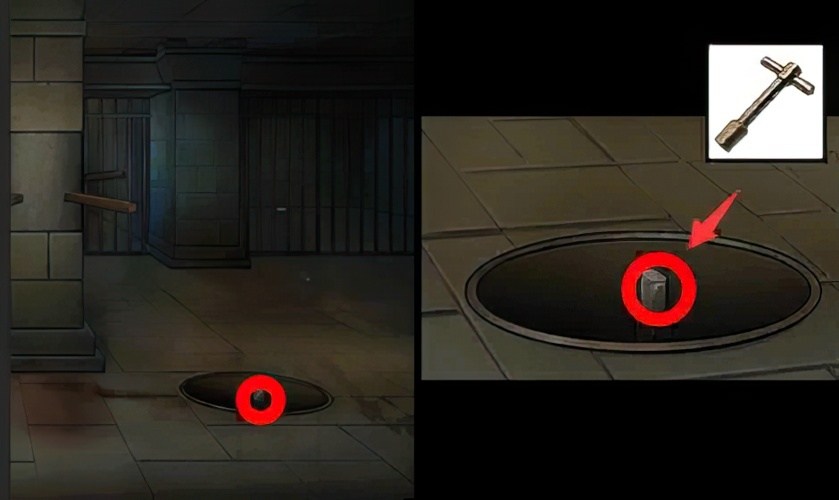
139. Enter the “cell”, check the manhole cover on the ground, and pry open the manhole cover with a crowbar.
140. Go back to the “Alchemy Room”, check the window, and loot the long stick.
141. Go back to the “Atrium” and pick up the cloth strips with a wooden stick.
142. Look at the cloth strips for clues.
143. Go back to the “Assembly Hall”, check the slate behind, unlock the slate mechanism according to the prompt of the cloth, and pick up the super glue and hexagon wrench.
144. Go back to the “cell”, check the floor and use a hex wrench to insert the hex nut on the ground.
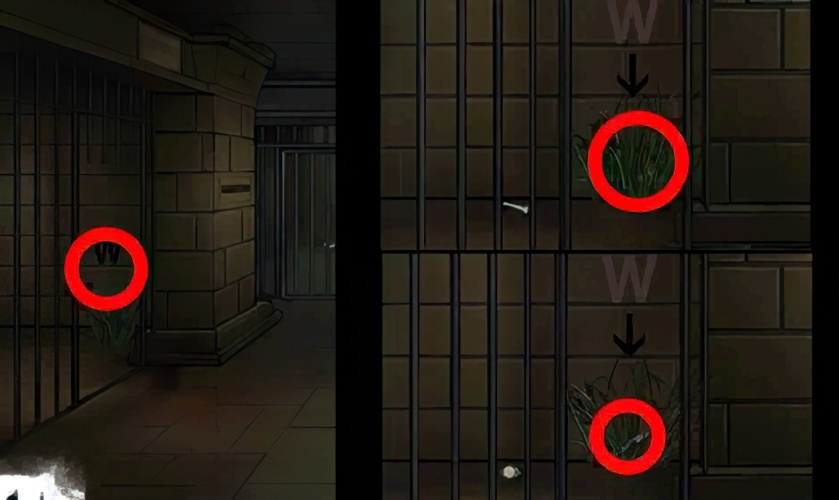
145. Go back to the “prison”, check the door in the “prison”, pull out the grass to pick up the pulley.

146. Go back to the “Alchemy House”, look at the window, and put the pulley on the rope on the window.
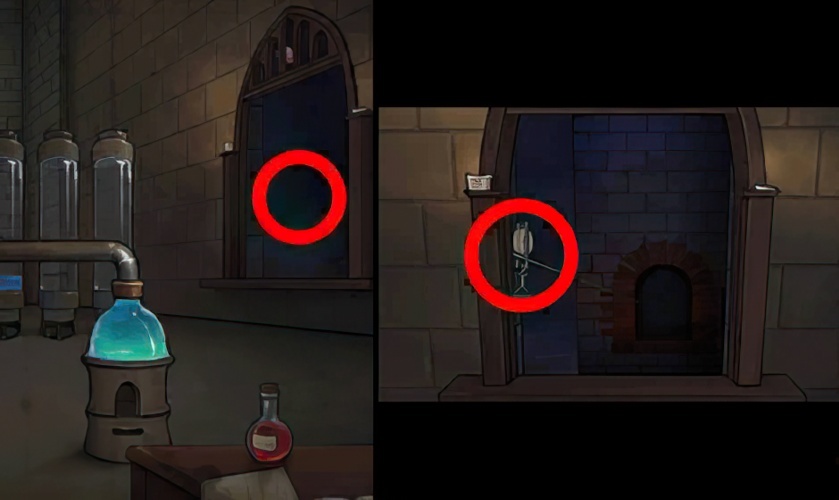
147. Go back to the “Alchemy Room”, check the window, and enter the “room” through the rope.
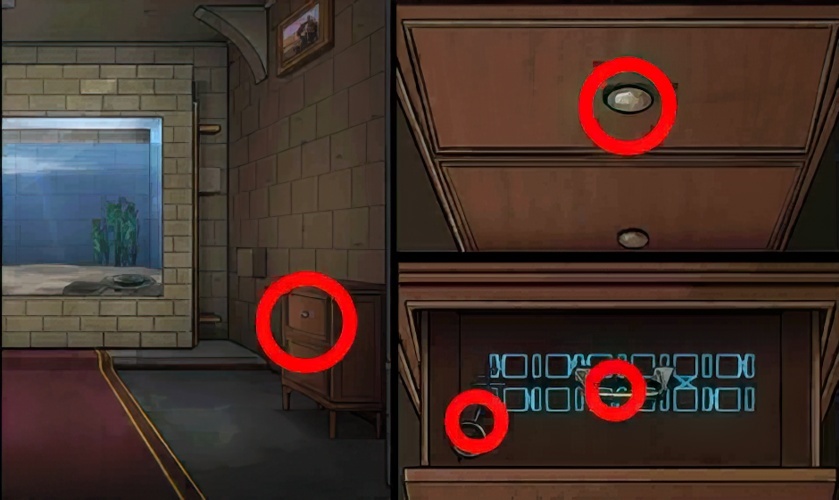
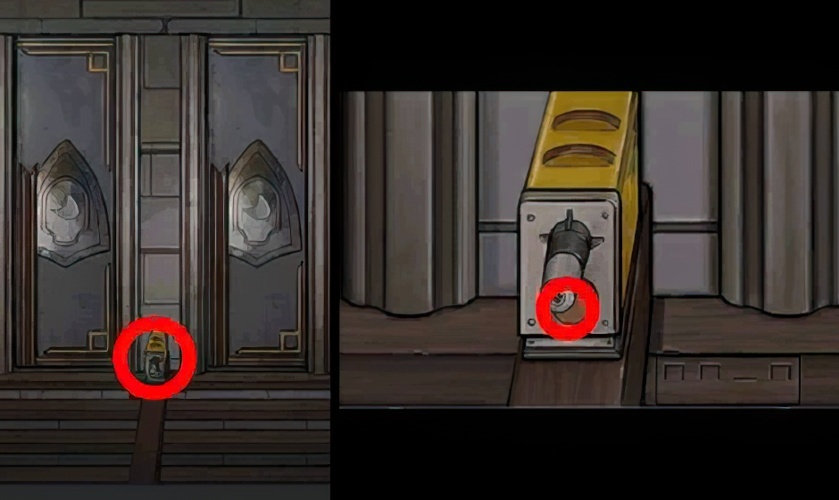
148. Enter the “room”, check the drawer, open the drawer, and pick up the handle and key.
149. Enter the “room”, check the cabinet on the left, fix the super glue and handle on the cabinet door, and open the cabinet.
150. Go back to the “room”, check the cabinet, and pick up the hammer badge.
151. Go back to the “Council Hall”, check the hammer armor, and place the badge in the armor groove.
152. Go back to the “Council Hall”, check the hammer armor, and loot the valve.

153. Go back to the “Alchemy Room”, check the pipeline on the right, place the valve in the corresponding position, and turn the valve.
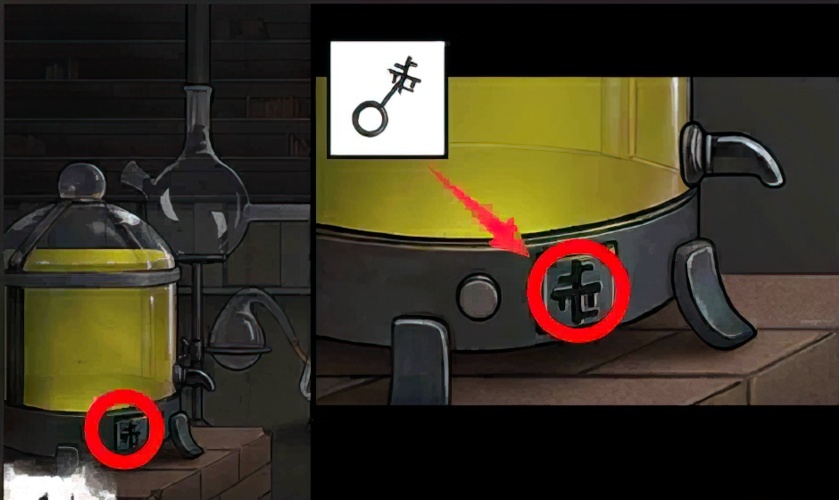
154. Go back to the “Alchemy Room”, look at the yellow nutrient solution jar on the left, and use the key to open the keyhole of the nutrient solution.
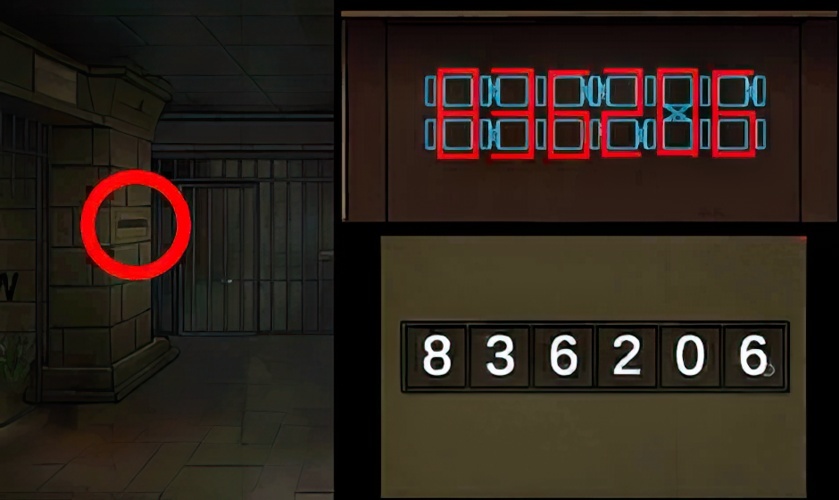
155. Go back to the “cell”, check the code lock on the column, and enter the correct code according to the prompt in the drawer, with a code lock.
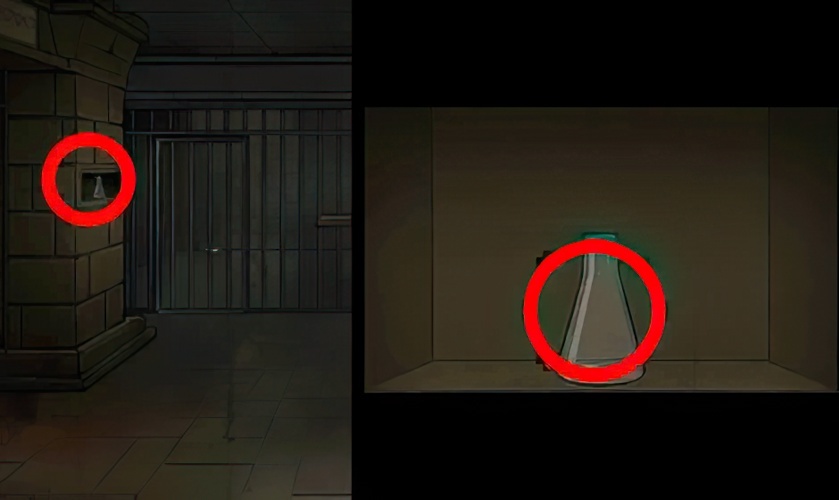
156. Go back to the “cell”, check the pillars on the wall, and pick up the nutrient solution container.
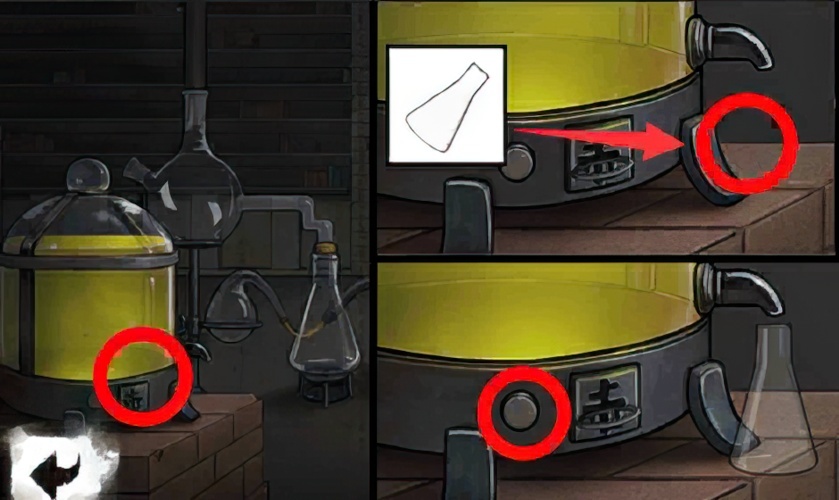
157. Go back to the “Alchemy Room”, check the yellow nutrient solution jar, place the container under the water outlet, and press the button.

158. Go back to the “Alchemy Room”, check the yellow nutrient solution jar, and pick up the yellow nutrient solution jar.

159. Go back to the “Alchemy Room”, look at the glass device on the left, and pour the yellow nutrient solution into the device.

160. Go back to the “Alchemy Room”, check the pipe on the left, install the valve at the corresponding place, and turn the valve.

161. Go back to the “Alchemy Room”, check the reaction device in the middle, and unlock the mechanism of the device.

162. Go back to the “room”, check the potted plants, and loot the halberd badge.
163. Go back to the “Council Hall”, check the halberd armor, and install the halberd badge into the groove of the armor.
164. Go back to the “Council Hall”, check the halberd armor, and loot the twine.

165. Go back to the “cell” and check the wall on the right. After unlocking the mechanism, fix the hemp rope to the ring.

166. Go back to the “cell” and look at the column in the middle. After fixing the rope to the column, push the column, pull out the ring, and open the door of the “cell”.
167. Go back to the “prison”, look at the “prison” on the right, and pick up the rocks on the ground.

168. Go back to the council room, look at the floor on the right, and insert the stone into the groove.
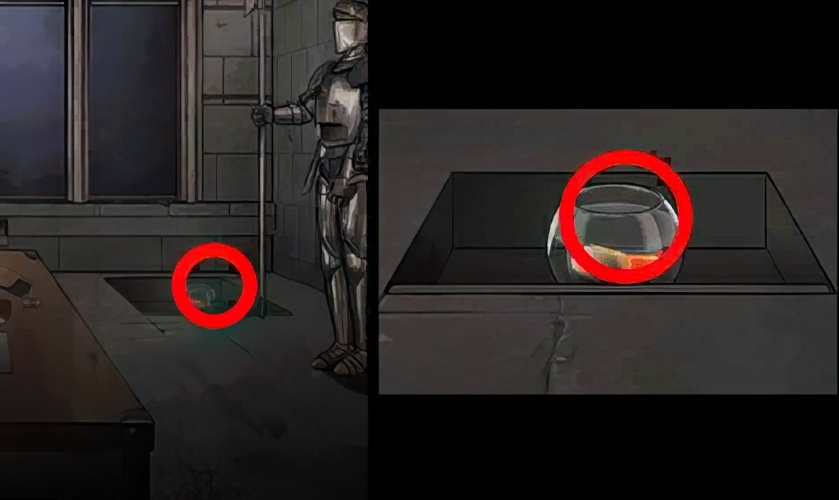
169. Go back to the council room, check the floor on the right, and pick up the goldfish.

170. Go back to the “Alchemy Room”, check the reaction device in the middle, soak the goldfish in the nutrient solution, and pick up the experimental goldfish.
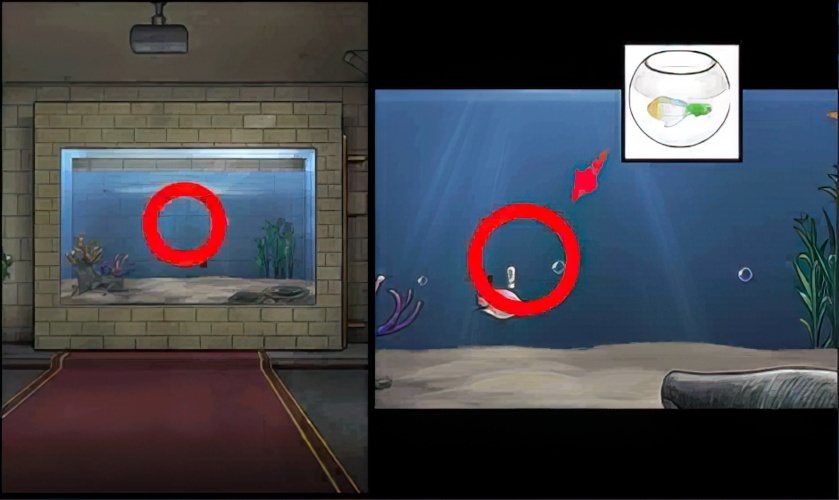
171. Return to the “room”, place the experimental goldfish like a fish tank, eat the fish in the bathtub, and pick up the key.

172. Go back to the “room”, check the door on the left, insert the key into the door, and enter the “ground floor”.
173. Enter the dungeon, check the walls, and pick up the white button.

174. Go back to the “bottom”, look at the stairs, pick up the frosted mirror, and pick up half of the inlay.
175. Go back to the “ground floor”, look at the stairway, and install the white button in the middle of the device.

176. Go back to the “ground floor”, look at the stairway, and follow the prompts on the wall to restore the device to its corresponding shape.

177. Go back to the “bottom”, look at the stairway, and pick up the circle.
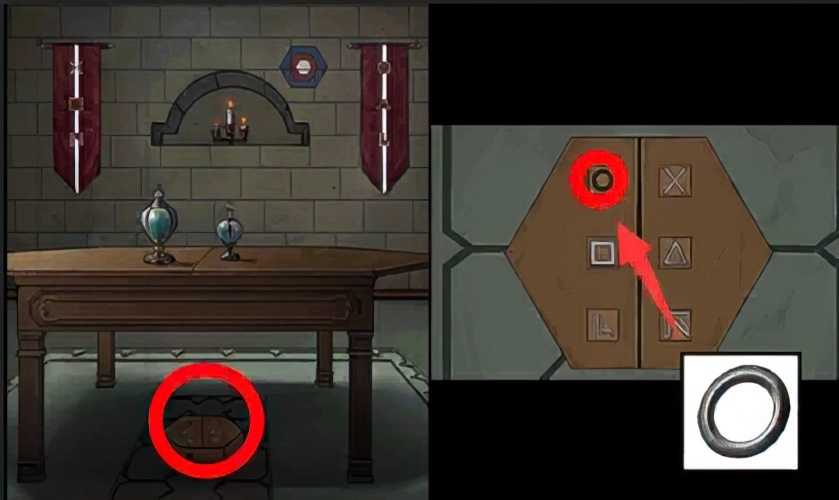
178. Go back to the “Bottom Layer”, look at the trap box below, and put the ring into the trap box.
179. Back to the “bottom”, according to the cloth strip on the wall, reset the position of the mark on the trap box, and pick up the cross key.
180. Go back to the “bottom layer”, check the desktop, and insert the cross key into the groove on the desktop.

181. Go back to the “Bottom”, check the desktop, complete the Sokoban mechanism, and pick up the “prison room” door key.

182. Go back to the “cell”, check the door of the “cell” in the middle, and use the key to open the door of the “cell”.
183. Go back to the “cell”, look at the door of the “cell” in the middle, and pick up half of the inlay.
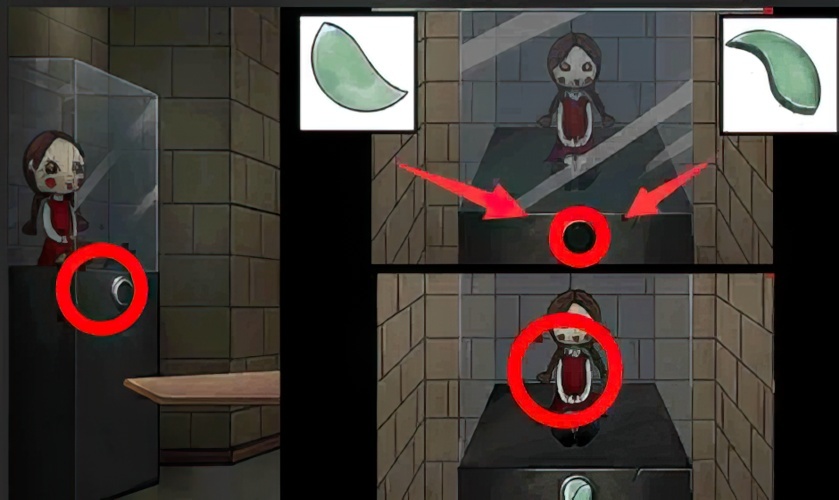
184. Go back to the “bottom”, look at the display cabinet on the left, insert the two and a half inlays into the groove, and pick up the flip doll.
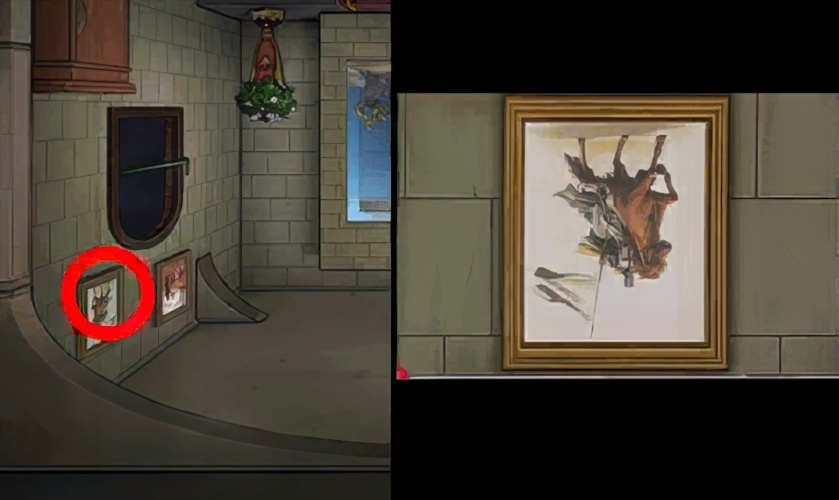
185. Go back to the “room”. Invert the scene to the ceiling, check the roof painting.
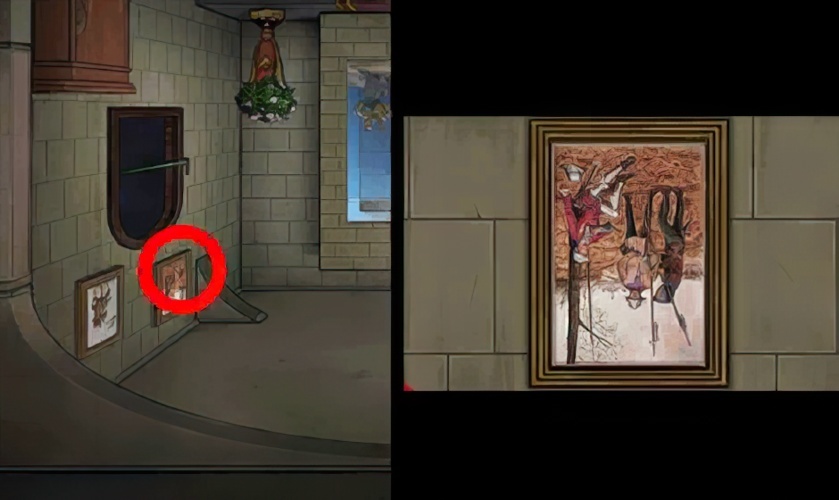
186. Go back to the “room”. Invert the scene to the ceiling, check the roof painting.
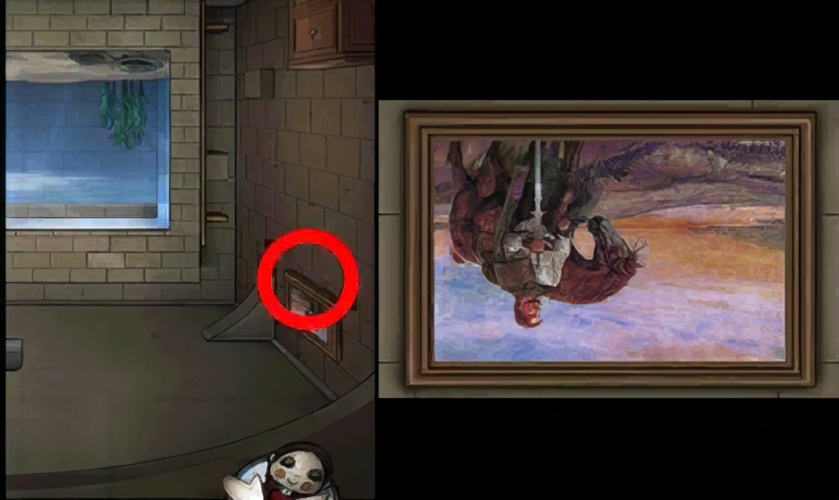
187. Go back to the “room”. Invert the scene to the ceiling, check the roof painting.
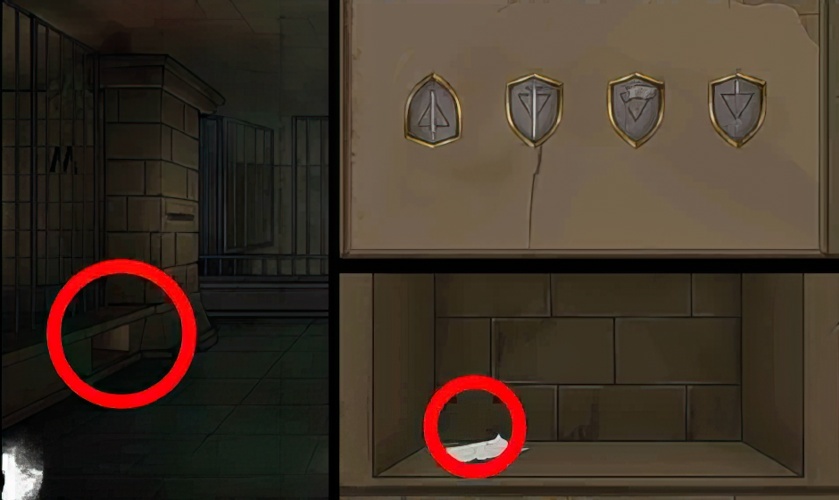
188. Go back to the “cell”. Invert the scene to the ceiling, check the beams, open the mechanism according to the position of the weapon in the picture, and pick up the paper.

189. Go back to the “room”. Invert the scene to the ceiling, check the wall, open the bricks on the wall with a crowbar, and pick up the dagger.

190. Go back to the “bottom”. Invert the scene to the ceiling, check the ceiling, and apply the dagger to the mechanism.

191. Go back to the “bottom”. Invert the scene to the ceiling, check the ceiling, unlock the mechanism, and pick up the luminous agent.

192. Check the piece of paper and pour the luminous agent on the piece of paper.
193. Go back to the “bottom layer”. Invert the scene to the ceiling, check the light, and put the paper under the light to illuminate it.

194. Go back to the “Congress Hall”. Invert the scene to the ceiling, check the cipher box on the ceiling, and enter the correct cipher according to the password on the paper to open the cipher lock.

195. Go back to the “Congress Hall”. Invert the scene to the ceiling, check the wall, and pick up the polishing paste.
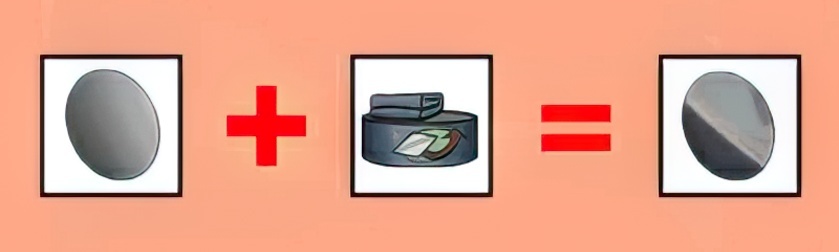
196. Combine the frosted mirror with the sanding paste to pick up the smooth mirror.

197. Go back to the “Alchemy Room”. Invert the scene to the ceiling, check the laser device, and place the smooth mirror in the corresponding position.
198. Go back to the “bottom”. Invert the scene to the ceiling, check the ceiling installation, pull the pull-down lever, and check the corresponding digital prompt.
199. Go back to the “room”. Invert the scene to the ceiling, look at the box in the middle, unlock the code and unlock the code lock according to the number on the ceiling of the “bottom”.

200. Go back to the “room”. Invert the scene to the ceiling, look at the box in the middle, and pick up the tarp.

201. Go back to the “Congress Hall”. Invert the scene to the ceiling, check the laser device, and wipe off the stains next to it with a tarp.

202. Go back to the “cell”. Invert the scene to the ceiling, check the device in the middle, follow the instructions on the ceiling of the “Congress Hall”, open the device, and pick up the bird inlay.
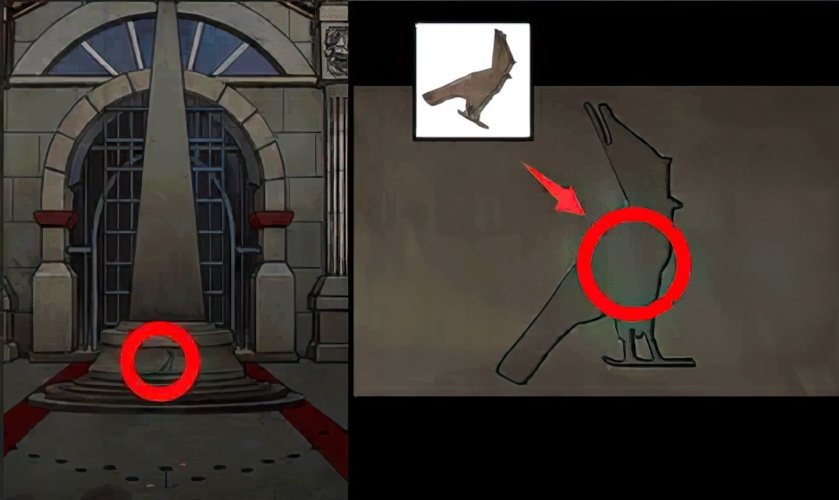
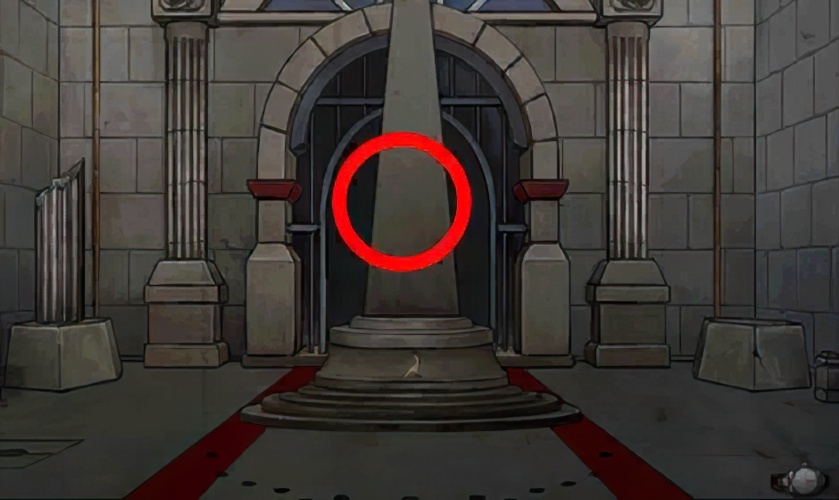
203. Go back to the “Atrium”, look at the obelisk in the middle, and insert the bird inlay into the groove.
204. Go back to the “Congress Hall”. Invert the scene to the ceiling, check the laser device in the middle, and press the button.
205. Go back to the “Atrium” and enter the “Throne of the Kings”.

206. Enter “The King’s Throne”. Invert the scene to the ceiling, check the device in the middle, and restore the mechanism to the corresponding state according to the prompt on the ceiling of the “Bottom Floor”, then check the prompt.
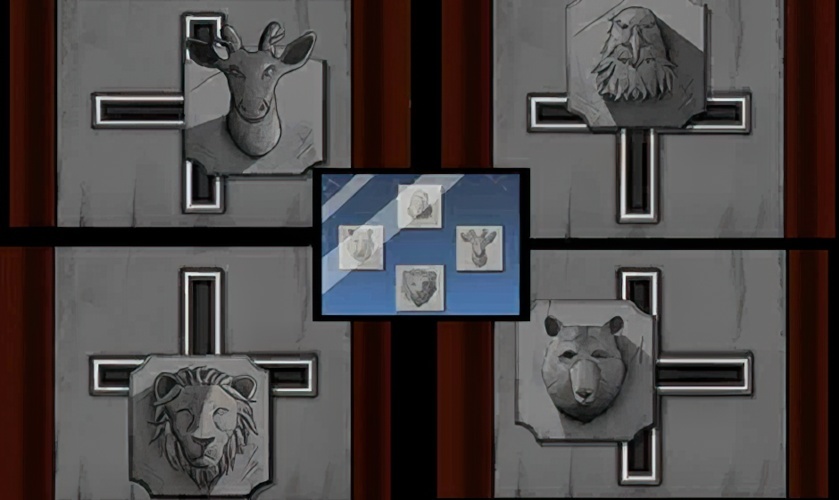
207. Go back to “The King’s Throne”. Invert the scene to the ground, according to the ceiling prompts, move the animal heads on the four pillars to the corresponding directions according to the prompt directions to unlock cage.
208. Go back to “The King’s Throne”. Invert the scene to the ground, look at the iron maiden in the middle, and move the joystick to unlock it according to the letter prompts in the “Prison Cell” and “Congress Hall” Open the agency and start negotiations with the patient.


