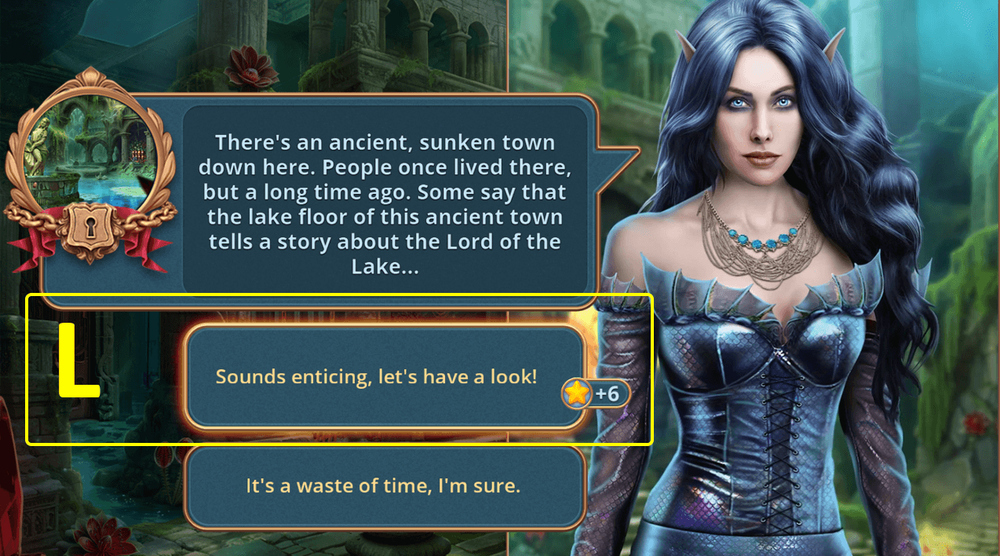
Hunter’s Journey 1: Tears of the Lake – An adventure in which you take on the role of Velimir, a young hunter who has spent his entire life striving to prove that he is worthy of bearing the surname of his father, a hero who is gone forever. But at the Academy, where hunters are trained to protect humanity from dark creatures, Velimir was an outsider. He failed to summon his own Animorph, a spiritual companion and symbol of every hunter’s power, and since then he has been considered a failure and a disgrace by others. Only Rodrick, his mentor and the man who replaced his family, saw something more in him. Finally, Velimir gets a chance to prove himself. Rodrick assigns him his first real task: to investigate the disappearance of a girl named Malena, who vanished near the shores of Lake Tears. The locals are afraid to even talk about what is happening in those parts. Old Agatha, the missing girl’s grandmother, swears that her granddaughter was kidnapped by mermaids, creatures with dead eyes that drag people to the bottom of the lake. Velimir receives a map and weapons, and together with Roderick, he sets off for the village of Tikhvod. There, they receive an unfriendly welcome: the elder does not trust hunters and is not willing to talk without a letter from the Academy. While Agatha searches for this letter, she asks for help with her affairs, and the heroes are forced to get involved in the daily life of the locals in order to advance their cause. In the process, they learn that Malena is not the first to disappear in these parts. Lake Tears seems to breathe anxiety, its waters hiding something ancient and sinister. Every action Velimir takes is a step toward his destiny. In a world where hunters are bound to Animorphs by blood and spirit, he must find his own strength, or he will forever remain only a shadow of someone else’s legend. If you can’t solve any of the puzzles or don’t know where to find the items, you can check out the walkthrough for Hunter’s Journey 1: Tears of the Lake on our website and find Malena.
Hunter’s Journey 1: Tears of the Lake – Walkthrough
Here you can see the complete walkthrough for Hunter’s Journey 1: Tears of the Lake, namely all chapters, including the bonus chapter, in pictures.
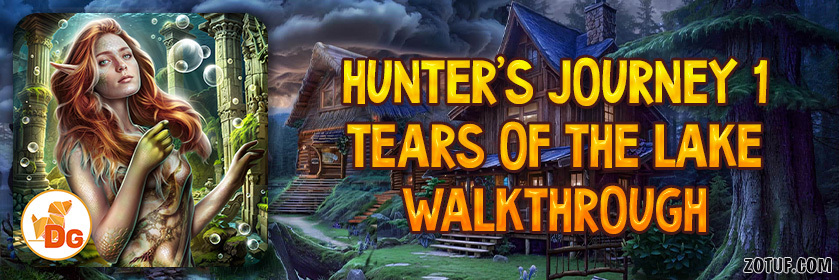
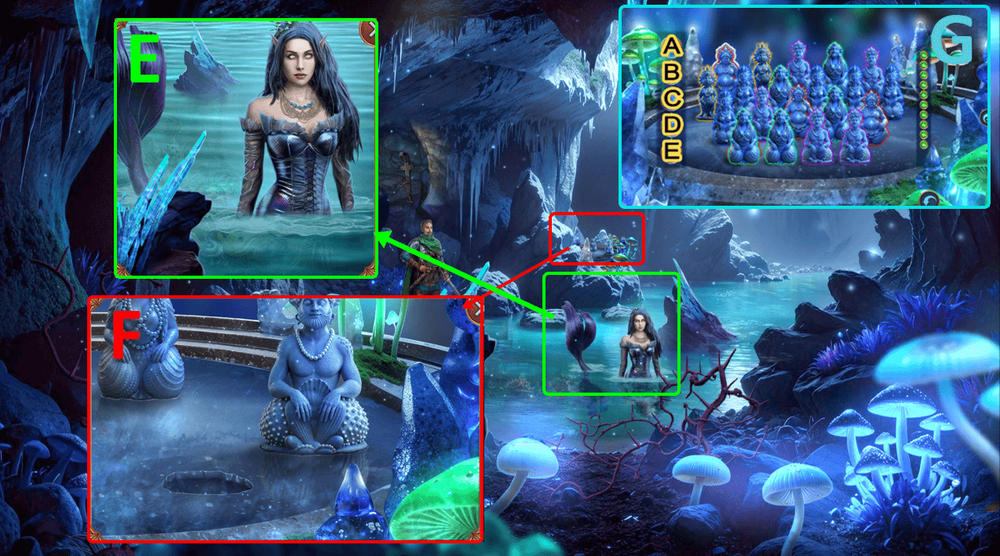
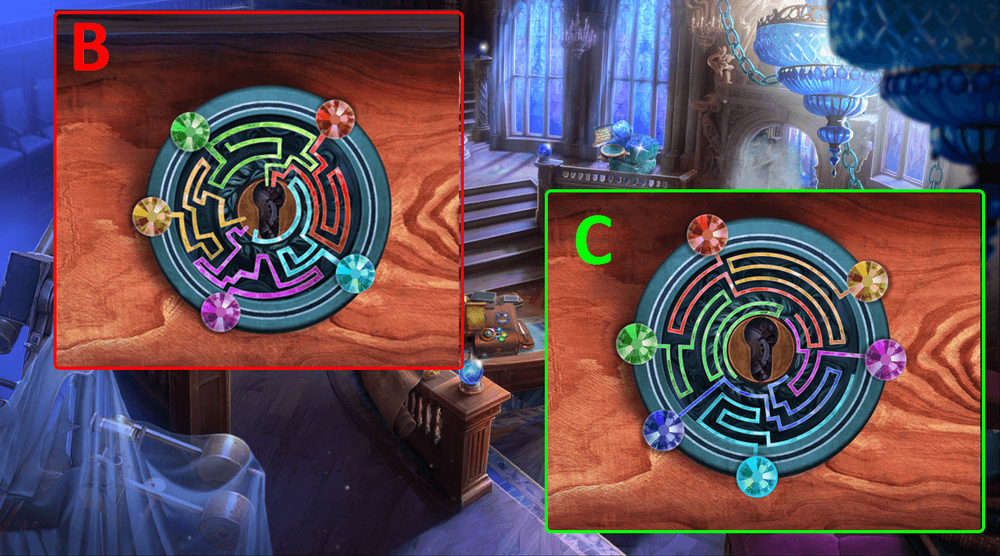
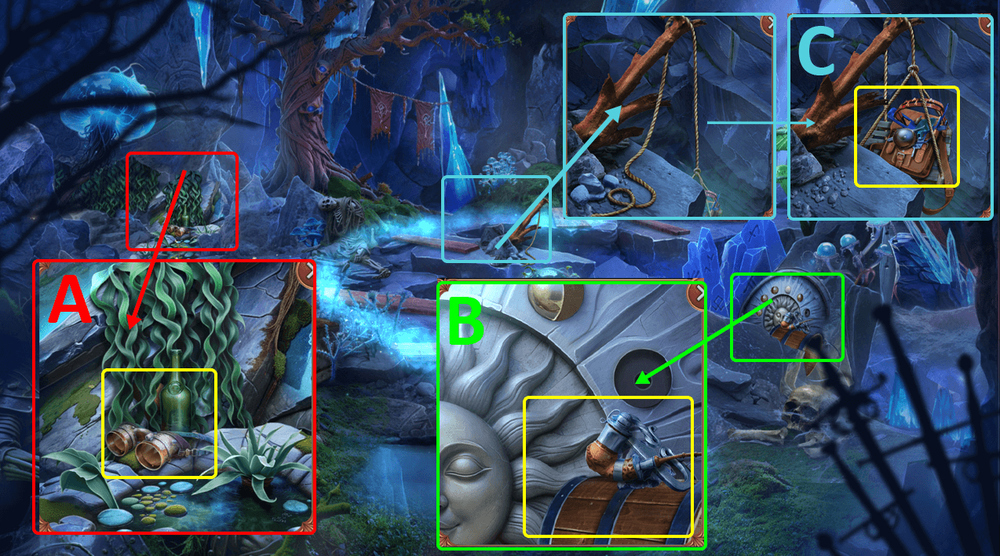
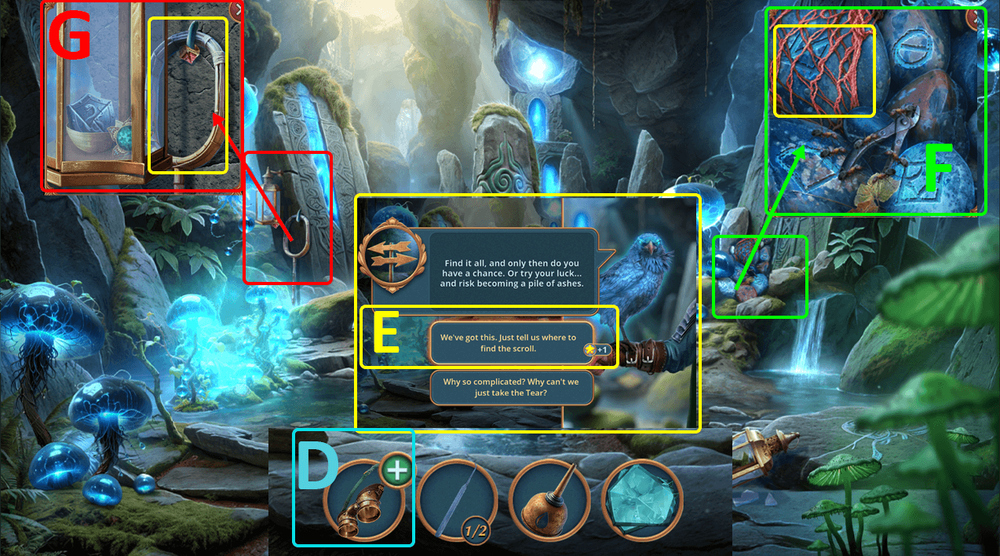
- Take SPEARHEAD (A).
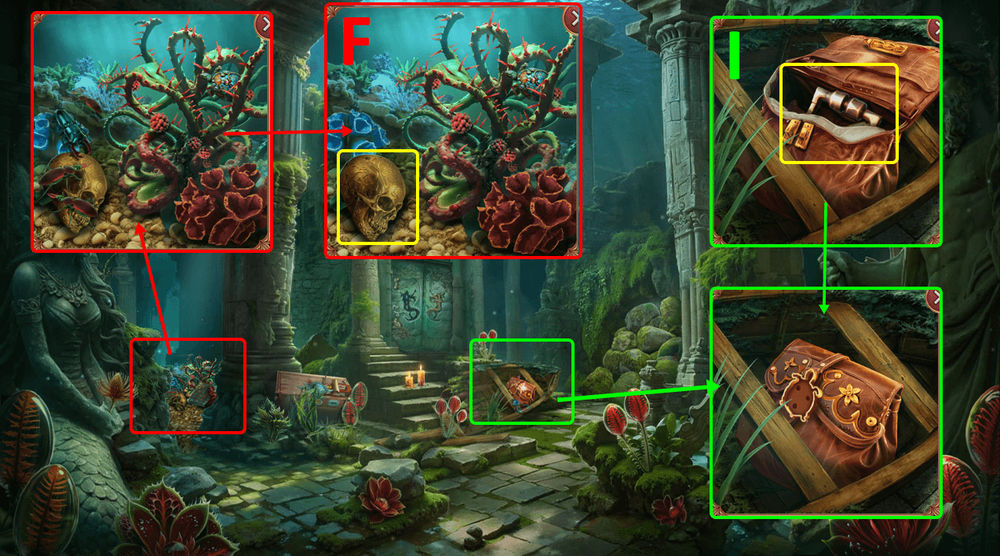
- Read the scroll, take ARROWS 1/3, use SPEARHEAD on the skull, take SPRAY NOZZLE and SNAKE FANG (B).
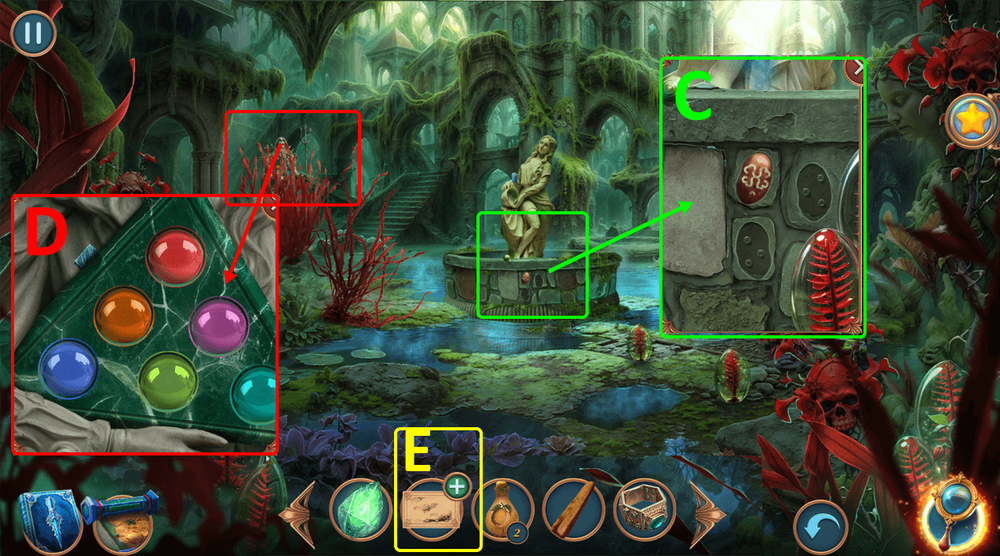
- Take CROCHET HOOK, use SNAKE FANG on the snake, take FLAG (C).
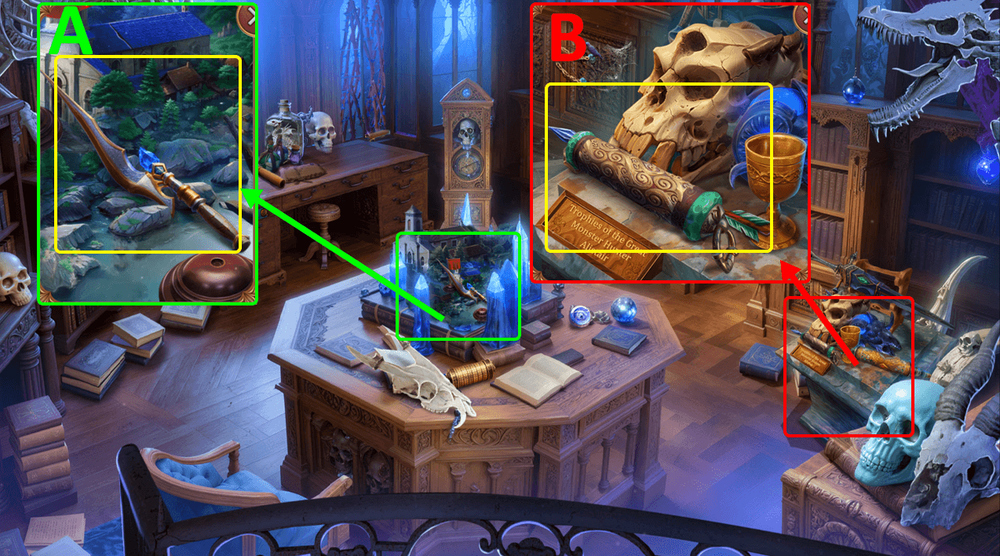
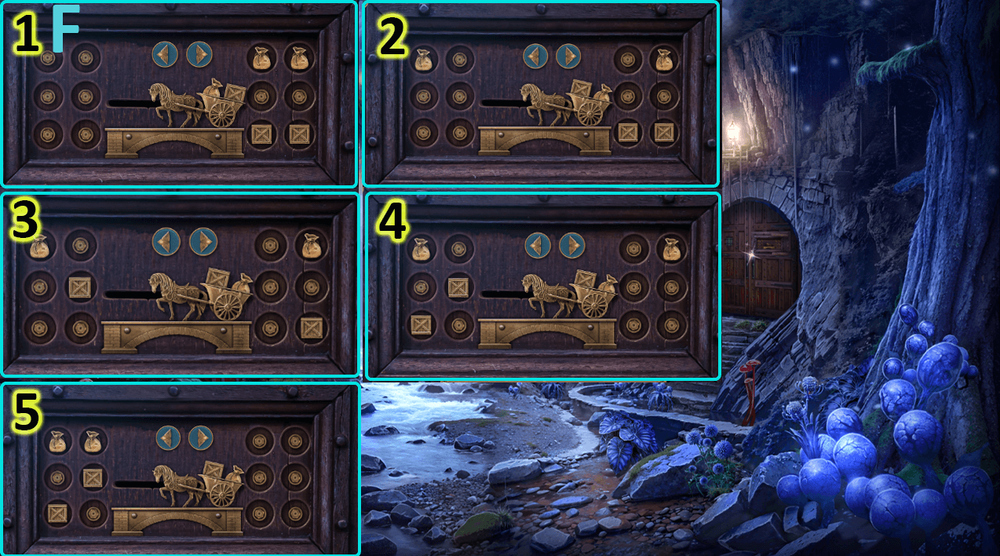
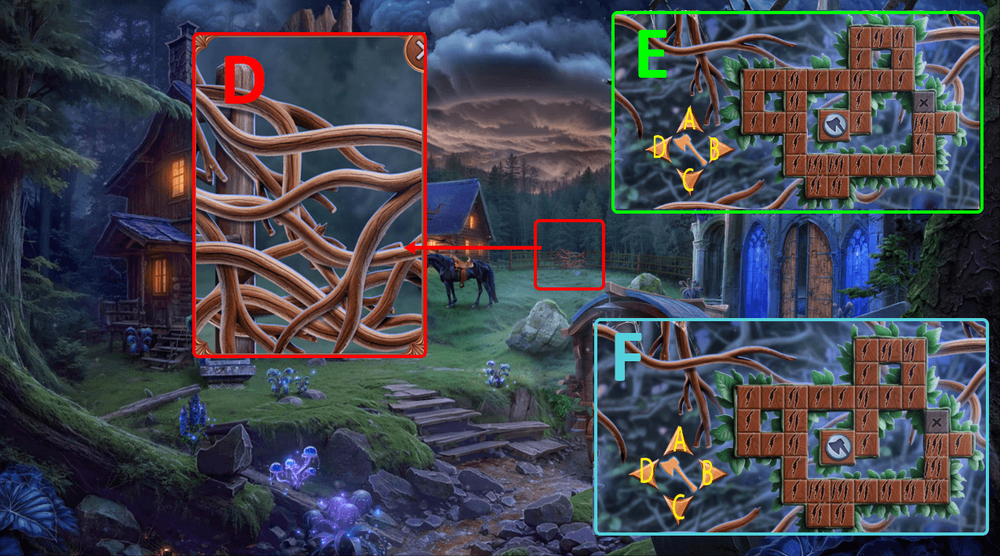
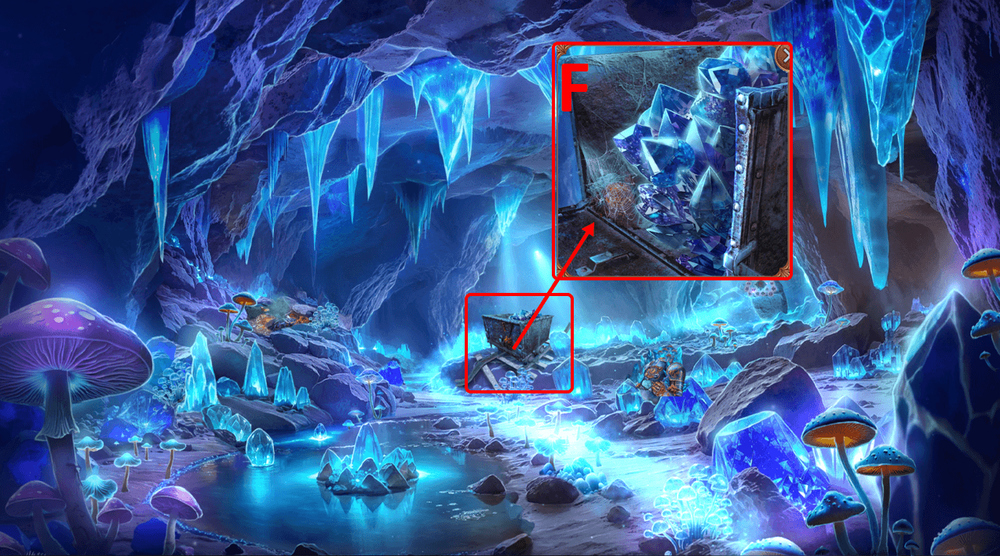
- Use FLAG on the mount (D).

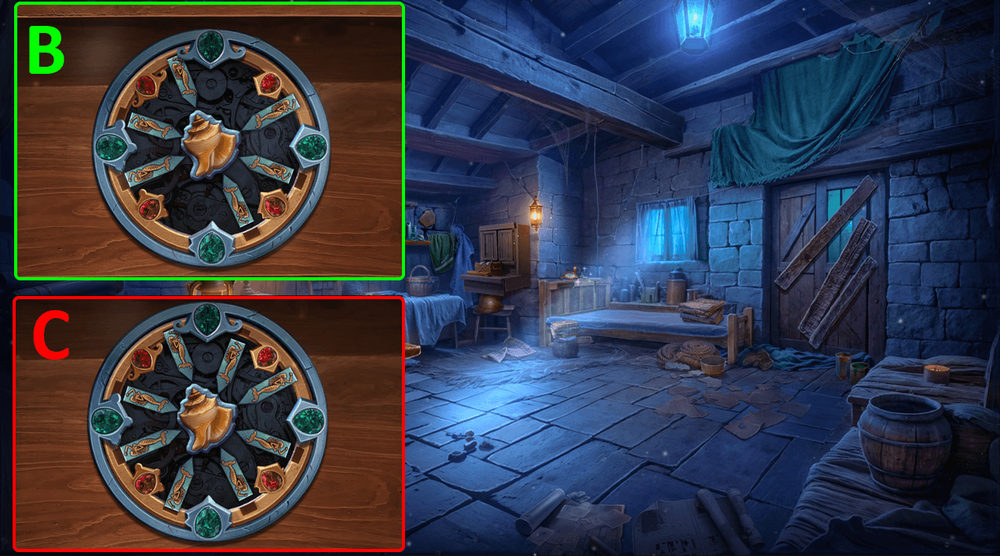
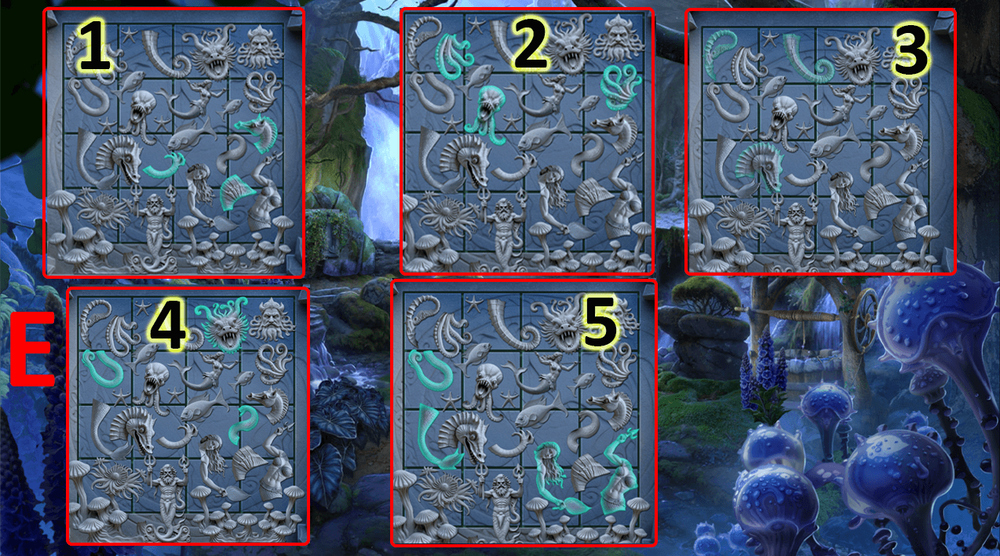
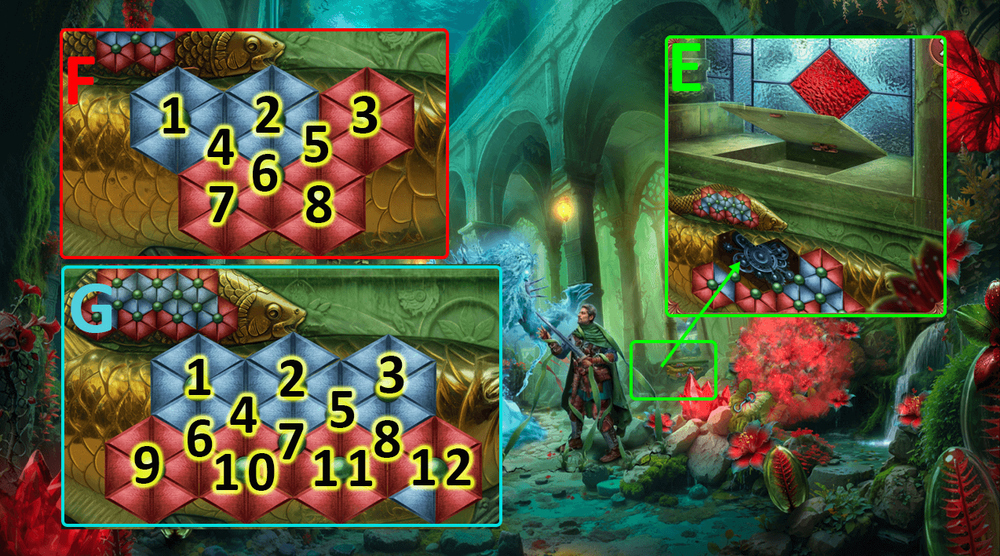
- Easy solution: Connect flags with the same numbers (E).
- Hard solution: Connect flags with the same numbers (F).
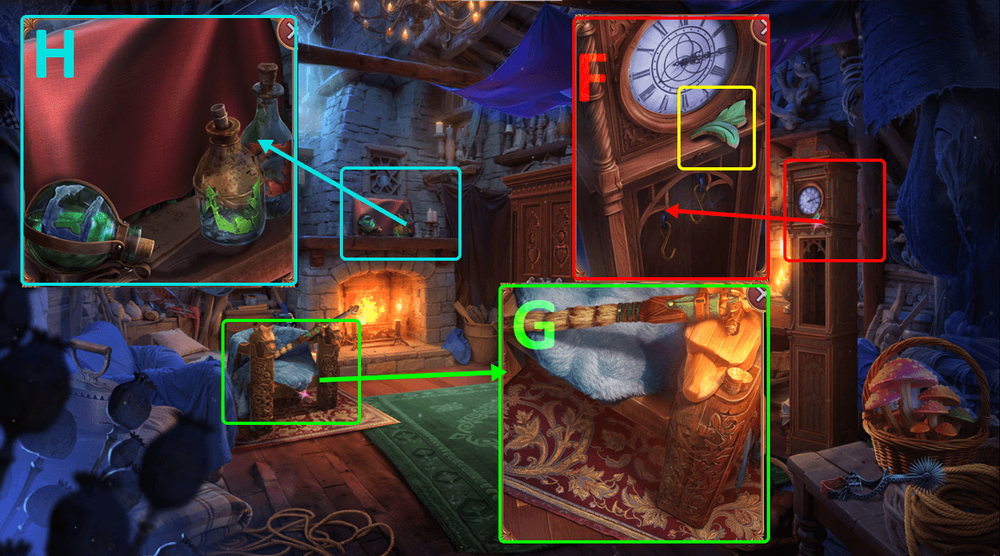
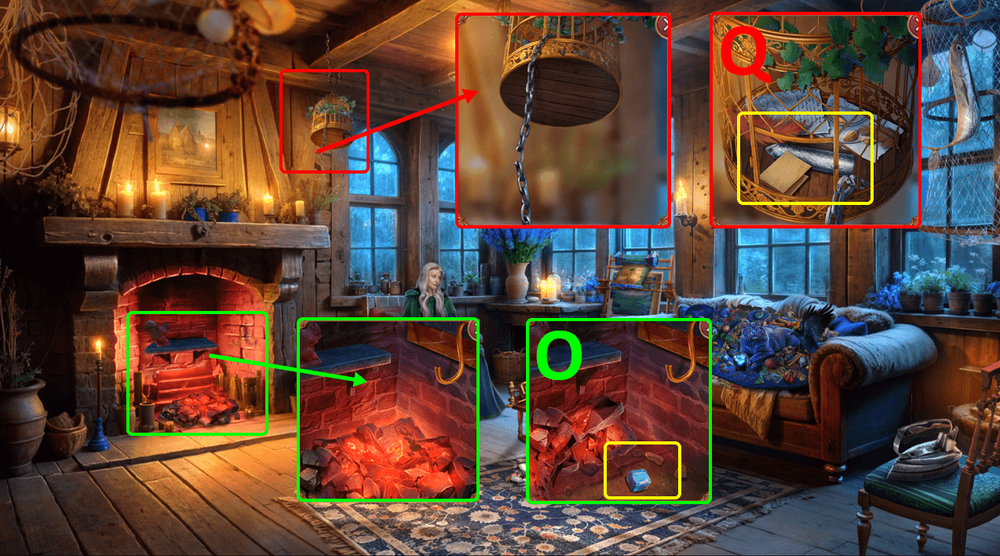
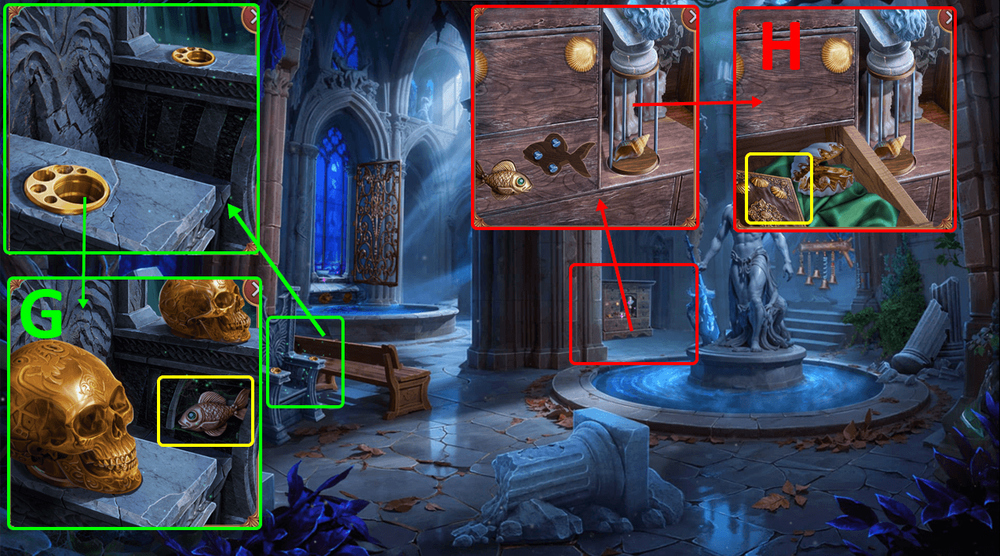
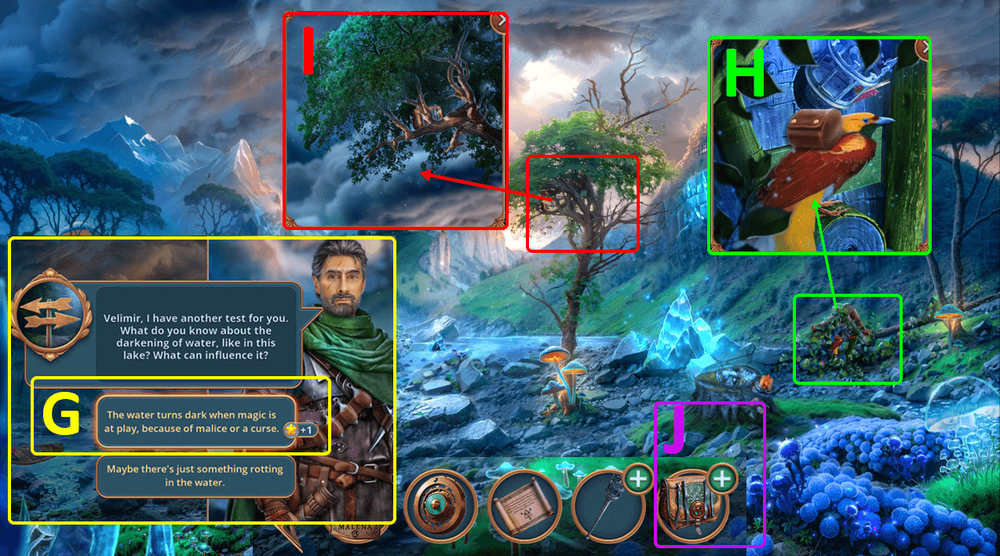
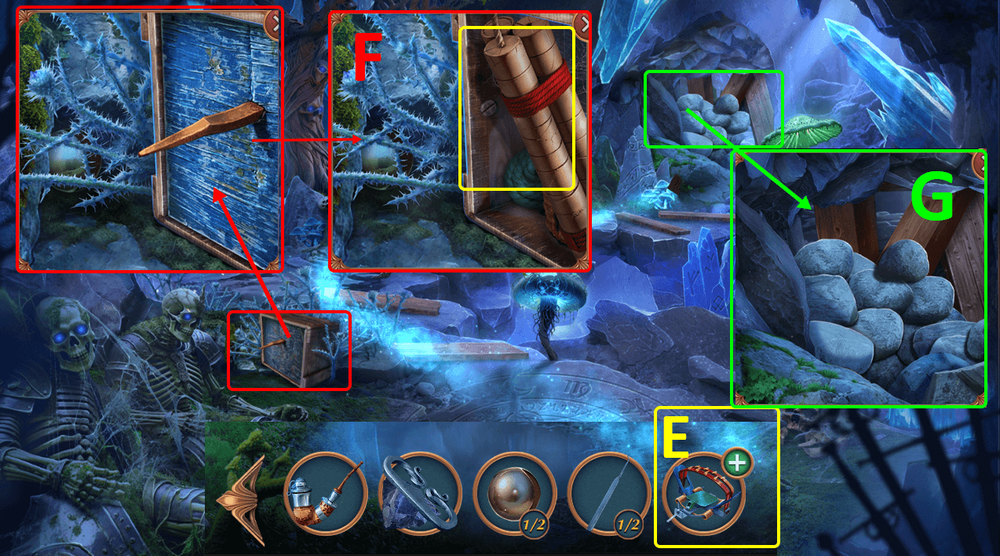
- Take WIND-UP BIRD.

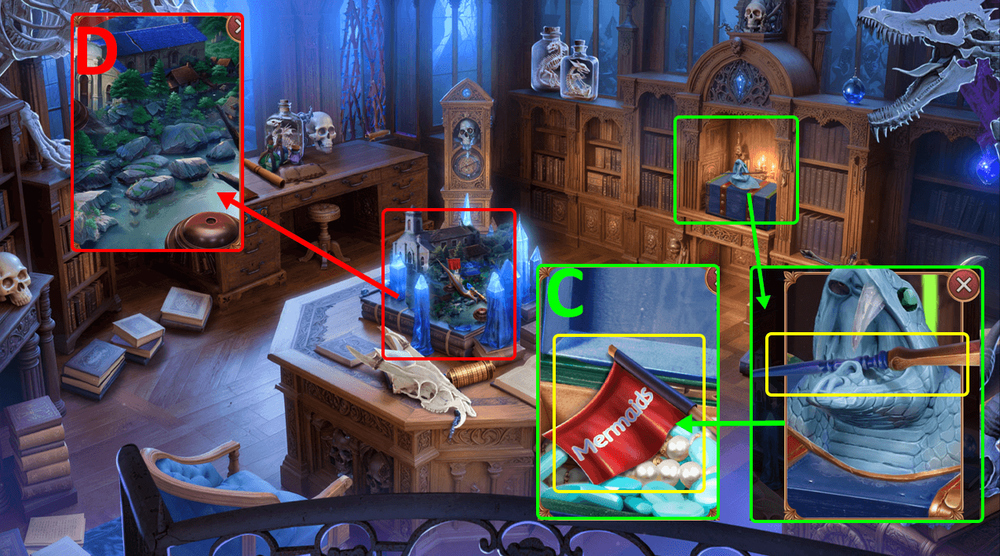
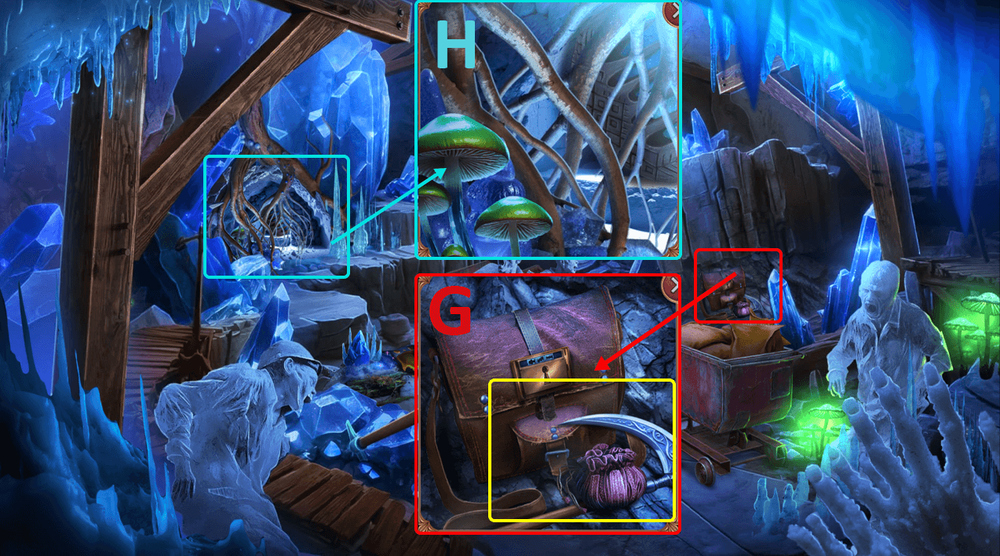
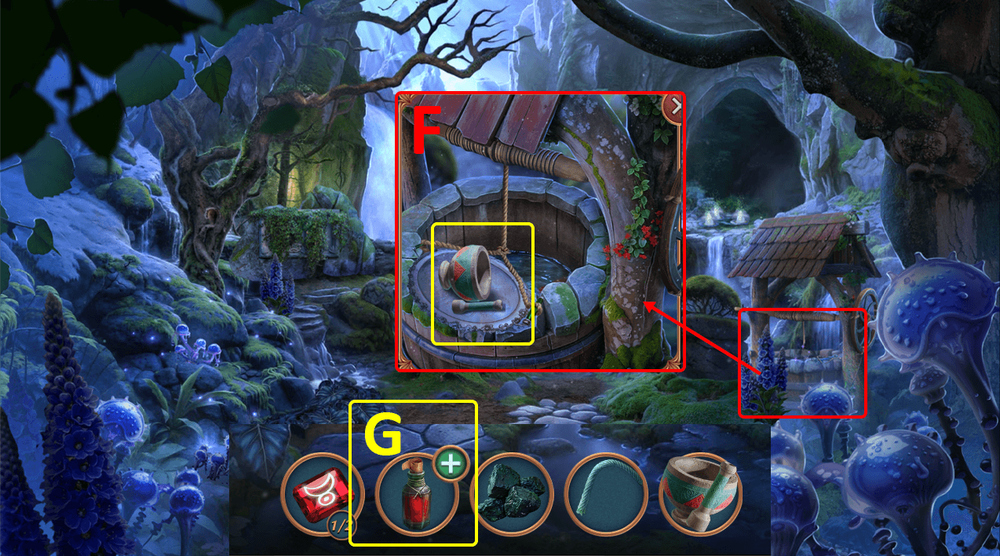
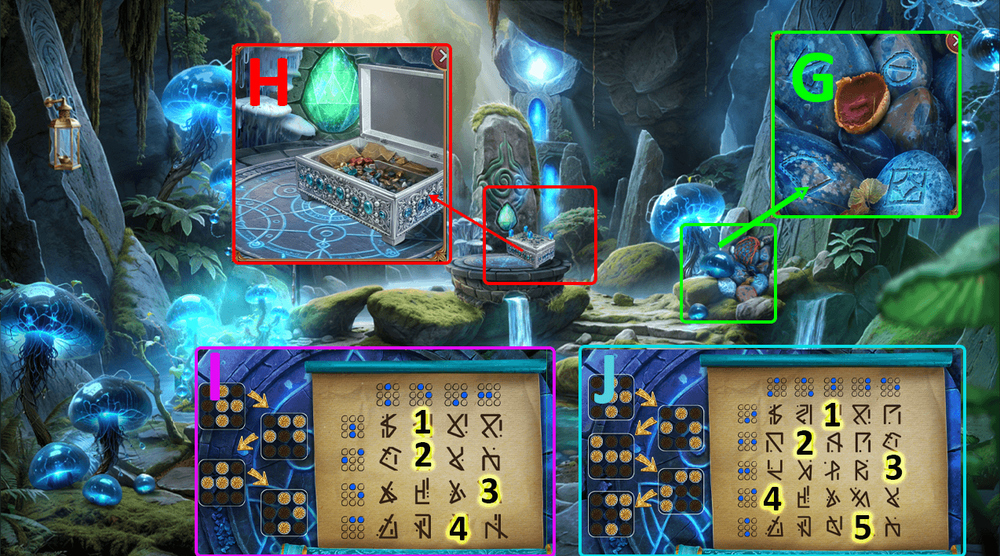
- Examine the cabinet, use WIND-UP BIRD on the lower chain, take SERENITY DEW (G).
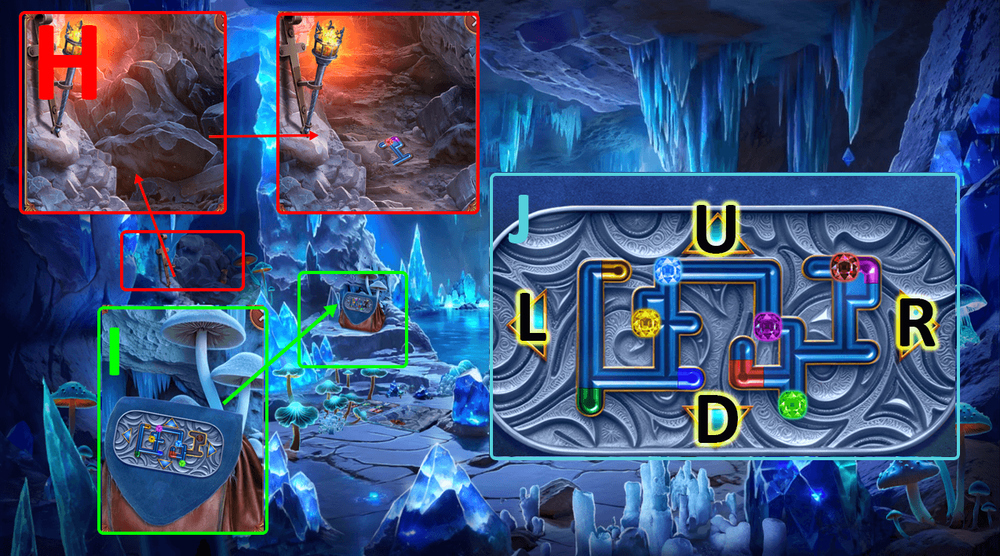
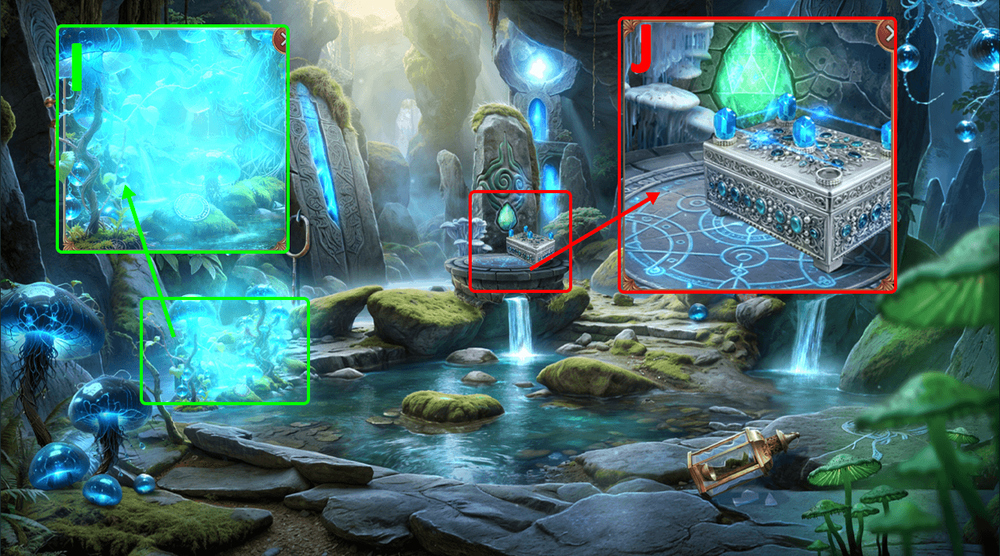
- Read the scroll, take STRING, use SPRAY NOZZLE and SERENITY DEW on the prickly vines, take CODE (H).
- Read the book, use CODE on the symbols, read Velimir’s diary, play puzzle, take CROSSBOW FRAME, examine the map (I).
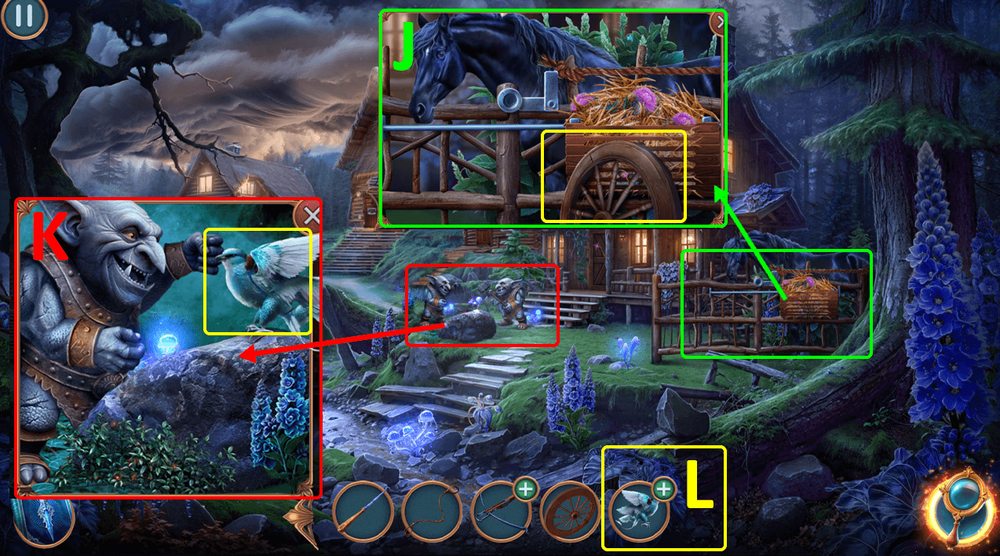
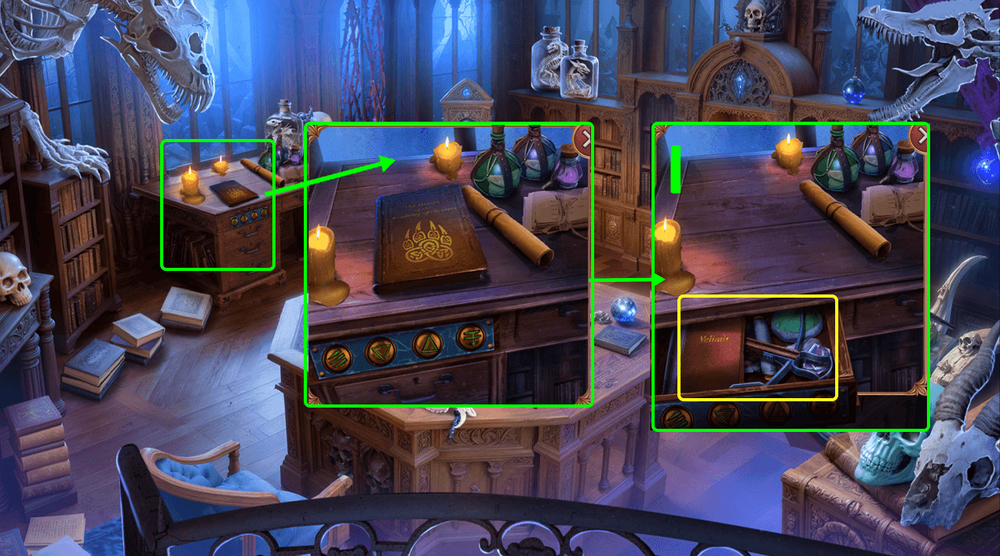
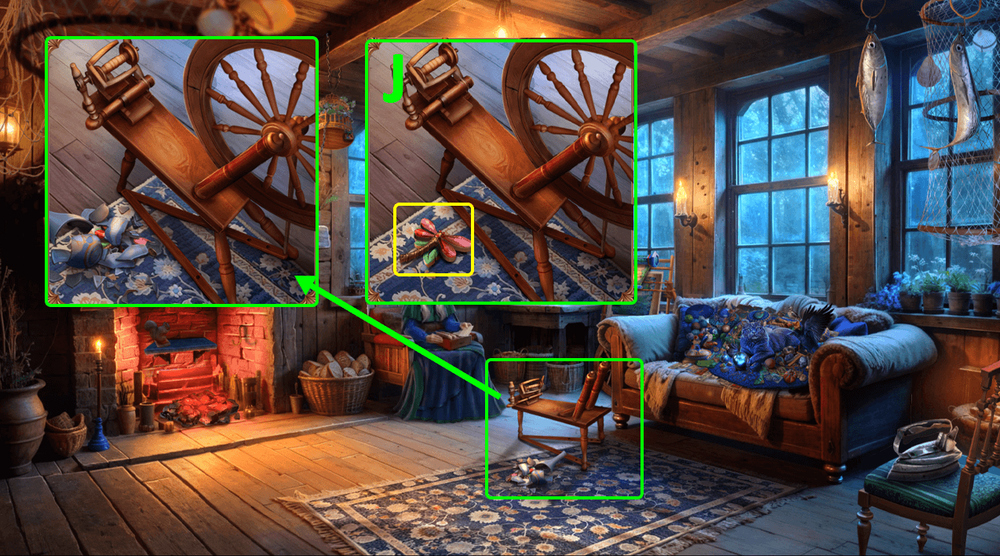
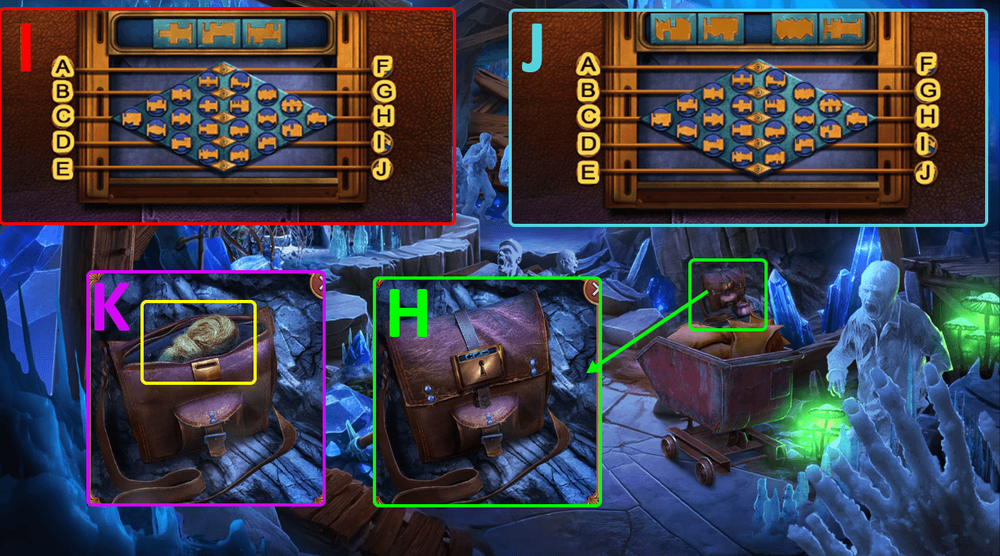
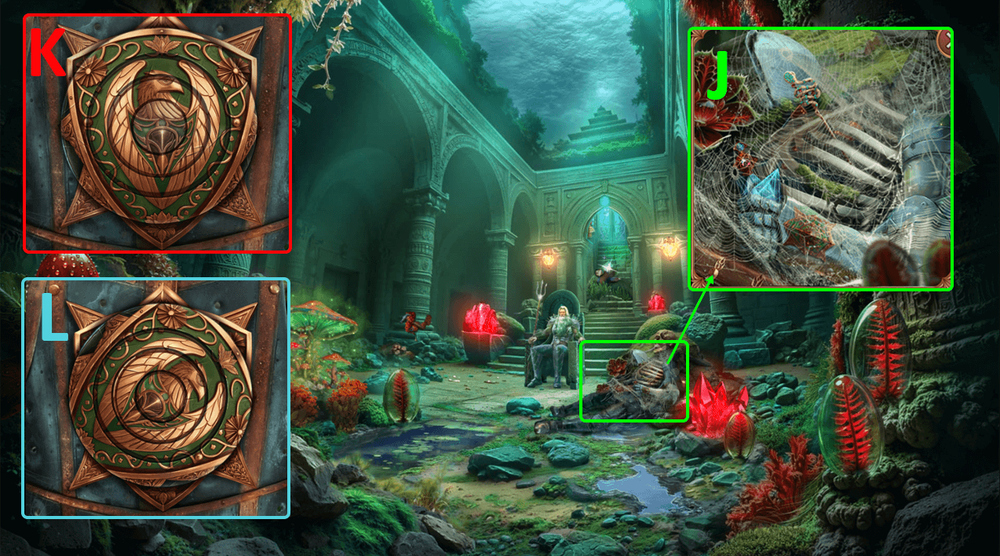
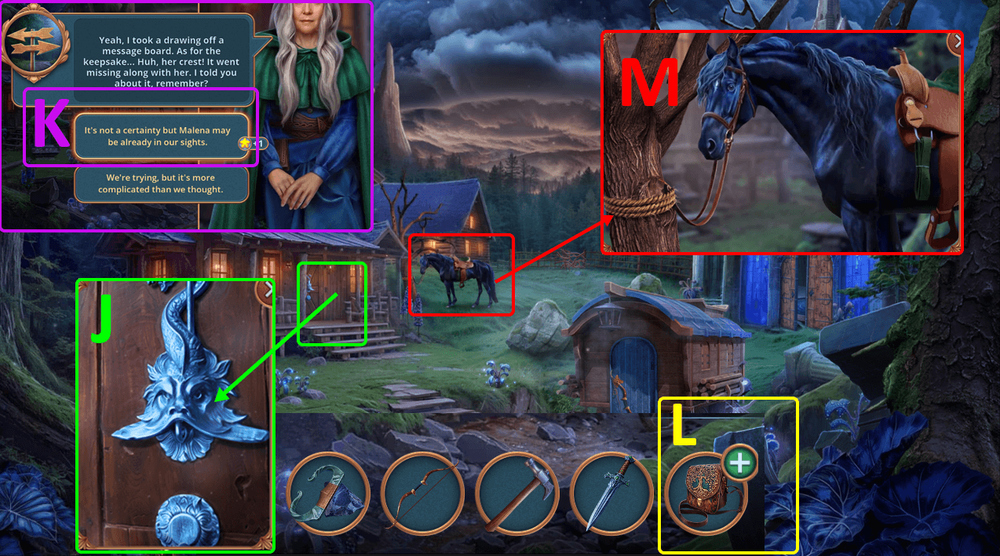
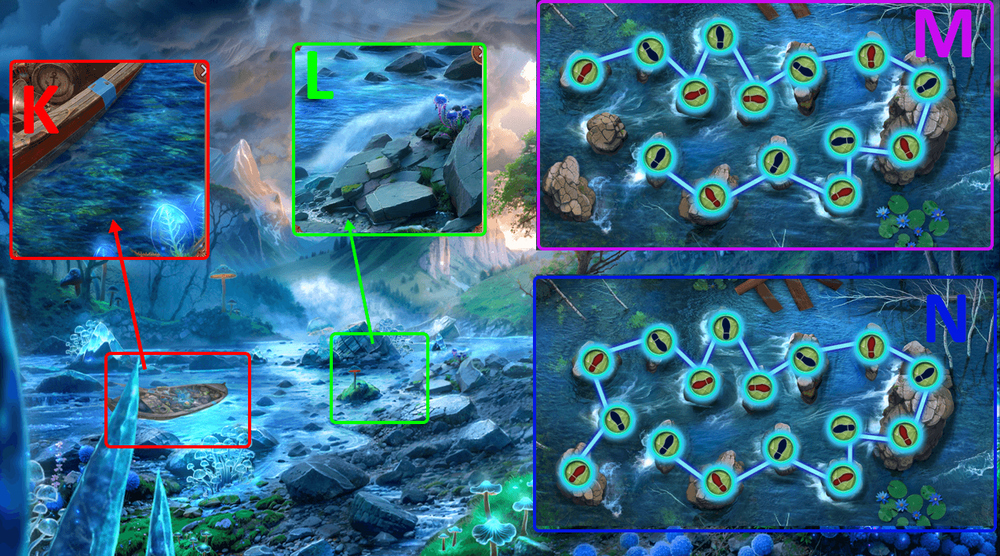
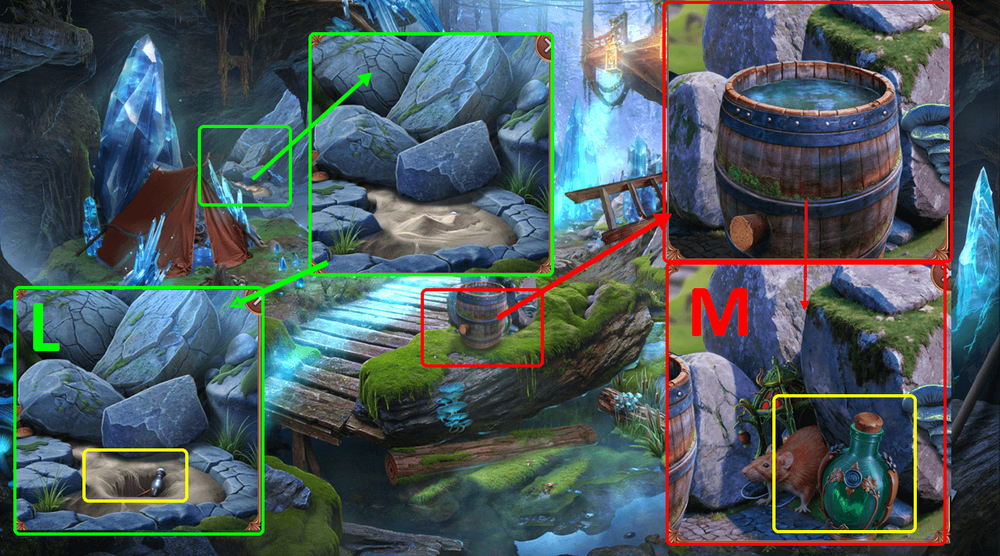
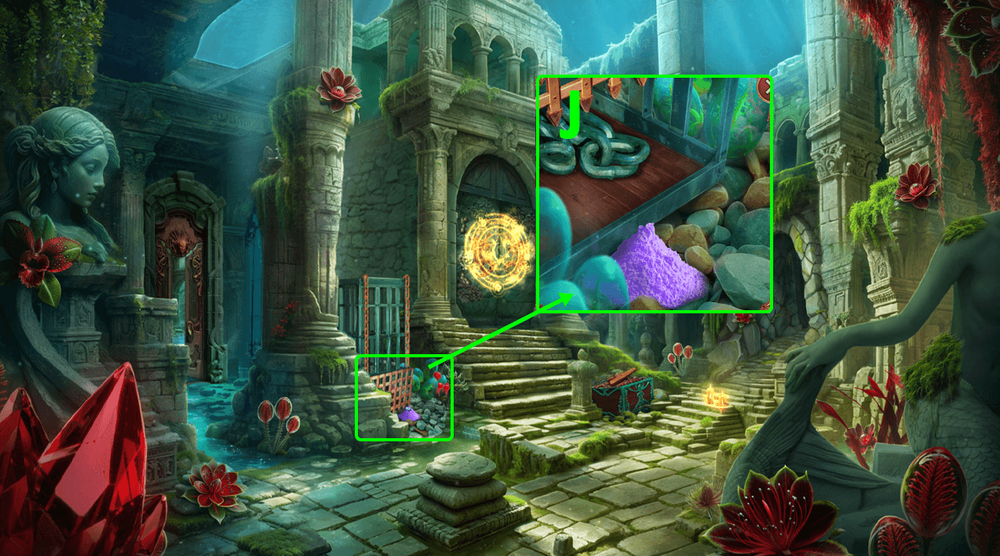
- Take SPINNING WHEEL (J).
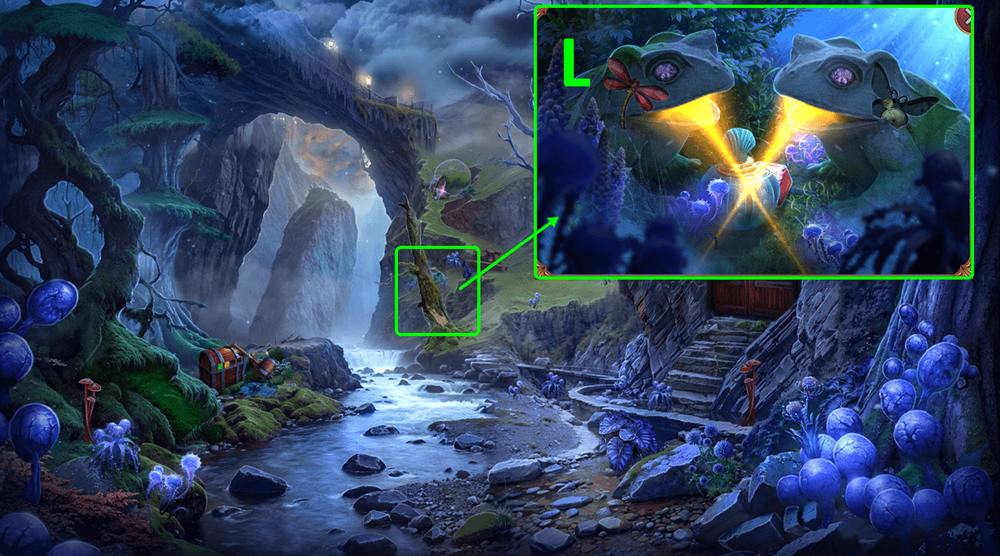
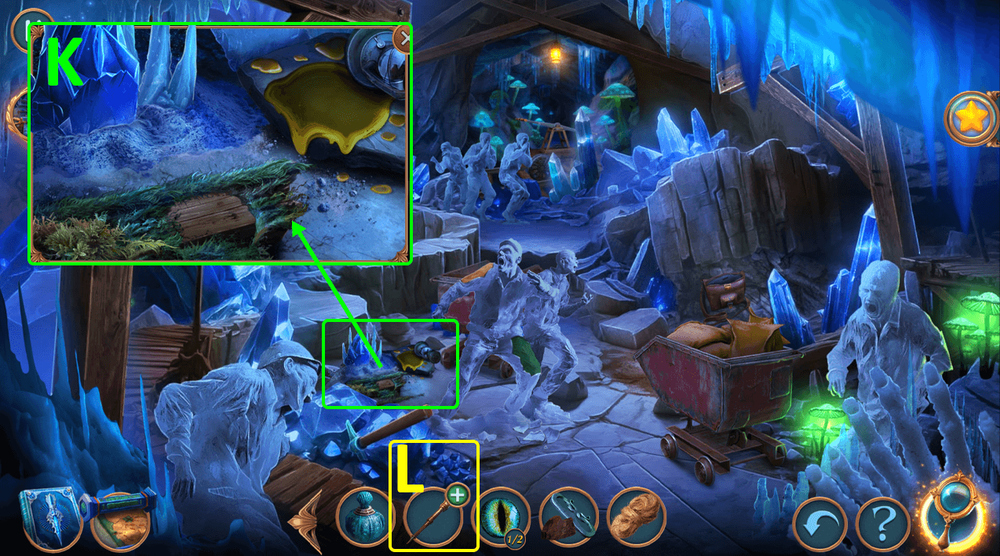
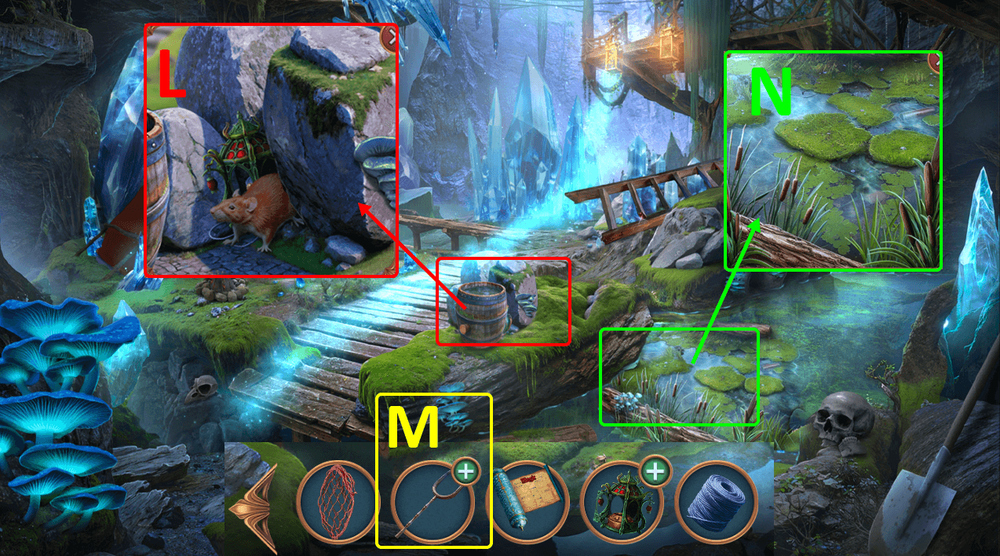
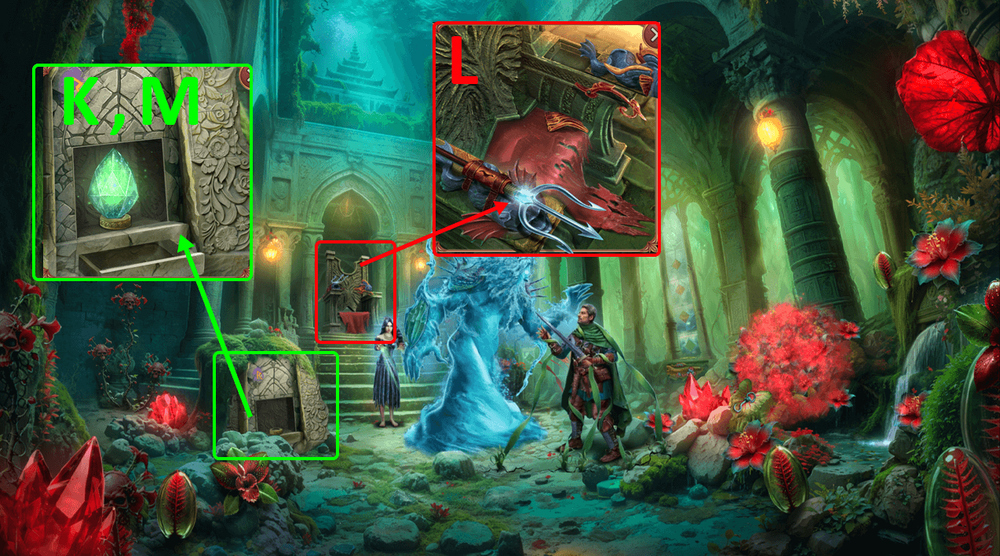
- Take POSTAL BIRD (K).
- Examine POSTAL BIRD, click on it, read the note (L).
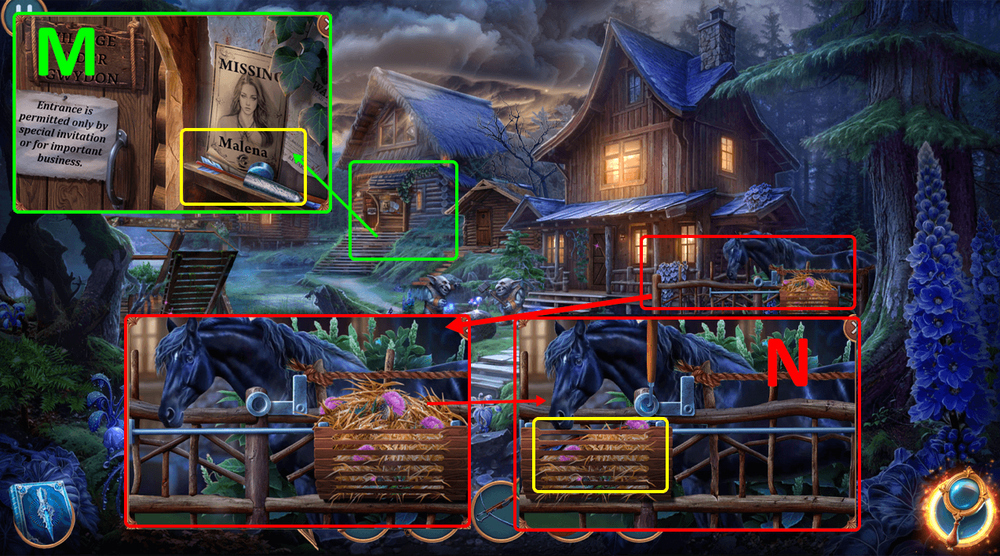
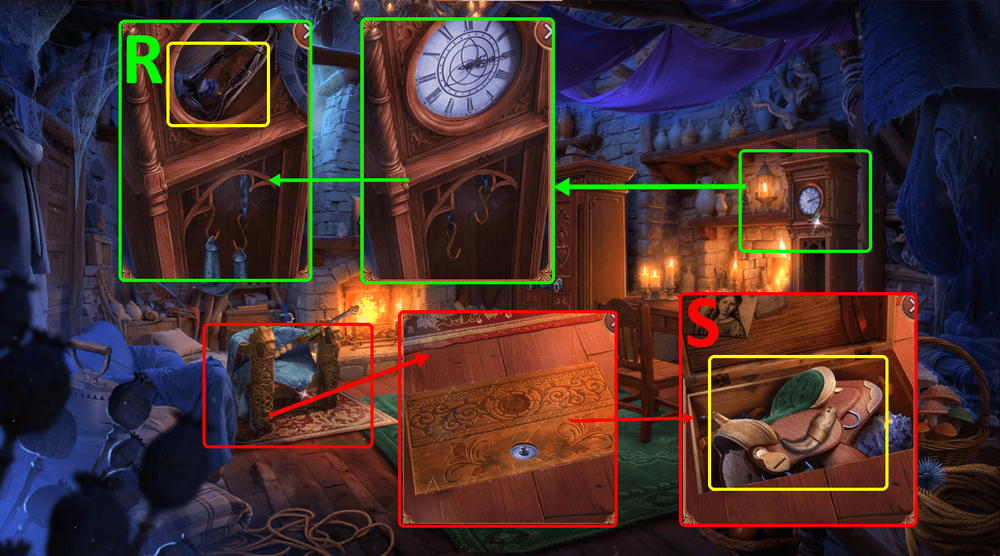
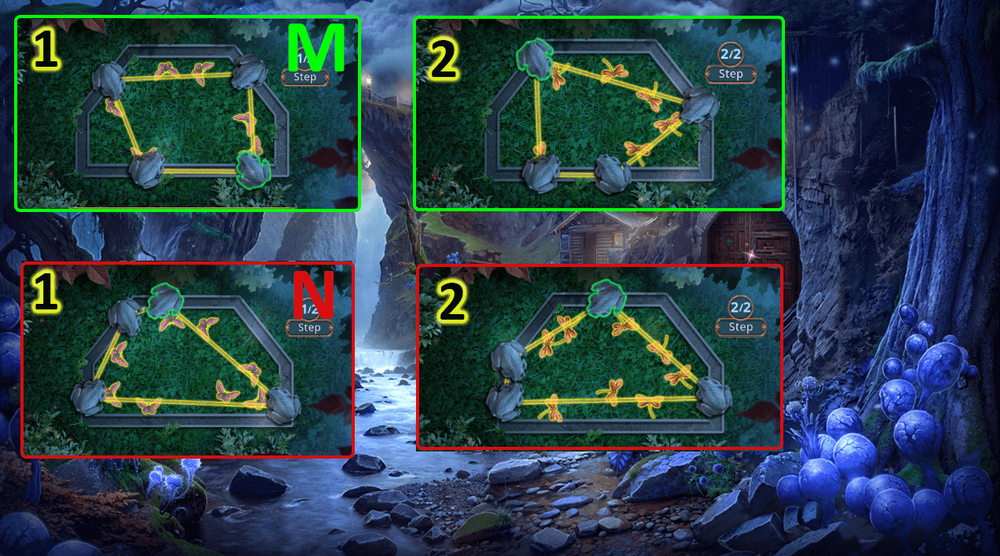
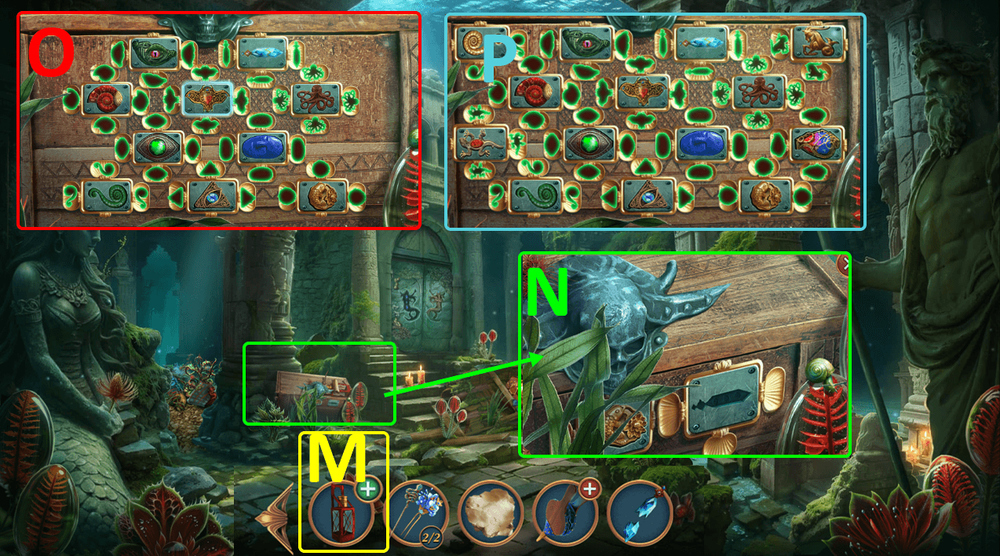
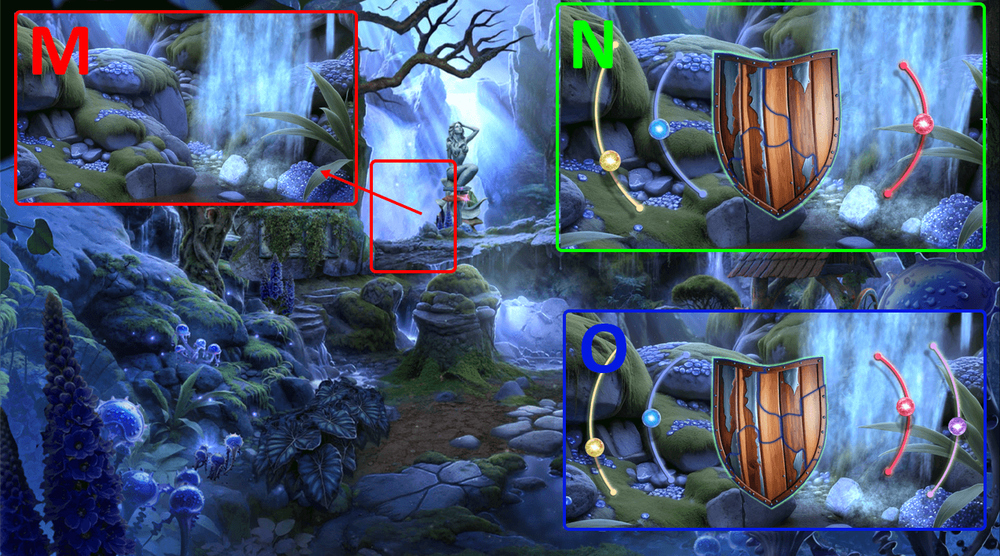
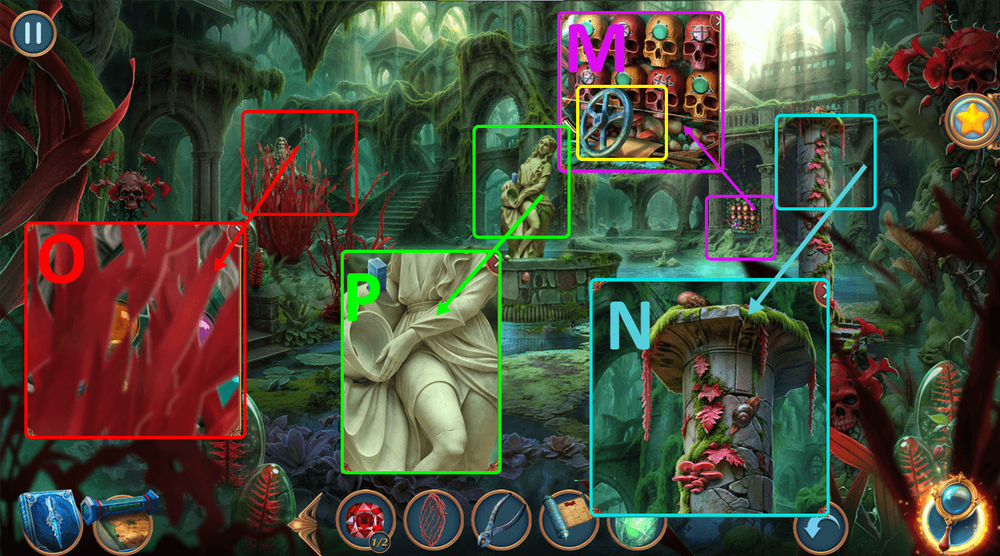
- Take CLOCK WEIGHT, ARROWS 2/3 and LEVER (M).
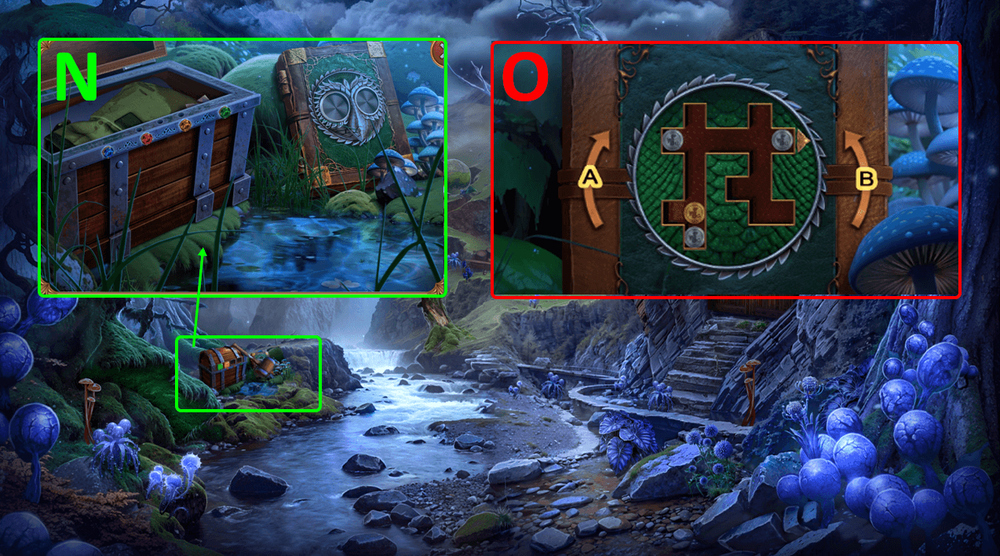
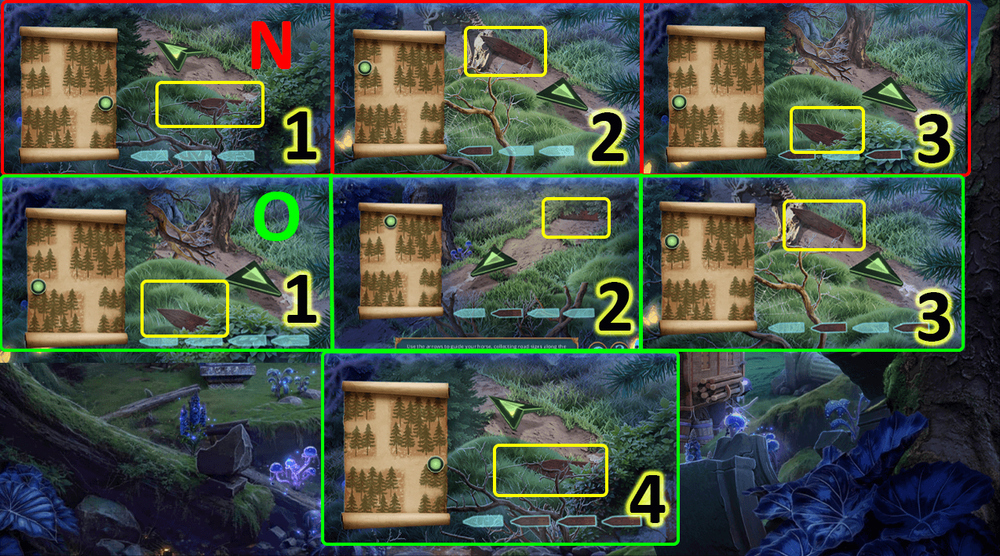
- Use LEVER on the trough lever mount, take ARROWS 3/3 (N).

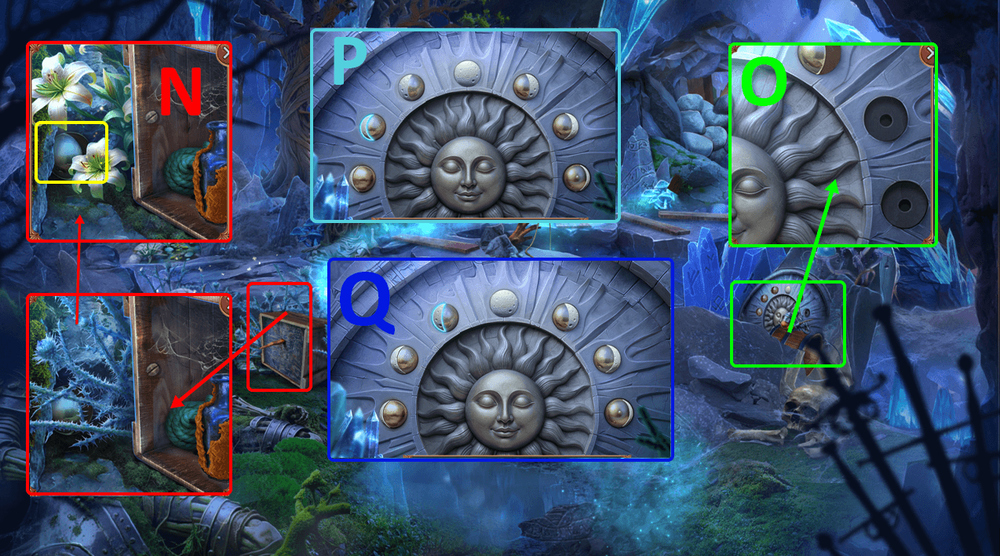
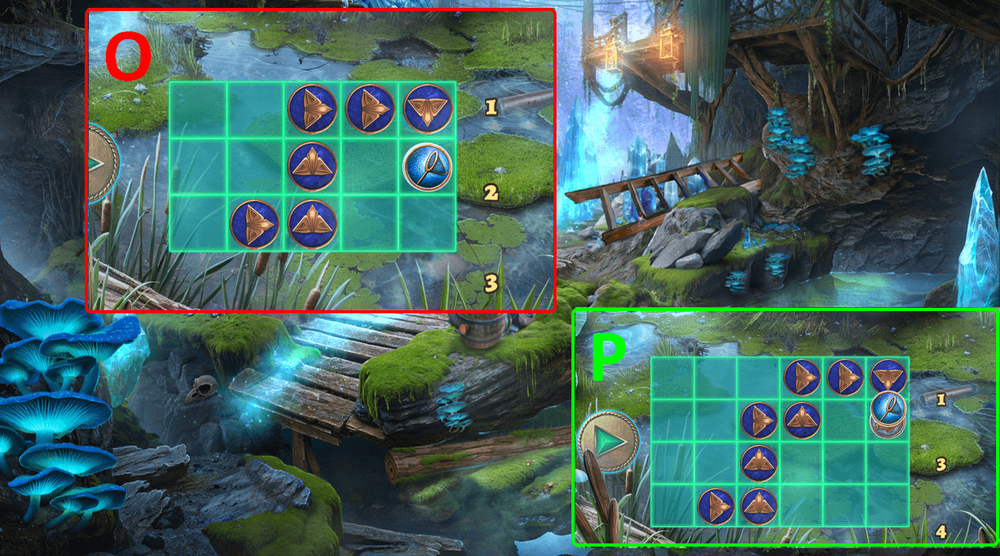
- Use STRING and ARROWS on CROSSBOW FRAME, get CROSSBOW (O).
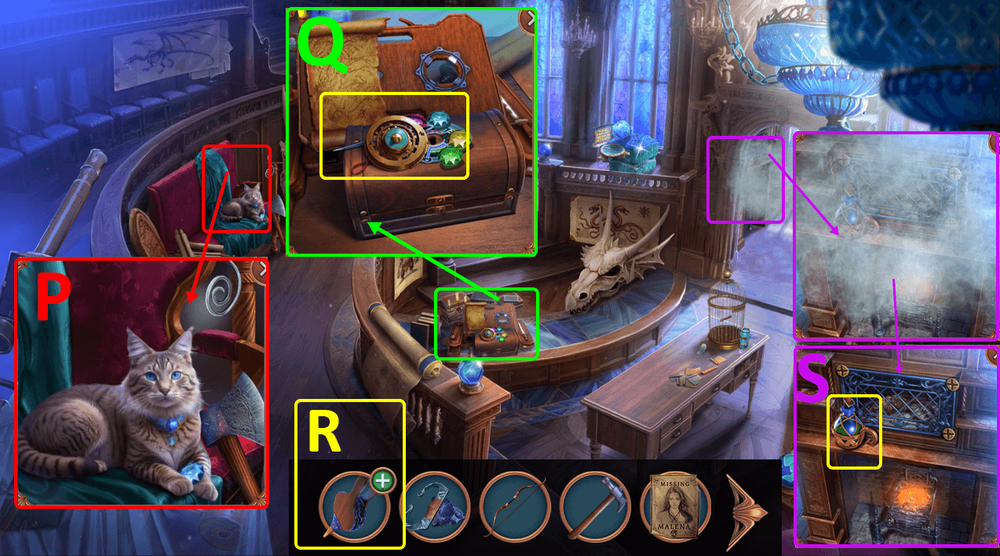
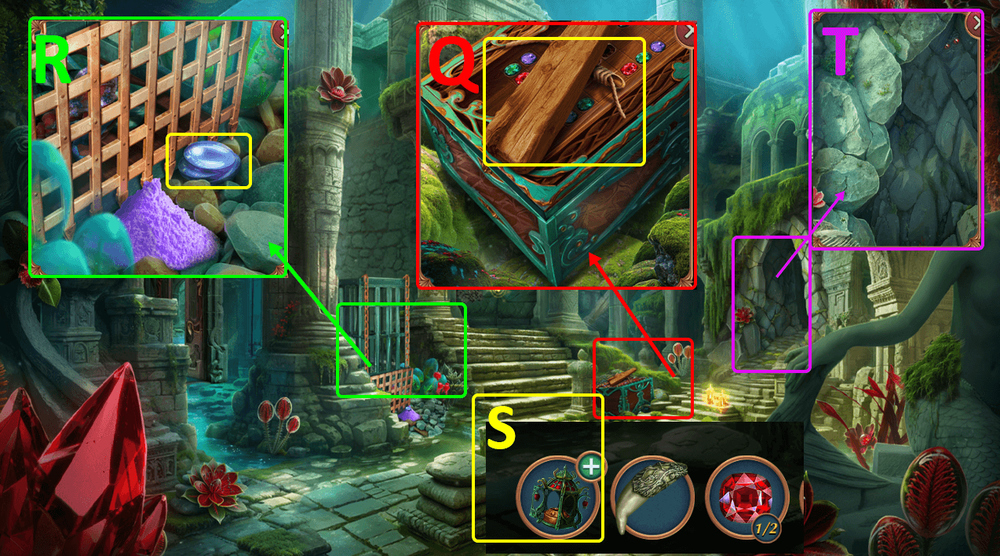
- Use CROSSBOW on the barrel, read the note, take HAMMER (P).
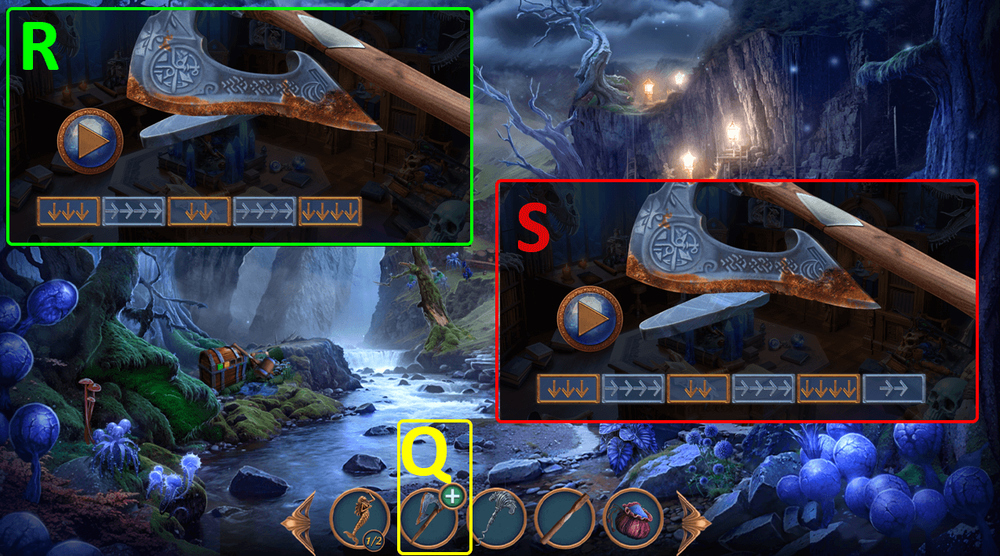
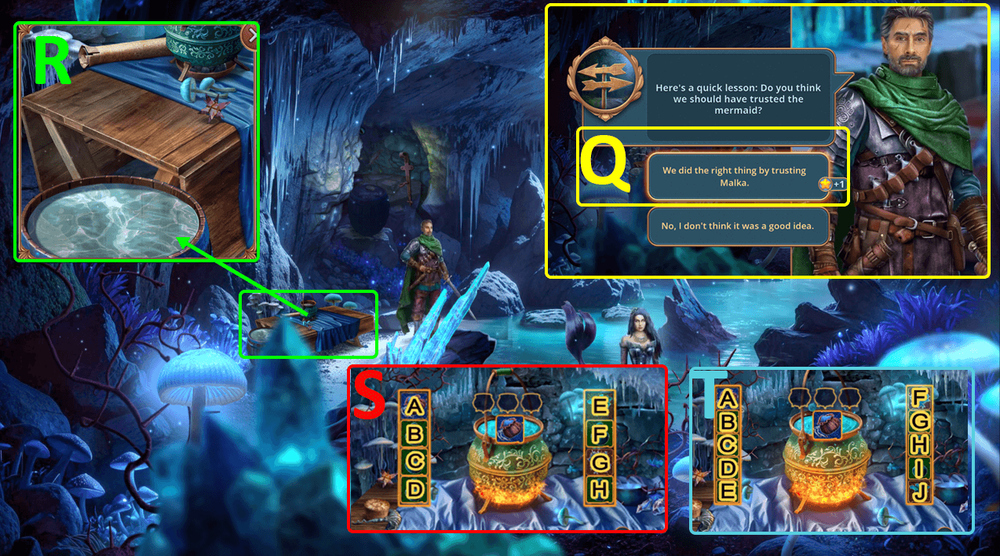
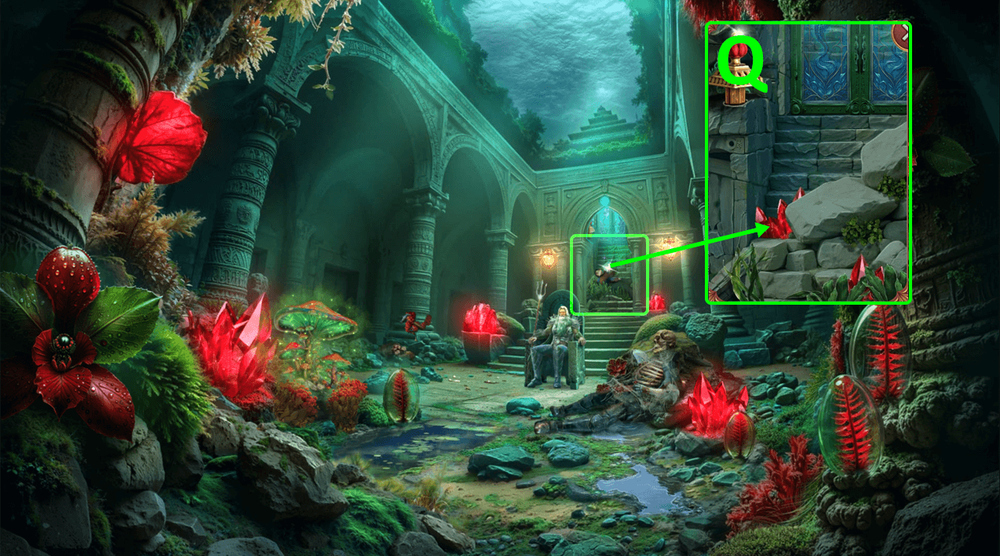
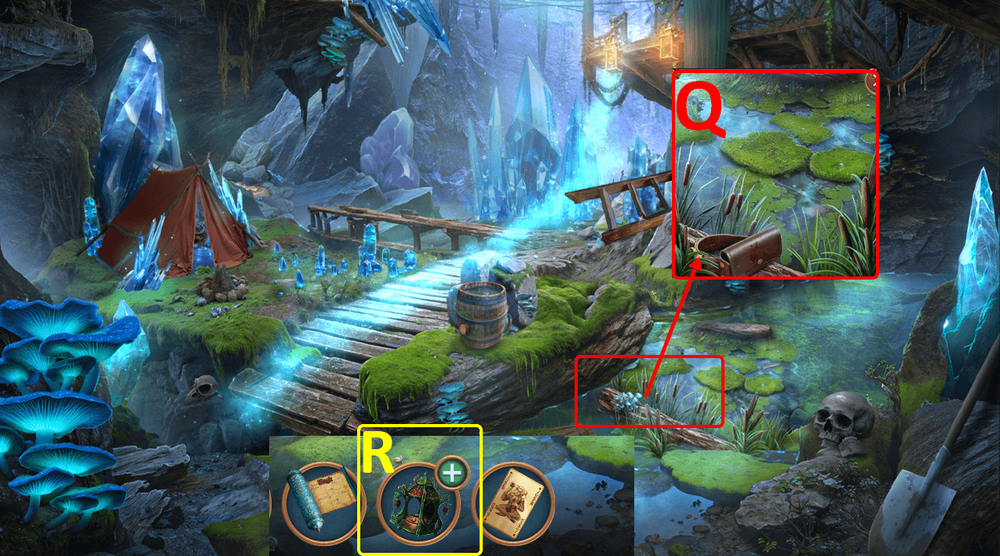
- Use HAMMER on the goblin (Q).
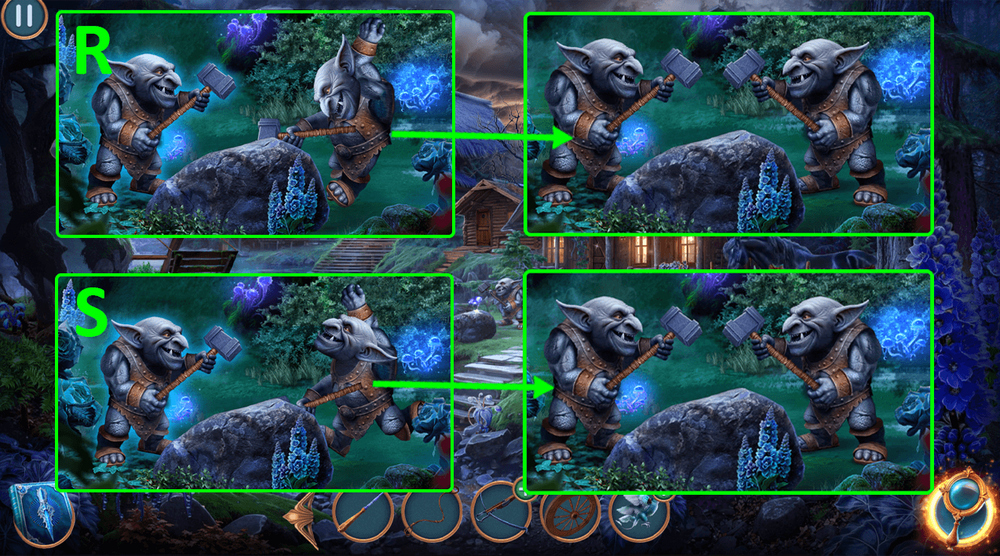
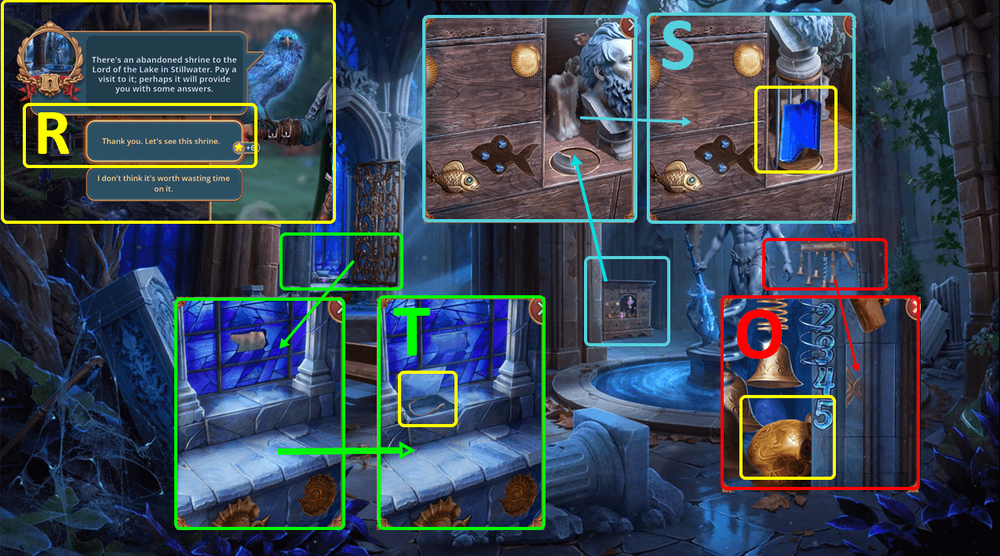
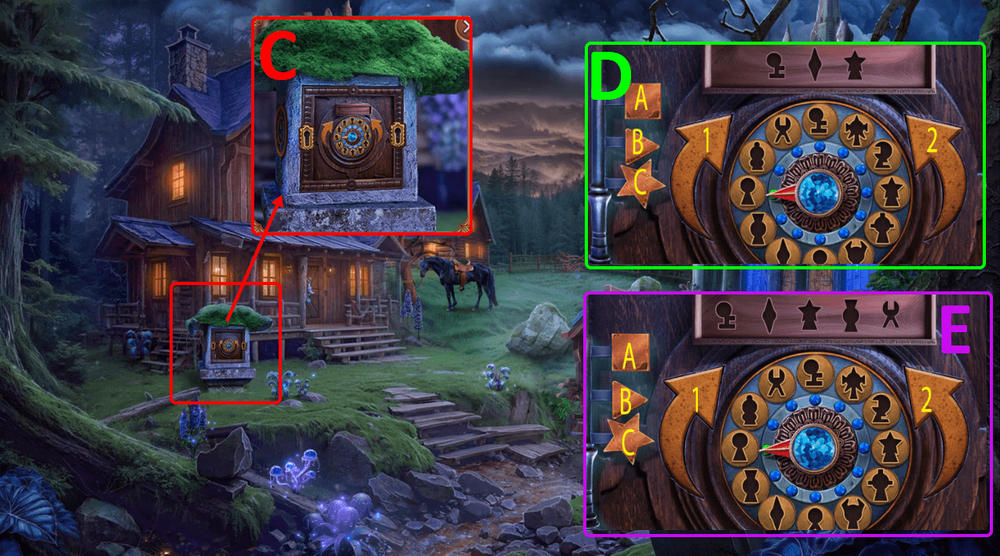
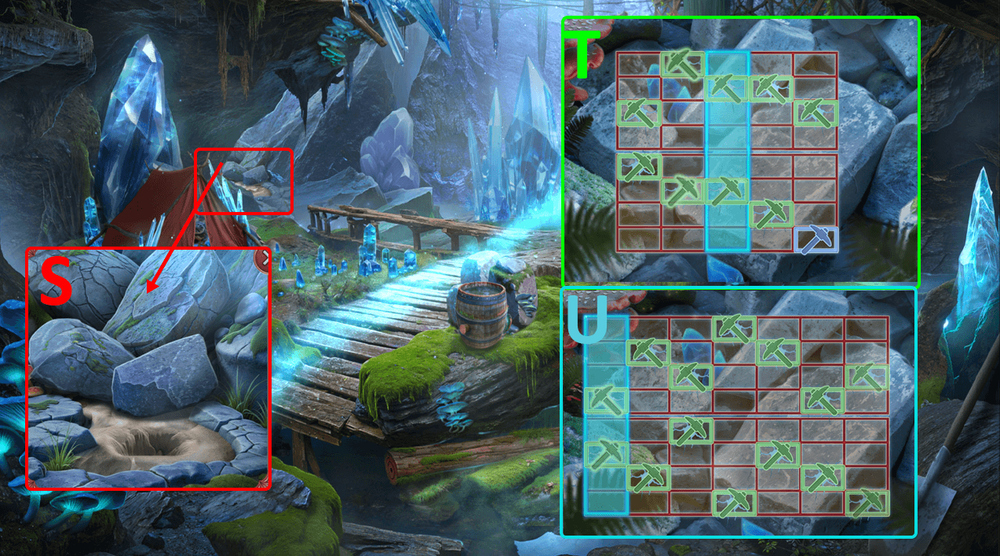
- Easy solution: Set to the correct position as shown in the picture (R).
- Hard solution: Set to the correct position as shown in the picture (S).
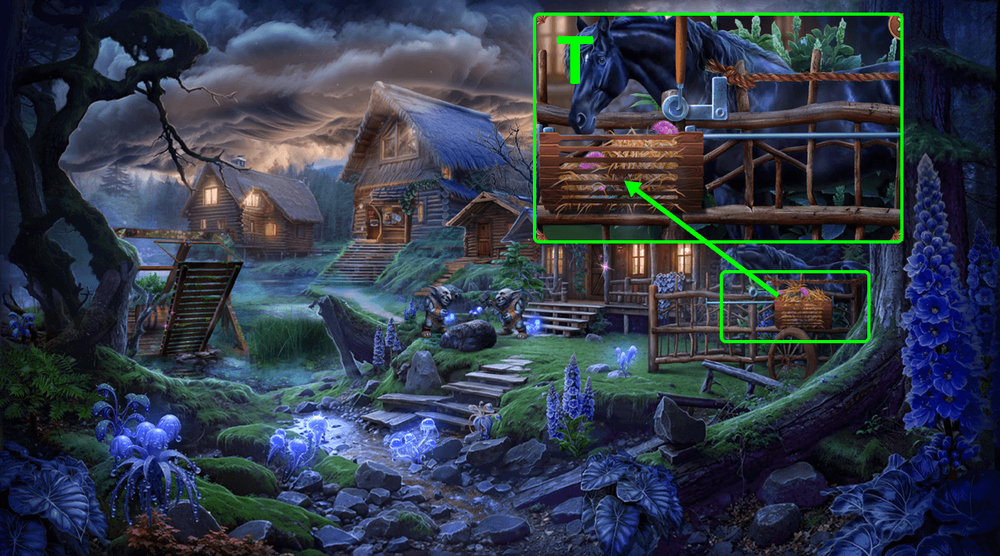
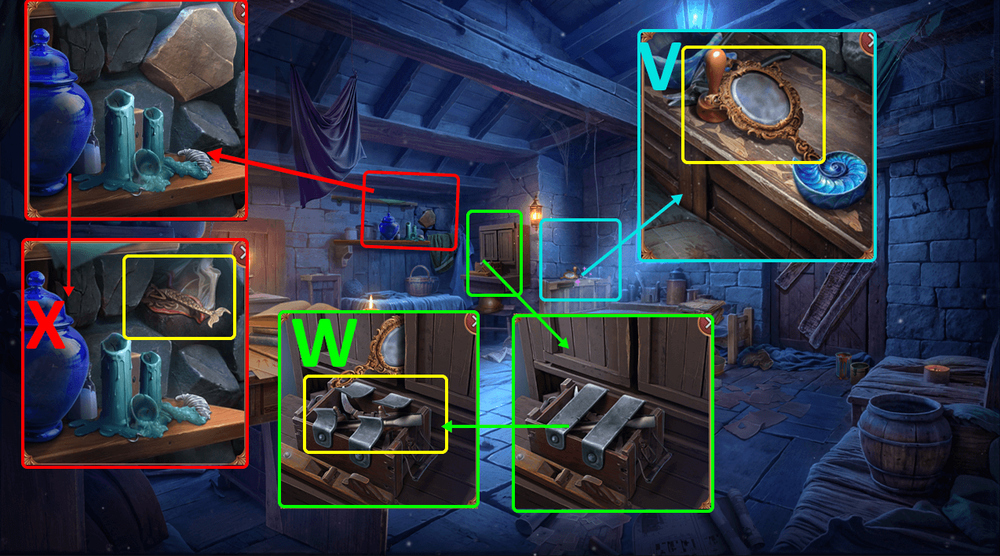
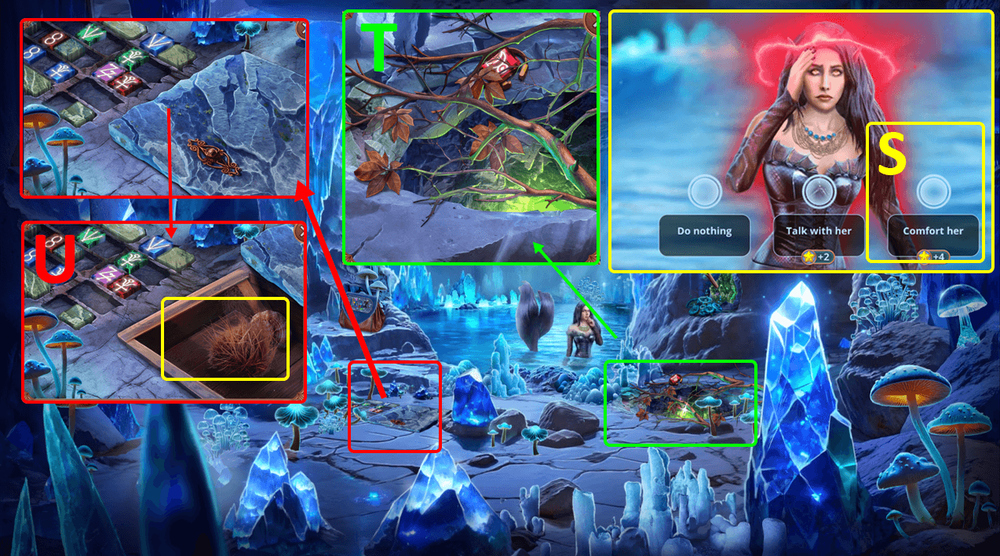
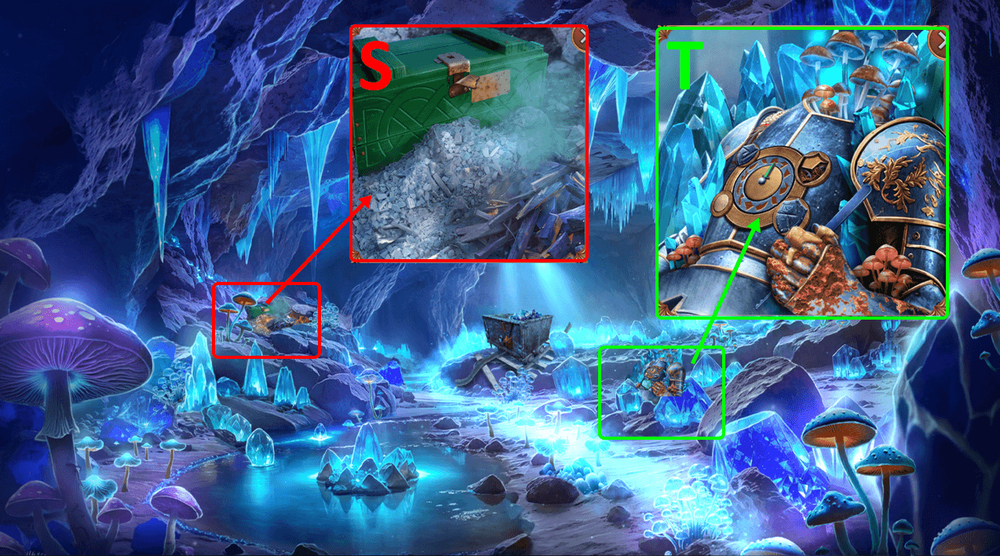
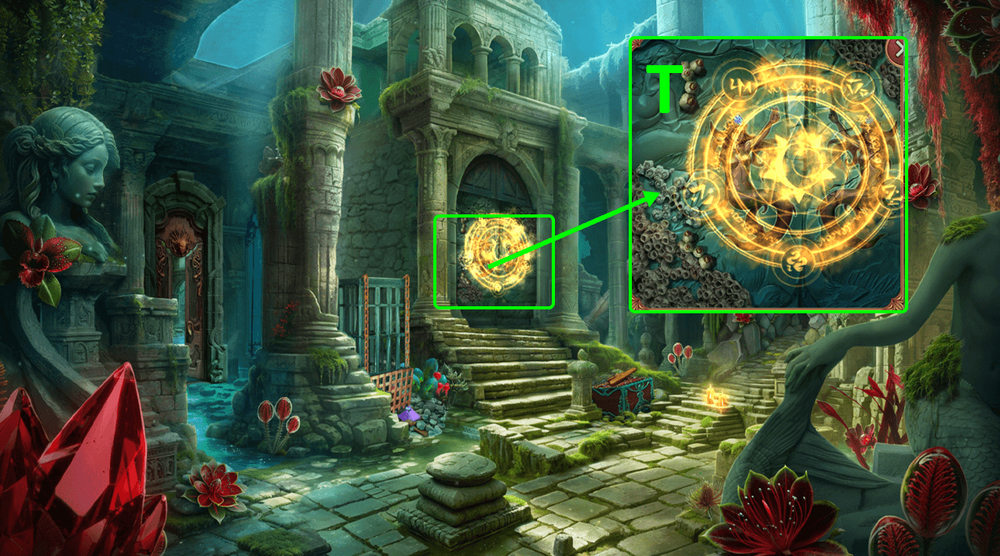
- Take FRAME PARTS 1/3 and BELL.
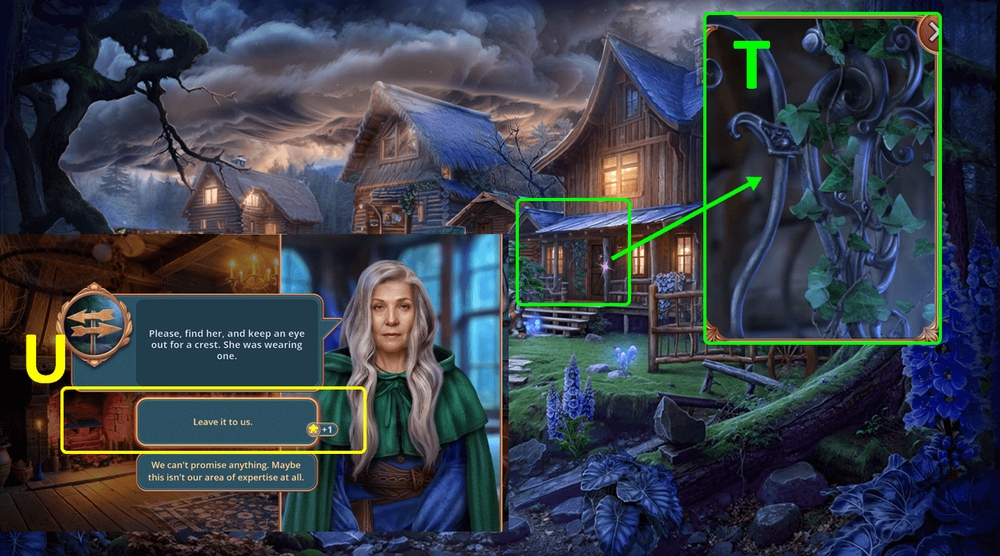
- Use BELL on the metal frame (T).
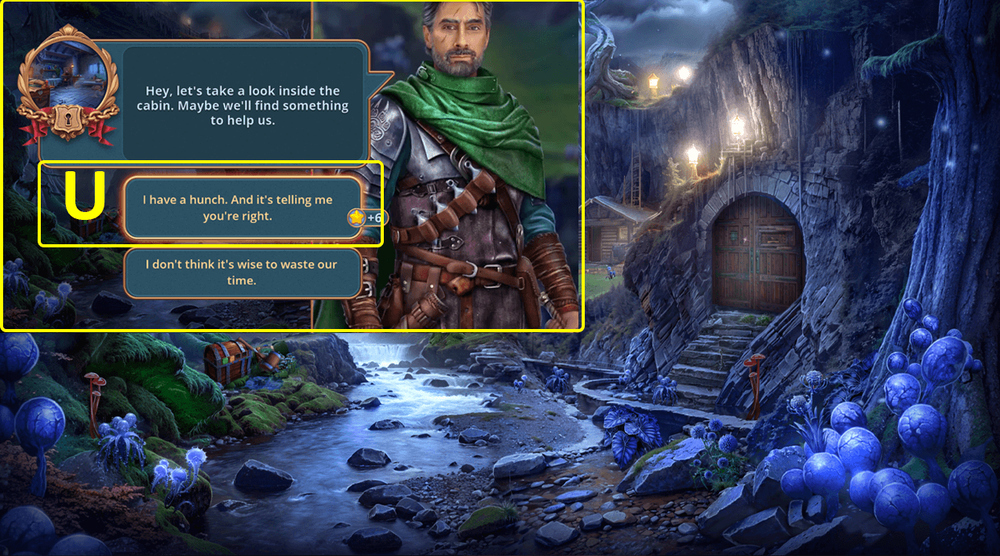
- Go forward.
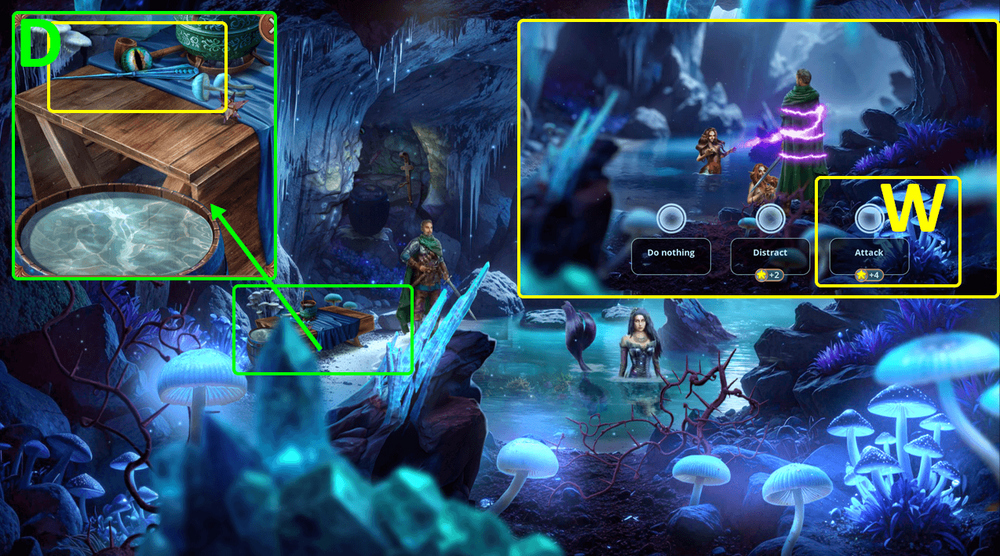
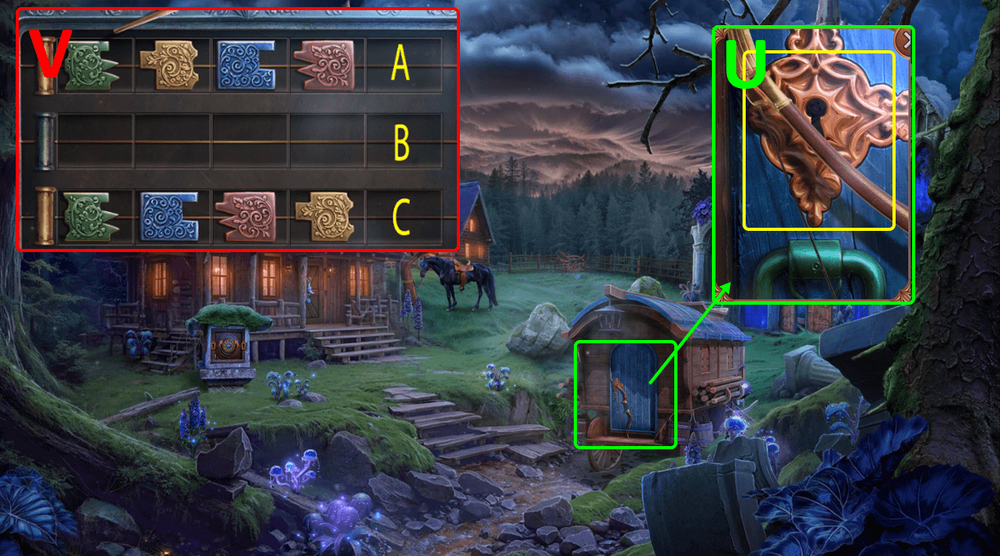
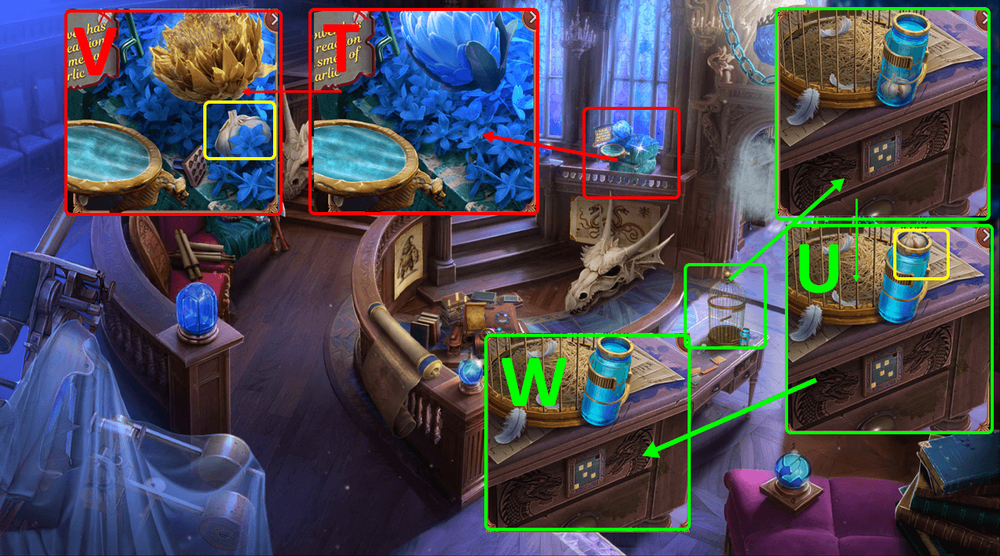
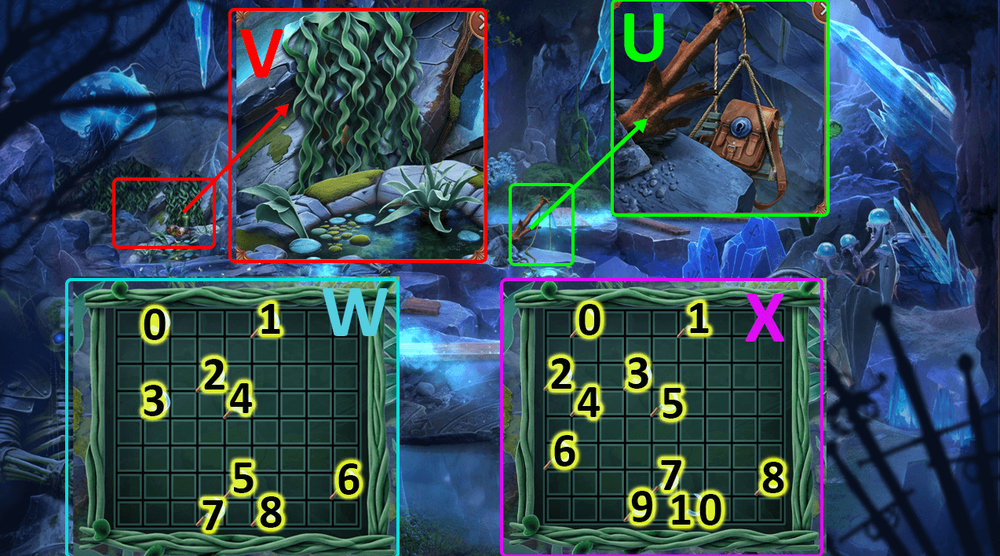
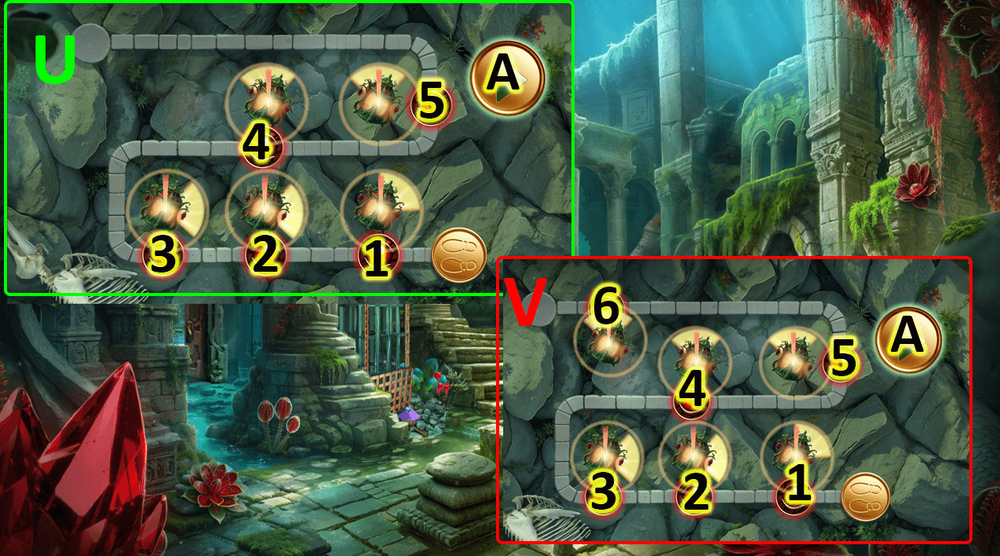
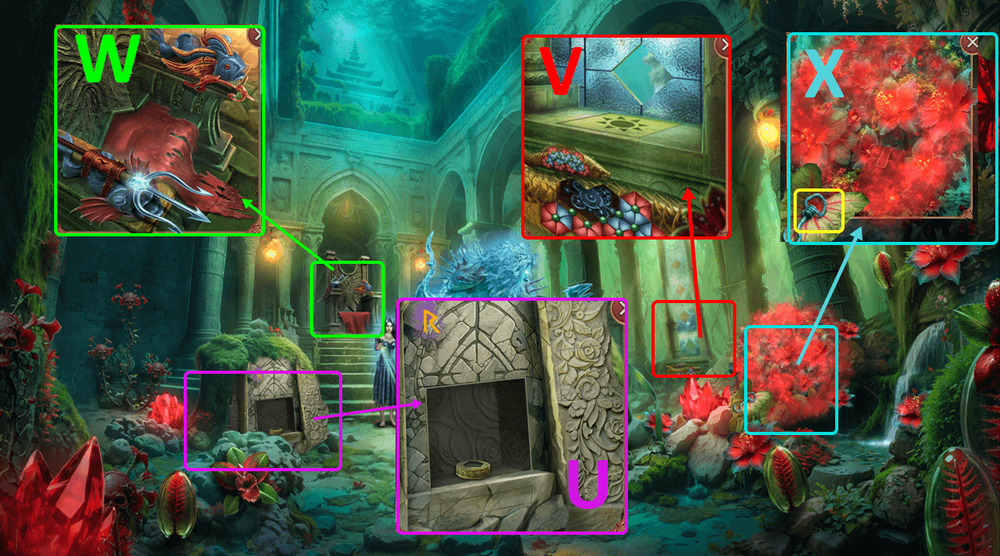
- Select this option (U).
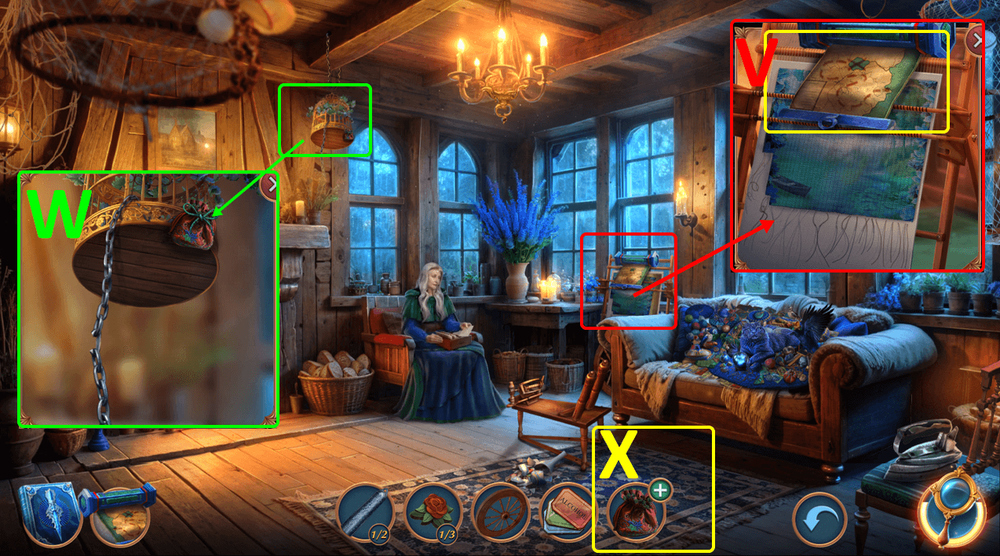
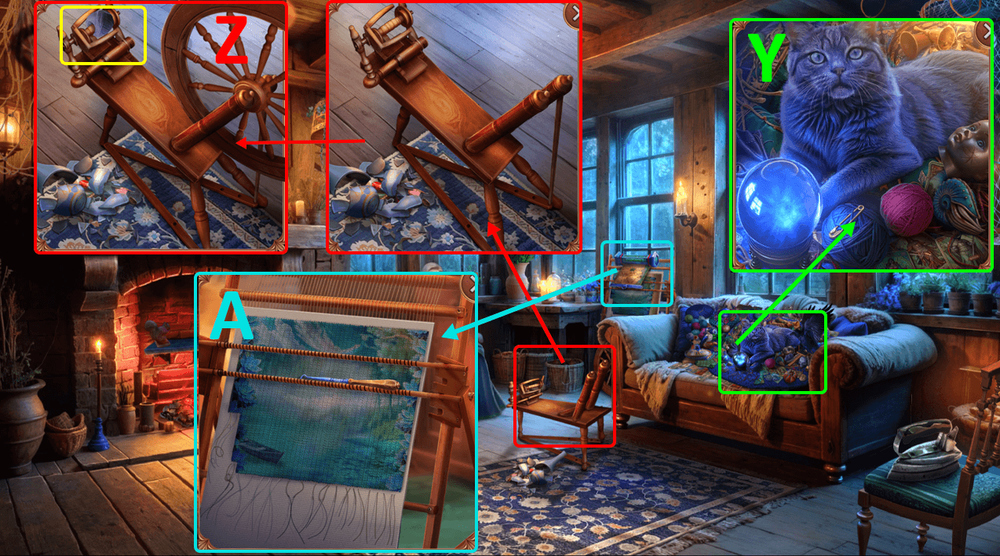
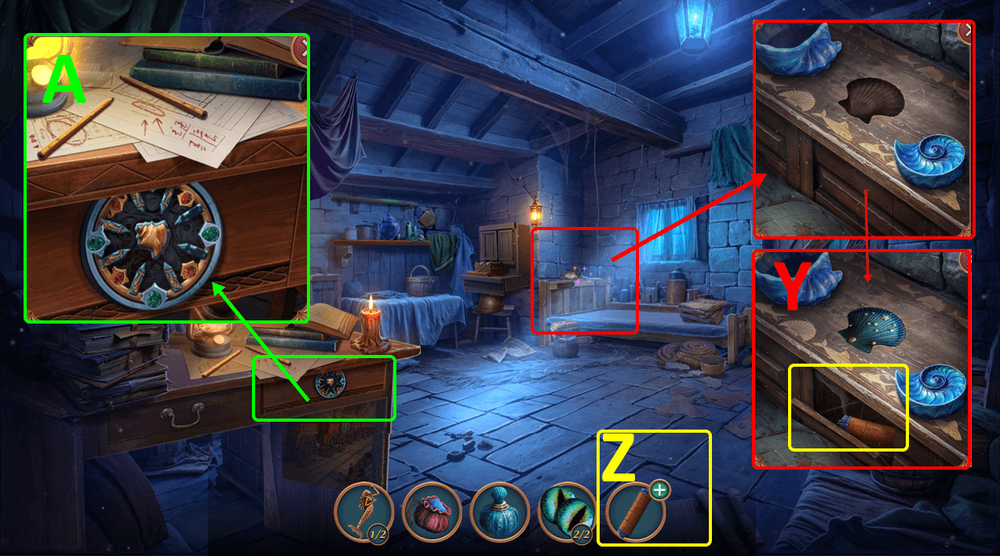
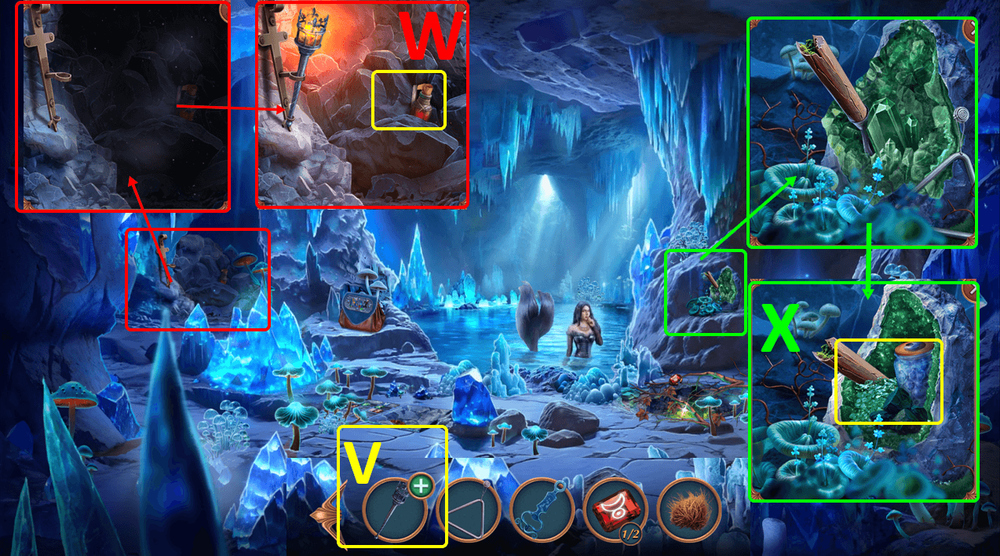
- Take the map and LABELS, use CROCHET HOOK on the loom (V).
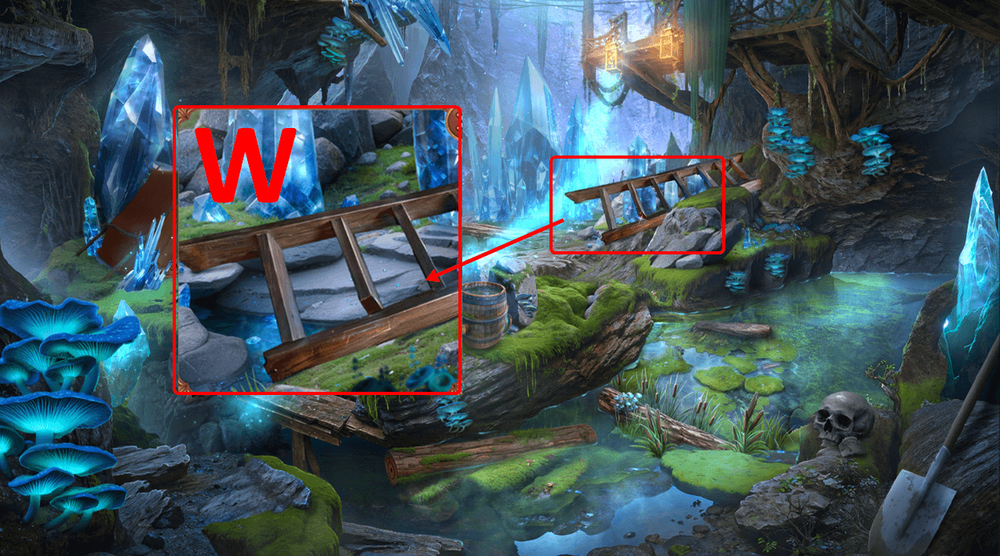
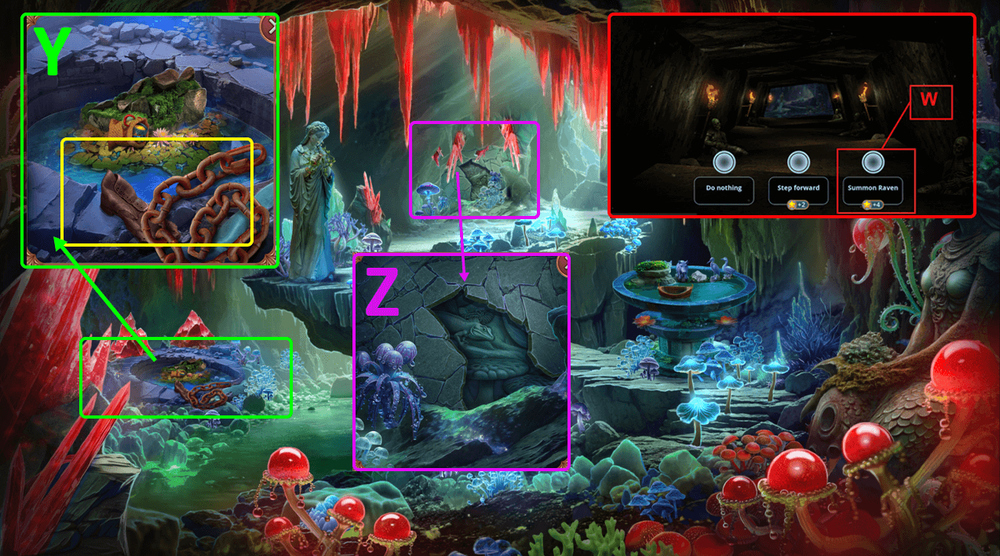
- Use POSTAL BIRD on the pouch, get POUCH (W).
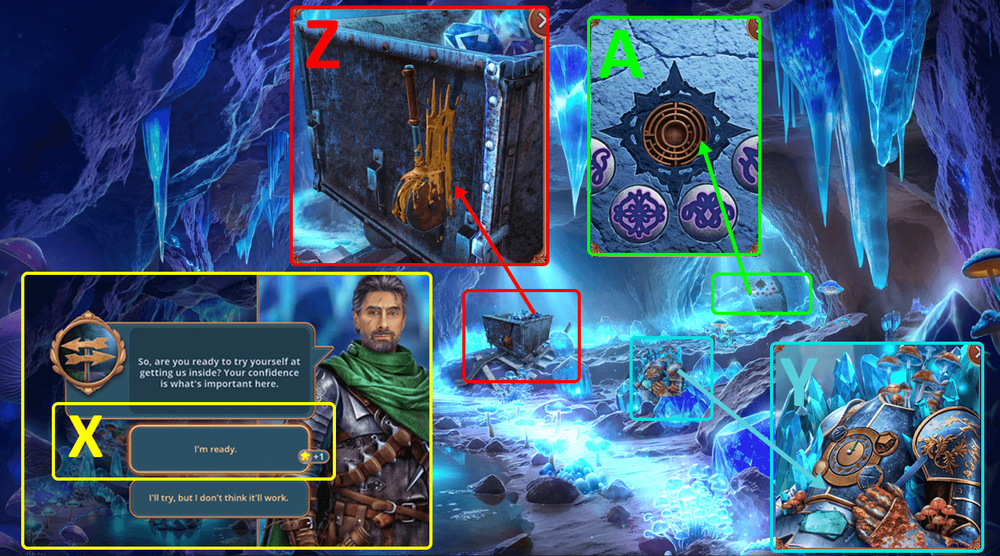
- Examine POUCH, open it, take NAILS and TOY (X).
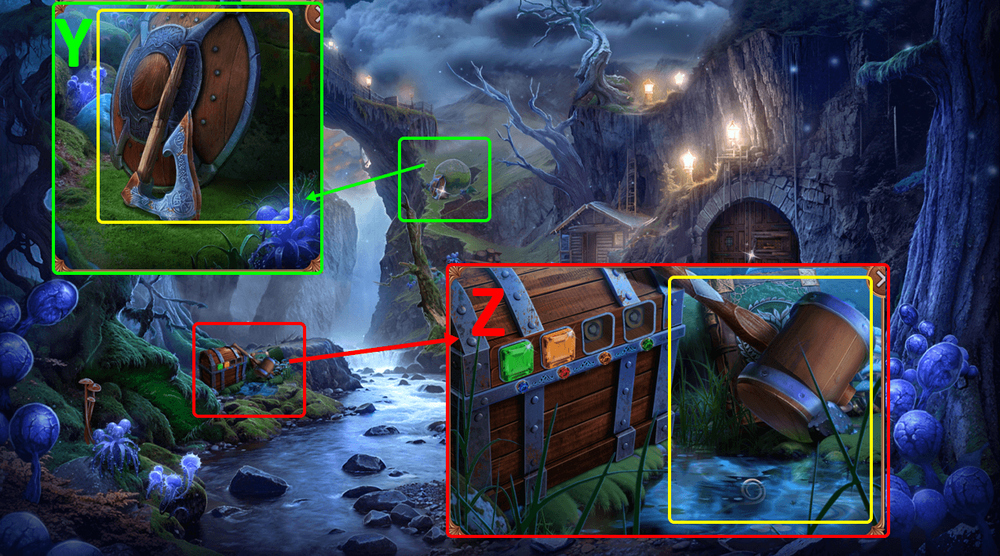
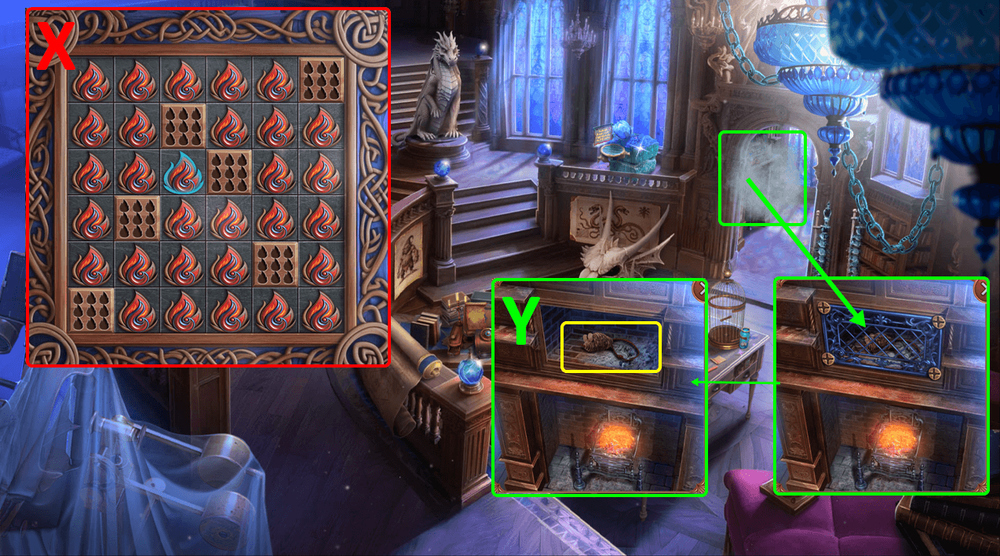
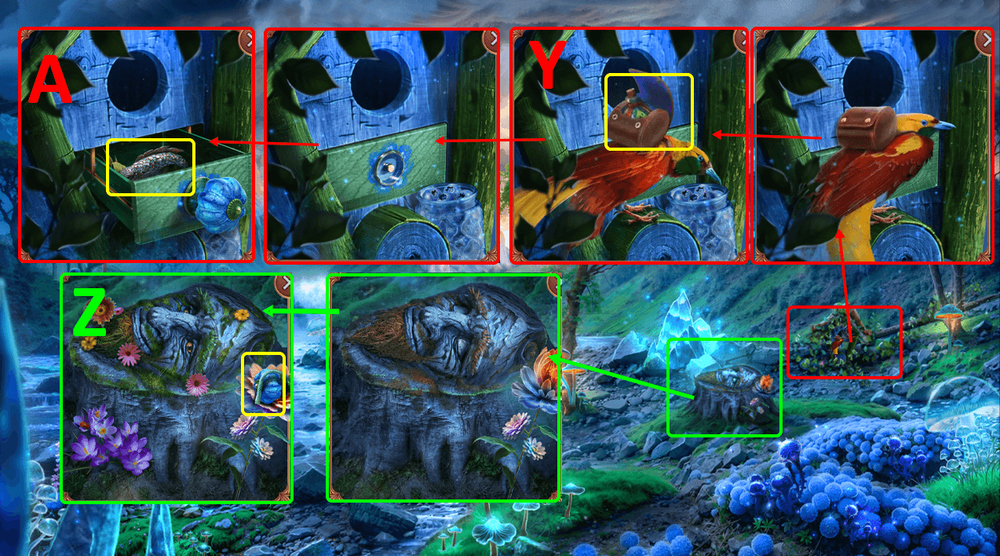
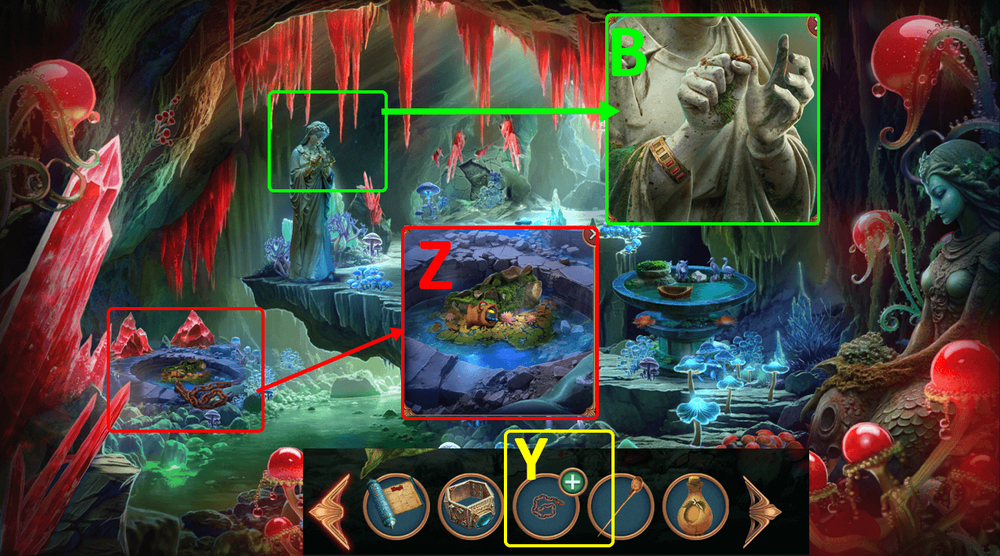
- Use TOY on the cat, play puzzle, earn HAIRBALL (Y).
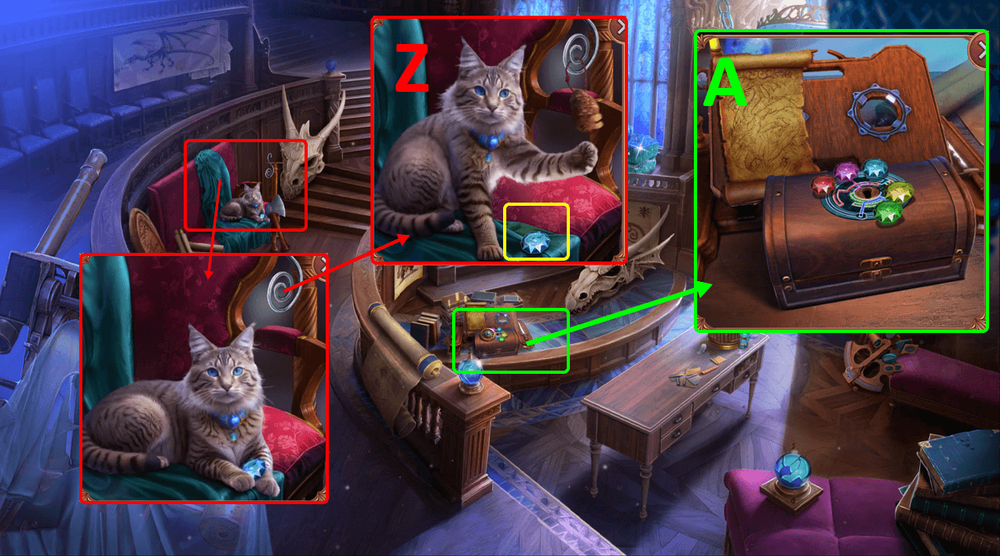
- Use SPINNING WHEEL and HAIRBALL on the device frame, take BALL OF THREAD (Z).
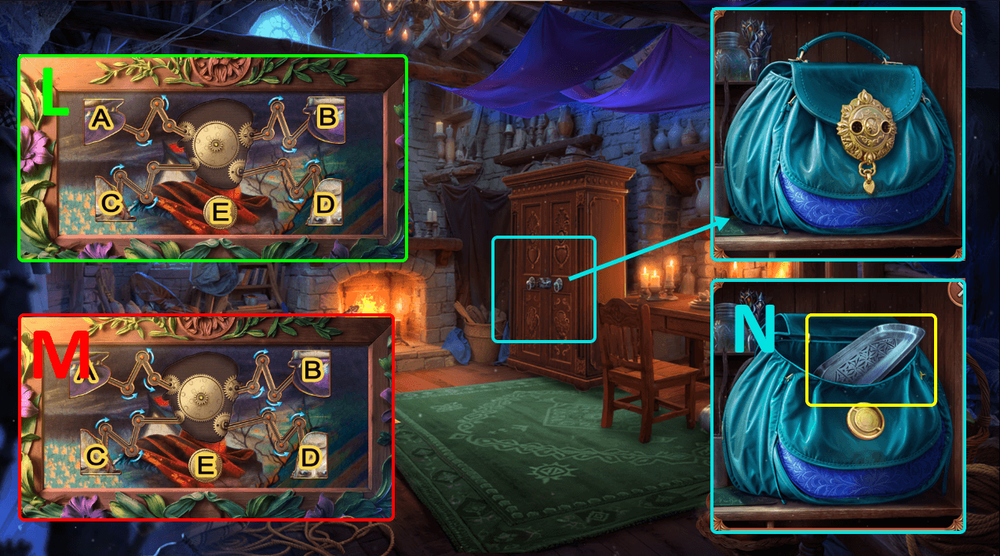
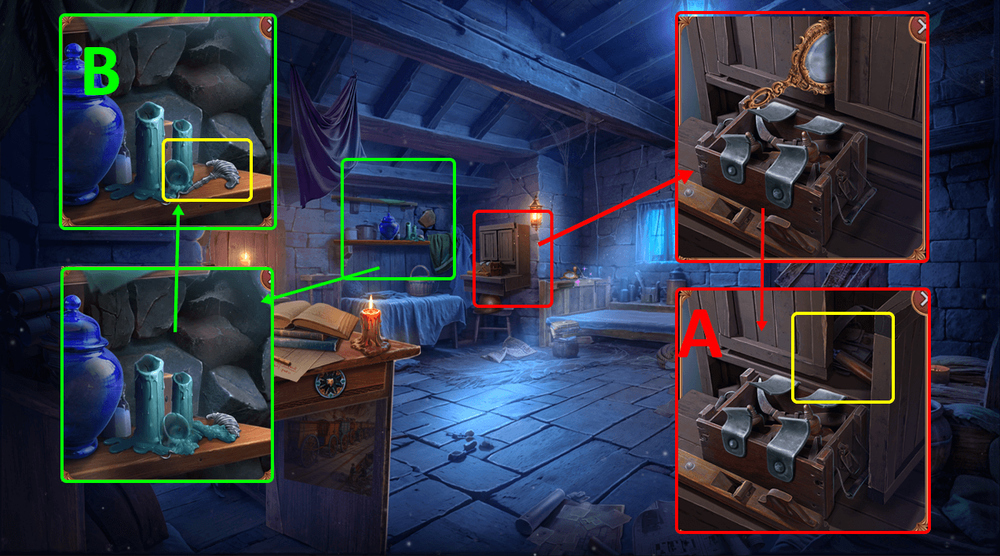
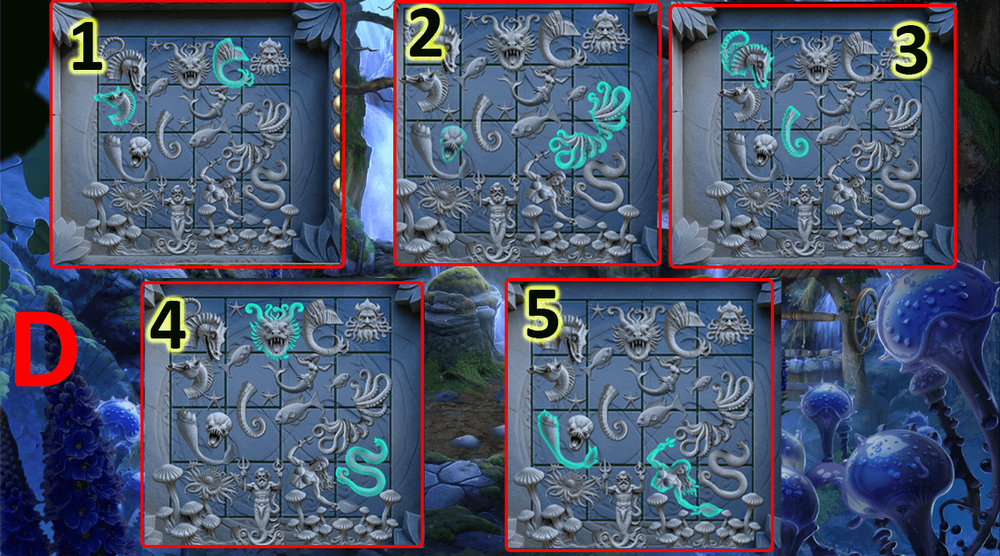
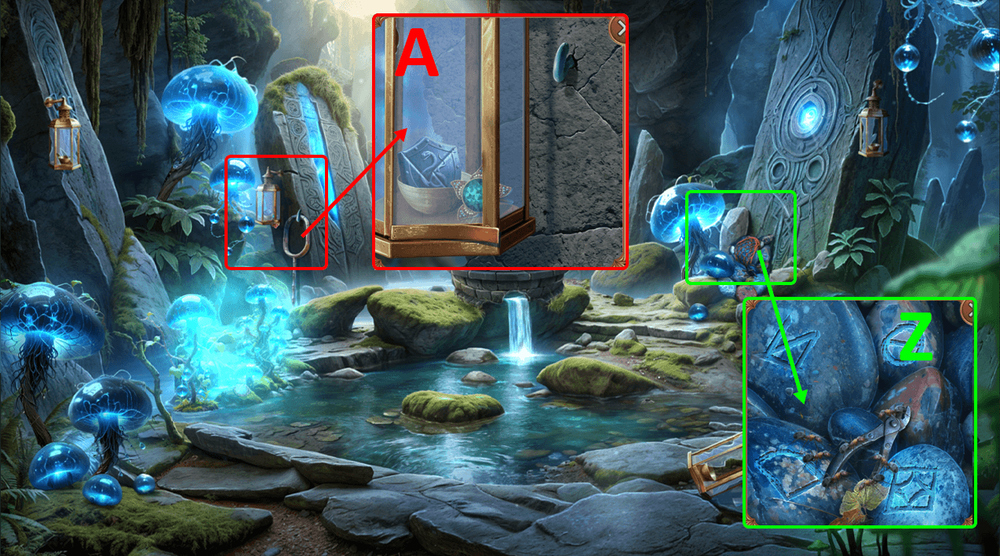
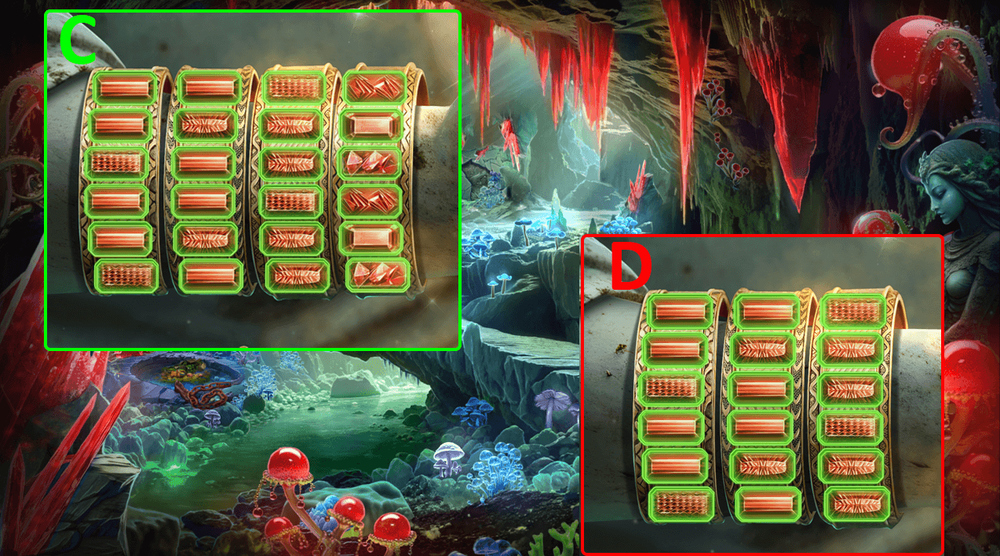
- Use BALL OF THREAD on the loom (A).
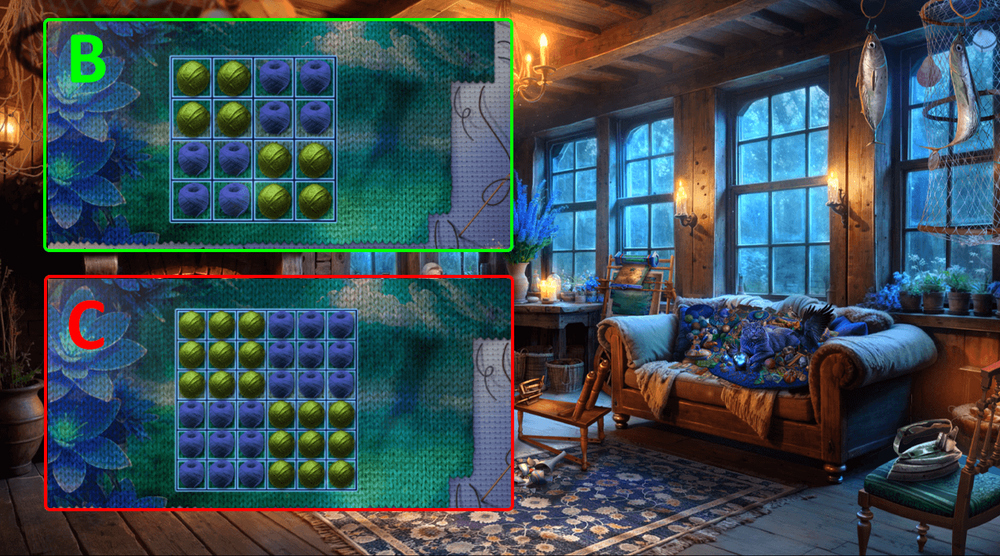
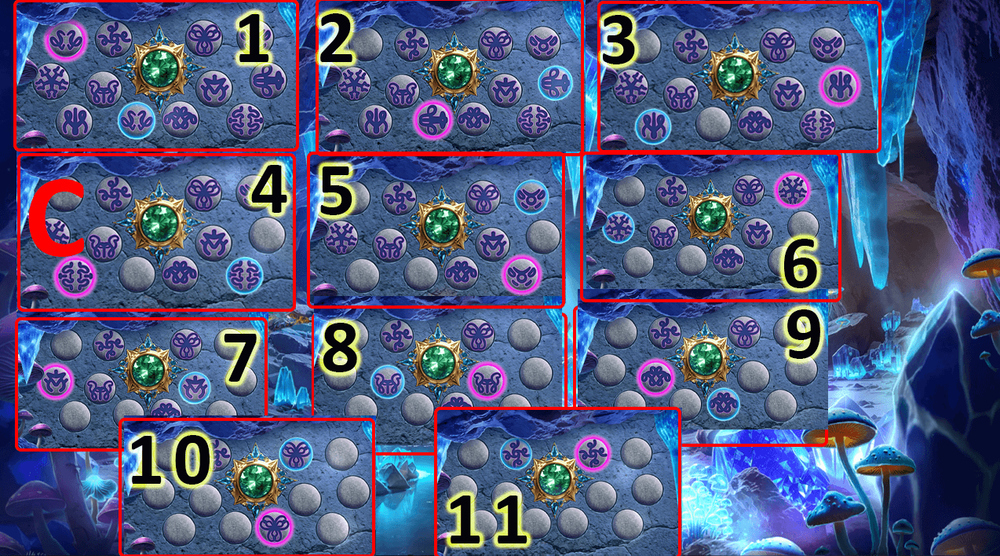
- Easy solution: Set to the correct position as shown in the picture (B).
- Hard solution: Set to the correct position as shown in the picture (C).
- Take TAPESTRY, give TAPESTRY to Agatha, take ACADEMY LETTER.
- Go back.
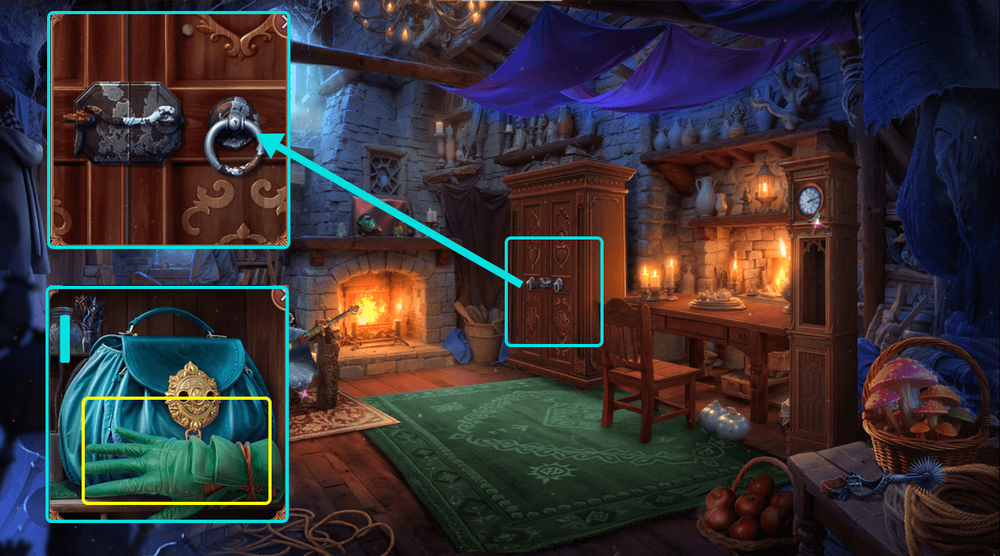
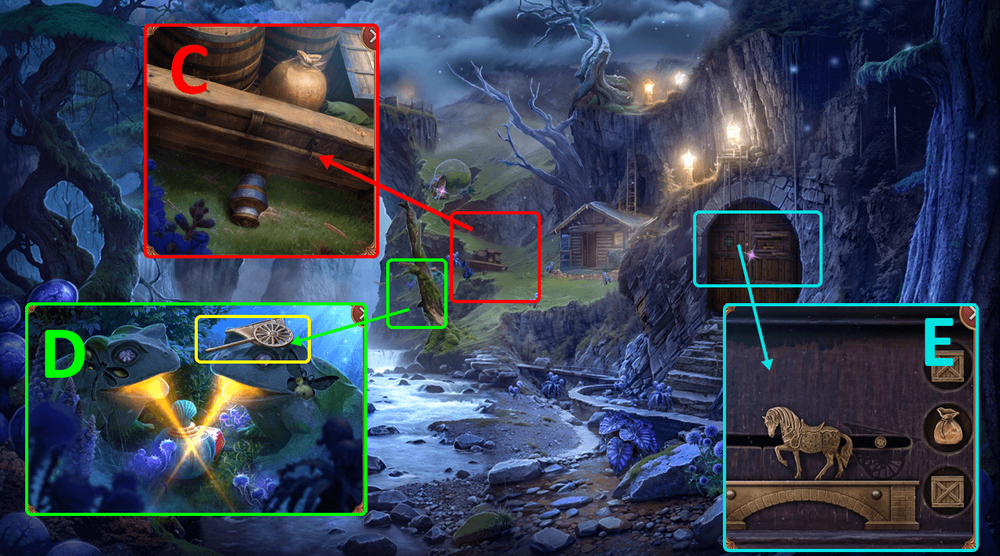
- Use ACADEMY LETTER on the door (D).
- Select this option, earn BARN KEYS (E).
- Use BARN KEYS on the barn door, go forward.
- Take FRAME PARTS 2/3 (F).
- Move the bed and the carpet (G).
- Use LABELS on the bottles, take ACID, move the cloth (H).
- Use ACID on the rusty latch, take GLOVE (I).
- Go to Agatha’s House.
- Use GLOVE on the shards, take DRAGONFLY FIGURINE and FRAME PARTS 3/3 (J).
- Go to the Barn.
- Use FRAME PARTS on the picture frame (K).
- Easy solution: press B, B, B, D, D, C, C, C, E (L).
- Hard solution: press B, B, D, C, C, E (M).
- Take TWO-PRONGED FORK.
- Use TWO-PRONGED FORK on the bag, take CAST-IRON POT (N).
- Go to Agatha’s House.
- Use CAST-IRON POT on the coals, take GEMSTONES 1/2 (O).
- Play puzzle, earn COLLAR.
- Use COLLAR on the chain, take WOOD CHIPS and CLOCK WEIGHTS 2/2 (Q).
- Go to the Barn.
- Use CLOCK WEIGHTS on the clock, take BRIDLE and HANDLE (R).
- Use HANDLE on the hatch door, take GIANT FANG and SADDLE (S).
- Go back.
- Use BRIDLE and SADDLE on the horse, click on them (T).
- Select this option (U).
- Go to the Miners’ Cabin.
- Take MIRROR, STAMP, and PLIERS (V).
- Use MIRROR on the cabinet doors, use PLIERS on the tool box, take CHISEL (W).
- Use CHISEL and STAMP on the highlighted stone, take MERMAID AMULETS 1/2 and GAUZE POUCH (X).
- Go back.
- Take BROKEN AXE and SHIELD, use GIANT FANG on the boulder (Y).
- Use GAUZE POUCH on the water, get HOOK, take MALLET (Z).
- Go to the Miners’ Cabin.
- Examine the gap in the mirror, use HOOK on the mechanism, take SCRAPER (A).
- Use SCRAPER on the wax, take CORKSCREW (B).
- Go back.
- Use NAILS, SHIELD, and MALLET on the cart, get SHAFT (C).
- Use DRAGONFLY FIGURINE on the frogs, take AMULET (D).
- Use AMULET on the puzzle (E).
- Solution: Follow the order shown in the picture (F).
- Go forward.
- Move the cart, take POUCH and SICKLE (G).
- Use SICKLE on the roots (H).
- Easy solution: Click on the sickle icon when the slider is in the green area.
- Complete three stages (I).
- Hard solution: Click on the sickle icon when the slider is in the green area.
- Complete three stages (J).
- Take CREST.
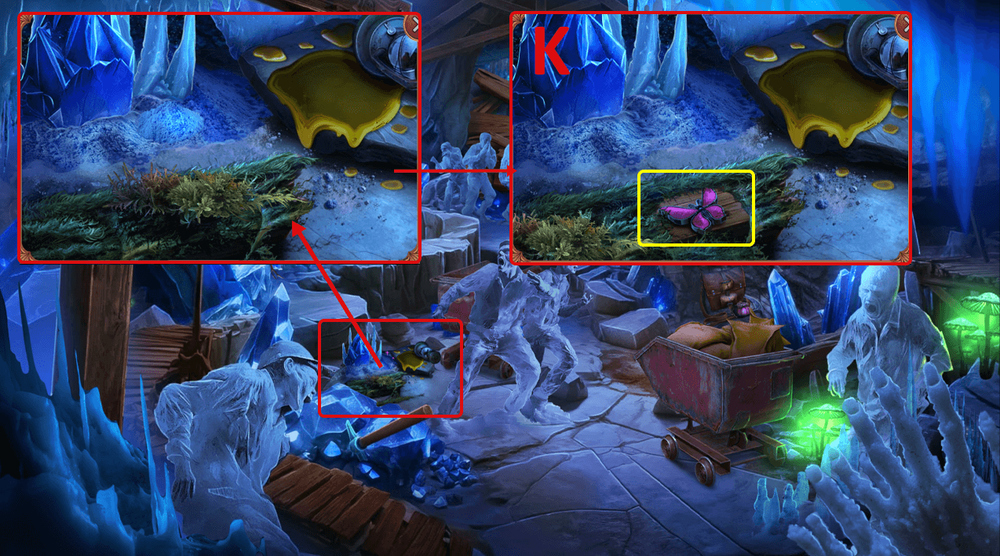
- Move the cloth, use POUCH on the dust, get SALT DUST, use CREST on the moss, take BUTTERFLY FIGURINE (K).
- Go back.
- Use BUTTERFLY FIGURINE on the frogs (L).
- Easy solution (M).
- Hard solution (N).
- Take VIAL and GEMSTONES 2/2.

- Use GEMSTONES on the chest (O).
- Solution: The correct position is shown in the picture (P).
- Take COLD TORCH and WHETSTONE.
- Use WOOD CHIPS, SHAFT, and WHETSTONE on BROKEN AXE (Q).
- Easy solution (R).
- Easy solution (S).
- Get AXE.
- Go to the Salt Mine.

- Use AXE on the beams, click on the mechanism (T).
- Easy solution: BAA: BAAA, BA, B, BBAA (U).
- Hard solution: BAAA, BAAA, ABAA, BA, BA, AAA (V).
- Select this option, read and take POTION RECIPE (W).
- Take KNITTING NEEDLE, EYES 1/2, and TUBE, use POTION RECIPE on the table (D).
- Give TUBE to Malka, play puzzle, earn SALT CRYSTAL IDOL (E).
- Use SALT CRYSTAL IDOL on the hollow (F).
- Solution: Press E C B D B A D (G).
- Take FLINT AND STEEL and HAIRPIN.
- Go back.
- Use KNITTING NEEDLE and HAIRPIN on the bag (H).
- Easy solution: B H H E A I (I).
- Hard solution: G E A J F C D J (J).
- Take FIBER.
- Use FIBER on the spilled oil, get OILED FIBER (K).
- Use FLINT AND STEEL and OILED FIBER on COLD TORCH, get TORCH (L).
- Go to the Deep Cave.

- Use TORCH on the dark cave, take EYES 2/2 (M).
- Use CORKSCREW on the cork, take SHELL (X).
- Go to the Miners’ Cabin.
- Use SHELL on the hollow, take MYSTERY BOX (Y).
- Examine MYSTERY BOX, click on the segments: 1-1-1-1, 2-2, 3, 4-4-4, take MERMAID AMULETS 2/2 (Z).
- Use MERMAID AMULETS on the puzzle (A).
- Easy solution: Solution is random (B).
- Hard solution: Solution is random (C).
- Read and take MINER’S DIARY.
- Go to the Deep Cave.
- Give MINER’S DIARY to Rodrik.
- Go to the Mine Entrance.
- Use EYES on the book (N).
- Solution: BBB, AA, AA (O).
- Read the book, take BLUE MOSS.
- Go to the Deep Cave.
- Play puzzle, earn LUNGROOT.
- Select this option (Q).
- Use SALT DUST, VIAL, BLUE MOSS, and LUNGROOT on the table (R).
- Easy solution: 1.
- memorize tile A and find it, 2.
- memorize tile B and find it, 3.
- memorize tile B and find it (S).
- Hard solution: 1.
- memorize tile A and find it, 2.
- memorize tile F and find it, 3.
- memorize tile H and find it (T).

- Take FLINT AND STEEL (A).
- Take BREASTPLATE PIECE (B).
- Read the scroll, take BURNER, HAIRPINS 1/2, and PICKAXE (C).
- Use PICKAXE on the rubble, play puzzle, get MERMAID FIGURINE (D).
- Use MERMAID FIGURINE on the gates (E).
- Go forward.
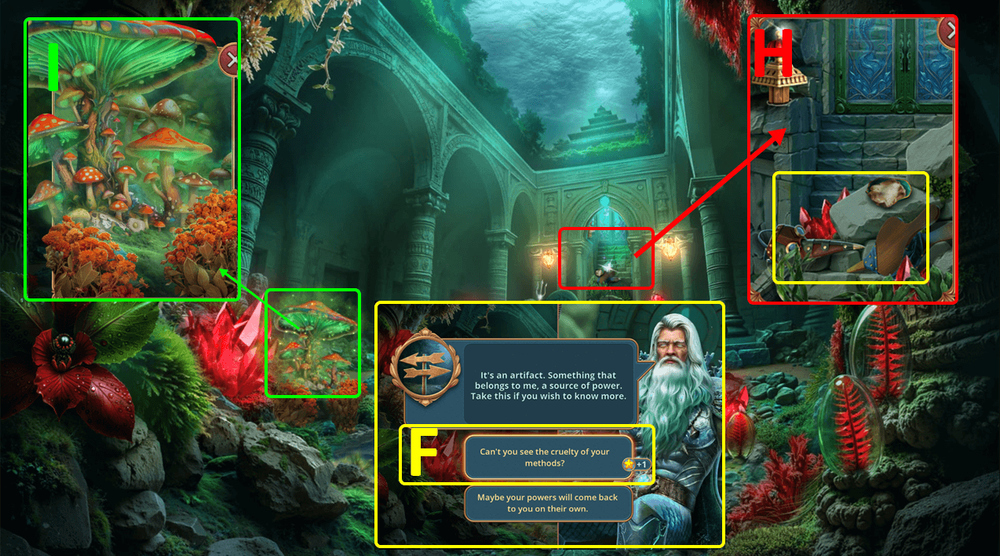
- Talk with the Lord of the Lake, select this option, get SCROLL (F).
- Examine SCROLL, open and read it, get RIBBON.
- Take CLAY, RIPPED BELLOWS, and MASK (H).
- Use MASK on the mushroom, use RIBBON on the fry flowers, get HERBS (I).
- Use HERBS on the cobwebs, take HAIRPINS 2/2, use BREASTPLATE PIECE on the skeleton (J).
- Easy solution: The correct position is shown in the picture (K).
- Hard solution: The correct position is shown in the picture (L).
- Take AMULET FRAGMENTS.
- Use FLINT AND STEEL, CLAY, and AMULET FRAGMENTS on BURNER, get CRYSTAL AMULET and FLINT AND STEEL (M).
- Go back.
- Use CRYSTAL AMULET on the chest (N).
- Easy solution: The correct position is shown in the picture (O).
- Hard solution: The correct position is shown in the picture (P).
- Take LASSO.
- Go to the Lord’s Sanctuary.
- Use LASSO on the banister (Q).
- Select this option (R).
- Go to the Abandoned Shrine.
- Take ARMRESTS and RESIN (O).
- Use RESIN on the shelf, take STAINED GLASS SHARD (S).
- Open the window, use STAINED GLASS SHARD on the stained glass window, take FISHING HOOK (T).
- Go back.
- Take BOW, use HAIRPINS on the keyhole (U).
- Solution: Switch A-B, C-B, C-B, C-A, C-B, A-C, B-C, B-C, B-A, C-B, C-B, A-C, B-C, A-B, A-B, A-C, B-A, C-A, B-C, A-B, A-B, C-A, B-A, B-A, B-A, B-C (V).
- Take KEYS 1/2.
- Go to the Lake of Tears.
- Play puzzle, get GOLD FIGURINE.
- Go to the Lord’s Sanctuary.
- Use GOLD FIGURINE on the red growth, take HAMMER, use FISHING HOOK on the item under the rubble, get BELL, take KEYS 2/2 (X).
- Go to the Abandoned Shrine.

- Use BELL on the empty spring (Y).
- Easy solution (Z).
- Hard solution (A).
- Take SHELL.
- Use SHELL under the windowsill, take PERFUME (B).
- Go back.
- Use KEYS on the safe (C).
- Easy solution: B1, C2, A2 (D).
- Hard solution: B1, C2, A2, C1, B1 (E).
- Take BLADE and GLOVE.
- Go to the Lake of Tears.
- Use PERFUME on the beetles, use GLOVE on the pricks, take TURTLE AMULET and ARMRESTS 2/2 (F).
- Use TURTLE AMULET on the bag, take KNOCKER (I).
- Go to the Abandoned Shrine.
- Use ARMRESTS on the chair, take FISH AMULET (G).
- Use FISH AMULET on the drawer, read the book, play puzzle (H).
- Go to Stillwater.
- Use KNOCKER on the door (J).
- Talk with Agatha, select this option, get AGATHA’S BAG (K).
- Examine AGATHA’S BAG, open it, read and take SKETCH OF MALENA and MAP (L).
- Use BLADE on the rope, use MAP on the horse (M).
- Easy solution: Find the items shown in the picture (N).
- Hard solution: Find the items shown in the picture (O).
- Take AXE (P).
- Take BAG LOCK PART and NEEDLE AND THREAD (Q).
- Use NEEDLE AND THREAD on RIPPED BELLOWS, get BELLOWS (R).
- Use BELLOWS, take EMPTY FLASK (S).
- Use EMPTY FLASK on the water, get FLASK WITH WATER (T).
- Use FLASK WITH WATER on the pet water bottle, take GARLIC (U).
- Use GARLIC on the flower bud, take DRAWER BUTTON (V).
- Use DRAWER BUTTON on the drawer (W).
- Solution: The correct position is shown in the picture (X).
- Take SILVER PIECE.
- Use SILVER PIECE on the grate, take CAT TOY (Y).
- Use CAT TOY on the cat, take CRYSTAL (Z).
- Use CRYSTAL on the chest (A).
- Easy solution (B).
- Hard solution (C).
- Read and take MEMORY SCROLL.
- Use AXE on the twigs (D).
- Easy solution: B, Ax2, Bx2, Ax2, D, B, Dx2, Cx2, Dx3, Cx2, Dx2, Ax2, Bx2, Cx4, Bx2, C, D, A, B, C, D, A, Bx5, Ax2, C, A, B, D, A (E).
- Hard solution: B, Ax2, Bx2, Ax2, D, B, Dx2, Cx2, Dx2, D, Cx2, Dx2, Ax2, Bx2, Cx4, B, C, B, A, D, C, B, A, D, B, Bx2, D, Bx3, D, B, Ax2, Cx2, Ax2, B, D, A (F).
- Select this option (G).
- Take UNLIT TORCH and ARROW (H).
- Use BOW and ARROW on the tree, get HUNTER’S POUCH (I).
- Use BAG LOCK PART on HUNTER’S POUCH, take FISHING ROD (J).
- Use FISHING ROD on the water, play puzzle, get HIGH BOOTS (K).
- Use HIGH BOOTS on the water (L).
- Easy solution (M).
- Hard solution (N).

- Take TRIANGLE, OPENER, and IRON STAKE (P).
- Use HAMMER and IRON STAKE on the stone, get ROAD SIGN (Q).
- Use ROAD SIGN on the geysers (R).
- Go to the Mines.
- Select this option (S).
- Move the branches, take SYMBOLS 1/2 and LEATHER WRISTBAND (T).
- Use LEATHER WRISTBAND on the hatch door, take DRY GRASS (U).
- Use FLINT AND STEEL and DRY GRASS on UNLIT TORCH, get TORCH (V).
- Use TORCH on the mount, take EXPLOSIVES GUIDE and TUNING FORK (W).
- Use TRIANGLE and TUNING FORK on the crystal, take COALS and BERRIES (X).
- Go to the Riverbank.
- Use BERRIES on the bird, use OPENER on the berries, take RAPID GROWTH INFUSION (Y).
- Use RAPID GROWTH INFUSION on the stump, take WICK and HANDLE (Z).
- Use HANDLE on the drawer, take FISH EMBLEM (A).
- Go to the Mine Entrance.

- Use FISH EMBLEM on the statue, take BAS-RELIEF PIECE (B).
- Use BAS-RELIEF PIECE on the wall (C).
- Easy solution (D).
- Hard solution (E).
- Take SILVER TRAY.
- Use SILVER TRAY on the well, take MORTAR AND PESTLE (F).
- Examine EXPLOSIVES GUIDE, read the note, use COALS, WICK, and MORTAR AND PESTLE on EXPLOSIVES GUIDE, get EXPLOSIVE (G).
- Go to the Mines.
- Use EXPLOSIVE on the cave-in, take LOCK PART (H).
- Use LOCK PART on the bag (I).
- Solution: Press R, D, R, D, R, U, R, L, D, R, D, U, L, D, L, D, R, D, R, U, R, U, L, D, R, U, R, U, L, D, R, L, D, L, D, L, U, L, U, D, R, L, U, L, D, L, D, U, R, D, L, U, R (J).
- Take BRUSH.

- Use BRUSH on the crystal dust, take BROKEN SPEAR (K).
- Use BROKEN SPEAR on the pit (L).
- Go to the Riverbank.
- Play puzzle, earn SHIELD.
- Go to the Mine Entrance.
- Use SHIELD on the waterfall (M).
- Easy solution: The correct position is shown in the picture (N).
- Hard solution: The correct position is shown in the picture (O).
- Take VINE.
- Go to the Mines.

- Use VINE on the pit, take SYMBOLS 2/2 (P).
- Use SYMBOLS on the floor (Q).
- Easy solution: The correct position is shown in the picture (N).
- Hard solution: The correct position is shown in the picture (O).
- Read the map.
- Take GLASS BOTTLE and GOGGLES FRAME (A).
- Take PIPE, FLINT AND STEEL, and BUCKET (B).
- Use BUCKET on the rope, take BAS-RELIEF PARTS 1/2, LOCK PICKS 1/2, and TRAP (C).
- Use PIPE on TRAP, earn SMALL TRAP (E).
- Use SMALL TRAP on the pin, take DYNAMITE (F).
- Click on the rocks to remove them, use DYNAMITE and FLINT AND STEEL on the wooden beams (G).
- Go forward.

- Select this option (H).
- Take OILCAN (I).
- Use GLASS BOTTLE on the stitches (J).
- Play puzzle, earn GOBLET.
- Use GOBLET on the sand, take CORKSCREW (L).
- Use CORKSCREW on the cork, take BLOOMING POTION (M).
- Go back.
- Use BLOOMING POTION on the bush, take BAS-RELIEF PARTS 2/2 (N).
- Use BAS-RELIEF PARTS on the slots (O).
- Easy solution: Follow the instructions (P).
- Hard solution: Follow the instructions (Q).
- Take SCRAPER and PICKAXE.
- Go forward.
- Use PICKAXE on the boulders (S).
- Easy solution: Follow the instructions (T).
- Hard solution: Follow the instructions (U).
- Take BARREL.
- Use BARREL on the ladder (W).
- Go forward.
- Select this option (X).
- Take DARK CRYSTAL GLASS, use OILCAN on the rust, earn OILCAN (Y).
- Use SCRAPER on the paint, take AMULET (Z).
- Use AMULET on the slot (A).

- Easy solution: Follow the instructions (B).
- Hard solution: Follow the instructions (C).
- Go forward.
- Select this option (E).
- Take NET (F).
- Take SCOOP NET FRAME and DIAMOND RING (G).
- Use DARK CRYSTAL GLASS and DIAMOND RING on GOGGLES FRAME, earn DARK GOGGLES (D).
- Use DARK GOGGLES on the light, take MIRROR (I).
- Use MIRROR on the box, take HINT (J).
- Go to the Abandoned Mines.
- Play puzzle, earn CHEESE.
- Give CHEESE to the rat, take BROKEN LANTERN and SPOOL OF THREAD (L).
- Use NET and SPOOL OF THREAD on SCOOP NET FRAME, earn SCOOP NET (M).
- Use SCOOP NET on the water (N).
- Easy solution: Follow the instructions (O).
- Hard solution: Follow the instructions (P).
- Examine the belt bag, click on it to open, take PLAYING CARD (Q).
- Use OILCAN on BROKEN LANTERN (R).
- Go forward.
- Use PLAYING CARD on the chest, take BRUSH (S).
- Use BRUSH on the rust, take LOCK PICKS 2/2 (T).
- Go to the Deep Cavern.
- Use LOCK PICKS on the bag, take FANG and BLADE (U).
- Use BLADE on the vines (V).
- Easy Solution: button sequence: 2, 7, 8, 1, 0, 3, 4, 5, 6 (W).
- Hard Solution: button sequence: 6, 2, 3, 9, 10, 1, 0, 4, 5, 7, 8 (X).
- Take STINKY MUSHROOM.
- Go to the Artifact Vault.
- Use STINKY MUSHROOM on the ants, take PLIERS, use HINT on the stones (Z).
- Use PLIERS on the lantern base, take EMBLEM (A).
- Go back.

- Use EMBLEM on the slot in the armor (B).

- Easy Solution: Follow the instructions (C).
- Hard Solution: Follow the instructions (D).
- Take FEATHERED HELMET.
- Use FEATHERED HELMET on the spider web, take GEMSTONES 1/2 and PIECE OF COAL (F).
- Go forward.
- Use PIECE OF COAL on the hint on the stones, earn SCROLL (G).
- Use SCROLL on the ritual circle (H).
- Easy solution: Follow the instructions (I).
- Hard solution: Follow the instructions (J).
- Take LAKE’S TEAR.
- Select this option (L).
- Go forward.
- Take VALVE, PAPER SHEET, and BOW AND ARROW (M).
- Use BOW AND ARROW on the top of the column, take STONES 1/2 (N).
- Click on the seaweed to remove it, take LEMON JUICE and HEXAGON RING (O).
- Use VALVE and HEXAGON RING on the pin, take TWEEZERS (P).
- Go back.
- Take BOARD and WICK (Q).
- Take MAGNIFYING GLASS (R).
- Use MAGNIFYING GLASS and WICK on BROKEN LANTERN, earn LANTERN (S).
- Use LANTERN on the cave (T).
- Easy solution: Press 1, 2, 2, 3, 4, 4, 5, 5, A (U).
- Hard solution: Press 1, 2, 2, 3, 4, 4, 5, 5, A (V).
- Select this option (W).
- Take HEAVY BOOT and CHAIN (Y).
- Use FANG and HEAVY BOOT on the cracked stone (Z).
- Play puzzle, earn SHARP SEASHELL.
- Use SHARP SEASHELL on the leaves, use TWEEZERS on the stuck object, earn STONES 2/2 and GEMSTONES 2/2 (B).
- Go to the Ancient Sunken City.
- Use STONES on the slots, earn DEVELOPING CHEMICAL and SPHERE POSITIONS (C).
- Use SPHERE POSITIONS on the spheres, click on the spheres until they are the same color as the clue, take HANDKERCHIEF (D).
- Use DEVELOPING CHEMICAL on PAPER SHEET (E).
- Go back.
- Use GEMSTONES on the lid (F).
- Solution: 2, 1, 2, 3, 4, 3, 2, 1, 2 (G).
- Take SPOON and PYRAMID.
- Use PYRAMID and BOARD on the lattice, take FROG FIGURINE, use LEMON JUICE and HANDKERCHIEF on the shell, take SHELL (I).
- Go to the Ancient Sunken City.
- Use SHELL on the crab, take BRUSH (J).
- Use BRUSH on the PAPER SHEET, earn SYMBOLS (K).
- Use SYMBOLS on the skulls (L).
- Easy solution: Arrange the symbols according to the hint (M).
- Hard solution: Arrange the symbols according to the hint (N).
- Examine the book, click on the items that match highlighted words.
- Go to the Underwater Tunnel.
- Use FROG FIGURINE on the empty stone (P).
- Easy solution: 2, 3, 3, 2, 1, 1, 1, 1, 2, 3, 3, 2, 1, 2, 3, 3, 2, 1, 1, 2 (Q).
- Hard solution: 2, 1, 2, 3, 3, 3, 3, 2, 1, 1, 1, 1, 1, 2, 3, 3, 3, 3, 2, 1, 2, 1, 2 (R).
- Take UNSEALING SCROLL.
- Go back.
- Use UNSEALING SCROLL on the magic seal (T).
- Go forward.
- Talk to the Lord of the Lake.
- Use LAKE’S TEAR on the stand, take STAINED GLASS SHARD (U).
- Use STAINED GLASS SHARD on the empty slot, take FILE (V).
- Use FILE on the fish without trident, take LOCK (W).
- Take HOOK (X).
- Go to the Underwater Tunnel.
- Use LOCK and HOOK on CHAIN, earn CHAIN AND HOOK (Y).
- Use CHAIN AND HOOK on the bag, take PAINT (Z).
- Play puzzle, earn BRACELETS.
- Use BRACELETS on the statue (B).
- Easy solution: Follow the instructions (C).
- Hard solution: Follow the instructions (D).
- Earn STONE PATTERN.
- Go to the Lord of the Lake’s Lair.
- Use STONE PATTERN on the puzzle (E).
- Easy solution: 4, 4, 7, 1, 1, 4, 1, 7, 4, 1, 7, 7, 7, 7, 6, 7, 6, 7, 5, 5, 5, 2, 2, 2, 2, 5, 5, 5, 5, 5, 8 (F).
- Hard solution: 6, 6, 1, 1, 6, 1, 6, 6, 6, 4, 4, 4, 4, 2, 2, 10, 7, 8, 8, 3, 3, 8, 3, 3, 8, 8, 8, 12 (G).
- Take WING.

- Use WING on the pollen, take POUCH (I).
- Go back.
- Use POUCH and SPOON on the powder, take PURPLE POWDER (J).
- Go to the Lord of the Lake’s Lair.
- Use PURPLE POWDER and PAINT on the top of the altar, take SPUR (K).
- Use SPUR on the trident, take TRIDENT (L).
- Use TRIDENT on the Lake’s Tear (M).

- Easy solution: Follow the instructions (N).
- Hard solution: Follow the instructions (O).
- Walkthrough Bonus Chapter, at the link below.


