Immortal Love 7: Stone Beauty – You finally return home after years at sea as a Navy captain to spend your life with the woman you love. But the joy of the reunion is overshadowed by a horror: your beloved has disappeared. No one has seen her since she won a beauty contest organized by the famous sculptor Cesare. Your investigation quickly leads to a shocking discovery a series of mysterious disappearances linked to the transformation of people into stone statues. Along the way you meet a man who is half already a sculpture. He reveals the terrible truth: the beauty contest is a trap. The girl proclaimed the winner is doomed to be turned to stone, just like him. This man was once Cesare’s apprentice and chose girls for him, whose statues the master would then create. One day he chose a girl named Bella, unaware that he was participating in a sinister plot. But realizing his mistake, he tried to stop the process, and now you have a chance to save Bella. Your main goal is to prevent Cesare from possessing the artifact that completes the transformation process. Only you can prevent further tragedies and save those who have not yet turned to stone. If you can not pass any of the puzzles or do not know where the items are, on our site you can watch the walkthrough of Immortal Love 7: Stone Beauty, and stop the sculptor, obsessed with the pursuit of perfect art.
Immortal Love 7: Stone Beauty – Walkthrough
Here you can see full walkthrough of Immortal Love 7: Stone Beauty game, namely for all chapters including bonus chapter in pictures.

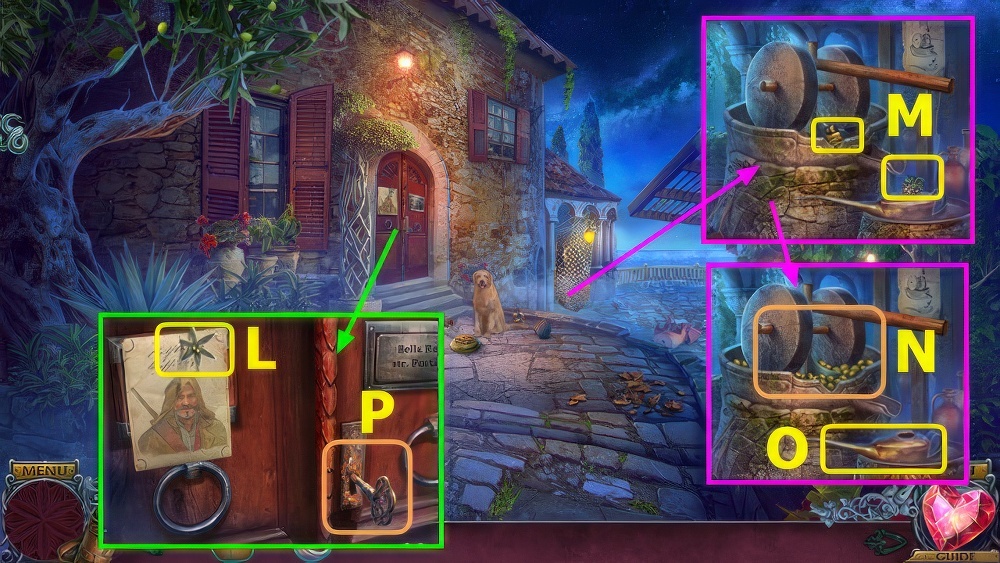
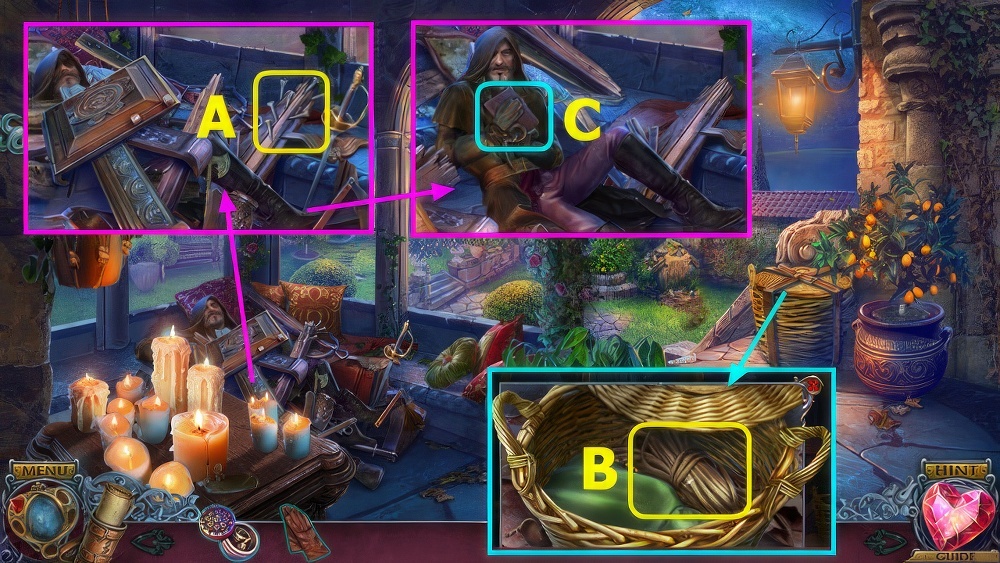
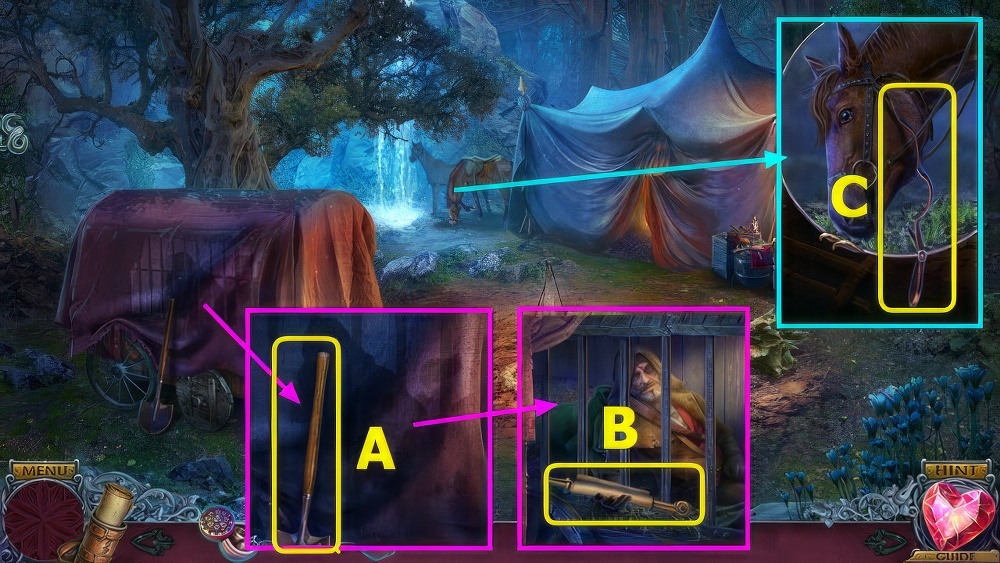
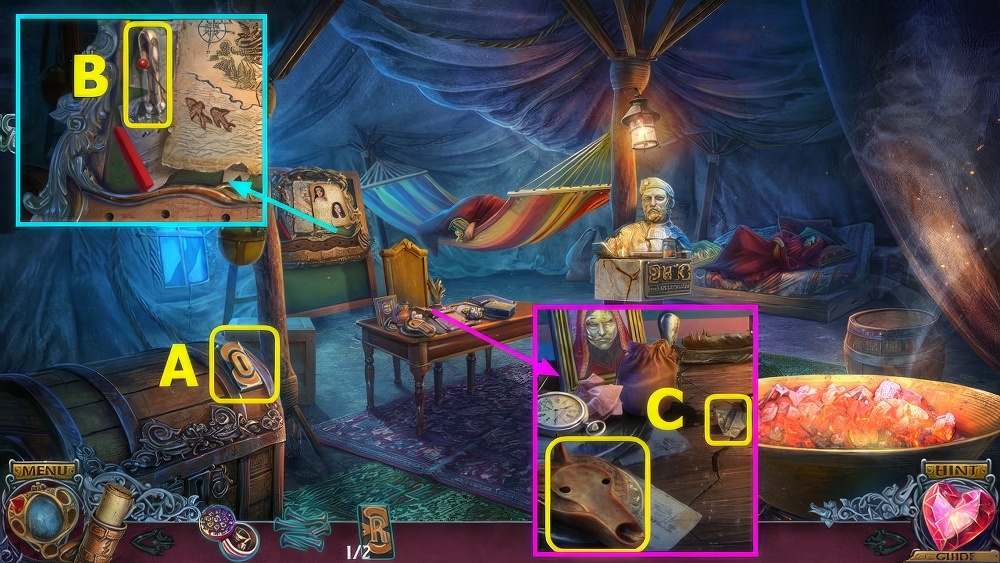
- Talk, take BASKET (A).
- Take LOCKED BAG (B).
- Select jacket on LOCKED BAG, take map, read note, and take SUNFLOWER SEEDS.
- Select (C).
- Place SUNFLOWER SEEDS, earn LOCK PART (D).
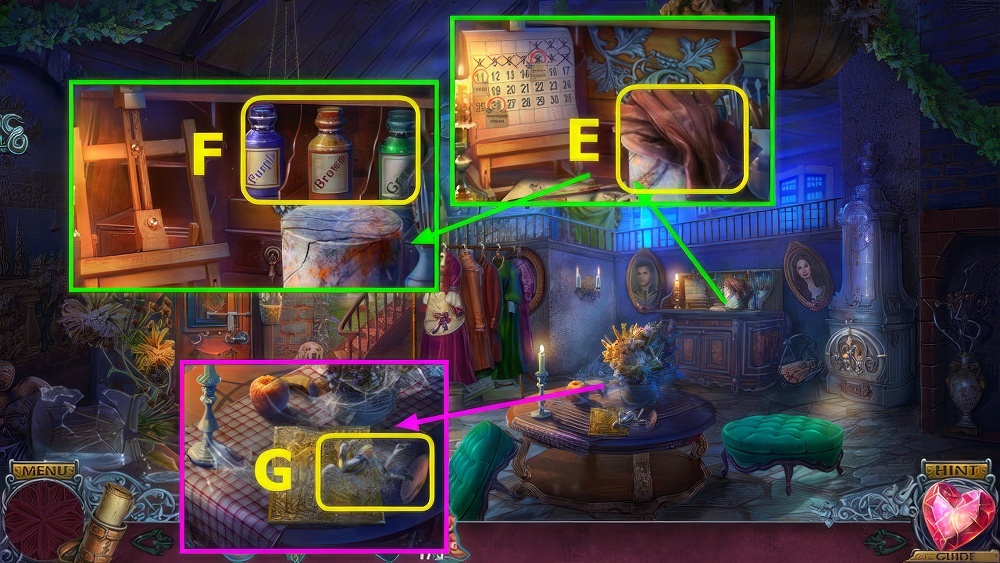
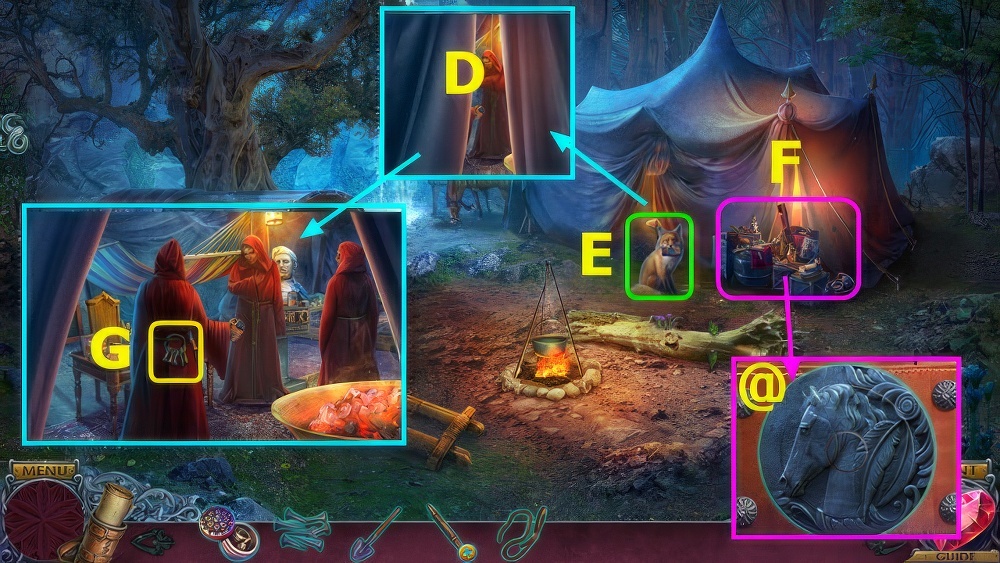
- Read note and place BASKET, select tree and take OLIVES (E).
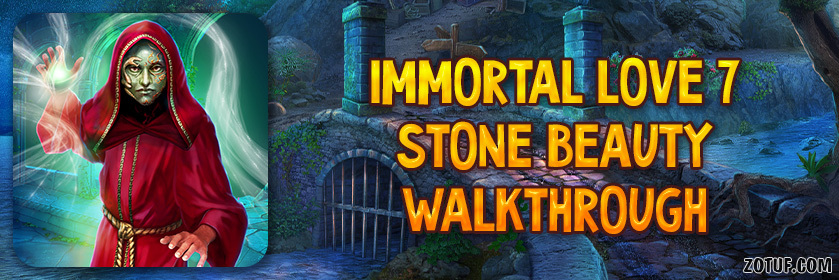
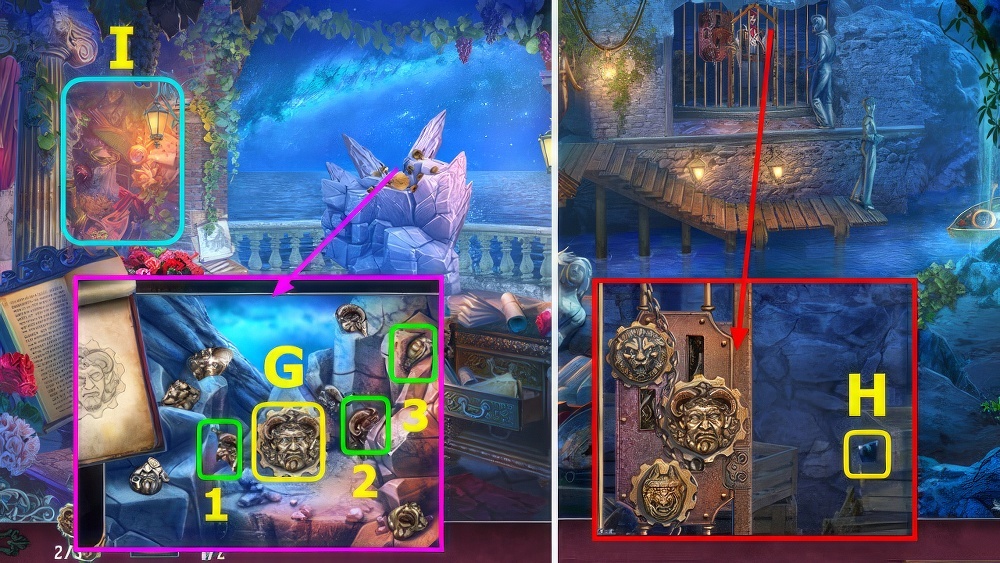
- LOCK PART on LOCKED BAG, walkthrough (F), remove items, take RINGS and CORKSCREW.
- Use CORKSCREW (G), play puzzle, earn DOG TREATS.
- Complete the picture.
- Select and drag picture parts to move them.
- Puzzle walkthrough (1).
- Select matching symbol pairs to close the fan and reunite the loving couple.
- Puzzle, select pairs (2).
- Read note, select bowl, use DOG TREATS (H).
- Befriend the dog.
- Select the correct action buttons on the left to prove your good intentions.
- Buttons turn green when selected correctly.
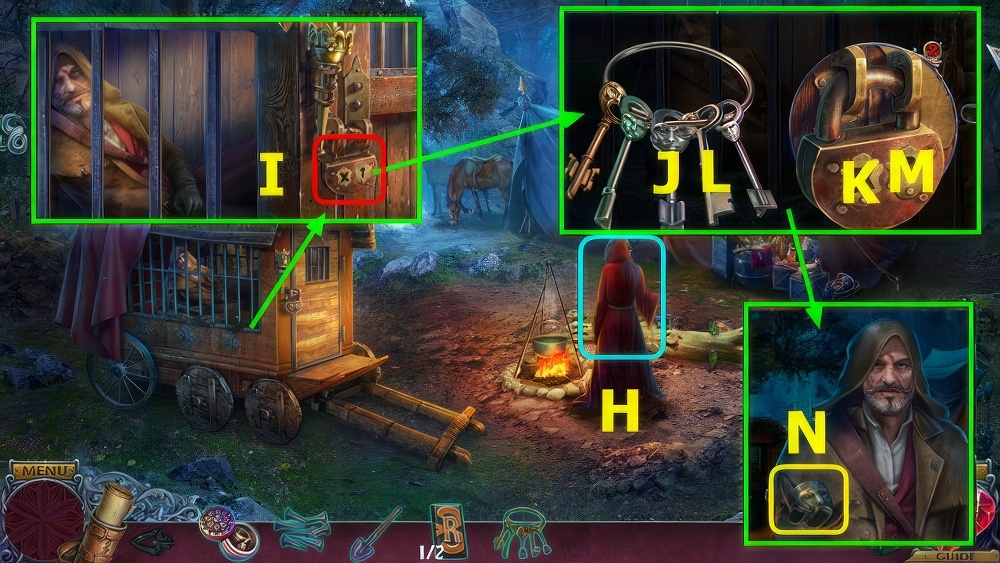
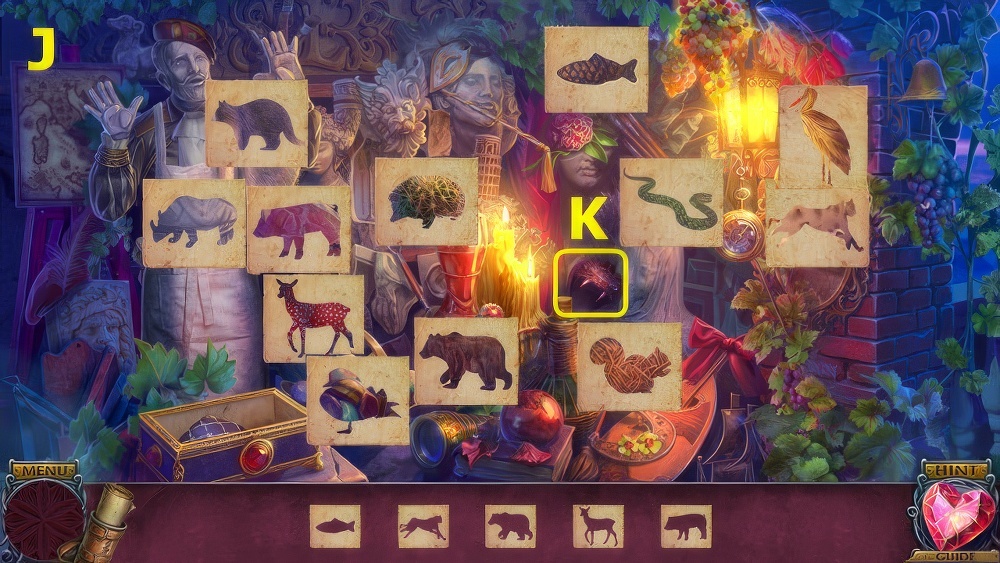
- Select I-J-K.
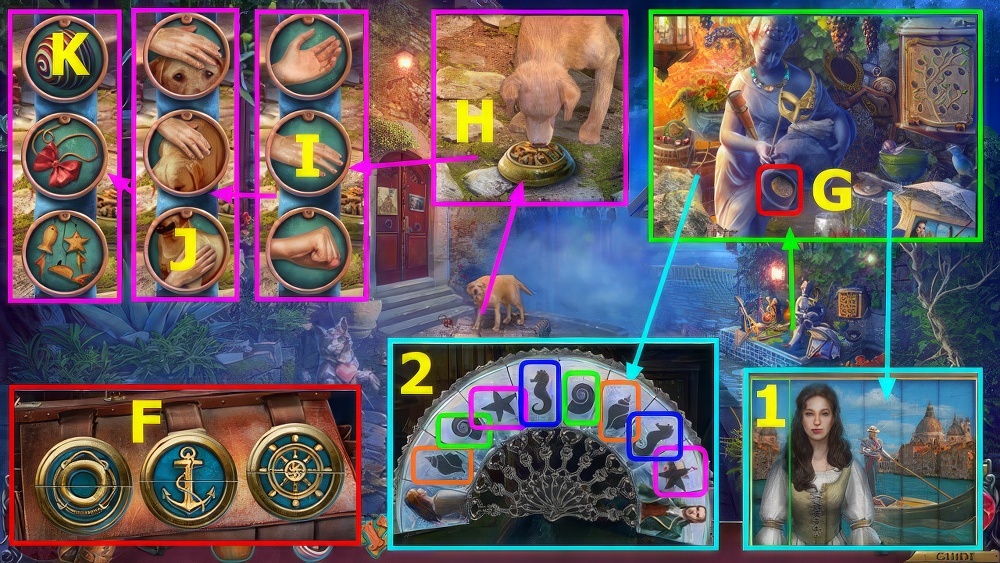
- Read note, take SHURIKEN (L).
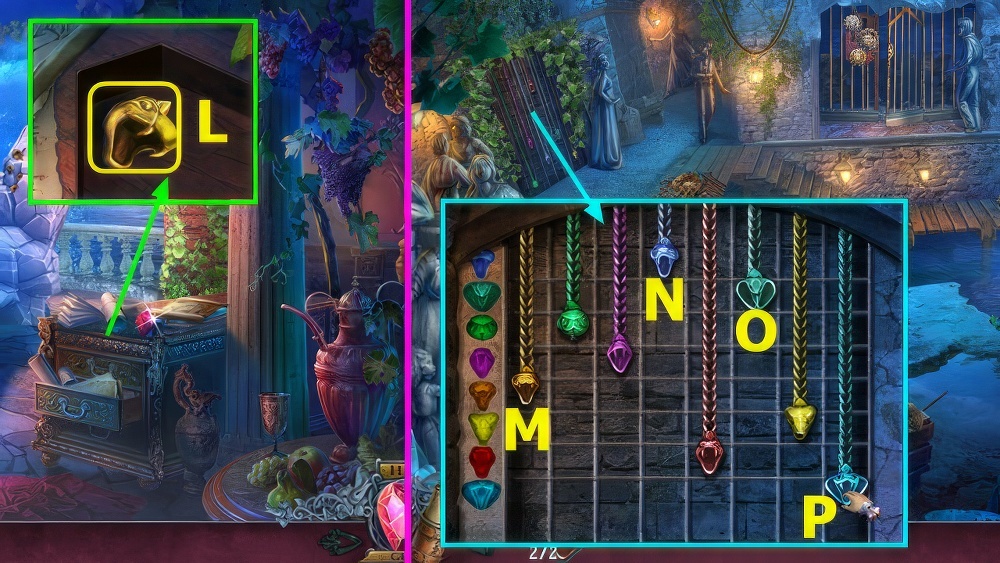
- Use SHURIKEN, take LIGHTER and GRAPES (M).
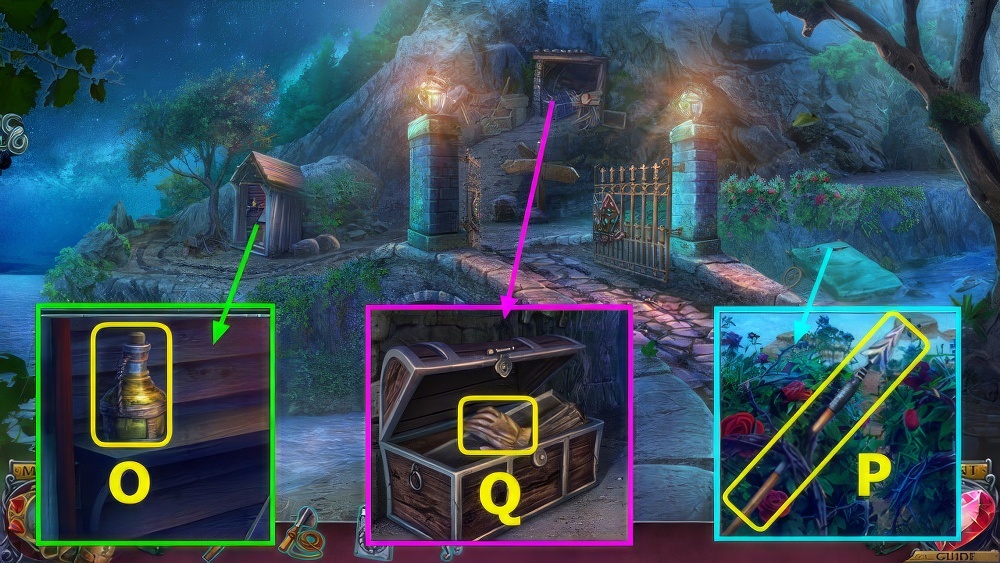
- Use OLIVES, select (N).
- Take OLIVE OIL (O).
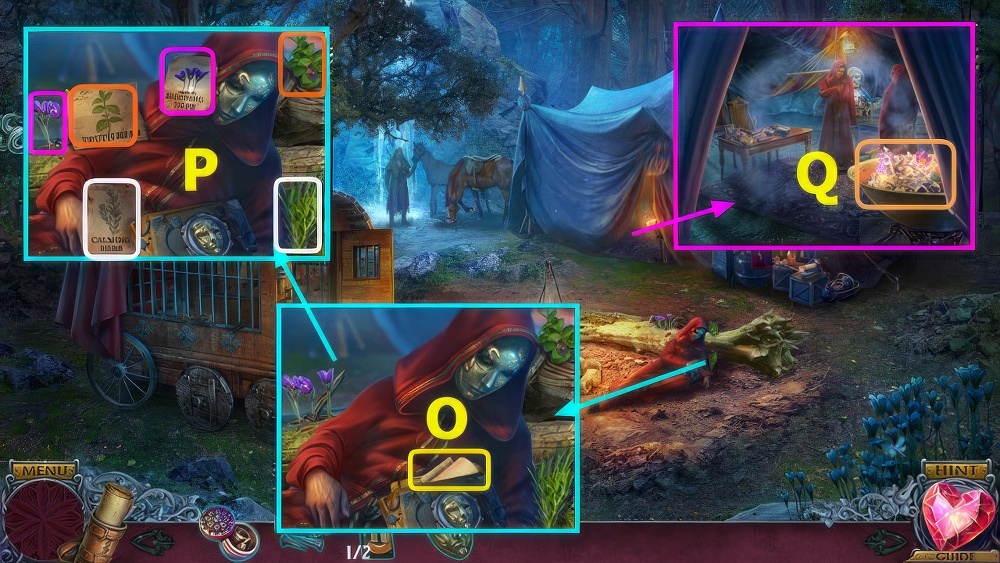
- Use OLIVE OIL, select (P).
- Go left.
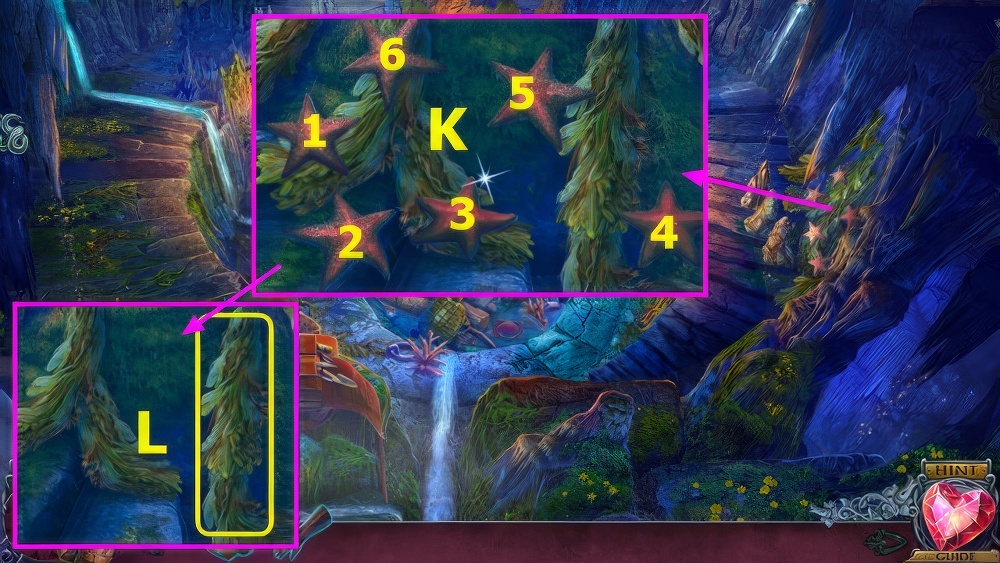
- Use LIGHTER 1-6 (A).
- Select (B).
- Read note, take 1/3 FIGURINE (C).
- Take LOG (D).
- Take GLOVES and read note (E).
- Open door, take PAINTS (F).
- Select, read note, take 2/3 FIGURINE (G).

- Use LOG (H).
- Select 5 times (I).
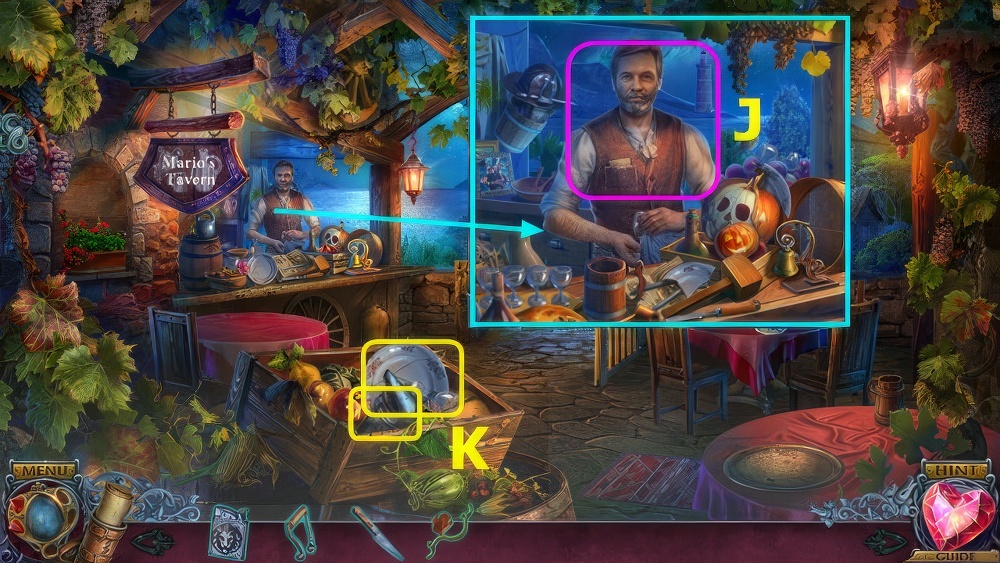
- Talk, take LEATHER ROLL (J).
- Take CARLO’S TEAR from LEATHER ROLL.
- Add GRAPES and read clue, play puzzle and take CODE.
- Take KERCHIEF.
- Use KERCHIEF (K).
- Use CODE, enter 3-4-2-1 (L).

- Correctly arrange the figurines in sections of the cupboard according to the pictures on the plates.
- Select two figurines to swap them.
- Figurines stay in place when arranged correctly.
- Restore emblems (M).
- Take PICTURE (N).
- PAINTS on PICTURE, walkthrough (O).
- Exit close-up.
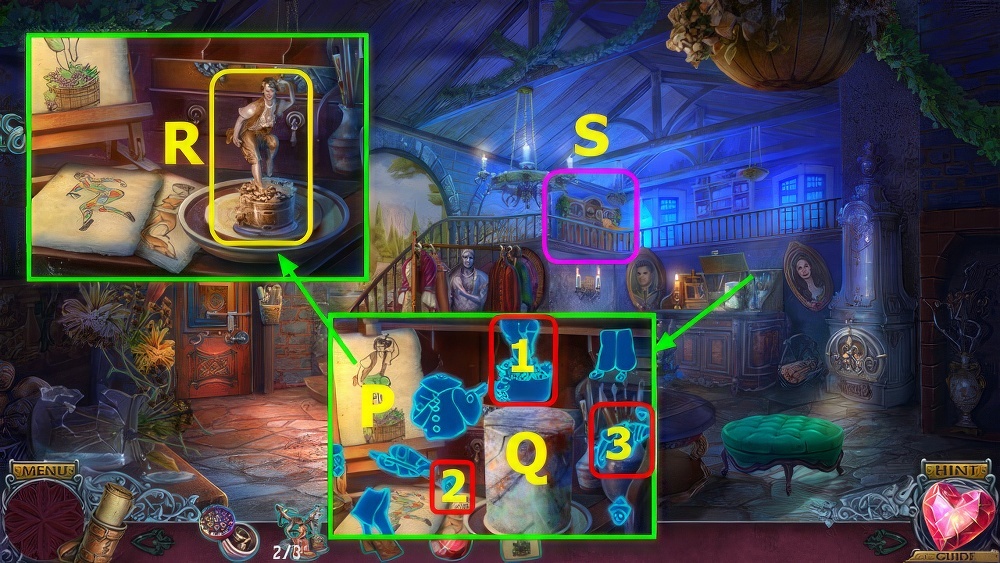
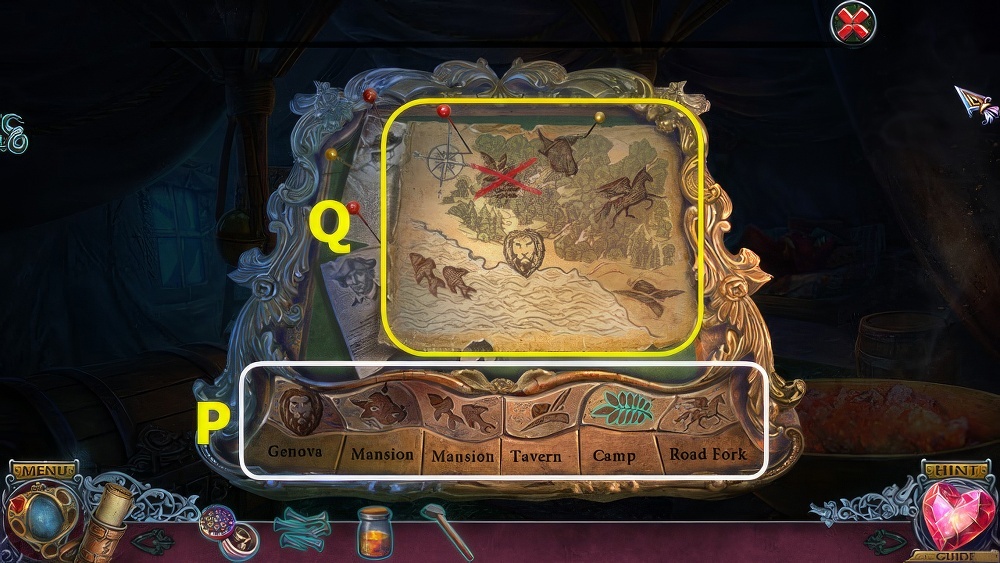
- Place PICTURE (P).
- Walkthrough 1-3 (Q).
- Take 3/3 FIGURINES (R).
- Select (S).
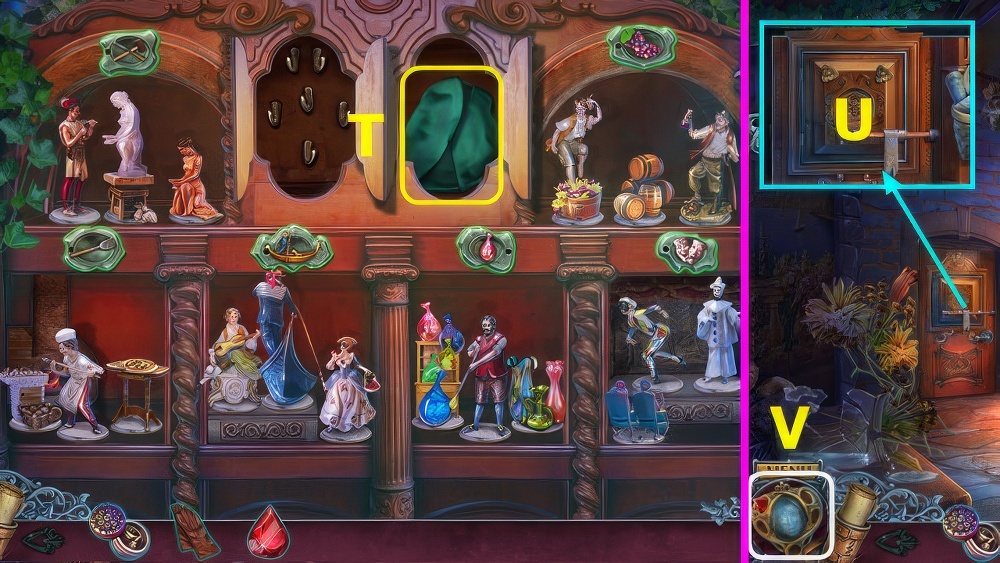
- Place FIGURINES, walkthrough, take ARTIFACT (T).
- Select, talk, select (U), earn ARTIFACT PARTS.
- Open ARTIFACT and place ARTIFACT PARTS.
- Talk and place CARLO’S TEAR, take artifact.
- The artifact is now on the menu bar (V).
- Select and play puzzle.
- Go left.
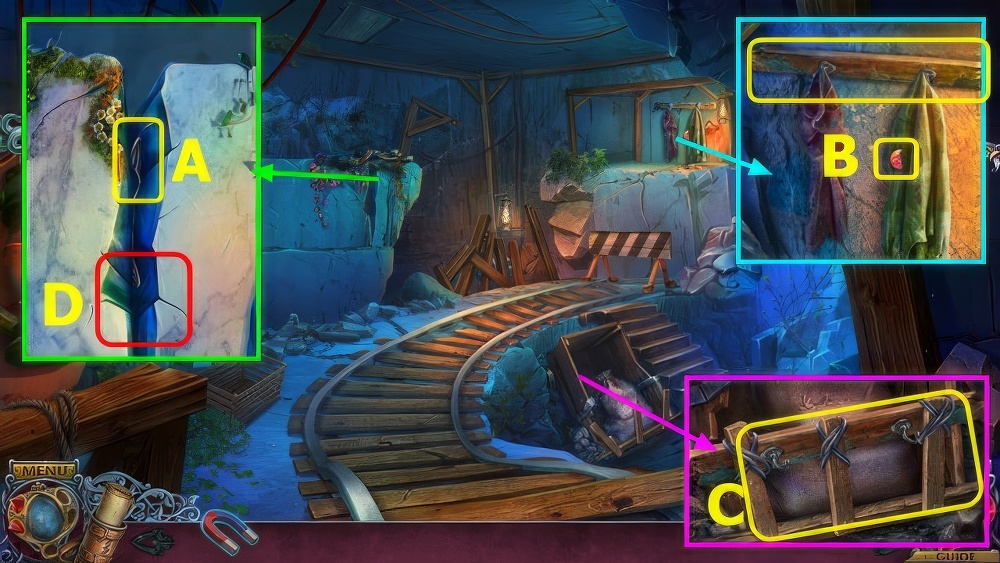
- Use GLOVE, earn NAILS (A).
- Select and play puzzle, earn UNLOADED RIFLE.
- Take KNIFE from UNLOADED RIFLE.
- Use KNIFE, take ROPE (B).
- Use ROPE, select book (C).

- Read book and select page.
- Restore the pictures.
- Select two unpinned picture parts to swap them.
- Then place the pictures where they belong in the text.
- Text turns green when placed correctly.
- Walkthrough (D).
- Walkthrough (E).
- Read clipping, take PIN (F).

- Use PIN, take GUNPOWDER, read note, take SAW (G).
- Take APPLE, use SAW, earn BULLETS (H).
- BULLETS and GUNPOWDER on UNLOADED RIFLE, earn LOADED RIFLE.
- Use LOADED RIFLE (I).

- Use the items around you to free yourself.
- Select an item and the area you want to use it.
- Then gather all your belongings.
- Select (J), use on (K).
- Use (K) on (L) and (M).
- Play puzzle, earn back NAILS and APPLE.
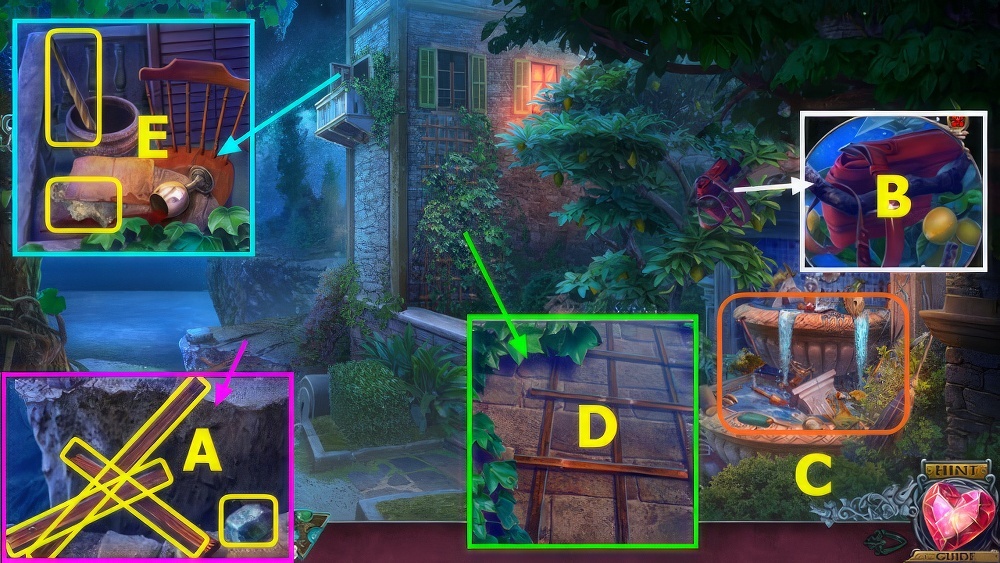
- Take SHOVEL, remove cloth (A).
- Talk, take LONG STICK (B).
- Give APPLE, take BRIDLE (C).
- Select, earn 1/2 LETTER (D).
- Select (E).
- Play puzzle, earn MAGNET (F).
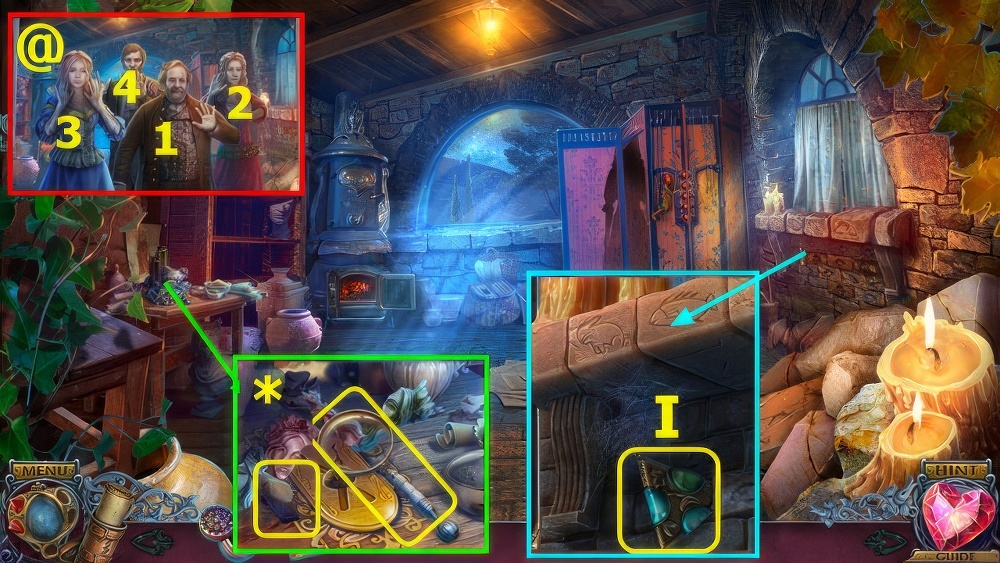
- Puzzle walkthrough (@).
- Remove papers from LONG STICK.
- Add BRIDLE and MAGNET, take MAGNET ROD.
- Use MAGNET ROD, earn KEYS (G).
- Use SHOVEL (H).
- Use KEYS (I).
- Move (J-K)-(L-M).
- Take BADGE (N).
- Take artifact and select hand, place BADGE, read note and take BANDAGE (O).
- Select pairs, earn SLEEPING HERB (P).
- Place SLEEPING HERB (Q), go forward.
- Use BANDAGE on scene.
- Take 2/2 LETTER (A).
- Read note, take TWEEZERS (B).
- Take OIL, remove papers, use TWEEZERS to take 1/2 MAP PART (C).

- Take CASKET, use OIL, earn WINDING KEY (D).
- Restore the picture by rotating the circles.
- Select a circle to rotate it.
- WINDING KEY on CASKET, select H-F-J-E-G-I-K.
- Open CASKET, read note, take MAP TILES.
- Take RESIN and HAMMER, place letters (L).
- Walkthrough (M).
- Read book, take 2/2 MAP PARTS (N).
- Select (O).
- Place MAP TILES, walkthrough (P).
- Place MAP PARTS, take MAP (Q).
- Go down.

- Use MAP (A).
- Use NAILS and HAMMER (B).

- Guide your token through the forest without being caught.
- Select a space on the grid to move to.
- Use items you find to overcome obstacles.
- Walkthrough (C).
- Walkthrough (D).

- Take SHOE (E).
- Select (F), take BROKEN BUCKET (G).
- Use SHOE (H).
- Take 1/2 KNOCKER and PLATE (I).
- PLATE and RESIN on BROKEN BUCKET, take BUCKET.

- Use BUCKET, take 2/2 KNOCKERS (J).
- Take MOUSE HINT, place KNOCKERS, walkthrough (K).
- Play puzzle, earn STAR KEY (L).
- Puzzle walkthrough (1).
- Puzzle walkthrough (2).
- Read note, place STAR KEY, take CAMEO (M).

- Move the tokens into the correct slots based on their color.
- Select a token and a highlighted slot to move it to.
- Select CAMEO, walkthrough (A-D)-(C-F)-(G-B)-(E-H)-(B-E)-(D-G)-(F-A)-(H-C)-(A-D)-(E-H)-(G-B)-(C-F).
- Read note, take LUCIA’S TEAR.
- LUCIA’S TEAR on artifact.
- Select artifact, play puzzle.
- Select 1-4 (@).
- Select items, take MAGNIFIER, select items and take WOODEN BLANK (*).
- Take 1/3 TRIANGLE (I).

- Use MOUSE HINT and MAGNIFIER, select 1-4 (J).
- Select and take RING and RED CLOTH (K).

- Use RING, take CHISEL (L).
- CHISEL on WOODEN BLANK, add RED CLOTH, take GLORIA.
- Place GLORIA, select 1-3 (M).
- Talk (N).
- Take STONE and PLANKS ×3 (A).
- Use STONE (B).
- Play puzzle, earn SHEARS (C).
- Use SHEARS and PLANKS, select (D).
- Read note, take TORCH HANDLE and HANDKERCHIEF (E).

- Use HANDKERCHIEF, take CHISEL (F).
- Use CHISEL, take WOODEN DOOR (G).
- Place WOODEN DOOR (H).
- Go left.

- Talk, give RINGS, take 2/3 TRIANGLE (I).
- Take ROPE (J).
- Go down.
- Play puzzle, earn LIGHTER (K).
- Puzzle walkthrough 1-4 (@).
- Use ROPE, take HOOK (L).
- Go left.

- Use HOOK, take BUCKET HANDLE and 3/3 TRIANGLES (M).
- Arrange the triangles so their gems are next to matching colored gems or border parts.
- Select arrow spaces between two triangles to swap them.
- Triangles rotate when swapped.
- Read note, place TRIANGLES, walkthrough (N).
- Take OIL (O).
- Take SPEAR (P).
- Remove barrier, use SPEAR, read note and take GLOVES (Q).

- Use GLOVES 1-2 (A).
- Use HOOK, remove cover, take TORCH HEAD and EMBLEM (B).
- Place EMBLEM, read book (C).

- Find differences between the two pictures (D).
- Take SCARF.
- TORCH HANDLE, LIGHTER, OIL, and SCARF on TORCH HEAD, take TORCH.
- Use TORCH (E).

- Read note, take BELL TONGUE and KNIFE (F).
- Use KNIFE, earn DRY VINE (G).
- Select panel, take HOLLOW BELL (H).
- Place HOLLOW BELL and BELL TONGUE, select bell (I).
- Talk, take BOX EMBLEM (J).
- Place BOX EMBLEM, take SMOKER and BARMAN’S TOOLS (K).
- Give BARMAN’S TOOLS, play puzzle, earn BARMEN’S BOX (J).
- KNIFE on BARMEN’S BOX, take DOOR HANDLE.

- Use SMOKER, take WAX (M).
- Use DRY VINE and WAX, take CANDLE (N).
- Place DOOR HANDLE, CANDLE, and use LIGHTER (O).
- Go forward.

- Take 1/2 BRICK, read note, take RAG (A).
- Take SHELL KEY (B).
- Take 2/2 BRICK, place RAG, take MOP (C).
- Place BUCKET HANDLE, take BUCKET (D).
- Use MOP (E).

- Take WATCH CAP (F).
- Place BUCKET and BRICKS, select (G-H×2).
- Take MAGNET (I).
- Place SHELL KEY (J), take FISH.
- Select, give FISH, take BROKEN WATCH (K).
- WATCH CAP on BROKEN WATCH, select and take MARIO’S BROTHER’S WATCH.
- Go down.

- Give MARIO’S BROTHER’S WATCH (L), play puzzle, earn CRYSTAL KEY.
- CRYSTAL KEY on BARMEN’S BOX, take MINE KEY.
- Go forward.
- Place MINE KEY (M).
- Go right.
- Use MAGNET, earn WIRE (A).
- Take 1/3 STRANGE TOKEN, remove garments, take PLANK (B).
- Use PLANK and WIRE, take LADDER (C).
- Place LADDER (D).

- Remove the indicated number of tiles from the board.
- Select and drag across three or more adjacent matching tiles to remove them.
- Some combinations may give you more moves.
- Your number of remaining moves is shown on top.
- This mini-game is randomly generated.
- Select chains (E) to meet requirements (F).

- Remove bag, take BROKEN BOTTLE (H).
- Use BROKEN BOTTLE, take AXE TOP (I).
- Take MINER’S TEAR, place AXE TOP, take PICKAXE (J).
- MINER’S TEAR on artifact, select artifact.
- Play puzzle.
- Use PICKAXE (K).

- Take BRANCH WITH WEB, remove boards, take HAMMER (L).
- Take 1/2 EMBLEM, use BRANCH WITH WEB, take FIREFLIES (M).
- Use FIREFLIES, take BROOCH (N).

- Place and select BROOCH, read note, take TORN MAP and 2/2 EMBLEM (O).
- Place EMBLEM, open crate, take TWEEZERS (P) and 1/2 MAP PIECES (pink).
- Use HAMMER, use TWEEZERS, take 2/2 MAP PIECES (green) (Q).

- Restore the map.
- Select a map piece and place it where it belongs in the frame.
- MAP PIECES on TORN MAP, walkthrough (R).
- Go forward.

- Take WRENCH (A).
- Take LEVER (B).
- Take DAGGER (C).
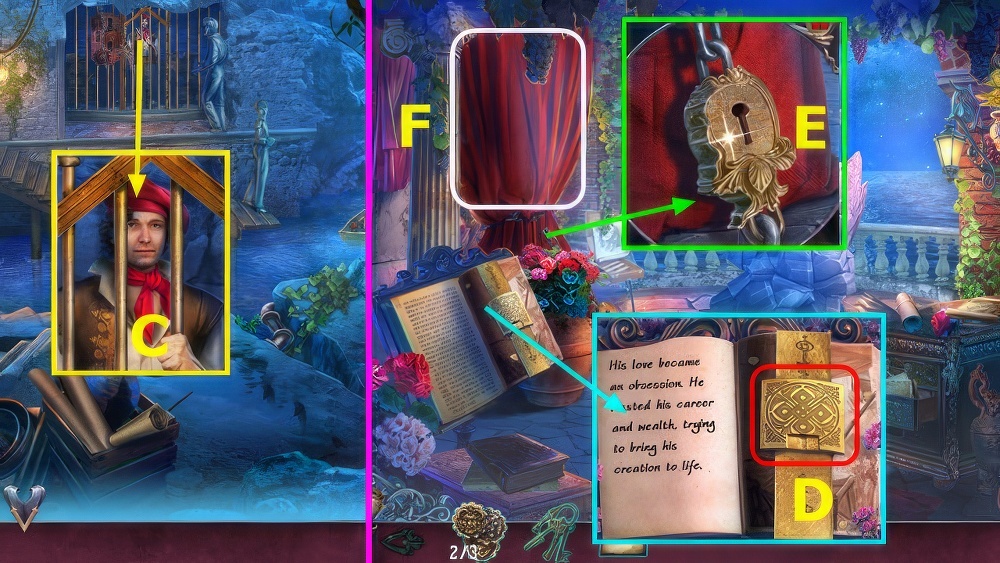
- Open curtain, select (D).

- Select pairs (E).
- Earn STATUE’S HAND.

- Place STATUE’S HAND (F).
- Use WRENCH, remove flowers, take 1/2 DOOR PLATE (G).
- Use LEVER, take 2/2 DOOR PLATE (H).
- Select (I).

- Arrange the glass pieces so they’re next to their matching colors on the door.
- Select a disc handle to rotate it.
- Overlapping different colors creates new colors.
- Place DOOR PLATES, walkthrough (J).
- Go forward.

- Read note, take 2/3 DOOR TOKEN, take CORKSCREW (K).
- Select 2 times, take 1/2 DRAWING SUPPLIES (L).
- Take MARBLE SHARDS (M).
- Go down.

- Place MARBLE SHARDS (N), select pairs, earn STATUE PARTS.
- Go forward.
- Place, select STATUE PARTS (O).
- Go left.

- Take HORN, use DAGGER, earn NET (P).
- Use CORKSCREW, take WINE (Q).
- Talk, take BELLA’S TEAR (R).
- BELLA’S TEAR on artifact, select artifact, play puzzle.

- Take STICK WITH HOOK (A).
- Use STICK WITH HOOK, earn 1/3 GEAR (B).
- Go down.
- Use NET (C).
- Take GEAR PART (D).
- Go down.

- Play puzzle, earn LAMP (E).
- Place GEAR PART, take 2/3 GEAR (F).
- Go forward.
- Use WINE, take 2/2 DRAWING SUPPLIES (G).
- Place LAMP, open cabinet, take 3/3 DOOR TOKEN (H).

- Move all of the tokens into their matching slots to open the door.
- Select a token and a direction to move it in.
- Tokens can only move along the lines to adjacent empty slots.
- Place DOOR TOKENS, walkthrough (I).
- Go forward.

- Use HORN on scene.
- Take SAW (A).
- Go down.
- Use SAW, take KEYS (B).
- Go left.
- Give DRAWING SUPPLIES, take DRAWING (C).
- Go to Work Room.
- Use KEYS, play puzzle, take 1/2 CRYSTAL DECORATION (D).
- Use KEYS (E).
- Play puzzle, earn RICARDO’S TEAR (F).
- RICARDO’S TEAR on artifact, select artifact, play puzzle.
- Place DRAWING, walkthrough 1-3, take 3/3 GEAR (G).
- Go down, go left.
- Place GEARS, take 2/2 CRYSTAL DECORATION (H).
- Go to Work Room.
- Select (I).
- Walkthrough (J).
- Take 1/2 SNAKE HEAD (K).
- Remove paper and place CRYSTAL DECORATIONS, select 3 times, take 2/2 SNAKE HEAD (L).
- Go down, left.
- Select and drag the weights into the correct positions based on the clue on the left.
- Moving one weight may move others.
- Place SNAKE HEADS, drag into shown position in order M-N-O-P.
- Go left.

- Take BAG KEY (A).
- Use BAG KEY, take SWITCH (B).
- Go down.
- Use SWITCH (C).
- Take LEMON (D).
- Go left.

- Use LEMON (E).
- Play puzzle, earn CERAMIC SHELL (F).
- Find a matching pair of pearls.
- Select a shell to see its pearl.
- Replace CERAMIC SHELL, select pairs (G).
- Go forward.

- Talk (H).
- Take SHARP SHELL (I).
- Remove debris, rake GLOVE (J).
- Go down.
- Use GLOVE 1-6 (K), take STAR INLAY.
- Use SHARP SHELL, earn VINES (L).
- Go forward.

- Use STAR INLAY, remove items, create and take UNLOADED PISTOL (M).
- Use VINES (N), play puzzle, earn RED GEMS.
- Go down.

- Play puzzle, earn GUNPOWDER (O).
- Use RED GEMS, take BULLETS (P).
- GUNPOWDER and BULLETS on UNLOADED PISTOL, take PISTOL.
- Go forward.
- Use PISTOL (Q).
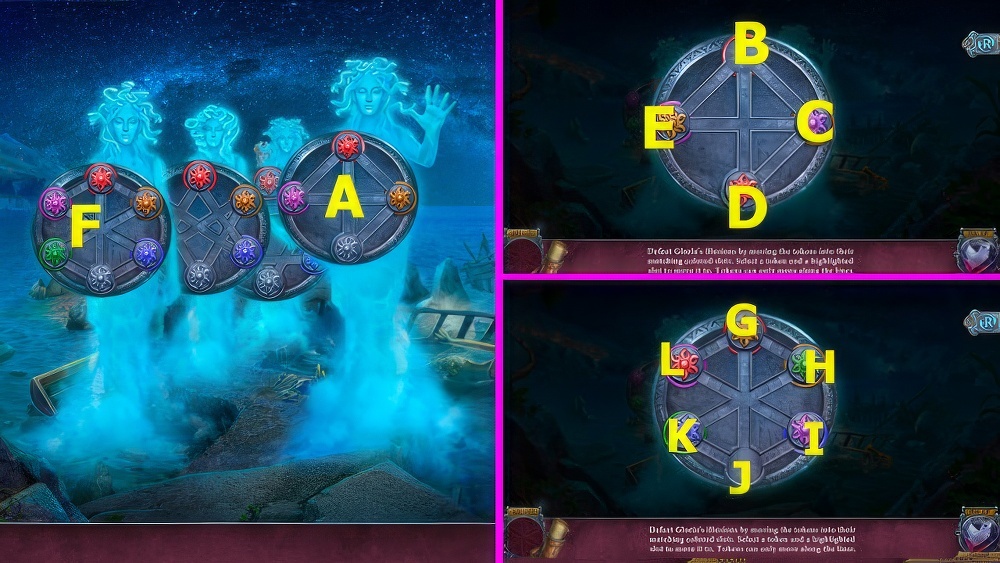
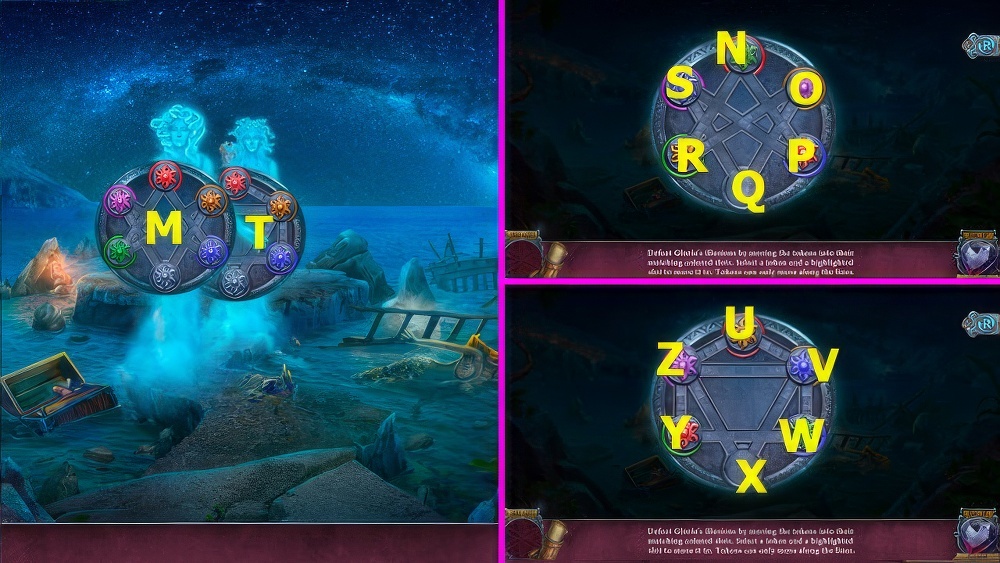
- Defeat Gloria’s illusions by moving the tokens into their matching colored slots.
- Select a token and a highlighted slot to move it to.
- Tokens can only move along the lines.
- Select (A).
- Walkthrough E-C-B-D.
- Select (F).
- Walkthrough K-H-G-L-I-J.
- Select (M).
- Walkthrough O-R-N-P-S-Q.
- Select (T).
- Walkthrough Z-Y-W-V-U-Z-X.
- Walkthrough Bonus Chapter, at the link below.


