
It Happened Here 2: Beacon of Truth – Explore unusual locations and unravel the mysteries of a small town with Emily Smith. Emily receives a call from her friend Catherine Malcolm, who informs her that the case of her husband’s murder, which took place at the old lighthouse, is closed as unsolved. Emily travels to a small seaside town and encounters the myths and legends surrounding the old lighthouse. It’s up to you to find out if these legends are connected to the unsolved case find the killer and discover the truth in this crime detective game. If you can not pass any of the puzzles or do not know where the items are, on our site you can watch the walkthrough of the game It Happened Here 2: Beacon of Truth, and solve the criminal mysteries.
It Happened Here 2: Beacon of Truth – Walkthrough
Here you can see the full walkthrough of It Happened Here 2: Beacon of Truth, namely for all chapters, including bonus chapter, in pictures.
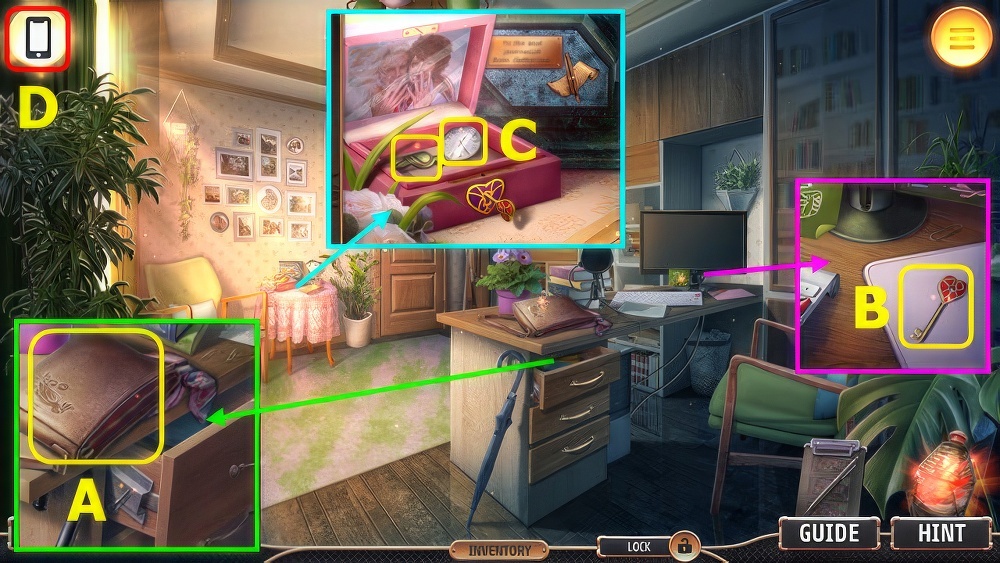
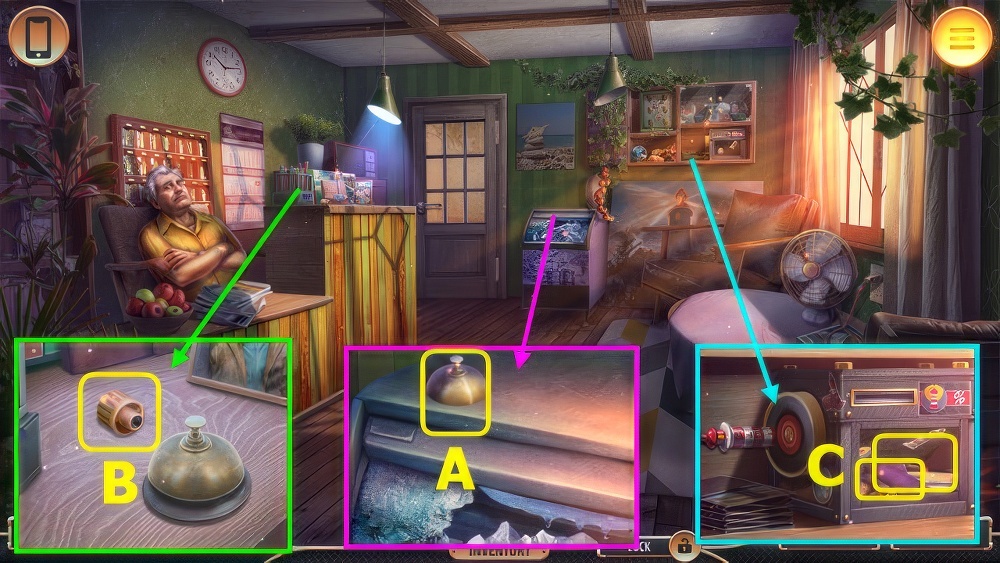
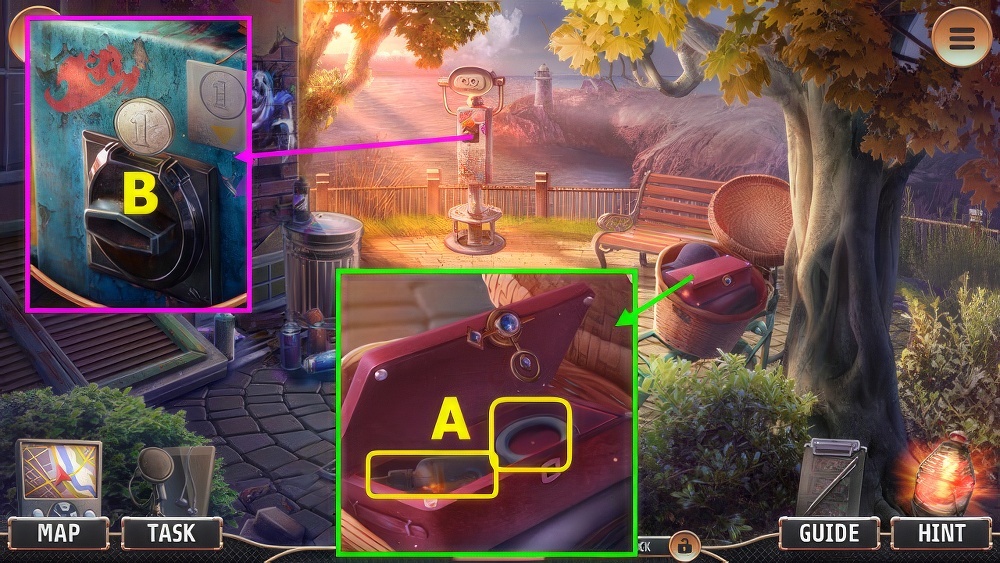
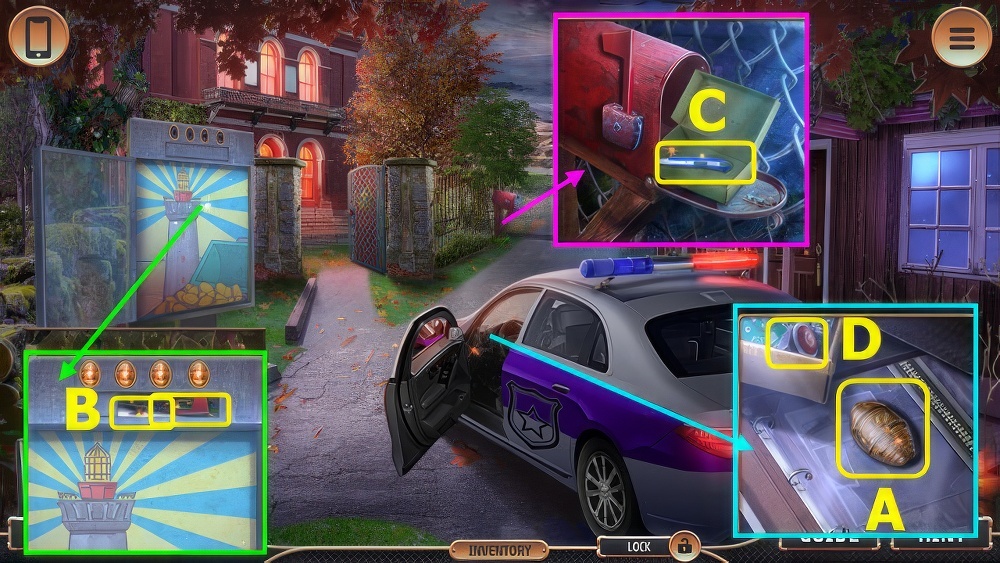
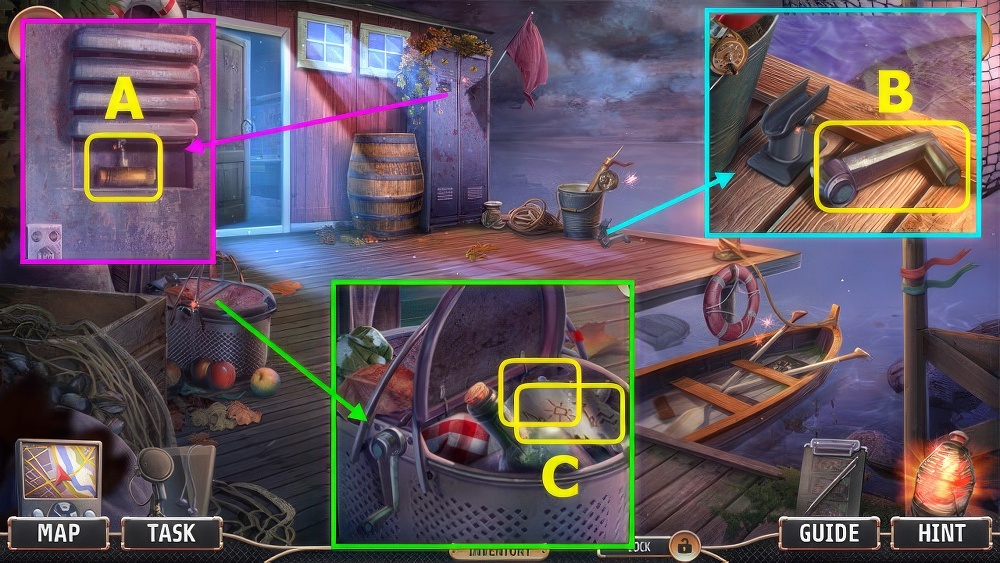
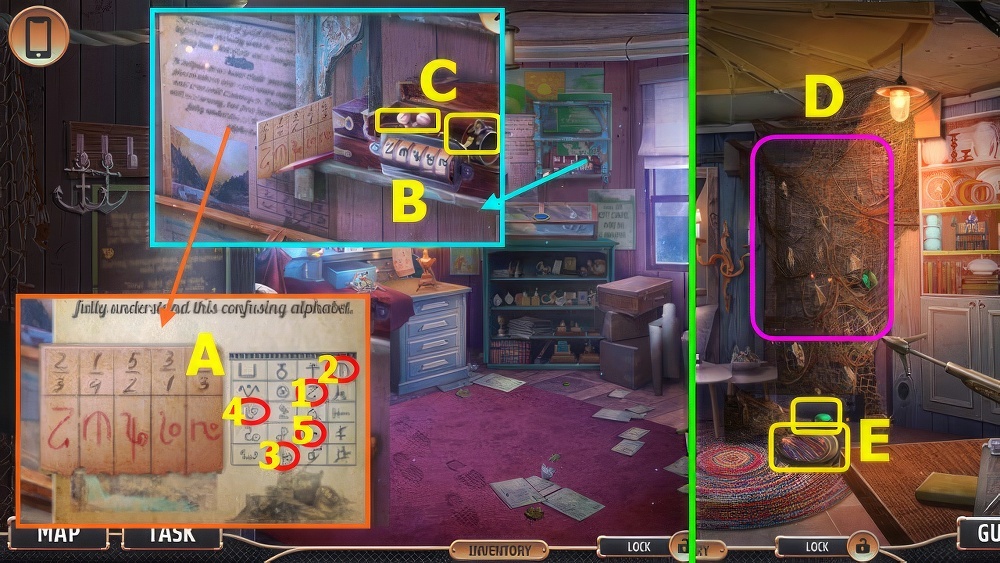
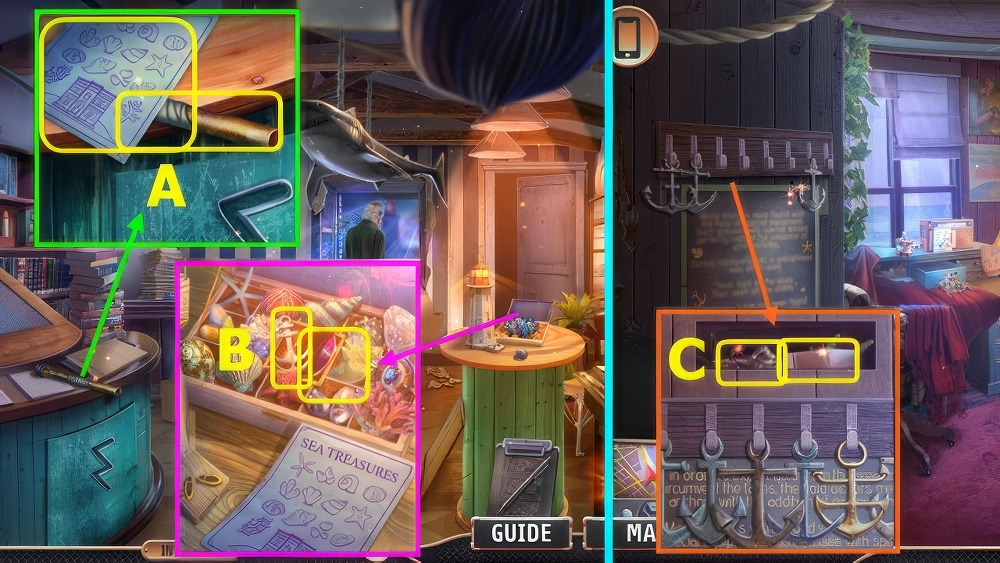
- Take EMILY’S BAG (A).
- Take BOX KEY (B).
- Take PODCASTING AWARD, use BOX KEY, take CLOCK FACE and PARROT KEYCHAIN (C).
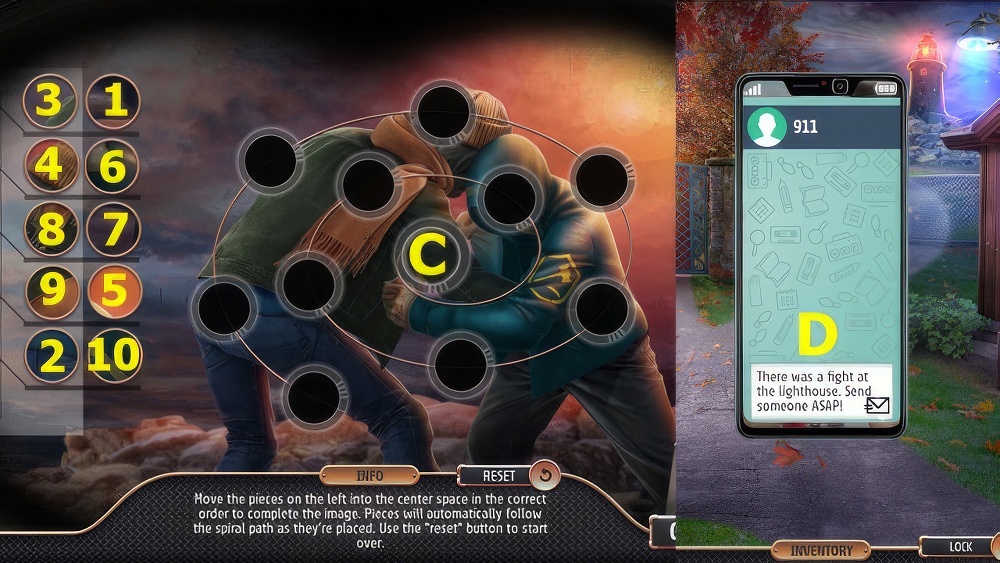
- PARROT KEYCHAIN on EMILY’S BAG, play puzzle, earn HAIR CLIP.
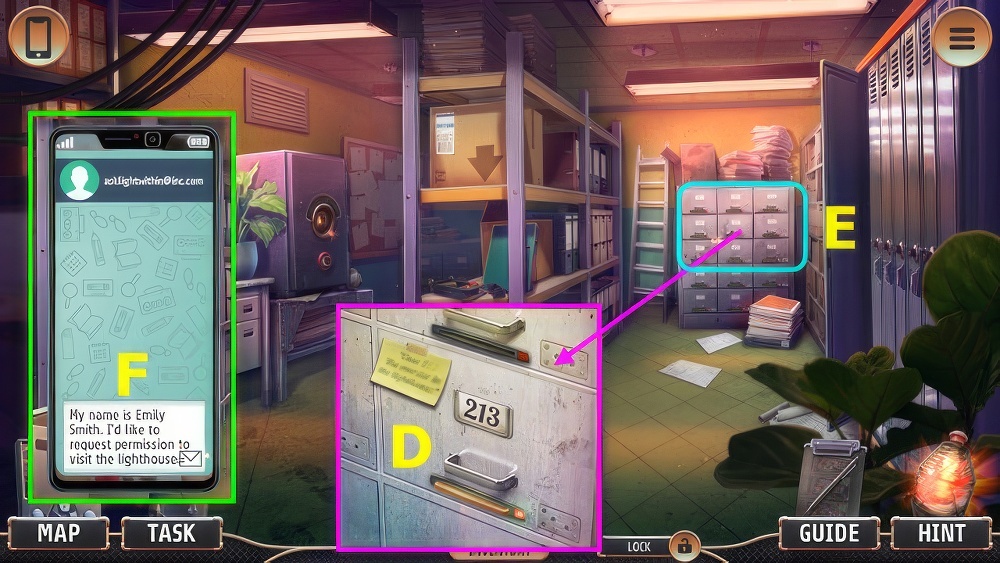
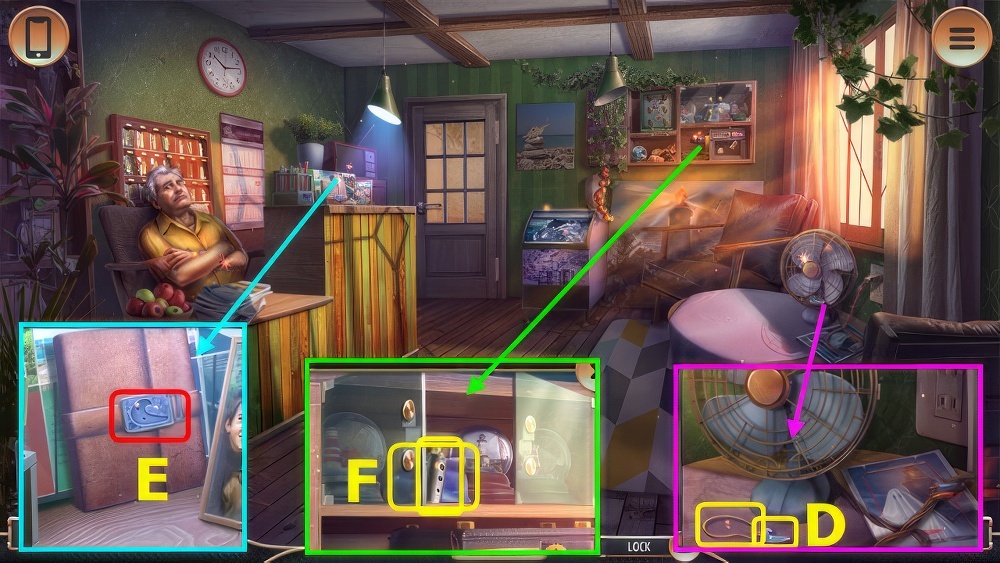
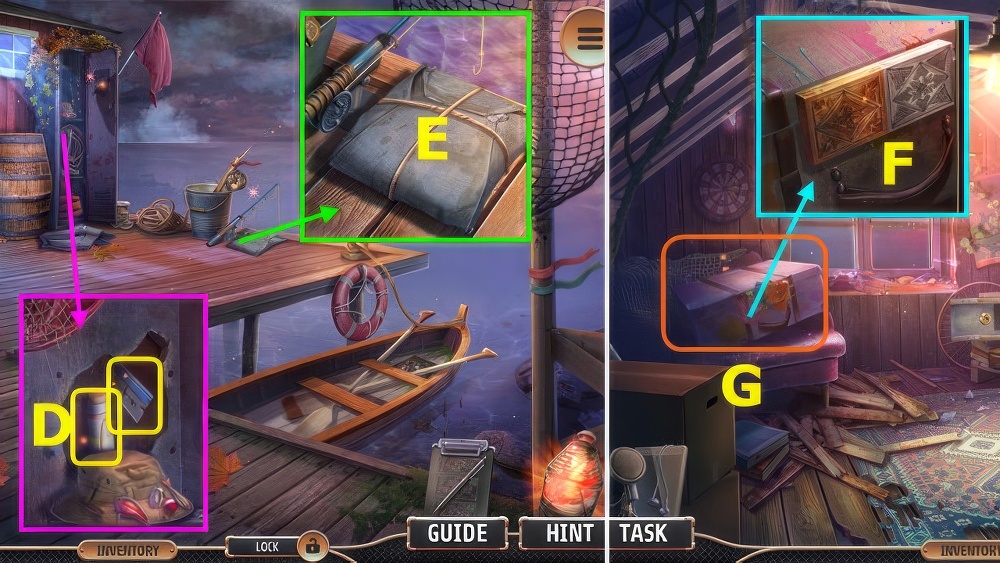
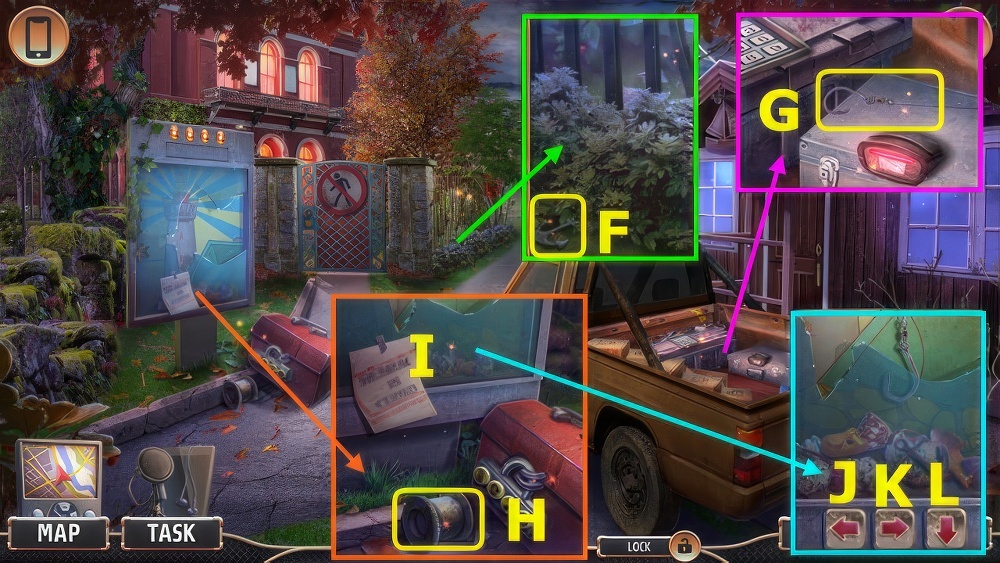
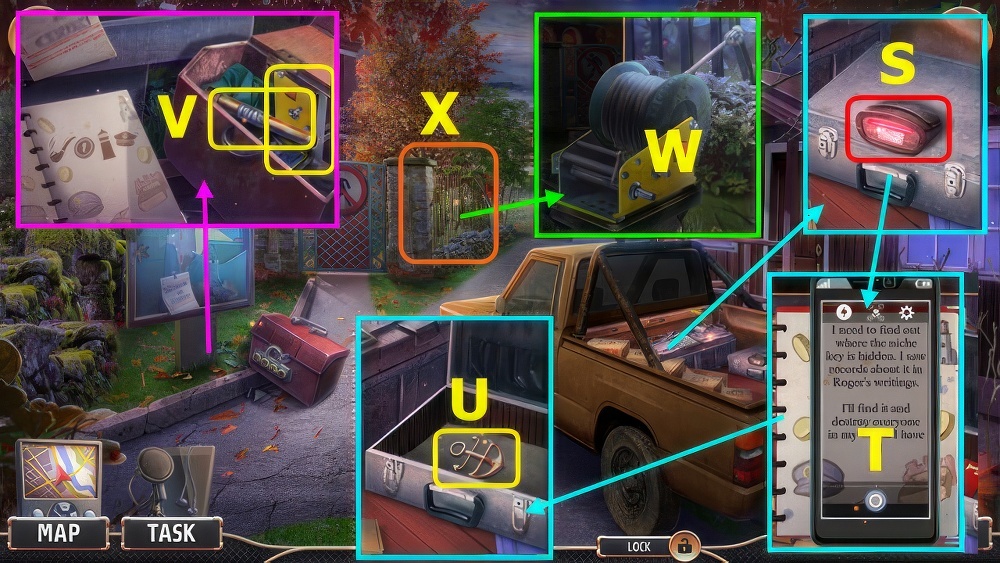
- The cellphone is now located in the upper left corner, select cellphone (D), select red button to answer.
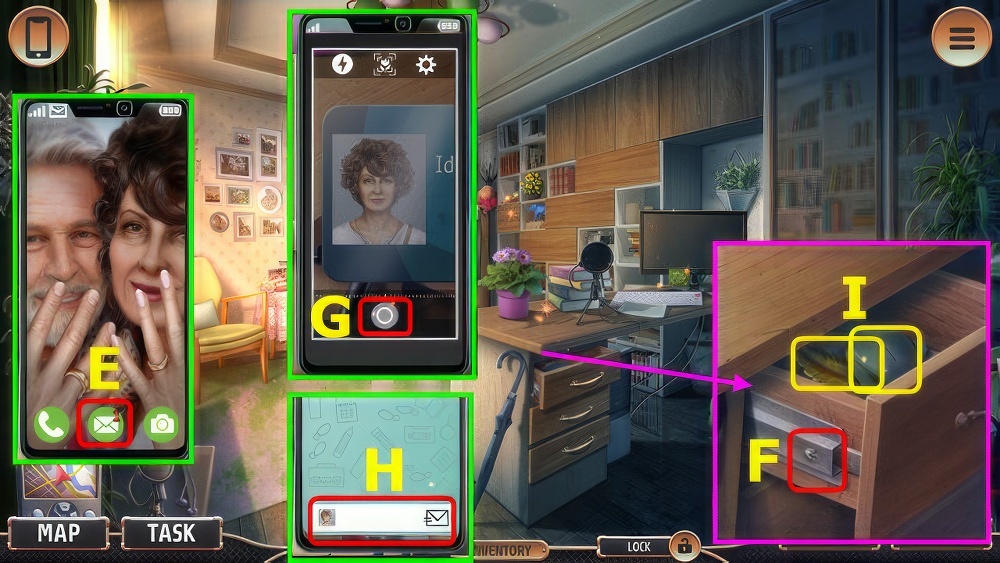
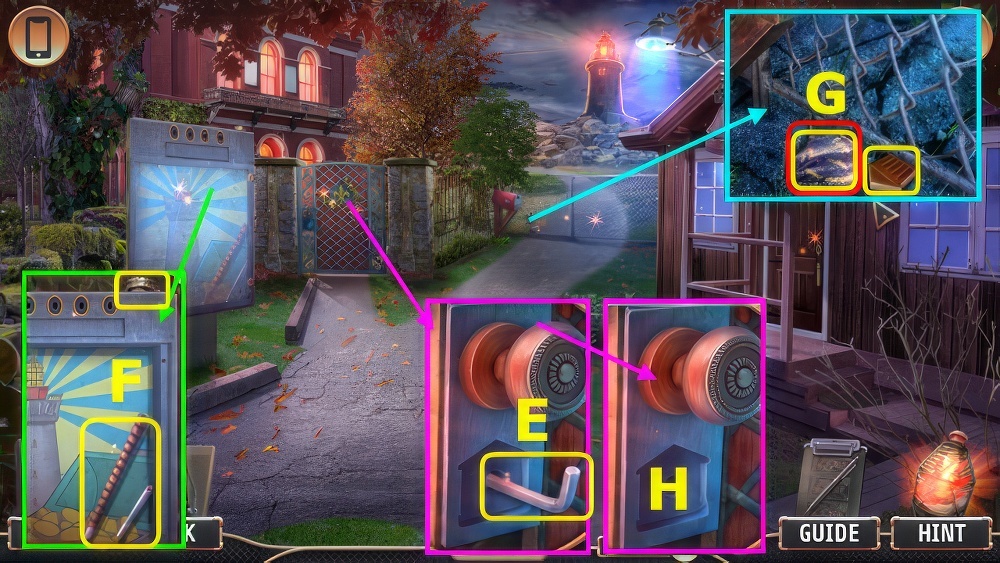
- Select (E) to open messages, select image 2x.
- Use HAIR CLIP (F).
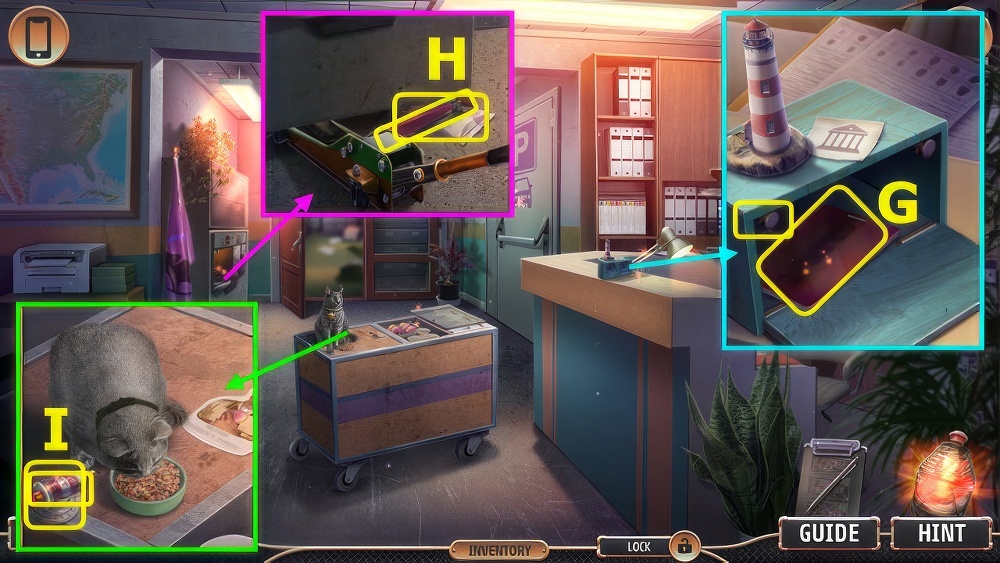
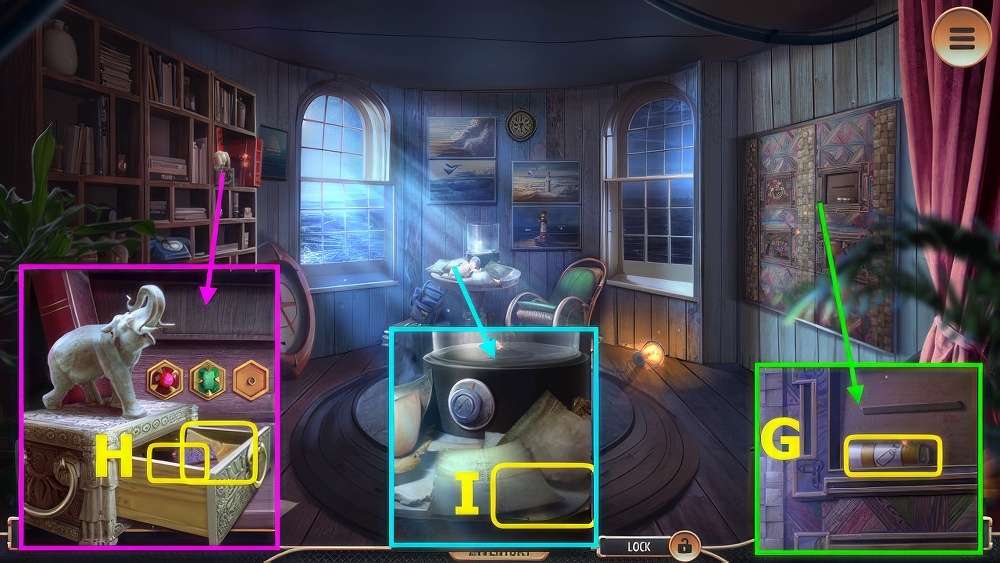
- Select cellphone, select (G) to take a photo.
- Open messages, select (H) to send photo.
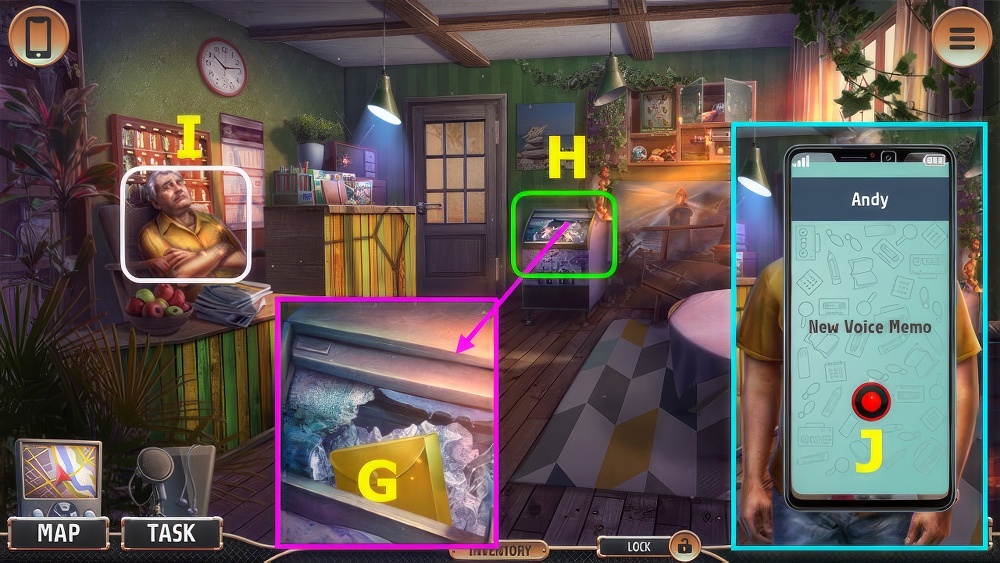
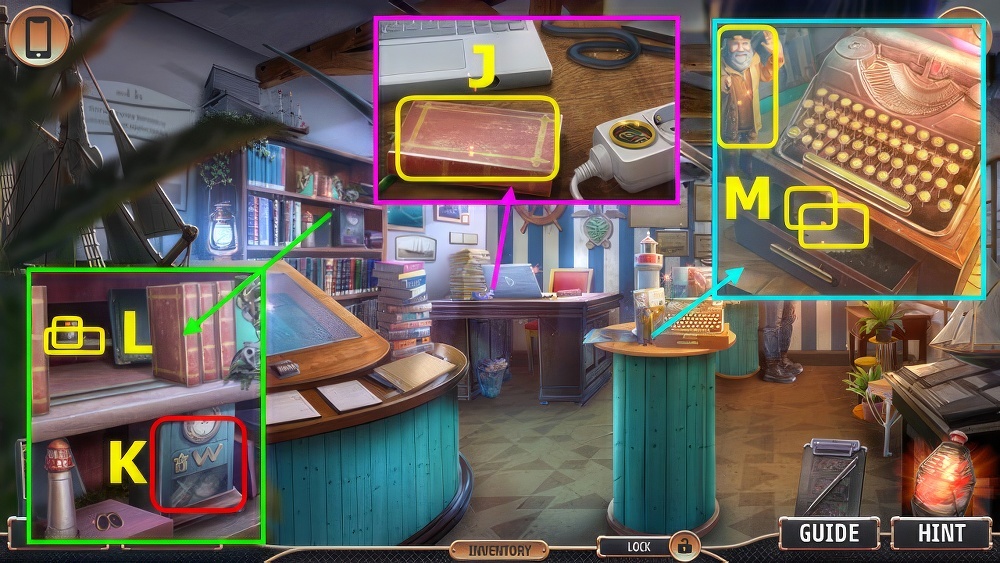
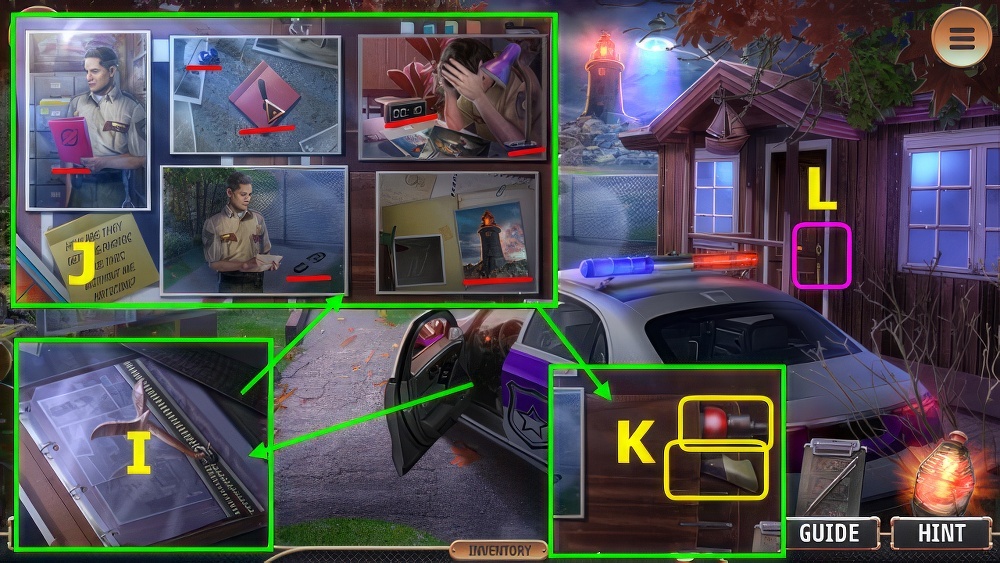
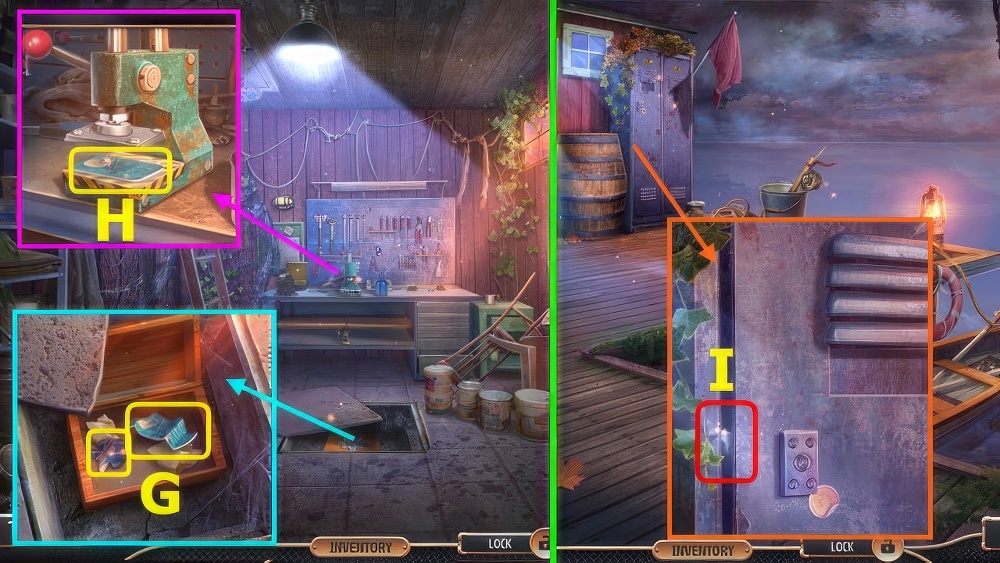
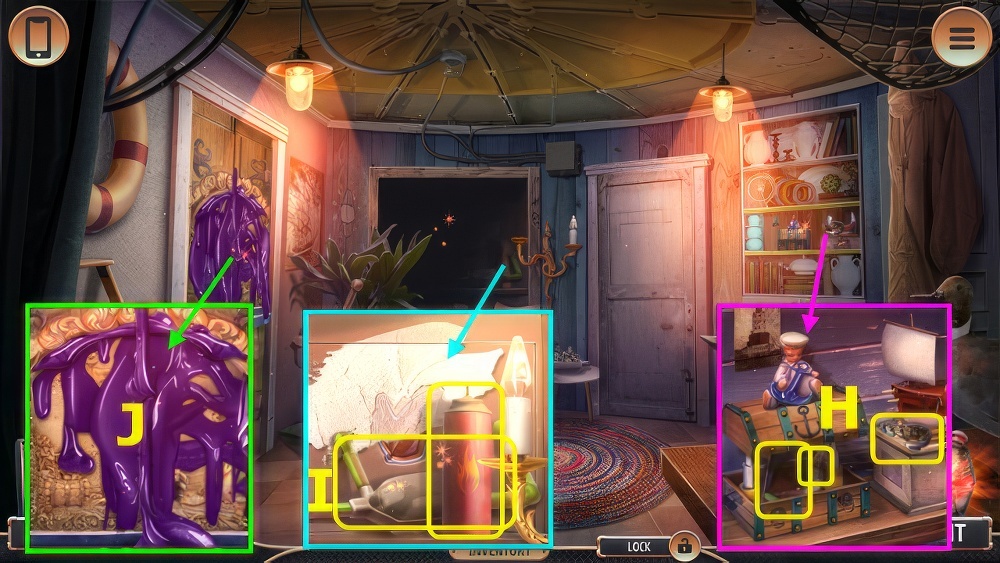
- Take USB MOUSE and GOLDEN QUILL (I).
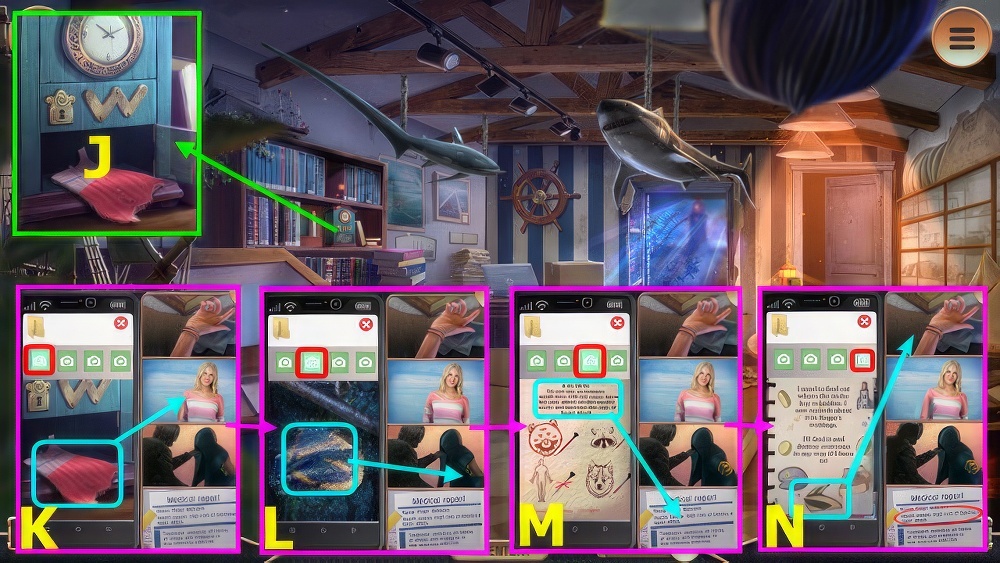
- Place PODCASTING AWARD and GOLDEN QUILL, take PHOTOGRAPH and LETTER OPENER (J).
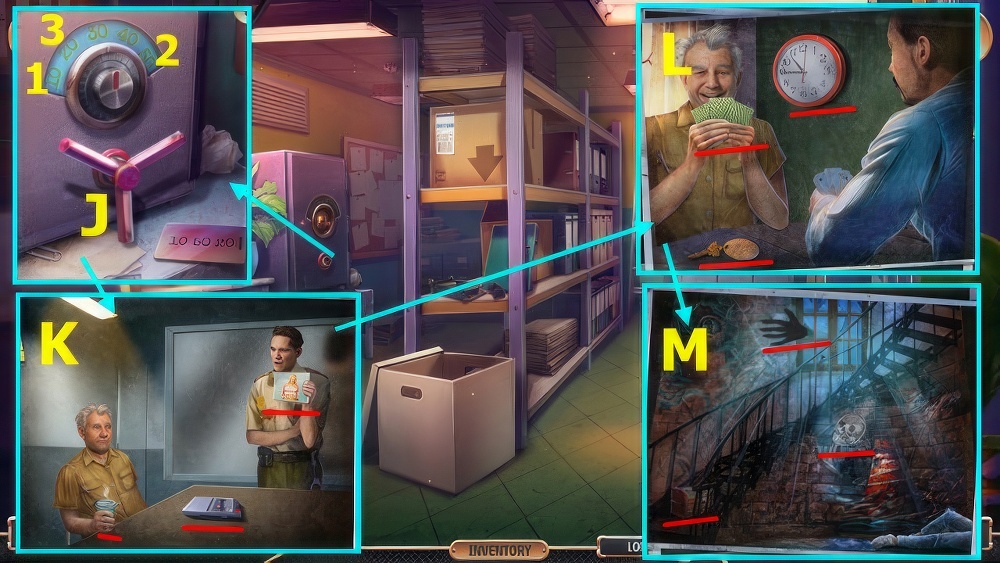
- Use LETTER OPENER, read note, take ENTER KEY and REMOTE CONTROL (K).
- Place USB MOUSE and ENTER KEY (L).
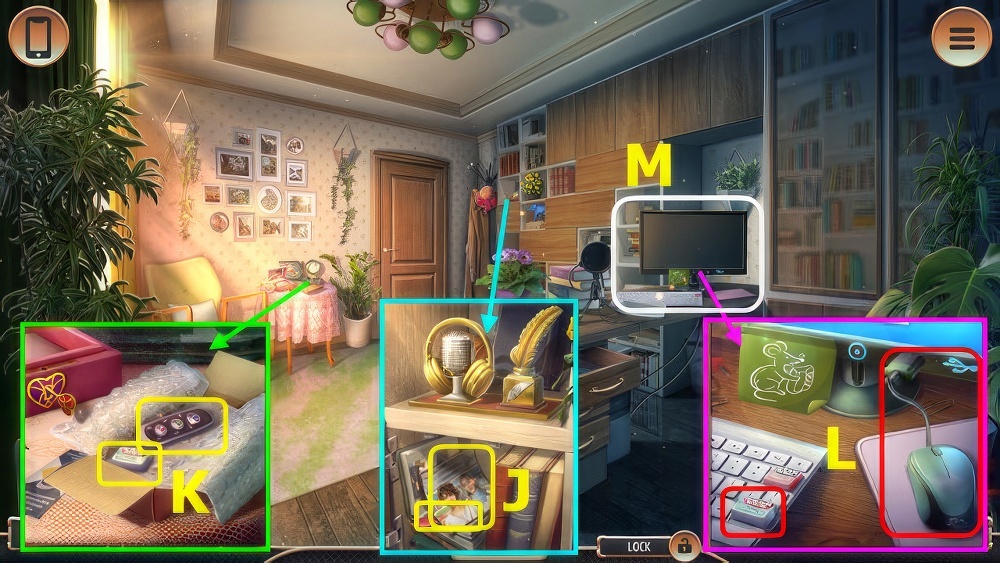
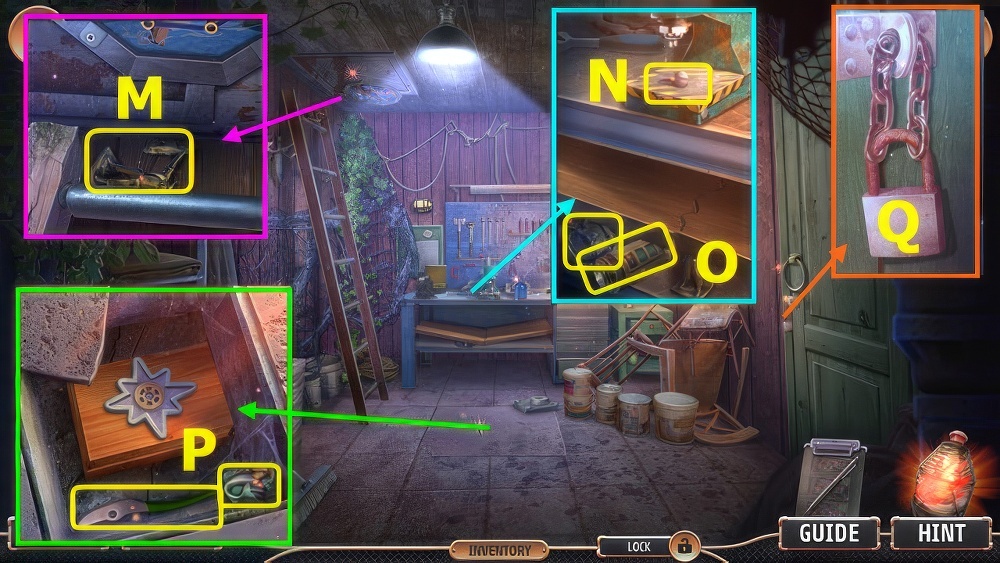
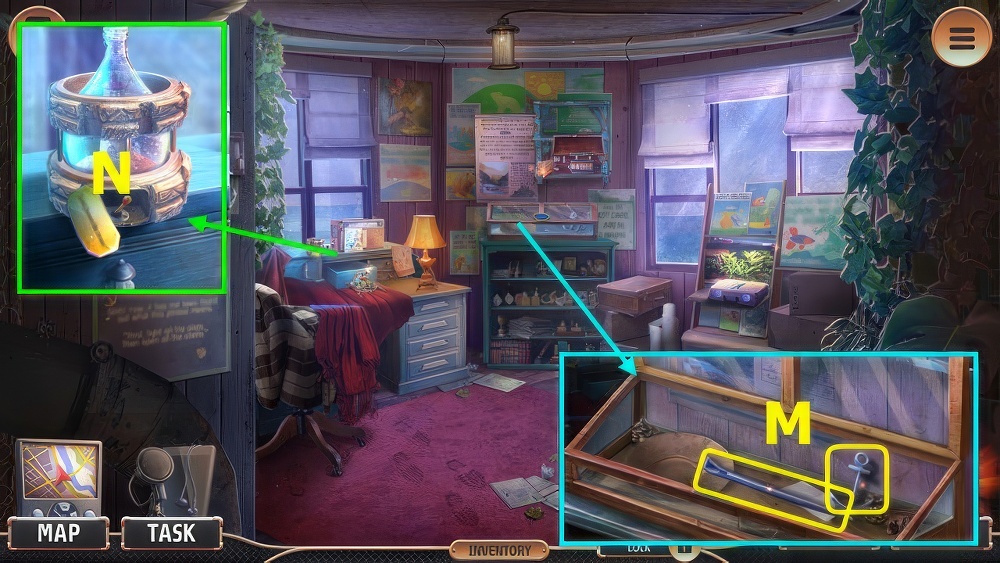
- Play puzzle, earn ticket (M).
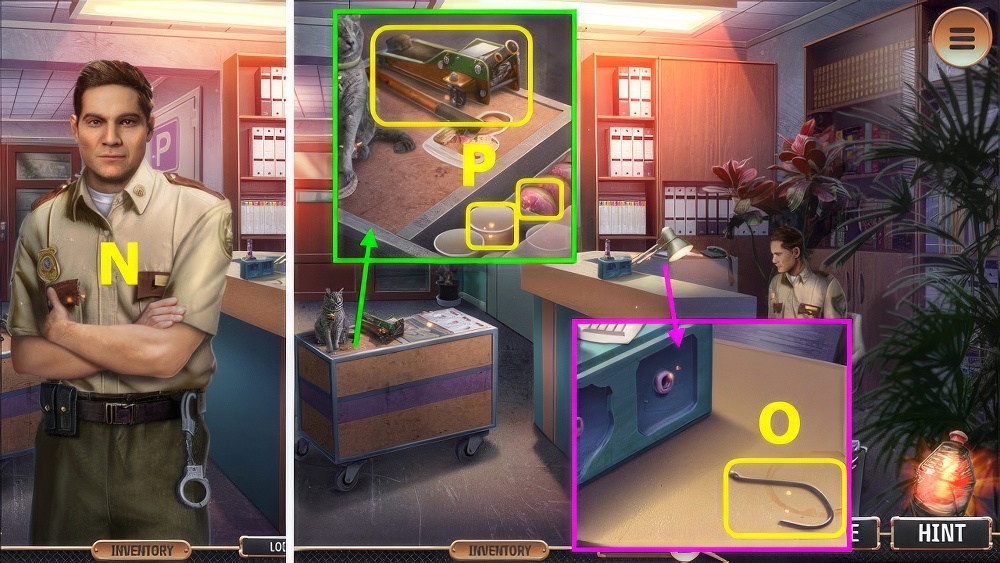
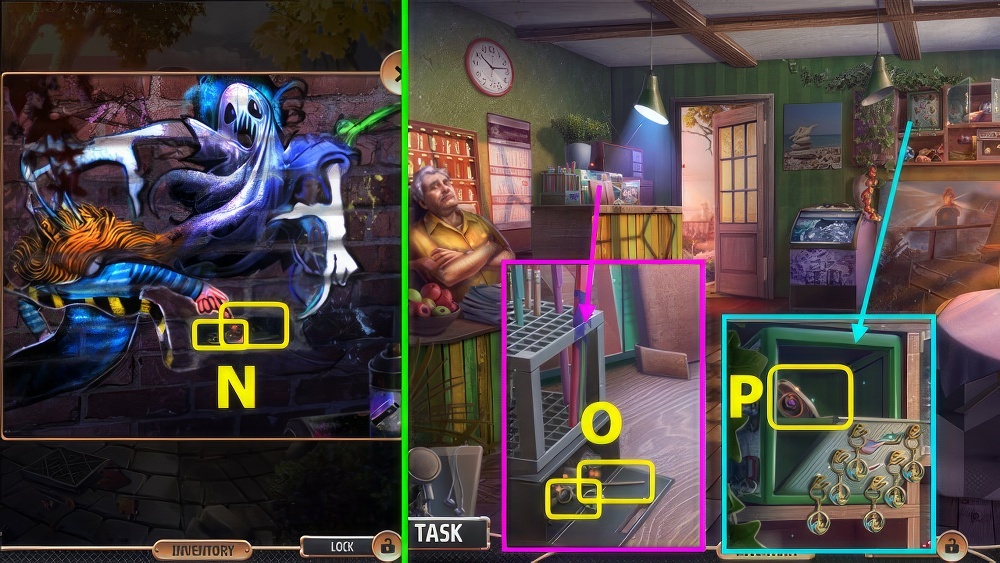
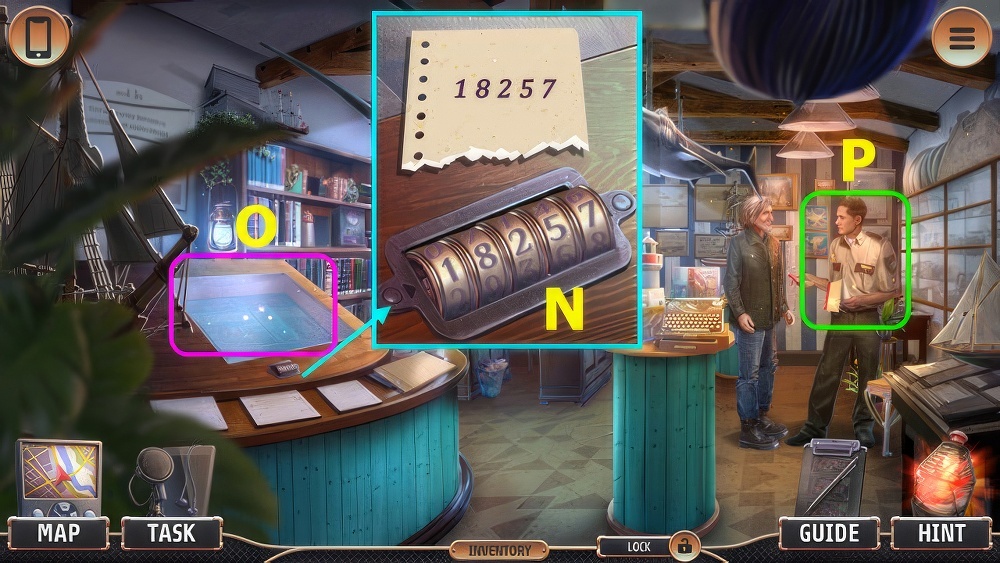
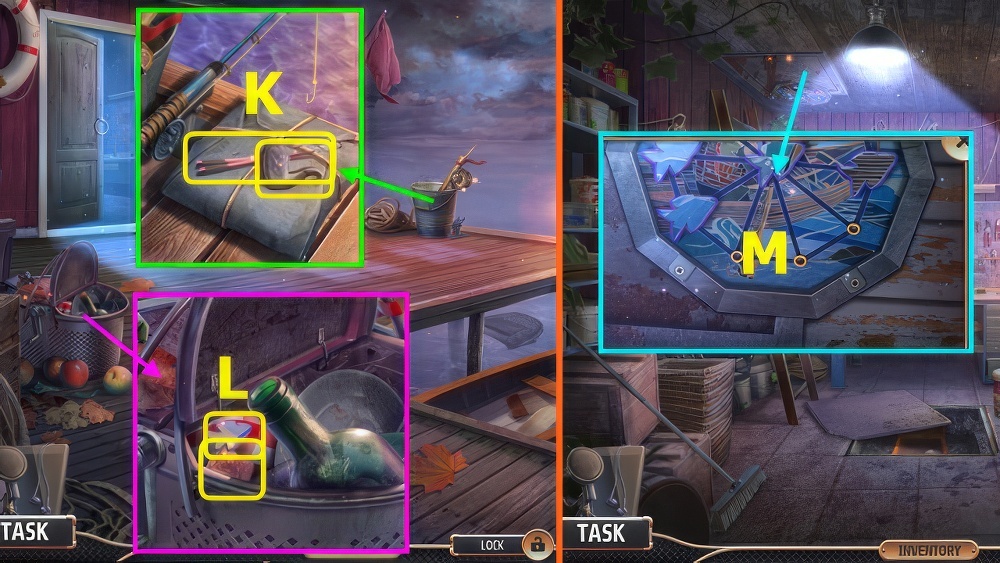
- Talk (N), earn 1/3 SLIDE.
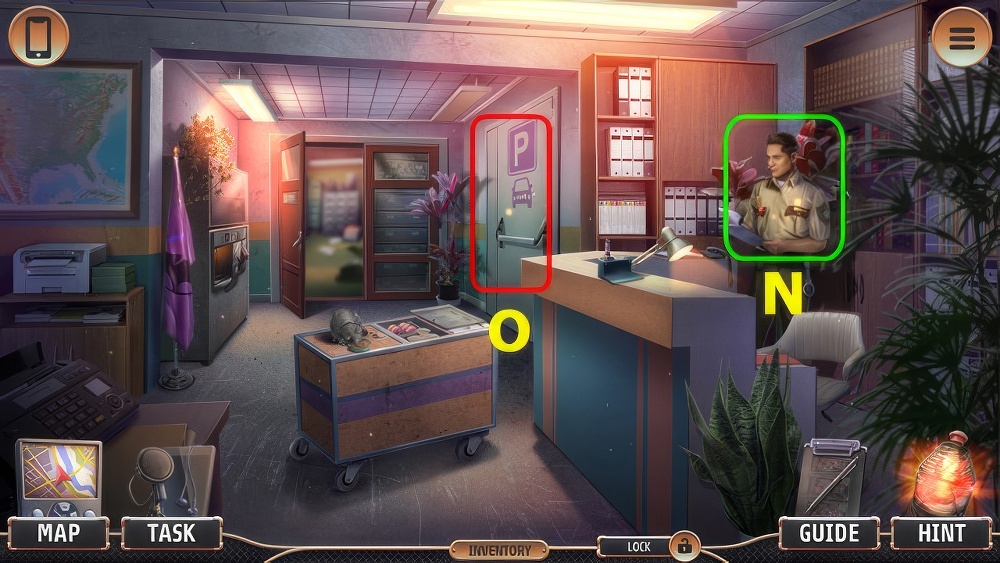
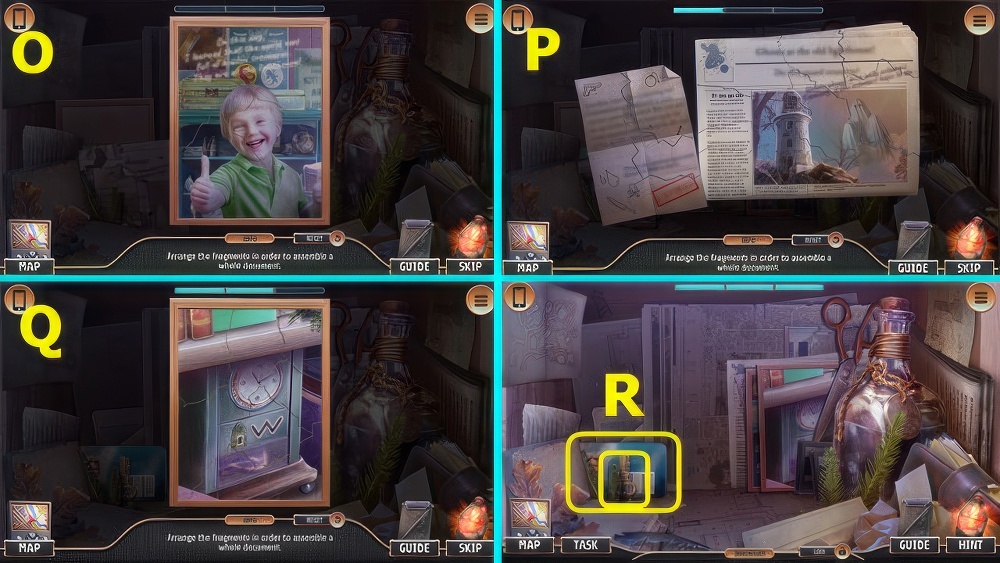
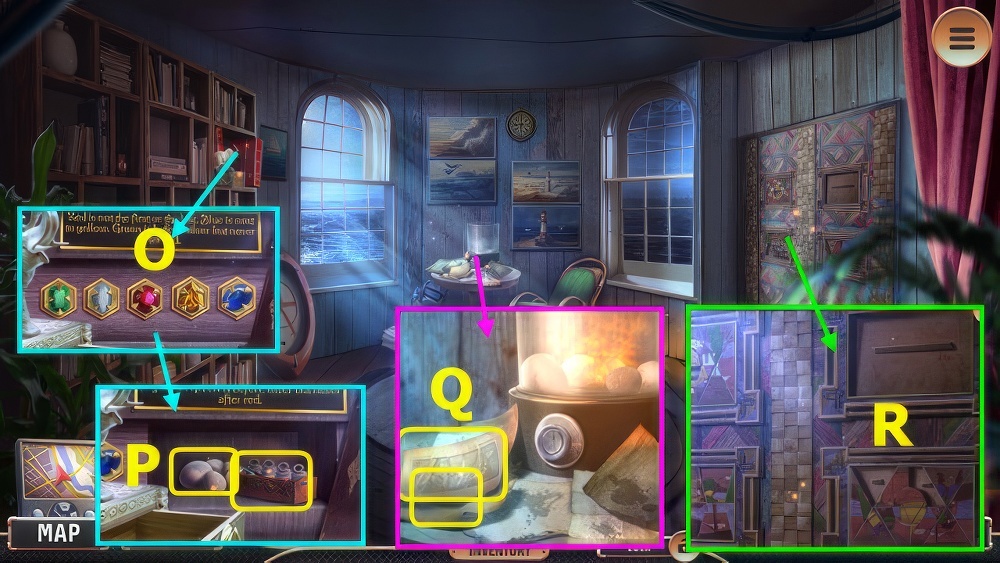
- Take HANDLE (O).
- Place HANDLE, take MOLECULE SYMBOL and PROJECTOR LENS (P).
- Take BATTERIES, place MOLECULE SYMBOL and CLOCK FACE, take 2/3 SLIDE and FRAME CORNER (Q).

- Place PHOTOGRAPH and FRAME CORNER, solution (A), select 1-4.
- Take LUNCHBOX and PHOTOGRAPHER FIGURINE (B).
- Place PHOTOGRAPHER FIGURINE, take 3/3 SLIDES and CABLE (C).
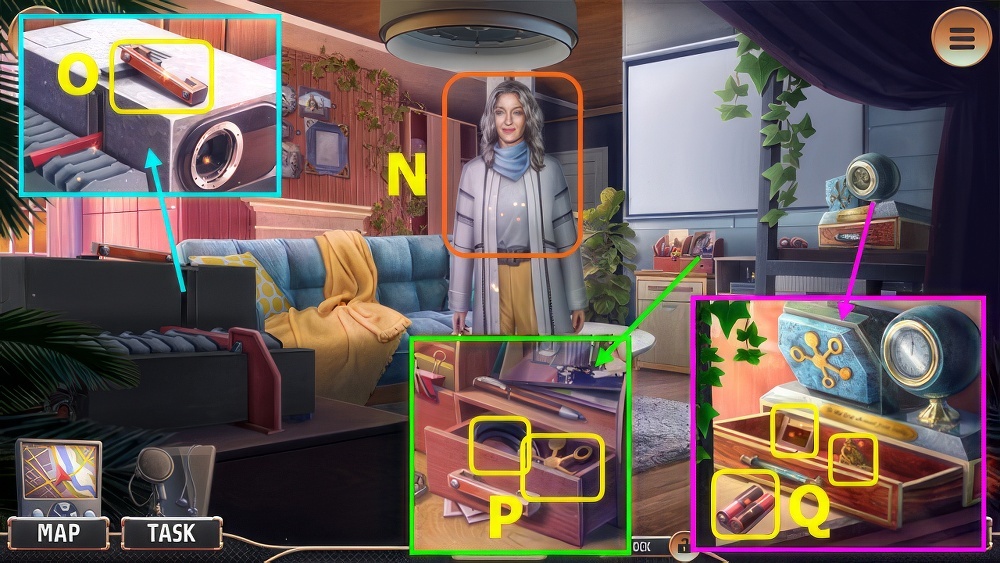
- CABLE and BATTERIES on REMOTE CONTROL, take PROJECTOR CONTROL.
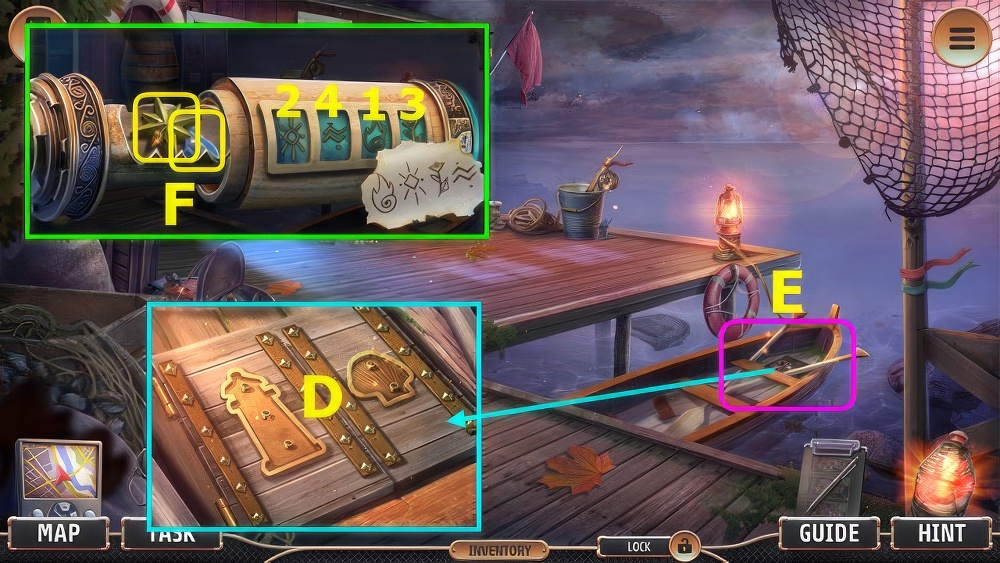
- Use PROJECTOR LENS, SLIDES, and PROJECTOR CONTROL (D).
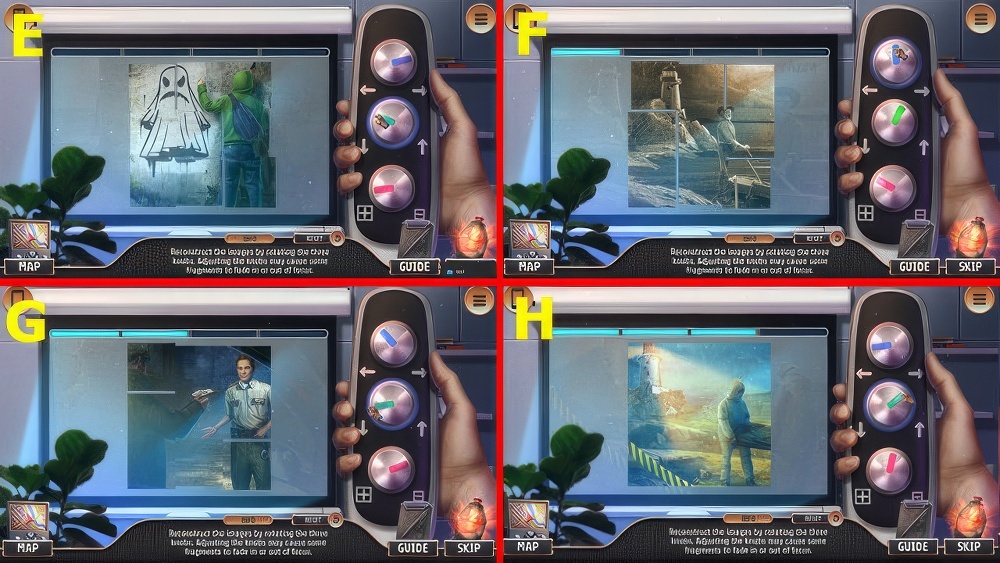
- Solution E-F-G-H.
- Hint-start with the red dial to get the pieces the same size.

- Enter 1-5-3 (I).
- Take POLICE STATION ADDRESS and COFFEE TOKEN (J).
- Use cellphone to record (K), earn PRESS PASS.
- Use POLICE STATION ADDRESS (L).
- Give PRESS PASS (N), earn MUSEUM SYMBOL.
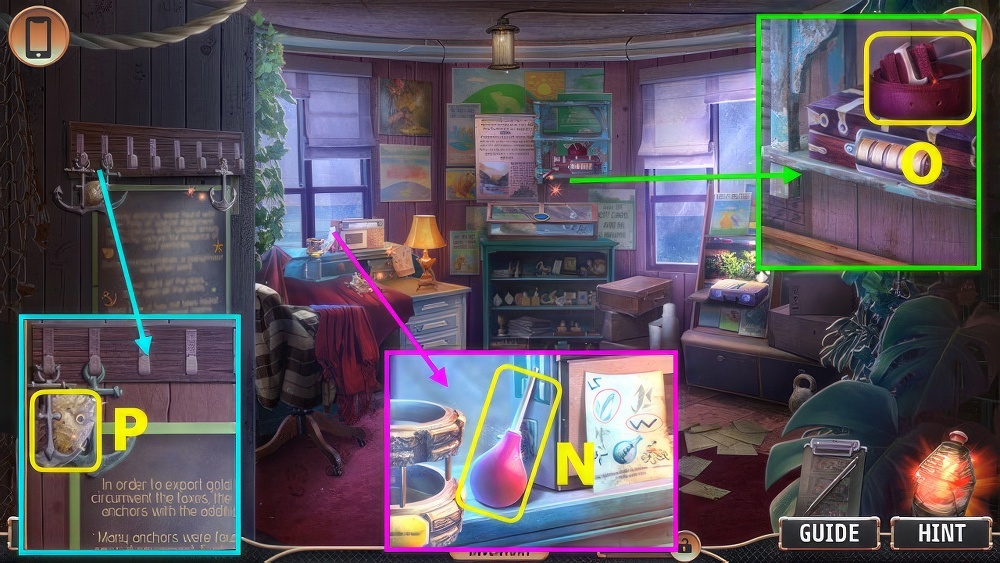
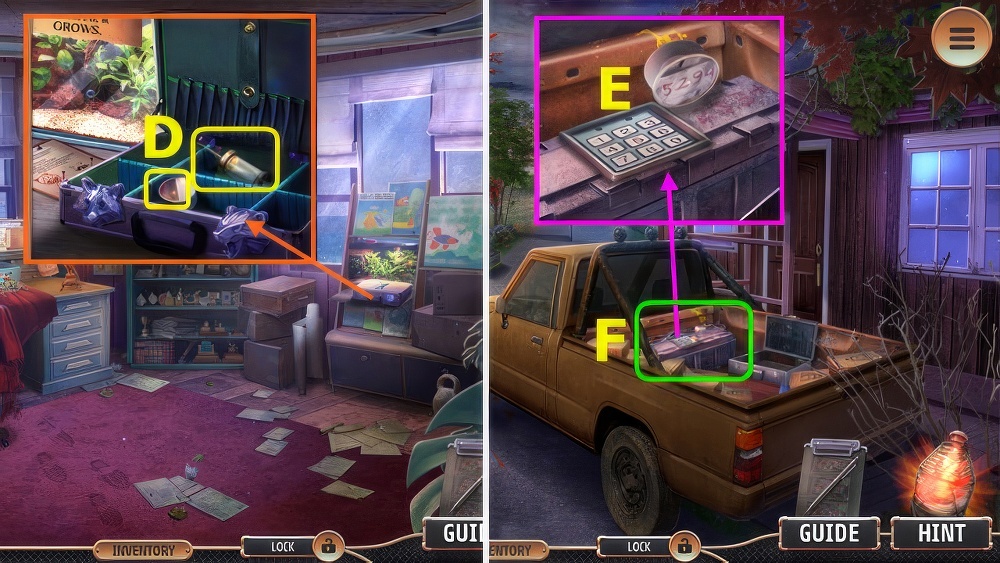
- Take HOOK (O).
- Take BROKEN JACK, use HOOK, take DONUT and PAPER CUP (P).
- Use PAPER CUP and COFFEE TOKEN, take HOT COFFEE (Q).
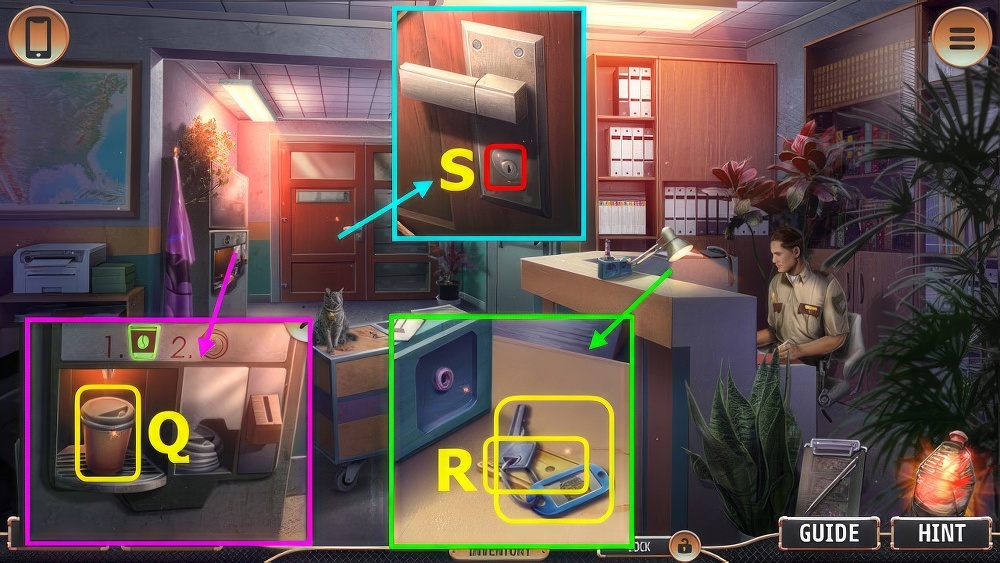
- Open LUNCHBOX, add HOT COFFEE and DONUT, take POLICEMAN’S LUNCH.
- Place POLICEMAN’S LUNCH, take PUNCH CARD and ARCHIVE KEY (R).
- Use ARCHIVE KEY (S).
- Go forward.
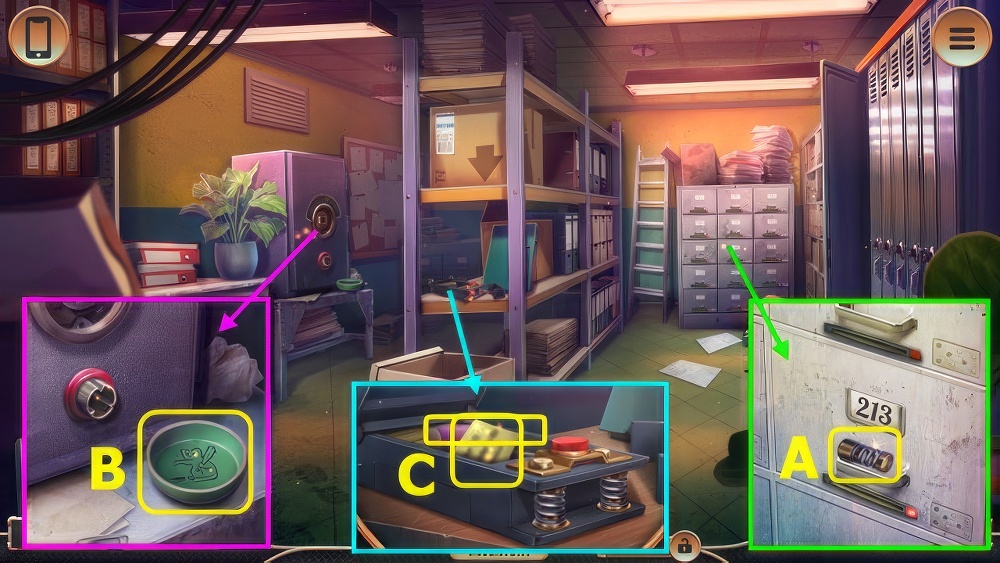
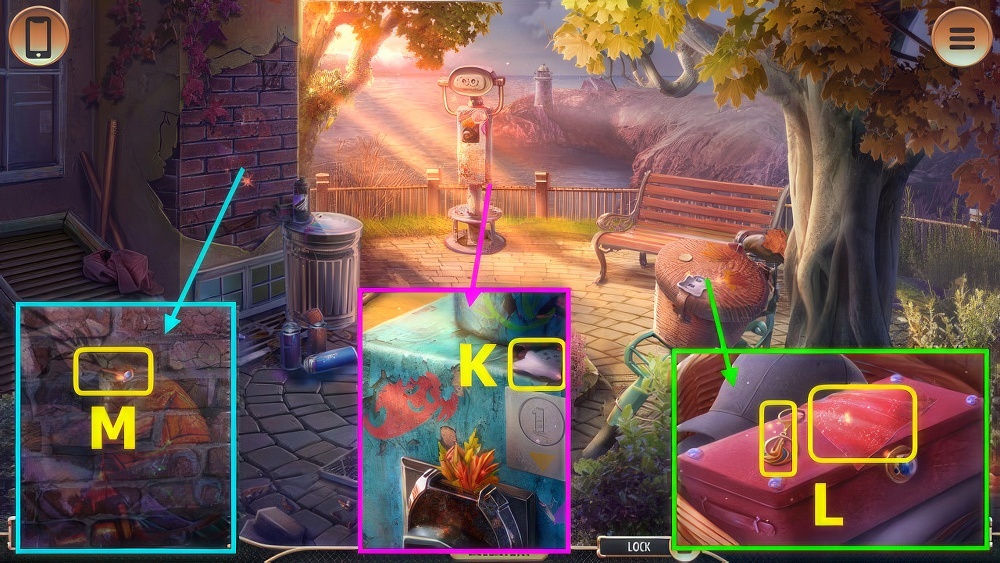
- Take SPRING (A).
- Take BOWL (B).
- Take SAFE HANDLE, place SPRING, take CASE NUMBER and SCREWDRIVER (C).
- Use CASE NUMBER and PUNCH CARD (D).
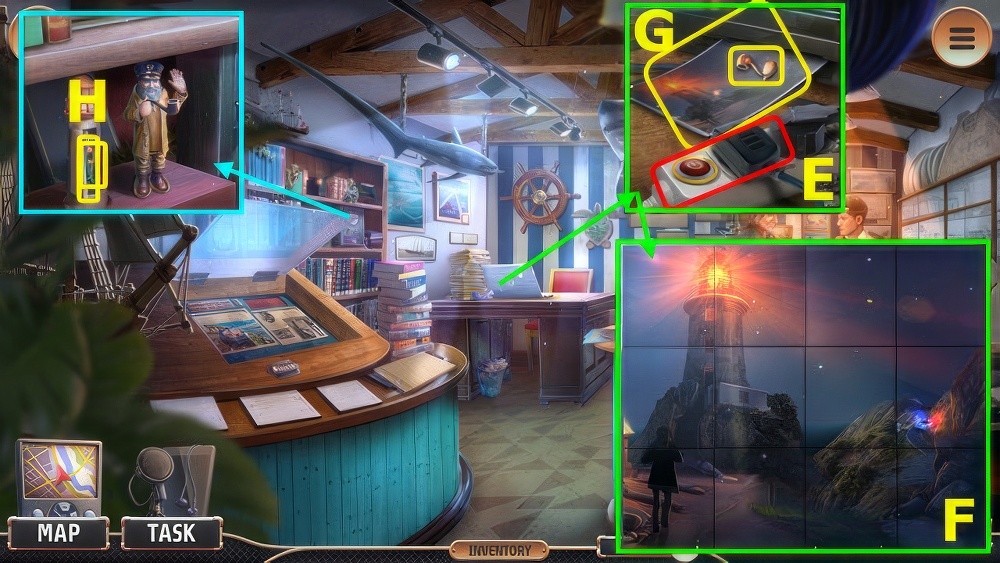
- Play puzzle, earn LIGHTHOUSE SYMBOL (E).
- Select cellphone, select (F) to send message.
- Walk down.
- Place LIGHTHOUSE SYMBOL and MUSEUM SYMBOL, take COMBINATION and SCREW (G).
- SCREW and SCREWDRIVER on BROKEN JACK, take JACK.
- Use JACK, take CAT FOOD and TWEEZERS (H).
- Use BOWL and CAT FOOD, take SAFE DIAL and MINIATURE LIGHTHOUSE (I).
- Go forward.
- Place SAFE HANDLE, SAFE DIAL, and COMBINATION, select 1-2-3 (J).
- Restore photos K-L-M, take BROKEN BLOWTORCH and INTERROGATION RECORD.
- Walk down.
- Give INTERROGATION RECORD (N), earn MOTEL BUSINESS CARD.
- Use MOTEL BUSINESS CARD (O).
- Take BELL (A).
- Take ROUND KNOB, place BELL (B), earn PROMO COUPON.
- Use MINIATURE LIGHTHOUSE and PROMO COUPON, take RUBBER GLOVE and UV LIGHT (C).
- Use RUBBER GLOVE and TWEEZERS, take RUBBER BAND and WAVE SYMBOL (D).
- Place WAVE SYMBOL (E), play puzzle, earn MAGNET.
- Use MAGNET, take NOZZLE and BLUE FILM (F).
- NOZZLE and ROUND KNOB on BROKEN BLOWTORCH, take BLOWTORCH.
- Use BLOWTORCH, select (G).
- Play puzzle, earn DAUGHTER’S PATCH (H).
- Give DAUGHTER’S PATCH (I).
- Select cellphone, select (J), earn 1/4 KEYCHAIN.
- Go forward.
- Take GHOST SYMBOL (K).
- Take COIN, place GHOST SYMBOL, take 2/4 KEYCHAIN and RED FILM (L).
- BLUE FILM, RUBBER BAND, and RED FILM on UV LIGHT.
- Take PIN, use UV LIGHT (M).
- Solution, take 3/4 KEYCHAIN and TISSUE PAPER (N).
- Walk down.
- Use TISSUE PAPER, take 4/4 KEYCHAINS and TOOTHPICK (O).
- Place KEYCHAINS, take METAL RING and GOLF-CLUB HEAD (P).
- Go forward.
- Use PIN and METAL RING, take OIL and FISHING LINE (A).
- Use TOOTHPICK, OIL, and COIN (B).
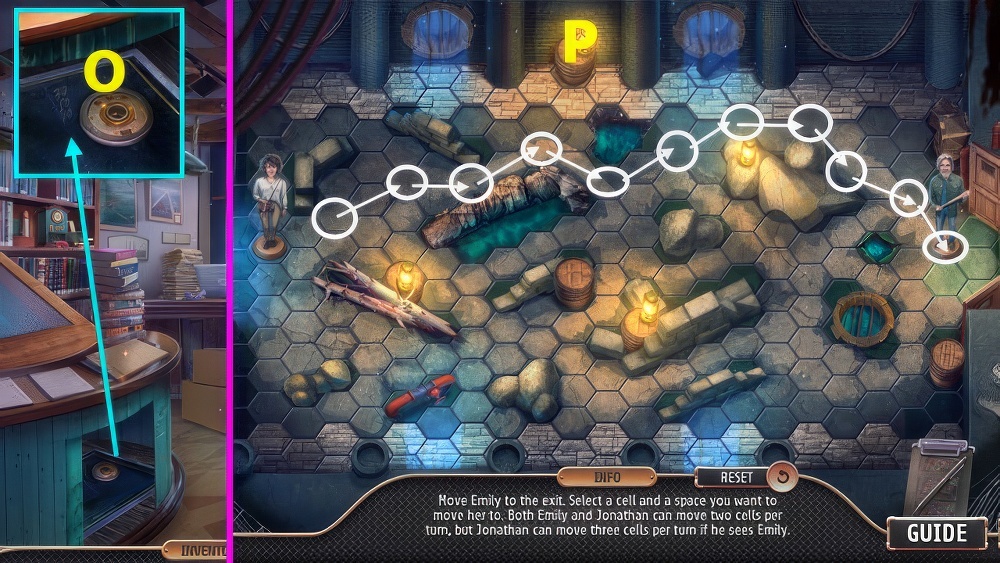
- Move 1-10 to (C).
- Select acene, select cellphone, select (Dx2).
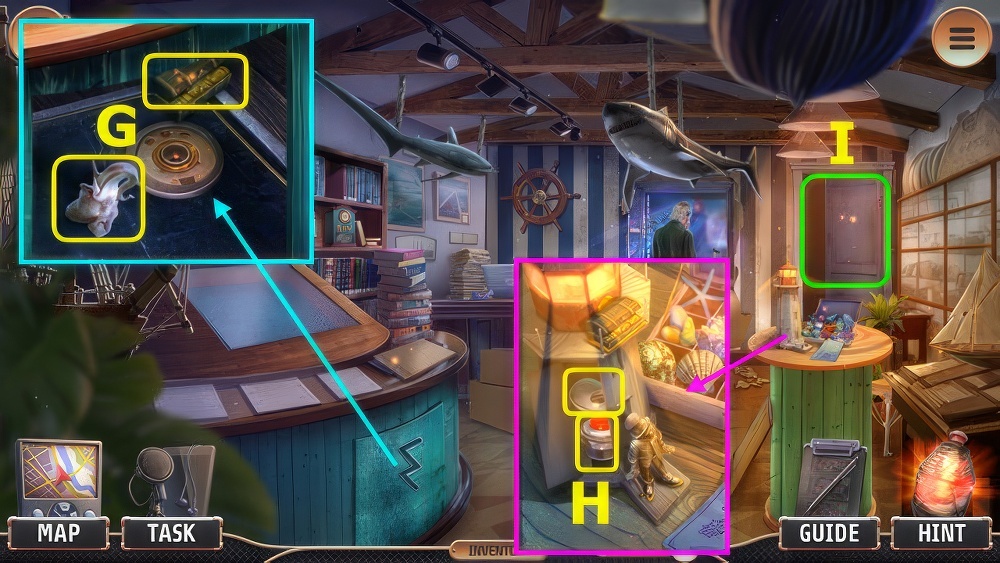
- Take HEX WRENCH (E).
- Use HEX WRENCH, take BROKEN STICK and CODE WHEEL (F).
- BROKEN STICK and FISHING LINE on GOLF-CLUB HEAD, take GOLF CLUB.
- Use GOLF CLUB, select (G), select cellphone and take photo.
- Take JACKET SAMPLE and MUSEUM TOKEN.
- Place MUSEUM TOKEN (H).
- Go left.
- Earn 1/4 SMALL BULB.
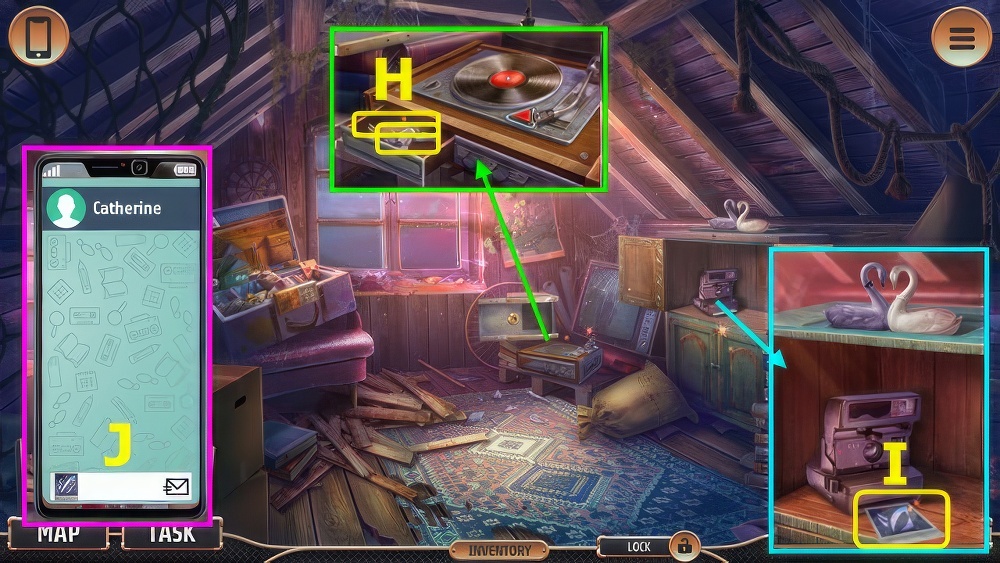
- Take UNUSUAL BOOK (J).
- Use cellphone to take photo (K).
- Place UNUSUAL BOOK, read journal, take 2/4 SMALL BULB and SPACEBAR (L).
- Use OIL and SPACEBAR, take CODE, 3/4 SMALL BULB and INCOMPLETE FIGURINE (M).
- Place CODE WHEEL and CODE, enter 1-8-2-5-7 (N).
- Play puzzle, earn KEEPER’S CAP (O).
- Give JACKET SAMPLE (P), earn LAPTOP CHARGER.
- Walk down.
- Take 4/4 SMALL BULBS (A).
- Place SMALL BULBS: take GLUE and MAILBOX FLAG (B).
- Place MAILBOX FLAG, open box, take BOX CUTTER (C).
- Use BOX CUTTER, take POWER BUTTON (D).
- Go left.
- Use LAPTOP CHARGER and POWER BUTTON (E).
- Solution (F).
- Take SMOKING PIPE and PRINTED FOOTAGE (G).
- SMOKING PIPE, KEEPER’S HAT and GLUE on INCOMPLETE FIGURINE, take KEEPER FIGURINE.
- Place KEEPER FIGURINE, take CUTTERS PART and WOODEN HAIRPIN (H).
- Walk down.
- Use WOODEN HAIRPIN and PRINTED FOOTAGE (I).
- Solution (J).
- Read note, take RUST REMOVER and POCKET KNIFE (K), earn STORAGE KEY.
- Use STORAGE KEY (L).
- Go right.
- Take FISHERMAN TROPHY (M).
- Take SCREW (N).
- Place FISHERMAN TROPHY, take CRYPTEX and SUCTION CUP (O).
- Take MACHINE PART, use SUCTION CUP and POCKET KNIFE, take MERMAID TOKEN and 2nd CUTTERS PART (P).
- SCREW, 2nd CUTTERS PART, and RUST REMOVER on CUTTERS PART, take CUTTERS.
- Use CUTTERS (Q).
- Go right.
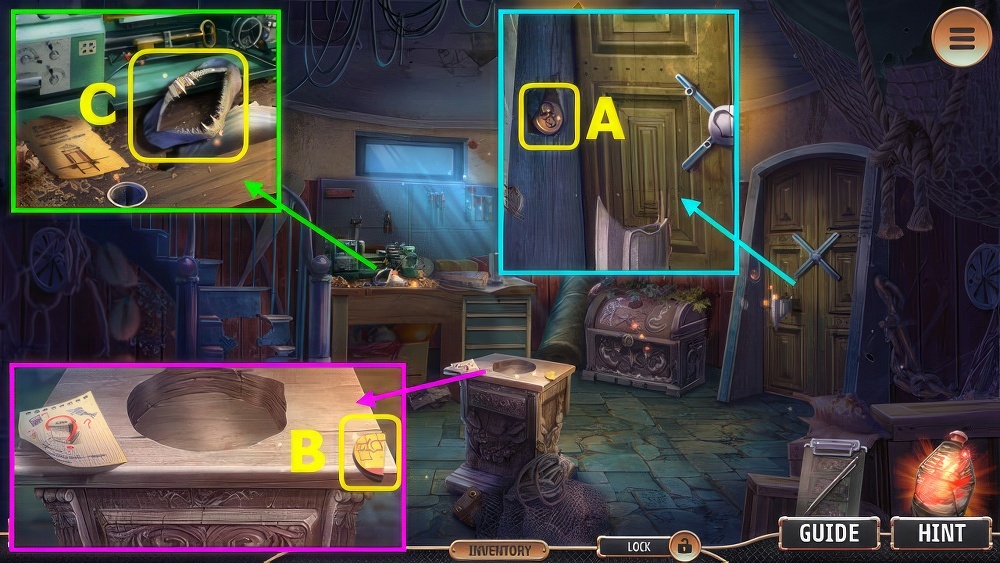
- Take CORKSCREW (A).
- Take CRANK (B).
- Use CRANK, take ROGER’S NOTE and LIGHTHOUSE TOKEN (C).
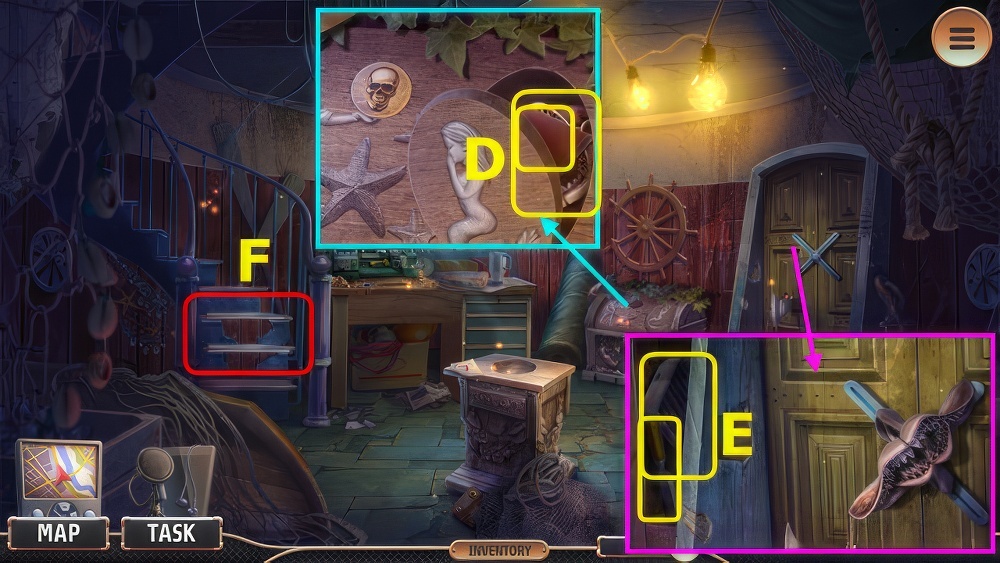
- Place LIGHTHOUSE TOKEN and MERMAID TOKEN (D).
- Play puzzle, earn CRYPTEX TILE (E).
- CRYPTEX TILE and ROGER’S NOTE on CRYPEX, select 1-4 (F), take LUCKY STAR and 1/3 MOSAIC PART.
- Go left.
- Place LUCKY STAR, take CRUMPLED MOON CALENDAR and 2/3 MOSAIC PART (G).
- Place MACHINE PART and CRUMPLED MOON CALENDAR, take MOON CALENDAR (H).
- Walk right.
- Use MOON CALENDAR (I), play puzzle, earn FISHING ROD.
- Place FISHING ROD, take BLACK SWAN and CHOPSTICKS (K).
- Use CORKSCREW and CHOPSTICKS, take 3/3 MOSAIC PARTS and BRONZE PLAQUE (L).
- Go left.
- Place MOSAIC PARTS (M).
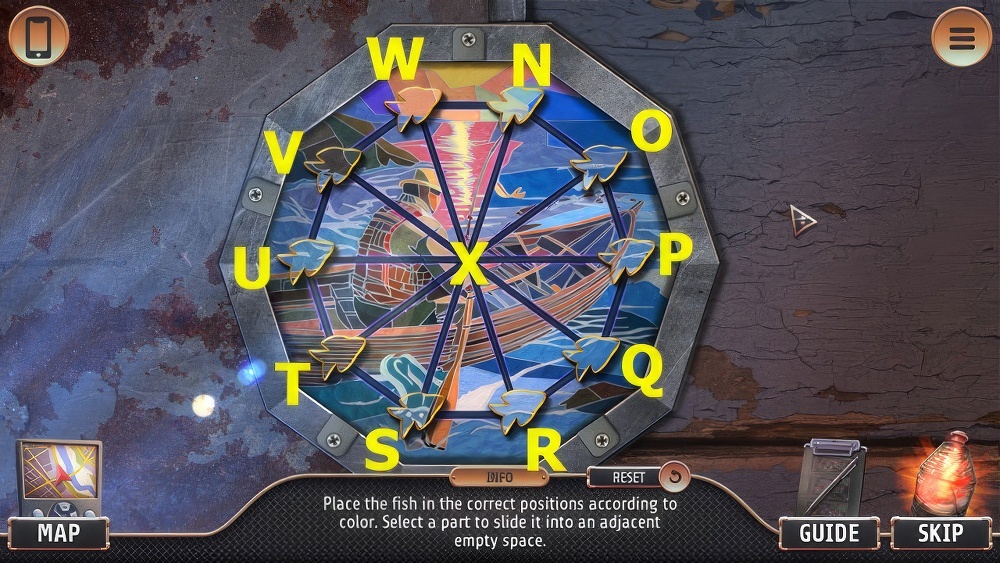
- Solution R-S-T-U-X-Q-R-S-T-U-X-W-V-X-P-O-N-W.
- X-O-N-X-U-T-S-R-Q-P-O-N-W-V-U-T-S-R-Q-P-O.
- N-W-V-U-T-S-R-Q-P-O-N-W-V-U-T-S-R-Q-P-O-X.
- Go forward.
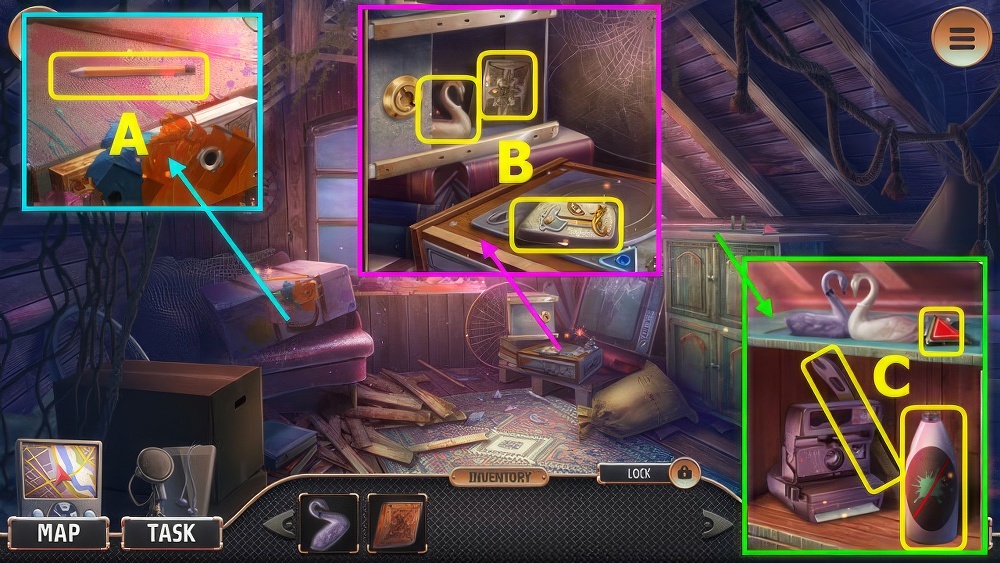
- Take PENCIL (A).
- Use PENCIL, take WHITE SWAN, SILVER PLAQUE and CIGARETTE CASE (B).
- Take TRIANGLE BUTTON, place BLACK SWAN and WHITE SWAN, take SOLVENT and CROWBAR (C).
- Walk down and right.
- Use CROWBAR, take WAX and RAZOR BLADE (D).
- Use RAZOR BLADE (E), play puzzle, earn SAILOR TOKEN.
- SAILOR TOKEN and WAX on CIGARETTE CASE, take ROGER’S HANDKERCHIEF and ROGER’S RING.
- Go left, forward.
- Use SOLVENT, ROGER’S HANDKERCHIEF, BRONZE PLAQUE, and SILVER PLAQUE (F).
- Play puzzle, earn VINYL RECORD (G).
- Place TRIANGLE BUTTON and VINYL RECORD, take BOY ANGEL STATUETTE and TWEEZERS (H).
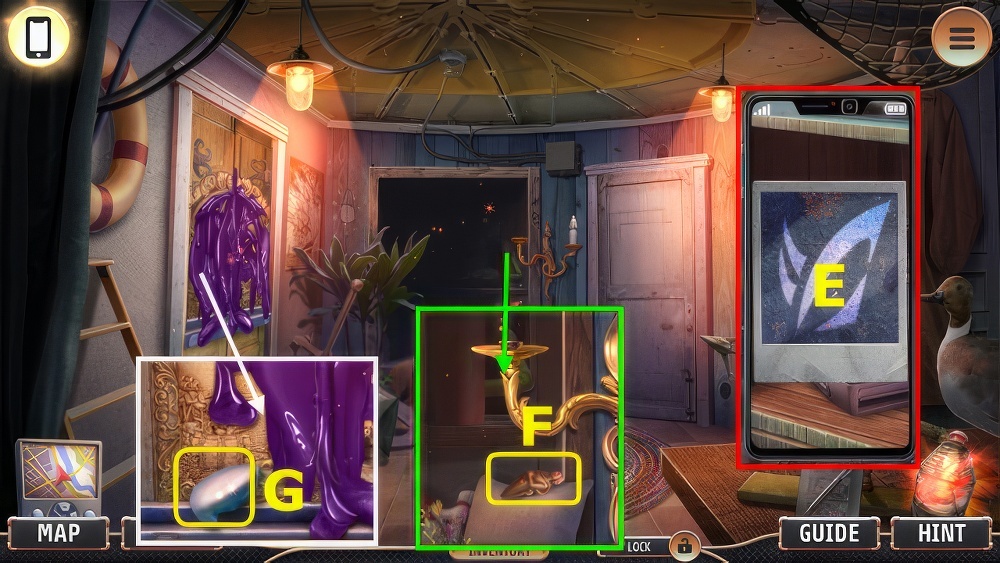
- Use TWEEZERS, select (I), use cellphone to take photo, take SYMBOL PHOTO.
- Select cellphone, select (Jx2).

- Give SYMBOL PHOTO (L), earn CERAMIC HEART.
- Take RULER (M).
- Use RULER, take ROGER’S WATCH and BROKEN LIGHTER (N).
- Place ROGER’S WATCH and ROGER’S RING, take WICK and GIRL ANGEL STATUETTE (O).
- Place GIRL ANGEL STATUETTE, BOY ANGEL STATUETTE, and CERAMIC HEART, take CATHERINE’S BRACELET (P).
- Select cellphone.
- Solution A-B-C-D.
- Select cellphone, select (E).
- Take 1/3 SHIP PART (F).
- Take SAILOR HAT (G).
- Place SAILOR HAT, take CONTROL LEVER, LIGHTBULB, and TENTACLE (H).
- Place LIGHTBULB, take LIGHTER FLUID and BROKEN CUTTING TOOL (I).
- LIGHTER FLUID and WICK on BROKEN LIGHTER, take LIGHTER.
- Use LIGHTER (J), play puzzle.
- Go left.
- Read note, take SPRAYER (N).
- Take KEEPER’S BELT (O).
- Take FUGU FISH (P).
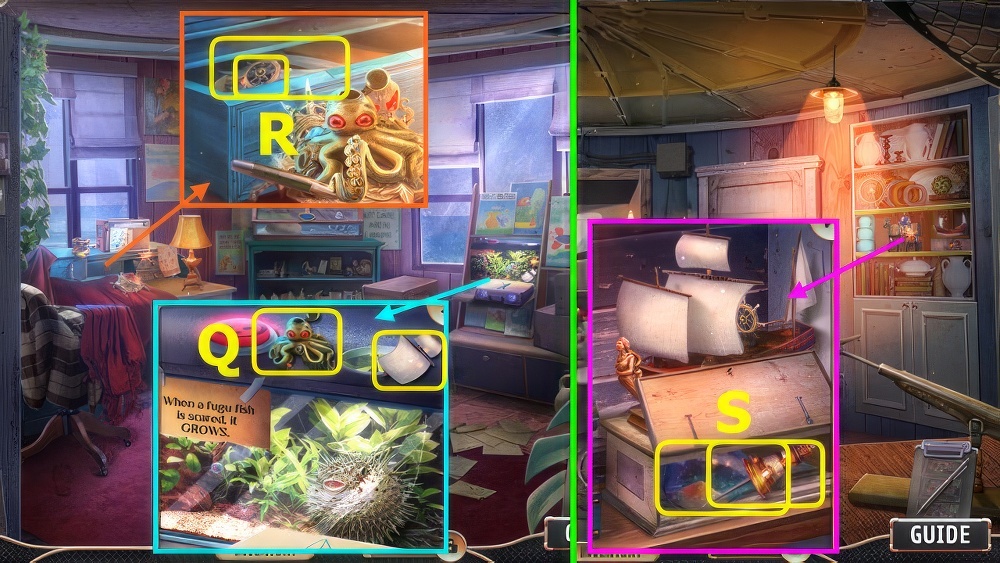
- Place FUGU FISH, press button, take INKWELL and 2/3 SHIP PART (Q).
- Place INKWELL and TENTACLE, take 3/3 SHIP PARTS and BLADES (R).
- Walk down.
- Place SHIP PARTS, take LIGHTHOUSE BROOCH and DIRTY BOTTLE (S).
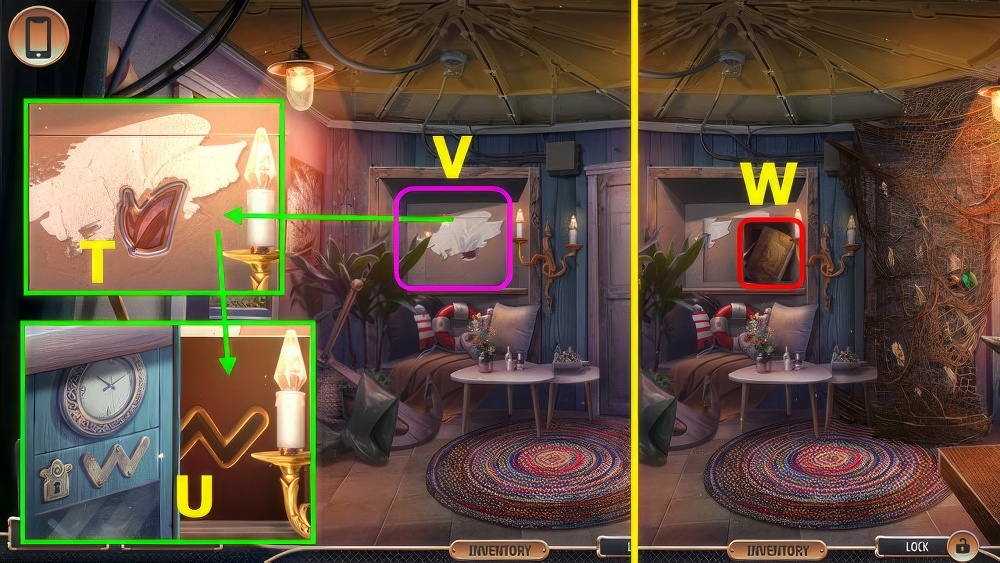
- Use LIGHTHOUSE BROOCH and CATHERINE’S BRACELET (T).
- Use cellphone to compare photo (U).
- Play puzzle, earn DECODER (V).
- Select (W).
- Go left.
- Place DECODER, select 1-5 (A).
- Set solution (B).
- Take BOLTS and GLASSES FRAME (C).
- BLADES, KEEPER’S BELT, CONTROL LEVER, and BOLTS on BROKEN CUTTING TOOL, take LONG CUTTERS.
- Walk down.
- Use LONG CUTTERS (D).
- Take ROPE and GREEN LENS (E).
- Go forward.
- Take 1/5 SMALL ANCHOR (F).
- Take FISHING HOOK (G).
- Take SPOOL (H).
- Use FISHING HOOK (I).
- Select Kx3-L-Jx10-L, earn 2/5 SMALL ANCHOR and MEDALLION.
- Go forward, left.
- Place MEDALLION, take 3/5 SMALL ANCHOR and CHISEL (M).
- SPRAYER and CHISEL on DIRTY BOTTLE, take BOTTLED LIGHTHOUSE.
- Place BOTTLED LIGHTHOUSE (N).
- Solution (O-P-Q).
- Take CLOCK KEY and JONATHAN’S ID (R).
- Walk down and forward.
- Use JONATHAN’S ID (S).
- Select notebook, use cellphone to take photo (T), earn JONATHAN’S NOTEBOOK.
- Take 4/5 SMALL ANCHOR (U).
- Use JONATHAN’S NOTEBOOK, take BLOWGUN PART and ELECTRIC WINCH (V).
- Use ELECTRIC WINCH, SPOOL, and ROPE (W).
- Go left (X).
- Take CATALOG INSTRUCTIONS and 2nd BLOWGUN PART (A).
- Take BEAR LATCH, place CATALOG INSTRUCTIONS, take 5/5 SMALL ANCHORS and RED LENS (B).
- GREEN LENS and RED LENS on GLASSES FRAMES, take GOLD DIGGER’S GLASSES.
- Walk down, forward, and left.
- Use SMALL ANCHORS and GOLD DIGGER’S GLASSES, play puzzle, take WEALTHY FIGURINE and RACCOON LATCH (C).
- Place RACCOON LATCH and BEAR LATCH, select note, take photo with cellphone, take EMPTY DART and STICKY MIRROR (D).
- Walk down and forward.
- Place STICKY MIRROR, select 5-2-9-4 (E).
- Play puzzle, earn ODD SYMBOL (F).
- Go left.
- Place ODD SYMBOL, take ELEPHANT PART and TREASURE FIGURINE (G).
- Place WEALTHY FIGURINE and TREASURE FIGURINE, take CIGARETTE HOLDER and BUTTON (H).
- 2nd BLOWGUN PART, EMPTY DART, and CIGARETTE HOLDER on BLOWGUN PART, take LOADED BLOWGUN.
- Use LOADED BLOWGUN (I).
- Use CLOCK KEY, take DIAL AND BROKEN KEY, use cellphone to take photo (J).
- Solution K-L-M-N.
- Place DIAL (O).
- Go left.
- This mini-game is randomly generated, your solution may vary.
- Our solution (P).
- Take PIRATE COIN (A).
- Read note, take 1/4 TILE (B).
- Read note, take EEL FANGS (C).
- Place PIRATE COIN, read note, take PANEL PICTURE and SHARK FANGS (D).
- SHARK FANGS and EEL FANGS on BROKEN KEY, take TOOTHY KEY.
- Place TOOTHY KEY, take CHISEL and STEPS (E).
- Place STEPS (F).
- Go left.
- Take GLUE (G).
- Use GLUE and ELEPHANT PART, take 2/4 TILE and KEY INSTRUCTIONS (H).
- Select paper, take CIRCULAR SAW (I).
- Walk down.
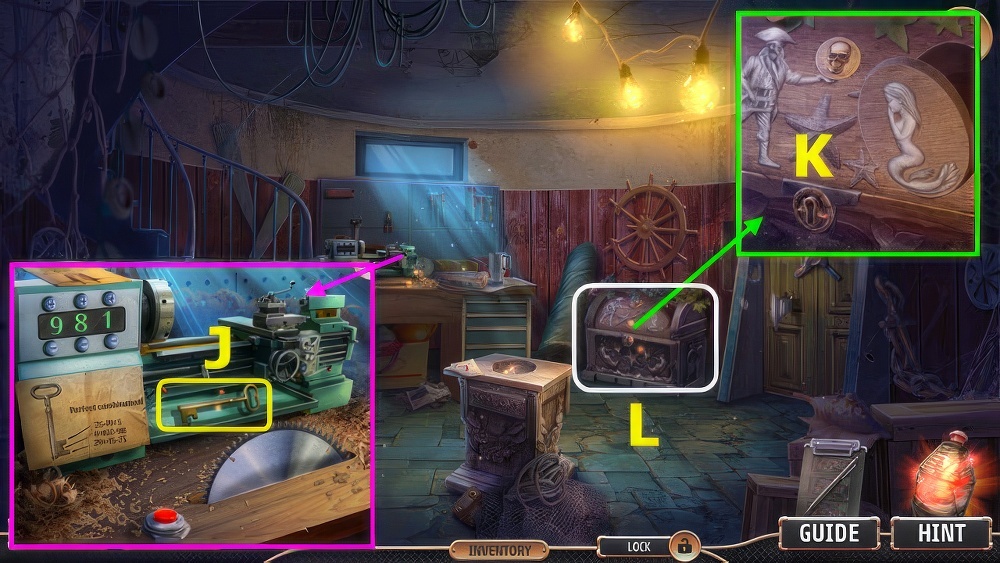
- Place BUTTON, CIRCULAR SAW, and KEY INSTRUCTIONS, set numbers 9-8-1, take ANCIENT KEY (J).
- Use ANCIENT KEY (K).
- Play puzzle, earn ANCIENT CORAL (L).
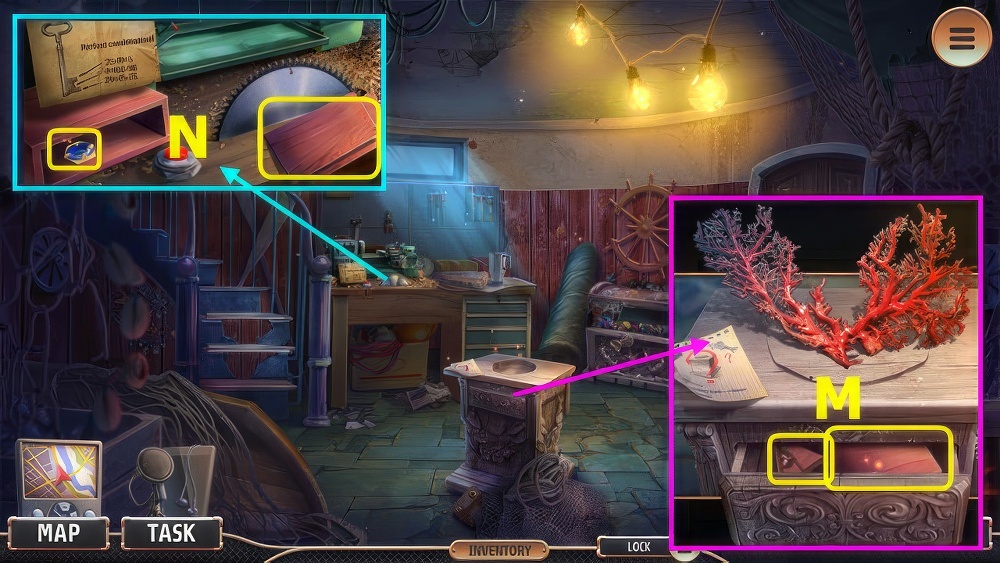
- Place ANCIENT CORAL, take 3/4 TILE and STRANGE CHEST (M).
- Use STRANGE CHEST, take ANCIENT SAPPHIRE and MAHOGANY (N).
- Go left.
- Place ANCIENT SAPPHIRE, solution (O).
- Take ROCKS and WOOD STAIN SET (P).
- Place ROCKS, take DRAWINGS and 4/4 TILES (Q).
- DRAWINGS, MAHOGANY, CHISEL, and WOOD STAIN SET on PANEL PICTURE, take PICTURE PANEL.
- Place PICTURE PANEL and TILES (R).

- Solution A-B-C-D.
- Walkthrough Bonus Chapter, at the link below.


