
Labyrinths of the World 10: Fool’s Gold (Bonus Chapter) – Forces us to persecute us another greedy and lost Lepreon named Aaron. You will play for Cedric before he became an elder, trying to disrupt the vile plans of Aaron to recreate an artifact of enormous power. Below you can see the walkthrough of the bonus chapter.
Bonus Chapter Walkthrough
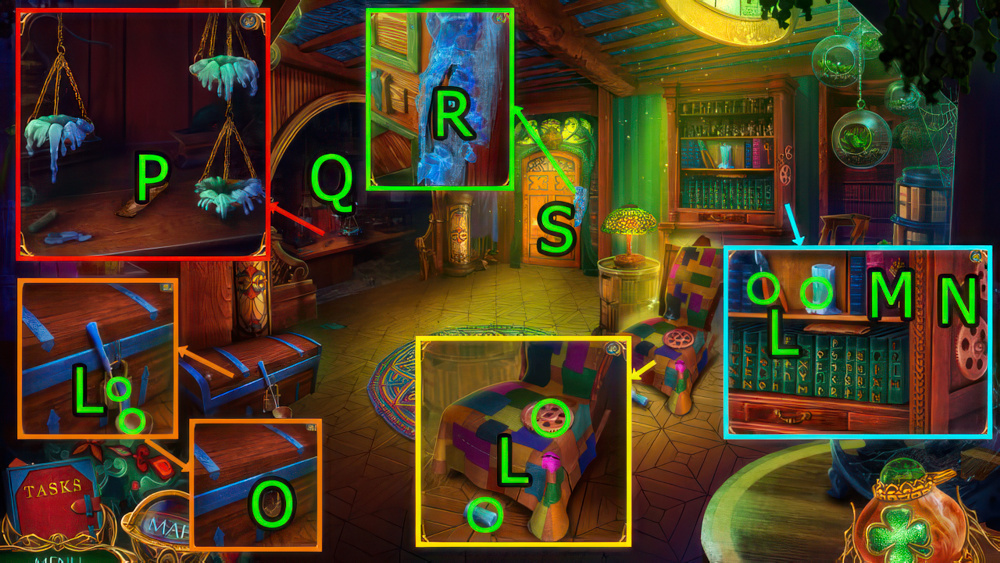
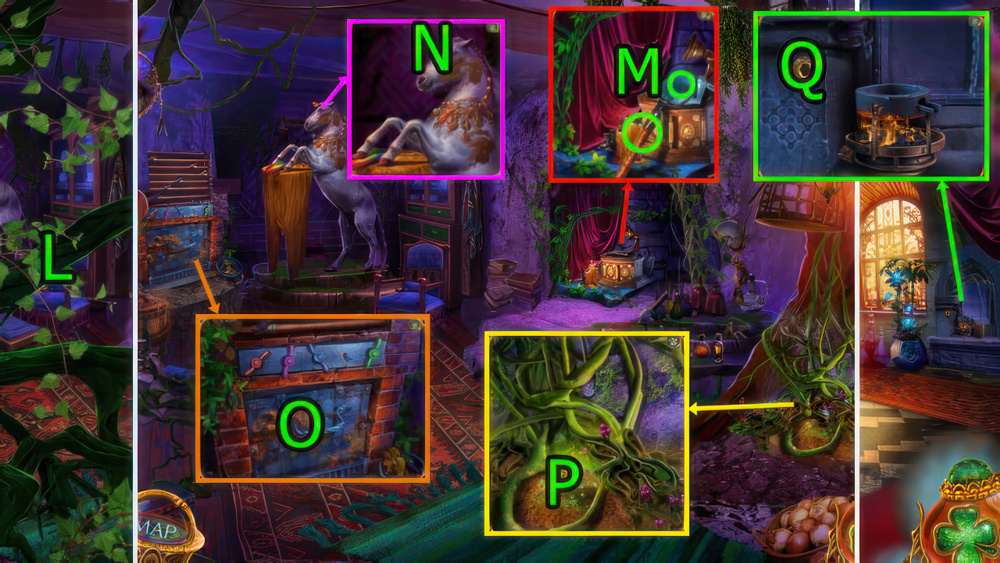
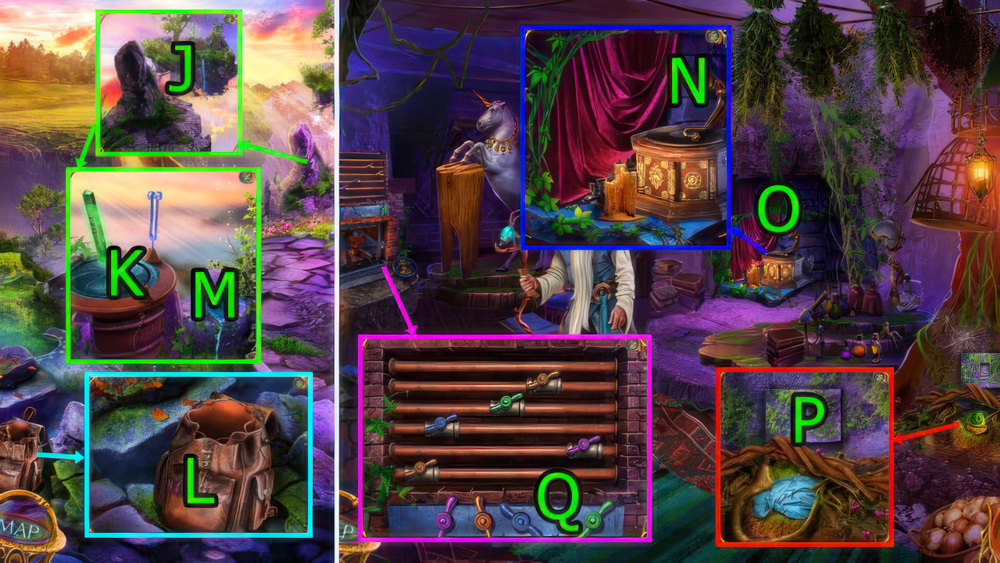
- Get LADLE, MAGNET, CANDLES (1/3), PLIERS, CANDLES (2/3), and GEAR (L).
- Press (M) and use GEAR on (N).
- Press (M), get TWISTED NAIL.
- Use TWISTED NAIL on (O), get GRAPPLING HOOK, MATCH, and CANDLES (3/3).
- Use CANDLES (3/3) and MATCH on (P).
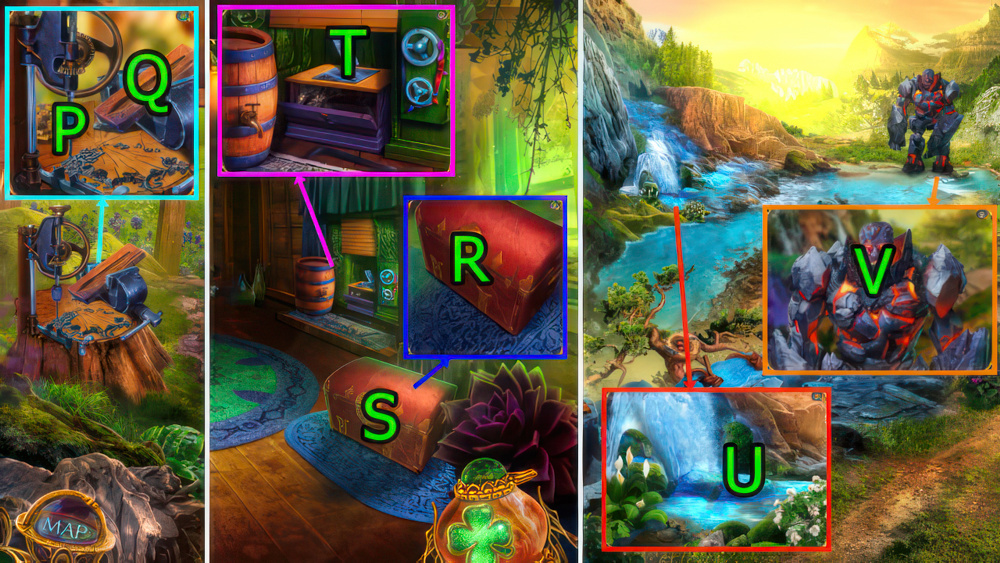
- Solve puzzle (Q), get FIRECRACKER.
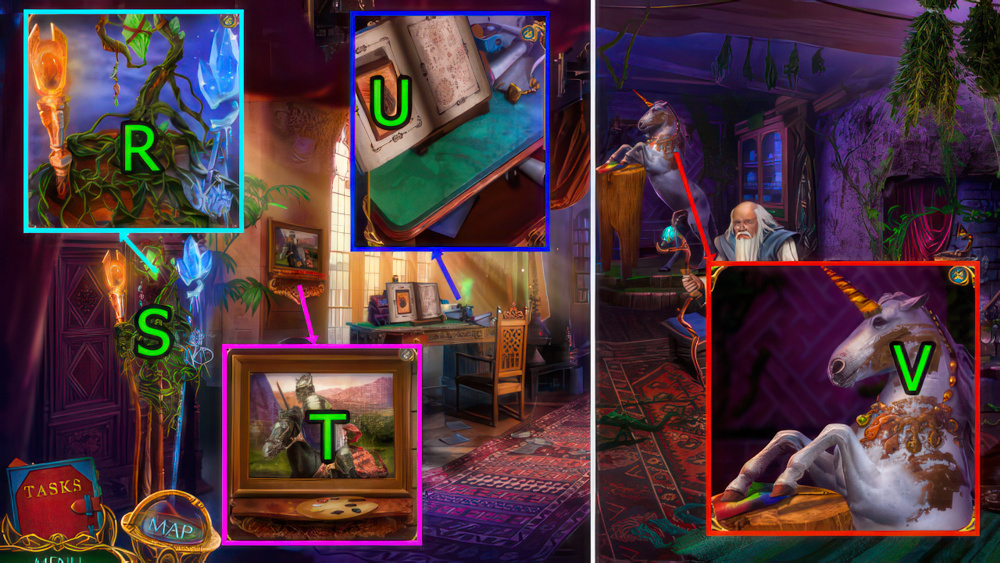
- Use FIRECRACKER on (R).
- Go (S).

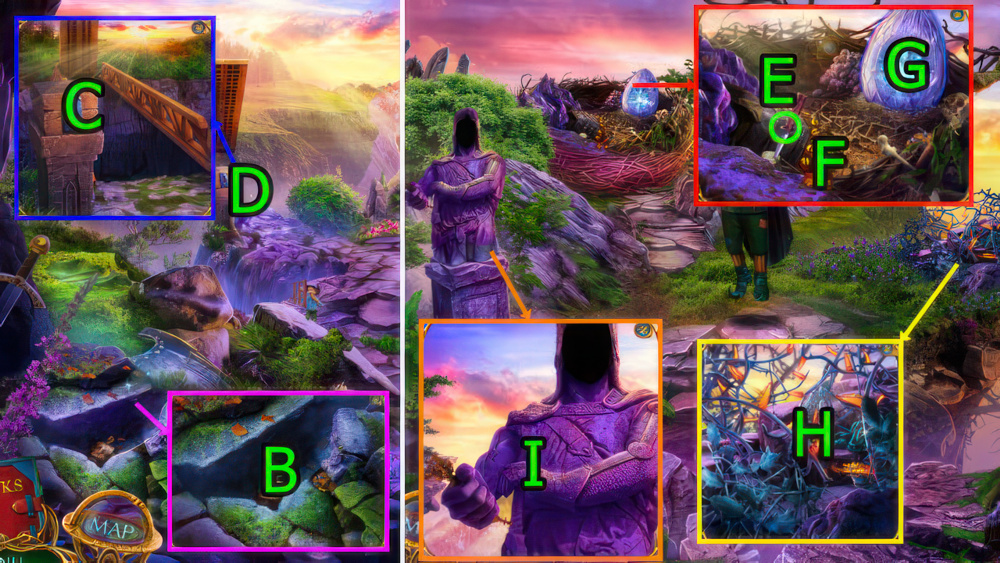
- Get EMPTY FLASK and RIBBONS (1/3) (T).
- Use LADLE on (U), get RIBBONS (2/3) and BARRETTE.
- Use PLIERS on (V), get TWEEZERS.
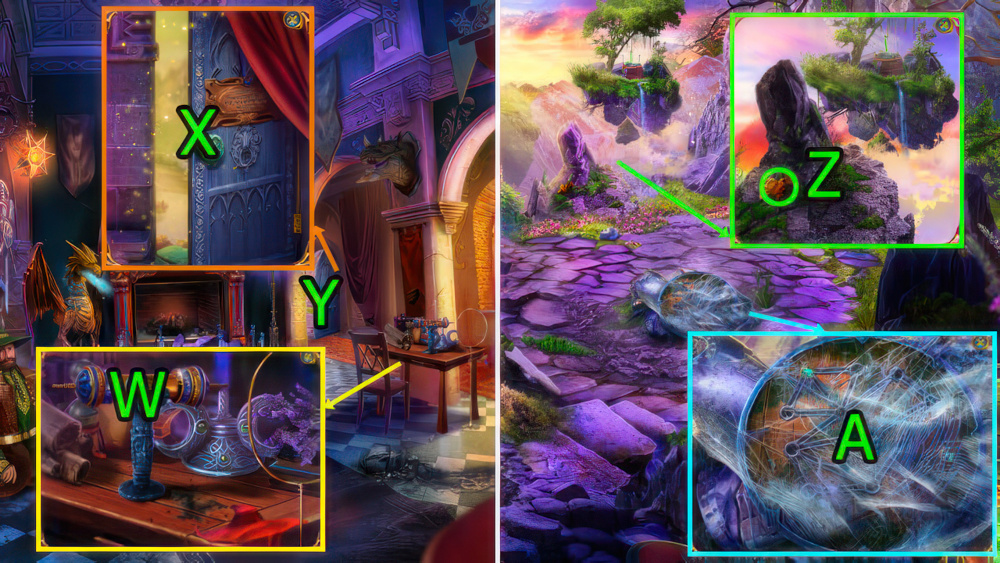
- Use GRAPPLING HOOK on (W), get SAW.
- Use SAW and BARRETTE on (X).
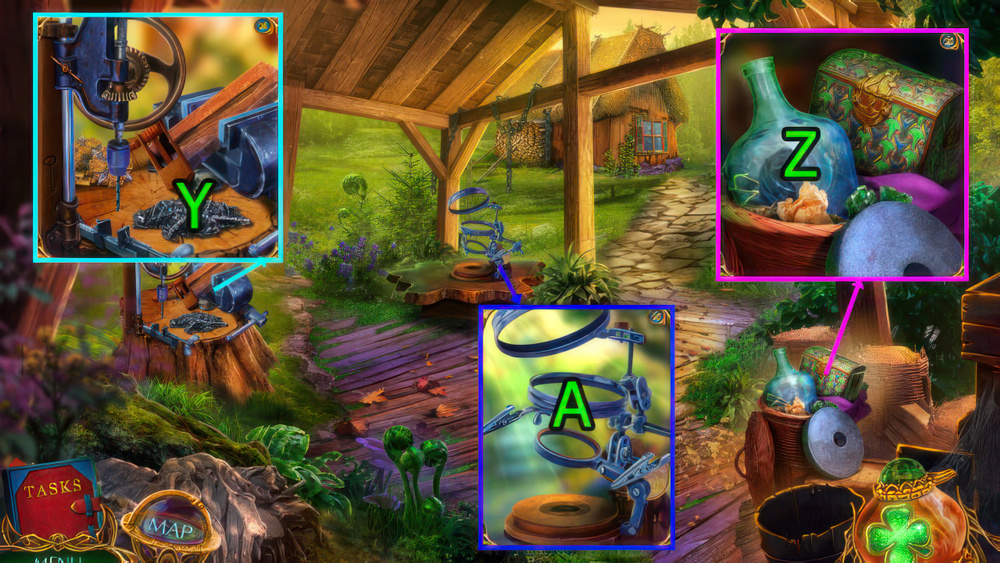
- Go (Y).
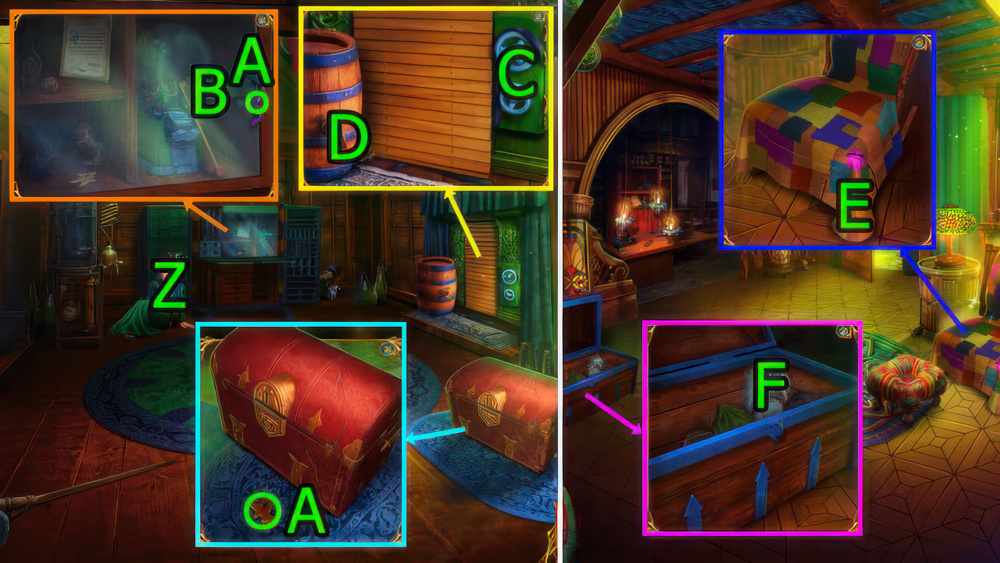
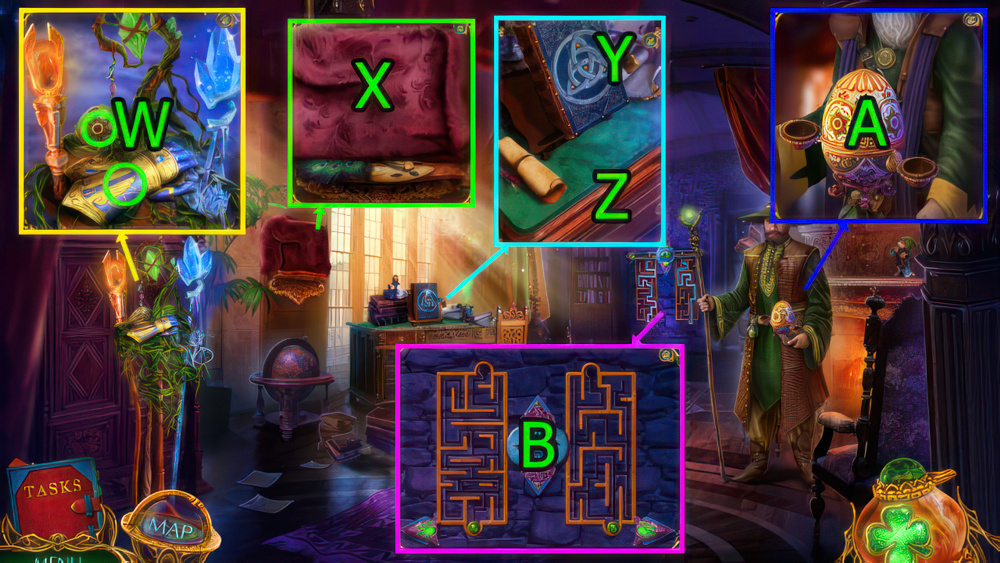
- Press (Z).
- Get RUNES (1/4) and RIBBONS (3/3) (A).
- Use MAGNET on (B), get RUNES (2/4) and XYLOPHONE HAMMER.
- Use RIBBONS (3/3) on (C), get SHOE WITH SPUR.
- Use EMPTY FLASK on (D), get SOLVENT.
- Go Outside the Academy.
- Use SHOE WITH SPUR on (E), get CLOTH.
- Use SOLVENT on (E), get RUNES (3/4) and GLUE.
- Use TWEEZERS on (E), get NUT.
- Use CLOTH and press (Fx2), get SUPER VISION GLASSES.
- Go Leprechaun Village.

- Use NUT on (G), get PEGS.
- Use SUPER VISION GLASSES on (H).
- Use XYLOPHONE HAMMER on (I).
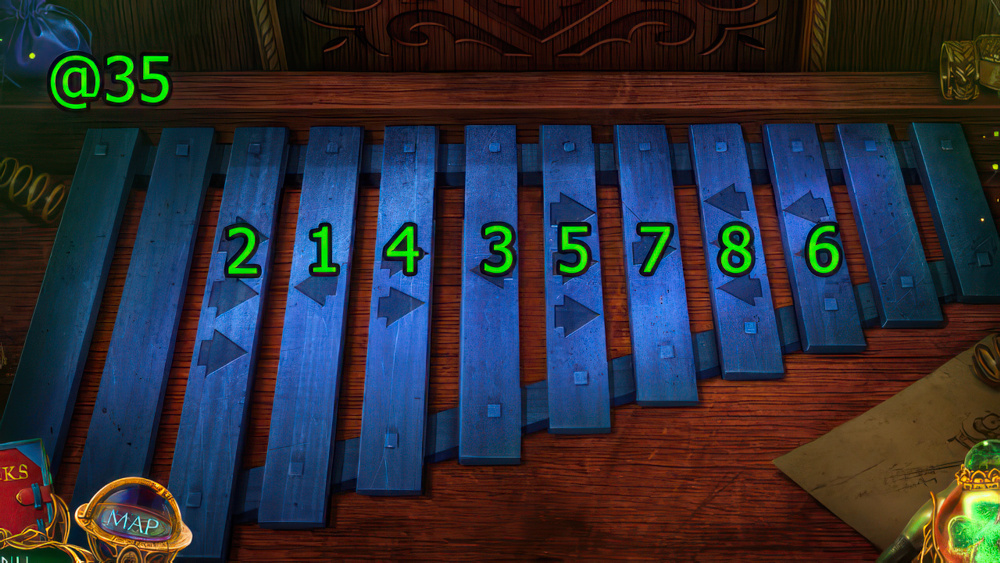
- Easy Solution (@35): Press (1-2-3-4-5-6-7-8).
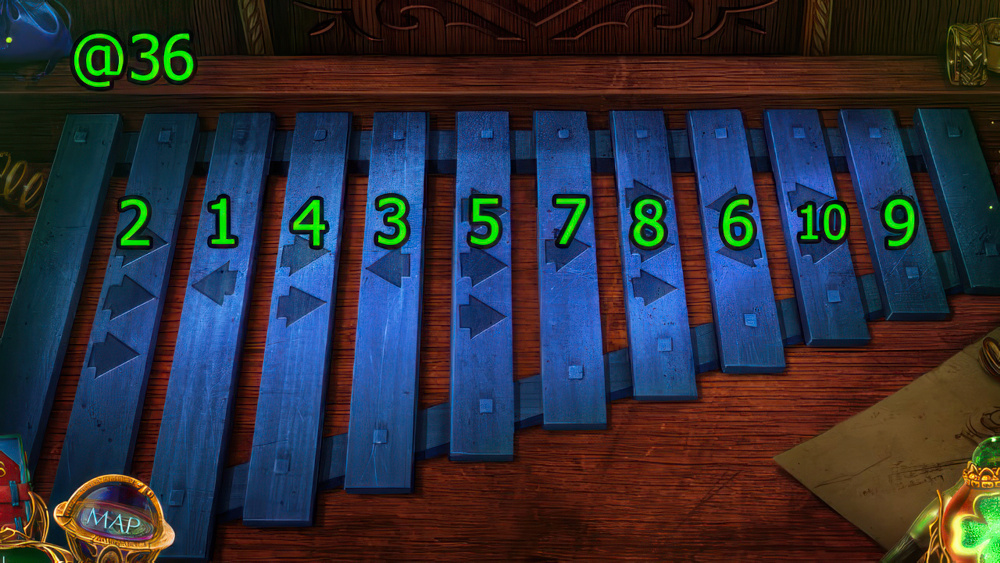
- Hard Solution (@36): Press (1-2-3-4-5-6-7-8-9-10).
- Get REVIVING WATER.
- Go Kyannate’s House.
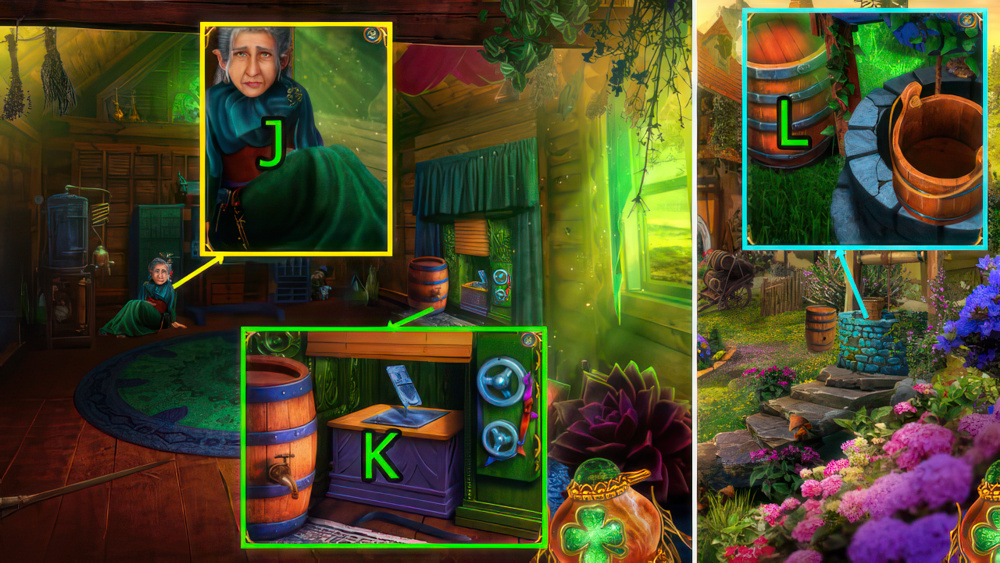
- Use REVIVING WATER on (J), get FAIRY AMULET.
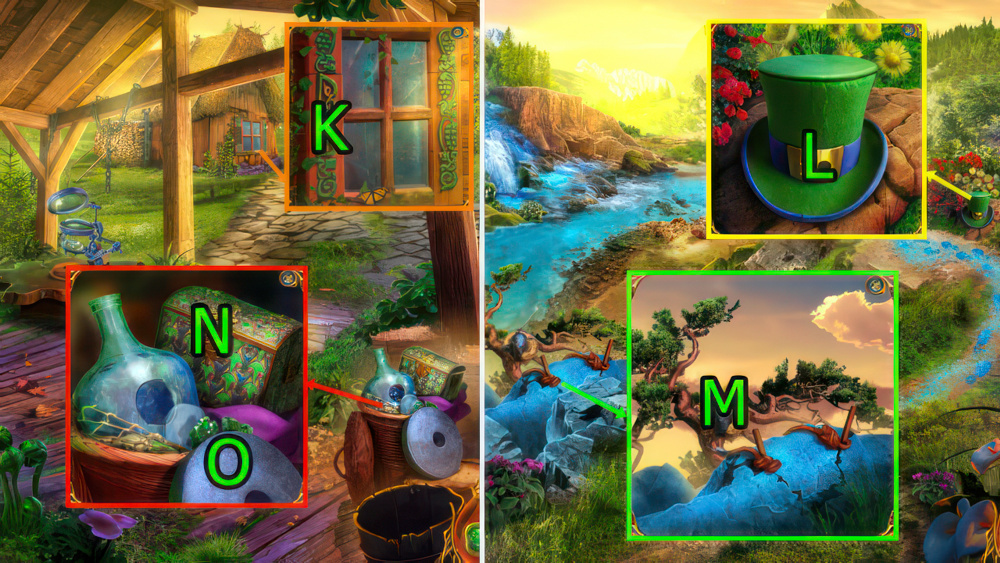
- Use FAIRY AMULET on (K), get BELLOWS and RUNES (4/4).
- Go Leprechaun Village.
- Use BELLOWS on (L), get ROPE LADDER and SCEPTER.
- Go Outside the Academy.
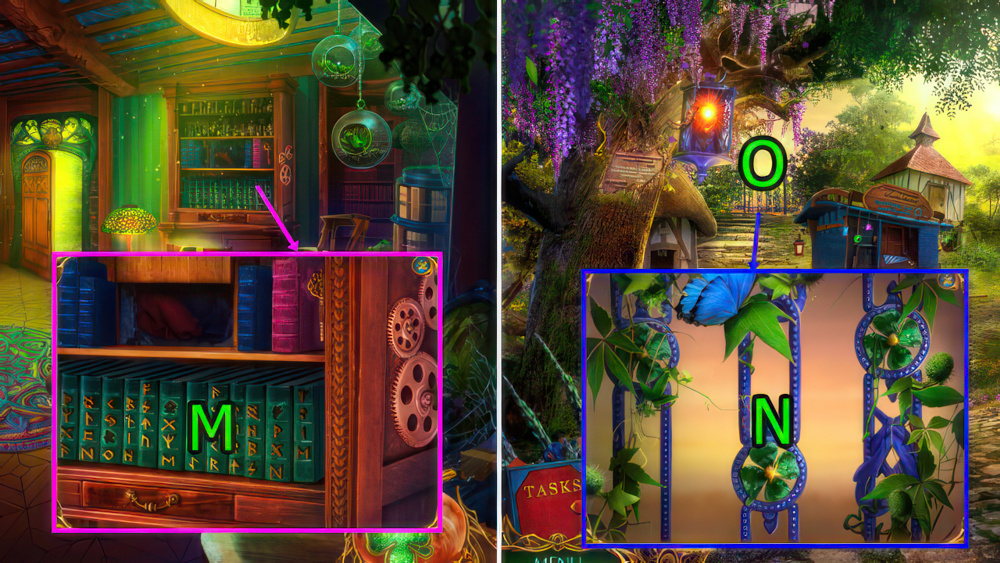
- Use RUNES (4/4) on (M), get ROPE and SHARP SHELL.
- Go Leprechaun Village.
- Use ROPE and SCEPTER on (N).
- Go (O).
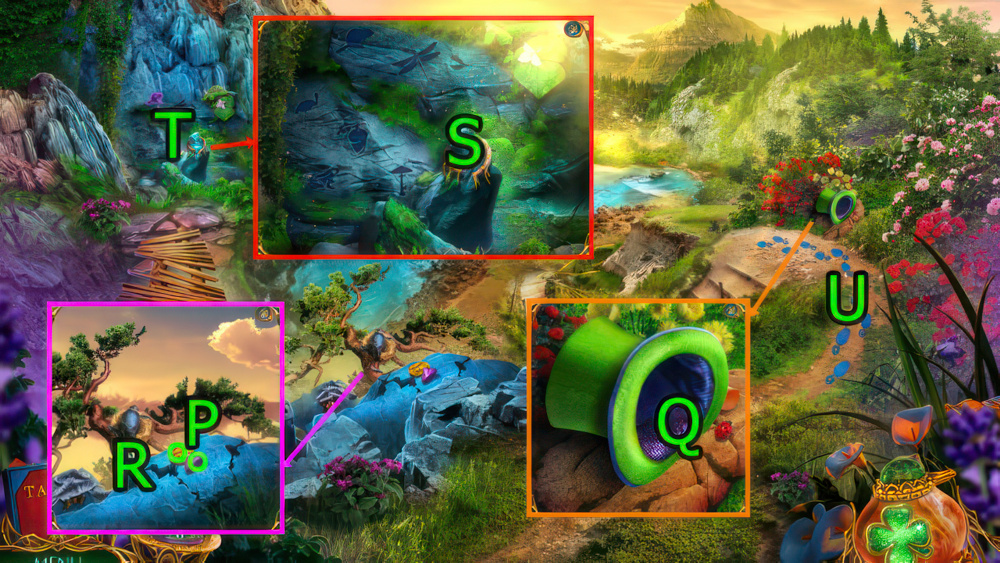
- Get COIN and DIAMOND (P).
- Use SHARP SHELL on (Q), get BROKEN STATUETTE and LENSES (1/3).
- Use PEGS and ROPE LADDER on (R), get FEATHER DUSTER and NECKLACE.
- Press and use NECKLACE on (S).
- Solve puzzle (T), get GLITTERING POWDER.
- Use GLITTERING POWDER on (U).
- Go Kyannate’s House.
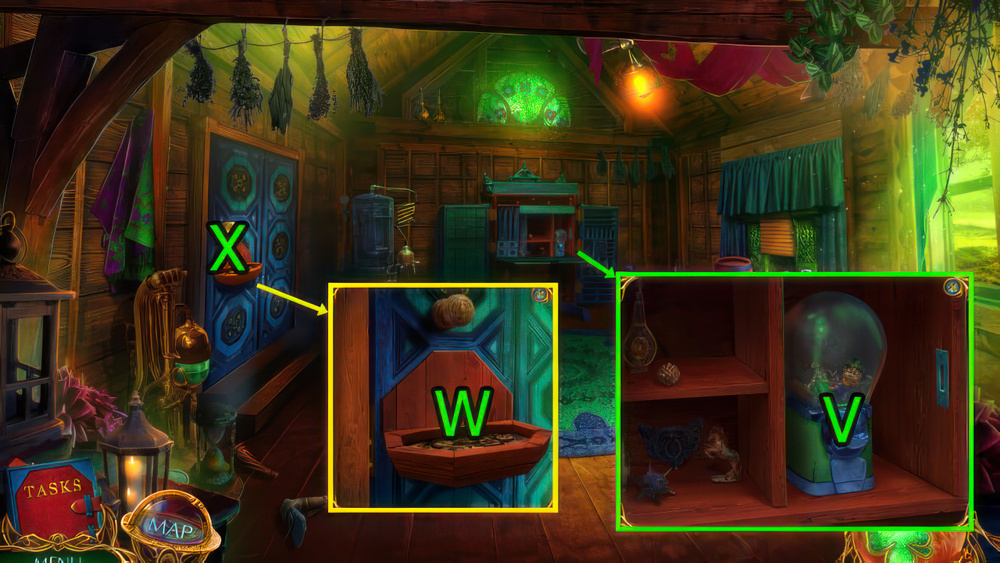
- Use COIN on (V), get CLOVER INLAY and FIGURINE PART.
- GLUE and FIGURINE PART on BROKEN STATUETTE, get LEPRECHAUN STATUETTE.
- Use LEPRECHAUN STATUETTE on (W).
- Go (X).
- Use FEATHER DUSTER on (Y), get RING WITH ENGRAVING, NOISEMAKER, and LENSES (2/3).
- Use DIAMOND on (Z), get LENSES (3/3) and BLACK SILK.
- Use LENSES (3/3) and RING WITH ENGRAVING on (A).
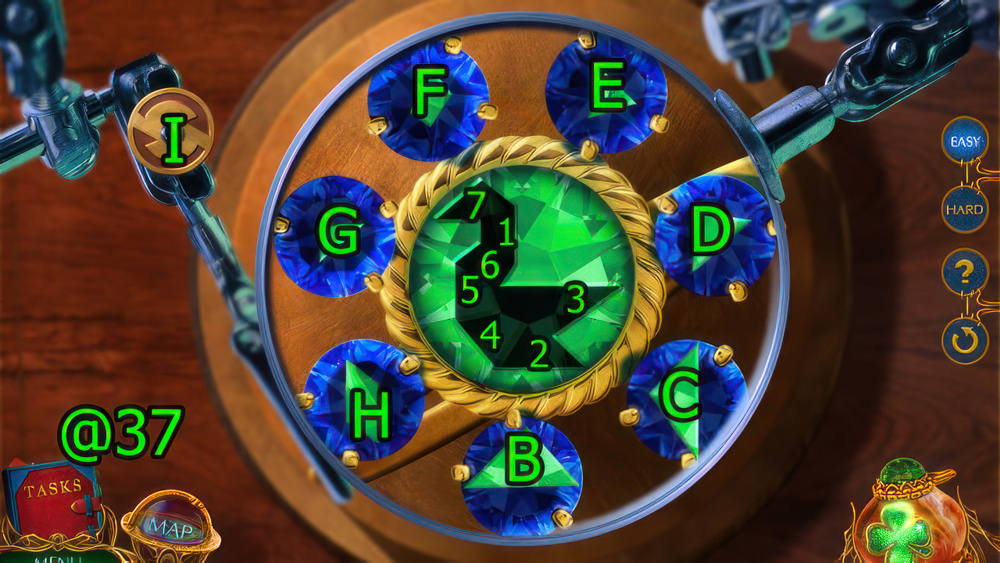
- Easy Solution (@37): Drag (H-1), press (Ix4), drag (G-7), press (I), drag (E-5)-(C-3), press (I) drag (D-4).
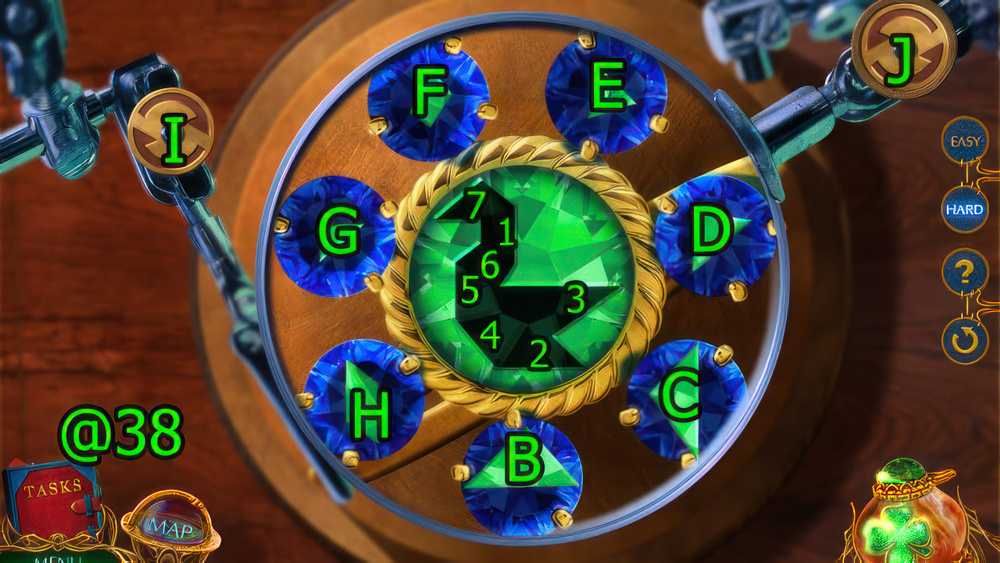
- Hard Solution (@38): Drag (H-1), press (Jx2), drag (C-3), press (J), drag (E-5), press (J), drag (G-7), press (Ix5), drag (B-2), press (I), drag (F-6), press (I), drag (D-4).
- Get WINDOW CACHE SKETCH.
- Use WINDOW CACHE SKETCH on (K), get UNFINISHED KEY.
- Go Edge of the World.
- Use CLOVER INLAY on (L), get NEEDLE AND THREAD.
- Use NOISEMAKER on (M), get METAL RIM and RUSTY ARROW TIP.
- BLACK SILK and NEEDLE AND THREAD on METAL RIM, get LIGHT ABSORBER.
- Go Kyannate’s Workshop.
- Press and use LIGHT ABSORBER on (N), get GLASS SHARD, HANDLE, and KEY SCHEME.
- Use RUSTY ARROW TIP on (O), get SHARP ARROW TIP.
- Use UNFINISHED KEY and KEY SCHEME on (P), get CRAFTED KEY.
- Use SHARP ARROW TIP on (Q), get ARROW TIP MOLD.
- Go Kyannate’s House.
- Use CRAFTED KEY on (R).
- Solve puzzle (S), get CRYSTAL SHOE.
- Use CRYSTAL SHOE on (T), get PINCERS and COOLING CRYSTAL.
- Go Edge of the World.
- Use ARROW TIP MOLD and COOLING CRYSTAL on (U), get ICE LANCE.
- Use ICE LANCE on (V).
- Get ENCHANTED GLOVES and ORNATE INLAYS (1/2) (W).
- Use GLASS SHARD on (X), get FAN.
- Use PINCERS on (Y), get HORN.
- Use HANDLE on (Z), get ORNATE INLAYS (2/2) and STAFF PART.
- Use ORNATE INLAYS (2/2) on (A), get ENERGY AMULET.
- Use ENERGY AMULET on (B).
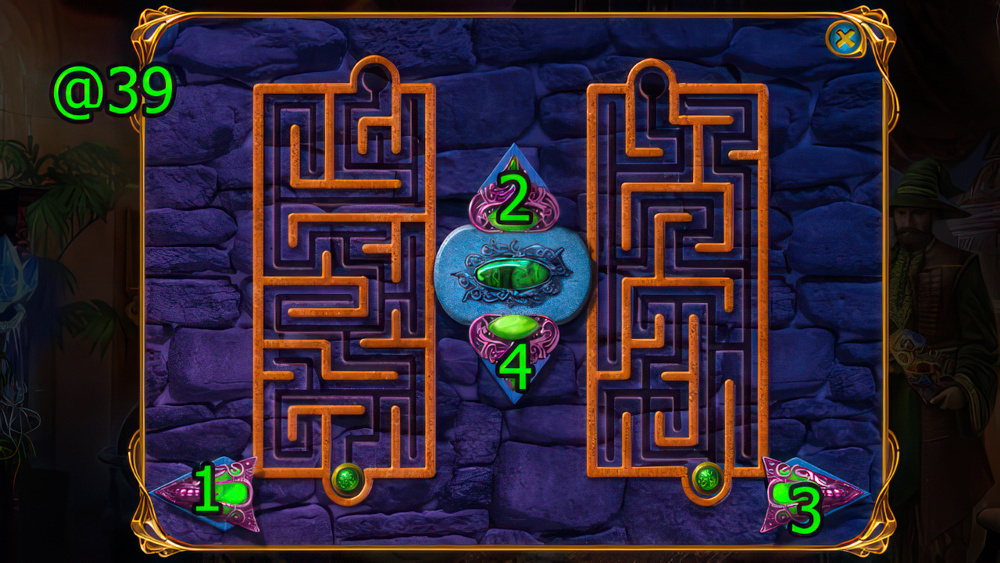
- Easy Solution (@39): Press (2-3-2-3-2-1-2-1-4-1-2)-(3-2-1-2-4-1-2-3)-(2-1-2-3-2).
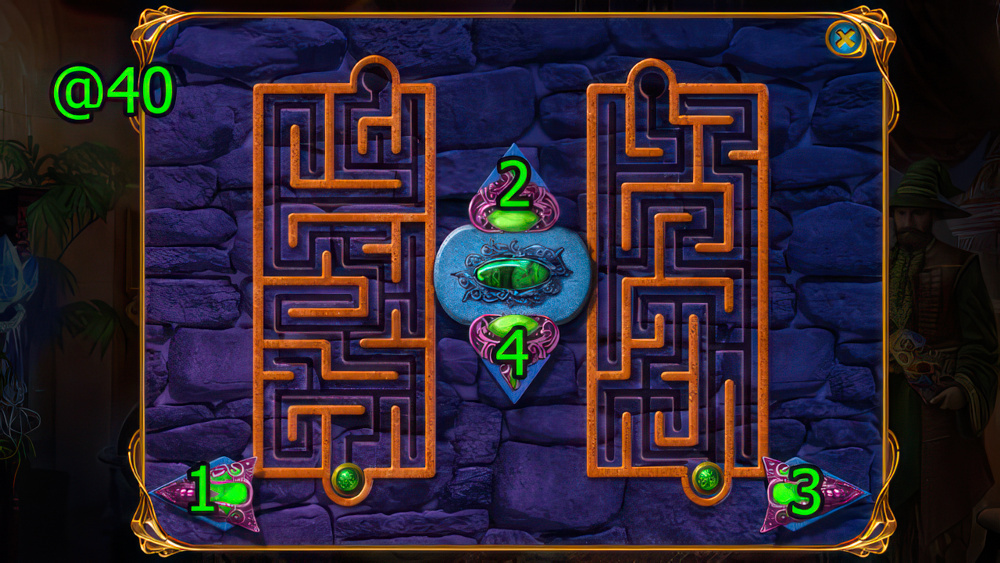
- Hard Solution (@40): Press (2-3-2-3-2-1-2-3-2×2)-(1-2-1-4-1-2-3)-(2-1×2-2-3-2).

- Go (C).
- Get BRUSH and STAFF PIECE (D).
- Use ENCHANTED GLOVES on (E).

- Easy Solution (@41): Press (1-2)-(3-4)-(5-6)-(7-8)-(9-10).
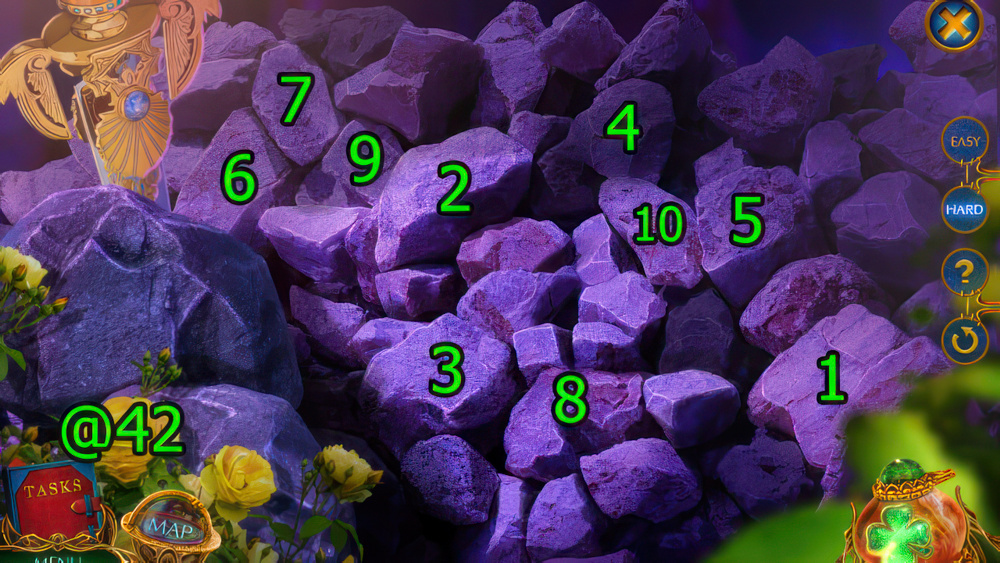
- Hard Solution (@42): Press (1-9)-(2-10)-(4-8)-(5-7)-(3-6).
- Get MAGIC DAGGER.

- Use MAGIC DAGGER on (F), get FLINT AND STEEL.
- Use PINCERS on (G), get FIRECRACKER.
- Use FAN on (H), get CONNECTING RING.
- Use FLINT AND STEEL and FIRECRACKER on (I), get COMB and FOIL.
- STAFF PIECE and CONNECTING RING on STAFF PART, get STRONG STAFF.
- Use STRONG STAFF on (J), get ACID POTION.
- Go (K).
- Use MAGIC DAGGER on (L).
- Get OVEN FORK and VISOR (M).
- Use HORN on (N), get SIGNET.
- Use ACID POTION on (O), get GARDEN SHEARS.
- Use OVEN FORK on (O), get WATER.
- Use VISOR on (P), get TALYESIN FIGURINE.
- Use FOIL on (P), get STAFF RESTORATION SPELL.
- Go Trophy Hall.
- Use SIGNET on (Q).
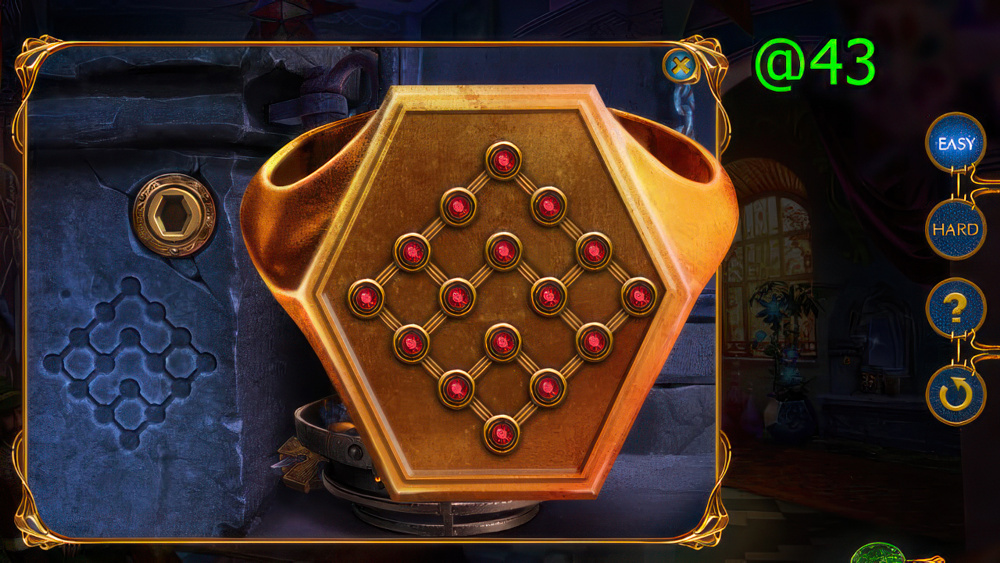
- Easy Solution (@43).
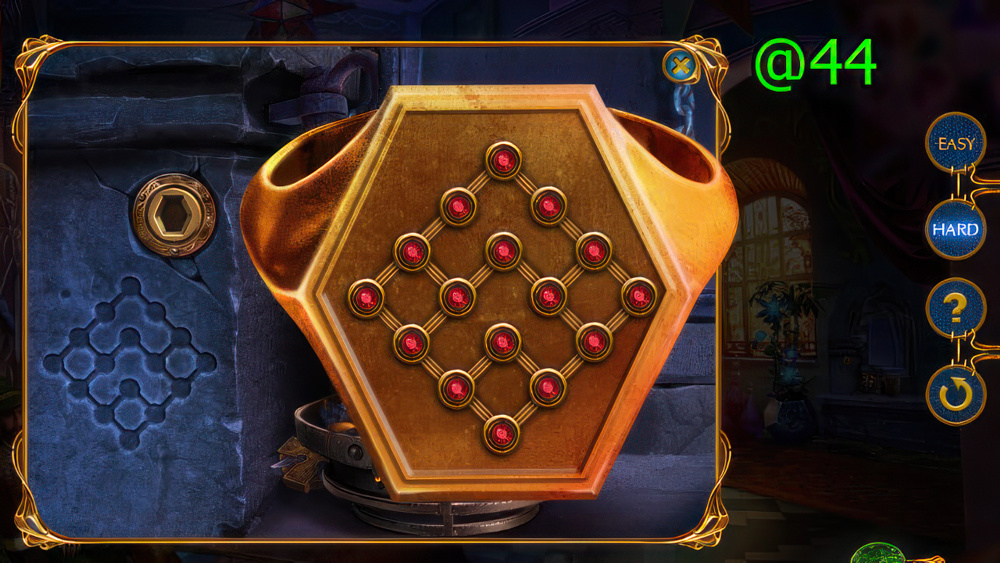
- Hard Solution (@44).
- Get LITTLE KEY.
- Go Wizards’ School.
- Use GARDEN SHEARS on (R).
- Solve puzzle (S), get MAGIC PAINTS.
- Use BRUSH and MAGIC PAINTS on (T), get ROUGH BRUSH.
- Use COMB on (T), get MERLIN FIGURINE and STAFF PART.
- Use LITTLE KEY and press (Ux2), get DRAGONFIGHTER’S CLOAK and GOLDEN POMMEL.
- Go Talyesin’s Hut.
- Use WATER and ROUGH BRUSH on (V), get DUSTER.
- Go Trophy Hall.
- Use TALYESIN FIGURINE and MERLIN FIGURINE and press (W), get MAP.
- Use MAP on (X).
- Go (Y).
- Get FLAT MEDAL (Z).
- Use DUSTER on (A).
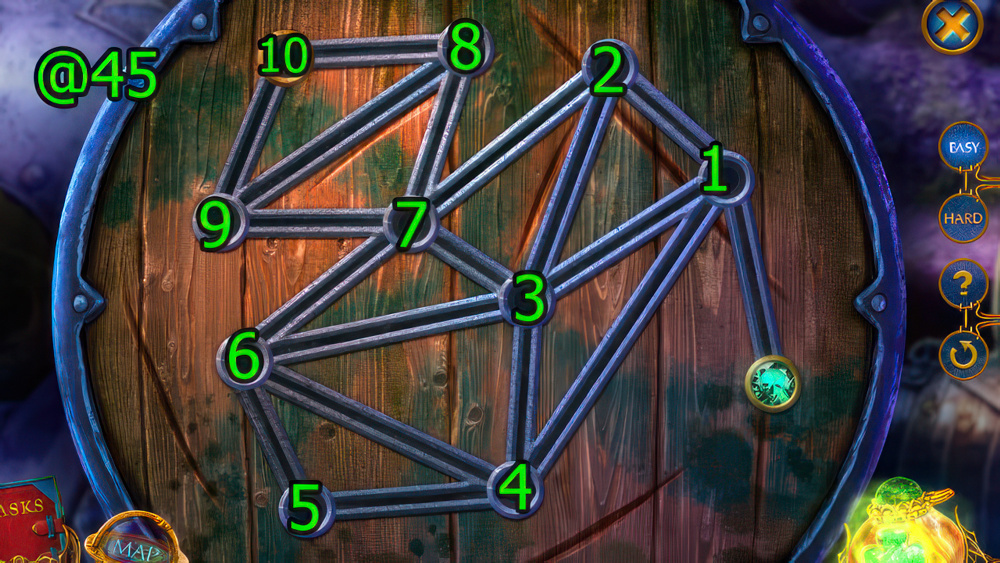
- Easy Solution (@45): Press (1-2-3-4-5-6-7-8-9-10).
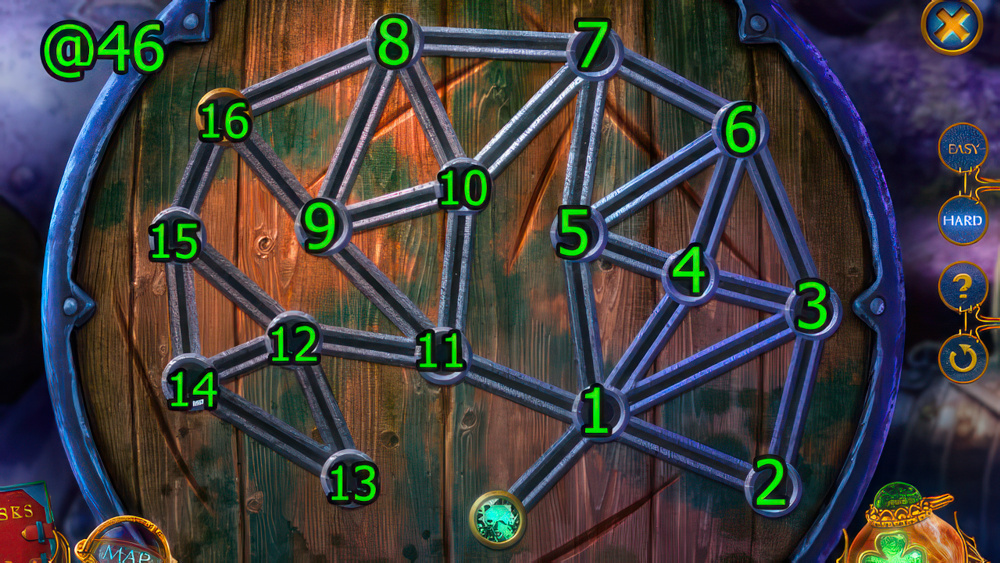
- Hard Solution (@46): Press (1-2-3-4-5-6-7-8-9-10-11-12-13-14-15-16).
- Get HALBERD.
- Use HALBERD and press (B), get BIG HAMMER and FRAGMENT.
- STAFF PART, STAFF RESTORATION SPELL, and FRAGMENT on GOLDEN POMMEL, get ASSEMBLED STAFF.
- Use ASSEMBLED STAFF on (C).
- Go (D).
- Get DAGGER (E).
- Use FLAT MEDAL on (F), get LEATHER STRIPS.
- Use BIG HAMMER on (G), get MAGNET FORK.
- Use DRAGONFIGHTER’S CLOAK on (H), get ANCHOR ON CHAIN.
- Use ASSEMBLED STAFF on (I), get SEA SHELL.
- Go Secret Path.
- Use ANCHOR ON CHAIN on (J).
- Use MAGNET FORK on (K), get DECORATIONS (1/2) and UNLIT TORCH.
- Use DAGGER on (L), get EMPTY FLASK.
- Use EMPTY FLASK on (M), get FLASK OF WATER.
- Go Talyesin’s Hut.
- Use SEASHELL on (N).
- Solve puzzle (O), get SIGNET RING.
- Use SIGNET RING on (P), get CUFFLINK and VALVE.
- CUFFLINK on LEATHER STRIPS, get FAN.
- Use VALVE on (Q).
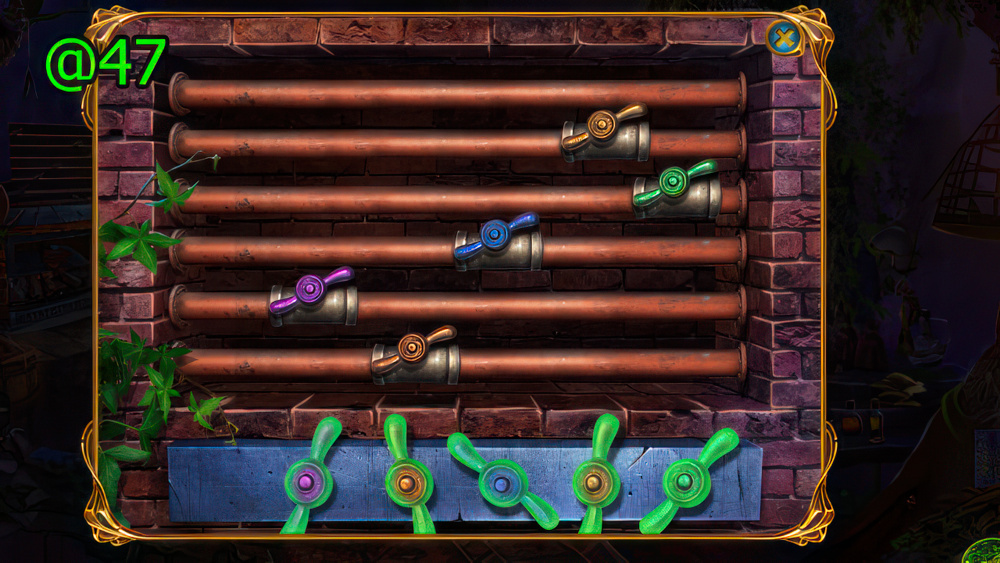
- Easy Solution (@47).
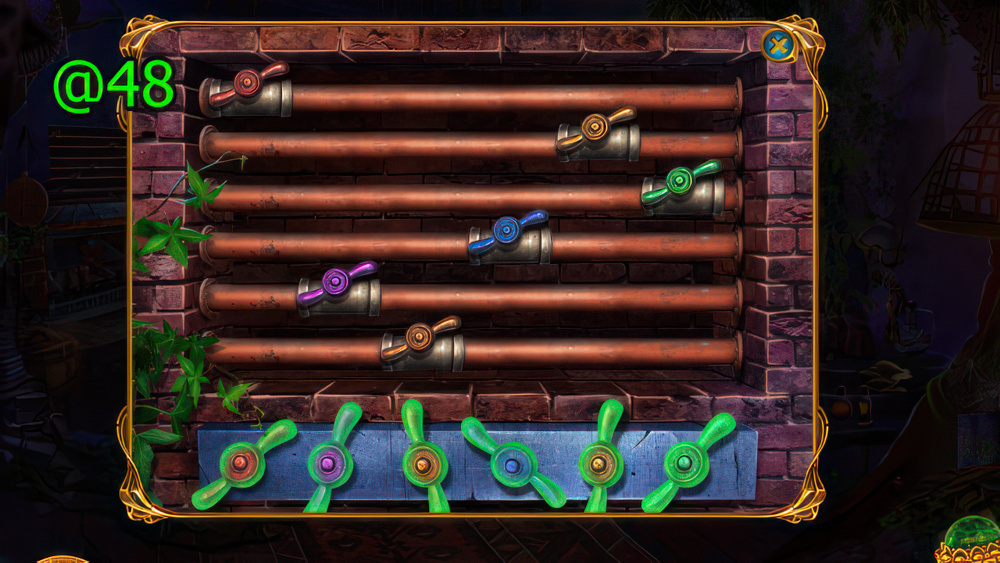
- Hard Solution (@48).
- Get DECORATIONS (2/2).

- Use UNLIT TORCH on (R), get BURNING TORCH.
- Go Secret Path.
- Use FLASK OF WATER on (S), use BURNING TORCH on (T).
- Use FAN on (U), get CRYSTAL OF POWER.
- Go Sky Peak.
- Use DECORATIONS and CRYSTAL OF POWER on (V), get TAMING STAFF.
- Use TAMING STAFF on (W).

- Easy Solution (@49).
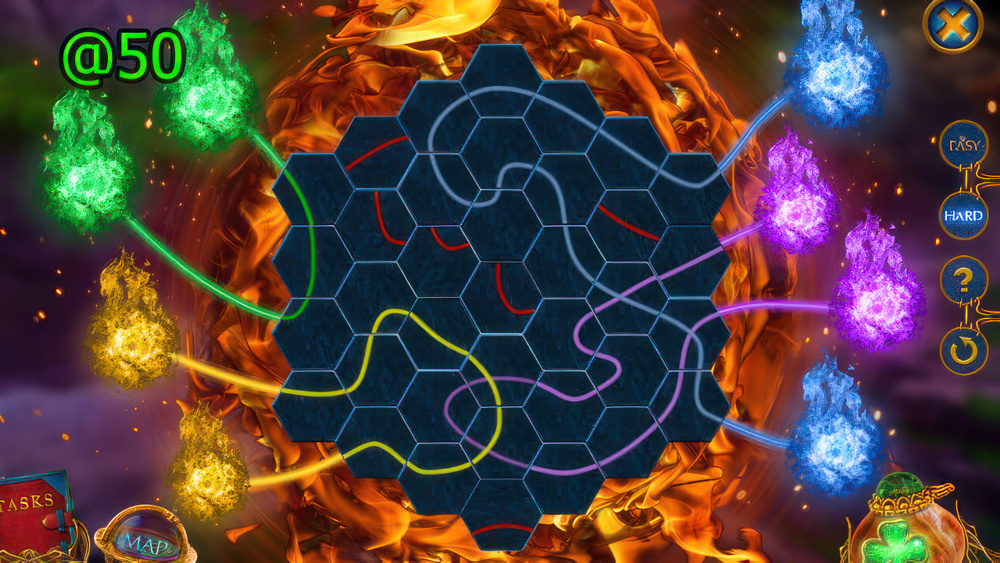
- Hard Solution (@50).
Congratulations! You have completed the game Labyrinths of the World 10: Fool’s Gold.


