
Labyrinths of the World 14: The Game of Minds (Bonus Chapter) – You will play as Captain Martin, who is trying to prevent the knight Heidmar from destroying Arcadia.
Bonus Chapter Walkthrough
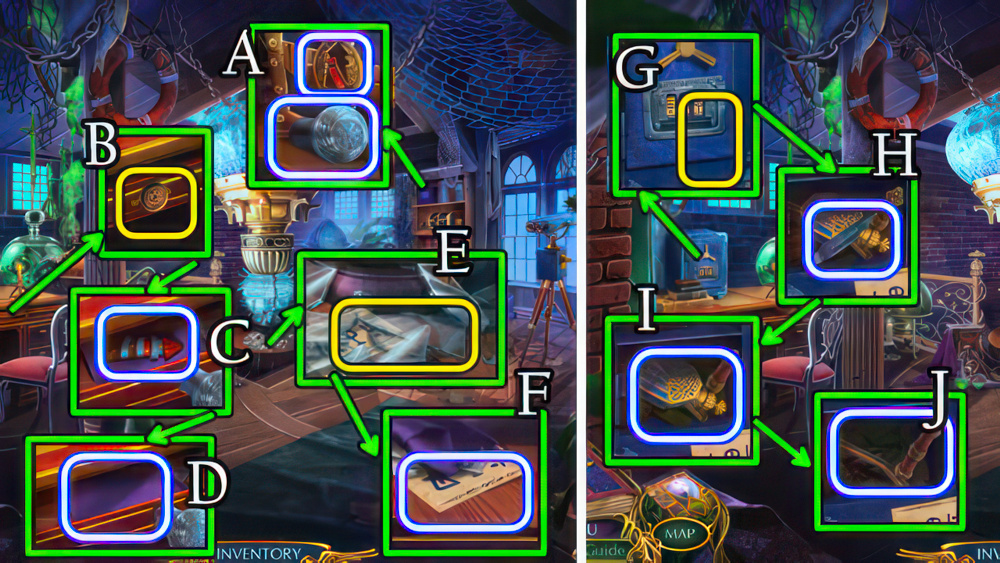
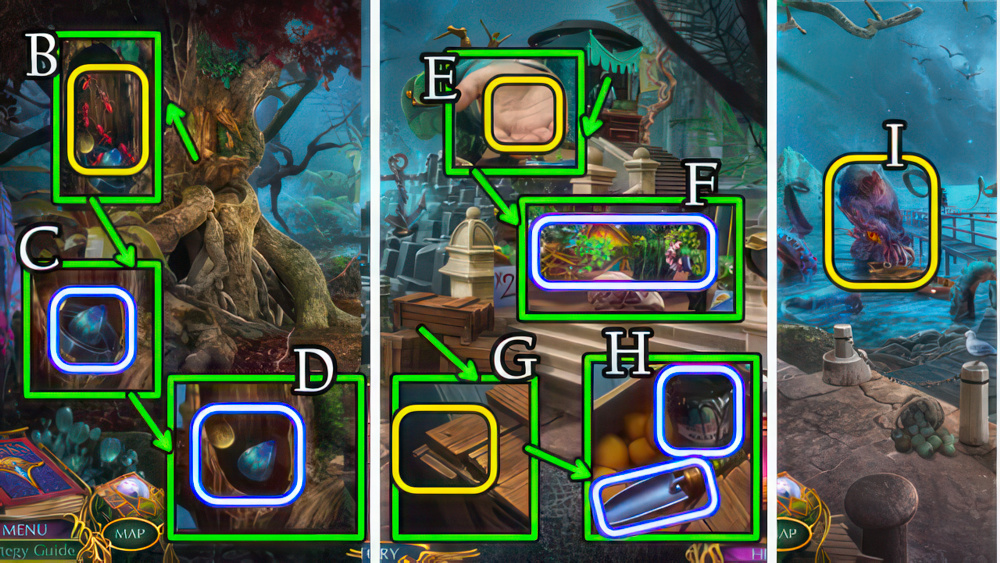
- Take CANE TOP, 1/2 EMBLEM FRAGMENTS (A).
- Take photograph, use CANE TOP (B), take BROKEN EMBLEM (C), NAPKIN (D).
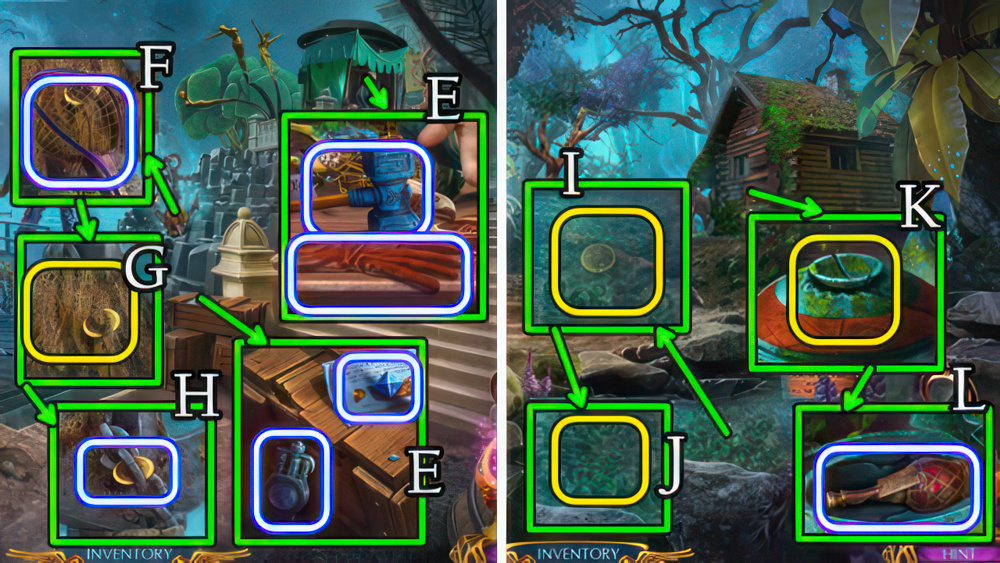
- Use NAPKIN (E), take SAFE CODE (F).
- Use SAFE CODE (G), match symbols, take KNIFE BLADE (H), FLASK (I) and HANDLE (J).
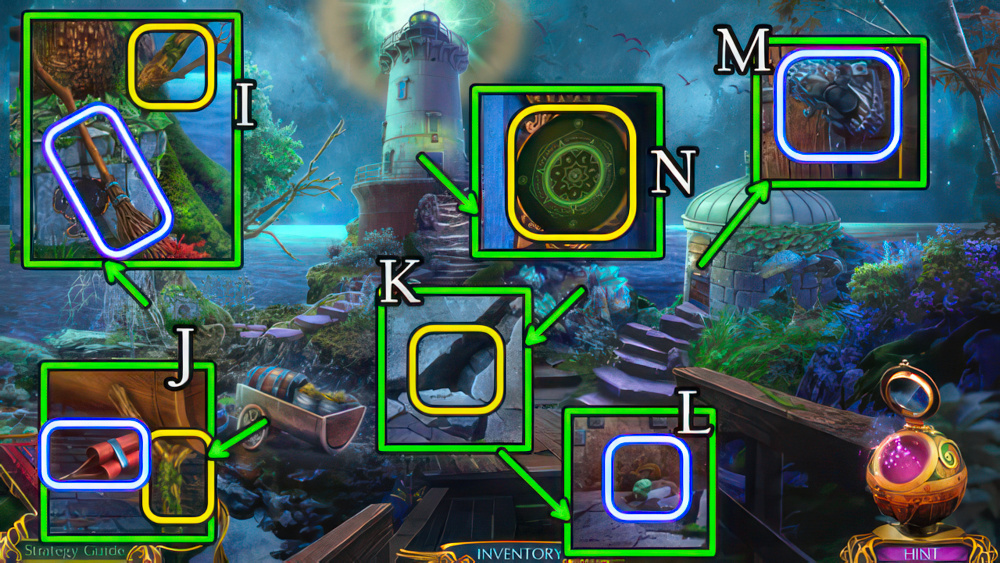
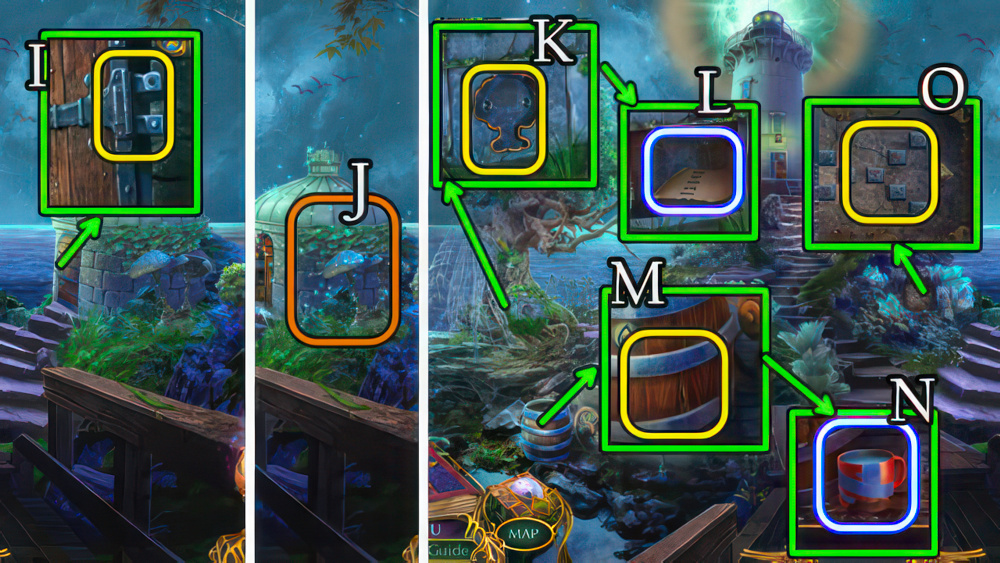
- Take WIRE, SCREWDRIVER (K), use HANDLE (L), take 2/2 EMBLEM FRAGMENTS (M).
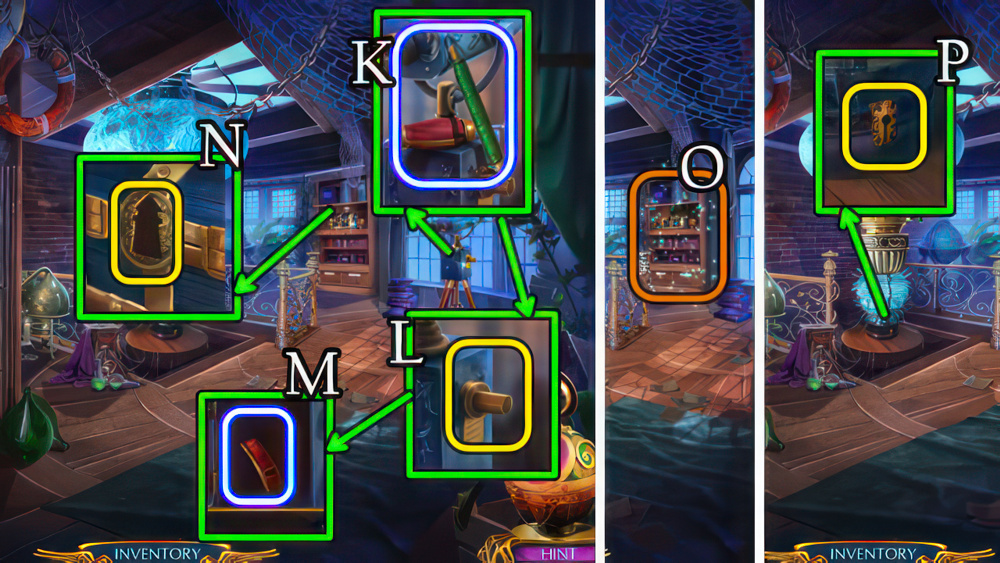
- 2/2 EMBLEM FRAGMENTS on BROKEN EMBLEM for LIGHTHOUSE EMBLEM.
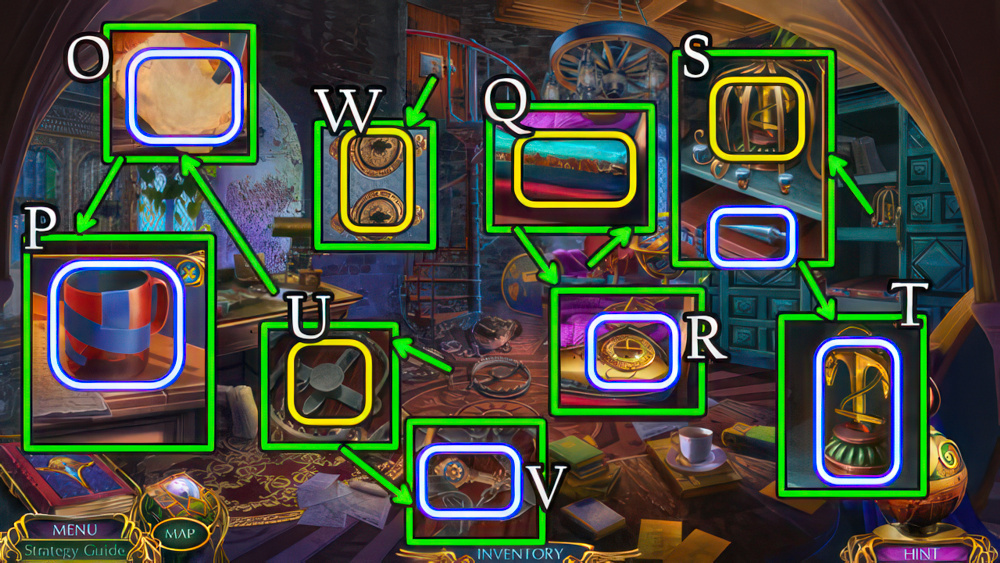
- Use LIGHTHOUSE EMBLEM (N), play puzzle (O), receive ODD KEY.
- Use ODD KEY (P).
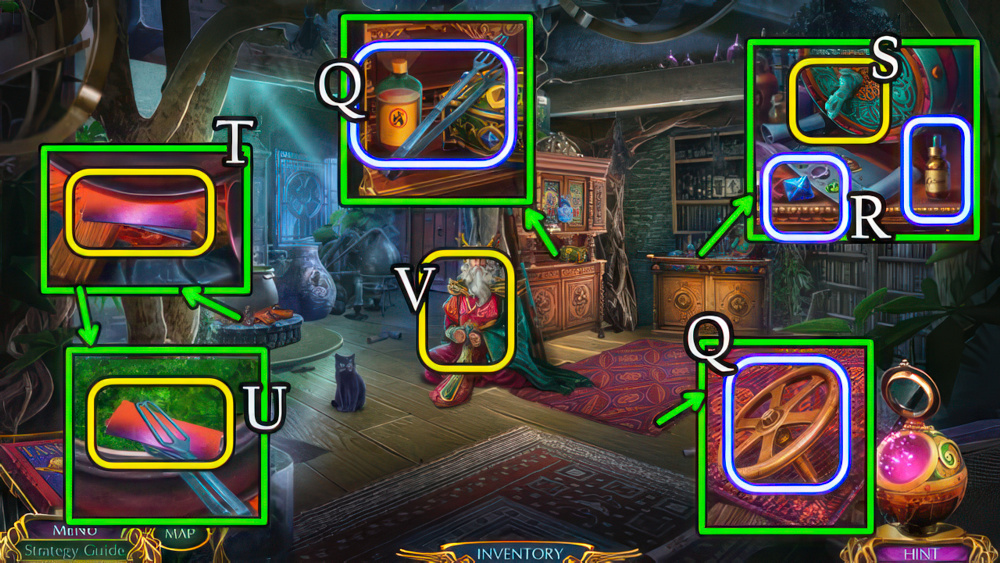
- Take VALVE, TONGS, TURPENTINE (Q) and note.
- Take 1/3 GEMS, GLUE (R), use VALVE, FLASK (S), receive WATER.
- Use TONGS (T), WATER (U), receive METAL PLATES.
- WIRE, METAL PLATES on KNIFE BLADE for KNIFE.
- Use KNIFE (V).
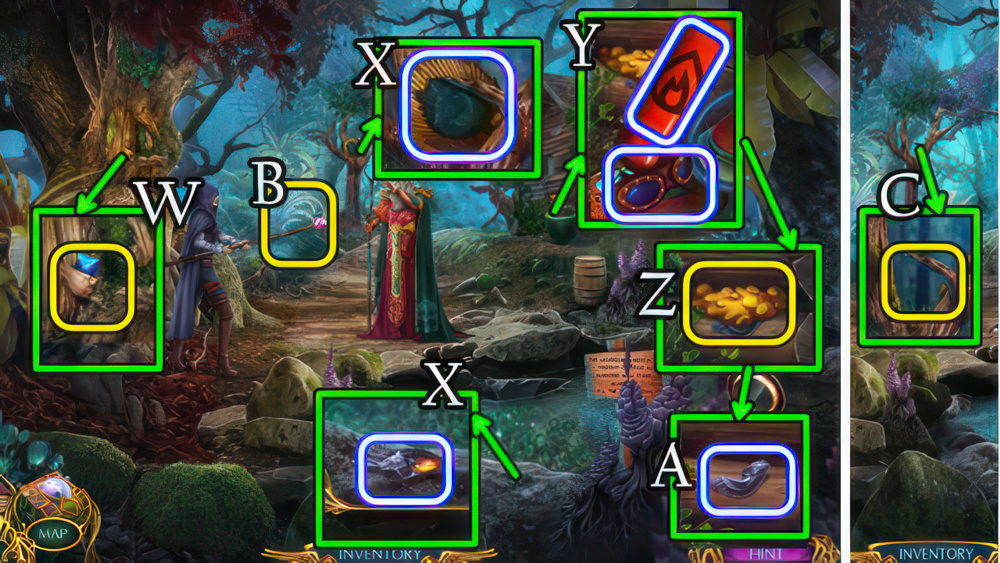
- Use SCREWDRIVER (W), receive 2/3 GEMS.
- Take AMULET PART, note, BROKEN AMULET (X).
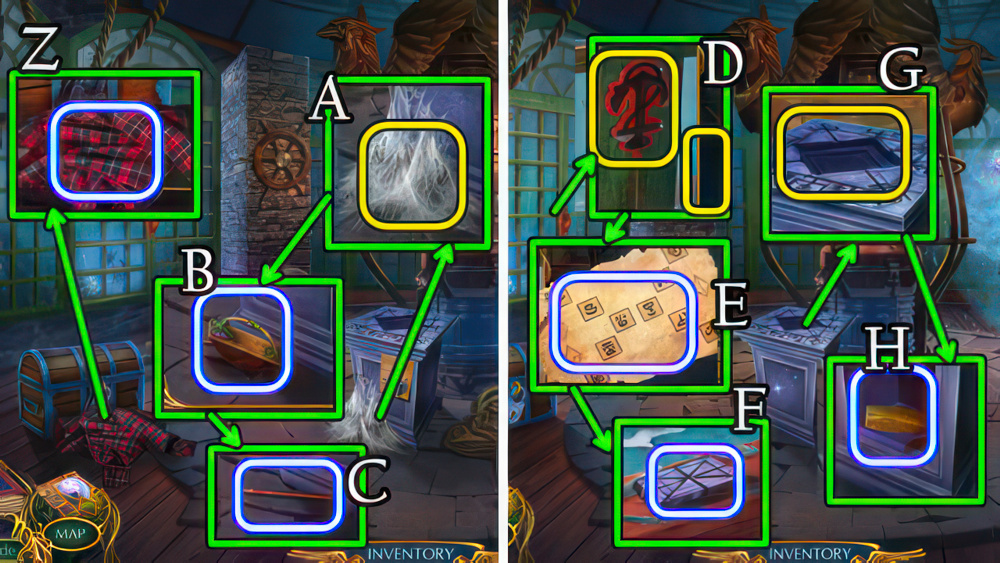
- Take GAS, PROTECTIVE GOGGLES (Y), use TURPENTINE (Z), take FIGURINE PART (A).
- GLUE, AMULET PART and FIGURINE PART on BROKEN AMULET for FIRE AMULET.
- Use FIRE AMULET (B), receive MAP.
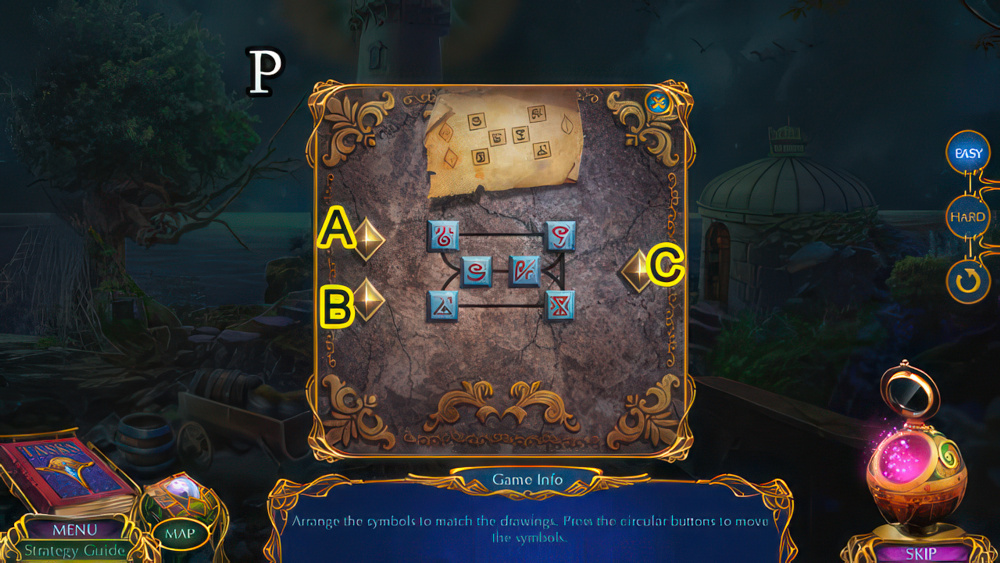
- Use MAP (C).

- Easy solution (D).
- L-Ux2-L-Dx2-Lx2-D-Lx3-D-L-Ux2-L-U-R-Ux3.
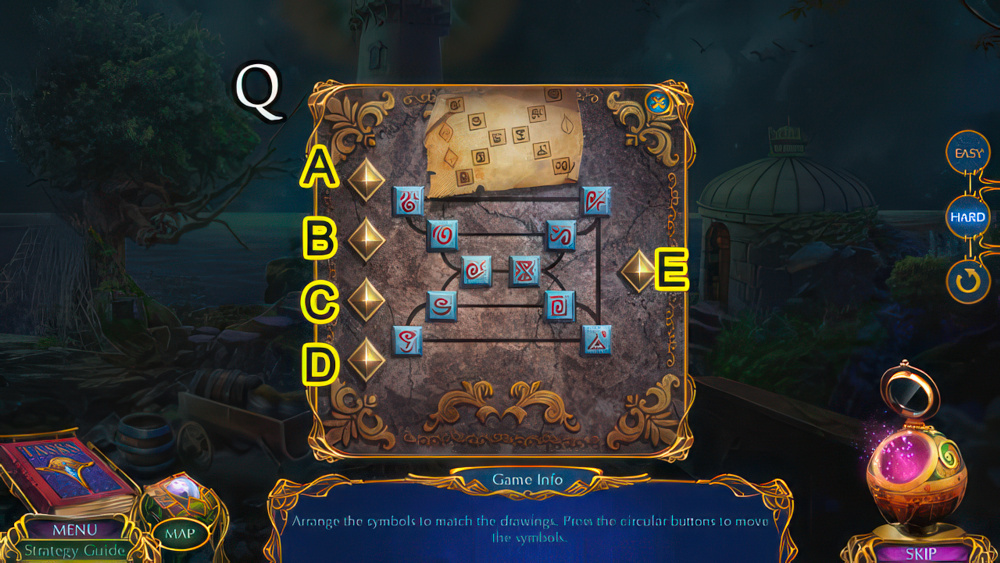
- Hard solution (D).
- Lx2-Dx2-Lx2-Ux4-Lx2-D-L-D-Rx2-D-L-D-Lx2-Ux2-L-U-R-Ux3.
- Take PROTECTION GLOVE and MALLET, 3/3 GEMS, note and LIGHTER (E).
- Take NET (F), use LIGHTER (G), take 1/3 COINS (H).
- Go down.
- Use NET (I), receive 2/3 COINS, NARWHAL HORN.
- Use PROTECTION GLOVE (J), receive WATER PLANTS.
- Use MALLET (K), take VINEGAR (L).
- Go down.

- Use 3/3 GEMS (M), take 1/2 ORNAMENT PARTS, SKULL (N).
- Use SKULL (O), receive SCALPEL.
- Go forward 2x.
- Use SCALPEL (P), open, take GAS CUTTER (Q).
- Use PROTECTIVE GOGGLES, GAS and GAS CUTTER (R), receive ANCHOR.
- Go down 2x.

- Lift carpet, use ANCHOR (S), play puzzle (T), receive LOCK LIQUID.
- Use LOCK LIQUID (U), take BRUSH, FIRST-BEGOTTEN STONE and 2/2 ORNAMENT PARTS (V).
- Use 2/2 ORNAMENT PARTS (W), take HEAVY STATUETTE (X), PUMICE (Y).
- Use WATER PLANTS, VINEGAR and FIRST-BEGOTTEN STONE (Z), take INSECTICIDE (A).
- Go forward.
- Use INSECTICIDE (B), take CLAMP (C), ACTIVATION GEMS and 3/3 COINS (D).
- Go forward.
- Give 3/3 COINS (E), take INACTIVATED TRIDENT (F).
- Use NARWHAL HORN, HEAVY STATUETTE (G), take SCOOP, RESIN (H).
- PUMICE, ACTIVATION GEMS on INACTIVATED TRIDENT for TRIDENT OF SEAS.
- Use TRIDENT OF SEAS (I).
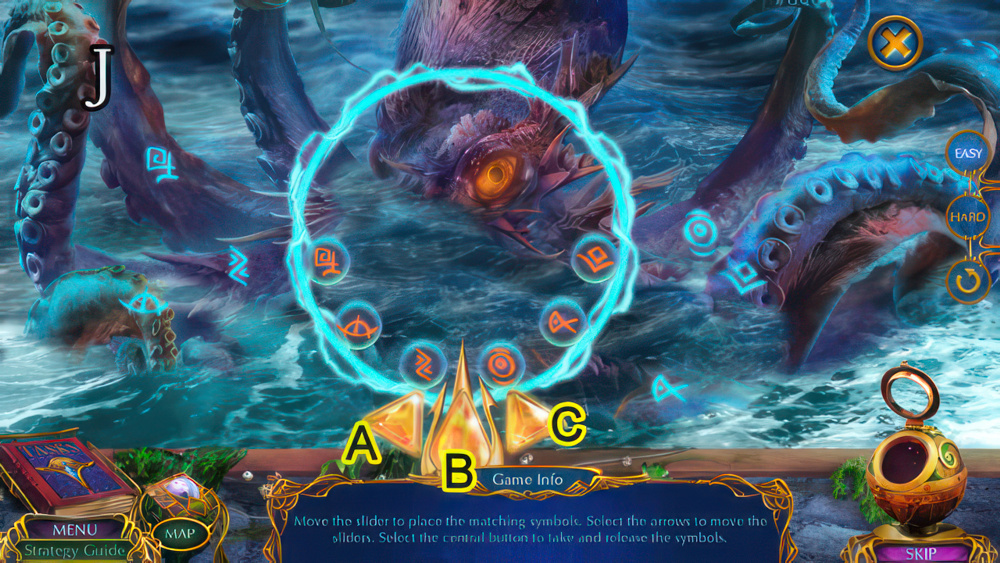
- Easy solution (J).
- B-Cx2-B-Ax2-B-A-B-Cx2-B-Ax2-B-A-B-Cx3-B-A-B-Ax2-B.
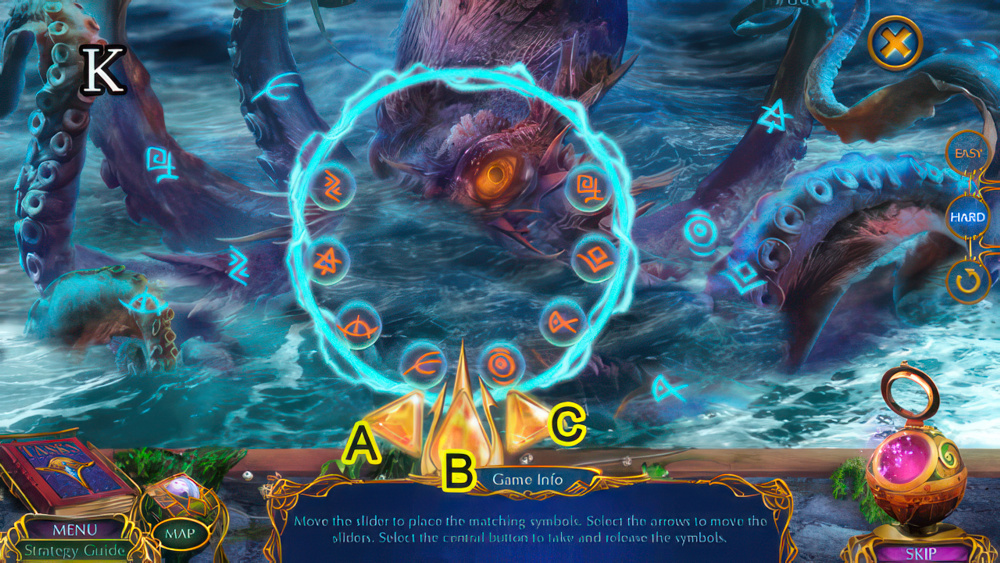
- Hard solution (K).
- A-B-Cx2-B-Cx2-B-A-B-C-B-Ax4-B-Ax2-B-Cx6-B-Ax2-B-A-B-C-B-C-B-Ax5-B.
- Take SPEAR.
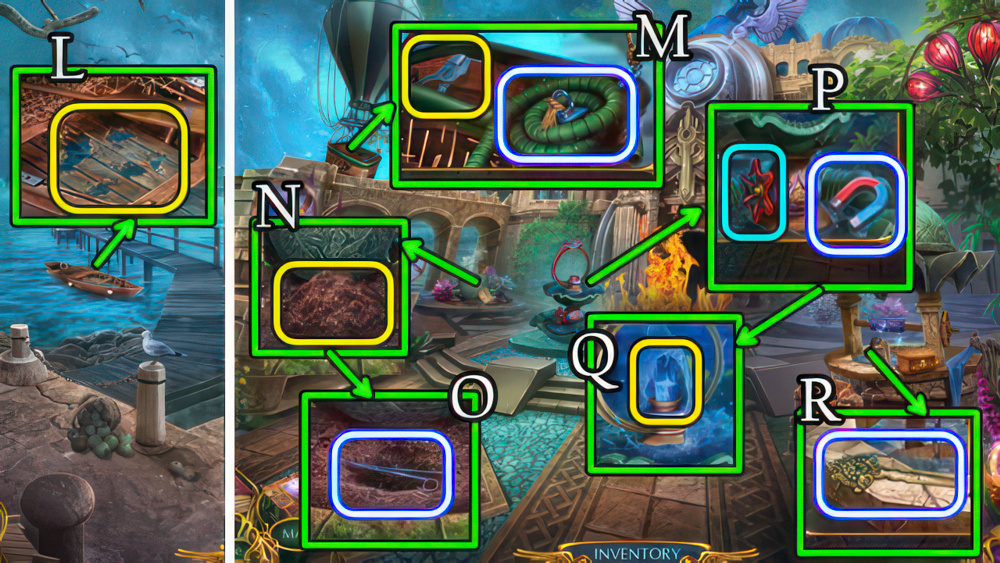
- Use RESIN, BRUSH (L).
- Go forward.
- Take HOSE, use SPEAR (M), receive CUTTERS.
- Take note, use SCOOP (N), take FORCEPS (O).
- Take MAGNET, use HOSE, select valve (P), use CLAMP (Q).
- Take HAIRPIN (R).
- Go forward.
- Take ELIXIR OF GROWTH, book, use FORCEPS (S), receive MATCHES, SOURCE FRAGMENT.
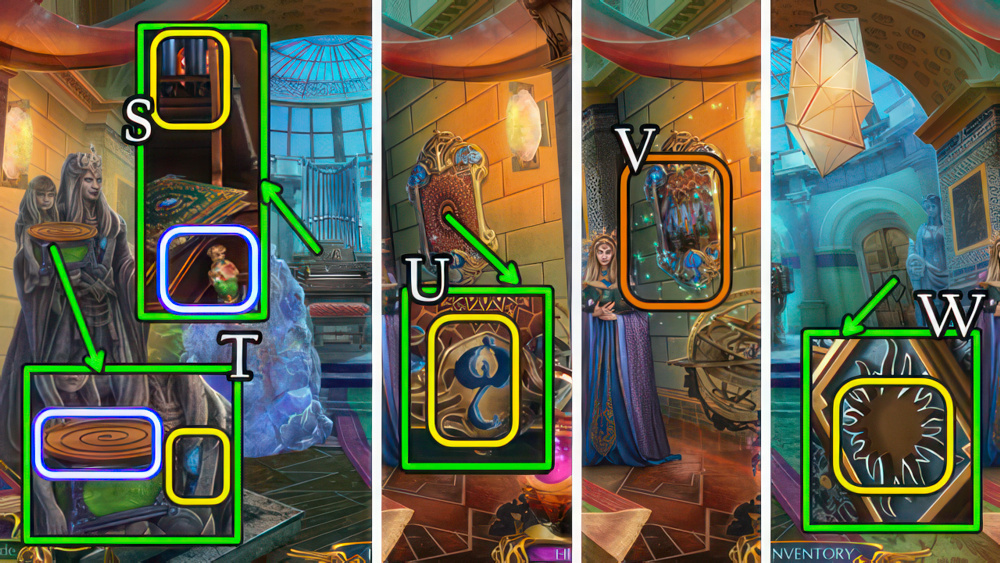
- Take BOWL, use MAGNET (T), receive PHOENIX INLAY.
- Use PHOENIX INLAY (U), play puzzle (V), receive SUN EMBLEM.
- Use SUN EMBLEM (W).
- Go forward.

- Take INCOMPLETE STAFF (X).
- Use CUTTERS (Y), take SCEPTER TOP (Z), INSTRUCTIONS, use MATCHES (A), take WAX (B).
- Use HAIRPIN (C), take note, GLOWING STONE and DEW DEVICE (D).
- Go down.
- GLOWING STONE, SCEPTER TOP on INCOMPLETE STAFF for DORM’S STAFF.
- Use DORM’S STAFF (E), take FAN (F), WELL HANDLE (G) and LITTLE BOX AMULET PIECES (H).
- Go down.
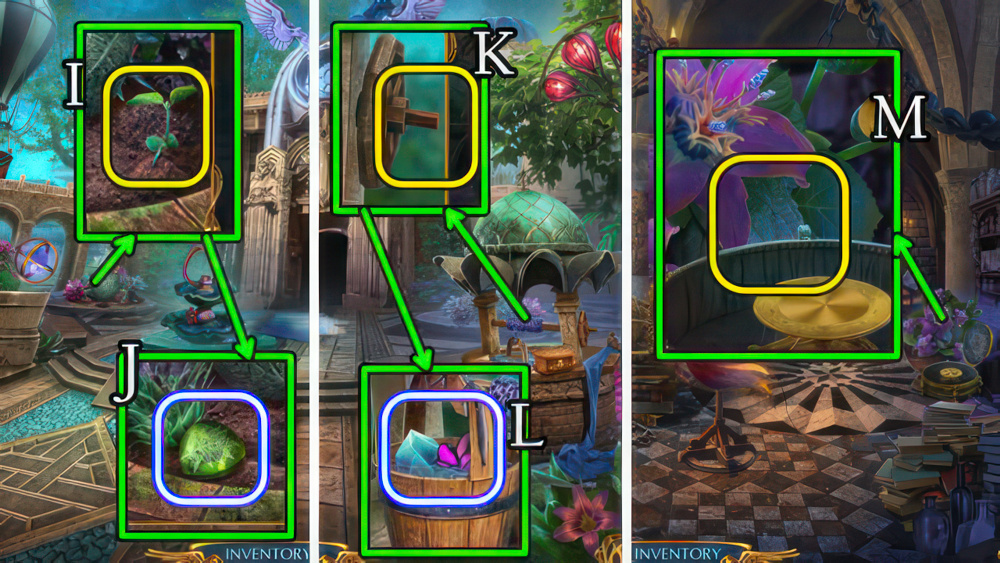
- Use ELIXIR OF GROWTH (I), take OASIS FRAGMENT (J).
- Use, select WELL HANDLE (K), take COOLING CRYSTAL, 1/2 STAINED GLASS PIECES (L).
- Go forward 2x.
- INSTRUCTIONS, BOWL, FAN and COOLING CRYSTAL on DEW DEVICE.
- Use DEW DEVICE (M).
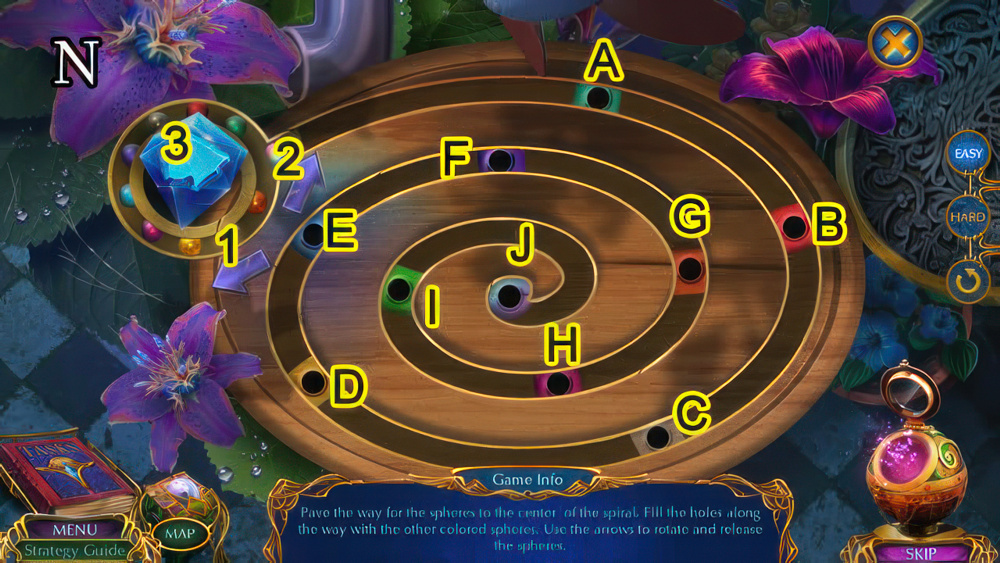
- Easy solution (N).
- Starting positions vary.
- Match ball, hole color in alphabetical order.
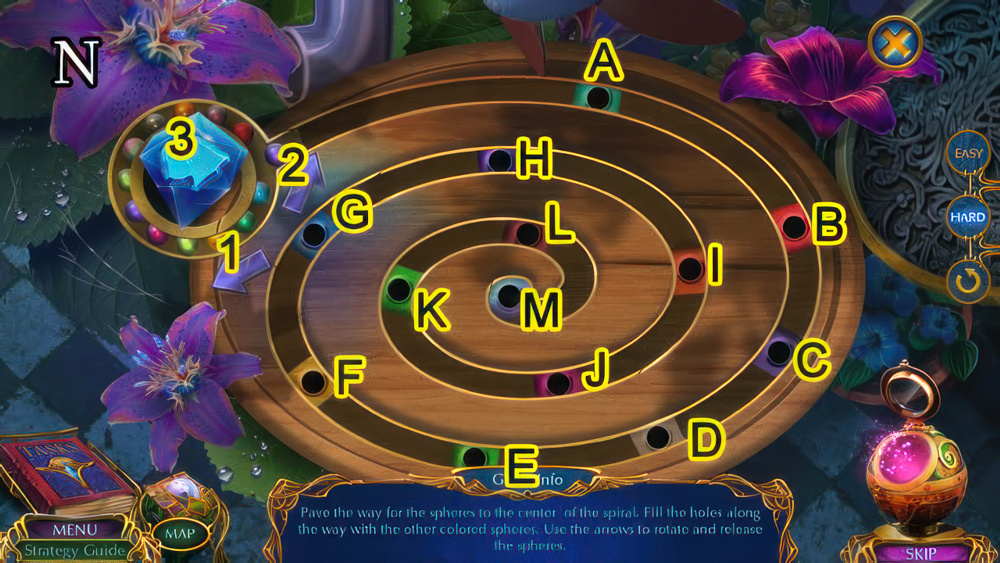
- Hard solution (O).
- Starting positions vary.
- Match ball, hole color in alphabetical order.
- Receive PURPLE LILY DEW.
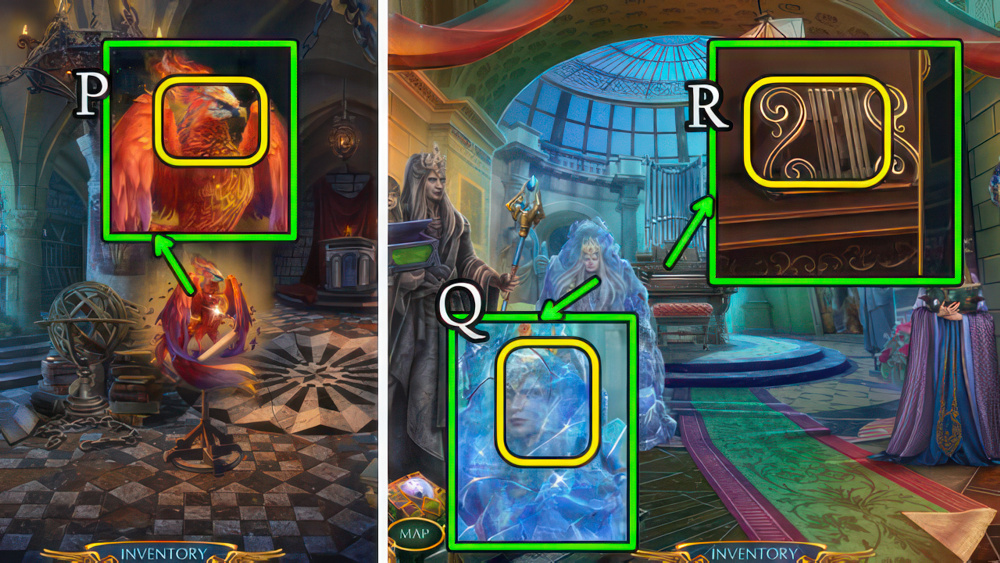
- Take note, use PURPLE LILY DEW (P), receive PHOENIX FEATHER.
- Go down.
- Use PHOENIX FEATHER (Q), speak to character, receive NOTES.
- Use NOTES (R).

- Easy solution (S).
- 5-10-13-14-7-11.
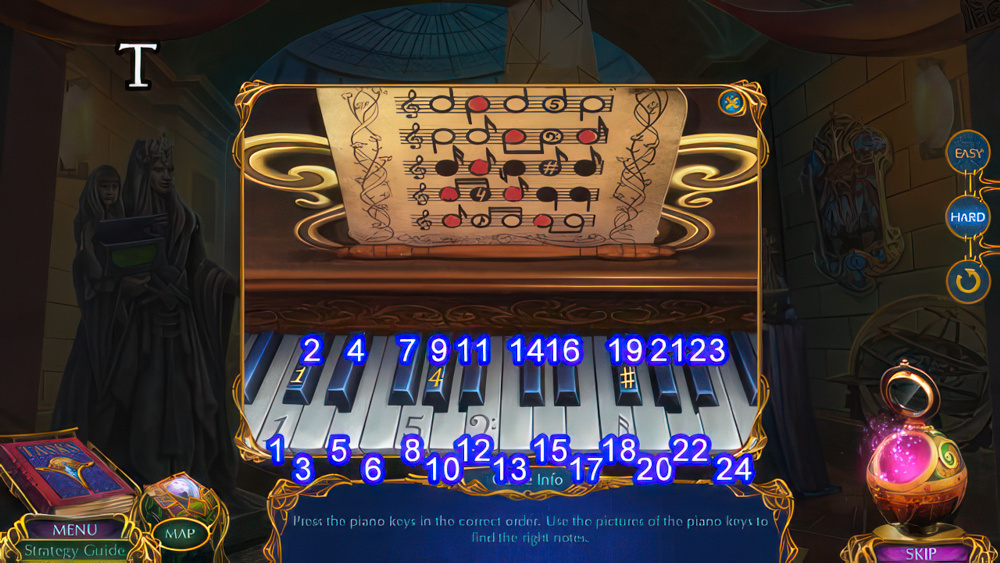
- Hard solution (T).
- 5-10-13-14-7-11-17-22.
- Take AERTIS FRAGMENT.
- Go down.
- SOURCE FRAGMENT, OASIS FRAGMENT and AERTIS FRAGMENT on LITTLE BOX AMULET PIECES for LITTLE BOX AMULET.
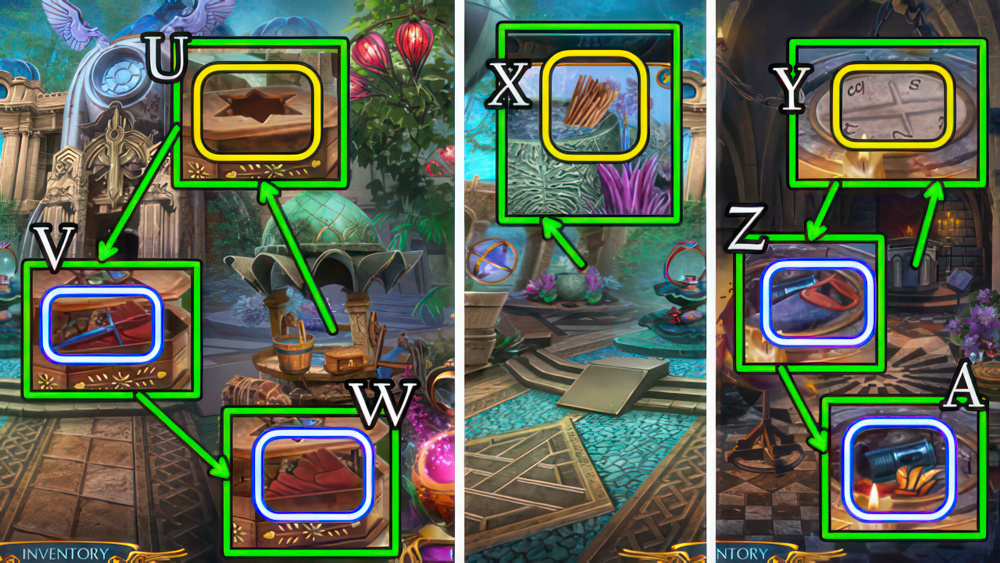
- Use LITTLE BOX AMULET (U), take DAGGER (V), PROTECTIVE GLOVES (W).
- Use PROTECTIVE GLOVES (X), receive WICKER.
- Go forward 2x.
- Use DAGGER (Y), take SAW (Z), 2/2 STAINED GLASS PIECES and BURNER (A).

- Use 2/2 STAINED-GLASS PIECES (B), take FLINT AND STEEL (C), BLUE TAPE (D) and SPHERE KEY (E).
- Go down 2x.
- Use SPHERE KEY (F), play puzzle (G), receive ROPE.
- Use ROPE, WICKER and BURNER (H).
- Take BROOM, use SAW (I), receive STICK.
- Use STICK, take DYNAMITE (J).
- Use DYNAMITE, FLINT AND STEEL (K), take note, AMULET CORE (L).
- Take note, AMULET BASE (M).
- AMULET CORE on AMULET BASE for TRAP AMULET.
- Use TRAP AMULET (N).
- Go forward.
- Take SHEET (O), use BLUE TAPE, take CUP (P).
- Take note, use WAX (Q), take BUCKLE (R).
- Take SPEAR TIP, use BUCKLE (S), take ANCHOR FIGURINE (T).
- Use BROOM (U), take KEY (V).
- Use KEY (W).

- Easy solution (X).
- B-A-Cx2-D-B-E.
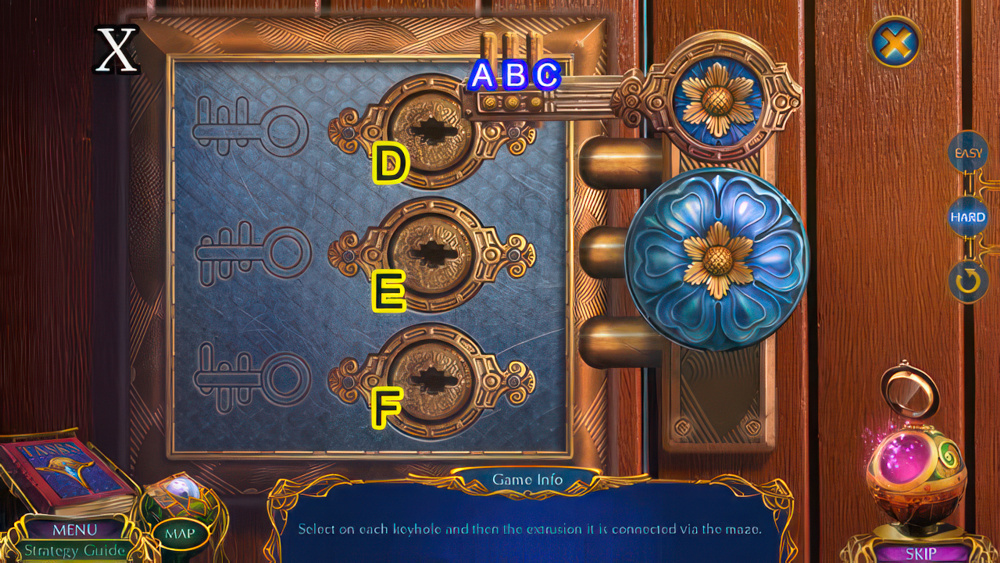
- Hard solution (X).
- B-A-Cx2-D-B-F-B-C-Bx2-A-C-Ax2-E.
- Go forward.
- Take note, SHIRT (Z).
- Take note, use SHIRT (A), take PAPERWEIGHT (B), PENCIL (C).
- Use ANCHOR FIGURINE, SHEET and PENCIL (D), take DRAWINGS (E), BLUE GEM (F).
- Use BLUE GEM (G), take WEDGE (H).
- Go down 2x.
- Use WEDGE (I), play puzzle (J), receive OAK EMBLEM.
- Use OAK EMBLEM (K), take SUITCASE CODE (L).
- Use SPEAR TIP, CUP and PAPERWEIGHT (M), take WATER (N).
- Use DRAWINGS (O).
- Easy solution (P).
- Ax3-Bx2-C-B-C-B-C-Bx3-C-B.
- Hard solution (Q).
- Dx2-A-E-A-Bx3-Cx3-Ax2-E-A-E-Ax3-E-Ax2.
- Take SCALPEL, KEY MOLD.
- Go forward.

- Select (R), use SUITCASE CODE, enter 8-4-5-9-1 (S), take HOOK (T).
- Use HOOK (U), take GAS BURNER (V).
- Use SCALPEL (W), take BROKEN CHEST KEY (X).
- Go forward.
- WATER, KEY MOLD and GAS BURNER on BROKEN CHEST KEY for CHEST KEY.
- Use CHEST KEY (Y), take TRANSFORMATION RUNE (Z).
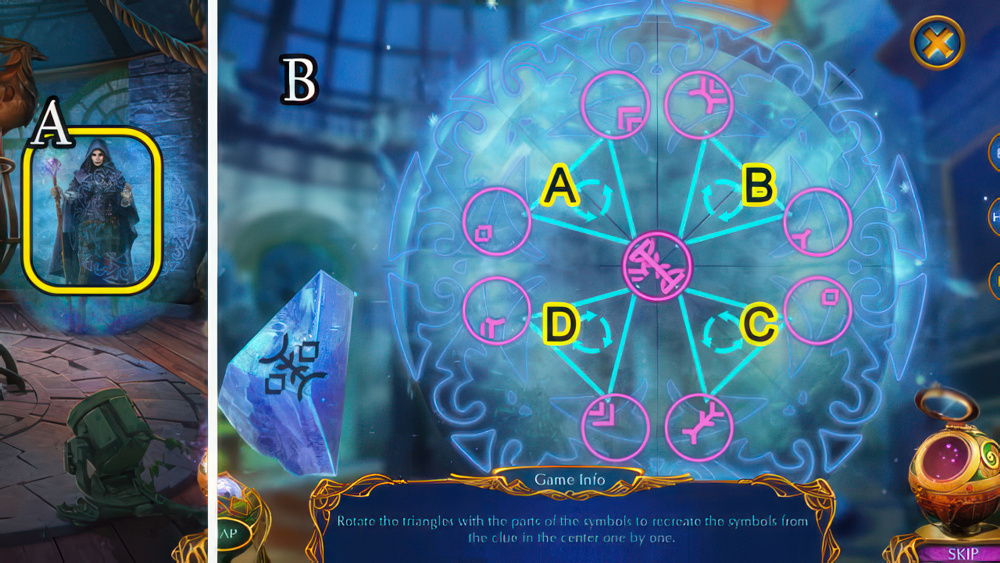
- Use TRANSFORMATION RUNE (A).
- Easy solution (B).
- Ax2-Bx3-Cx2-Ax2-B-Cx2-Dx2.
- Hard solution (B).
- Ax2-Bx3-Cx2-Ax2-B-Cx2-Dx2-Ax2-B-Cx2-Dx2.
Congratulations! You have completed the game Labyrinths of the World 14: The Game of Minds.


