Labyrinths of the World 7: A Dangerous Game (Bonus Chapter) – You’re on a journey with your best friend Christina and stumble upon a mysterious board game. Suddenly, you find yourself in a parallel world where your friend has disappeared. You have to defeat the evil mastermind of this bizarre world, and save your friend.
Bonus Chapter Walkthrough

- Get WIRE, BROOM, BROKEN CLIPPERS, UMBRELLA, and CLIPPERS PART (A).
- CLIPPERS PART and WIRE on BROKEN CLIPPERS, get CLIPPERS.
- Use CLIPPERS on (B), get METAL ROD.
- Use METAL ROD on (C).
- Get STAINED GLASS PART and CHISEL.
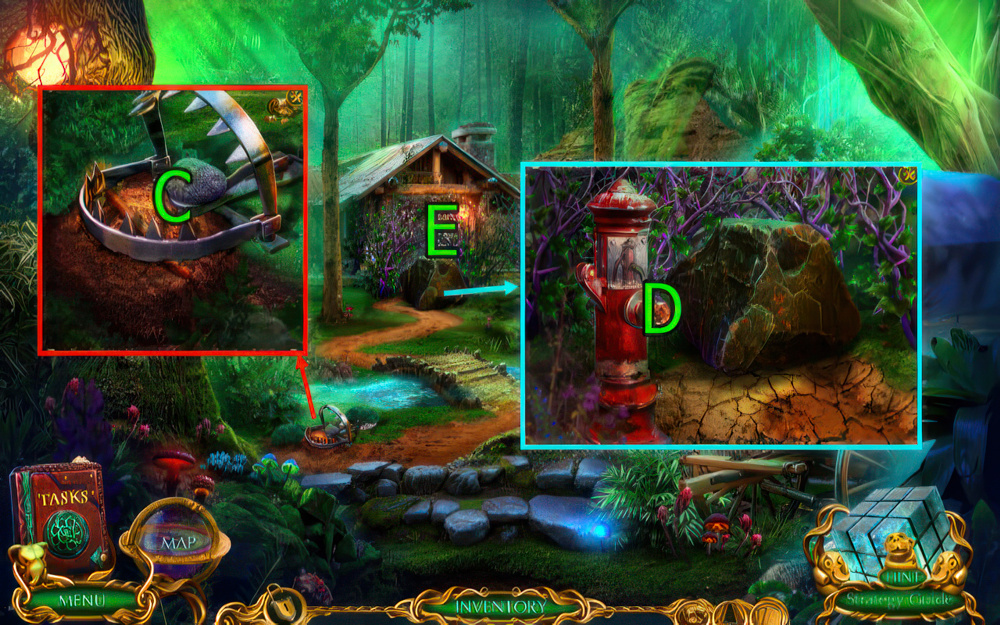
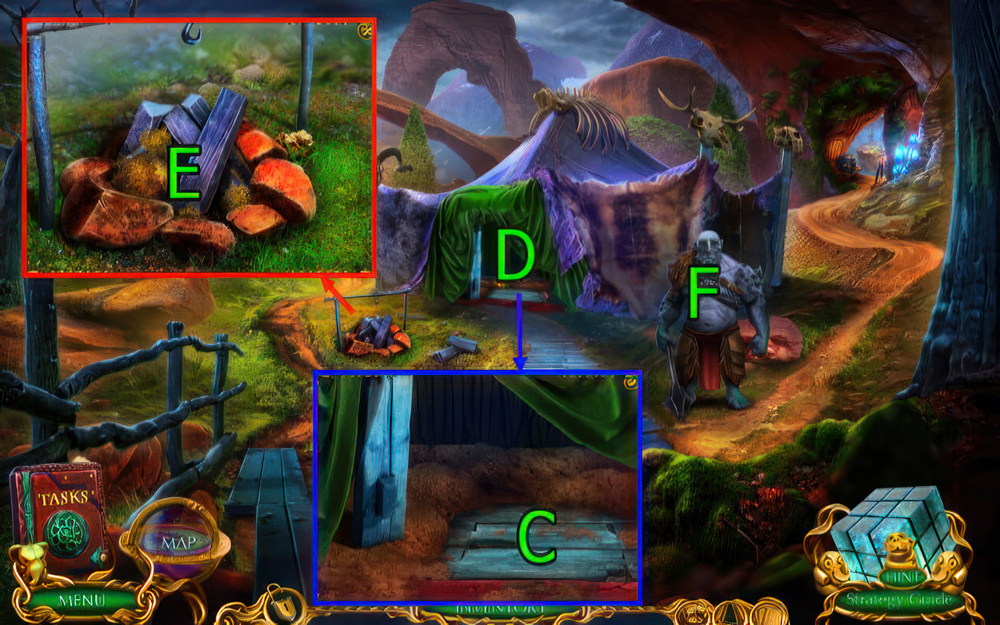
- Get HAMMER (D).
- Use STAINED GLASS PART on (E).
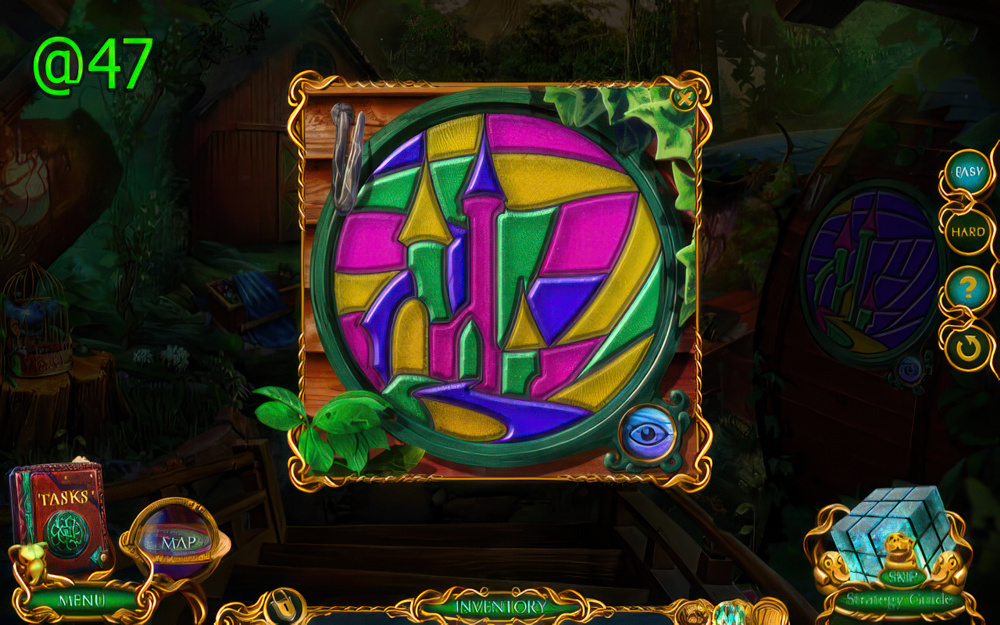
- Easy solution (@47).

- Hard solution (@48).
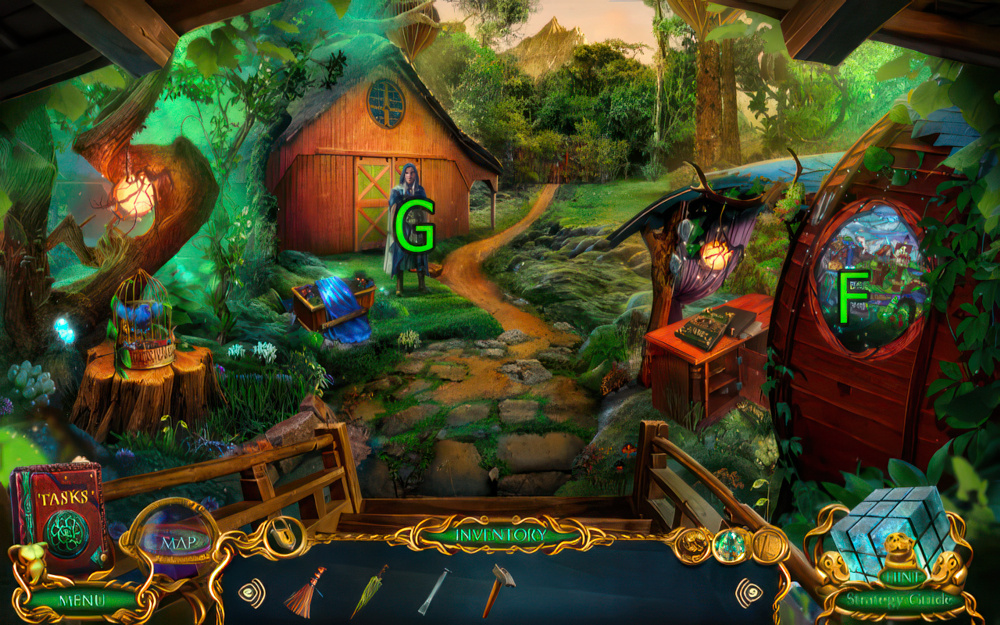
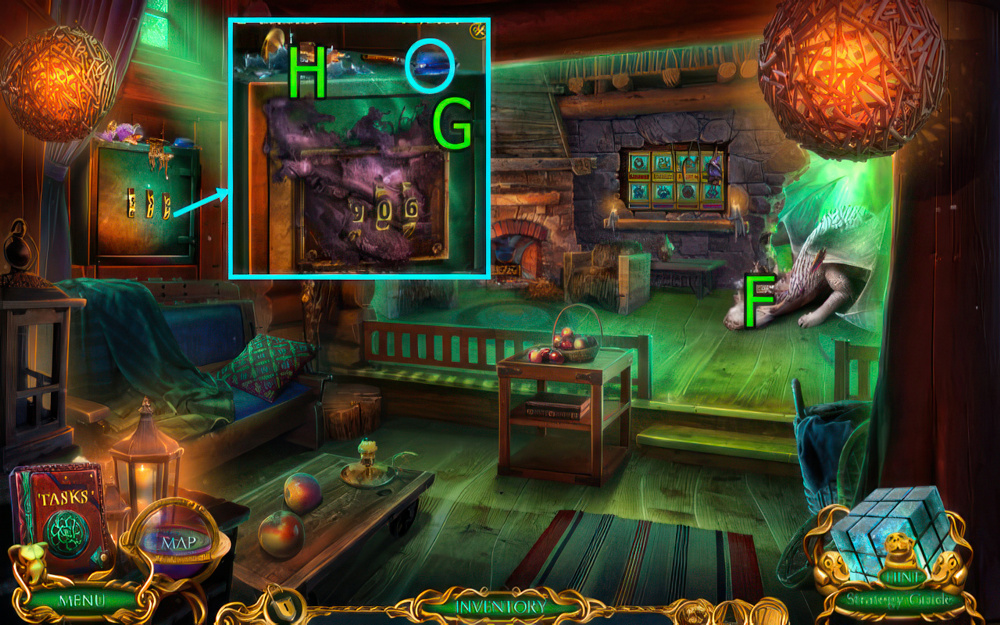
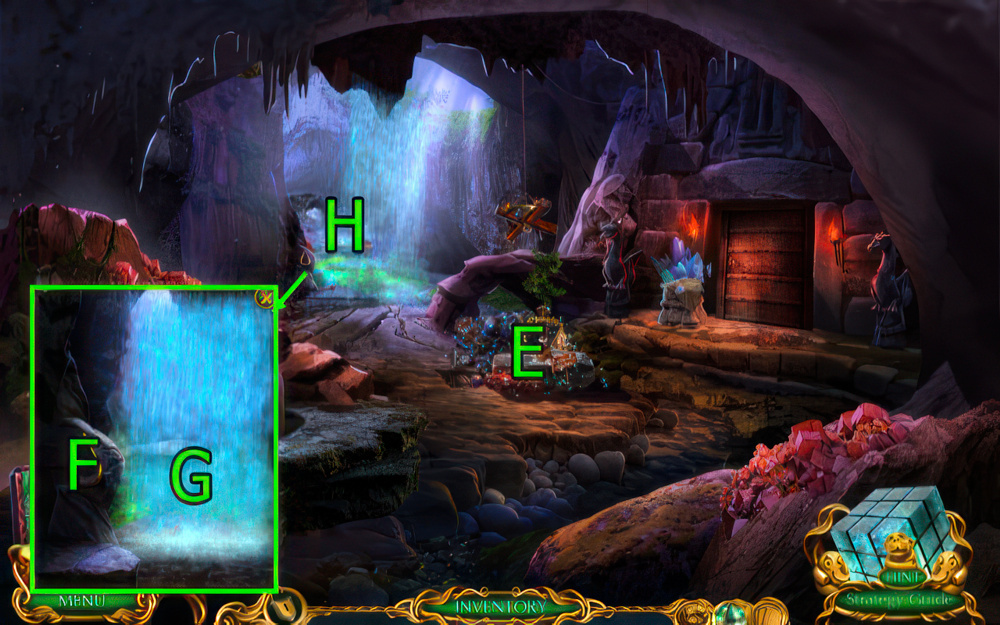
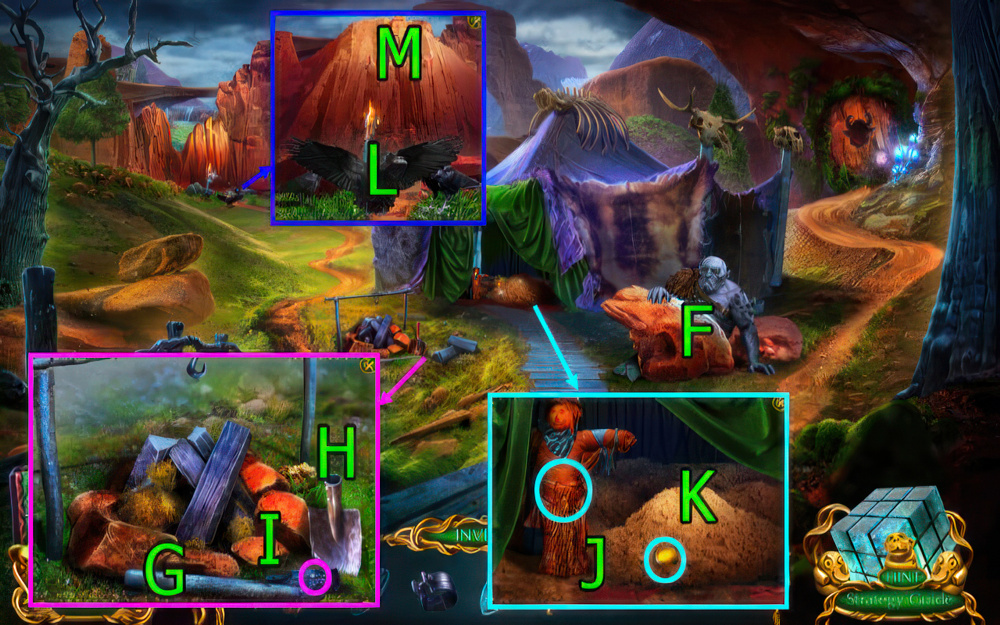
- Solve puzzle (F), get EMERALD.
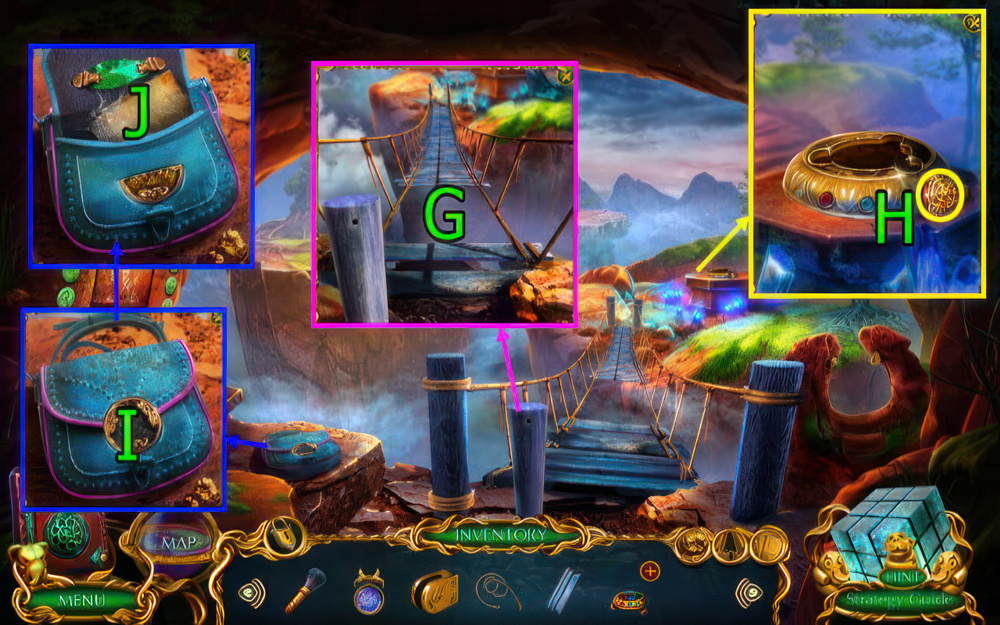
- Use EMERALD on (G), get MAGIC ELVEN POWDER.
- Go Stables.

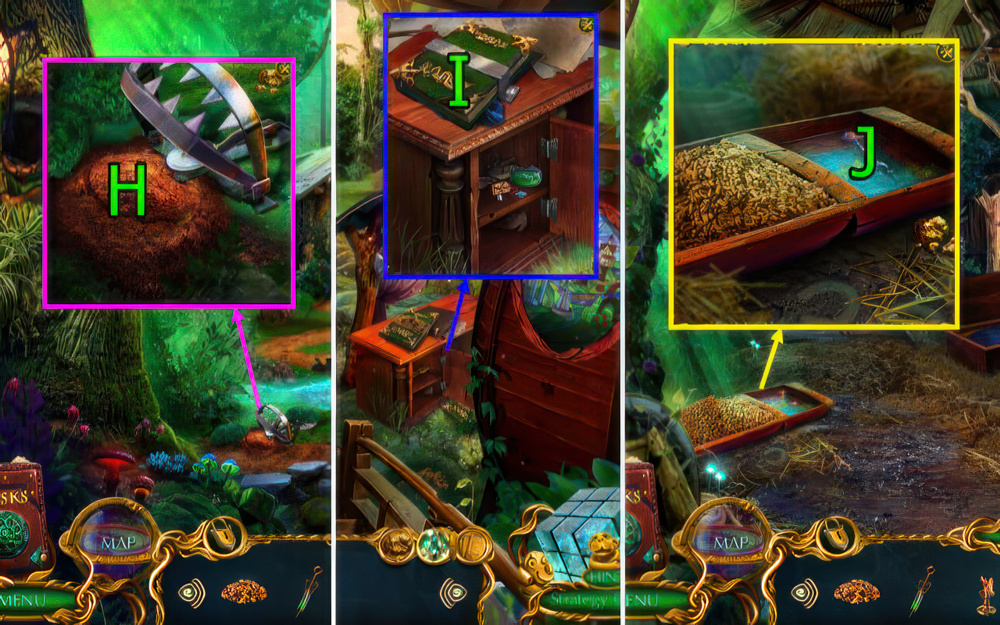
- Use MAGIC ELVEN POWDER on (H), get FORCEPS.
- Get BROKEN SLINGSHOT (I).
- Use CHISEL and HAMMER on (J).
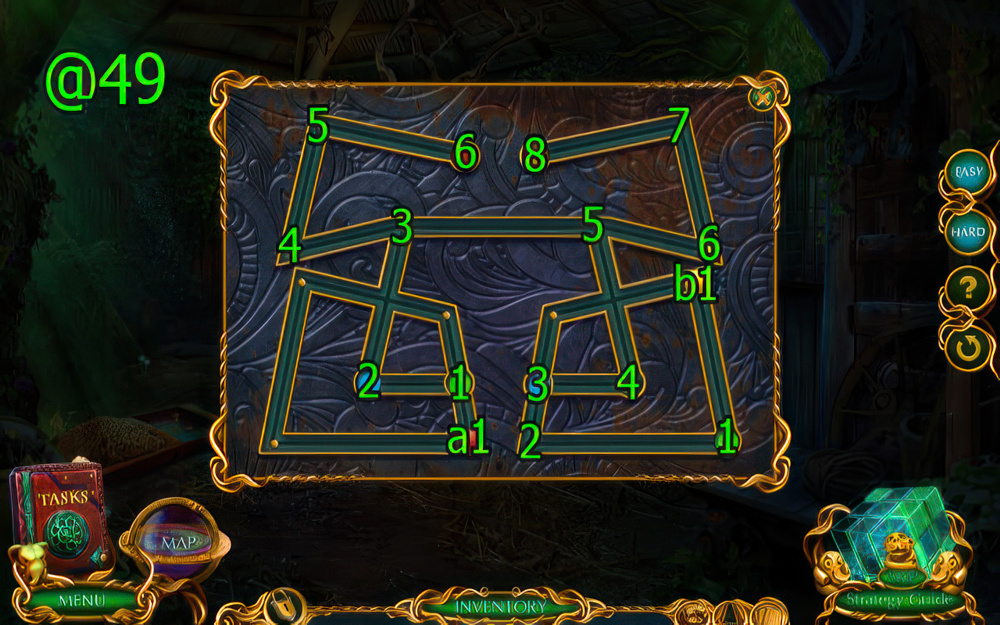
- Easy solution (@49): (a1-1)-(b1-1)-(a1-2-3)-(b1-2-3)-(a1-2)-(b1-4-5-6-7-8)-(a1-3-4-5-6).

- Hard solution (@50): (b1-3-2)-(a1-1)-(b1-1)-(a1-2-3)-(b1-2-3).
- (a1-2)-(b1-4-5-3-4-5-6)-(a1-3-5-6-7-8).
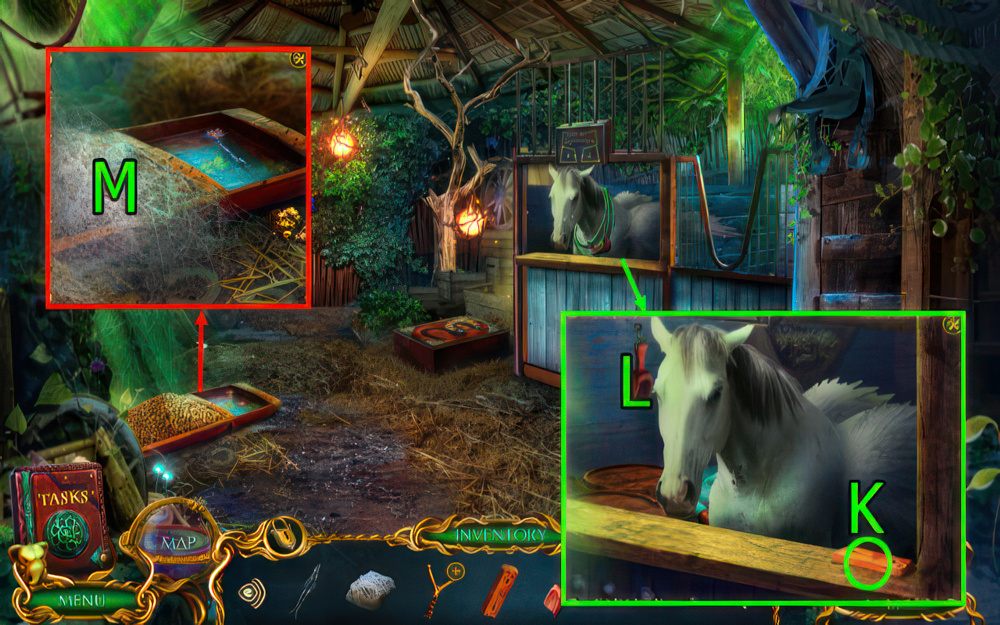
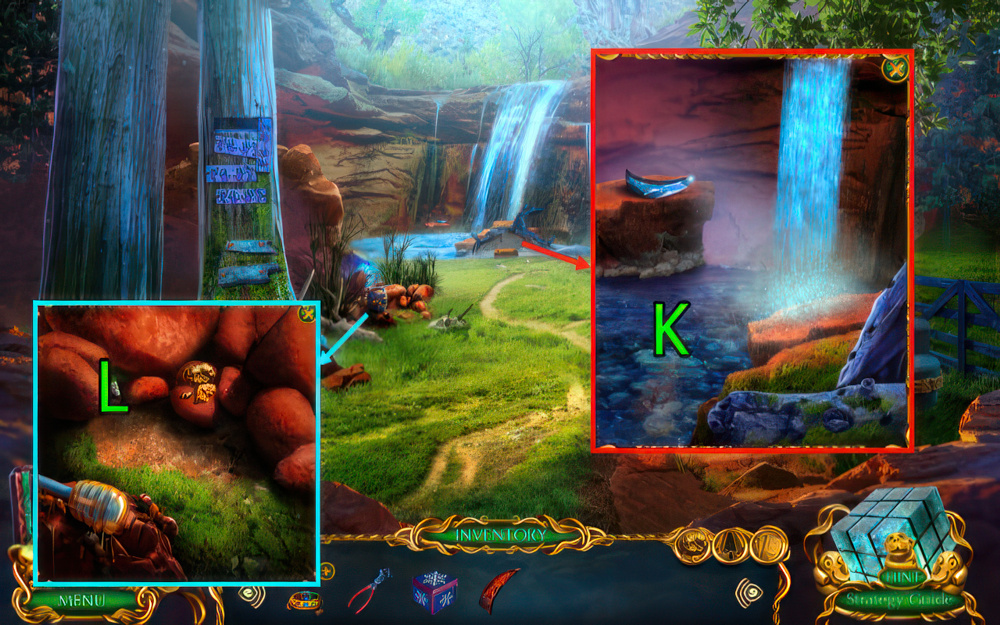
- Get WOODEN BAR (K).
- Use UMBRELLA (L), get SCOOP.
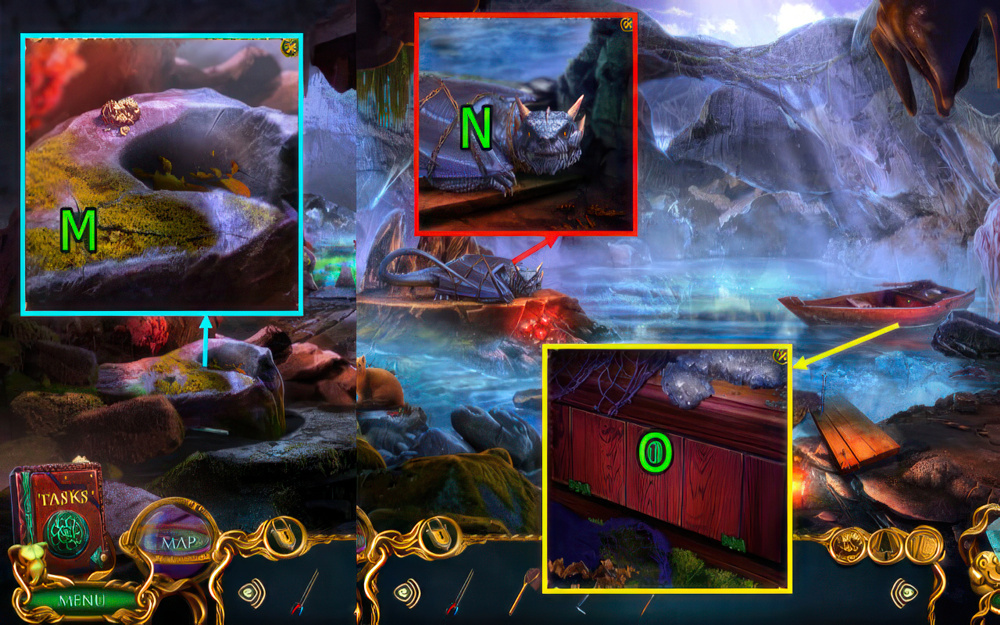
- Use BROOM on (M), get STONE.
- Use SCOOP on (M), get SEEDS.
- Go Down.

- Use SEEDS on (N), get RIVETS and GATES KEY.
- Use GATES KEY on (O).
- Go Dark Thickets.

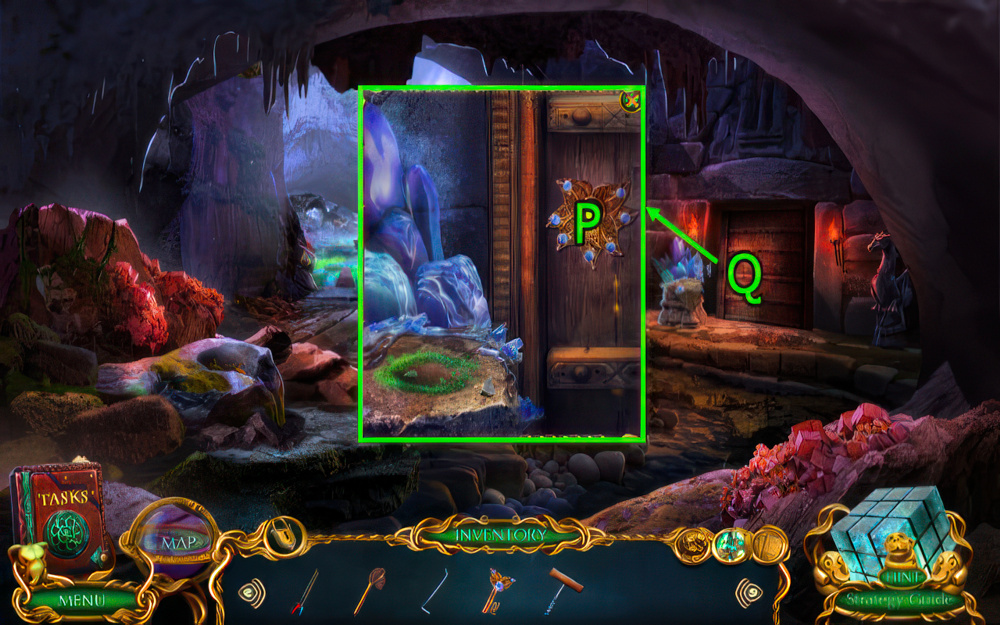
- Get MUSHROOM (P), press (Q).
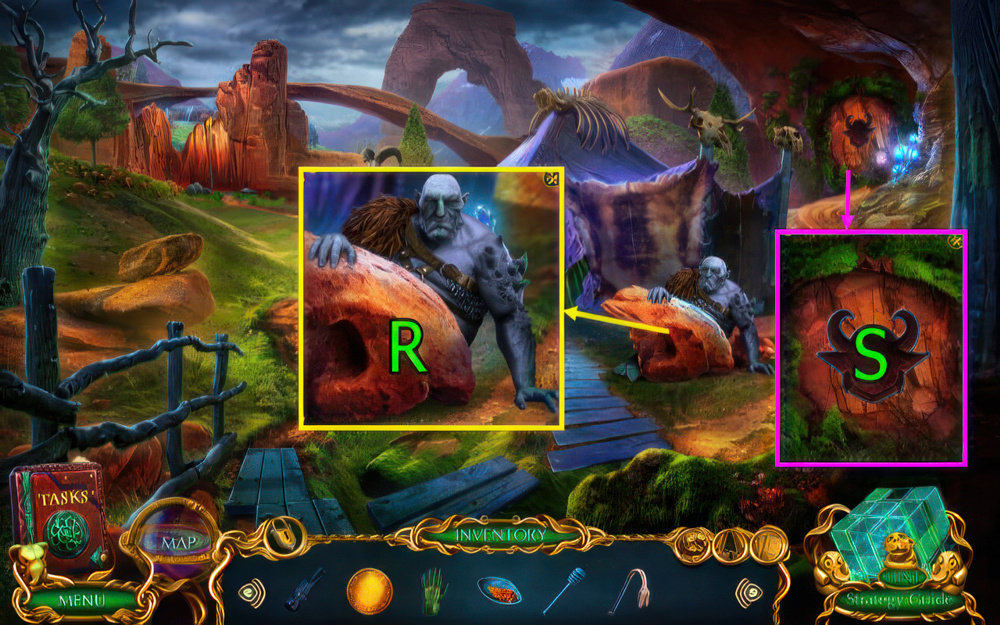
- Use MUSHROOM on (R), get APPLE.
- Use WOODEN BAR and RIVETS on (S), get KNIFE.
- Go Stables.

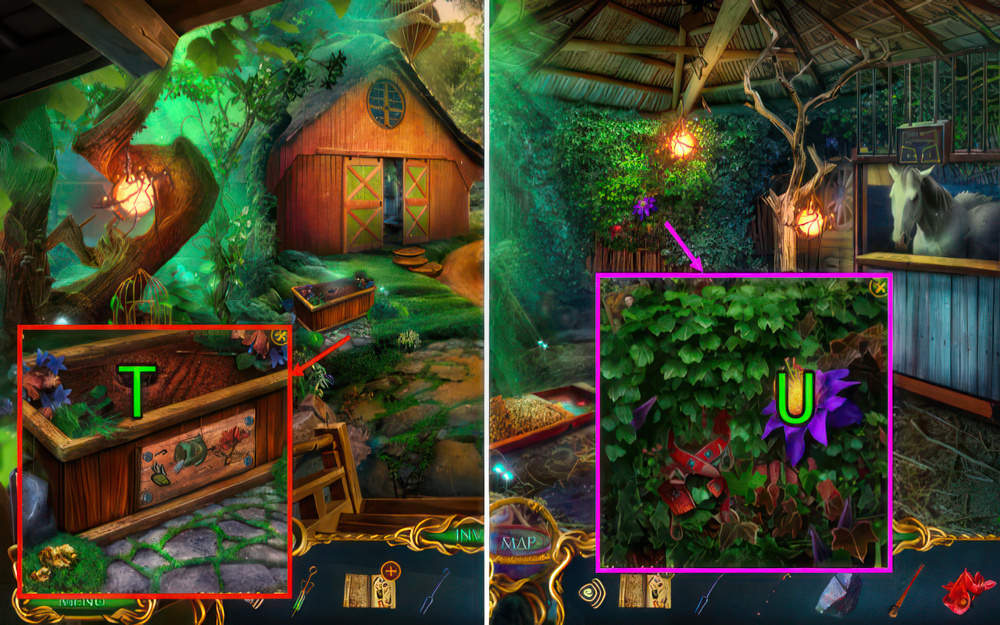
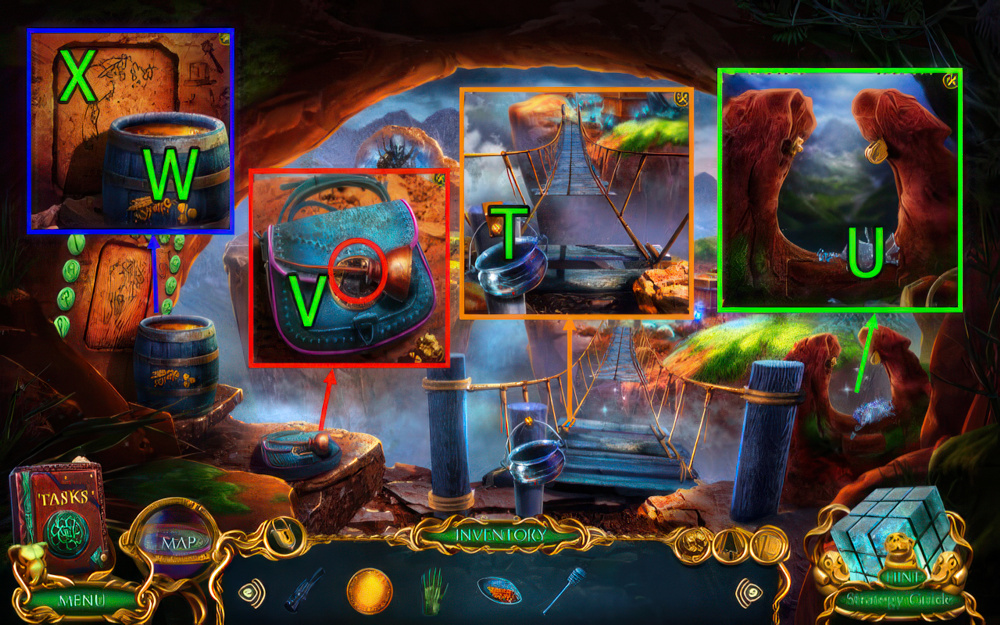
- Use APPLE on (T), get HOSE and SLING.
- SLING and STONE on BROKEN SLINGSHOT, get SLINGSHOT.
- Use KNIFE on (U), get HORSESHOE.
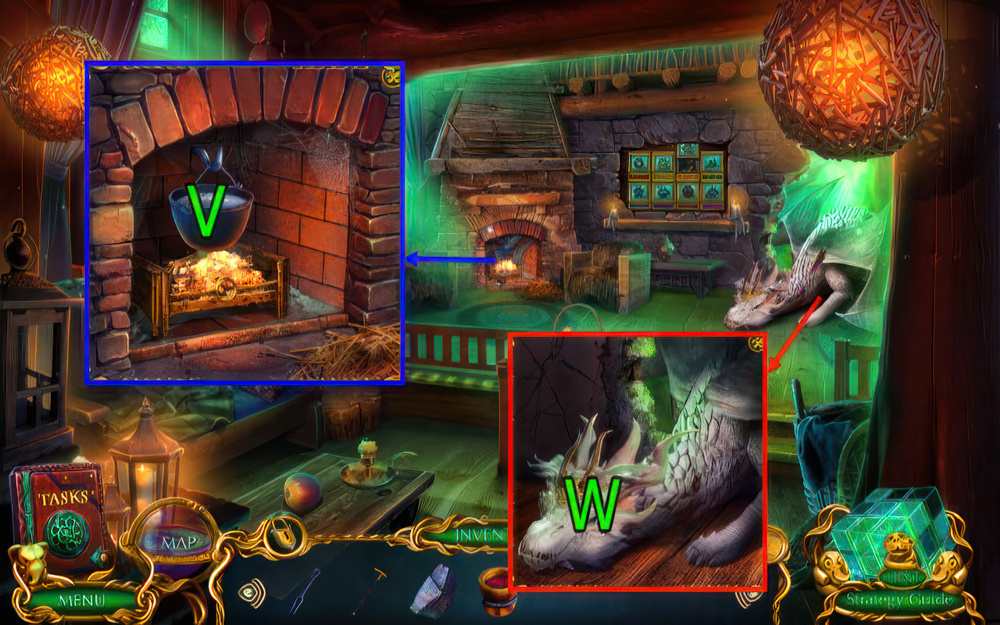
- Use HORSESHOE on (V).
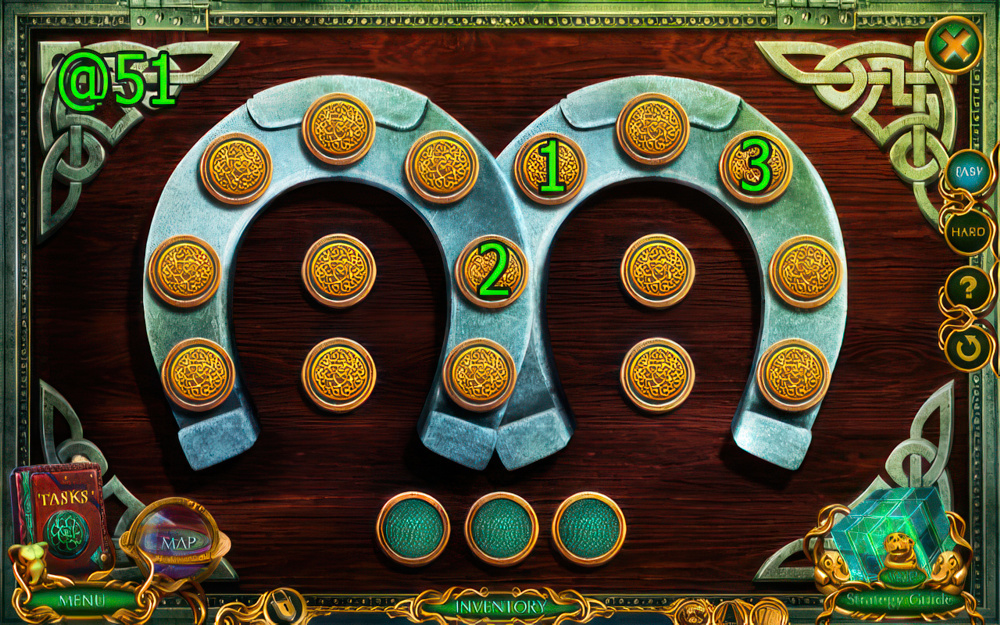
- Easy solution (@51).

- Hard solution (@52).
- Get AXE.
- Go Dark Thickets.
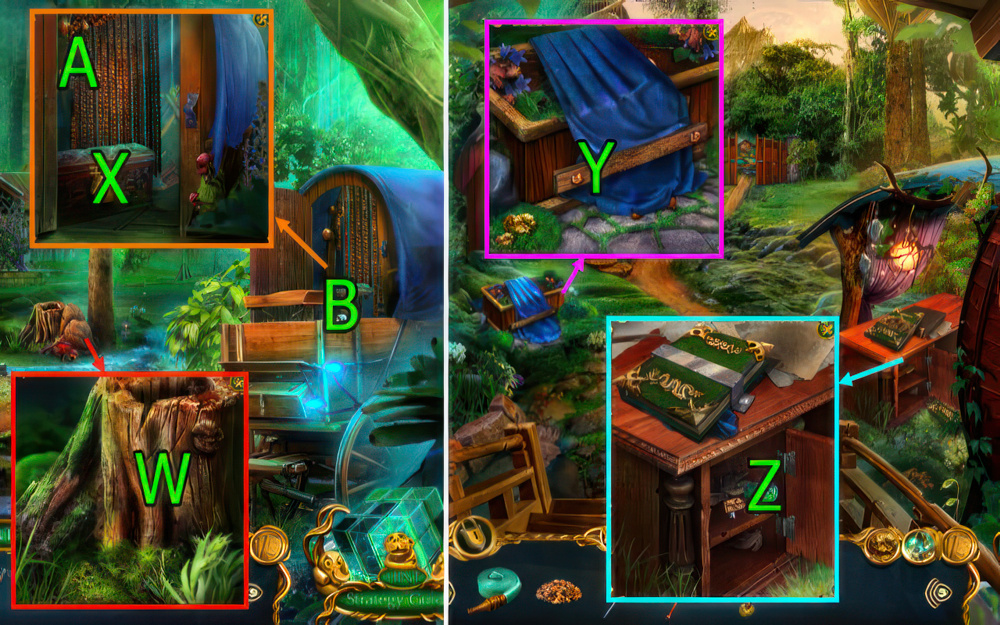
- Use AXE and FORCEPS on (W), get BOX KEY and KINDLING.
- Use BOX KEY on (X), get SCREWDRIVER and PUMP LEVER.
- Go Down.
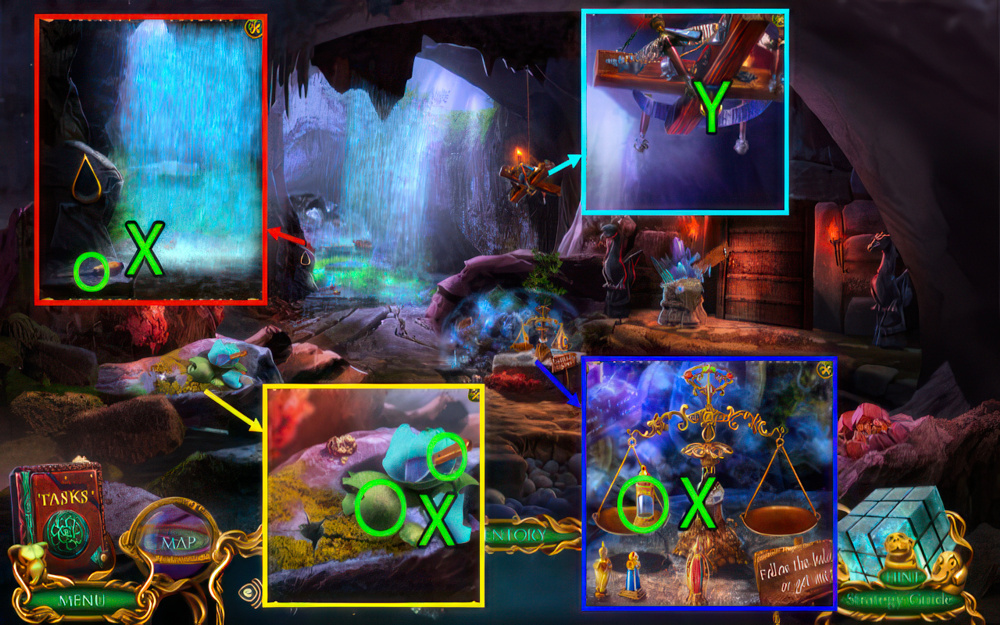
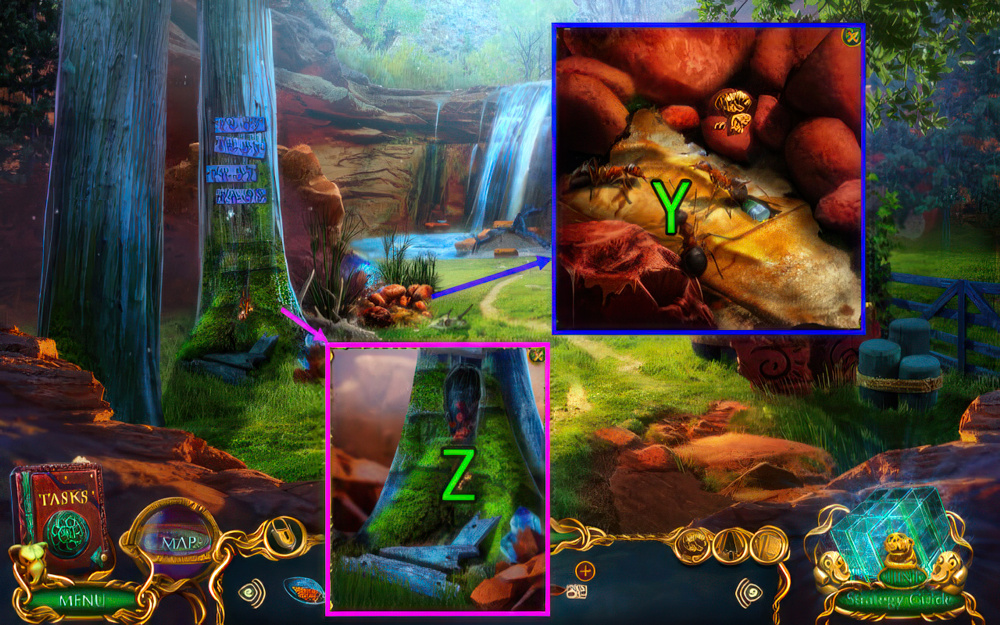
- Use SCREWDRIVER and press (Y), get GLOVE, HOOK, and SYRINGE.
- Use SYRINGE on (Z), get FERTILIZER.
- Go Dark Thickets.
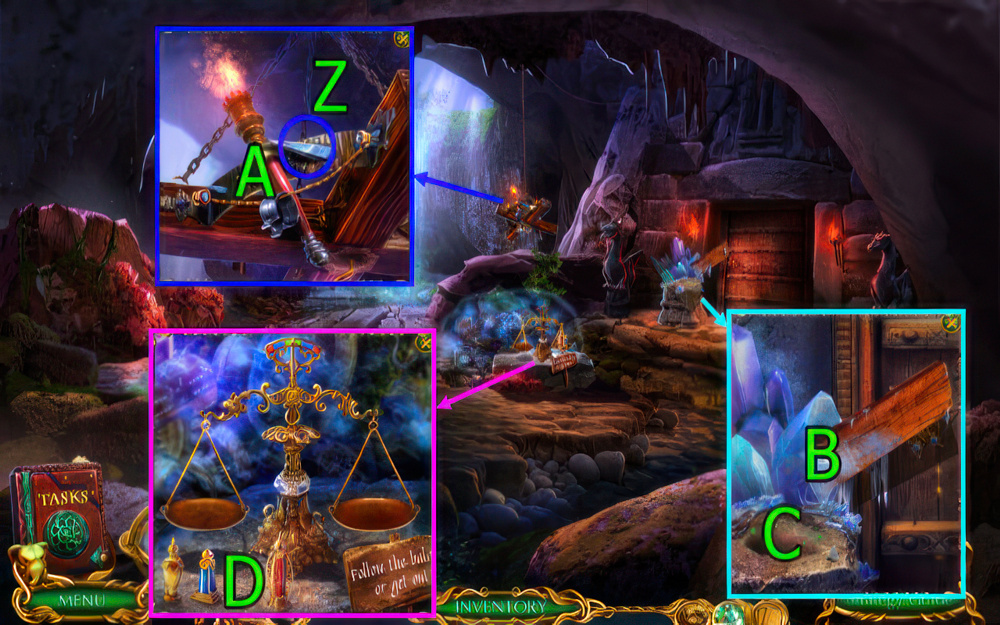
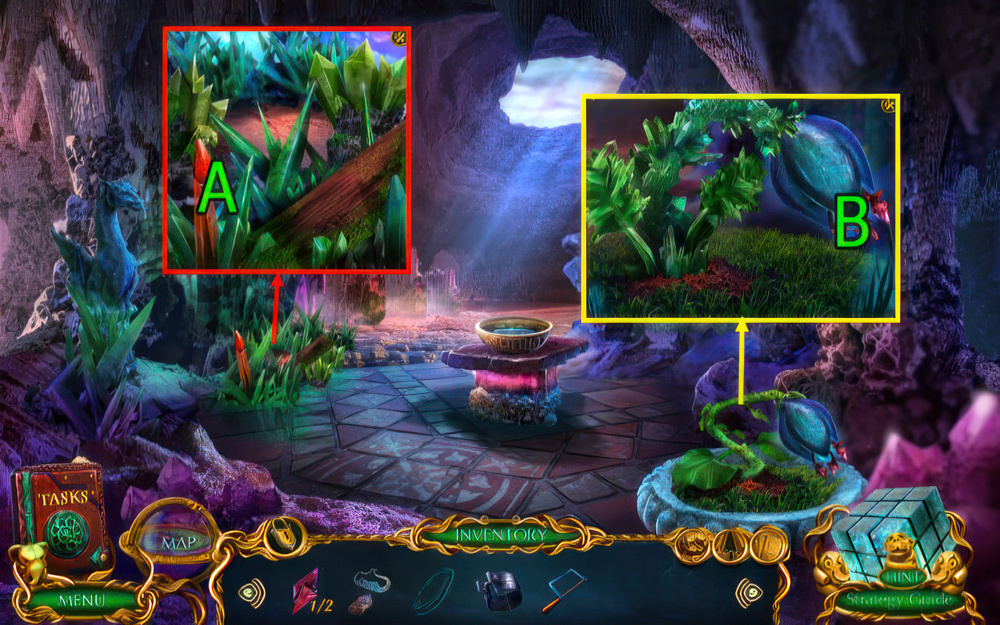
- Use HOOK on (A).
- Solve puzzle (B), get CLAMP.
- Use SLINGSHOT on (C), get BOTTLE BRUSH.
- Use BOTTLE BRUSH, HOSE, CLAMP, and PUMP LEVER on (D).
- Go (E).
- Go (F), get DRAGON TEARS.
- Get TROWEL (G).
- Use GLOVE on (H), CANDLE STUMP.
- Go Down.
- Use TROWEL on (H), get TONGS.
- Go Down.
- Use DRAGON TEARS on (I).
- Get RESTORATIVE POTION RECIPE and CLOTH.
- Go Stables.
- Use CLOTH on (J), get WET CLOTH, FORK, and WHISTLE.
- Go Charles’s House.
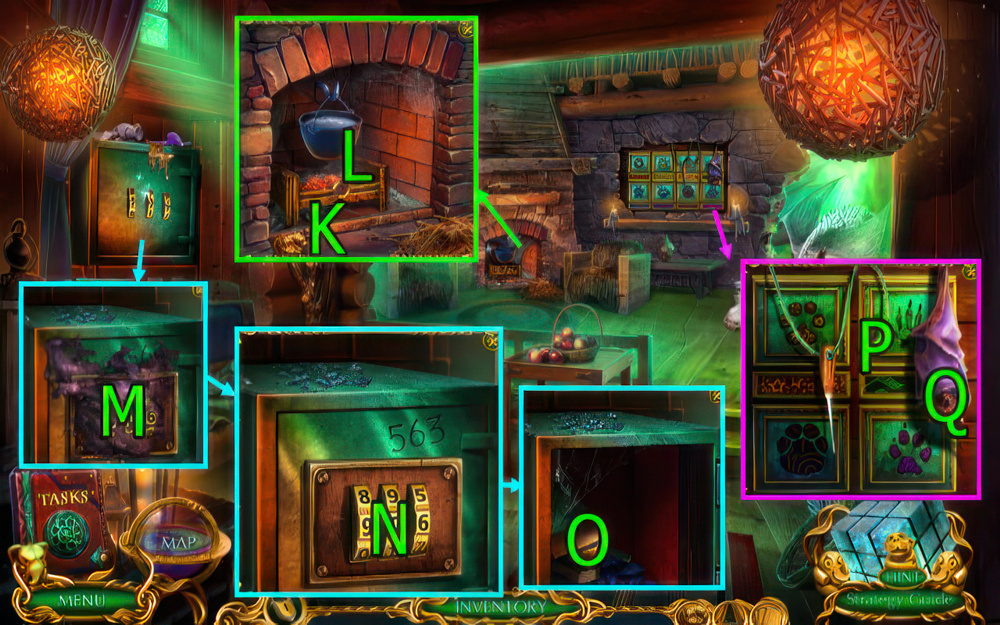
- Use KINDLING on (L), drag (K) to (L).
- Use CANDLE STUMP on (L), get LIT CANDLE.
- Use WET CLOTH on (M).
- Set (N) to 563, get CANE.
- Press (O), get STONE and MORTAR AND PESTLE.
- Use WHISTLE on (Q).
- Use LIT CANDLE on (P), get AWL.

- Easy solution (@53): (A-C)-(B-D)-(B-H)-(C-F)-(F-G)-(E-H)-(E-F).
- Hard solution (@53): (D-H)-(E-F)-(A-E)-(B-C)-(C-D).
- (A-B)-(B-C)-(F-G)-(E-F)-(G-H)-(F-G).
- Get DIARY TOKEN.
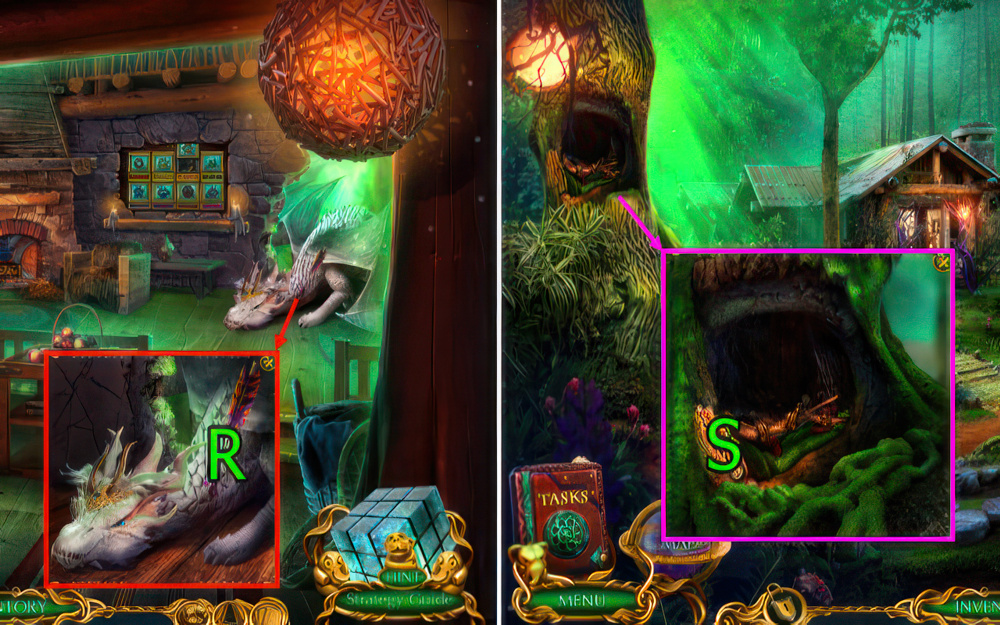
- Use TONGS on (R), get DIARY.
- DIARY TOKEN on DIARY, get BRUSH and BELLADONNA BERRIES.
- Go Down.
- Use AWL (S), get SEED.
- Go Down.
- Use SEED and FERTILIZER on (T), get MEDICINAL FLOWER.
- Go Stable.
- Use BRUSH on (U), get POLLEN ON A BRUSH.
- MORTAR AND PESTLE, BELLADONNA BERRIES, POLLEN ON A BRUSH, and MEDICINAL FLOWER on RESTORATIVE POTION RECIPE, get UNBREWED POTION.
- Go Charles’s House.
- Use UNBREWED POTION on (V), get RESTORATIVE POTION.
- Use RESTORATIVE POTION on (W).
- Get SCREWDRIVER, SCRAPER, DRAGON EGGSHELL, and FLASK (X).
- Use CANE on (Y).
- Get SPIKE (Z).
- Use FORK on (A), get TORCH.
- Use TORCH on (B), get BOARD.
- Use DRAGON EGGSHELL, STONE, and FLASK on (C), get CRUSHED SHELL.
- Use CRUSHED SHELL on (D).

- Easy solution (@54): (1-b1)-(3-b1)-(2-a1)-(4-a1).

- Hard solution (@55): (2-a1)-(4-a1)-(1-b1)-(3-b1)-(5-b1).
- Solve puzzle (E), get PASSAGE AMULET.
- Use PASSAGE AMULET on (F), get EXTENDED MAGNET.
- Use BOARD on (G).
- Go (H).

- Use SCREWDRIVER on (I), get SCOOP NET.
- Use SPIKE on (J), get COGWHEEL.
- Use COGWHEEL on (K), get NAIL PULLER and LIGHTER.
- Use SCRAPER on (L), get DYNAMITE.
- Go Down.
- Use DYNAMITE and LIGHTER on (M), get FILE.
- Go Lake.
- Use FILE on (N), get LOCKPICK.
- Use LOCKPICK on (O), get CRYSTAL HALL KEY and CORKSCREW.
- Go Down.
- Use CRYSTAL HALL KEY on (P).
- Go (Q).

- Get BROKEN FRETSAW (R).
- Use EXTENDED MAGNET on (S), get SCREWS.
- Use NAIL PULLER on (T), get GOLDEN TILE.
- Use GOLDEN TILE on (U).

- Easy solution (@56): (2-4-1-3-5).
- Hard solution (@56): (3-2-6-5).
- Get PURIFYING LIQUID.

- Use PURIFYING LIQUID on (V), get CRANBERRIES.
- Go Lake.
- Use CRANBERRIES and SCOOP NET on (W), get FILLED BOTTLE.
- CORKSCREW on FILLED BOTTLE, get CRYSTAL STAMEN (1/2) and BOTTLE.
- Go Crystal Hall.

- Use BOTTLE on (X), get WATER and WRENCH.
- Use WATER on (Y), get FLINT AND STEEL and LASSO.
- Go Down.
- Use WRENCH on (Z), get METAL RING and CHAIN.
- CHAIN and SCREWS on BROKEN FRETSAW, get FRETSAW.
- Go Crystal Hall.
- Use FRETSAW on (A), get CRYSTAL STAMEN (2/2).
- Use CRYSTAL STAMEN on (B), get PETAL and POST.
- Go Lake.

- Use POST on (C).
- Solve puzzle (D), get ARTIFACT.
- Use ARTIFACT on (E).
- Go (F), get KNIFE.
- Drag (G) and use METAL RING on (H), get SHOVEL.
- Get COAL (I).
- Get COIN and SCARECROW (J).
- Use SHOVEL on (K), get GLOVE.
- Use SCARECROW on (L), get TORCH.
- Use LASSO on (M).
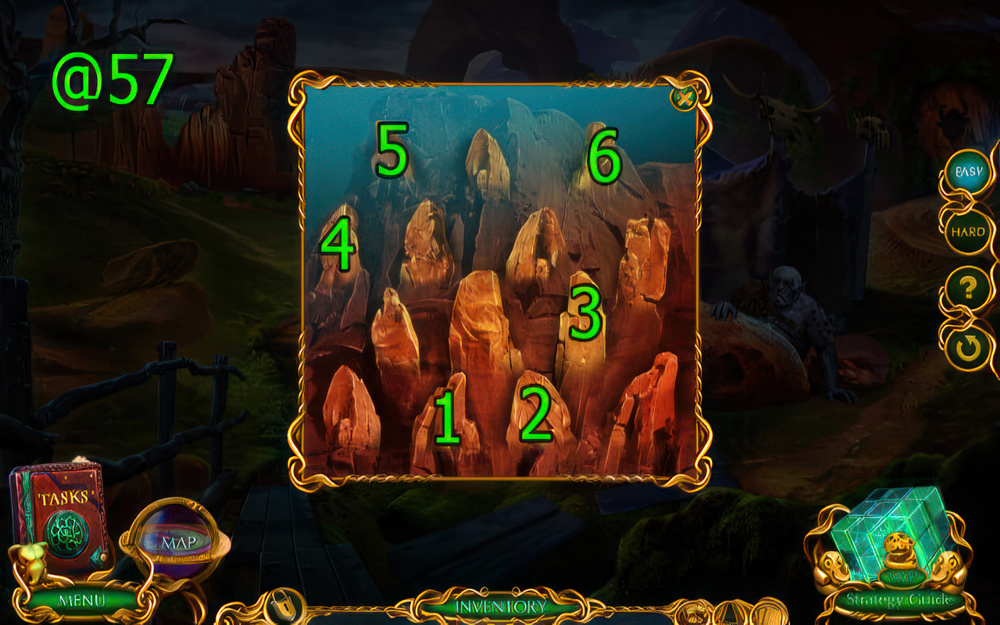
- Easy solution (@57): (1-3-4-6).
- Hard solution (@57): (1-2-3-4-5-6).
- Go Gurrin’s Lair.

- Use TORCH and PETAL on (N), get RESIN and HONEY DIPPER.
- Use KNIFE on (O), get PLIERS.
- Use PLIERS on (P), get NAILS.
- Get CROWBAR (Q).
- Go Down.
- Use CROWBAR on (R), get CLIFF AMULET.
- Use CLIFF AMULET on (S).
- Go Sacred Gorge.
- Use COIN on (T), get CAULDRON.
- Use GLOVE on (U), get SILVER COINS.
- Get OILER (V).
- Use HONEY DIPPER on (W), get HONEY.
- Use COAL on (X).
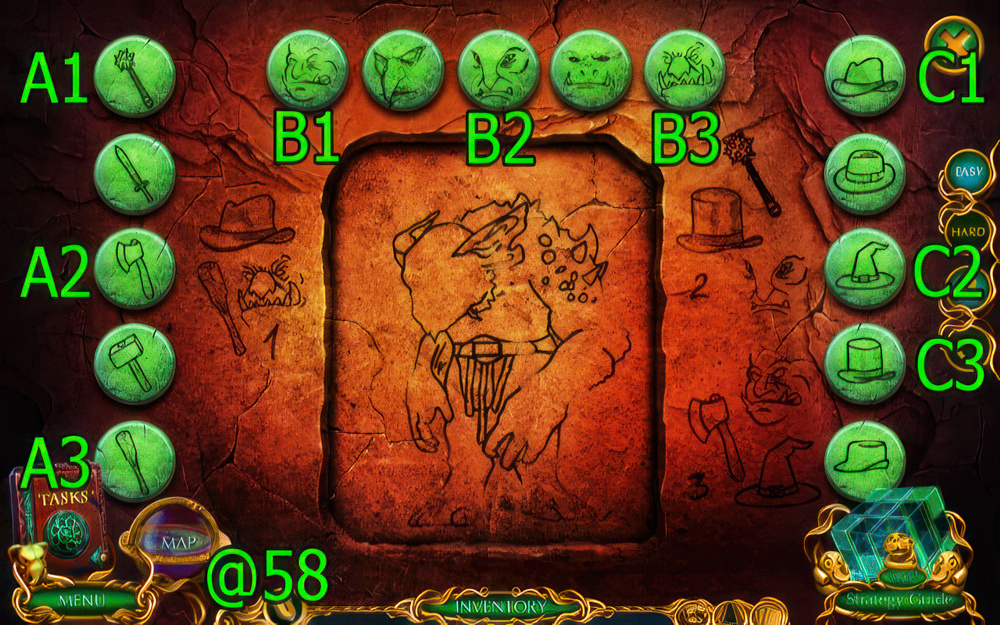
- Easy solution (@58): (A3-B3-C1)-(A1-B2-C3)-(A2-B1-C2).
- Hard solution (@58): (A3-B3-C1)-(B2-C3)-(A2-B1-C2).
- Get RECIPE.
- Go Gurrin’s Lair.
- Use HONEY and press (Y), get BROKEN SHAVING BRUSH and HAMMER.
- RESIN on BROKEN SHAVING BRUSH, get SHAVING BRUSH.
- Use NAILS and HAMMER on (Z).
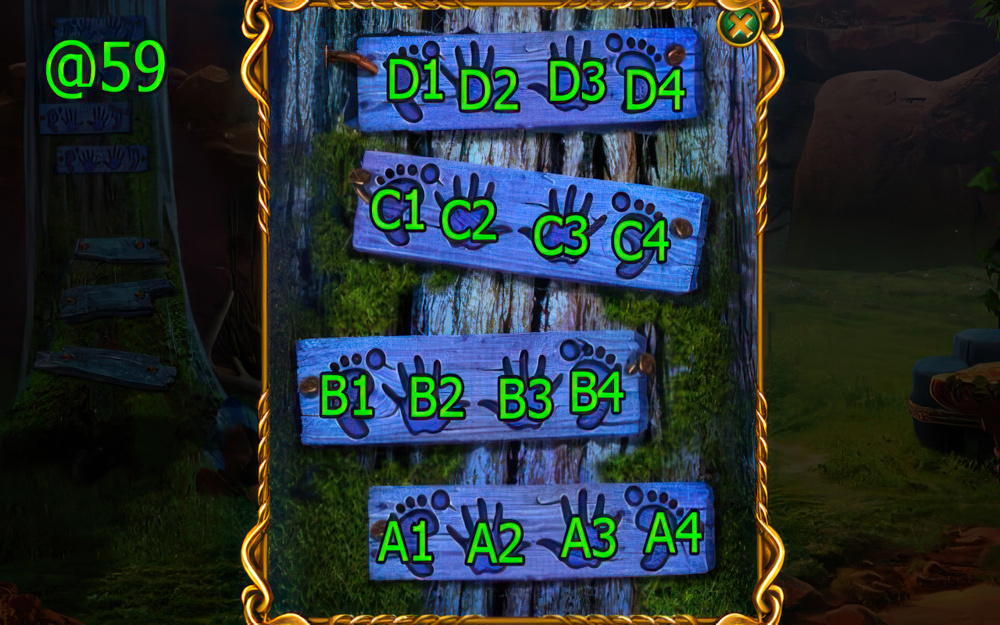
- Easy solution (@59): (A4-B3-C1-D1)-(A3-B4-C1-D2)-(A1-B3-C3-D4).
- Hard solution (@59): (A1-B3-B4-C1-C4-D2)-(A4-B2-B4-C4-C2-D1)-(A2-B3-B1-C2-C1-D3).
- Get LENS, SAW, and CONE.

- Use OILER on (A), get TANGLED ROPE and LENS BRACE.
- Press TANGLED ROPE, get ROPE.
- Use CAULDRON on (B), get CAULDRON WITH WATER.
- Go Down.
- Use SAW on (C), get BOARDS.
- Solve puzzle (D), get EMPOWERING POTION.
- SILVER COINS, CONE, and EMPOWERING POTION on RECIPE, get BOWL WITH INGREDIENTS.
- Use FLINT AND STEEL, CAULDRON WITH WATER, and BOWL WITH INGREDIENTS on (E).
- Get SILVER CONCOCTION.
- Use SILVER CONCOCTION on (F), get BROKEN PORTAL ARTIFACT.
- Go Sacred Gorge.
- Use BOARDS and ROPE on (G).
- Get BAG AMULET (H).
- Use BAG AMULET on (I), get FORCEPS.
- Use SHAVING BRUSH on (J), get FREEZING POWDER.
- Go Gurrin’s Lair.
- Use FREEZING POWDER on (K), get SECOND ARTIFACT STONE.
- Use FORCEPS on (L), get ACID.
- Go Sacred Gorge.

- Use LENS BRACE and LENS on (M), get FIRST ARTIFACT STONE.
- Use ACID on (N), get THIRD ARTIFACT STONE.
- FIRST ARTIFACT STONE, SECOND ARTIFACT STONE, and THIRD ARTIFACT STONE on BROKEN PORTAL ARTIFACT, get PORTAL ARTIFACT.
- Use PORTAL ARTIFACT on (O).
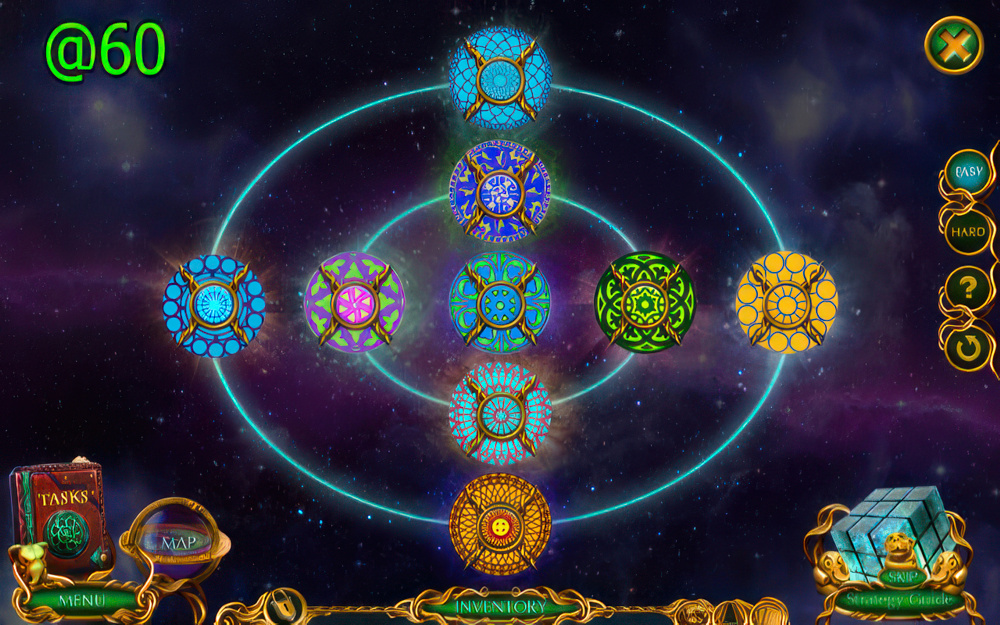
- Easy and hard solution (@60): Match the patterns to the circles as shown.
Congratulations! You have completed the game Labyrinths of the World 7: A Dangerous Game.


