Labyrinths of the World 9: Lost Island (Bonus Chapter) – When the earth’s crust began to crack and cause catastrophic events around the world, the Order of Seekers organized a special expedition to search for answers. Your brother Simon stumbled upon something really big, but soon after that he disappeared, and the order asked you to find him, and catch a thief who escaped from the seekers and could be responsible for all vile actions.
Bonus Chapter Walkthrough
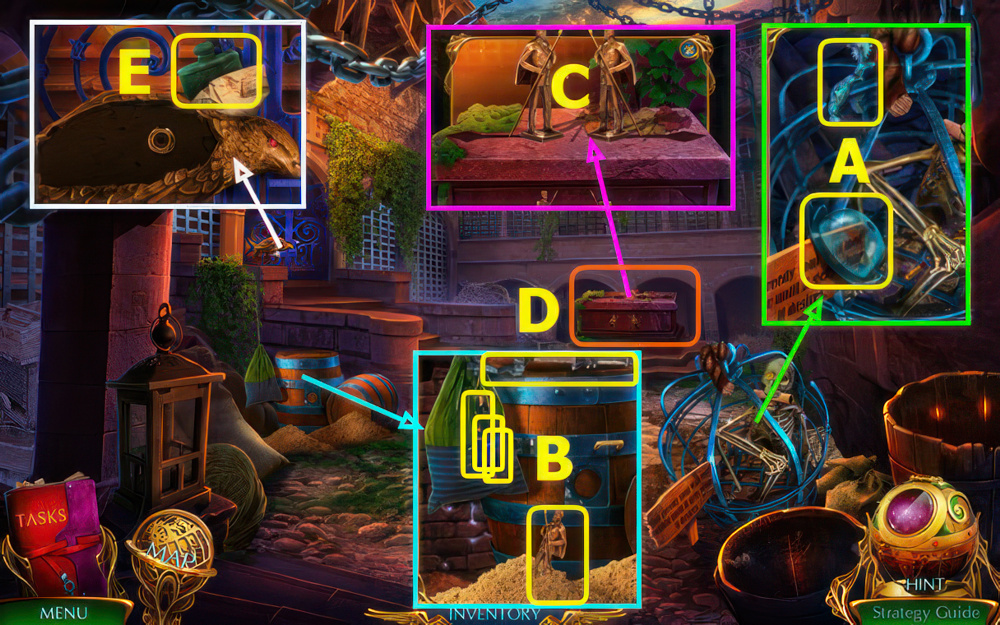
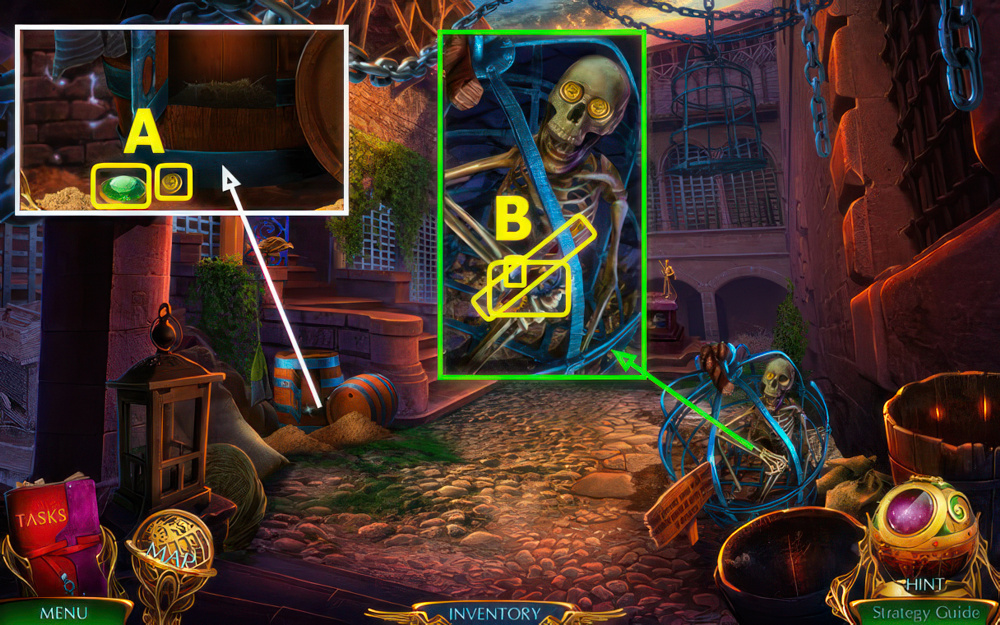
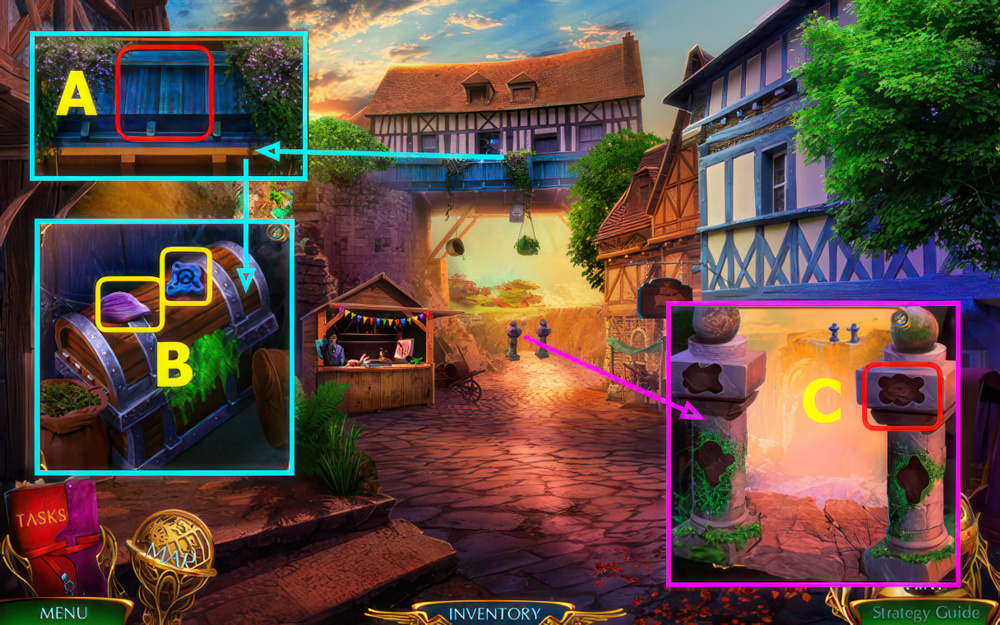
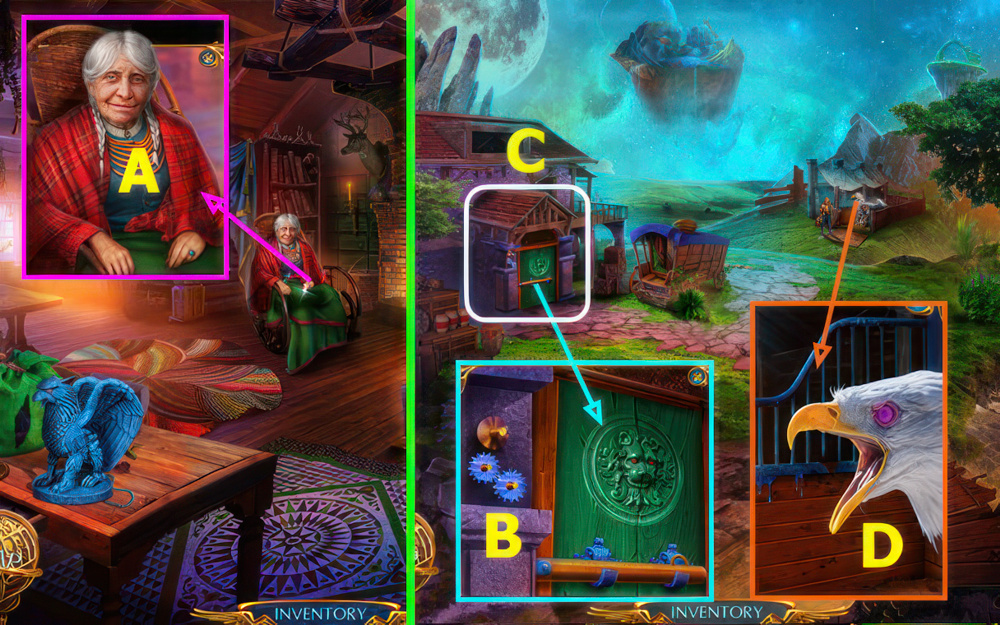
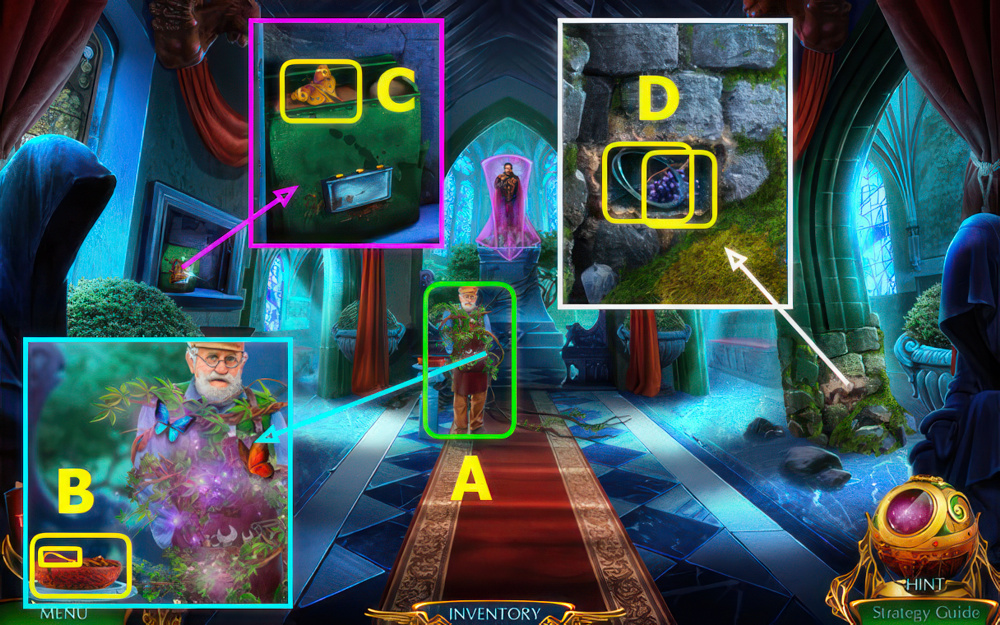
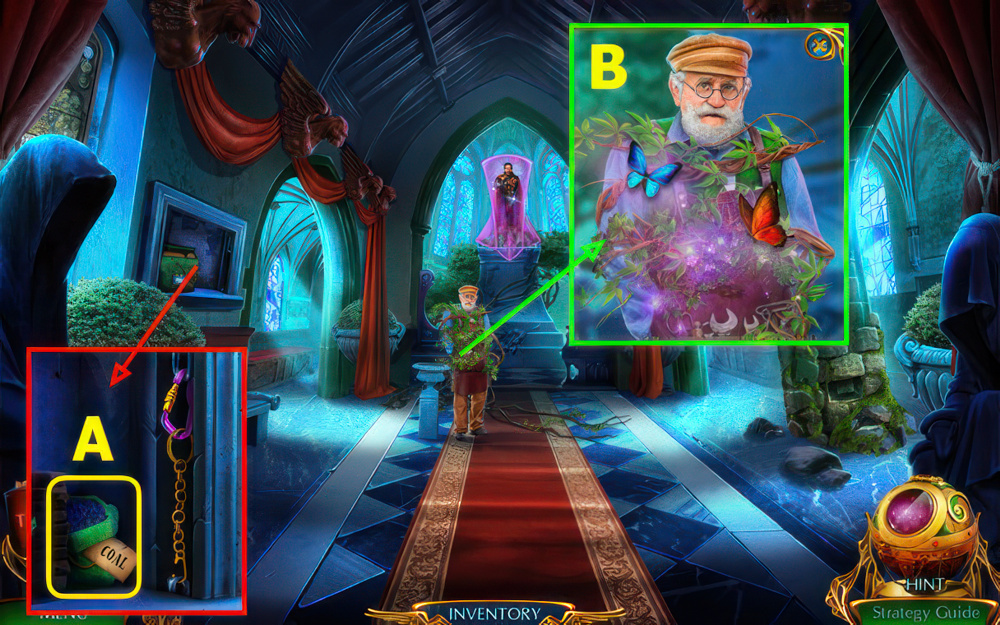
- Take BROKEN DOME and SHARP SPUR (A).
- Use SHARP SPUR, take 1/2 QUILL WITH PARCHMENT, HEAVY CANDLESTICK, TORCH, 1/2 and 2/2 WARDEN FIGURINE (B).
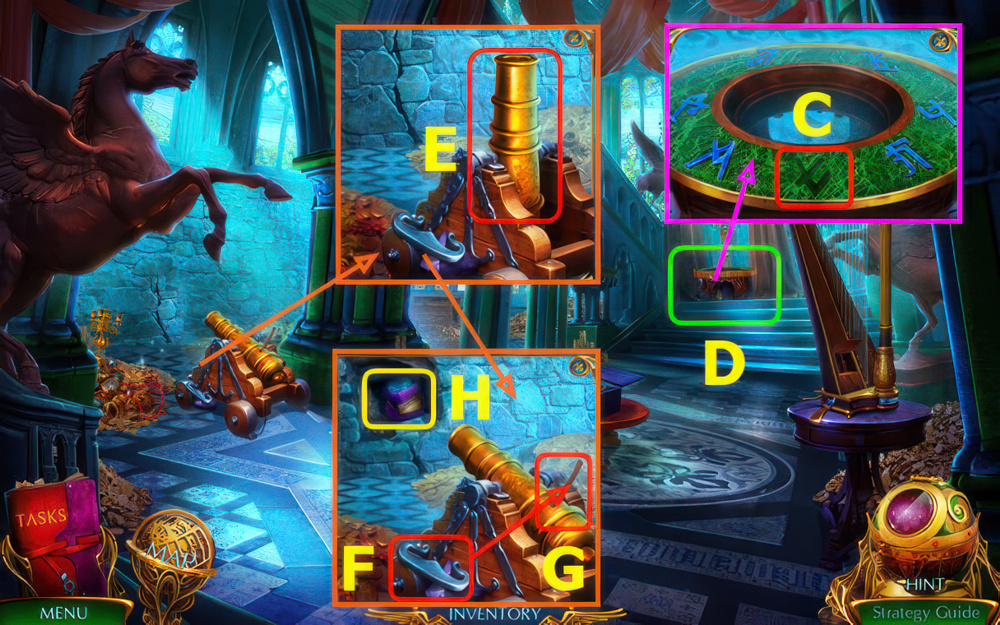
- Place WARDEN FIGURINES (C).
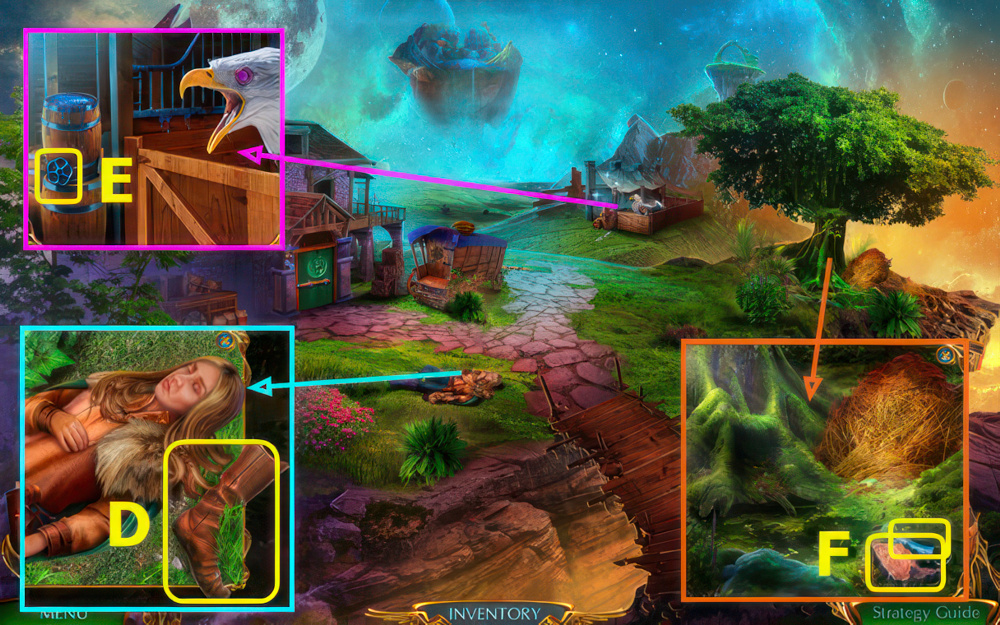
- Play puzzle, earn BRONZE WING (D).
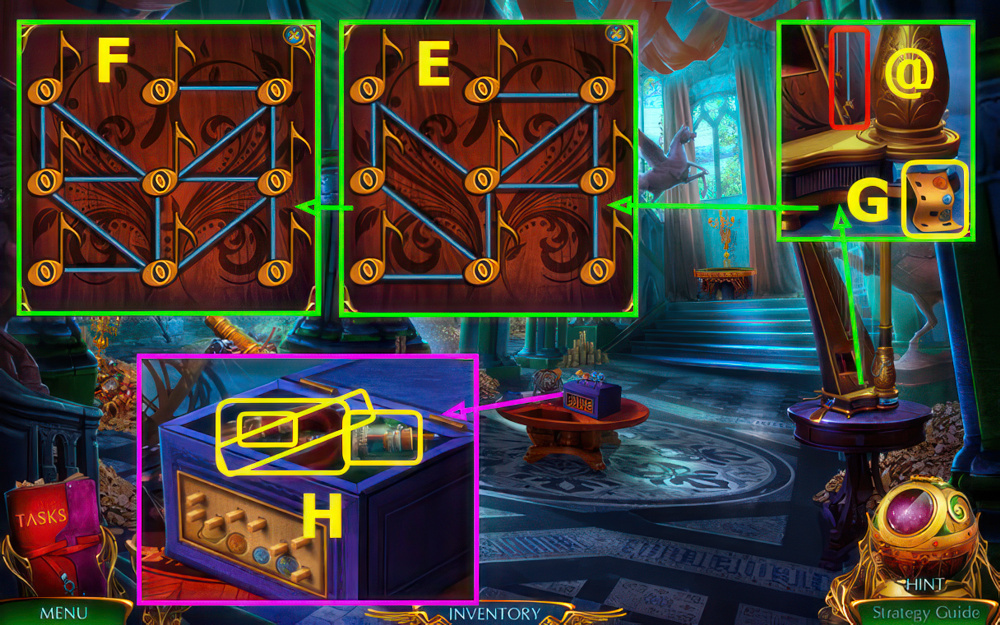
- Read note, take ALCOHOL FLASK, place BRONZE WING (E).
- Walk left.
- You earn DYNAMITE.
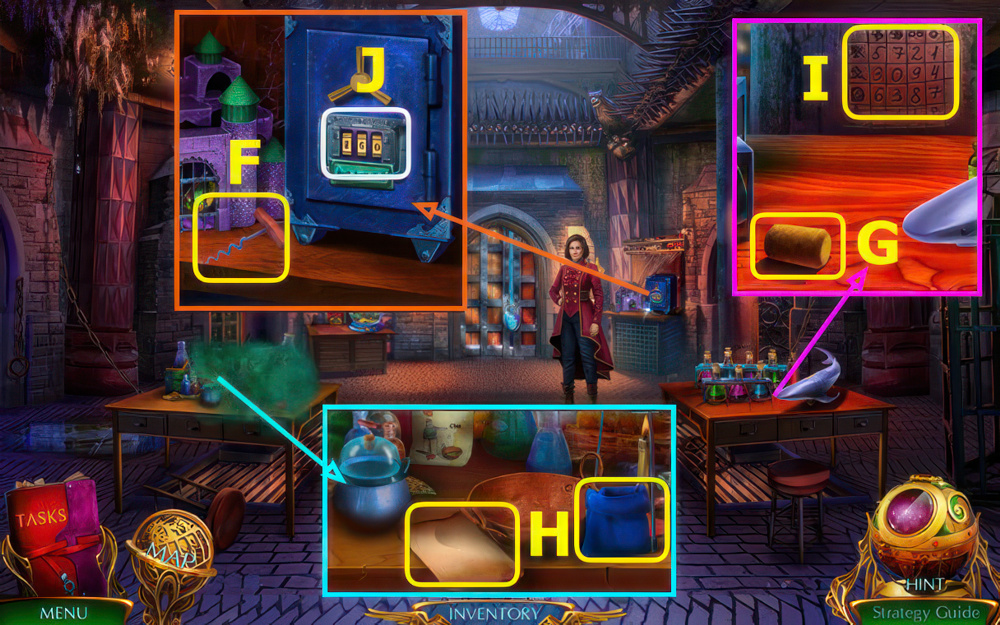
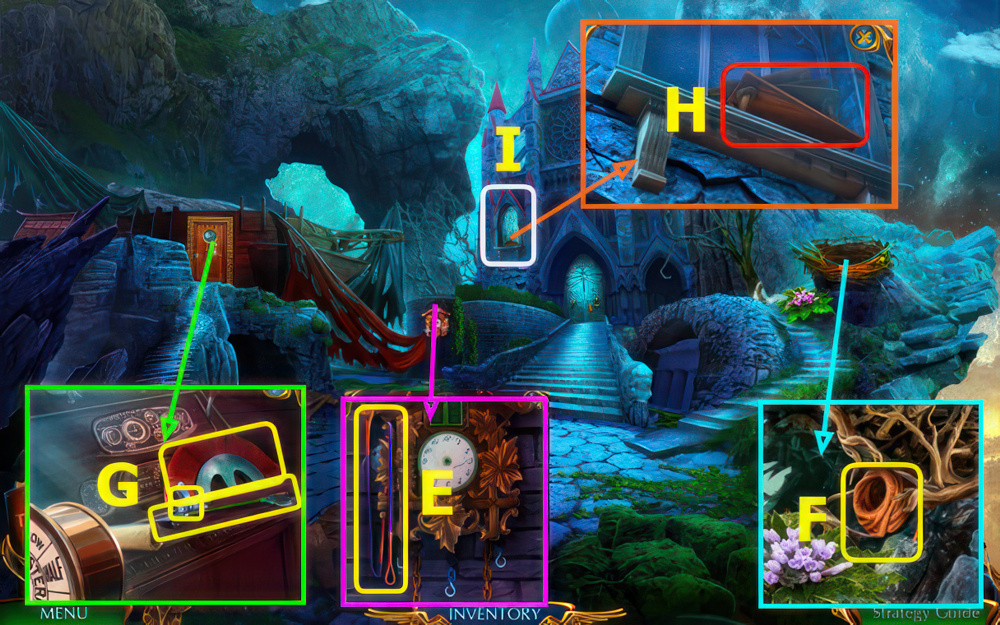
- Take CORKSCREW (F).
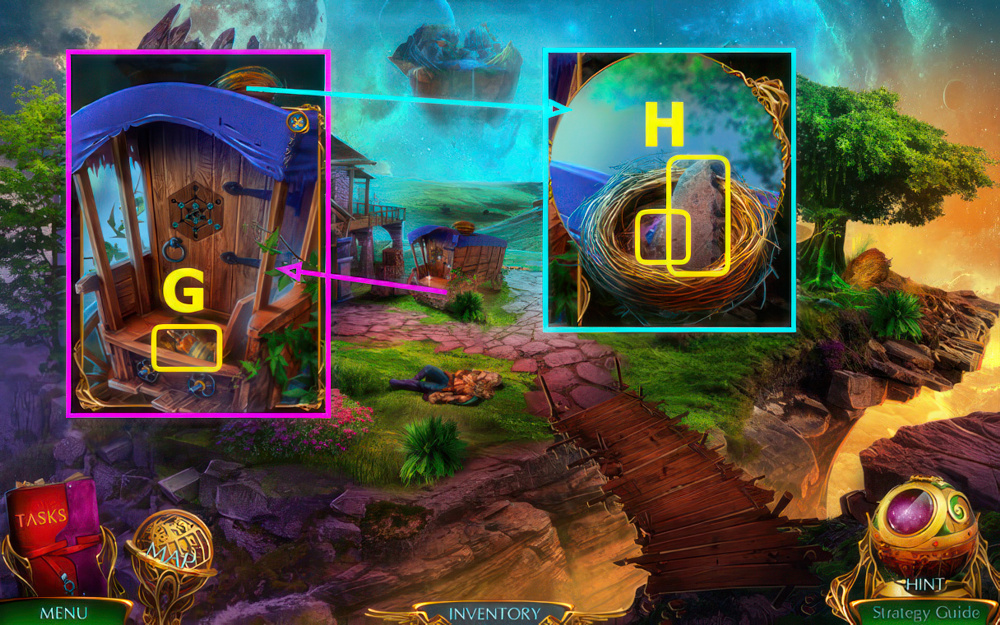
- Take CORK (G).
- CORK and CORKSCREW on BROKEN DOME, earn MAKESHIFT DOME.
- Place MAKESHIFT DOME.
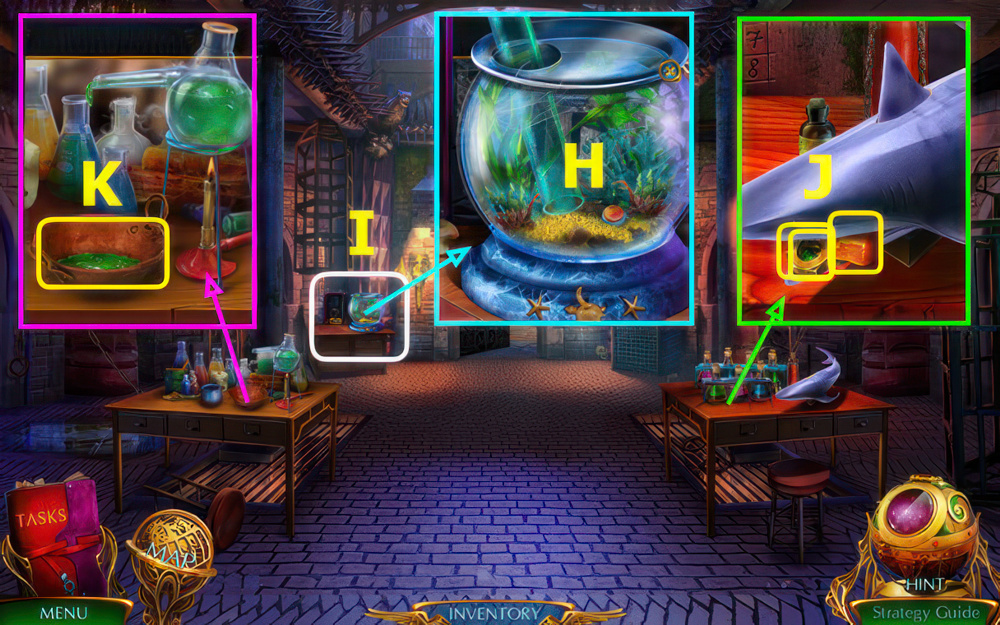
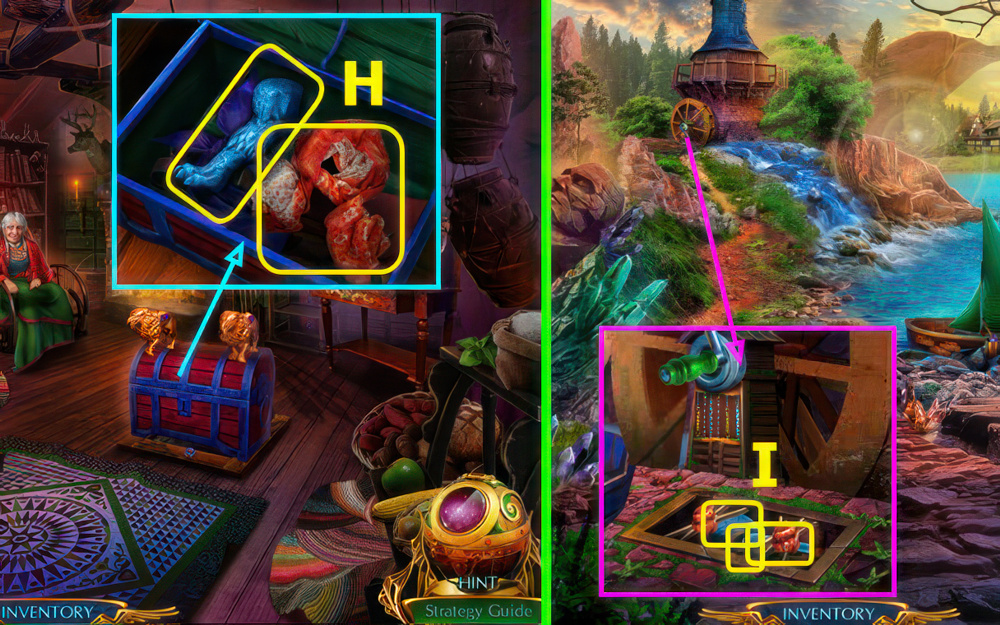
- Take 2/2 QUILL AND PARCHMENT and CANVAS BAG (H).
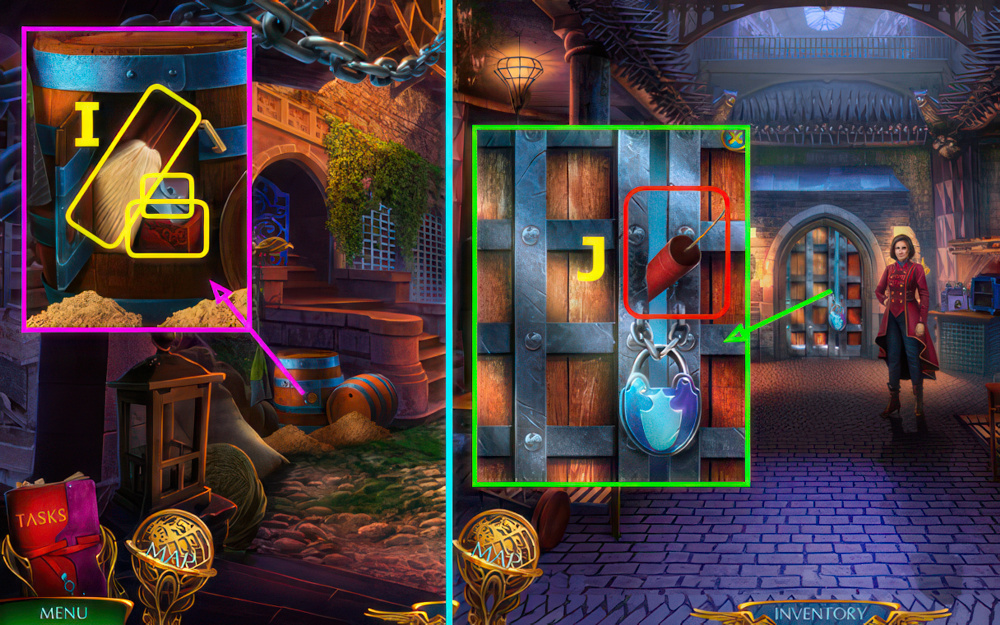
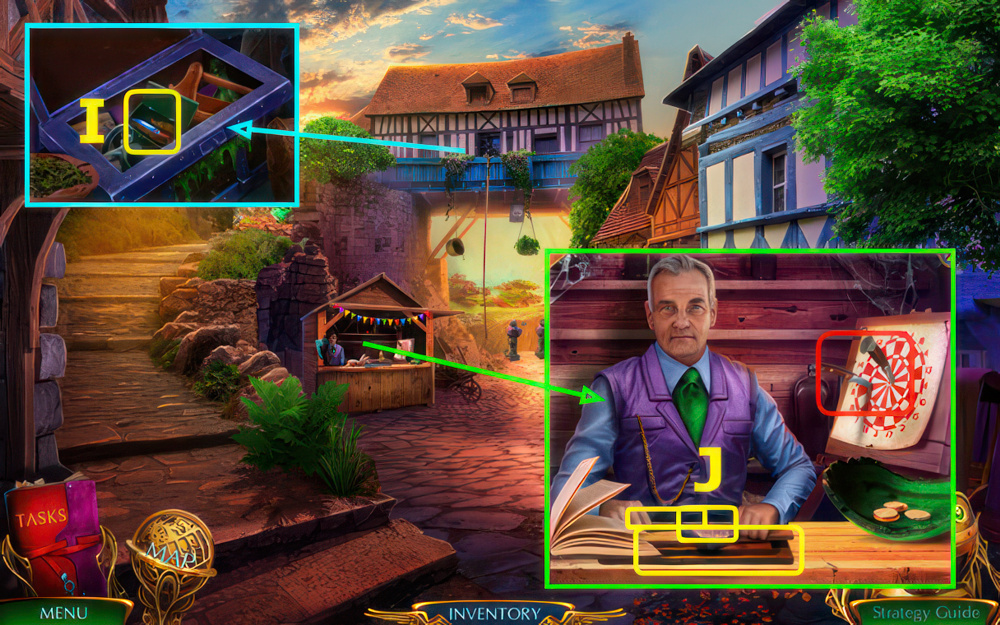
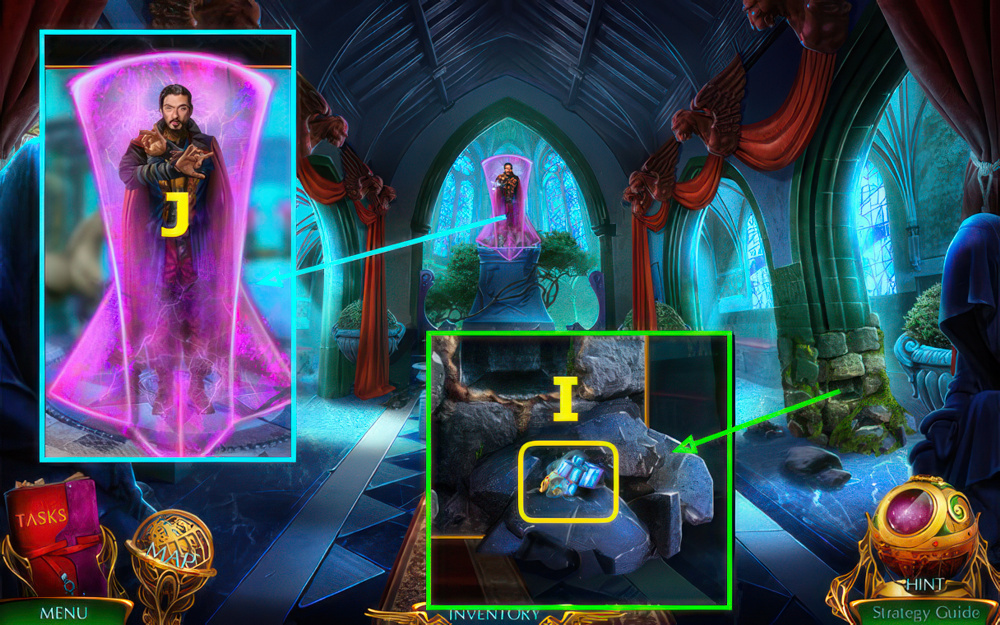
- Use QUILL WITH PARCHMENT, earn SAFE CODE (I).
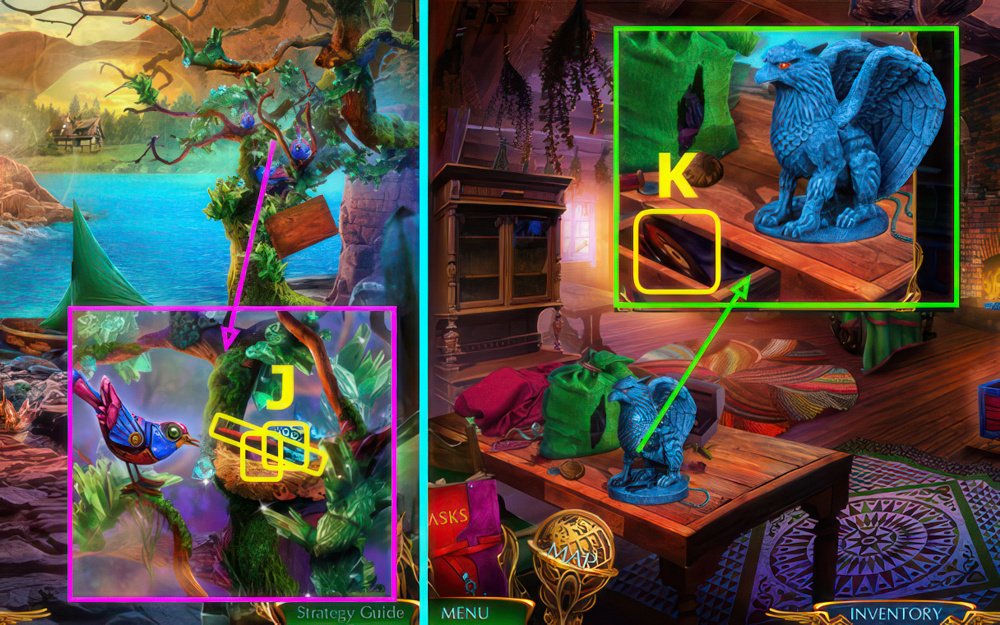
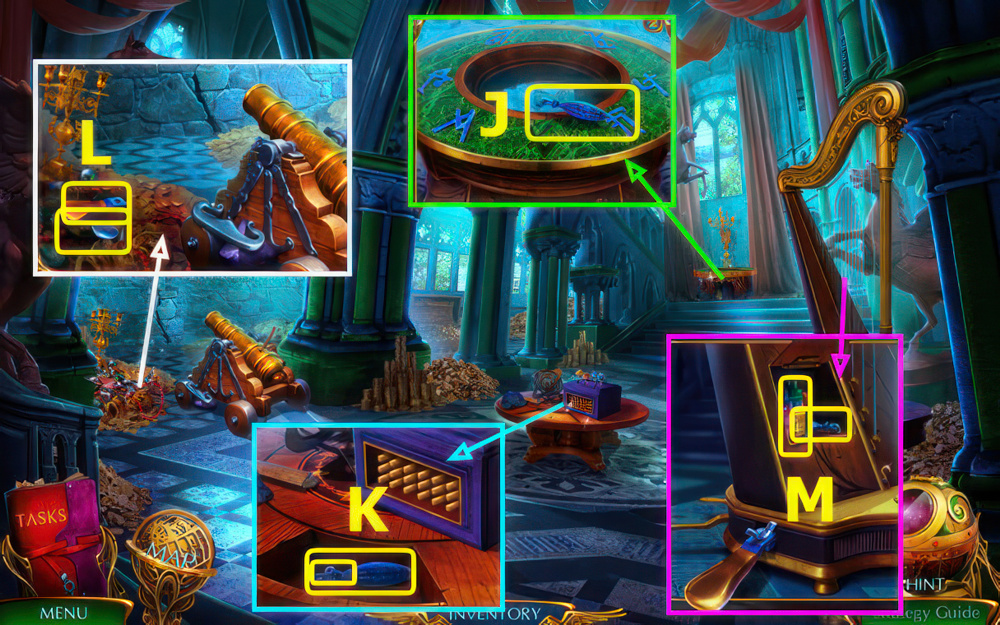
- Place SAFE CODE (J).
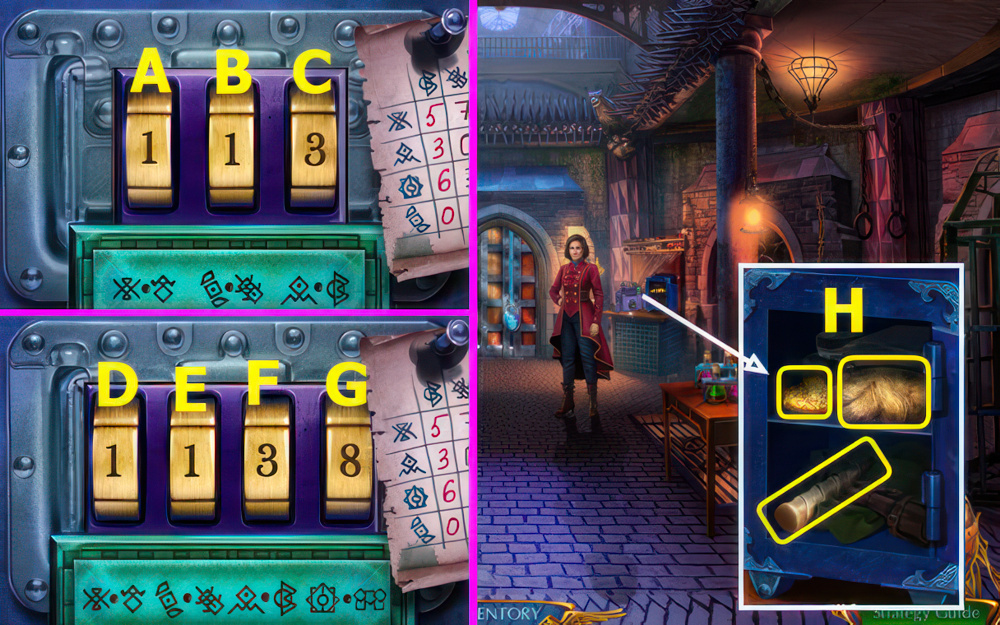
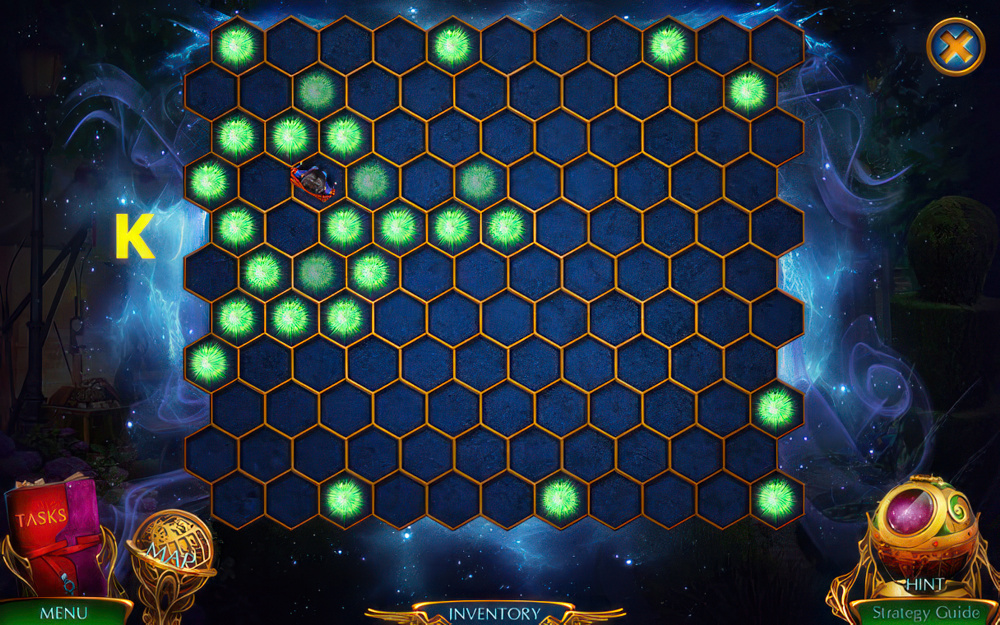
- Easy solution Ax9-Cx4-B.
- Hard solution Fx9-Ex6-Dx4-G-9.
- Read note, take UNICORN HORN, 1/3 VIOLETTE’S AMULET, and WIG (H).
- Walk down.
- Use UNICORN HORN and HEAVY CANDLESTICK.
- Take BROOM, FLINT WITH STEEL, and SCOOP BASE (I).
- WIG, ALCOHOL FLASK, and FLINT WITH STEEL on TORCH, earn LIT TORCH.
- Go left.
- Use DYNAMITE and LIT TORCH (J).
- Go forward.
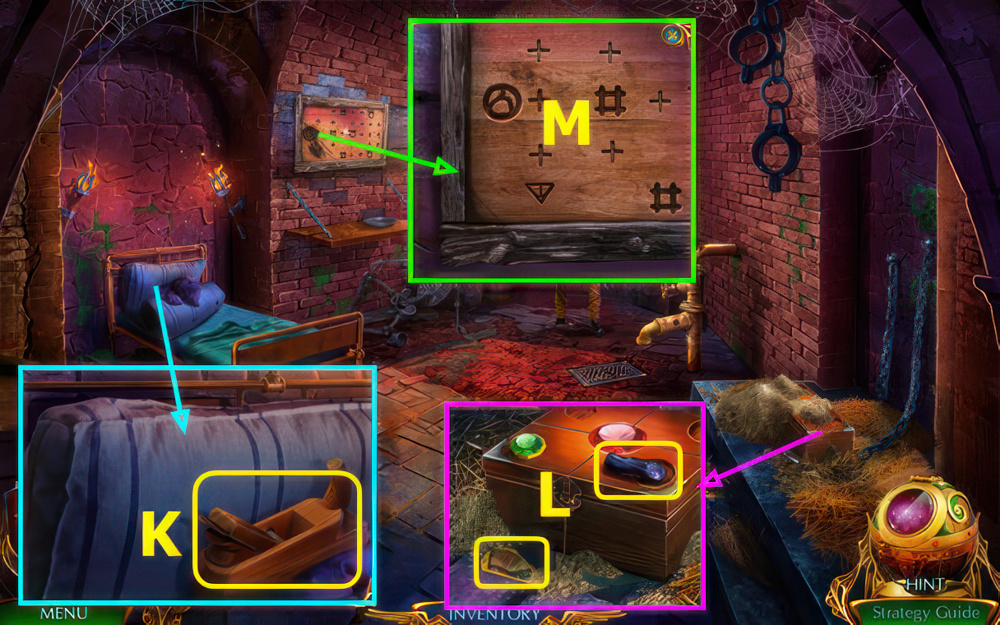
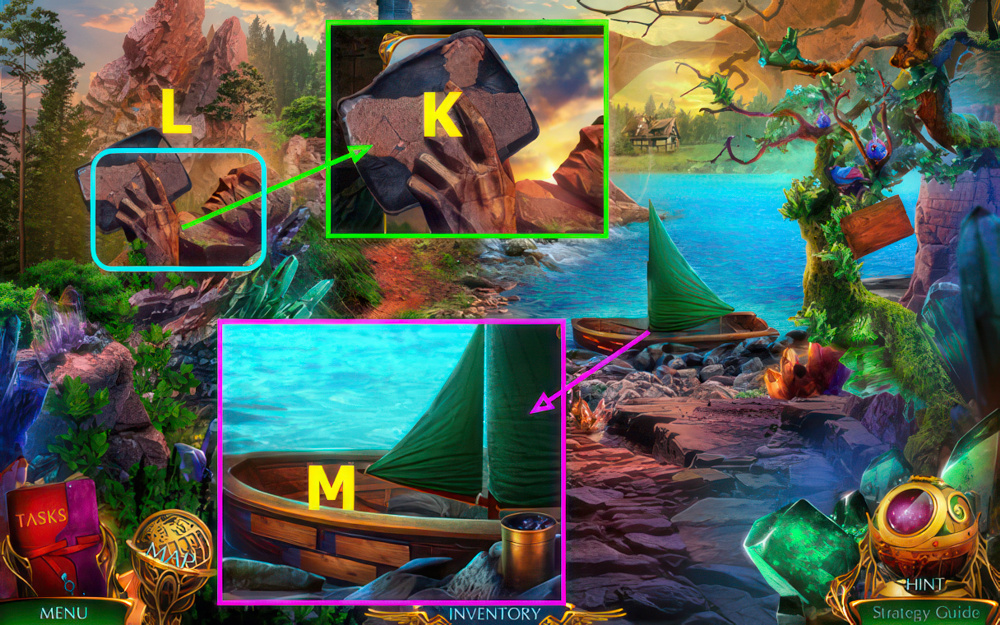
- Take SCRUB PLANE, select pillow (K).
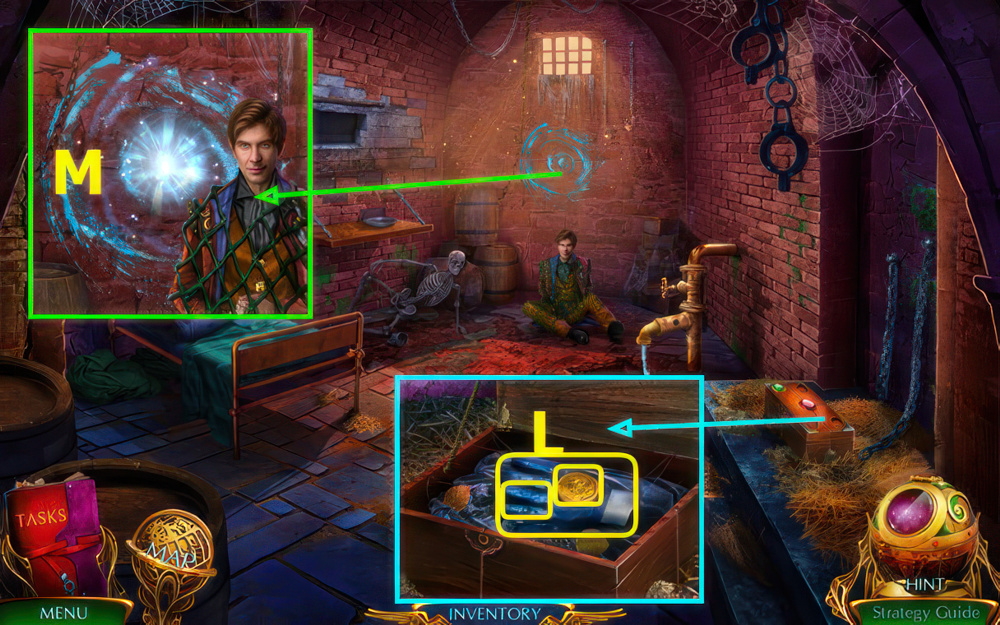
- Read note, use BROOM, take 2/3 VIOLETTE’S AMULET and COAL (L).
- Use COAL (M).
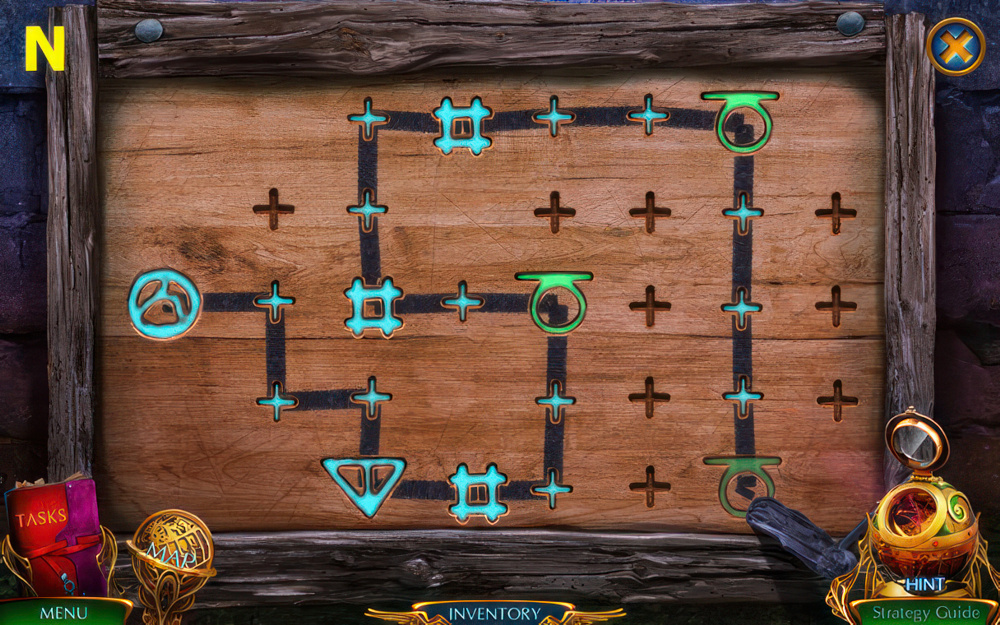
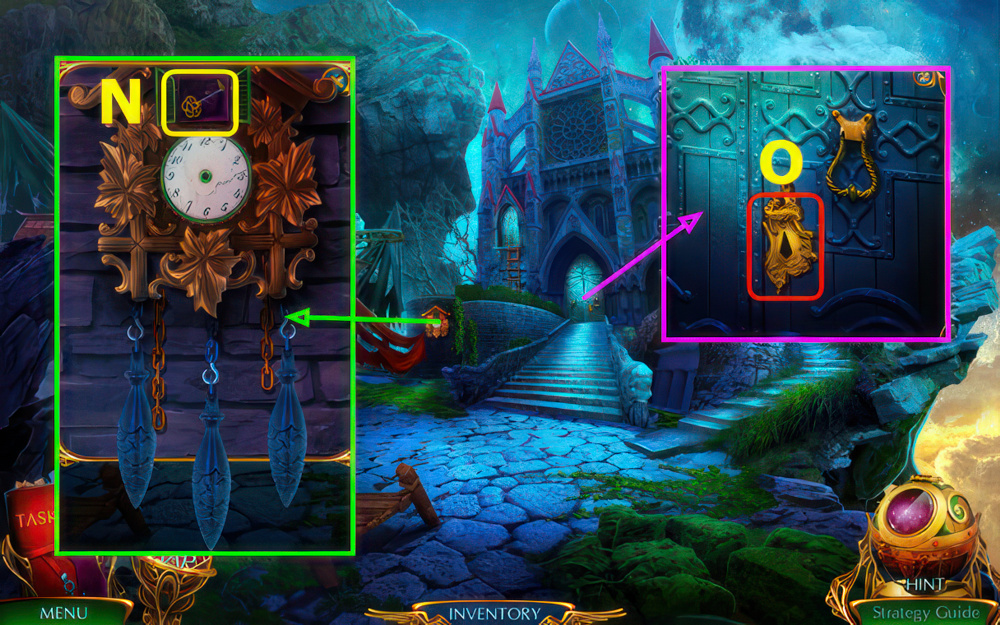
- Solution (N).
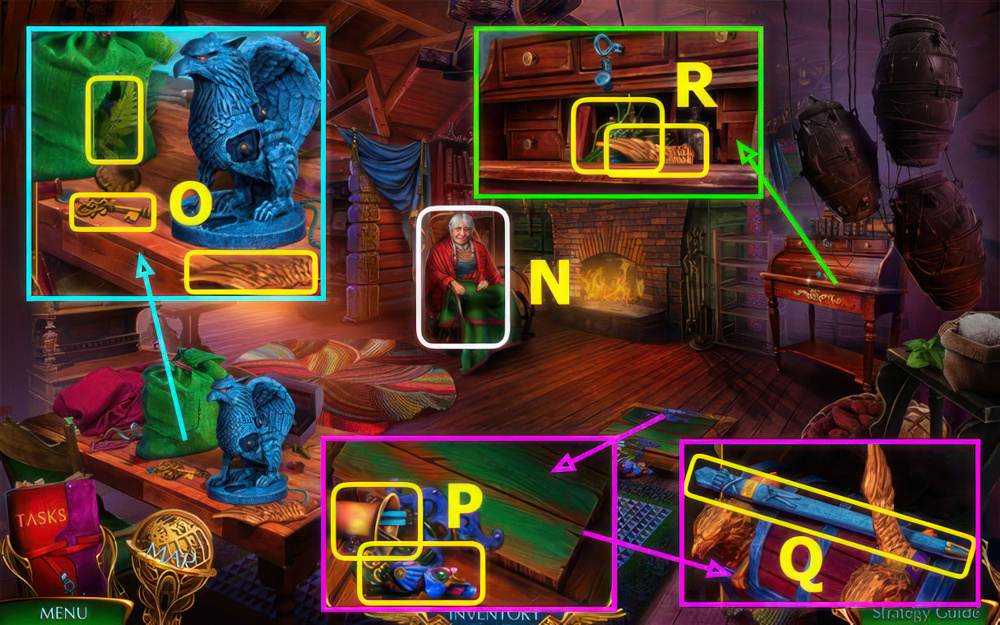
- Take STICK and CLAMP.
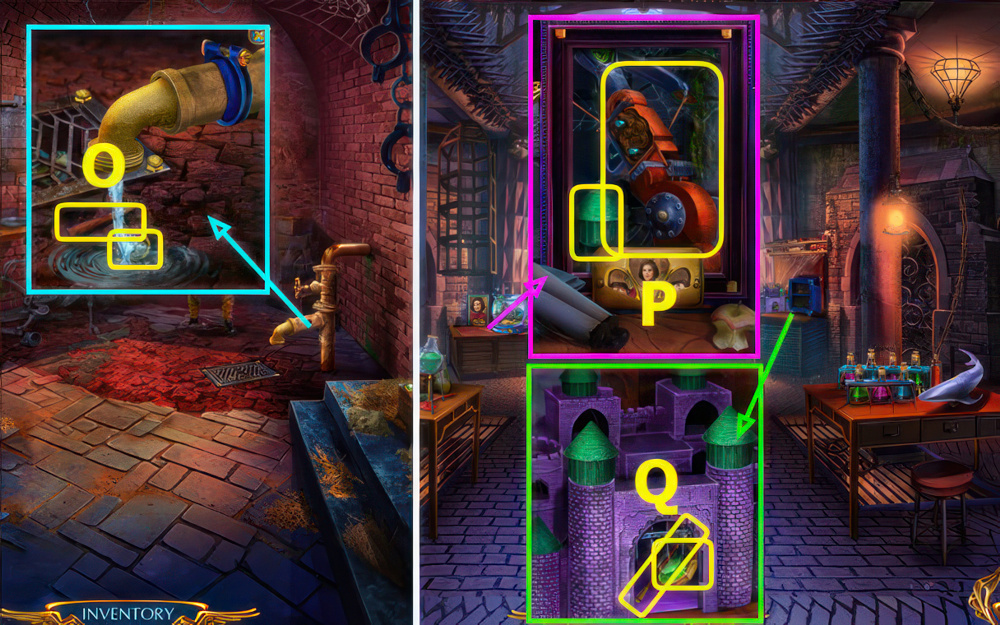
- Use CANVAS BAG and CLAMP, take 3/3 VIOLETTE’S AMULET and WEDGE (O).
- SCRUB PLANE, STICK, and WEDGE on SCOOP BASE, earn HANDMADE SCOOP.
- Walk down.
- Place VIOLETTE’S AMULET, take MODEL TOWER and BROKEN NET GUN (P).
- Place MODEL TOWER, take BROKEN MAGIC BRUSH and 1/3 GREEN CRYSTAL (Q).
- Walk down.
- Use HANDMADE SCOOP, take 2/3 GREEN CRYSTAL and ANCIENT COIN (A).
- Read note, place ANCIENT COIN.
- Take BULLET, CRESCENT WRENCH, and NET GUN BELT (B).
- NET GUN BELT on BROKEN NET GUN, earn NET GUN.
- Walk left, forward.

- Use CRESCENT WRENCH, take TURTLE (C).
- Use NET GUN, earn IMPROVISED LOCKPICK (D).
- Use IMPROVISED LOCKPICK, read diary, take SHARP BLADE (E).
- Use SHARP BLADE, use (F-G), take PAINTBRUSH.
- Walk down.
- Place TURTLE (H).
- Play puzzle, earn SHARK FIN (I).
- Place SHARK FIN, take NUT, HARDENED RESIN, and 3/3 GREEN CRYSTAL (J).
- Use HARDENED RESIN, take BOWL WITH GLUE (K).
- Go forward.
- Place GREEN CRYSTALS, take 1/3 ANCIENT COIN, GLOVE, and BRUSH CLAMP (L).
- PAINTBRUSH, BOWL WITH GLUE, and BRUSH CLAMP on BROKEN MAGIC BRUSH, earn MAGIC BRUSH.
- Use MAGIC BRUSH (M).
- Go forward.
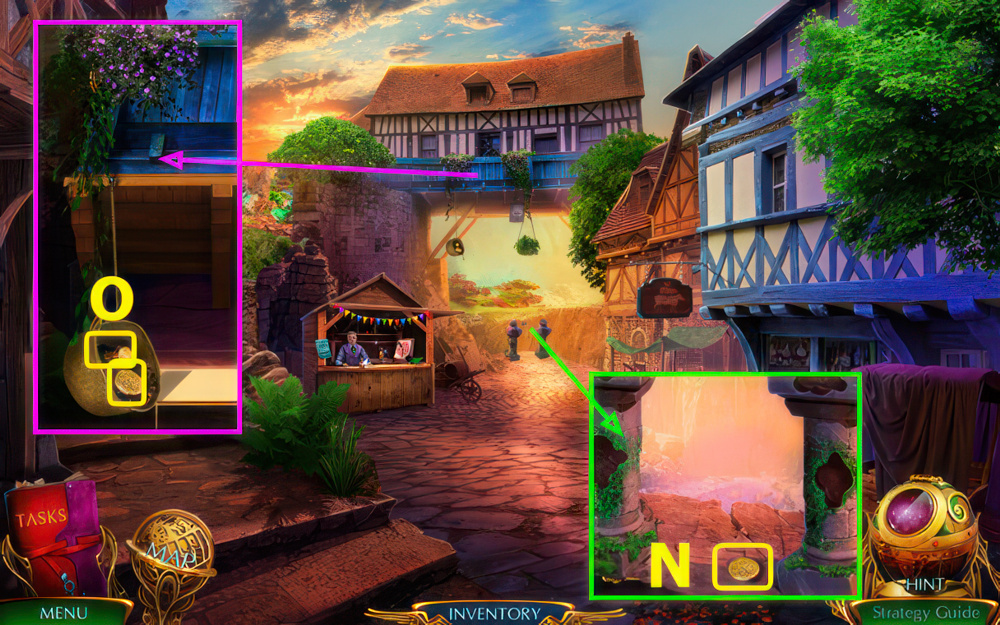
- Take 2/3 ANCIENT COIN (N).
- Take BOLT and 3/3 ANCIENT COIN (O).
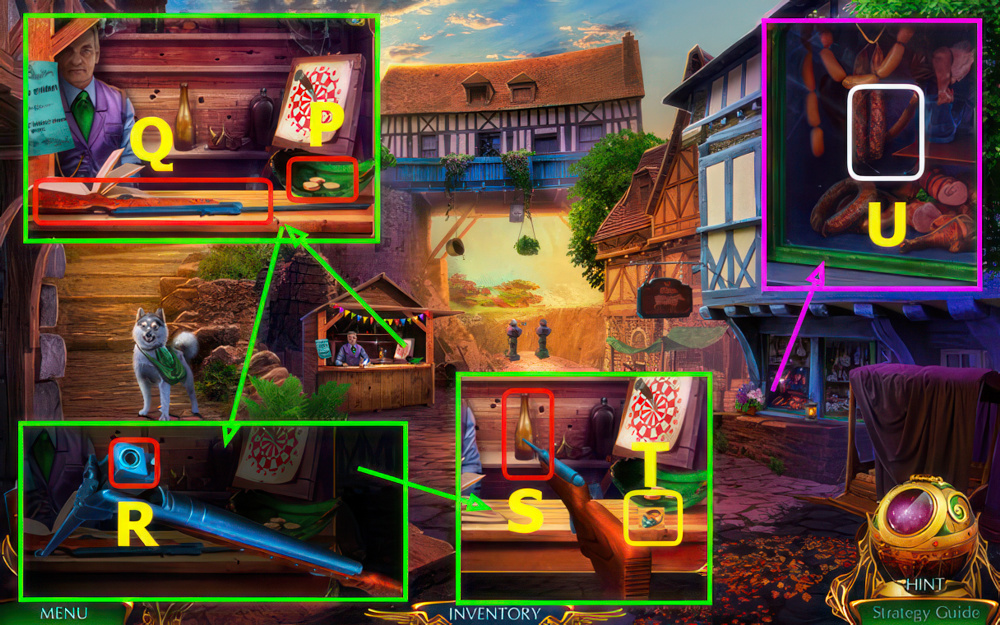
- Place ANCIENT COINS (P), select (Q).
- Place BULLET, select (R).
- Select rifle and (S), take DIAMOND RING (T).
- Use DIAMOND RING (U).
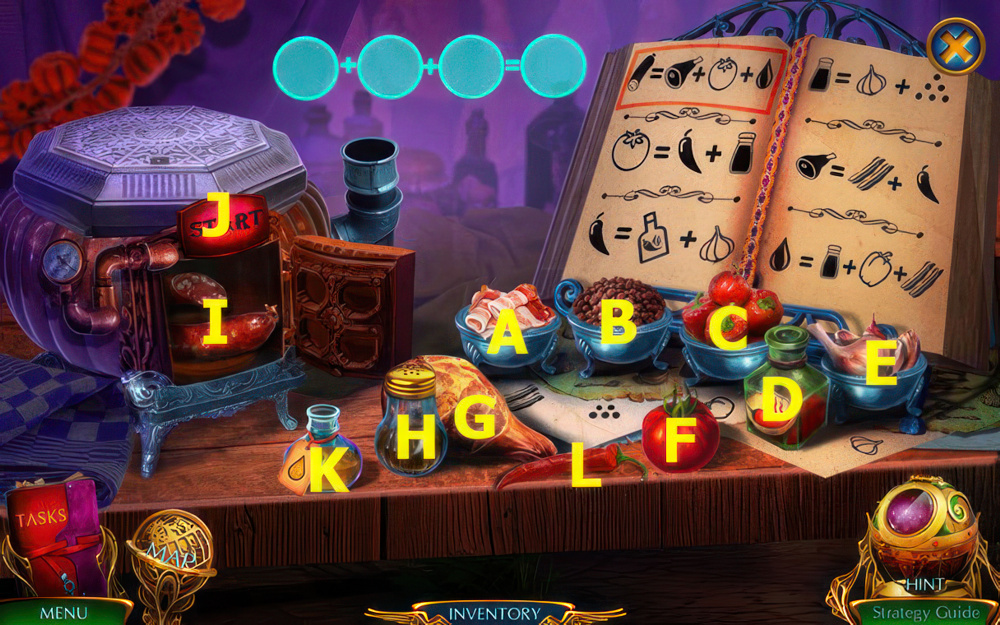
- Select (B-E-J)-(A-C-H-J)-(D-E-J)-(A-L-J)-(H-L-J)-(K-G-F-J).
- Take SAUSAGE (I).
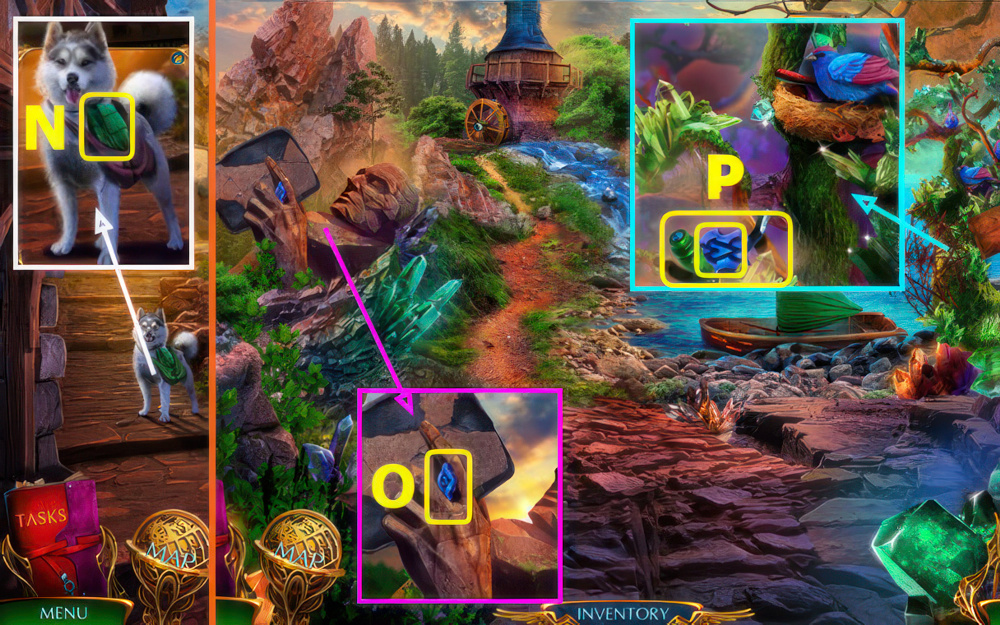
- Use SAUSAGE: take SAILCLOTH (N).
- Walk left.
- Take 1/4 RUNE (O).
- Use GLOVE, take 2/4 RUNE and LEVER (P).
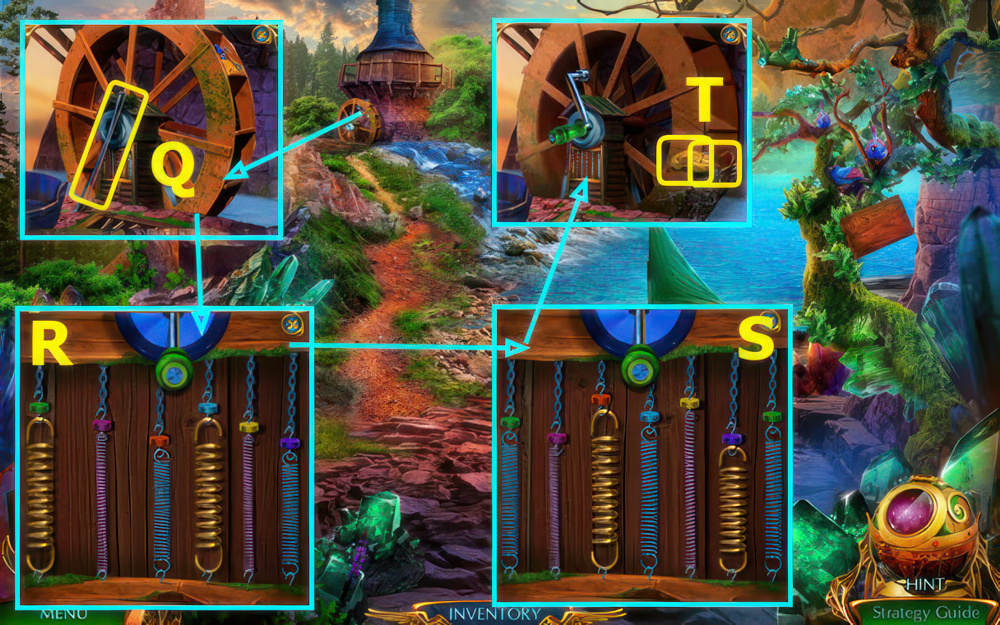
- Take FIDDLESTICK, place LEVER and BOLT (Q).
- Easy solution (R).
- Hard solution (S).
- Take GRAPPLING HOOK and 3/4 RUNES (T).
- Walk down.
- Use GRAPPLING HOOK (A).
- Take SHARP FIN and 4/4 RUNE (B).
- Use RUNES (C).
- Go forward.
- Take BOOT (D).
- Take VALVE (E).
- Use BOOT, take 1/3 TABLET FRAGMENT and SPRING (F).
- Use VALVE and NUT, read note, take SOLVENT (G).
- Use FIDDLESTICK, take 2/3 TABLET FRAGMENT and MAGIC BERRIES (H).
- Walk down.
- Use SOLVENT, play puzzle, take THROWING KNIFE (I).
- Use THROWING KNIFE.
- Take 3/3 TABLET FRAGMENT, WOODEN BOARDS, and BRUSH (J).
- Go left.
- Place TABLET FRAGMENTS (K).
- Play puzzle, earn MAGIC TAR (L).
- Place SAILCLOTH, MAGIC TAR, and WOODEN BOARDS (M).
- Go forward.
- Talk (N).
- Use SHARP FIN, take FERN, PADLOCK KEY, and 1/3 GRIFFIN WING (O).
- Take BROKEN BIRD and MORTAR AND RECIPE (P).
- Use PADLOCK KEY, take SHEATHE (Q).
- Read note, use SPRING, take 2/3 GRIFFIN WING and HEALING HERB (R).
- Read recipe in MORTAR AND RECIPE, add HEALING HERB.
- FERN, and MAGIC BERRIES, earn HEALING POTION.
- Walk down 2x, go forward.
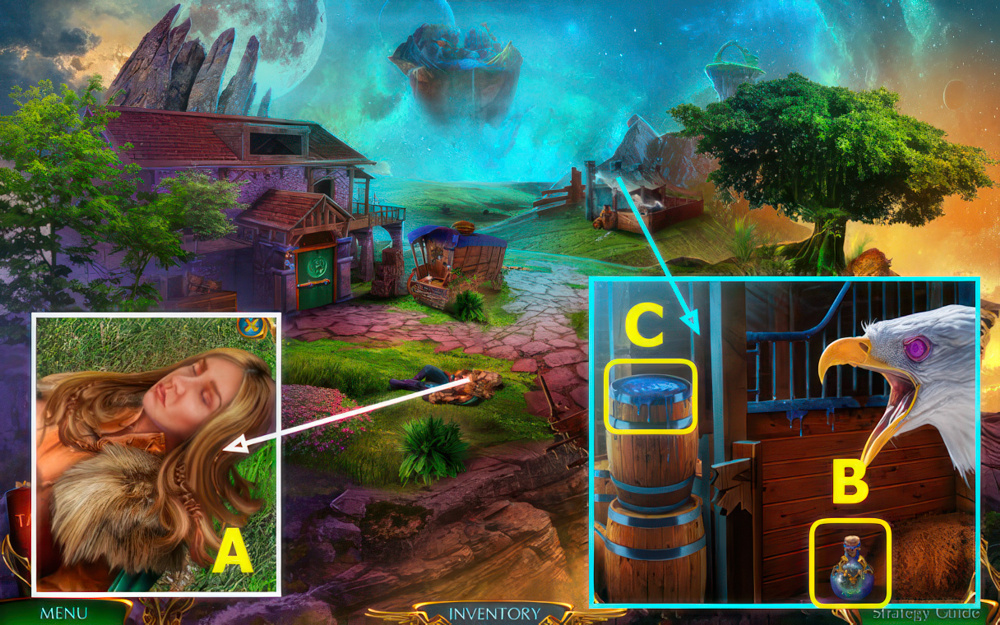
- Use HEALING POTION (A).
- Take EMPTY POISON VIAL (B).
- Use BRUSH, earn BRUSH WITH RESIN (C).
- Return to Cornelia’s Hut.
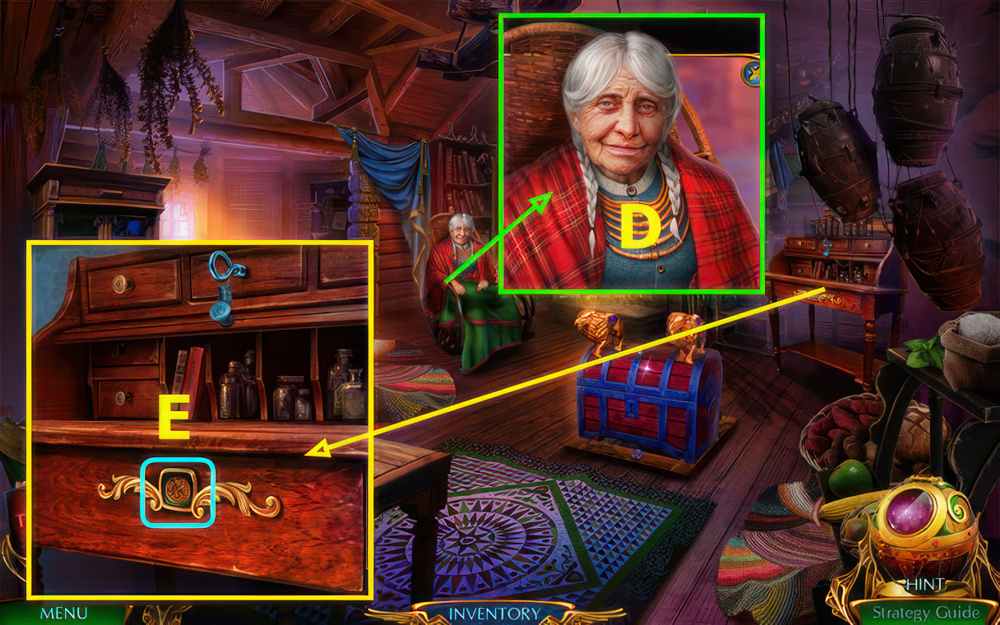
- Give EMPTY POISON VIAL, earn UNA’S SIGNET (D).
- Use UNA’S SIGNET (E).
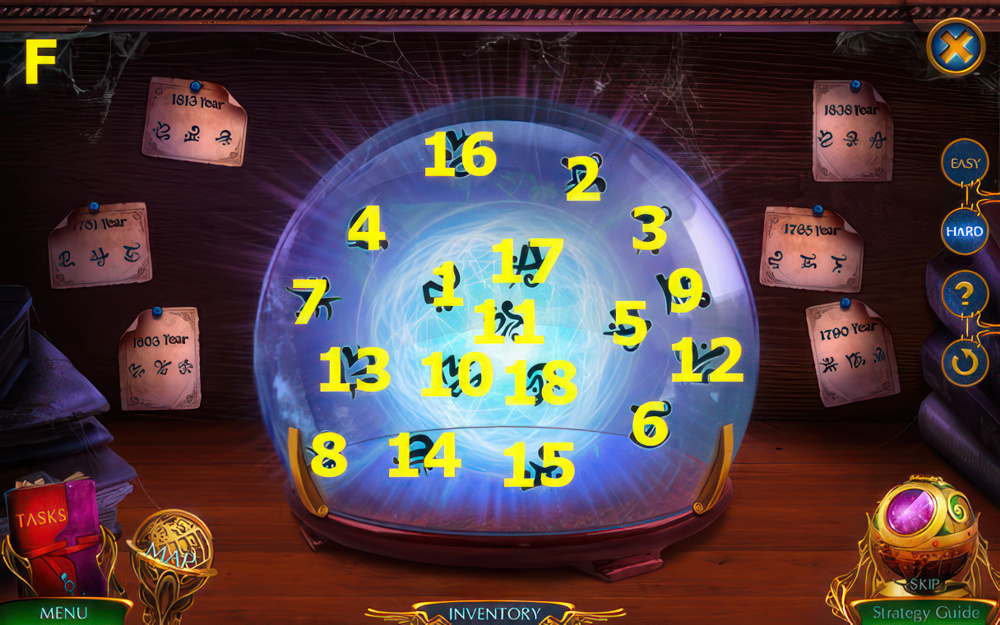
- Select 1-18 (F).
- Take DISMANTLED MEMORY SPHERE and 3/3 GRIFFIN WING.
- Place GRIFFIN WINGS, take 1/2 GRIFFIN PAW AND WING and UNA’S SCARF (H).
- Walk down.
- Use UNA’S SCARF and SHEATHE.
- Take HEX WRENCH, GEAR, and 2/2 GRIFFIN PAW AND WING (I).
- BRUSH WITH RESIN and GEAR on BROKEN BIRD, earn MECHANICAL BIRD.
- Place MECHANICAL BIRD, take CUTTERS, CACHE TOKEN, and MEMORY CRYSTAL (J).
- Go forward.
- Place GRIFFIN PAW AND WING, take CRYSTAL BALL PEDESTAL (K).
- Go to Griffin Camp.
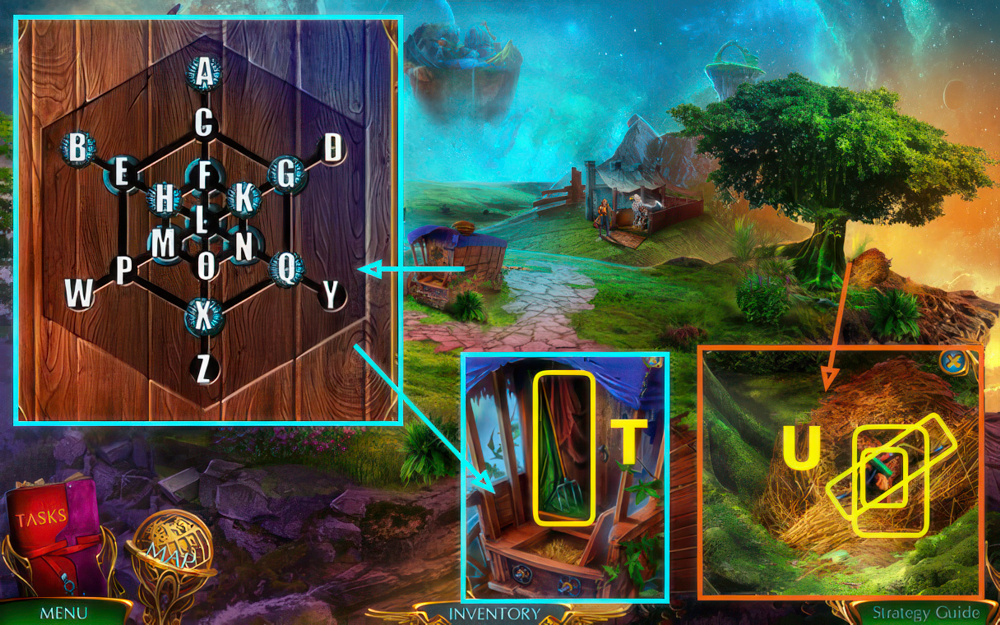
- Place CACHE TOKEN, solution (G-C)-(C-E)-(H-L)-(L-N)-(N-Q)-(Q-Y).
- (K-L)-(L-M)-(M-P)-(C-F)-(F-L)-(L-O)-(O-X)-(N-L)-(L-F)-(L-K)-(Q-G).
- (O-X)-(G-Q)-(L-F)-(Q-G)-(G-C)-(M-P)-(Q-G).
- Take PITCHFORK (T).
- Use PITCHFORK, take CORKSCREW, BROKEN BOW, and GRIFFIN FIGURINE (U).
- MEMORY CRYSTAL, CRYSTAL BALL PEDESTAL, and GRIFFIN FIGURINE on DISMANTLED MEMORY SPHERE, earn MEMORY SPHERE.
- Go to Cornelia’s Hut.
- Give MEMORY SPHERE, earn GEAR WITH CHAIN (A).
- Return to Griffin Camp.
- Use GEAR WITH CHAIN (B).
- Play puzzle, earn TAMING ALMANAC (C).
- Use TAMING ALMANAC (D).
- Take BOWSTRING (E).
- Use CUTTERS, take ROPE (F).
- Use HEX WRENCH, read note, take ARROW, WINGED BOLT, and PLUME (G).
- BOWSTRING, ARROW, and ROPE on BROKEN BOW, earn BOW AND ARROW WITH ROPE.
- Use BOW AND ARROW WITH ROPE (H).
- Go (I).
- Take 1/3 COUNTERWEIGHT (J).
- Use CORKSCREW, take 2/3 COUNTERWEIGHT and 1/2 CLOCK HAND (K).
- Use PLUME, take HARP PEDAL and SPOON (L).
- Use HARP PEDAL and WINGED BOLT, take SOLVENT and 3/3 COUNTERWEIGHTS (M).
- Walk down.
- Place COUNTERWEIGHTS, take SPECIAL KEY (N).
- Use SPECIAL KEY (O).
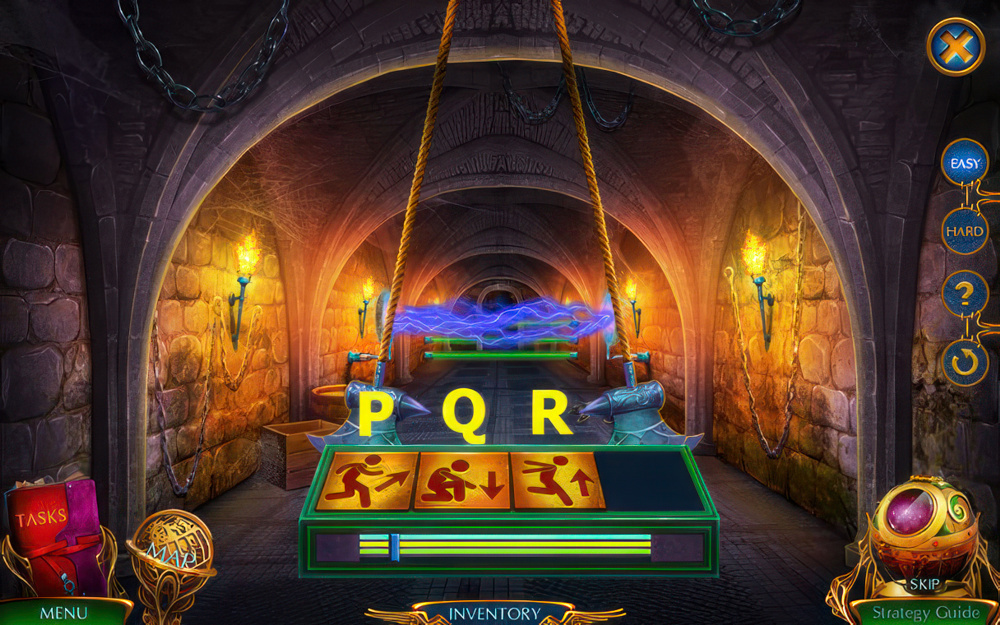
- Easy solution, stage 1, select (Q), wait 3.00 seconds, select (P), wait 3.50 seconds, select (R).
- Stage 2, select (R), wait 3.07 seconds, select (P), wait 4.28 seconds, select (Q).
- Stage 3, select (Q), wait 2.29 seconds, select (P), wait 2.17 seconds, select (R).
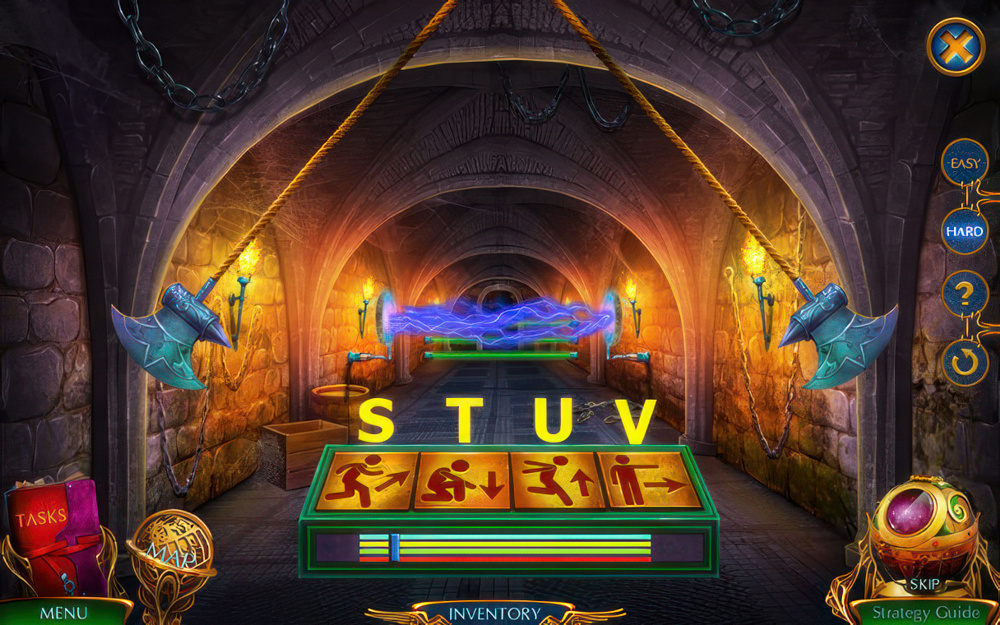
- Hard solution, stage 1, select (T), wait 2.79 seconds, select (V), wait 1.87 seconds, select (S), wait 3.38 seconds, select (U).
- Stage 2, select (U), wait 2.80 seconds, select (S), wait 2.20 seconds, select (V), wait 3.20 seconds, select (T).
- Stage 3, select (T), wait 2.57 seconds, select (S), wait 2.19 seconds, select (V), wait 0.50 seconds, select (U).
- Talk (A).
- Take CHAIN and CEREMONIAL BOWL (B).
- Use SOLVENT, take WOUNDED BUTTERFLY (C).
- Use SPOON, take HARP STRINGS and ELDERBERRY (D).
- Go to Hall of Gifts.
- Replace HARP STING (@).
- Easy solution (E).
- Hard solution (F).
- Take PUNCH CARD (G).
- Place PUNCH CARD, take UMBRELLA HANDLE, VIAL, GUN BRUSH, and 2/2 CLOCK HAND (H).
- Walk down.

- Place CLOCK HANDS, take FLARE BASE and CARABINER (P).
- Use VIAL, earn VIAL WITH MANDRAKE DEW (Q).
- Use UMBRELLA HANDLE, play puzzle, earn HEALING PETAL (R).
- CEREMONIAL BOWL, ELDERBERRY, VIAL WITH MANDRAKE DEW, and HEALING PETAL on WOUNDED BUTTERFLY, earn MAGIC BUTTERFLY.
- Go forward.
- Use CHAIN and CARABINER, take COAL (A).
- Use MAGIC BUTTERFLY, earn RITUAL RUNE (B).
- Go to Hall of Gifts.
- Place RITUAL RUNE (C).
- Play puzzle, earn CANNONBALL (D).
- Select, use GUN BRUSH and CANNONBALL (E).
- Use (F-G), take SALTPETER (H).
- COAL and SALTPETER on FLARE BASE, earn FLARE.
- Walk down, forward.
- Use FLARE, take ENERGY CRYSTAL (I).
- Use ENERGY CRYSTAL (J).
- This mini-game is randomly generated.
- Example solution shown (K).
Congratulations! You have completed the game Labyrinths of the World 9: Lost Island.


