Living Legends 12: Frozen Destiny – Your family’s winter ball was supposed to be the happiest event of your life, the perfect time to announce your engagement to Albert. Your family is happy for you, a celebration is being prepared, and even a gift found on the street seems like a pleasant surprise. However, the joy is overshadowed by a disturbing premonition: a strange amulet promising protection from magic causes Albert to worry, and his attempt to keep you safe leads to the fact that the jewelry breaks. But this is only a portent of trouble. As the ball begins, the Snow Queen, a sorceress who has remained in the shadows for years, suddenly appears. She kidnaps Albert, plunging the entire castle into the power of an icy curse. Rooms are covered with frost, time seems to freeze, and you have to fight the frost to save those you care about. Alone in the face of danger, you find an unusual ally, a mirror that promises to help. It tells you of a long-standing curse placed by the queen and of her lost mountain castle where she takes her victims. To save Albert, you must gather shards of ice from the hearts of the victims and awaken an ancient power. The path to unravel is not easy, icy obstacles, riddles and magic will hinder you. If you can not pass any of the puzzles or do not know where the items are, on our site you can watch the walkthrough of the game Living Legends 12: Frozen Destiny, and break the icy shackles.
Living Legends 12: Frozen Destiny – Walkthrough
Here you can see the full walkthrough of Living Legends 12: Frozen Destiny game, namely for all chapters, including bonus chapter, in pictures.

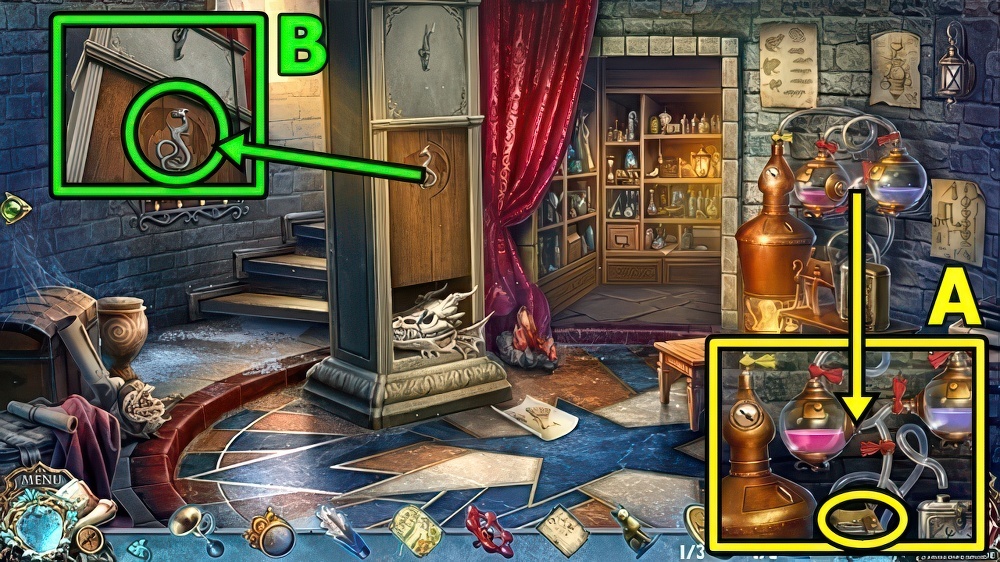
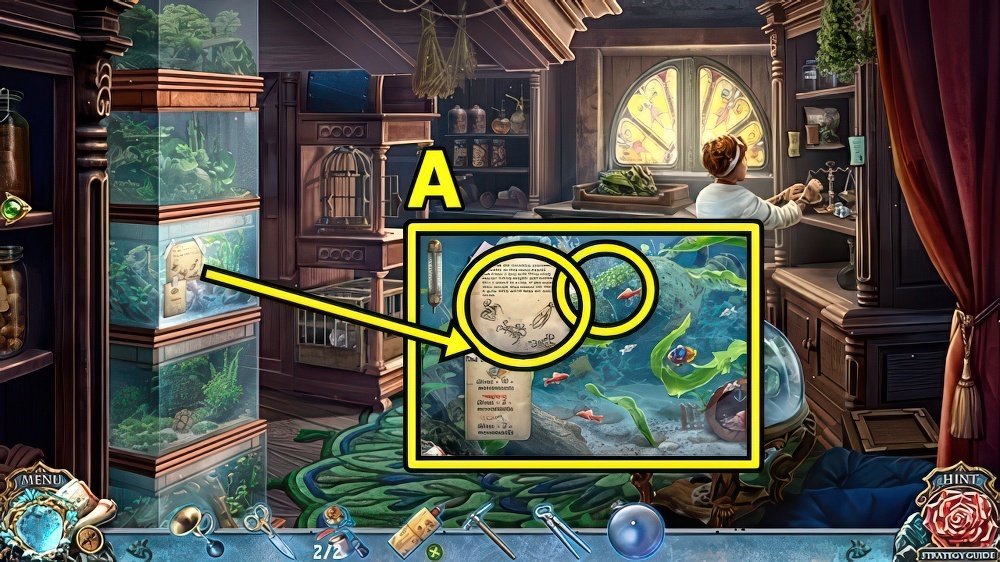
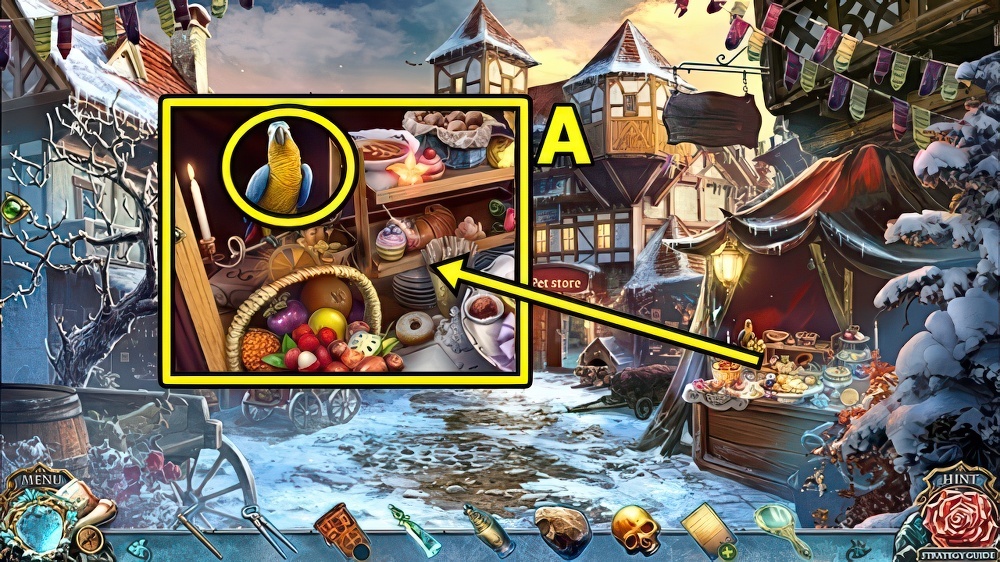
- Open (A).
- Read, examine.
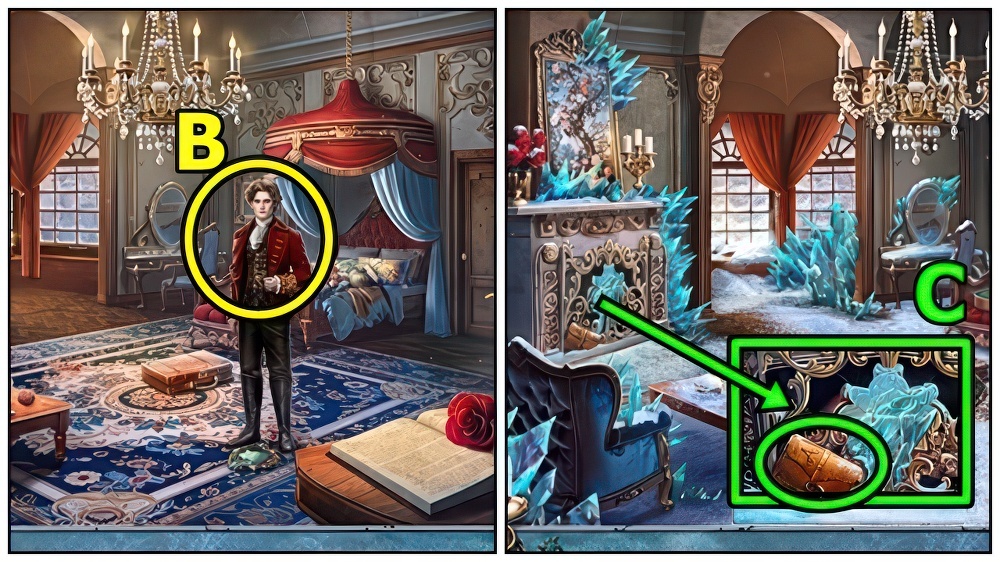
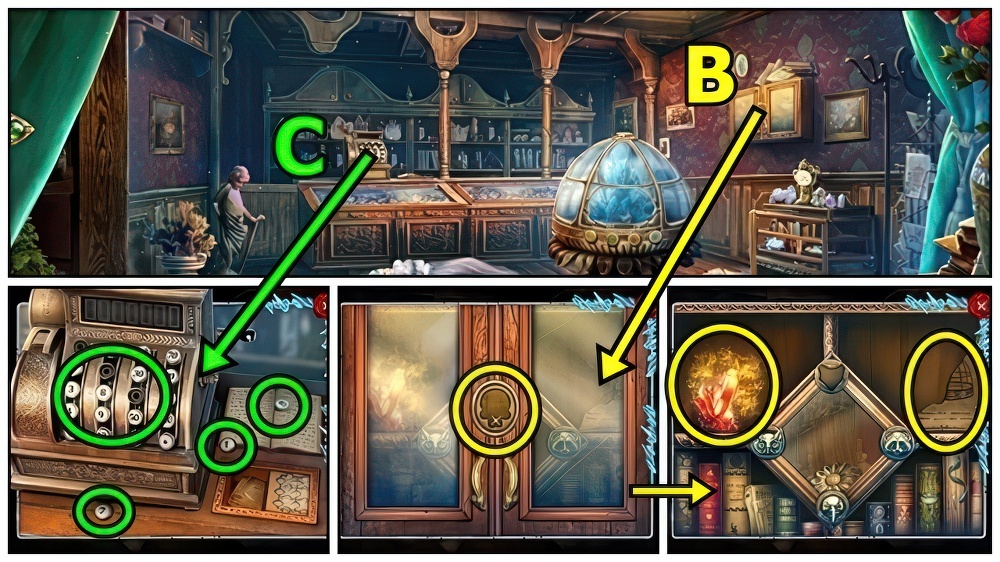
- Talk (B).
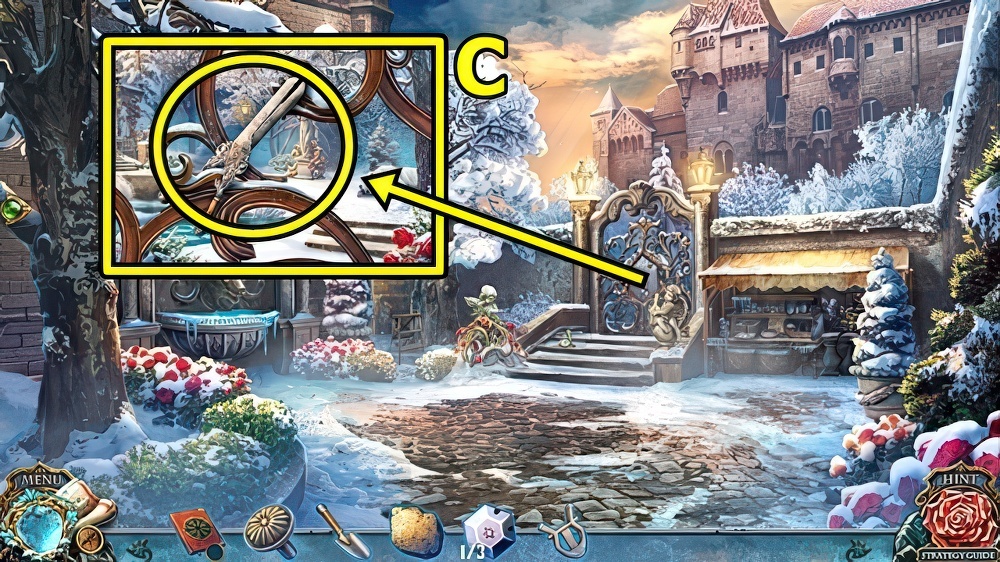
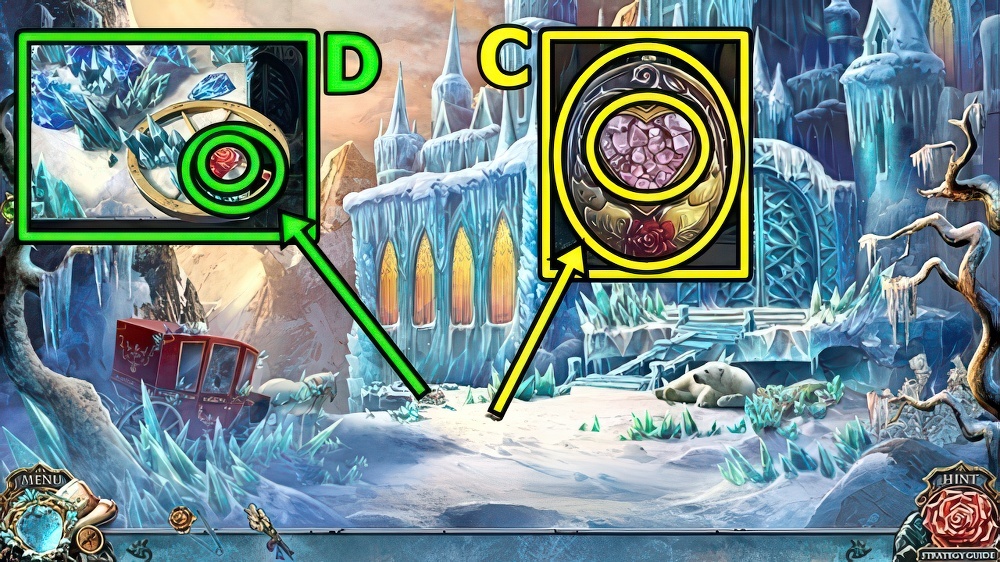
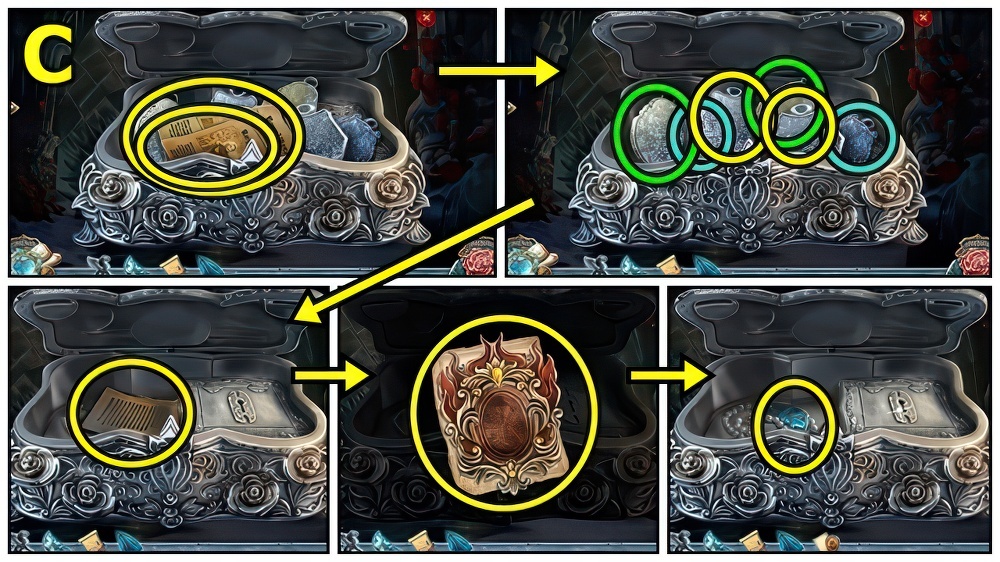
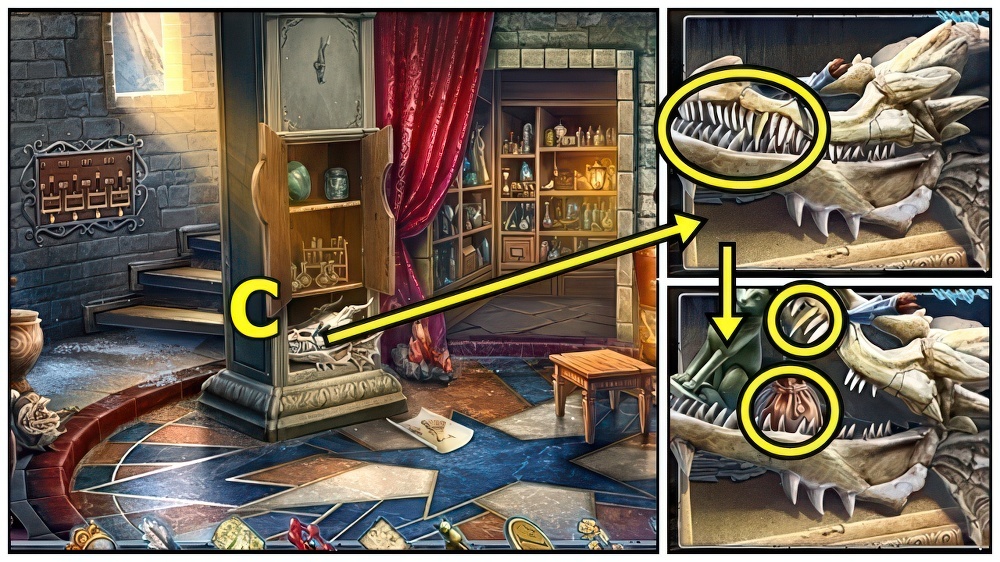
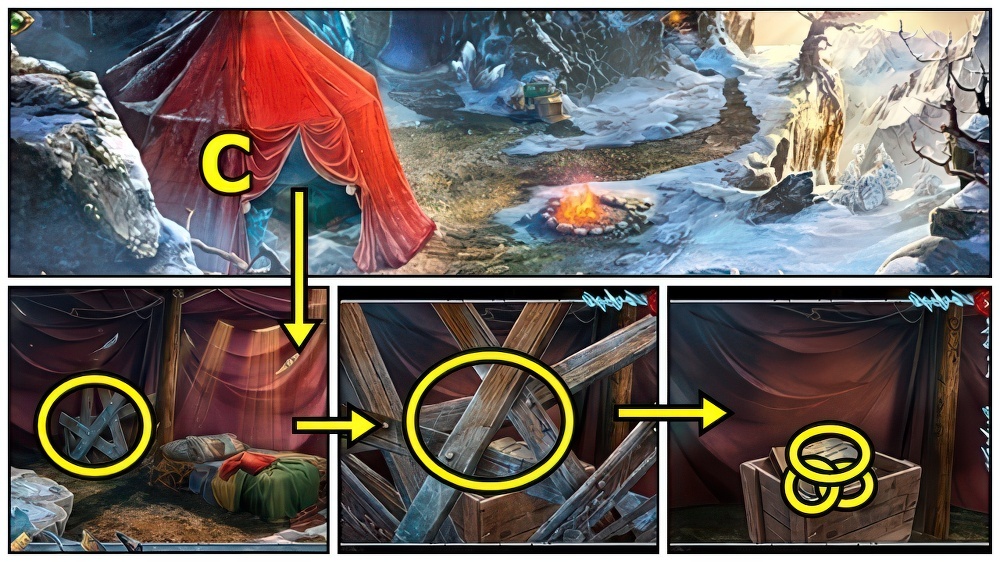
- Take ALBERT’S CASE (C).
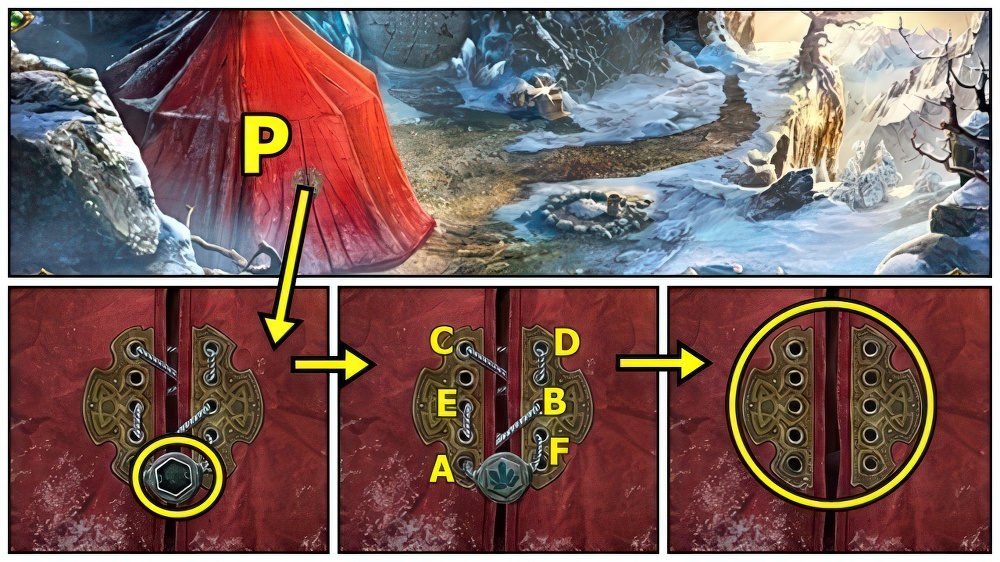
- Open ALBERT’S CASE, examine, take HEAVY SEAL.
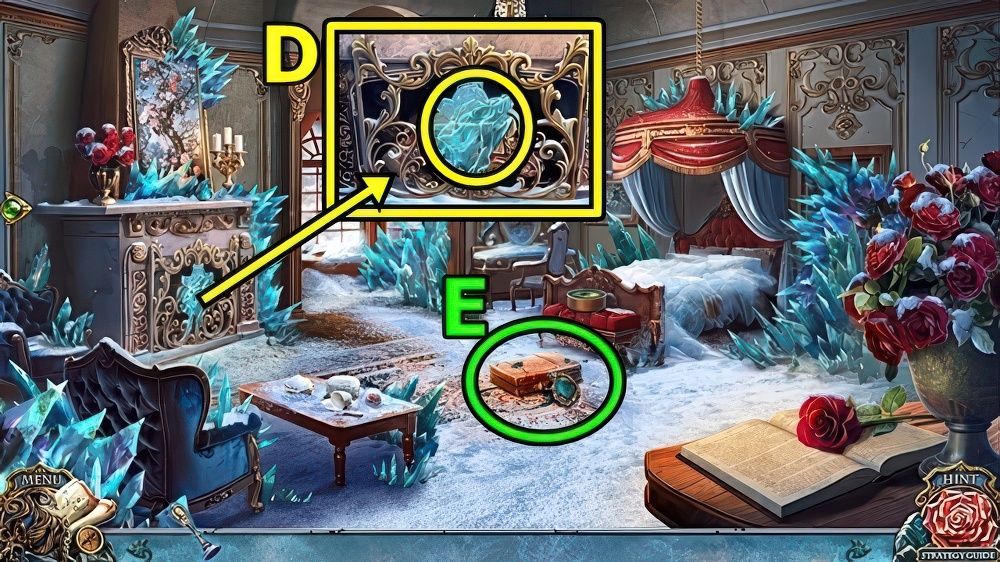
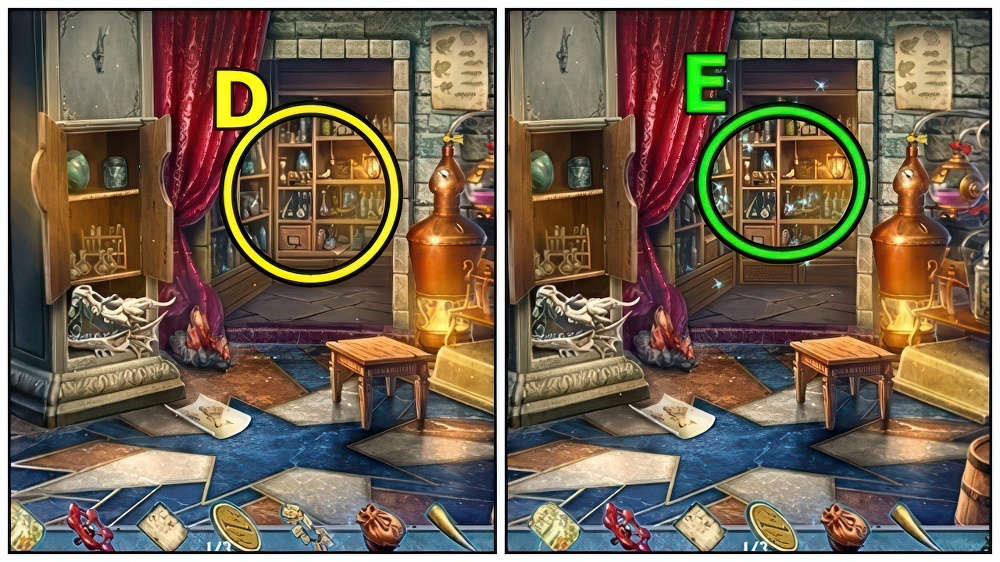
- Use HEAVY SEAL (D), take SUITCASE KEY.
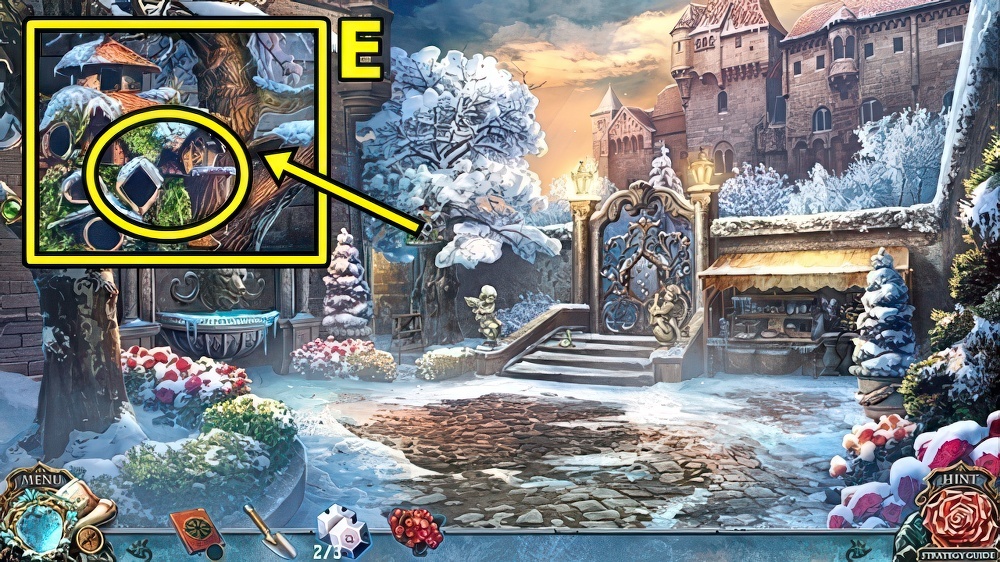
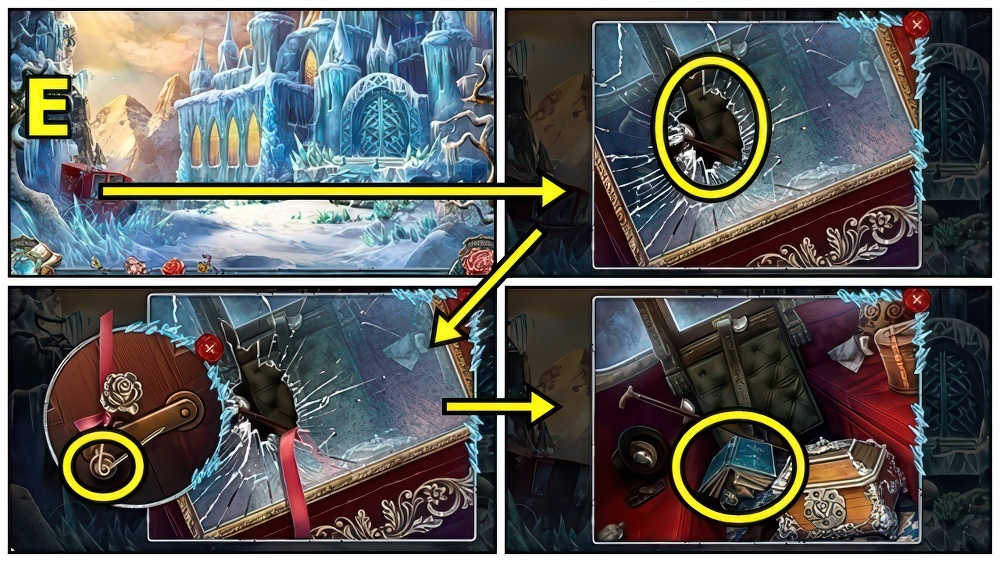
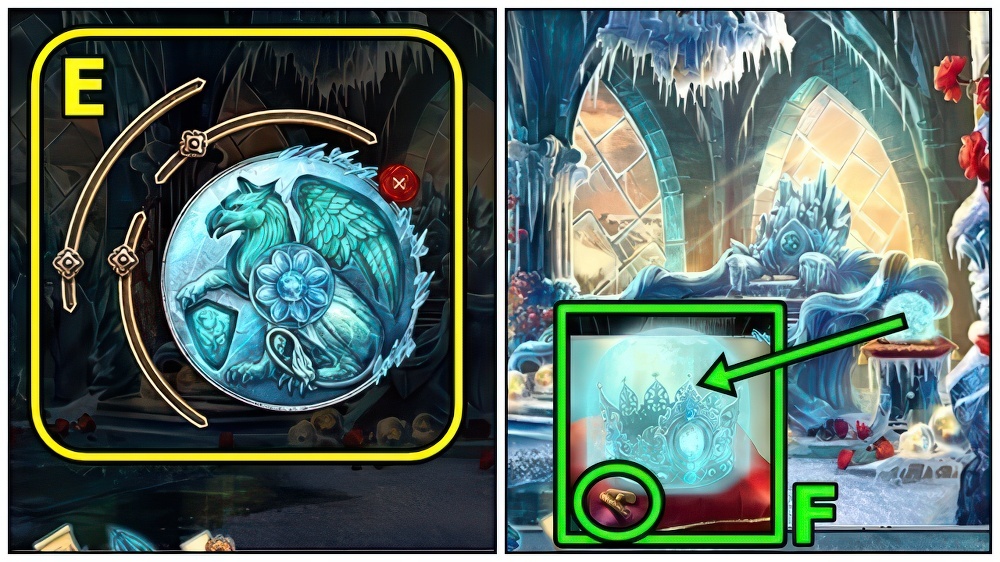
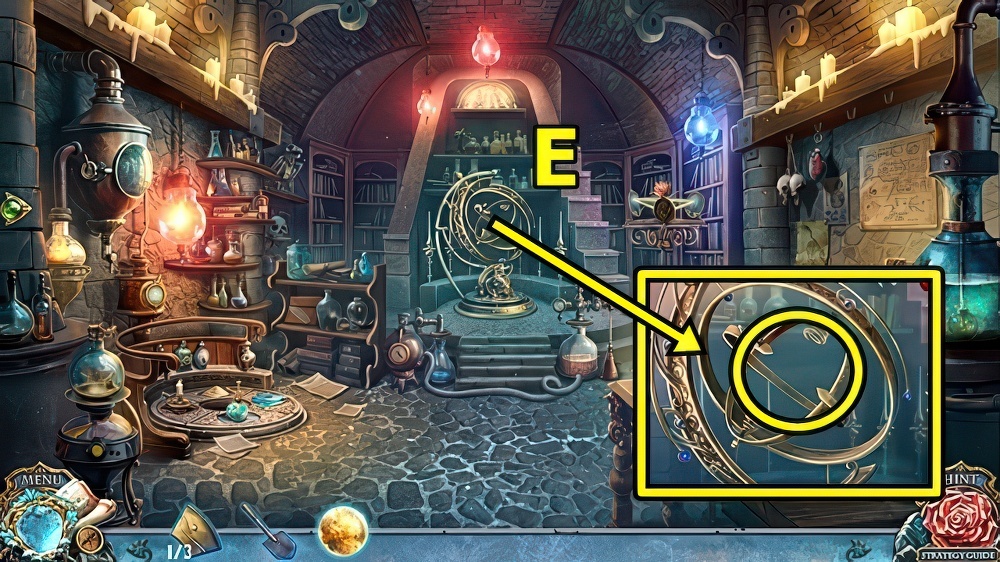
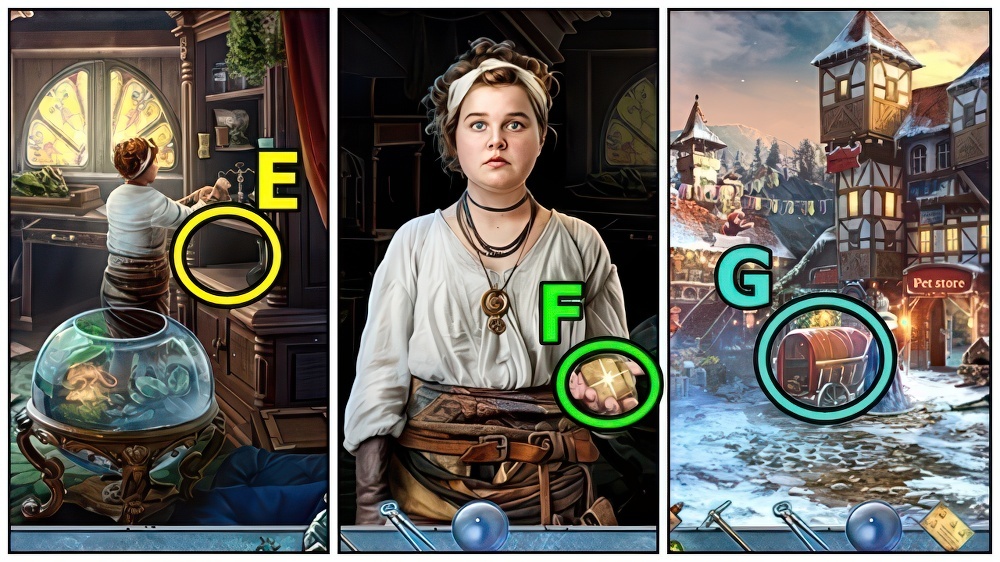
- Examine (E).
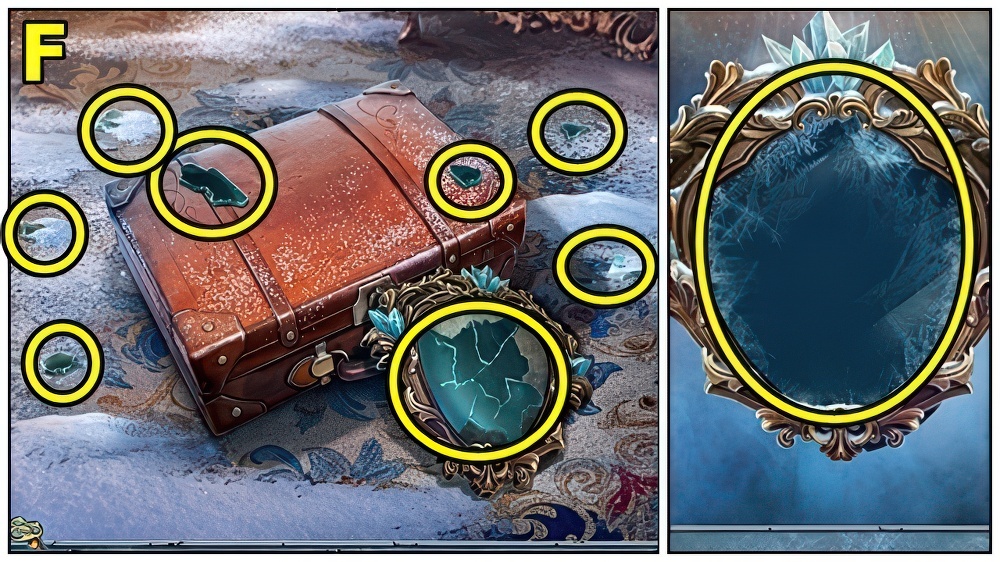
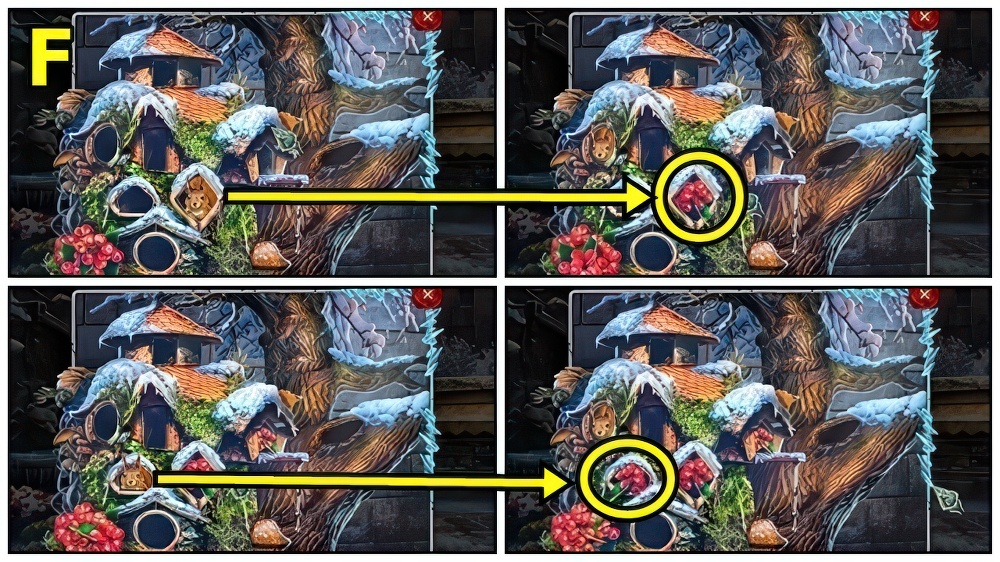
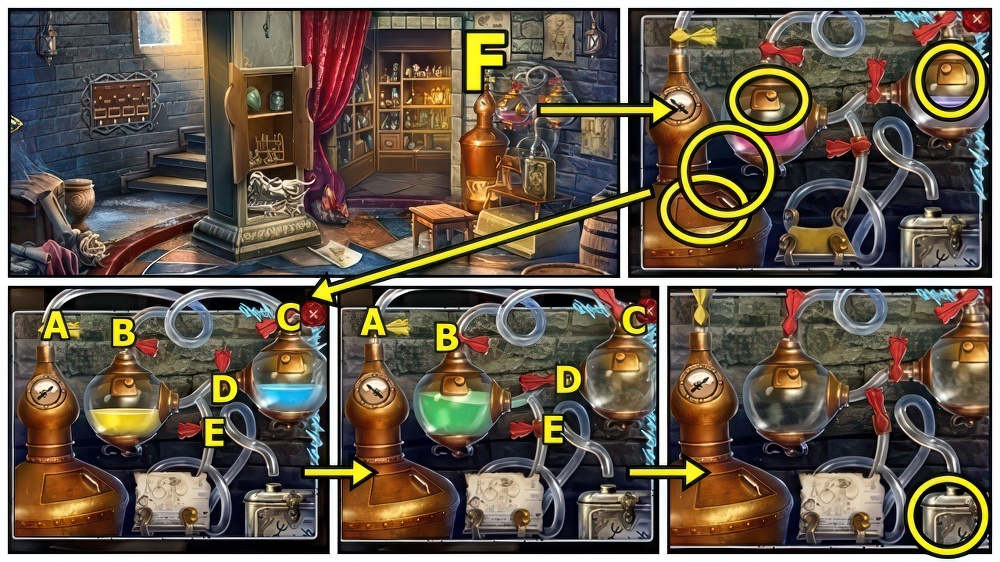
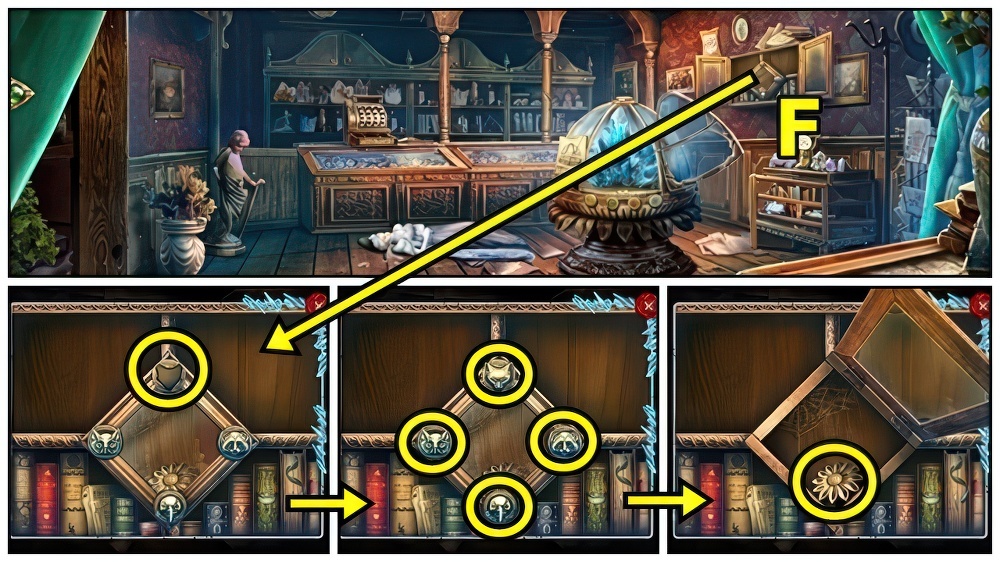
- Examine (F).
- Reassemble, take MIRROR.

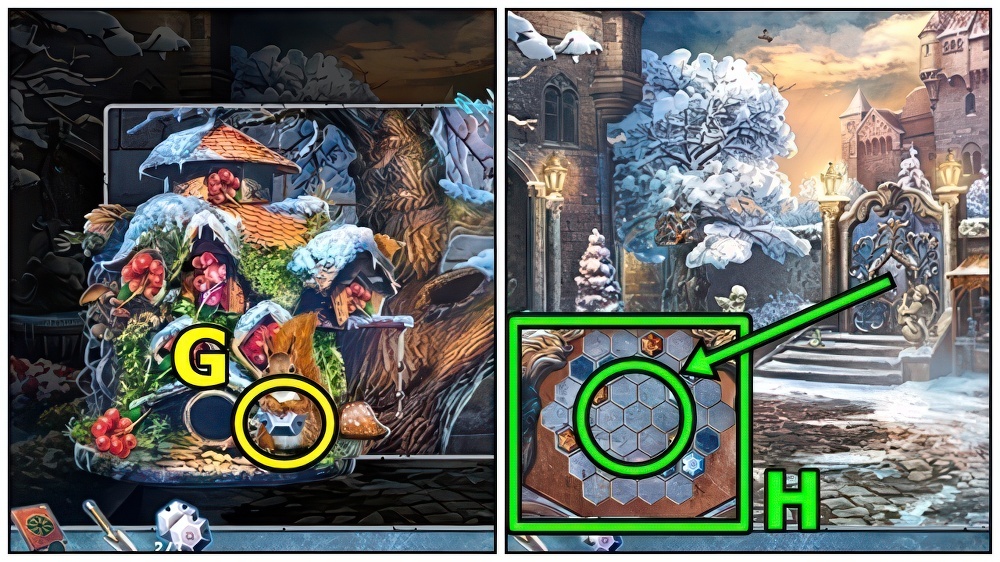
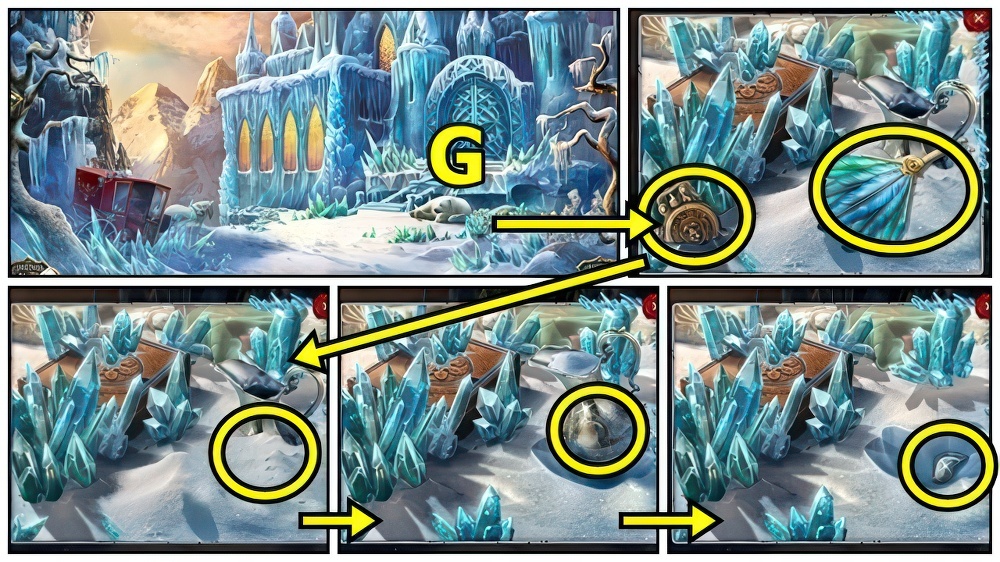
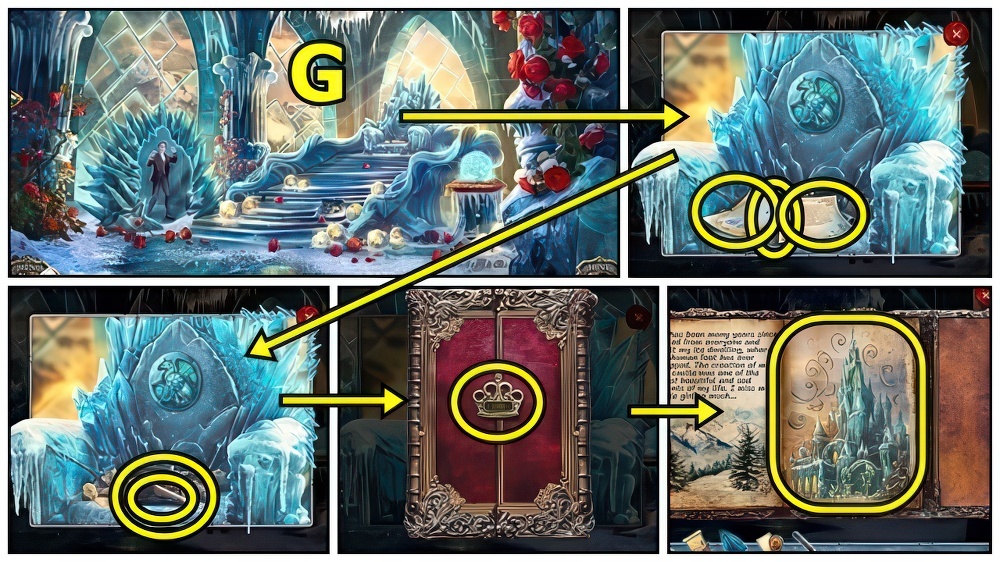
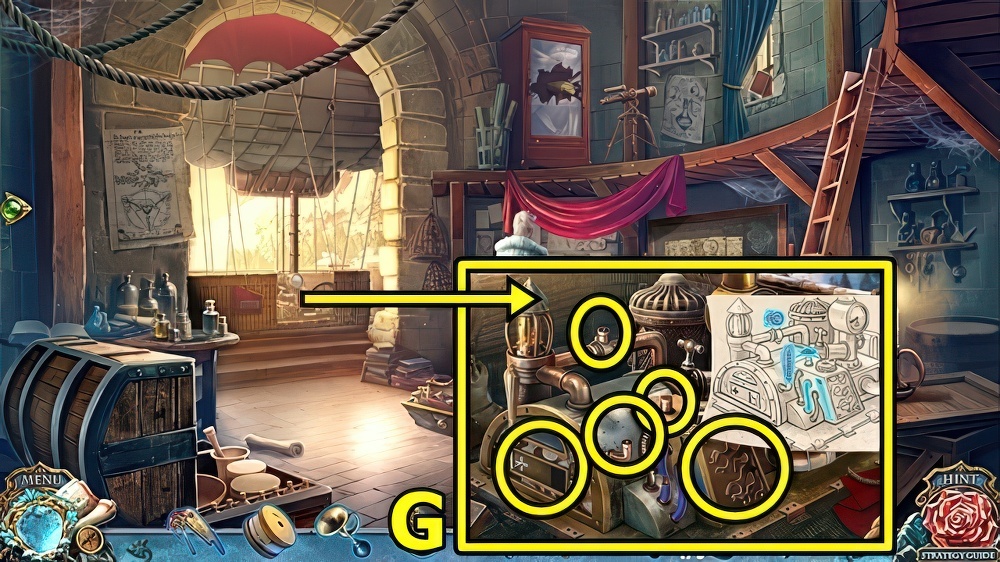
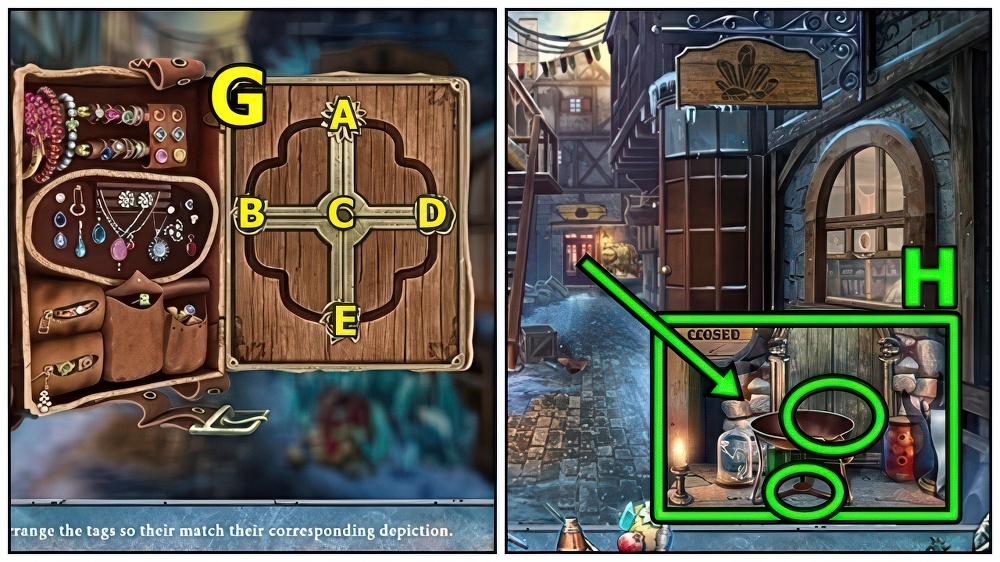
- Use SUITCASE KEY (G), take DIARY, read, take MATCHES.
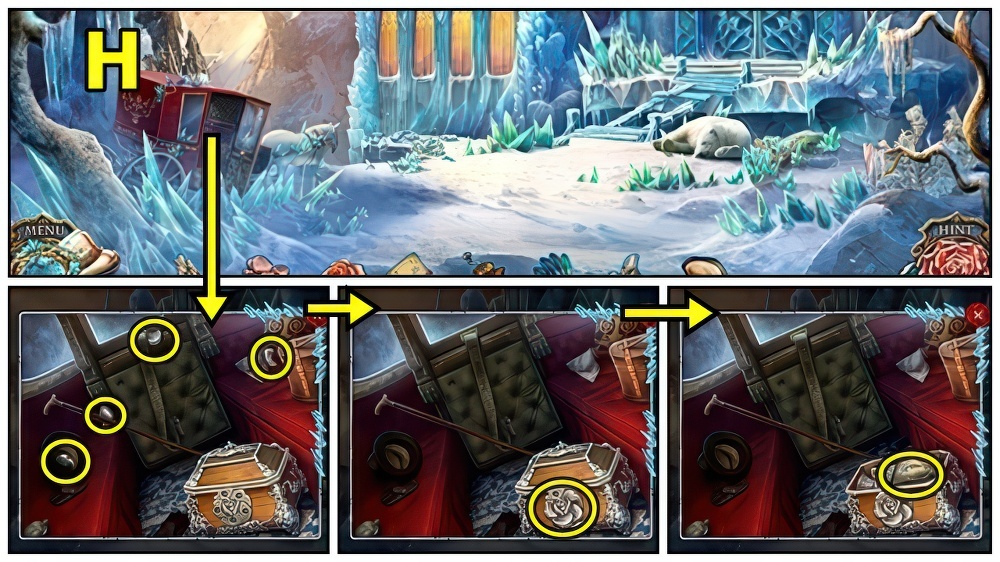
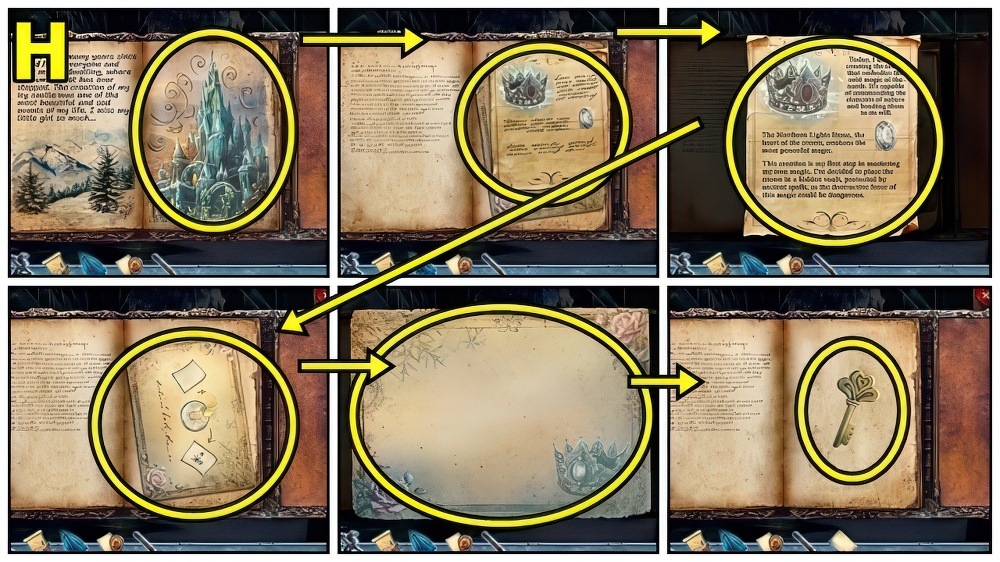
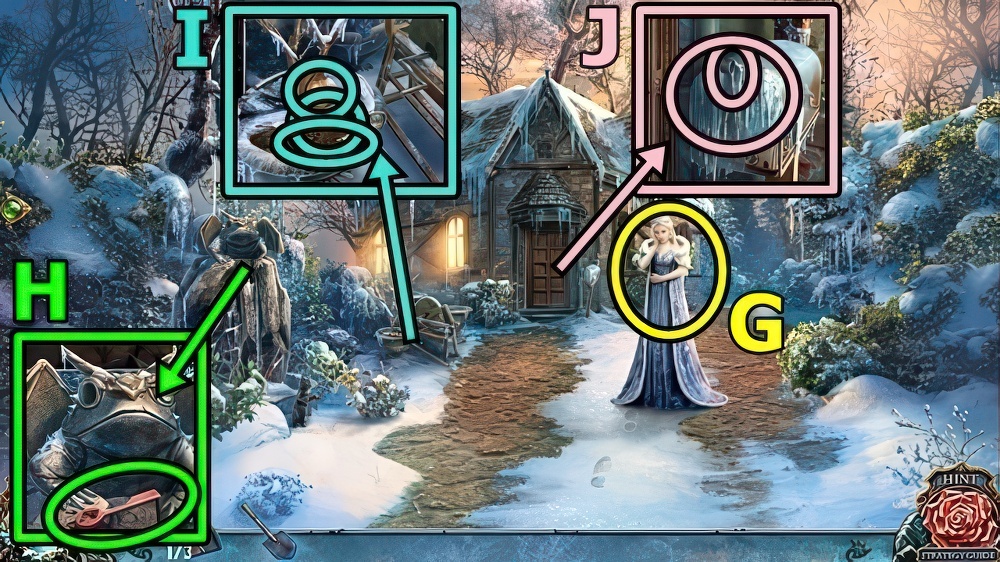
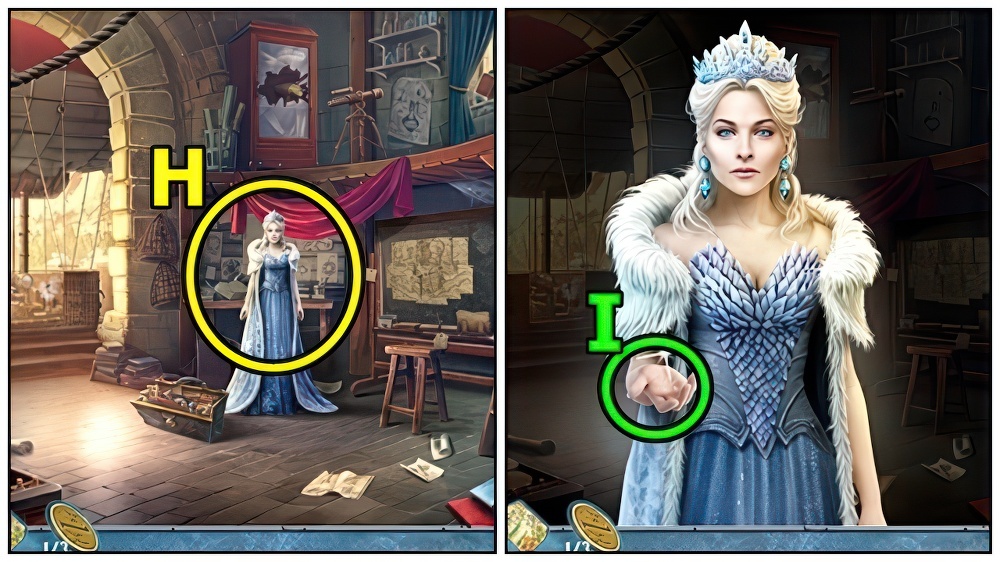
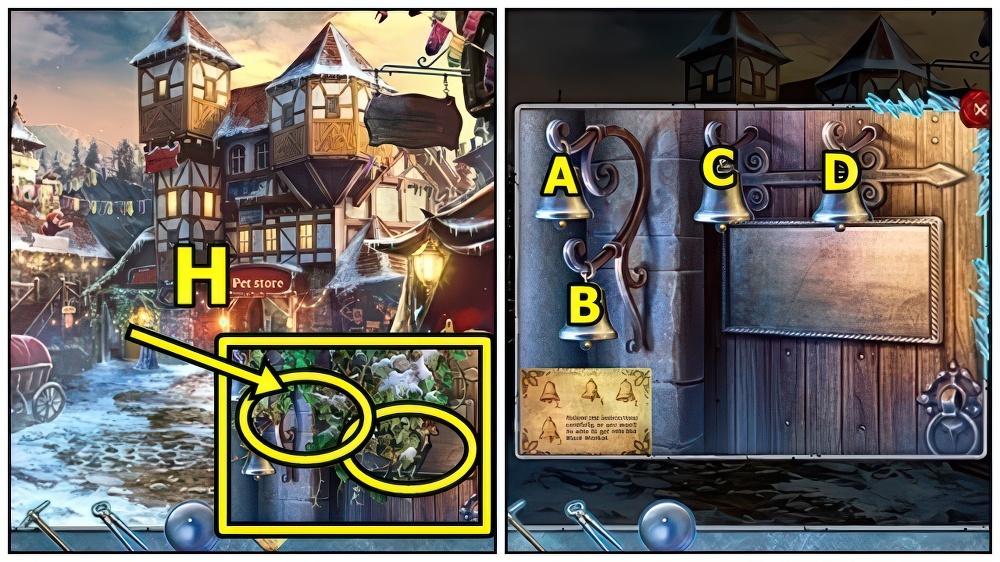
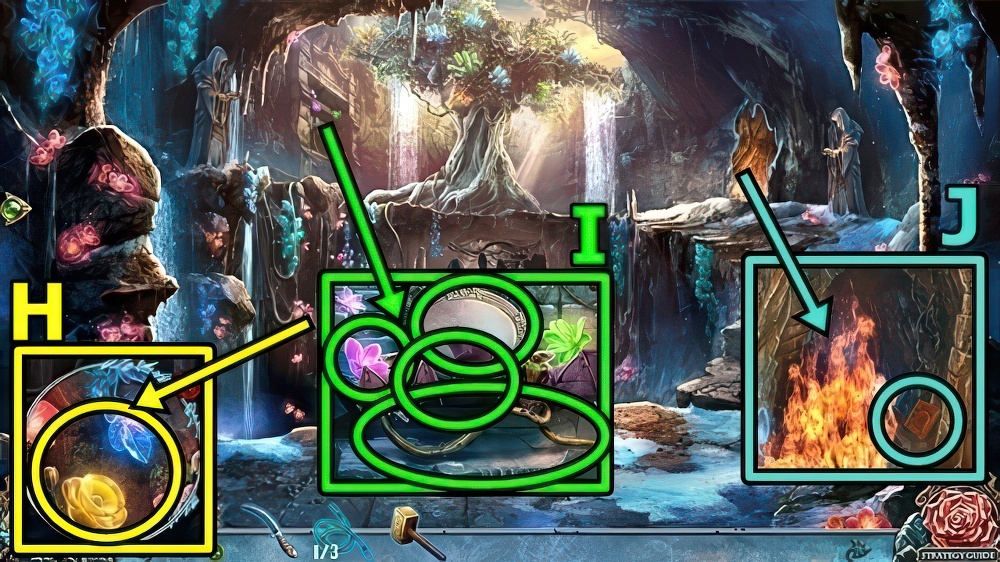
- Use MATCHES (H).

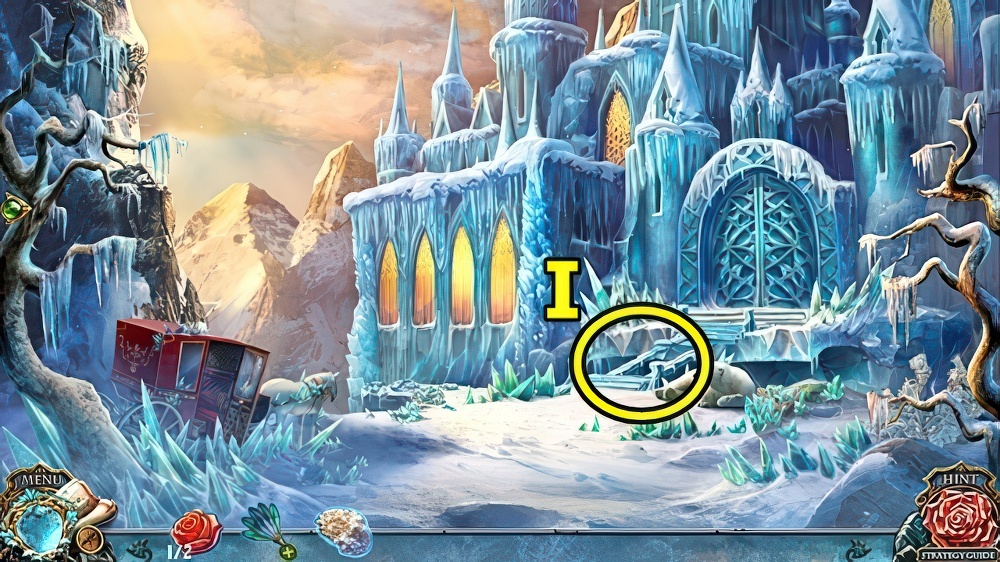
- Take BOX BUTTON (I).
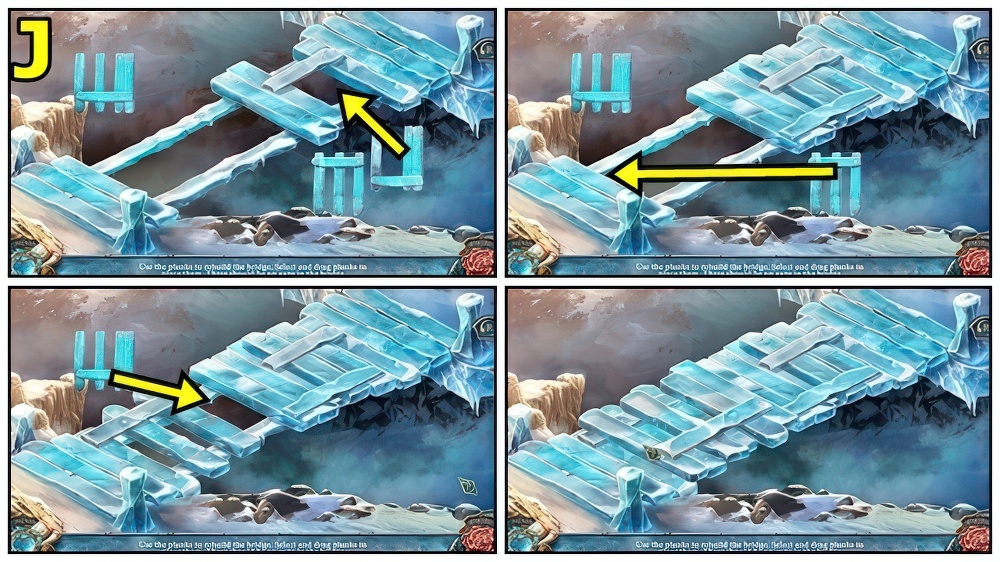
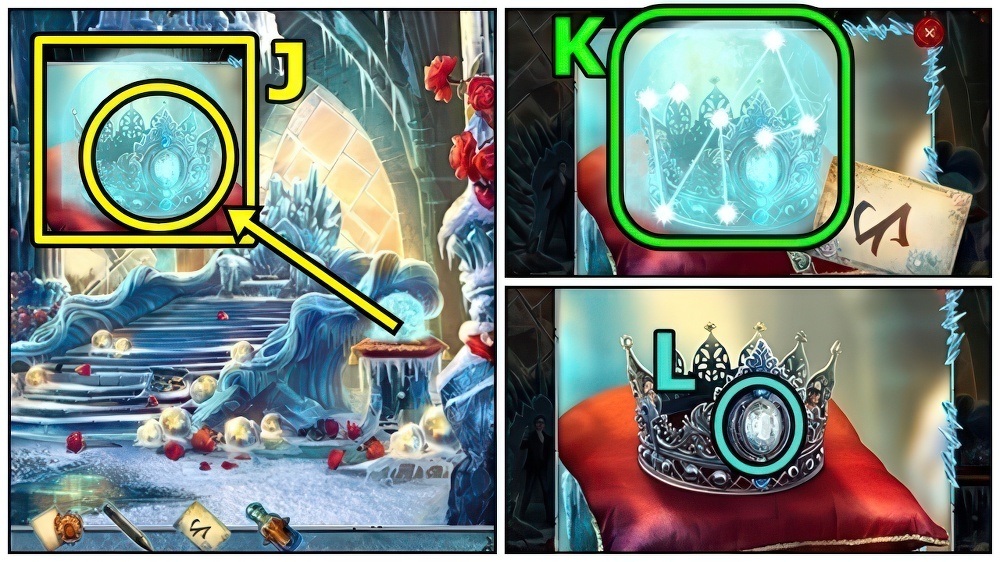
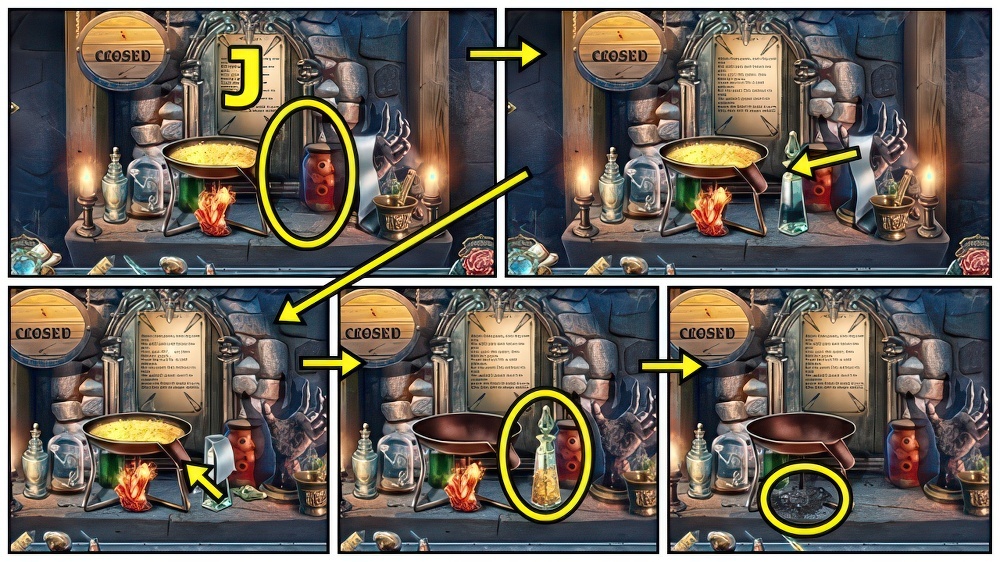
- Take LETTER OPENER (J) and CUP.
- Add BOX BUTTON, take CHAIN.
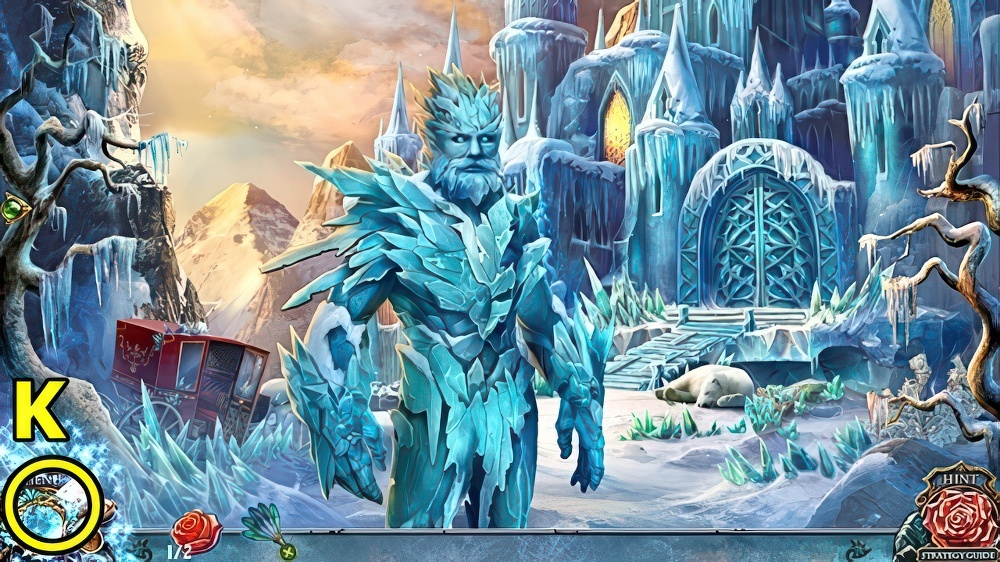
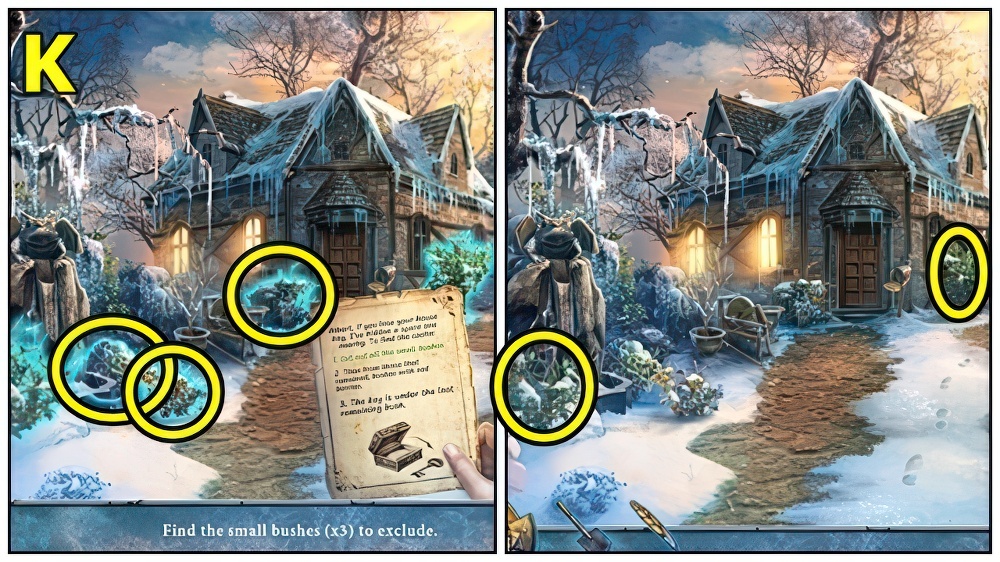
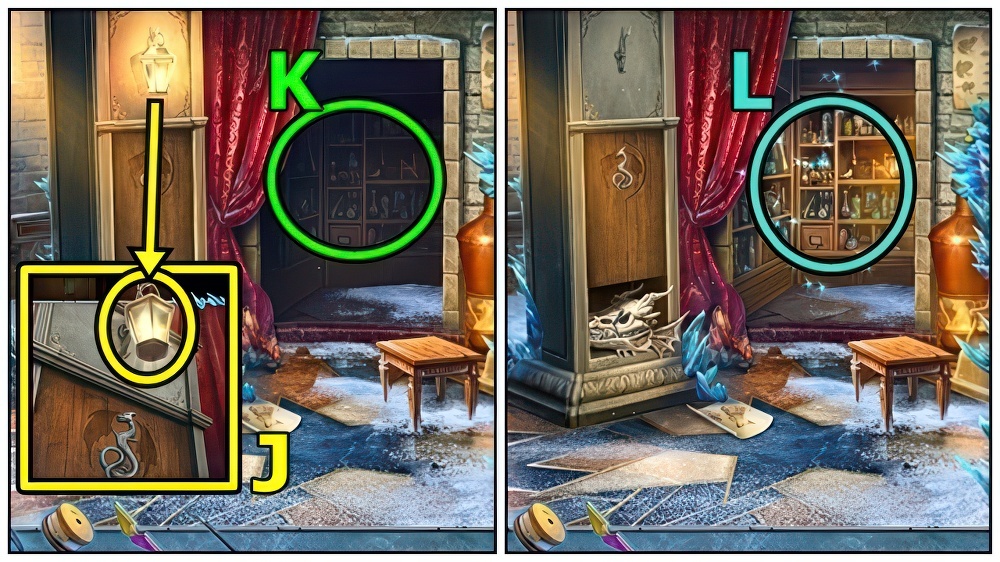
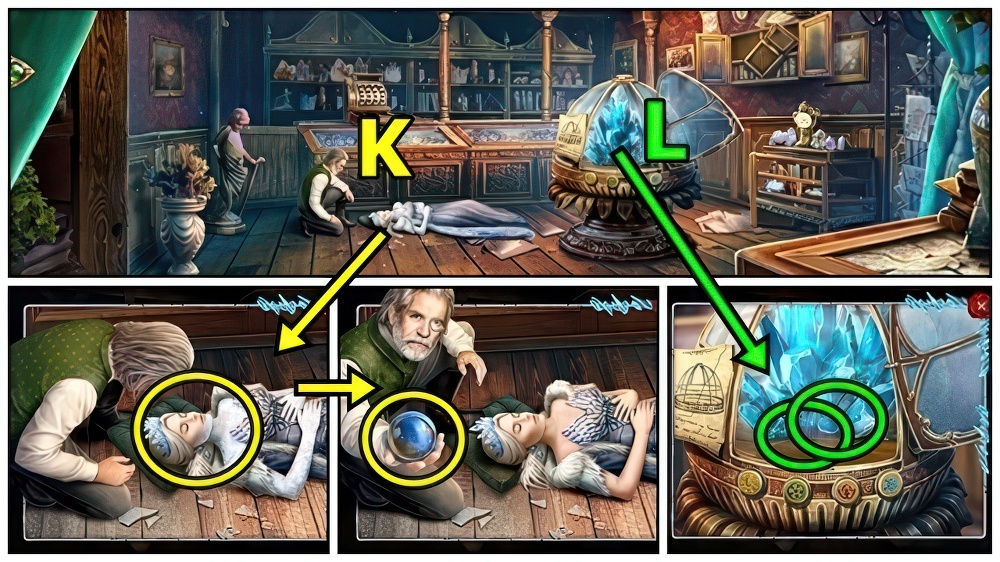
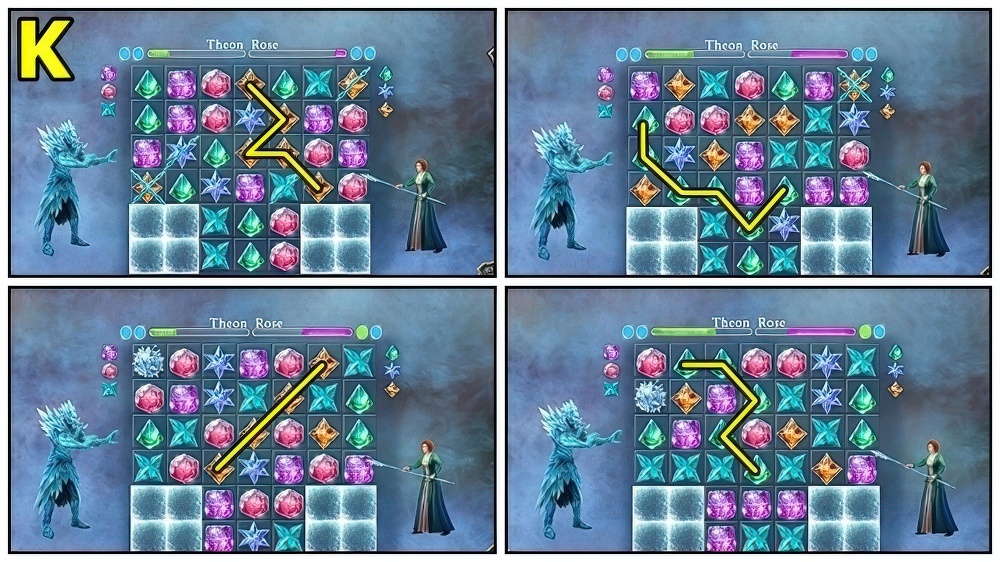
- Play puzzle (K), take SCARF ROPE.

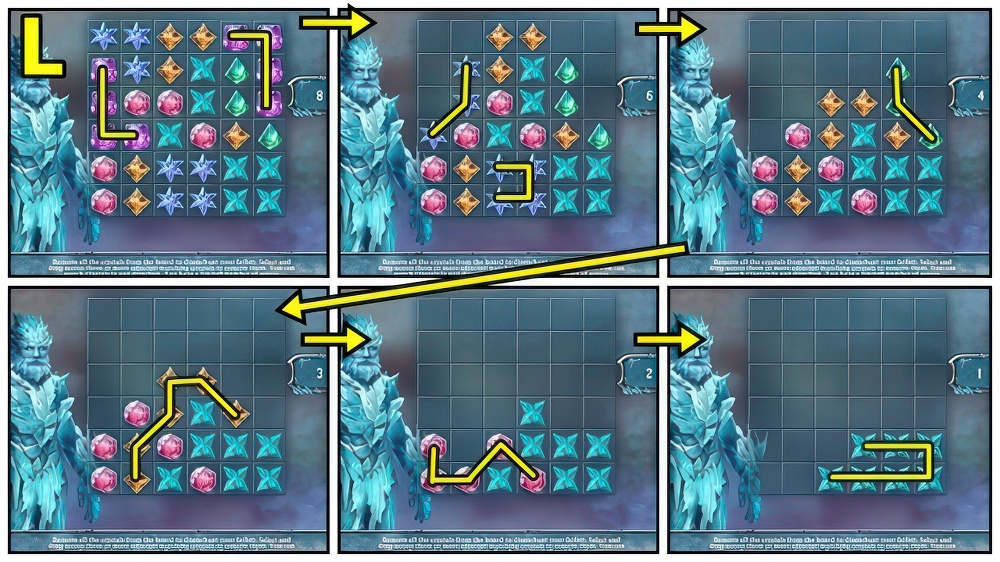
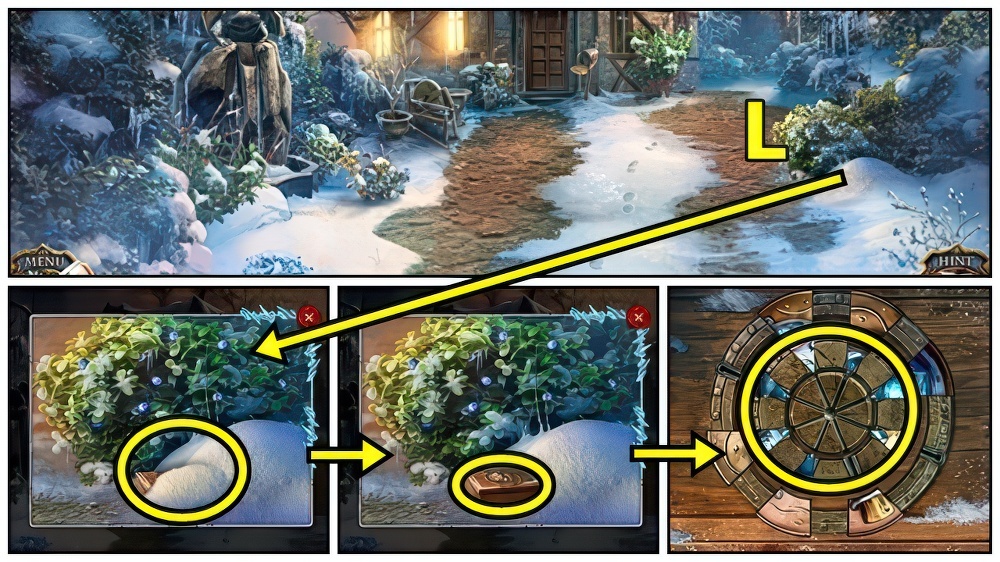
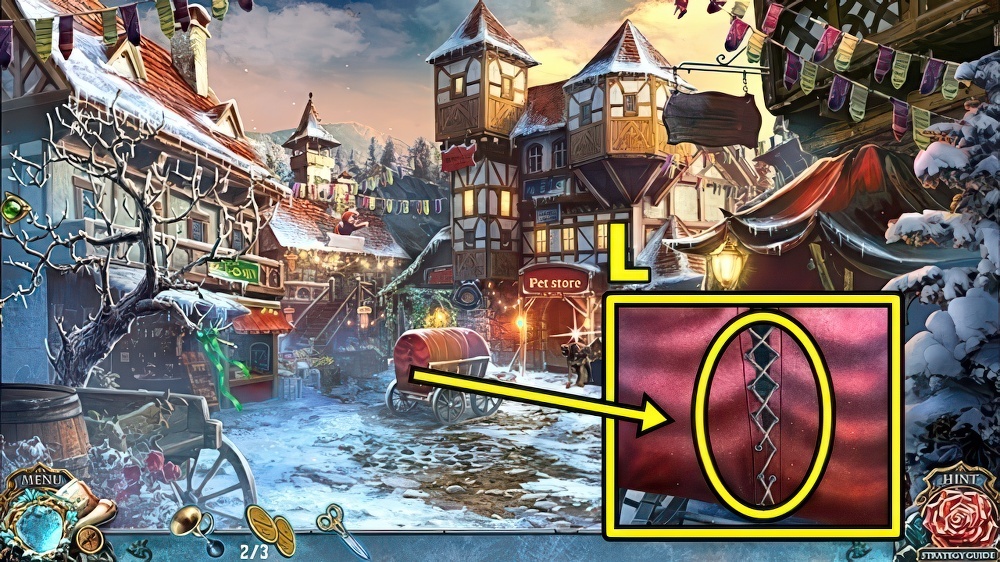
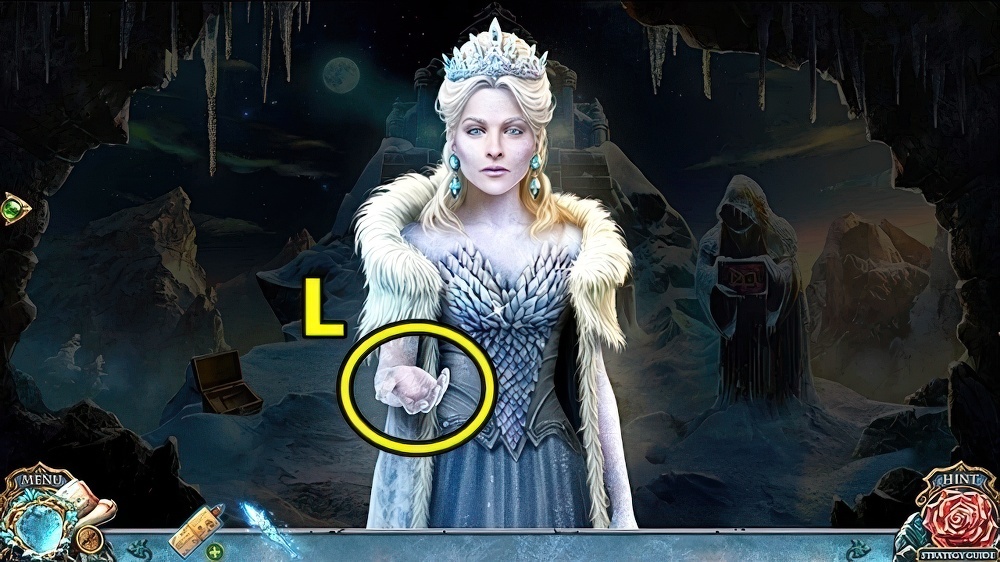
- Add CHAIN (L), then SCARF ROPE.
- Go to Castle’s Courtyard.

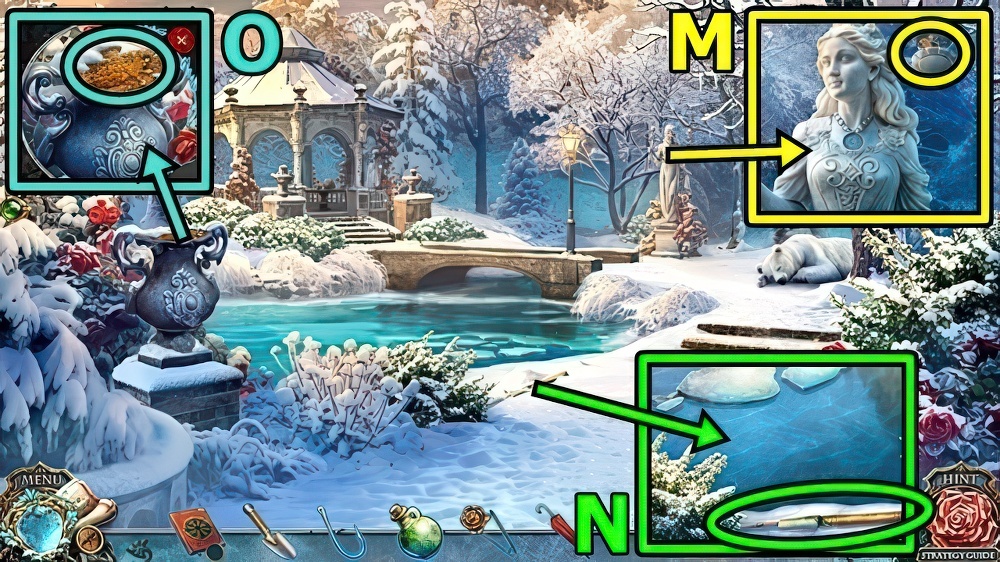
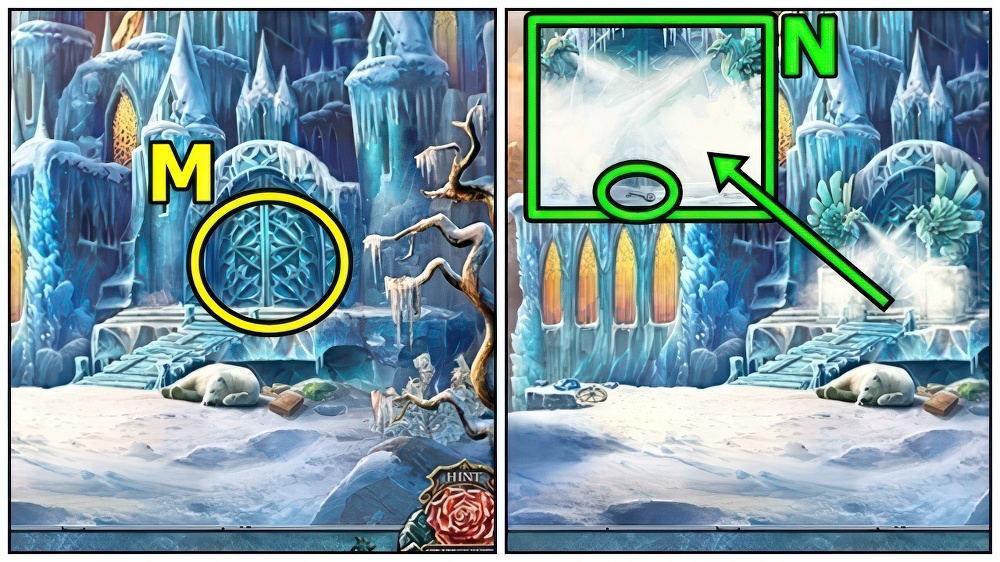
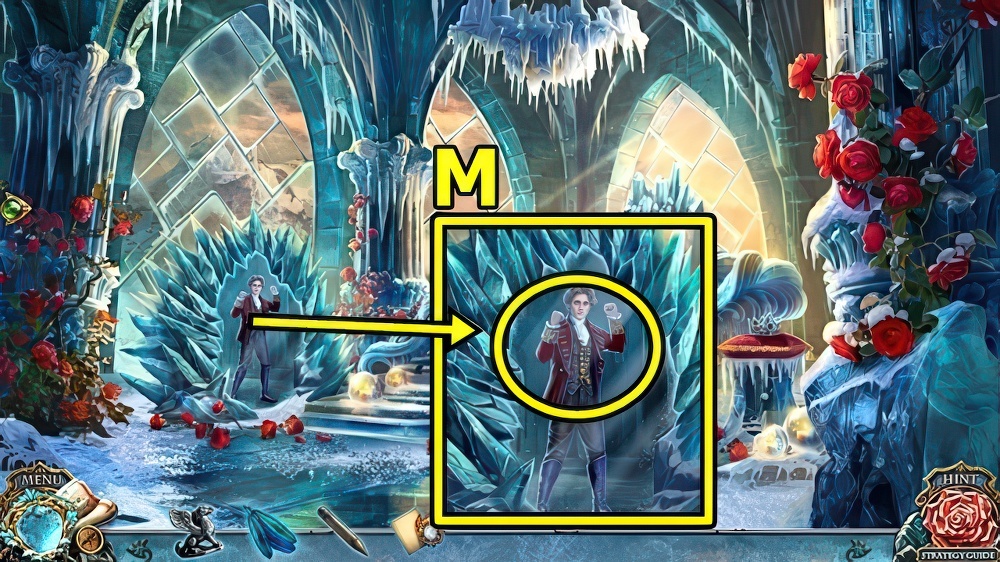
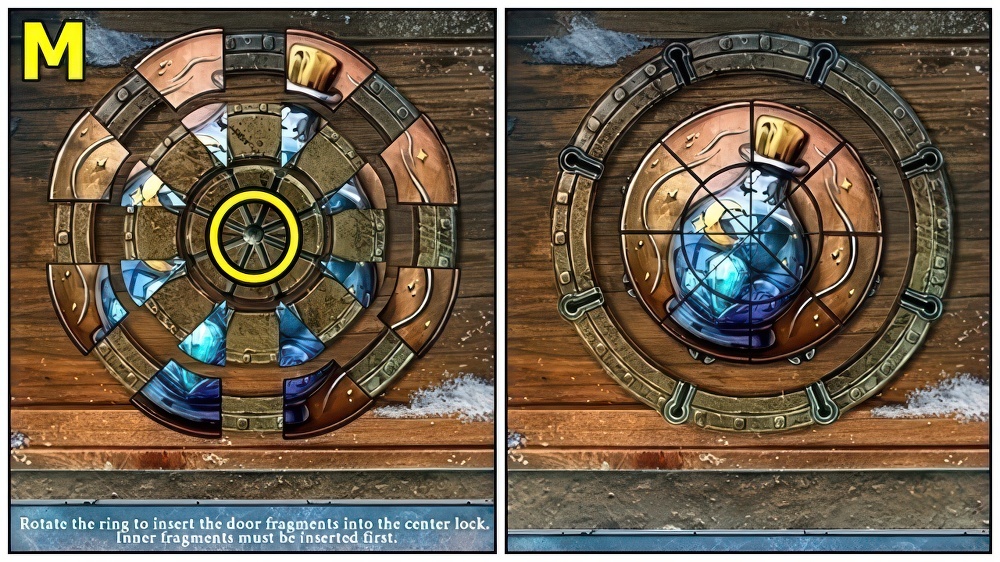
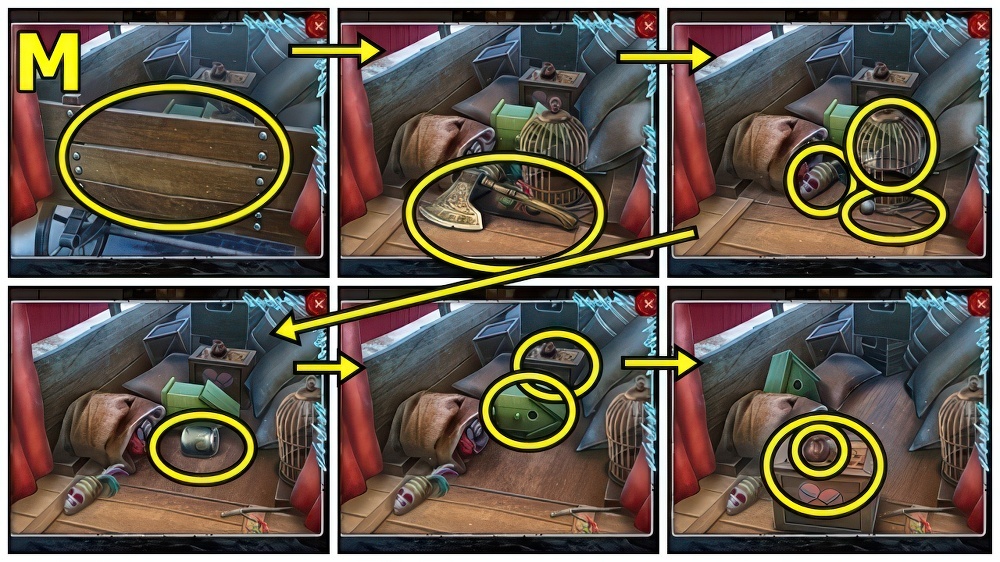
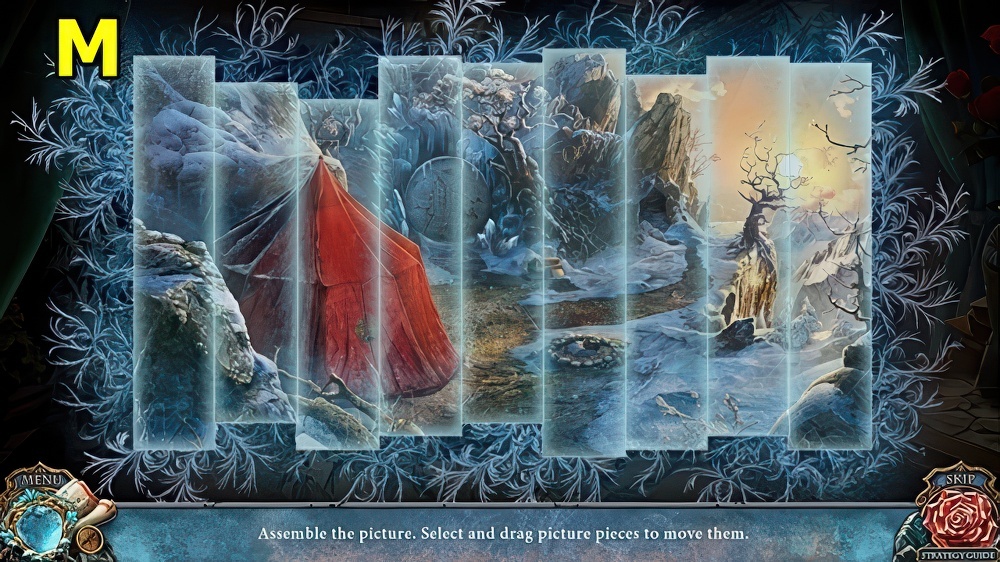
- Take BROKEN LANTERN (M).
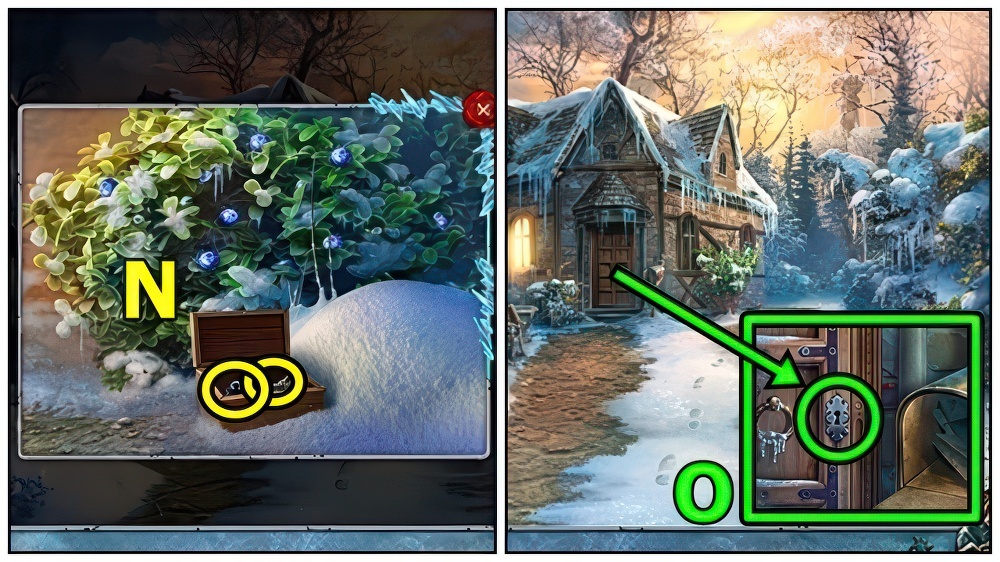
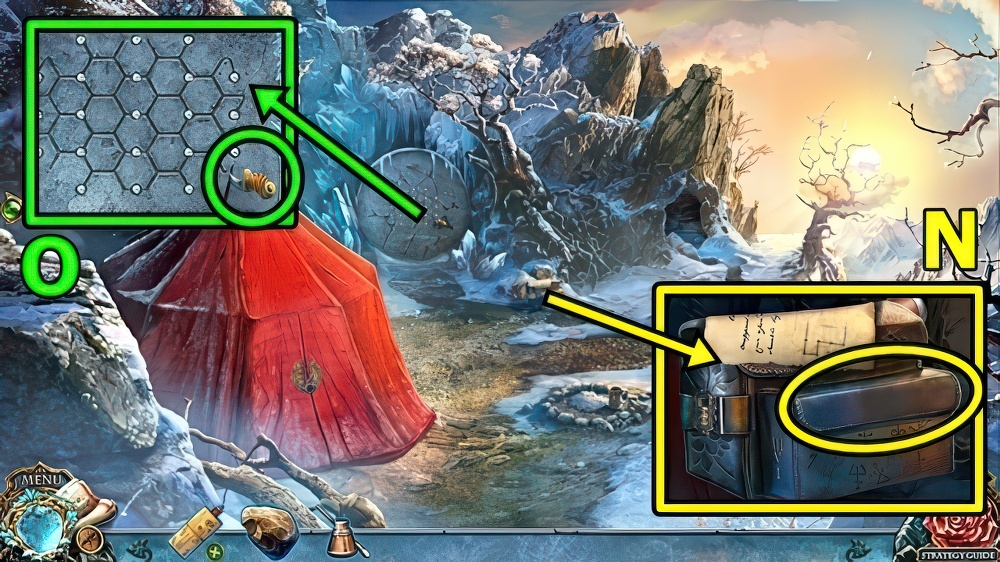
- Take LANTERN PART (N).
- LANTERN PART and MATCHES on BROKEN LANTERN, take LANTERN.
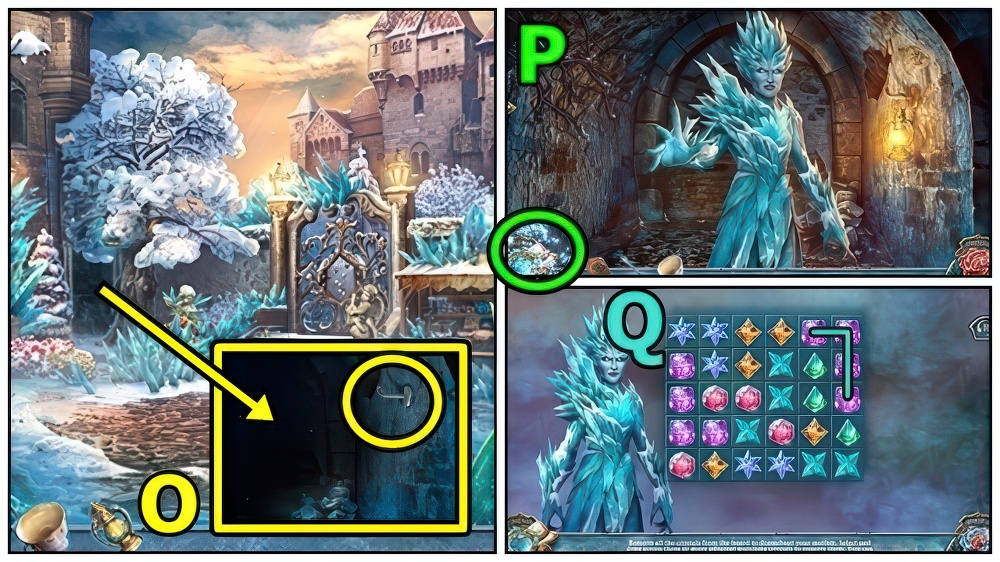
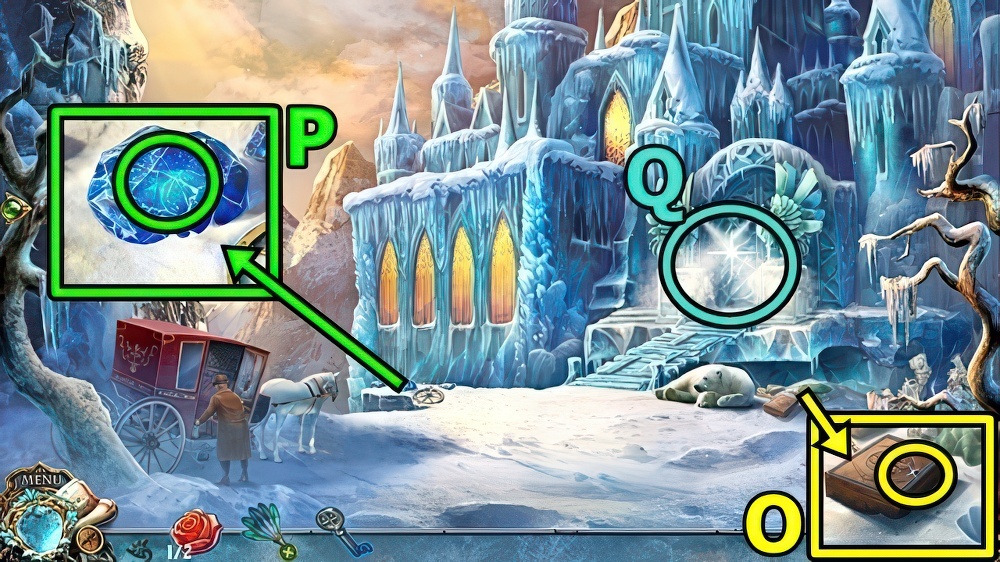
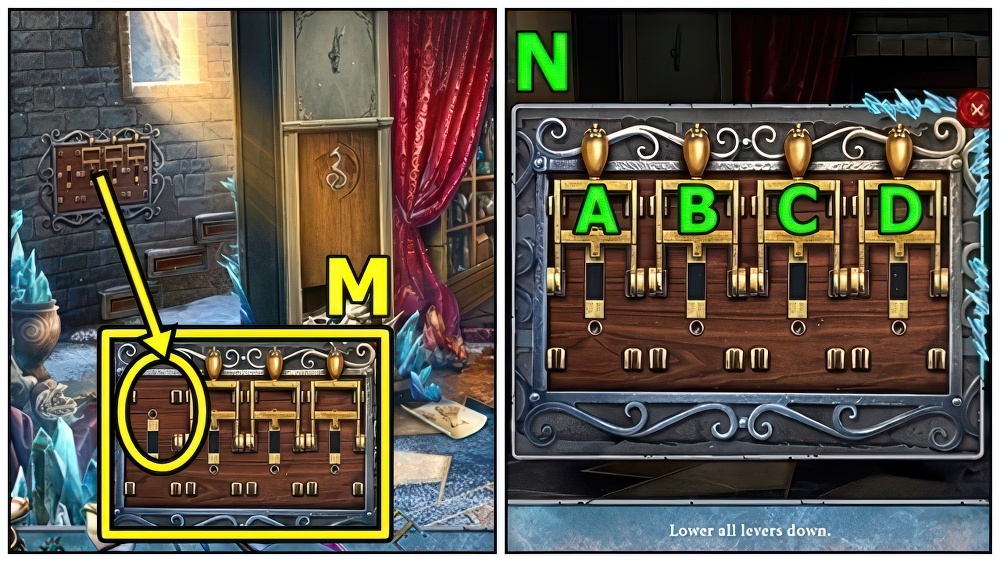
- Add LANTERN (O).
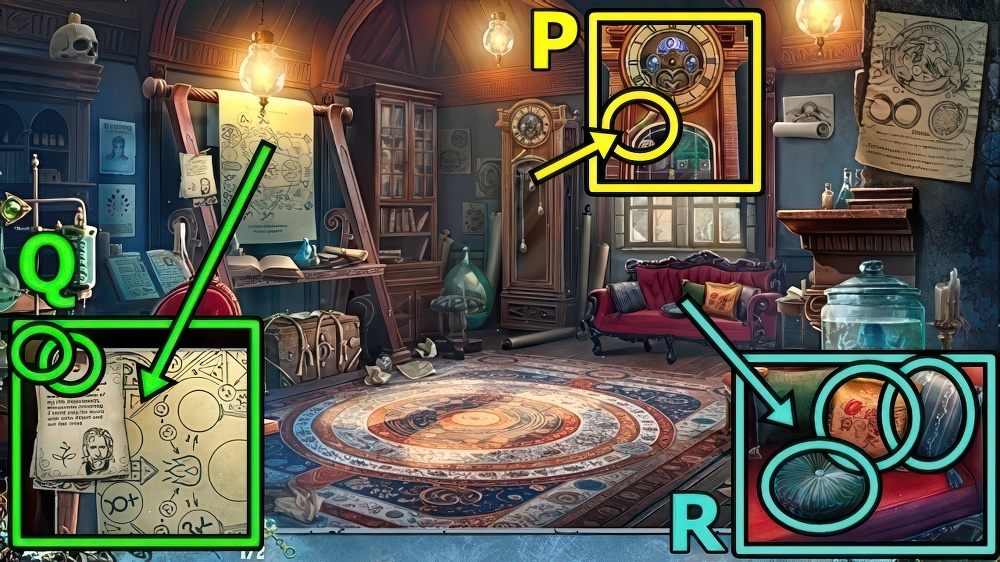
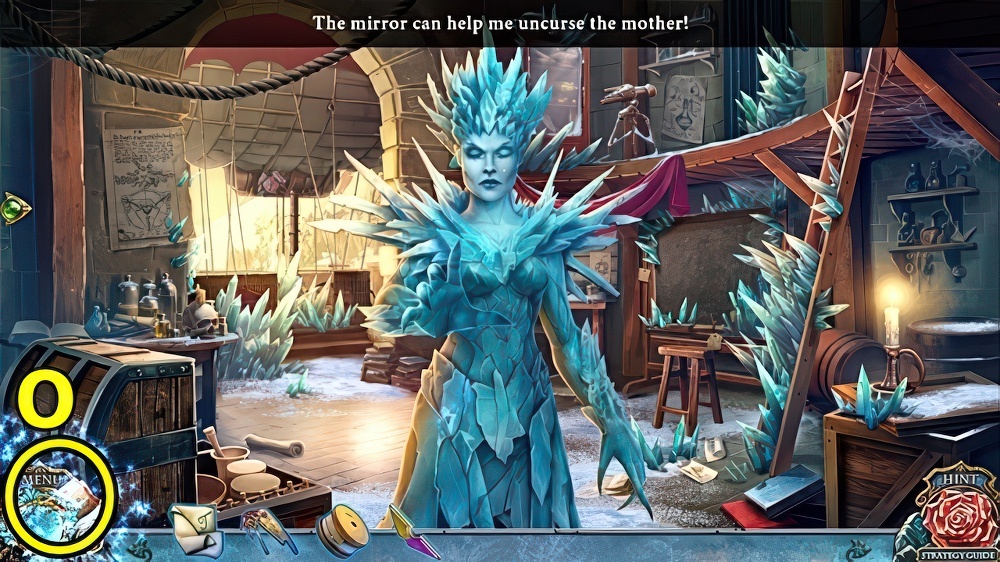
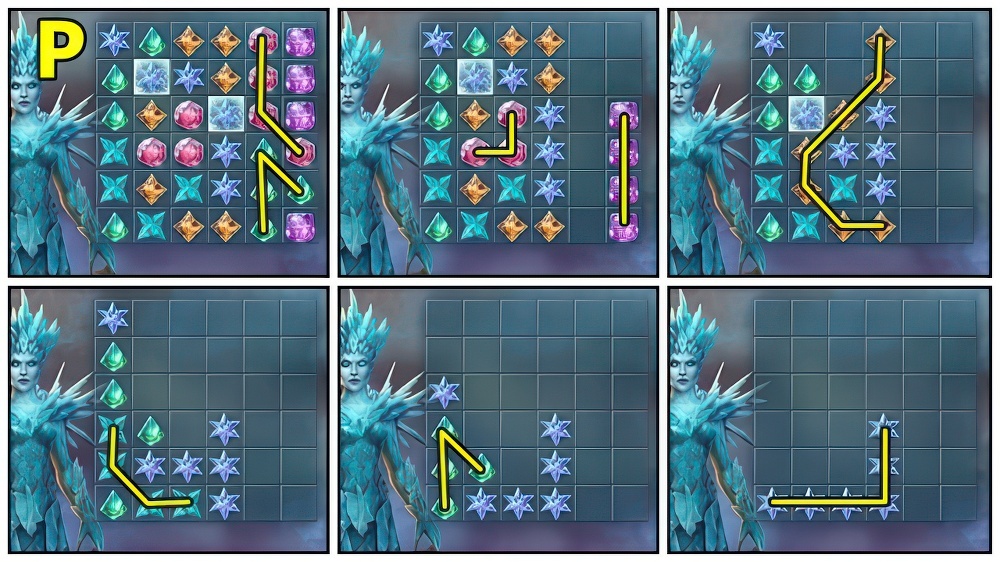
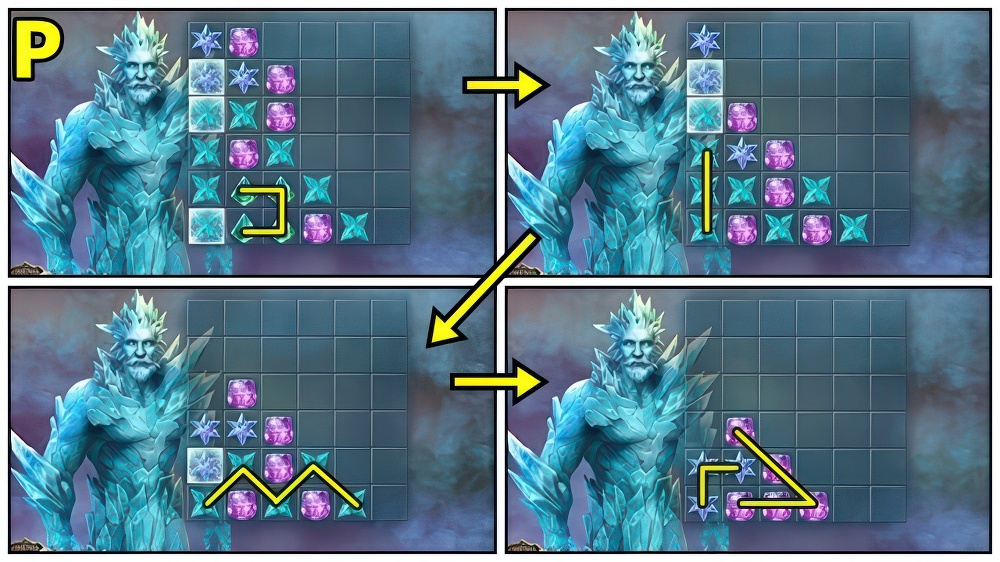
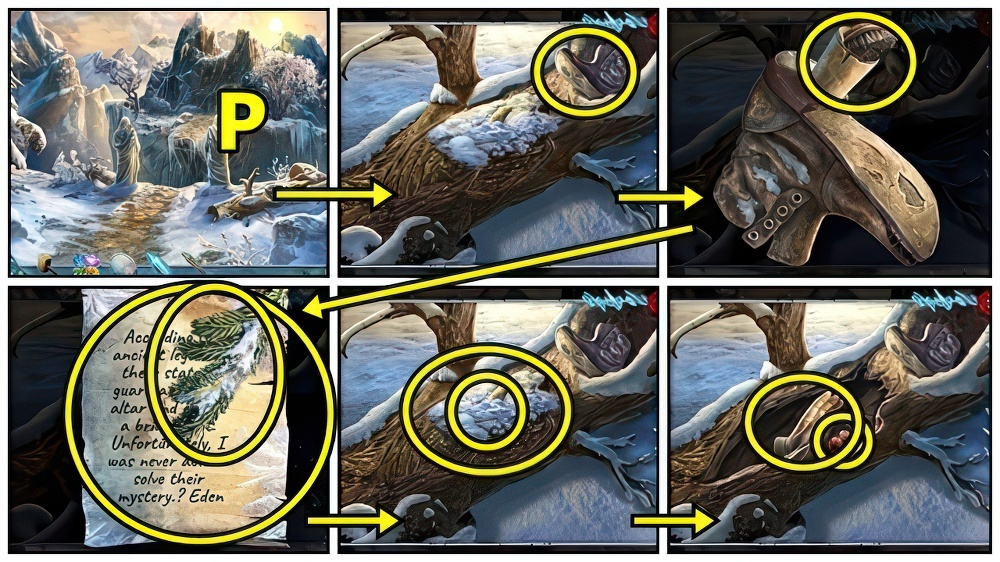
- Use MIRROR (P).
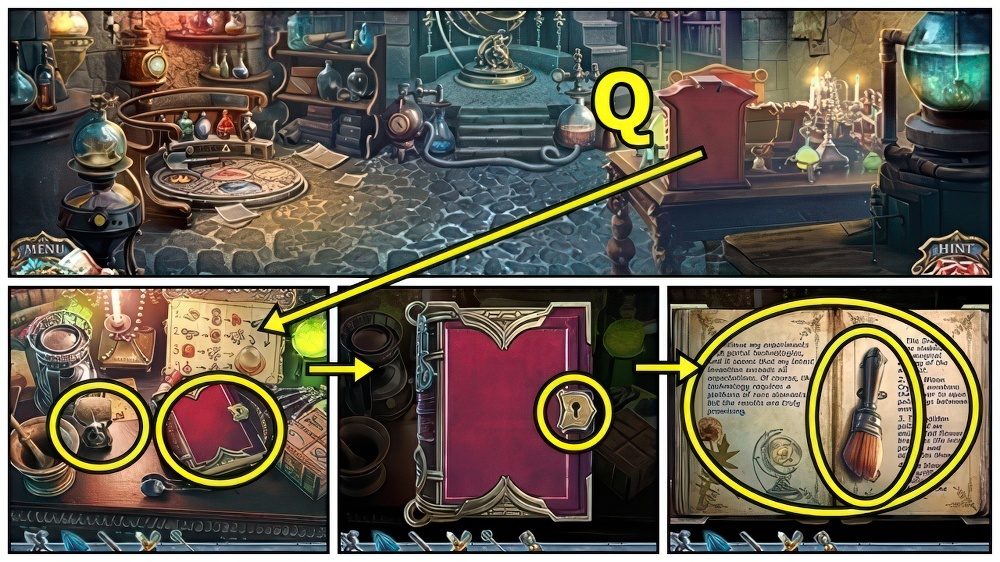
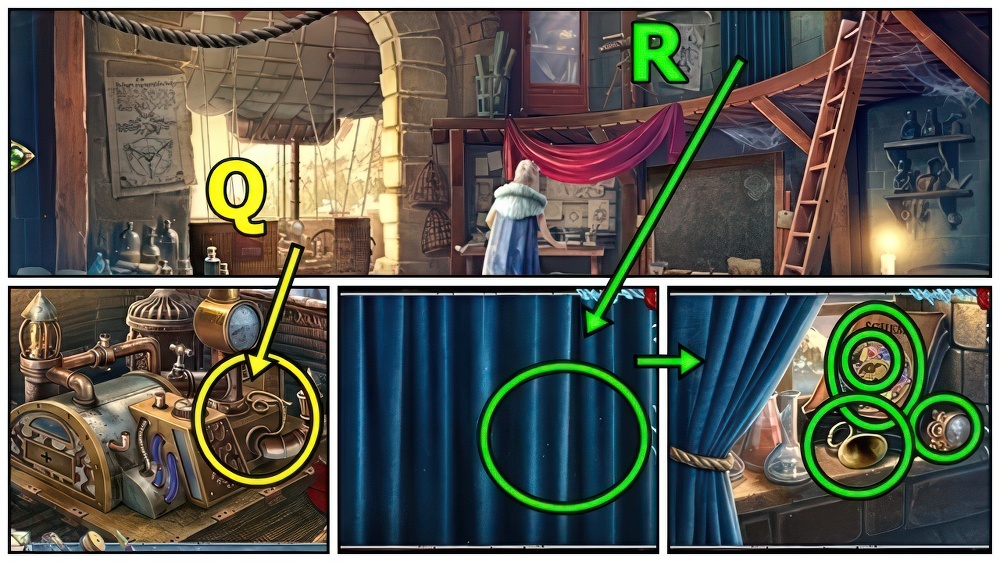
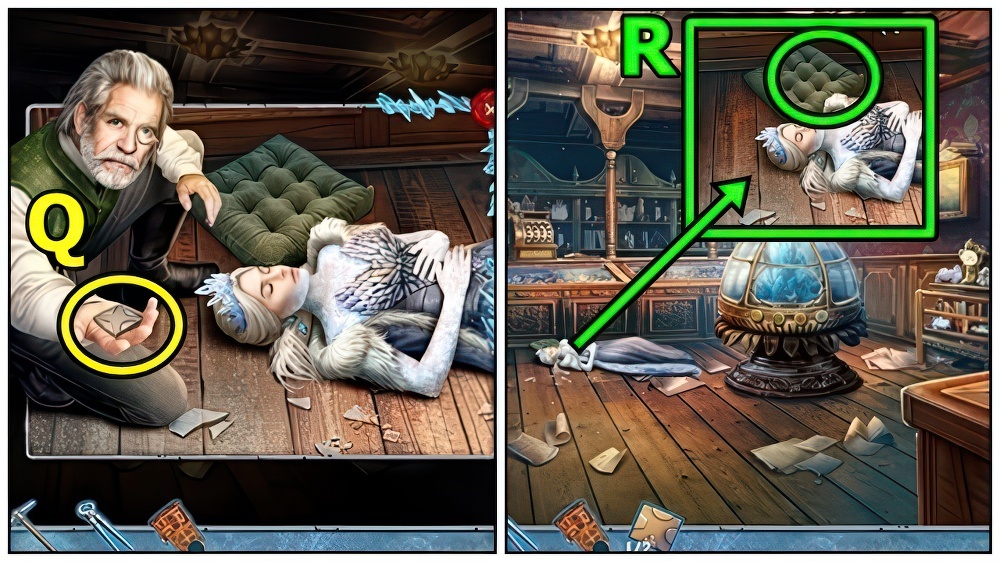
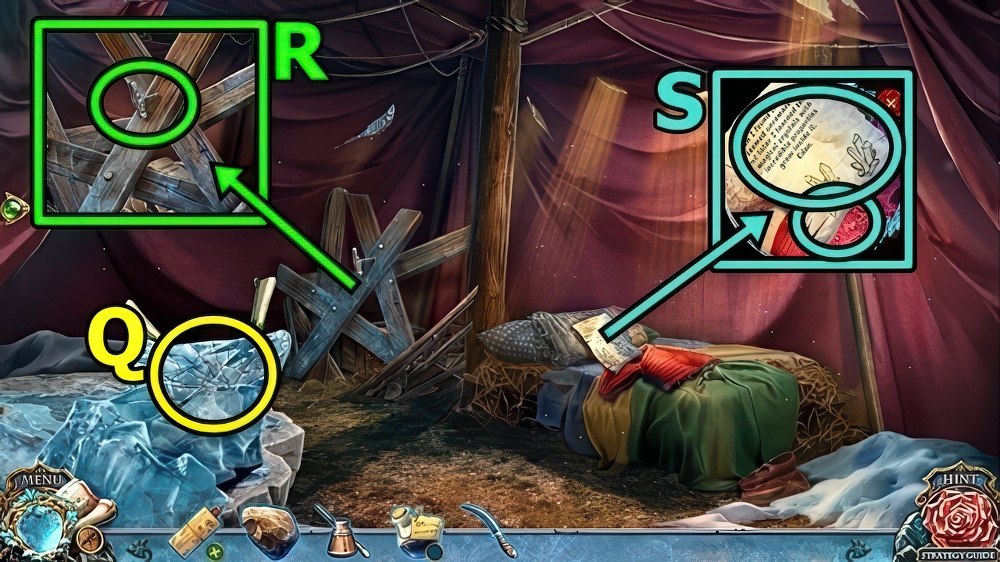
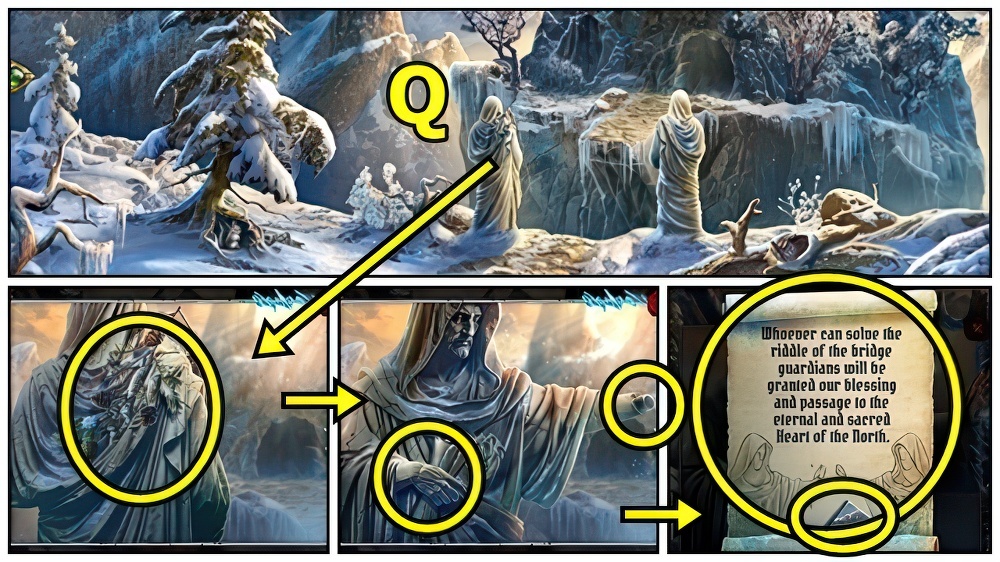
- Solution (Q).

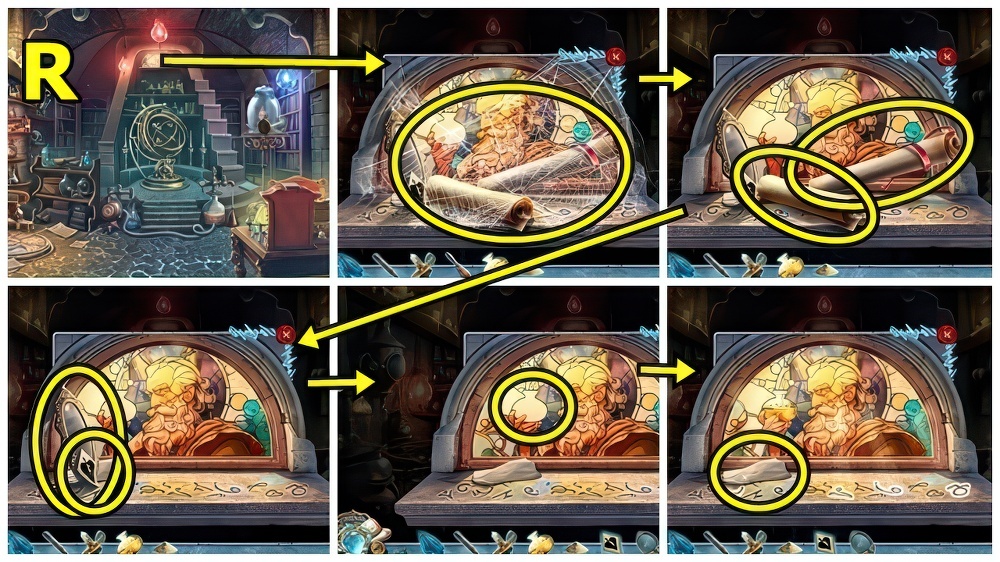
- Solution (R).
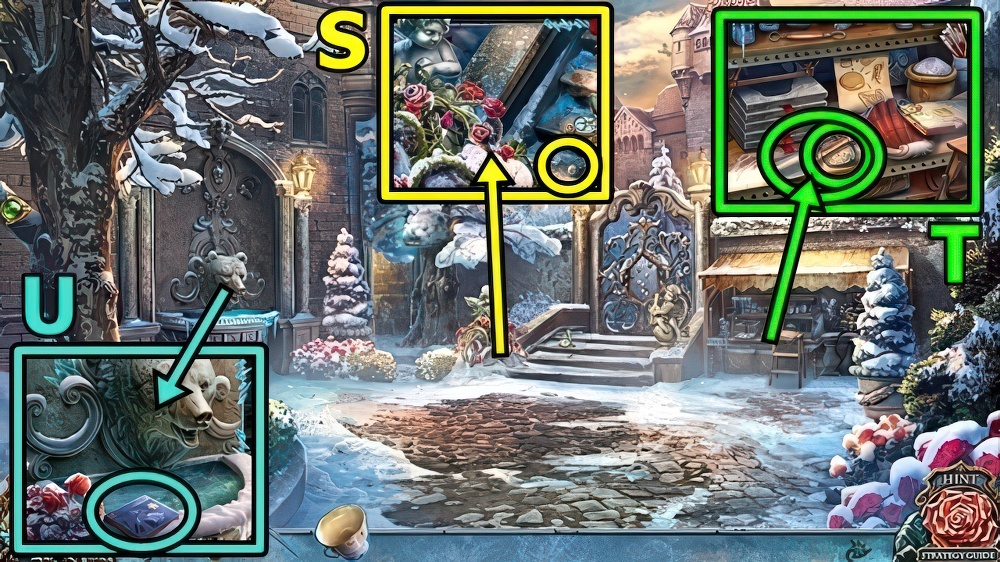
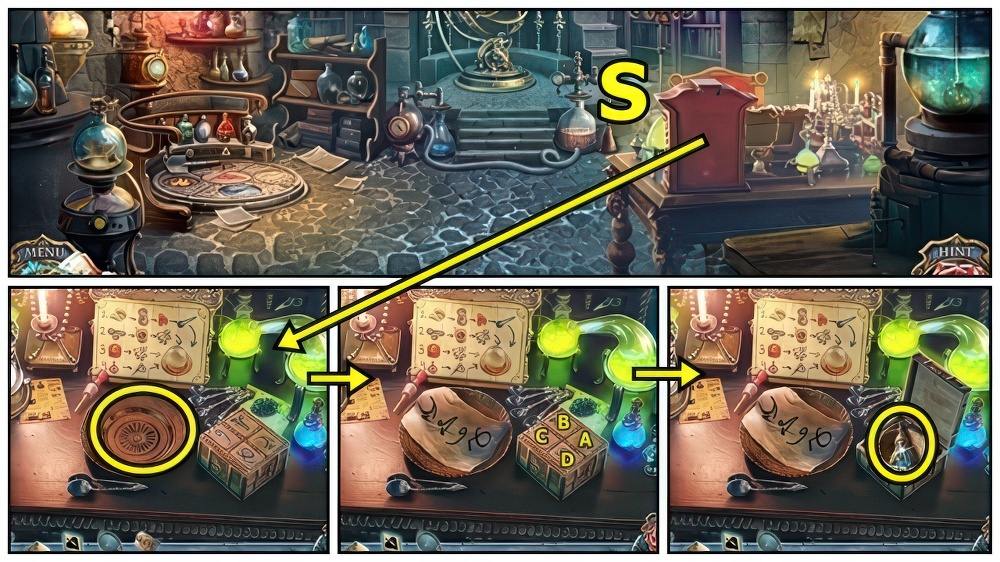
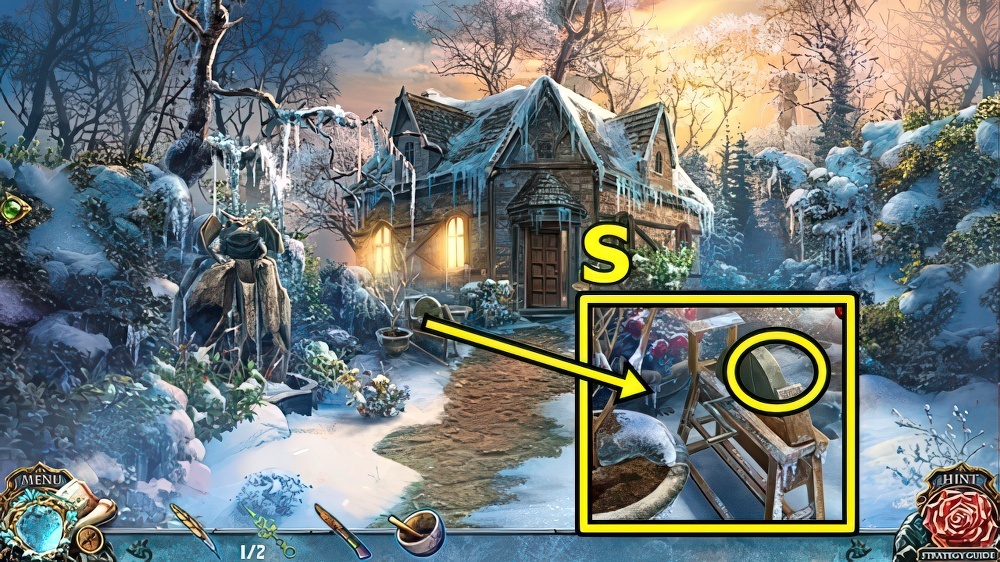
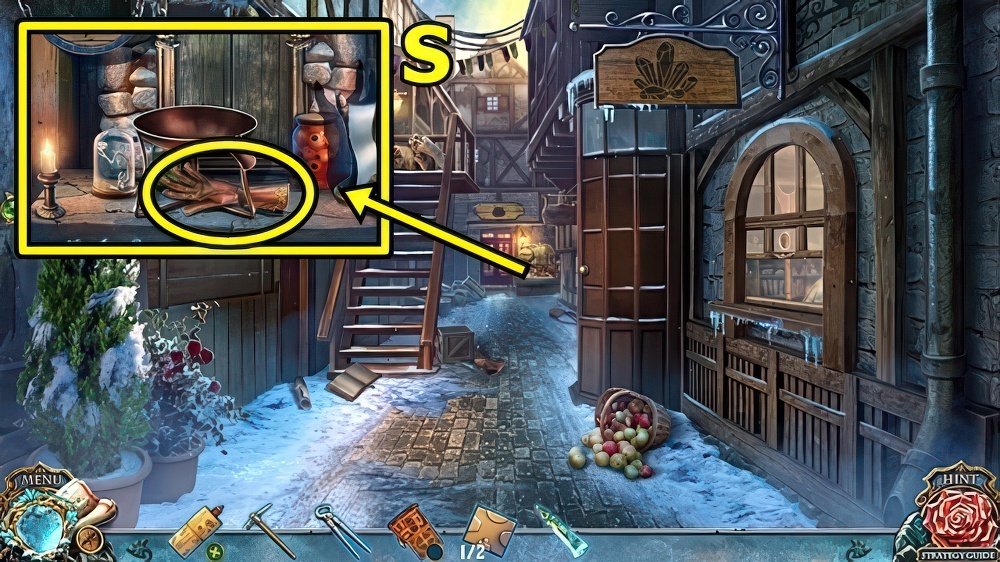
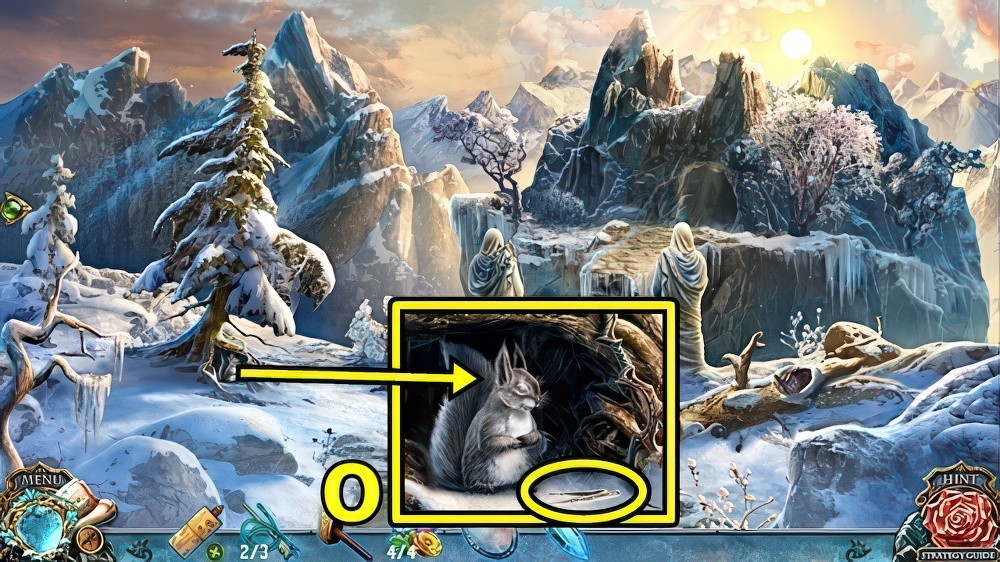
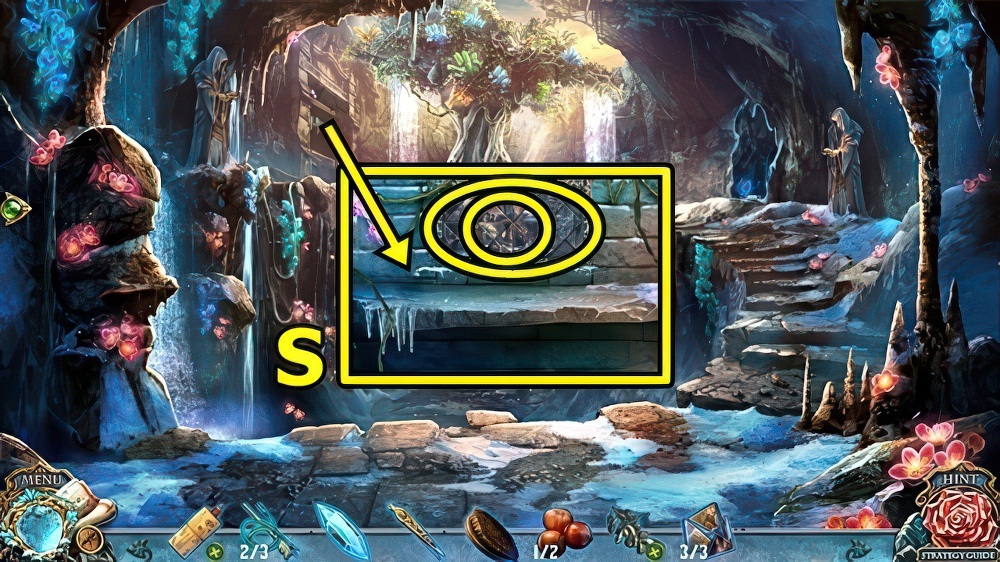
- Take SCREW (S).
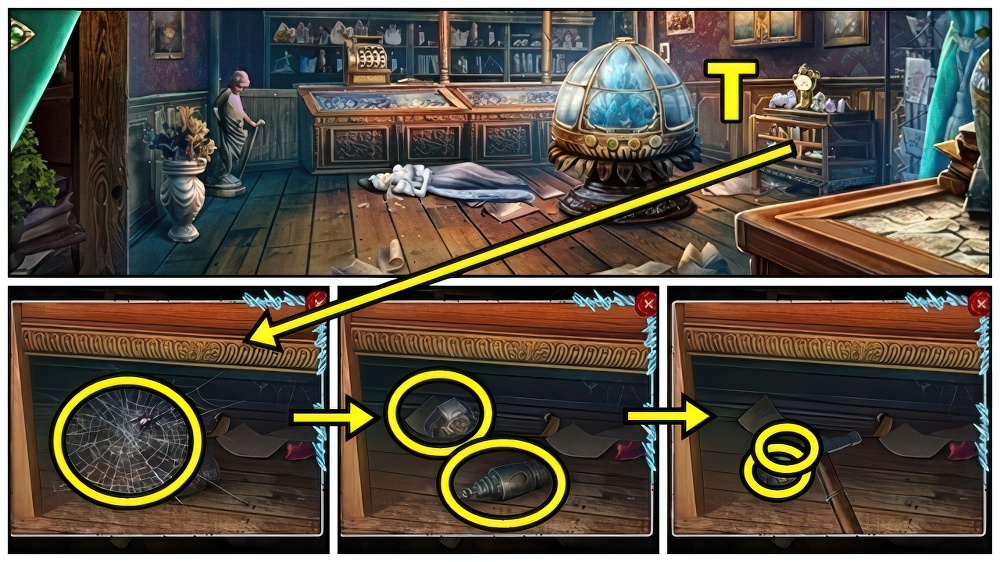
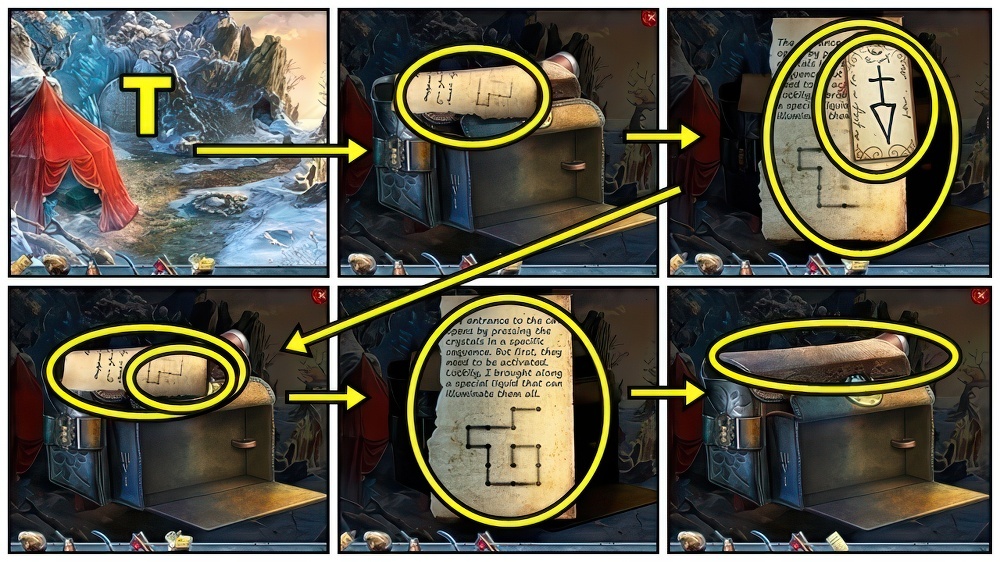
- Take GARDEN SHOVEL (T) and WHETSTONE.
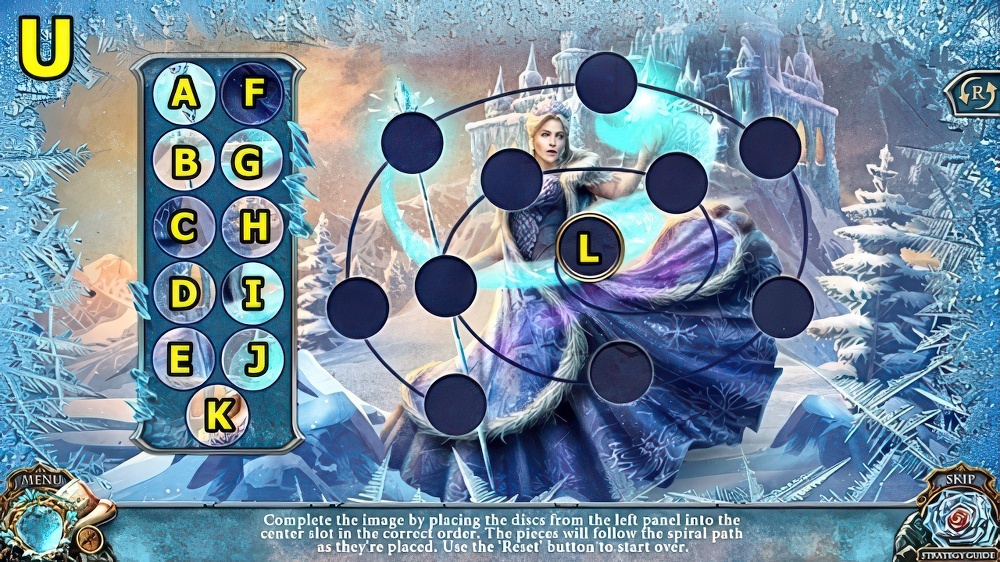
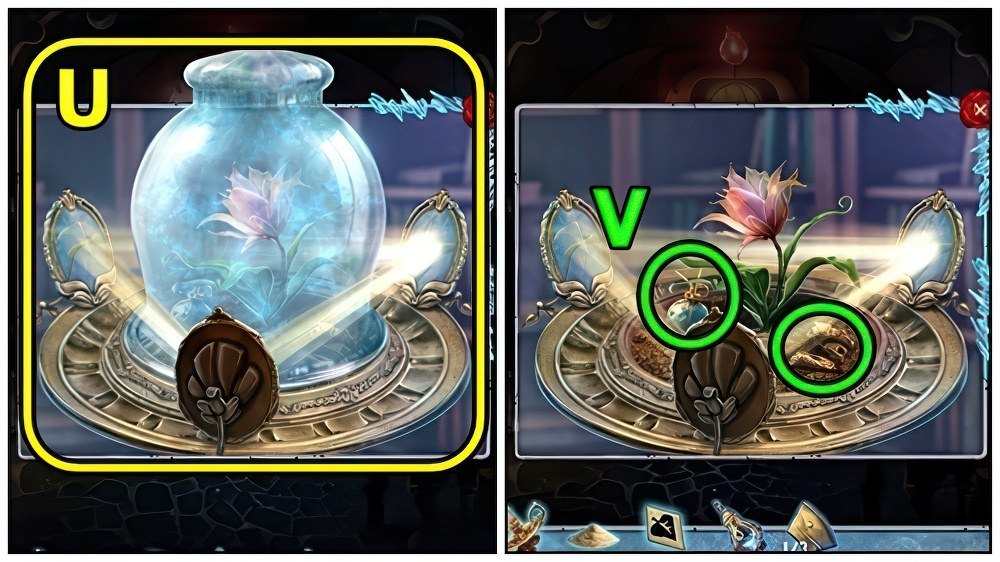
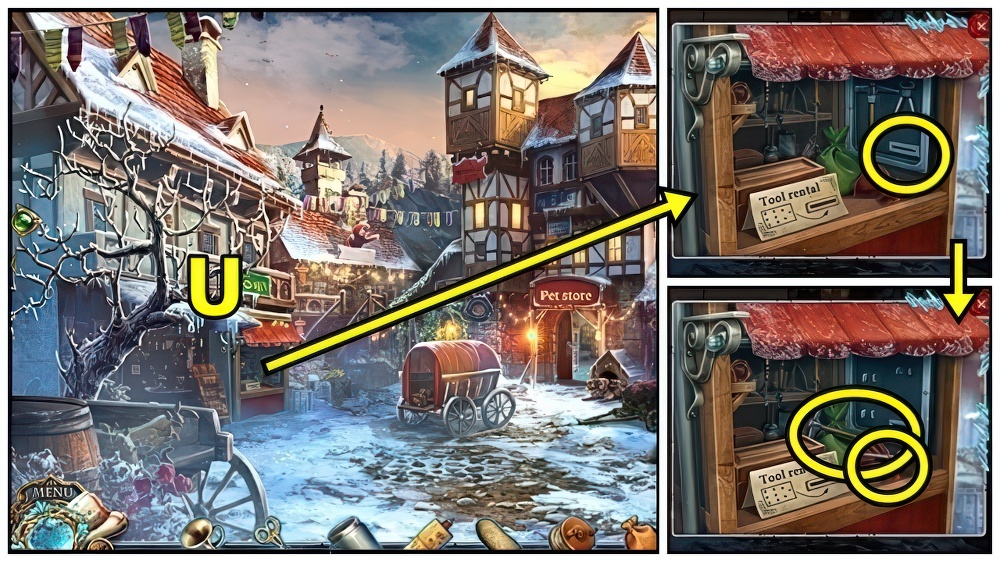
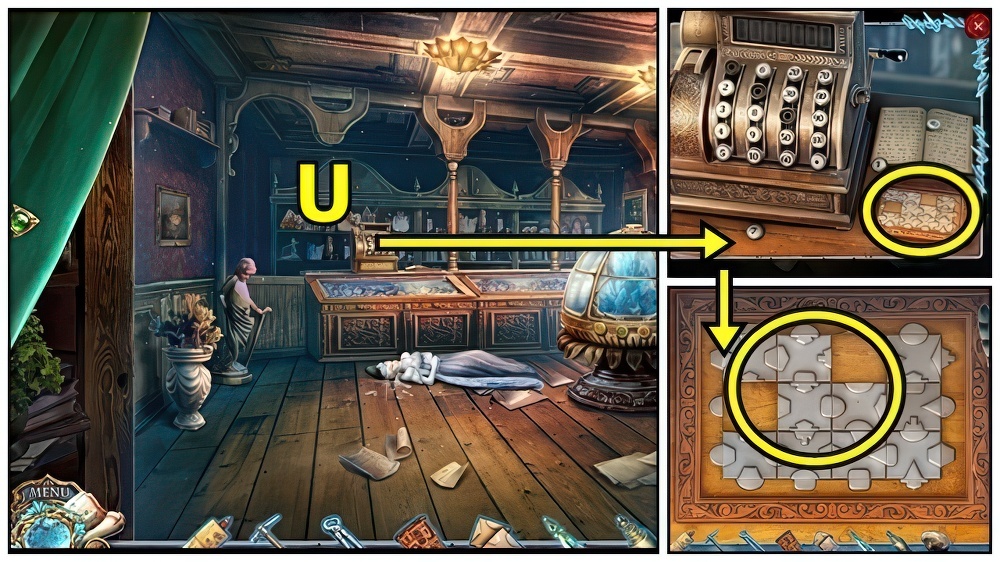
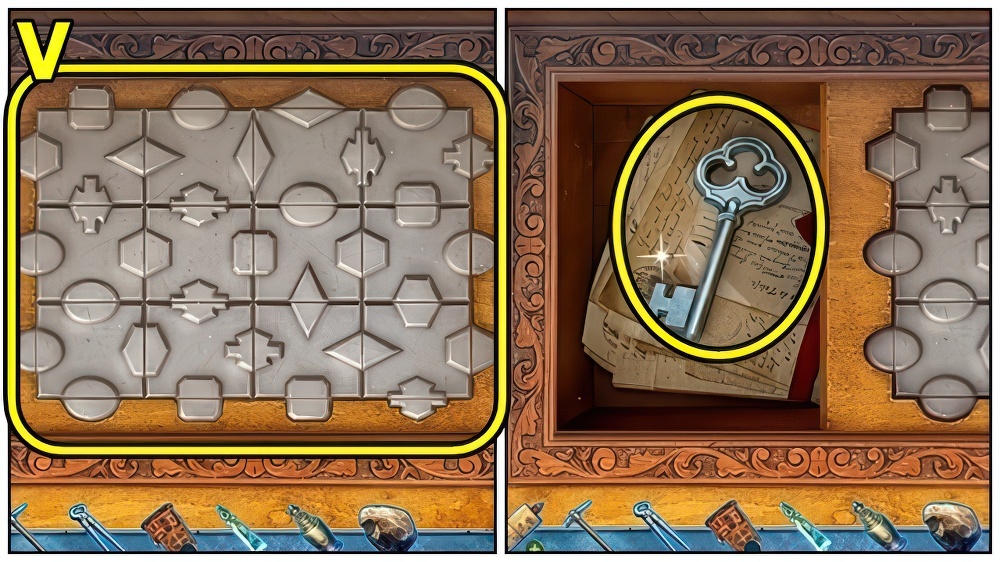
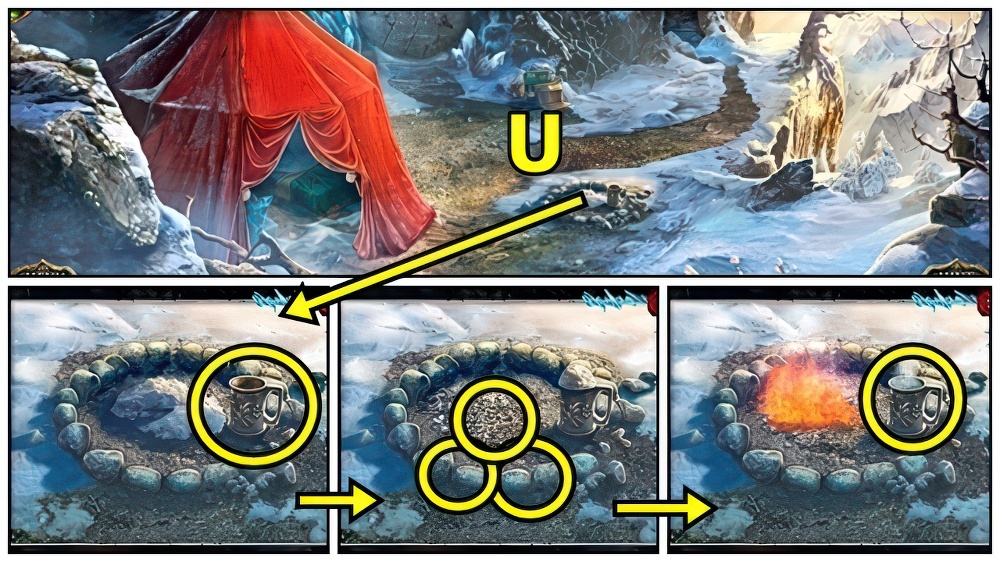
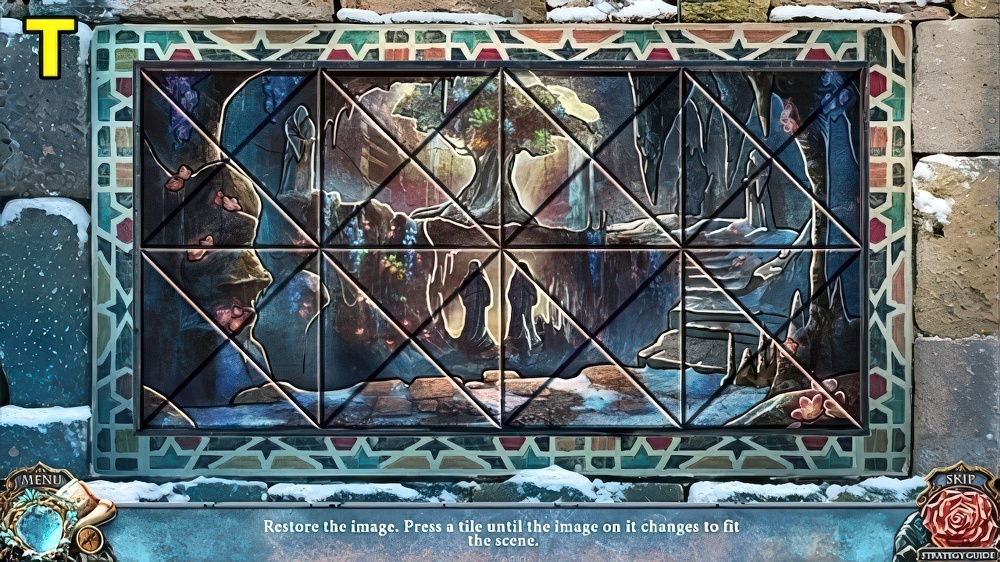
- Open (U), play puzzle.

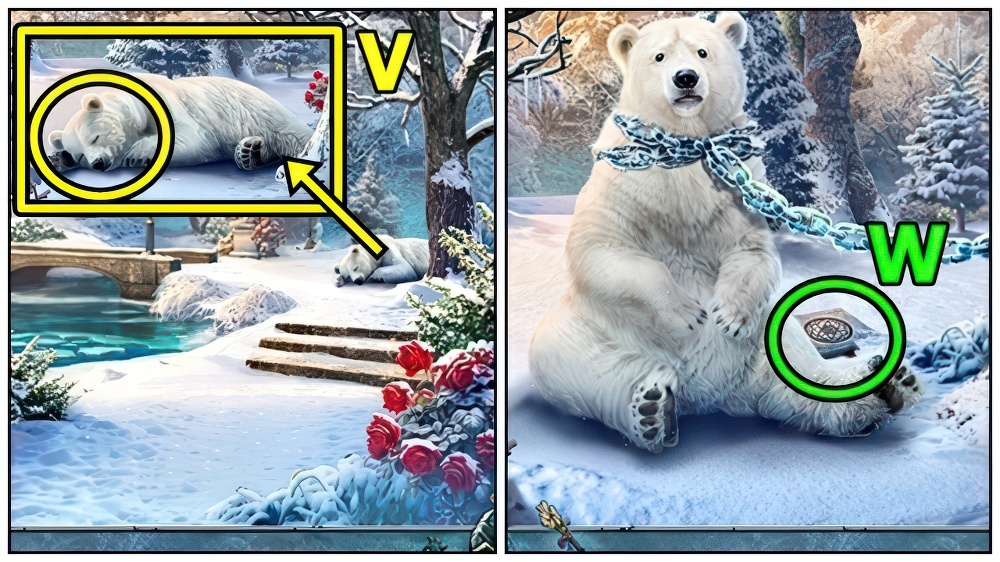
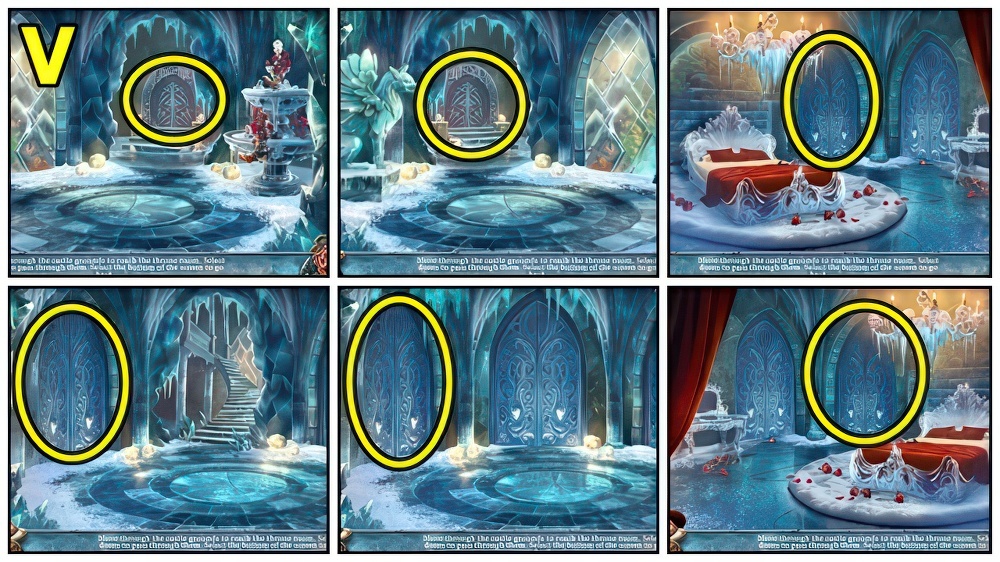
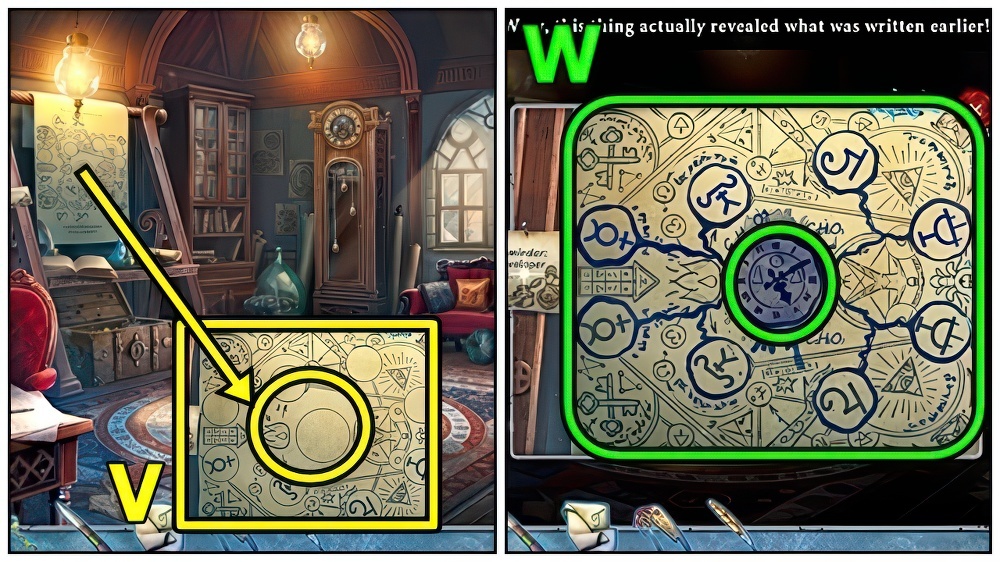
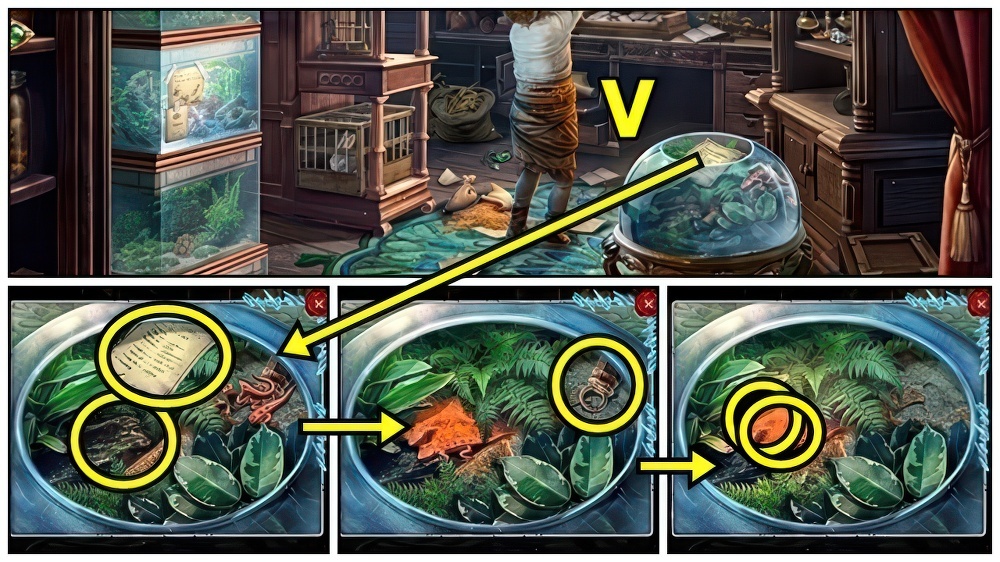
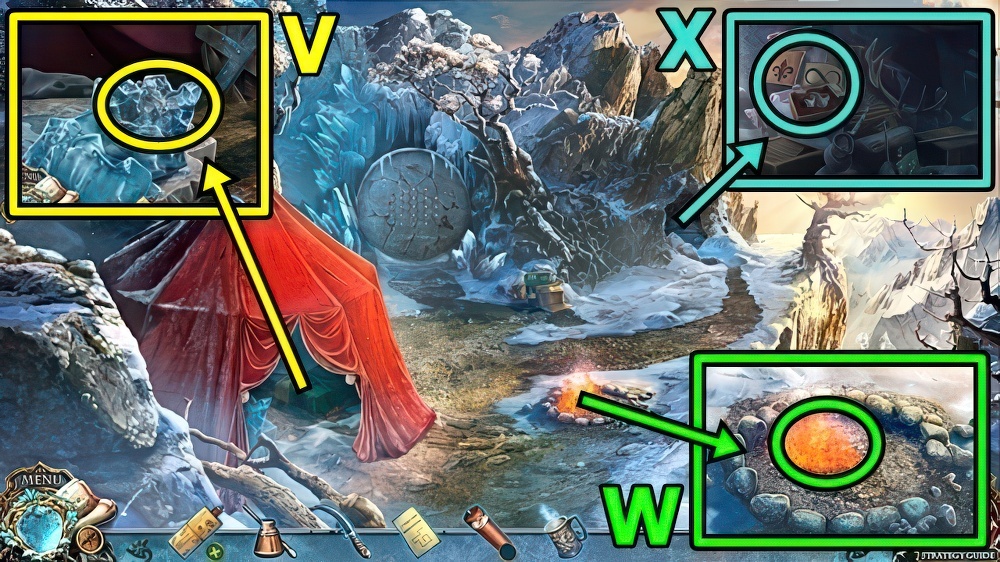
- Add CUP (V), receive BEAR TOKEN, SHOELACE and CUP WITH WATER.

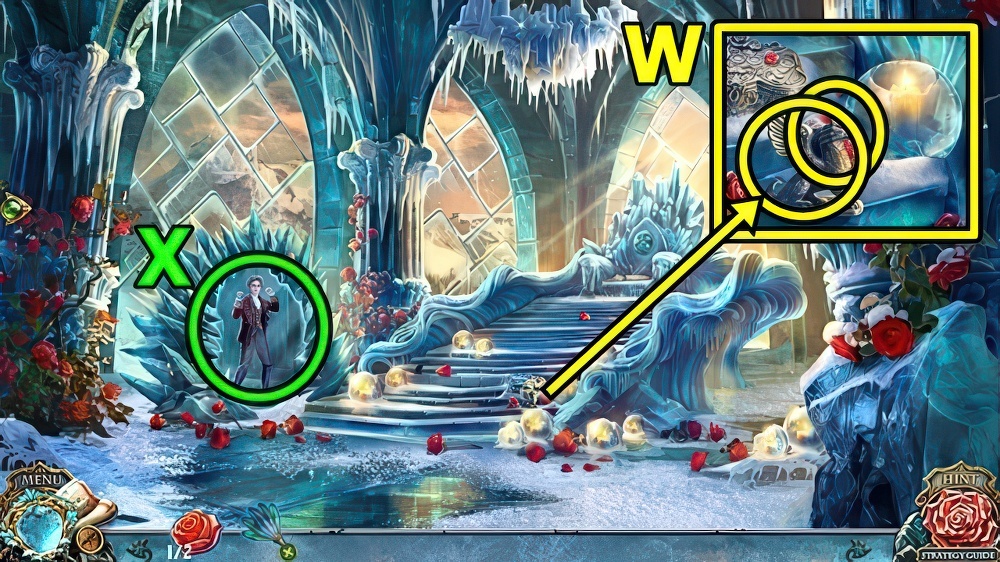
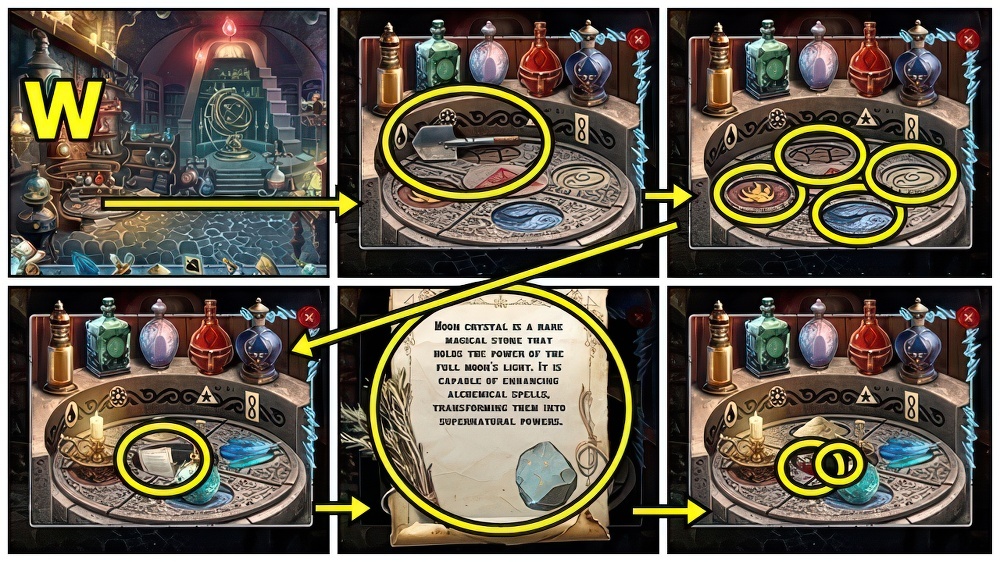
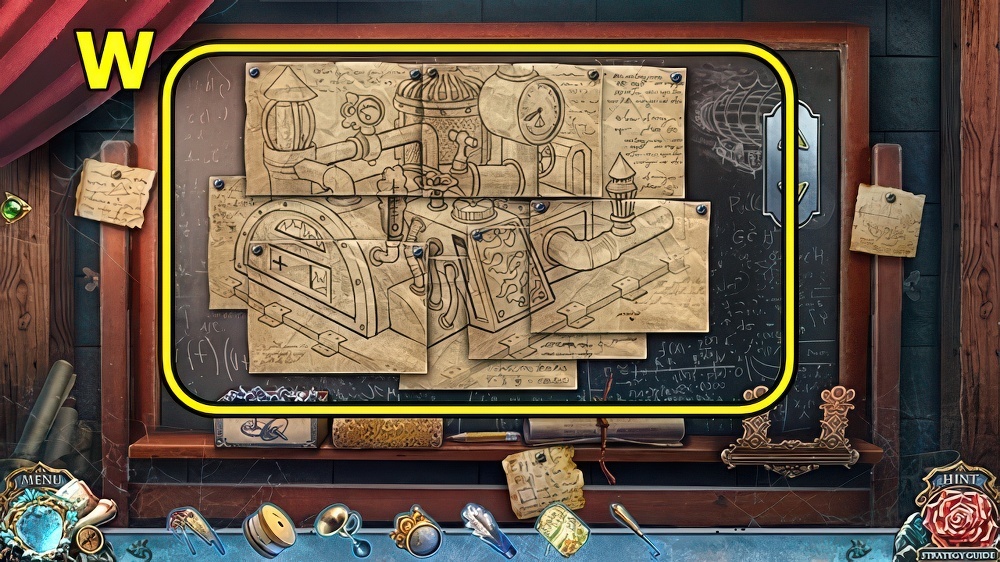
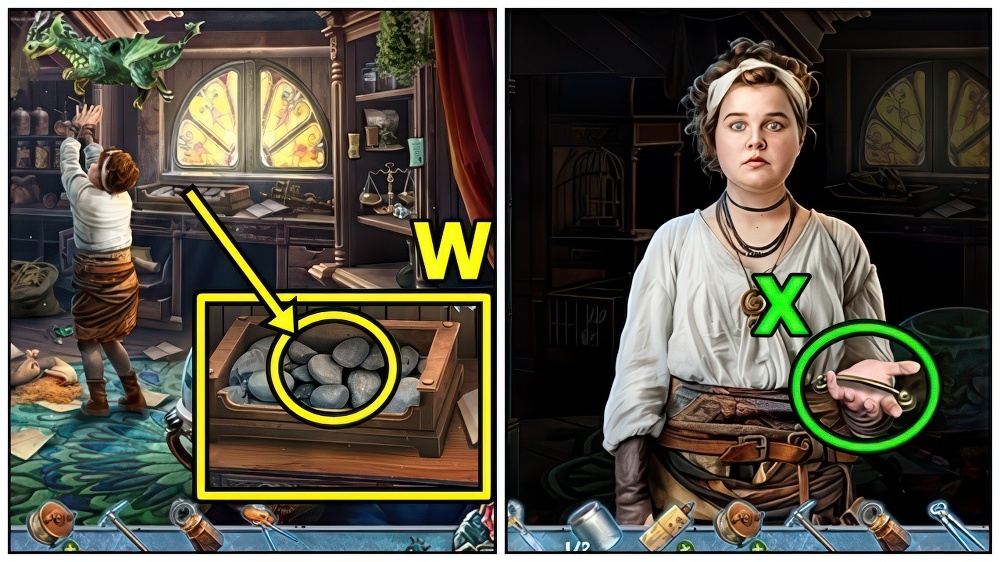
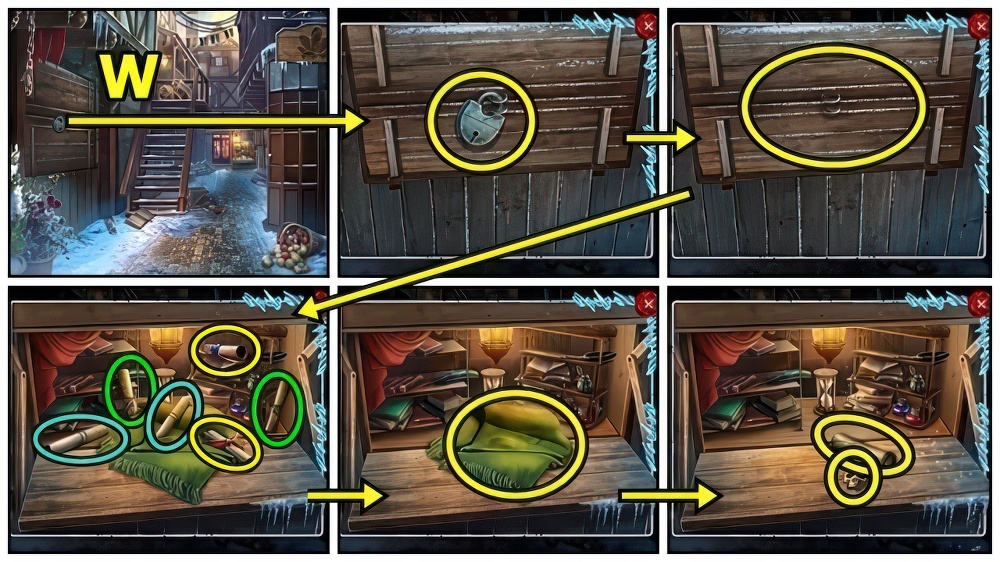
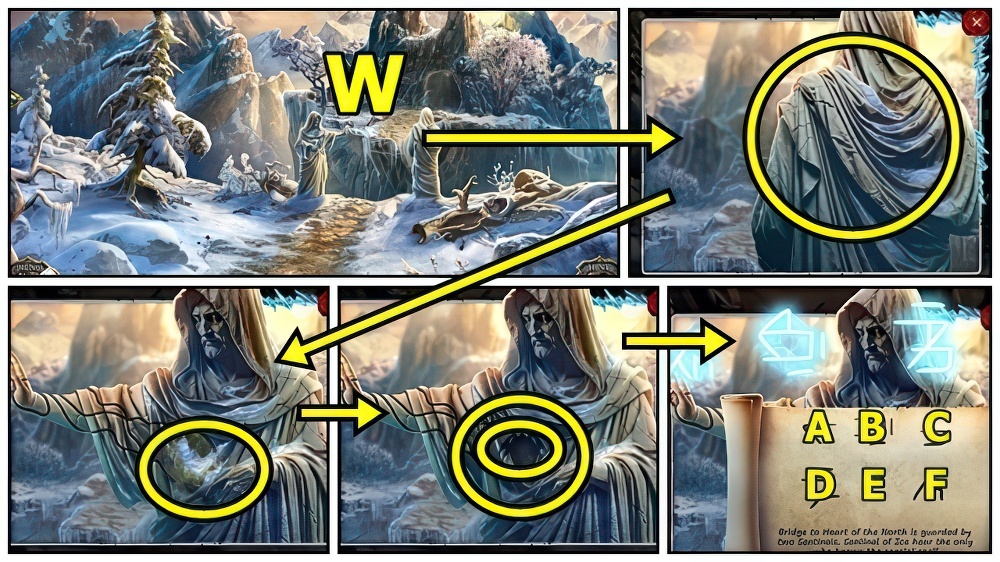
- Read (W), examine.
- Add BEAR TOKEN.
- Read.

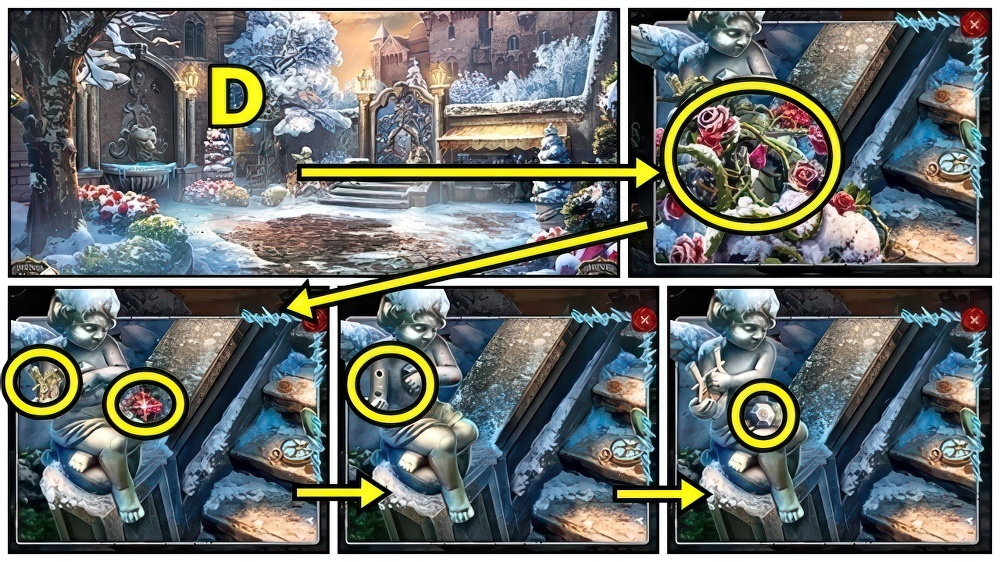
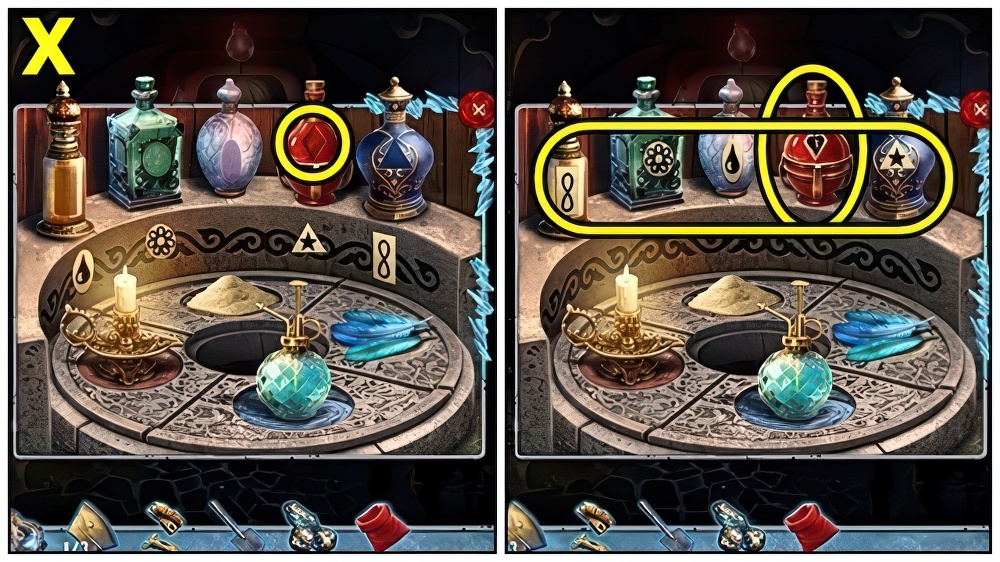
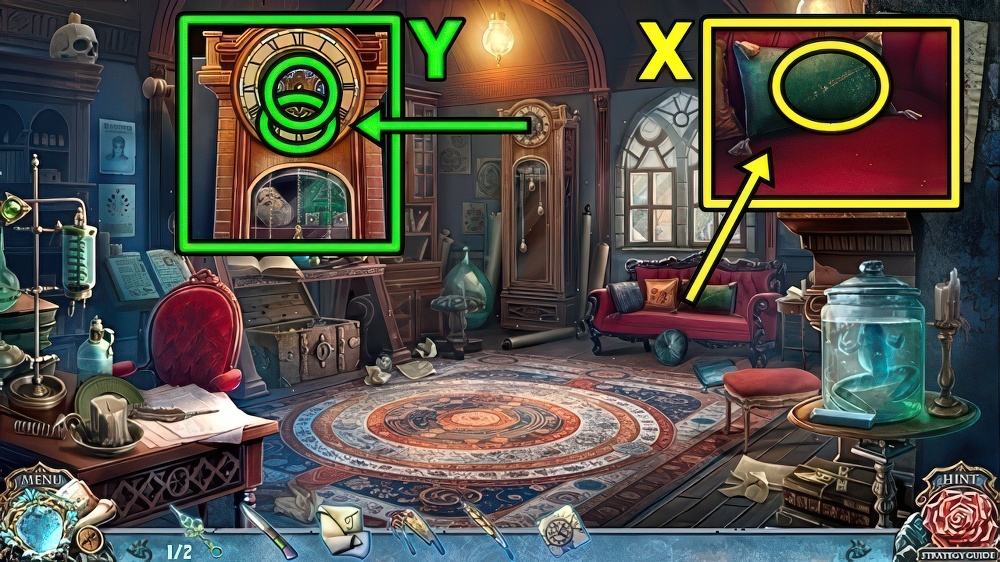
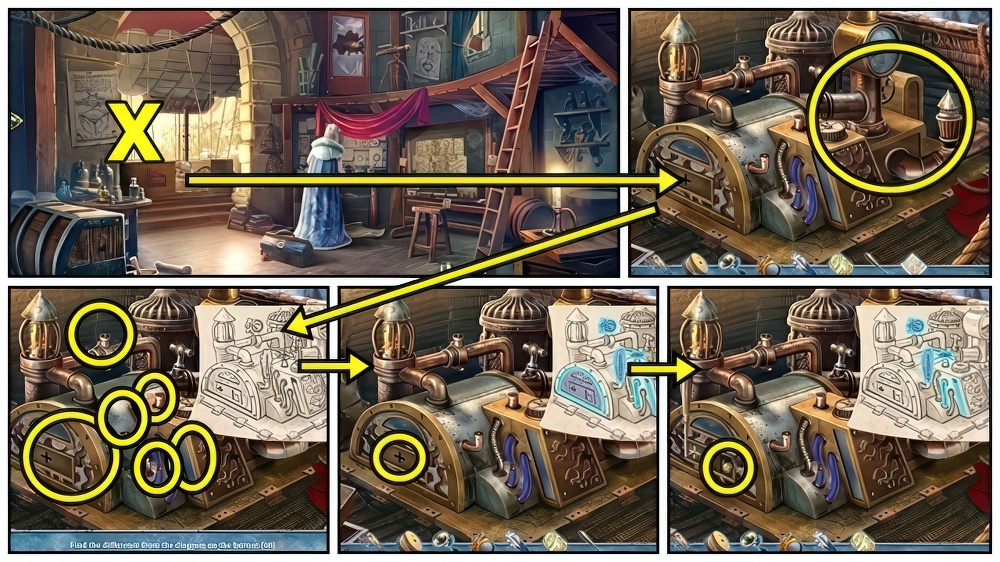
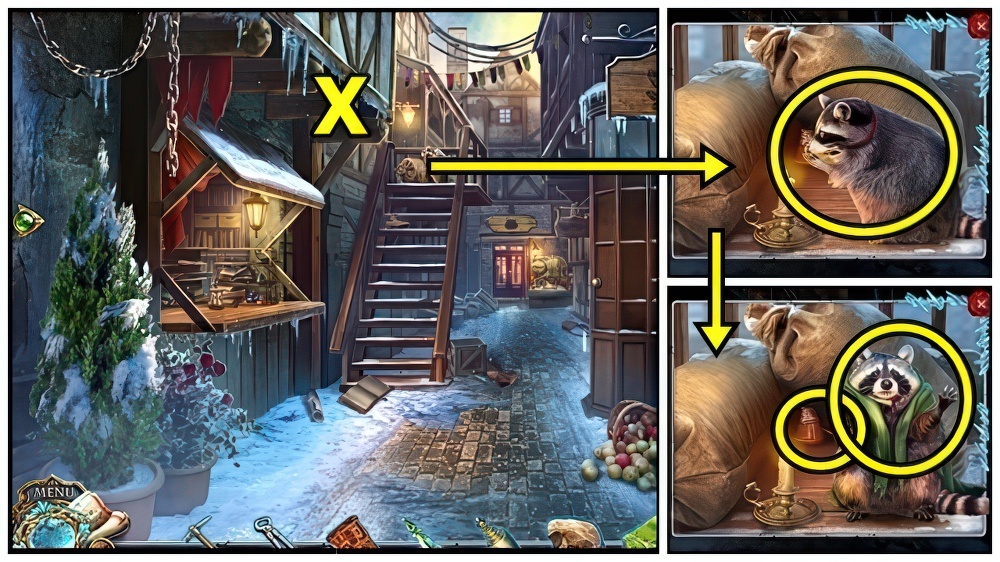
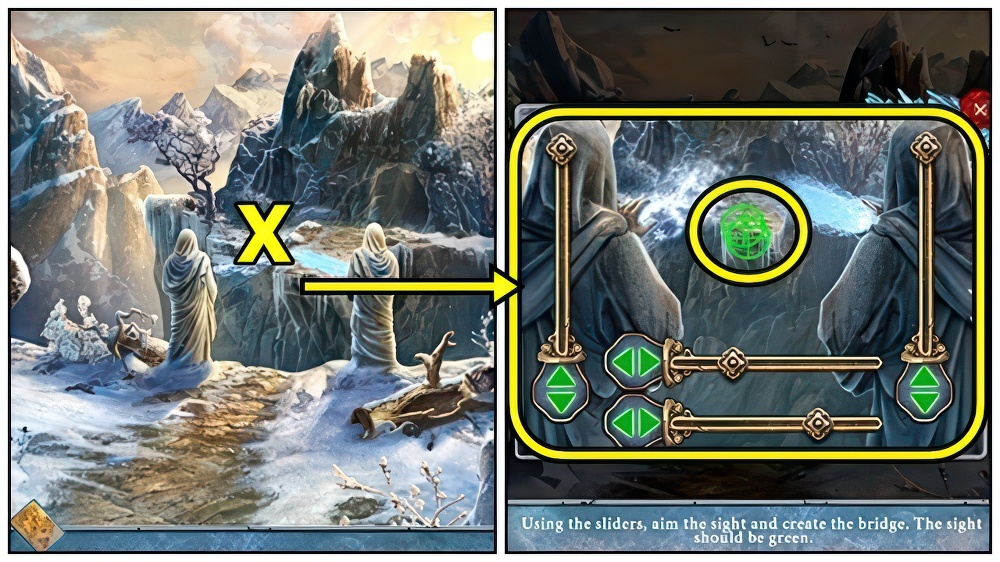
- Read (X).
- Take GATE GEM 1/3, close.
- Remove.
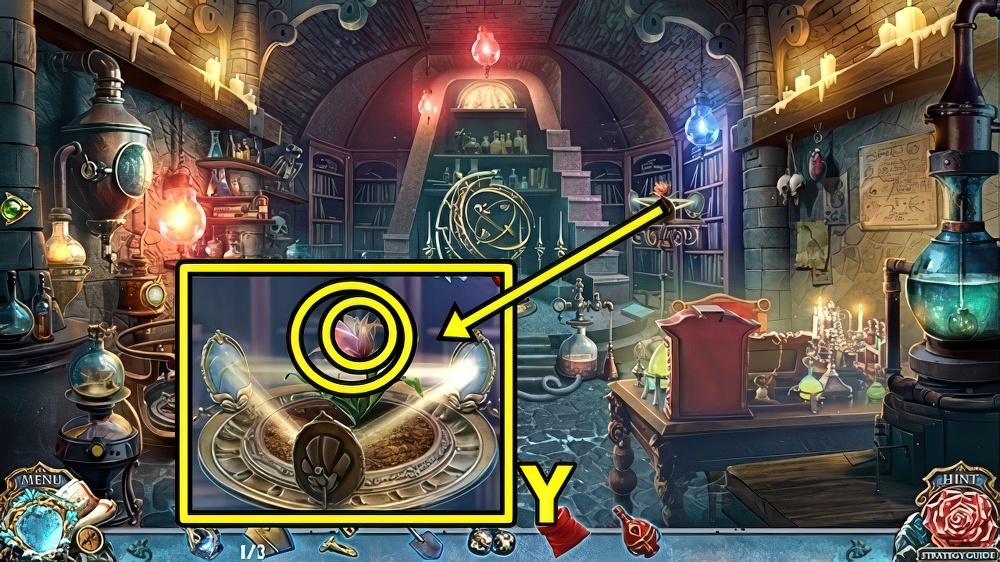
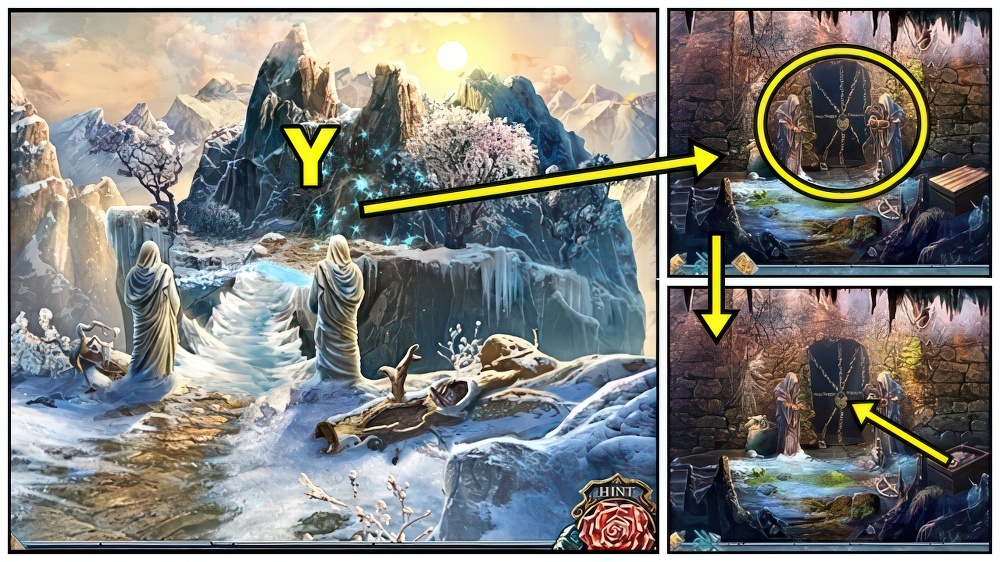
- Use SHOELACE, receive GARDEN LADDER.
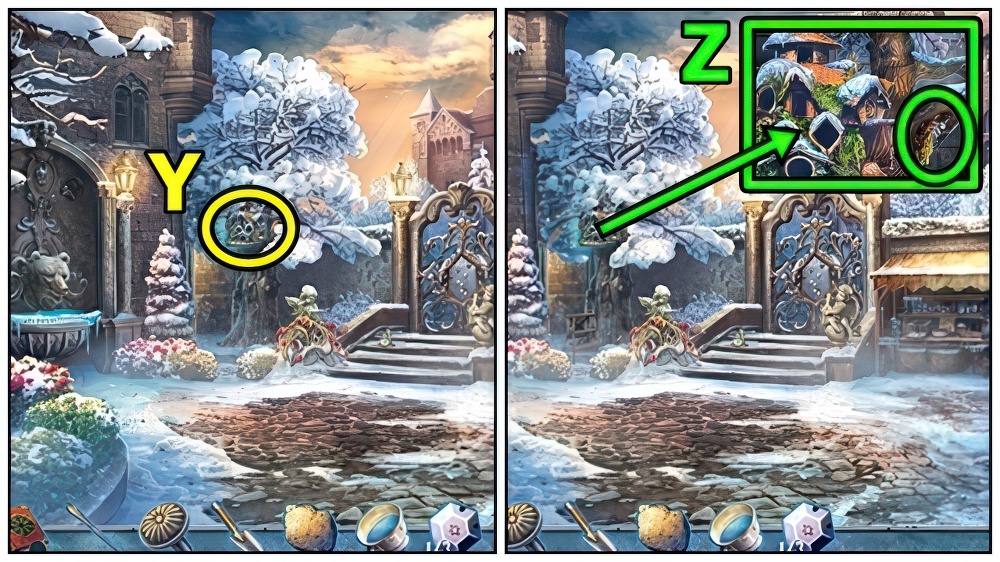
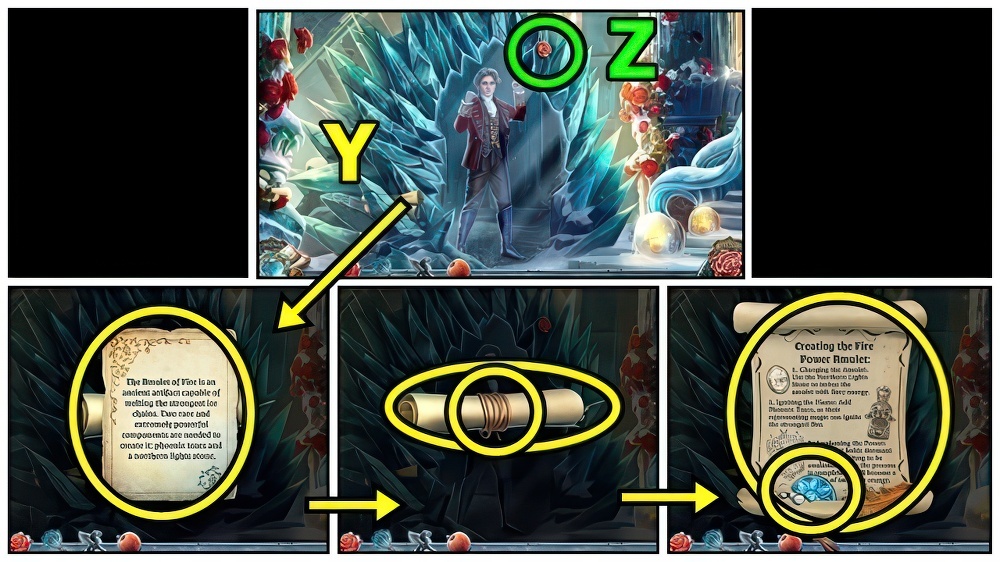
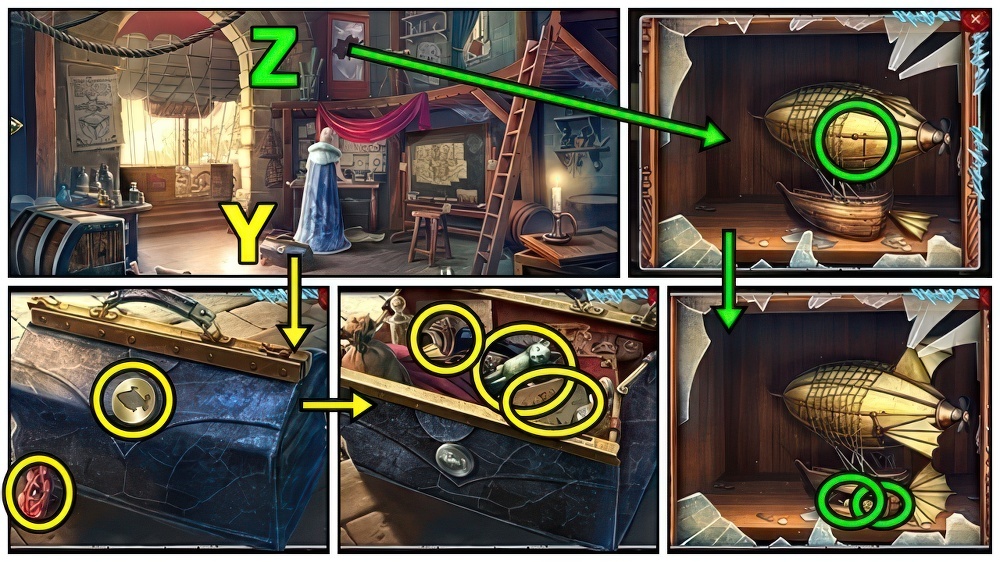
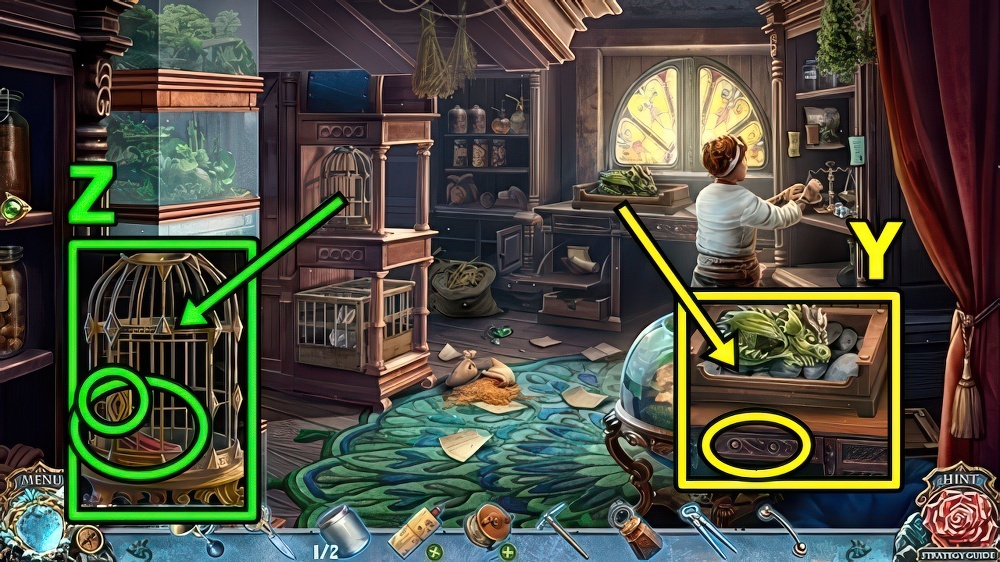
- Place GARDEN LADDER (Y).
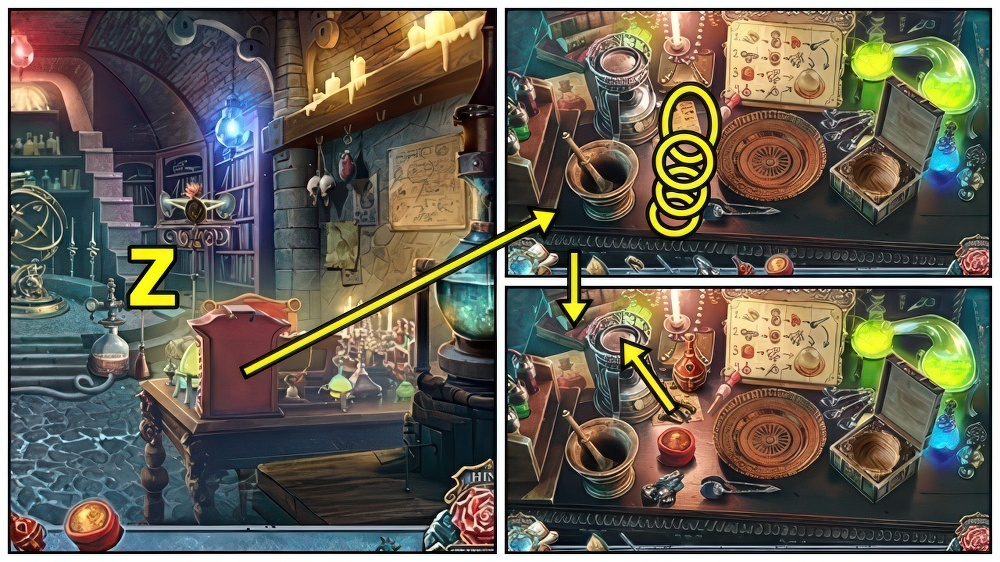
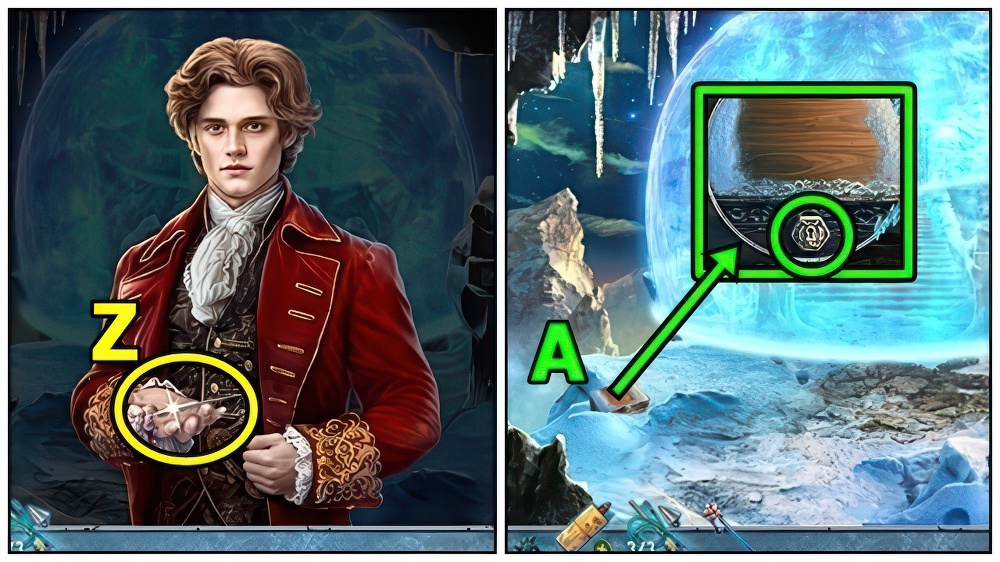
- Use LETTER OPENER (Z), receive RESIN.
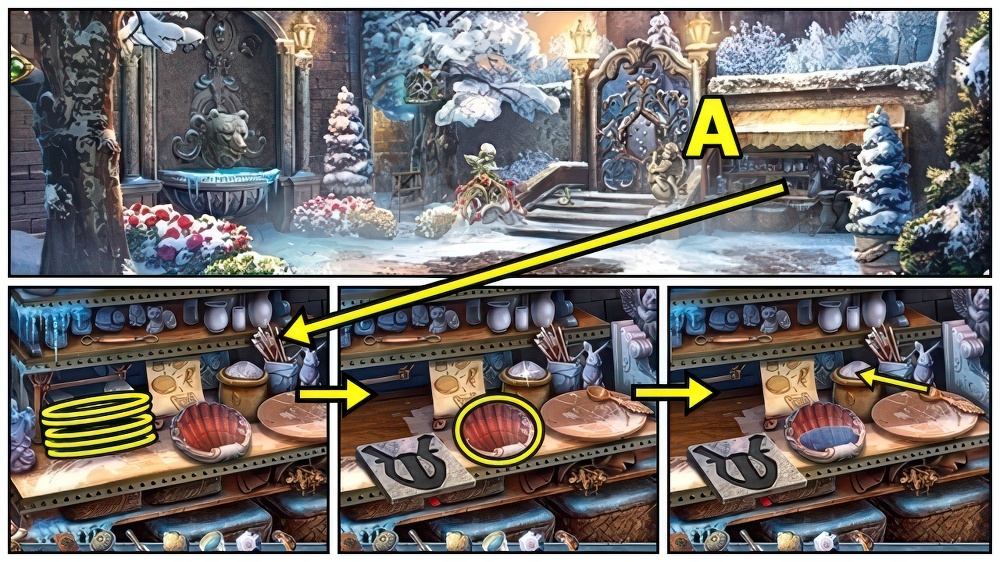
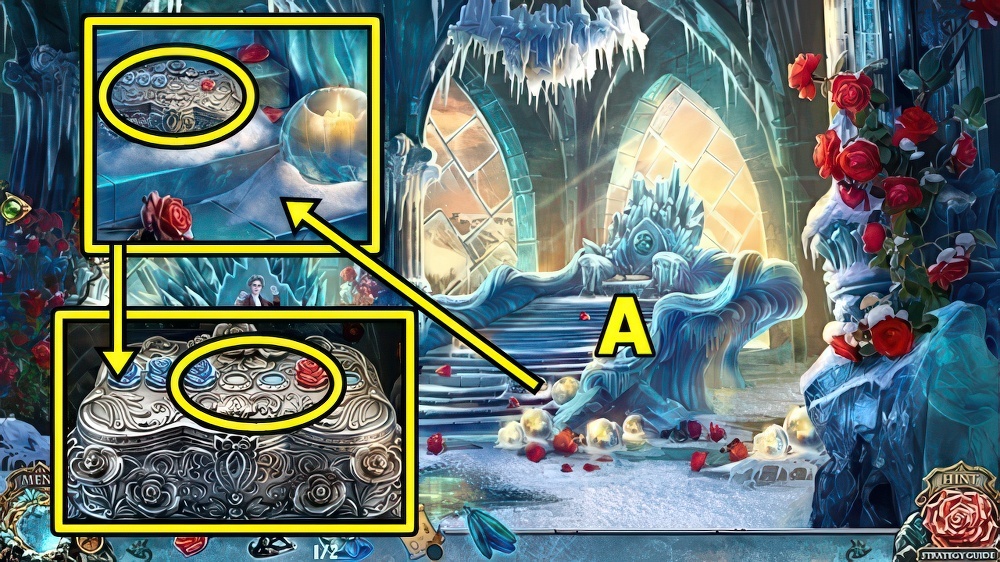
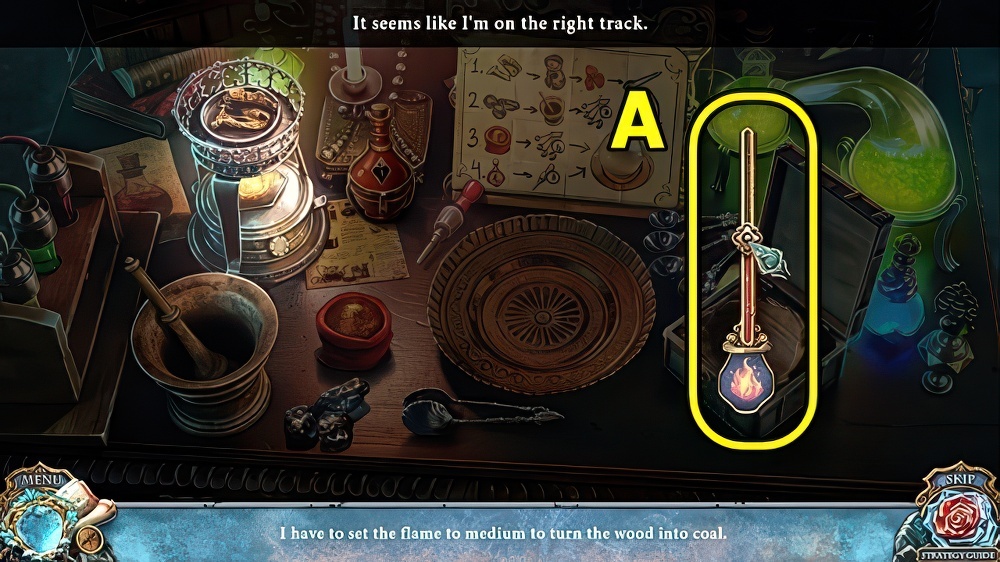
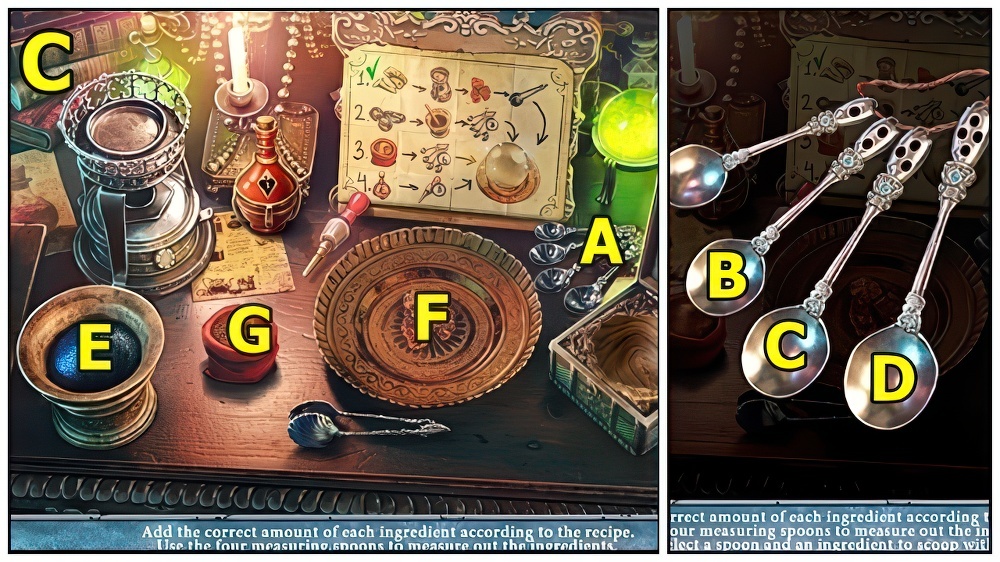
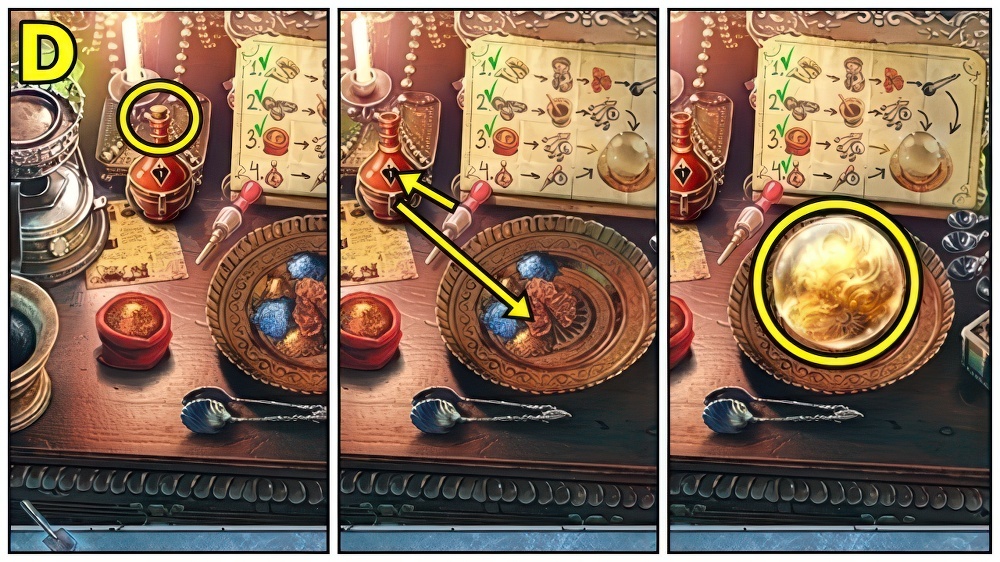
- Move molds (A).
- Add CUP WITH WATER, use Spoon.
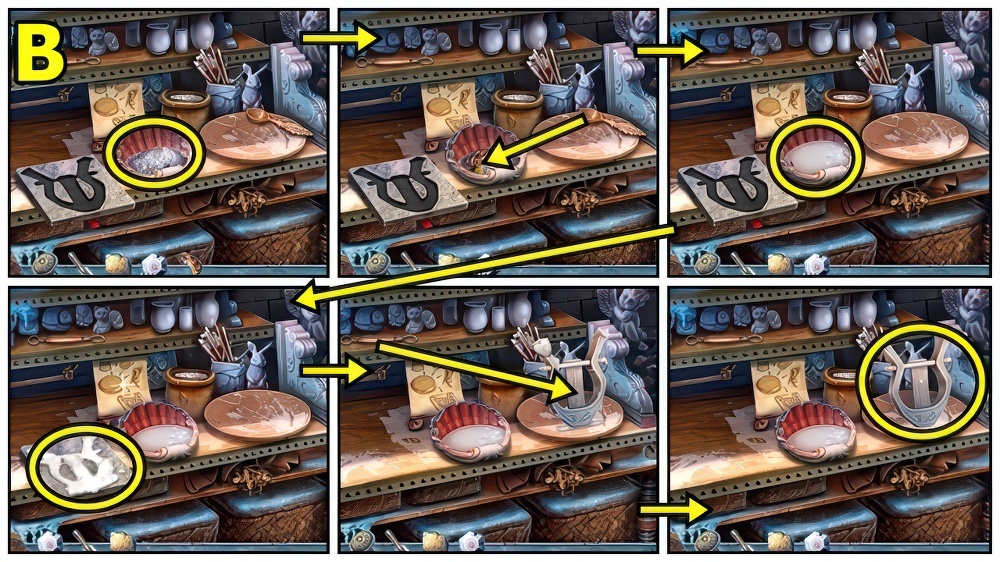
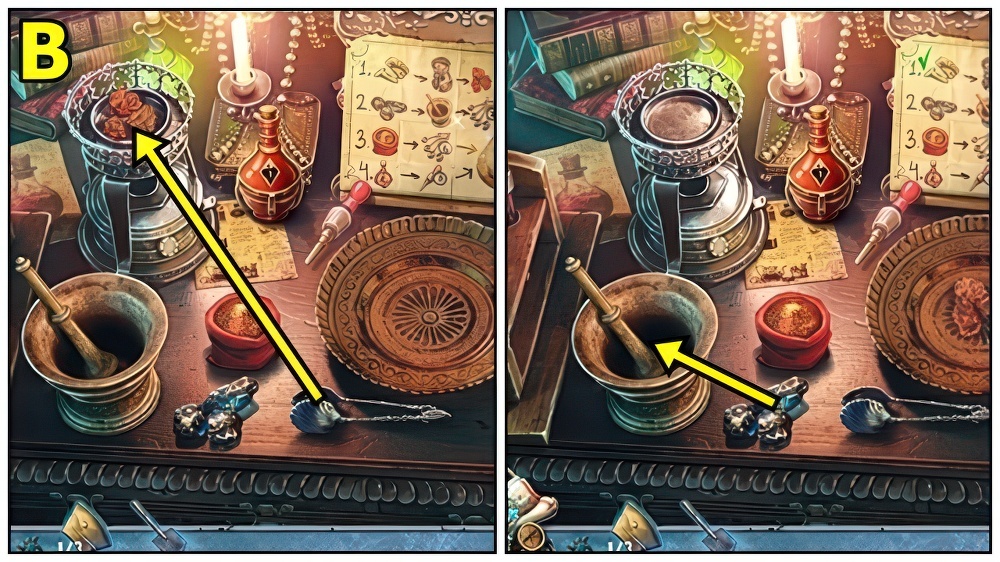
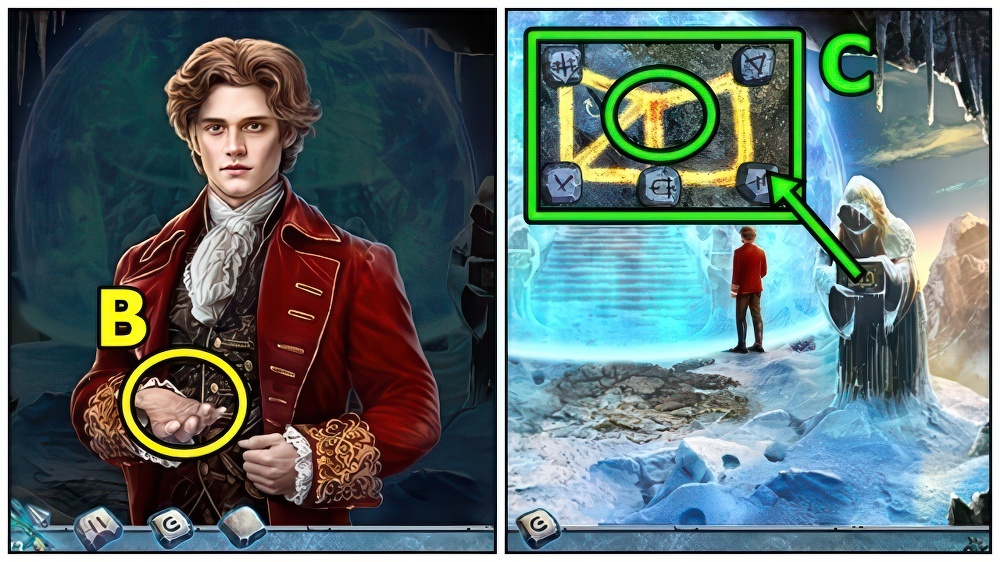
- Add RESIN (B), use Spoon.
- Add Mixture.
- Grab.
- Use Tool, take LYRE.
- Take BROKEN SHEARS (C).
- SCREW on BROKEN SHEARS, add WHETSTONE, take SHEARS.
- Use SHEARS (D), take BERRIES.
- Remove, add LYRE, take GATE TILES 2/3.
- Give BERRIES (E).
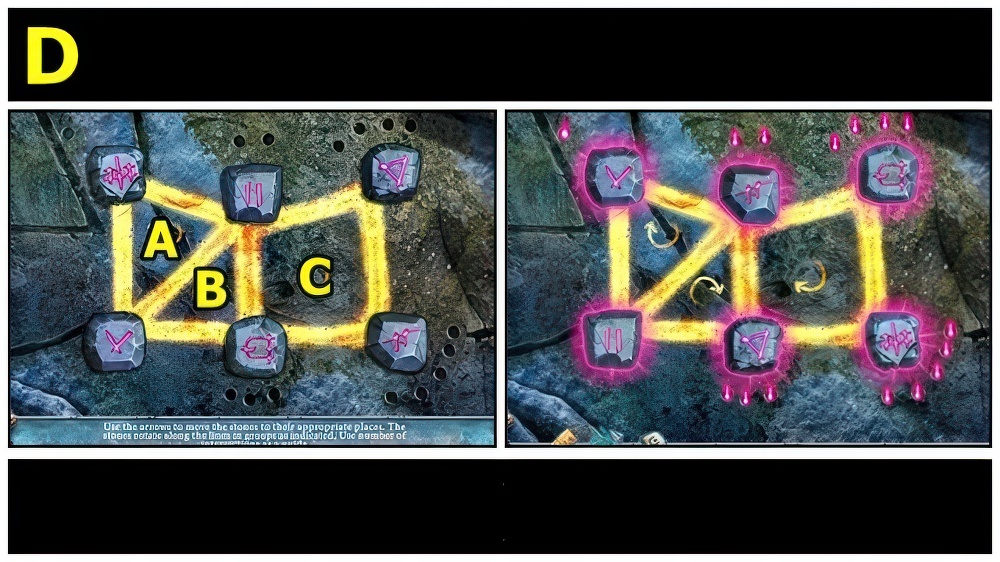
- Solution is random, screenshot is an example (F).
- Take GATE TILES 3/3 (G).
- Add GATE TOKENS (H).
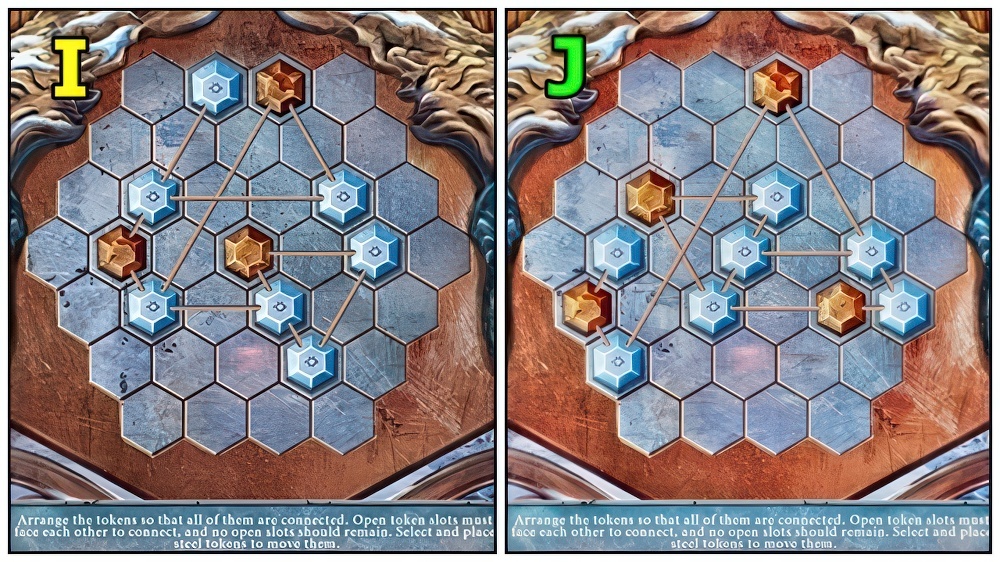
- Solution (I) Casual.
- Solution (J) Hard.
- Enter Lake Garden.
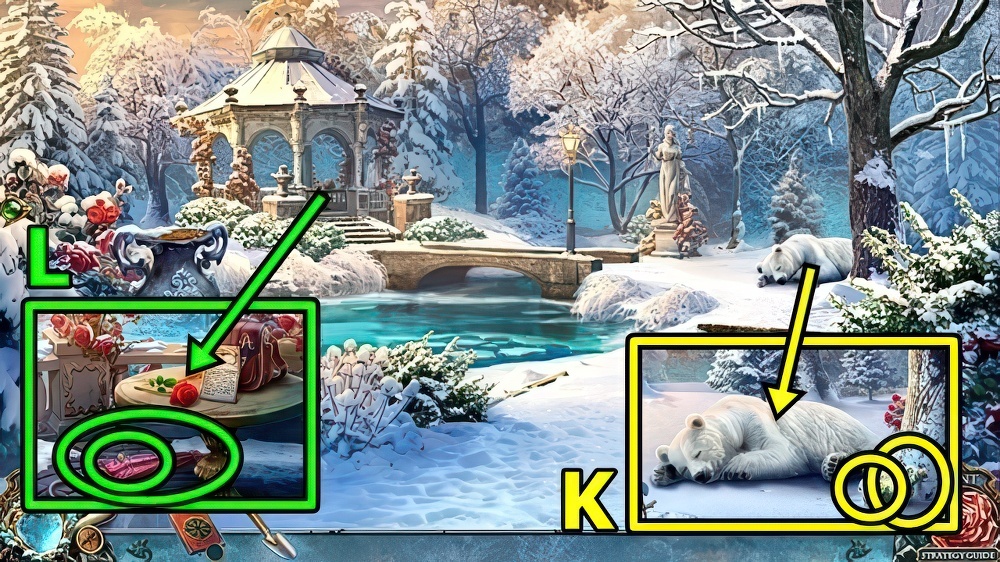
- Take HOOK (K) and OIL.
- Take PIN (L) and UMBRELLA.
- Use UMBRELLA (M), take BISCUIT.
- Take FISHING ROD (N).
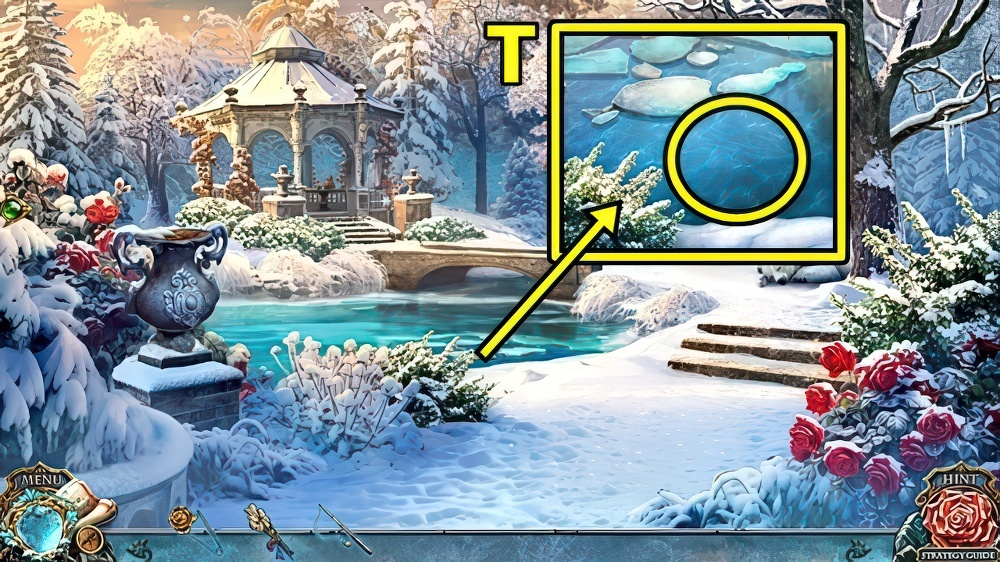
- Use GARDEN SHOVEL (O), take SNOWFLAKE TOKEN.
- SNOWFLAKE TOKEN on DIARY.
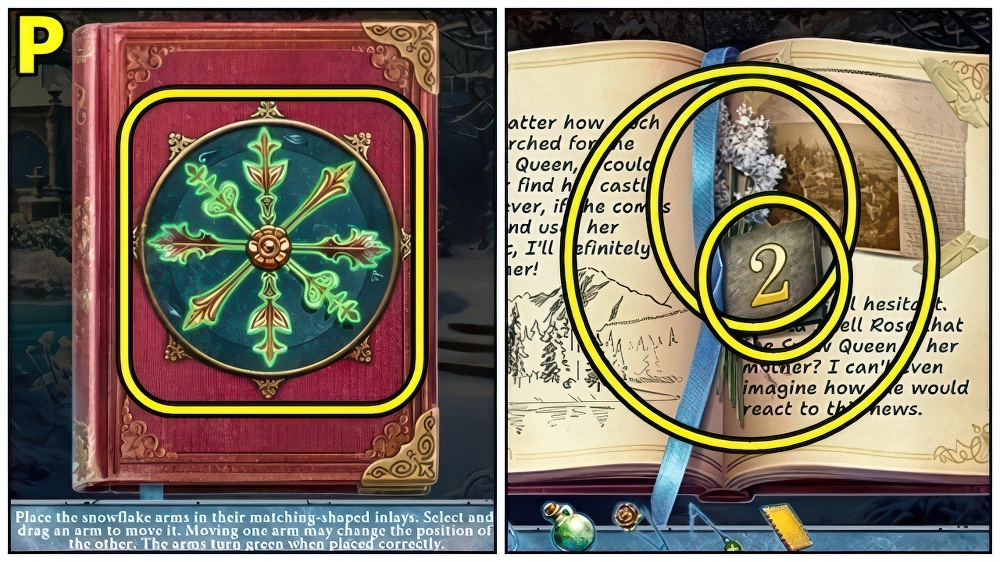
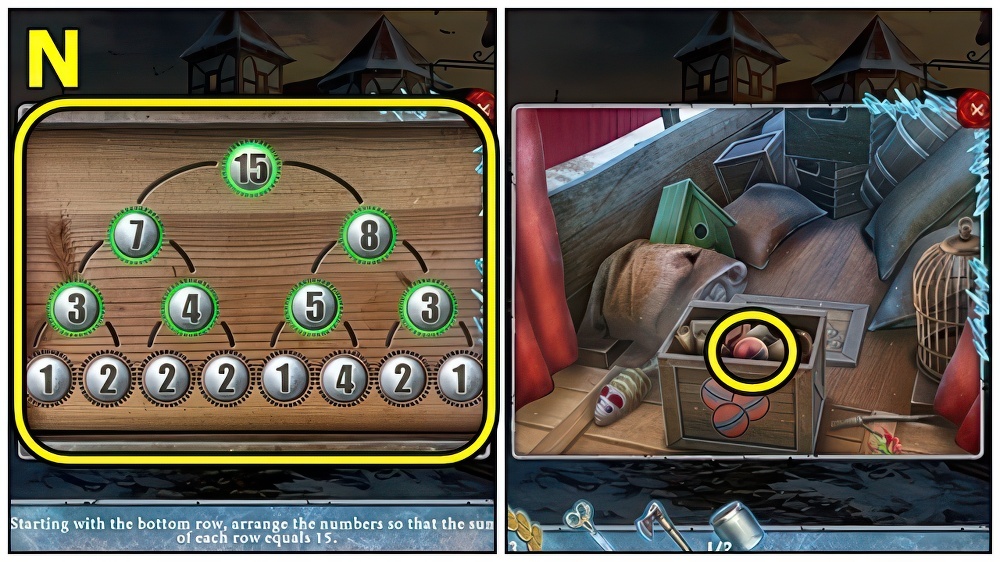
- Solution (P).
- Take NUMBERED TILE and WHITE LAVENDER.
- Close.
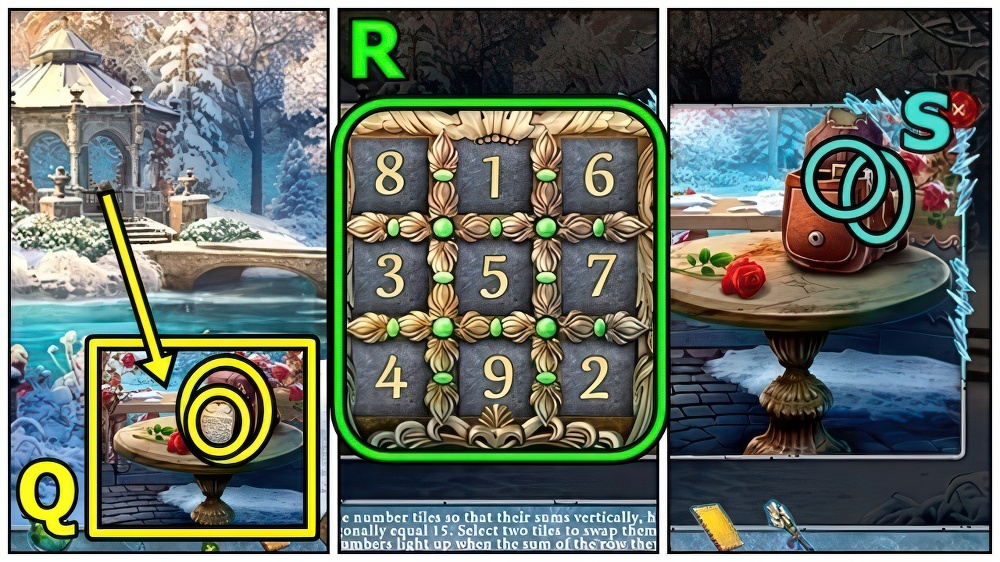
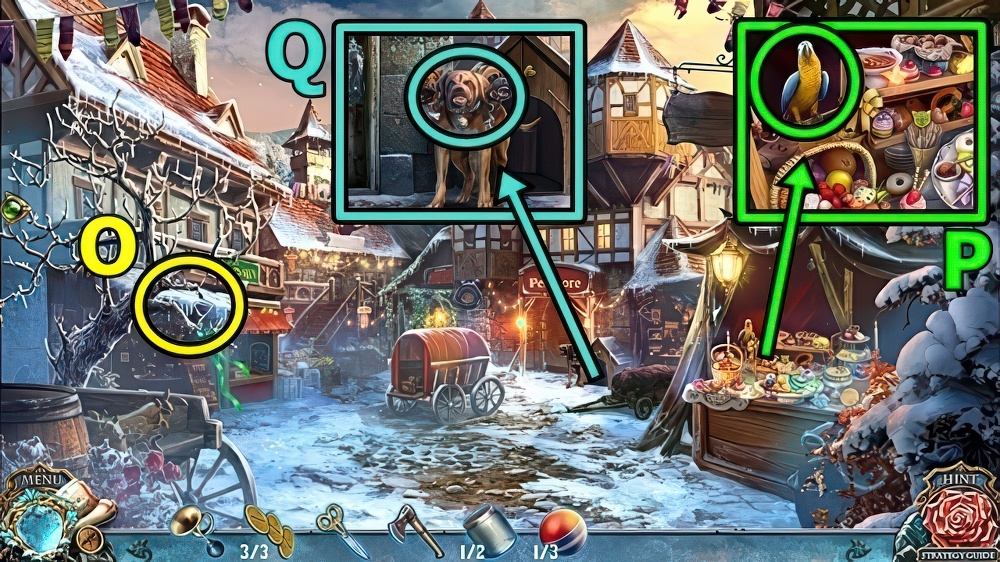
- Read (Q).
- Add NUMBERED TILE.
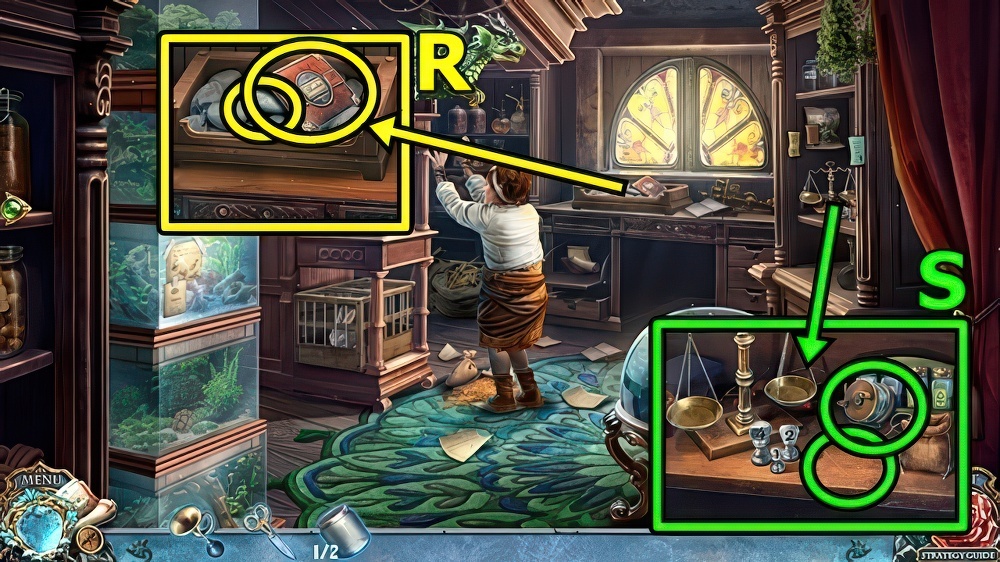
- Solution (R).
- Examine (S), take FISHING LINE.
- Remove items from FISHING ROD, add HOOK, FISHING LINE, OIL and BISCUIT, take FISHING ROD.
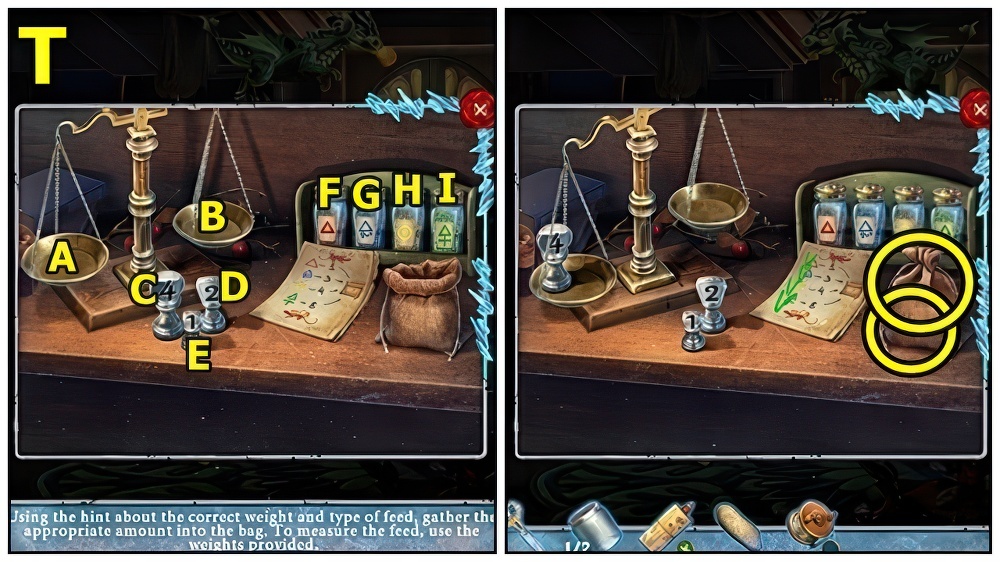
- Use FISHING ROD (T).
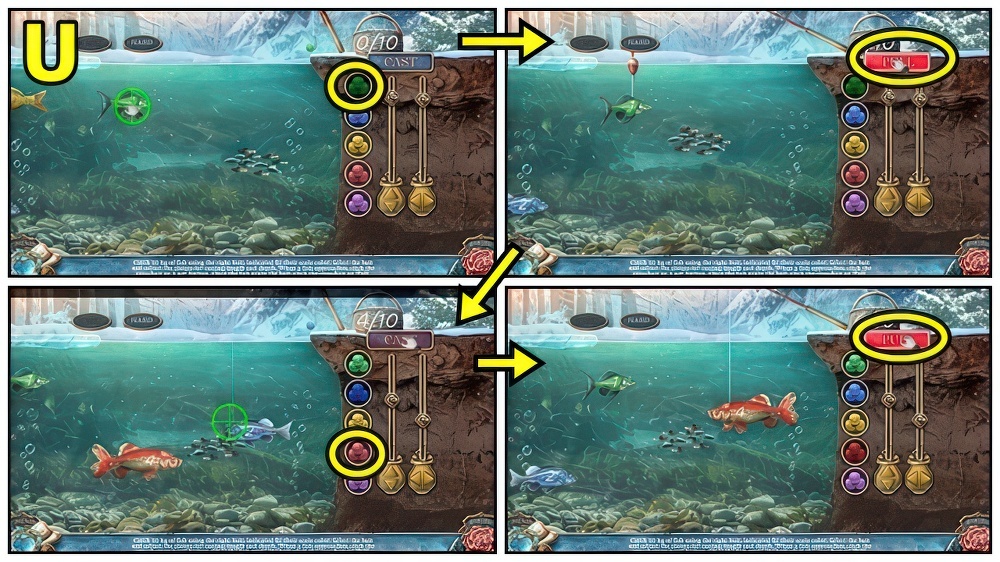
- Solution (U).
- Receive FISH.
- Give FISH (V).
- Take MEDALLION MOLD (W).
- Move down.
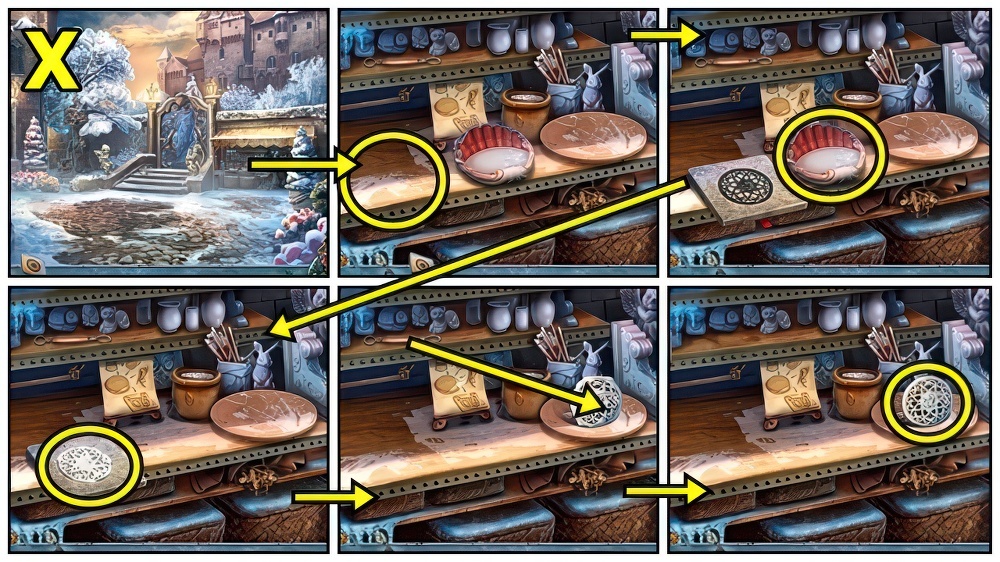
- Add MEDALLION MOLD (X), pour, move, use Tool, take MEDALLION.
- Enter Lake Garden.

- Add MEDALLION (Y), receive SCEPTER.
- Examine (Z).
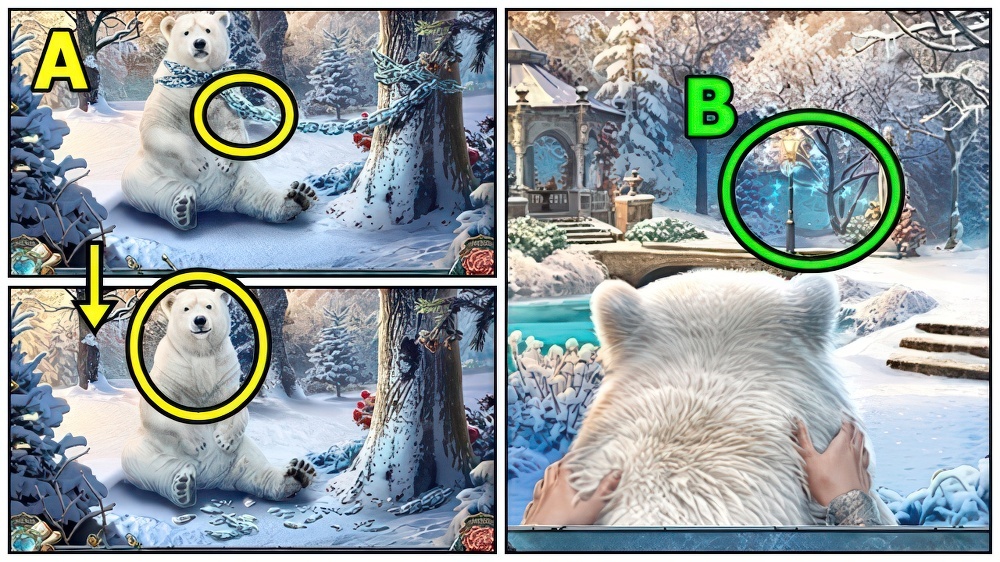
- Use SCEPTER (A), take Alaric.
- Play puzzle (B).
- Take QUARTZ SHARDS (C), examine.
- Take ROSE 1/2 (D) and RIBBON.
- PIN on RIBBON, take RIBBON WITH PIN.
- Use RIBBON WITH PIN (E), catch.
- Examine.

- Read (F), turn pages, take RECIPE.
- Take GRINDER.
- Open GRINDER, take SPOON.
- Take FEATHER FAN (G) and LIGHTER.
- Use SPOON, then LIGHTER, receive MELTED SNOW.
- Take CASKET PETAL.
- Reassemble (H).
- Add CASKET PETAL, take SEA SALT.
- RECIPE, WHITE LAVENDER, SEA SALT, QUARTZ SHARDS and MELTED SNOW on GRINDER, grind, take MAGIC DUST.
- Use MAGIC DUST (I).
- Solution (J).
- Use MIRROR (K).
- Solution (L).
- Examine (M).
- Take KEY (N).
- Use KEY (O), take ICE CARVING TOOL.
- Use ICE CARVING TOOL (P), take GRIFFIN FEATHER.
- Examine (Q).

- Add GRIFFIN FEATHER (R).
- Solution (S).
- Take TILE.

- Add TILE (T).
- Solution (U) (E-L)-(H-L)-(A-L)-(J-L)-(D-L)-(C-L)-(F-L)-(B-L)-(K-L)-(G-L)-(I-L).
- Solution (V).
- Take STEEL FIGURINE (W) and APPLE.
- Examine (X).
- Read (Y), take ELASTIC BAND, open, take THRONE GEM 1/2 and SPELL.
- Remove FEATHERS from FEATHER FAN.
- Add ELASTIC BAND, then APPLE, take SLINGSHOT.
- Use SLINGSHOT (Z), receive ROSES 2/2.
- Add ROSES (A).
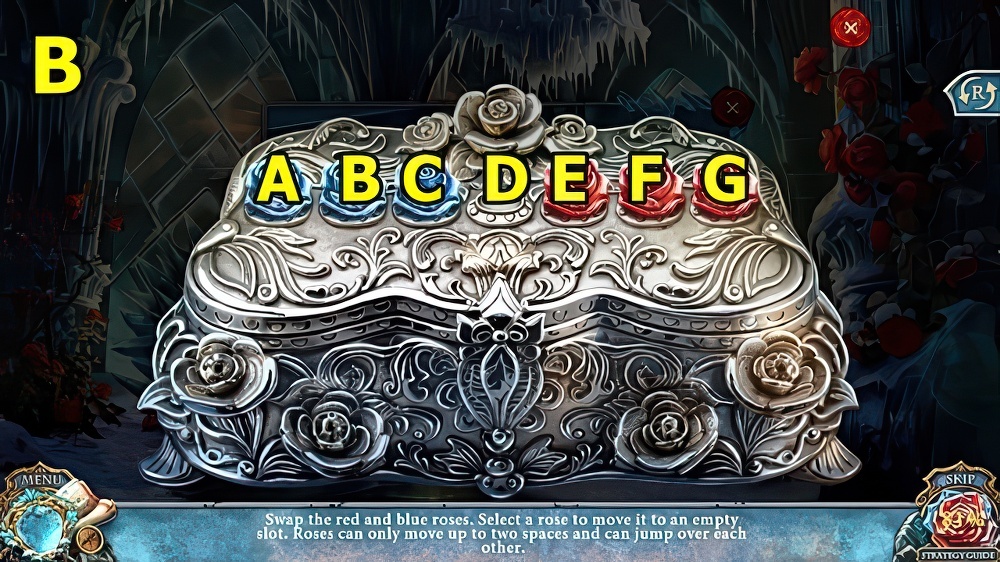
- Solution (B) C-E-F-D-B-A-C-E-G-F-D-B-C-E-D.
- Read (C), find duplicates, read, take FIRE AMULET and THRONE GEMS 2/2.

- Add THRONE GEMS (D), examine.
- Solution (E).
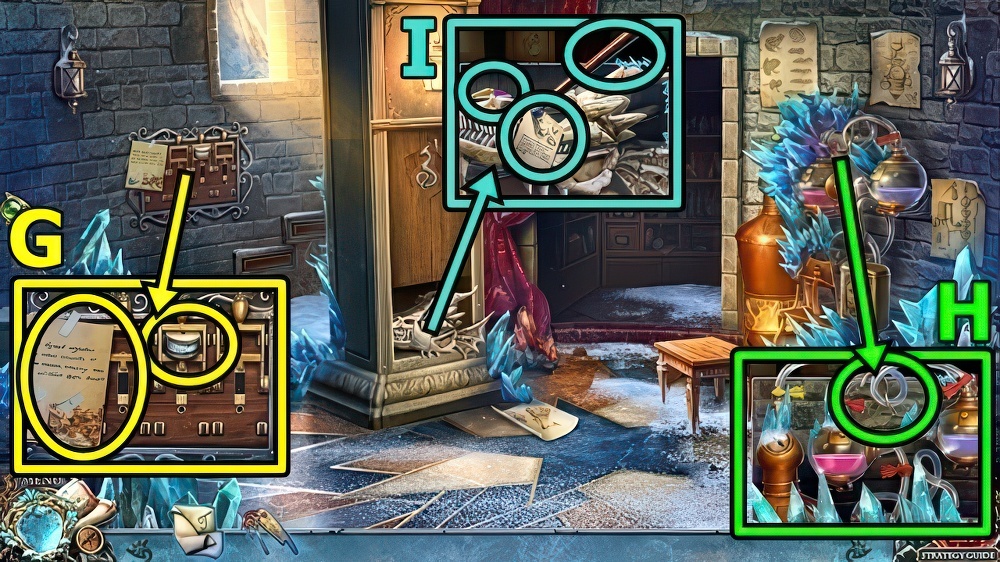
- Take DIARY KEY (F).
- Read (G), take PENCIL.
- Examine.
- Add DIARY KEY, assemble.
- Examine (H), take SPELLBOOK PAGE and CACHE KEY.

- Add SPELLBOOK PAGE (I), receive CROWN CLUE.
- Use CACHE KEY, take PHOENIX TEARS.
- Add CROWN CLUE (J).
- Solution (K).
- Take NORTHERN LIGHTS STONE (L).
- FIRE AMULET on SPELL, add NORTHERN LIGHTS STONE and PHOENIX TEARS, take FIRE AMULET.
- Add FIRE AMULET (M).
- Play puzzle.

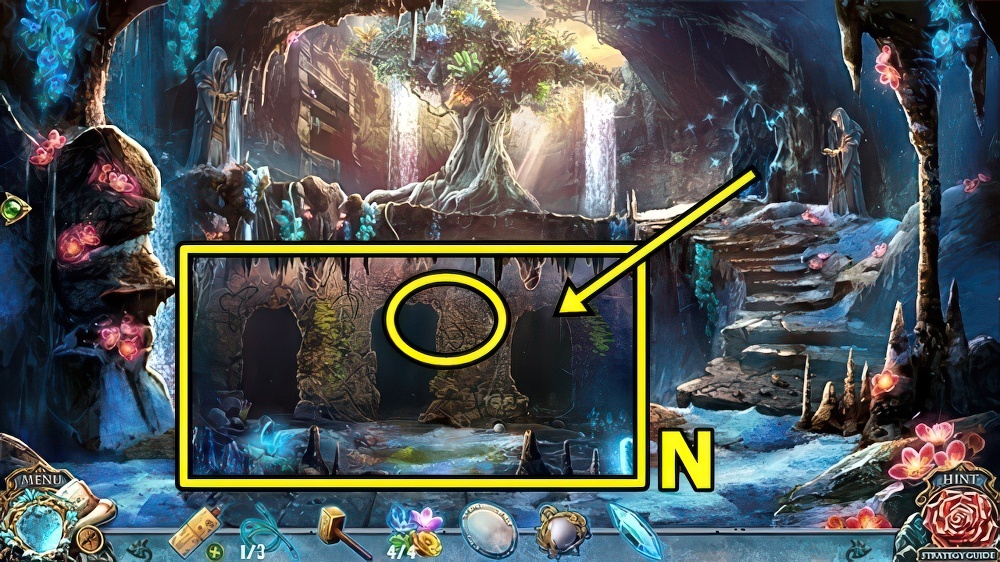
- Burn (N).
- Take CANDLE (O).
- Take DIARY KEY (P).
- Take HOURGLASS (Q).
- Add DIARY KEY, take BRUSH, close.
- Take STAINED GLASS from HOURGLASS, use STEEL FIGURINE, take SAND.
- Use BRUSH (R).
- Read, take LABEL and MIRROR.
- Add STAINED GLASS.
- Use PENCIL, receive CODE.
- Add CODE (S), press A-B-C-D, examine, read, take MAGIC FERTILIZER.

- Take LOCK PIECE 1/3 (T).
- Add MIRROR.
- Solution (U).
- Take WATER (V) and DRAGON WOOD.
- Take SHOVEL (W).
- Add SAND, CANDLE, FEATHERS and WATER, read, take MOON CRYSTAL and POUCH.
- Add LABEL (X).
- Rearrange Labels, take GRIFFIN BLOOD.
- Use MAGIC FERTILIZER (Y), then POUCH, receive GOLDEN DUST.
- Add DRAGON WOOD (Z), GOLDEN DUST, MOON CRYSTAL and GRIFFIN BLOOD.
- Add.
- Solution: Move and hold (A).
- Use Tongs (B).
- Add.
- Solution (C) A-D-E-F-A-C-E-F-A-D-G-F-A-B-G-F.
- Remove top (D), use Dropper three times.
- Take GOLDEN BALL.
- Add GOLDEN BALL (E).

- Solution (F) Casual and Hard: A-B-C-D-E-F-G.
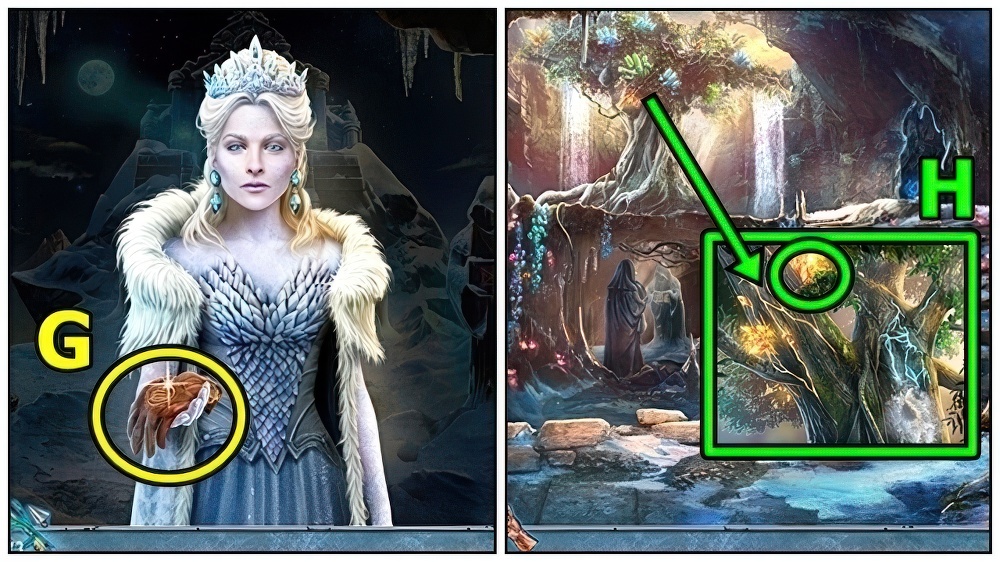
- Talk (G).
- Take MAILBOX FLAG (H).
- Take FEATHER (I) and ALCHEMICAL FIRE.
- Use SHOVEL, take LOCK PIECES 2/3.
- Add ALCHEMICAL FIRE (J), then MAILBOX FLAG.
- Read, take LOCK PIECES 3/3.
- Find items (K).
- Use SHOVEL (L).
- Examine, add LOCK PIECES.
- Solution (M).
- Take KEY (N) and CLOCK HAND 1/2.
- Use KEY (O), enter.
- Take KNIFE HANDLE (P).
- Add KNIFE HANDLE (Q), take RUSTY KNIFE, read.
- Move cushions (R), take MORTAR AND PESTLE.
- Move down.
- Add RUSTY KNIFE (S), receive KNIFE.

- Add MORTAR AND PESTLE (T), take Berries.
- Take BERRIES.
- Enter Alchemist’s House.

- Take HEADSCARF (U).
- Use KNIFE.
- Read, take DEVELOPMENT FLUID and FLINT.
- Grind BERRIES, add DEVELOPMENT FLUID, then FEATHER, receive QUILL WITH INK.
- Use QUILL WITH INK (V).
- Solution (W).
- Use KNIFE, take CLOCK HINT.
- Use KNIFE (X), take CLOCK HANDS 2/2 and FROG EYE.
- Add CLOCK HANDS (Y) and CLOCK HINT.
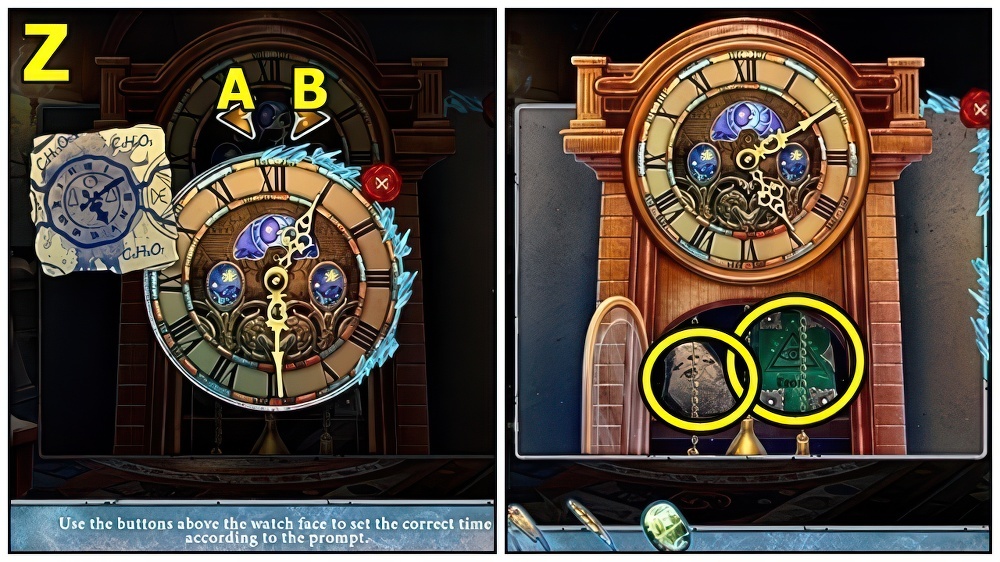
- Solution (Z) Bx4.
- Take STONE WITH CLUE and ALCHEMIST DIARY.
- Move down.
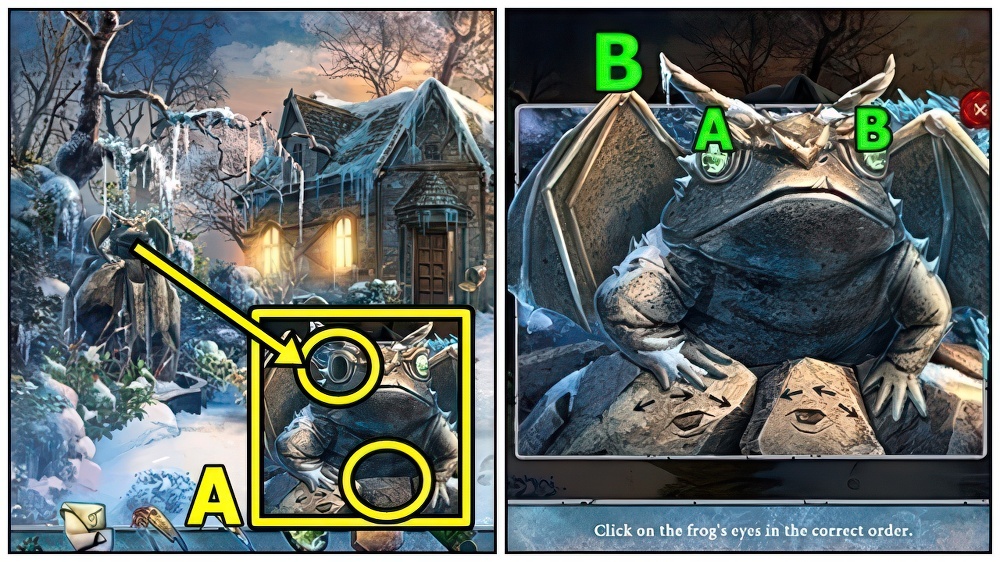
- Add FROG EYE (A) and STONE WITH CLUE.
- Solution (B) A-Bx2-Ax2-B.
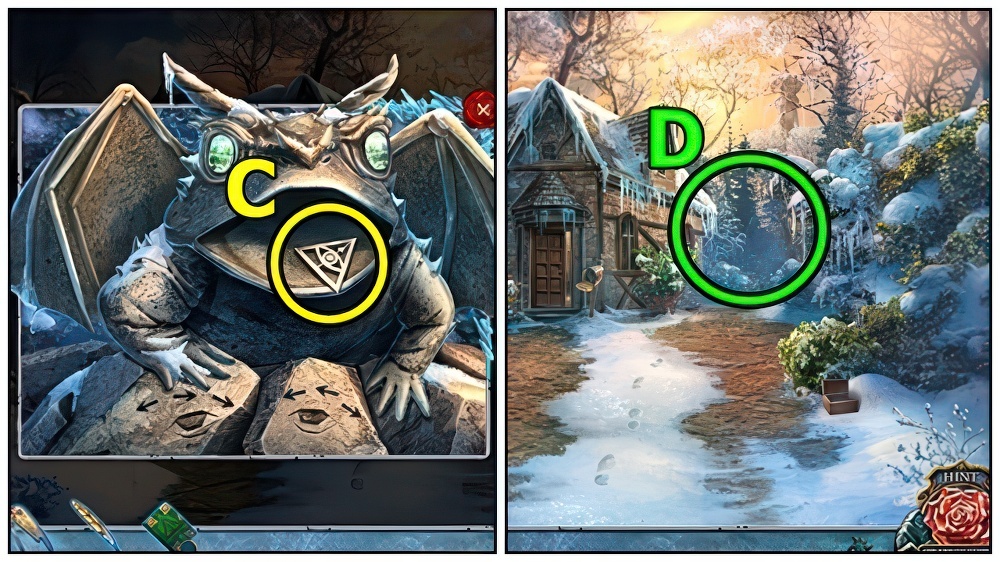
- Take DIARY EMBLEM (C).
- DIARY EMBLEM on ALCHEMIST DIARY, use QUILL WITH INK, play puzzle, take TOWER MAP.
- Use TOWER MAP (D).
- Move forward.

- Solution (E) Casual.
- Solution (F) Hard.
- Read (G), take RIBBON.
- Take HOOK (H).
- Read (I), take CRYSTAL and STICK.
- RIBBON and HOOK on STICK, assemble, take CANE.
- Use CANE (J), receive LANTERN.
- Use LANTERN (K).
- Play puzzle (L), receive LEVER.
- Add LEVER (M).
- Solution: A-B-D-A (N).
- Go to Tower Top.
- Use MIRROR (O).
- Solution (P).
- Take ROPE (Q).
- Use ROPE (R), take HORN and MANOMETER.
- Add CRYSTAL.
- Examine.

- Solution (S).
- Take EMERGENCY HAMMER (T) and SCHEMATICS.

- Use EMERGENCY HAMMER (U), then HEADSCARF, take THERMOMETER and MAP.
- Read, take PINS.
- Take AIRSHIP LEVER (V).
- Add SCHEMATICS and PINS.
- Solution (W).
- Receive BURNER SCHEMATIC.
- Add BURNER SCHEMATIC (X).
- Find differences.
- Use AIRSHIP LEVER, take BAG TOKEN.
- Take VALVE (Y).
- Add BAG TOKEN, take AIRSHIP MODEL PART, ALCHEMICAL BURNER RECIPE and STATUE.
- Add AIRSHIP MODEL PART (Z), take COIN 1/3 and DRAGON WING 1/2.
- Move down.
- Take DRAGON WINGS 2/2 (A).
- Add DRAGON WINGS (B), take LABELS, read, take TOOTH EXTRACTOR.
- Add STATUE (C), take FIRE POWDER.
- Use TOOTH EXTRACTOR, take DRAGON TOOTH.
- Add LABELS (D).
- Play puzzle (E), receive ACID.
- Add ALCHEMICAL BURNER RECIPE (F), FIRE POWDER, DRAGON TOOTH and ACID.
- Solution: C-D-A, B-C-D-E-A.
- Take BURNER FUEL.
- Return to Tower Top.
- Add THERMOMETER (G), VALVE, RIBBON, MANOMETER and BURNER FUEL.
- Add FLINT.
- Talk (H).
- Give MAP (I).
- Move left.

- Take HOLDER (J).
- Add HOLDER (K), take SCISSORS and COINS 2/3.
- Use SCISSORS (L).
- Remove (M), take HATCHET, move items, take BOTTLE 1/2 and COINS 3/3, move items, open, examine.
- Solution (N).
- Take BALL 1/3.
- Use HATCHET (O), receive TOYS AND TREATS 2/3.
- Give COINS (P), play puzzle, receive BONE.
- Give TOYS AND TREATS (Q).
- Enter Exotic Pet Store.
- Take ZOO BOOK (R) and STONE.
- Open ZOO BOOK, take FOOD HINT.
- Take FISHING LINE (S).
- Add FOOD HINT.
- Solution (T) (E-A)-(F-B)-B-(D-A)-(G-B)-B-(A-E)-(A-D)-(C-A)-(H-B)-B-(I-B)-B-(I-B)-B.
- Take SALAMANDER FOOD and SHOP VOUCHER.
- Move down.
- Add SHOP VOUCHER (U), take TONGS and PICKAXE.
- Enter Exotic Pet Store.
- Read (V), add SALAMANDER FOOD, take WEIGHT.
- Add STONE, use TONGS, receive HOT STONE.
- Add HOT STONE (W), receive TONGS.
- Take HANDLE (X).
- Add HANDLE (Y), read, take LENS and PARROT KEY.
- Use PARROT KEY (Z), take COLORFUL FEATHER.
- WEIGHT and COLORFUL FEATHER on FISHING LINE, take OCTOPUS TOY.
- Read (A), add OCTOPUS TOY.
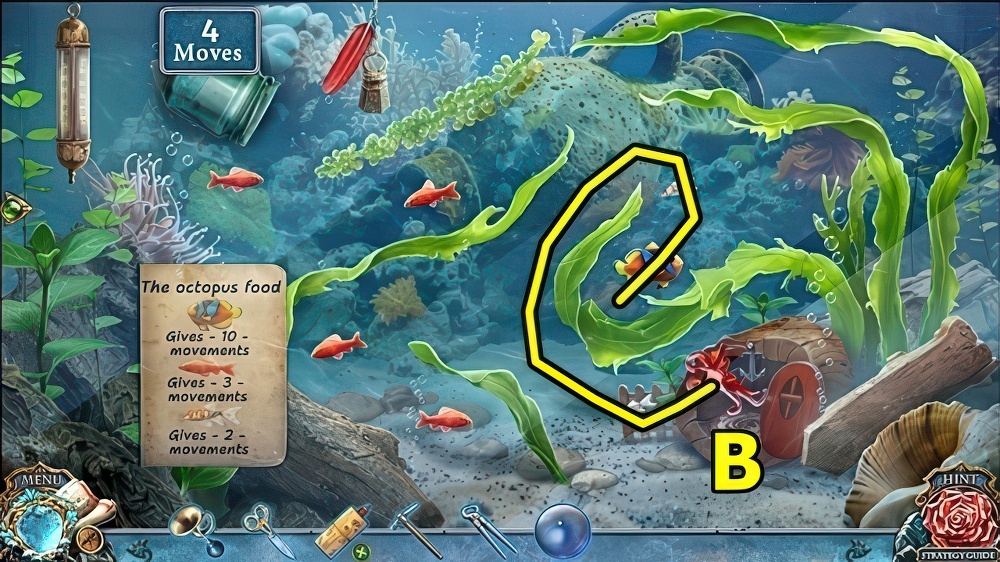
- Solution (B).
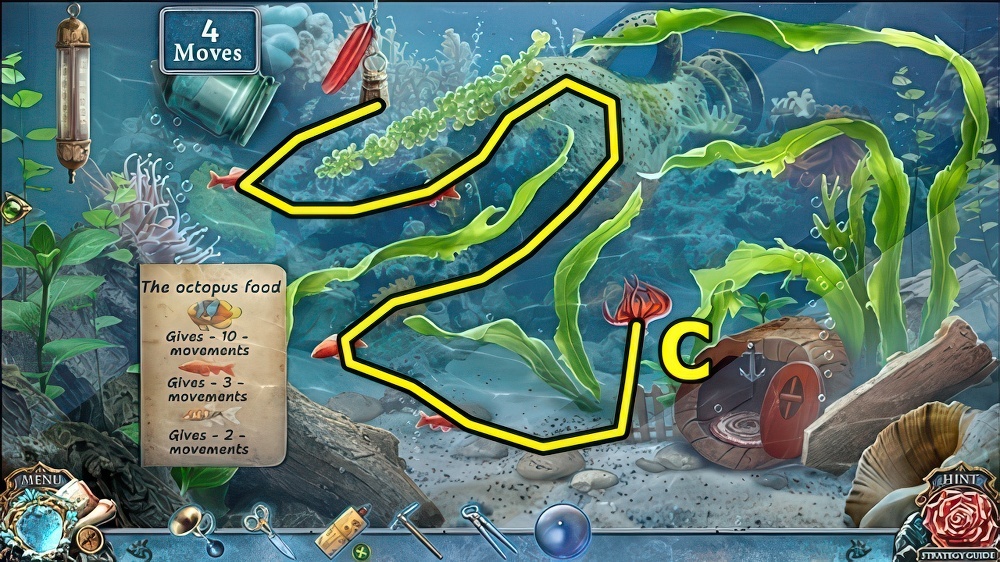
- Solution (C).
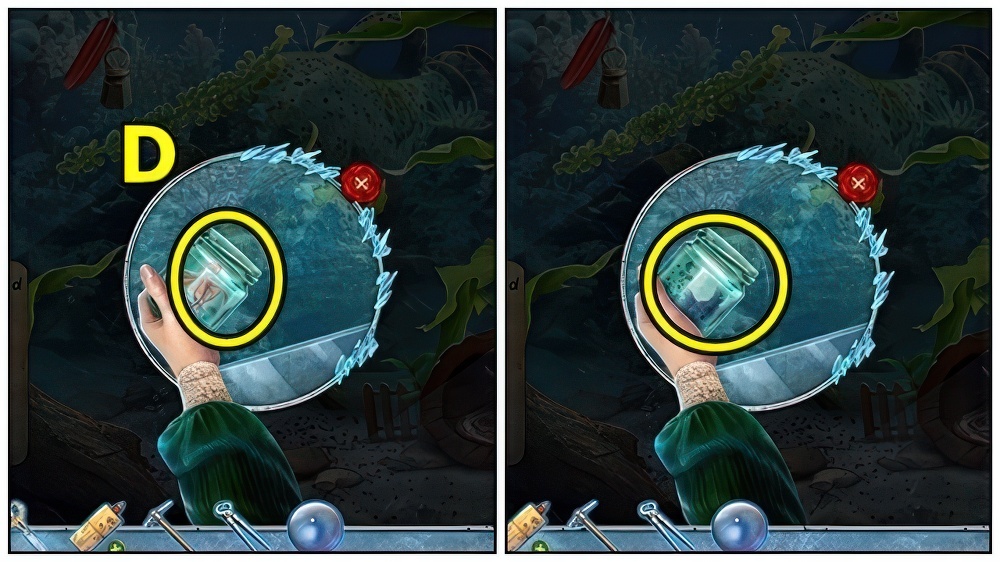
- Use HORN (D), take INK BOTTLE.
- Add INK BOTTLE (E).
- Take BLACK MARKET HINT (F).
- Move down.
- Move (G).
- Use SCISSORS (H), then BLACK MARKET HINT, ring bells D-A-B-C.
- Enter Dark Alley.
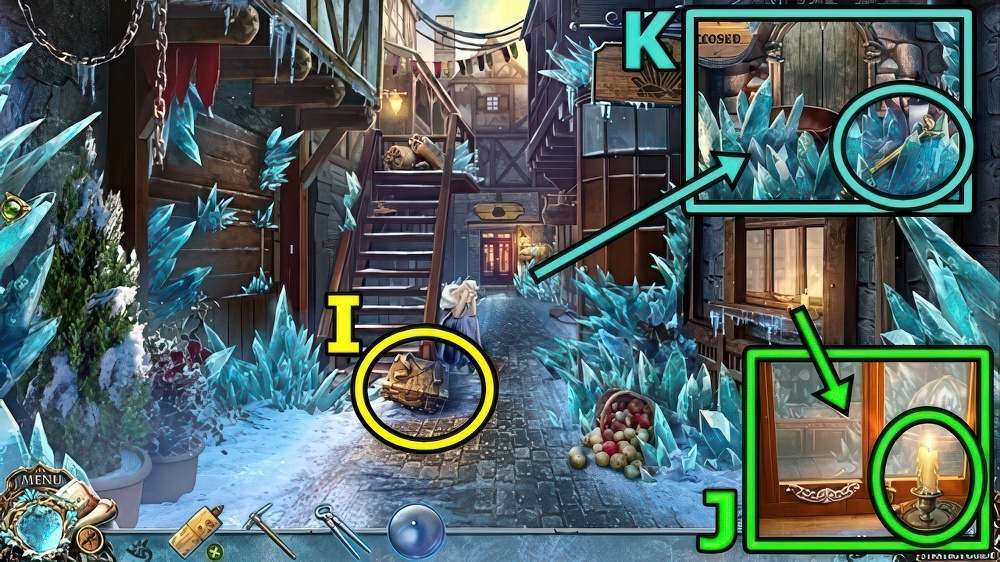
- Take SUITCASE (I).
- Take CANDLE (J).
- Take MONOCLE HANDLE (K).

- Move (L).
- Add CANDLE, take BROKEN MONOCLE.

- MONOCLE HANDLE and LENS on BROKEN MONOCLE, assemble, take MONOCLE.
- Open SUITCASE, read, use MONOCLE, play puzzle, take DIAMOND.
- Use DIAMOND (M), unlatch.
- Enter Crystal Shop.
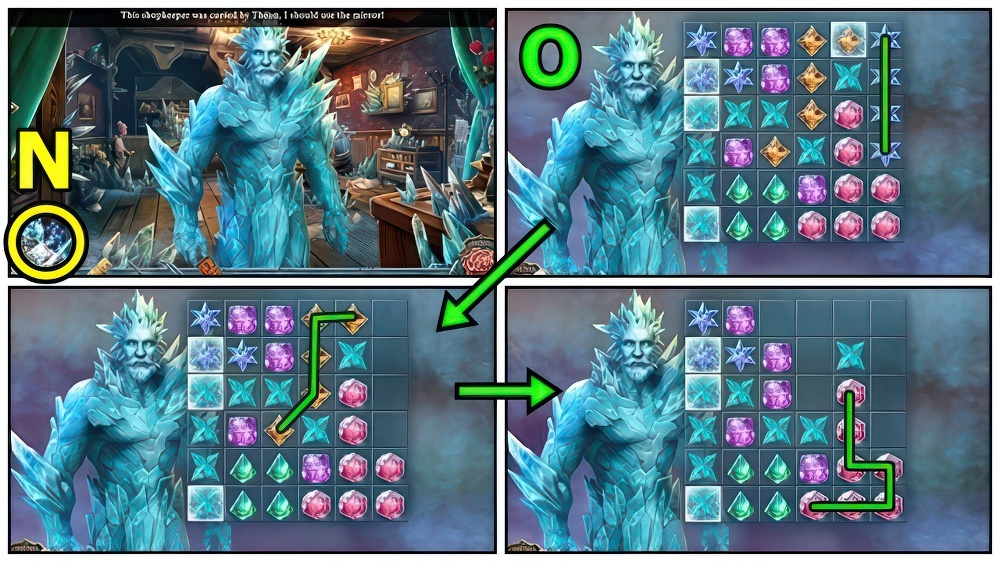
- Use MIRROR (N).
- Solution (O).
- Solution (P).
- Take COUNTER TILES 1/2 (Q).
- Move (R), take FLASK.
- Move down.
- Take GLOVES (S).
- Enter Crystal Shop.
- Use GLOVES (T), take ICE WATER.
- Use PICKAXE, take COUNTER TOKENS 2/2 and FLINT.
- Add COUNTER TOKENS (U).
- Solution (V).
- Take POTION STAND KEY.
- Move down.
- Use POTION STAND KEY (W), open, find matching potions, take BLANKET and SKULL TOKEN.
- Read, take INGREDIENTS LIST.
- Give BLANKET (X), take RACCOON and GLUE.
- Return to Exotic Pet Store.

- Read note on RACCOON, take.
- Give RACCOON (Y).
- Take PARROT MIRROR (Z).
- Move down.
- Use PARROT MIRROR (A), play puzzle, receive WINTER POMEGRANATE.
- Return to Crystal Shop.
- Add SKULL TOKEN (B), take BUTTON HINT 1/2.
- Use TONGS, receive FIRE CRYSTAL.
- Add GLUE (C), return buttons.

- Solution (D) A-B-A-B-C-B-D-B-E-B-E.
- Take BUTTON HINT 2/2.

- Add BUTTON HINT (E), press D-A-B-C.
- Take FOX HEAD.
- Use PICKAXE, receive NORTH CRYSTAL.
- Insert FOX HEAD (F), rotate heads, take FLOWER TOKEN.
- Move down.
- FLOWER TOKEN on SUITCASE.
- Solution (G): (E-C)-(B-E)-(A-B)-(D-A)-(C-D)-(B-C)-(A-B)-(C-A).
- Play puzzle, take MAGIC FLOWER.
- ICE WATER, WINTER POMEGRANATE, NORTH CRYSTAL and MAGIC FLOWER on INGREDIENTS LIST, take RECIPE WITH INGREDIENTS.
- Add RECIPE WITH INGREDIENTS (H) and FIRE CRYSTAL.

- Solution (I): (A-C)-(E-C)-(D-C)-(F-C)-(B-C)-(F-C).
- Add FLASK (J), add Gauze.
- Move Flask.
- Take VITALITY POTION and ASH.
- Enter Crystal Shop.
- Give VITALITY POTION (K).
- Take TELEPORT SPHERE.
- Add TELEPORT SPHERE (L) and ASH.
- Solution (M).
- Open (N), take TENT TOKEN and DEVELOPMENT FLUID.
- Take KNIFE (O).
- Add TENT TOKEN (P), unlace A-B-C-D-E-F, open.
- Use KNIFE (Q), receive FUEL 1/2.
- Take CORKSCREW (R).
- Read (S).
- Use KNIFE, receive FUEL 2/2.
- CORKSCREW on DEVELOPMENT FLUID, take OPENED DEVELOPER.
- Read (T), remove, replace.
- Use OPENED DEVELOPER, take CAVE HINT.
- Open, take TUBE.
- Move (U).
- Add FUEL, KNIFE and FLINT.
- Take HOT WATER.
- Use HOT WATER (V), take BROKEN LANTERN.
- Reassemble BROKEN LANTERN, add GLUE, take LANTERN.
- Add LANTERN (W), receive GLOWING LANTERN.
- Use GLOWING LANTERN (X), play puzzle, receive FILE.

- FILE on TUBE, read, take LUMINOUS LIQUID.
- Examine (Y).
- Add LUMINOUS LIQUID, then CAVE HINT.
- Solution (Z).
- Enter Cave of Ice and Cold.

- Take BOX INLAY HALF 1/2 (A).
- Take STALACTITE (B).
- Move down.
- Use STALACTITE (C), read, take BOWSTRING 1/2 and BOX INLAY HALF 2/2.

- Add BOX INLAY HALF (D), play puzzle, take HAMMER.
- Enter Cave of Ice and Cold.
- Use HAMMER (E).
- Use MIRROR (F).

- Solution (G).
- Use KNIFE (H), receive FLOWERS 2/4.
- Shoo (I).
- Take SILVER SAUCER and ROOT.
- Use KNIFE, receive FLOWERS 4/4.
- Use ROOT (J), receive ALBERT’S DIARY.
- Move down.

- Open ALBERT’S DIARY, turn page, take BAG TOKEN.
- Add BAG TOKEN (K), adjust dial 3-5-1.
- Take ALCHEMICAL SPOON and MAGIC COMPASS.
- Enter Cave of Ice and Cold.

- Use ALCHEMICAL SPOON (L), receive BIG WATER CRYSTAL.
- Use BIG WATER CRYSTAL (M), receive WATER CRYSTAL.
- Add MAGIC COMPASS (N).
- Play puzzle, take ARROW.
- Go to Magic Bridge.
- Take TWEEZERS (O).
- Examine (P), take BRUSH, move, read.
- Use BRUSH, then HAMMER, take HAND and NUTS 1/2.
- Take TREE BRANCH (Q).
- Add HAND.
- Read, take WALL TOKEN 1/3.
- Move down.

- Add SILVER SAUCER (R) and FLOWERS.
- Add Flowers.
- Read, take WALL TILES 2/3, turn page.
- Use TWEEZERS, receive WALL TILES 3/3.
- Add WALL TILES (S).
- Examine.
- Solution (T).

- Take CAVE MAP (U) and SPELL.
- Enter Magic Bridge.

- TWEEZERS on TREE BRANCH, take NUTS 2/2.
- Give NUTS (V), take AMULET.
- WATER CRYSTAL on AMULET, take WATER AMULET.
- Turn (W).
- Use BRUSH, add WATER AMULET, then SPELL.
- Select runes (A-F)-(B-E)-(C-D).
- Solution (X).
- Add CAVE MAP (Y), play puzzle, receive ARROWHEAD.
- Use Key.
- Take HAIRPIN (Z).
- Insert HAIRPIN (A), take STRAIGHT RUNE, ROUND RUNE and EMPTY RUNE.
- Give EMPTY RUNE (B).
- Add STRAIGHT RUNE (C).
- Solution (D) A-Cx2.

- Add ROUND RUNE (E).
- Solution (F) B-A-B-Cx2-B.
- Take MAGIC GLOVE (G).
- Return to Cave of Ice and Cold.
- Use MAGIC GLOVE (H), receive FIRE CRYSTAL.
- Go to Magic Bridge.

- Use BOW ACCESSORIES (I) and FIRE CRYSTAL, receive BOW OF FIRE.
- Return to Heart of the North.
- Use BOW OF FIRE (J).
- Solution (K) Puzzle is randomly generated.
- Receive STAFF.
- Give STAFF (L).
- Walkthrough Bonus Chapter, at the link below.


