
Living Legends 3: Wrath of the Beast (Bonus Chapter) – After saving your homeland, the adventure doesn’t end. Once again you find yourself at the center of dangerous events, your daughter Jenny goes missing. A vague premonition turns to alarm, and you set out to find her, solving mysteries and facing new threats. The investigation leads you to uncover another mystery. Someone is using Jenny in their magical intrigue, and an ancient amulet of transformation once again becomes the key to survival. It’s up to you to team up with your allies, and battle the witch who threatens your family. Uncover the witch’s true motives and do everything you can to protect your daughter and her future.
Bonus Chapter Walkthrough

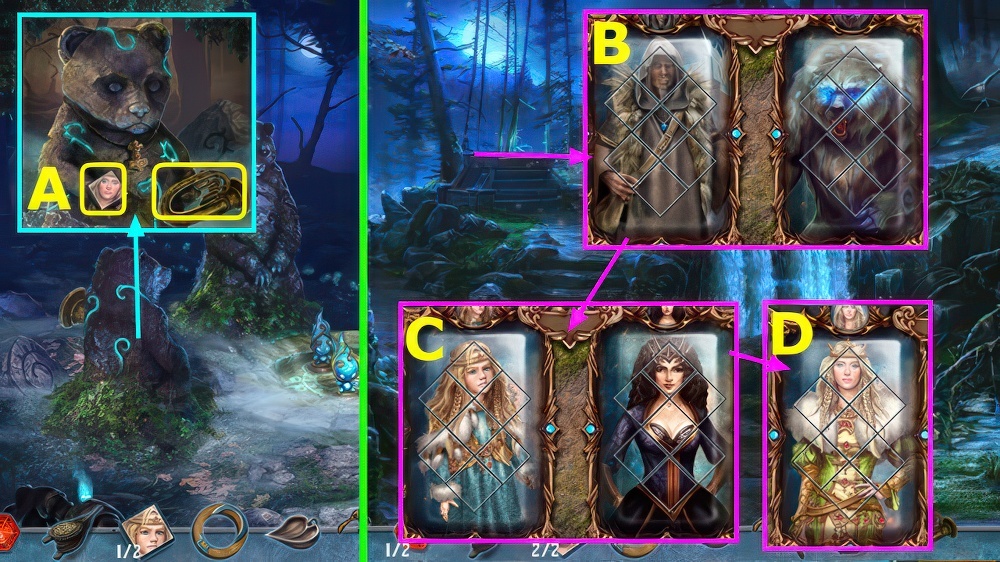
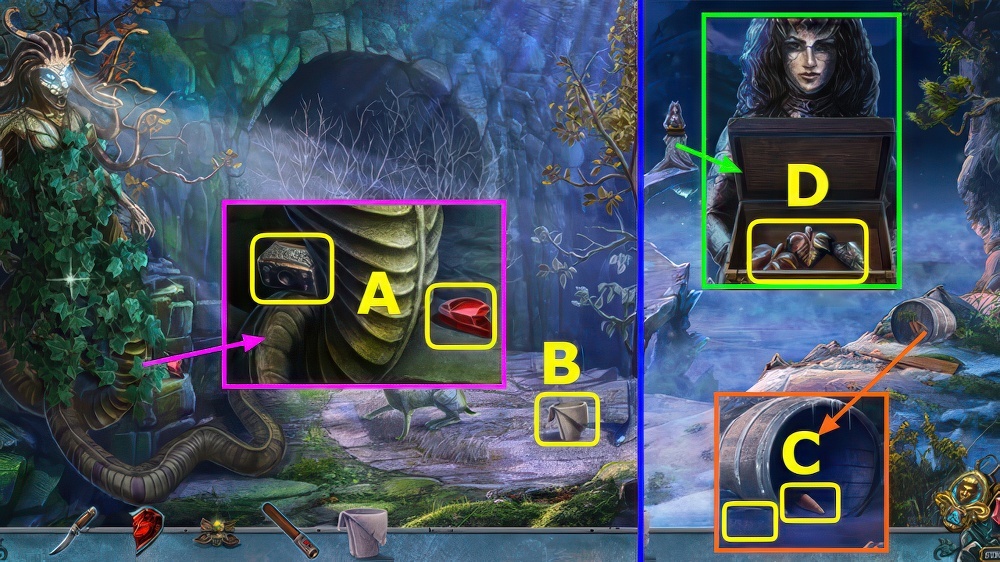
- Talk (A).
- Take STICK and BROKEN TOY (B).
- Take LOCKED BOX (C).
- Go forward.

- Take KEY and PRUNER (D).
- KEY on LOCKED BOX, play puzzle, earn PAINT.
- Use PRUNER, take DOLLHOUSE (E).
- Select DOLLHOUSE, play puzzle, earn 1/2 STAR.
- Puzzle mini-game solution, select 1-3 (F).
- Take BLANKET and CARVING INSTRUCTIONS (G).
- Walk down.

- Use STICK and BLANKET, take 2/2 STARS (H).
- Take CHISEL (I).
- Go forward.
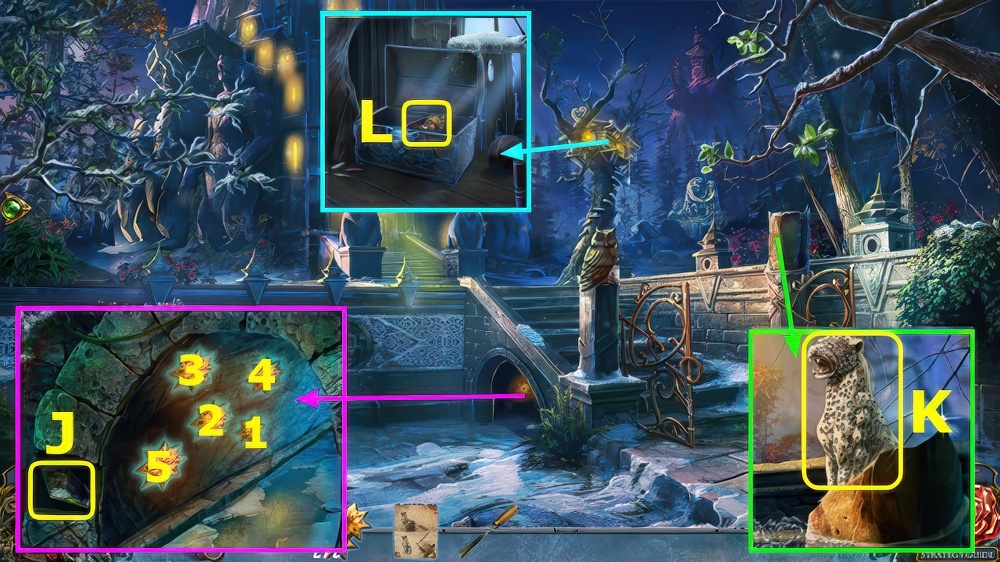
- Place STARS, select 1-5, take 1/2 PUZZLE PIECE (J).
- Use CARVING INSTRUCTIONS, CHISEL, and PAINT, take WOOD LEOPARD (K).
- Place WOOD LEOPARD, take 2/2 PUZZLE PIECES (L).
- Walk down.

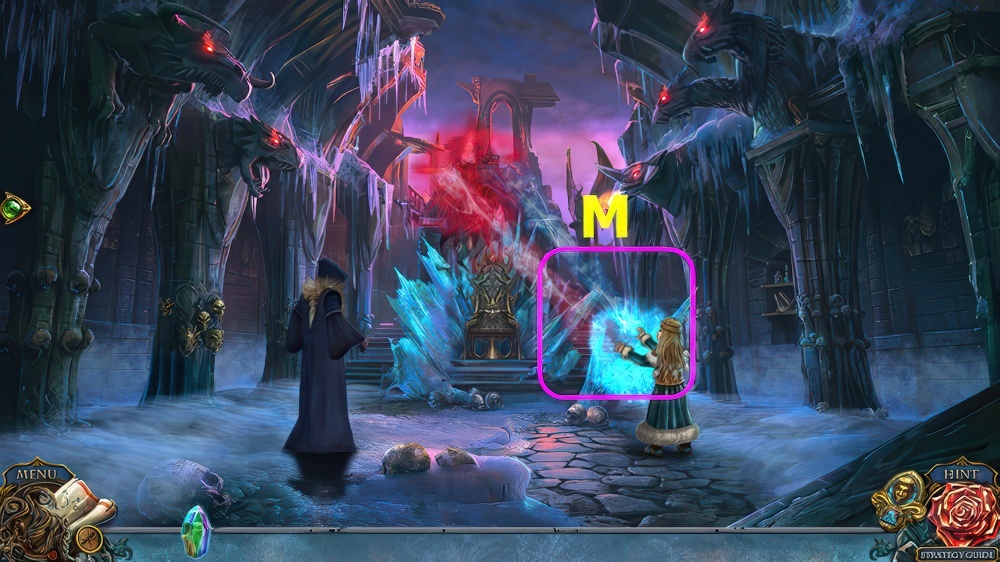
- Place PUZZLE PIECES, solution (M).
- Select (N).
- Select (O).

- Use CLAWS 3x (A).
- Go right.
- Use CLAWS 3x (B).
- Go left.

- Select 3x, use CLAWS (C).
- Use (D-E), select.

- Use CLAWS 2x, select (F).
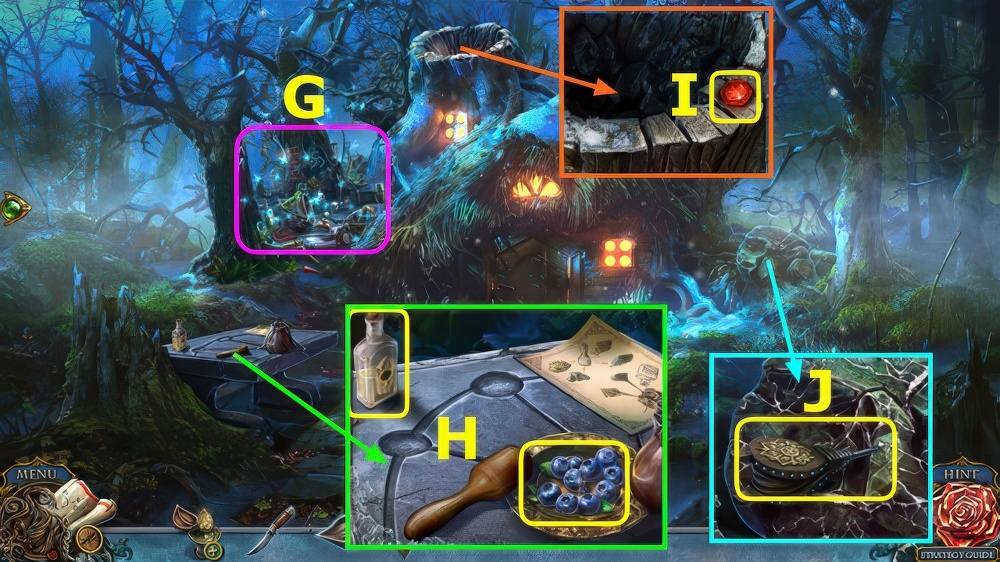
- Select (G).
- Take KNIFE (H).
- Select leaf, take CROWBAR (I).
- Walk down.

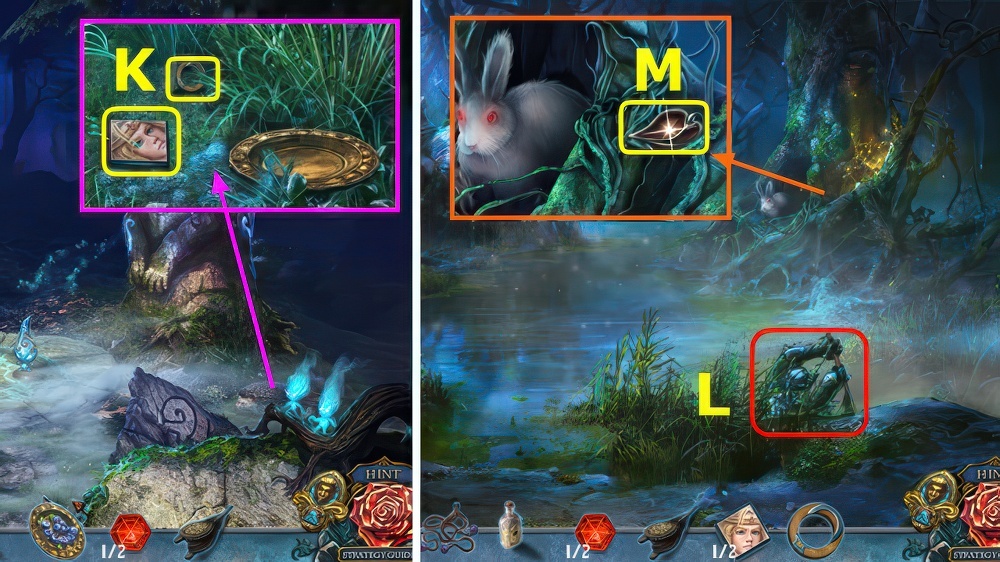
- Take HANDLE (K).
- Select frog, take 1/3 CRYSTAL and CHAIN (L).
- Use CROWBAR, take 2/3 CRYSTALS (M).
- Take 1/2 CHEST PANEL (N).
- Take 2/2 CHEST PANELS (O).
- Go left.

- Place CHEST PANELS (A).
- Solution (B).
- Take 3/3 CRYSTALS and 1/3 PUZZLE PIECES (C).
- Place CRYSTALS (D).
- Solution F-I-E-G-J-H-F-I-E-G-J-H.
- Go forward.

- Play puzzle, earn FISHING NET (L).
- Puzzle mini-game solution (M).
- Take BUCKET (N).
- Take CANDLE (O).
- Read note, 2/3 PUZZLE PIECES (P).
- Walk down.

- Use HANDLE, CHAIN, and BUCKET, take 1/2 LEAF and BUCKET OF WATER (A).
- Walk down.
- Use FISHING NET (B).
- Select pairs (C), take BROKEN AMULET.
- Restore BROKEN AMULET, solution (D), take CANCER AMULET.
- Go left, forward.

- Play puzzle, earn NITROGEN (E).
- Place CANCER AMULET, solution (F), take 2/2 LEAVES.
- Select painting, place LEAVES, take 3/3 PUZZLE PIECES (G).
- Take 1st WOOD PETAL (H).

- Place PUZZLE PIECES, solution F-Ex2-D-Ax4-Bx2-C-I-Kx2-Hx3-Mx7-Ox6-Px6-Rx3-S-Qx4-Tx2-V-Gx2.
- Take INSTRUCTIONS.

- Place INSTRUCTIONS, BUCKET OF WATER, and NITROGEN, take SNOWFLAKES (A).
- Walk down.
- Use CANDLE and SNOWFLAKES (B).
- Restore snowflakes (C).
- Take FREEZE ARTIFACT (D).
- Walk down.

- Use FREEZE ARTIFACT (E).
- Go right.
- Talk, take LOCKED CASE (F).
- Select LOCKED CASE, play puzzle, take BOOT MOLD.
- Go left.
- Play puzzle, earn BOLA (G).
- Select each berry, take OIL and BERRIES (H).
- Take 1/2 RED EYE (I).
- Take BELLOWS (J).
- Walk down.
- Use BERRIES, take 1/2 TILE and DIAL (K).
- Go right.
- Use BOLA (L).
- Take 2nd WOOD PETAL (M).

- Use OIL, take RUSTY PICKAXE and MEDALLION (N).
- Take LADLE (O).
- Take VALVE (P).
- Walk down.
- Place MEDALLION, take 2/2 TILES and BROKEN TRUMPET (A).
- VALVE on BROKEN TRUMPET, take TRUMPET.
- Walk down.
- Place TILES, solution (B-C-D), take SALTPETER.
- Go right, left, and forward.

- Select scene, use TRUMPET (E).
- Take HANDLE (F), place BOOT MOLD.
- Take 2/2 RED EYES (G), select wood (H), use BELLOWS (I), place LADLE (J).
- Take SHOVEL use HANDLE and RUSTY PICKAXE, earn PICKAXE (K).
- Walk down.

- Use SHOVEL, take CHARCOAL (L).
- Walk down.
- right.
- Use PICKAXE, take SULFUR (M).
- Place RED EYES, take FLINT AND STEEL (N).
- Walk down, left.

- Play puzzle, earn BEAR LEG (O).
- Read instructions, place DIAL, solution (P).
- Place SALTPETER (Q), CHARCOAL (R), and SULFUR (S).
- Use (T-R)-(T-S).
- Move (Q-U)-(R-U)-(S-U), take GUNPOWDER.
- Go forward.

- Take 3rd WOOD PETAL, place BEAR LEG, select A-B-C-D.
- Move E right 6x, move F left 1x, move G left 5x.
- Take 1st HEART HALF and WICK.
- 3 WOOD PETALS on BROKEN TOY, take TOY FLOWER.
- Walk down.

- Use GUNPOWDER, WICK, and FLINT AND STEEL, take SILVER (N).
- Go forward.
- Place SILVER (O).
- Use (P-O), take MOLTEN SILVER.
- Use MOLTEN SILVER, take MAGIC BOOTS (Q).
- Walk down 2x, go right.
- Use MAGIC BOOTS (R).
- Go forward.
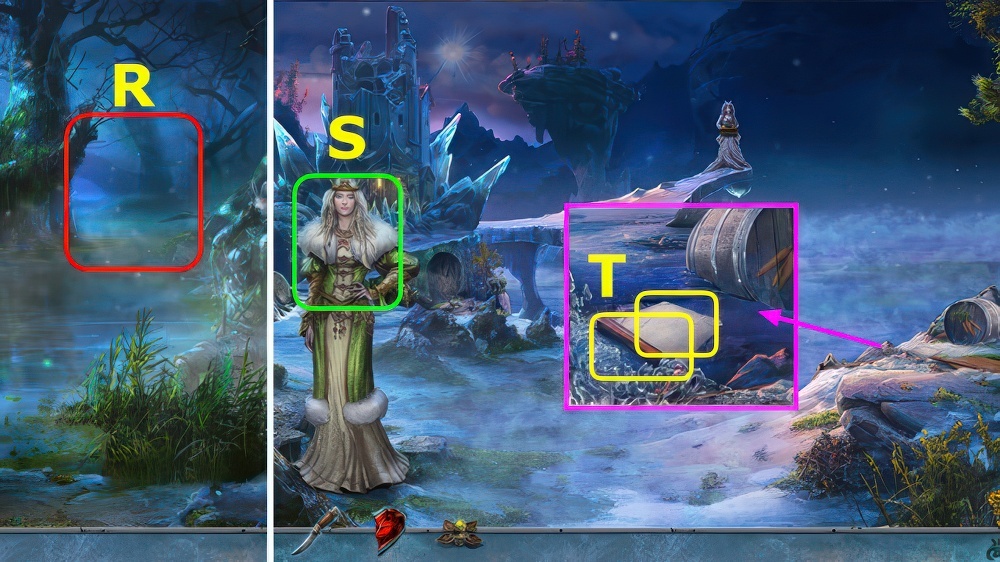
- Talk (S).
- Take HAMMER HANDLE and PAPER (T).
- Select PAPER 4x, take PAPER CUP.
- Go forward.
- Use KNIFE, take HAMMER BASE and 2nd HEART HALF (A).
- HAMMER HANDLE on HAMMER BASE, take HAMMER.
- Place PAPER CUP, take STONE CUP (B).
- Walk down.
- Use HAMMER, take CARROT.
- Use STONE CUP, earn VINEGAR (C).
- Place 2 HEART HALVES, open box, take STONE LEAVES (D).
- Walk down.

- Use CARROT, take BALL OF FUR (E).
- Go forward.
- Use VINEGAR and BALL OF FUR, select (F).
- Solution (G), take MIRROR.
- Go forward.

- Place MIRROR (H).
- Select 3x (I).
- Go forward.

- Go left-right-right-left (J).

- Go left-forward-forward (K).

- Play puzzle, earn GEMS (L).
- Restore chest (M).
- Select (N).
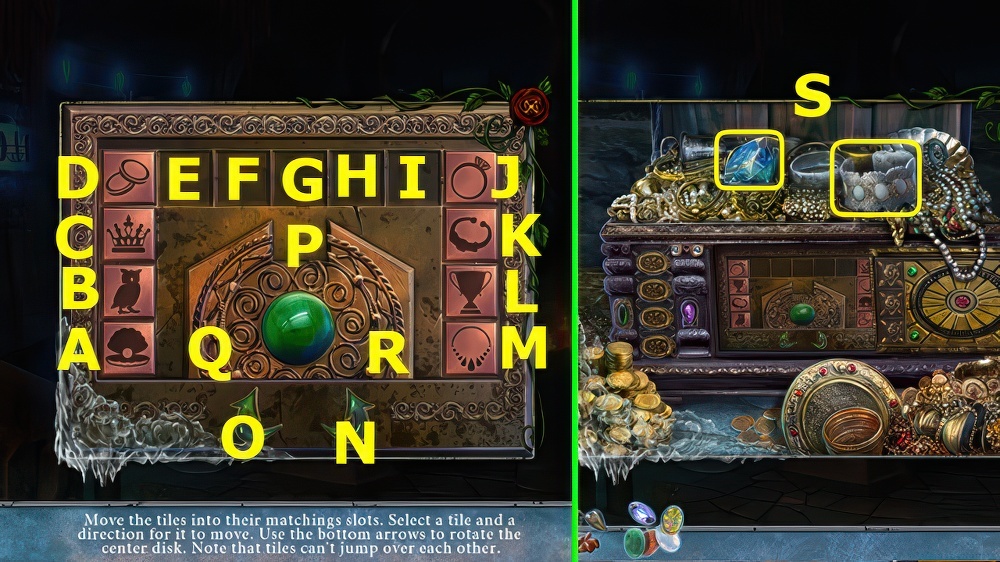
- Solution (J-P)-(D-F)-(C-E)-(B-D)-(A-C)-N-(Q-B)-Ox2-(M-R)-N-(P-G).
- O-(L-R)-Nx2-(Q-A)-O-(G-I)-(F-H)-(E-P)-O-(R-L)-(H-F)-N-(I-P).
- O-(R-M)-N-(K-P)-(L-J)-(M-K)-(F-I)-(D-G)-(C-F)-(B-D)-(A-C).
- N-(Q-B)-O-(G-P)-N-(Q-A)-O-(F-P)-O-(R-L)-N-(I-P)-O-(R-M).
- Take DIAMOND and INCOMPLETE BRACELET (S).
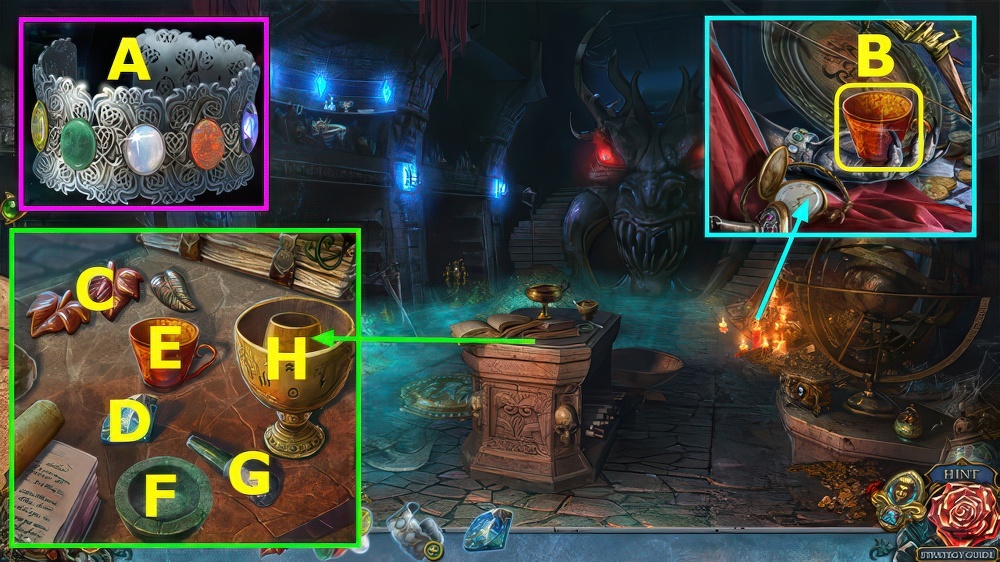
- GEMS on INCOMPLETE BRACELET, solution (A), take BRACELET.
- Place BRACELET, take AMBER CUP (B).
- Place STONE LEAVES (C), DIAMOND (D), and AMBER CUP (E).
- Move (C-F)-(D-F)-(E-F)-(G-F)-(F-H).

- Solution (I).
- Use TOY FLOWER, take CRYSTAL OF VIRTUE (J).
- Play puzzle, earn DRAGON’S TOOTH (K).
- Place DRAGON’S TOOTH (L).
- Go forward.
- Use CRYSTAL OF VIRTUE (M).
Congratulations! You have completed the game Living Legends 3: Wrath of the Beast.


