
Lost Lands 1: Dark Overlord (Bonus Chapter) – The main character had a dream in which the spirit of the lake asked for help. And this is not just a dream, she must return to this world and find out what happened. Once these unusual creatures helped her return her son. But now they need your help.
Bonus Chapter Walkthrough

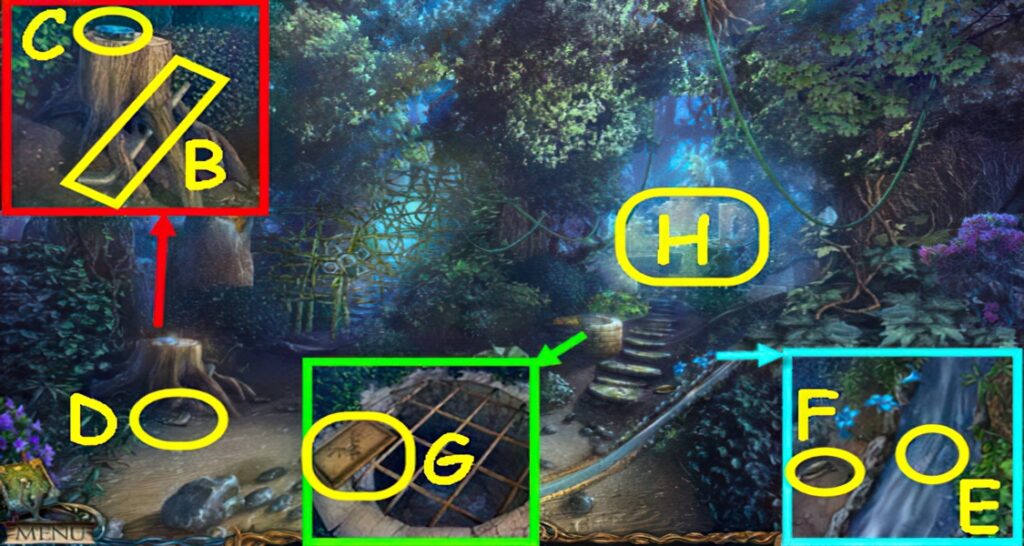
- Use the clippers on the plant, take the ANTLERS (A).
- Go up the left path (B).
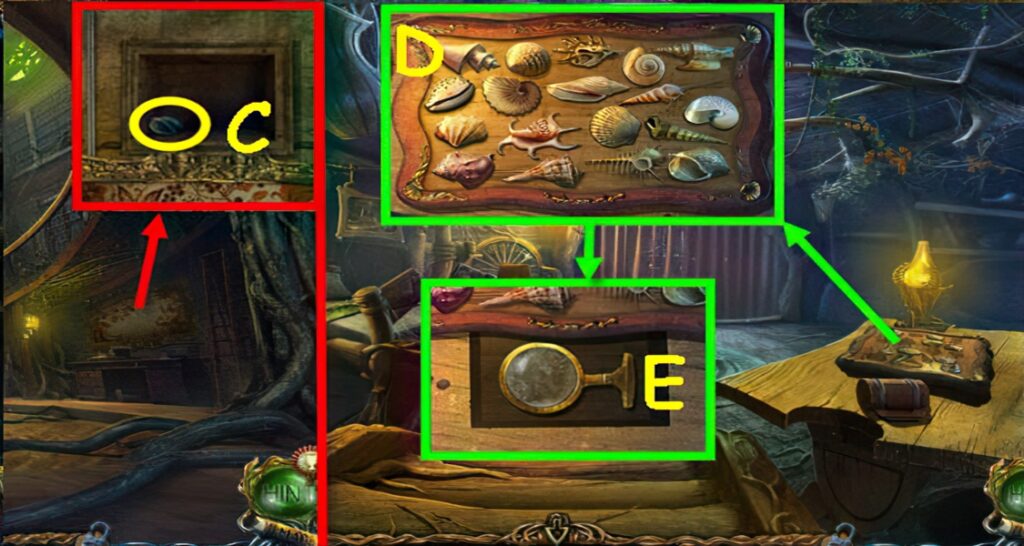
- Take the FEATHER (C).
- Move the leaves, take the SEASHELL (D).
- Enter The Library.
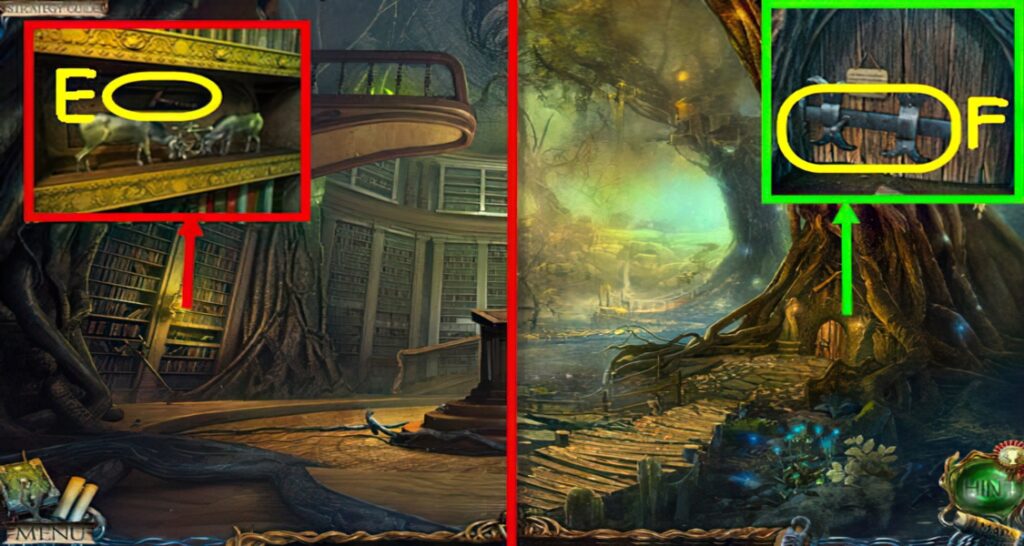
- Place the ANTLERS on the deer, take the HAMMER (E).
- Go to the Forest.
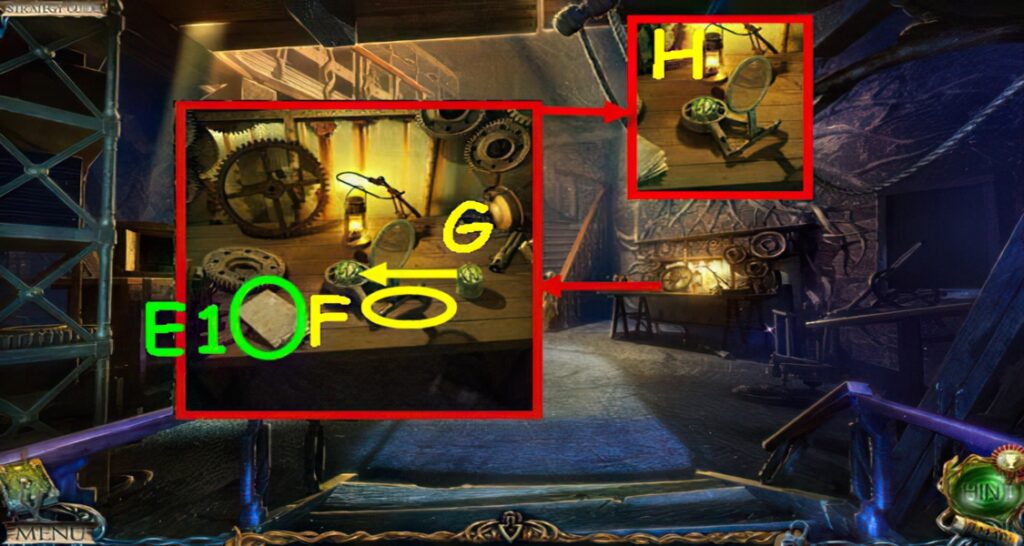
- Read the sign, use the HAMMER on the latch (F) and enter.
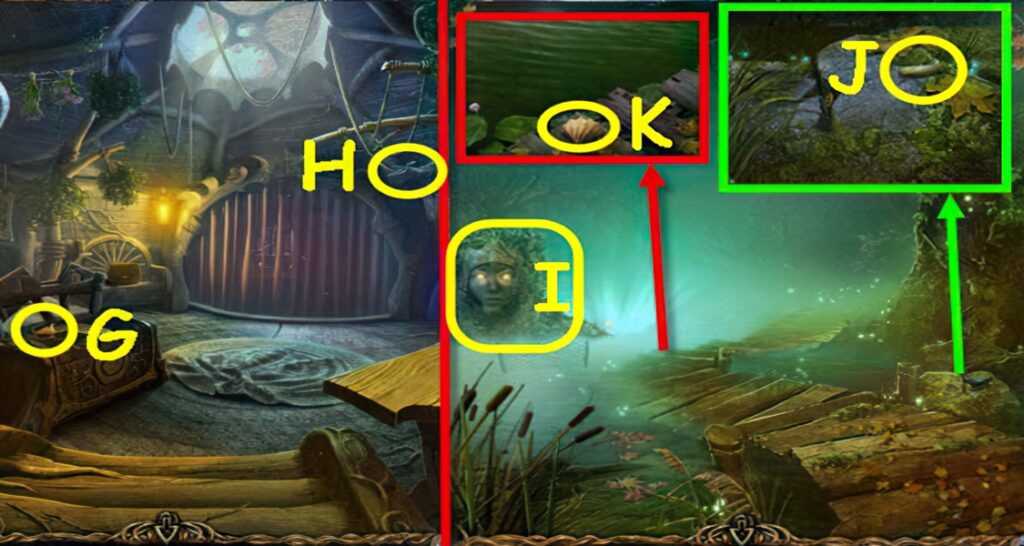
- Take the 2nd SEASHELL (G) and SHEARS (H).
- Go to The Lake.
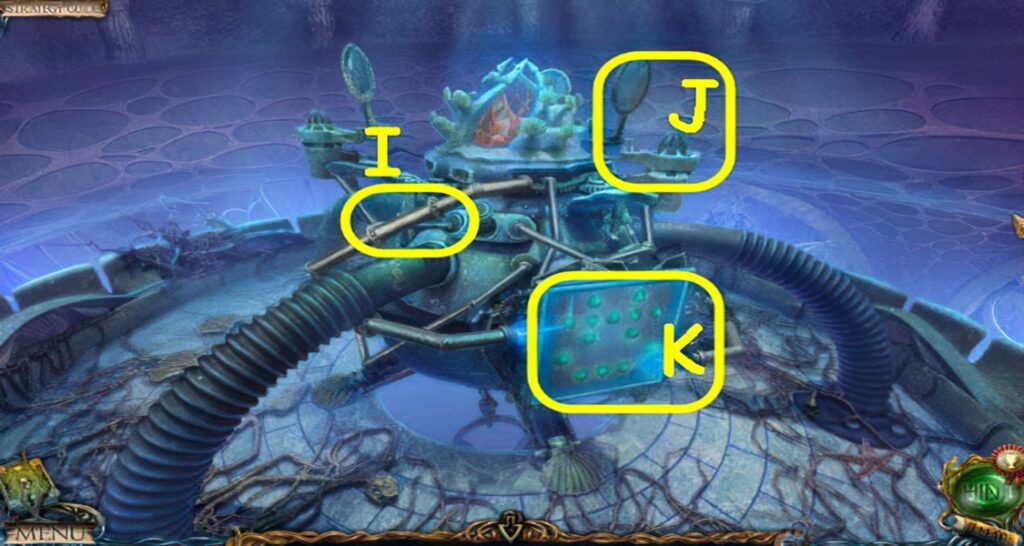
- Speak to the Lake Spirit (I), receive an UNFINISHED POTION.
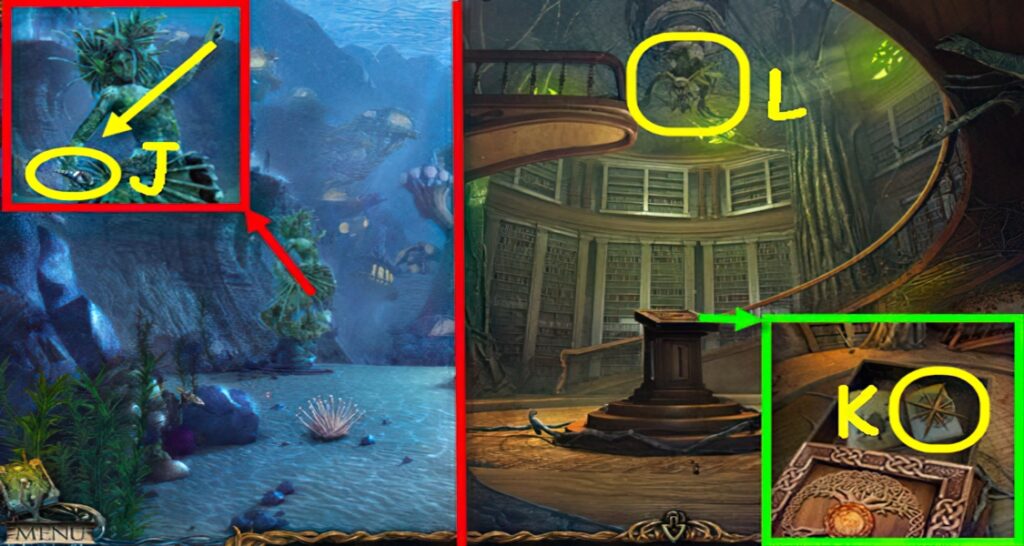
- Take the CICADA (J).
- Take the 3rd SEASHELL (K).
- Go to The Foot of the Tree.

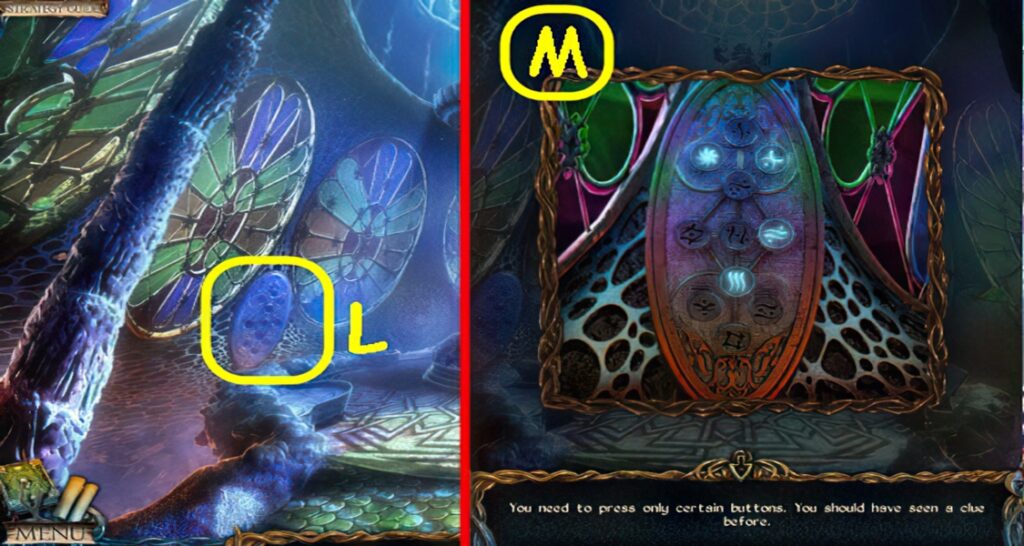
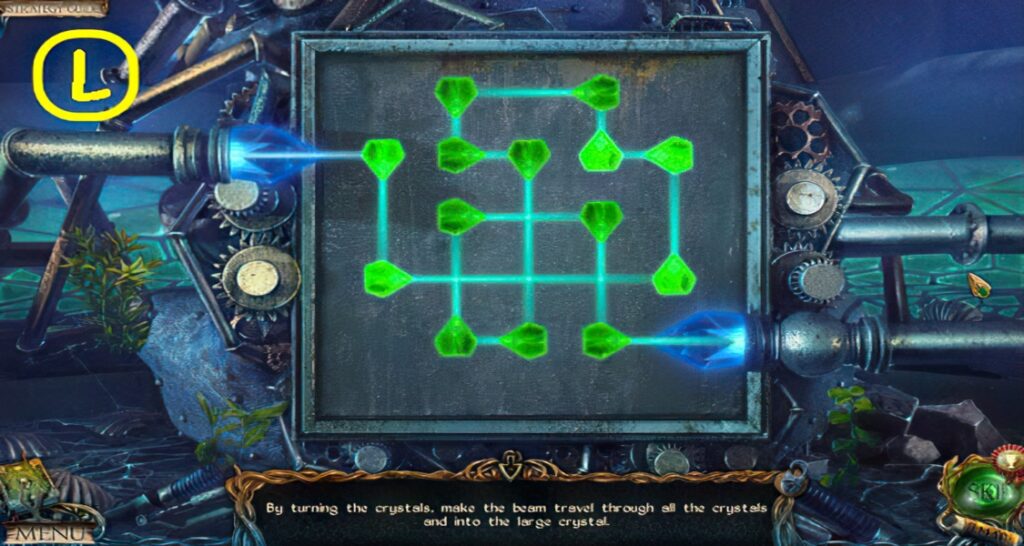
- Place the CICADA on the anthill, take the TILE (L).
- Go to The Dwarf’s Cottage.
- Move the rug, place the TILE on the board to trigger a puzzle (M).
- Lead the ball through all holes.
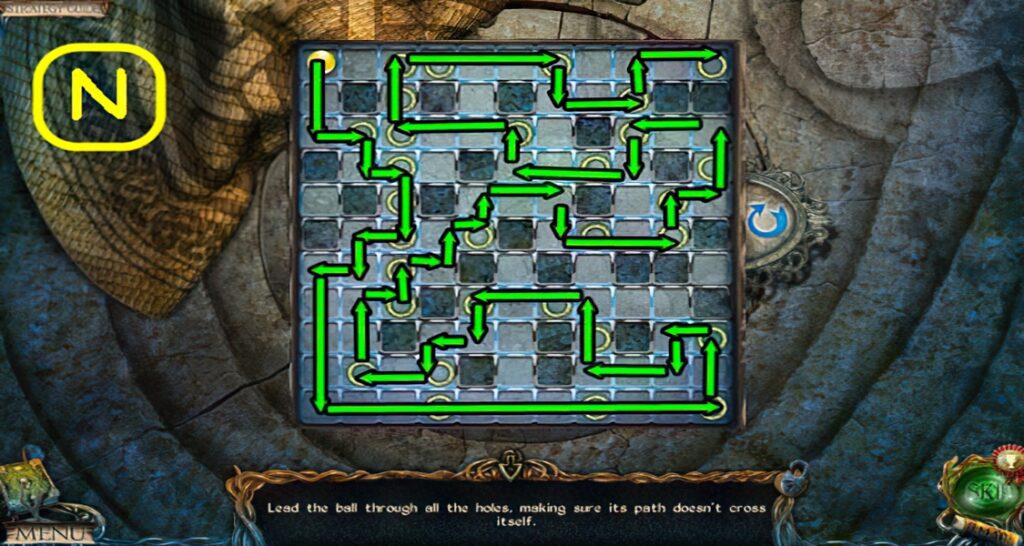
- Solution (N).
- Take the HOOK.
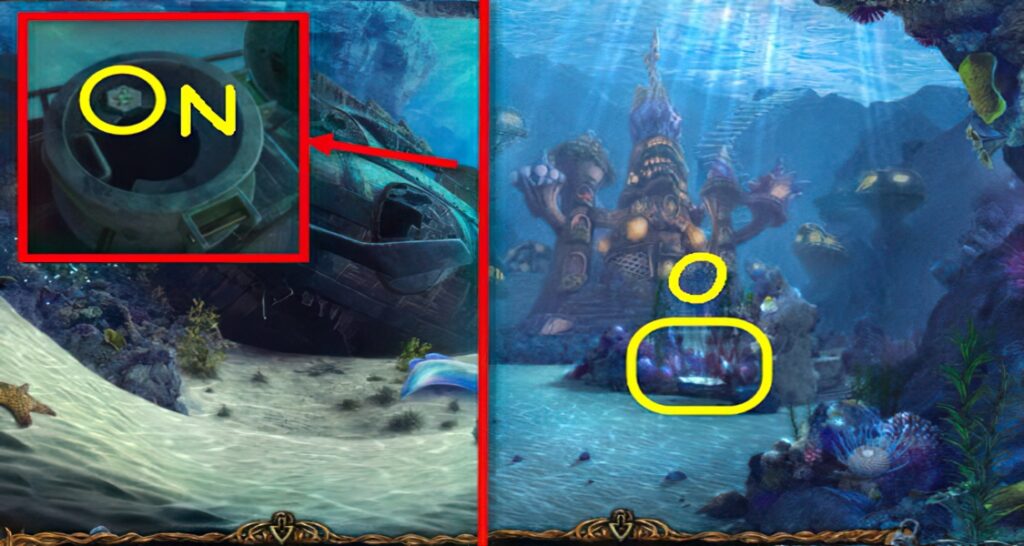
- Go to The Lake.
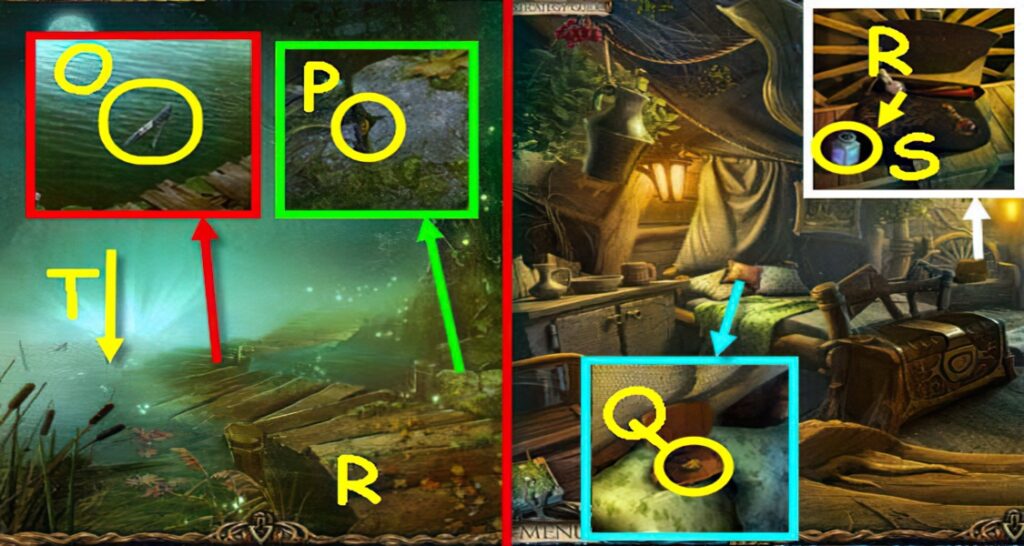
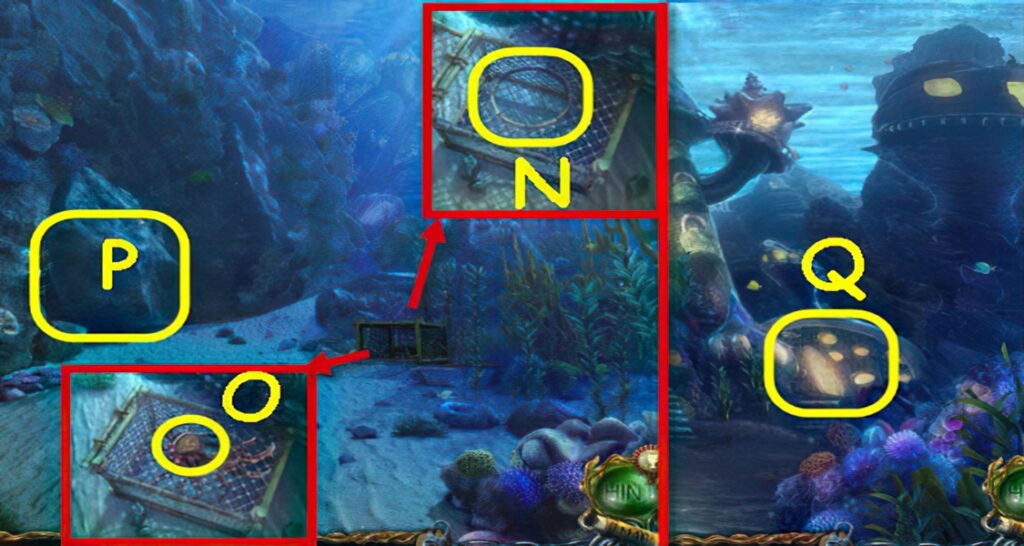
- Use the HOOK and SHEARS to get the TWEEZERS (O).
- Use the TWEEZERS to get the MEDALLION (P).
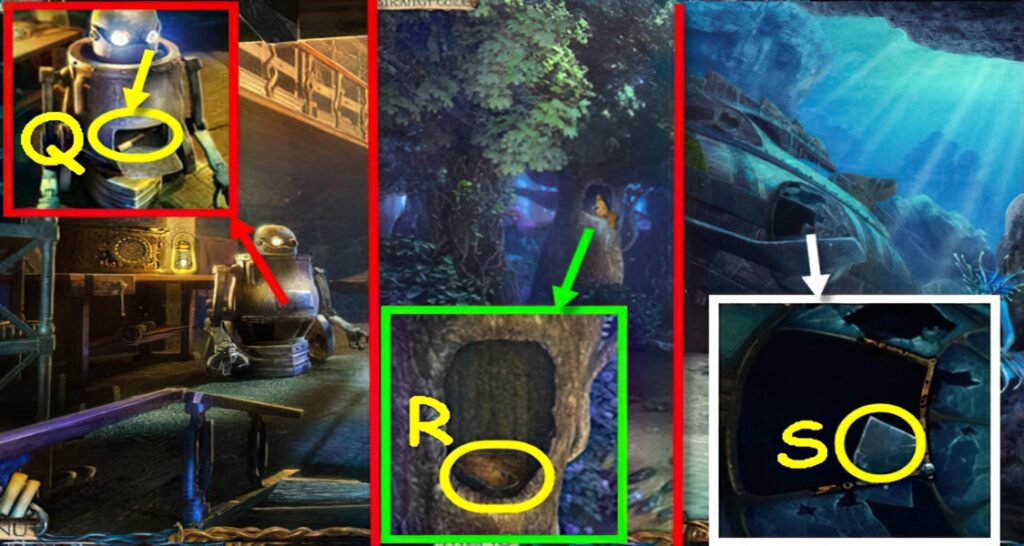
- Go to The Dwarf’s Cottage.
- Move the pillow, place the MEDALLION on the box and take the WAX (Q).
- Use the WAX on the lock and select it twice, place the UNFINISHED POTION by the bag, pour the bottle (R) in the potion. Take the POTION (S).
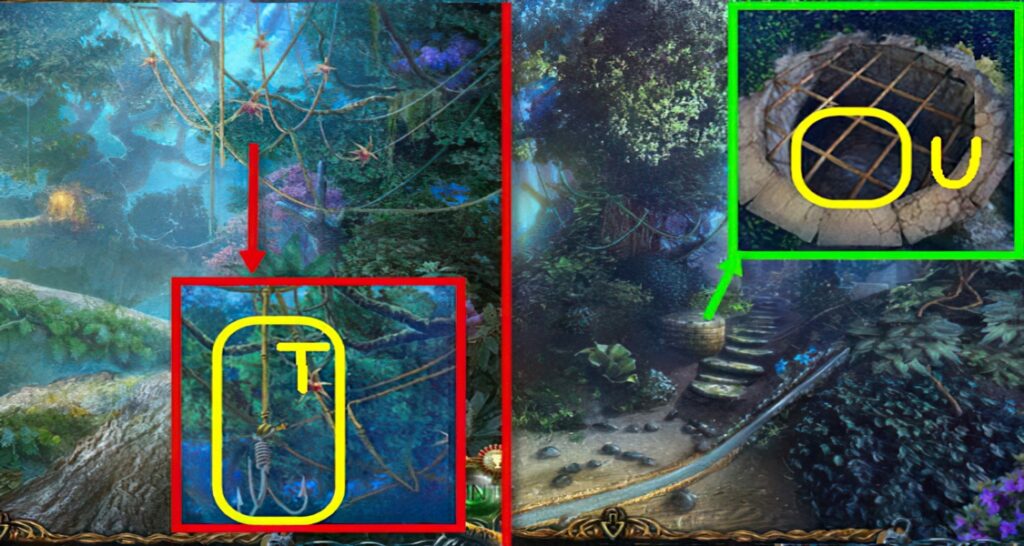
- Go to The Lake.
- Go down (T) and then forward to Outside the Castle.
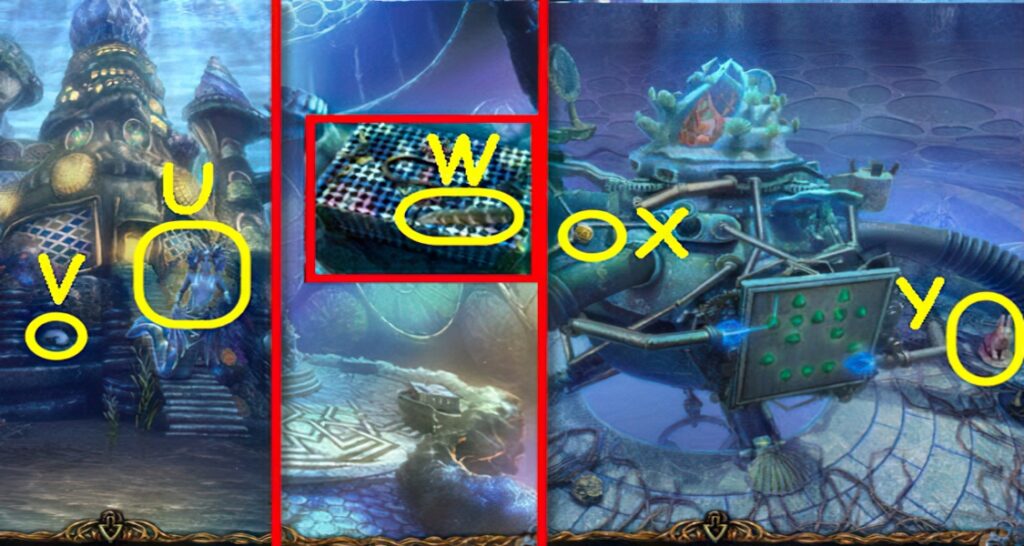
- Speak to Undine (U), receive a MEDALLION.
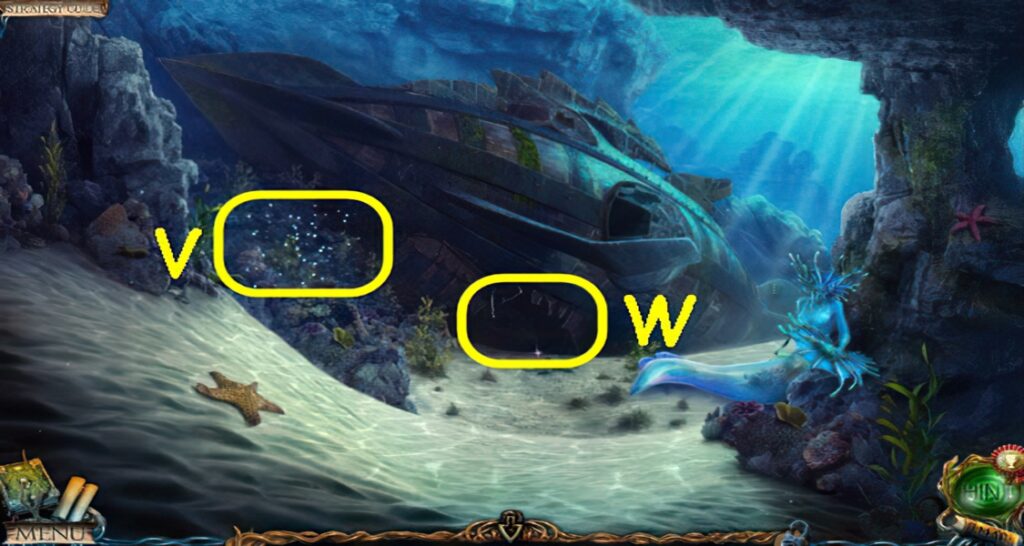
- Take the 4th SEASHELL (V).
- Go up the steps.
- Take the 2nd FEATHER (W).
- Go up.
- Take the gold MEDALLION (X) and 1st ANIMAL FIGURINE (Y).
- Go to The Caves.
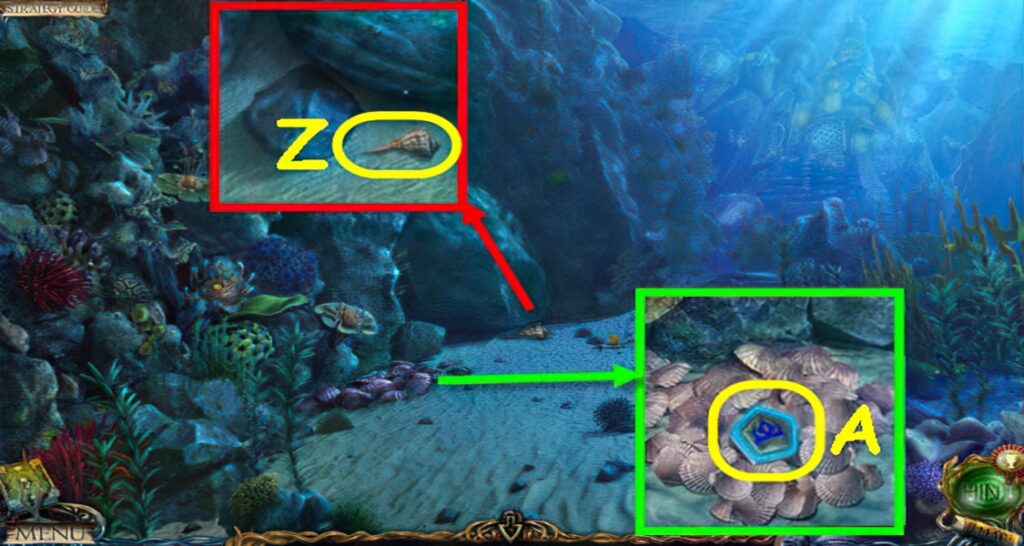
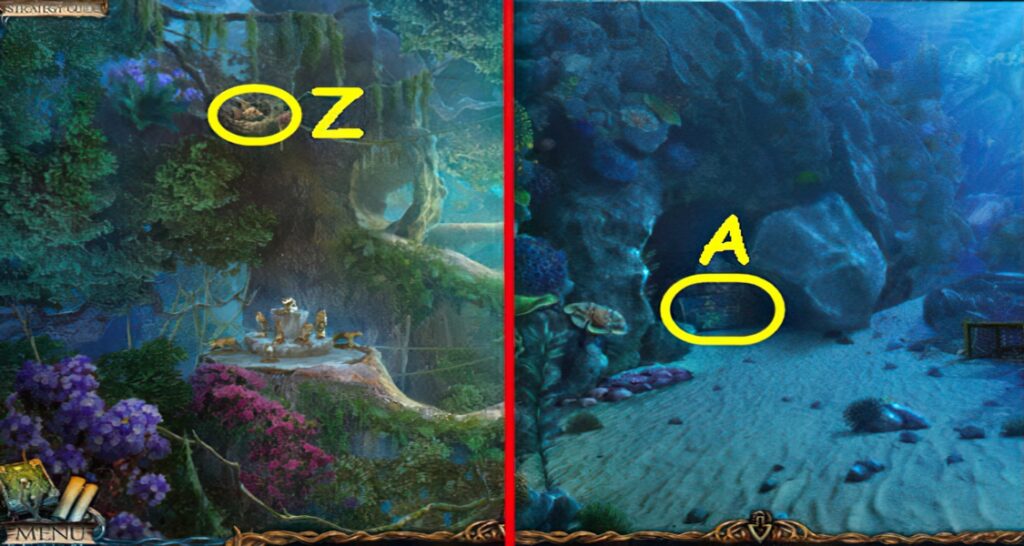
- Take the 5th SEASHELL (Z).
- Select the shells twice, take the 2nd MEDALLION (A).
- Go to The Entrance to the Old Forest.
- Pull the BENT PIPE 3x to get it (B).
- Take the 3rd MEDALLION (C).
- Take the STATUE HAND (D).
- Take the 6th SEASHELL (E) and SHELLFISH (F).
- Take the OWL TABLET (G).
- Examine the ruins to access a puzzle (H).
- Play the puzzle.
- You receive a COMPONENT (I).
- Back out.
- Place the STATUE HAND on the statue, take the large SEASHELL (J).
- Go to The Library.
- Place the gold MEDALLION in the recess, take the LOCK PIECE (K) and read the book.
- Place the 2 FEATHERS and OWL TABLET on the owl to trigger a puzzle (L).
- Arrange the feathers.
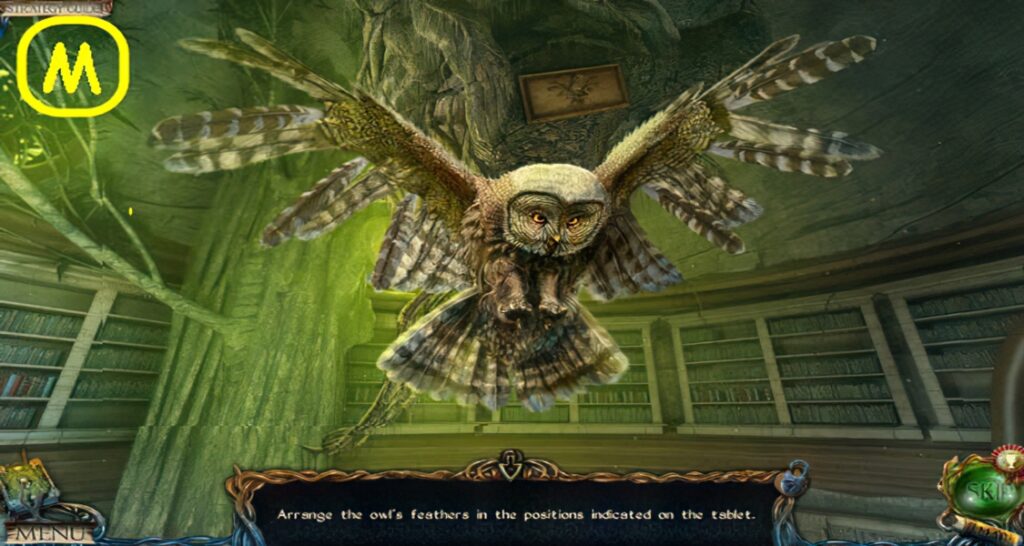
- Solution: (M).
- You receive a 4th MEDALLION and CRAB TRAP.
- Go to The Caves.
- Place the CRAB TRAP on the sand, place the SHELLFISH inside (N).
- Take the gold MEDALLION (O).
- Use the BENT PIPE on the boulder (P).
- Go to Outside the Castle.
- Place the gold MEDALLION on the lock to trigger a puzzle (Q).
- Play the puzzle.
- You receive a CHEST PIECE (R).
- Go to The Underwater Castle.
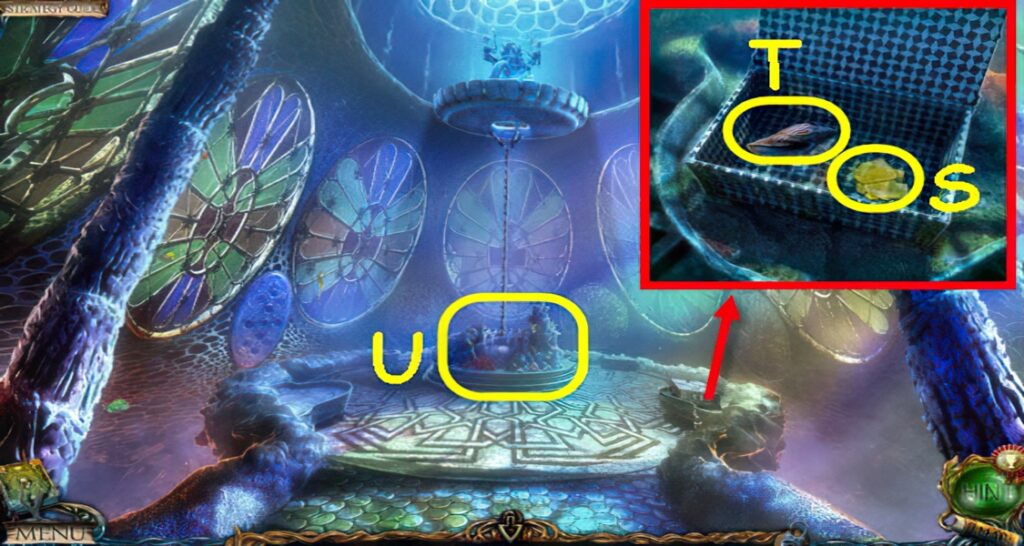
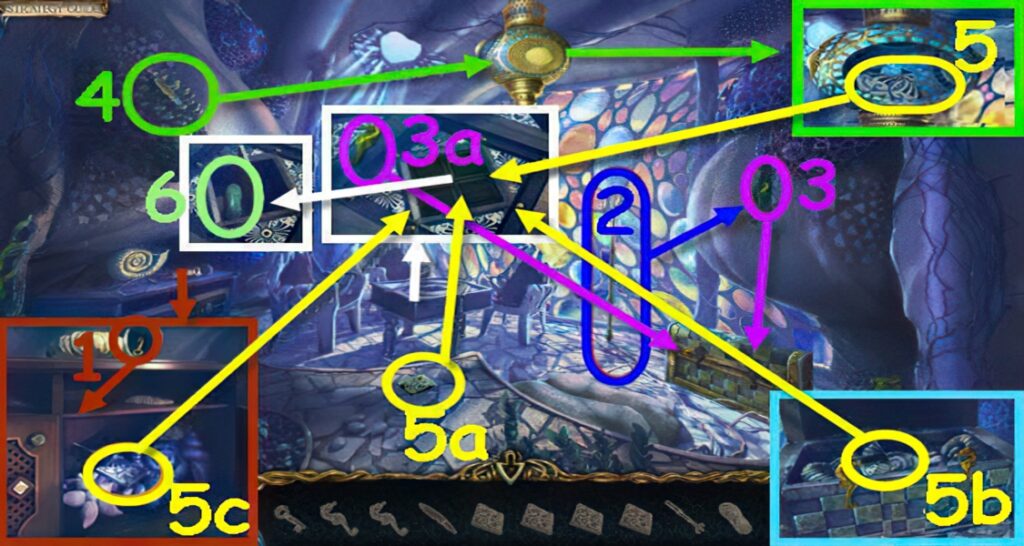
- Place the CHEST PIECE on the chest, take the MOSAIC (S) and 7th SEASHELL (T).
- Place the large SEASHELL by the shells to trigger a puzzle (U).
- Move the small shells to their correct location.
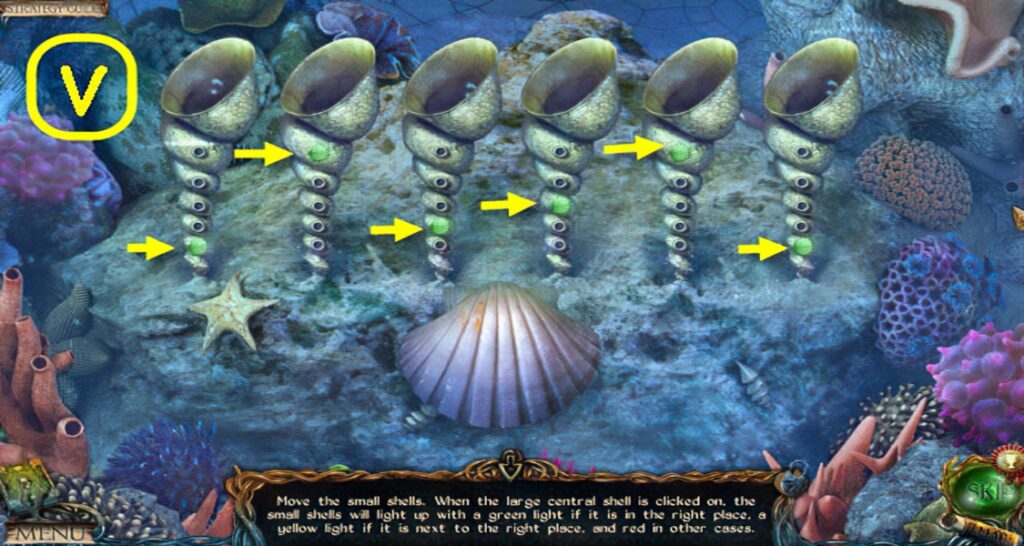
- Solution (V).
- Receive the 5th MEDALLION.
- Back out.
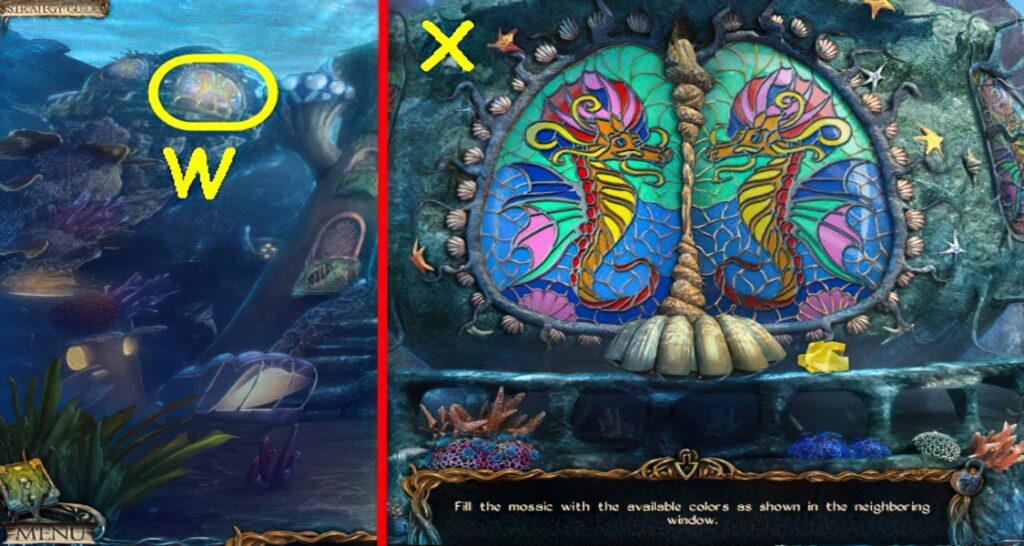
- Place the MOSAIC on the ledge to trigger a puzzle (W).
- Complete the image.
- Solution (X).
- Take the 2nd LOCK PIECE.
- Go to The Entrance to the Old Forest.

- Place the 5 MEDALLIONS in their matching shaped slots (Y).
- Enter The Old Forest.
- Take the FISH FIGURINE (Z).
- Go to The Caves.
- Place the FISH FIGURINE on the lock to trigger a puzzle (A).
- Free the block.
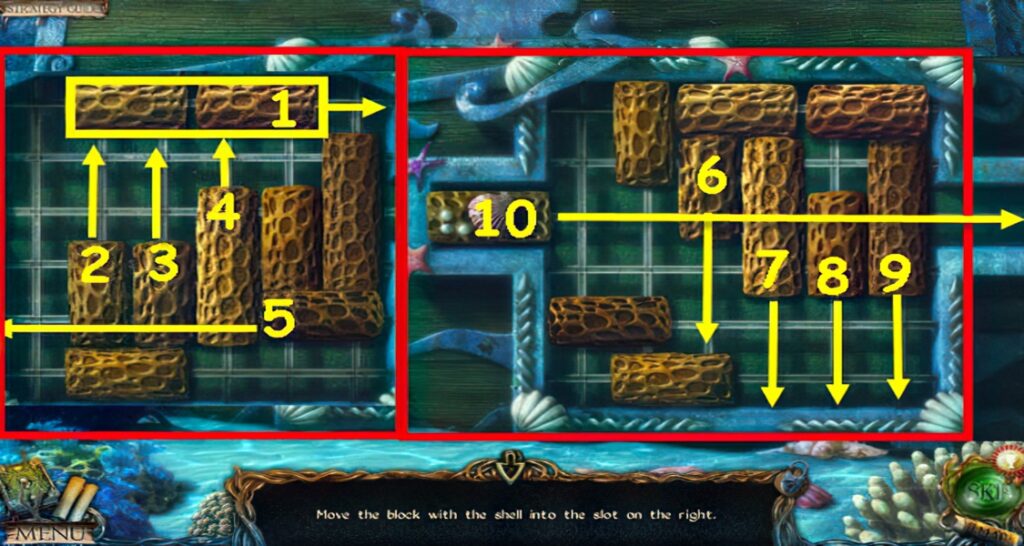
- Solution: 1-10.
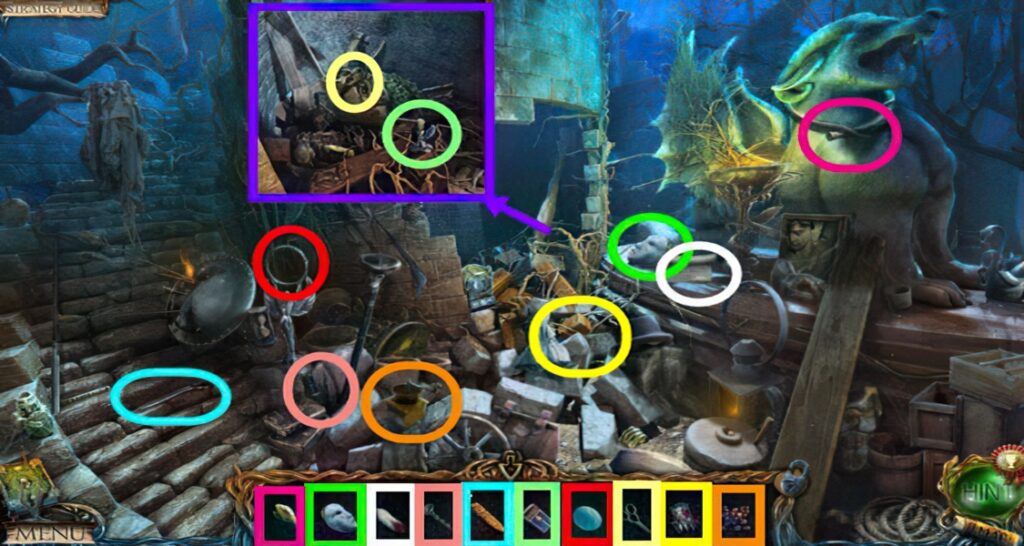
- Take the 2nd ANIMAL FIGURINE (B) and PIECE OF PIPE (C).
- Go to Outside the Hermit’s Hut.
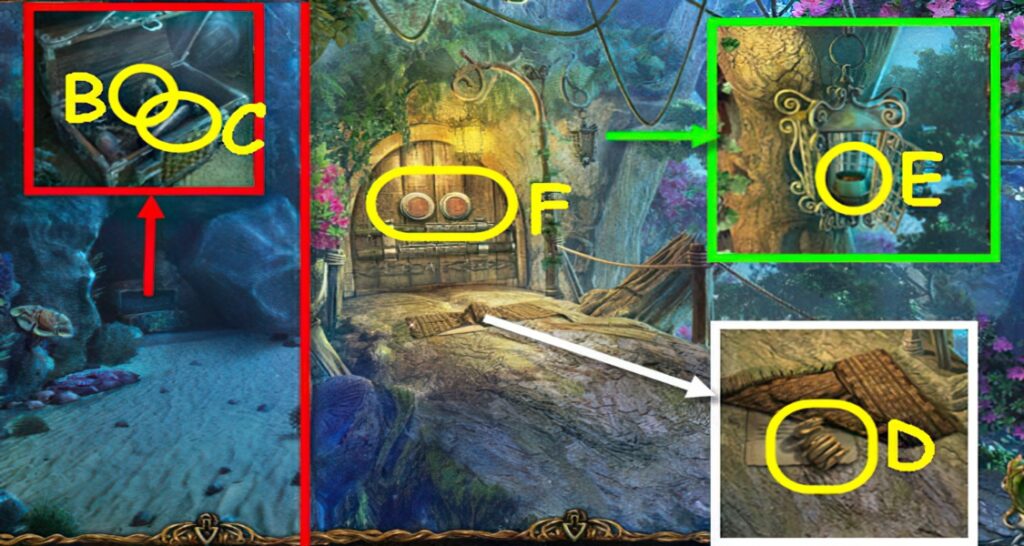
- Move the rug, take the 3rd ANIMAL FIGURINE (D) and read the note.
- Open the door, take the OIL (E).
- Place the 2 LOCK PIECES in the slots to trigger a puzzle (F).
- Turn the dial to unlock the lock.
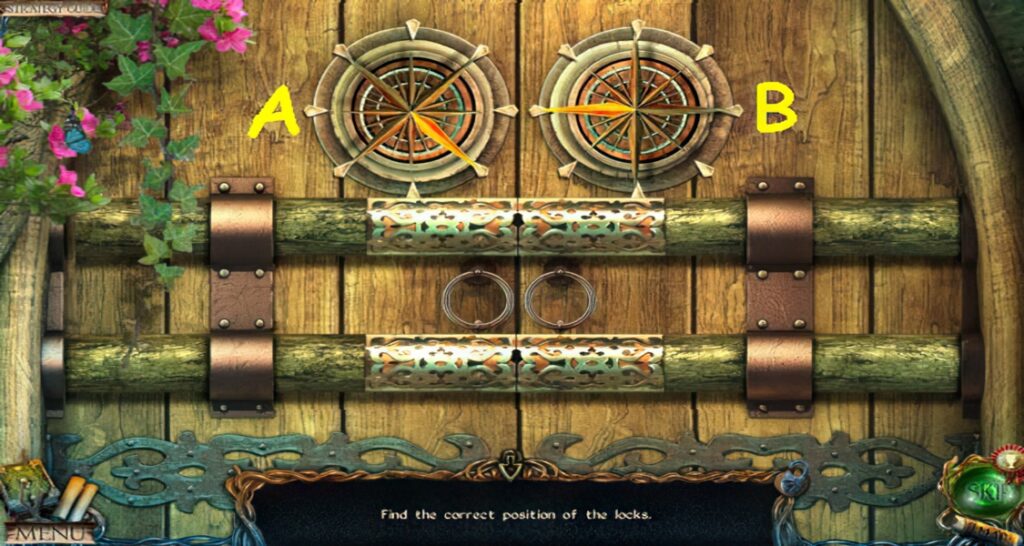
- Solution: Ax5 and Bx6.
- Enter The Hermit’s Hut.
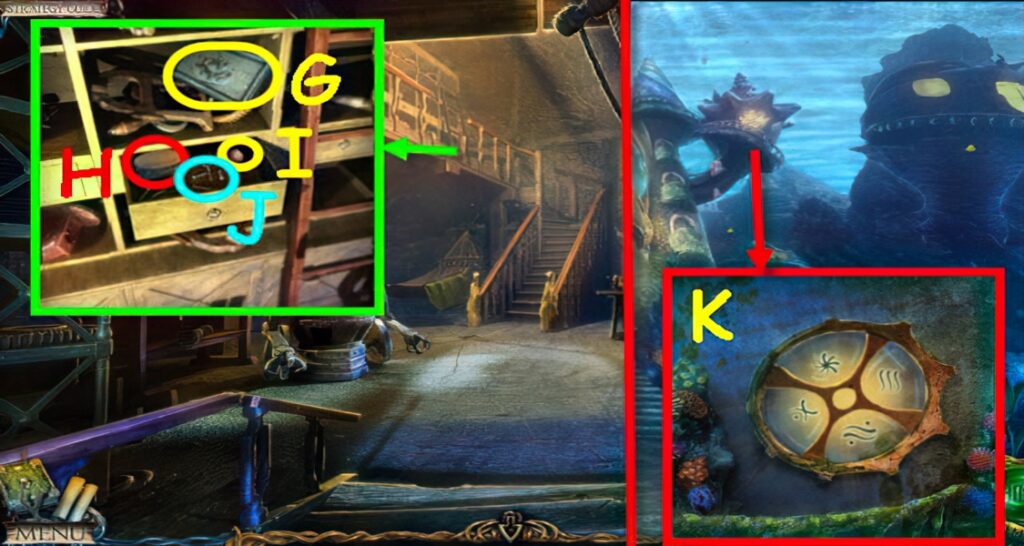
- Take the ANIMAL TABLET (G).
- Open the drawer, take the BRUSH (H), NUT (I) and SCREWS (J).
- Go to Outside the Castle.
- Use the BRUSH on the dirty glass to get a clue (K).
- Go to The Underwater Castle.
- Examine the hatch to trigger a puzzle (L).
- Select the correct runes.
- Solution (M).
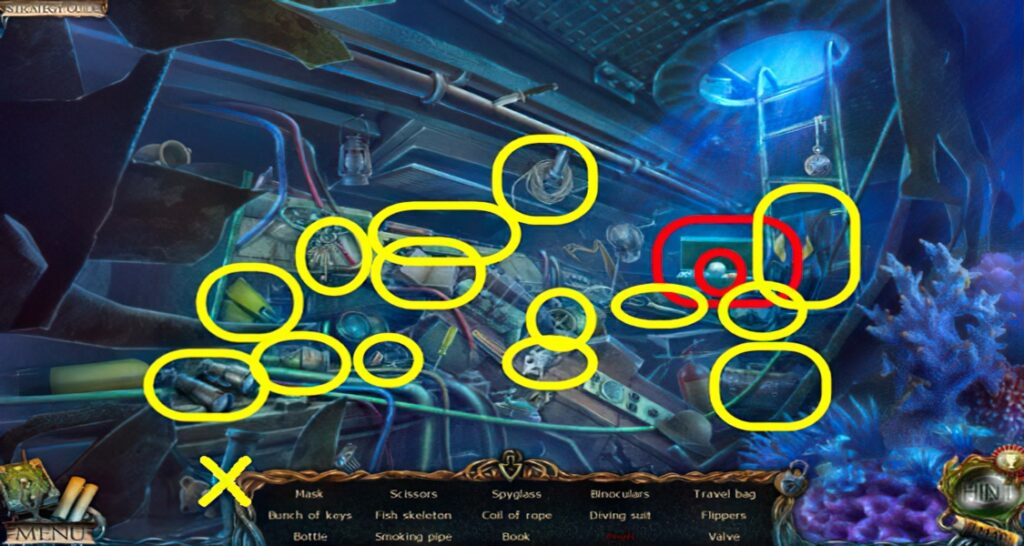
- Go to the Bathyscaphe.
- Turn the valve, take the HEXAGON (N).
- Go to The Square.
- Place the HEXAGON on the reef to trigger a puzzle (O).
- Find the pairs.

- Solution: 1-12.
- Take the GLASS EYE.
- Go to The Hermit’s Hut.
- Place the GLASS EYE in the socket, take the SCREWDRIVER (Q).
- Go to The Entrance to the Old Forest.
- Give the NUT to the squirrel, take the HOOK (R).
- Go to The Bathyscaphe.
- Use the SCREWDRIVER on the screw, take the SHARD OF GLASS (S).
- Go to The Old Forest.
- Attach the HOOK to the vine, use the SHARD OF GLASS on it to receive a VINE WITH HOOK (T).
- Go to The Entrance to the Old Forest.
- Use the VINE WITH HOOK to get the FISHING NET (U).
- Go to The Bathyscaphe.
- Use the FISHING NET on the plankton, receive a NET FULL OF PLANKTON (V).
- Place the NET FULL OF PLANKTON in the hole to trigger a puzzle (W).
- Play the puzzle.
- You receive a VALVE (X).
- Go to The Old Forest.
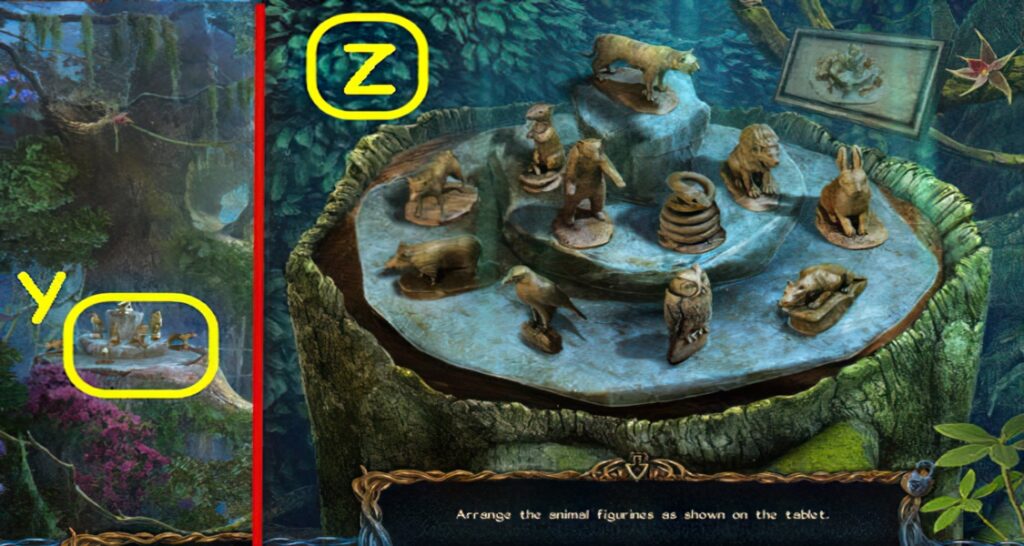
- Place the 3 ANIMAL FIGURINES and ANIMAL TABLET on the stump to trigger a puzzle (Y).
- Arrange the animals.
- Solution (Z).
- Take the 8th SEASHELL.
- Go to The Hermit’s Hut.
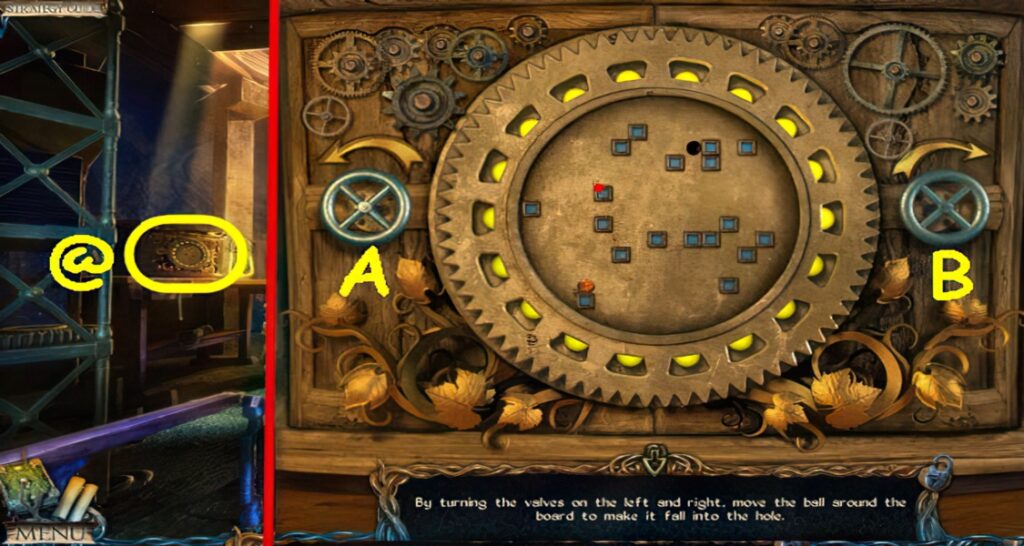
- Place the VALVE on the mechanism to trigger a puzzle (@).
- Move the ball to the hole.
- Turn the following valves: Bx3 and Ax2.
- Take the BRUSH WITH PAINT.
- Go to The Library.
- Use the BRUSH WITH PAINT on the painting, take the 9th SEASHELL (C).
- Go to The Dwarf’s Cottage.
- Place the 9 SEASHELLS in their matching slots (D), take the LENS (E).
- Go to The Hermit’s Hut.
- Read the directions (E1) and place the COMPONENT on the table. Place the LENS and SCREWS on it, tighten with the SCREWDRIVER (F).
- Place the core (G) in the base, pour the OIL in it.
- Take the ASSEMBLED COMPONENT (H).
- Go to The Device.
- Place the PIECE OF PIPE on the pipes (I) and the ASSEMBLED COMPONENT on the device (J).
- Select the panel to trigger a puzzle (K).
- Complete the circuit.
- Solution (L).
Congratulations! You have completed the game Lost Lands 1: Dark Overlord.


I can’t find the statue hand where u say it is
I lost the vent pipe when I moved the boulder first
Thank you! Your walkthrough was most helpful!
Muy buenos los gráficos
The statue hand is no longer where this walk-through says it is. Maybe the squirrel in the tree is hiding it?
Thank you so much. I couldn’t have done it without you ! 😁