Lost Lands 1: Dark Overlord – A game in the adventure genre with the search for items, various mini-games and puzzles, telling about an unusual story in a fictional world with many unknown corners and mysterious inhabitants. Passing the game is very exciting and addictive. A young mother and her son were about to leave the summer cottage in the woods. Susan was distracted for just a second by a phone call. Meanwhile, her son, who was playing nearby, heard strange voices and went to look for the source of the sound, the sound from an eerie looking tree beckoning little Jimmy to come closer. Being a curious child, as children often are, he approaches the tree, and before you know it or even finish your conversation, poor Jimmy was sucked into some sort of portal inside the tree. Now there’s nothing left but to follow him into a strange new world where he’s been kidnapped by a mysterious dark force. It will be up to you to muster up the courage to track Jimmy down and rescue him. Solve many puzzles and learn about the history of the Lost Lands, show logic in passing the levels, and save your son. If you can not pass any of the puzzles or do not know where the items are, on our site you can watch the walkthrough of Lost Lands 1: Dark Overlord, and free the whole world from evil.
Lost Lands 1: Dark Overlord – Walkthrough
Here you can see the full walkthrough of Lost Lands 1: Dark Overlord, namely for all chapters, including bonus chapter, in pictures.
Jimmy
My son and I were on our way home. He was playing with his teddy bear while I talked on the phone. It was calm and quiet around us. Suddenly, a cry from my son cut through the silence. I rushed towards the sound. What I saw nearly made me lose my mind. Some kind of roots or branches had entangled my child. They picked him up in the air and then dragged him into an old tree. This image is burned into my memory. I don’t know how, but I have to follow my son.
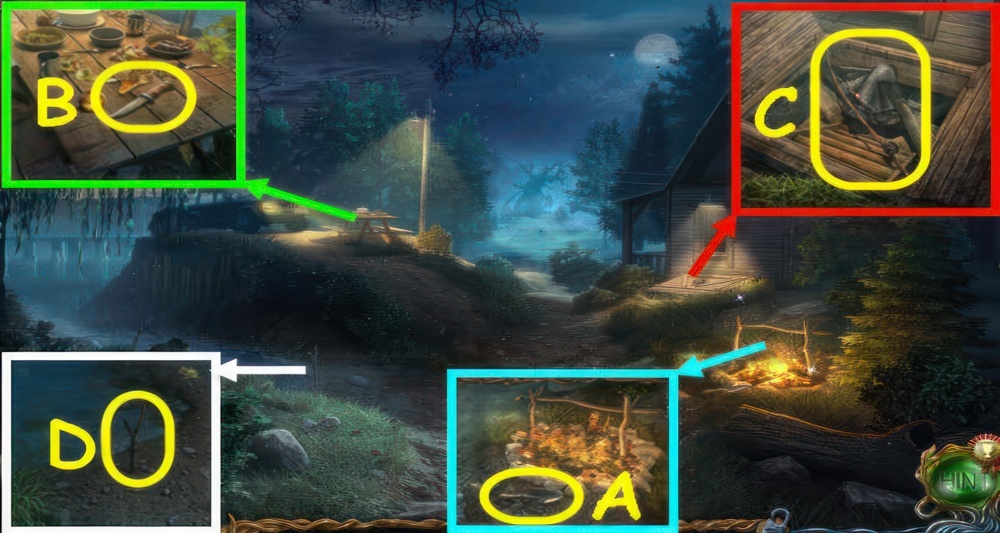
- Take the TROWEL (A).
- Take the KNIFE (B).
- Use the KNIFE on the rope and open the hatch, take the FISHING ROD (C).
- Place the FISHING ROD in the holder, receive a 1/3 WOODEN DISC (D).
- Go forward.
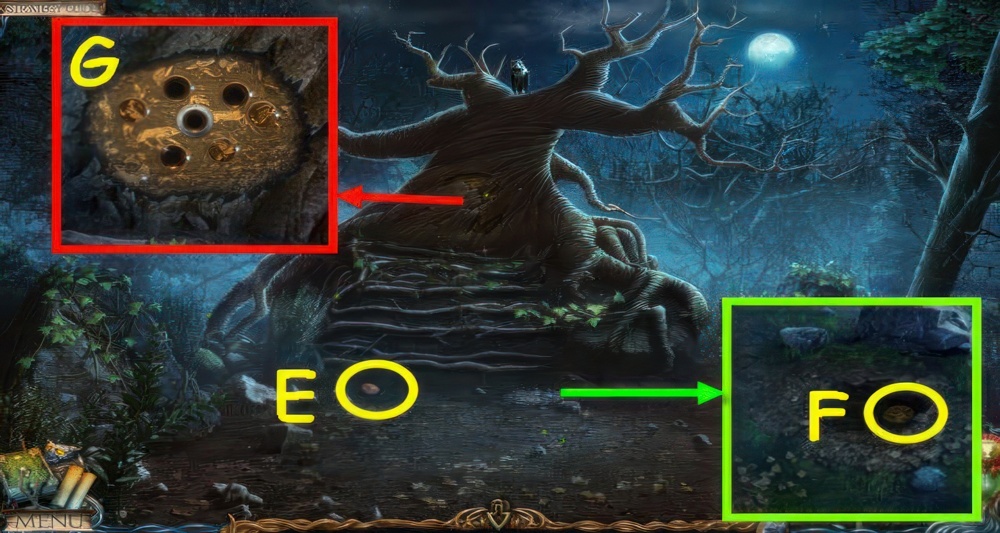
- Take the 2/3 WOODEN DISC (E).
- Use the TROWEL on the dirt, take the 3/3 WOODEN DISC (F).
- Remove the wood, insert the 3 WOODEN DISCS in the slots to trigger a puzzle (G).
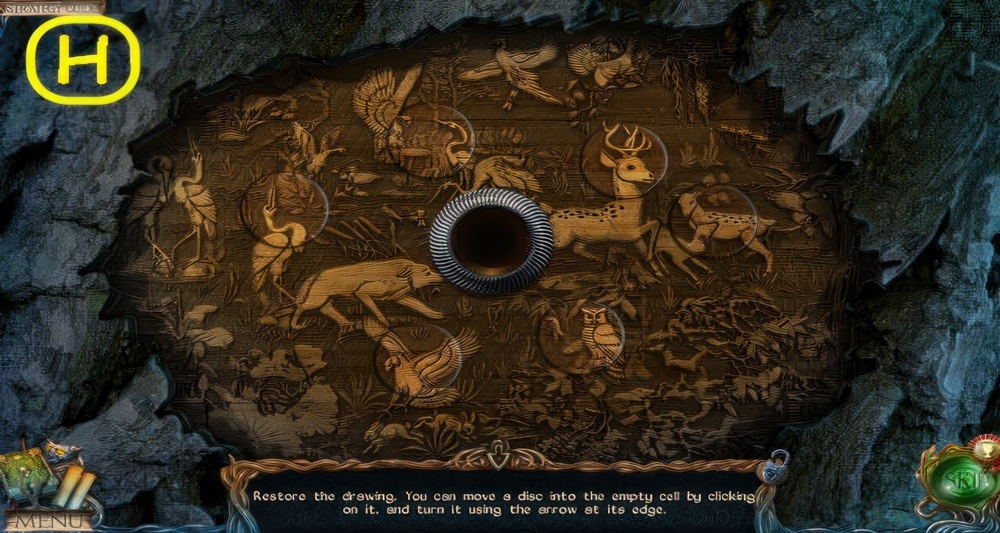
- Restore the drawing.
- You can move a disc into the empty cell by clicking on it, and turn it using the arrow at its edge.
- Walkthrough (H).
Bridge
I don’t know what happened, exactly, or where I am. One thing is clear this isn’t our forest any more. Everything’s different here. But that doesn’t matter right now, my boy, my Jimmy, was in the midst of all of this, surrounded by a strange black smoke. I reached out to him, but the thing broke off and carried him further away, over the bridge.
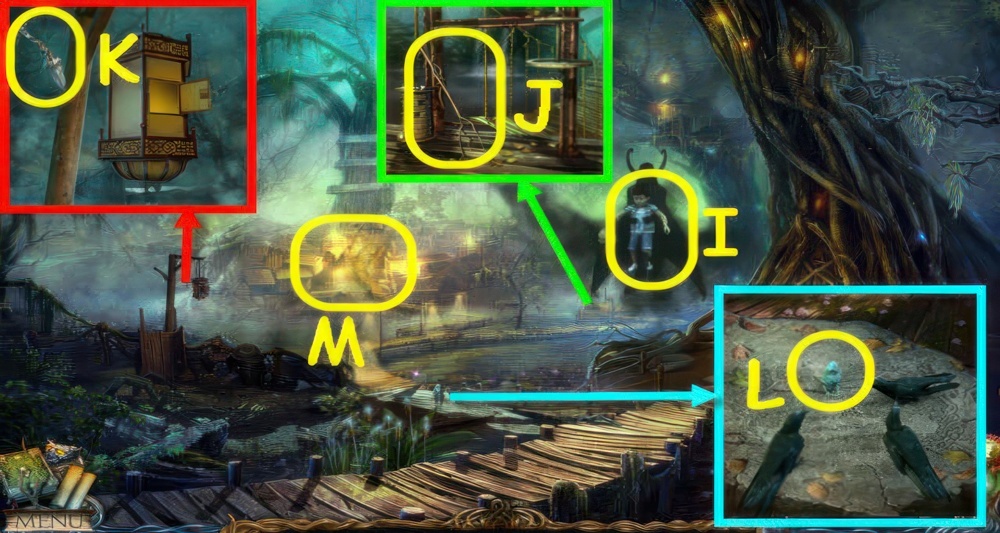
- Select Jimmy (I).
- Take the DRIED TWIG (J).
- Take the DAGGER (K).
- Use the DRIED TWIG on the birds, receive an OWL (L).
- Go forward (M).

- Use the OWL to get the DOOR-KNOCKER (N).
- Take the 1/3 (O).
- Go back.
- Place the DOOR-KNOCKER on the door, select it (P).
- Enter the tree.
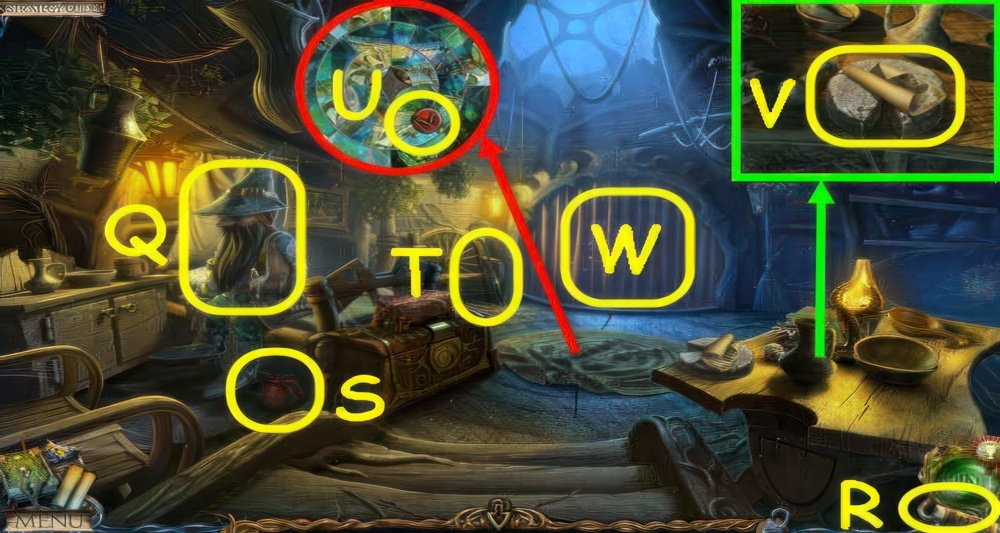
- Speak to Uri (Q).
- Receive a map which will be added to your toolbar (R).
- Take the OIL (S) and BUTTERFLY NET (T).
- Lift the rug, take the 1/3 RED DISC (U).
- Read the recipe, take the 2/3 WEIGHT (V).
- Open the curtain to trigger a puzzle (W).
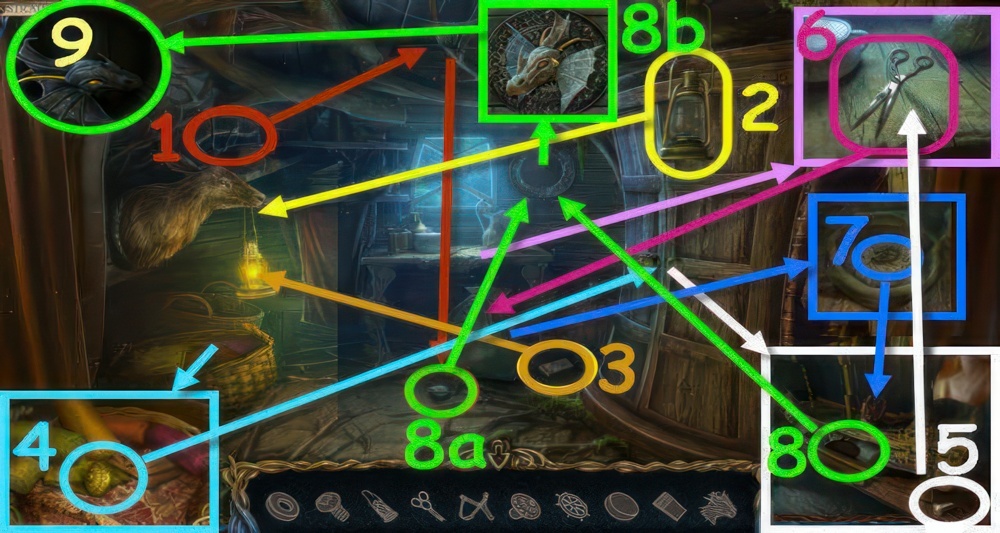
- Play the puzzle.
- You receive a HEAD (1-9).
- Go to Outside the Tree.

- Place the HEAD on the door, select each head ×2 and enter (X).
- Take the 3/3 WEIGHT (Y).
- Go back ×2.
- Place the 3 WEIGHTS on the scale (Z), cross the bridge.
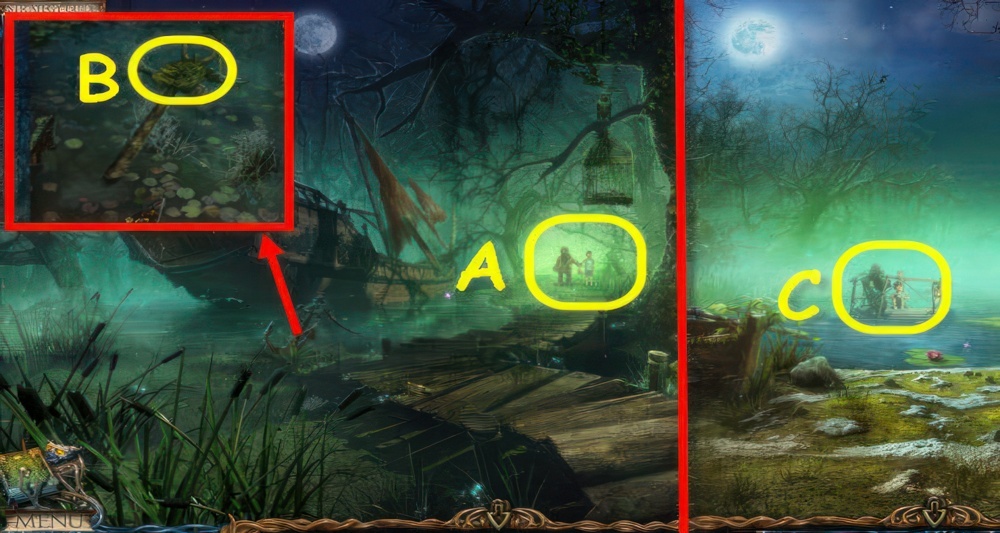
- Select Timmy (A).
- Take the PONDWEED (B).
- Go forward.
- Select Timmy (C).
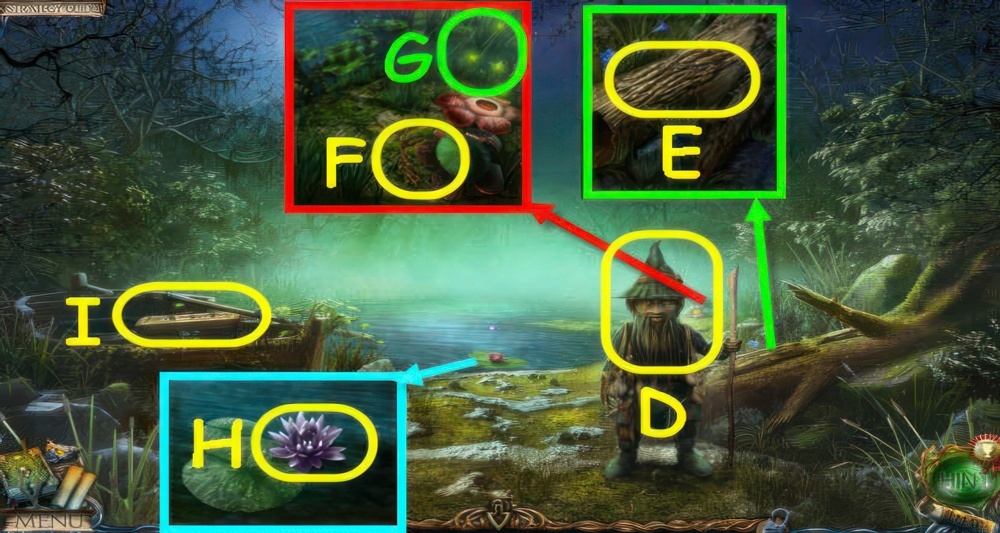
- Speak to Uri (D).
- Take the BARK (E).
- Select the flower, use the DAGGER on the root and take the FLOWER ROOT (F).
- Use the BUTTERFLY NET to get the FIREFLIES (G).
- Use the DAGGER on the LILY (H), take it.
- Select the box to trigger a puzzle (I).
Potion
At first I thought that the dwarf next to Jimmy was Uri. I was mistaken, it turns out it was his brother. He and Uri are like two peas in a pod. But what does he want with my boy. Nothing is clear yet, I need to go further. Uri said that we’re on an island. The only means to get to the other bank turned out to be a raft. There was a bridge here before, but the Lake Spirit destroyed it. The dwarf says that this spirit can help us get across. There’s a recipe for a potion which summons the Lake Spirit. I’ll try to make it. I need to gather the necessary ingredients and prepare the potion to summon the Lake Spirit.

- Rearrange the figurines by clicking on the handles to turn the circles.
- Arrange the figurines so that each is next to the image that corresponds to it.
- Walkthrough: C×3, B, A, C×4, B, A, C×4, B, A, C×3, B, A, C, B, A.
- Take the 2/3 RED DISC (J).
- Go to The Forest.
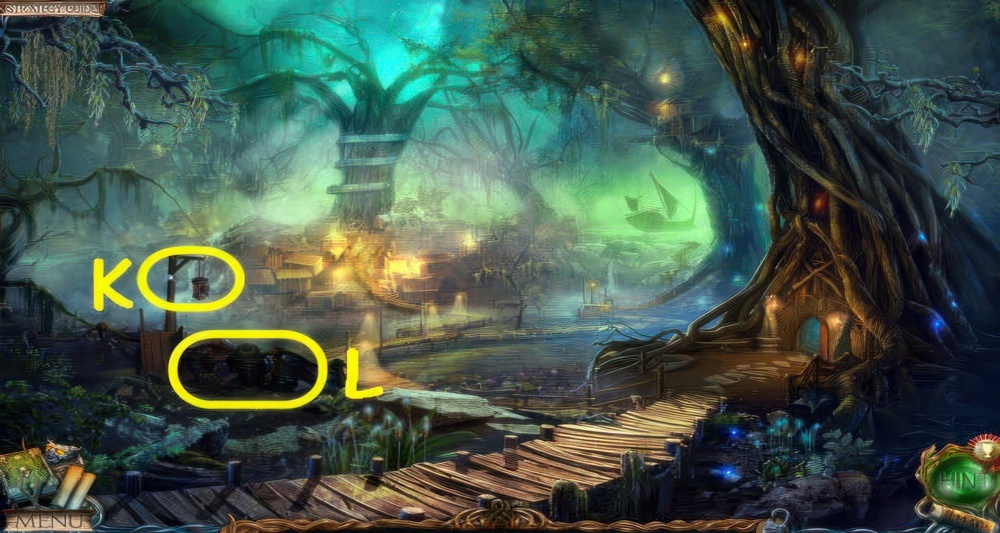
- Place the FIREFLIES in the lantern (K).
- Zoom into the debris to access a puzzle (L).
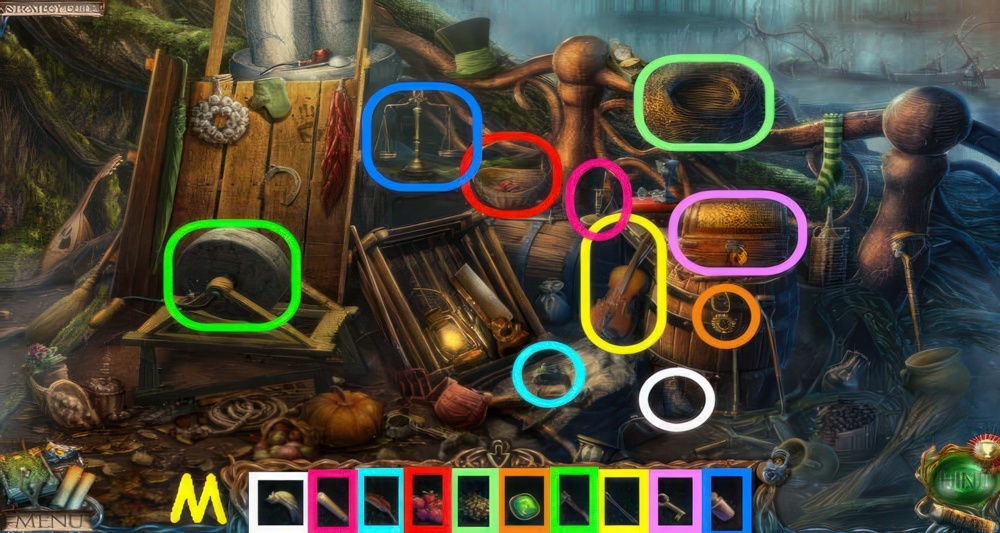
- Play the puzzle.
- You receive a CLAW HAMMER (M).
- Go to The Swamp.
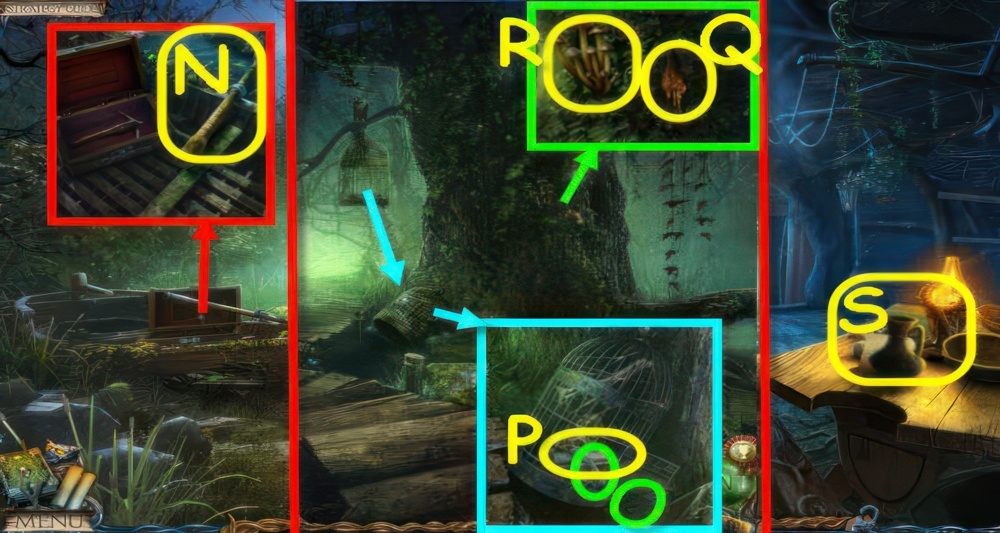
- Use the CLAW HAMMER on the bolts to receive an OAR (N).
- Go back.
- Use the OAR on the cage, open it.
- Take the EMPTY BOTTLE (O).
- Take PAGE WITH A CONSTELLATION (P).
- Use the DAGGER and EMPTY BOTTLE to get TREE SAP (Q).
- Use the DAGGER to get MUSHROOMS (R).
- Go to Uri’s Cottage.
- Examine the table (S).
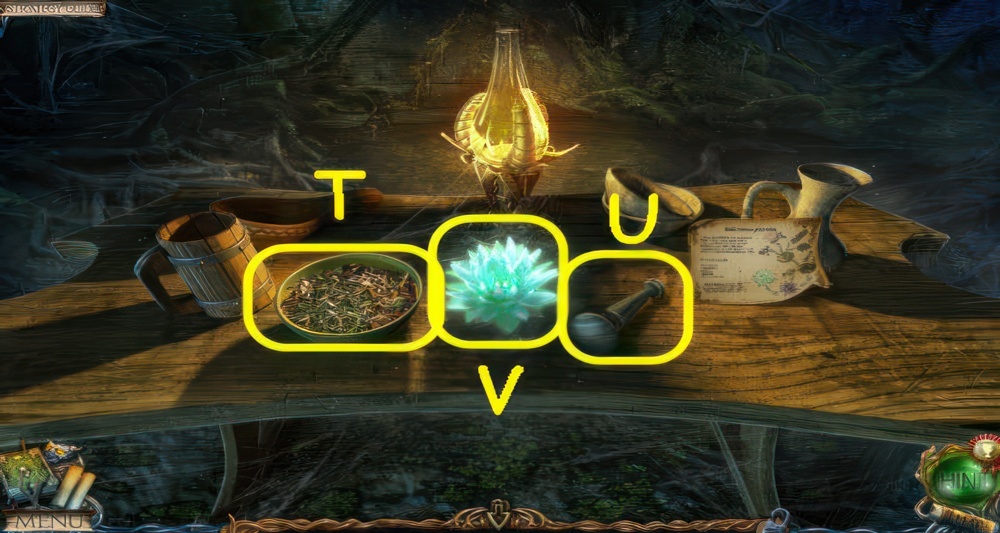
- Place the PONDWEED, BARK, FLOWER ROOT and MUSHROOMS in the bowl (T).
- Use the pestle (U) on it.
- Place the LILY in the holder, use the bowl and TREE SAP on it.
- Take the ENCHANTED LILY (V).
- Go to The Swamp.
Pearl
The Lake Spirit really did appear as soon as I put the lily in the water. She agreed to help me, but only if I bring him a pearl. The spirit spoke about some kind of ship. I hope the pearl is still there.

- Place the ENCHANTED LILY on the pad (W).
- Speak to the Lake Spirit (X).
- Take the ARROW WITH ROPE (Y).
- Place the ARROW WITH ROPE on the crossbow, take the LOADED CROSSBOW (Z).
- Go back.
- Use the LOADED CROSSBOW on the gangplank (A).
- Enter the ship.
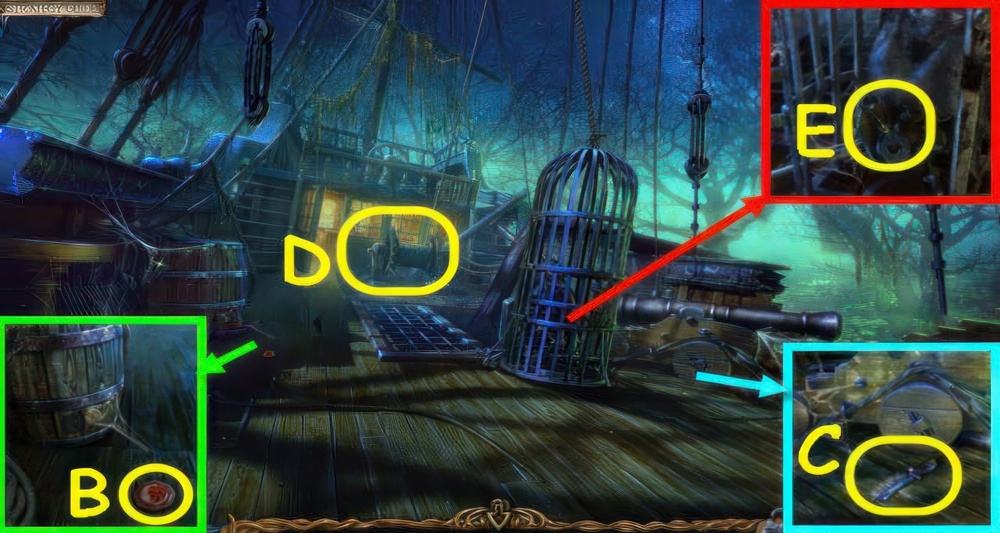
- Take the RED OCTAGON (B).
- Take the BRUSH (C).
- Use the OIL on the winch, select it (D).
- Use the DAGGER on the rope and open the door, take the MECHANISM PART (E).
- Go forward.
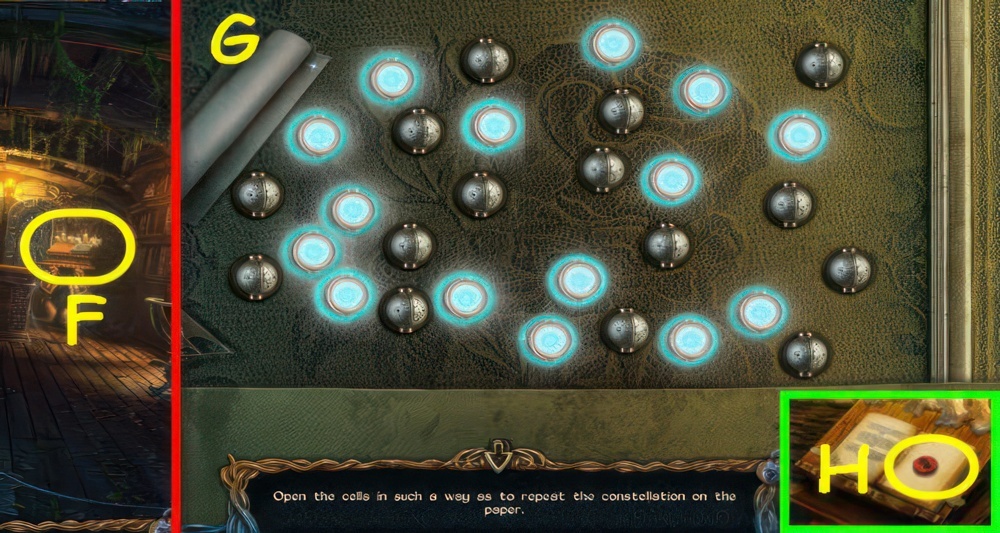
- Open the book, place the PAGE WITH A CONSTELLATION on it to trigger a puzzle (F).
- Open the cells in such a way as to repeat the constellation on the paper.
- Walkthrough (G).
- Take the 3/3 RED DISC (H).
- Go to Outside the Tree.
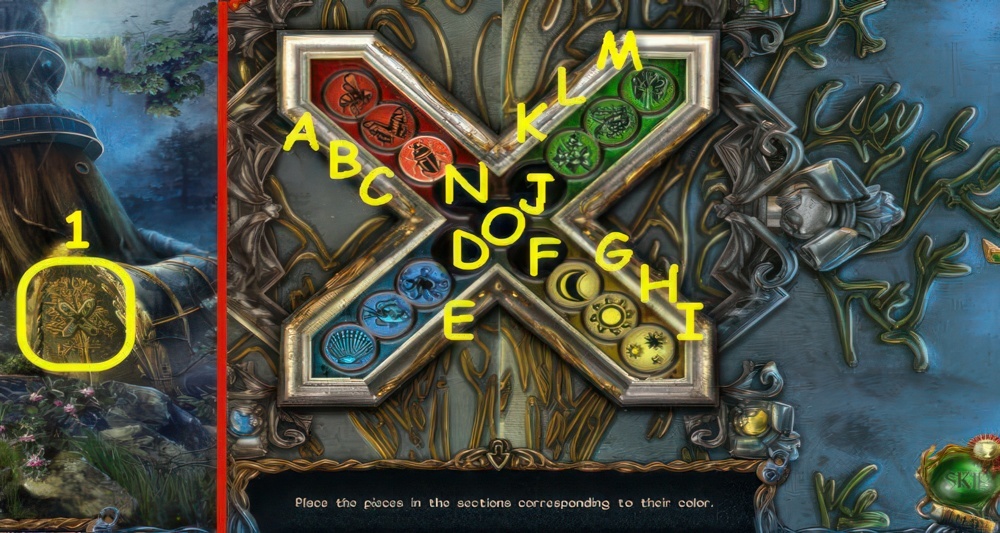
- Place the 3 RED DISCS on the door to trigger a puzzle (1).
- Place the pieces in the sections corresponding to their color.
- Walkthrough: C-J, B-F, A-D, F-A, D-N, E-F, N-E, J-D, K-B, L-C.
- M-N, D-M, F-L, G-K, H-J, I-D, N-I, J-H, C-J, B-G, J-B, D-C.
- Enter the passage.
Gate key
The dwarf and Jimmy went through these gates. I’ve already seen the gates in a scroll I found at the top of the tree. They lead to the caves. And if you believe the legend, evil lives in these caves. I’m afraid to think of what could happen to my boy there. Right now, the gates are closed and I need to open them again. In the scroll, I read about a key. But to get it, I’ll need to collect three statuettes. I think this is the only way into the caves.
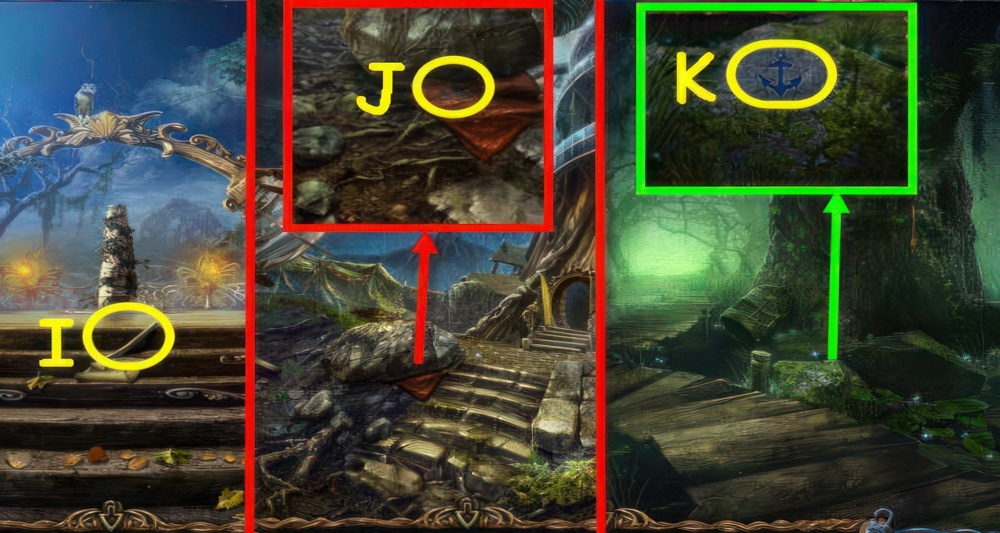
- Read the note, take the STICK (I).
- Go back.
- Use the STICK on the rock, note the 1/3 clue (J).
- Go to Outside the Ship.
- Use the BRUSH on the moss, note the 2/3 clue (K).
- Go to The Captain’s Cabin.

- Remove the cloth, get the 3/3 clue (L).
- Take the PURPLE OCTAGON (M).
- Select the lock and place the MECHANISM PART on it to trigger a puzzle (N).
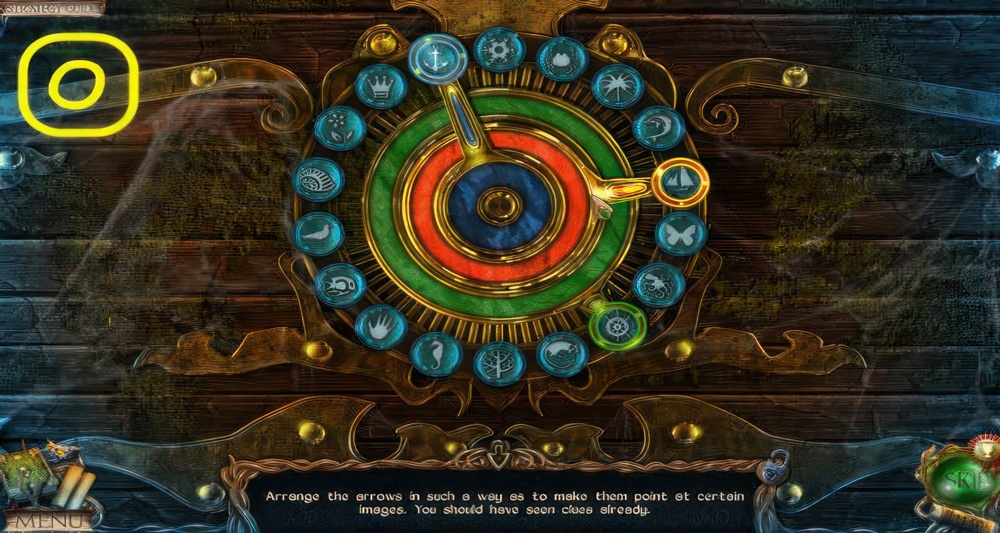
- Use the clues in your journal to set the arrows.
- Arrange the arrows in such a way as to make them point at certain images.
- You should have seen clues already.
- Walkthrough (O).

- Open the shell, take the PEARL (P).
- Go to The Swamp.
- Give the PEARL to the Lake Spirit (Q).
- Go forward.
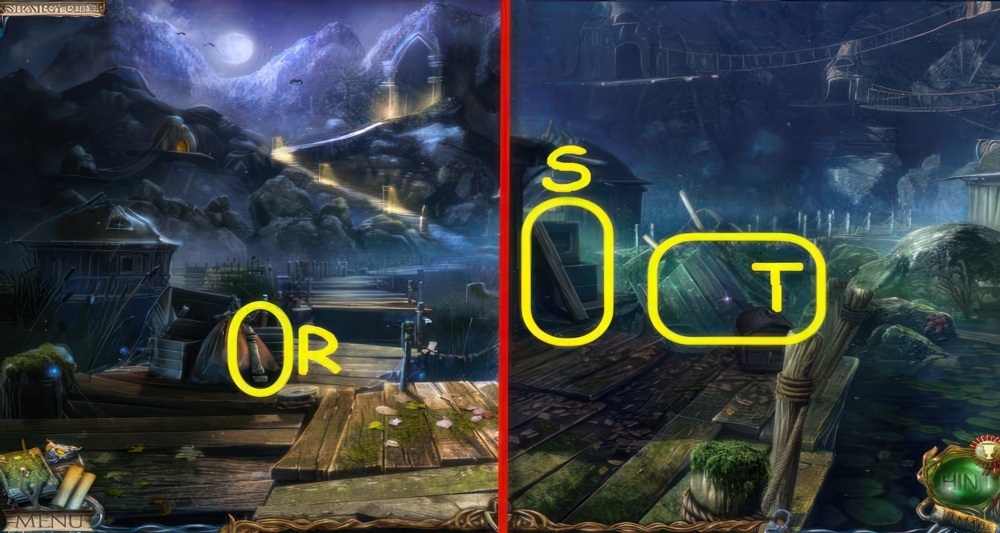
- Take the 1/2 STOOL LEG (R).
- Go to Outside the Cottage on the Water.
- Take the LONG PLANK (S).
- Zoom into the cart to access a puzzle (T).
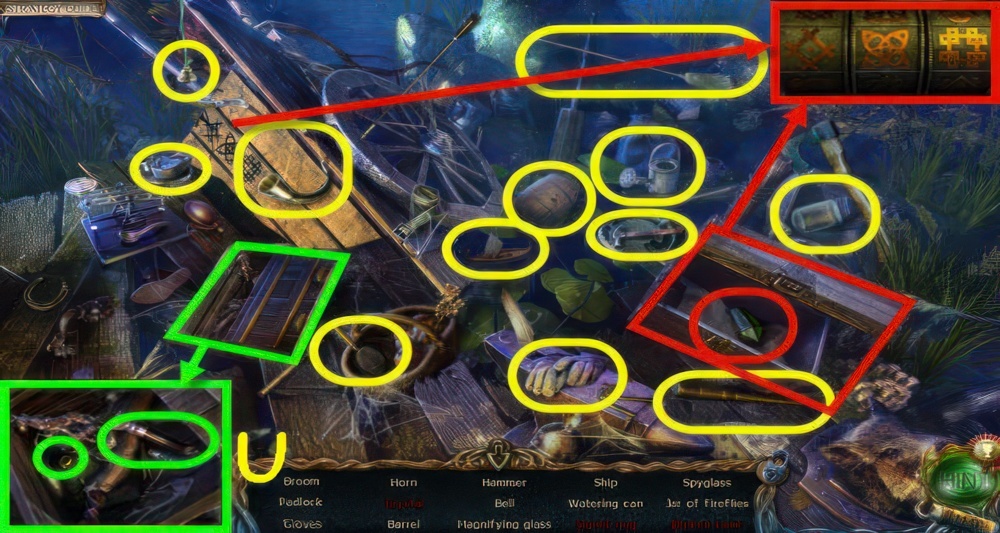
- Play the puzzle.
- You need to set 3 specific symbols.
- You receive a 1/2 CRYSTAL (U).
- Go back.
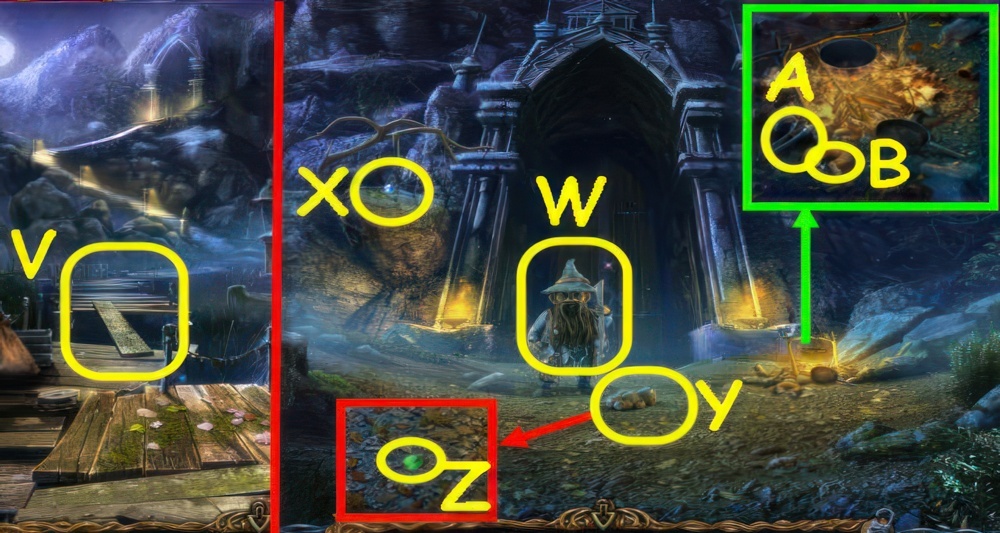
- Place the LONG PLANK on the gap (V).
- Go up the stairs.
- Speak to Uri (W).
- Use the OWL to get the 1/4 SAPPHIRE (X).
- Take the TEDDY BEAR (Y).
- Take the 1/4 EMERALD (Z).
- Take the TONGS (A) and BREADCRUMBS (B).
- Go back.
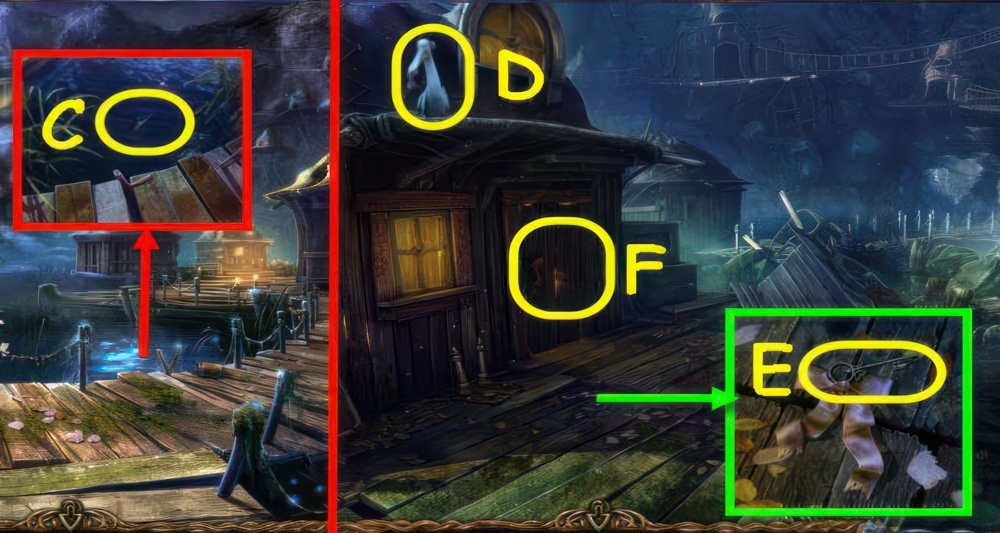
- Use the BREADCRUMBS and BUTTERFLY NET in the water to receive a FISH (C).
- Return to Outside the Cottage on the Water.
- Give the FISH to the pelican (D).
- Take the KEY (E).
- Use the KEY in the lock (F), turn it.
- Enter the Cottage on the Water.
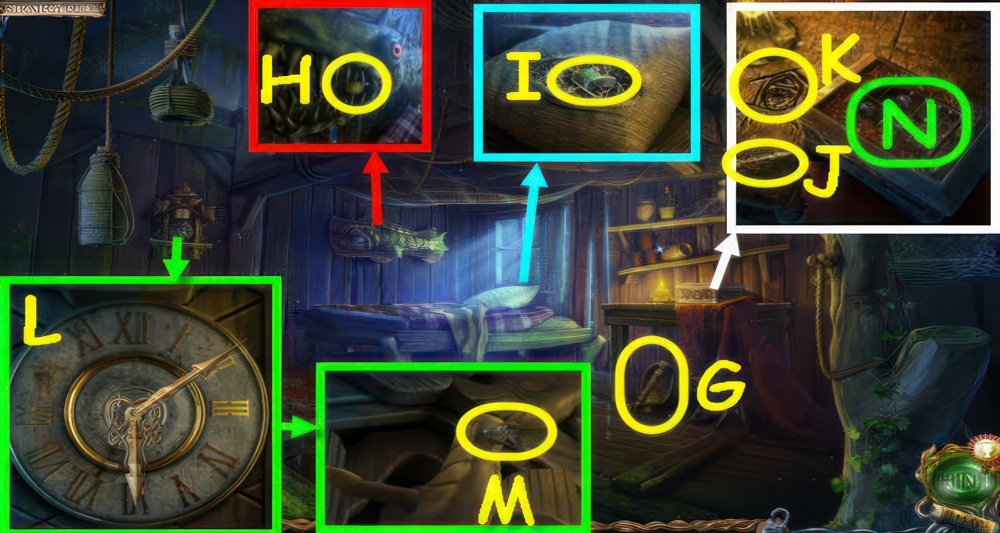
- Take the 2/2 STOOL LEG (G).
- Use the TONGS to get the GOLD OCTAGON (H).
- Use the DAGGER on the pillow, take the MOSAIC PIECE (I).
- Take the CLOCK HAND (J) and note the clue (K).
- Place the CLOCK HAND on the clock, set it per the clue (L).
- Take the FISH FIGURINE (M).
- Place the FISH FIGURINE on the box, select it to trigger a puzzle (N).
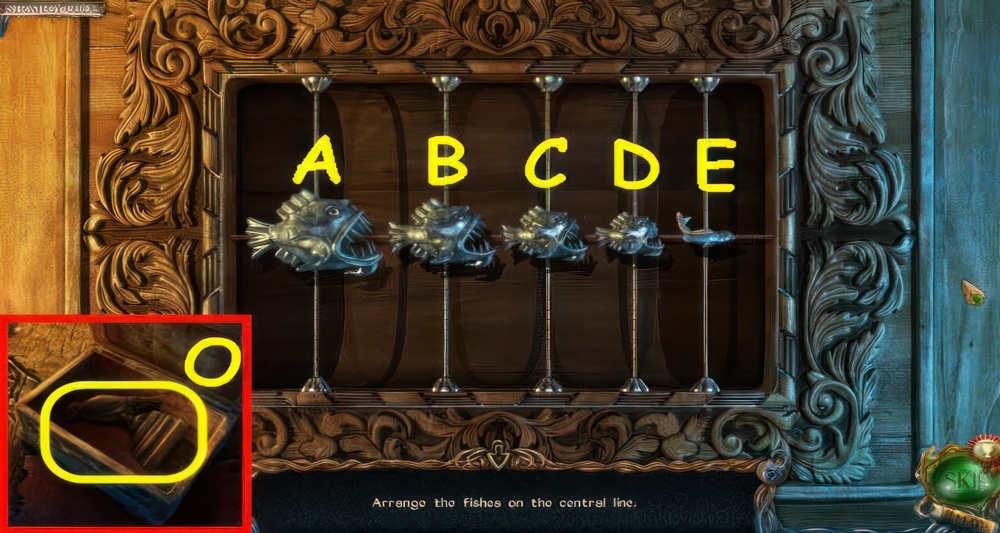
- Place all fish in the center.
- Walkthrough: A, B, C, D, E, A, C, E.
- Take the BIRD FIGURINE (O).
- Go back.
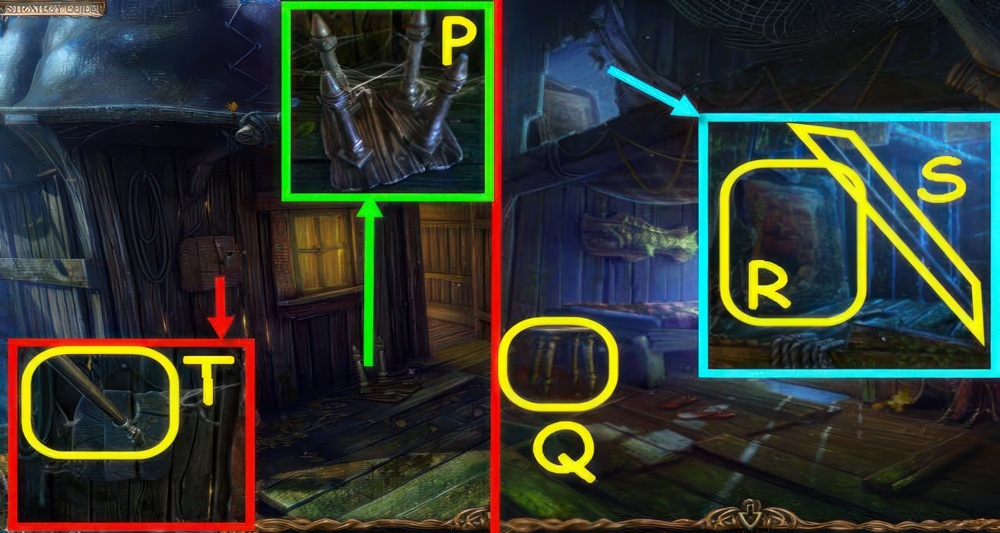
- Place the 2 STOOL LEGS on the STOOL (P), take it.
- Enter the cottage.
- Place the STOOL on the floor (Q).
- Take the PICTURE (R) and STICK (S).
- Go back.
- Place the STICK in the hook and select it 3x to receive a BOAT HOOK (T).
- Go to Uri’s Cottage.
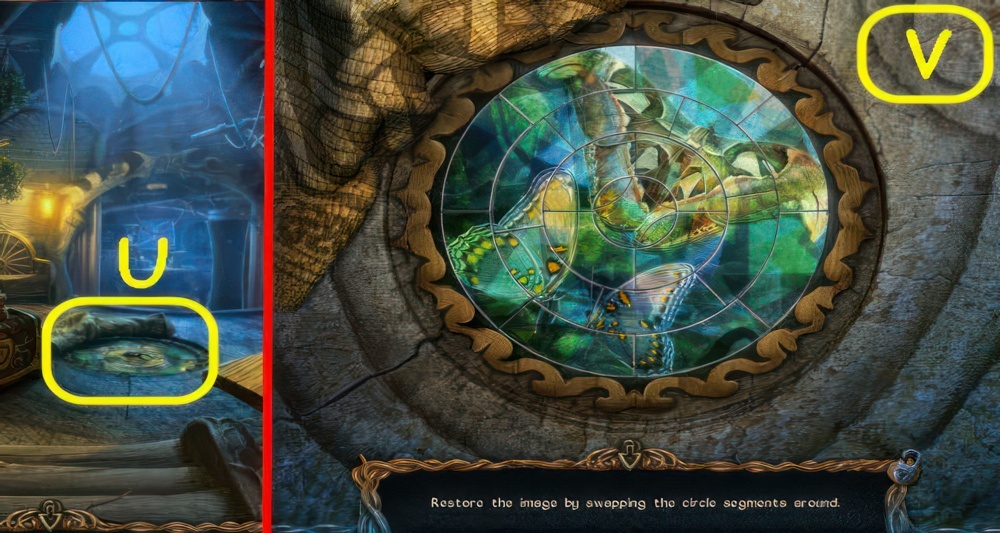
- Place the MOSAIC PIECE on the mosaic to trigger a puzzle (U).
- Restore the image by swapping the circle segments around.
- Swap the pieces to complete the image (V).
- Zoom into the center opening to access a puzzle.
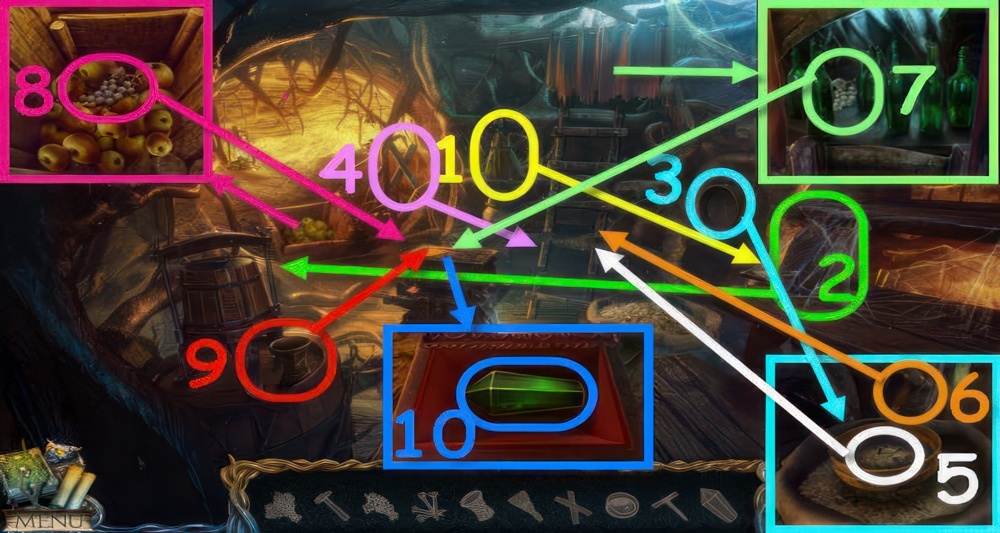
- Play the puzzle.
- You receive a 2/2 CRYSTAL (1-10).
- Go to The Captain’s Cabin.
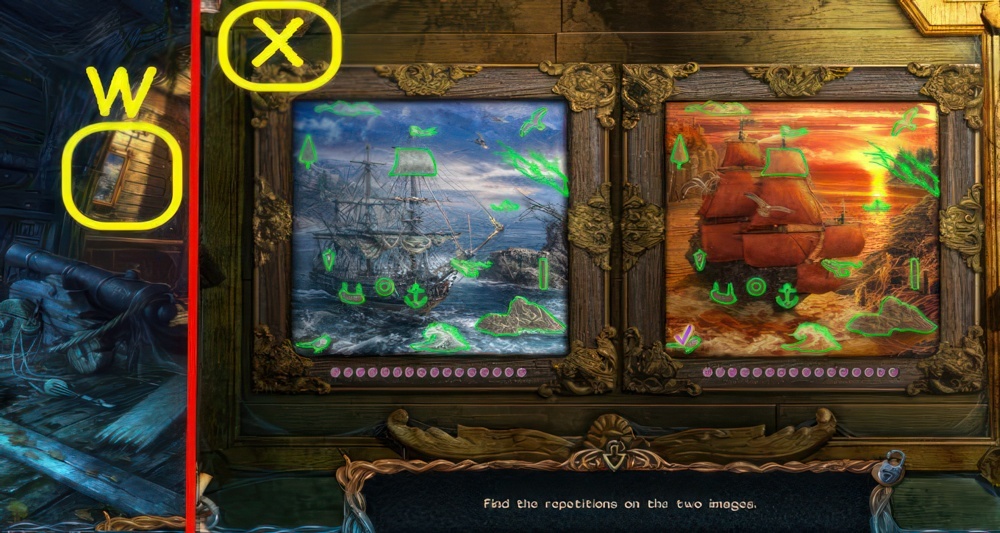
- Place the PICTURE on the wall to trigger a puzzle (W).
- Find the repetitions on the two images.
- Walkthrough (X).
- Take the DEER FIGURINE.
- Go to Outside the Tree.
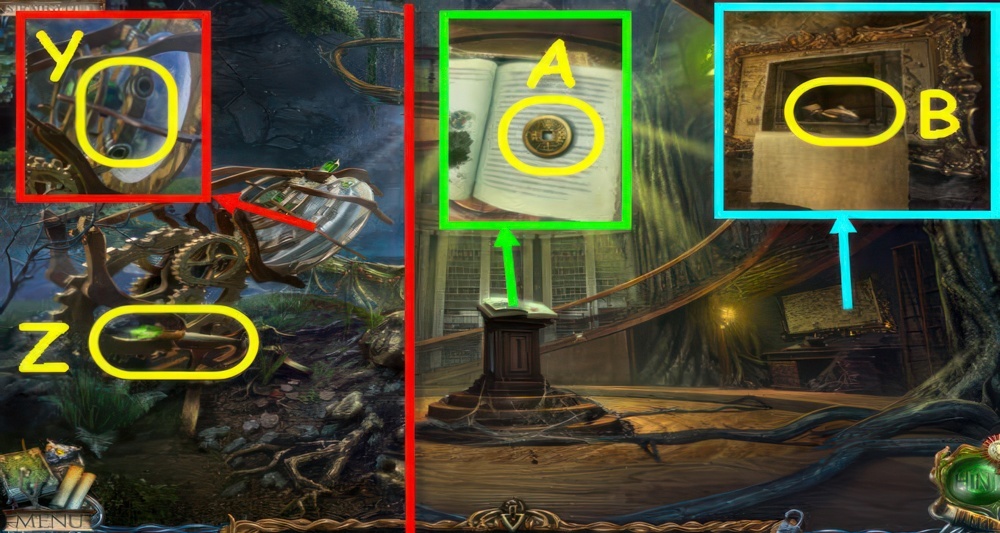
- Place the 2 CRYSTALS in the slots (Y).
- Pull the lever (Z).
- Enter The Library.
- Take the 1/2 COIN (A).
- Use the DAGGER on the map, take the FISH FIGURINE (B).
- Go to The Top of the Tree.
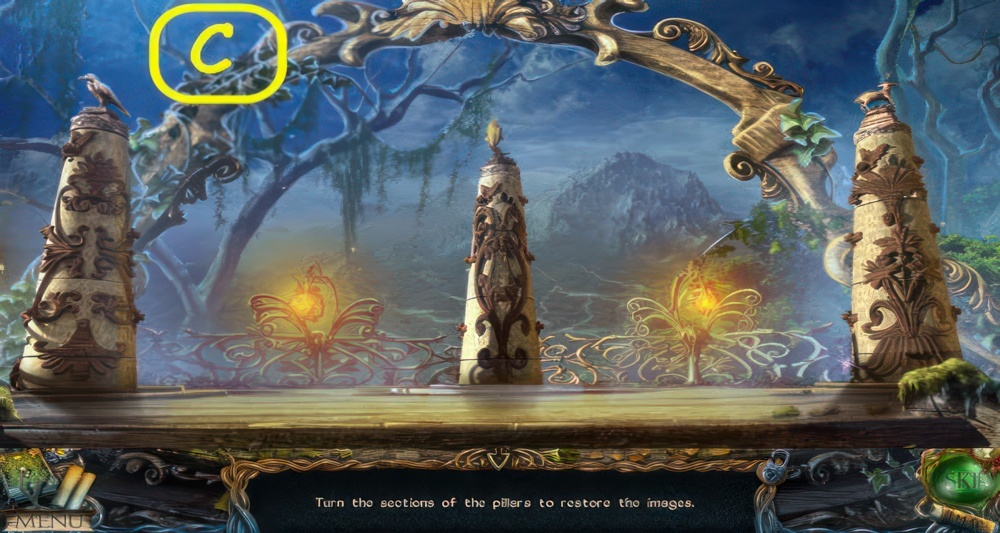
- Starting on the left, place the BIRD FIGURINE, FISH FIGURINE, and DEER FIGURINE on the pedestals to trigger a puzzle.
- Turn the sections of the pillars to restore the images.
- Walkthrough (C).
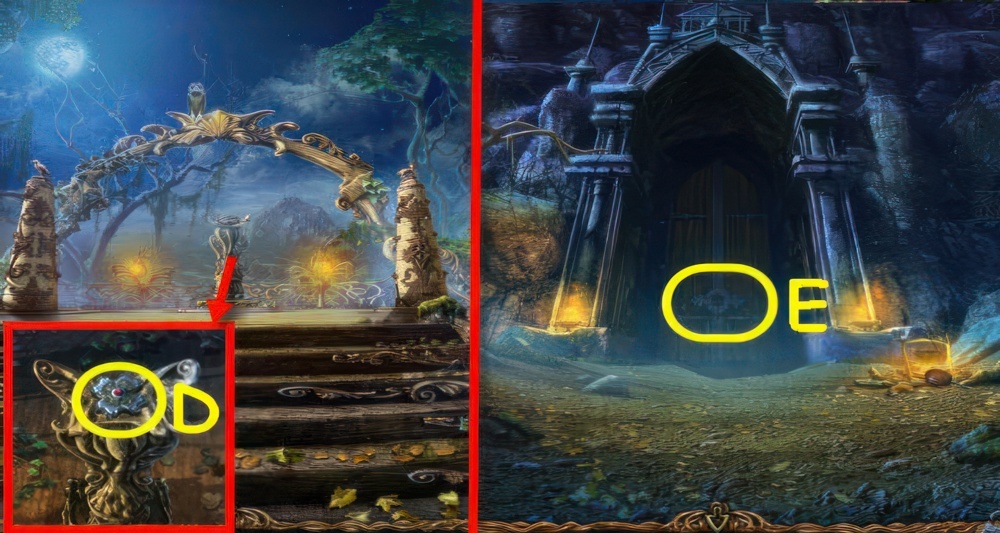
- Take the GATE KEY (D).
- Go to The Gates.
- Place the GATE KEY on the gate (E).
- Go forward.
Lift
There’s a way out of the caves. My Jimmy must be somewhere on the surface right now. To get up there, I’ll need to start the lift.
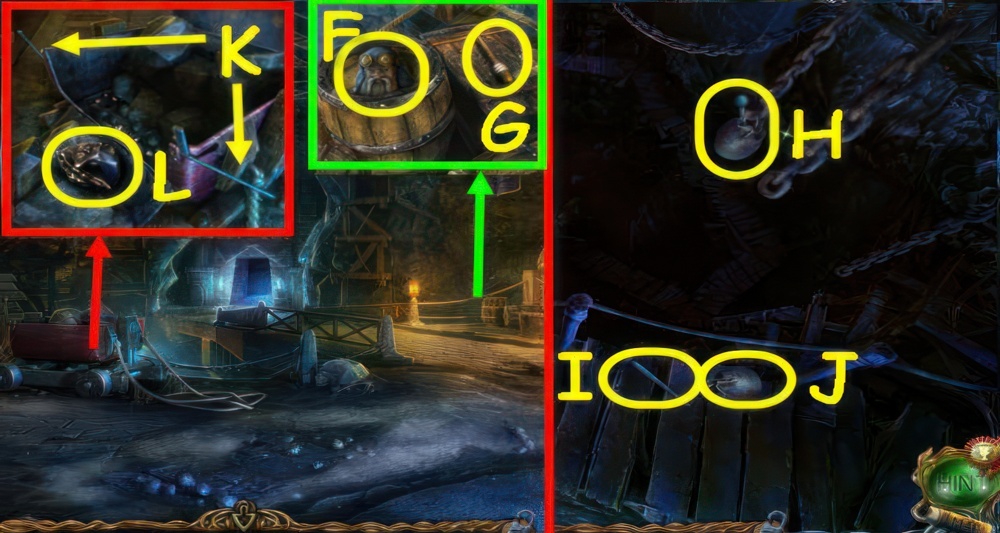
- Open the lid, take the 1/3 STATUE HEAD (F).
- Select the torch 3x to receive a TORCH (G).
- Go to The Underground Descent.
- Use the BOAT HOOK on the sack (H).
- Take the LEVER (I) and SACK (J).
- Go back.
- Place the LEVER in the slot, pull the 2 levers (K) and take the TAR (L).
- Go back.
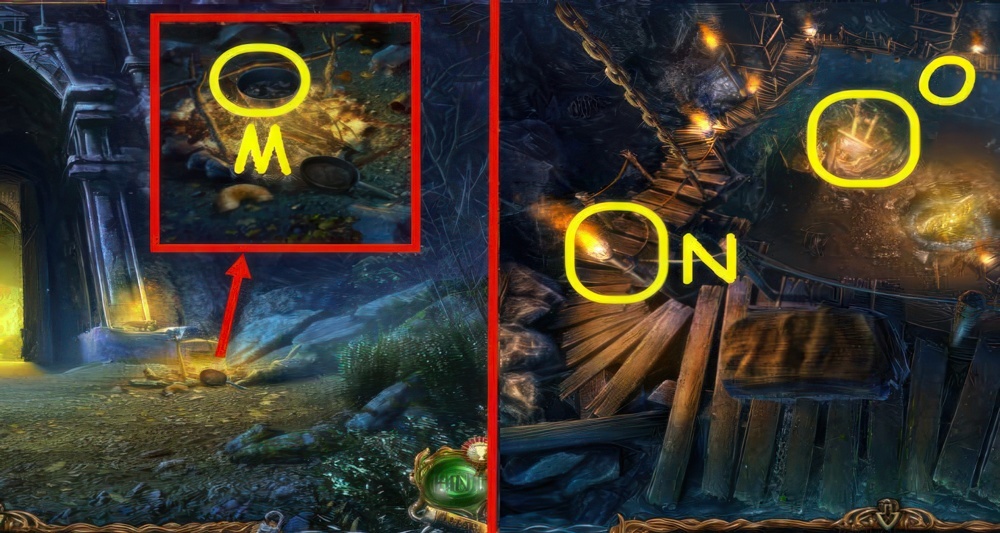
- Place the TAR in the pot and dip the TORCH in it, receive a TORCH (M).
- Go to The Underground Descent.
- Use the TORCH on the holder (N).
- Zoom into the puzzle (O).
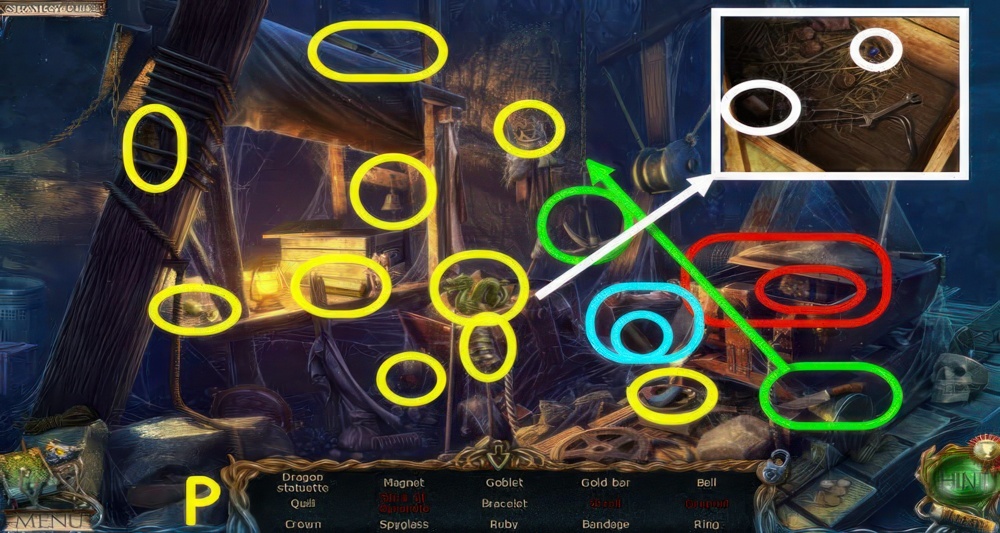
- Play the puzzle.
- You receive DYNAMITE (P).
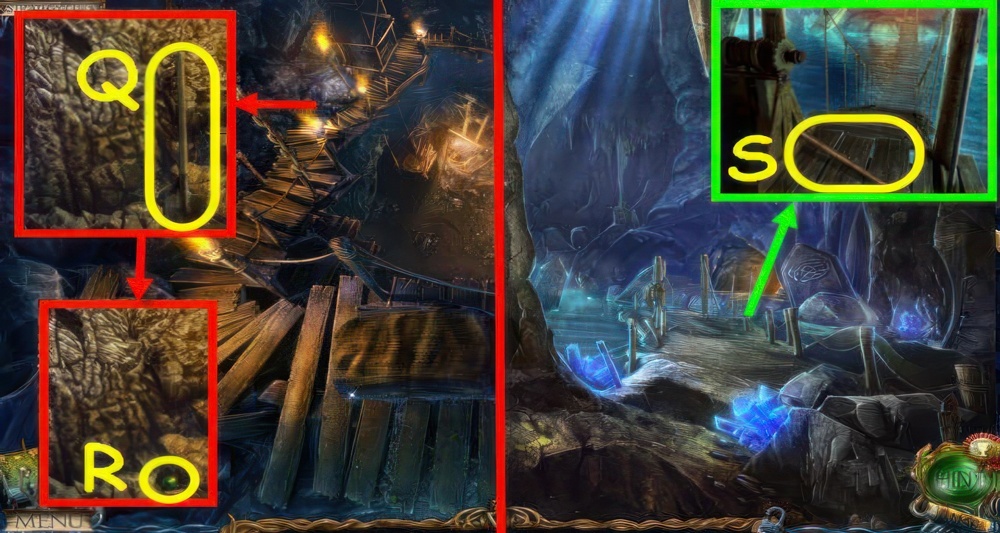
- Take the SPADE (Q) and 2/4 EMERALD (R).
- Go to The Underground Lake.
- Take the HANDLE (S).
- Go to The Demon Statue.
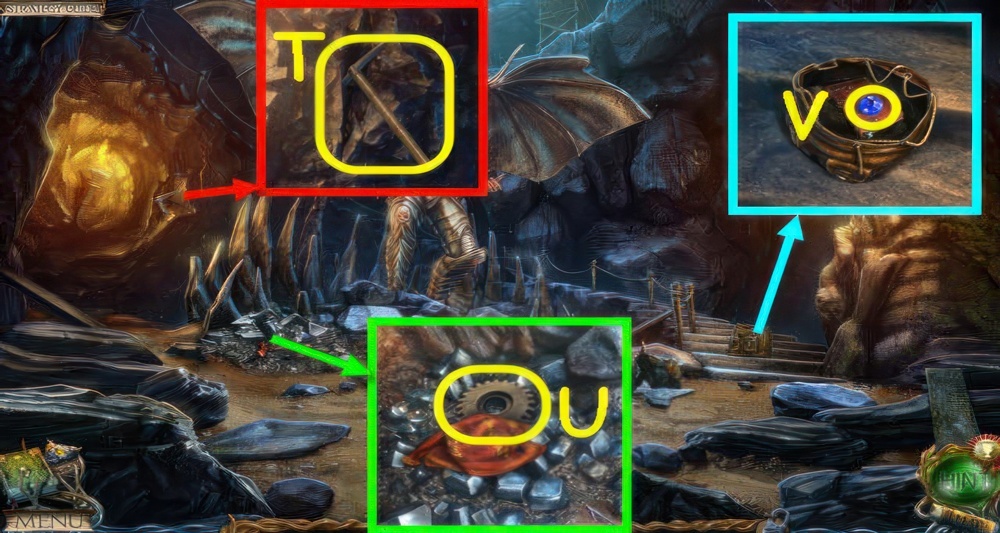
- Remove the broken handle and place the HANDLE on it, select it ×2 to receive a PICK (T).
- Use the SPADE on the rubble, select the tapestry and take the WOODEN COG (U).
- Use the DAGGER on the rope, take the 2/4 SAPPHIRE (V) and read the book.
- Go back.
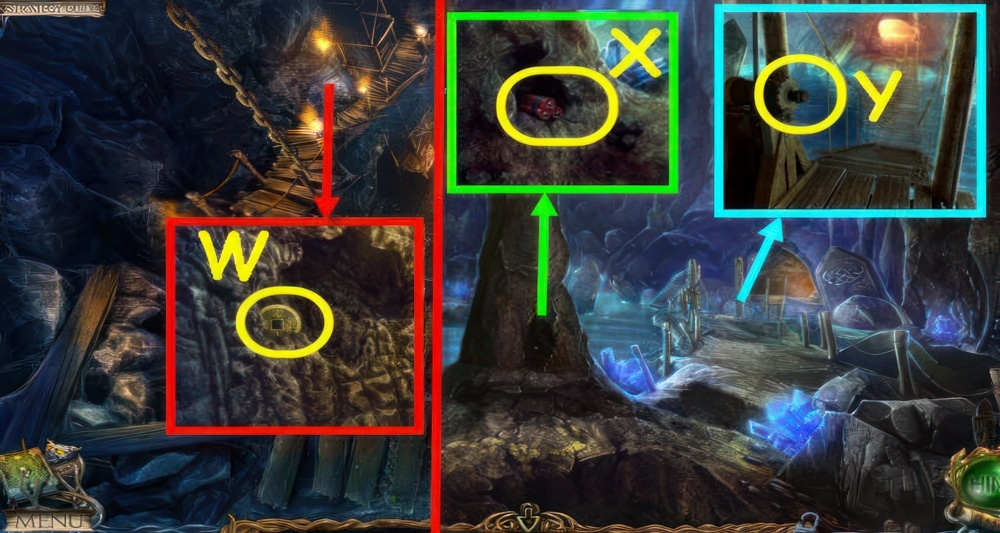
- Use the PICK on the wall, take the 2/2 COIN (W).
- Go to The Underground Lake.
- Use the DYNAMITE and TORCH in the hole (X).
- Place the WOODEN COG on the winch (Y).
- Enter The Hanging Bridges on the right.
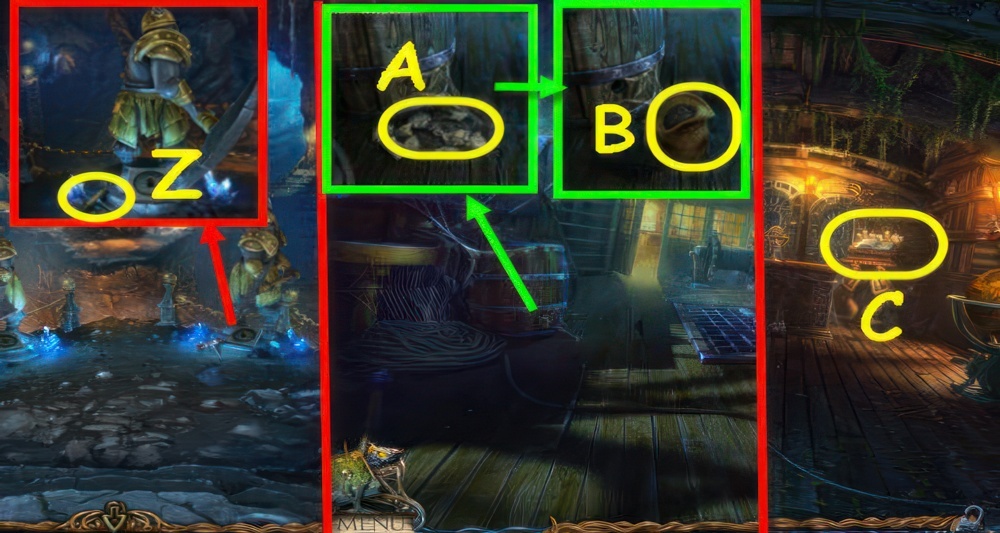
- Take the CORKSCREW (Z).
- Go to The Ship.
- Use the CORKSCREW on the cork, take the TORN PAGE (A).
- Use the SACK on the powder, take the GUNPOWDER (B).
- Go forward.
- Place the TORN PAGE on the book to trigger a puzzle (C).
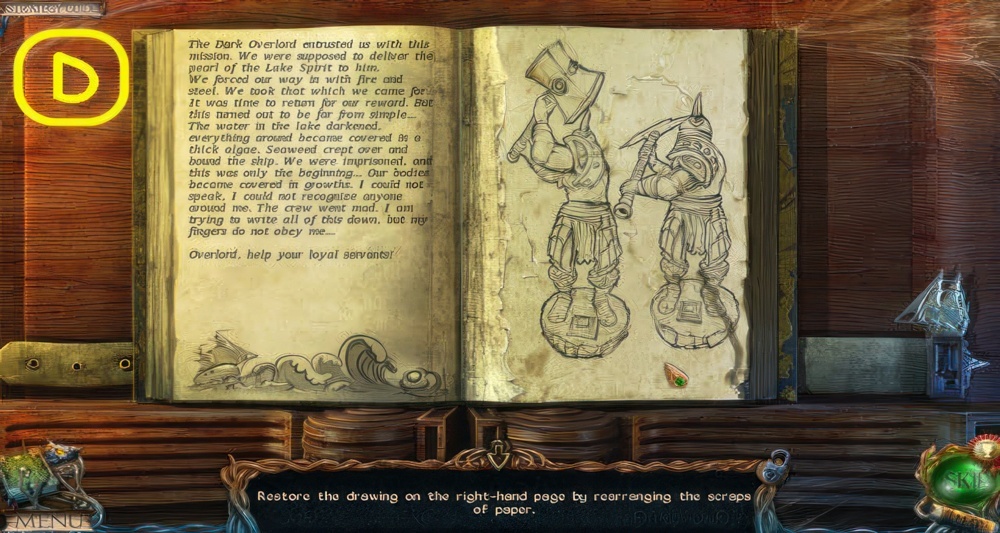
- Assemble the pages.
- Restore the drawing on the right-hand page by rearranging the scraps of paper.
- Walkthrough (D).
- Go to The Hanging Bridges.
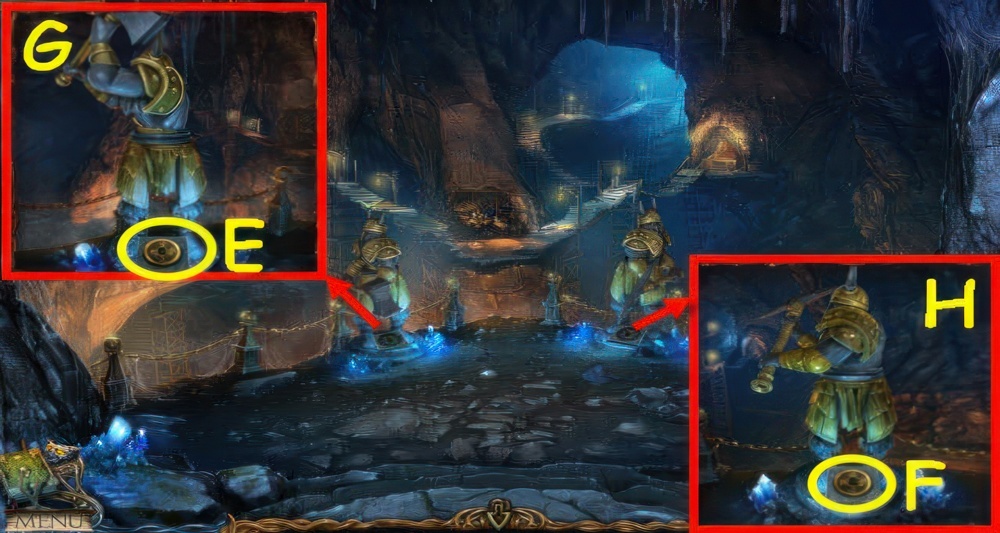
- Place a 2 COIN in each base (E-F).
- Arrange the statues per the clues in your journal.
- Walkthrough (G-H).

- Remove the cover, take the 2/3 STATUE HEAD (I).
- Move the items to find the KEY (J).
- Zoom into the alcove to access a puzzle (K).
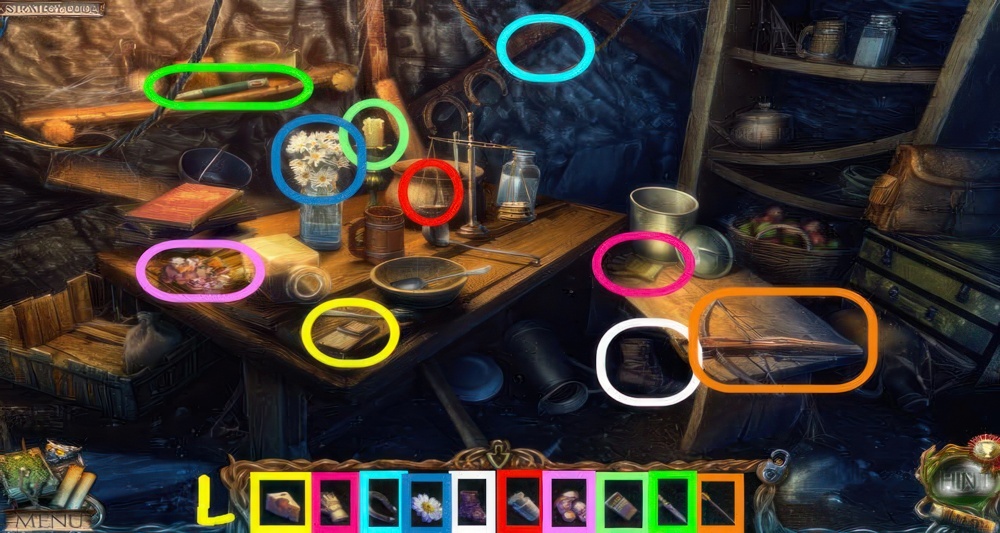
- Play the puzzle.
- You receive a 3/4 SAPPHIRE (L).
- Go to At the Lift.
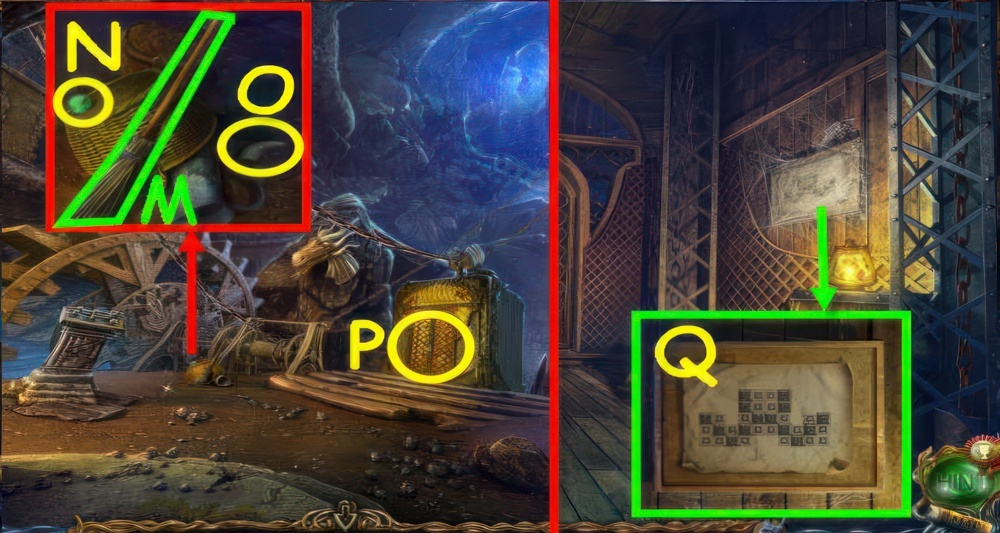
- Take the BROOM (M), 3/4 EMERALD (N) and STONE HORN (O).
- Use the KEY on the padlock, remove it and enter (P).
- Use the BROOM on the cobwebs, take the DIAGRAM (Q).
- Go to The Underground Lake.
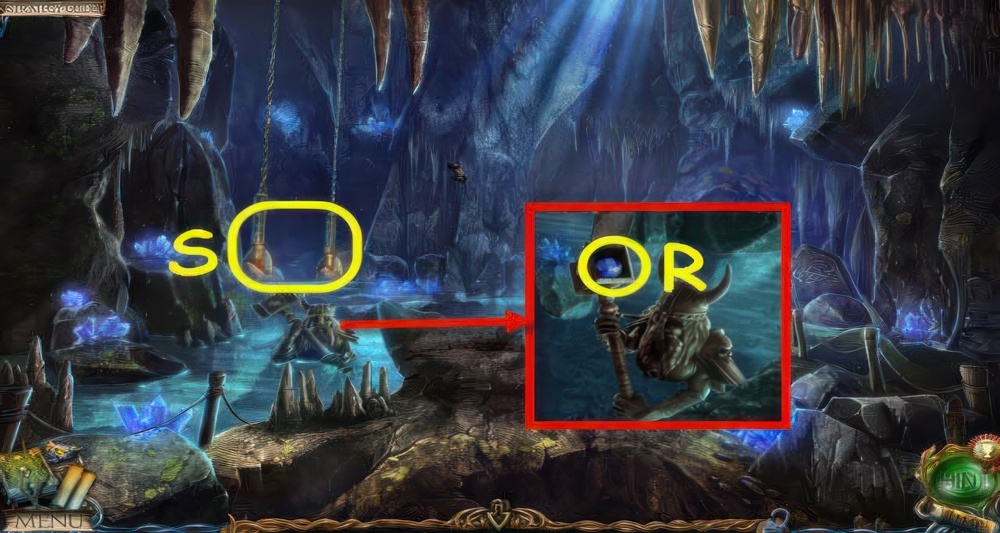
- Place the STONE HORN on the helmet, take the 4/4 SAPPHIRE (R).
- Go forward (S).
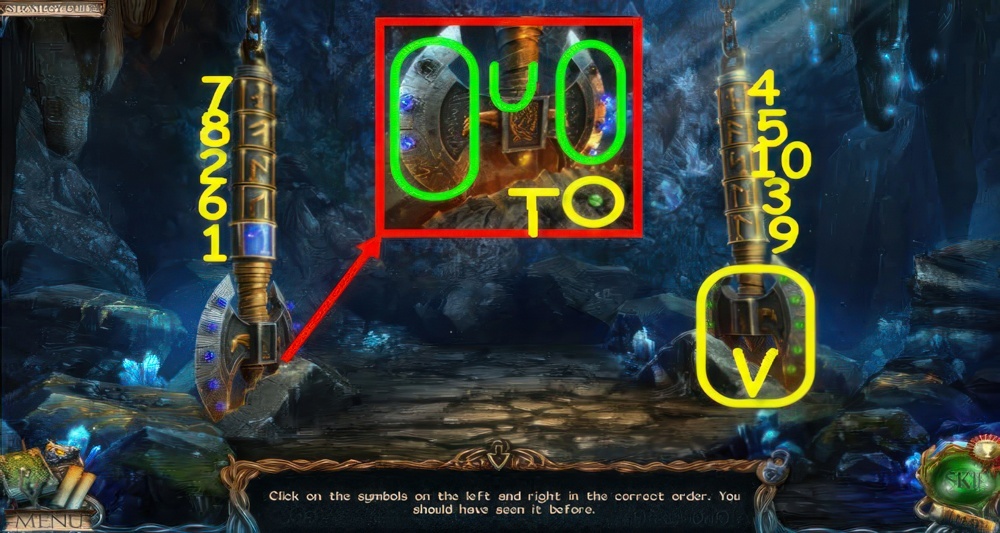
- Take the 4/4 EMERALD (T).
- Place the 4 SAPPHIRES in the slots (U).
- Place the 4 EMERALDS in the slots to trigger a puzzle (V).
- Click on the symbols on the left and right in the correct order.
- Walkthrough: 1-10.
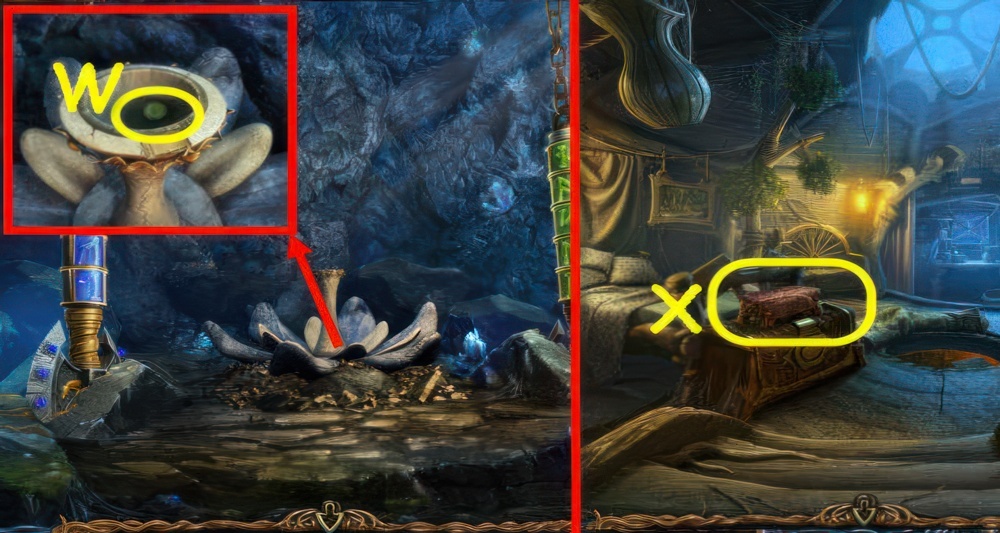
- Read the note, take the GREEN OCTAGON (W).
- Go to Uri’s Cottage.
- Remove the cloth, place the RED OCTAGON, PURPLE OCTAGON, GOLD OCTAGON and GREEN OCTAGON in the slots to trigger a puzzle (X).
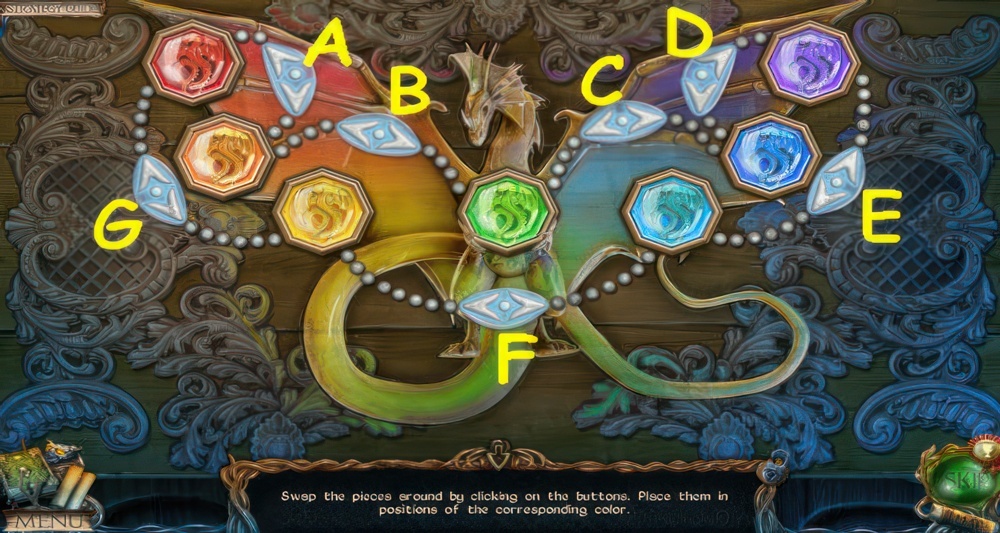
- Place the octagons in their matching slots.
- Swap the pieces around by clicking on the buttons.
- Place them in positions of the corresponding color.
- Walkthrough: B, A, G, A, G, F, D, E, D, C, E.
- Take the SOLVENT and CONTINENT FIGURE.
- Go to The Captain’s Cabin.
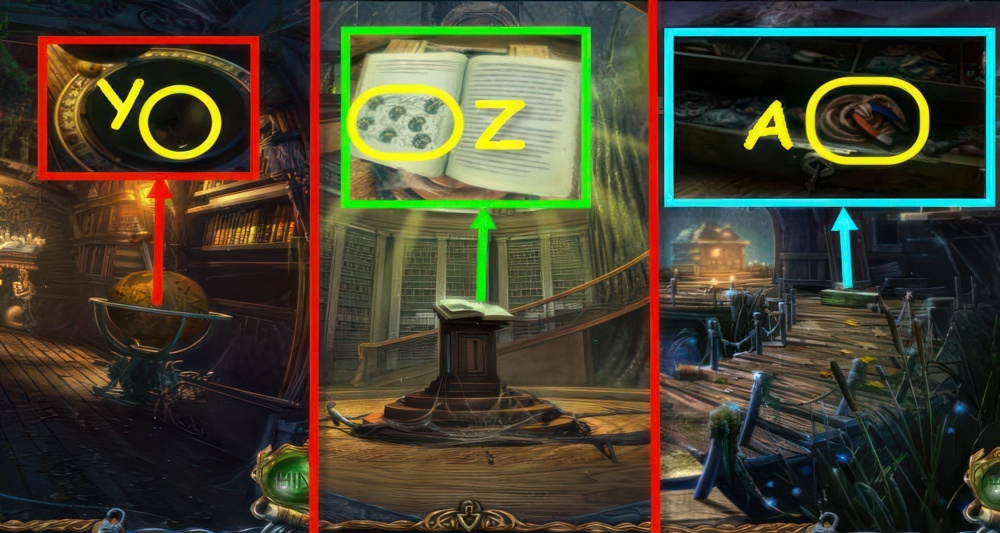
- Place the CONTINENT FIGURE on the globe, take the CROSS-SHAPED KEY (Y).
- Go to The Library.
- Use the SOLVENT on the stain, select the diagram to get a clue (Z).
- Go to The Bank at the Cliffs.
- Use the CROSS-SHAPED KEY on the lock, take the MAGNET (A).
- Go to The Cottage on the Water.
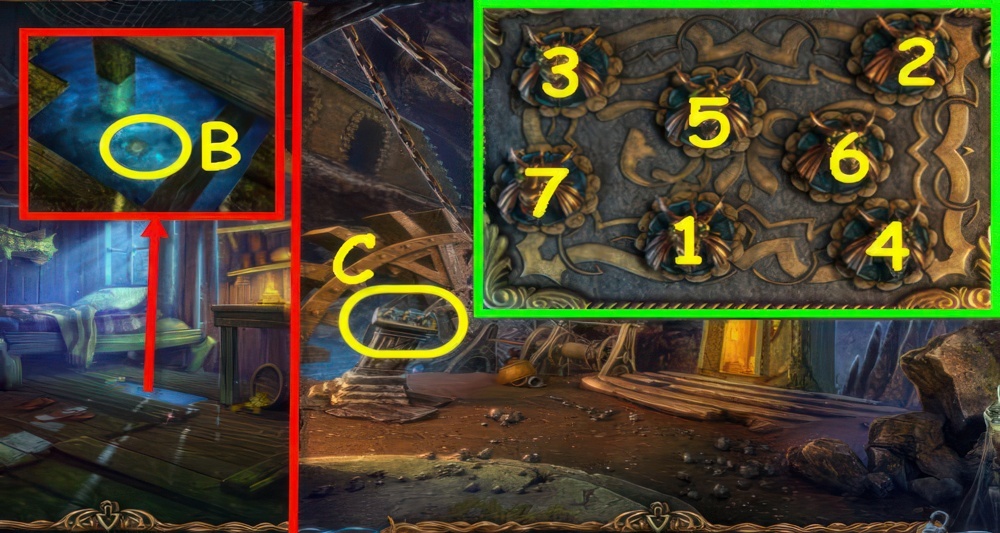
- Use the MAGNET to retrieve the STAR MEDALLION (B).
- Go to At the Lift.
- Examine the pedestal to trigger a puzzle (C).
- Click on the heads in the right order.
- Walkthrough: 1-7.
- Go to The Library.
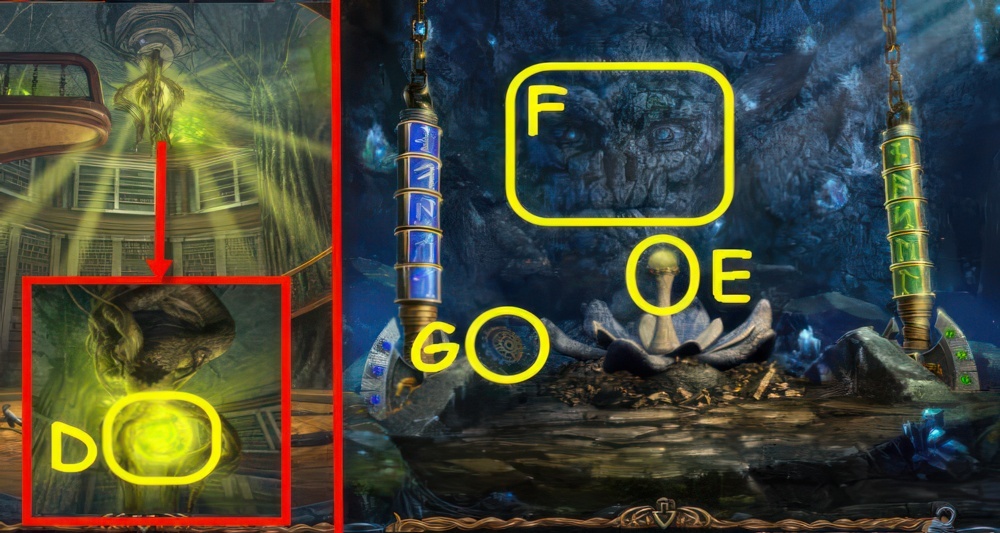
- Place the STAR MEDALLION in the slot, receive an ORB (D).
- Go to The Underground Lake Shore.
- Place the ORB on the pedestal (E).
- Speak to the Spirit (F).
- Take the COG (G).
- Go to The Lift.
Mountain Spirit’s potion
The Mountain Spirit told me that his strength is disappearing. He can’t help me until he recovers it. I have to bring him a life potion. I hope it’ll help him. To do this, I need to find the ingredients for a special potion and prepare it.

- Place the COG on the panel to trigger a puzzle (H).
- Place the cogs so that they all interlock.
- Walkthrough: (I).
- Select the door, go forward.

- Take the 1/10 BAS-RELIEF PIECE (J).
- Go forward.
- Take the SHOVEL (K) and COINS (L).
- Go back.
- Use the SHOVEL on the snow, take the HAMMER (M).
- Place the HAMMER in the statue’s hands (N).
- Take the 3/3 STATUE HEAD (O).
- Send the OWL to retrieve the 1/2 VALVE (P).
- Go forward.
- Open the tent and zoom in to access a puzzle.

- Play the puzzle.
- You receive an OVEN MITT (Q).
- Go to The Caves.
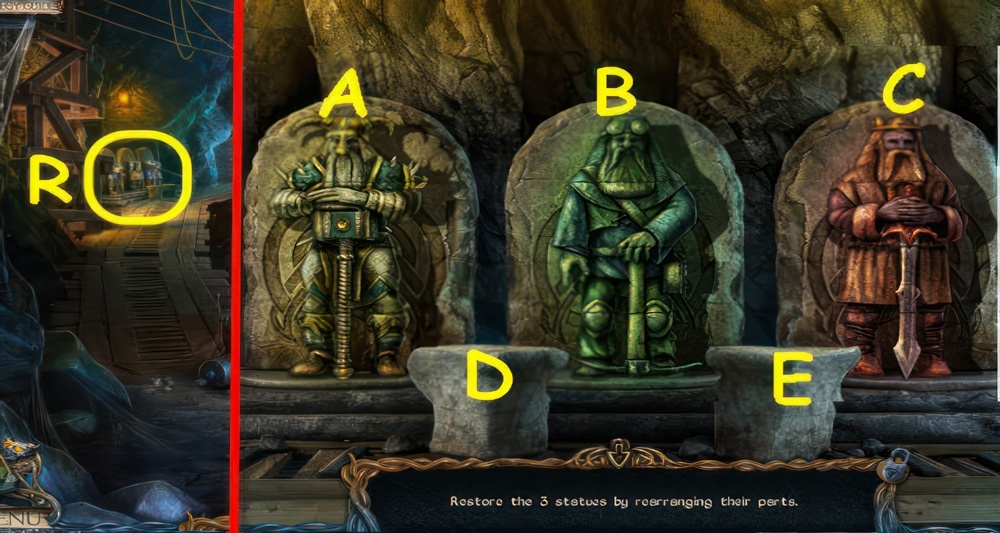
- Place the 3 STATUE HEADS on the statues to trigger a puzzle (R).
- Restore the 3 statues by rearranging their parts.
- Walkthrough: B-D×3, A-E×2, A-B, D-E, D-A, C-D, C-A, C-B, D-B, E-C×2, D-C, E-A.
- Take the MOSAIC PIECES.
- Go to The Demon Statue.
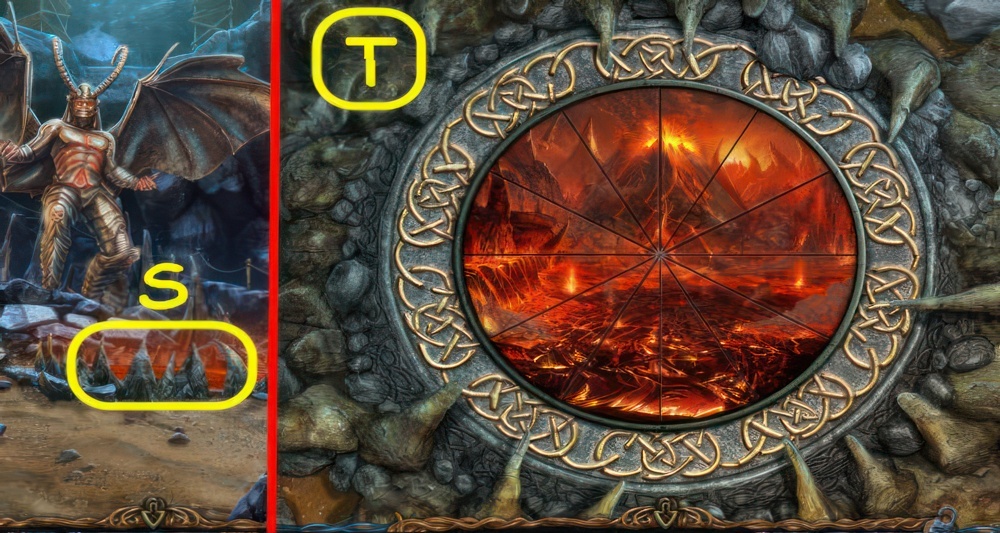
- Place the MOSAIC PIECES on the mosaic to trigger a puzzle (S).
- Restore the image by rearranging the mosaic pieces.
- Swap any two pieces to complete the image (T).
- Read the note, take the BUTTONS.
- Go to Outside the Castle.
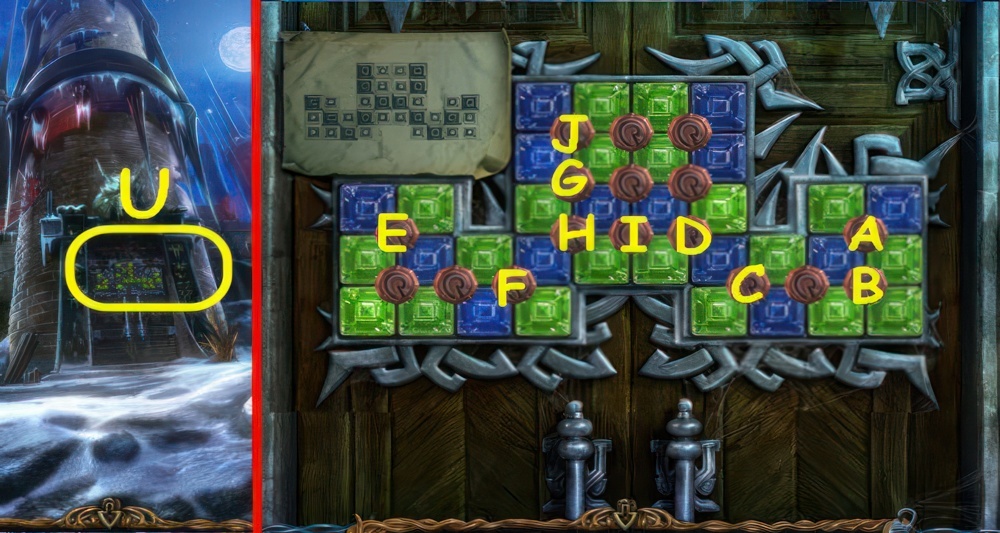
- Place the DIAGRAM and BUTTONS on the door to trigger a puzzle (U).
- Rearrange the squares as shown on the diagram by clicking on the buttons with arrows on.
- Walkthrough: A, B×2, C×3, D, E, F, G, H×2, F, I, J×2.
- Go forward.
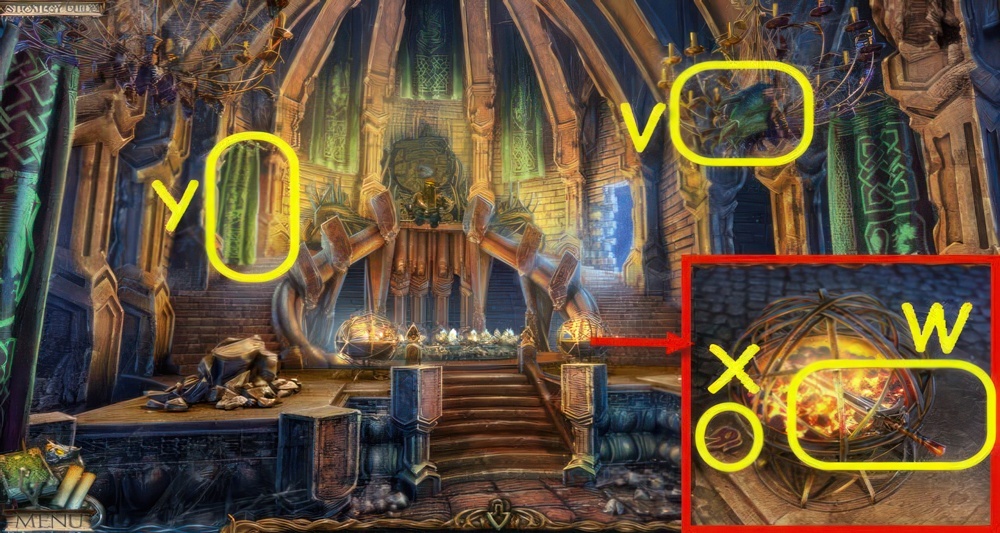
- Select anywhere, receive a KEY.
- Use the OWL to retrieve the 2/10 BAS-RELIEF PIECE (V).
- Use the OVEN MITT to get the SWORD (W).
- Take the FIRE SYMBOL (X).
- Open the curtain and enter The Corridors (Y).
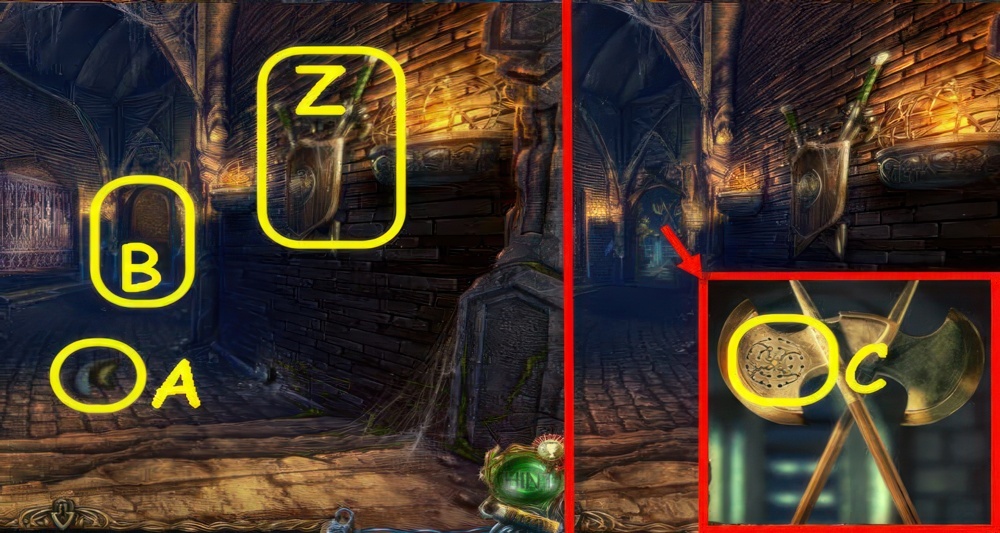
- Push in both swords (Z), take the 3/10 BAS-RELIEF PIECE (A).
- Use the KEY in the lock (B).
- Select the symbol for a clue (C).
- Go to Exit to the Dirigible.
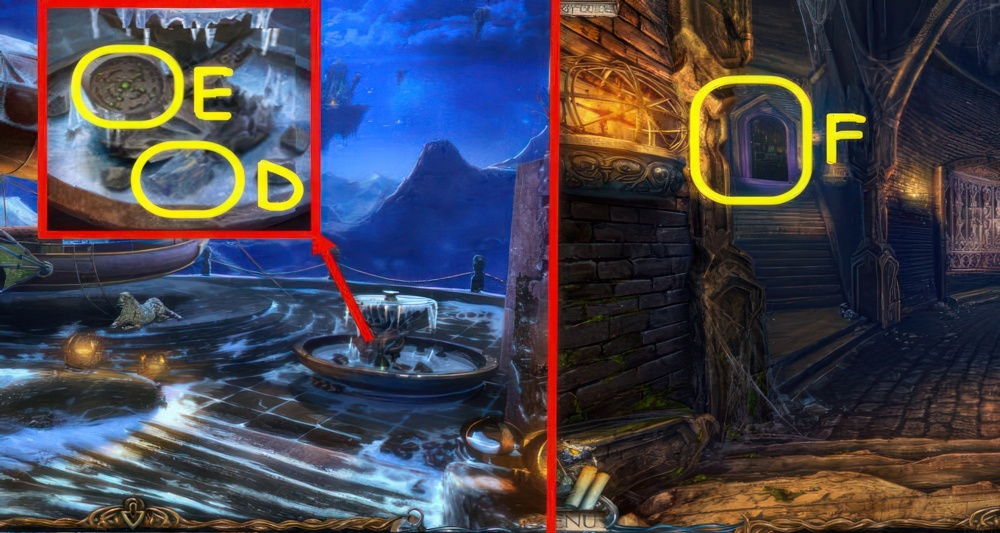
- Use the SWORD on the ice, take the OBJECT IN ICE (D) and select the clue (E).
- Go to The Corridors.
- Examine the door to trigger a puzzle (F).
Break the spell on Jimmy
I found my son, but it was already too late. Jimmy is under a spell. He doesn’t recognize me, his own mother. He doesn’t want his teddy bear. He doesn’t care about anything. And the foul dwarf. He’s gone into hiding. What can I do. I have to find a way to break the spell on Jimmy. In the alchemist’s laboratory, I met his soul again. He told me how I can destroy the demon. The Alchemist created the philosopher’s stone, and with its help, turned him into a golden statue. But a reverse element can also be made, which will destroy the gold. So I can destroy both the statue and the demon and break the spell on my son.
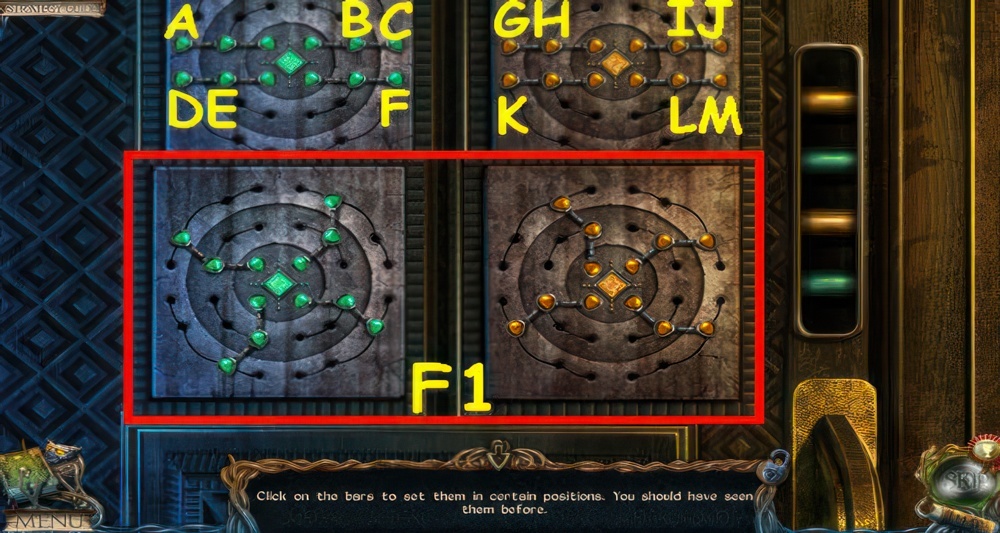
- Duplicate the position as noted in your journal.
- Click on the bars to set them in certain positions.
- Walkthrough (F1): A, C, B, D, E, D, E, F, G, H, G, H, J, I, J, K, M, L, M.
- Go up the stairs.
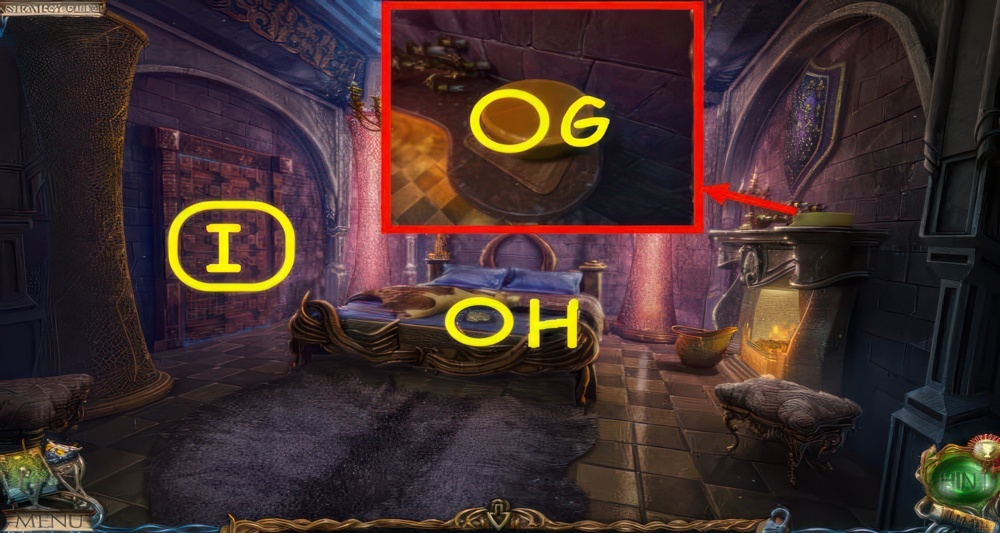
- Speak to the Alchemist.
- Use the DAGGER on the cheese, take a PIECE OF CHEESE (G).
- Move the hide, take the 1/3 SYMBOL (H).
- Open the door and zoom in to access a puzzle (I).
Alchemist’s tower
My meeting with the spirit of the alchemist has filled me with hope. He told me that his castle is floating high in the sky. He’s performed various alchemical experiments there. He must have made the stone there that turned the demon into a golden statue. The Alchemist says that he has everything we need there to destroy the demon once and for all. But to get to the castle, first I’ll have to repair the dirigible.
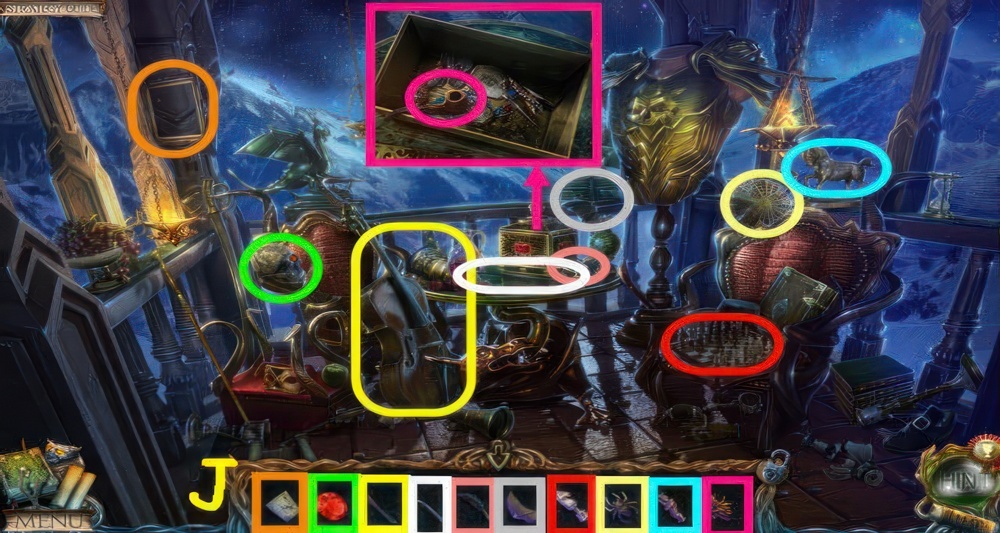
- Play the puzzle.
- You receive PINCERS (J).
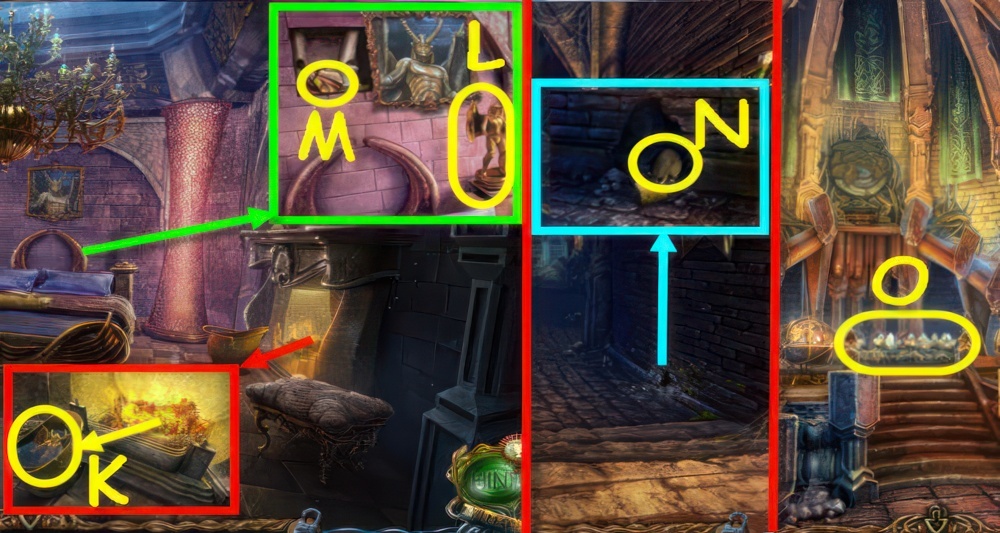
- Place the OBJECT IN ICE on the fire, use the PINCERS on it and take the STATUETTE (K).
- Place the STATUETTE on the bedpost (L), take the PIECES (M) and read the note.
- Go back.
- Place the PIECE OF CHEESE by the hole, take the RAT (N).
- Go back.
- Place the PIECES on the mosaic to trigger a puzzle (O).
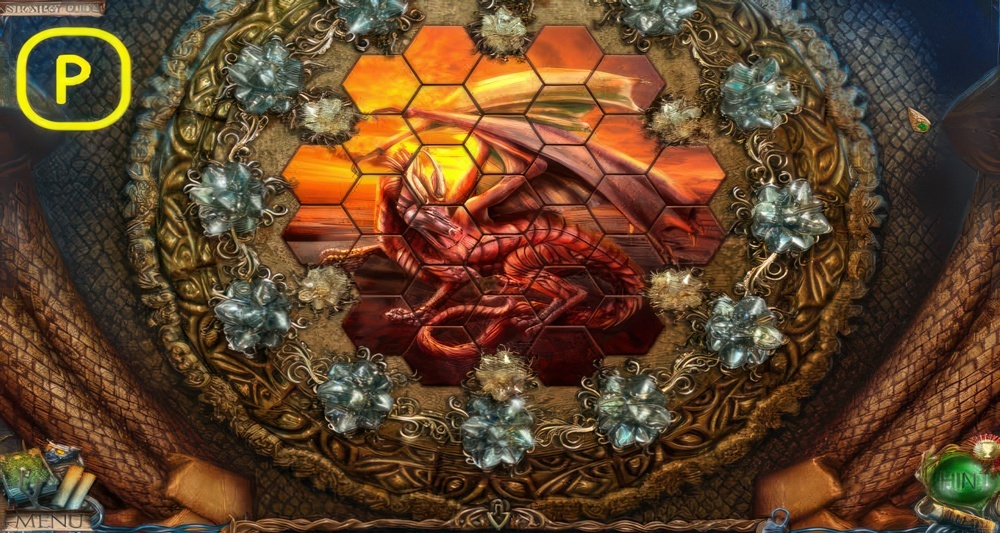
- Restore the image by rearranging the mosaic pieces.
- Switch the pieces to complete the image (P).
- Take the PROPELLER BLADE and 2/3 SYMBOL.
- Go to The Viewing Point.
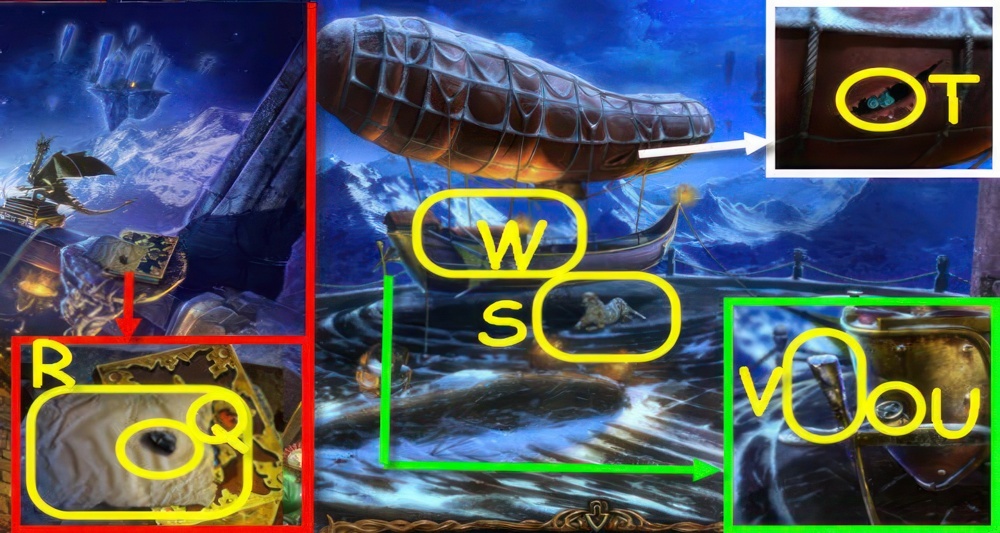
- Take the COAL (Q) and BLANK PIECE OF PAPER (R).
- Go to Exit to the Dirigible.
- Use the RAT on the leopard (S).
- Take the AIR SYMBOL (T) and 2/2 VALVE (U).
- Remove the top propeller and place the PROPELLER BLADE on it (V).
- Select the airship to trigger a puzzle (W).
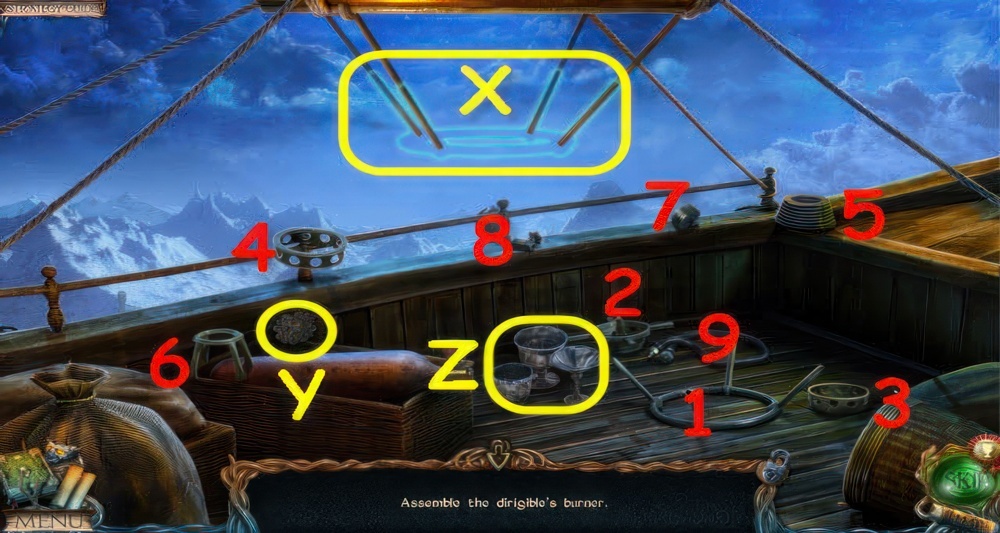
- Assemble the dirigible’s burner.
- Place the items on the outlines (X) as numbered (1-9).
- Take the 3/3 SYMBOL (Y) and CUPS (Z).
- Go to The Corridors.
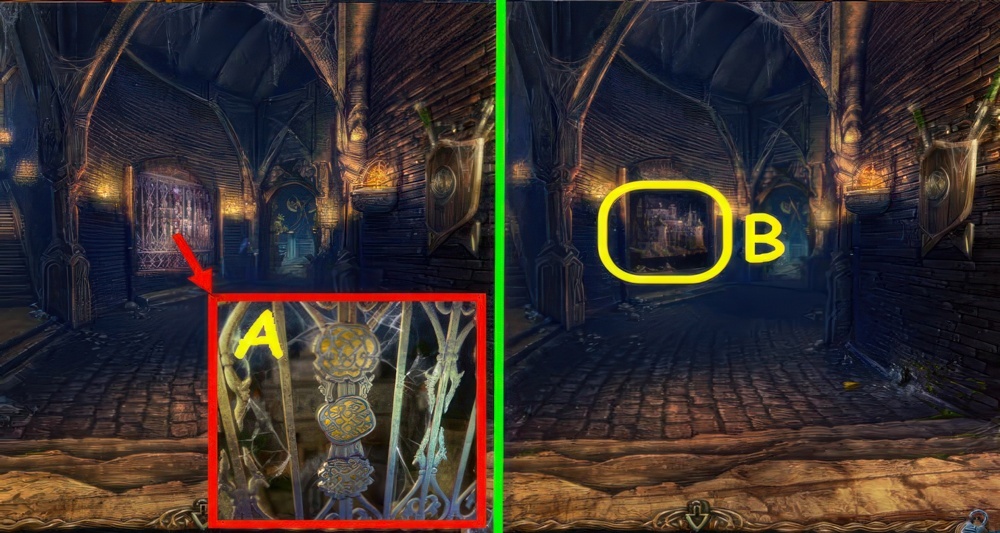
- Place the 3 SYMBOLS in their matching slots (A).
- Zoom into the alcove to trigger a puzzle (B).
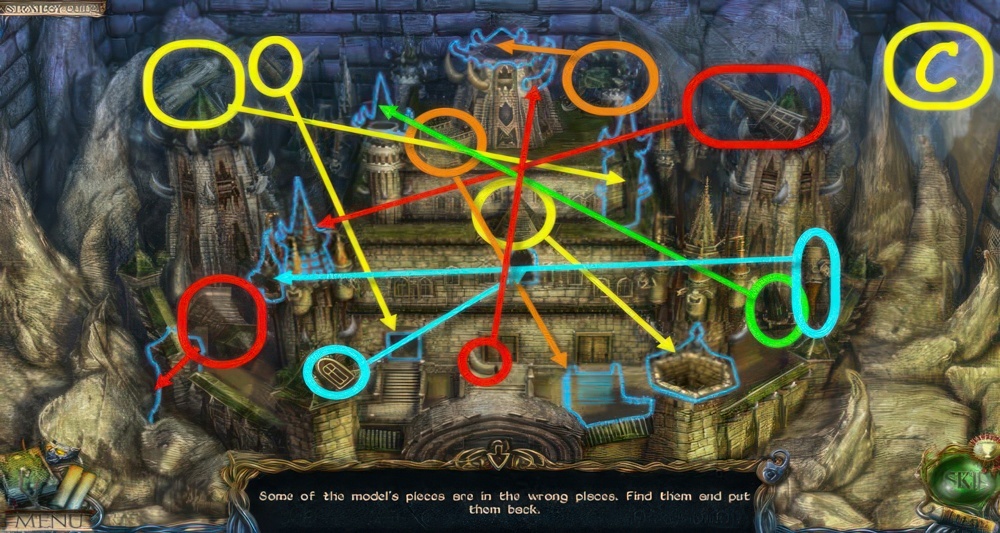
- Some of the model’s pieces are in the wrong places.
- Find them and put them back.
- Assemble the castle (C).
- Take the EARTH SYMBOL.
- Go to The Lift.

- Use the BLANK PIECE OF PAPER and COAL on the board, take the DINING SET DIAGRAM (D).
- Go to The Captain’s Cabin.
- Place the CUPS and DINING SET DIAGRAM on the shelves to trigger a puzzle (E).
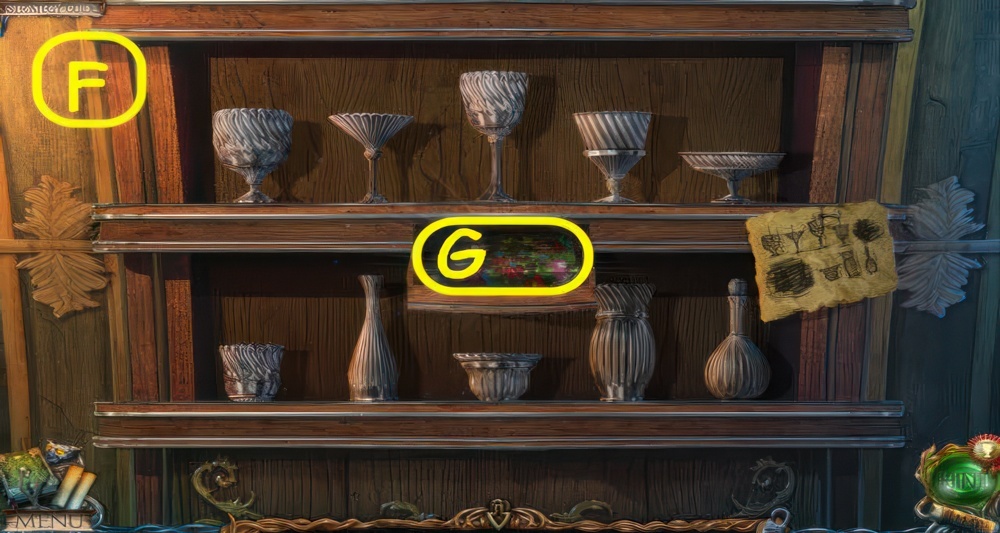
- Move the cups into the positions shown on the drawing.
- Walkthrough (F).
- Take the BOOK (G).
- Go to The Library.
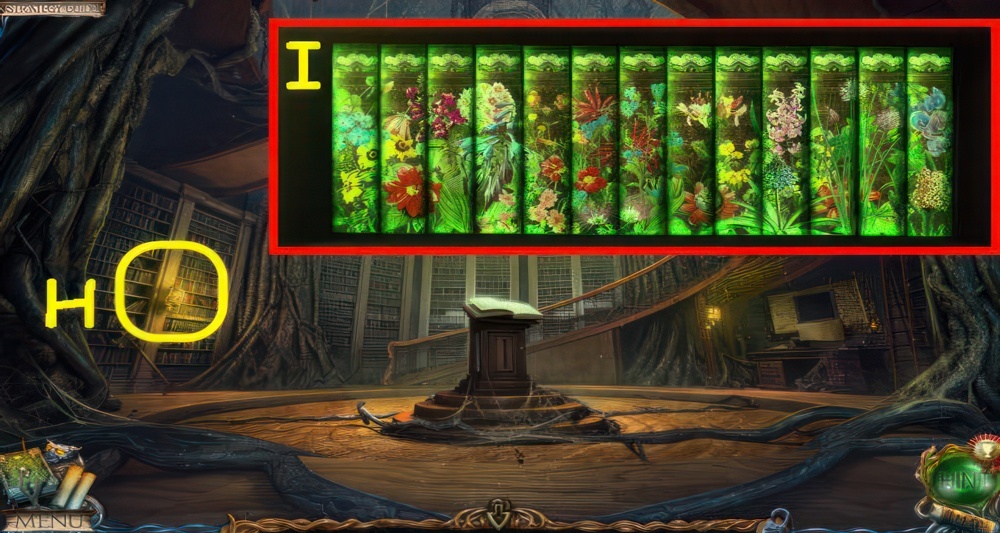
- Place the BOOK on the shelf to trigger a puzzle (H).
- Create an image by rearranging the books.
- Complete the image (I).
- Take the WATER SYMBOL.
- Go to The Viewing Point.
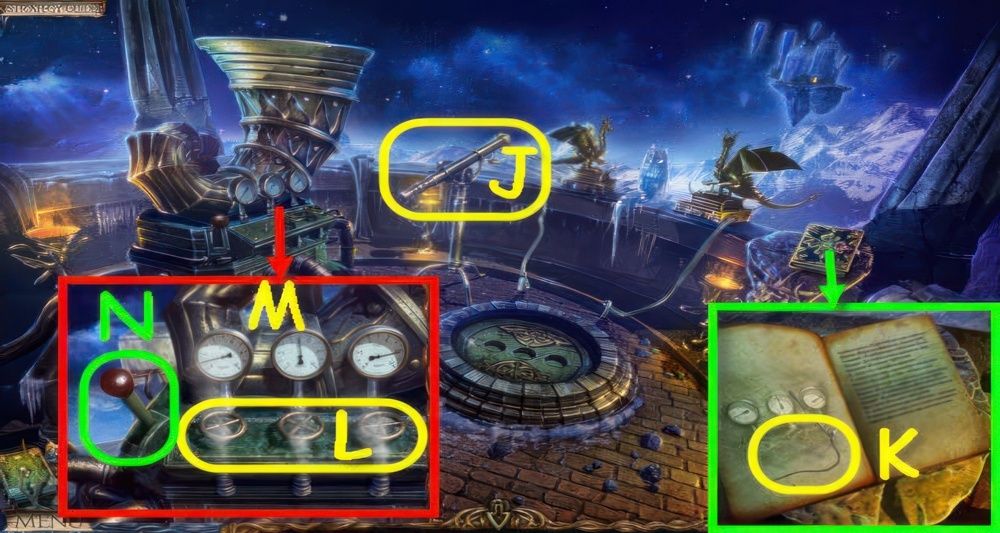
- Look through the telescope (J).
- Place the FIRE SYMBOL, AIR SYMBOL, EARTH SYMBOL and WATER SYMBOL in their matching slots, take the NEEDLE (K) and select the diagram for a clue.
- Place the 2 VALVES on the stems to trigger a puzzle, rotate to set the gauges per the clue (L).
- Walkthrough (M), pull the lever (N).
- Go to Exit to the Dirigible.
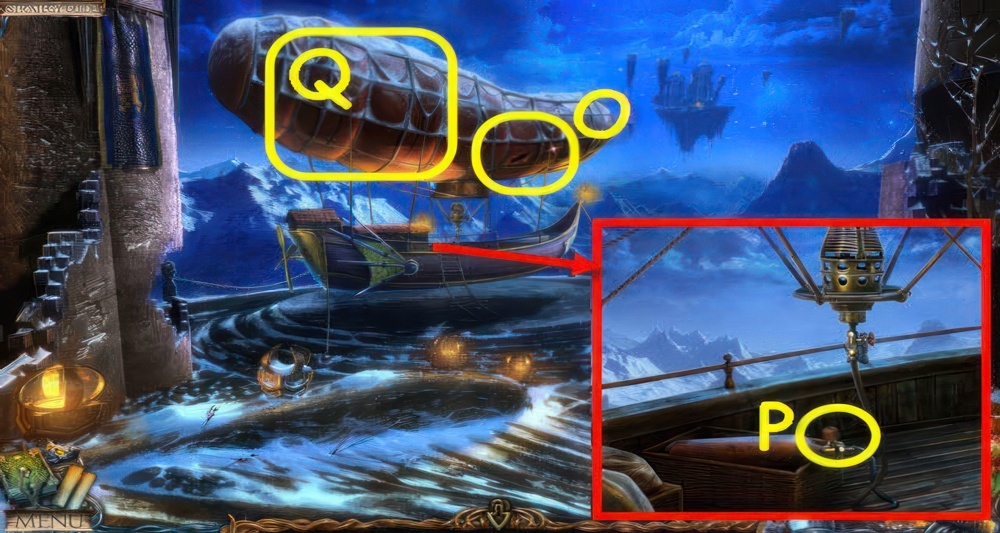
- Use the NEEDLE on the hole (O).
- Select the airship (Q).
- Turn the Valve (P).
- Select the airship again.

- Use the OWL to retrieve the RAMROD (R).
- Take the CANNON BALL (S) and MALLET (T).
- Use the MALLET on the WHEEL (U), take it.
- Take the 1/3 RUNE (V).
- Place the GUNPOWDER, CANNON BALL and RAMROD in the cannon (W).
- Place the WHEEL on the axle (X), use the MALLET on it.
- Push the cannon ×2, go forward.
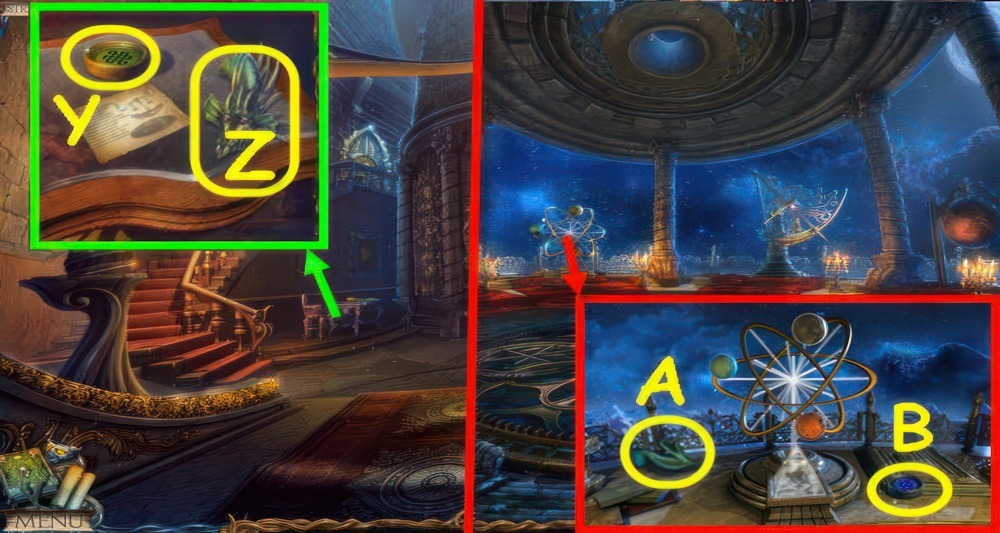
- Read the note, take the 2/3 RUNE (Y) and 4/10 BAS-RELIEF PIECE (Z).
- Go up the staircase.
- Take the 5/10 BAS-RELIEF PIECE (A) and 3/3 RUNE (B).
- Go to The Viewing Point.
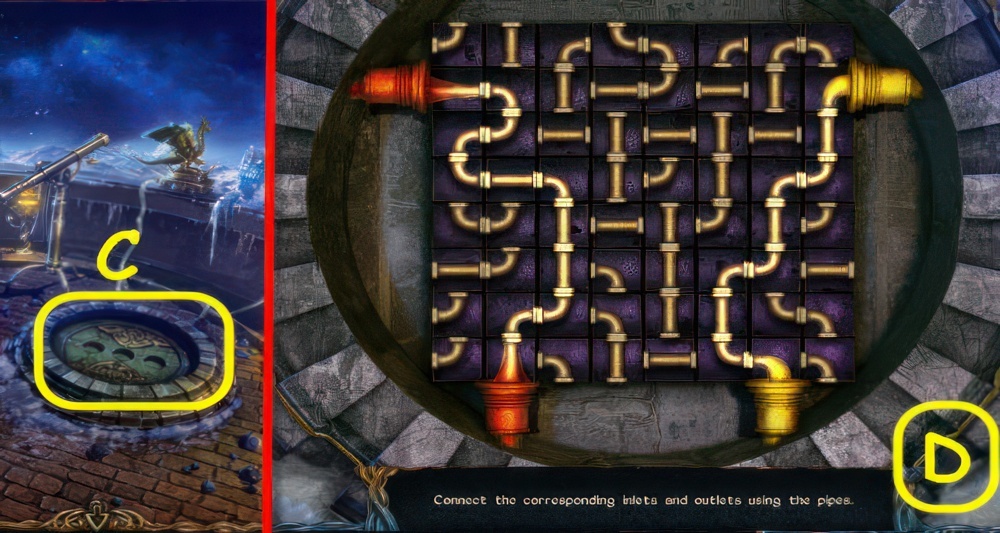
- Place the 3 RUNES in their matching slots and zoom in to trigger a puzzle (C).
- Connect the corresponding inlets and outlets using the pipes.
- Walkthrough (D).
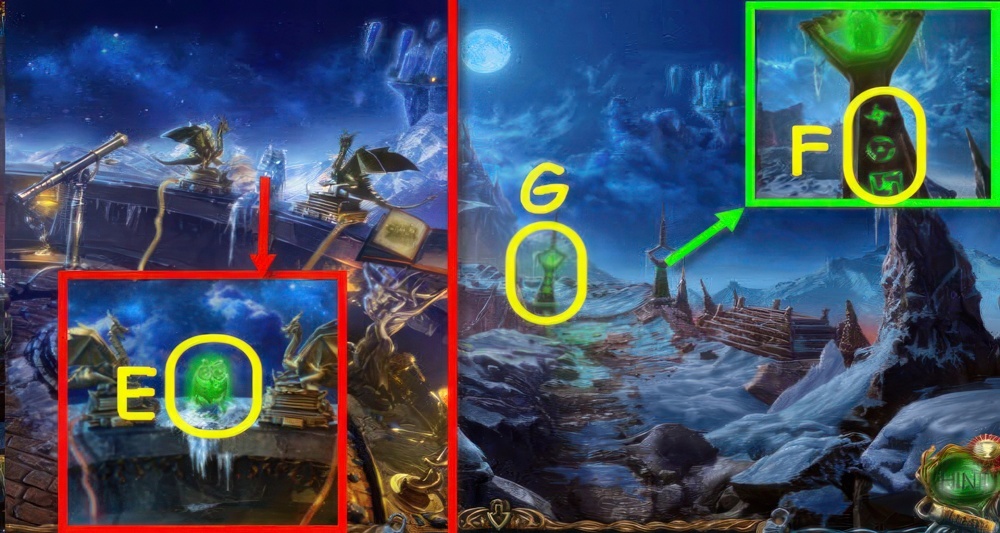
- Turn the dragon heads to face the owl, take the GLASS OWL (E).
- Go to The Path to the Castle.
- Place the GLASS OWL on the pillar, select the runes (F).
- Select the runes to get a clue (G).
- Go to The Tower Hall.
Magic powder
I need to create some magic powder the opposite of the philosopher’s stone. It will destroy the demon’s statue and help to break the spell on Jimmy.
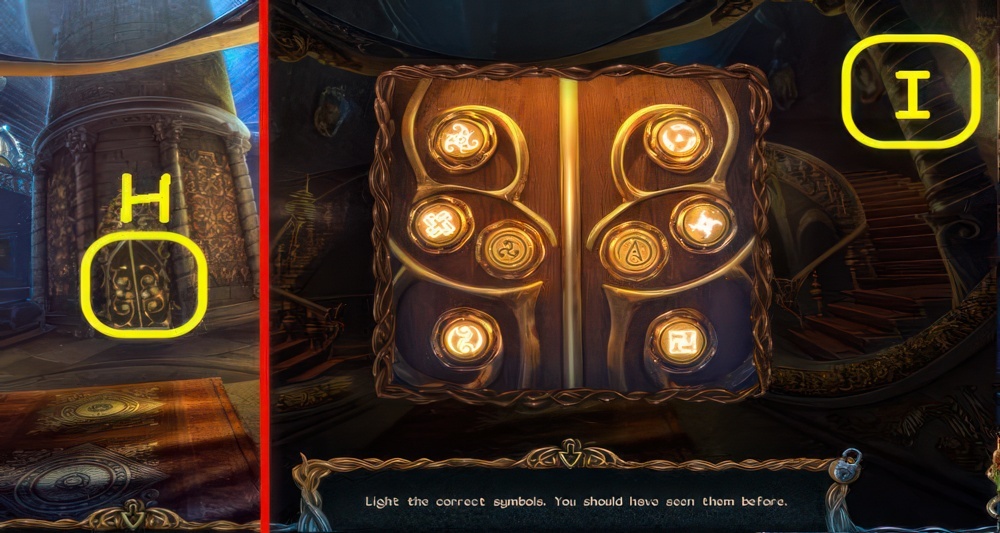
- Examine the door to trigger a puzzle (H).
- Light the correct symbols.
- Select the correct runes (I).
- Go forward.
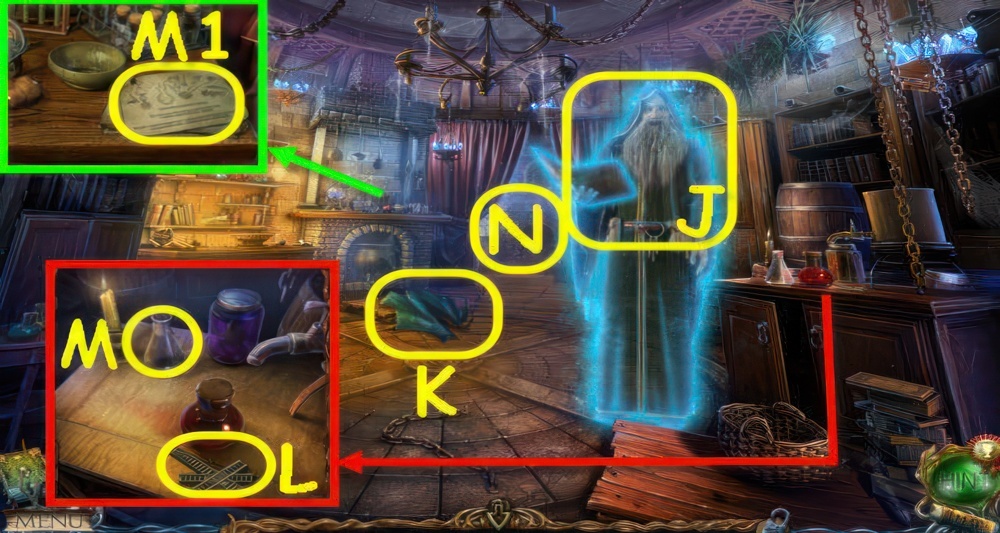
- Speak to the Alchemist (J).
- Take the 6/10 BAS-RELIEF PIECE (K).
- Take the RAILS (L) and FLASK (M).
- Read the recipe (M1).
- Zoom into the alcove to access a puzzle (N).
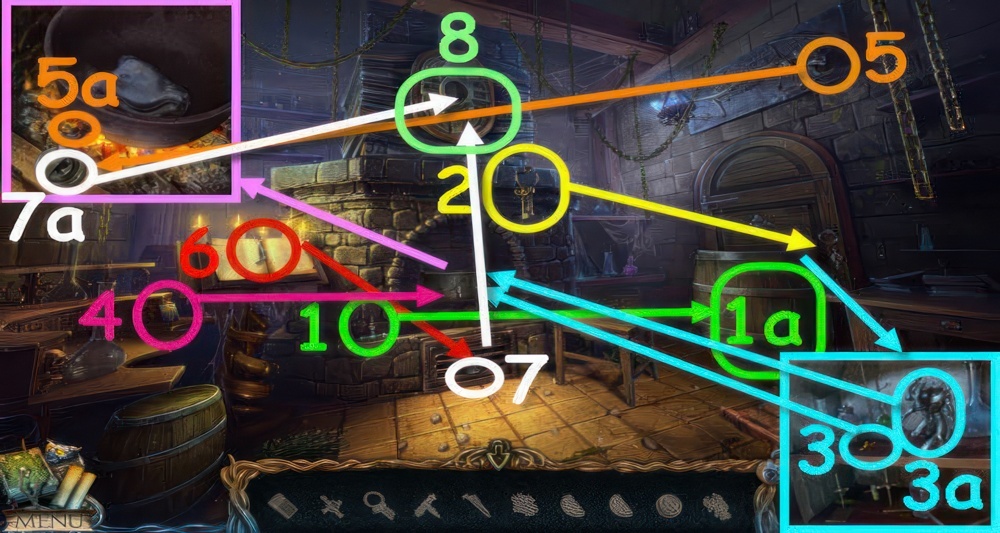
- Play the puzzle.
- You receive the DRIED NIGHTSHADE BERRIES (1-8).
- Go to The Underground Descent.
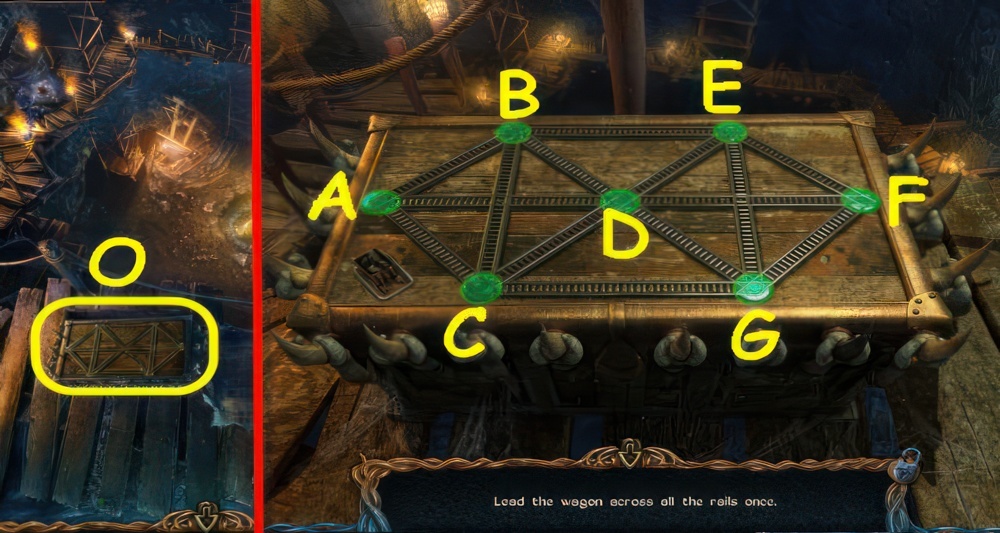
- Remove the cover, place the RAILS on the chest to trigger a puzzle (O).
- Lead the wagon across all the rails once.
- Walkthrough: A, B, C, A, D, G, C, D, E, B, D, F, G, E, F.
- Take the 7/10 BAS-RELIEF PIECE and CIRCLE SEGMENT.
- Go to The Tower Hall.
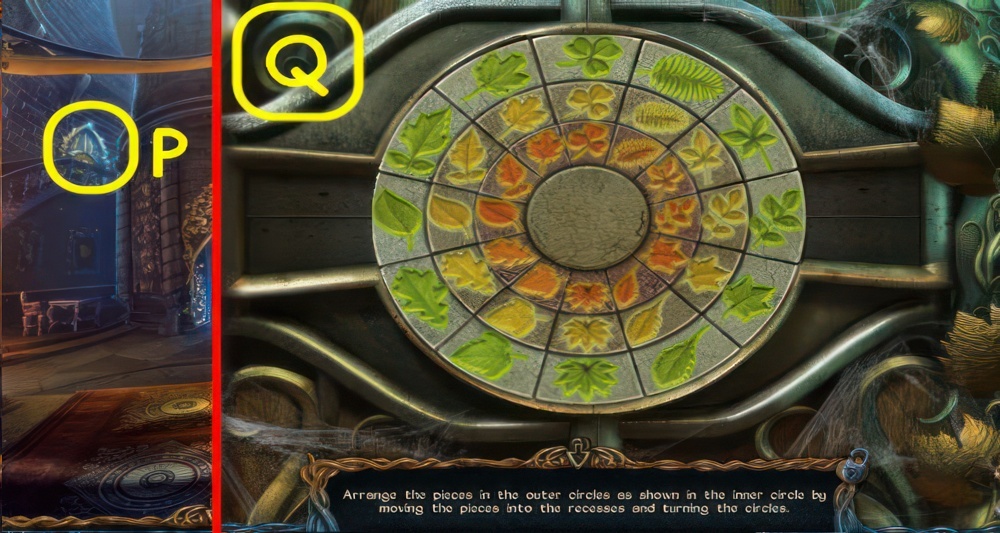
- Place the CIRCLE SEGMENT on the lock to trigger a puzzle (P).
- Arrange the pieces in the outer circles as shown in the inner circle by moving the pieces into the recesses and turning the circles.
- Line up all matching pieces (Q).
- Enter The Greenhouse.

- Use the OWL to retrieve the SUN FIGURINE (R).
- Go to The Observatory.
- Place the SUN FIGURINE in the center, take the TABLET PIECE (S).
- Go to The Dwarf’s Room.
- Place the TABLET PIECE on the tablet to trigger a puzzle (T).
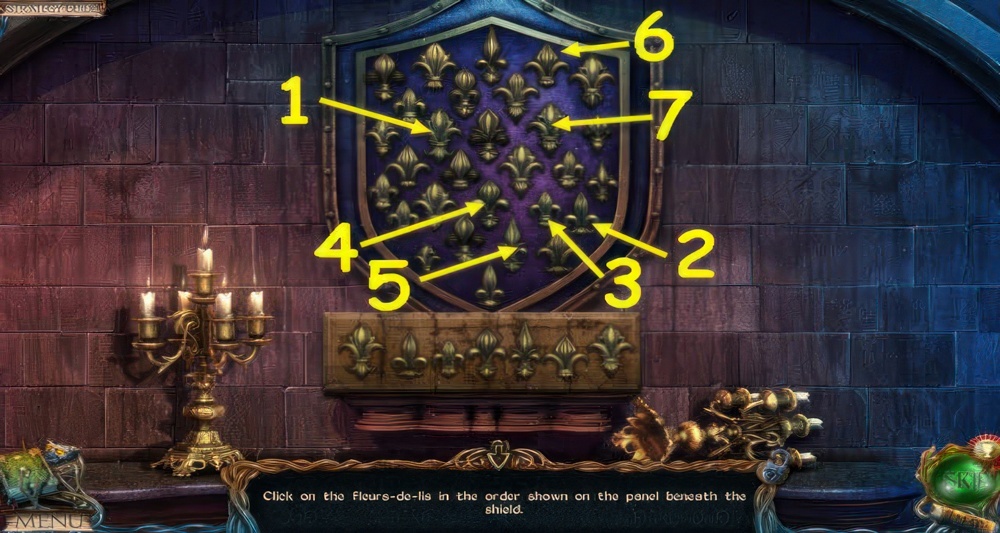
- Select the fleurs-de-lis in order 1-7.
- Take the 8/10 BAS-RELIEF PIECE and GLOVE.
- Go to The Greenhouse.
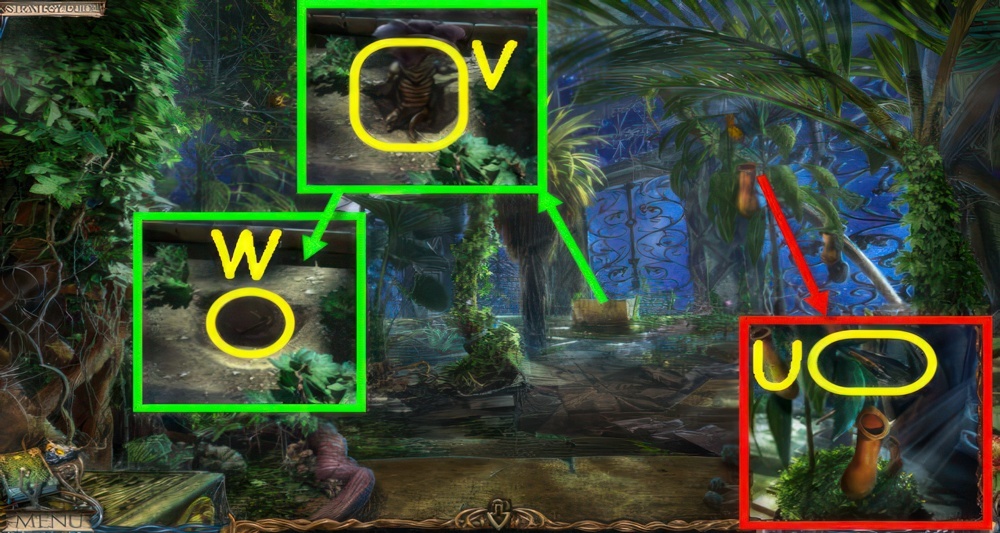
- Move the leaves, take the TROWEL (U).
- Use the TROWEL on the dirt, use the GLOVE to get the MANDRAKE ROOT (V).
- Take the KEY (W).
- Go to The Alchemist’s Laboratory.
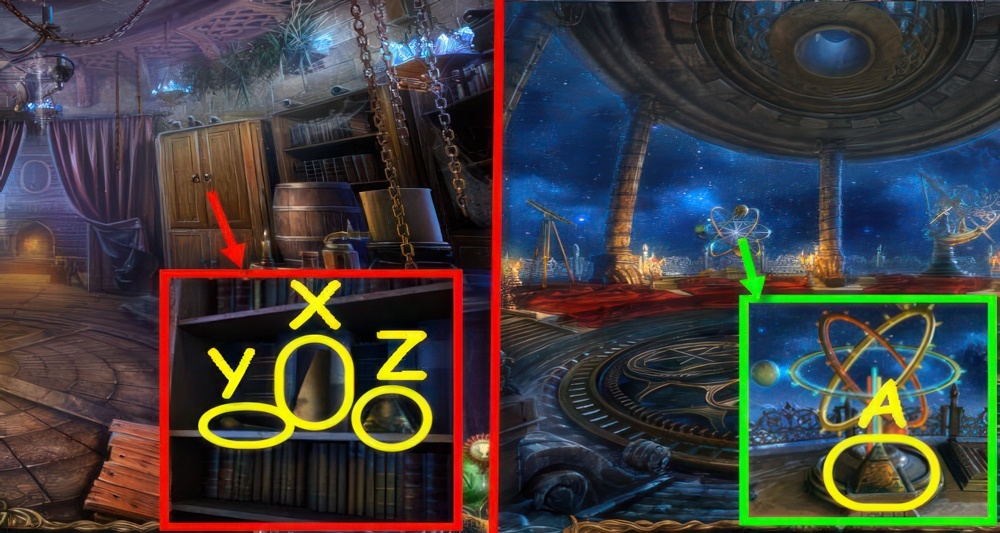
- Use the KEY on the lock, take the RECIPE (X).
- Take the DROPPER (Y).
- Take the PYRAMID (Z).
- Go to The Observatory.
- Place the PYRAMID on the pedestal to trigger a puzzle (A).
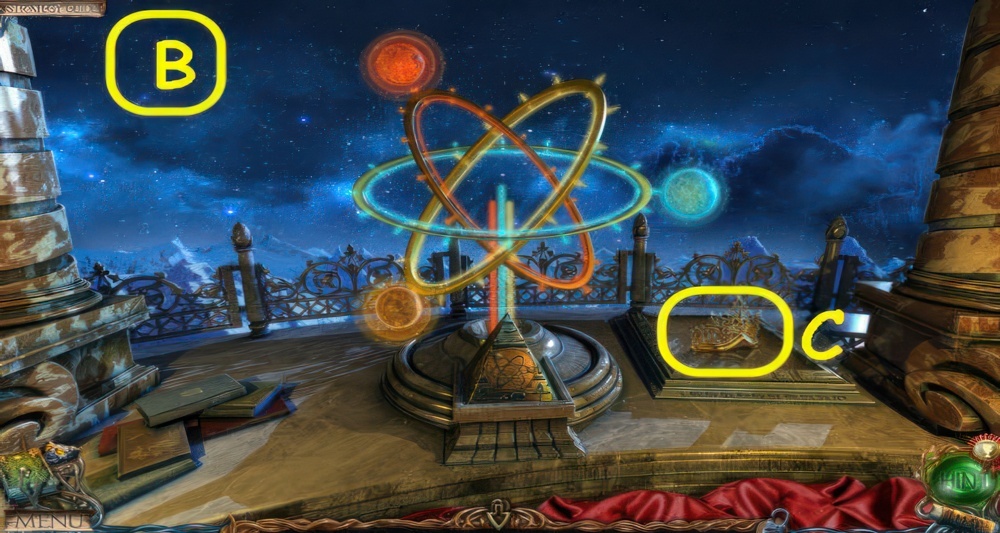
- Arrange the planets as shown on the pyramid below.
- Drag the planets to their correct location (B).
- Take the CROWN (C).
- Go to The Tower Hall.
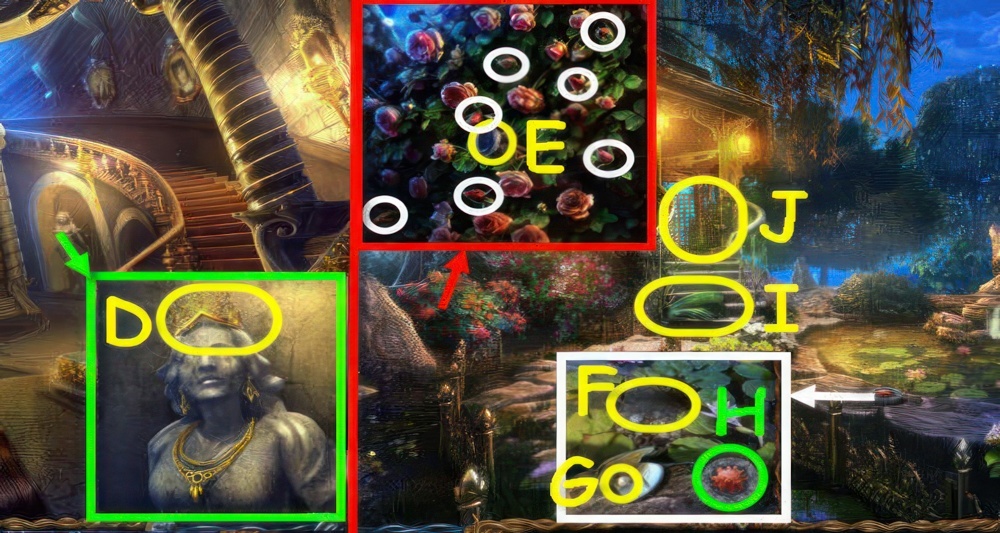
- Place the CROWN on the statue (D).
- Enter The Indoor Patio.
- Take the LENS (E), pick the 7 ROSEBUDS circled in white.
- Use the FLASK on the water, receive a FLASK OF WATER (F).
- Move the oyster and use the DAGGER on it, take the PEARL (G) and MOSAIC PIECE (H).
- Take the 9/10 BAS-RELIEF PIECE (I).
- Zoom into the gazebo to access a puzzle (J).
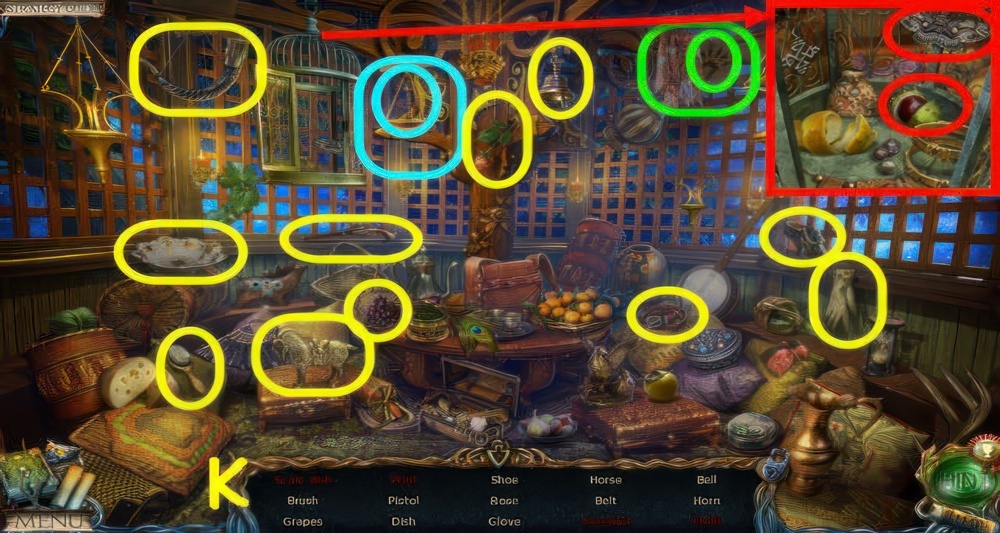
- Play the puzzle.
- You receive a SCALE DISH (K).
- Go to The Greenhouse.
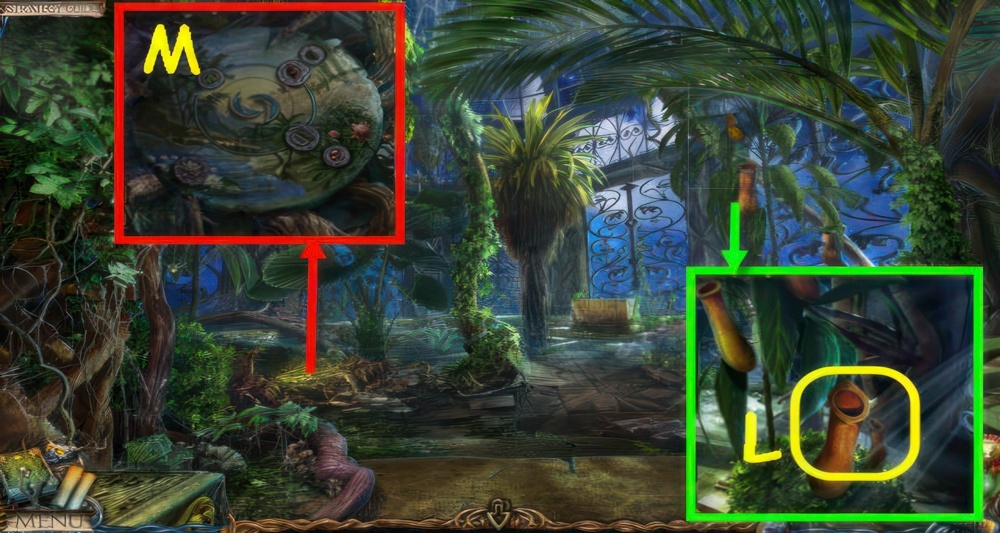
- Use the DROPPER in the plant, receive a PITCHER PLANT NECTAR (L).
- Use the DAGGER on the vines, place the MOSAIC PIECE on the disk to trigger a puzzle (M).

- Arrange the discs to correspond to the images by clicking on the buttons and the discs.
- Walkthrough: B, A, C, D, B×3.
- Take the 10/10 BAS-RELIEF PIECE and FLUTE.
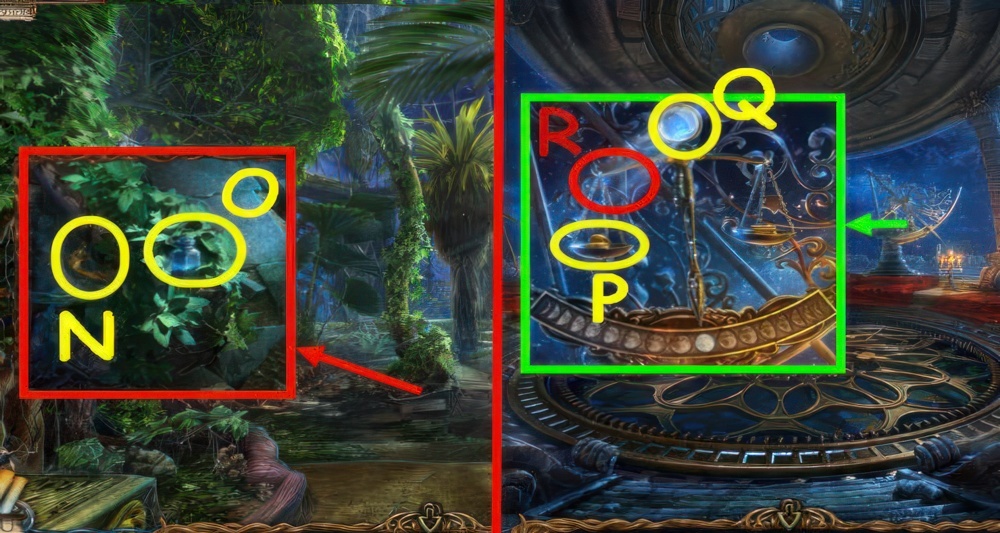
- Use the FLUTE on the snake, take the COPPER POWDER (N) and SNAKE SCALES (O).
- Go to The Observatory.
- Place the SCALE DISH on the scale, place the COINS on the scale (P).
- Move 4 coins from the left scale to the right, place the LENS in the top (Q).
- Use the FLASK OF WATER on the beam (R) to receive LUNAR TEARS.
- Go to The Throne Room.
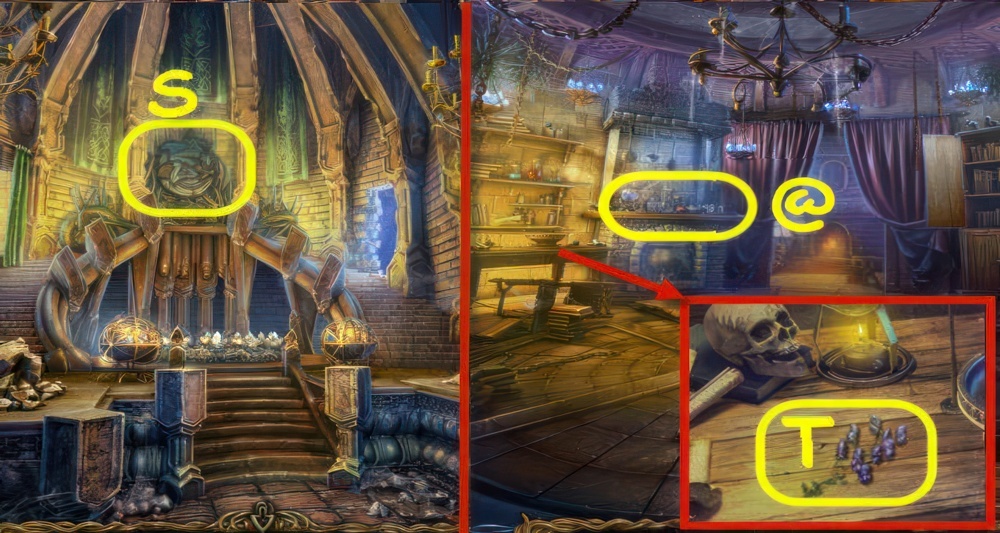
- Place the 10 BAS-RELIEF PIECES on the bas-relief (in their matching slots) to receive the DRAGON’S BLOOD (S).
- Go to The Alchemist’s Laboratory.
- Take the ACONITE (T).
- Zoom into the mantle (@).
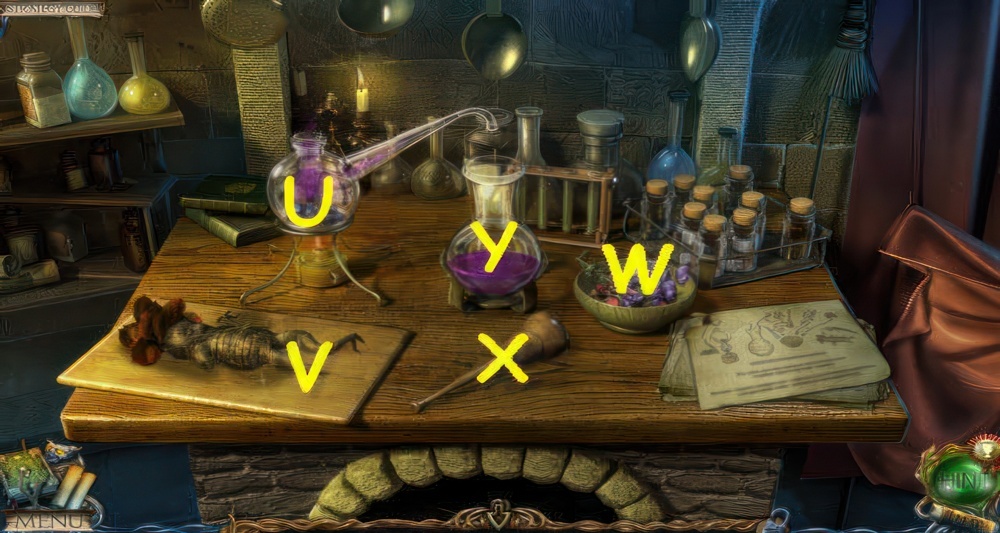
- Place the DRIED NIGHTSHADE BERRIES in the beaker (U).
- Place the MANDRAKE ROOT on the board, use the DAGGER on it and select it (V).
- Place the 7 ROSEBUDS and ACONITE in the mortar (W).
- Select the pestle (X).
- Place the PITCHER PLANT NECTAR in the beaker (Y).
- Select the mortar (W).
- Take the LIFE POTION (Y).
- Go to The Underground Lake Shore.
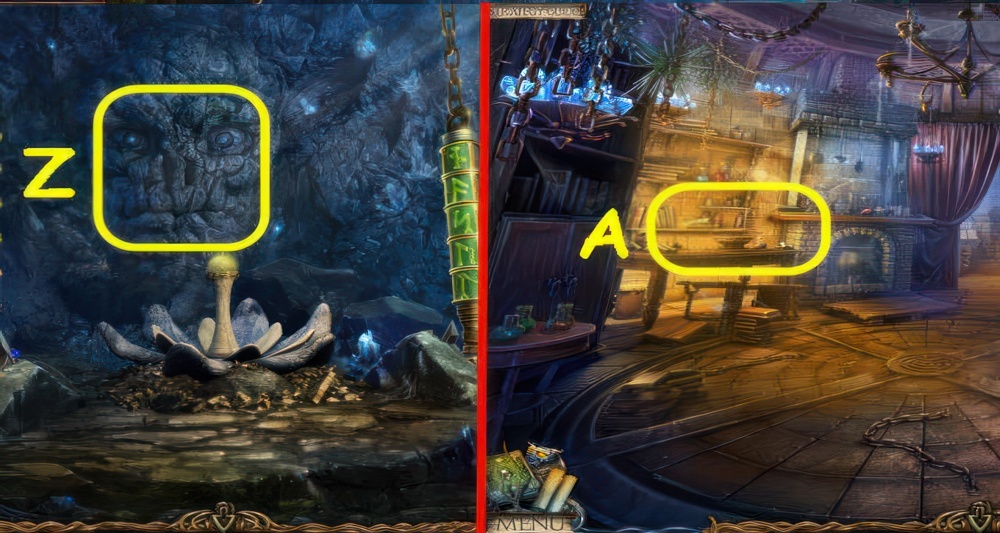
- Give the LIFE POTION to the Mountain Spirit (Z), receive a LIVING STONE.
- Go to The Alchemist’s Laboratory.
- Zoom into the table, place the RECIPE on it (A).

- Place the DRAGON’S BLOOD and COPPER POWDER in the bowl (B).
- Place the SNAKE SCALES in the mortar (C).
- Use the pestle (D) on it and select it.
- Place the PEARL in the mortar (C), use the pestle on it and select it.
- Use the pestle on the bowl (B), place the LIVING STONE and LUNAR TEARS in it.
- Use the pestle on it, take the ANTIPHILOSOPHER’S POWDER (B).
- Go to The Demon Statue.
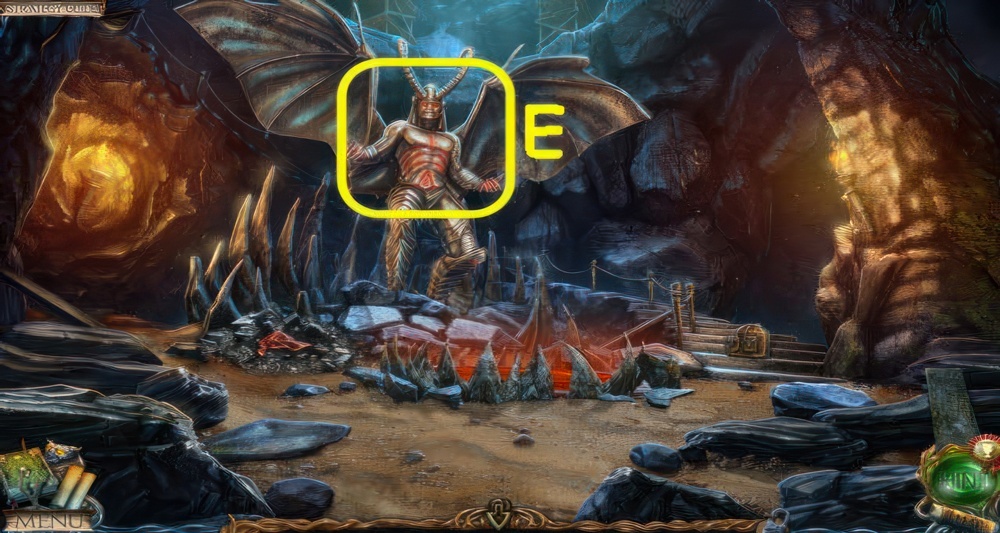
- Use the ANTIPHILOSOPHER’S POWDER on the demon (E).
- The TEDDY BEAR will be automatically used.
- Walkthrough Bonus Chapter, at the link below.


