Lost Lands 2: The Four Horsemen – Adventure game in which you will play as a brave girl in a fantasy world. A terrible evil threatens the Lost Lands. There are rumors of four mysterious Horsemen: Heat, Coldness, Death and Darkness. They scorch villages, sow death and cover the world in darkness to enslave all things. Their main goal is to find the key that will allow them to control parallel worlds, and they will stop at no one. And only the chosen protector of the Lost Lands can stop them. But there are also rumors of a brave girl from another world named Susan, who once saved their world from the forces of evil. For this girl you will pass this complicated story. If you are stuck at any point and can not move forward, on our site you will find a walkthrough for the game Lost Lands 2, and destroy all the riders.
Lost Lands 2: The Four Horsemen – Walkthrough
Here you can see the full walkthrough for Lost Lands 2: The Four Horsemen, namely for all chapters, including bonus chapter, in pictures.
Cottage
Something horrible has happened to me. One second I’m standing in an underground parking lot at a mall, the next I’m in a forest glade somewhere. I hope there’s someone in that cottage who can explain where I am and how I got here.
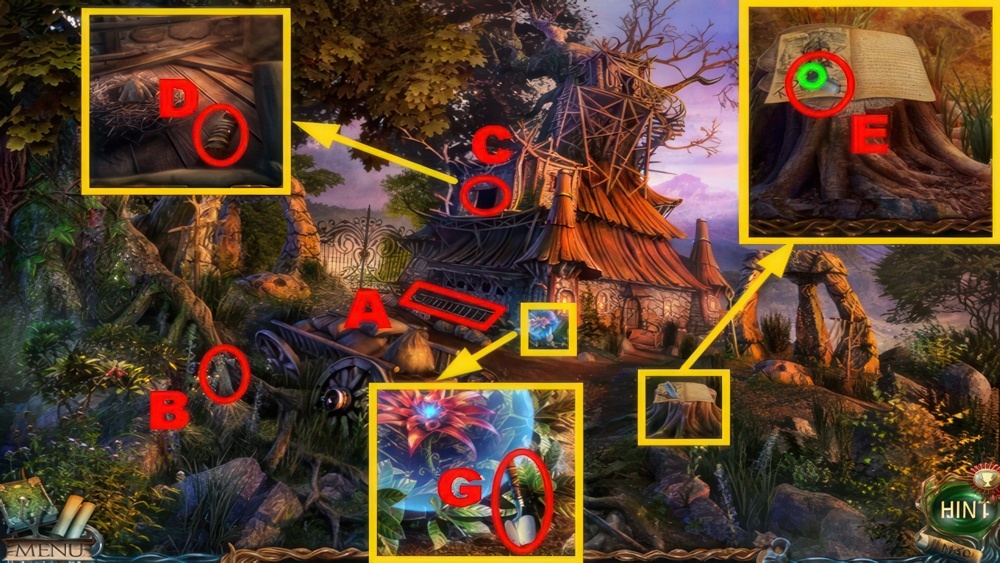
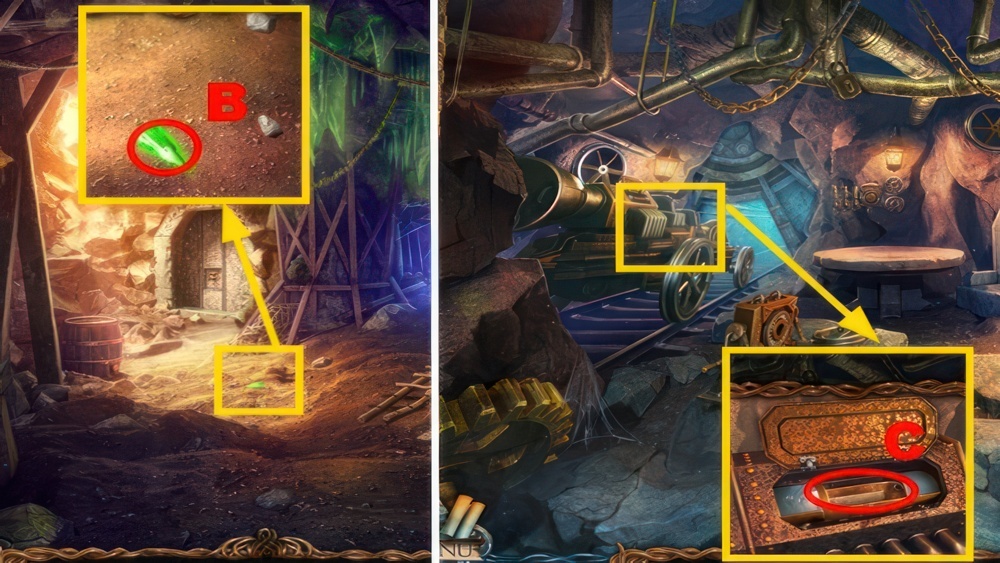
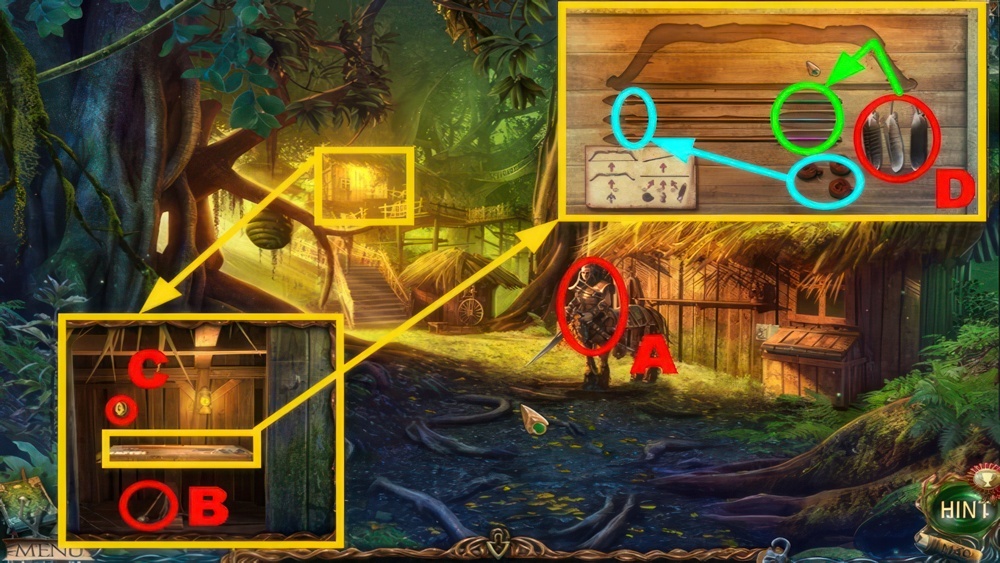
- Take the LADDER (A) and MONK FIGURINE 1/8 (B).
- Place the LADDER (C).
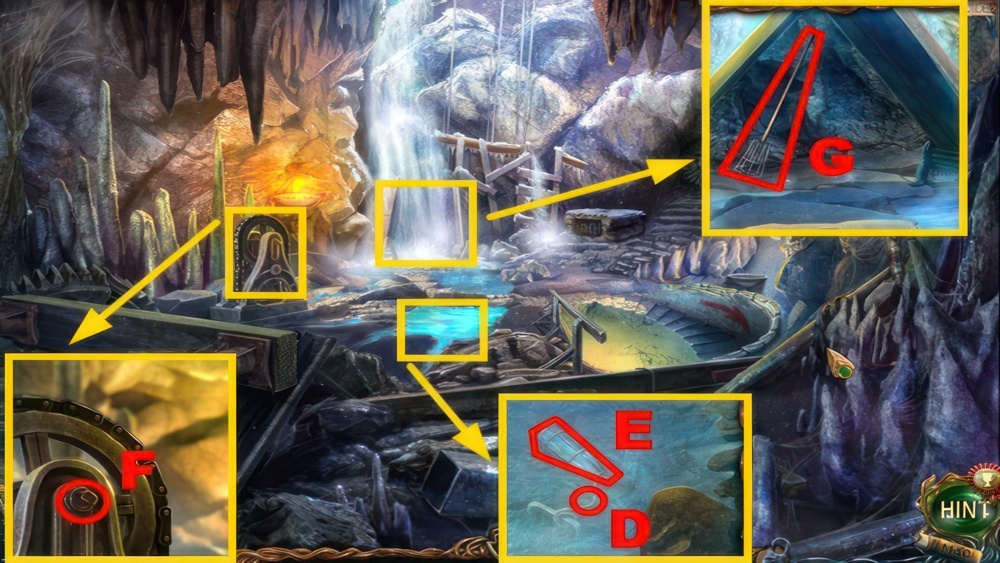
- Take the KNIFE HANDLE (D).
- Place the KNIFE HANDLE (🟢).
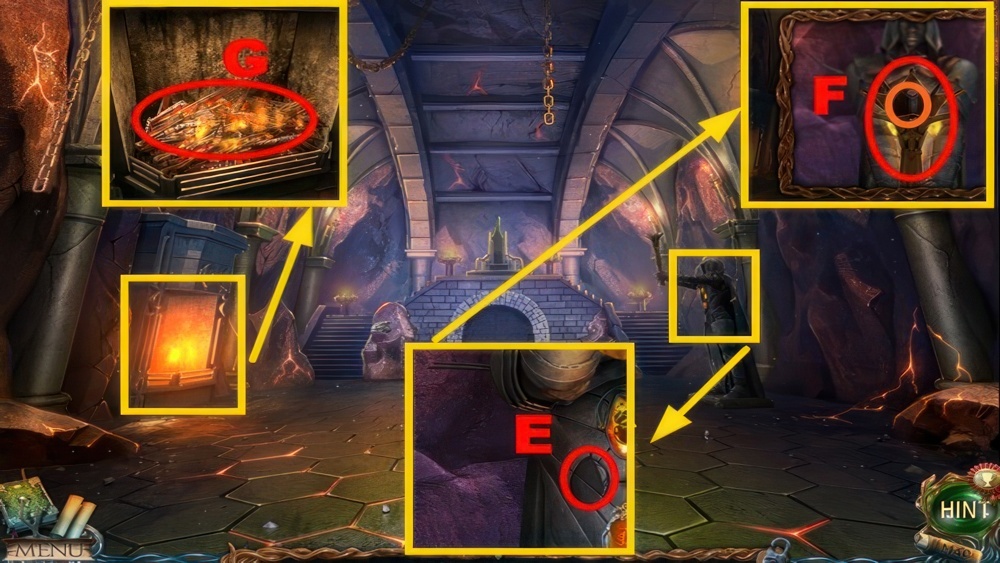
- Take the KNIFE (E).
- Take the SHOVEL (G).
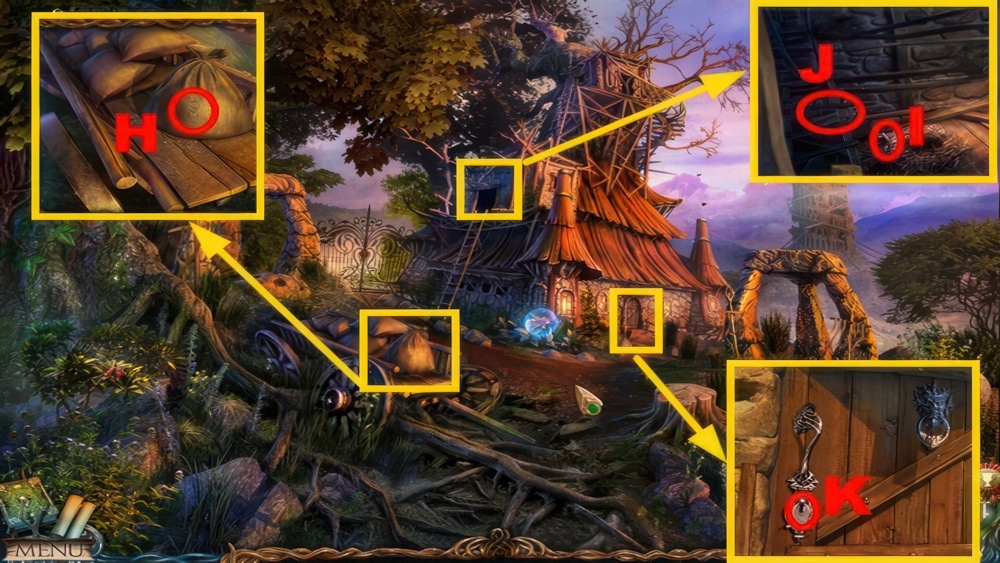
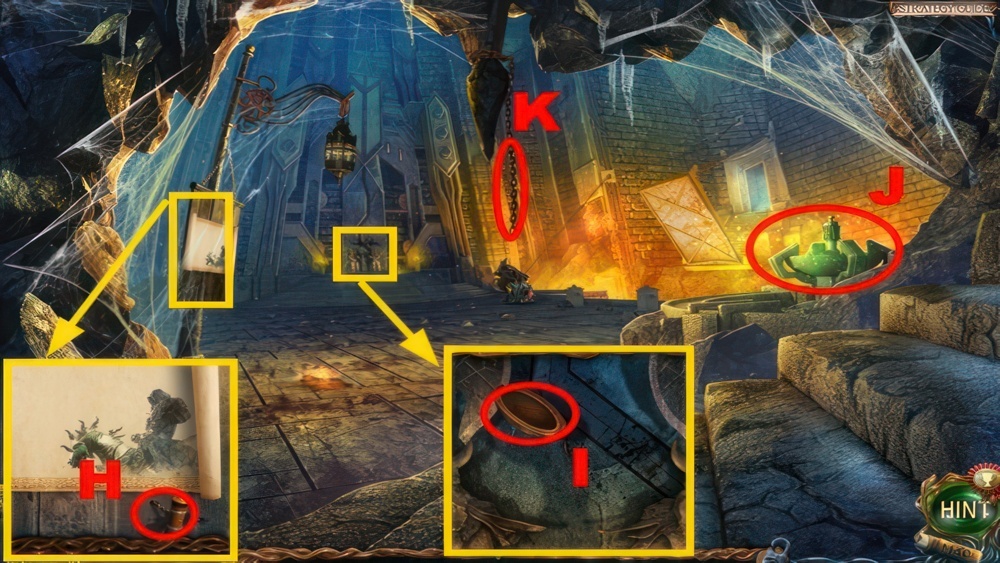
- Use the KNIFE (H).
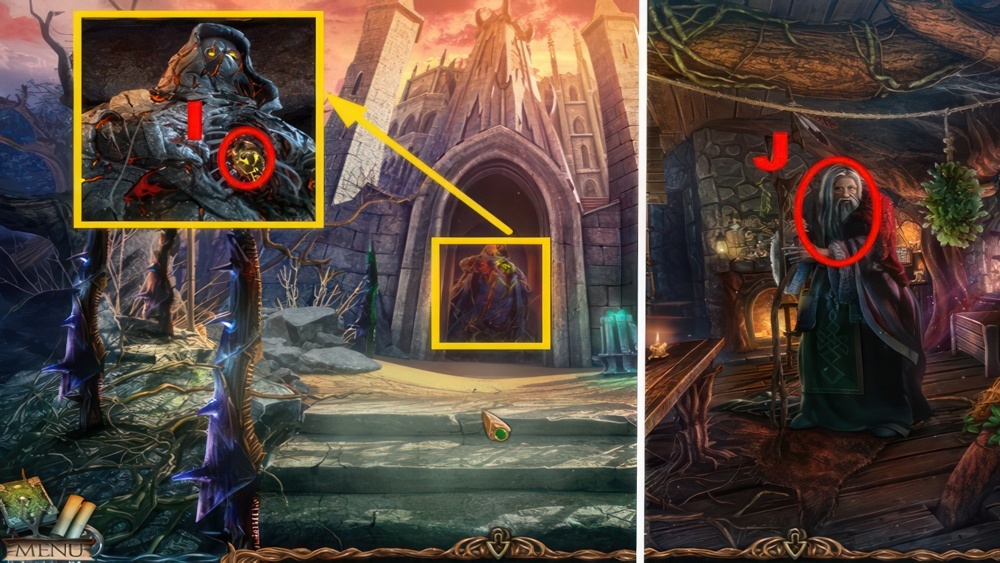
- Take the KEY (I) and MONK FIGURINE 2/8 (J).
- Place the KEY (K), turn it.
- Enter Maaron’s Cottage.
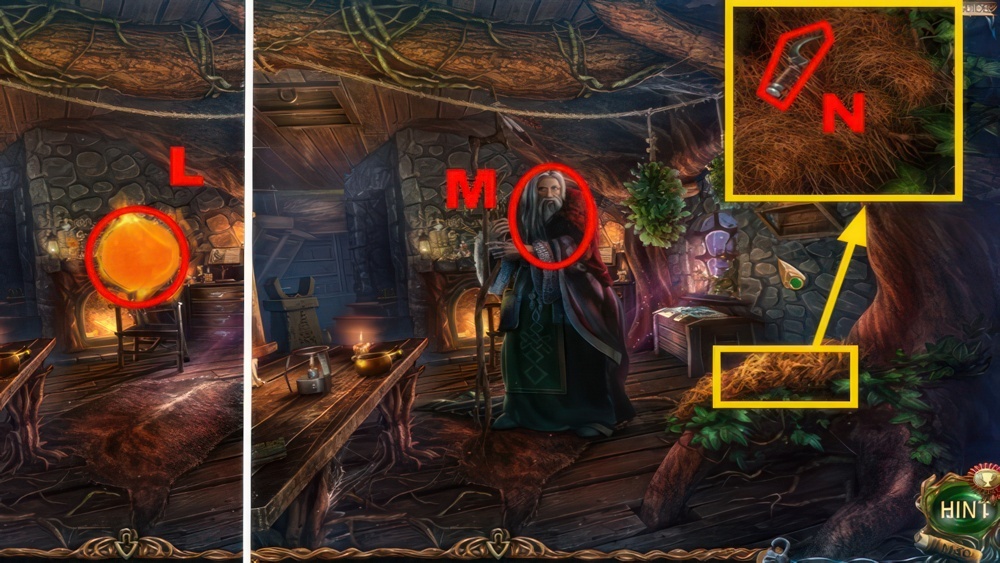
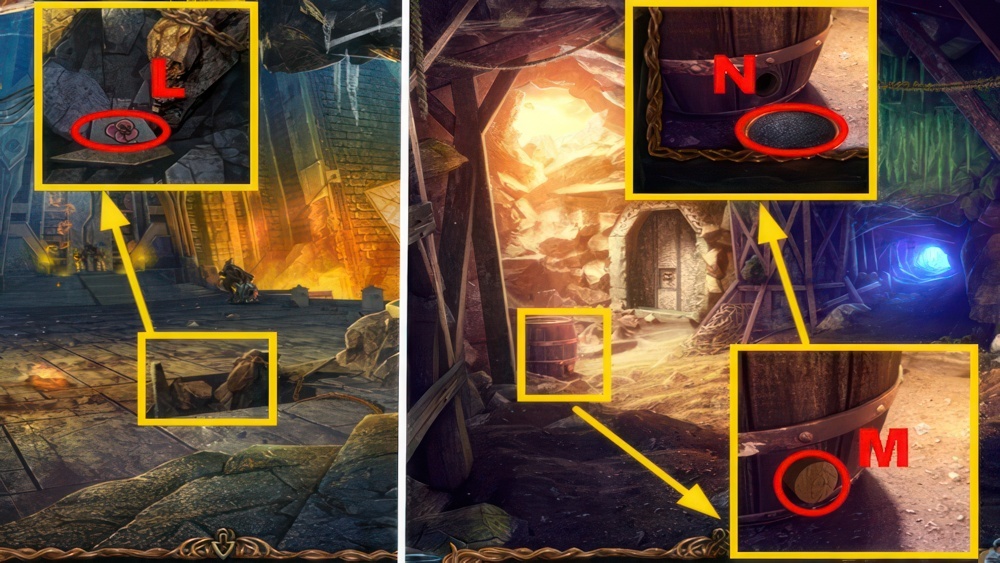
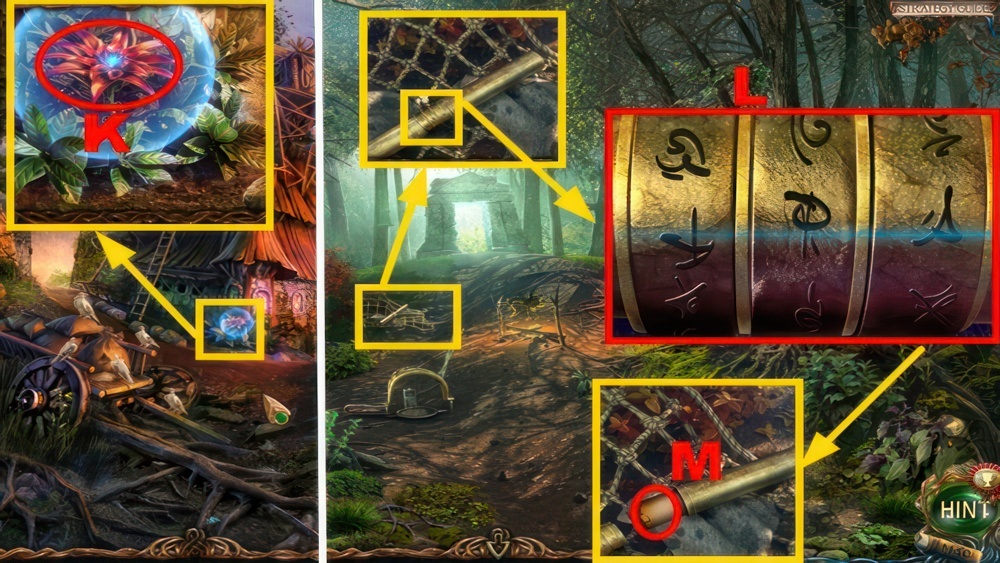
- Grab the sphere (L).
- Talk to the man (M), you acquire the RUNE.
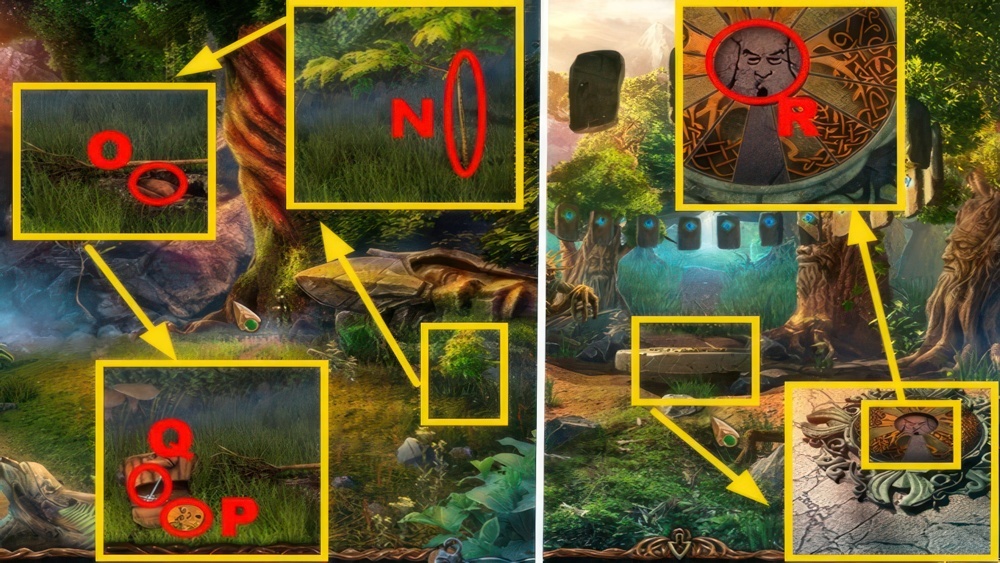
- Remove hay twice, take the SICKLE (N).
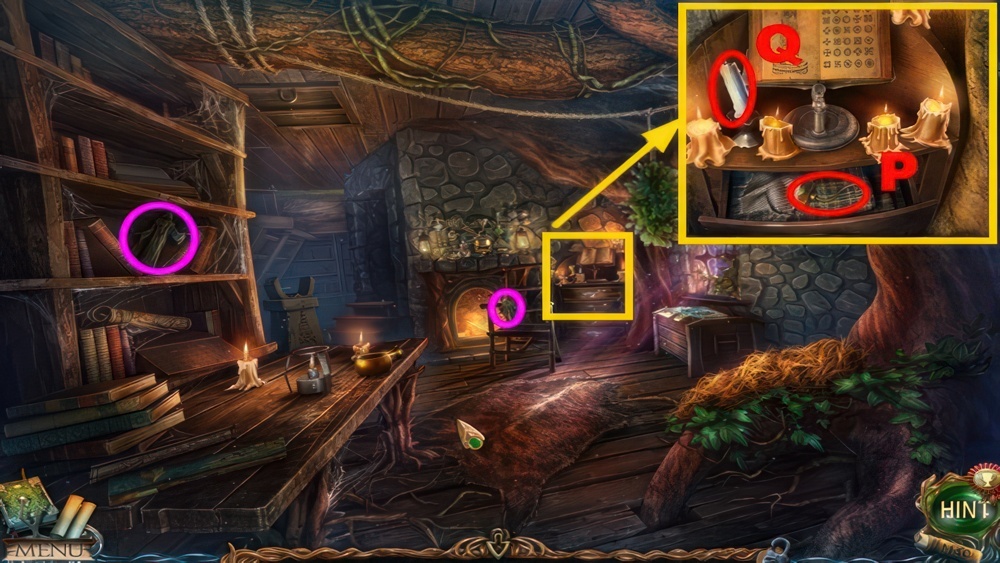
- Take 2 MONK FIGURINES (🟣).
- Open the drawer, move the cloth, take the FULL OIL CAN (P) and CANDLE (Q).
- Go down.
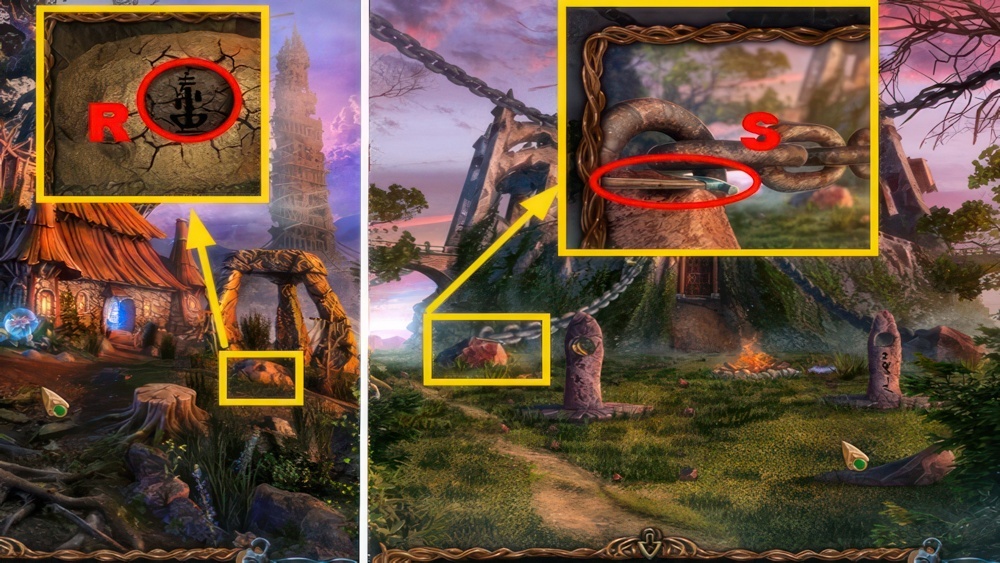
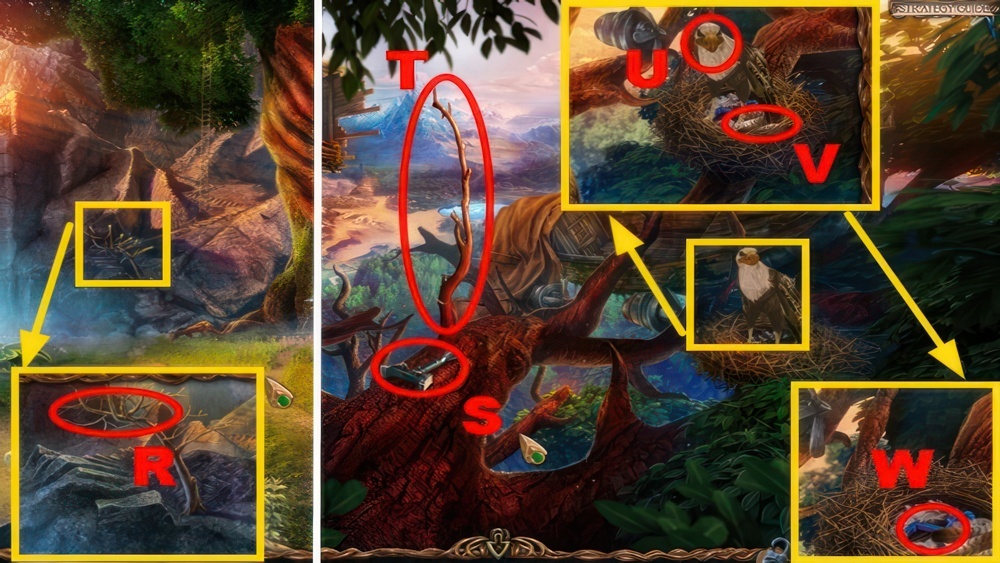
- Place the RUNE (R).
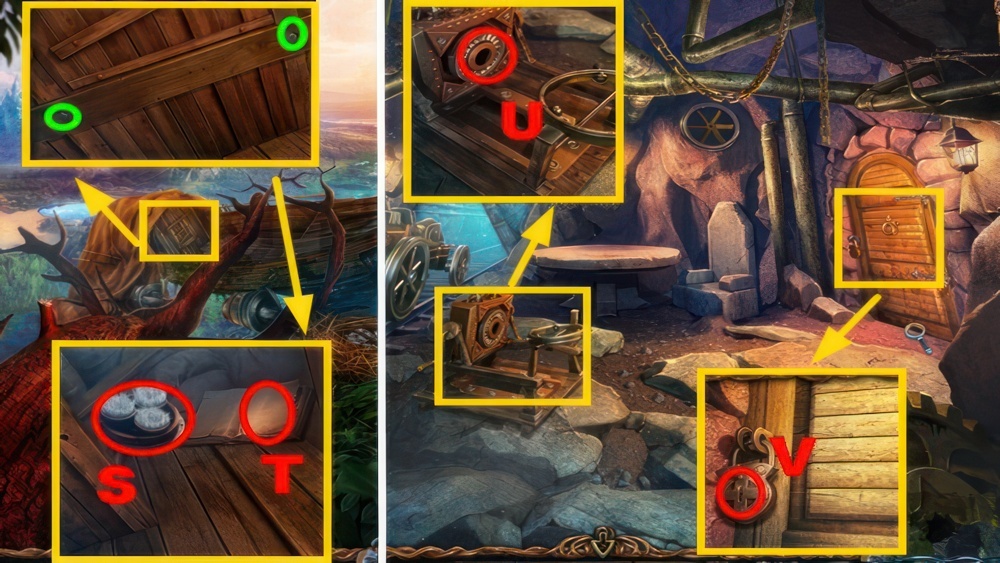
- Take the HAMMER (S).
- Go left.
Lake of Life
I met an old druid, by the name of Maaron-Hermit. Apparently it was him who summoned me to the Forgotten Lands. He said that some unknown Evil had befallen these lands, but he doesn’t know exactly what it is, and he’s asked me for help. He arranged a meeting for me at the Lake of Life, just behind some tower. I must set off to the lake and find a way to get to the Wasteland from there.
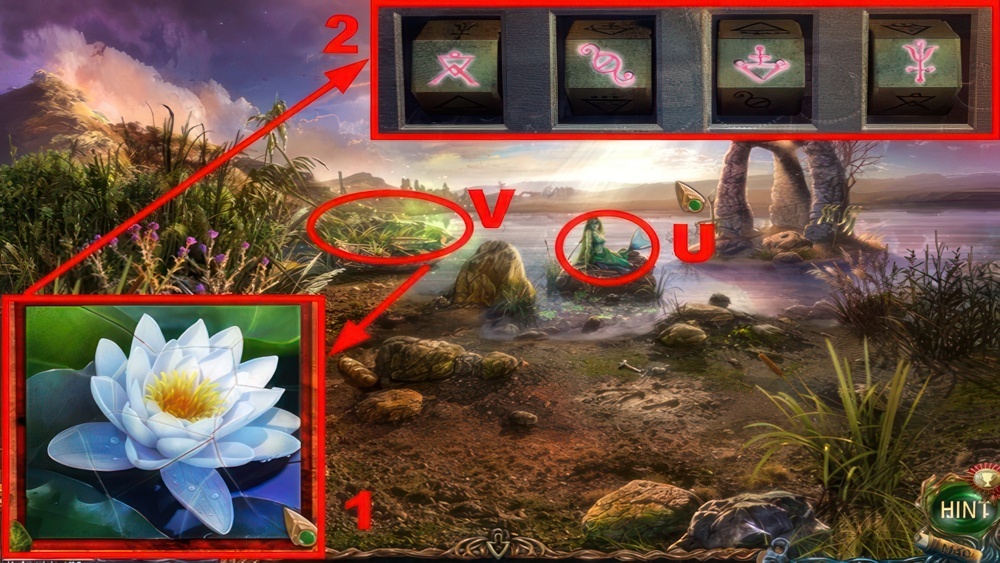
- Talk to the mermaid (U).
- Play the puzzle (V).
- Restore the mosaic.
- Use the magnifier to reveal hidden symbols.
- Puzzle walkthroughs: (1) and (2).
- You receive the STOPCOCK.
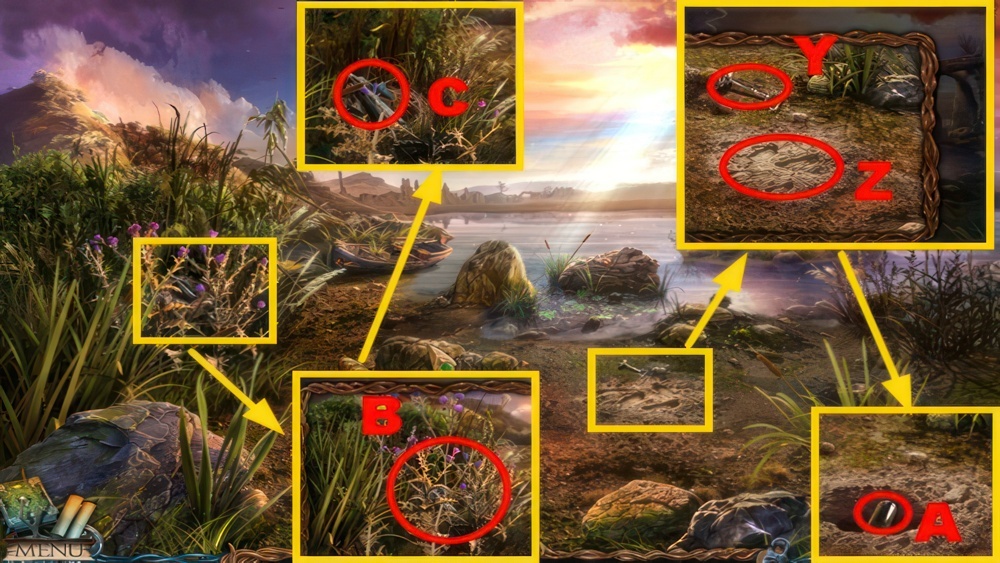
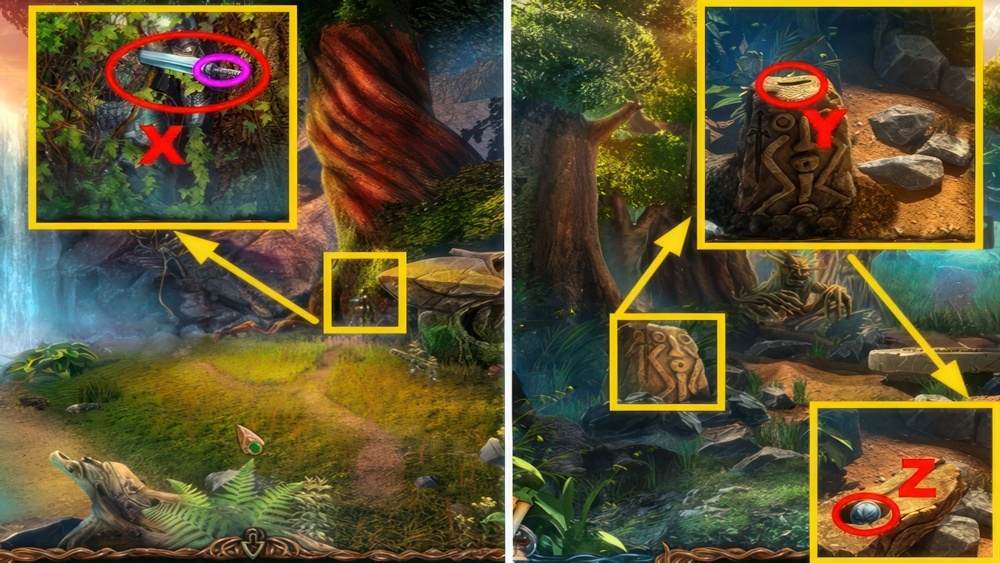
- Take the KEY (Y).
- Use the SHOVEL (Z).
- Take the MUSIC BOX DRUM (A).
- Use the SICKLE (B).
- Take MONK FIGURINE 5/8 (C).
- Go down ×2.
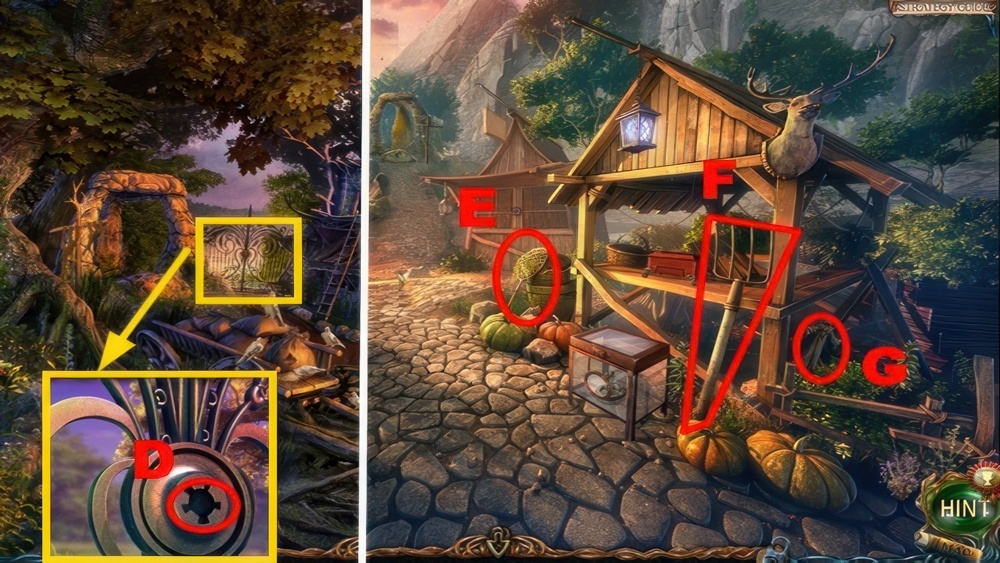
- Place the KEY (D).
- Go left.
- Take the NET (E), PITCHFORK (F), and MONK FIGURINE 6/8 (G).
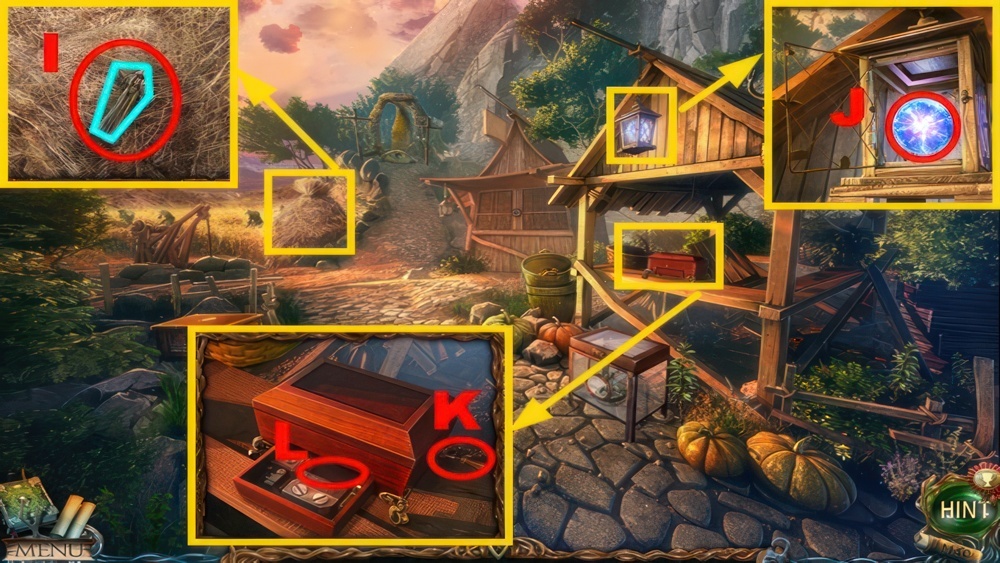
- Use the PITCHFORK (I).
- Take MONK FIGURINE 7/8 (🟦).
- Open the lantern, take the ENERGY SPHERE (J).
- Go the handle (K), place the MUSIC BOX DRUM (L).
- Go to Maaron’s Cottage.
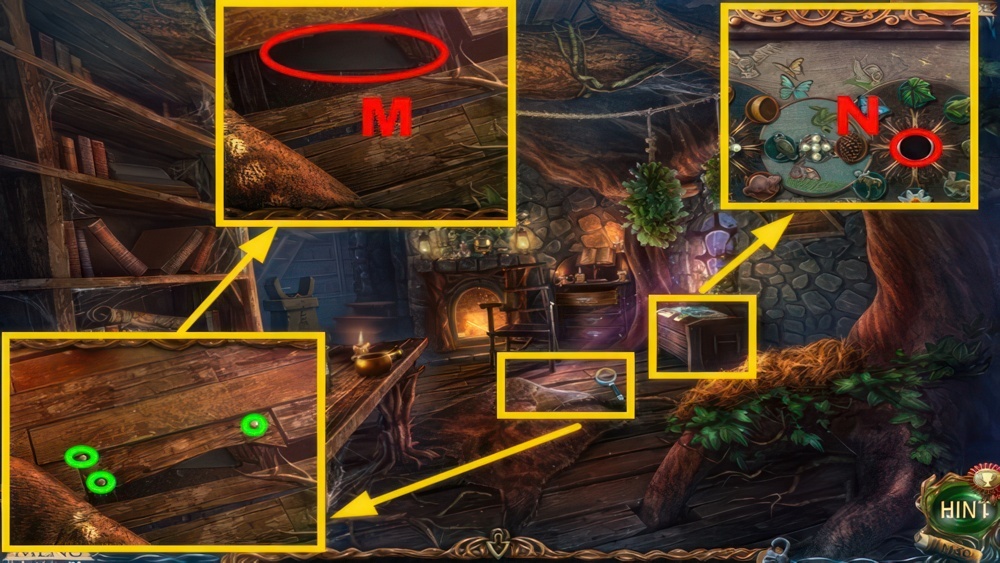
- Go the carpet, use the HAMMER three times (🟢).
- Go the board, take the SAW (M).
- Place the STOPCOCK (N).
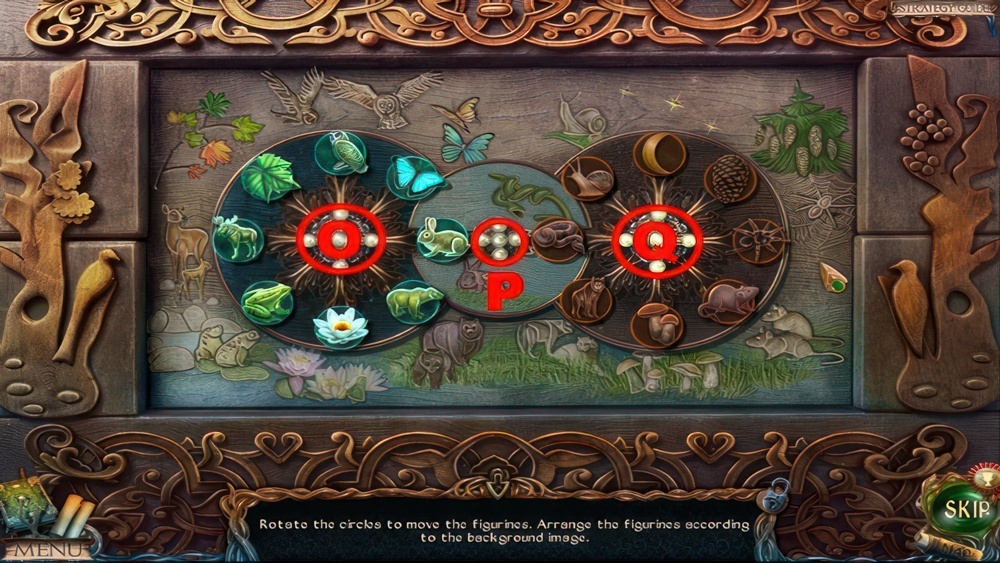
- Play the puzzle.
- Rotate the circles to move the figurines.
- Arrange the figurines according to the background image.
- Walkthrough: Q×4-P-O-Q×3-P-O-Q×5-P-O-Q×2-P-O-Q×3.
- P-O-Q×4-P-O-Q×5-P-O×2-P-O×7-P-O-Q-P-Q×2-P-Q×3-P.
- Q×4-P-Q×6-P-Q-P-Q-P-Q-P-Q×2-P-Q×7-P-Q-P-Q.
Tower
This mysterious tower must be guarding numerous secrets. I should go inside and explore.
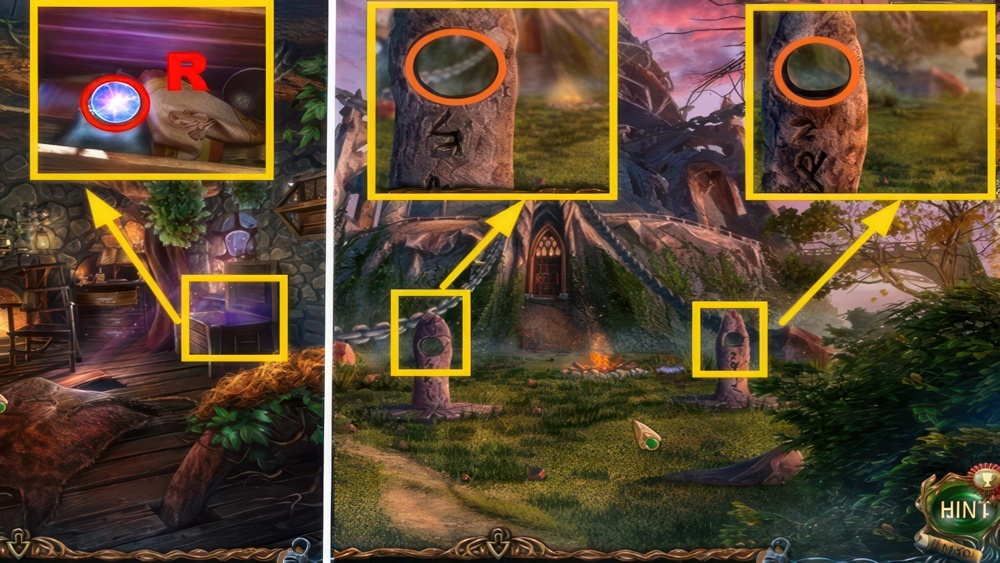
- Take the ENERGY SPHERE (R).
- Go down, turn right.
- Place 2 ENERGY SPHERES (🟠).
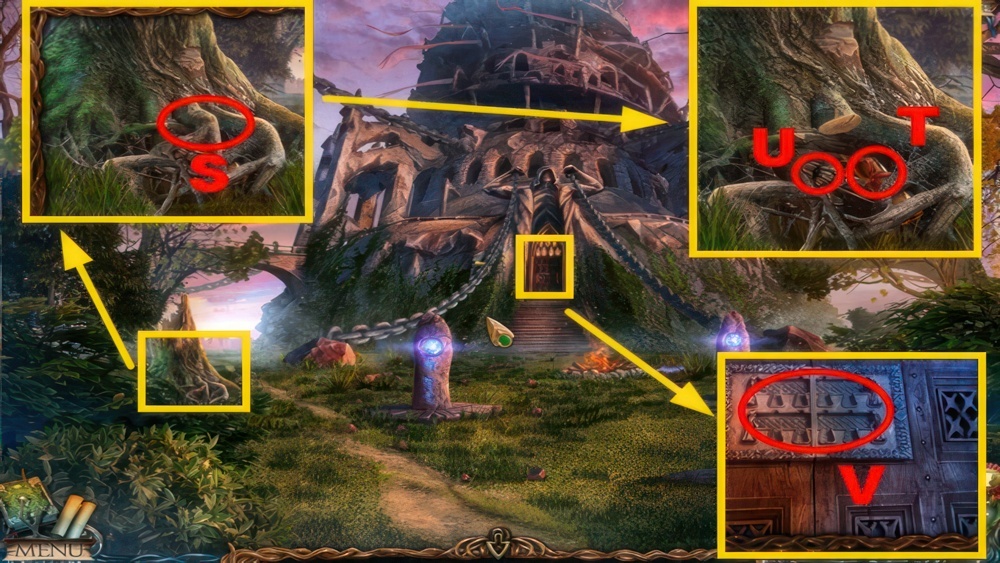
- Use the SAW (S).
- Take the WATER PORTAL ACTIVATION (T) and MONK FIGURINE 8/8 (U).
- Place 8 MONK FIGURINES (V).
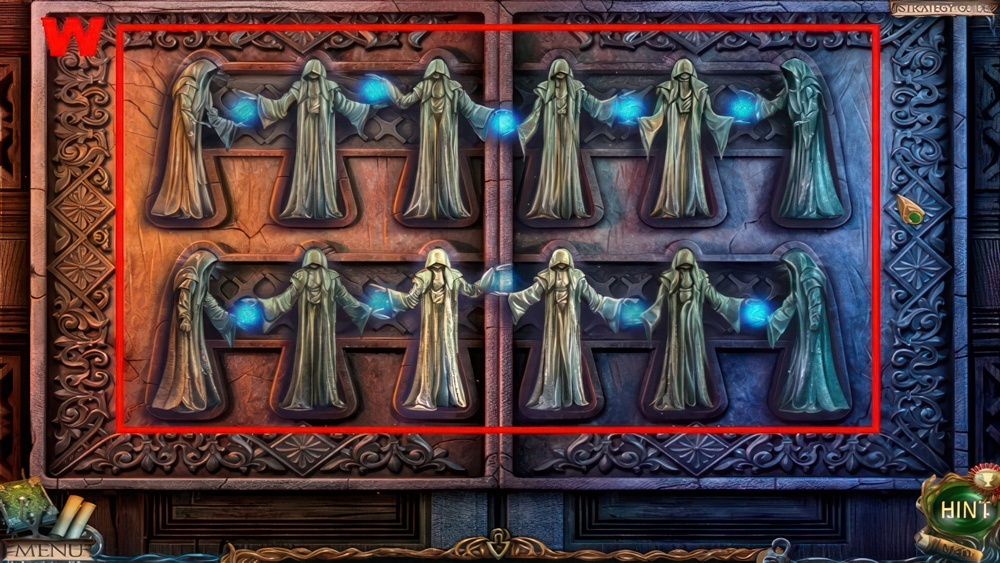
- Play the puzzle.
- Arrange the figurines so that the monks’ hands form a closed energy chain.
- Walkthrough: (W).
- Go forward.
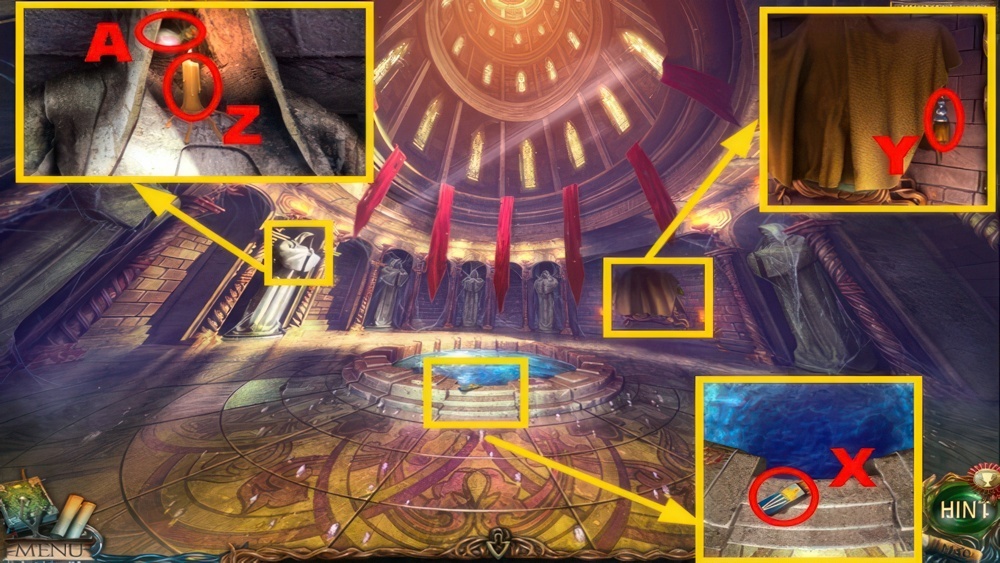
- Take the MATCHBOX (X).
- Use the KNIFE (Y) to acquire the TASSEL.
- Use the CANDLE and MATCHBOX (Z).
- Take the PURPLE ESSENCE (A).
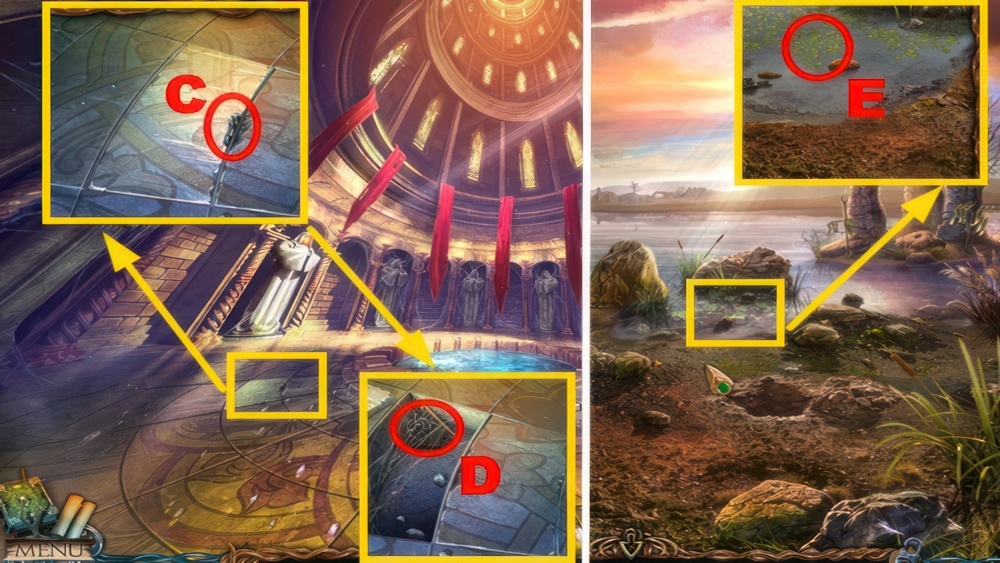
- Use the KNIFE (C).
- Take the MOSAIC FRAGMENT (D).
- Go down, turn left.
- Use the NET (E) to acquire the DUCKWEED.
- Go to Maaron’s Cottage.
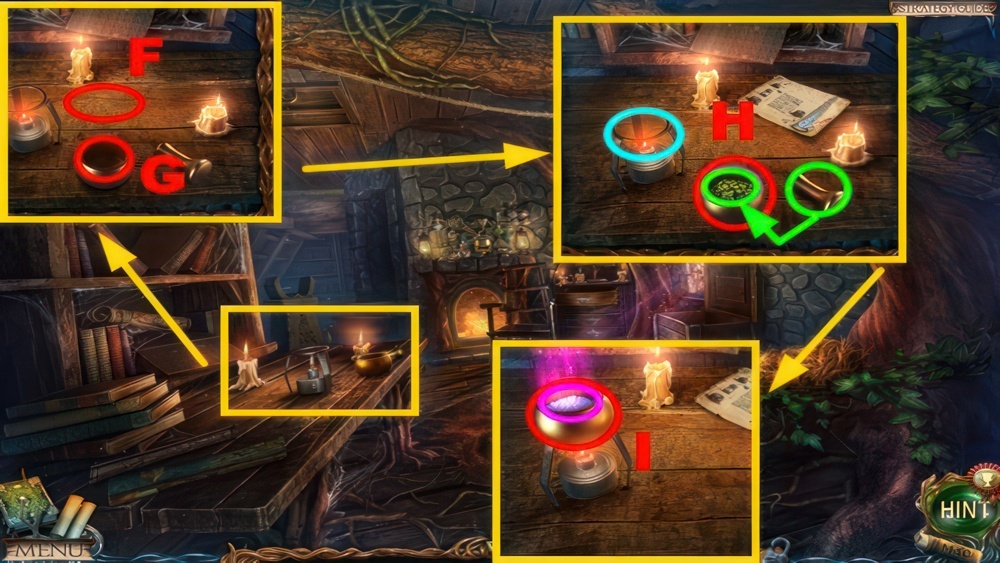
- Place the WATER PORTAL ACTIVATION (F) and DUCKWEED (G).
- Use the pestle (🟢).
- Put the mortar (H) on the burner (🔵).
- Use the PURPLE ESSENCE (🟣).
- Take the POWDER OF FLYING (I).
- Go down, turn left.
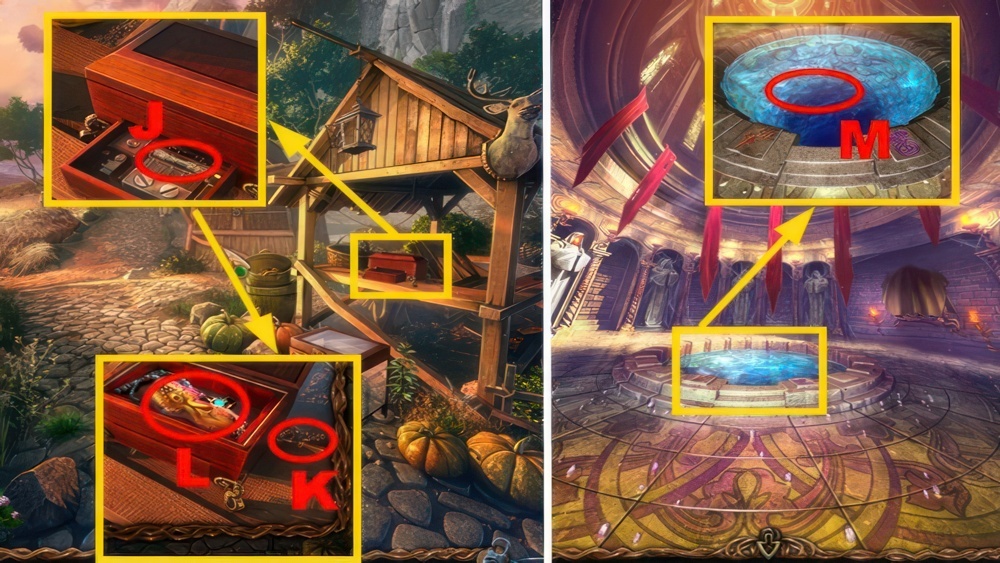
- Use the TASSEL (J), close the compartment.
- Go the handle (K).
- Take the PHOENIX FEATHER (L).
- Go to the Tower Hall.
- Place the PHOENIX FEATHER and POWDER OF FLYING (M).
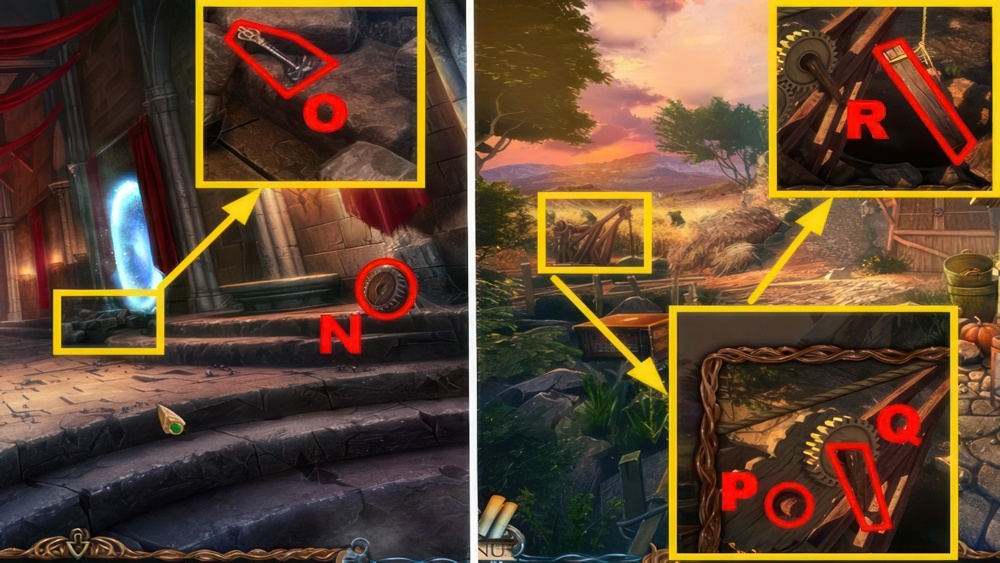
- Take the WOODEN GEAR (N).
- Remove 3 stones, take the KEY (O).
- Go to the Halfling Settlement.
- Place the WOODEN GEAR (P).
- Turn the handle (Q).
- Take the PLANK (R).
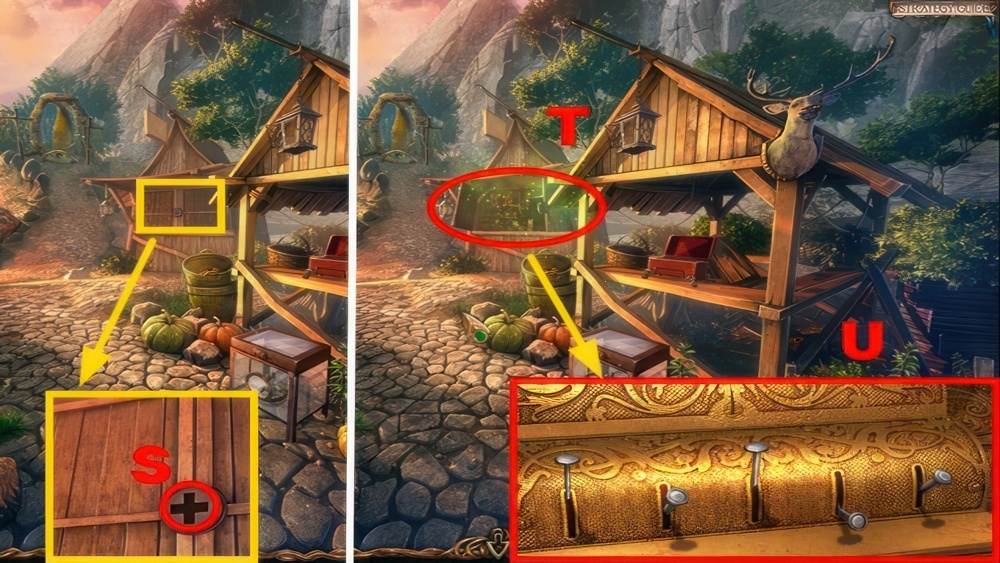
- Use the KEY (S).
- Play the puzzle (T).
- Place the keys in the given positions, then pull the lever to check if they’re correct.
- Puzzle walkthrough: (U).
- You receive the STONE CHIP.
- Go to the Lake of Life.
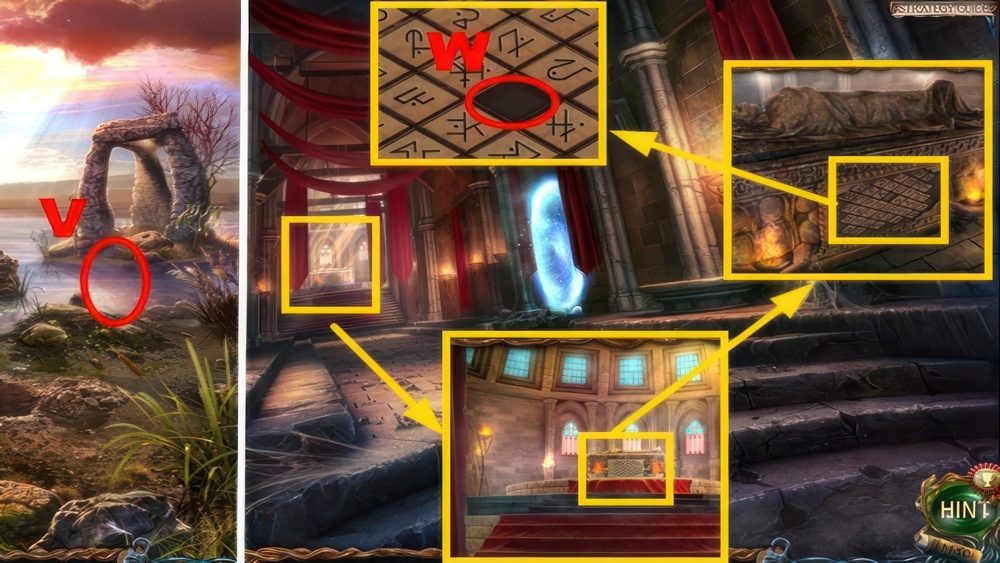
- Place the PLANK (V).
- Go to the Upper Corridor.
- Place the STONE CHIP (W).
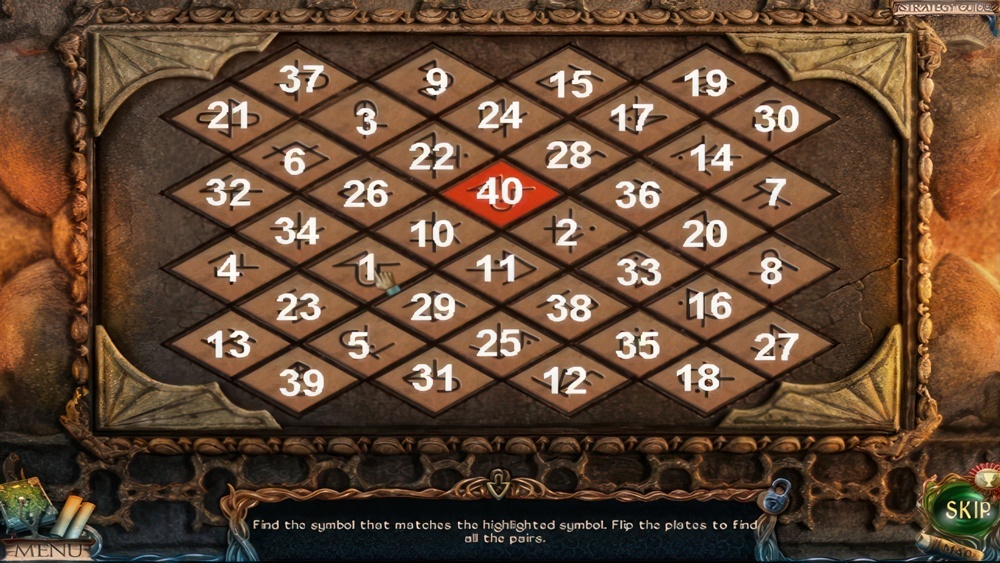
- Play the puzzle.
- Find the symbol that matches the highlighted symbol.
- Flip the plates to find all the pairs.
- Walkthrough: 1-40.
The Compass of the Worlds
In the tomb of an ancient ruler of the Forgotten Lands, I came across an interesting manuscript. It describes the power and importance of the Space Portal, and in particular the Compass of the Worlds – the key to the portal. “The ruler of the Portal, rules space” – as it’s written in the manuscript. Now it’s clear why Maaron has been so concerned. The Evil plans to seize the portal.
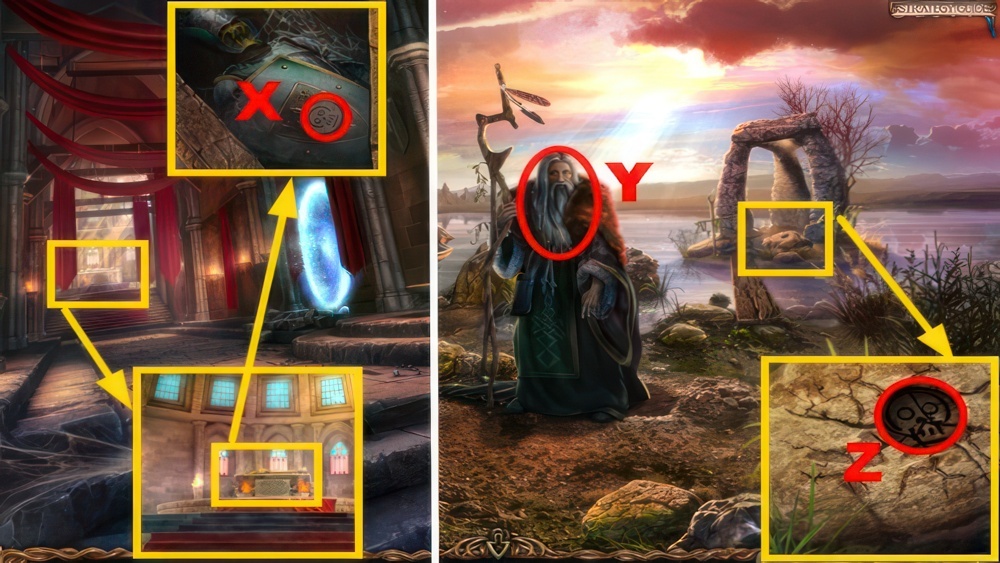
- Take the RUNE (X).
- Go down ×2, turn left.
- Talk to the man (Y), you receive the MOSAIC FRAGMENT.
- Place the RUNE (Z).
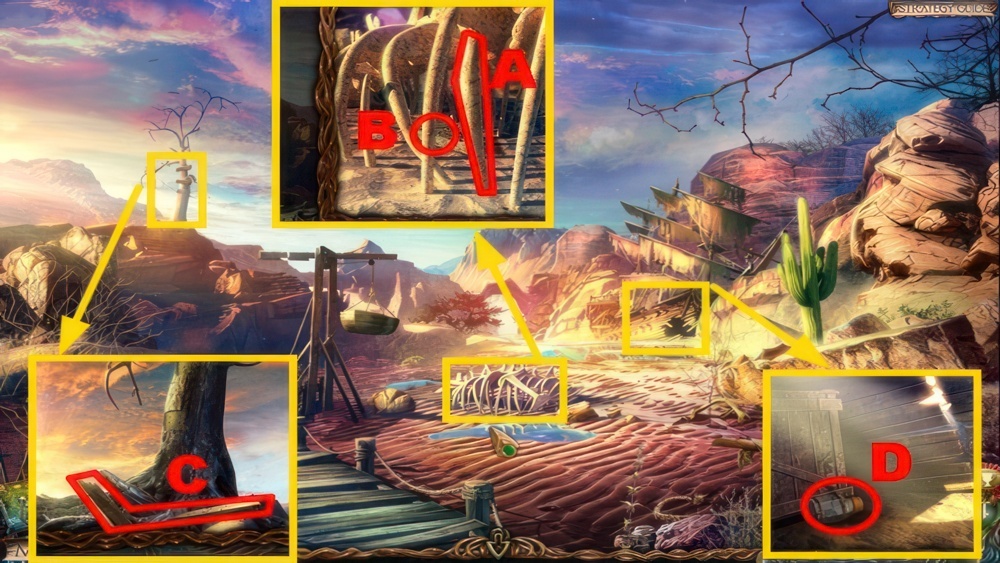
- Take the WHALE RIB (A) and STONE RUNE (B).
- Take the PLANKS (C) and JAR OF FLIES (D).
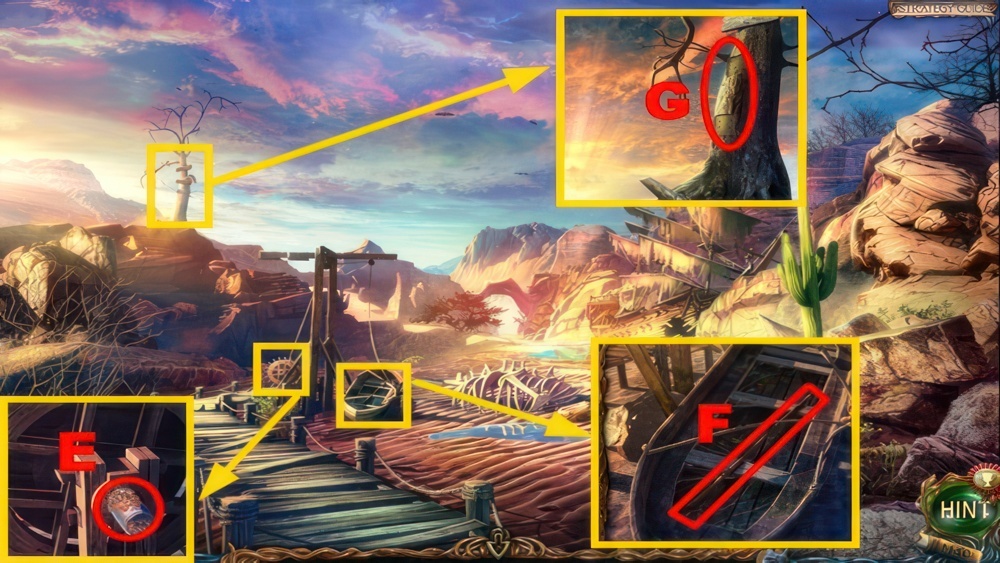
- Use the FULL OIL CAN (E).
- Take the GAFF (F).
- Place the PLANKS (G).
- Go forward.
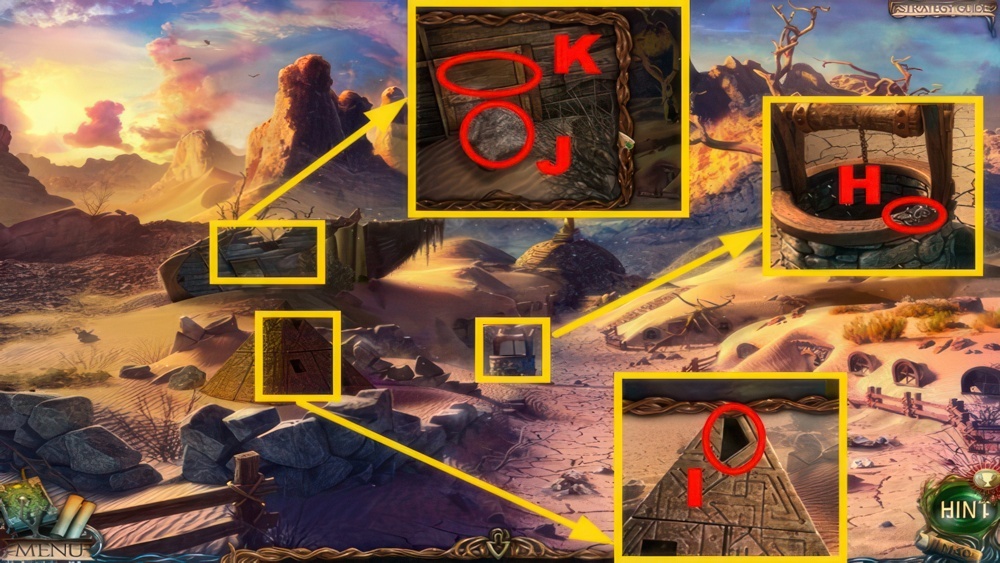
- Take the NAILS (H).
- Place the STONE RUNE (I).
- Use the WHALE RIB (J).
- Open the compartment (K).
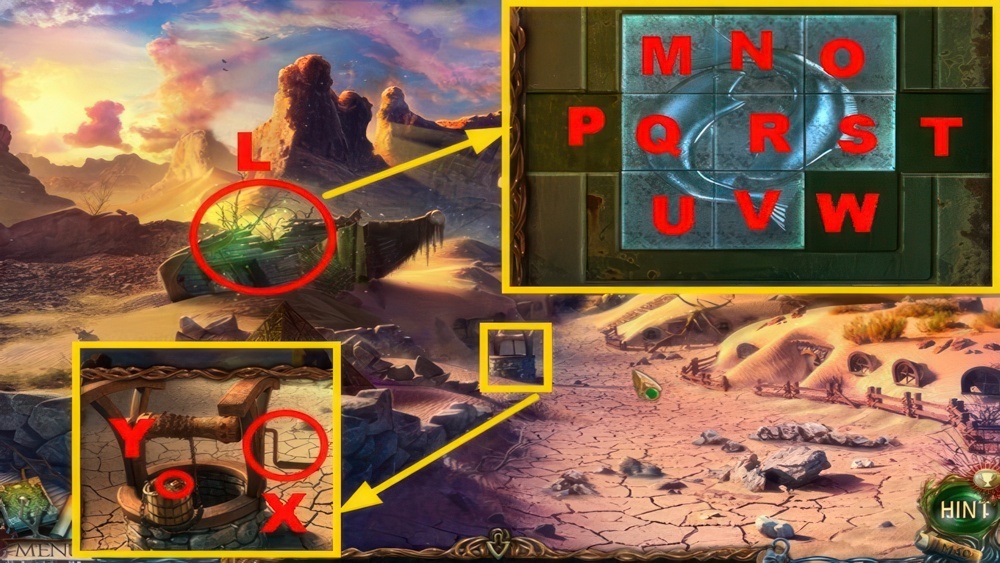
- Play the puzzle (L).
- Slide the mosaic fragments to restore the image.
- Puzzle walkthrough: Q, → , U, ↑ , V, ← , R, ↓ , Q, → , U, ↑ , Q, ← , R, ←.
- Q, ↓ , S, ← , R, ← , O, ↓ , N, → , M, → , Q, ↑ , S, ← , R, ← , O, ↓ , S, →.
- N, → , Q, → , R, ↑ , U, ↑ , Q, → , V, ← , W, ← , P, → , O, ↓ , S, ↓ , T, ← , S, ↑ , W, ↑.
- You receive the HANDLE.
- Place the HANDLE (X), turn it.
- Remove soil twice, take the DYNAMITE (Y).
- Go down.
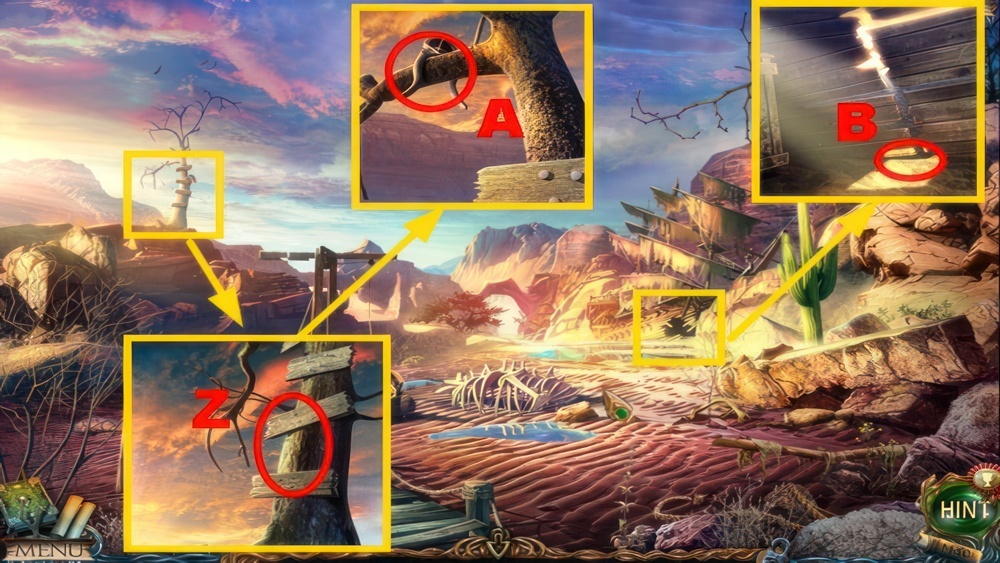
- Use the NAILS and HAMMER (Z).
- Take the TONGS (A).
- Place the DYNAMITE (B).
- Go down ×2.
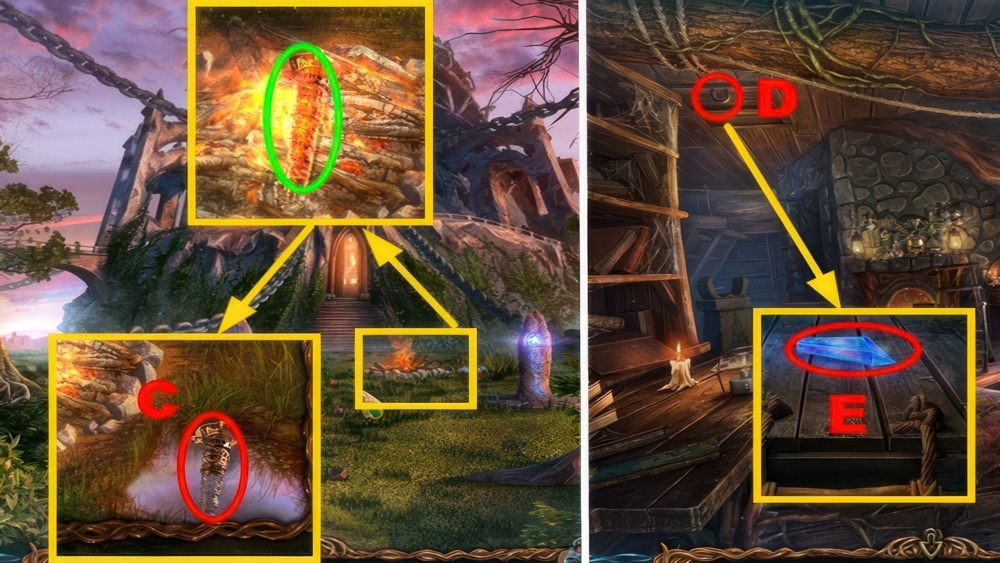
- Use the TONGS (🟢).
- Take the TOWER FIGURINE (C).
- Go to Maaron’s Cottage.
- Use the GAFF (D).
- Take the CRYSTAL (E).
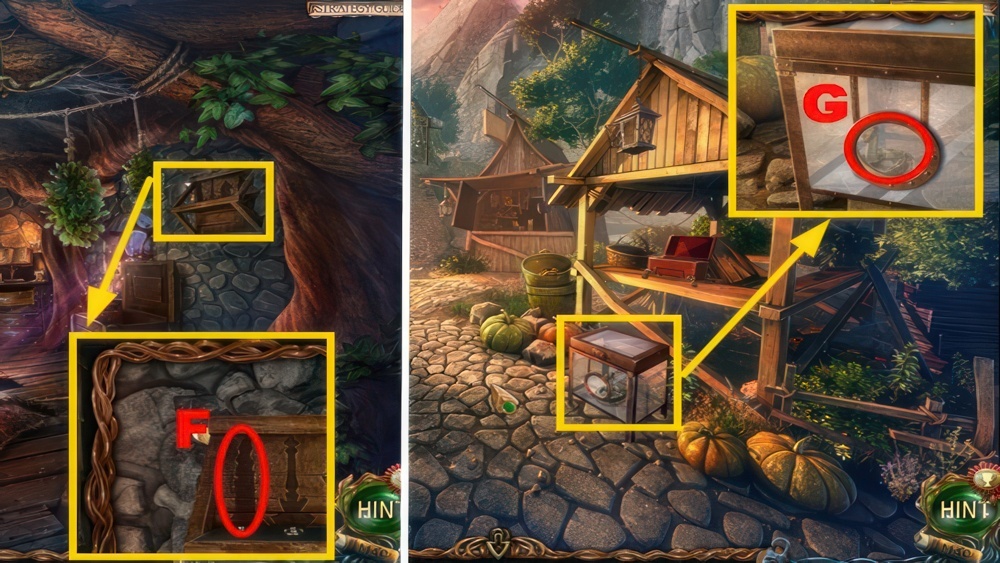
- Place the TOWER FIGURINE (F).
- Go down, turn left.
- Place the JAR OF FLIES (G) to acquire the SNAKE IN A JAR.
- Go to the Abandoned Halfling Settlement.
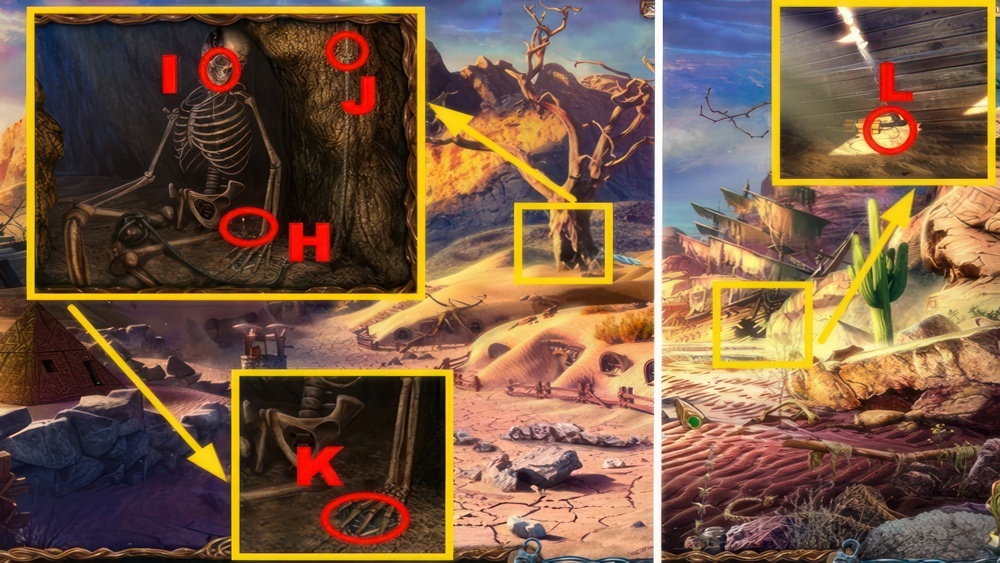
- Use the SNAKE IN A JAR (H).
- Take the MONOCLE (I).
- Use the KNIFE (J) to acquire the STONE ON A ROPE.
- Go the hand, take the MOSAIC FRAGMENT (K).
- Go down.
- Place the MONOCLE (L).
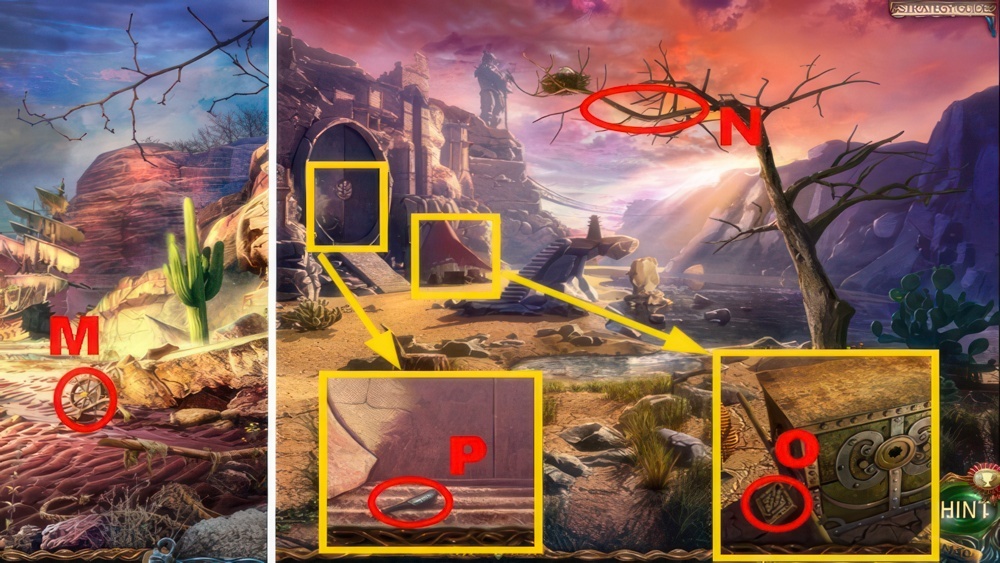
- Take the SHIP’S WHEEL (M).
- Go right.
- Place the STONE ON A ROPE (N).
- Take the STONE RUNE (O) and BRUSH (P).
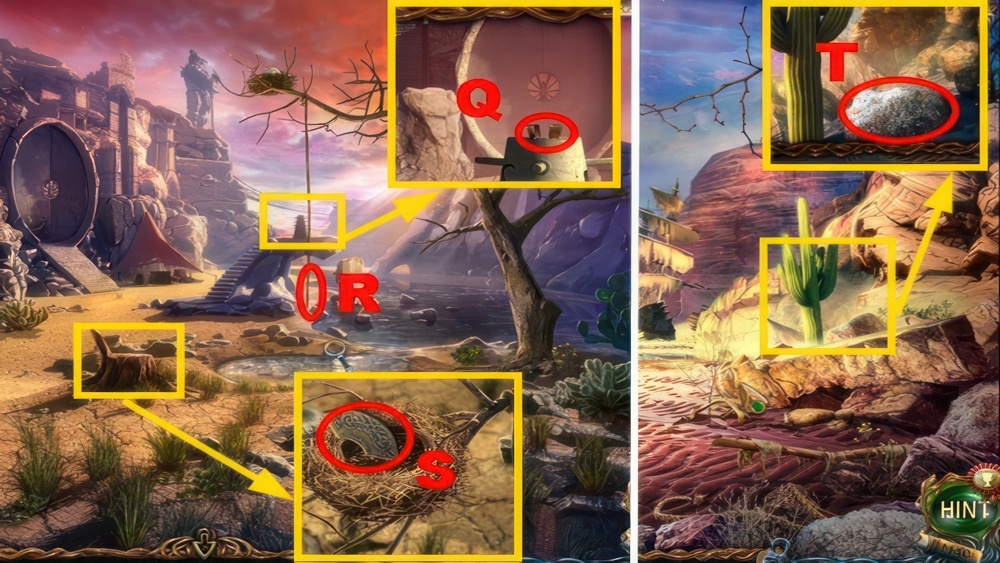
- Place the CRYSTAL (Q).
- Pull the rope (R).
- Take the MOSAIC FRAGMENT (S).
- Go down.
- Use the BRUSH (T).
- Go left.
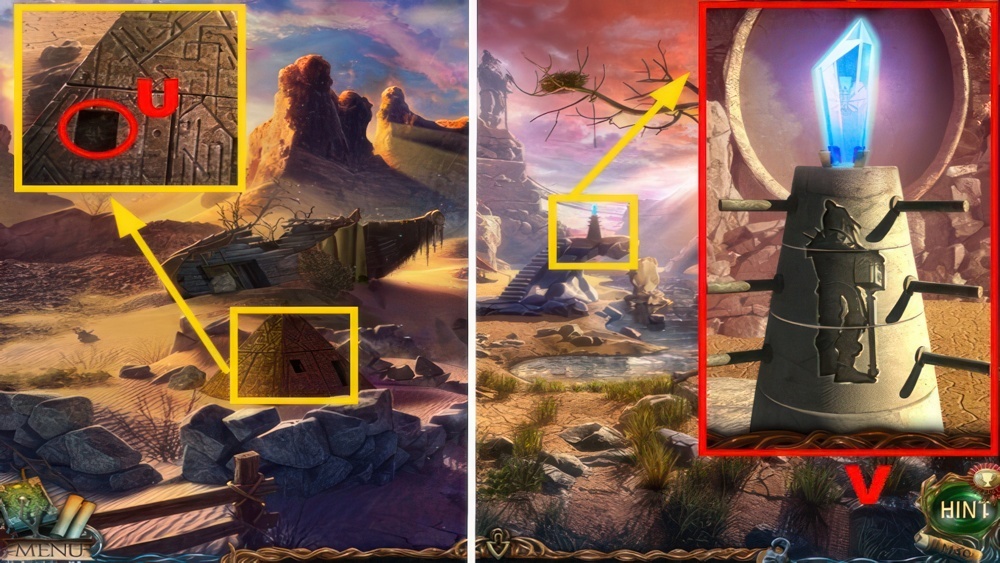
- Place the STONE RUNE (U).
- Go to the Canyon.
- Arrange the image correctly: (V).
- Go left.
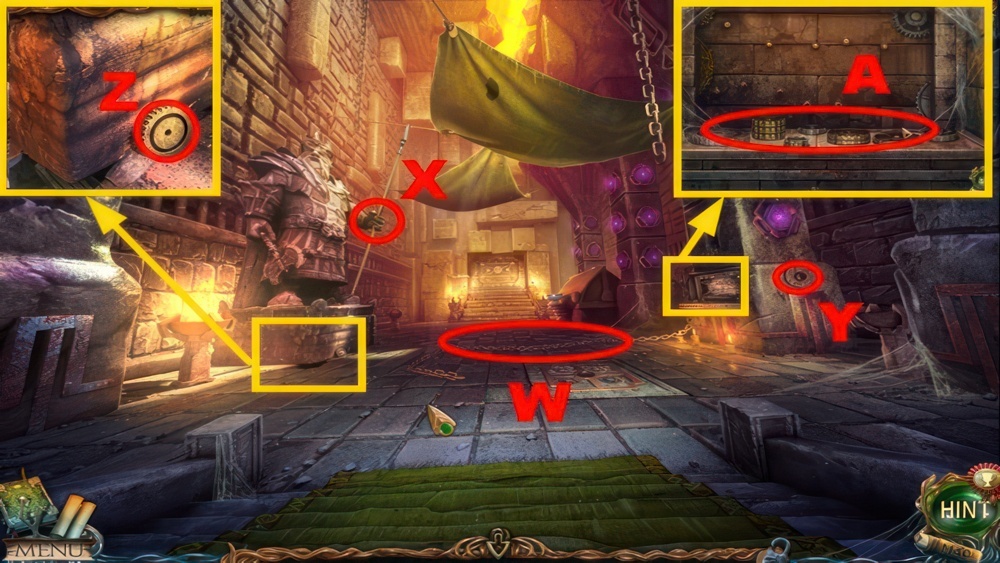
- Connect the chain (W) to statue (X).
- Place the SHIP’S WHEEL (Y).
- Take the GEAR (Z).
- Place the GEAR (A).
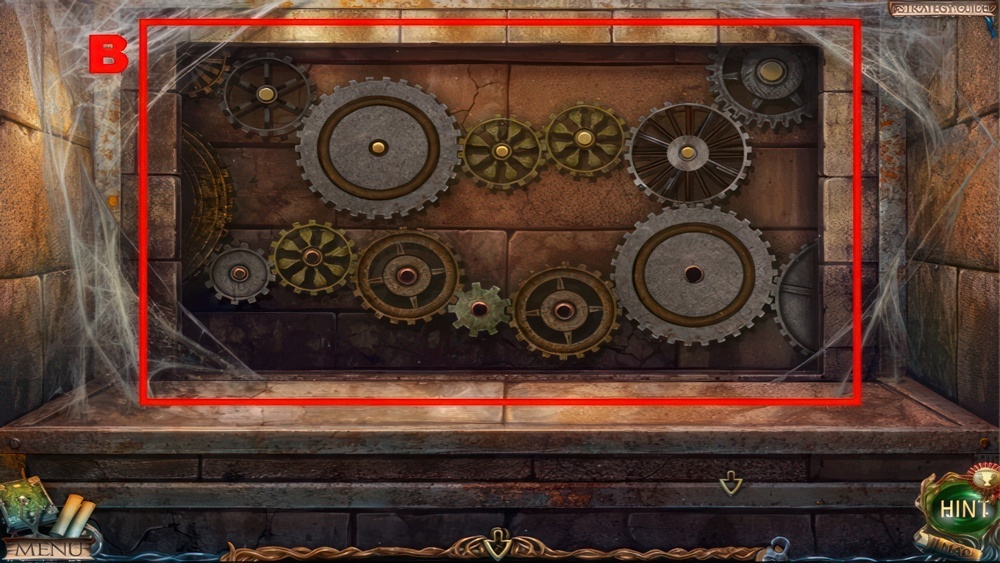
- Play the puzzle.
- Place all the gears to create a continuous chain and activate the mechanism.
- Walkthrough: (B).
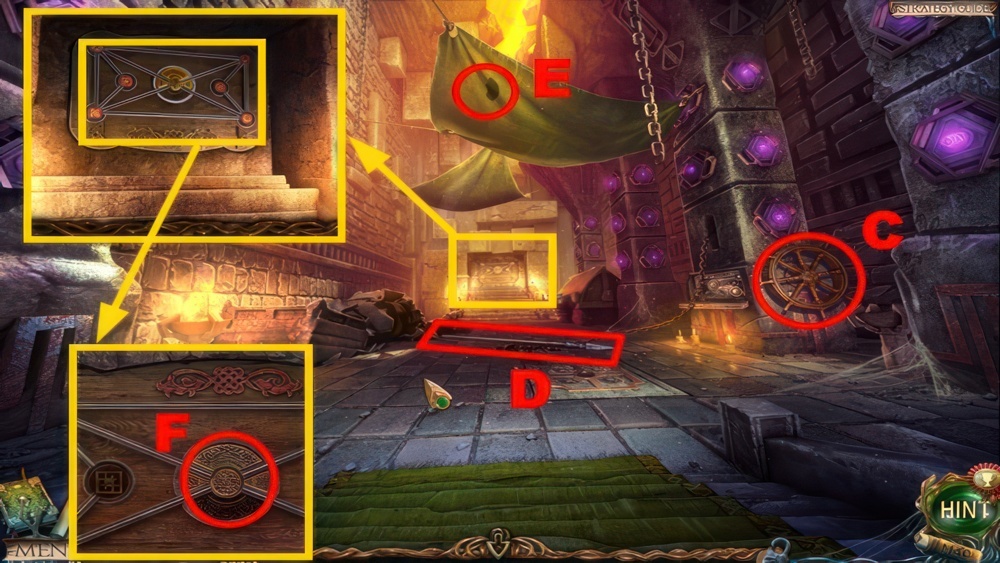
- Rotate the wheel (C).
- Take the SPEAR (D).
- Use the SPEAR (E) to acquire the MOSAIC FRAGMENT.
- Place 5 MOSAIC FRAGMENTS (F).
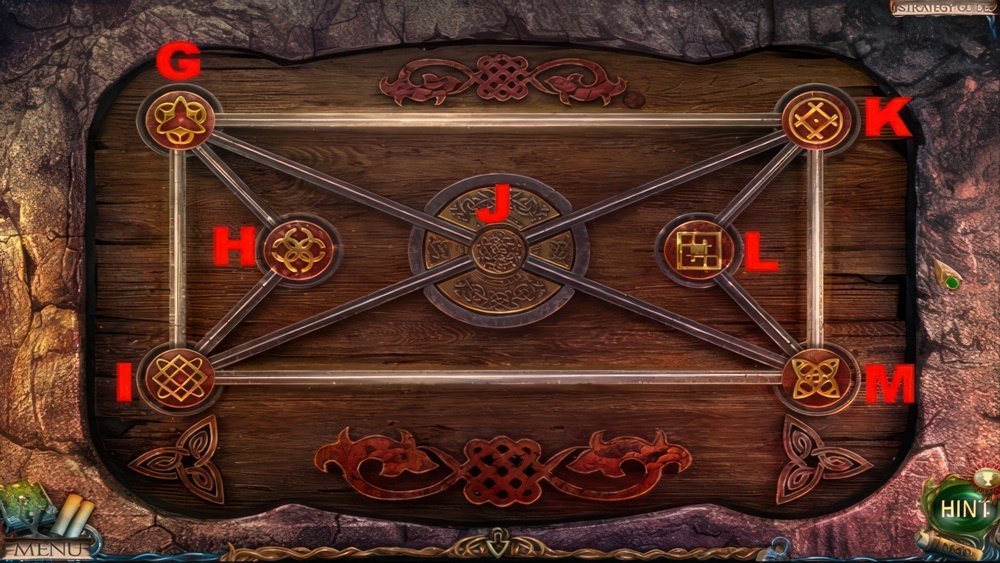
- Play the puzzle.
- Move the symbols into the correct spots.
- Symbols on a disc must correspond to the symbols beneath.
- Walkthrough: G-K-J-I-M-J-K-L-M-J-G-H-I-J-G-K-J-M-L.
- K-J-G-H-I-M-J-G-H-I-M-J-G-H-I-M-J-G-I-J-M-L-K-G-J-K-L-M-J-I-M-J.
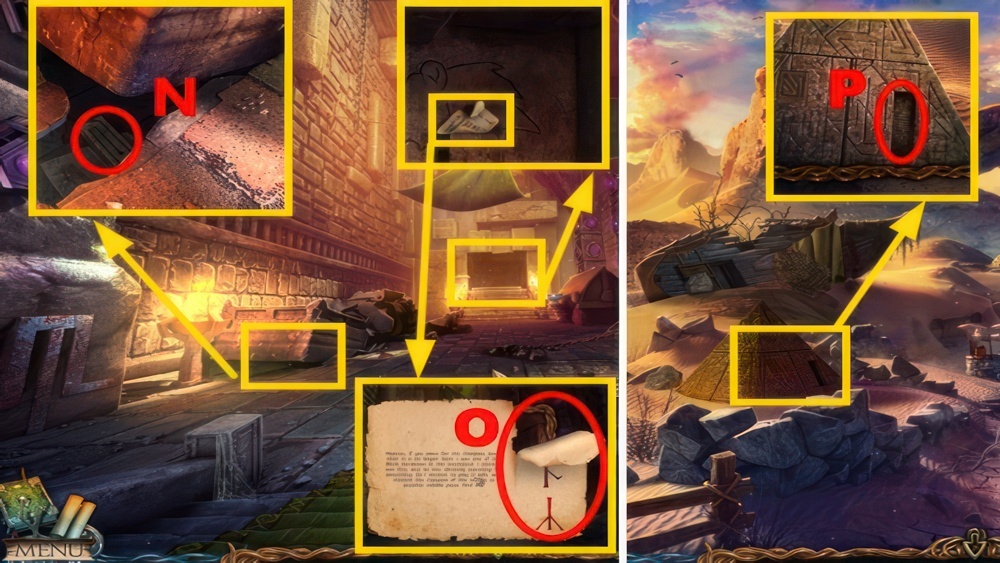
- Take the STONE RUNE (N) and NOTE WITH THE SYMBOLS (O).
- Go to the Abandoned Halfling Settlement.
- Place the STONE RUNE (P).
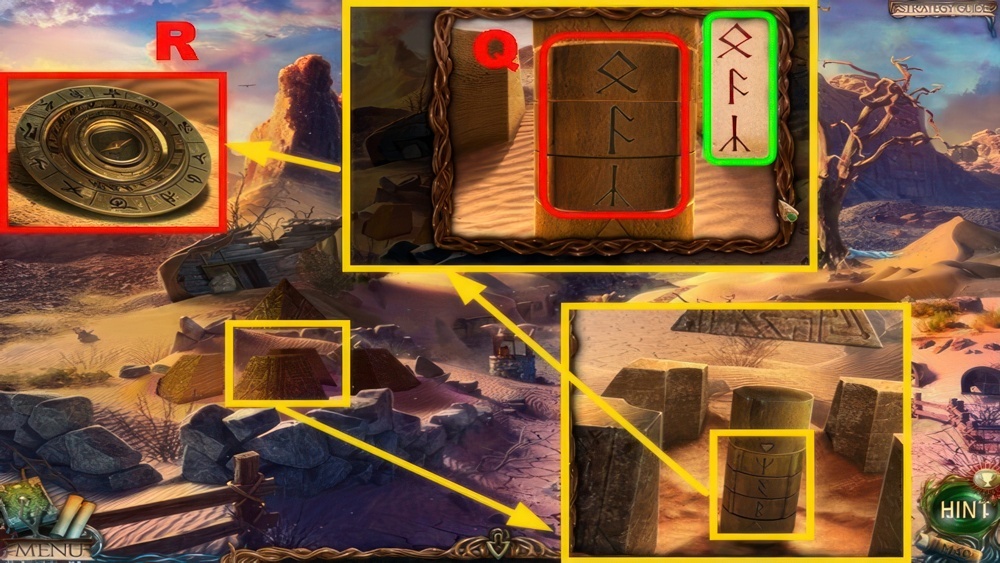
- Place the NOTE WITH THE SYMBOLS (🟩).
- Enter the correct symbols (Q).
- Take the device (R).
Going Up
The Compass is lost and possible now in the hands of Fire. I must find a way to get to the surface and quickly bring Maaron the sad news.
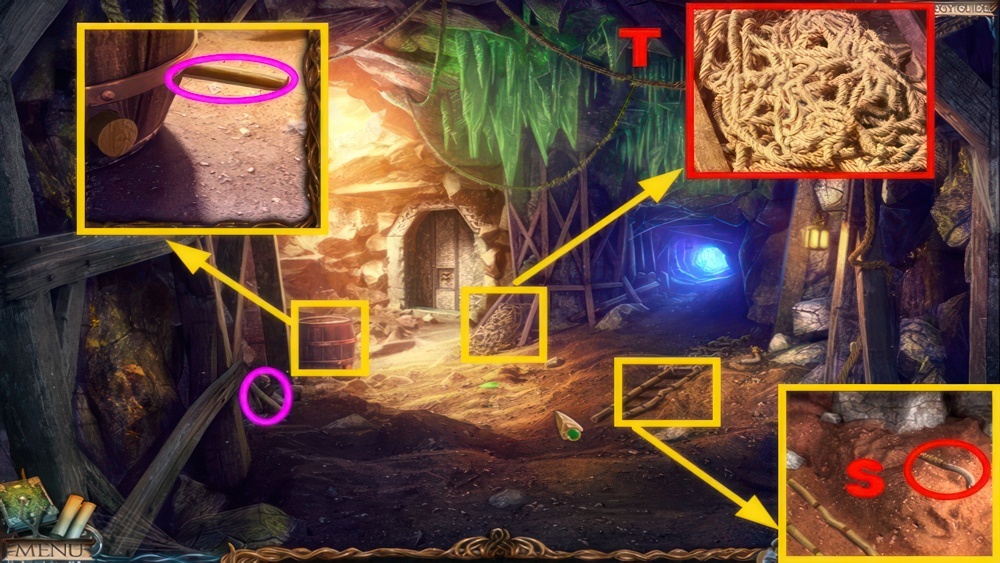
- The dwarf will talk to you.
- Take 2 STEPS (🟣), LEVER (S), and ROPE SECTIONS (T).
- Go right.
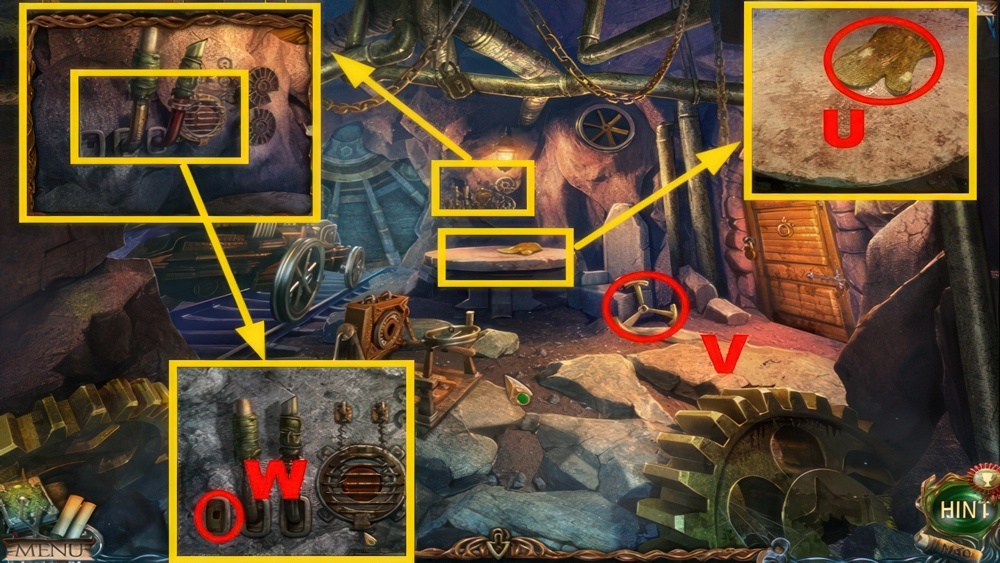
- Take the GLOVE (U) and FLYWHEEL (V).
- Place the LEVER (W).
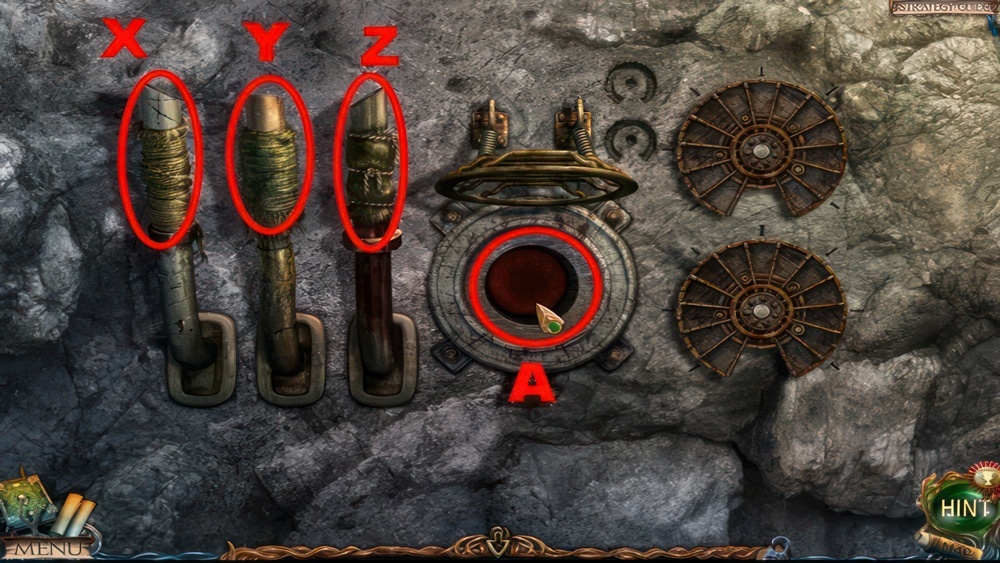
- Play the puzzle.
- Use the levers to rotate the discs according to the hint.
- Walkthrough: Z-Y×2-××3-Y×2-Z×2-Y×6.
- Push the button (A).
- Go down.
- Collect the CRYSTAL (B) with the GLOVE.
- Go right.
- Open the compartment, place the CRYSTAL (C), close the capsule and compartment.
- Go forward.
- The dwarf will talk to you.
- Use the KNIFE (D).
- Take the BOTTLE OF COLD WATER (E).
- Place the FLYWHEEL (F).
- Take the YIELD REMOVER (G).
- Go downstairs.
- Take the CORKSCREW (H) and BOWL (I).
- Play the puzzle (J) to acquire the HAMMER.
- Pull the chain twice (K).
- Take the CIRCLE SECTOR (L).
- Go down ×3.
- Use the BOWL and CORKSCREW (M).
- Take the POWDER (N).
- Go to the Square.
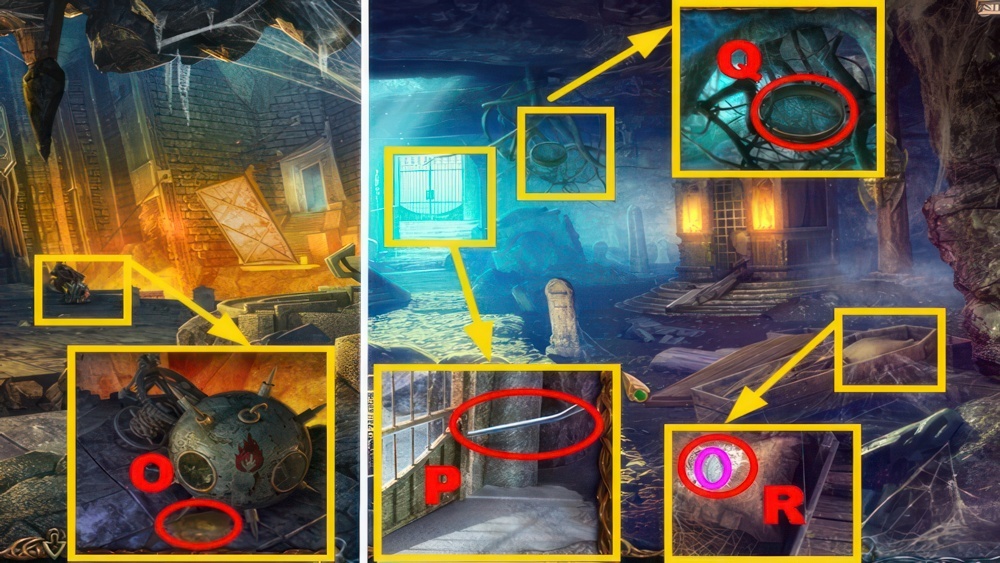
- Use the POWDER (O).
- Go right ×2.
- Take the CROWBAR (P) and SIEVE (Q).
- Use the KNIFE (R).
- Take the FEATHER (🟣).
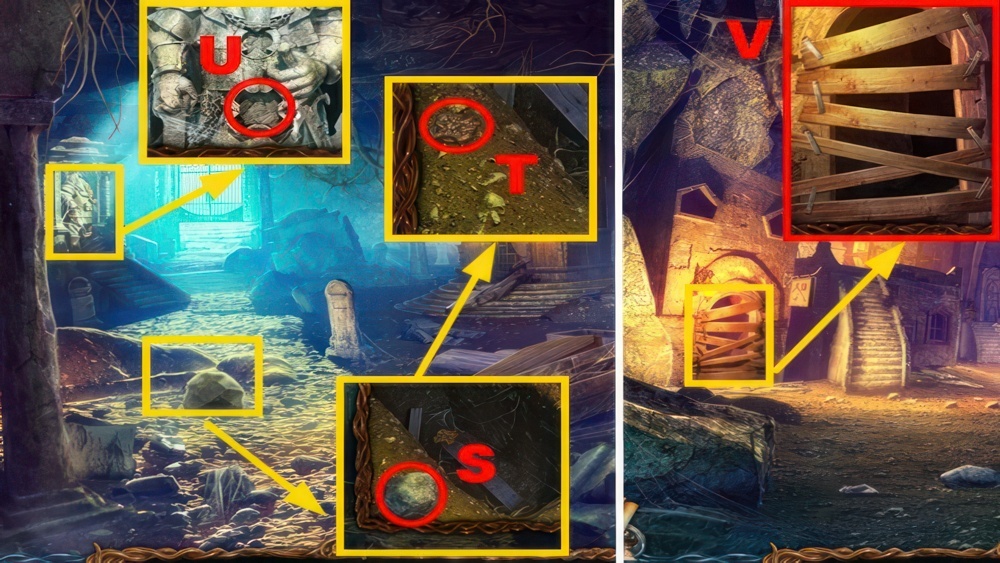
- Push the stone (S).
- Take the MEDALLION (T).
- Place the MEDALLION (U).
- Go down.
- Use the CROWBAR (V).
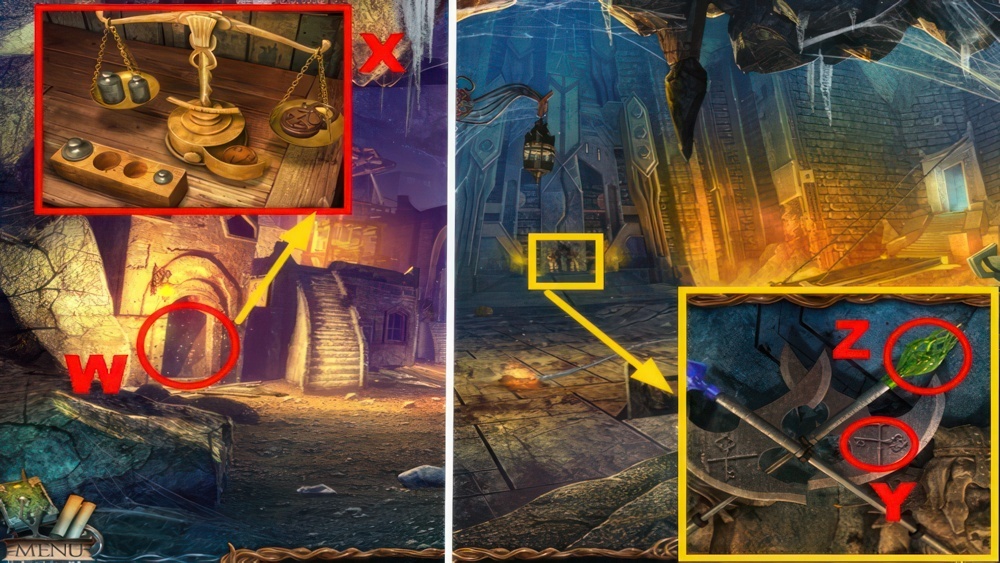
- Play the puzzle (W).
- Puzzle walkthrough: (X).
- You receive the EMERALD SYMBOL.
- Go down.
- Place the EMERALD SYMBOL (Y).
- Take the EMERALD KEY (Z).
- Go right ×2.
Horsemen Defeated
Fire and Chill are dead. This must have happened at Rocky Town. I’d better go and check what’s left of the Horsemen.
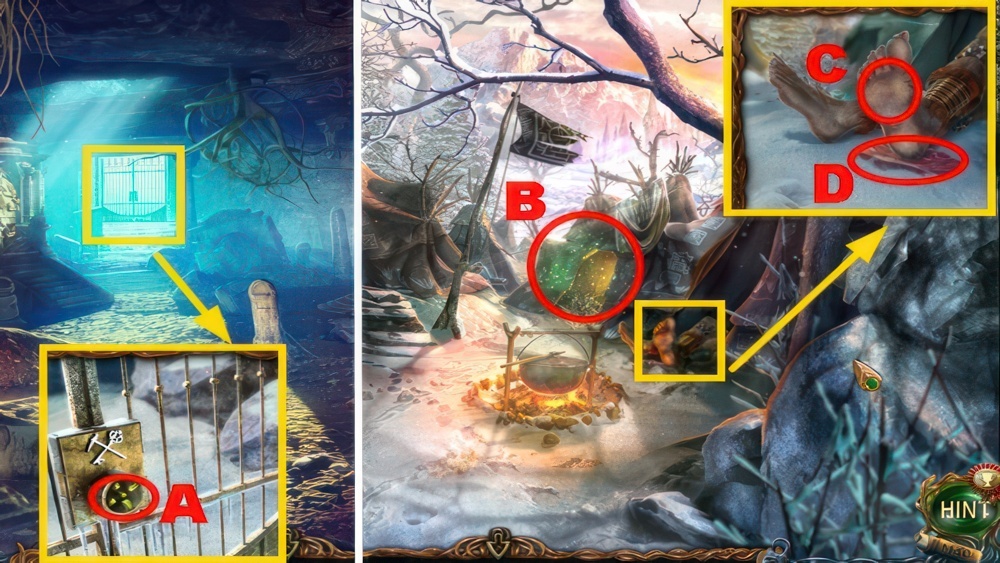
- Place the EMERALD KEY (A).
- Go forward.
- Play the puzzle (B) to acquire the SYMBOL.
- Use the FEATHER (C).
- Take the MEAT (D).
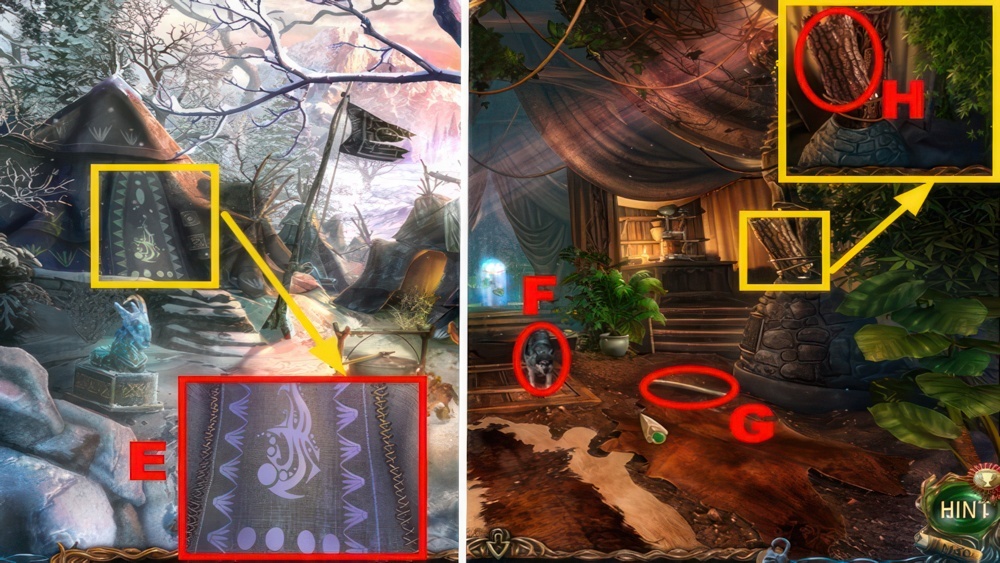
- Use the KNIFE (E), open the tent.
- Go left.
- Throw the MEAT (F).
- Take the STEP (G) and TROUGH (H).
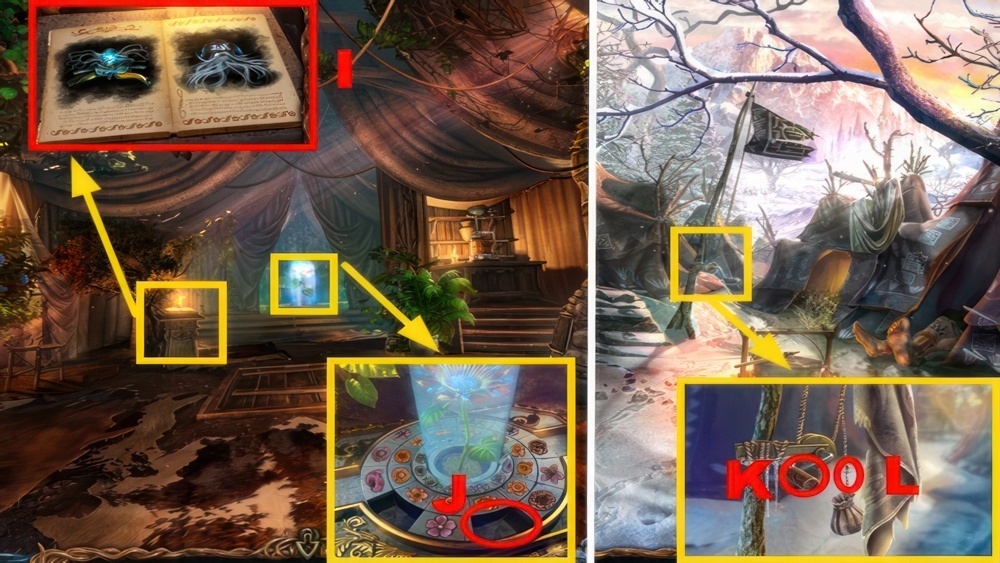
- Read the book (I).
- Place the CIRCLE SECTOR (J).
- Go down.
- Go the handle (K).
- Use the KNIFE (L) to acquire the LEATHER SACK.
- Go down ×4.
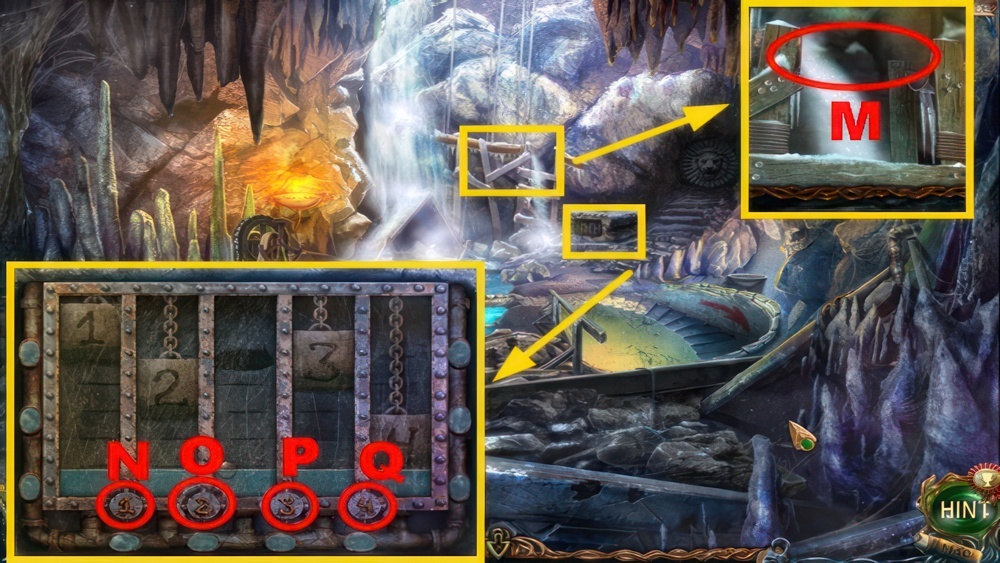
- Place the TROUGH (M).
- Play the puzzle.
- Use the stopcocks to lower the weights.
- Walkthrough: N-O-P-Q-N-O-P-Q-N-O-P-Q-N-P-Q.
- N-P-Q-N-P-Q-N-P-Q-N-Q-N-Q-N-Q-N-Q-N-Q×2.
- Go right.
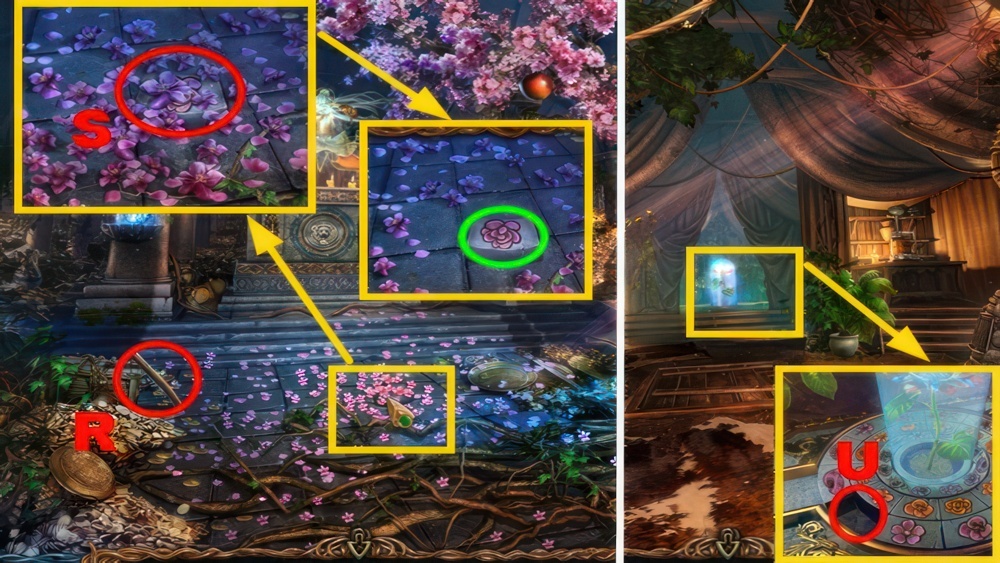
- The man will talk to you.
- Take the STEP (R), DIVINE TREE FLOWERS (S), and CIRCLE SECTOR (🟢).
- Go to the Marquee.
- Place the CIRCLE SECTOR (U).

- Play the puzzle.
- Rearrange segments of outer circles as shown in the inner circle.
- Move segments to grooves and rotate the circles.
- Walkthrough: (V).
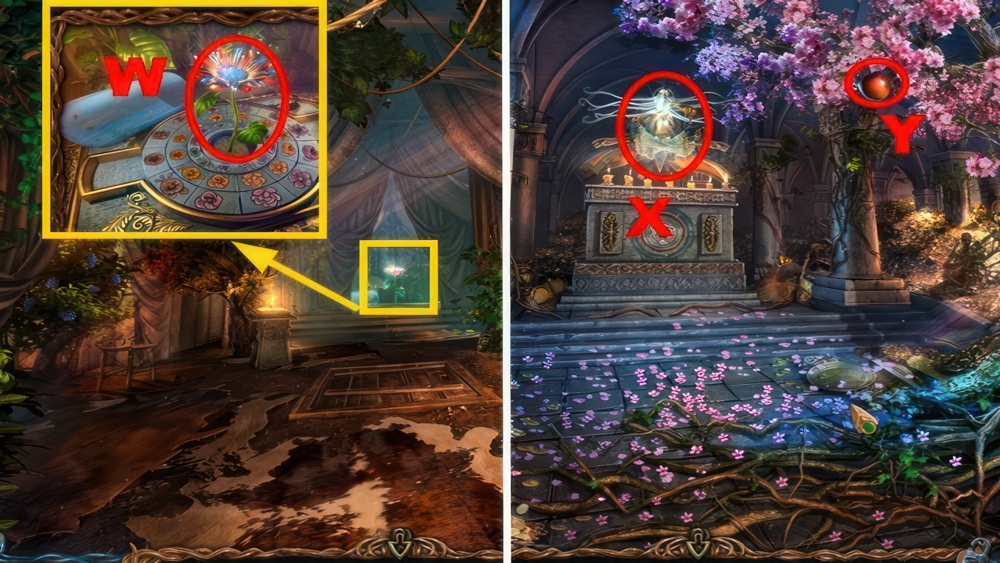
- Use the KNIFE (W) to acquire the FLOWER.
- Go to Mountgore’s Temple.
- Use the FLOWER (X).
- Use the YIELD REMOVER (Y) to collect MOUNTGORE’S APPLE.
- Go to the Mines.
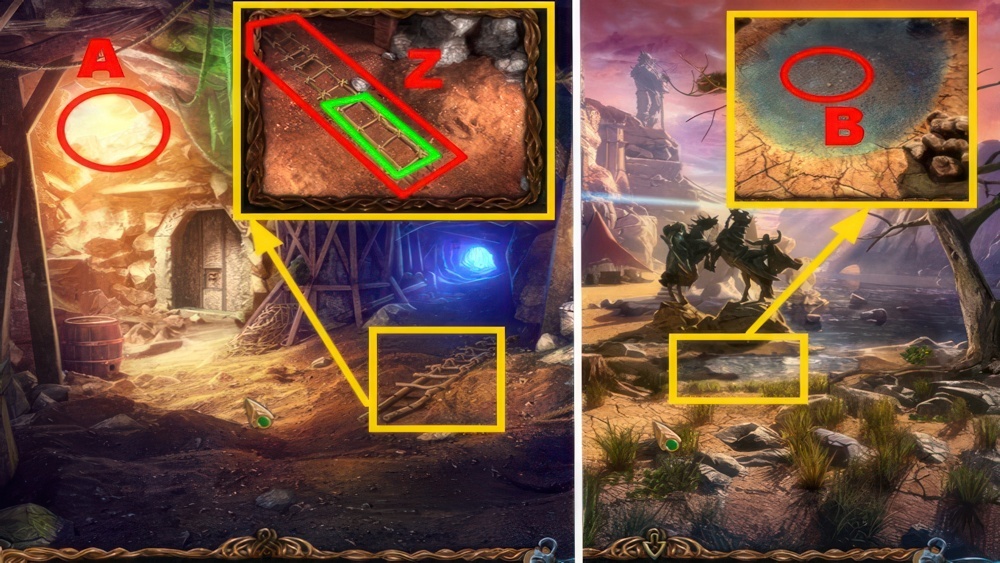
- Place 4 STEPS and the ROPE SECTIONS (🟩).
- Take the LADDER (Z).
- Place the LADDER (A).
- Go to the Canyon.
- Use the SIEVE (B) to acquire the GOLD ORE.
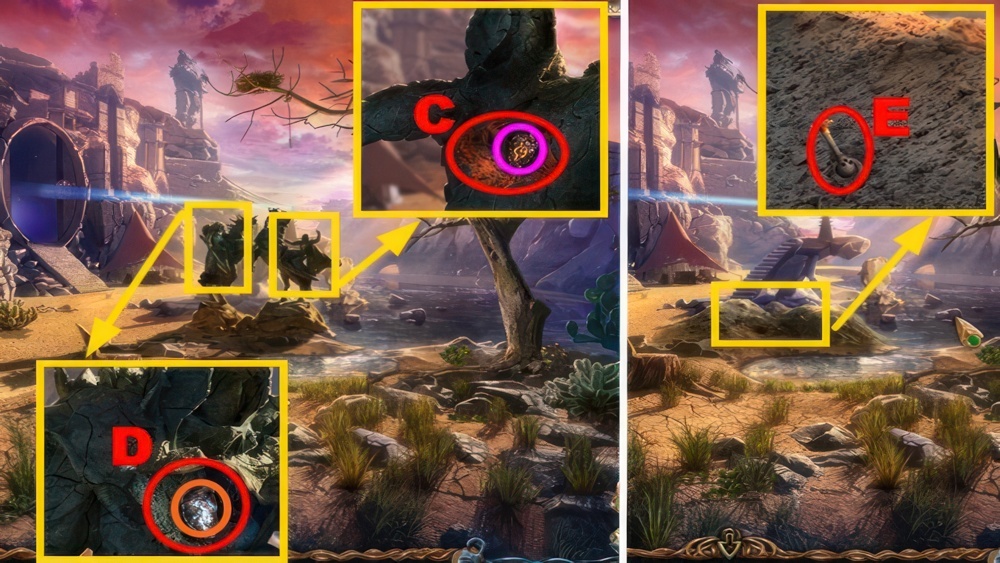
- Use the HAMMER twice (C) and (D), take 2 STONE HEARTS (🟣) and (🟠).
- Remove sand, take the KEY (E).
- Go left.
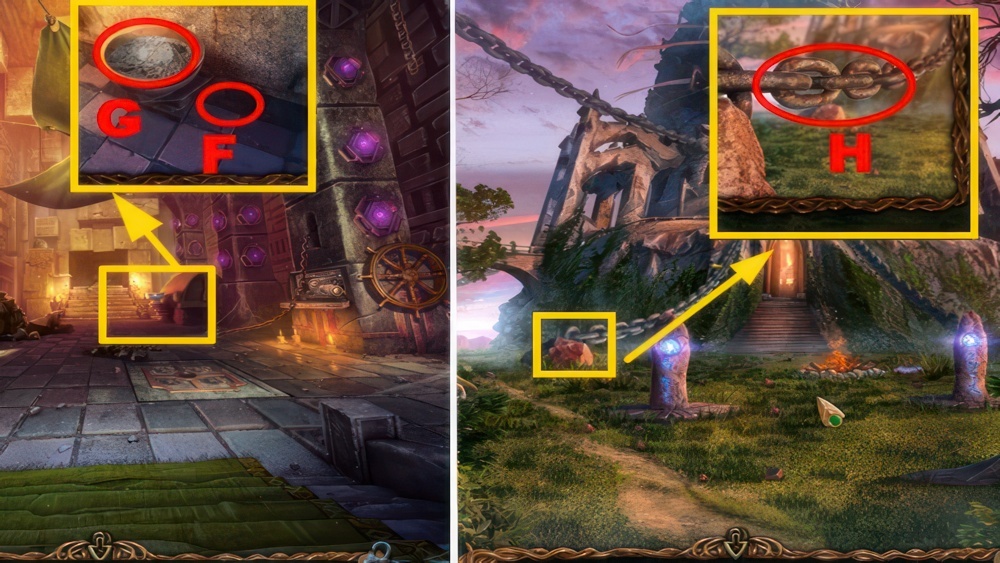
- Place the LEATHER SACK (F), collect the ash (G) to acquire the SACK OF ASHES.
- Go down ×4.
- Use the HAMMER (H) to acquire the HORN.
- Go to Maaron’s Cottage.
Horsemen’s Hearts
We found rocky hearts in Chill and Fire’s remains. Let’s bring them to Maaron – he’ll know what to do next.
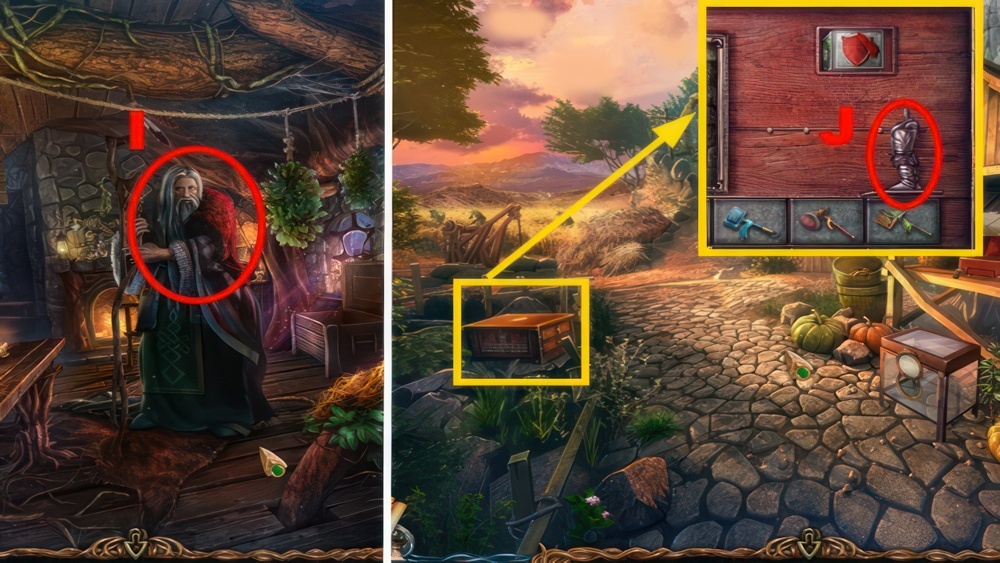
- Give 2 STONE HEARTS to the druid (I), you receive the DWARF FIGURINE.
- Go down, turn left.
- Place the DWARF FIGURINE (J).
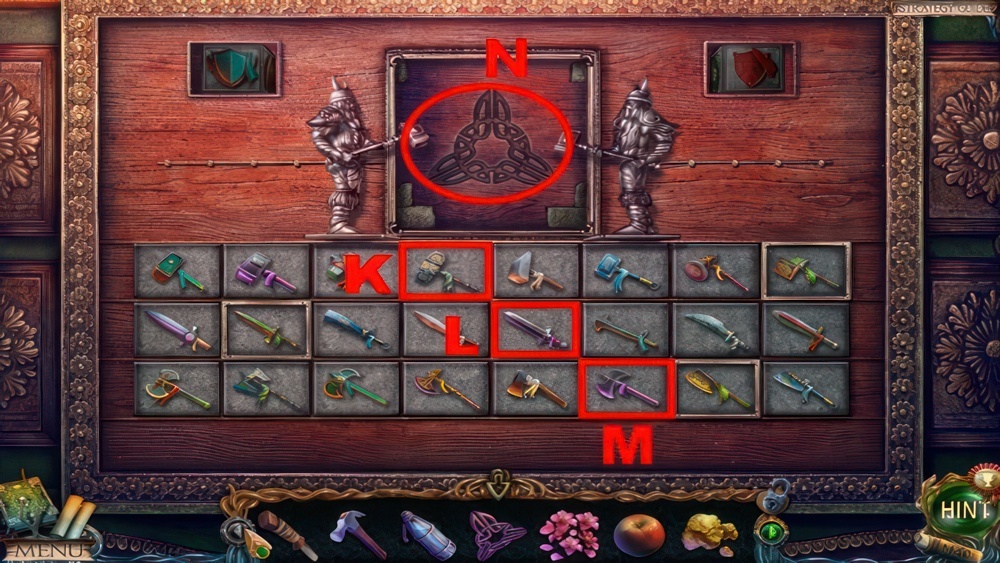
- Play the puzzle.
- Move the frames at the bottom to select the weapons corresponding with the shield image at the top.
- Walkthrough: K, ← ×3, L, → , M, ← ×3, K, → ×6, L, ← ×5, M, →.
- K, ← ×5, L, → ×4, M, → ×2, K, → ×2, L, → ×2, M, ← ×4, K, ←.
- L, → , M, ← , K, → ×3, L, ← ×5, M, → ×7, K, ← , L, →.
- M, ← ×3, K, → ×3, L, ← ×2, M, → ×2.
- Place the SYMBOL (N).
Heading to Swamps
Maaron suspects that the third Horseman possesses the Compass now. Let’s set out to the Swamps and see if that’s right.
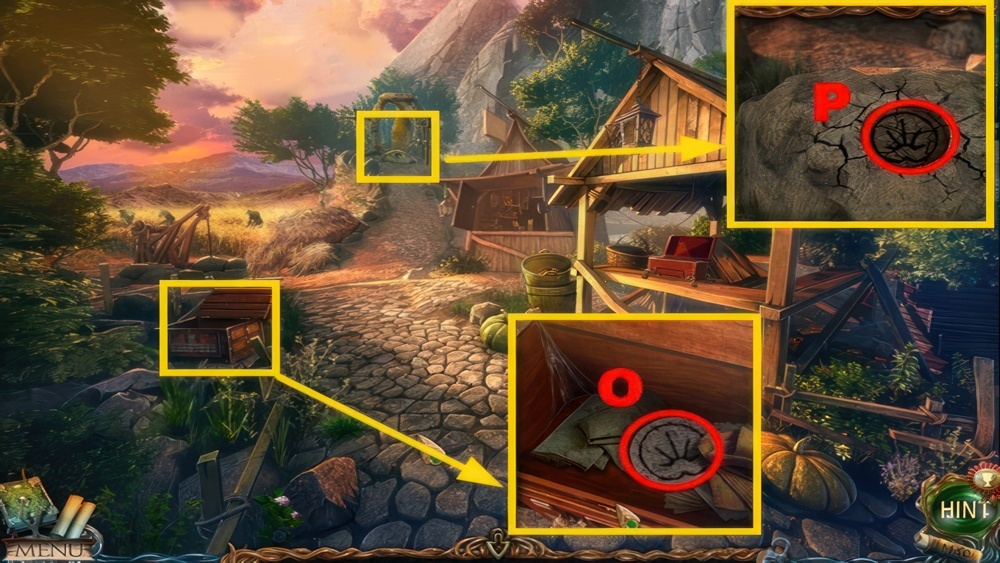
- Take the RUNE (O).
- Place the RUNE (P).
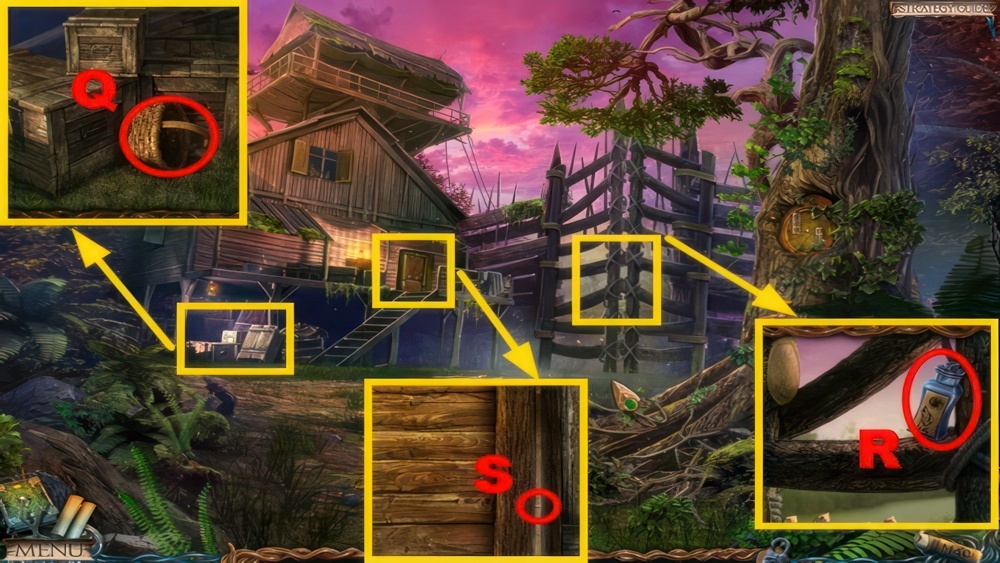
- Take the BASKET (Q) and BUBBLE (R).
- Use the KNIFE (S).
- Go forward.
Turning Potion
Fanglon is about to turn into a wolf, but we need him completely sane. Let’s prepare a turning potion for Fanglon. Ambiguous race of the Lost Lands. On one hand they’re friendly, but on the other – they must be feared. At the full moon, werewolves turn into a giant wolf-like creature. Werewolves have lived in the Swamps since time immemorial. However, Chimera’s appearance in the area led the race to the brink of extinction. Some witnesses claim, though, that someone resembling a werewolf still inhabits the Swamps.
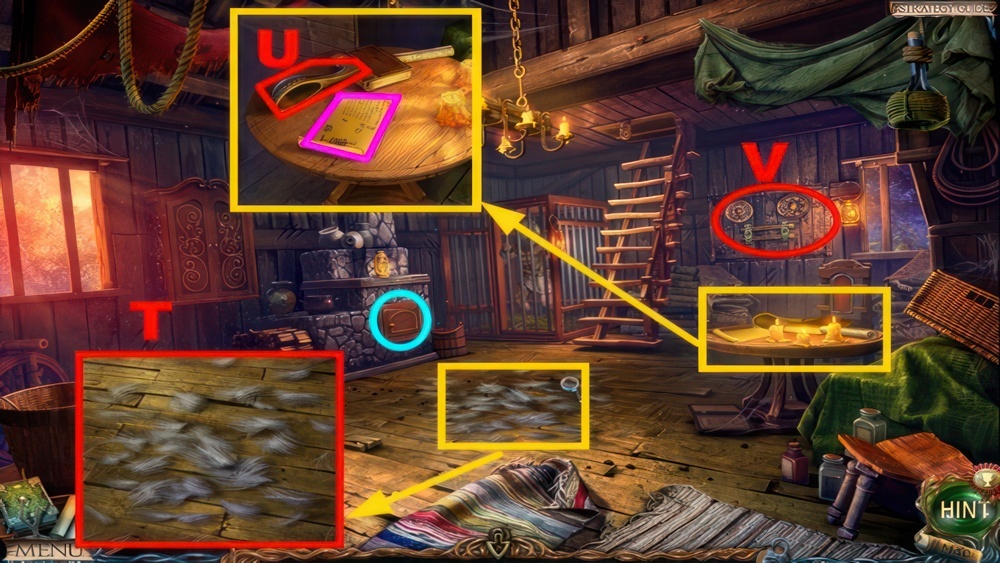
- The werewolf will talk to you.
- Take the WOOL (T) and SCOOP (U), read the recipe (🟪).
- Open the compartment (🔵).
- Examine the area (V).
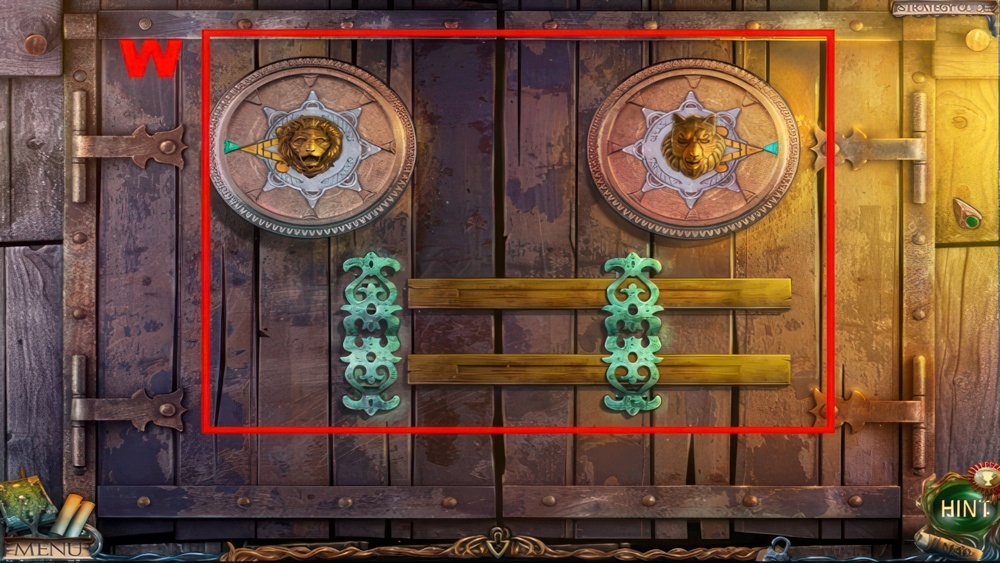
- Play the puzzle.
- Rotate the discs to open the latches. You’ve seen a hint earlier.
- Walkthrough: (W).
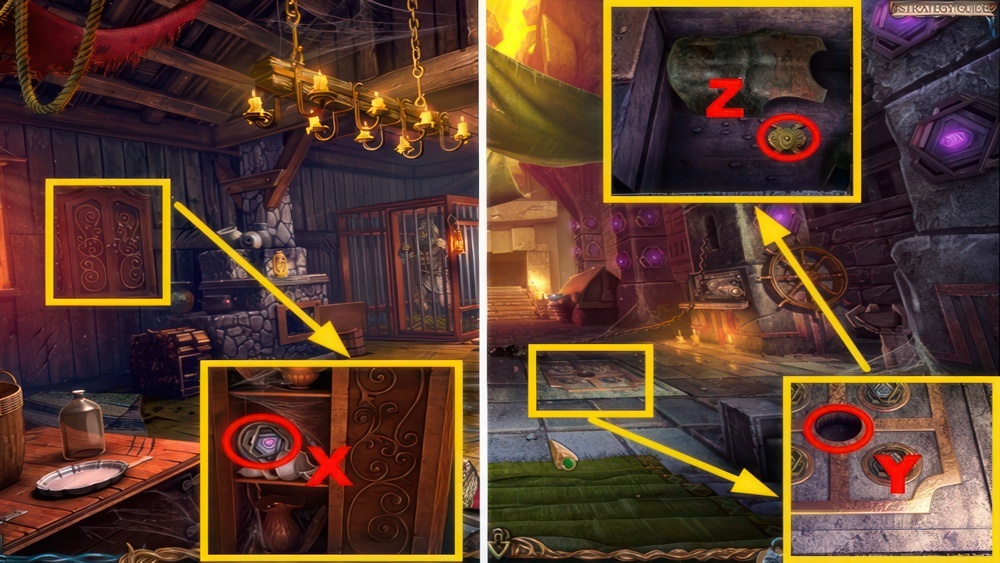
- Open the cupboard, take the MEDALLION (X).
- Go to the Dwarf Temple.
- Place the MEDALLION (Y), push it.
- Go the armor, take the MEDALLION (Z).
- Go to the Mines.
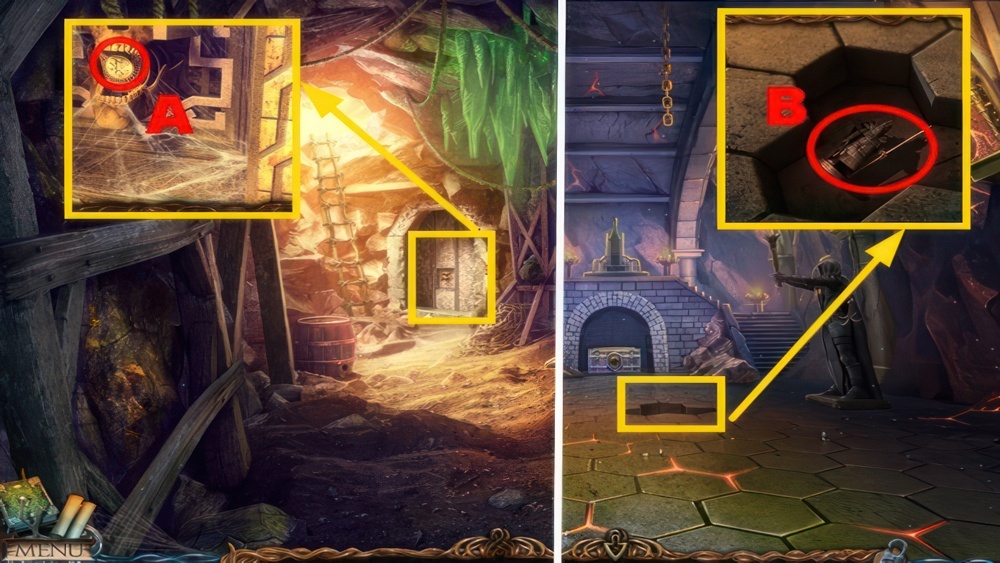
- Place the KEY (A).
- Enter the Fire’s Dwelling.
- Take the DWARF FIGURINE (B).
- Go to the Dwarf Cemetery.
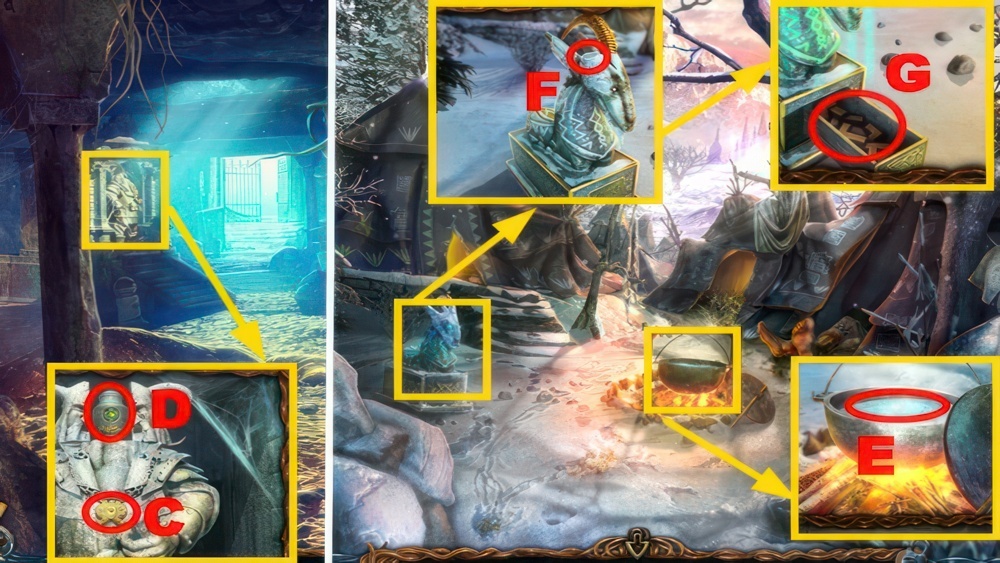
- Place the MEDALLION (C).
- Take the URN OF ASHES (D).
- Go forward.
- Remove the lid, use the SCOOP (E) to acquire the SAUCEPAN OF BOILING LIQUID.
- Use the SAUCEPAN OF BOILING LIQUID and HORN (F).
- Take the PUZZLE (G).
- Go left.
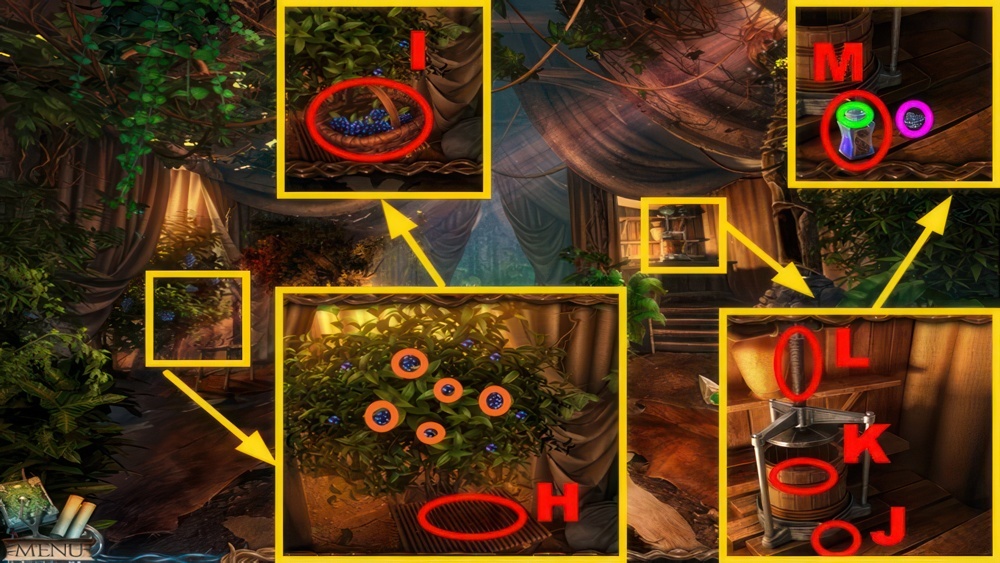
- Place the BASKET (H), collect the berries (🟠).
- Take the BASKET OF BERRIES (I).
- Place the BUBBLE (J) and BASKET OF BERRIES (K), pound the berries (L).
- Use the SACK OF ASHES and URN OF ASHES (🟢), close the bottle (🟣).
- Take the TURNING POTION (M).
- Go to the Fire’s Dwelling.
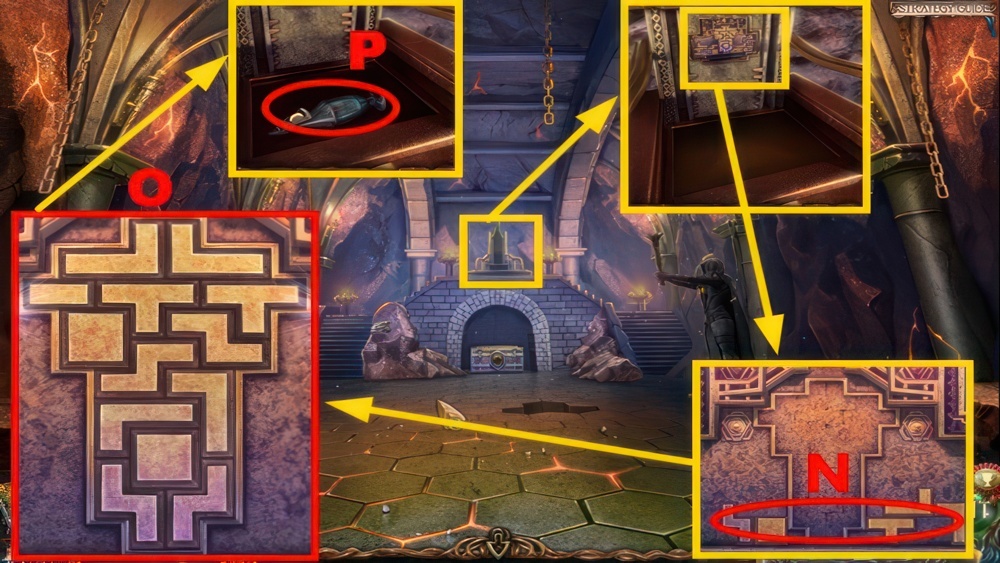
- Place the PUZZLE (N).
- Play the puzzle.
- Arrange all the plates within the frame.
- Pay attention to the colors of the plates.
- Walkthrough: (O).
- Take the MOONDUST (P).
- Go to Maaron’s Cottage.
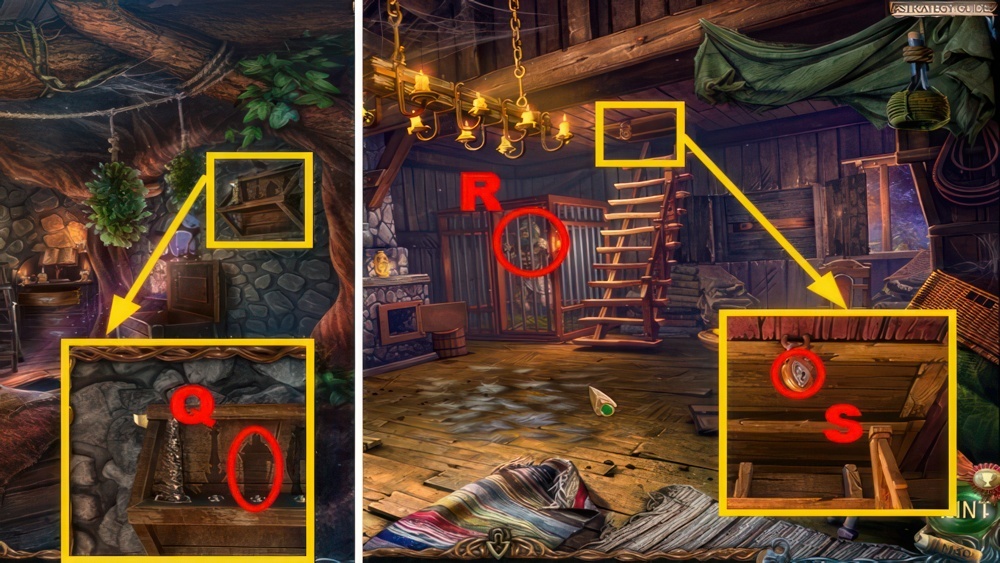
- Place the DWARF FIGURINE (Q).
- Go to the Werewolf’s Hut.
- Use the TURNING POTION (R), you receive the KEY.
- Use the KEY (S), open the trapdoor.
- Go upstairs.
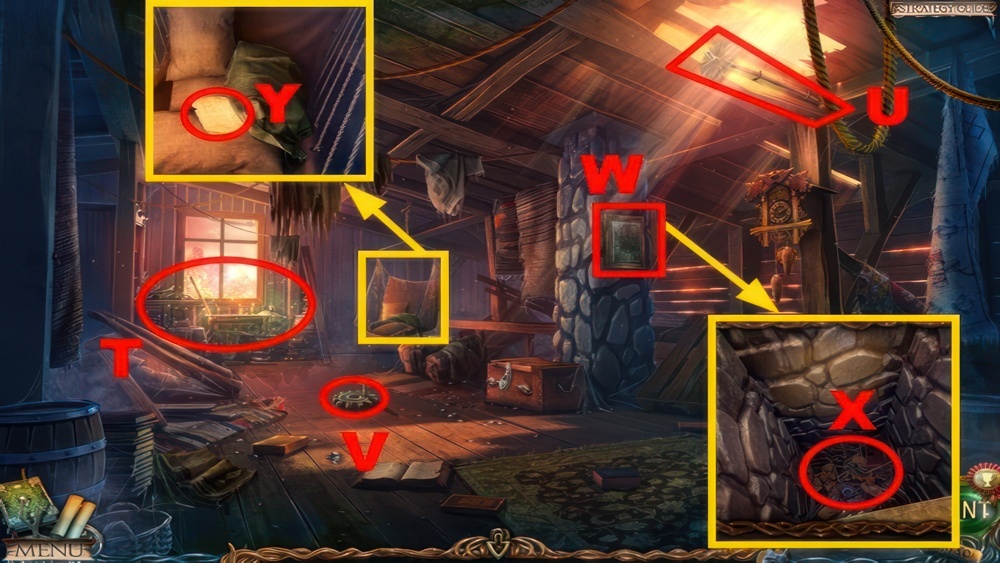
- Play the puzzle (T) to acquire the LANTERN.
- Take the BRUSH (U) and LATCHING MECHANISM GEAR (V).
- Open the compartment (W).
- Use the BRUSH (X).
- Remove the blanket.
- Take the LANTERN POTION RECIPE (Y).
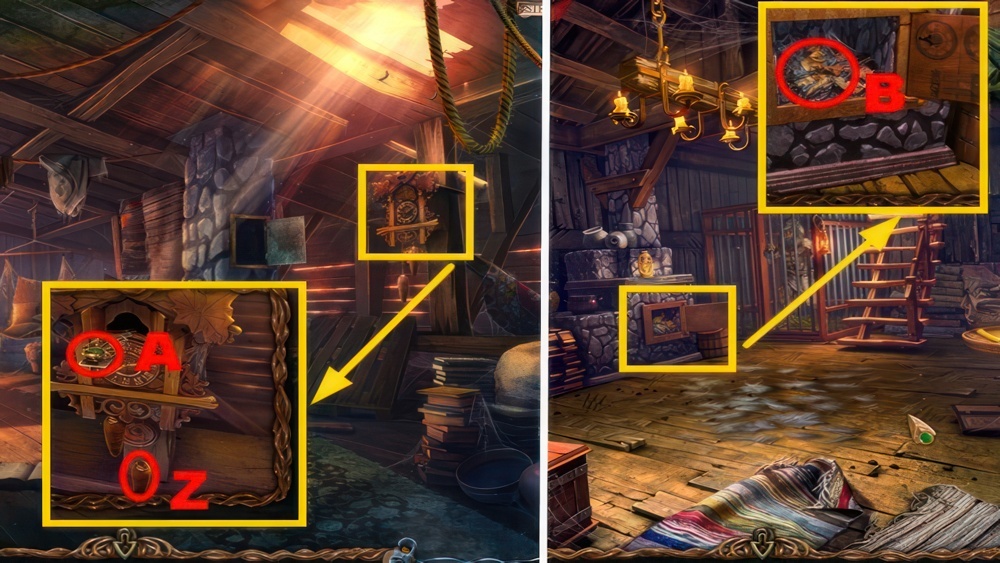
- Pull the weight (Z).
- Take the VIAL (A).
- Go down.
- Remove debris, take the STONE FLOWER (B).
- Go down.
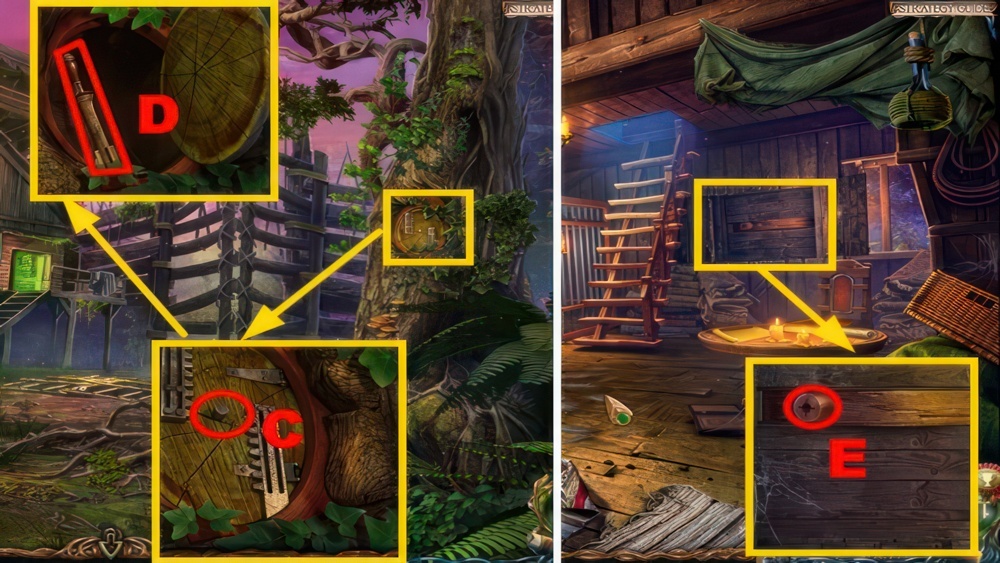
- Place the LATCHING MECHANISM GEAR (C), turn it.
- Take the LEVER (D).
- Go forward.
- Place the LEVER (E), pull it.
- Go down, turn right.
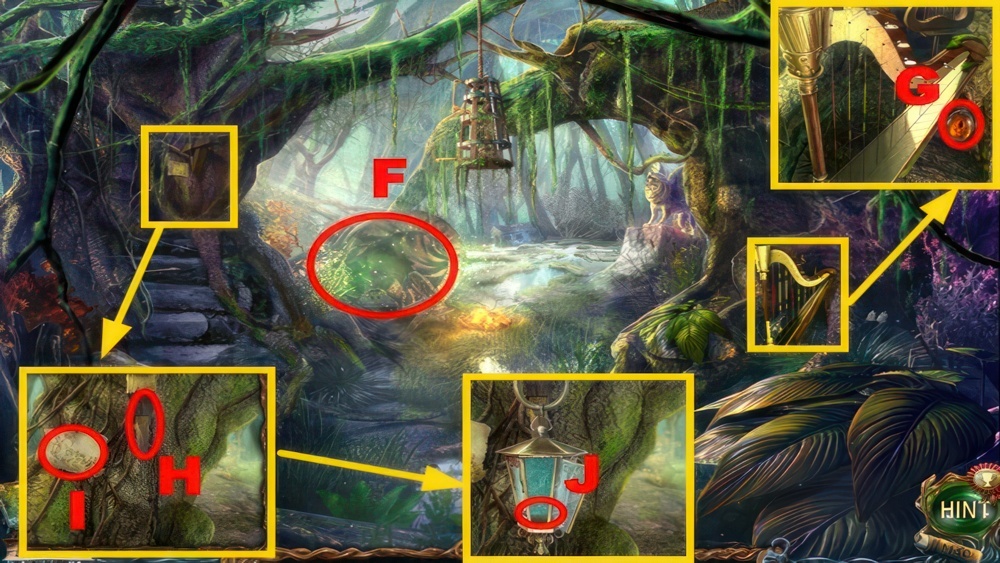
- Play the puzzle (F) to acquire the WEIGHT.
- Take the STONE OF FIRE (G).
- Read the note (I).
- Place the LANTERN (H) and WOOL (J).
- Go to the Halfling Settlement.
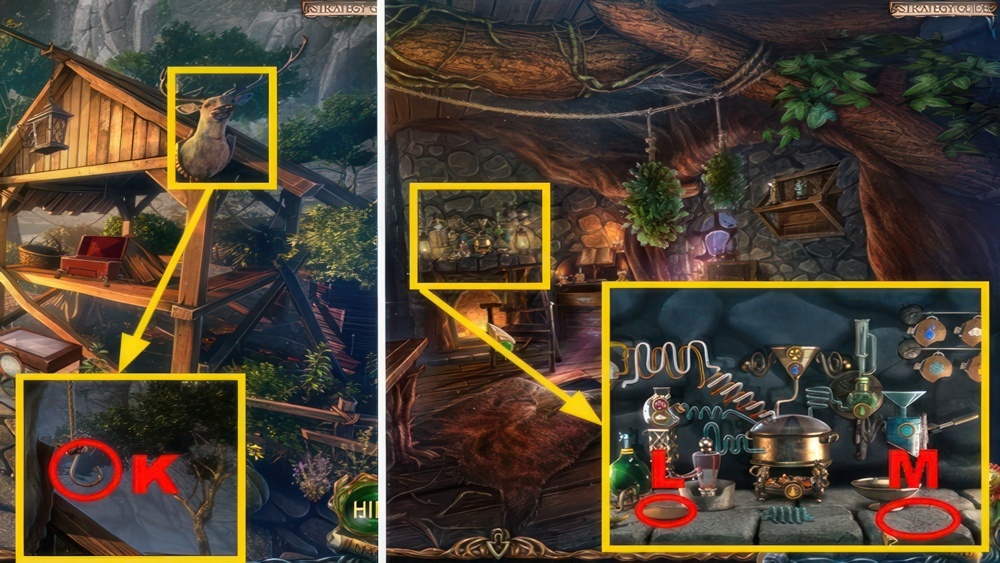
- Place the WEIGHT (K) to acquire the HANDLE.
- Go to Maaron’s Cottage.
- Place the LANTERN POTION RECIPE (M) and VIAL (L).
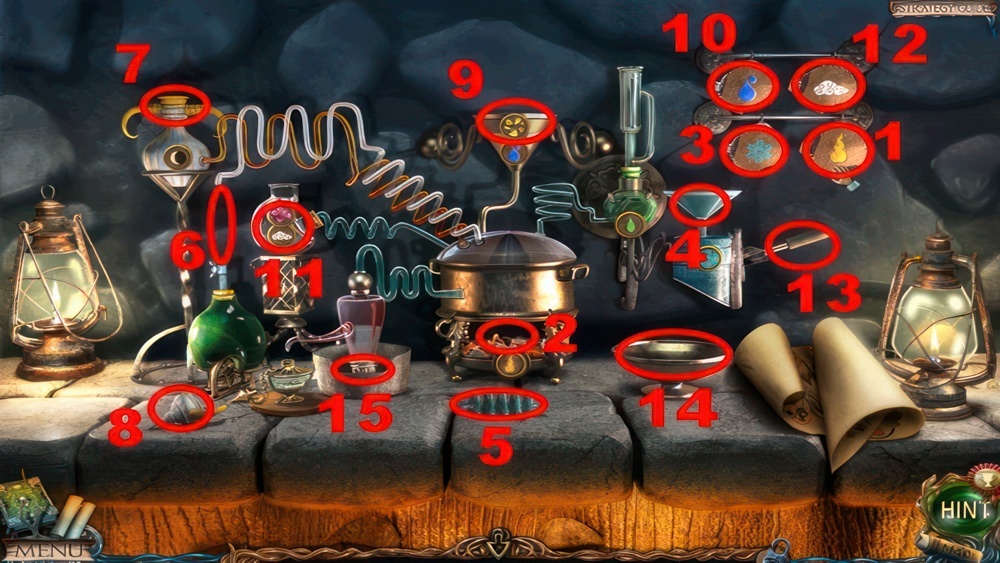
- Potion preparation: 1-2-3-4-5-6-MOONDUST-7-8-7-GOLD ORE-9.
- 10-9-DIVINE TREE FLOWERS-11-12-11-13-14-15.
- Go to the Upper Corridor.
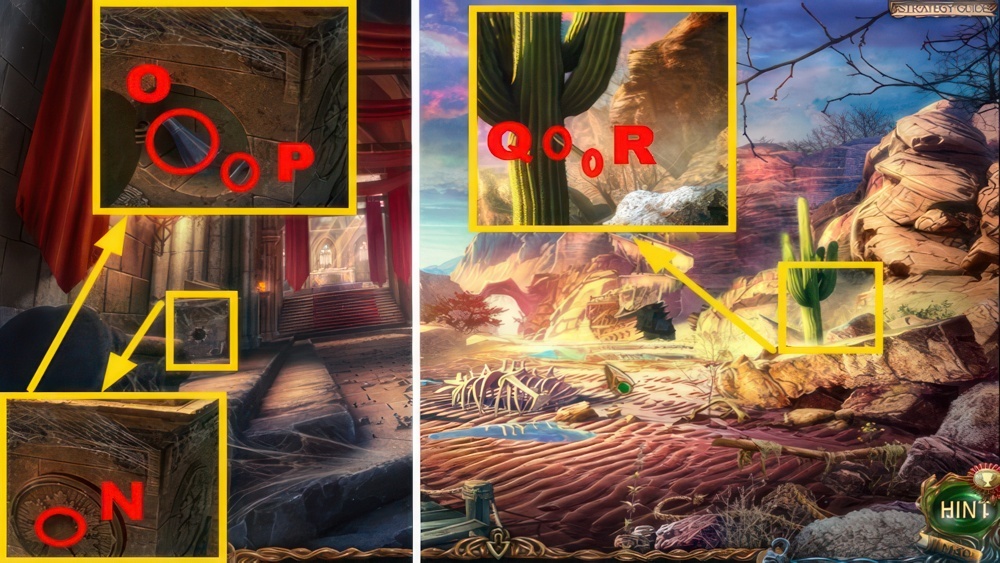
- Place the STONE FLOWER (N).
- Take the FLASK (O) and GLASS PIPE (P).
- Go to the Forsaken Sea.
- Place the GLASS PIPE (Q) and FLASK (R) to acquire the CACTUS JUICE.
- Go to the Fire’s Dwelling.
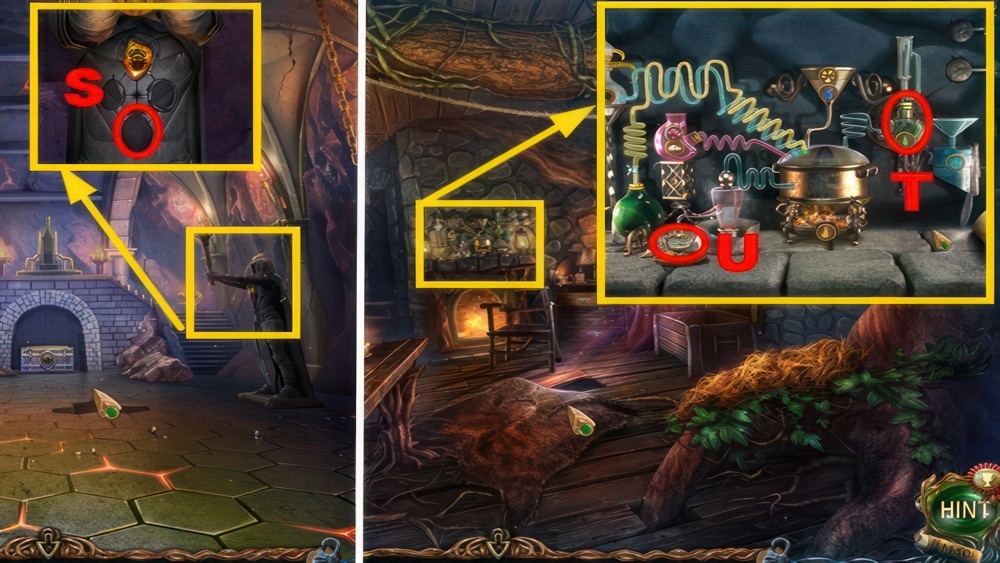
- Place the STONE OF FIRE (S).
- Go to Maaron’s Cottage.
- Use the CACTUS JUICE (T).
- Take the LANTERN POTION (U).
- Go to the Swamps.
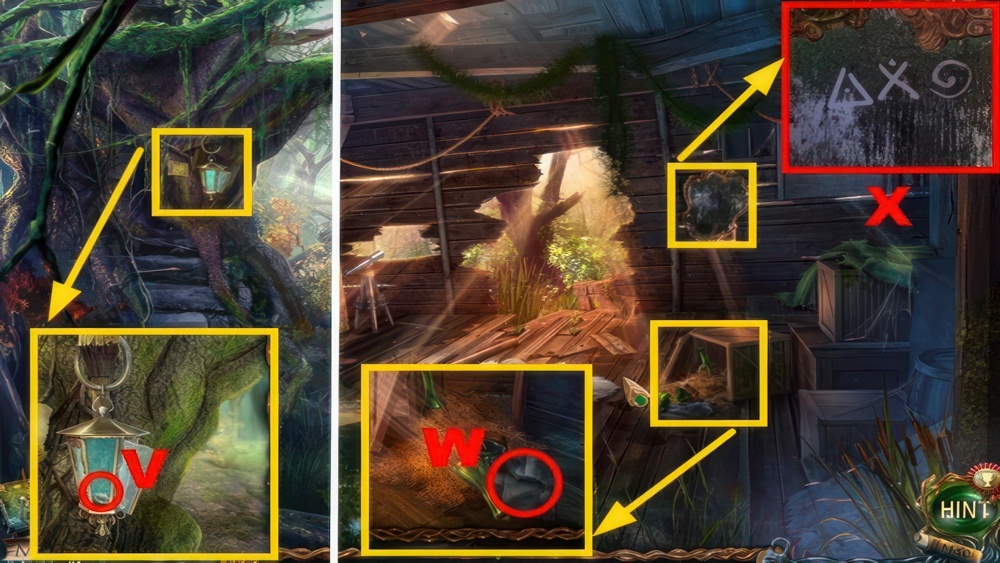
- Use the LANTERN POTION (V).
- Go forward.
- Take the ALCOHOL-SOAKED CLOTH (W).
- Make note of the symbols (X).

- Make the correct combination.
- Enter the correct code (Y).
- Take the PRECIOUS STONE (Z).
- Use the HAMMER (A).
- Take the CORK (B).

- Place the CORK (🟣).
- Take the BOTTLE OF RUM (C).
- Clean the mirror, take the MIRROR (D).
- Go forward.
- Take the SCISSORS (E).
- Pull the chain twice (F).
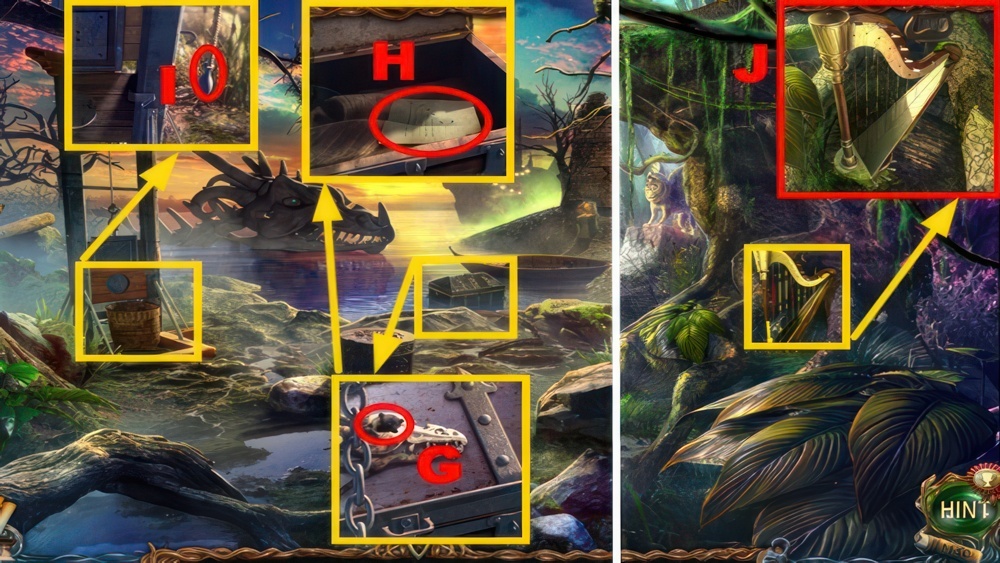
- Place the PRECIOUS STONE (G).
- Take the TUNING TABLE (H).
- Pull the rope (I).
- Go down ×2.
- Place the TUNING TABLE (J).
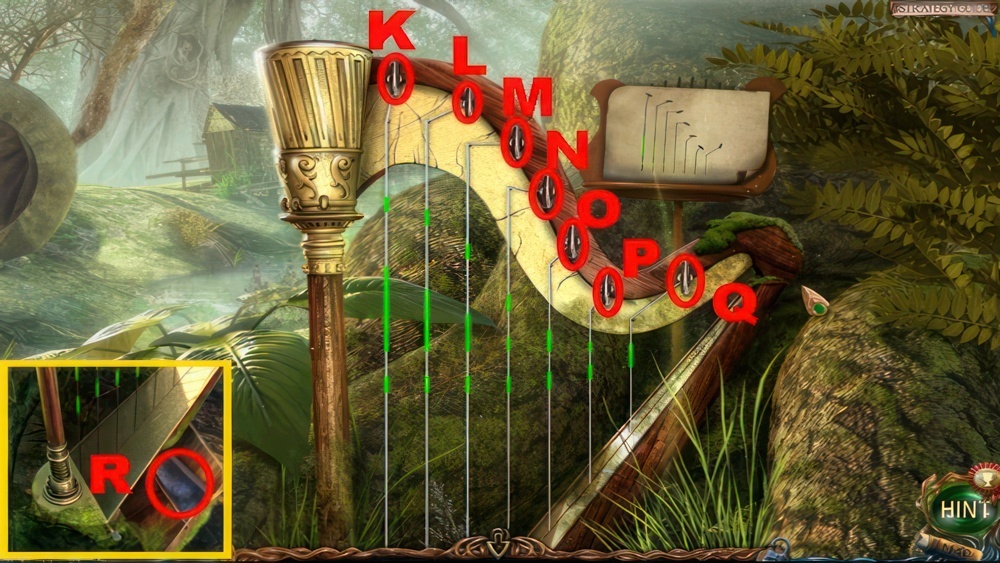
- Play the puzzle.
- Place the string markers as indicated in the hint.
- Walkthrough: K×4-L×3-M×5-N×2-O×5-P×7-Q×5.
- Take the FRESCO DETAIL (R).
- Go forward ×2.
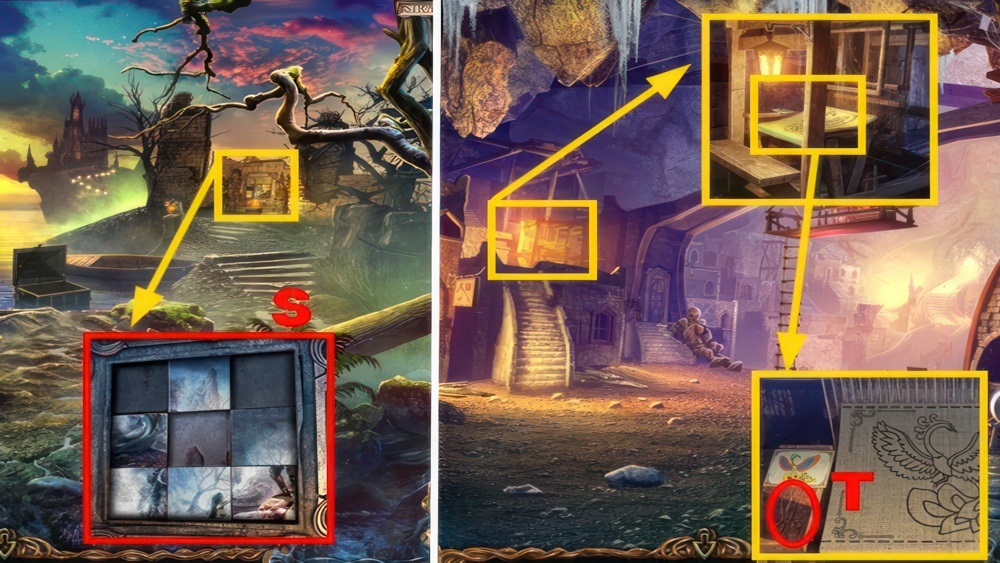
- Place the FRESCO DETAIL (S).
- Go to the Dwarf Slums.
- Place the SCISSORS (T).
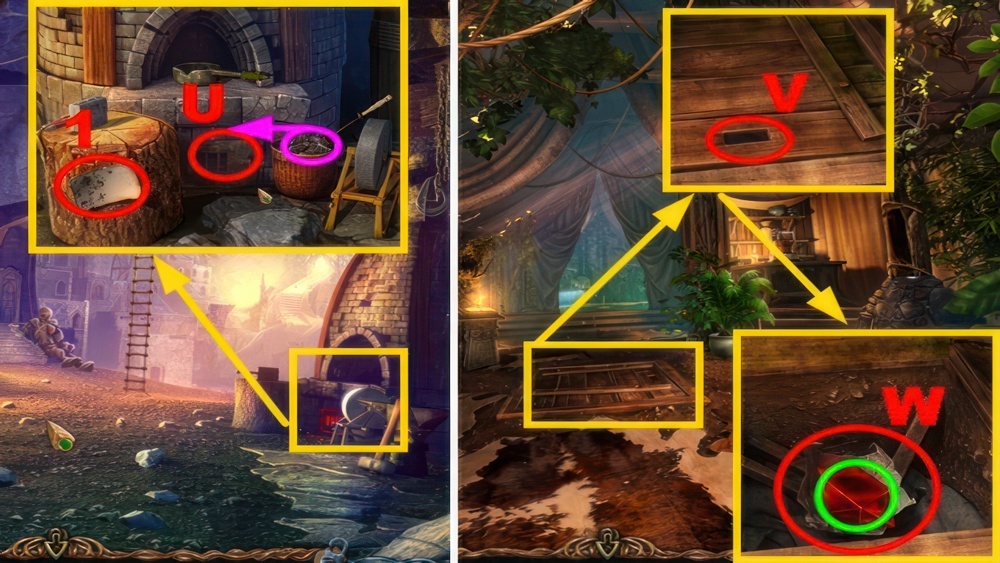
- Read the recipe (1).
- Open the compartment, use the coal (🟣) and BOTTLE OF RUM (U).
- Go to the Marquee.
- Place the HANDLE (V), pull it.
- Open the package, take the RED STONE (🟢) and read the note (W).
- Go down ×3.
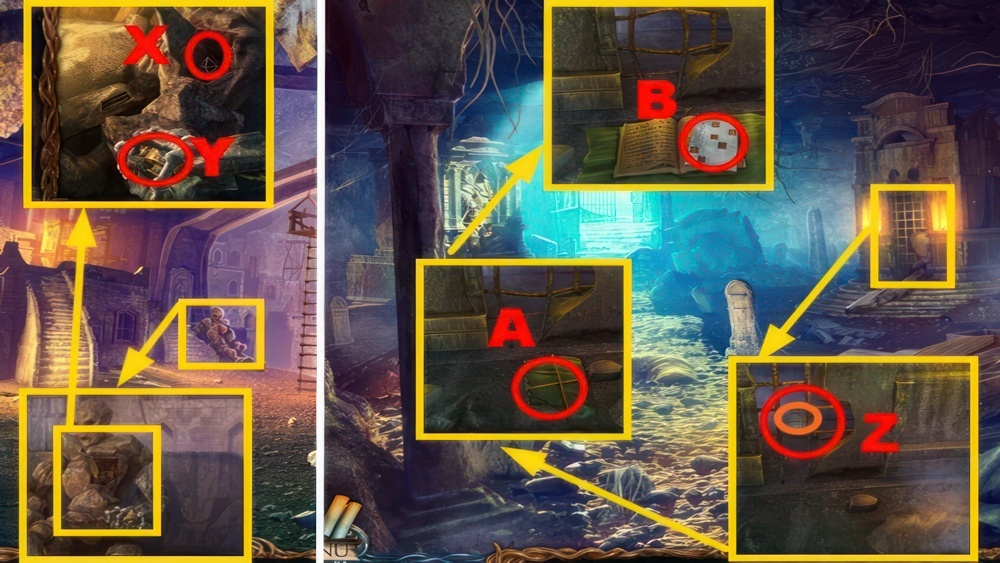
- Open the compartment, place the RED STONE (X).
- Take the JACK (Y).
- Go right.
- Use the JACK (Z), take the parcel (🟠).
- Use the KNIFE (A), open the parcel and book.
- Take the PUNCH CARD (B).
- Go to Maaron’s Cottage.
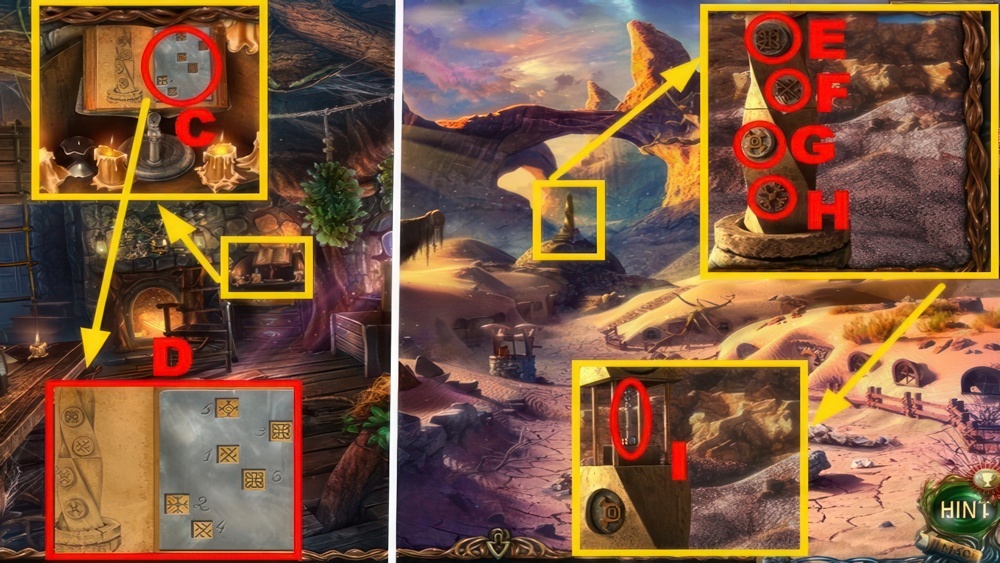
- Place the PUNCH CARD (C).
- Make note of the symbols (D).
- Go to the Abandoned Halfling Settlement.
- Press the buttons in the correct order.
- You’ve already seen a hint about this.
- Push the symbols: F-H-E-F-G-E.
- Take the KEY (I).
- Go to the Canyon.
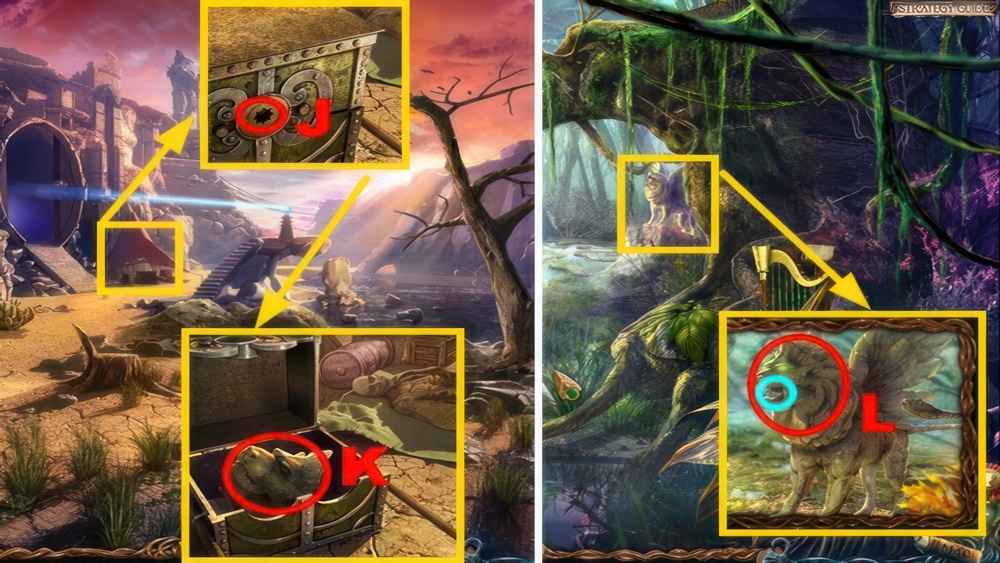
- Use the KEY (J).
- Take the CHIMERA HEAD (K).
- Go to the Swamps.
- Place the CHIMERA HEAD (L), take the FRESCO DETAIL (🔵).
- Go forward ×2.
Mural
On the Dead Lake shore there’re some ruins with a mural. I suppose it depicts a Horseman… Let’s restore it.
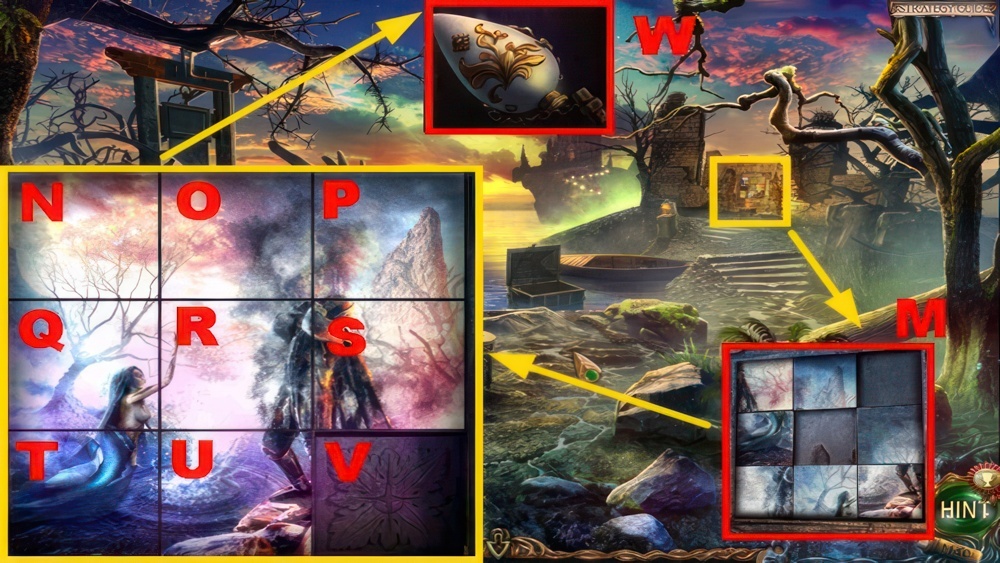
- Place the FRESCO DETAIL (M).
- Play the puzzle.
- Slide the mosaic fragments to restore the image.
- Walkthrough: O-P-S-R-O-N-Q-R-O-P-S-R-Q-N-O-R-U-T-Q-R-U-V.
- Take the VIAL FOR LIVING WATER (W).
- Go to the Lake of Life.
Into the Darkwoods
I must set off to the Darkwoods – to do that I must find a rune in the magic mirror in the Tower of the Worlds.
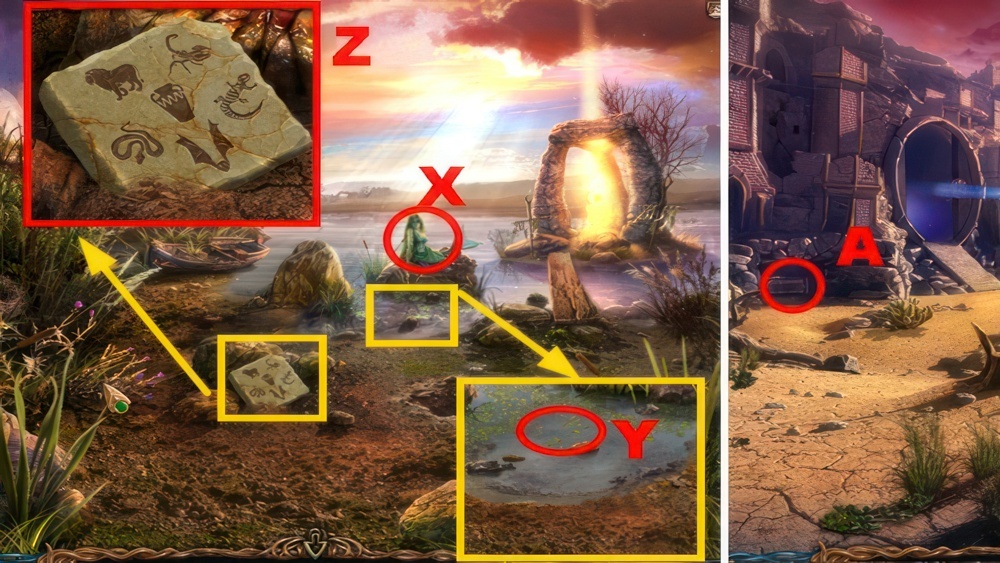
- Talk to the mermaid (X).
- Place the VIAL FOR LIVING WATER (Y) to acquire the LIVING WATER.
- Inspect the plate (Z).
- Go to the Canyon.
- Inspect the area (A).
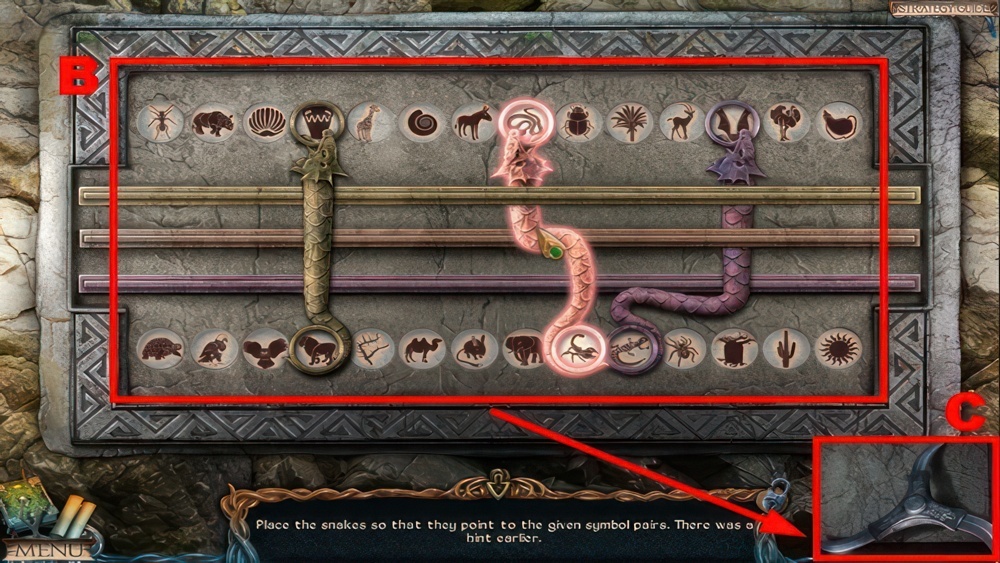
- Play the puzzle.
- Place the snakes so that they point to given symbol pairs.
- Walkthrough: (B).
- Take the BOOMERANG (C).
- Go to the Swamps.
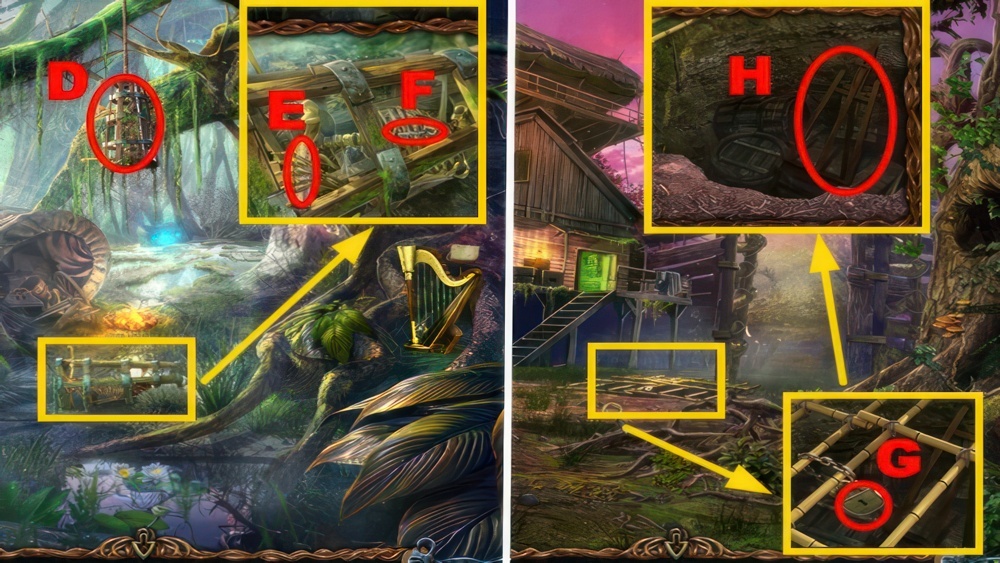
- Throw the BOOMERANG (D).
- Take the note (E) and KEY (F).
- Go down.
- Use the KEY (G).
- Take the EASEL (H).
- Go to the Tower Hall.
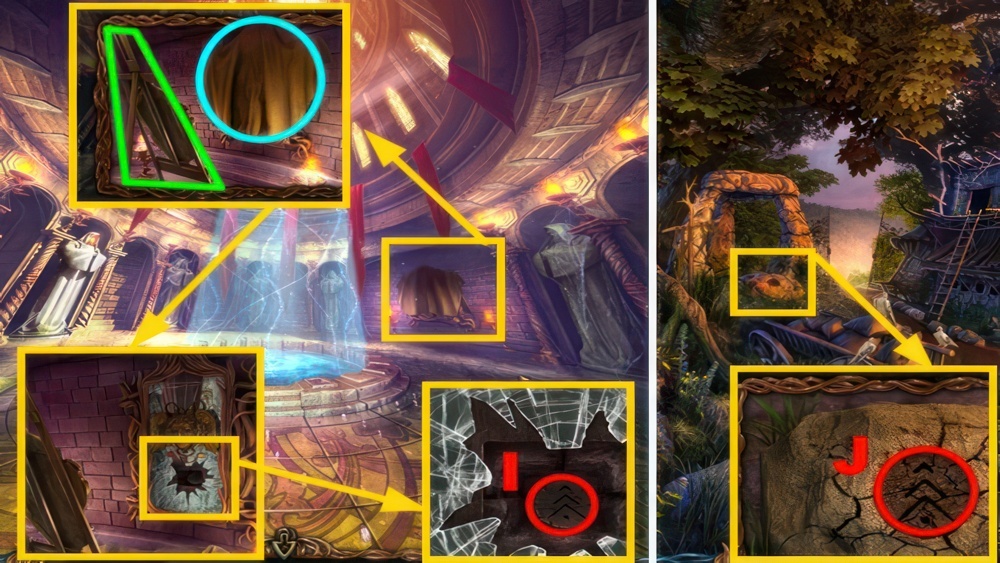
- Place the EASEL and MIRROR (🟩), remove the blanket (🔵).
- Take the RUNE (I).
- Go down ×2.
- Place the RUNE (J).
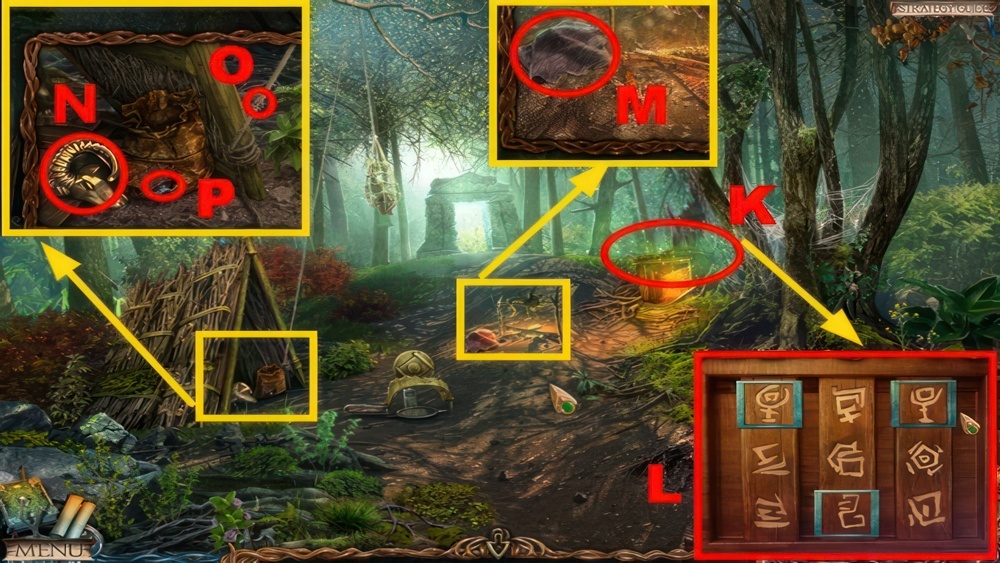
- Play the puzzle (K).
- Move the frames over the correct symbols.
- Puzzle walkthrough: (L).
- You receive the COLORFUL THREADS.
- Take the BOAR SKIN (M).
- Take the RAM (N), use the KNIFE (O).
- Remove the patch, take the WOLF FIGURINE (P).
- Go forward.
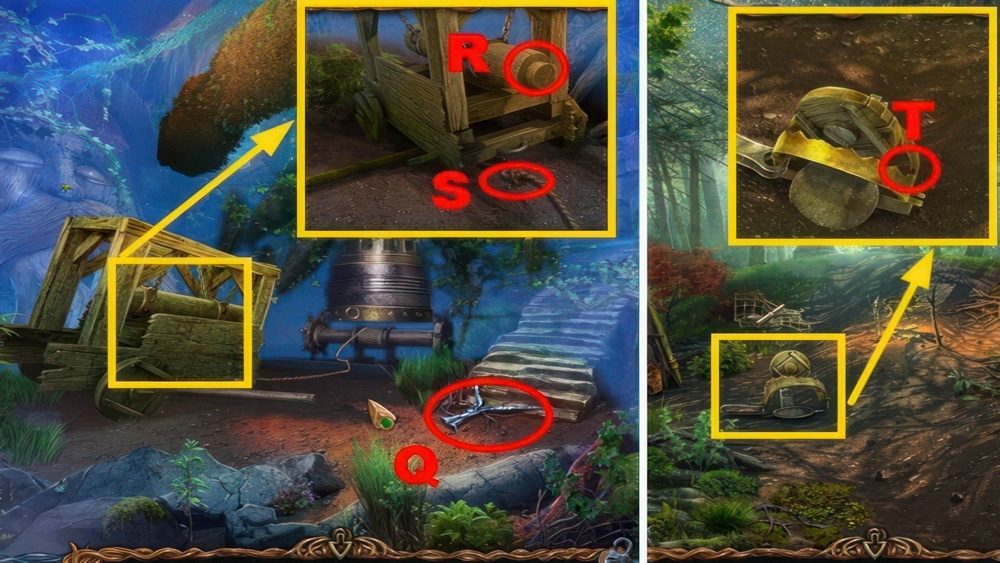
- Take the TONGS (Q).
- Place the RAM (R).
- Move the rope (S).
- Go down.
- Place the TONGS (T), push the tongs to acquire the WHEEL.
- Go forward.
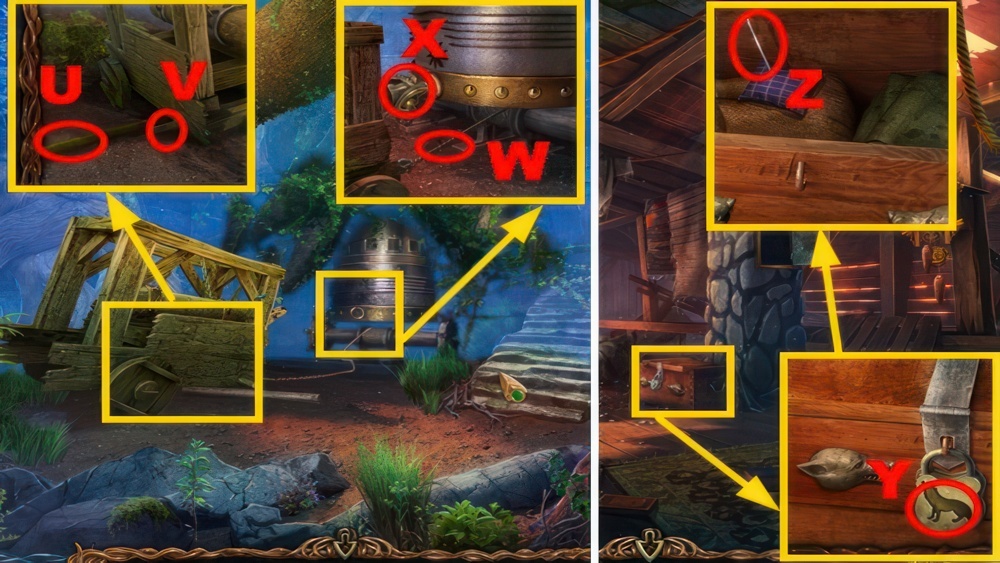
- Pull the rod (U).
- Place the WHEEL (V).
- Pull the rope (W) and ram (X).
- Go to the Attic.
- Place the WOLF FIGURINE (Y), open the chest.
- Take the NEEDLE (Z).
- Go to the Dwarf Slums.
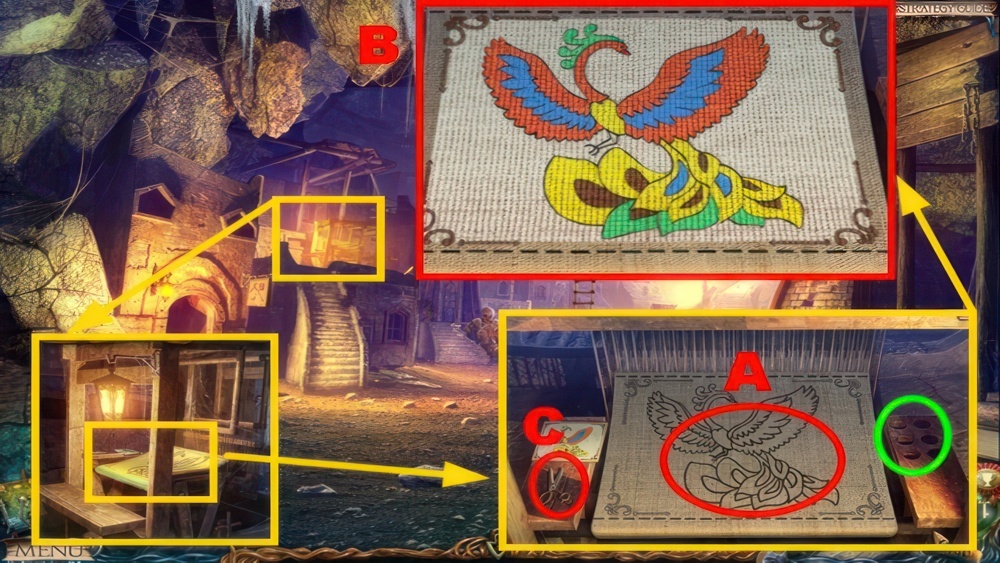
- Place the COLORFUL THREADS (🟢) and NEEDLE (A).
- Play the puzzle.
- Use the needle and thread to embroider the correct pattern.
- Walkthrough: (B).
- Cut the tapestry with the scissors (C) to acquire the TAPESTRY.
- Go to the Junction.
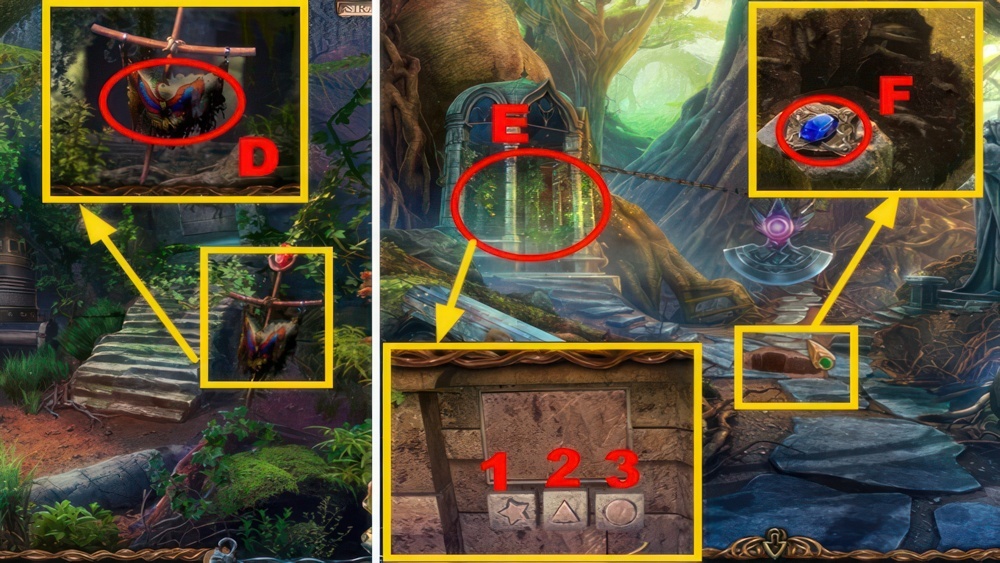
- Place the TAPESTRY (D).
- Go left.
- Play the puzzle (E).
- Press the buttons in the correct order.
- Puzzle walkthrough: 1-2-3-1-2.
- You receive the PENDULUM FIGURINE.
- Take the MEDALLION (F).
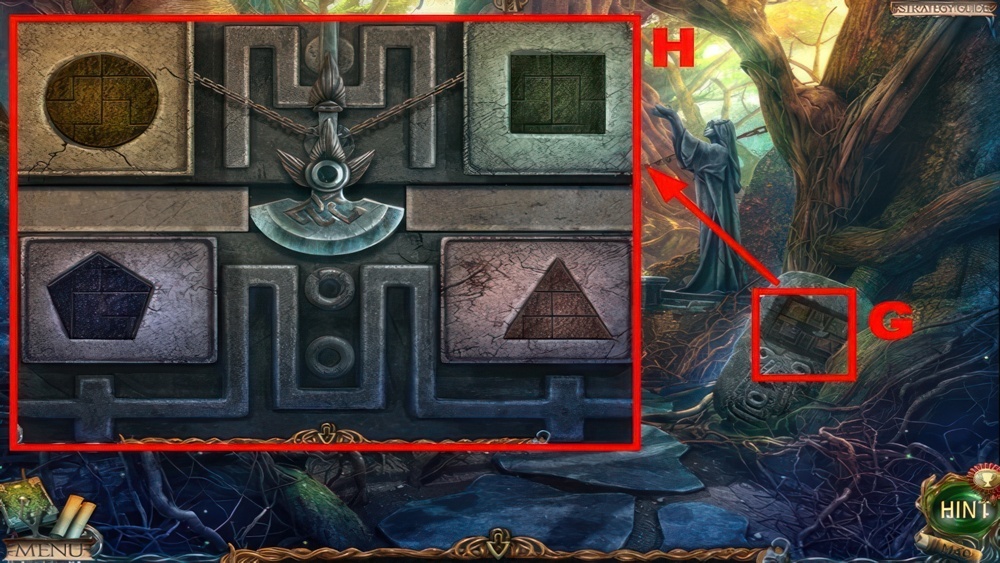
- Examine the area (G).
- Play the puzzle.
- Arrange the puzzles to restore the pendulum.
- Walkthrough: (H).
Weapon
Warrior tribes and various races inhabit the Darkwoods. They can help us to craft a weapon against the Horseman.
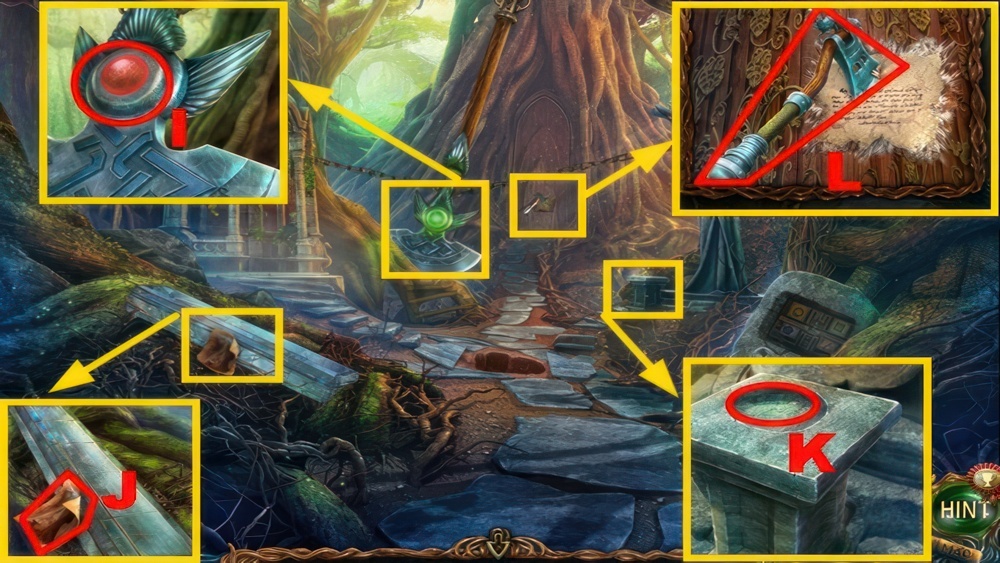
- Take the FOREST HUNTERS’ STAR (I).
- Read the note (J).
- Place the FOREST HUNTERS’ STAR (K).
- Take the AXE (L).
- Go down.
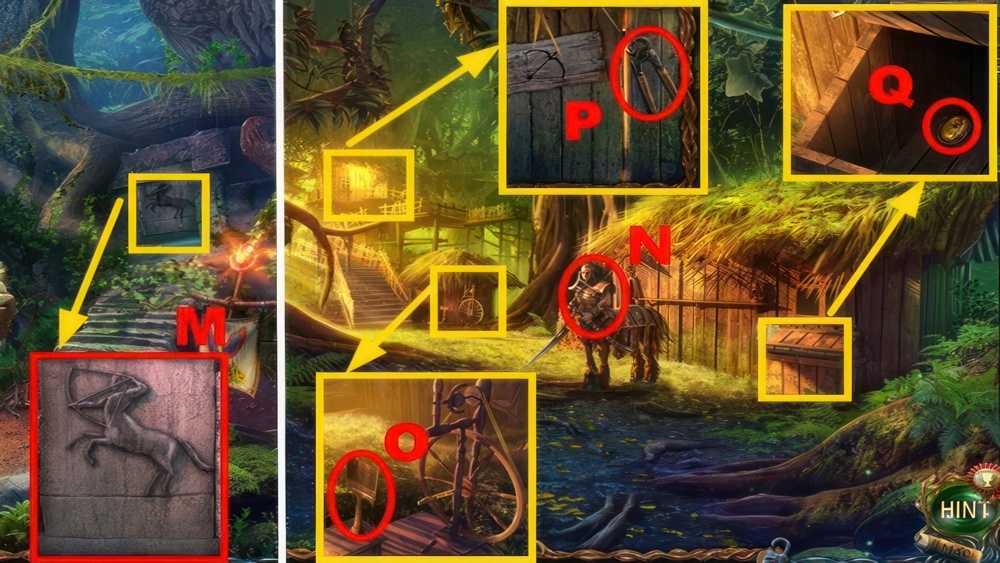
- Use the AXE (M).
- Go right.
- Talk to the centaur (N).
- Take the COMB (O) and PINCERS (P).
- Open the compartment, take the STONE OF FIRE (Q).
- Go to Maaron’s Cottage.
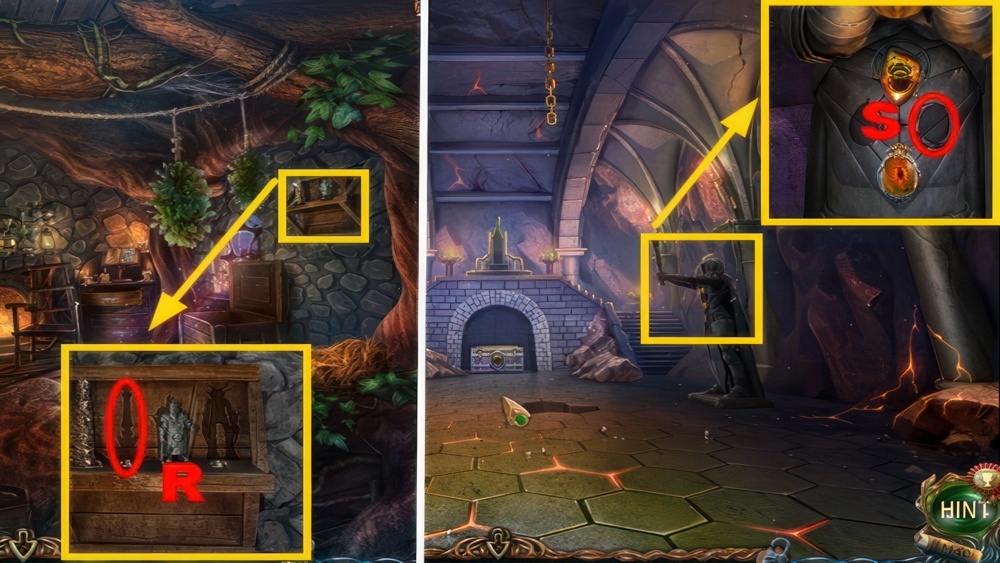
- Place the PENDULUM FIGURINE (R).
- Go to the Fire’s Dwelling.
- Place the STONE OF FIRE (S).
- Go to the Dwarf Cemetery.
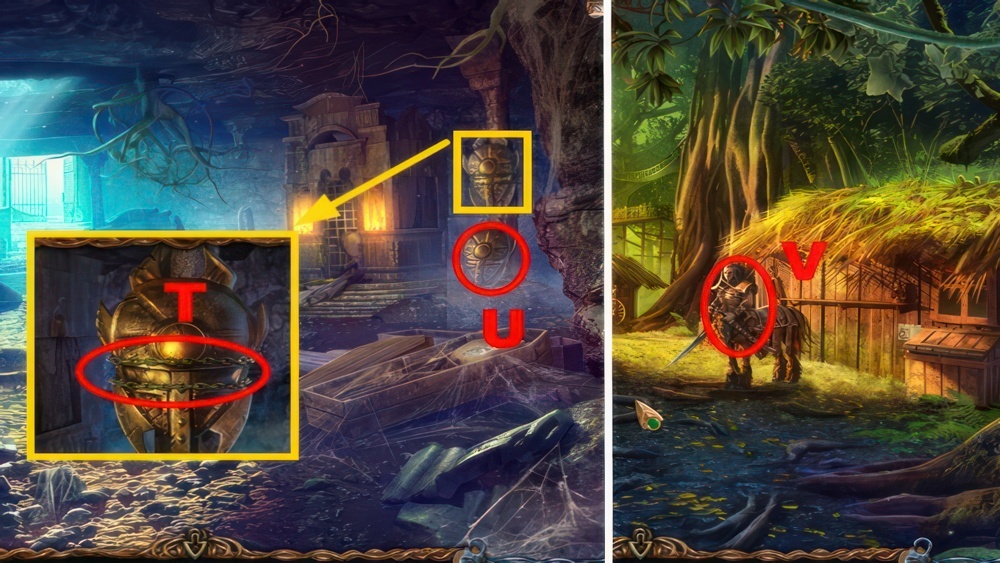
- Use the PINCERS (T).
- Take the DWARF SHIELD (U).
- Go to the Centaurs Village.
- Give the DWARF SHIELD to the centaur (V), you receive the CRYSTAL KEY.
- Give the BOAR SKIN to the centaur.
- Go down, turn left.
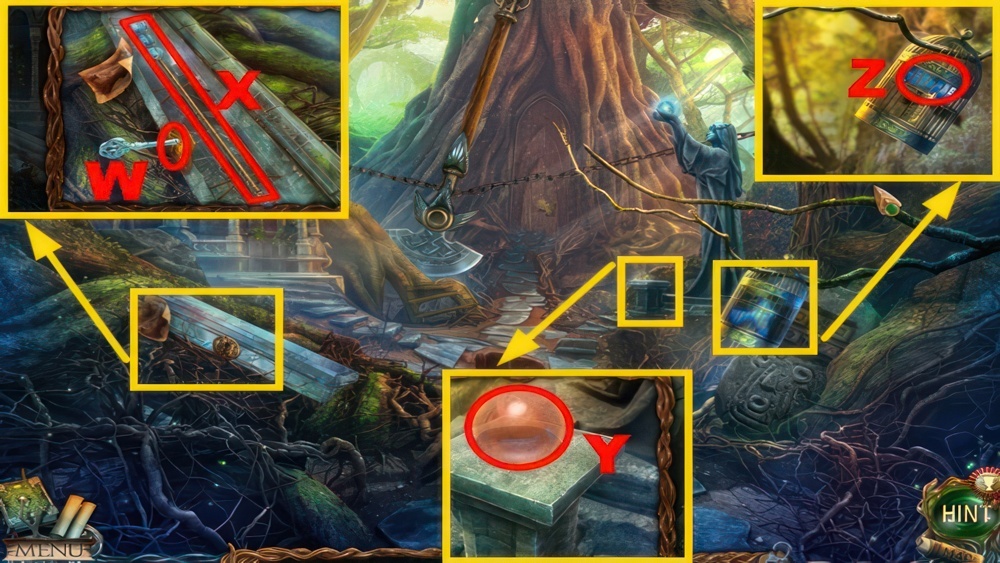
- Place the CRYSTAL KEY (W).
- Take the STAFF (X).
- Use the STAFF (Y).
- Open the cage, take the BIRD (Z).
- Go down.
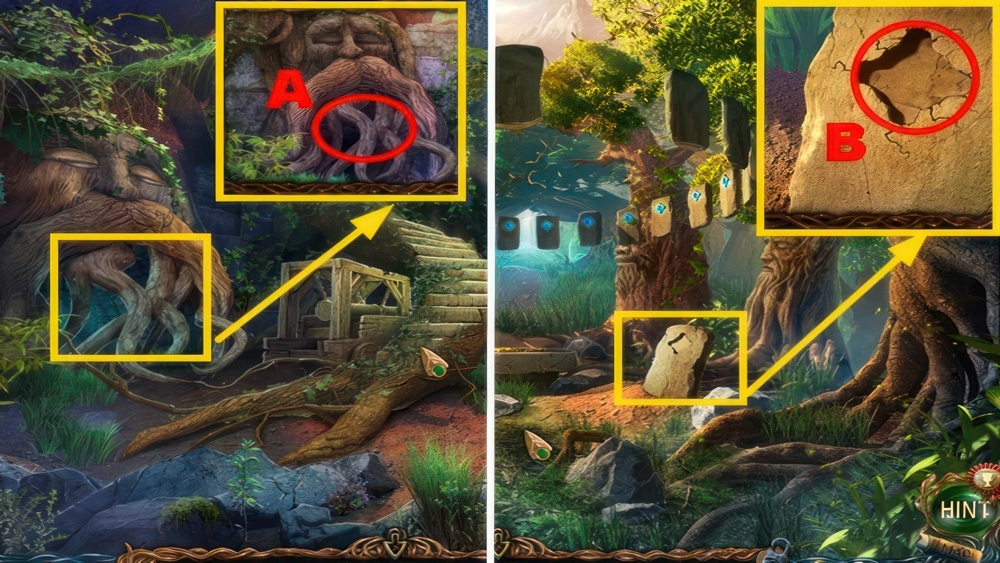
- Use the BIRD (A).
- Go left.
- Place the MEDALLION (B).
- Go forward.
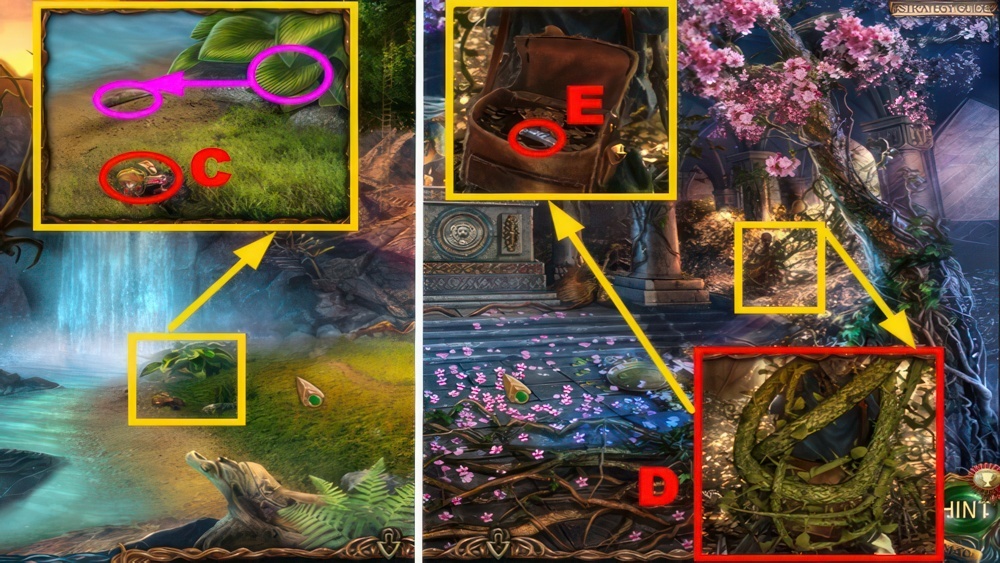
- Take the VENOM (C), use the leaf (🟣) to acquire the FISH.
- Go to Mountgore’s Temple.
- Use the VENOM (D).
- Open the bag, take the PATTERN FRAGMENT (E).
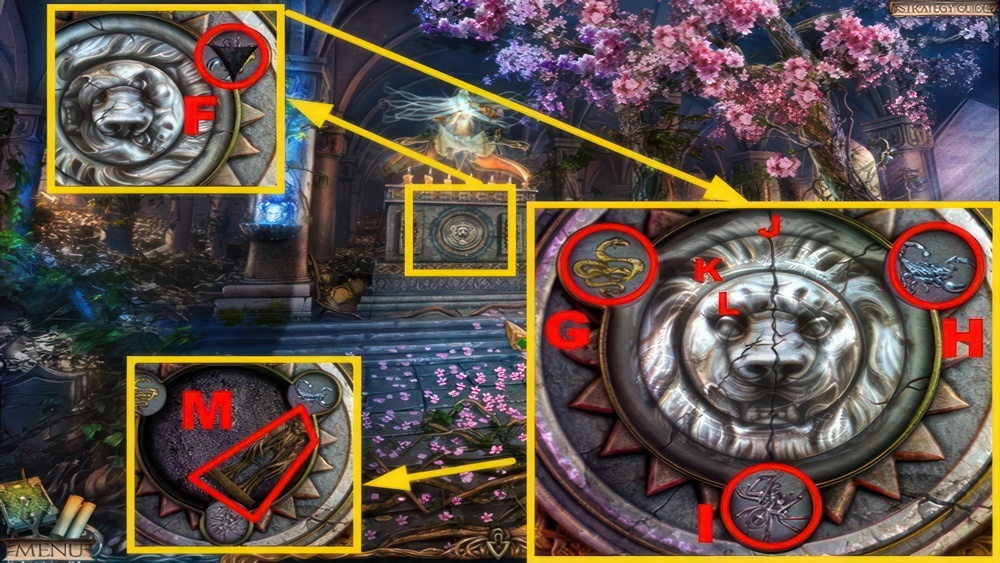
- Place the PATTERN FRAGMENT (F).
- Play the puzzle.
- Rotate the circles and move the fragments to restore the pattern.
- Clockwise ↻.
- Counterclockwise ↺.
- Walkthrough: G-H-J-↻-I×2-J-↺-I-J-↻-I×2-J-↺-G×2-I×2-J-↺-H×2.
- J-↻-H×2-J-↺-H×2-I×2-J-↻-I-G×2-J-↺-H×2-G-I-J-↻-H-J-↻-H×2.
- J-↺-H-J-↻-H×2-I-G×2-J-↻-G-J-↺-G-J-↻-G×2-K-↻-L-↺.
- Take the ONTUS FIGURINE (M).
- Go to Maaron’s Cottage.
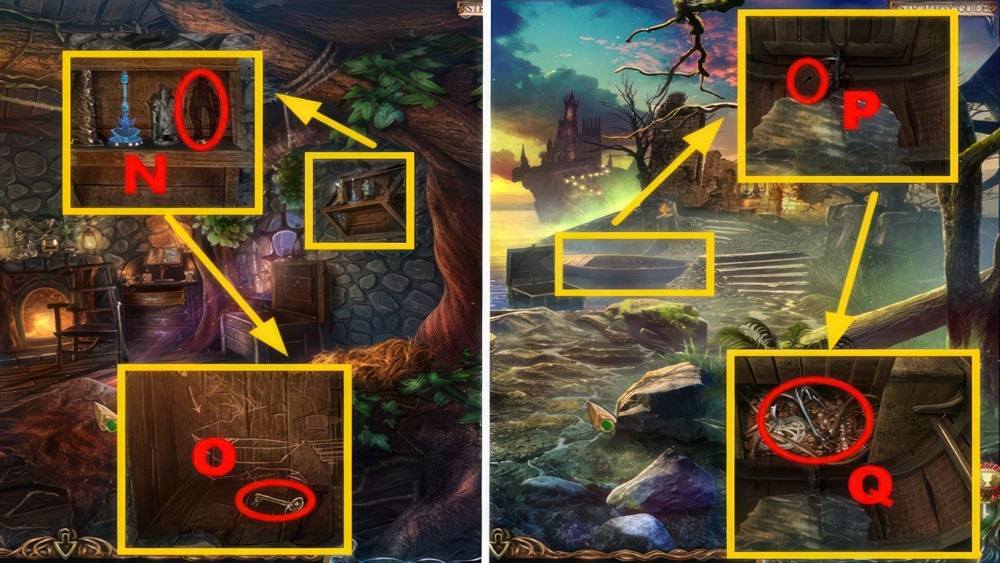
- Place the ONTUS FIGURINE (N).
- Take the KEY (O).
- Go to the Dead Lake.
- Use the KEY (P), take the HOOK (Q).
- Go to the Waterfall.
Curse on the Island
The wounded Horseman’s returned to his lair. We’re not sure if he’s dead or alive. We’d better go and check.
- Throw the HOOK (R).
- Climb up.
- Take the SWORD HILT (S).
- Use the KNIFE (T), take the RED TREE TWIG.
- Use the FISH (U).
- Take the FEATHERS (V) and SAPPHIRE SYMBOL (W).
- Go down.
- Place the SWORD HILT (🟣).
- Take the SWORD (X).
- Go down.
- Place the SWORD (Y).
- Take the CHIP (Z).
- Go to the Centaurs Village.
- Use the RED TREE TWIG (A).
- Take the DOOR KNOCKER (B) and STONE OF FIRE (C).
- Place the FEATHERS (D).
- Use the feathers (🟢) and leather (🔵).
- Go to the Fire’s Dwelling.
- Place the STONE OF FIRE (E).
- Remove dirt, place the ALCOHOL-SOAKED CLOTH (🟠).
- Take the TORCH (F).
- Place the TORCH (G) to acquire the BURNING TORCH.
- Go to the Square.
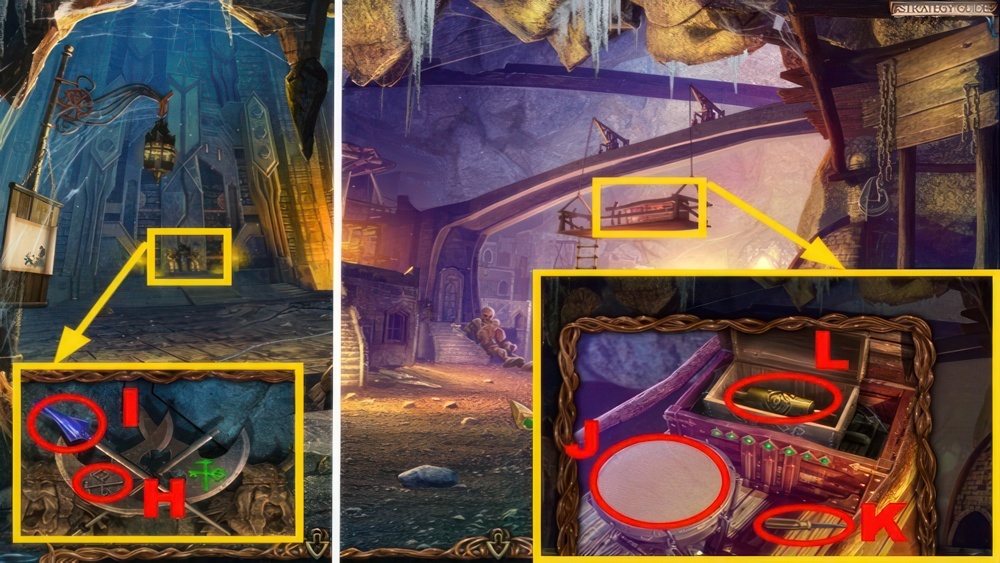
- Place the SAPPHIRE SYMBOL (H).
- Take the KEY (I).
- Go right.
- Use the DOOR KNOCKER (J), open the chest.
- Take the SCREWDRIVER (K) and ROLLER-SHAPED SEAL (L).
- Go to the Fire’s Dwelling.
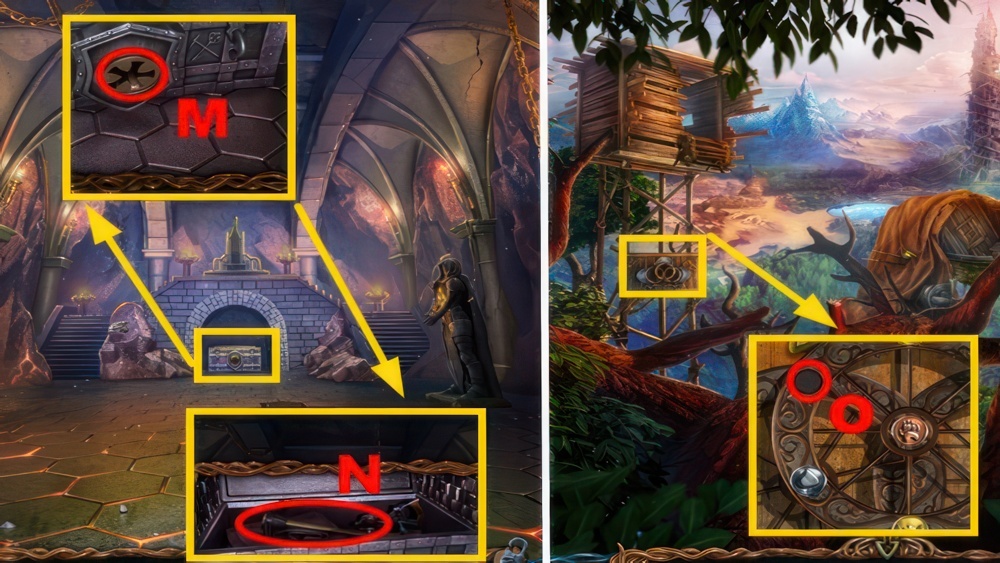
- Place the KEY (M).
- Take the PICKAXE (N).
- Go to the Red Tree Top.
- Place the CHIP (O).
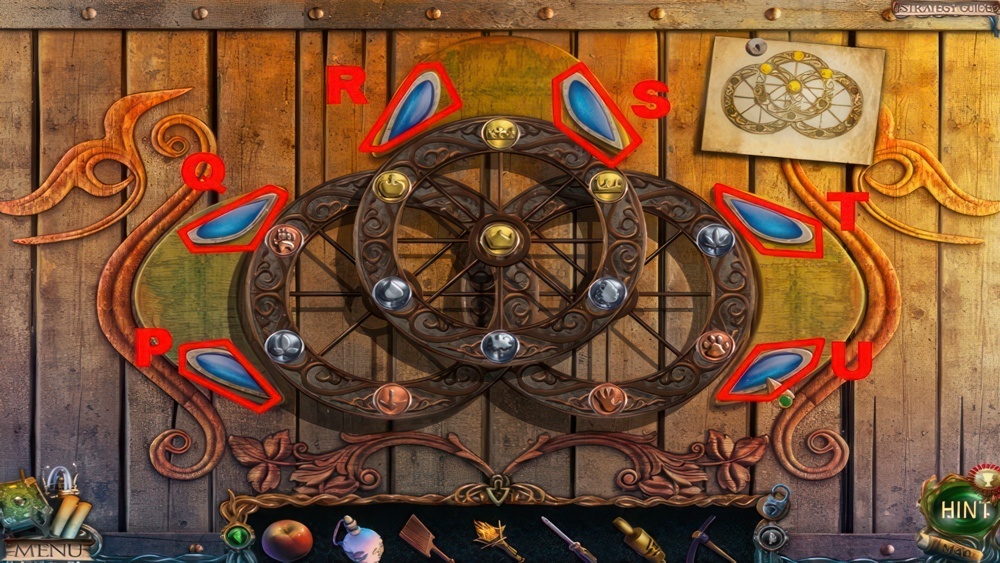
- Play the puzzle.
- Use the buttons to restore the pattern.
- Walkthrough: R-U-R-P-R-U-P-U.
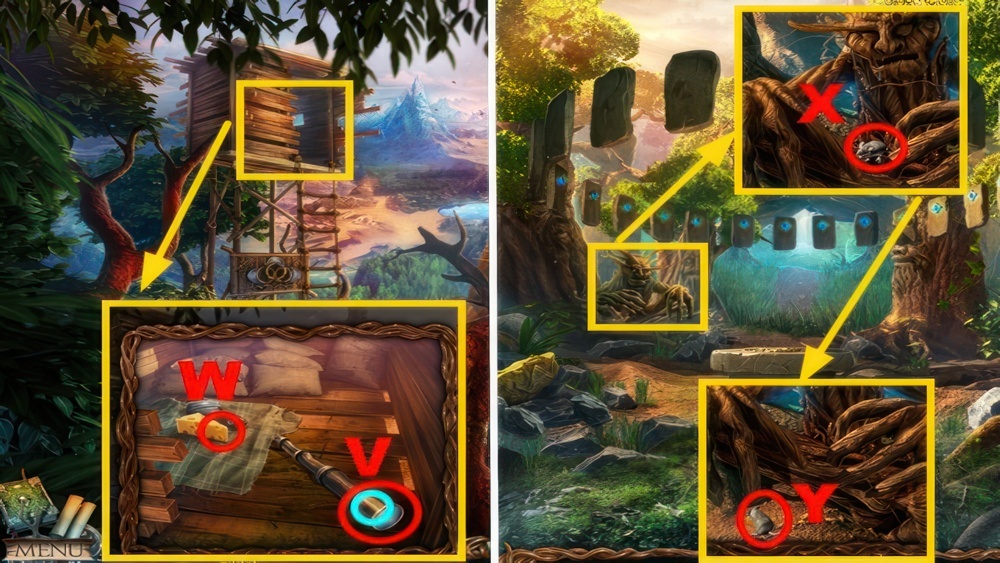
- Use the SCREWDRIVER (🔵), open the sack.
- Take the LENS (V) and CHEESE (W).
- Go down ×2.
- Use the CHEESE (X).
- Take the MOUSE (Y).
- Go down ×2.
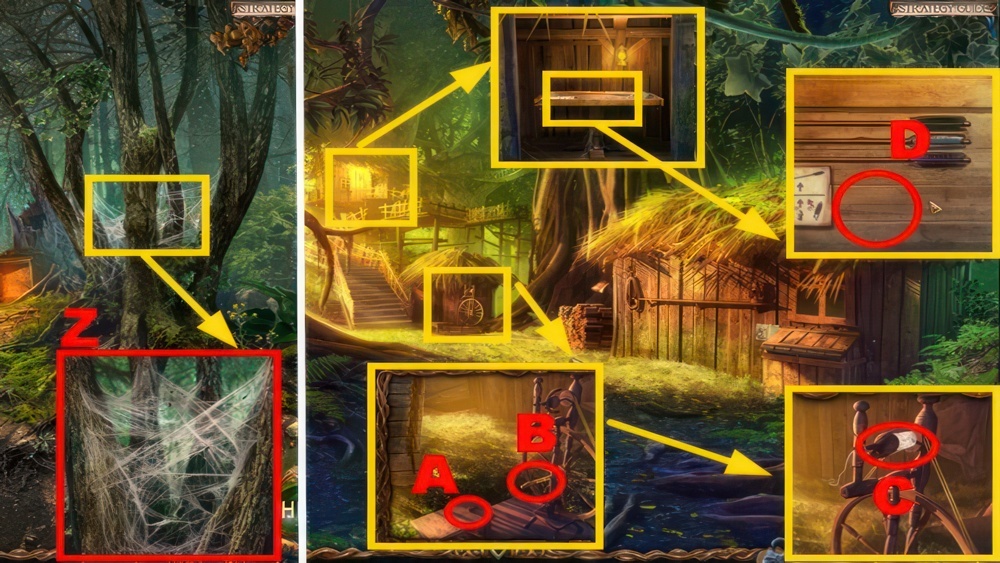
- Use the MOUSE and COMB (Z) to acquire the COMB WITH THREAD.
- Go forward, turn right.
- Place the COMB WITH THREAD (A).
- Turn the handle (B).
- Take the BOWSTRING (C).
- Place the BOWSTRING (D).
- Go to the Abandoned Farm.
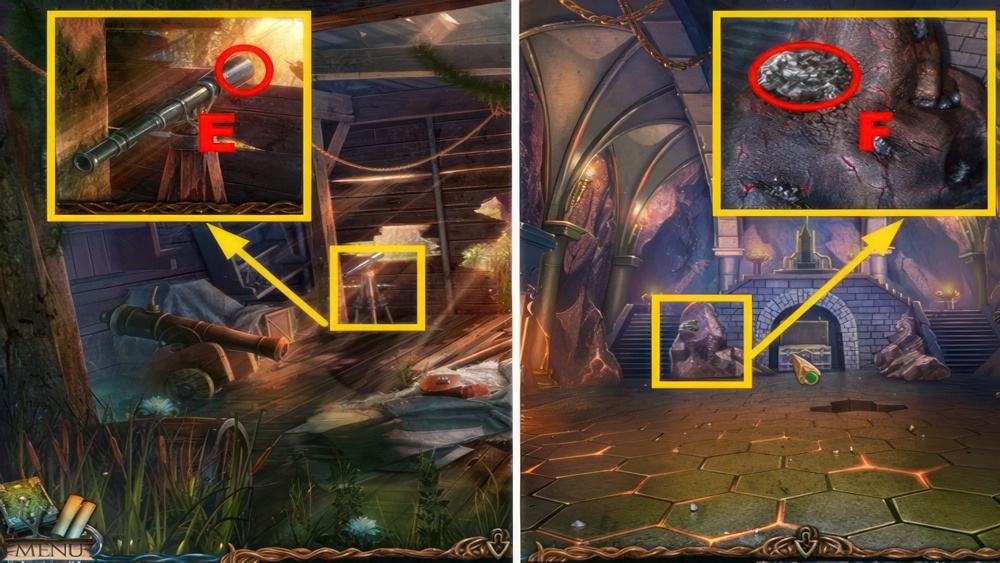
- Place the LENS (E).
- Go to the Fire’s Dwelling.
- Use the PICKAXE to acquire the METAL (F).
- Go to the Dwarf Slums.
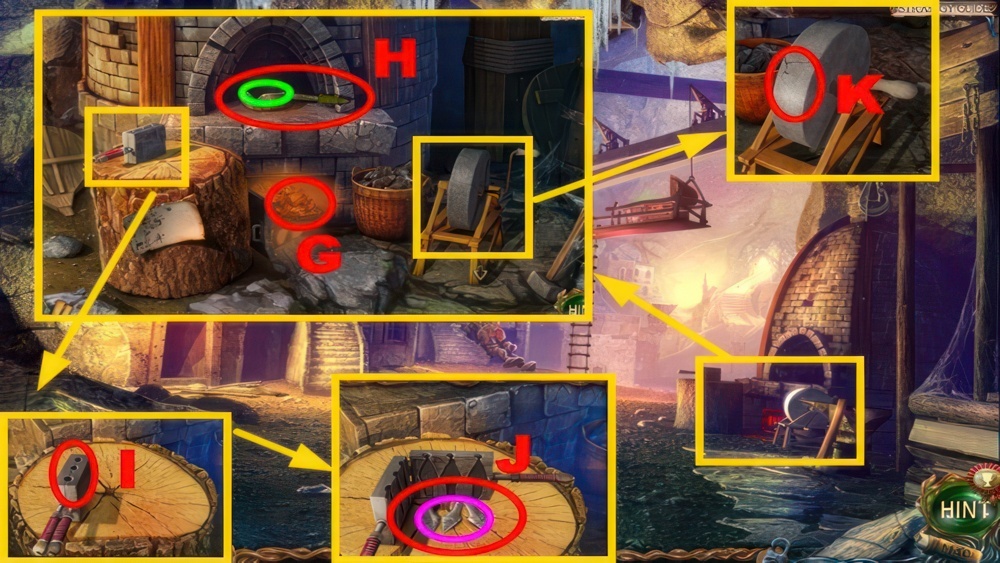
- Use the BURNING TORCH (G) and METAL (🟢).
- Take the MELTED METAL (H), use the MELTED METAL (I).
- Open the mold, use the BOTTLE OF COLD WATER (J).
- Take the UNFINISHED ARROWHEADS (🟣).
- Place the UNFINISHED ARROWHEADS (K) to acquire the ARROWHEADS.
- Go to the Centaurs Village.
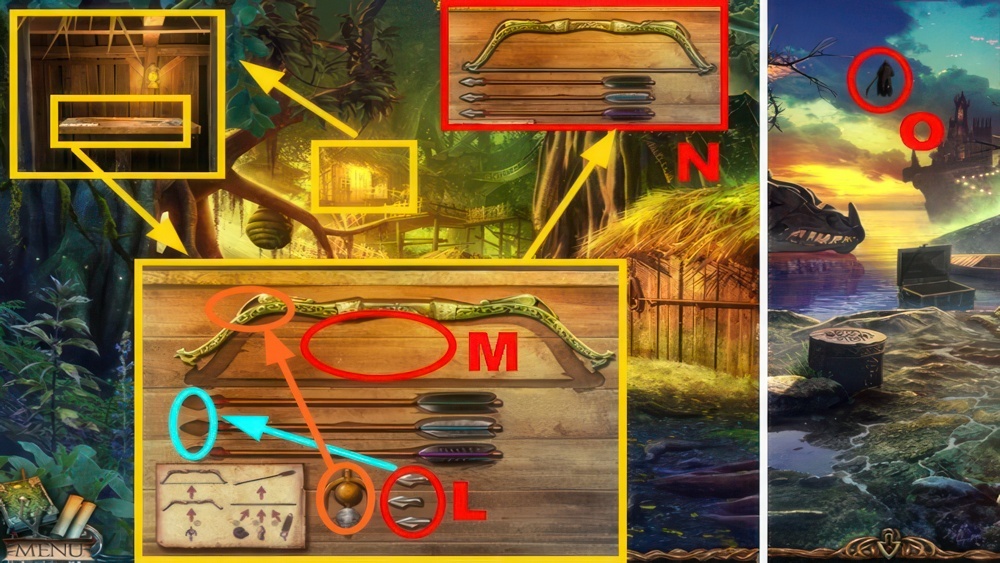
- Place the ARROWHEADS (L).
- Use the arrowheads (🔵), bowstring (🟠), and LIVING WATER (M).
- Take the BOW AND ARROWS (N).
- Go to the Dead Lake.
- Shoot the BOW AND ARROWS (O).
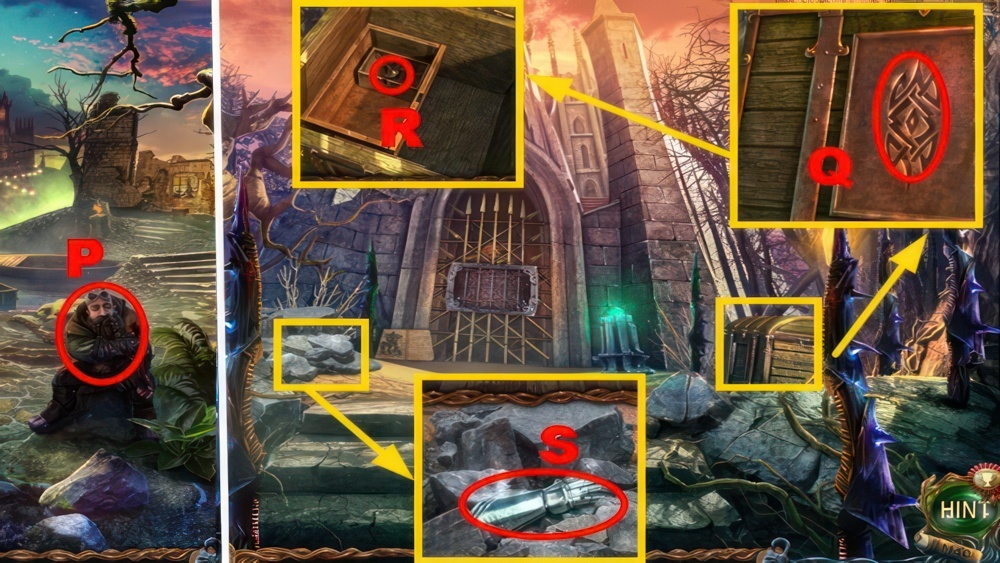
- Talk to the dwarf (P), give MOUNTGORE’S APPLE to him.
- Go forward.
- Use the ROLLER-SHAPED SEAL (Q).
- Open two boxes, take the SPINNING TOP (R).
- Remove 3 stones, take the ARMORED GLOVE (S).
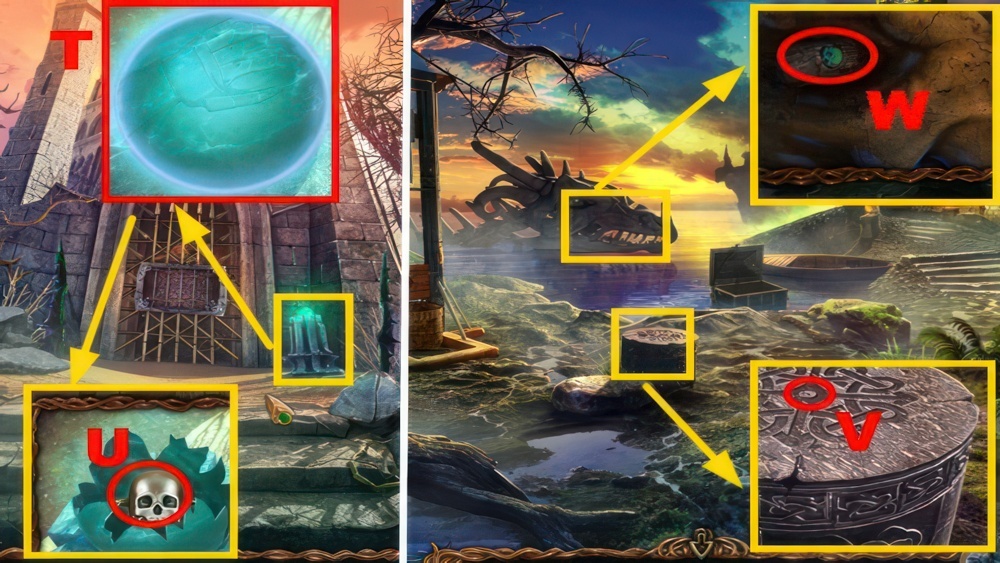
- Place the ARMORED GLOVE (T).
- Take the SKULL FIGURINE (U).
- Go down.
- Place the SPINNING TOP (V), turn it.
- Collect the PETRIFIED EYE with the HAMMER (W).
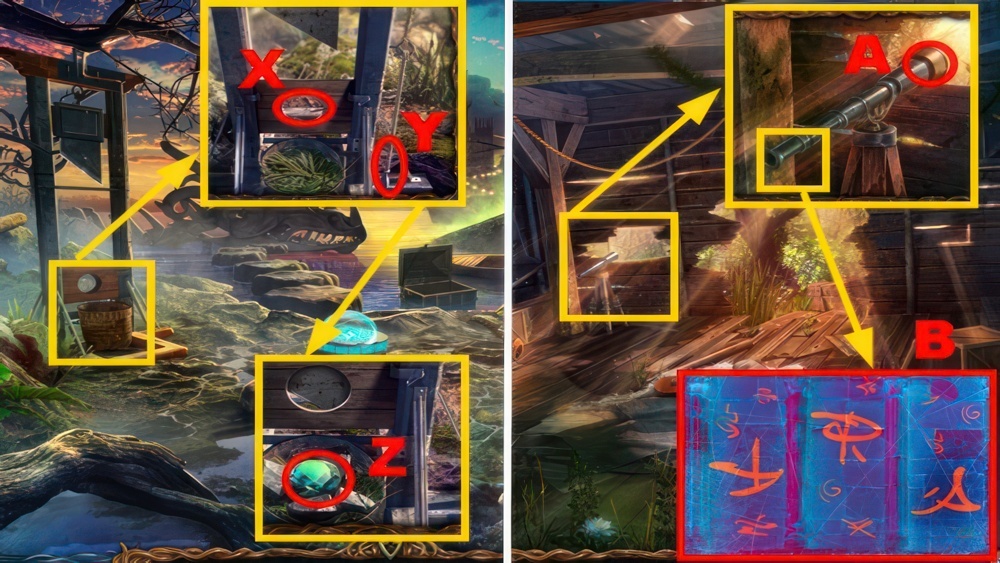
- Place the PETRIFIED EYE (X).
- Pull the rope (Y).
- Take the DRAGON EYE (Z).
- Go down.
- Place the DRAGON EYE (A).
- Make note of the symbols (B).
- Go forward ×2.
Death’s Heart
We must return to Maaron at once to bring him Death’s heart and tell what we saw in the crystal mirror.
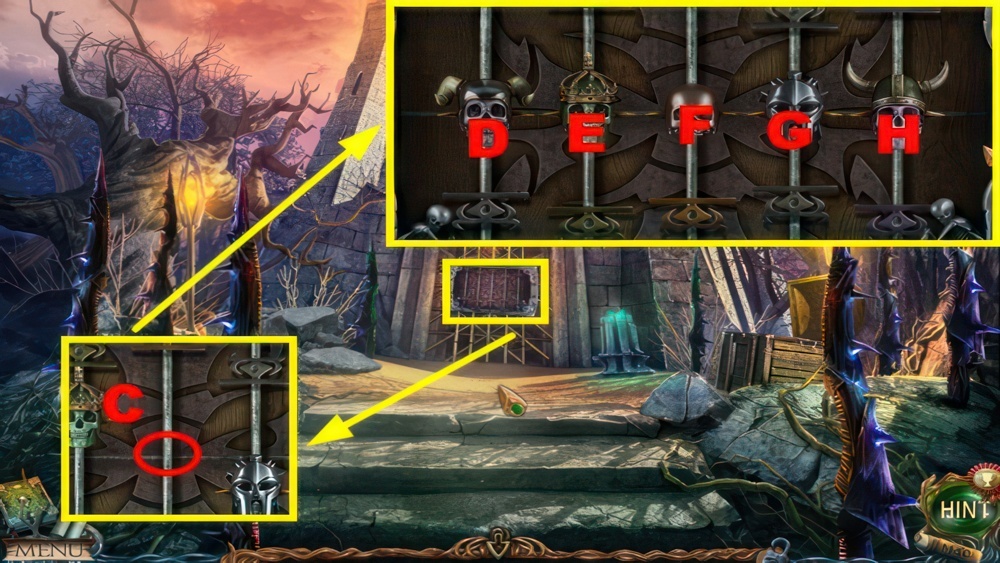
- Place the SKULL FIGURINE (C).
- Play the puzzle.
- Arrange all the figurines in the central line.
- Walkthrough: H-center, F-center, D-down, F-center, G-center, H-center.
- D-down, G-up, E-center, H-center, F-center, D-center, F-center, H-center, F-center.
- Use the HAMMER (I) to acquire the STONE HEART.
- Go to Maaron’s Cottage.
- Give the STONE HEART to the man (J), you acquire the SPRAY and KEY.
- Go down.
- Use the SPRAY (K) to acquire the FLOWER.
- Go left.
- Input the correct code in the cryptex.
- Arrange the symbols correctly (L).
- Read the note (M).
- Go to the Waterfall.
- Pull out the tree (N) and bag (O), open the bag.
- Take the WOODEN DISC (P) and T-WRENCH (Q).
- Go down.
- Place the WOODEN DISC (R).
- Go forward ×2.
- Use the T-WRENCH (🟢), open the door.
- Take the BRUSH (S) and CLEAN SHEET (T).
- Go to Folnur’s Refuge.
- Place the BRUSH (U).
- Use the KEY (V).
Lens and Spell
I must find a large glass lens for Maaron and Filnur’s invention, and a spell for the stone hearts. We will meet in the Stronghold’s central hall. I was right thinking that the telescope was aimed here on purpose. It turns out that some symbols were drawn with invisible paint on the scene. We had to use the dragon eye crystal to reveal it. So, I suppose these symbols are a code of some sort. All I need to know now is what the code is for.
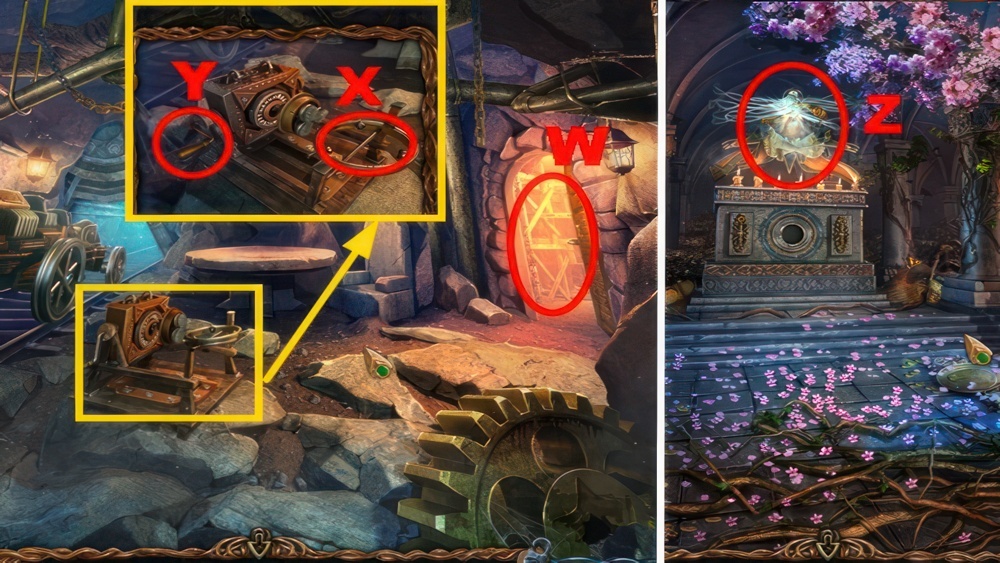
- Play the puzzle (W) to acquire the OLD LENS.
- Place the OLD LENS (X).
- Go the handle (Y), take the LENS.
- Go to Mountgore’s Temple.
- Use the FLOWER (Z), you acquire the WOODEN PART.
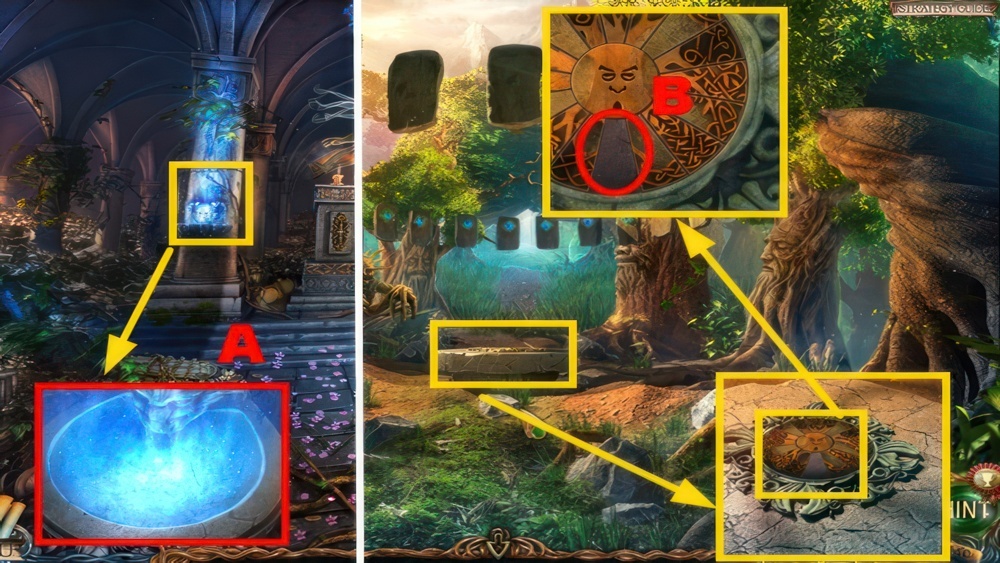
- Place the CLEAN SHEET (A), take the SPELL SCROLL.
- Go to the Ontus Glade.
- Place the WOODEN PART (B).
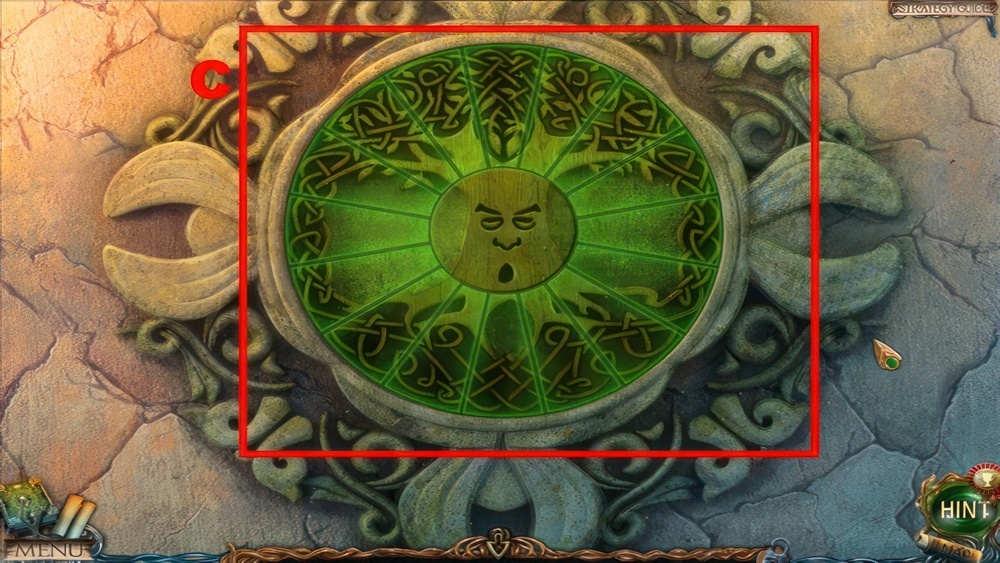
- Play the puzzle.
- Move circle sectors to restore the initial pattern.
- Walkthrough: (C).
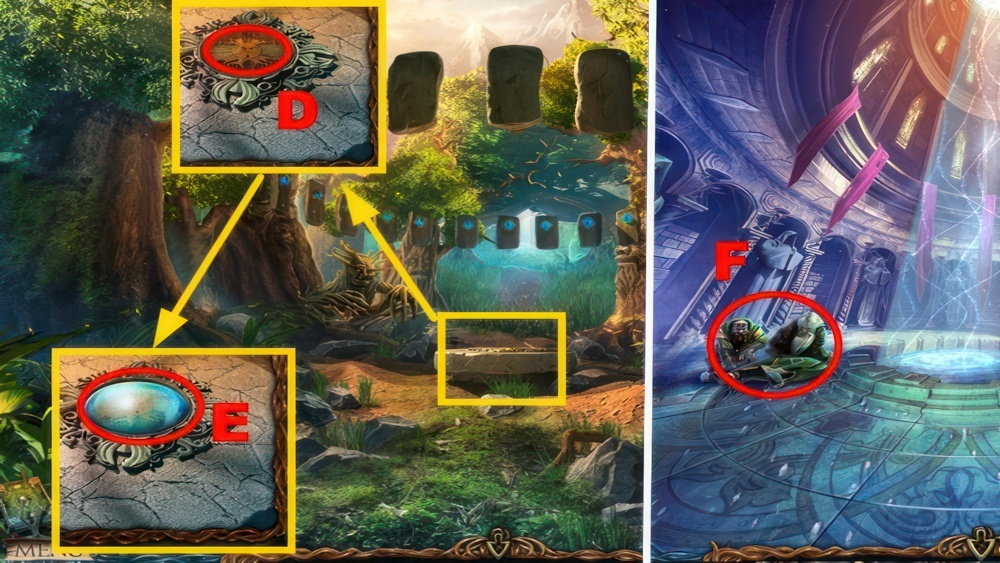
- Place the LENS (D).
- Take the LIGHT-FILLED LENS (E).
- Go to the Tower Hall.
- Talk to the men (F).
- Go up.
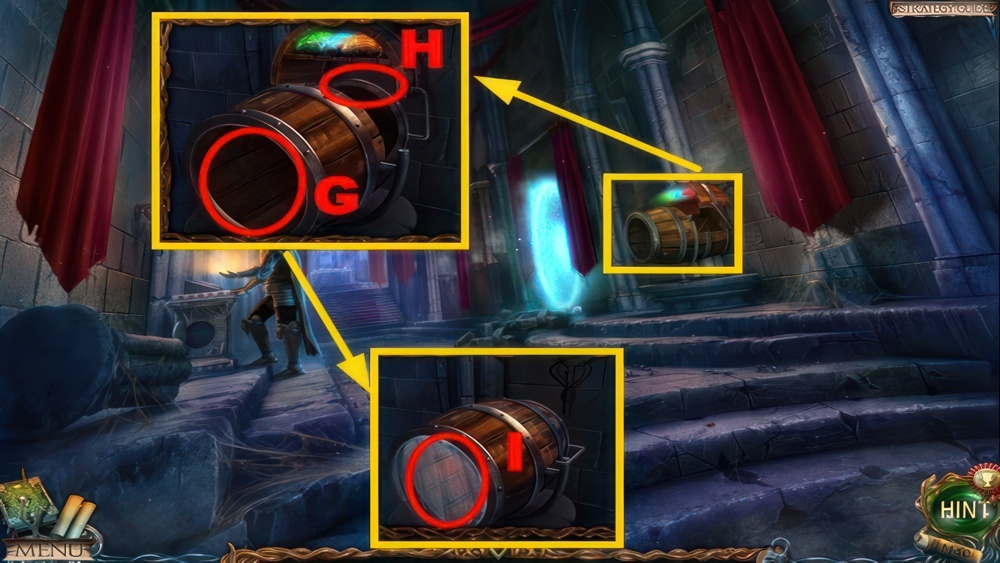
- Place the LIGHT-FILLED LENS (G).
- Shut the barrel (H).
- Place the SPELL SCROLL (I).
- Walkthrough Bonus Chapter, at the link below.


they changed the puzzle to restore the pendulum in the darkwoods in an obviously newer version and i find the new puzzle impossible to solve.
has anyone solved it? it consists of sliding some pieces around to match 5 rings up on a board.
would be very grateful for input! thanks