Lost Lands 3: The Golden Curse (Bonus Chapter) – Susan again fell into the time portal to the lost lands of the druids. She learns that Maaron is no longer a hermit and needs help to fight the petrified demons that somehow come to life, causing great suffering to his village and people, now, he has become the elder of the druid guild. The half-bird, half-human Harpy demon has just attacked the village, inflicting huge poisonous wounds with its razor-sharp claws, but you’ll find out why in the bonus chapter. Below you can watch the walkthrough of the bonus chapter of Lost Lands 3: The Golden Curse.
Bonus Chapter Walkthrough

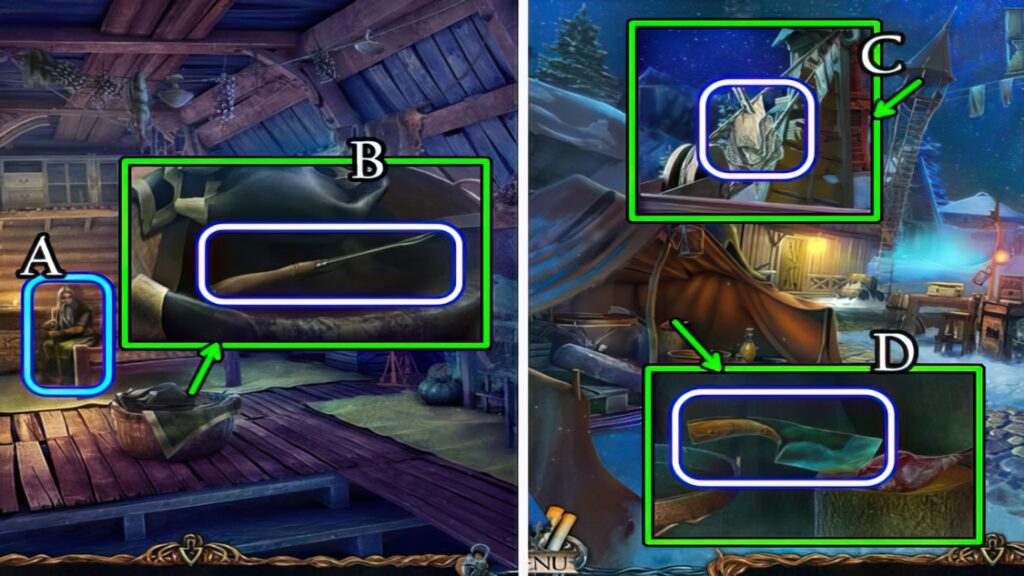
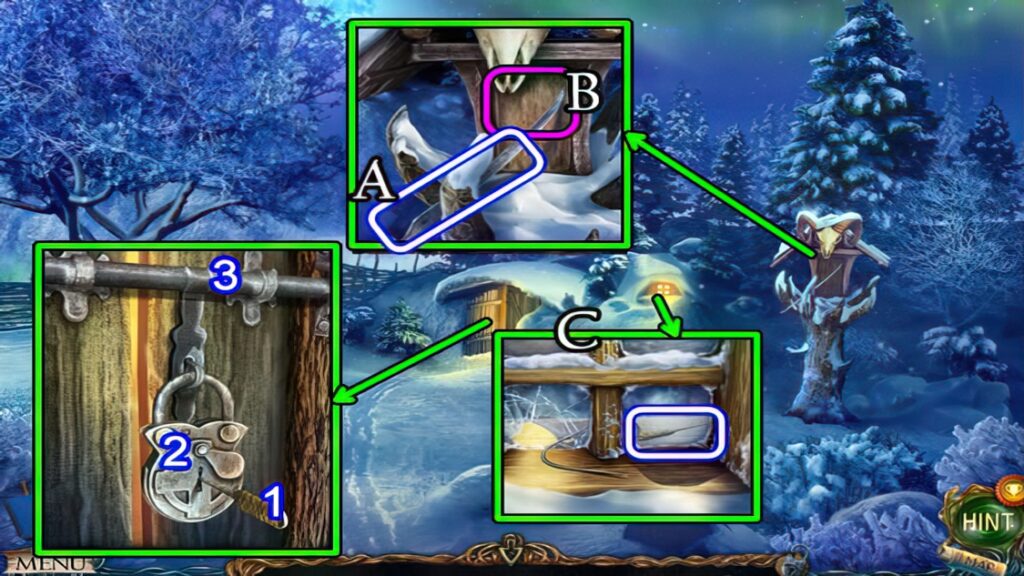
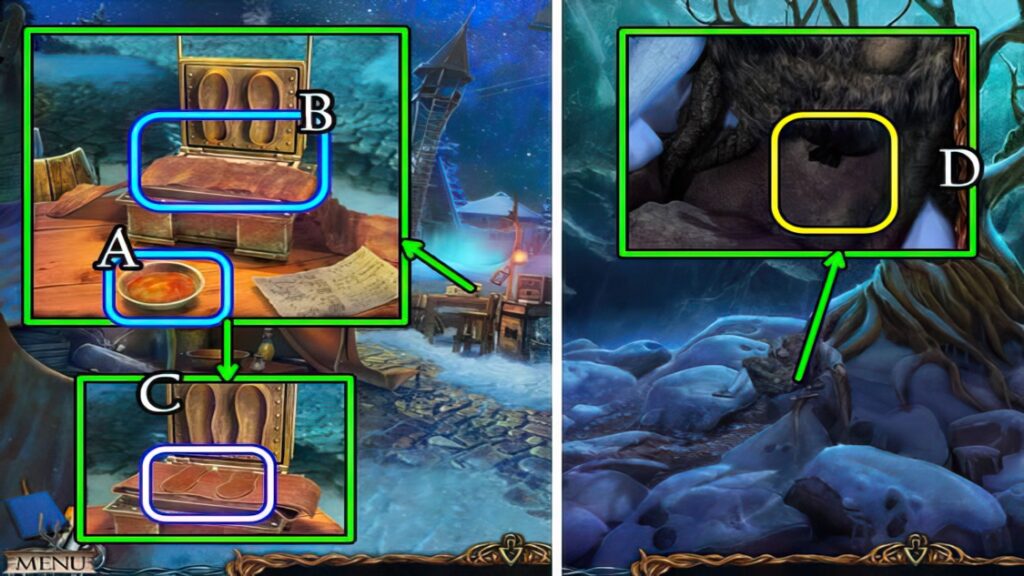
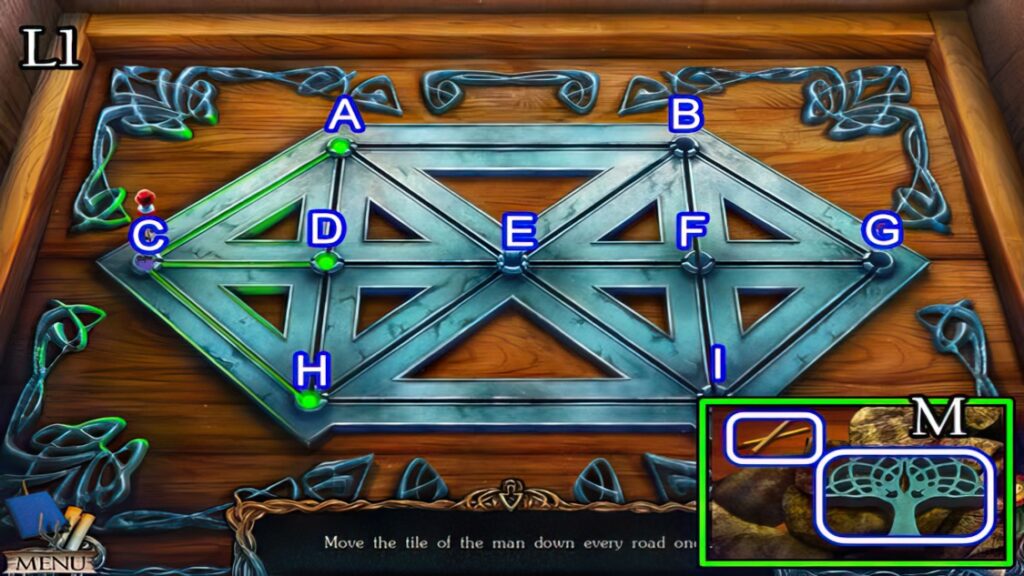
- Select (A).
- Solution (B).
- Take the FUR CAPE (C).

- Uncover and take the HAMMER (D).
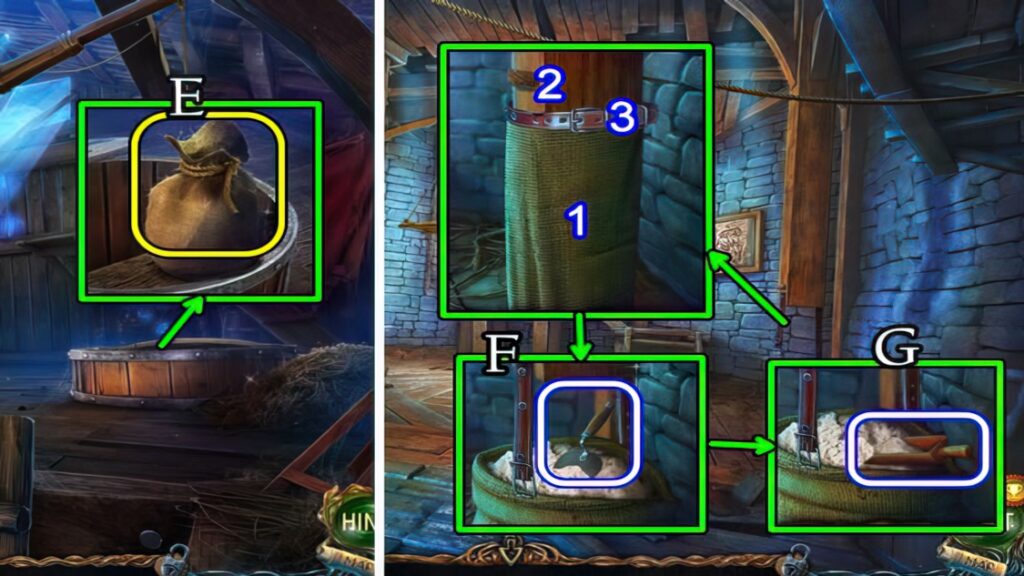
- Use the HAMMER (E), touch the latch.
- Walk forward, then down.

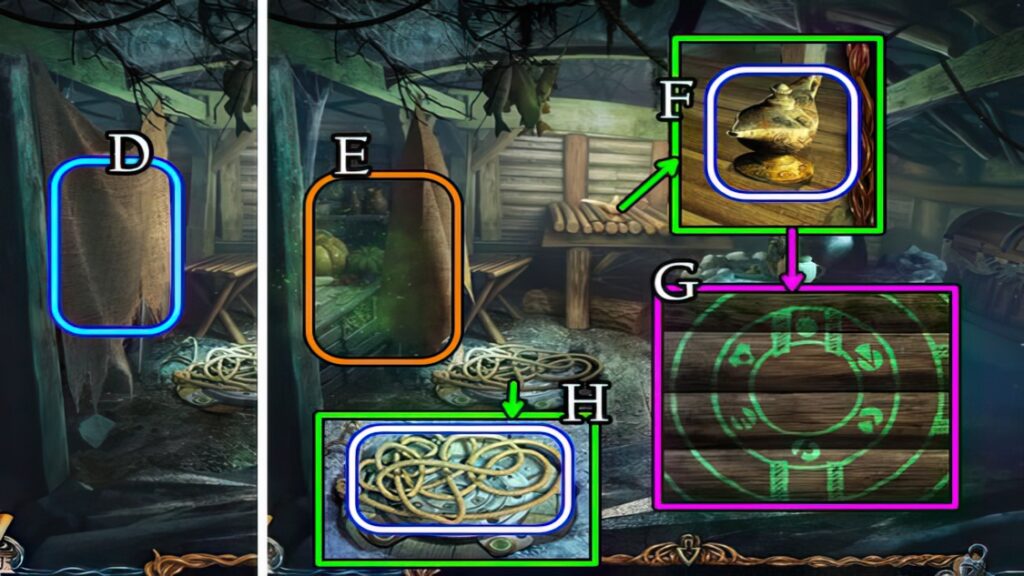
- Grab the SHAWL (F).
- Walk left and forward.
- Place the FUR CAPE. Take the DOOR KEY (G).
- Return to the Boat Hold.
- Use the DOOR KEY (H).
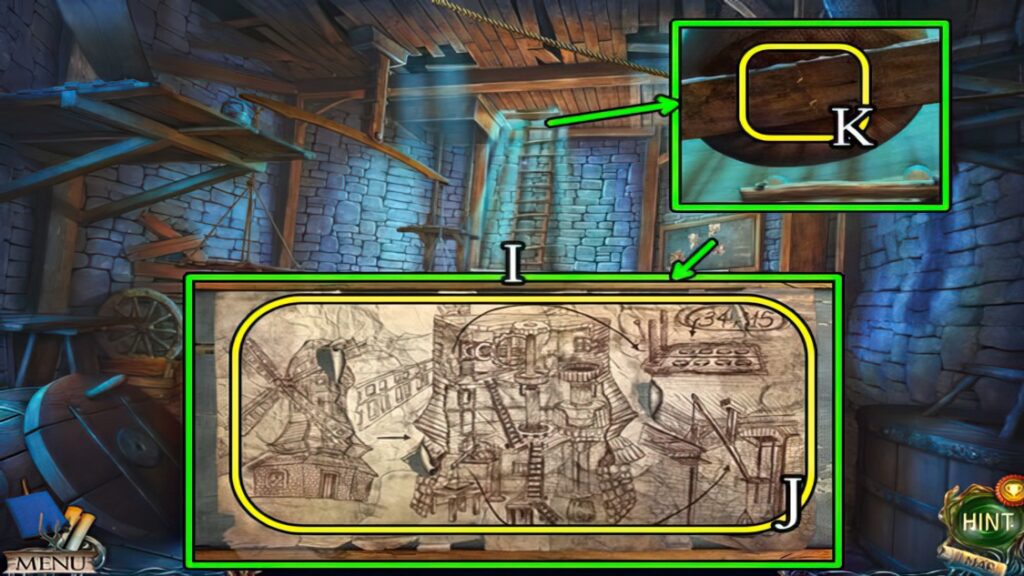
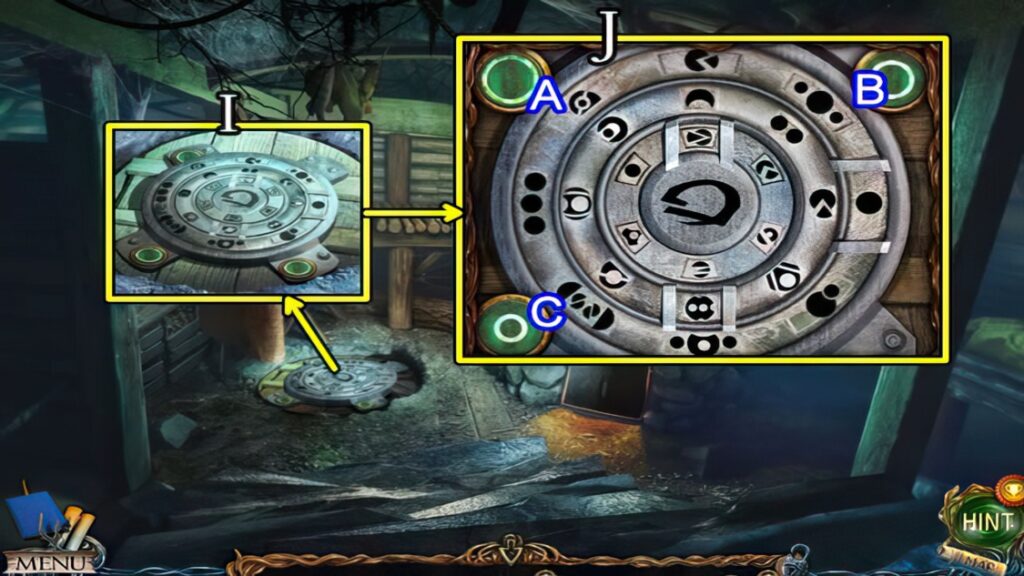
- Play the puzzle (I), receive a LADLE.
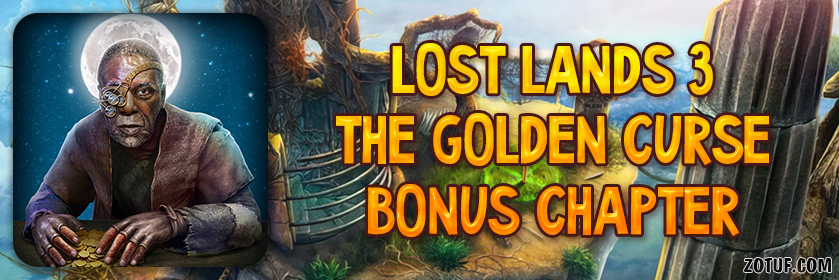
- Walk forward, down and left.
- Use the HAMMER. Place the LADLE, receive a LADLE FULL OF WATER (J).
- Walk forward.
- Give the LADLE FULL OF WATER (K).
- Remove the peg-leg, take the KNIFE (L).
- Walk down 2x and right.
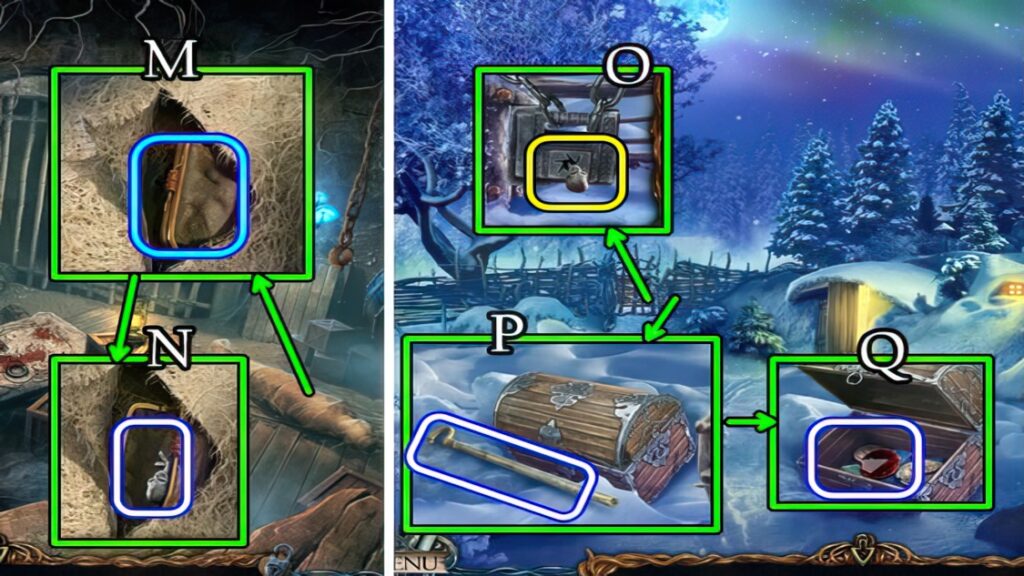
- Use the KNIFE (M).

- Select (N) and place (O).
- Walk right to the Exit from village.
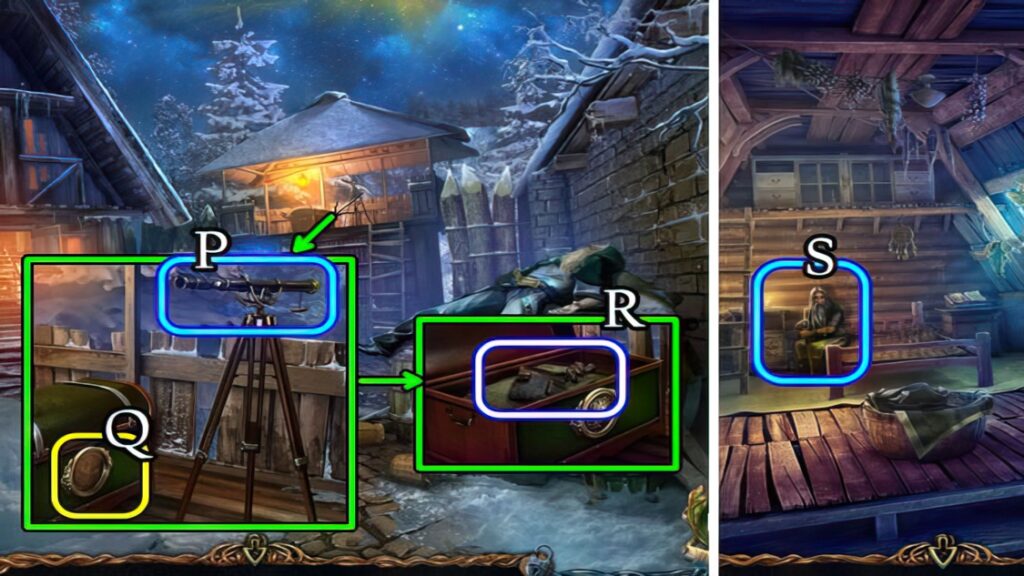
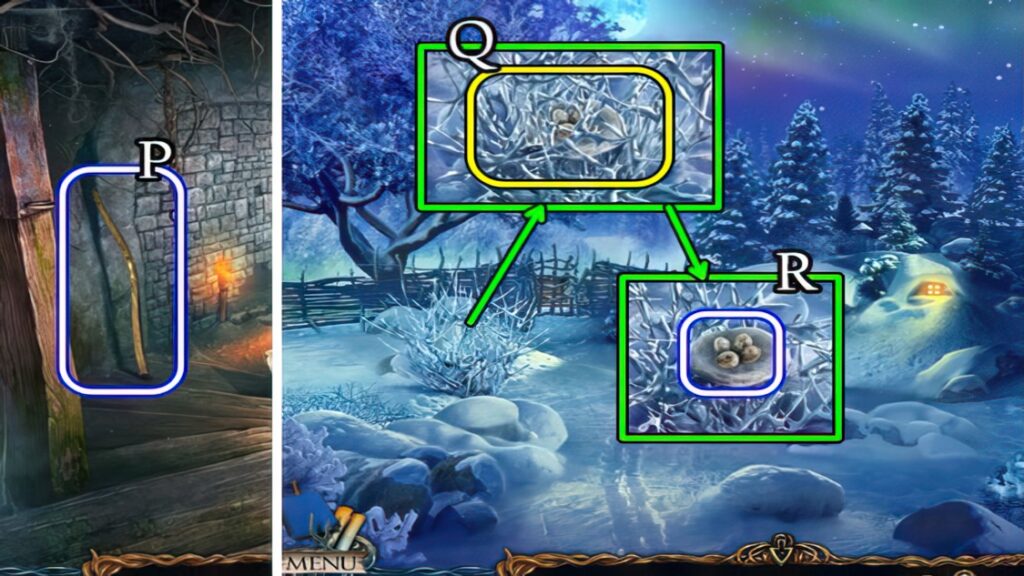
- Take the BROKEN BROOM (P).
- Select and take the CORK WITH A CORKSCREW (Q).
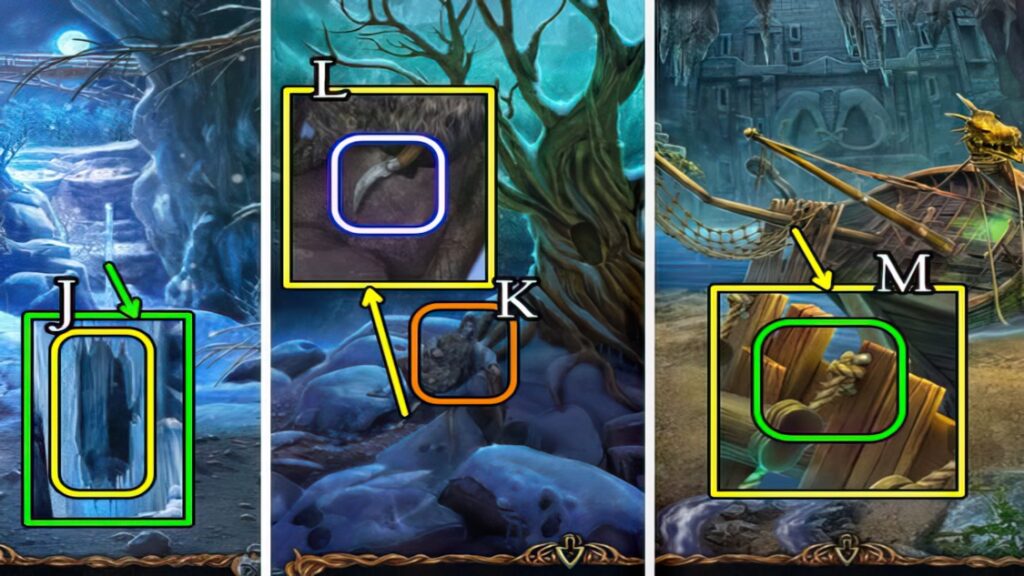
- Slide the latch (R), walk right.
- Use the BROKEN BROOM (S), receive a BROKEN BROOM and HOLDER.
- Combine the BROKEN BROOM, HOLDER and SHAWL for a BROOM (Inventory).
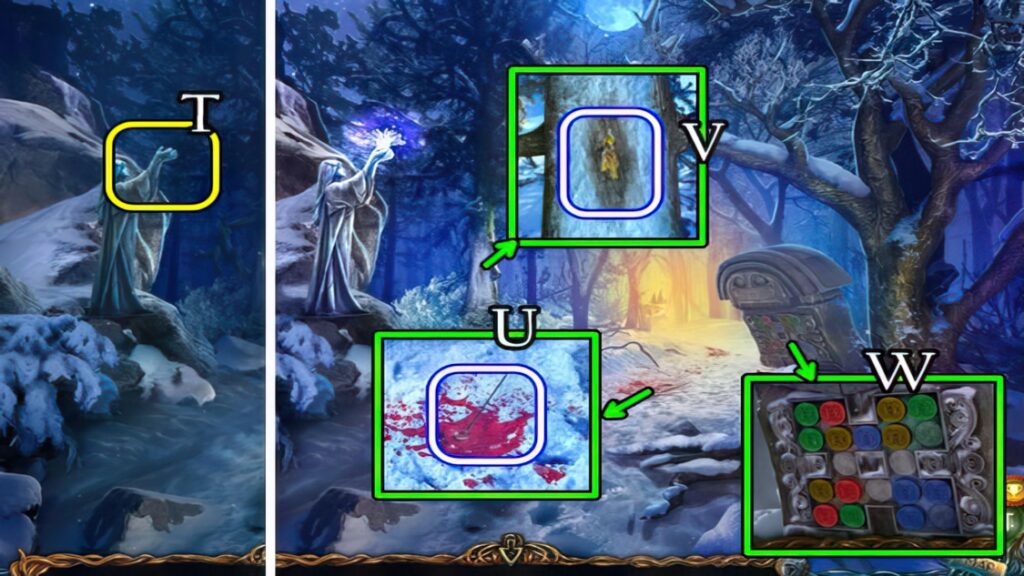
- Use the BROOM (T), receive a ROLLER.
- Walk down 2x.
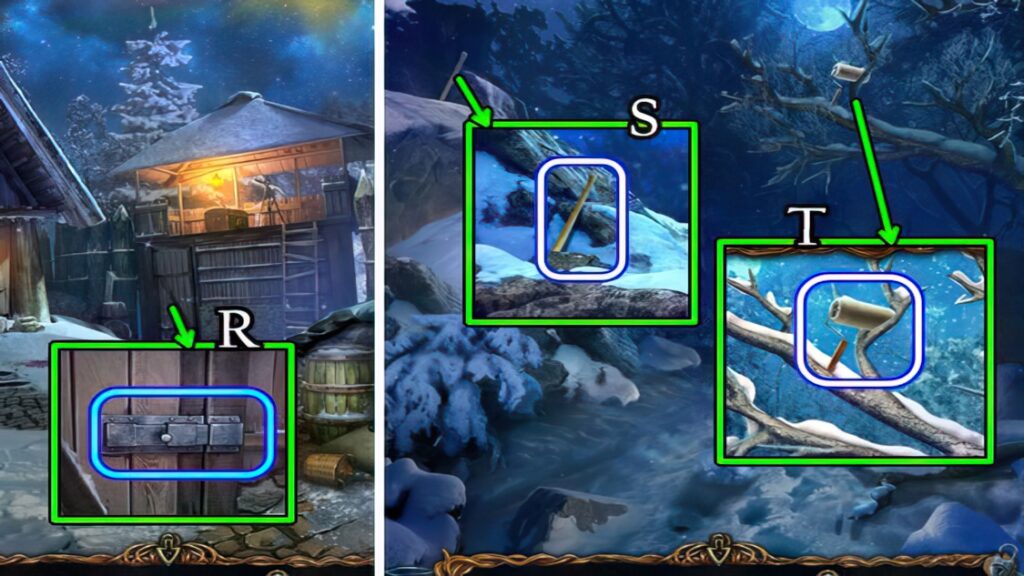
- Remove the cork from a CORK WITH A CORKSCREW (Inventory) for a CORKSCREW.
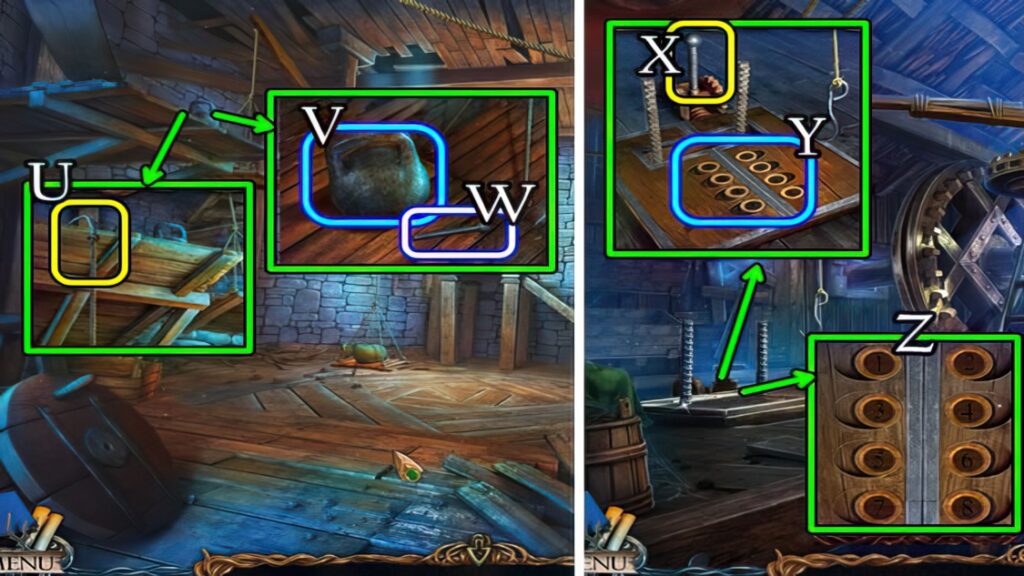
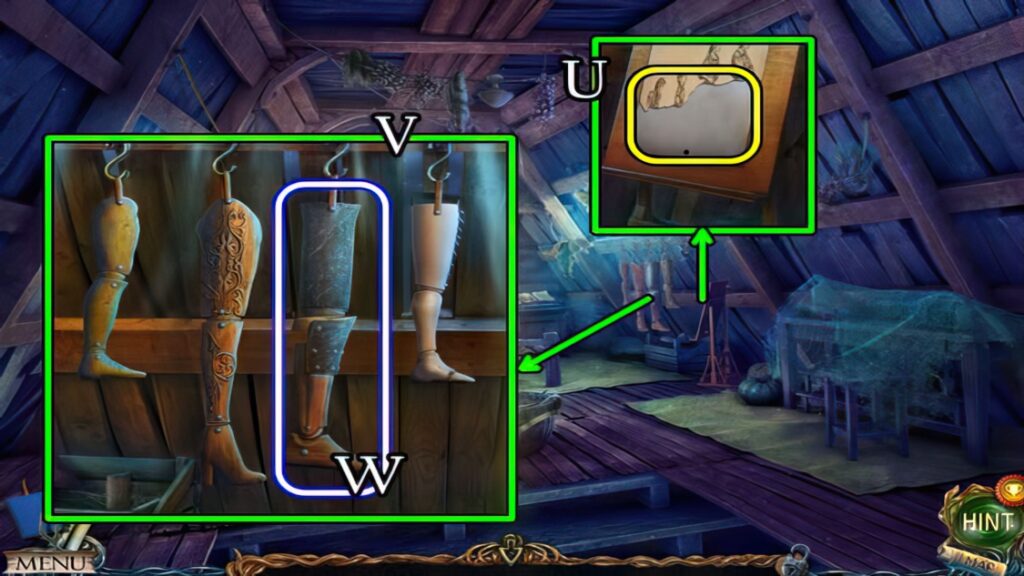
- Place and select the CORKSCREW (U).
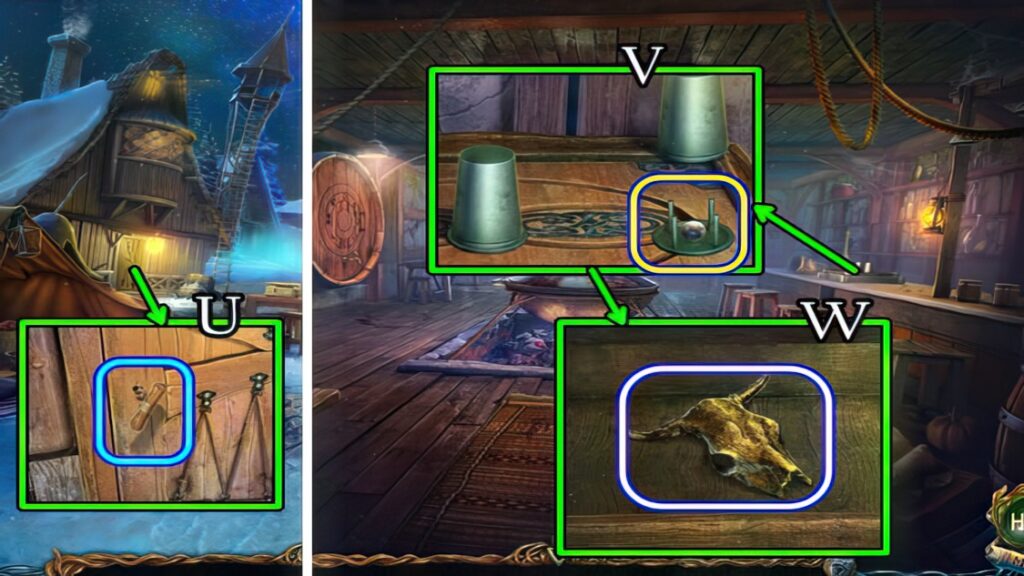
- Walk left.
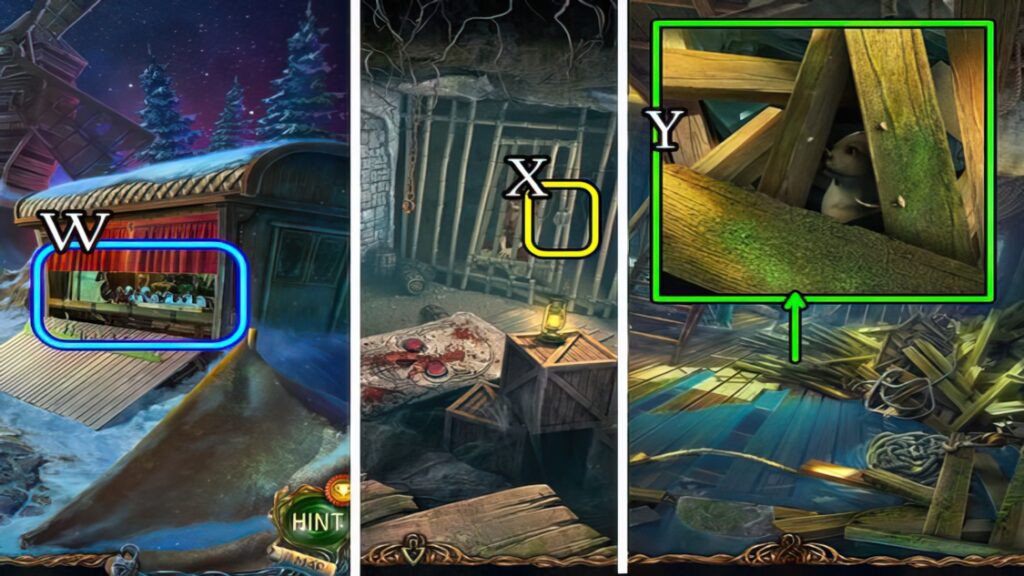
- Solution (V).
- Take the FORGED PIECE (W).
- Return to the Exit from village.

- Place the FORGED PIECE (X).
- Take the KEY (Y).
- Use the KEY (Z).
- Walk left.
- Speak to the man (A).
- Uncover and take the NAIL PULLER (B).
- Walk down 2x.
- Select, then take the PIECES OF BLUEPRINTS (C).
- Grab the HATCHET (D).

- Take the SCREW-HOOK (E).
- Use the NAIL PULLER for NAILS. Remove the frame and glass (F).
- Enter the Mill (ground floor).
- Grab the FLOUR SCOOP (G).
- Place the PIECES OF BLUEPRINTS (H).
- Solution (I).
- Use the ROLLER (J).
- Use the HATCHET (K).
- Climb the ladder.

- Take the WEDGE (L).
- Place the WEDGE (M).
- Take the CIRCLE (N).
- Uncover and take the AMULET (O).
- Return to the Exit from village.
- Select (P) 2x.
- Place the AMULET (Q), take MAARON’S BAG (R).
- Walk left.
- Give MAARON’S BAG (S), receive the LIGHT OF HOPE.
- Walk down and right.
- Place the LIGHT OF HOPE (T).
- Take the NEEDLE (U).
- Use the KNIFE for GLUE (V).
- Place the CIRCLE (W).
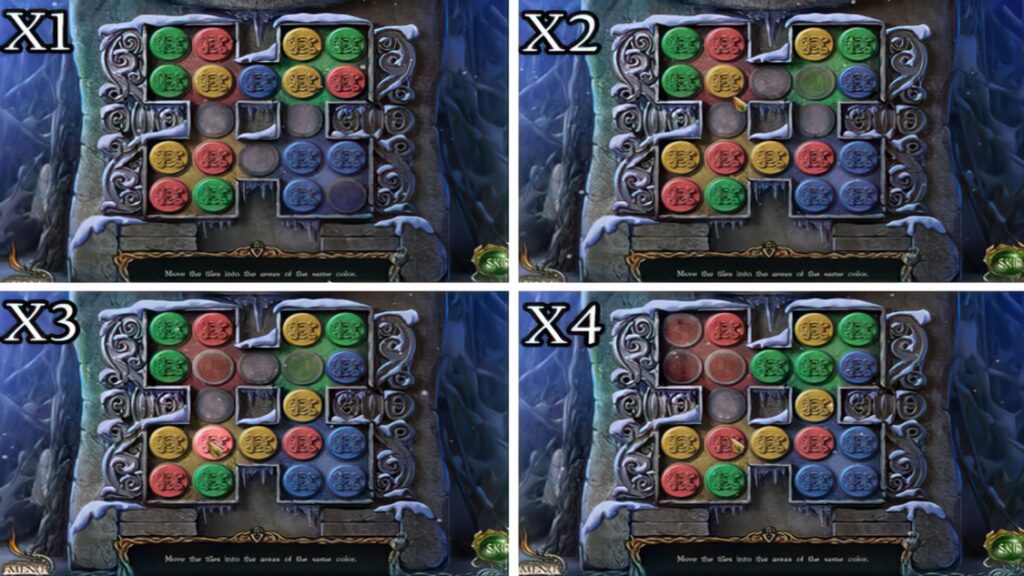
- Solution (X1-X2-X3-X4).
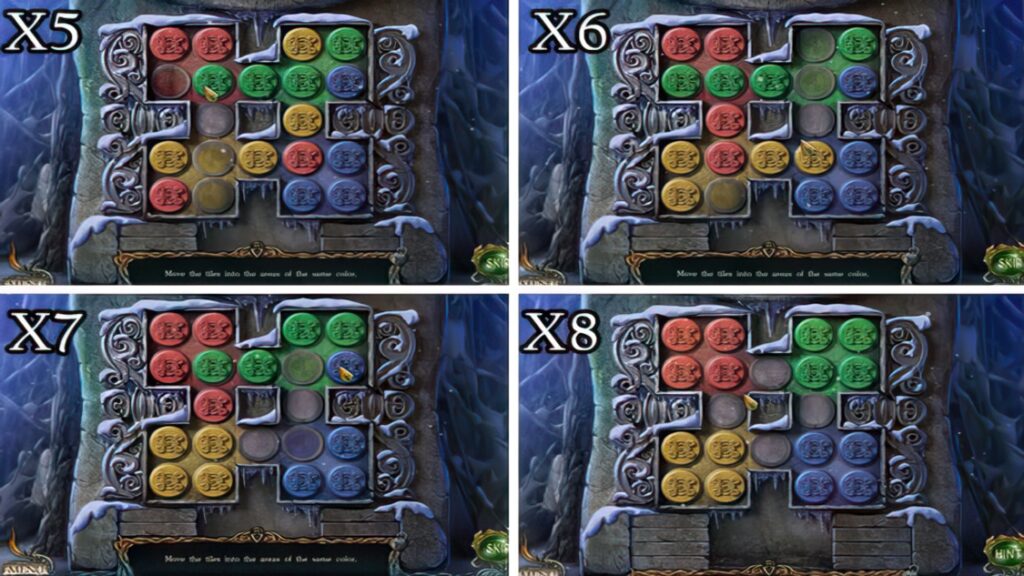
- Solution (X5-X6-X7-X8).
- Take the WOOD DUST.
- Select the NEEDLE 5x (Inventory) for a HOOK.
- Walk left.
- Take the SCYTHE BLADE (A) and note (B).
- Use the HOOK to take the LOCKPICK (C).
- Use the LOCKPICK (1). Select (2). Slide (3).
- Walk forward.
- Touch the drape (D).
- Play the puzzle (E), receive a WHETSTONE.
- Take the OIL LAMP (F). Note (G).
- Return to the Tavern.
- View the image on the barrel.
- Return to the Goblin’s hut.
- Take the ROPE WITH A HOOK (H).
- Select (I).
- Solution (J). Ax4-Bx6-Cx4.
- Walk down the steps.

- Grab the TORCH (K).
- Walk down.
- Select (L). Place the TORCH for a LIT TORCH (M).
- Walk down the steps.
- Use the LIT TORCH (N).
- Speak to mother (O).
- Grab the HOLDER (P).
- Combine the SCYTHE BLADE, WHETSTONE and HOLDER for a SCYTHE (Inventory).
- Walk down 2x.
- Use the SCYTHE (Q). Take the EGG (R).
- Return to the Mill (ground floor).

- Place the SCREW-HOOK (S). Select (T).
- Select 1-2.
- Select the ROPE WITH A HOOK 3x (Inventory) for a KNOTTED ROPE WITH A HOOK.
- Use the KNOTTED ROPE WITH A HOOK (U).
- Touch (V), take the LEVER (W).
- Climb the ladder.
- Place the LEVER (X), select (Y).
- Solution (Z). 3-4-7-1-5.
- Pull the lever.
- Take the WEIGHTS (A), select (B).
- Place the WEIGHTS (C).
- Select (D).
- Use the KNIFE (E). Take the EMPTY SACK.
- Walk down.
- Place the EMPTY SACK (1). Select (2). Touch (3).
- Take the TROWEL (F).
- Place the FLOUR SCOOP. Take FLOUR (G).
- Walk down.

- Place the FLOUR and EGG (H). Select (I-J). Knead.
- Take MORTAR IN A BOWL.
- Return to the Cell.
- Place the MORTAR IN A BOWL (K), use the TROWEL.

- Solution (L1-L2-L3-L4).
- Speak to mother, receive a NOTE.
- Touch the NOTE 2x (Inventory), receive BLUEPRINTS.
- Use the KNIFE. Select the purse (M).
- Solution. 9-8-4.
- Take the KEY (N).
- Walk down 2x.
- Place and select the KEY (O).
- Take the HOOK (P).
- Open and take the RED STONE (Q).
- Return to the Cell.

- Place the RED STONE (R).
- Take the CAGE KEY and BOTTLE OPENER (S).
- Place and select the CAGE KEY (T).
- Return to the Field Hospital.
- Place the BLUEPRINTS (U).
- Solution (V).
- Take the INCOMPLETE PROSTHETIC DEVICE (W).
- Return to the Tree of Life.
- Talk to father. Receive a CAGE KEY.
- Return to the Boat Hold.

- Use the CAGE KEY. Take the LEATHER (X).
- Return to the Tavern.
- Use the HOOK (Y), take the BLOWTORCH (Z).
- Walk down.
- Place the GLUE, use the BLOWTORCH (A). Open the press and place the LEATHER (B). Select the glue, then leather. Close the press, take the INSOLE (C).
- Return to the Tree of Life.
- Attempt to place the INCOMPLETE PROSTHETIC DEVICE (D).
- Combine the INCOMPLETE PROSTHETIC DEVICE, INSOLE, NAILS and HAMMER for a PROSTHETIC DEVICE (Inventory).
- Place the PROSTHETIC DEVICE. Receive PART OF A PAGE.
- Return to the Field Hospital.

- Place the PART OF A PAGE (E) and select.
- Return to the Cave.
- Take the DROP-TREE LEAF (F).
- Walk left.
- Take the BERRIES (G).
- Walk forward.

- Use the BOTTLE OPENER (H), take WOOD CHIPS.
- Take the SYMBOL (I).
- Return to the Cell.
- Use the KNIFE for a GLOWSHROOM (J).
- Walk down.
- Place the SYMBOL (K).
- Select (L).
- Solution (L1). A-D-H-C-D-E-I-H-E-B-A-E-F-G-I-F-B-G.
- Take the MATCHES and SHELF LOCK (M).
- Return to the Market.

- Place the DROP-TREE LEAF. Strike MATCHES. Place the OIL LAMP (N), use the MATCH.
- Take the DRY LEAF (O).
- Return to the Field Hospital.
- Place and select the SHELF LOCK (P). Take the ELIXIR OF WELLNESS (Q).

- Place the WOOD CHIPS, DRY LEAF and BERRIES (1). Select (2). Place the GLOWSHROOMS (3), touch (4).
- Take the MORTAR FOR HEATING LIQUIDS (5).
- Return to the Goblin’s Hut.
- Place the MORTAR FOR HEATING LIQUIDS and ELIXIR OF WELLNESS (6). Select (7).
- Take the TEA IN A MORTAR.
- Return to the Field Hospital.

- Place the TEA IN A MORTAR and WOOD DUST, take the MEDICINE (R).
- Return to the Tree of Life.
- Give the MEDICINE (S).
- Return to the Cell.
- Touch (T).
- Return to the Field Hospital.
- Speak to Maaron (U), receive a TILE.
- Walk down 2x.
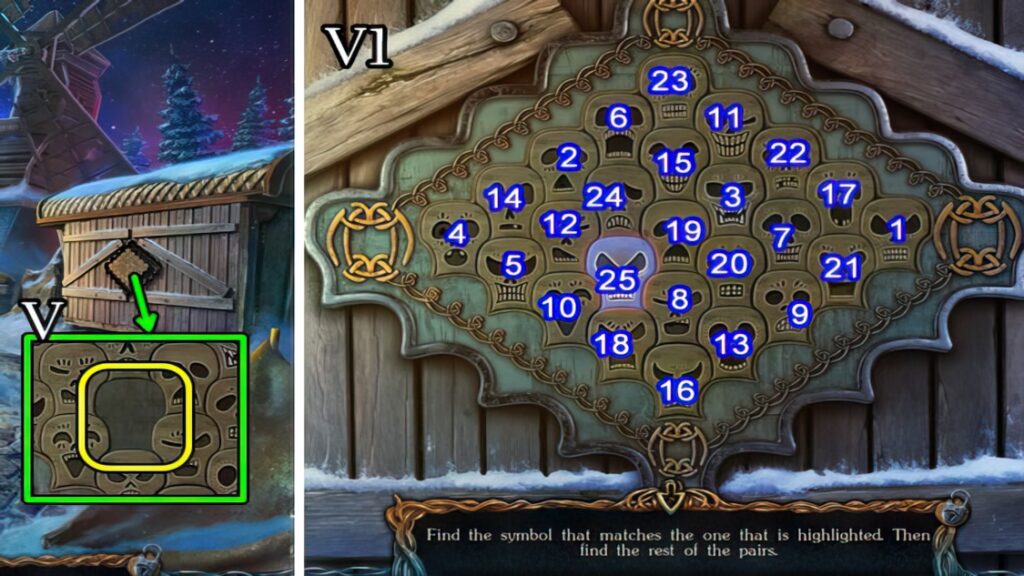
- Place the TILE (V).
- Solution (V1).
- Play the puzzle (W), receive MAARON’S STAFF.
- Return to the Cell.
- Place MAARON’S STAFF (X).
- Return to the Boat Hold.
- Select the boards (Y).
Congratulations! You have completed the game Lost Lands 3: The Golden Curse.


Thank you for the walk through! Wouldn’t have been able to complete the game otherwise haha!