Lucky Season 1: King of Fools – The game’s walkthrough starts with you bringing a pot of gold to the leprechauns’ hiding place. Next, the leprechauns were happily preparing for St. Patrick’s Day, but someone stole all their gold coins. The leprechauns labor for a year to create the lucky coins. Then they go through a portal to the human world to hide each coin. But one leprechaun, whose name has been consigned to oblivion, didn’t want to give up his coins. The magic of luck was running out, and the leprechaun still couldn’t part with the gold. He decided to eat all the coins he had minted. The magic quickly filled him up and just as quickly drained out. He began to devour the coins of other leprechauns. People had forgotten about leprechauns, and luck magic was almost non-existent in the world. The leprechaun didn’t understand why everyone was afraid of him. He wandered lonely in the square and noticed his reflection. The leprechaun screamed loudly when he recognized it as the ugly face of a cluricon. Leprechauns mint coins and are not greedy to toss them to humans. When a person finds such a coin, the joy of good fortune fills our world with magic. If unlucky people stop believing in leprechauns in our world magic will disappear. If you can not pass any of the puzzles or do not know where the items are, on our site you can watch the walkthrough of the game Lucky Season 1: King of Fools, and find out who is behind the theft of gold.
Lucky Season 1: King of Fools – Walkthrough
Here you can see the full guide for the walkthrough of Lucky Season 1: King of Fools, namely for all chapters, including bonus chapter, in pictures.
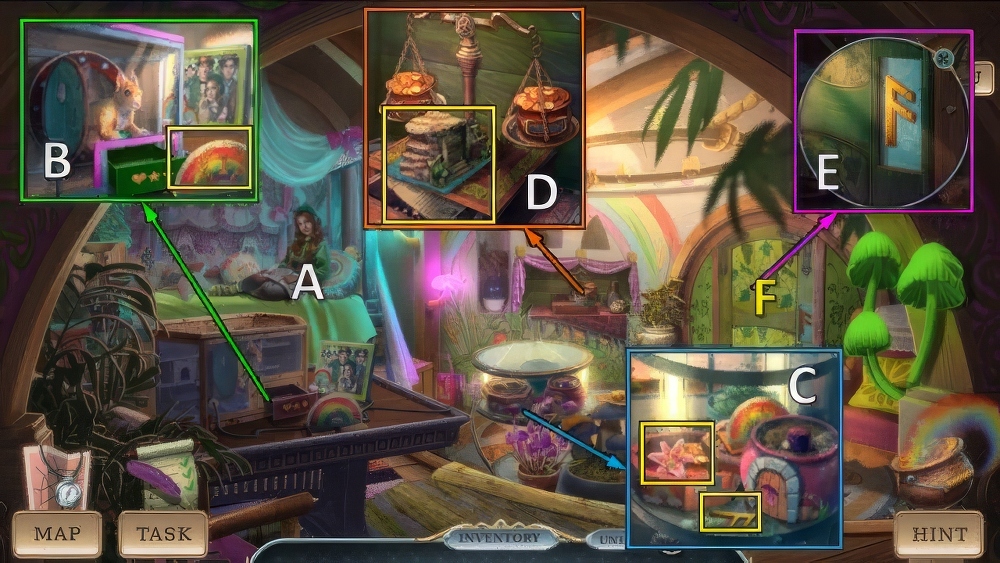
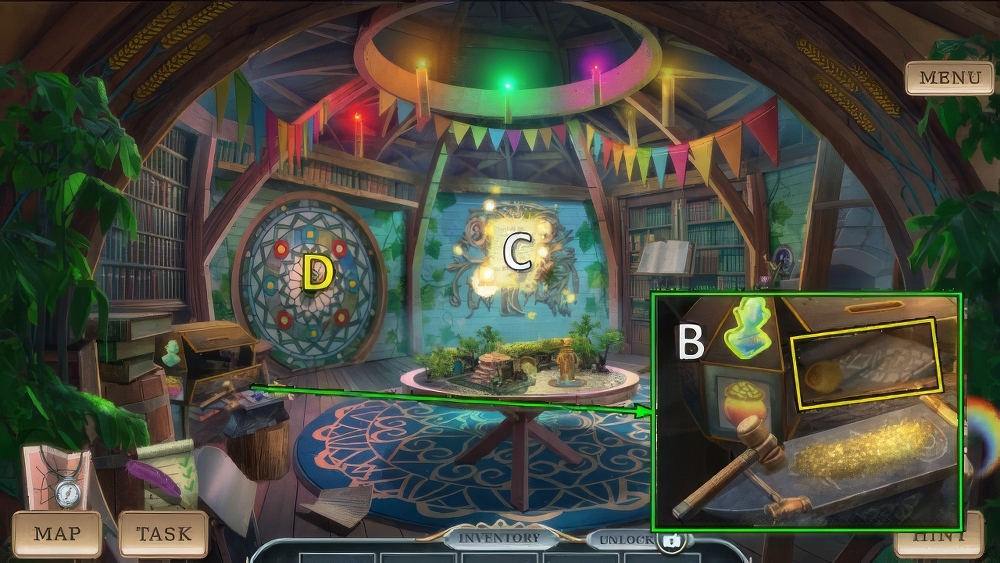
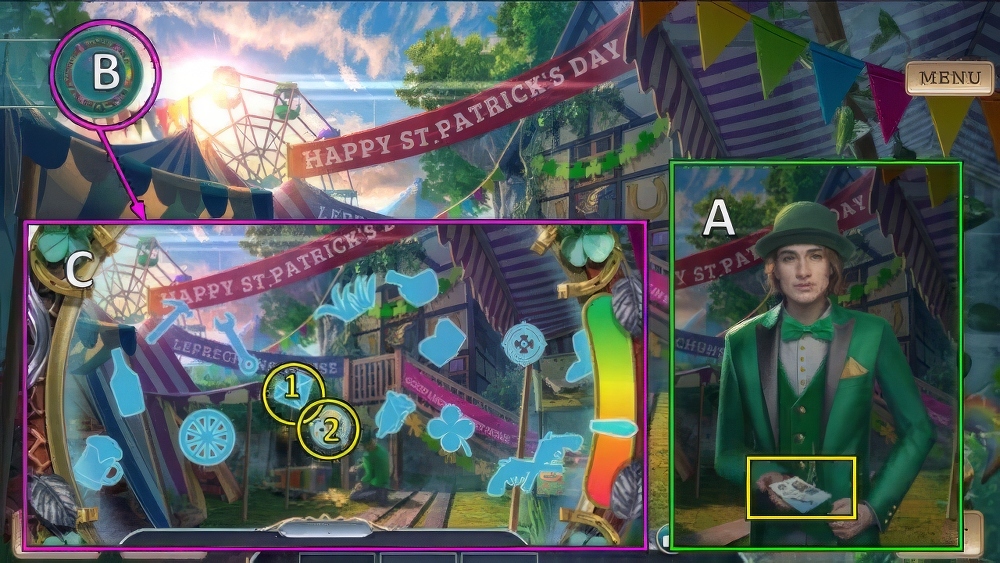
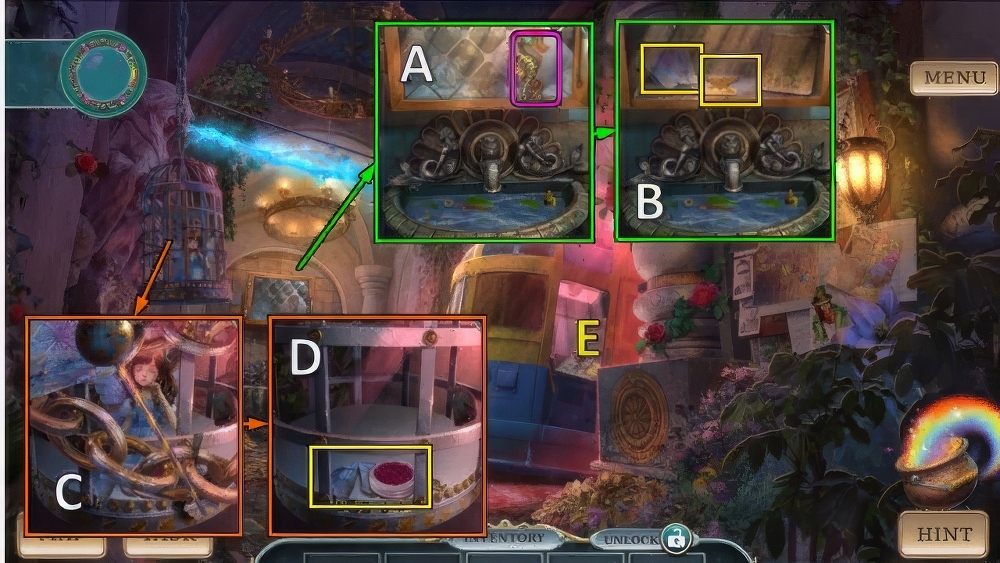
- Talk (A).
- Take RAINBOW AWARD (B).
- Place RAINBOW AWARD, take RUNE OF KNOWLEDGE, LILY’S FLOWER and WILL’S GOLD (C).
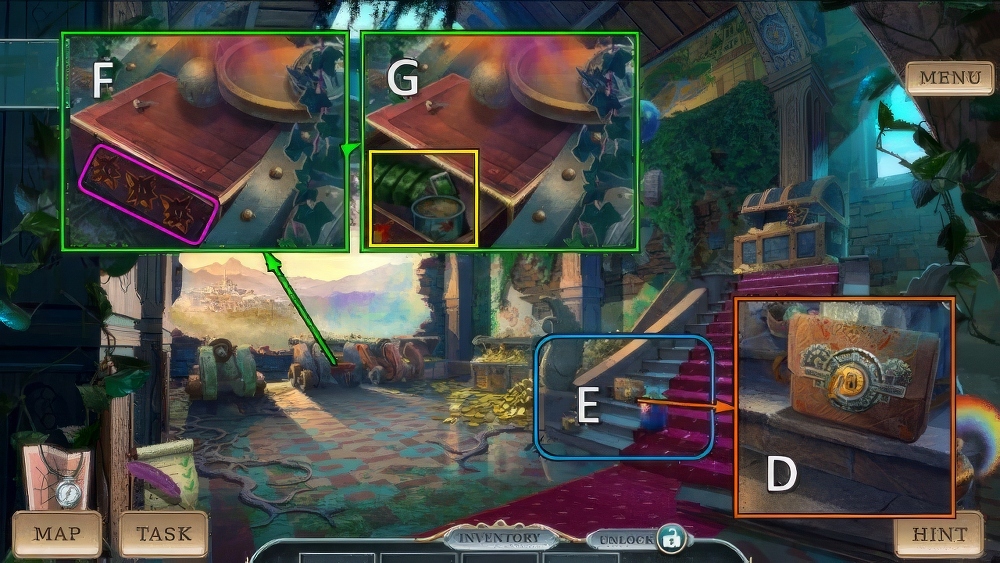
- Place WILL’S GOLD, take TOWN MINE FIGURINE, RUNE KEY and HARP STRING 1/3 (D).
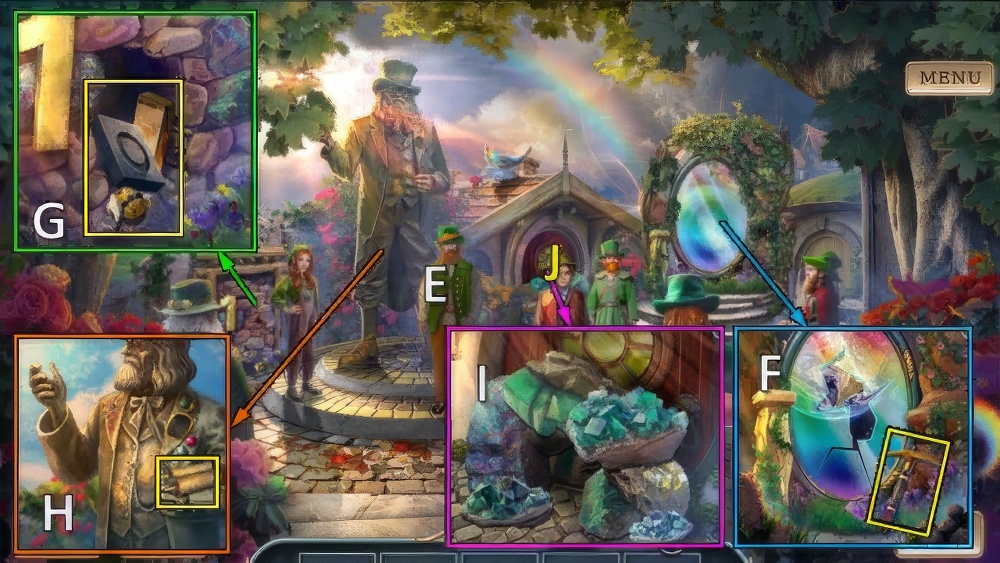
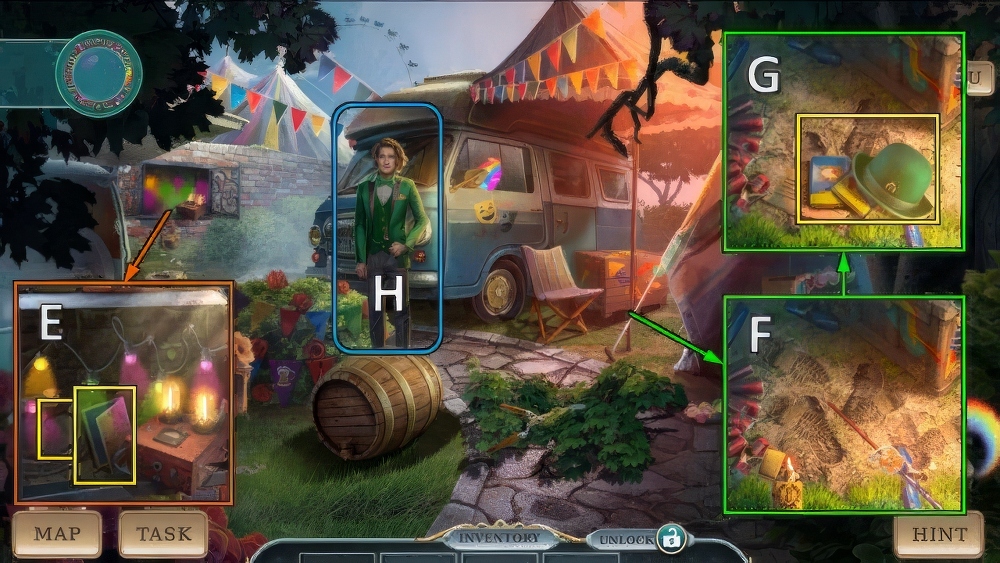
- Use RUNE OF KNOWLEDGE and RUNE KEY (E).
- Go (F).
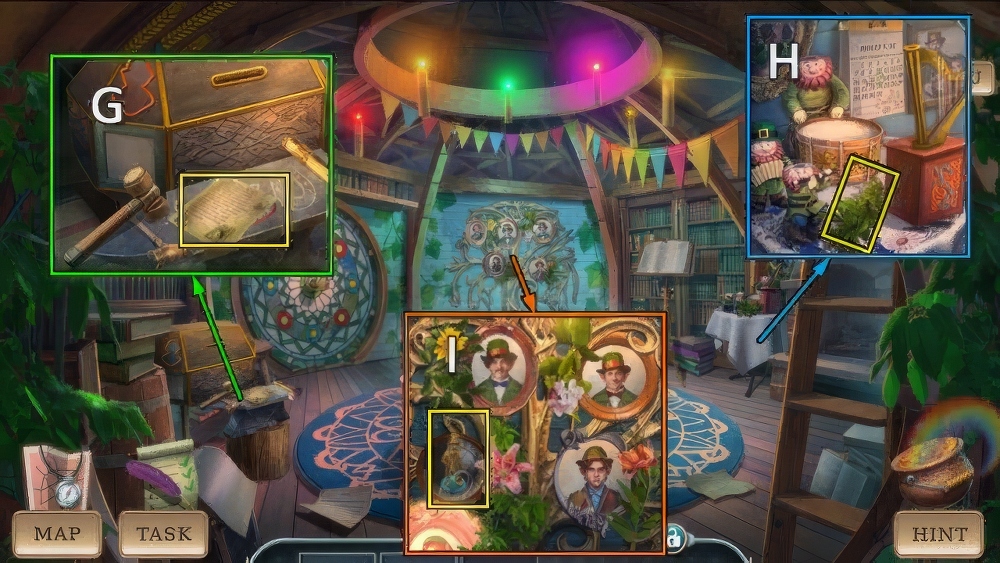
- Take note and HARP STRING 2/3 (G).
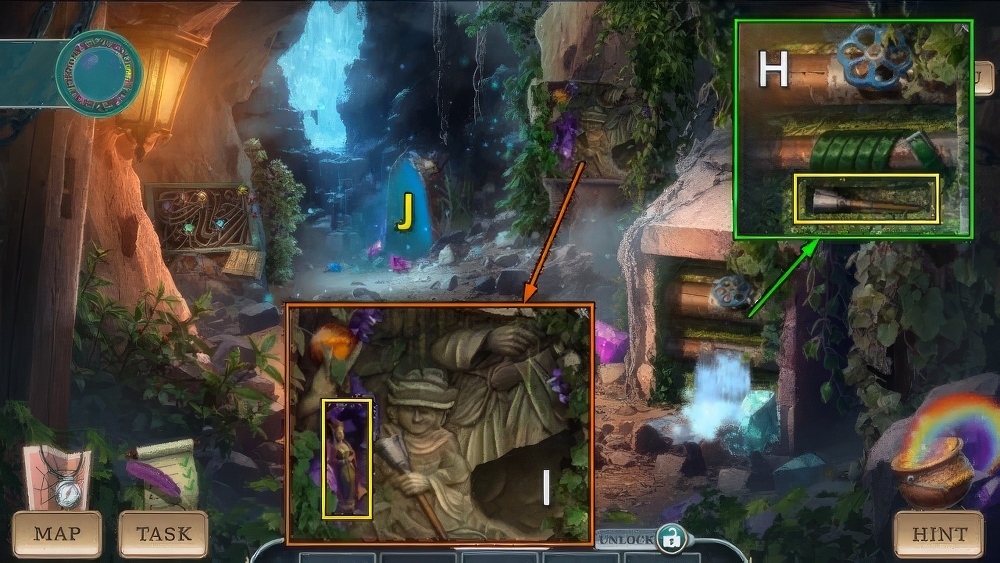
- Take PLANT STEM (H).
- Place LILY’S FLOWER and PLANT STEM, take HARP STRING 3/3 and FOUNDER’S FIGURINE (I).

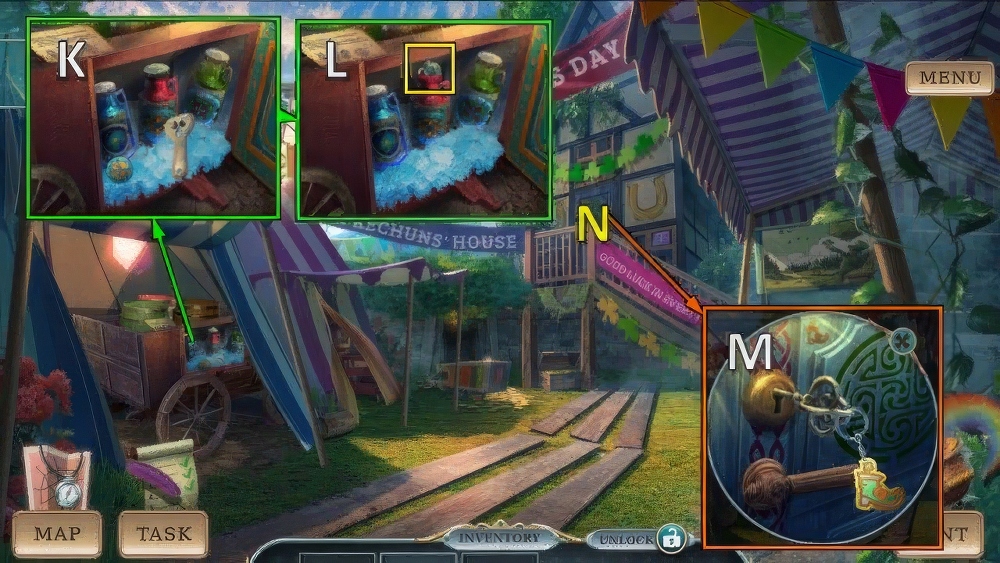
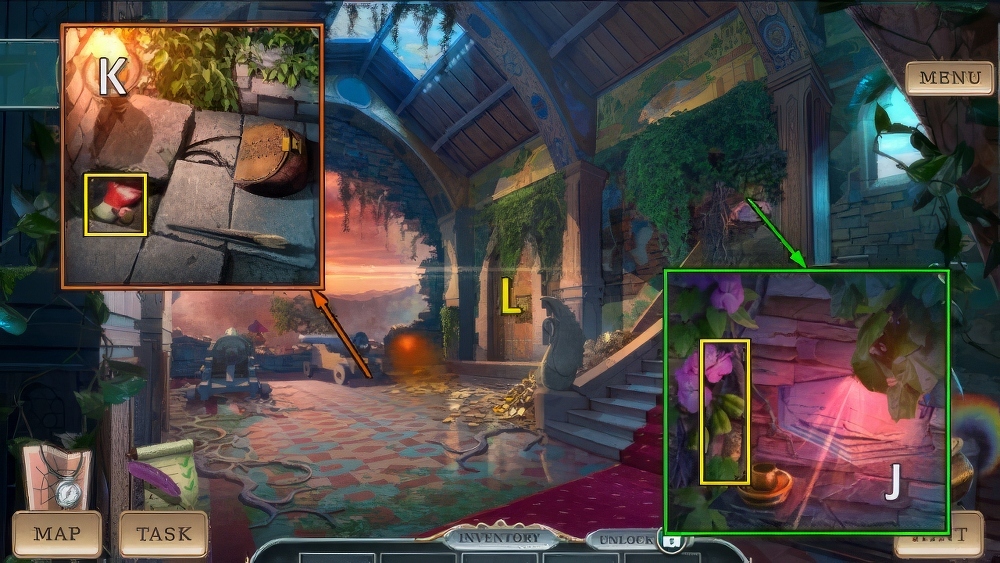
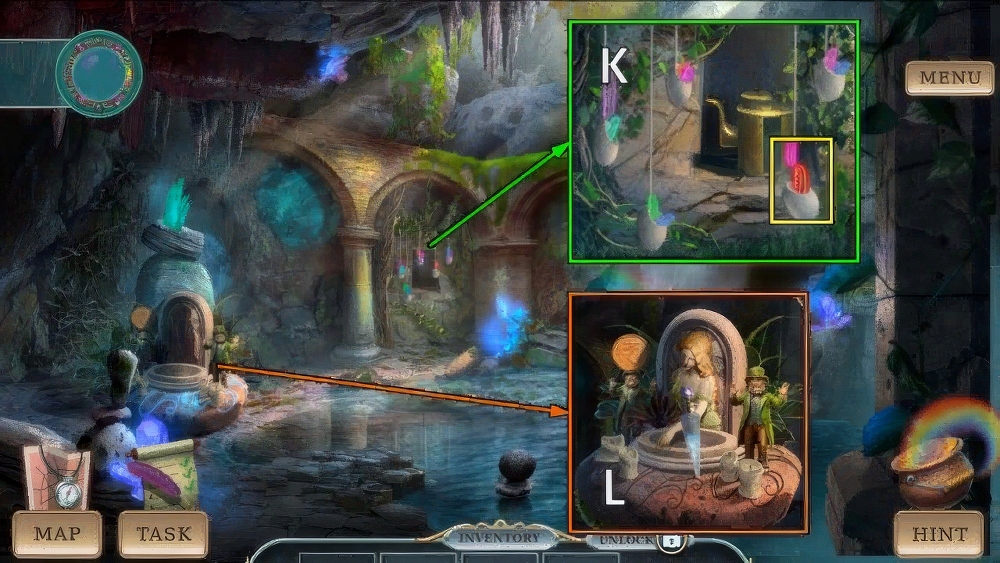
- Take LOCKED BOOK (J), place FOUNDER’S FIGURINE and TOWN MINE FIGURINE for puzzle (K).
- Receive HATS.
- Place HATS, take CLOVER INLAY and GOLDEN HORSESHOE (L).
- Walk down.

- CLOVER INLAY on LOCKED BOOK.
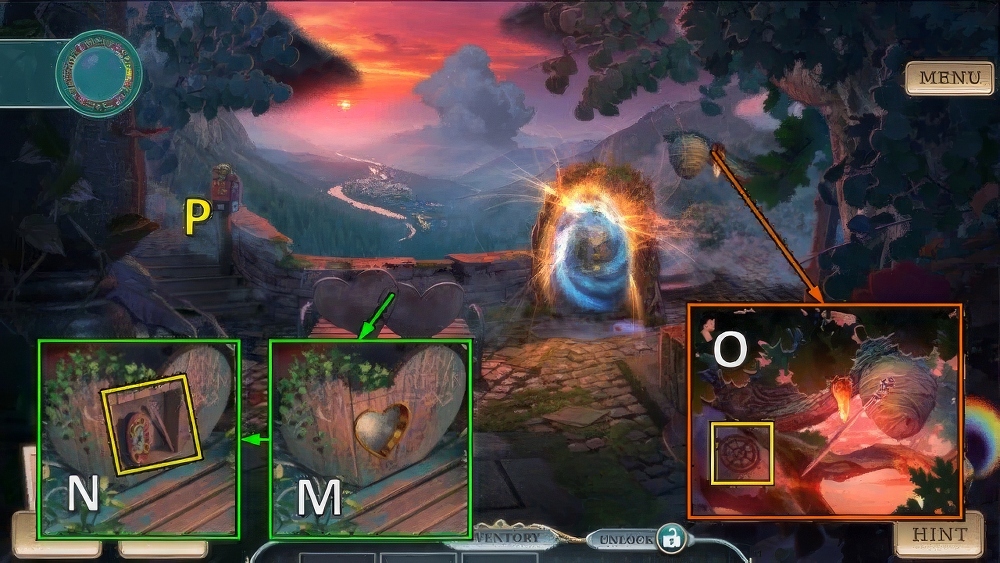
- Read page and swap 1-2 (M).
- Take LUCKY KNOT and BOOK OF FAIRY TALES.
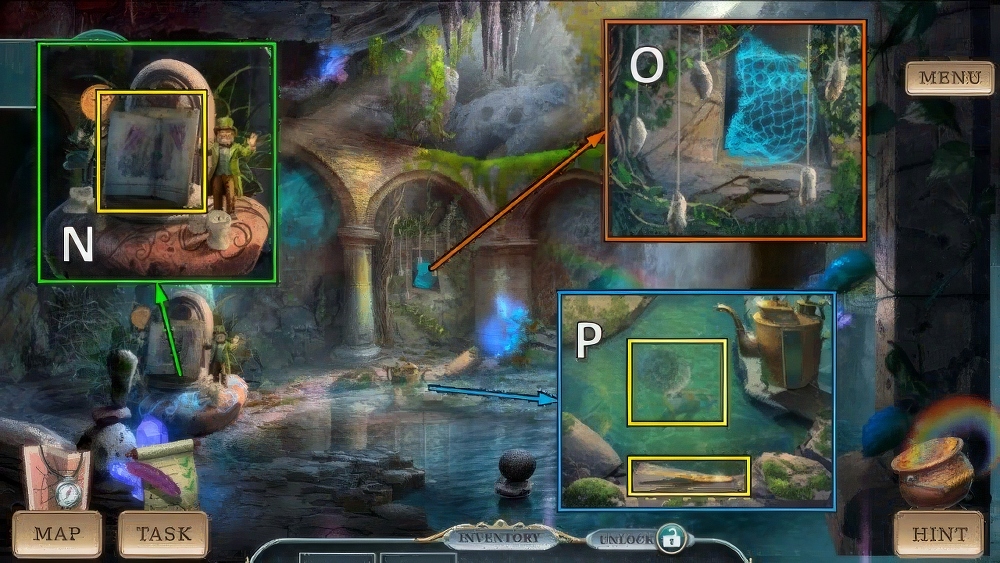
- Offer BOOK OF FAIRY TALES, talk for puzzle (N).
- Receive HARP CROWN.
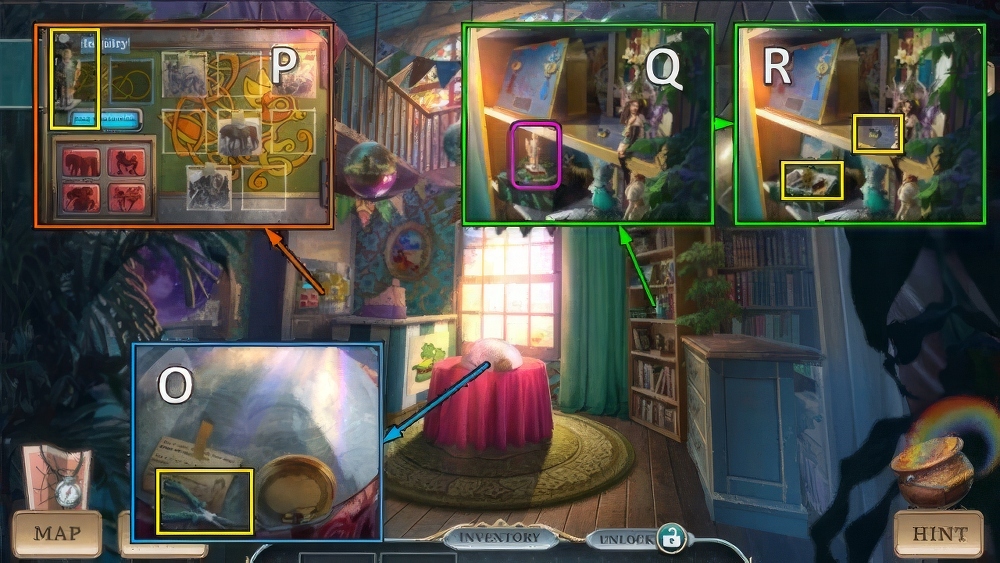
- Take TORN BOOT (O).
- Go (P).
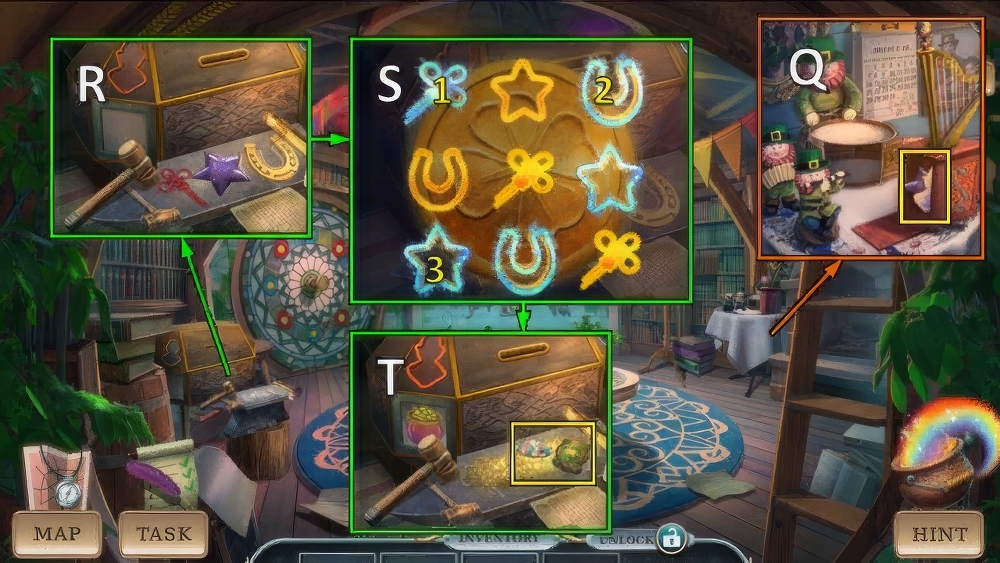
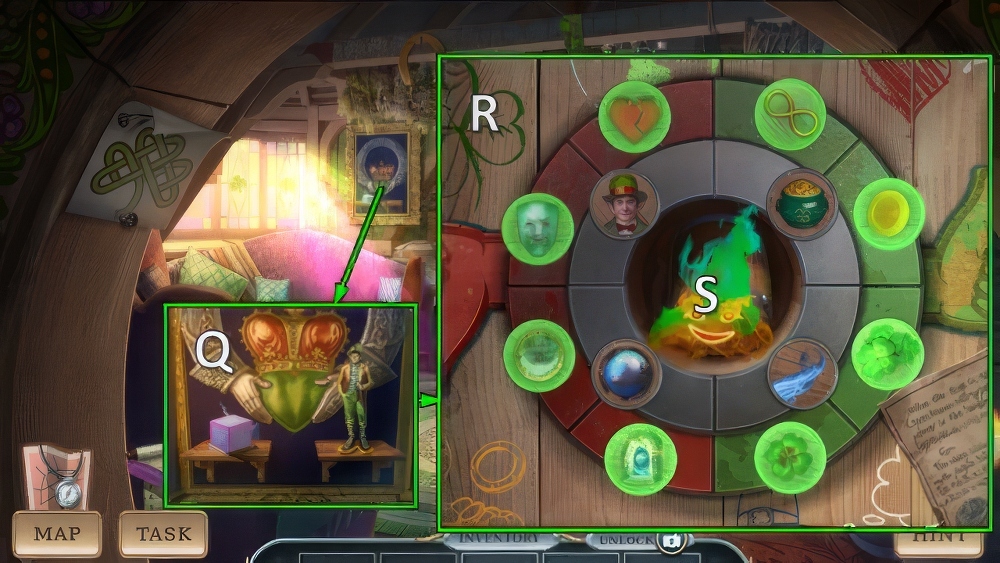
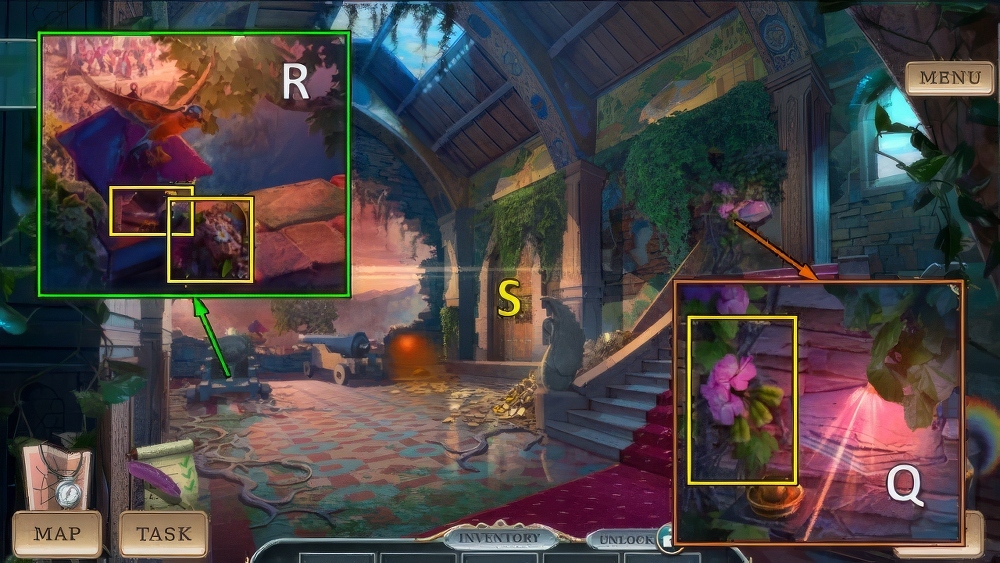
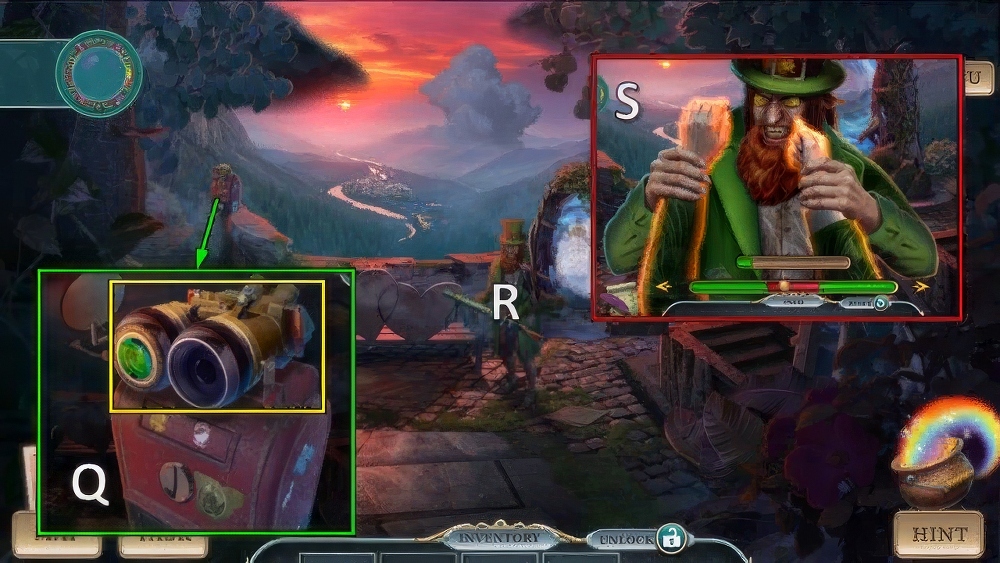
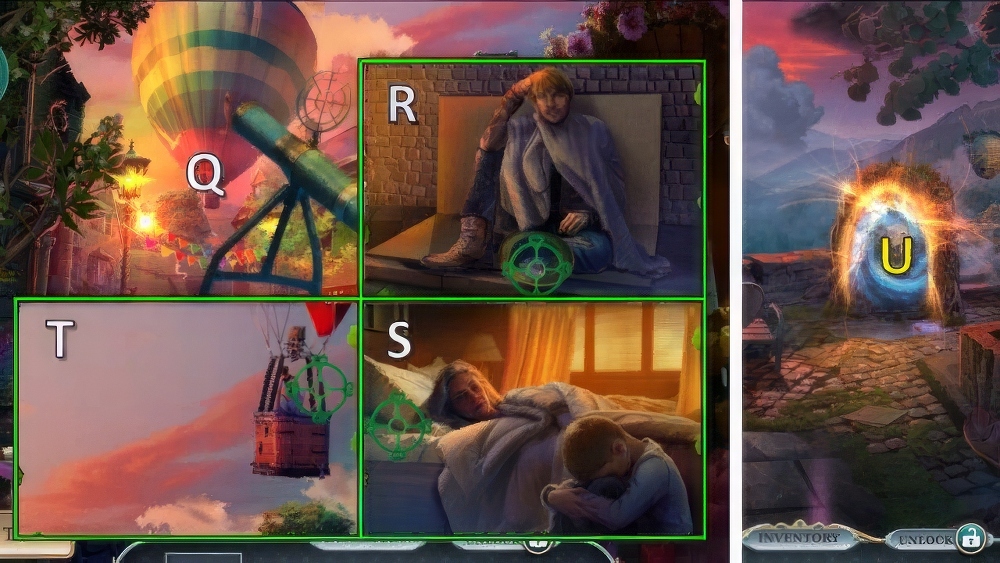
- Place HARP STRING and HARP CROWN, take PERSONAL TOKEN and LUCKY STAR (Q).
- Place LUCKY KNOT, LUCKY STAR and GOLDEN HORSESHOE (R).
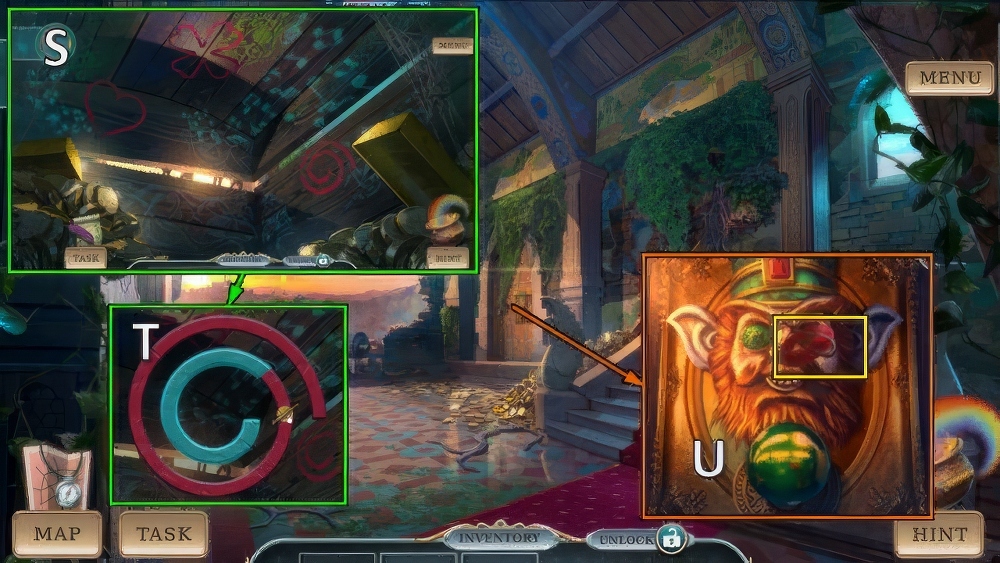
- Select 1-2-3 (S).
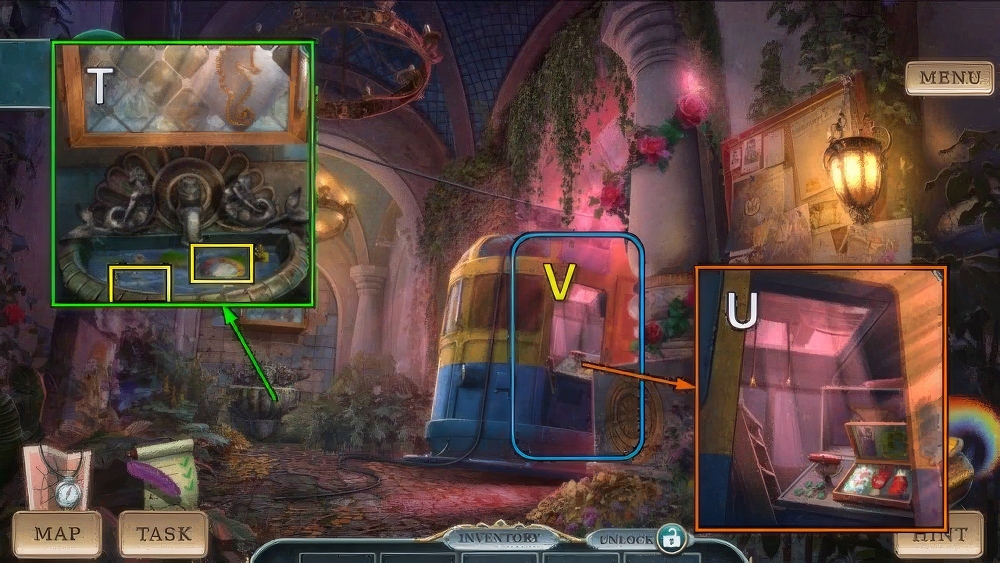
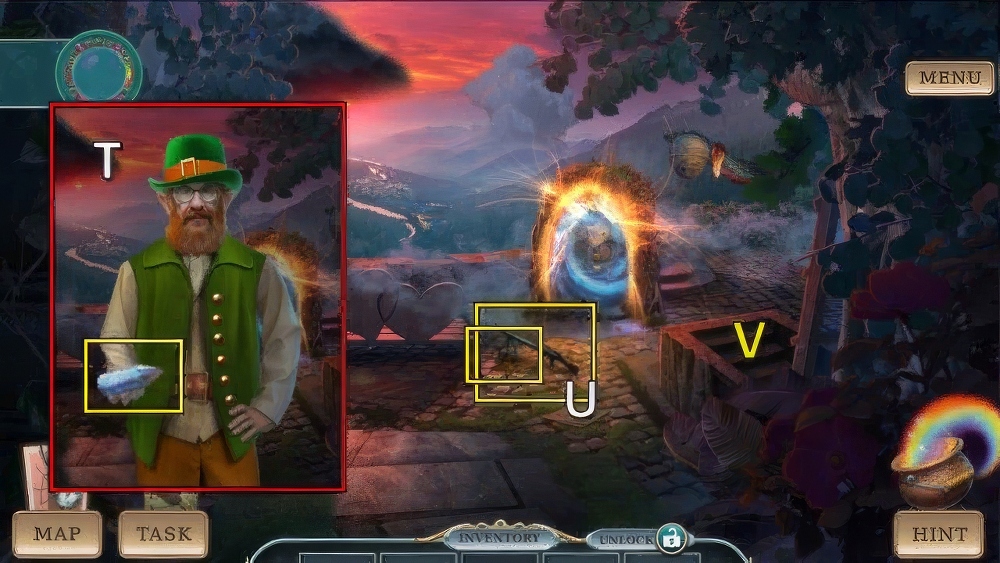
- Take CRUMBS OF JOY and BOOT BUCKLE (T).
- Walk down.

- Offer CRUMBS OF JOY (U), take EMERLALD and HEEL (V).
- BOOT BUCKLE and HEEL on TORN BOOT, take LUCKY BOOT.
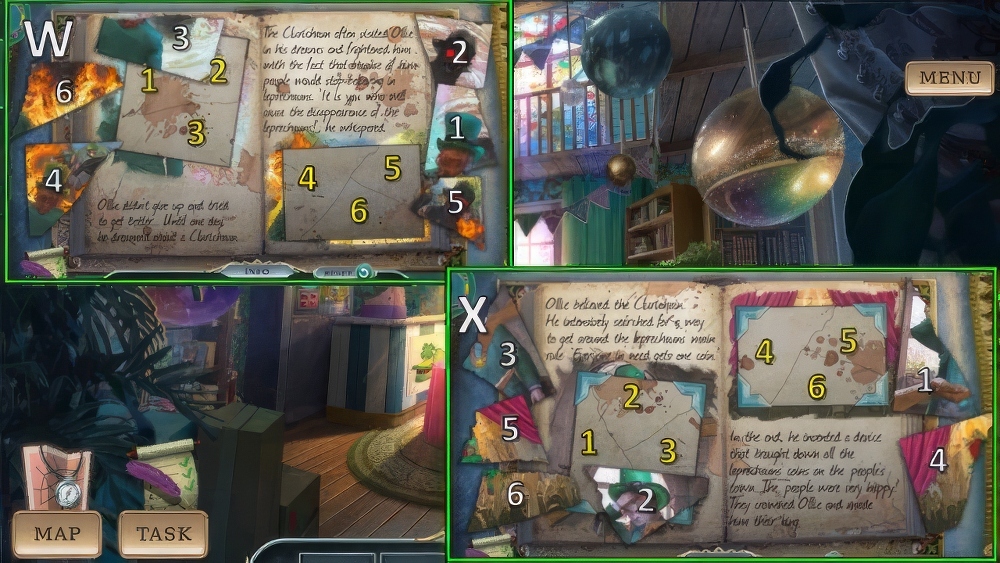
- Offer LUCKY BOOT (W).
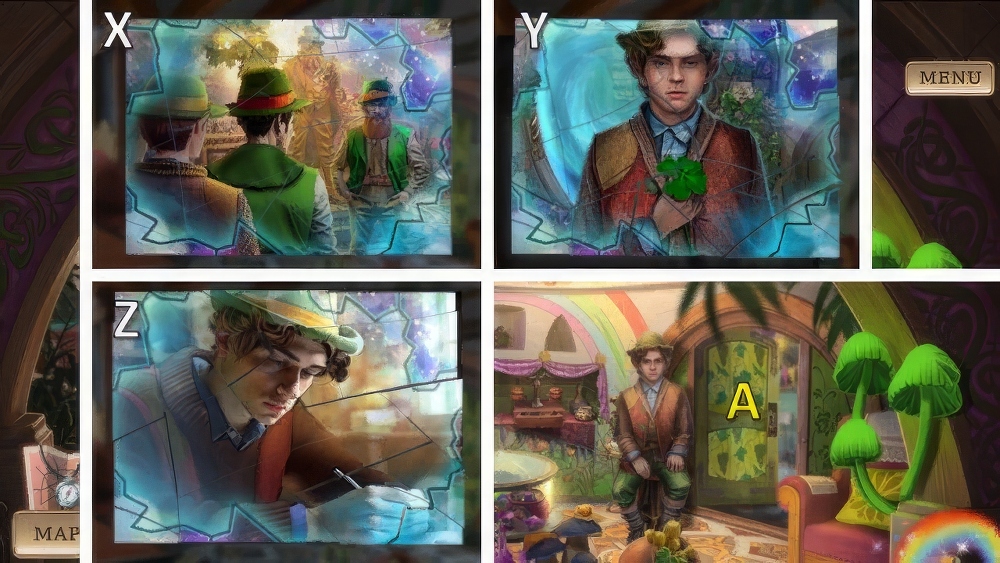
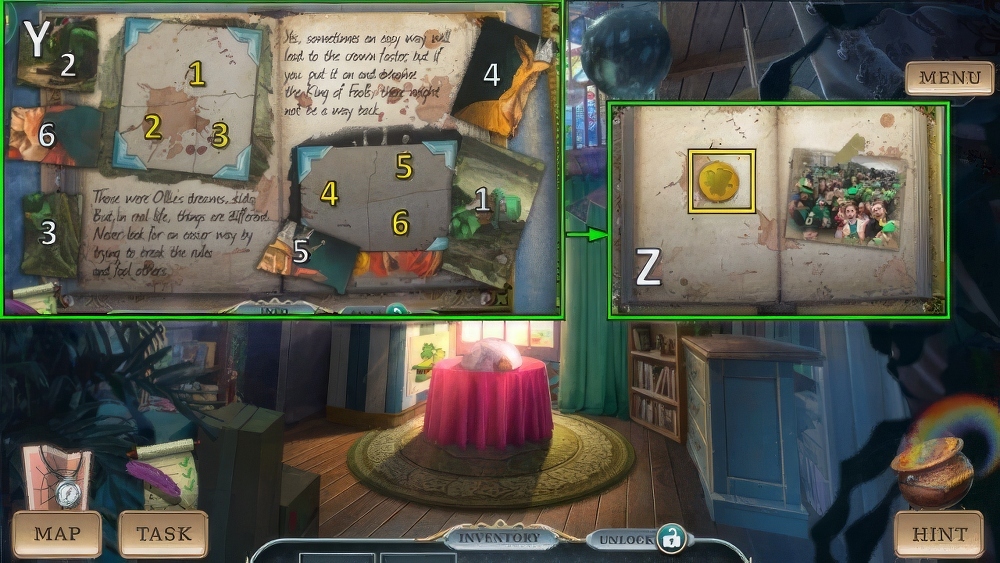
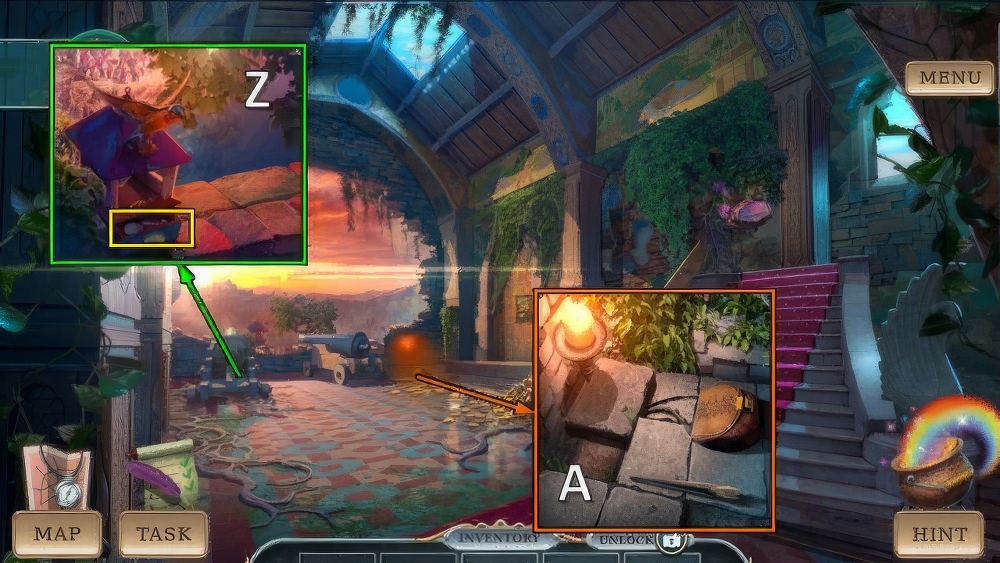
- Solution (X-Y-Z).
- Receive ENERGY CUBE and FAIRY POLLEN.
- Go (A).
- Place SILHOUETTE INLAY, take LAST COIN and PRINTED RUG (B).
- Read note (C).
- Go (D).
- Offer PRINTED RUG (E).
- Take PICKAXE (F).
- Use PICKAXE, take FERTILIZER, MOLD 1/2 and GOLD BAR (G).
- Take DONAL’S HUMAN PORTRAIT.
- Place EMERALD, FAIRY POLLEN and GOLD BAR for puzzle.
- Receive MAGICAL HELPER (H).
- Use MAGICAL HELPER (I).
- Go (J).

- Take DISTILLER PART (K).
- Take MISSING PORTAL PART (L).
- Place DISTILLER PART, take RESTORING ALCOHOL and DONAL’S PLANT (M).
- Walk down twice.

- Place DONAL’S PLANT and FERTILIZER, take DISSOLVING DROPS and MOLD 2/2 (N).
- Use DISSOLVING DROPS (O), take LIQUID GLASS and DONAL’S FIGURINE (P).
- Go to Donal’s Hut.
- Place ENERGY CUBE and DONAL’S FIGURINE (Q).
- Solution (R).
- Take MAGIC FLAME and BAR MUG (S).

- Place MOLD and MAGIC FLAME, take WIRE CLAMPS and REVIVING POWDER (T).
- Offer BAR MUG (U).
- Take BAR MUG (V).
- Walk down twice.

- Place WIRE CLAMPS, receive FLOWER OIL and MUSHROOM TOP (W).
- Place MUSHROOM TOP, take LEVITATION SPELL and SILK THREAD (X).
- Go to Central Square.
- RESTORING ALCOHOL and SILK THREAD on MISSING PORTAL PART, light all beads.
- Take LEY LINES NED.
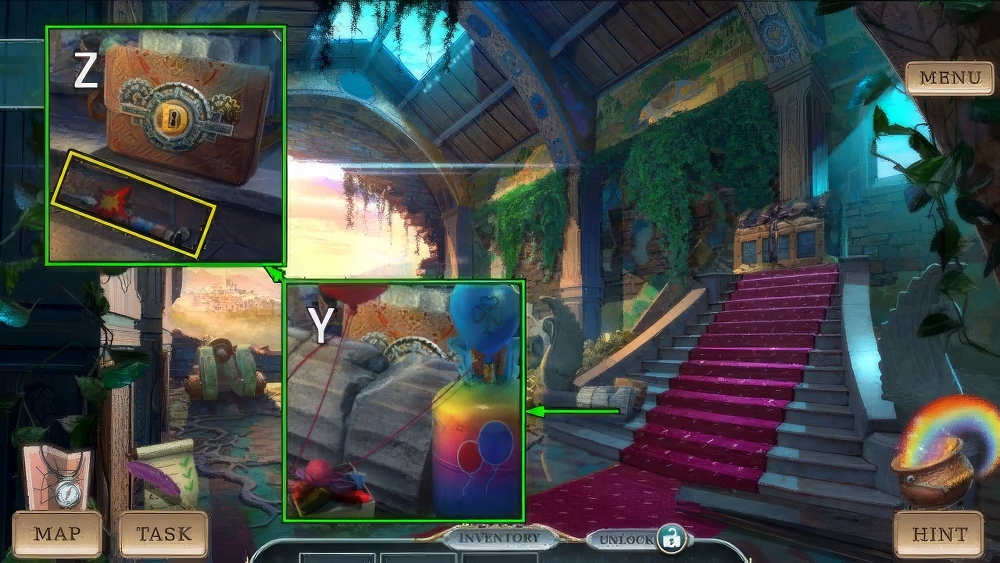
- Use LEY LINES NET, BAR MUG and LIQUID GLASS (Y).
- Play puzzle (Z).
- Receive magic lens and BAR MUG.

- Talk (A).
- Take JACKET FABRIC (B).
- JACKET FABRIC and REVIVING POWDER on DONAL’S HUMAN PORTRAIT, receive FIREFLY TRAP.
- Use magic lens (C).
- Select (D).

- Take CELTIC ROSE (E).
- Place CELTIC ROSE, take SPICE SET and GAME TOKEN (F).
- Use FLOWER OIL and GAME TOKEN, take CONNECTING WIRE and MOTHWING (G).
- LAST COIN and MOTHWING on LEVITATION SPELL.
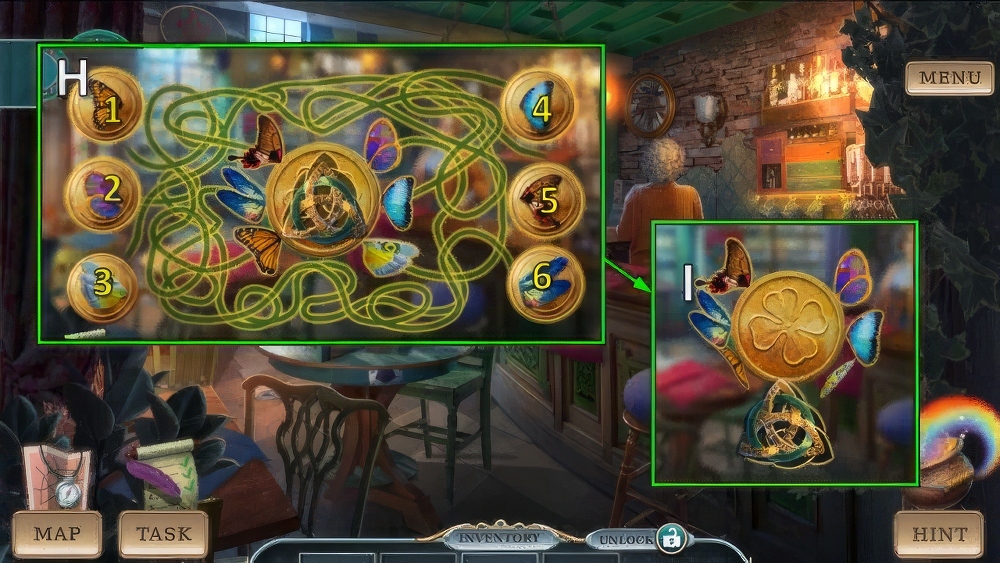
- Solution (H): (1-5)-(3-6)-(1-3)-(2-3)-(3-4).
- Take TRINITY KNOT and ENCHANTED COIN (I).
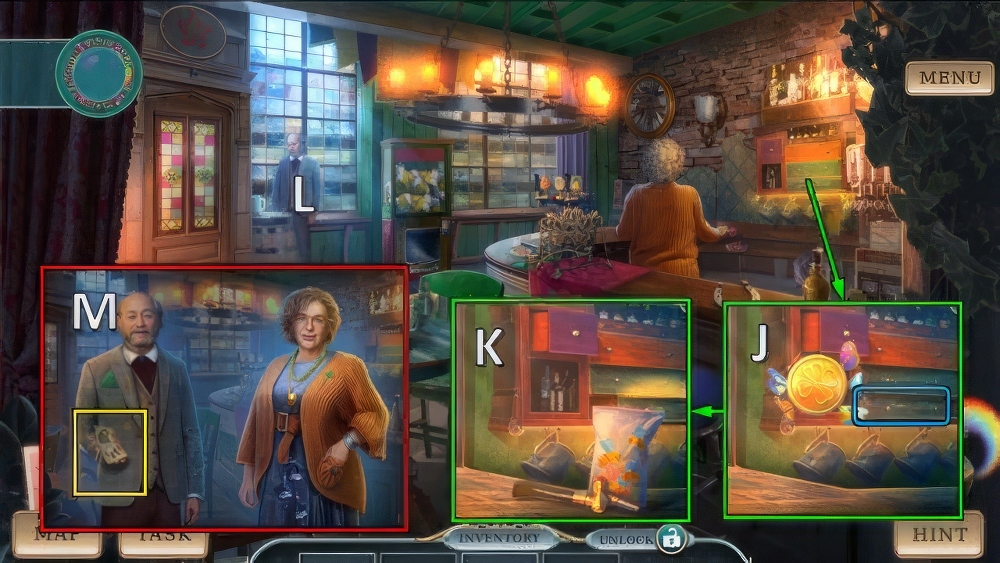
- Use ENCHANTED COIN, open (J).
- Receive INSECT FOOD and BEER TAP (K).
- Talk (L).
- Take BEER RECIPE (M).

- Place BEER TAP, BAR MUG, SPICE SET and BEER RECIPE, select 2-1-3 (N).
- Receive MUG OF BEER.
- Offer MUG OF BEER (O), receive BROKEN GARLAND.
- FESTIVAL ADDRESS and DONAL’S COIN from BROKEN GARLAND.
- Use FESTIVAL ADDRESS, go (P).
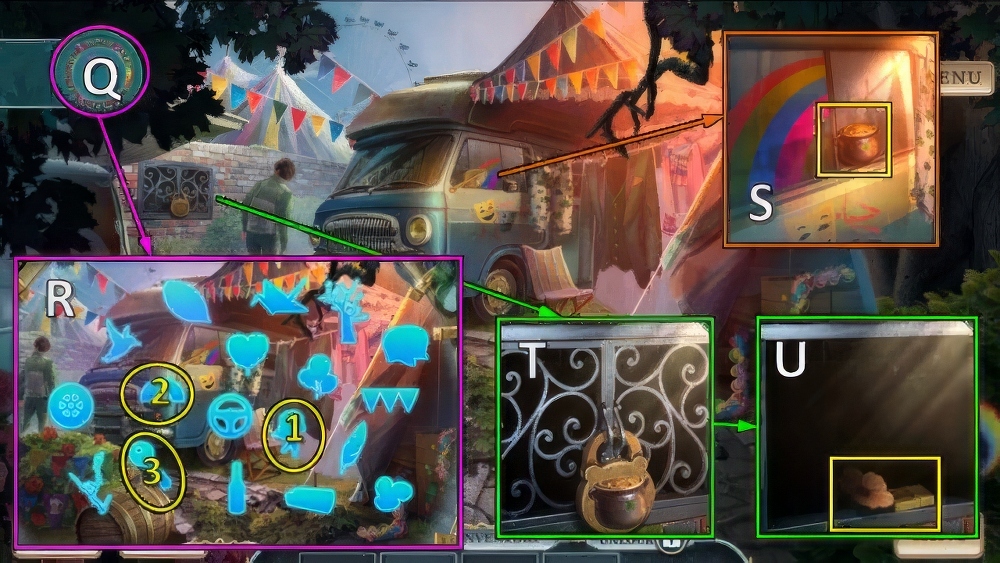
- Use magic lens (Q).
- Select 1-2-3 (R).
- Take FESTIVAL MAGNET (S).
- Place FESTIVAL MAGNET (T), take LANTERN LID and PRIZE LIGHTER (U).
- LANTERN LID and INSECT FOOD on FIREFLY TRAP, take LANTERN TRAP.
- Use LANTERN TRAP.
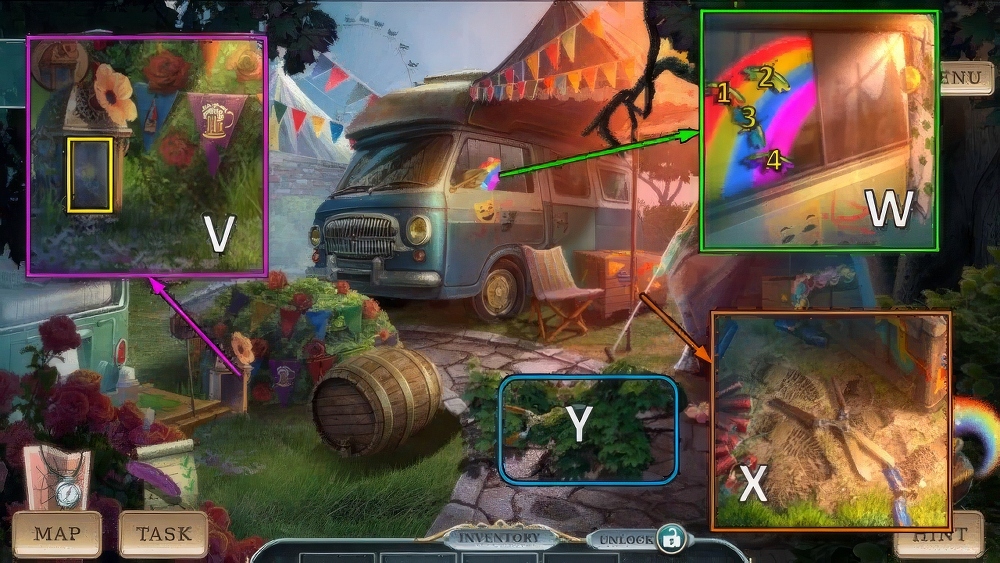
- Open, take HYPNOTIC FIREFLIES (V).
- Use HYPNOTIC FIREFLIES and DONAL’S COIN, solution (W): (1-3)-(2-4).
- Take GARDEN SHEARS (X).
- Use GARDEN SHEARS, play puzzle (Y).
- Receive EMERALD BARK BEETLE and DONAL’S COIN PURSE.
- Walk down.

- Use EMERALD BARK BEETLE (Z), take FLOWER BUTTON (A).
- Place FLOWER BUTTON (B), take LIGHTBULBS (C).
- Go (D).
- TRINITY KNOT, CONNECTING WIRE and LIGHTBULBS on BROKEN GARLAND, take LIGHT GARLAND.
- Place LIGHT GARLAND, take FESTIVAL MAP and STRAND OF HAIR (E).
- STRAND OF HAIR on DONAL’S COIN PURSE, take STICK OF REALITY.
- Use STICK OF REALITY and PRIZE LIGHTER (F), take LEPRECHAUN’S HAT and PACK OF FIRECRACKERS (G).
- Offer LEPRECHAUN’S HAT, play puzzle (H).
- Receive LEPRECHAUN’S HEAD.

- Use FESTIVAL MAP (I).
- Solution (J).
- Receive FOLDING CANE.
- Take DEWDROPS (K).

- Take MATCHBOX (L).
- Use PACK OF FIRECRACKERS and MATCHBOX, take AMULET LADYBUG and METAL RIVET 1/3 (M).
- AMULET LADYBUG on DONAL’S COIN PURSE, take FAST GROWING PELLETS and METAL RIVET 2/3.
- Take BARK FOR CRAFTS (N).
- Use FAST GROWING PELLETS, receive CRANK HANDLE and SHARP STONE (O).
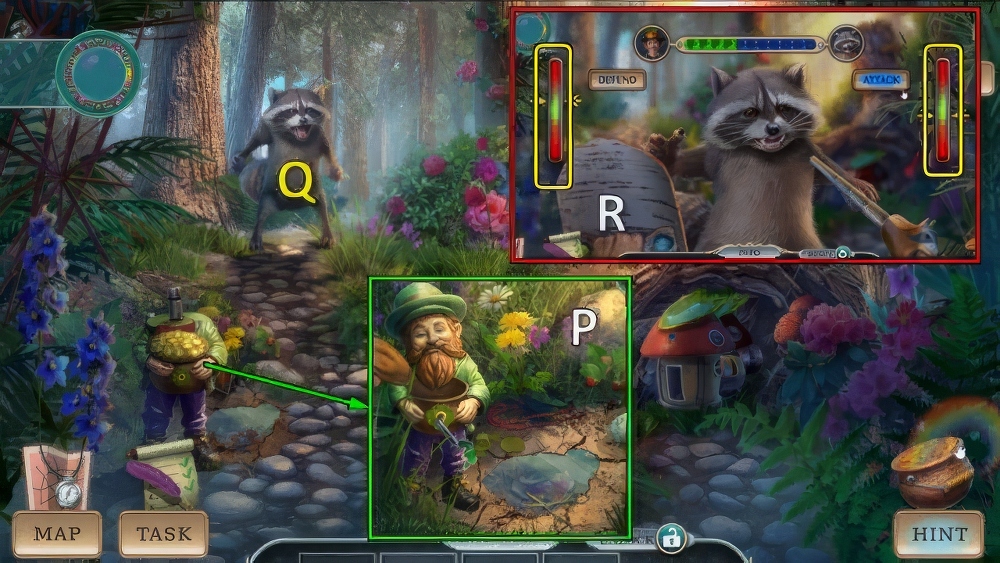
- Place LEPRECHAUN’S HEAD and CRANK HANDLE for puzzle (P), receive FEATHERS and METAL RIVET 3/3.
- FOLDING CANE, METAL RIVETS and SHARP STONE on BARK FOR CRAFTS, take IMPROVISED ARMOR.
- Use IMPROVISED ARMOR (Q).
- Defeat raccoon (R).
- Go (Q).

- Take CHILD’S BOW (S).
- Take STAG BEETLE (T).
- Use STAG BEETLE, take EMPTY SHELL (U).
- Walk down.

- Place DEWDROPS and EMPTY SHELL, take HORN FRAGMENTS and PINK PETALS (V).
- Offer PINK PETALS, take FAERIE SPINDLE (W).
- Go (X).
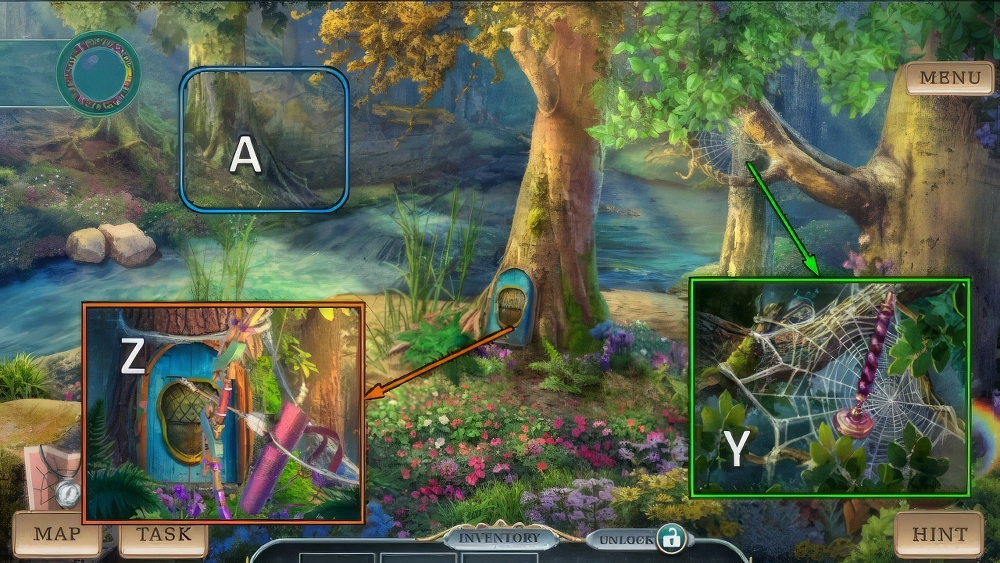
- Use FAERIE SPINDLE (Y), receive COILED SPIDERWEB and VINTAGE FOB.
- FEATHERS, HORN FRAGMENTS and COILED SPIDERWEB on CHILD’S BOW, take BOW WITH ARROWS.
- Use BOW WITH ARROWS (Z), receive BOW WITH TIED ROPES.
- Use BOW WITH TIED ROPES, play puzzle (A).

- Take TRAVEL HAIR DRYER (B).
- Take AMULET BEER (C).
- Place AMULET BEER (D), take EMBROIDERED HANDKERCHIEF (E).
- Walk down.
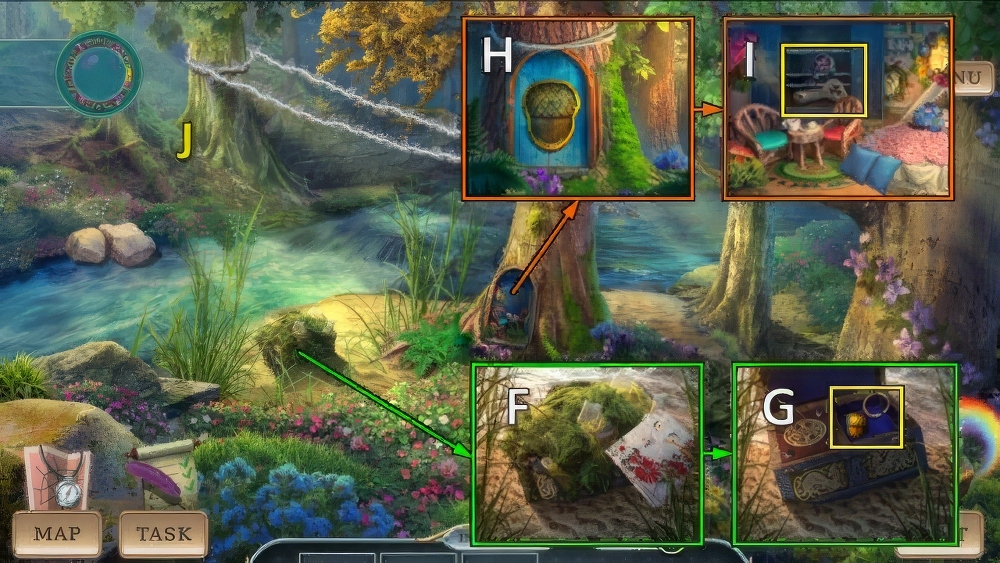
- Use EMBROIDERED HANDKERCHIEF and TRAVEL HAIR DRYER (F), take GOLDEN ACORN and BRACELET BASE (G).
- Place GOLDEN ACORN for puzzle (H), take OPENER and CHARM CREATURE 1/5 (I).
- Go (J).
- Place VINTAGE FOB and OPENER (K), take CHARM CREATURE 2/5 and SPARE KEY (L).
- Use SPARE KEY (M).
- Go (N).
- Take SMALL PLIERS (O).
- Take ST.
- PATRICK STATUETTE (P).
- Place ST.
- PATRICK STATUETTE (Q), take CHARM CREATURE 3/5, HAIRPIN and BATTERY (R).
- Walk down three times.

- Use HAIRPIN, take DISPERSING LENS and CHARM CREATURE 4/5 (S).
- Place DISPERSING LENS and BATTERY, take TOY HAMMER and CHARM CREATURE 5/5 (T).
- Go to Souvenir Store.

- SMALL PLIERS and CHARM CREATURE on BRACELET BASE, take MISTRESS’S BRACELET.
- Place MISTRESS’S BRACELET (U).
- Solution (V).
- Solution (W-X).
- Solution (Y).
- Take FESTIVAL TOKEN (Z).
- Take REQUIRED PARTS (A).
- Use magic lens (B).
- Select 1-2 (C).

- Talk (D), receive TROLLEY FRAME.
- Place FESTIVAL TOKEN and TOY HAMMER, hit leprechauns x5.
- Take GIFT SCOOP-NET and WINNING TICKET (E).
- Walk down.

- Take UNUSUAL SCREWDRIVER and SMALL WHEEL with GIFT SCOOP-NET (F).
- Use UNUSUAL SCREWDRIVER (G), take BRAKE PART and KNOT FOR MEMORY (H).
- Go to Souvenirs Store.
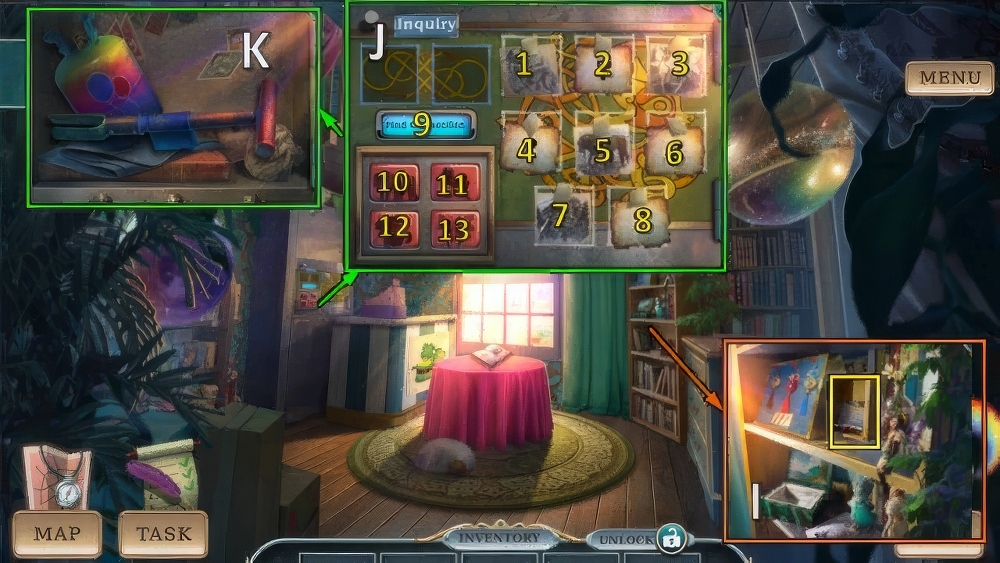
- Place WINNING TICKET and KNOT FOR MEMORY, take CODE RIDDLE and SOFT PENCIL (I).
- Place CODE MESSAGE (J).
- Solution: (1-2-9)-(5-8-9)-(7-4-9)-(3-6-9), 11-10-12-13.
- Take STEERING WHEEL and HELIUM CYLINDER (K).
- Walk down.

- SMALL WHEEL, TROLLEY FRAME, BRAKE PART and STEERING WHEEL on REQUIRED PARTS, take TROLLEY PARTS.
- Place TROLLEY PARTS, play puzzle (L).
- Receive SELF-MOVING TROLLEY.
- Place SELF-MOVING TROLLEY, go (L).

- Use magic lens (M).
- Select (N).
- Take GOLDEN SLAB (O).
- Take ELDER’S HAND (P).
- Place ELDER’S HAND, take ANCIENT RAMROD and PARCHMENT (Q).

- Place PARCHMENT and SOFT PENCIL, take MYSTERIOUS TEXT (R).
- Access MYSTERIOUS TEXT: solution (S).
- Receive NOTE WITH CODE.
- Place NOTE WITH CODE (T), select 1-2-3-4-5-6-7-8.
- Go (U).

- Take CANNONBALL (V).
- Take note, use CANNONBALL (W).
- Take SET OF BALLS and D KEY (X).
- Place HELIUM CYLINDER and SET OF BALLS (Y), take SPARK SYMBOL 1/3 and FILE (Z).
- Walk down.
- Use FILE, take VALVE (A).
- Replace VALVE, take SPARK SYMBOL 2/3 and SILVER GEAR (B).
- Go (C).
- Place D KEY and SILVER GEAR (D).
- Play puzzle (E), receive SPARK SYMBOL 3/3 and KING STATUETTE.
- Place SPARK SYMBOL (F), take GUN GREASE and DONAL’S BELT (G).
- Walk down.
- Place DONAL’S BELT, take ANCIENT TORCH (H).
- Place ANCIENT TORCH, take QUEEN STATUETTE and FALCONNIER (I).
- Go (J).

- Place KING STATUETTE and QUEEN STATUETTE (K), take CONTROL LEVER and POWDER OF VISIBILITY (L).
- ANCIENT RAMROD, CONTROL LEVER and GUN GREASE on GOLDEN SLAB, take NEUTRALIZING KIT.
- Place NEUTRALIZING KIT (M).

- Solution: 1-4 (N), 3-5-7 (O), 4-8-11-12 (P).
- Take DONAL’S FLUTE (Q).
- Talk (R).
- Use DONAL’S FLUTE (S).
- Trace shapes (T).
- Take HOOK ON FISHING LINE (U).

- Move candle, use HOOK ON FISHING LINE (V).
- Take CANDLESTICK and WILDLIFE SANCTUARY MAP (W).
- Move, take BRUSH FOR TUBE (X).
- Place FALCONNIER and CANDLESTICK, take BURNING CANDLE (Y).

- Place BURNING CANDLE, take EMERALD EYE (Z).
- Place EMERALD EYE for puzzle (A).
- Go (B).

- Use magic lens (C).
- Select 1-2 (D).
- Take PEAK PART (E).
- Take SLICE OF LEMON (F).

- Take WILDLIFE SANCTUARY MAINTENANCE, use SLICE OF LEMON and BRUSH FOR TUBE (G).
- Take MERMAN VALVE and CALL BIRD (H).
- Place MERMAN VALVE, take BOTTLE OF WATER and GLOWING FASTENER 1/3 (I).
- Walk down.
- Use BOTTLE OF WATER, take DONAL’S CANE (J).
- Use DONAL’S CANE, take COPPER SCREW and WORKING GLOVE (K).
- Go (L).

- PEEK PART, BOTTLE OF WATER and COPPER SCREW on POWDER OF VISIBILITY, take ESSENCE OF ENLIGHTENMENT.
- Use ESSENCE OF ENLIGHTENMENT (M).
- Play puzzle (N), receive MASTER KEY.
- Use MASTER KEY (O), take STEEL BIRD FEATHER and GLOWING FASTENER 2/3 (P).
- Walk down.
- Take SOLID IVY and SEED MIXTURE with STEEL BIRD FEATHER (Q).
- Place SEED MIXTURE and CALL BIRD, take SWALLOW GIFTS and MALLET (R).
- Go (S).
- Use SWALLOW GIFTS, take MAGIC MIRROR and GLOWING FASTENER 3/3 (T).
- Open WILDLIFE SANCTUARY MAINTENANCE, move note.
- Place WILDLIFE SANCTUARY MAP, WORKING GLOVE, SOLID IVY and GLOWING FASTENER.
- Take REPAIR SET.
- Place REPAIR SET (U).
- Play puzzle, go (V).

- Take GILDED RUNE 1/2 (W).
- Take VILLAGE PHOTO (X).
- Take WILDLIFE SANCTUARY TOKEN (Y).
- Use WILDLIFE SANCTUARY TOKEN, take FLEXIBLE TUBE and AMULET SEA HORSE (Z).
- Walk down.
- Place AMULET SEA HORSE (A), take GILDED RUNE 2/2 and FREEZING SNOWFLAKE (B).
- Use FREEZING SNOWFLAKE and MALLET (C), take FAIRY POLLEN and TINY WINGS (D).
- Go (E).

- GILDED RUNE, VILLAGE PHOTO and TINY WINGS on MAGIC MIRROR, take GUIDING SPELL.
- Use FAIRY POLLEN and GUIDING SPELL (F).
- Solution (G): I-Jx2-Kx3-Lx3.
- Go (M).
- Take PAGES STUCK TOGETHER (N).
- Take GLOWING NET (O).
- Take ANTIQUE TWEEZERS, take WATER THROWER and FLAT AMMONITE with GLOWING NET (P).
- Walk down.
- Use FLAT AMMONITE, take BROKEN DEVICE and MAGNIFYING LENS (Q).
- ANTIQUE TWEEZERS and MAGNIFYING LENS on PAGES STUCK TOGETHER, take LEGEND PROOF.
- Offer LEGEND PROOF, use WATER THROWER (R).
- Defeat Donal (S).
- Take STONE OF TRUTH (T).
- Take DONAL’S CANNON and PILE OF COINS (U).
- Go (V).

- Use STONE OF TRUTH, take EPHEMERAL WHIRLWIND and FOCUS DROPS (W).
- Use FLEXIBLE TUBE and EPHEMERAL WHIRLWIND, take MISTY ECOSYSTEM and BARREL WITH SPOON (X).
- Use MISTY ECOSYSTEM, take BRANCH OF SILK (Y).
- Go to Ancient Hall.
- Use BRANCH OF SILK, take HUMAN DOLLAR and DONAL’S KEY (Z).
- Use DONAL’S KEY (A).

- Solution (B-C-D-E).
- Take SELF-IGNITING PIPE and GODDESS OF LUCK (F).
- Go to Rockdeck Mountain.

- Use SELF-IGNITING PIPE and BARREL WITH SPOON, take AMBER RESIN (G).
- AMBER RESIN, MAGNIFYING LENS and FOCUS DROPS on BROKEN DEVICE, take SEARCHER OF BAD LUCK.
- Place SEARCHER OF BAD LUCK (H).
- Play puzzle, go (I).
- Offer HUMAN DOLLAR, take BABY CATERPILLAR (J).
- Go to Forgotten Cave.
- Place BABY CATERPILLAR, take GLOWING MILK (K).
- Use GLOWING MILK and GODDESS OF LUCK for puzzle (L), receive HEART IN LOVE.
- Walk down.
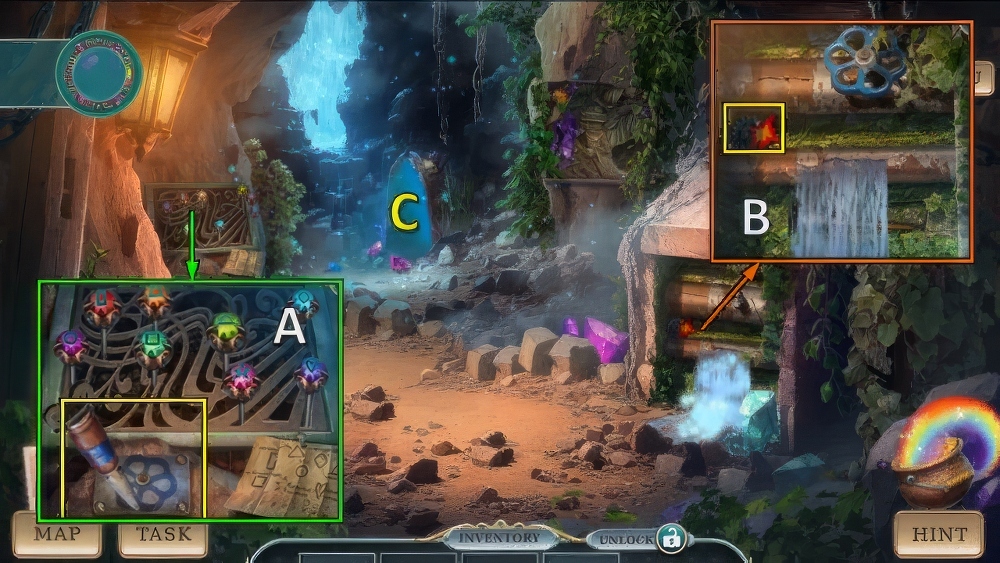
- Place HEART IN LOVE (M), take COIN DRUM and DIAMOND FILE (N).
- Use DIAMOND FILE, take AIM LIMITER (O).
- Go (P).
- PILE OF COINS, AIM LIMITER and COIN DRUM on DONAL’S CANNON, take COIN CANNON.
- Use COIN CANNON (Q).
- Solution (R-S-T).
- Go (U).
- Walkthrough Bonus Chapter, at the link below.


