Magic City Detective 5: The Carnival Begins – The game’s walkthrough begins with you joining forces with Elizabeth, a half-blood wizard, and trying to find out if she can be trusted. In this city painted in solemn colors, your mystery-solving skills will be put to a real test. New Orleans is trembling and Mardi Gras celebrations are in full swing. Elizabeth is ready to help, but are her intentions so pure. The human and Other worlds are frozen in anticipation of grand events that could turn everything upside down. You, the magical detective, are at the center of all these events. If you can not pass any of the puzzles or do not know where the items are, on our site you can watch the walkthrough of the game Magic City Detective 5: The Carnival Begins, and complete the investigation.
Magic City Detective 5: The Carnival Begins – Walkthrough
Here you can see the full walkthrough of Magic City Detective 5: The Carnival Begins, namely for all chapters, including bonus chapter, in pictures.

- Take CARNIVAL MASK, BALLON and CARNIVAL LANTERNS 1/3 (A).
- Use CARNIVAL MASK on the magic pollen.
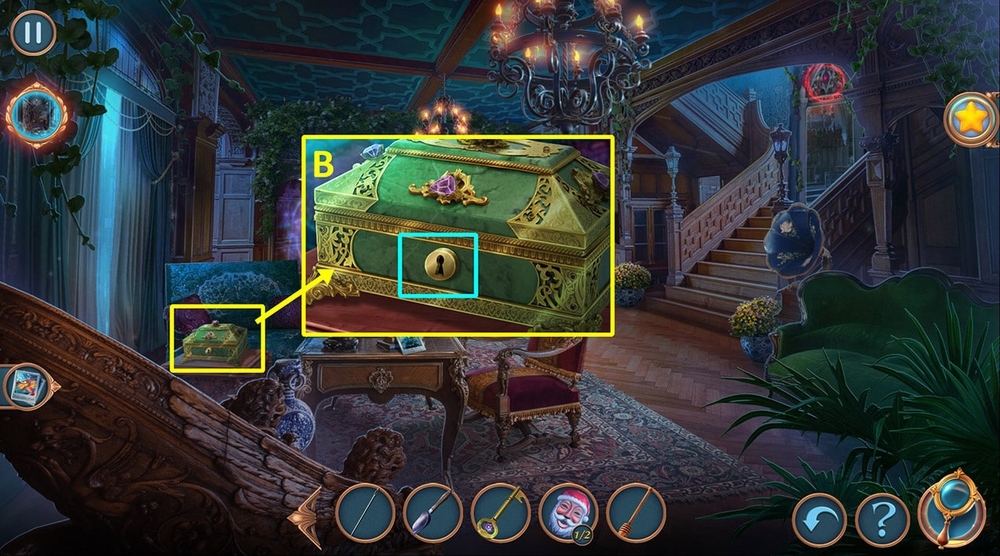
- Take TASK BOOK, CHAIN and CARNIVAL LANTERNS 2/3 (B).
- Take MAGIC SPHERE, use CHAIN on the swing.
- Take CARNIVAL LANTERNS 3/3, BATTERIES 1/2 and POUCH (C).
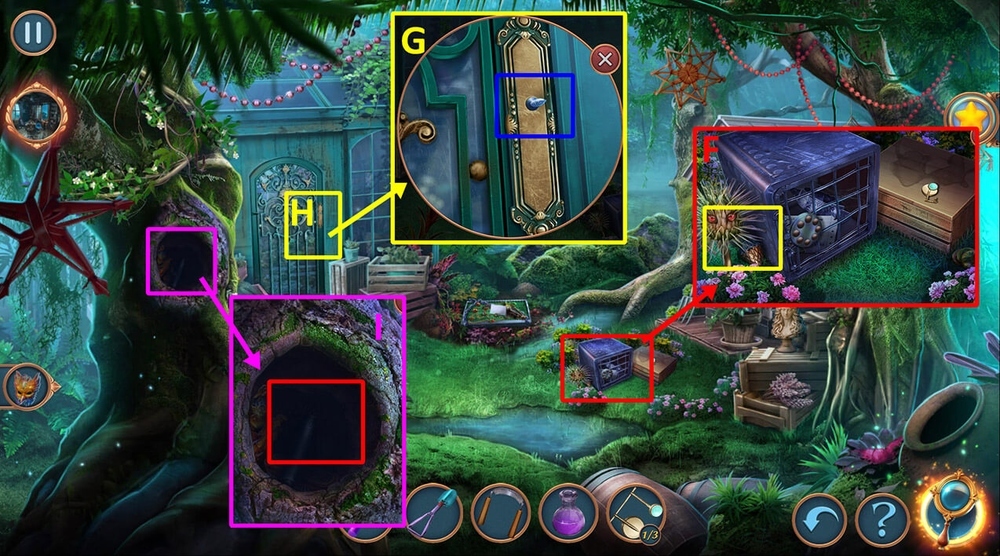
- Use CARNIVAL LANTERNS 3/3 on the balcony (D).

- Play puzzle, earn DOOR RING (E).
- Use DOOR RING on the door (F).
- Go to the Guardian’s house.

- Talk to Clarisse, select the first option, earn CLARISSE’S PURSE (G)
- Go to the Library.

- Play puzzle, earn BOOK (H).
- Take RIPPER and ARTIFACT PARTS 1/3 (I).
- Use BOOK on the bookshelf, take CORKSCREW (J).

- Use CORKSCREW on the cork, take SOLVENT (K).
- Open CLARISSE’S PURSE, take SIGNET RING (L).
- Go back.

- Take PIPE, UMBRELLA and INSTRUCTION, read INSTRUCTION (M).
- Take BROKEN MAGIC KEY and MAGIC DUST DESCRIPTION, read MAGIC DUST DESCRIPTION, use POUCH and CARNIVAL MASK on THE POWDER, get MAGIC DUST (N).
- Use UMBRELLA on the armchair, take NOTE, use SIGNET RING on the suitcase, take HAIRPIN, read NOTE (O).

- Use SOLVENT on the glue, take LATCH 1/2, use HAIRPIN on the floor, take KEY PIECE (P).
- Use BALLON on PIPE (Q).
- Use KEY PIECE and MAGIC DUST on BROKEN MAGIC KEY, take MAGIC KEY and MAGIC DUST (R).
- Use MAGIC KEY on the door lock (S).

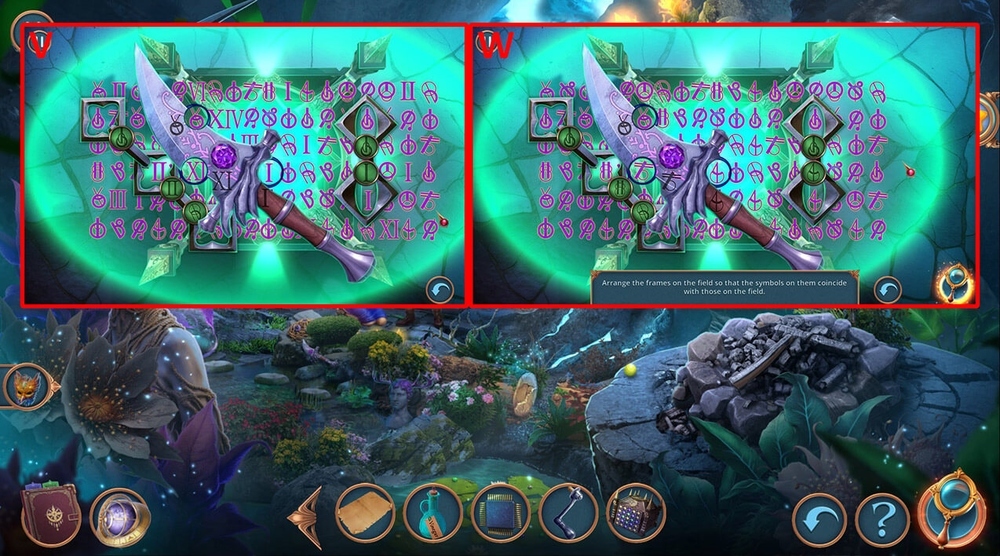
- Easy solution: A-C-G-I-1 (T).
- Hard solution: G-H-H-C-J-K-K-F-1 (U).
- Go to the Artifact Storage (V).

- Take LOCK PICKS 1/2 and GEAR (W).
- Use CARNIVAL MASK on laser defense (X).
- Easy solution: 4-A, 2-B, 1-C, 4-D, 2-E, 3-F, 1-G, 5 (Y).
- Hard solution: 4-A, 1-B, 3-C, 2-D, 1-E, 3-F, 1-G, 4-H, 2-I, 3-J, 1-K, 5 (Z).
- Take CARNIVAL MASK and VINTAGE LEATHER BRACELET (A).

- Use GEAR and VINTAGE LEATHER BRACELET on the mechanism, take DUCT TAPE (B).
- Use MAGIC DUST and DUCT TAPE on the fingerprint, take THIEF’S FINGERPRINTS and DUCT TAPE (C).
- Use DUCT TAPE on PIPE (D).
- Go to the Magic Neighborhood.

- Play puzzle, earn CUFFLINC (E).
- Use CUFFLINC and RIPPER on the bag, take DETECTIVE’S AMULET, NEWSPAPERS and MALLET, read NEWSPAPERS (F).
- Use DETECTIVE’S AMULET on the door (G).
- Go to the Magical Investigations Agency.

- Take ENVELOPE, open it, read LETTER, take BATTERIES 2/2 (H).
- Use CARNIVAL MASK on the potted plant, take LOCK PINS 2/2, use MALLET on the stone, take LATCH 2/2, NOTE and USB RECEIVER, read NOTE (I).
- Go to the Library.

- Use LATCH 2/2 on the toolbox, take ARTIFACT PARTS 2/3 and HANDLE (J).
- Use HANDLE on the box, take COMB (K).
- Go to the Magical Investigations Agency.

- Use LOCK PINS 2/2 on the drawer lock (L).
- Play puzzle, earn PASSWORD (M).
- Take FUNNELS 1/2, use THIEF’S FINGERPRINTS and PASSWORD on the computer (N).

- Take HINT, read HINT, use BATTERIES 2/2 and USB RECEIVER on the mouse, take COMPUTER MOUSE (O).
- Use COMPUTER MOUSE on the computer (P).
- Play puzzle, earn CDs (Q)

- Talk to Clarisse, select the first option (R).
- Go to the Guardian’s house.
- Use CDs on the nightstand, take SILK NAPKIN (S).
- Use SILK NAPKIN on the lamp, take LIGHT BULB (T).
- Go to the Artifact Storage.

- Use LIGHT BULB on the lamp, take BIRD AMULET (U).
- Use BIRD AMULET on the cage, take SPRING and FUNNELS 2/2 (V).
- Use FUNNELS 2/2 on PIPE, take STETHOSCOPE (W).
- Go to the Magical Investigations Agency.

- Use STETHOSCOPE on the safe (X).
- Easy solution: A-Bx2-B-Cx3-Dx3-Ex3-F-Gx3-H-Ix3-Gx3-Kx3-L-Mx3-Nx3-Ox3-Px3-Q (Y).
- Hard solution: A-B-Cx3-Dx2-Ex3-F-A-Bx2-Dx2-Gx3-H-Gx3-Kx3-G-L-Mx3-C-I-Nx3-L.
- Ox3-Px3-Ex3-Q-H-G (Z).
- Take GOLD COINS, CARTRIDGE and MARDI GRAS FILES, read MARDI GRAS FILES (A).

- Use CARTRIDGE on the printer, take SYLVANUS’S PHOTO (B).
- Go back.

- Use GOLD COINS on the seller, take MAGICAL NEW ORLEANS MAP and DIET GUMBO (C).
- Go to the Guardian’s house.

- Use DIET GUMBO on the cat, take SCREWDRIVER and RUBBER GLOVE, use COMB on on the nails, take ARTIFACT PARTS 3/3 (D).
- Go to the Library.

- Use ARTIFACT PARTS 3/3 on the lock (E).
- Easy solution: A-C-D-1 (F).
- Hard solution: A-A-A-B-B-D-E-E-E-1 (G).
- Earn MARDI GRAS BOOK and read it.
- Go to the Artifact Storage.

- Use RUBBER GLOVE on the electrical panel, take NAIL FILE and CANDLE (H).
- Go to the Magical Investigations Agency.

- Play puzzle, earn PENDULUM PENDANT (I).
- Use SYLVANUS’S PHOTO, MAGICAL NEW ORLEANS MAP, CANDLE and PENDULUM PENDANT on the evidence board (J).
- Easy solution: B-Cx3, B-Ax3, Ax3-Bx2-Cx3 (K).
- Hard solution: B-Cx3, B-Ax3, Ax3-Bx2-Cx3 (L).

- Solution 1: A-E, D-F, H-L, D-K, C-J, H-D, H-A, I-B, H-C, H-G, H-I (M).
- Solution 2: P-K, K-F, F-B, M-I, I-E, E-A, E-I, I-M, C-F, F-I, J-E, F-C, K-O, G-K, G-J, F-J, N-J, N-K, K-H, N-K, L-H, H-D, P-L, L-H (N).
- Solution 3: B-Dx2-Cx2-D-A-Bx2-F-A-Dx2-F-Ex2-Fx2-Ax2-D-B-A-B-Ax2-C-Bx2-C-Bx2 (O).
- Place SPRING on the wind chimes (P).
- Use CARNIVAL MASK on the statue, take CHIMES 1/2 (Q).

- Take LOCK PARTS 1/3 and CHIMES 2/2 (R).
- Use CHIMES 2/2 on the wind music, take WIND MUSIC (S).
- Use WIND MUSIC on the porch (T).
- Play puzzle, earn GLASSES OF REVEALING (U).

- Use GLASSES OF REVEALING on the wall (V).
- Go to the Magical Rarities Market.
- Take ROPE and LOCK PARTS 2/3 (W).
- Use SCREWDRIVER on the drain, take LOCK PARTS 3/3 (X).

- Use LOCK PARTS 3/3 on the lock (Y).
- Easy solution: A-B, C-G, L-K, 3, 3, 1, C-G, 2, 2, E-H, 3, 2, E-H, 4, 4, 4, F-J, 4, 3, K-L, 3, 3, 4, 4, K-L (Z).
- Hard solution: 4, 1, D-I, 4, C-G, 1, 1,D-I, 4, 2, 1, 1, 1, A-B, 1, D-I, 2, 1, 3, C-G, 1, 1, 2, 2, A-B, 2, 2, H-E (A).
- Go to Sylvanus’s Shop.

- Talk to Elizabeth, Select the first option (B).

- Take SKULL AMULET and STATUETTES 1/2 (C).
- Use NAIL FILE on the chain, take CLAPPER and NUT, use SKULL AMULET on the box, take STATUETTES 2/2 (D).
- Use CLAPPER on the bell (E).

- Place STATUETTES 2/2 on the table (F).
- Play puzzle, earn LONG PIN (G).
- Use LONG PIN on the box, take BOOK OF POTIONS and MAGNET (H).
- Use MAGNET on ROPE, take ROPE AND MAGNET (I).
- Go to the New Orleans Street.

- Use ROPE AND MAGNET on the drain, take SCENTED OIL (J).
- Easy solution: B-A-B-A-Bx2-Ax3-B-A-Bx2-A-Bx2-A (K).
- Hard solution: B-A-B-A-Bx2-Ax3-B-A-Bx2-A-Bx2-A-1 (L).
- Earn LIGHTER.

- Use LIGHTER on the candles, take CANDLESTICK (M).
- Go to the Magical Rarities Market.

- Use CANDLESTICK on the roll-up shutters (N).
- Easy solution: A-J, D-L, B-G, C-K, E-H, F-I (O).
- Hard solution: C-G, E-H, F-I, B-J, N-K, A-L, M-O, D-P (P).

- Take MARDI GRAS VUVUZELA (Q).
- Use MARDI GRAS VUVUZELA on the crocodile, take FANG and DRAGON (R).
- Use FANG on BOOK OF POTIONS (S).
- Go to Sylvanus’s Shop.

- Use DRAGON on the bell (T).
- Easy solution: F-C-D-B-E-A (U).
- Hard solution: H-C-G-B-F-A-D-E (V).
- Select the third option (W).
- Go to the New Orleans Street.

- Play puzzle, earn WAND OF LEVITATION (X).
- Use WAND OF LEVITATION on the pedestal, take VALVE (Y).
- Go to the Magical Rarities Market.

- Use VALVE and NUT on the crane, take WATER STONE and STAPLE REMOVER (Z).
- Use STAPLE REMOVER on the poster, take EMPTY FLASK (A).
- Use WATER STONE and EMPTY FLASK on BOOK OF POTIONS (B).
- Go to Sylvanus’s Shop.

- Play puzzle, earn DIAMOND (C).
- Use DIAMOND on the glass, take GOLDEN CHAMOMILE ROOT (D).
- Use GOLDEN CHAMOMILE ROOT on BOOK OF POTIONS (E).
- Easy solution: A-B-B-B-B-C-C-E-E-E-E-F-F-G-G-G-H-H-J-J-J-J-L-L-L-L-M-M-M-M (F).
- Hard solution: A-A-B-B-B-D-D-E-F-G-G-G-H-H-I-J-J-J-J-K-L-L-L-M-M-M-M-N-N-N (G).
- Earn TRACKING POTION.

- Use TRACKING POTION on the footprints (H).
- Easy solution: A-B-C-D-E-F-G-H-I-J-K-L-M (I).
- Hard solution: A-B-C-D-E-F-G-H-I-J-K-L-M-N-O (J).
- Talk to SYLVANUS, select the first option (K).

- Take NOTE, WOODEN HANDLE and HEAVY KNIFE, read note (A).
- Use HEAVY KNIFE on the toy dispenser, take RITUAL NEEDLE and SHARK NECKLACE (B).
- Use SHARK NECKLACE on the drain grate, take ELIZABETH’S RING (C).

- Use ELIZABETH’S RING on Elizabeth’s bag (D).
- Play puzzle, earn GOLDEN KEY (E).
- Use GOLDEN KEY on the door lock (F).
- Go to the Esmero’s House.

- Talk to Esmero, select the first option (G).

- Take VERBENA ROOT (H).
- Take SKROLL and FLEUR-DE-LIS AMULETS 1/2, read SKROLL “BLOOMING” (I).
- Use HEAVY KNIFE on the curtain ties, take NOTE and FLEUR-DE-LIS AMULETS 2/2, read NOTE (J).
- Use RITUAL NEEDLE and FLEUR-DE-LIS AMULETS 2/2 on the bloodstone (K).
- Go to the Ritual Hall.

- Place VERBENA ROOT near the machinery (L).
- Take POMEGRANATE (M).
- Use HEAVY KNIFE and POMEGRANATE on the board, take HEAVY KNIFE, CRACKED POMEGRANATE and WATERING CAN AMULET (N).
- Place CRACKED POMEGRANATE near the machinery (O).
- Use WATERING CAN AMULET on the cage, take SCAPULA, use SKROLL “BLOOMING” on the flower, take CORNFLOWER, place HEAVY KNIFE on the cage bottom board (P).
- Place CORNFLOWER near the machinery (Q).

- Take DRIED DAISY and RITUAL BOOK, read RITUAL BOOK (R).
- Place DRIED DAISY near the machinery (S).
- Solution: Place the ingredients in bowls as shown in the picture (T).
- Take PAINKILLER POTION (U).
- Go back.

- Use PAINKILLER POTION on ESMERO (V).
- Talk to Esmero, select the first option, earn KEY (W).
- Go to the Mardi Gras Spirit’s Lair.

- Take LAUGHING MASKS 1/2 and MAGICAL CANDLES (X).
- Use MAGICAL CANDLES in the cave (Y).
- Play puzzle, earn SKULL AMULET (Z).
- Use SKULL AMULET on the bag, take SPOON (A).
- Go back.
- Use KEY on the casket, take NOTE, ESSENTIAL OIL and BONE COOKIE, read NOTE, place RITUAL NEEDLE on the table, use SPOON on the glue can, take SPOONFUL OF GLUE (B).
- Go back.

- Use BONE COOKIE on the dog, take ARCADE BUTTON 1/2, use SCAPULA on the pile of earth, take ANTIRUST and NOTE, read NOTE (C).
- Play puzzle, earn FEATHER FAN (D).
- Use FEATHER FAN on the leaves, take DUCT TAPE, use WOODEN HANDLE on the barbed wire, take SELF-MADE IRON BRUSH, use SPOONFUL OF GLUE on the mask, earn LAUGHING MASKS 2/2 (E).
- Go to the Mardi Gras Spirit’s Lair.

- Use LAUGHING MASKS 2/2 on the mannequins (F).
- Solution: Arrange the masks as shown in the picture (G).
- Take DREAM CATCHER (H).
- Use DREAM CATCHER on the water, take CUFFLINK (I).
- Go to the Charmed Quarter.

- Place DUCT TAPE on the toy dispenser (J).
- Go to the Ritual Hall.

- Use CUFFLINK on the bag, take CAMERA (K).
- Use ANTIRUST and SELF-MADE IRON BRUSH on the mechanism cover, take NOTE, FOLDING CANE and ELECTRONIC DICTIONARY, read NOTE (L).

- Use ELECTRONIC DICTIONARY on the newspaper (M).
- Play puzzle, take STATUETTE (N).
- Use STATUETTE on the cage bottom board, take HEAVY KNIFE, SCREWDRIVER, RED CHALK and ARCADE BUTTON 2/2 (O).
- Go to the Charmed Quarter.

- Use ARCADE BUTTON 2/2 on the toy dispenser (P).
- Easy solution: Take out five toys (Q).
- Hard solution: Take out five toys.
- You have 5 tries (R).
- Earn DOLLS 1/2 and TOY FORK.
- Use TOY FORK on the nails, take SCREWS SET and CROTCHET HOOK, use CAMERA on the symbols, take FRESCA PHOTO (S).
- Go to the Mardi Gras Spirit’s Lair.

- Play puzzle, earn FRESCA PART (T).
- Use FRESCA PHOTO and FRESCA PART on the magic circle (U).
- Solution: select the symbols as shown in the photo (V).
- Go back.

- Use CROTCHET HOOK on the tablecloth, take TREADS (W).
- Use TREADS on the doll’s dress, take DOLLS 2/2 (X).
- Go to the Ritual Hall.

- Use DOLLS 2/2 on the magic dome, take TAMBOURINE (Y).
- Use ESSENTIAL OIL, RED CHALK and TAMBOURINE on the magic circle (Z).
- Solution: 2-1-6-8-5-3-3-8-7-4-3-8 (A).

- Take FUNNEL, SIGNS 1/2 and CHESS FIGURINES 1/3 (B).
- Take FLOWERS 1/3, use HEAVY KNIFE on the plate, take SIGNS 2/2, HEAVY KNIFE and GLASSCUTTER (C).
- Use SCREWDRIVER, SCREWS SET and SIGNS 2/2 on the wall (D).
- Play puzzle, earn HINT (E).

- Use HINT on the code lock (F).
- Solution: 0-5-3-3-*-4-6-* (G).
- Go to the Artifact Storage.

- Take NOTE and BOTTLE, read NOTE, place GLASSCUTTER on the table (H).
- Place FOLDING CANE near the cupboard (I).
- Take CHESS FIGURINES 2/3 and DARK VELVET (J).
- Place DARK VELVET on the table (K).

- Use FEATHER FAN on the smoke, take CHESS FIGURINES 3/3 (L).
- Use CHESS FIGURINES 3/3 on the game board (M).
- Easy and hard solution: 2-2-2-2-1-1-4-3 (N).
- Take STONE PYRAMID (O).

- Use STONE PYRAMID on the cupboard, take TWINE WITH A LOOP and COAT HANGER (P).
- Place TWINE WITH A LOOP near the cabinet doors (Q).
- Use FUNNEL and HEAVY KNIFE on BOTTLE (R).
- Go back.

- Use COAT HANGER on the holes in the floor, take SLINGSHOT and NOTE, read NOTE (S).
- Play puzzle, earn BASILISK OIL (T).
- Use BASILISK OIL on SYLVANUS (U).

- Solution 1: Assemble the pattern as shown in the picture (V).
- Solution 2: Assemble the pattern as shown in the picture (W).
- Solution 3: Assemble the pattern as shown in the picture (X).
- Earn PALETTE AMULET.
- Use PALETTE AMULET on the door lock (Y).
- Go to the Squire in front of the Art Museum.

- Take FLOWERS 2/3, use SLINGSHOT on the branch, earn PEAR (Z).
- Take BROKEN BIKE BATTERY and FLAG (A).
- Use FLAG on the statue (B).
- Use PEAR on BOTTLE, take WASP TRAP (C).

- Use WASP TRAP on the wasps, take WICK, STAPLER and FLOWERS 3/3 (D).
- Use FLOWERS 3/3 on the chair, take WREATH (E).
- Use WREATH on the statue (F).

- Easy solution: 1-2-3-4-5-6-6 (G).
- Hard solution: 1-1-2-3-4-4-5-7-8-9-9 (H).
- Take LIGHTER, WIRES 1/3 and DRUM (I).

- Use DRUM on the bench, take SOLDERING IRON and GLASS (J).
- Use SOLDERING IRON on BROKEN BIKE BATTERY (K).
- Go to the Artifact Storage.

- Use STAPLER and GLASS on the table, take MIRROR (L).
- Use MIRROR on the cabinet doors (M).
- Play puzzle, earn ARTIFACT LIST (N).
- Give ARTIFACT LIST to SYLVANUS (O).

- Talk to SYLVANUS, select the first option (P).
- Earn LOCK CODE.
- Go back.

- Use LOCK CODE on the lock (Q).
- Solution: Arrange the symbols as shown in the picture (R).
- Take KEY and FLASHLIGHT (S).
- Go to the Squire in front of the Art Museum.

- Use FLASHLIGHT on the birdhouse, take NOTE and GARDEN SHEERS, read NOTE (T).
- Use GARDEN SHEERS on the thorn plant, take WIRES 2/3 and NOTE, read NOTE (U).
- Go to the Artifact Storage.

- Play puzzle, earn NOTE and NECKLACE OF COLD, read note (V).
- Use NECKLACE OF COLD on the lock, take NOTE, CHARGER WIRE and MAGNETIC CARD, read NOTE (W).
- Use CHARGER WIRE on BROKEN BIKE BATTERY (X)
- Go to the Squire in front of the Art Museum.

- Use MAGNETIC CARD on the bike, take CANDLES 1/2 and WIRES 3/3 (Y).
- Use WIRES 3/3 on BROKEN BIKE BATTERY, take WORKING BATTERY (Z).
- Use WORKING BATTERY and KEY on the bike (A).
- Easy solution: 2-3-6-1-8-9-4-5-7-A (B).
- Hard solution: 9-6-2-4-8-7-A (C).

- Talk to Elizabeth, select the third option (D).

- Play puzzle, earn ANTI-MAGIC SPHERE (E).
- Use LIGHTER on the wax, take FRAGMENT (F).
- Place WICK near the tube (G).
- Take BROKEN STAFF and WAX (H).
- Use WAX on the tube, take CANDLES 2/2 (I).

- Use CANDLES 2/2 on the candle holder, take CONNECTOR (J).
- Take NOTE, read NOTE, use ANTI-MAGIC SPHERE, FRAGMENT and CONNECTOR on BROKEN STAFF, take MAGIC EATER (K).
- Use MAGIC EATER on Elizabeth’s protective dome (L).

- Talk to Elizabeth, select the first option (M).
- Easy and hard solution: capture more cells on the field (N).

- Take EMPTY FIRST AID KIT, WIRE and MANICURE SCISSORS (A).
- Use MANICURE SCISSORS on the curtain clasps, take BANDAGES and HUMMER (B).
- Take NOTE, read NOTE, use HUMMER on the bottle, take MARKER and KITTING HOOK (C).
- Use KITTING HOOK on the water, take AMMONIA and DOUBLE TOOTH FORK (D).

- Use DOUBLE TOOTH FORK on the nails, take HEMOSTATIC SPONGE (E).
- Open EMPTY FIRST AID KIT, use BANDAGES, AMMONIA and HEMOSTATIC SPONGE on EMPTY FIRST AID KIT, take ASSEMBLED FIRST AID KIT (F).
- Use ASSEMBLED FIRST AID KIT on Clarisse (G).

- Easy solution: Connect the drops of blood (by clicking on them) as shown in the image (H).
- Hard solution: Connect the drops of blood (by clicking on them) as shown in the image (I).

- Take FISHING ROD, FOLDING SHOVEL and NOTE, read NOTE (J).
- Take CHISEL, use FOLDING SHOVEL on the earth, take HOOK (K).
- Use WIRE and HOOK on FISHING ROD, take SELF-JEWELED FISHING ROD (L).

- Use SELF-JEWELED FISHING ROD on the water (M).
- Easy solution: Score 50 points by fishing out leaves (N).
- Hard solution: Score 60 points by fishing out the leaves.
- The movement speed of the net is increased (O).
- Take DOORBELL (P).

- Use DOORBELL on the door, use FOLDING SHOVEL on the earth, take HOOK (Q).
- Go Inside Elizabeth’s house.
- Talk to Bonnie, choose the first option (R).
- Go to Elizabeth’s library.

- Take DEBARKER and BRACELET (S).
- Use BRACELET to the holes in the shelf, take GEAR and ALCHEMICAL COMPONENTS 1/2 (T).
- Use GEAR on the mechanism, take ALCHEMICAL COMPONENTS 2/2 (U).

- Use ALCHEMICAL COMPONENTS 2/2 on the alchemist’s table, choose the first option (V).
- Solution: 2-5-6-A-1-9-8-A-4-3-7-A-B-C-D-A (W).
- Earn SOPORIFIC FOR PLANTS.
- Go back.

- Take WOOL, HEAVY STATUETTE and PHOTO, examine PHOTO (X).
- Take SAX KEYS, use CHISEL and HEAVY STATUETTE on the lock, take CUTTING OF THE PROTECTIVE MASK and SEWING MACHINE AMULET (Y).
- Use SEWING MACHINE AMULET on the piano, take THREAD AND NEEDLE (Z).

- Open the door (A).
- Use WOOL and THREAD AND NEEDLE on CUTTING OF THE PROTECTIVE MASK, take PROTECTIVE MASK (B).
- Use PROTECTIVE MASK on poisonous gases (C).
- Easy solution: Collect 3 correct tracks to get out of the maze (D).
- Hard solution: Collect 5 correct tracks to get out of the maze (E).
- Use SOPORIFIC FOR PLANTS on an aggressive plant, take SAX KEYS 2/3 and LITTLE WEIGHTS 1/2, use FOLDING SHOVEL on the box, take LEATHER GLOVE and GREENHOUSE HANDLE (F).
- Use GREENHOUSE HANDLE on the door (G).
- Play puzzle, earn GLOWING FLOWER (H).
- Use GLOWING FLOWER on the hollow, take MUSIC BOX SHAFT and IRON BRUSH, place MARKER in the hollow, use DEBARKER on the resin, earn LITTLE WEIGHTS 2/2 (I).
- Go to Elizabeth’s library.

- Use LITTLE WEIGHTS 2/2 on the wall clock, take MATCHES (J).
- Use MATCHES on the candle, take PIECE OF WAX (K).
- Go back.
- Use PIECE OF WAX on the zipper, take BOOK WITH SYMBOL (L).
- Go to Elizabeth’s library.

- CANE HANDLE on CANE.
- Use BOOK WITH SYMBOL on section in the shelf (M).
- Easy solution: 1-4,2-3,6-E,5-F,B-C,A-D (N).
- Hard solution: 1-5,4-6,8-G,2-H,B-F,E-A,3-C,7-D (O).

- Take AMULET BOOK (P).
- Use AMULET BOOK on the book, take BOOK, read BOOK (Q).
- Go back.

- Place MUSIC BOX SHAFT in the music box (R).
- Go back.
- Use LEATHER GLOVE on the thorn, take SAX KEYS 3/3 (S).
- Go behind Elizabeth’s house.

- Take NOTE, MAGIC SAXOPHONE and PARCHMENT, read NOTE (T).
- Use PARCHMENT on the numbers, take CODE (U).
- Use SAX KEYS 3/3 on MAGIC SAXOPHONE (V).
- Go to the Swamps.

- Use CODE on the lock (W).
- Solution: set the code on the code lock according to the clue (X).
- Take AMPHIBIAN FEED (Y).
- Use AMPHIBIAN FEED on the frog (Z).

- Easy solution: fill the field by connecting chips of the same color to each other with a continuous line (A).
- Hard solution: fill the field by connecting chips of the same color to each other with a continuous line (B).
- Take MOUTHPIECE and ANTISTAPLER (C).
- Use MOUTHPIECE on MAGIC SAXOPHONE (D).
- Go Inside Elizabeth’s house.

- Examine the photo box, use ANTISTAPLER on the lid of the photo box (E).
- Play puzzle, take MUSIC SHEET (F).
- Use MUSIC SHEET on MAGIC SAXOPHONE, take MAGIC SAXOPHONE (G).
- Use MAGIC SAXOPHONE on BONNIE (H).

- Easy solution: avoid red notes by using arrows.
- You have 3 lives (I).
- Hard solution: avoid red notes by using arrows.
- You have 1 life (J).
- Talk to Bonnie, select the first option (K).
- Earn BONE LOCK PICK.
- Go behind Elizabeth’s house.

- Use BONE LOCK PICK on the lock, take AMULET BELLS 1/3, use FOLDING SHOVEL on the electrical panel, take LUXURY FEATHER (L).
- Play puzzle, earn FLOWER POLLEN IA A BAGGY (M).
- Use LUXURY FEATHER and FLOWER POLLEN IA A BAGGY on the cage lock (N).

- Solution: select the prints in the correct order (O).
- Take NOTE and SHARP SPUR, read note (P).
- Go to the Swamps.

- Use SHARP SPUR on the seam, take CAMERA and CORKSCREW (Q).
- Use CORKSCREW on the bottle, take CORK and WATER BOTTLE (R).
- Go Inside Elizabeth’s house.

- Use CORK on the drawer, take NOTE and WINDING KEY, read NOTE (S).
- Use WINDING KEY on the music box (T).

- Easy solution: swap the highlighted tubes.
- Line up the notes in a single line (U).
- Hard solution: swap the highlighted tubes.
- Line up the notes in a single line (V).
- Take AMULET BELLS 2/3 and FORCEPS (W).
- Go behind Elizabeth’s house.

- Use FORCEPS on the board, earn AMULET BELLS 3/3 (X).
- Use AMULET BELLS 3/3 on the skull lock (Y).
- Solution: connect the bells as shown in the image (Z).
- Earn SPIRIT CHAIN.
- Intervene, choose the third option (A).

- Use FOLDING SHOVEL on the potty, take MAILBOX KEY (B).
- Use MAILBOX KEY on the mailbox, take METAL ROSES 1/2 (C).
- Take LEFT HALF OF PLIERS and METAL ROSES 2/2 (D).

- Use METAL ROSES 2/2 on the gate lock (E).
- Easy solution: 3-2-2-3-2-2-3-2 (F).
- Hard solution: 1-3-1-4-2-3-3-1-1-4 (G).
- Go to the City Park.

- Take PHOTO, NEW CHIP and HANDLE, examine PHOTO (H).
- Use HANDLE on the ticket register, take LITTLE TICKET and NOTE, read NOTE (I).
- Take PAINTS AND BRUSH, use NEW CHIP and LITTLE TICKET on the ticket reader (J).
- Play puzzle, earn VINEGAR (K).

- Take BANKNOTES 1/2, use IRON BRUSH, VINEGAR and CAMERA on the box, take PORTAL INSTRUCTIONS (L).
- Use PAINTS AND BRUSH and PORTAL INSTRUCTIONS on the drawing board (M).
- Easy and hard solution: color the image as shown in the picture (N).
- Go to the Mardi Gras Spirit Lair.

- Talk to Elizabeth, select the first option (O).
- Take SPRING (P).
- Take SHOVEL HANDLE and NUT, use SHARP SPUR on the rag, take RAG (Q).

- Place SHOVEL HANDLE near the cart (R).
- Use WATER BOTTLE and RAG on the fire, take RIGHT PART OF PLIERS (S).
- Use RIGHT HALF OF PLIERS and SPRING on LEFT HALF OF PLIERS, take PLIERS (T).
- Go to New Orleans street.

- Use PLIERS on the lantern, take FLAG FROM MAILBOX (U).
- Use FLAG FROM MAILBOX and NUT on the mailbox (V).
- Easy solution: arrange the gears as shown in the picture (W).
- Hard solution: arrange the gears as shown in the picture (X).
- Take PICTURE and SAW, examine PICTURE (Y).
- Go to the Mardi Gras Spirit Lair.

- Use SAW on the log, take WOODEN CIRCLE (Z).
- Use WOODEN CIRCLE on the cart, take MARDI GRAS SPIRIT’S BOOK, read MARDI GRAS SPIRIT’S BOOK (A).
- Use MARDI GRAS SPIRIT’S BOOK on the protective dome (B).

- Solution 1: assemble the image as in the picture (C).
- Solution 2: assemble the image as in the picture (D).
- Solution 3: assemble the image as in the picture (E).
- Earn ELIZABETH’S PURSE.

- Place SPIRIT CHAIN near Elizabeth and ESMERO (F).
- Open ELIZABETH’S PURSE, take DAGGER OF WORLDS, TRASFER PAPER and BANKNOTES 2/2 (G).
- Place DAGGER OF WORLDS near Elizabeth and ESMERO (H).
- Go back.

- Use BANKNOTES 2/2 on the seller (I).
- Easy solution: select the correct numbers.
- They are shown in black in the pictures (J).
- Hard solution: select the correct numbers.
- They are shown in black in the pictures (K).

- Take BANANAS (L).
- Place TRASFER PAPER on the scroll (M).
- Go back.

- Use BANANAS on the ants, take ULTRAVIOLET LAMP (N).
- Go to the City Park.
- Use ULTRAVIOLET LAMP on the scroll, take DRAWING (O).
- Play puzzle, earn GEMSTONE (P).
- Use DRAWING and GEMSTONE on the castle (Q).

- Solution: put the gems of certain colors in the correct position based on the picture (R).
- Take CATCH BOX (S).
- Go to the Mardi Gras Spirit Lair.

- Use CATCH BOX on Elizabeth and ESMERO (T).
- Talk to Elizabeth and Clarisse, select the first option (U).
- Easy solution: correct arrangement of the symbols is shown in the picture (V).
- Hard solution: correct arrangement of the symbols is shown in the picture (W).
- Walkthrough Bonus Chapter, at the link below.


