Maze of Realities 2: Reflection of Light (Bonus Chapter, Extra) – In Arizona, archaeologists have discovered a meteorite that fell into the Grand Canyon. But on the way there they disappear, you have to solve all the riddles in another universe and save your friends.
Bonus Chapter, Extra Walkthrough
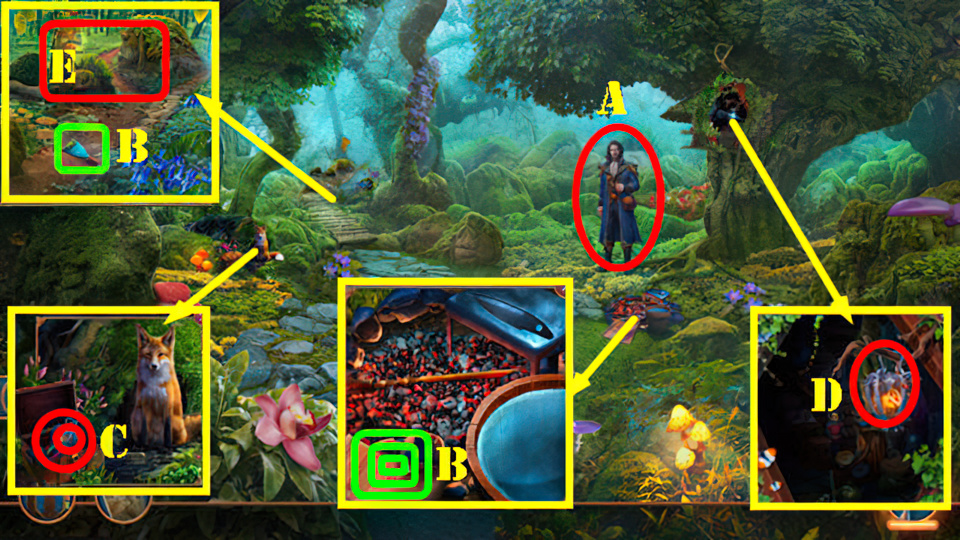
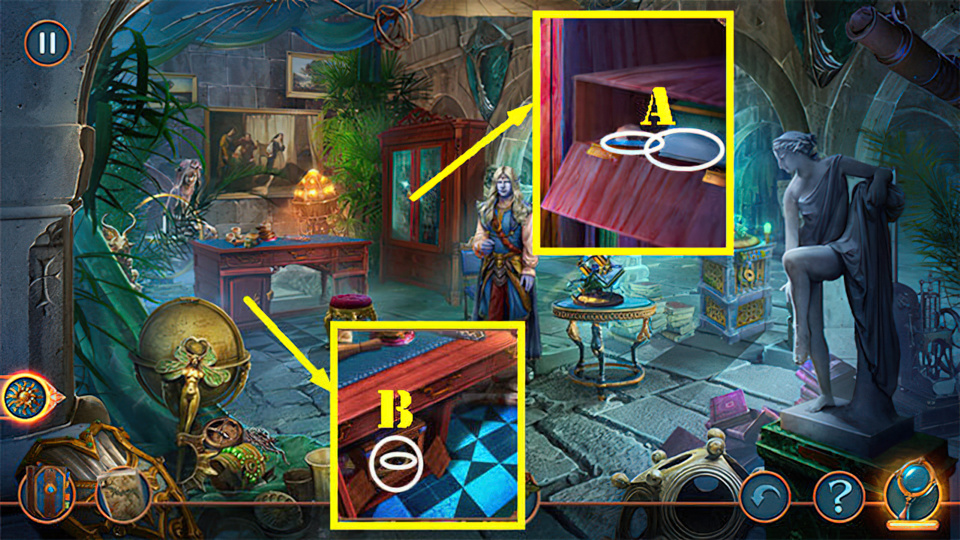
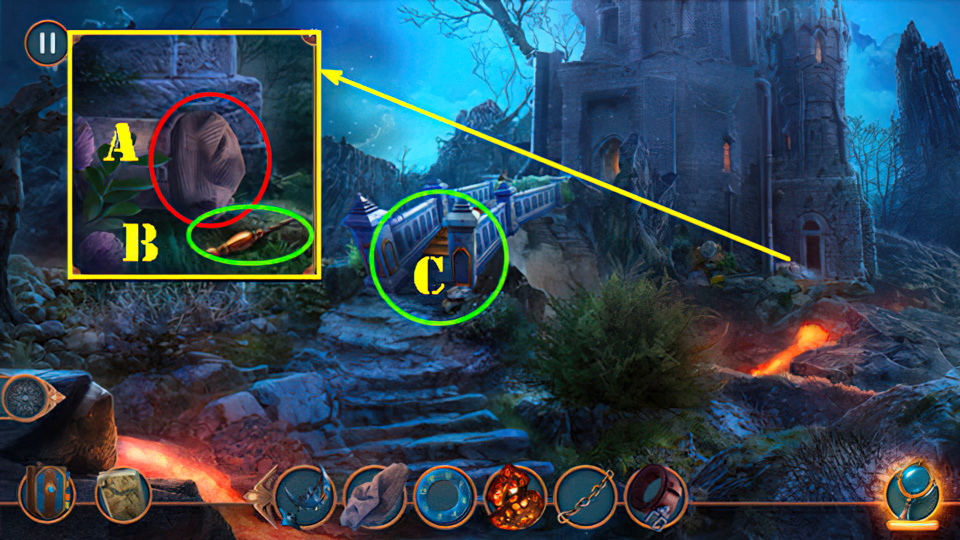
- Talk (A).
- Take METAL SCRAPER, NEWSPAPER, MAGNIFYING GLASS, and HAIRPIN (B).
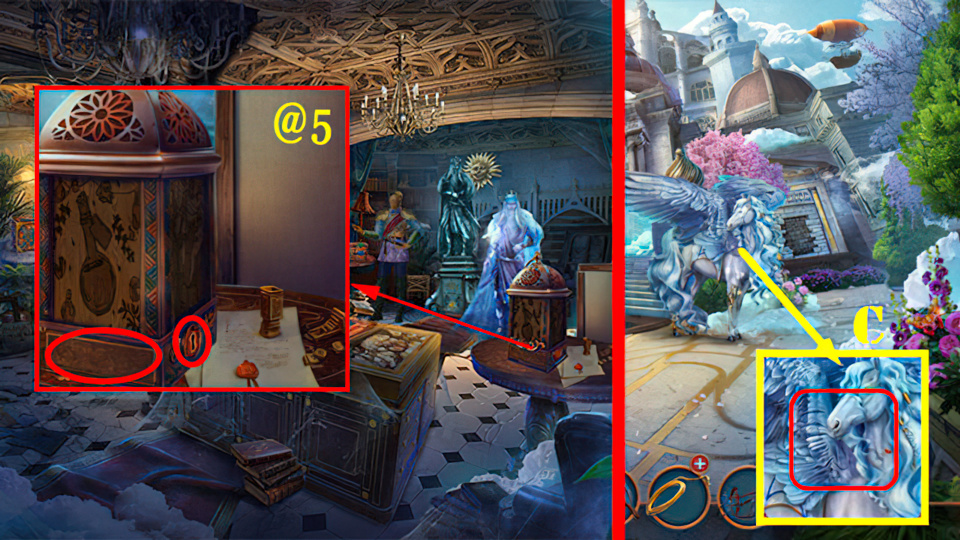
- Use HAIRPIN, take ELASTIC BAND and LANTERN (C).
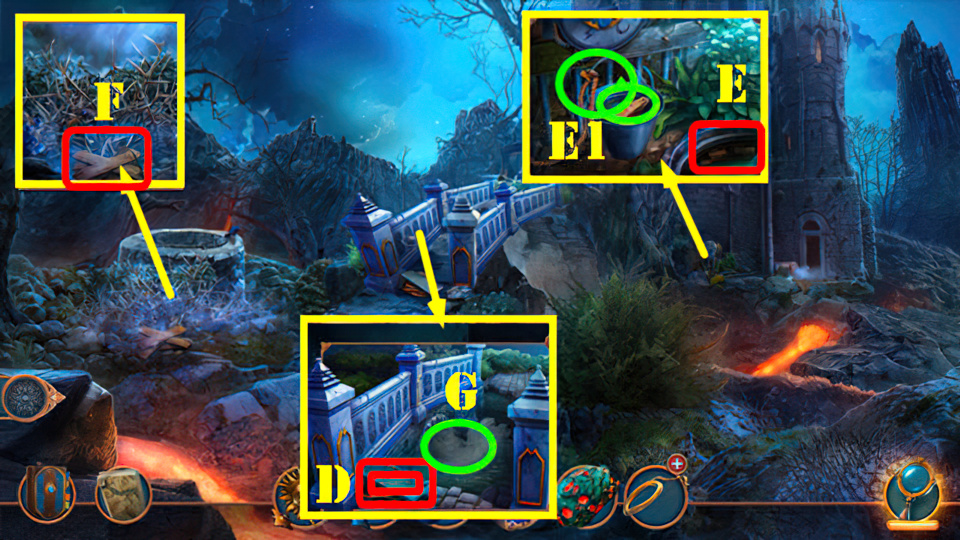
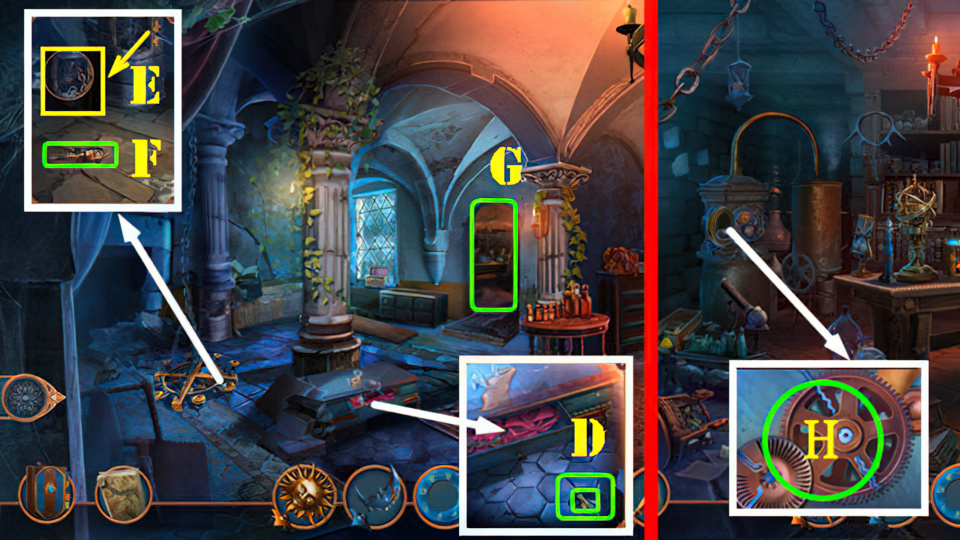
- Hang LANTERN (D). Play puzzle, receive COMPASS.
- Use COMPASS (E).
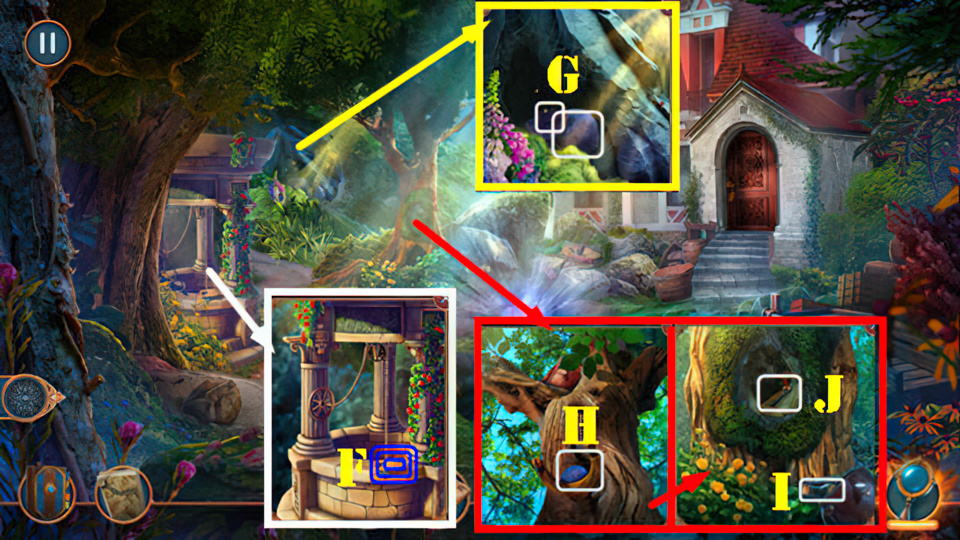
- Take Note, COGS 1/2, and SHARD OF MIRROR (F).
- Use MAGNIFYING GLASS and SHARD OF MIRROR, take PIECE OF COAL and STONE (G).
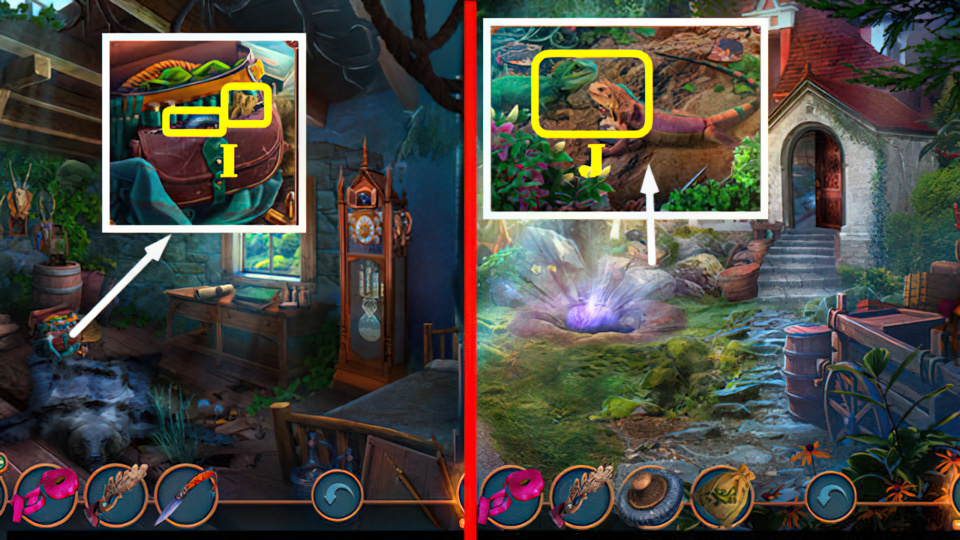
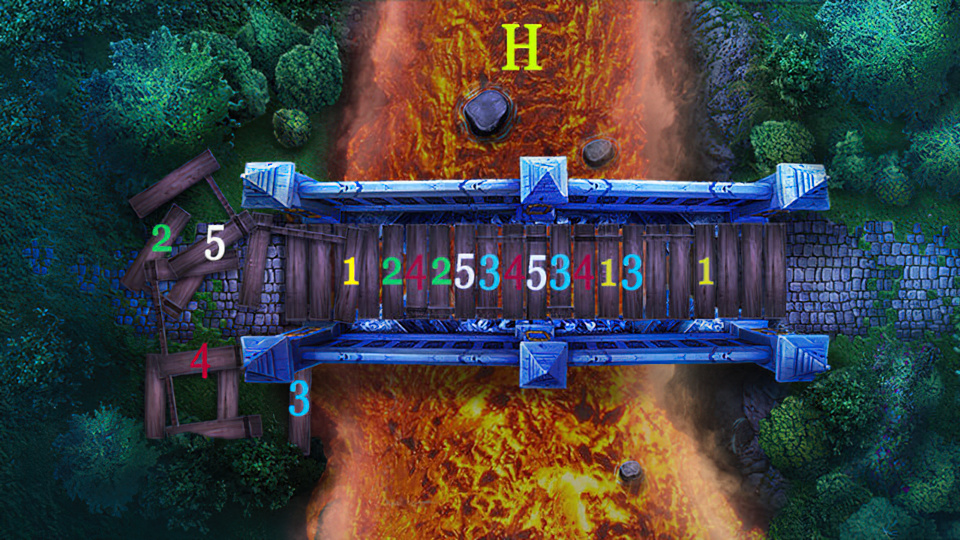
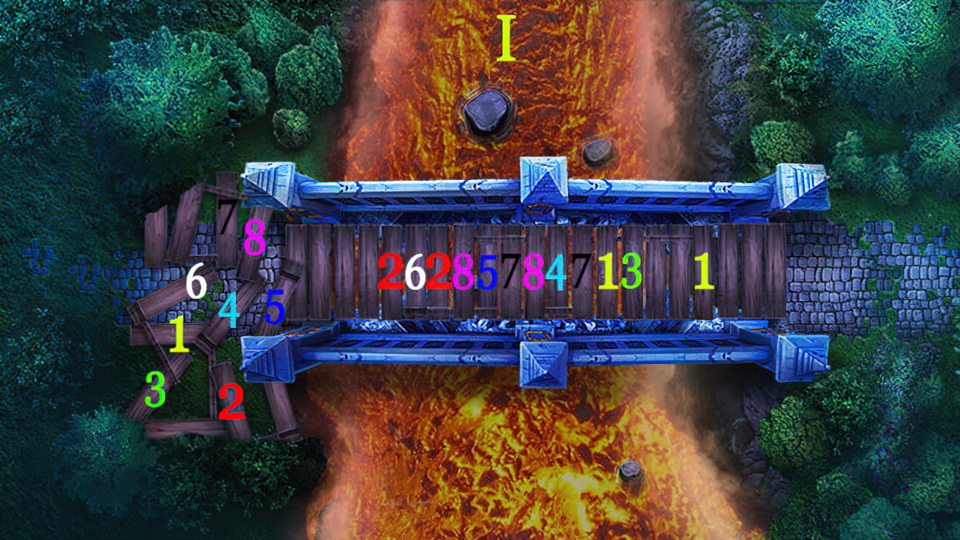
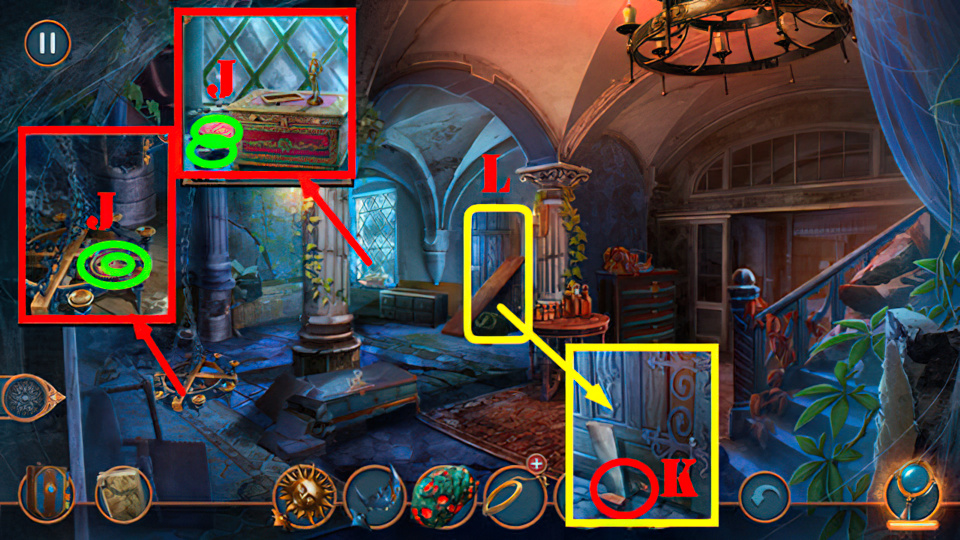
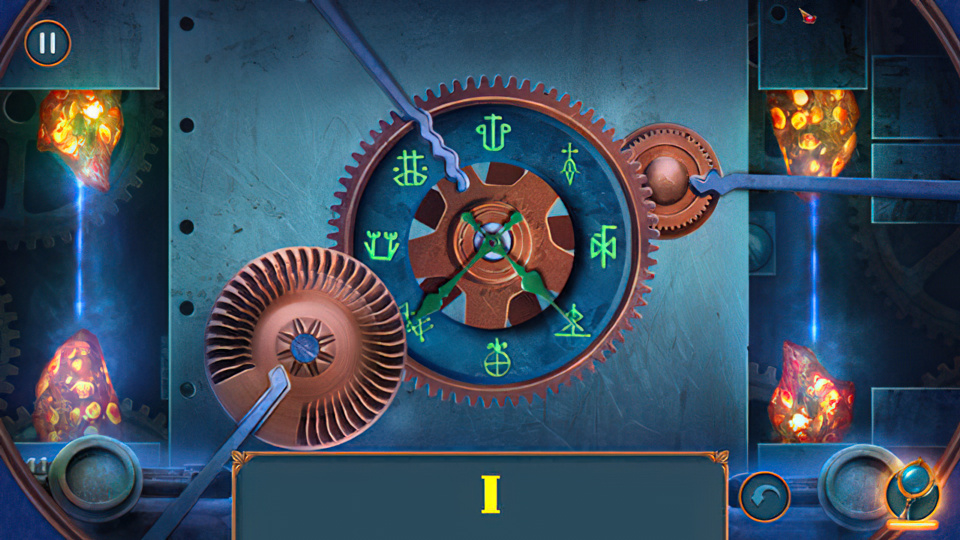
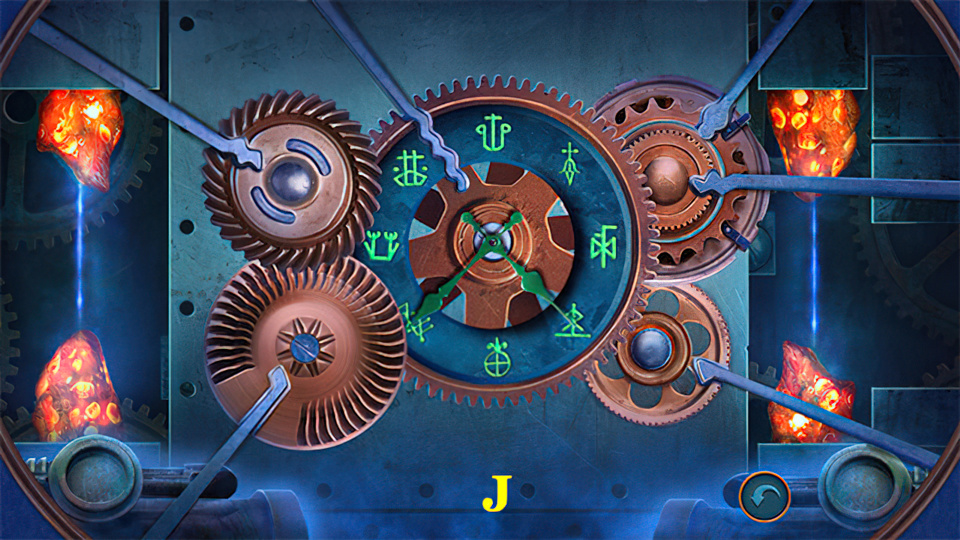
- Use ELASTIC BAND and STONE (H), take AMMONIA (I). Use METAL SCRAPER, take WOODEN HANDLE (J).
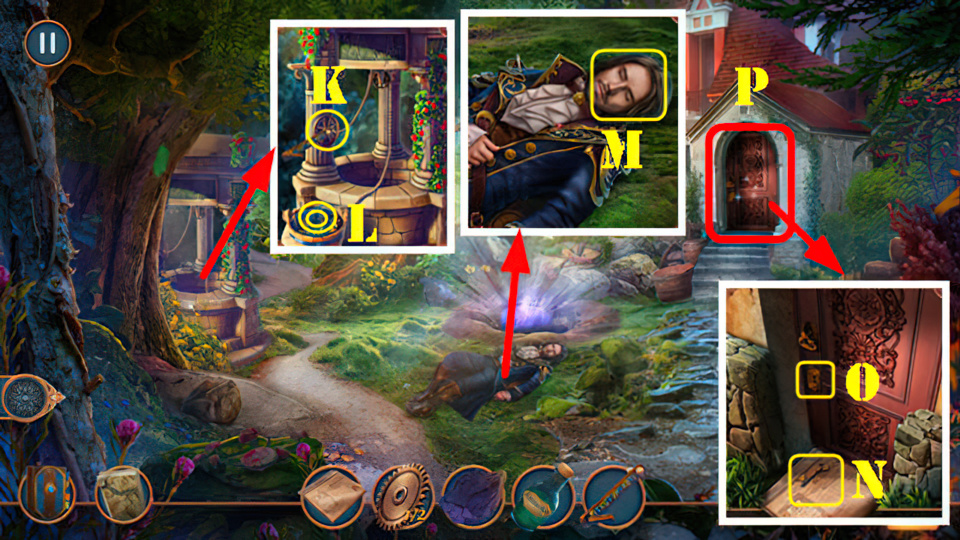
- Place WOODEN HANDLE (K), take NET and BUTTONS 1/3 (L).
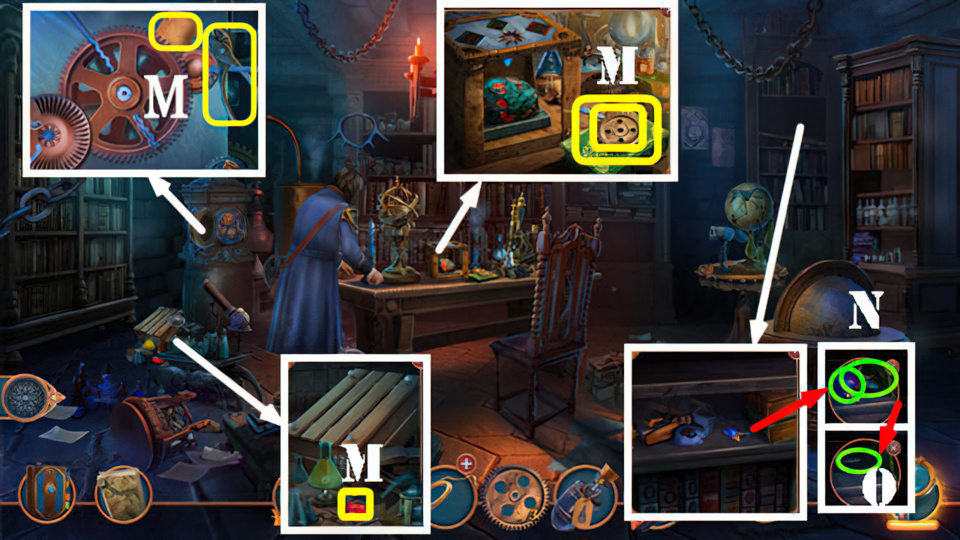
- Use AMMONIA (M), receive QUILL.
- Place NEWSPAPER (N) and QUILL (O). Grab key (N) and place in lock (O).
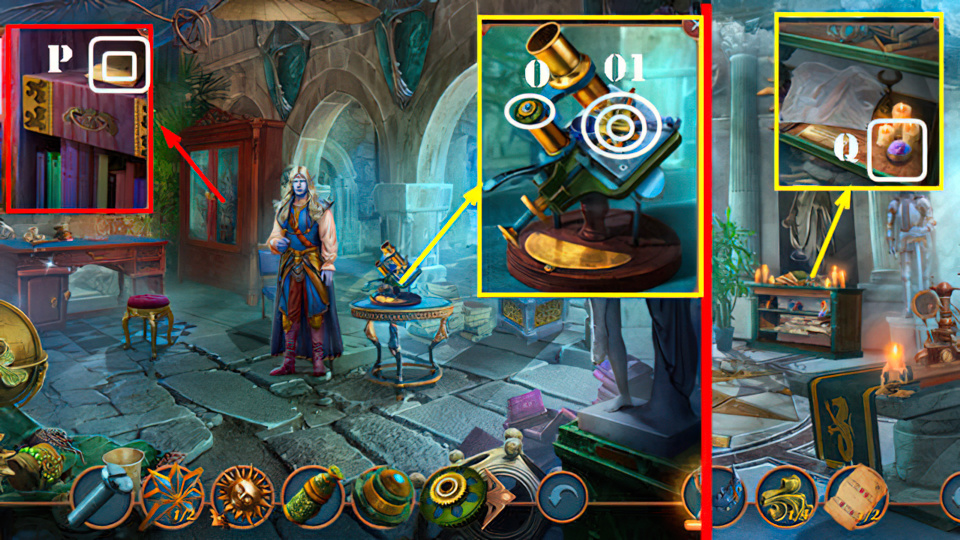
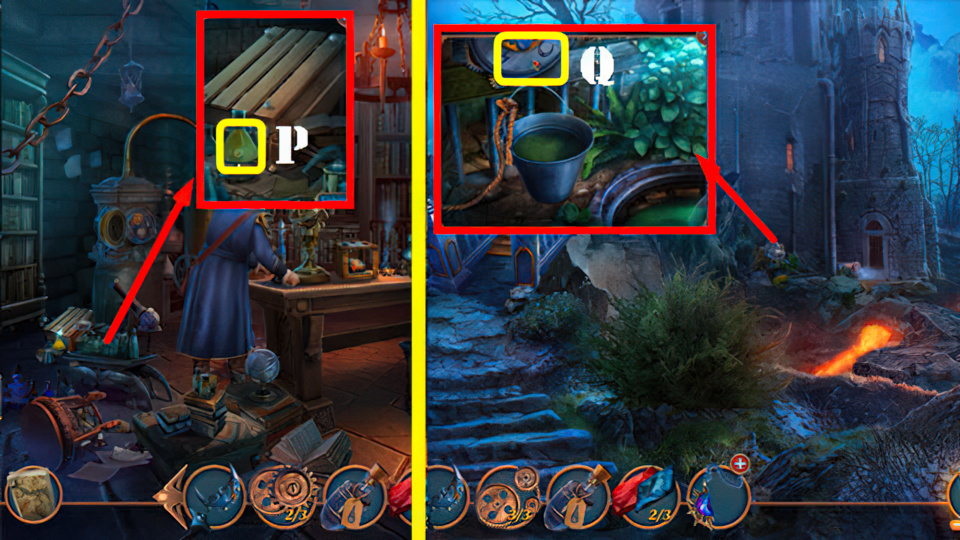
- Enter (P).
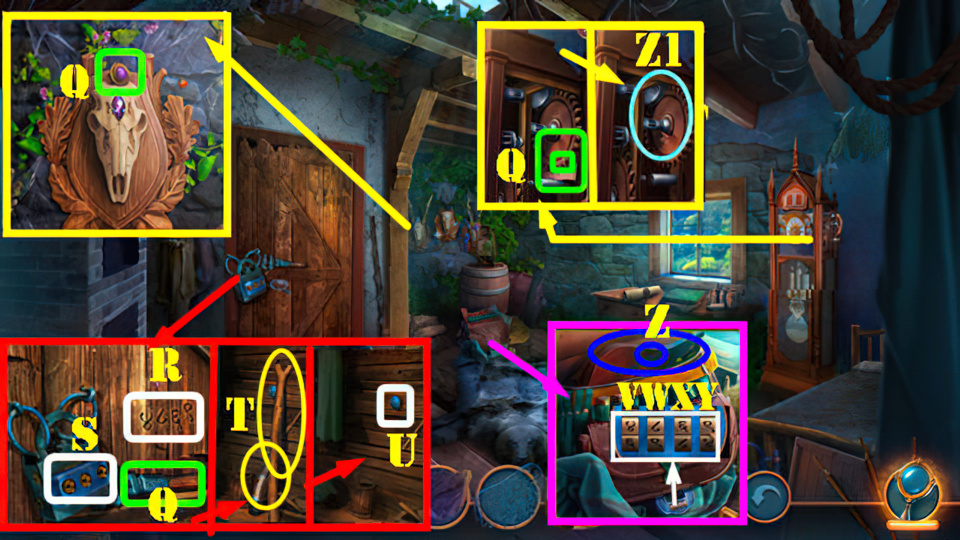
- Take ADJUSTABLE WRENCH, BUTTONS 2/3, BUTTONS 3/3, and PIECE OF PAPER (Q).
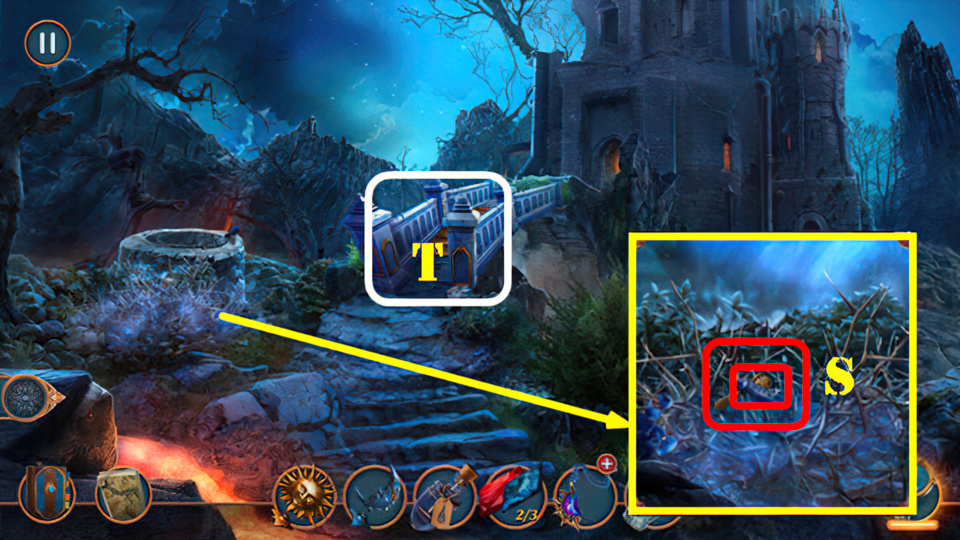
- Use PIECE OF PAPER and PIECE OF COAL (R), receive CODE. Place BUTTONS 3/3 (S).
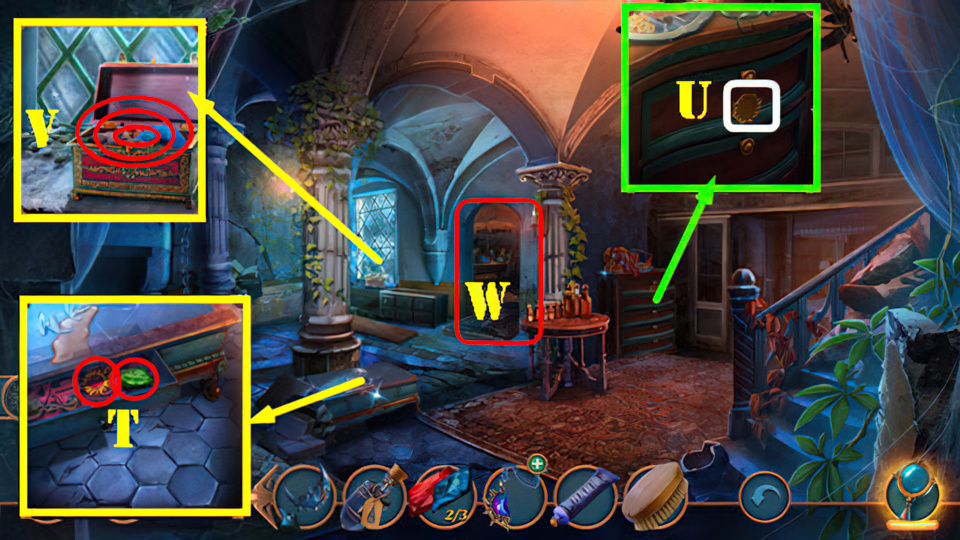
- Take STICK and ANTLERS (T). Use ADJUSTABLE WRENCH (U), receive BOLT.
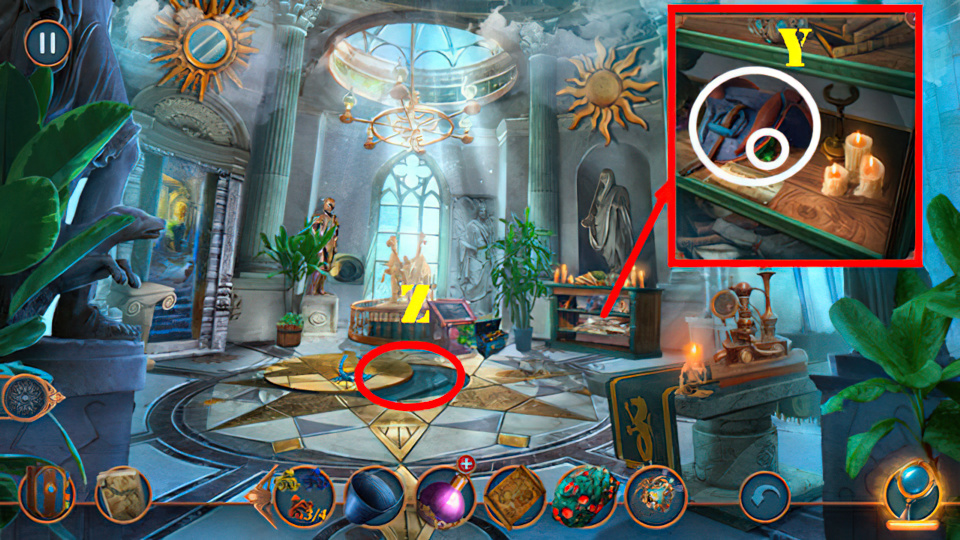
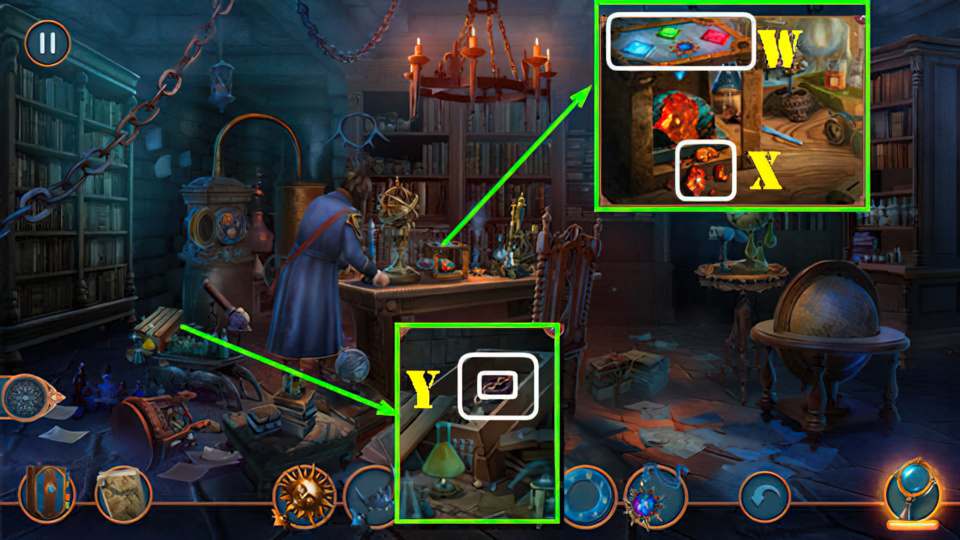
- Place CODE, select (Vx2-W-Xx2-Yx2). Take BELLOWS and COGS 2/2 (Z).
- Place COGS 2/2 (Z1).
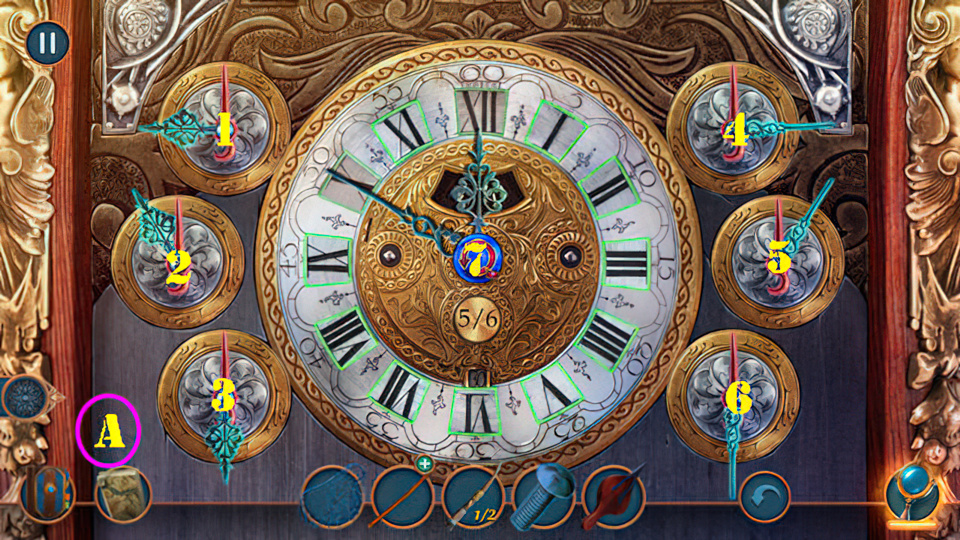
- Easy and Hard Solutions (A): (5-7)-(5-2-7)-(5-2-7)-(5-2-7)-(3-6-7).
- Take BALL.
- Go back twice.
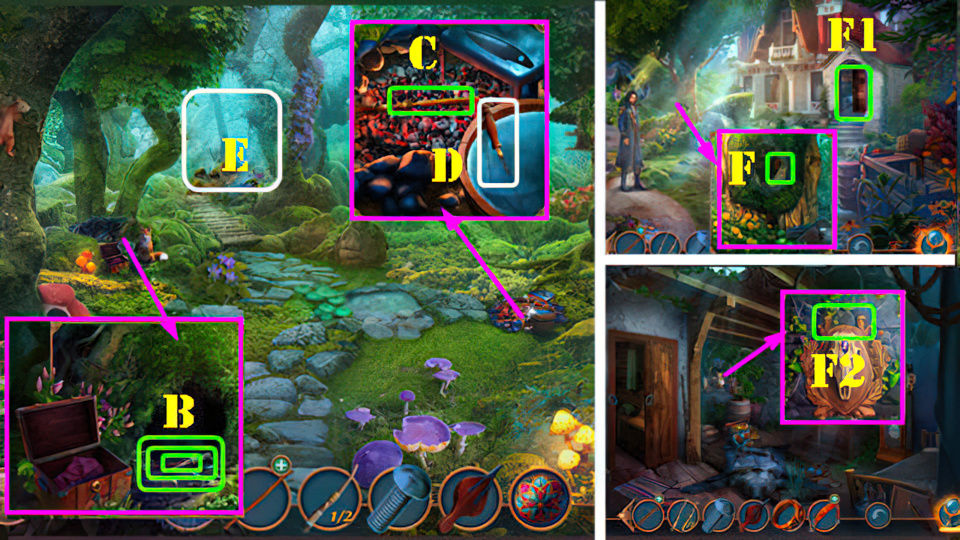
- Use BALL, take IRON STAMP, ANTLERS 2/2, and OVEN FORK (B).
- Use OVEN FORK (C), take SKEWER (D).
- Go (E).
- Use SKEWER (F), receive KNIFE HANDLE.
- Go (F1).
- Place ANTLERS 2/2 (F2).
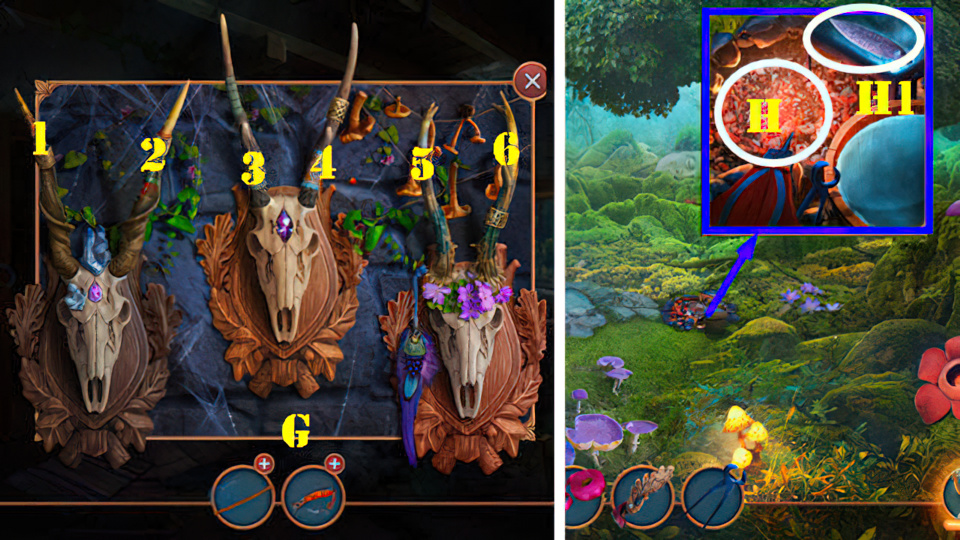
- Easy Solution (G): (5-6-2-1).
- Hard Solution (G): (2-1-3-6-4-1).
- Take RIBBON, STATUETTE, and PINCERS.
- Return to Ancient Forest.
- Place BELLOWS, IRON STAMP, and PINCERS (H). Take BLADE (H1).
- Return to Huntes Hut.
- BOLT and BLADE on KNIFE HANDLE, receive POCKETKNIFE.
- Use POCKETKNIFE, take METAL SPONGE and LIZARD FOOD (I).
- Go back.
- Use LIZARD FOOD (J).
- Play puzzle.
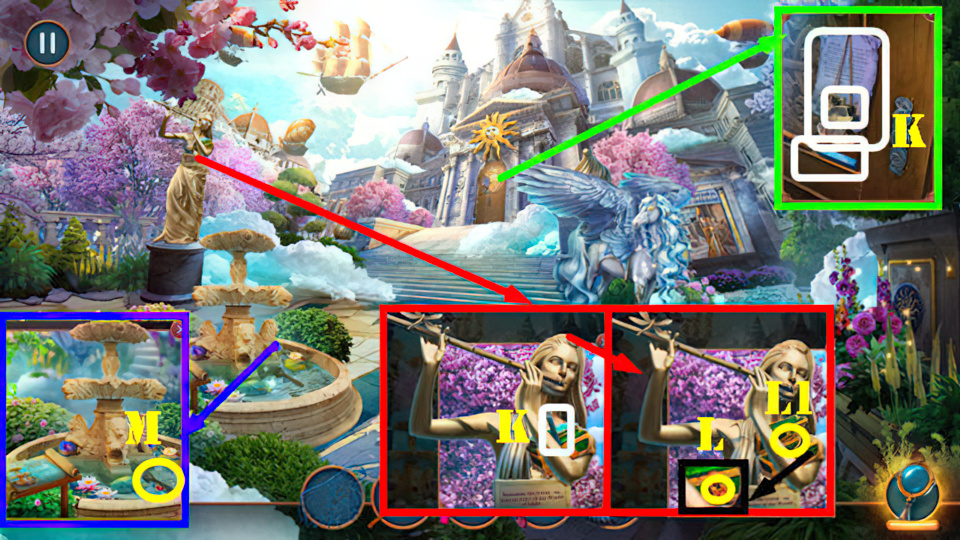
- Take LOCKPICKS 1/2, Note, TILES 1/4, and CHISEL (K).
- Use STATUETTE and CHISEL (L), take NECKLACE (L1).
- NET, RIBBON, and NECKLACE on STICK, receive SCOOP NET.
- Use SCOOP NET (M), receive SCREW and BRUSH.

- Use BRUSH, take TILES 2/4 and LOCKPICKS 2/2 (N).
- Use LOCKPICKS 2/2 (O).
- Enter (P).
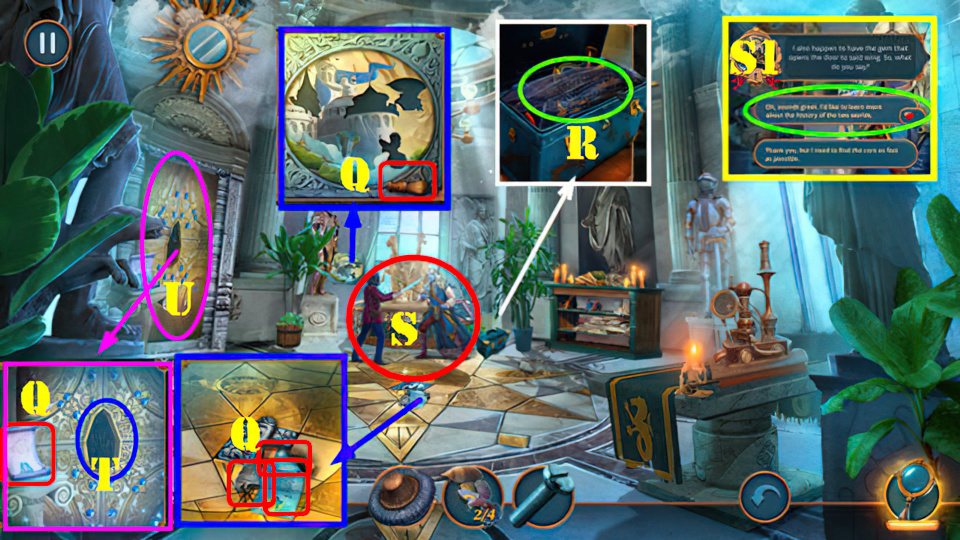
- Take 2 Notes, SHAVING BRUSH, TILES 3/4, and SOLVENT (Q).
- Use METAL SPONGE and SOLVENT, take NET (R).
- Use NET (S). Select first statement (S1), receive GEM.
- Place GEM (T).
- Enter (U).
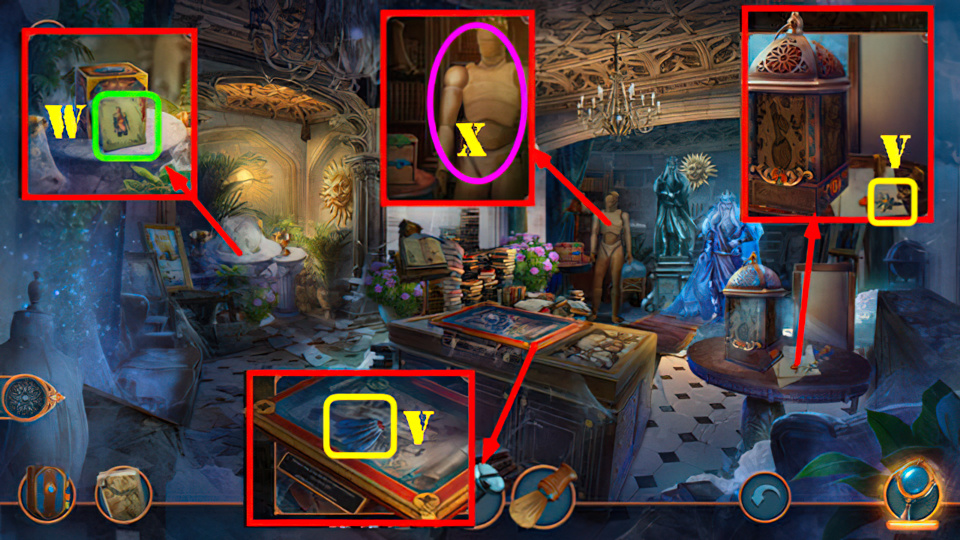
- Take STAR AMULETS 1/2 and BUNCH OF FEATHERS (V).
- Use BUNCH OF FEATHERS, take PICTURE OF MANNEQUIN (W).
- Use PICTURE OF MANNEQUIN (X).
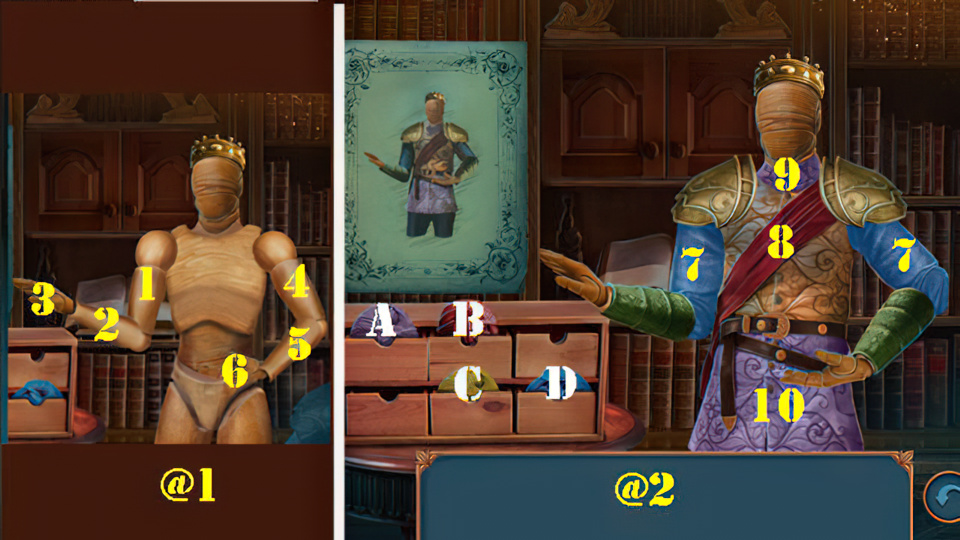
- Easy Solution (@1): (2×2)-(4×3)-(5×2)-(6×3).
- Easy Solution (@2): (D-7)-(D-7)-(B-8)-(A-9)-(A-10).
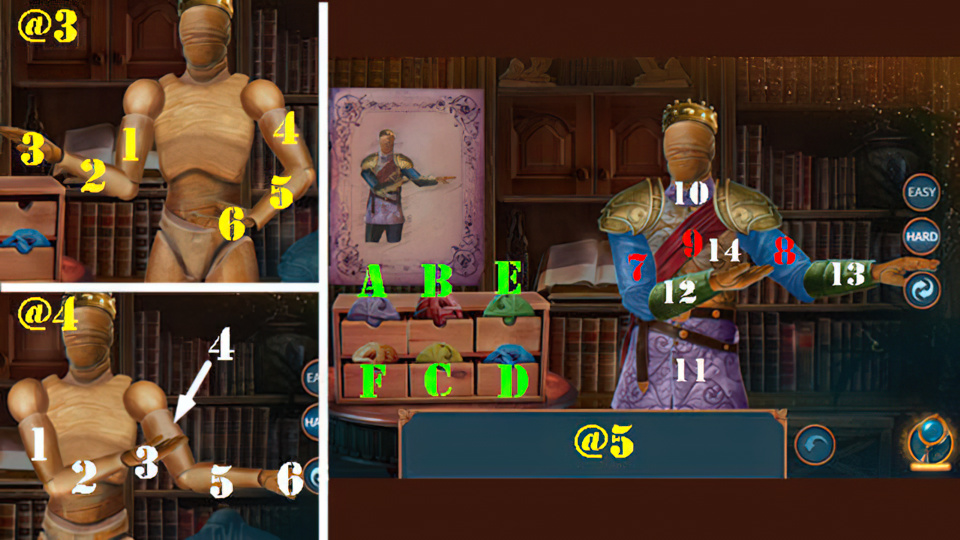
- Hard Solution (@3): (2×2)-(4×3)-(5×2)-(6×3).
- Hard Solution (@4): (1×3)-(2×4)-(5×4)-(6).
- Hard Solution (@5): (D-7)-(D-8)-(B-9)-(A-10)-(A-11)-(E-12)-(E-13)-(F-14).
- Take SUN STATUETTE and RESIN.
- Go back.

- Place TILES 4/4 (G).
- Solution: (H).
- Take EYEPIECE and RING.
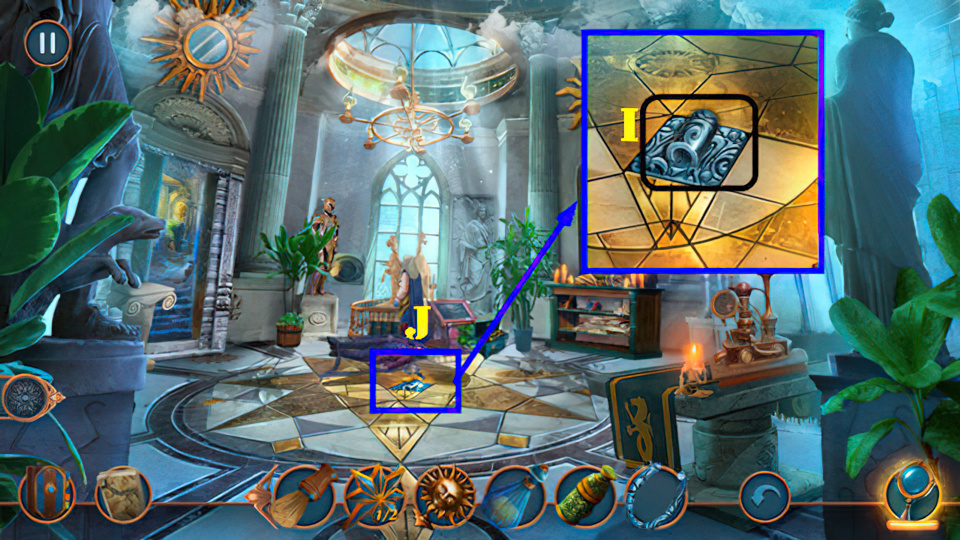
- Place RING (I).
- Go (J).
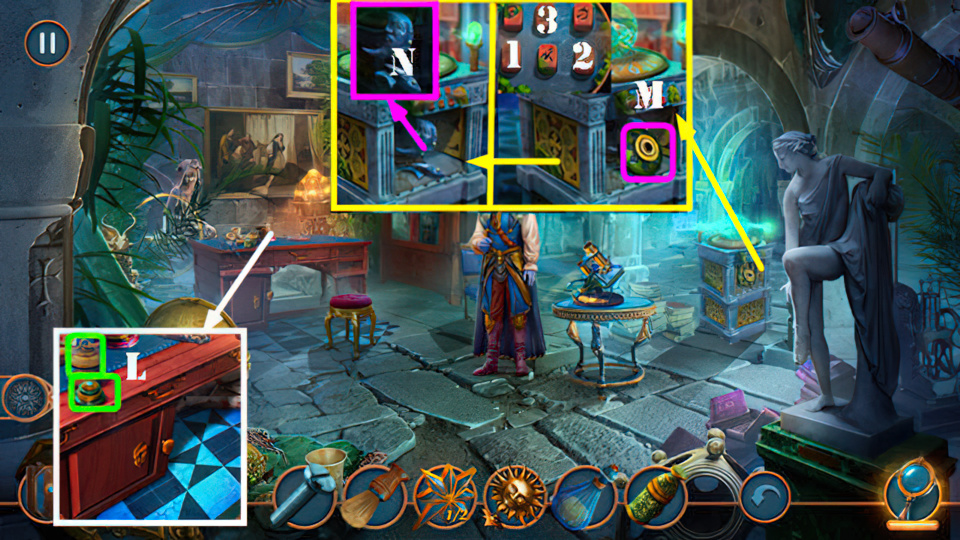
- Take DIAPHRAGM and LOOSE POWDER (L).
- Use LOOSE POWDER and SHAVING BRUSH. Select 1-2-3.
- Take COG (M). Use RESIN (N), receive MOON STATUETTE.
- Use SCREW and COG (O), take INLAYS 1/4, STAR AMULETS 2/2, and SCOOP (O1).
- Use SCOOP, take SHEET MUSIC 1/2 and FIRE STRIKER AND FLINT (P).
- Go back.
- Use FIRE STRIKER AND FLINT, take CRYSTAL SPHERE (Q).
- Go back.
- Place CRYSTAL SPHERE (R), take FRESCO PART (S).
- Place FRESCO PART, take INLAYS 2/4, BUCKET, and SHEET MUSIC 2/2 (T).
- Place SHEET MUSIC 2/2 (U).
- Easy Solution: (2-4)-(1-4)-(2-3-4)-(1-3-4).
- Hard Solution: (2-4)-(2-3-4)-(1-4)-(3-4)-(1-3-4)-(2-4).
- Take BOTTLE OF PERFUME, MAP OF THE WORLD OF LIGHT, and MIRROR.
- Return to Basement.
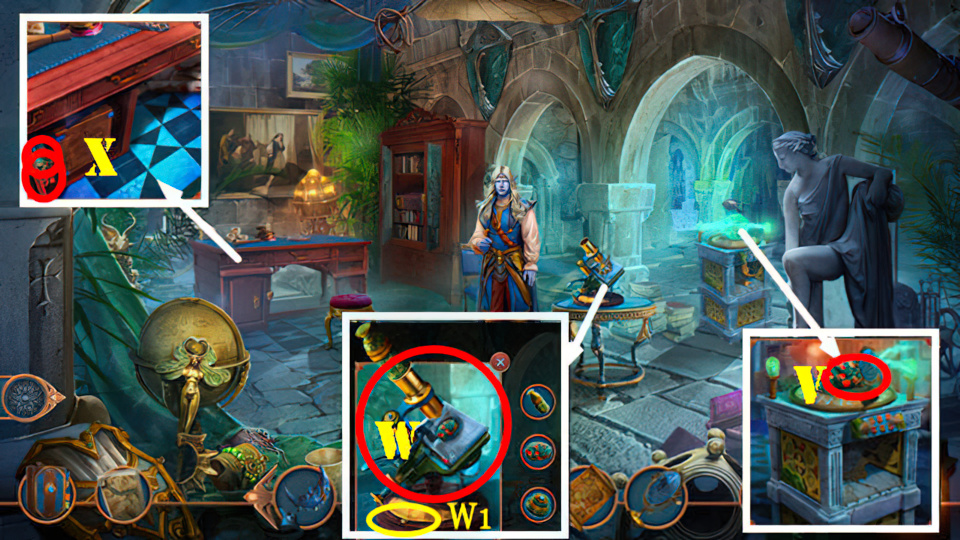
- Place MIRROR, take CORE (V).
- Place EYEPIECE, DIAPHRAGM, and CORE (W). Play puzzle, receive CORE.
- Take KEY (W1).
- Use KEY, take INLAYS 3/4 and COMB (X).
- Go back.
- Use COMB, take SADDLE and INLAYS 4/4 (Y).
- Go (Z).
- Place INLAYS 4/4, take Note and OLD SAW (A).
- Use OLD SAW, take FISHING LINE and REINS (B).
- Return to Secret Wing of the Museum
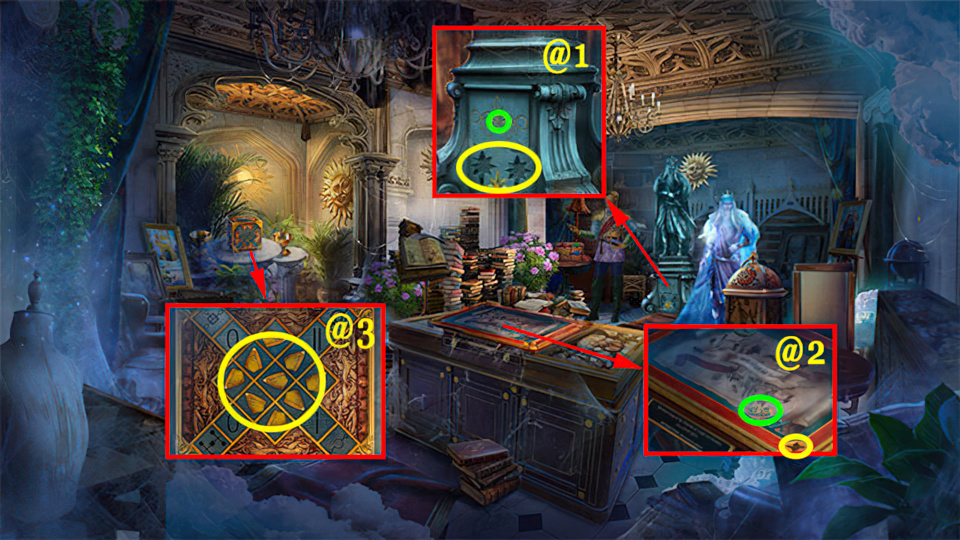
- Use STAR AMULETS 2/2, take INSTRUCTIONS (@1).
- Place MOON STATUETTE and SUN STATUETTE, take EXQUISITE KEY (@2).
- Place INSTRUCTIONS (@3).
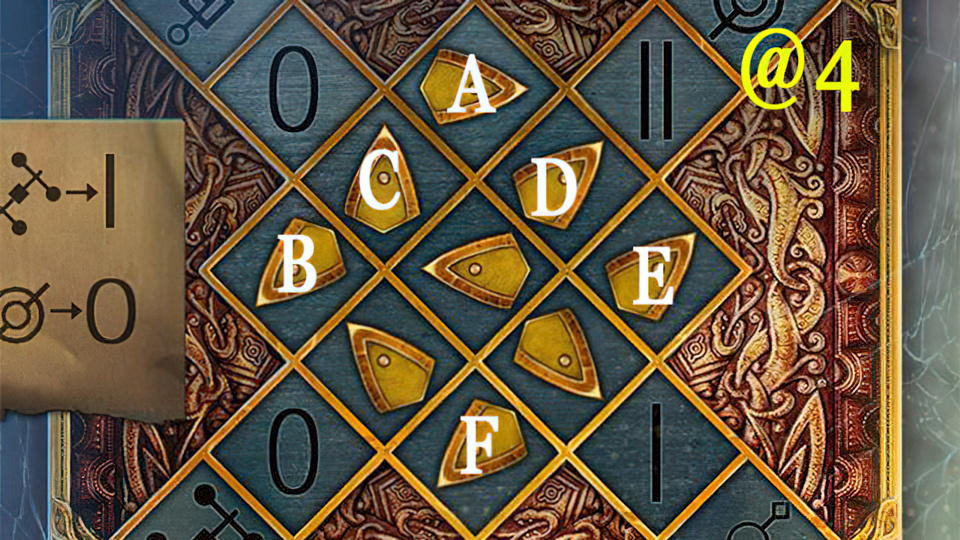
- Easy and Hard Solutions (@4): (Ax4)-(Bx3)-(Cx7)-(D)-(Ex3)-(F).
- Take FLORAL TOKEN.
- Use EXQUISITE KEY, use FLORAL TOKEN (@5). Play puzzle
- Go back twice.
- Place MAP OF THE WORLD OF LIGHT, SADDLE, and REINS (C).
- Take METAL PLANK and ROPE (D).
- Open cover, use BUCKET and ROPE (E), take METRONOME and PUMP (E1).
- PUMP on BOTTLE OF PERFUME, receive PERFUME.
- Use PERFUME, take PLANKS (F).
- Place PLANKS (G).
- Easy Solution (H): (1-5).
- Hard Solution (I): (1-8).
- Go forward to the Tower.
- Take COGS 1/3, HEX KEY, WATER and BOOKS 1/2 (J).
- HEX KEY on METRONOME,
- Receive METRONOME BASE.
- Remove plank and sheet, place METAL PLANK and METRONOME BASE (K).
- Go (L).
- Take Note, PLIERS. MAGIC STONES 1/3, COGS 2/3, and BOOKS 2/2 (M).
- Use BOOKS 2/2, take PENDANT PART and MAGIC STONES 2/3 (N). Use PLIERS (O), receive HOOK.
- HOOK on FISHING LINE, receive FISHING LINE AND HOOK.
- Use FISHING LINE AND HOOK (P), receive COGS 3/3.
- Go back twice.
- Place COGS 3/3 (Q).
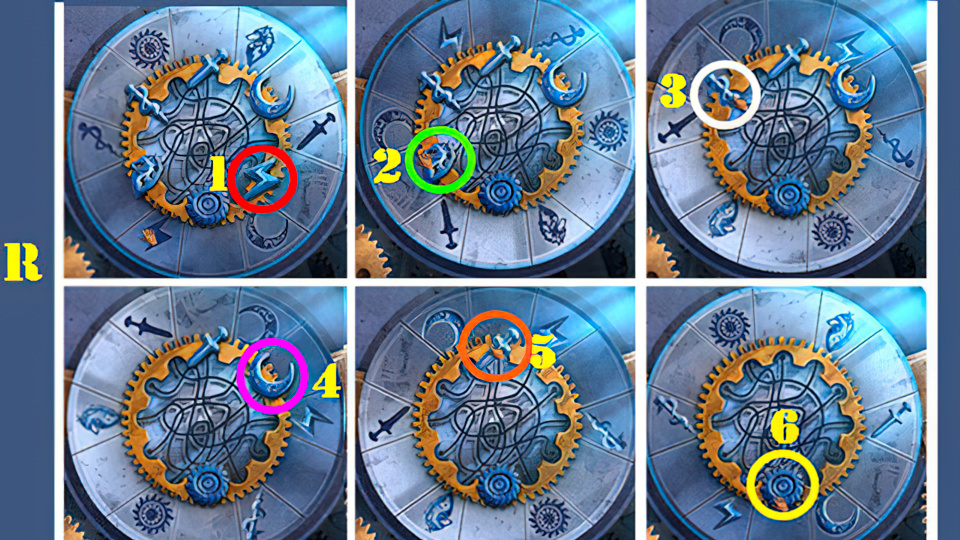
- Easy and Hard Solutions (R): position each disk as shown for each step and then select (1-6).
- Take GLOVE.
- Use GLOVE, take GLUE and BOAR-BRISTLE BRUSH (S).
- Go (T).
- Use WATER and BOAR-BRISTLE BRUSH, take MAGIC STONES 3/3 and SUN CHARM (T).
- Place SUN CHARM (U). Play puzzle, receive GRIFFIN FIGURINE.
- Place GRIFFIN FIGURINE, take PIECE OF BURLAP, DIAL, and PENDANT SHARD (V).
- Go (W).
- GLUE and PENDANT SHARD on PENDANT PART, receive PENDANT.
- Place MAGIC STONES 3/3 and PENDANT (W), take CORE FRAGMENTS (X).
- Receive SILVER FORK.
- Use SILVER FORK, take CHAIN and BELT (Y).
- Go back twice.
- Use PIECE OF BURLAP and BELT (A), take AWL (B).
- Go (C).
- Use AWL, take CLOCK HANDS and CARABINER (D).
- Use CHAIN and CARABINER (E), take LEVER (F).
- Go (G).
- Place DIAL, CORE FRAGMENTS, CLOCK HANDS, and LEVER (H).
- Easy Solution (I).
- Hard Solution (J).
Congratulations! You have completed the game Maze of Realities 2: Reflection of Light.


