
Maze of Realities 2: Reflection of Light – The walkthrough of the game begins with the fact that archaeologists discover that a meteorite fell into the Grand Canyon in Arizona and scientists come to its place. Along the way, the canyon where the meteorite fell, the archaeologists mysteriously disappear. You and your niece Emma join a search party to find missing scientists. Once you find their abandoned camp, a meteorite transports you to another universe. Now, in order to save your friends, you must unravel the mystery of the new universe, find clues and collect all the artifacts. If you are stuck and do not know how to get through one of the locations, on our website you can watch the walkthrough of the game Maze of Realities 2: Reflection of Light, and save the scientists.
Maze of Realities 2: Reflection of Light – Walkthrough
Here you can watch the complete walkthrough of the game Maze of Realities 2: Reflection of Light, namely the main story and the bonus chapter.
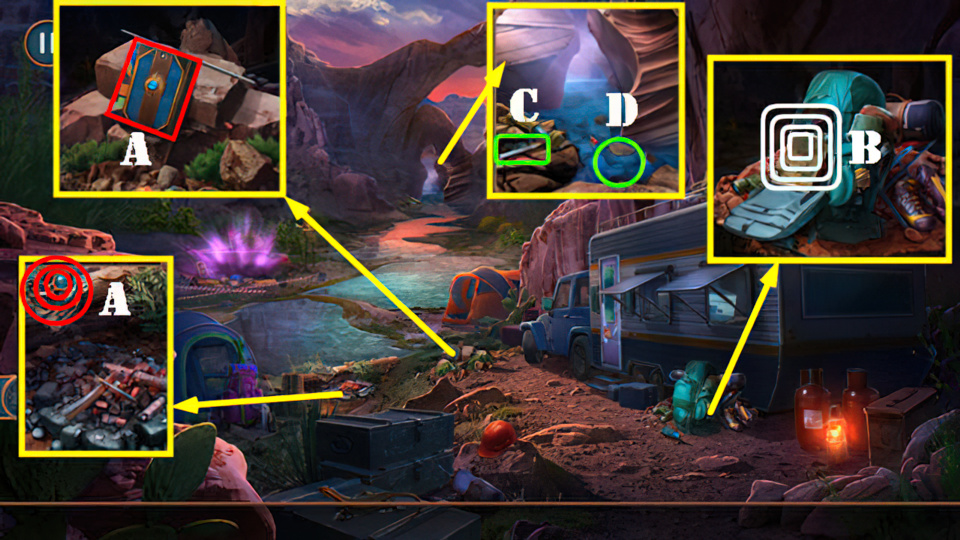
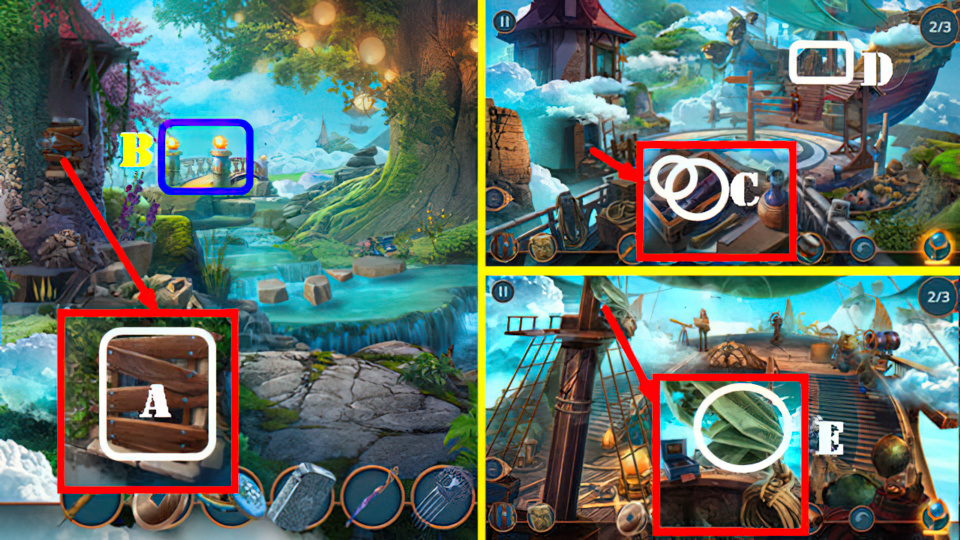
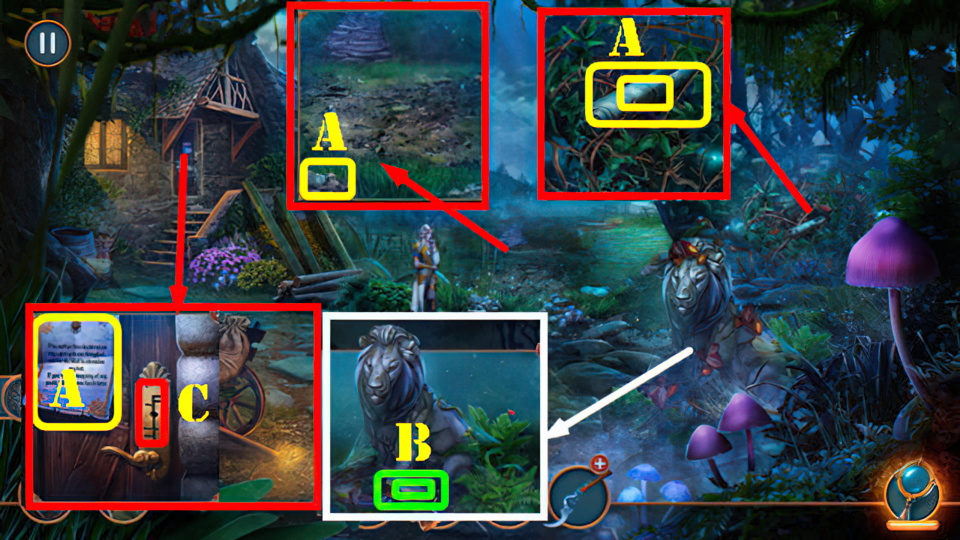
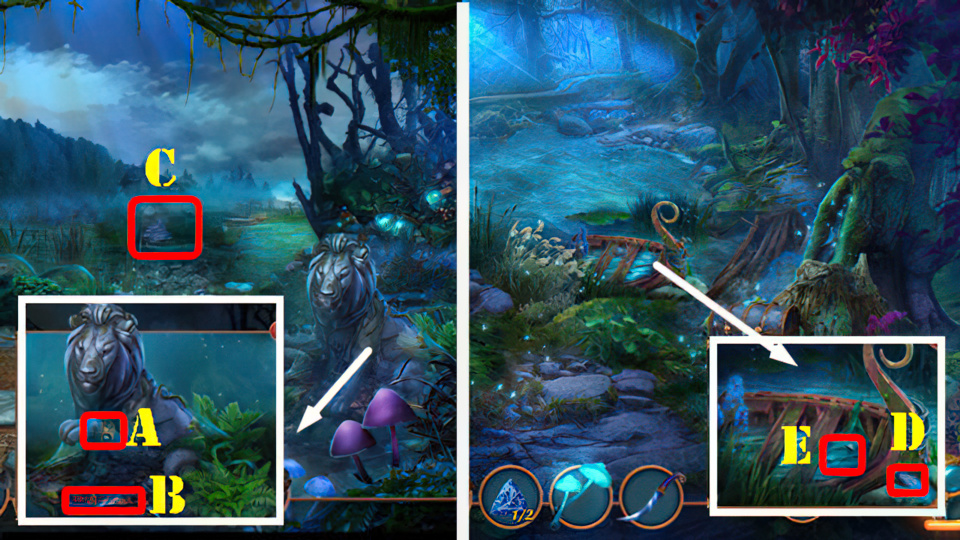
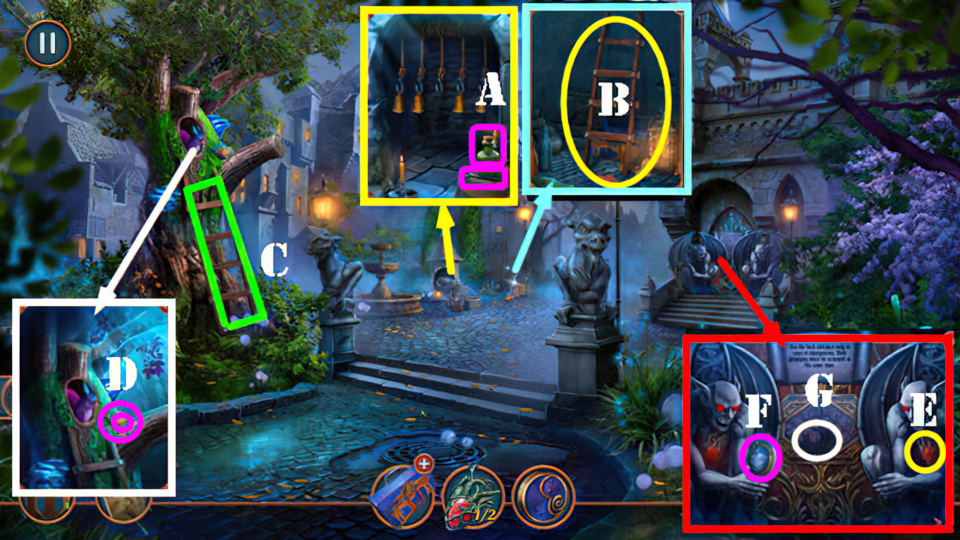
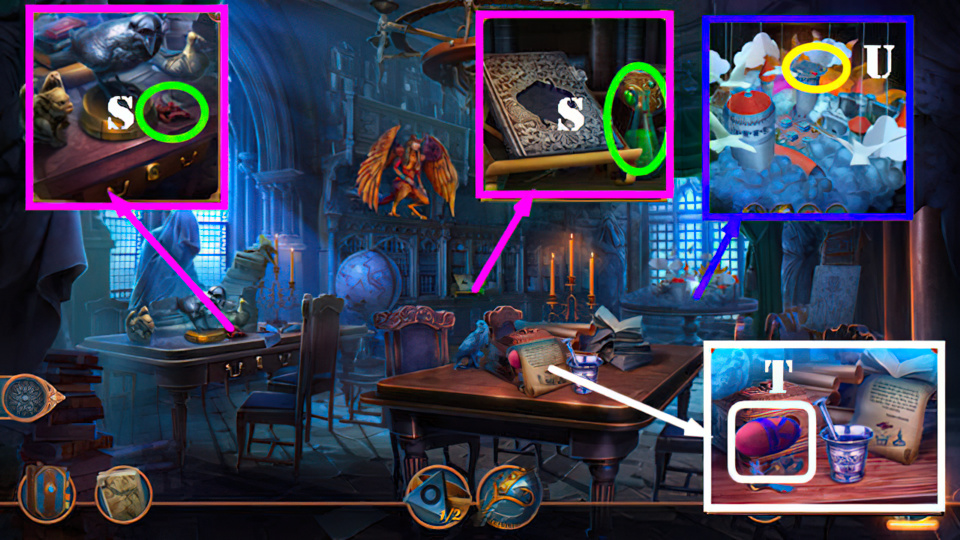
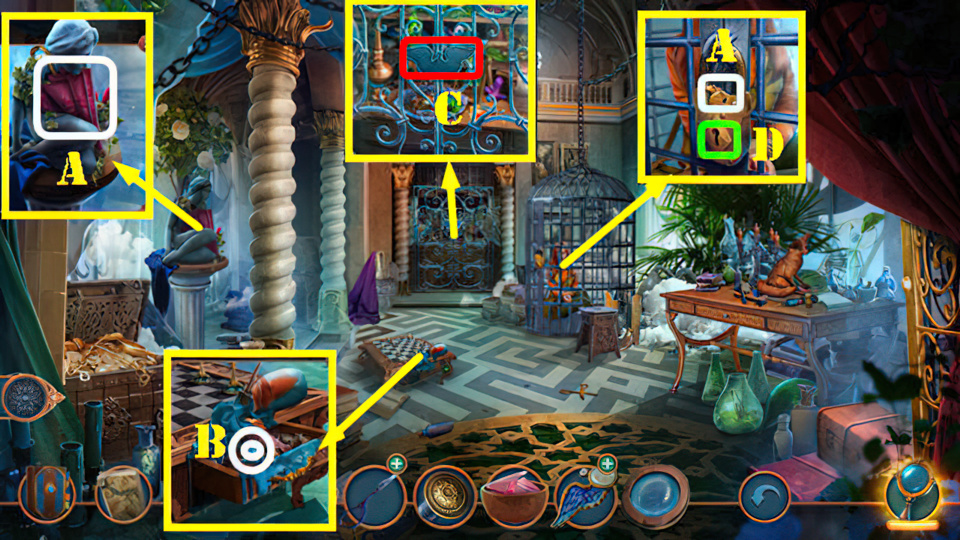
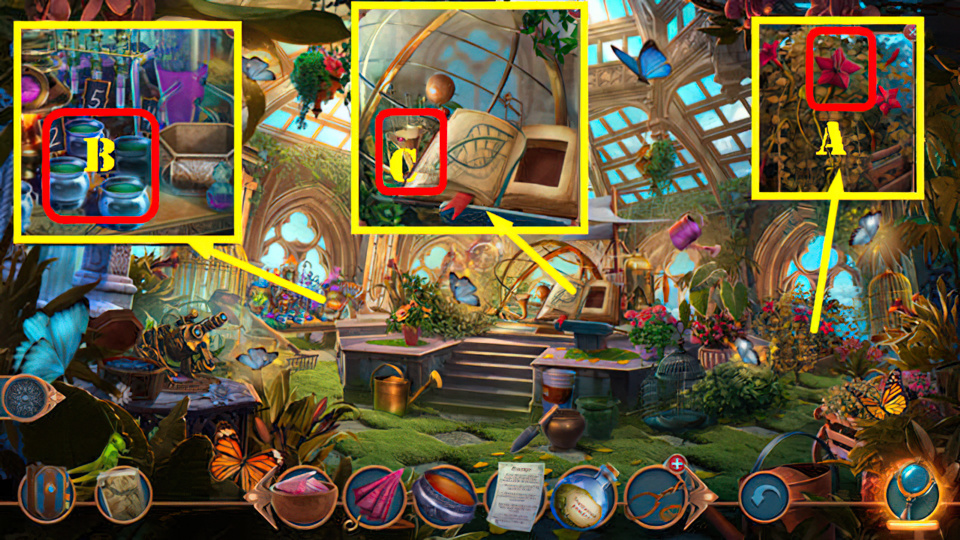
- Take Mirror, CLEAR STAMP, NECKERCHIEF, and Journal (A).
- Open pocket, take Map, Notebook, CAMERA, EMPTY FLASK, and BLOWTORCH (B).
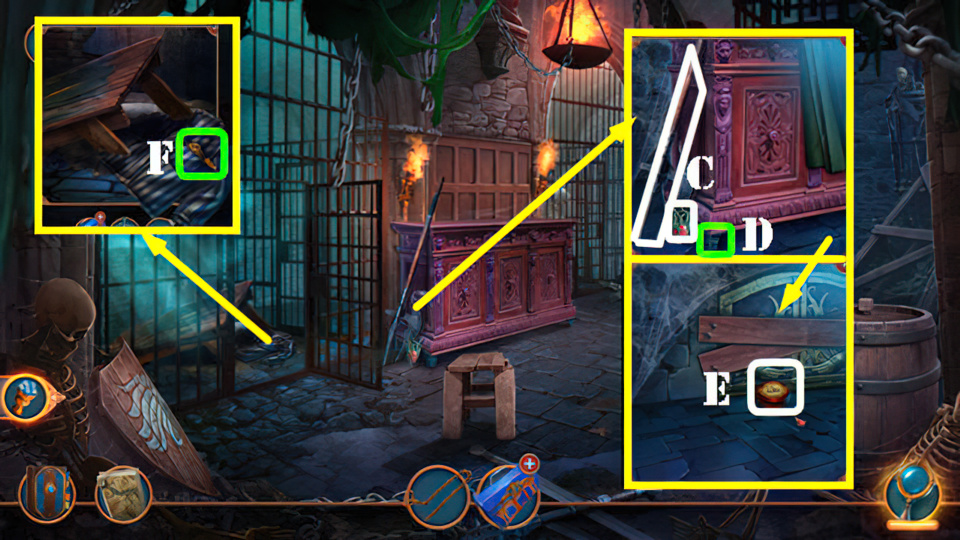
- Use NECKERCHIEF, take DIAMOND FILE (C).
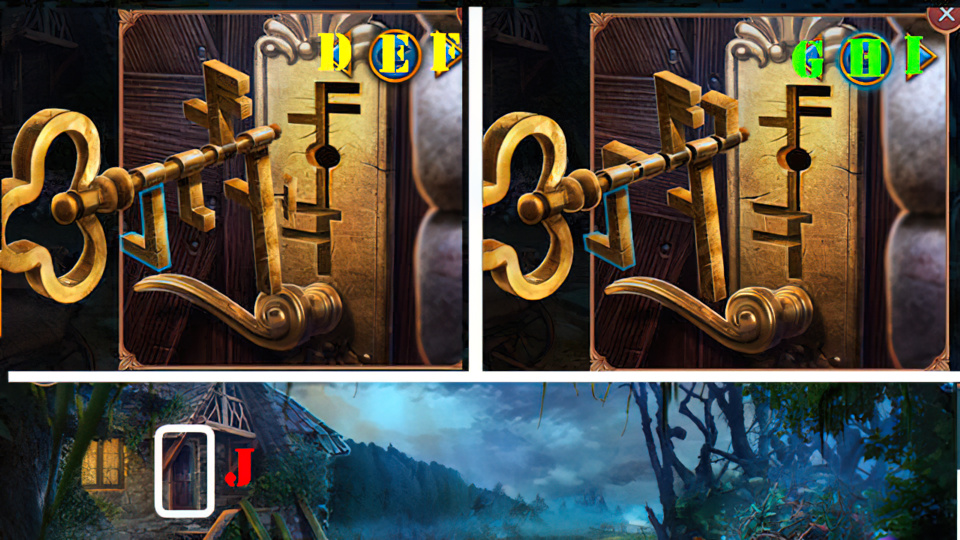
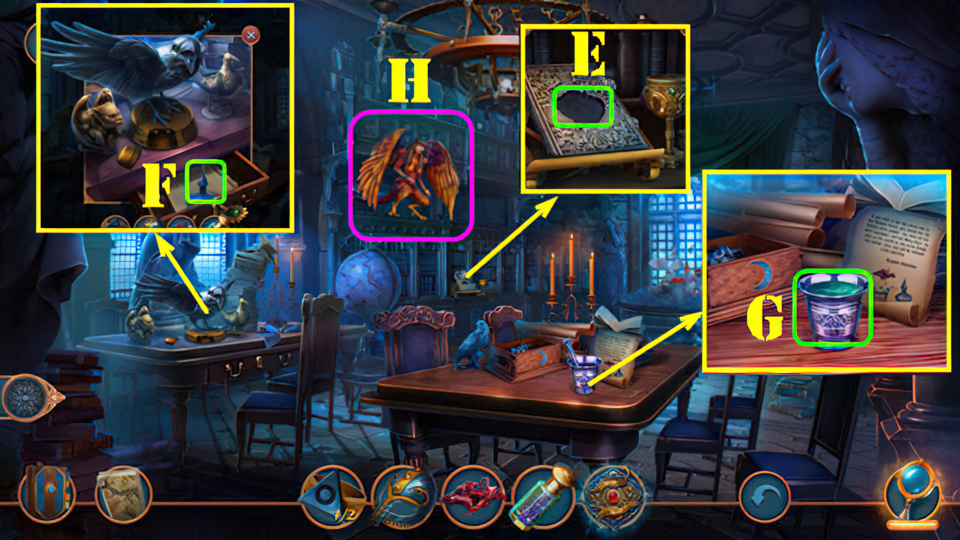
- Use EMPTY FLASK (D), receive WATER.
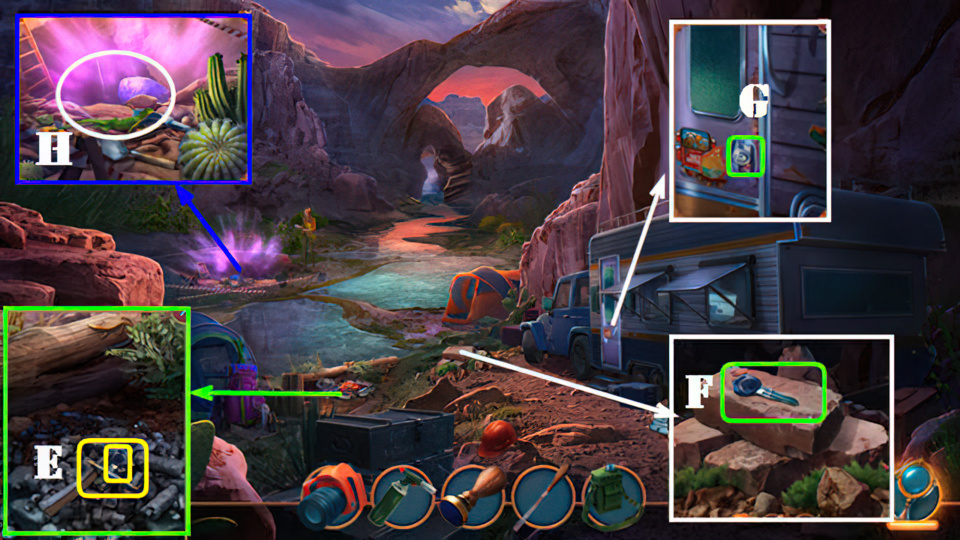
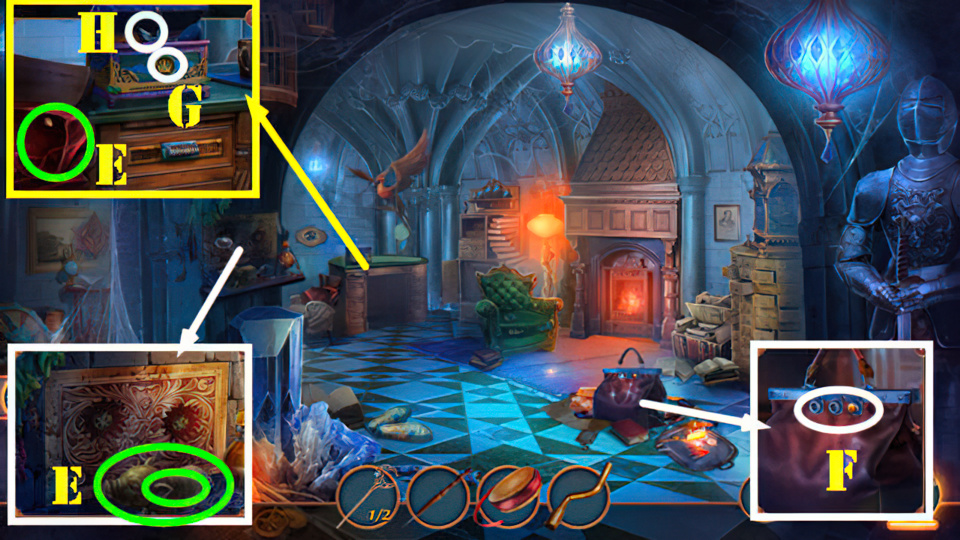
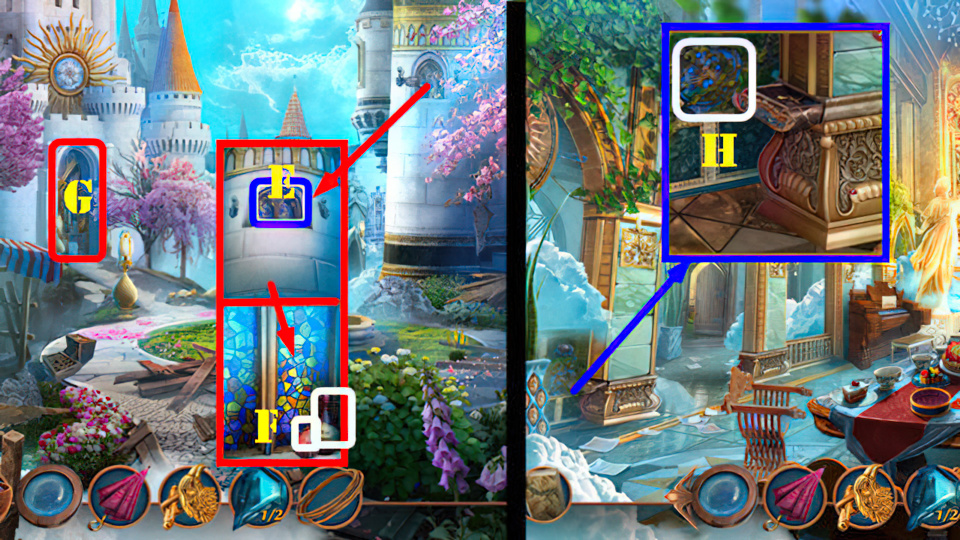
- Use WATER, take FOUNTAIN PEN and CRACKED KEY (E).
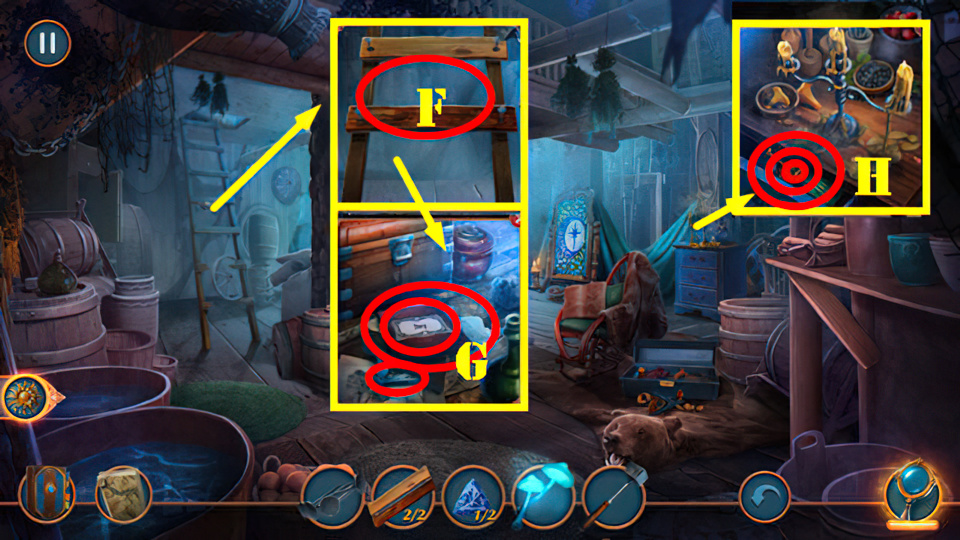
- Use BLOWTORCH, DIAMOND FILE, and CRACKED KEY, take KEY (F).
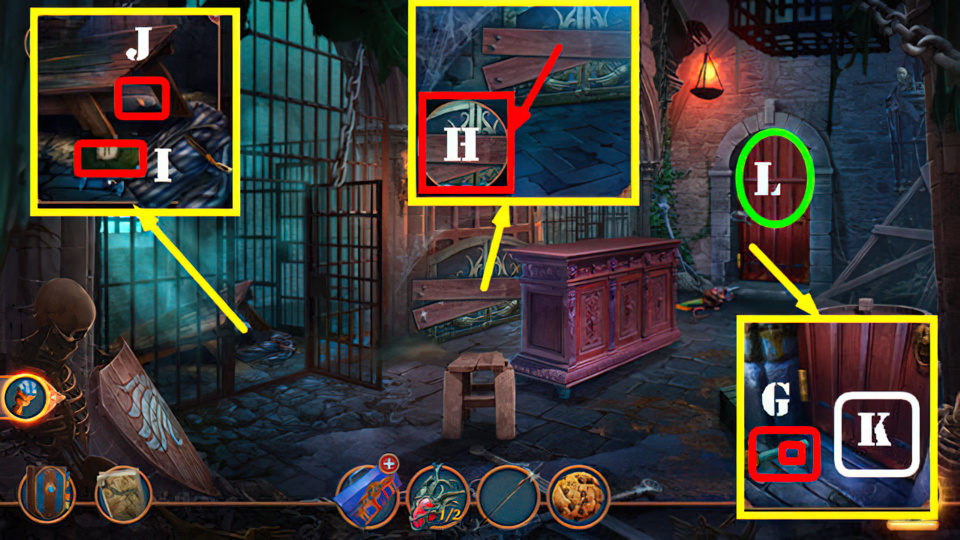
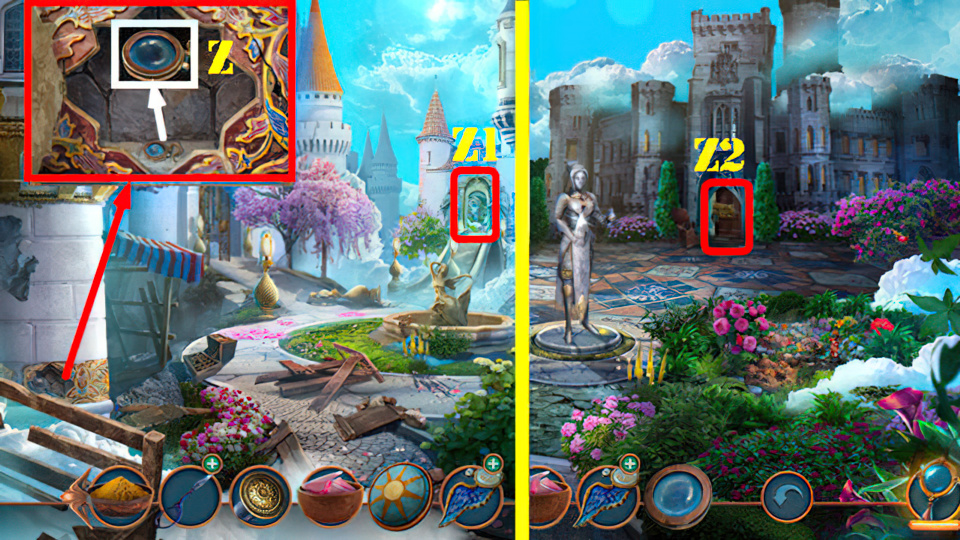
- Use KEY (G), play puzzle, receive DETECTOR.
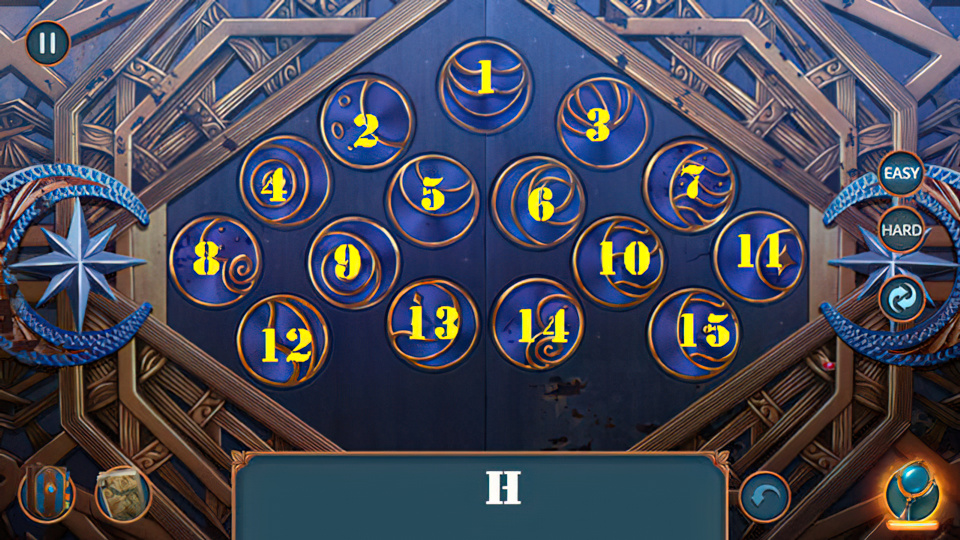
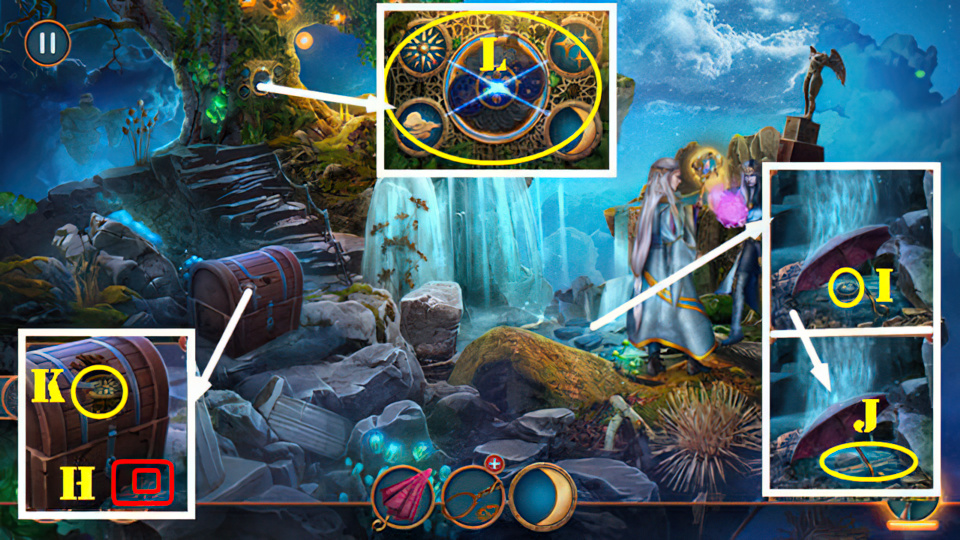
- Use DETECTOR (H).
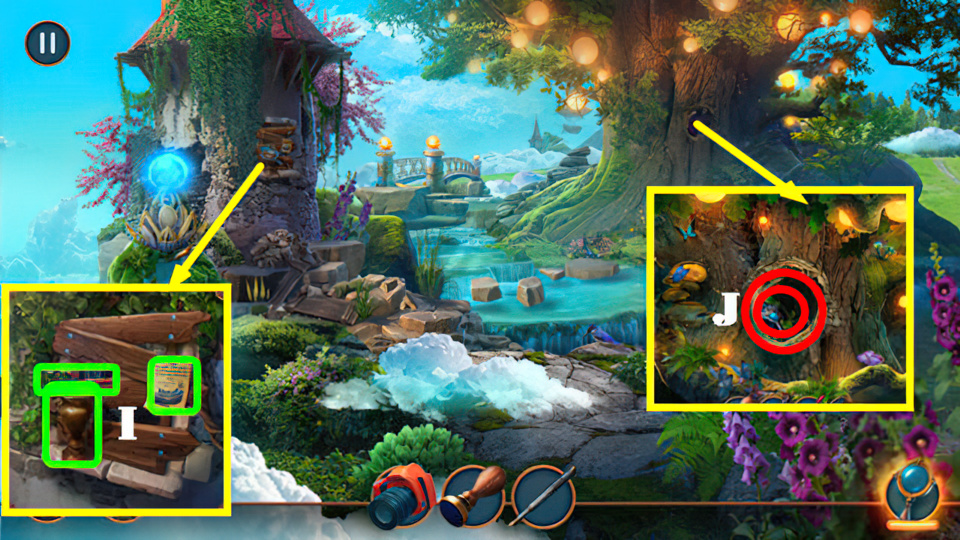
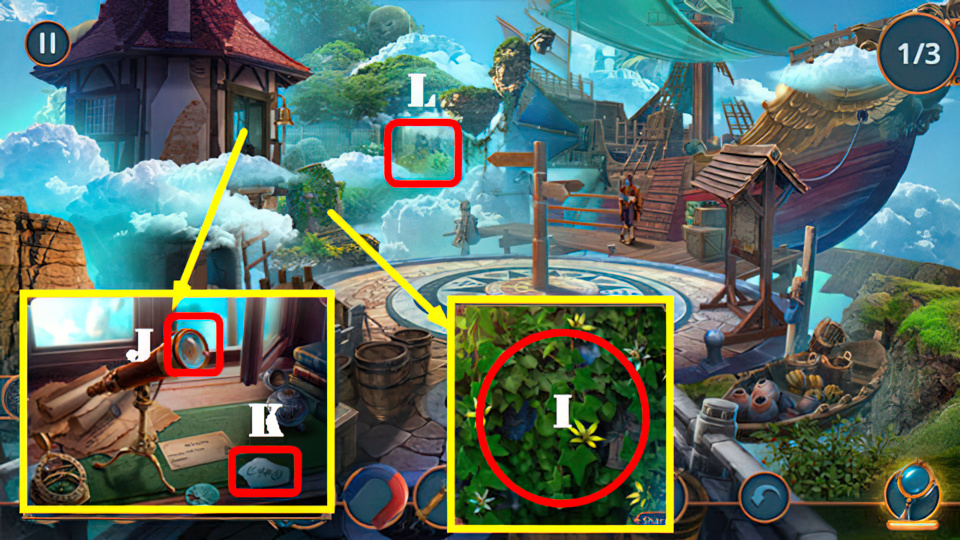
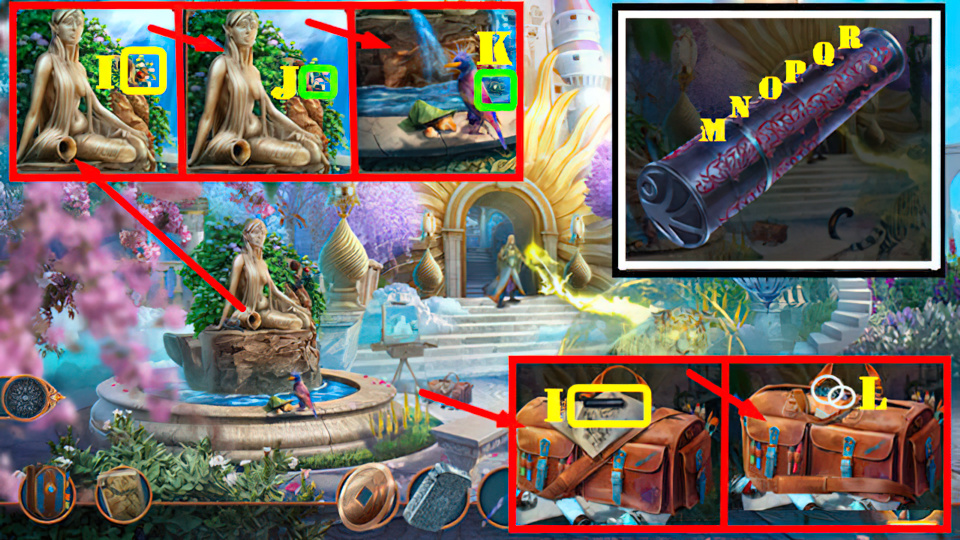
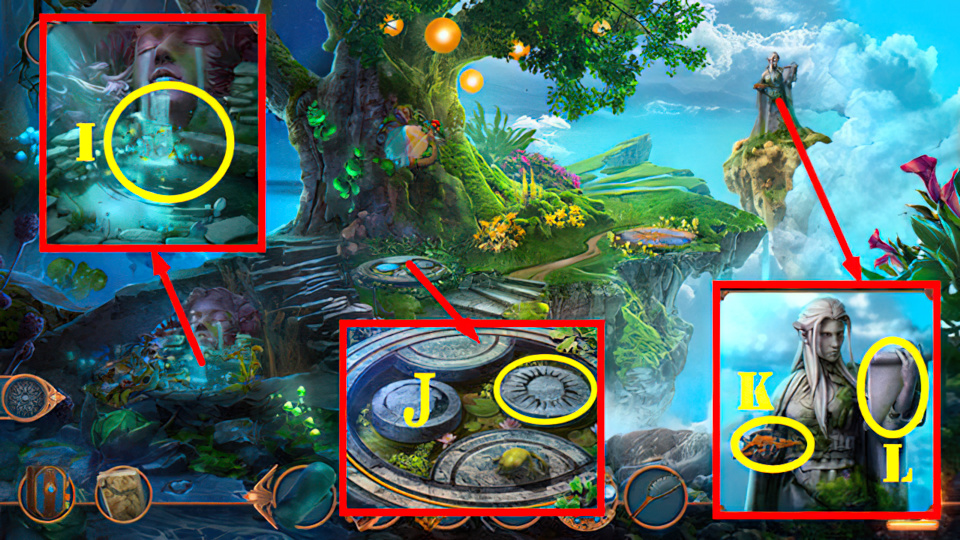
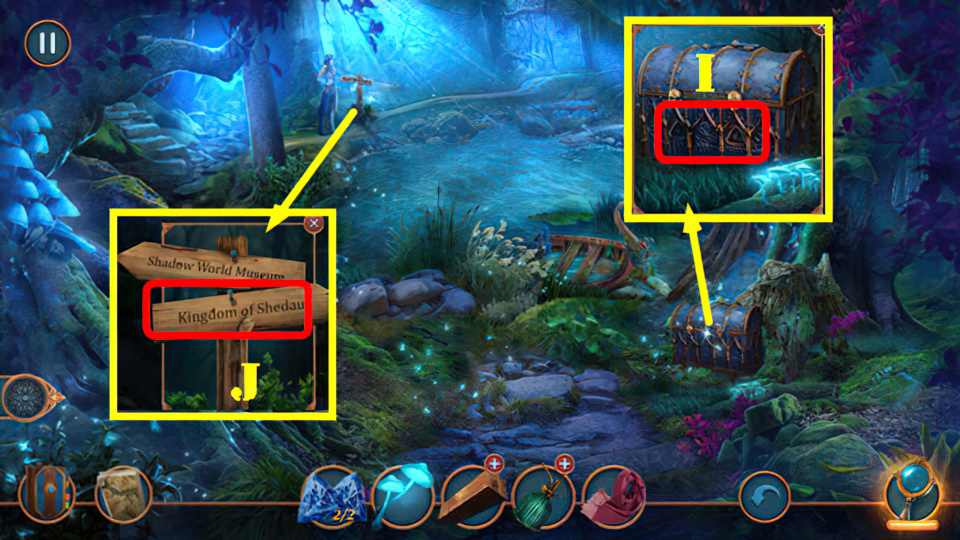
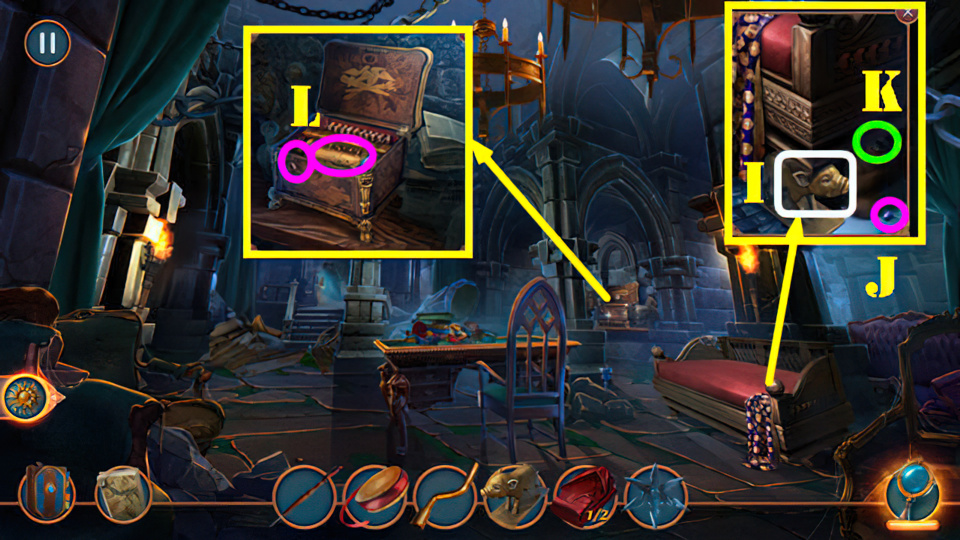
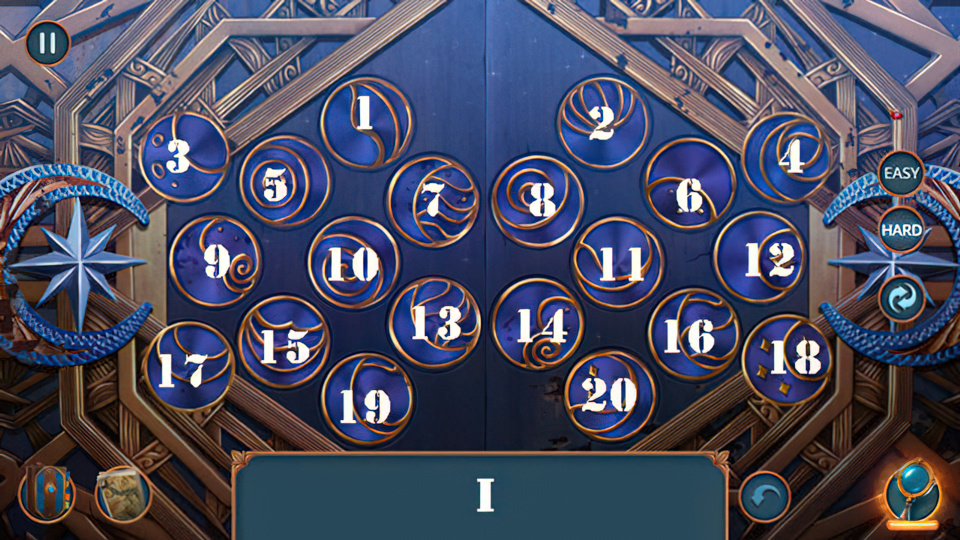
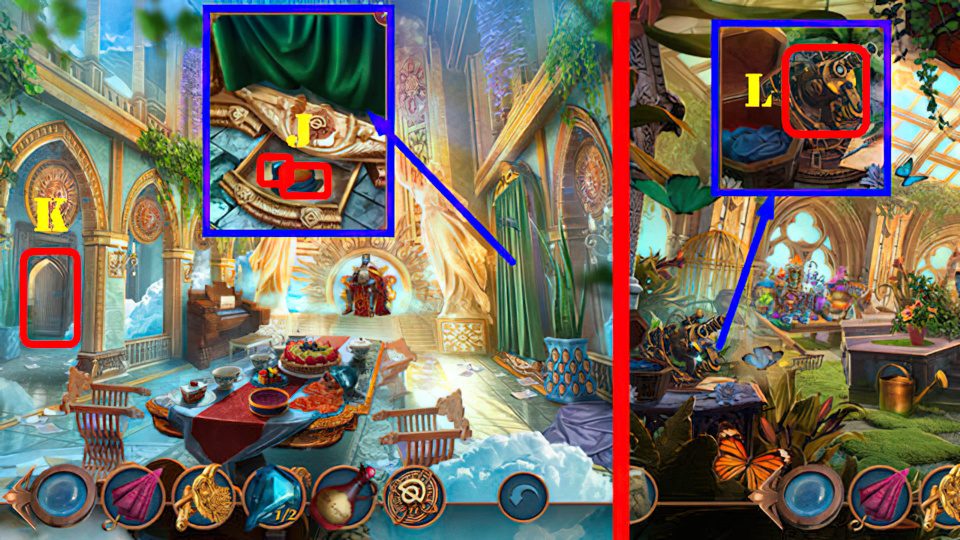
- Take TROWEL, VASE, and Note (I).
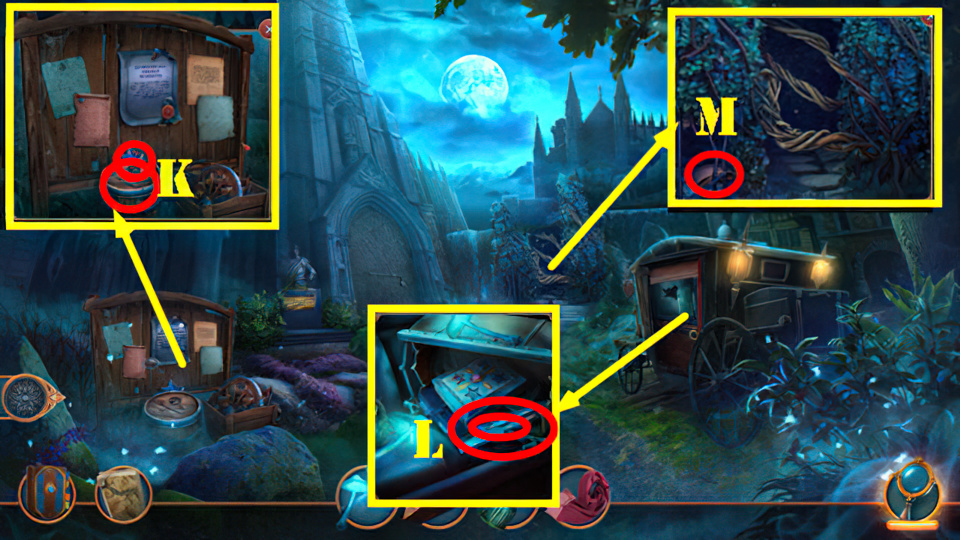
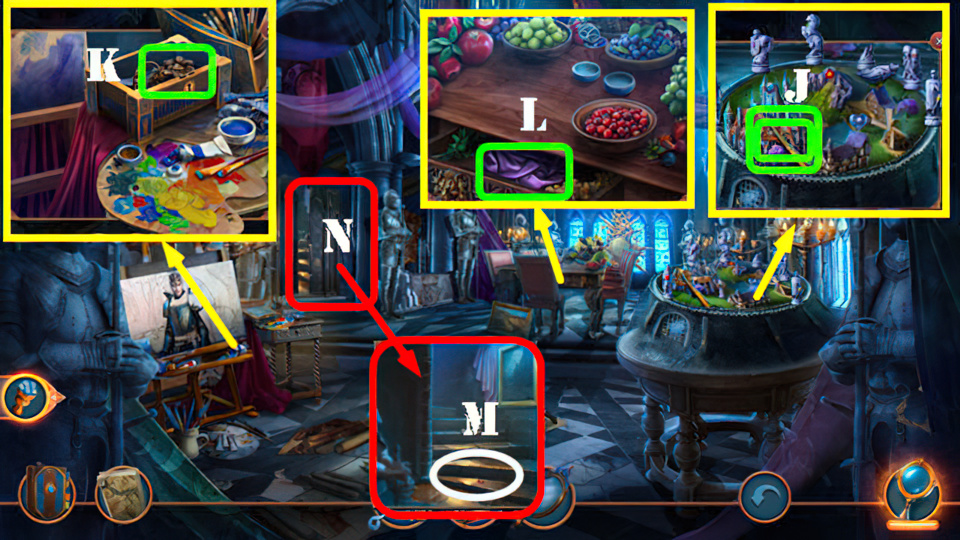
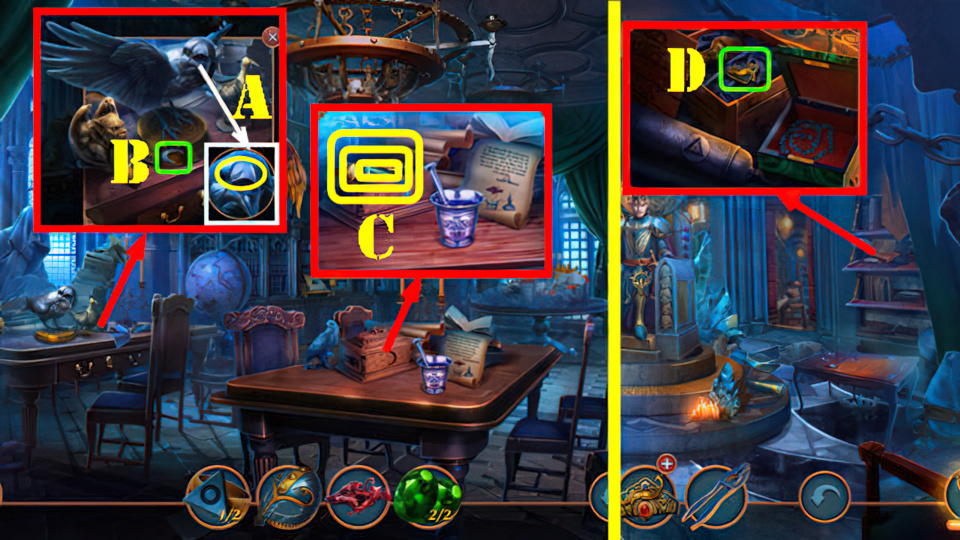
- Use CAMERA, take HAIRPIN and LONG VINE (J).
- Select LONG VINE, receive LASSO.
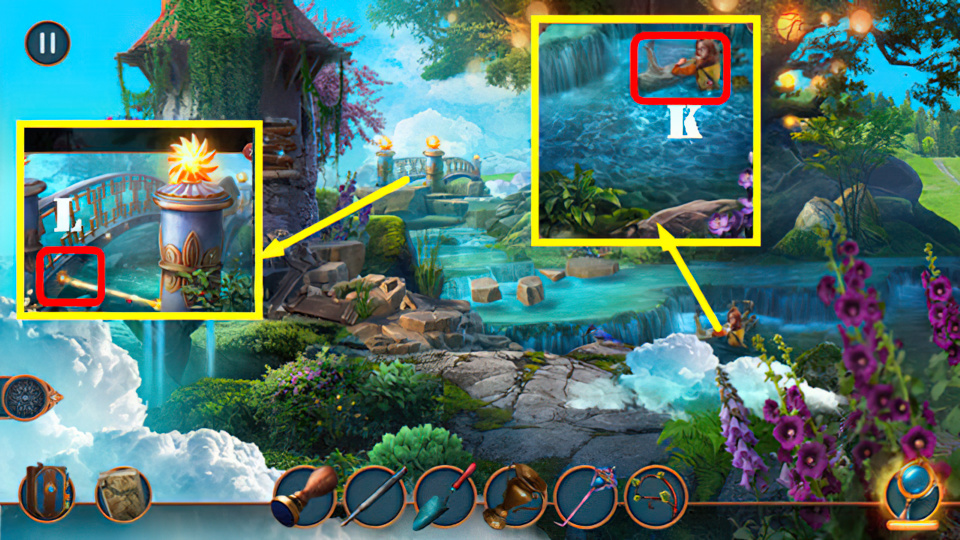
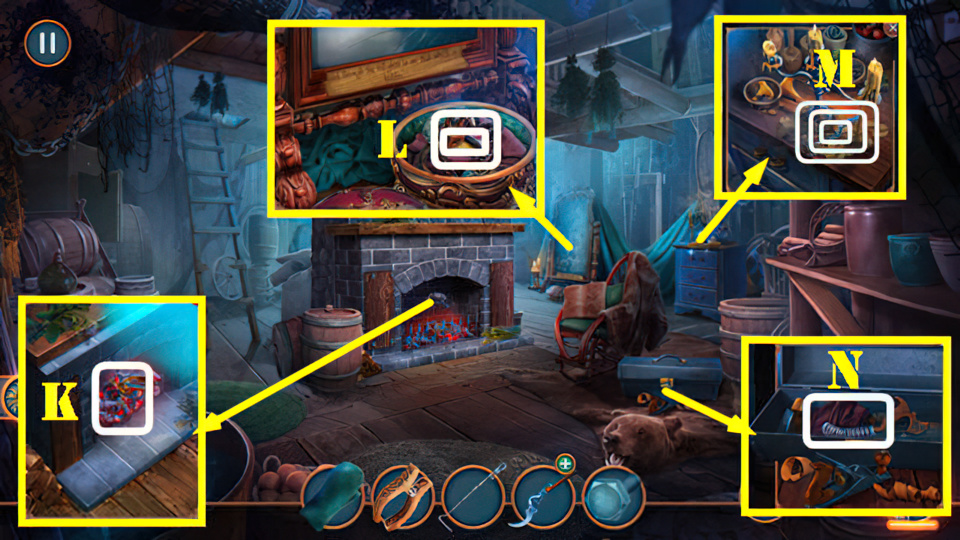
- Use LASSO (K), receive ENCYCLOPEDIA.
- Select ENCYCLOPEDIA 4x, take MIRROR.
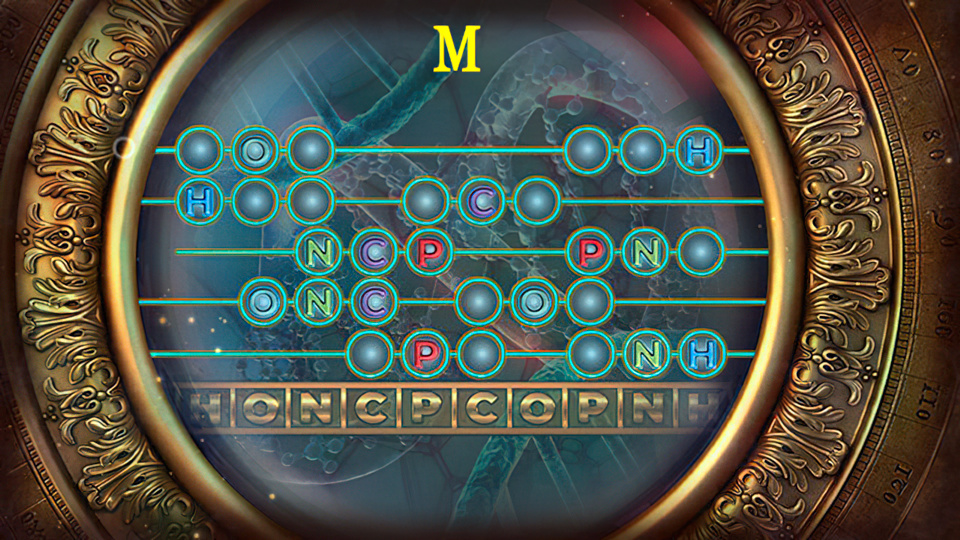
- Place MIRROR (L).
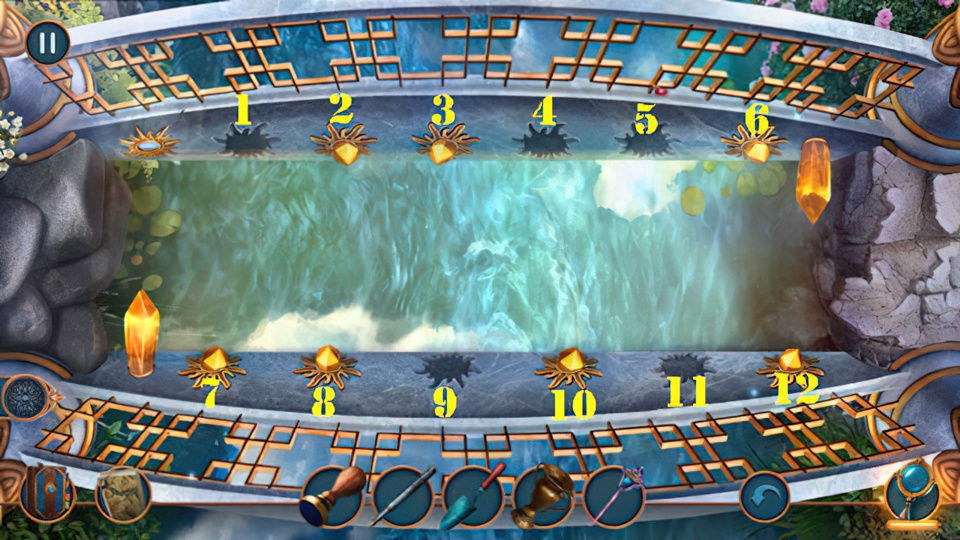
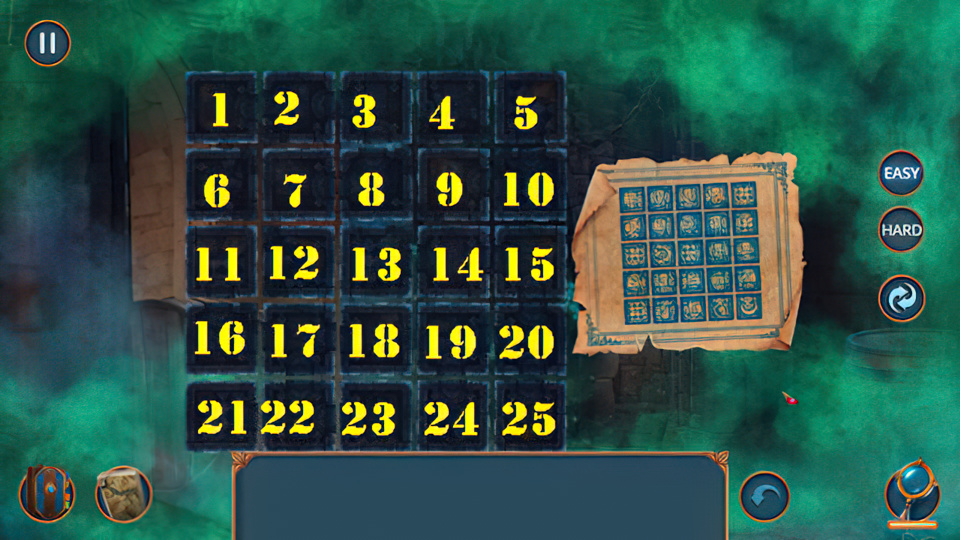
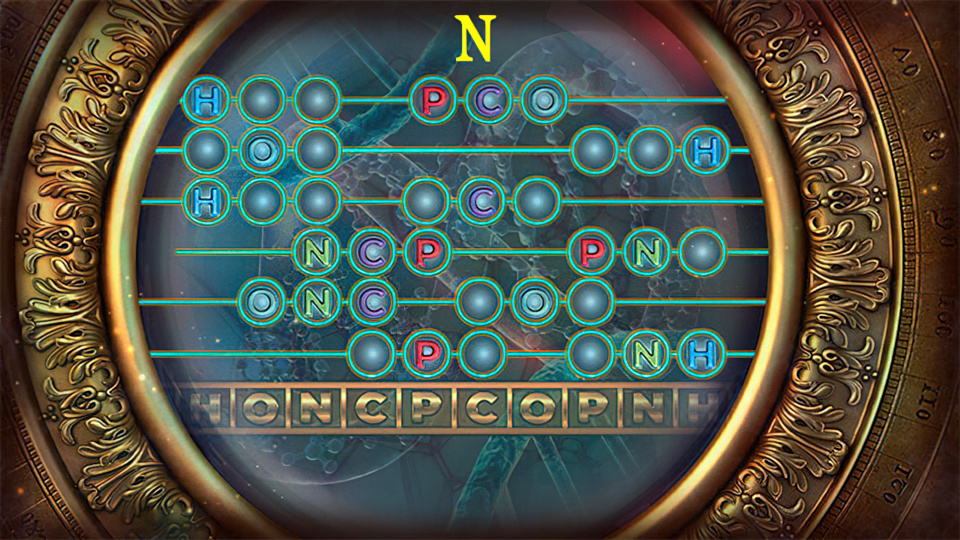
- Easy Solution: (6-7)-(11-12)-(9-6).
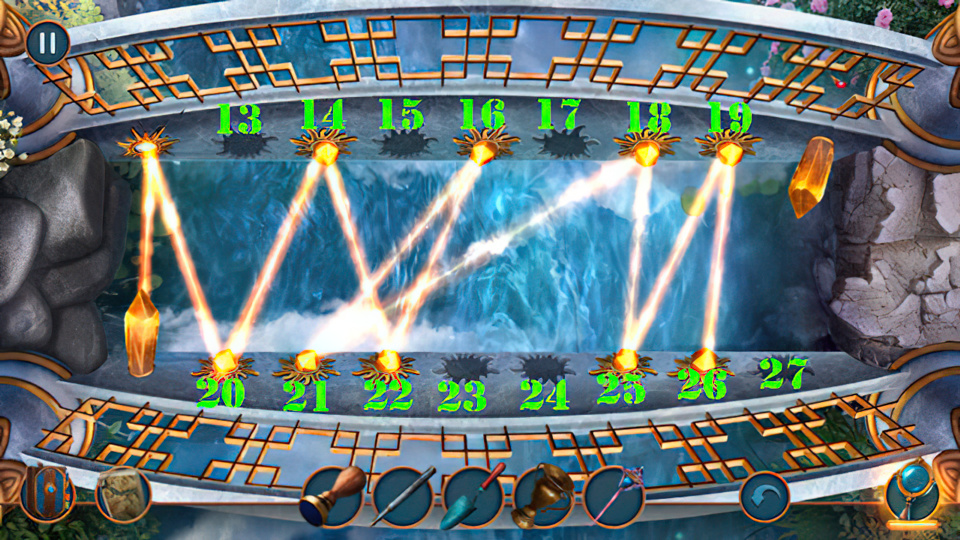
- Hard Solution: (14-20)-(27-22)-(23-14)-(15-16)-(17-21)-(24-25)-(13-26)-(25-26).
- Go forward to Flying Ships Harbor.
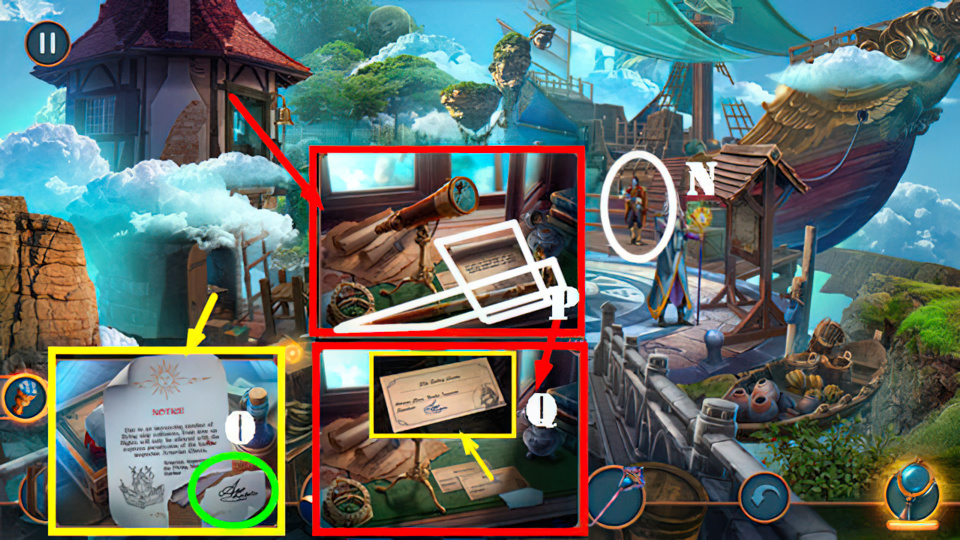
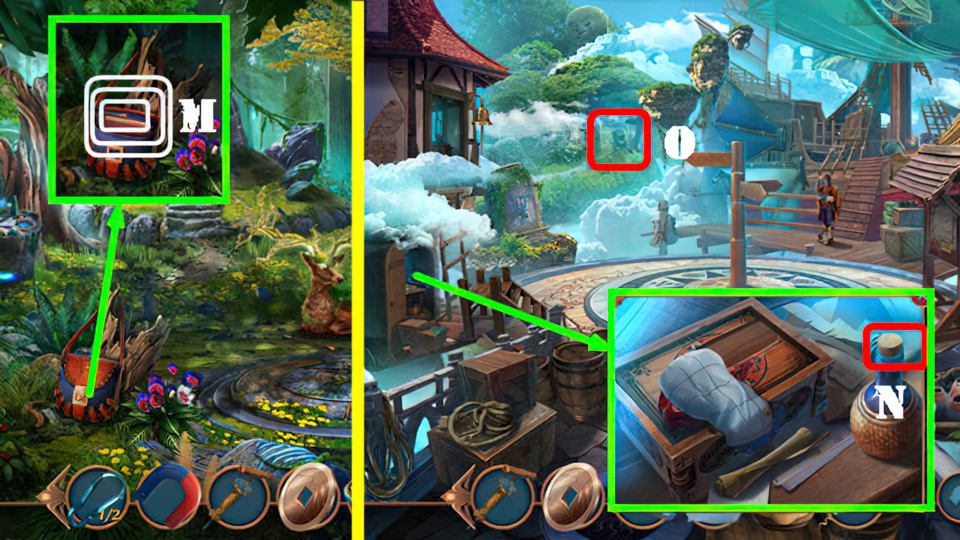
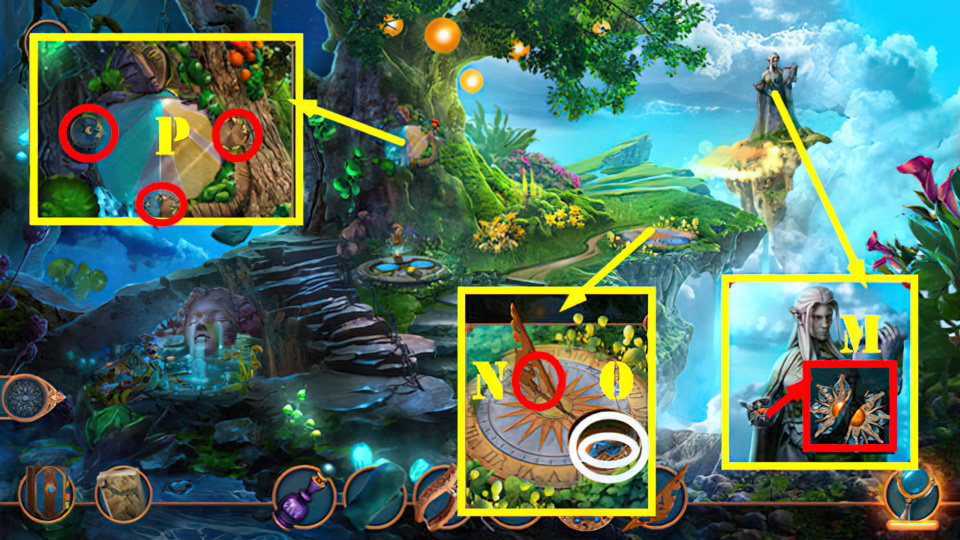
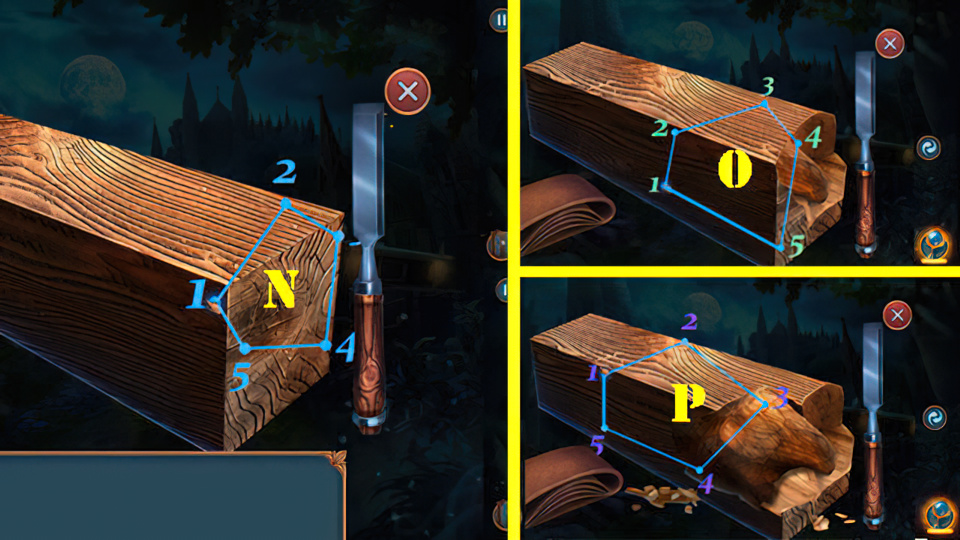
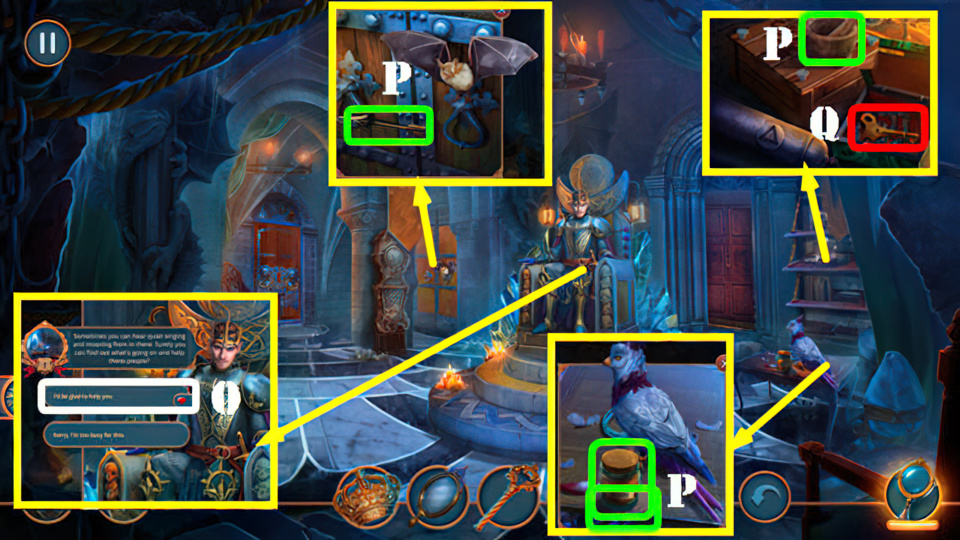
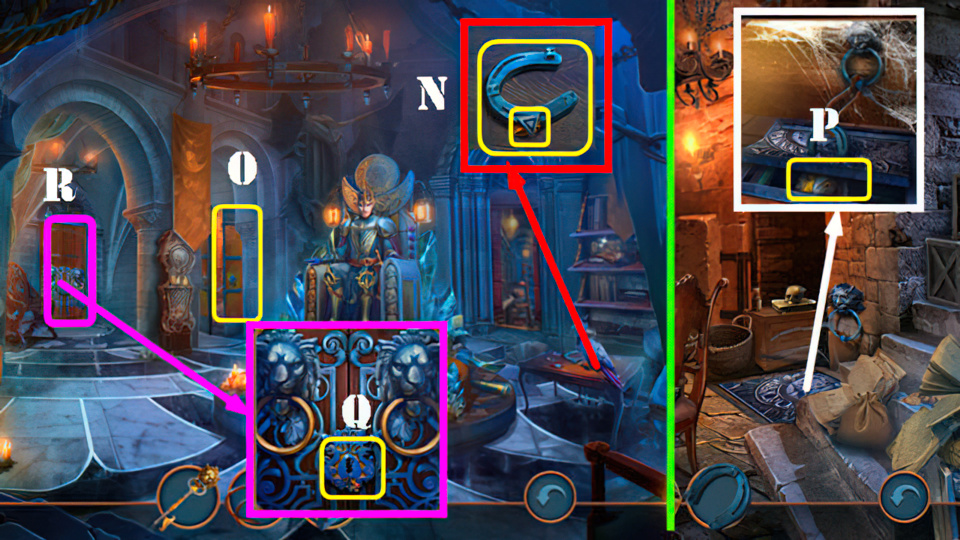
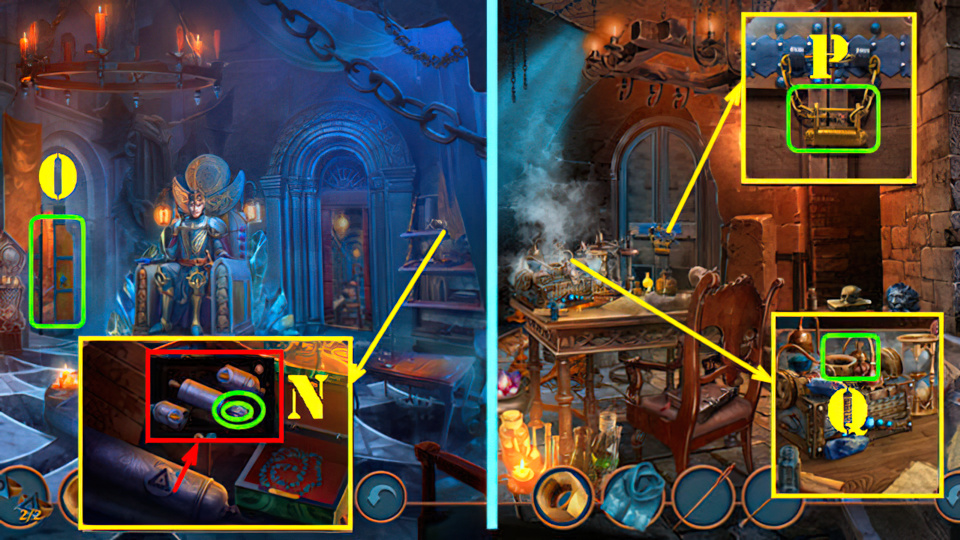
- Talk (N).
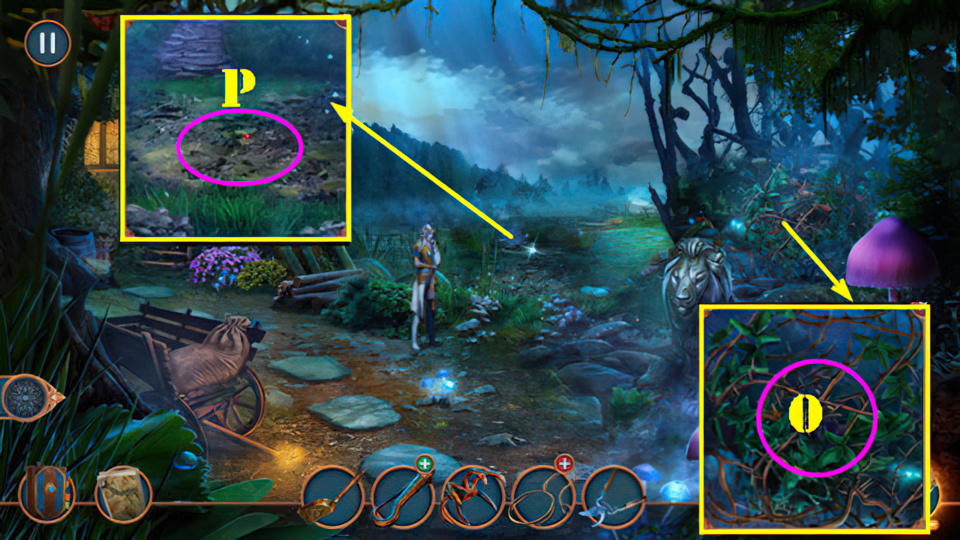
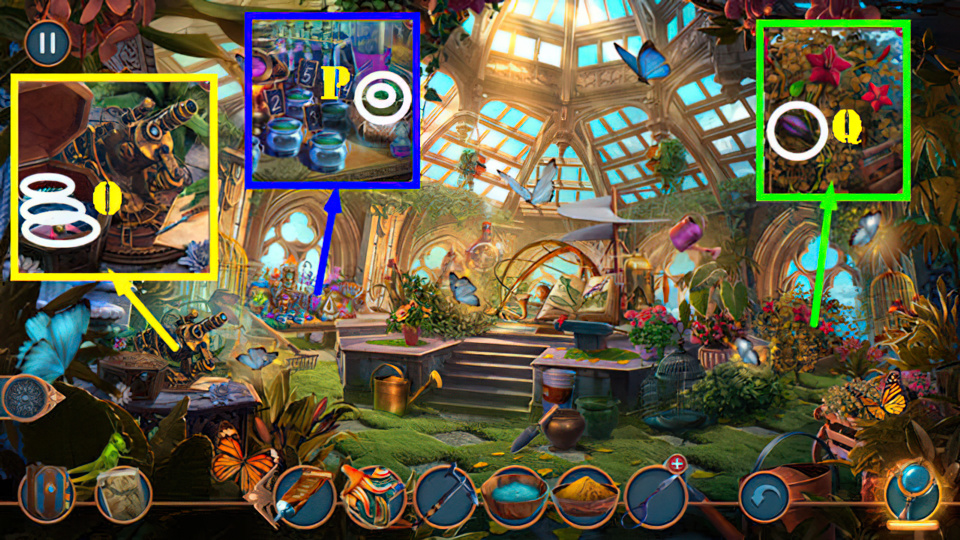
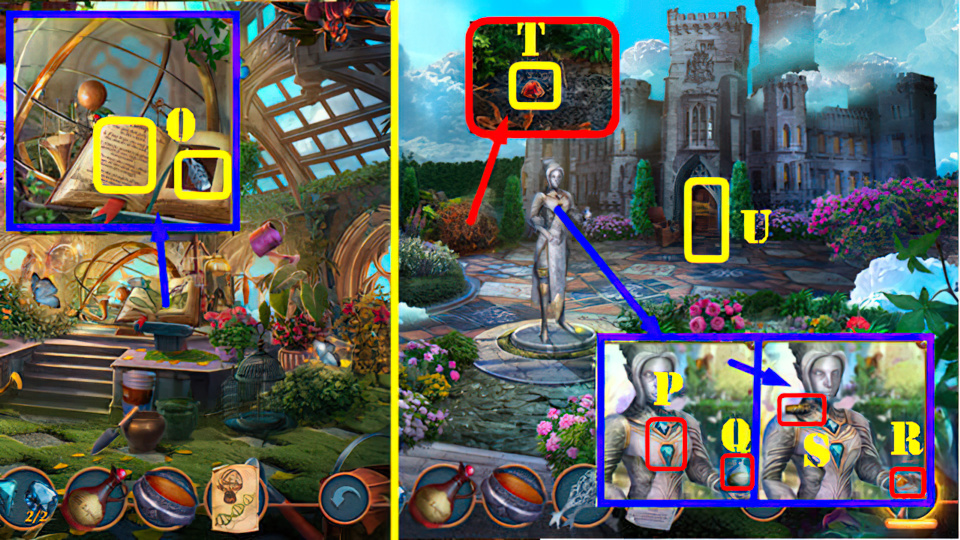
- Select note, take SIGNATURE (O).
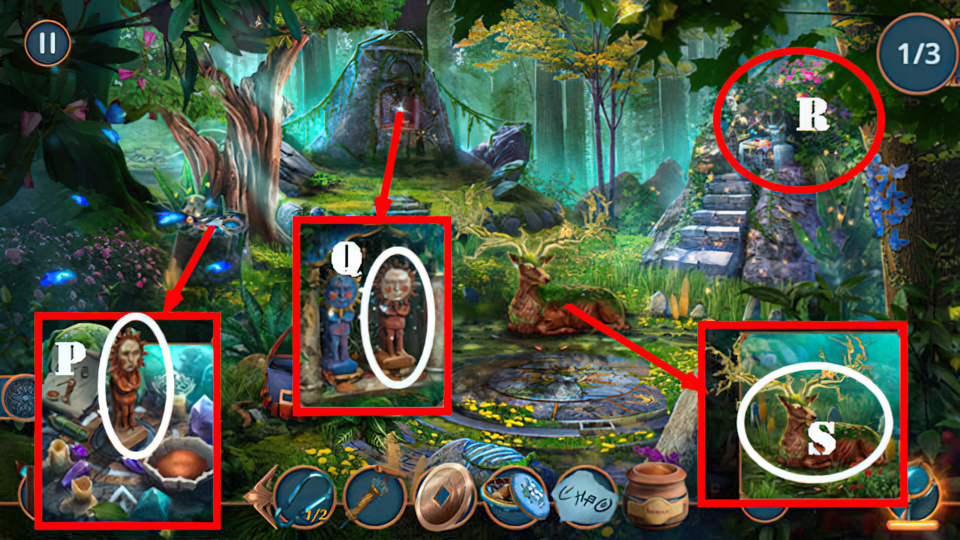
- Take CANE and Note (P).
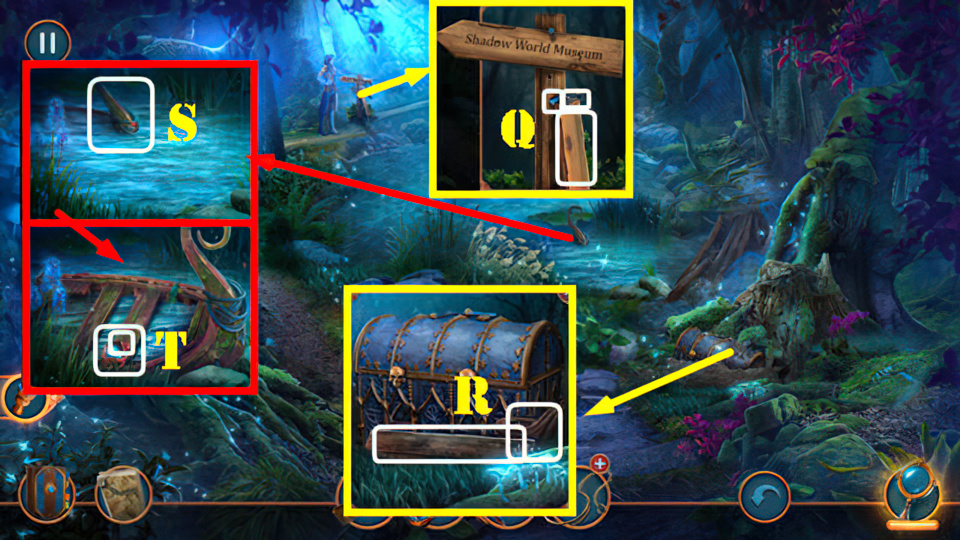
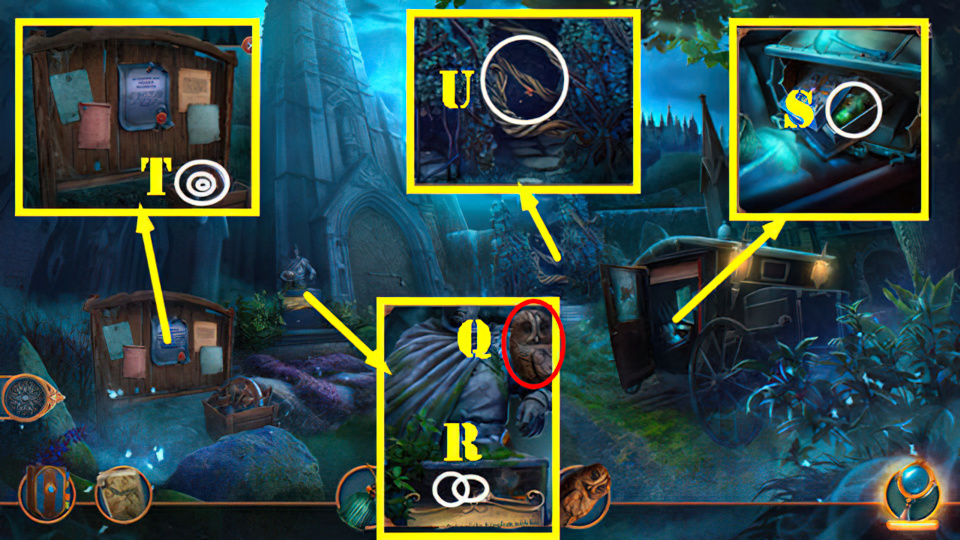
- Select check, use FOUNTAIN PEN, SIGNATURE, and CLEAR STAMP, take SHIP SAILING LICENSE (Q).
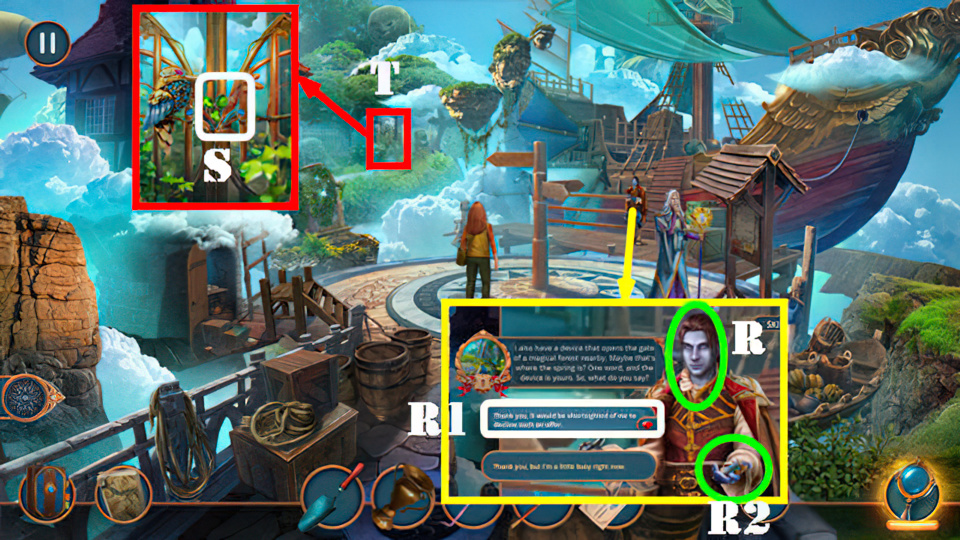
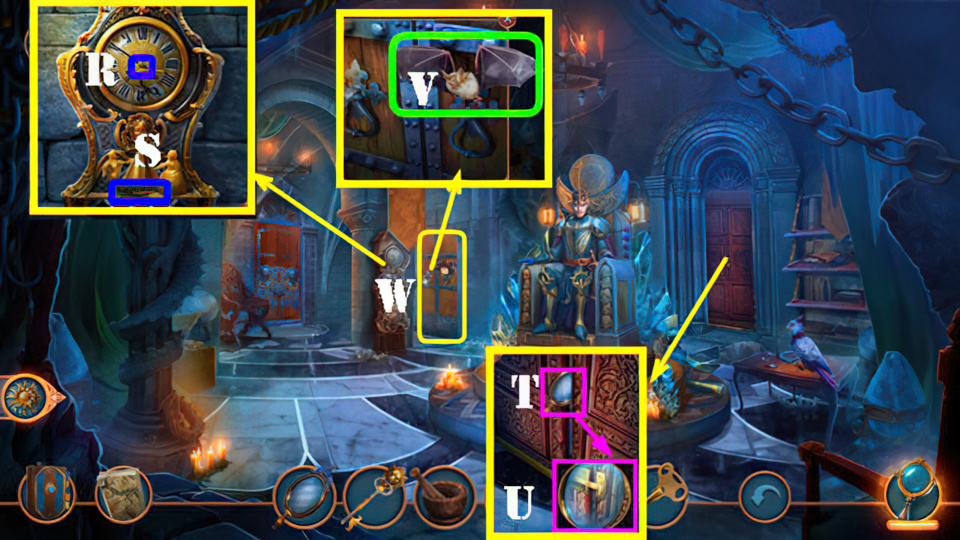
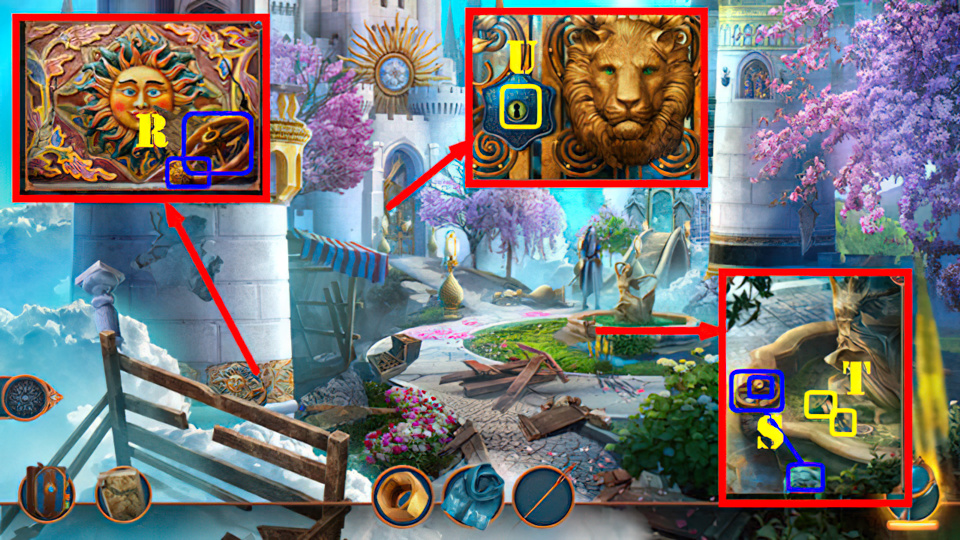
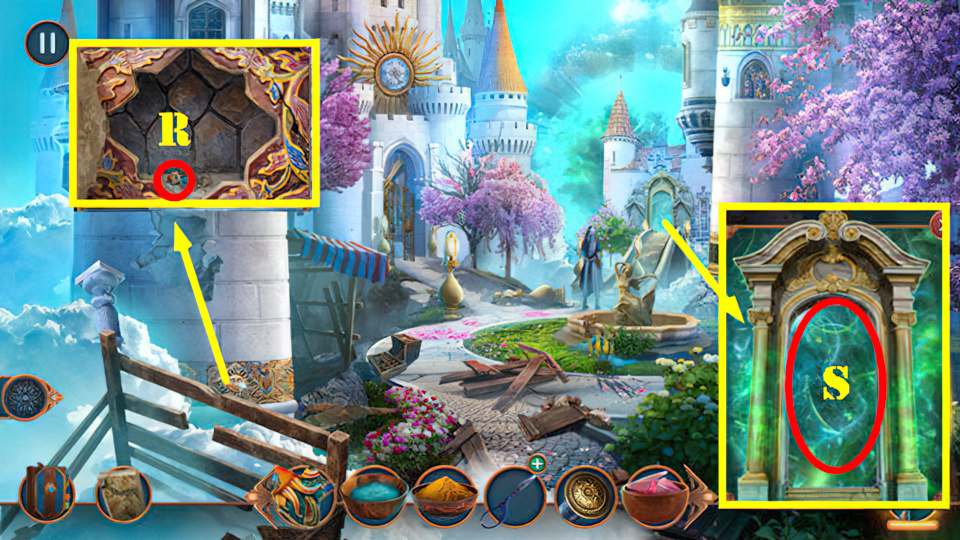
- Give SHIP SAILING LICENSE (R). Select first statement (R1), take MECHANICAL BIRD (R2).
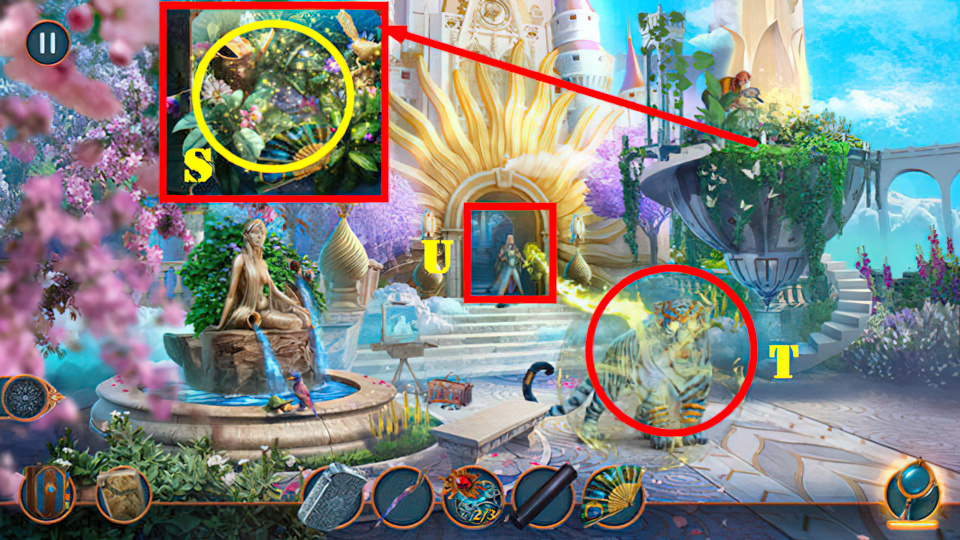
- Place MECHANICAL BIRD (S).
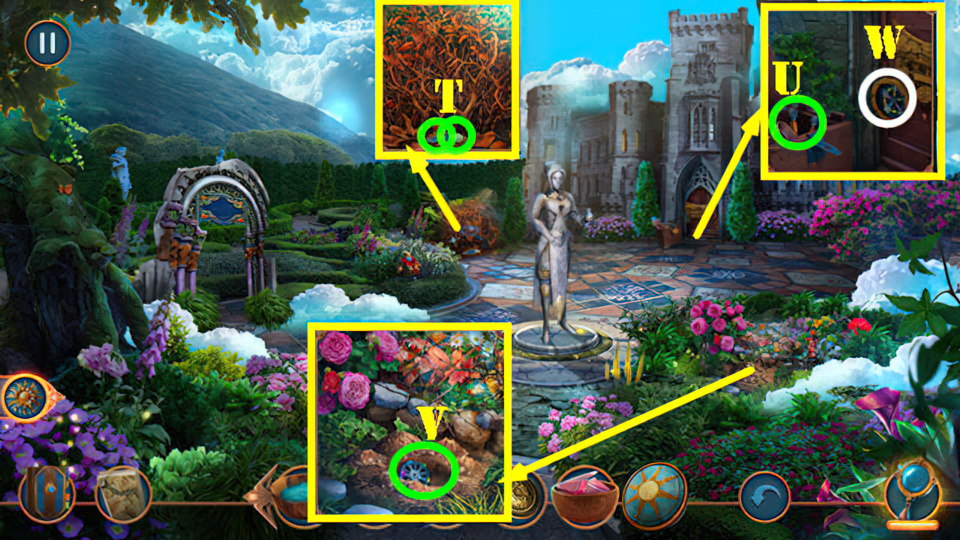
- Go (T).
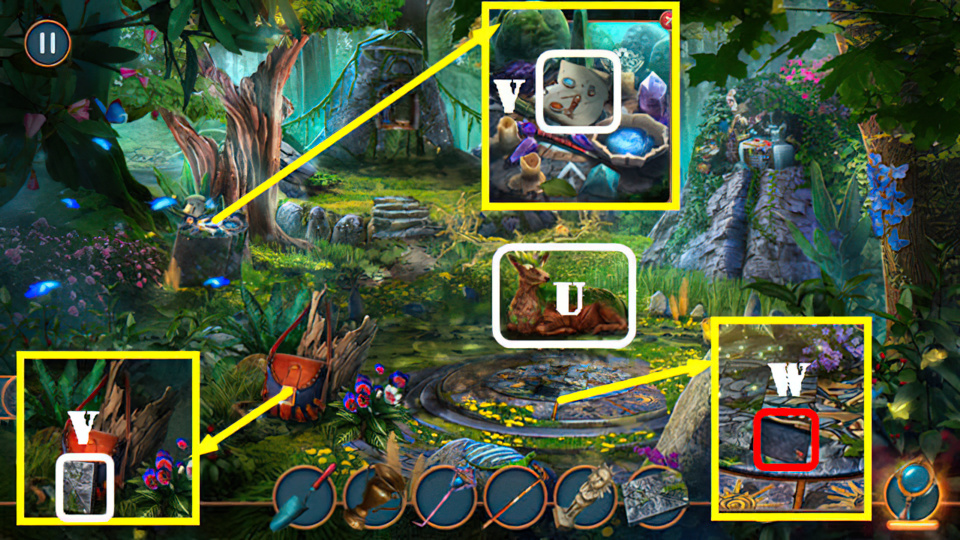
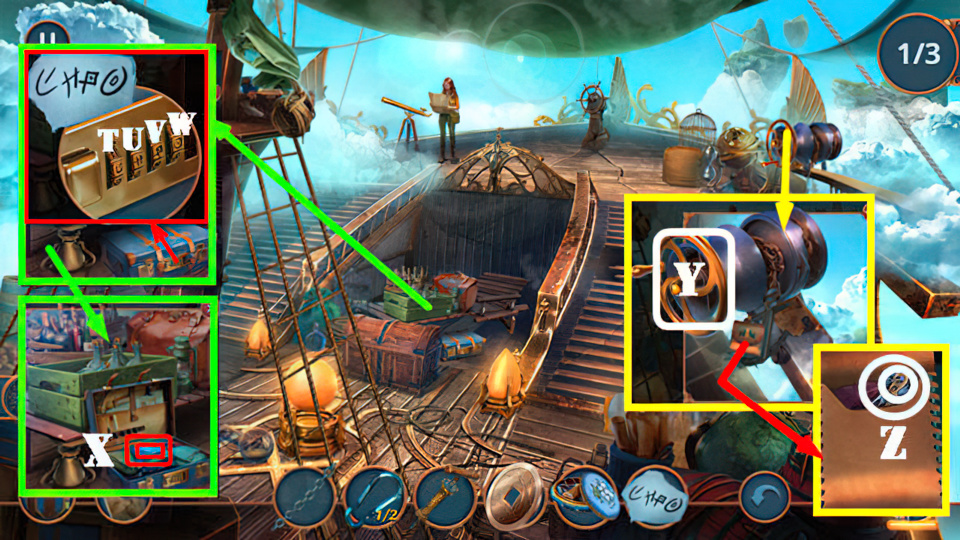
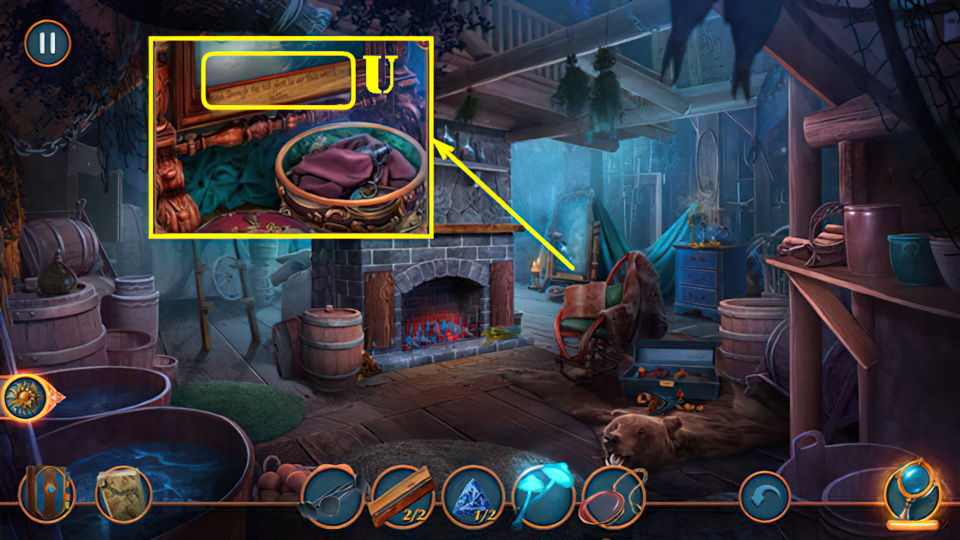
- Talk (U), receive IDOL.
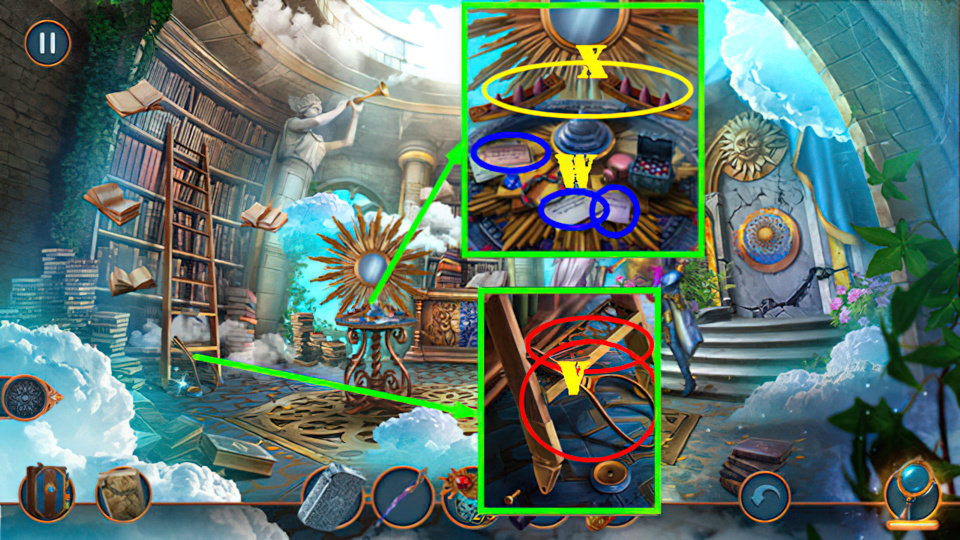
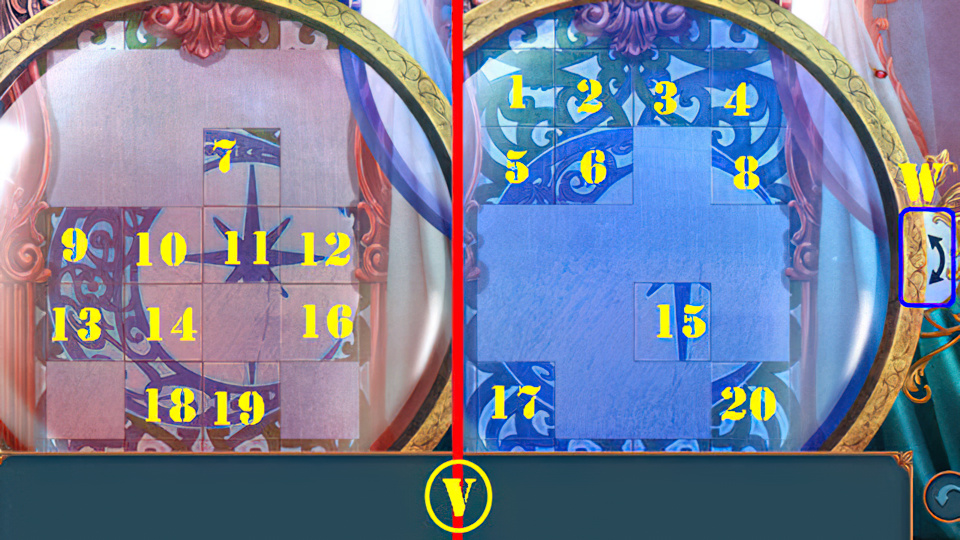
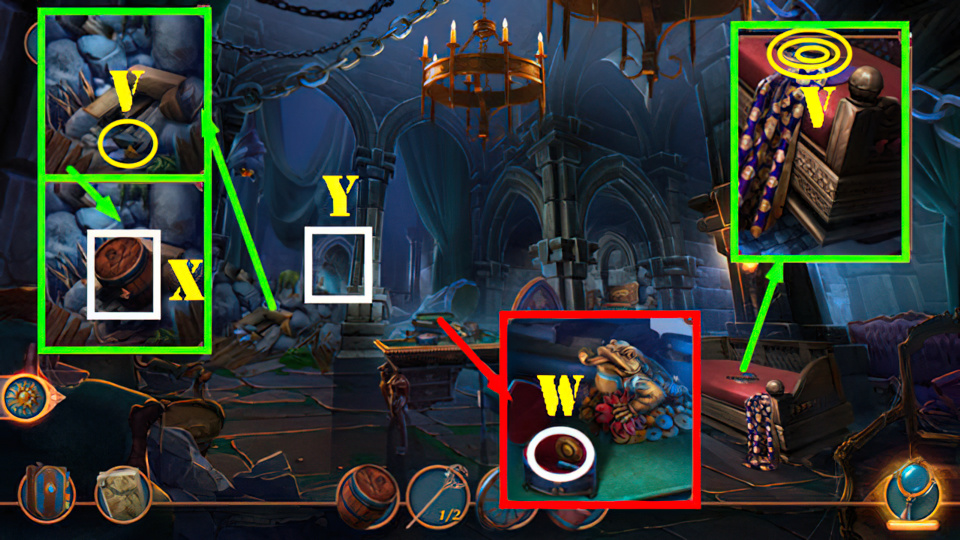
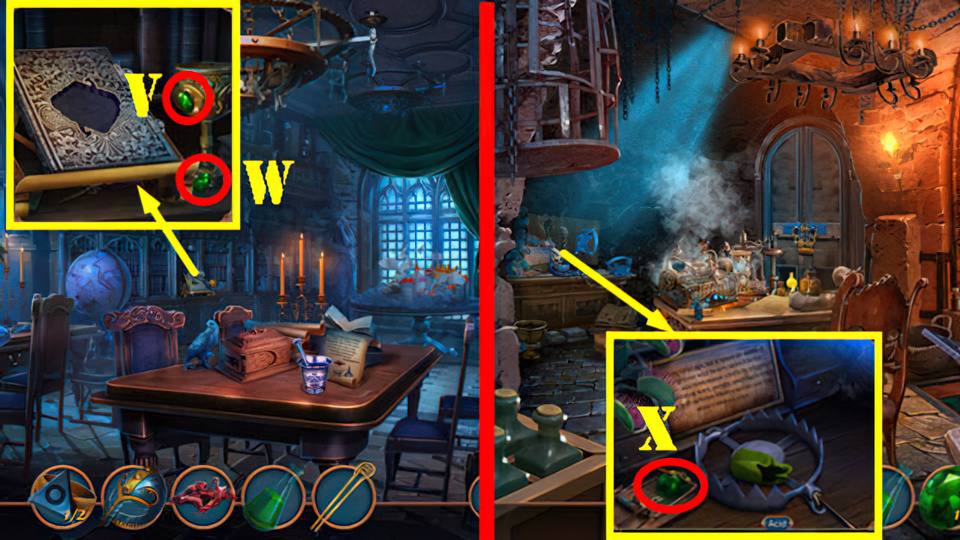
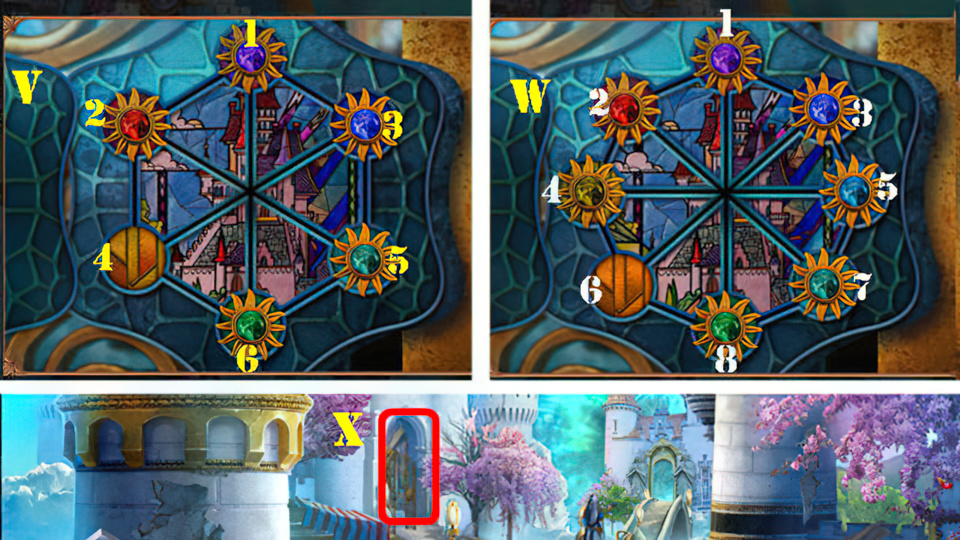
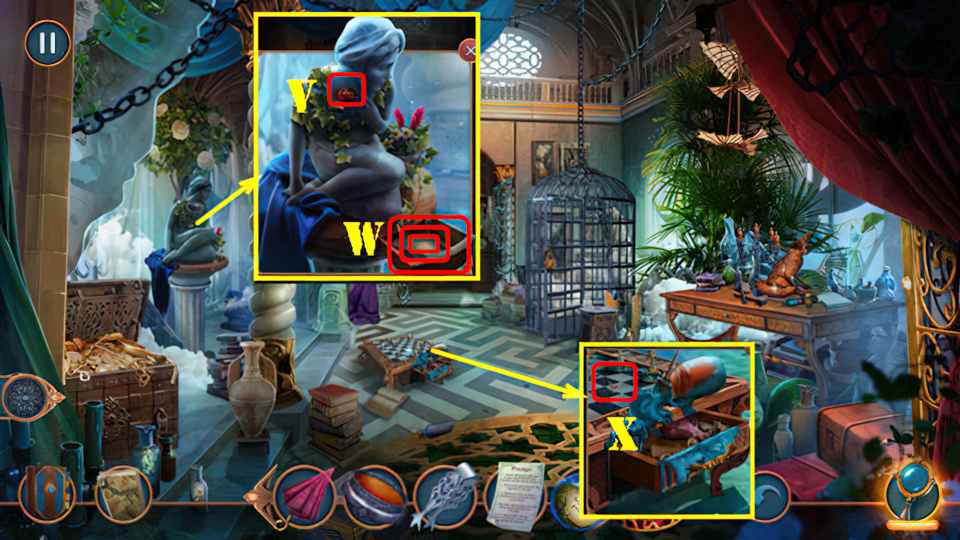
- Take Note and CALENDAR PART (V).
- Place CALENDAR PART (W).
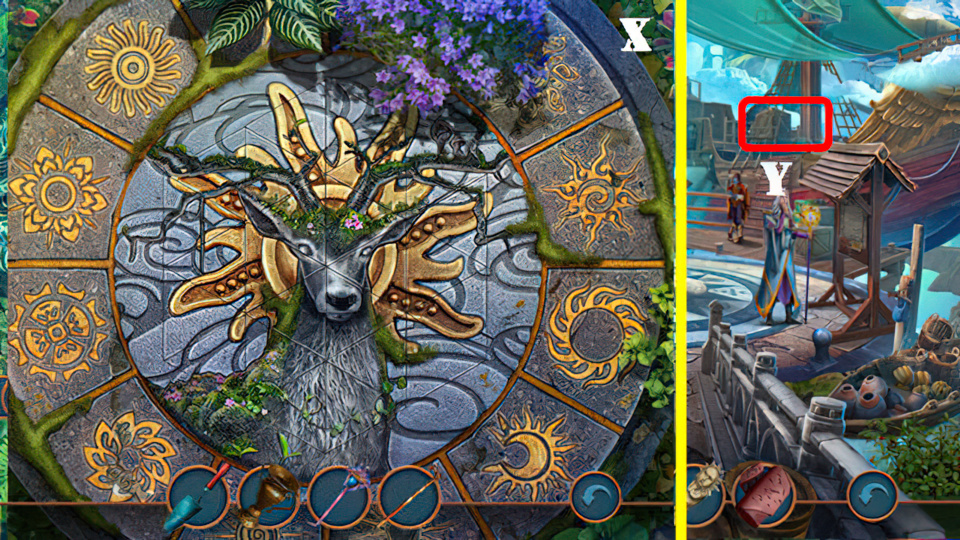
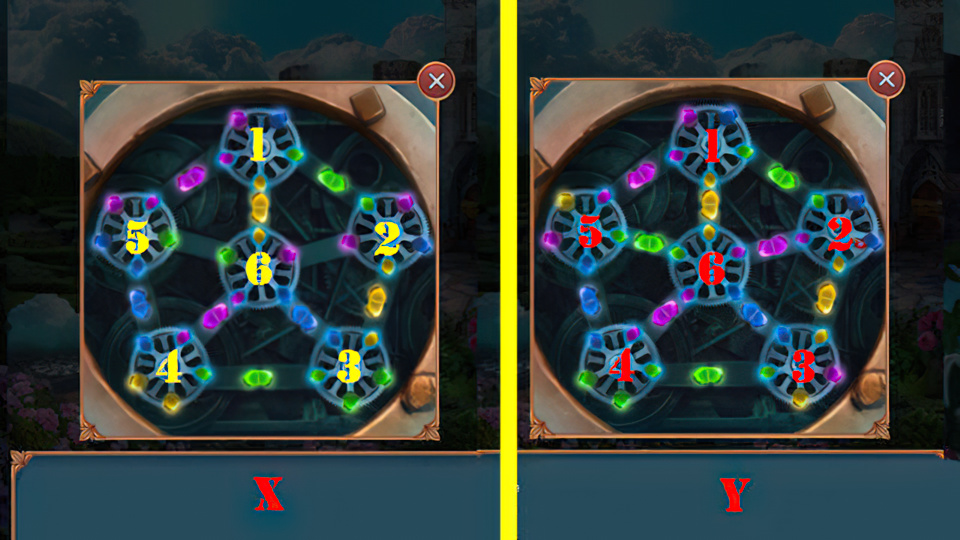
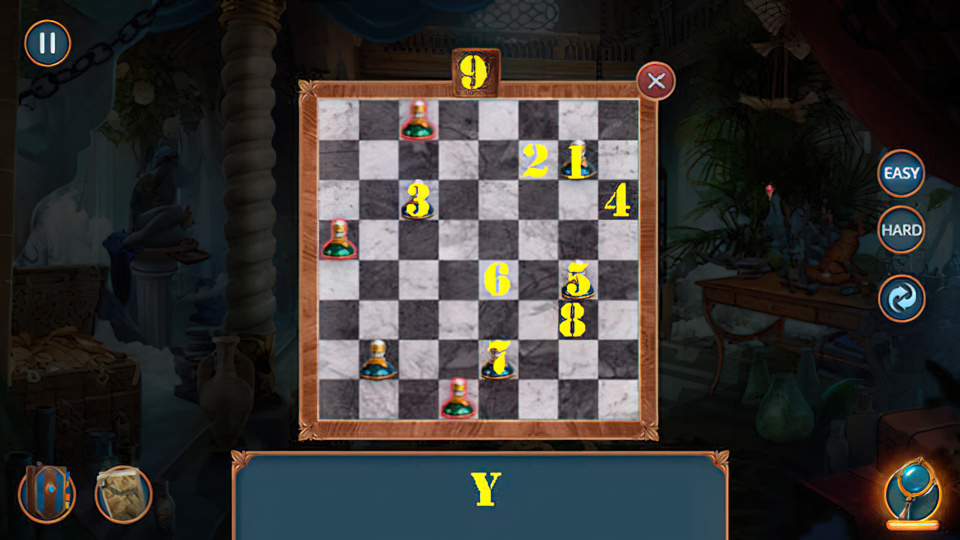
- Solution (X).
- Take PUNCHED TAPE.
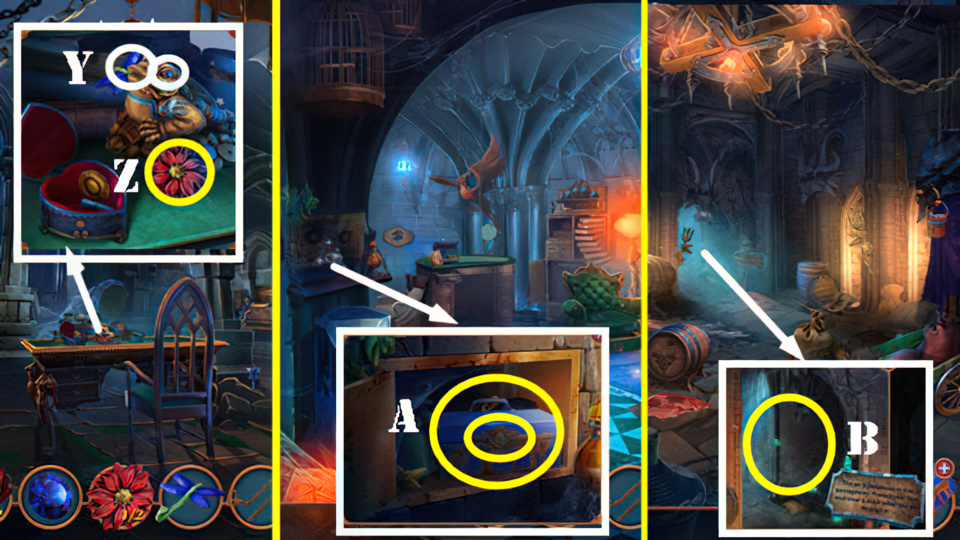
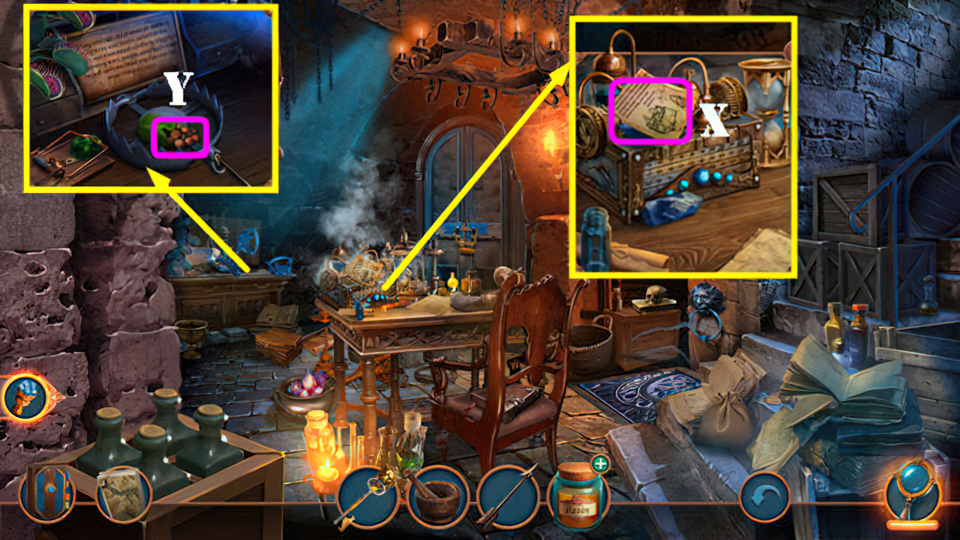
- Go back and then forward (Y).
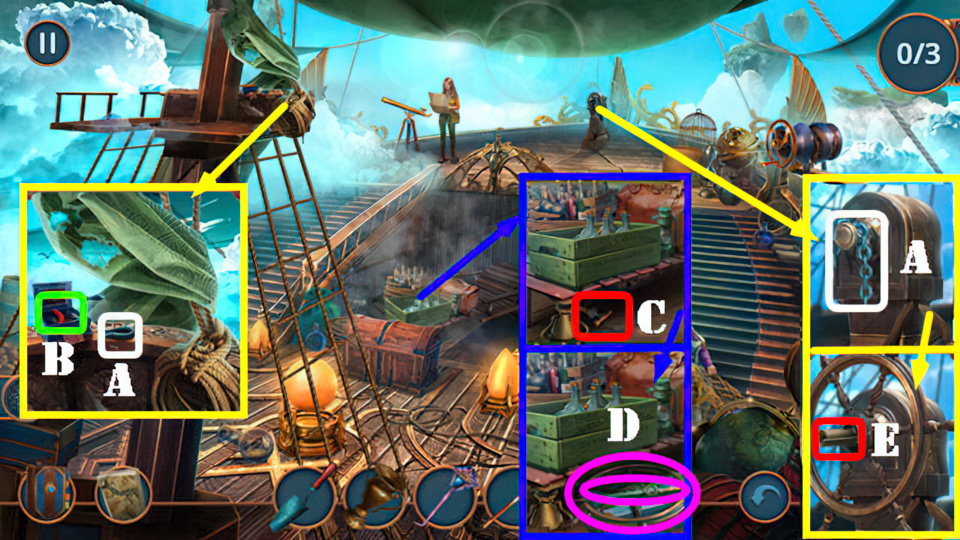
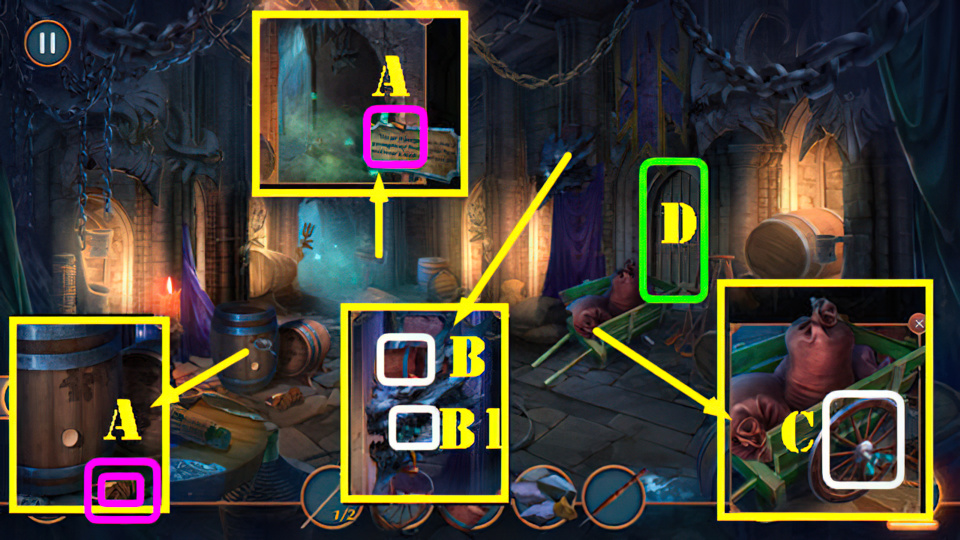
- Take CHAIN and CARABINERS 1/2 (A).
- Use PUNCHED TAPE, take MAGNET (B).
- Use VASE, take PUMP (C). Use CANE, take DAGGER IN SHEATH and HELM (D).
- Place HELM, take TREASURE MAP (E).
- Go back twice.
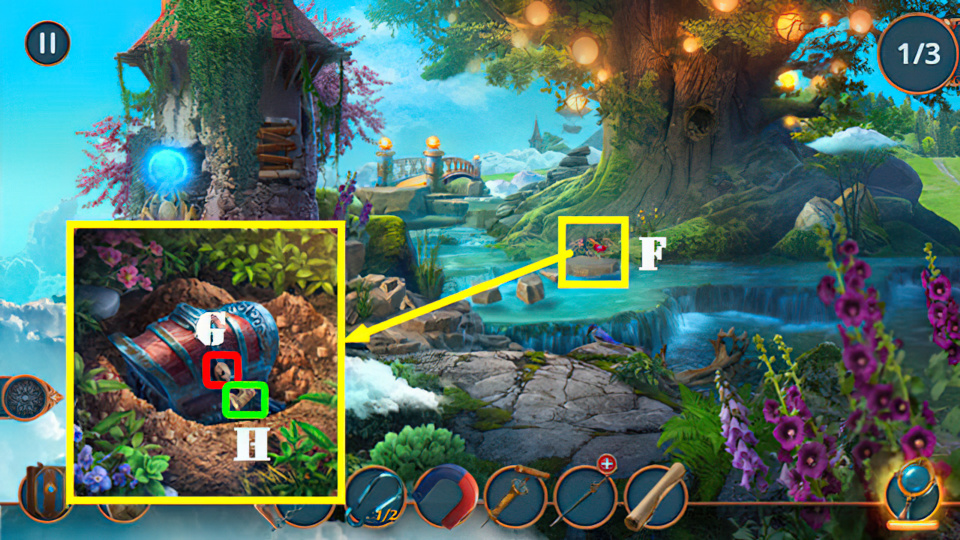
- Place TREASURE MAP (F).
- Use TROWEL, take COIN (G).
- Use HAIRPIN (H).
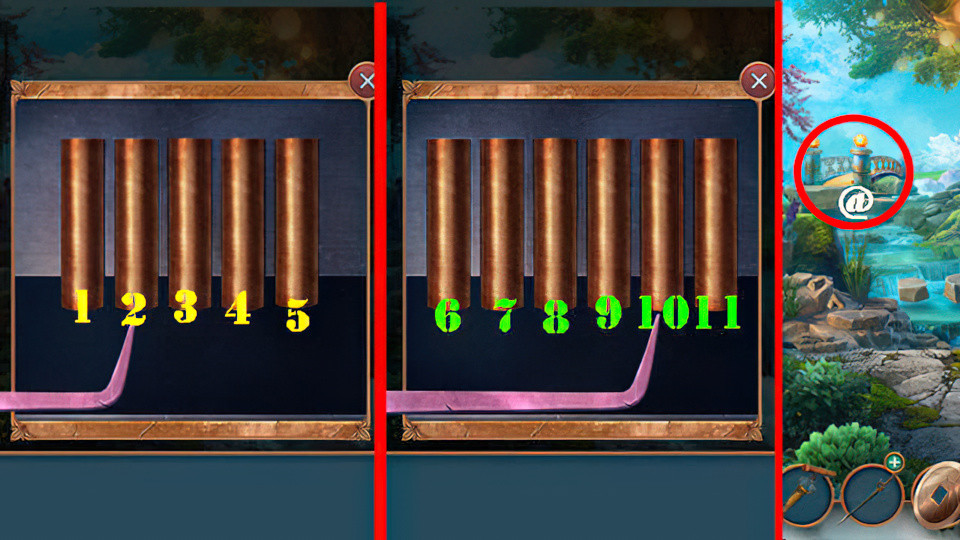
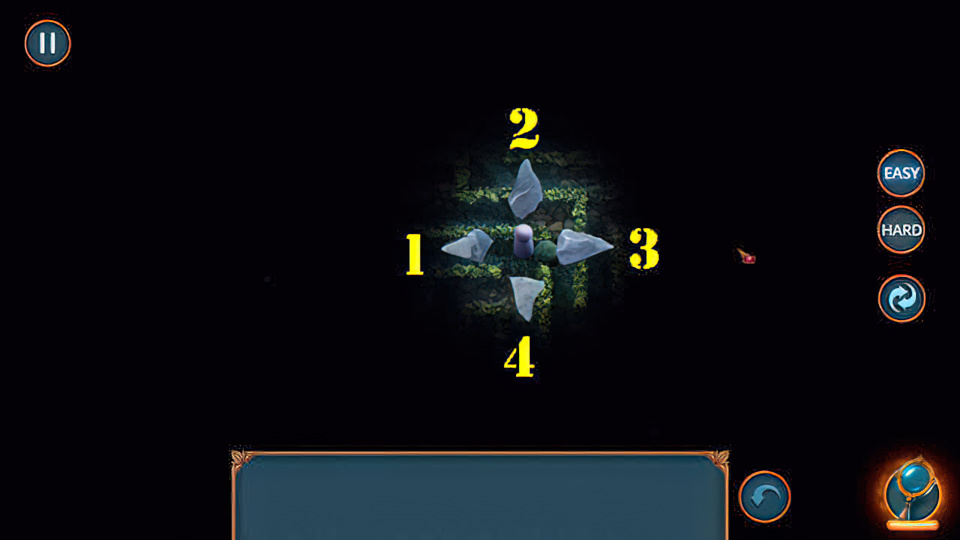
- Easy Solution: (5-4-1-2-3).
- Hard Solution: (10-9-11-6-7-8).
- Take SEWING KIT and CELESTIAL AMULET.
- Go (@).
- CELESTIAL AMULET on DAGGER IN SHEATH, receive SHARP DAGGER.
- Use SHARP DAGGER (I). Play puzzle, receive LENS.
- Remove broken lens and replace with LENS (J), take CODE (K).
- Go (L).
- Use MAGNET, take book, CLOSED JAR, and CORKSCREW (M).
- Go back.
- Use CORKSCREW (N), receive CORK.
- Go (O).
- CORK on CLOSED JAR, receive HENNA.
- Place IDOL and use HENNA, take PAINTED IDOL (P).
- Place PAINTED IDOL (Q).
- Play puzzle (R), receive LIVING WATER.
- Use LIVING WATER (S).
- Return to Flying Ship.
- Place CODE, select (T-Ux3-V-Wx3). Take LIGHTER and CARABINERS 2/2 (X).
- Place CHAIN and CARABINERS 2/2 (Y). Open bag, take TWEEZERS and COMB (Z).
- Go back twice.
- Use COMB (A). Play puzzle, receive STATUETTE.
- Go (B).
- Use PUMP and STATUETTE, take TUBE and DURABLE FABRIC (C).
- Go (D).
- Use SEWING KIT and DURABLE FABRIC (E).
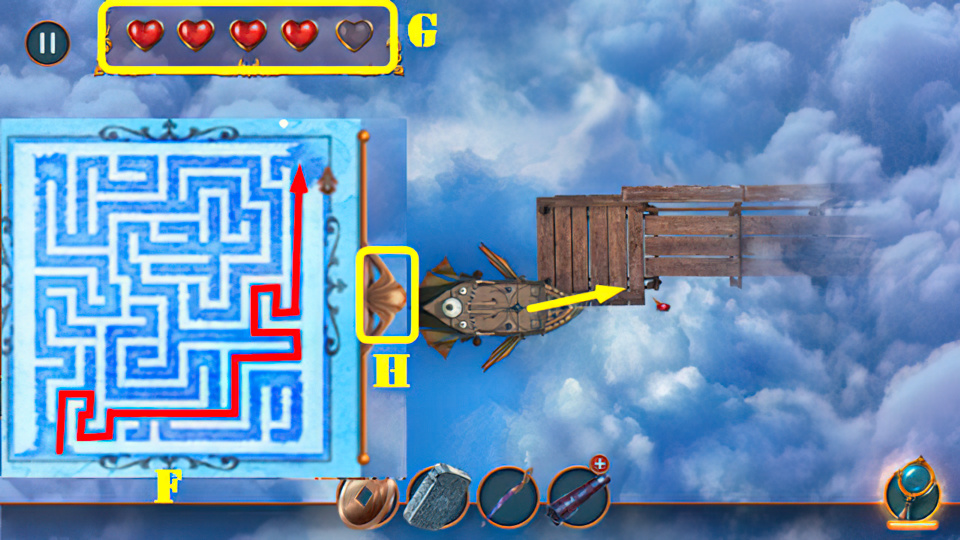
- Easy and Hard Solutions: Follow the path shown (F).
- If you encounter any obstacles, wait until they pass to move forward.
- In Hard Mode, you lose a heart (G) for every obstacle you hit. Collide with 5 obstacles and the puzzle will reset.
- Pull the tab (H) to view the maze. You cannot move the ship until the tab is off the screen.
- Take TOKENS 1/3 and PIECE OF COAL (I).
- Use COIN (J), take HAIRPIN (K).
- Remove paper and use HAIRPIN, take TUBE DETAIL and TOKENS 2/3 (L).
- TUBE DETAIL on TUBE. Select Mx2-N-Ox2-Q-Rx2. Take wallet and FAN.
- Use FAN (S). Play puzzle, receive ELIYAs STAFF.
- Use ELIYAs STAFF (T), receive GOLD SHIELD.
- Go (U).
- Take BUTTERFLY NET BASE and INCENSE (V).
- Take 3 Notes (W).
- Use LIGHTER and INCENSE (X).
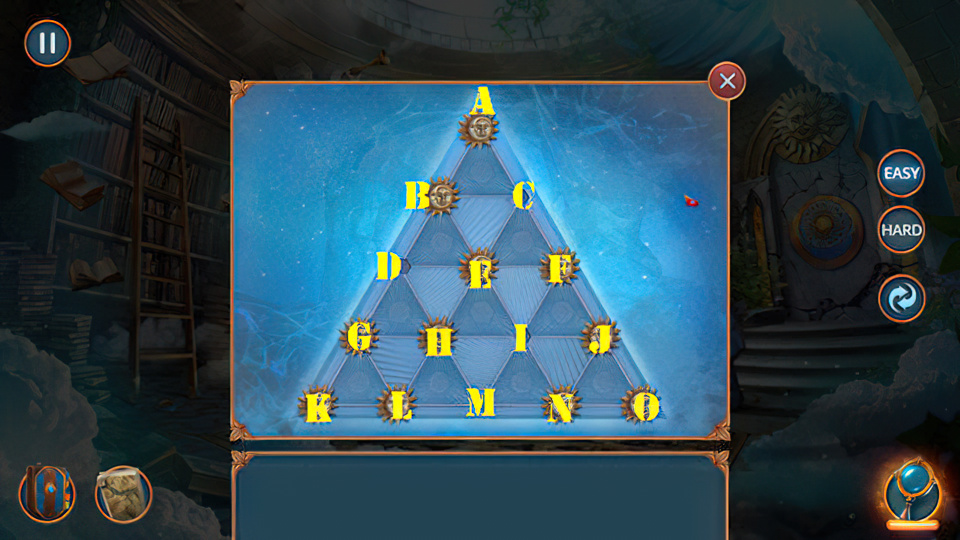
- Easy Solution: (A-D)-(O-M)-(J-C)-(L-N)-(D-M)-(K-D)-(C-H)-(N-L)-(L-E)-(D-F).
- Hard Solution: (O-M)-(L-N)-(K-D)-(J-C)-(A-F)-(H-J)-(B-I)-(N-E)-(J-C)-(C-H)-(D-M).
- Take CUFFLINK and GOLD TOKEN.
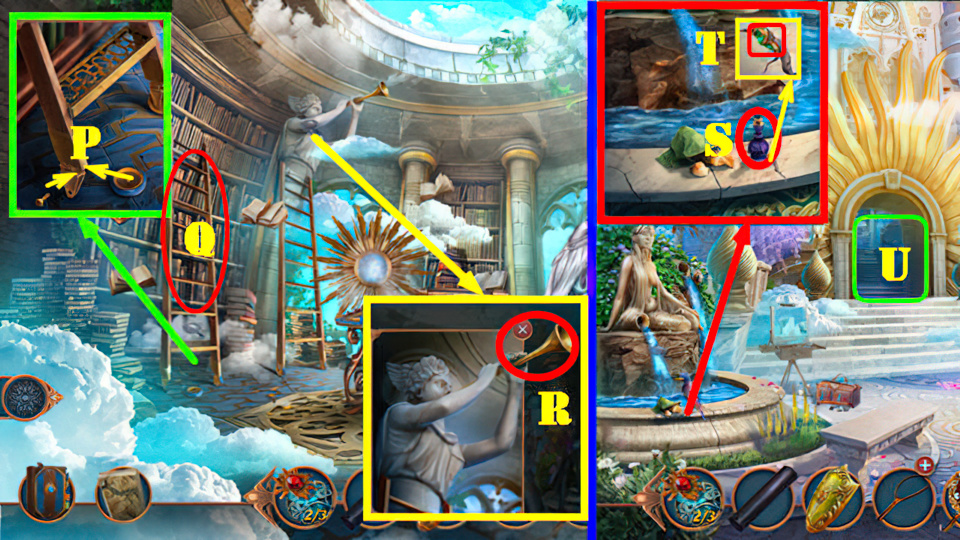
- Place wheel and screw, use GOLD TOKEN (P).
- Move ladder (Q), take TRUMPET (R).
- Go back.
- Use TRUMPET, take GLUE (S). Use TWEEZERS (T), receive TOKENS 3/3.
- Go (U).
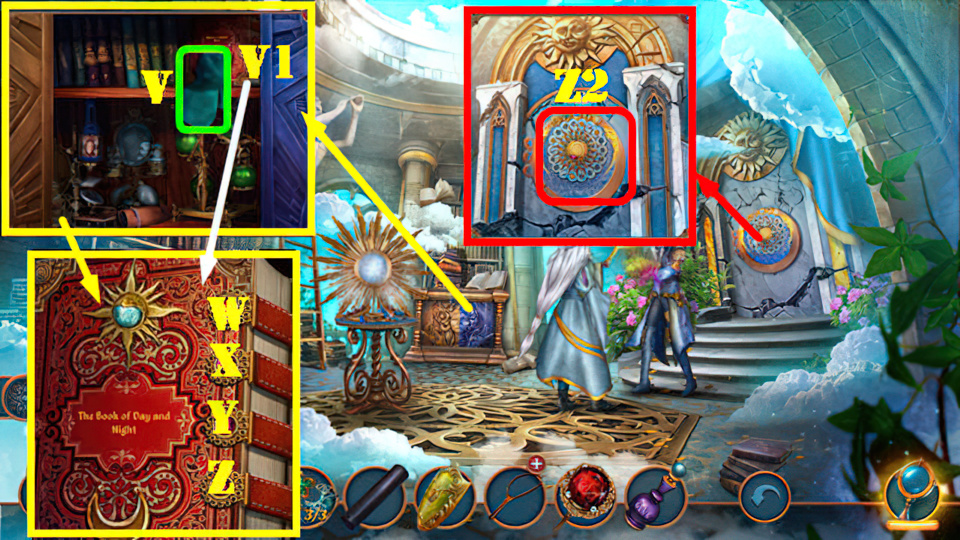
- Use TOKENS 3/3, take MITT (V). Select book, place CUFFLINK (W).
- Solution: W-Y-X-Z. Take BOOK.
- Use BOOK (Z2).
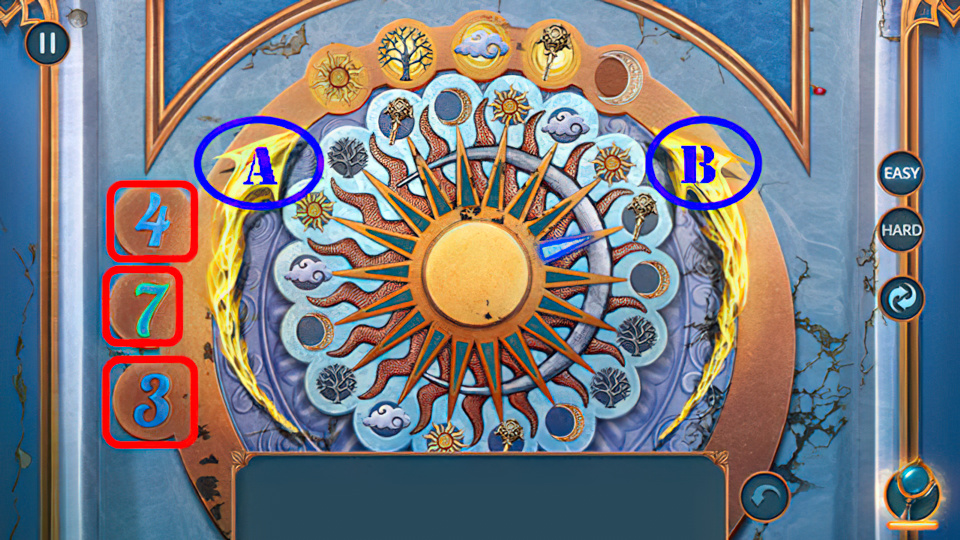
- Easy Solution: (7-A)-(4-A)-(4-A)-(7-B)-(4-A).

- Hard Solution: (4-D)-(4-C)-(7-D)-(3-D)-(3-C)-(4-C)-(3-D).
- Use GOLD SHIELD (E).

- Take CLIP and JEWELRY BOX (F).
- Place PIECE OF COAL (F1).
- Take POKER, RIBBON, and MOONSTONE (G). Look at note (H).
- Open JEWELRY BOX, take Note, LANTERN, and LACE.
- RIBBON and LACE on BUTTERFLY NET BASE, receive BUTTERFLY NET.
- Use BUTTERFLY NET and LANTERN (I).
- Play puzzle, receive LANTERN WITH FIREFLIES.
- Place LANTERN WITH FIREFLIES (J).
- Take GNOMON (K). Look at note (L).
- Use GLUE (M), receive SUNSTONE.
- Place GNOMON (N), take PRUNING SHEARS PART and EARTHSTONE (O).
- Place MOONSTONE, SUNSTONE, and EARTHSTONE (P).

- Easy Solution: (1-2-3-4-5-6-7-8-9-10-11).
- (8-9-10-11-7-3-2-12-13-14-15).
- (12-13-14-15-16-17-18-19-20-21-22-23-24-25-26).
- Hard Solution: (1-2-3-4-5-6-7-8-9-10-11).
- (8-9-10-11-7-3-2-12-13-14-15).
- (12-13-14-15-16-17-18-19-20-21).
- Place blue stone in slot 22.
- Wait until the green button (Q) rises all the way up, and then move the blue stone quickly through: (23-24-25-26).
- Take Note, Newspaper, BOLT, and ROPE (A).
- Use ROPE and find 4 leaves, take Note and KEY (B).
- Use KEY (C).
- Easy Solution: Ex2-D-Ex3-D-Ex3-D-Ex2.
- Hard Solution: G-H-G-H-G-Hx2-G-Hx3.
- Enter (J).
- Use POKER and MITT (K), receive SHOVEL and HOOK BASE.
- Use CLIP, take HOOK BLADES and MATCHES (L).
- Use MATCHES, take PRUNER PART, MONOCLE, and MALLET FIGURINE (M).
- Place MALLET FIGURINE, take SPRING (N).
- Go back.
- BOLT, PRUNER PART, and SPRING on PRUNING SHEARS PART.
- Receive PRUNING SHEARS.
- Use PRUNING SHEARS (O). Play puzzle, receive SWAMP SHOES.
- Use SWAMP SHOES (P).
- Take NAILS, PLANKS 1/2, and SAPPHIRE 1/2 (Q).
- Use SHOVEL, take PLANKS 2/2 and ROPE (R).
- HOOK BLADES and ROPE on HOOK BASE, receive CLIMBING HOOK WITH ROPE.
- Use CLIMBING HOOK WITH ROPE (S), take GLOWING MUSHROOMS and RED LENS (T).
- Go to Forest Hut.
- RED LENS on MONOCLE, receive MONOCLE WITH LENS.
- Use MONOCLE WITH LENS (U).
- Easy Solution (V): (7-14)-(7-11)-(9-19)-(9-18)-(9-16)-(9-13)-(9-10)-(9-12).
- Select button (Y) to obtain blue lens (W).
- (1-3)-(2-6)-(2-5)-(2-8)-(2-4)-(17-20).
- Hard Solution (X): (9-19)-(9-18)-(9-16)-(9-13)-(9-10)-(9-12).
- Select button (Y) to access green lens (Y).
- (1-3)-(2-6)-(2-5)-(2-8)-(2-4).
- Switch to blue lens: (7-14)-(7-11)-(17-20).
- Take GOLD BRACELET.
- Go back.
- Place BRACELET (A), take DAGGER (B).
- Go (C).
- Use DAGGER (D), take MEAT MALLET (E).
- Return to Forest Hut.
- Use PLANKS 2/2, NAILS, and MEAT MALLET (F), take Diary, WOODEN BLOCK, and HORSESHOE (G).
- Use HORSESHOE, take SPRAYER, TOWEL, and SAPPHIRE 2/2 (H).
- Return to Forest Edge.
- Use SAPPHIRE 2/2 (I). Play puzzle, receive SIGN PLATE.
- Place SIGN PLATE (J).
- Take POWDER BARREL and STAR FIGURINES 1/2 (K).
- Open door and place GLOWING MUSHROOMS, take CHISEL and ROD (L).
- Use TOWEL and ROD, take SANDPAPER (M).
- CHISEL and SANDPAPER on WOODEN BLOCK. Solution: 1-2-3-4-5-1 (N). Repeat the same pattern two more times: (O-P).
- Receive WOODEN OWL.
- Place WOODEN OWL (Q), take HAIRPINS 1/2 and STAR FIGURINES 2/2 (R).
- Place STAR FIGURINES 2/2, take INSECTICIDE (S).
- INSECTICIDE on SPRAYER, receive SPRAYER WITH AGENT.
- Use SPRAYER WITH AGENT, take WHEEL, BUCKET, and AXE (T).
- Use AXE (U).
- Easy Solution: (1×3)-(2-3-4)-(3-2-3-2)-(1×2)-(2×2)-(3×3)-(2-1).
- Hard Solution: (1×3)-(2-3-4)-(3-2-3-2)-(1×5)-(2-3-2)-(3×5)-(2-1).
- Take STONES, WICK, and HEART AMULET (V).
- Place HEART AMULET, take MATCHES (W).
- Use POWDER BARREL, WICK, and MATCHES (X).
- Go (Y).
- Take ROLLER ORGAN HANDLE, ROPE, and RIBBON (A).
- Use BUCKET, STONES, and ROPE (B), take WINGNUT (B1).
- Use WHEEL and WINGNUT (C).
- Go (D).
- Take PROTECTIVE EQUIPMENT 1/2, PIG FIGURINE, and HAIRPINS 2/2 (E).
- Use HAIRPINS 2/2 (F). Play puzzle, receive CROWN BADGE.
- Place CROWN BADGE (G), take SHURIKEN (H).
- Go back twice.
- Use PIG FIGURINE (I), take BLUE STONE (J).
- Use SHURIKEN, take ROLLER (K).
- Place ROLLER ORGAN HANDLE and ROLLER (L).
- Easy Solution: (M).
- Hard Solution: (N).
- Take FLOWER INLAYS 1/2 and CORKSCREW.
- Go to Underground Corridor.
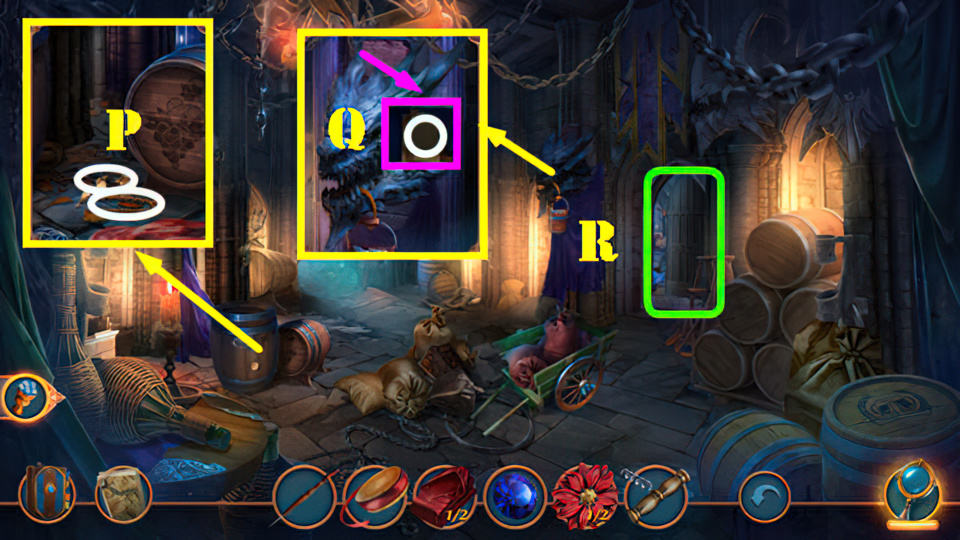
- Use CORKSCREW and push barrel, take CHAIN and IRON SPOKE (P).
- Use IRON SPOKE, take CODE (Q).
- Go (R).
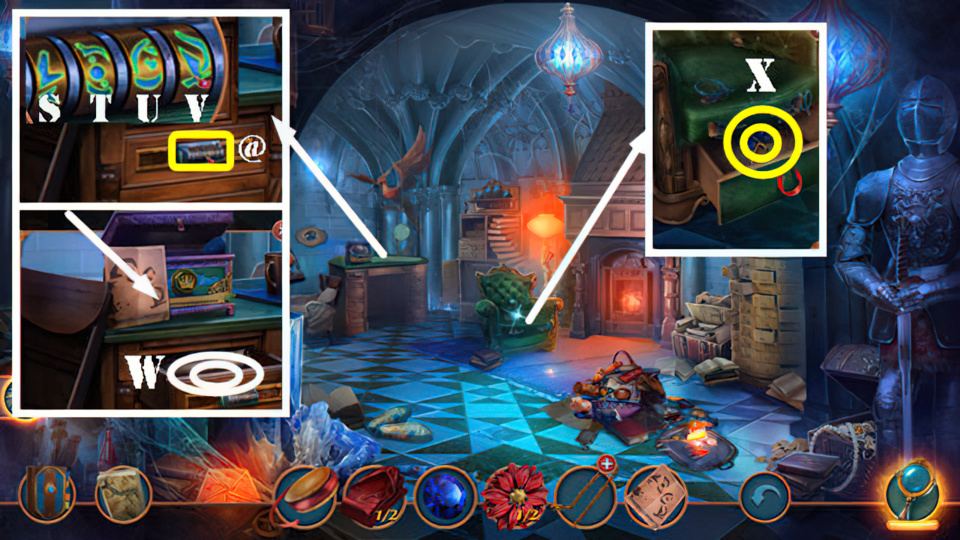
- Place CODE (@), select Sx2-Tx2-U-Vx3. Take Note and NEEDLE AND THREAD (W).
- Use RIBBON and NEEDLE AND THREAD, take CARABINER and DRAGONFLY FIGURINE (X).
- Return to Shedaur Dungeon.
- Use BLUE STONE and DRAGONFLY FIGURINE (Y), take FLOWER INLAYS 2/2 (Z).
- Return to Ancient Secret Chamber.
- Place FLOWER INLAYS 2/2, take LOCKED REPAIR KIT and PROTECTIVE EQUIPMENT 2/2 (A).
- Go back.
- Use PROTECTIVE EQUIPMENT 2/2 (B).
- Easy and Hard Solutions:
- Solution part one: (23-22-17-16-12)-(6-2-3-8-4-10-9)-(13-14-15-20-19-24).
- Solution part two: (22-23-18-17-16)-(11-12-7-13-8-3-4)-(9-14-10-15-19).
- Solution part three: (23-22-17-16)-(12-6-2-7-3)-(8-4-10-9-13-18)-(14-15-20-19-24).
- Take GARGOYLES HEARTS 1/2 and HALBERD (C).
- CARABINER on CHAIN, receive CARABINER AND CHAIN.
- Use CARABINER AND CHAIN (D), take SHOE WAX (E).
- Use SHOE WAX, take COOKIE (F).
- Give COOKIE, take BUTTON WITH SYMBOL and SAW (G).
- Use SAW (H). Play puzzle, receive TORTURE HANDBOOK.
- Use TORTURE HANDBOOK (I), take STONE (J).
- Use HALBERD and STONE (K).
- Go (L).
- Take LOCKPICKS 1/2 and ALCOHOL (A).
- ALCOHOL on LOCKED REPAIR KIT,
- Receive OPENED REPAIR KIT.
- Use OPENED REPAIR KIT, play puzzle, take LADDER (B).
- Place LADDER (C), take CROWN FIGURINE and GARGOYLES, HEARTS 2/2 (D).
- Place GARGOYLES HEARTS 2/2 (E), take MIRROR (F). Place BUTTON WITH SYMBOL (G).
- Easy Solution (H): (8-14)-(14-4)-(4-3)-(3-9).
- (9-11)-(11-2)-(2-7)-(7-13)-(13-1)-(1-10).
- (10-5)-(5-12)-(12-6)-(6-15).
- Hard Solution (I): (9-14)-(14-5)-(5-2)-(2-10)-(10-12)-(12-3).
- (3-7)-(7-20)-(20-15)-(15-16)-(16-17)-(17-1)-(1-4).
- (4-19)-(19-8)-(8-18)-(18-11)-(11-13)-(13-6).
- Move forward to Shedaur Castle.
- Take LOCKPICKS 2/2 and SCEPTER FIGURINE (J).
- Use LOCKPICKS 2/2, take DRAWER HANDLE (K).
- Place DRAWER HANDLE, take TABLECLOTH (L).
- Use TABLECLOTH (M).
- Go (N).
- Select first statement (O), receive KEY.
- Take MORTAR AND PESTLE, ARROW, RESIN, and Note (P).
- Use CROWN FIGURINE and SCEPTER FIGURINE, take WINDING KEY (Q).
- Use WINDING KEY (R), take CROCHET HOOK (S).
- Use MIRROR (T) and CROCHET HOOK (U). Play puzzle,
- Receive TORCH.
- Use TORCH (V) and open door.
- Go (W).
- Take Note (X).
- Use ARROW, take NUTS (Y).
- Go back 3 times.
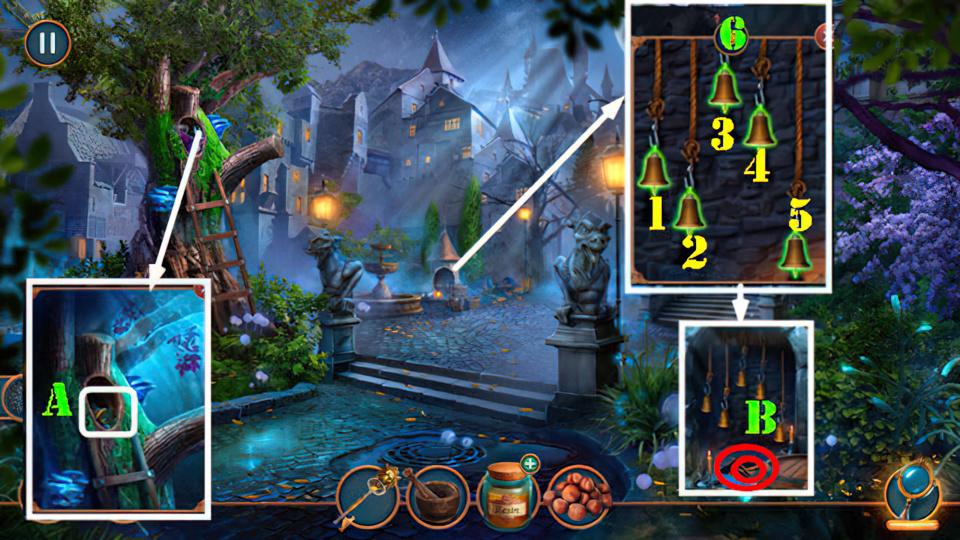
- Give NUTS, take BELL (A).
- Place BELL, solution: (1×2)-(2×3)-(4)-(5×4)-(6).
- Take WIRE and PAINT BRUSH (B).
- Go to Shedaur Castle.
- Remove top on RESIN and use PAINT BRUSH, receive RESIN.
- Use RESIN (C).
- Easy Solution: (D).
- Hard Solution: (E).
- Take Note and OIL (F).
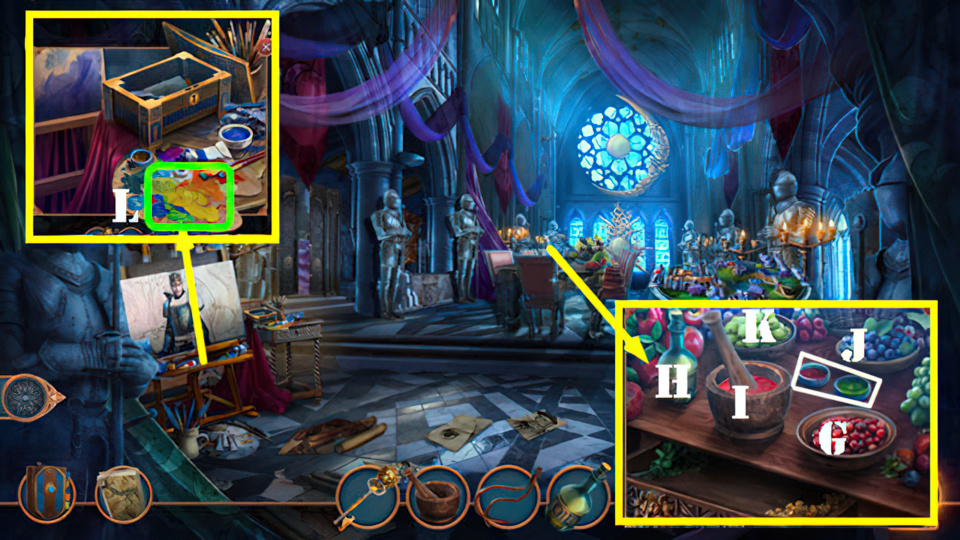
- Place MORTAR AND PESTLE and OIL. Place berries (G) and then oil (H) into mortar (I).
- Pour mortar contents (I) into bowl (J).
- Place green grapes (K) and oil (H) into mortar (I).
- Place mortar contents (I) into bowl (J). Take PAINTS (J).
- Use PAINTS (L).
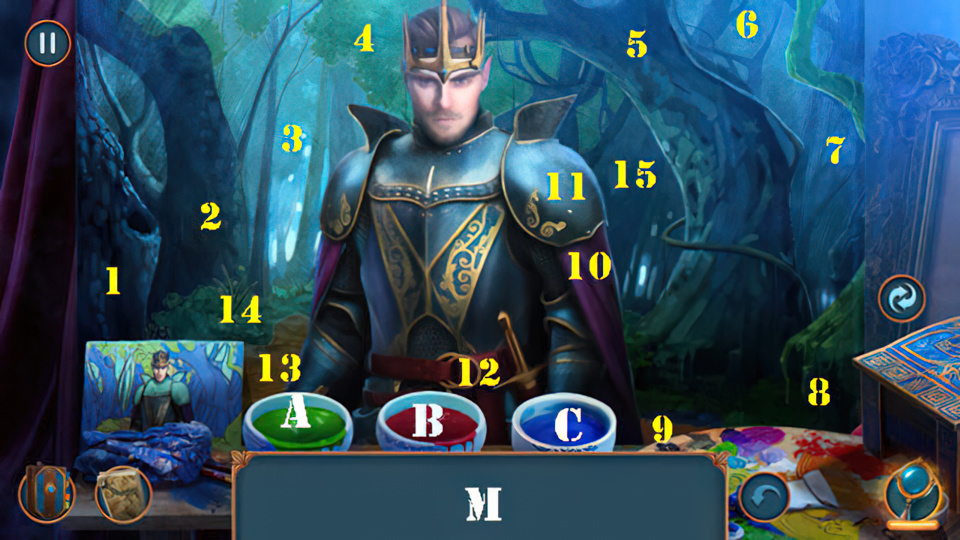
- Solution (M): (A-14,4,8)-(B-12)-(C-1,2,15,5,7).
- (Mix A and C, use on 3,6,11).
- (Mix B and C, use on 10).
- (Mix A and B, use on 13,9).
- Take CANDIES.
- Go to Throne Hall.
- Use CANDIES, take SIGNET RINGS 1/2 and HORSESHOE (N).
- Go (O).
- Use WIRE and HORSESHOE, take HELMET (P).
- Go back.
- Use KEY (Q).
- Go (R).
- Take DARK SUNFLOWER ROOTS and ACID (S).
- Look at Note and take SHIP (T).
- Place SHIP (U).
- Easy Solution: (1×2)-(2×2)-(4×3)-(2-1-2)-(1×3)-(3×2)-(1×2)-(3-1-3-1)-(2×3).
- (4×2)-(2×2)-(1×2)-(2×3)-(4-3-4-3)-(4×2)-(2)-(4×2)-(3-4-2-4).
- Hard Solution: (1×2)-(2-1-2)-(4×2)-(3-4-2-3-2-1)-(2×4)-(4-2)-(1×2)-(3×2)-(1).
- (2×2)-(1)-(3×2)-(1×2)-(3×5)-(1-3-1)-(2×8)-(4-3-4-2).
- Take GOLD BARRETTE
- Use GOLD BARRETTE (V), take EMERALDS 1/2 (W).
- Return to Basement.
- Use ACID (X), receive EMERALDS 2/2.
- Return to Abandoned Statues Chamber.
- Place EMERALDS 2/2 (A), take CRESCENT AMULET (B).
- Place CRESCENT AMULET, take STONE POWDER, AMULET SHARD, and NUTCRACKER (C).
- Go back.
- Use NUTCRACKER, take AMULET PART (D).
- Go to Abandoned Statues Chamber.
- AMULET PART on AMULET SHARD, receive EXQUISITE AMULET.
- Place EXQUISITE AMULET (E). Play puzzle, receive KEY.
- Use KEY, take FOG ELIXIR (F).
- Use DARK SUNFLOWER ROOTS, STONE POWDER, and FOG ELIXIR, take POTION OF REVERSAL (G).
- Use POTION OF REVERSAL (H).
- Go back 3x.

- Use HELMET (I), take NUT and SQUARE WRENCH (J).
- Go (K).
- Use SQUARE WRENCH, take SCARF and SIGNET RINGS 2/2 (L).
- Go (M).
- Use SIGNET RINGS 2/2, take NEEDLE and MACE (N).
- Go (O).
- Use MACE (P). Play puzzle, receive MAGIC STONE OF MOVING.
- Place MAGIC STONE OF MOVING (Q).
- Take SUN AMULETS 1/2 and VALVE (R).
- Place NUT, VALVE, and SCARF (S). Take SOLVENT and KEY (T).
- Use KEY (U).
- Easy Solution (V): (3-5-2-4-3-5-6)-(1-3-5-6-1-3-5-6-1-3)-(4-6-1-3-5-6-4).
- Hard Solution (W): (1-2-4-6-8-1-3-5-4-2)-(1-3-5-4-2-1-3-5-7-8)-
- (6-4-2-1-8-6-4-2-1-8-6).
- Enter (X).
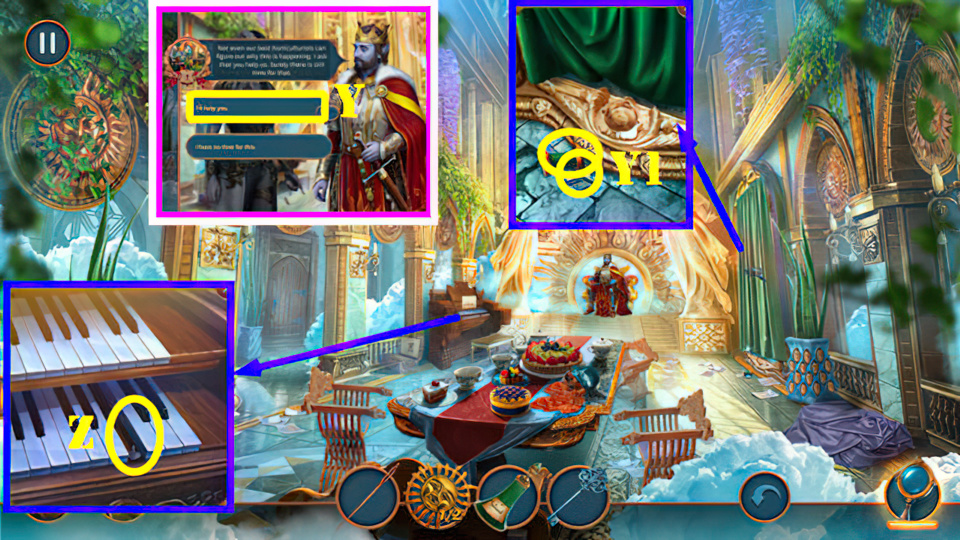
- Select first statement (Y). Receive KEY.
- Take THREADS and PIANO KEY (Y1).
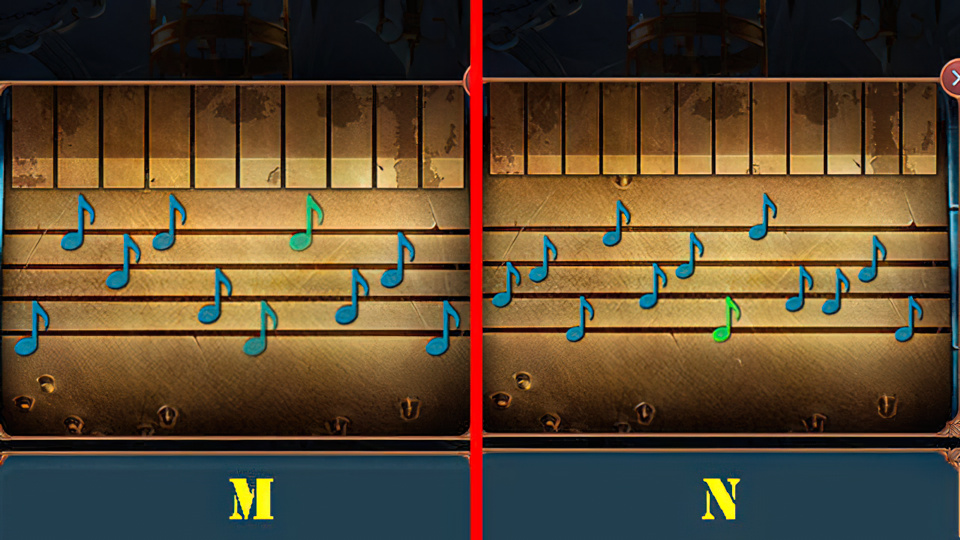
- Place PIANO KEY (Z).
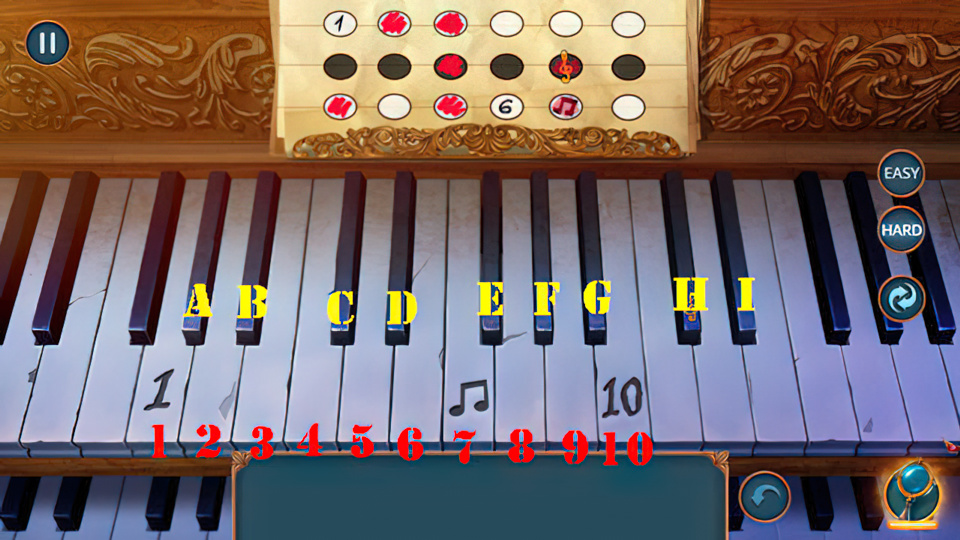
- Easy Solution: (2-3)-(F-H)-(3-5-7)-(D-E-G)-(6-8-10).
- Hard Solution: (2-3)-(F-H)-(3-5-7)-(D-E-G)-(6-8-10)-(8-9-10).
- Take RIBBON.
- Use NEEDLE, THREADS, and RIBBON, take DIADEM (J).
- Place DIADEM, take GLUE and BAS-RELIEF PART (K).
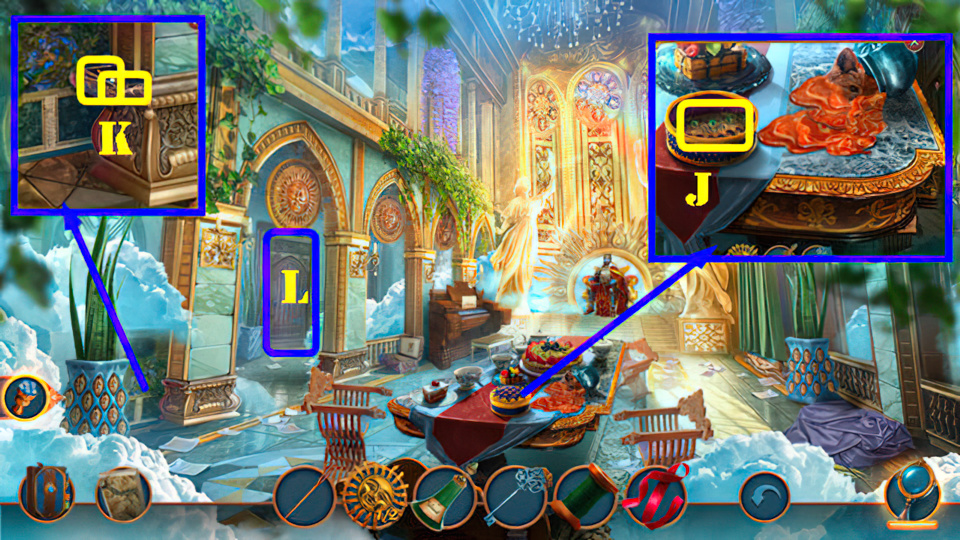
- Use KEY and go (L).
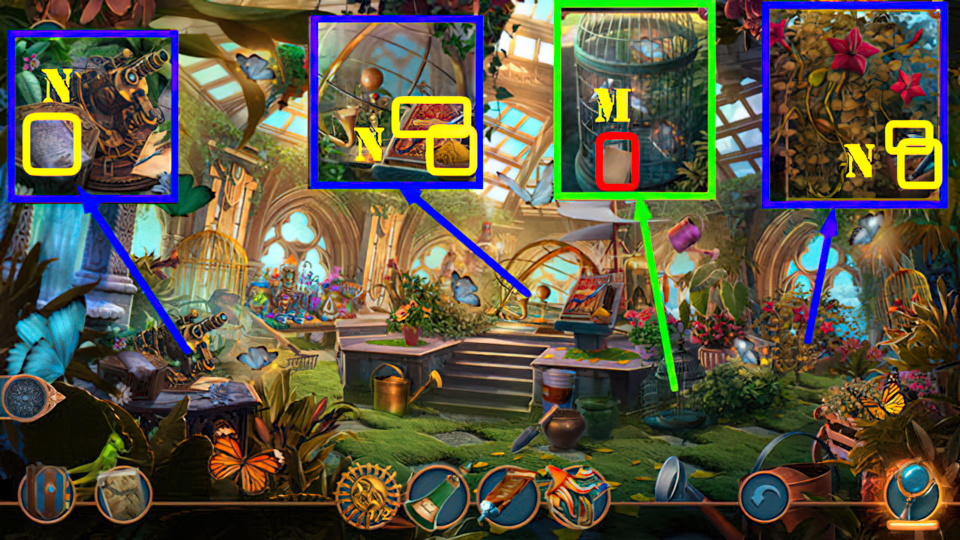
- Take Note and open cage (M).
- Take Note, PICKAXE, SUN WORMWOOD POWDER, POWDER OF CLARITY, and SCISSORS PART (N).
- Use PICKAXE, take BOLT, STAR SHARDS, and FEATHER TOKEN (O).
- Place FEATHER TOKEN, take MAGICAL FERTILIZER and COIN (P).
- Use MAGICAL FERTILIZER, take LEAF (Q).
- Go back twice.
- Place BAS-RELIEF PART, take RING OF CLARITY (R).
- Use RING OF CLARITY (S).
- Take BROKEN WINGED AMULET and SUN AMULETS 2/2 (T).
- Place SUN AMULETS 2/2, take SCOOP (U).
- Use SCOOP, take COG (V).
- Place COG (W).
- Easy Solution (X): (1×1)-(4×1)-(2×1)-(3×2)-(5×4).
- Hard Solution (Y): (2×1)-(4×4)-(6×4)-(2×1)-(4×1)-(1×1)-(5×1)-(3×1)-(6×2)-(1×1).
- Go back.
- Use COIN (Z), receive LENS.
- Go (Z1-Z2).
- Take SHINY CUFFLINK and UMBRELLA (A).
- Use SOLVENT on the stain and then take the green rag on the right side of the table to clean it off, take GEMS 1/2 and SECOND WING (B).
- GLUE and SECOND WING on BROKEN WINGED AMULET,
- Receive WINGED AMULET.
- Place WINGED AMULET (C). Play puzzle, receive KEY.
- Use KEY (D), receive LASSO.
- Go back twice.
- Use LASSO (E), take SHELL and HOT LIQUID (F).
- Go (G).
- Use SHELL (H).
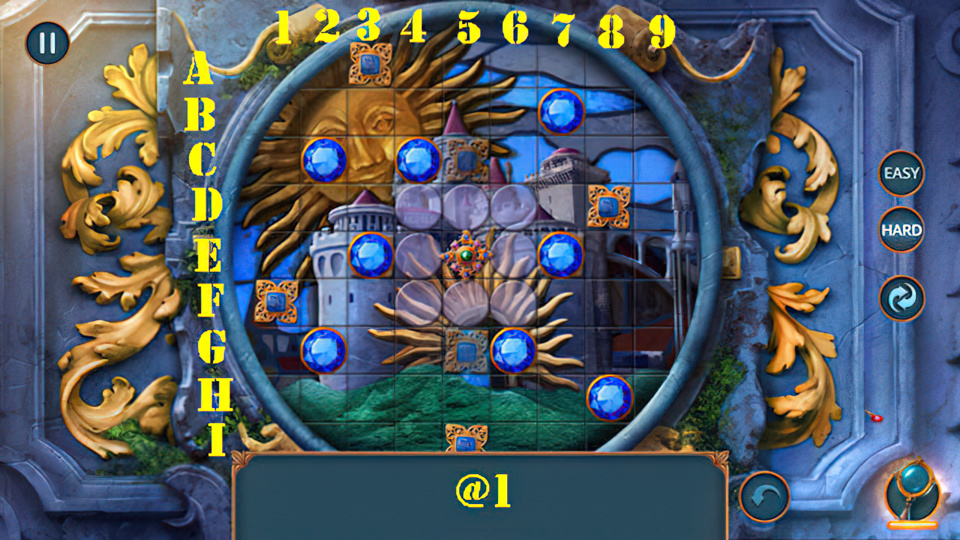
- Easy Solution (@1): (E5-D5)-(D5-D4)-(D4-C4)-(C4-B4)-(B4-B5)-(B5-C5)-
- (C5-D5)-(D5-E5)-(E5-E4)-(E4-F4)-(F4-F3)-(F3-F2)-(F2-E2)-(E2-E3)-
- (E3-D3)-(D3-D4)-(D4-C4)-(C4-C5)-(C5-C6)-(C6-D6)-(D6-E6)-(E6-F6)-(F6-F7)-
- (F7-G7)-(G7-F7)-(F7-F6)-(F6-F5)-(F5-G5)-(G5-F5)-(F5-E5).
- Hard Solution (@1): (E5-E6)-(E6-D6)-(D6-C6)-(C6-D6)-(D6-E6)-(E6-E5)-
- (E5-E4)-(E4-D4)-(D4-D3)-(D3-C3)-(C3-D3)-(D3-E3)-(E3-F3)-(F3-E3)-
- (E3-E4)-(E4-E5)-(E5-E6)-(E6-F6)-(F6-F7)-(F7-G7)-(G7-F7)-(F7-F6)-
- (F6-F5)-(F5-G5)-(G5-F5)-(F5-E5).
- Take MIRROR BUTTON.
- Place MIRROR BUTTON, take RESIN and GEMS 2/2 (J).
- Go (K).
- Place LEAF and LENS (L).
- Easy Solution: (M).
- Hard Solution: (N).
- Take INSTRUCTION.
- Open on the book. Place INSTRUCTION on book.
- Flip pages 2 times, take Note, FORCEPS, and RECIPE (O).
- Go By Yarats Residence.
- Place GEMS 2/2 (P), take LEVITATION POWDER (Q).
- Place SHINY CUFFLINK (R), take LIGHTER (S).
- Use HOT LIQUID and LIGHTER, take HEART AMULET (T).
- Go (U).
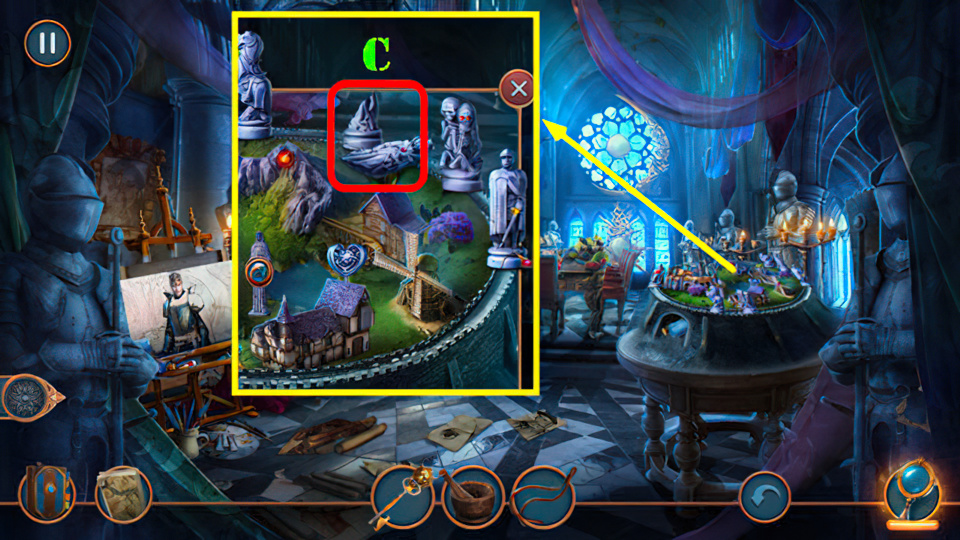
- Place HEART AMULET (V), take Note, BROKEN SCOOP NET and CHESS PIECE (W).
- Place CHESS PIECE (X).
- Easy and Hard Solutions (Y): (1-2)-(3-4)-(5-6)-(7-8)-(9).
- Take GOLD CHAIN and NAPKIN.
- Return to Lightruns Castle.
- Use NAPKIN, take STATUETTE PART (Z1).
- Go back.
- Use FORCEPS (Z2), receive SCISSORS PART.
- Return to Garden.
- BOLT and SCISSORS PART on SCISSORS PART, receive LAB SCISSORS.
- Use LAB SCISSORS (A), receive CYPRESS FLOWER.
- Place POWDER OF CLARITY, SUN WORMWOOD POWDER, STAR SHARDS, RECIPE, and CYPRESS FLOWER (B). Play puzzle, receive BLOSSOM POTION.
- Use BLOSSOM POTION (C).
- Return to Yarats Residence.

- Use RESIN and STATUETTE PART (D), take SHADOW CIRCLE and LEATHER GLOVE (E).
- Go back.
- Use LEATHER GLOVE (F). Play puzzle, receive ARCH PART.
- Use LEVITATION POWDER and ARCH PART (G).
- Take MOSQUITO NET and WORLD CIRCLE (H).
- Use UMBRELLA, take REFLEX WORLD CIRCLE (I).
- GOLD CHAIN and MOSQUITO NET on BROKEN SCOOP NET, receive SCOOP NET.
- Use SCOOP NET (J), receive BROKEN ARROW.
- Use BROKEN ARROW, take CIRCLE OF LIGHT (K).
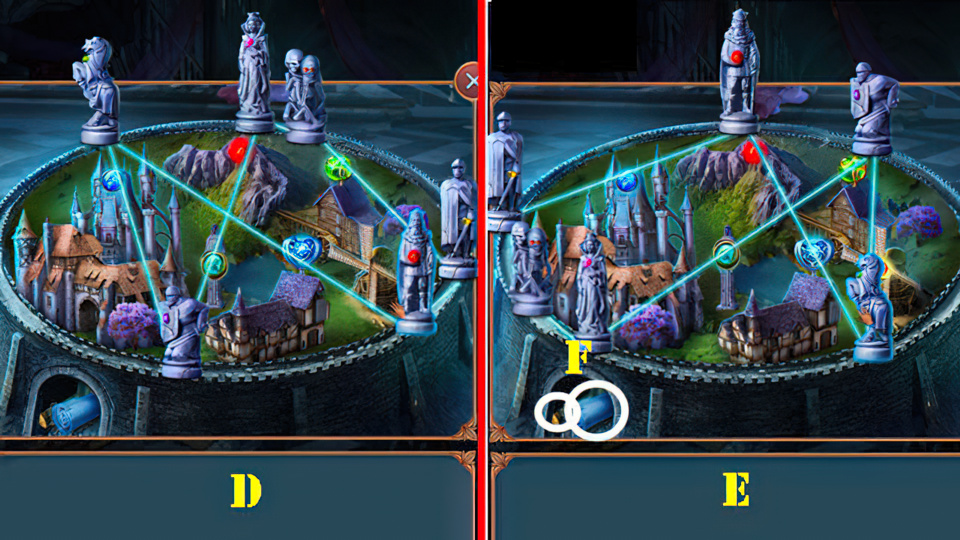
- Place SHADOW CIRCLE, REFLEX WORLD CIRCLE, WORLD CIRCLE, and CIRCLE OF LIGHT (L).
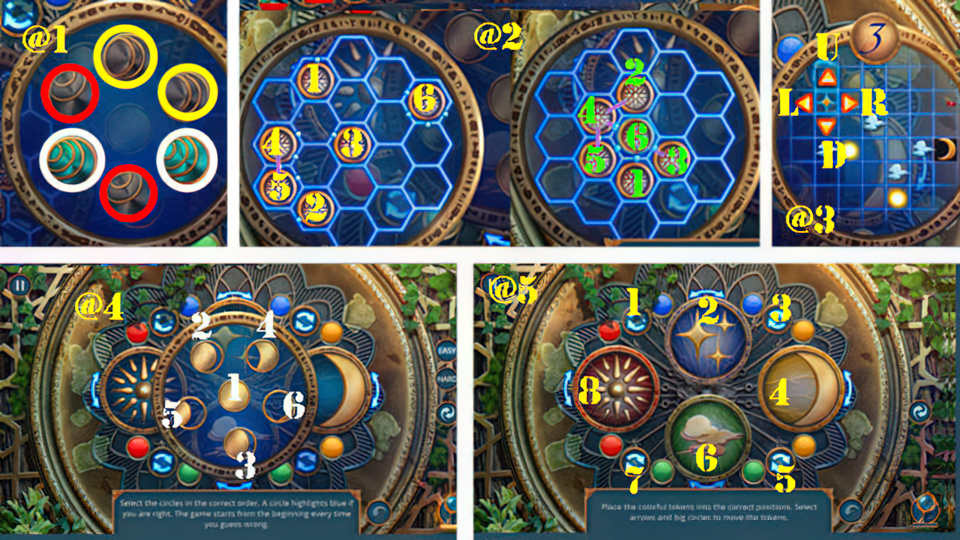
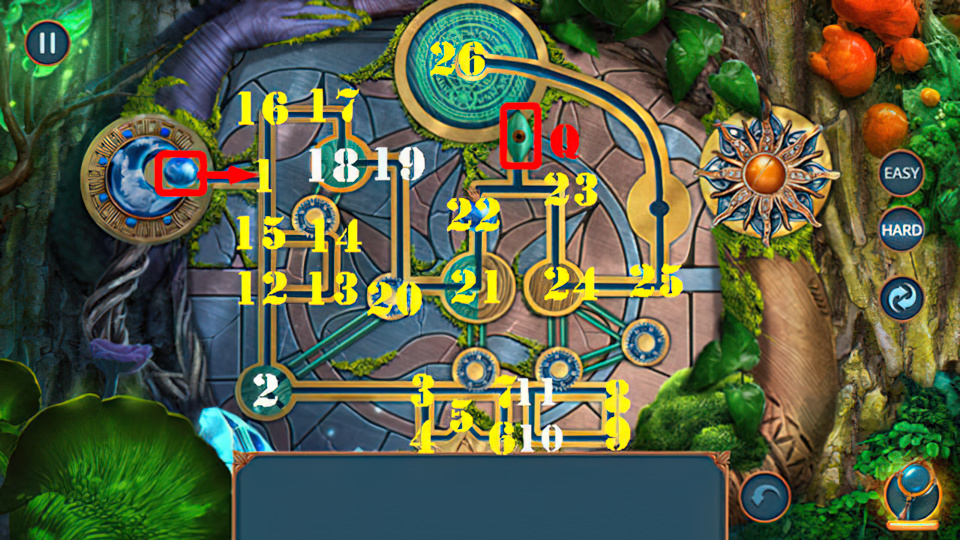
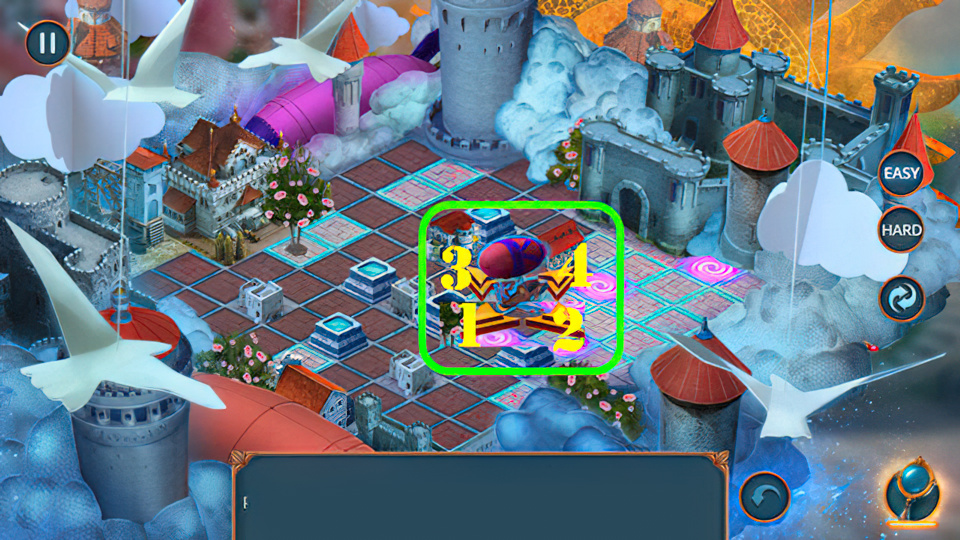
- Easy Solution round one (@1): (1-3).
- Easy Solution round two (@2): Place yellow numbers in the matching spots of the green numbers (1-6).
- Easy Solution round three (@3): (Dx2)-(R)-(Dx3)-(Rx2)-(Ux3)-(R).
- Easy Solution round four (@4): select (1-6).
- Easy solution round five (@5): (5-8-7-2-3-1-2-8-1).

- Hard Solution round one (@6): select matching pairs.
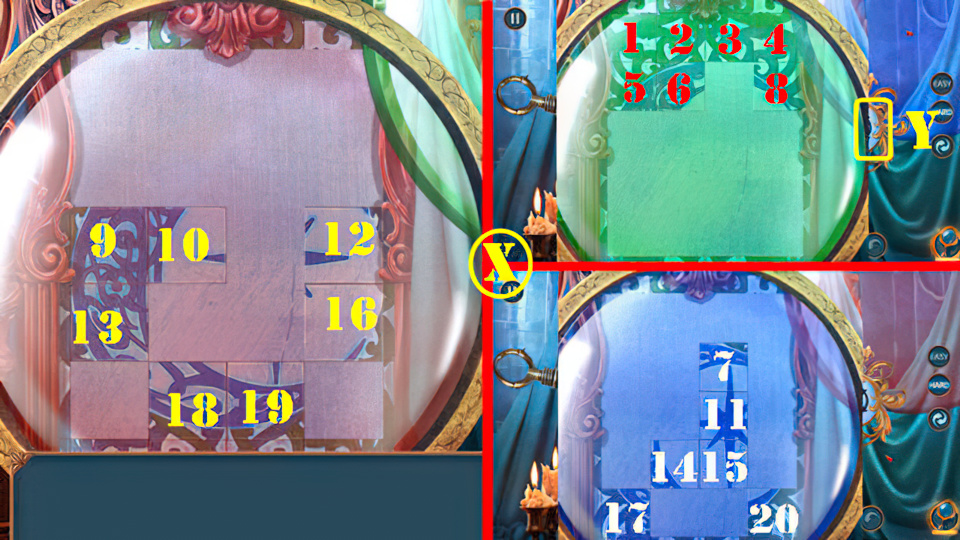
- Hard Solution round two (@7): Place yellow numbers in the matching spots of the green numbers (1-9).
- Hard Solution round three (@8): (Dx2)-(L)-(Dx2)-(Rx2)-(U)-(Rx2)-(Ux2)-(R)-(Dx3).
- Hard Solution round four (@9): (1-10).
- Hard Solution round five (@10): (5-8-7-2-3-1-2-8-1).
- Walkthrough Bonus Chapter, at the link below.


