
Maze of Realities 5: Synergy of Worlds – Etheria is facing serious problems: power outages and evacuation of the inhabitants. A mysterious disease has struck the World Tree, the foundation of this world’s existence. The Tree summons several outsiders to save Etheria and find a cure. But you can’t trust each of them. You take on the role of a hero who explores the ancient ruins and encounters the riddles guarding the secrets of the World Tree. Your mission is to figure out what is behind the spread of the disease, establish the work of portals and protect the innocent inhabitants of Etheria. Along the way you will meet a guardian of the Tree named Tyrone, who asks for your help in treating a wounded bumblebee. The story unfolds on a mysterious island where many challenges await you. Only by solving the riddles and uncovering the secrets, you will be able to save Etheria from destruction. If you can not pass any of the puzzles or do not know where the items are, on our site you can watch the walkthrough of the game Maze of Realities 5: Synergy of Worlds, and protect the Etherians.
Maze of Realities 5: Synergy of Worlds – Walkthrough
Here you can see the full walkthrough of Maze of Realities 5: Synergy of Worlds game, namely for all chapters, including bonus chapter, in pictures.

- Take NEEDLE, the journal, SHEET, and SLEEPING BAG (A).
- Take the map and ALCOHOL (B).
- Use SLEEPING BAG on the hole in the boat, take UNDERWATER FLASHLIGHT (C).

- Read the note, take STRAW (D).
- Use UNDERWATER FLASHLIGHT on the tent (E).
- Easy solution: 9-10 10-6 2-6 6-8 2-3 2-5 2-7 5-9 4-10 1-3 1-7 4-7 3-5 (F).
- Hard solution: 9-10 10-6 2-6 6-8 2-3 2-5 2-7 5-9 4-10 1-3 1-7 4-7 3-5 (G).
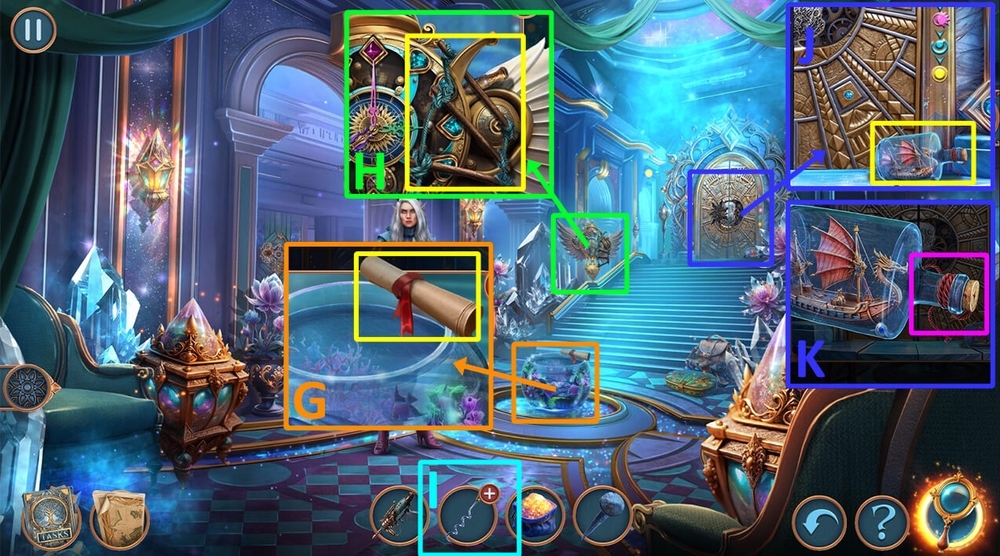
- Read the journal, take PIKE POLE (H).

- Use PIKE POLE on the box in the water (I).
- Open the box (J), read and take PARACHUTE INSTRUCTIONS (K).

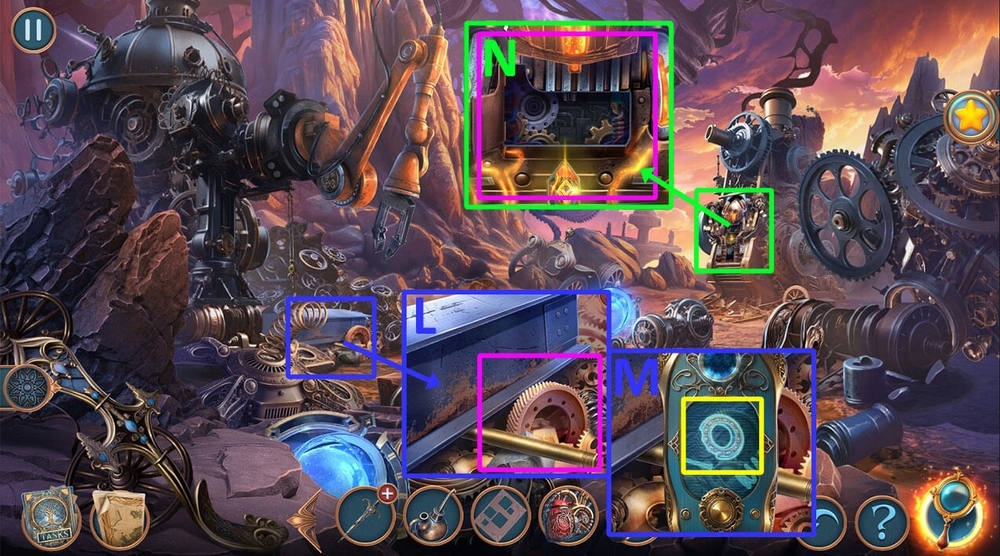
- Use PARACHUTE INSTRUCTIONS on the backpack (L).
- Easy solution: 5-8 11-12 9-10 7-4 3-9 6-2 1-7 (M).
- Hard solution: 7-10 14-15 11-2 3-11 6-5 9-4 8-13 1-9 12-1 (N).
- Get PARACHUTE.
- Use PARACHUTE on the portal (O).

- Open the door (P).
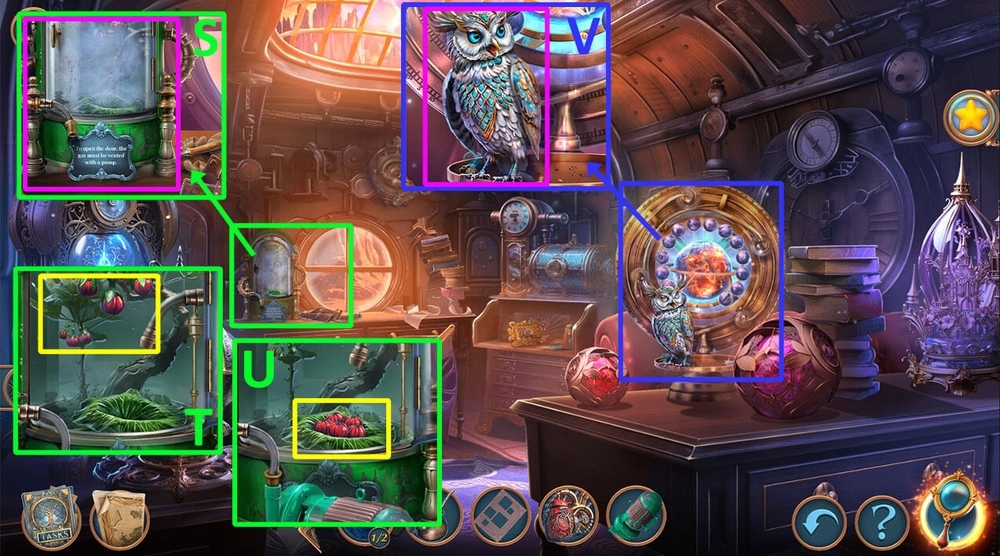
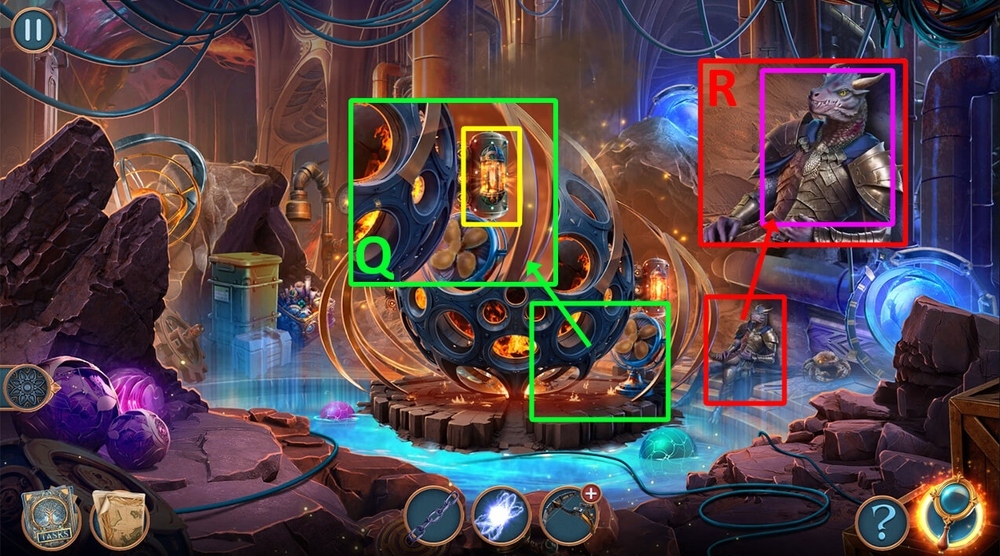
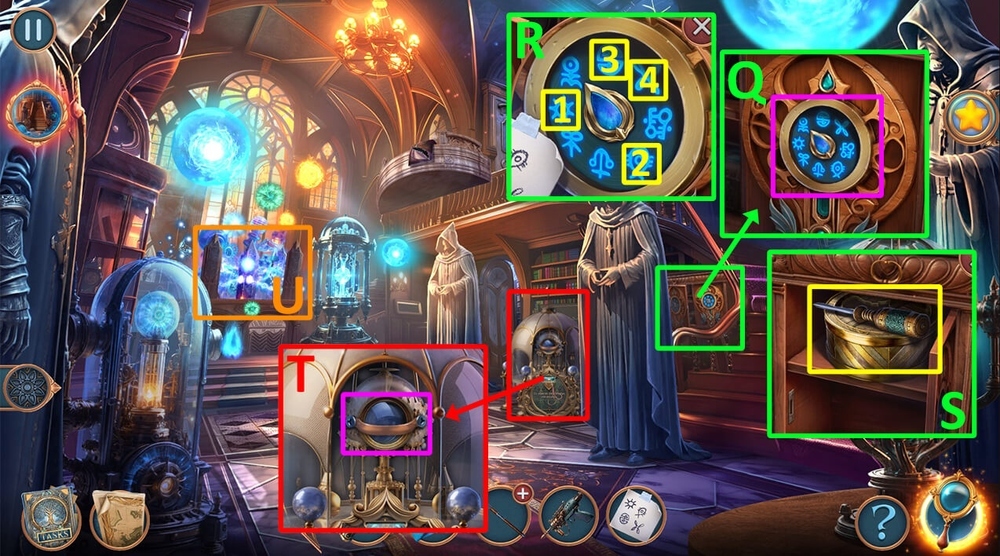
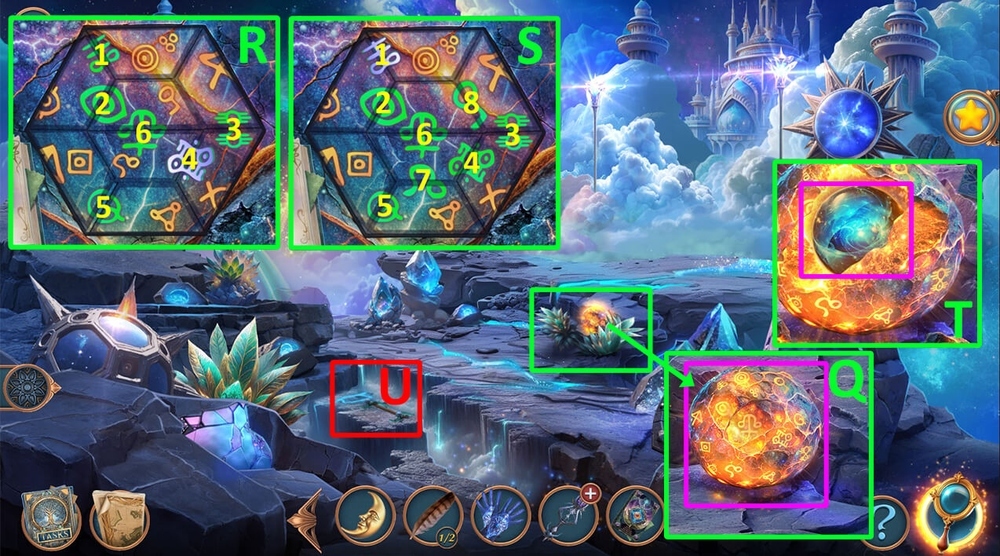
- Read the note, take SEASHELL (Q).
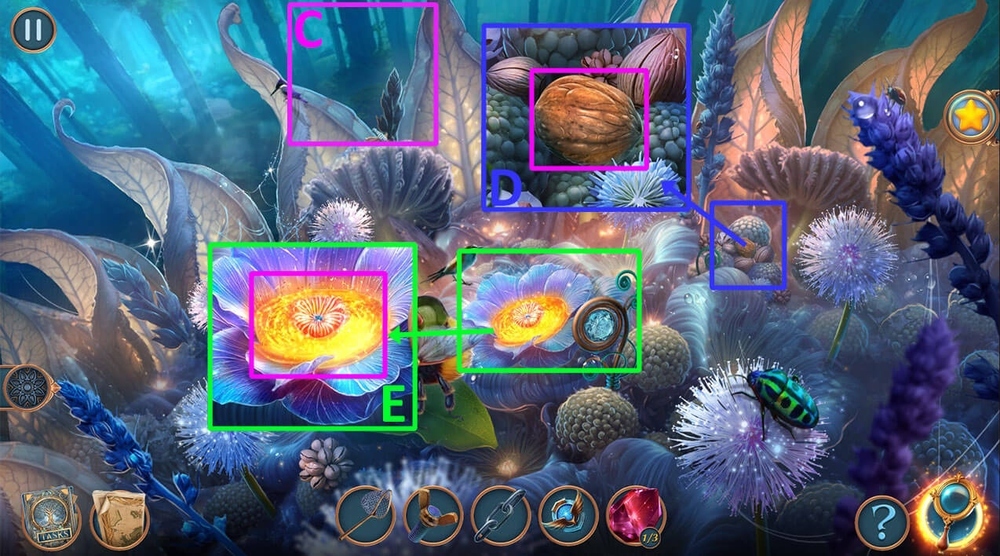
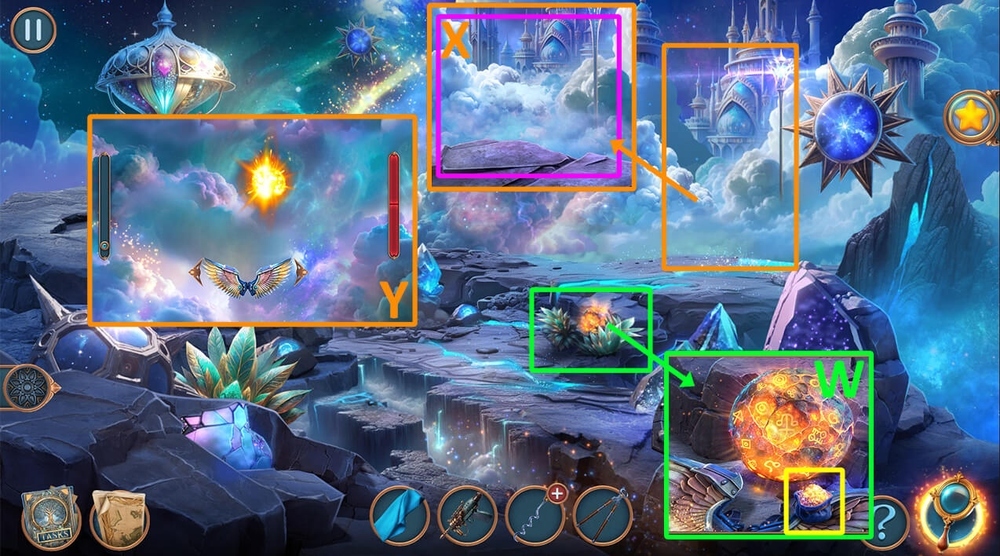
- Use SEASHELL on the sand (R), pick up all the pearls, take PEARL SHELL (S), clear the dust (T).

- Use PEARL SHELL on the box, get SEASHELL, take GOLDEN LEAF (U).
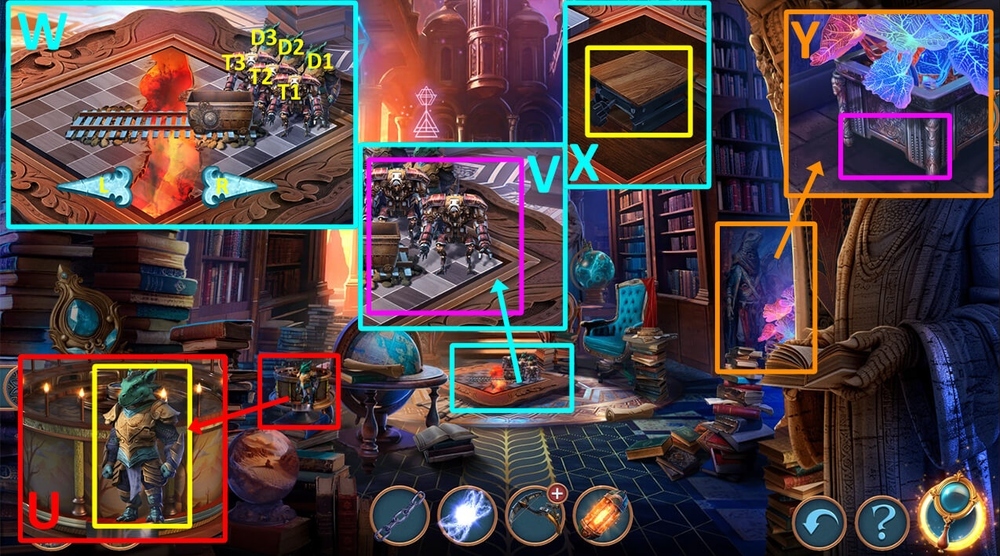
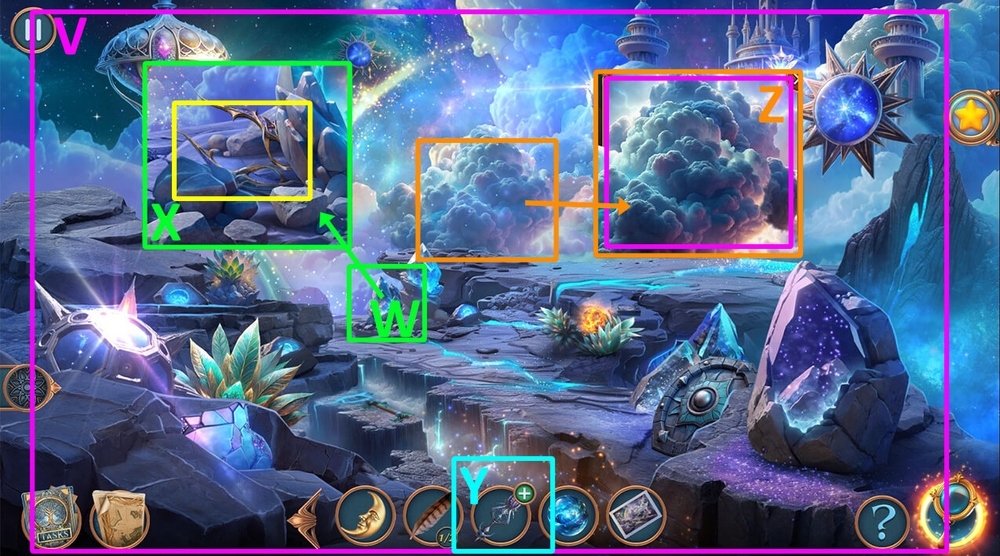
- Use GOLDEN LEAF on the pay-gate (V).
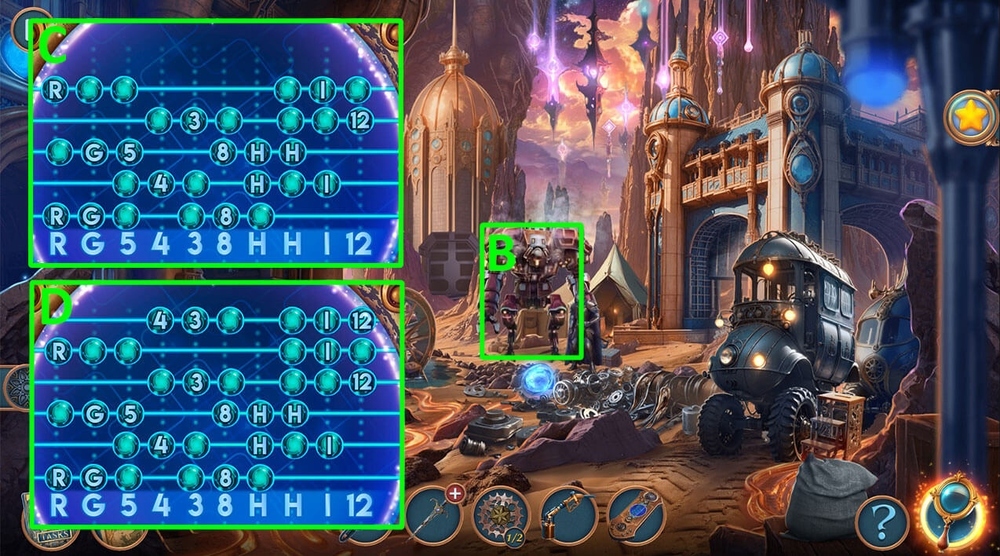
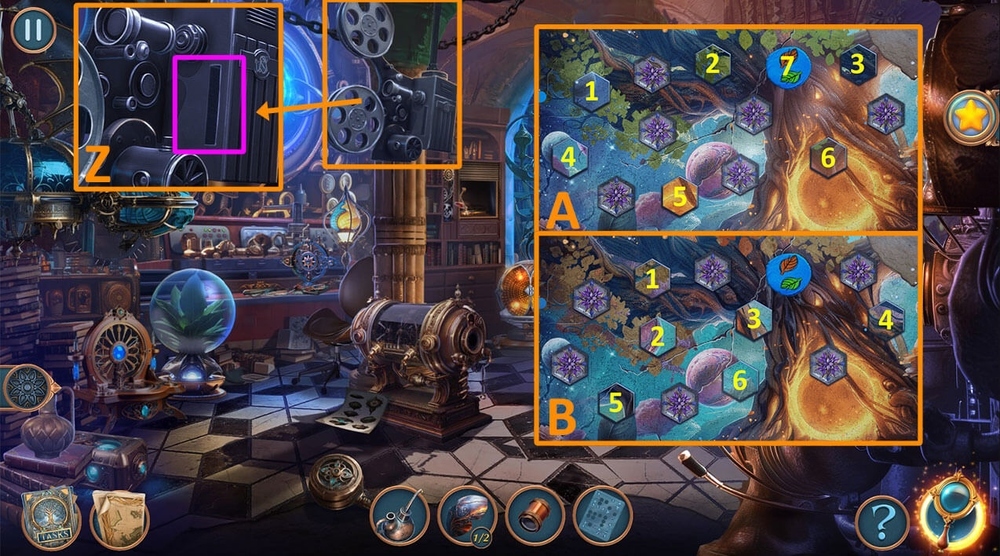
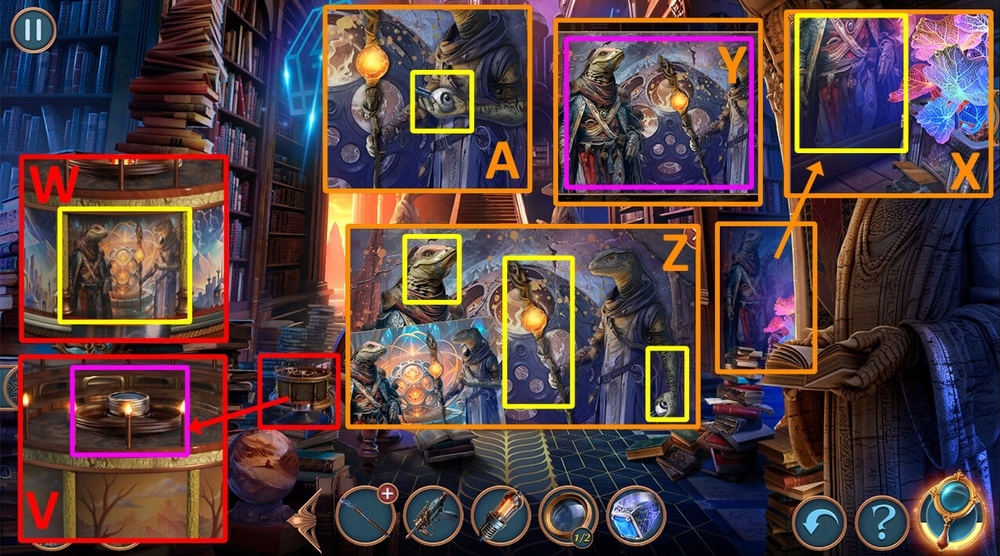
- Easy solution: 3-6-9, 4-5-10, 2-4-8, 3-7-12 (W).
- Hard solution: 3-6-7-9, 4-5-10-11, 1-2-4-8, 3-5-7-12 (X).
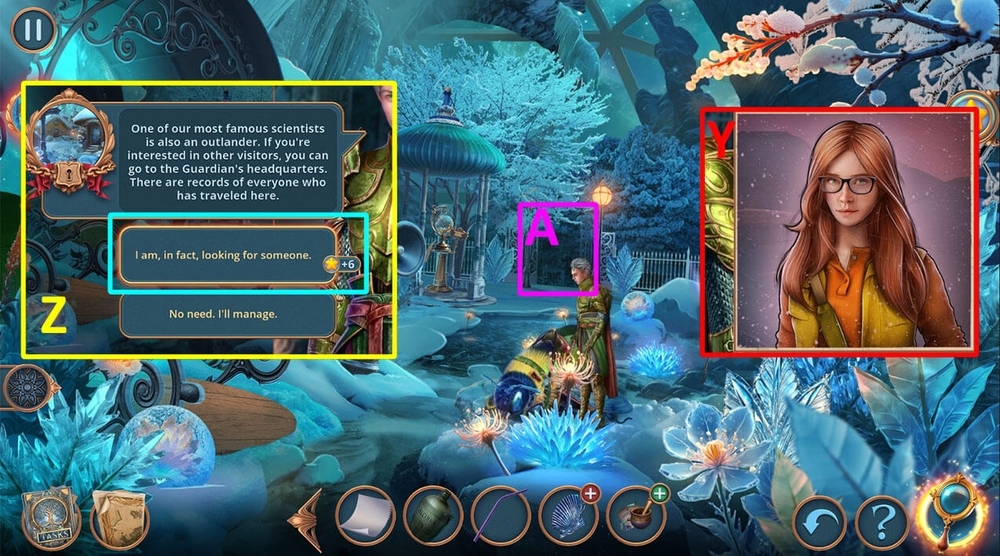
- Solution: Rotate the elements to assemble the image above (Y).
- Select this option, get TREATMENT RECIPE (Z).
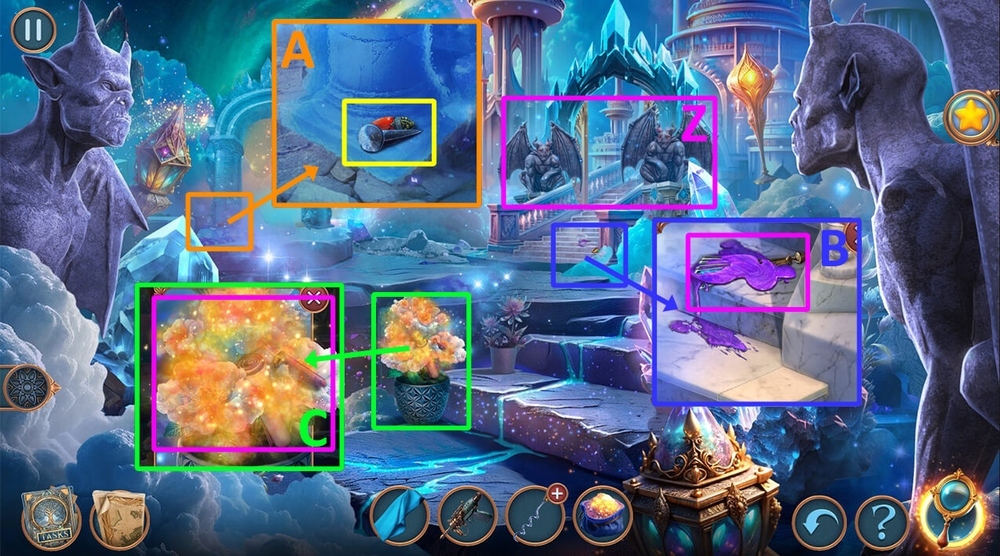
- Go forward (A).

- Take HANDLES 1/2 and HOOK (B).
- Read the note (C).
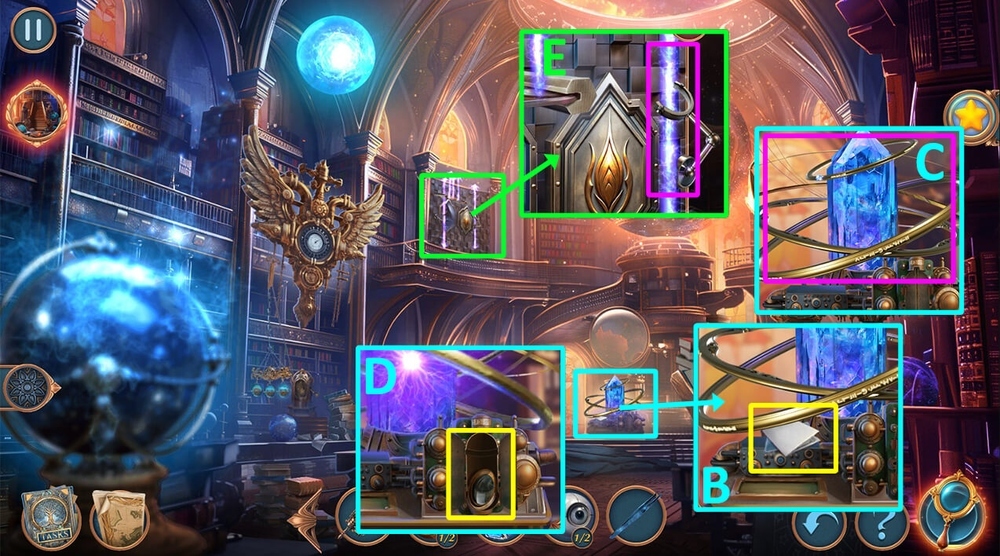
- Use HOOK on the lamp, get HANDLES 2/2 (D).
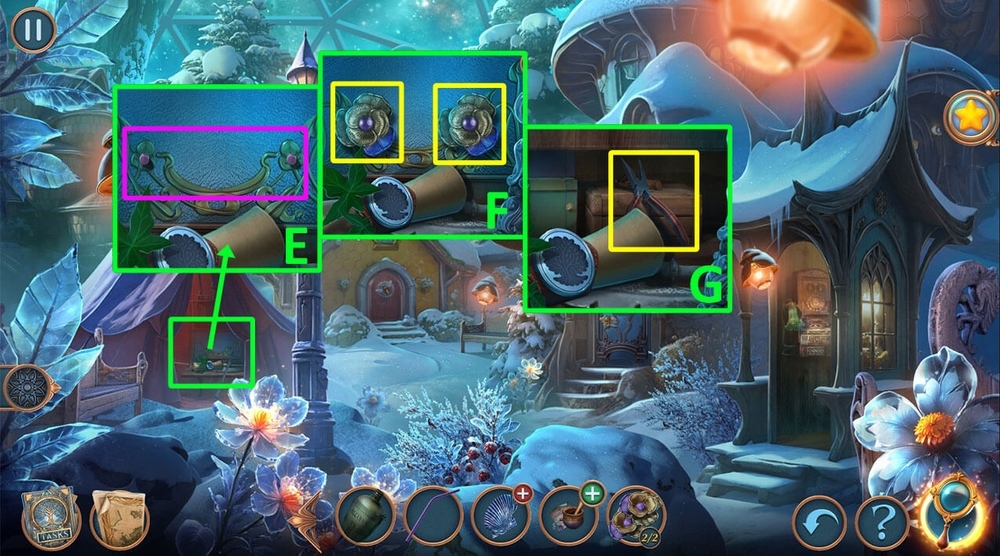
- Use HANDLES on the glass (E), press left, right, right (F), take PLIERS (G).
- Go back.

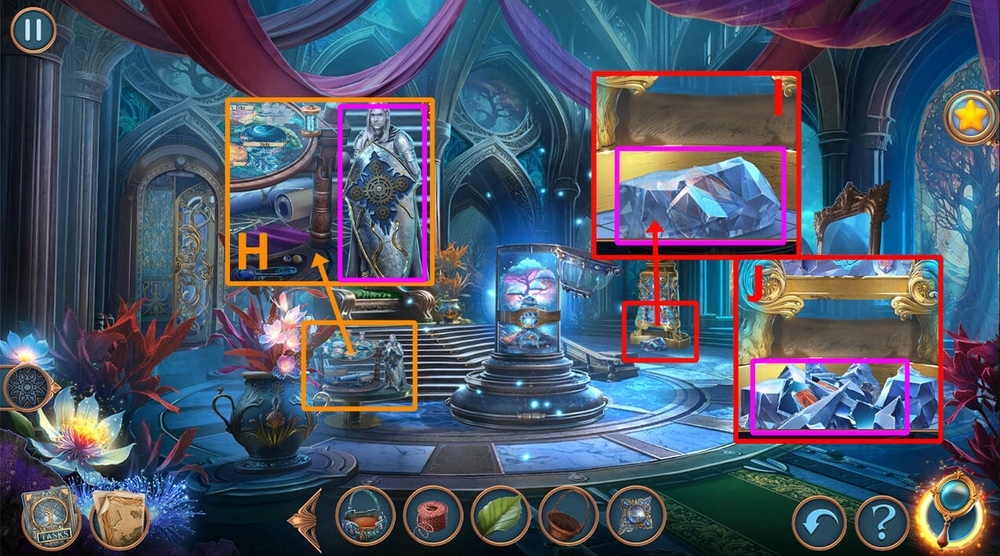
- Take ICE GRASS and SCALED GLOVE (H).
- Press on the globe (I), play puzzle (J).
- Use SCALED GLOVE on the globe, get FLAMING CRYSTAL (K).

- Use FLAMING CRYSTAL on the ice (L).
- Easy solution: RD, RU, LU, LD, L, RU, L, RD, R, LU, LD, L, LU, R, LD, L, LD, RD (M).
- Hard solution: RD, LD, L, LU, R, LD, LU, L, LD, RD, R, RU, L, LU, R, LD, L, RD, R, RU, R, RU, L, LD, L, RU (N).
- Take MAGIC BEANS (O).

- Use ALCOHOL, ICE GRASS, and MAGIC BEANS on TREATMENT RECIPE, get TREATMENT (P).
- Use TREATMENT on the bumblebee (Q).
- Get CRYSTAL PIPE.

- Take BOTTLE (R).
- Take RUBIES 1/2 (S).
- Use STRAW and BOTTLE on the crack in the trunk, get RED JUICE (T).
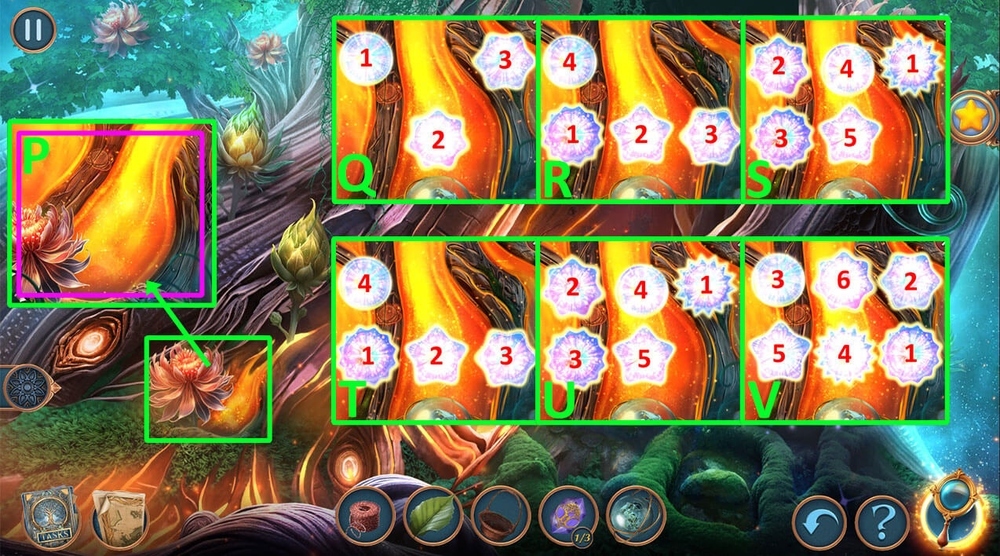
- Use SHEET and RED JUICE on the rock, get MUSIC SHEET (U), click on the crabs (V).

- Use CRYSTAL PIPE and MUSIC SHEET on the bridge (W).
- Easy solution: 2, 4, 3, 6 (X).
- Hard solution: 3, 5, 2, 4, 6, 9 (Y).

- Go forward (Z).

- Select this option (A).
- Read the note, take STONE BOWL and STRANDS OF MOONLIGHT (B).
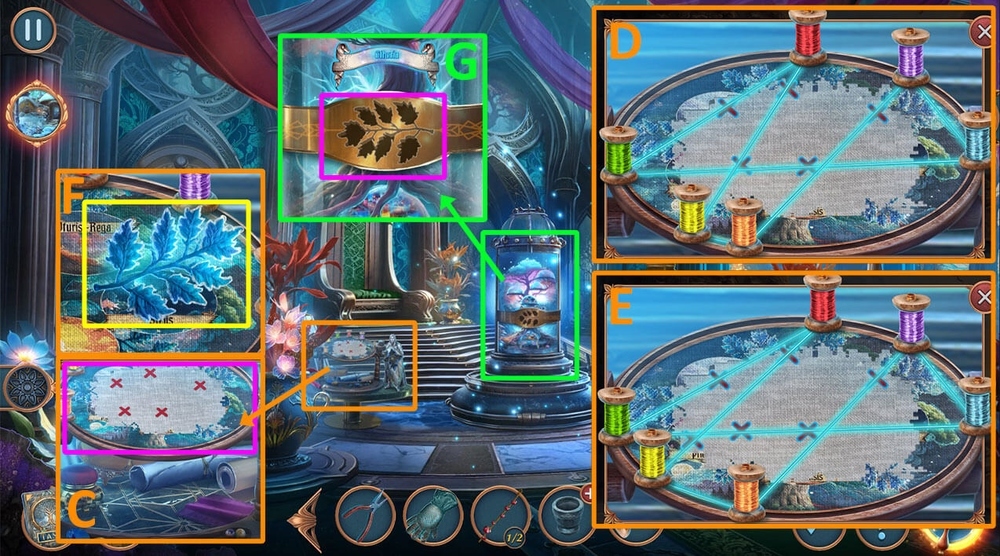
- Use NEEDLE and STRANDS OF MOONLIGHT on the embroidery hoop (C).
- Easy solution: Follow the instructions on the image (D).
- Hard solution: Follow the instructions on the image (E).
- Take TREE BRANCH (F).
- Use TREE BRANCH on the metal band (G).

- Play puzzle, earn KEY (H).
- Use KEY on the keyhole (I).
- Select this option (J).

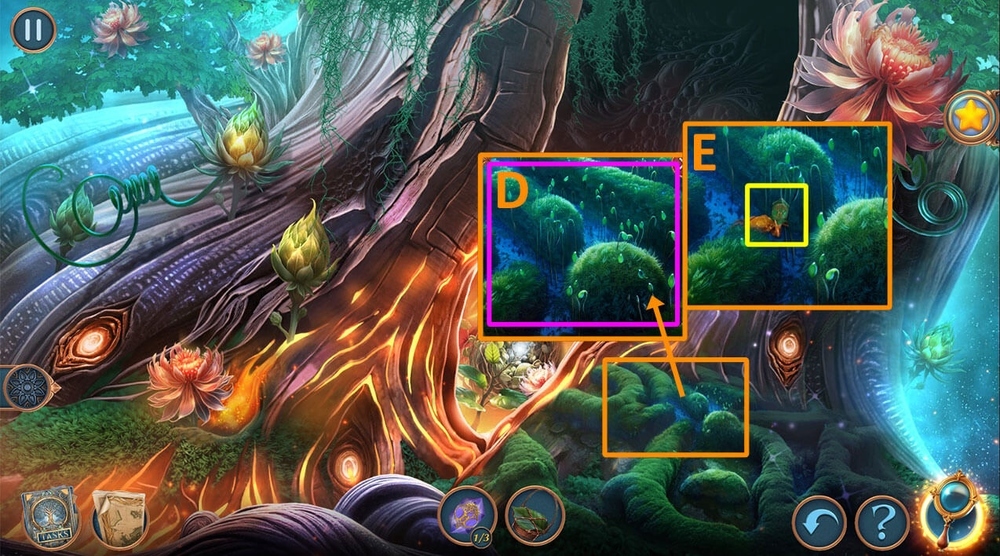
- Move the leaves (K).
- Take PESTLE (L).
- Use PESTLE on STONE BOWL, get MORTAR AND PESTLE (M).

- Use MORTAR AND PESTLE on the berries, get OIL (N).
- Read the note (O).

- Take CROSSBOW (P), use PLIERS on the breastplate, get GUARDIAN SEAL, use OIL on the vambrace, get SHARPENER (Q).
- Use SHARPENER on SEASHELL, get SHARD SEASHELL (R).

- Use SHARD SEASHELL on the mushroom (S).
- Easy solution: Click 1-16 (T).
- Hard solution: Click 1-21 (U).
- Get MUSHROOM PIECE, take STRING (V).
- Go to Guardians Headquarters.
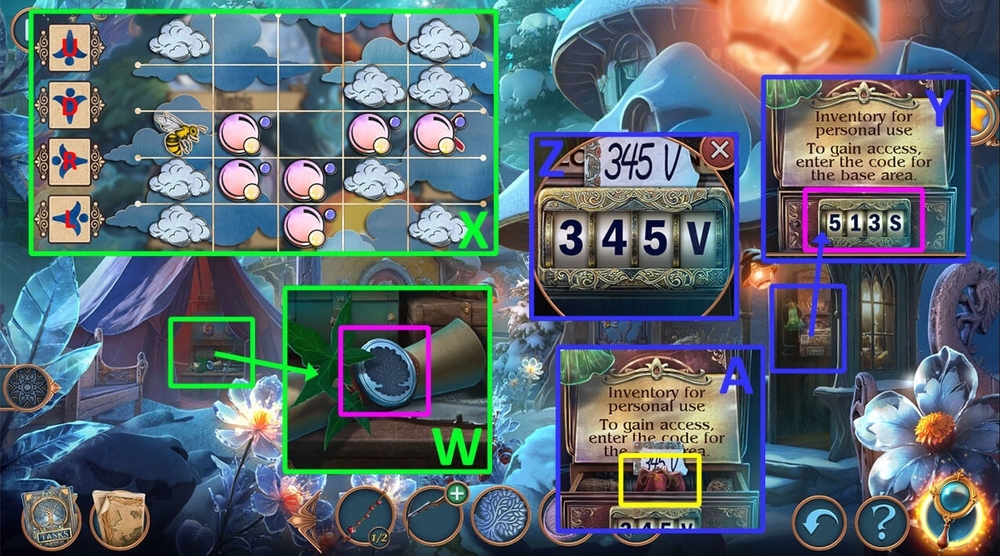
- Use GUARDIAN SEAL on the scroll (W).
- Solution: U, R, U, L, U, R, D (X).
- Get CODE.
- Use CODE on the device (Y), enter 345V (Z), take POUCH (A).
- Go to Pristempis.

- Use MUSHROOM PIECE on the flower bed (B).
- Take GUIDE TO FLOWERS (C).
- Use POUCH on the pollen, get POLLEN (D).
- Use GUIDE TO FLOWERS on the flower bed (E).

- Play puzzle, earn LADDER (F).
- Go to Guardians Headquarters.

- Use POLLEN on the bee (G), click on the chair (H), take KEY (I).
- Use KEY on the panel (J), read the book (K).
- Go to Oturis Rega.

- Use LADDER on the tree (L), take RUBIES 2/2 and RESIN (M).
- Use RUBIES on the strings (N).
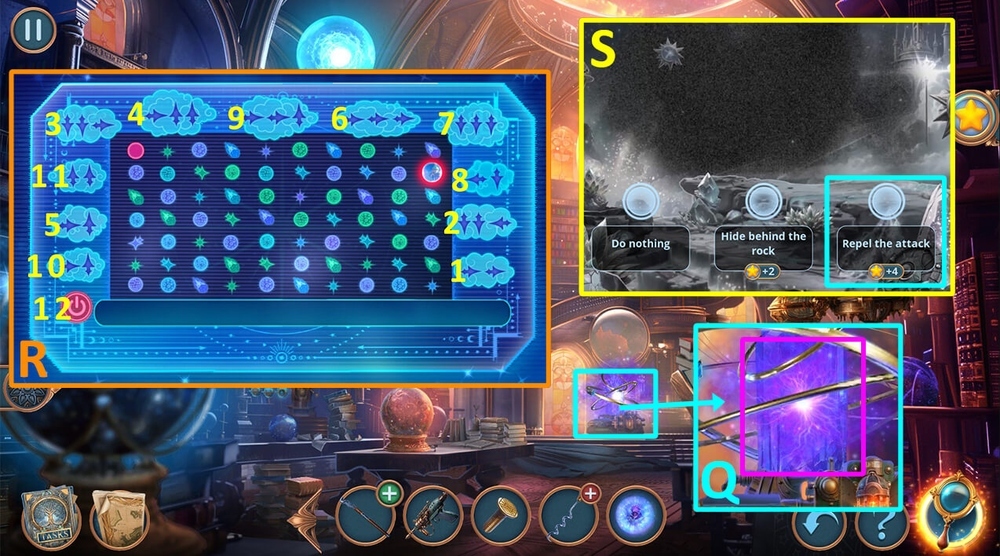
- Easy solution: 1, 9, 2, 10, 6, 7, 3, 11, 7, 11, 8, 12 (O).
- Hard solution: 11, 7, 1, 5, 2, 10, 8, 5, 12, 9, 6, 8, 11, 9 (P).
- Get RUBY NET.
- Go back.

- Use RUBY NET on the water, get FLAT PEBBLE (Q).
- Use FLAT PEBBLE on the sign, take TONGS (R).
- Go to Foot of the Tree.

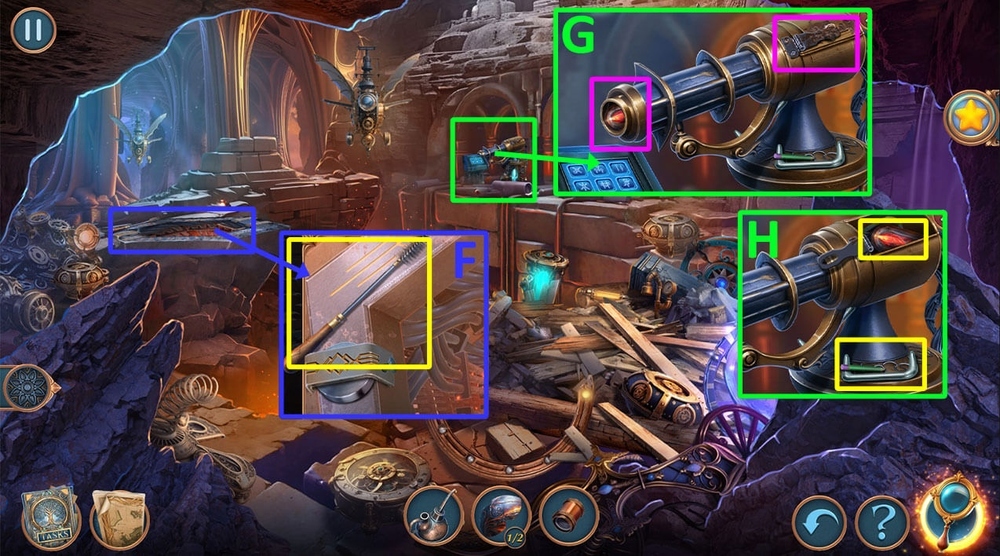
- Use TONGS on the crack in the trunk, read the note, get DART (S).
- Use DART on the water, get SEDATING DART (T).

- Use STRING and SEDATING DART on CROSSBOW, get CROSSBOW and STRING (U).
- Use CROSSBOW on the panther (V).
- Solution: Follow the instructions on the image (W).
- Get HEALING ELIXIR.

- Take TREE LEAF (X), click on the cocoon (Y), take a leaf and use on the cocoon, get GROWTH POWDER (Z).
- Read the note, take BASKET (A), use GROWTH POWDER on the bud, take MAGIC FLOWER (B).

- Use MAGIC FLOWER on HEALING ELIXIR, get HEALING SPRINKLER (C).
- Use HEALING SPRINKLER on the inside of the tree (D).
- Easy solution: 1-5 2-6 3-8 4-7 (E).
- Hard solution: 1-6 2-7 3-9 4-8 5-10 (F).
- Take SHIELD PART (G).
- Go back x2.
- Use SHIELD PART on the figurine, take DIAMOND HAMMER (H).
- Use DIAMOND HAMMER on the crystal (I), use SCALED GLOVE on the shards, get CRYSTAL SHARD (J).
- Go to Pristempis.

- Use RESIN and CRYSTAL SHARD on the empty space (K), take TREE AMULETS 1/3 (L).
- Play puzzle, earn REFLECTED SUNFLOWER (M).
- Go to Wintris.

- Use REFLECTED SUNFLOWER on the mechanism (N), take EMPTY ORB (O).
- Go Inside the Tree.
- Use EMPTY ORB on the liquid (P).
- Easy solution: Click on the spheres in the order shown (Q-S).
- Hard solution: Click on the spheres in the order shown (T-V).
- Get ENERGY ORB.

- Use ENERGY ORB on the cocoon (W).
- Easy-Hard solution: Follow the instructions.
- Random mechanic (X).
- Take TREE BUD (Y).
- Go back.

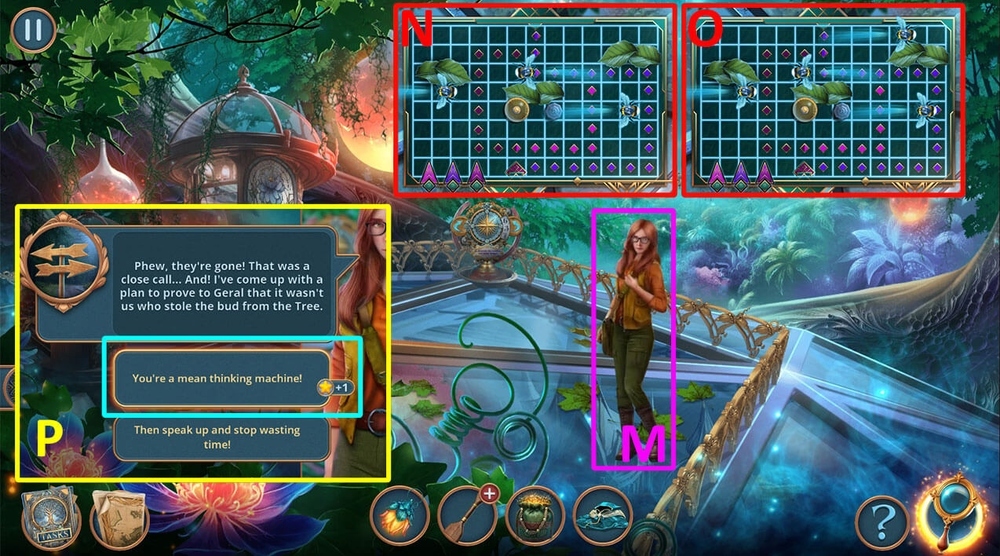
- Offer TREE BUD to the person (Z).
- Select this option, get CRAB FOOD (A).
- Go to Oturis Rega.

- Use CRAB FOOD on the crabs (B).
- Use STRING, BASKET, and TREE LEAF on the crabs, get SUN CRABS (C).
- Go Inside the Tree.
- Use SUN CRABS on the moss (D), take TREE AMULETS 2/3 (E).
- Go to Throne Room.

- Play puzzle, earn TREE AMULETS 3/3 (F).
- Use TREE AMULETS on the puzzle (G).
- Solution: Rotate the elements to match the image above (H).
- Read the notes (I).

- Take FLOWER LANTERN, FEATHERLESS DUSTER, and THORNY FRUIT (J).
- Read the scroll, take MAGIC SPORES (K).
- Use THORNY FRUIT on the cloak, get INVISIBLE CLOAK (L).
- Offer INVISIBLE CLOAK to the person (M).
- Easy-Hard solution: Choose one of three paths to avoid crossing paths with the hornets.
- Random mechanic (N-O).
- Select this option, get NAIL FILE (P).

- Use NAIL FILE on the metal spike, get THIN THORN (Q).
- Use THIN THORN on the keyhole (R), read the book (S).
- Take FEATHER 1/3 (T), take MEMORIA’S LOCATION (U).

- Use MAGIC SPORES and MEMORIA’S LOCATION on the mechanism (V).
- Easy solution: Press the buttons 3, L, 6, R, 7, L, 3, R (W).
- Hard solution: Press the buttons 3, L, 6, R, 7, L, 3, R, 6, R, 3, R (X).
- Take the wristband (Y).

- Move the leaf (Z).

- Take FEATHER 2/3 and INTENSIFYING LENS (A).
- Remove the crystal (B), use FLOWER LANTERN and INTENSIFYING LENS on the lantern post (C), take PRETTY SPINDLE (D).
- Read the note, take NET (E), use PRETTY SPINDLE on the web, get WEB ROPE (F).
- Use WEB ROPE on the stalk (G).

- Play puzzle, earn MEMORIA FLOWER (H).

- Move the leaves (I).

- Read the note, take SCREW and FEATHER 3/3 (J).
- Use FEATHER on FEATHERLESS DUSTER, get FEATHER DUSTER (K).

- Click on the metal panel (L).
- Use MAGIC SPORES and FEATHER DUSTER on the pattern (M), press all the highlighted symbols (N).
- Take PIECE OF CHAIN and ADJUSTABLE PLIERS (O).
- Use ADJUSTABLE PLIERS on the big pea plant, take BIG PEA (P).

- Use BIG PEA on the golden flow (Q).
- Solution: Follow the instructions on the image (R).
- Read the note, take ENERGY STAFF (S).
- Use ENERGY STAFF on the person, get GERAL’S BADGE (T).
- Go back.

- Examine GERAL’S BADGE, read and take WEB HINT (U).
- Use WEB HINT on the web (V).
- Easy solution: Click on the buttons: 4, 4, 4, 2, 5, 6, 6, 6, 1, 1, 1, 7, 7, 7, 3, 3, 3 (W).
- Hard solution: Click on the buttons: 5, 5, 7, 2, 2, 3, 6 (X).
- Take BRONZE FLY AMULET (Y).
- Go to Foot of the Tree.

- Use BRONZE FLY AMULET on the box, take REPELLENT (Z).
- Use REPELLENT on each flower monster (A), read the note, take PORTAL GEMS 1/3 (B).
- Go back.
- Play puzzle, earn WRENCH (C).
- Use WRENCH on the nut, take PORTAL GEMS 2/3 and WALNUT SHELL HALF (D).
- Use WALNUT SHELL HALF on the flower, get FLOWER NECTAR (E).
- Go to Foot of the Tree.

- Use FLOWER NECTAR on the butterfly, take DULL DAGGER and PORTAL GEMS 3/3 (F).
- Use PORTAL GEMS on the portal (G).
- Solution: Click on the buttons: 1, 8, 8, 8, 8, 3, 8, 1, 8, 4, 4, 4 (H).

- Offer GERAL’s BADGE to the person (I).

- Use WRENCH on the lever (J), take LEVER (K).
- Take MOBILE STEP (L).
- Use SCREW and LEVER on the mill wheel (M), pull the lever (N), use NET on the water, get ACCESS KEY (O).

- Take STONE PIECE and GEARS 1/2 (P), use MOBILE STEP on the vehicle (Q).
- Use ACCESS KEY on the panel (R).
- Easy solution: Click 1, 5, 4, 3, 5, 6, 2, 5 (S).
- Hard solution: Click 4, 12, 11, 6, 8, 12, 1, 7, 10, 3, 8, 14, 2, 9, 5, 13 (T).

- Go forward (U).

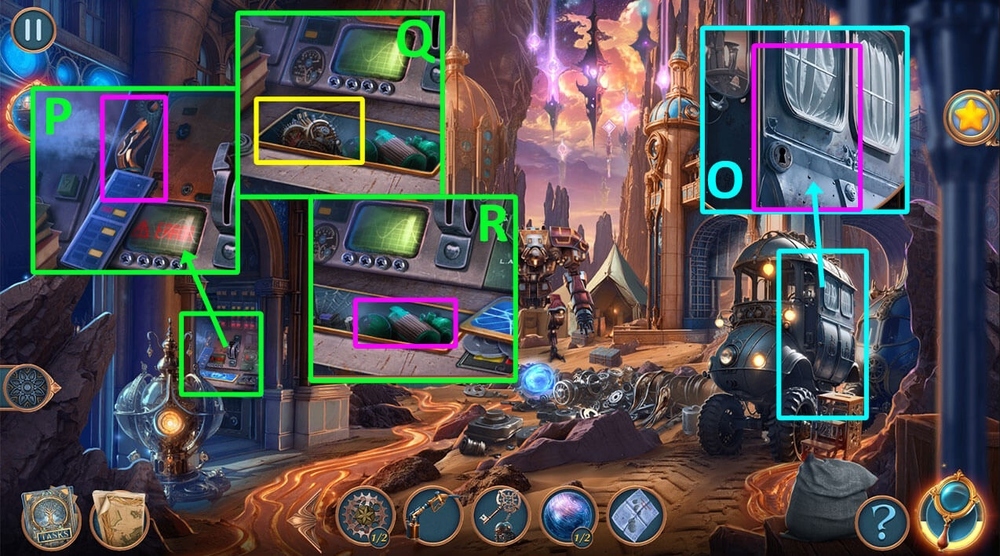
- Read the note, take GAS GUN and PIPE (V).
- Use STONE PIECE and PIPE on the metal bar (W), take STURDY GLOVE (X).

- Use STURDY GLOVE on the glass shards, get FIRE SYMBOL (Y).
- Use FIRE SYMBOL on the slot (Z), take REMOTE CONTROL (A).
- Go back.
- Use REMOTE CONTROL on the technobot (B).
- Easy solution: Follow the instructions on the image (C).
- Hard solution: Follow the instructions on the image (D).

- Solution: Click 1-6, 2-16, 3-14, 4-8, 5-12, 7-9, 10-13, 11-15, 2-7 (E).
- Select this option, get CABIN KEY (F).
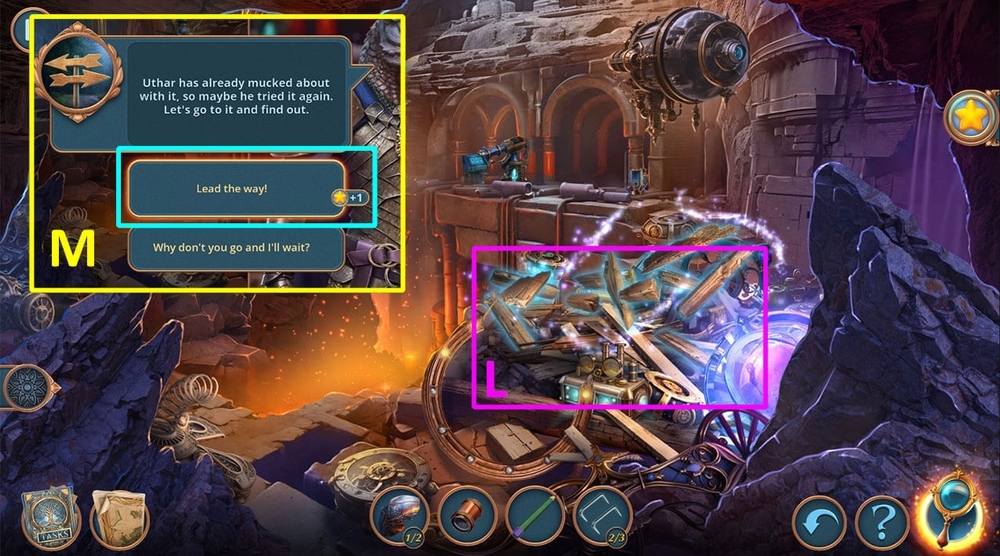
- Go to Uthar’s Former Quarters (G).

- Read the note, take WOOD CUTTERS (H).
- Take PLANETS 1/2 (I).

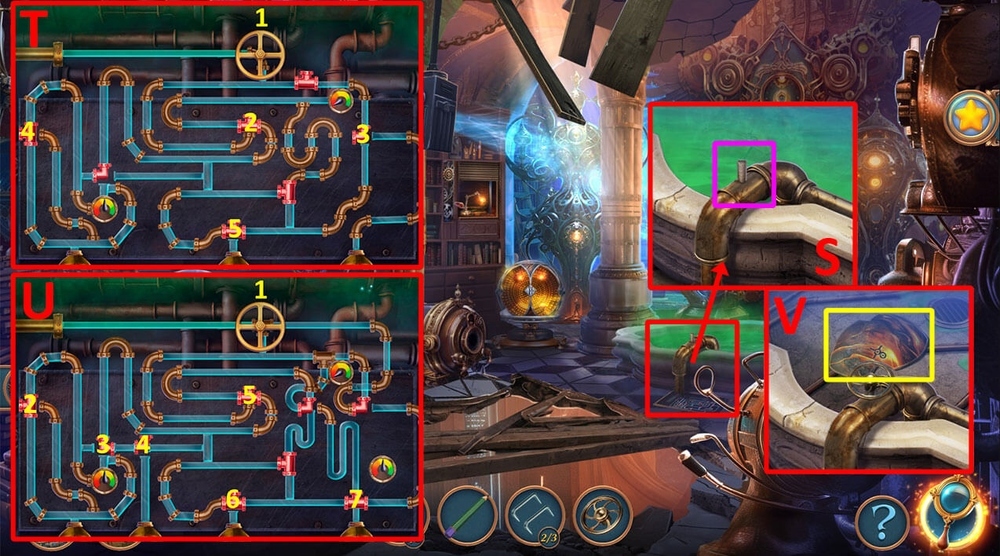
- Use WOOD CUTTERS on the wooden tablet (J).
- Easy solution: Arrange the elements according to the prompt (K).
- Hard solution: Click 7 and put 6, 7-2, 7-5-3, 7-1, 7-4 (L).
- Take BAROMETER HAND (M).
- Use BAROMETER HAND on the dial, read and take PUMP SCHEME (N).
- Go back.
- Use CABIN KEY on the keyhole, take FUEL, STENCIL, and TECHNO-GLASSES (O).
- Use GAS GUN and TECHNO-GLASSES on the pipe (P).
- Take MECHANICAL HEART and GEARS 2/2 (Q), use PUMP SCHEME on the gap, get PUMP (R).
- Go to Uthar’s Former Quarters.
- Use PUMP on the tube (S), pick up the berries (T), take BERRIES (U).
- Use BERRIES on the owl, take SUCTION CUP (V).
- Go to Tech Dump.

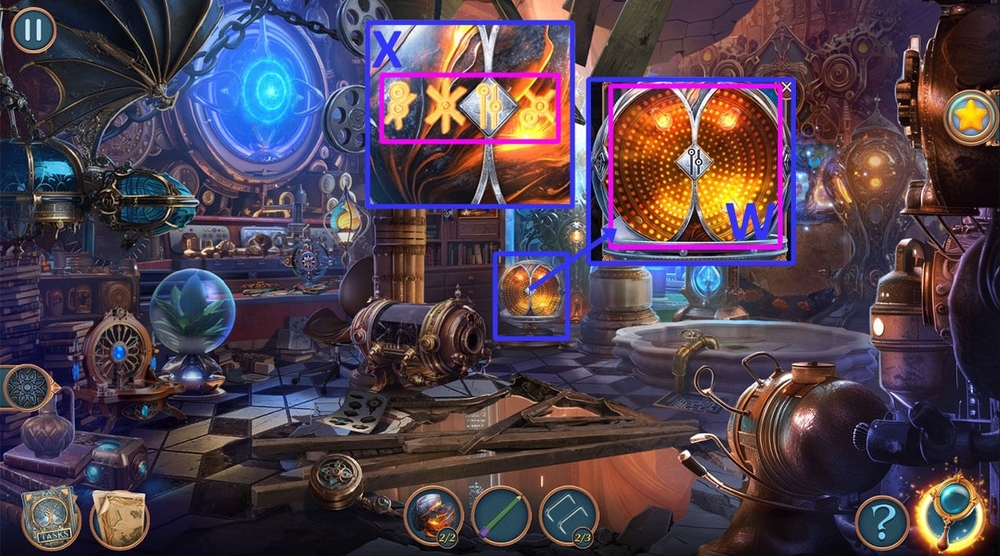
- Use GEARS on the mechanism (W).
- Easy solution: Set the elements as shown in the picture (X).
- Hard solution: Set the elements as shown in the picture (Y).
- Get HAND DRILL.
- Use HAND DRILL on the hole, take RUBY (Z).
- Get back.

- Use RUBY on the box (A).
- Easy solution: Click 1-8 (B).
- Hard solution: Click 1-8 (C).
- Read the note, take DEVICE IDENTIFIER (D), use SUCTION CUP on the globe, get PLANETS 2/2 (E).
- Go to Uthar’s Former Quarters.

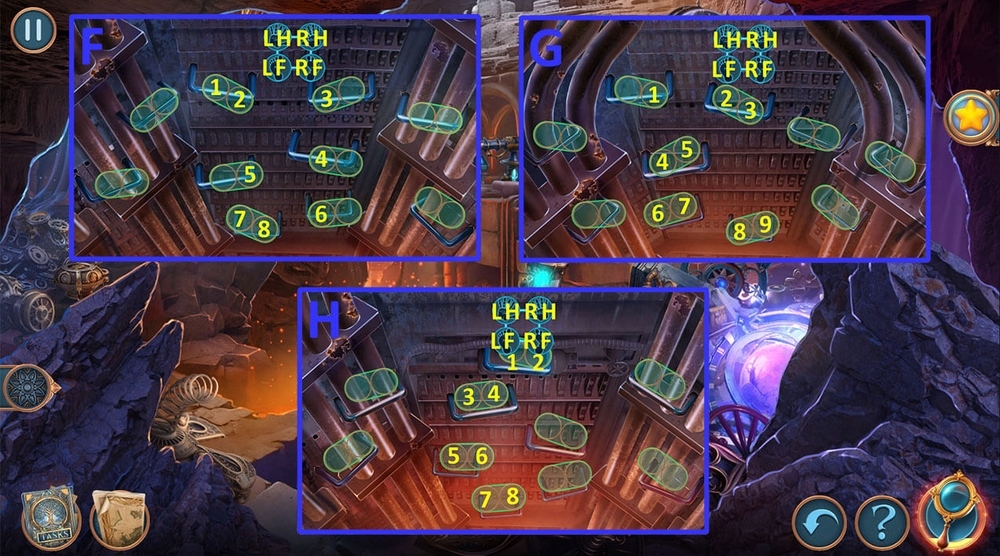
- Use PLANETS on the mechanism (F).
- Easy solution: Click on the marked items (G).
- Hard solution: Click on the marked items (H).
- Take DRAGON FIGURINE (I).
- Use DRAGON FIGURINE on the cabinet (J), read the note (K).
- Go to Tech Dump.
- Use DEVICE IDENTIFIER on the junk (L), click on the screen, get ROUND BEARING (M).
- Use FUEL, MECHANICAL HEART, and ROUND BEARING (N).

- Read the note, take CARABINER (O).
- Take MODEL FRAGMENTS 1/2 (P), use PIECE OF CHAIN and CARABINER on the broken chain (Q), read the note, take PORTABLE FAN (R).

- Use PORTABLE FAN on the green gas (S), read the note, take ENERGY FIELD BLOCKER and GRINDSTONE (T).
- Use GRINDSTONE on DULL DAGGER, get SHARP DAGGER (U).
- Use ENERGY FIELD BLOCKER on the illusion (V), read the note, take LAMP SOCKET (W), use STENCIL and SHARP DAGGER on the tablet (X), click on each circle, get PUNCH CARD (Y).
- Use PUNCH CARD on the device (Z).
- Easy solution: Click 1-4, 2-1, 3-2, 5-6, 3-5, 7 (A).
- 1-2, 3-4, 5-3, 6-5, 1-6 (B).

- Hard solution: Click 1-5, 3-6, 4-2, 7-3, 4-1, 7-1, 8 (C).
- 1-5, 2-4, 3-1, 2-8, 7-6, 3-7, 2-3 (D).
- Select this option (E).
- Take RAMROD (F).
- Use FUEL on the rusty hinge, use RAMROD on the muzzle (G), take MAGIC CRYSTAL, PENCIL, and STAPLES 1/3 (H).

- Use MAGIC CRYSTAL on the capsule (I).
- Take STAPLES 2/3, read the note, take ANTI-GRAVITATOR (J).
- Use ANTI-GRAVITATOR on the wooden rubble (K).
- Play puzzle (L).
- Select this option, get POUCH (M).
- Go back.

- Use POUCH on the light bulb, get FIERY LIGHT BULB (N).
- Use LAMP SOCKET and FIERY LIGHT BULB on the lamp (O), move the glass screen, take METAL COMB (P).
- Go to Tech Catacombs.

- Use METAL COMB on the nail, take MAGNET (Q).
- Use MAGNET on the base of the mechanism, get VALVE (R).
- Go back.
- Use VALVE on the pipe (S).
- Easy solution: Click 2, 3, 4, 4, 5, 1 (T).
- Hard solution: Click 2, 2, 3, 3, 3, 4, 4, 5, 6, 7, 7, 1 (U).
- Take MODEL FRAGMENTS 2/2 (V).
- Use MODEL FRAGMENTS and PENCIL on the mechanism (W), get ACCESS CODE (X).
- Go to Tech Catacombs.

- Use ACCESS CODE on the screen (Y), click 1-4 (Z), take STAPLES 3/3 (A).
- Play puzzle, earn STAPLE GUN (B).

- Use STAPLES and STAPLE GUN (C).
- Solution: 1) move LF-3, RF-4, LH-2, LF-6, RH-3, RF-10, LF-8, LH-7, LF-9, RH-8 (D).
- 2) move LF-3, RF-4, LH-2, RH-1, LF-7, RH-3, RF-8, LH-5, RH-6 (E).
- 3) move LF-2, RF-4, LH-1, RH-3, LF-5, RF-6, LH-2, RH-4, LF-7, RF-8, LH-5, RH-6 (F).
- 4) move LF-5, RF-3, LH-1, RH-2, LF-6, RF-7, LH-4, RH-5, RF-9, LF-8, LH-6, RH-7 (G).
- 5) move LF-3, RF-4, LH-1, RH-2, LF-5, RF-6, LH-3, RH-4, RF-8, LF-7, LH-5, RH-6 (H).

- Take CHAIN PIECE and ENERGY STRANDS, take and read the note, take FAN BLADES (I).
- Use FAN BLADES on the fan (J), take CROSSBOW and TECHNOCRAB (K).

- Use TECHNOCRAB on the floor under the beam (L), click on the crab, earn EMPTY CAPSULE, read the note (M).
- Use EMPTY CAPSULE on the empty slot (N).
- Easy solution: Click 1-5 (O).
- Hard solution: Click 1-7 (P).
- Take ENERGY CAPSULE (Q).
- Give ENERGY CAPSULE to Flammar (R).

- Select this option (S).
- Go forward (T).
- Take DRACONIAN PIECE (U).
- Use DRACONIAN PIECE on the other figurines (V).
- Solution: Click T1, D1, L, T1, R, D2, L, D2, R, T2, L, T2, R, D3, L, D3, R, T3, L, T3, D1 (W).
- Take JACK (X).
- Use JACK on the flowerpot, take KNIFE (Y).
- Go back.

- Take HANDKERCHIEF and STUDENT PASS (Z).
- Use STUDENT PASS on the card receiver, take BOLT (A).
- Use BOLT on CROSSBOW, earn CROSSBOW (B).

- Use CROSSBOW on the sack, earn LIGHTHOUSE PART and PINCERS PART, read the note (C).
- Use ENERGY STRANDS and LIGHTHOUSE PART on the obelisk (D).
- Play puzzle (E).
- Select this option, earn SOLDERING GUN (F).
- Go to Hall of Worlds (G).
- Remove the cloth (H).
- Use CHAIN PIECE and SOLDERING GUN on the chain, earn SOLDERING GUN (I), click on the lever (J), take and read the note, take BLOCKER (K).
- Use BLOCKER on the rays, take CHRONICLE FRAGMENT (L).

- Use CHRONICLE FRAGMENT on the book (M).
- Easy solution: Click A, A, A, A, 1, A, A, A, 2, 3, 4, A, 5 (N).
- Hard solution: Click A, A, A, A, 1, A, A, A, 2, 3, 4, A, 5, A, A, 6, A, 7 (O).
- Take SYMBOLS (P).
- Go back.
- Use SYMBOLS on the lock (Q), press the symbols on the lock according to the clue (R), take SCREWDRIVER, use KNIFE on the box, take LIGHT BULB (S).
- Use SCREWDRIVER on the screws, take LENSES 1/2 (T).
- Play puzzle, earn MAGIC RING (U).
- Go to Old Library.
- Use LIGHT BULB in the lamp socket (V), take SLIDE (W).
- Click on the mural (X), use SLIDE on the mural (Y), find the differences between the slide and the picture, click on the arm of the Draconian on the right, on the head of the Draconian on the left, on the staff (Z), take MECHANICAL EYES 1/2 and TWEEZERS (A).
- Go to Hall of Worlds.
- Take and read the note, take TRANSLUCENT PLATE and BOLT (B), use MAGIC RING on the machine (C), take LENSES 2/2, use ENERGY CAPSULE on the empty slot (D).
- Use LENSES on the mounts, earn MAGIC WHISTLE, read the note (E).
- Go back.

- Use MAGIC WHISTLE on the balcony (F).
- Easy solution: Arrange the elements as shown in the image (G).
- Hard solution: Arrange the elements as shown in the image (H).
- Take CORKSCREW and LIGHT CUTTER (I).
- Use TRANSLUCENT PLATE and LIGHT CUTTER on the key imprint, earn GLASS KEY (J).
- Go to Hall of Worlds.

- Use GLASS KEY on Uthar’s sphere, earn ENERGY IMPRINT (K), use TWEEZERS on the object in the sphere, earn SUCTION CUP (L).
- Go to Old Library.

- Use SUCTION CUP on the silver fragment of the base, take MECHANICAL EYES 2/2 (M).
- Use MECHANICAL EYES on the door (N), click on the scroll (O) and play puzzle (P).
- Go to Hall of Worlds.
- Use ENERGY IMPRINT on the machine (Q).
- Solution: Click 1-12 (R).
- Select this option (S).

- Click on the plant to open it (T).
- Take and read the diary, take PINCERS HALF (U).
- Use BOLT and PINCERS HALF on PINCERS PART, earn PINCERS (V).
- Take STARDUST, use PINCERS on the wings, take WINGS (W).
- Use WINGS on the clouds (X).
- Solution: Reach the end without hitting any obstacles (Y).
- Click on the gates (Z).
- Take TITANIUM WEDGE and SOLVENT (A).
- Use HANDKERCHIEF and SOLVENT on the stain, take FAN (B).
- Use FAN on the cloud of pollen, take and read the note, take FIRECRACKER (C).

- Use FIRECRACKER on the gargoyles in the background (D).
- Easy solution: Arrange the tracks as shown in the image and then press P (E).
- Hard solution: Arrange the tracks as shown in the image and then press P (F).
- Take and read the note (G).
- Take LADDER and CORKSCREW HANDLE (H).
- Use CORKSCREW HANDLE on CORKSCREW (I).
- Take a closer look at the bottle (J), use CORKSCREW on the cork, earn EARRING (K).

- Use EARRING on the box, take and read the note, take EMBERLIS’S PENDANT (L).
- Use EMBERLIS’S PENDANT on the empty slot (M).
- Easy solution: Click B, R, R, B, L, B, R, R, R, B, R, B, L, L, B (N).
- Hard solution: Click B, R, S, R, B, L, B, R, R, R, B, R, B, L, L, B, S, R, S, R, R, S, R, R, S, L, L, L, S (O).
- Go forward (P).
- Take and read the note (Q).
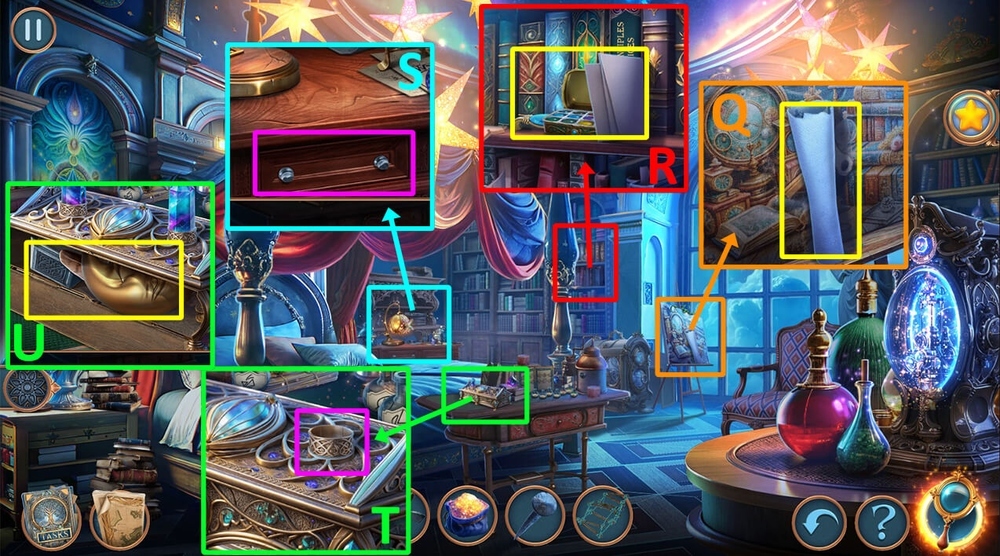
- Take and read the note, take PAINTS and METAL HANDLE (R).
- Use SOLDERING GUN and METAL HANDLE on the drawer, take CRYSTAL STELLA (S).
- Use CRYSTAL STELLA on the box (T).
- Take MOON, FEATHERS 1/2, and STAR HAMMER (U).
- Go to Arcania Fields.

- Use TITANIUM WEDGE, LADDER, and STAR HAMMER on the ledge (V).
- Play puzzle, earn MEMORY STONE (W).
- Use MEMORY STONE on the cloud, click on the memories as they appear to skip them, take UTHAR’S MEMORIES (X).
- Go to Castle Halls.

- Give UTHAR’S MEMORIES to Emberlis (Y).
- Select this option (Z).
- Solution: Rotate the parts as shown in the image, earn BUNDLE OF THINGS (A).

- Click on BUNDLE OF THINGS to open it, take FISH FOOD and RECIPE (B).
- Use FISH FOOD on the fish tank, take UNUSUAL GLOVES (C).
- Use UNUSUAL GLOVES on the glasses, take HOLO-GLASSES (D).
- Go back.

- Use HOLO-GLASSES on the column (E).
- Easy solution: Click in the following order 1) 3, 2, 1, 2) 1, 3, 2, 3) 2, 3, 1 (F).
- Hard solution: Click in the following order 1) 4, 3, 1, 5, 2, 2) 1, 3, 2, 4, 5, 3) 1, 3, 5, 4, 2 (G).
- Click on the star to open it, take PARTICLE COLLECTOR and STELLAR SCISSORS (H).
- Use STELLAR SCISSORS on the flower, take CLOUD PETALS and VALVE (I).
- Go to Emberlis’s Room.

- Use VALVE on the lamp, take DRACONIAN SCALE (J).
- Use RECIPE on the box, read it (K), use STARDUST, CLOUD PETALS, and DRACONIAN SCALE on the box (L).
- Easy solution: 1-2-P-B, 1-3-P-B, 4-3-P-B, 5-6-P (M).
- Hard solution: 1-2-P-B, 2-3-P-B, 7-5-P-B, 1-6-P-B, 8-4-P (N).
- Earn BOOK TITLE.

- Use BOOK TITLE on the bookshelf (O), click on the book with the same title, read and take BOOK (P).
- Go to Arcania Fields.
- Use BOOK on the strange core (Q).
- Easy solution: Assemble the puzzle as shown in the image, then tap the elements in the sequence indicated on the image (R).
- Hard solution: Assemble the puzzle as shown in the image, then tap the elements in the sequence indicated on the image (S).
- Use GLOVES on the core, take STELLAR CORE (T).
- Play puzzle, earn PHOTO (U).
- Use PHOTO on the background, click on it (V), spot the differences, click on the stone near the ledge (W).
- Take PARTICLE COLLECTOR PART (X).
- Use STELLAR CORE and PARTICLE COLLECTOR PART on PARTICLE COLLECTOR, earn PARTICLE COLLECTOR (Y).
- Use PARTICLE COLLECTOR on the cloud, take LEVER (Z).
- Go forward.

- Use LEVER on the lever socket, take FEATHERS 2/2 (A).
- Go to Emberlis’s Room.

- Use FEATHERS on the wing (B).
- Easy solution: Click 1-R-7, 6-R-2, 3-R-10, 8-R-5, 4-R-9 (C).
- Hard solution: Click 1-R-10, 12-R-2, 3-R-9, 14-R-4, 5-R-16, 11-R-6, 7-R-15, 13-R-8 (D).

- Take ENCHANTED BRUSH (E).
- Use PAINTS and ENCHANTED BRUSH on the painting, earn WINDING KEY (F).
- Go back.
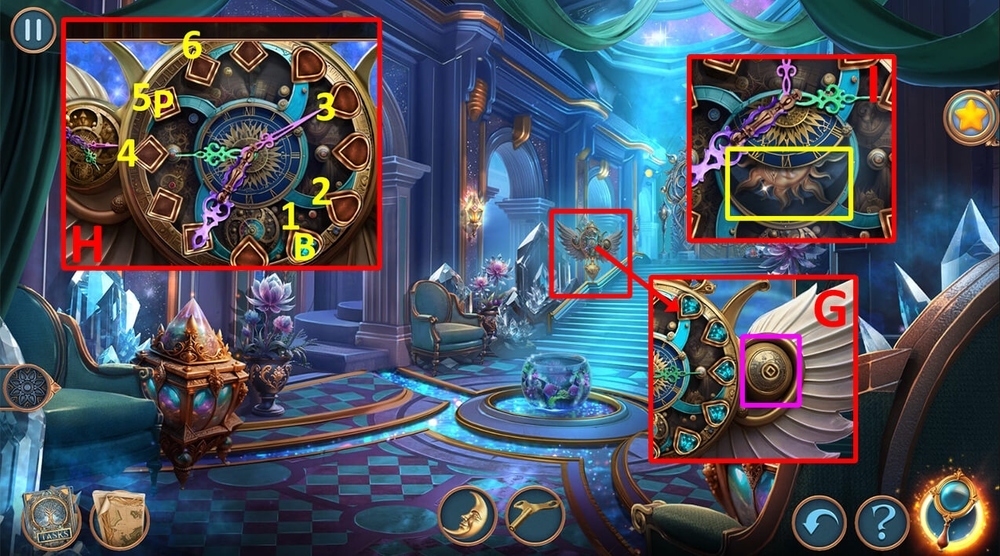
- Use WINDING KEY on the clock (G).
- Solution: Move the crystals into the correct slots in the following sequence: B – 2, P – 4, P – 5, P – 6, B – 3, B – 1 (H).
- Take SUN (I).
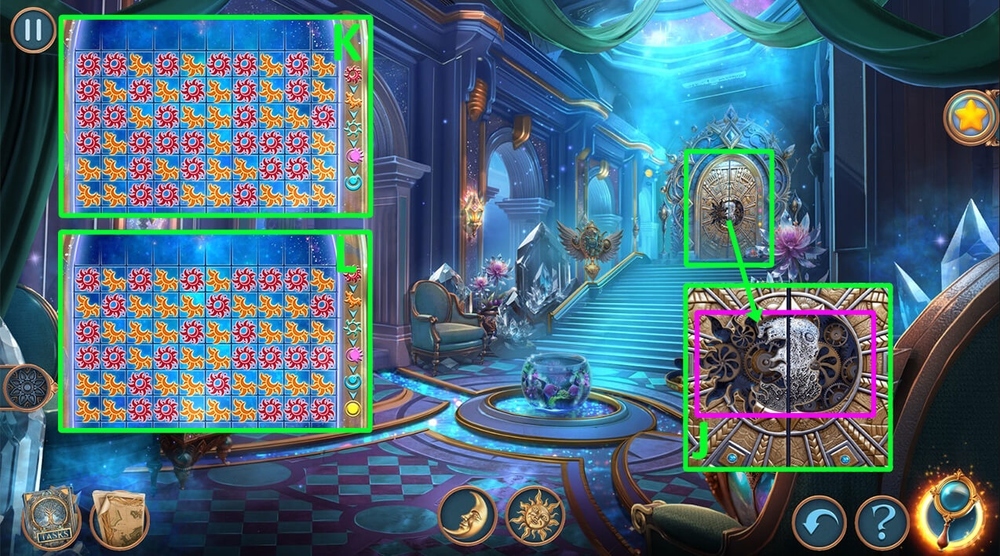
- Use MOON and SUN on the door (J).
- Easy solution: Collect chains of three moons and suns at a time until you reach the highest image.
- Random mechanic (K).
- Hard solution: Collect chains of three moons and suns at a time until you reach the highest image.
- Random mechanic (L).
- Walkthrough Bonus Chapter, at the link below.


