
Mind Echoes 1: The Lost Mysteries (Bonus Chapter) – Emily Rivers has barely gotten a handle on the mysteries of Starlight Dreams when the past comes back to haunt her. An unexpected meeting with Detective Mark Sullivan reveals a new mystery to her, one that once again involves Starlight. This time Emily’s attention is drawn to Starlight Med, a medical facility that is part of the same chain as the infamous hotel. Sullivan tells her about a series of strange murders taking place at the hospital. He is surprised to learn that Emily, like her mother, is now investigating paranormal cases. He suggests she join the investigation as a forensic scientist and hands over the case files. For Emily, this is more than just a job. Everything that happened to her parents started with Starlight. And now, with a new string of tragedies pointing to that name once again, she can’t let the case go cold. Arriving at the morgue, Emily immediately senses a strong energy emanating from the victim’s body. It is one of the oldest patients in the facility. After the fire, he was transferred to the hospital, and now he died under mysterious circumstances. The autopsy shows that there are no visible signs of violence on the body, but the cause of death remains unexplained – he faded away in just a month for no apparent reason. Investigating the evidence, Emily is plunged into a new round of mysteries that lead her even further into the depths of history. It’s up to you to find out what links the dead patient to the events at the hotel. What dark forces continue to operate in the shadows. And whether Emily can uncover the conspiracy before it takes new lives.
Bonus Chapter Walkthrough

- Get CASE FILE, open and read it, play puzzle, take PAPER CLIP.
- Use PAPER CLIP on the lock, take SCALPEL, read the note (A).

- Take GEAR, use SCALPEL on the cardboard box, take COMPUTER MOUSE, ENGINE OIL, and SPIRIT FIGURINE (B).

- Take the EMF detector, use GEAR on the mechanism (C).
- Use SPIRIT FIGURINE on the puzzle (D).

- Easy solution: Click Ax3, Bx3, C, D, E (E).

- Hard solution: Click A, Bx3, C, D, E (F).

- Take SUCTION-CUP ARROW (G).
- Use SUCTION-CUP ARROW on the glass, take GAVEL, SINGING BOWL, and CHAIN (H).
- Use CHAIN on the mechanism (I).

- Solution: Follow the instructions in the image (J).

- Take MY ID (K).
- Offer MY ID to the character at the location (L).

- Select this option, get FORENSICS KIT (M).

- Take MAGNIFYING GLASS (N).
- Take DUCT TAPE and MEDICAL SHAFT, use COMPUTER MOUSE on the laptop (O).

- Use GAVEL and MEDICAL SHAFT on the door, take MEDICAL GLOVES, use ENGINE OIL on the mortuary refrigerator (P).
- Open FORENSICS KIT, use MAGNIFYING GLASS and MEDICAL GLOVES on FORENSICS KIT, get FORENSICS KIT.
- Use FORENSICS KIT on the table (Q).

- Play puzzle, get FLASH DRIVE (R).
- Use FLASH DRIVE on the laptop (S).

- Easy solution: Follow the instructions in the image (T).

- Hard solution: Follow the instructions in the image (U).

- Read the note, take GLASS TUBE (V).
- Use GLASS TUBE on the mortuary refrigerator, take NET and SOLVENT (W).

- Play puzzle, earn CADUCEUS (X).
- Use CADUCEUS on the drawer, take PERFUME BOTTLE and METRONOME, use SOLVENT on the stain, take MAP (Y).

- Offer MAP to the character at the location (Z).

- Easy solution: Click 1, 2, 3 (A).

- Hard solution: Click 1, 2, 3 (B).

- Take SHAFT (C).
- Use SHAFT on NET, get SCOOP NET.
- Use SCOOP NET on the fountain, take CLAWS 1/3 and TOUCH PANEL (D).

- Use DUCT TAPE and TOUCH PANEL on the wires (E).

- Easy solution: Click E, F, D, C, D, B, A, B (F).

- Hard solution: Click C, G, H, D, E, D, A, B, A (G).
- Go forward.

- Take CLAWS 2/3, move the papers (H).
- Take CANE (I).

- Use METRONOME and CANE on the cabinet, take ELECTRICIAN’S MANUAL and CLAWS 3/3 (J).
- Use CANE on the vent (K).
- Go back.

- Use CLAWS on the statue (L).

- Easy solution: Click C, Bx2, Ax2, D, F, E, G, F (M).

- Hard solution: Click C, Ax2, Ex2, G, Fx2 (N).

- Take GARDEN SHEARS (O).

- Use GARDEN SHEARS on the roses, take CLEANING AGENT, use SINGING BOWL on the flowerpot, take CALL BELL (P).

- Use ELECTRICIAN’S MANUAL on the fuse box (Q).
- Go to the Hospital Lobby.

- Use CALL BELL on the desk, click on the call bell (R).

- Select this option, get ACCESS CARD (S).

- Use ACCESS CARD on the panel (T).

- Easy solution: Follow the instructions in the image (U).

- Hard solution: Follow the instructions in the image (V).
- Go forward.

- Take TWEEZERS (W).
- Move the duvet, use TWEEZERS on the hole in the mattress, get FUSE (X).
- Go to the Hospital Yard.

- Use FUSE on the fuse box (Y).

- Easy solution: Follow the instructions in the image (Z).

- Hard solution: Follow the instructions in the image (A).

- Take TOY GUN (B).

- Use TOY GUN on the bag (C).
- Take HOSPITAL STRAPS (D).
- Go to the Hospital Lobby.

- Use HOSPITAL STRAPS on the vent, take PIN and FILE NUMBER (E).
- Use FILE NUMBER on the drawer (F).

- Play puzzle, earn MOSAIC (G).
- Go to the Patient Room.

- Use the EMF detector on the background.
- Use MOSAIC on the windowsill, take FISHING ROD, ROPE, and SCARF (H).
- Use CLEANING AGENT and SCARF on the stains (I).

- Easy solution: Follow the instructions in the image 1 (J).

- Easy solution: 2 (J).

- Hard solution: Follow the instructions in the image 1 (K).

- Hard solution: 2 (K).
- Go forward.

- Use PIN on the chair (L).
- Take WRENCH SET and PUMP (M).

- Use PUMP on PERFUME BOTTLE, get PERFUME BOTTLE.
- Use PERFUME BOTTLE on the insects, read the note, take DRIED LAVENDER (N).
- Offer DRIED LAVENDER to the character at the location (O).

- Select this option, get OLD COMB (P).
- Go forward.

- Move the plant (Q).
- Take GLUE (R).

- Take ANATOMICAL PARTS 1/3 (S).
- Examine the code panel, use GLUE on it, enter 1780, then OK, take OLD PIPE (T).

- Use OLD PIPE on the lower drawer, take CHAIN MAIL GLOVE (U).
- Go to the Patient Room.

- Use CHAIN MAIL GLOVE, examine the shards, use GLUE , get MIRROR (V).
- Go to the Nether Hospital Lab.

- Use MIRROR on the lamp, take MICROSCOPE KNOB (W).
- Use MICROSCOPE KNOB on the microscope, take PUNCHED CARD (X).
- Go back.

- Examine the bag, use PUNCHED CARD on the clasp, click on each segment of it, take ANATOMICAL PARTS 2/3 and WATER FLASK (Y).
- Go to the Nether Hospital Lab.

- Use WATER FLASK on the pipe, take ANATOMICAL PARTS 3/3 (Z).
- Use ANATOMICAL PARTS on the dummy (A).

- Easy solution: Click 1-3, 1-3, 2-1, 3-2, 3-1, 2-3, 1-3, 2-1, 2-1, 3-2, 1-3, 1-2, 1-2, 3-1, 2-3, 2-1, 3-1, 2-3 (B).

- Hard solution: Click 1-3, 2-3, 2-1, 2-1, 3-2, 1-3, 1-2, 1-2, 3-1, 2-3, 2-1, 3-2, 3-1, 3-2, 1-3, 2-1, 2-3, 1-3, 2-1 (C).

- Read the note (D).
- Go to the Patient Room.

- Use OLD COMB on the board, take MAGNET, use WRENCH SET on the pipes (E).

- Easy solution: Click Cx3, Bx5, E, Fx4, Ex3, B, Ax5, Dx3 (F).

- Hard solution: Click Ax4, Ex5, Fx5, Bx3, Cx2, Dx4, Cx2, B, F, Gx6, Hx2 (G).

- Take SEAM RIPPER (H).
- Use SEAM RIPPER on the pillow, take RESET BUTTON (I).
- Go back.

- Use RESET BUTTON on the container, click the button, examine the note, restore it (J).
- Use the EMF detector on the background.
- Play puzzle, earn METAL BADGE (K).

- Select this option (L).
- Go to the Nether Patient Room.

- Use METAL BADGE on the lamp, take WIRE (M).
- Use WIRE on FISHING ROD, get FISHING ROD.
- Use FISHING ROD on the ceiling fan, get HOSPITAL FLOOR PLAN (N).
- Use HOSPITAL FLOOR PLAN on the closed door (O).

- Easy solution: Click on the arrows shown in the picture, then click A (P).
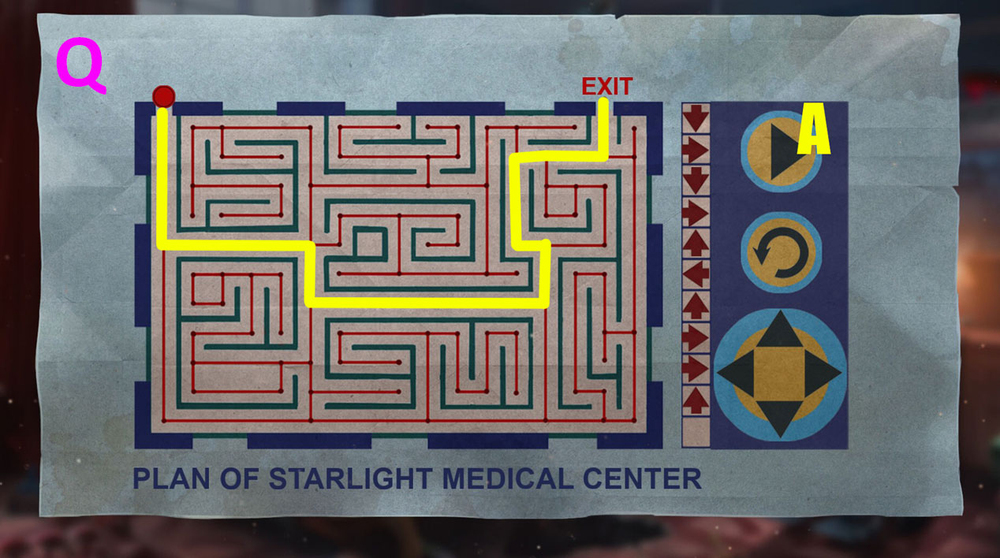
- Hard solution: Click on the arrows shown in the picture, then click A (Q).

- Select this option (R).

- Take CORKSCREW (S).
- Use CORKSCREW on the drawer, read the note, take CANDLE, move the newspaper (T).

- Take LENS, move the cloth (U).
- Use CANDLE on the bag, take SNAKE AMULET, use LENS on the projector (V).

- Use SNAKE AMULET on the drawer (W).

- Easy solution: Follow the instructions in the image (X).

- Hard solution: Follow the instructions in the image (Y).

- Take WHEEL (Z).
- Go back.

- Use WHEEL on the chair, take FLASHLIGHT (A).
- Use FLASHLIGHT, ROPE, and MAGNET on the hole, get CONNECTOR (B).
- Go to the Nether Lobby.

- Examine the hairdryer, use CONNECTOR on the wire, click on the jacket, use SEAM RIPPER on the seam, take REMOTE CONTROL (C).

- Use REMOTE CONTROL on the VCR, take SLIDES (D).
- Use SLIDES on the projector (E).

- Solution: Step 1: 1, 2, 3, 4 (F).

- Solution: Step 2: 1, 2, 3, 4, 5 (F).

- Solution: Step 3: 1, 2, 3, 4 (F).
Congratulations! You have completed the game Mind Echoes 1: The Lost Mysteries.


