Mind Echoes 2: Remnants of the Past – Once again, you find yourself on the edge between the past and the present, and one wrong step could cost you your life. When people start disappearing in a reconstructed historical park, and the latest video from the scene shows something that cannot be, the investigation becomes a matter not only of logic, but also of intuition. As you delve into the case, you discover that behind the tourist facade lies a kingdom frozen in time. Its inhabitants are ghostly and forgotten, but still loyal to their king. Especially one knight who has sworn to defend the ancient land until his last breath, or until the last soul that disturbs his peace. This is a continuation of the case started by your parents, who died under mysterious circumstances. Together with detective Mark Sullivan, you return to the Eternal Memories project to investigate phenomena that science cannot explain. A frightening video recording, the victim’s last words, personal belongings that store the energy of the past—every element leads to the solution. Use an EMP detector, intuition, and attention to detail to understand who is behind what is happening and what role you play in this ancient conflict. If you can’t solve a puzzle or don’t know where to find items, you can check out the Mind Echoes 2: Remnants of the Past walkthrough on our website and restore the border between worlds.
Mind Echoes 2: Remnants of the Past – Walkthrough
Here you can view the complete walkthrough for Mind Echoes 2: Remnants of the Past, including all chapters, including the bonus chapter, in pictures.
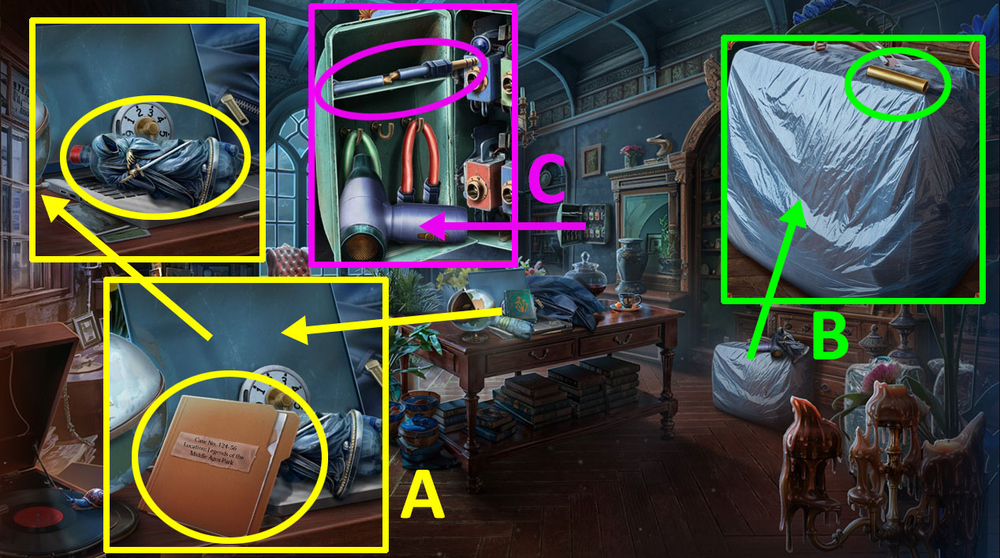
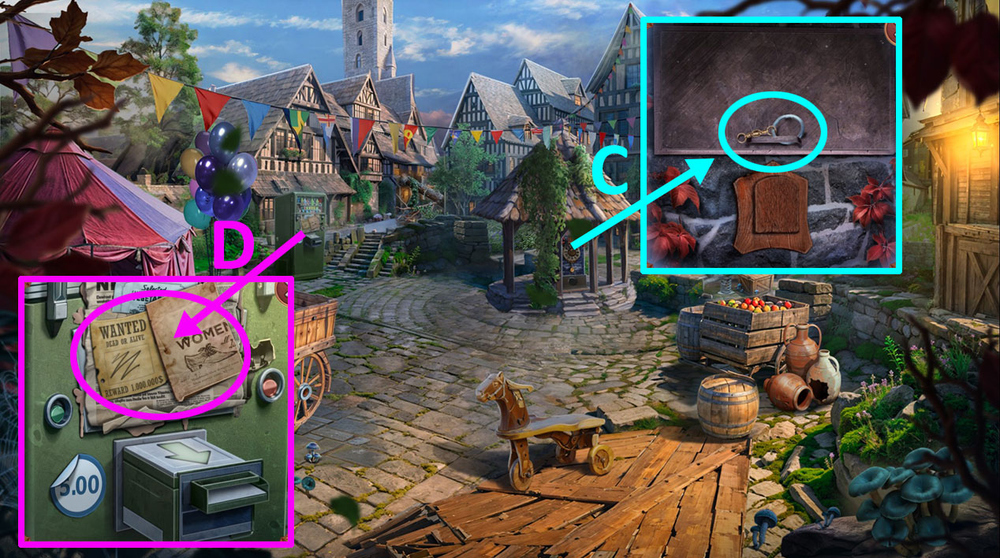
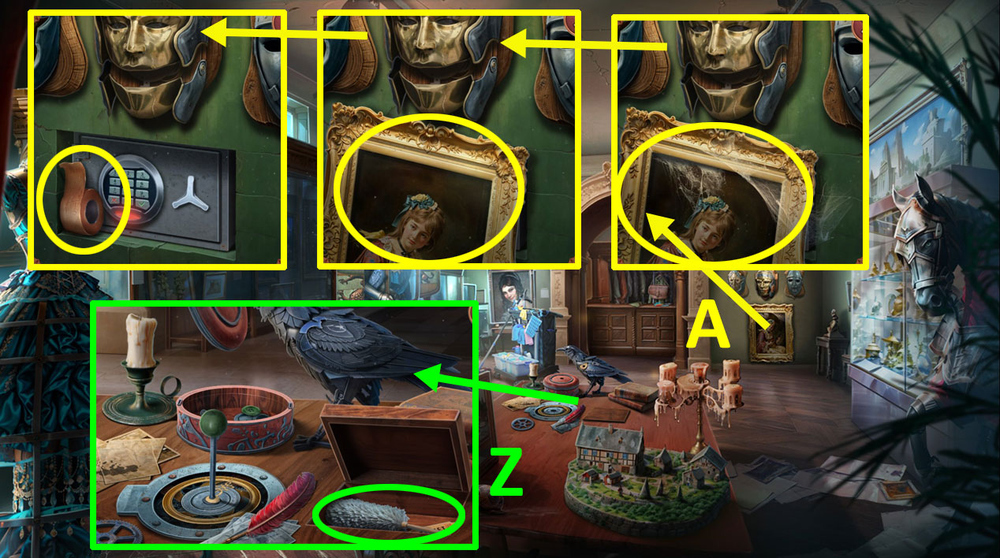
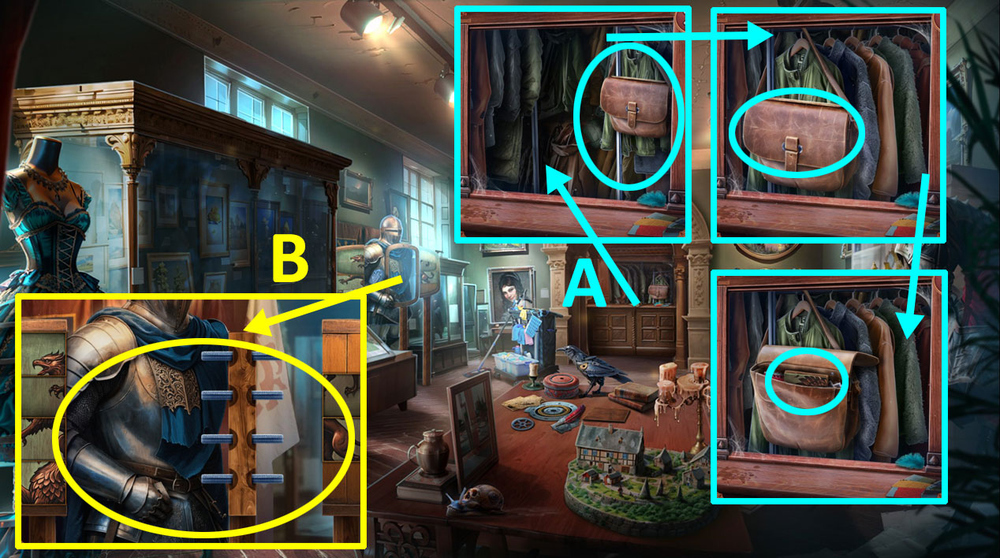
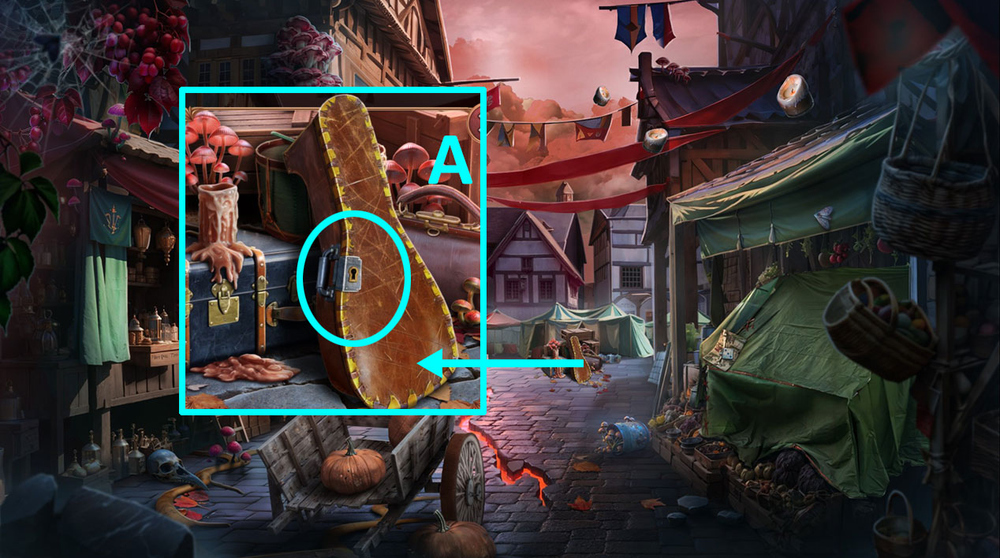
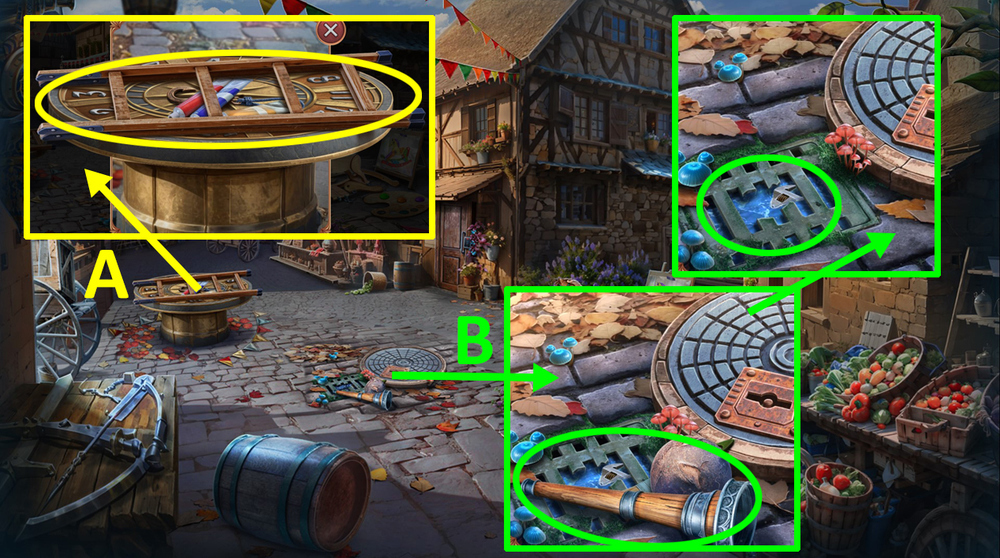
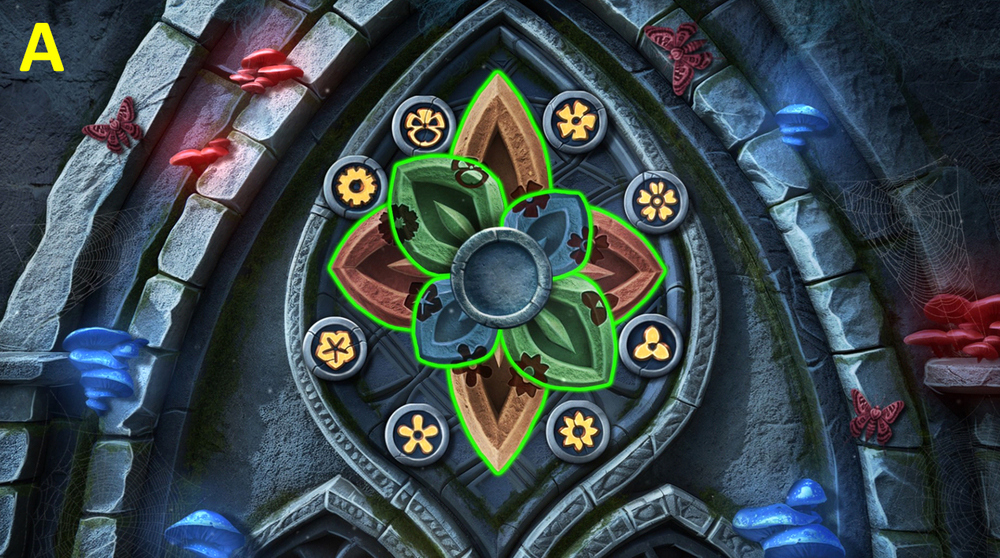
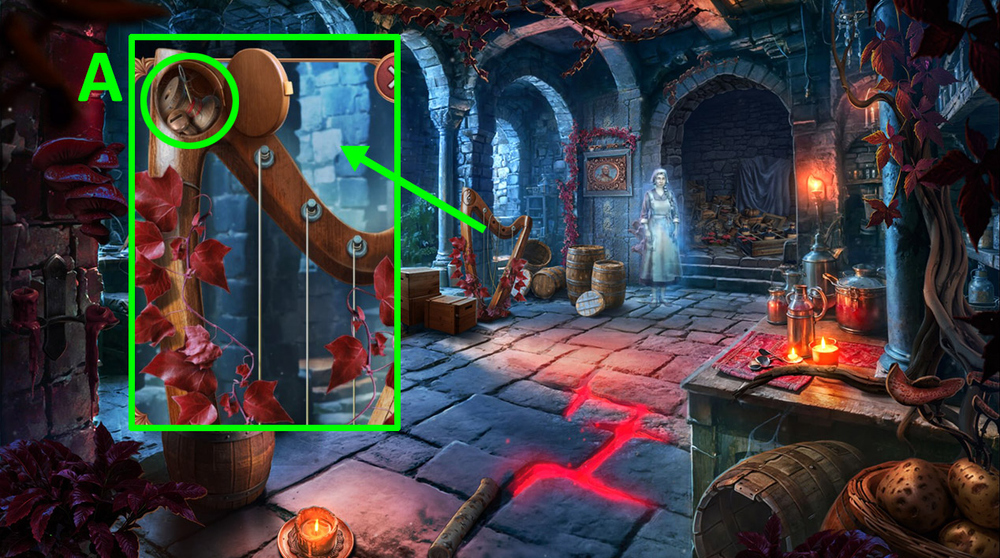
- Read CASE FILE, take FIGURINE, WATER, and SAFE HANDLE (A).
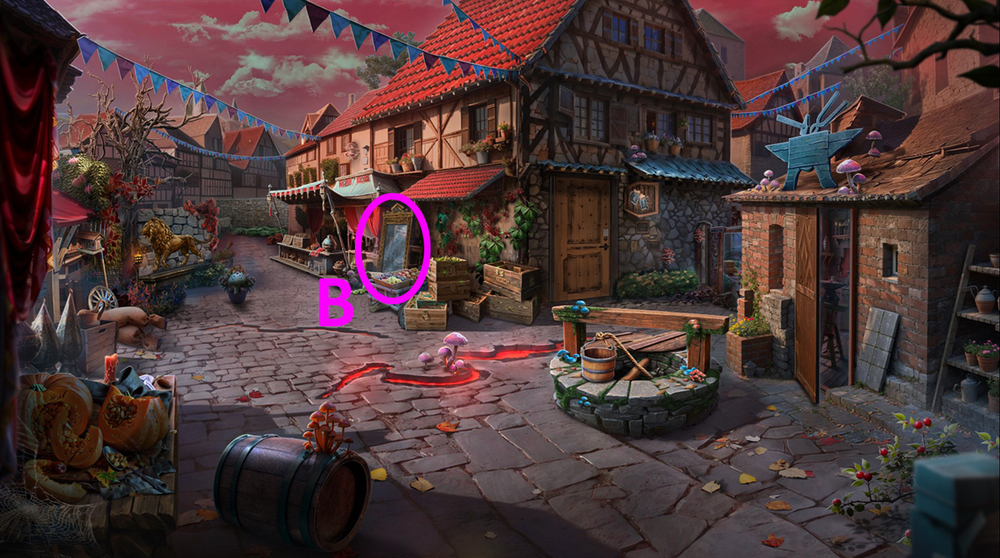
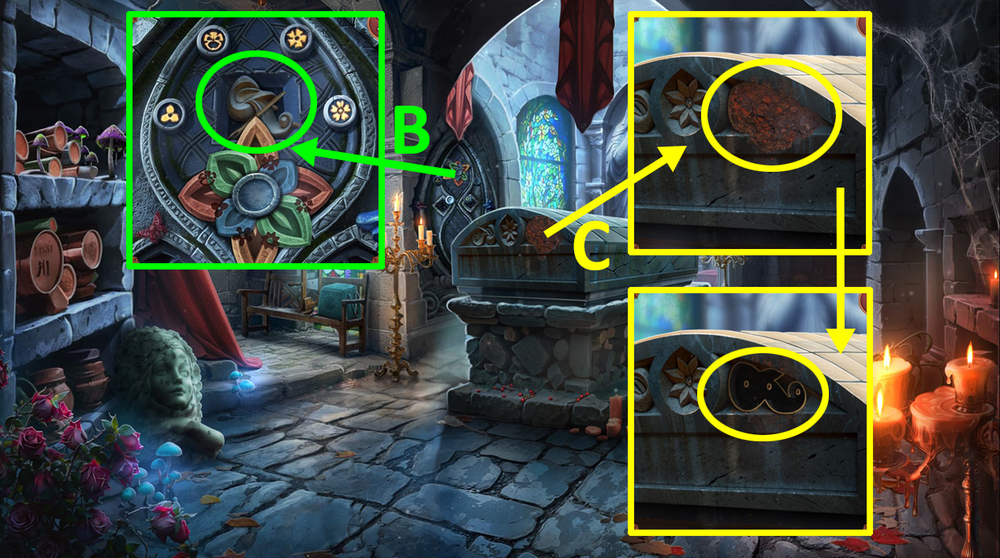
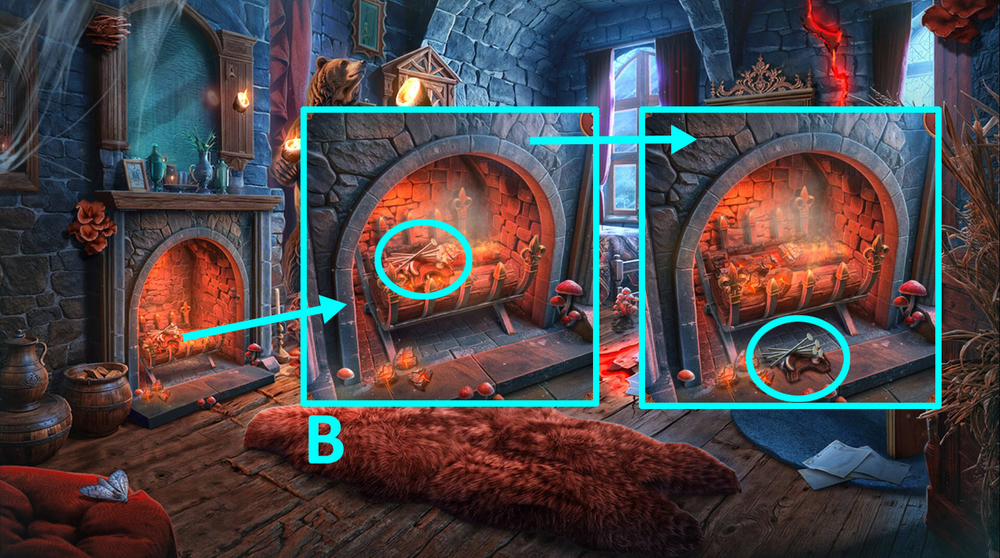
- Take HEAT-SHRINK TUBING (B).
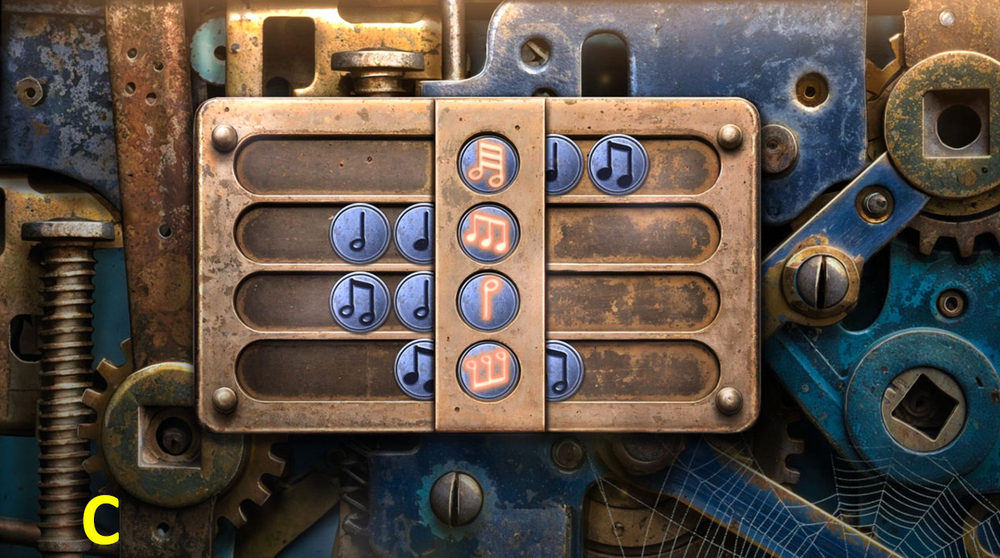
- Use HEAT-SHRINK TUBING on the wire (C).
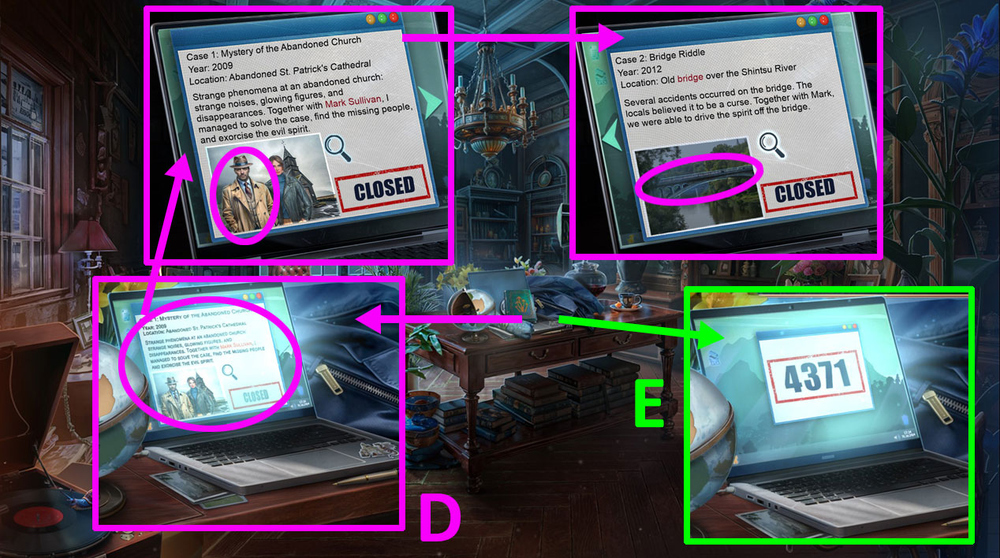
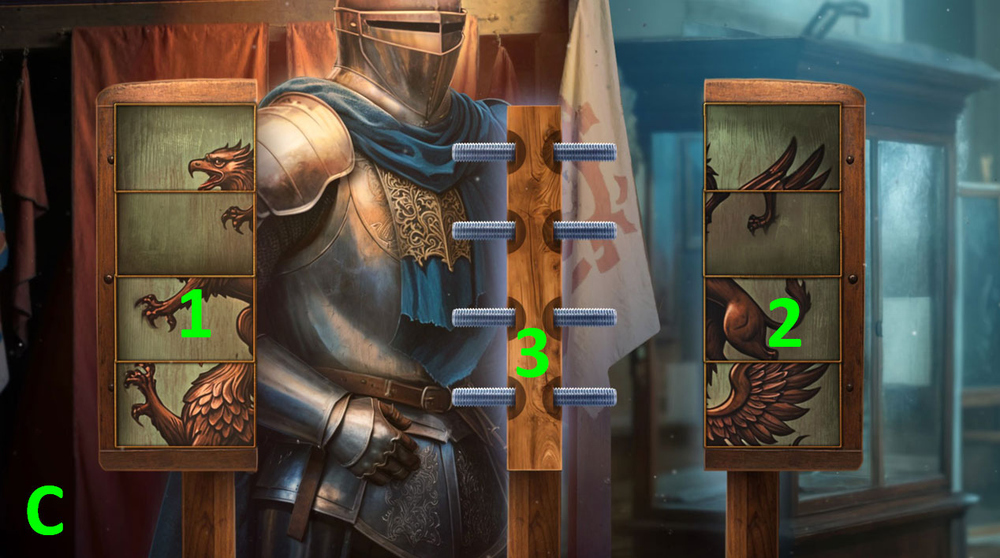
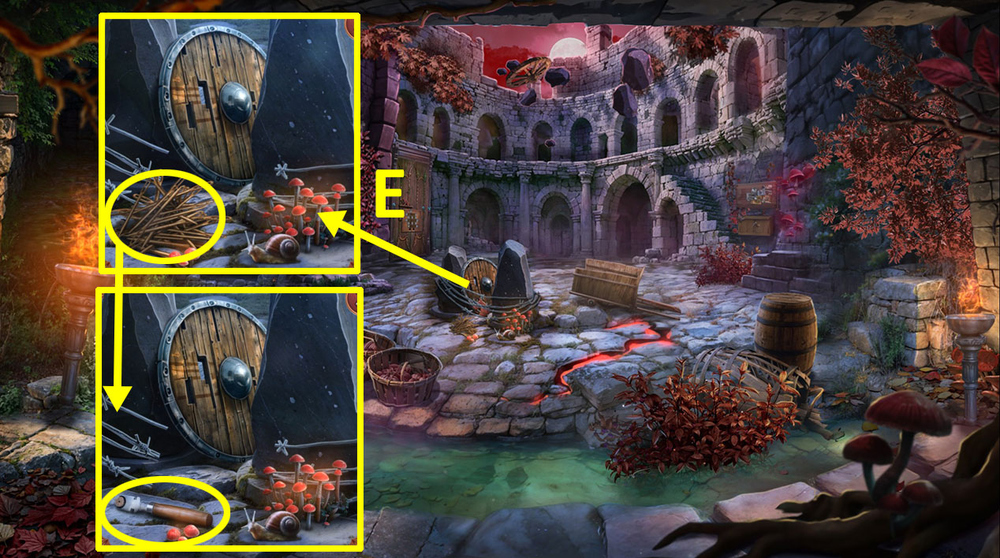
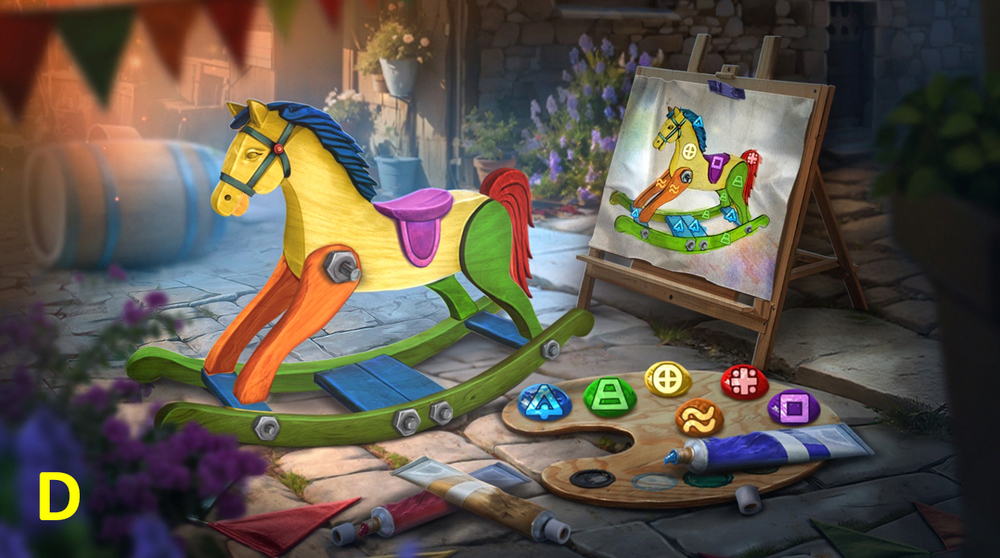
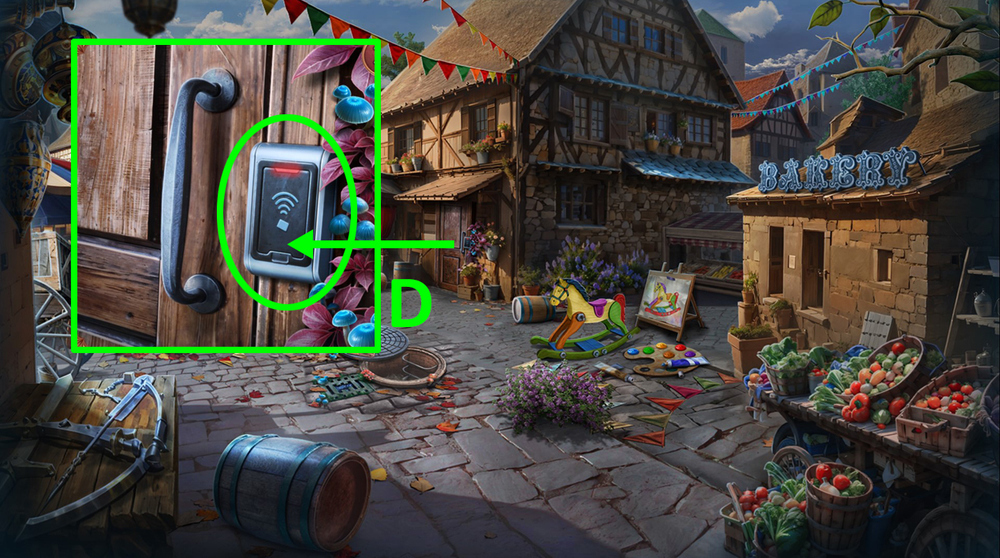
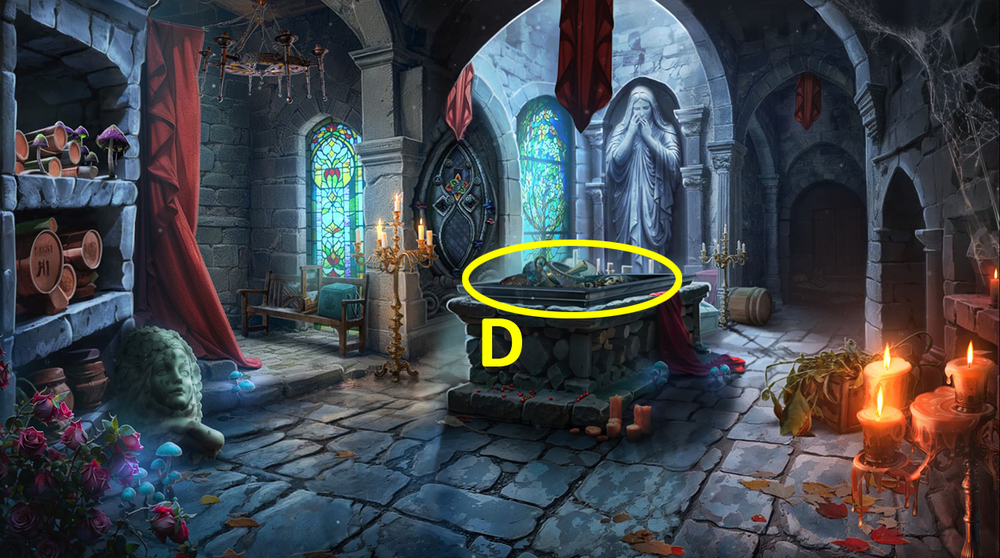
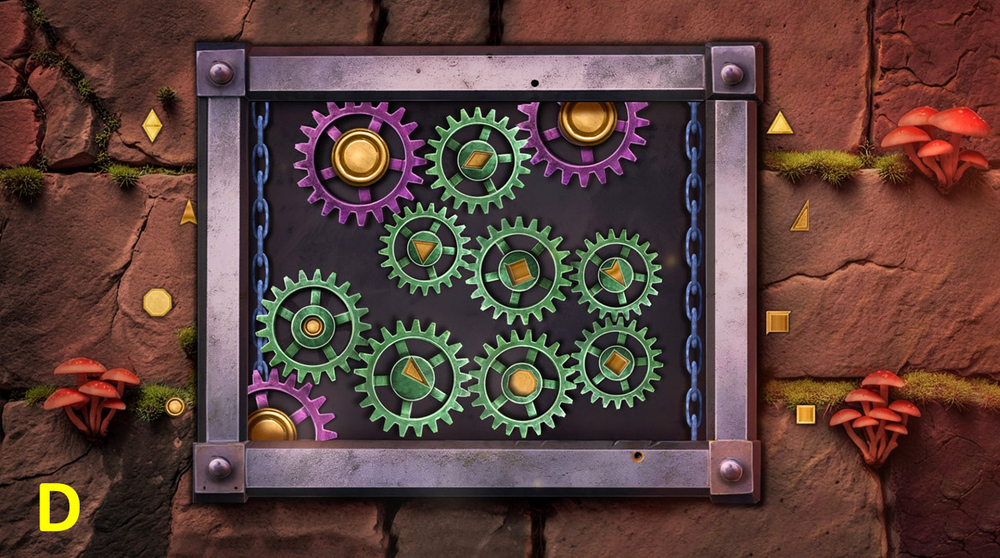
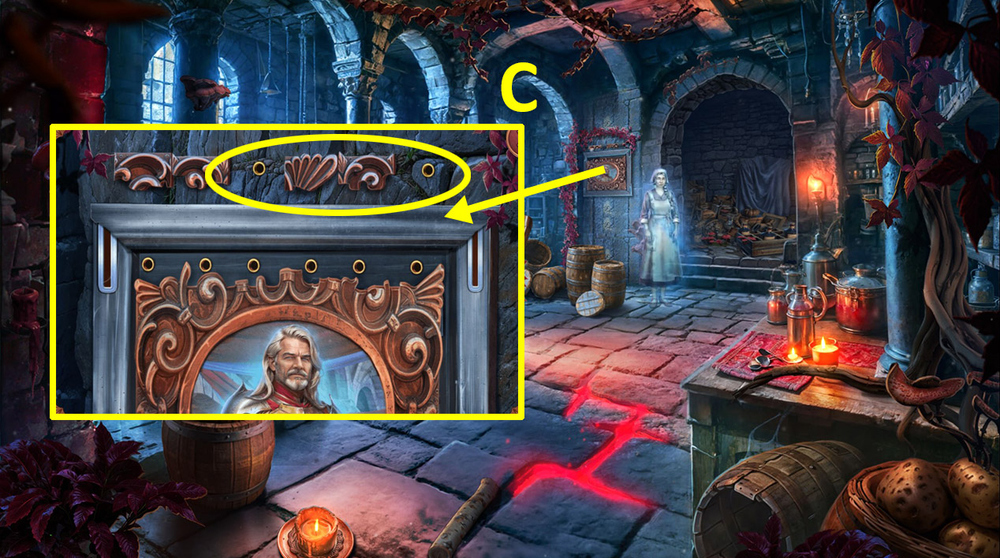
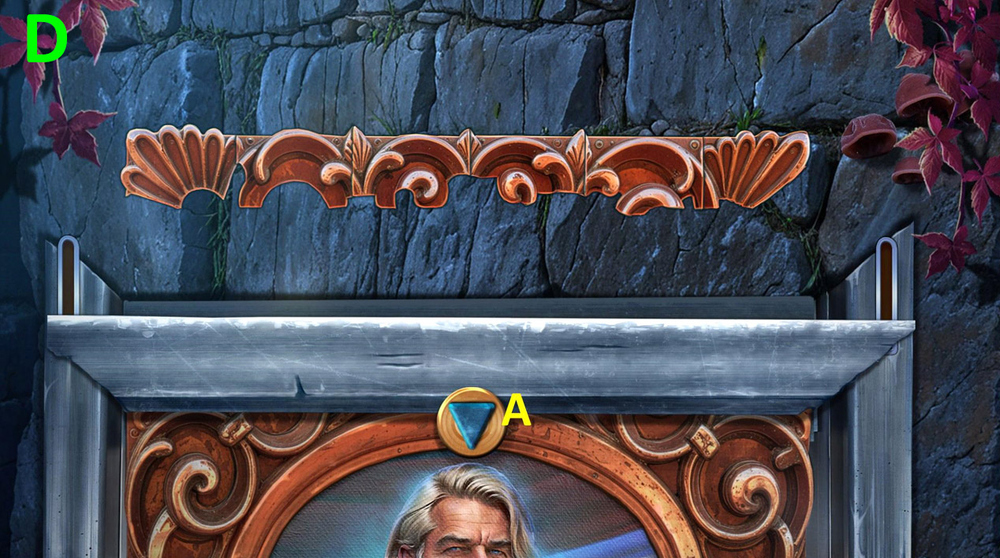
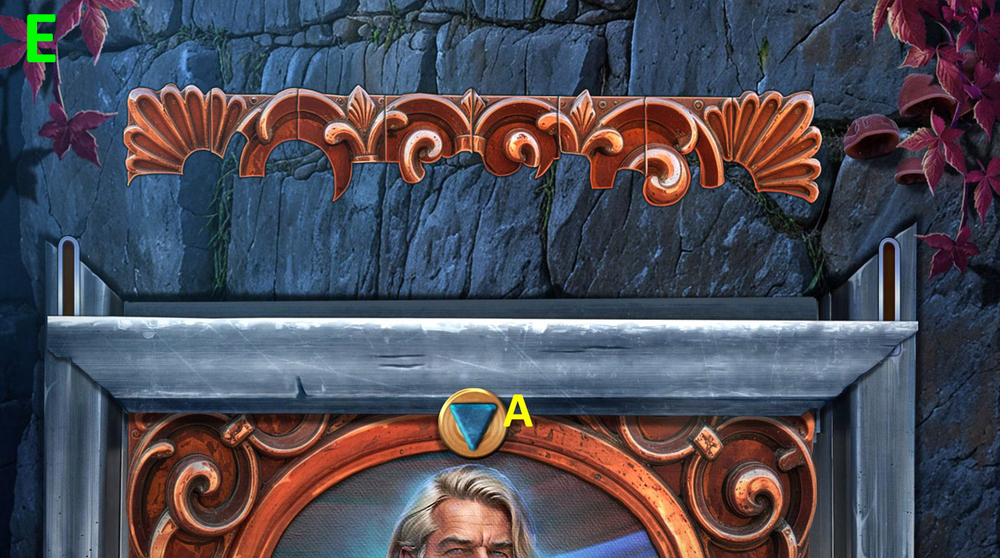
- Examine the laptop, click on the photo, then on the bridge, memorize the code (D).
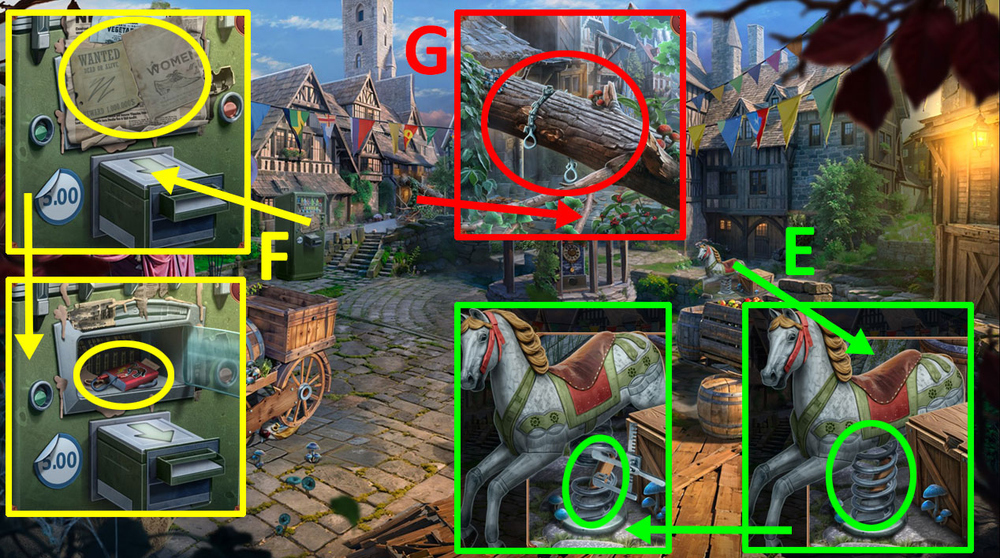
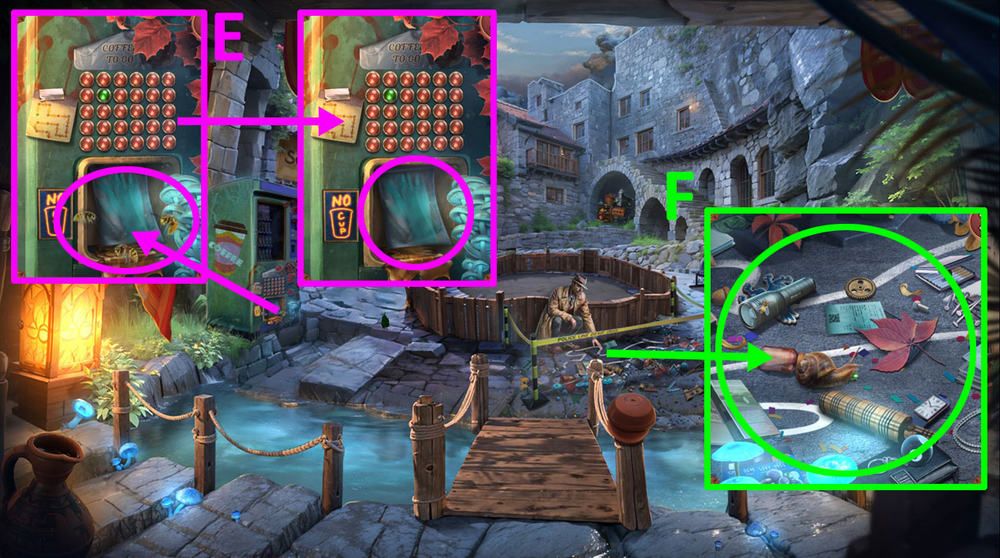
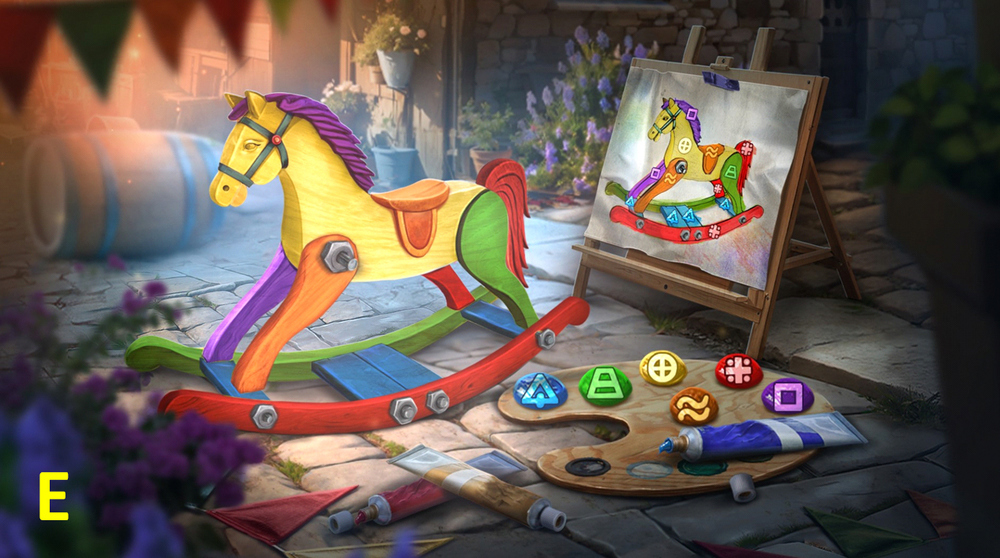
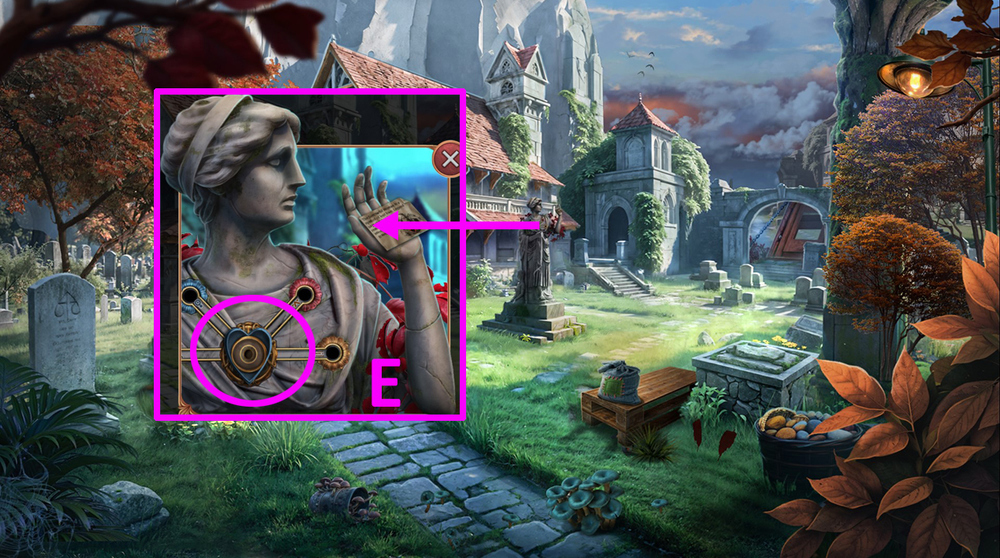
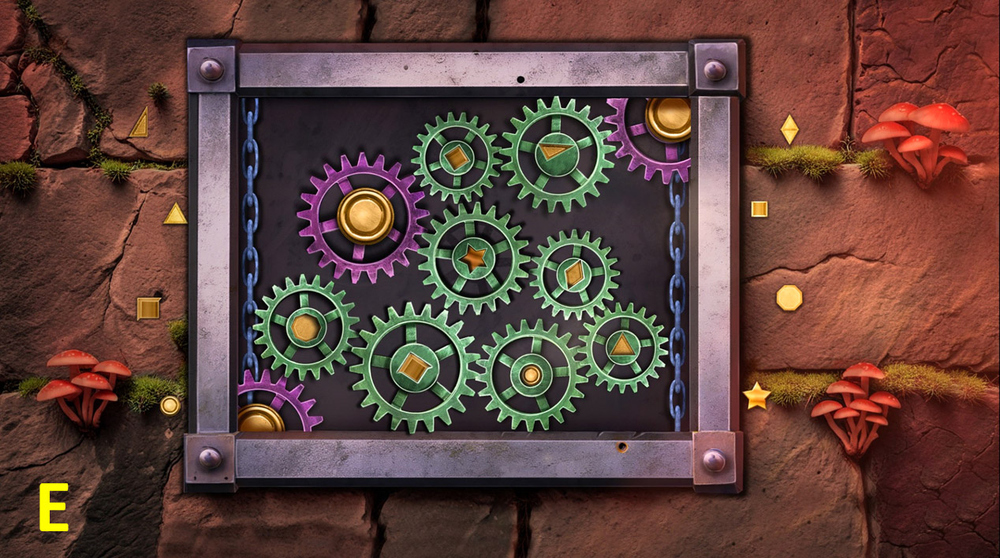
- Memorize the code (E).
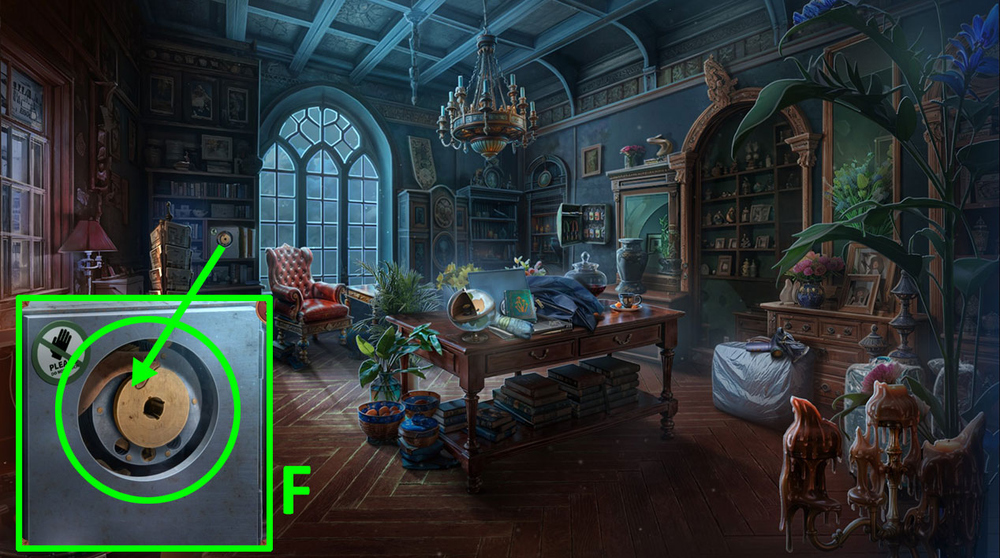
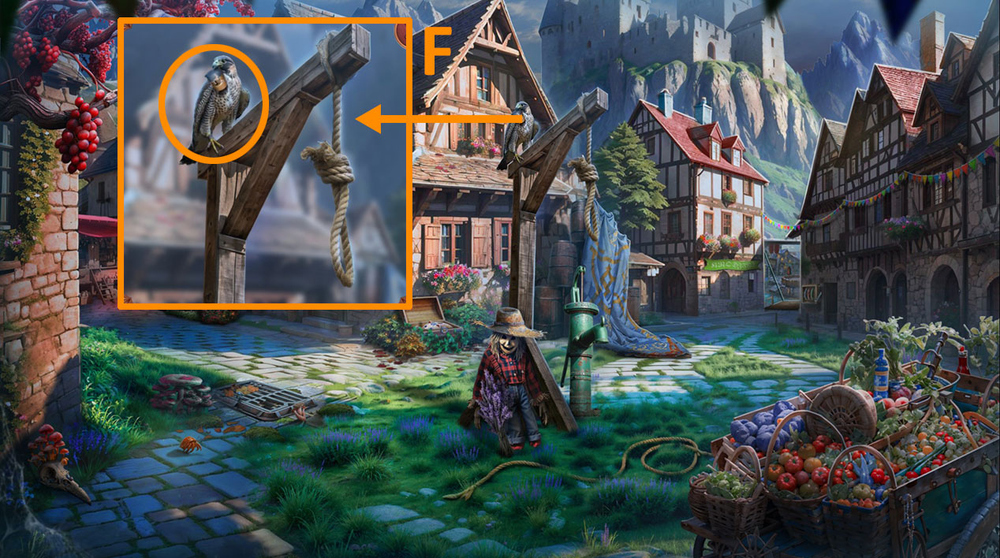
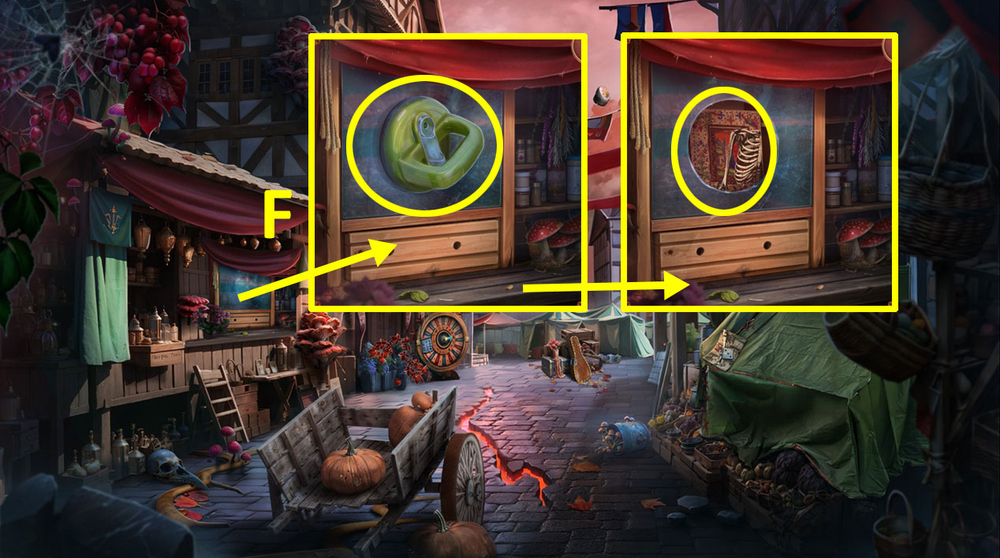
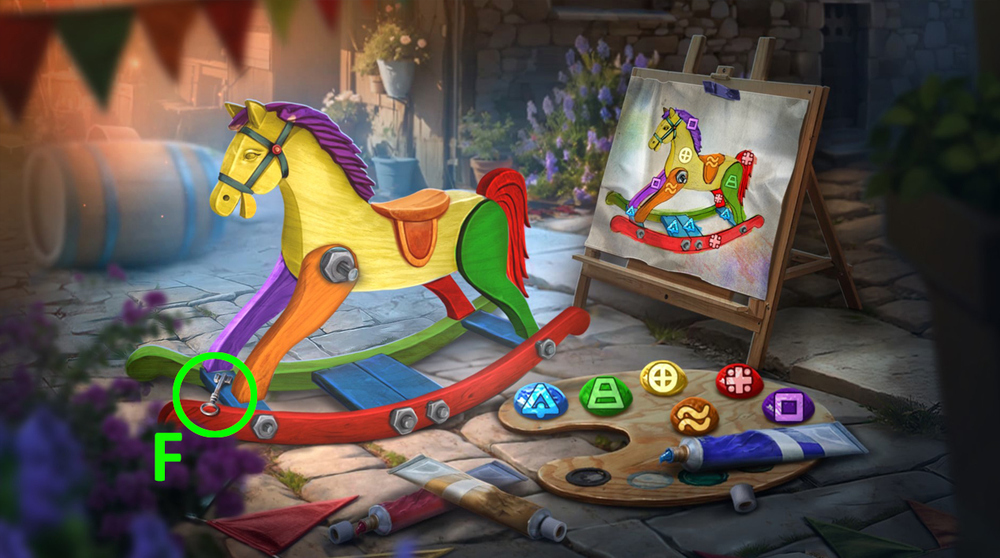
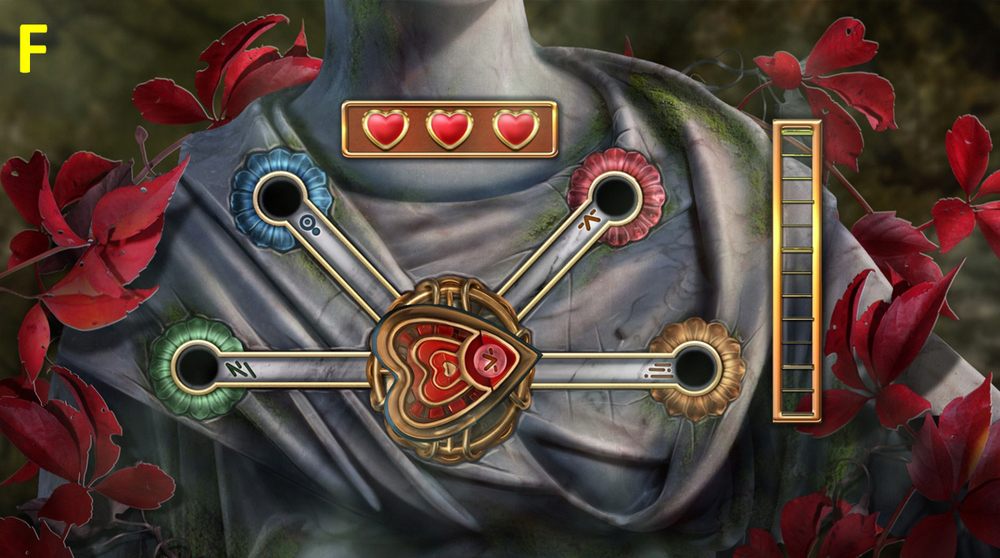
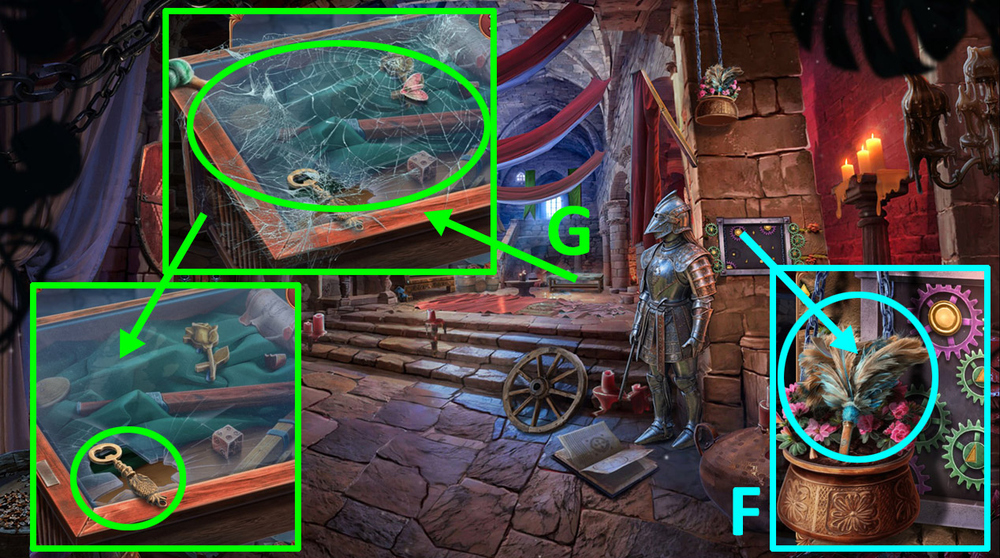
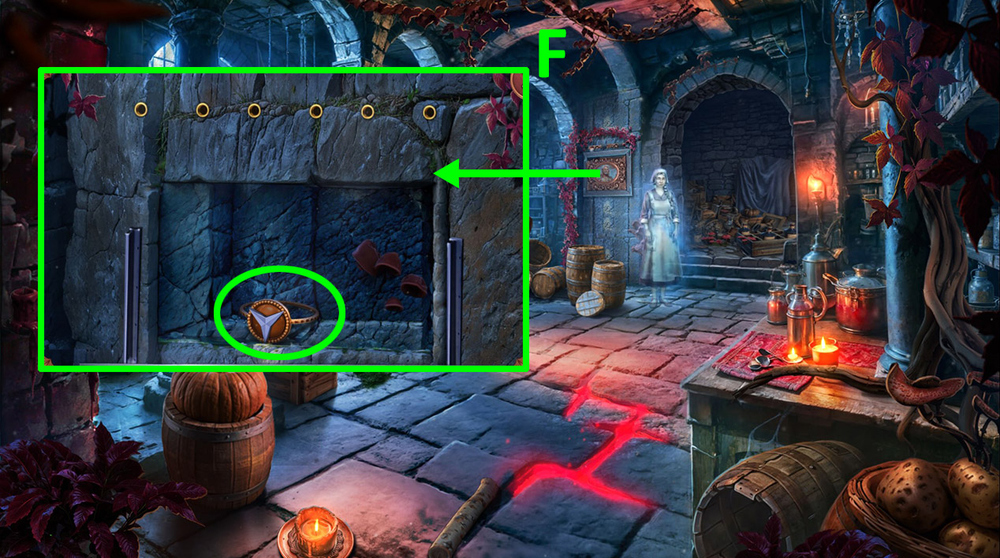
- Use SAFE HANDLE on the safe (F).
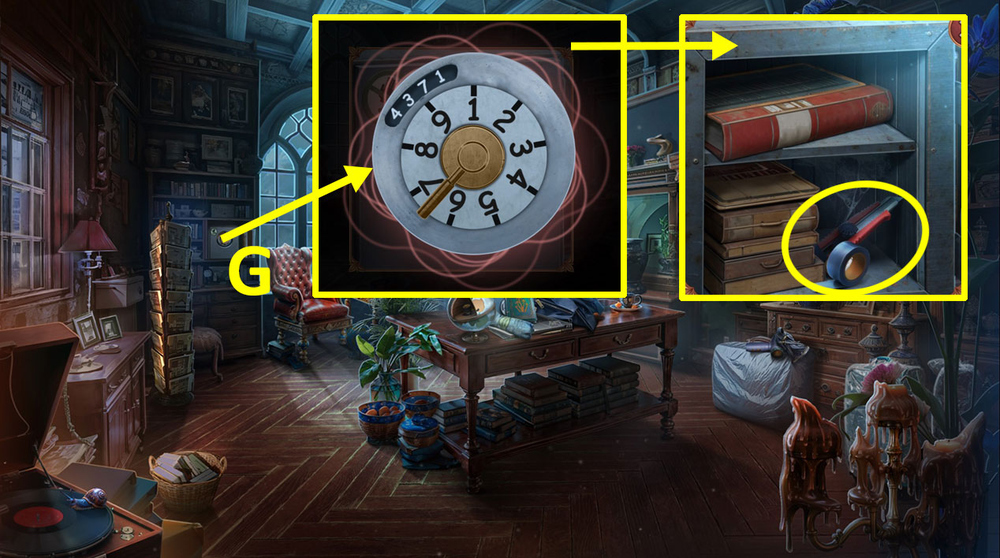
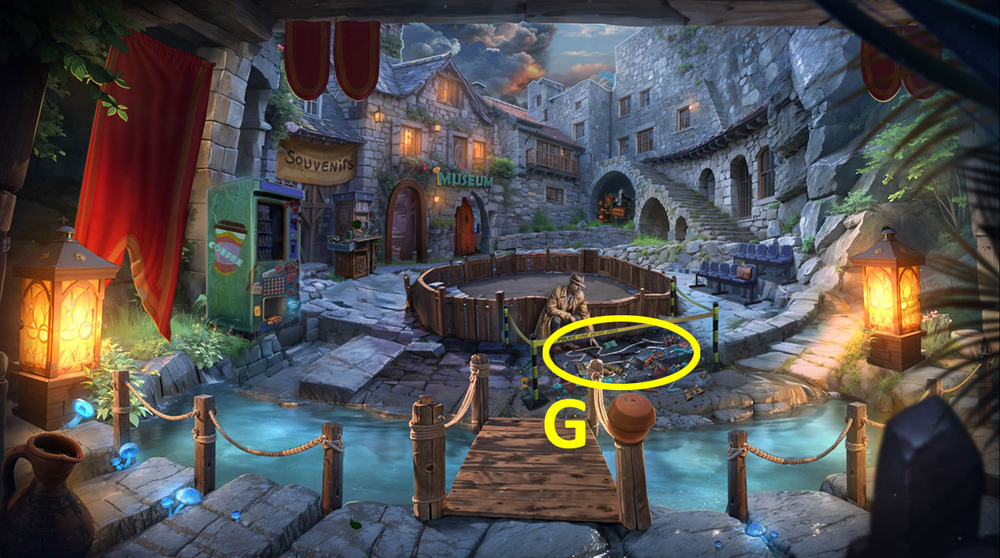
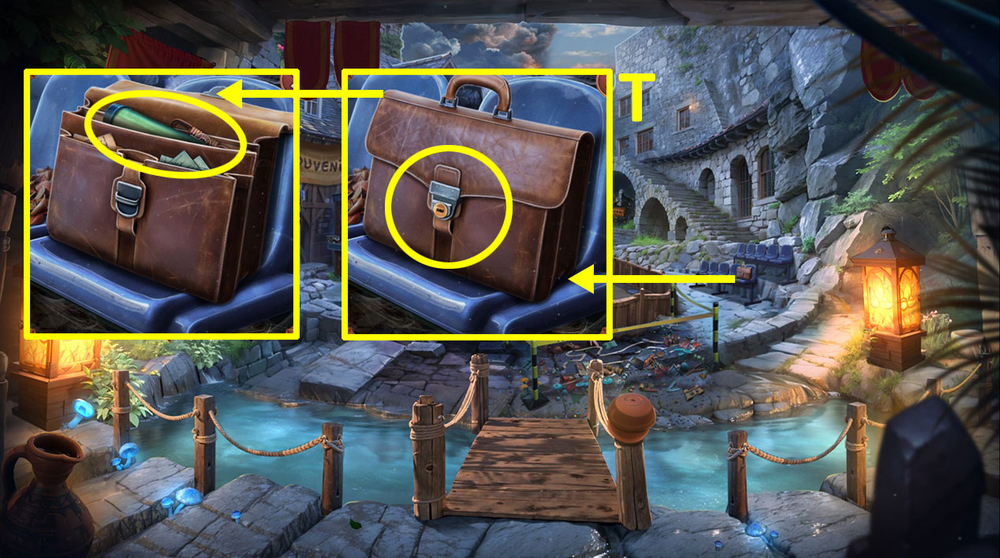
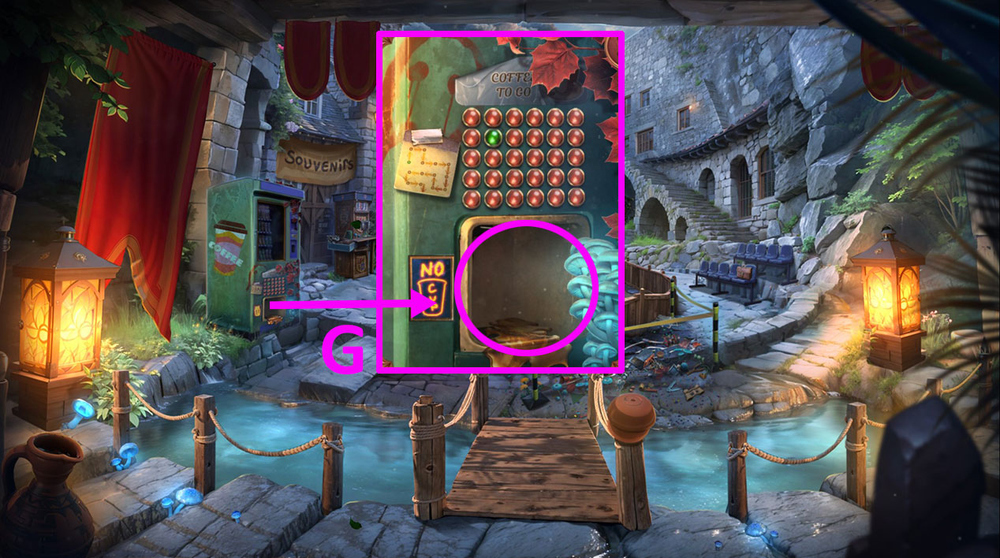
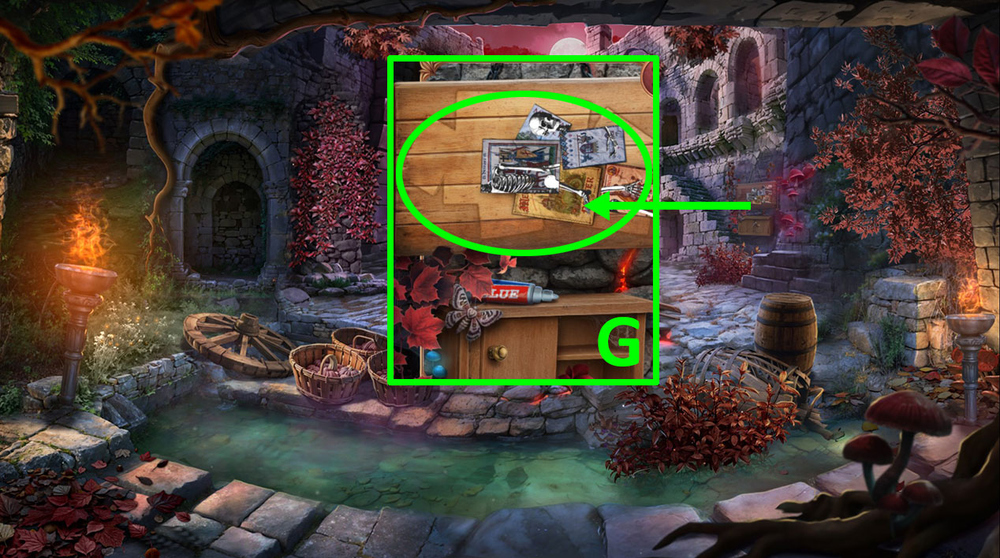
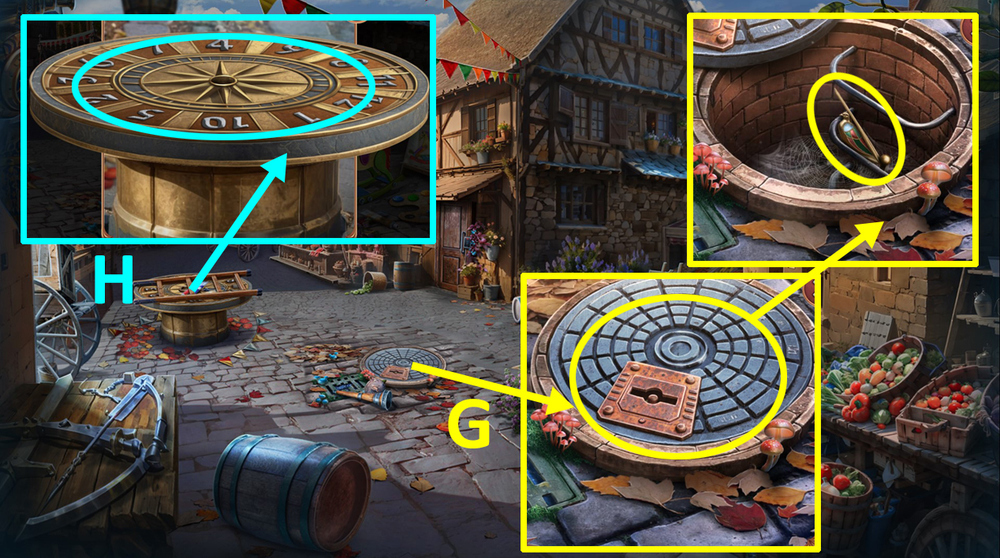
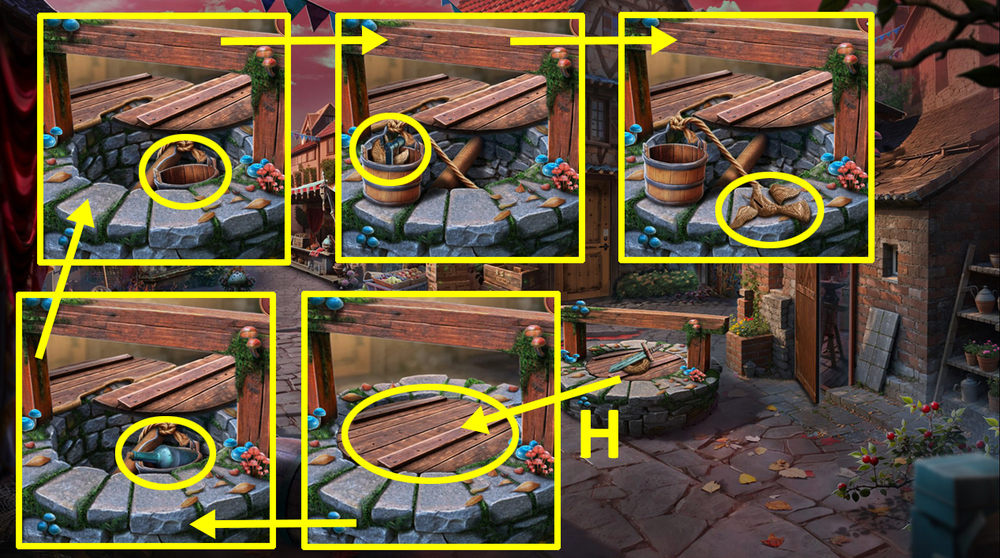
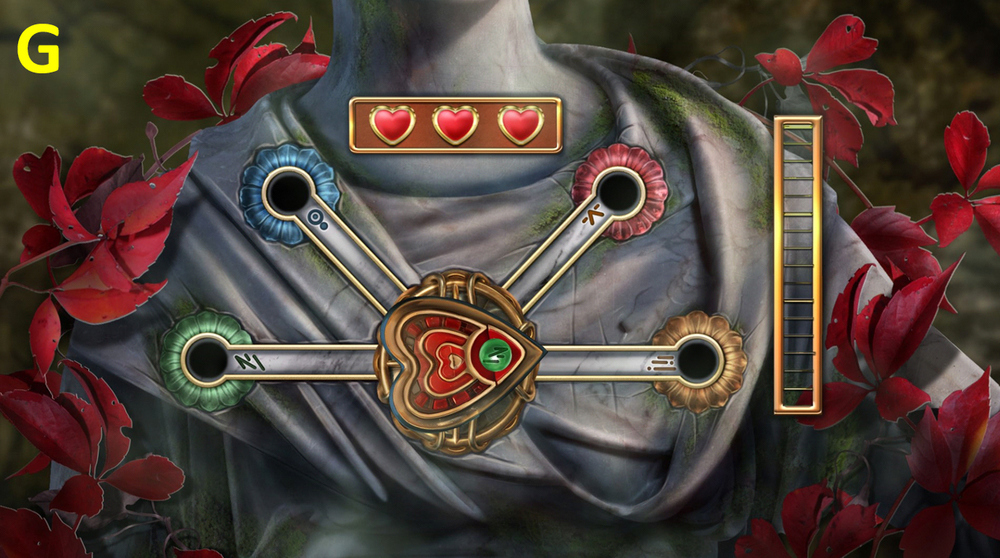
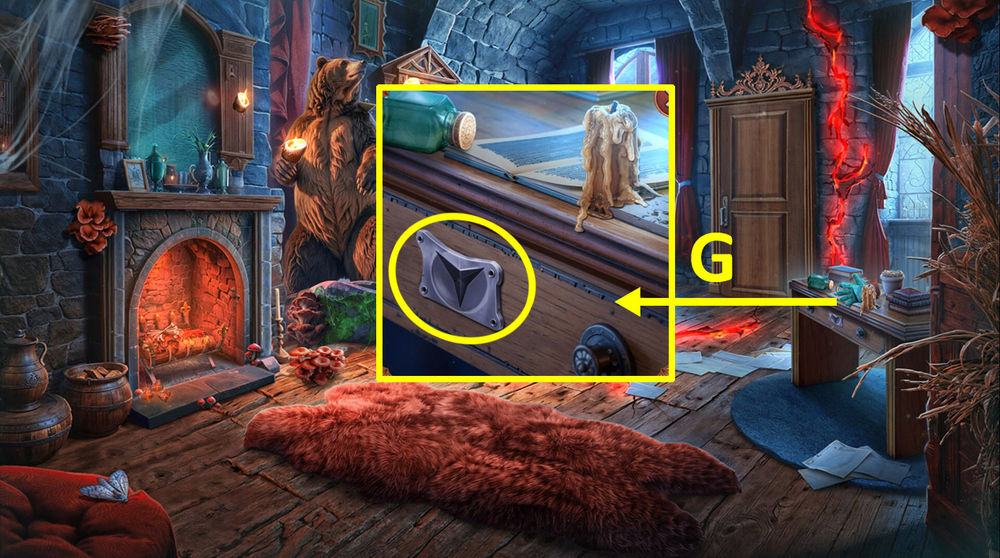
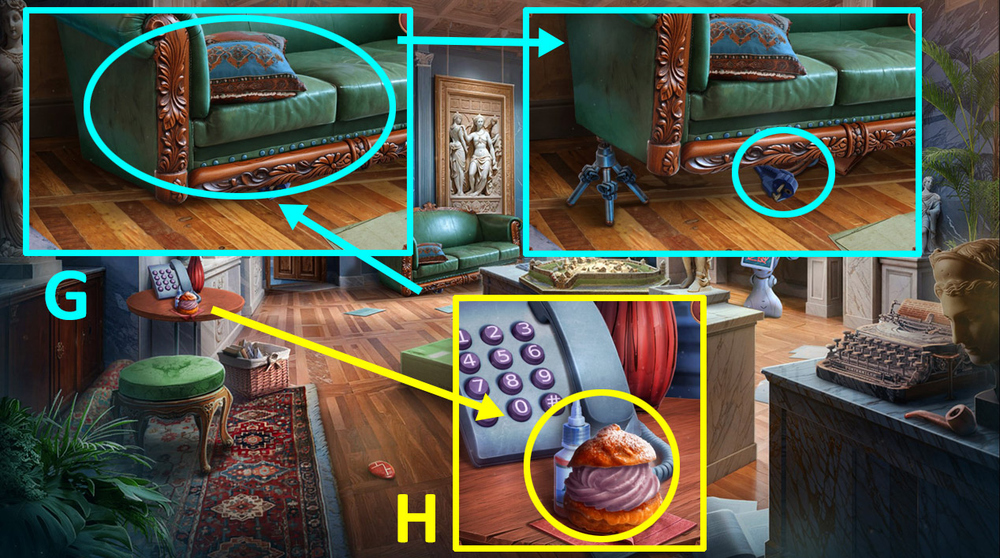
- Examine the code lock, drag the handle to enter 4371, take DUCT TAPE and BOX CUTTER (G).
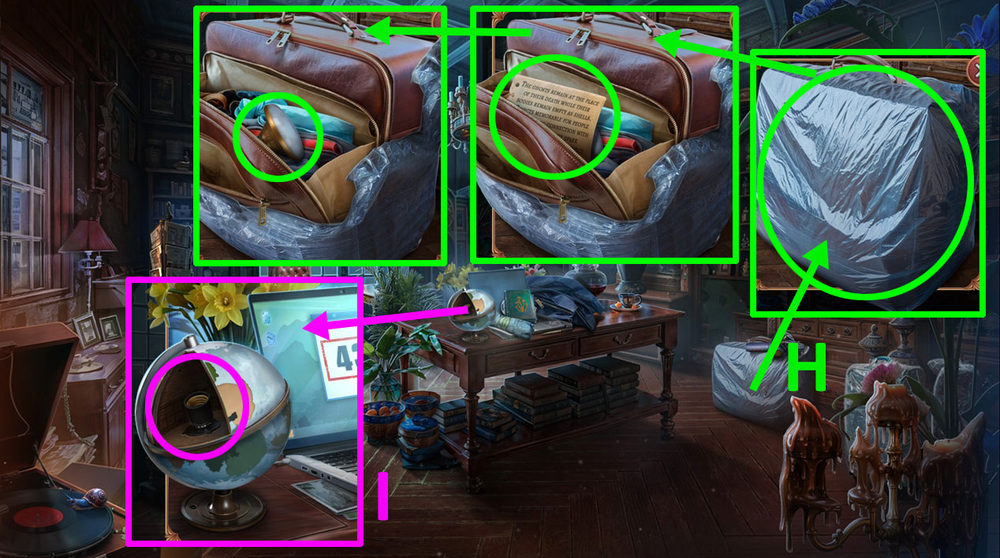
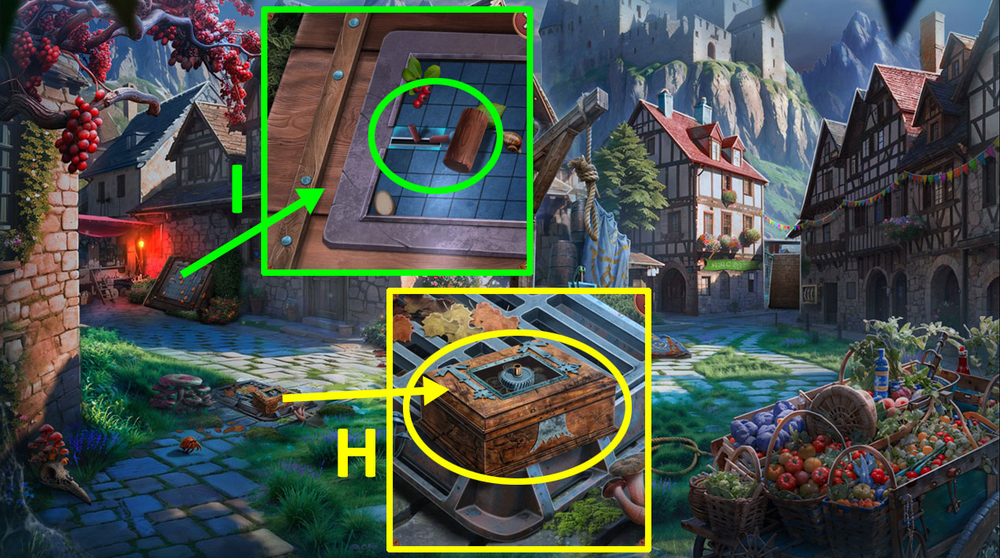
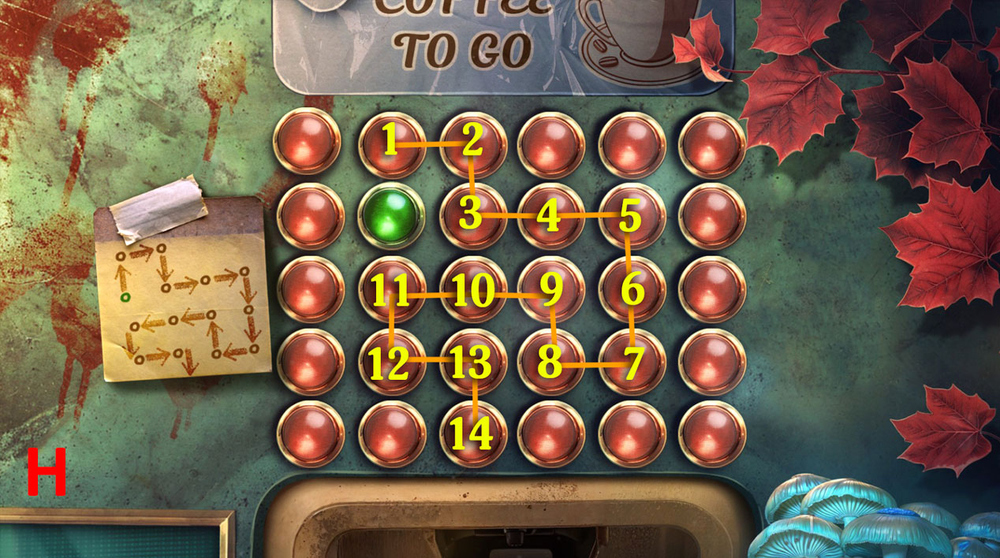
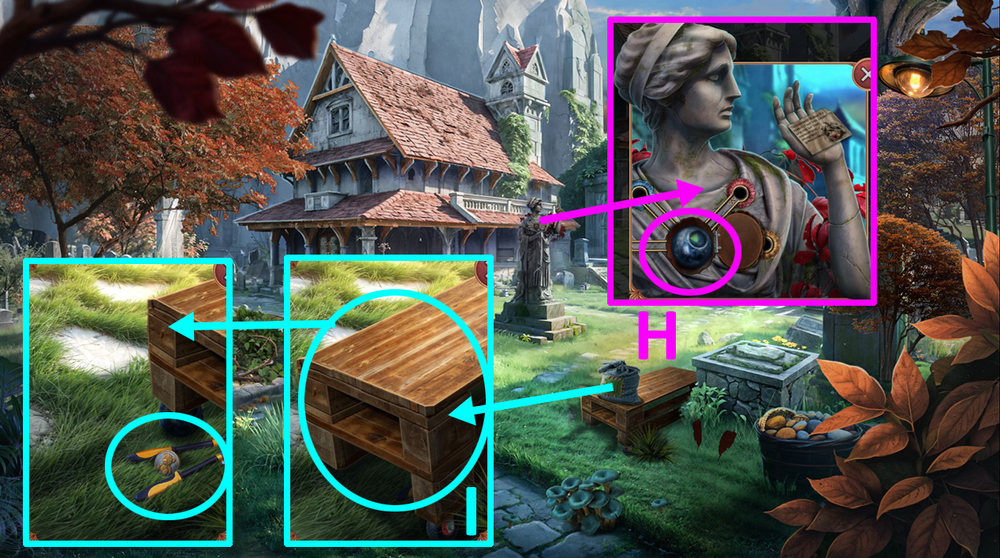
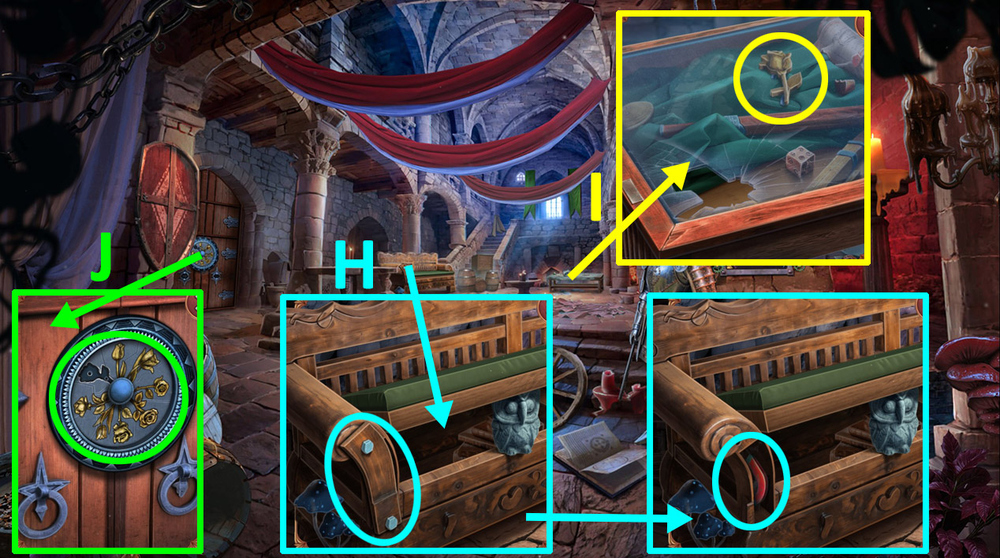
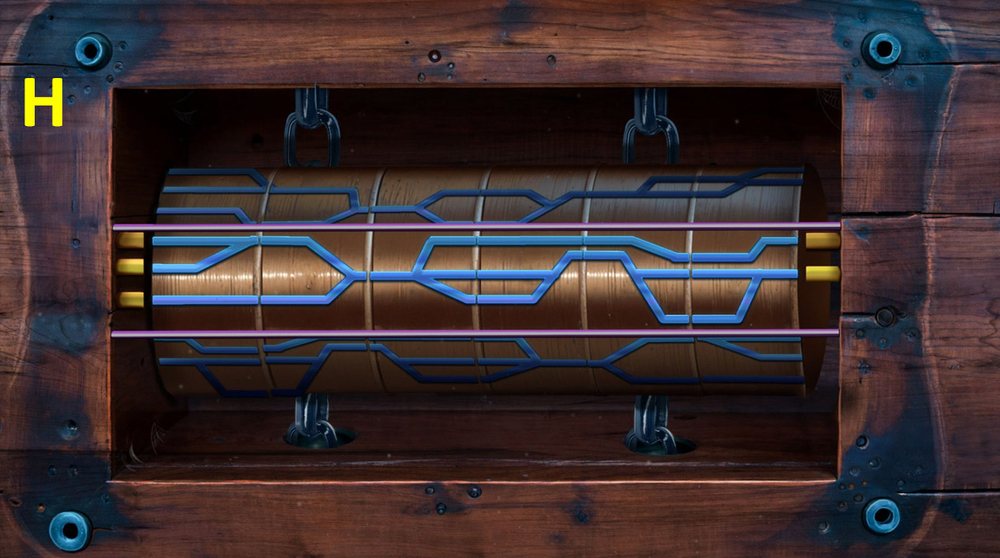
- Use BOX CUTTER on the bag, take and read the note, take LIGHT BULB (H).
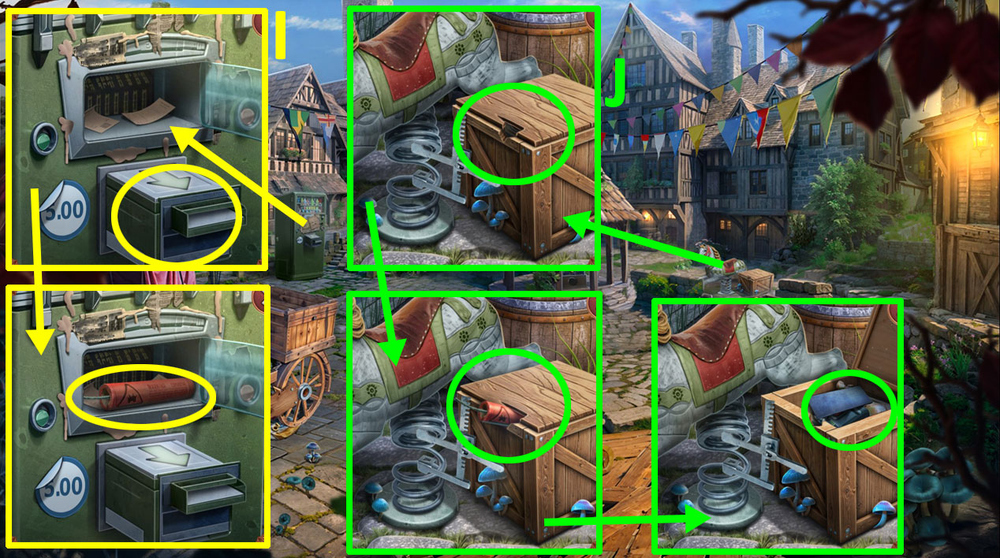
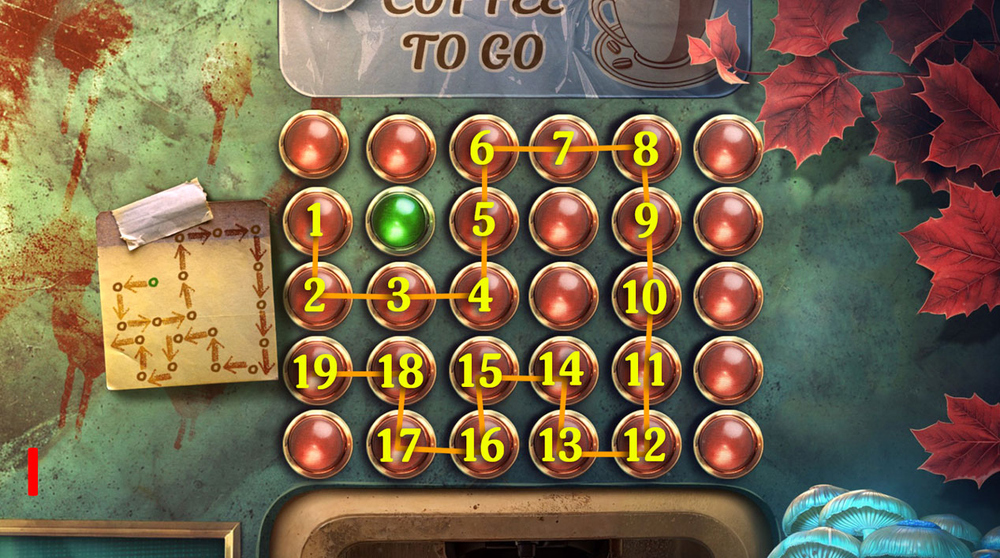
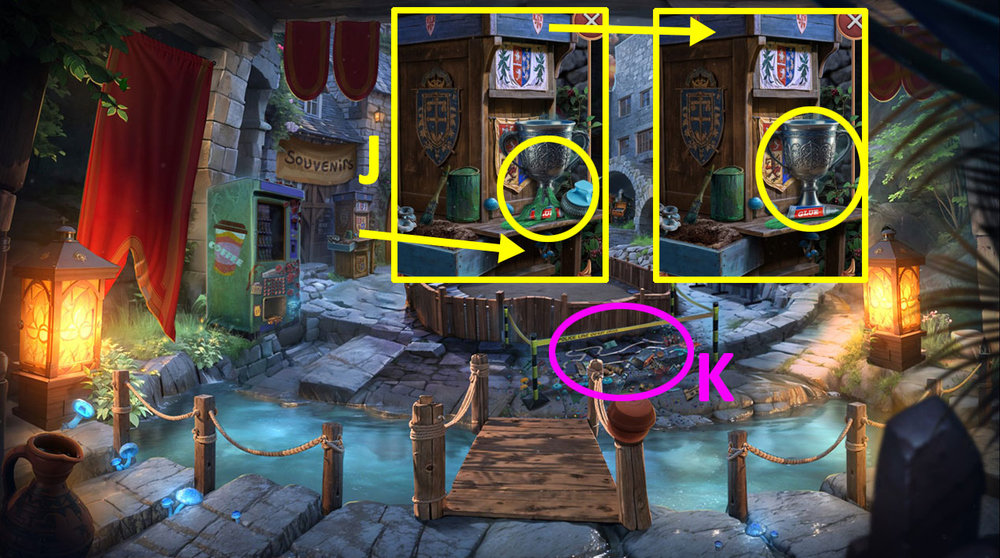
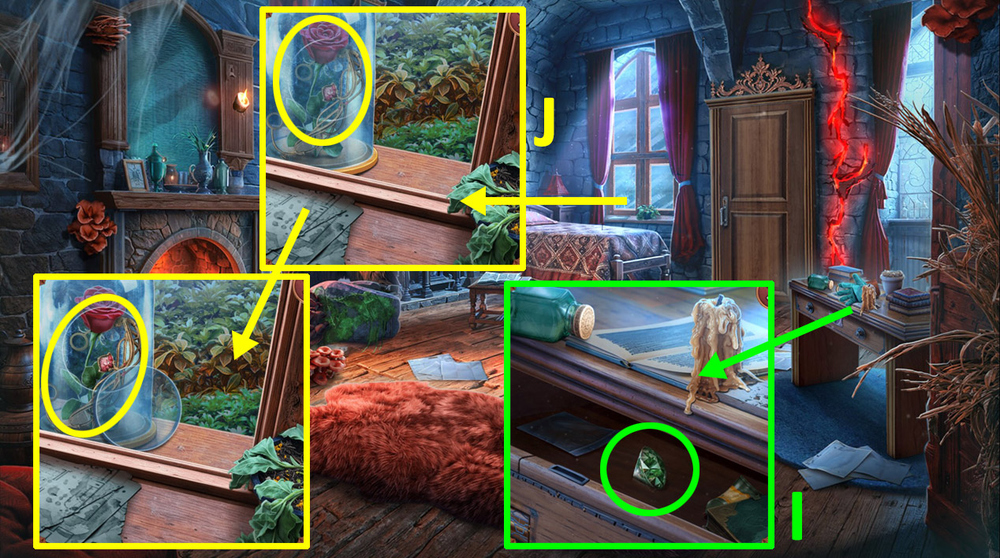
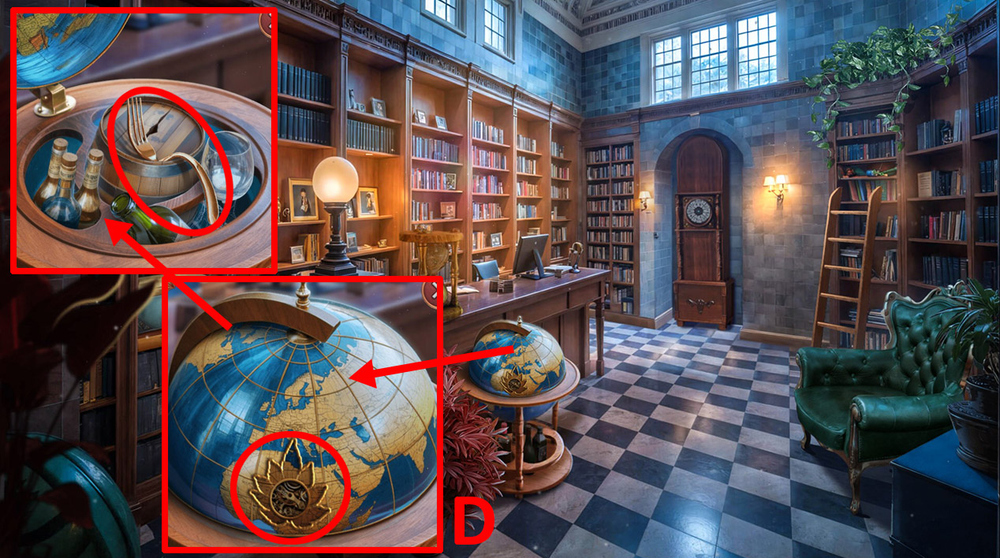
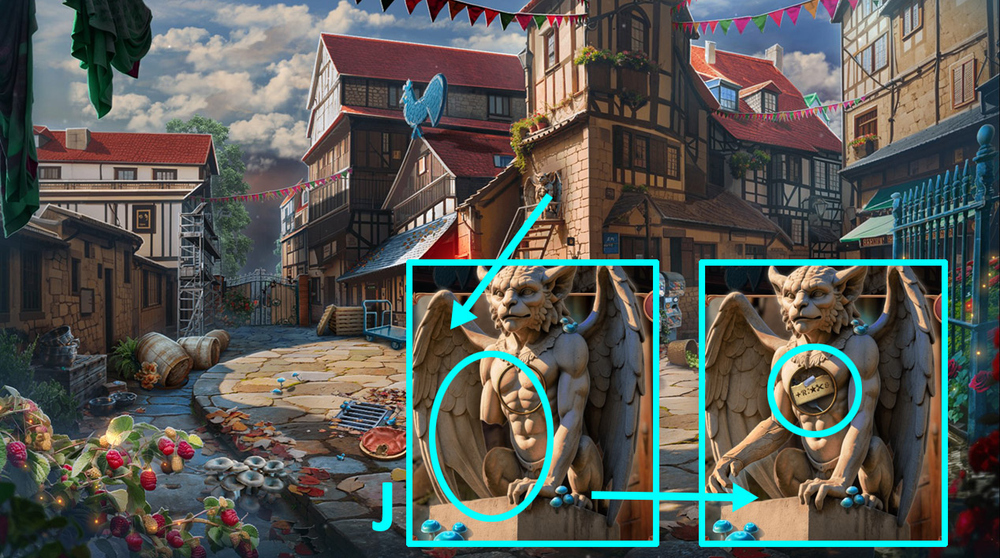
- Use LIGHT BULB on the globe (I).

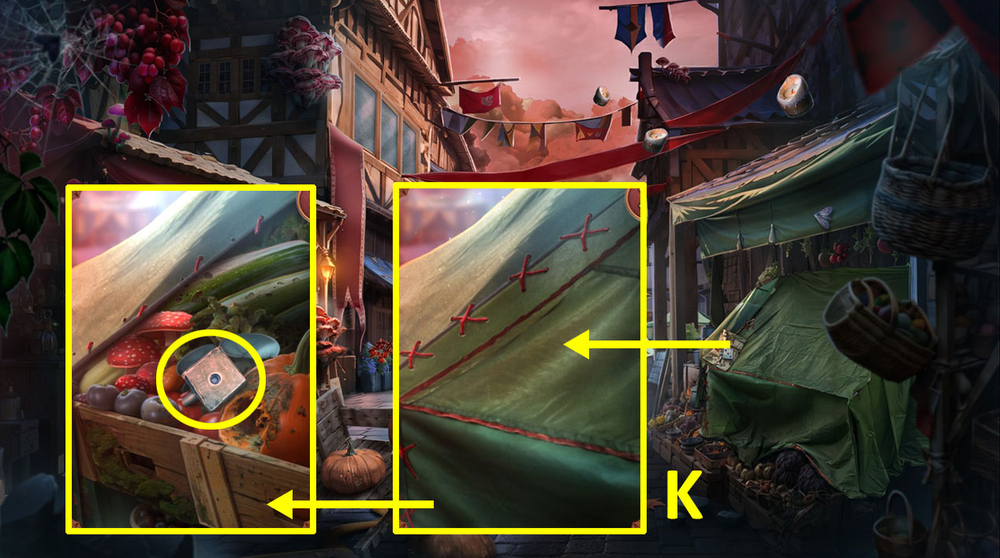
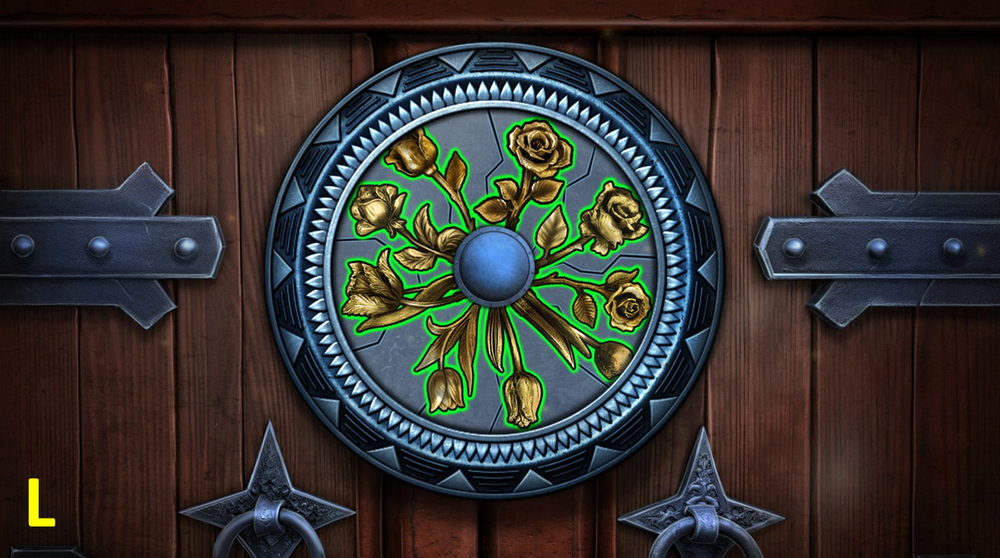
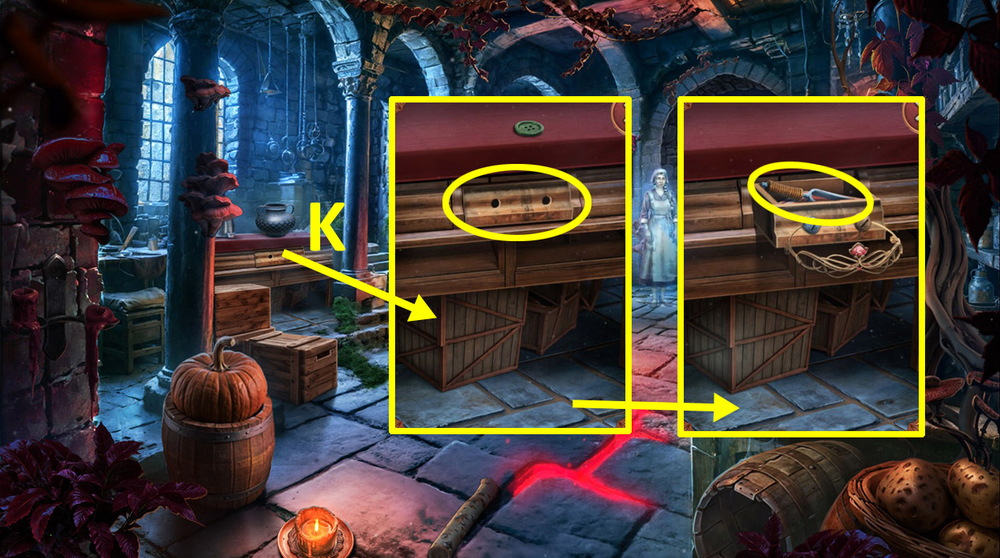
- Easy solution: Set the sliders as shown in the picture (J).

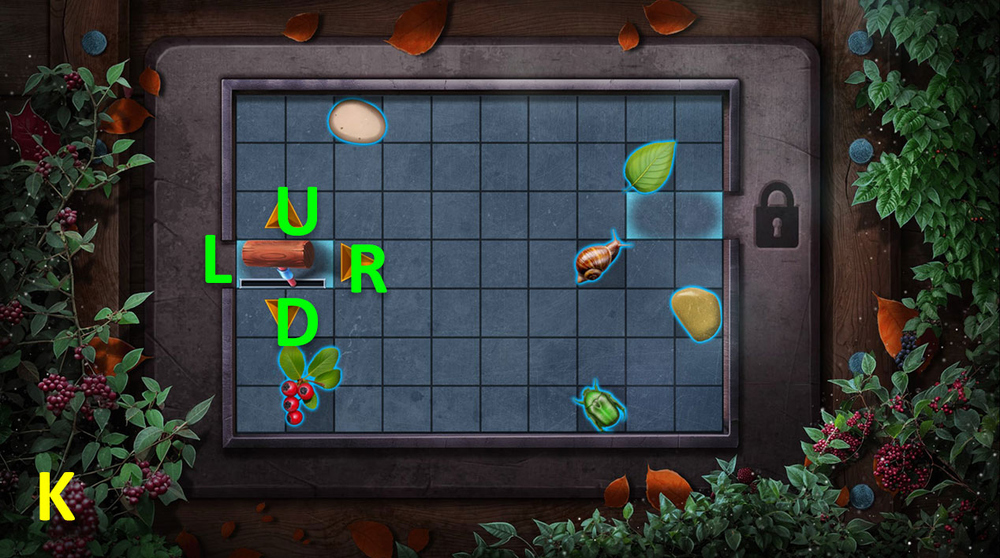
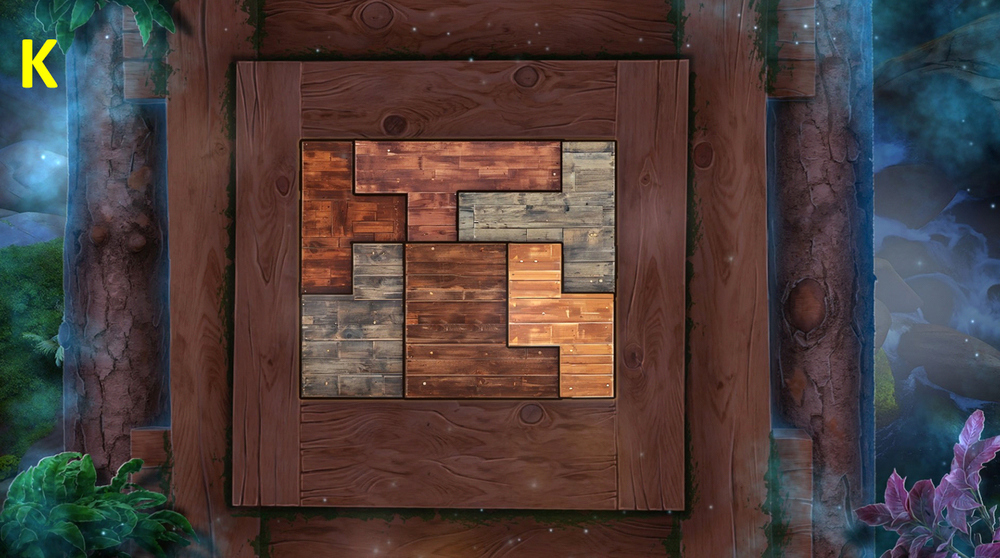
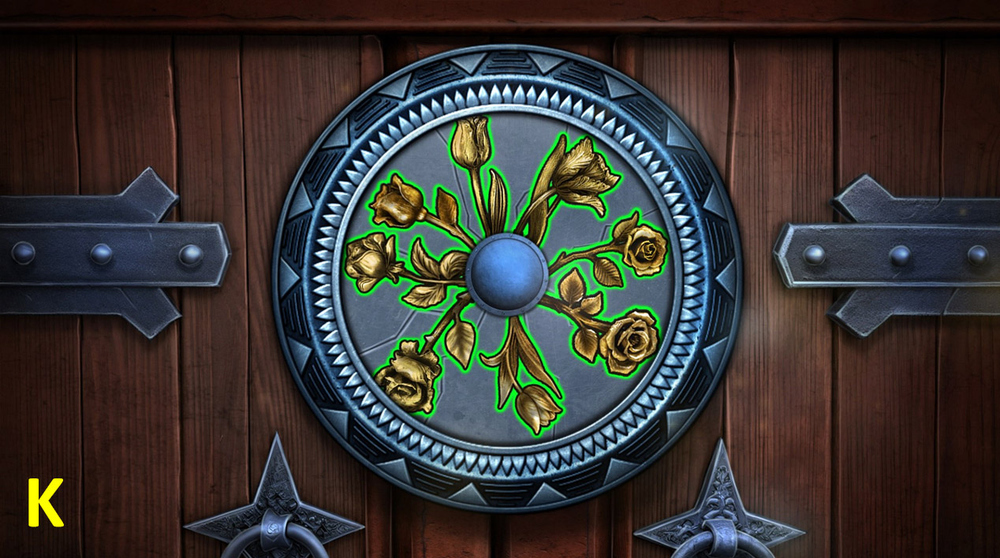
- Hard solution: Set the sliders as shown in the picture (K).
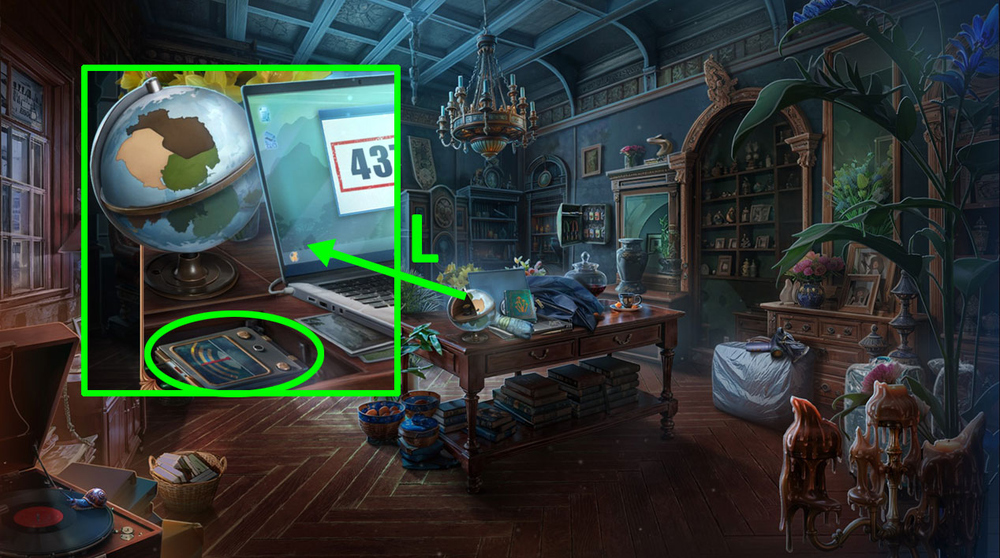
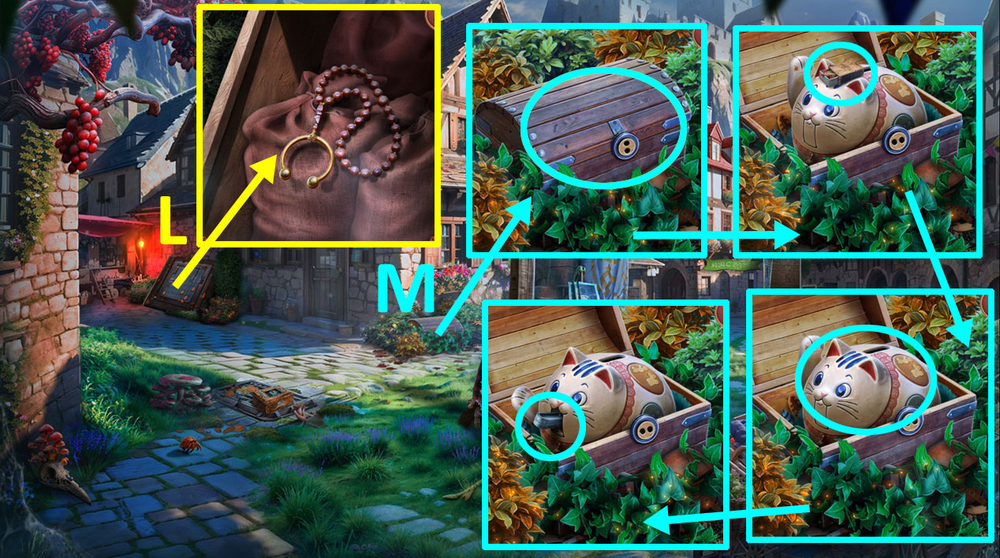
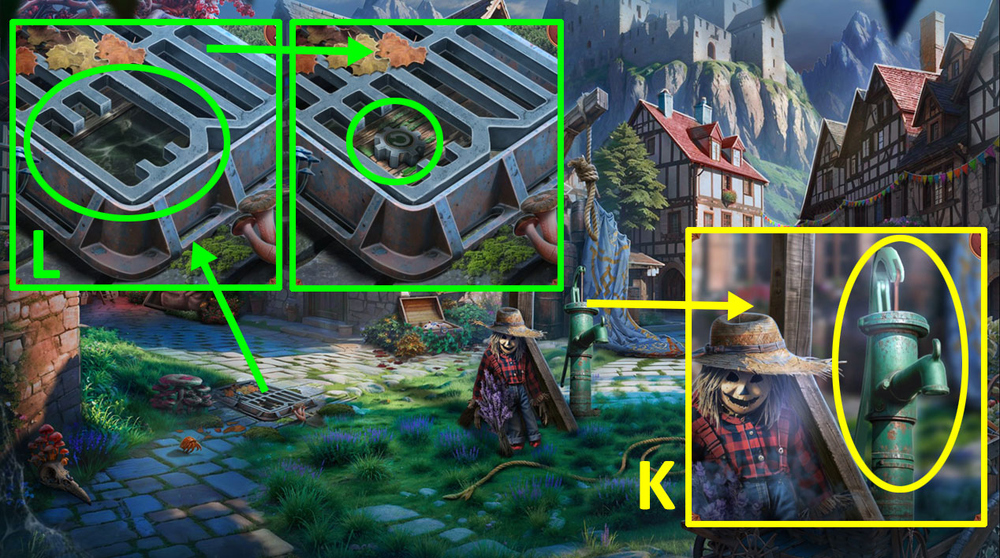
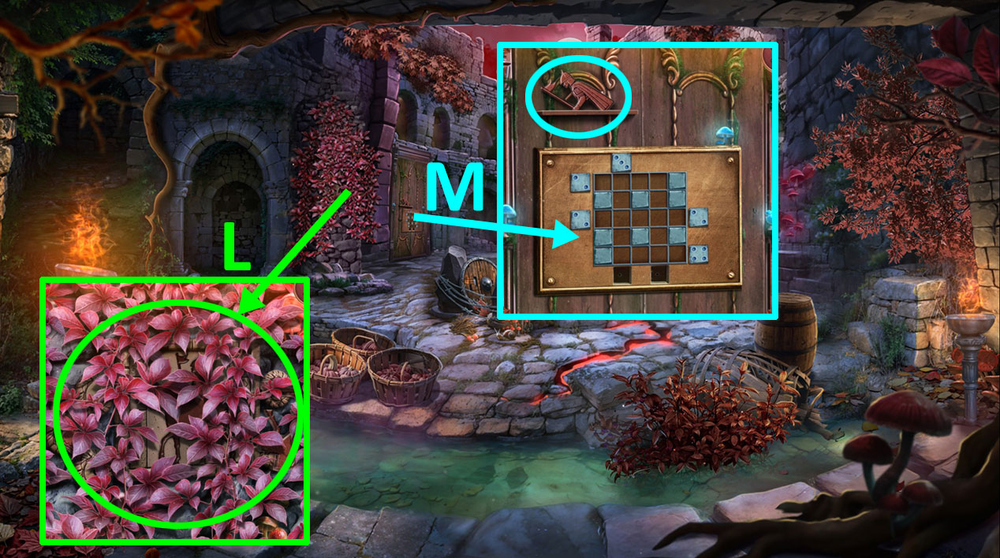
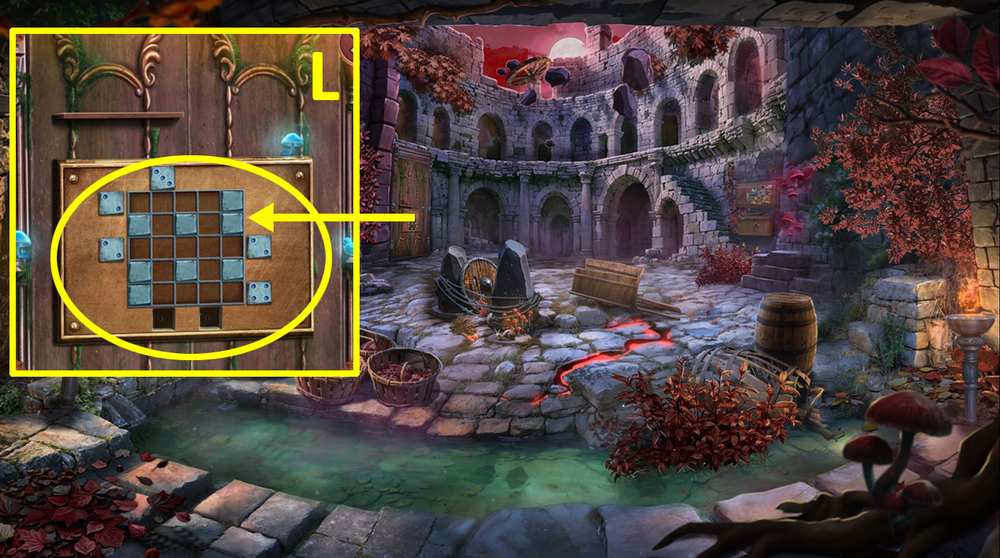
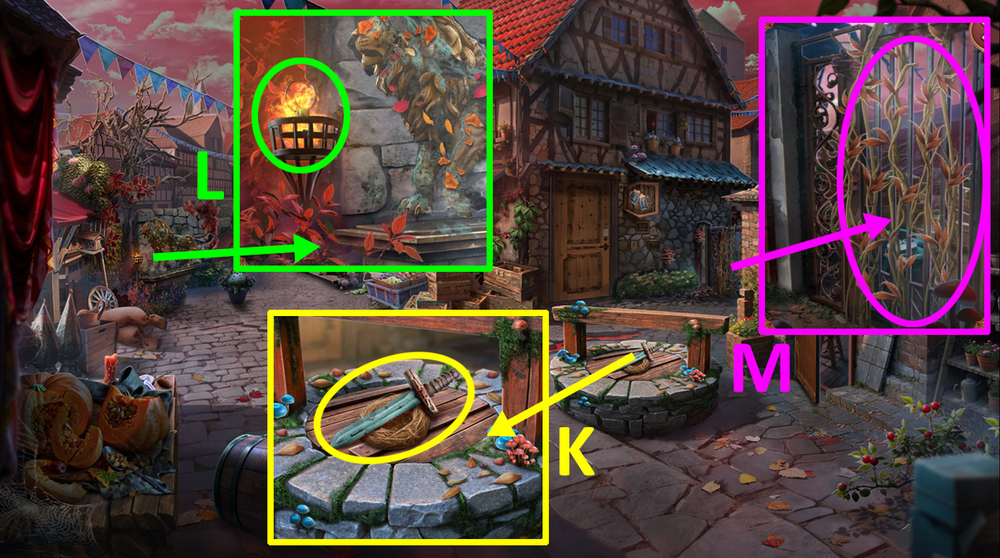
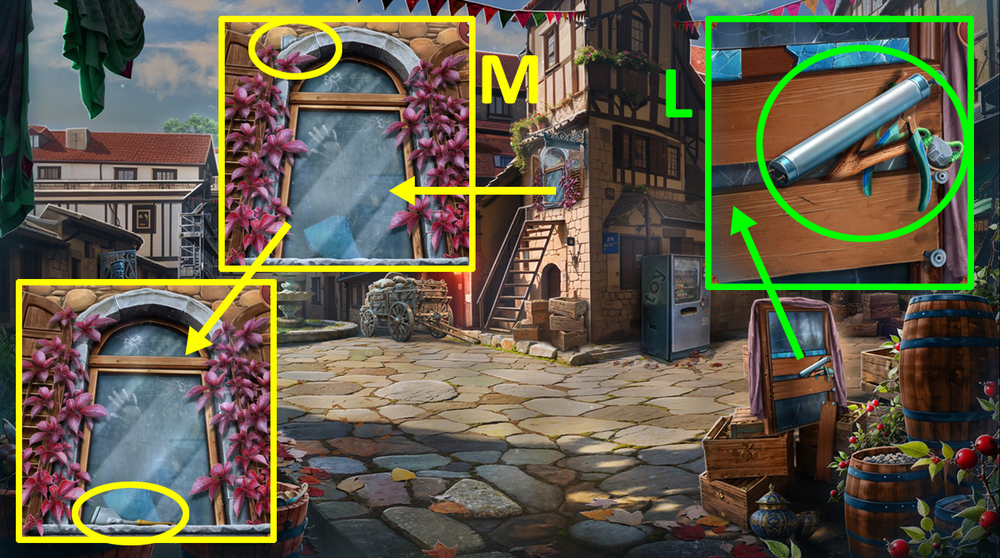
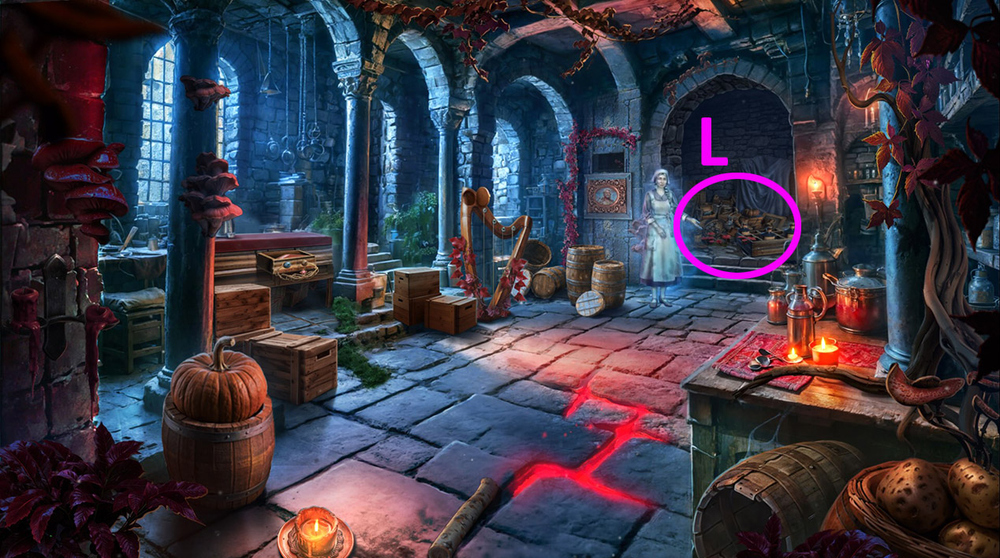
- Take the EMF detector (L).
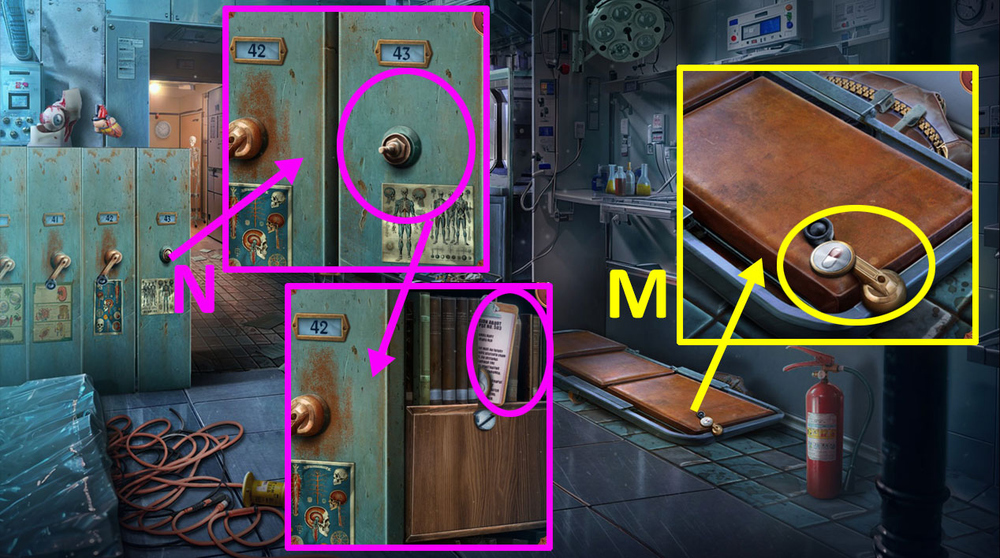
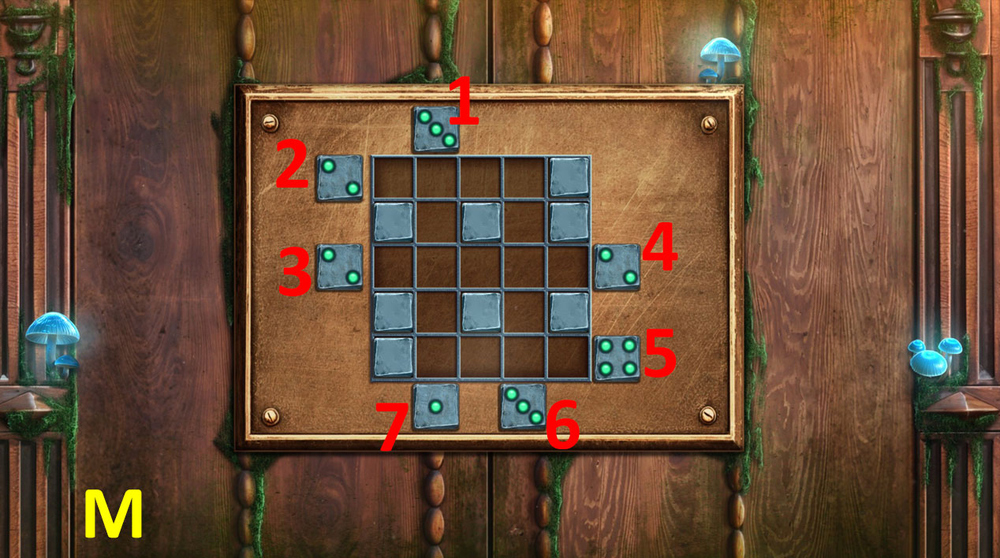
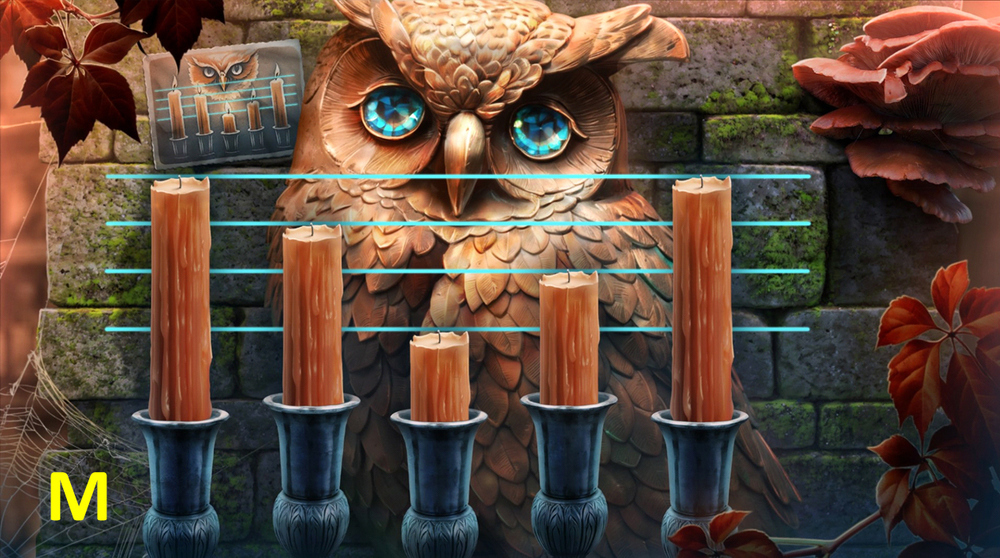
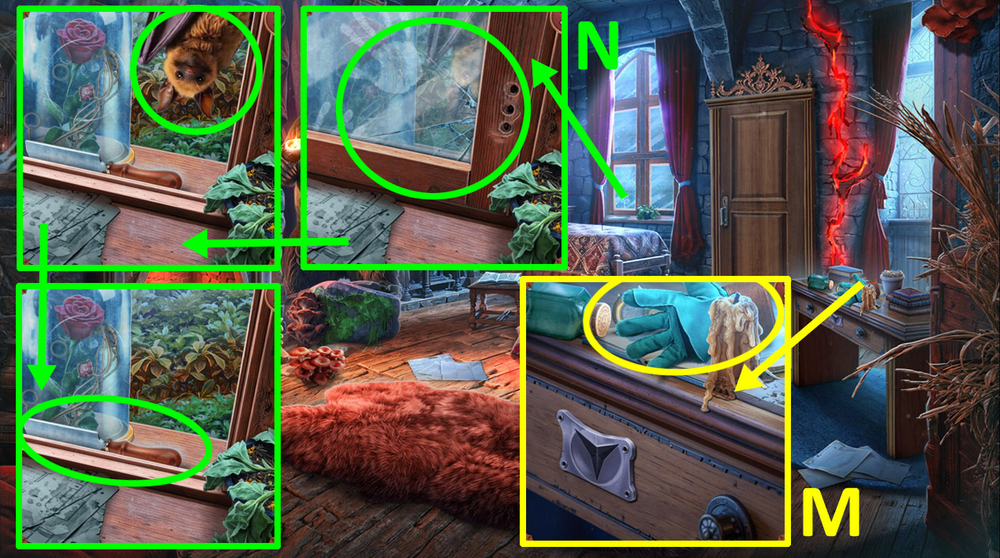
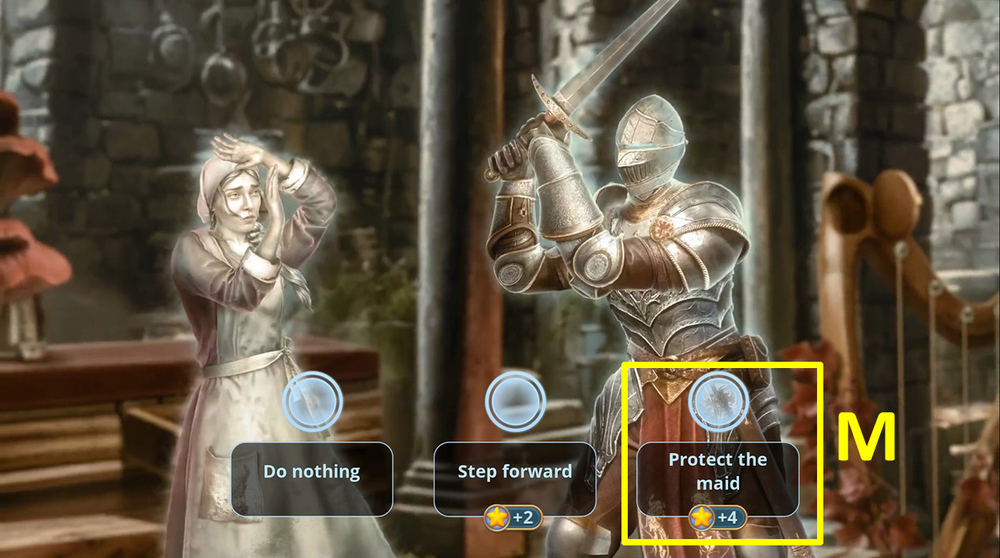
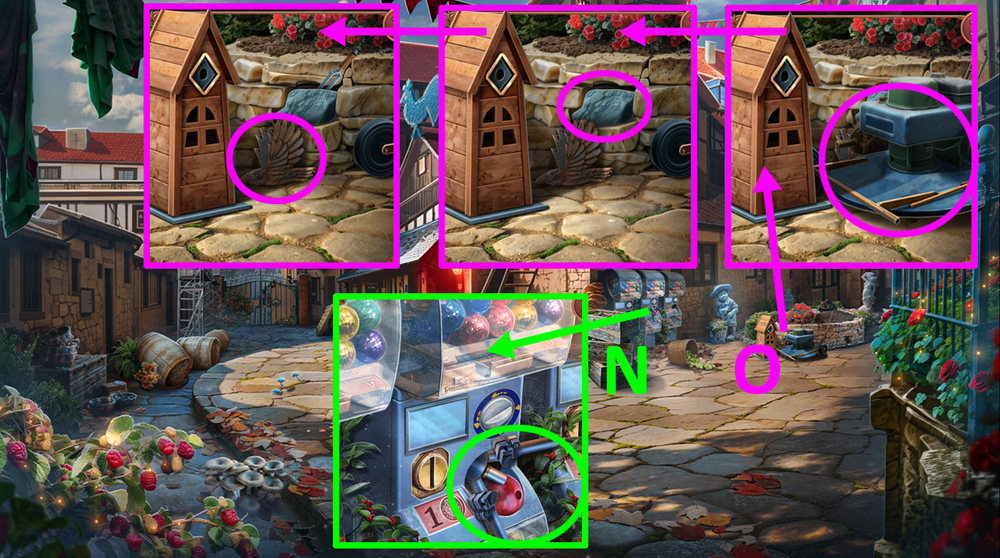
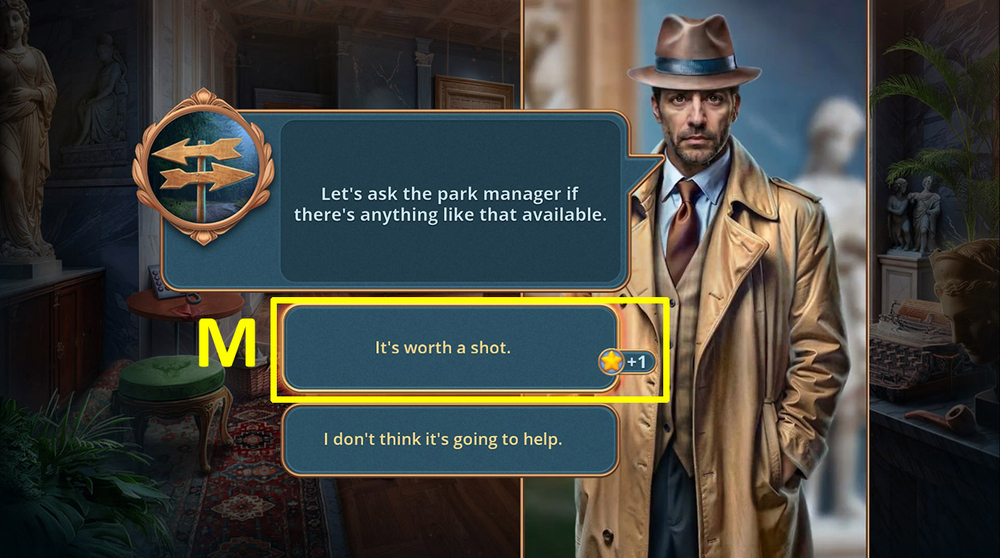
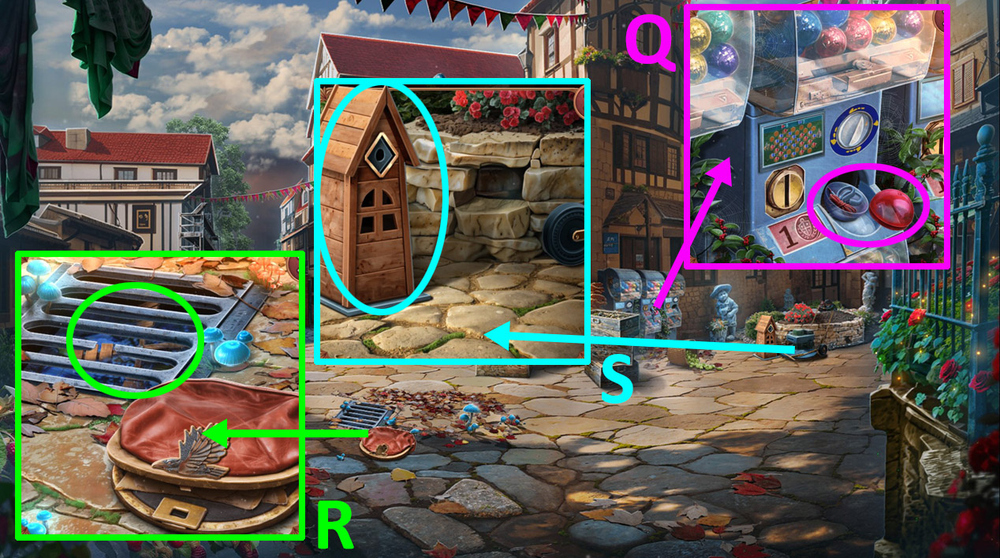
- Take HYGIEIA SYMBOLS 1/3 and HANDLE (M).
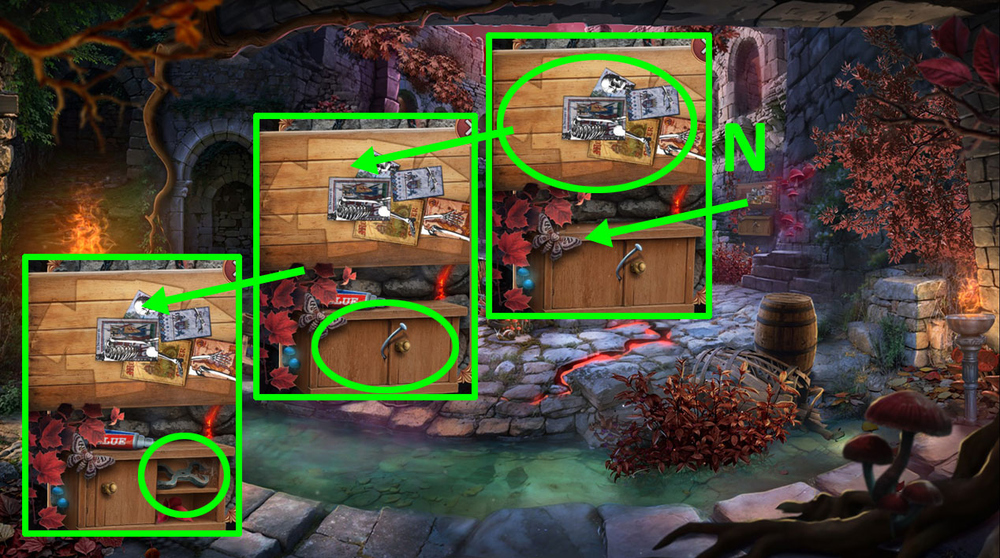
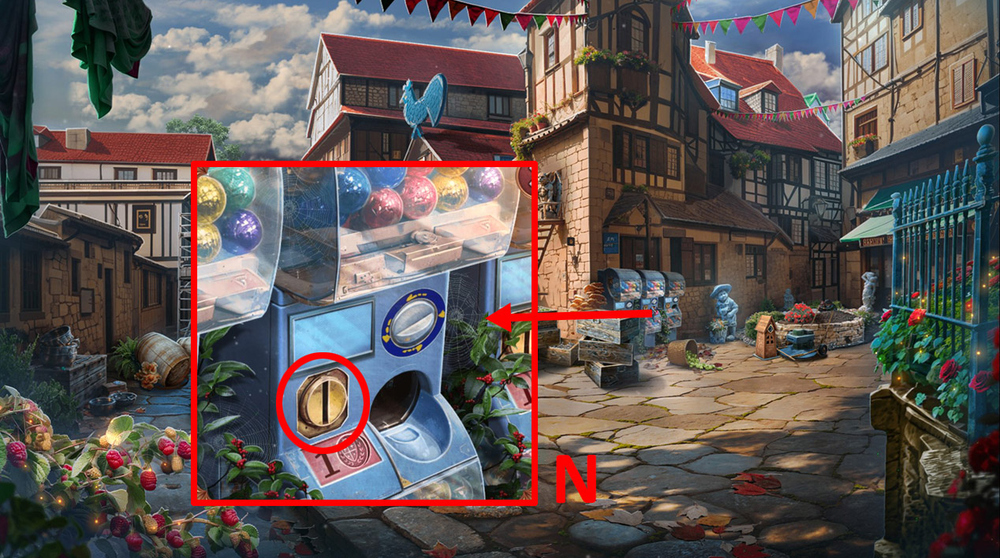
- Use HANDLE on the pin, take HYGIEIA SYMBOLS 2/3, read CORONER’S REPORT (N).
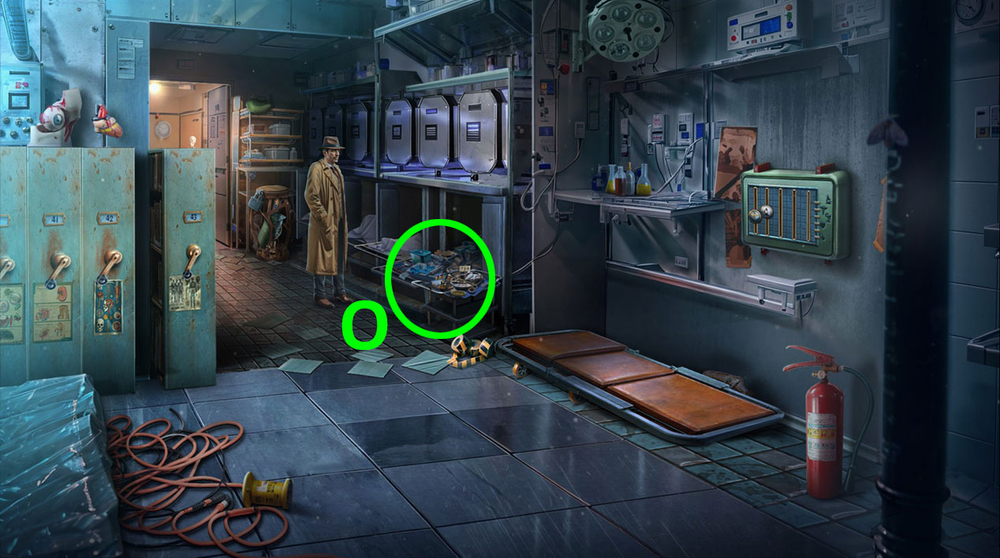
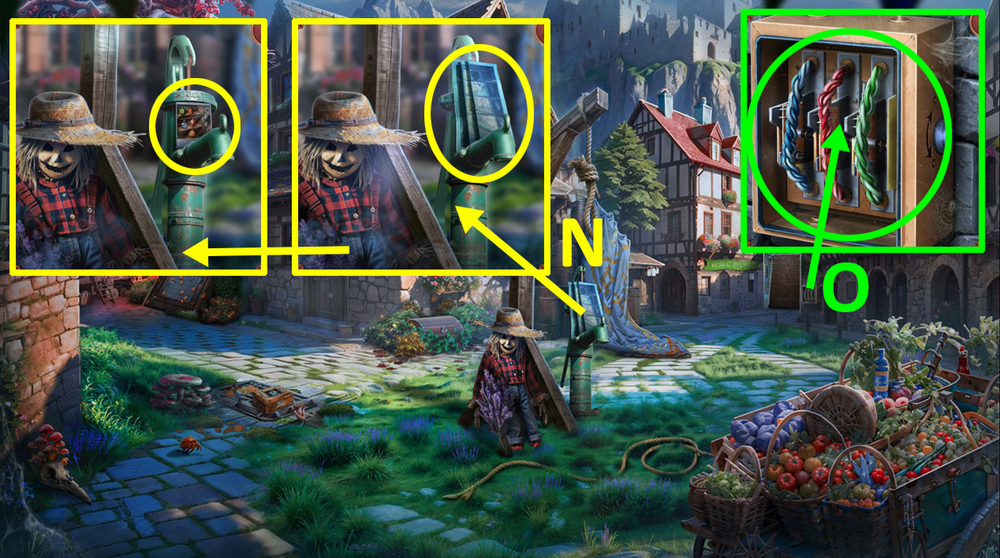
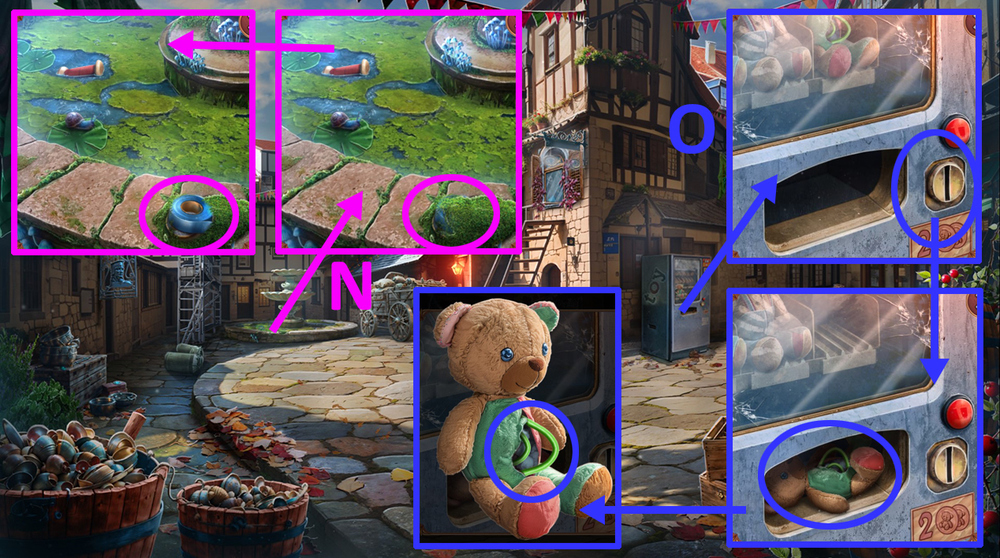
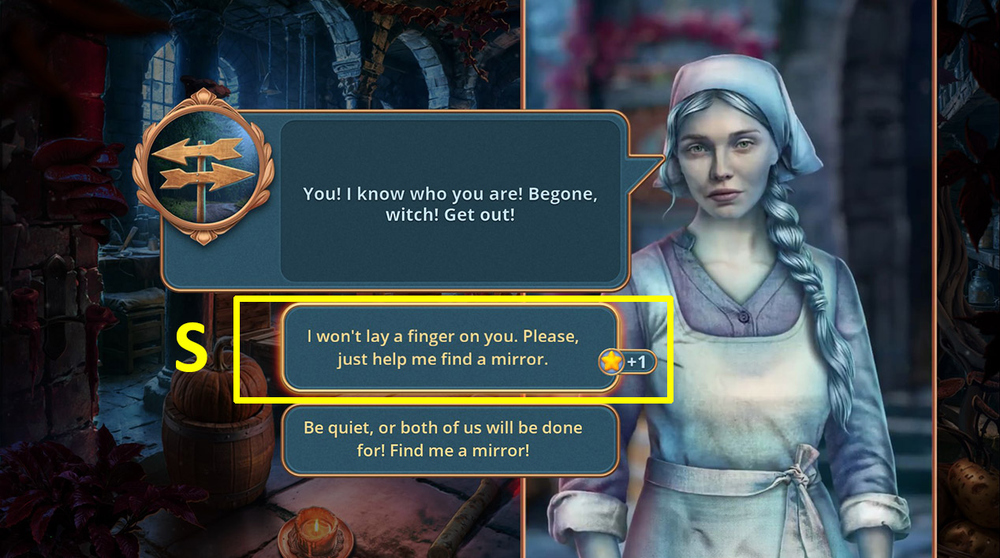
- Use CORONER’S REPORT on the pile of things near Mark.
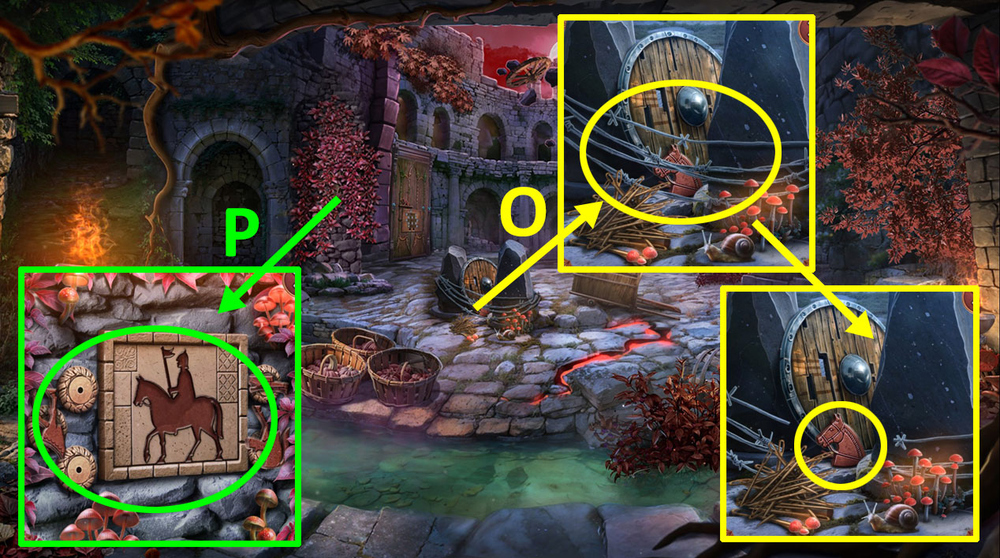
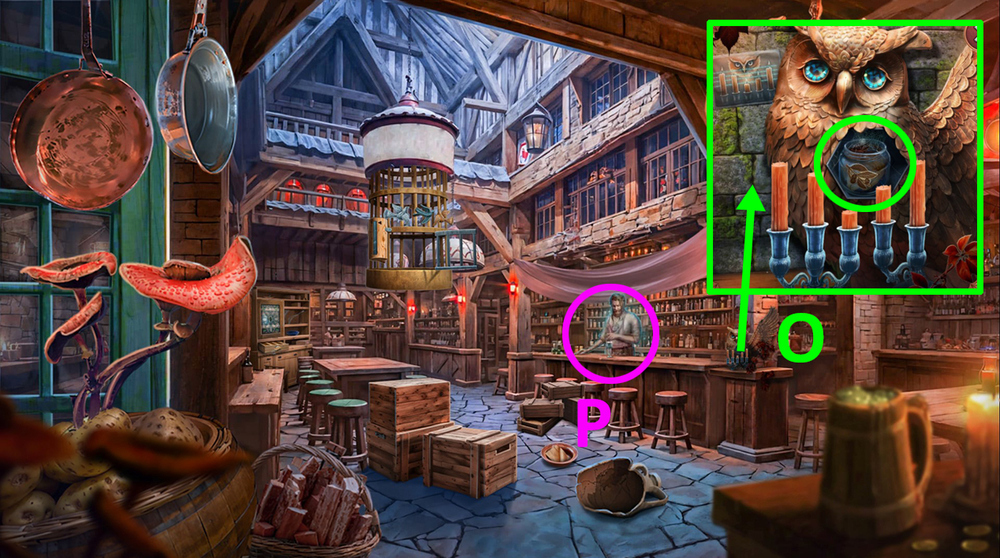
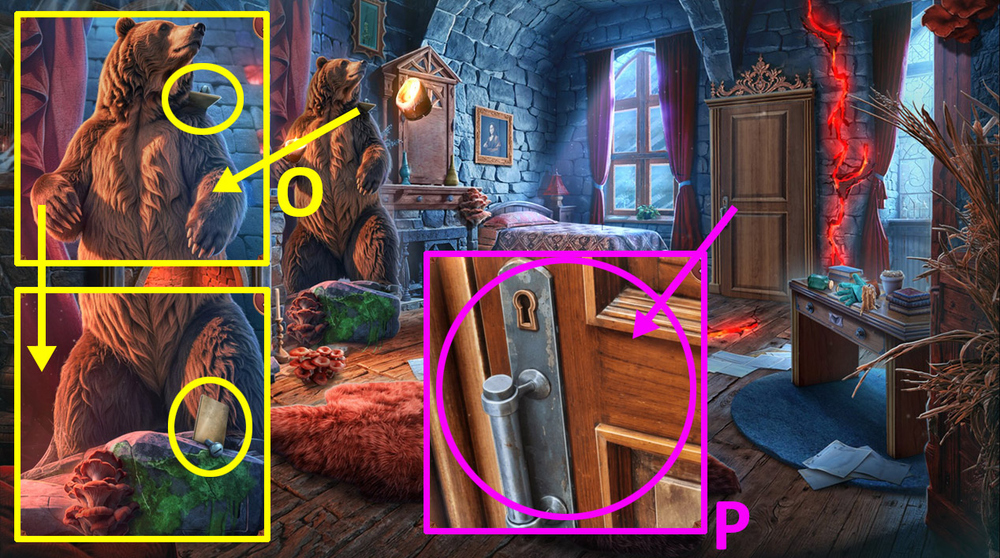
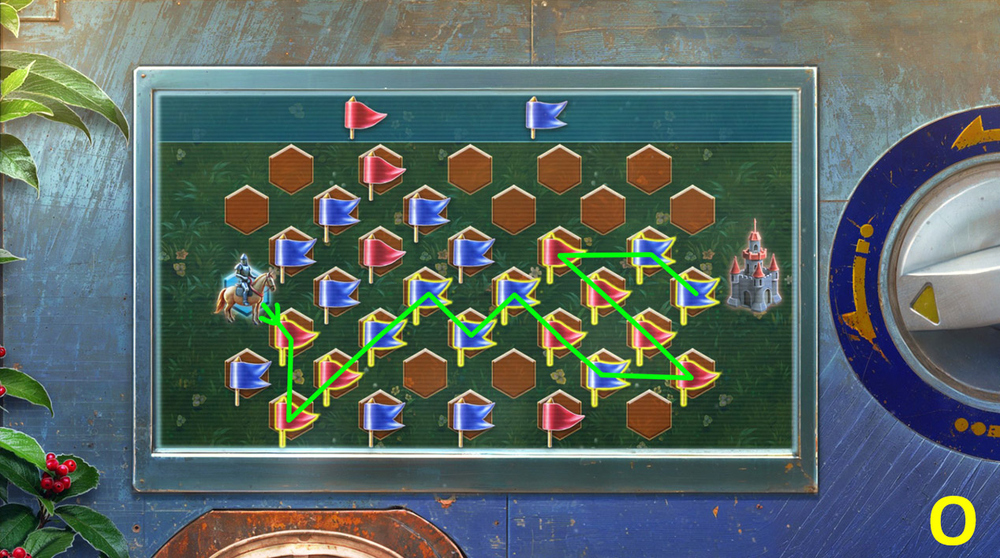
- Play puzzle (O).
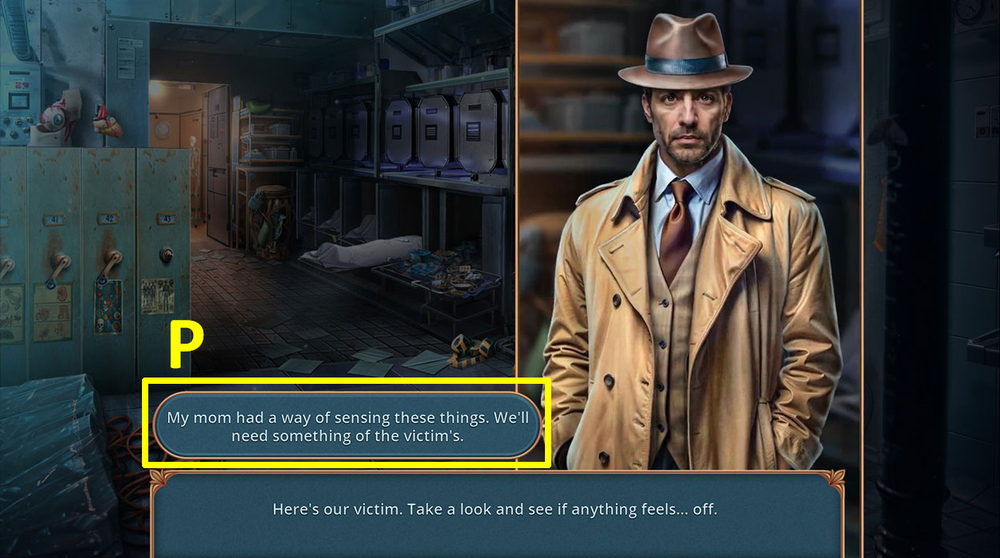
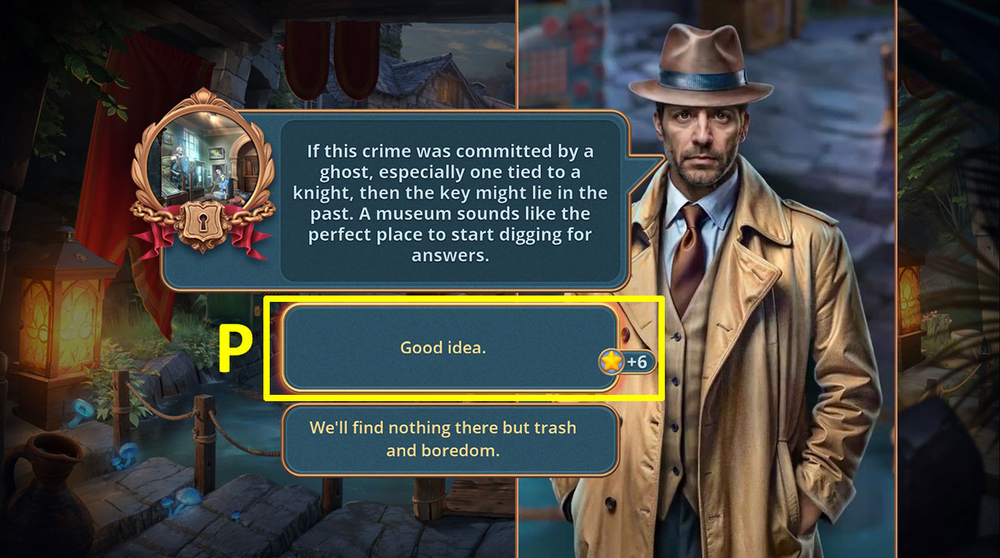
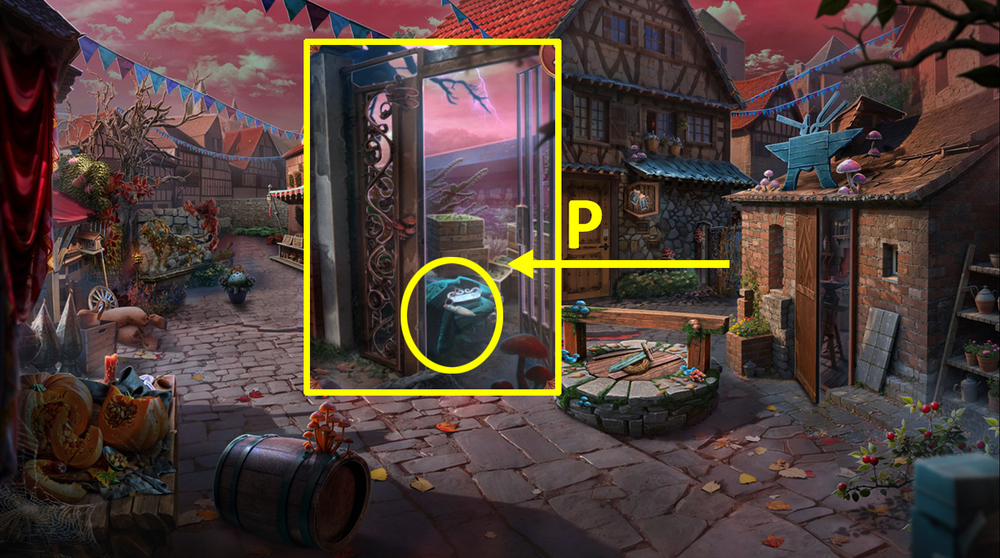
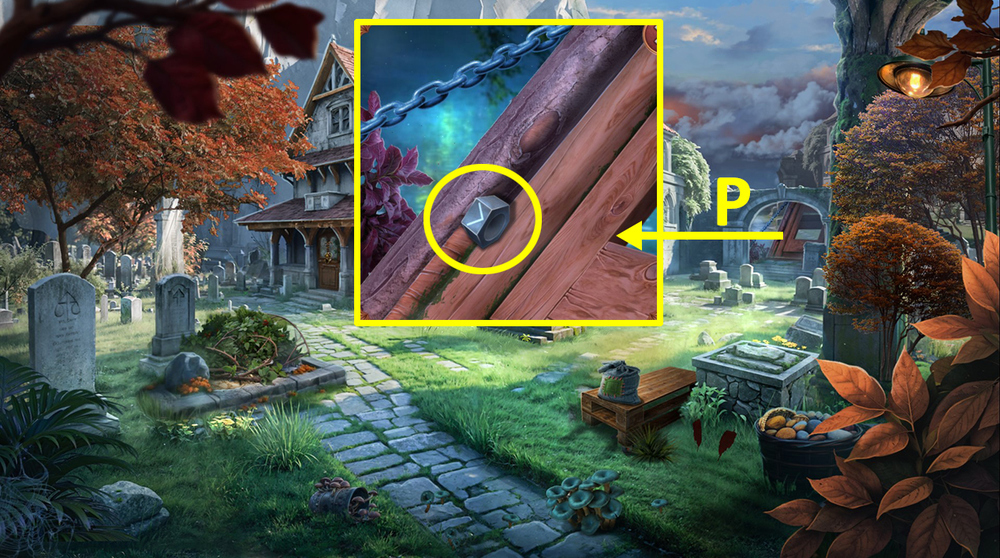
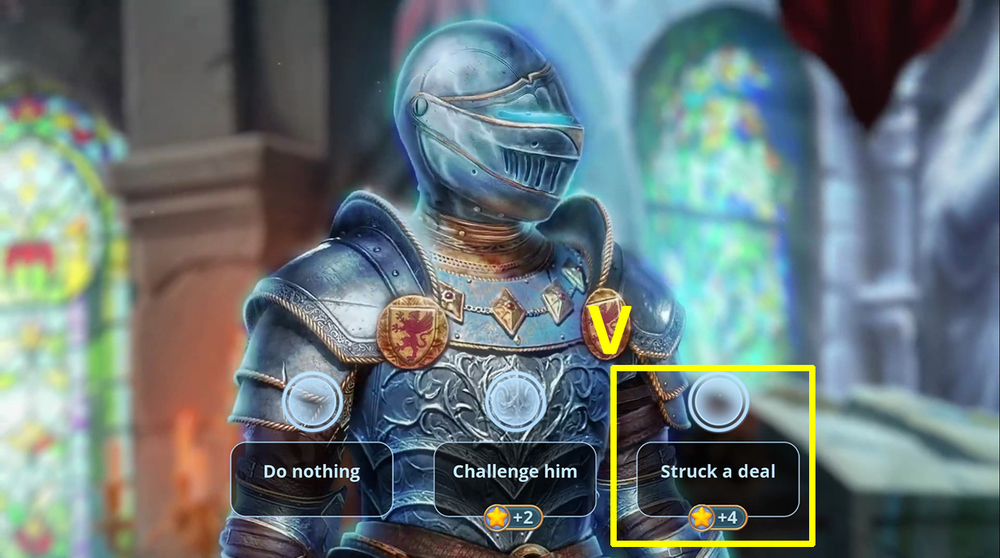
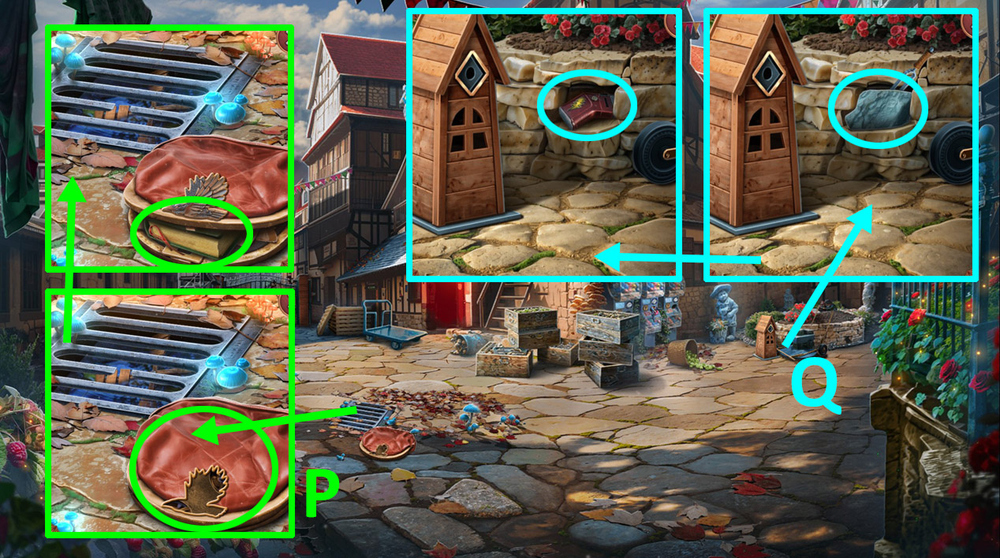
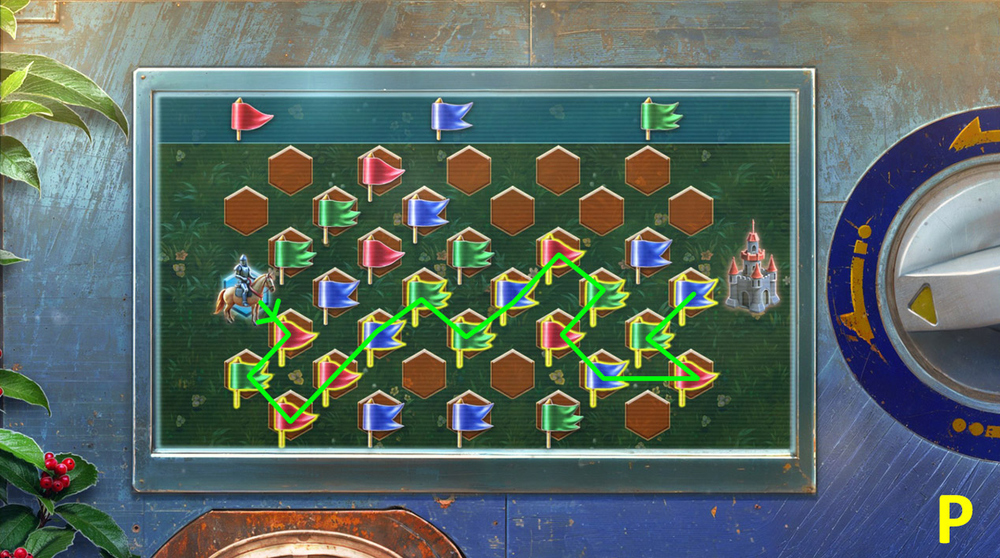
- Click on the line (P).
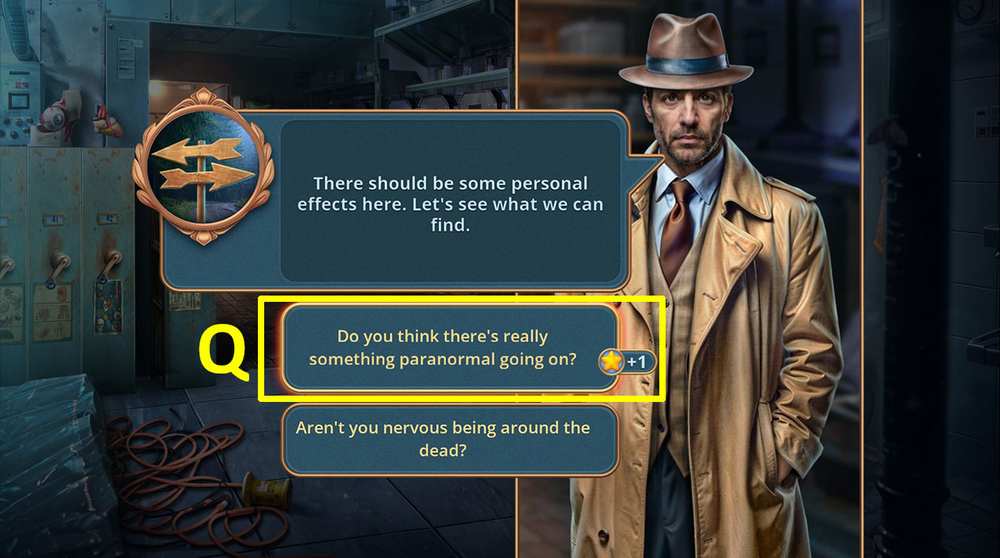
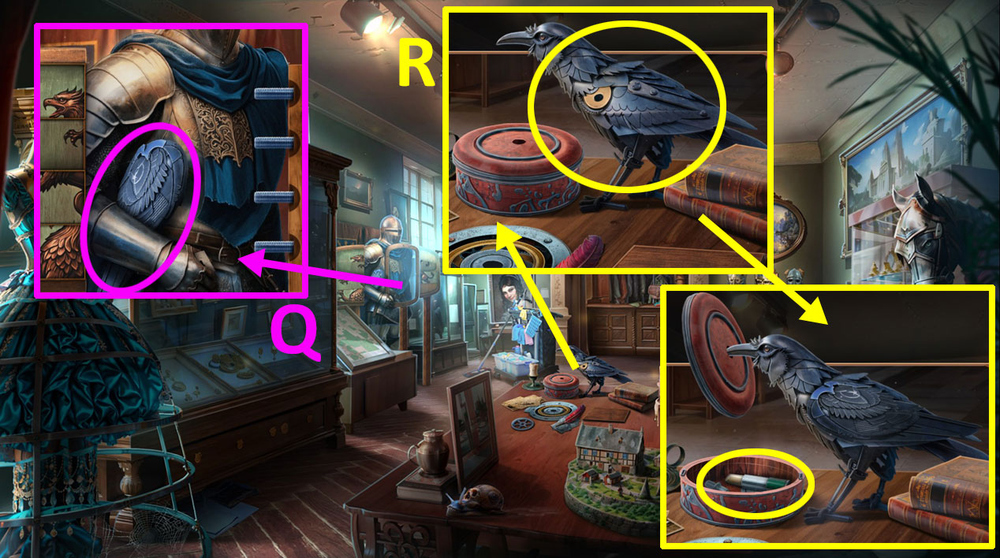
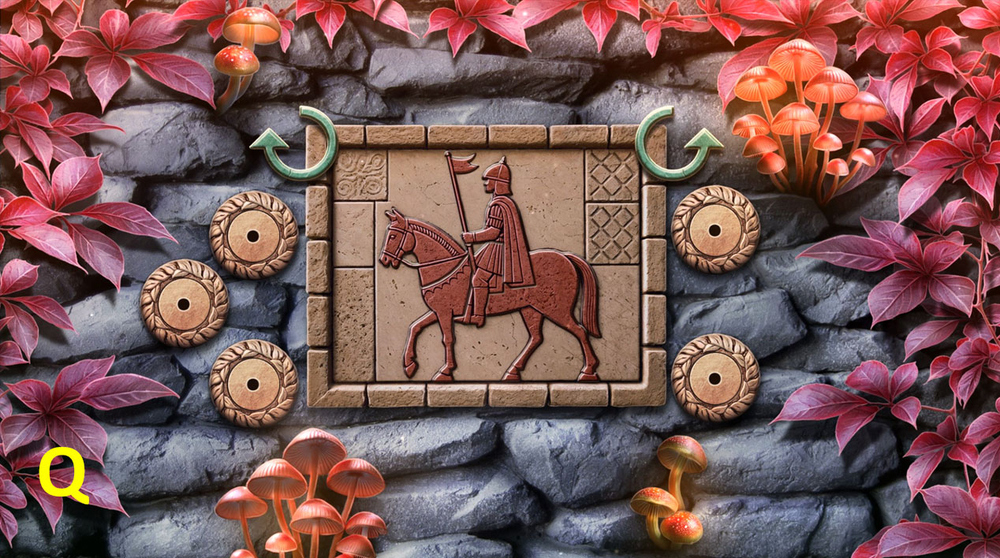
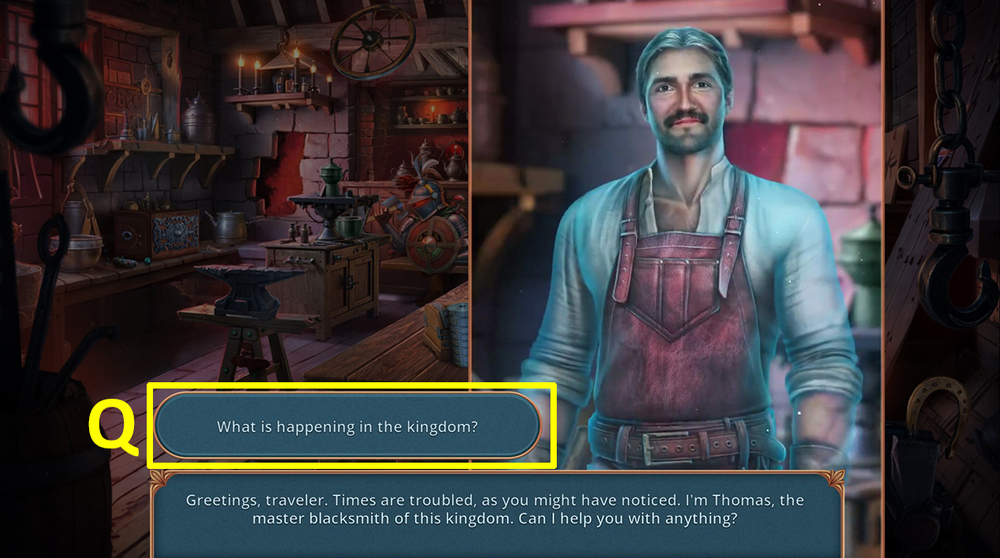
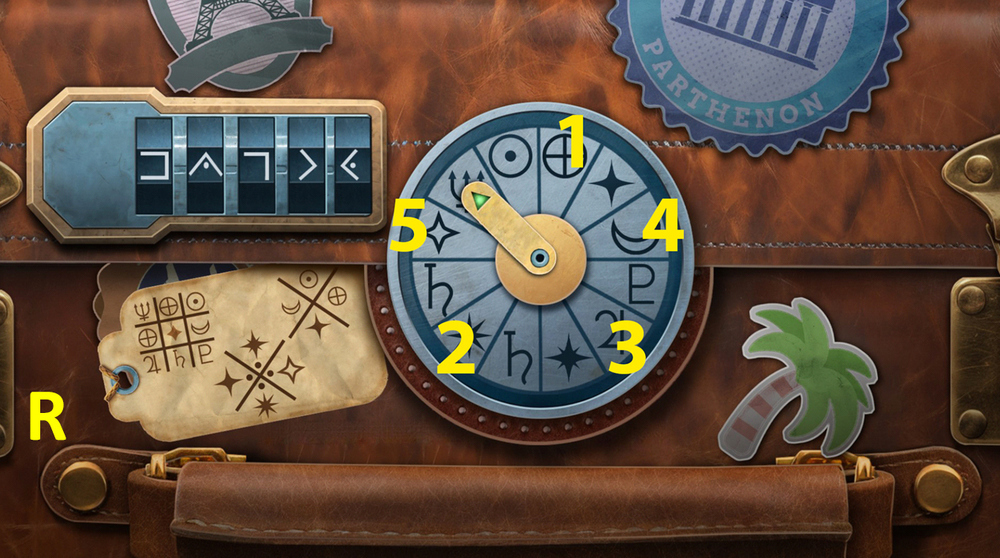
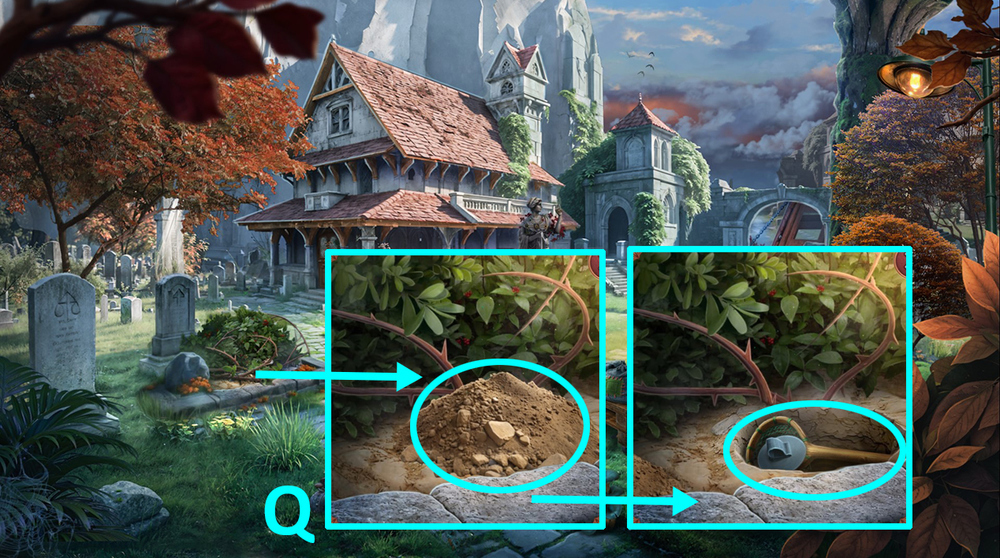
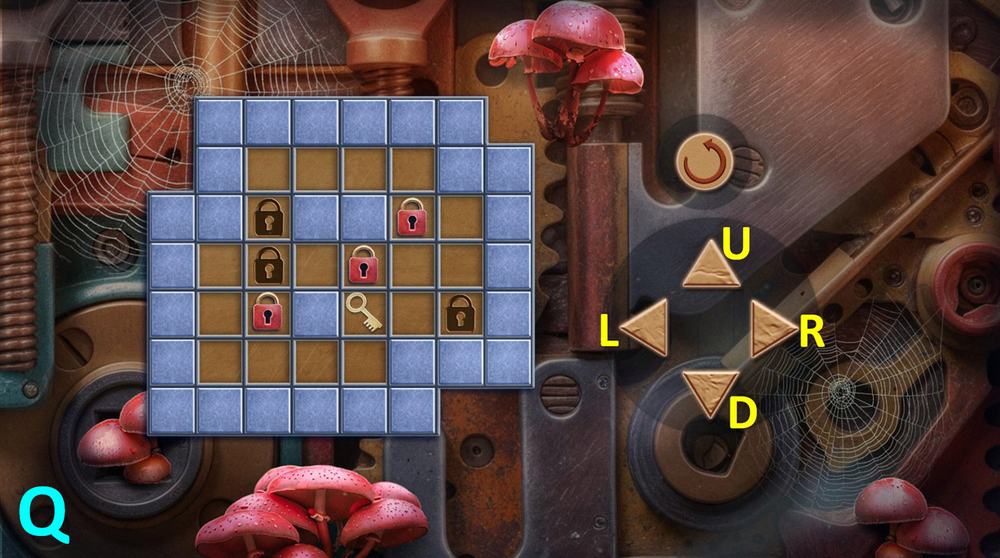
- Select this option (Q).
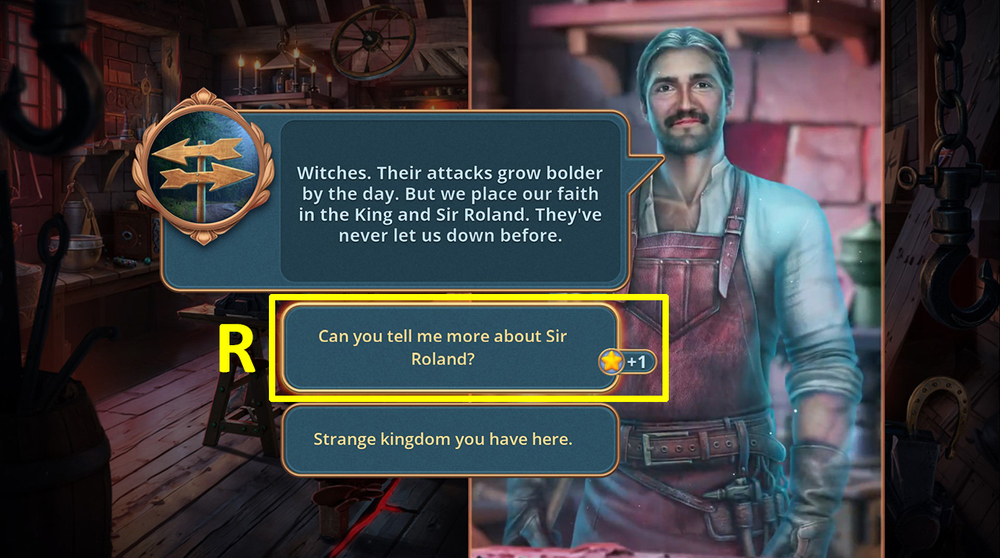
- Earn FOUNTAIN PEN.
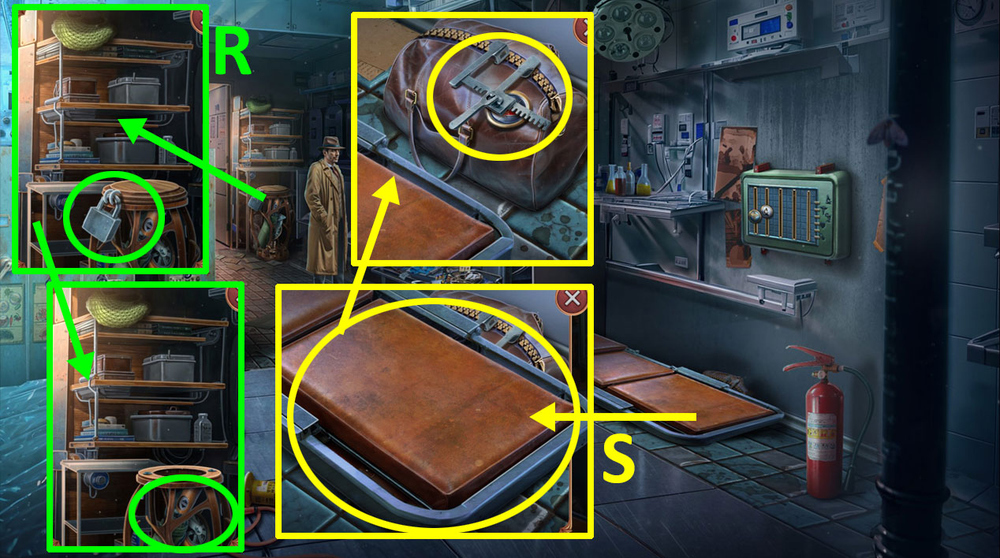
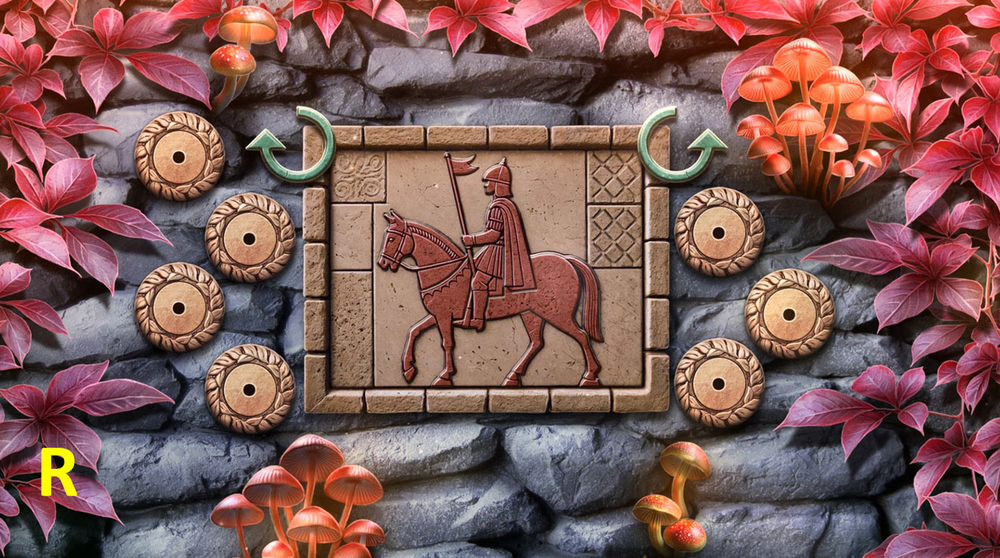
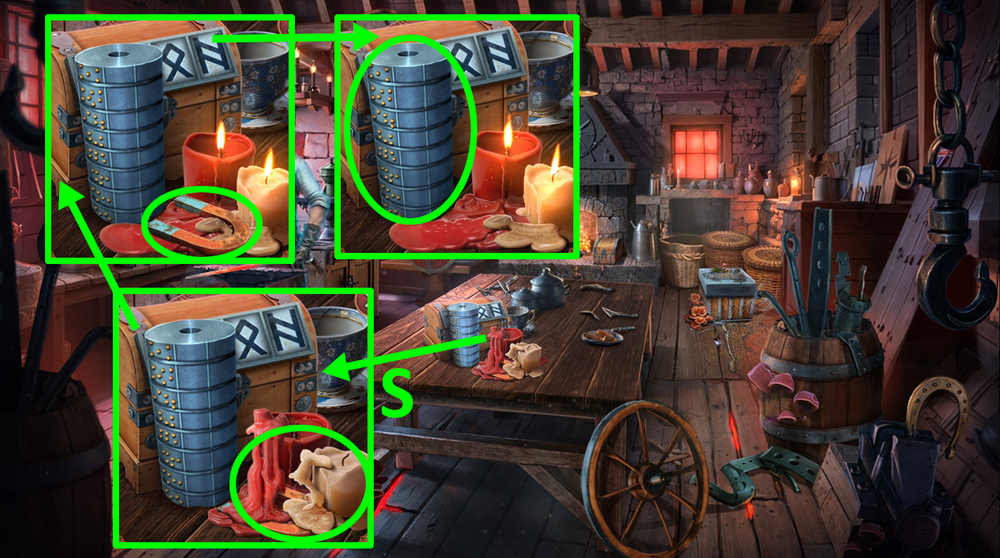
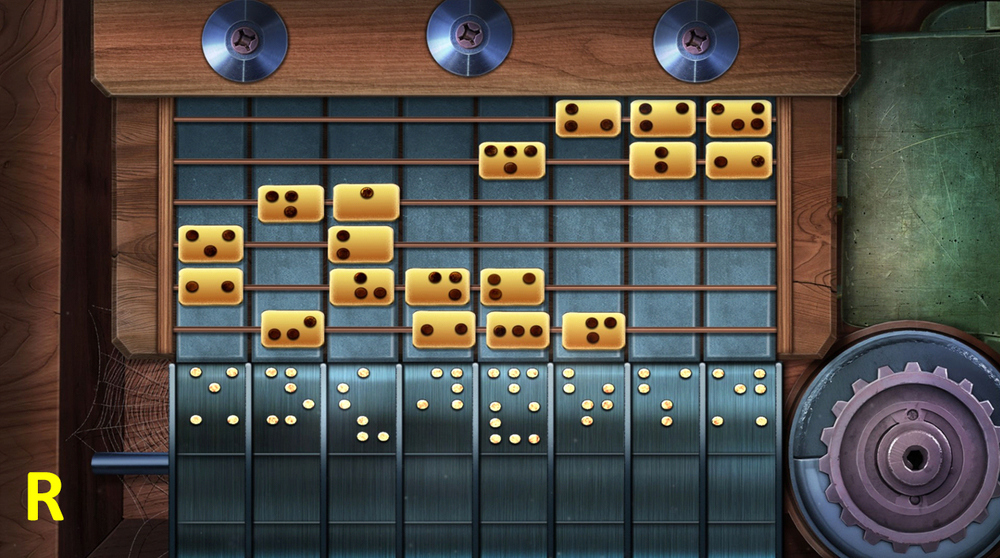
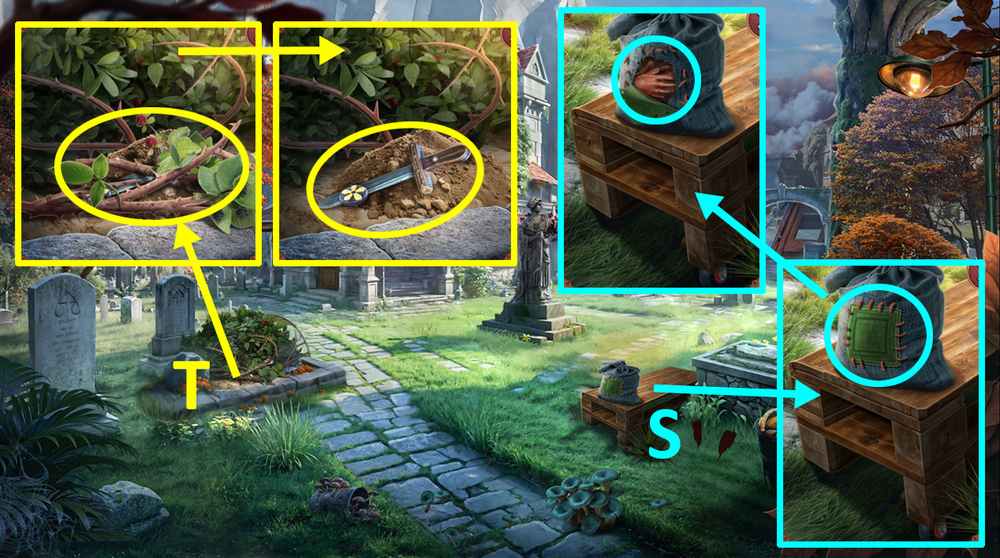
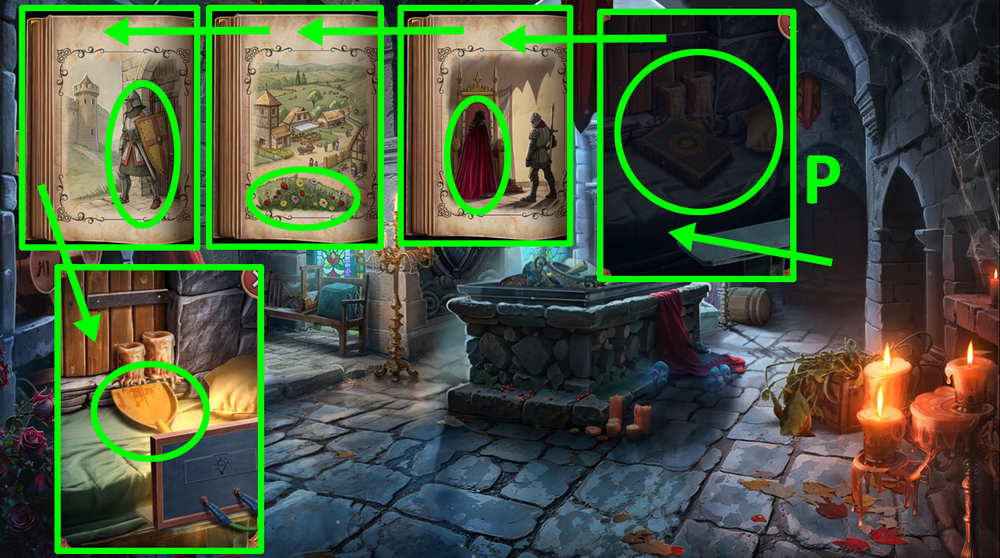
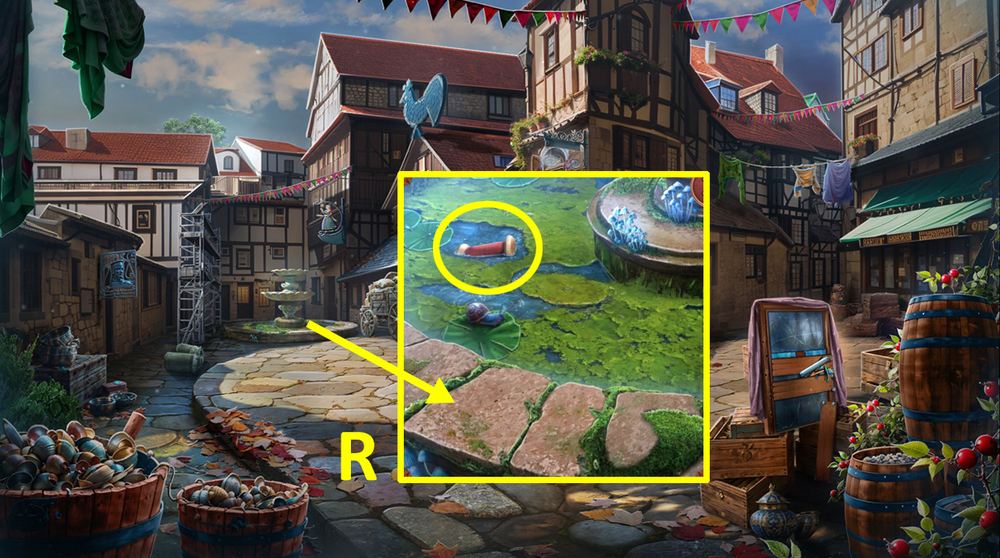
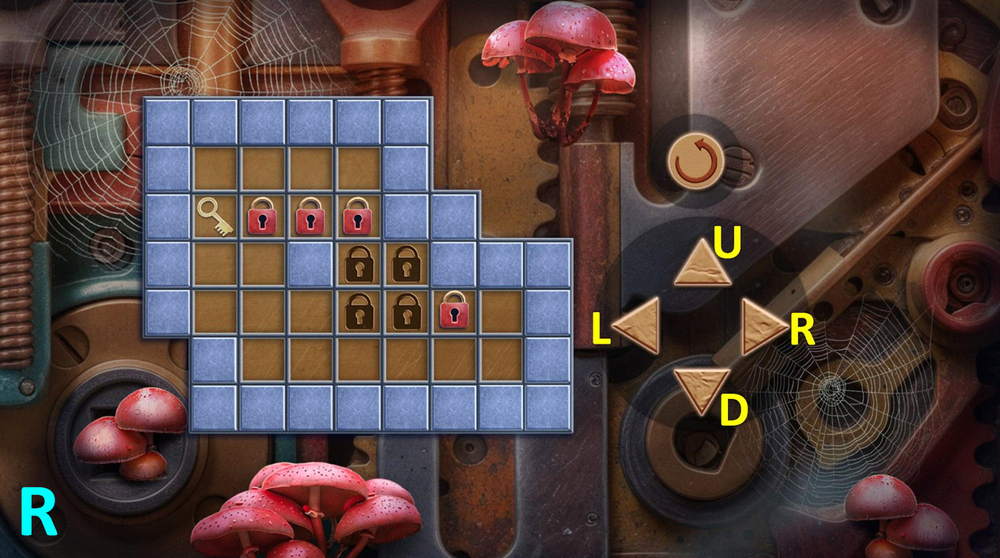
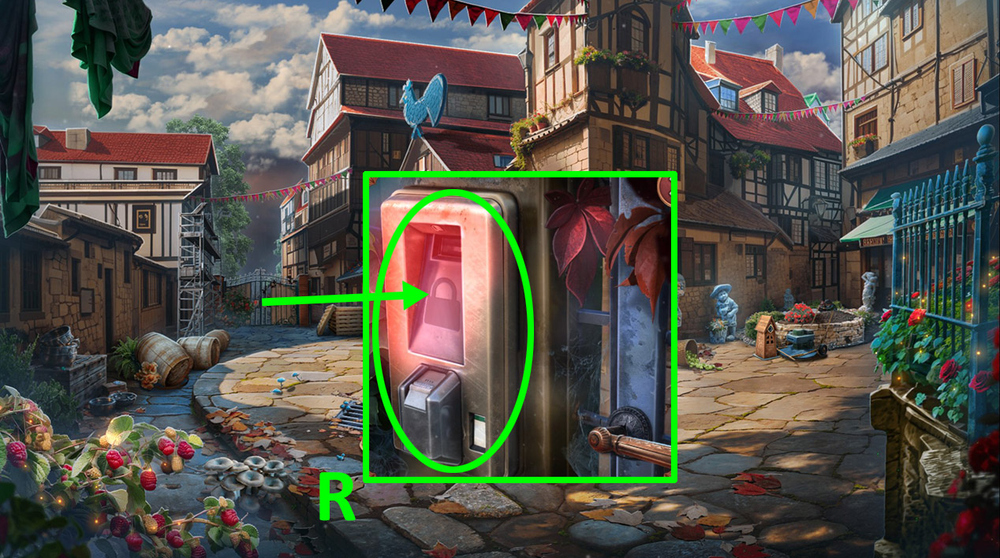
- Use FOUNTAIN PEN and FIGURINE on the lock, earn UMBRELLA and WHEEL (R).
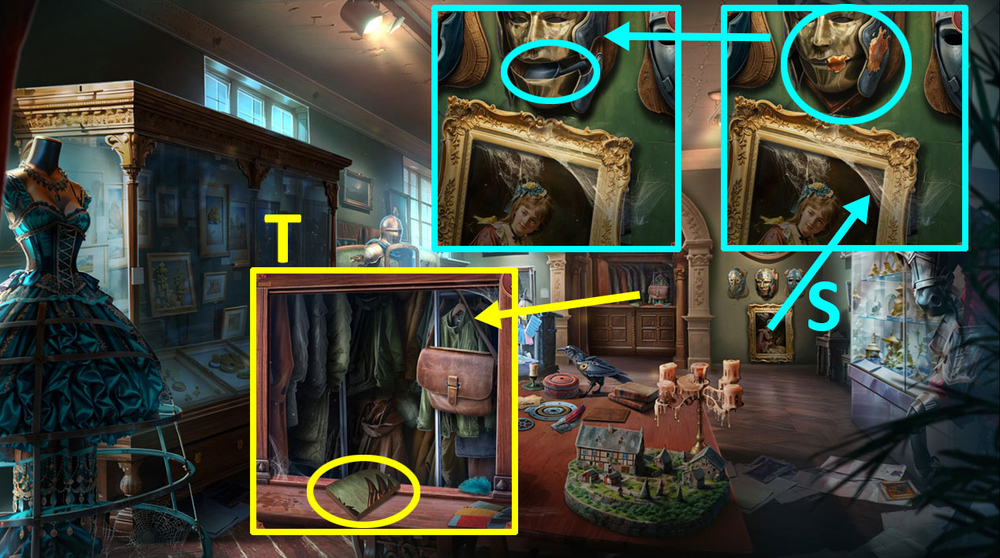
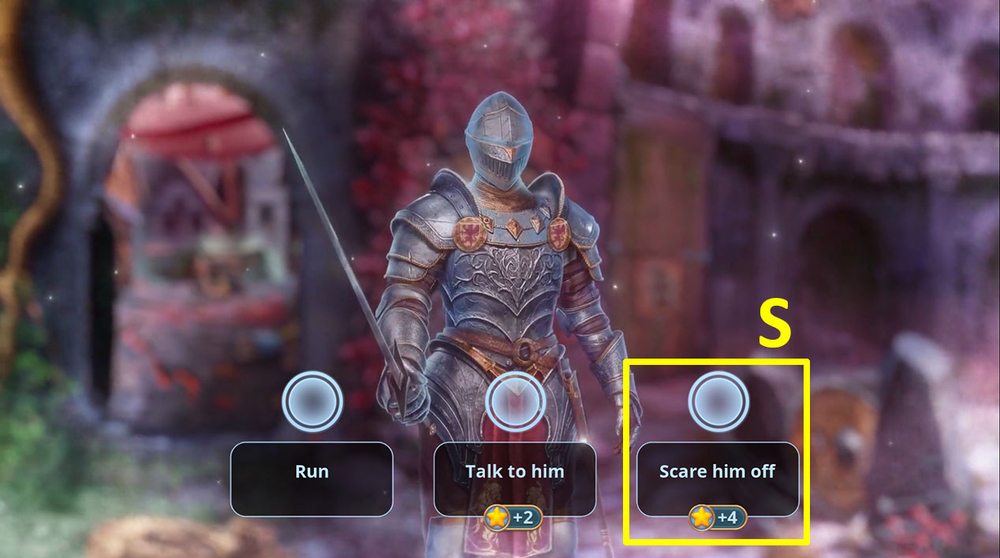
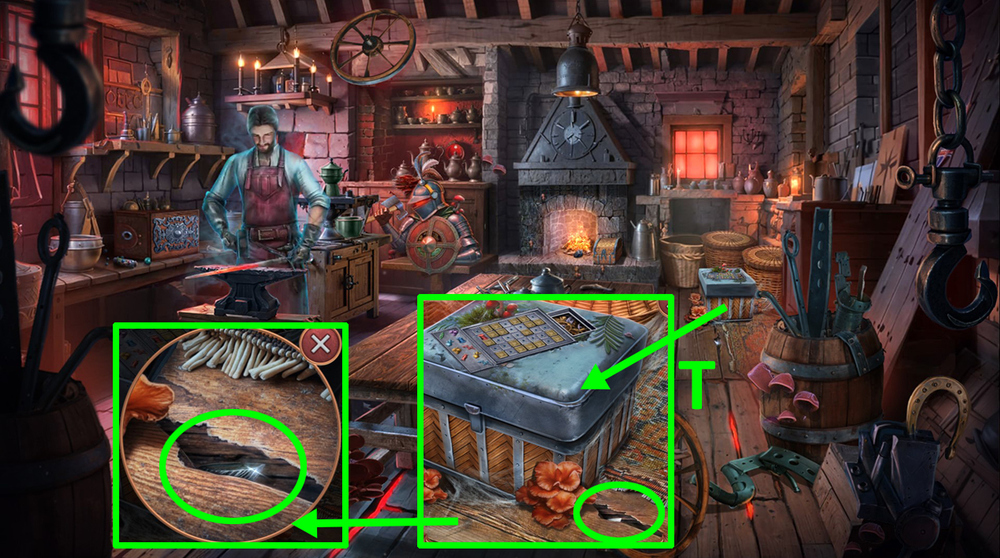
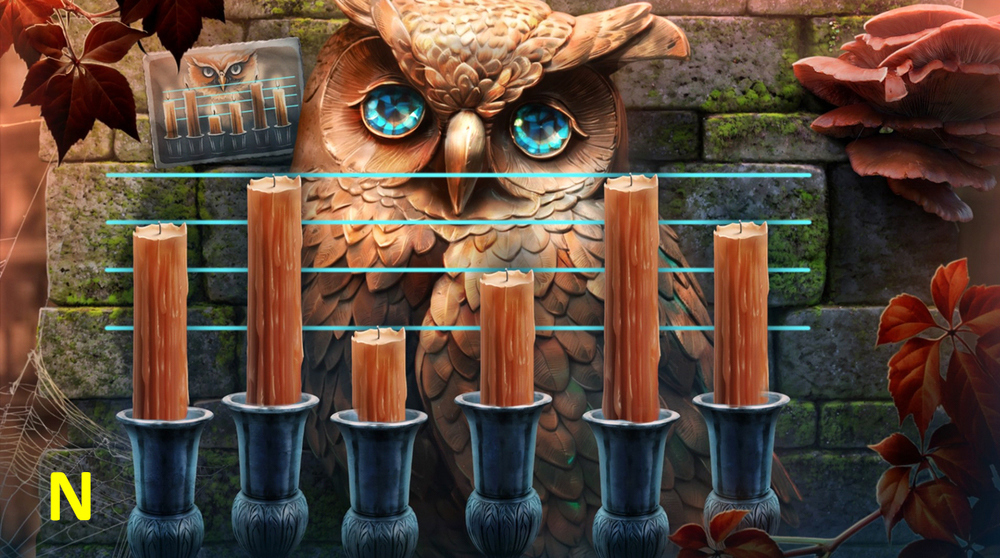
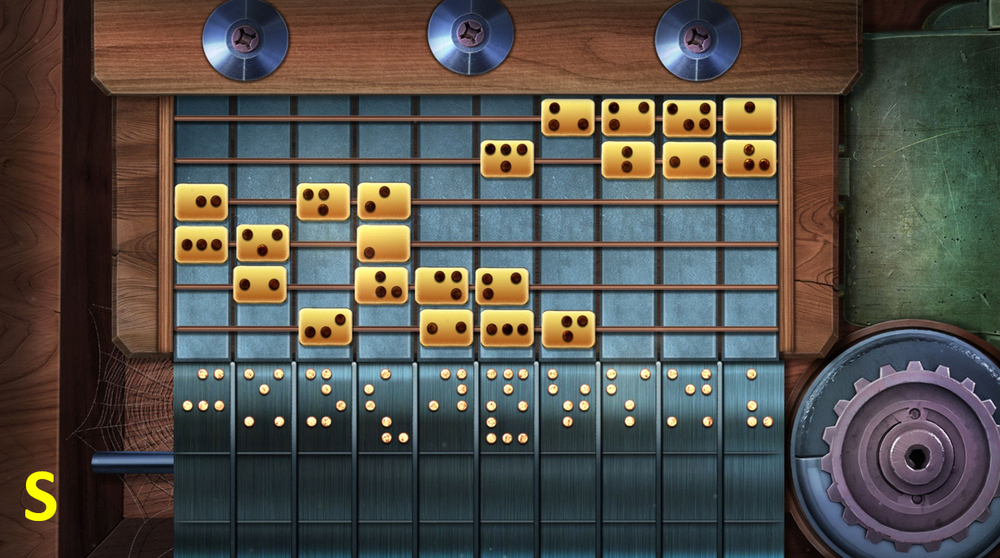
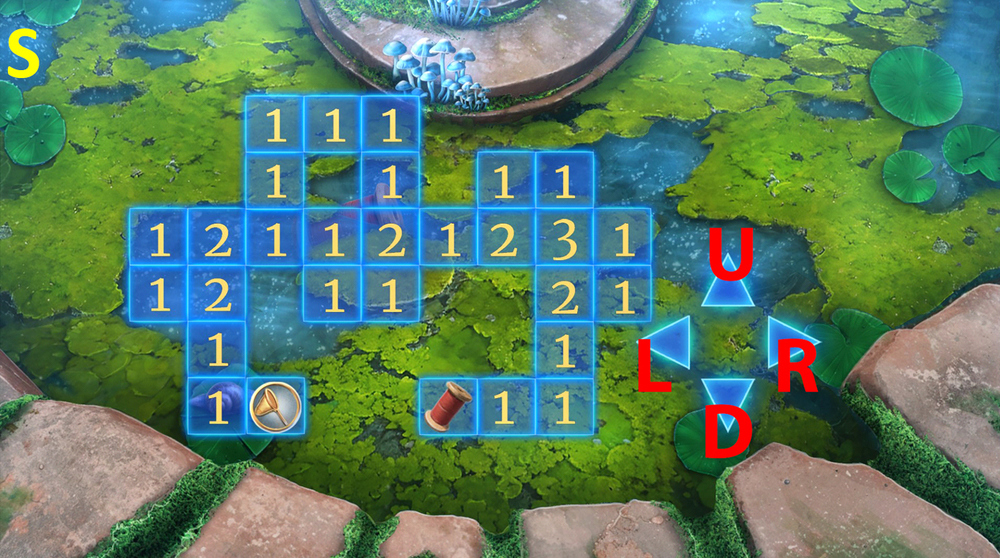
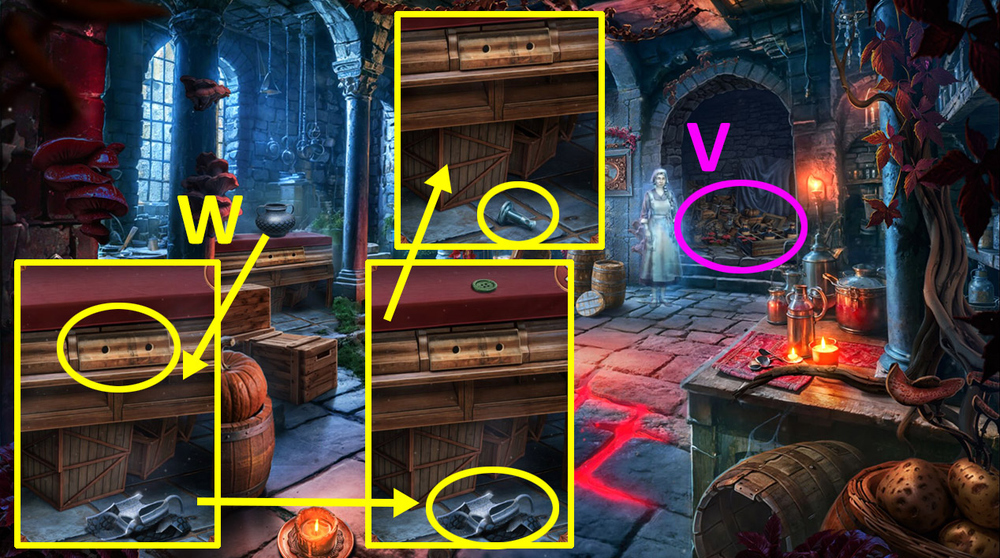
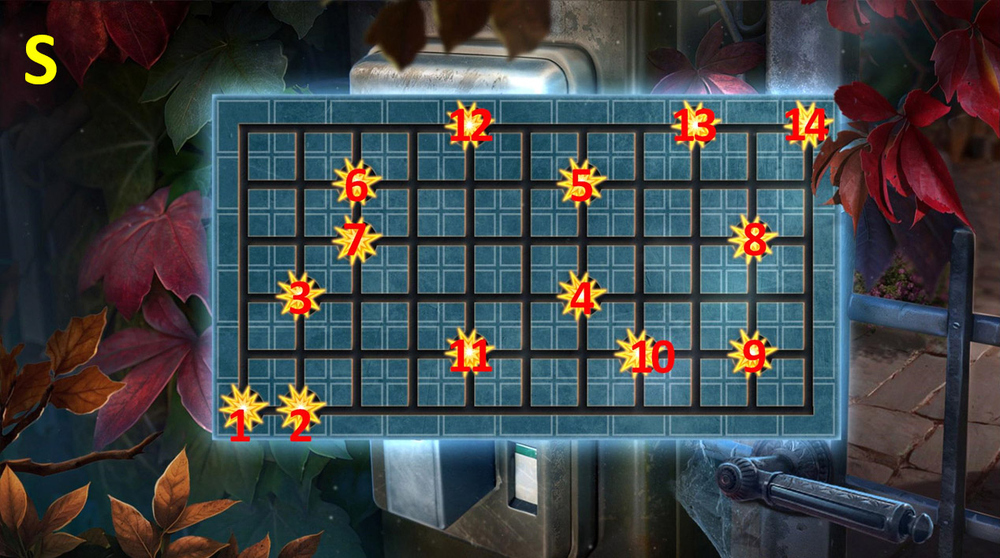
- Use WHEEL on the gurney, take RIB SPREADER and HYGIEIA SYMBOLS 3/3 (S).
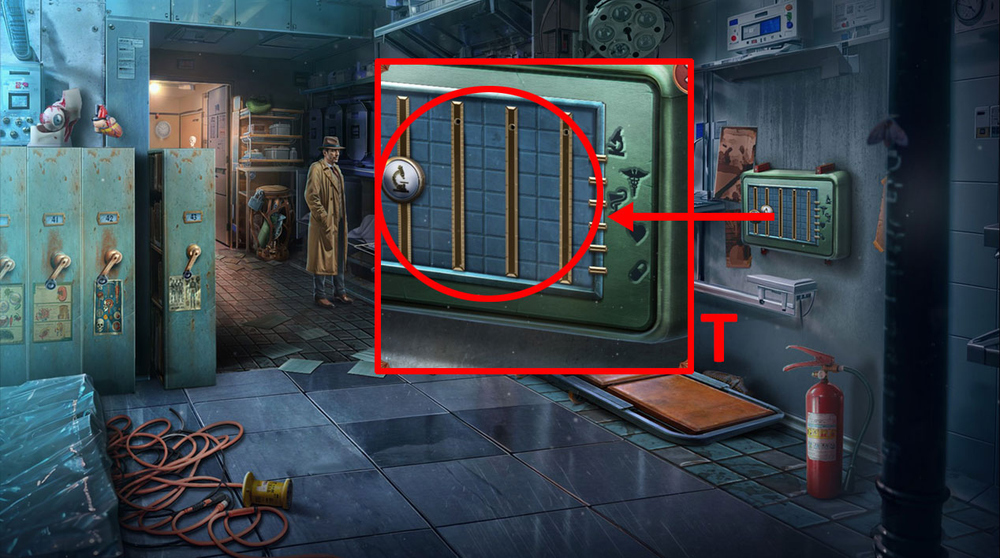
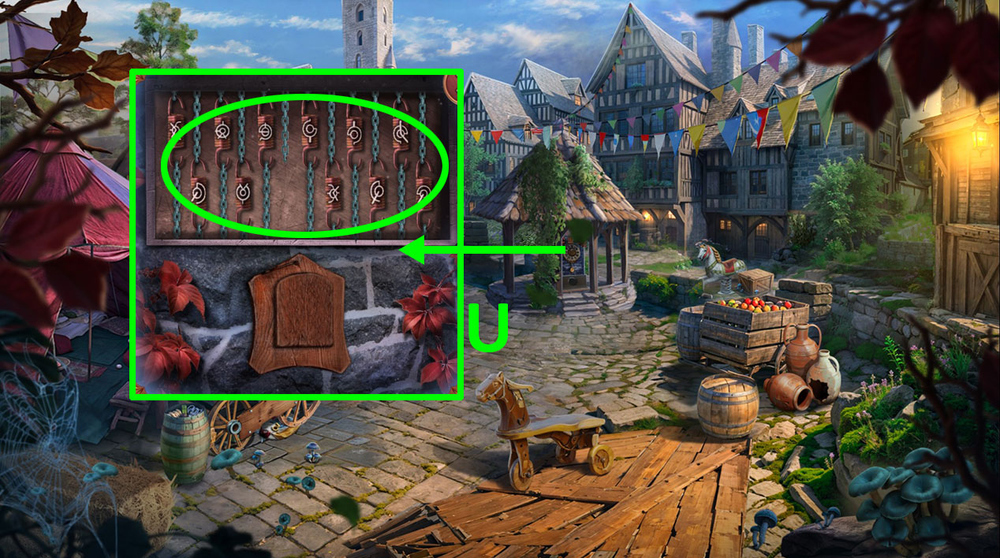
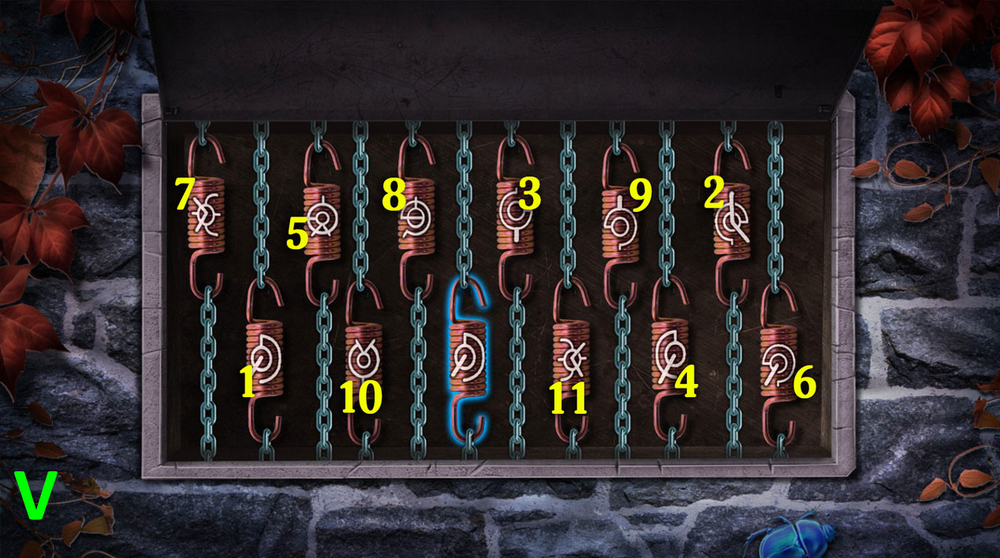
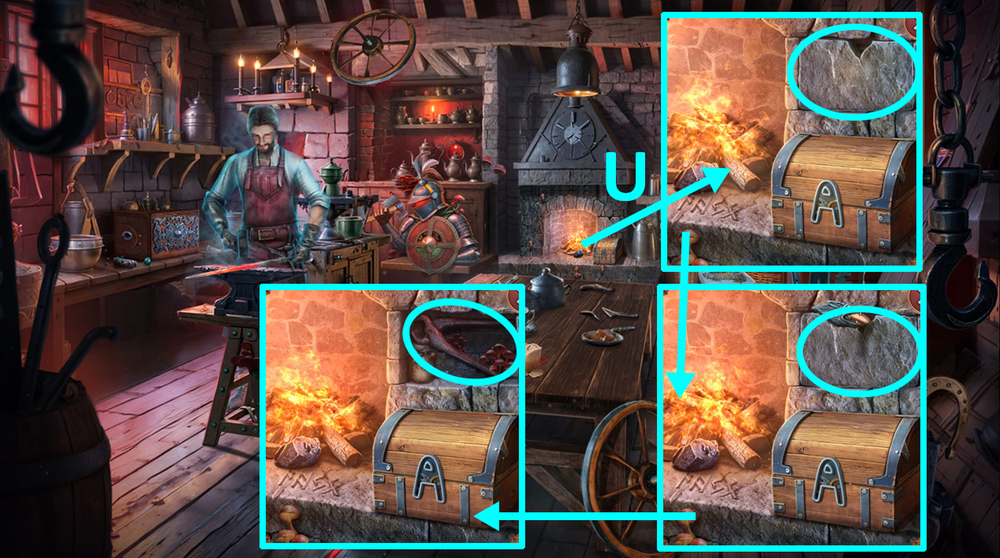
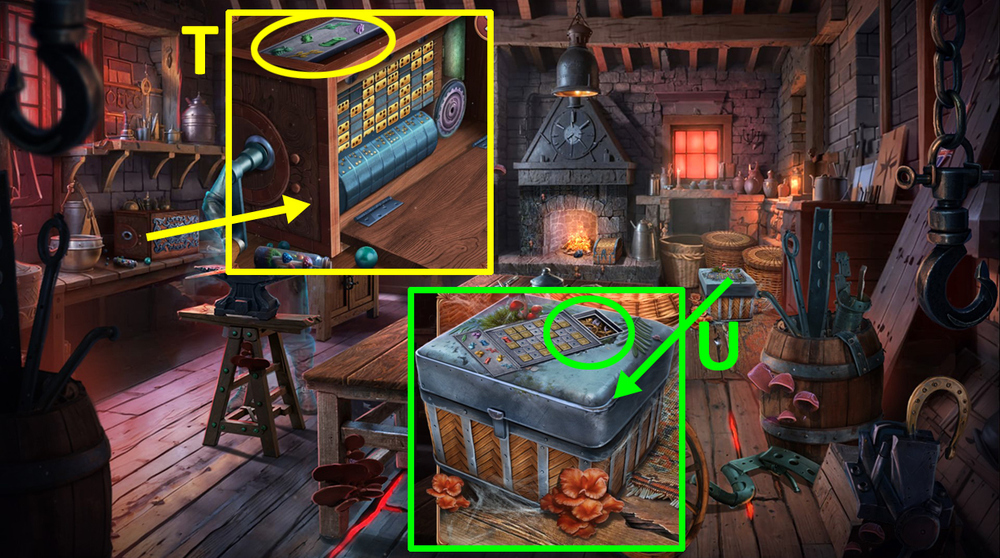
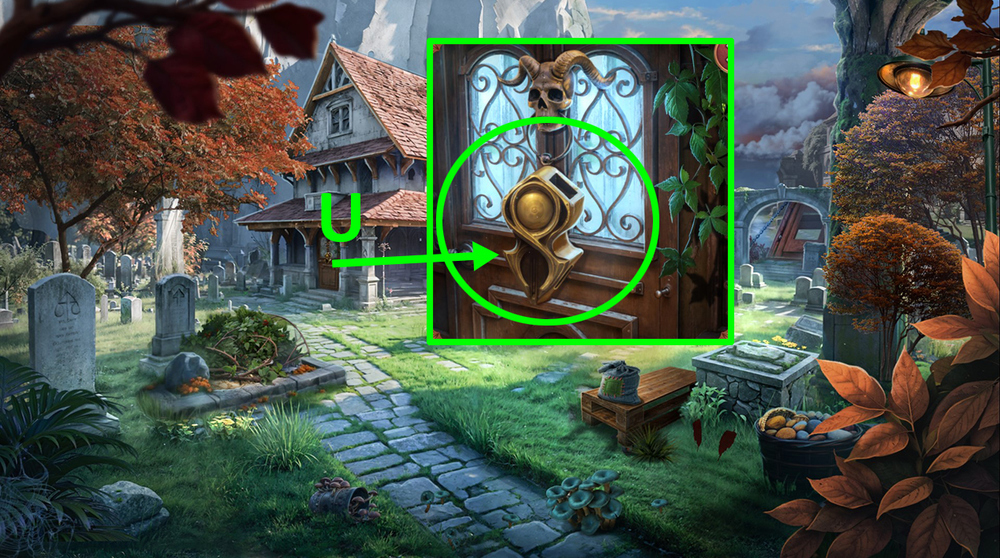
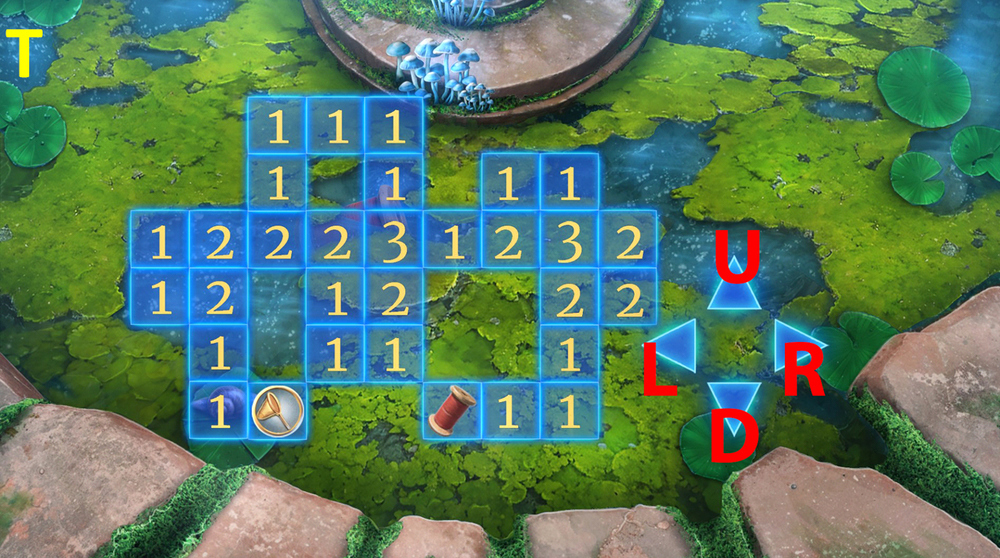
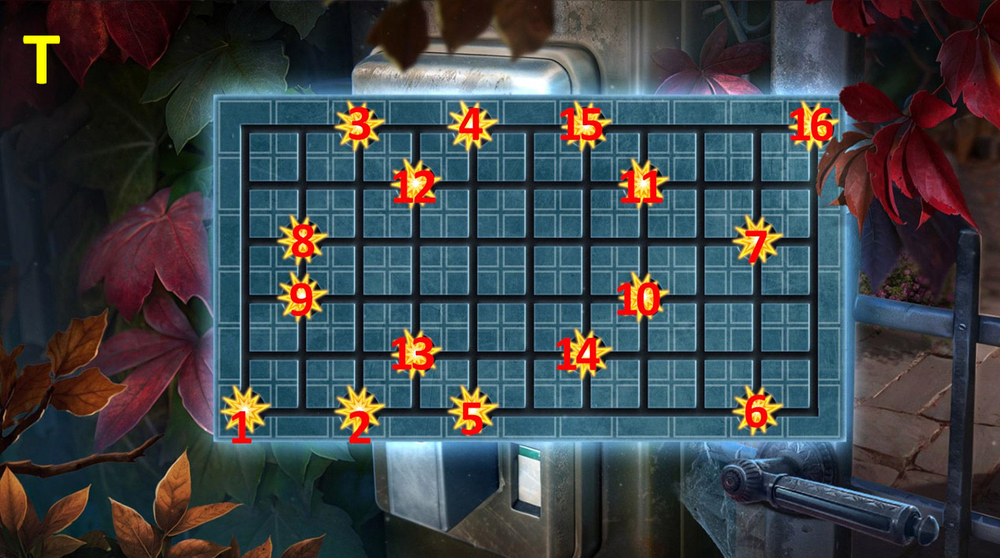
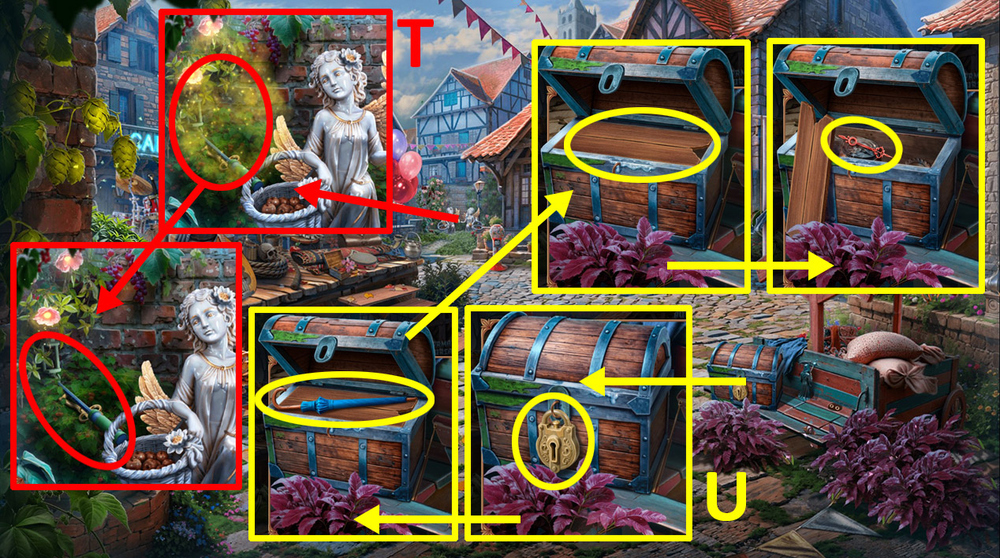
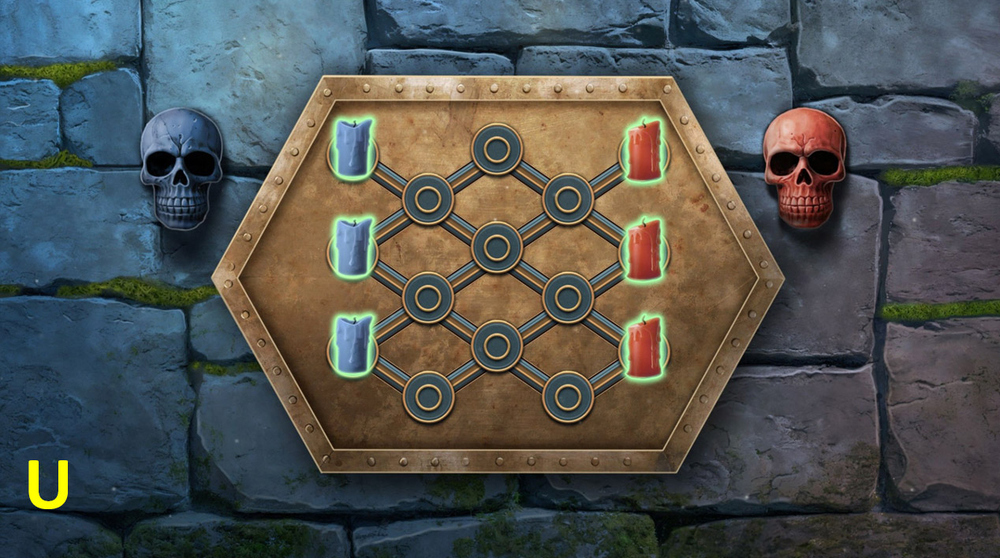
- Use HYGIEIA SYMBOLS on the panel (T).
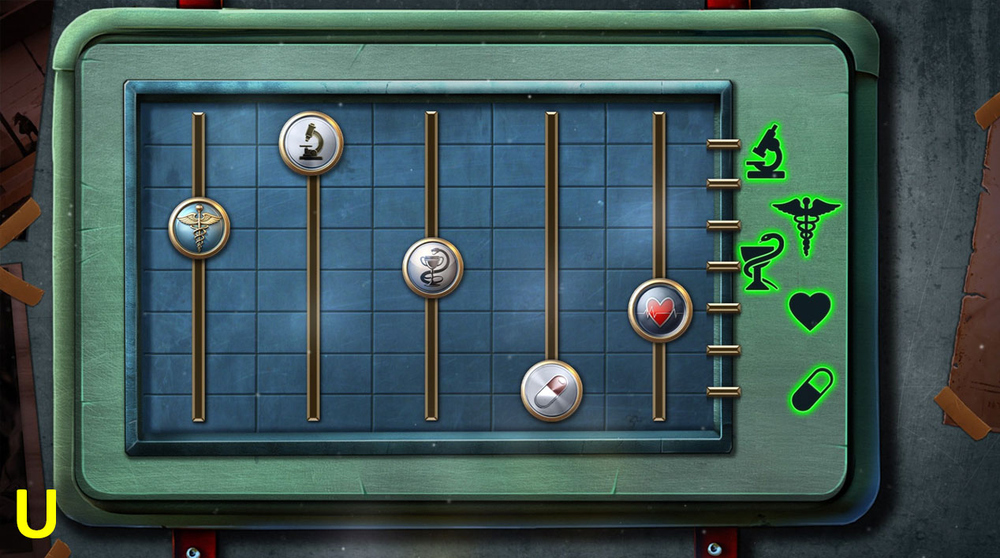
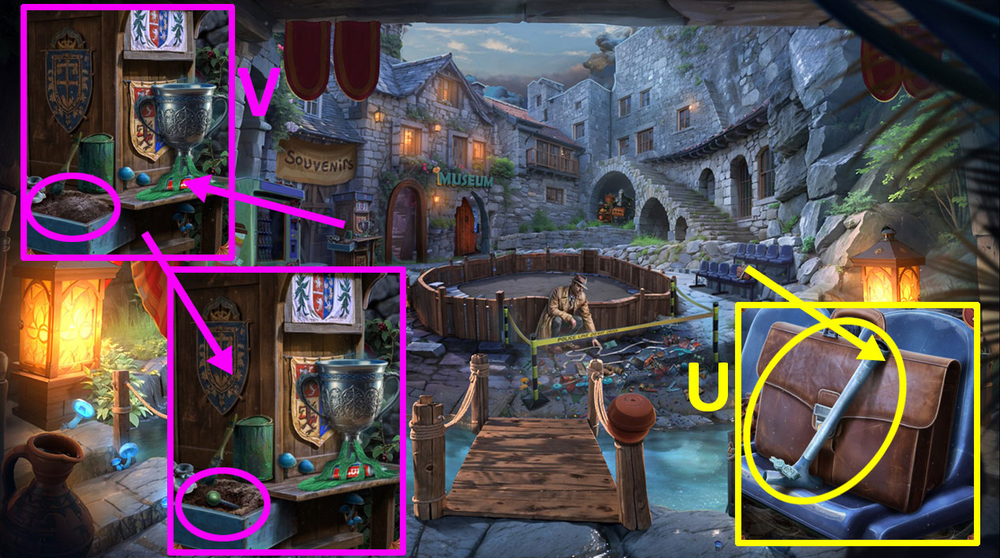
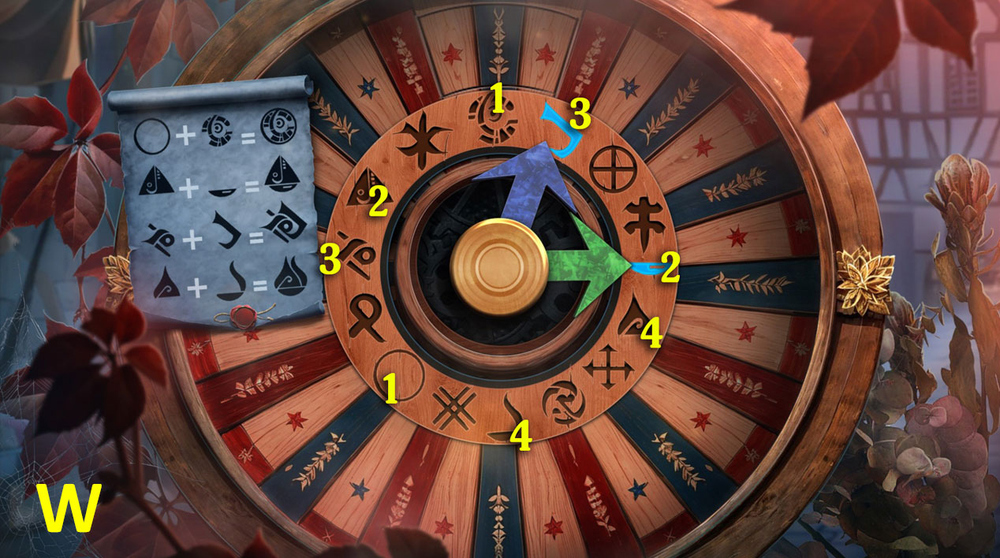
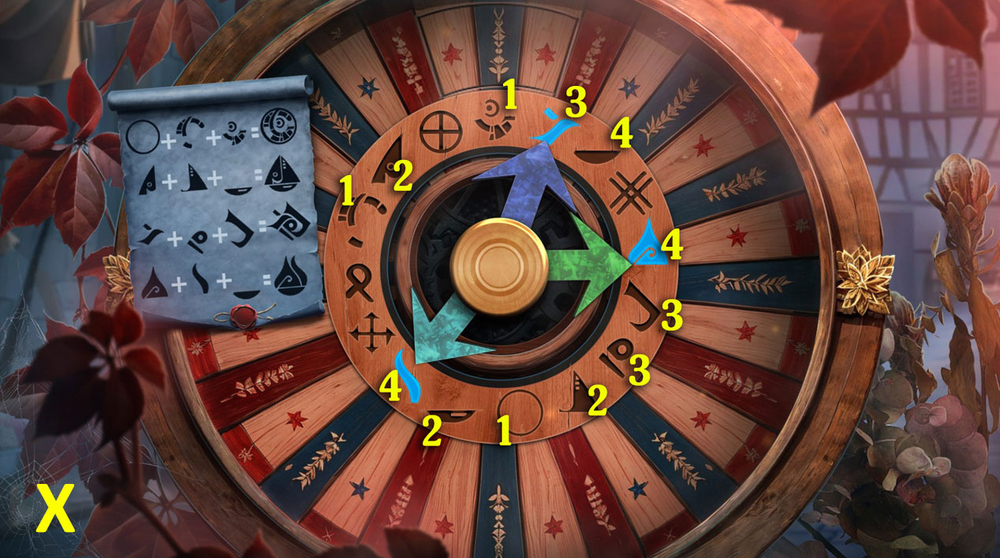
- Easy solution: Set the sliders as shown in the picture (U).
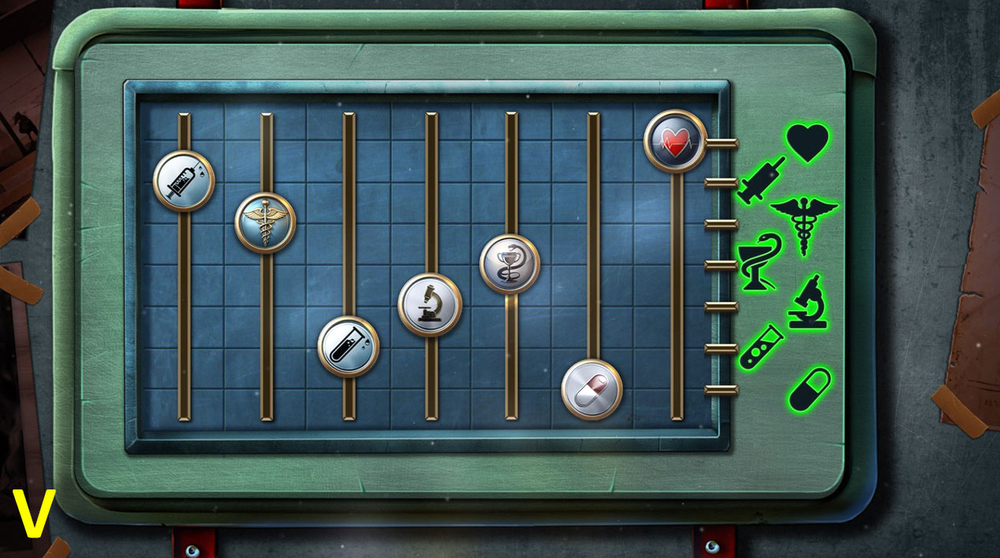
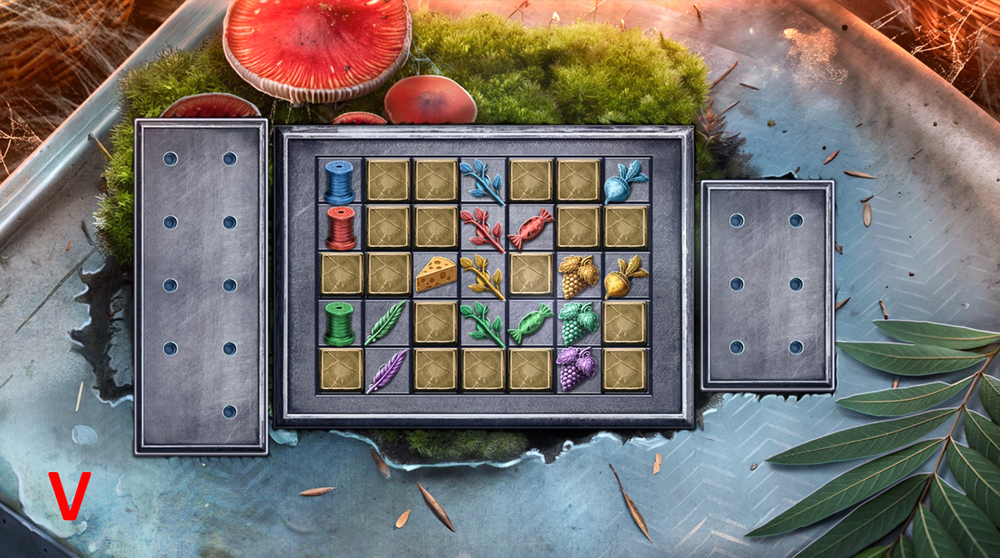
- Hard solution: Set the sliders as shown in the picture (V).

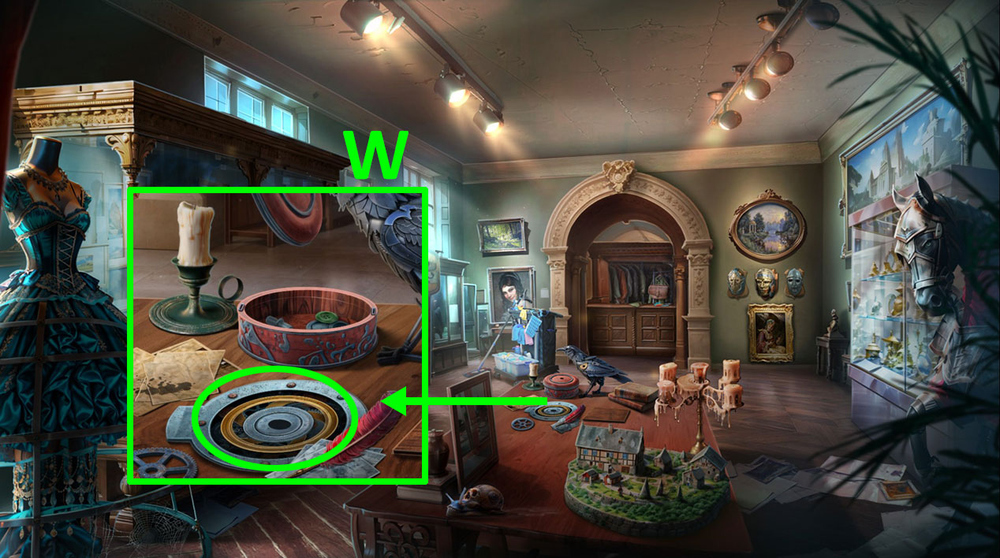
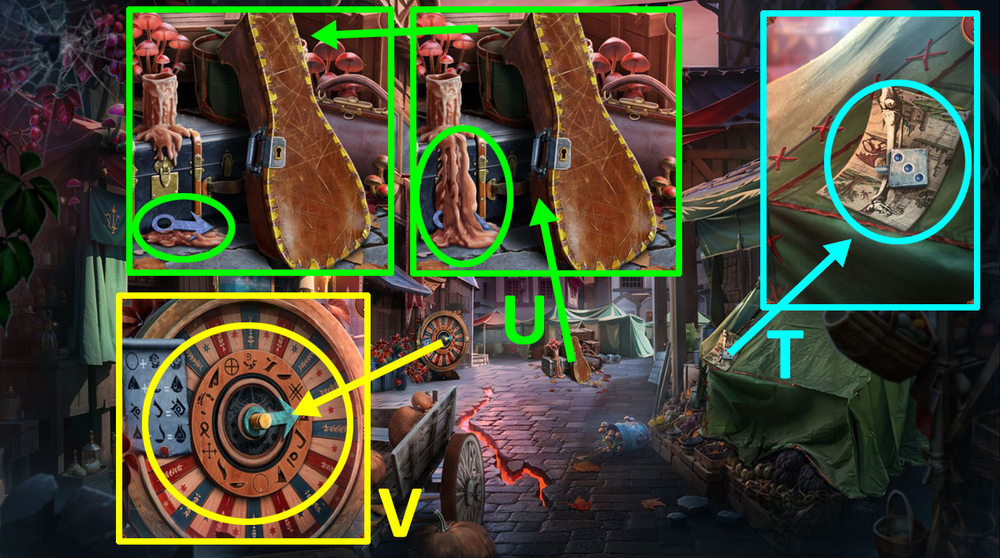
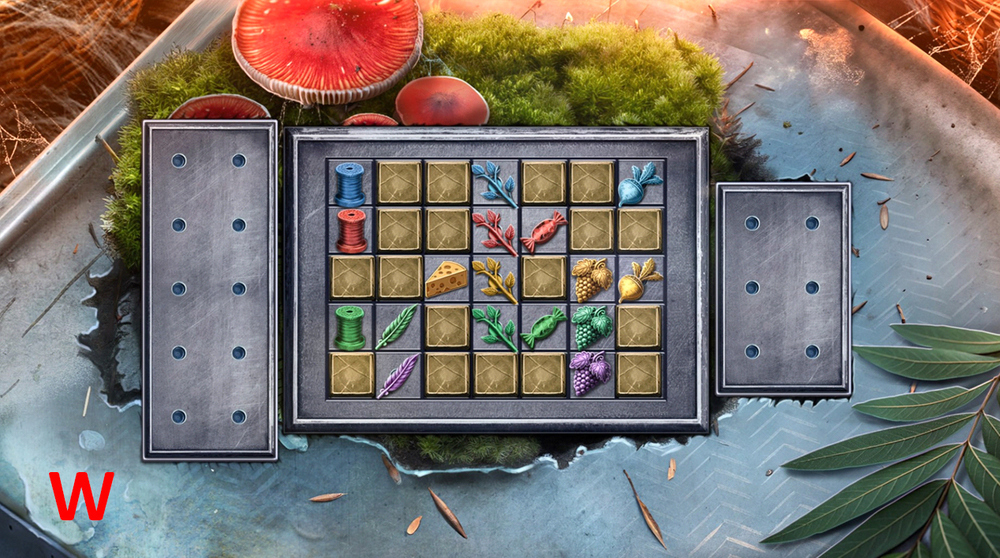
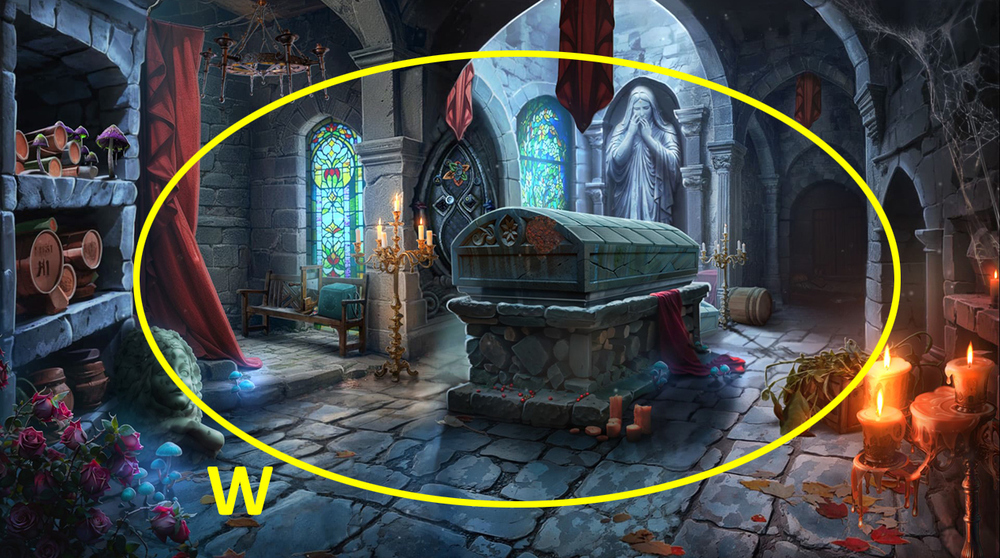
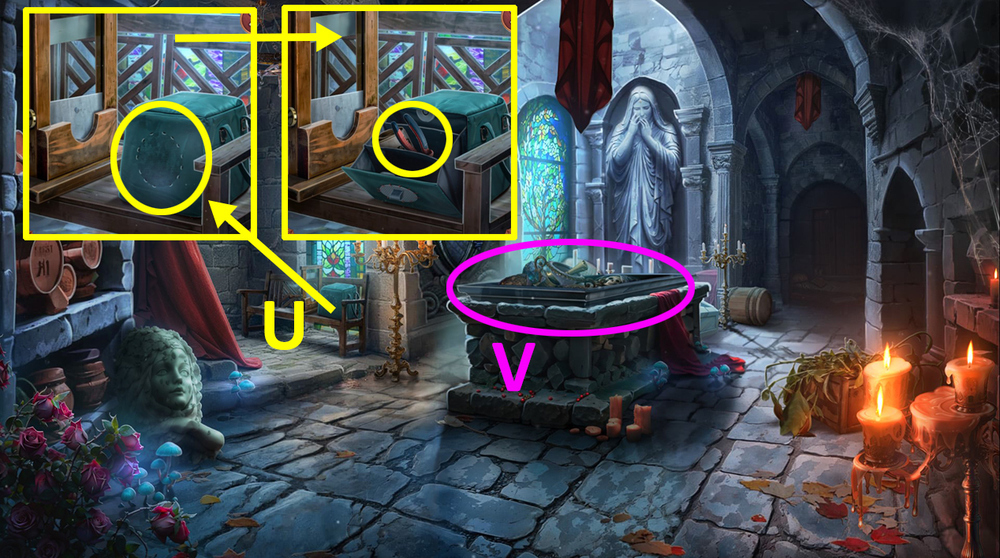
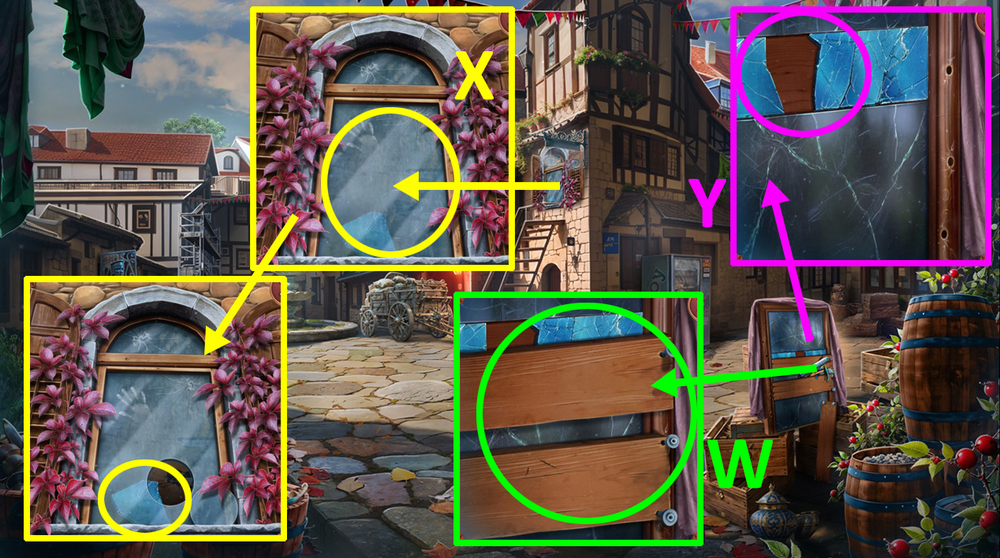
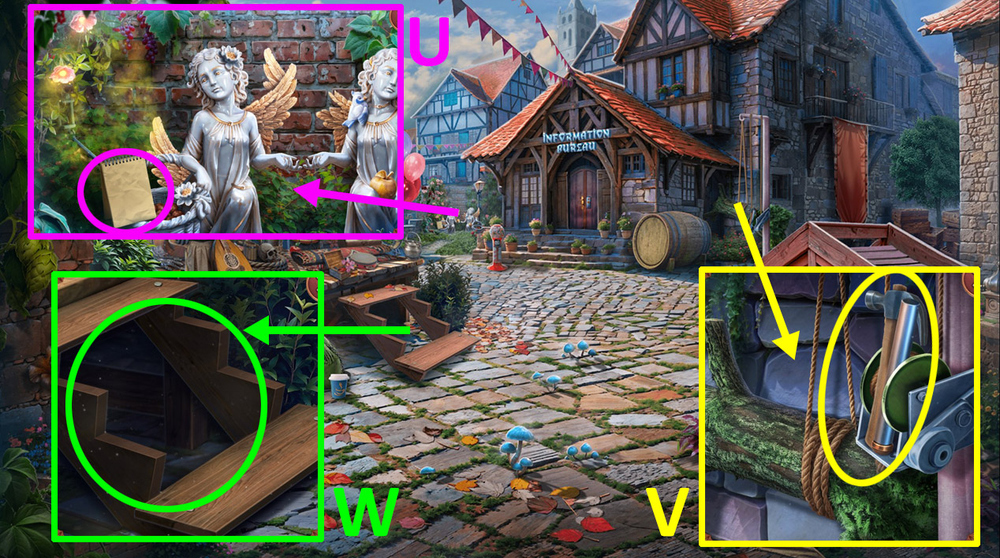
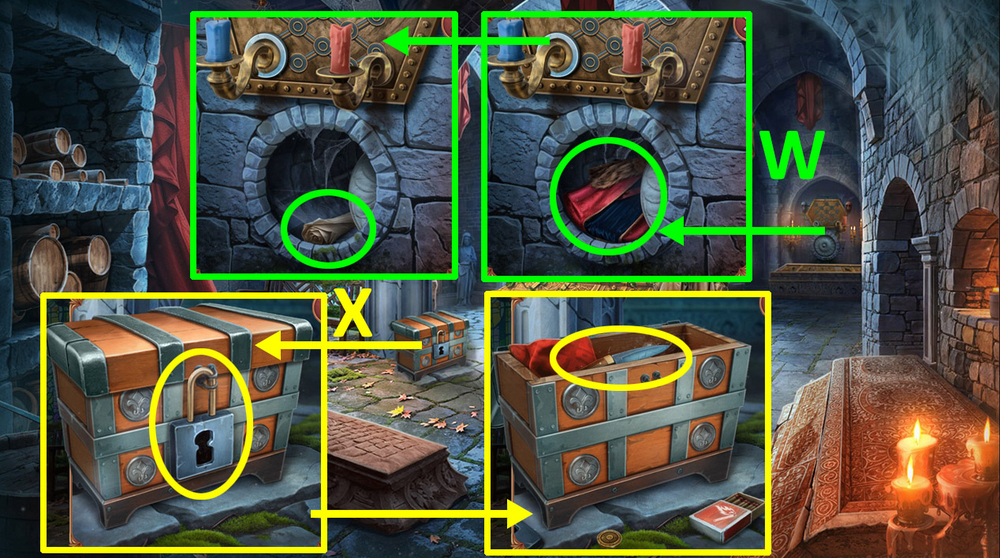
- Take SYRINGE (W).
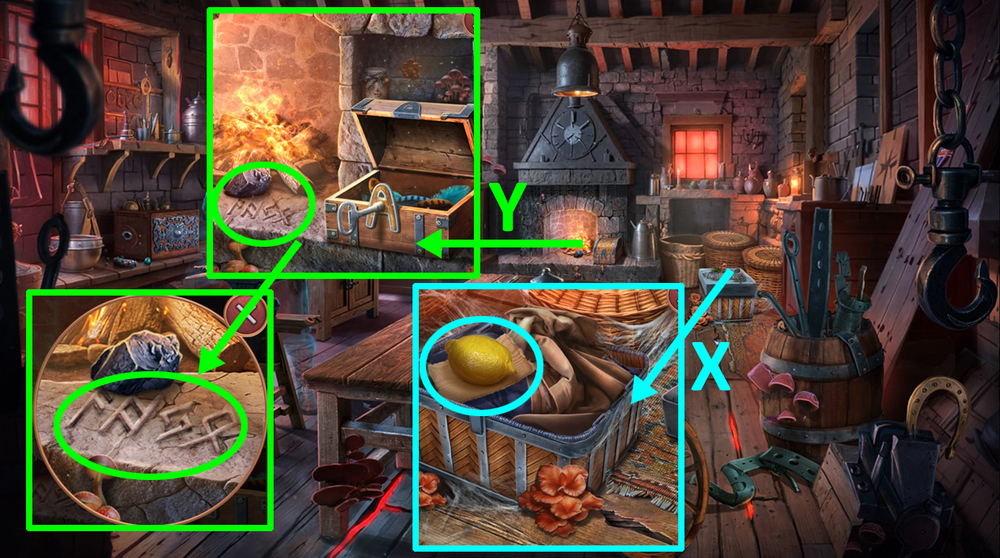
- Use SYRINGE on UMBRELLA, earn OPEN UMBRELLA.
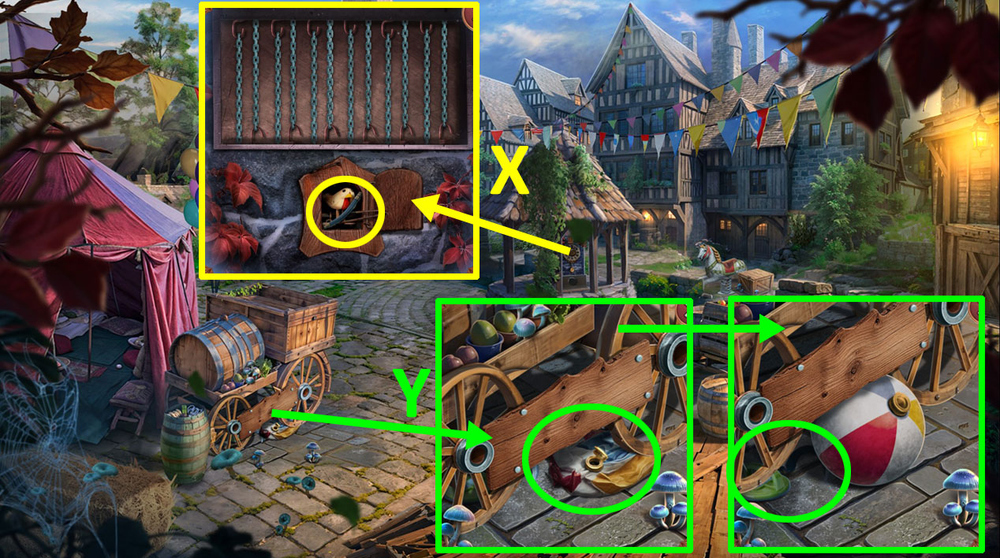
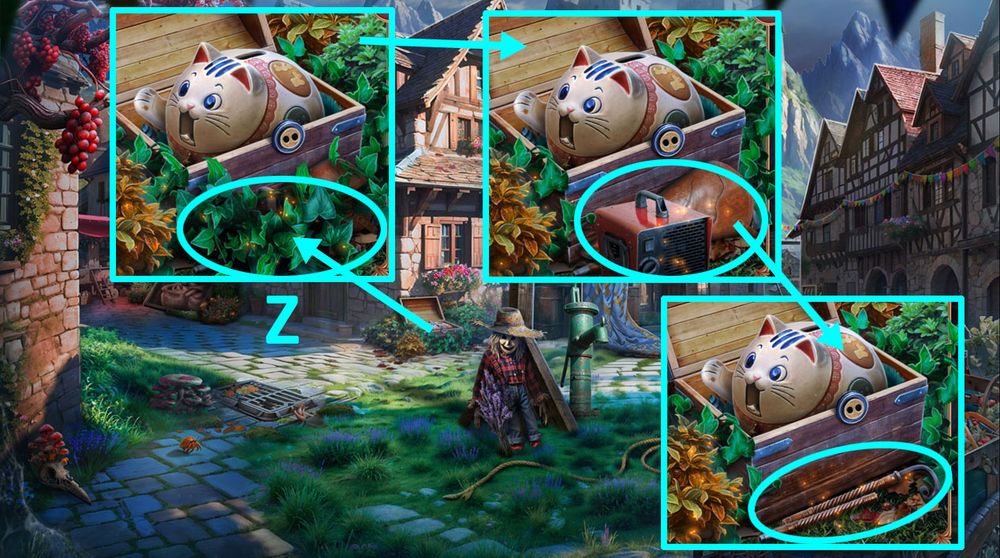
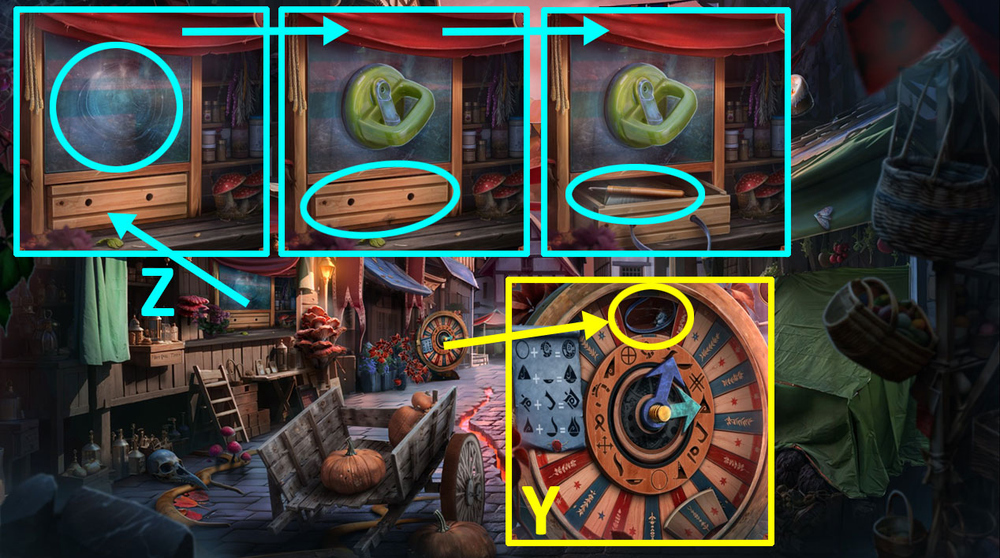
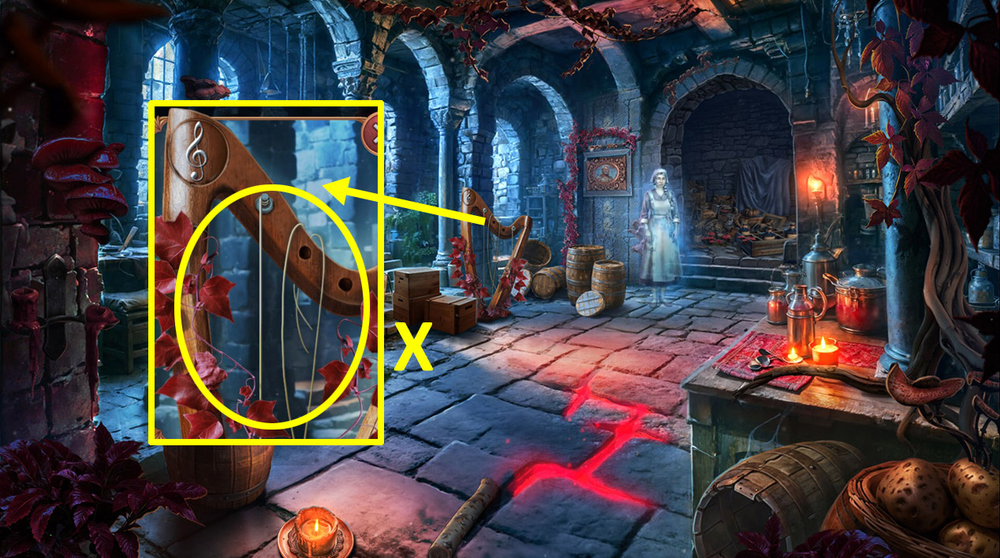
- Use OPEN UMBRELLA on the bag, take KEY FOB (X).
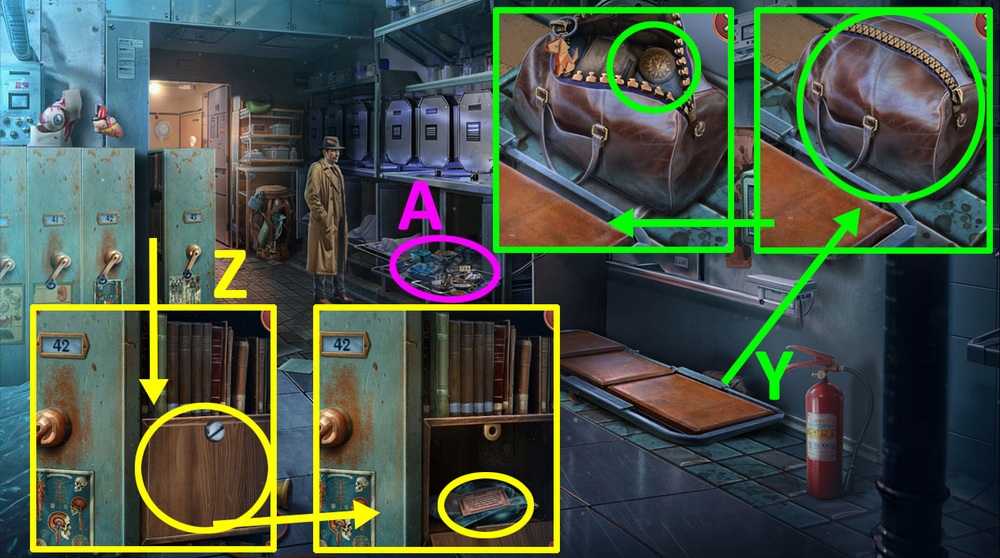
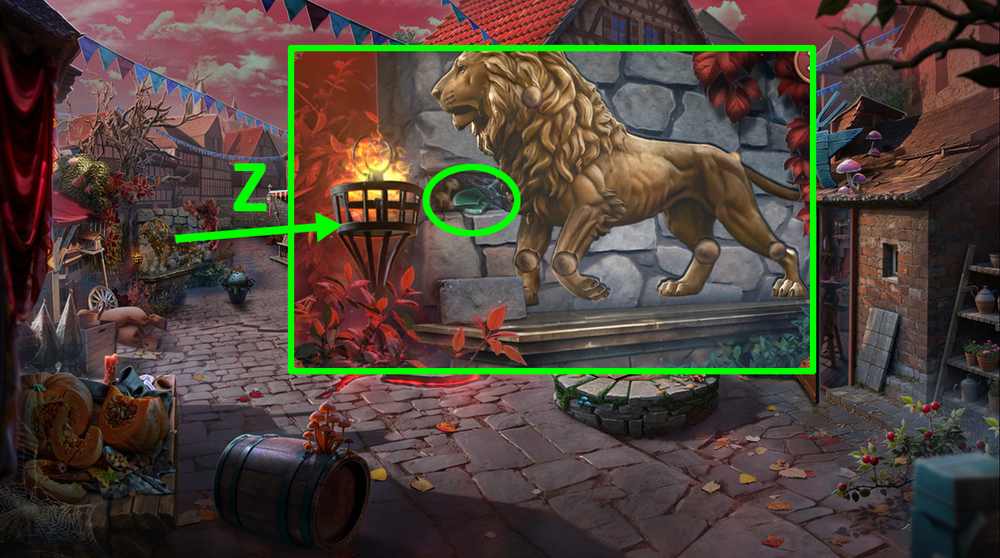
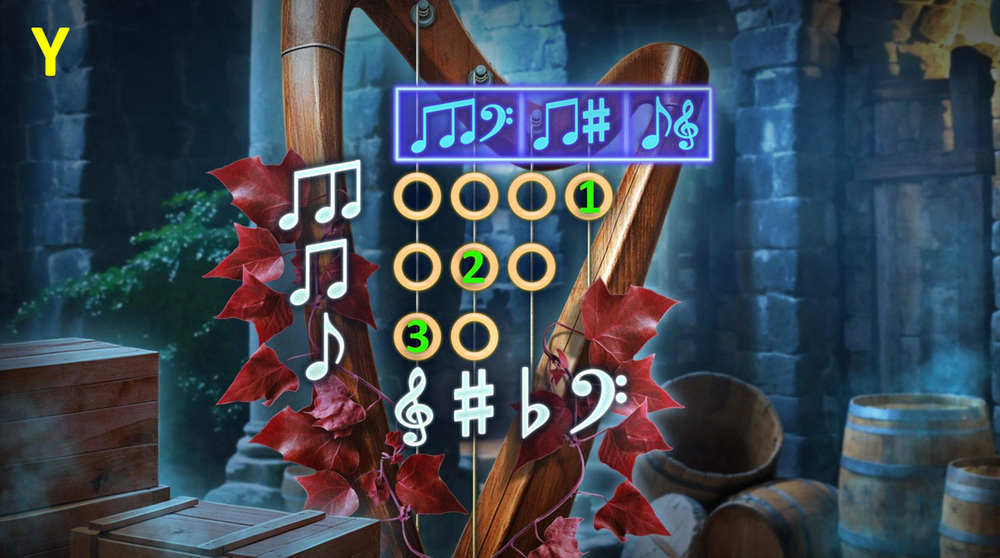
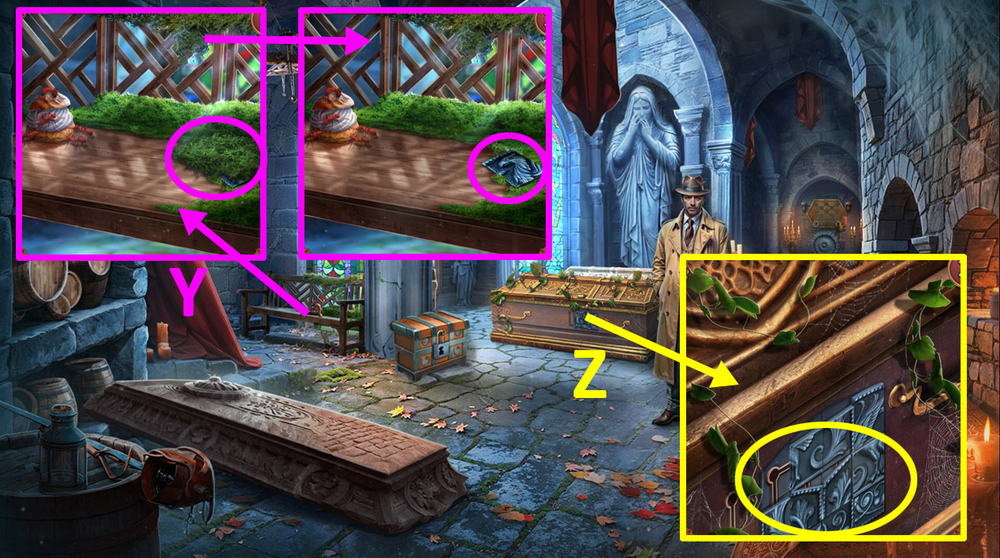
- Use KEY FOB on the bag, take OLD COIN (Y).
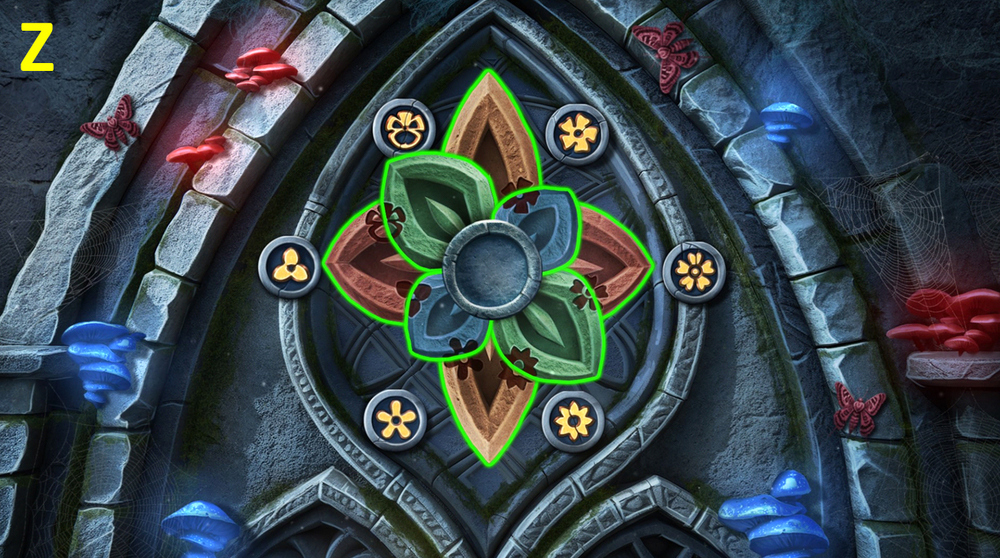
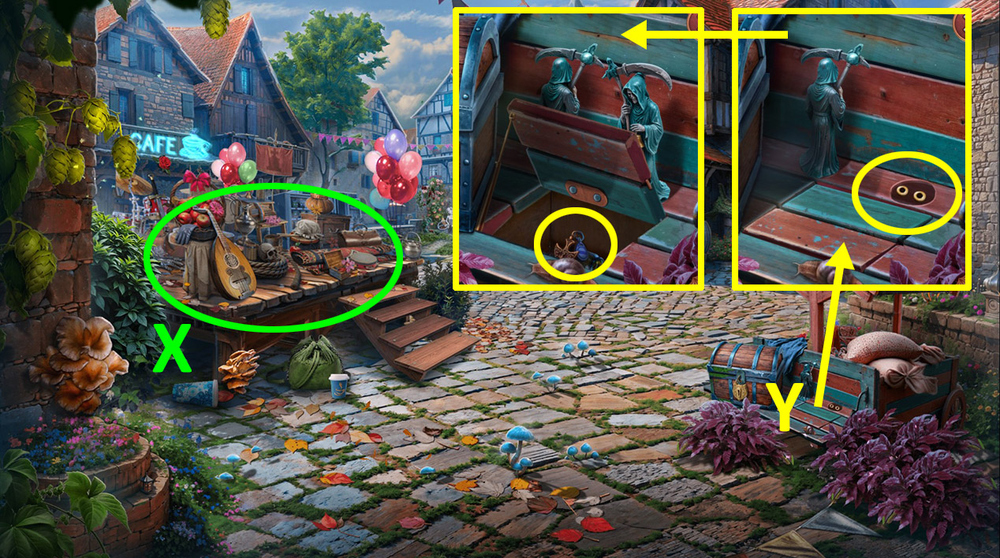
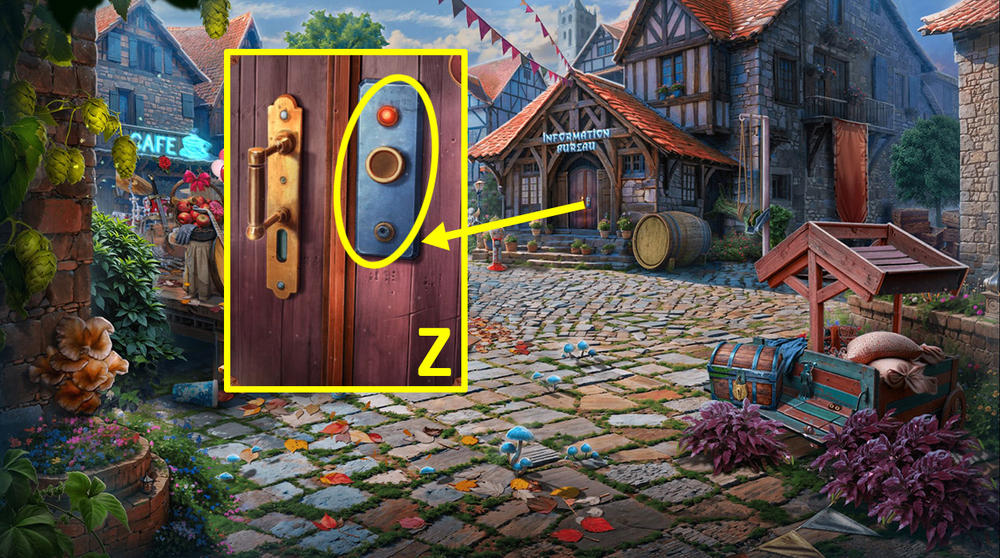
- Use OLD COIN on the screw, take and read the note (Z).
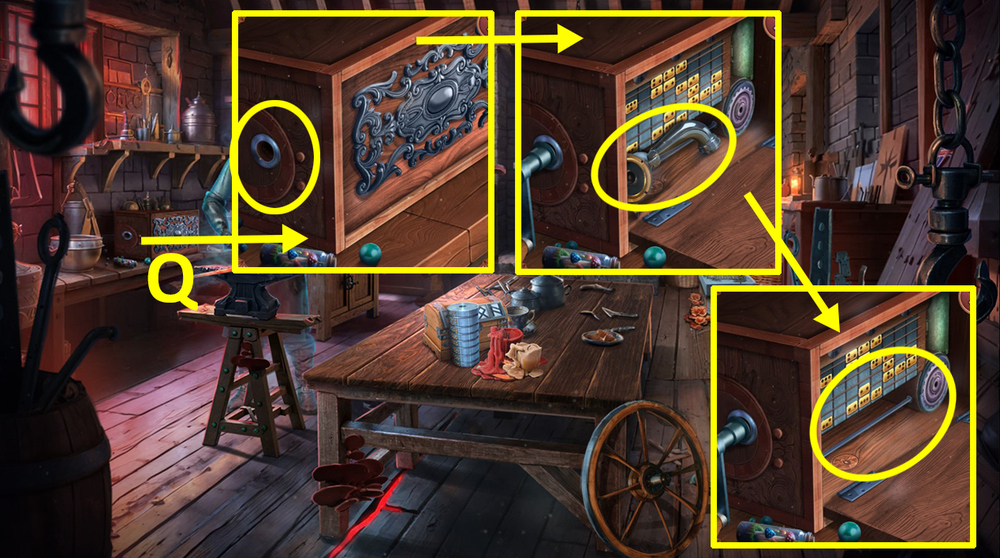
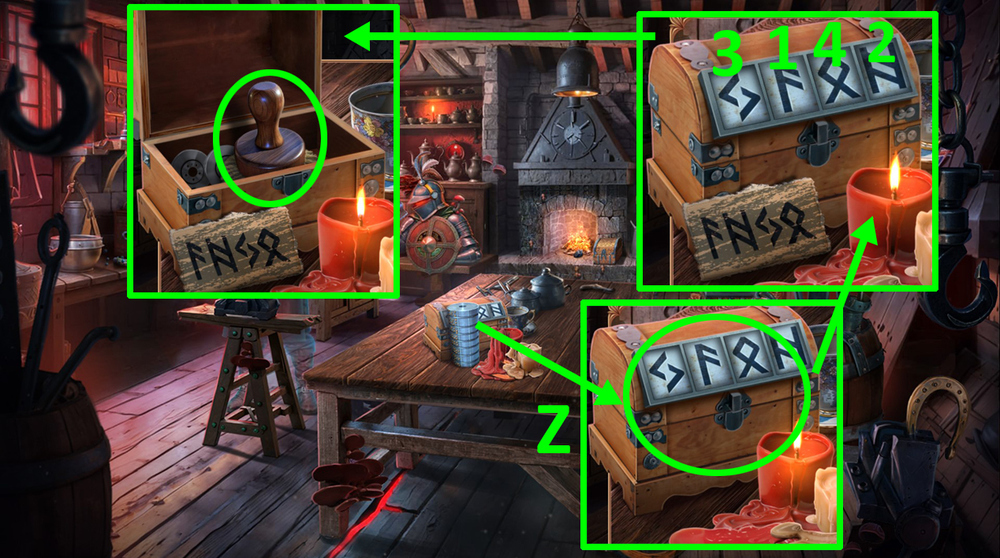
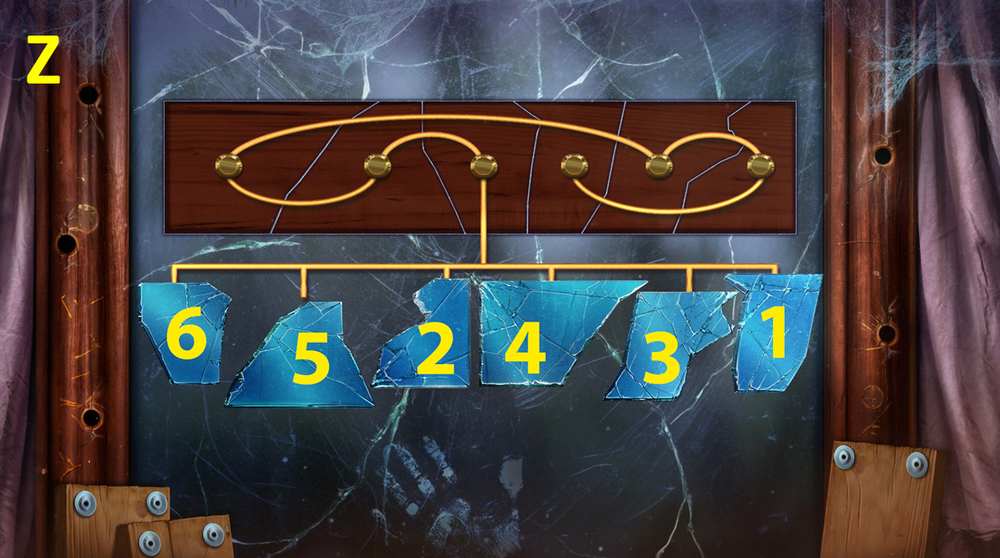
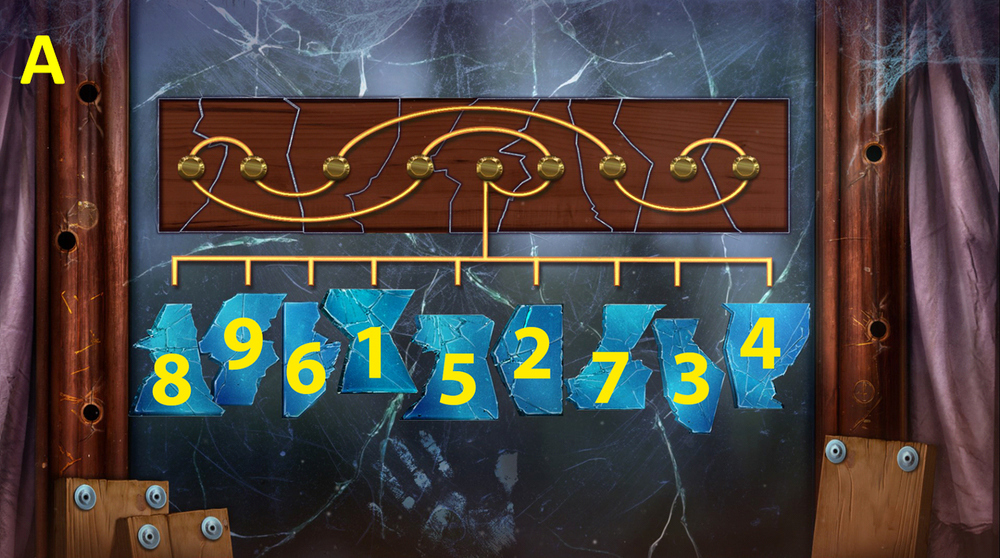
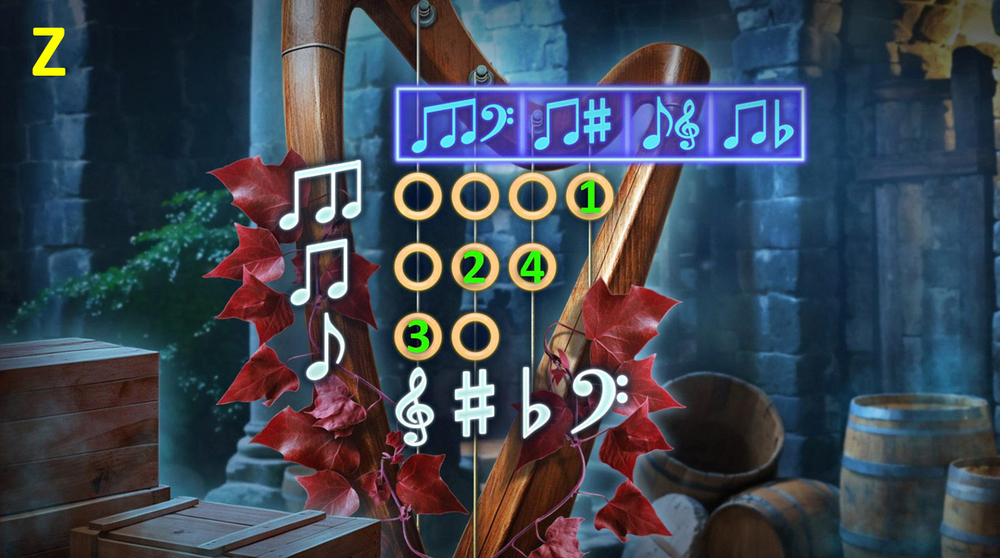
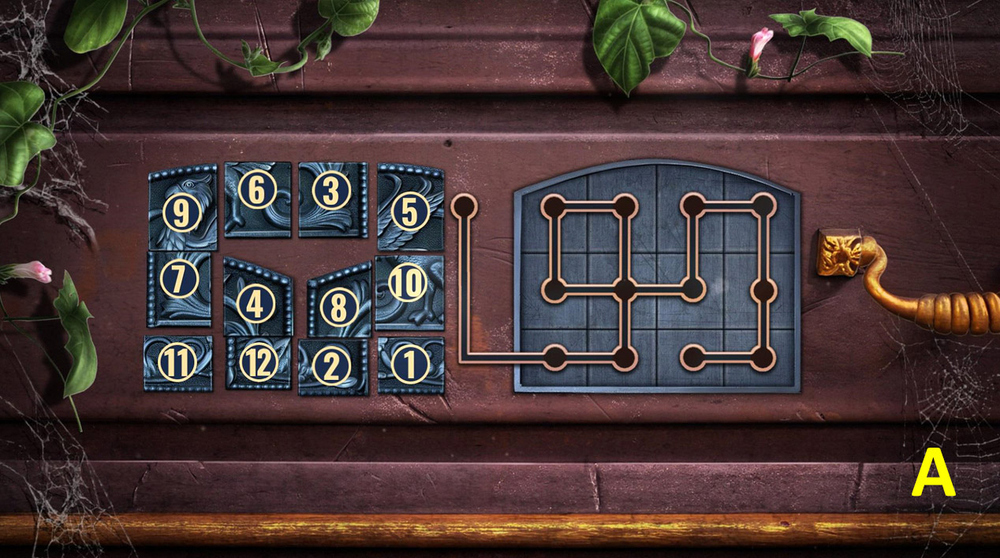
- Play puzzle (A).
- Select this line (B).
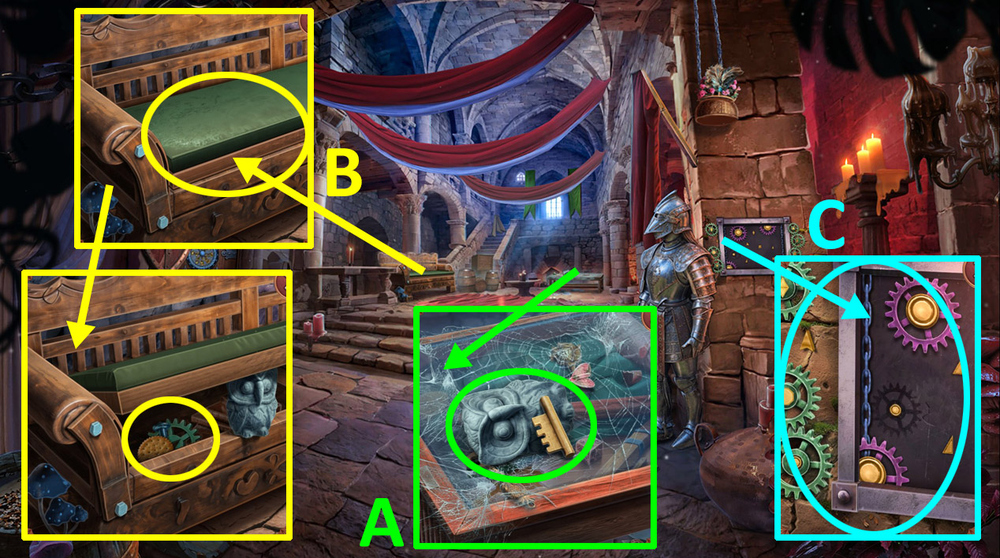
- Take SAW HANDLE 1/2(C).
- Use WATER on the posters (D).
- Use RIB SPREADER on the spring, take PALETTE KNIFE (E).
- Use PALETTE KNIFE on the posters, take CHARGER and SAW HANDLE 2/2 (F).
- Use SAW HANDLE on the rope chainsaw (G).
- Go forward.
- Take JEWELRY BOX (H).
- Use DUCT TAPE on the broken lever (I).

- Easy solution: Click: R, D, L, U, R, D, R, U, R, U (J).
- Hard solution: Click: D, R, D, L, U, R, D, R (K).
- Take BEADS (L).
- Use BEADS on the chest, take MATCHES, use OLD COIN on the piggy bank, take SWITCH (M).
- Take the map, take PHOTO (N).
- Use SWITCH on the switchboard (O).
- Go forward.
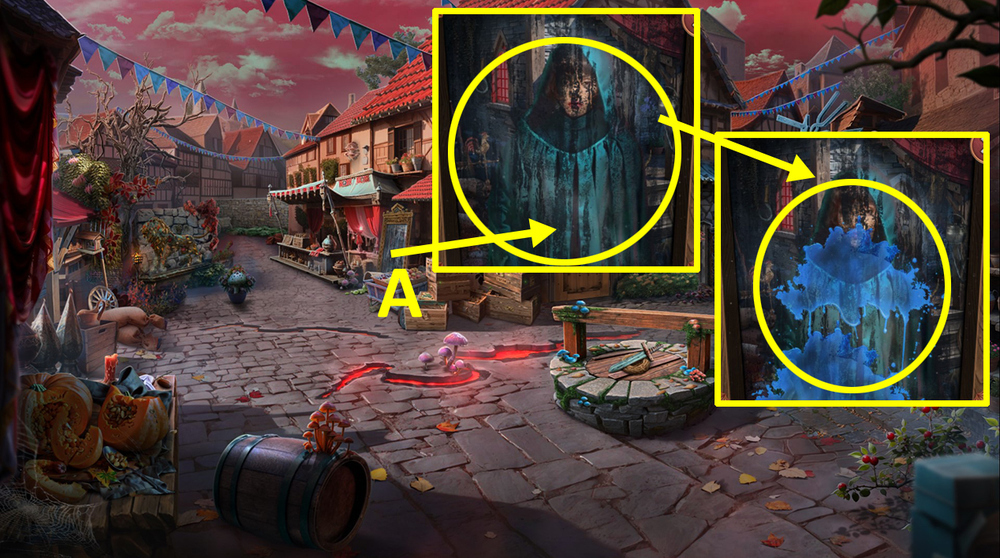
- Use EMF detector on the background.
- Select this option (P).
- Go forward.
- Take MECHANICAL WING (Q).
- Use MECHANICAL WING on the crow, take LIP BALM (R).
- Use LIP BALM on the dirty mask, take SCOOP (S).
- Take EMBLEM PARTS 1/2 (T).
- Go back.
- Take KEY LAYOUT and PUMP HANDLE (U).
- Use SCOOP on the pile of dirt, take LEVER (V).
- Go forward.
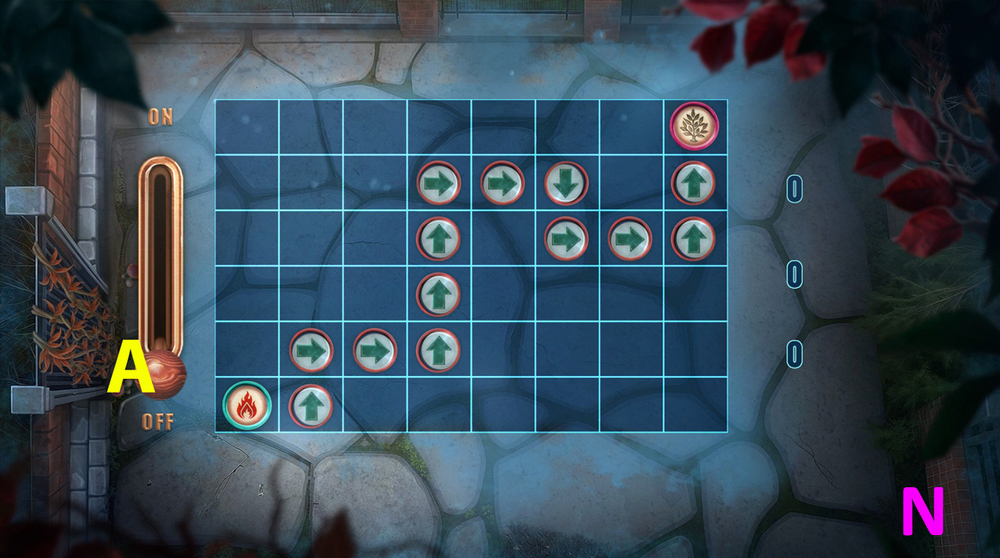
- Use LEVER on the empty socket (W).
- Easy solution: Click: 5, R, 2, L, 3, L (X).
- Hard solution: Click: 5, R, 2, L, 3, L, L, 5, R (Y).
- Take DUSTER (Z).
- Use DUSTER on the painting, click on it, take BAND-AID TAPE (A).
- Go back.
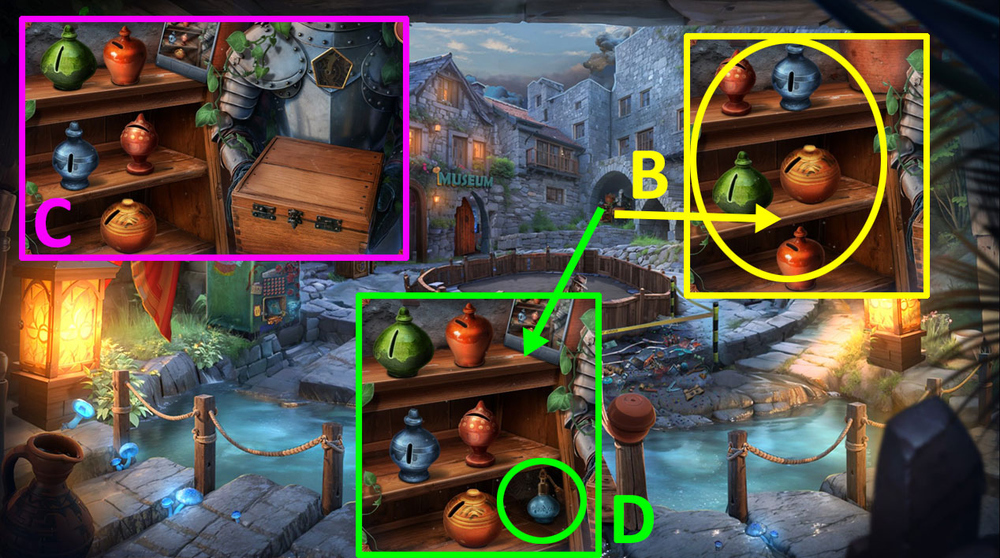
- Use PHOTO on the pots (B).
- Solution: Arrange the pots according to the picture (C).
- Take PERFUME (D).
- Use PERFUME on the wasps, take LATEX GLOVES (E).
- Use LATEX GLOVES on the crime scene (F).
- Play puzzle, earn DEAD PHONE (G).

- Use CHARGER on DEAD PHONE, earn PHONE.
- Select this option, earn MOCK BILL (H).
- Go to the Park Center.
- Use MOCK BILL on the receiver, take FIRECRACKER (I).
- Use FIRECRACKER on the crate, take METAL PLATE, BATTERY, and CANISTER (J).
- Use METAL PLATE on KEY LAYOUT.
- Go forward.
- Use CANISTER on the water pump, earn WATER CANISTER (K).
- Use WATER CANISTER on the grate, take GEAR (L).
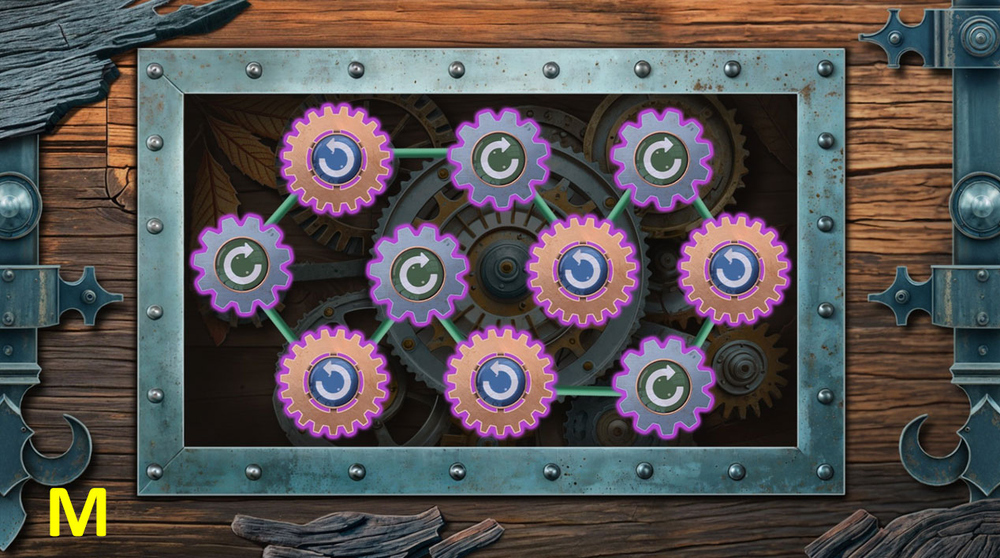
- Use GEAR on JEWELRY BOX.
- Easy solution: Connect the gears according to the picture (M).
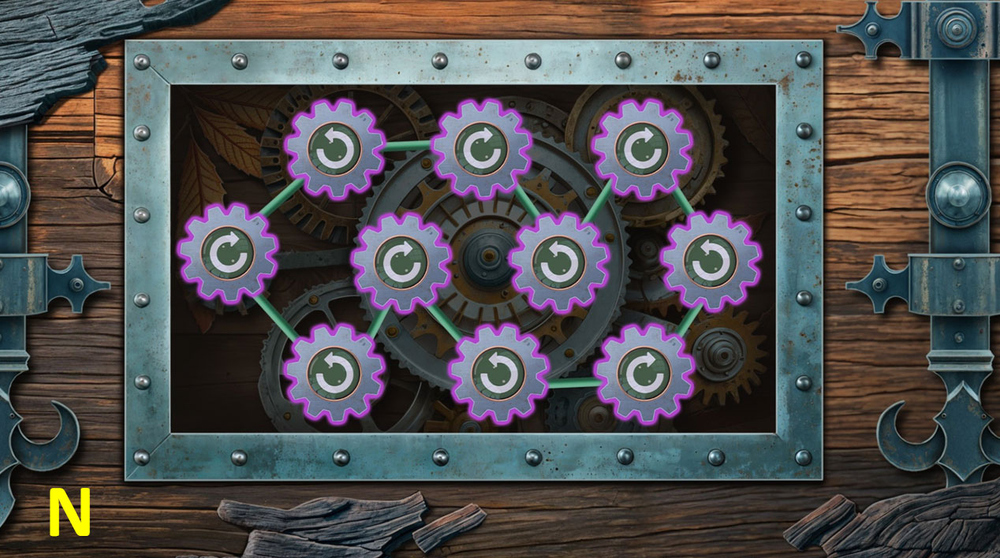
- Hard solution: Connect the gears according to the picture (N).
- Take LION AMULET.
- Go forward.

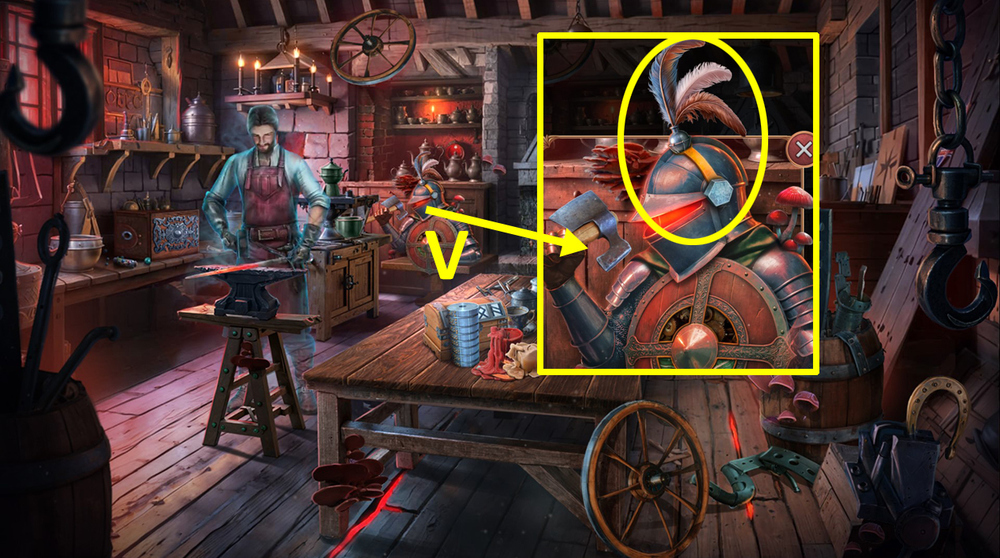
- Use LION AMULET on the armor (O).
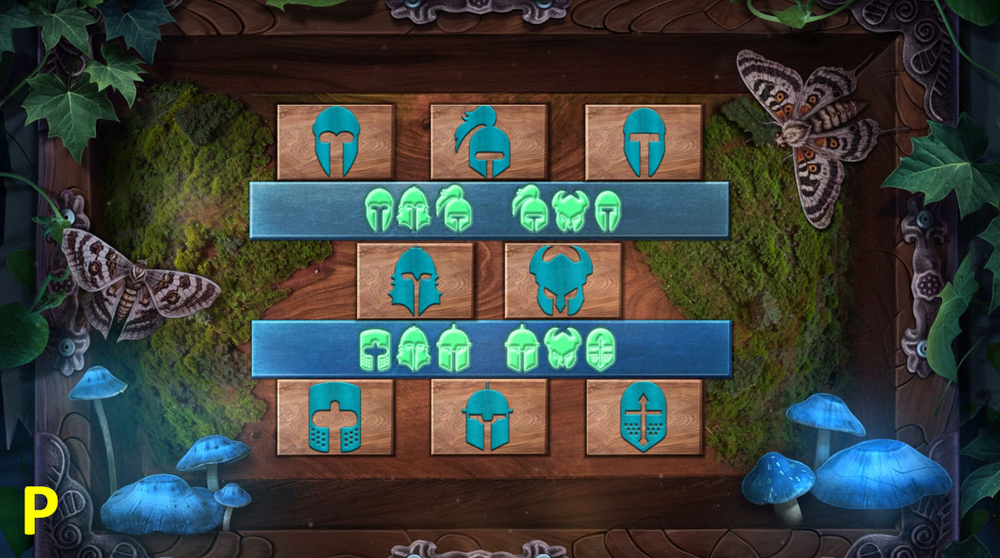
- Easy solution: Arrange the helmets according to the picture (P).

- Hard solution: Arrange the helmets according to the picture (Q).

- Take STEEL BRUSH and FILE (R).
- Use STEEL BRUSH on the goblet (S).
- Use FILE on the KEY LAYOUT, earn KEY.
- Use KEY on the bag, take PUMP and SPRING (T).
- Use PUMP HANDLE on PUMP.
- Go to the Park Center.
- Use SPRING on the free chain (U).
- Easy solution: Click: 1, 2, 3, 4, 5, 6, 7, 8, 9, 10, 11 (V).
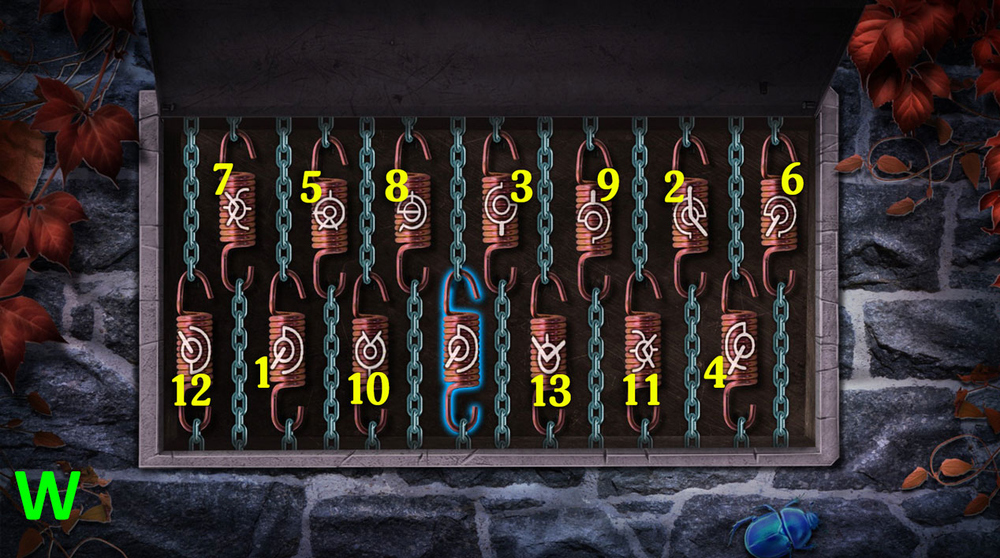
- Hard solution: Click: 1, 2, 3, 4, 5, 6, 7, 8, 9, 10, 11, 12, 13 (W).
- Take TUBE (X).
- Use TUBE on PUMP, earn PUMP.
- Use PUMP on the beach ball, take SUCTION CUP HANDLE and SICKLE (Y)
- Go forward.
- Use SICKLE on the leaves, take HEATER and GAUNTLET, use BAND-AID TAPE on the broken cane, earn CANE (Z).
- Go to the Medieval Museum.
- Use CANE on the bag, click on it, take EMBLEM PARTS 2/2 (A).
- Use EMBLEM PARTS on the shield (B).
- Solution: Click: 2-3, 1-3, 1-2, 1-3, 1-3, 2-1, 3-2, 3-1, 2-1, 2-1, 2-3, 2-3, 1-2, 3-1, 3-2, 1-2, 3-1, 3-2 (C).
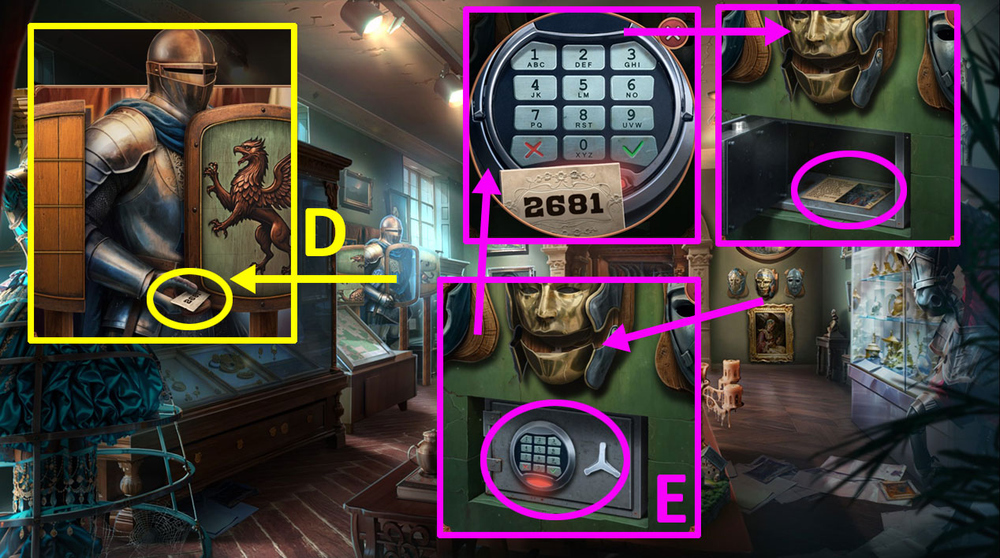
- Take CODE (D).
- Use CODE on the safe, enter 2681, press check mark, take and read the note (E).
- Go to the Park’s Old Area.
- Use GAUNTLET on the bird, earn PAPER CUP (F).
- Go forward.
- Use PAPER CUP on the machine (G).
- Easy solution: Click: 1, 2, 3, 4, 5, 6, 7, 8, 9, 10, 11, 12, 13, 14 (H).
- Hard solution: Click: 1, 2, 3, 4, 5, 6, 7, 8, 9, 10, 11, 12, 13, 14, 15, 16, 17, 18, 19 (I).
- Earn HOT TEA.
- Use HOT TEA on the goblet, take GLUE and GOBLET (J).
- Use EMF detector on the background.
- Play puzzle (K).
- Click on the leaves (L).
- Take STONE SLABS 1/2 (M).
- Use GLUE on the posters, use GOBLET on the nail, take BOLT CUTTER (N).
- Use BOLT CUTTER on the wire, take STONE SLABS 2/2 (O).
- Use STONE SLABS on the picture (P).
- Easy solution: Arrange the fragments according to the picture (Q).
- Hard solution: Arrange the fragments according to the picture (R).
- Go forward.
- Select this option (S).
- Take FRAME PARTS 1/2 and POSTERS 1/2 (T).
- Use BATTERY and HEATER on the wax, take ARROW (U).
- Use ARROW on the dial (V).
- Easy solution: Drag arrows to: 1-1, 2-2, 3-3, 4-4 (W).
- Hard solution: Drag arrows to: 1-1-1, 2-2-2.
- 3-3-3, 4-4-4 (X).
- Take HEADBAND (Y).
- Use SUCTION CUP HANDLE on the glass, use HEADBAND on the drawer, take CROCHET HOOK (Z).
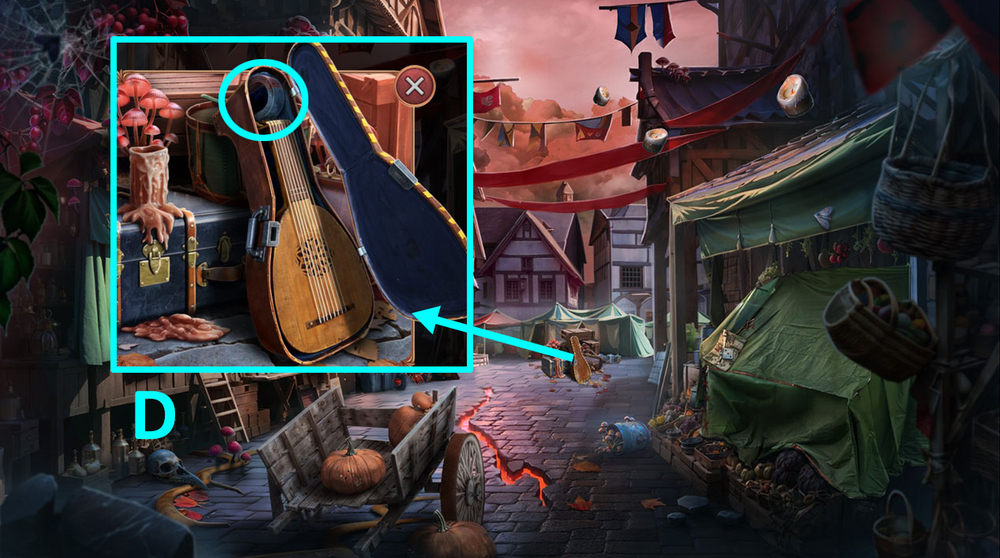
- Use CROCHET HOOK on the guitar case (A).

- Easy solution: Arrange according to the picture (B).
- Hard solution: Arrange according to the picture (C).
- Take MAGNET (D).
- Go back.
- Use MAGNET on the needles, take GLASS CUTTER (E).
- Go forward.
- Use GLASS CUTTER on the glass, take POSTERS 2/2 (F).
- Go back.
- Use POSTERS on the board (G).
- Easy solution: Arrange the posters according to the picture (H).
- Hard solution: Arrange the posters according to the picture (I).

- Take DAGGER (J).
- Go forward.
- Use DAGGER on the stitches, take FRAME PARTS 2/2 (K).
- Go back.
- Use FRAME PARTS on the board (L).
- Solution: Click: 1, 1, 1, 2, 2, 3, 3, 4, 4, 5, 5, 5, 5, 6, 6, 6, 7, 7 (M).
- Take STEPLADDER, TUBES OF PAINT, and HOOK PENDANT (A).
- Take TORCH, CANNONBALL, and BRUSH, use HOOK PENDANT on the broken water grid, earn WRENCH (B).
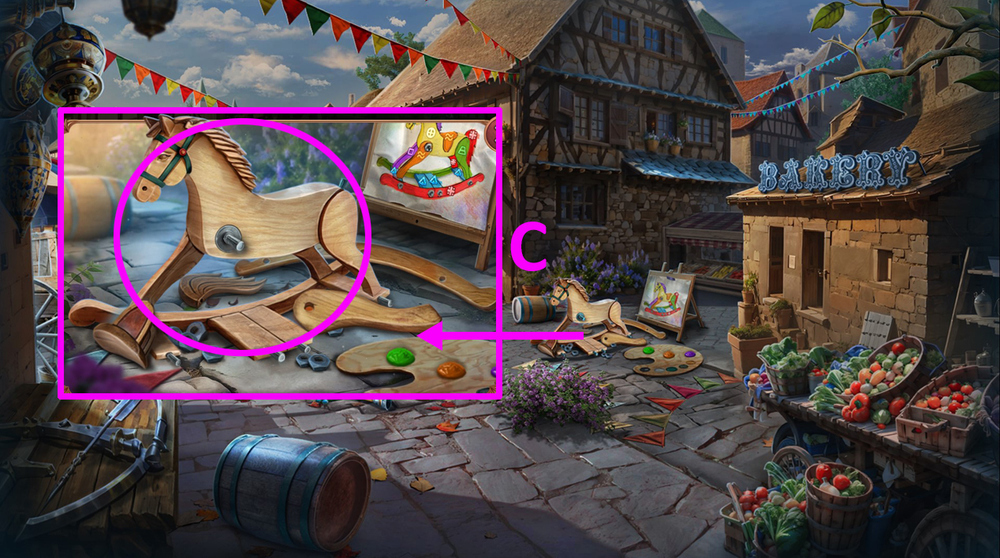
- Use TUBES OF PAINT, BRUSH, and WRENCH on the wooden horse (C).
- Easy solution: Follow the instructions on the image (D).
- Hard solution: Follow the instructions on the image (E).
- Take KEY (F).
- Use KEY on the sewer hatch, take SUNDIAL HAND (G).
- Use SUNDIAL HAND on the sundial (H).
- Solution: Follow the instructions on the image (I).

- Take the flag (J).
- Take FAKE SWORDS 1/2 and HAY (K).
- Use HAY on TORCH, earn TORCH.
- Use TORCH on the fire, earn BURNING TORCH (L).
- Use BURNING TORCH on the vines (M).
- Easy solution: Arrange the arrows as shown on the image and click A (N).

- Hard solution: Arrange the arrows as shown on the image and click A (O).
- Take FLINT AND STEEL and the cloak (P).
- Go forward.
- Click on the line (Q).
- Select this option (R).
- Use FLINT AND STEEL on the candles, take MAGNET and MUSIC BOX DRUM (S).
- Examine the gap in the floor, use MAGNET on the shiny object, earn IRON CLAW (T).
- Use IRON CLAW and CANNONBALL on the chipped stone block, take PLIERS (U).
- Use PLIERS on the helmet, earn PLUMAGE (V).
- Go back.
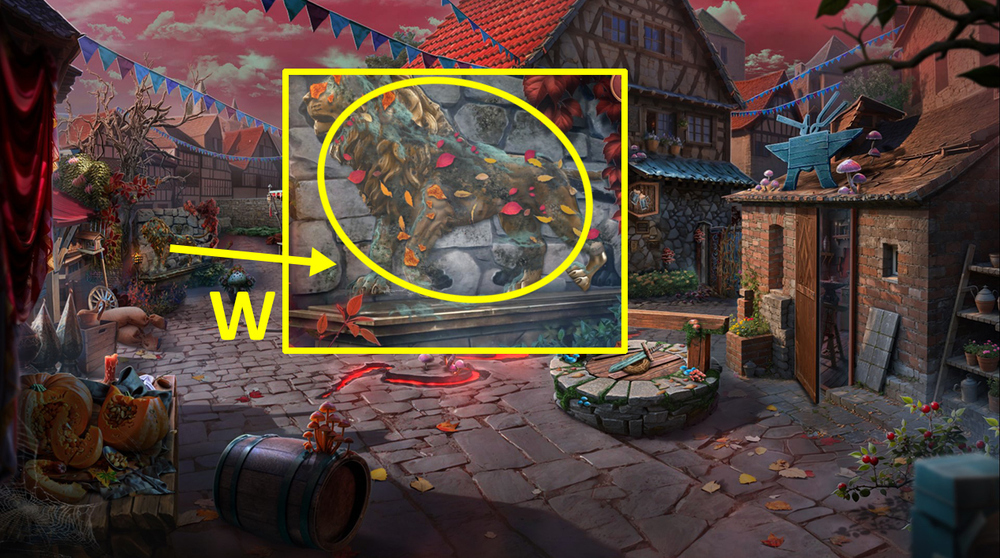
- Use PLUMAGE on the lion (W).
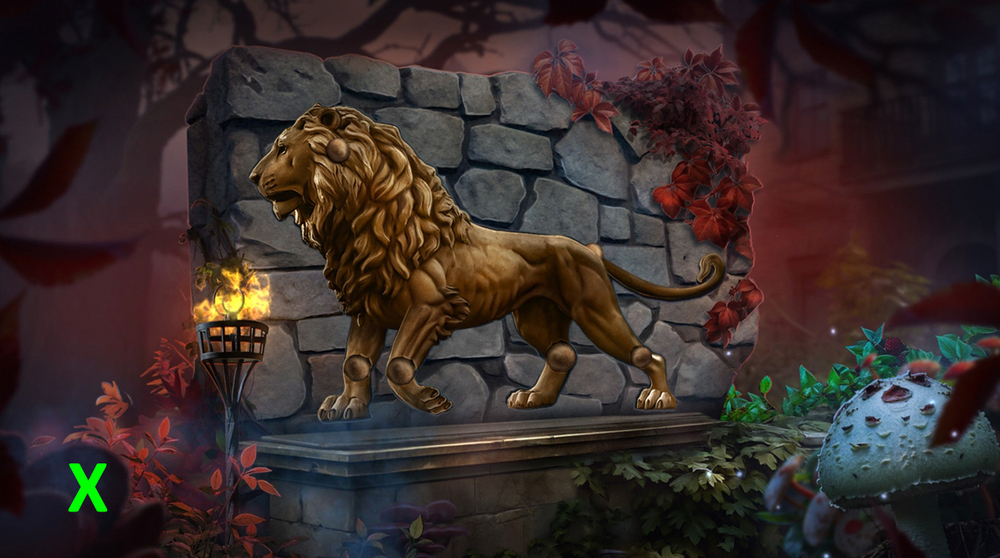
- Easy solution: Follow the instructions on the image (X).
- Hard solution: Follow the instructions on the image (Y).
- Take STONE PARTS (Z).
- Click on the line (A).
- Click on the line (B).
- Select this option (C).
- Go to the Nether Tavern.
- Speak to the Tavern Keeper.
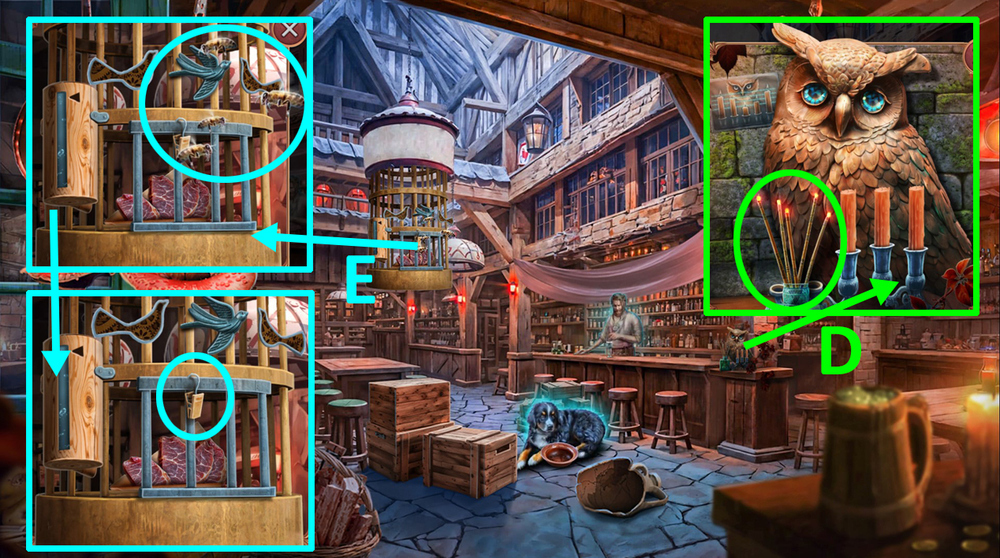
- Take INCENSE (D).
- Use INCENSE on the wasps, take GOLDEN CLIP (E).
- Use GOLDEN CLIP on the pin in the keyhole, take BIRD AMULETS 1/2 and RESIN (F).
- Go to the Nether Forge.
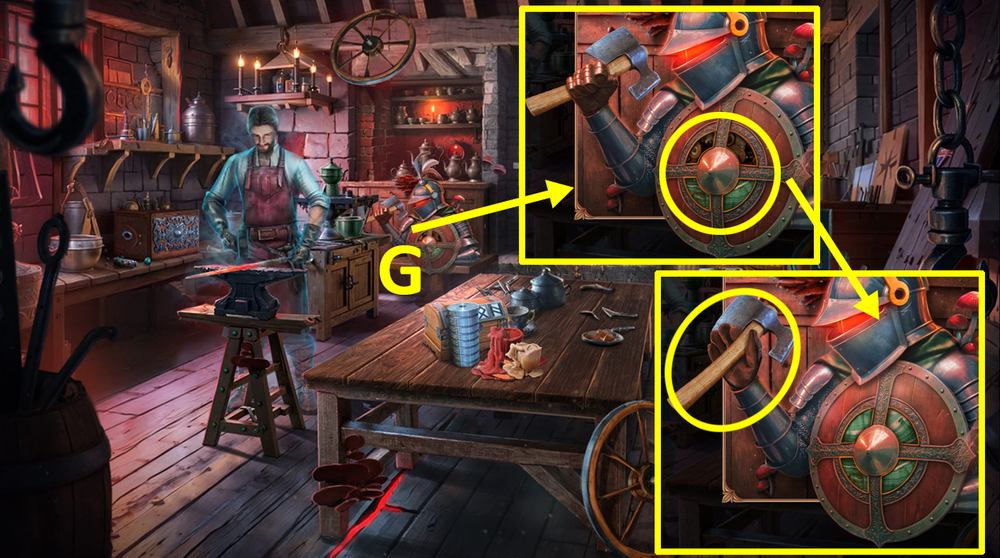
- Use STONE PARTS on the shield, take AXE (G).
- Go back.
- Use AXE on the well lid, take BOTTLE WITH WATER, use CANNONBALL on the bucket, take HANDLE, use RESIN on the broken bird amulet, earn BIRD AMULETS 2/2 (H).
- Go to the Nether Tavern.
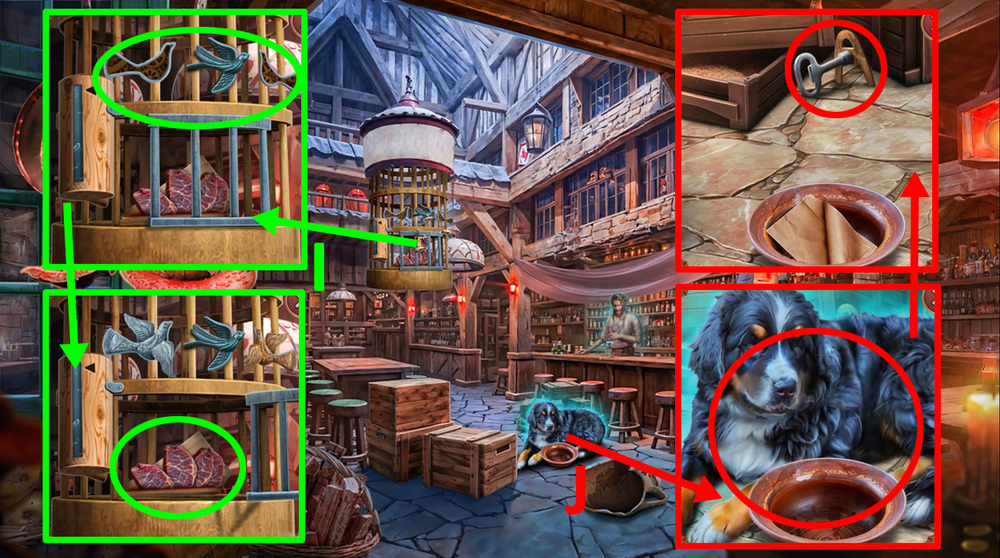
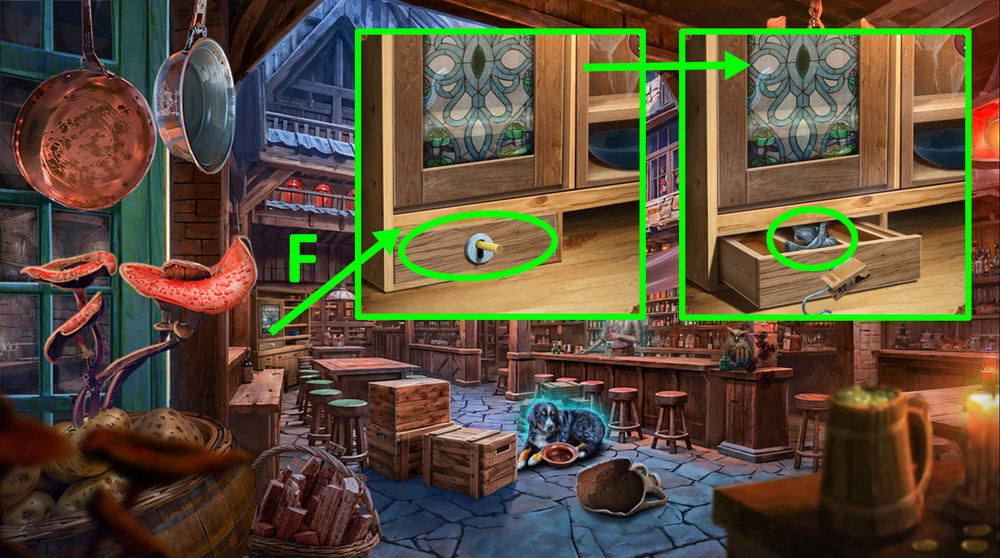
- Use BIRD AMULETS on the cage, take JERKY (I).
- Use JERKY on the bowl, take KEY (J).
- Go to the Nether Forge.
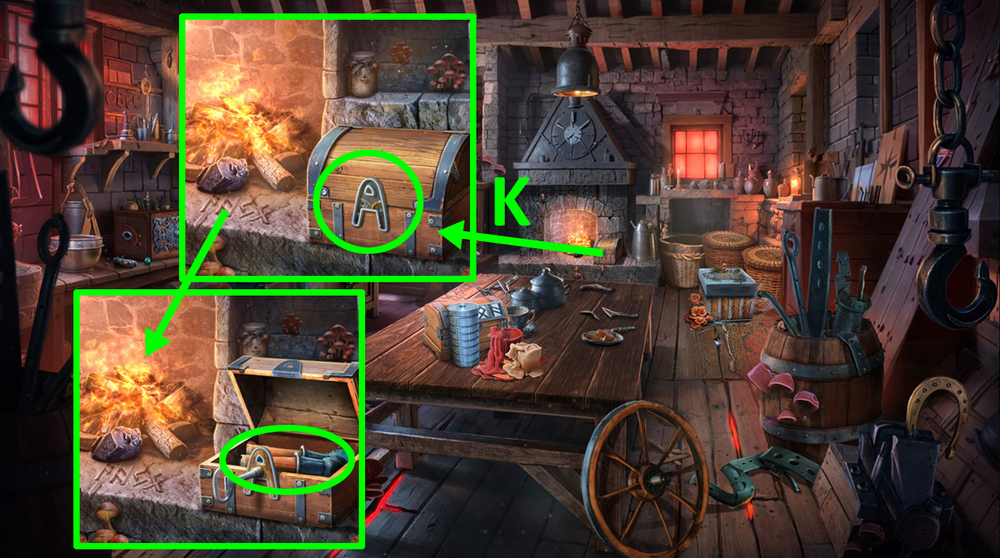
- Use KEY on the chest, take CANDLESTICK PART (K).
- Go to the Nether Tavern.
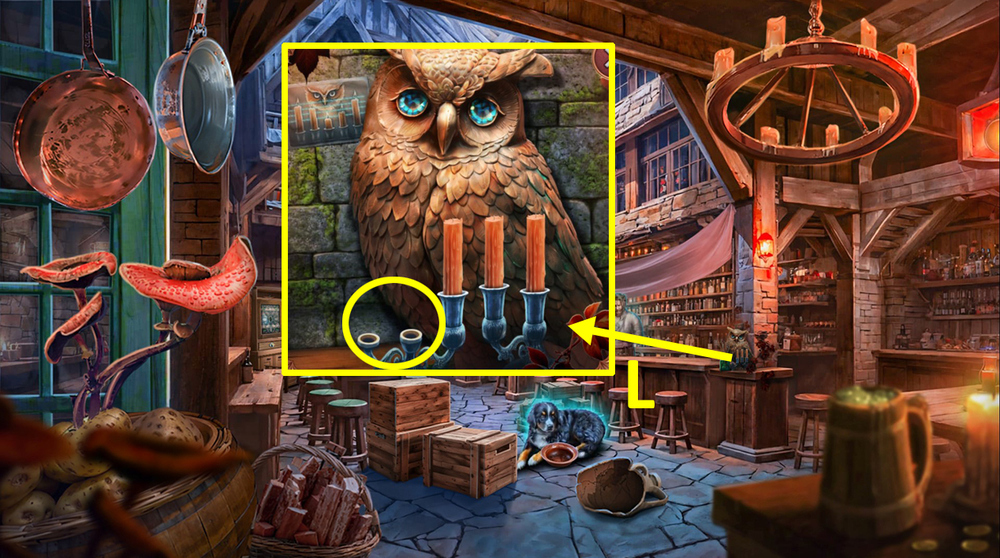
- Use CANDLESTICK PART on the candlestick (L).
- Easy solution: Follow the instructions on the image (M).
- Hard solution: Follow the instructions on the image (N).
- Take DRIED CHERRY LEAVES (O).
- Give DRIED CHERRY LEAVES to the Tavern Keeper (P).
- Go to the Nether Forge.
- Use HANDLE on the empty socket, take NEEDLE, use MUSIC BOX DRUM on the mechanism (Q).
- Easy solution: Follow the instructions on the image (R).
- Hard solution: Follow the instructions on the image (S).
- Take PUZZLE PIECE (T).
- Use PUZZLE PIECE on the lid (U).
- Easy solution: Follow the instructions on the image (V).
- Hard solution: Follow the instructions on the image (W).
- Take LEMON and LEAFLET (X).
- Examine the runes, use LEAFLET on them, earn BOX CODE (Y).
- Use BOX CODE on the runes, click on the runes in the order shown in the clue, take WIRE BRUSH (Z).
- Go back.
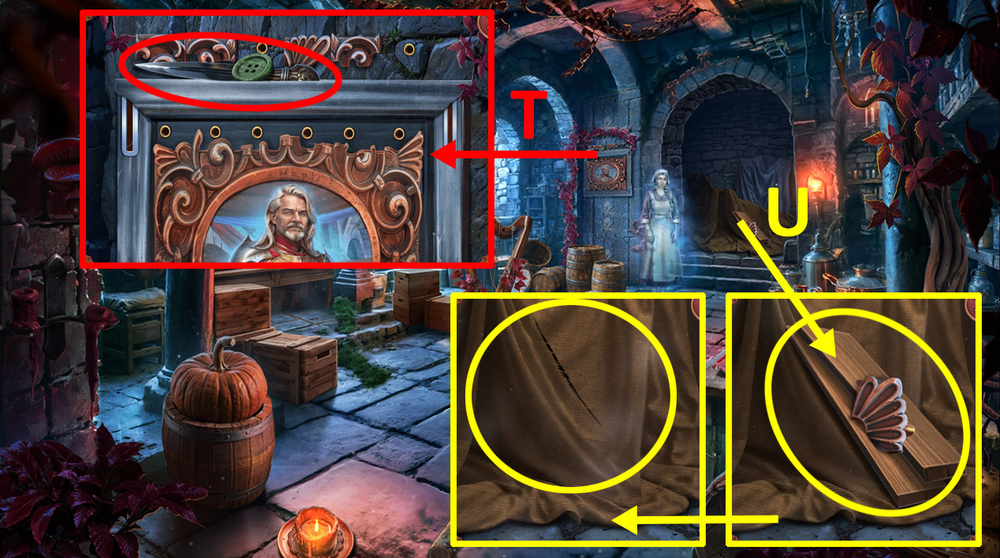
- Use BOTTLE WITH WATER on the mirror, then use WIRE BRUSH on it (A).
- Play puzzle (B).
- Select this option (C).
- Earn ACCESS CARD.
- Use ACCESS CARD on the lock (D).
- Go forward.
- Select this option (E).

- Take FLASH (F).
- Use NEEDLE on the vinyl record player (G).
- Take LIGHT BULB (H).
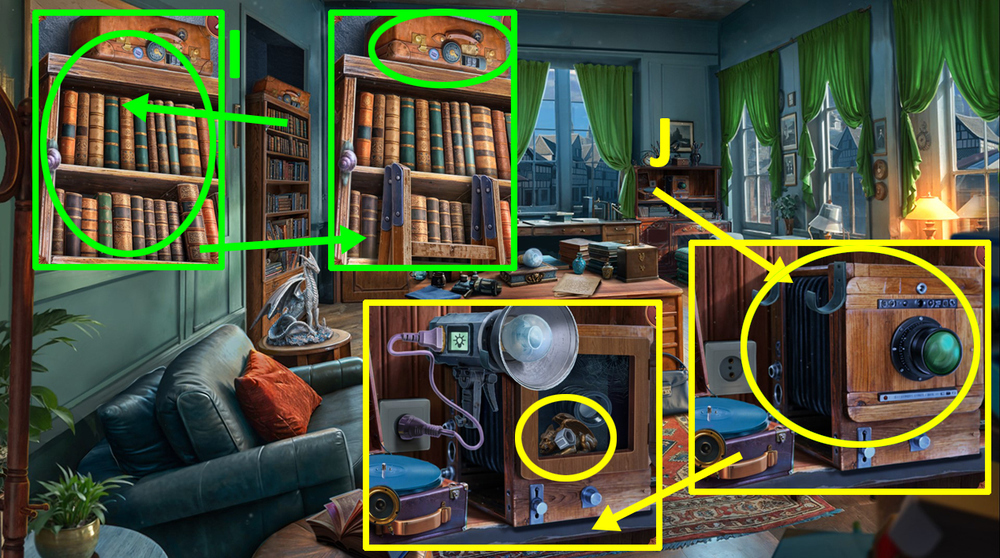
- Use STEPLADDER on the bookshelf, take SUITCASE and WIRE (I).
- Use LIGHT BULB and WIRE on FLASH, earn FLASH.
- Use FLASH on the vintage camera, take LOCK PARTS 1/2 and GARGOYLE FIGURINE (J).

- Use GARGOYLE FIGURINE on the box, take SCOOP and VINYL RECORD (K).
- Use VINYL RECORD on the vinyl record player, take ARCHIVE KEY (L).
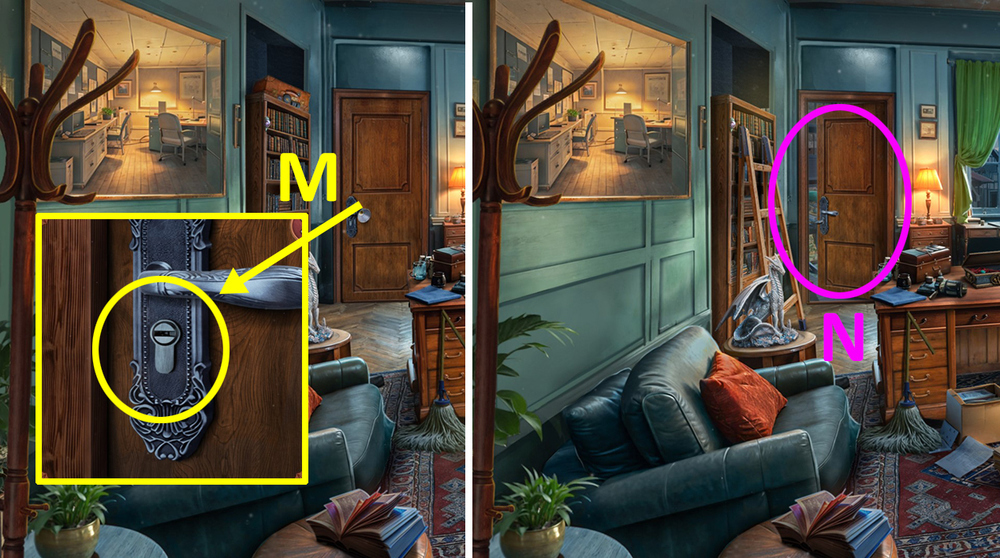
- Use ARCHIVE KEY on the keyhole (M).
- Play puzzle (N).
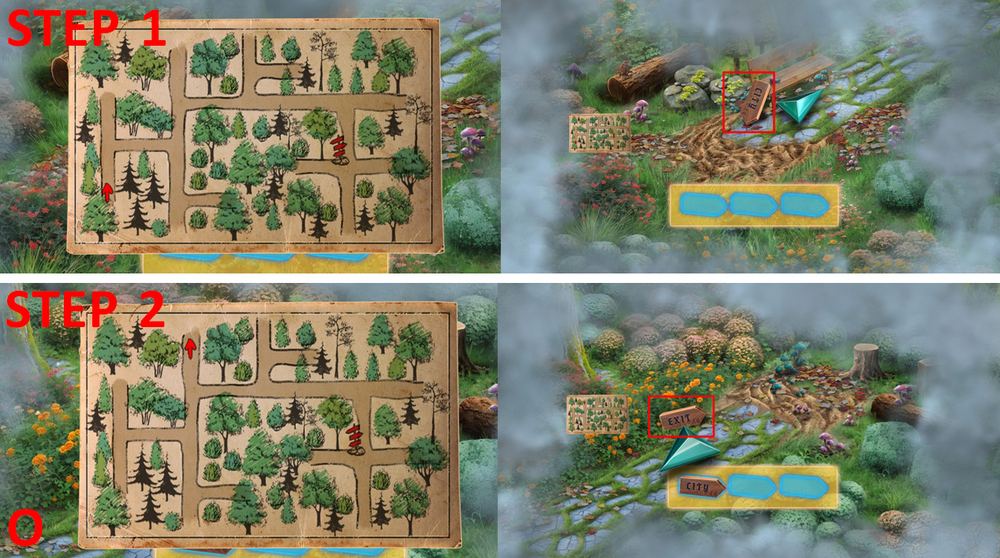
- Solution: Step 1: go here, take the item shown on the image, Step 2: go here, take the item shown on the image (O).
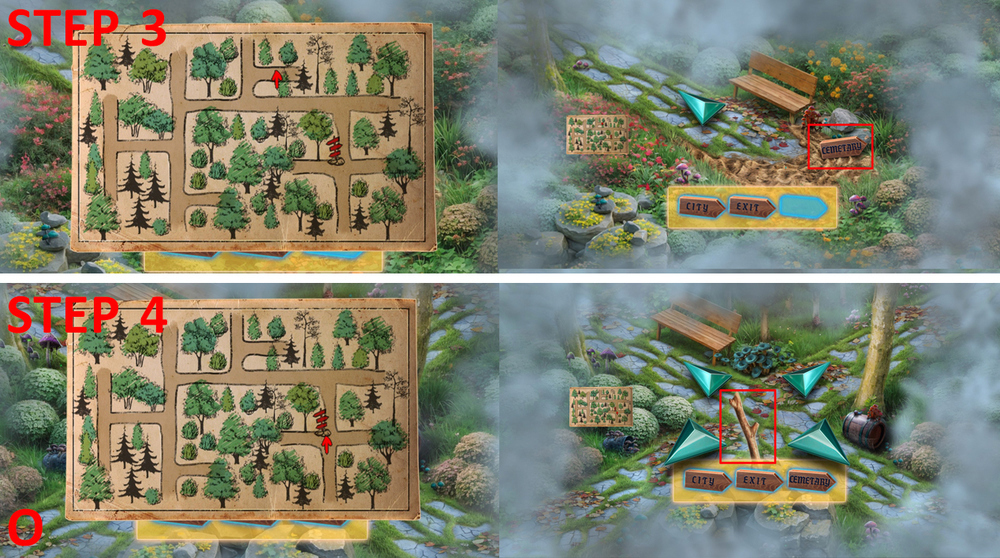
- Solution: Step 3: go here, take the item shown on the image, Step 4: go here, click on the item shown on the image (O).
- Take LOCK PARTS 2/2 (P).
- Use LOCK PART on SUITCASE.
- Easy solution: Drag the pointer according to the sequence shown on the image (Q).
- Hard solution: Drag the pointer according to the sequence shown on the image (R).
- Take BROKEN NEON SIGN and PIZZA CUTTER.
- Use PIZZA CUTTER on the sack, take LEATHER GLOVES (S).
- Use LEATHER GLOVES on the vines, take RELIEF PARTS 1/2 and FAKE SWORDS 2/2 (T).
- Use FAKE SWORDS on the door (U).
- Go forward.
- Select this option (V).
- Use EMF detector (W).

- Take GLUE and RELIEF PARTS 2/2, use LEMON on the cutter, earn LEMON HALF (X).
- Use RELIEF PARTS on the empty slots (Y).
- Easy solution: Follow the instructions on the image (Z).
- Hard solution: Follow the instructions on the image (A).
- Take NEEDLE AND THREAD 1/2 and STONE PATTERN (B).
- Use LEMON HALF on the rust, use STONE PATTERN on the slot (C).
- Play puzzle, earn HEART AMULET (D).
- Use GLUE on SCOOP.
- Go back.
- Use HEART AMULET on the statue (E).
- Easy solution: Random (F).
- Hard solution: Random (G).
- Take CRYSTAL BALL (H).
- Use CRYSTAL BALL on the bench, take COINS 1/2 and CUTTERS (I).

- Use CUTTERS on the chain (J).
- Solution: Follow the instructions on the image (K).
- Go forward.
- Take NEON LAMP, PLIERS, and SLINGSHOT (L).
- Use SLINGSHOT on the upper left part of the window frame, take SCRAPER (M).
- Use SCRAPER on the moss, take COINS 1/2 and DUCT TAPE (N).
- Use COINS on the coin receiver, examine the bear, use PLIERS on it, earn WIRE (O).
- Use NEON LAMP, DUCT TAPE, and WIRE on BROKEN NEON SIGN, earn NEON SIGN.
- Go to the Crypt.
- Use NEON SIGN on the darkness, click on the pictures that match the highlighted words: king, flowers, and knight, take SCOOP PART (P).
- Use SCOOP PART on SCOOP, earn SCOOP.
- Go back.
- Use SCOOP on the pile of earth, take LOOP and SCOOP NET (Q).
- Go to the Reconstruction Zone.
- Use SCOOP NET on the water (R).
- Easy solution: L, U, U, U, L, D, R, U, R, U, U, R, R, D, D, L, D, R, U, R, R, U, R, D, L, R, R, D, L, U, D, D, D, L, L (S).
- Hard solution: L, U, U, U, L, D, R, U, R, R, R, U, U, L, L, D, D, R, R, D, D, L, U, R, U, R, R, R, U, L, D, R, R, D, L, U, R, D, L, D, D, L, L (T).
- Earn NEEDLE AND THREAD 2/2.
- Go to the Crypt.
- Use NEEDLE AND THREAD and LOOP on the bag, take PLIERS (U).
- Play puzzle, earn JEWEL RING (V).
- Go to the Reconstruction Zone.
- Use PLIERS on the nails (W).
- Use JEWEL RING on the window glass, take MIRROR SHARD (X).
- Use MIRROR SHARD on the mirror (Y).
- Easy solution: 1, 2, 3, 4, 5, 6 (Z).
- Hard solution: 1, 2, 3, 4, 5, 6, 7, 8, 9 (A).
- Take KEY FRAGMENT and OWL FIGURINE (A).
- Use OWL FIGURINE on the bench, take CRACKER, TUNING PEGS 1/2, and GEARS (B).
- Use GEARS on the mechanism (C).
- Easy solution: Follow the instructions in the image (D).
- Hard solution: Follow the instructions in the image (E).
- Take DUSTER (F).
- Use DUSTER on the webs, take OPENER (G).
- Use OPENER on the bolted-down board, take MAGNET (H).
- Use MAGNET on the rose, get ROSE AMULET (I).
- Use ROSE AMULET on the doors (J).
- Easy solution: Follow the instructions in the image (K).
- Hard solution: Follow the instructions in the image (L).
- Go forward.
- Take TORN GLOVE and HANDLE (M).
- Use HANDLE on the window, use CRACKER on the bat, get BAT, take FILE (N).
- Use BAT on the bear’s right shoulder, take SCREWS 1/2 and METAL PLATE (O).
- Use FILE and METAL PLATE on KEY FRAGMENT, get KEY.
- Use KEY on the door (P).
- Easy solution: D, Lx3, Ux2, R, Ux2, Rx3, Dx2, L, D, R, L, D, Lx2, Ux2, Dx2, Rx2, Ux2, L (Q).
- Hard solution: U, Rx3, D, U, Lx2, Dx2, L, D, Rx2, D, Rx4, U, L, D, L, U, D, Lx2, U, R, Lx2, Ux3, Rx2, D, L, U, L, Dx2, L, D, Rx2 (R).
- Go forward.
- Select this option (S).
- Take BUTTON and DAGGER (T).
- Take FRAME PARTS 1/2 and BOARDS, use DAGGER on the cloth (U).
- Play puzzle, earn BROOCH (V).
- Use BUTTON on the drawer, use BROOCH on the shards, take TUNING PEGS 2/2 (W).
- Use TUNING PEGS on the harp (X).
- Easy solution: Click: 1, 2, 3 (Y).
- Hard solution: Click: 1, 2, 3, 4 (Z).
- Take SCREWS 2/2 and THREAD AND NEEDLE (A).
- Use THREAD AND NEEDLE on TORN GLOVE, get PROTECTIVE GLOVE.
- Go back.
- Use PROTECTIVE GLOVE on the fire, get NAILS and FRAME PARTS 2/2 (B).
- Go to the Nether Pantry.
- Use FRAME PARTS on the pattern above (C).
- Easy solution: Place the fragments to match the image, then click A (D).
- Hard solution: Place the fragments to match the image, then click A (E).
- Take SIGNET RING (F).
- Go back.
- Use SIGNET RING on the drawer (G).
- Solution: Follow the instructions in the image (H).
- Take DIAMOND (I).
- Use DIAMOND on the window, take DIADEM (J).
- Go to the Nether Pantry.
- Use SCREWS and DIADEM on the drawer, take TUNING FORK (K).
- Play puzzle (L).
- Select this option (M).
- Take TRIPOD and TOY EGG (N).
- Use TOY EGG on the lawnmower, use TUNING FORK on the loose stone, take RAVEN (O).
- Use RAVEN on the bag, take HEAVY BOOK (P).
- Use HEAVY BOOK on the loose stone, take TASER (Q).
- Use TASER on the gates (R).
- Easy solution: Click: 1, 2, 3, 4, 5, 6, 7, 8, 9, 10, 11, 12, 13, 14 (S).
- Hard solution: Click: 1, 2, 3, 4, 5, 6, 7, 8, 9, 10, 11, 12, 13, 14, 15, 16 (T).
- Go forward.
- Take NOTEBOOK (U).
- Take TRIPOD LEG and HAMMER (V).
- Use BOARDS, NAILS, and HAMMER on the broken steps (W).
- Play puzzle, earn REAPER FIGURINE (X).
- Use REAPER FIGURINE on the mount near the identical reaper, take KEY FOB (Y).
- Use KEY FOB on the buzzer (Z).
- Go forward.
- Select this option (A).
- Go to the Library.

- Take CLOCK HANDS 1/2 and COOLING SPRAY (B).
- Use COOLING SPRAY on the tin box, take GOLD LEAF (C).
- Use GOLD LEAF on the globe, take GOLD FORK (D).
- Go back.
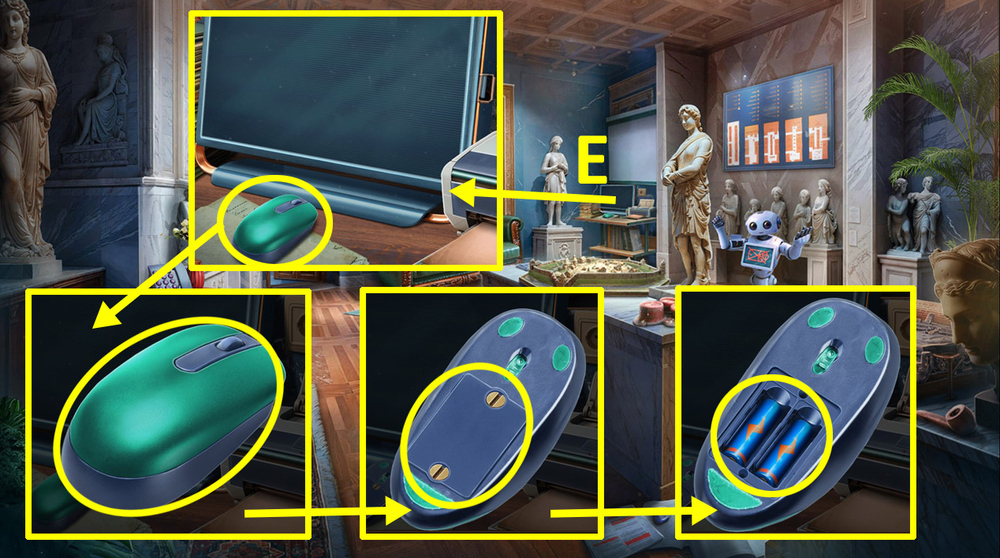
- Examine the computer mouse, turn it over, use opener on it, take BATTERIES (E).
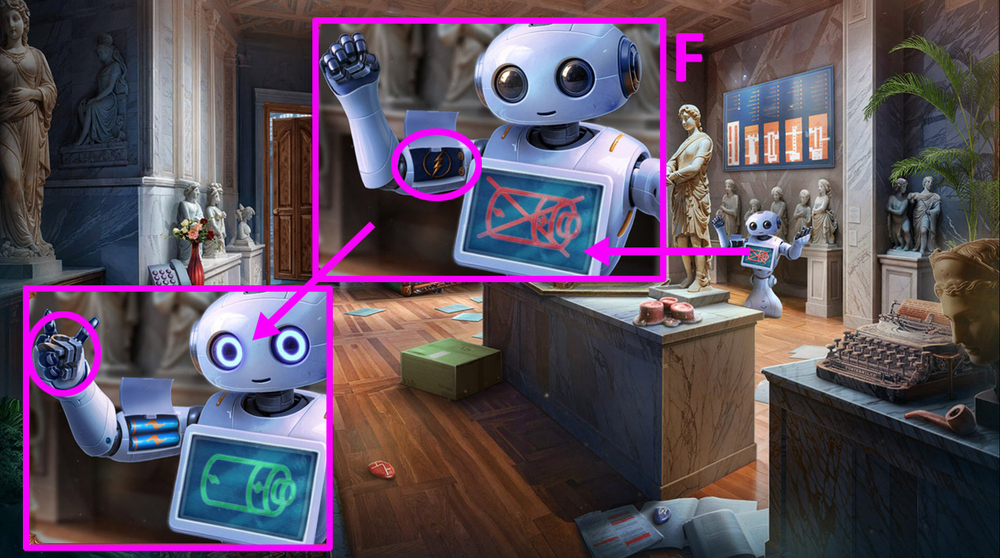
- Use BATTERIES on the robot’s arm, take TRIPOD BRACKET (F).
- Use TRIPOD LEG and TRIPOD BRACKET on TRIPOD, get TRIPOD.
- Use TRIPOD on the couch, take CABLE (G).
- Take CAKE and PAINT (H).
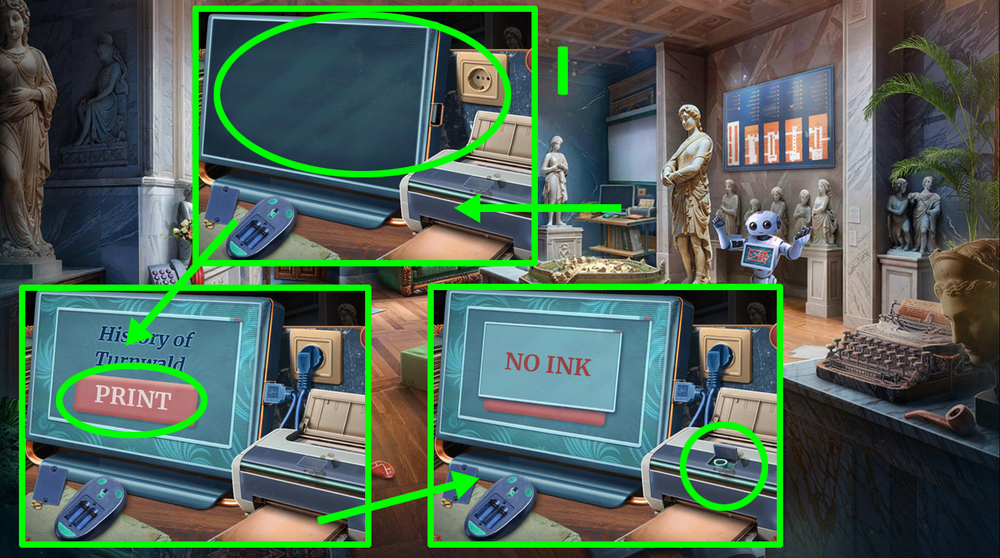
- Use CABLE on the computer, press the ‘Print’ button, use PAINT on the printer (I).

- Easy solution: Follow the instructions in the image (J).
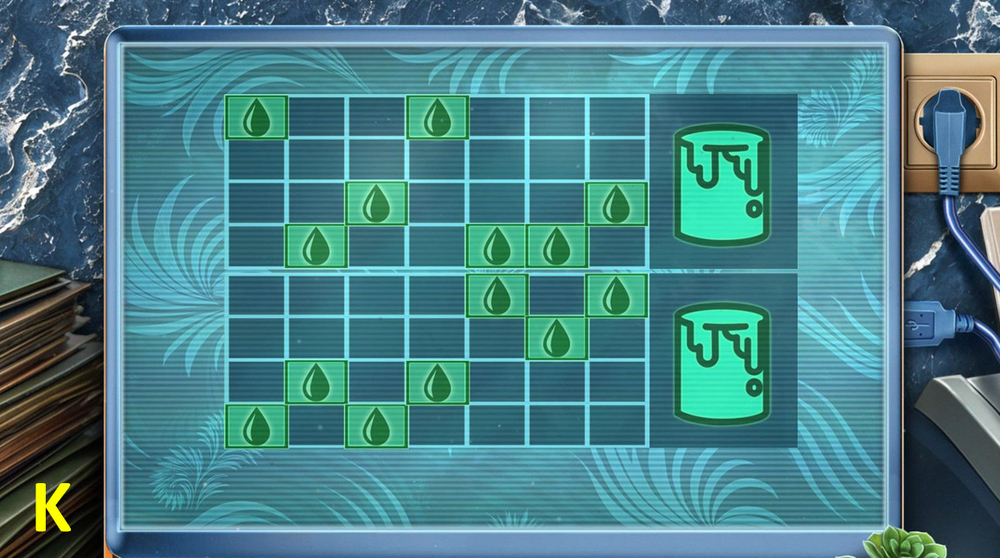
- Hard solution: Follow the instructions in the image (K).
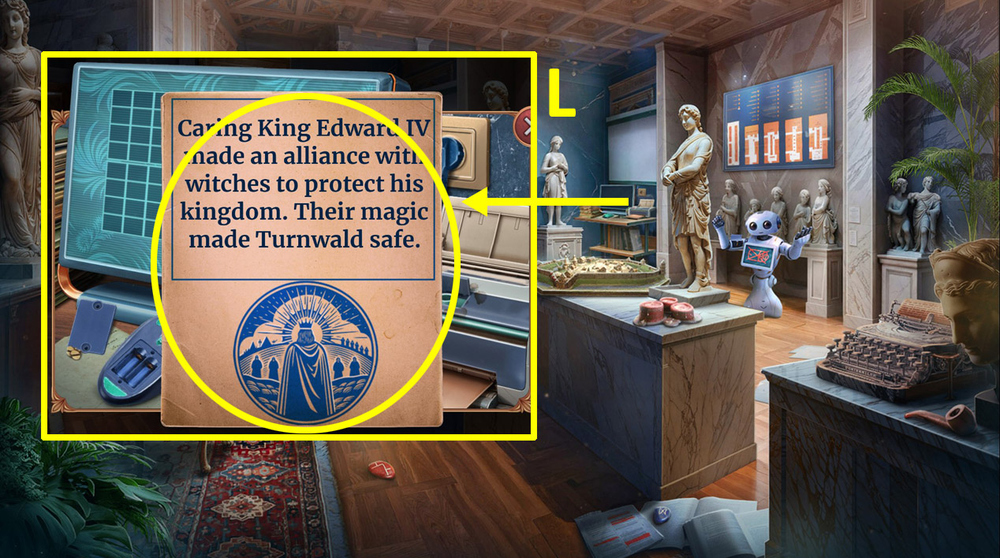
- Read the notes (L).
- Select this option, get GAME TOKEN (M).
- Go to the Reconstruction Section.
- Use GAME TOKEN on the machine (N).
- Easy solution: Follow the instructions in the image (O).
- Hard solution: Follow the instructions in the image (P).
- Take HEADPHONES (Q).
- Use HEADPHONES on the drain, get WINDMILL WINGS (R).
- Use WINDMILL WINGS on the windmill, get WINDMILL (S).
- Go to the Entertainment Area.
- Use WINDMILL on the pollen, take SELFIE STICK and KEY (T).
- Use KEY on the lock, take UMBRELLA, use GOLD FORK on the crack inside the chest, take CLOCK HANDS 2/2 (U).
- Go to the Library.

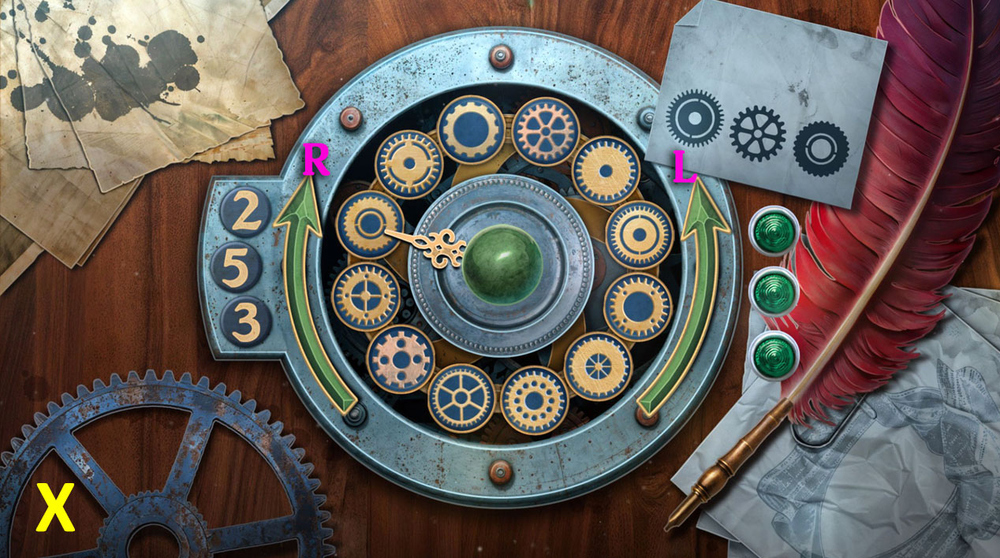
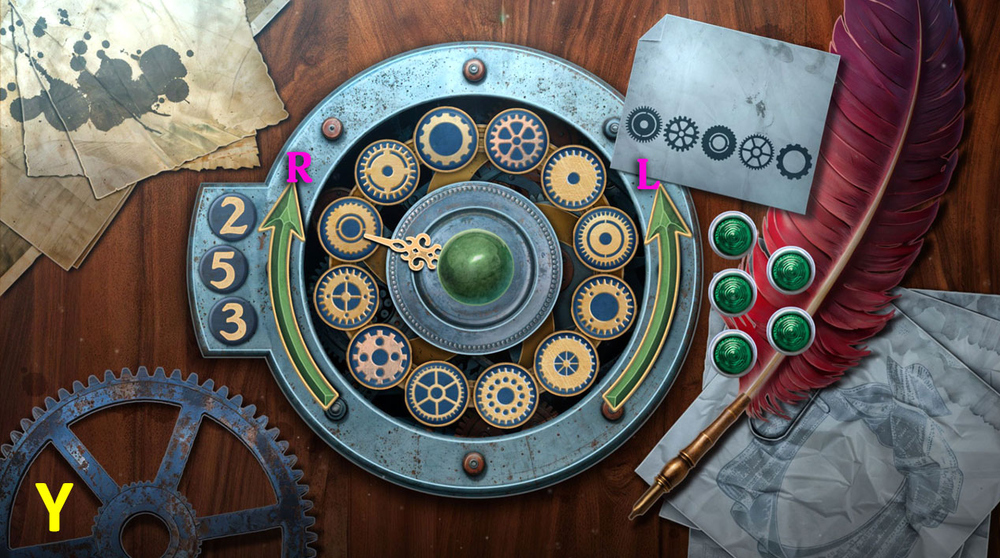
- Use CLOCK HANDS on the clock face (V).
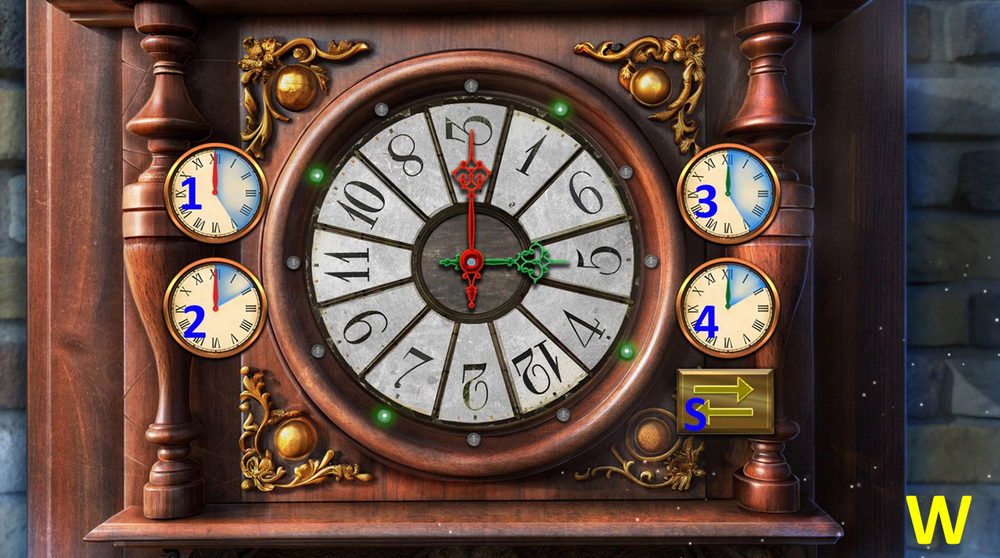
- Easy solution: Click: S, 2, 2, 2, 3, 4, 4, 4, S, 2, 2, 2, 3, 3, 3, S, 2, 2, 2, 3, 3, 3, S, 1, S, 3, 3, 3, 3, 3, S (W).
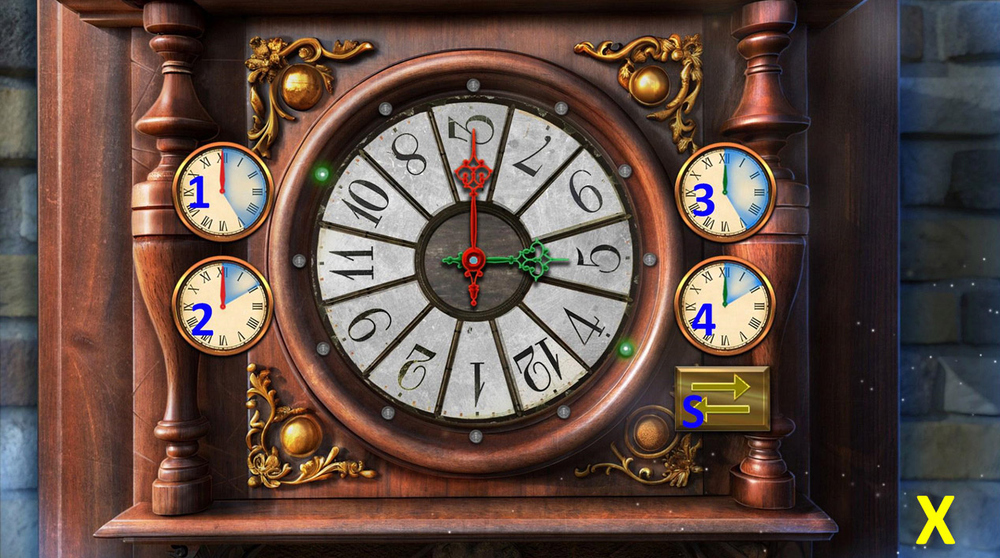
- Hard solution: Click: S, 4, S, 4, 2, S, 2, 2, 4, 4, 4, S, 3, 4, S, 1, S, 3, 4, 4, 4, S, 4, S (X).
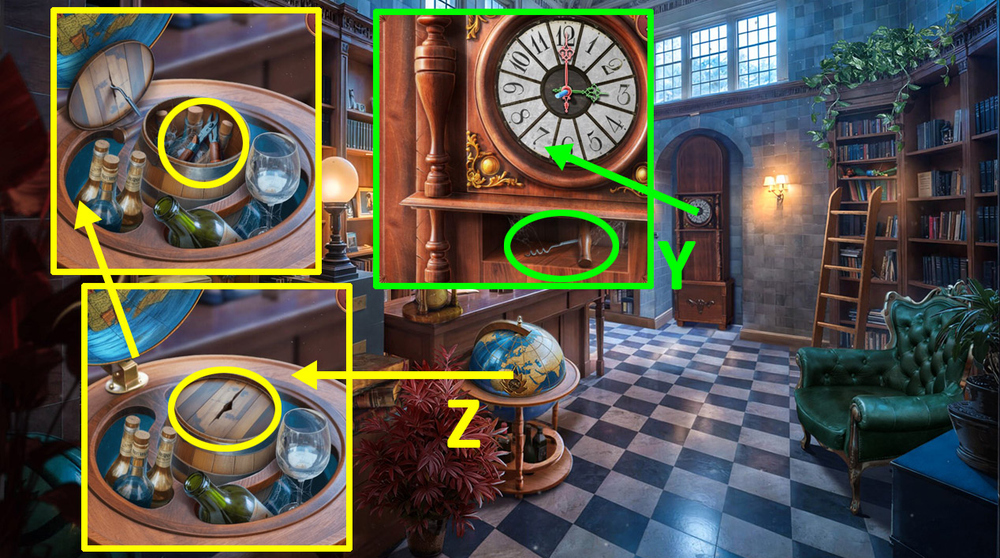
- Take CORKSCREW (Y).
- Use CORKSCREW on the barrel, take CUTTERS (Z).
- Go back.
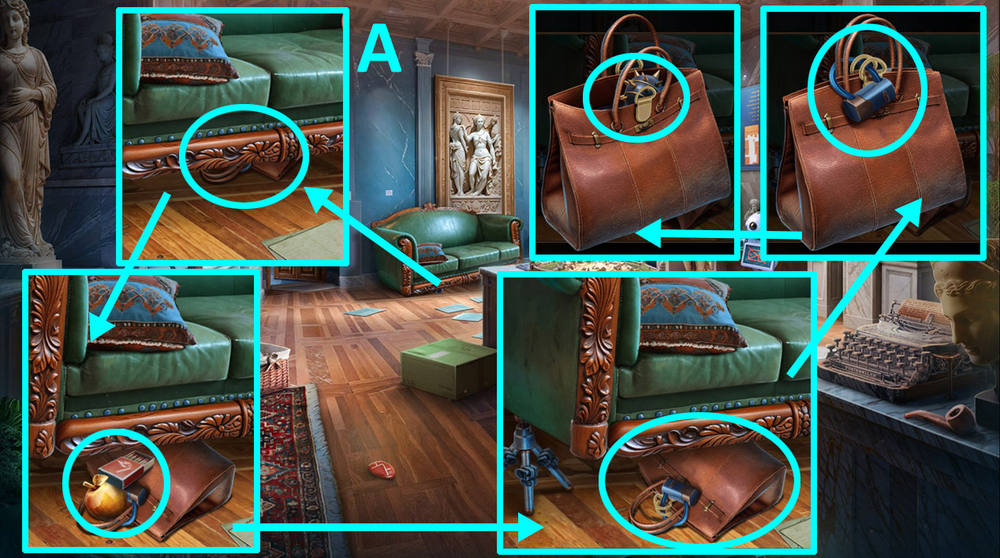
- Use UMBRELLA under the couch, take MATCHES and GOLDEN APPLE, examine the bag, use CUTTERS on the lock, take MORNING STAR (A).
- Go to the Library.
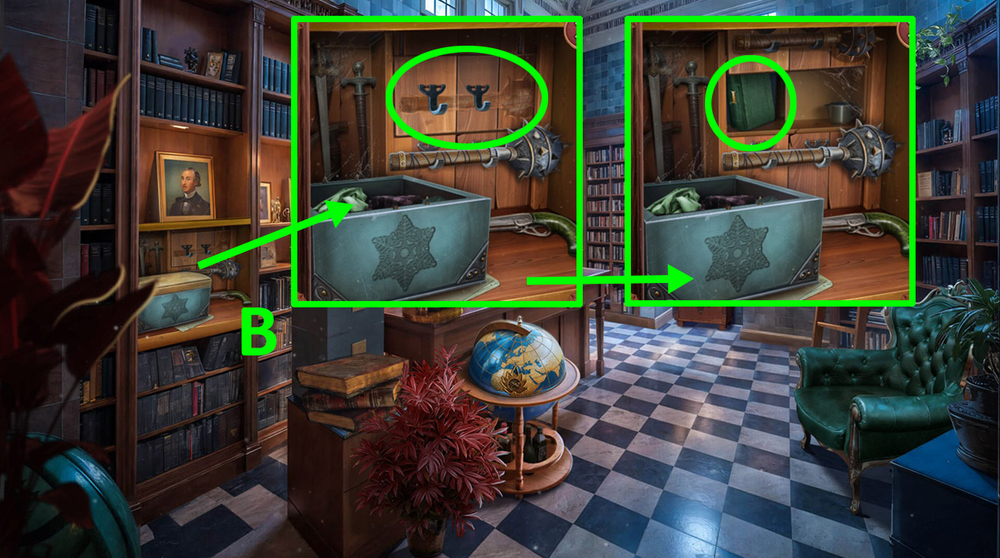
- Use MORNING STAR on the mount near the identical one, take OLD BOOK (B).
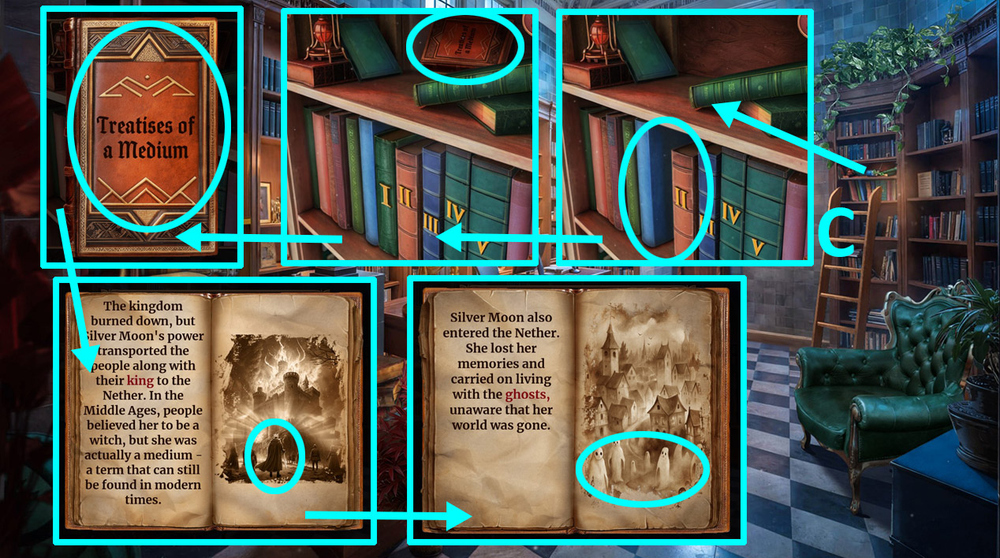
- Use OLD BOOK on the lower shelf, examine the book on the upper shelf, open it, play puzzle (C).
- Go to the Entertainment Area.
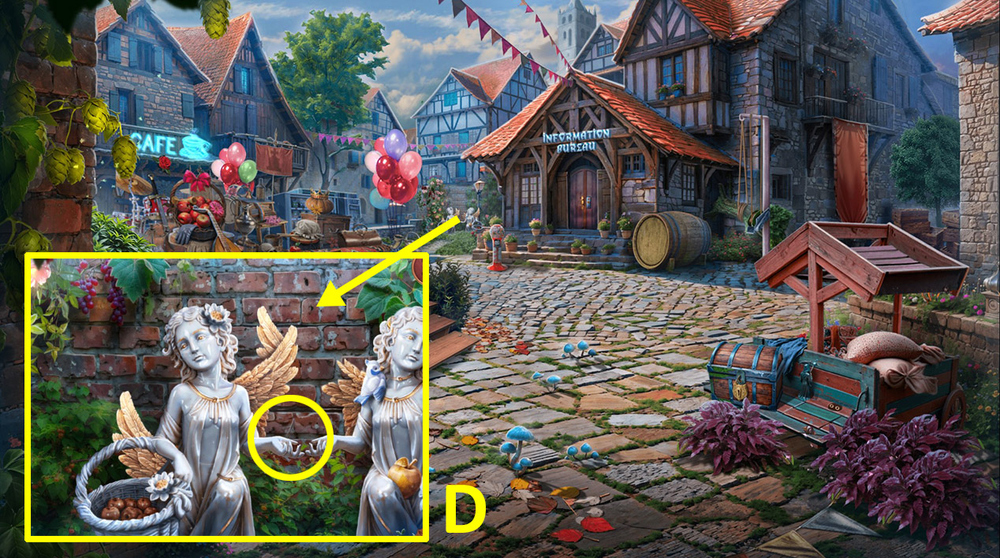
- Use GOLDEN APPLE on the palm of the left angel (D).
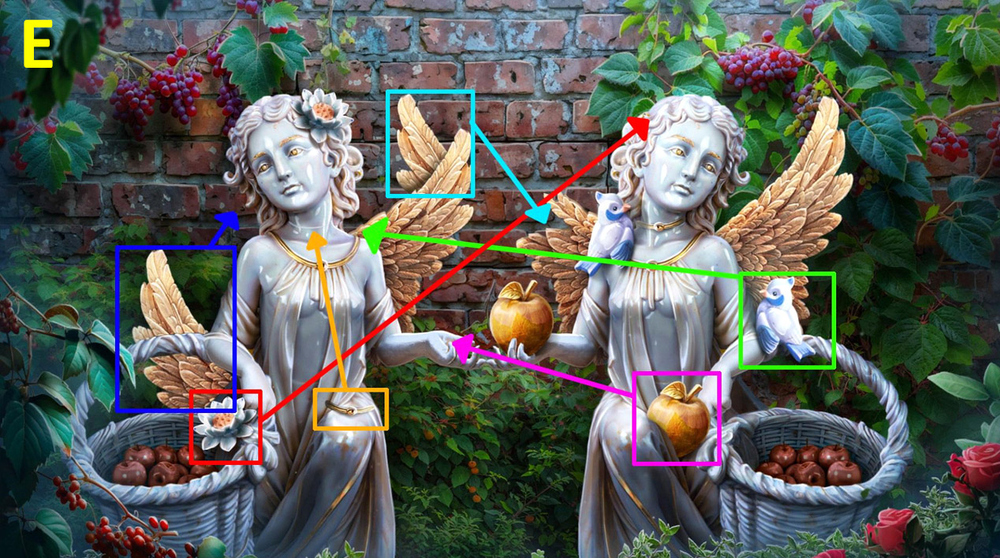
- Easy solution: Follow the instructions in the image (E).
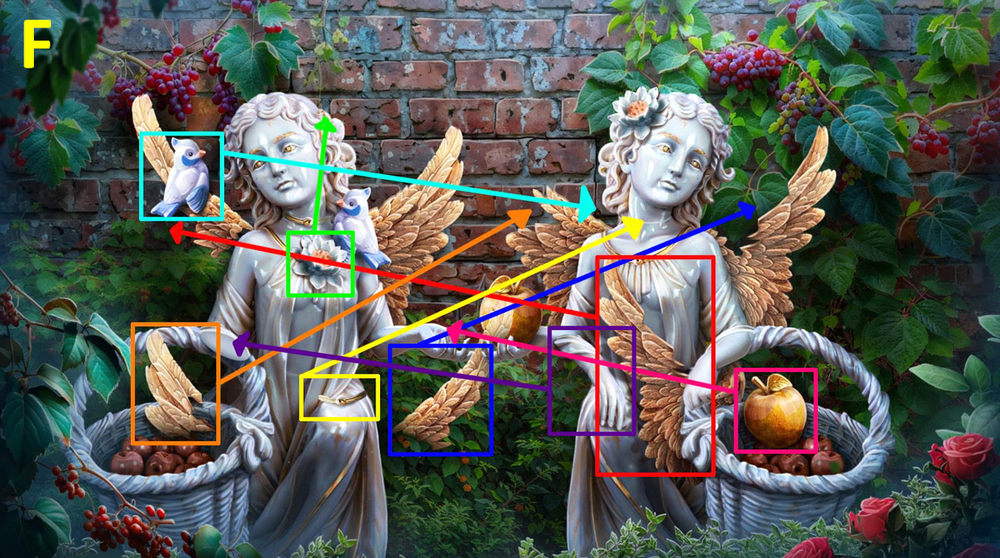
- Hard solution: Follow the instructions in the image (F).

- Take MECHANISM HANDLE (G).
- Use MECHANISM HANDLE on the winch, take SHOELACE and CHALK (H).
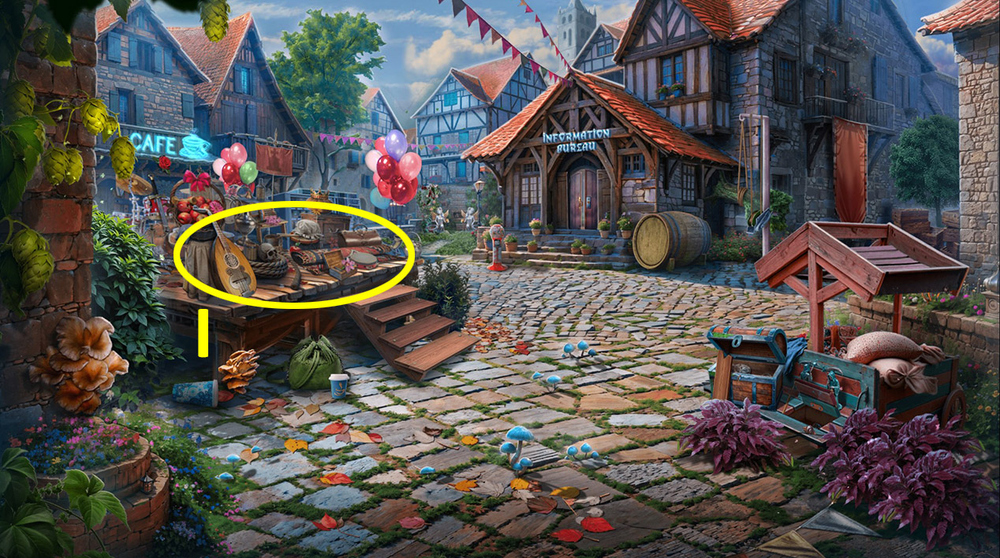
- Play puzzle, earn STATUE PART (I).
- Go back.
- Use STATUE PART on the gargoyle, take WI-FI PASSWORD (J).
- Go to the Bureau’s History Section.
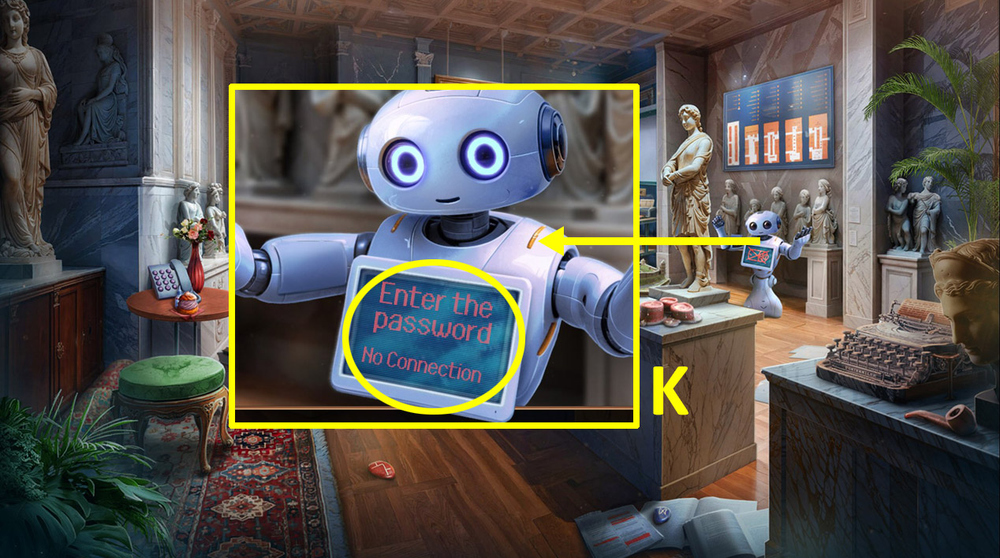
- Use WI-FI PASSWORD on the display (K).
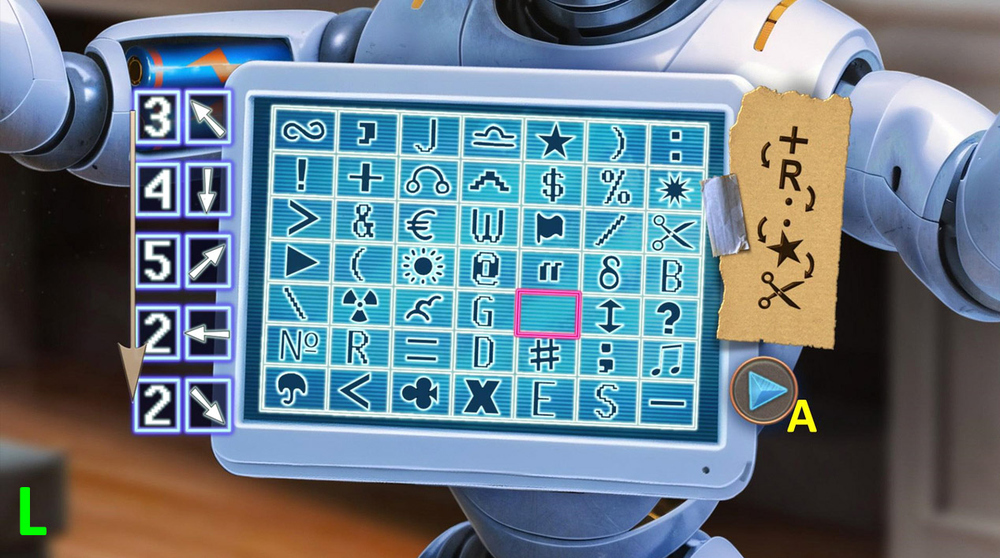
- Easy solution: Select the symbols indicated in the image, then press A (L).
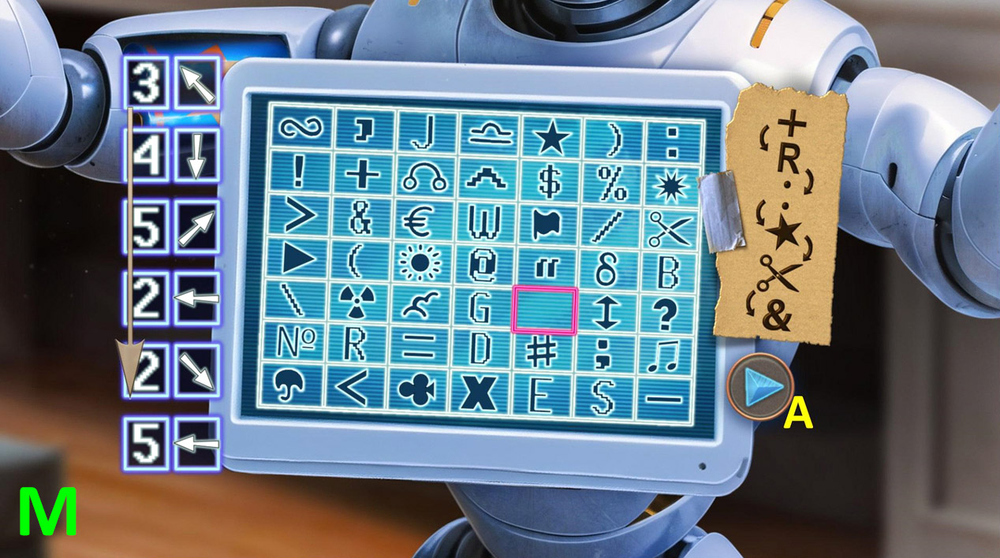
- Hard solution: Select the symbols indicated in the image, then press A (M).
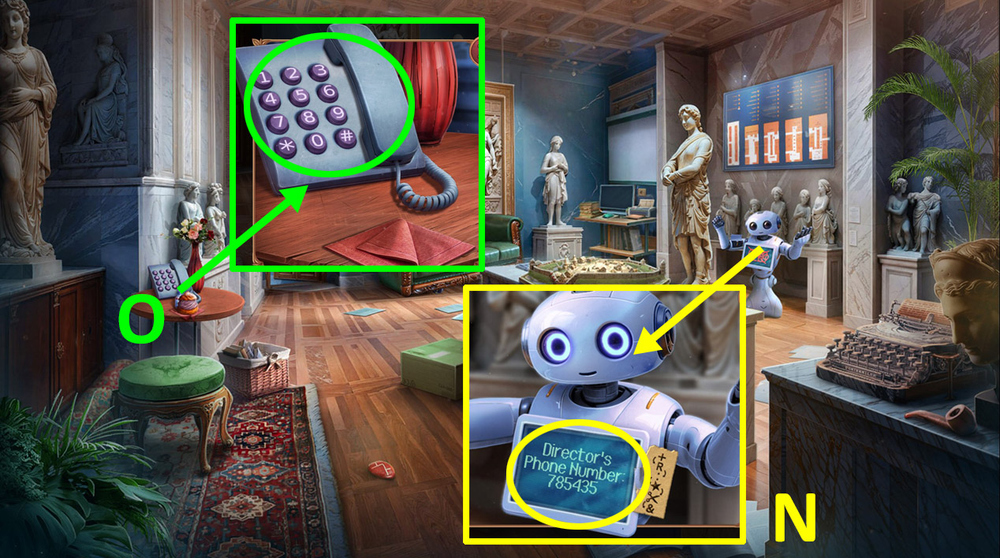
- Use NOTEBOOK and CHALK on the display, get DIRECTOR’S PHONE (N).
- Use DIRECTOR’S PHONE on the phone (O).
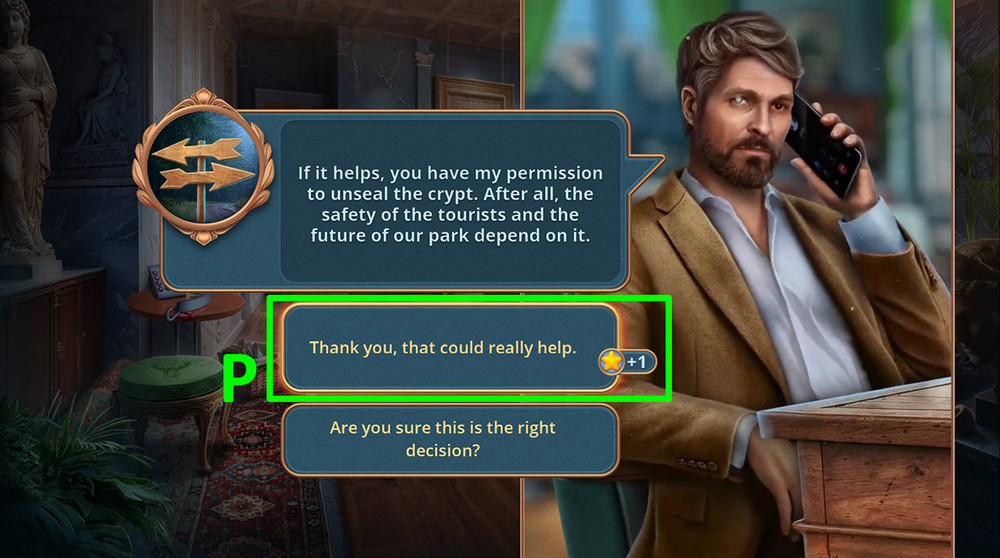
- Select this option (P).
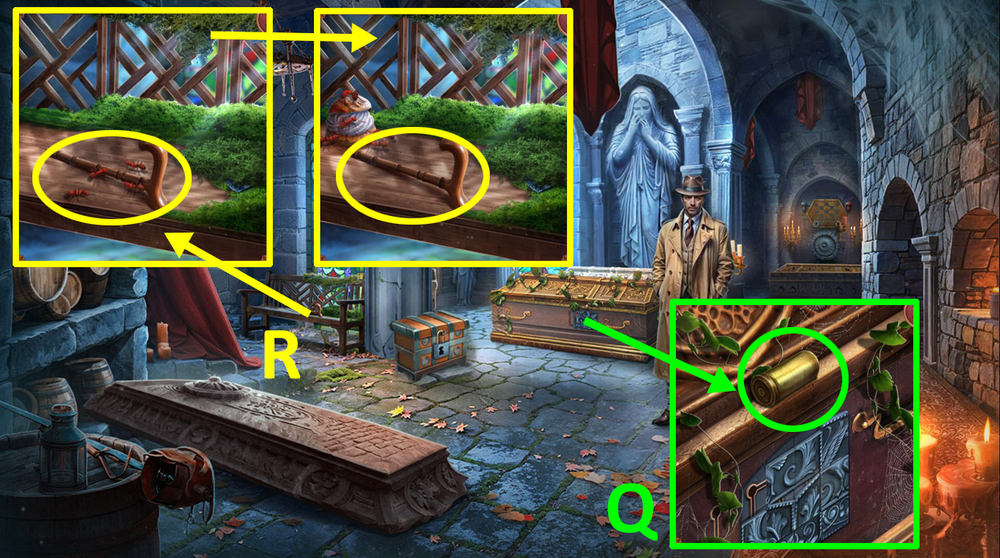
- Use the EMF detector on the background.
- Take BULLET (Q).
- Use CAKE on the ants, take BROKEN CANE (R).
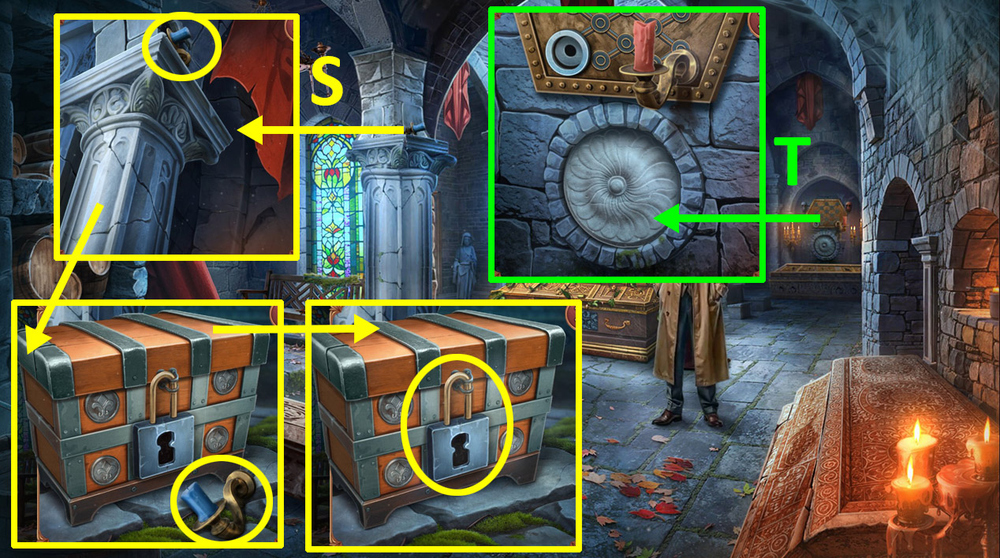
- Use SHOELACE and BROKEN CANE on SELFIE STICK, get GRABBING STICK.
- Use GRABBING STICK on the top of the column, take CANDLESTICK, use MATCHES and BULLET on the chest (S).
- Use CANDLESTICK on the mount in the wall (T).
- Easy solution: Follow the instructions in the image (U).

- Hard solution: Follow the instructions in the image (V).
- Take CLOAK and PAPER ROLL (W).
- Use PAPER ROLL on the chest, take KNIFE (X).
- Use KNIFE on the moss, take ORNAMENT PART (Y).
- Use ORNAMENT PART on the puzzle (Z).
- Solution: Follow the instructions in the image (A).
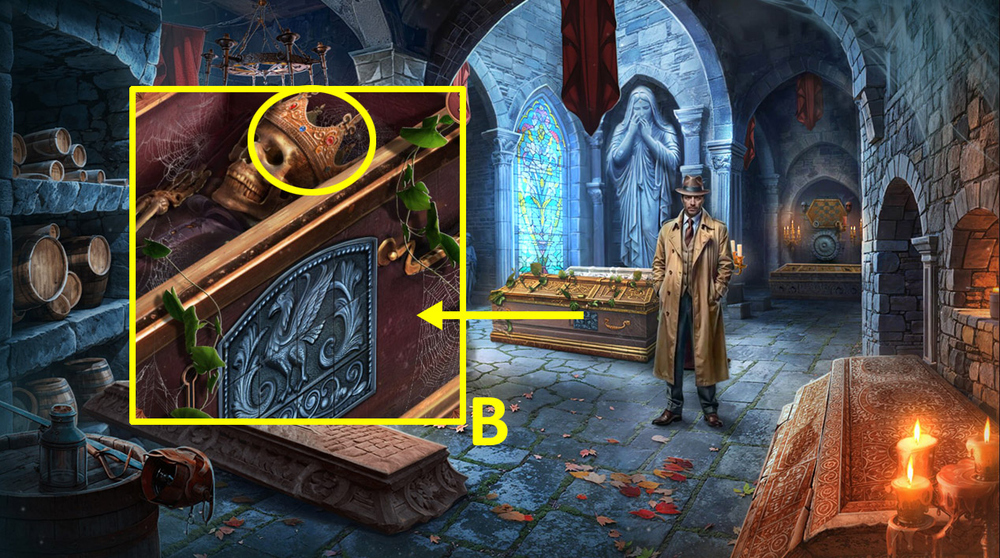
- Take CROWN (B).
- Walkthrough Bonus Chapter, at the link below.


