
Mystery of Myths 1: Heart of Athens – Join Elijah Reed, one of the best detectives ever, and solve a case where myths become reality. This time his investigation will lead to the heart of Greece, Athens, where ancient legends have begun to come to life, threatening peace and safety. Your guide in this dangerous adventure is Pan himself, the Greek god of nature. Together you will have to figure out what awakened the harpies, who suddenly began to attack people. While the townspeople are trying to come to their senses after another attack, you will go to interrogate the victims, investigate the scene and find out what is behind these inexplicable events. But this is just the beginning. In the course of your investigation, you’ll encounter a cult that worships Medusa and learn about an ancient plot that could turn Athens into a city of statues. You will have to get ahead of the mythical creatures, thwart their plans and find a way to restore the balance between the world of humans and the worlds of legends. Explore the iconic places of Athens, solve ancient riddles and uncover secrets that even the gods did not give rest. In this adventure every step can be the key to saving the city, but be prepared, the deeper you delve into the world of myths, the harder it is to distinguish truth from fiction. If you can not pass any of the puzzles or do not know where the items are, on our site you can watch the walkthrough of Mystery of Myths 1: Heart of Athens, and save Athens from disaster.
Mystery of Myths 1: Heart of Athens – Walkthrough
Here you can see the full walkthrough of Mystery of Myths 1: Heart of Athens game, namely for all chapters, including bonus chapter, in pictures.
- Earn CASE FILE.
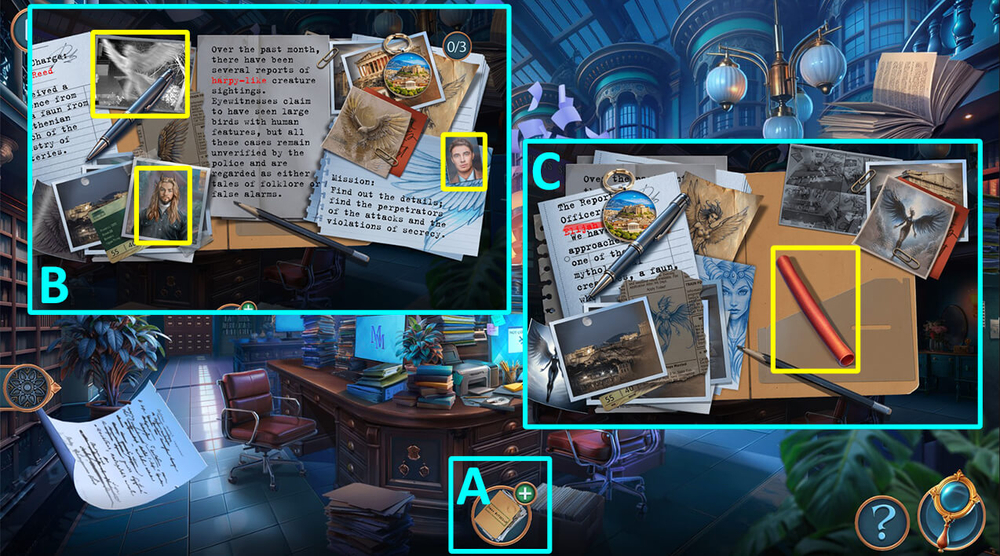
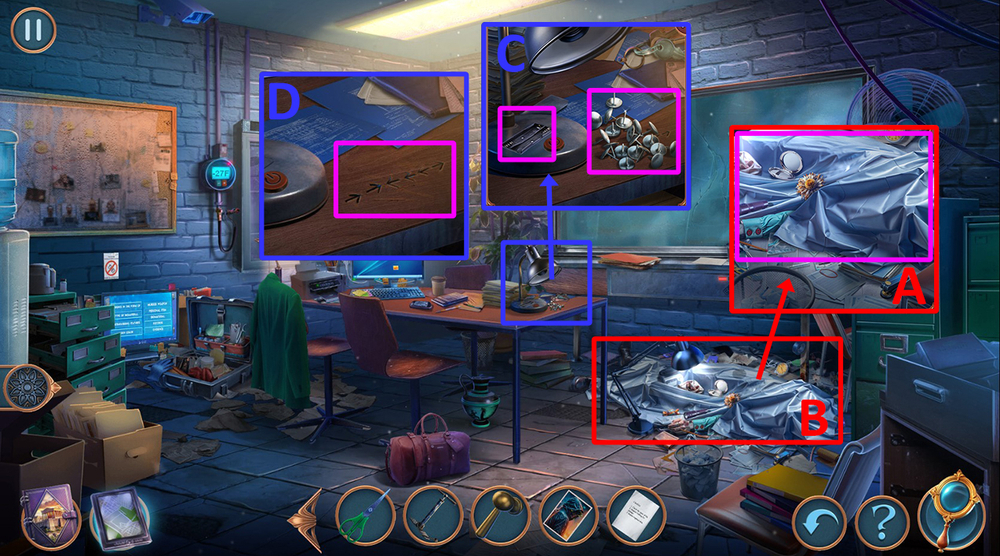
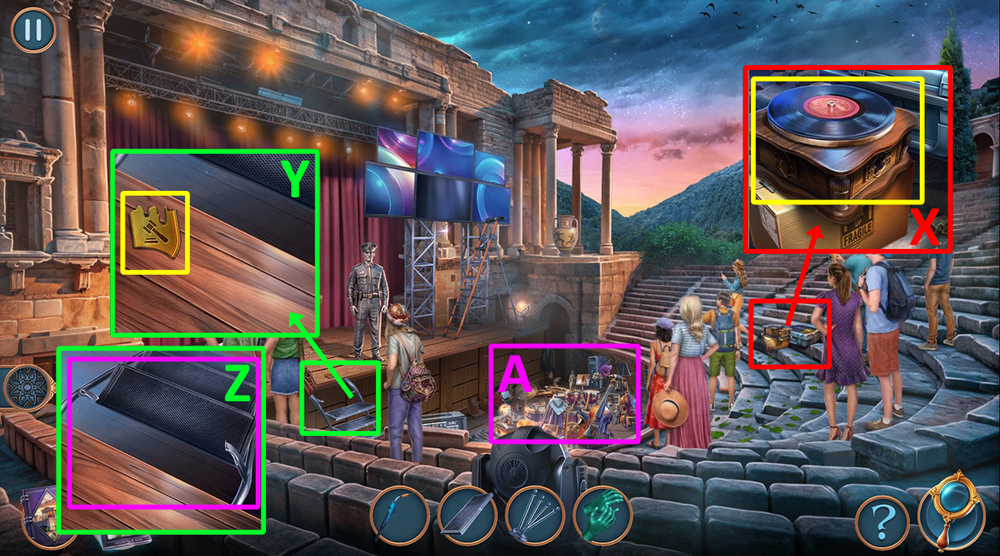
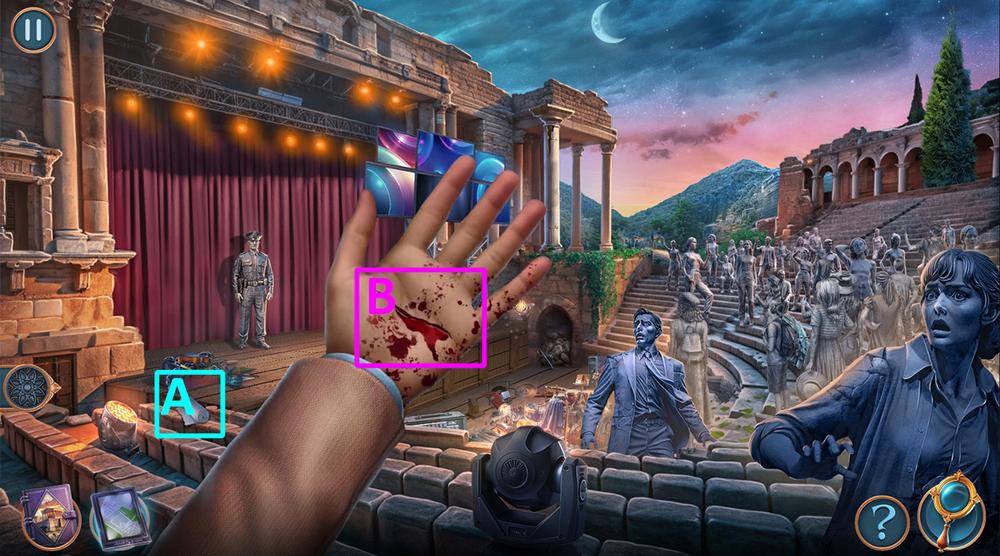
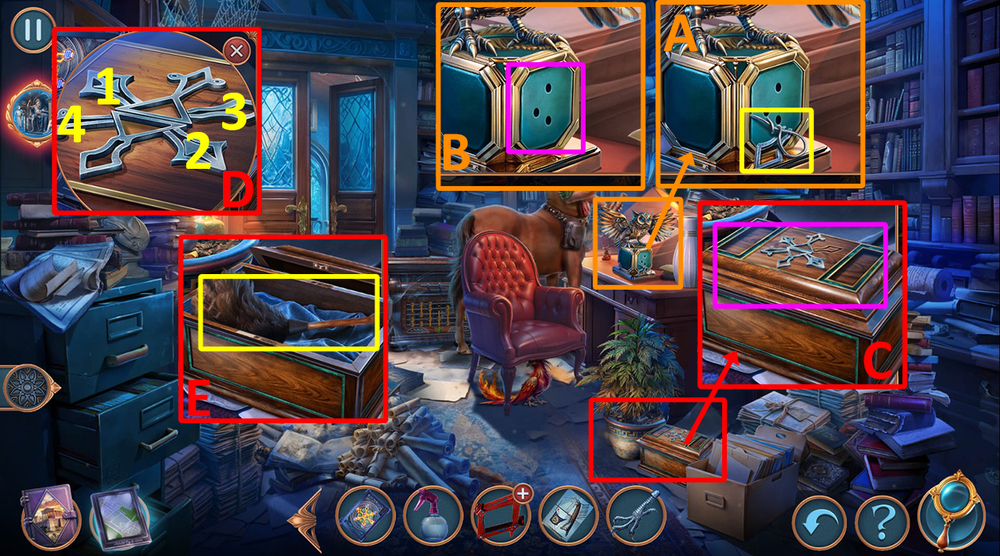
- Open CASE FILE, click on the folder (A).
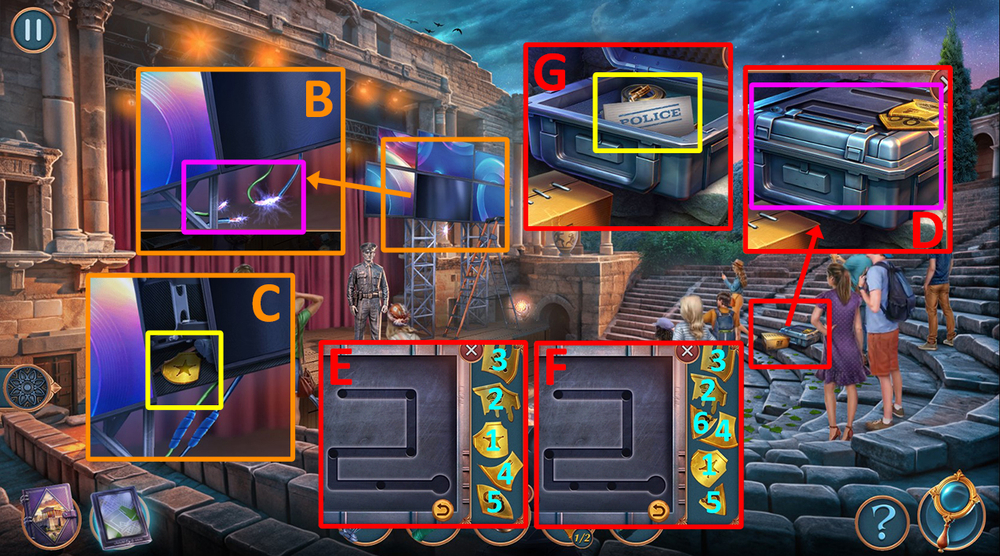
- Click on images matching the highlighted words (B).
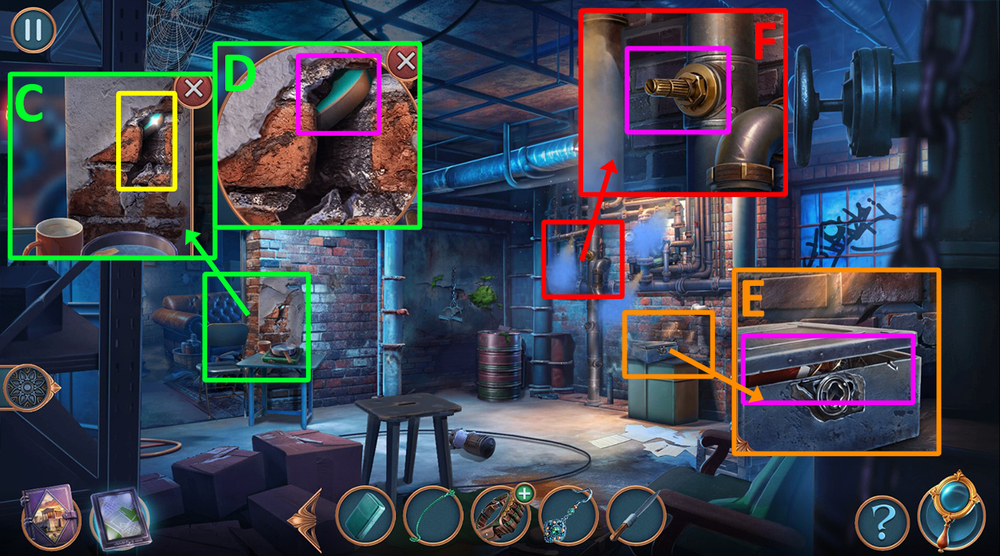
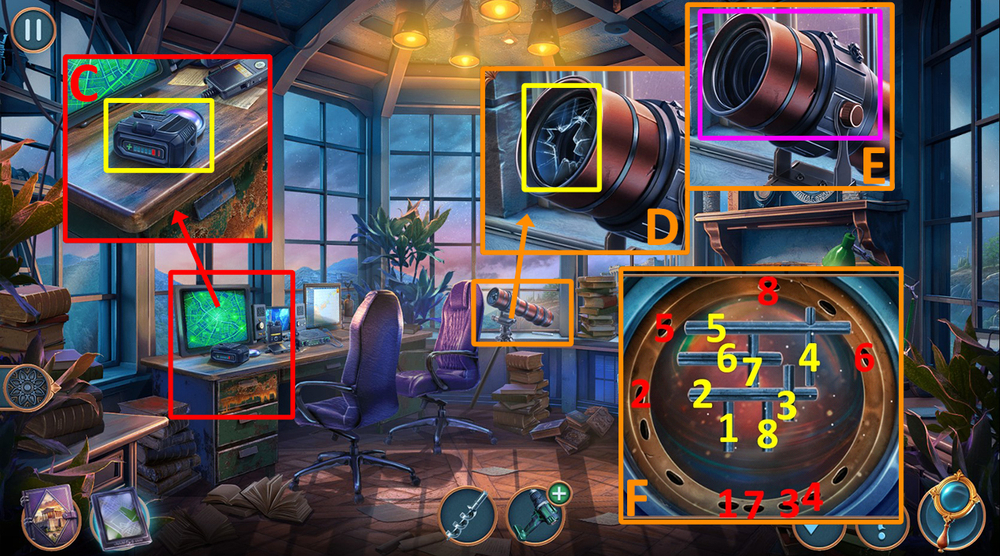
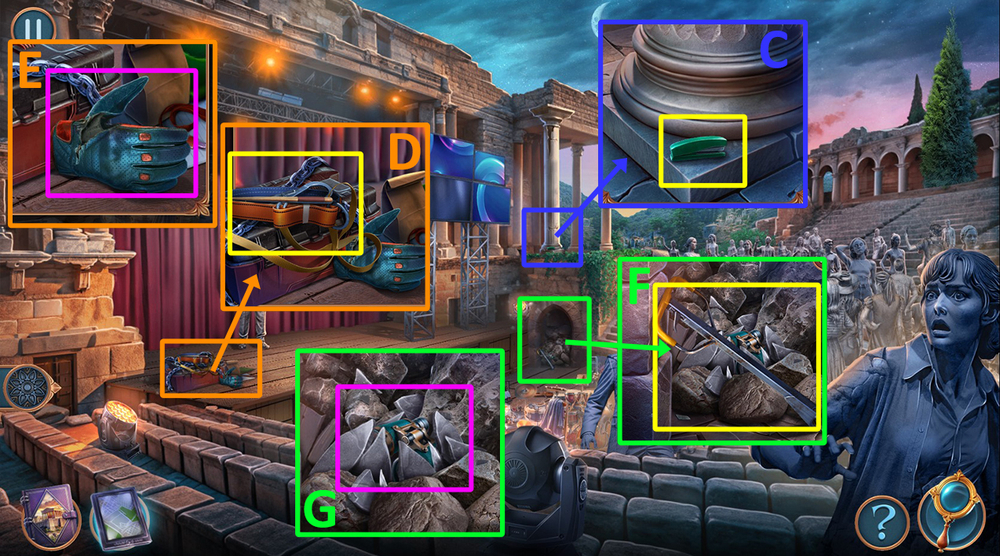
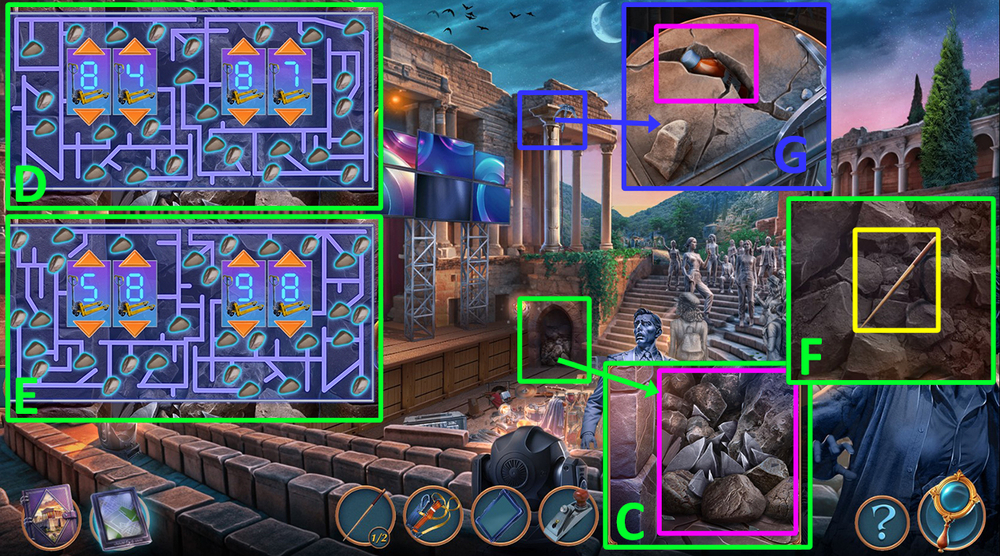
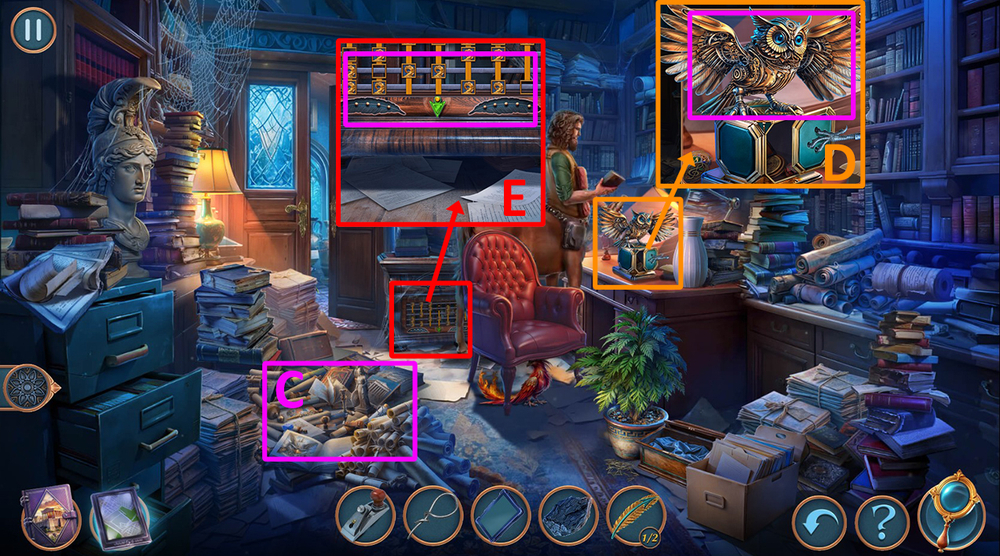
- Take HEAT-SHRINK TUBING (C).
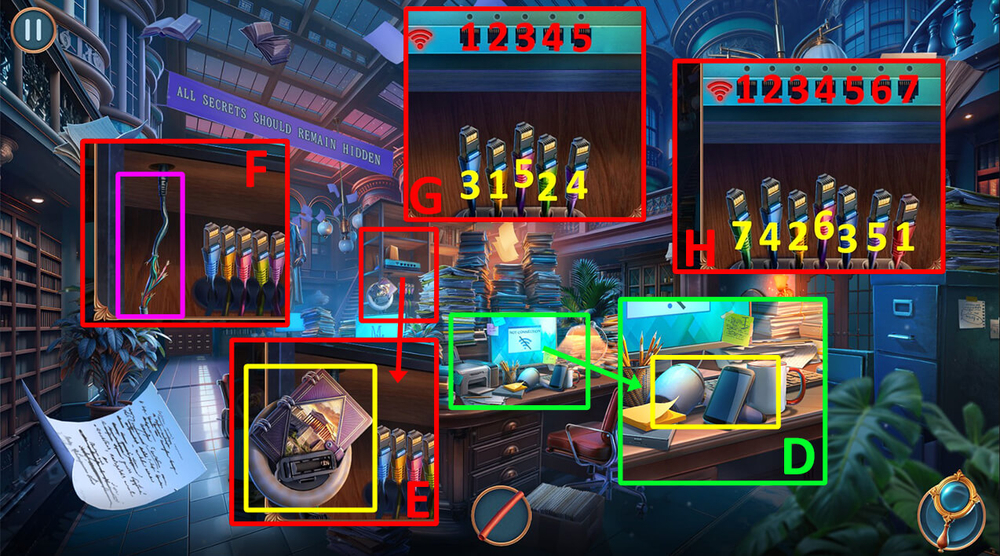
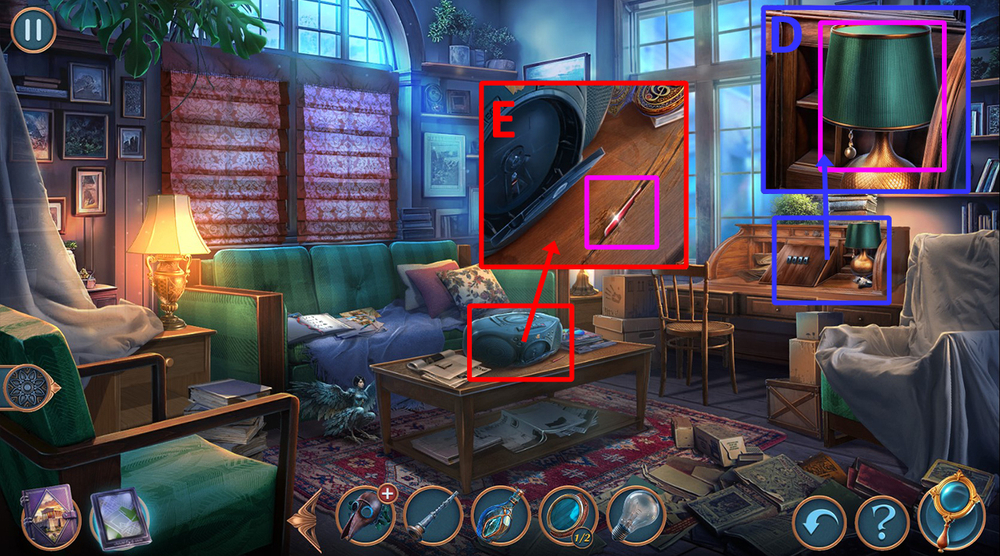
- Take HAIRDRYER and MY PHONE (D).
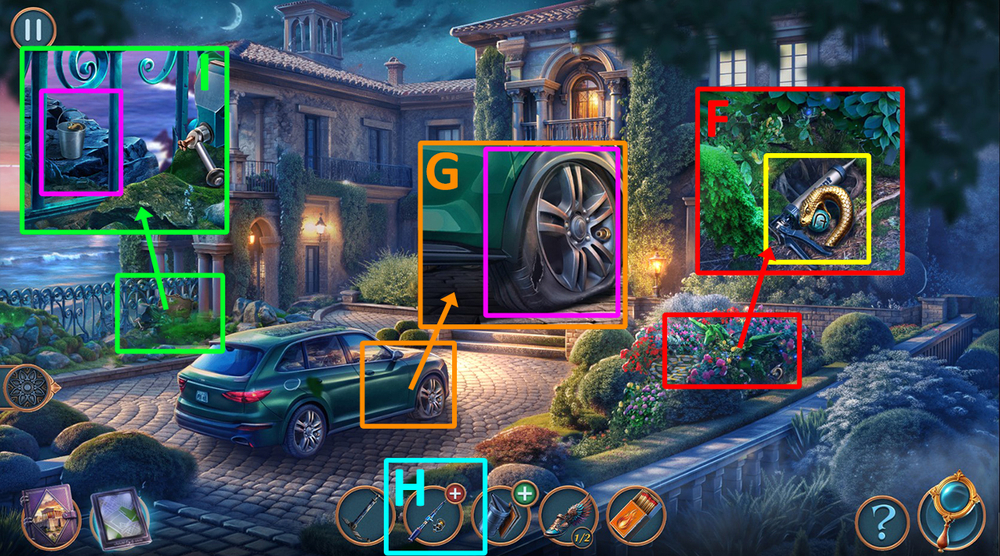
- Take the journal and LIGHT (E).
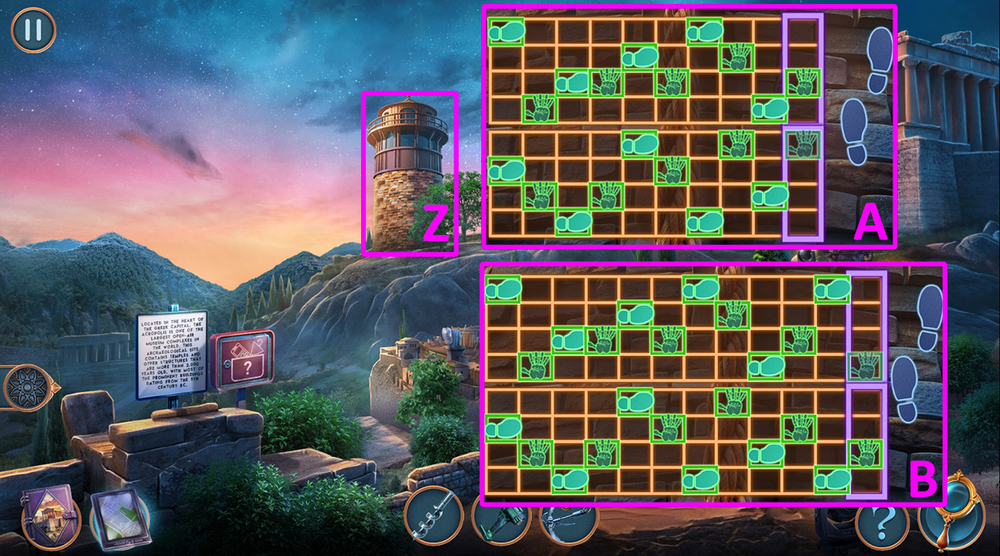
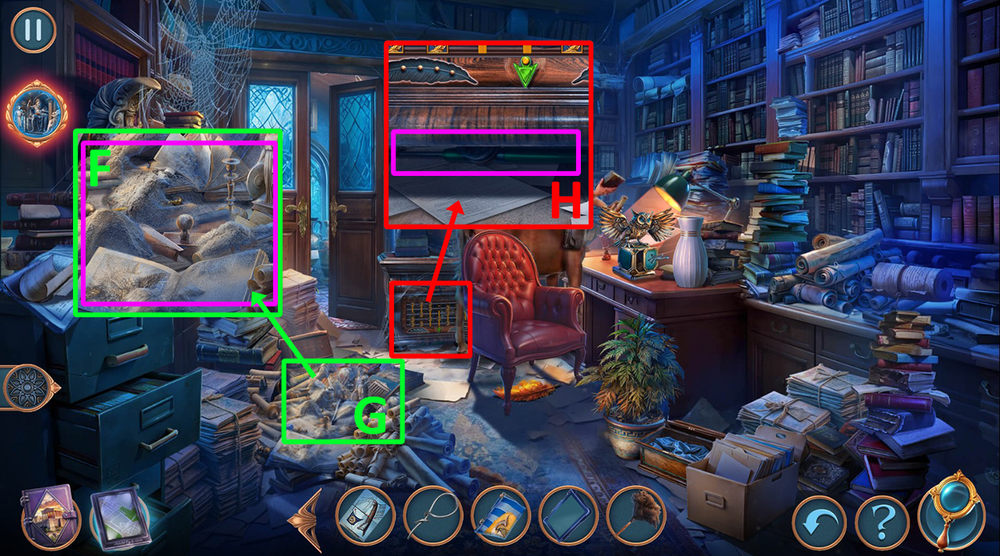
- Use HAIRDRYER and HEAT-SHRINK TUBING on the damaged wire (F).
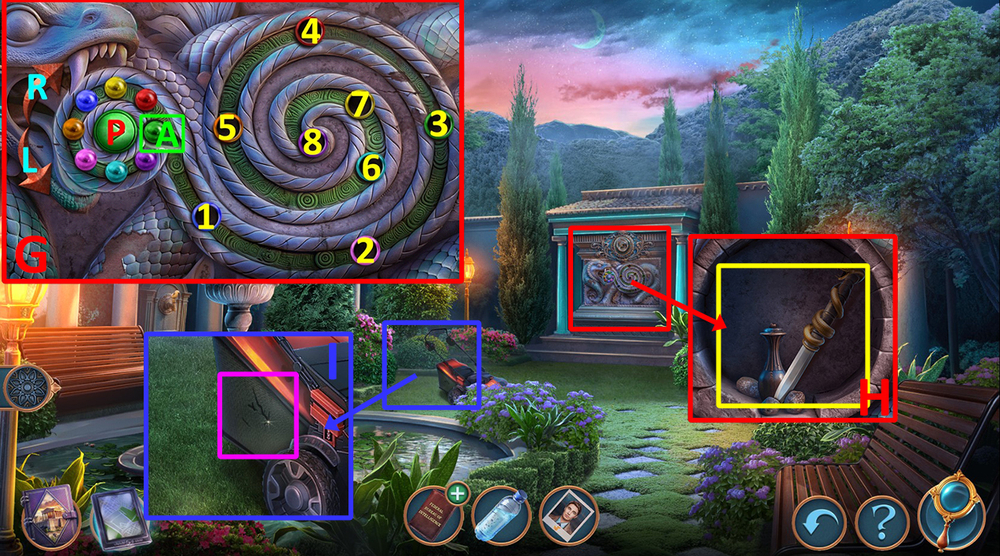
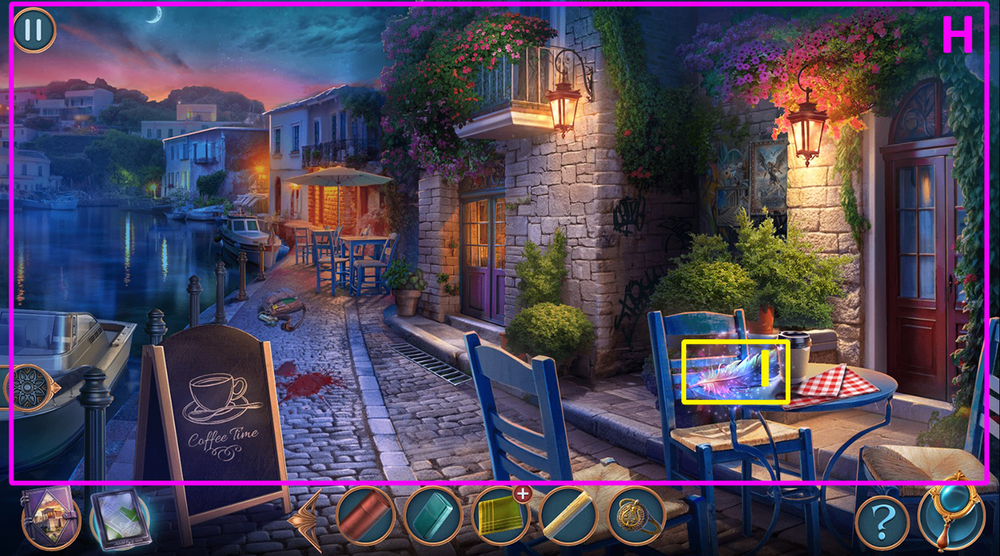
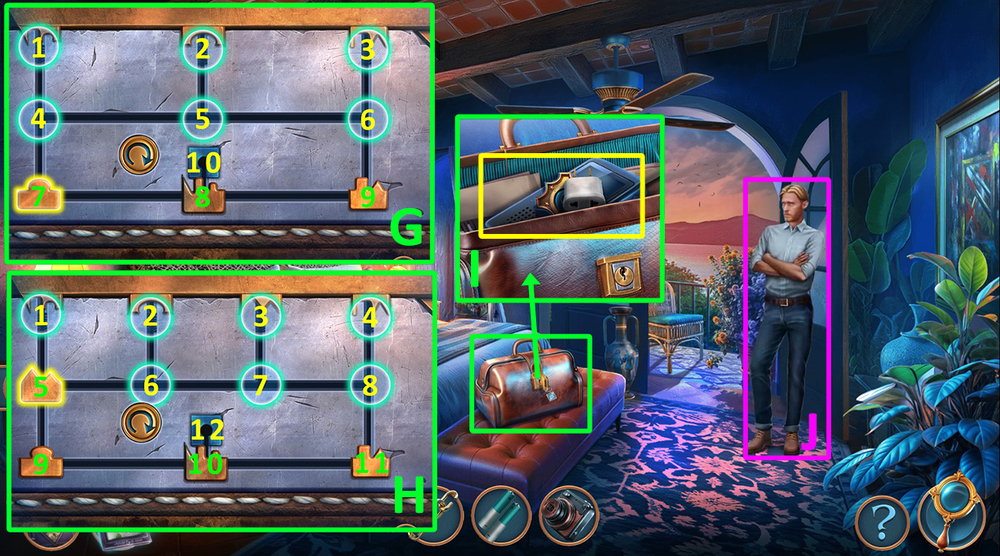
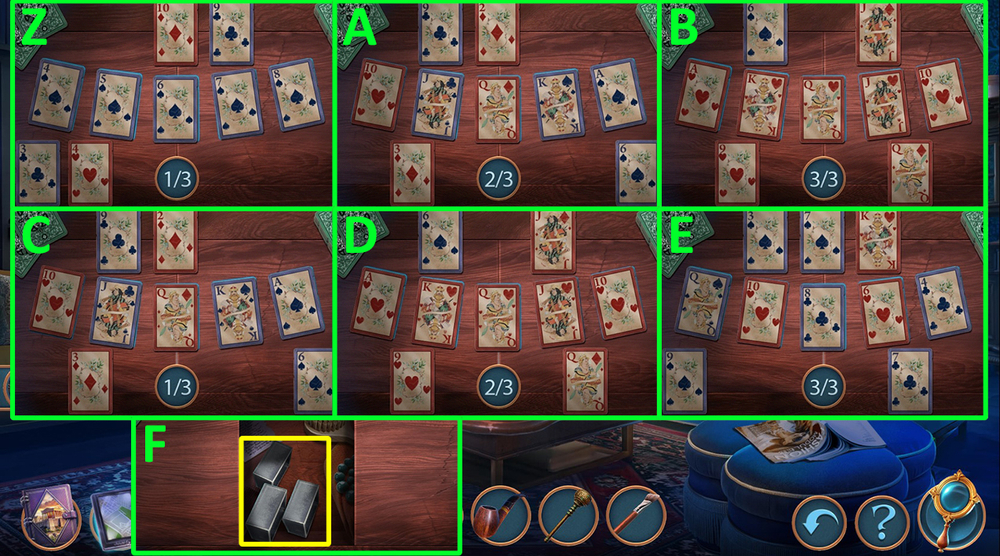
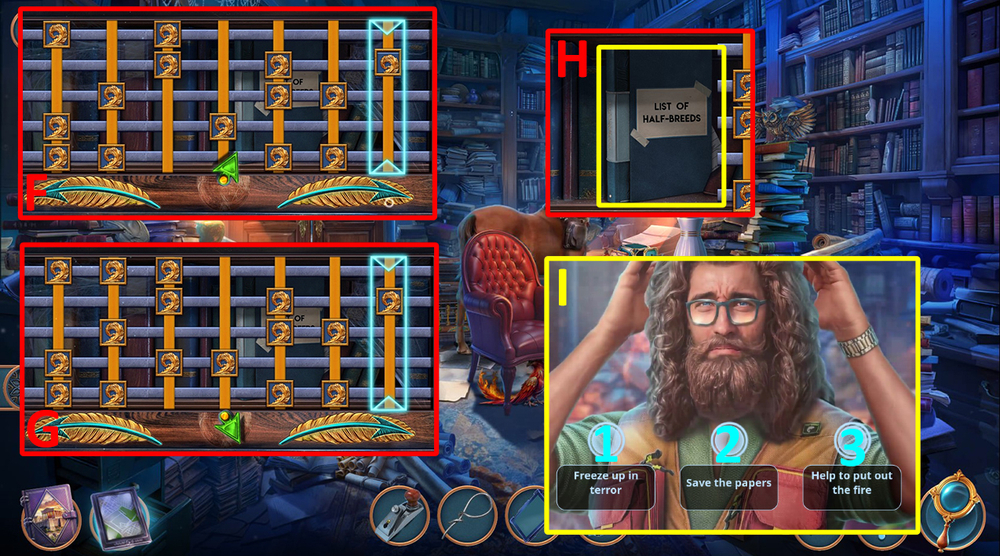
- Easy solution: Click on the same numbers (G).
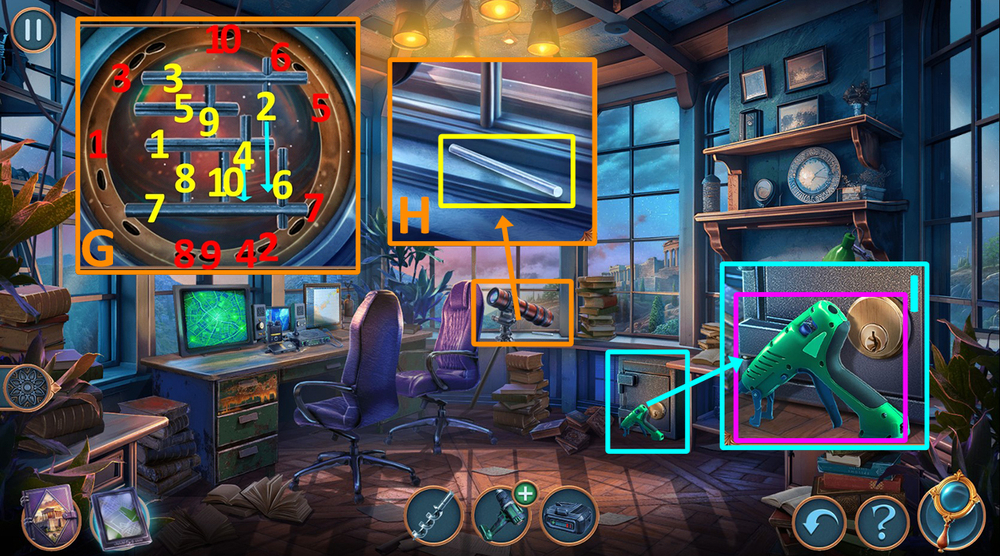
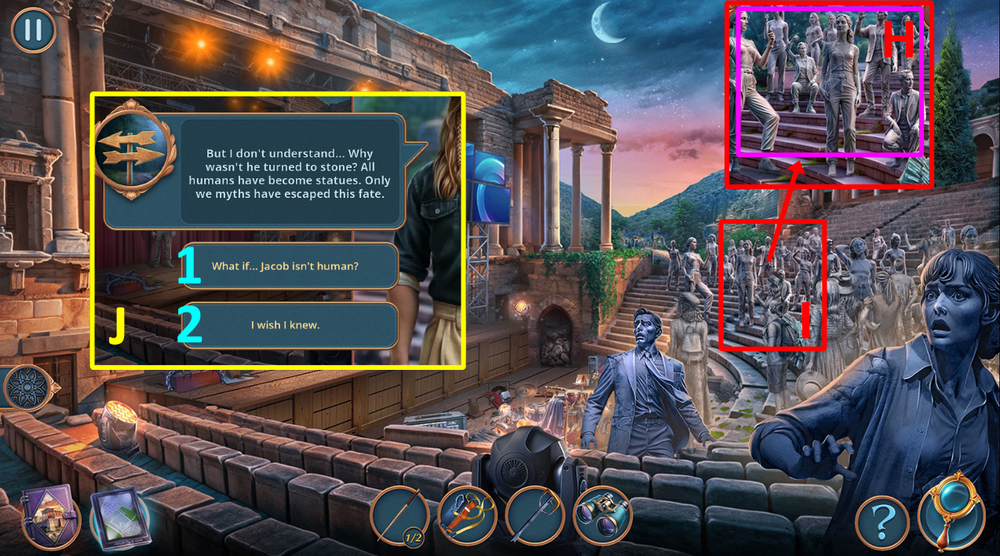
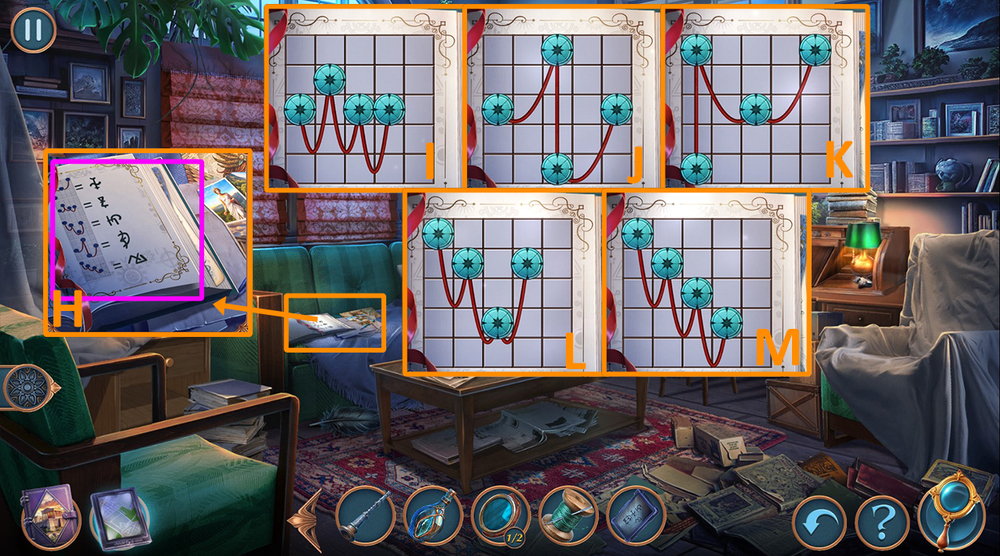
- Hard solution: Click on the same numbers (H).
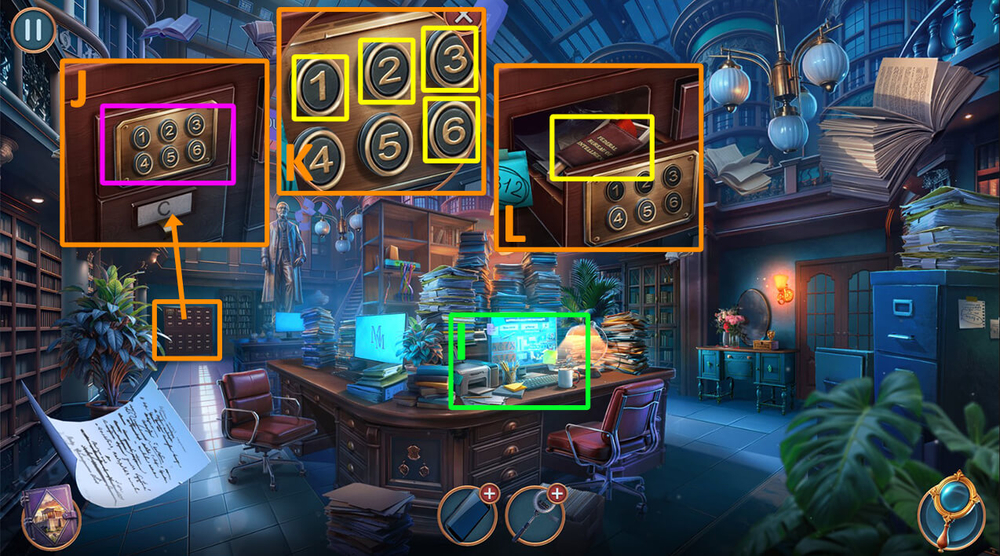
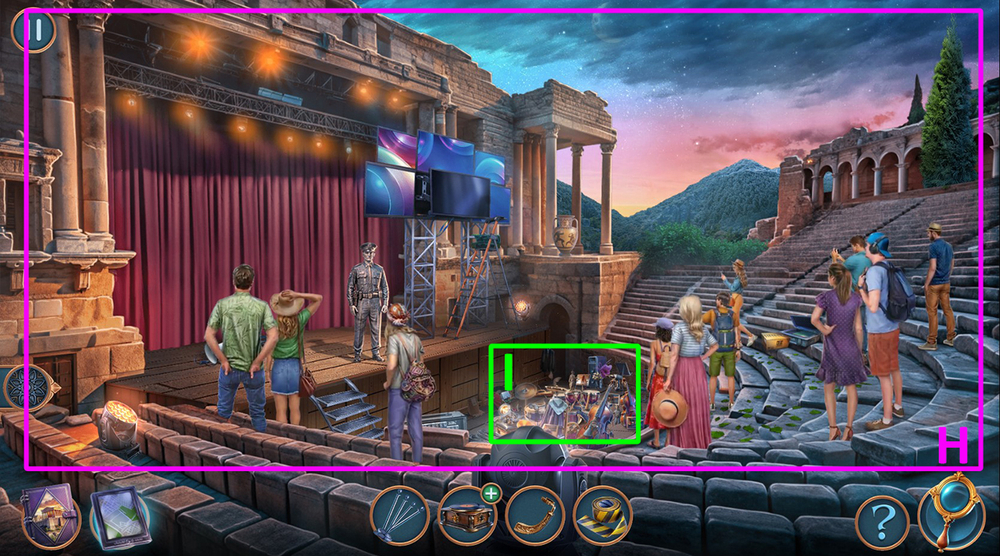
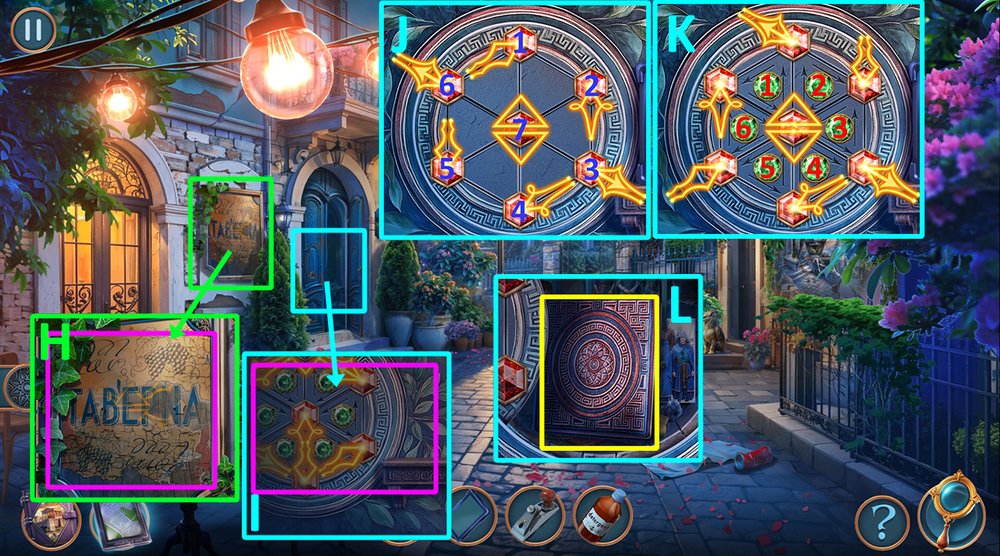
- Play puzzle, earn CODE (I).
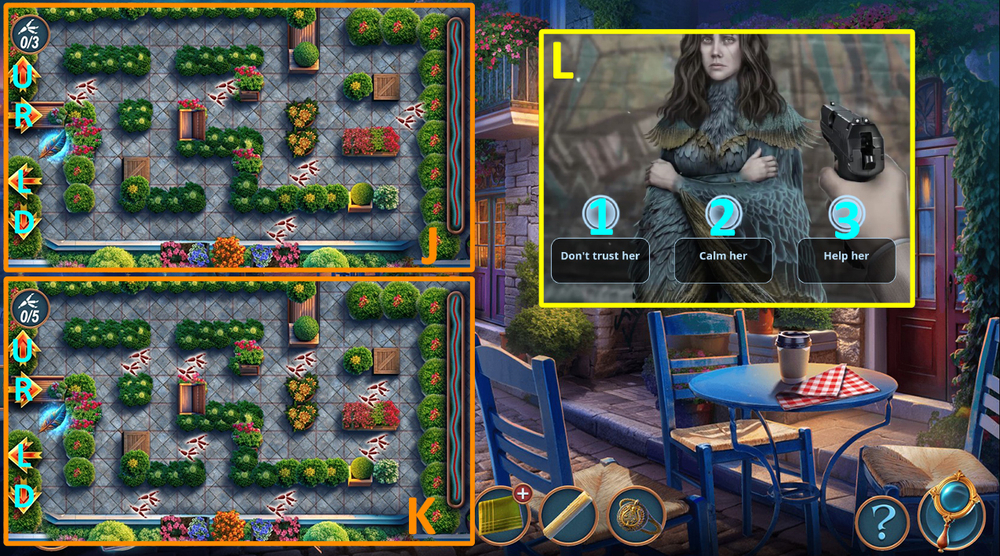
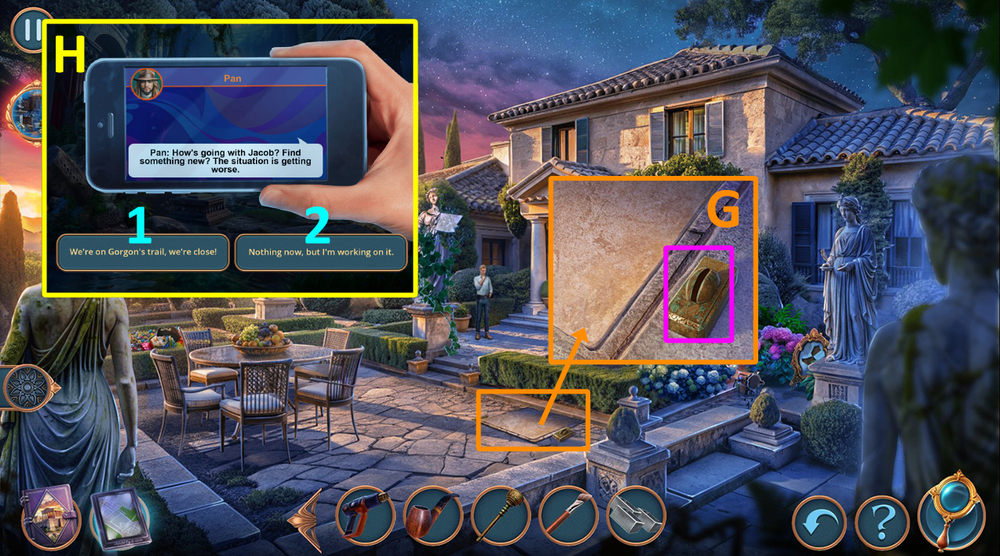
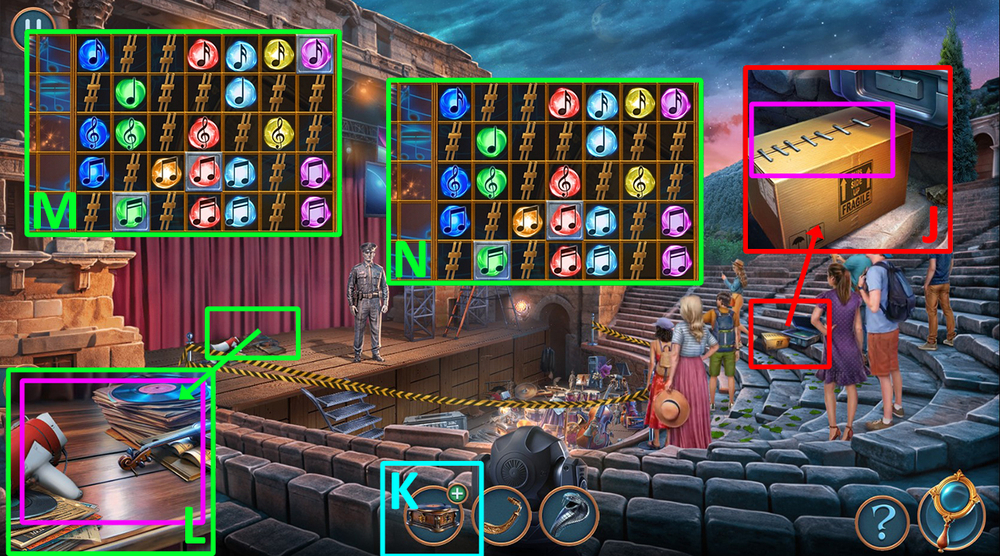
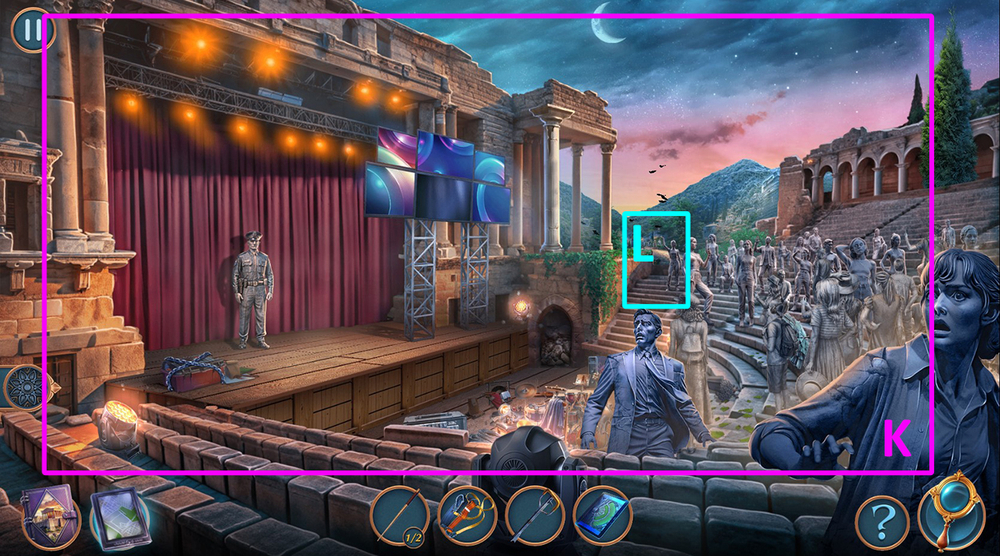
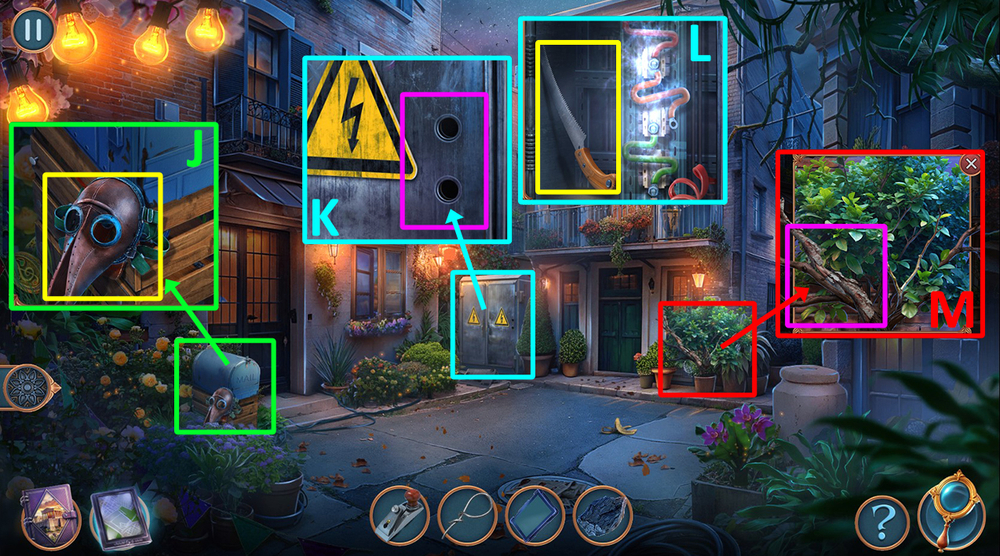
- Use CODE on the numbers (J), enter 6312 (K).
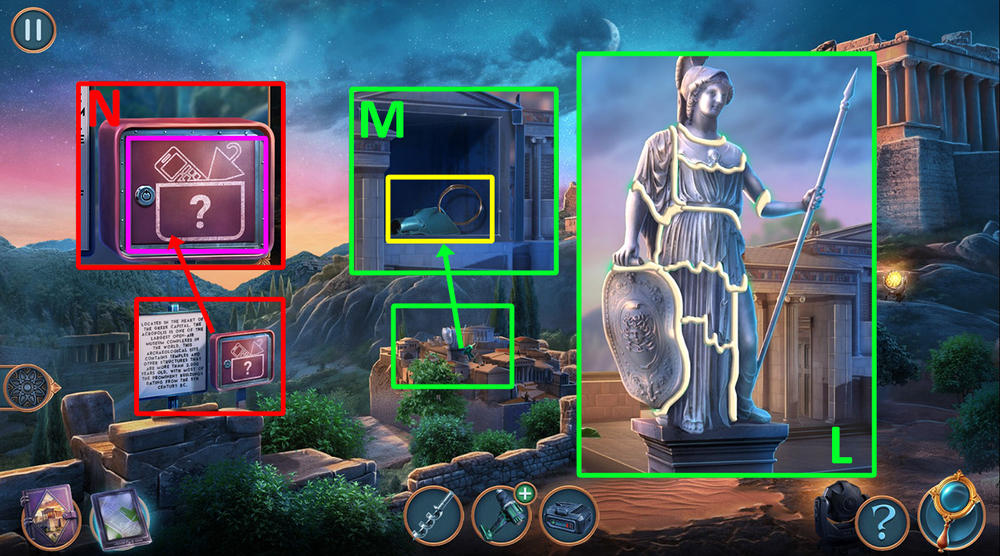
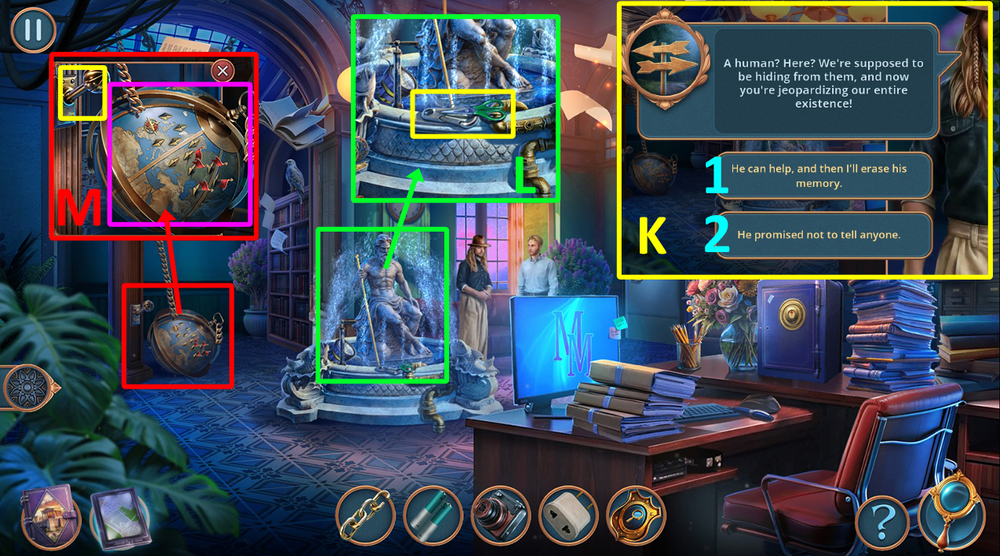
- Take FAKE ID and CARPENTER’S KIT (L).
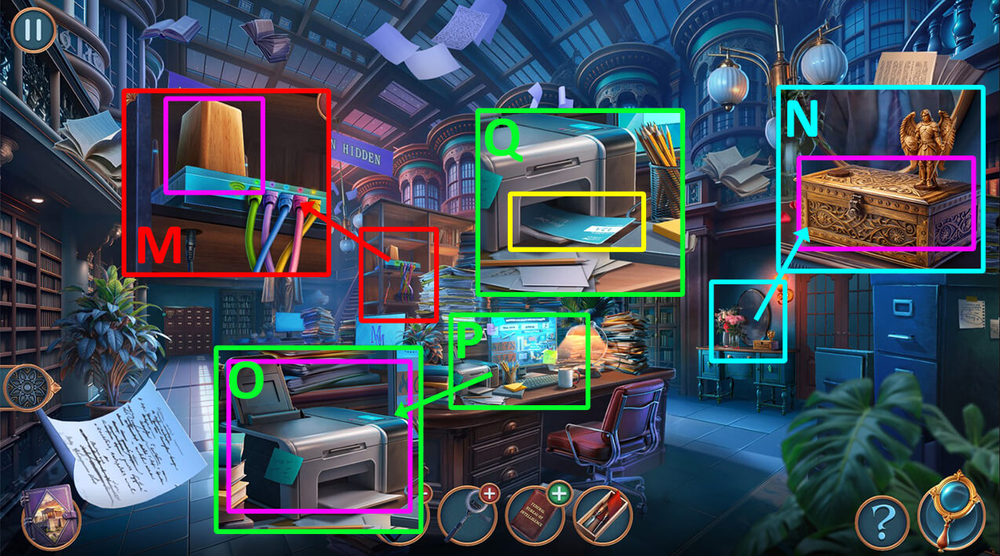
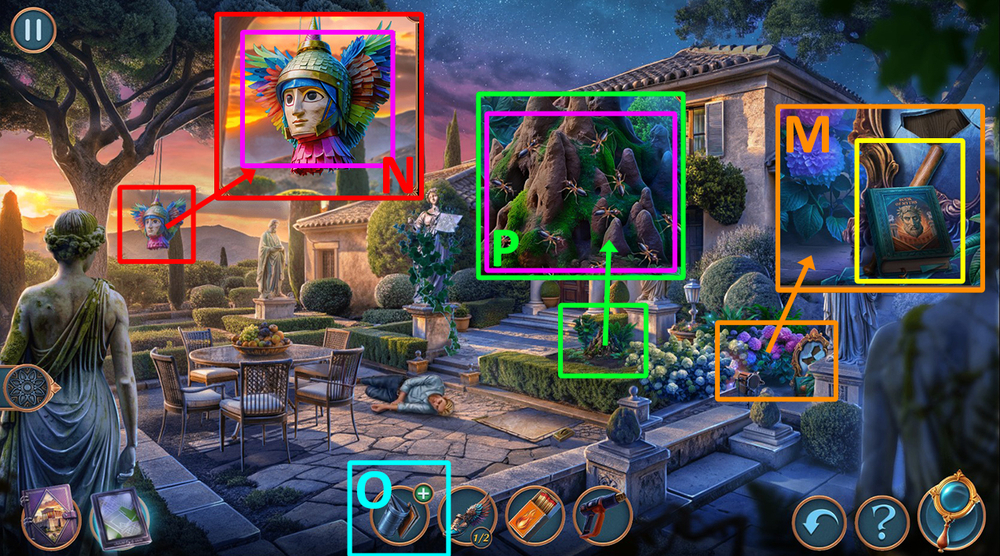
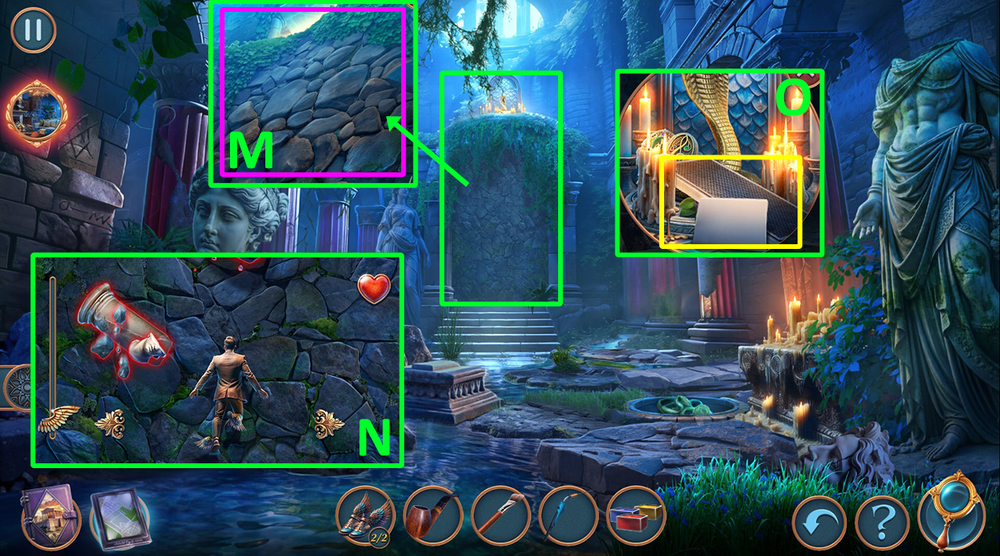
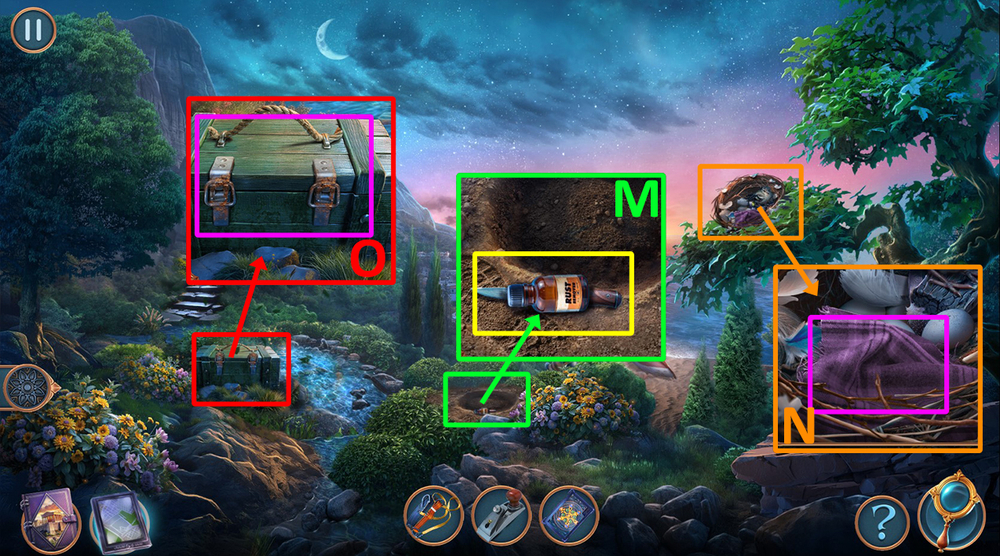
- Use CARPENTER’S KIT on the wooden block, take FIGURINE (M).
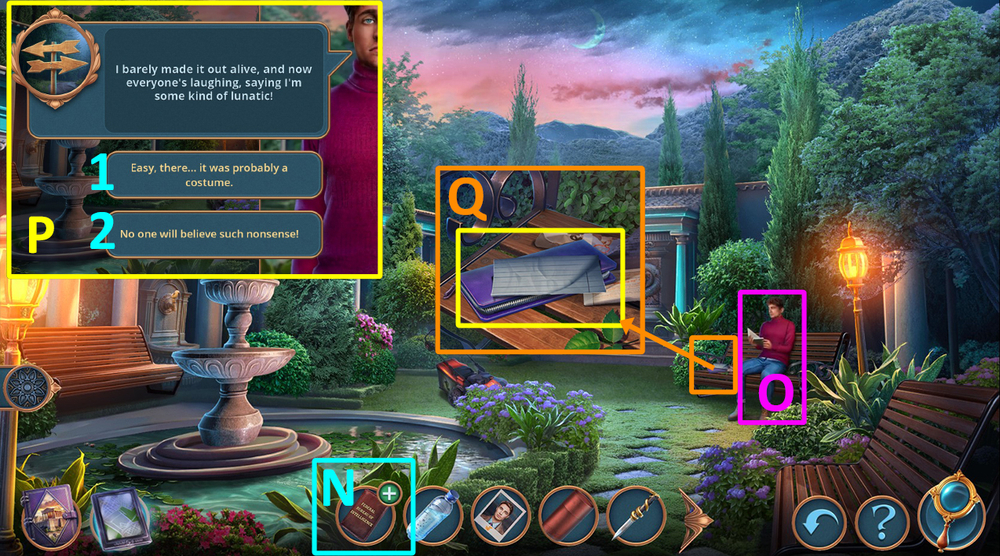
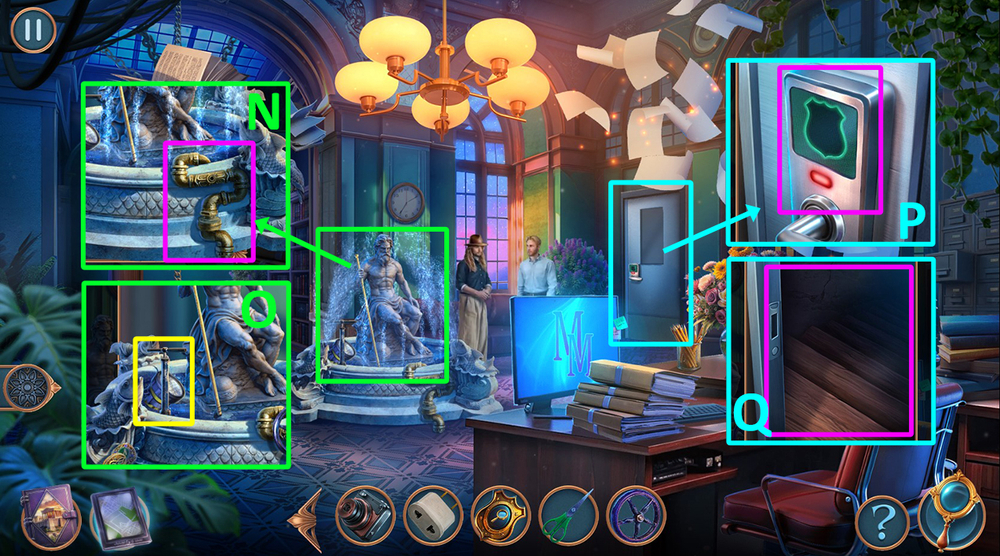
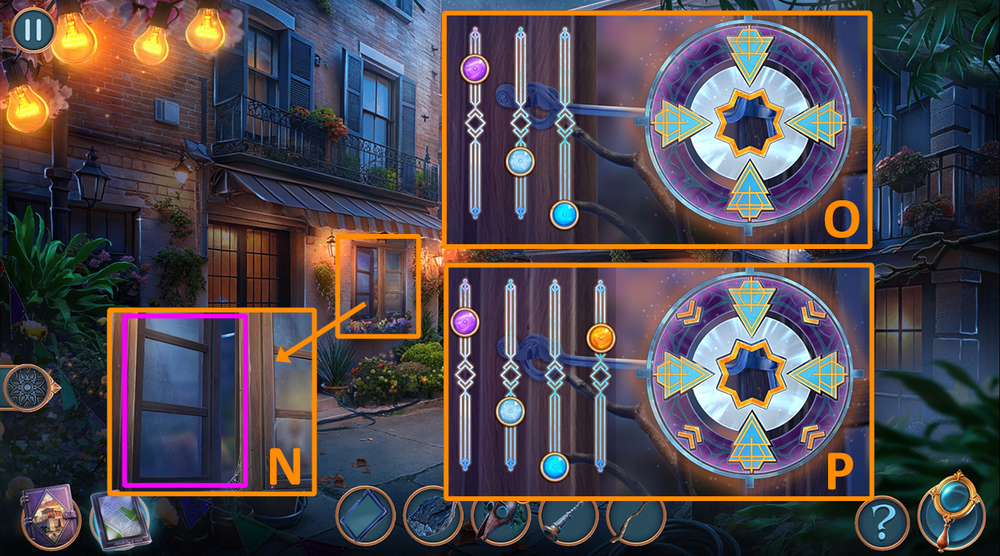
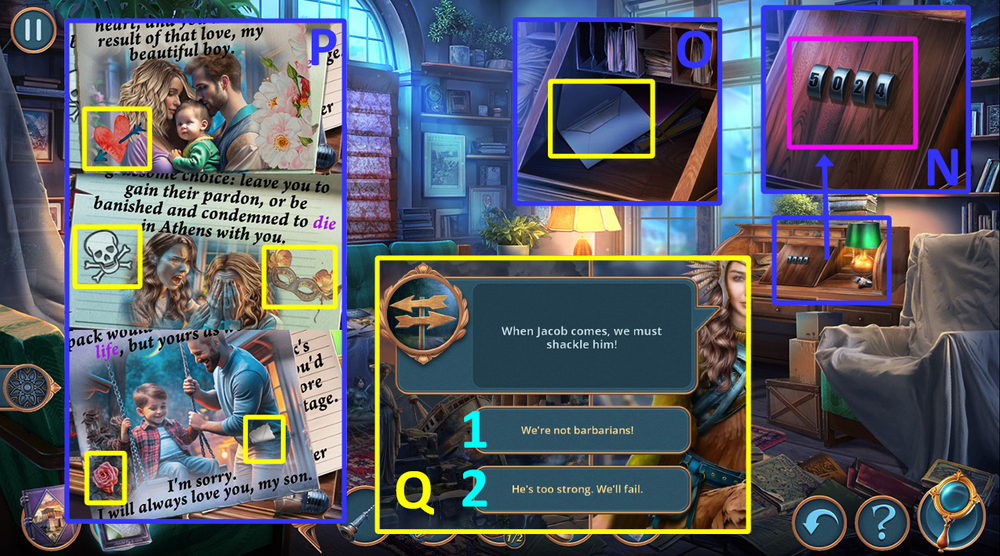
- Use FIGURINE on the box, take PRINTING PAPER (N).
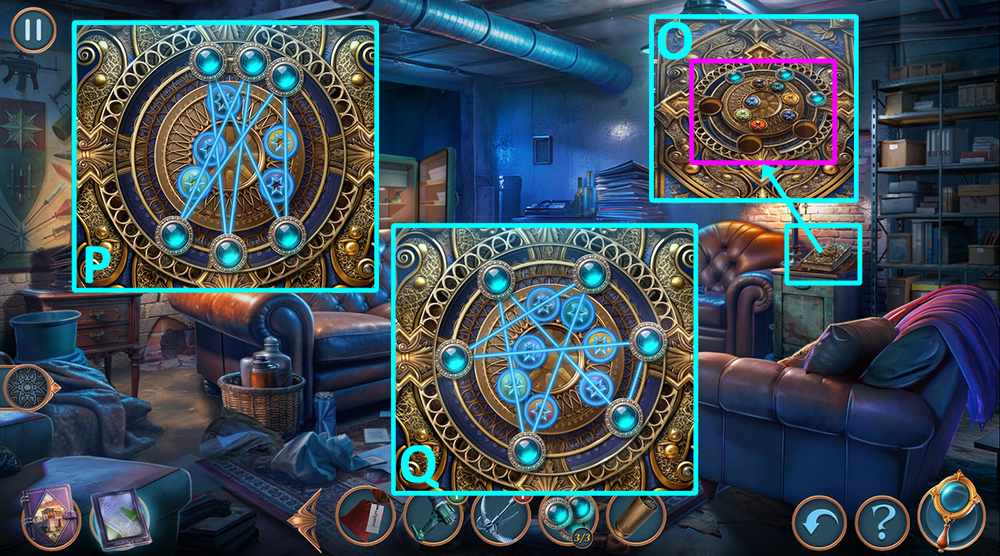
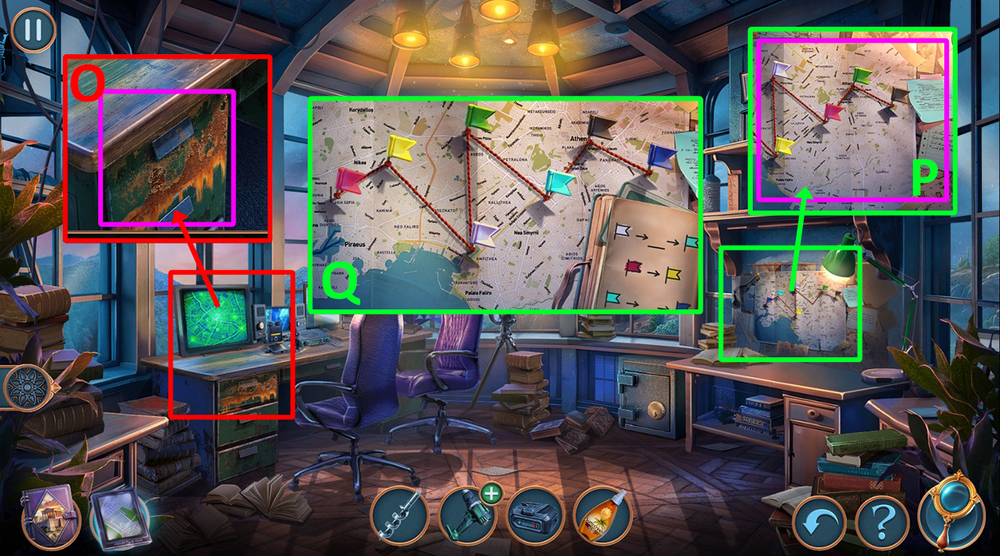
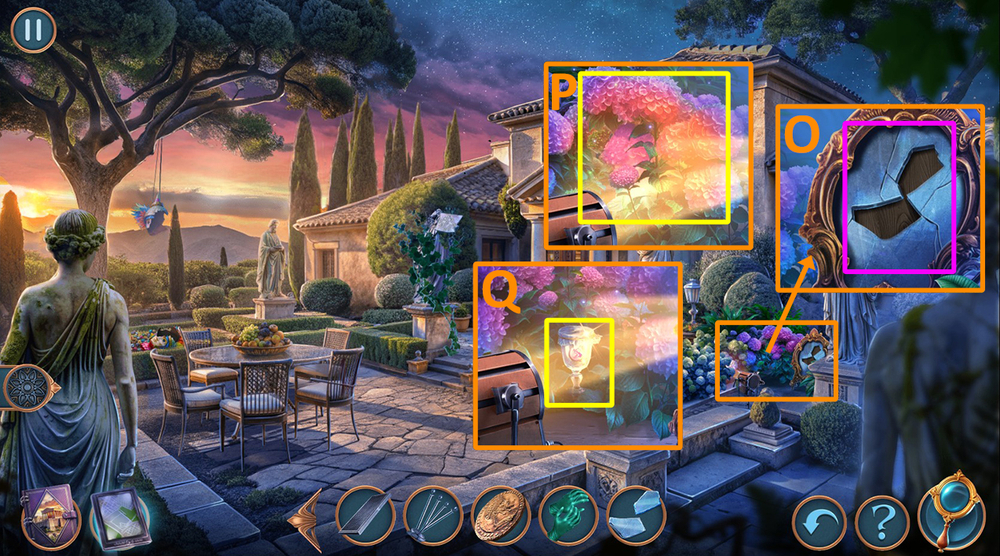
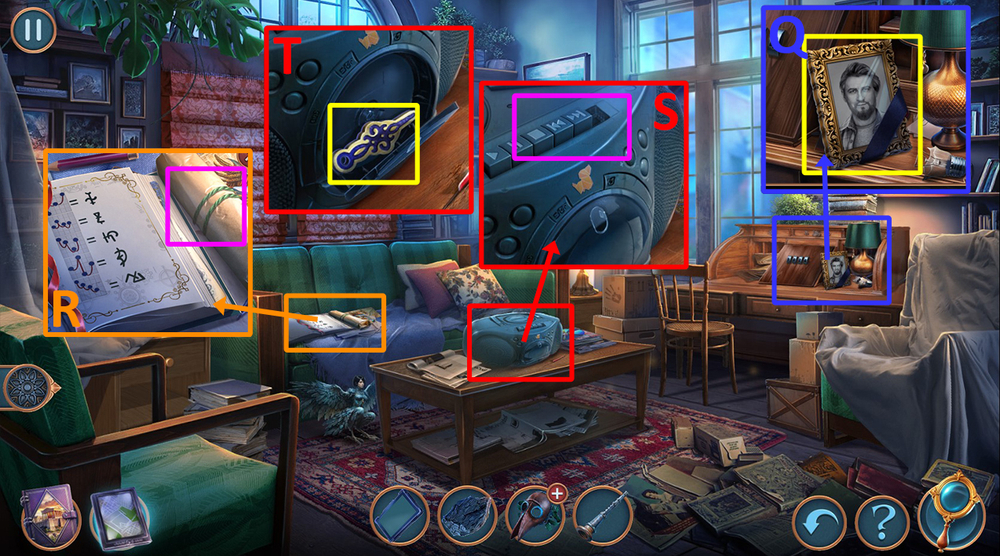
- Use PRINTING PAPER on the printer (O).
- Play puzzle (P).
- Click on the printed ticket (Q).
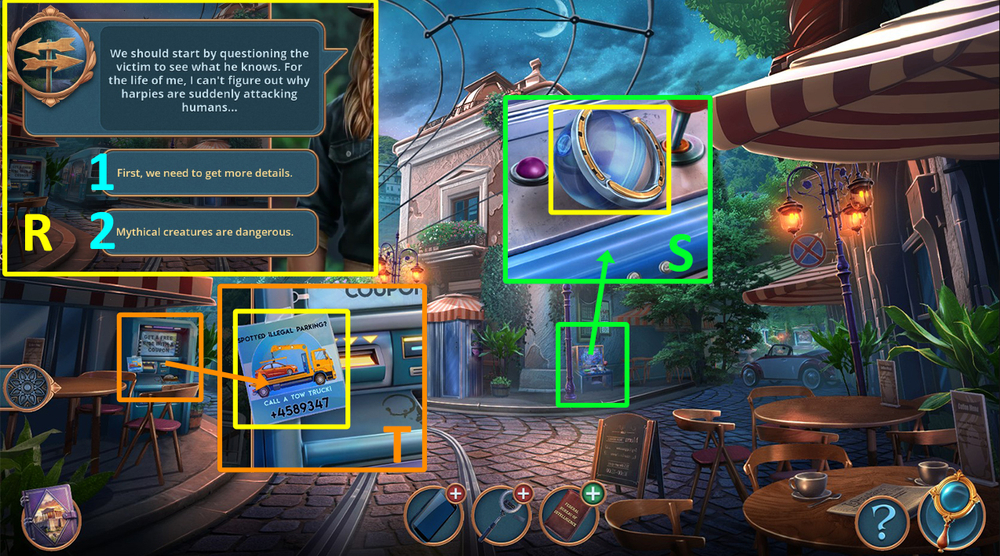
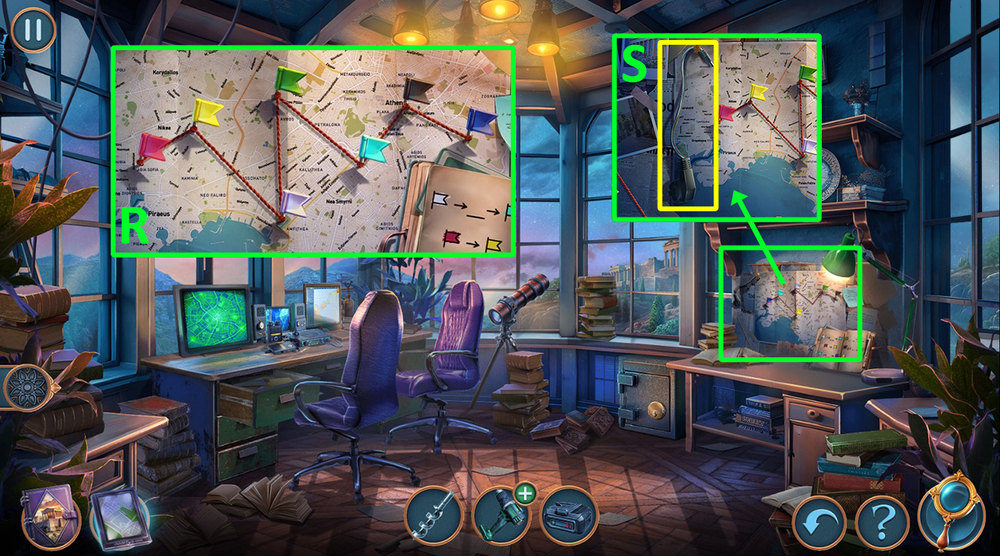
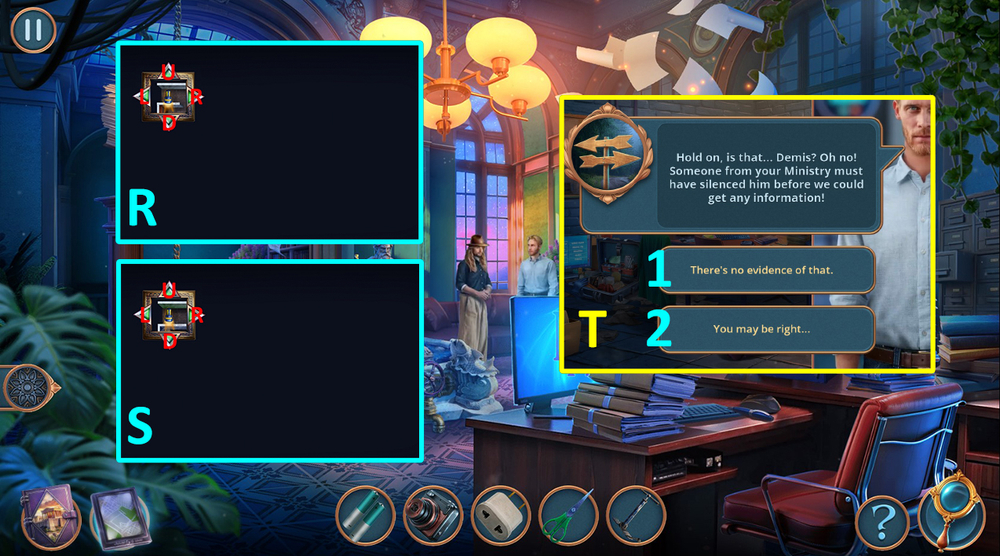
- Select 1 or 2 (R).
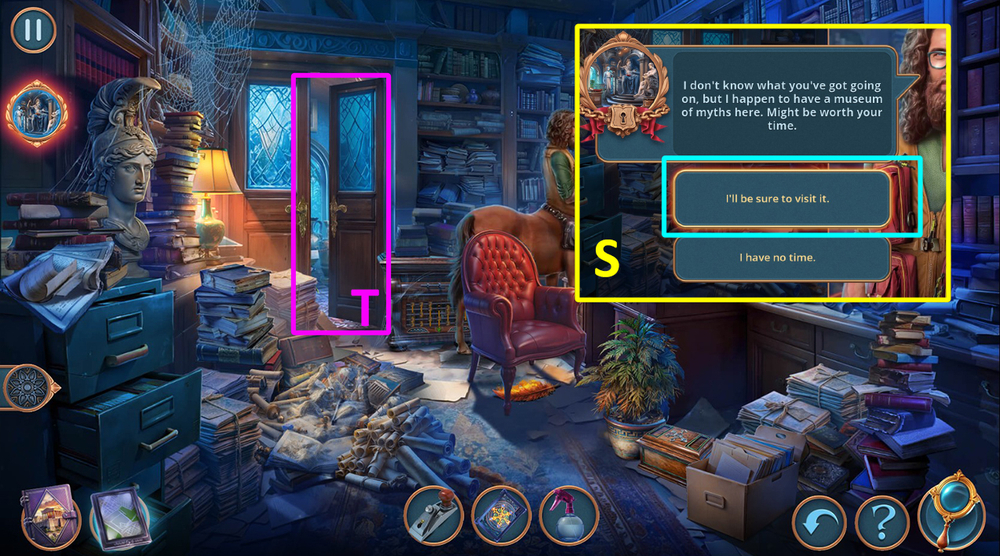
- Take HORSESHOE and TOY BOX (S).
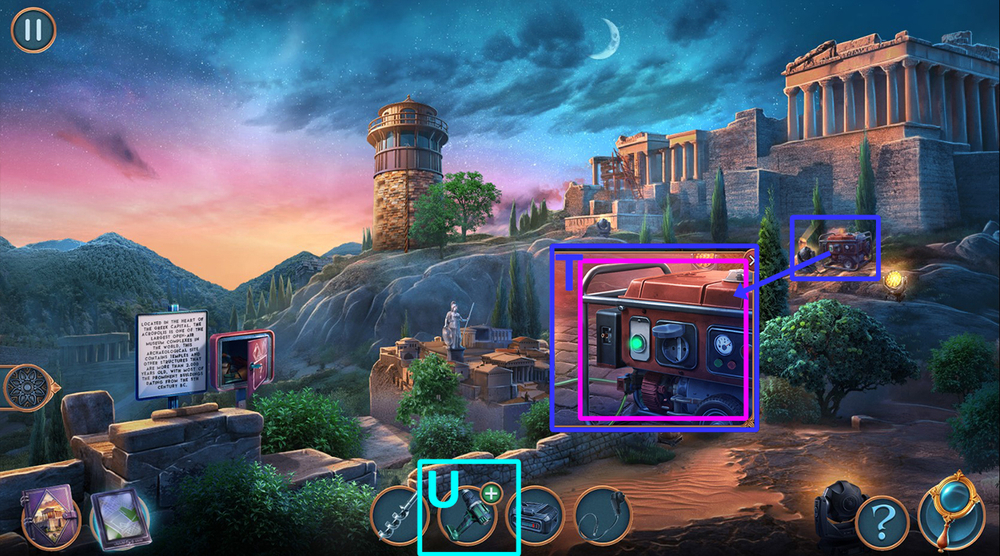
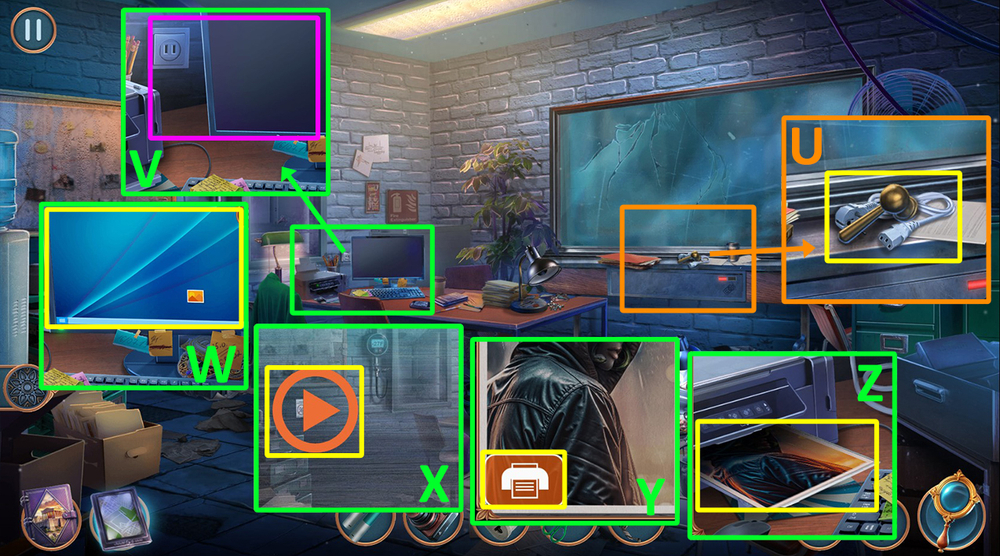
- Take TOW TRUCK NUMBER (T).
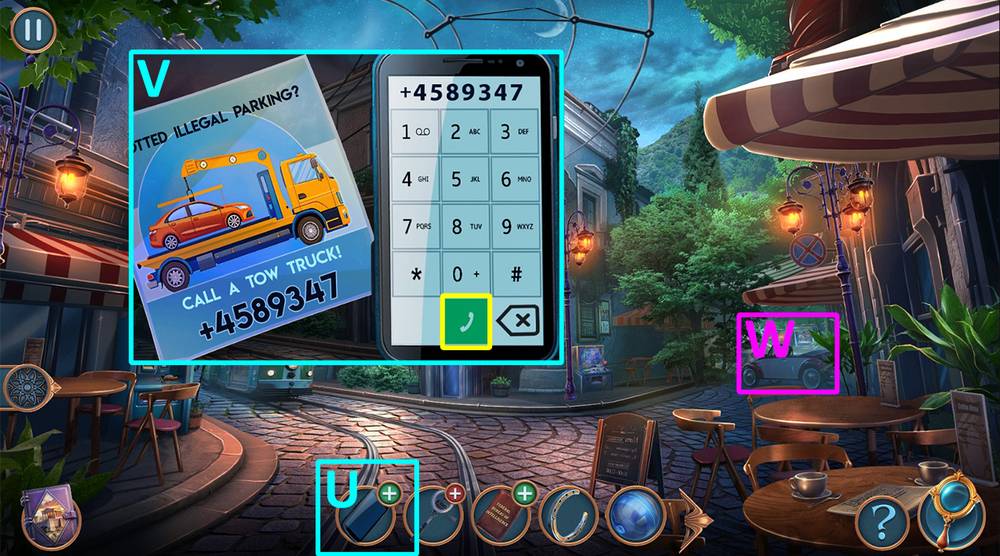
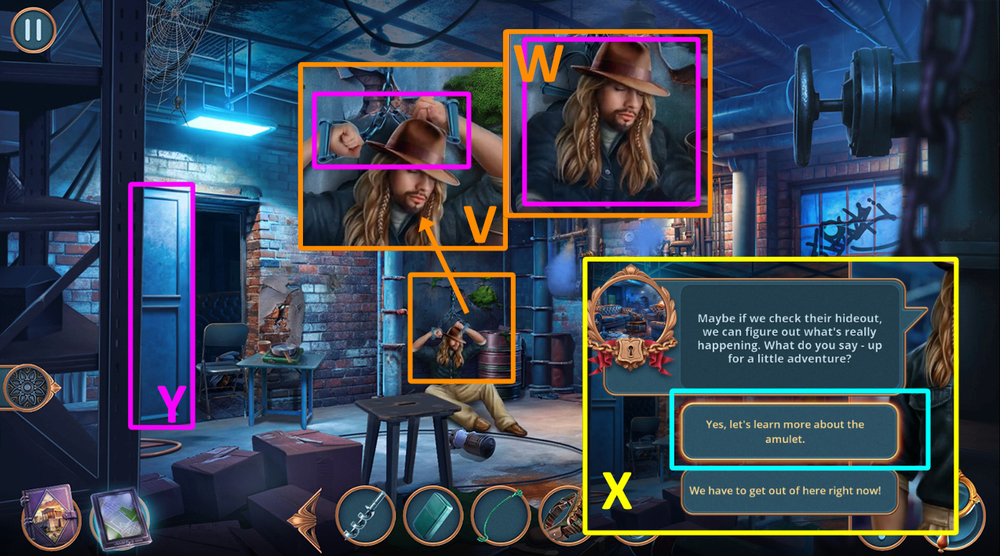
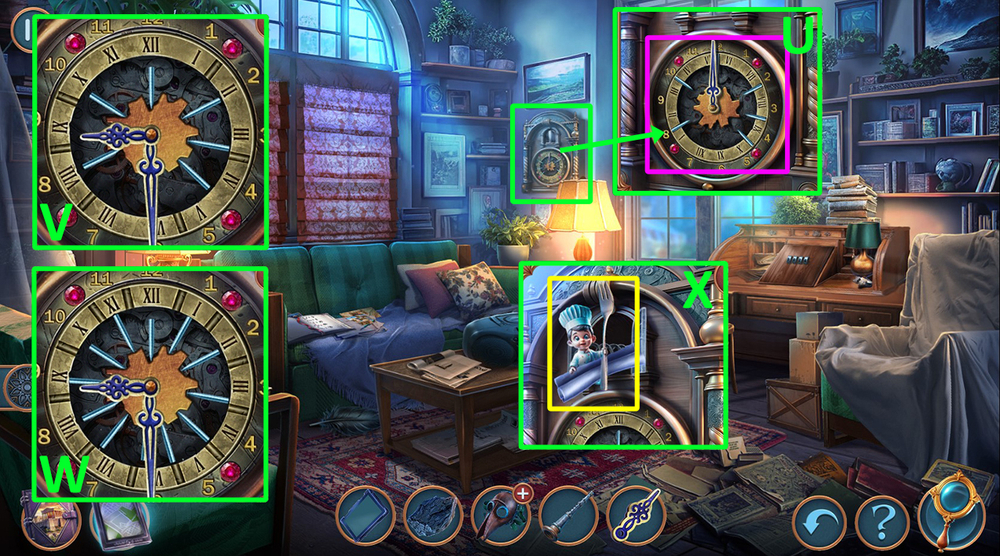
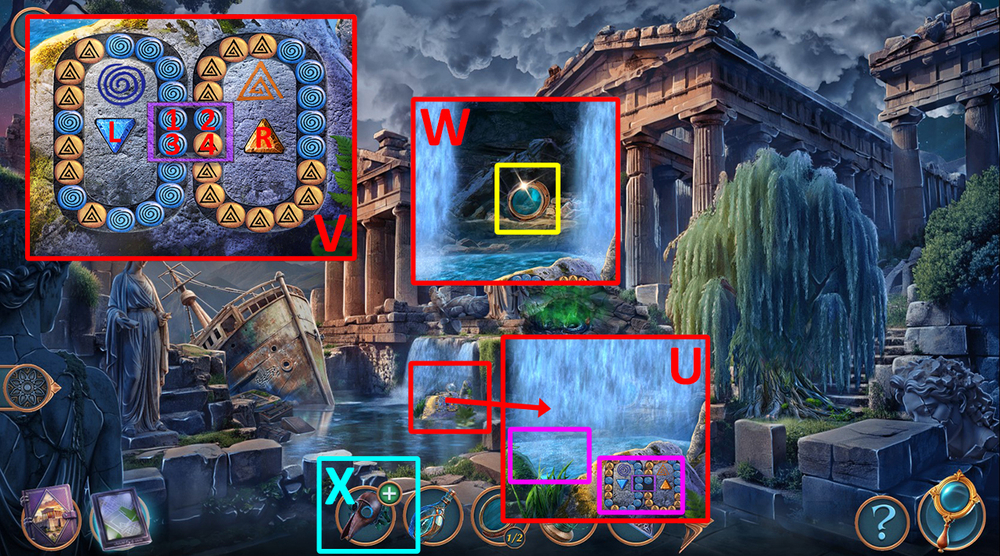
- Use TOW TRUCK NUMBER on MY PHONE, click on the screen (U), enter the number: 4589347, press ‘call’ (V).
- Go forward (W).
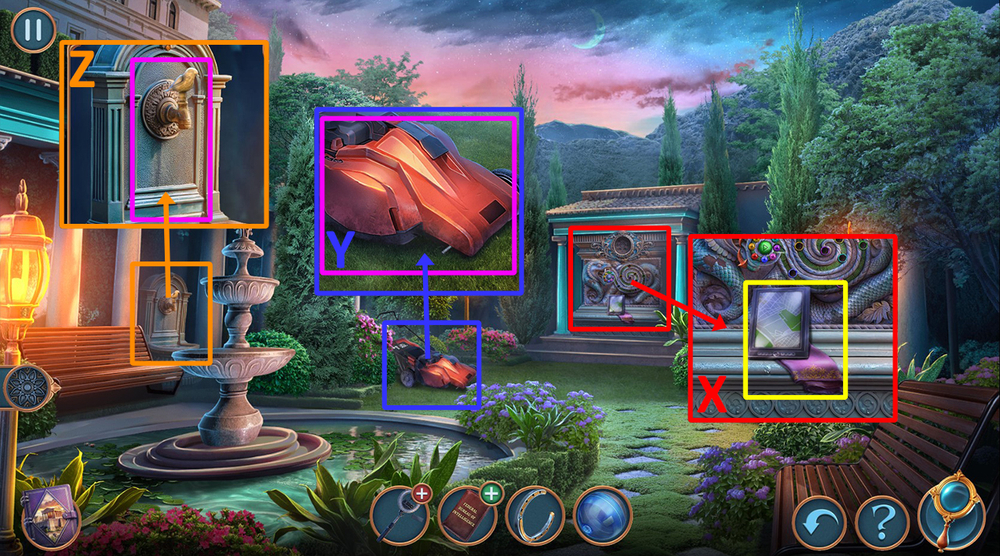
- Take the tablet and NAPKIN (X).
- Use TOY BOX on the lawnmower, take EMPTY BOTTLE (Y).
- Use EMPTY BOTTLE on the fountain, earn WATER (Z).
- Go back.
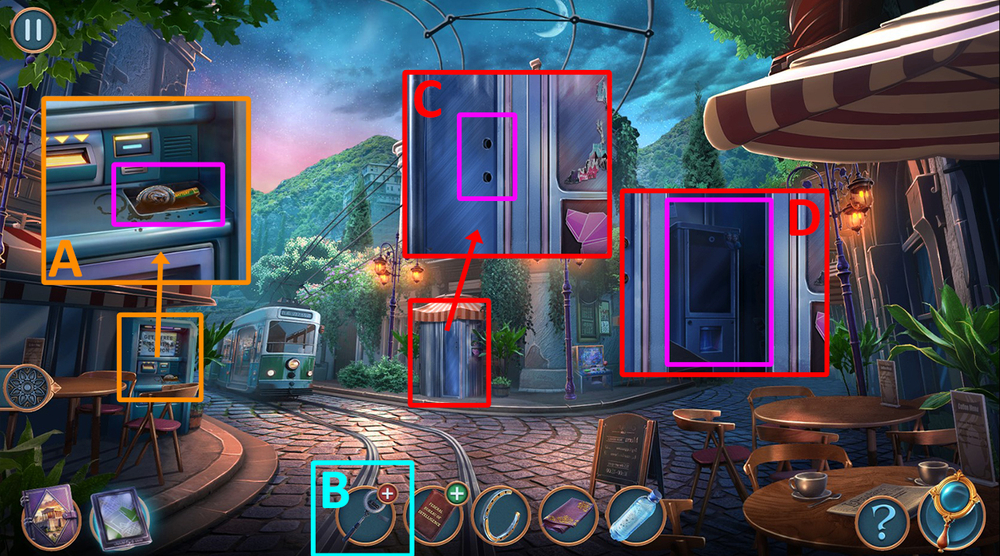
- Use WATER and NAPKIN on the mud puddle, earn WATER, take AMULET OF ASCLEPIUS and BATTERY (A).
- Use BATTERY on LIGHT, earn SELFIE LIGHT (B).
- Use HORSESHOE on the door, take CYLINDRICAL CASE (C).
- Use SELFIE LIGHT on the photo booth, take MY PHOTO (D).
- Go forward.
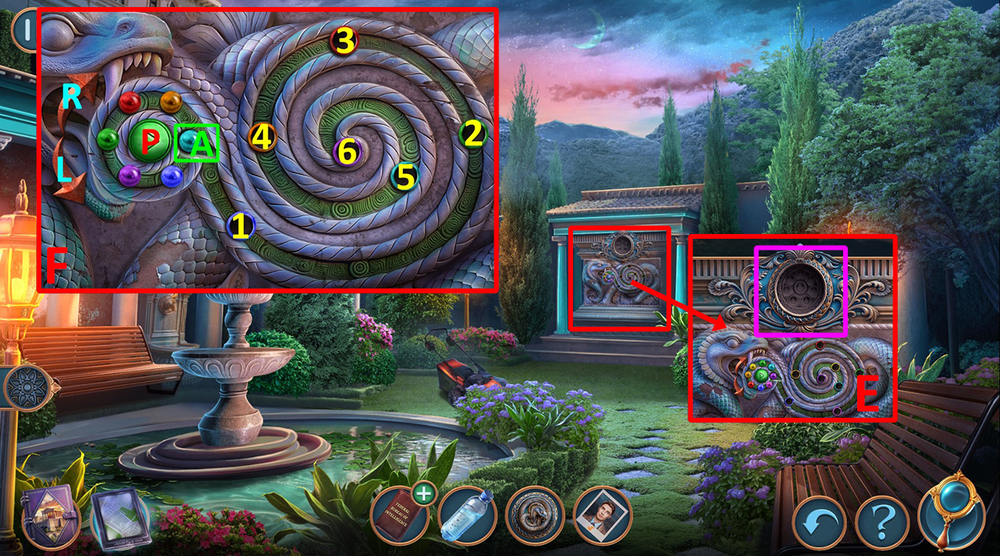
- Use AMULET OF ASCLEPIUS on the empty slot (E).
- Easy solution: Use the arrows R and L to select the desired ball in zone A and click P.
- Drive the balls into the holes of the corresponding color (F).
- Hard solution: Use the arrows R and L to select the desired ball in zone A and click P.
- Drive the balls into the holes of the corresponding color (G).
- Take ASCLEPIUS KNIFE (H).
- Use ASCLEPIUS KNIFE on the lawnmower bag, earn ASCLEPIUS KNIFE, take GAME TOKEN (I).
- Go back.
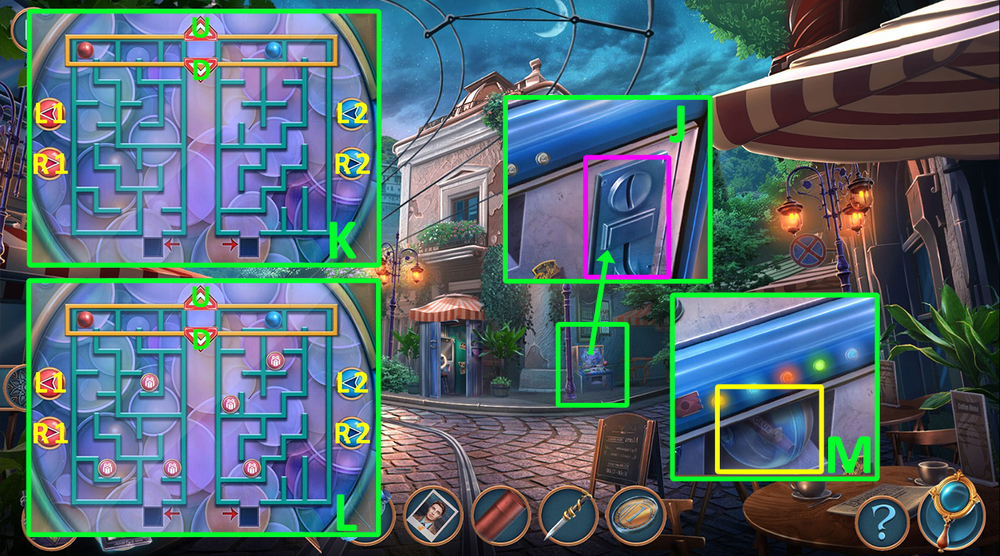
- Use GAME TOKEN on the coin receiver (J).
- Easy solution: Click L2, L2, D, R2, D, L2, R1, D, R2, L1, D, R2, U, R2, R1, U, L2, L1, U, R2, U, R2, D, D, R1, D, L1, D, R1, D, R1, D, R1, U, R1, D, L2, D, L2, L1, D, L2, D (K).
- Hard solution: Click R1, L2, L2, D, R1, R2, D, L2, R1, D, L1, D, U, R2, D, R2, U, R1, R2, U, L1, L2, U, R2, L1, U, R2, L1, D, D, R1, D, L1, D, L2, D, L2, D, R1, L2, D, U, L1, R2, U, R2, U, R1, R2, D, R1, D, R1, U, R1, D, L2, D, L1, L2, D, L2, D (L).
- Take the capsule, click on it to open it, earn GLUE (M).
- Go forward.
- Click on the FAKE ID to open it, use MY PHOTO and GLUE on FAKE ID, earn FAKE DETECTIVE ID (N).
- Use FAKE DETECTIVE ID on the person (O).
- Select 1 or 2 (P).
- Take and read the note, click on the wallet to open it, take FREE TICKET COUPON (Q).
- Go back.
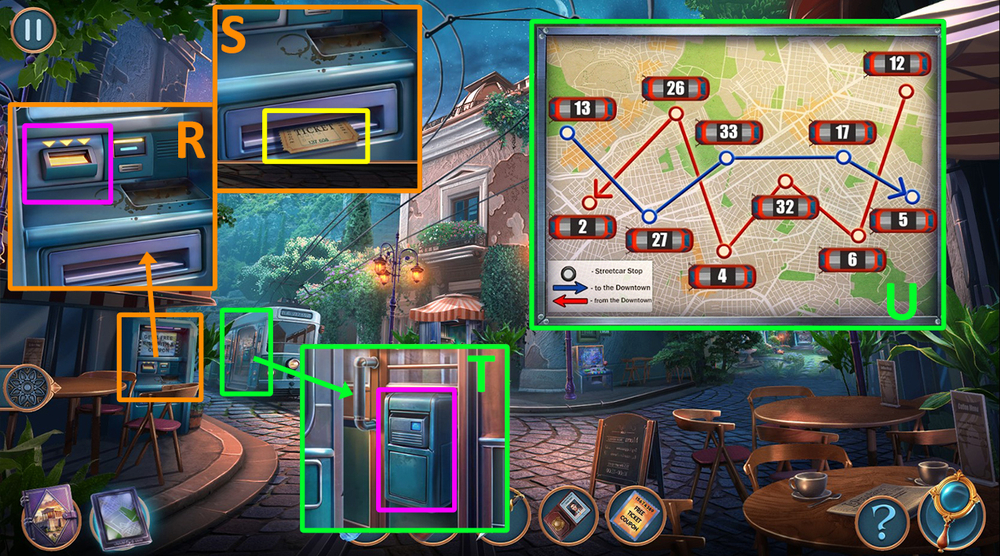
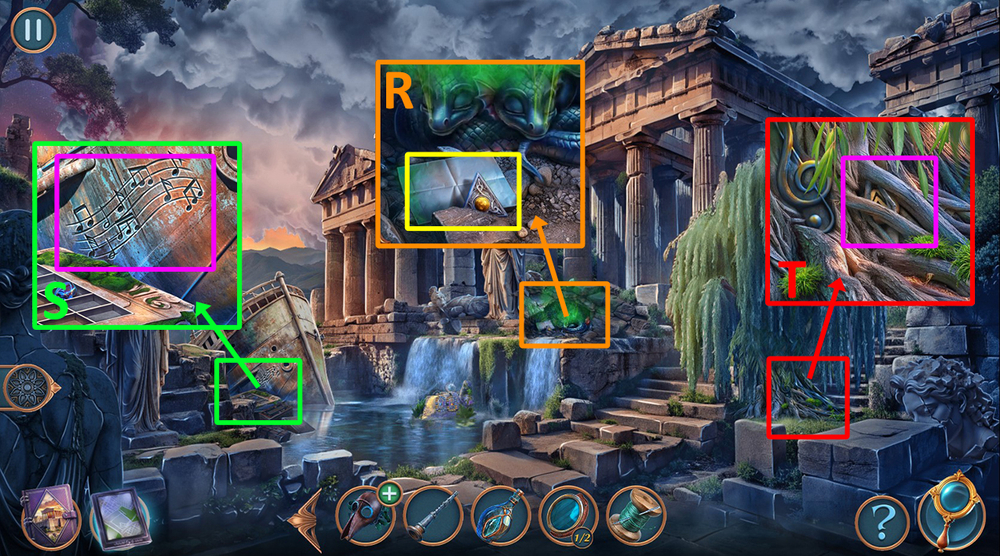
- Use FREE TICKET COUPON on the machine (R), take STREETCAR TICKET (S).
- Use STREETCAR TICKET on the ticket machine (T).
- Solution: Arrange the elements so that the image is as shown in the picture (U).
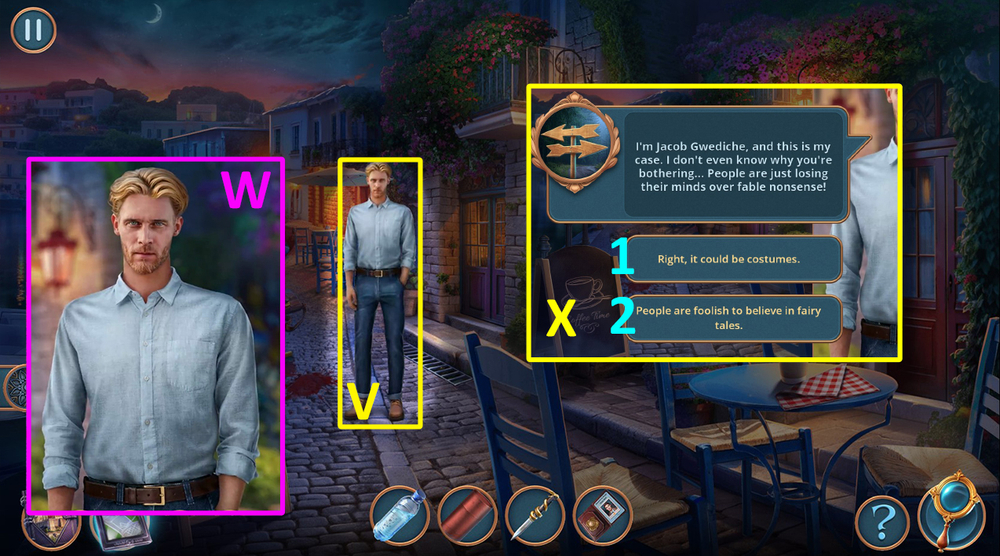
- Click on the man to talk to him (V).
- Give FAKE DETECTIVE ID to the man (W).
- Select 1 or 2 (X).
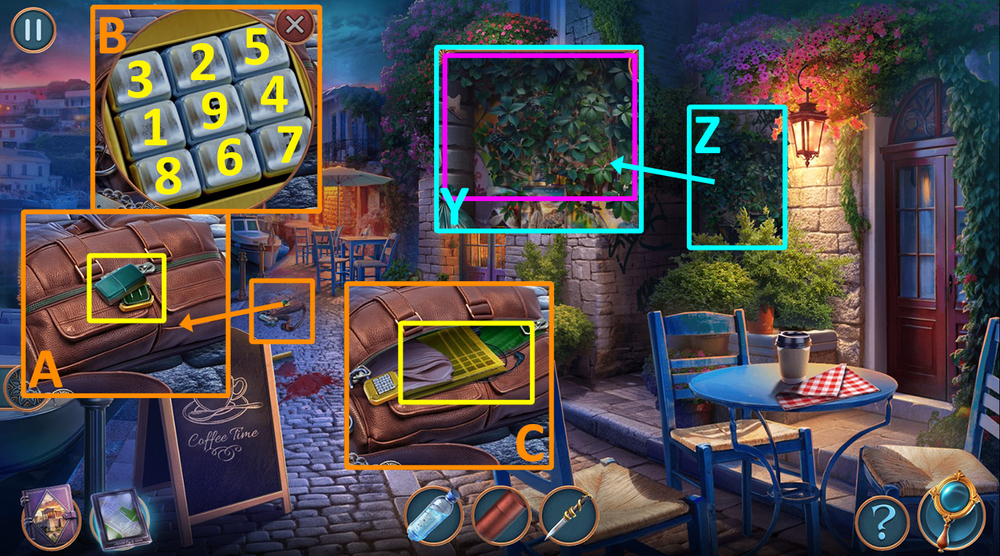
- Use ASCLEPIUS KNIFE on the vines (Y).
- Play puzzle, earn CODE (Z).
- Take LIGHTER, use CODE on the bag (A), click in the order shown on the image (B), take HANDKERCHIEF and HEADPHONES (C).
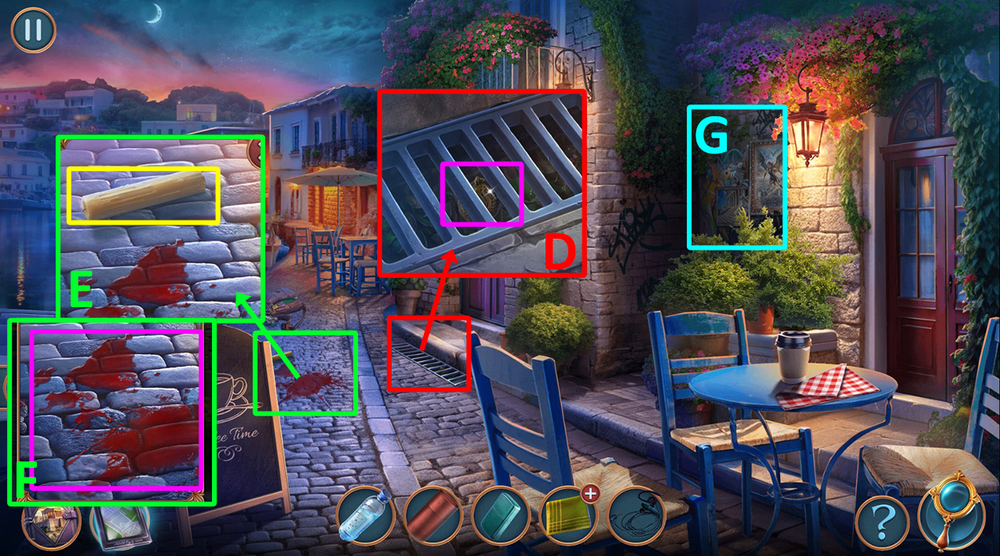
- Use HEADPHONES on the grates, earn MYSTERIOUS AMULET (D).
- Take CANDLE (E), use MYSTERIOUS AMULET on the blood, earn MYSTERIOUS AMULET (F).
- Play puzzle (G).
- Use MYSTERIOUS AMULET on the background (H).
- Click on the feather (I).
- Easy solution: D, R, U, U, L, R, R, R, D, R, U, R, D, R, U, L, U (J).
- Hard solution: D, R, U, U, R, R, R, R, D, R, U, R, R, D, D, R, R, D, L, R, U, U, U, L, U (K).
- Select 1, 2, or 3 (L).
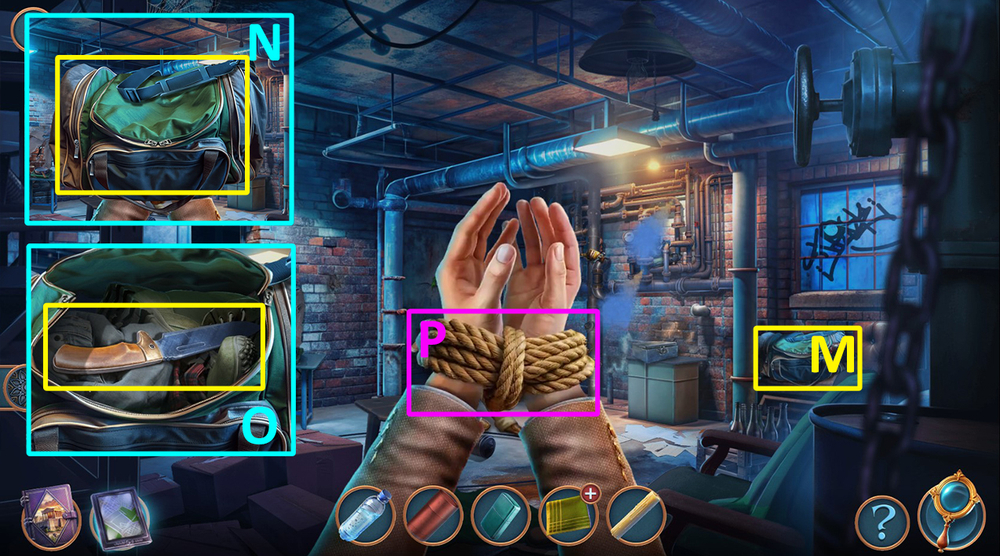
- Click on the bag to take it (M).
- Click on the bag to open it (N), take KNIFE (O).
- Use KNIFE on the rope (P).
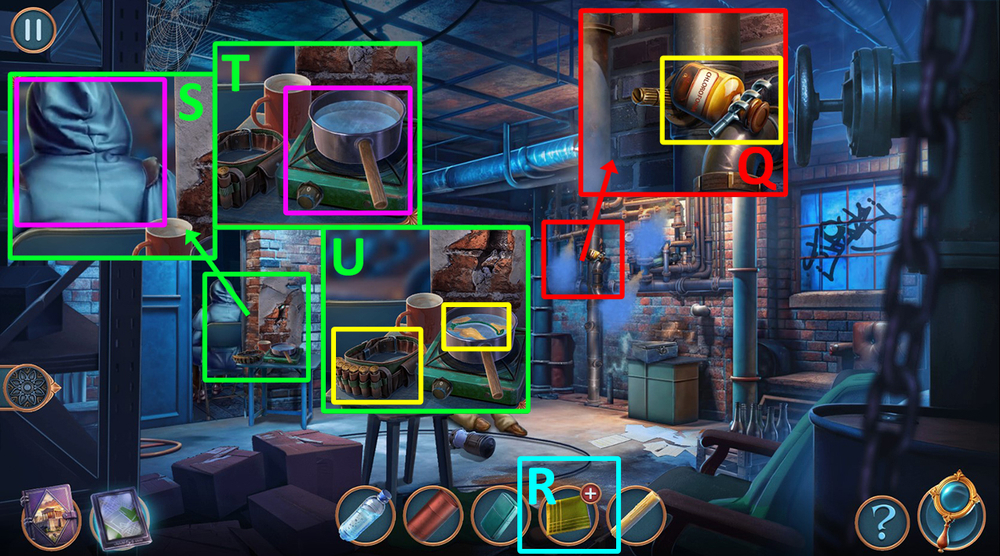
- Take DRILL BIT and CHLOROFORM (Q).
- Use CHLOROFORM on HANDKERCHIEF, earn CHLOROFORM HANDKERCHIEF (R).
- Use CHLOROFORM HANDKERCHIEF on the guard (S), use LIGHTER on the mini stove, use CANDLE on the pot (T), take CARTRIDGE, SHACKLES KEY, and WICK (U).
- Use SHACKLES KEY on the shackles (V), use WATER on Pan (W).
- Select this option, earn HARPY’S EARRING (X).
- Go forward (Y).

- Take KNIFE HANDLE (Z).
- Take OLD BANDAGE (A).
- Use KNIFE HANDLE and OLD BANDAGE on the blade, earn THIN KNIFE (B)
- Go back.
- Take a closer look at the hole in the wall (C), use THIN KNIFE on the stuck object, earn FRIDGE HANDLE (D).
- Use HARPY’S EARRING on the box, take SALTPETER BAG and VALVE (E).
- Use VALVE on the pipe (F).
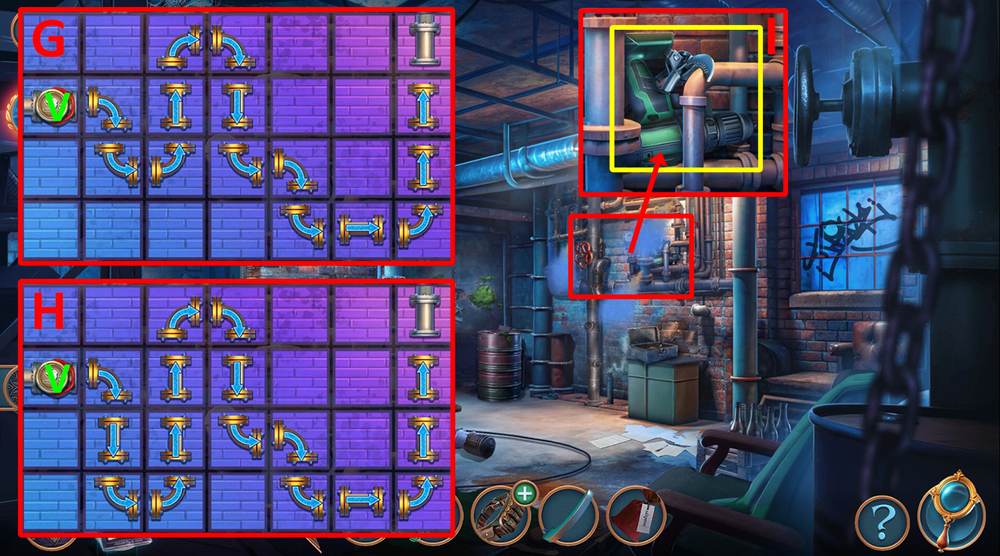
- Easy solution: Place the pipes as shown in the image and click V (G).
- Hard solution: Place the pipes as shown in the image and click V (H).
- Take DRILL, HOOK, and NUTCRACKER (I).
- Go forward.
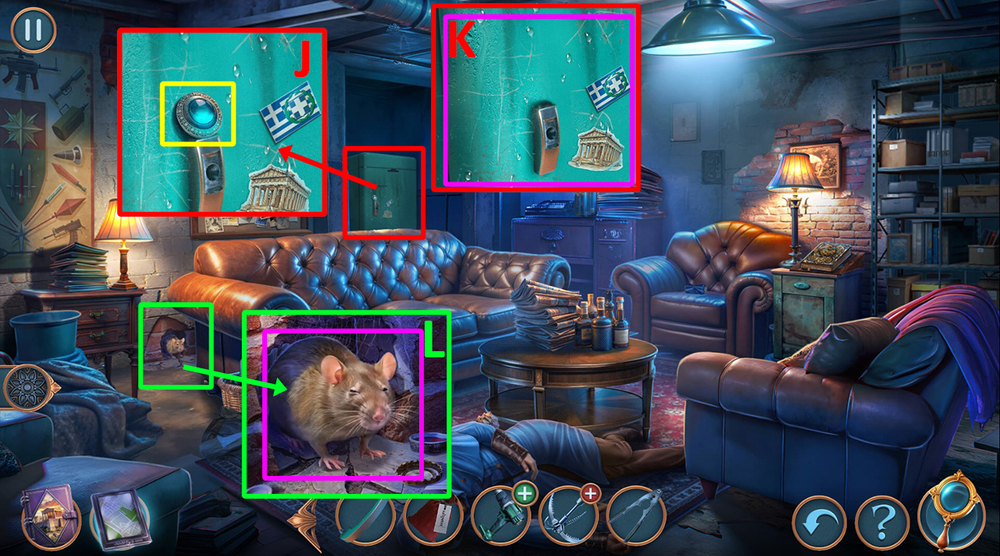
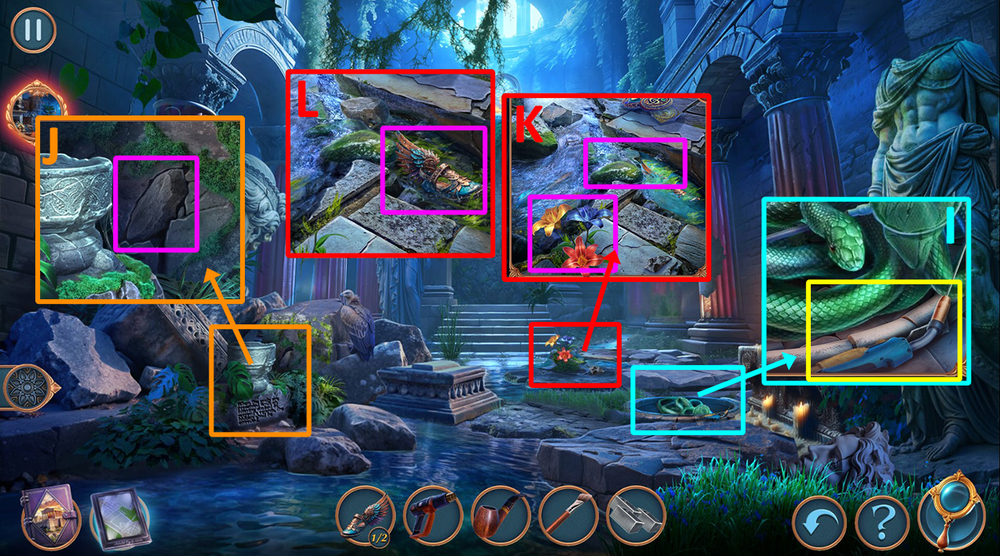
- Take GEMS 1/3 (J), Use FRIDGE HANDLE on the fridge, take CHEESE (K).
- Use CHEESE on the mouse, take GEMS 2/3 and SHELL (L).
- Go back.
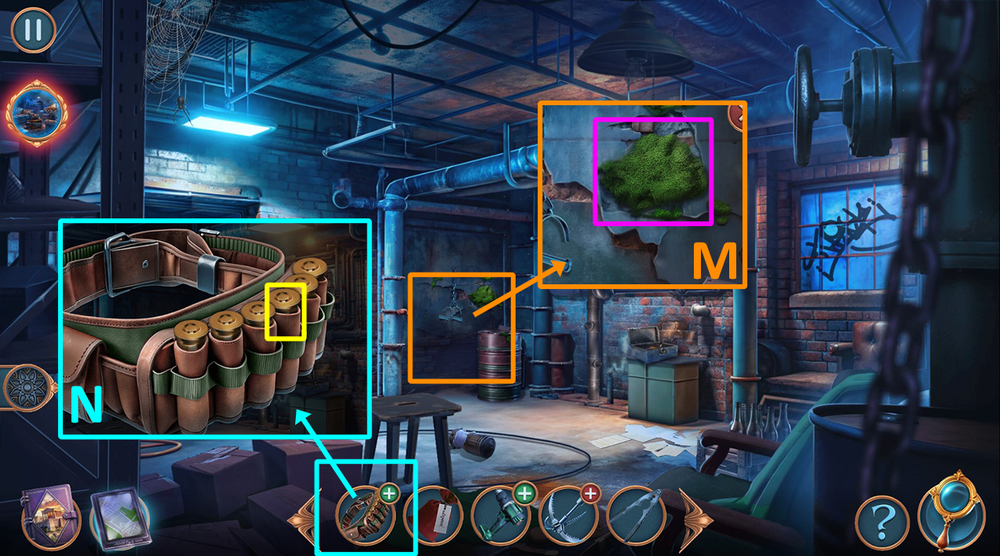
- Use SHELL on the moss, take GEMS 3/3 (M).
- Click on one of the cartridges, use NUTCRACKER on CARTRIDGE, earn GUNPOWDER (N).
- Go forward.
- Use GEMS on the book (O).
- Easy solution: Arrange the elements so that the image is as shown in the picture (P).
- Hard solution: Arrange the elements so that the image is as shown in the picture (Q).
- Read the note.
- Go back.
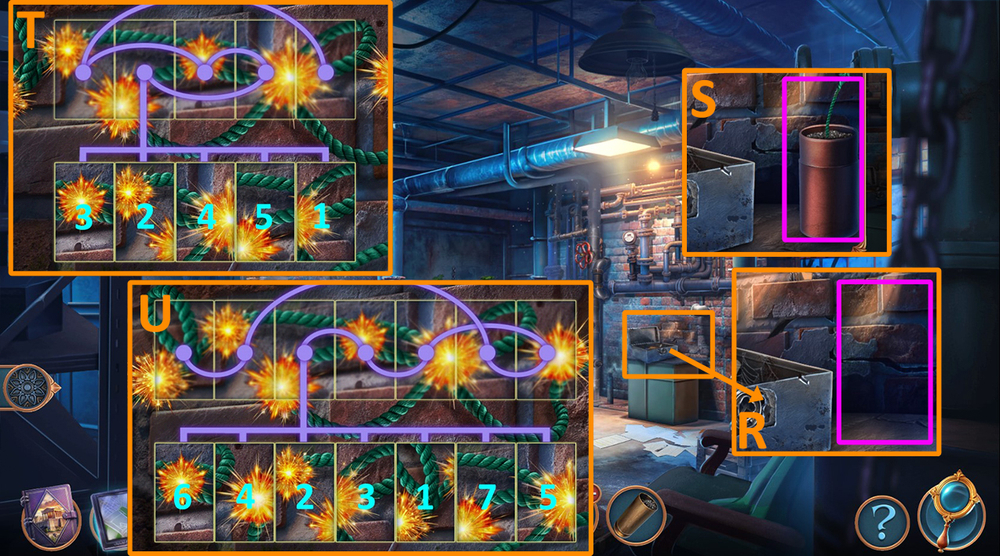
- Use CYLINDRICAL CASE, WICK, SALTPETER BAG, and GUNPOWDER on the empty spot near the box (R), Use LIGHTER on the cylindrical case (S).
- Easy solution: Click 1-5 (T).
- Hard solution: Click 1-7 (U).
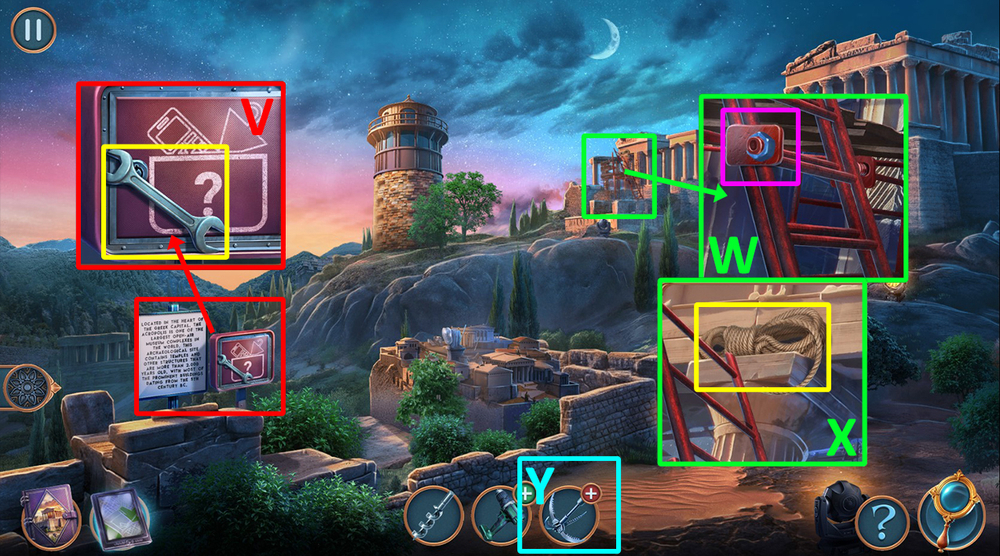
- Take WRENCH (V).
- Use WRENCH on the ladder (W), take ROPE (X).
- Use ROPE on HOOK, earn HOOK (Y).
- Use HOOK on the tower (Z).
- Easy solution: Arrange the elements so that the image is as shown in the picture (A).
- Hard solution: Arrange the elements so that the image is as shown in the picture (B).
- Take DEAD BATTERY and LENS (C).
- Click on the broken lens to remove it (D).
- Use LENS on the telescope (E).
- Easy solution: Move detail in slot 1-1, 2-2, 3-3, 4-4, 5-5, 6-6, 7-7, 8-8 (F).
- Hard solution: Move detail in slot 1-1, 2-down, 3-3, 4-down, 5-5, 6-6, 7-7, 8-8, 9-9, 10-10, 4-4, 2-2 (G).
- Take GLUE GUN STICK (H).
- Use GLUE GUN STICK on the glue gun, take GLUE GUN (I).
- Go back.
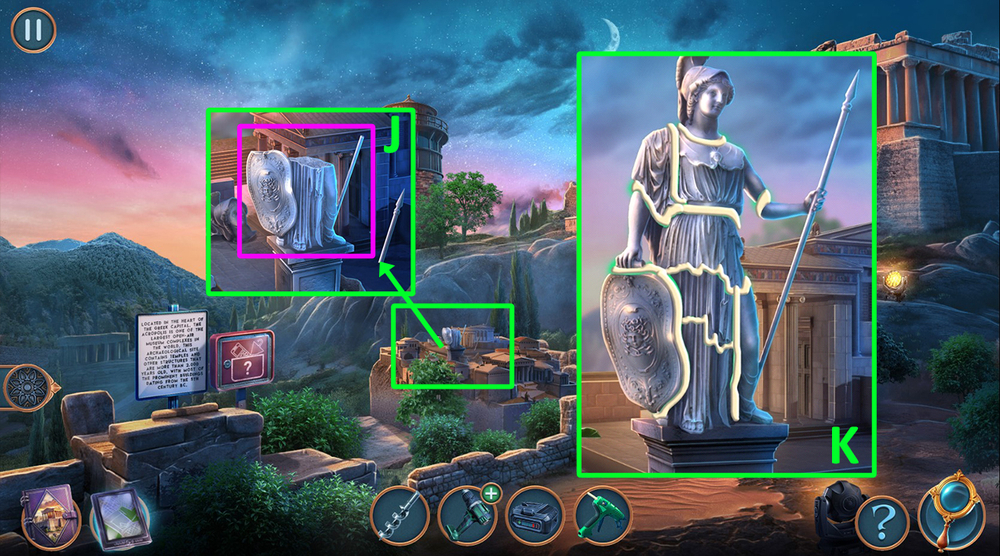
- Use GLUE GUN on the statue (J).
- Easy solution: Arrange the elements so that the image is as shown in the picture (K).
- Hard solution: Arrange the elements so that the image is as shown in the picture (L).
- Take TUBULAR KEY (M).
- Use TUBULAR KEY on the keyhole, take SUNSCREEN OIL (N).
- Go forward.
- Use SUNSCREEN OIL on the drawer, read and take MAGE’S DIARY (O).
- Use MAGE’S DIARY on the map (P).
- Easy solution: Arrange the elements so that the image is as shown in the picture (Q).
- Hard solution: Arrange the elements so that the image is as shown in the picture (R).
- Take WIRE (S).
- Go back.
- Use DEAD BATTERY and WIRE on the generator, earn CHARGED BATTERY (T).
- Use DRILL BIT and CHARGED BATTERY on DRILL, earn DRILL (U).
- Go forward.
- Use DRILL on the safe (V).
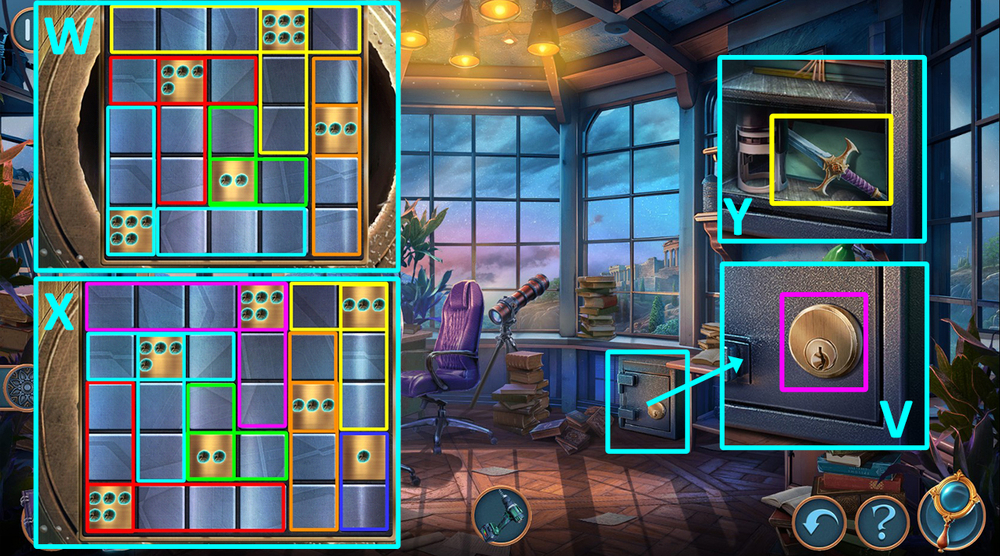
- Easy solution: Arrange the elements so that the image is as shown in the picture (W).
- Hard solution: Arrange the elements so that the image is as shown in the picture (X).
- Take DAGGER, take and read the note (Y).
- Use DAGGER on Demis (Z).
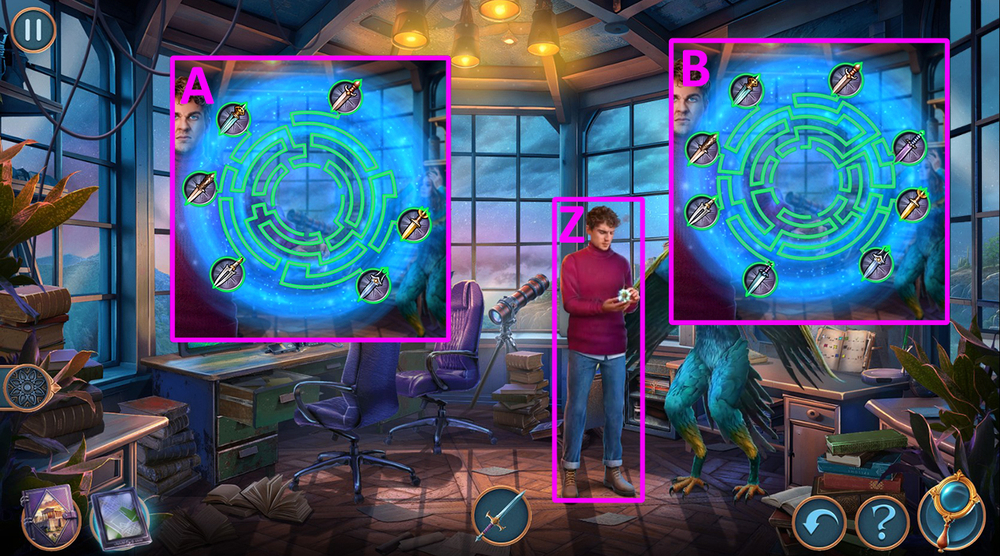
- Easy solution: Arrange the elements so that the image is as shown in the picture (A).
- Hard solution: Arrange the elements so that the image is as shown in the picture (B).
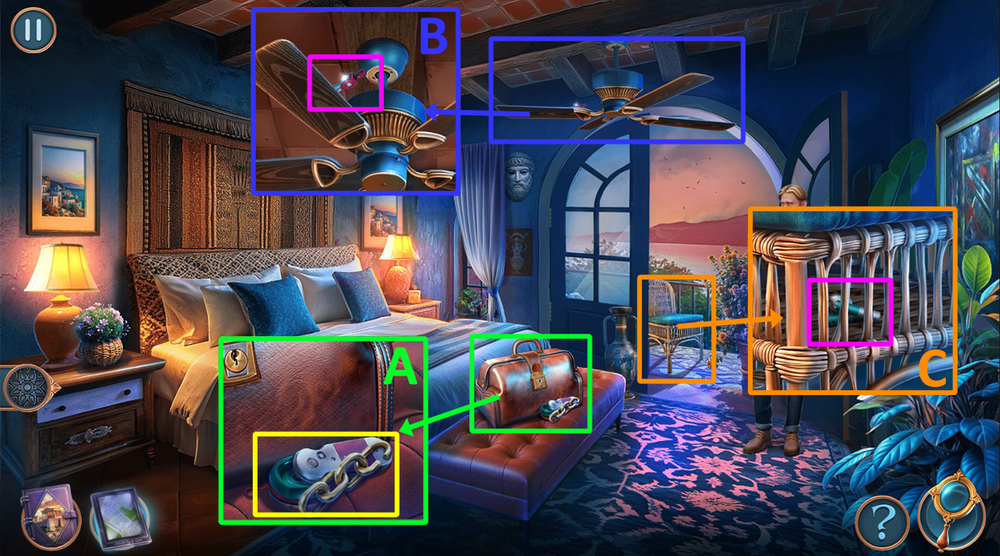
- Take CHAIN, SWITCHBLADE, and YO-YO (A).
- Use YO-YO on the fan, earn DIVIDERS (B).
- Use DIVIDERS on the chair, earn BUTTON and BATTERIES (C).
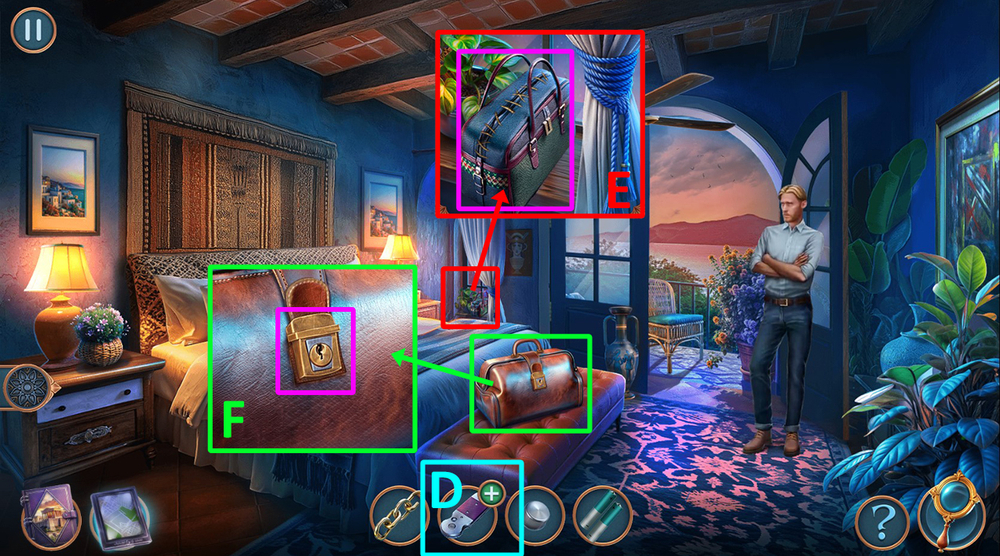
- Use BUTTON on SWITCHBLADE, earn SWITCHBLADE (D).
- Use SWITCHBLADE on the bag, take CAMERA and SUITCASE KEY (E).
- Use SUITCASE KEY on the suitcase (F).
- Easy solution: Click 7, 6, 2, 8, 5, 1, 9, 10, 3 (G).
- Hard solution: Click 5, 8, 3, 9, 7, 2, 10, 6, 1, 11, 12, 4 (H).
- Take ADAPTER and MINISTRY BADGE, take a closer look at the voice recorder, press the red button, earn GISELLE’S CONFESSION (I).
- Give GISELLE’S CONFESSION to Jacob (J).
- Select 1 or 2 (K).
- Take SCISSORS and CARABINER (L).
- Use CHAIN and CARABINER on the broken chain, click on the lever, take VALVE (M).
- Use VALVE on the pipe (N), take PUMP and DIVING LIGHT (O).
- Use MINISTRY BADGE on the door lock (P), use DIVING LIGHT on the stairs (Q).
- Easy solution: Click R, D, L, D, D, R, D, L, D, R, U, R, D, R, U, R, D, R, U, R, U, L, U, R, D, R (R).
- Hard solution: Click R, D, L, D, R, D, R, D, L, D, R, U, R, U, R, D, R, U, R, D, R (S).
- Select 1 or 2 (T).
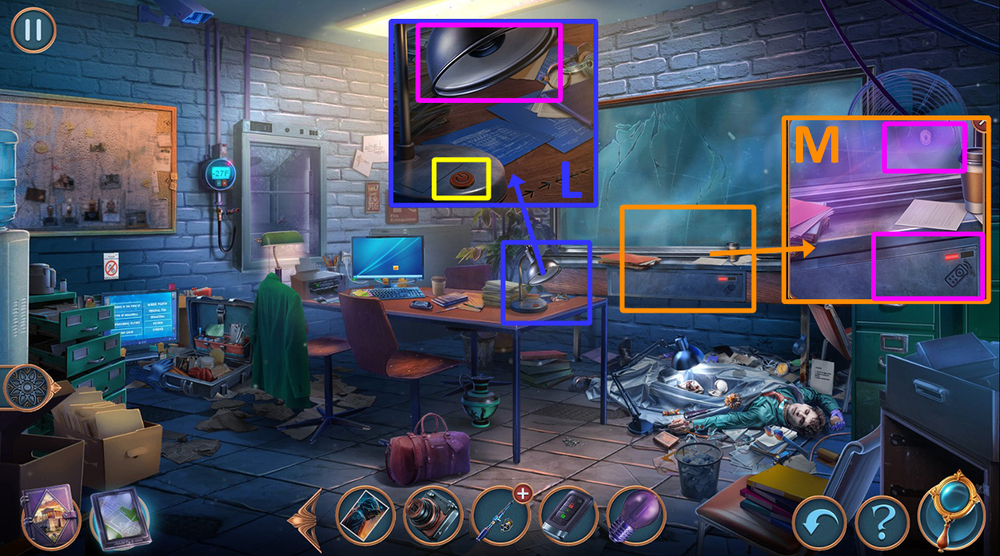
- Take HANDLE and MONITOR CABLE (U).
- Use ADAPTER and MONITOR CABLE on the socket (V), click on the icon on the screen (W), click on the ‘Play’ button 5 times (X), then click on the ‘Print’ button (Y), take KILLER’S PHOTO and CAUSE OF DEATH CHECKLIST (Z).
- Use CAUSE OF DEATH CHECKLIST on the body (A).
- Play puzzle, earn HANDKERCHIEF (B).
- Use BATTERIES on the lamp, use HANDKERCHIEF on the pushpins (C), use CAMERA on the arrows, earn CODE (D).
- Go back.
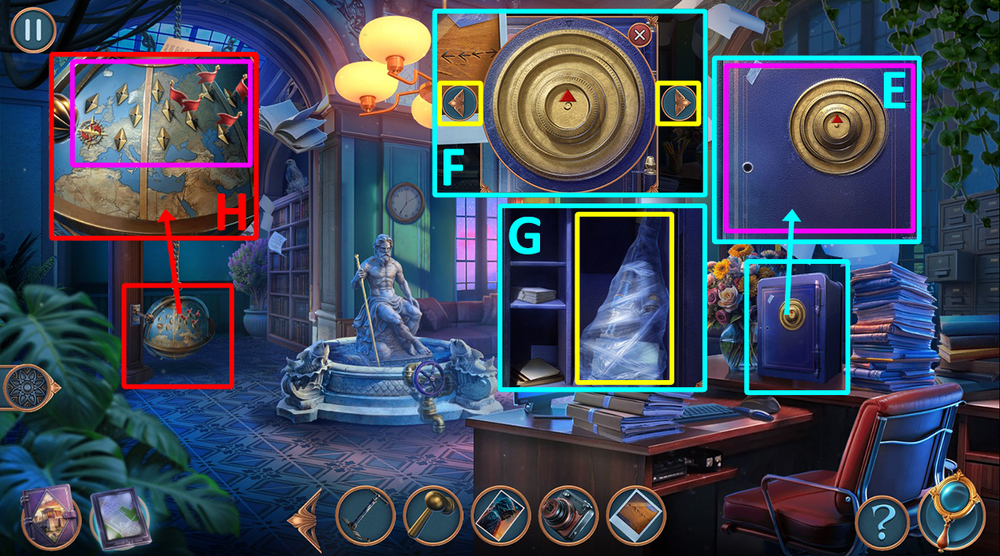
- Use HANDLE and CODE on the safe (E), press the arrows as shown in the clue: right, right, left, left, left, right (F), open the plastic bag, take and read the note, take SPINNING ROD and FLAGS (G).
- Use FLAGS on the globe (H).
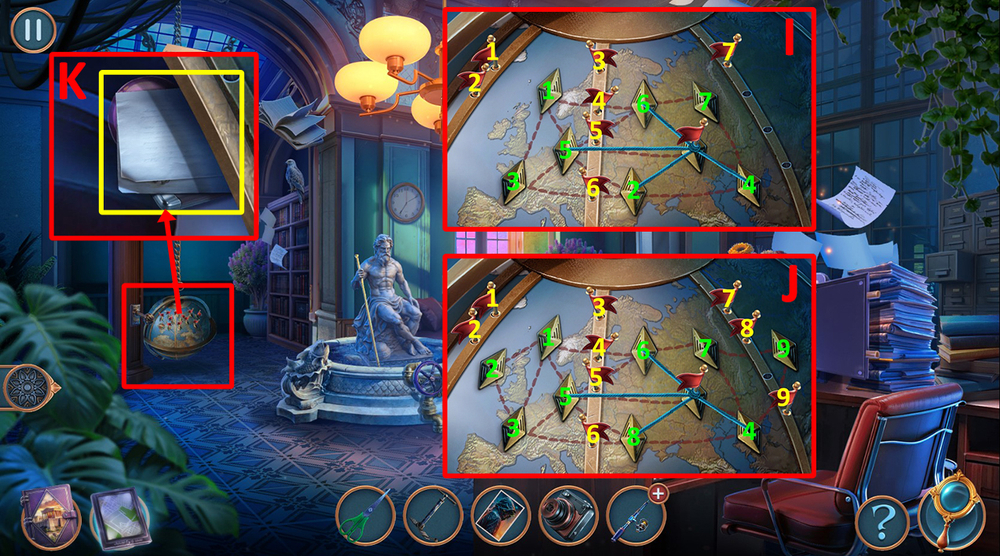
- Easy solution: Place the flags in the appropriate slots (I).
- Hard solution: Place the flags in the appropriate slots (J).
- Take and read the note, take REMOTE and UV BULB (K).
- Go forward.
- Use UV BULB on the lamp, press the power button (L).
- Use REMOTE on the remote sign, take BEE SMOKER and TRIDENT, use CAMERA on the fingerprint, earn FINGERPRINTS (M).
- Go back.
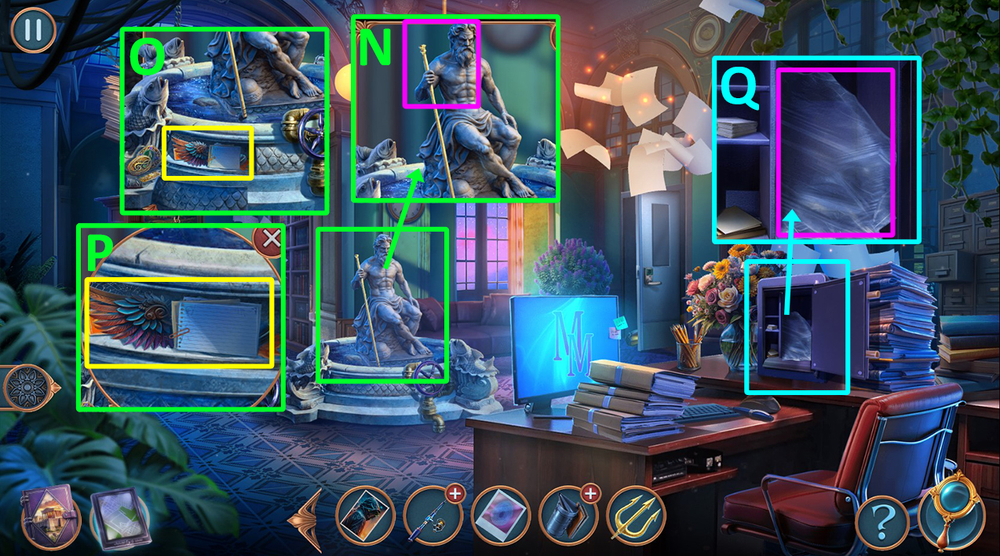
- Use TRIDENT on the statue (N), take a closer look at the stash (O), take and read the note, take WINGED SANDALS 1/2 and MATCHES (P).
- Use SCISSORS and MATCHES on the plastic bag, earn SAMPLE BAGS (Q).
- Go forward.
- Use SAMPLE BAGS on the body, play puzzle, earn PETRIFIED SKIN (R).
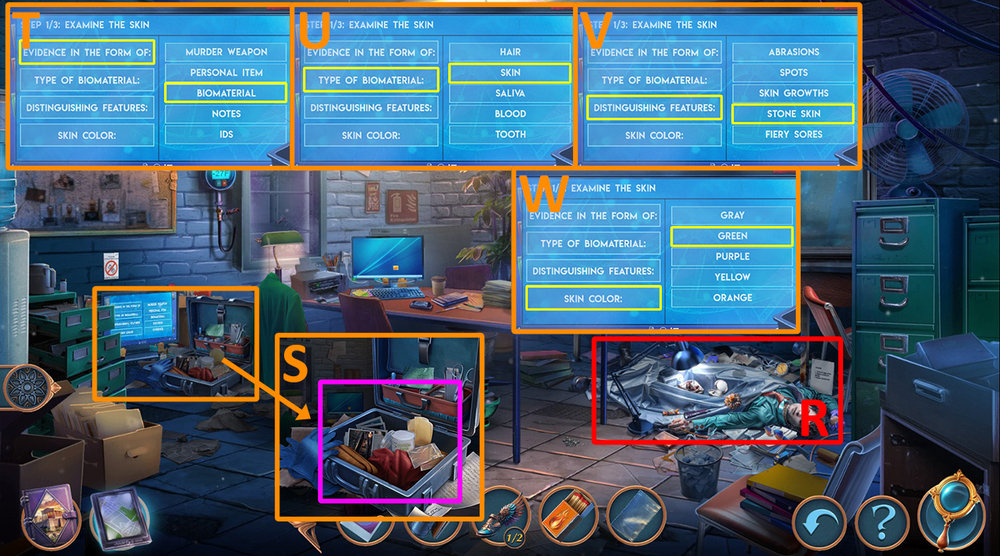
- Use KILLER’S PHOTO, FINGERPRINTS, and PETRIFIED SKIN on the suitcase (S).
- Solution: Step 1: select as shown in the images (T, U, V, W).
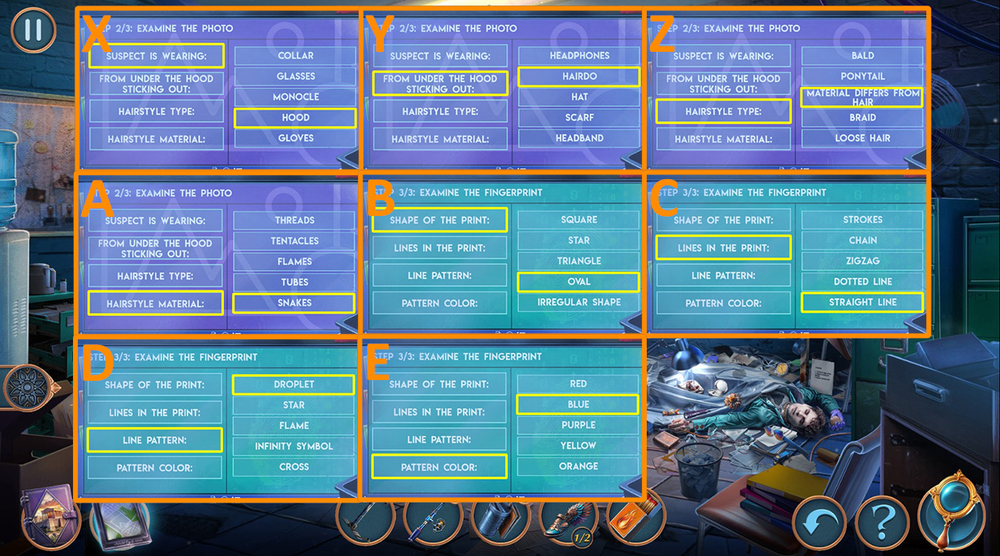
- Solution: Step 2: select as shown in the images (X, Y, Z, A).
- Solution: Step 3: select as shown in the images (B, C, D, E).
- Take STONE SNAKES 1/2 and TIRE SEALANT (F).
- Use PUMP and TIRE SEALANT on the tire, take CONSTRUCTION DRYER and HOOK (G).
- Use HOOK on SPINNING ROD, earn SPINNING ROD (H).
- Use SPINNING ROD on the bucket, take STONE SNAKES 2/2 (I).

- Use STONE SNAKES on the door (J).
- Easy solution: Click U, L, L, U, L, L, U, R(x4), U, L, U, L(x4), U, R, R, U, R, R, U (K).
- Hard solution: Click U, L(x4), U, R(x4), U, L, U, L, L, U, R, R, U (L).
- Take and read the book, take SMOKING PIPE and BATON (M).
- Use BATON on the pinata, take DRIED PETALS (N).
- Use MATCHES and DRIED PETALS on BEE SMOKER, earn BEE SMOKER (O).
- Use BEE SMOKER on the anthill (P).
- Easy-Hard solution: Clamp down on the smokestack to move.
- Release the fuse when the indicator light turns red.
- Wait until the indicator light turns green and continue moving again (Q).
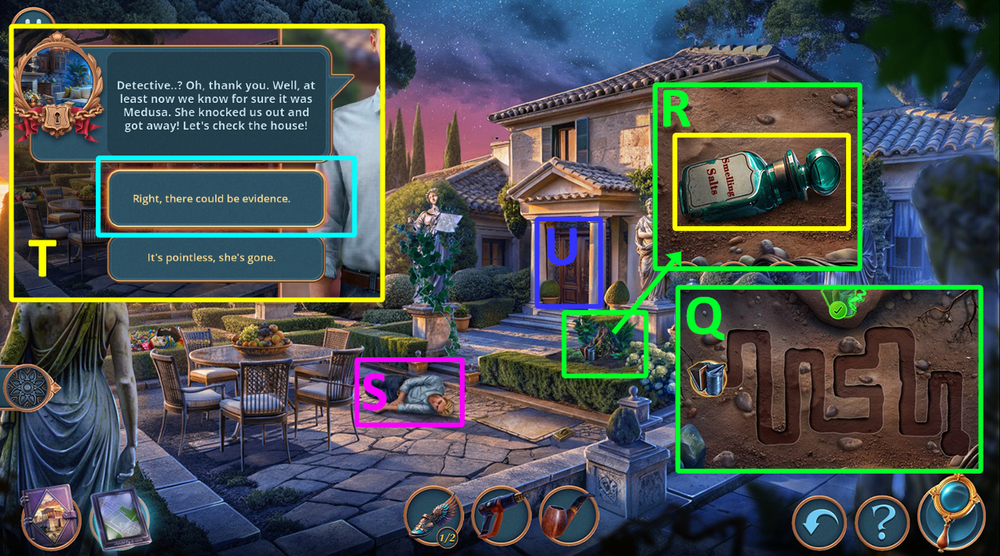
- Take SMELLING SALTS (R).
- Use SMELLING SALTS on Jacob (S).
- Select this option, earn LEVER (T).
- Go forward (U).
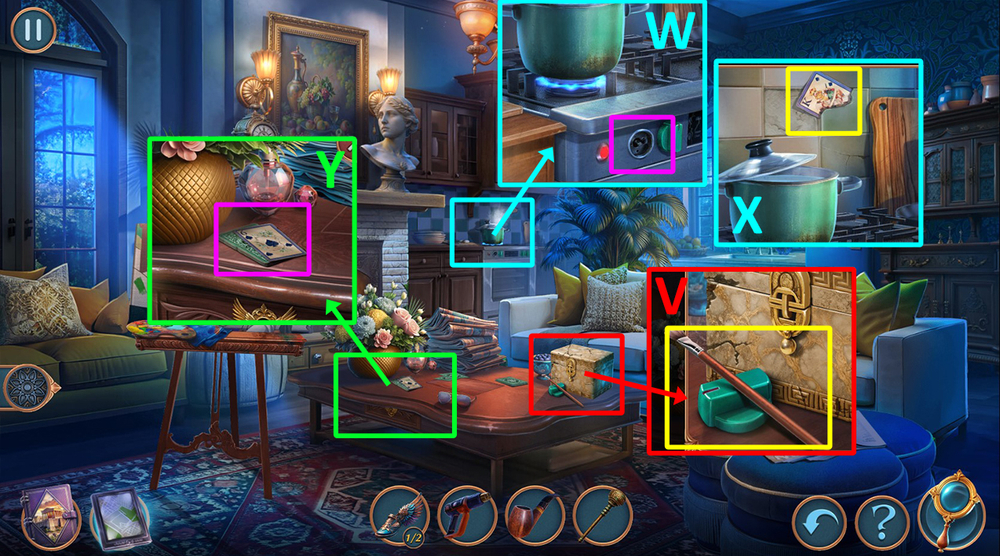
- Take BRUSH and SWITCH (V).
- Use BRUSH on the painting (W).
- Use SWITCH on the empty socket, take PLAYING CARD (X).
- Use PLAYING CARD on the card deck (Y).
- Easy solution: Follow the instructions (Z, A, B).
- Hard solution: Follow the instructions (C, D, E).
- Take PAINTING CUVETTES (F).
- Go back.
- Use LEVER on the mechanism (G).
- Go to the Underground Crypt.
- Select 1 or 2 (H).
- Take WELDING GUN and CHISEL (I).
- Use CHISEL on the stone, earn STONE (J).
- Use PAINTING CUVETTES on the flowers, take PAINTS, use STONE on the stream (K), use CONSTRUCTION DRYER on the sandal, earn WINGED SANDALS 2/2 (L) .
- Use WINGED SANDALS on the wall (M).
- Easy-Hard solution: Make it to the end without hitting any obstacles by using the arrow keys (N).
- Take and read the note, take METAL STEP and WILD BERRIES (O).
- Go to Medusa’s House.
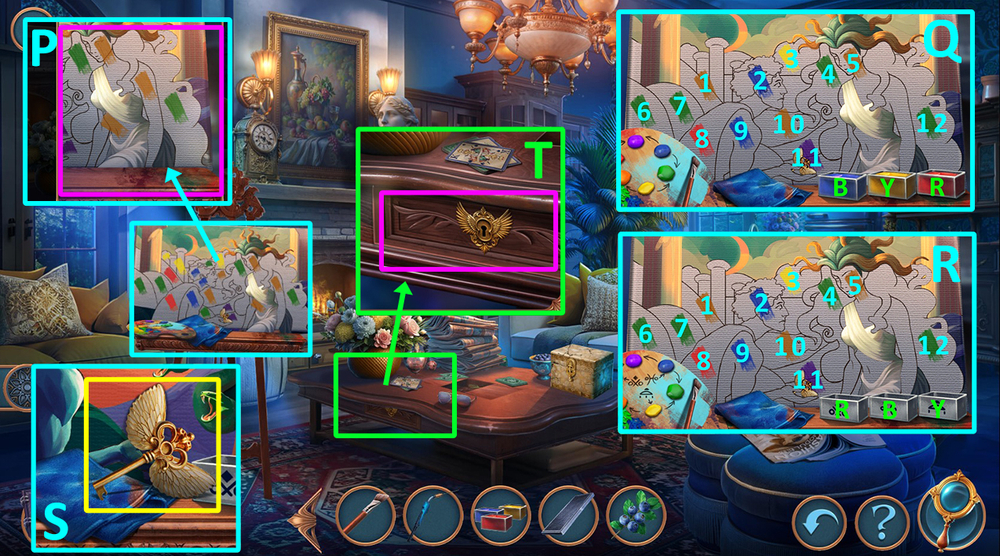
- Use PAINTS on the painting (P).
- Easy solution: Click B, 2, 9, R, 11, Y, 3, R, 1, 10, 5, B, Y, 6, 7, 4, 12, R, 8 (Q).
- Hard solution: Click B, 2, 9, R, 11, Y, 3, R, 1, 10, 5, B, Y, 6, 7, 4, 12, R, 8 (R).
- Take WINGED KEY (S).
- Use WINGED KEY on the drawer, take and read the note, take LEGENDARY HELMET (T).
- Go to Medusa’s Yard.

- Use LEGENDARY HELMET on the acid, earn ACID (U).
- Give WILD BERRIES to the chipmunk, take CAR KEY (V)
- Use CAR KEY on the car (W), use SMOKING PIPE on the socket (X), take PEGS and MAGNET (Y).
- Go to Medusa’s House.
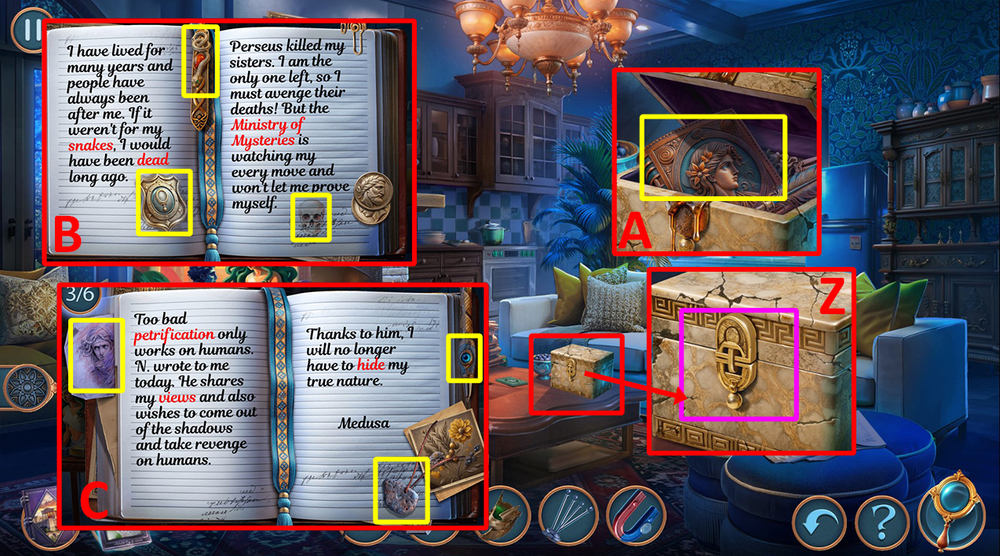
- Use ACID on the box (Z), open the book (A), click on the objects that match the highlighted words (B, C).
- Go to Medusa’s Garden.
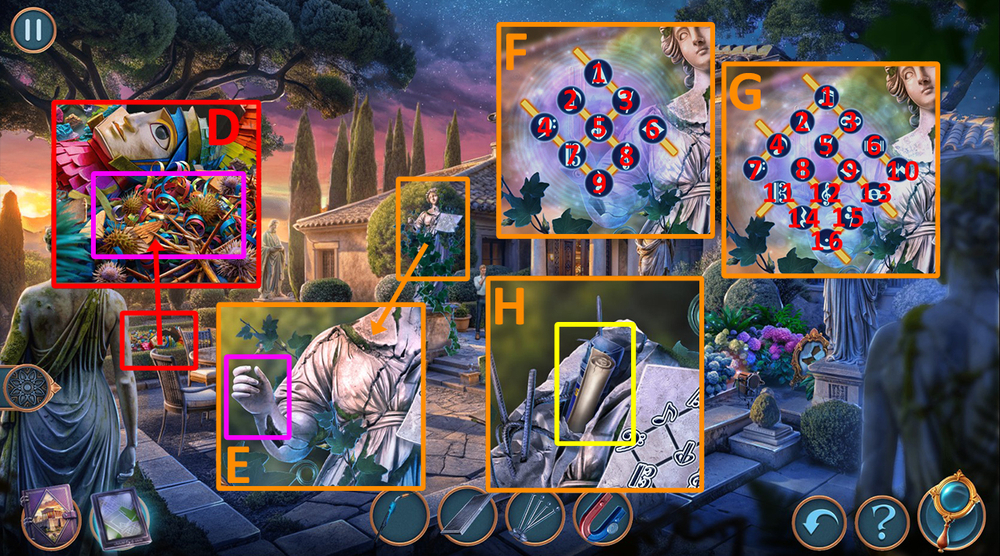
- Use MAGNET on the confetti, earn TUNING FORK (D).
- Use TUNING FORK on the statue’s hand (E).
- Easy solution: Click 8, 8, 6, 8, 8, 8, 6, 6, 4, 1, 2, 4, 2, 2, 1, 1, 1, 2 (F).
- Hard solution: Click 5, 5, 3, 3, 1, 4, 4, 11, 11, 9, 15, 15, 13, 13, 15, 15, 13, 12, 16, 14, 15, 15, 15, 16, 16, 16, 15 (G).
- Take and read the note, take SLEEPING GAS (H).
- Go to the Underground Crypt.
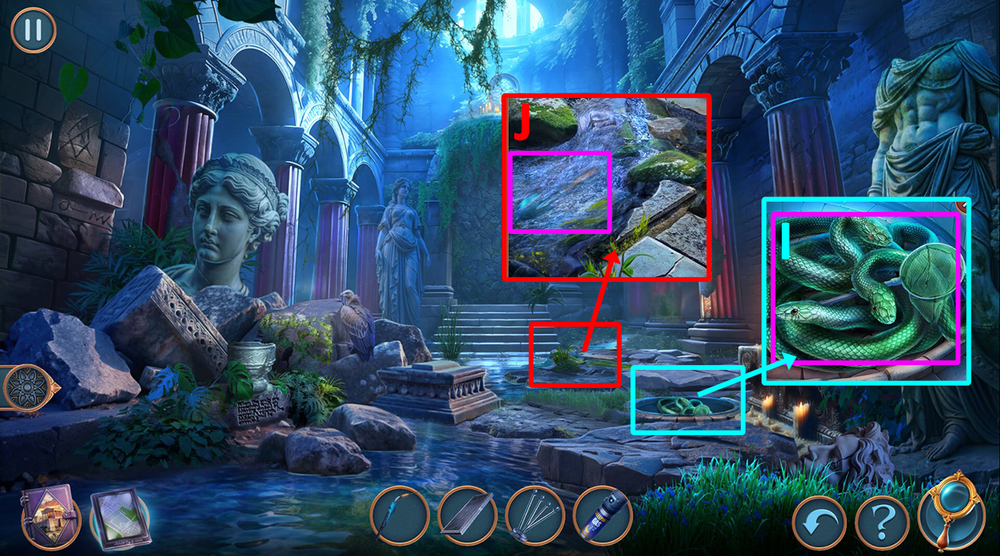
- Use SLEEPING GAS on the snakes, take SCOOP NET (I).
- Use SCOOP NET on the stream, earn SHOVEL (J).
- Go to Medusa’s Yard.
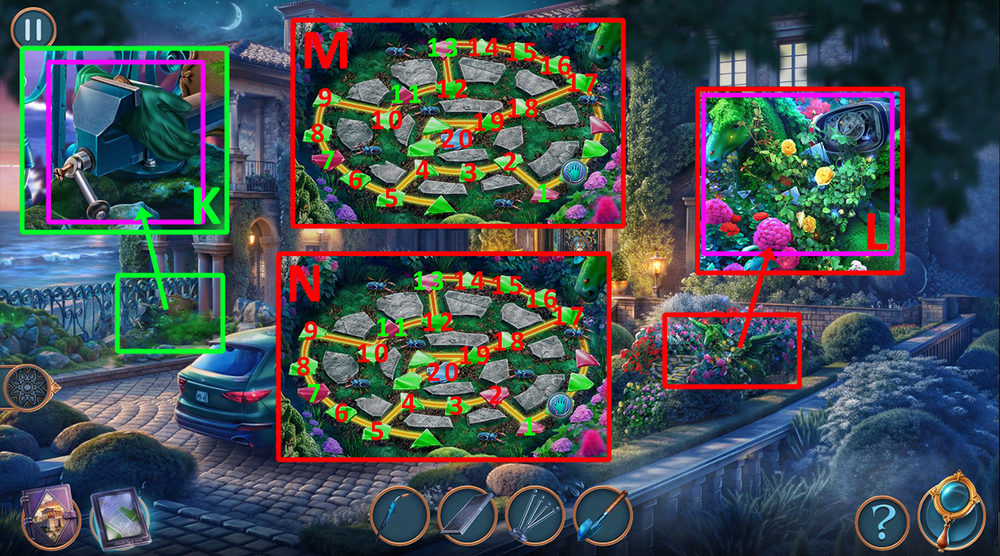
- Use SHOVEL on the screw, take ANTIQUE COIN and GLOVES (K).
- Use GLOVES on the roses (L).
- Easy solution: Go 1-20 avoiding the red glass (M).
- Hard solution: Go 1-20 avoiding the red glass (N).
- Earn MIRROR SHARDS.
- Go to Medusa’s Garden.
- Use MIRROR SHARDS on the mirror (O), click on the bushes (P), take GLASS (Q).
- Go to the Underground Crypt.
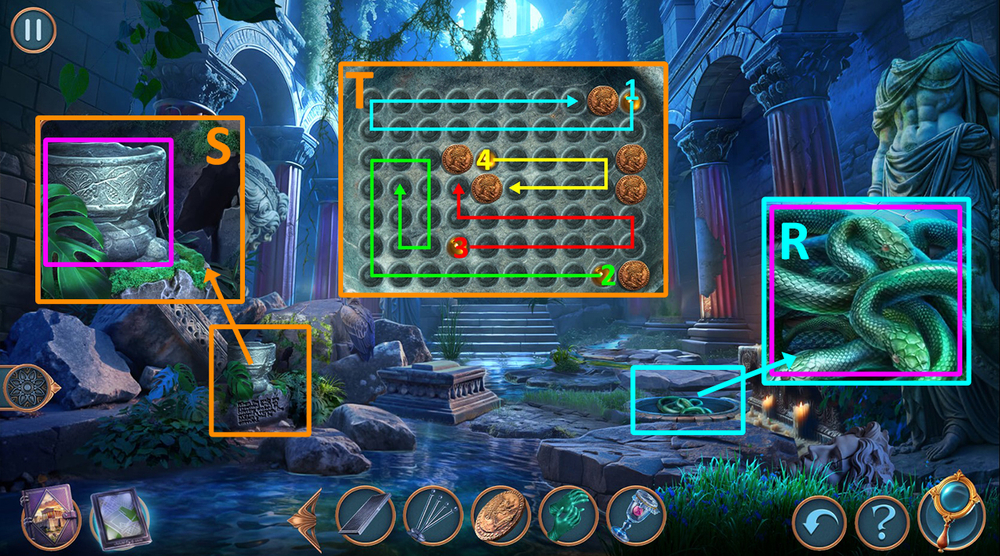
- Use GLASS on the snakes, earn SNAKE VENOM (R).
- Use ANTIQUE COIN and SNAKE VENOM on the stone cup (S).
- Easy solution: Follow the instructions (T).
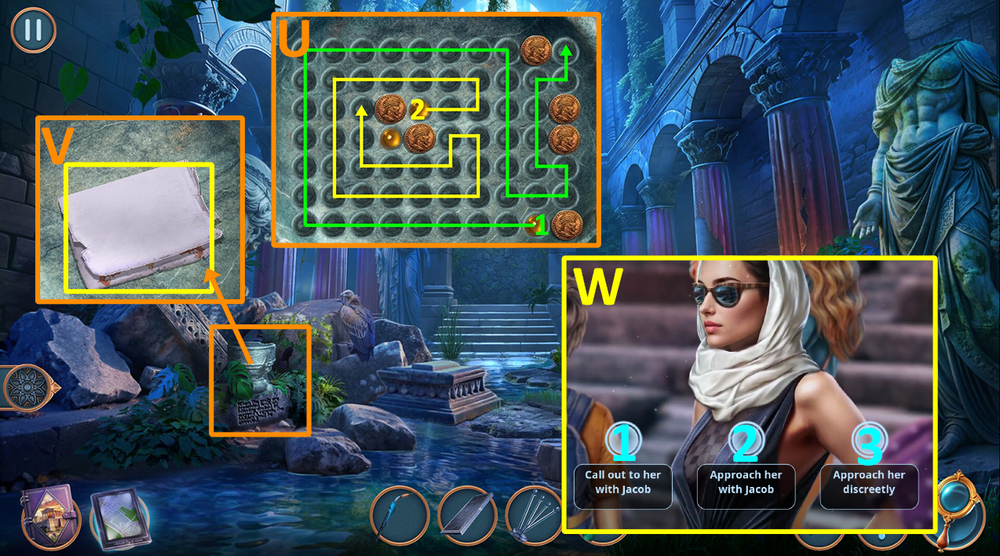
- Hard solution: Follow the instructions (U).
- Take and read the note (V).
- Select 1, 2, or 3 (W).
- Take GRAMOPHONE (X).
- Take POLICE BADGES 1/2 (Y), use WELDING GUN and METAL STEP on the steps (Z).
- Play puzzle, earn TOOLBOX (A).
- Use GLOVES and TOOLBOX on the wires (B), take POLICE BADGES 2/2 (C).
- Use POLICE BADGES on the suitcase (D).
- Easy solution: Click 1-5 (E).
- Hard solution: Click 1-6 (F).
- Take and read the note, take HANDLE and POLICE TAPE (G).
- Use PEGS and POLICE TAPE on the background (H).
- Play puzzle, earn SILVER SNAKE’S HEAD (I).
- Use SILVER SNAKE’S HEAD on the staples, take HORN (J).
- Use HANDLE and HORN on GRAMOPHONE, earn GRAMOPHONE (K).
- Use GRAMOPHONE on the stage (L).
- Easy solution: Follow the instructions (M).
- Hard solution: Follow the instructions (N).
- Take BANDAGE (A).
- Use BANDAGE on the hand (B).
- Take STAPLER (C).
- Take CHOPSTICKS 1/2 and SAFETY ROPE (D), use STAPLER on the glove, earn GLOVE (E).
- Take PALLET TRUCK HANDLE (F), use GLOVE on the shards, earn BINOCULARS (G).
- Use BINOCULARS on the statues (H).
- Play puzzle (I).
- Select 1 or 2, earn TABLET (J).
- Use TABLET on the background (K).
- Go forward (L).
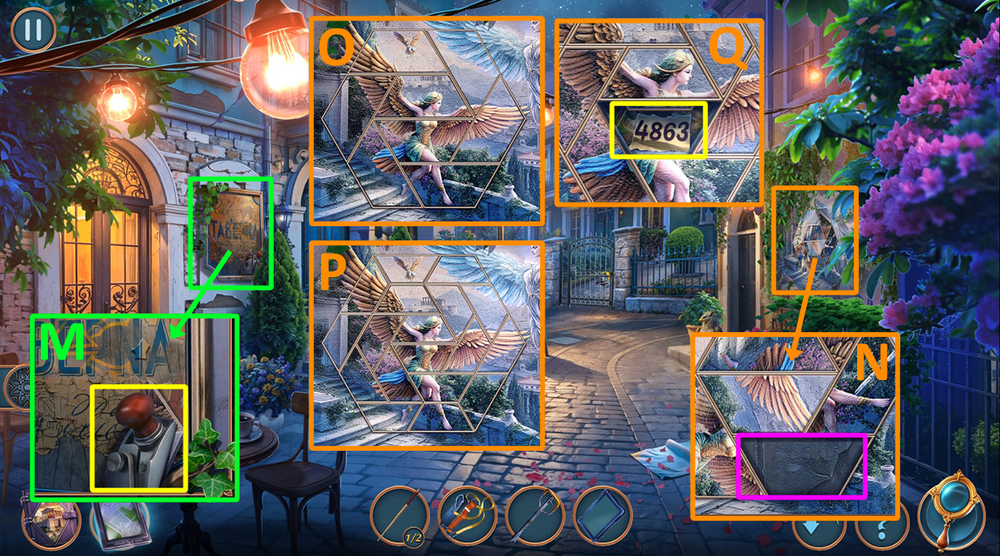
- Take PLANER and MOSAIC PIECE (M).
- Use MOSAIC PIECE on the mosaic (N).
- Easy solution: Follow the instructions (O).
- Hard solution: Follow the instructions (P).
- Take CODE (Q).
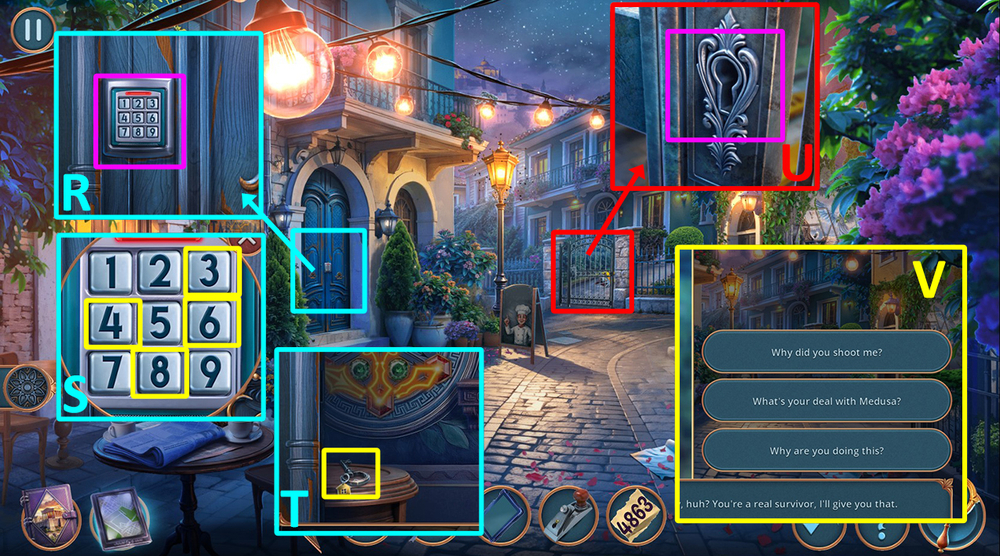
- Use CODE on the code lock (R), enter 4863 (S), take KEY (T).
- Use KEY on the keyhole (U).
- Click on these lines one by one (V).
- Select 1 or 2 (W).
- Take GRAPPLING HOOK (X).
- Go back.

- Use GRAPPLING HOOK on the column (Y).
- Play puzzle, earn FILE (Z).
- Use FILE on the chain, take WHEEL (A).
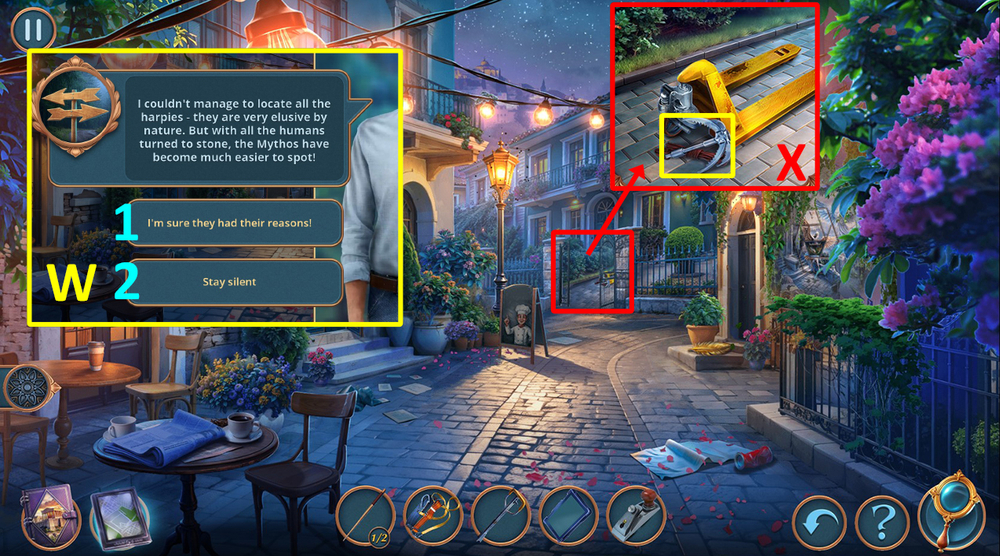
- Go forward.
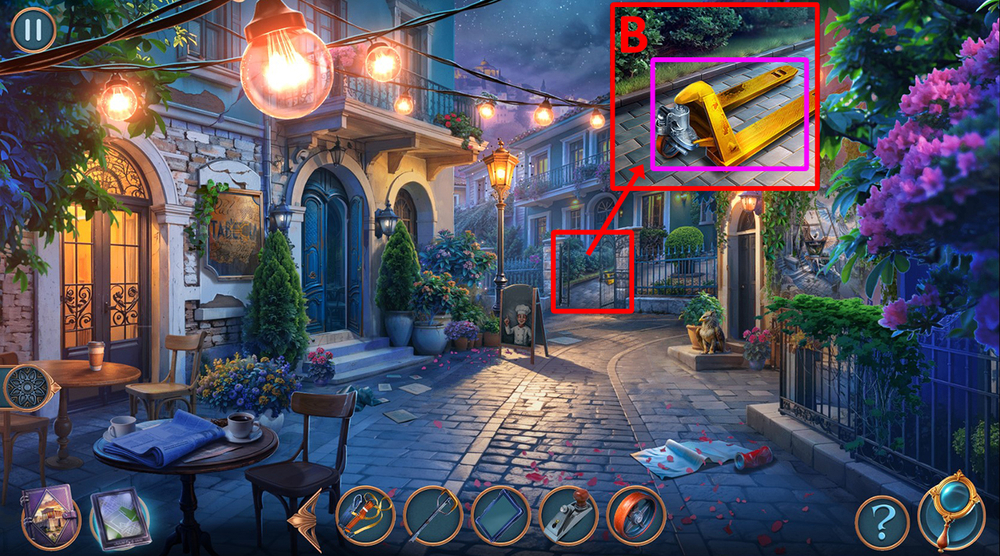
- Use PALLET TRUCK HANDLE and WHEEL on the pallet truck, earn PALLET TRUCK (B).
- Go back.
- Use PALLET TRUCK on the rubble pile (C).
- Easy solution: Follow the instructions (D).
- Hard solution: Follow the instructions (E).
- Take CHOPSTICKS 2/2 (F).
- Use CHOPSTICKS on the bottle, earn DETERGENT (G).
- Go forward.
- Use DETERGENT on the sign, use TABLET on the symbol, earn ARGONAUTS SYMBOL (H).
- Use ARGONAUTS SYMBOL on the strange device (I).
- Easy solution: Click 3-7, 6-7, 3-7, 1-2, 4-5 (J).
- Hard solution: Click 3, 2, 1, 2, 3, 2, 5, 5, 2 (K).
- Earn ARGONAUTS SYMBOL, take and read Jacob’s diary (L).
- Take RUST REMOVER and SHARP KNIFE (M).
- Use SHARP KNIFE on the fabric, earn PIECE OF CLOTH (N).
- Use RUST REMOVER and PIECE OF CLOTH on the box, take SPRAYER and TREKKING POLES (O).
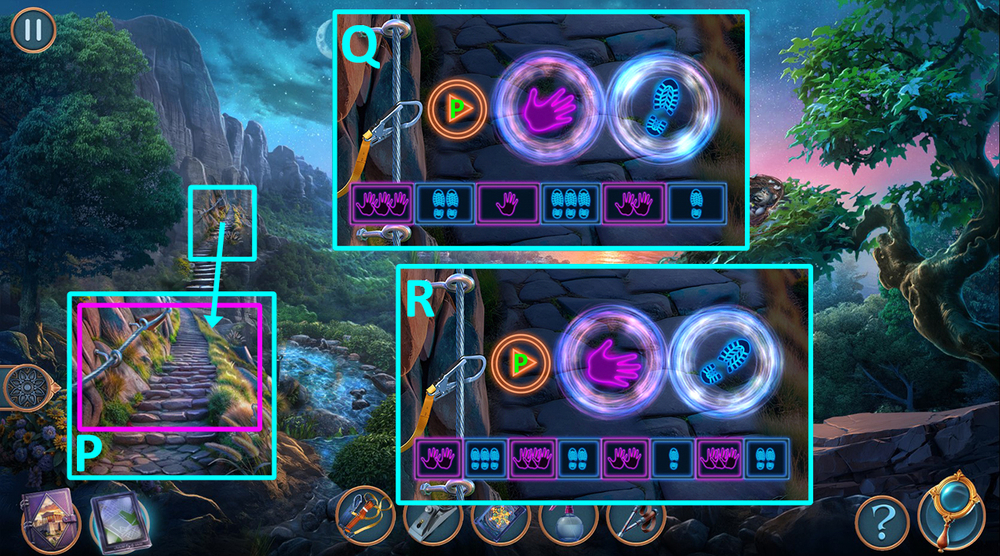
- Use SAFETY ROPE and TREKKING POLES on the path (P).
- Easy solution: Place your arms and legs as shown in the image then press the P button (Q).
- Hard solution: Place your arms and legs as shown in the image then press the P button (R).
- Select this option (S).
- Go forward (T).
- Take DISASSEMBLED JACK (U).
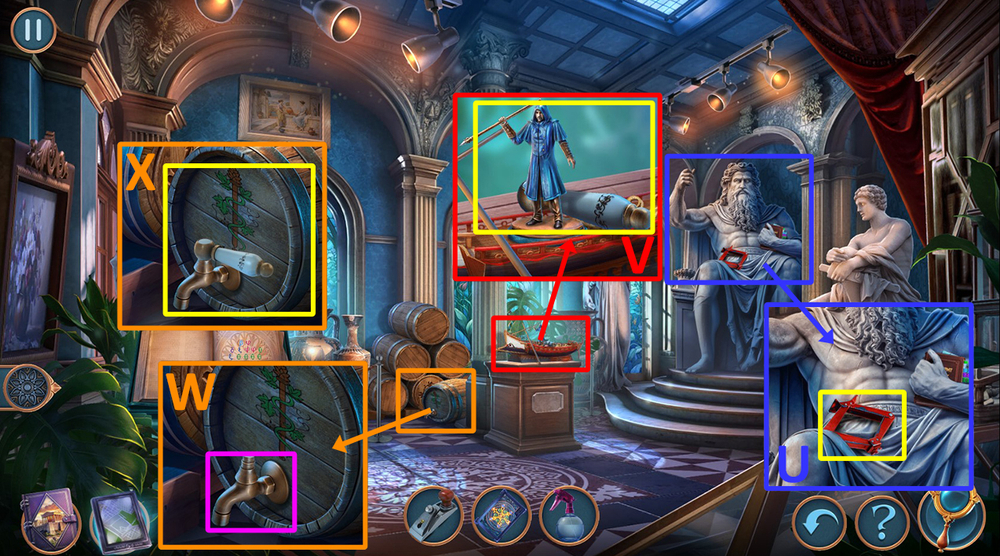
- Take ARGONAUT FIGURINE and FAUCET HANDLE (V).
- Use FAUCET HANDLE on the tap (W), click on the barrel, take HARPY FIGURINE (X).
- Use ARGONAUT FIGURINE and HARPY FIGURINE on the empty slots (Y), take and read LAYOUT GUIDE, take HARPY’S CLAW (Z).
- Go back.
- Take WIRE and LOCK PART (A), use HARPY’S CLAW on the box, take LAYOUT PIECE (B).
- Use ARGONAUTS SYMBOL and LOCK PART on the box (C), press on the fragments from I to IV according to the picture on the tablet (D), take FEATHER DUSTER (E).
- Use FEATHER DUSTER on the dust (F).
- Play puzzle, earn CHIRON’S CANE (G).
- Use CHIRON’S CANE under the cabinet, earn FISHING ROD (H).
- Go forward.
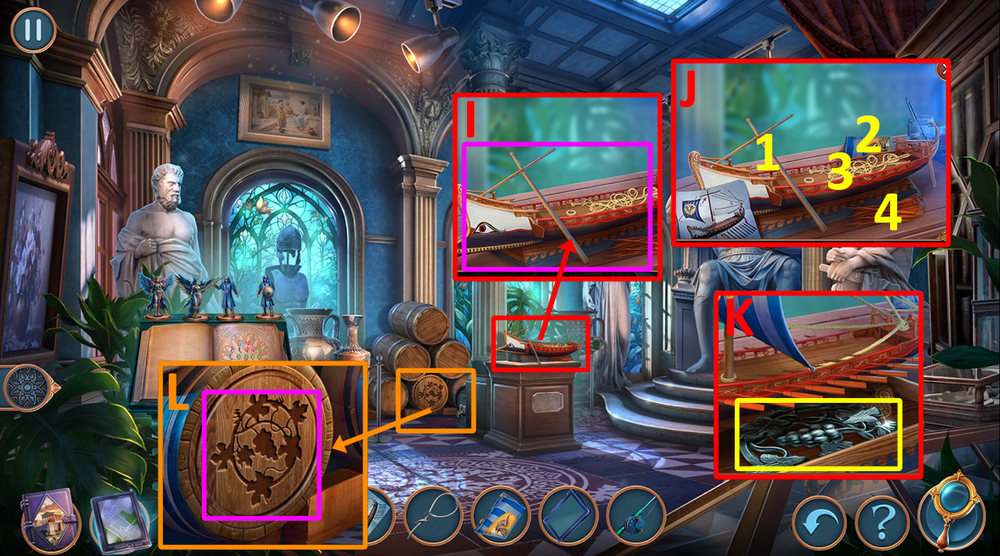
- Use LAYOUT GUIDE and LAYOUT PIECE on the ship (I), click on the mast (1), sail (2), ropes (3), and oars (4) (J), take VINE AMULET (K)
- Use VINE AMULET on the barrel, take JACK LEVER (L).
- Go to Mount Pelion.
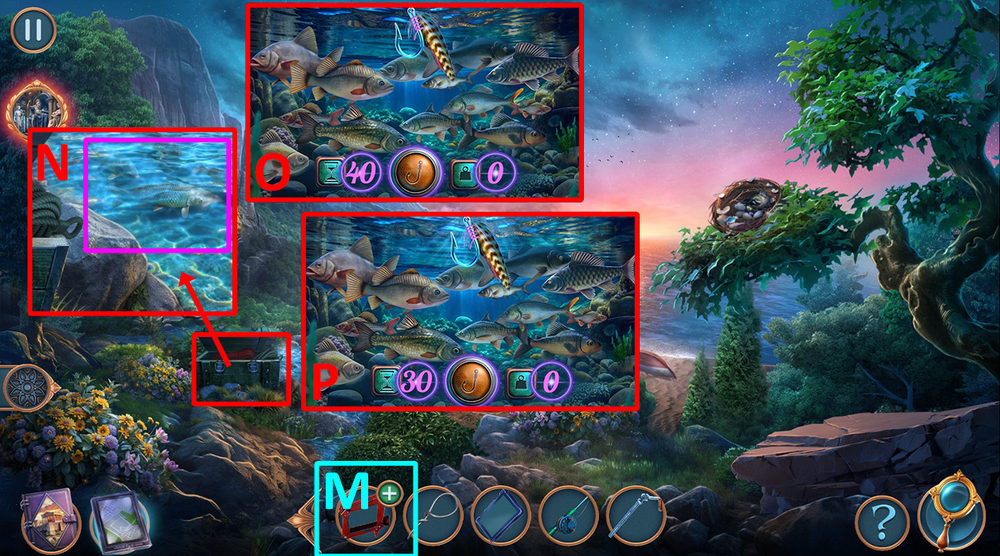
- Use JACK LEVER on the DISASSEMBLED JACK, earn MAKESHIFT JACK (M).
- Use FISHING ROD on the water (N),
- Easy solution: Catch 50 ounces of fish, lower the rod by pressing the appropriate button (O).
- Hard solution: Catch 50 ounces of fish, lower the rod by pressing the appropriate button (P).
- Earn FISH.
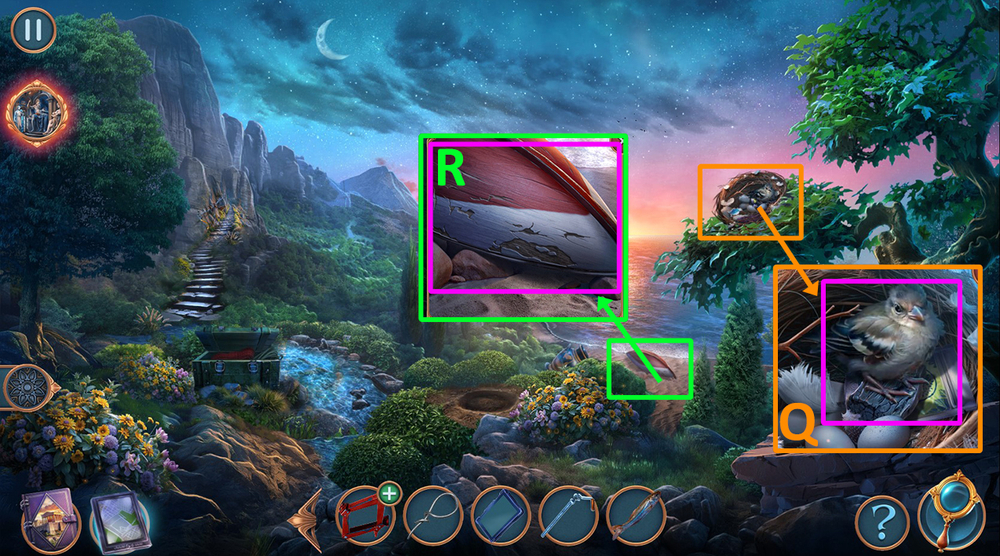
- Give FISH to the bird, earn COAL and TREE FERTILIZER (Q).
- Use MAKESHIFT JACK on the boat, earn LIGHTNING BOLT (R).
- Go to the Myth Museum.
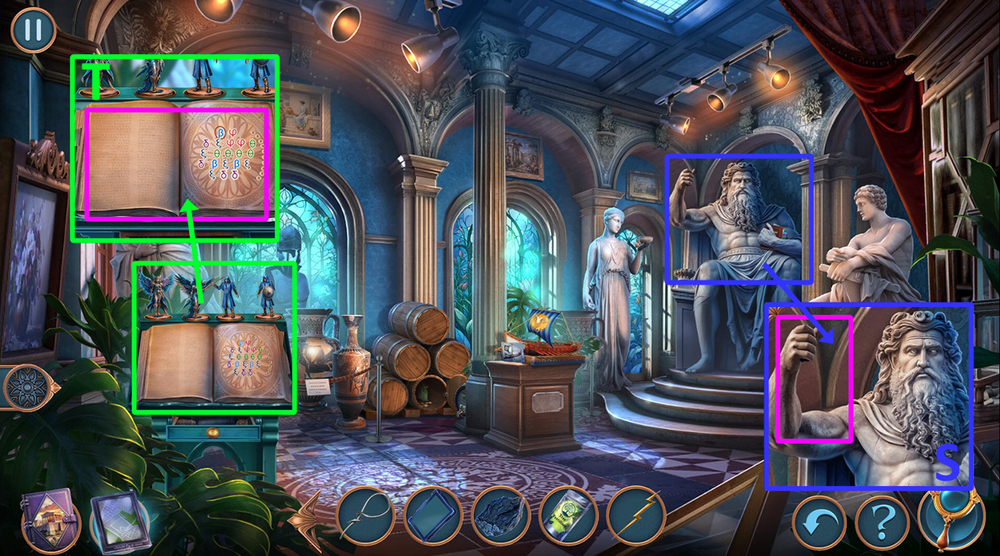
- Use LIGHTNING BOLT on the statue, take ANCIENT GREEK DICTIONARY (S).
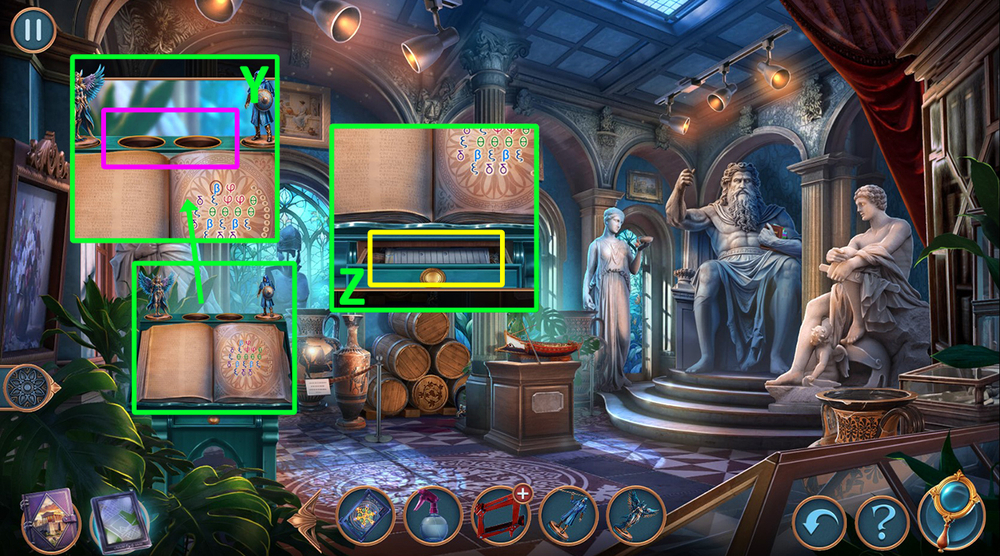
- Use ANCIENT GREEK DICTIONARY on the book (T).
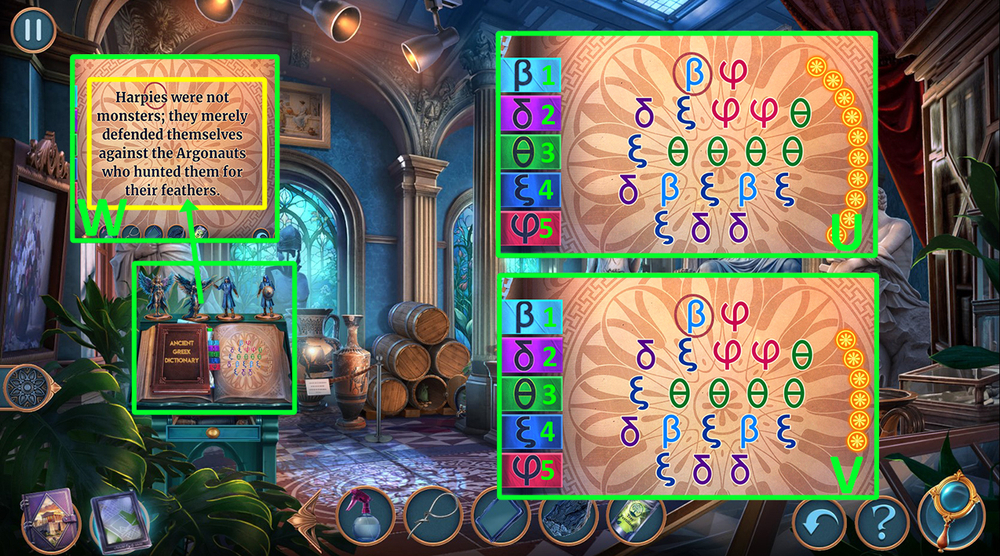
- Easy solution: Click 5, 3, 1, 4, 2 (U).
- Hard solution: Click 5, 3, 1, 4, 2 (V).
- Flip through the pages by clicking on them (W).
- Go back.
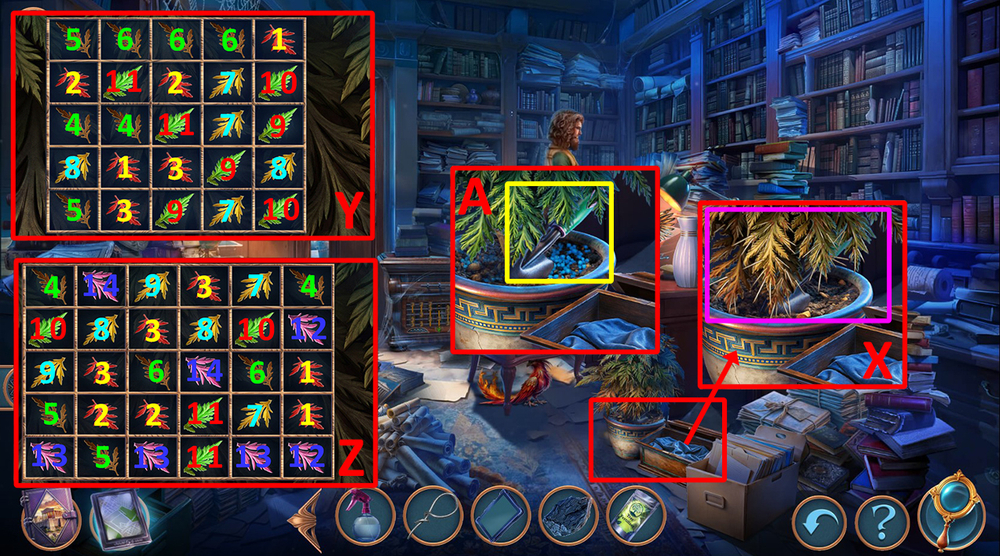
- Use SPRAYER and TREE FERTILIZER on the plant (X).
- Easy solution: Click on the same numbers in order (Y).
- Hard solution: Click on the same numbers in order (Z).
- Take GARDEN SHOVEL (A).
- Go back.
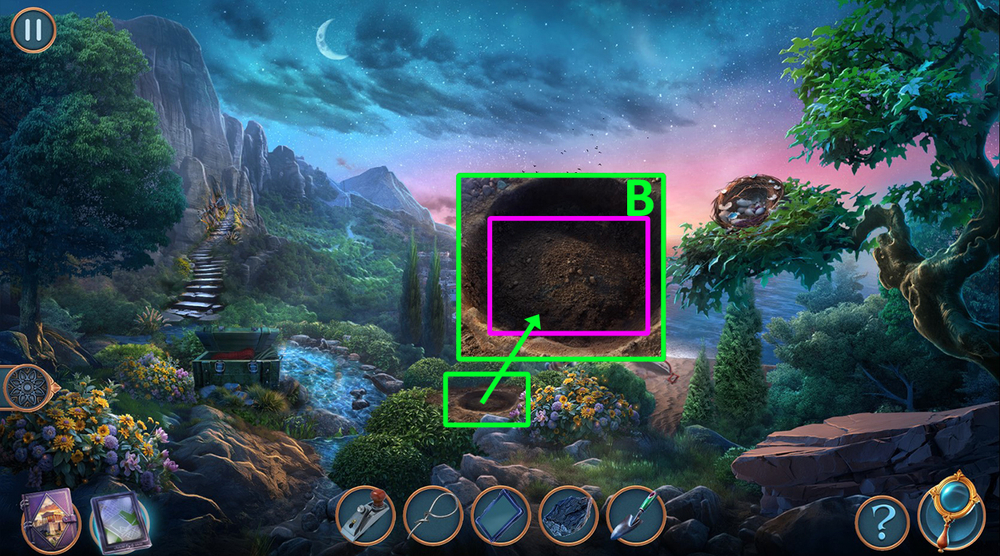
- Use GARDEN SHOVEL on the dirt, take METAL FEATHERS 1/2 (B).
- Go forward.
- Play puzzle, earn RESURRECTION SPELL (C).
- Use RESURRECTION SPELL on the owl, take METAL FEATHERS 2/2 (D).
- Use METAL FEATHERS on the empty slots (E).
- Easy solution: Follow the instructions (F).
- Hard solution: Follow the instructions (G).
- Take and read the book (H).
- Select 1, 2, or 3 (I).
- Take RIPPED GAS MASK, SILVER FLUTE, and BELT (J).
- Use BELT on the holes (K), examine the saw, use WIRE on the saw, earn SAW (L).
- Use PLANER and SAW on the bush, earn LONG BRANCH (M).
- Use LONG BRANCH on the window (N).
- Easy solution: Follow the instructions (O).
- Hard solution: Follow the instructions (P).
- Take and examine the photo, take SCISSORS (Q).
- Use SCISSORS on the bundle, take BUTTON (R).
- Use BUTTON on the tape recorder (S), take CLOCK HAND (T).
- Use CLOCK HAND on the dial (U).
- Easy solution: Follow the instructions (V).
- Hard solution: Follow the instructions (W).
- Take and read the note, take LITTLE CHEF (X).
- Go back.

- Use LITTLE CHEF on nails, take CRYSTAL VIAL, LENSES 1/2, and DEFLATED RUBBER BALL (Y).
- Use DEFLATED RUBBER BALL on the wires (Z).
- Easy solution: Click 1-3, 1-3, 1-2, 3-1, 2-1, 2-1, 2-1, 3-2, 3-2, 1-3, 2-3, 2-3 (A).
- Hard solution: Click 2-3, 1-2, 1-3, 1-2, 3-1, 2-1, 2-1, 2-3, 2-1, 3-2, 3-2, 3-2, 3-2, 1-3, 2-3, 2-3, 2-1, 3-2, 3-2, 1-3, 2-1, 2-3, 2-3 (B).
- Take LIGHT BULB (C).
- Go forward.
- Use LIGHT BULB on the lamp, turn it on, take LONG CLIP (D).
- Use LONG CLIP on the stuck object, earn MAILBOX FLAG (E).
- Go back.
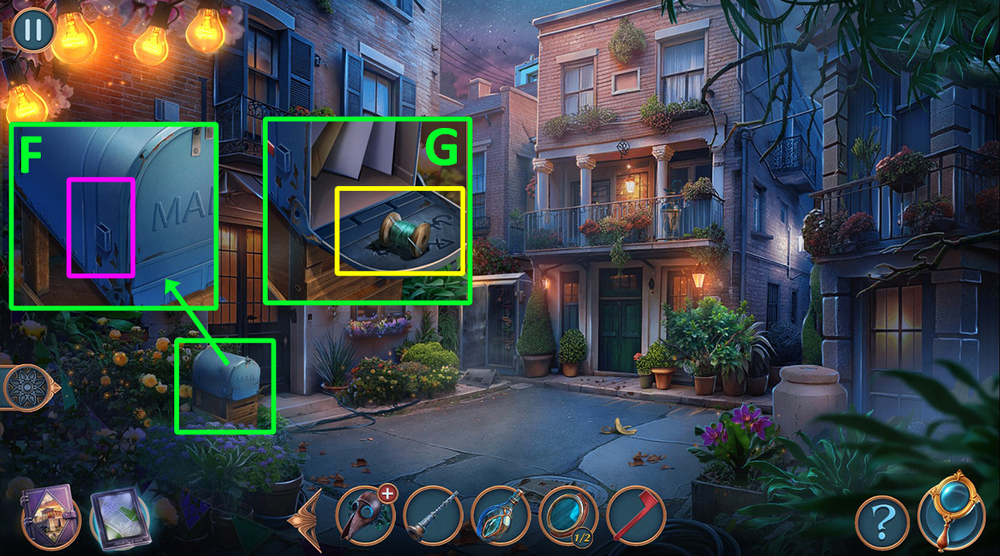
- Use MAILBOX FLAG on the mailbox (F).
- Take NEEDLE AND THREAD, use TABLET on the symbols, earn PUZZLE CLUE (G).
- Go forward.
- Use PUZZLE CLUE on the book (H).
- Easy solution: Follow the instructions (I, J, K, L).
- Hard solution: Follow the instructions (I, J, K, L, M).
- Earn SOLVED PUZZLE.
- Use SOLVED PUZZLE on the code panel (N).
- Take and read the letter (O), click on the objects that match the highlighted words: heart, mask, skull, letter, rose (P).
- Select 1 or 2 (Q).
- Take MOON SILVER and PAPER (R).
- Use COAL and PAPER on the music notes, earn NOTE SHEETS (S).
- Use SILVER FLUTE and NOTE SHEETS on the tree, take RUNESTONE (T).
- Use CRYSTAL VIAL on the water, earn HARPY’S TEAR, use RUNESTONE on the puzzle (U).
- Solution: Click Lx5, 1-2, Lx2, Rx9, 1-2, 3-4, Lx3, Rx2, 1-2, 3-4, Lx2, R, 1-4 (V).
- Take LENSES 2/2 (W).
- Use NEEDLE AND THREAD and LENSES on RIPPED GAS MASK, earn GAS MASK (X).

- Use GAS MASK on the green cloud, take PERSEUS’ RUBY (Y).
- Use MOON SILVER, HARPY’S TEAR, and PERSEUS’ RUBY on the stone table (Z).
- Easy solution: Click 1, 1, 2, 2, 3, 3, 3, 4, 5, 5, 5, 5 (A).
- Hard solution: Click 1, 1, 1, 1, 1, 2, 2, 2, 6, 6, 6, 6, 6, 3, 3, 3, 3, 5 (B).
- Take the handcuffs (C).
- Walkthrough Bonus Chapter, at the link below.


