Mystery of Myths 2: Mystery of the Fjords (Bonus Chapter) – Continues the story of Elijah Reed when it seemed the worst was over. However, new disturbing news from Bergen is keeping the Ministry of Mysteries on edge, a huge rune has appeared in the sky above the city, the myths are alarmed, and it doesn’t bode well. All things point to one thing, Ragnarok is indeed near. An urgent mission awaits you, study the notebook, read Imogen’s letter and head north. The port of Bergen is still recovering from the previous Loki events, and the atmosphere in the city remains tense. Elijah is greeted on the spot by old acquaintances, including the agile but perpetually in trouble Ratatosk. He is once again caught up in fishing nets, and asks for help, offering in exchange important information he knows where the Eye is hidden. The path to the clue leads to an ancient fortress where Jormungandr, a giant serpent, one of the key creatures of Ragnarök, awaits you. He is displeased and determined to let no one near the shore. A direct confrontation is certain doom, but there is a chance, legends say Jormungandr is partial to riddles. The only way to pass on, turn to the Ministry for an ancient puzzle capable of distracting and propitiating the serpent. Find a way through the myths to change the fate of the world, or at least delay its end.
Bonus Chapter Walkthrough
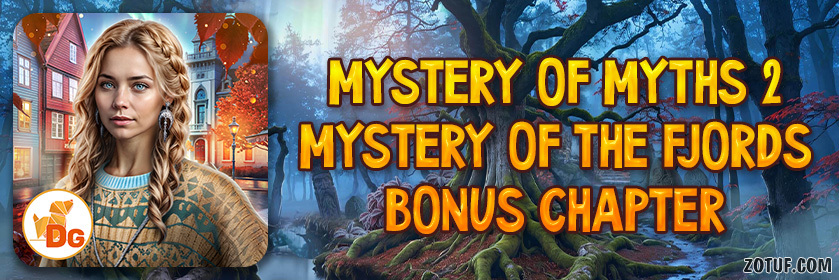
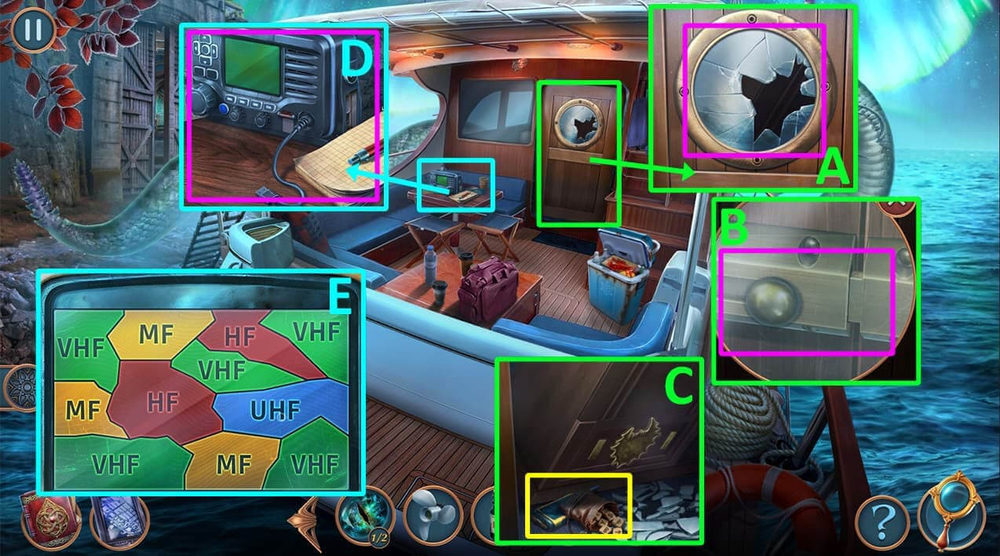
- Take CRYPTEX and STAPLE REMOVER (A).
- Take WAVE PENDANT (B).
- Use STAPLE REMOVER on the staples, take FLASH DRIVE, click on the envelope, take ENCRYPTED LETTER (C).
- Examine the USB adapter (D).
- Use FLASH DRIVE on it (E).

- Play puzzle (F).
- Take COORDINATES (G).
- Use COORDINATES on the map (H).
- Take CLAW and PEN (I).
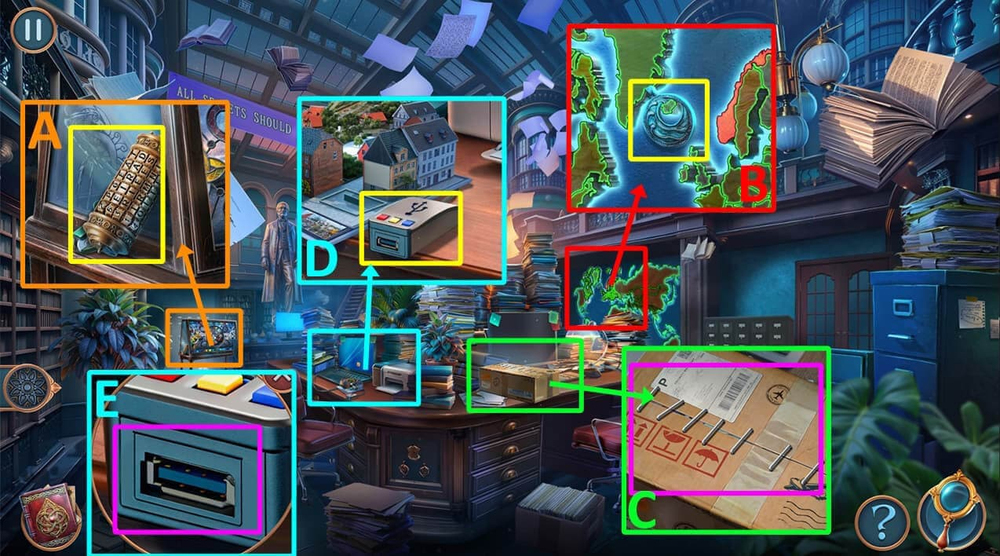
- Use CRYPTEX and PEN on ENCRYPTED LETTER, earn RATATOSK’S LETTER (J).
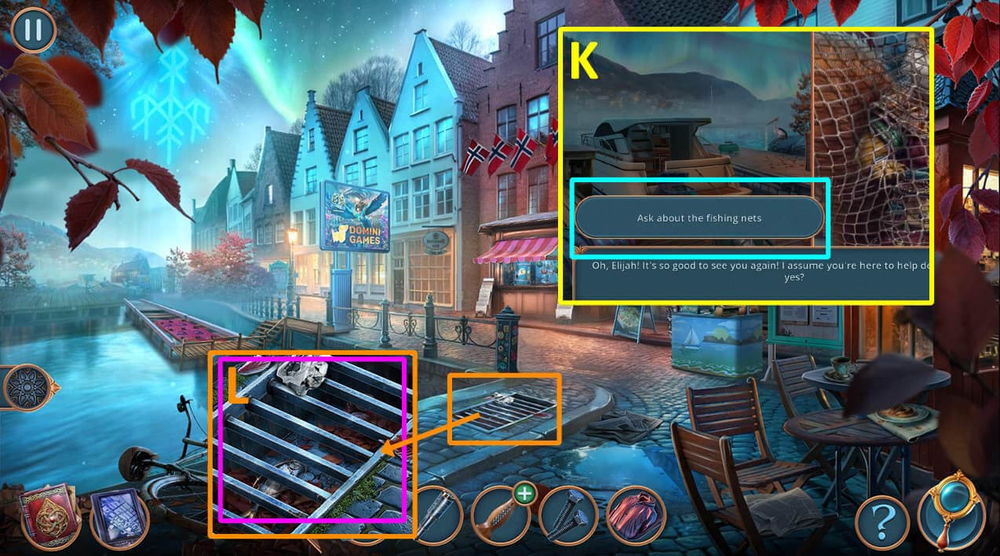
- Use RATATOSK’S LETTER on the stained glass (K).
- Easy Solution: Follow the instructions in the image (L).
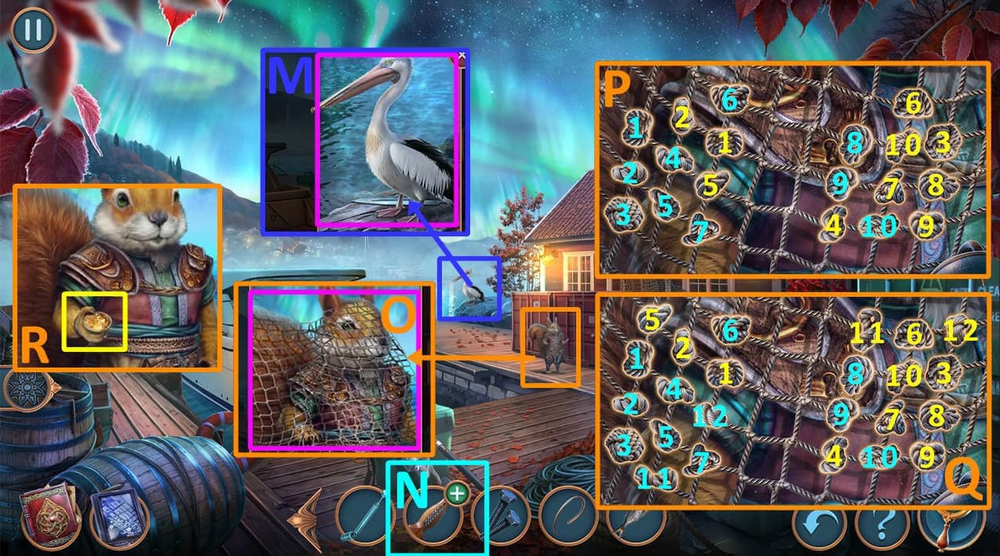
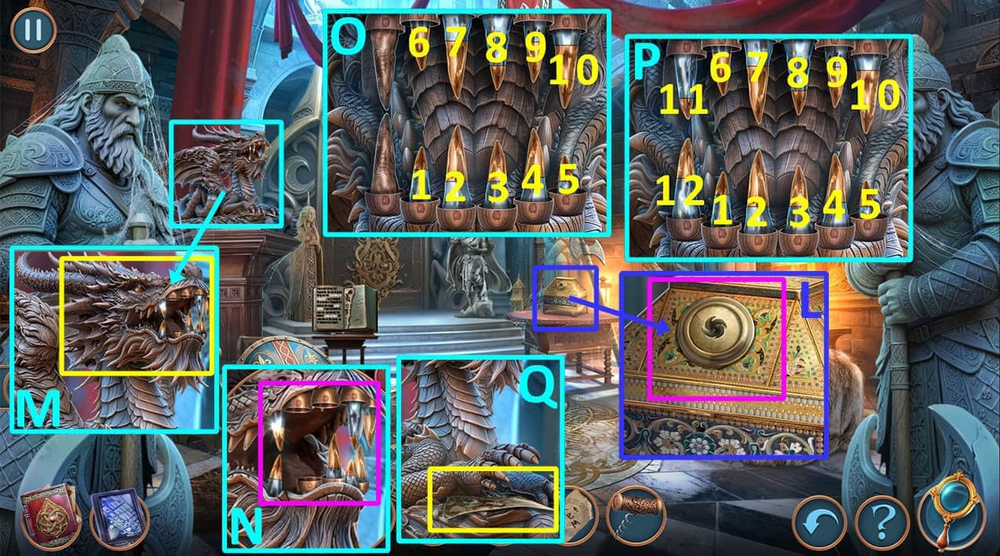
- Hard Solution: Follow the instructions in the image (M).
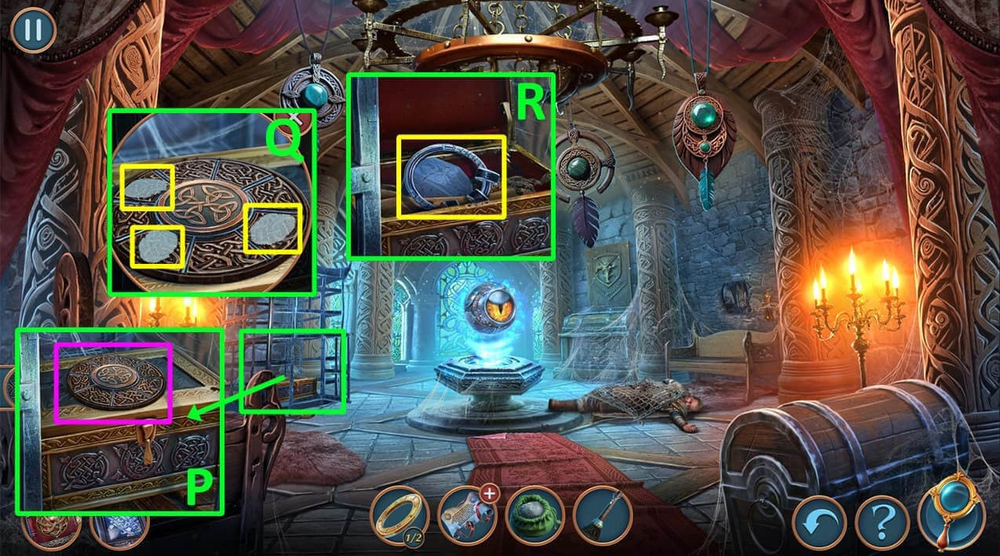
- Take LOCK PICKS 1/2 and MOONSTONE (N).
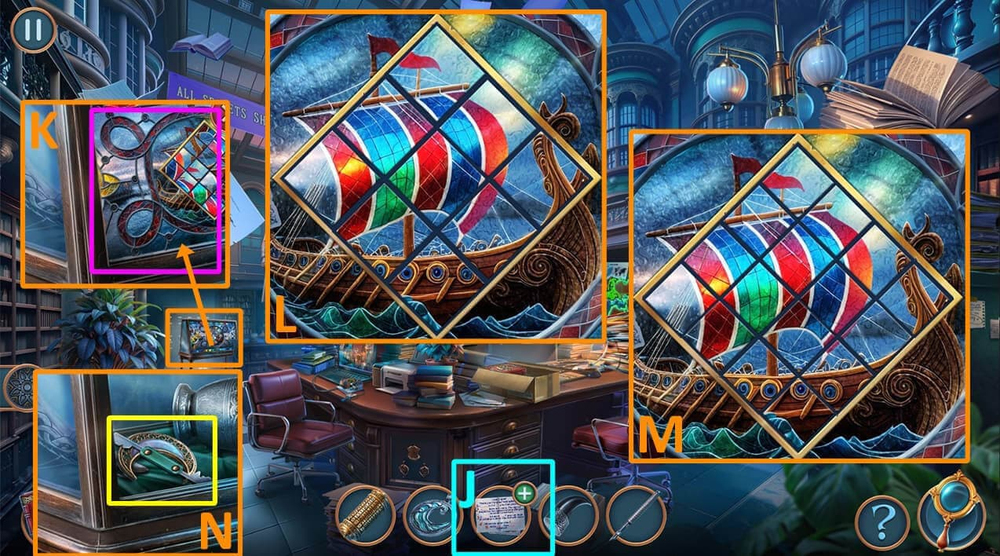
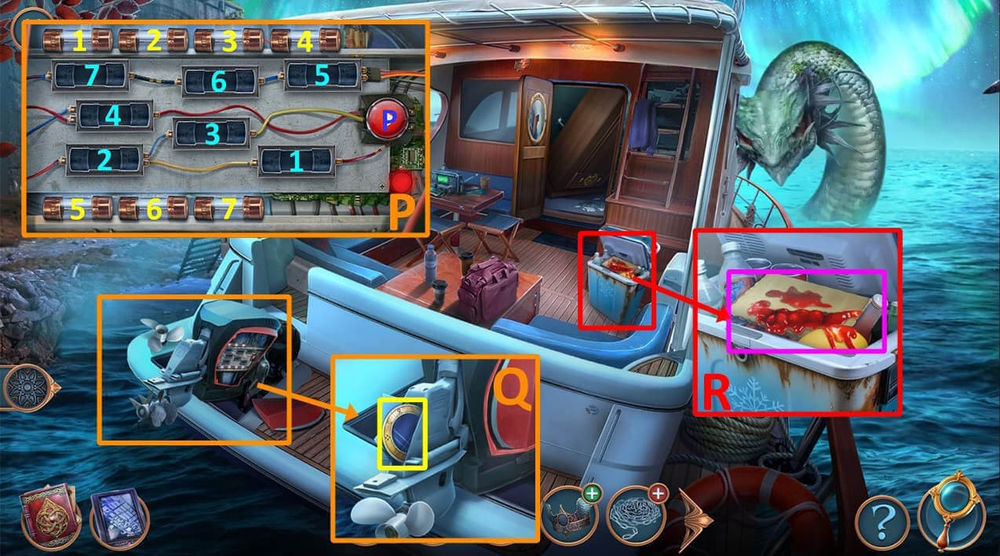
- Use MOONSTONE on the box (O).
- Press 3124 (P), click on the envelope, read the note, take SILVER PINS and HOUSE MODEL (Q).
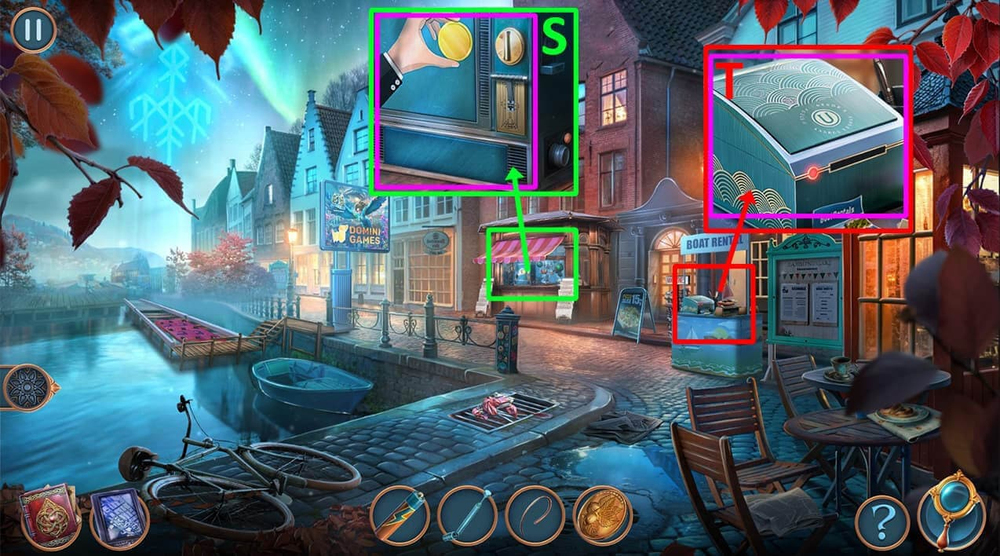
- Use HOUSE MODEL on the city model (R).
- Play puzzle (S).
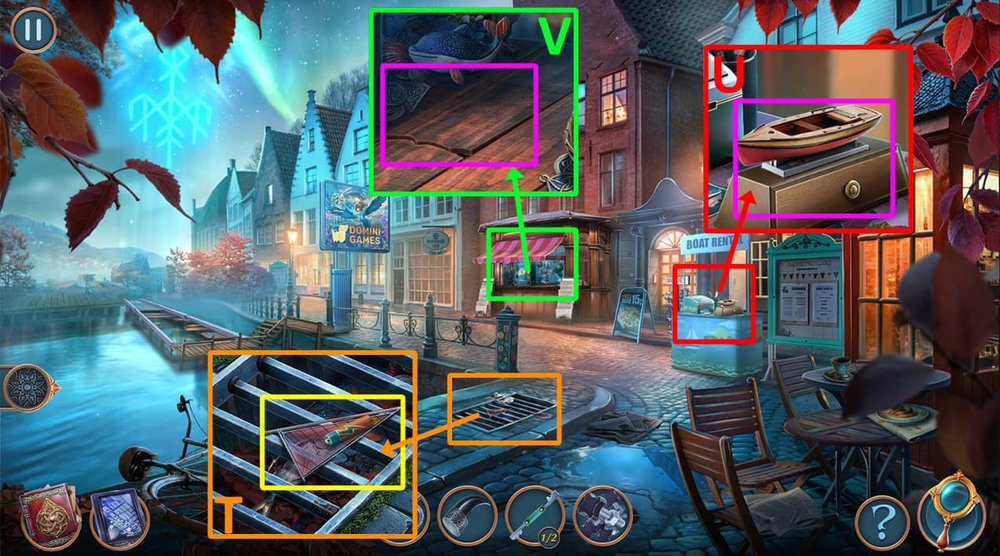
- Take BATTERY and CARDBOARD SAIL (T).
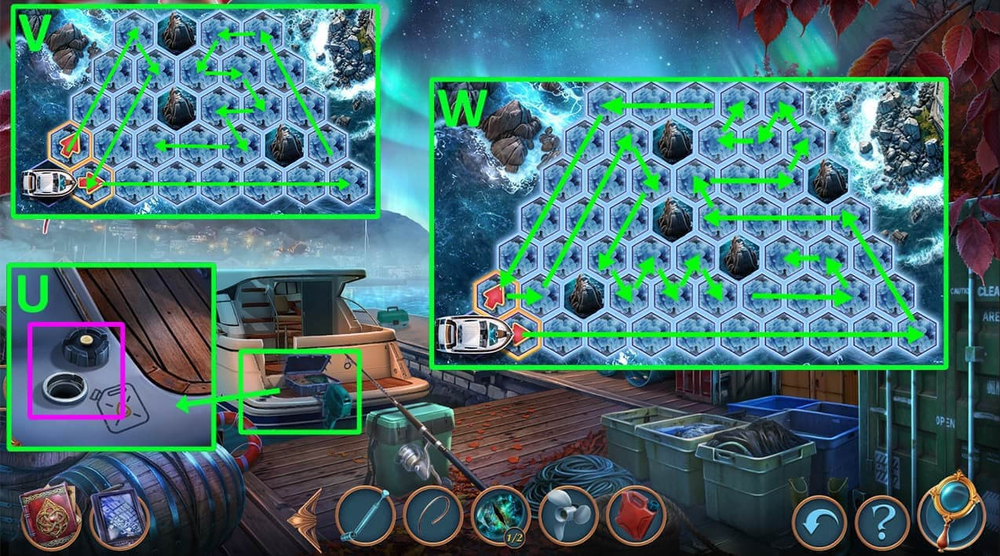
- Use CARDBOARD SAIL on the boat model, take ANTENNA and ANCHOR (U).
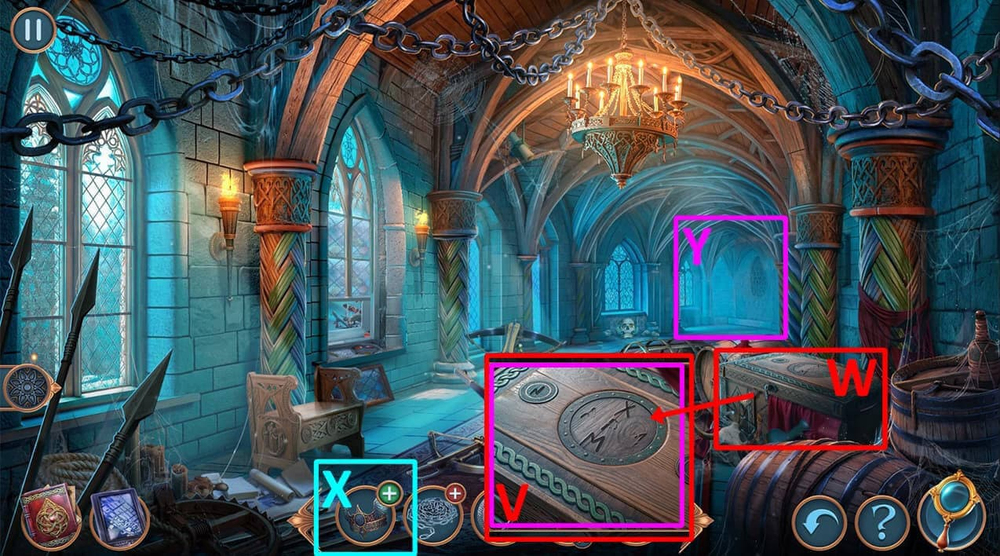
- Use CLAW and ANCHOR on the table crack, take SPYGLASS and KICKBOARDS (V).
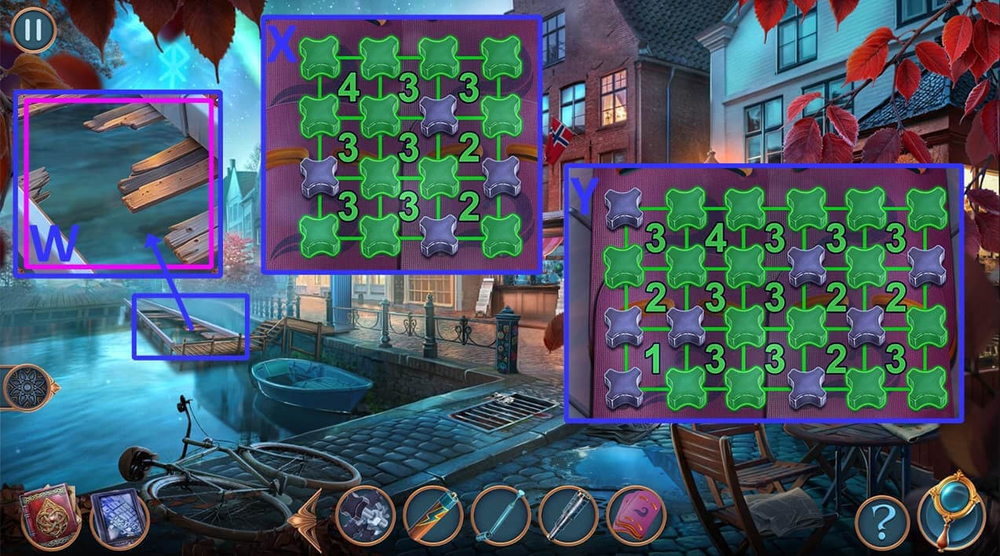
- Use SILVER PINS and KICKBOARDS on the broken planks (W).
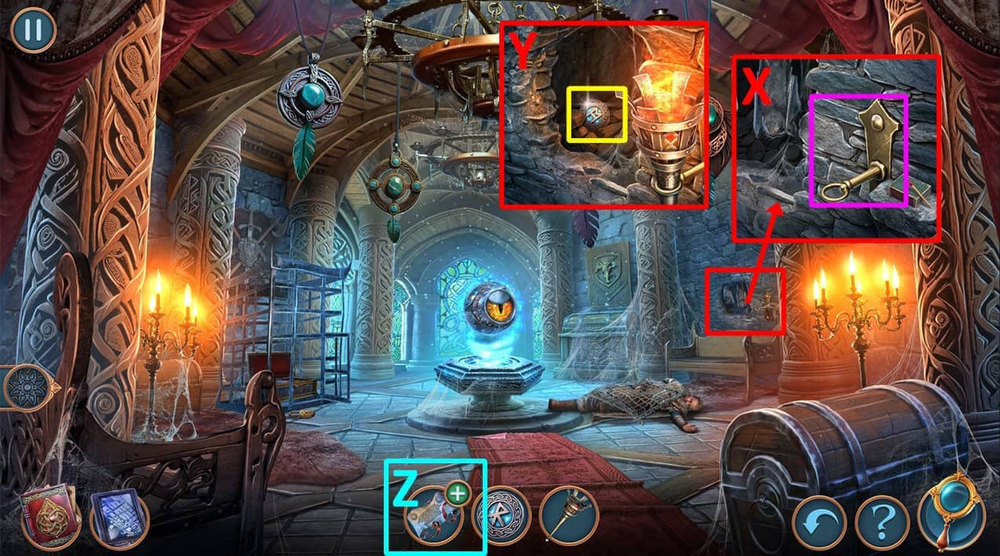
- Easy Solution: Follow the instructions (X).
- Hard Solution: Follow the instructions (Y).
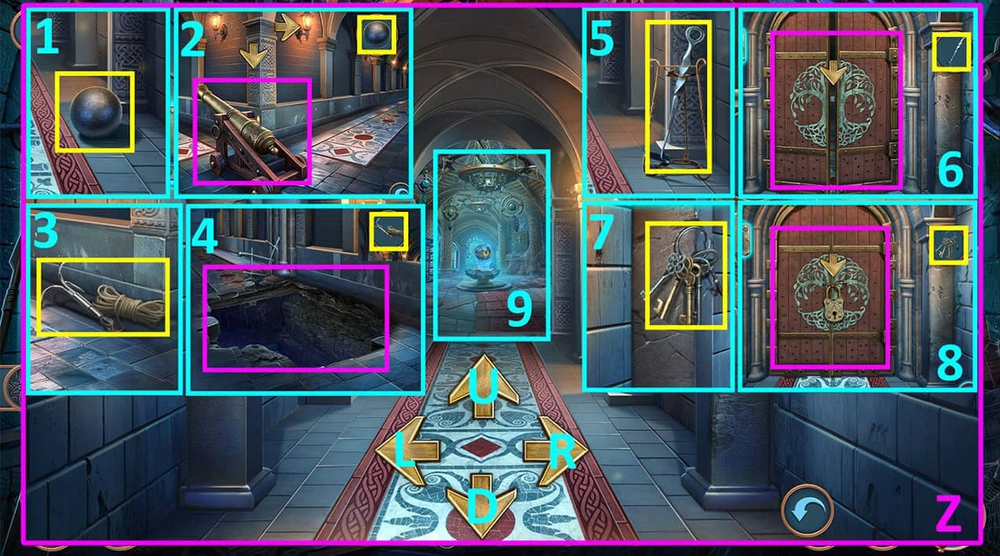
- Go forward.

- Take HILT (Z).
- Take FISHING LINE (A).
- Use FISHING LINE on the barrel lid, take OUTBOARD MOTOR and GOLD FISH (B).
- Use OUTBOARD MOTOR on the boat, use WAVE PENDANT and GOLD FISH on the box lid (C).
- Easy Solution: Click U, U, L, L, U, U, L, R, R, U, U, R, R, D, L, D, R, U, U, L, D, L, L, L, L, U, U, R, D, U, U, U, R, U, L, L, L, R, U (D).
- Hard Solution: Click U, U, L, L, U, U, L, R, U, R, U, U, U, D, R, D, R, D, L, D, R, U, U, L, D, L, L, L, U, U, R, D, U, U, U, R, U, L, L, L, R, U (E).
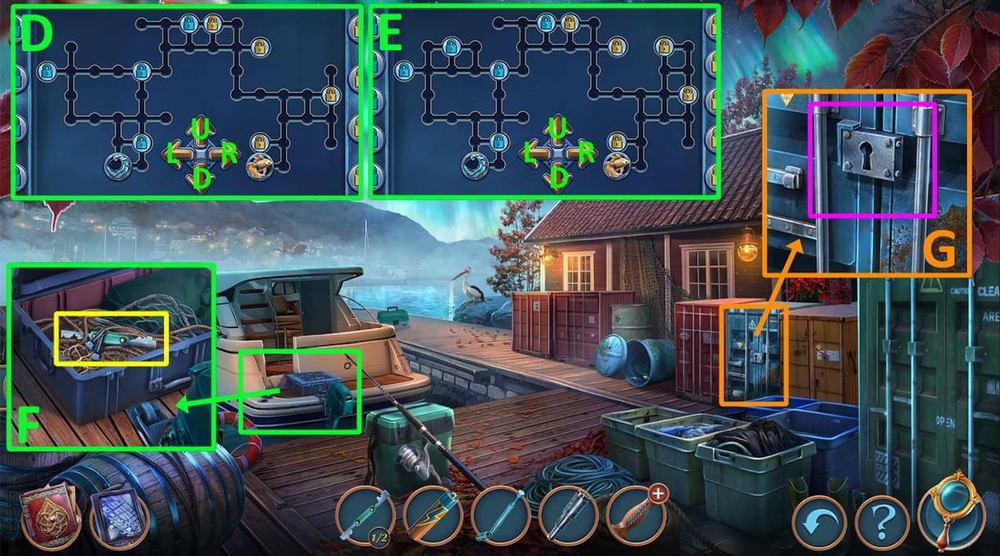
- Take SCREWS and LOCK PICKS 2/2 (F).
- Use LOCK PICKS on the lock (G).
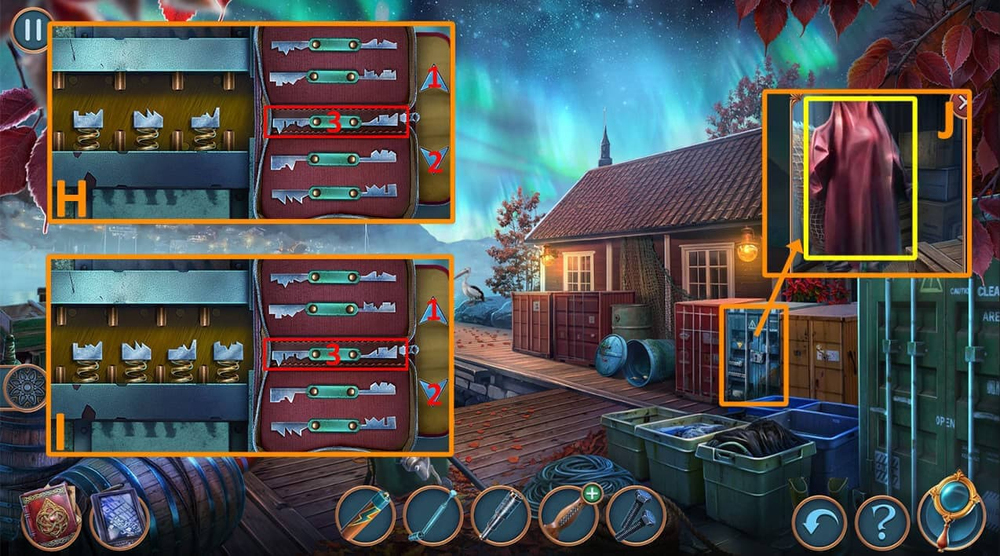
- Easy Solution: Click 1, 3, 1, 3, 1, 1, 3 (H).
- Hard Solution: Click 2, 2, 3, 2, 2, 3, 1, 3, 1, 1, 3 (I).
- Take COAT (J).
- Select this option (K).
- Go back.
- Use SPYGLASS and COAT on the grate, take WIRE and DRIED FISH (L).
- Go forward.
- Use DRIED FISH on the bird, take DAGGER’S BLADE (M).
- Use SCREWS and DAGGER’S BLADE on HILT, earn DAGGER (N).
- Use DAGGER on the net (O).
- Easy Solution: Click on the paired knots (P).
- Hard Solution: Click on the paired knots (Q).
- Take GOLD COIN (R).
- Go back.
- Use GOLD COIN on the coin receiver, take JORMUNGANDR’S EYES 1/2 and TICKET (S).
- Use TICKET on the ticket scanner, take SPARE PROPELLER and GASOLINE (T).
- Go forward.
- Use GASOLINE on the gas tank (U).
- Easy Solution: Follow the instructions in the image (V).
- Hard Solution: Follow the instructions in the image (W).
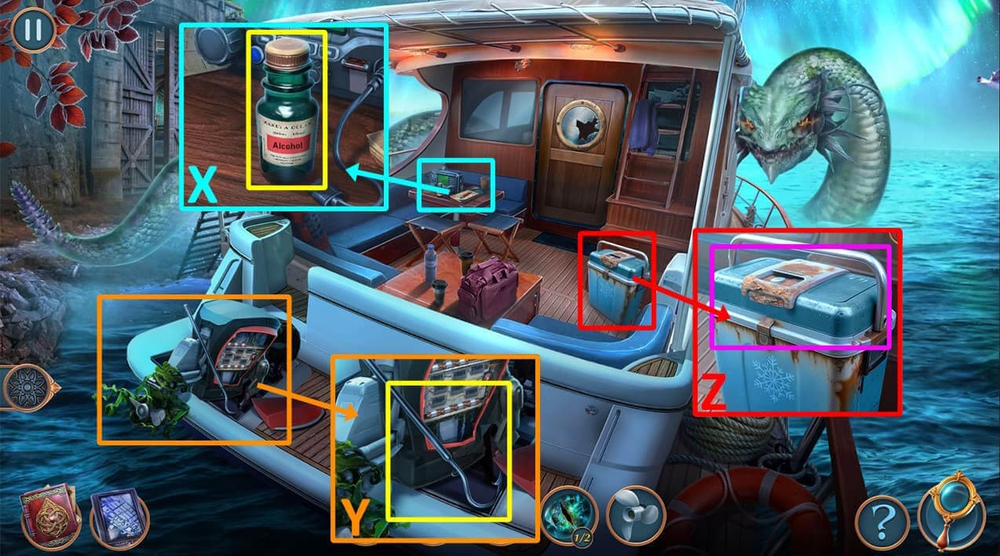
- Take ALCOHOL (X).
- Take HARPOON HOOK (Y).
- Use HARPOON HOOK on the rusty latch, take BATON and MIRROR (Z).
- Use MIRROR on the broken window (A).
- Use WIRE on the latch (B).
- Take BAG OF RUNES and WALKIE-TALKIE (C).
- Use BATTERY, ANTENNA and WALKIE-TALKIE on the radio (D).
- Easy Solution: Follow the instructions in the image (E).

- Hard Solution: Follow the instructions in the image (F).
- Take RIDDLE.
- Use RIDDLE on the giant serpent (G).
- Go forward (H).
- Select this option (I).
- Earn ODIN’S CROWN.
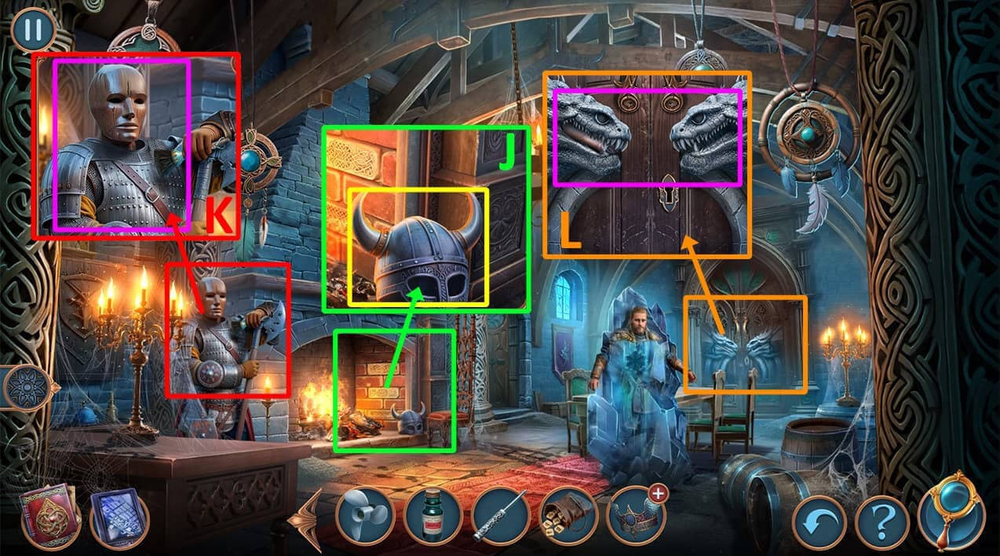
- Take VIKING’S HELMET (J).
- Use VIKING’S HELMET on the mannequin, take CHAINS and JORMUNGANDR’S EYES 2/2 (K).
- Use JORMUNGANDR’S EYES on the stone snakes, take and read the note, take ODIN’S EYE and GAUNTLET (L).
- Go back.
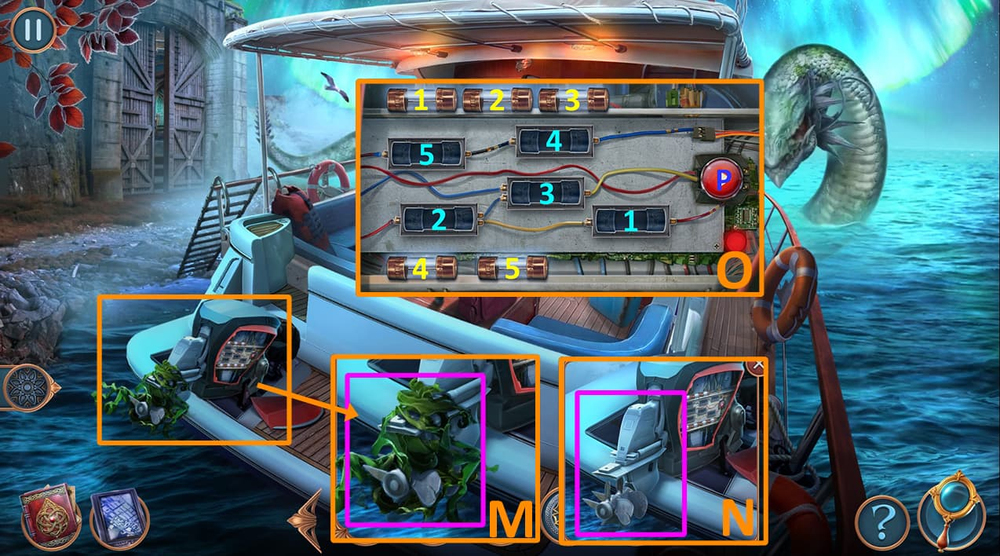
- Use GAUNTLET on the seaweed (M).
- Use SPARE PROPELLER on the boat motor (N).
- Easy Solution: Follow the instructions (O).
- Hard Solution: Follow the instructions (P).
- Take RUNE RINGS 1/2 and HANDKERCHIEF (Q).
- Use ALCOHOL and HANDKERCHIEF on the red spot, take FIREPLACE DRAWING (R).
- Go forward.
- Use BATON and FIREPLACE DRAWING on the fireplace (S).
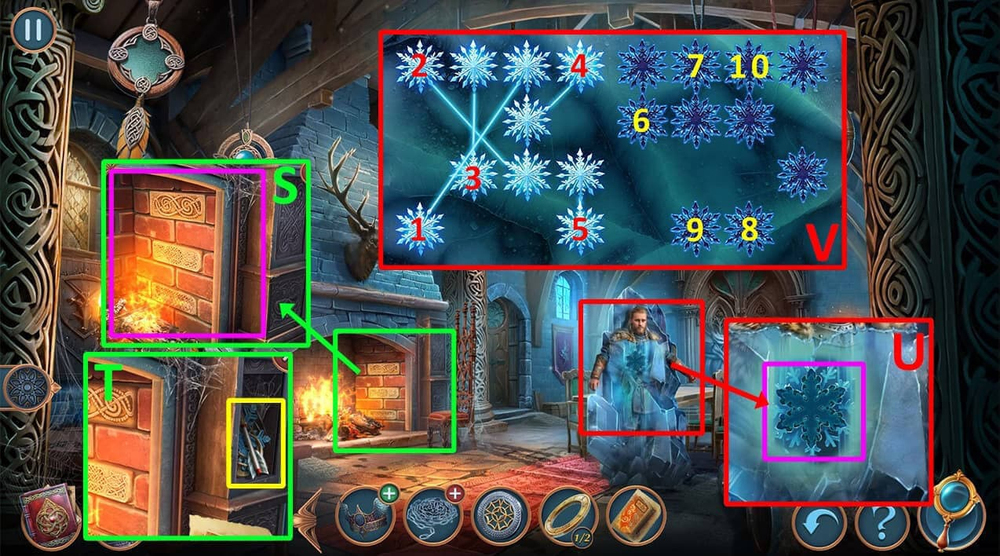
- Take ARROW WITH ROPE and MAGIC ICE PIECE (T).
- Use MAGIC ICE PIECE on the slot (U).
- Easy Solution: Move 1-9, 2-7, 3-8, 4-10, 5-6 (V).
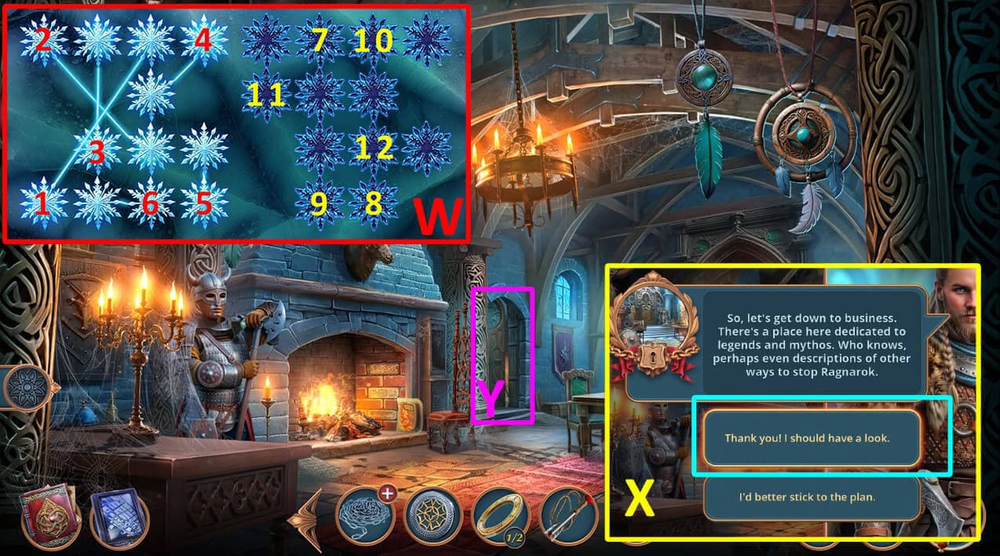
- Hard Solution: Move 1-9, 2-7, 3-8, 4-10, 5-11, 6-12 (W).
- Select this option (X).
- Earn ASGEIR’S KEY.
- Go forward (Y).

- Take DRAGON’S TEETH 1/3 (Z).
- Take DRAGON WING (A).
- Use DRAGON WING on the dragon (B), take THOR’S HAMMER (C).
- Use THOR’S HAMMER on the statue (D), take ENGRAVED STONE and DRAGON’S TEETH 2/3 (E).
- Go back.
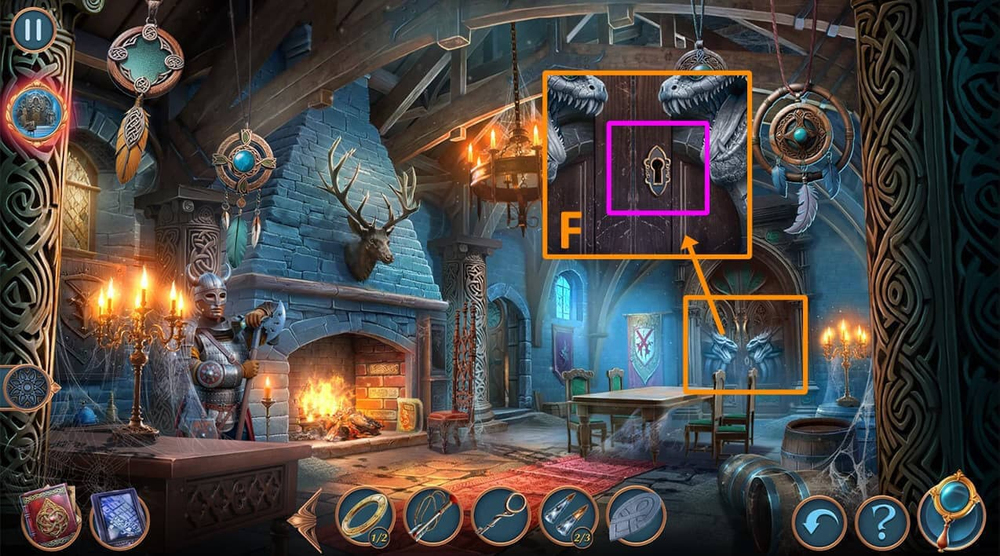
- Use ASGEIR’S KEY on the keyhole (F).
- Go forward.

- Take BARREL LID (G), click on the gear (H).
- Take SPEARHEAD (I).
- Use SPEARHEAD on the hinge (J), take GEAR and PAINTED RUNES, use ENGRAVED STONE on the slot, take CORKSCREW (K).
- Go to the Hall of Fables.
- Use CORKSCREW on the jewelry box, take DRAGON’S TEETH 3/3 (L).
- Click on dragon’s head (M), use DRAGON’S TEETH on the dragon’s mouth (N).
- Easy Solution: Click 1, 1, 1, 3, 3, 3, 2, 2, 2, 4, 4, 5, 5, 5, 9, 9, 6, 6, 6, 7, 7, 7, 8, 8, 8, 10, 10, 10 (O).
- Hard Solution: Click 9, 9, 11, 11, 10, 6, 6, 7, 7, 7, 8, 8, 8, 2, 2, 2, 1, 1, 12, 12, 12, 3, 4, 4, 5 (P).
- Take SCRAP OF PAPER and DRAGON PENDANT (Q).
- Go to the Boat at Sea.

- Use DRAGON PENDANT on the slot, take TWEEZERS (R).
- Go to the Hall of Fables.

- Use TWEEZERS on the object in the crack, earn PAPER CLIP (S).
- Use PAPER CLIP and SCRAP OF PAPER on the book (T), click on the items that match the highlighted words: a plant, swords, and an hourglass (U).
- Go to the Fortress Hallway.
- Use BAG OF RUNES and PAINTED RUNES on the chest (V).
- Play puzzle, earn PINCERS (W).
- Use ODIN’S EYE and PINCERS on ODIN’S CROWN, earn ALL-SEEING EYE (X).
- Use ALL-SEEING EYE on the hallway (Y).
- Solution: Take 1, click U, use 2, click L, take 3, click R, use 4, click L, take 5, click D, D, L, use 6, click U, take 7, click U, R, use 8, click U, 9 (Z).
- Select this option (A).
- Take WOODEN HANDLE (B).
- Take SKELETON HAND (C).
- Use SKELETON HAND on the lock, take OLD NET (D).
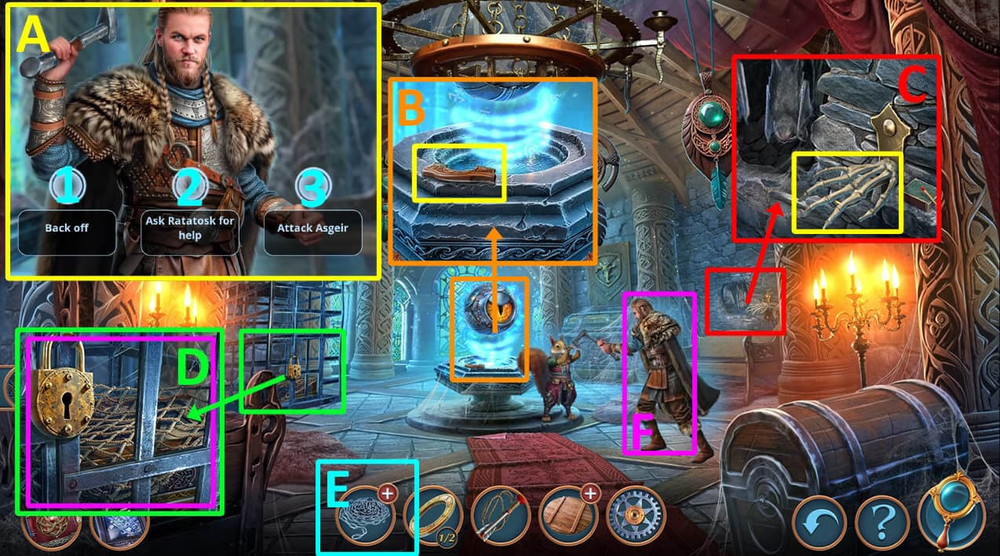
- Use OLD NET on CHAINS, earn WEIGHTED NET (E).
- Use WEIGHTED NET on Asgeir (F).

- Solution: Remember the starting position of the required chip and click on it after shuffling (G).
- Select this option (H).
- Earn ASGEIR’S BAG.
- Examine ASGEIR’S BAG, click on it to open, read and take LEGEND OF RAGNAROK, take SLINGSHOT (I).
- Go to the Boat at Sea.

- Use ARROW WITH ROPE and SLINGSHOT on the shiny object, earn HARPOON TRIGGER (J).
- Go to the Fortress Hallway.

- Use GEAR and HARPOON TRIGGER on the mechanism (K).
- Take and read the note, click on the pouch, earn ASH, take RESIN (L).
- Use WOODEN HANDLE and RESIN on BARREL LID, earn WOODEN SHIELD (M).
- Go back.

- Use WOODEN SHIELD on the mannequin (N), take BRUSH (O).
- Go to the Eye of Ragnarok Hall.
- Use ASH and BRUSH on the chest (P).
- Click on the tiles with ash on them (Q).
- Take RUNE RINGS 2/2 (R).
- Go back.

- Use RUNE RINGS on the skull (S).
- Easy Solution: Click 3, R, 4, L, 2, L, 3, L (T).
- Hard Solution: Click 3, R, 4, L, 2, L, 3, L, 4, L (U).
- Take RUNE OF END (V).
- Play puzzle, earn TORCH (W).
- Go forward.
- Use TORCH on the holder (X).
- Take RUNE OF BEGINNING (Y).
- Use RUNE OF END and RUNE OF BEGINNING on LEGEND OF RAGNAROK, earn NEW DAWN’S SCROLL (Z).
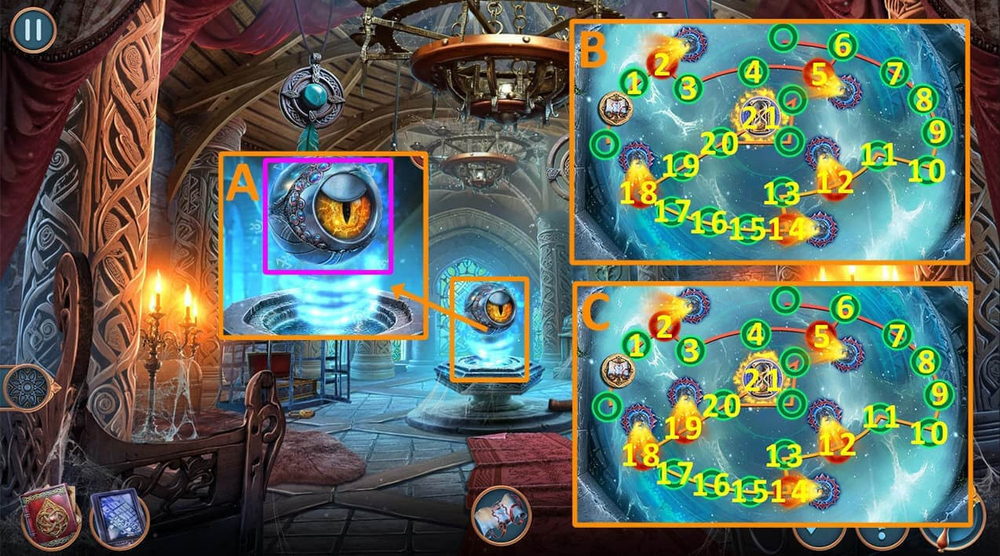
- Use NEW DAWN’S SCROLL on the Eye (A).
- Easy Solution: Go 1-21 avoiding the red cells (B).
- Hard Solution: Go 1-21 avoiding the red cells (C).
Congratulations! You have completed the game Mystery of Myths 2: Mystery of the Fjords.


