
Mystery of Myths 2: Mystery of the Fjords – Continuation of the exciting mystery story, in which you will again have to take control of the experienced agent of the Ministry of Secrets, Elijah Reed. This time the challenge comes from the quiet, seemingly peaceful city of Bergen in Norway. From here come reports of strange creatures that are not found in any biology textbook. Alas, there is no local branch of the Ministry there, which means you are on the spot alone. Your task is to find out what is going on in the surrounding forests, where mythical monsters have been spotted. As always, rumors can be fiction, but sometimes they hide the truth, which can turn the idea of reality. The work to be done incognito, no one must know about the existence of myths and a secret organization. Mystery at any cost. The first clues will be the Bergen Library, an amazing place that serves as a museum at the same time. Here you will be met by Fabian, a curator who loves order and prefers to consider oddities as silly gossip. His assistant Freya, however, is another matter entirely, she is passionate about mythology and knows many details about Scandinavian legends that may not be fiction at all. As you explore the exhibits, ancient manuscripts and objects, you will unlock access to the worlds of Yggdrasil, the ancient tree of worlds. Your journey will lead to encounters with Valkyries, magical squirrels and other creatures from forgotten tales. You will have to find out what the ancient artifacts of the gods are hiding and prevent the impending Ragnarok, the end of all worlds. If you can not pass any of the puzzles or do not know where the items are, on our site you can watch the walkthrough of Mystery of Myths 2: Mystery of the Fjords, and stop the disaster.
Mystery of Myths 2: Mystery of the Fjords – Walkthrough
Here you can see the full walkthrough of Mystery of Myths 2: Mystery of the Fjords game, namely for all chapters, including bonus chapter, in pictures.
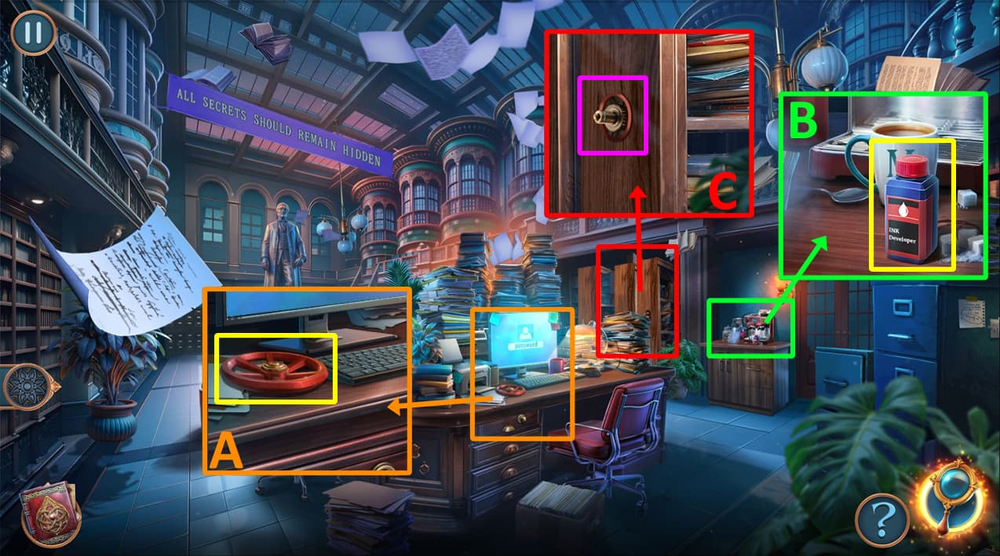
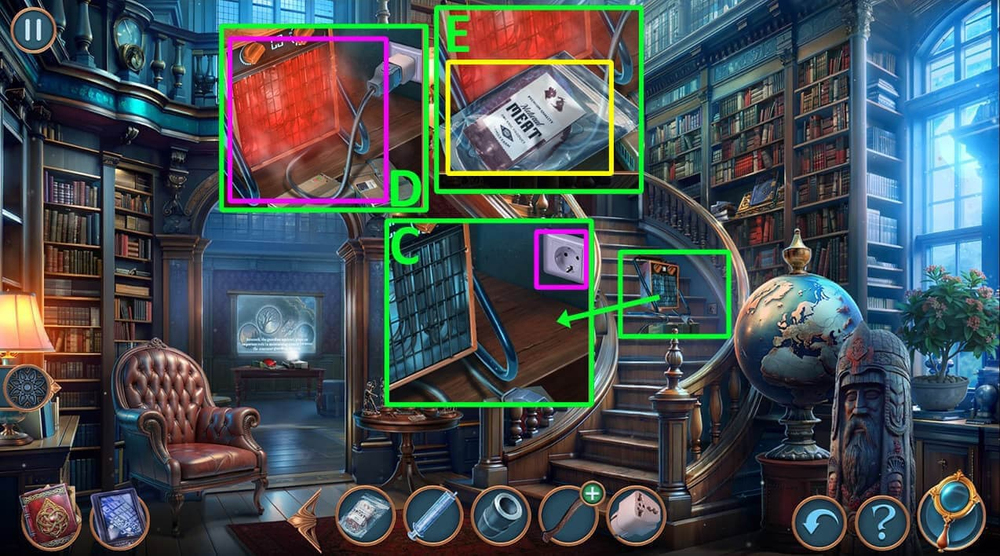
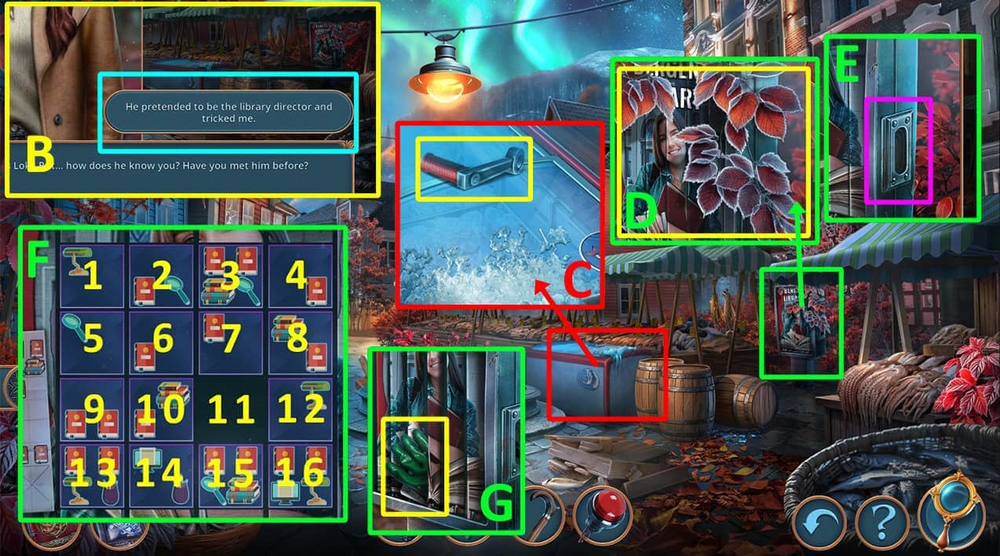
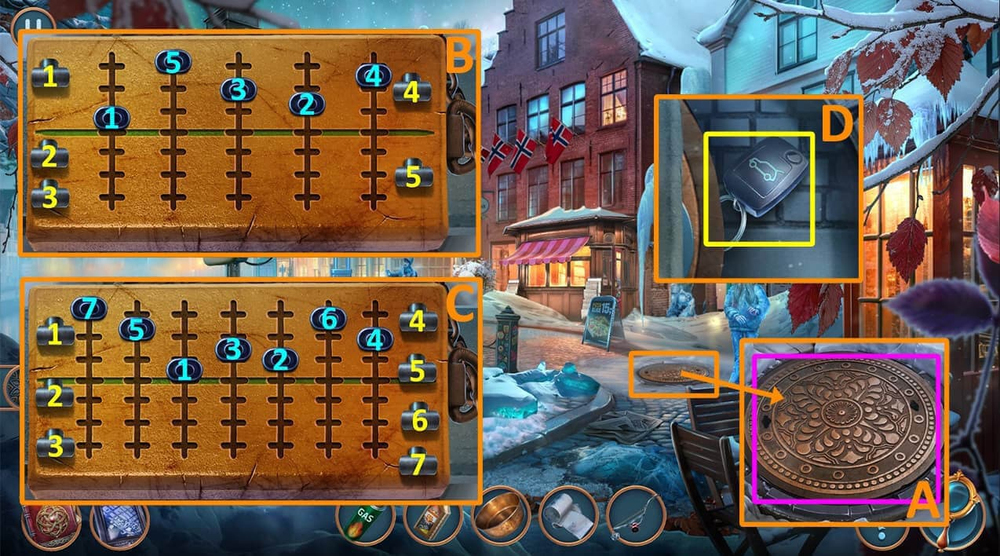
- Take HANDWHEEL (A).
- Take INK DEVELOPER (B).
- Use HANDWHEEL on the pin (C).
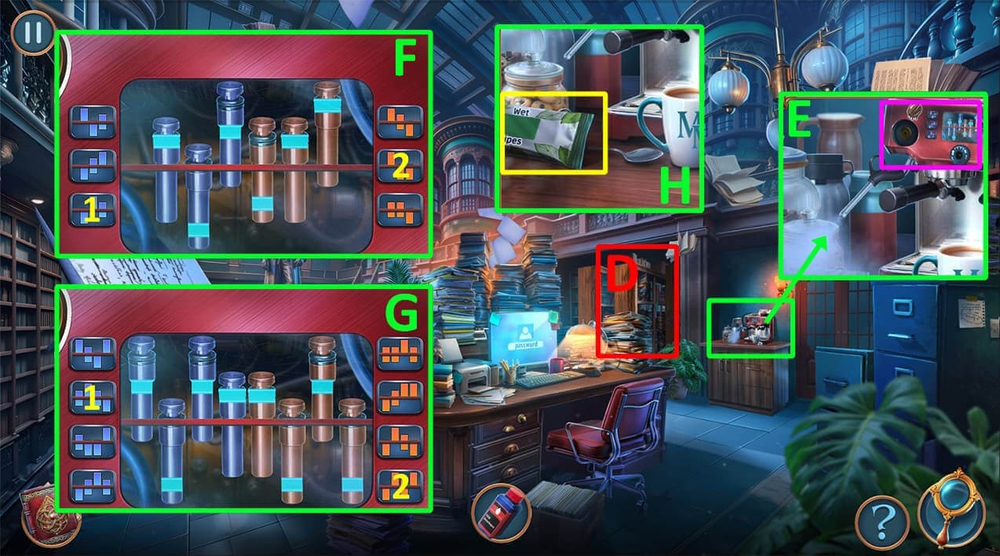
- Play puzzle, earn PRESSURE RELIEF VALVE (D).
- Use PRESSURE RELIEF VALVE on the coffee machine (E).
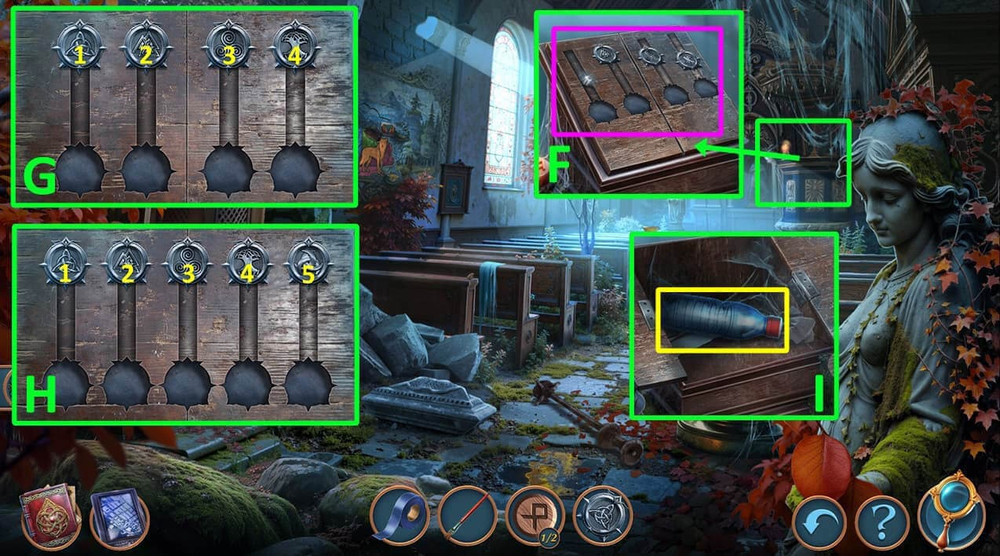
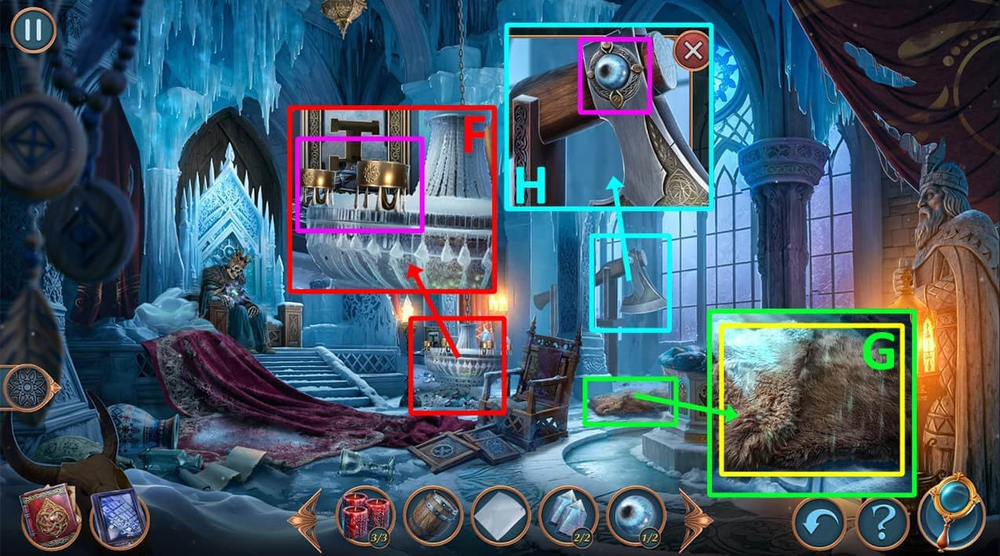
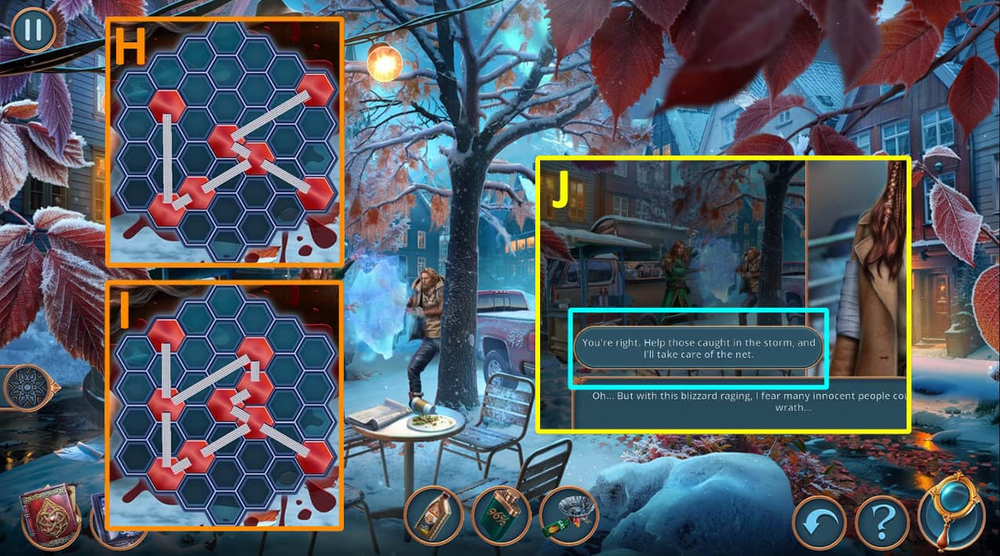
- Easy solution: Click 1-2 (F).
- Hard solution: Click 1-2 (G).
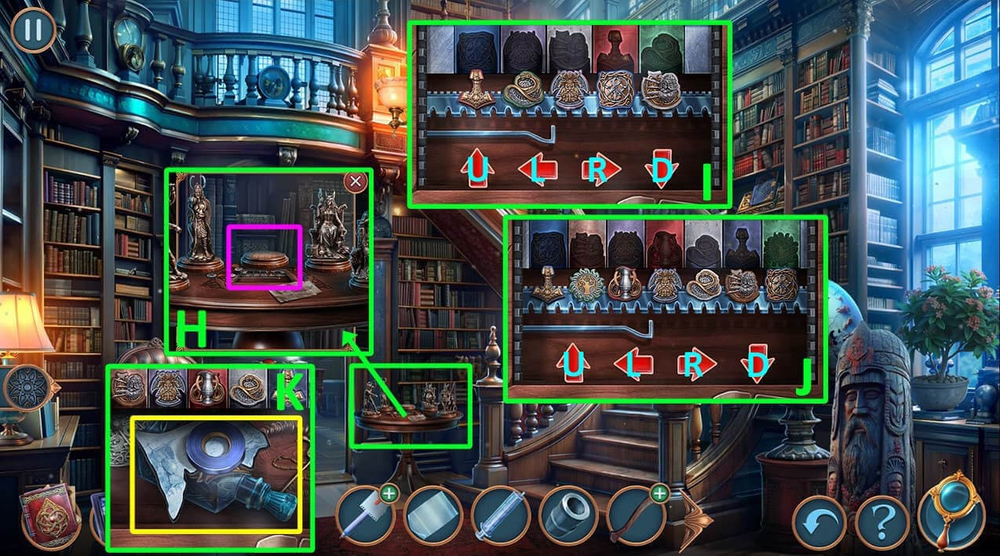
- Take WET WIPES and BINDER CLIP (H).
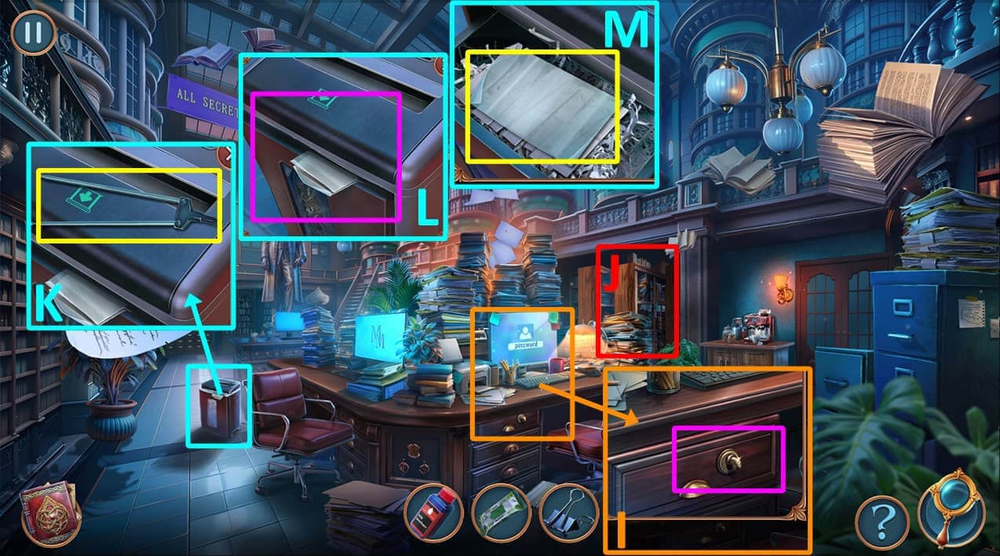
- Use BINDER CLIP on the drawer, take DUCT TAPE (I).
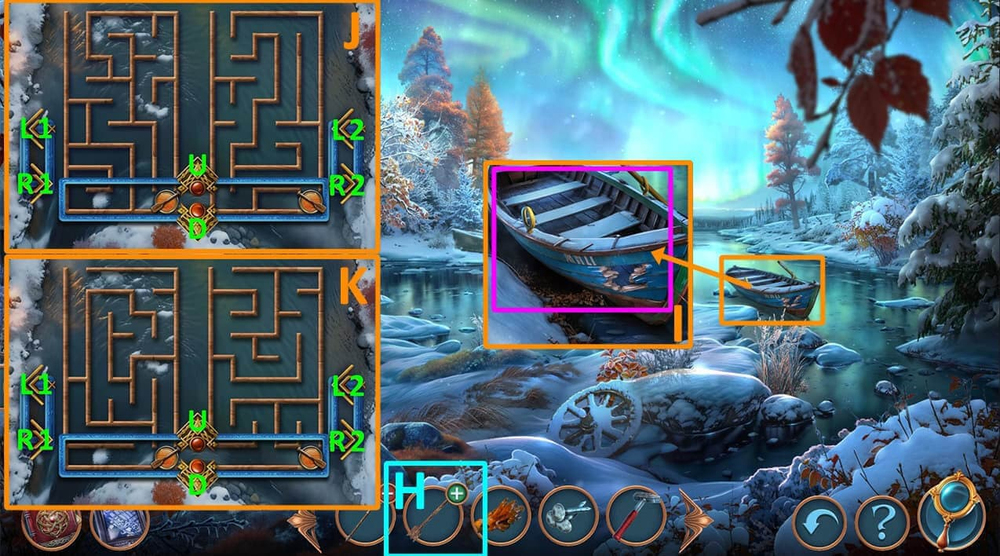
- Play puzzle, earn RULER (J).
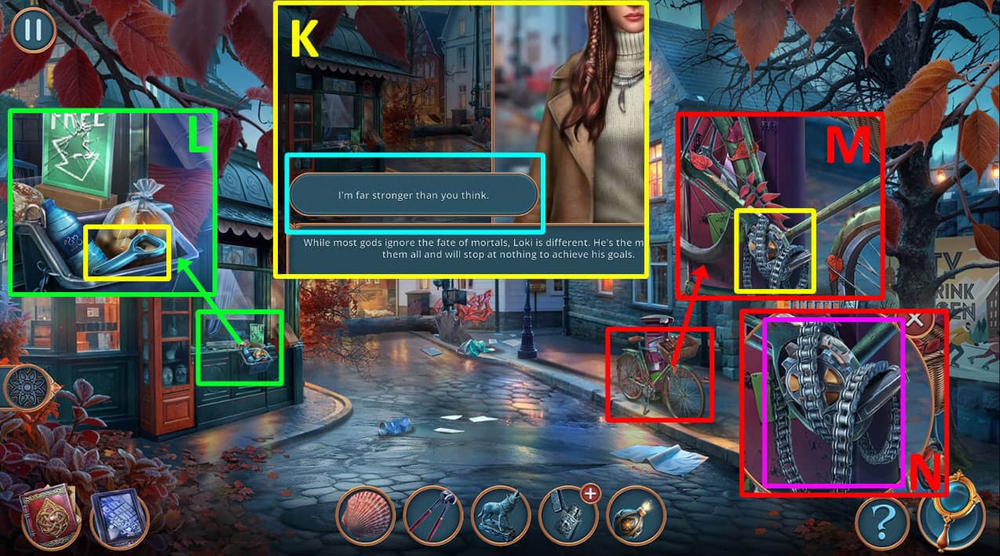
- Take DOUBLE ANTENNA (K).
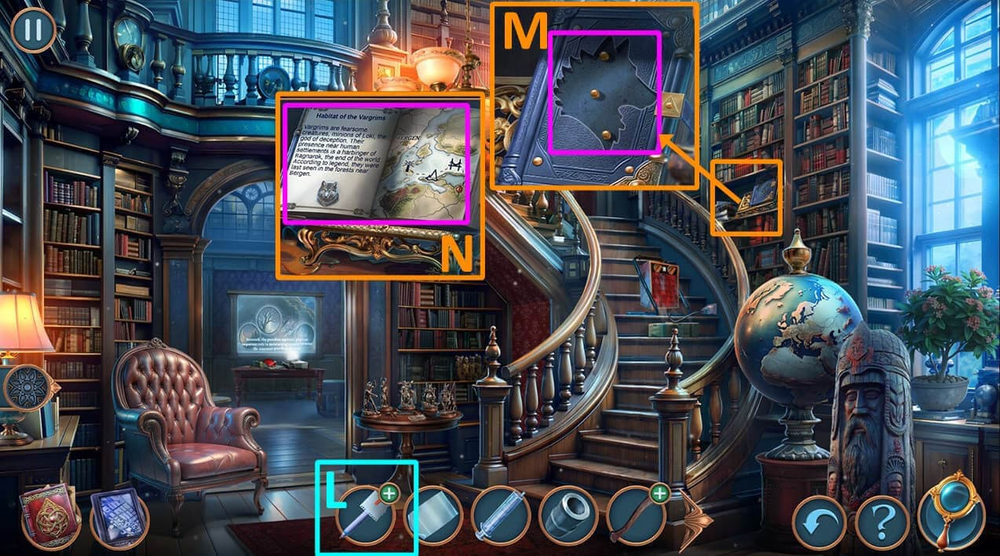
- Use RULER on the shredder (L).
- Take TRACING PAPER, use DUCT TAPE on the paper strips (M).

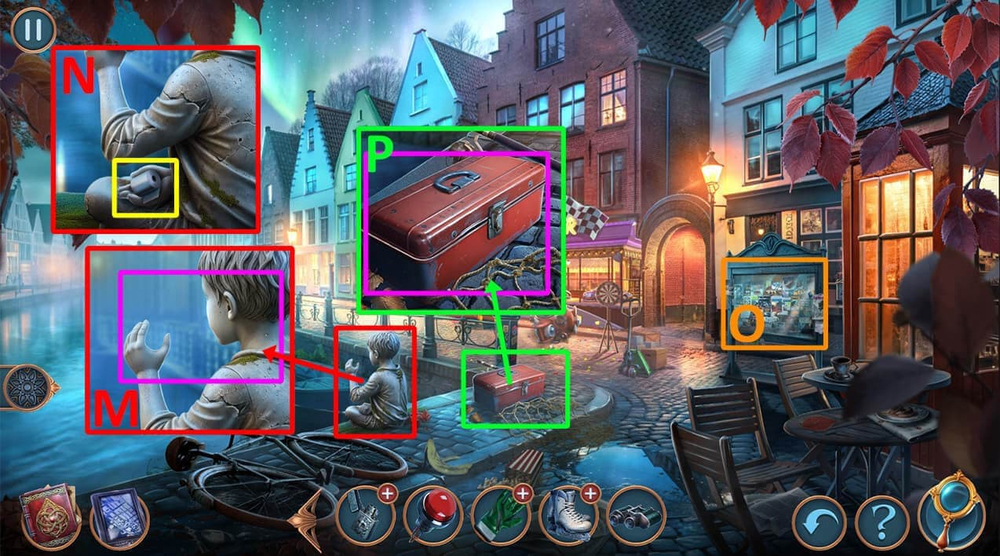
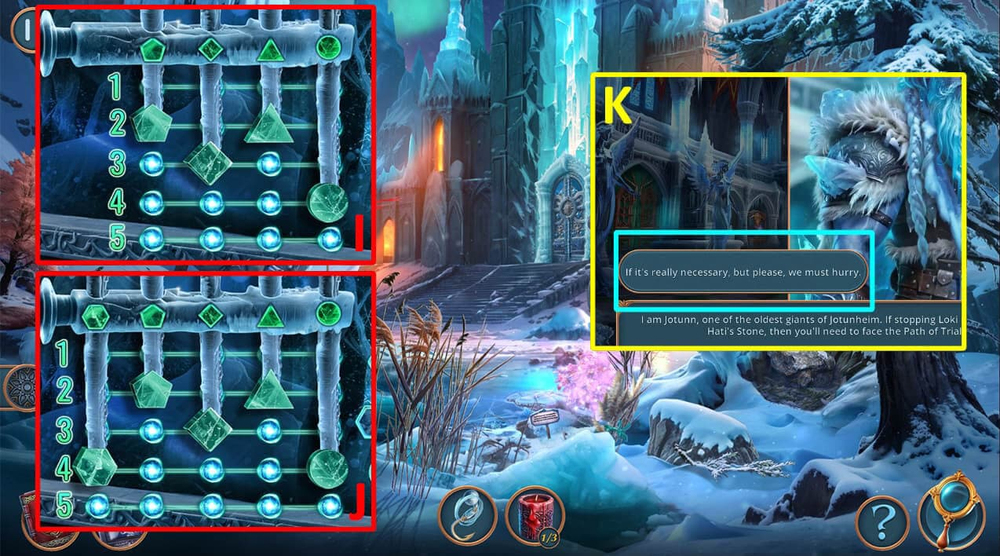
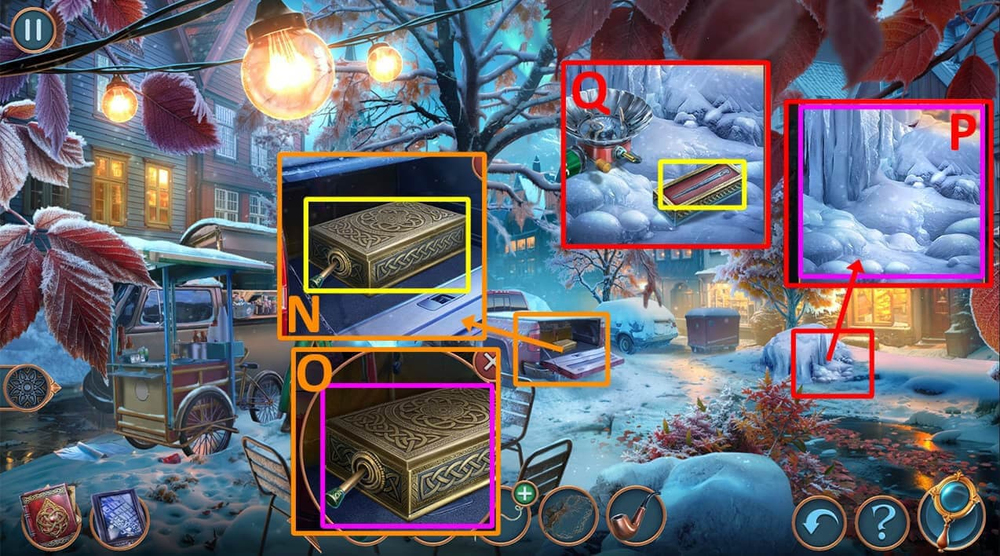
- Easy solution: Follow the instructions in the image (N).
- Hard solution: Follow the instructions in the image (O).
- Earn PASSWORD HINT.
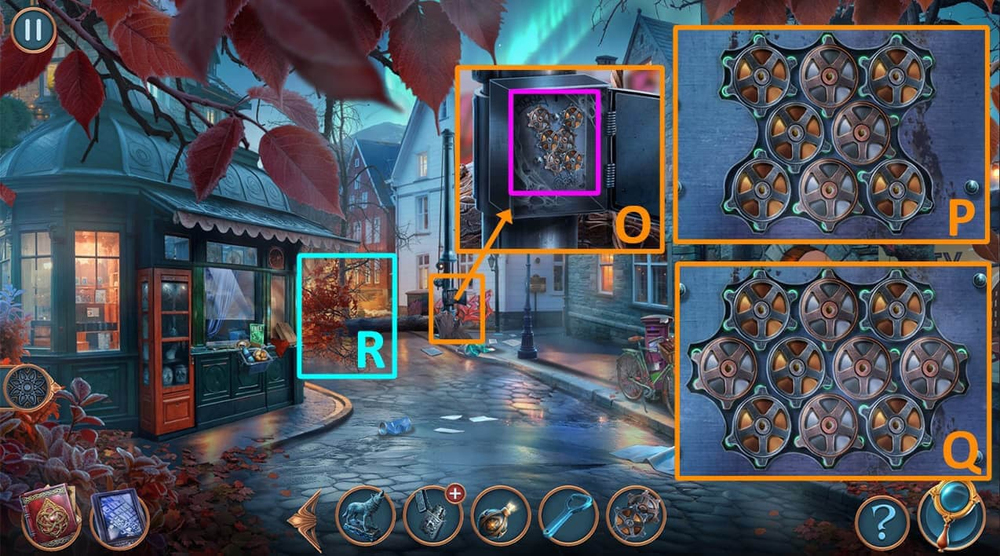
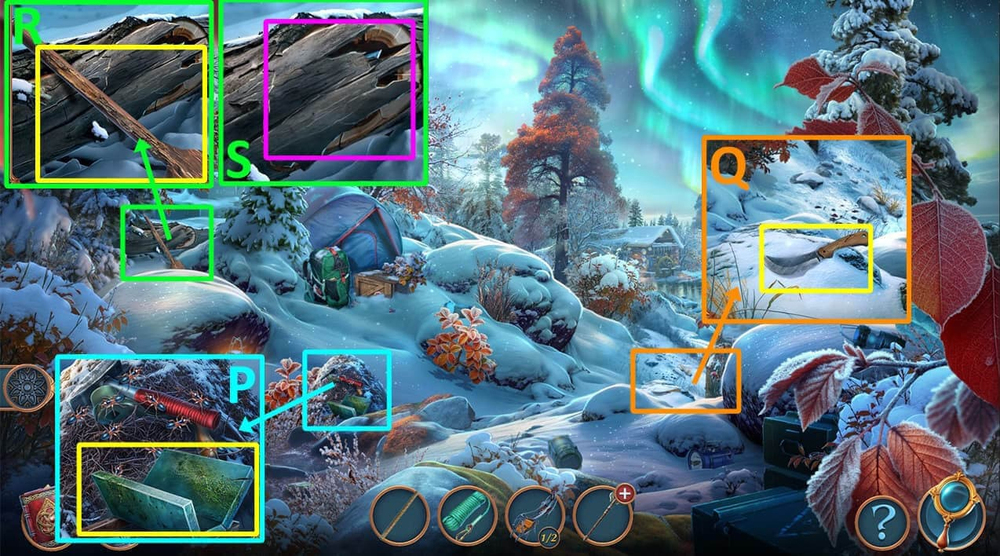
- Use INK DEVELOPER on PASSWORD HINT, earn PASSWORD HINT (P).
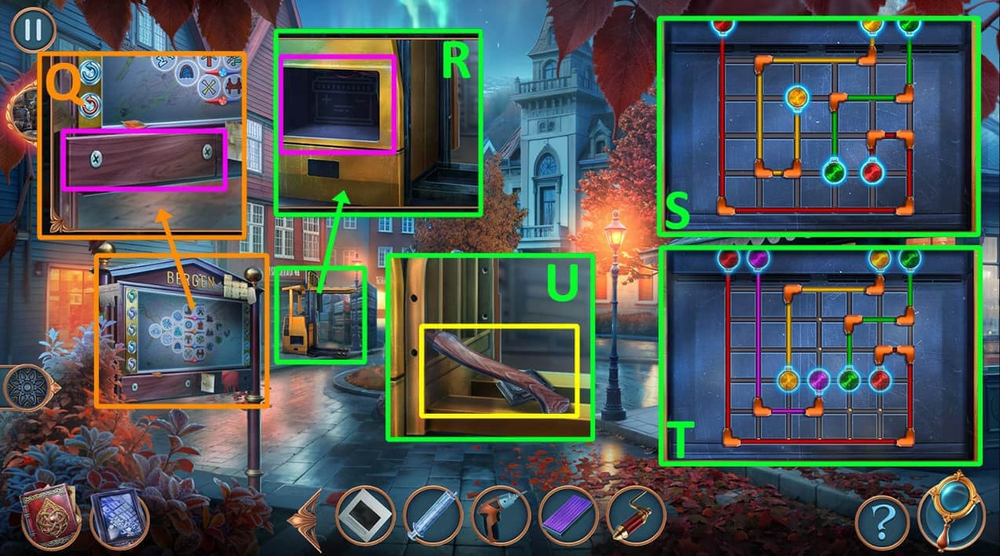
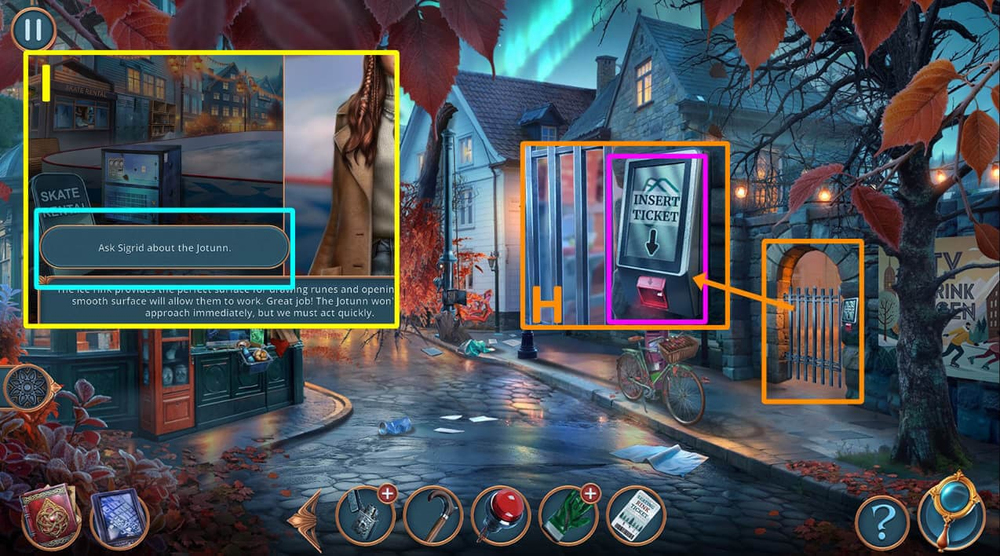
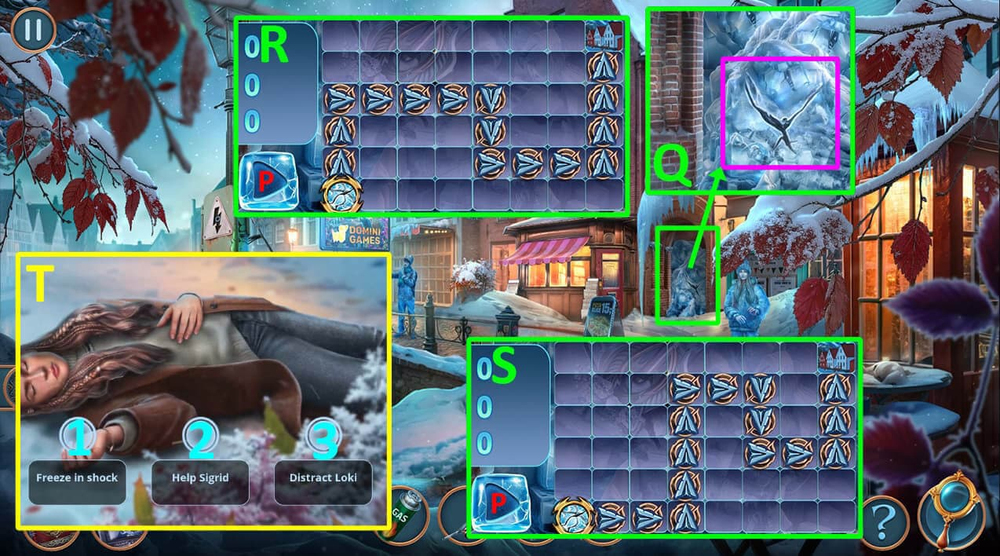
- Use PASSWORD HINT on the screen (Q).
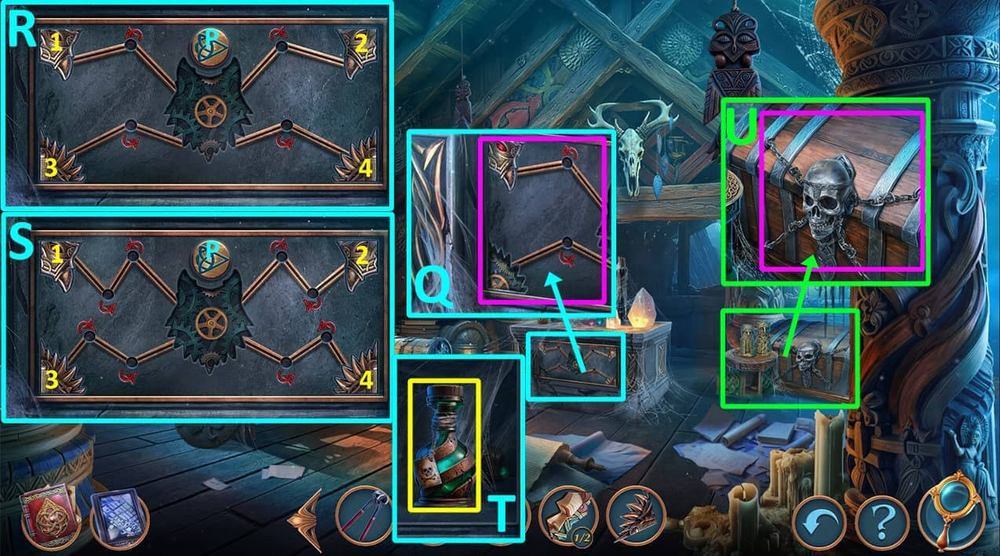
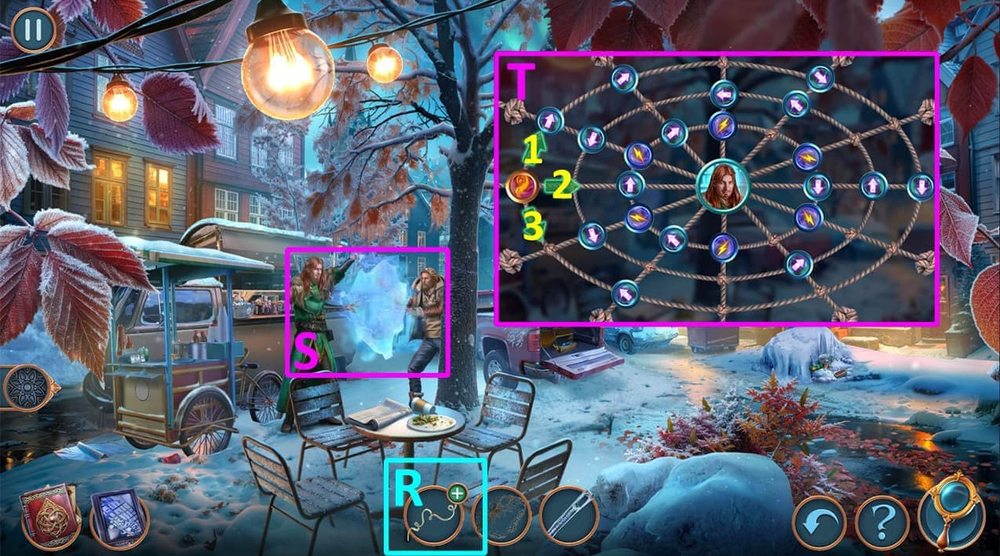
- Easy solution: Follow the instructions in the image (R).

- Hard solution: Follow the instructions in the image (S).
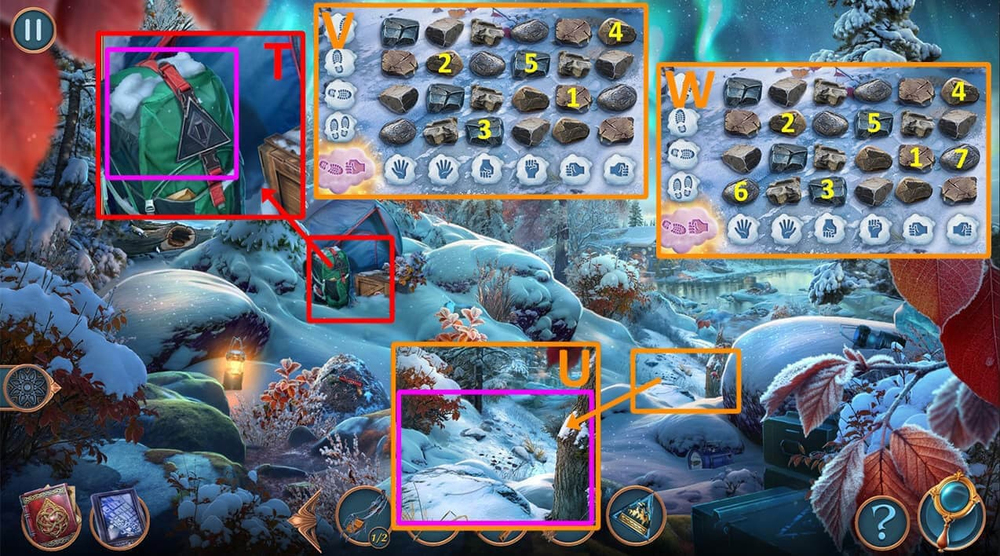
- Click on the screen (T).
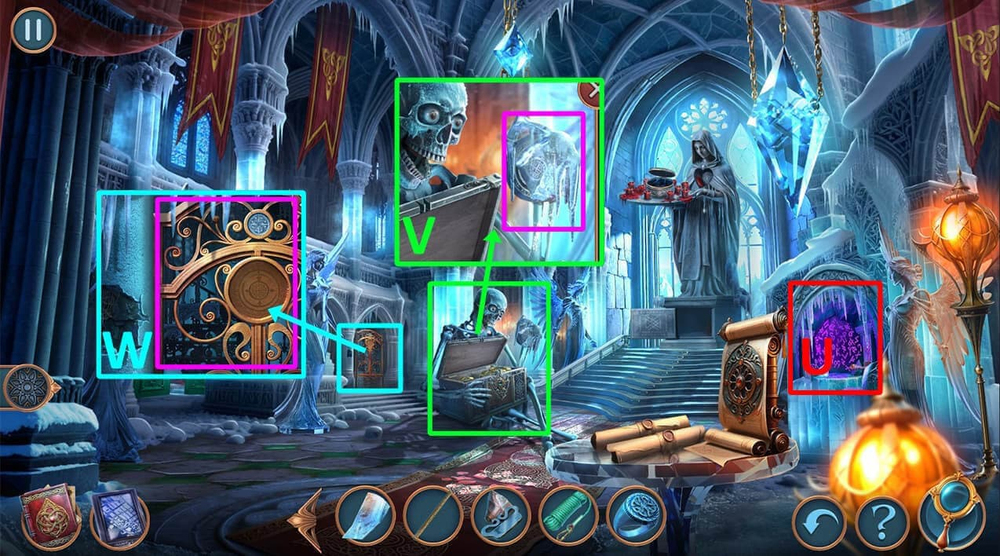
- Select this option (U).
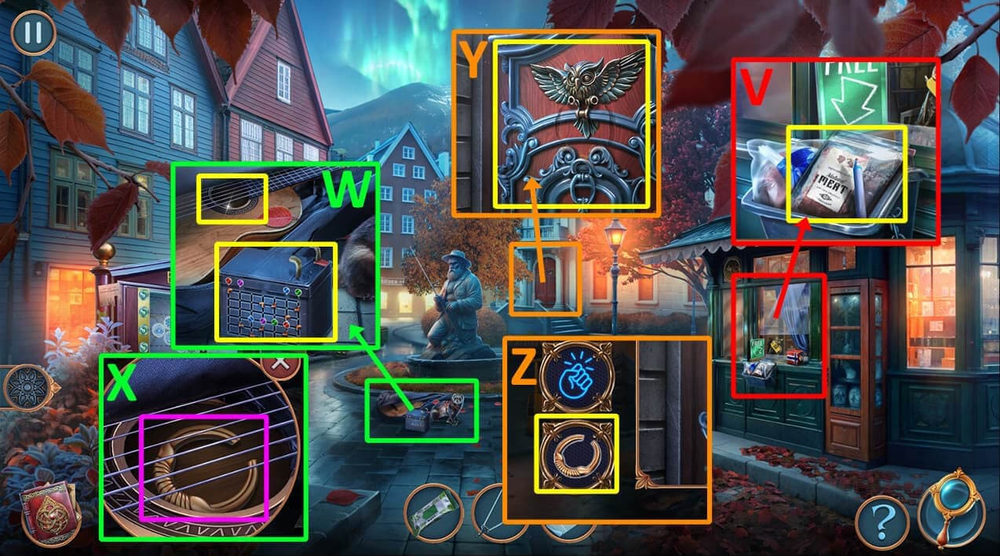
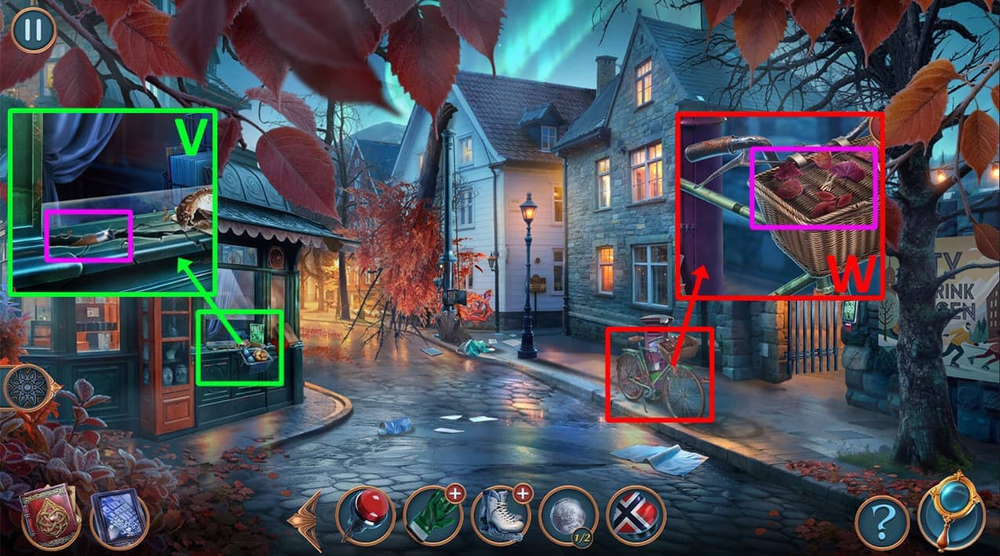
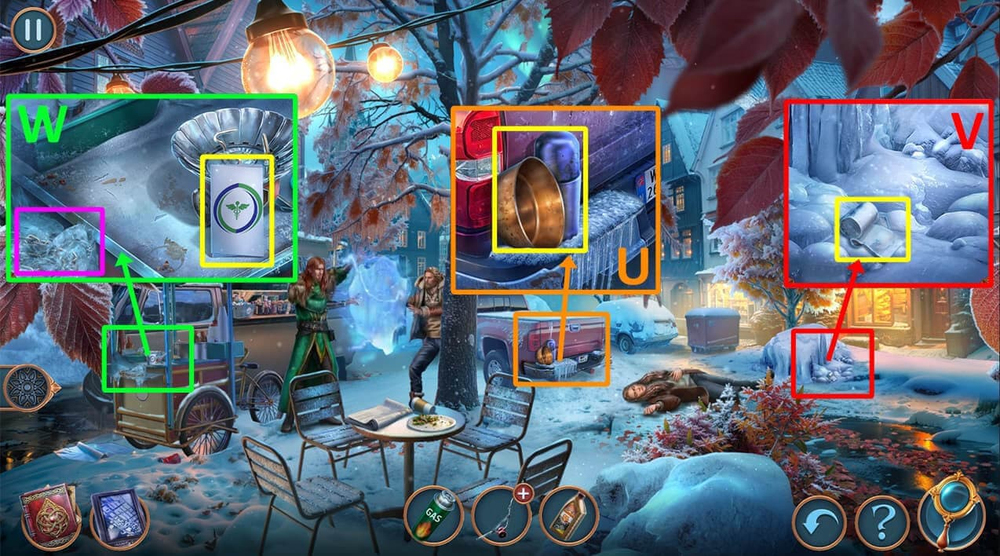
- Take DRIED MARKER and FROZEN MEAT (V).
- Take BATTERY, examine the guitar (W).
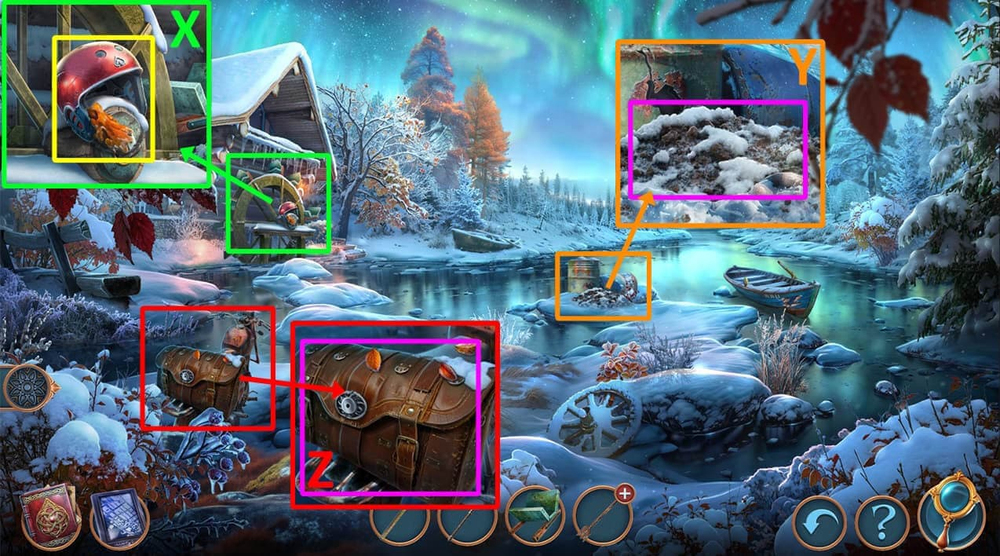
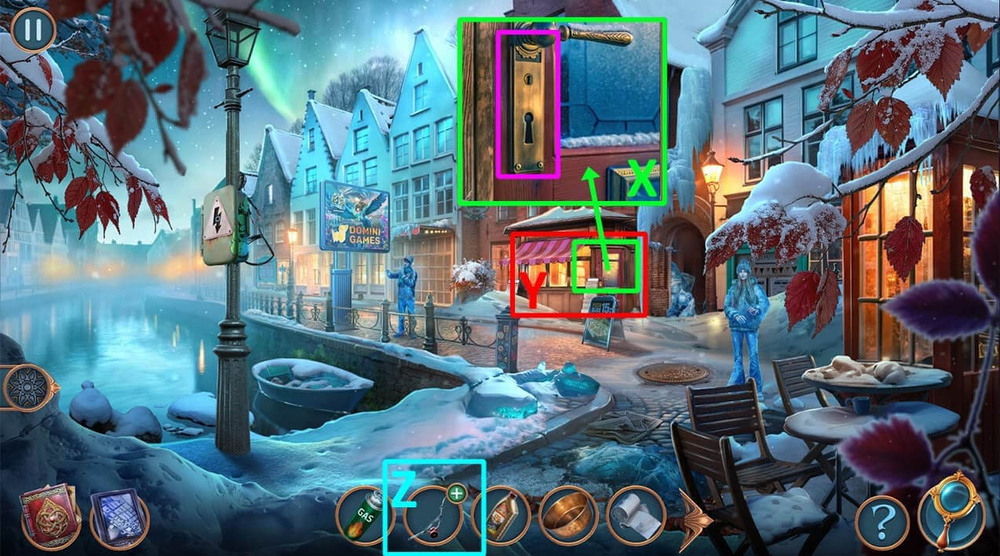
- Use DOUBLE ANTENNA on the item inside, earn KNOCKER (X).
- Click on the door to knock, use KNOCKER on the door (Y).
- Click on the knocker icon (Z).
- Go forward.

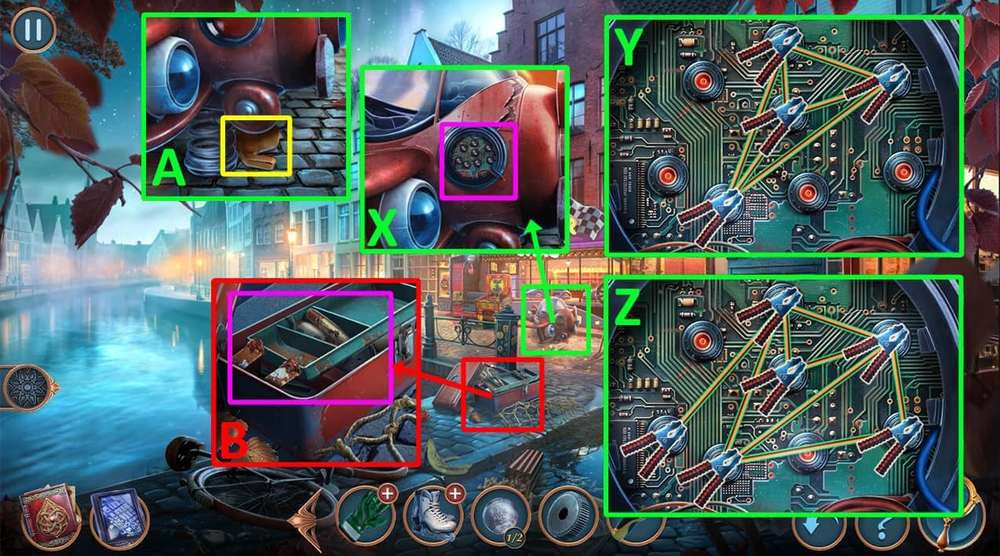
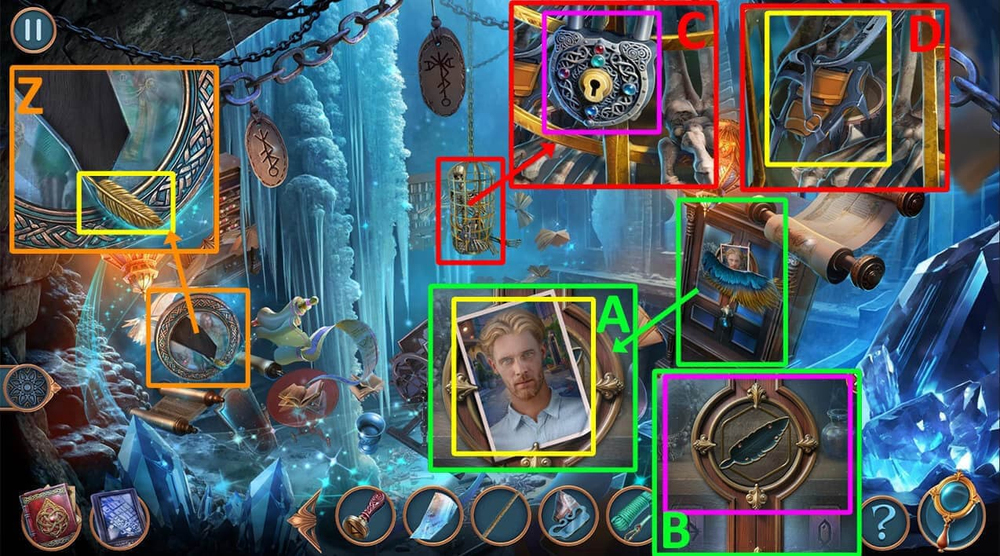
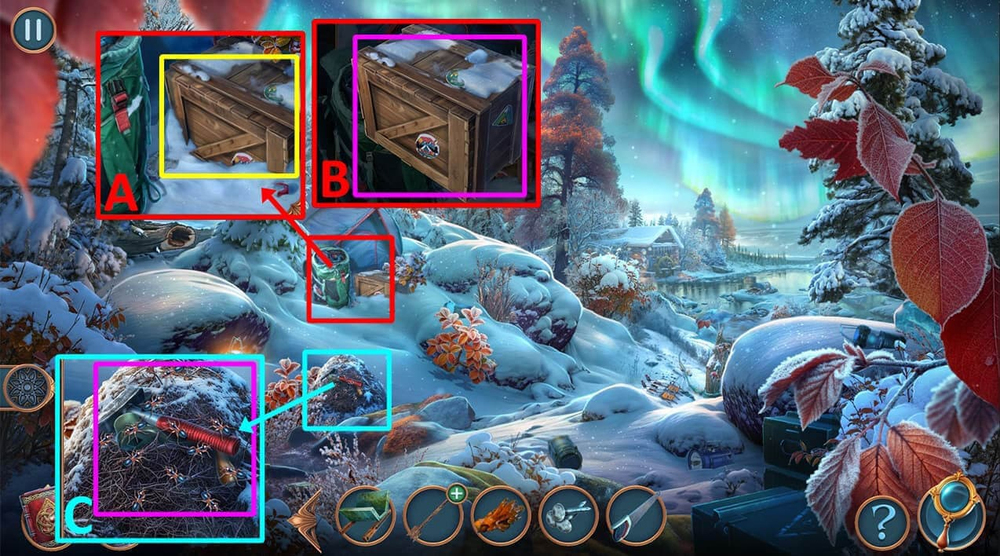
- Select this option (A).
- Earn MANUSCRIPT COPY.
- Go forward (B).
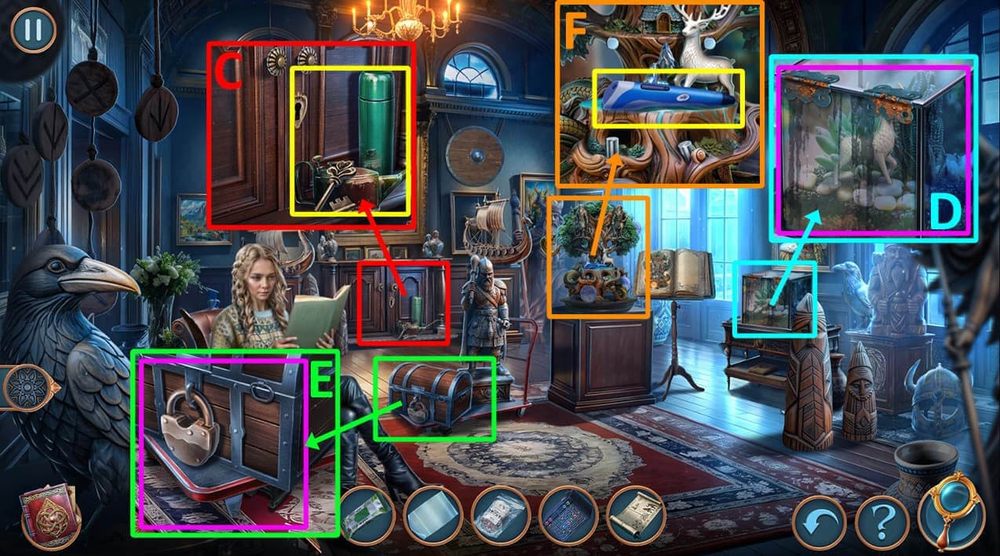
- Take BROKEN KEY, OILER, and EMPTY THERMOS (C).
- Use OILER on the hinges, take MODEL PARTS 1/2 (D).
- Use EMPTY THERMOS on the cart, take PUMP (E).
- Take 3D PEN (F).
- Go back.

- Take SLIDE (G), use WET WIPES on the dirty spot, earn BATTERY (H).
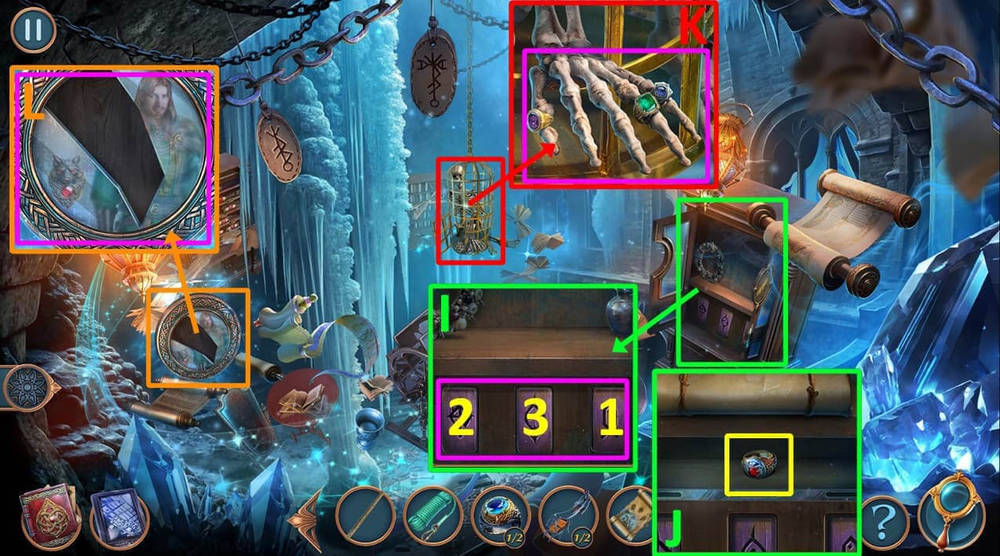
- Take SYRINGE and the tablet, examine the electric screwdriver (I).
- Use BATTERY on it, earn ELECTRIC SCREWDRIVER (J).
- Use PUMP on the warmer, take TIGER’S FANG and MODEL PARTS 2/2 (K).
- Go forward.

- Use MODEL PARTS on the model (L).
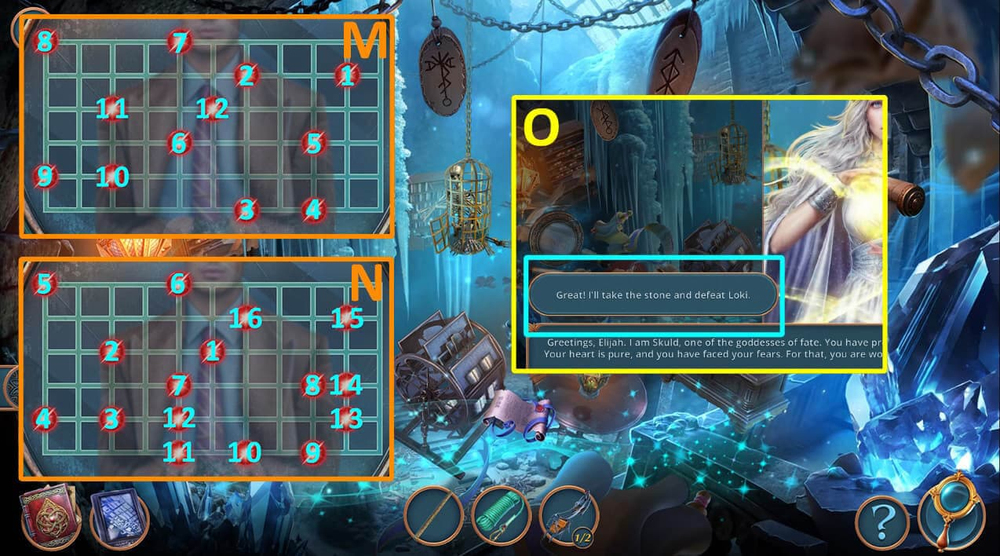
- Solution: Follow the instructions in the image (M).
- Take MJOLLNIR REPLICA (N).
- Use TIGER’S FANG and MJOLLNIR REPLICA on the lock (O).
- Take PLASTICINE MOLD and HANDLE (P).
- Go to Bergen Central Square.
- Use ELECTRIC SCREWDRIVER on the screws, take WEDGE and WIRES (Q).
- Use BATTERY and WIRES on the battery slot (R).
- Easy solution: Follow the instructions in the image (S).
- Hard solution: Follow the instructions in the image (T).
- Take AXE SHAFT and LIGHT (U).
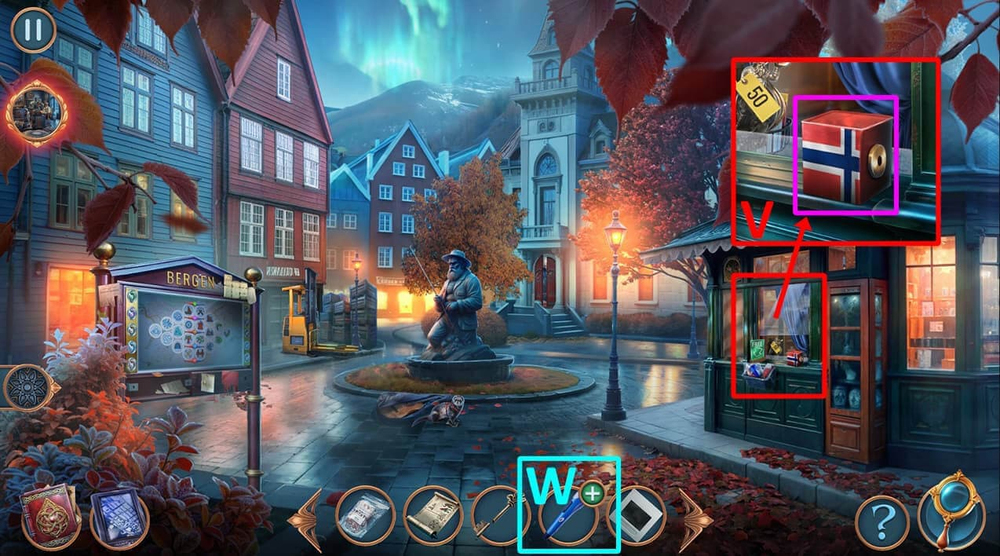
- Use HANDLE on the box, take PLASTIC STRING (V).
- Use BROKEN KEY, PLASTICINE MOLD, and PLASTIC STRING on 3D PEN, earn PLASTIC CABINET KEY (W).
- Go to the Library’s Museum.

- Use PLASTIC CABINET KEY on the keyhole, take and read ASGARDIAN GODS ALMANAC (X).
- Give ASGARDIAN GODS ALMANAC to Freya, Talk to Freya (Y).
- Go back.
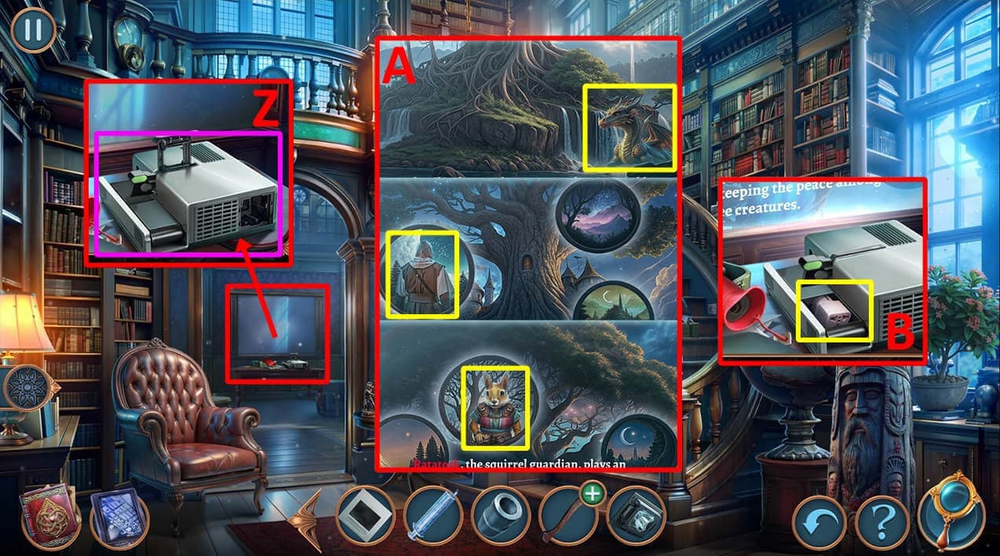
- Use SLIDE and LIGHT on the projector (Z).
- Click on the items that match the highlighted words (A).
- Take ADAPTER (B).
- Use ADAPTER on the socket (C).
- Use FROZEN MEAT on the warmer (D).
- Take DEFROSTED MEAT (E).
- Go back.

- Give DEFROSTED MEAT to the ferret, take BANKNOTE (F).
- Use BANKNOTE on the figurine, earn HEIMDALL FIGURINE (G).
- Go forward.
- Use HEIMDALL FIGURINE on the empty stand (H).
- Easy solution: Click U, Lx3, D, R, U, Rx9, D, Lx4, U, Rx3, D, Lx2, U, D, Rx3, U, Lx12, D, Rx5, U, Lx3, D, Rx4, U, Lx3, D, Lx3, U (I).
- Hard solution: Click Rx4, U, Lx12, D, Rx3, U, Lx4, D, Rx2, U, Lx2, D, R, U, Rx15, D, Lx9, U, Rx6, D, Lx3, U, Rx10, D, Lx4, U, Rx2, D, R, U, D, Lx3, U (J).
- Take DUCT TAPE, MURAL PIECES 1/2, WOLF AMULET, and VINTAGE COLOGNE (K).
- Examine DRIED MARKER, use SYRINGE and VINTAGE COLOGNE on the DRIED MARKER, earn MARKER (L).
- Use WOLF AMULET on the book, click on the book (M).
- Use TRACING PAPER and MARKER on the book, earn OLD MAP SKETCH (N).
- Go back.
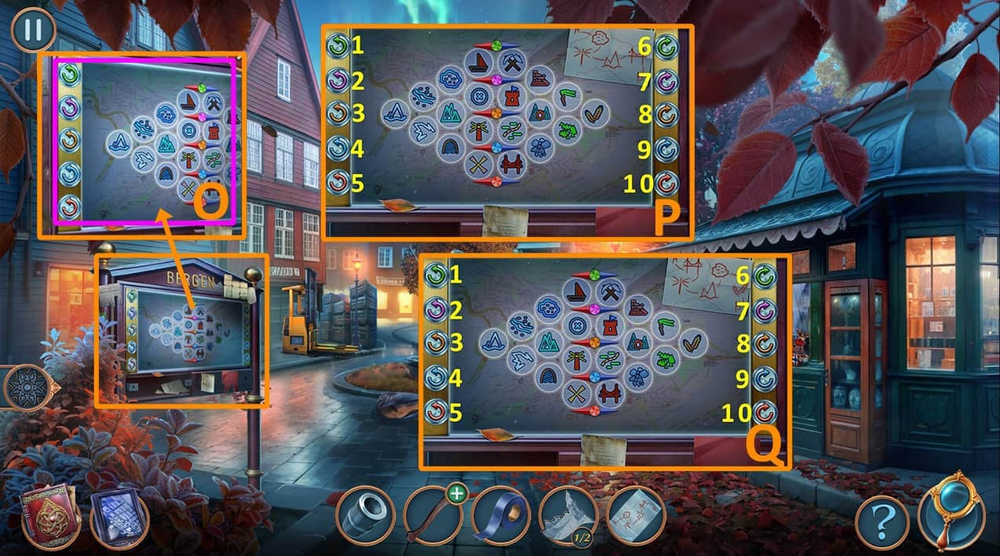
- Use OLD MAP SKETCH on the city map (O).
- Easy solution: Click 1-8, 3-9, 1-10, 5-9 (P).
- Hard solution: Click 5-9, 3-9, 1-10, 1-8, 5-6 (Q).

- Take SLINGSHOT and SHARP BLADE (R).
- Use WEDGE and SHARP BLADE on AXE SHAFT, earn AXE (S).
- Use AXE on the fallen tree (T).
- Go forward.
- Select this option (U).
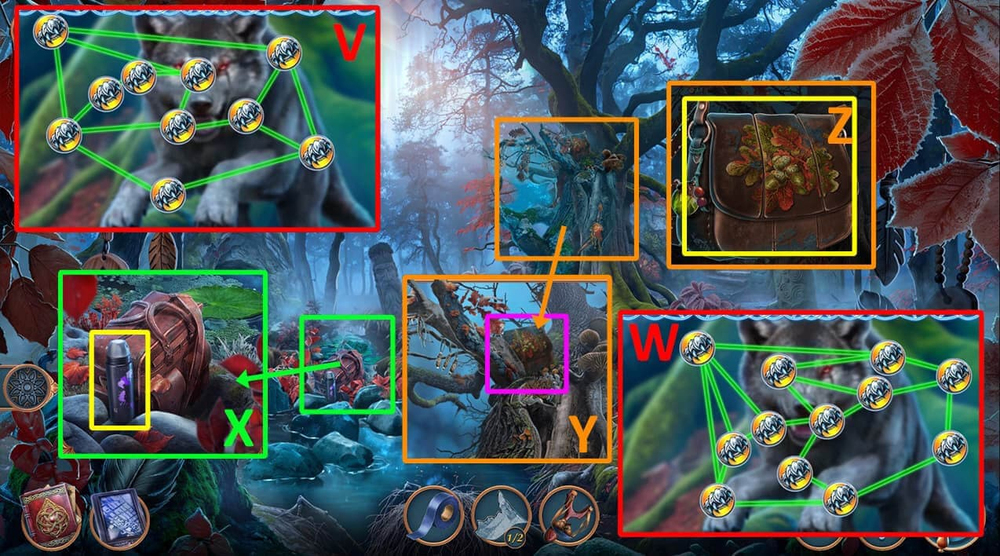
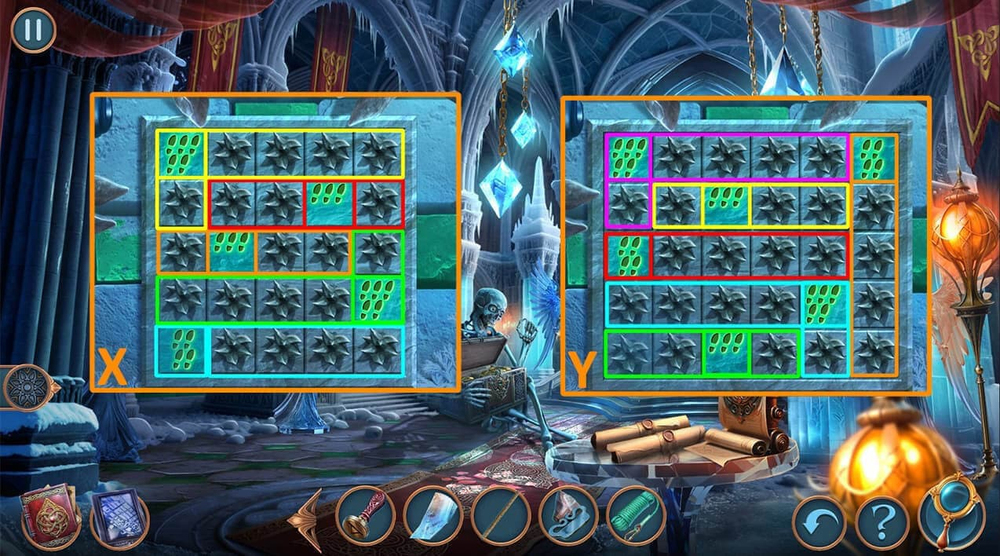
- Easy solution: Follow the instructions in the image (many different solutions) (V).
- Hard solution: Follow the instructions in the image (many different solutions) (W).
- Take DEODORANT (X).
- Use SLINGSHOT on the bag (Y), click on it to open, take and read the note, take STRANGE LANTERN (Z).
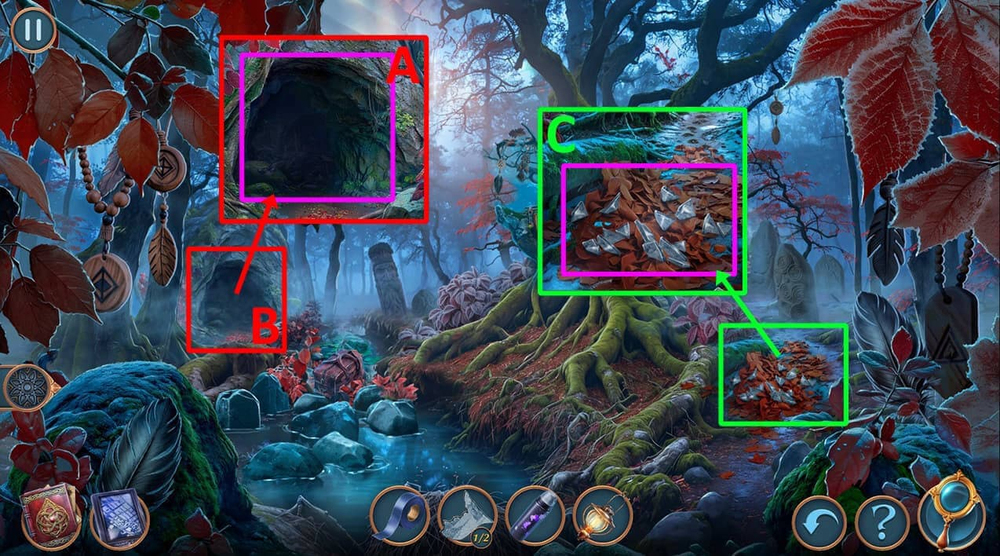
- Use STRANGE LANTERN on the cave (A).
- Play puzzle, earn RAKE (B).
- Use RAKE on the leaves with shards, take CHURCH KEY (C).
- Go back.
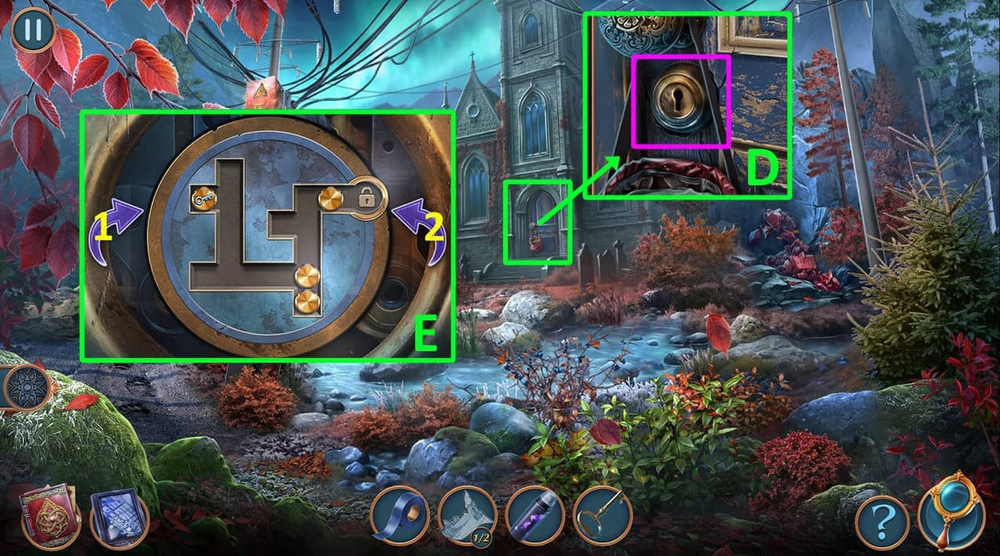
- Use CHURCH KEY on the keyhole (D).
- Solution: Click 2, 1, 1, 2, 2, 2, 1, 2, 2, 2, 2, 2, 1, 1, 1, 1, 2 (E).
- Go forward.
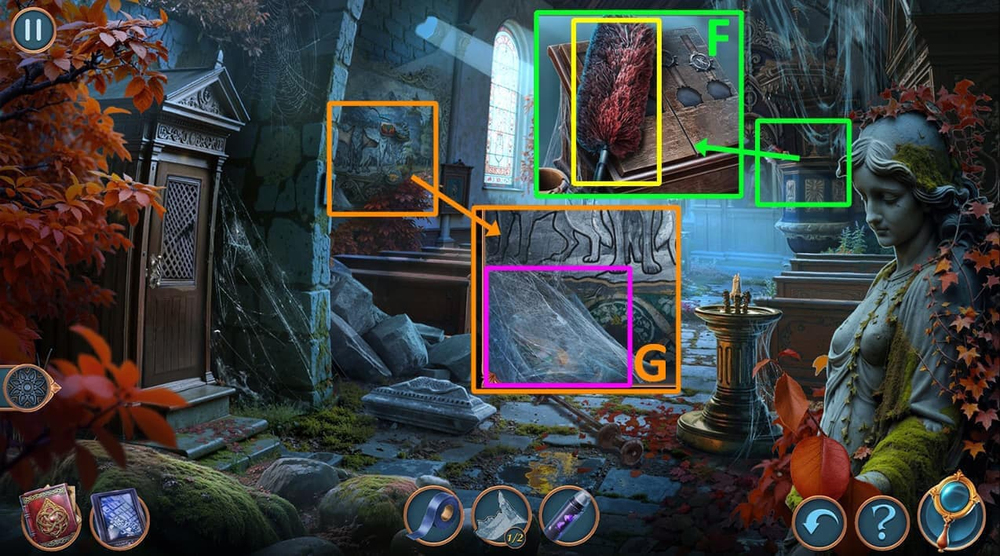
- Take FEATHER DUSTER (F).
- Use FEATHER DUSTER on the web, take BIRD FIGURINE (G).

- Use BIRD FIGURINE on the door (H), take BRUSH (I), use DEODORANT on ants, take KEY CHAIN (J).
- Go to the Misty Woods.
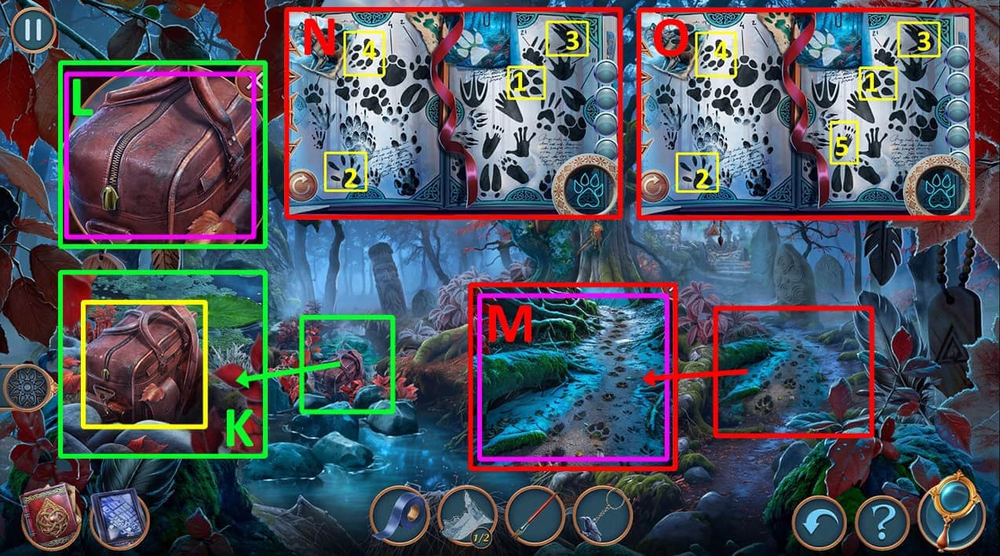
- Examine the bag (K), use KEY CHAIN on the zipper, take HUNTER’S HANDBOOK (L).
- Use HUNTER’S HANDBOOK on the tracks (M).
- Easy solution: Move and rotate the magnifying glass from 1 to 4 (N).
- Hard solution: Move and rotate the magnifying glass from 1 to 5 (O).
- Click on the book.
- Go forward.

- Select this option (P).
- Take PORTAL PARTS 1/2 and HELMET (Q).
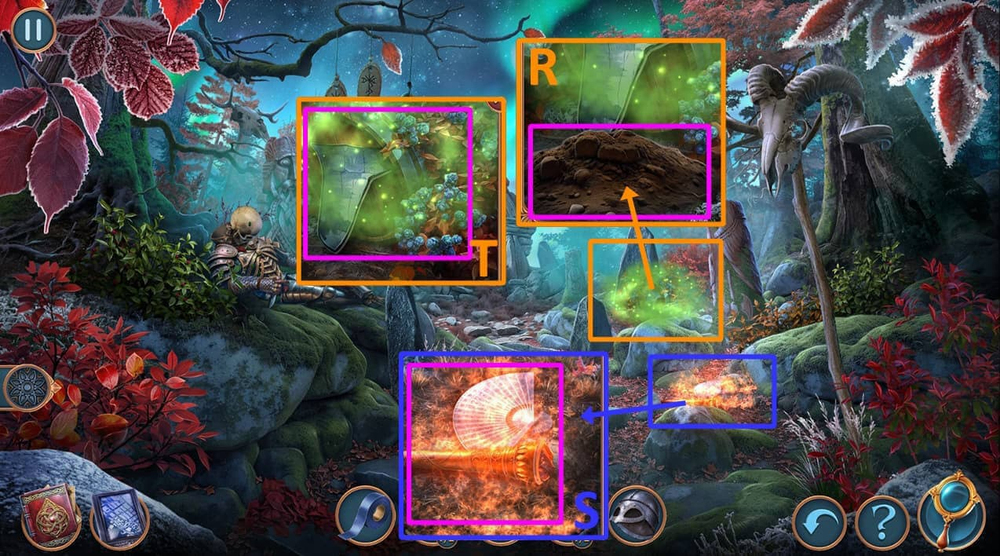
- Use HELMET on the pile of dirt, earn HELMET WITH DIRT (R).
- Use HELMET WITH DIRT on the fire, take FAN (S).
- Use FAN on the green cloud, take MURAL PIECES 2/2 (T).
- Go to the Abandoned Church.

- Use MURAL PIECES on the mural (U).
- Easy solution: Follow the instructions in the image (V).
- Hard solution: Follow the instructions in the image (W).
- Take STRANGE CANDLE (X).
- Use STRANGE CANDLE on the empty holder (Y), take WOVEN BRACELET (Z).
- Go to the Ancient Stone Circle.
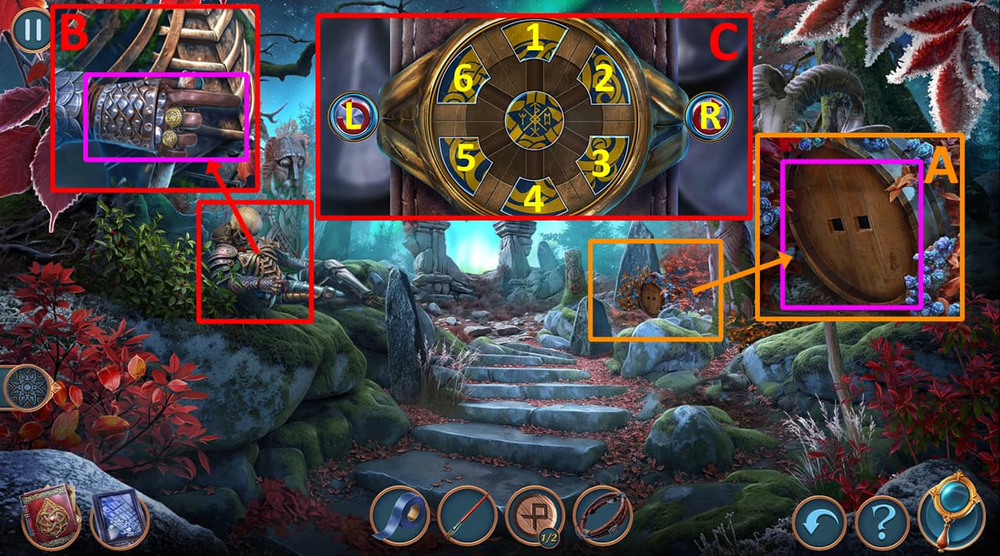
- Use WOVEN BRACELET on the barrel, take VIKING’S RING (A).
- Use VIKING’S RING on the free finger (B).
- Solution: Click R, 3, R, 2, R, 1, 6, R, 5, R, 4, R (C).
- Earn KNIFE.
- Go to the Abandoned Church.
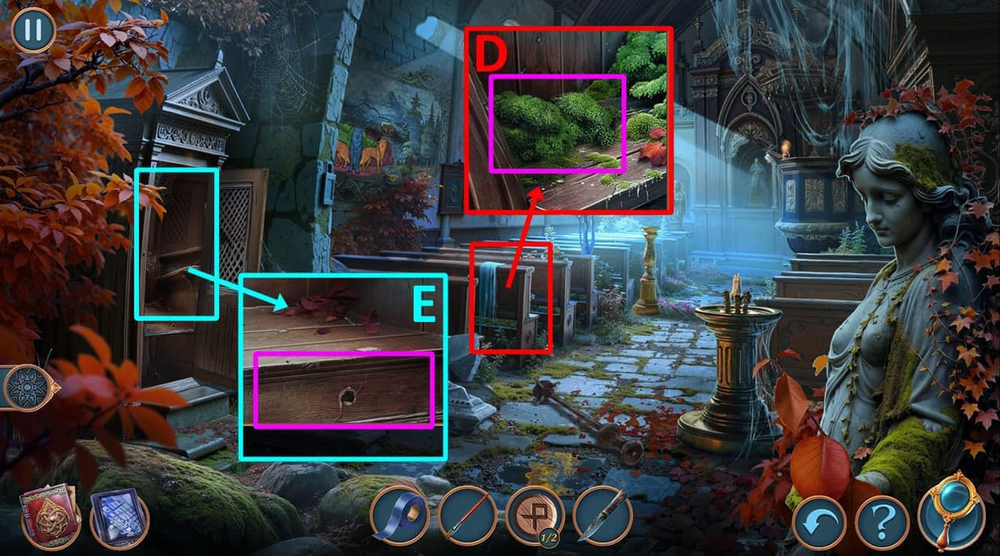
- Use KNIFE on the moss, take CORKSCREW (D).
- Use CORKSCREW on the drawer, take NORSE AMULET (E).
- Use NORSE AMULET on the lectern (F).
- Easy solution: Click 1, 1, 1, 1, 4, 4, 4, 4, 2, 2, 2, 3, 3, 3 (G).
- Hard solution: Click 1, 1, 1, 1, 5, 5, 5, 5, 3, 3, 3, 4, 4, 4 (H).
- Take EMPTY BOTTLE (I).
- Go to the Misty Woods.
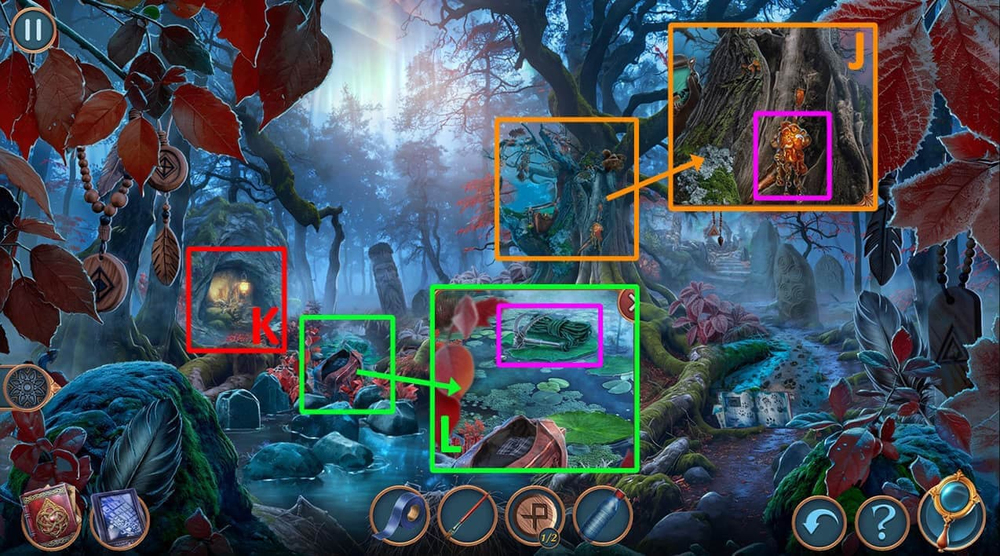
- Use EMPTY BOTTLE on the resin-like liquid (J).
- Play puzzle, earn SCOOP NET (K).
- Use SCOOP NET on the objects in the water, earn GRAPPLING HOOK (L).
- Go back.

- Use GRAPPLING HOOK on the pole (M), use DUCT TAPE on the wire (N).
- Take PORTAL PARTS 2/2 and CABLE CUTTERS (O).
- Use CABLE CUTTERS on the bush, take MORTAR AND PESTLE (P).

- Use MORTAR AND PESTLE on the crystal (Q), use OIL on the mortar (R).
- Use BRUSH on the paint, earn VERMILION PAINT (S).
- Select this option (T).
- Earn RUNE PATTERN.
- Go to the Ancient Stone Circle.
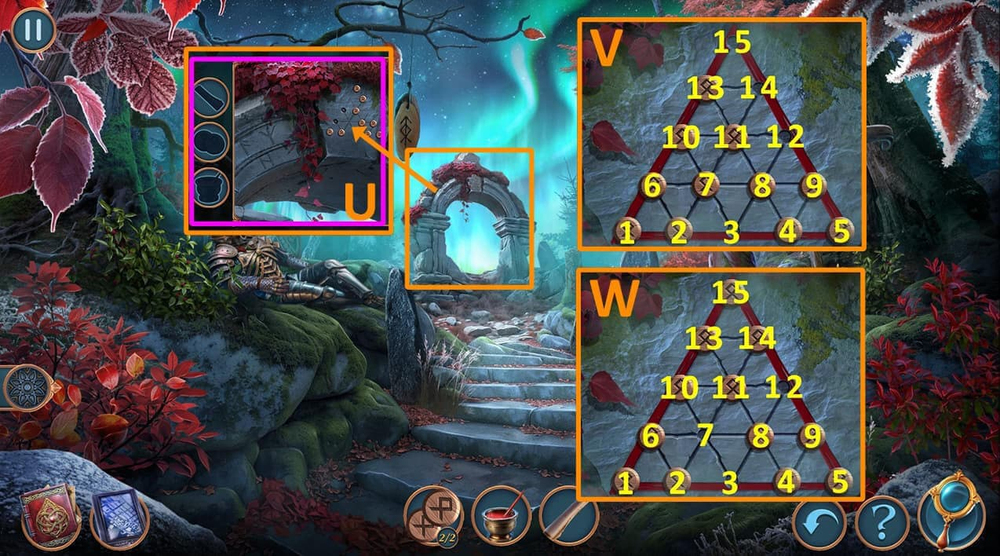
- Use PORTAL PARTS, VERMILION PAINT, and RUNE PATTERN on the portal (U).
- Easy solution: Click 10-15, 7-14, 15-12, 9-7, 5-3, 6-8, 2-4, 12-3, 4-2, 1-3 (V).
- Hard solution: Click 5-12, 14-7, 10-3, 15-10, 4-11, 2-4, 6-13, 13-8, 12-3, 4-2, 1-3 (W).
- Take SCOOP NET FRAME (A).
- Take SHOVEL and BANDAGE (B).
- Use BANDAGE on the sticks, earn BALANCE STICK (C).
- Use BALANCE STICK on the root bridge (D).
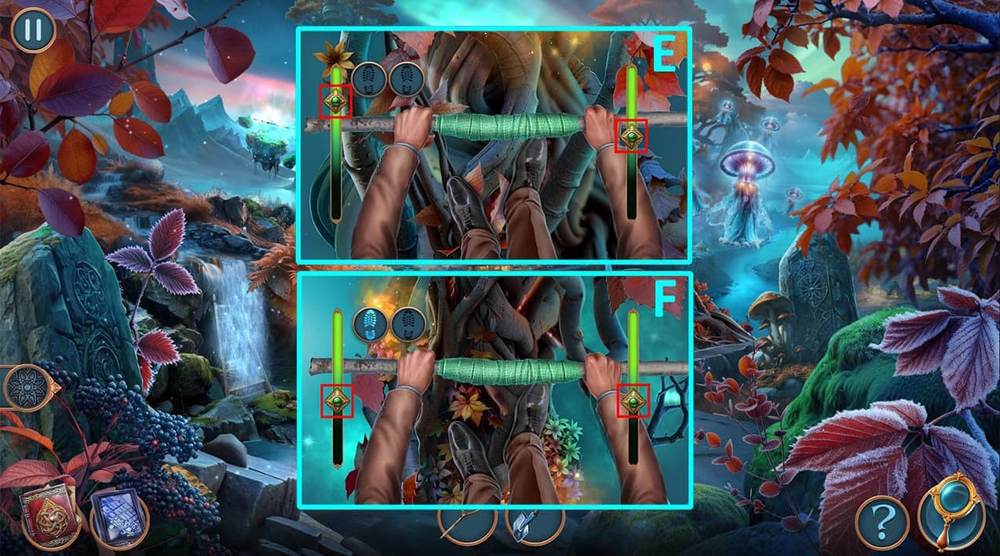
- Solution: Click on the screen when the slider is in the selected area (E-F).
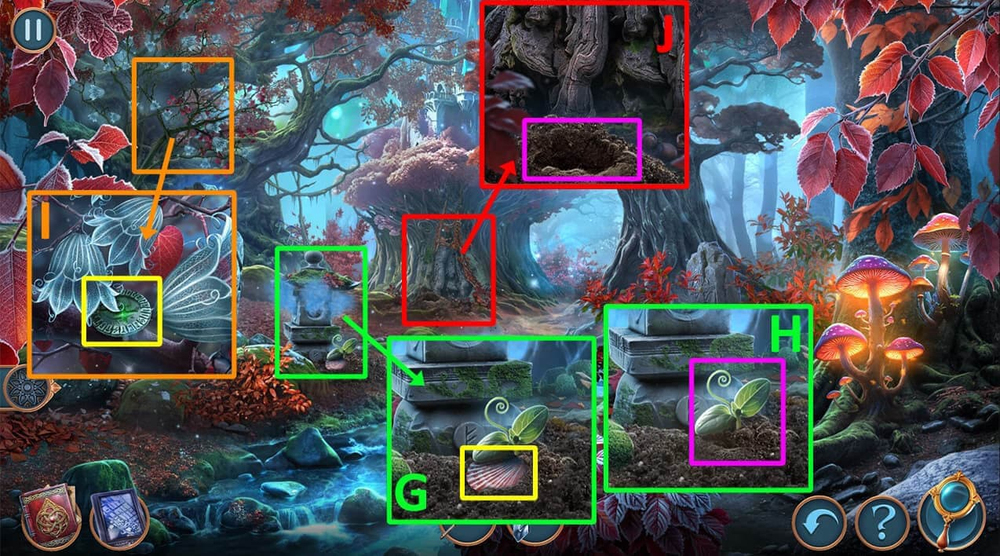
- Take SHELL (G), use SHOVEL on the sprout, earn SMALL SPROUT (H).
- Take RUNE OF GROWTH (I).
- Use SMALL SPROUT and RUNE OF GROWTH on the hole (J).
- Go forward.
- Take LONG VINE (K).
- Use LONG VINE on the woman, Play puzzle (L).
- Select this option (M).
- Earn GEM.

- Examine the bag (N), use GEM on the slot (O), arrange gems according to the slots’ colors, click 1-2, 3-2 (P), take MAGIC VIAL, NEEDLE, and SNAKE RING (Q).
- Use SNAKE RING on the stuck object, earn FAN (R).
- Go back.
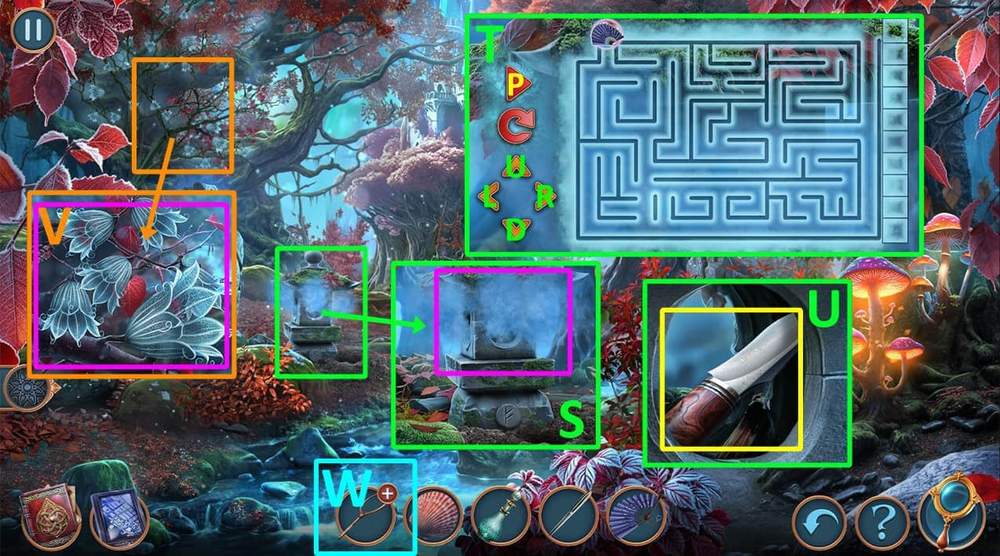
- Use FAN on the smoke (S).
- Solution: Click D, R, R, D, L, D, R, U, R, U, P (T).
- Take LITTLE KNIFE (U).
- Use LITTLE KNIFE on the flower, earn NET FLOWER (V).
- Use NET FLOWER on SCOOP NET FRAME, earn IMPROVISED SCOOP NET (W).
- Go back.
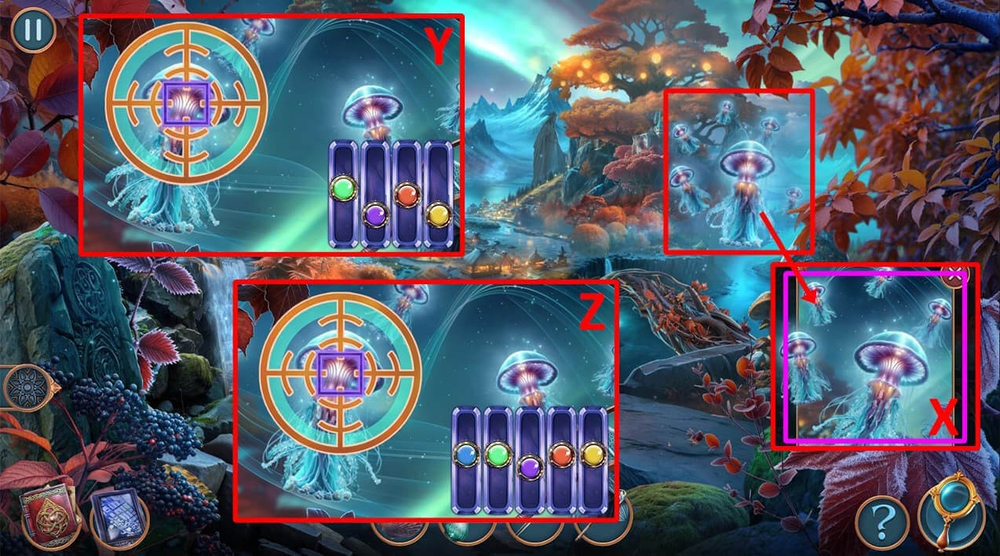
- Use IMPROVISED SCOOP NET on the jellyfish (X).
- Easy solution: Follow the instructions in the image (Y).
- Hard solution: Follow the instructions in the image (Z).
- Earn MUSHROOM CAP JELLYFISH.
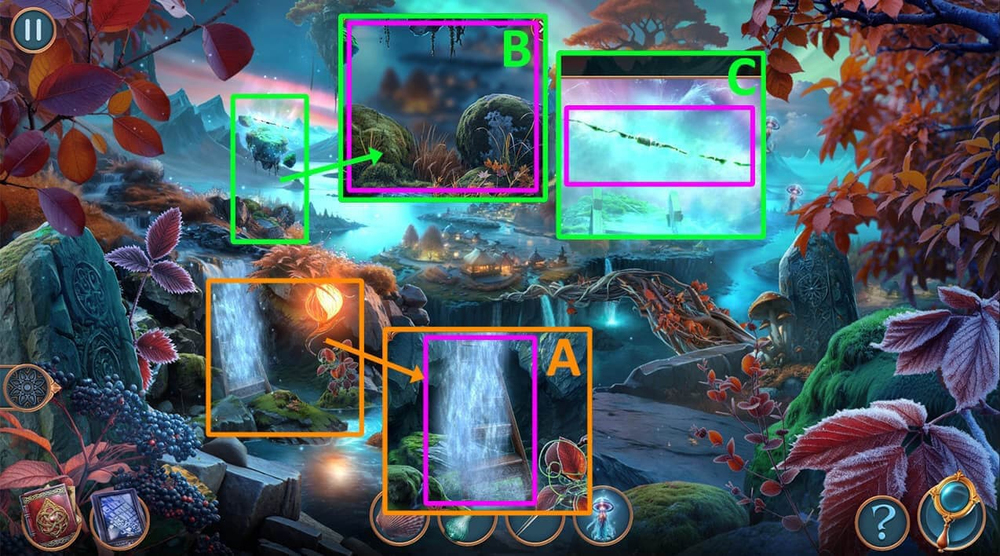
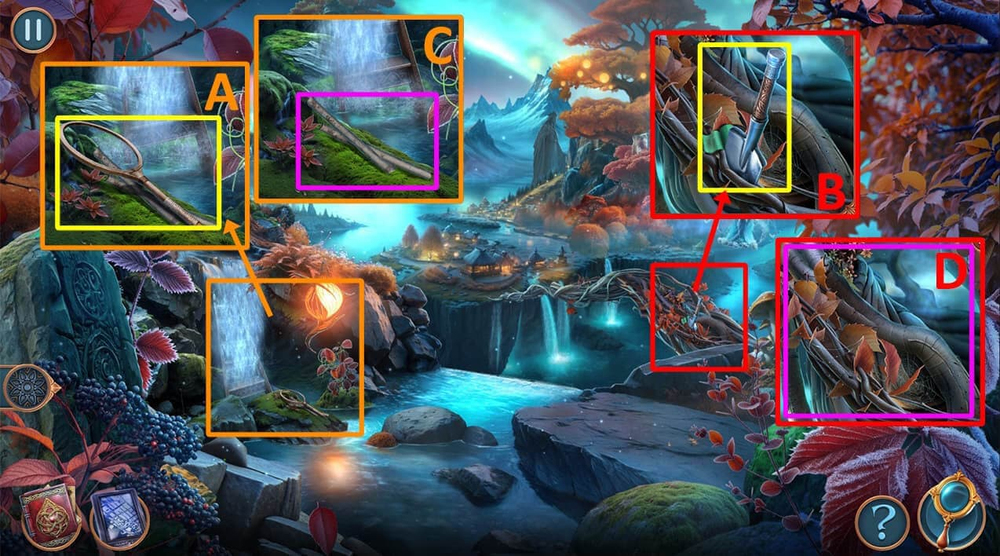
- Use MUSHROOM CAP JELLYFISH on the waterfall, take WOODEN LADDER (A).
- Use WOODEN LADDER on the cliff (B), use MAGIC VIAL on the breach, earn OTHERWORLDLY TRACES (C).
- Go to the Top of the Tree.
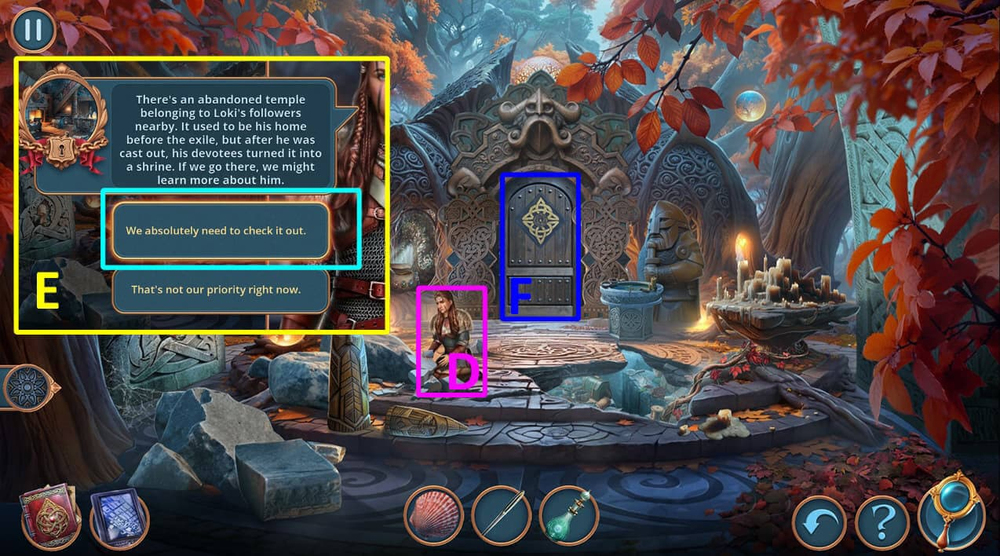
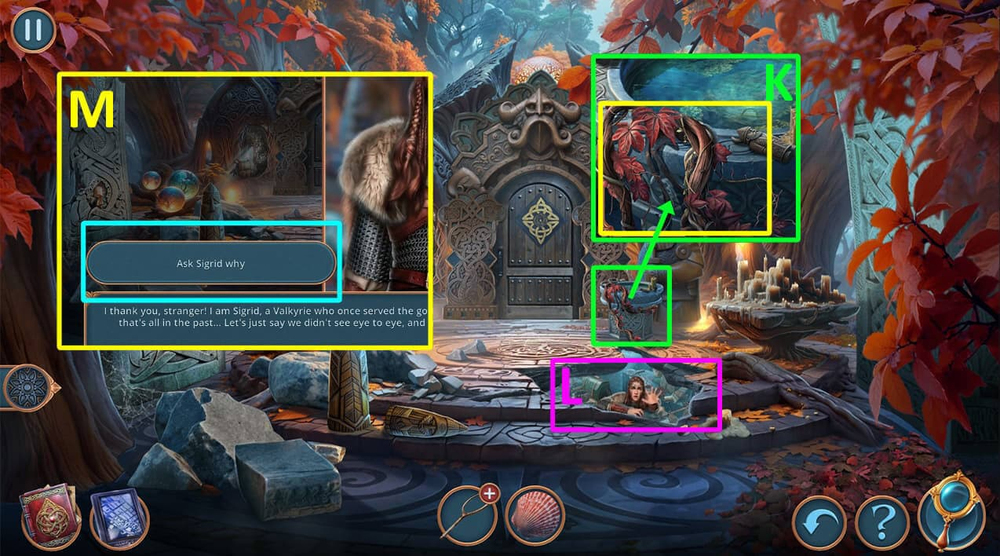
- Give OTHERWORLDLY TRACES to Sigrid (D).
- Select this option (E).
- Earn SIGRID’S PENDANT.
- Go forward (F).
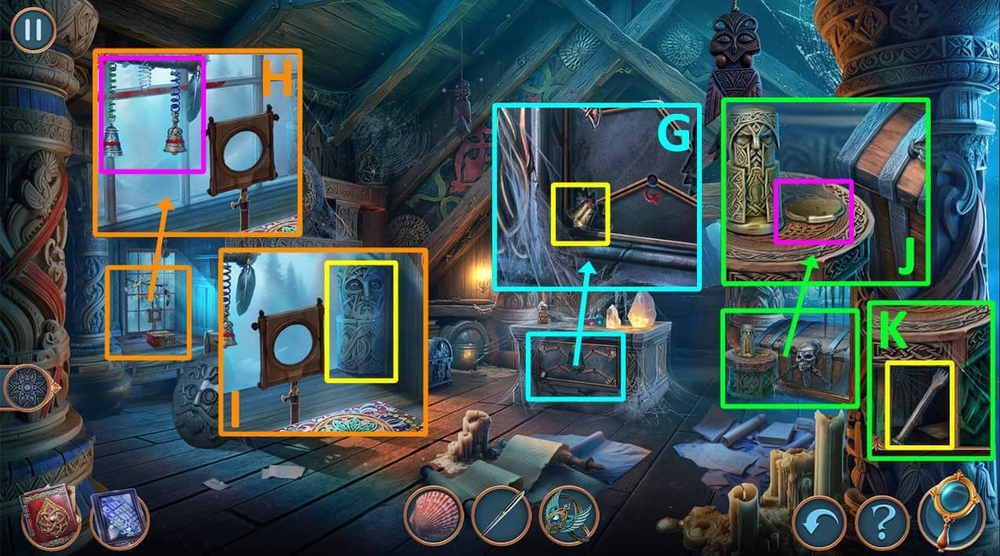
- Take BELL (G).
- Use BELL on the spring (H), take SPIRIT FIGURINE (I).
- Use SPIRIT FIGURINE on the stand (J), take CHISEL (K).
- Go back.

- Use SIGRID’S PENDANT on the water, take CUTTERS and WET HANDKERCHIEF (L).
- Play puzzle (M).
- Earn STAINED GLASS PIECE.
- Use STAINED GLASS PIECE on the slot (N), use WET HANDKERCHIEF on the stained glass window, take HEAVY STATUETTE and MAGIC FERTILIZER (O).
- Use CHISEL on the stone, earn BAS-RELIEF PIECES 1/2, take WOLF AMULET’S PIECE (P).
- Go forward.
- Use WOLF AMULET’S PIECE on the slot (Q).
- Easy solution: Click 1, 2, 2, 2, 3, 4, P (R).
- Hard solution: Click 1, 2, 2, 2, 3, 3, 4, 4, P (S).
- Take ACID (T).
- Use ACID on the lock, take KEY (U).
- Go to the Alfheim Forest.
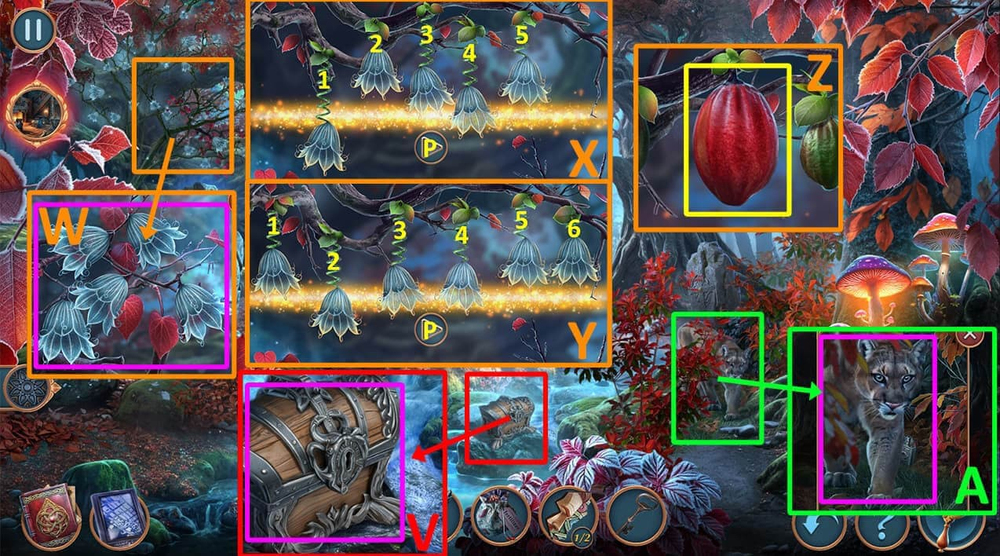
- Use KEY on the chest, take GOLDEN FORK (V).
- Use MAGIC FERTILIZER on the flowers (W).
- Easy solution: Click 1-2, 4-2, 3-5, 4-3, P (X).
- Hard solution: Click 1-2, 6-2, 3-6, 4-5, 6-5, P (Y).
- Take MAGIC FRUIT (Z).
- Use MAGIC FRUIT on the animal, take LIGHTER and SMALL REEL (A).
- Go to Loki’s Abandoned Temple.

- Use GOLDEN FORK on the nails, take LENS WITH HOLES (B).
- Use LENS WITH HOLES on the frame (C), click on the lighted petals (D), take and read the note, take BAS-RELIEF PIECES 2/2 (E).
- Use BAS-RELIEF PIECES on the slot (F).
- Go to the Edge of Alfheim.

- Use SMALL REEL on the green thread, earn MAGIC THREAD (G).
- Use NEEDLE and MAGIC THREAD on the breach (H).
- Easy solution: Click 2, 1, 4, 6, 3 (I).
- Hard solution: Click 3, 6, 2, 7, 9, 5 (J).
- Select this option (K).
- Earn MAGIC BOMB.
- Take OPENER (L).
- Examine the chain (M), use CUTTERS on the chain, take MECHANISM PART (N).
- Use MECHANISM PART on the panel (O).
- Easy solution: Follow the instructions in the image (P).
- Hard solution: Follow the instructions in the image (Q).
- Go forward (R).

- Take CANE (S).
- Take BUTTON (T).
- Use SHELL on the paint (U).

- Play puzzle (V).
- Earn SUCTION CUP.
- Use SUCTION CUP on the glass, take WHEEL (W).

- Use OPENER and WHEEL on the forklift (X).
- Easy solution: Follow the instructions in the image (Y).
- Hard solution: Follow the instructions in the image (Z).
- Go forward.
- Select this option (A).
- Talk to Sigrid, click on the line (B).
- Take LEVER (C).
- Click on the branch (D).
- Use LEVER on the socket (E).
- Solution: Click 15, 16, 12, 8, 7, 11, 10, 6, 2, 3, 4, 8, 12, 11, 10, 6, 2, 3, 7, 8, 4, 3, 2, 1, 5, 6, 10, 11, 15, 14.
- 13, 9, 5, 6, 10, 11, 7, 6, 10, 9, 5, 6, 10, 11, 7, 6, 5, 9, 13, 14, 10, 11, 15, 14, 10, 11, 15, 14, 13, 9, 10, 14.
- 13, 9, 10, 14, 15, 16, 12, 11, 10, 14, 15, 11, 12, 16, 15, 11, 12, 16 (F).
- Take RIPPED GLOVE and SKATING RINK TICKET (G).
- Go to Bergen Central Square.
- Use SKATING RINK TICKET on the panel (H).
- Go forward.
- Select this option (I).

- Take SKATES (J), use CANE on the box, take WET WIPES (K).
- Use WET WIPES on the binoculars, take BINOCULARS (L).
- Go to the Hanseatic Embankment.
- Use BINOCULARS on the statue (M).
- Take THERMAL PAPER (N).
- Play puzzle, earn KNITTING NEEDLE (O).
- Use HEAVY STATUETTE and KNITTING NEEDLE on the box, take FISH HOOK (P).
- Go forward.
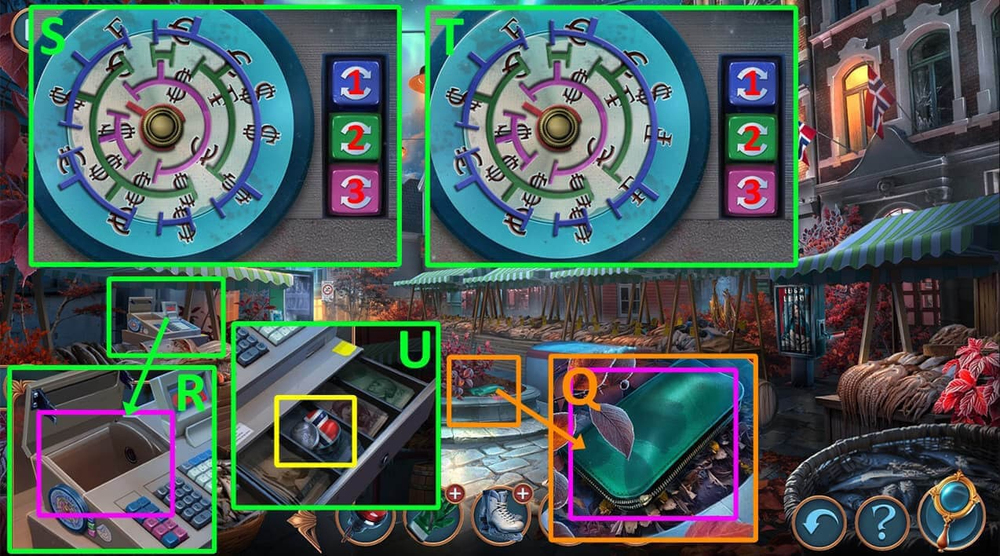
- Use FISH HOOK on the wallet, take ROLLER (Q).
- Use THERMAL PAPER and ROLLER on the cash register (R).
- Easy solution: Click 1(x5), 2(x4), 3(x3) (S).
- Hard solution: Click 1(x5), 2(x4), 3(x3) (T).
- Take COINS 1/2 and MAGNET (U).
- Go to Bergen Central Square.
- Use MAGNET on the stuck object, earn CORKSCREW (V).
- Use CORKSCREW on the basket, take LIGHTER WHEEL and SOLDERING IRON (W).
- Go to the Hanseatic Embankment.
- Use BUTTON and SOLDERING IRON on the plane (X).
- Easy solution: Follow the instructions in the image (Y).
- Hard solution: Follow the instructions in the image (Z).
- Take OILER (A).
- Use OILER on the box, take STAPLER (B).
- Go to the City Skating Rink.
- Use STAPLER on RIPPED GLOVE, earn RUBBER GLOVE (C).
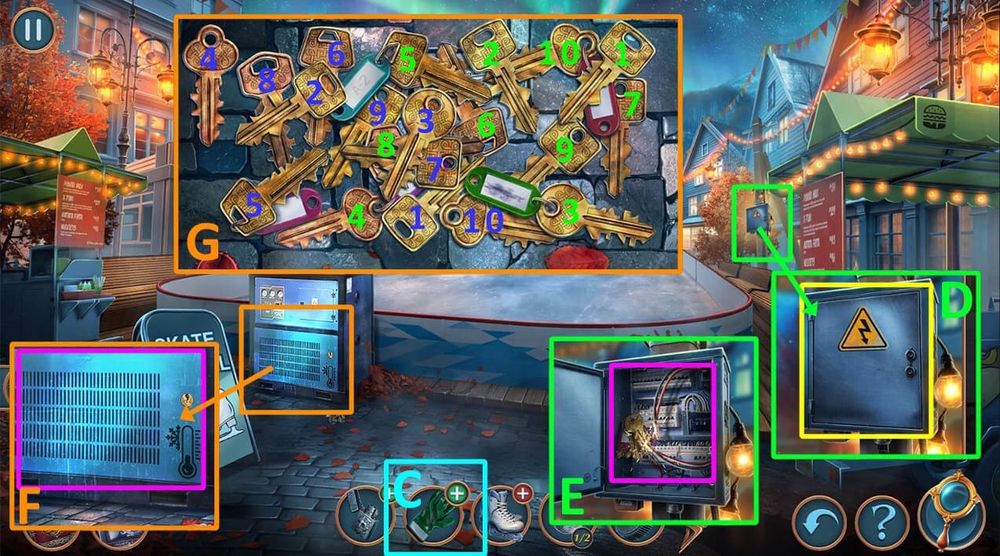
- Open the switchboard (D).
- Use RUBBER GLOVE on the switchboard, take BUNDLE OF KEYS (E).
- Use BUNDLE OF KEYS on the keyhole (F).
- Easy solution: Click on the paired keys (G).
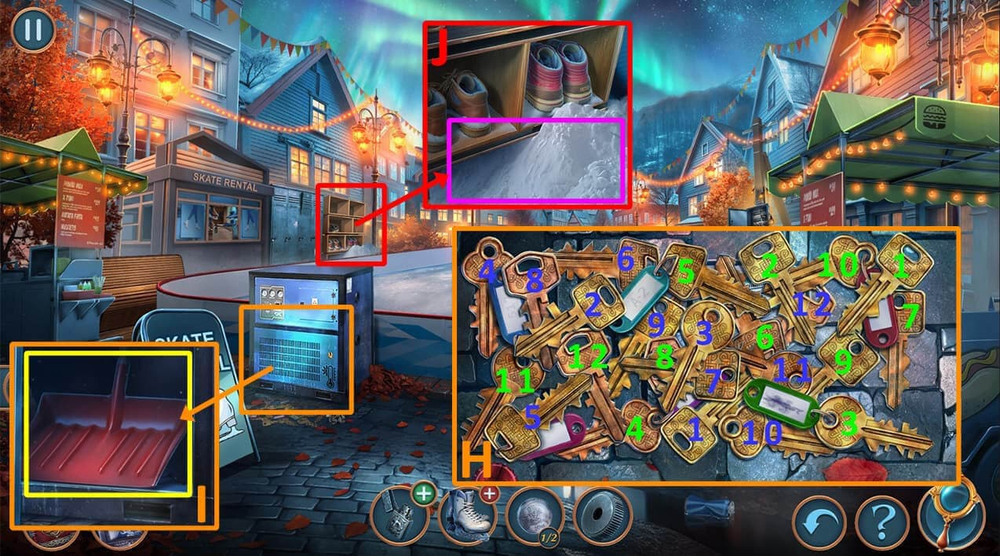
- Hard solution: Click on the paired keys (H).
- Take SNOW SHOVEL (I).
- Use SNOW SHOVEL on the snow, take PAINT and COINS 2/2 (J).
- Go to the Fish Market.
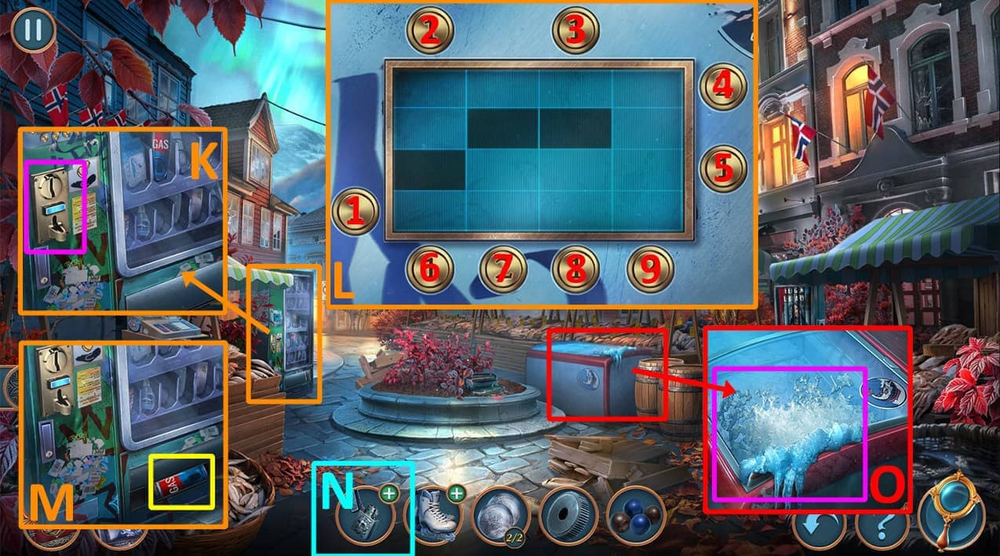
- Use COINS on the coin receiver (K).
- Solution: Click 6, 7, 7, 1, 8, 5, 9, 9, 9, 3, 4, 4, 2 (L).
- Take GAS (M).
- Use LIGHTER WHEEL and GAS on the LIGHTER, earn LIGHTER (N).
- Use LIGHTER on the ice, take SHARPENER (O).
- Go to the City Skating Rink.
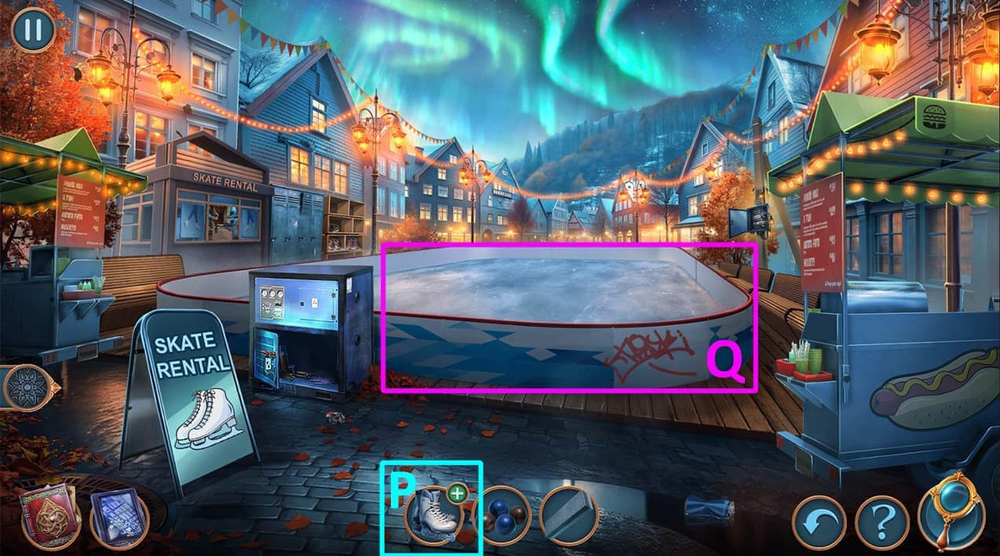
- Use PAINT and SHARPENER on SKATES, earn SKATES WITH PAINT (P).
- Use SKATES WITH PAINT on the ice rink (Q).

- Easy solution: Click 5, 2, 2, 2, 6, 6, 6, 9, 10, 14, 13, 15, 14, 16, 15, 15, 14, 12, 16, 15, 8, 12, 16, 12, 4, 3 (R).
- Hard solution: Click 12, 12, 12, 9, 8, 8, 13, 13, 13, 16, 19, 18, 18, 17, 17, 19, 18, 18, 20, 15, 19, 20.
- 15, 19, 20, 10, 15, 15, 5, 4, 4, 9, 10, 10, 9, 9 (S).
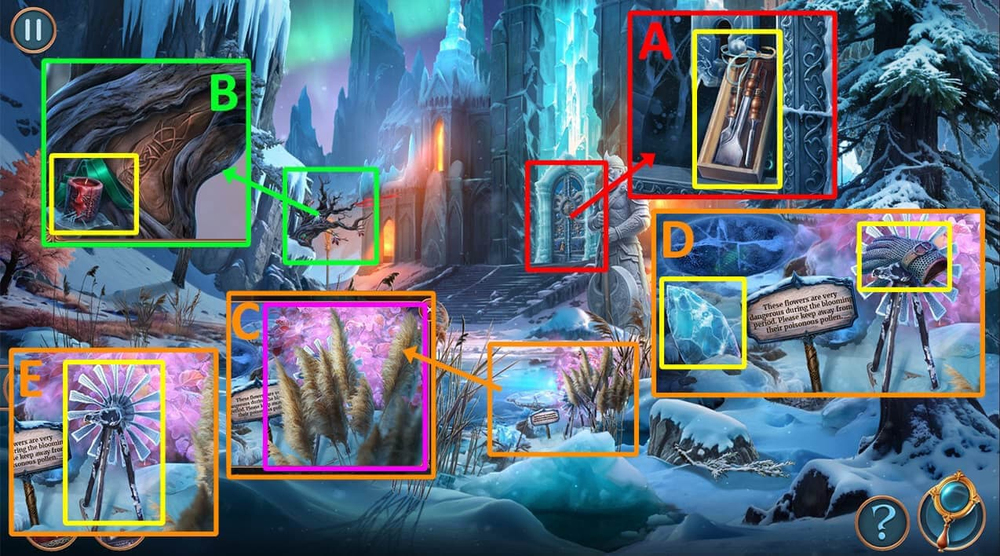
- Take LINE WITH HOOK and CARVING KIT (A).
- Take CANDLES 1/3 and RIBBON (B).
- Use RIBBON on the reed (C).
- Take PIECE OF ICE and CHAINMAIL GLOVE (D), click on the wind vane (E).
- Use CHAINMAIL GLOVE on the shards, take KEY PATTERN (F).
- Use CARVING KIT and KEY PATTERN on PIECE OF ICE, earn ICE KEY (G).
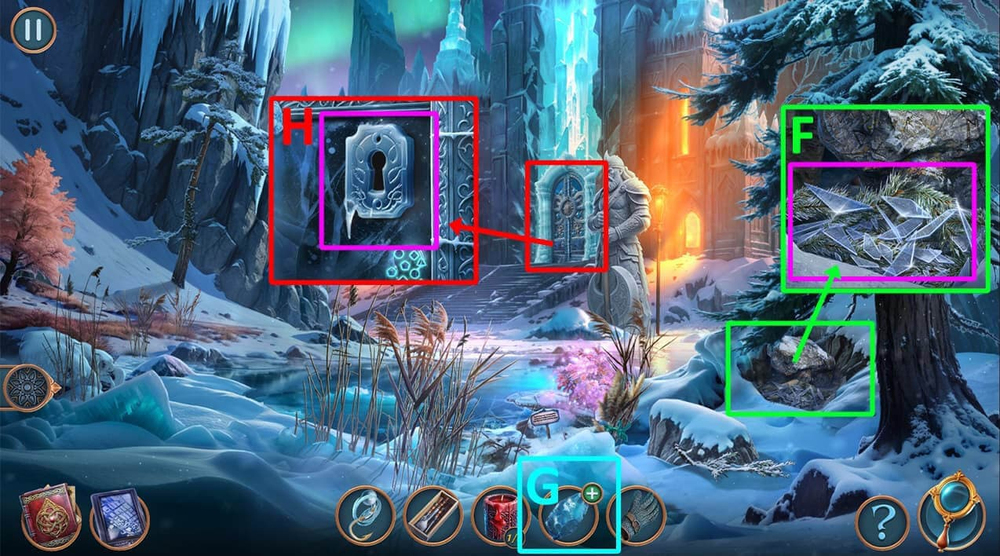
- Use ICE KEY on the keyhole (H).
- Easy solution: Follow the instructions in the image (I).
- Hard solution: Follow the instructions in the image (J).
- Go forward.
- Select this option (K).
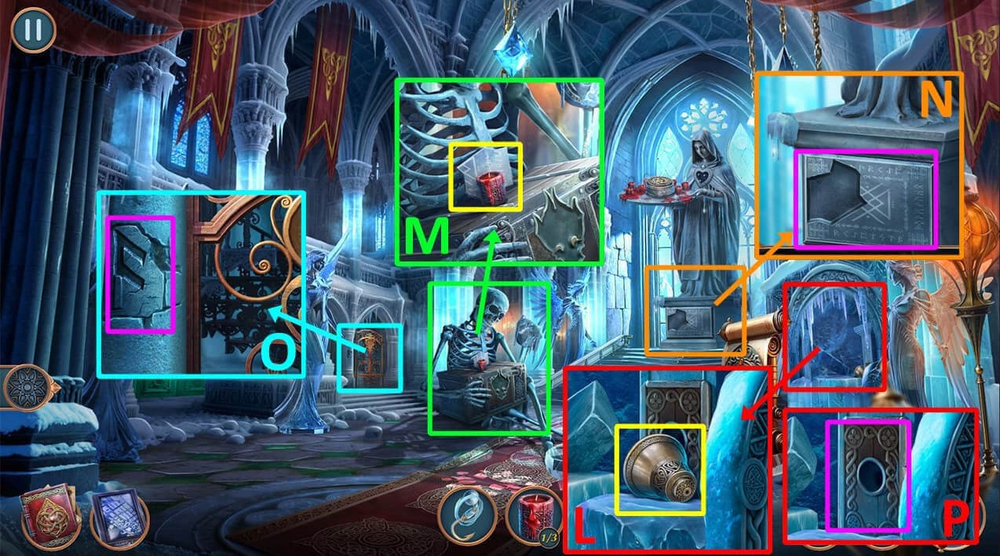
- Take BELL (L).
- Take CANDLES 2/3 and RUNESTONE (M).
- Use RUNESTONE on the stand, take RUNE PART and BARREL (N).
- Use RUNE PART on the clot in the column, take GOLDEN BELL-END and STONE STAFF (O).
- Use STONE STAFF on the empty socket (P).
- Play puzzle, earn STONE HEART (Q).
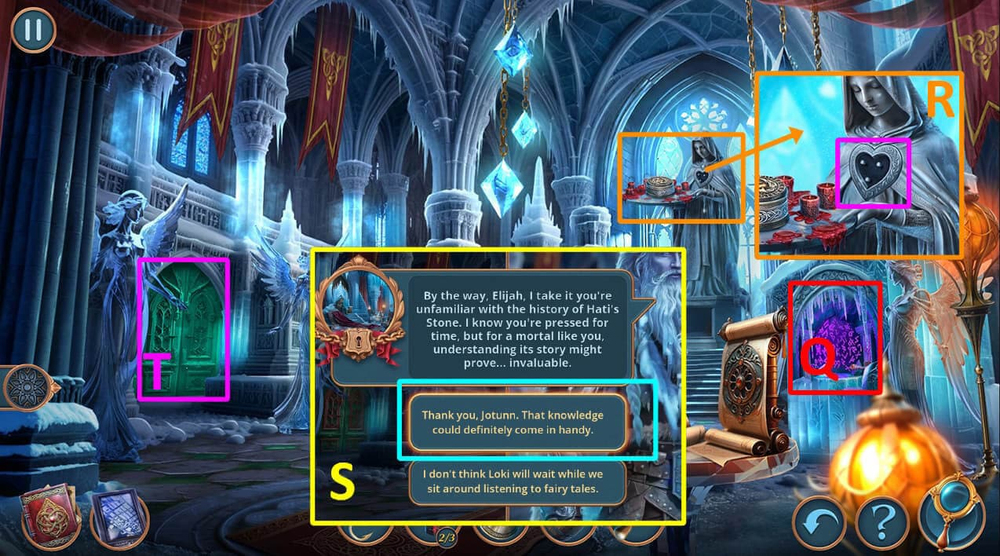
- Use STONE HEART on the statue, take PAPER and BELL’S PIECE (R).
- Select this option (S).
- Go forward (T).
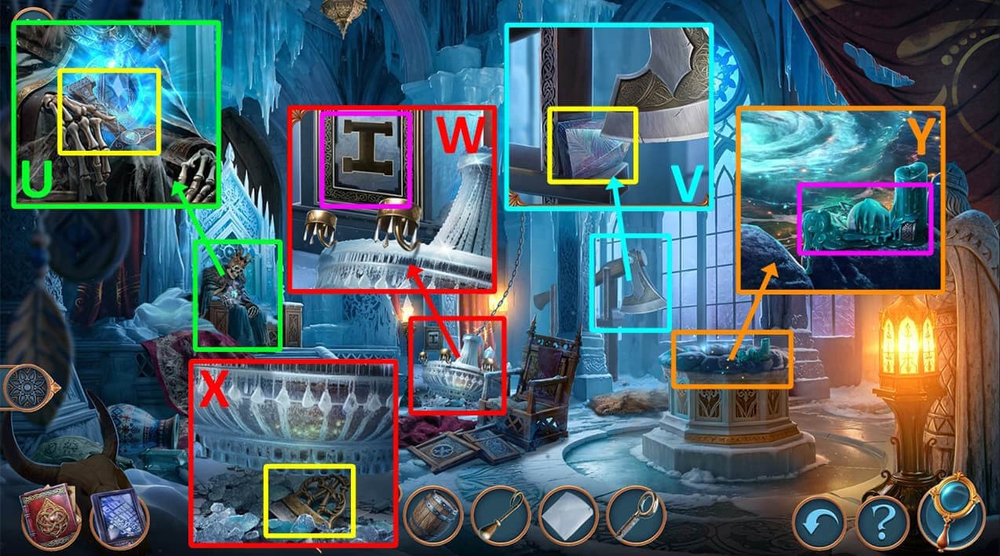
- Take ROYAL SWORD’S HILT (U).
- Take CRYSTALS 1/2 (V).
- Use ROYAL SWORD’S HILT on the slot in the wall (W), take SCRAPER (X).
- Use SCRAPER on the wax, take GIANT’S EYES 1/2 and GLOWING STAFF (Y).
- Go to the Foothills.

- Use GOLDEN BELL-END and BELL’S PIECE on BELL, earn RINGING BELL (Z).
- Use GLOWING STAFF on the tree, use RINGING BELL on the bird, take CRYSTALS 2/2, GIANT WARRIOR’S STAMP, and WIND VANE PART (A).
- Use WIND VANE PART on the triangle spot (B).
- Easy solution: Follow the instructions in the image (C).
- Hard solution: Follow the instructions in the image (D).
- Take MIRROR SHARD and CANDLES 3/3 (E).
- Go to the Hidden Chamber.
- Use CRYSTALS on the chandelier (F).
- Click on the bearskin, take BARRETTE (G).
- Use BARRETTE on the eye, earn GIANT’S EYES 2/2 (H).
- Go back.
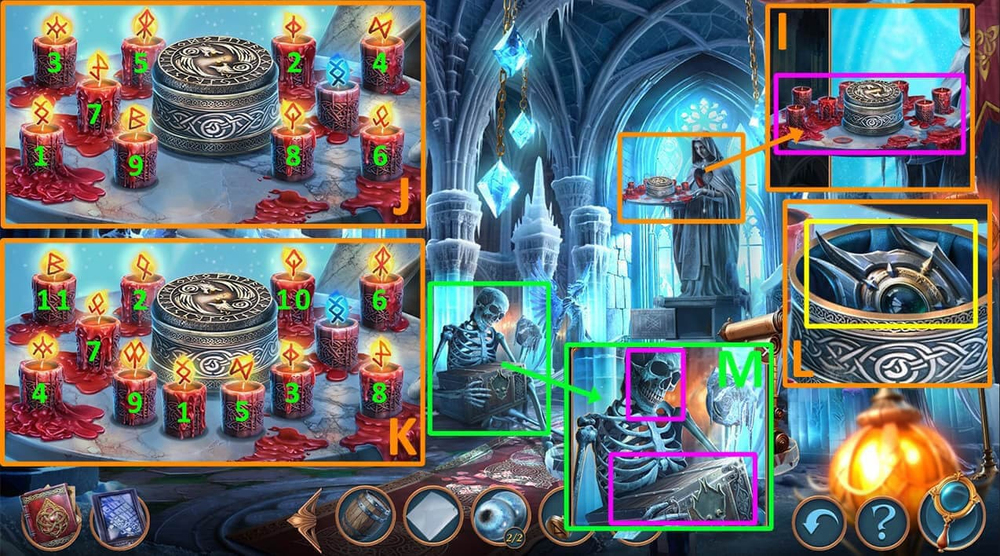
- Use CANDLES on the stone dish (I).
- Easy solution: Click 1-9 (J).
- Hard solution: Click 1-11 (K).
- Take METAL AMULET (L).
- Use METAL AMULET on the chest, use GIANT’S EYES on the skull, take STEEL POLE, take and read the note, take VIAL OF MEMORIES (M).
- Go forward.
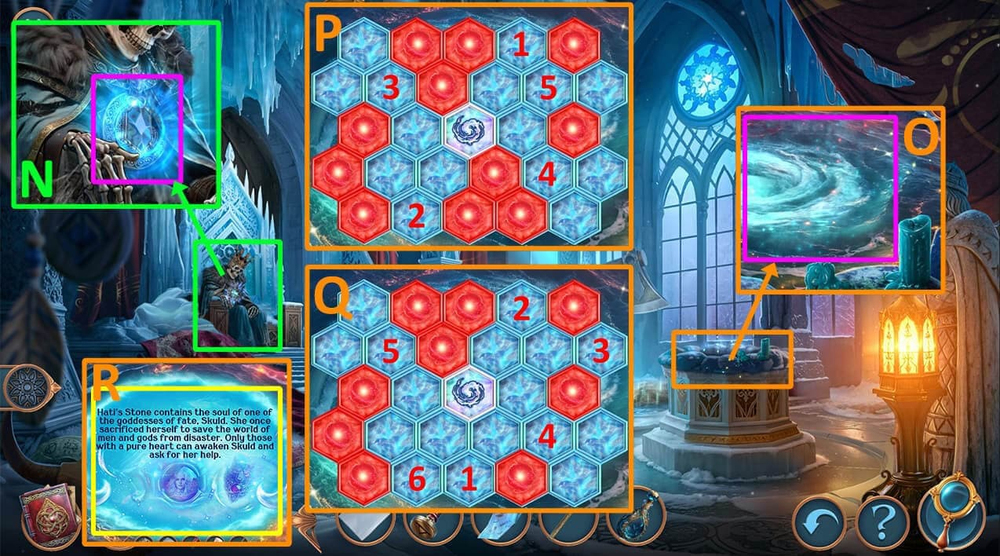
- Use VIAL OF MEMORIES on the amulet, earn GIANT’S MEMORIES (N).
- Use GIANT’S MEMORIES on the water (O).
- Easy solution: Click 1-5 (P).
- Hard solution: Click 1-6 (Q).
- Read the memories (R).
- Go to the Foothills.

- Use BARREL and STEEL POLE on the boulder, earn STEEL POLE, take FLINT AND STEEL and PICKAXE (S).
- Use PICKAXE on the ice, use LINE AND HOOK on the water, earn SAFETY ROPE and FROST GIANT’S RING (T).
- Go forward.
- Play puzzle, earn MAGIC TORCH (U).
- Use MAGIC TORCH on the skeleton’s frozen hand, take STONE SLAB (V).
- Use FROST GIANT’S RING and STONE SLAB on the gate slots (W).
- Easy solution: Follow the instructions in the image (X).
- Hard solution: Follow the instructions in the image (Y).
- Take HARPY’S FEATHER (Z).
- Click on the (A), use HARPY’S FEATHER on the slot, take RINGS 1/2 and GUNPOWDER (B).
- Use PAPER, FLINT AND STONE and GUNPOWDER on the lock (C), take CLIMBING SHOES 1/2 and WAX (D).

- Use GIANT WARRIOR’S STAMP and WAX on the scroll (E).
- Easy solution: Follow the instructions in the image (F).
- Hard solution: Follow the instructions in the image (G).
- Take WARRIOR’S SCROLL (H).
- Use WARRIOR’S SCROLL on the runes, click on the runes in the order shown in the scroll 1-3 (I), take RINGS 2/2 (J).
- Use RINGS on the skeleton’s hand, take EMPTY HATI’S STONE (K).
- Use MIRROR SHARD and EMPTY HATI’S STONE on the mirror (L).
- Easy solution: Click 1-12 (M).
- Hard solution: Click 1-16 (N).
- Select this option (O).
- Earn VALKYRIE’S SPEAR.
- Take MILL’S PART (P).
- Take KNIFE (Q).
- Take BROKEN OAR (R), use KNIFE on the tree bark, take TRIANGLE AMULET (S).
- Use TRIANGLE AMULET on the backpack, take CLIMBING SHOES 1/2 (T).
- Use SAFETY ROPE and CLIMBING SHOES on the cliff (U).
- Easy solution: Click 1-5 (V).
- Hard solution: Click 1-7 (W).
- Take RESIN and HELMET (X).
- Use HELMET on the pile of dirt, take AWL (Y).
- Use AWL on the bag, take and read the note, take NAILS and SAW (Z).
- Go back.
- Examine the crate (A).
- Use SAW on it, take INSECTICIDE (B).
- Use INSECTICIDE on the ants, take HAMMER and LEVER (C).
- Go forward.

- Use MILL’S PART and LEVER on the mill (D).
- Easy solution: Click 1-6 (E).
- Hard solution: Click 1-8 (F).
- Take GAS CYLINDER and CUTTING BOARD (G).
- Use NAILS, HAMMER and CUTTING BOARD on BROKEN OAR, earn NEW OAR (H).
- Use RESIN and NEW OAR on the boat (I).
- Easy solution: Click L1, U(x3), L2(x2), L1(x2), U, R2, R1, U, L1(x2), U(x3), L2(x2), D, L2, U(x2) (J).
- Hard solution: Click L2(x2), U(x2), L2, D, L2, U(x3), L1, D(x2), L1, U, L1, R2(x4), U(x4), R1, D, L2, R1.
- D, L1, D, L2(x2), U, R1(x2), L2, U, R2(x2), U, L1, U, L2(x2), L1(x3), U (K).

- Take FROZEN TUSK (L).
- Take LIFTER and OIL (M).
- Use STEEL POLE on the pliers, earn PLIERS (N).
- Use PLIERS on the wire, earn WIRE (O).
- Use FROZEN TUSK and WIRE on VALKYRIE’S SPEAR, earn VALKYRIE SPEAR (P).
- Use VALKYRIE’S SPEAR on the ice (Q).
- Easy solution: Place the arrows as shown in the image and click P (R).
- Hard solution: Place the arrows as shown in the image and click P (S).
- Select this option (T).
- Take GOLDEN BOWL and THERMOS (U).
- Take DIRTY BANDAGE (V).
- Use THERMOS on the frozen chain, take CHAIN and KEY, examine the note (W).
- Go back.
- Use KEY on the door (X).
- Play puzzle, earn MAGNET (Y).
- Use CHAIN and MAGNET on LIFTER, earn MAGNET LIFTER (Z).
- Use MAGNET LIFTER on the sewer manhole (A).
- Easy solution: Place the weights in the appropriate slots (B).
- Hard solution: Place the weights in the appropriate slots (C).
- Take CAR KEY (D).
- Go forward.

- Use CAR KEY on the trunk, take ALCOHOL and SWITCH (E).
- Use GAS CYLINDER, GOLDEN BOWL, DIRTY BANDAGE, ALCOHOL and SWITCH on the burner, earn EMPTY FLASK, take CLEAN BANDAGE and BURNER (F).
- Use CLEAN BANDAGE on Sigrid (G).
- Easy solution: Follow the instructions in the image (H).
- Hard solution: Follow the instructions in the image (I).
- Select this option (J).
- Earn SIGRID’S BAG.
- Go back.

- Examine SIGRID’S BAG, click on it to open, take and read the scroll, take CLAY and SIF’S HAIR (K).
- Use CLAY on the empty slot, take OLD NET (L).
- Play puzzle, earn SMOKING PIPE (M).
- Go forward.
- Examine the box (N).
- Use OIL and SMOKING PIPE on it, take MOLD FOR ICE (O).
- Use EMPTY FLASK, BURNER and MOLD FOR ICE on the snow (P).
- Take ICE NEEDLE (Q).
- Use OLD NET and ICE NEEDLE on SIF’S HAIR, earn ENCHANTED NET (R).
- Use ENCHANTED NET on Loki (S).
- Solution: Click 1, 1, 1, 2, 3, 2, 2 (T).
- Walkthrough Bonus Chapter, at the link below.


