Mystery Trackers 19: Forgotten Voices – A year ago, an event happened at a cadet training camp that many would rather forget. Now young agents Ginger, Black, and Slate get a chance to prove themselves by working in the communications center. Their attention is drawn to a strange SOS signal: three students desperately asking for help, fleeing a strange green wave in the school hallway. But there’s a mystery – the signal was made a year ago. Determined by all means to find out what happened, the newcomers head to Misthill College. However, the situation only gets more confusing: none of the staff and students of the college do not recognize the existence of the missing students. It’s as if they never existed. Dive into an investigation full of unexpected twists and turns to help Ginger, Black and Slate get to the bottom of the mystery. Uncover the mystery of the strange signal, explore every room of the college, collect clues, solve complex puzzles and find out what lies behind the green wave and the events of a year ago. If you can not pass any of the puzzles or do not know where the items are, on our site you can watch the walkthrough of Mystery Trackers 19: Forgotten Voices, and find the missing students.
Mystery Trackers 19: Forgotten Voices – Walkthrough
Here you can see the full walkthrough of Mystery Trackers 19: Forgotten Voices game, namely for all chapters, including bonus chapter, in pictures.

- Select (A), play mini-puzzle, speak to character, receive HEADSET.
- Use HEADSET (B), select screen.
- Solution (C) Ax2-B-C.
- Speak to characters, select screen (D), then screen, speak to character.

- Speak to character, play puzzle (E), receive Map, speak to character.
- Take BRIEFCASE, 1/2 COAT-OF-ARMS PART, JANITOR’S KEY (F).
- Take CAN OPENER (G), use JANITOR’S KEY (H).
- Take SCREWDRIVER, 2/2 COAT-OF-ARMS PART (I).
- 2/2 COAT-OF-ARMS PART on BRIEFCASE for note, STUDENT ID and INSTRUCTIONS.

- Use STUDENT ID (J).
- Solution (K1) 1-4.

- Solution (K2) 5-7.

- Solution (K3) 8-15.
- Take SODA.

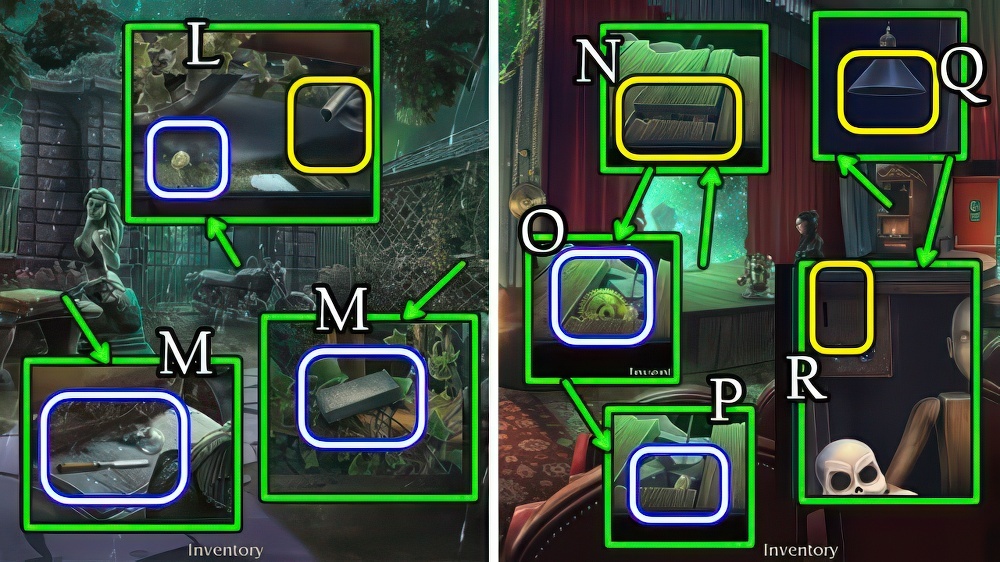
- Use SCREWDRIVER (L), receive SMALL SCREWS, use SODA (M).
- Go right.
- Take PEN (N), use SODA (O), receive CAN.
- Take MOP AMULET, SUGAR (P).
- Go down.

- Use MOP AMULET (Q), take MAGNET, BROKEN MOP (R).
- Go right.
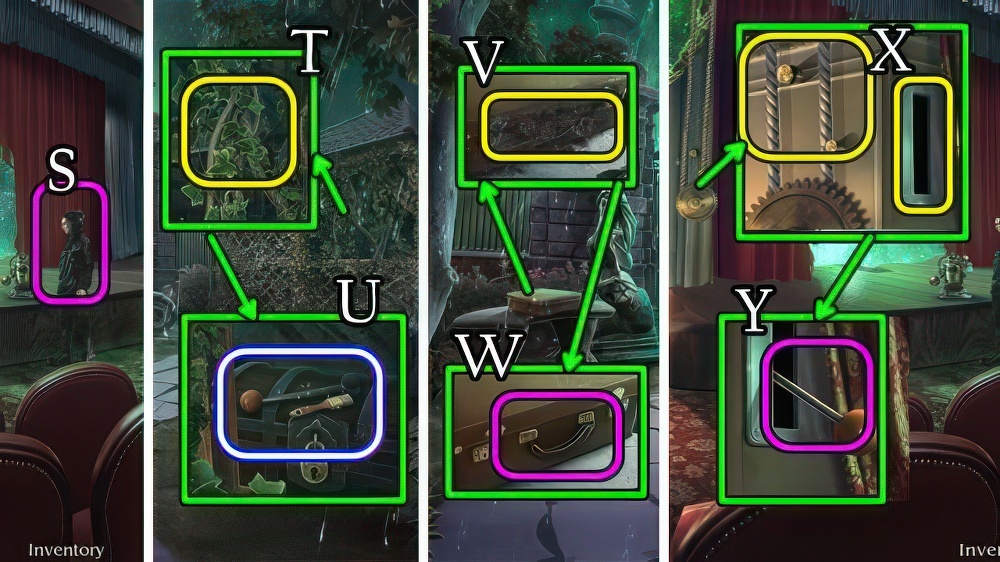
- Use MAGNET (S), play mini-puzzle, receive NITRATE.
- Go down.
- CAN, CAN OPENER, NITRATE, SUGAR and PEN on INSTRUCTIONS for SMOKE BOMB.
- Use SMOKE BOMB (T), select scene.
- Go left.
- Take BRUSH, DRAWER HANDLE, 1/3 METAL THUMBS (U).
- Go down, then right.
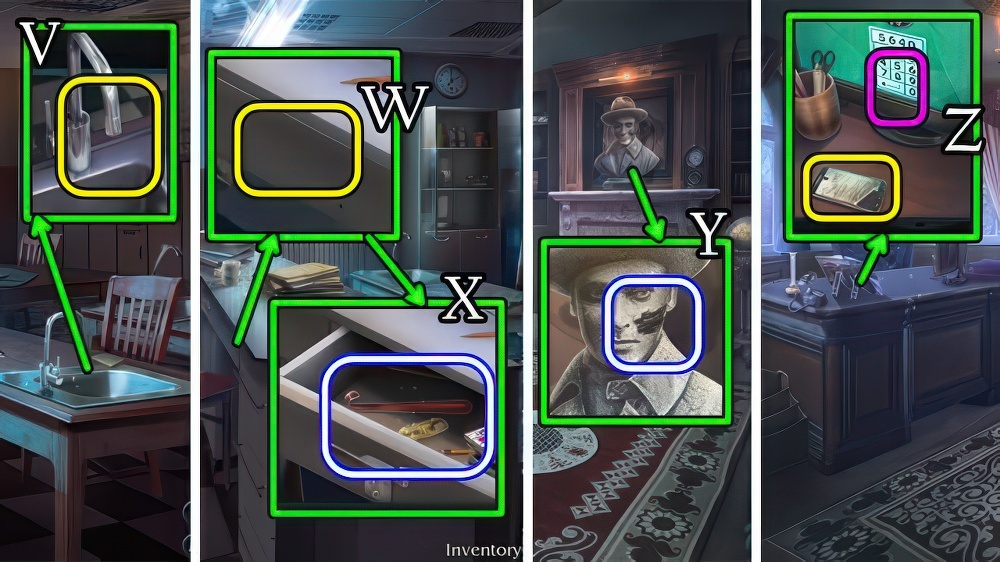
- Use BRUSH (V), receive WET BRUSH.
- Use DRAWER HANDLE, SMALL SCREWS and SCREWDRIVER (W).
- Take SHOEHORN, 2/3 METAL THUMBS (X).
- Go down, then left.
- Use WET BRUSH (Y), receive HEADMASTER’S PASSWORD.
- Use HEADMASTER’S PASSWORD, select 5-6-4-0, arrow (Z).
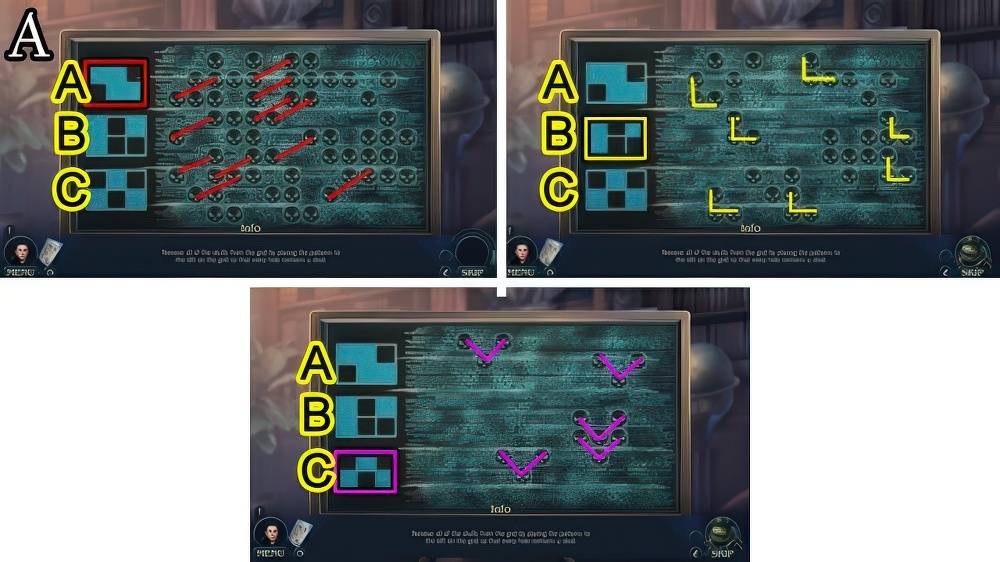
- Solution (A) A-C.

- Select (B), 1-3, select (C), select (D), take 3/3 METAL THUMBS (E).
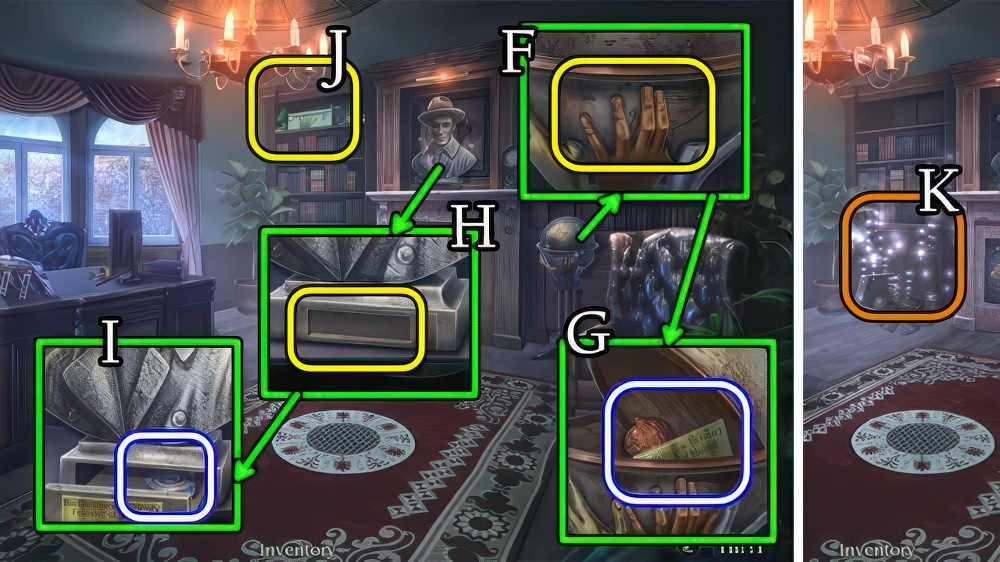
- Use 3/3 METAL THUMBS (F), take LOCK PART, NAMEPLATE (G).
- Use NAMEPLATE (H), take TAPE (I).
- TAPE, SHOEHORN and SCREWDRIVER on BROKEN MOP for LONG HOOK.
- Use LONG HOOK (J), play puzzle (K), receive TIMER.

- Take 1/3 STATUETTE PART, 2/3 STATUETTE PART, HAIRPIN (L).
- Open, take FLAGPOLE, BROKEN STATUETTE (M).
- Use HAIRPIN (N), take STAR, GLUE (O).

- Use STAR (P), take BUS FIGURINE, 3/3 STATUETTE PART (Q).
- 3/3 STATUETTE PART, GLUE on BROKEN STATUETTE for FOUNDER STATUETTE.
- Use FLAGPOLE (1), BUS FIGURINE (2) and FOUNDER STATUETTE (3), take VOICE RECORDER, PHOTO BOX and note (R).
- Use VOICE RECORDER (S).
- Go right.
- Speak to characters, receive SHIELD AMULET.
- Go down.

- Use SHIELD AMULET (T).
- Solution (U).
- Take ALANA’S AWARD, MONOGRAM A.

- Use ALANA’S AWARD (V).
- Take STAPLE REMOVER, MUSIC BOX CRANK (W).
- Go right.
- Use STAPLE REMOVER (X).
- Take 1/3 MOSAIC PART, MONOGRAM G (Y).
- Go down.
- Use MONOGRAM A, MONOGRAM G (Z), take WOODEN LENS, PHOTOGRAPHER (A).
- WOODEN LENS on PHOTO BOX, take photo, ALANA’S MEDALLION and ROLL OF FILM.
- Go right.

- Use ALANA’S MEDALLION (B) for mini-puzzle, receive FIGURINE MODEL, 2/3 MOSAIC PART.
- Use MUSIC BOX CRANK, FIGURINE MODEL and PHOTOGRAPHER (C), take ALANA’S RING, 3/3 MOSAIC PART (D).
- Use, select 3/3 MOSAIC PART (E), take DARKROOM KEY (F).
- Give DARKROOM KEY (G), speak to character, play puzzle (H), receive MISSING PHOTOS, speak to character.
- Go down.

- Use MISSING PHOTOS (I).
- Use SLATE’S DEVICE (J), select 1-3, speak to characters.
- Select character on bench, speak to character, receive LIGHT PANEL.

- Take BUTTON, WHEEL (K).
- Take UNCHARGED PHONE (L), use WHEEL (M), take CHARGING CABLE, VALVE and note (N).
- Use LIGHT PANEL, VALVE (O), select D2x-Ux2-D, take JOYSTICK, CHIMERA’S HEAD (P).
- Use BUTTON, JOYSTICK (Q).

- Solution (R) Avoid 1-15.

- Take TRADING CARD (S).
- Give TRADING CARD (T), speak to character, receive POWERBANK.
- POWERBANK, CHARGING CABLE on UNCHARGED PHONE, select envelope icon, watch video, take PHOTO HINT.
- Use CHIMERA’S HEAD, PHOTO HINT (U), select 1-3, take FOLDING KNIFE (V), 1/2 BRACELETS (W).
- Take 2/2 BRACELETS (X).

- Use 2/2 BRACELETS (Y), take KEYCARD (Z).
- Use KEYCARD (A), play puzzle (B), select (C).

- Take INCOMPLETE MONKEY TOY, DECOR PART (D).
- Take OWL FIGURE, use DECOR PART (E), take CRYPTEX, TURTLE FIGURE (F).
- Use OWL FIGURE, TURTLE FIGURE (G), take WOODEN HAMMER (H), OLD BOOK (I).
- Use WOODEN HAMMER (J), take WINDING KEY (K).

- WINDING KEY on INCOMPLETE MONKEY TOY for MONKEY TOY.
- Take OLD BOOK, use MONKEY TOY (L), use ALANA’S RING (M), select (N), play mini-puzzle, take 1/4 CARD INDEX KEY, STATUE EYE.
- Use STATUE EYE (O), take LION BOOKEND, 2/4 CARD INDEX KEY (P).
- Use 2 OLD BOOK, LION BOOKEND (Q), take CRYPTEX TILES, MECHANIC BUTTON (R).
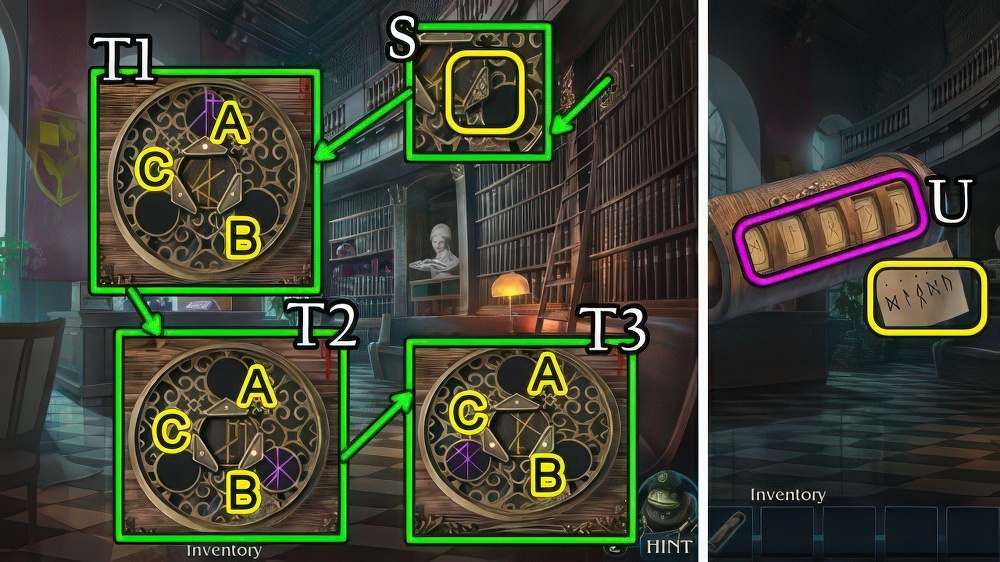
- Use MECHANIC BUTTON (S).
- Solution (T1-T3) A-B-Cx2, A-B-Cx2, B.
- Take KALEIDOSCOPE INSET, CRYPTEX CODE.
- CRYPTEX TILES, CRYPTEX CODE on CRYPTEX, match CRYPTEX CODE (U), take TUNING FORK, 3/4 CARD INDEX KEY.

- Use TUNING FORK (V), take 4/4 CARD INDEX KEY (W).
- Use 4/4 CARD INDEX KEY (X), play puzzle (Y), receive METAL ROSE.

- Take FOOTBALL GLOVES (Z).
- Use FOOTBALL GLOVES (A), take FIRE EMBLEM, BOLT (B).
- Take BROKEN SECATEURS, use FIRE EMBLEM (C), take FIRE EXTINGUISHER, COIN (D).
- Remove (E), take DEFLATED BALL, use FIRE EXTINGUISHER (F).
- Go right.

- Take SECATEURS PART (G).
- Go down.
- SECATEURS PART, BOLT and COIN on BROKEN SECATEURS for SECATEURS.
- Use SECATEURS (H), open (I), play mini-puzzle, take STONE PETAL, MASTER KEY.
- Use MASTER KEY (J), take BROKEN PUMP, BULB (K).
- Go (L).
- Replace BULB, pull chain (M).
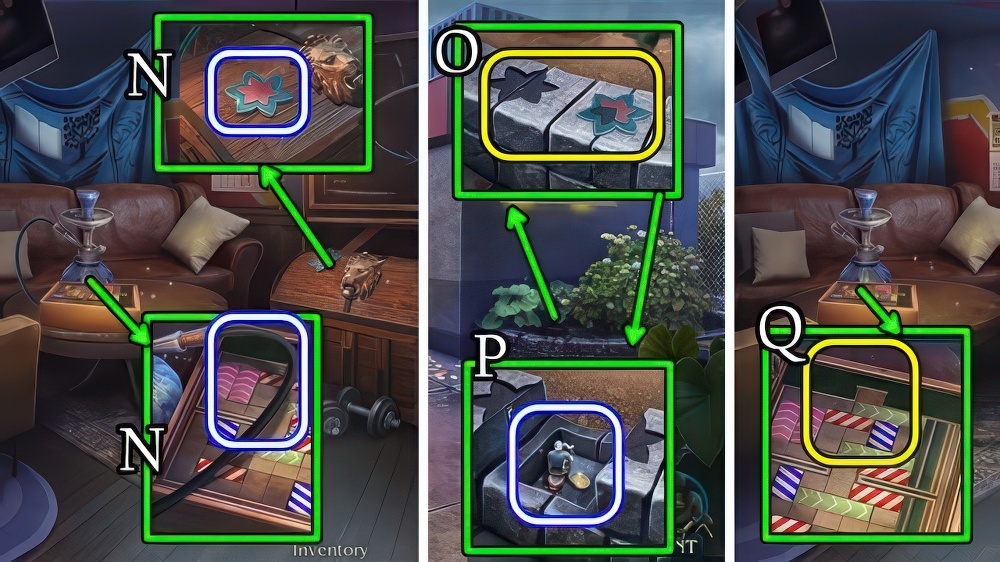
- Take STONE FLOWER, HOSE (N).
- Go down.
- Use STONE PETAL, STONE FLOWER (O), take MOTORCYCLE, CLASP PART (P).
- Go right.
- Use TIMER, MOTORCYCLE (Q).
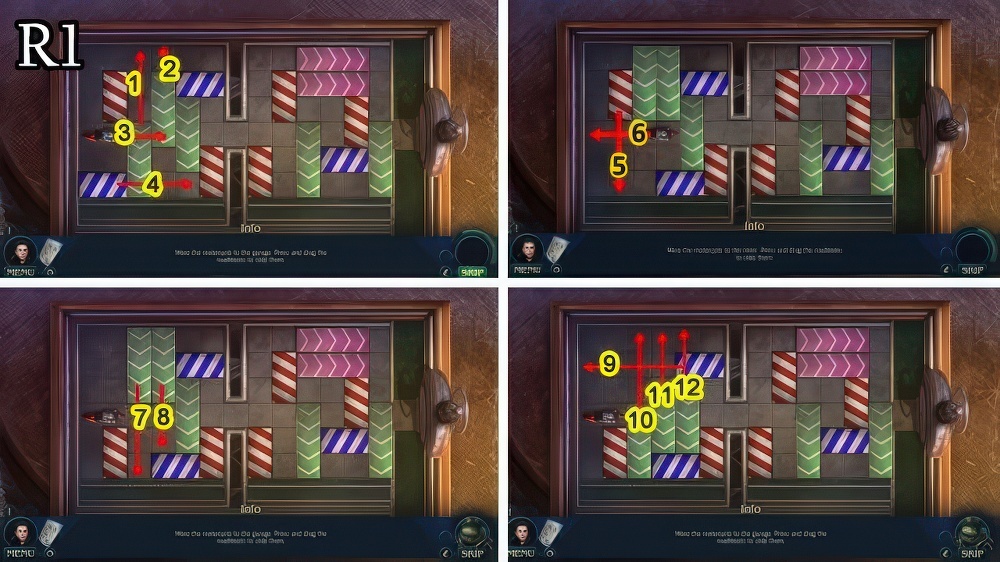
- Solution (R1) 1-12.

- Solution (R2) 13-26.
- Take FOOTBALL HELMET.
- Go down.

- Use FOOTBALL HELMET (S), take PUMP HANDLE (T), TIE (U).
- PUMP HANDLE, HOSE and DEFLATED BALL on BROKEN PUMP for FOOTBALL.
- Use FOOTBALL (V), receive WAIST BAG.
- Go (W).
- LOCK PART, CLASP PART on WAIST BAG for note, CHEST RING.
- Use CHEST RING (X), play puzzle (Y), take UNUSUAL COMPASS, speak to character.

- Take BROKEN JACK, METAL DEBRIS (Z).
- Take TIGER’S FANG, use METAL DEBRIS (A), take ANTI-RUST, FEATHER (B).
- Use FEATHER, TIGER’S FANG (C), take WINDOW HANDLE, JACK ARM (D).
- Use WINDOW HANDLE (E), take SELFIE STICK, 1/3 PUZZLE PART and NUT (F).
- JACK ARM, NUT and ANTI-RUST on BROKEN JACK for JACK.
- Use JACK (G).
- Go left.

- Take REYES’S MEDALLION, 2/3 PUZZLE PART (H).
- Use FOLDING KNIFE (I), take THREAD, 3/3 PUZZLE PART (J).
- Go down.
- Use 3/3 PUZZLE PART (K).
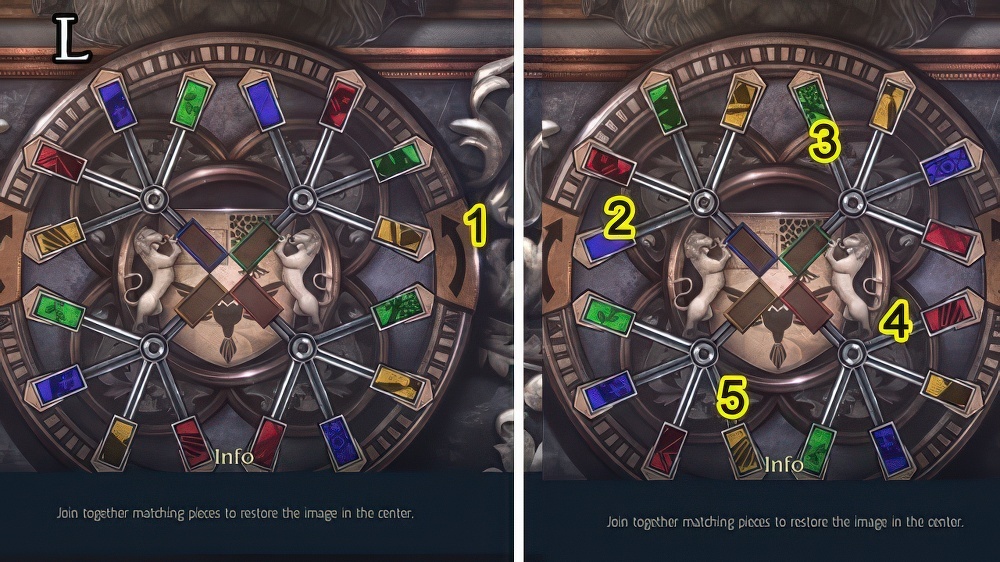
- Solution (L) 1-5.
- Take TRISH’S MEDALLION, 1/4 NEWSPAPER CLIPPING.
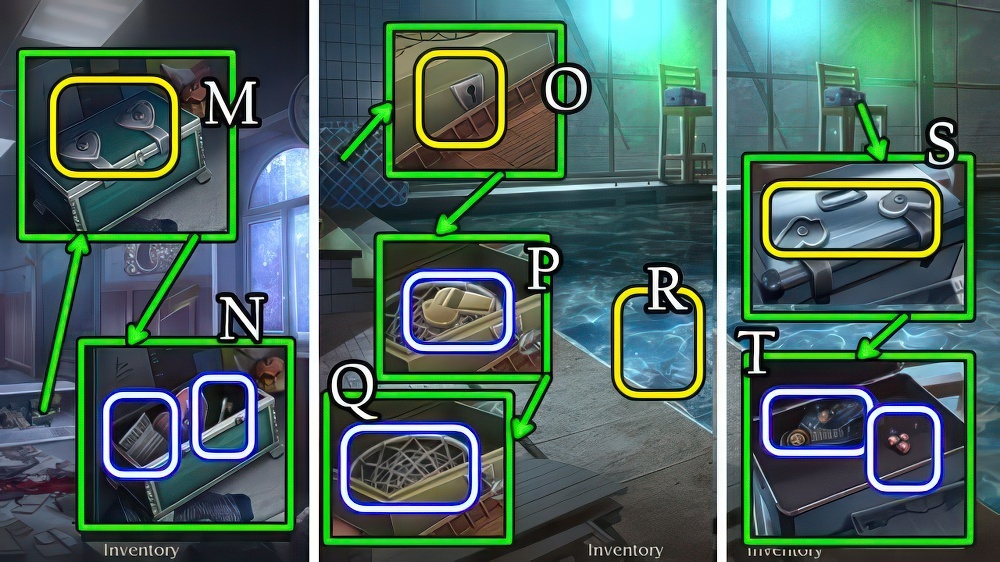
- Use REYES’S MEDALLION, TRISH’S MEDALLION (M), take note, 2/4 NEWSPAPER CLIPPING and LITTLE KEY (N).
- Go left.
- Use LITTLE KEY (O), take GOLDEN WHISTLE (P), NET (Q).
- NET, THREAD on SELFIE STICK for HOMEMADE NET.
- Use HOMEMADE NET (R), play mini-puzzle, take TAPE, SILVER WHISTLE.
- Use GOLDEN WHISTLE, SILVER WHISTLE (S), take CAPTAIN FIGURE, NUTS (T).
- Go down.
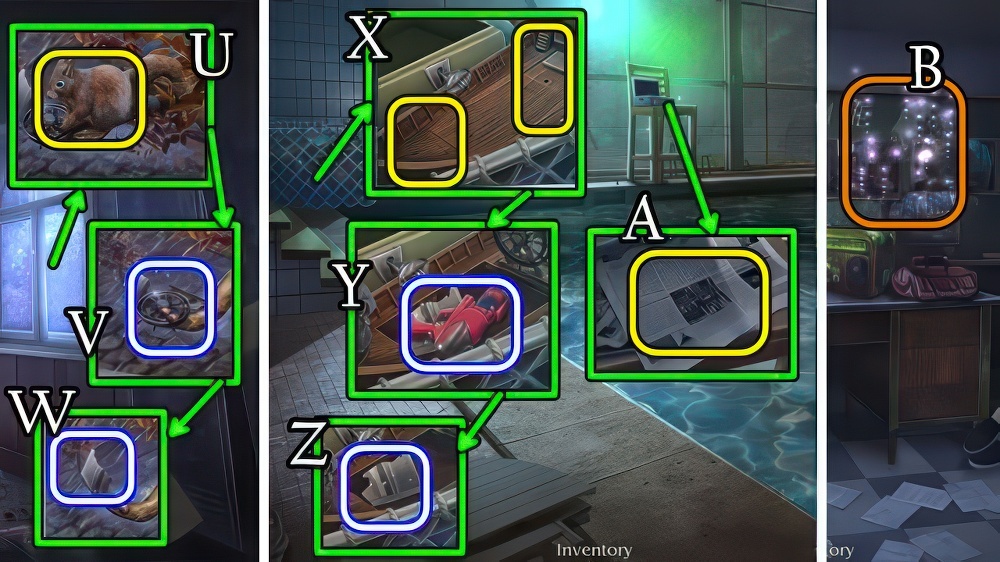
- Use NUTS (U), take STEERING WHEEL (V), 3/4 NEWSPAPER CLIPPING (W).
- Go left.
- Use STEERING WHEEL, CAPTAIN FIGURE (X), take SQUIRT GUN (Y), 4/4 NEWSPAPER CLIPPING (Z).
- Use 4/4 NEWSPAPER CLIPPING, TAPE (A), take newspaper.
- Go down.
- Select scene, speak to characters, play puzzle (B).

- Speak to characters.
- Take COSMETIC BAG, CODE PART, AMULET EYE, AMULET LIPS (C).
- AMULET LIPS, AMULET EYE on COSMETIC BAG take LIPSTICK, COSMETIC MIRROR.
- Use COSMETIC MIRROR (D).
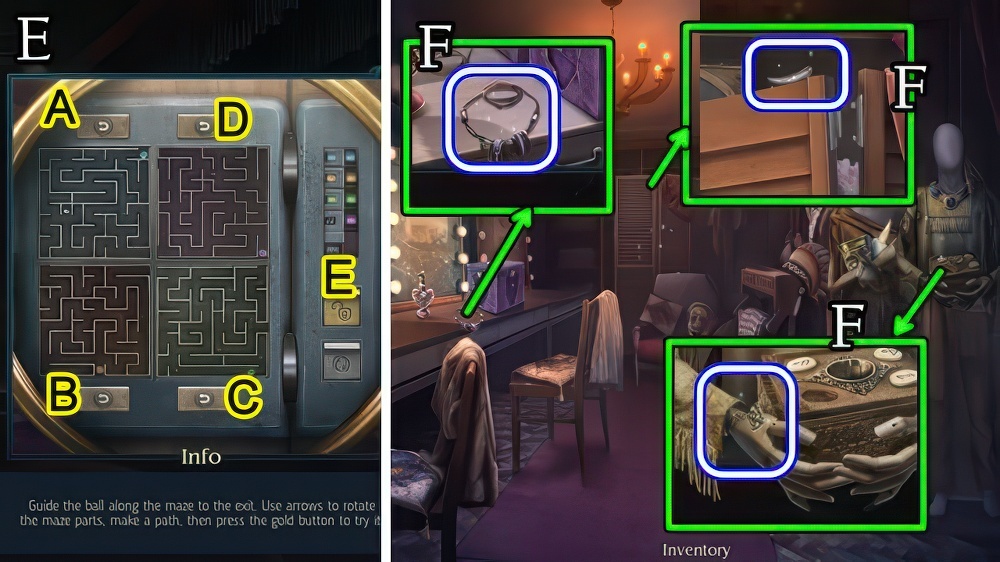
- Solution (E) Ax2-B-Cx2-D-E.
- Go forward.
- Take OLD NECKLACE, OLD KEY, 1/3 FANGS (F).
- Go down.

- Use OLD KEY (G), take SPRAY, 2/3 FANGS (H).
- Go (I).
- Use SPRAY, CODE PART and LIPSTICK (J), receive SUITCASE CODE.
- Go down.
- Use SUITCASE CODE, select 1-6-7-2 (K), play mini-puzzle, take START BUTTON, 3/3 FANGS.
- Go forward.

- 3/3 FANGS on OLD NECKLACE for TRIBAL NECKLACE.
- Use TRIBAL NECKLACE (L), take CANDLE INSET, HAPPY MASK (M).
- Go down.
- Use START BUTTON, CANDLE INSET, METAL ROSE and KALEIDOSCOPE INSET (N), select (O).
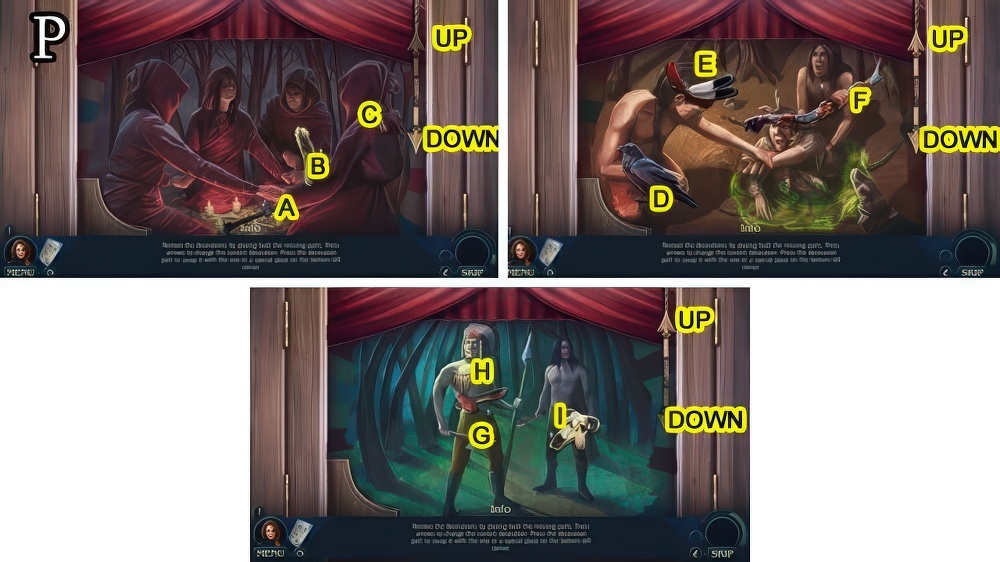
- Solution (P) A-DOWNx2-I-UPx2-A-DOWN-F-D-UP-C-DOWNx2-G-UPx2-B-DOWNx2-H-UP-F.
- Take SAD MASK, 1/3 PLAYING CARD.
- Go forward.

- Use HAPPY MASK, SAD MASK (Q), take 2/3 PLAYING CARD, METAL PIN (R).
- Use METAL PIN (S), take 3/3 PLAYING CARD, GEAR (T).
- Go down.
- Use 3/3 PLAYING CARD (U), take SIX-POINTED STAR (V), METAL PROPELLER (W).

- Use SIX-POINTED STAR (X), play puzzle (Y), take STRANGE MEDALLION.
- GEAR, METAL PROPELLER on STRANGE MEDALLION, take DEVICE BLUEPRINT, STRANGE CRYSTAL.
- Give DEVICE BLUEPRINT (Z), speak to character, receive OLD RUNE.
- Go forward.
- Use OLD RUNE, STRANGE CRYSTAL (A), use DEVICE BLUEPRINT, take DEVICE PART (B).

- Use DEVICE BLUEPRINT, take STRANGE FLASK (C).
- Go down.
- Play puzzle (D), select (E).

- Take HACKSAW BLADE, BROKEN HACKSAW, LITTLE SKULL (G).
- Take GRIP, use LITTLE SKULL (H), take SAW NUT (I), LACE (J).
- HACKSAW BLADE, SAW NUT on BROKEN HACKSAW for HACKSAW.
- Use HACKSAW (K).
- Go forward.
- Take 1/2 COINS, use SQUIRT GUN (L), receive MACHINE OIL.
- Take GRINDSTONE, CHISEL, BULB (M).
- Go down.
- Use CHISEL (N), take CURTAIN GEAR (O), 2/2 COINS (P).
- Use BULB (Q), 2/2 COINS (R).
- Solutions vary.
- Take DEAD BATTERY, AXE BLADE.
- Select (S), speak to characters, receive NECKTIE, OLD PHOTO.
- Go forward.
- LACE, AXE BLADE and GRINDSTONE on GRIP for AXE.
- Use AXE (T), take BRUSH, LEVER MECHANISM (U).
- Use BRUSH (V), select (W), play mini-puzzle, take 1/4 FEATHER TOTEM, CURTAIN GEAR.
- Go down.
- Use 2 CURTAIN GEAR, LEVER MECHANISM and MACHINE OIL (X), select (Y).
- Enter Secret Chamber.

- Take 2/4 FEATHER TOTEM, STARFISH, SHELL (Z).
- Return to Backyard.
- Use STARFISH, SHELL (A), take HOOK (B), 3/4 FEATHER TOTEM (C).
- Go down.

- HOOK on NECKTIE for IMPROVISED HOOK.
- Use IMPROVISED HOOK (D).
- Take 4/4 FEATHER TOTEM, INFINITY SYMBOL (E).
- Go (F).
- Use 4/4 FEATHER TOTEM, OLD PHOTO (G).

- Solution (H) (A-B)-(C-D)-(E-F)-(G-H)-(I-J)-(K-L).
- Take 1/3 WINDOW PART, LITTLE PANICLE.

- Use LITTLE PANICLE (I), take note, TIARA (J).
- Return to Backyard.
- Use TIARA (K), take CELTIC SYMBOL, 2/3 WINDOW PART (L).
- Use INFINITY SYMBOL, CELTIC SYMBOL (M).
- Take HOODED FIGURE, 3/3 WINDOW PART (N).
- Return to Secret Chamber.
- Use 3/3 WINDOW PART (O).
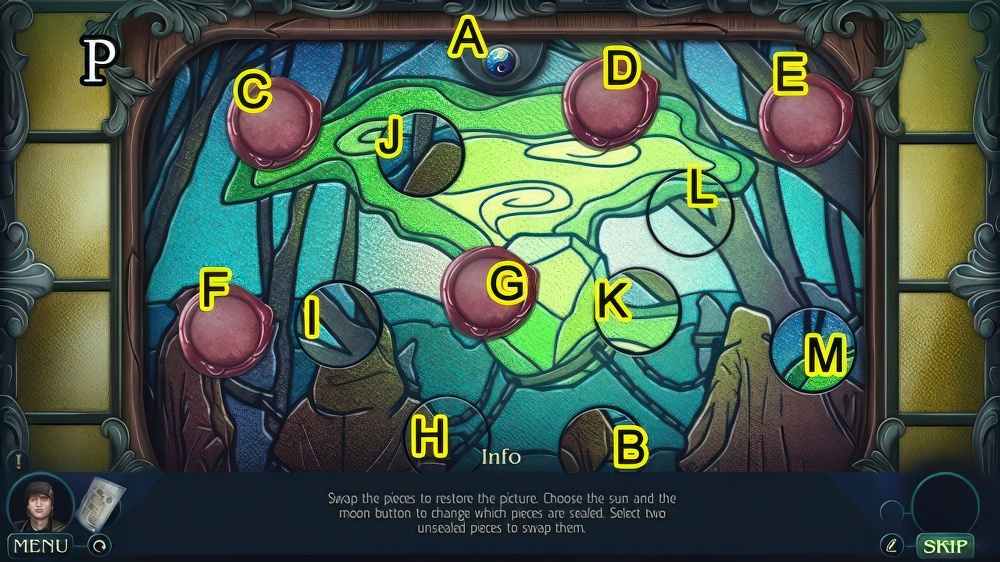
- Solution (P) A-(B-F)-(G-B)-A-(B-J)-(K-B)-A-(B-D)-A-(B-K)-(M-B)-A-(B-C).
- (B-G)-(E-B)-A-(B-M)-(B-I)-A-(B-E).
- Take HOODED FIGURE, OLD DIARY.

- Use 2 HOODED FIGURE (Q), DEAD BATTERY (R), take SIGNET RING (S).
- SIGNET RING on OLD DIARY, play mini-puzzle, take OLD BARRETTE, WIRE.
- Use OLD BARRETTE (T).
- Take UNUSUAL KEY, TRANSISTOR (U).
- Return to Backyard.
- Use UNUSUAL KEY (V).
- Take DEVICE DETAIL (W).
- Return to Secret Chamber.

- Use WIRE, TRANSISTOR and DEVICE DETAIL (X).
- Take CHARGED BATTERY (Y).
- Go down.
- Use CHARGED BATTERY (Z), speak to characters, play puzzle (A).
- Walkthrough Bonus Chapter, at the link below.


