
Mystery Trackers 20: Reflections of the Past – A detective returns to work years after retirement to investigate a series of tragic events. After receiving an urgent message from the Commander, you travel to Quiet Hollow, where you find the Mystery Trackers headquarters in ruins and all the agents dead. You are tasked with finding out who is behind this disaster and stopping the criminals who threaten the safety of the world. You will have to find out what happened in the Order’s castle and reconstruct the chain of events that led to the destruction of the central headquarters. During the investigation, you encounter mysterious individuals, one of whom is a time traveler known as the Phantom. He claims to have information that can shed light on what is happening and insists on meeting with you. Fix the equipment, recover the data, and step by step uncover the truth. If you can not pass any of the puzzles or do not know where the items are, on our site you can watch the walkthrough of Mystery Trackers 20: Reflections of the Past, and return the Order of Secret Trackers its former glory.
Mystery Trackers 20: Reflections of the Past – Walkthrough
Here you can see the full walkthrough of Mystery Trackers 20: Reflections of the Past game, namely for all chapters, including bonus chapter, in pictures.

- Take ELF (A).
- Take UPPER REEL and MEMORY CHEST (B).
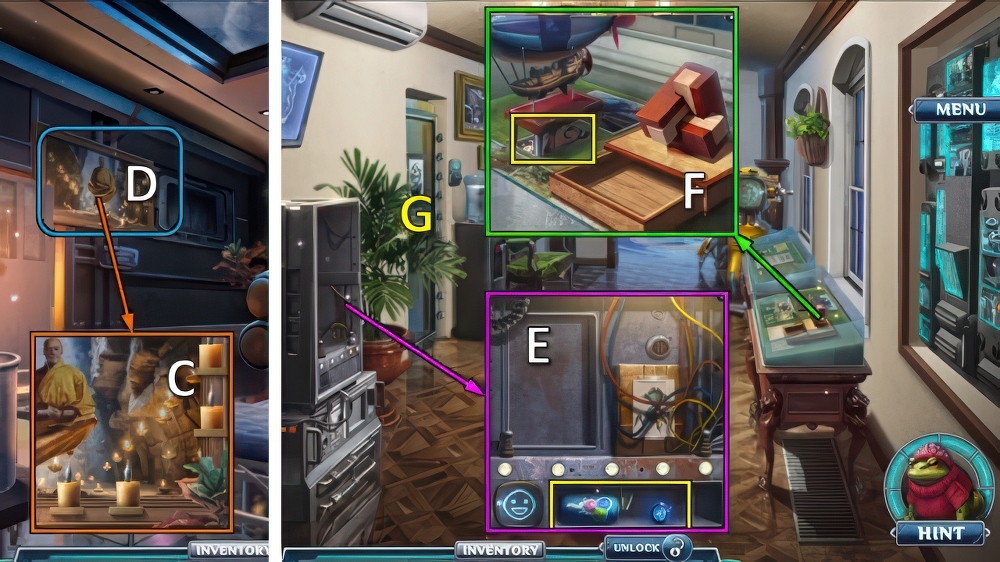
- Send ELF (C).
- Take ELF EMBLEM and LOWER REEL (D).
- LETTER T from MEMORY CHEST, place ELF EMBLEM.
- Take FILM and SUITS 1/4.

- Take SUITS 2/4 (E).
- Place UPPER REEL, LOWER REEL and FILM (F).
- Play puzzle (G), receive LETTER M.
- Place LETTER M and LETTER T, move letters (H).
- Go (I).

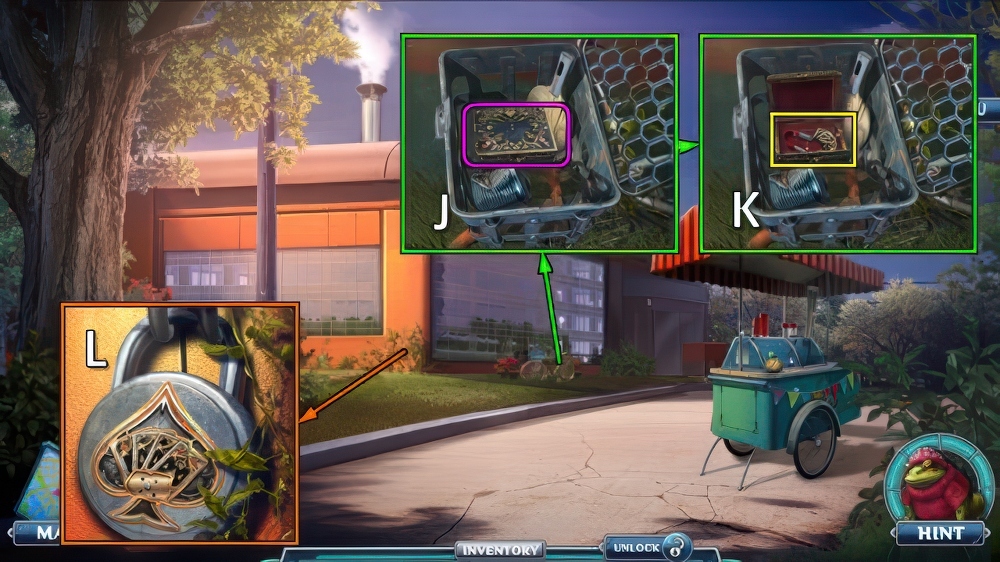
- Take BASIN (J).
- Take QUEEN AND CYANIDE PHOTO (K).
- Place BASIN, take SUITS 3/4, PHANTOM PHOTO and GLUE (L).

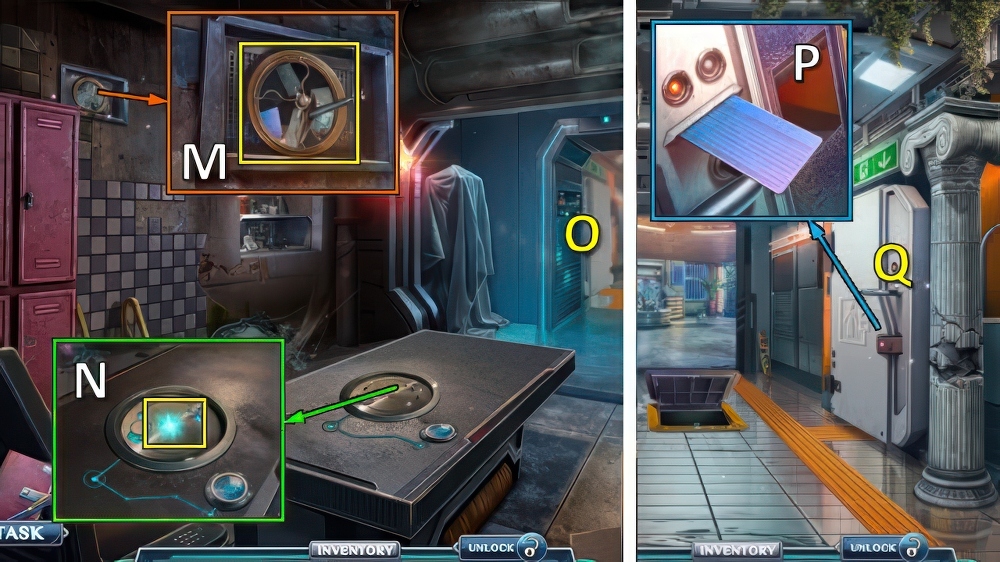
- Take GEM FRAGMENT, place QUEEN AND CYANIDE PHOTO and PHANTOM PHOTO (M).
- Solution (N): (3-5)-O-(3-2)-(1-4)-(1-3)-O-(3-6).
- Take CYANIDE’S GAS MASK and AUTO FEEDER BUTTON (P).
- Walk down.

- Place AUTO FEEDER BUTTON, take GEM SHARD and SUITS 4/4 (Q).
- GEM SHARD and GLUE on GEM FRAGMENT, take MT GEM.
- Place MT GEM (R), take PHANTOM’S HANDKERCHIEF (S).
- Go (T).

- Place SUITS (U).
- Take QUEEN OF HEARTS and ROPE (V).
- Turn on monitor.
- Place CYANIDE’S GAS MASK, PHANTOM’S HANDKERCHIEF and QUEEN OF HEARTS, enter 2-7-4 (W).

- Solution (X-Y).
- Watch video, take FLOOR PLAN and RUBBER BONE (Z).
- Walk down.

- Place ROPE and RUBBER BONE, take GLASS CUTTER and BAG (A).
- Place BAG for mini-puzzle, take WORK PHONE (B).

- Take METAL RUNGS (C).
- Take KEY FOB (D).
- Take AFRICA TOKEN, use KEY FOB (E).
- Take BLOWTORCH and HAND FAN (F).

- Use HAND FAN, receive BLOWTORCH.
- Take METAL BEAMS (G).
- METAL BEAMS and BLOW TORCH on METAL RUNGS, take STEEL LADDER.
- Place STEEL LADDER (H).
- Send ELF (I), take SUCTION CUP and LOCKPICK (J).

- Use LOCKPICK (K), take USB SPLITTER and MAP MODELS (L).
- Use GLASS CUTTER and SUCTION CUP, take LEVER and EURASIA (M).
- Place AFRICA TOKEN, EURASIA and MAP MODELS (N).
- Play puzzle (O).
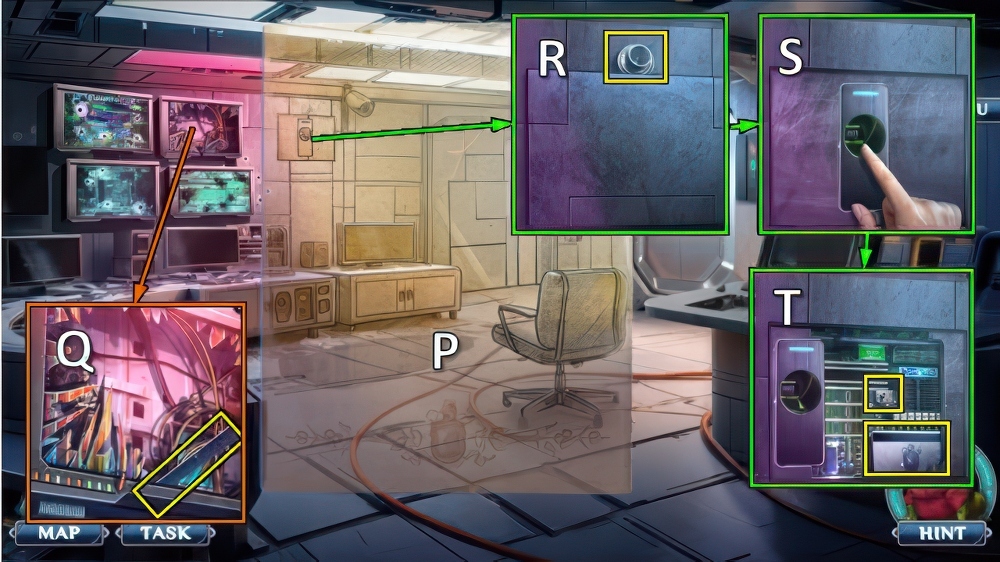
- Place and align FLOOR PLAN (P).
- Take RULER (Q).
- Take SAFE DIAL, use RULER (R).
- Touch (S).
- Take SECURITY BADGE and USB WITH FOOTAGE (T).

- Take USB WITH APP (U).
- USB SPLITTER, USB WITH FOOTAGE and USB WITH APP on WORK PHONE for mini-puzzle, take FUSE.
- Replace FUSE and LEVER, take BACKUP BATTERY (V).
- Use SECURITY BADGE (W).
- Go (X).
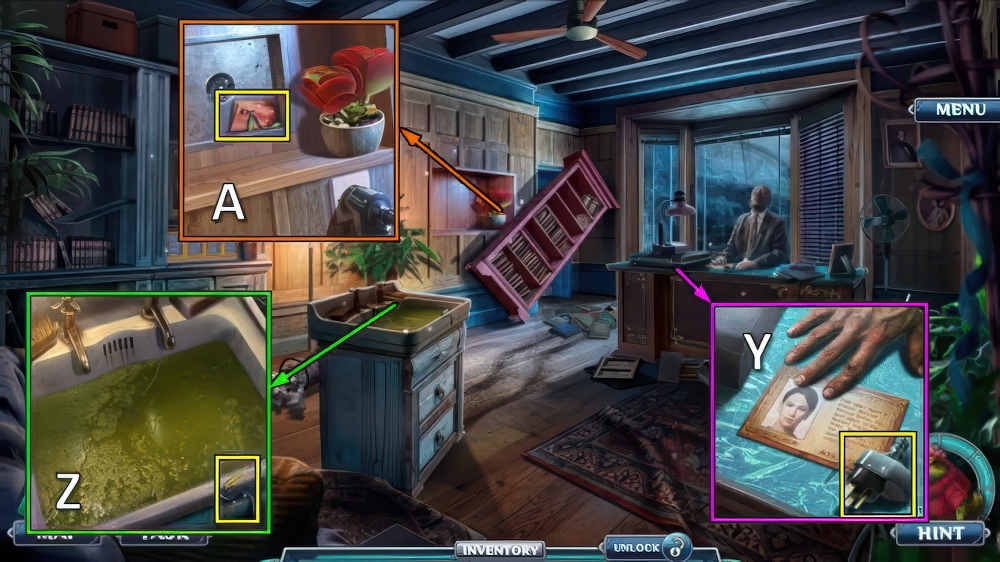
- Take FALSE PLUG (Y).
- Take CABLES 1/3 (Z).
- Use FALSE PLUG, take CABLES 2/3 and THICK FABRIC (A).
- Walk down.

- Use THICK FABRIC, take COMMANDER FIGURINE and CABLES 3/3 (B).
- Place BACKUP BATTERY and CABLES, take INSTANT CAMERA (C).
- Go (D).

- Use INSTANT CAMERA, take SAFE CLUE (E).
- Place SAFE DIAL and SAFE CLUE (F).
- Solution (G): (1-5-13-17-1)-(3-11-19-15-7-3)-(4-8-20-12-4)-(10-14-10).
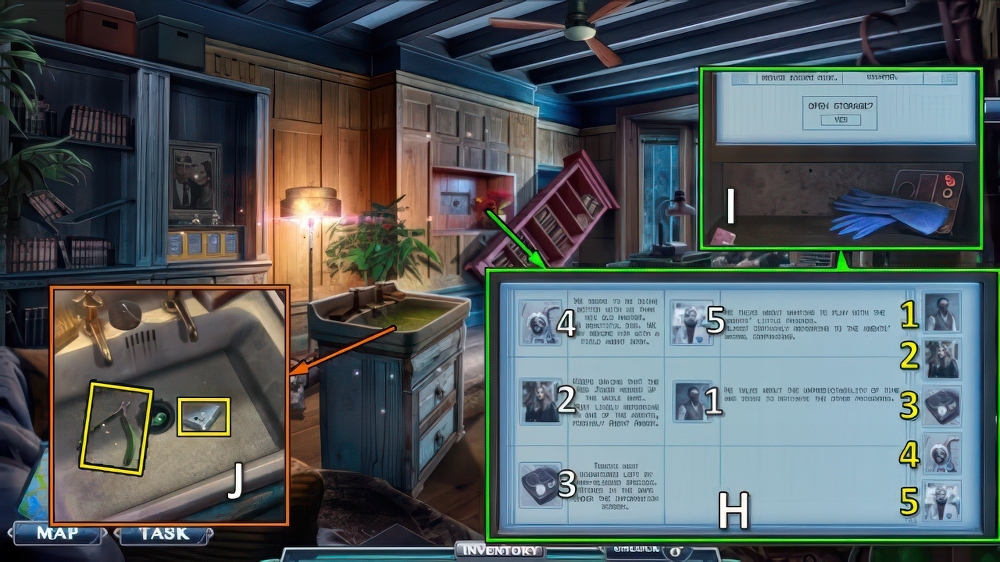
- Solution (H).
- Take INCOMPLETE DEVICE and RUBBER GLOVES (I).
- Use RUBBER GLOVES, take ENTER KEY and CUTTERS (J).
- Walk down.
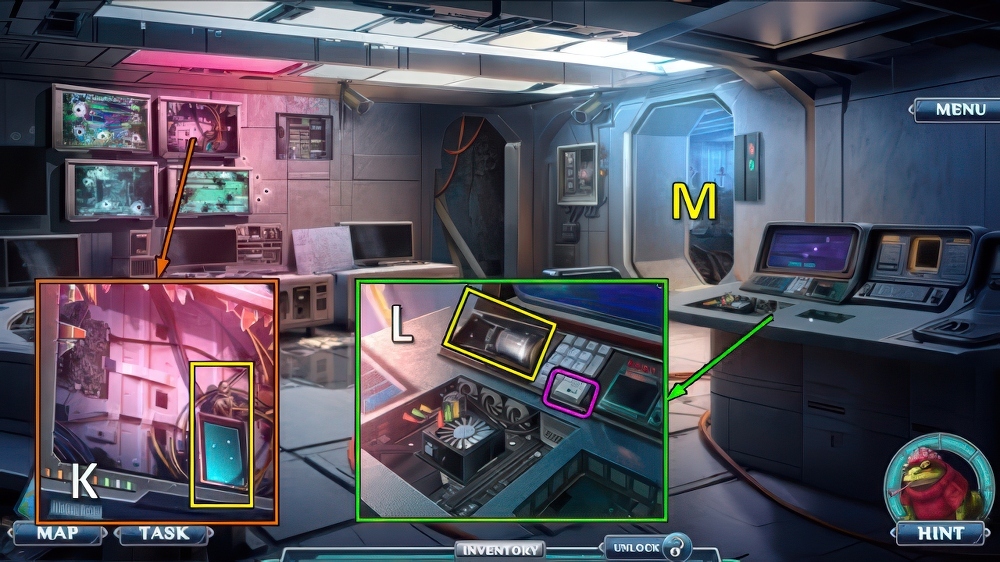
- Use CUTTERS, take THERMAL DISPLAY and AMBER FIGURINE (K).
- Place ENTER KEY, take EMPTY JAR and ANTENNA (L).
- Go (M).
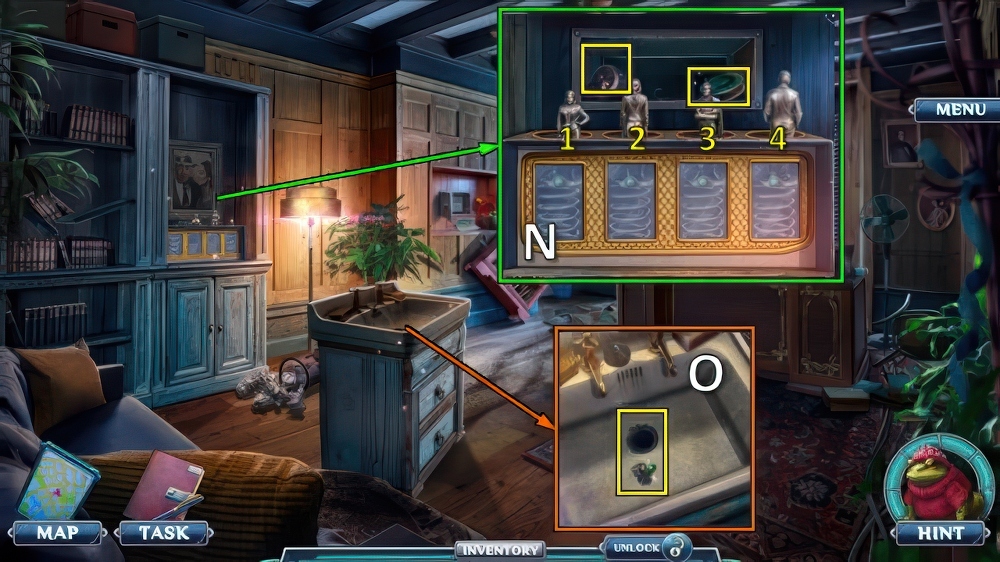
- Place COMMANDER FIGURINE and AMBER FIGURINE.
- Solution: (1-2)-(1-3)-(3-4).
- Take LENS and FISHHOOK (N).
- Use FISHHOOK, take DICE SYMBOL and LED BULB (O).
- Walk down.
- THERMAL DISPLAY, ANTENNA, LENS and LED BULB on INCOMPLETE DEVICE, take THERMAL TRACKER.
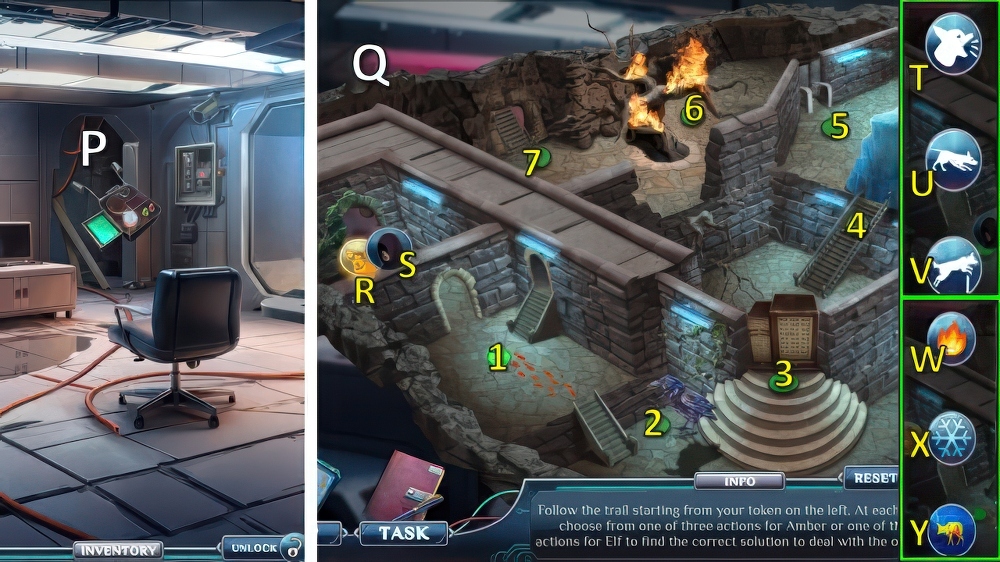
- Use THERMAL TRACKER (P).
- Solution (Q): (S-1-Y)-(R-2-T)-(R-3-V)-(S-4-W)-(R-5-U)-(S-6-X)-7.
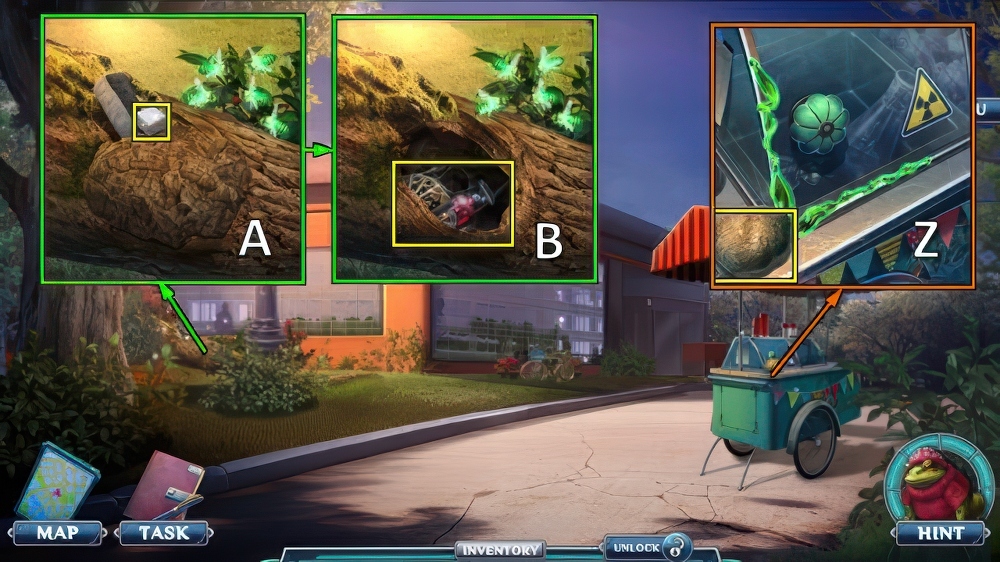
- Take HEAVY STONE.
- (Z)
- Take SUGAR CUBE, use HEAVY STONE (A).
- Take SPADE CREST 1/2 and RUST CLEANER (B).
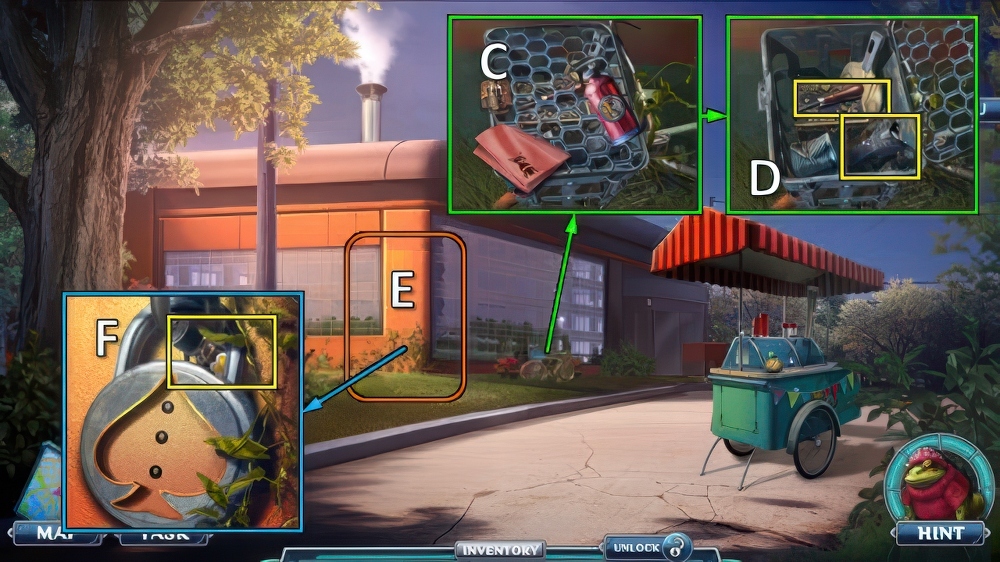
- Use RUST CLEANER and THICK FABRIC (C), take AWL and STUN GUN (D).
- Send ELF (E).
- Move vines, take PROPOLIS OIL (F).

- SUGAR CUBE, PROPOLIS OIL and AWL on EMPTY JAR, take BAIT FOR BEES.
- Use BAIT FOR BEES, take MUTATED BEES (G).
- Use MUTATED BEES (H), take LAB FLASK and EMERALD BEE (I).
- Place EMERALD BEE (J), take SPADE CREST 2/2 and MAGNET (K).
- Place SPADE CREST and DICE SYMBOL for puzzle (L).
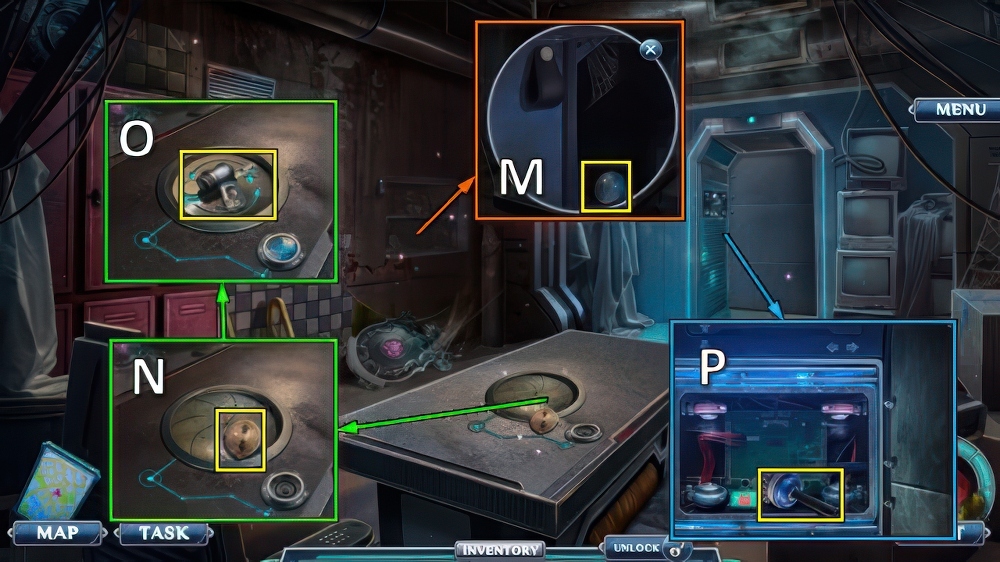
- Take START BUTTON (M).
- Take MAGNETIC MUFFLER 1/2, place START BUTTON (N).
- Take TOKEN and LAMP SOCKET (O).
- Take IRON BRUSH (P).
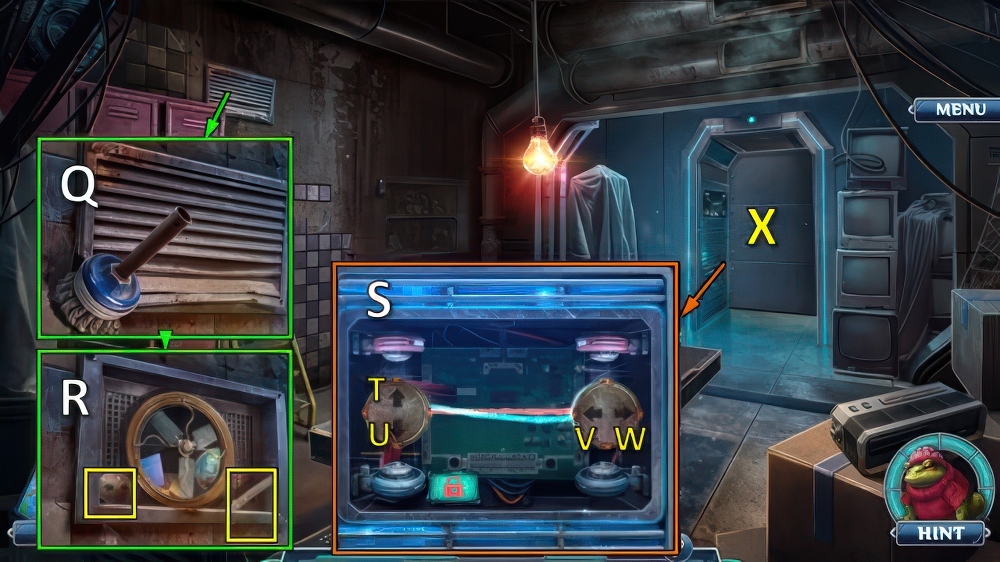
- Use IRON BRUSH, use TOKEN (Q).
- Take COLD WELDING and MAGNETIC MUFFLER 2/2 (R).
- Place MAGNETIC MUFFLER (S).
- Solution: Vx4-T.
- Go (X).
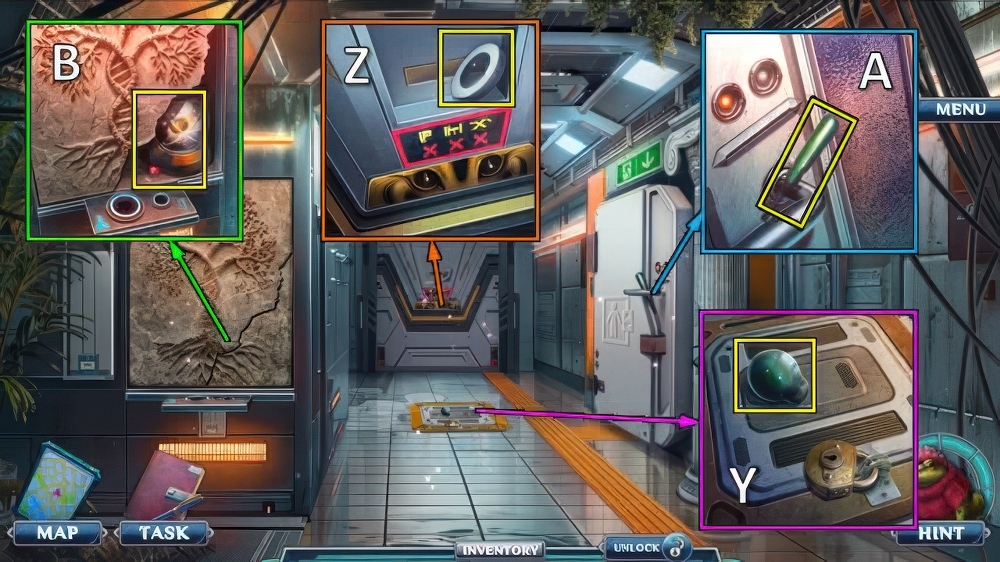
- Take LAMP DOME (Y).
- Take ADHESIVE TAPE (Z).
- Take CHISEL (A).
- Use CHISEL, take RUBY EYE and SOLAR PLASMA (B).
- Walk down.
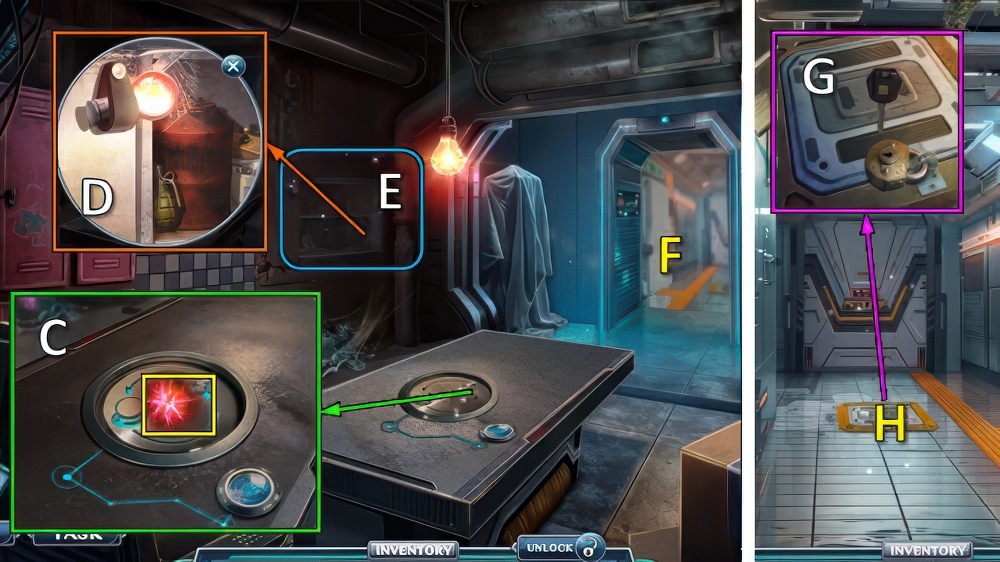
- Place SOLAR PLASMA, take LIGHT CHARGE (C).
- LAMP DOME, COLD WELDING and LIGHT CHARGE on LAMP SOCKET, take EVERLASTING LIGHT BULB.
- Place EVERLASTING LIGHTBULB (D).
- Play puzzle (E), receive SPARE KEY.
- Go (F).
- Use SPARE KEY (G).
- Go (H).

- Take LOST HANDLE (I).
- Take CYANIDE’S TABLET (J).
- Use LOST HANDLE (K), take CODE FIGURE and DIAMOND (L).
- Walk down.

- Use DIAMOND, take LAB TEST TUBE and EMERALD EYE (M).
- Place EMERALD EYE and RUBY EYE (N), take BATTERY and FINE POWDER (O).
- Go (P).

- Use FINE POWDER and ADHESIVE TAPE for mini-puzzle, take FINGERPRINT (Q).
- FINGERPRINT and CODE FIGURE on CYANIDE’S TABLET for puzzle, receive CYANIDE’S RING.
- Use CYANIDE’S RING (R), take LAB FLASK, DISCHARGED STUN GUN and MAGNET (S).
- Walk down.

- Place LAB FLASK and LAB TEST TUBE (T), take VENUS and STUN GUN LID (U).
- BATTERY and STUN GUN LID on DISCHARGED STUN GUN, take STUN GUN.
- Use STUN GUN (V).
- Go (W).

- Take TWEEZERS (X).
- Take DISASSEMBLED GUN (Y).
- Use TWEEZERS, take LED STRIP 1/3 and FISHING LINE (Z).
- Take LED STRIP 2/3 (A).
- Go to Storage Room.
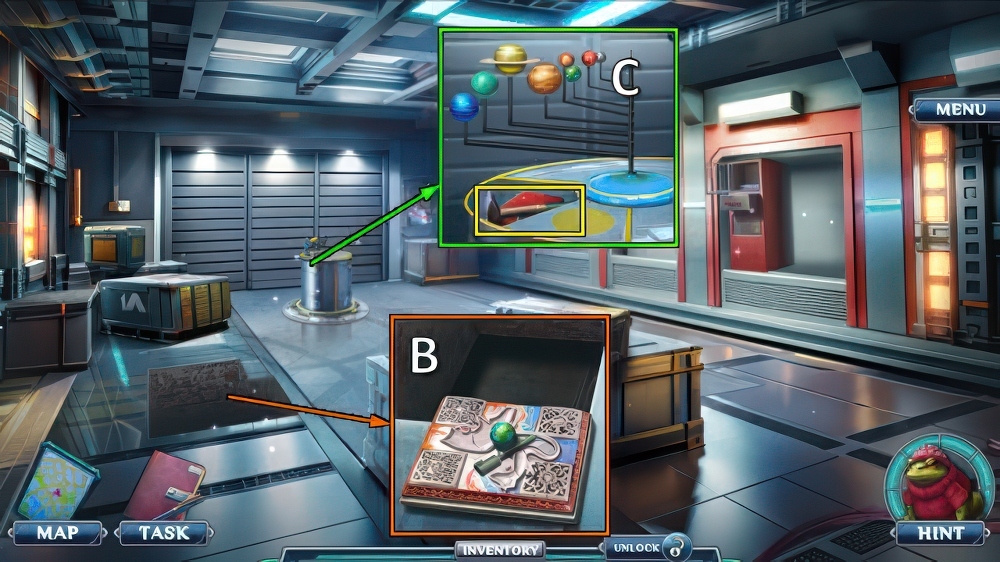
- FISHING LINE on MAGNET, take MAGNET ON FISHING LINE.
- Use MAGNET ON FISHING LINE, take LED STRIP 3/3 and EARTH (B).
- Place VENUS and EARTH, take HAMMER and ANIMAL DATA (C).
- Go to Menagerie.
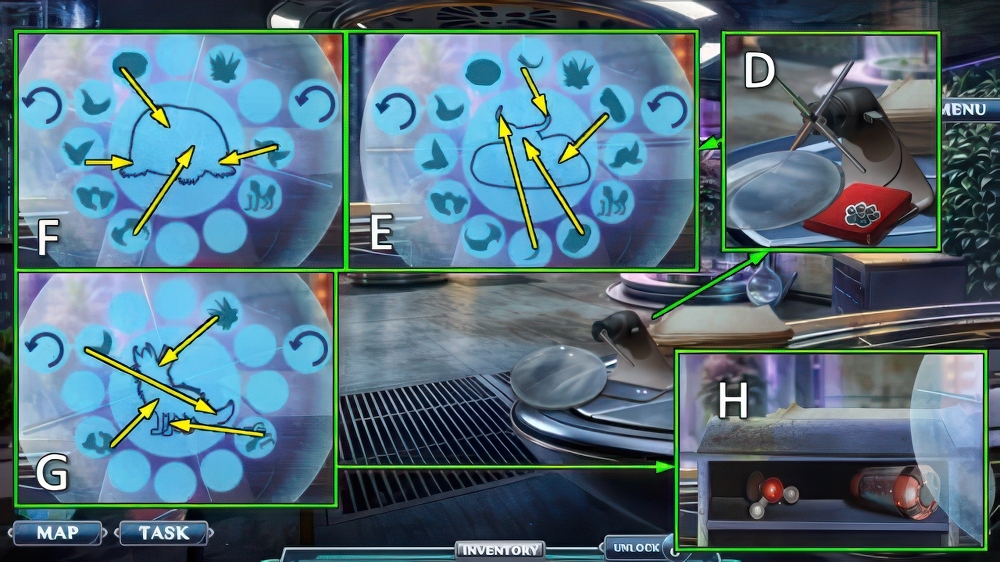
- Place LED STRIP and ANIMAL DATA (D).
- Solution (E-F-G), orientation is random.
- Take HYDRAULIC LIQUID and WATER MOLECULE (H).
- Go to Storage Room.

- Place WATER MOLECULE, take SMALL KEY and EMPTY BODY (I).
- Use SMALL KEY, take SCISSORS and LIGHTER (J).
- Go to Menagerie.
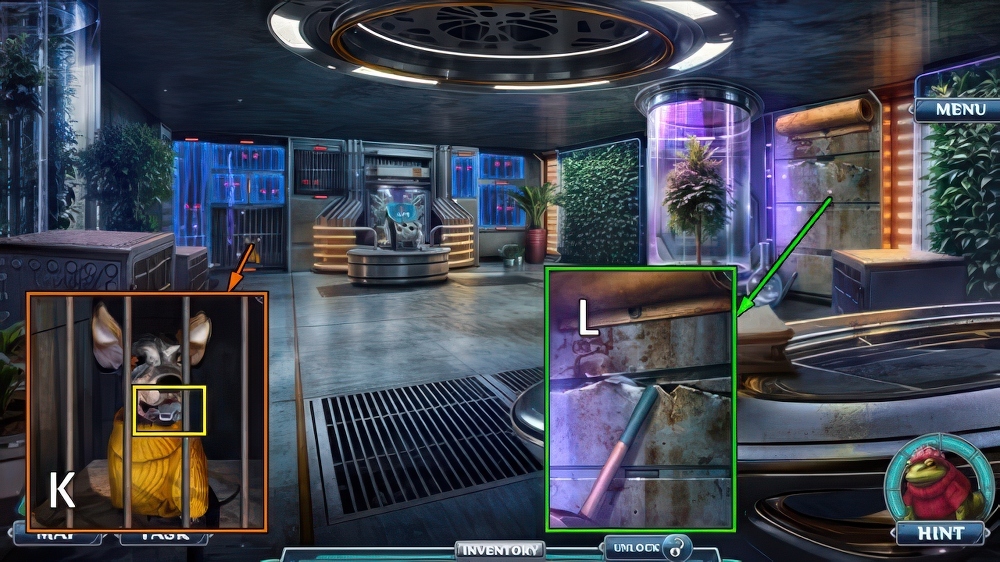
- Use SCISSORS, take NAILS and GUN HAMMER (K).
- Use NAILS and HAMMER for mini-puzzle (L), receive SWORD HANDLE.
- Walk down twice.
- Use SWORD HANDLE, take TIME PLASMA, LAB ASSISTANT’S PUNCH CARD and SALTPETER (M).
- Place TIME PLASMA, take FREEZING CHARGE (N).
- Go (O).
- Use LAB ASSISTANT’S PUNCH CARD (P).
- Go (Q).

- FREEZING CHARGE and GUN HAMMER on DISASSEMBLED GUN, take FREEZING GUN.
- Use FREEZING GUN, play puzzle (R).
- Receive MASTER KEY.
- Take SHOVEL (S).
- Take ICE LIZARD, use SHOVEL (T).
- Take STOPPER WITH WICK and DIELECTRIC LIQUID (U).
- Take TRIPOD (V).
- Walk down.
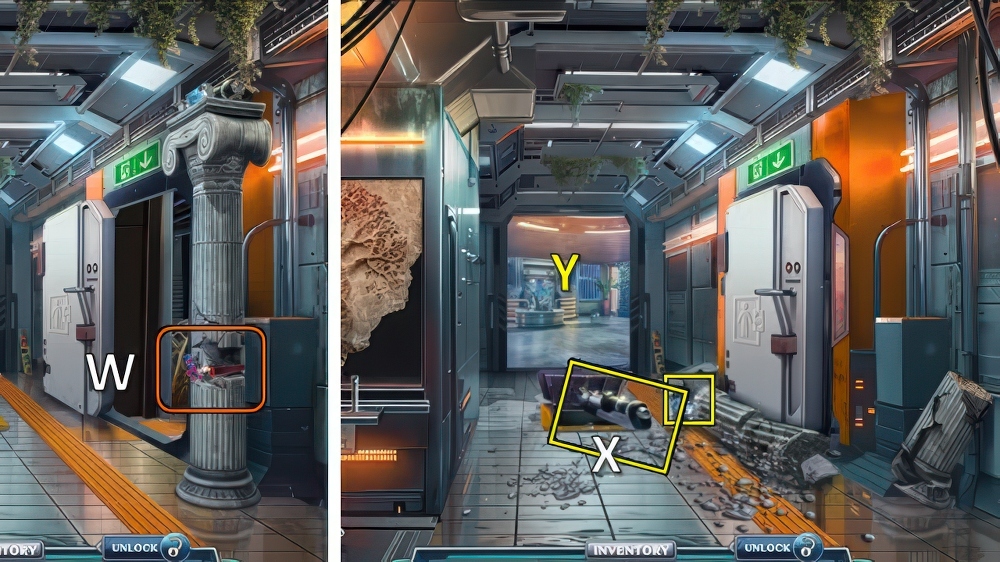
- SALTPETER and STOPPER WITH WICK on EMPTY BODY, take IMPROVISED BOMB.
- Use IMPROVISED BOMB and LIGHTER (W).
- Take COOLING LIQUID and GUN BARREL (X).
- Go (Y).
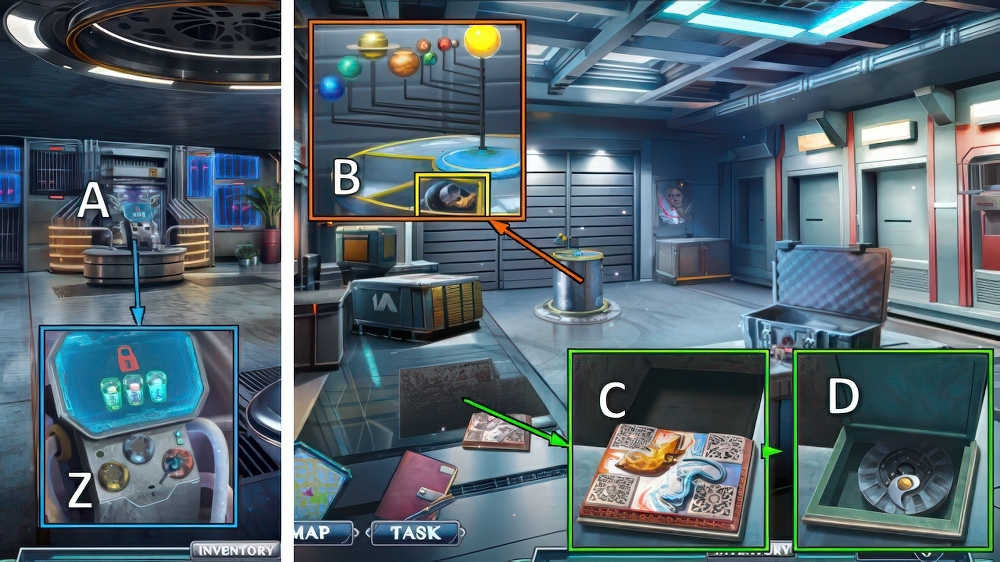
- Place COOLING LIQUID, DIELECTRIC LIQUID, HYDRAULIC LIQUID and MASTER KEY (Z).
- Play puzzle (A), receive ELF and SUN.
- Go to Storage Room.
- Place SUN, take FIERY FOX and GUN BUTT (B).
- Place ICE LIZARD and FIERY FOX (C), take YANG and GUN LOADING CASE (D).
- Walk down.
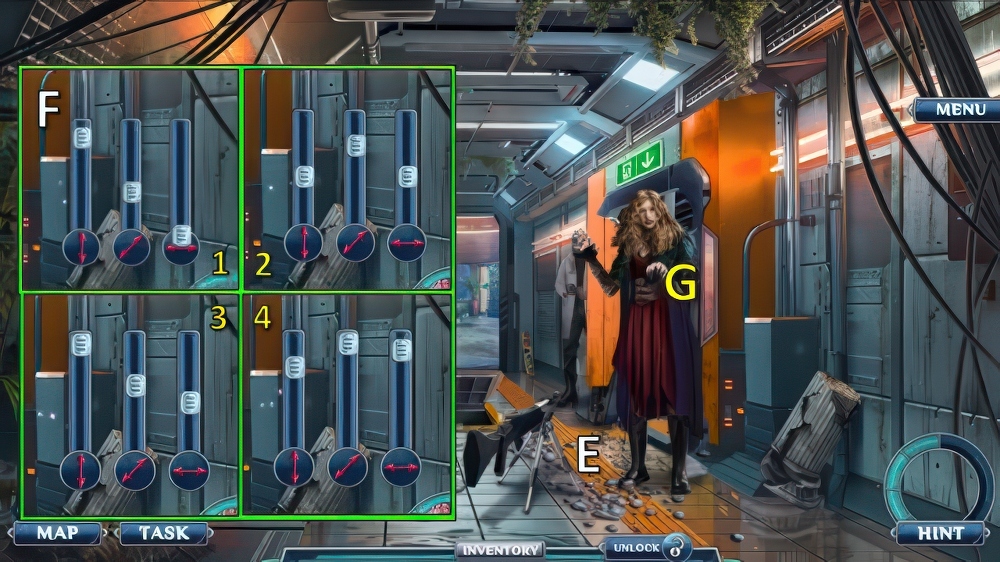
- GUN LOADING CASE, GUN BARREL and GUN BUTT on TRIPOD, take PARALYZING GUN.
- Place PARALYZING GUN (E).
- Send ELF (E).
- Solution (F).
- Receive CANDLE and YIN
- Go (G).
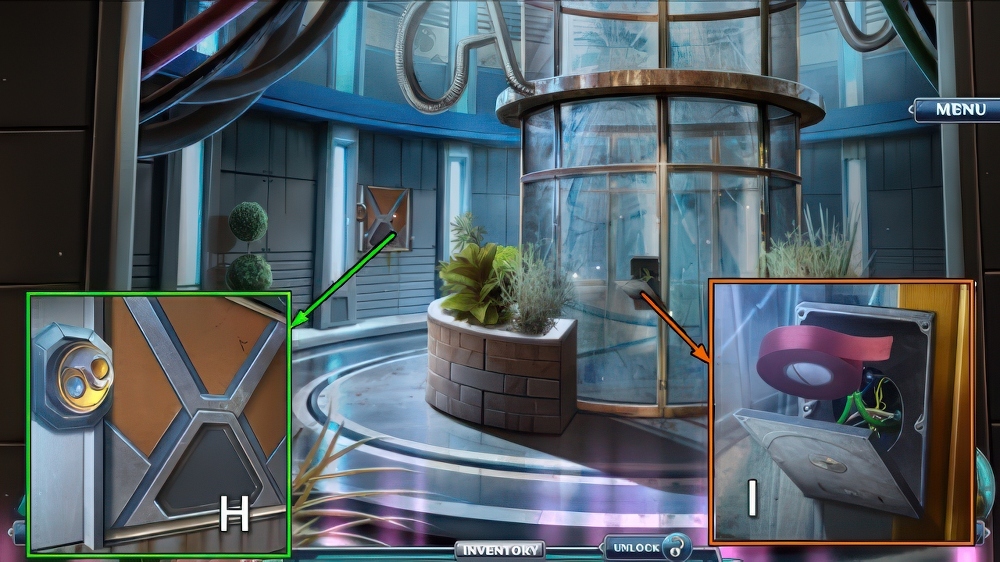
- Place YIN and YANG for mini-puzzle (H), receive ELECTRICAL TAPE.
- Use ELECTRICAL TAPE (I).
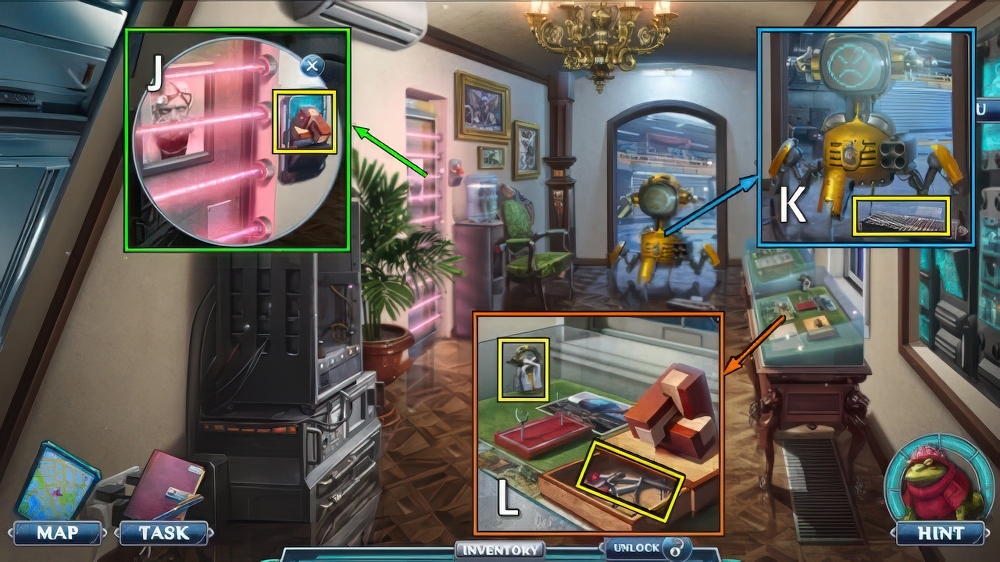
- Take VICTORIAN PUZZLE (J).
- Take XYLOPHONE (K).
- Place VICTORIAN PUZZLE, take LAB ASSISTANT ROBOT, HANDCUFFS and XYLOPHONE MALLETS (L).

- Take SHUTDOWN COMMAND (M).
- XYLOPHONE MALLETS and SHUTDOWN COMMAND on XYLOPHONE, take ROBOT’S XYLOPHONE.
- Use ROBOT’S XYLOPHONE (N).
- Go (O).

- Use HANDCUFFS (P).
- Solution (Q).

- Take DEFLATED AIRSHIP (R).
- Send ELF, take CHEF ROBOT and RECORDING EYE (S).
- Use RECORDING EYE (T), receive RECORDED EYE.
- Walk down.
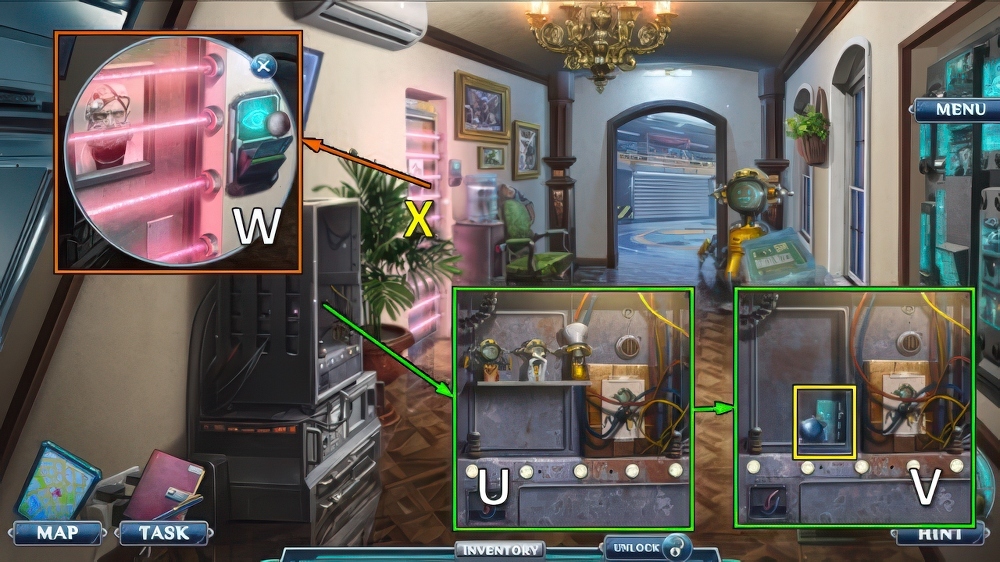
- Place LAB ASSISTANT ROBOT and CHEF ROBOT (U), take DAMAGED HYPNO EYE and PASSCARD (V).
- Use PASSCARD and RECORDED EYE (W).
- Go (X).
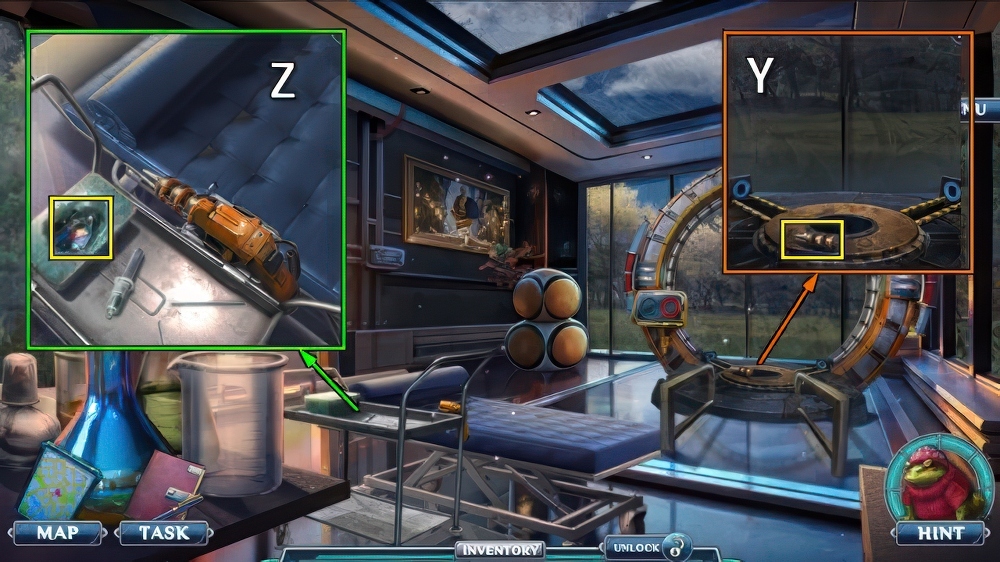
- Take SPARE LASER (Y).
- Place SPARE LASER, take GLUE and SCREWDRIVER BADGE (Z).
- Go to Laboratory Garage.

- Use LIGHTER and SCREWDRIVER BADGE for mini-puzzle (A), receive PAPER CLIP.
- Remove glove, use PAPER CLIP.
- Take PATCH and MORPHEUS’S PART (B).
- Go to Cyanide’s Laboratory.
- Place MORPHEUS’S PART and CANDLE (C).
- Play puzzle (D), take SCREEN BUTTON.
- Walk down.
- Place SCREEN BUTTON, take HELIUM and ENERGY SPHERE (E).
- PATCH, GLUE and HELIUM on DEFLATED AIRSHIP, take ORDER’S AIRSHIP.
- Place ORDER’S AIRSHIP, take HYPNO EYE ORBIT, MAGNETIC KEY and SIFTING LEVER (F).
- Go (G).

- Place MAGNETIC KEY (H), send ELF (I).
- ENERGY SPHERE and HYPNO EYE ORBIT on DAMAGED HYPNO EYE, take RESTORED HYPNO EYE.
- Use RESTORED HYPNO EYE (J).
- Play shooter game (K).

- Take HONEY (L).
- Use HONEY, take ROPES, TROWEL, EMPTY FLASK and PRESSURE SENSOR (M).
- Take POT (N).
- Take LIQUID GLASS and CORKSCREW, use POT and TROWEL.
- Take ENERGY VINE (O).
- Walk down.

- Place PRESSURE SENSOR and SHIFTING LEVER, take NEEDLE and WINEGLASS (P).
- Use WINEGLASS and CORKSCREW (Q), receive ANCIENT DRINK.
- Go to Cyanide’s Laboratory.

- Use NEEDLE, take MY BLOOD (R).
- ANCIENT DRINK, MY BLOOD and LIQUID GLASS on EMPTY FLASK, take PORTAL LIQUID.
- Place PORTAL LIQUID and ENERGY VINE (S).
- Solution (T): (2-3)-(18-10)-(7-18)-(3-20)-(3-6)-(7-8)-(9-14)-(13-16)-U-(1-7)-(3-17)-(5-13)-(7-15)-(9-11)-(11-15)-(13-19)-(17-19).
- Go (V).
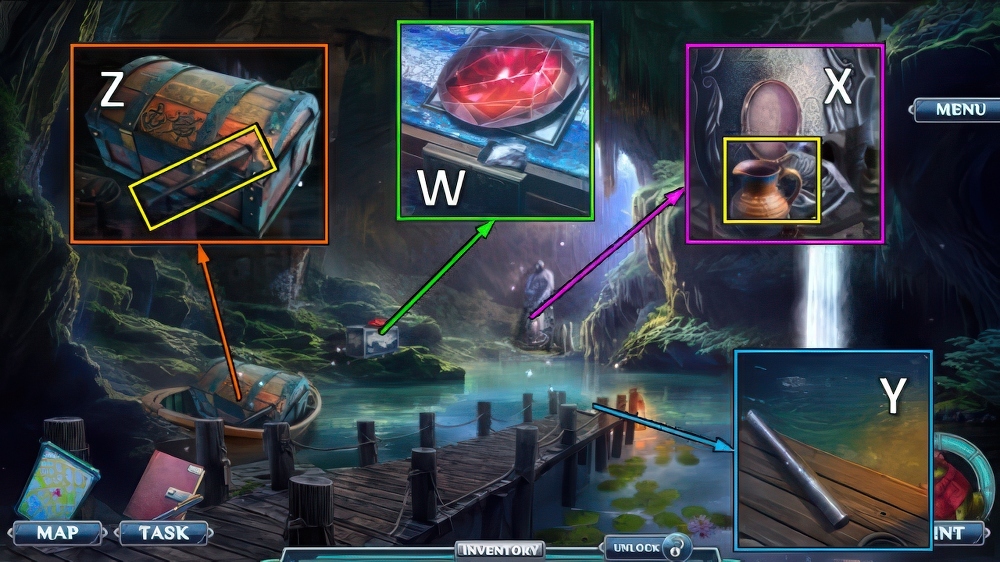
- Take CENTRAL STONE and BENT PLAQUES (W).
- Take ANCIENT JUG (X).
- Take IRON PIPE 1/3, use ANCIENT JUG (Y).
- Receive FILLED JUG.
- Take IRON PIPE 2/3 (Z).
- Go to Meditation Place.

- Use FILLED JUG (A), take IRON PIPE 3/3 and HAMMER (B).
- Use BENT PLAQUES and HAMMER, take FIXED PLAQUES (C).
- Go to Cave of the Past.

- Place FIXED PLAQUES (D).
- Solution (E): 3-2-1-4-5-6-3-2-1-4-5-8-9-6-5-8-9-6-3-2-1-4-5-6-3-2-1-4-5-8-7-4-5-8-9-6-5-8-7-4-5-8-9-6-5-8-9.
- Take SPEAR FRAGMENT and MANNEQUIN BASE (F).
- IRON PIPE and SPEAR FRAGMENT on ROPES, take ROPE LADDER.
- Place ROPE LADDER (G).
- Go (H).
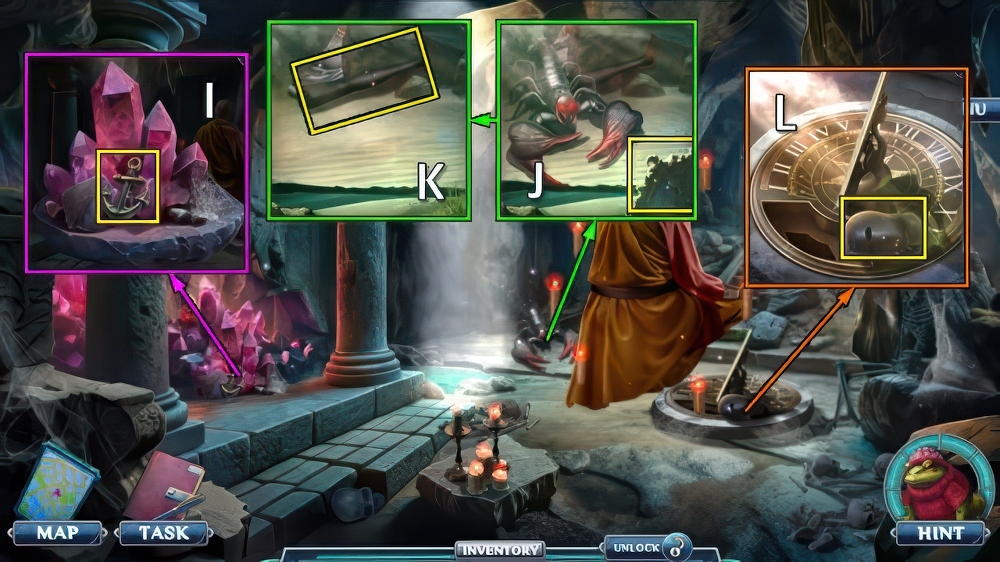
- Take ANCHOR (I).
- Take MIRROR, send ELF (J).
- Take LEG and SHIELD PART (K).
- Take HEAD (L).
- Walk down.

- Place CENTRAL STONE and SHIELD PART (M).
- Play puzzle (N), receive STEERING WHEEL.
- Place ANCHOR and STEERING WHEEL (O).
- Take ARM 1/2 and SCOOP-NET (P).
- Use SCOOP-NET for mini-puzzle, take TIME STONE (Q).
- Go (R).
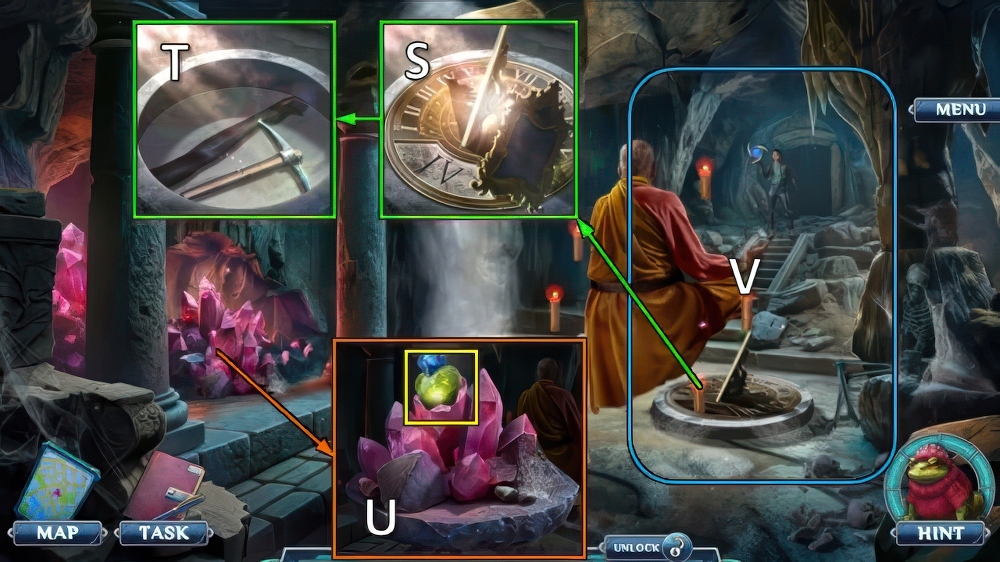
- Place TIME STONE and MIRROR (S).
- Take PICKAXE and ARM 2/2 (T).
- Use PICKAXE, take CRYSTAL HEART (U).
- HEAD, LEG, ARM and CRYSTAL HEART on MANNEQUIN BASE, take PREPARED MANNEQUIN.
- Use PREPARED MANNEQUIN, play puzzle (V).
- Receive MANNEQUIN WITH MORPHEUS.
- Walk down twice.

- Place MANNEQUIN WITH MORPHEUS (W).
- Walkthrough Bonus Chapter, at the link below.


