
Mystical Riddles 1: Snowy Peak Hotel (Bonus Chapter, Extra) – The protagonist of the main chapter receives a call from lawyer Giovanni Salieri, who informs him that his deceased grandfather left him an inheritance. But in order to settle all the formalities, Mr. Salieri needs some documents.
Bonus Chapter, Extra Walkthrough
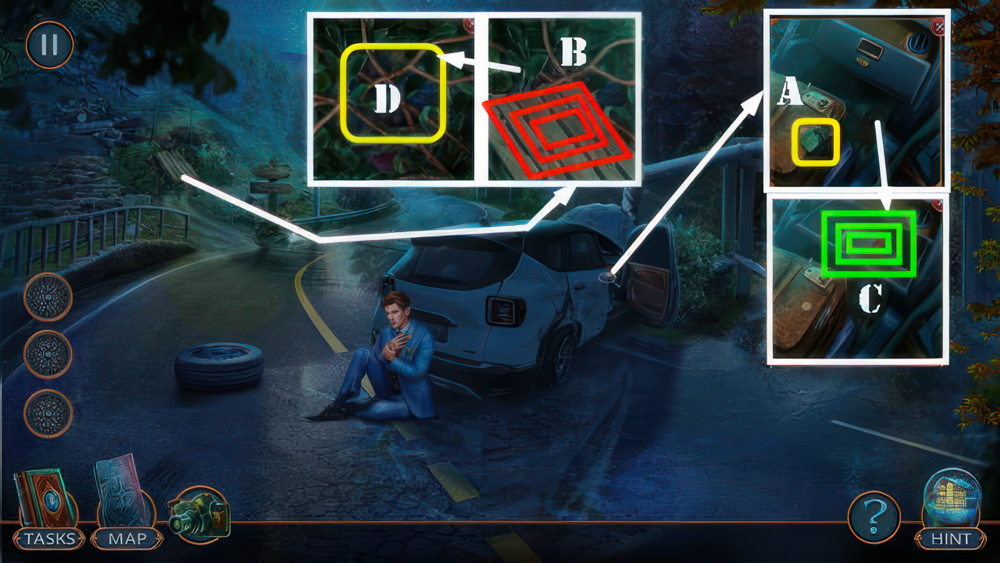
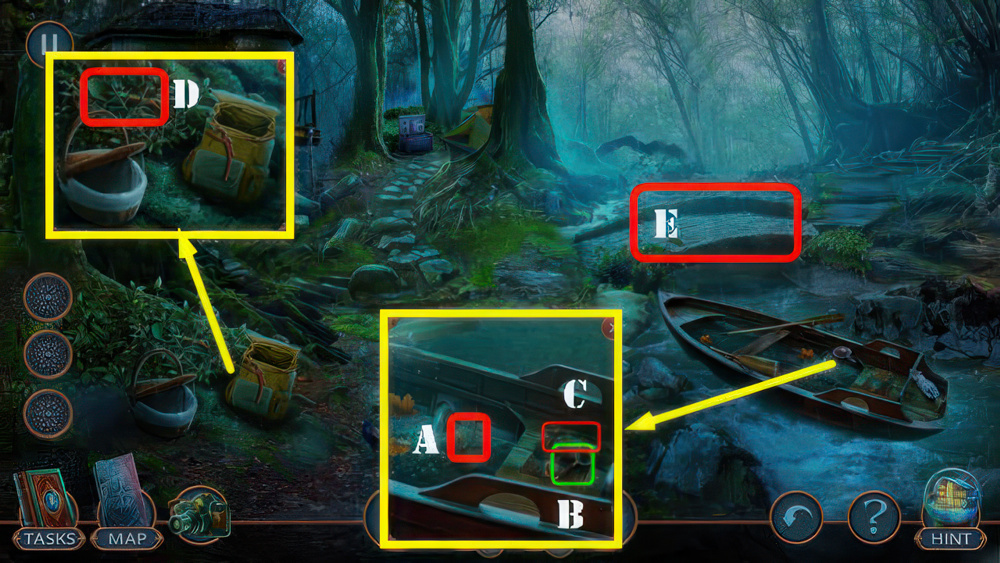
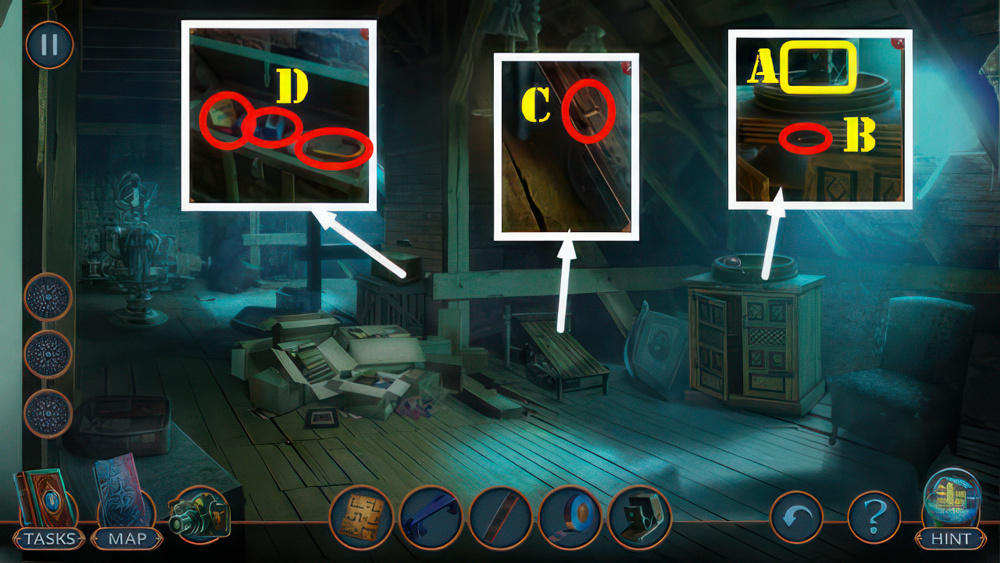
- Take Note (A).
- Take PALLET, LOCK PARTS 1/2, and LATCH (B).
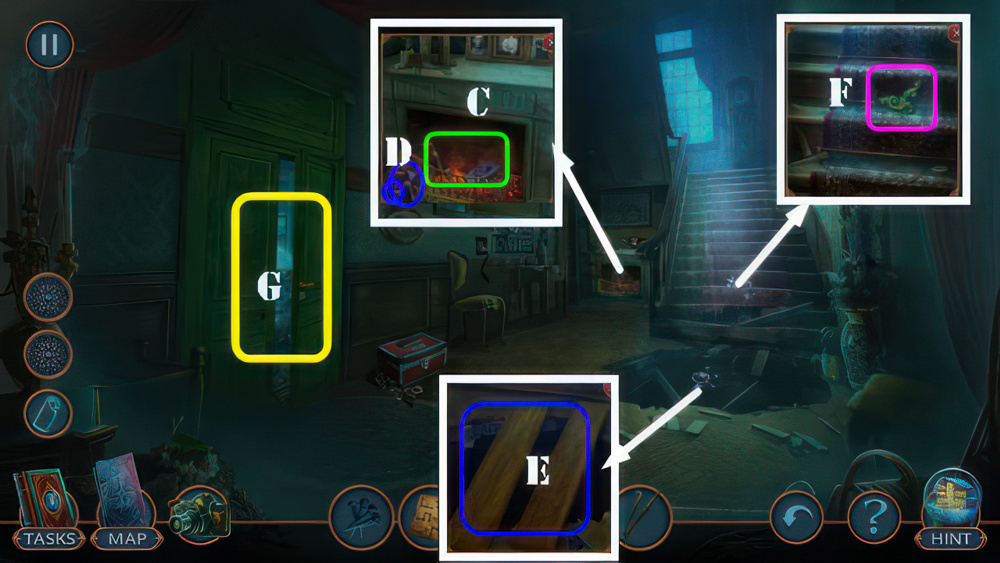
- Place LATCH, take BANDAGE, HERBICIDE, and CARABINERS 1/3 (C).
- Use HERBICIDE (D).
- Play puzzle, receive SWISS ARMY KNIFE.
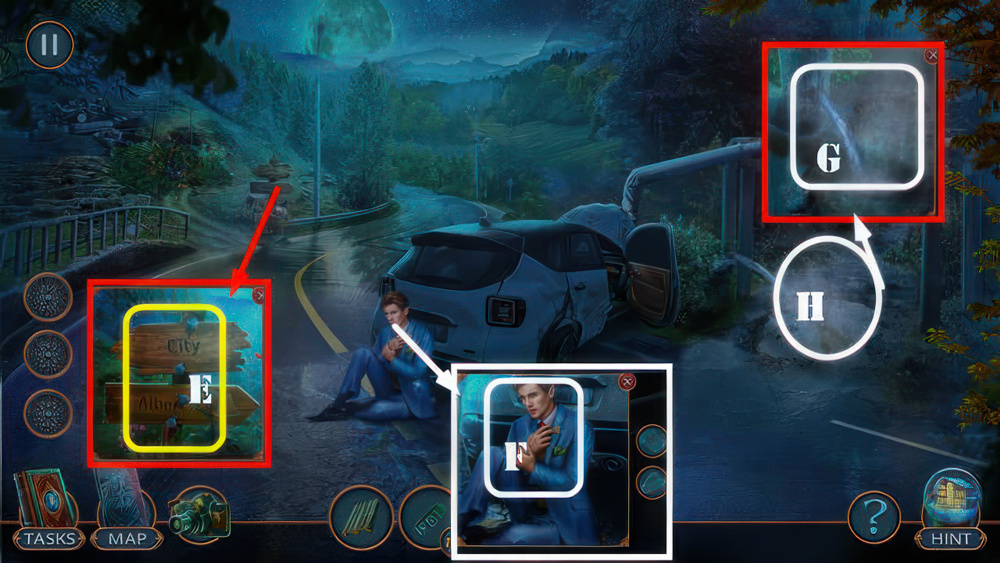
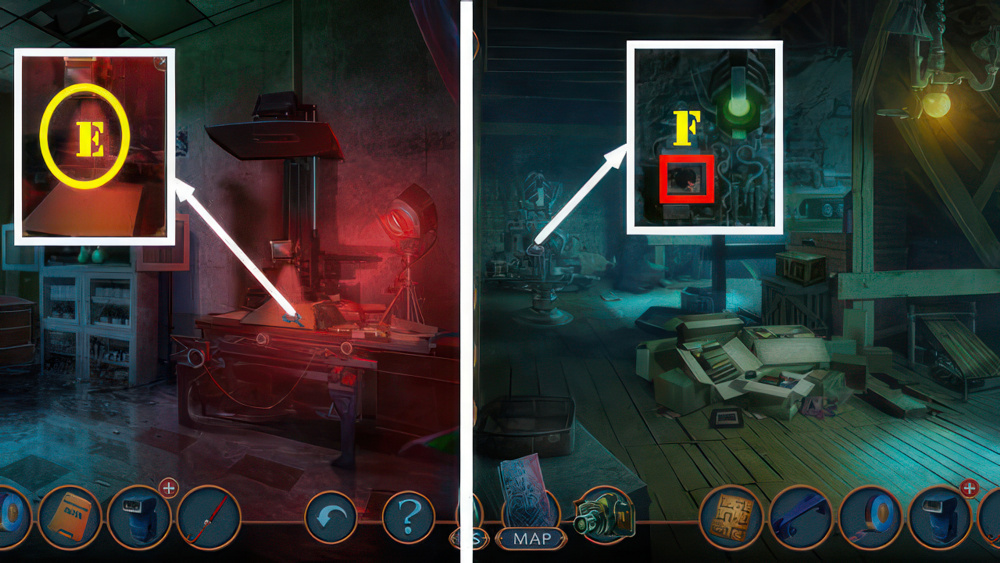
- Use SWISS ARMY KNIFE (E), receive PLANKS.
- Select man, place BANDAGE and PLANKS (F), receive BELT.
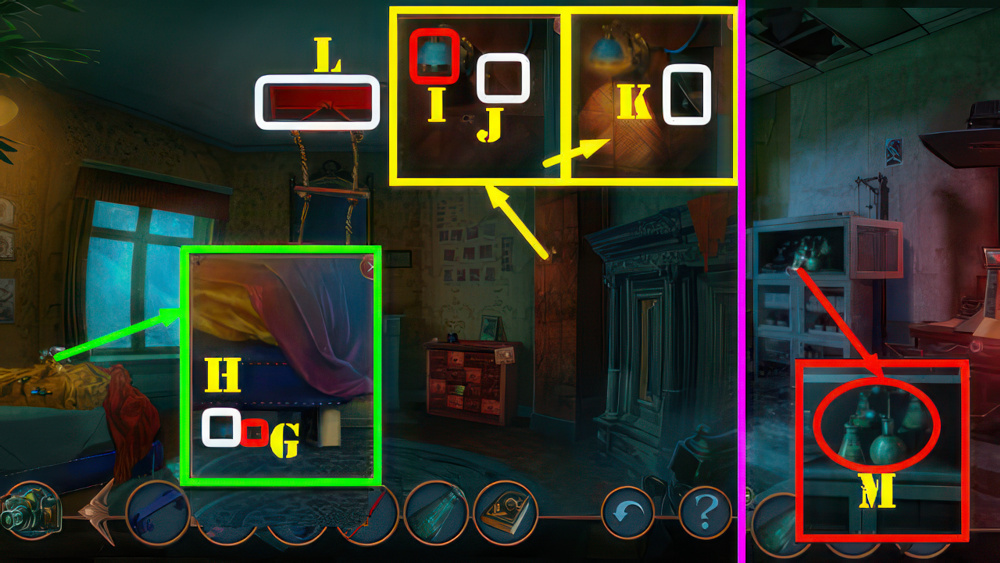
- Use BELT and PALLET (G).
- Go (H).
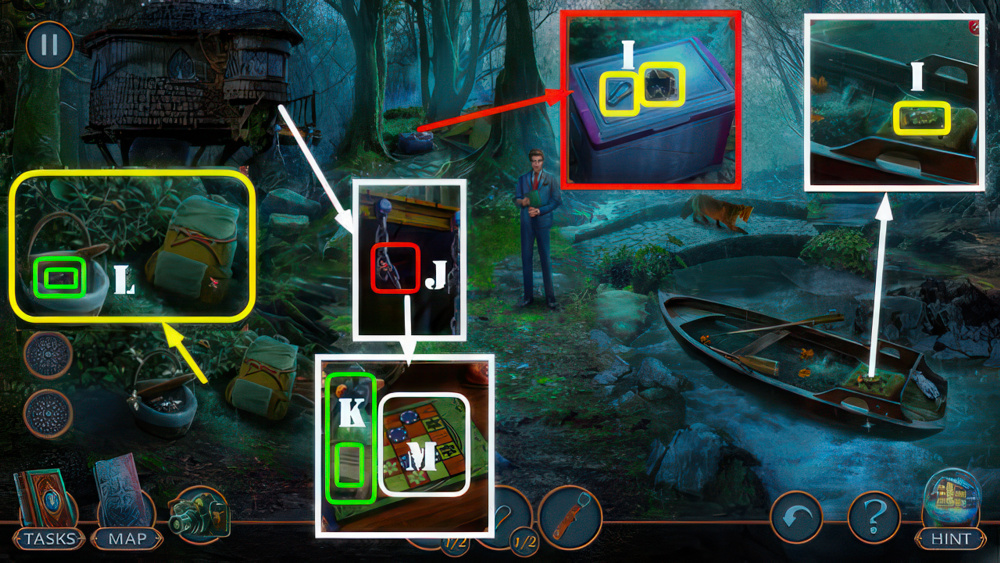
- Take INSECTICIDE, DICE, and CARABINERS 2/2 (I).
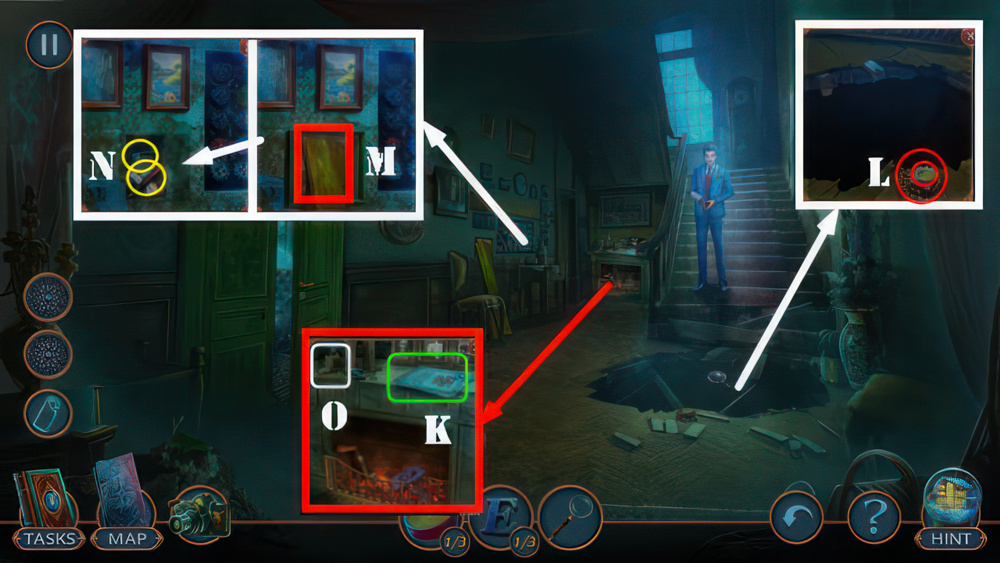
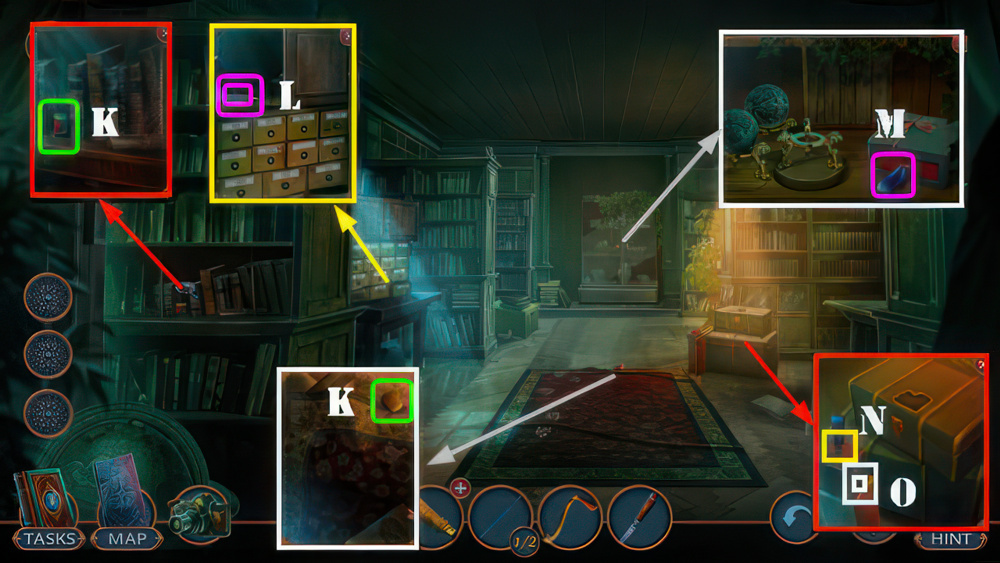
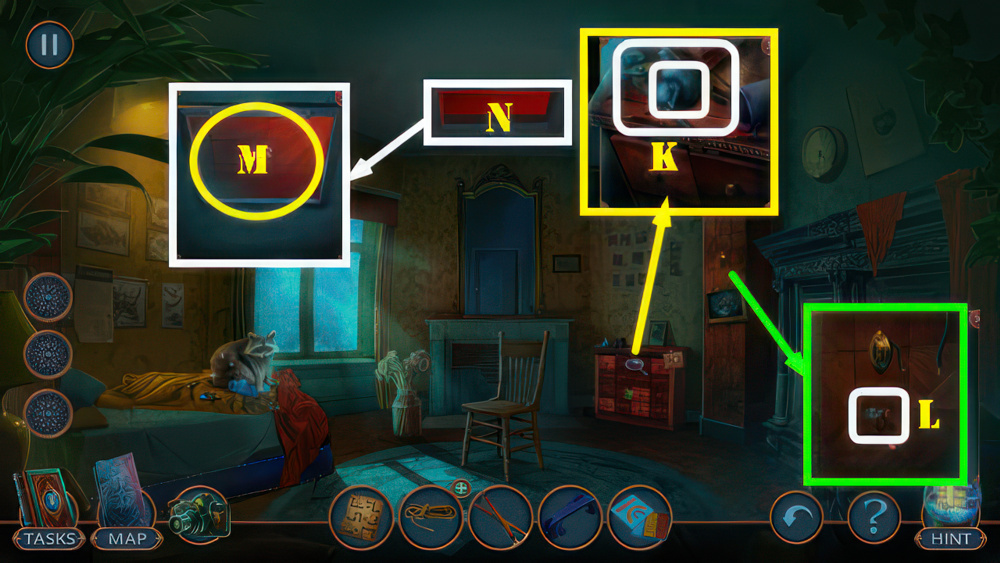
- Place CARABINERS 2/2 (J), take Note and EMPTY SPRAYER (K).
- INSECTICIDE on EMPTY SPRAYER, receive INSECTICIDE.
- Use INSECTICIDE, take CORKSCREW and CHIP (L).
- Place DICE and CHIP (M).
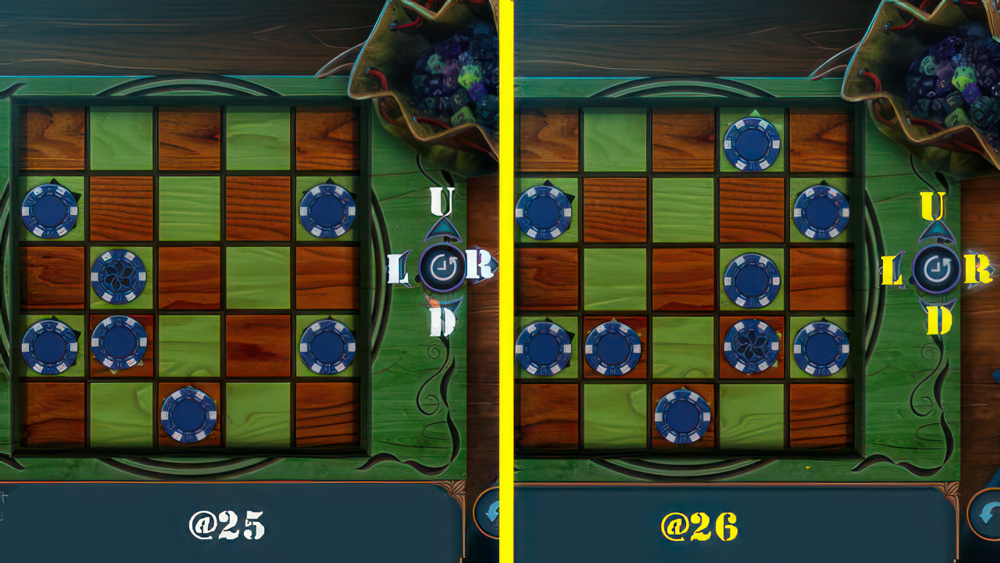
- Easy Solution (@25): Lx2-U-L-Rx2-L-Dx2-L-Rx2-L-Ux2-L-D.
- Hard Solution (@26): D-Ux2-Rx2-D-L-Rx2-D-U-Lx2-D-R-D-R-L-Ux2-R-D.
- Take RING.
- Walk down.
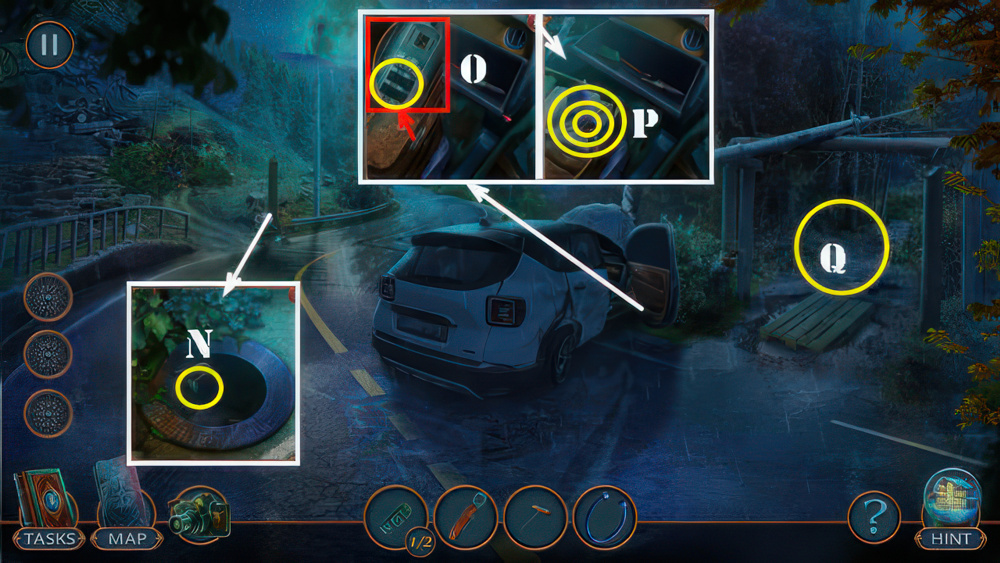
- Use RING, take LOCK PARTS 2/2 (N).
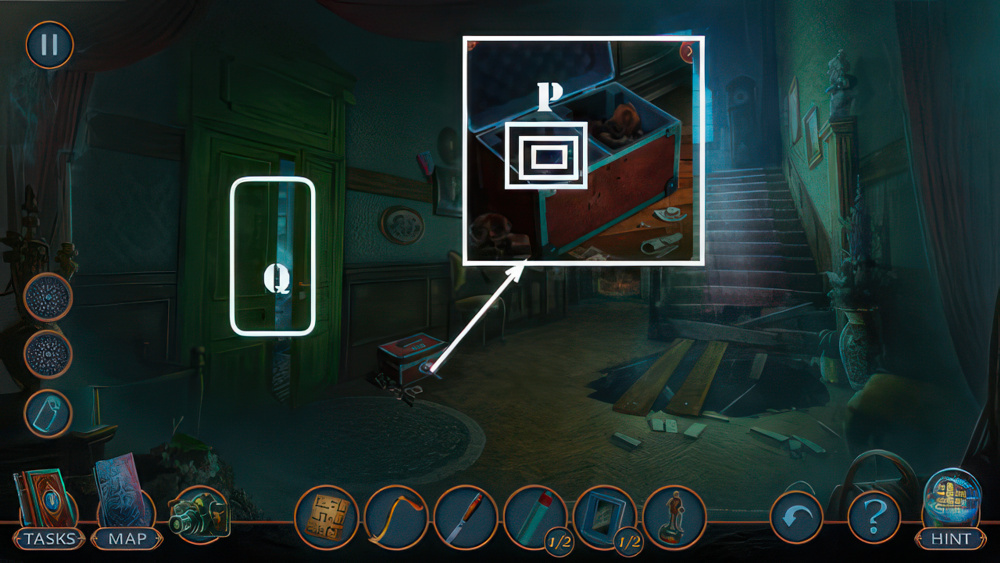
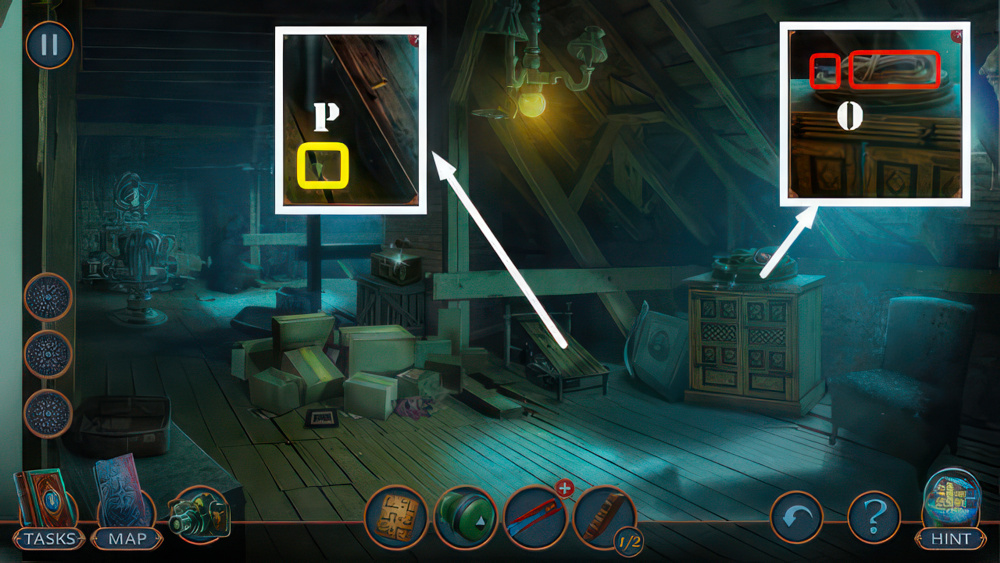
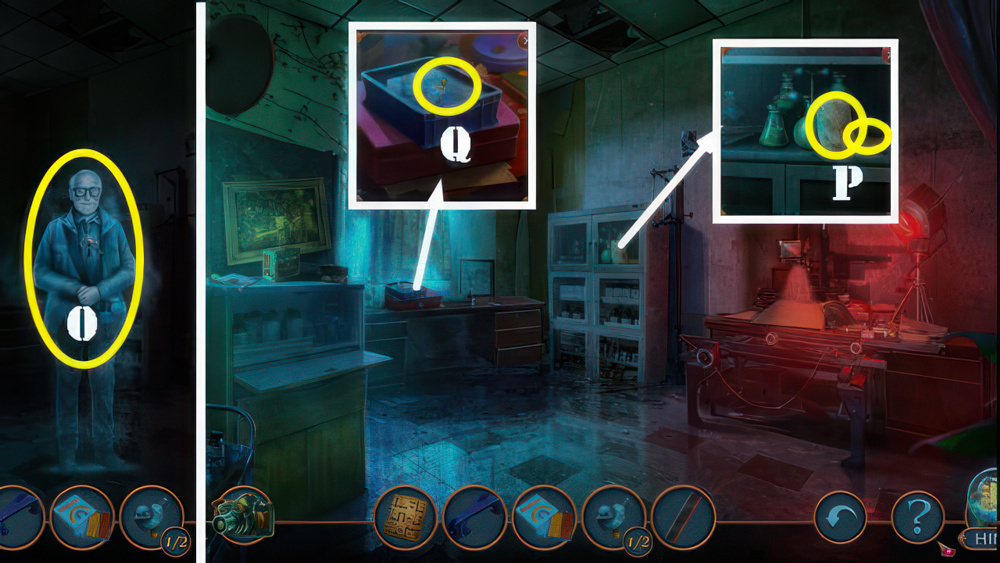
- Place LOCK PARTS 2/2 (O), take CHAIN, HAIRDRYER, and CLOTHESPIN (P).
- Go (Q).

- Remove cushion and use CLOTHESPIN, take WHETSTONE (R).
- SWISS ARMY KNIFE on WHETSTONE, receive SHARP KNIFE.
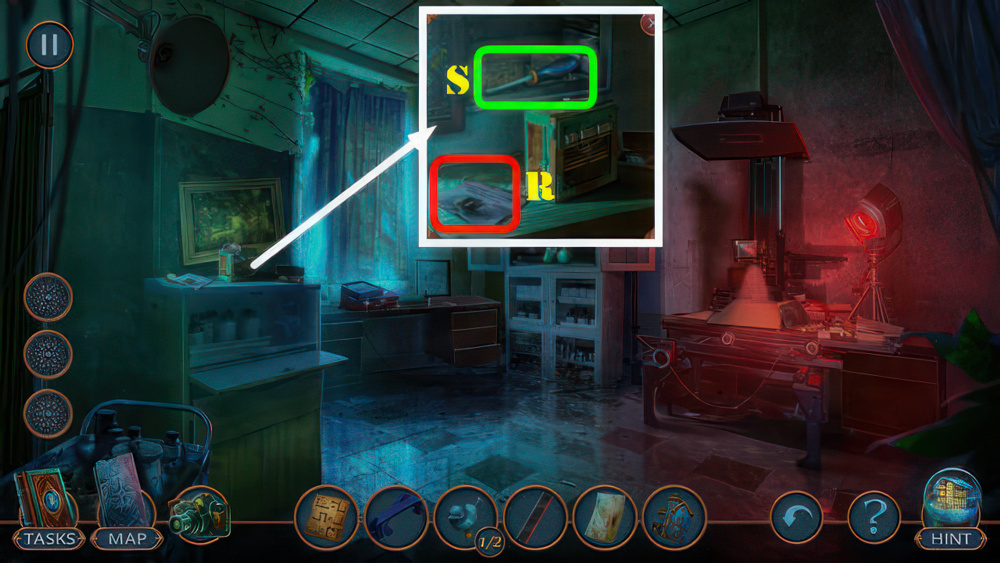
- Use SHARP KNIFE, take SNOWFLAKE (S).
- Place SNOWFLAKE, take FISH (T).
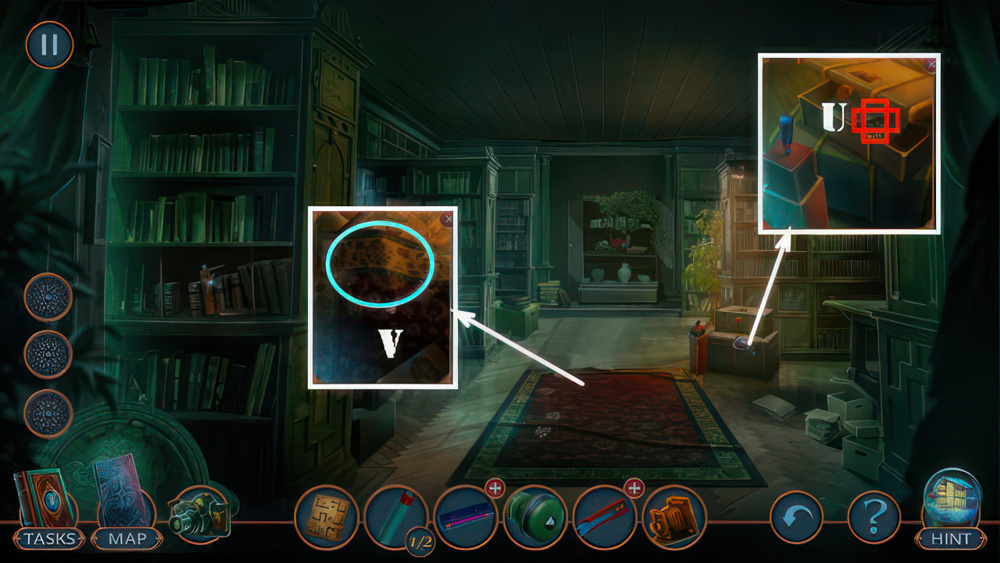
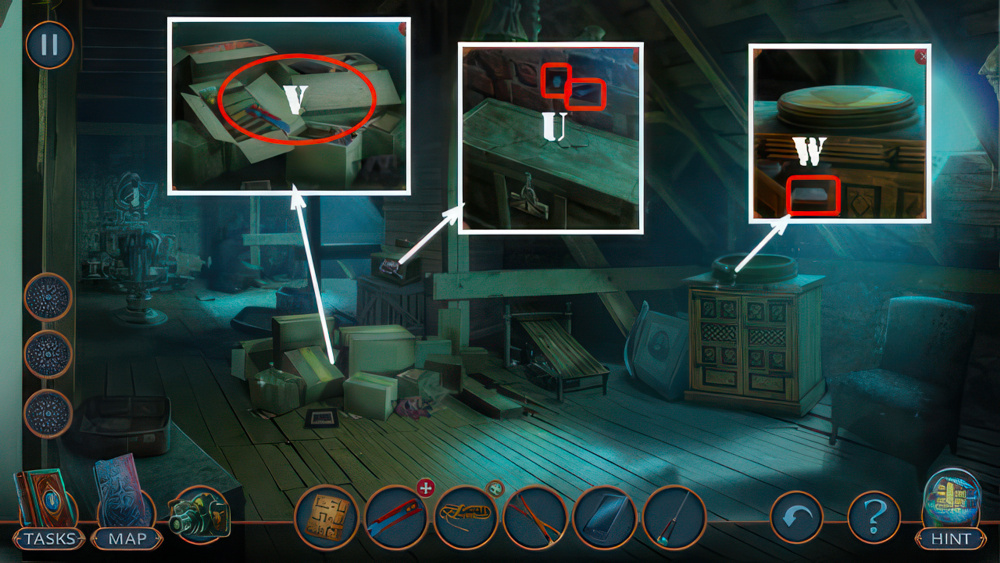
- Throw FISH (U).
- Go (V).
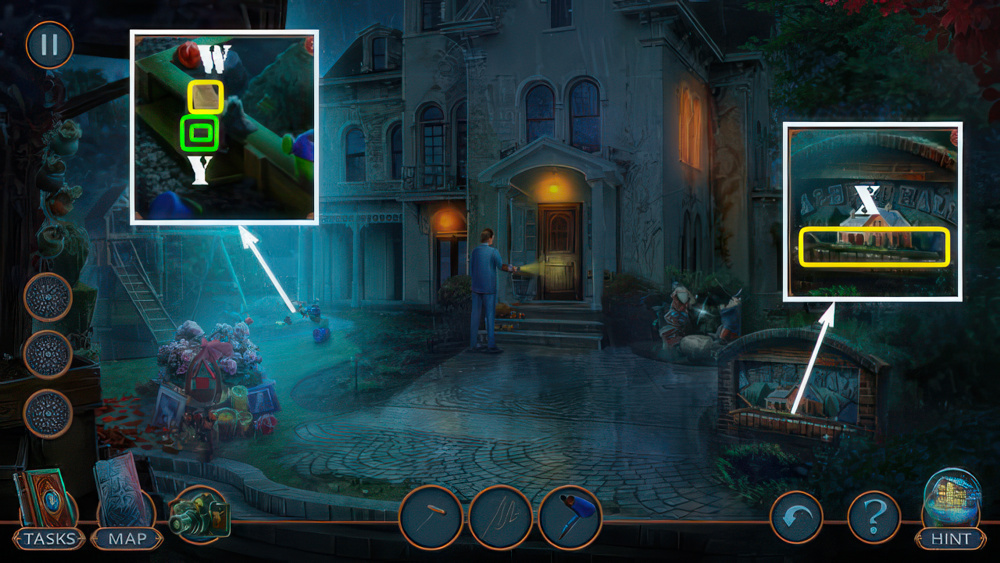
- Take Note (W).
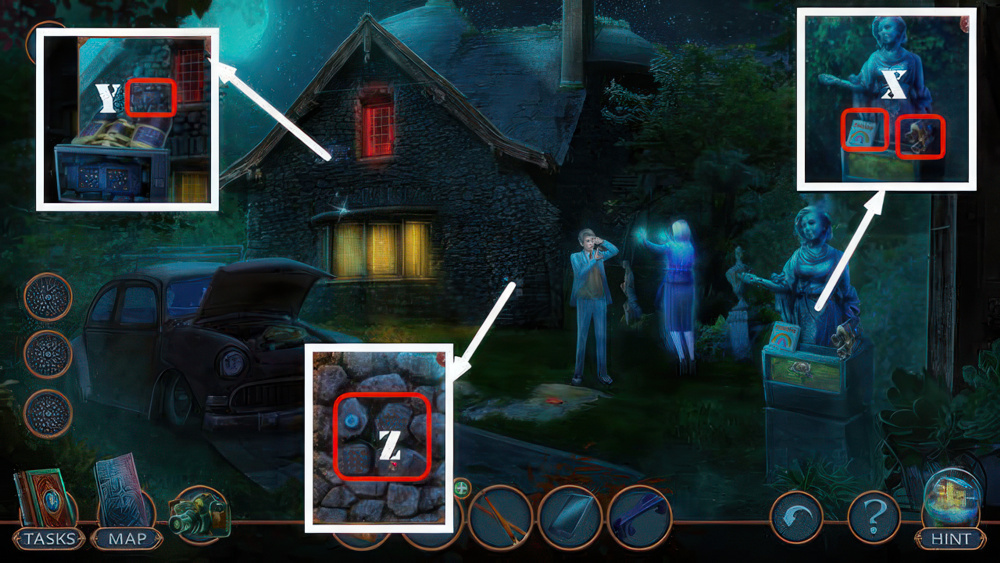
- Take STICK (X).
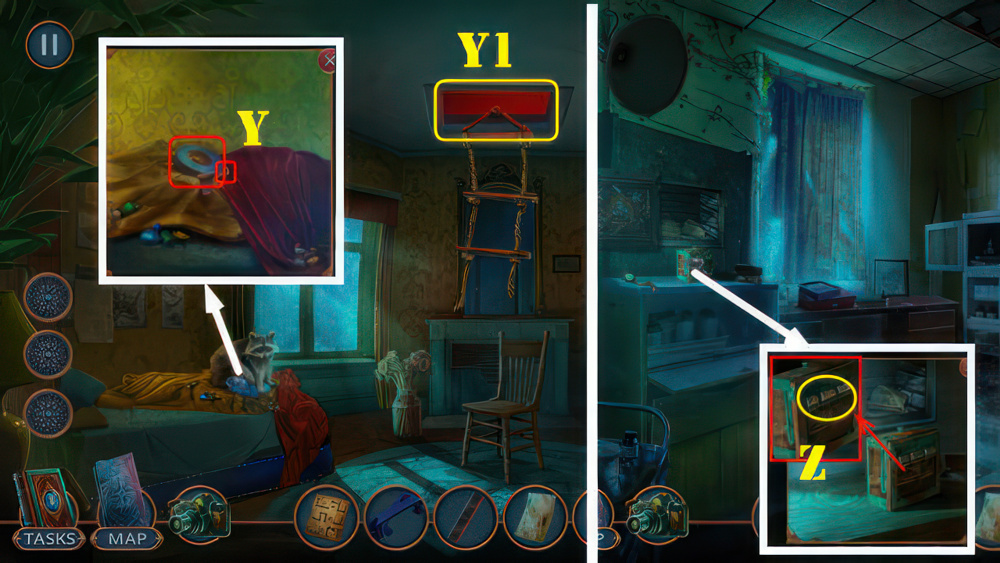
- Use CORKSCREW, take NET, CANDLES 1/3, and LETTERS 1/3 (Y).
- Walk down.
- CHAIN and NET on STICK, receive BUTTERFLY NET.
- Use BUTTERFLY NET (A), take MAGNIFYING GLASS (B).
- Use HAIRDRYER (C), receive GLOVE.
- Use GLOVE (D), receive SHOVEL.
- Go (E).
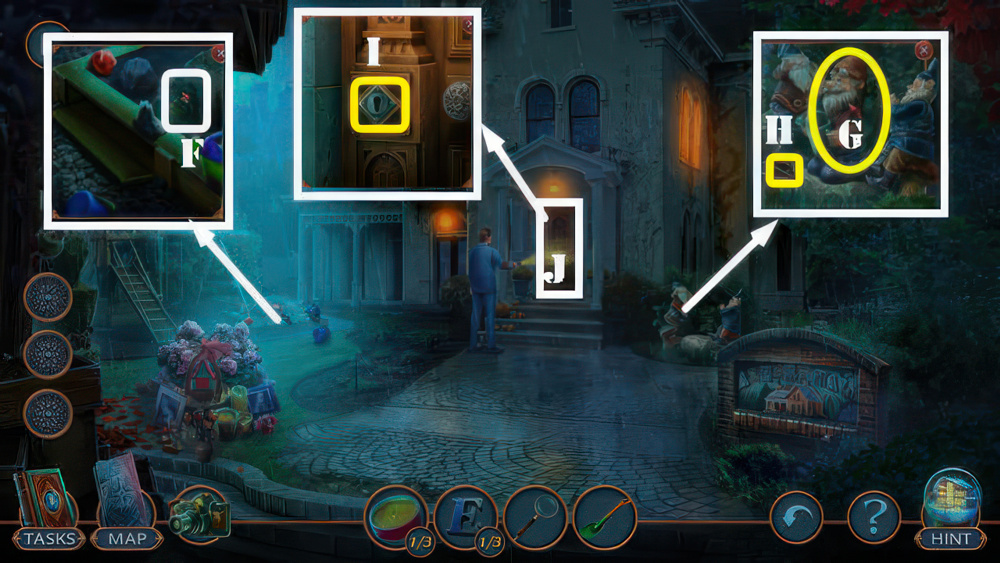
- Use SHOVEL (F).
- Play puzzle, receive GARDEN GNOME.
- Place GARDEN GNOME (G), take KEY (H).
- Use KEY (I).
- Enter (J).
- Take Note (K).
- Take CANDLES 2/3, LETTERS 2/3, and CHAIN (L).
- Take PLANKS (M).
- Remove painting, take PEN and LIGHTER (N).
- Use LIGHTER, take LETTERS 3/3 (O).
- Walk down.
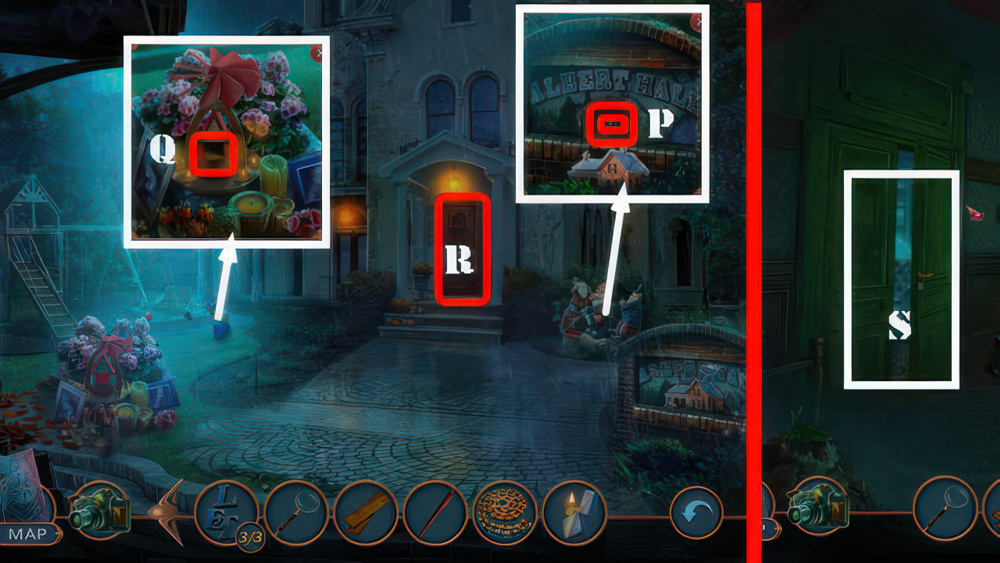
- Place LETTERS 3/3, take PEN and NAILS (P).
- Place CANDLES 3/3 and use LIGHTER, take SCHEME (Q).
- Go (R-S).

- Take Note and SEAM RIPPER PART (T).
- Take NOTEPAD (U).
- Select camera 3x (V), use MAGNIFYING GLASS, PEN, and NOTEPAD (W), receive CODE.
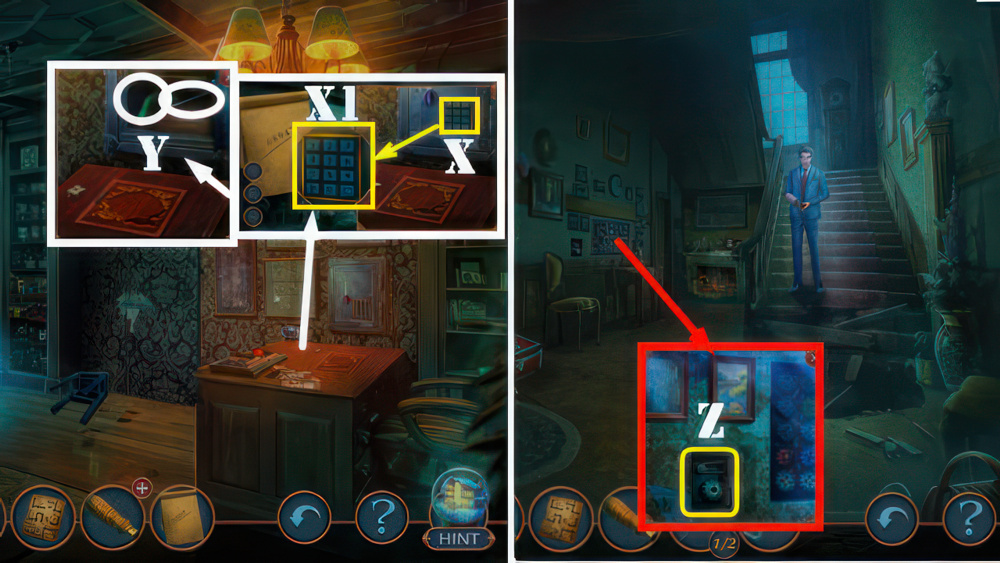
- Remove papers and use CODE (X).
- Solution: 68942B (X1).
- Take NEEDLE AND THREAD 1/2 and HANDLE (Y).
- Walk down.
- Place CHAIN and HANDLE (Z).
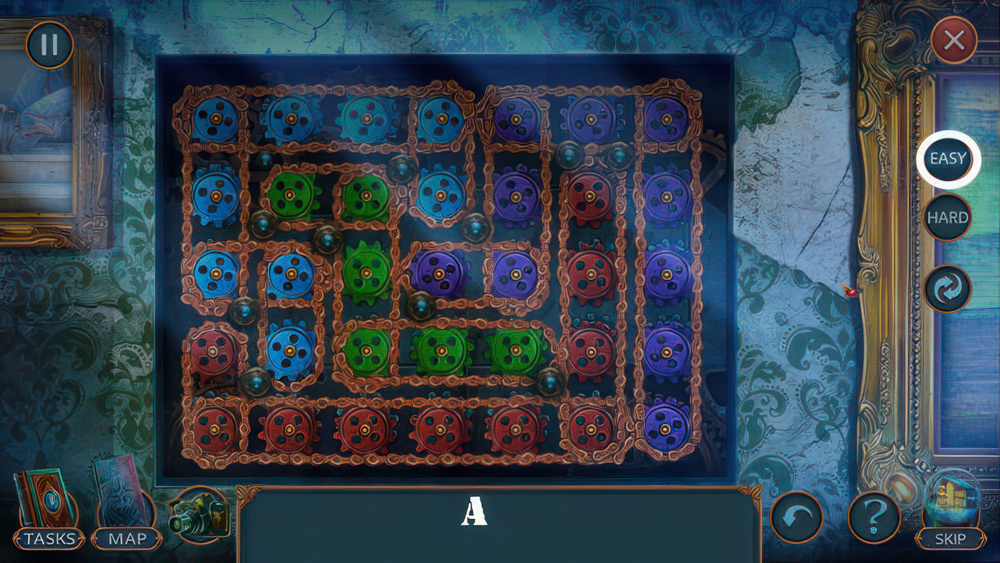
- Easy Solution: (A).

- Hard Solution: (B).
- Take FIREPLACE TONGS.
- Use FIREPLACE TONGS (C).
- Take HANDLE and PAPERWEIGHT (D).
- Use PLANKS, NAILS, and PAPERWEIGHT (E).
- Take INLAY (F).
- Go (G).

- Place INLAY, take MAGNET and CHISEL (H).
- Use MAGNET (I).
- Go (J).
- Take NEEDLE AND THREAD 2/2 and CORK (K).
- Use CORK, take BATTERIES 1/2 and SEAM RIPPER PART (L).
- SEAM RIPPER PART on SIM RIPPER PART, receive SEAM RIPPER.
- Open door and use SEAM RIPPER (M), receive LOOP.
- Use NEEDLE AND THREAD 2/2 and LOOP (N), take SLIDES 1/2 and FIGURINE (O).
- Walk down twice.
- Use CHISEL and FIGURINE, take UV LAMP, HANDLE, and SLIDES 2/2 (P).
- Go (Q).

- Place HANDLE and SLIDES 2/2 (R).
- Play puzzle, take KEY (R1).
- Use KEY, take BOX CUTTER and AMULET (S).
- Go (T).
- Place AMULET, take BATTERIES 2/2 and HAIRPIN (U).
- BATTERIES 2/2 in UV LAMP, receive UV LAMP.
- Use UV LAMP (V).

- Easy Solution: (J-K-A)-(I-L-G)-(H-F-C).
- Hard Solution: (J-K-A-B)-(I-L-G-E)-(H-F-C-D).
- Use HAIRPIN (M).
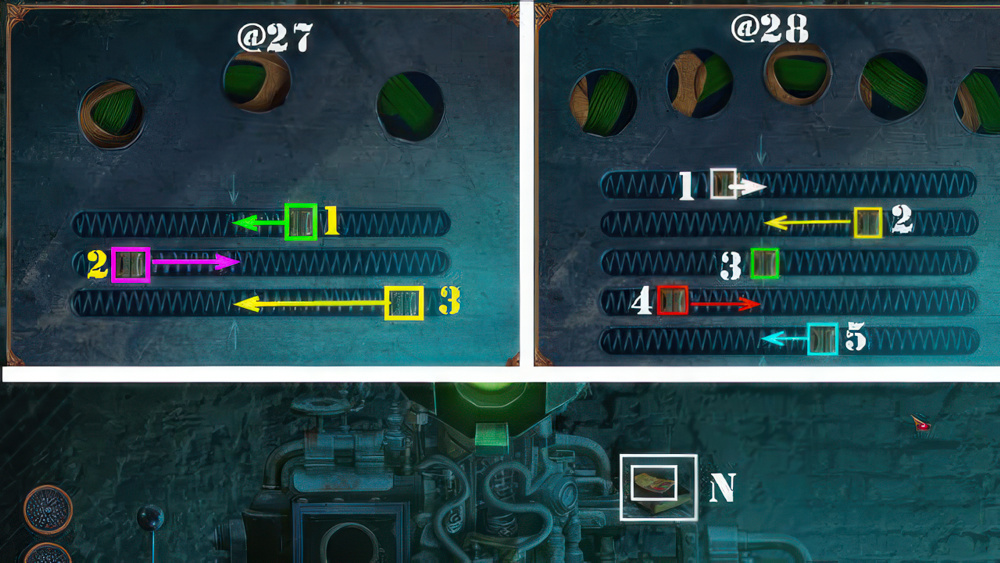
- Easy Solution (@27).
- Slide all pieces to the center in this order: (1-3-2).
- Hard Solution (@28): Slide all the pieces to the center in this order: (1-2-4-5-3-2).
- At this point, the pieces will be slightly off center.
- Move the pieces into place in this order: (5-3-2).
- Take Note and BOOKS 1/2 (N).
- Take ROPE and TWEEZERS (O).
- Use TWEEZERS (P), receive STICKER.
- Walk down.

- Place STICKER and HANDLE, take SPHERE and STICKS (Q).
- Place SPHERE (R), take CELL PHONE and BOOKS 2/2 (R1).
- Place BOOKS 2/2, take AWL (S).
- Go (T).
- Use AWL, take HANDLES and SLIDER (U).
- SLIDER on BOX CUTTER, receive BOX CUTTER.
- Use BOX CUTTER (V).
- Play puzzle, receive BURNT PHOTO.
- Use BURNT PHOTO, take Note (W).
- Take PLASTICINE and BINOCULARS (X).
- Use CELL PHONE and BINOCULARS (Y), receive HINT.
- Use HINT (Z).

- Solution: (D-A)-(D-B)-(H-E)-(H-F)-(I).
- Go (J).
- Take FIGURINES 1/2 and PINCERS (K).
- Remove painting and use PINCERS (L), receive HOOK.
- STICKS and HOOK on ROPE, receive LADDER.
- Place LADDER (M).
- Go (N).
- Talk (O), receive NEGATIVE.
- Open cabinet door, take PHOTO and GLOVE (P).
- Use GLOVE (Q), receive BROKEN AMULET.
- Take Note (R).
- PLASTICINE on BROKEN AMULET, receive AMULET.
- Select painting, place AMULET, take SCREWDRIVER (S).
- Walk down twice.

- Use SCREWDRIVER, take FIGURINES 2/2 and LOCK PARTS 1/2 (T).
- Place FIGURINES 2/2 (U), take SCHEME (V).
- Go (W).
- Place SCHEME (X).

- Easy Solution: (E-A)-(J-M)-(P-F)-(D-C)-(L-H)-(K-P).
- Hard Solution: (D-C)-(P-O)-(O-N)-(N-J)-(J-F)-(A-E)-(M-N)-(N-J)-(L-P)-(K-G)-(G-H).
- Open drawer, take STONES (Q).
- Use STONES, take DUCT TAPE and LOCK PARTS 2/2 (Y).
- Go (Y1).
- Place LOCK PARTS 2/2 and PHOTO (Z).
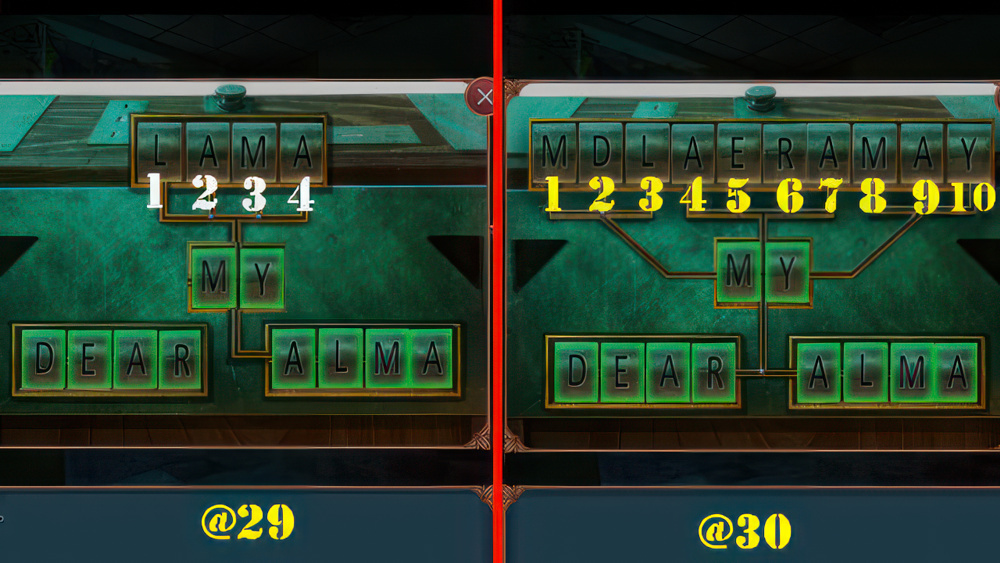
- Easy Solution (@29): 4-3-1-2.
- Hard Solution (@30): 8-9-10-3-2-4-6-7-5-1.
- Take GIOVANNI’S PHOTO and CAMERA.
- GIOVANNI’S PHOTO is automatically used.
- Walk down.
- Place CAMERA (A), take DART PART (B).
- Use DART PART (C), receive DART.
- Use DART, take FLASH, UMBRELLA, and PHOTO PAPER (D).
- Return to Darkroom.
- Place NEGATIVE and PHOTO PAPER (E).
- Play Hop, receive RICARDO’S PHOTO.
- Return to Attic.
- Place RICARDO’S PHOTO (F), receive BAG.
- Go to Outbuilding.
- Open BAG, take EMPTY FLASK and BOOK.
- Use BOOK, take BUTTON (G).
- Use UMBRELLA (H), receive LAMP.
- Place LAMP (I) and use DUCT TAPE (J), take TUBE (K).
- Go (L).
- Place EMPTY FLASK and TUBE (M).
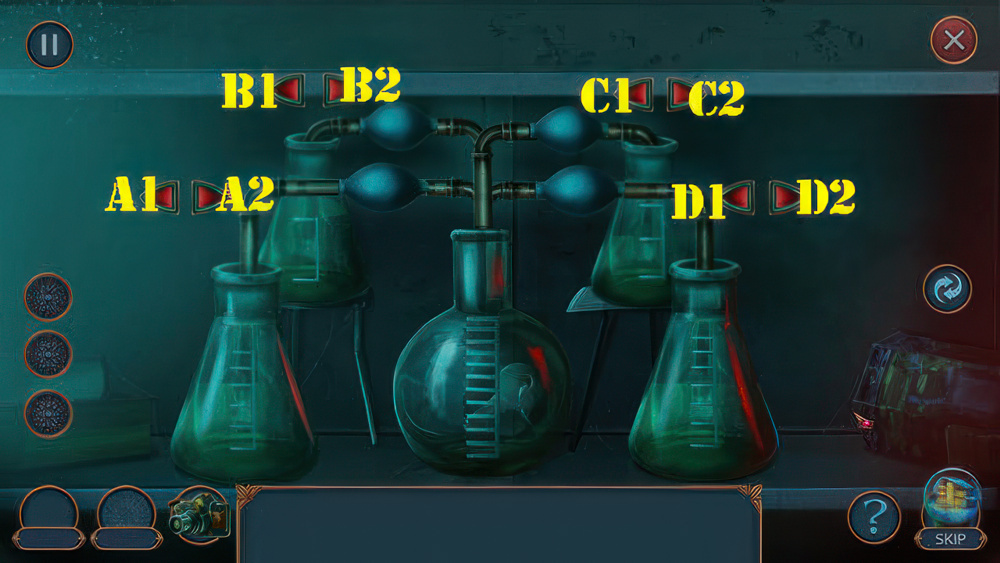
- Solution: (A2-B2-C1-D1)-(A1-B1-C2-D2)-(A2-B2-C1).
- Take KEY.
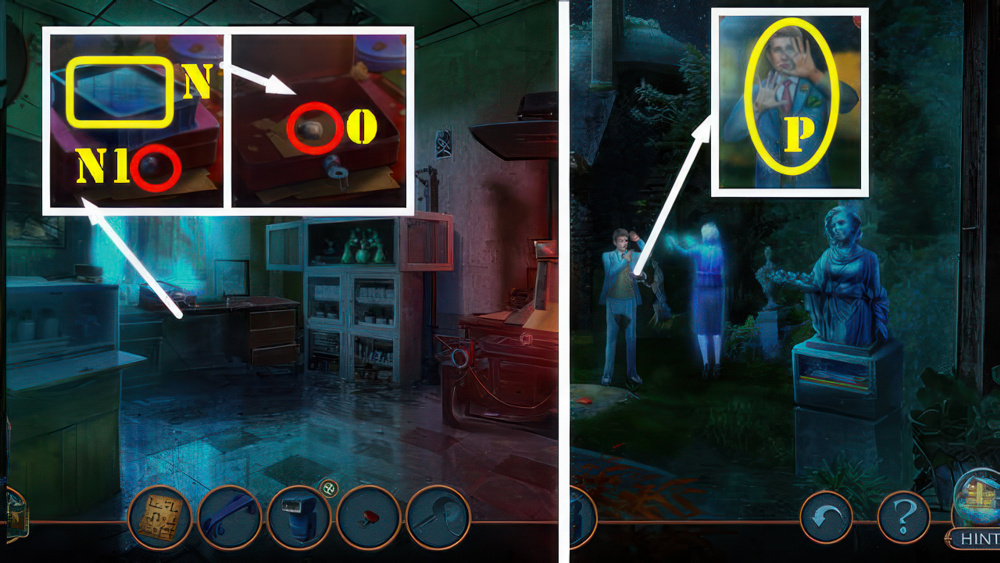
- Place HANDLES (N) and use KEY (N1), take BULB (O).
- BUTTON and BULB on FLASH, receive CHARGED FLASH.
- Walk down twice.
- Use CHARGED FLASH (P).
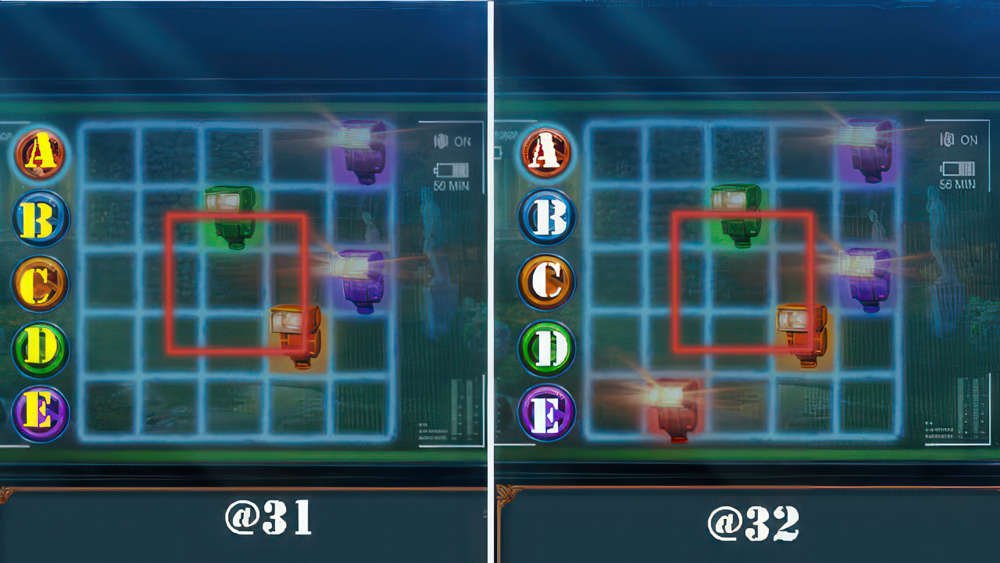
- Easy Solution (@31): Bx4-C-A-Bx5-Ex2-Ax3-Ex3-Cx3-A-Dx2-Cx4-Ax7-E-Ax5.
- Hard Solution (@32): Bx4-C-A-Bx5-Ex2-Ax3-Ex3-Cx3.
- A-Dx2-Cx4-Ax7-E-Ax6-Bx3-Ax7.
Congratulations! You have completed the game Mystical Riddles 1: Snowy Peak Hotel.


