
Mystical Riddles 4: Ghostly Park (Bonus Chapter) – You are once again called upon for help, the park has reopened and is regaining its popularity. But visitors are disappearing again without a trace. Rumors are spreading through the town. People believe there is still a curse hanging over the park. The park had to be closed for a while, but there is still a guard who can let you in. You will have to investigate the paranormal phenomena occurring in the amusement park.
Bonus Chapter Walkthrough
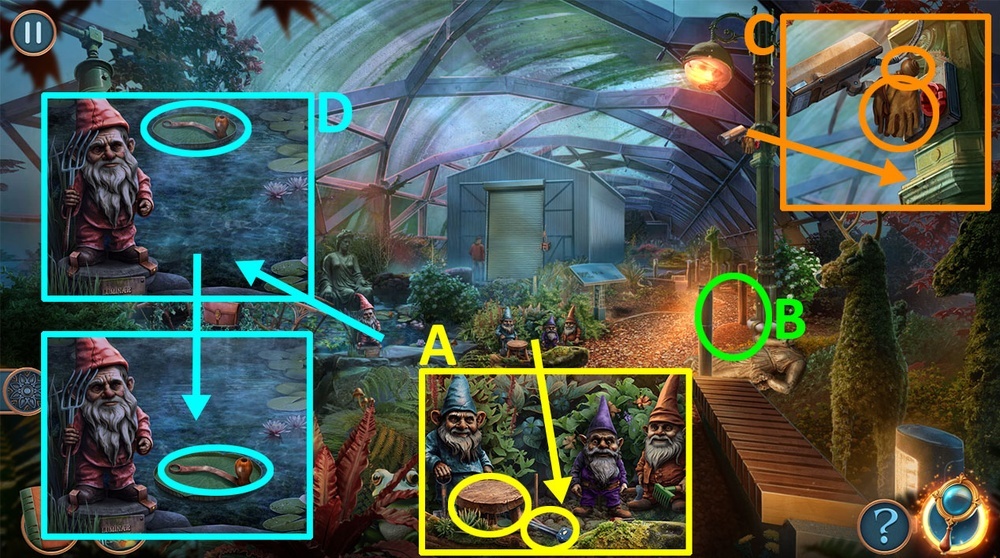
- Take STOOL, MONOPOD, and TISSUE PACK (A).
- Use STOOL on the lamp post (B).
- Take AWL and GLOVES (C).
- Use MONOPOD on the lily pad, take HANDLE (D).

- Open the bag, take Camera Manual, read the Camera Manual, take CAMERA and BROKEN HAIR DRYER, use GLOVES on the prickly bush (E).
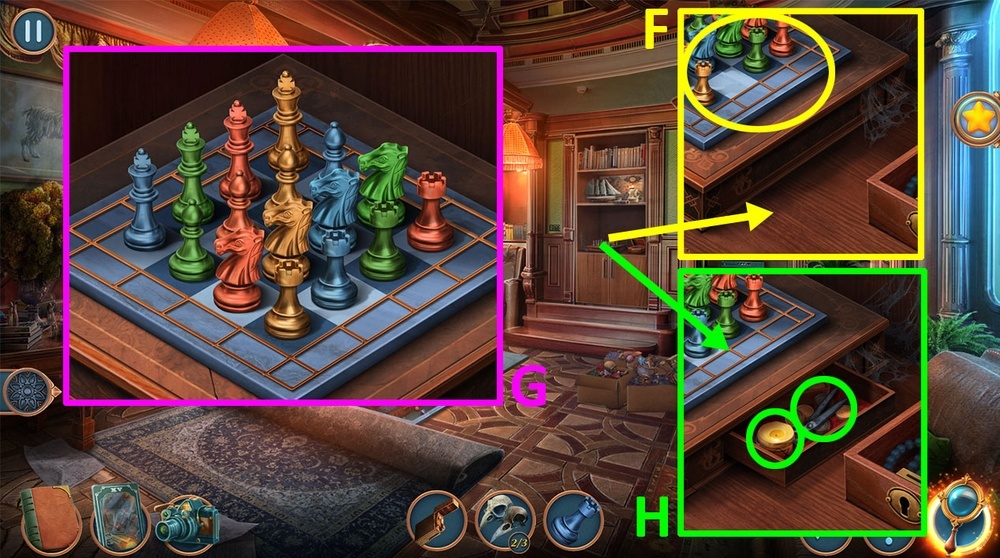
- Easy solution: Use the picture as a hint (F).
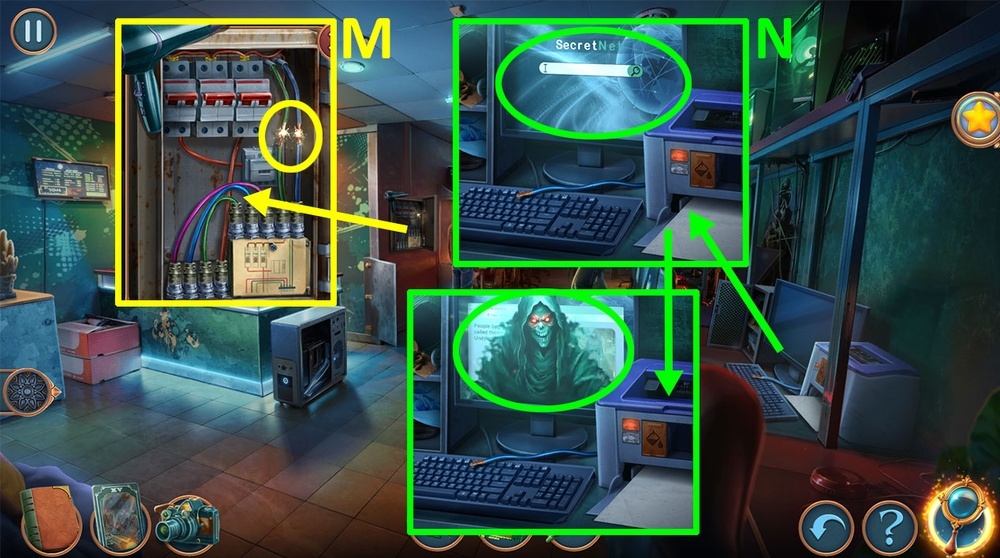
- Hard solution: Use the picture as a hint (G).

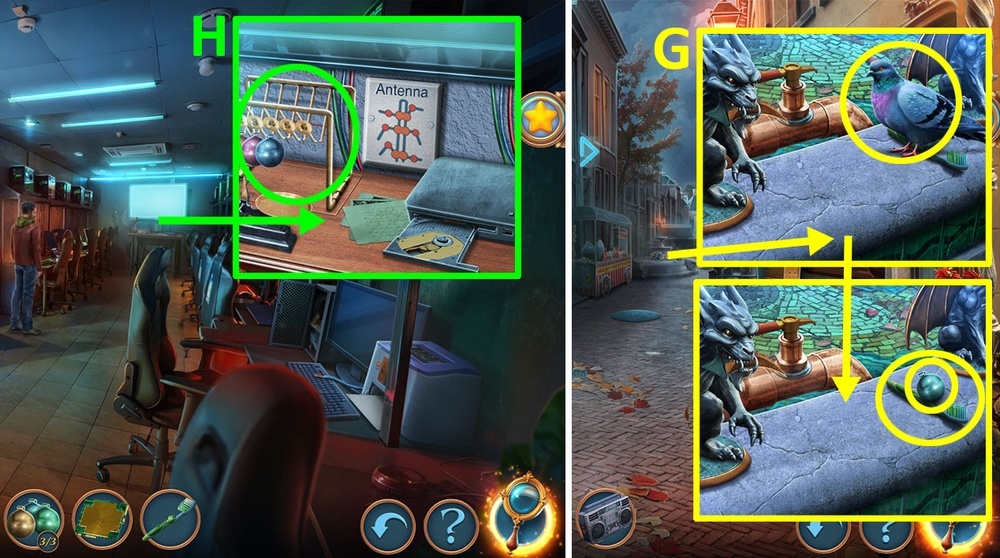
- Take LOCK PICKS 1/2 and LOVE PADLOCK (H).
- Take apart the BROKEN HAIR DRYER.
- Use HANDLE and LOVE PADLOCK on the mechanism (I).
- Go to the Tech Room.

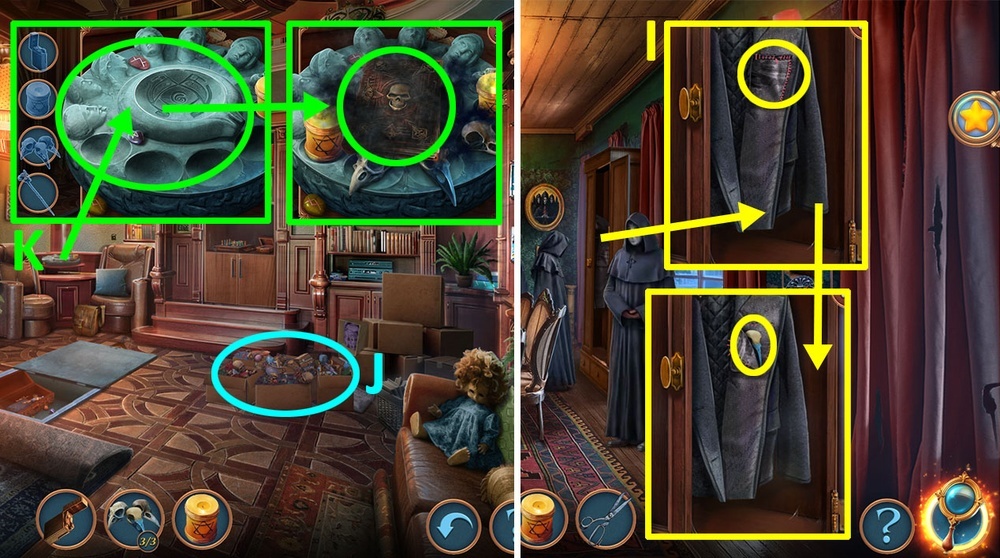
- Use CAMERA on the ghost (J).
- Select this option (K).
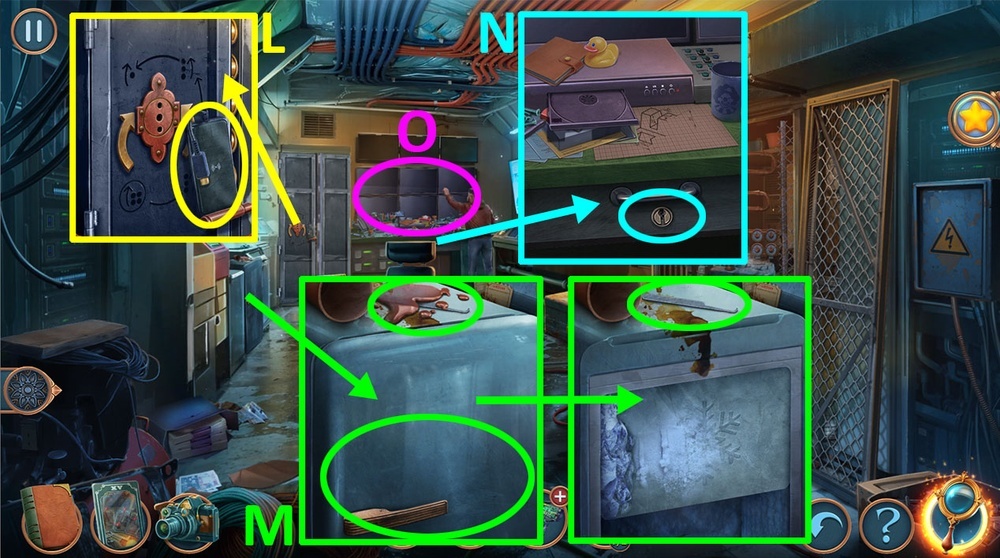
- Take POWER BANK (L).
- Use POWER BANK on the BROKEN HAIR DRYER.
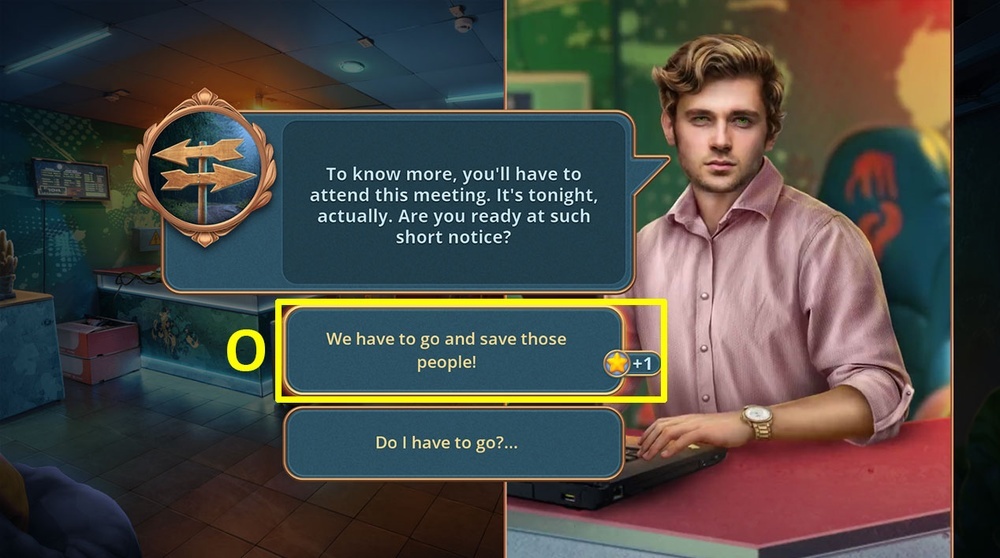
- Open the fridge, use TISSUE PACK on the spilled coffee, earn TISSUE PACK, take LOCK PICKS 2/2 (M).
- Use LOCK PICKS on the lock on the drawer (N).
- Play puzzle, earn GNOME’S TORCH (O).
- Go to the Amusement Park Garden.
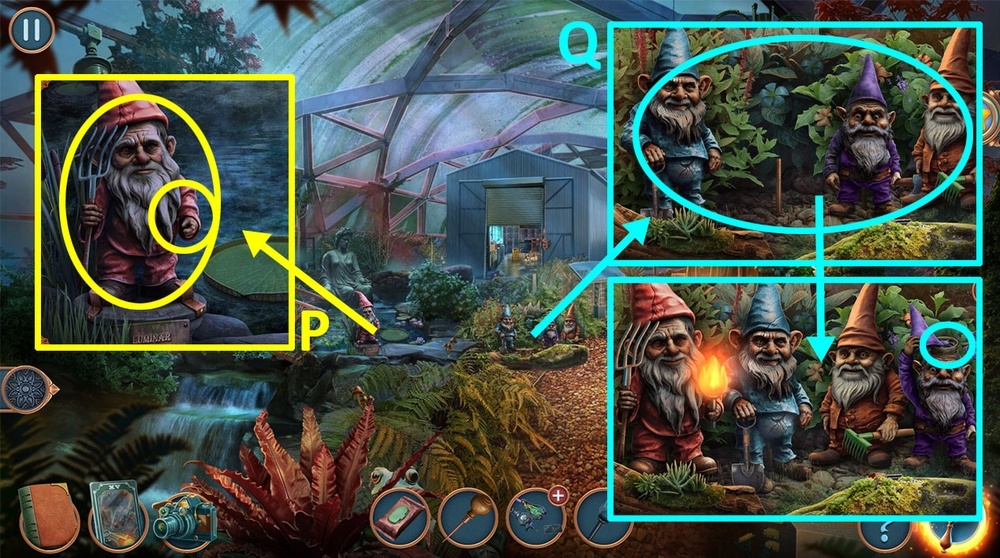
- Use GNOME’S TORCH on the gnome, take GNOME (P).
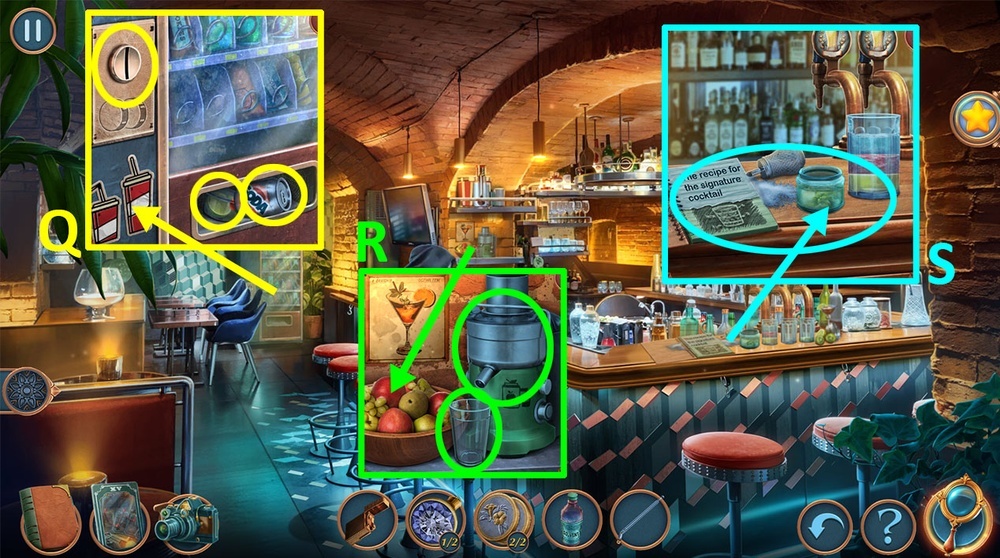
- Use GNOME on the bush (Q).
- Solution: Place the colored gnomes in accordance with the color of the flowers, take FAN.
- Use FAN on BROKEN HAIR DRYER, earn WIRELESS HAIR DRYER.
- Go to the Tech Room.
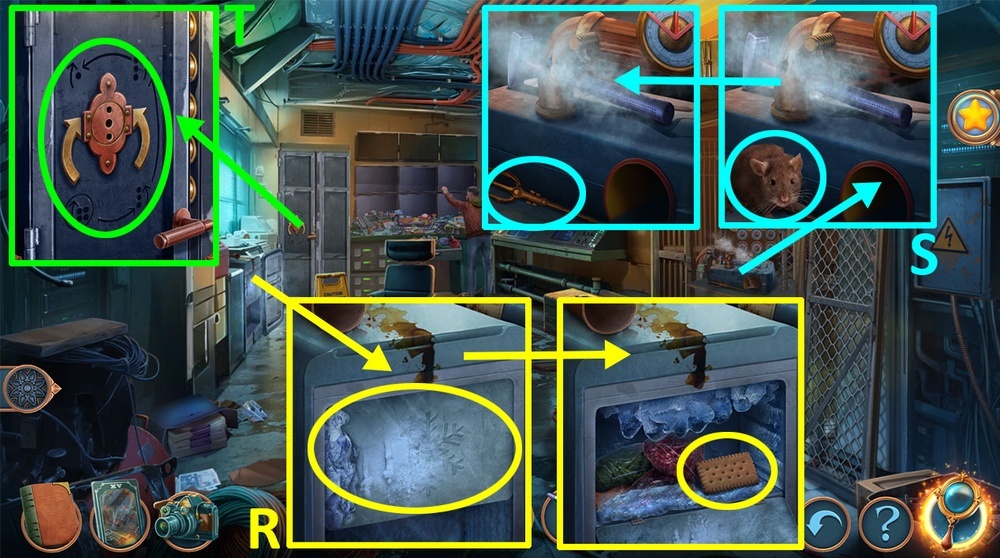
- Use WIRELESS HAIR DRYER on the freezer, take CRACKER (R).
- Use CRACKER on the mouse, take TRIDENT (S).
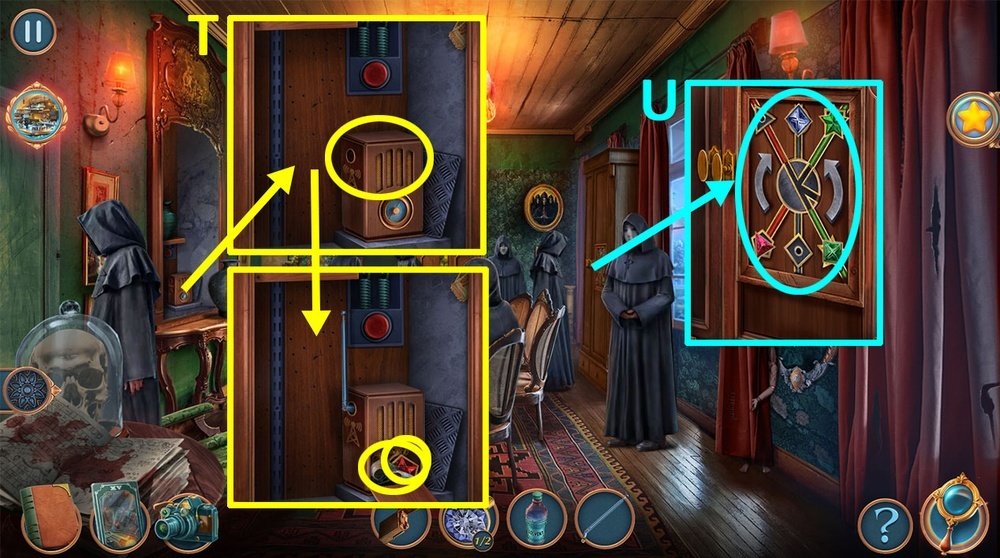
- Use TRIDENT on the lock (T).
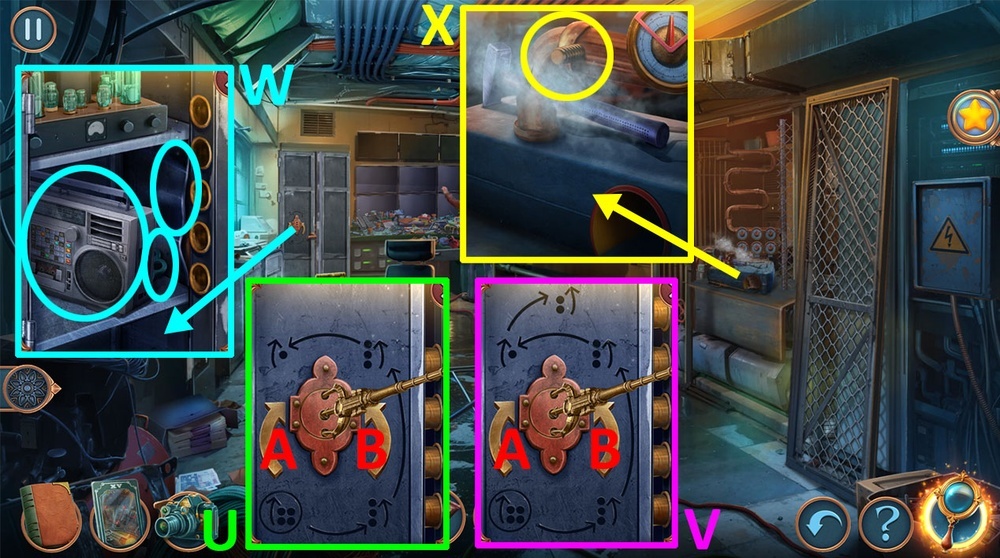
- Easy Solution: Ax4, Bx6, A (U).
- Hard Solution: Ax4, Bx6, A, Bx2 (V).
- Take TAPE RECORDER and VALVE, use AWL on the metal panel (W).
- Use VALVE on the pipe (X).

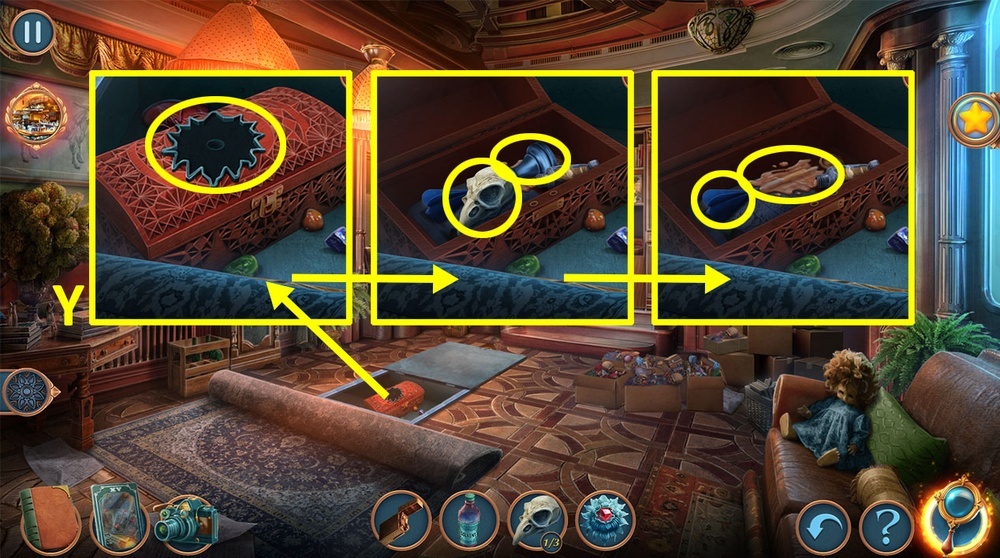
- Easy solution: Ax2, Bx3, Cx2, Dx10, E, F (Y).
- Hard solution: Ax2, Bx6, Cx3, Dx2, Ex10, F, G (Z).
- Take HAMMER (A).
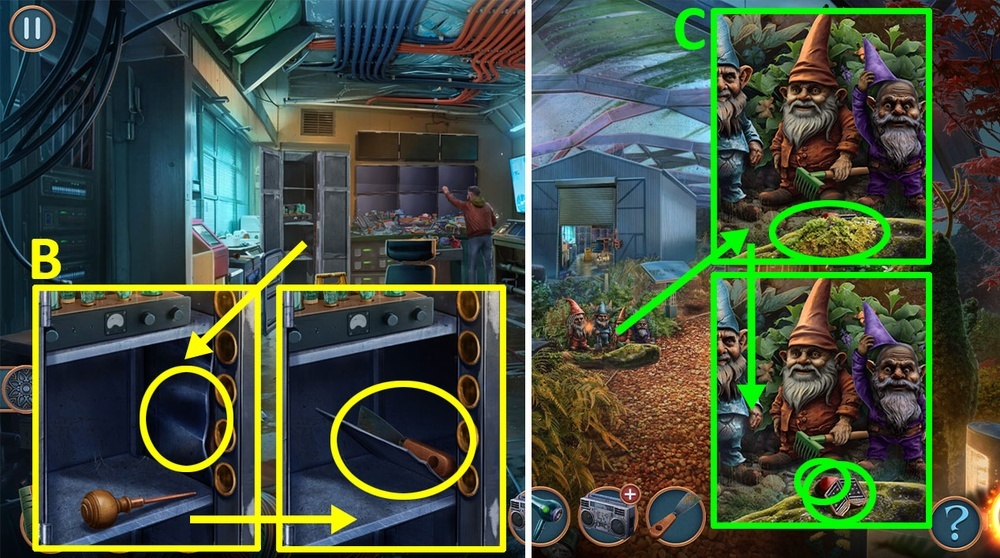
- Use HAMMER on the metal panel, take SPATULA (B).
- Go to the Amusement Park Garden.
- Use SPATULA on the moss, take BOOK AMULET and BUTTON (C).

- Use BUTTON on the socket, take CCTV RECORD (D).
- Go to the Tech Room.
- Use CCTV RECORD on the CD player (E).
- Play puzzle (F).
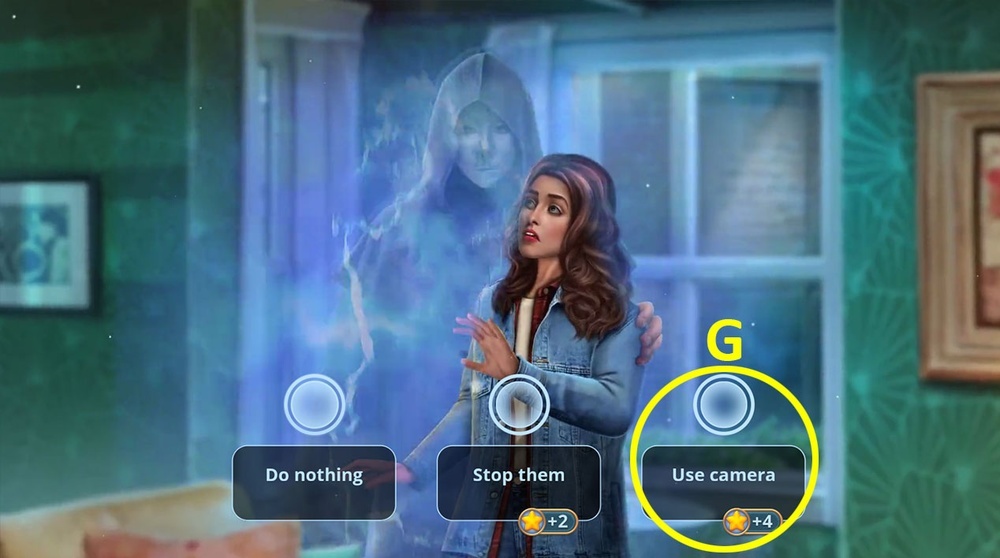
- Select this option (G).

- Take EMPTY CARTRIDGE (H).
- Use BOOK AMULET on the bag, take FAKE BOOK (I).
- Use FAKE BOOK on the shelf (J).
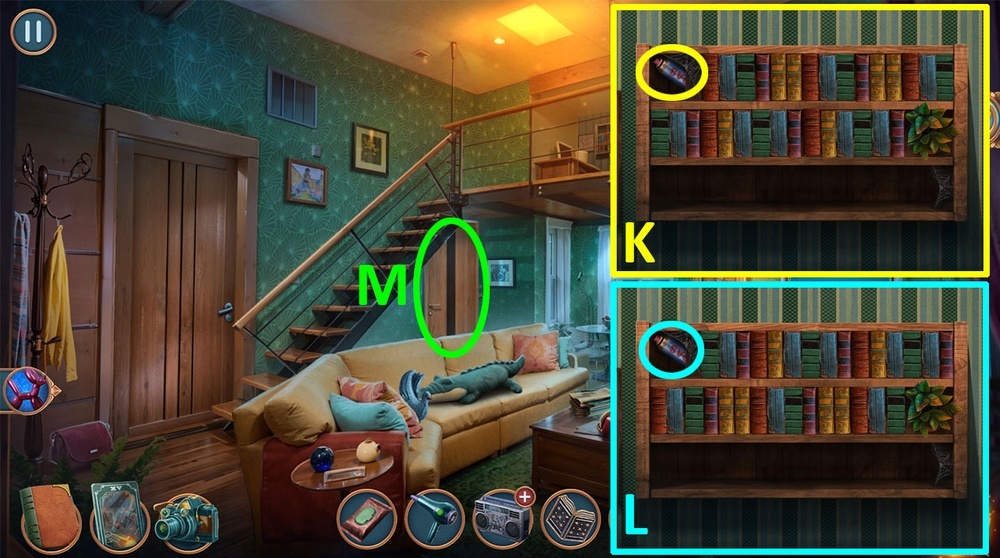
- Easy solution: Use the picture as a hint, take GAS CYLINDER (K).
- Hard solution: Use the picture as a hint, take GAS CYLINDER (L).
- Open the door (M).
- Go to the City Street.
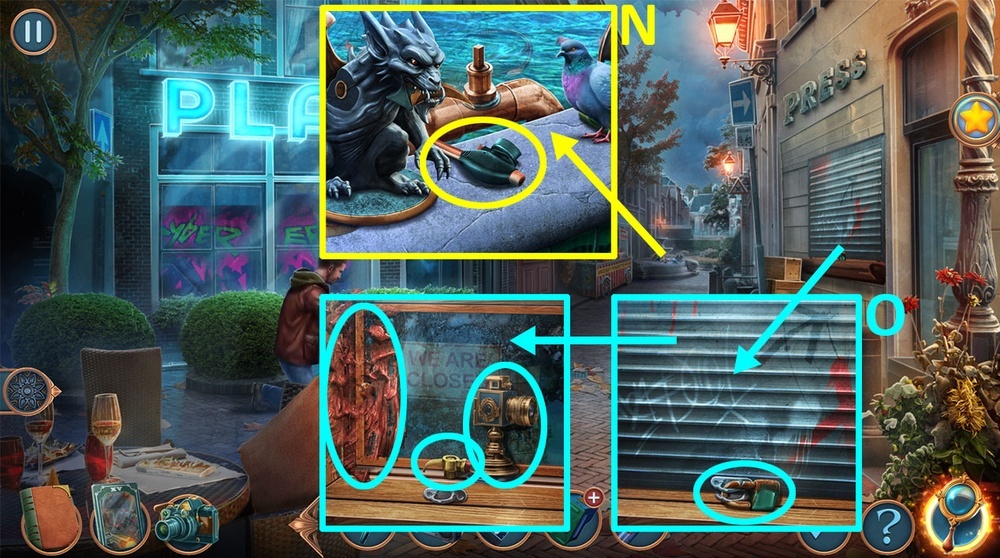
- Take BURNER NOZZLE (N).
- Use BURNER NOZZLE and GAS CYLINDER on the rusted lock, take FIGURINE and HANDLE, use TISSUE PACK on the paint (O).
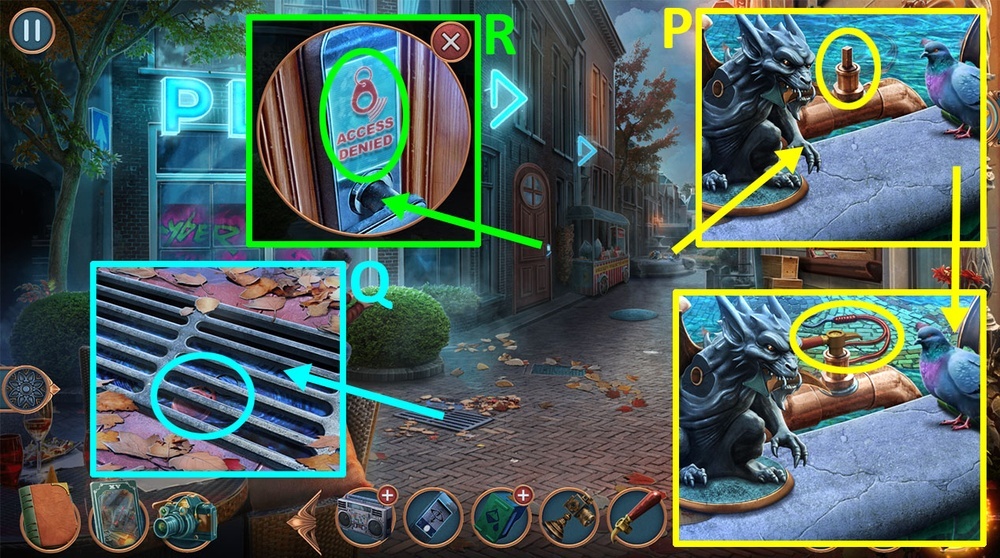
- Use HANDLE on the pipe, take HOOK (P).
- Use HOOK on the grid, earn KEY (Q).
- Use KEY on the electronic lock (R).

- Easy solution: Dx2, Ex2, B, D, Ax3, Dx3, Cx2, Bx2, Dx6, Cx2, Ax2, D, Bx6 (S).
- Hard solution: Dx2, Ex2, B, D, Ax3, Dx3, Cx2, Bx2, Dx6, Cx2, Ax2, D, Bx6 (T).
- Go to Computer Club.

- Select this option (U).
- Use PHOTO on Jerry, earn PHONE (V).

- Use PHONE on the antenna scheme, earn ANTENNA INSTRUCTIONS (W).
- Use FIGURINE on the lock, take ANTENNA PIECE (X).
- Take BALLS 1/3, use ANTENNA PIECE and ANTENNA INSTRUCTIONS on the antenna (Y).

- Solution: Easy: B, Ax2, Dx2, C, Fx2, E, Hx2, G, I, J, L, K.
- Hard: B, Ax2, Dx2, C, Fx2, E, G, J, Ix2, L, K, F, A (Z).
- Take SCHEME (A).
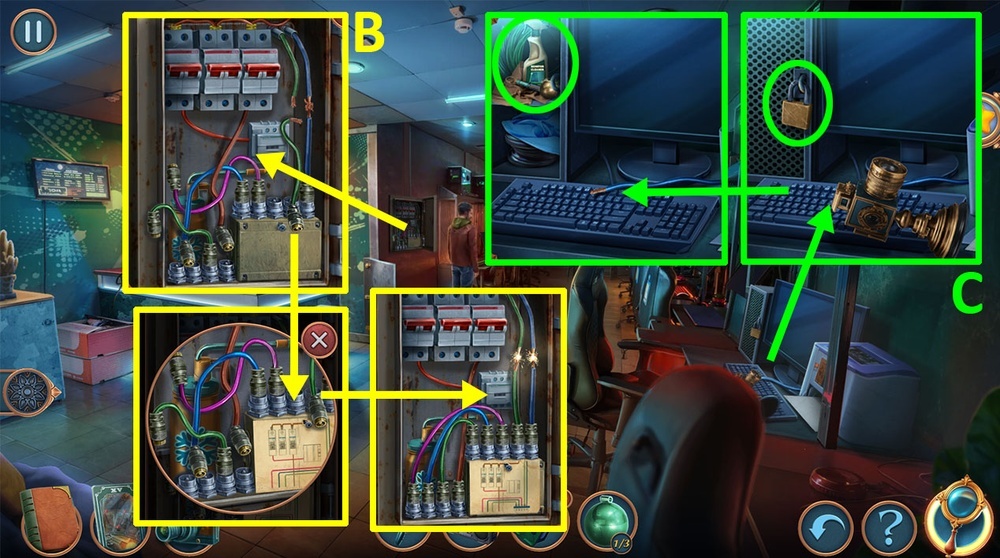
- Use SCHEME on the junction box, connect the wires, use WIRELESS HAIR DRYER on the sparkling wires, take LIQUID NITROGEN (B).
- Use LIQUID NITROGEN on the lock, take BALLS 2/3, SYRINGE and MONITOR CLEANER (C).
- Use SYRINGE on the EMPTY CARTRIDGE.
- Go to the City Street.
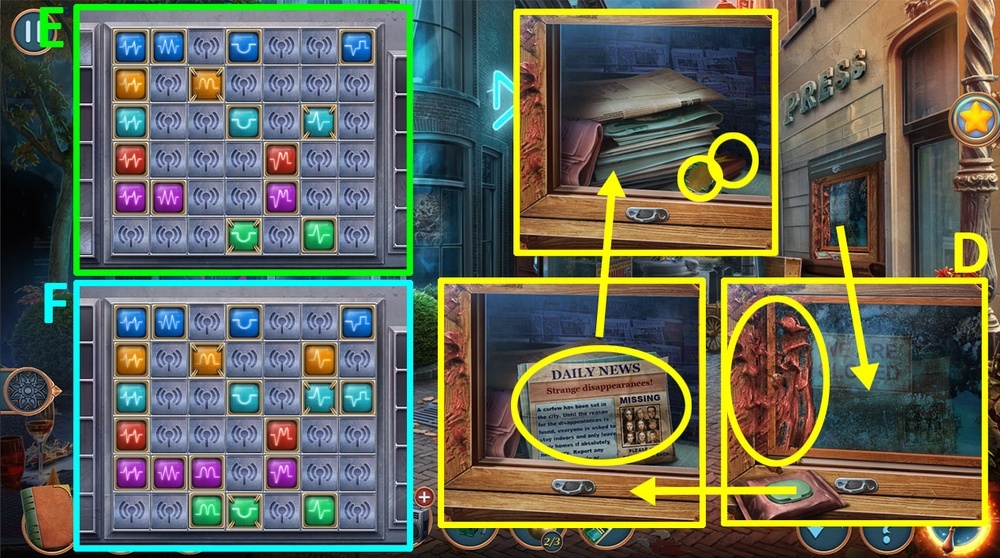
- Use MONITOR CLEANER on the paint, read the newspaper, take CHIP and BATTERIES (D).
- Use BATTERIES on TAPE RECORDER.
- Easy solution: Use the picture as a hint (E).
- Hard solution: Use the picture as a hint (F).
- Earn TAPE RECORDER.
- Use TAPE RECORDER on the dove, take BALLS 3/3 and TOOTHBRUSH (G).
- Go to Computer Club.
- Use BALLS on the puzzle (H).

- Easy solution: Use the picture as a hint (I).
- Hard solution: Use the picture as a hint (J).
- Take WIRES 1/2 and HEAT-SHRINK TUBES (K).
- Use HEAT-SHRINK TUBES on the sparkling wires (M).
- Click on the computer, click on the search engine, read the article, use CAMERA on the ghost (N).
- Select this option (O).
- Earn LIGHTER.
- Go to Nancy’s house.
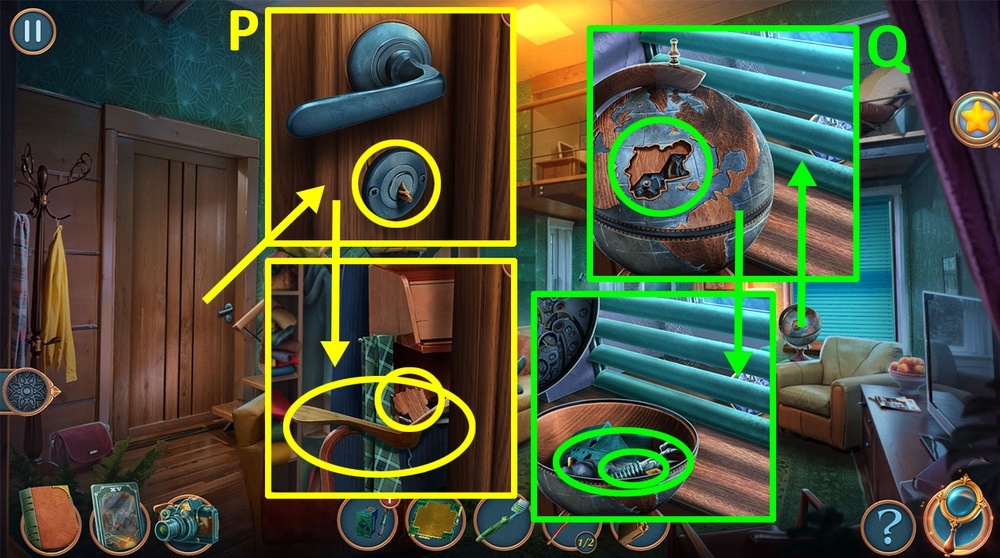
- Use TOOTHBRUSH and LIGHTER on the broken key, take HANGER and WOODEN MAINLAND (P).
- Use WOODEN MAINLAND on the globe, take SPRING and GARGOYLE PART (Q).
- Go to the City Street.

- Use GARGOYLE PART, take METAL SHARP FANG (R).
- Go to the Computer Club.
- Use METAL SHARP FANG on the wire, earn WIRES 2/2 (S).
- Go to Nancy’s House.

- Use CHIP and WIRES on the remote (T).
- Easy and Hard solution: Use the picture as a hint (U).
- Take BLINDS REMOTE.

- Use BLINDS REMOTE on the blinds, take STRANGE PARTS 1/2 and INK (V).
- Use INK on EMPTY CARTRIDGE, earn FULL CARTRIDGE.
- Go to the Computer Club.
- Use FULL CARTRIDGE on the printer, click on the computer screen, take CULTIST PHOTO (W).
- Go to Nancy’s house.

- Use CULTIST PHOTO on the closet, take black cloak, man’s shoes, cape and mask (X).
- Select this option (Y).
- Go to the Cultists’ Bar.

- Take COINS 1/2 and NAPKIN (Z).
- Take SOLVENT and PENCIL (A).
- Use NAPKIN on the spilled sugar, take DIAMOND RING, use PENCIL on the notebook (B).
- Use DIAMOND RING on the glass, take TWEEZERS (C).
- Go to the Cultists’ Gathering Hall.

- Click on the broken antenna, click on the metal panel, use SPRING on the mechanism (D).
- Take EMBLEM (E).
- Use EMBLEM on the frame, take BUTTON (F).

- Use BUTTON on the mechanism, take WING (G).
- Use WING on the angel (H).
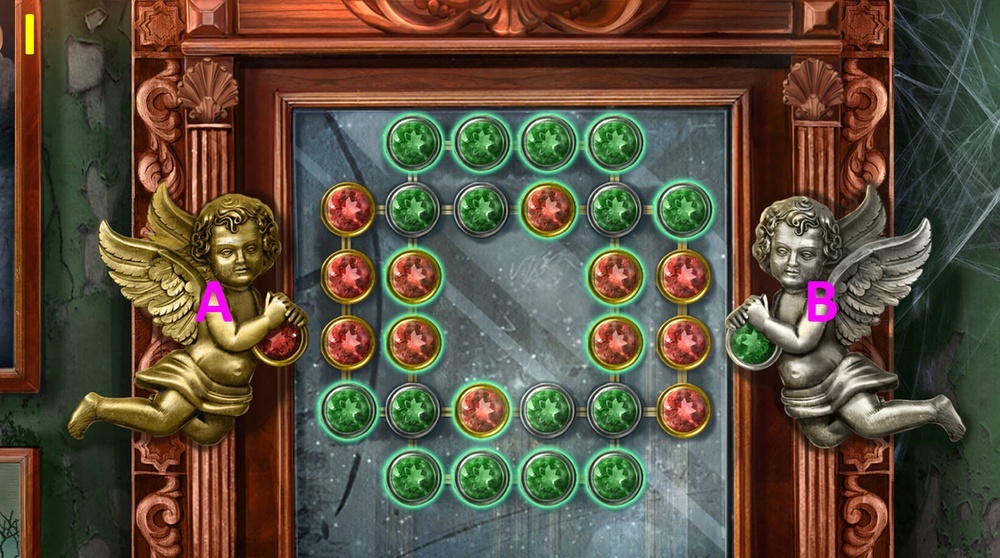
- Solution: Bx5, A, B, A, B (I).
- Go to the Secret Room.
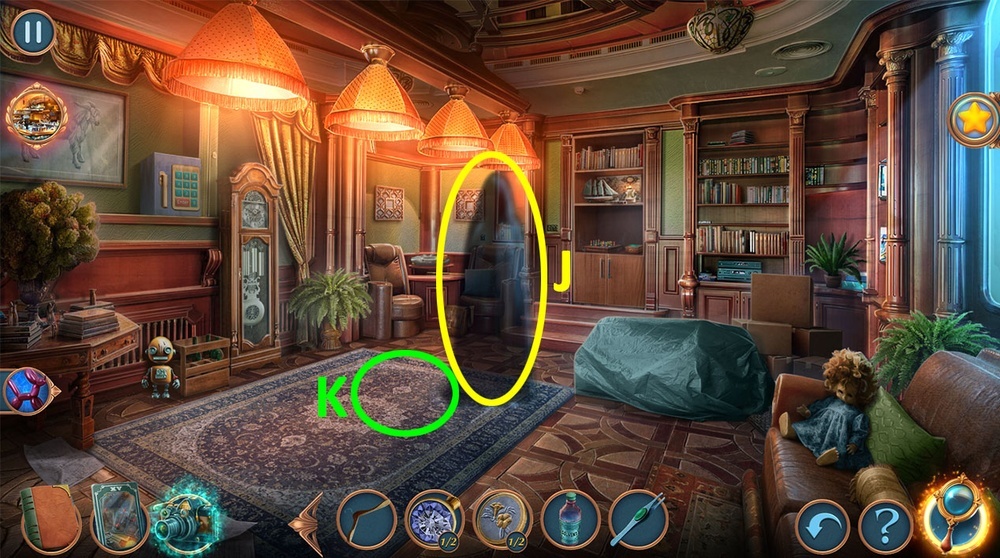
- Use CAMERA on the shadow (J).
- Remove the carpet (K).
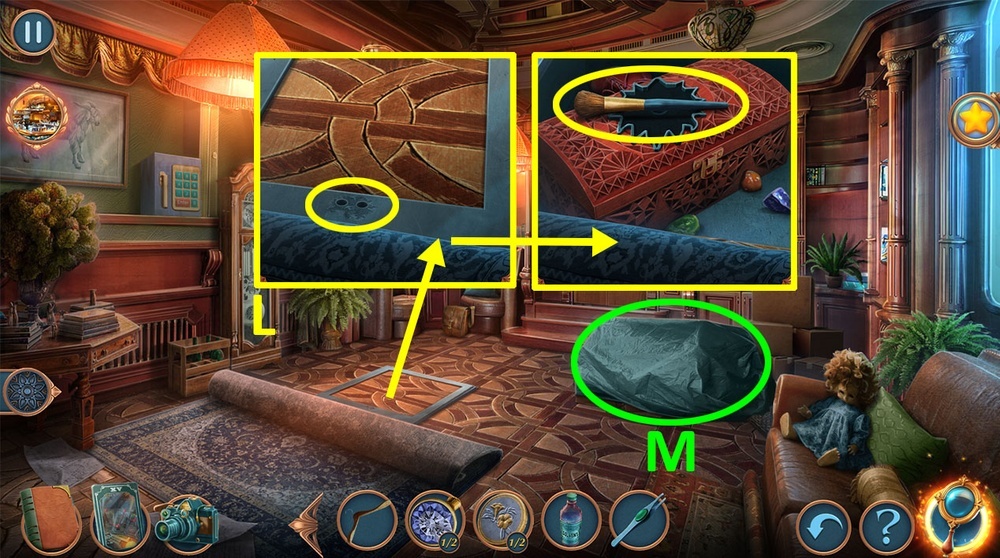
- Use HANGER on the two holes in the hatch, take BRUSH (L).
- Remove the cover, play puzzle, earn KEY (M).
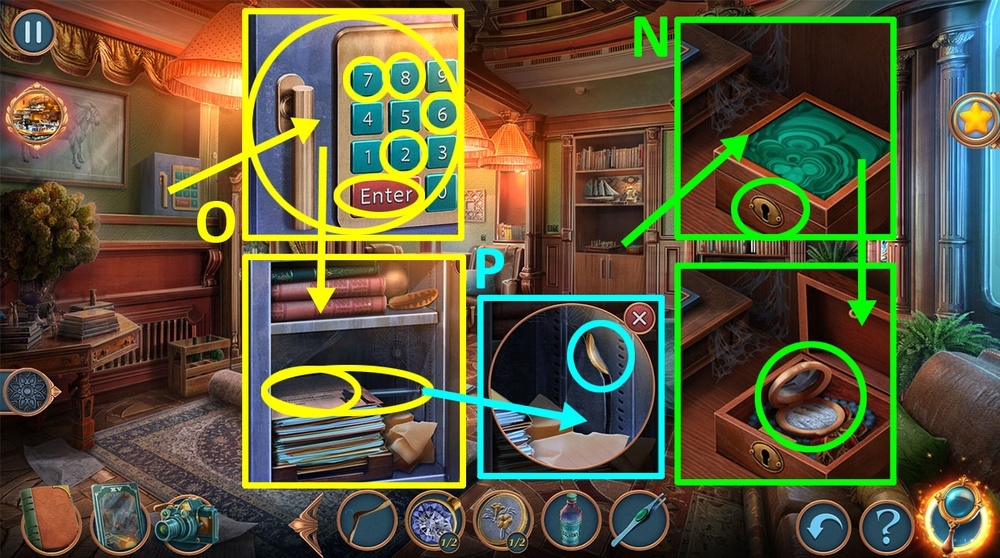
- Use KEY on the box, take POWDER (N).
- Use BRUSH and POWDER on the keypad, open the safe by entering: 8-6-2-7-enter, take the note, read the note, take ANTENNA (O).
- Click on the wall of the safe, use TWEEZERS on the gap, earn COINS 2/2 (P).
- Go to the Cultists’ Bar.
- Use COINS on the vending machine, take CLUB SODA and LIME (Q).
- Use LIME on the juice maker, earn LIME JUICE (R).
- Use LIME JUICE and CLUB SODA on the notebook (S).
- Go to the Cultists’ Gathering Hall.
- Use ANTENNA on the radio, take RAVEN SCULLS 1/3 and STRANGE PARTS 2/2 (T).
- Use STRANGE PARTS on the mechanism (U).

- Easy solution: Use the picture as a hint (V).
- Hard solution: Use the picture as a hint (W).
- Take STONE FLOWER (X).
- Go to the Secret room.
- Use STONE FLOWER on the box, take RAVEN SCULLS 2/3 and CHESS PIECE, use SOLVENT on the wax, take DART (Y).
- Go to the Cultists’ Bar.
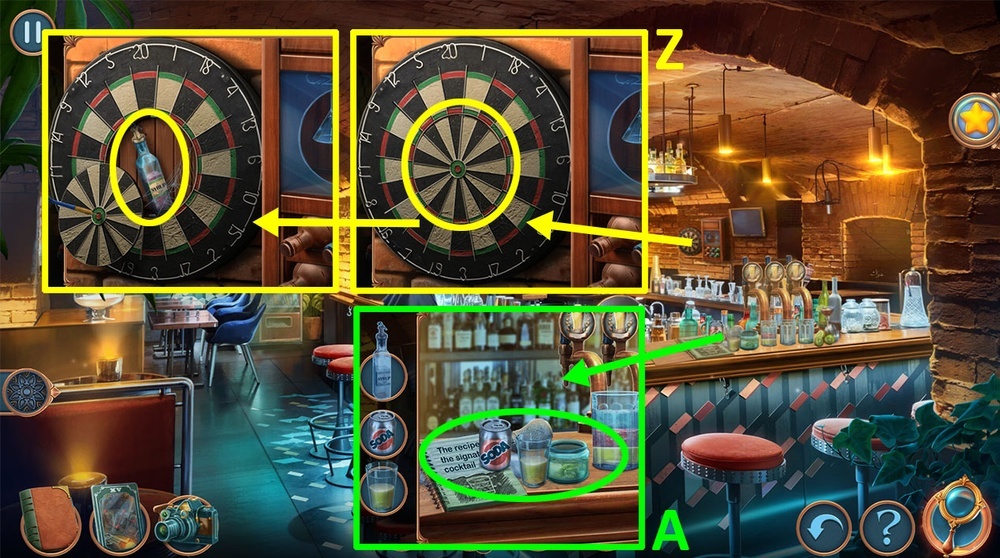
- Use DART on the dart board, take SYRUP (Z).
- Use SYRUP on the notebook (A).
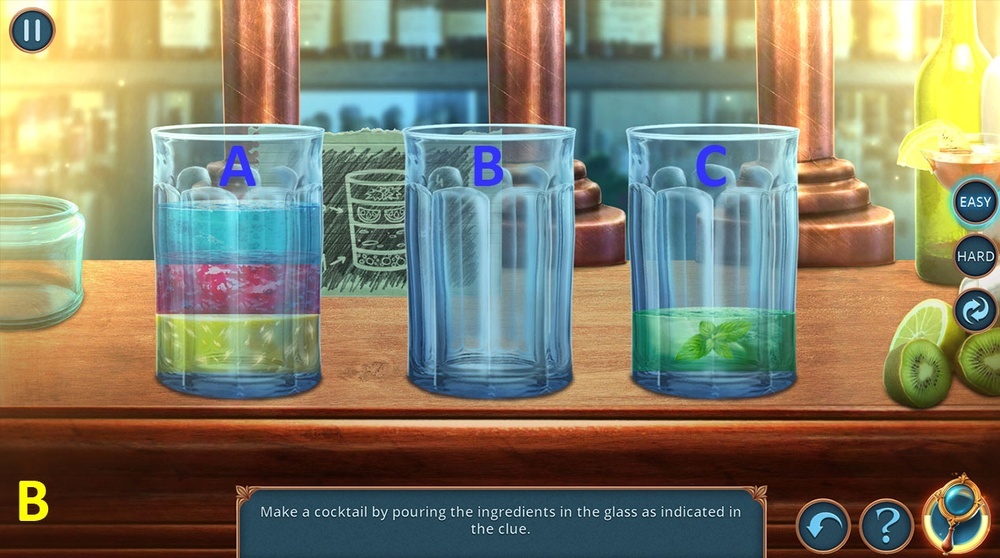
- Easy and Hard solution: A-B, A-B, A-B, C-B (B).
- Earn SIGNATURE COCKTAIL.

- Use SIGNATURE COCKTAIL on the cultist (C).
- Solution: Use the picture as a hint (D).
- Solution: Use the picture as a hint (E).
- Go to the Secret Room.
- Use CHESS PIECE on the chess board (F).
- Easy and Hard solution: Use the picture as a hint (G).
- Take RITUAL CANDLE and SCISSORS (H).
- Go to the Cultists’ Gathering Hall.
- Use SCISSORS on the pocket, take RAVEN SCULLS 3/3 (I).
- Go to the Secret Room.
- Play puzzle, earn RITUAL NEEDLE (J).
- Use LIGHTER, RAVEN SCULLS, RITUAL CANDLE, and RITUAL NEEDLE on the ritual table, take RITUAL BOOK (K).
- Go to the Cultists’ Gathering Hall.

- Use RITUAL BOOK on Nancy (M).
- Easy solution: Use the picture as a hint (N).
- Hard solution: Use the picture as a hint (O).
Congratulations! You have completed the game Mystical Riddles 4: Ghostly Park.


