
Mystical Riddles 5: Haunted Portraits – The events unfold three years after the main story. Oliver Cook, formerly the owner of an art gallery, has remodeled his establishment into an art school. However, it didn’t take long for new problems to arise. Students at the school start fainting en masse and some of them end up in a comatose state. You, as a researcher of paranormal phenomena, invited to understand what is happening. Perhaps behind these oddities is an evil spirit Tenebris Mortis. You need to find out who summoned him and for what purpose.
Bonus Chapter Walkthrough

- Open the trunk, take GRINDSTONE, WALLET, and TROWEL, read the business card (A).
- Use TROWEL on the dirt, read the paper, take PRUNERS PART, open the hatch, take PORTABLE SPEAKER and TRAY (B).

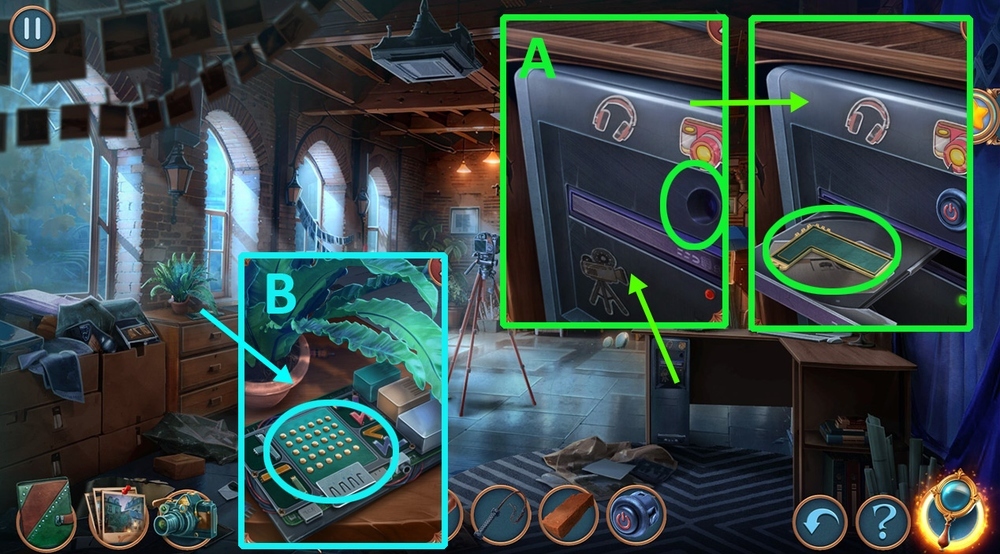
- Use TRAY on the pipe, take BUTTON (C).
- Use PORTABLE SPEAKER and BUTTON on the intercom (D).
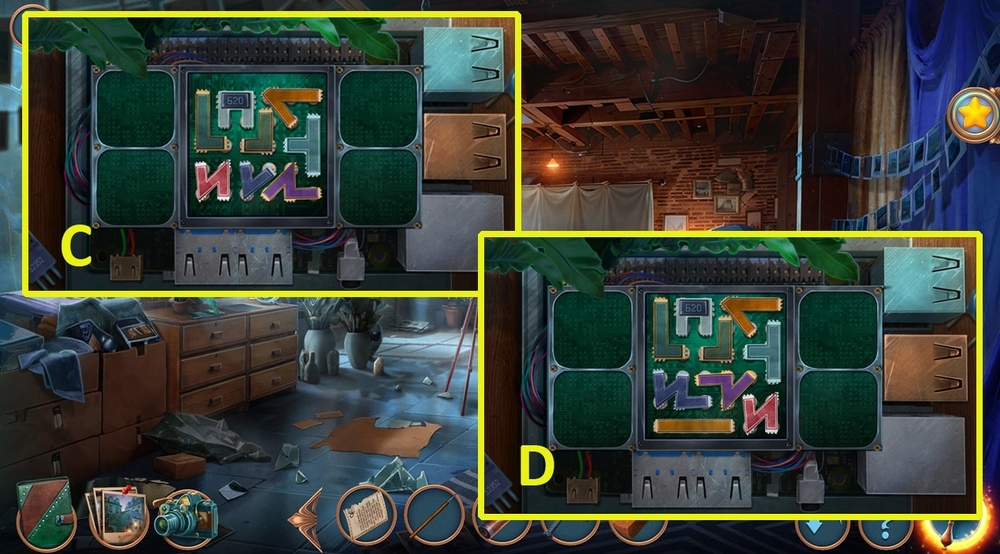
- Easy solution: follow the instructions on the image (E).
- Hard solution: follow the instructions on the image (F).
- Press the button.
- Go forward.

- Solution: follow the instructions on the image (G).
- Solution: follow the instructions on the image (H).
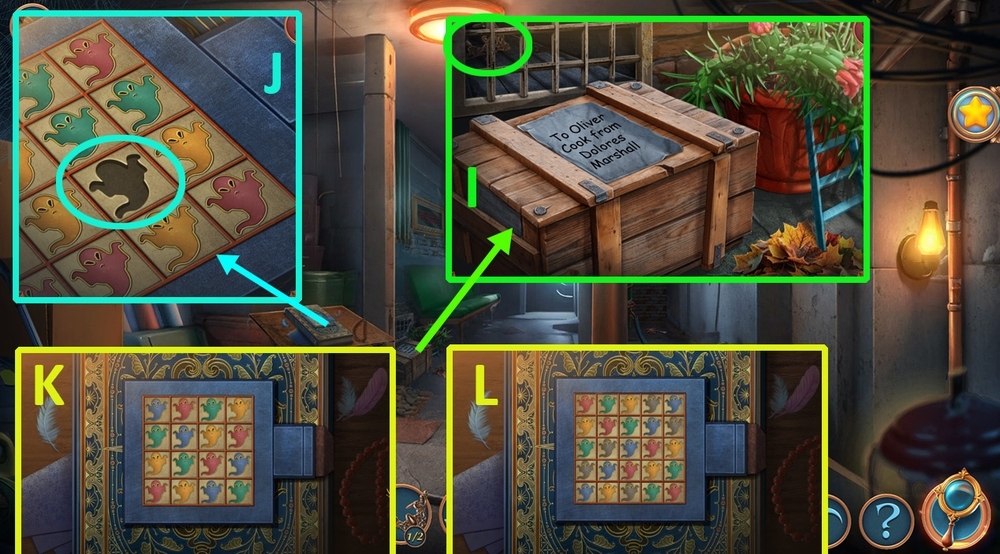
- Solution: follow the instructions on the image (I).

- Take CREDIT CARD from WALLET (J).
- Read the poster, take BOWL and PRUNERS OTHER PART (K).

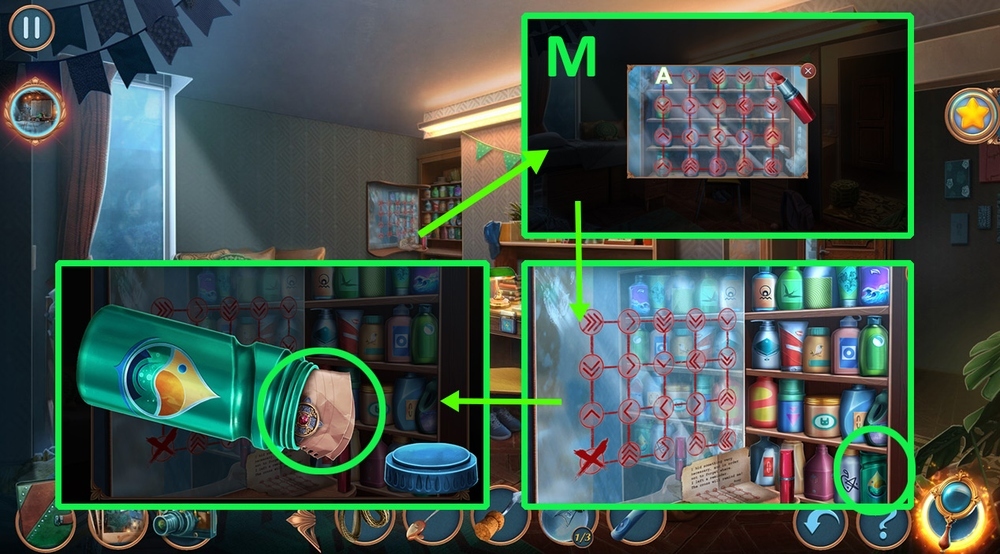
- Use CREDIT CARD on the drawings on the wall, take LOCK PICKS (L).
- Use LOCK PICKS on WALLET, take DETECTIVE ID (M).
- Offer DETECTIVE ID to the person (N).

- Go forward, use your camera on the background, examine the photo.
- Take SPRING, read the description on the bottle, take DEVELOPER BOTTLE, use CREDIT CARD on the box, take LIST OF STUDENTS and CAMERA AMULET (O).
- Use CAMERA AMULET on the book (P).
- Play puzzle, earn CLUB LEAFLET (Q).

- Use GRINDSTONE, PRUNERS OTHER PART, and SPRING on PRUNERS PART, get PRUNERS (R).
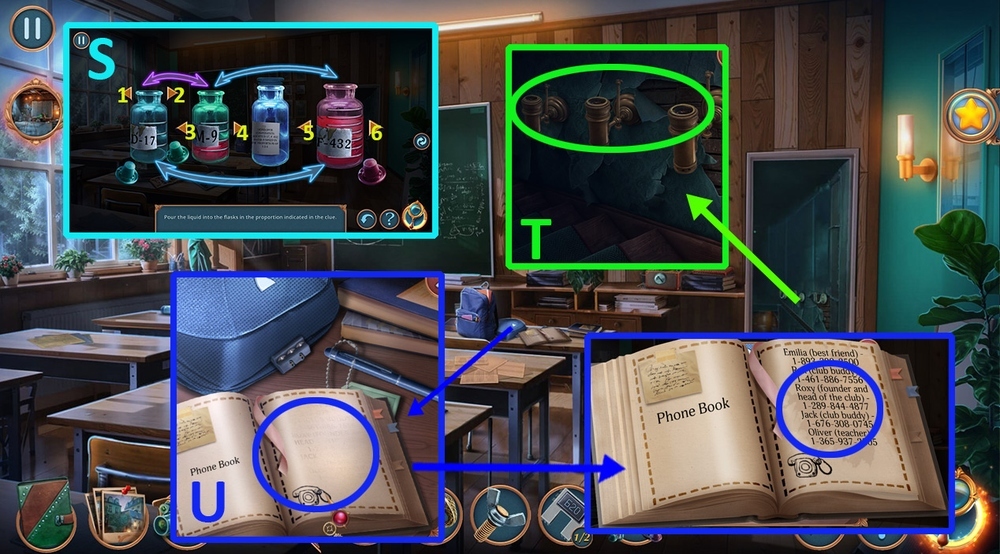
- Offer CLUB LEAFLET to the person (S).
- Select this option, get HEX KEY SET (T).
- Go In Front of Oliver’s School.

- Use HEX KEY SET on the box, take REAGENT F-432, use PRUNERS on the bag, use BOWL on the dog food, get DOG FOOD (U).
- Offer DOG FOOD to the dog (V).
- Go forward.

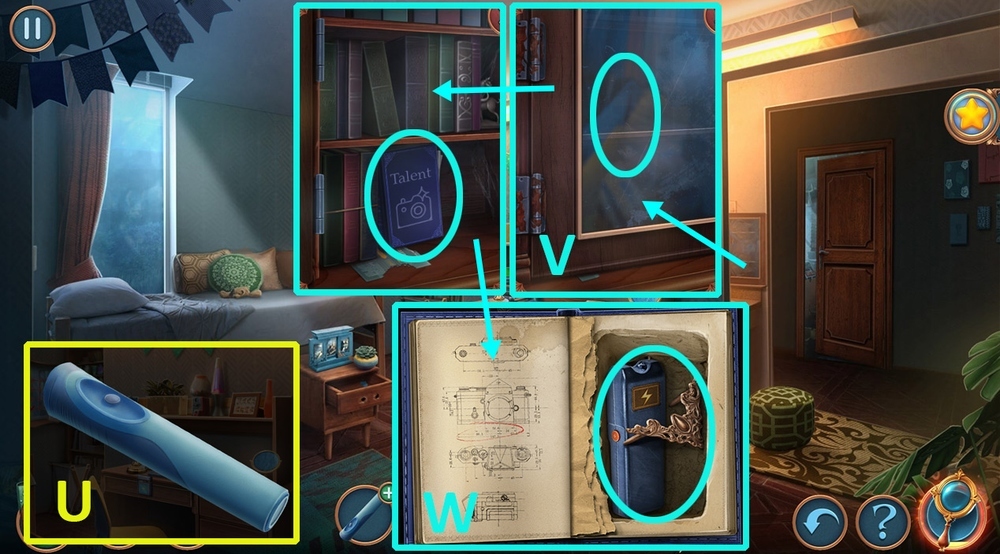
- Use CREDIT CARD on the machine money receiver, follow the instructions on the note, take TOY LADDER (W).
- Take REAGENT M-9, read the tag, take TALC, use PRUNERS on the BUSH (X).

- Easy solution: follow the instructions on the image (Y).
- Hard solution: follow the instructions on the image (Z).
- Take COMB.
- Use COMB on the fence, take NITROGEN (A).

- Use NITROGEN on the padlock, take ARMBAND, read the note, take LIPSTICK and PIN (B).

- Select this option, earn ROOM KEYS (C).
- Go to School’s Hallway.
- Use LIST OF STUDENTS and ROOM KEYS on the table (D).

- Easy solution: follow the instructions on the image (E).
- Hard solution: follow the instructions on the image (F).
- Go forward.
- Select this option (G).
- Go forward.

- Take CORK and SPOON (H).
- Take sugar cubes and put them into boiling water, use SPOON on the content, get CARAMEL (I).

- Use CORK on the metal spike, take CHISEL (J).
- Go back.
- Take LIGHT BULBS 1/3, read and take MANUAL (K).
- Take TOOTHBRUSH, use LIPSTICK and MANUAL on the mirror (L).
- Solution: drag the lipstick onto the A button (M).
- Take the green bottle on the bottom shelf, open it, take ANTI-MAGIC RING, read the note.
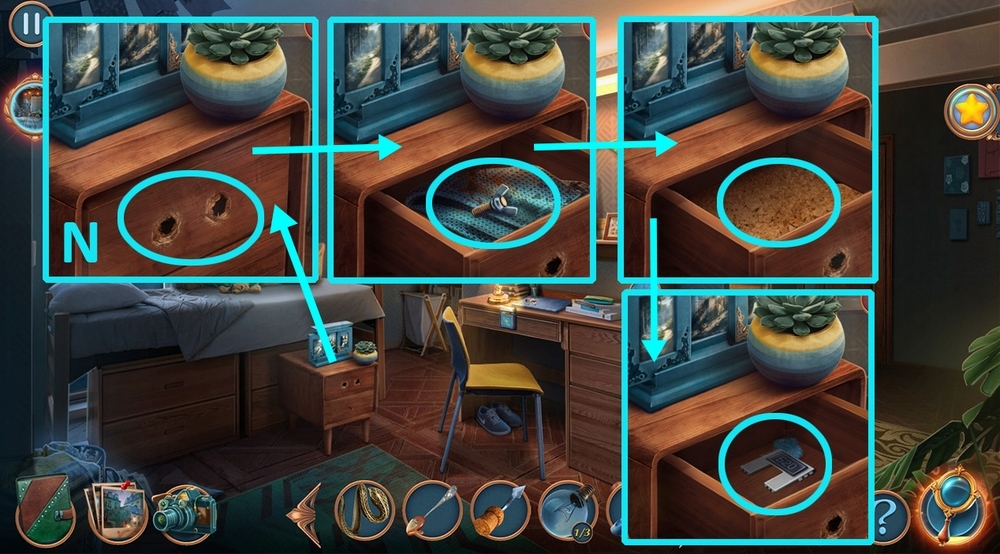
- Use ARMBAND on the drawer, take NUT, use TALC on the handkerchief, take HANDKERCHIEF, use CHISEL on the bottom of the drawer, take CHIP FRAGMENTS 1/2 (N).
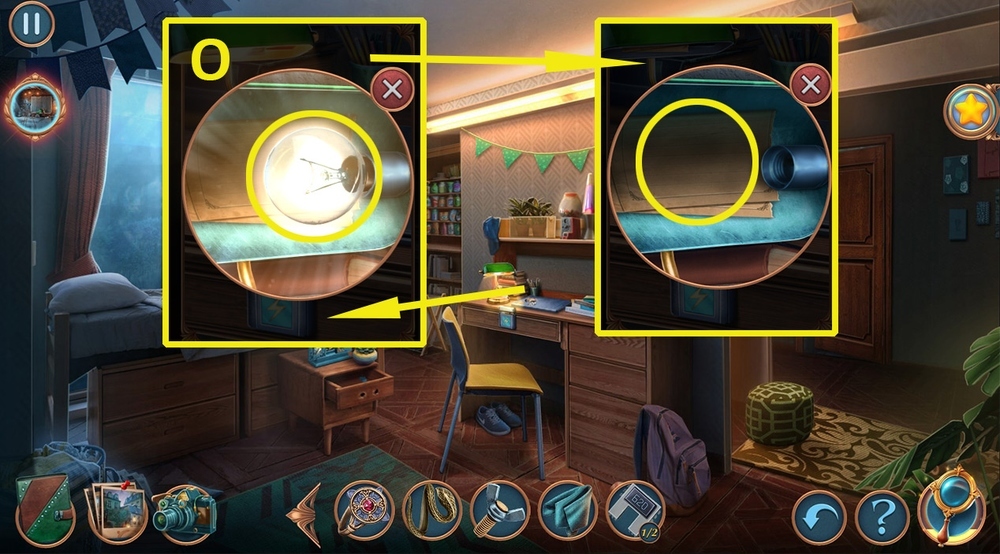
- Click on the lamp, use HANDKERCHIEF on the light bulb, get LIGHT BULBS 2/3, read the note (O).
- Go to Photography Classroom.

- Play puzzle, earn PHOTO (P).
- Use PHOTO on the wall, take LIGHT BULBS 3/3 and REAGENT D-17 (Q).
- Use REAGENT F-432, REAGENT M-9, and REAGENT D-17 on DEVELOPER BOTTLE (R).
- Solution: click 4-3-5, get DEVELOPING AGENT (S).
- Use LIGHT BULBS on the plug-in mountings (T).
- Use DEVELOPING AGENT on the book, read the book, take ROXY’S NUMBER (U).
- Go forward, use your camera on the background, examine the photo.

- Move the curtain, use ANTI-MAGIC RING on the frame (V).
- Easy solution: 1-H, 2-D, 3-B, 4-A, 5-G, 6-F, 7-E, 8-C (W).
- Hard solution: 1-I, 2-A, 3-D, 4-C, 5-J, 6-H, 7-G, 8-B, 9-F, 10-E (X).
- Read the text.

- Use TOY LADDER on the plant, take BATTERY, VALVE, and KNITTING NEEDLE (Y).
- Use NUT and VALVE on the petcock, use CARAMEL on the ants, take BRICK, BUTTON, and WHIP (Z).
- Go to Photo Shoot Room.
- Use BUTTON on the disk unit, take CHIP FRAGMENTS 2/2 (A).
- Use CHIP FRAGMENTS on the plate (B).
- Easy solution: follow the instructions on the image (C).
- Hard solution: follow the instructions on the image (D).
- Take NEW CHIP.
- Go to In Front of Oliver’s School.

- Use WHIP on the vent, take MAGNET, use BRICK on the fan, take SAW (E).
- Use MAGNET on the buckles, take DEAD PHONE, FAVORITE TRINKET, and MIRROR (F).
- Go to School’s Garden.

- Use MIRROR on the gap, use KNITTING NEEDLE on the latch (G).
- Play puzzle, earn GAS TORCH (H).

- Use SAW on the branch, take CAMERA LENS, use GAS TORCH on the chain, take CHAIN PIECE (I).
- Go to Photo Shoot Room.
- Use NEW CHIP and CAMERA LENS on the camera (J).

- Easy solution: follow the instructions on the image (K).
- Hard solution: follow the instructions on the image (L).
- Go to School’s Hallway.

- Use CHAIN PIECE on the board, press the red button, take CHALK and CONNECTOR (M).
- Use CONNECTOR on the charger, take CHARGER (N).
- Go to Photography Classroom.

- Use ROXY’S NUMBER, DEAD PHONE, and CHARGER on the table (O).

- Easy solution: click B-1-2-3-4-5-6-7-A-1-2-3-B-1-2-3 (P).

- Hard solution: click A-1-2-3-4-5-6-B-1-2-3-C-1-2-3-B-1-2-3 (Q).

- Select this option (R).
- Use PHONE on the symbols, get CODE (S).
- Click on the code lock, use CODE on the lock, enter the code from the phone, take AROMA OIL and NOZZLE (T).
- Use BATTERY and NOZZLE on TOOTHBRUSH, get TOOTHBRUSH (U).
- Go to Roxy’s Room.
- Use AROMA OIL and TOOTHBRUSH on the cabinet (V).
- Play puzzle, examine the book, take FRAME PARTS 1/2 and STUN GUN (W).

- Use STUN GUN on the panel, examine the tag, take DIADEM and FOX TAIL, read the paper clipping (X).
- Go to School’s Garden.

- Play puzzle, earn ROSE (Y).
- Use FAVORITE TRINKET, CHALK, and ROSE on the drawer (Z).

- Select this option, use camera on the background, examine the photo (A).
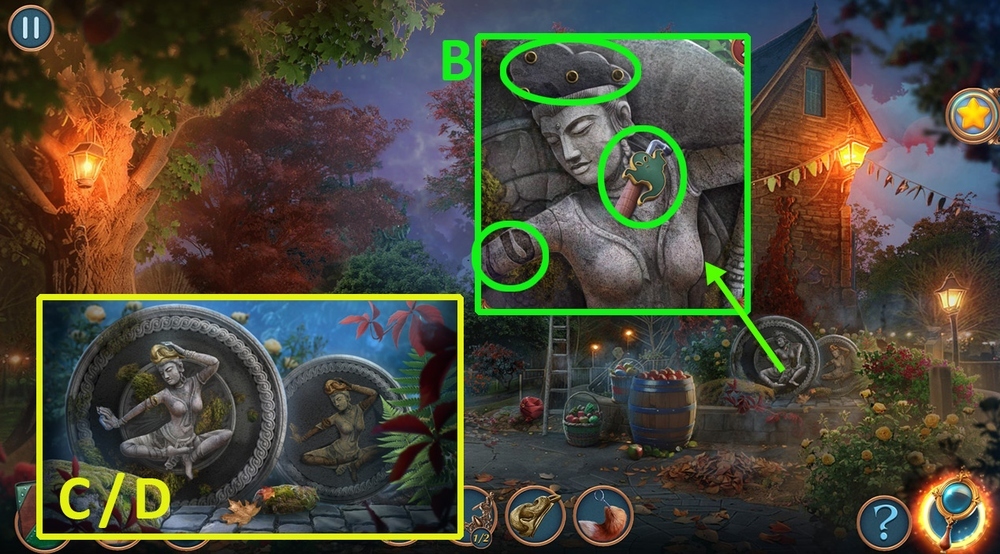
- Take SPIRIT’S AMULET and TUNING KEY, use ARMBAND and DIADEM on the sculpture (B).
- Easy solution: follow the instructions on the image (C).
- Hard solution: follow the instructions on the image (D).
- Take SMELLING SALTS.
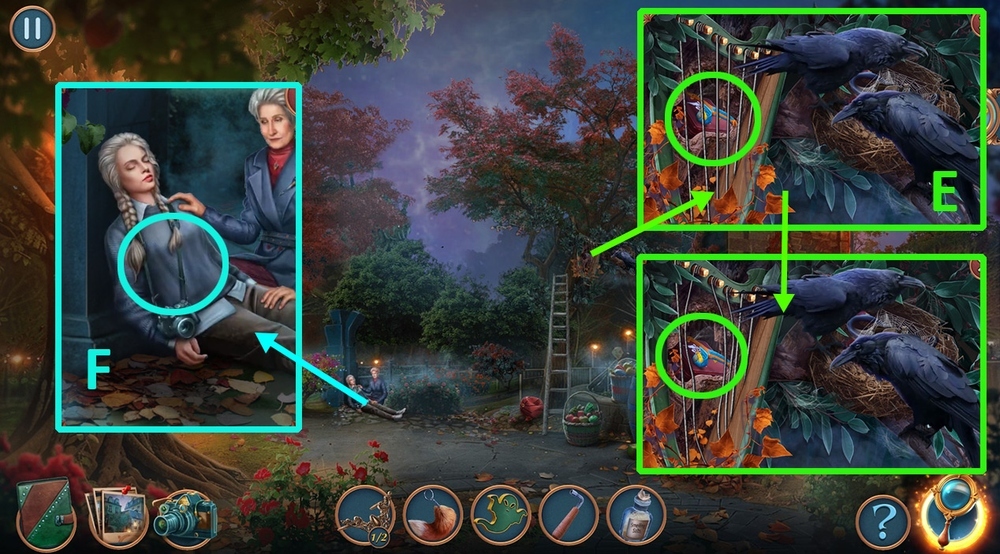
- Use TUNING KEY on the harp, take TOY ROD and FIRST AID KIT (E).
- Use SMELLING SALTS and FIRST AID KIT on the person (F).

- Easy solution: follow the instructions on the image (G).
- Hard solution: follow the instructions on the image (H).
- Go to Basement.
- Use TOY ROD on the bars, get FRAME PARTS 2/2 (I).
- Use SPIRIT’S AMULET on the book (J).
- Easy solution: follow the instructions on the image (K).
- Hard solution: follow the instructions on the image (L).
- Read and take DOLORES’S BOOK.
- Go to Roxy’s Room.

- Use FRAME PARTS on the frame, take WHISTLE (M).
- Go to Roxy’s Photo.
- Use WHISTLE on the ravens, take OLD SHOE, use FOX TAIL on the spiderweb, take PUMP (N).

- Use PUMP on the basketball, take BASKETBALL (O).
- Go to Basement.
- Use OLD SHOE on the box (P).
- Use BASKETBALL on the ring (Q).
- Easy and hard solution is random.

- Use FANG on the box, read the note, take MAGIC CRYSTAL (R).
- Go to School’s Garden.
- Offer DOLORES’S BOOK, RUNES, and MAGIC CRYSTAL to the person (S).

- Easy solution is random (T).
- Hard solution is random (U).
Congratulations! You have completed the game Mystical Riddles 5: Haunted Portraits.


