
Mystical Riddles 5: Haunted Portraits – Neil Clarke is asking for your help as only you can find his missing wife, Virginia. The police have been powerless, and the last place she was seen is the art gallery of renowned photographer Oliver Cooke. Virginia is not the first to disappear in this mysterious place. Immerse yourself in a world of mystery and danger to solve a new mystery of a young woman’s disappearance. At first glance, the gallery appears to be a successful but unremarkable establishment. However, it soon becomes obvious that something dark and sinister lurks within these walls. You have to confront this darkness and unravel the network of secrets and lies. If you can not pass any of the puzzles or do not know where the items are, on our site you can watch the walkthrough of the game Mystical Riddles 5: Haunted Portraits, and solve the cases of paranormal nature.
Mystical Riddles 5: Haunted Portraits – Walkthrough
Here you can see the full walkthrough of Mystical Riddles 5: Haunted Portraits game, namely for all chapters, including bonus chapter, in pictures.

- Take CANE, read the note (A).
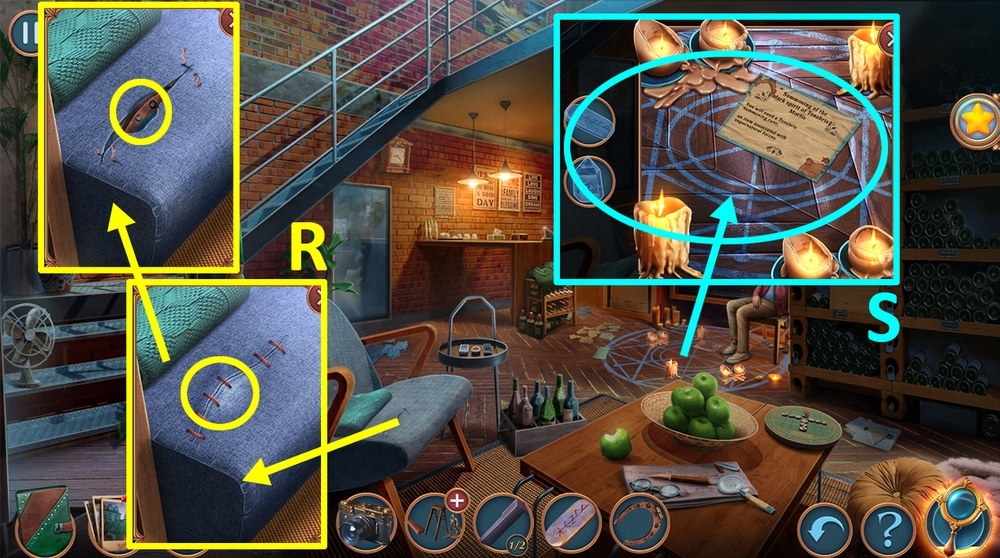
- Use CANE on the recliner lever socket, take BUSINESS CARD, NAILS, and BANKNOTE (B).
- Take journal and TISSUE, use BANKNOTE on the table (C).
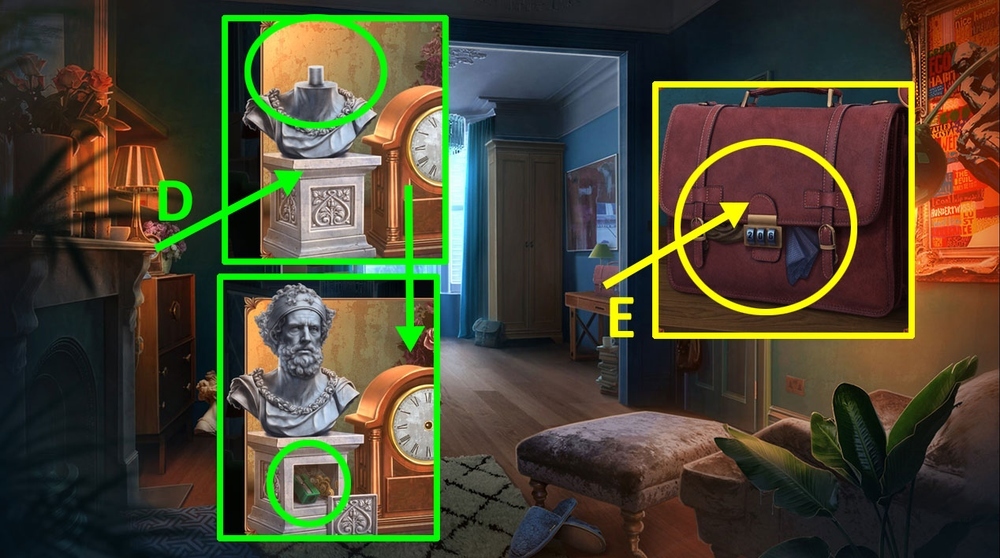
- Play puzzle, earn BUTTER (D).

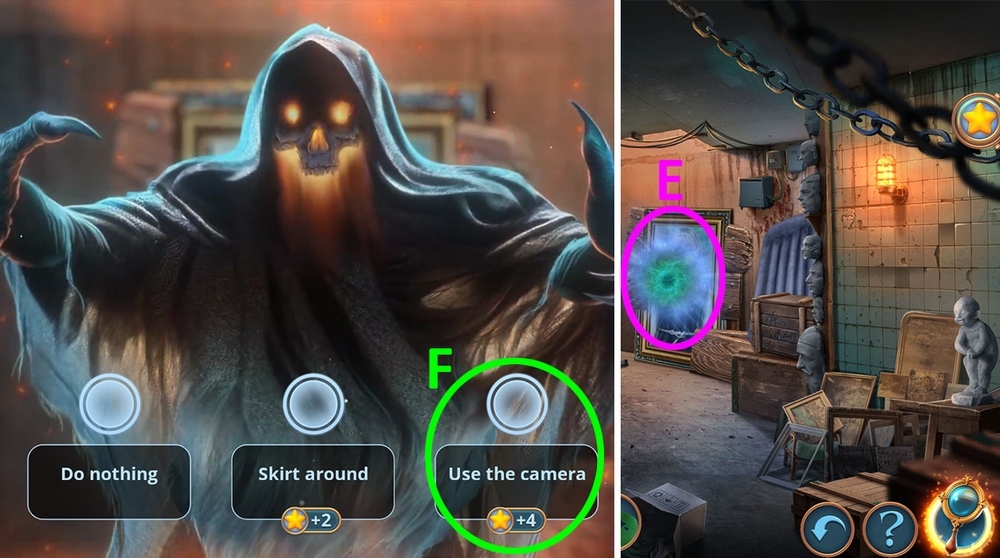
- Use BUTTER on the rucksack, take camera, read the note, take TICKET and UMBRELLA (E).
- Use camera on the ghost, examine the photo (F).
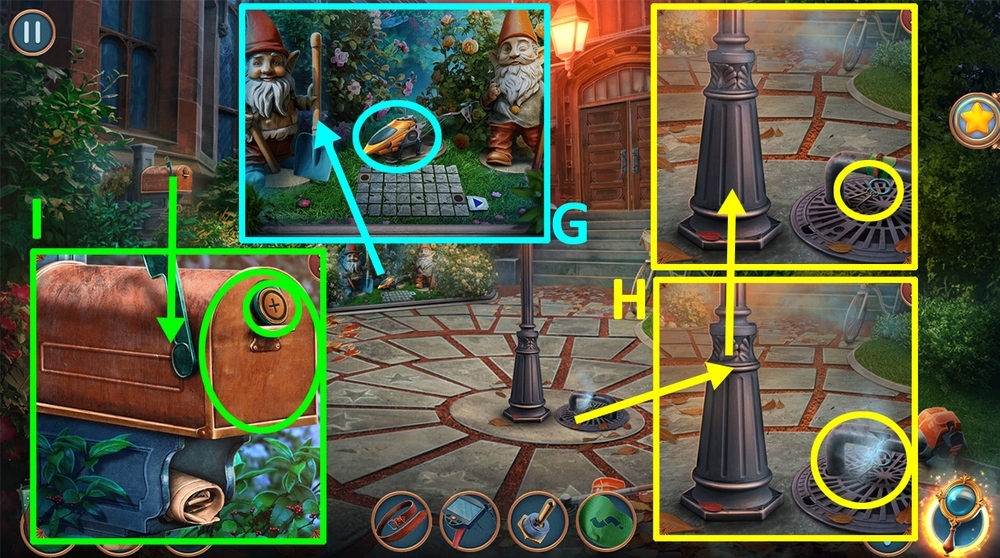
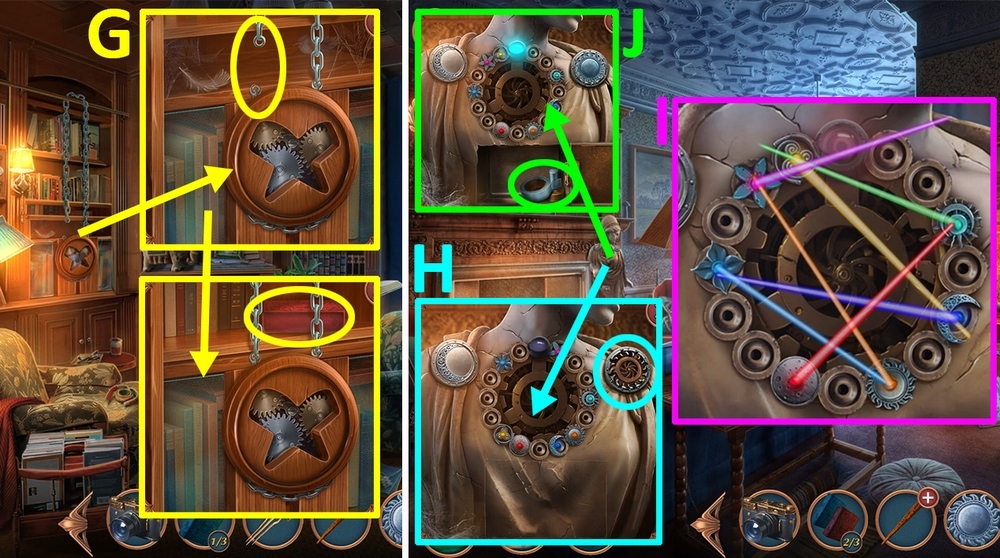
- Take the map and CANISTER, use TICKET on the turnstile (G).
- Use CANISTER on the gas pump (H).

- Go forward (I).
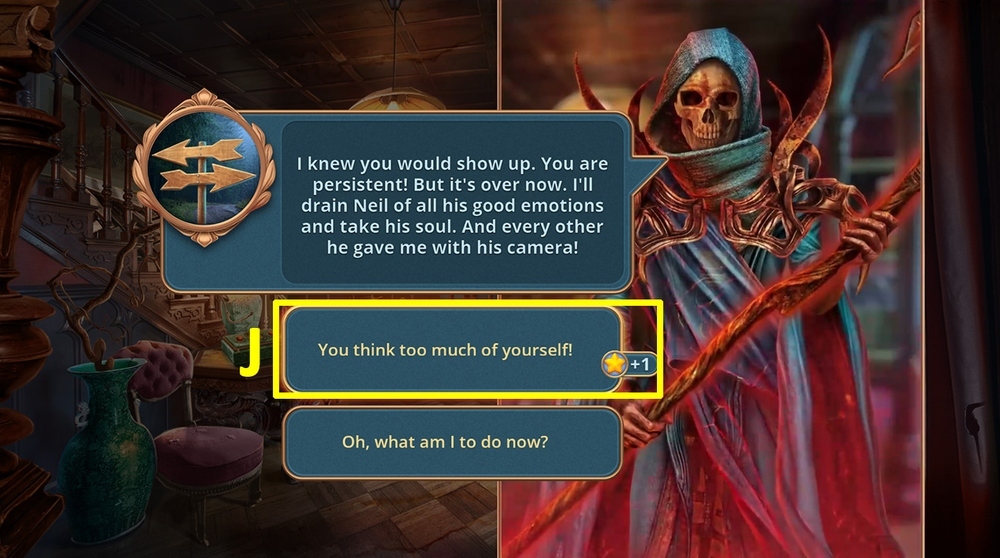
- Talk to the person (J).
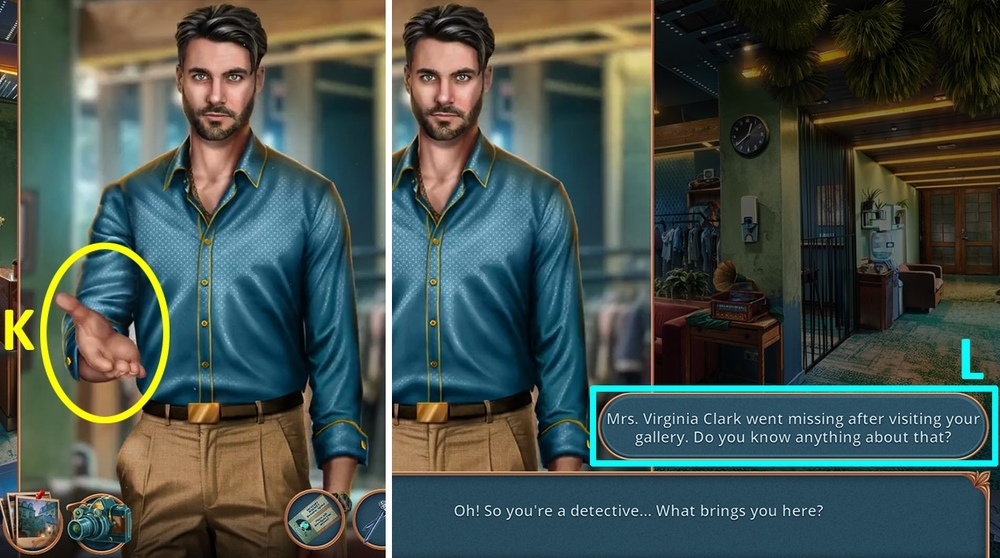
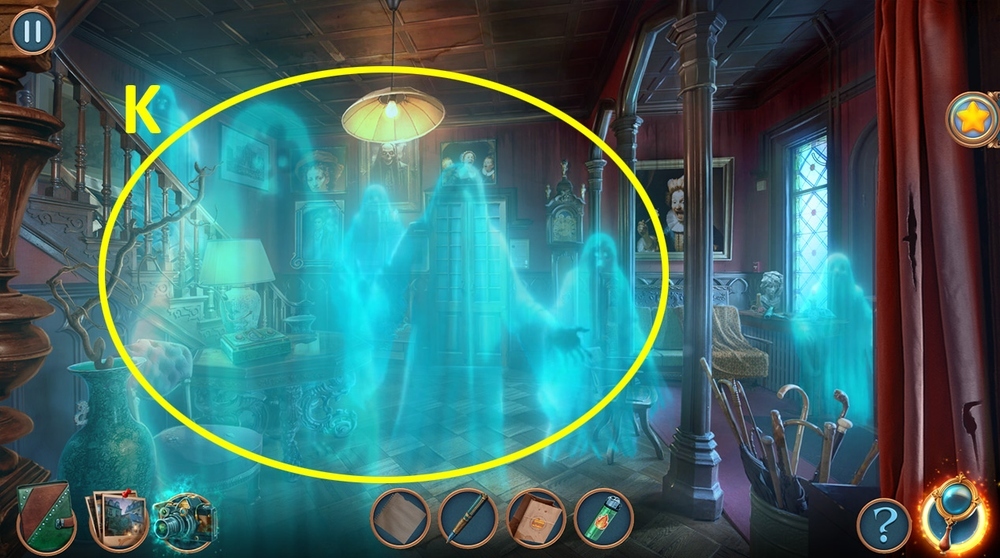
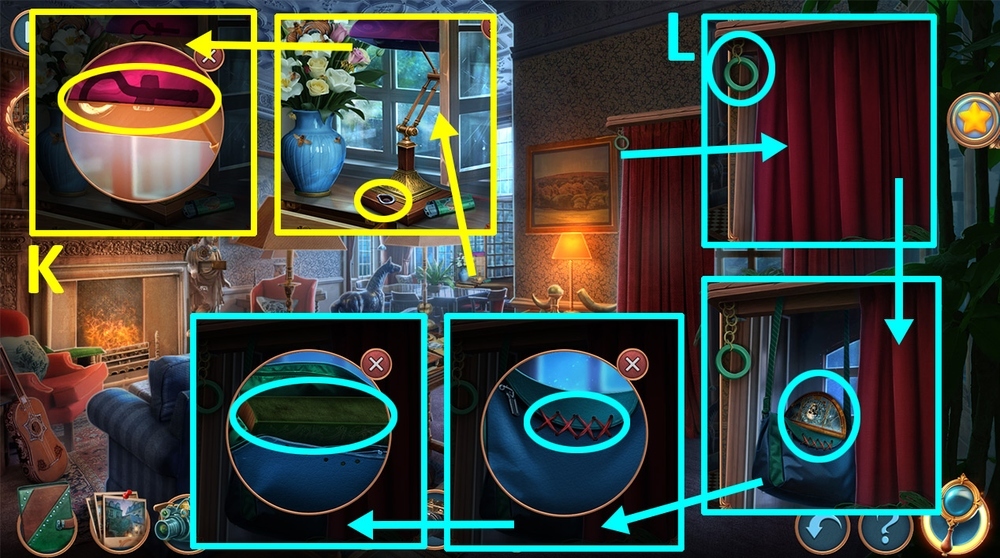
- Give him BUSINESS CARD (K).
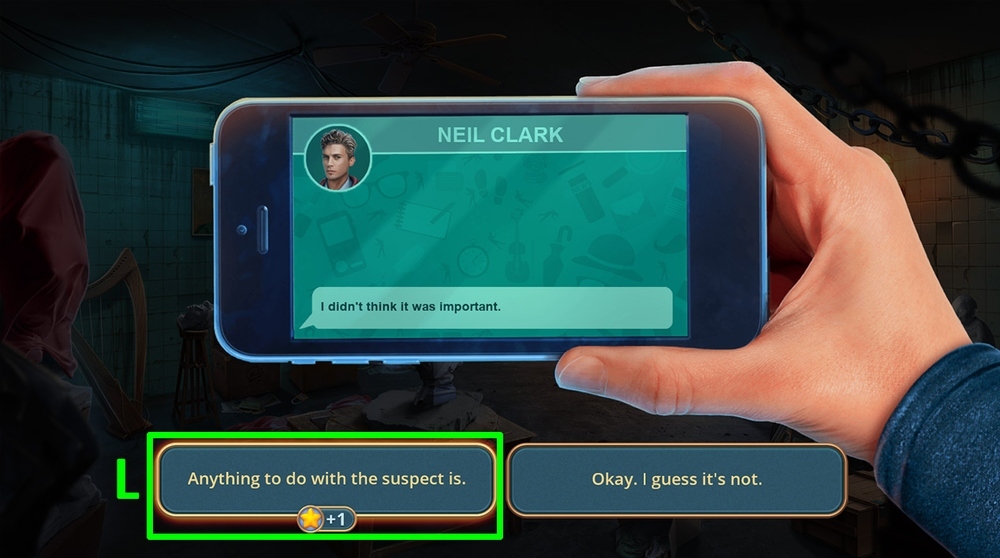
- Talk, go through all dialog options (L).

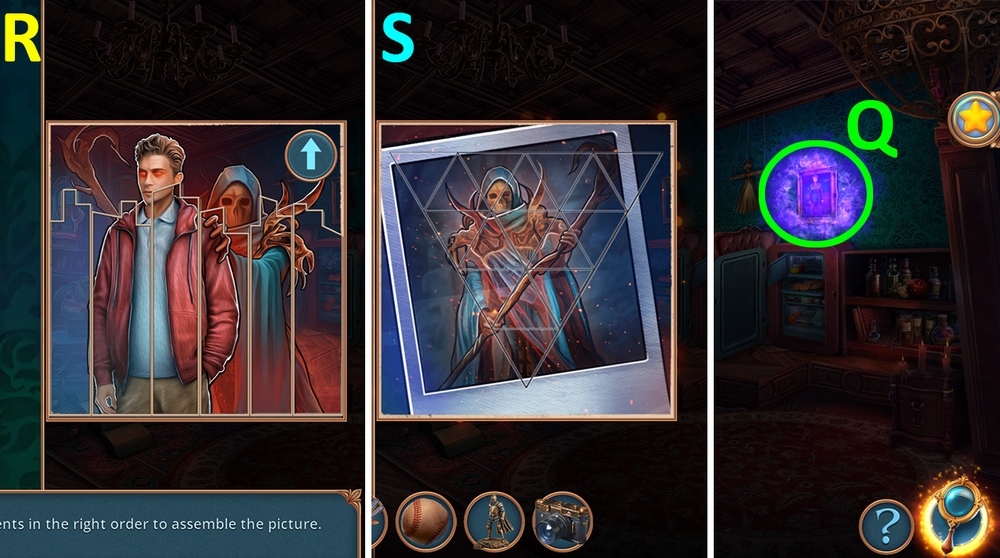
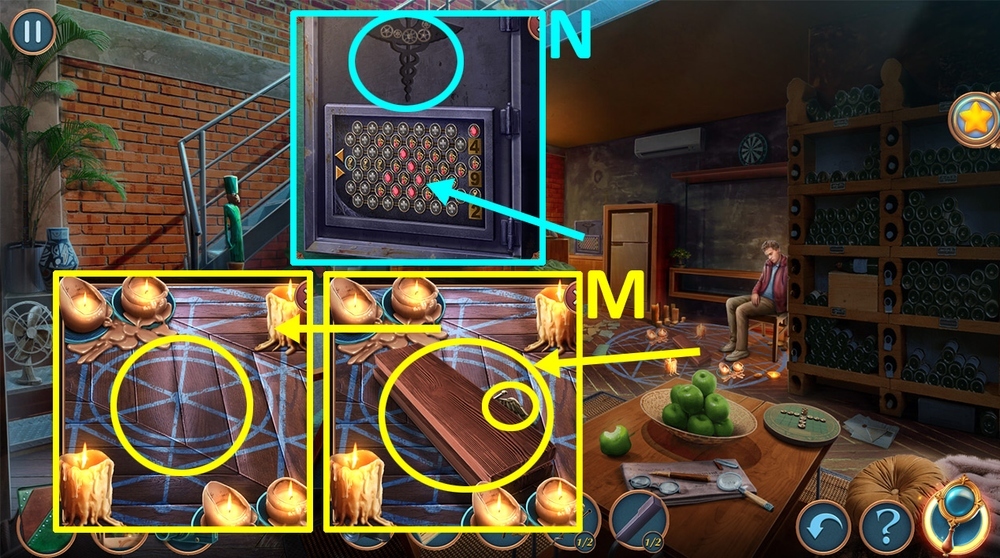
- Solution: arrange the tiles as in the image (M).

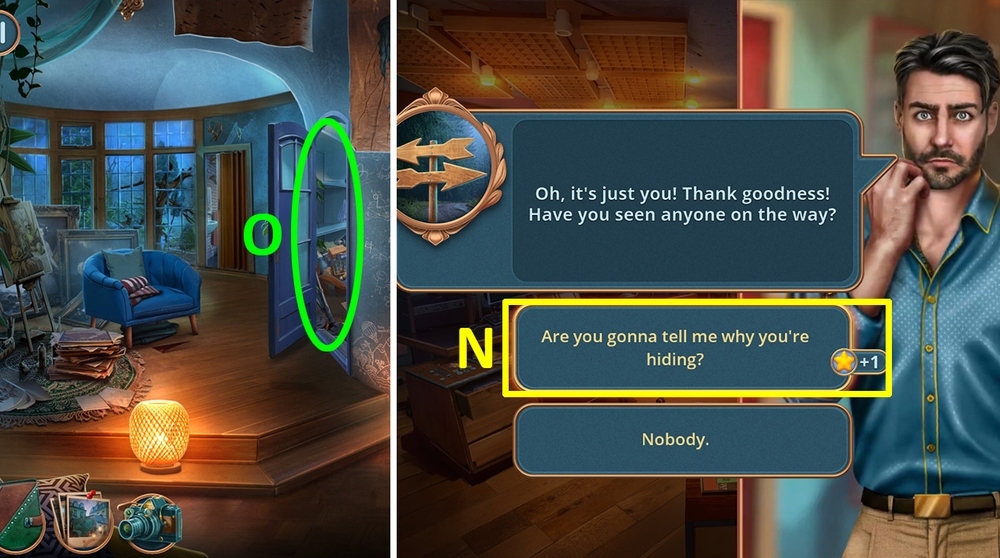
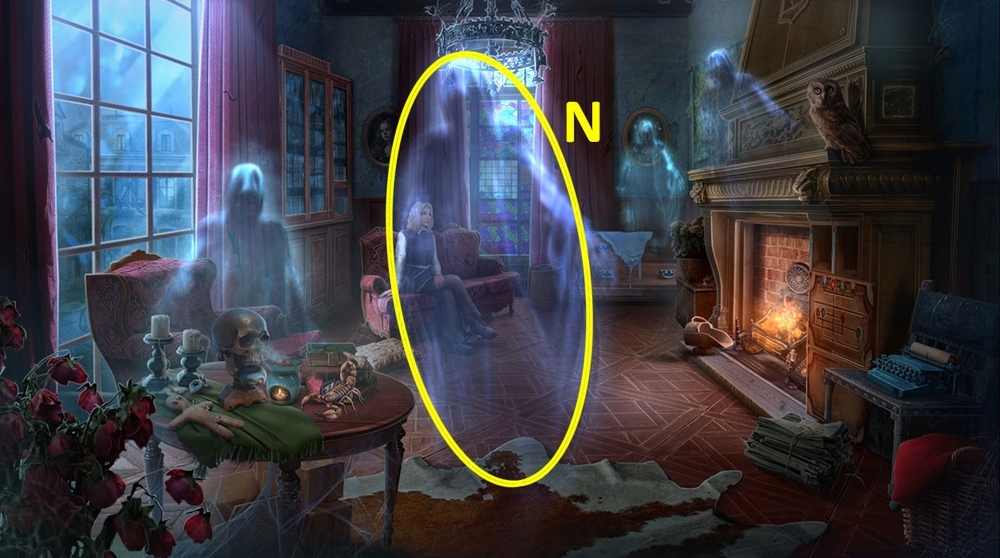
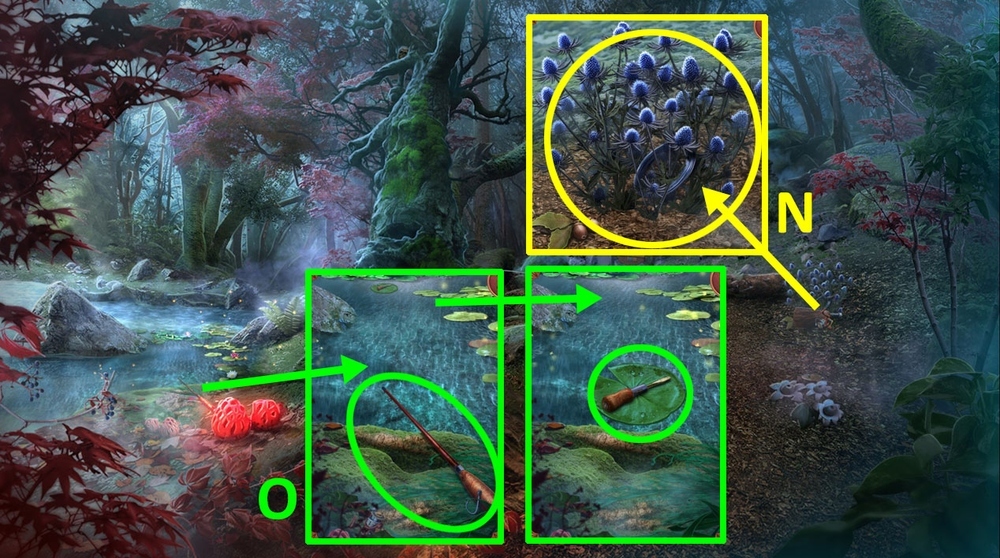
- Select this option (N).

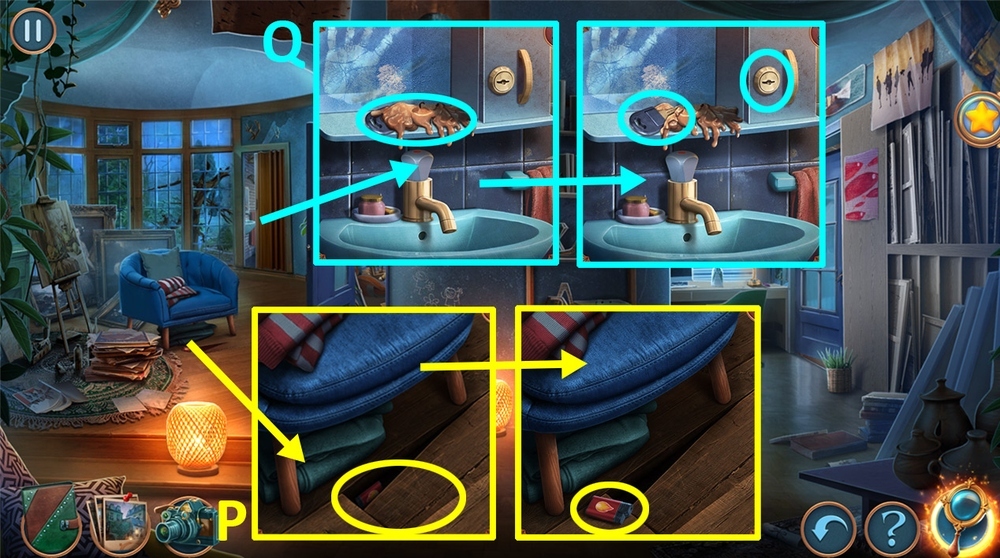
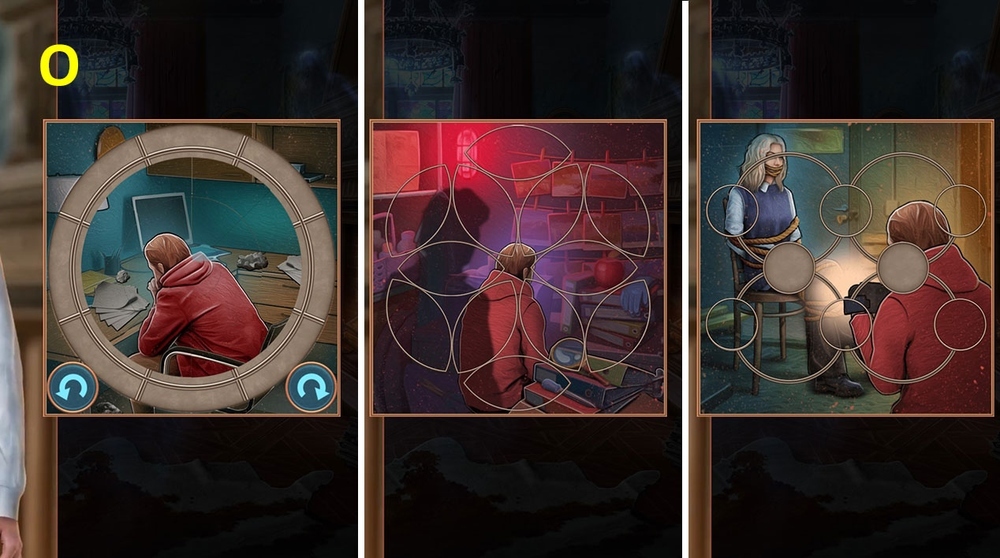
- Take VINYL RECORD (O).
- Take NEEDLE, use TISSUE on the stain (P).
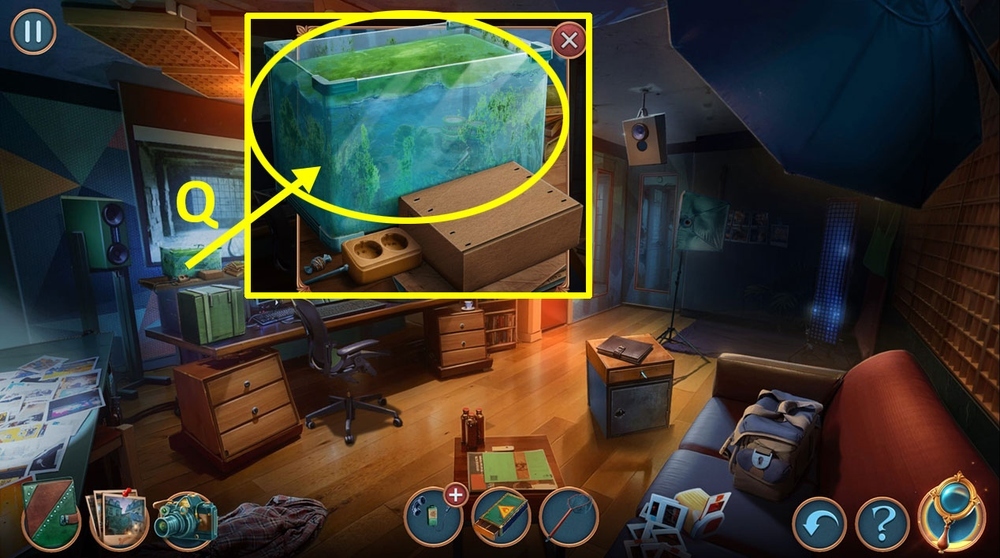
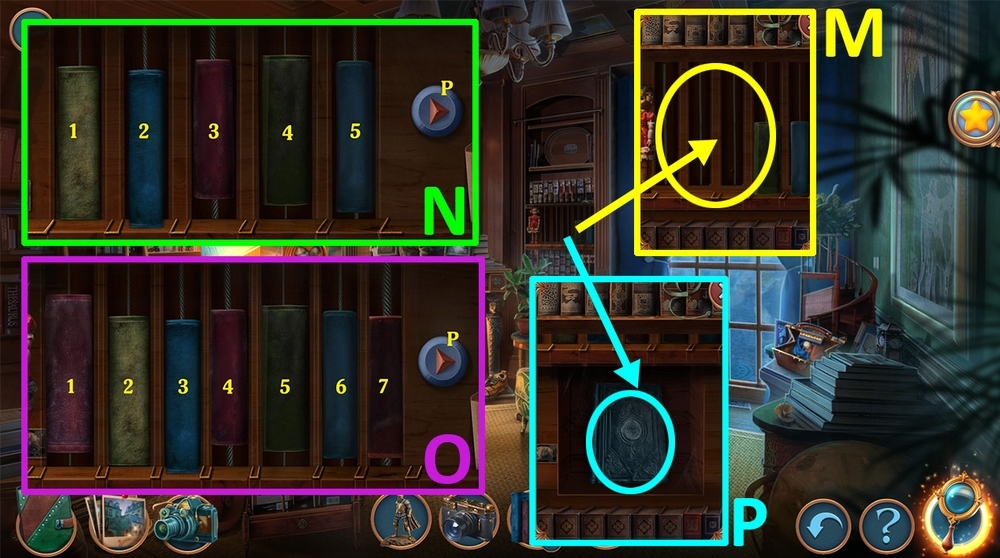
- Use VINYL RECORD and NEEDLE on the phonograph (Q).

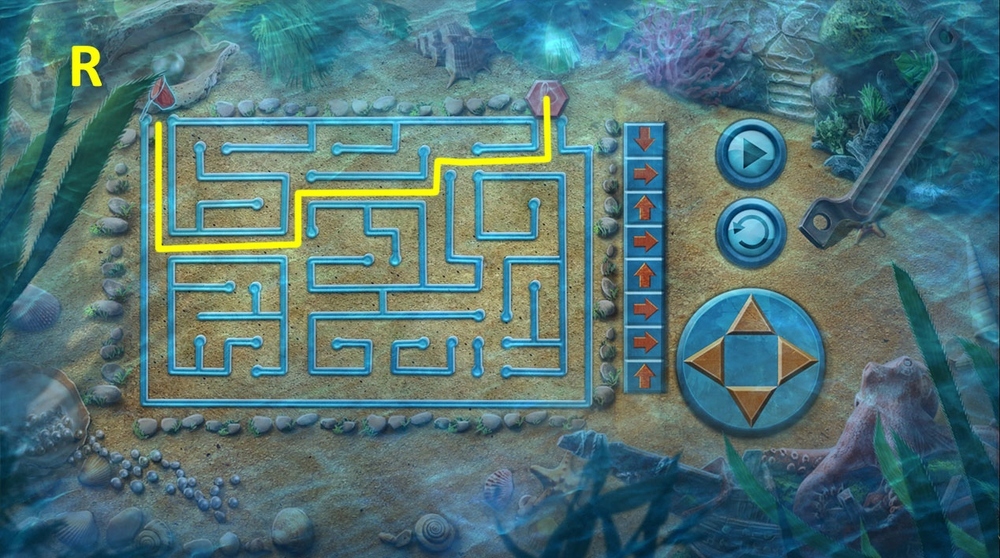
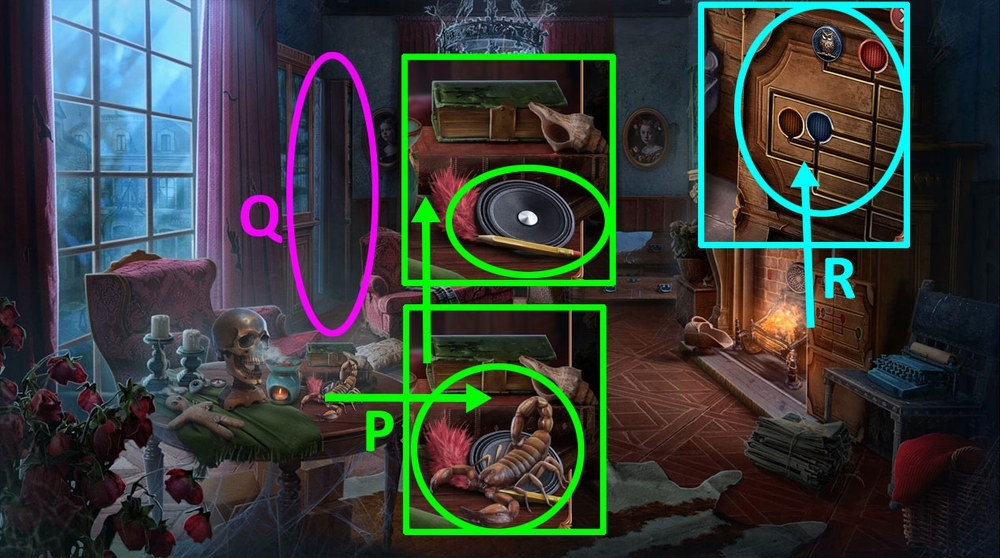
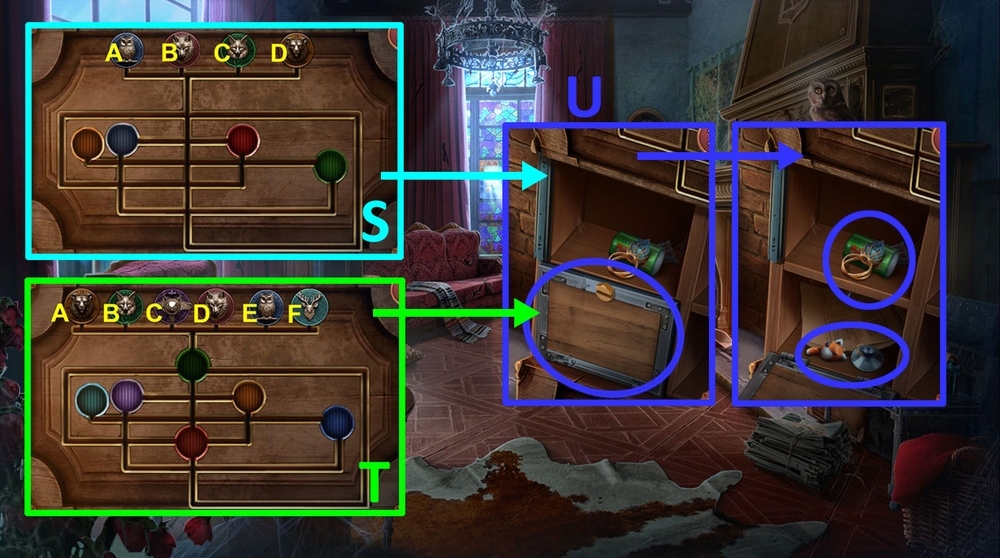
- Easy solution: Ax1, Bx1, Cx3, Dx3, Ex1, Fx1, press G (R).
- Hard solution: Ax1, Bx1, Cx2, Dx3, Ex1, Fx1, Bx1, press G (R).
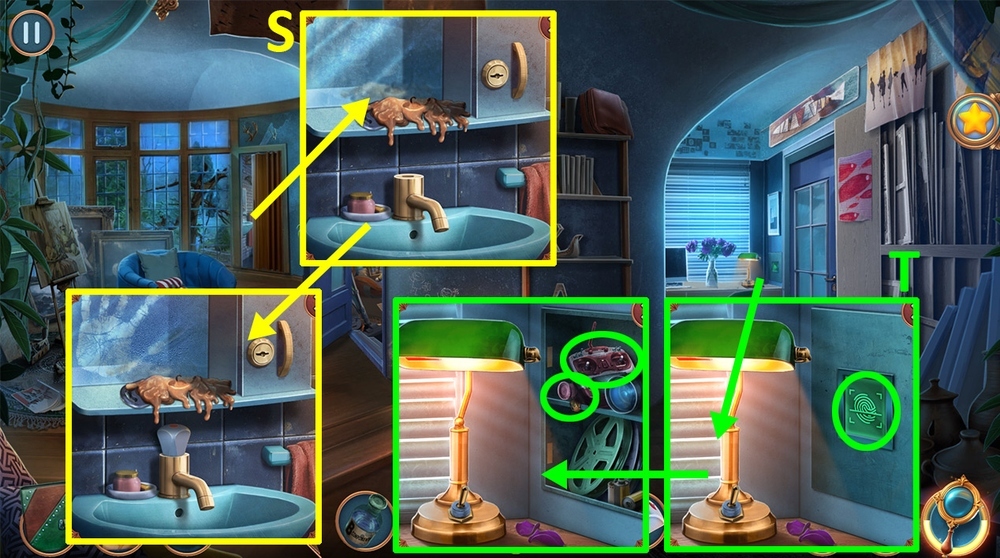
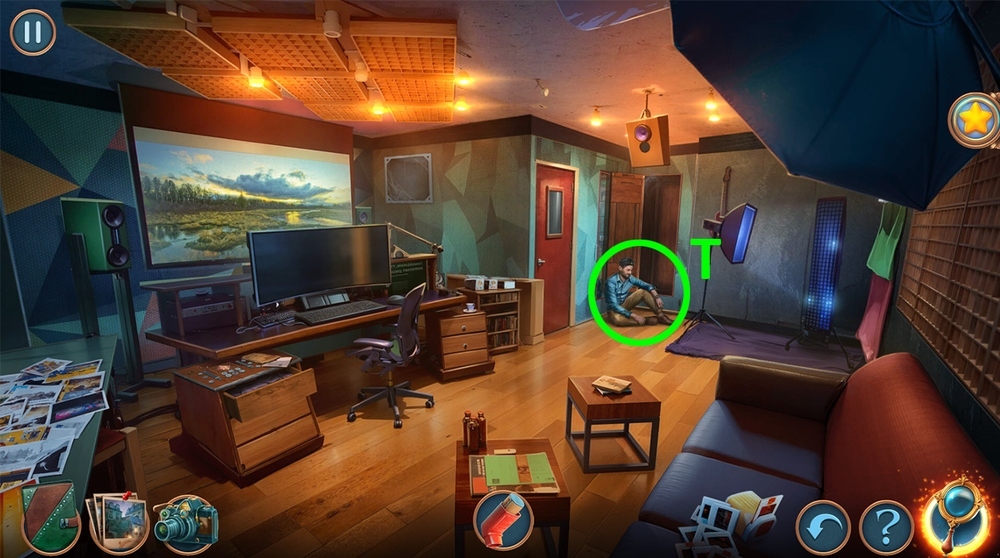
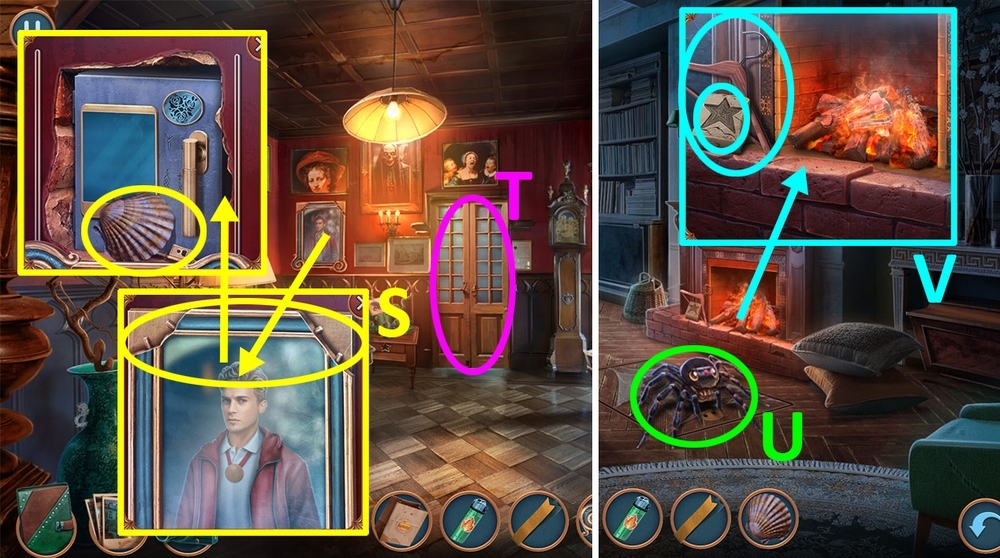
- Take MUSIC SHEETS 1/2 and MUG (S).

- Use MUG on the stain, take UMBRELLA SHAFT (T).
- Use UMBRELLA SHAFT on UMBRELLA, get UMBRELLA.
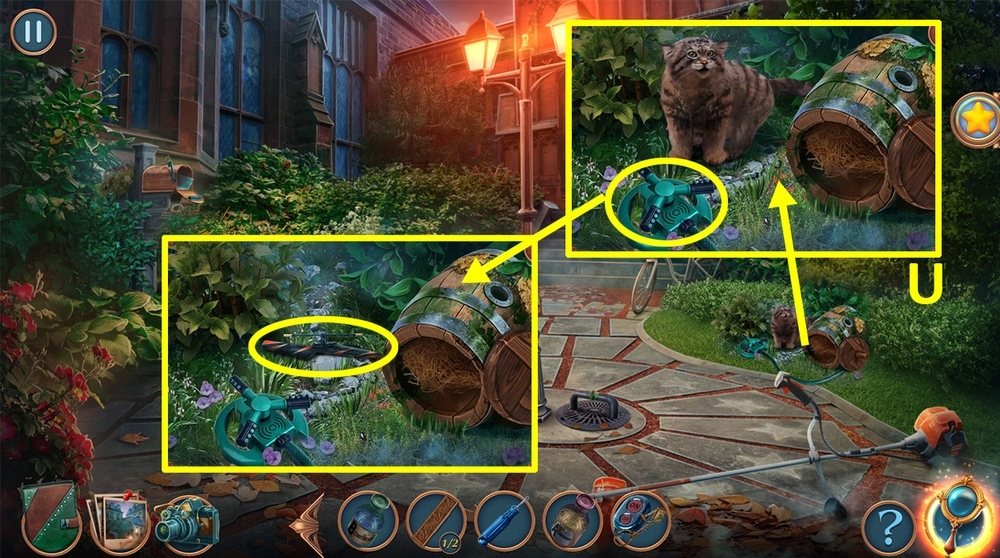
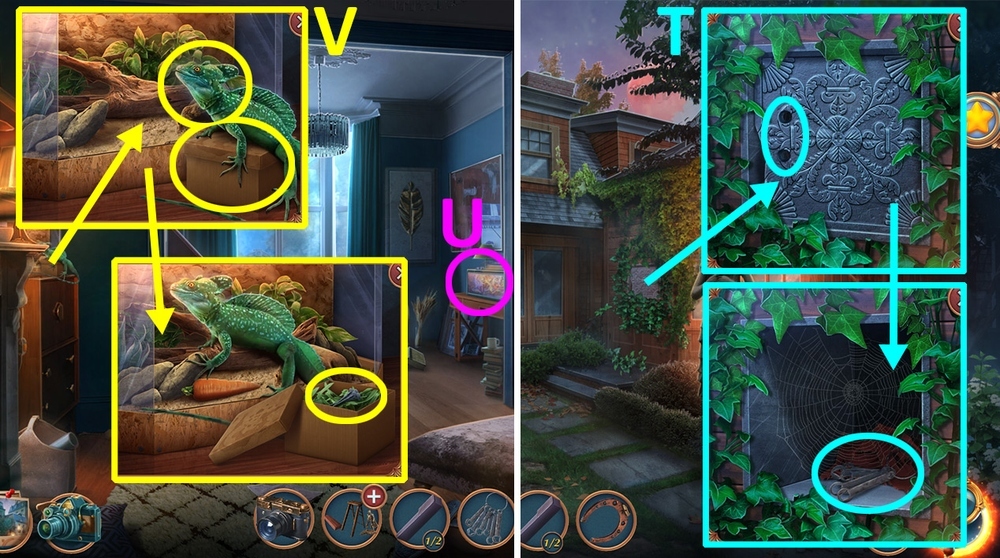
- Use UMBRELLA on the bag, take MAGNETIC KEY and SHOE (U).
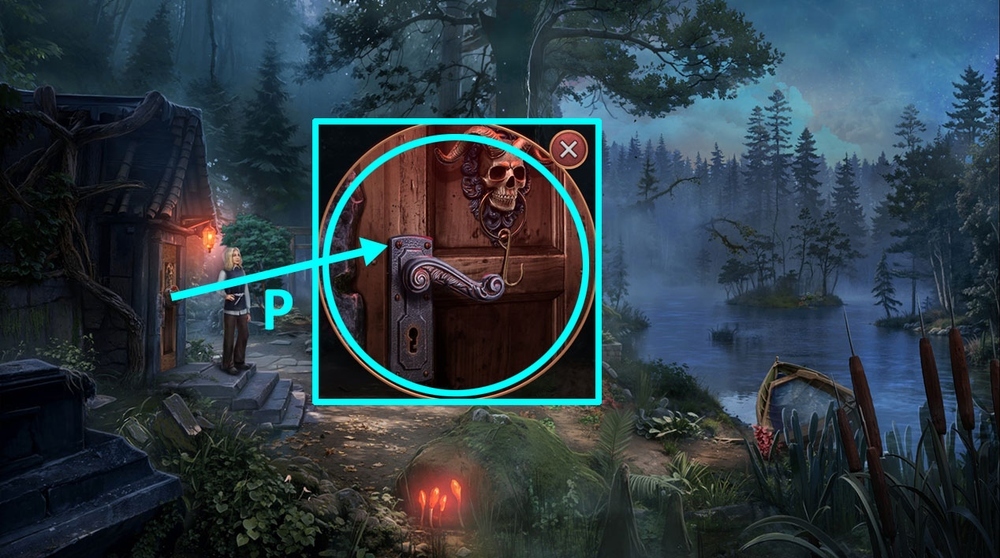
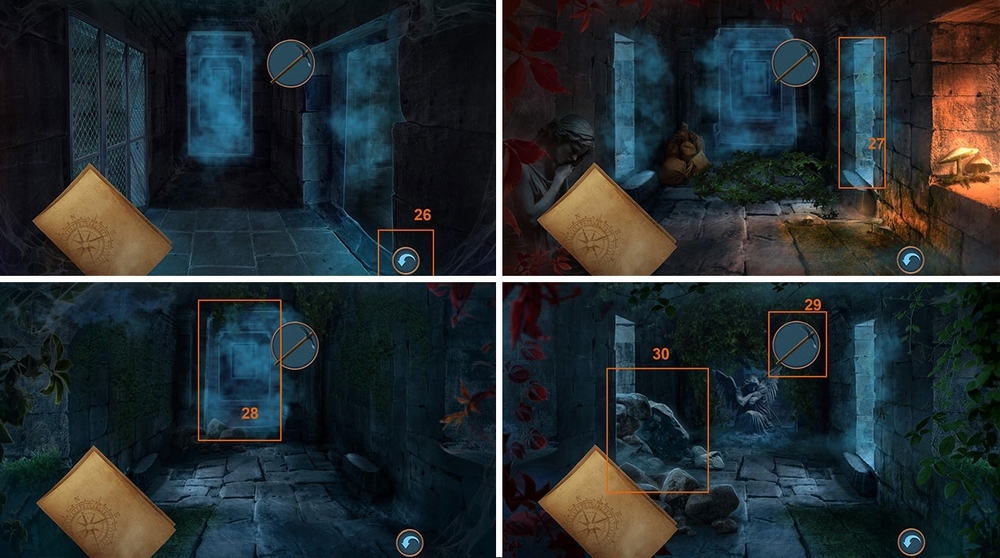
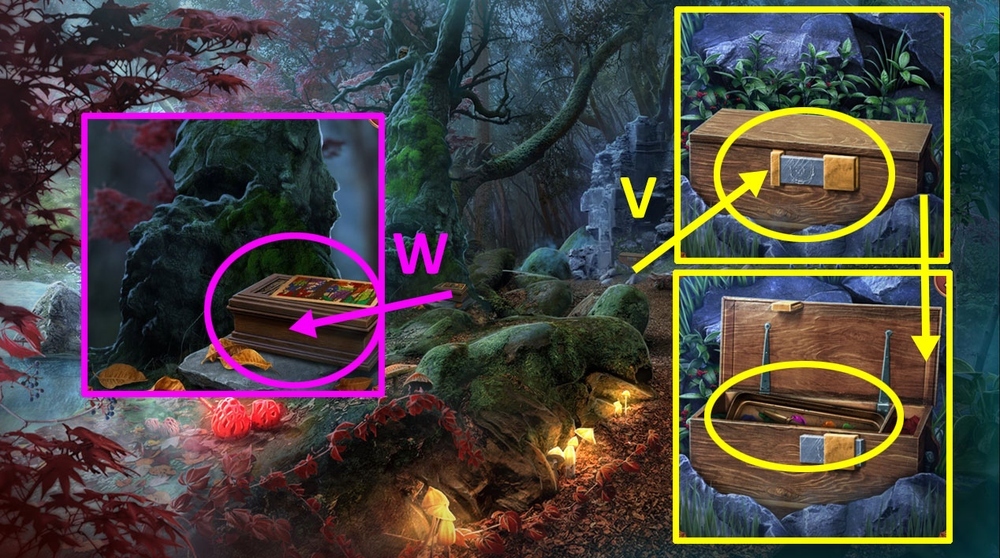
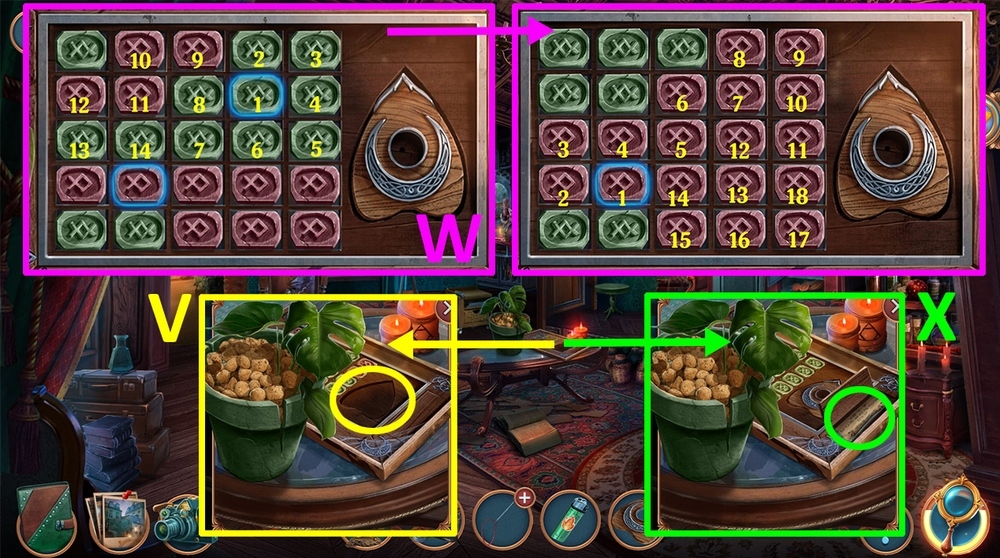
- Use MAGNETIC KEY on the door (V).
- Go forward.

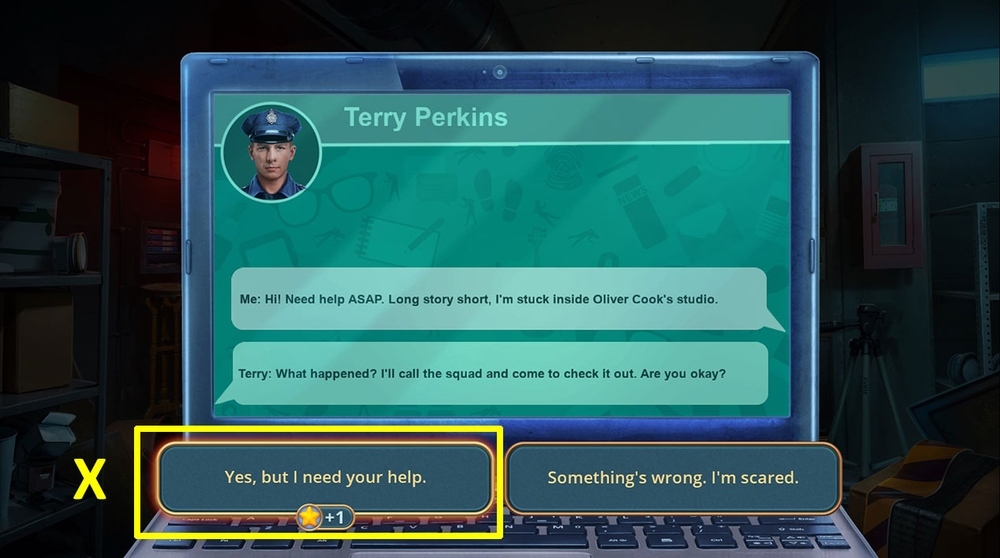
- Talk, go through all dialog options (W).
- Select this option (X).
- Go to Art Cafe.

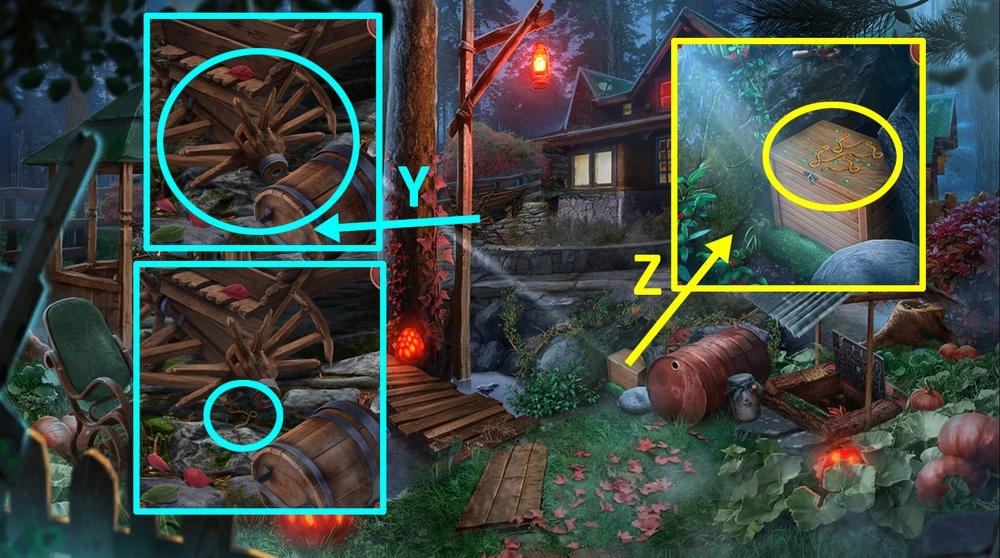
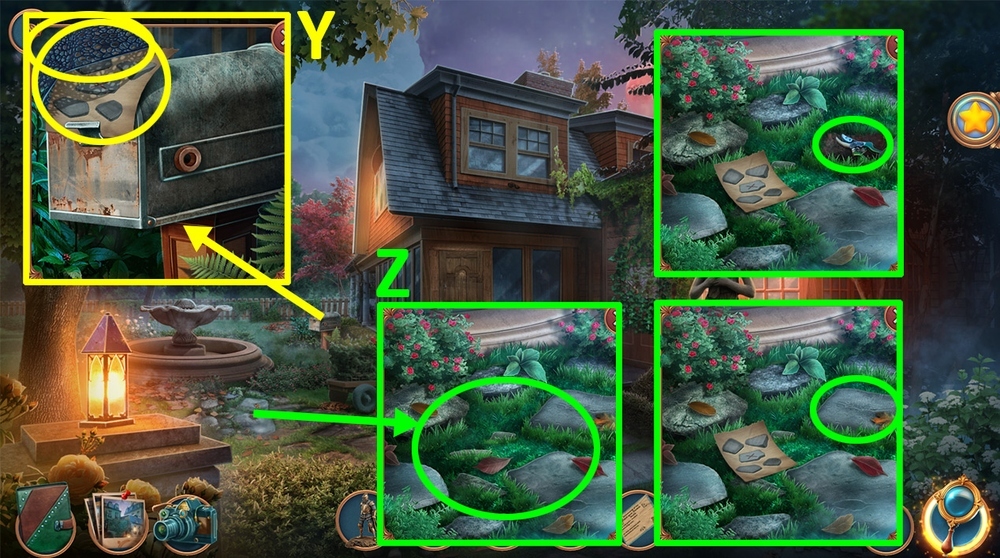
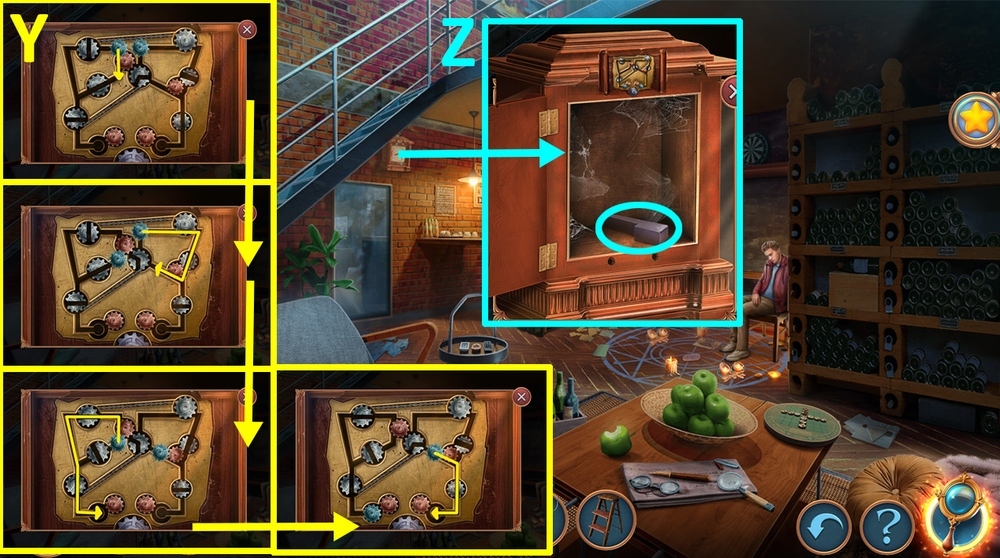
- Take PEG (Y).
- Use PEG on the broken key, take BUTTON (Z).
- Read the note, use BUTTON on the socket, press the button (A).
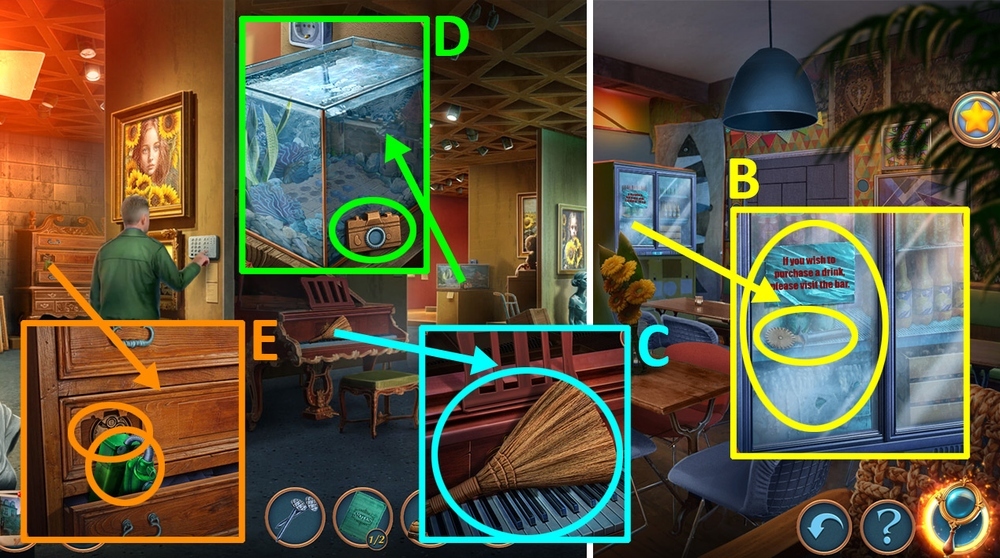
- Open the fridge, take PIZZA CUTTER (B).
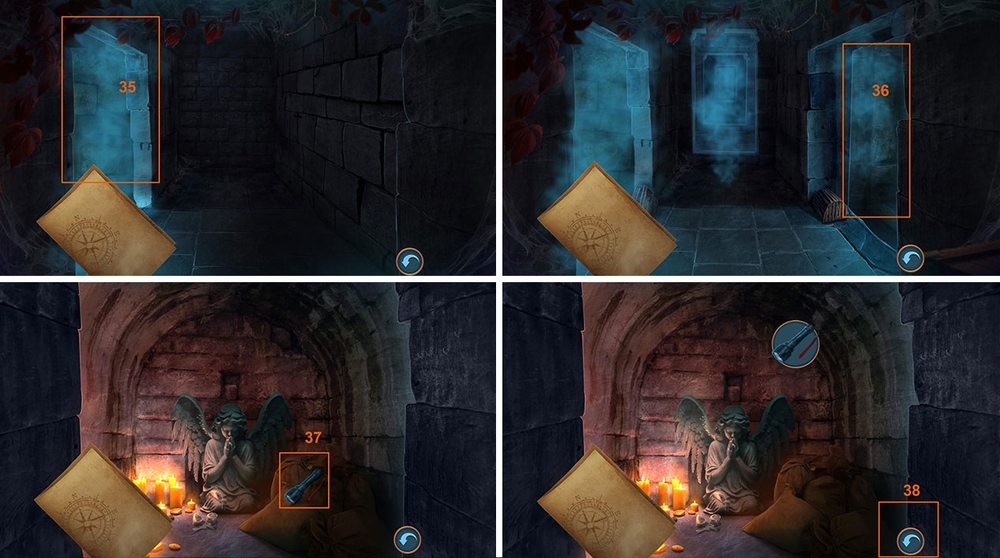
- Go back.
- Take BROOM (C).
- Take CAMERA AMULET (D).
- Take FILTER PART, use CAMERA AMULET (E).

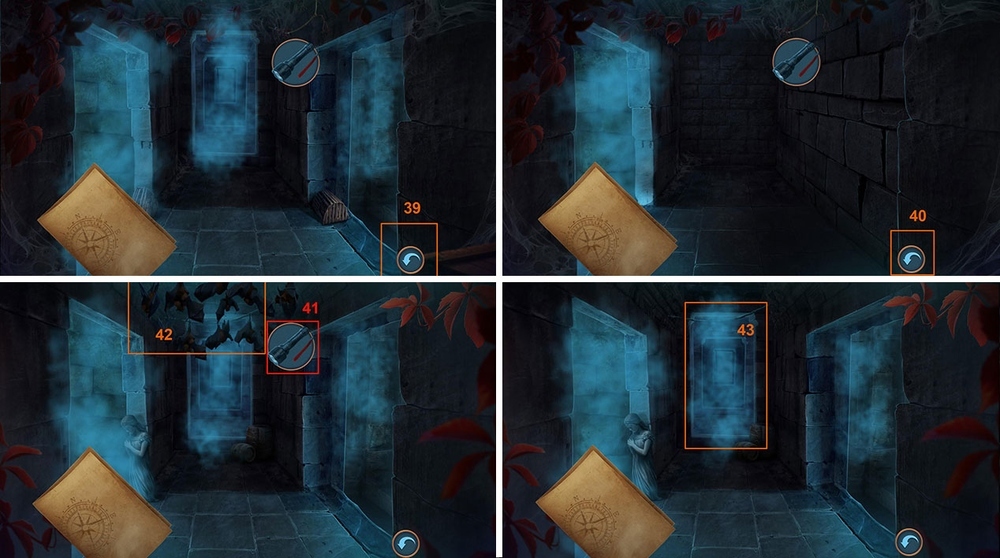
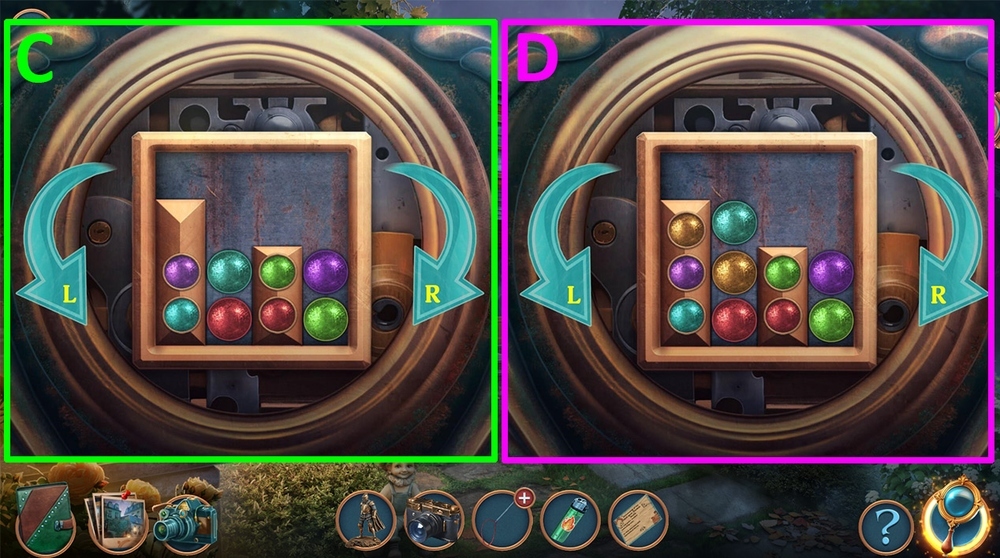
- Easy solution: set routes as in the image (F).

- Hard solution: set routes as in the image (G).

- Take HANDLE and DEFLATED MATTRESS (H).
- Use NAILS, SHOE, and HANDLE in the hatch, take COIN (I).
- Go back.

- Use PIZZA CUTTER on the coffee box, take COFFEE POD (J).
- Go to Art Cafe.
- Use COFFEE POD on the coffee machine, take HOT COFFEE (K).

- Use HOT COFFEE on the ice, take IRON CHOPSTICK and BEVERAGES 1/2 (L).
- Go to Photo Gallery.
- Use IRON CHOPSTICK and a shoe nearby on the floorboard, take BOX OF BEADS (M).
- Go to Art Cafe.

- Use BOX OF BEADS on the canvas (N).
- Easy solution: color as in the image (O).
- Hard solution: color as in the image (P).

- Take BEVERAGES 2/2 (Q).
- Use BEVERAGES on the bar, place cyan – green – red – orange, read the note (R).
- Go to Street.

- Use COIN on the gas pump, take GAS CANISTER (S).
- Use GAS CANISTER on the gas tank (T).
- Take HDMI CABLE (U).
- Go to Photo Gallery.
- Use HDMI CABLE on the port in the screen (V).

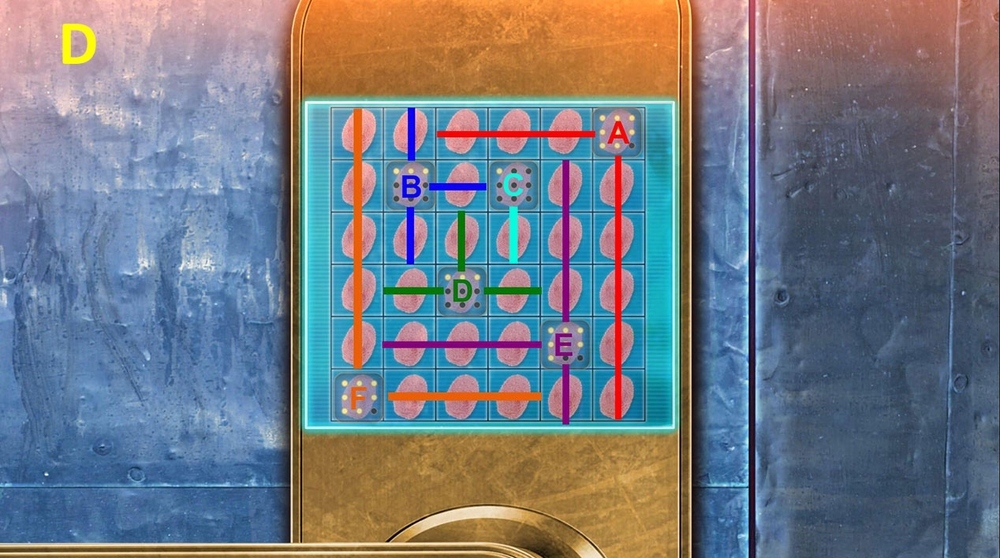
- Easy solution: use tiles from the image (A-H) (W).

- Hard solution: use tiles from the image (A-H) (X).

- Take SPINNING TOP (Y).
- Use SPINNING TOP on the shoe rack, take TUBE and PUMP (Z).
- Use PUMP on DEFLATED MATTRESS, get MATTRESS.
- Use TUBE on FILTER PART.
- Go to Modern Art Section.
- Use MATTRESS on the floor (A).
- Go forward.
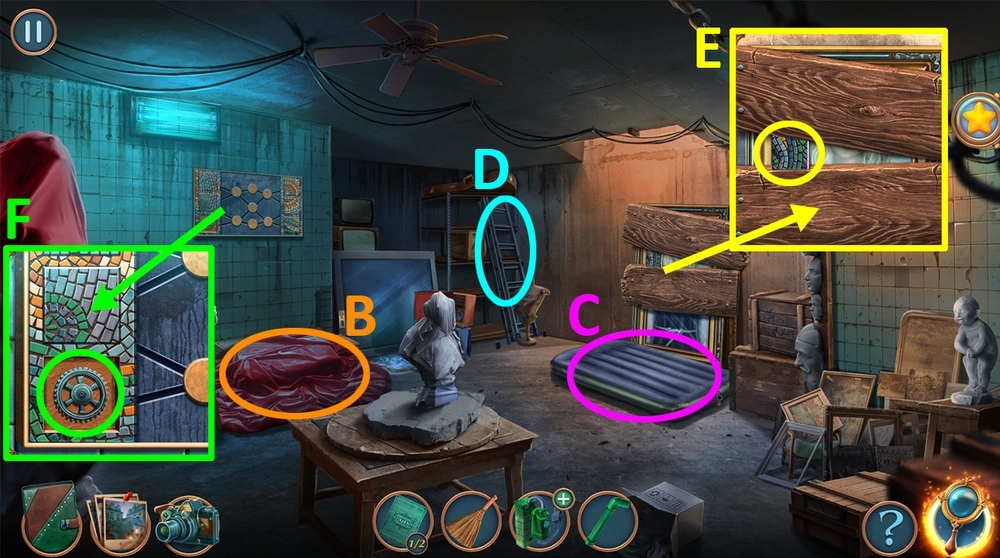
- Remove the tarp (B).
- Remove the mattress (C).
- Move the ladder (D).
- Take MOSAIC PART (E).
- Use MOSAIC PART on the puzzle (F).

- Easy solution: arrange the tiles as in the image (G).
- Hard solution: arrange the tiles as in the image (H).
- Take MULTI-OUTLET and FLASH DRIVE (I).
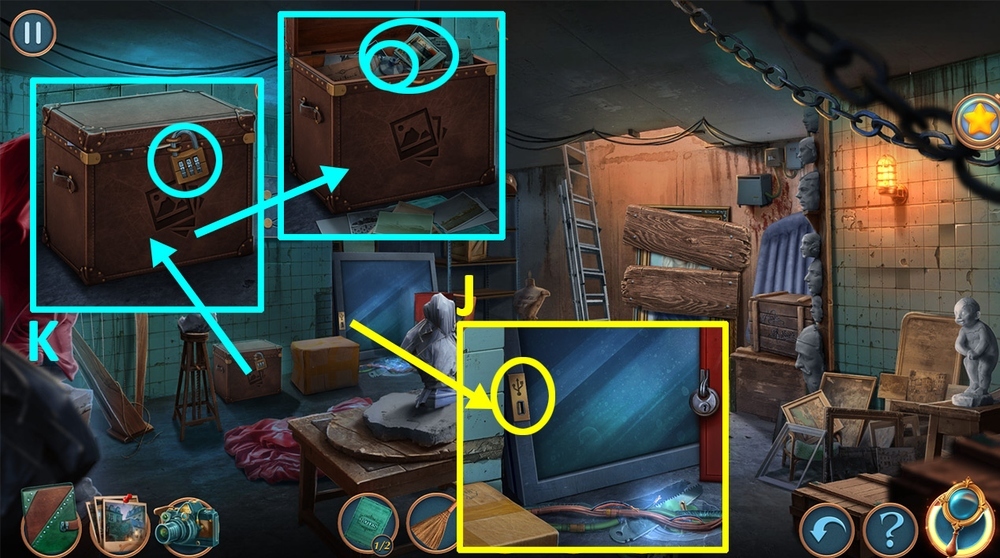
- Use FLASH DRIVE on the USB port (J).
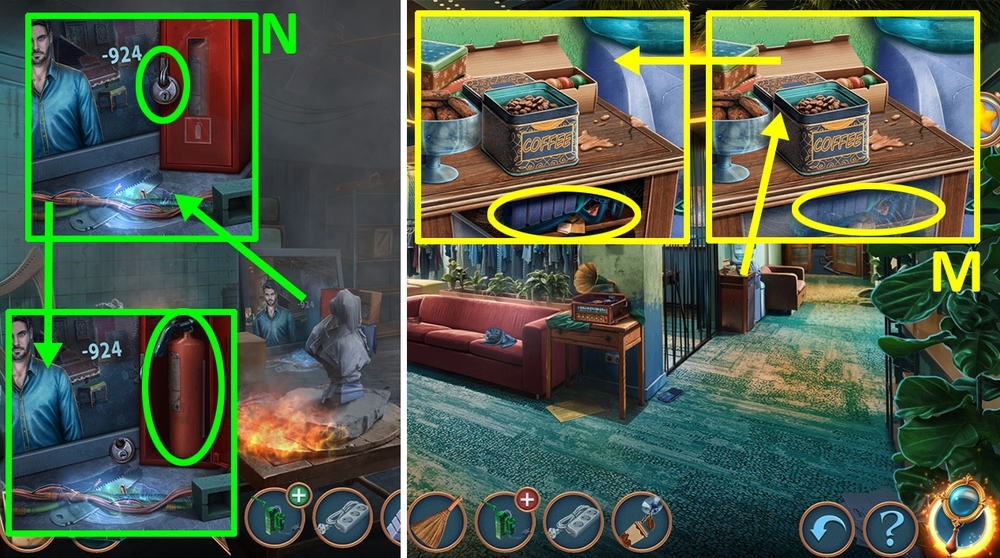
- Enter the code: 924, examine the photos, take SUCTION CUP KEY CHAIN (K).
- Select this option (L).
- Go to Photo Gallery.
- Use SUCTION CUP KEY CHAIN on the glass, take SPONGE, SAW, and KEY (M).
- Go to Basement.
- Use KEY on the lock, take FIRE EXTINGUISHER (N).
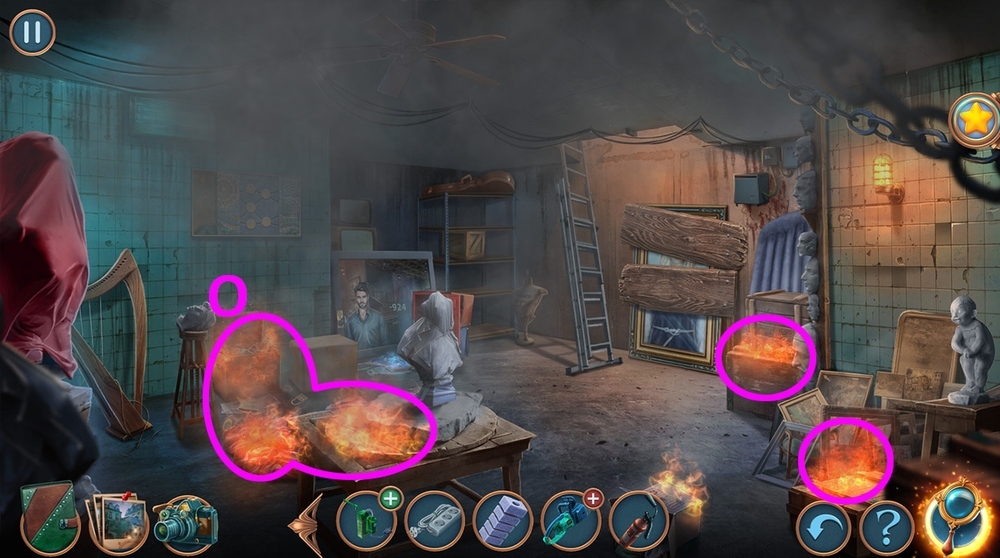
- Use FIRE EXTINGUISHER on the fire (O).

- Solution: Cx7, Bx1, Ax4, Bx2 (P).

- Use SPONGE on FILTER PART.
- Use BROOM on the burnt paper, take BELT and MUSIC SHEETS 2/2 (Q).
- Go back.
- Use MUSIC SHEETS on the piano (R).

- Easy solution: position as in the image (S).
- Hard solution: position as in the image (T).
- Take VIDEO ENDOSCOPE and FILTER MANUAL (U).

- Use FILTER MANUAL on FILTER PART, get FILTER.
- Use MULTI-OUTLET and FILTER on the fish tank (V).
- Easy solution: Cx1, Bx1, Ax1, Dx1, Ax2, Bx3, Cx1, Bx1, Cx2, Dx1, Ax1, Dx2, Ax1, Cx2, Dx1, Ax2, Cx4.
- Bx1, Ax3, Bx2, Ax1, Bx1, Cx4, Dx1, Ax3, Cx1, Dx2, Cx1, Dx1, Ax2, Bx1, Cx2, Bx2, Cx1, Bx1, Ax3 (W).
- Hard solution: Cx1, Bx2, Ax1, Dx1, Cx1, Dx2, Ax2, Bx1, Cx1, Dx1, Cx1, Bx1, Ax2, Dx1, Ax3, Bx2, Cx2.
- Dx1, Bx1, Ax2, Dx2, Cx3, Bx1, Ax1, Bx3, Ax1, Bx2, Cx1, Dx4, Ax2, Dx2, Cx3, Bx1, Cx1, Bx4, Ax1, Cx1.
- Dx4, Ax1, Dx1, Ax3, Bx2, Cx2, Bx1, Cx1, Ax1, Bx1, Ax1, Bx2, Cx1, Dx1, Cx2, Dx2, Ax2, Bx1, Ax1, Bx1.
- Cx1, Dx3, Ax2, Dx2, Cx2, Bx4, Dx3, Cx3, Dx1, Ax3, Bx3, Cx2, Dx1, Bx1, Ax2, Dx3, Cx3, Bx1, Ax1, Bx2.
- Cx1, Dx1, Ax1, Bx1, Ax2, Dx1, Ax2, Dx2, Cx4, Bx3, Ax2, Bx1, Ax1, Bx2, Cx1, Dx5, Bx1, Ax2, Dx2, Cx3.
- Ax1, Bx3, Cx2, Bx2, Ax1, Cx1, Dx2, Ax2, Bx1, Ax1, Bx2, Cx1, Dx5, Bx1, Ax2, Dx2, Cx2 (X).
- Take SCREW (Y).
- Go to Street.

- Play puzzle, earn RUBBER GLOVE (Z).
- Go to Basement.
- Use RUBBER GLOVE on the wires, remove each wire, take TOGGLE SWITCH, RUBBER PATCH, and SAW BLADE (A).

- Use SCREW and SAW BLADE on SAW, get SAW.
- Use SAW on the boards (B).
- Easy solution: set timers as in the image (C).
- Hard solution: set timers as in the image (D).
- Use the camera on the portal (E).
- Select this option (F).
- Take RC HELICOPTER (G).
- Use BELT and RUBBER PATCH on the pipe, take LOCK PICKS (H).
- Take BATTERY, use LOCK PICKS on the keyhole (I).

- Easy and Hard solution: B-F, F-A, F-D, B-I, F-B, G-E, G-C, H-E, F-E, J-E, G-E (J).

- Read the note, take CORK (K).
- Use CORK on the spike, take ADHESIVE TAPE and WIRE, click on the blades (L).
- Use VIDEO ENDOSCOPE and WIRE on the door (M).
- Use BATTERY on RC HELICOPTER.
- Go forward.

- Use the camera on the hand (N).
- Take STOP BATH, POWDER, and MIRROR FRAME PARTS 1/2 (O).
- Take SCREWDRIVER, use TOGGLE SWITCH on the socket in the lamp, switch the light on, take SUN AMULET (P).
- Use SUN AMULET on the hollow (Q).
- Play puzzle, earn VALVE (R).
- Use VALVE on the faucet, use ADHESIVE TAPE and POWDER on the palm print, get FINGERPRINT (S).
- Use FINGERPRINT on the fingerprinting panel, take CONTROLLER, DEVELOPING SOLUTION, and SPRINKLER REMOTE (T).
- Use CONTROLLER on RC HELICOPTER.
- Go back.
- Use SPRINKLER REMOTE on the sprinkler, take BLADES (U).
- Use BLADES on RC HELICOPTER.

- Easy solution: set a path as in the image (V).
- Hard solution: set a path as in the image (W).
- Get HELICOPTER.
- Go to Studio.
- Use HELICOPTER on the bag (X).
- Open the bag, take KEY (Y).

- Use KEY on the keyhole (Z).
- Go forward.
- Open the door (A).
- Take FIXER (B).

- Use SCREWDRIVER on the vent, take PUZZLE PART (C).
- Use PUZZLE PART on the puzzle (D).
- Easy and Hard solution: Solution is random (E).
- Read the note, take BROKEN VACUUM and PHOTO (F).

- Use STOP BATH, DEVELOPING SOLUTION, and FIXER on the tubs, put PHOTO in each tub, put PHOTO on the wall, find the pairs of photos and their negatives, take GNOME (G).
- Go to Oliver’s Yard.

- Use GNOME on the empty place (H).
- Easy solution: set a path as in the image (I).
- Hard solution: set a path as in the image (J).
- Take BACK SCRATCHER (K).
- Go to Workshop.

- Use BACK SCRATCHER on the stuff in the vent, take VACUUM NOZZLE and MIRROR FRAME PARTS 2/2 (L).
- Use MIRROR FRAME PARTS on the mirror (M).
- Select this option (N).
- Go back.
- Play puzzle, earn BATTERY (O).
- Use VACUUM NOZZLE and BATTERY on BROKEN VACUUM, get VACUUM.
- Use VACUUM on the loose floorboard, take LIGHTER (P).
- Use LIGHTER on the wax, use the key on the cupboard (Q).

- Easy and Hard solution: position as in the image (R).
- Take INHALER (S).
- Go to Workshop.
- Give INHALER to the person (T).
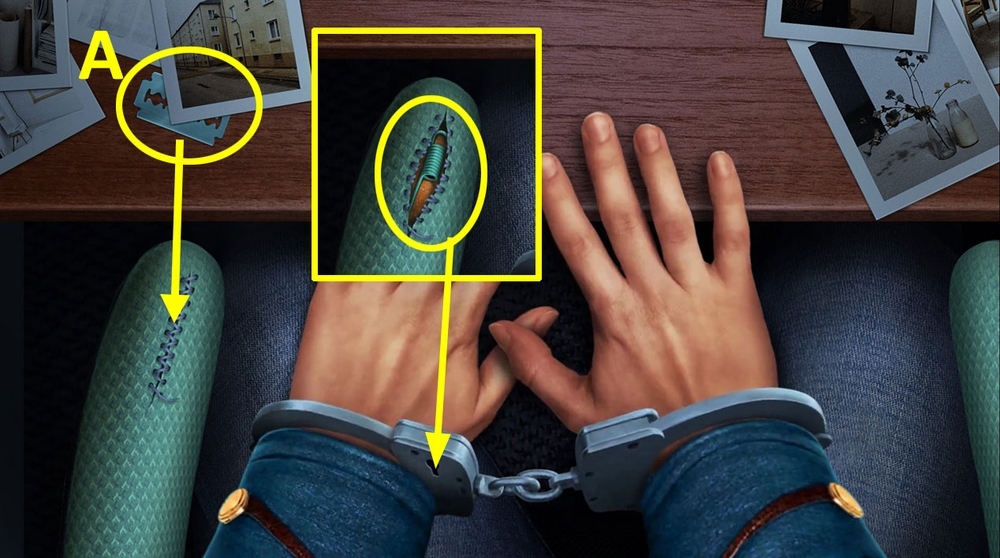
- Take the blade and use it on the seam, take the spring and use it on the cuff (A).

- Easy solution: click L, Ux4, Lx2, R, L, Dx2, Rx7, Dx2, Lx2, Ux2, Dx4, Lx2, D, R, U, L, D, R, U, Lx5, Ux2, L, R, D, Ux2 (B).
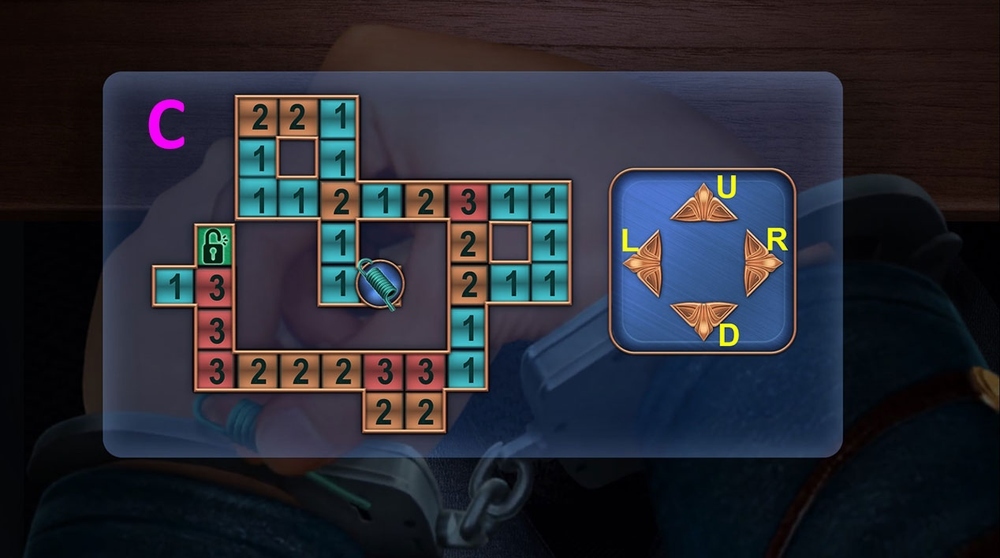
- Hard solution: click L, Ux2, Lx2, Ux2, R, L, Rx2, Dx2, Rx3, L, Rx3, Dx2, Lx2, Ux2, Dx4, Lx2, D, R, U, L, D, R, U, Lx3, R, Lx3, R, L, Ux2, Dx2, Ux2, L, R, U (C).

- Take FAN (D).
- Use FAN on the smoke, take FISH TANK FILTER, MATCHES, and MAGNET, open the laptop (E).

- Use MAGNET on the glass, take SCOOP, BUTTON, and KEY (F).
- Use KEY on the door (G).
- Use BUTTON on the drawer (H).
- Go forward.

- Use the camera on the ghost, examine the photo (I).
- Take FILTER TUBE and KEY CARD (J).
- Use FILTER TUBE on FISH TANK FILTER.
- Use KEY CARD on the panel (K).

- Play puzzle, earn STAPLE REMOVER (L).
- Use STAPLE REMOVER on the box, take FIRECRACKER (M).
- Use MATCHES and FIRECRACKER on the hole, take TOY SPEAR (N).
- Go back.

- Use TOY SPEAR on the figurine, take BRUSH, CORK, and FILTER PART (O).
- Use BRUSH on the panel (P).
- Use FILTER TUBE and FILTER PART on FISH TANK FILTER, get FISH TANK FILTER.
- Go to Workshop.
- Use FISH TANK FILTER and SCOOP on the fish tank (Q).
- Easy solution: set the sequence from the image (R).

- Hard solution: set the sequence from the image (S).
- Earn HANDLE.

- Use CORK on the screw, take CLEANING AGENT (T).
- Go back.

- Use HANDLE on the drawer, take CD, BATTERY, and TALC (U).
- Use TALC on the panel, click 2-6-7-8-OK, take HAIRPIN and CHARGER (V).
- Use CHARGER on the laptop, click on the laptop (W).
- Use this option (X).
- Go to Workshop.

- Play puzzle, earn LIGHT BULB (Y).
- Use LIGHT BULB on the socket, take the photo on the right, take STICKY TAPE (Z).
- Use STICKY TAPE on the plate, get FINGERPRINT (A).
- Go back.

- Use FINGERPRINT on the panel (B).

- Easy solution: use the sequences from the image (C).
- Hard solution: use the sequences from the image (D).

- Select this option (E).

- Take CROW SKULL TOKENS 1/2 (F).
- Use HAIRPIN on the keyhole, take LOCK HINT and MAGNIFYING GLASS (G).
- Use CD and MAGNIFYING GLASS on the vines, take PUMP and CROW SKULL TOKENS 2/2 (H).

- Take PUTTY, use CROW SCULL TOKENS and LOCK HINT on the puzzle (I).
- Easy solution: set as in the image (J).
- Hard solution: set as in the image (K).

- Take BARRETTE (L).
- Click on the key, use BARRETTE on the broken key (M).
- Go forward.
- Use the camera on the ghosts, examine the photo (N).
- Solution: arrange as in the image (O).

- Select this option (P).

- Move the old candle (Q).
- Use CLEANING AGENT on the stain (R).
- Take BROKEN RECEIVER and CANDLE (S).
- Take the front panel from BROKEN RECEIVER.
- Use CANDLE on the incense burner, take HANDKERCHIEF (T).

- Use HANDKERCHIEF on the stain, move the latch, take METAL DETECTOR, BATTERIES 1/2, and BOOK (U).
- Use BATTERY on METAL DETECTOR.
- Use BOOK on the shelf (V).
- Play puzzle, earn OLD SAW (W).
- Go back.

- Use OLD SAW on the fallen tree (X).
- Go forward (Y).
- Select this option (Z).
- Go forward.

- Take COIL and BROOM (A).
- Use BROOM on the sand, take KITE, use COIL on the fishing rod (B).
- Use KITE on the skull, take SKULL AMULET (C).
- Go back.

- Take TILES 1/2, PUTTY KNIFE, and KEG (D).
- Use PUMP on the water, take the cork and use it on the hole in the boat, use PUTTY and PUTTY KNIFE on the hole, take FANG PENDANT and DETECTOR PART (E).
- Use DETECTOR PART on METAL DETECTOR, get METAL DETECTOR.
- Use METAL DETECTOR here (F).
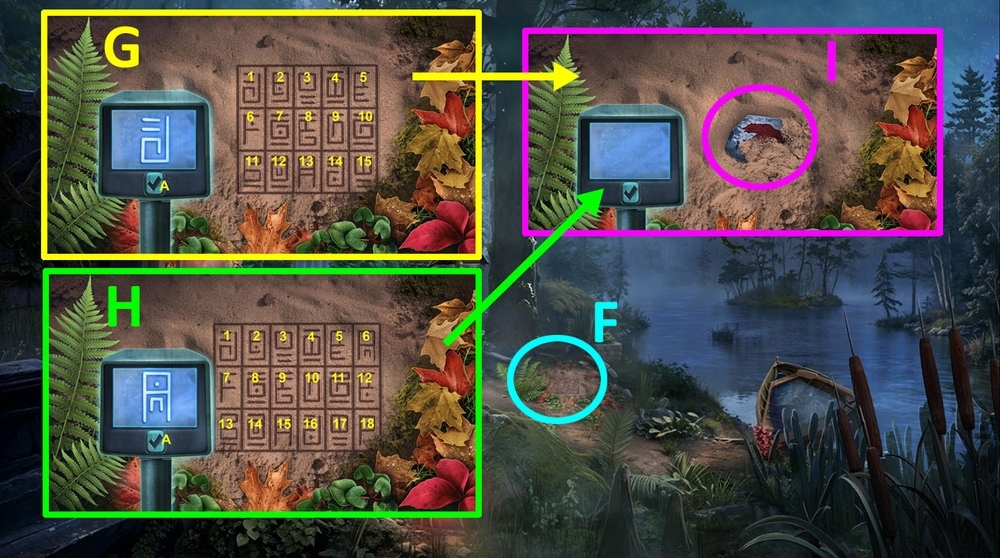
- Easy solution: 1-A, 14-A, 7-A, 4-A, 2-A, 15-A, 3-A, 9-A, 6-A, 5-A, 12-A, 10-A, 13-A, 11-A, 8-A (G).
- Hard solution: 6-A, 18-A, 1-A, 16-A, 8-A, 4-A, 2-A, 17-A, 3-A, 10-A, 7-A, 5-A, 14-A, 11-A, 15-A, 13-A, 9-A, 12-A (H).
- Take TILES 2/2 (I).

- Use TILES on the well, take PUZZLE PARTS 1/2 and ORGAN DETAIL (J).
- Go back.

- Use KEG on the broken wheel (K).
- USE ORGAN DETAIL on the organ (L).

- Easy solution: D, A, E (M).
- Hard solution: D, A, E, G, B (N).
- Take OLD KEY (O).
- Go forward.
- Use OLD KEY on the keyhole (P).

- Solution: follow the instructions, 1-4 (Q).
- Solution: 5-8.

- Solution: 9-12.
- Solution: 13-16.
- Solution: 17-21.

- Solution: 22-25.
- Solution: 26-30.

- Solution: 31-34.
- Solution: 35-38.
- Solution: 39-43.

- Solution: 44-45.

- Use the camera on the ghosts, examine the photo (R).

- Take GLASS 1/2 and CANDLESTICK (S).
- Click on the skull, use FANG PENDANT and CANDLESTICK on the padlock, take CARBINE, read the note (T).

- Use CARBINE on the chandelier (U).
- Easy solution: 1, 2, 3, 4, 5, 6, 7, 8, 9, 10, 11, 12, 1 (V).
- Hard solution: 1, 2, 3, 4, 5, 6, 7, 8, 9, 10, 11, 12, 13, 14, 1 (W).
- Take BOARD (X).
- Go inside the picture.
- Use BOARD on the broken wheel, take PUZZLE PARTS 2/2 (Y).
- Use PUZZLE PARTS on the puzzle (Z).

- Easy solution: Ax3, B, C, Dx3, Ex2, Fx2 (A).
- Hard solution: Ax3, B, Cx2, Dx2, Ex2 (B).
- Take PLIERS and RUBY (C).
- Go to Crypt.

- Use PLIERS on the hatch (D).
- Use RUBY on the chest, read the note (E).
- Play puzzle (F).

- Select this option, earn TONGS (G).
- Go to Mrs. Clark’s House.

- Use TONGS on the fire, take GLASS 2/2 (H).
- Use GLASS on the window (I).
- Solution: arrange as in the image (J).
- Open the floorboard, take HOOK (K).
- Go to Lake of Spirits.

- Use HOOK on the rope, take METAL ROD (L).
- Go to Crypt.

- Use METAL ROD on the hatch, take BOWL, use SKULL AMULET on the recess, take GLOVE (M).
- Go to Phantom Forest.
- Use GLOVE on the bush, get LINE (N).
- Use LINE on the fishing rod, take SCREWDRIVER (O).
- Go to Mrs. Clark’s House.
- Use BOWL on the scorpion, take BROKEN PENCIL and SPEAKER (P).
- Play puzzle, earn WOLF FIGURINE (Q).
- Use WOLF FIGURINE on the puzzle (R).
- Easy solution: D, C, A, B (S).
- Hard solution: F, E, C, A, D, B (T).
- Use SCREWDRIVER on the drawer, take DIAMOND RING and BATTERIES 2/2 , take SUCTION CUP (U).
- Use BATTERIES and SPEAKER on BROKEN RECEIVER, get RECEIVER.
- Go to Phantom Forest.
- Use SUCTION CUP on the box, take PAINTS (V).
- Use PAINTS on the box (W).

- Easy solution: paint as in the image (X).

- Hard solution: paint as in the image (Y).

- Read the note (Z).
- Go to Crypt.

- Use RECEIVER on the ravens, use the camera on the photo (A).

- Take DENTED NOTEBOOK (B).
- Use BROKEN PENCIL on DENTED NOTEBOOK.
- Use DIAMOND RING on the glass, take BAS-RELIEF PARTS 1/2 and BUST PART, use METAL ROD on the tile (C).
- Use BUST PART on the bust, take SHARPENER (D).
- Use SHARPENER on DENTED NOTEBOOK, get CODE.
- Use CODE on the bag (E).
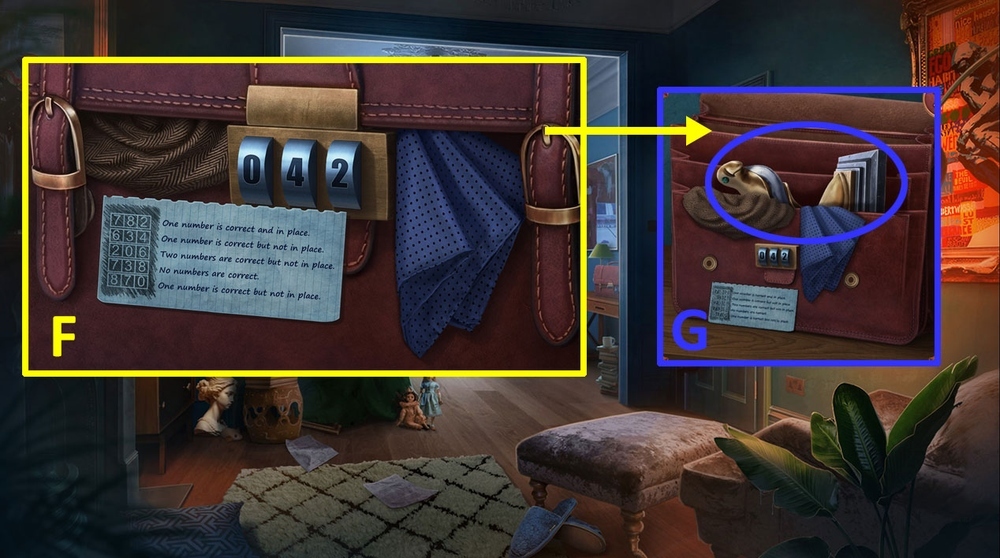
- Solution: enter 042 (F).
- Take HEAVY STATUETTE (G).
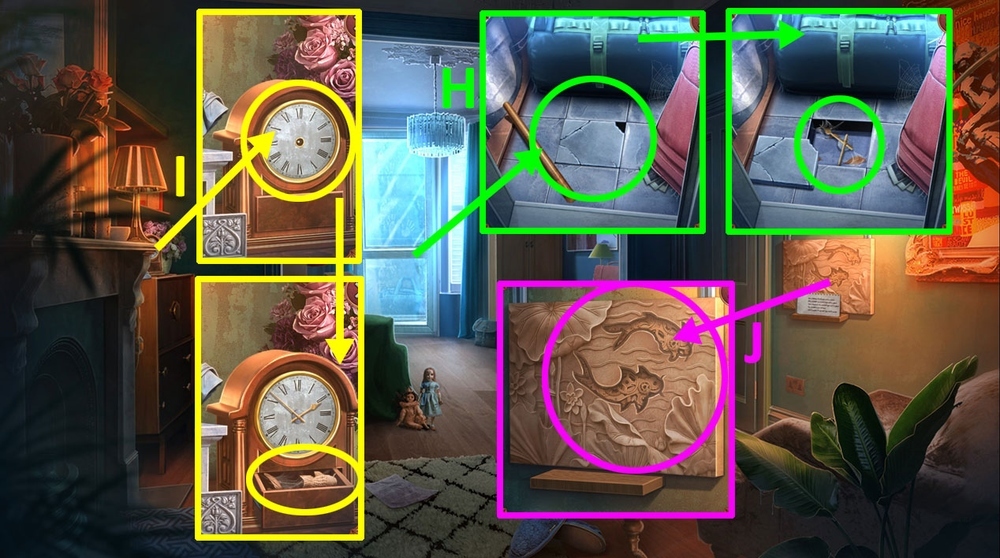
- Use HEAVY STATUETTE on the tile, take CLOCK HANDS (H).
- Use CLOCK HANDS on the clock, take BAS-RELIEF PARTS 2/2 (I).
- Use BAS-RELIEF PARTS on the bas-relief (J).

- Solution: enter DETEGERE (K).
- Read the note (L).

- Try to hide behind the curtain (M).
- Try to hide behind the door (N).
- Try to jump out of the window (O).
- Hide in the closet (P).

- Select this option (A).
- Read the instructions.

- Take CANDLES, PAPER SHEET, and SHAWL (B).
- Use SHAWL on the green shards, take PORTAL SCROLLS, PEN, and HEATING PAD (C).

- Open the fridge, use HEATING PAD on the freezer (D).
- Easy solution: use the picture as a hint (E).
- Hard solution: use the picture as a hint (F).
- Take BUTTER (G).
- Use BUTTER on the rusted bag lock, take PAPER BAG and LIGHTER (H).
- Use CANDLES, PORTAL SCROLL, and LIGHTER on the pedestal, earn LIGHTER, use Camera on the sparks (I).
- Select this option (J).
- Use Camera on the ghosts (K).

- Take STICKERS and FRAME PARTS 1/2 (L).
- Use PAPER SHEET and PEN on the octopus carving on the desk, take FIGURINE DRAWING (M).
- Use FIGURINE DRAWING on the octopus sculpture, move octopus’s legs as shown in the picture, take GEM (N).

- Use GEM on the box (O).
- Easy solution: use the picture as a hint (P).
- Hard solution: use the picture as a hint (Q).
- Take FRAME PARTS 2/2 (R).
- Use FRAME PARTS on the frame, take SEASHELL and KEY (S).
- Use KEY on the doors (T).
- Go forward.
- Click on the big spider (U).
- Take AMULET MOLD and HANGER (V).

- Use HANGER on the holes in the floor (W).
- Play puzzle, earn GLOVE (X).
- Use GLOVE on the fire, earn STAPLE REMOVER (Y).
- Click on the photo frame, turn it, use STAPLE REMOVER on the staples on the back of the frame, take PHOTO PIECE and WEDDING RING (Z).
- Use STICKERS on PHOTO PIECE.
- Go back.

- Use WEDDING RING on the flower imprint on the safe (A).
- Easy solution: use the picture as a hint (B).
- Hard solution: use the picture as a hint (C).
- Take BASEBALL and PHOTO PIECE (D).

- Use PHOTO PIECE on PHOTO PIECE, take DECRYPTION CODE.
- Use AMULET MOLD on the desk (E).
- Go to Neil Clark’s Ghostly Room.
- Use DECRYPTION CODE on the laptop (F).

- Easy solution: click: 1-2-3-4-5 (G).
- Hard solution: click: 1-2-3-4-5-6-7 (H).
- Click on the laptop’s screen, read the text and see the picture (I).

- Click on the wallpaper, use PAPER BAG and SEASHELL on the spackle on the wall, earn PLASTER (J).
- Go back.
- Use PLASTER on the star mold, take and use the bag of plaster on the mold, then decanter with water, then hairdryer, then hammer, take and earn STAR AMULET (K).

- Use STAR AMULET on the star shape on the drawer, take PIPE (L).
- Go to Neil Clark’s Ghostly Room.
- Play puzzle, earn FIGURINE (M).
- Use PIPE and FIGURINE on the stick-out brick, take KEY (N).

- Use KEY on the wall safe, take NEIL’S CAMERA (O).
- Select this option (P).
- Use Camera on the portrait, take photo (Q).
- Easy solution: assemble the picture as a hint (R).
- Hard solution: assemble the picture as a hint (S).

- Select this option (T).
- Go to Library.

- Take BOOKS 1/3 and SOLVENT (U).
- Use GLOVE and SOLVENT on the thick layer of paint, memorize the name “KING” (V).
- Enter “KING” on the lock, take COIN (W).
- Go back.

- Use BASEBALL on the broken side table, take LIGHT BULB, CRESCENT FIGURINE, and LION’S EYE figurine (X).
- Use LION’S EYE on the lion’s head, click on the lion’s head (Y).
- Use LIGHT BULB on the pedestal (Z).
- Go to Dolores’s Secret Room.

- Use CRESCENT FIGURINE on the mechanism in the statue (A).
- Use LIGHTER on the bees, use COIN on the screws on the drawer, take COMB, STICK, and SUN FIGURINE (B).
- Go to Library.

- Use COMB on the holes in the little door (C).
- Easy solution: click: A, B, Cx2, Dx3, Ex2 (D).
- Hard solution: click: A, B, C, Dx3, Ex3 (E).
- Take BLADE and BEADS (F).
- Use BEADS on the broken chain, take BOOKS 2/3 (G).
- Go to Dolores’s Secret Room.
- Use SUN FIGURINE on the mechanism in the statue (H).
- Solution: use the picture as a hint (I).
- Take STICKY TAPE and SWITCH (J).
- Use SWITCH on the table lamp, take HOOK (K).
- Use STICKY TAPE and HOOK on STICK, earn STICK WITH HOOK.
- Use STICK WITH HOOK on the curtain ring, take MIRROR PART, use BLADE on the bag’s stitching, take BOOKS 3/3 (L).
- Go to Library.
- Use BOOKS on the shelves (M).
- Easy solution: 3, 1, 5, 3, 4, 5, P (N).
- Hard solution: 4, 2, 6, 4, 5, 6, 7, 1, P (O).
- Read the book and play puzzle (P).
- Go back.
- Use MIRROR PART on the pedestal, take BROKEN SCOOP NET and KNIGHT (Q).
- Go to Dolores’s Secret Room.
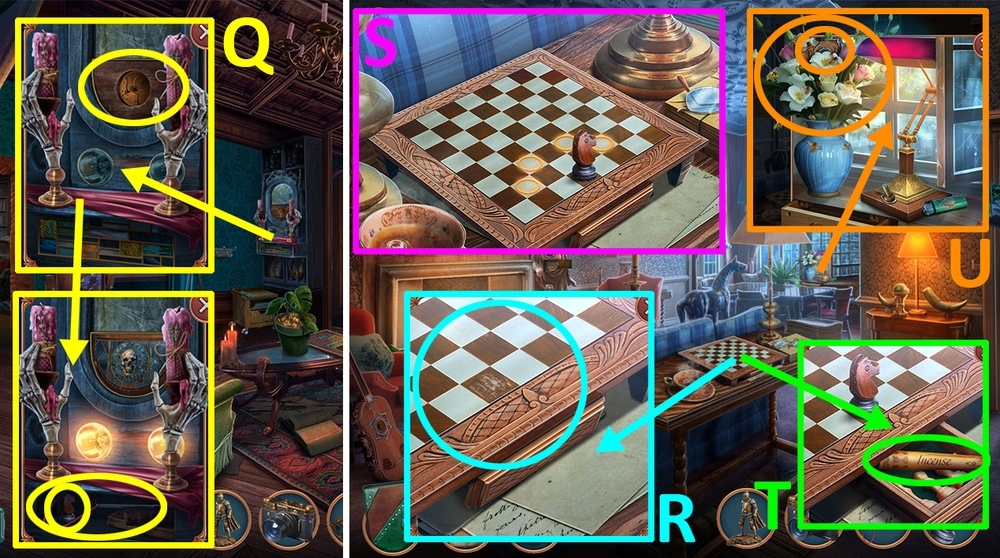
- Use KNIGHT on the chess board (R).
- Solution is random (S).
- Take INCENSE (T).
- Use INCENSE on the bees, earn LIGHTER and take POINTER (U).
- Go back.
- Use POINTER on the board (V).
- Solution: Drag through: 1-2-3-4-5-6-7-8-9-10-11-12-12-14, Drag through: 1-2-3-4-5-6-7-8-9-10-11-12-12-14-15-16-17 (W).
- Take and read the spell, earn RITUAL (X).
- Take NET and STONE’S DRAWING (Y).
- Use STONE’S DRAWING on the stones, click on the stone from the hint, take GARDEN SHEARS (Z).

- Use GARDEN SHEARS on the vines, take AWL (A).
- Use NET on BROKEN SCOOP NET.
- Use RITUAL and AWL on the door, take and use the key on the lock, earn RITUAL (B).
- Easy solution: click Lx2, R, Lx4, R (C).
- Hard solution: click Rx2, L, Rx2, Lx3, R, Lx2, Rx2, Lx2 (D).
- Go to Neil Clark’s House.

- Select this option (E).

- Take LADDER and CADUCEUS 1/2 (F).
- Use FIGURINE on LADDER.
- Use LIGHTER on wax, take PIANO KEYS 1/2 and RIBBON (G).
- Use RIBBON on BROKEN SCOOP NET, earn SCOOP NET.
- Use SCOOP NET on the aquarium (H).
- Play puzzle, earn EARRING (I).

- Use EARRING on the purse, take BUTTON (J).
- Use BUTTON on the niche in the desk, press the button (K).
- Go to Neil’s Hidden Room.
- Select this option (L).
- Take BOARDS and CADUCEUS 2/2, use RITUAL on the ritual drawing (M).
- Use BOARDS on LADDER.
- Use CADUCEUS on the slot (N).

- Easy solution: use pictures as a hint (O).
- Hard solution: use pictures as a hint (P).
- Take TENEBRIS’S RUNE and SCALPEL (Q).
- Use SCALPEL on the stitching, take HORSESHOE (R).
- Use TENEBRIS’S RUNE on the ritual drawing (S).
- Go In Front of Neil’s House.
- Use HORSESHOE on the holes in the wall, take SET OF WRENCHES (T).
- Go to Neil Clark’s House.
- Play puzzle, earn CARROT (U).
- Use CARROT on the gecko, open the box and take NAILS (V).
- Use NAILS on LADDER, earn LADDER.
- Go to Neil’s Hidden Room.

- Use LADDER on the brick wall, use SET OF WRENCHES on the clock (W).
- Easy solution: use pictures as a hint (X).
- Hard solution: use pictures as a hint (Y).
- Take PIANO KEYS 2/2 (Z).
- Go back.
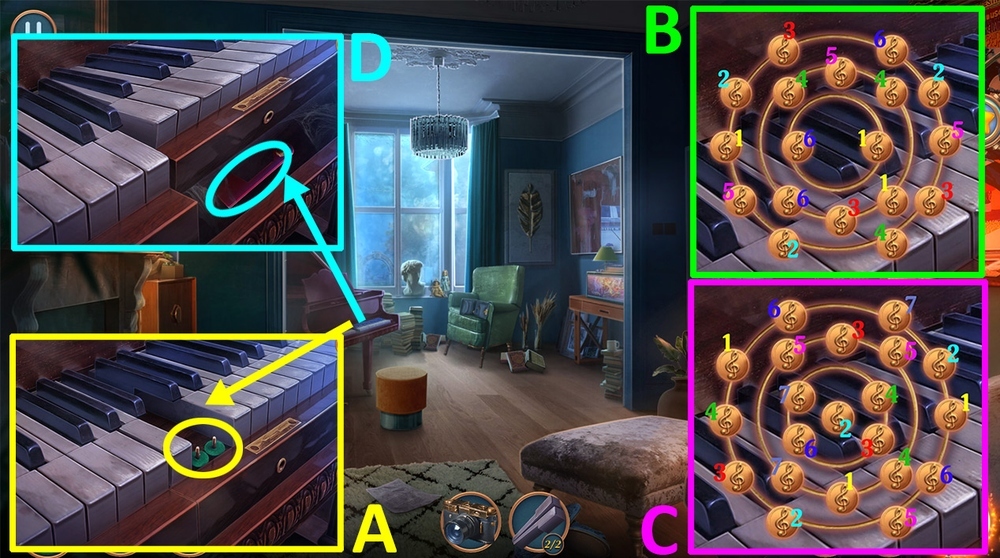
- Use PIANO KEYS on piano (A).
- Easy solution: click 1-1-1, 2-2-2, 3-3-3, 4-4-4, 5-5-5, 6-6-6 (B).
- Hard solution: click 1-1-1, 2-2-2, 3-3-3, 4-4-4, 5-5-5, 6-6-6, 7-7-7 (C).
- Take FLAG (D).
- Go back.

- Use FLAG on the mailbox, take SUMMONING STONE (E).
- Go to Neil’s Hidden Room.
- Use SUMMONING STONE on the ritual drawing, use Camera on the ritual drawing (F).

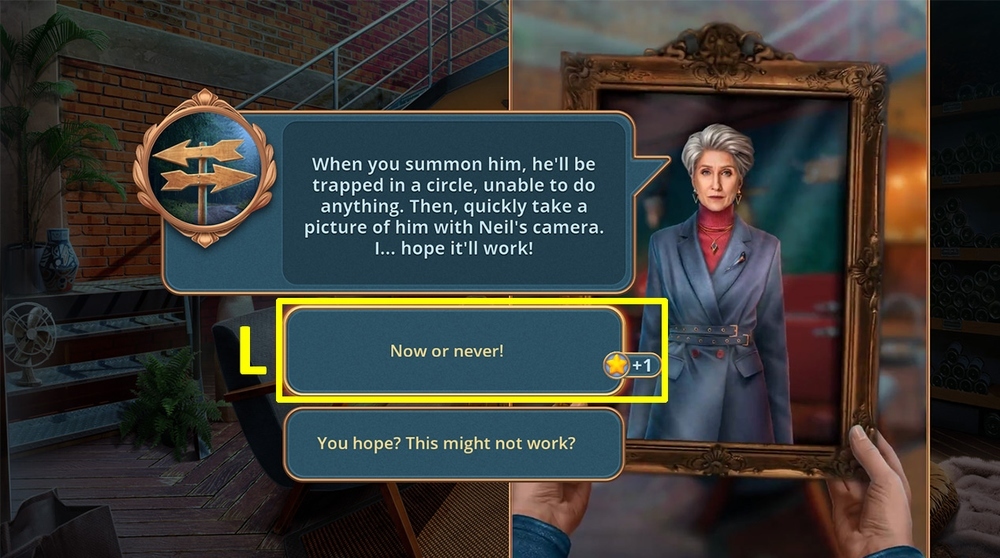
- Use NEIL’S CAMERA on Tenebris (G).
- Easy solution: solution is random (H).
- Hard solution: solution is random (I).
- Walkthrough Bonus Chapter, at the link below.


