Mystical Riddles Season 1 Episode 4: Price of Desire – The game starts with Rebecca coming to you and telling you that her daughter Emma has been kidnapped by some strange creature, and you are just helping those who have suffered from mystical forces. The police do not believe her, that her daughter disappeared right from her room, and Rebecca asks you to come. Rebecca and Emma were sitting alone in her room on the second floor and someone rang the doorbell, she went to answer it and her daughter was gone. It’s up to you to figure out who might have kidnapped her, an evil criminal or something much scarier. If you can not pass any of the puzzles or do not know where the items are, on our site you can watch Mystical Riddles Season 1 Episode 4: Price of Desire walkthrough and find out what happened that night.
Mystical Riddles Season 1 Episode 4: Price of Desire – Walkthrough
Here you can see the full walkthrough of Mystical Riddles Season 1 Episode 4: Price of Desire, specifically the main story.
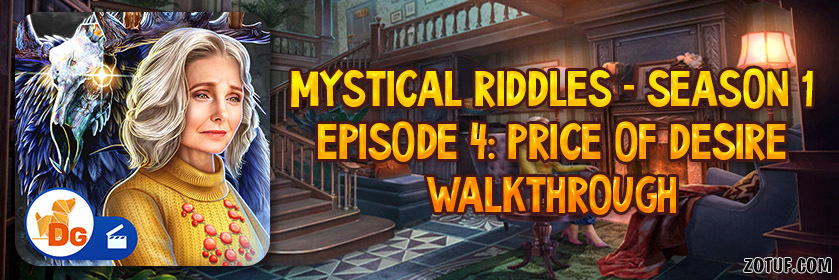
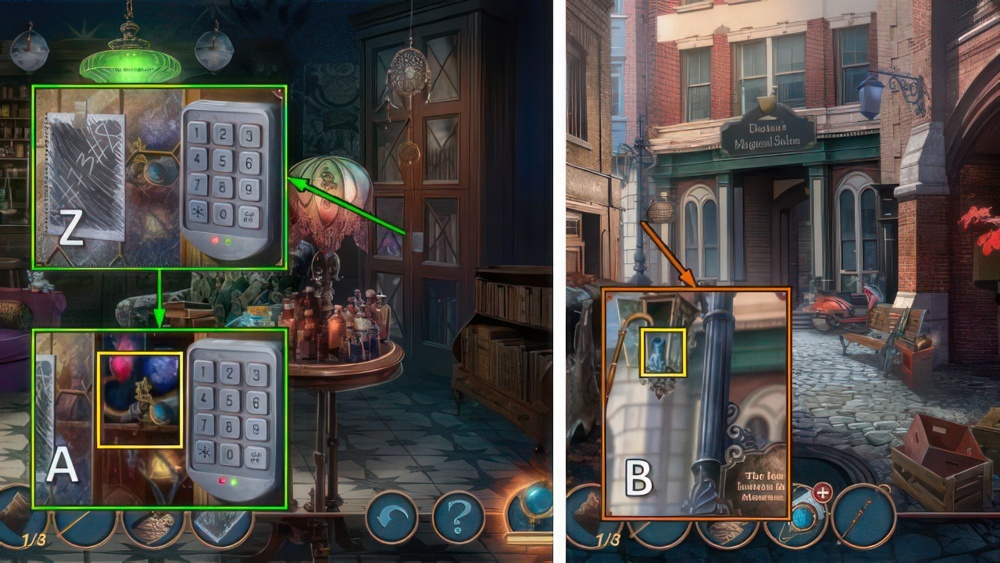
- Take KEY 1/2, COIN and CROCHET HOOK (A).
- Use CROCHET HOOK (B).
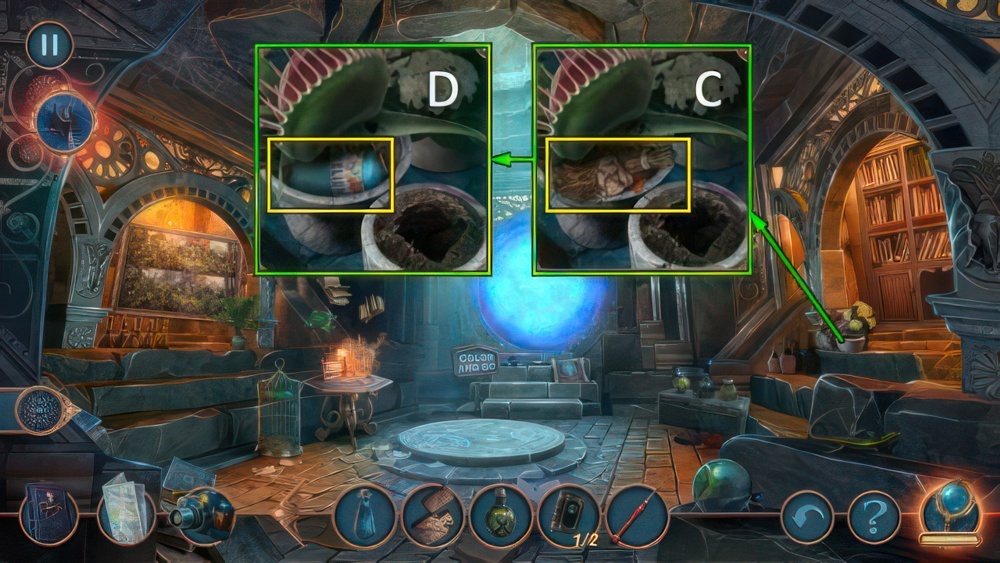
- Take KEY 2/2 and EMMA’S ROOM KEY (C).
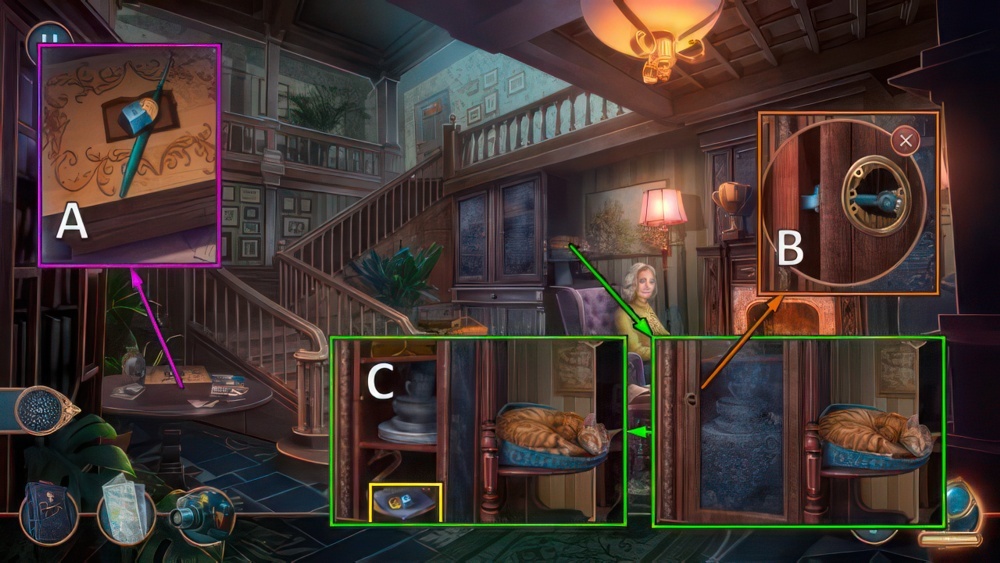
- Use EMMA’S ROOM KEY (D).
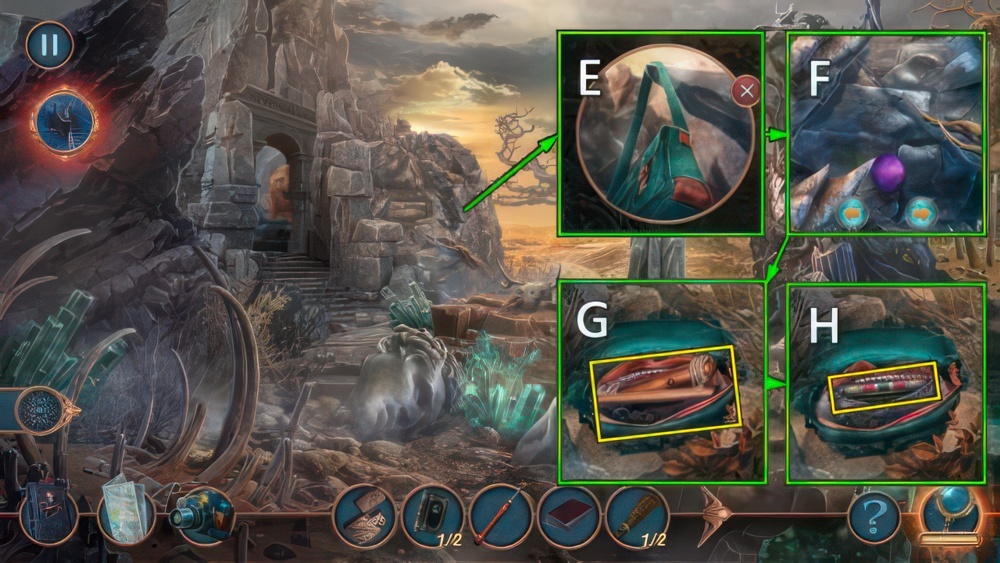
- Take note, ESOTERIC TOME and THREAD BALL (E).
- Offer THREAD BALL (F).
- Take note and COMPUTER MOUSE (G).

- Place KEY and COMPUTER MOUSE, take EMMA’S PHOTO (H).
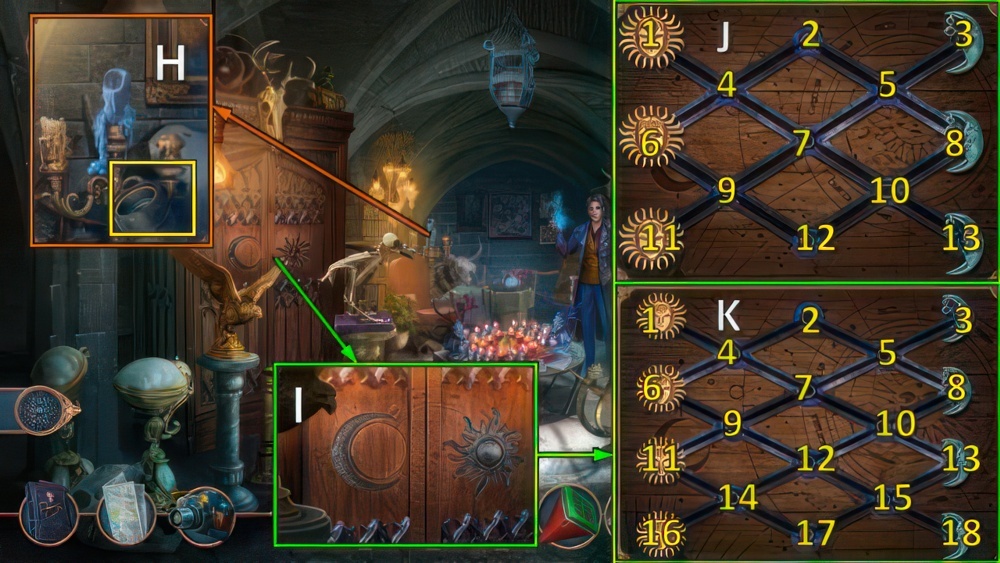
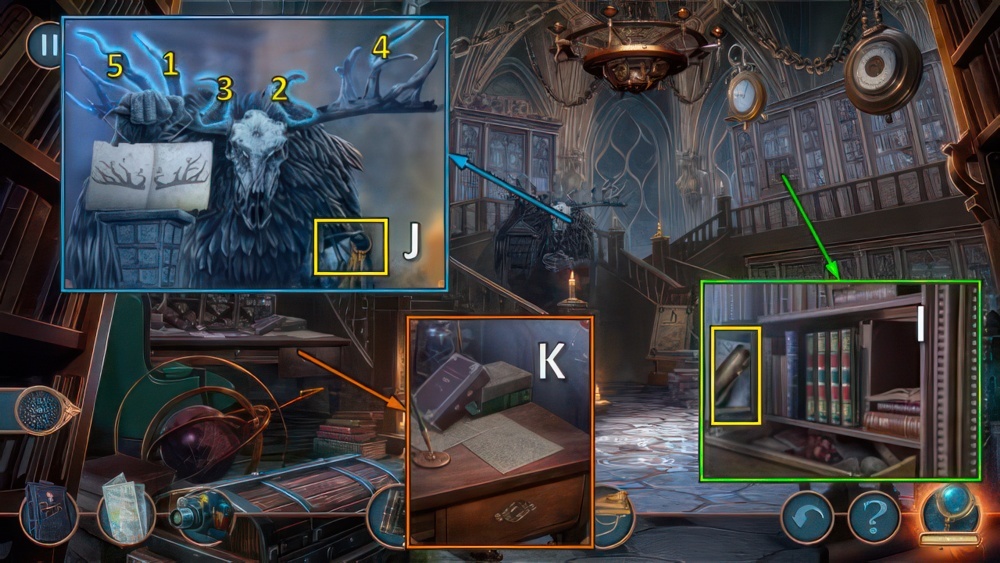
- Open, take note and BOOK EMBLEM (I).
- Place BOOK EMBLEM (J).
- Play puzzle (K), receive REBECCA’S MEDICAL RECORD.
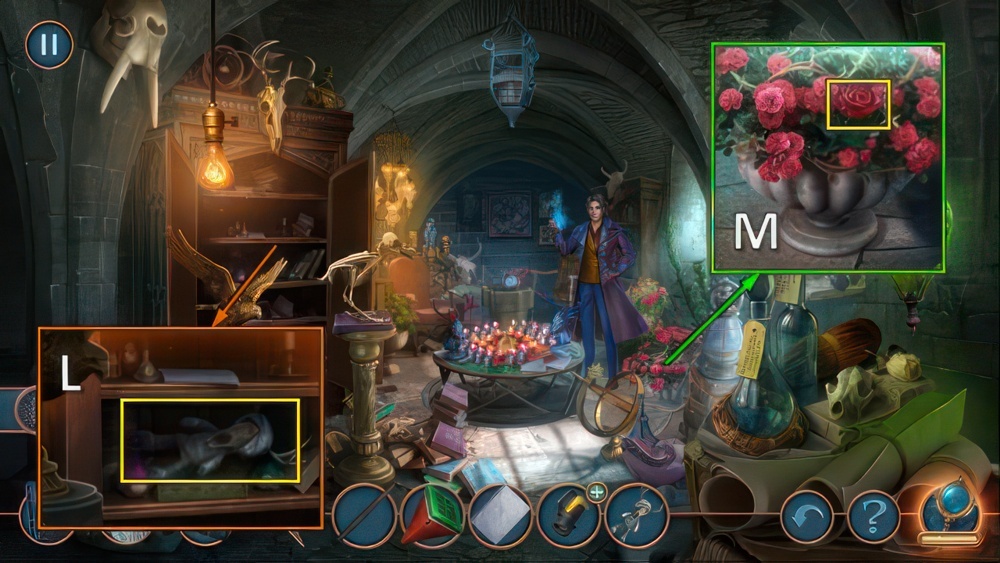
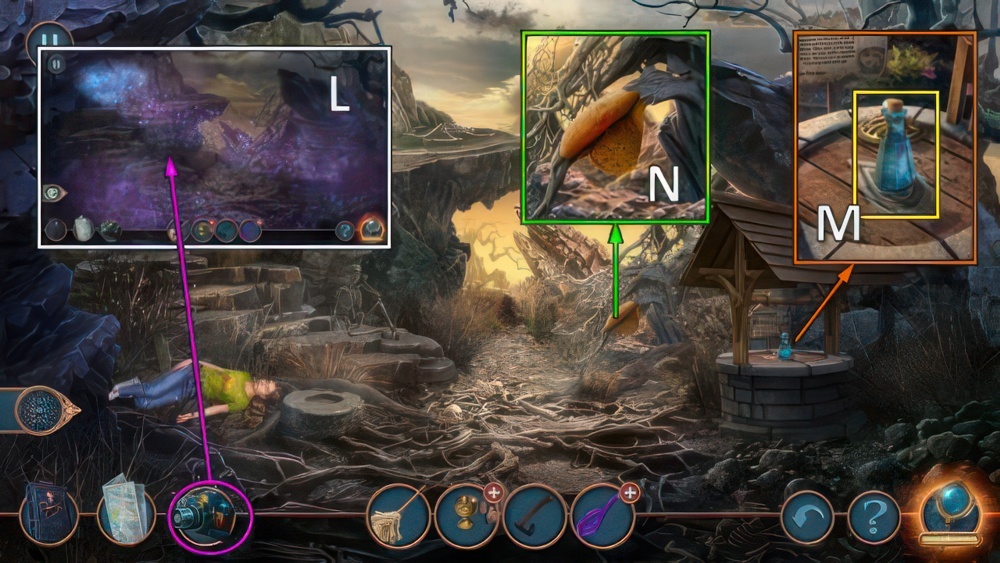
- Offer REBECCA’S MEDICAL RECORD (L), receive PURSE.

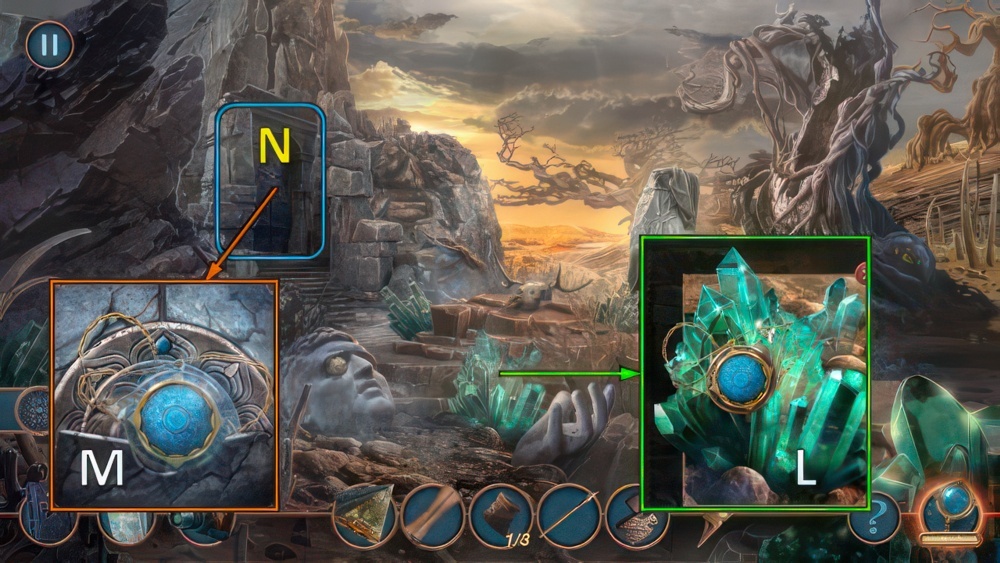
- Use camera (M).
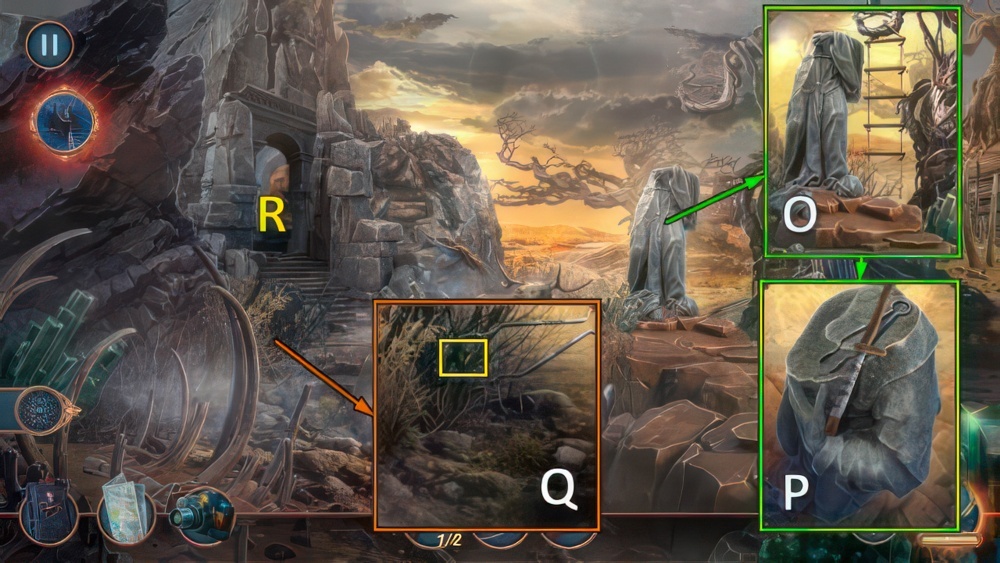
- Take CHISEL (N).
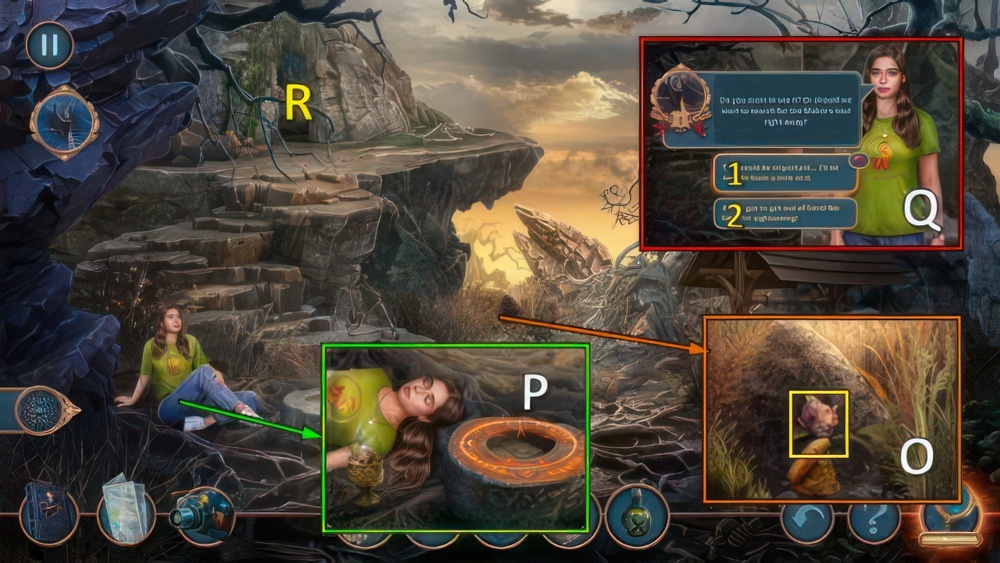
- Use CHISEL and ESOTERIC TOME (O).
- Take LIGHT BULB and THREADS (P).

- Tak DOOR RING with THREADS (Q).
- Take SCISSORS (R).
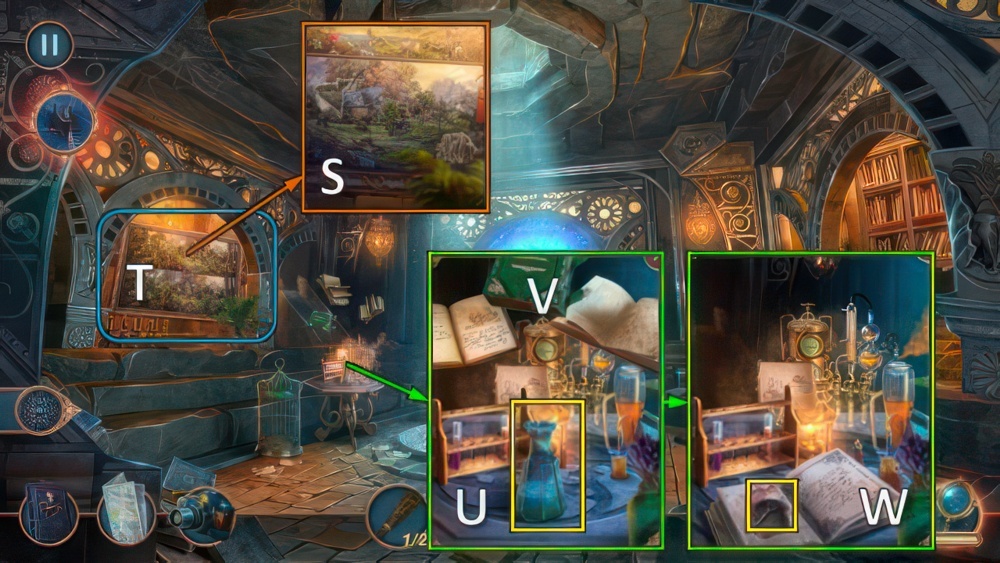
- Place DOOR RING (S).
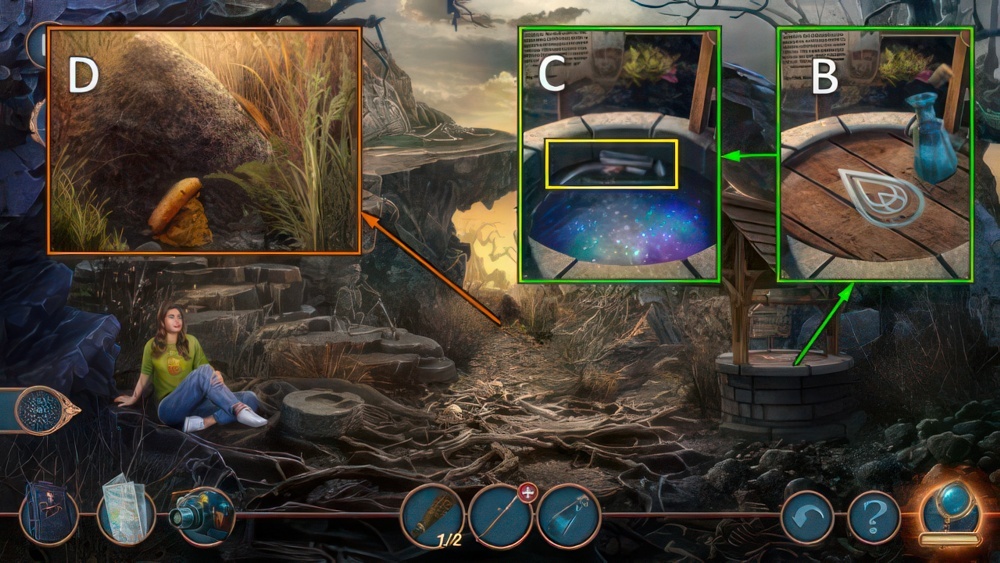
- Go (T).

- Offer EMMA’S PHOTO (U).
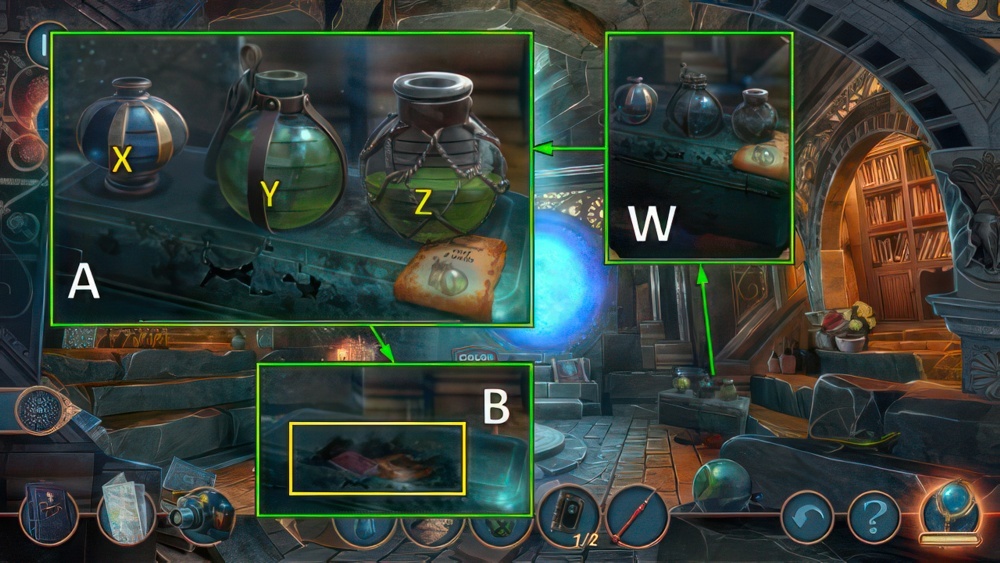
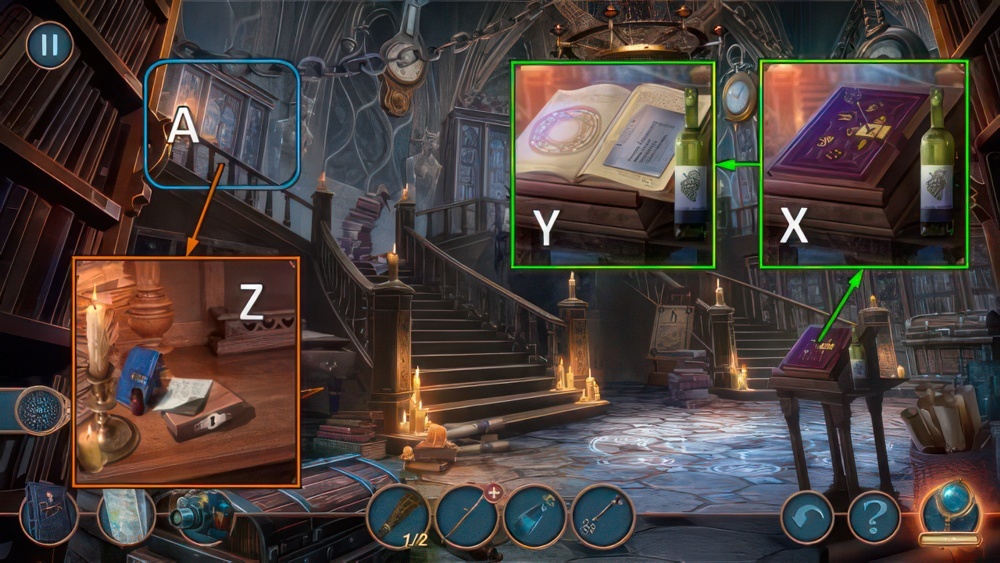
- Use COIN, take CRYSTAL (V).
- Take MOON AMULET and CRAYON, place CRYSTAL (W).
- Easy solution (X): (3-2)-(2-1)-(4-3)-(3-2)-(5-4)-(4-3)-(6-5)-(5-4).
- Hard solution (X): A-Z-D-C-Z-Y-C-B.
- Take note, SOAP and CUFF LINK (E).
- CUFF LINK on PURSE, take NOTEBOOK and ID.
- Show ID (F).
- Go (G).
- Take FLASHLIGHT and SUN AMULET (H).
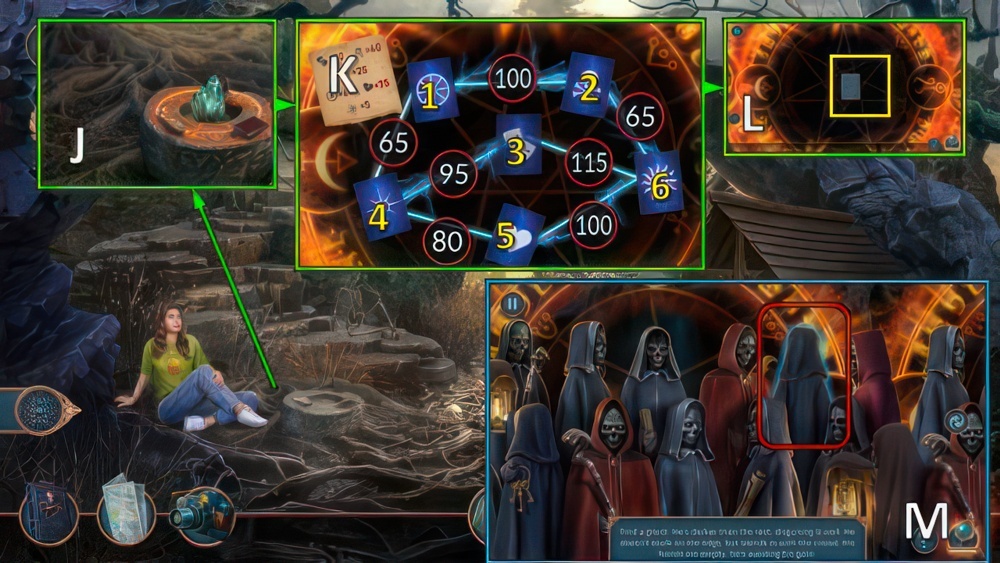
- Place SUN AMULET and MOON AMULET (I).
- Easy solution (J): (6-4)-(11-9-6)-(8-10-12)-(3-5-8-10)-(4-2-5-3)-(6-4-2-5).
- (1-4-2)-(12-9-11)-(10-12-9-6)-(13-10-12-9)-(5-8-10-13)-(2-5-8)-(9-7-4-1).
- Hard solution (K): (6-4)-(11-9-6)-(16-14-11-9)-(1-8-15-17-14-16)-(13-15-17-14).
- (8-10-13-15-17)-(3-5-8-10-13-15)-(4-2-5-3)-(9-7-5-8-10)-(6-4-2-5-8)-(1-4-2-5).
- (14-11-9-6-4-1)-(17-14-11-9-6)-(15-17-14-11)-(10-13-15-18)-(5-7-10-13).
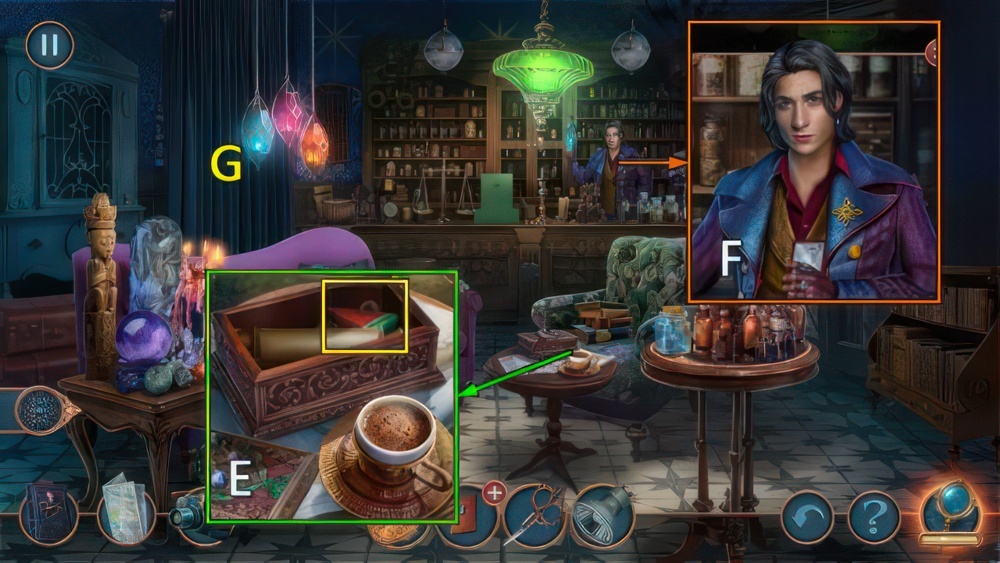
- Take DOLL OF THE MAKER OF WISHES (L).
- Take RED ROSE with SCISSORS, take NAIL CLIPPERS (M).
- Walk down.

- Use NAIL CLIPPERS (N).
- Take NUT (O).
- Offer NUT (P).
- Use SOAP, take PYRAMID, BANKNOTE, note and CANDLE 1/3 (Q).
- Walk down.
- Use BANKNOTE, take CHARGER (R).
- LIGHT BULB and CHARGER on FLASHLIGHT, receive DEAD FLASHLIGHT.
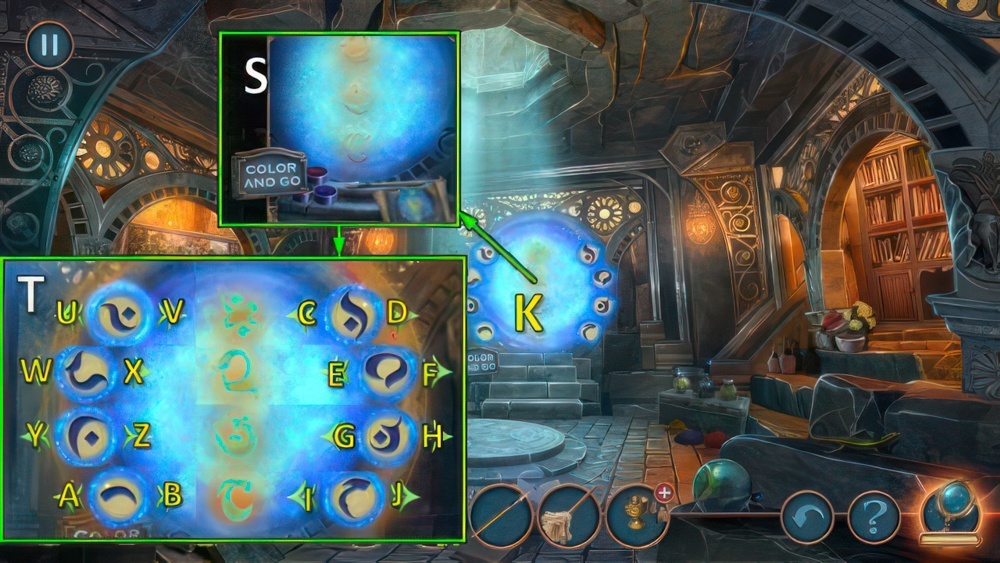
- Place DEAD FLASHLIGHT (S).
- Play puzzle (T), receive SKULL KEY.
- Use SKULL KEY.
- Take PORTAL INSTRUCTIONS and UV LAMP (U).
- Go to Ritual Room.
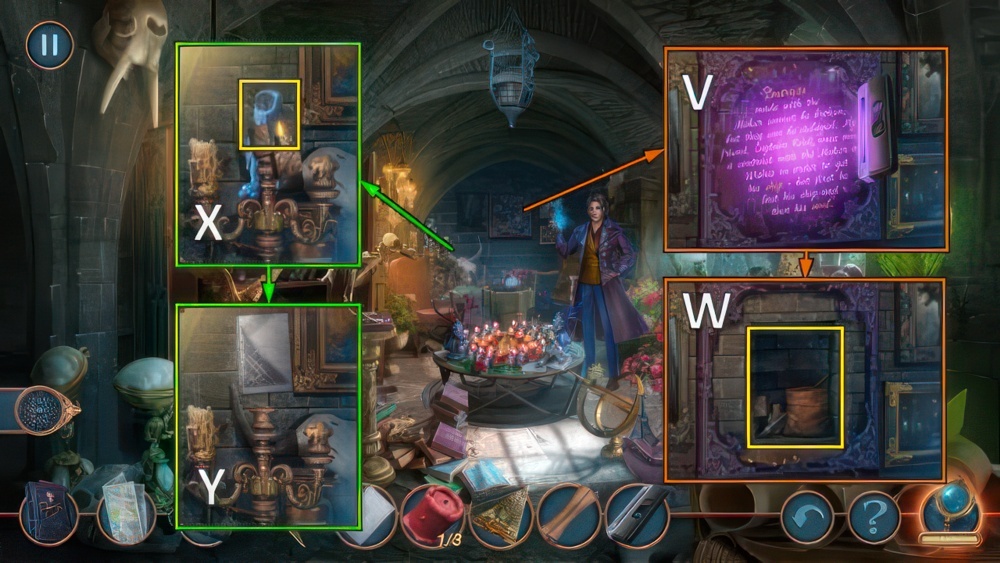
- Use UV LAMP for mini-puzzle (V).
- Take POUCH 1/3, BRUSH and LIGHTER (W).
- Use LIGHTER, take CANDLE 2/3 (X).
- Use NOTEBOOK and CRAYON, receive CODE (Y).
- Walk down.
- Place CODE, enter *-#-7-3-#-8 (Z).
- Take AMULET, CRYSTAL BALL and CANE (A).
- Walk down.
- Take CANDLE 3/3 with CANE (B).
- Go to Ritual Room.
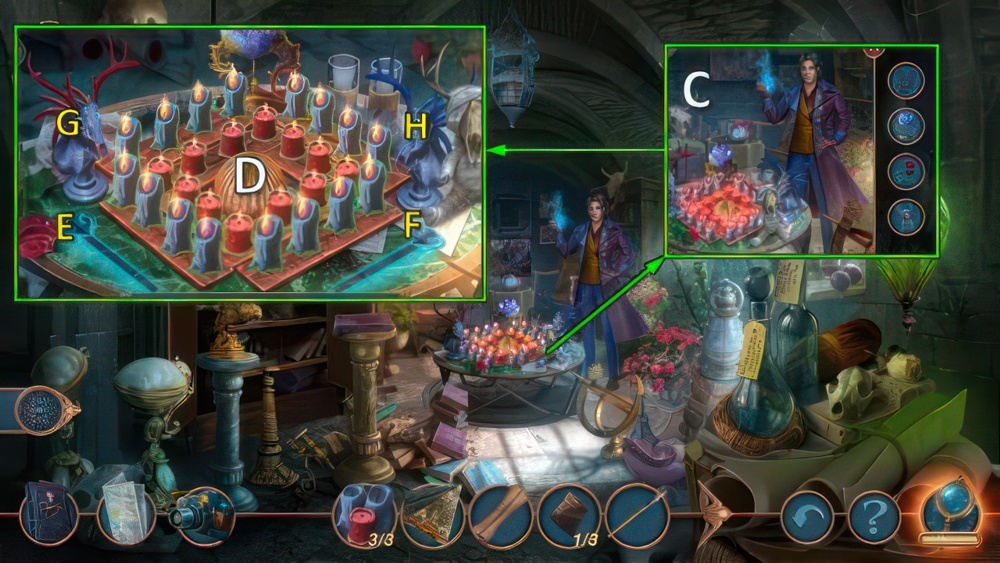
- Place DOLL OF THE MAKER OF WISHES, RED ROSE, CRYSTAL BALL and CANDLE (C).
- Easy solution (D): Fx2-E-Fx2-Ex7.
- Hard solution (D): H-G-Ex5-F-H-Fx7-Ex7.

- Take POUCH 2/3, BROOM and STURDY STICK (I).
- Take note, place PYRAMID and STURDY STICK (J).
- Take HAND-CENSER and CHAIN (K).
- CHAIN on AMULET, receive CHARGED AMULET.
- Use CHARGED AMULET (L).
- Use CHARGED AMULET (M).
- Play puzzle (N).
- Go (N).

- Take note, AXE, DEFLATED BALLOON and SCOOP (O).
- Use SCOOP, take POUCH 3/3 (P).
- Take DYE with POUCH (Q).
- Take note, place DYE.
- Use water, take PAINT (R).
- Place PORTAL INSTRUCTIONS, PAINT and BRUSH (S).
- Easy solution (T): U-X-Y-B-C-F-G-J.
- Hard solution (T): Wx2-Z-A-Dx2-E-G-Ix2-Y.
- Go (K).
- Use camera (L).
- Take GLASS BOTTLE and HAND-CESURE TOP (M).
- Use AXE, take HONEYCOMB (N).
- Use HONEYCOMB, take FLOWER (O).
- LIGHTER, HAND-CESURE TOP and FLOWER on HAND-CENSER, receive FULL HAND-CENSER.
- Use full HAND-CENSER (P).
- Select 1 or 2 (Q).
- Note: if you’ve selected 2, you need to skip the steps marked with #, below.
- Receive ACID.
- # Go (R).

- # Take note and CORKSCREW (S).
- # Take BOOK 1/2 (T).
- # Use CORKSCREW (U).
- # Take SEAM RIPPER (V).
- Go to Private Suite.
- Use ACID (W).
- Easy solution (A): (X-Y)-(Z-X)-(Y-Z)-(Z-X)-(X-Y)-(Z-X)-(Y-Z).
- Hard solution (A): (Z-X)-(X-Y)-(Z-X)-(X-Y)-(Y-Z)-(X-Y)-(Z-X)-(X-Y).
- Take TAROT CARDS and PLANT FEED (B).
- Offer PLANT FEED.
- Take note and DRIED GRASS 1/2 (C).
- Use BROOM, take HELIUM CYLINDER (D).
- Walk down.
- HELIUM CYLDINDER on DEFLATED BALLOON.
- Use DEFLATED BALLOON (E).
- Avoid obstacles (F).
- Open, take ROPE LADDER (G).
- # Use SEAM RIPPER, take BOOK 2/2 (H).
- # Go to Maker of Wishes Hideout.
- # Place BOOK, take note and CLUE (I).
- # Place CLUE, select 1-2-3-4-5.
- Take LOCKPICKS (J).
- # Use LOCKPICKS (K).

- # Easy solution (L): (11-4)-(4-10)-(11-3)-(11-4)-(12-2)-(12-6)-(2-8)-(12-2)-(5-7)-(1-9)-(1-7)-(5-9).
- # Hard solution (M): (5-9)-(1-11)-(1-9)-(4-13)-(13-8)-(4-16)-(2-14)-(2-10)-(5-15).
- (11-5)-(8-14)-(3-13)-(4-13)-(2-14)-(7-12)-(3-12)-(2-16)-(7-16)-(6-12)-(2-12).
- # Take RUNE (N).
- Go to Other World.
- Place ROPE LADDER (O).
- Take HANDLE and COAL TONGS (P).
- Take THREAD AND NEEDLE with COAL TONGS (Q).
- Go (R).
- Use THREAD AND NEEDLE (S).
- Play puzzle (T), receive POTION BASE.
- Place GLASS BOTTLE and POTION BASE, take OPENING POTION (U).
- # Use RUNE (V).
- # Take CHAIN KEY (W).
- # Go to Maker of Wishes Hideout.
- # Use CHAIN KEY (X).
- # Take note and MASTER’S LIST (Y).
- # Place MASTER’S LIST (Z).
- # Play puzzle (A).
- Go to Fields of Sorrow.
- Use OPENING POTION (B).
- Take note, SOUL WATER and SCYTHE BLADE (C).
- SCYTHE BLADE on HANDLE, receive SCYTHE.
- Use SCYTHE (D).

- Easy solution (E).
- Hard solution (F).
- Take note, DRIED GRASS 2/2 and DYNAMITE (G).
- Walk down twice.

- Place LIGHTER and DYNAMITE (H).
- Take CRYSTAL CHUNK (I).
- Go to Fields of Sorrow.
- Place TAROT CARDS, SOUL WATER, CRYSTAL CHUNK and DRIED GRASS (J).
- Solution (K): (1-6)-(4-2)-(5-6)-(5-3)-(3-4).
- Take note (L).
- Find and select (M).
Congratulations! You have completed the game Mystical Riddles Season 1 Episode 4: Price of Desire.


