
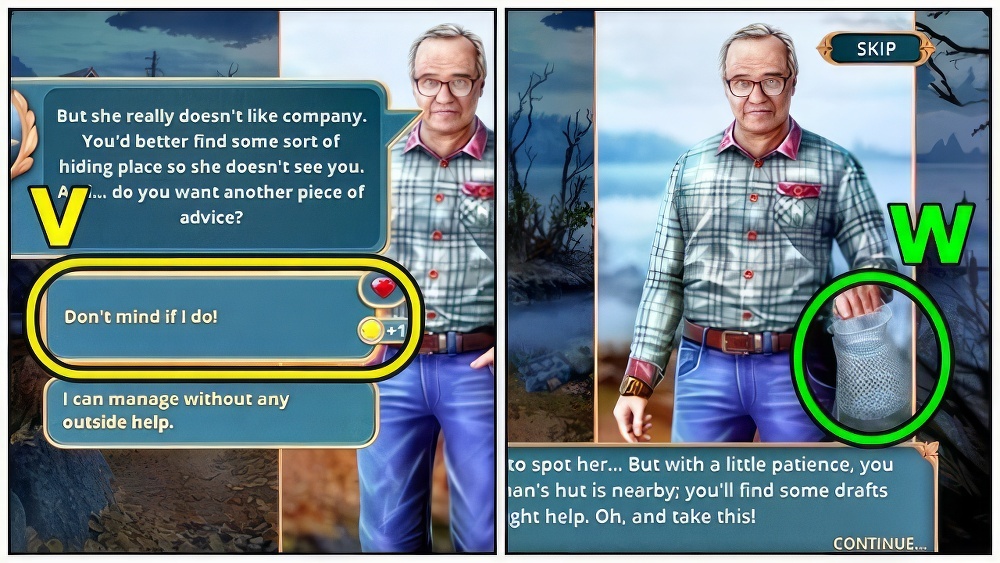
Myth or Reality 2: Mystery of the Lake – Embark on a thrilling detective adventure in the Loch Ness Hotel, where Scotland’s secrets, ancient history and mysterious events intertwine. In the role of a famous journalist specializing in paranormal phenomena, you will have to solve the mystery of the Loch Ness Monster. But be careful: the monster is on the loose, and recent attacks on tourists are causing serious alarm. You check into a hotel full of antiques and mysterious but friendly neighbors. The owners, Mr. and Mrs. Crossbury, warn you: the hotel is not responsible for your safety, especially given the strange weather events and possible dangers awaiting you. Explore each room, find hidden objects, interact with the locals and immerse yourself in an atmosphere of mystery. If you can not pass any of the puzzles or do not know where the items are, on our site you can watch the walkthrough of Myth or Reality 2: The Mystery of the Lake, and solve the crime behind the legends of the monster.
Myth or Reality 2: Mystery of the Lake – Walkthrough
Here you can see the full walkthrough of Myth or Reality 2: Mystery of the Lake game, namely for all chapters, including bonus chapter, in pictures.
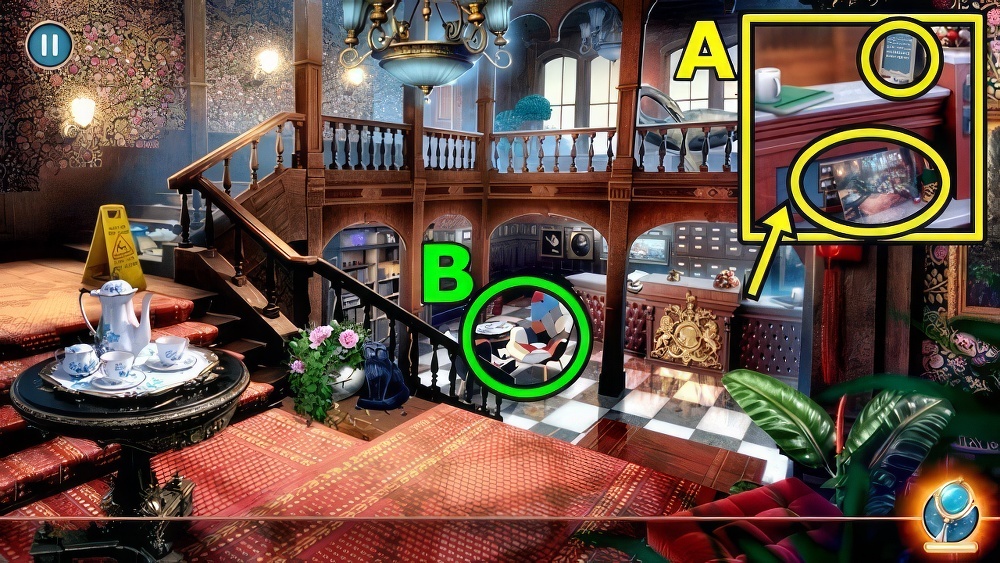
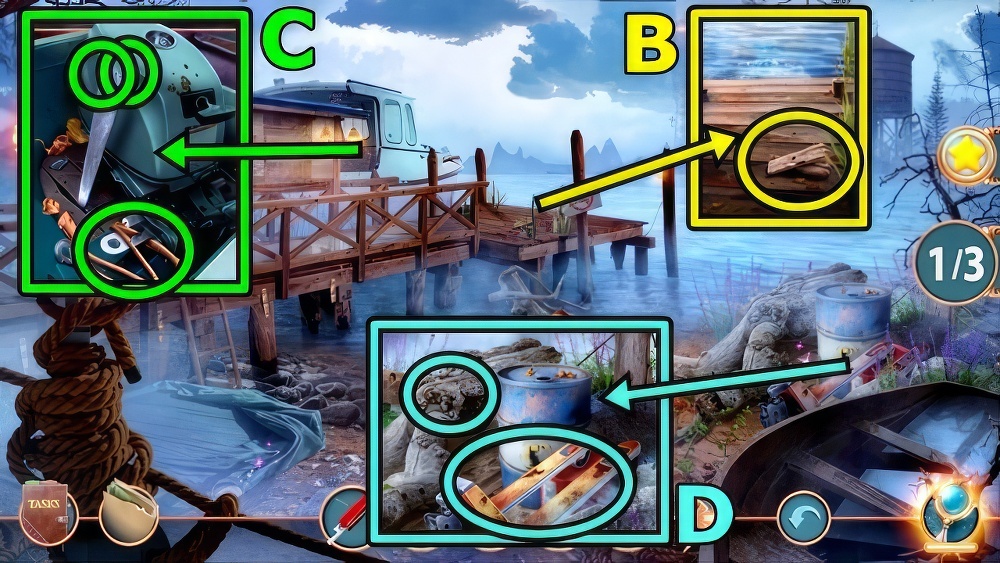
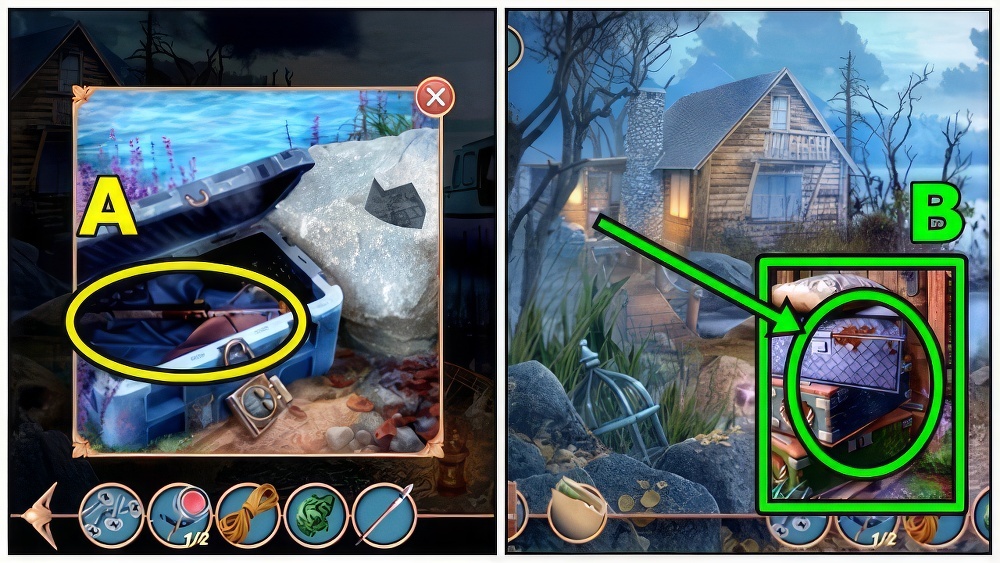
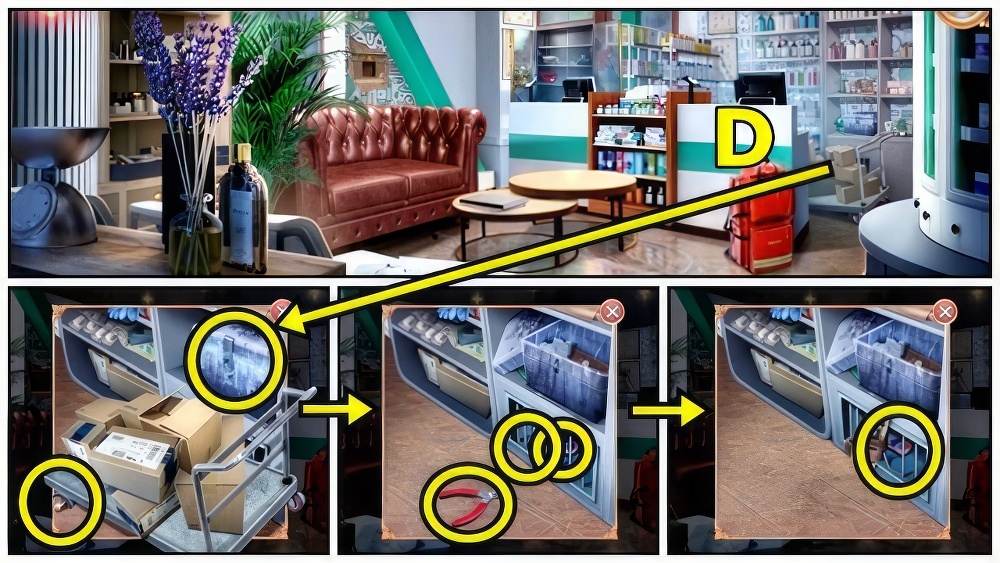
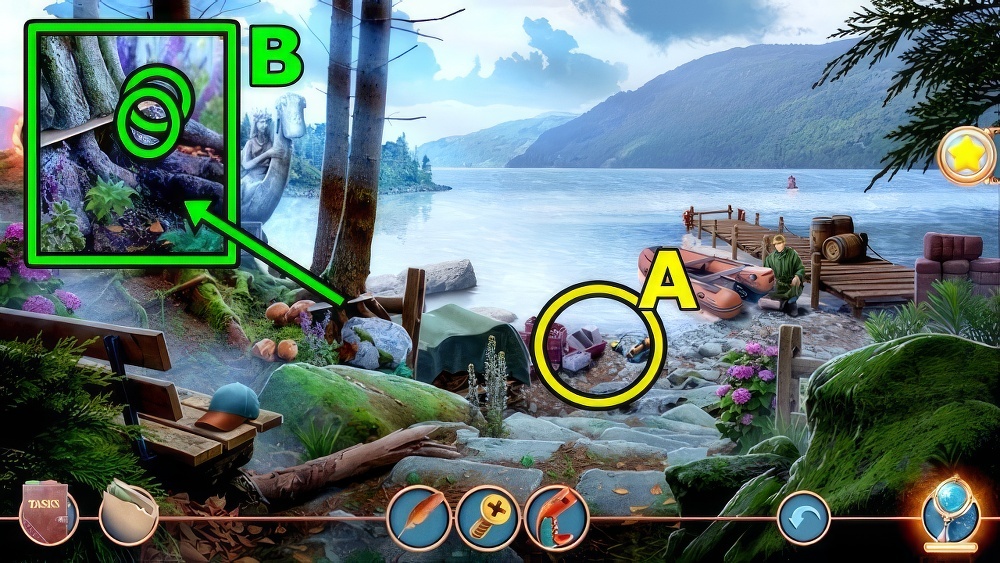
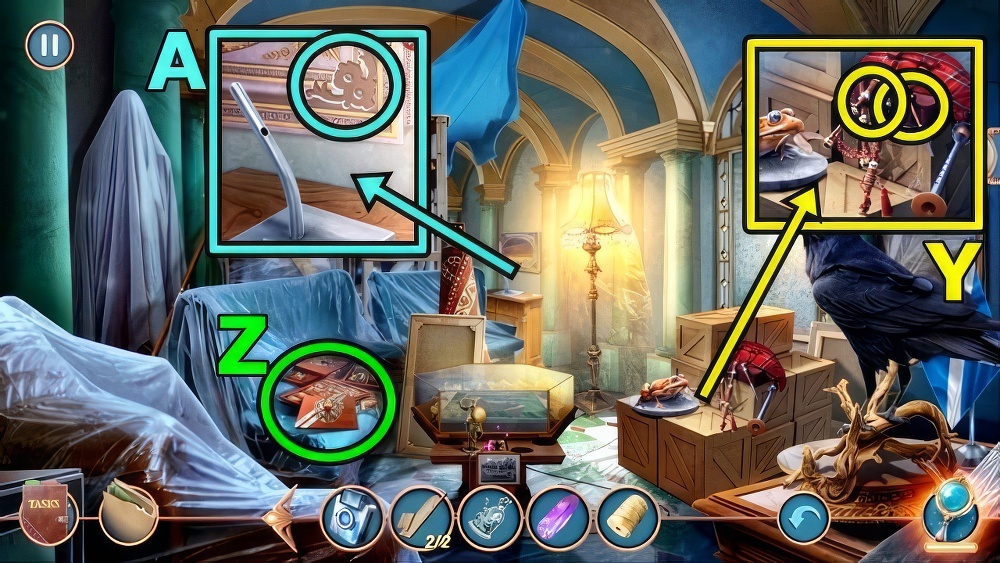
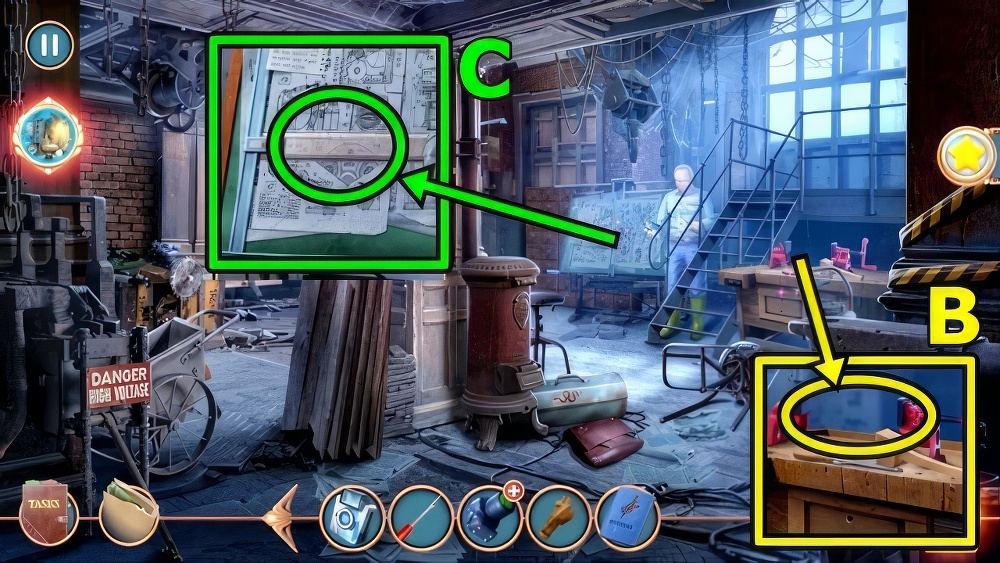
- Take HOTEL LOBBY PHOTO (A). Read.
- Use HOTEL LOBBY PHOTO (B).
- Play puzzle, take SWISS KNIFE.

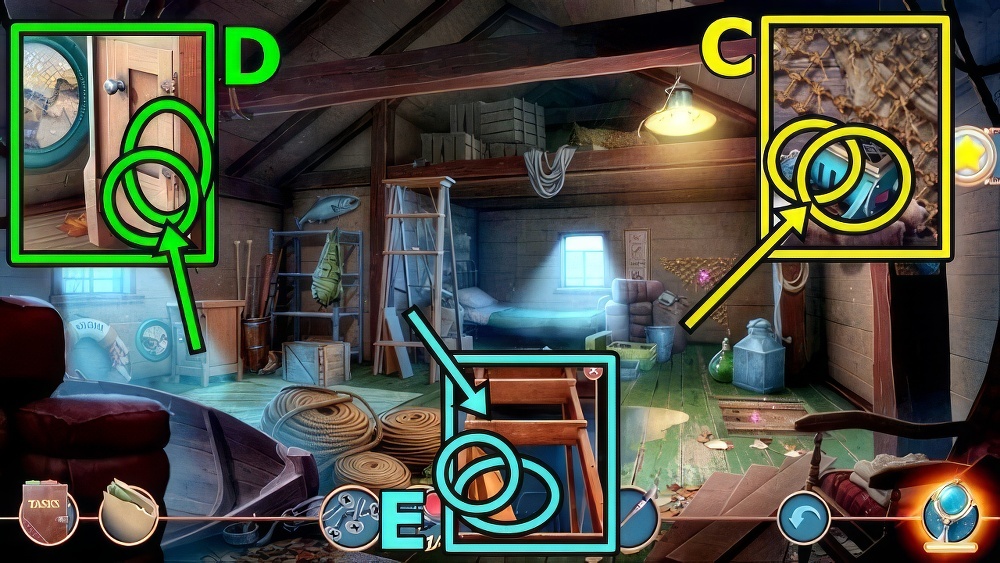
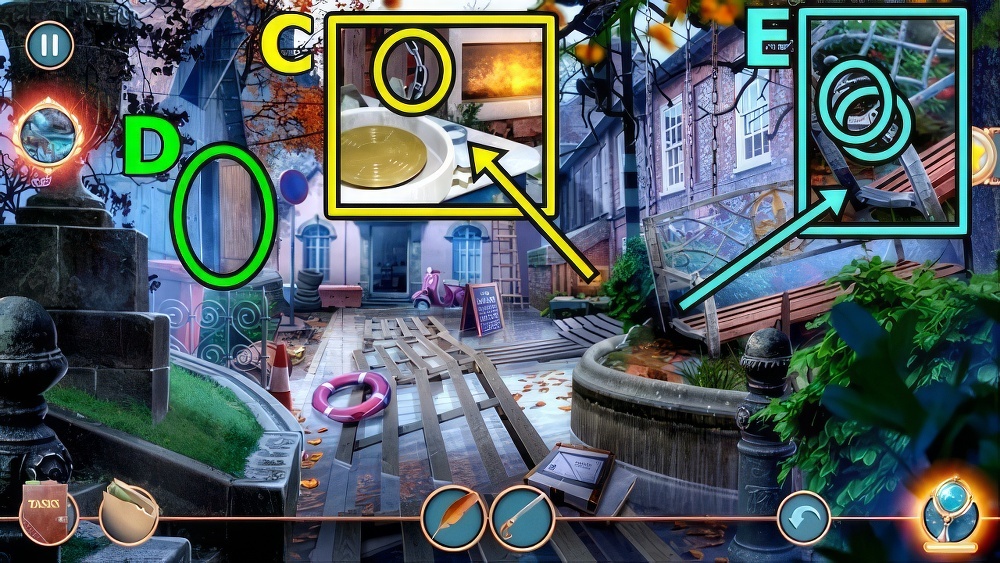
- Take Task Book (C), read.
- Use SWISS KNIFE, receive DOORMAT.
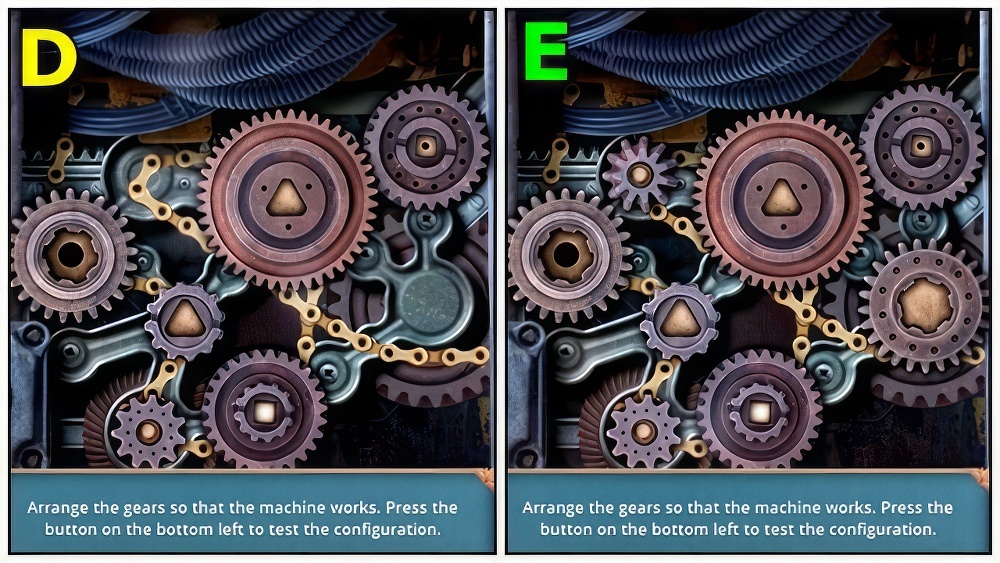
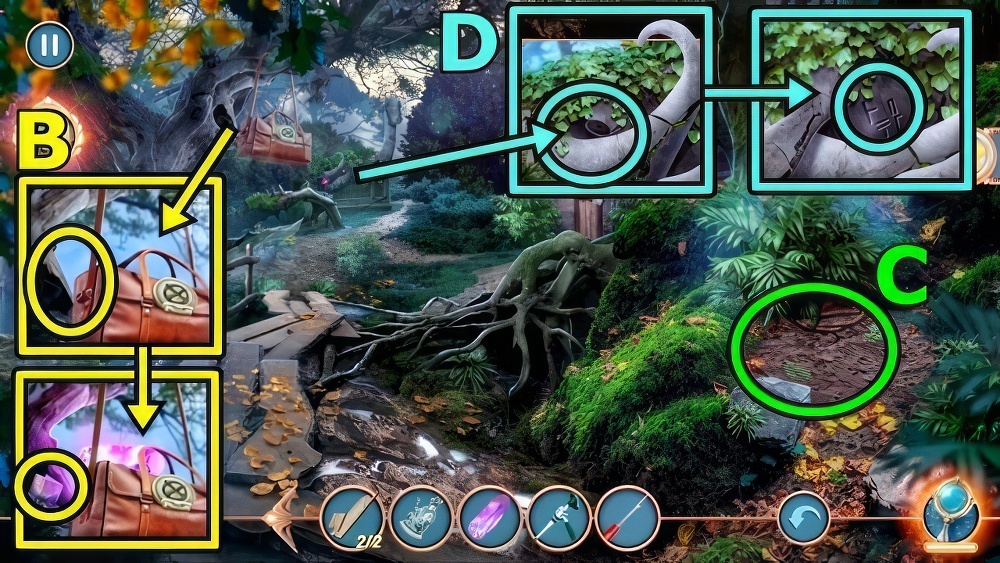
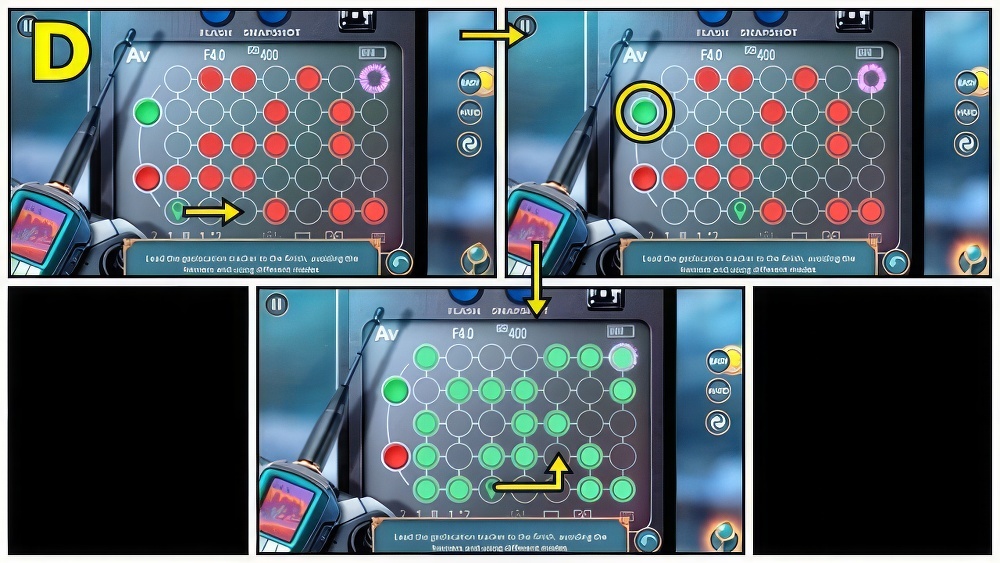
- Take Map (D), ROPE and HANGER PULLER. Add DOORMAT.
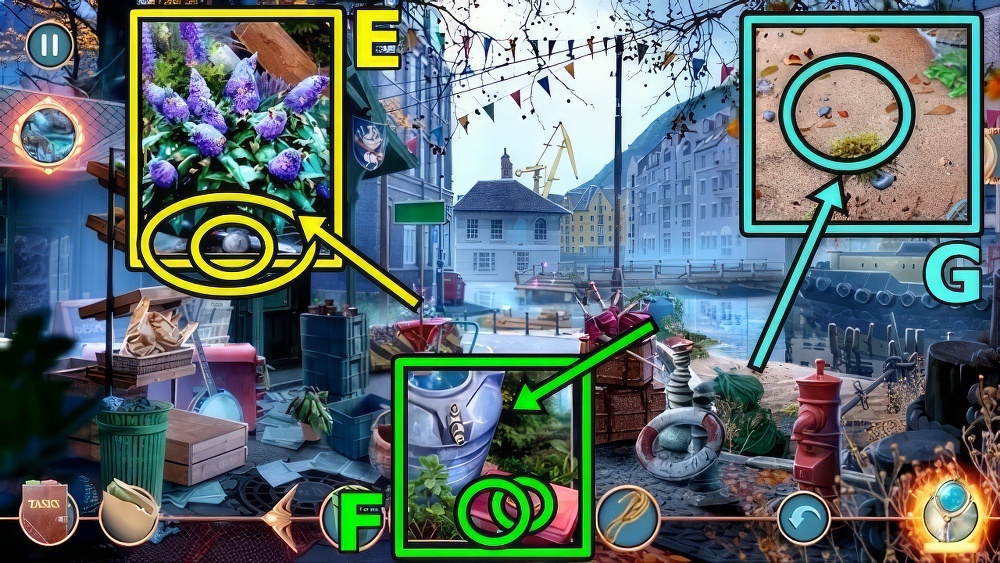
- Go to Hotel Corridor.
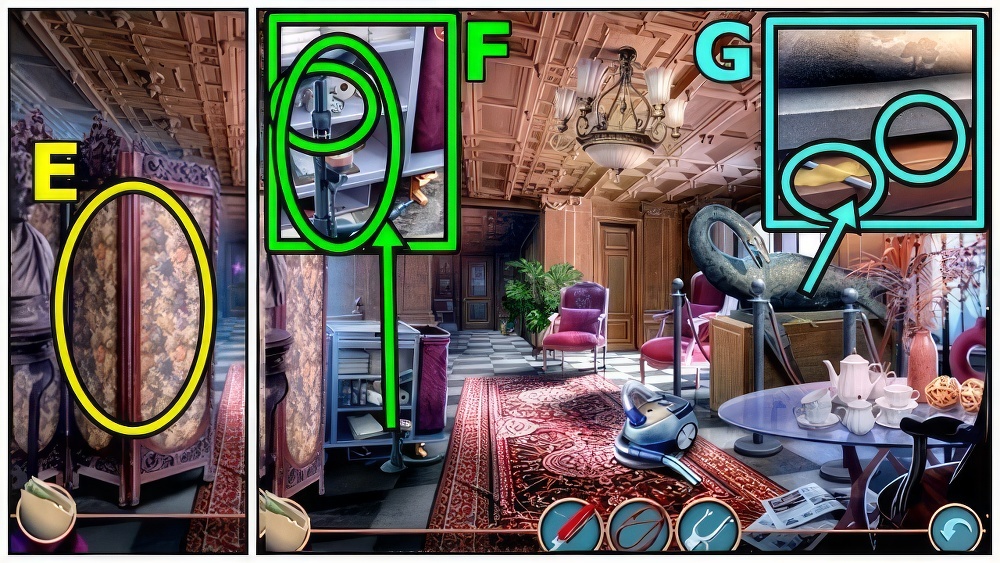
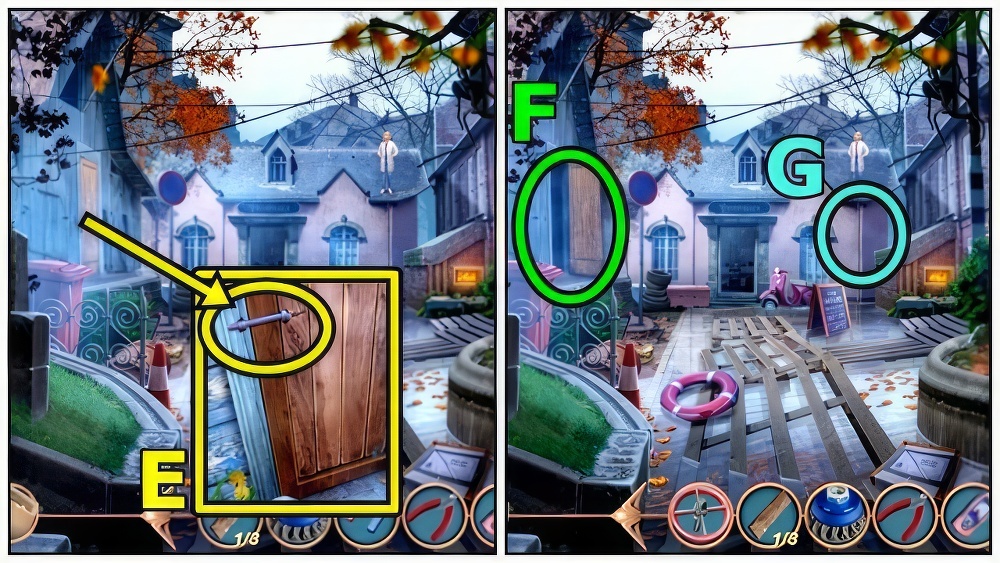
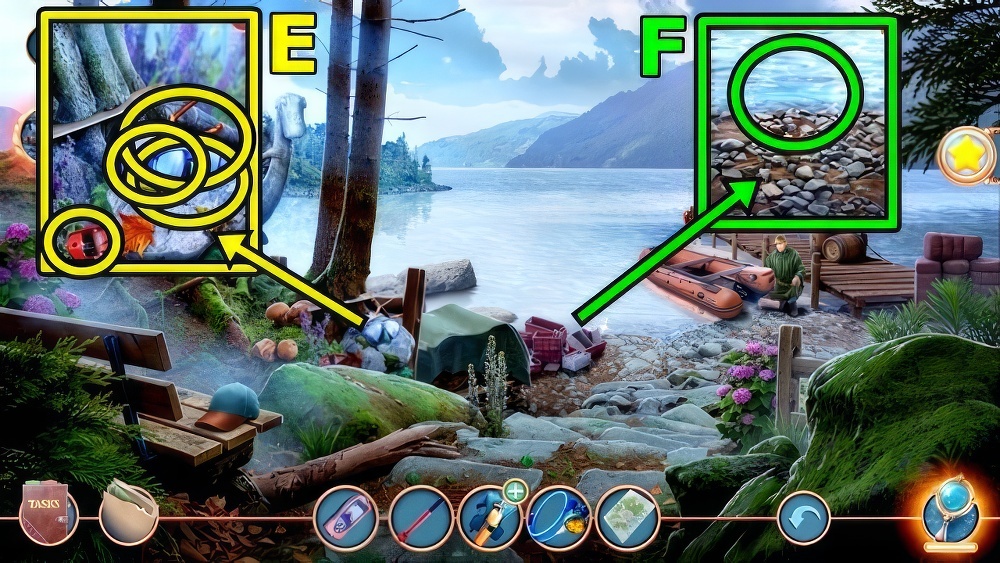
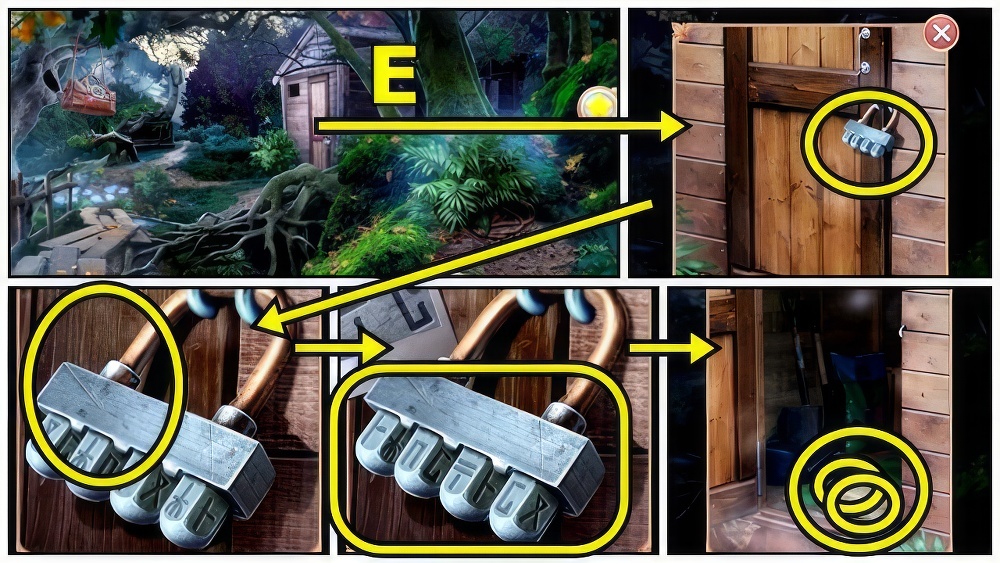
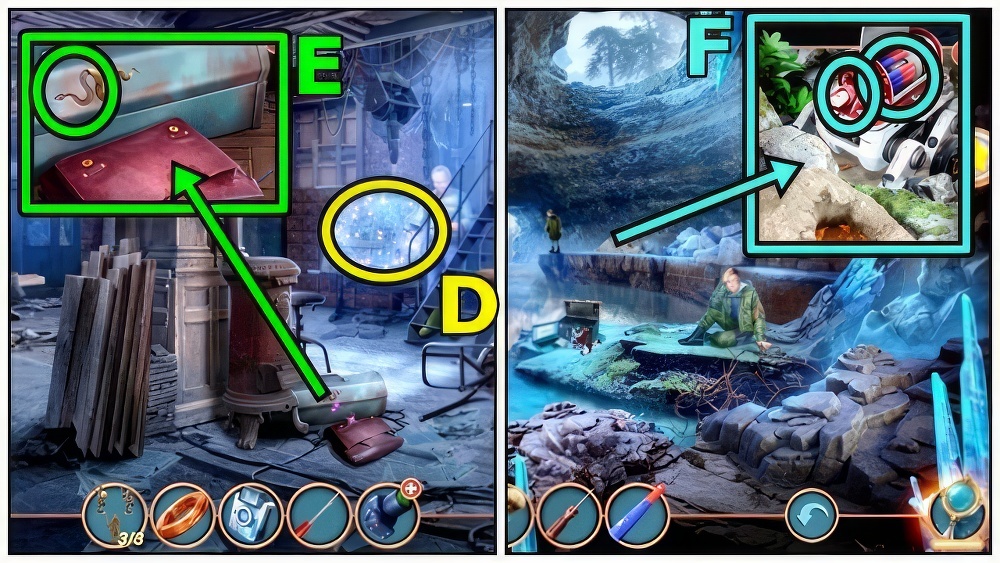
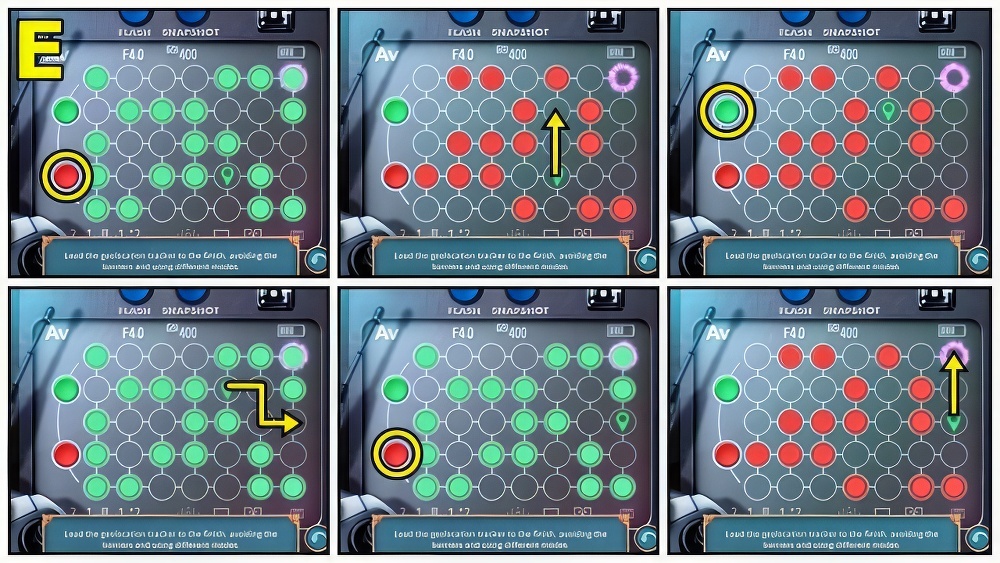
- Move (E).
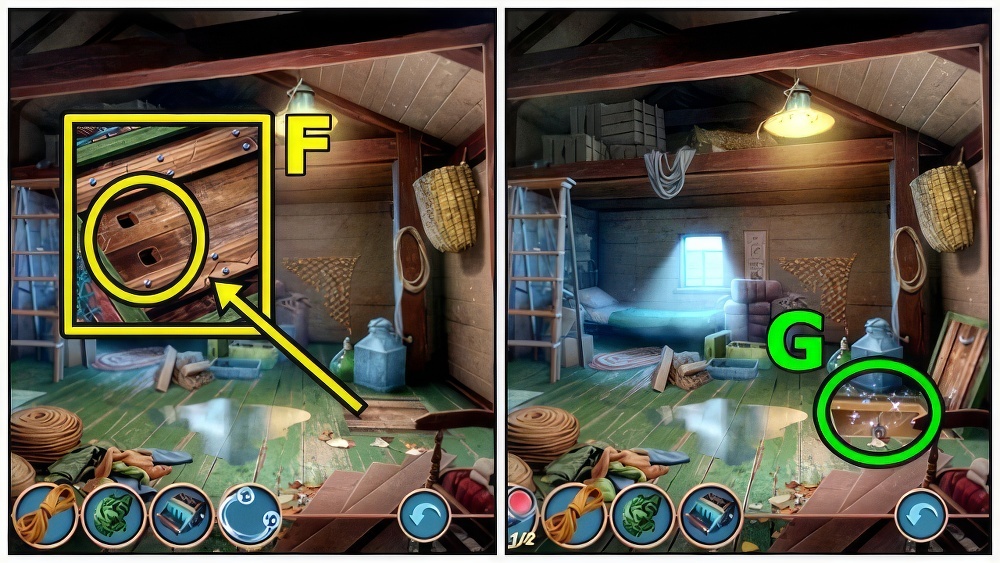
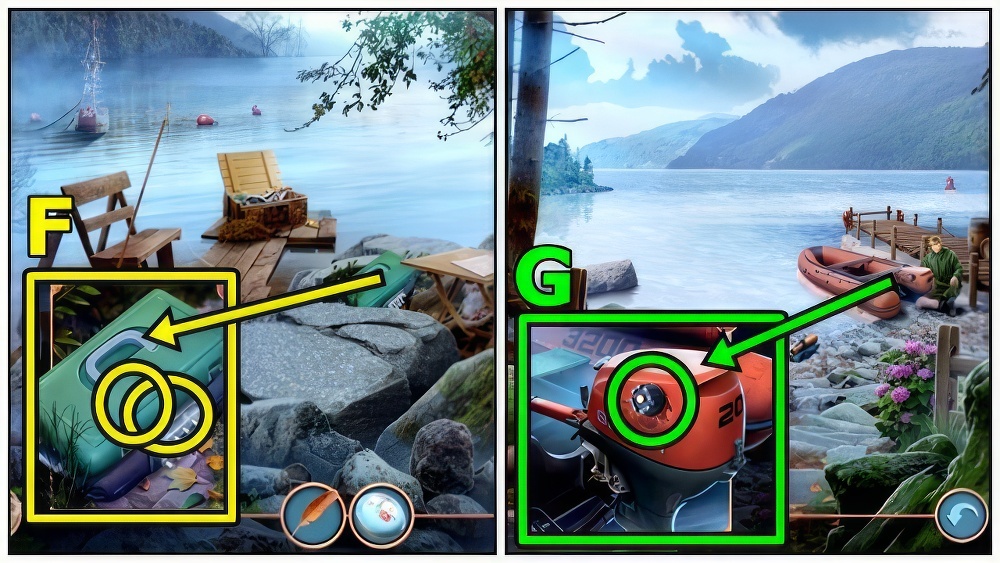
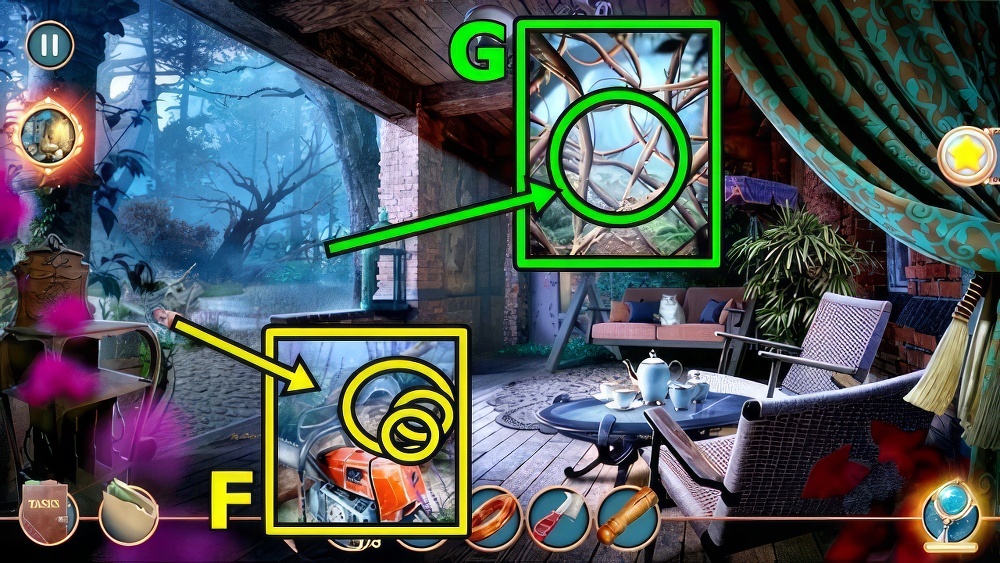
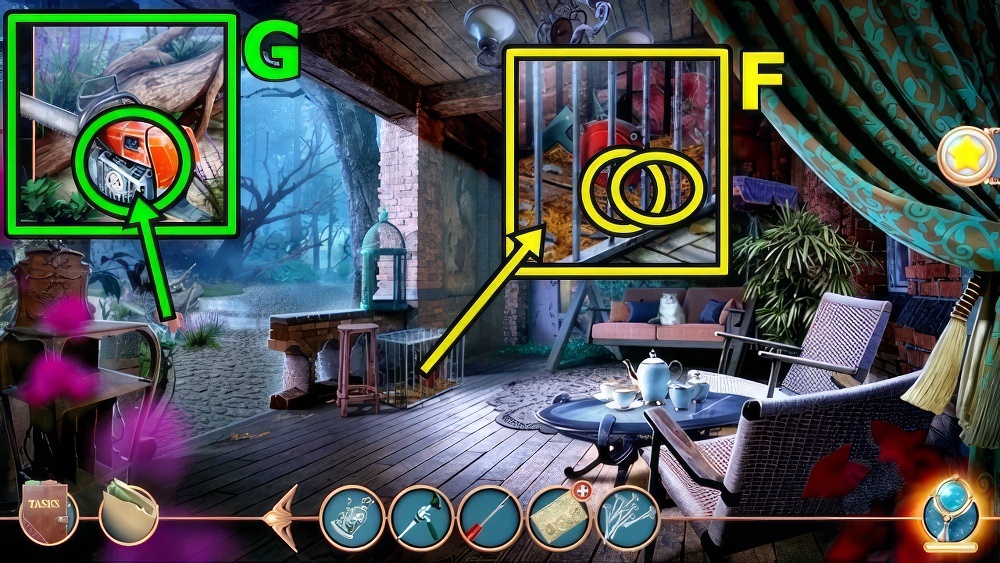
- Take PUMP (F) and LIGHTER.
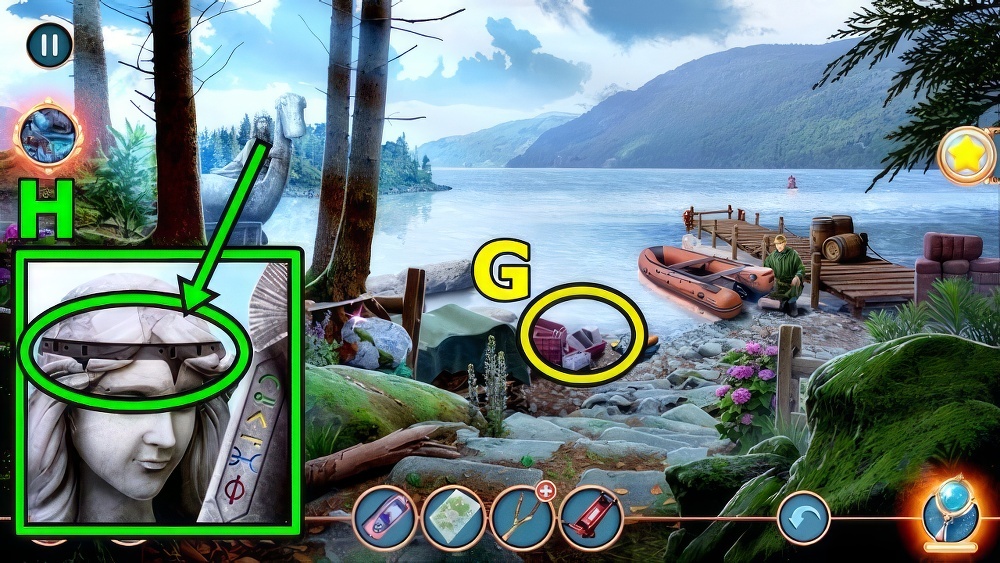
- Use LIGHTER (G), take METAL PENCIL. Use HANGER PULLER, receive WEIGHT.
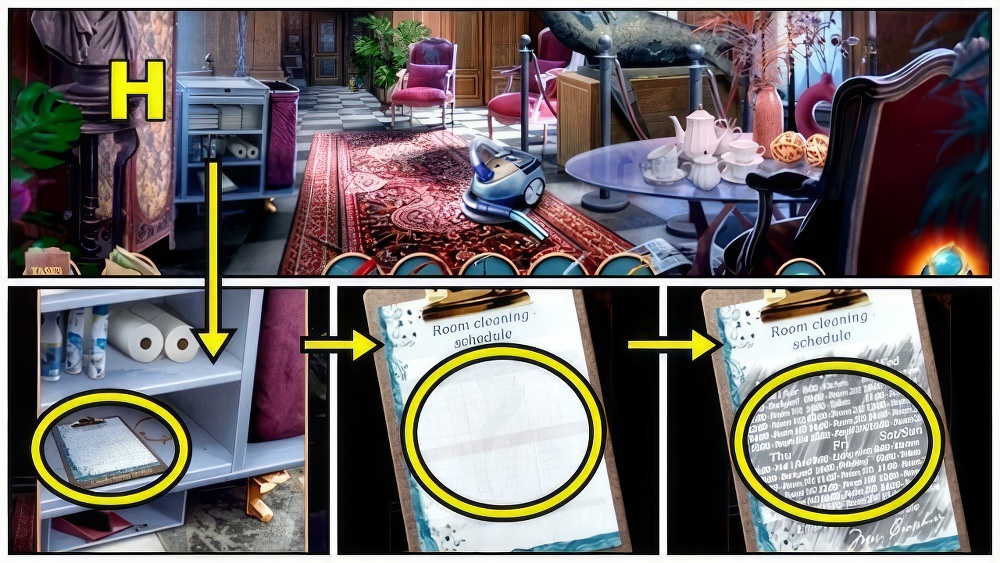
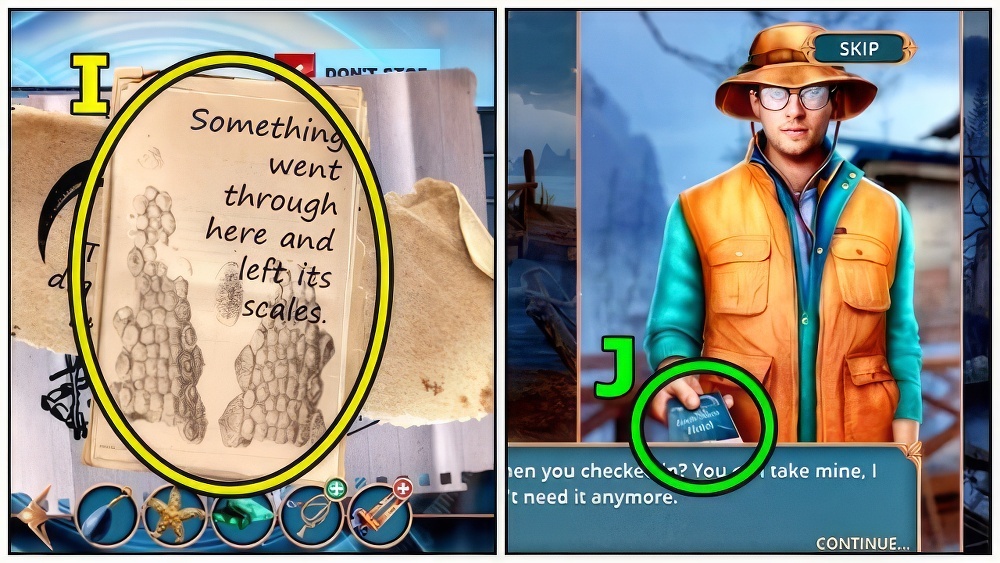
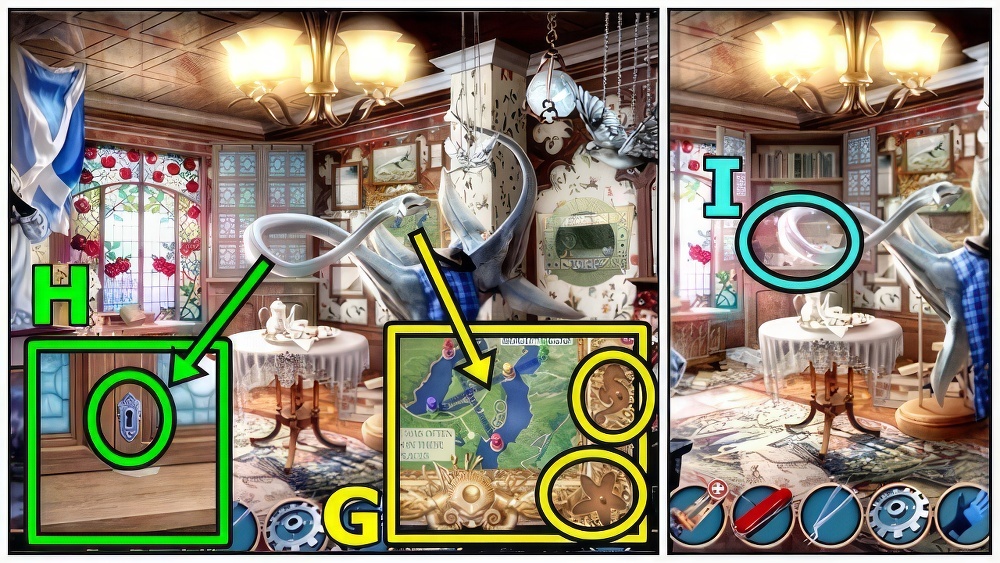
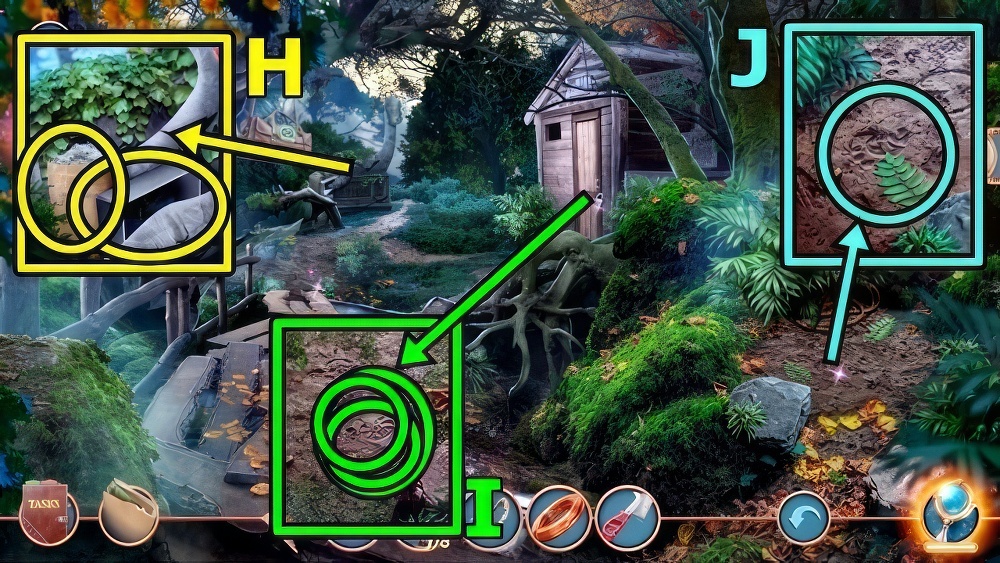
- Examine (H). Use METAL PENCIL, take ROOM CLEANING SCHEDULE.

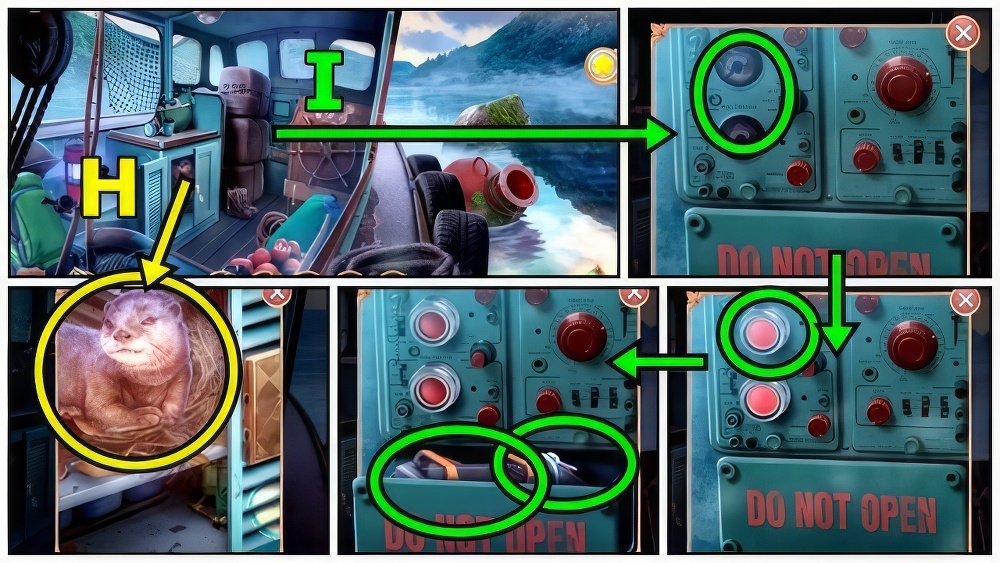
- Use ROOM CLEANING SCHEDULE (I).
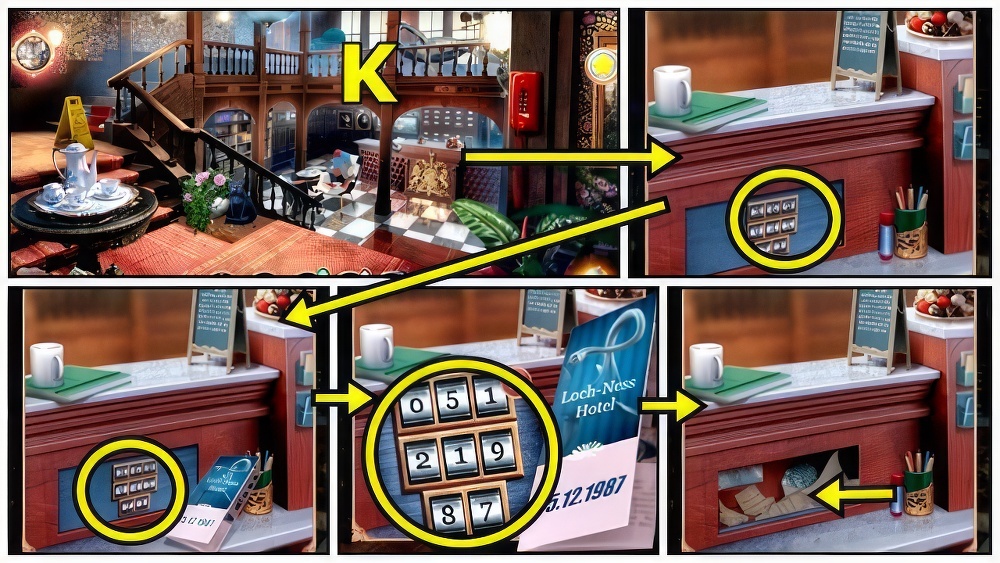
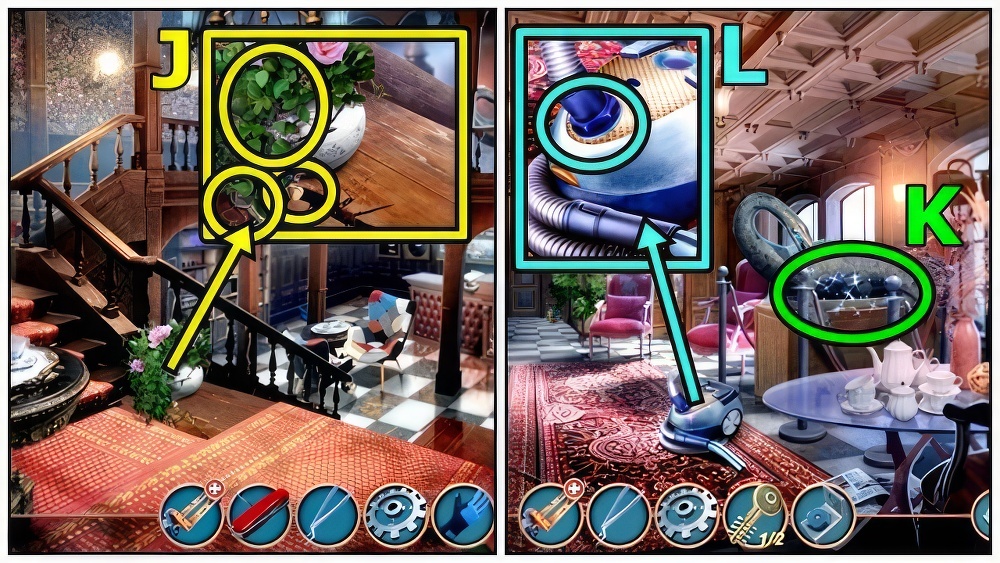
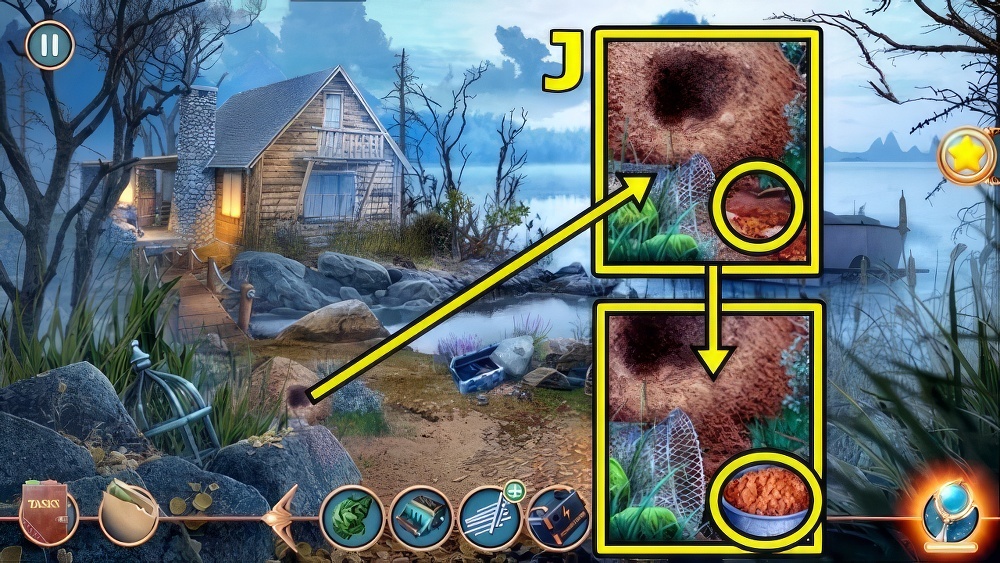
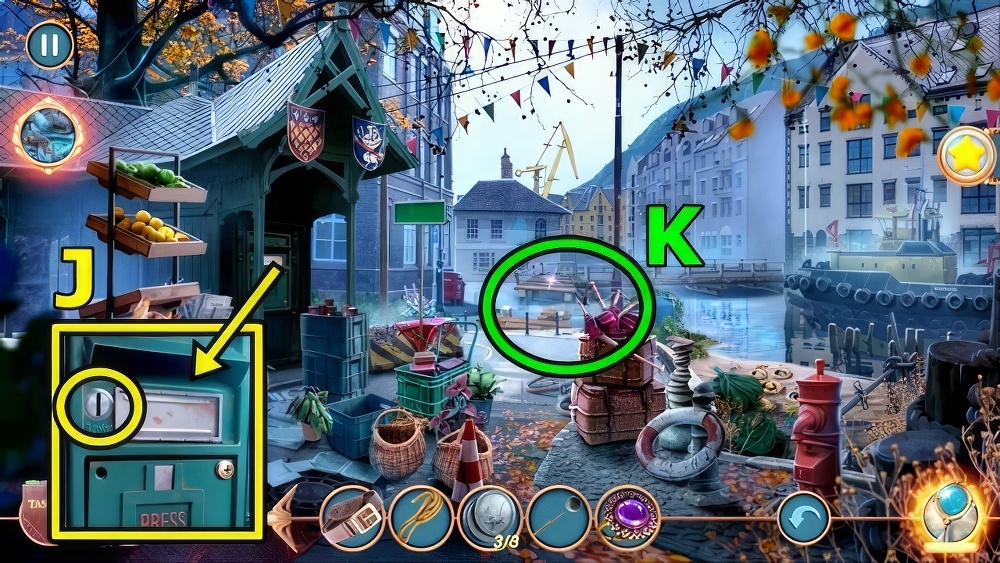
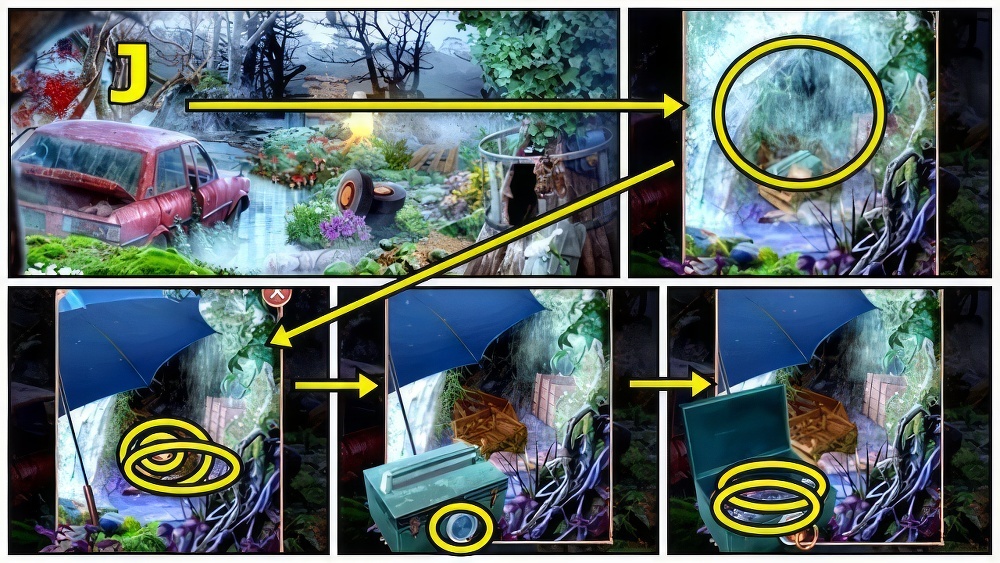
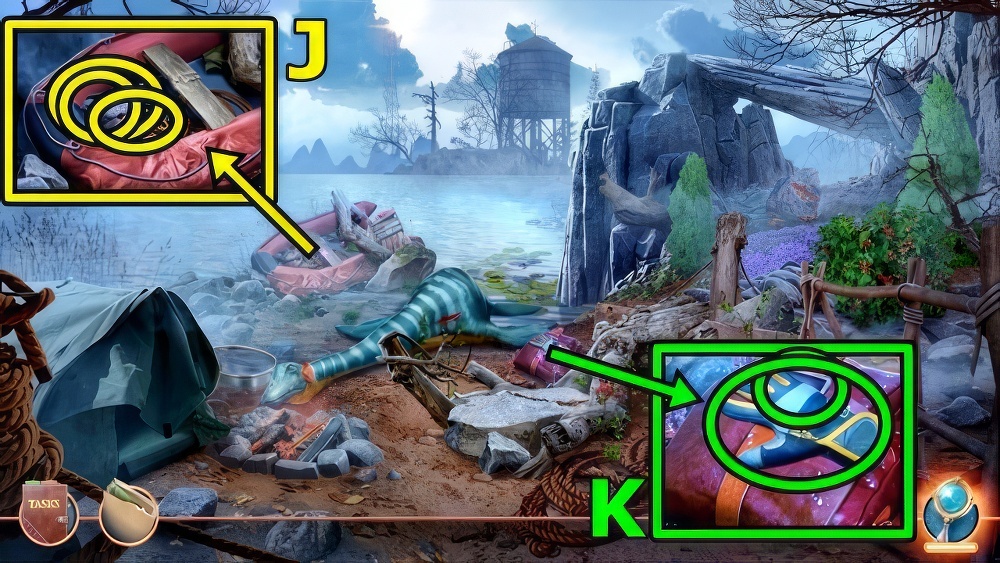
- Select (J).
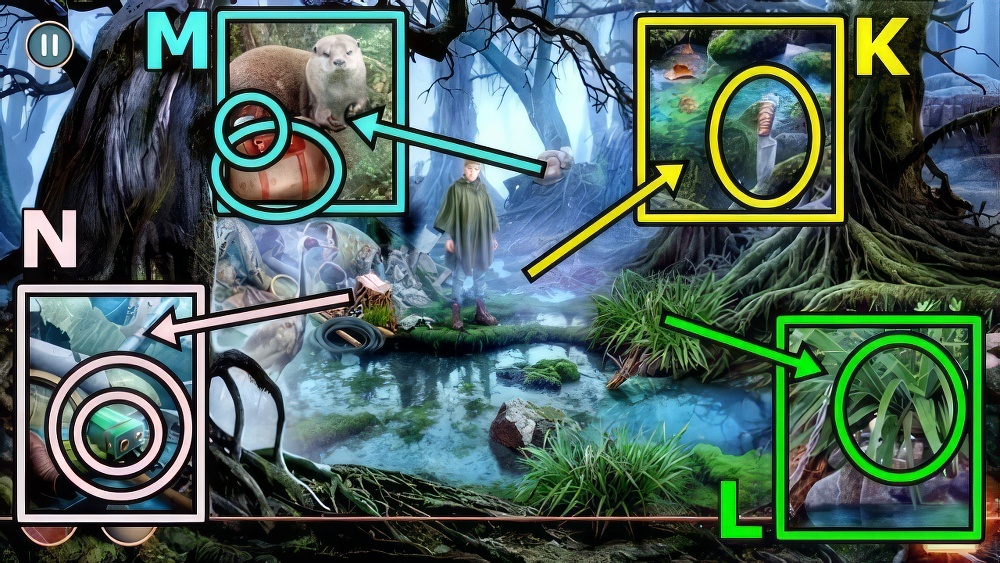
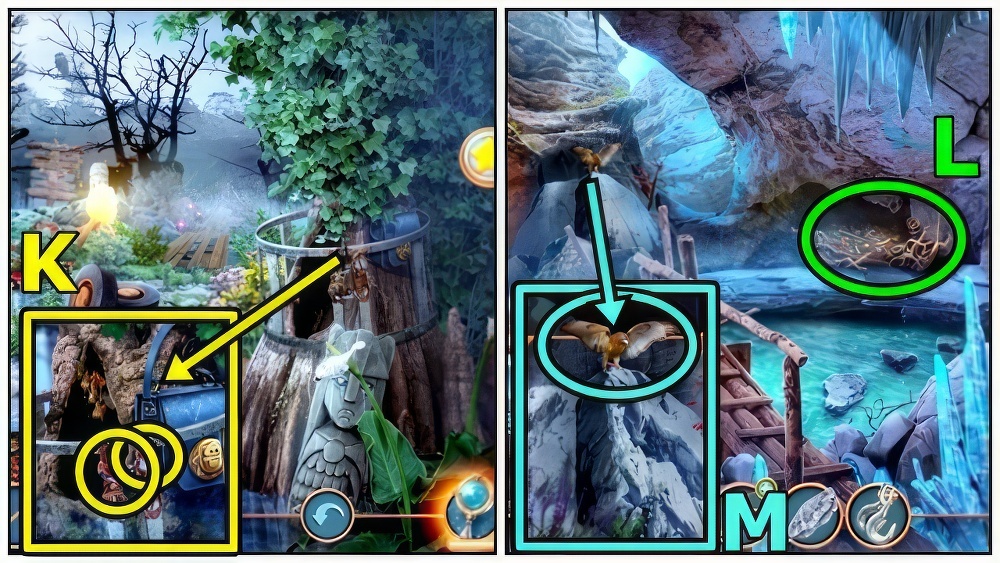
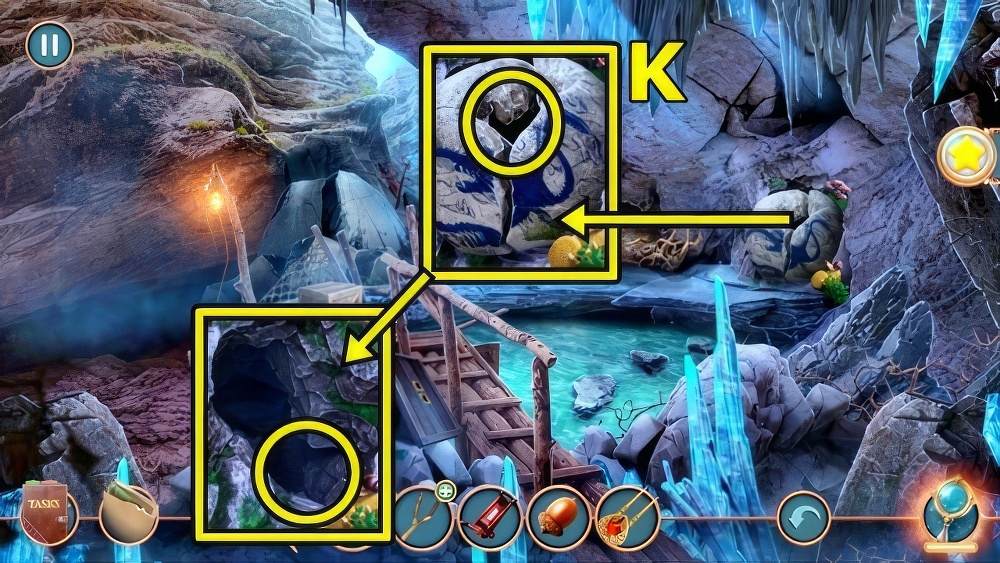
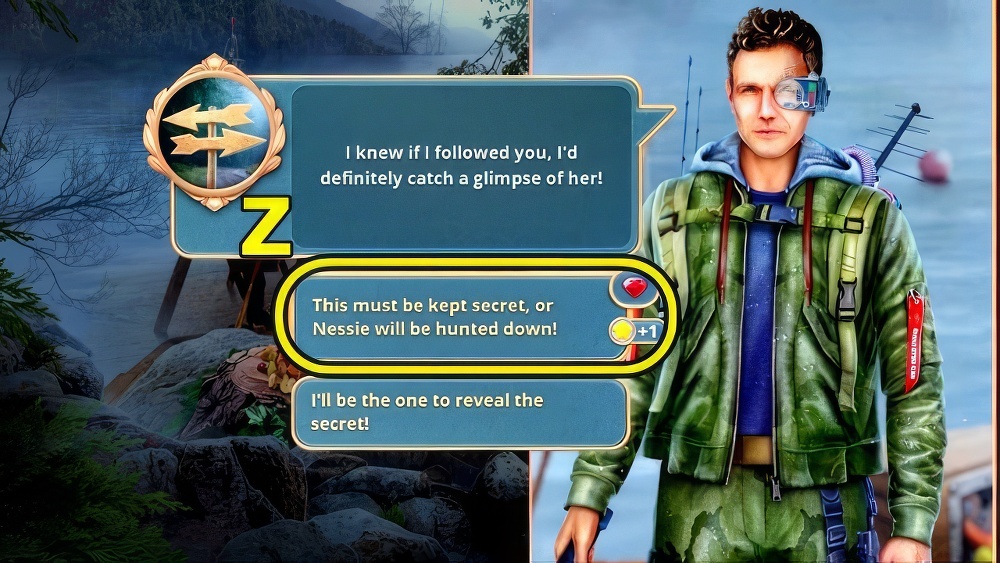
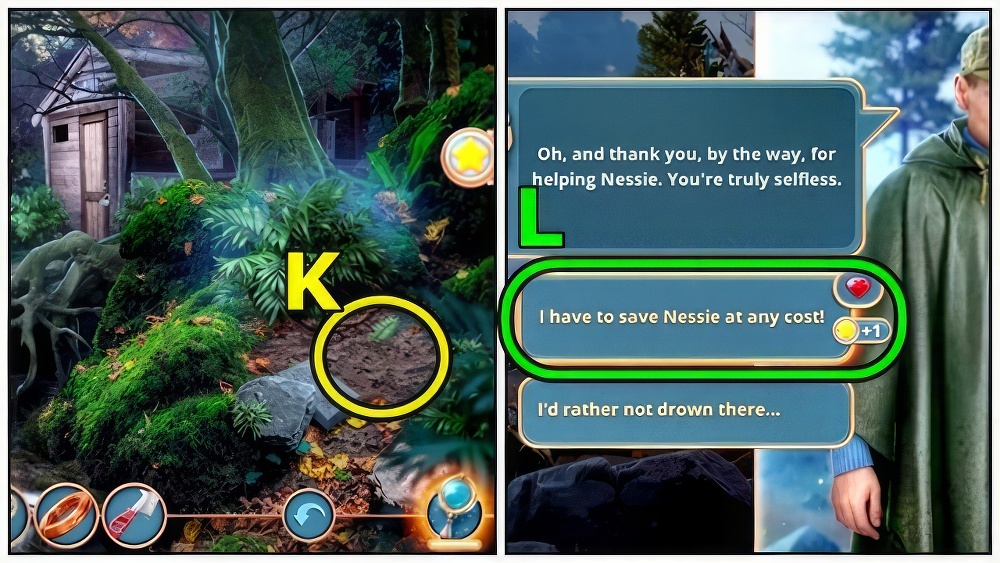
- Talk (K).
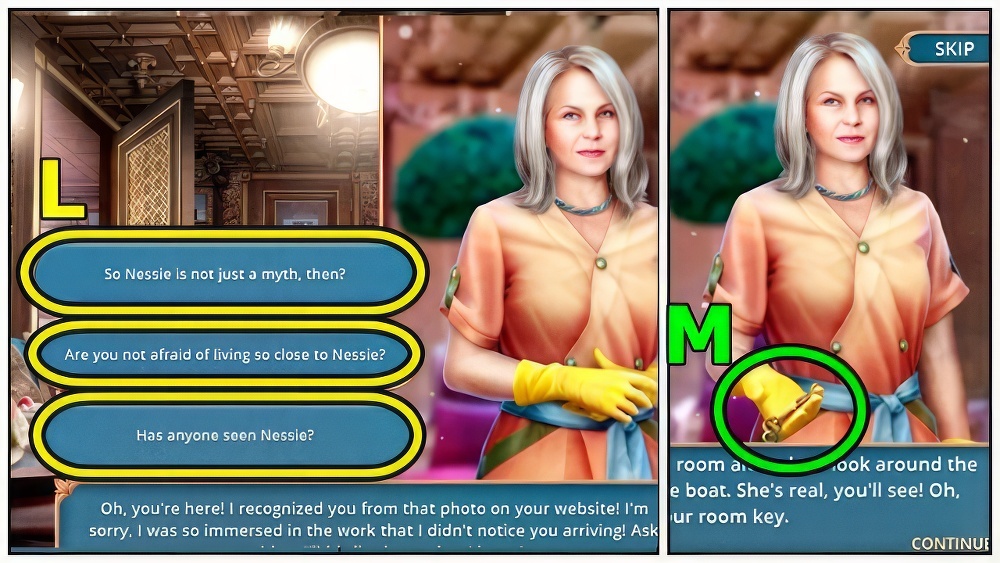
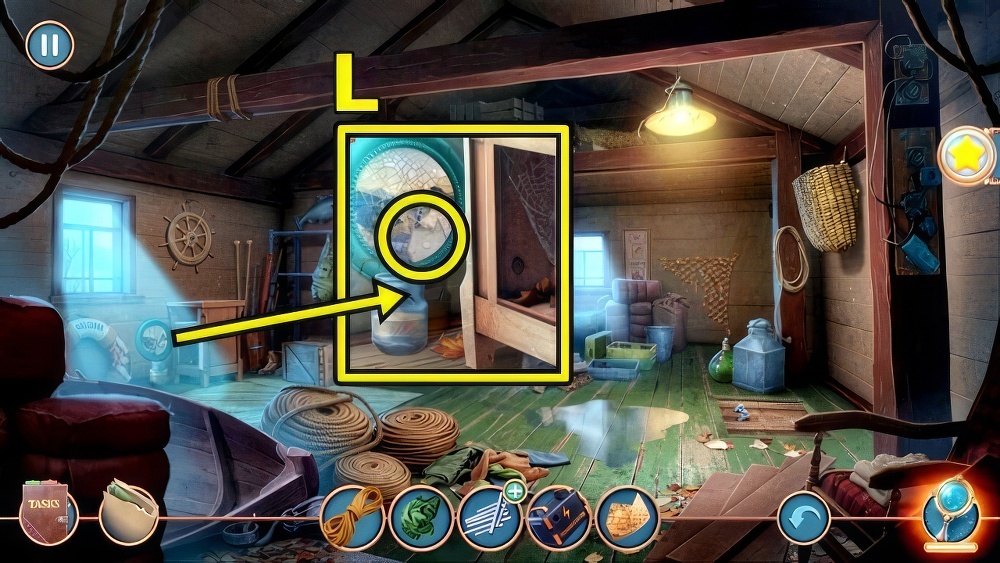
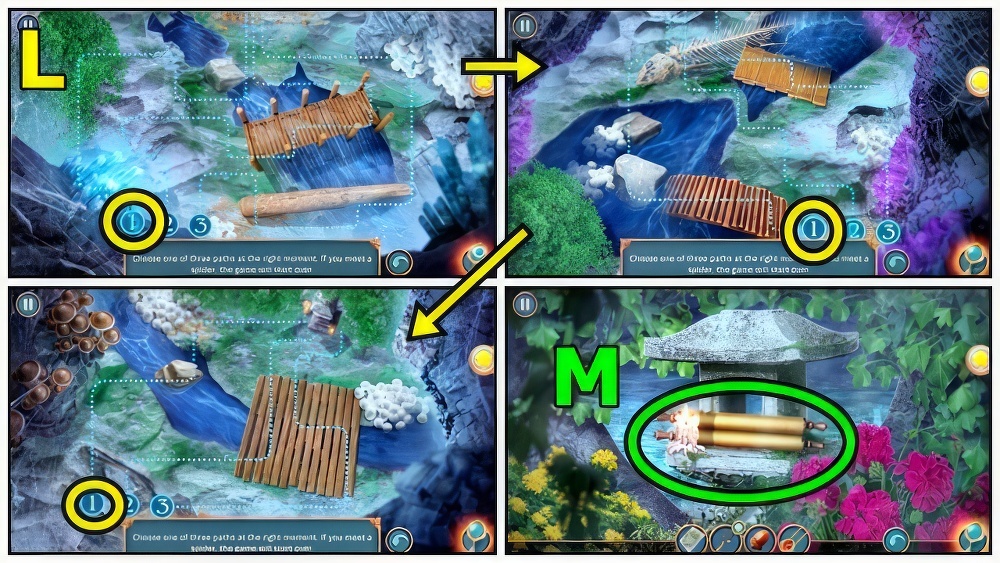
- Select (L).
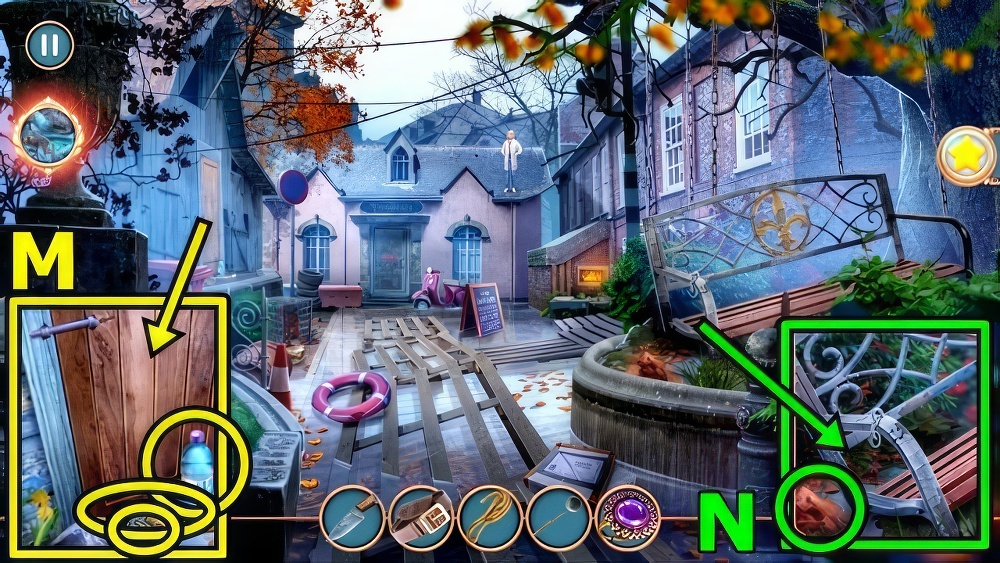
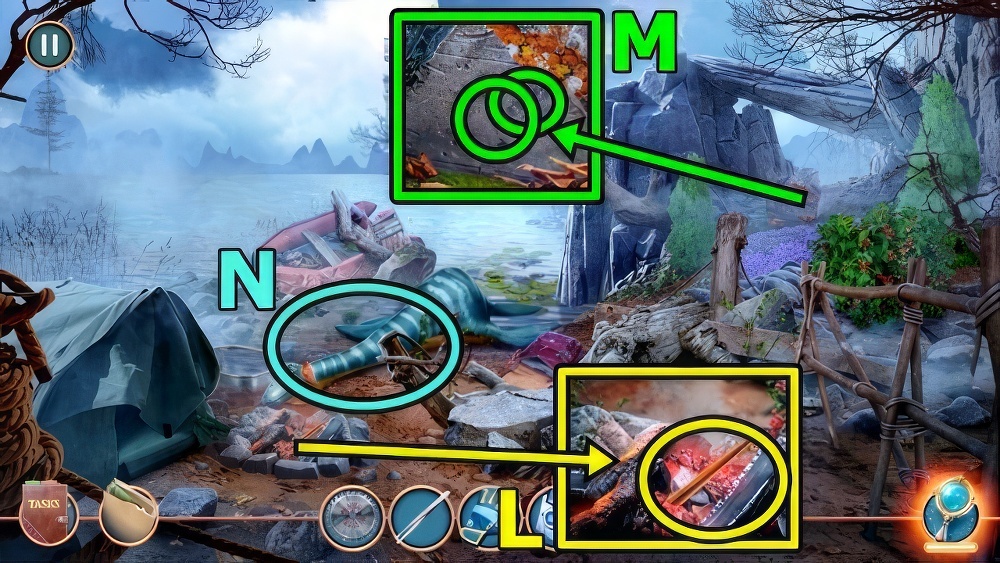
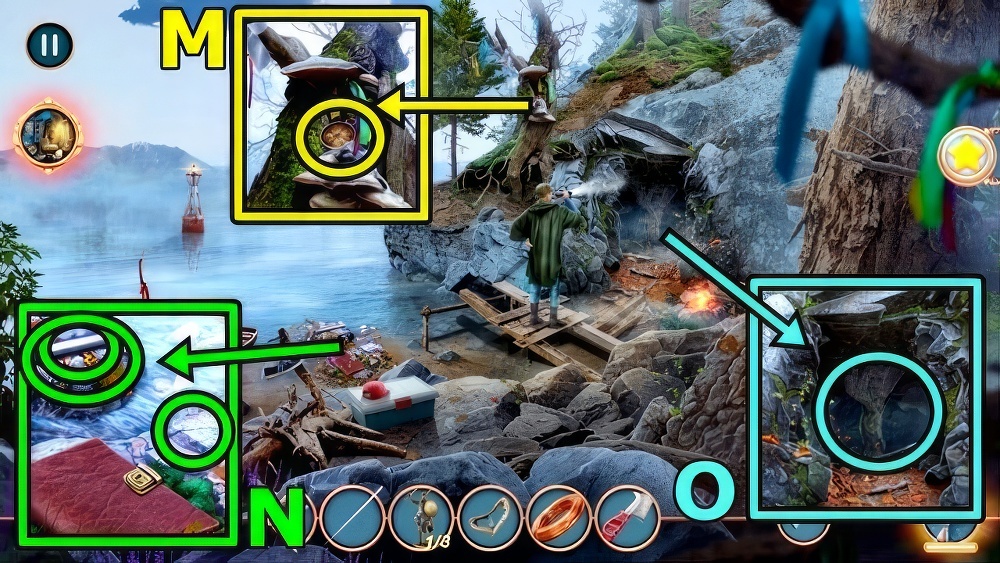
- Take ROOM KEY (M).
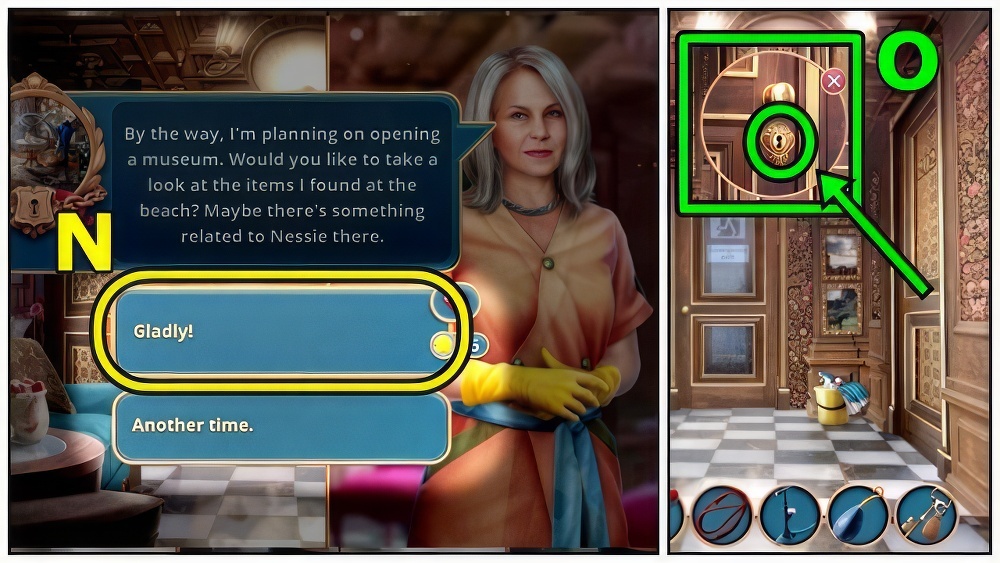
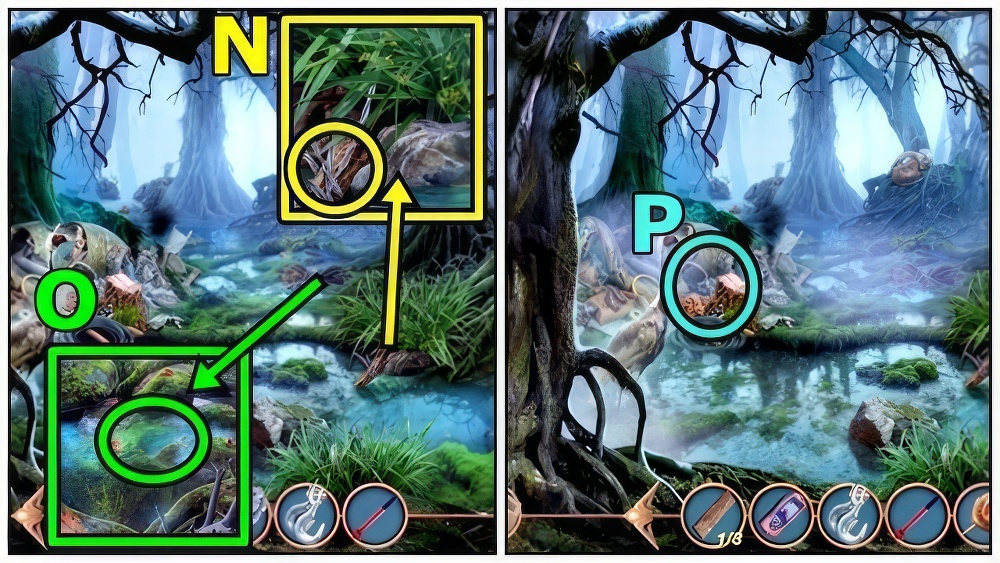
- Select (N).
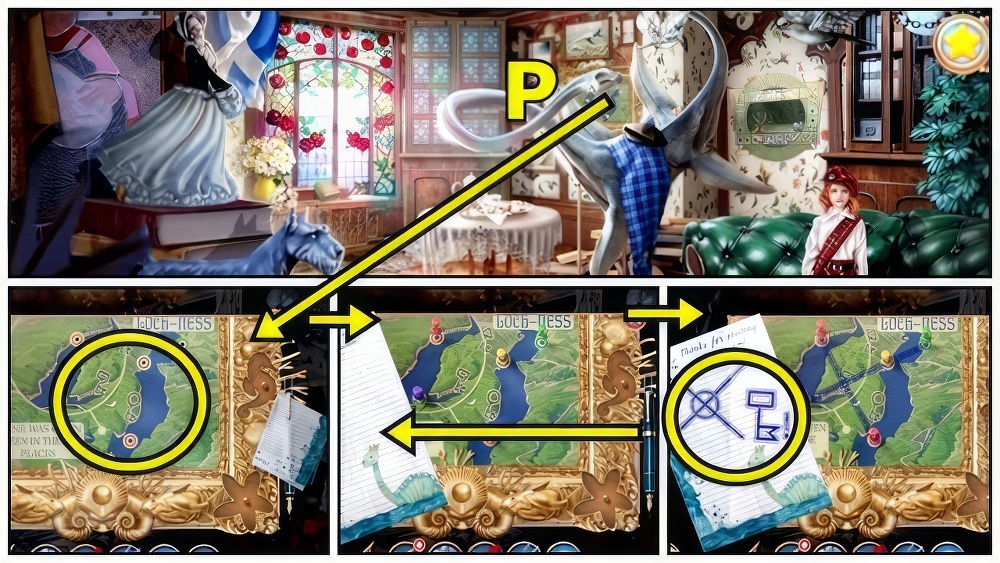
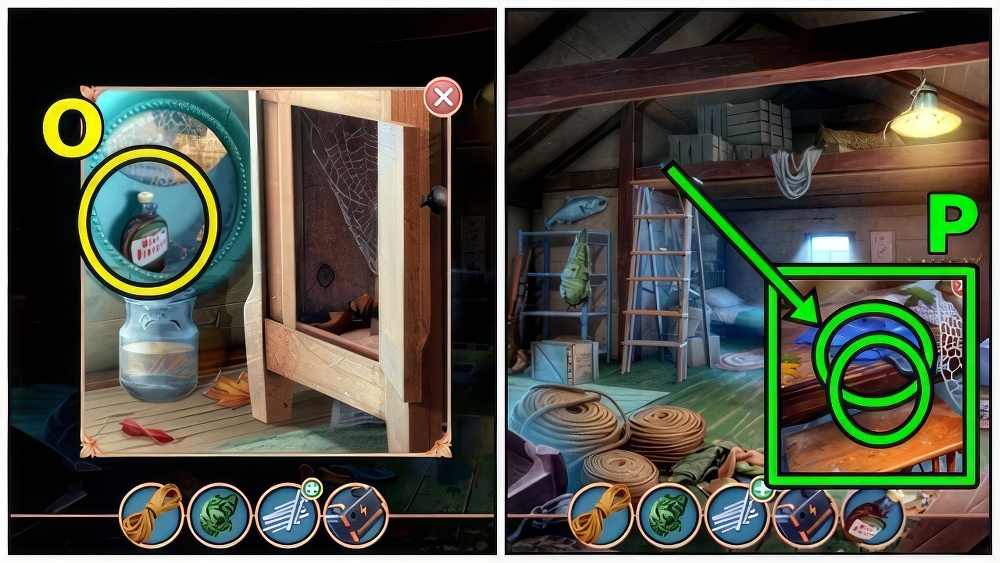
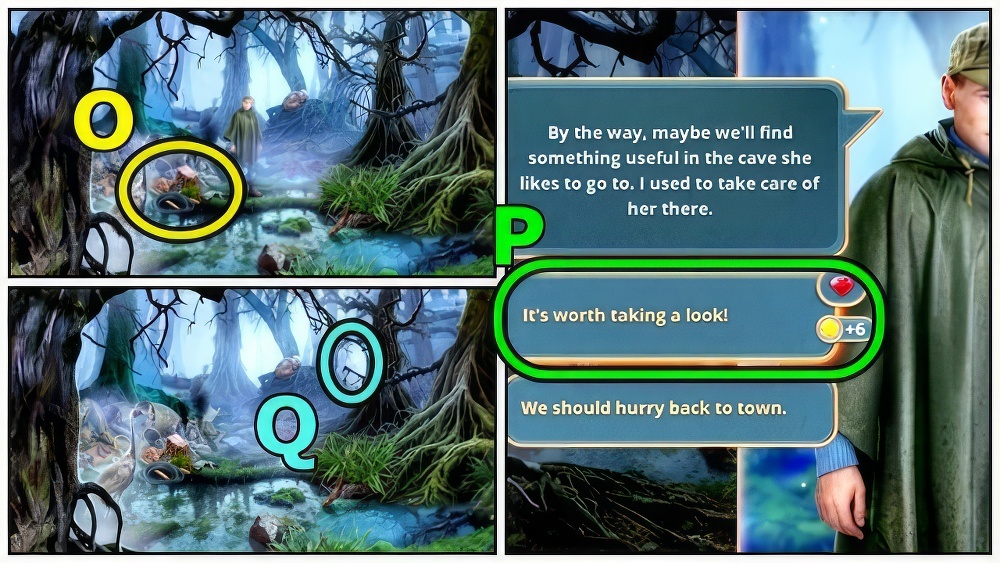
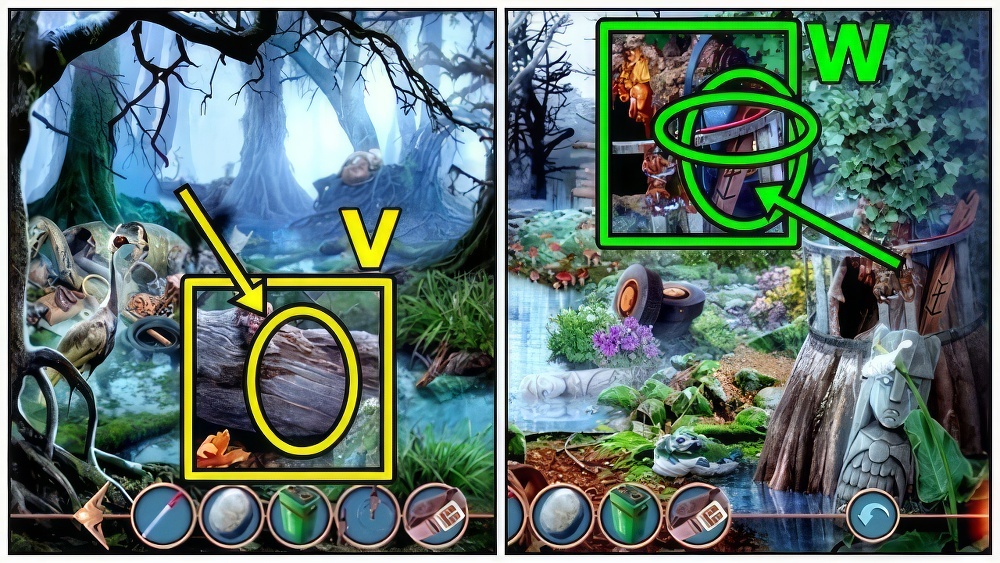
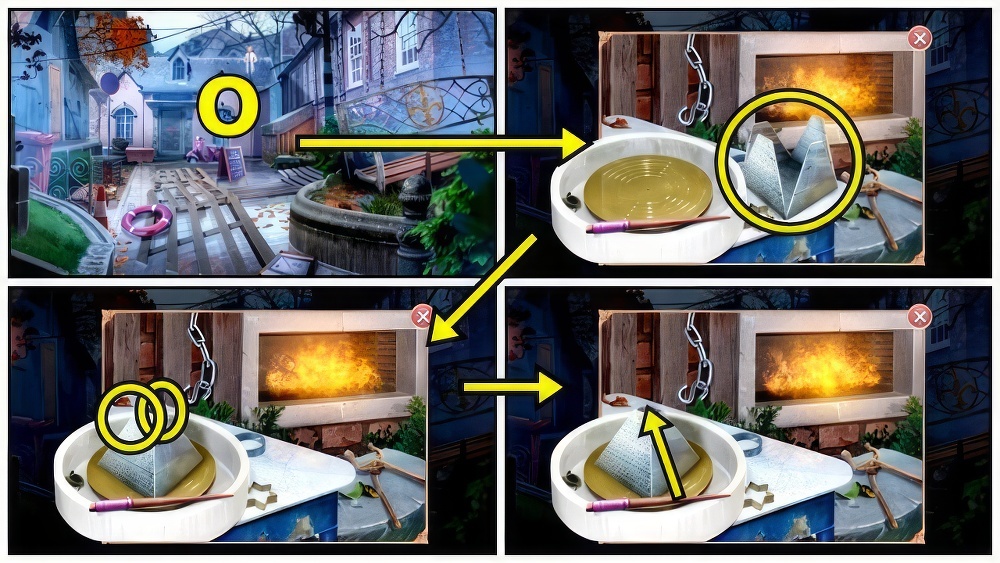
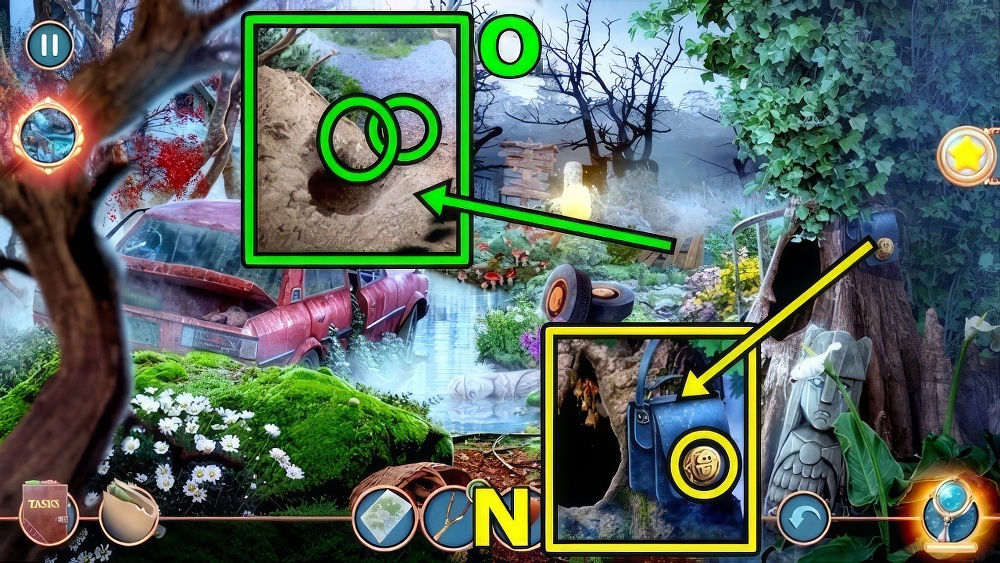
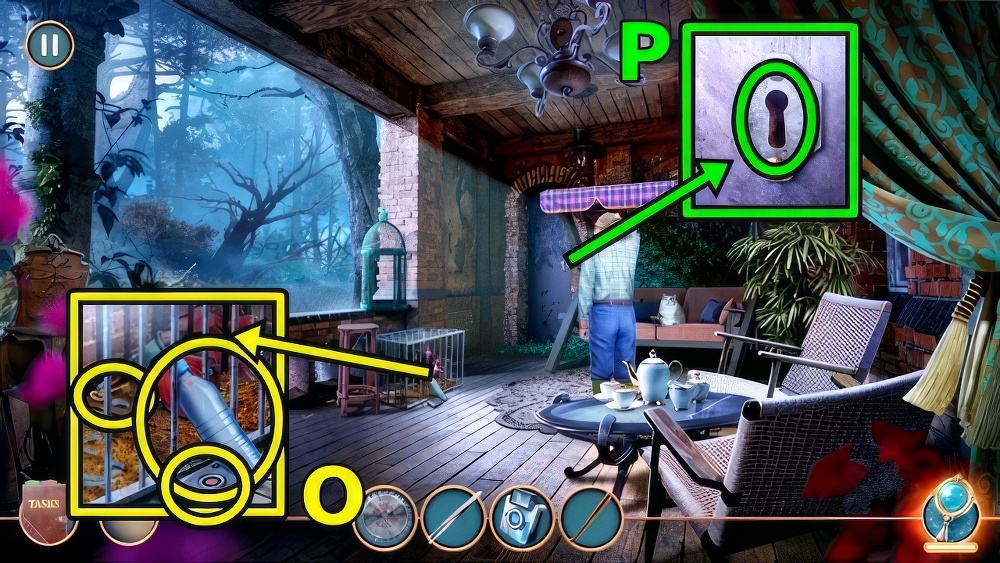
- Use ROOM KEY (O).
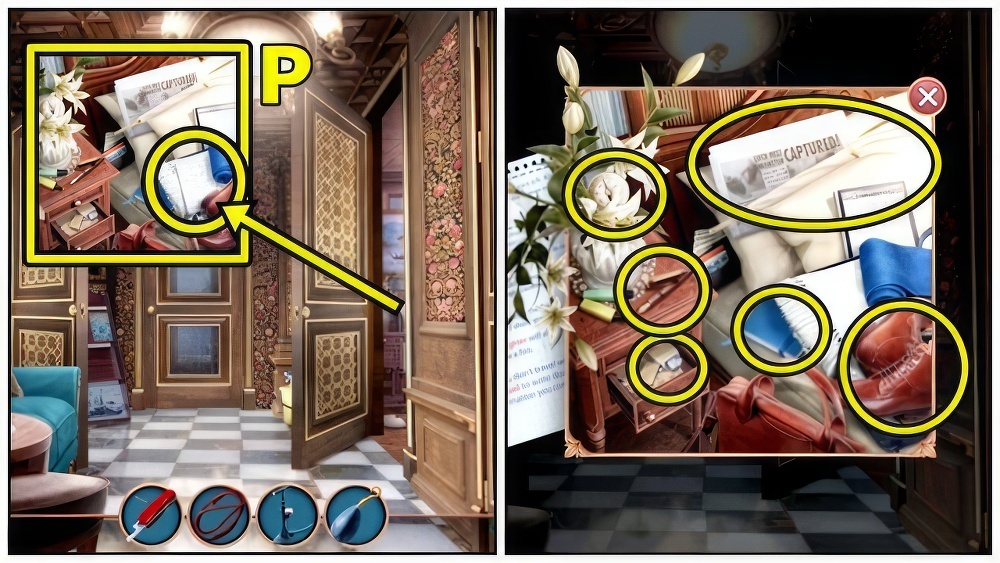
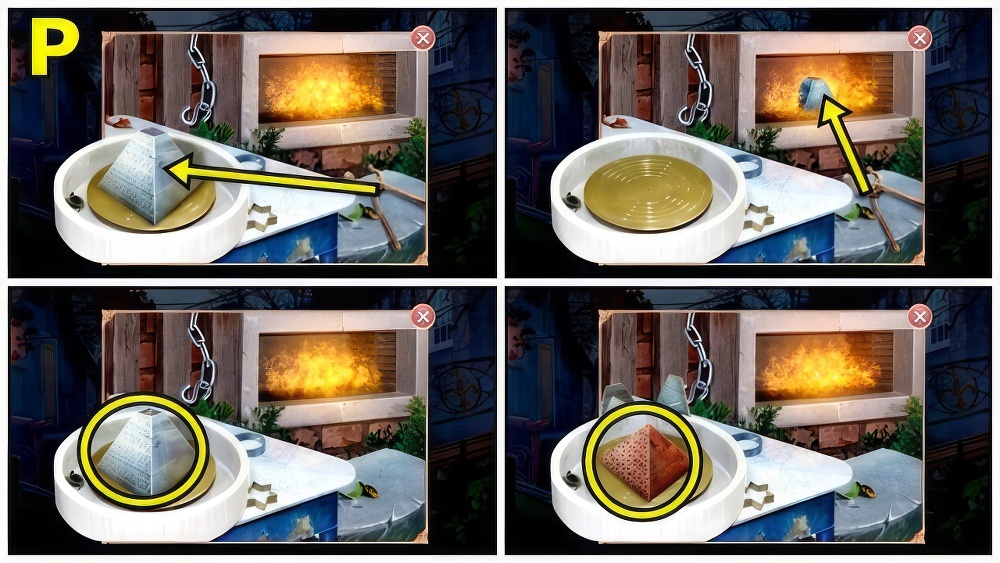
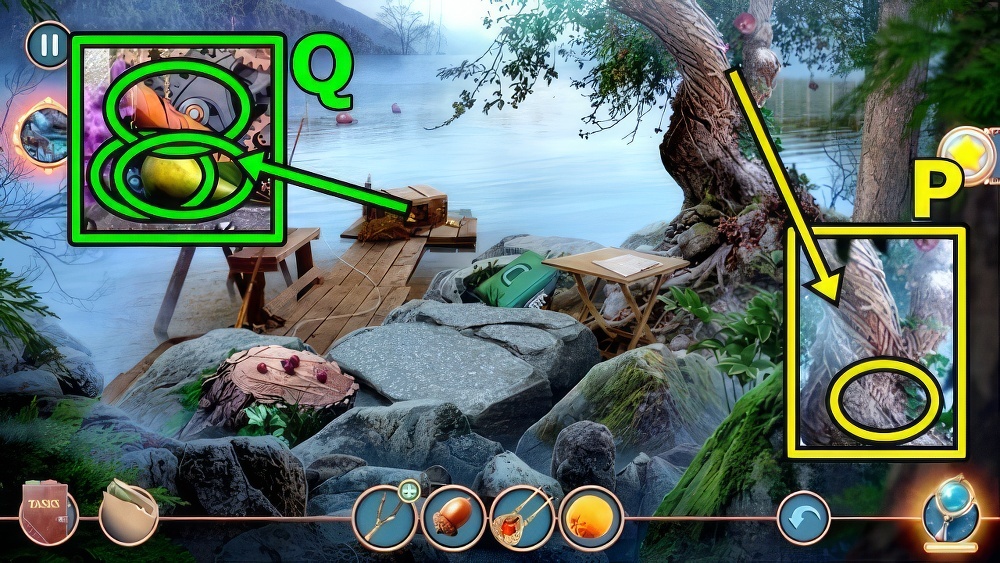
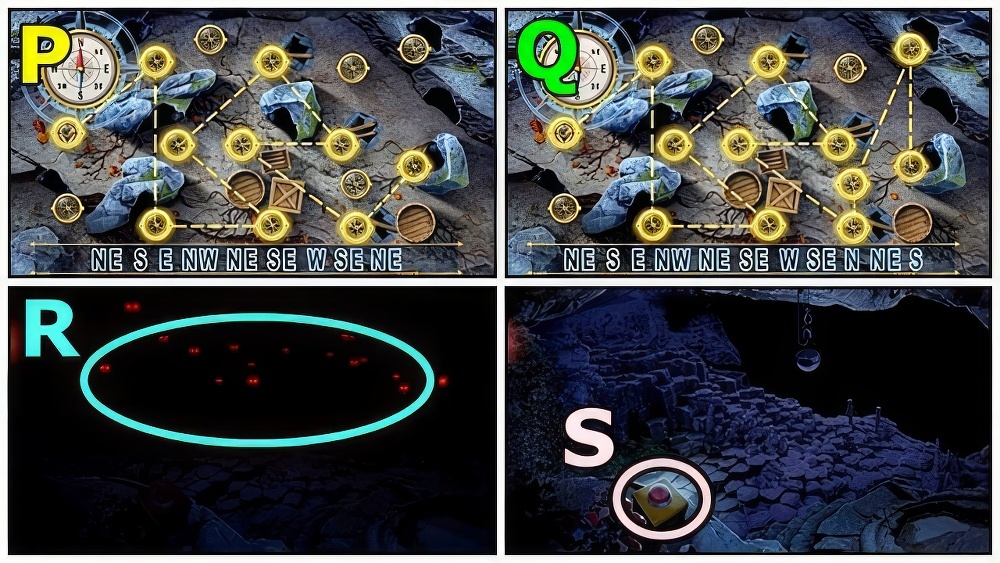
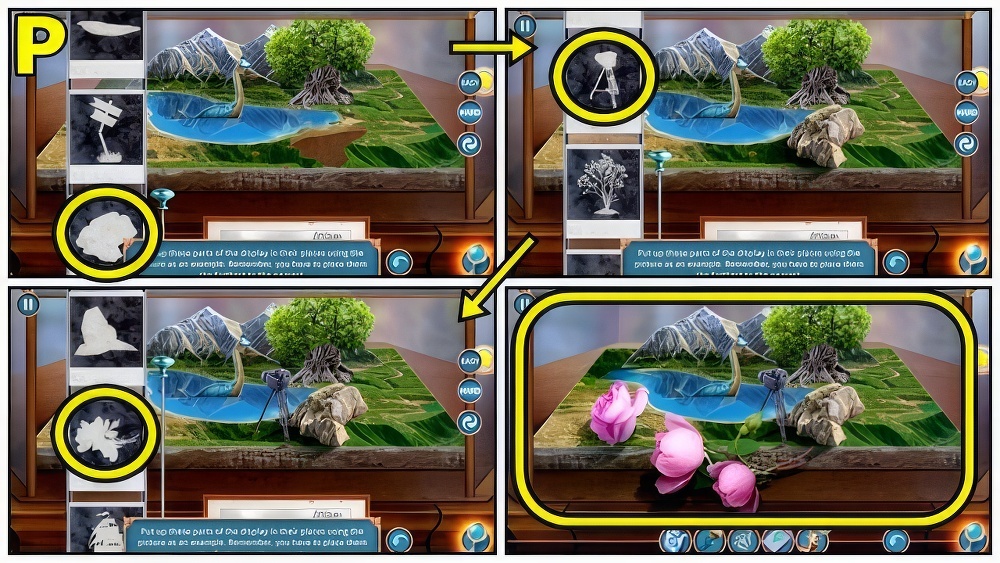
- Read (P), find items.
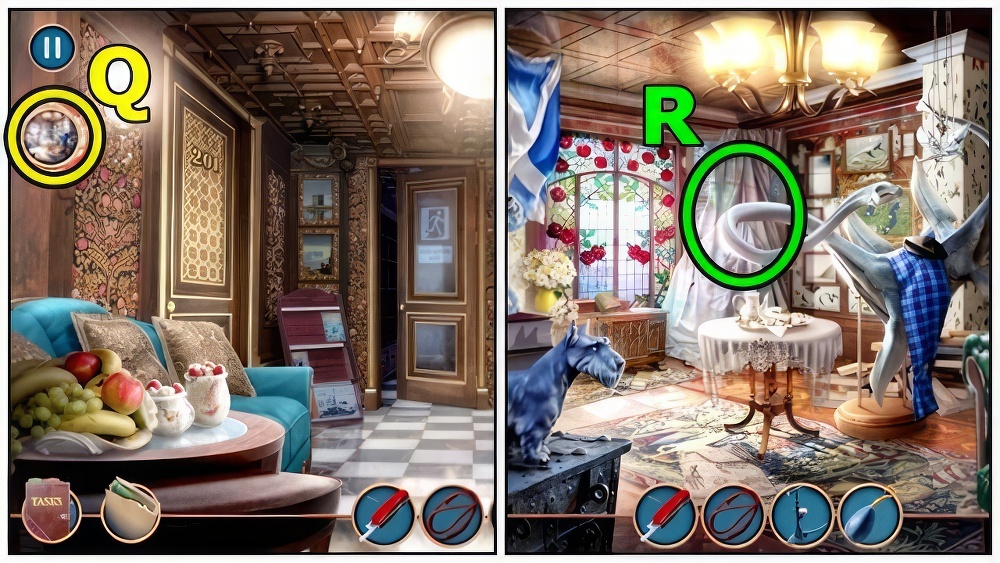
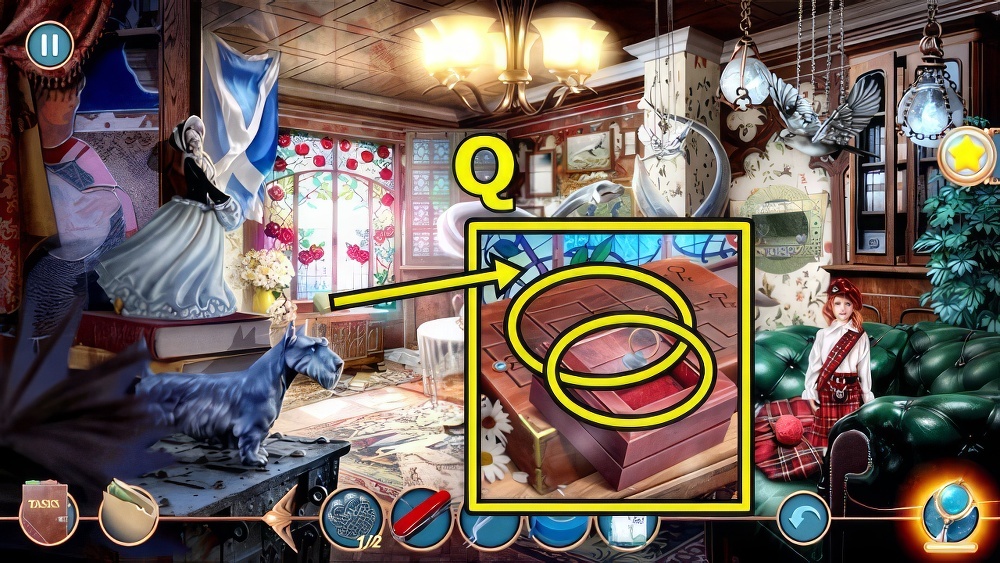
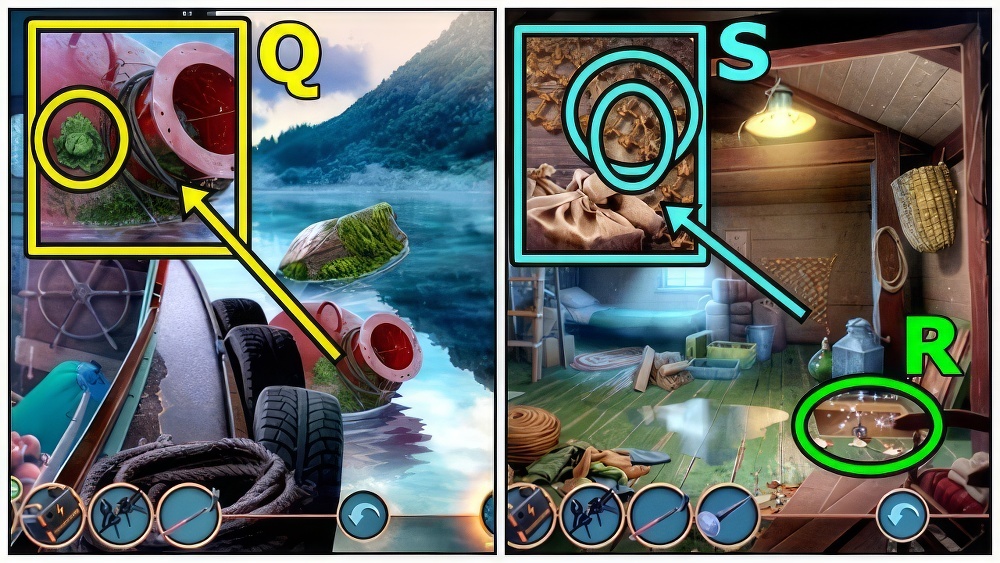
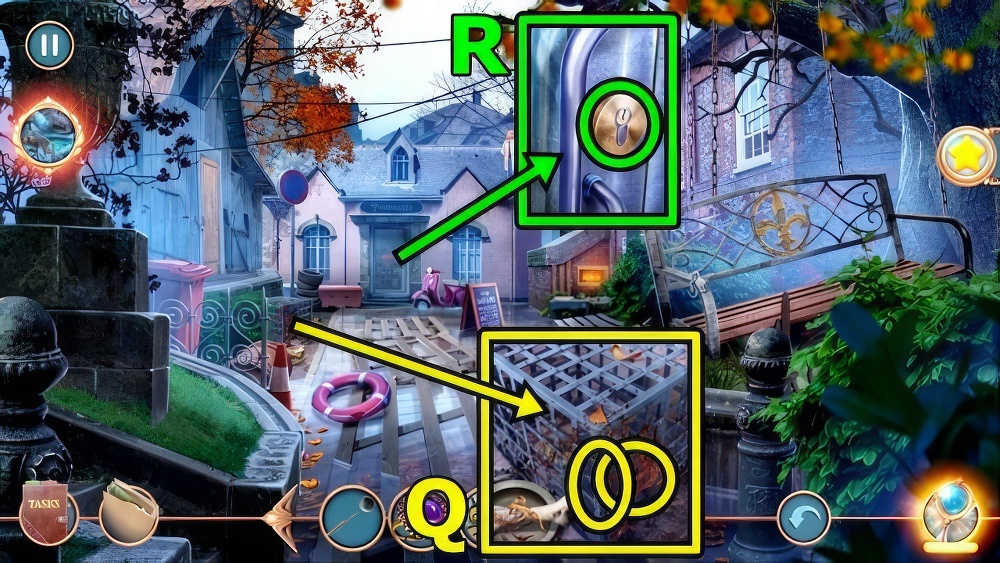
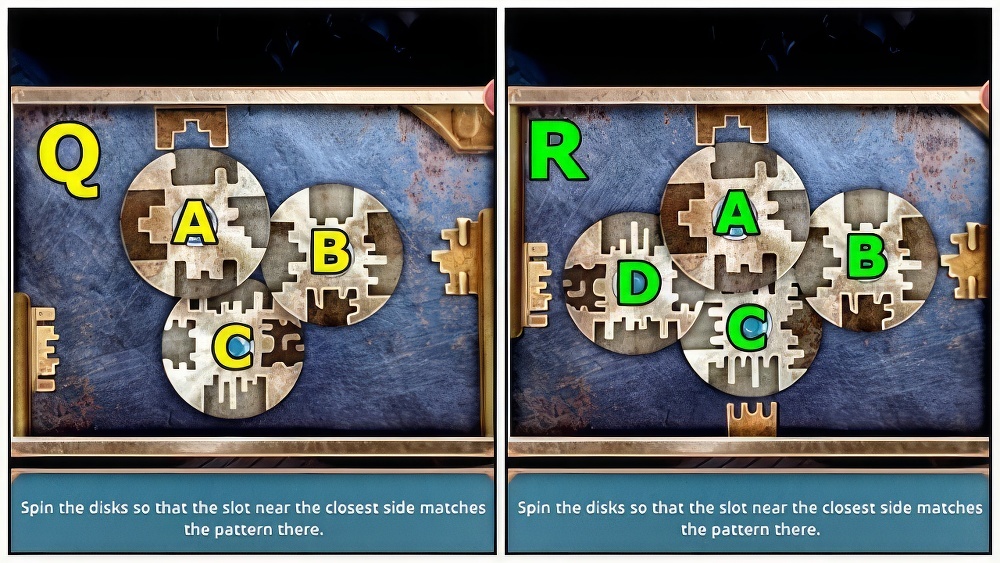
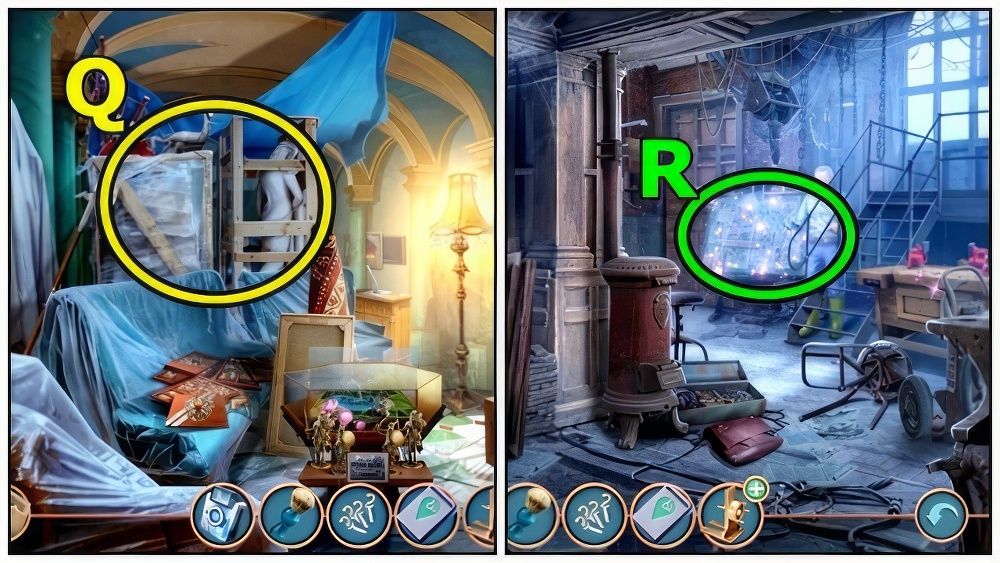
- Enter Mrs. Crossbury’s Museum (Q).
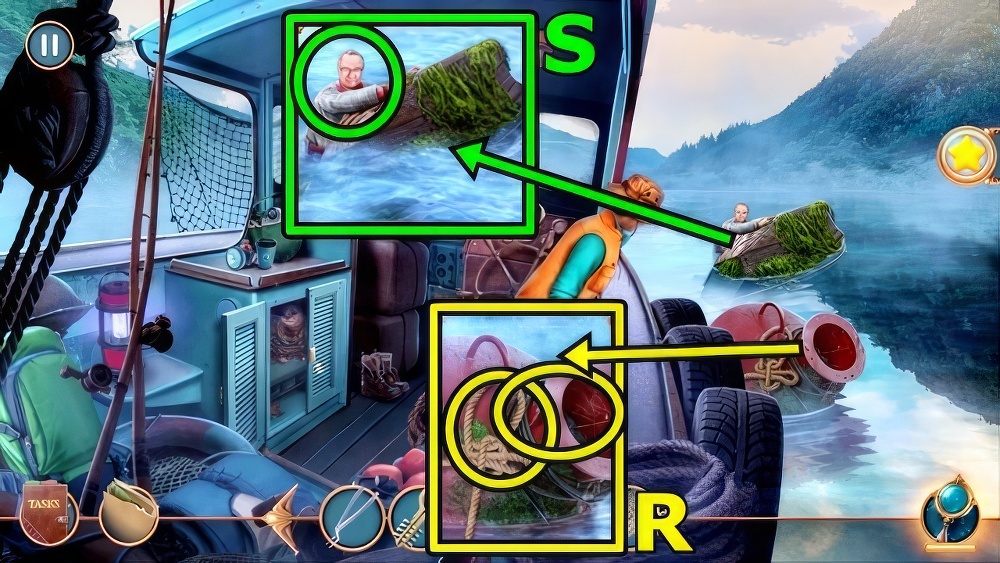
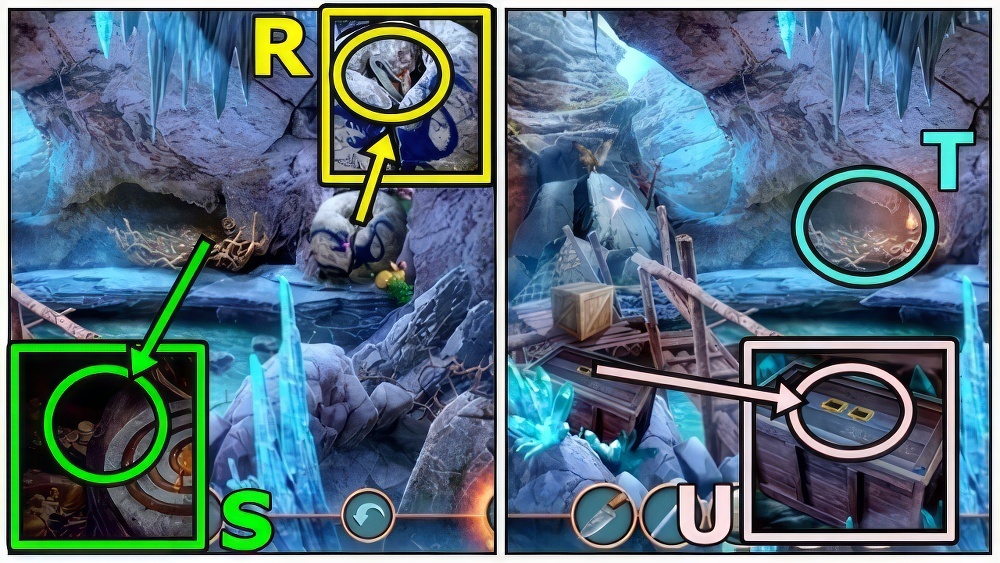
- Remove (R).
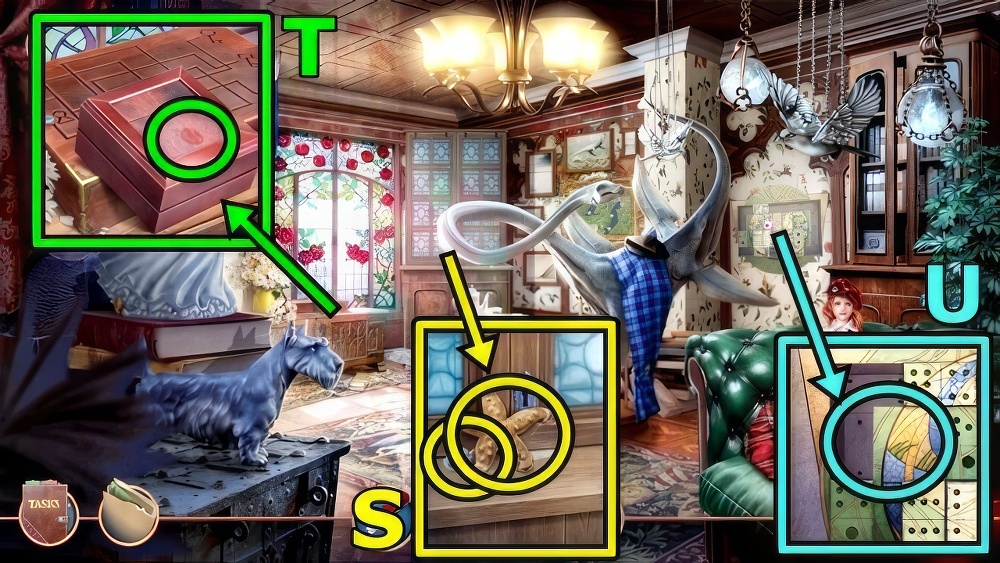
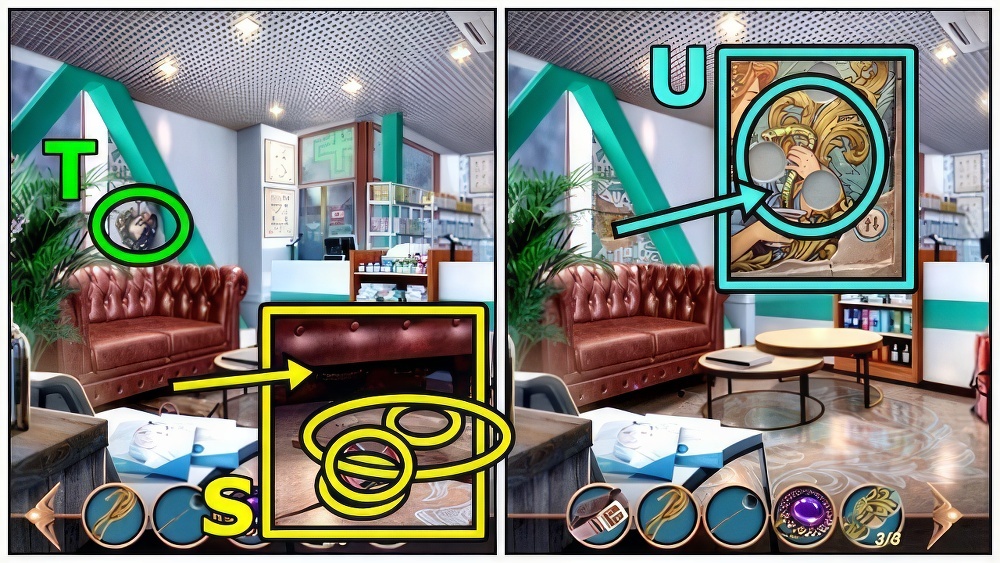
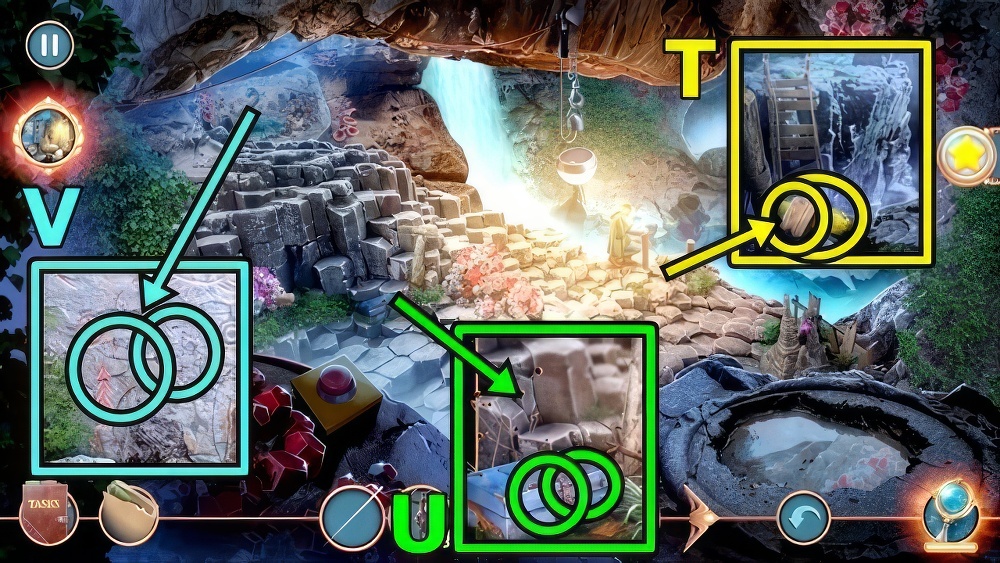
- Take STARFISH FIGURINE (S) and SUCTION CUP.
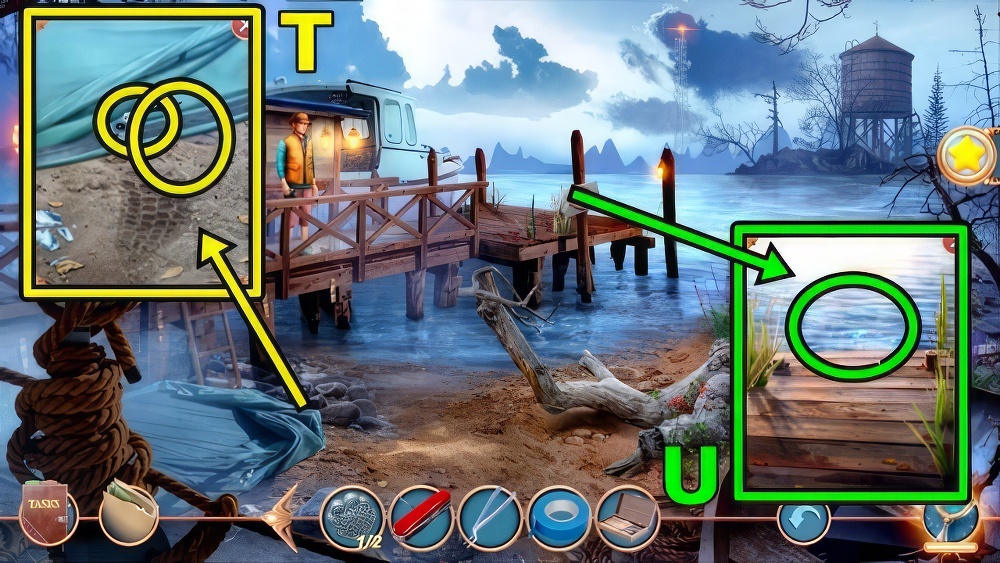
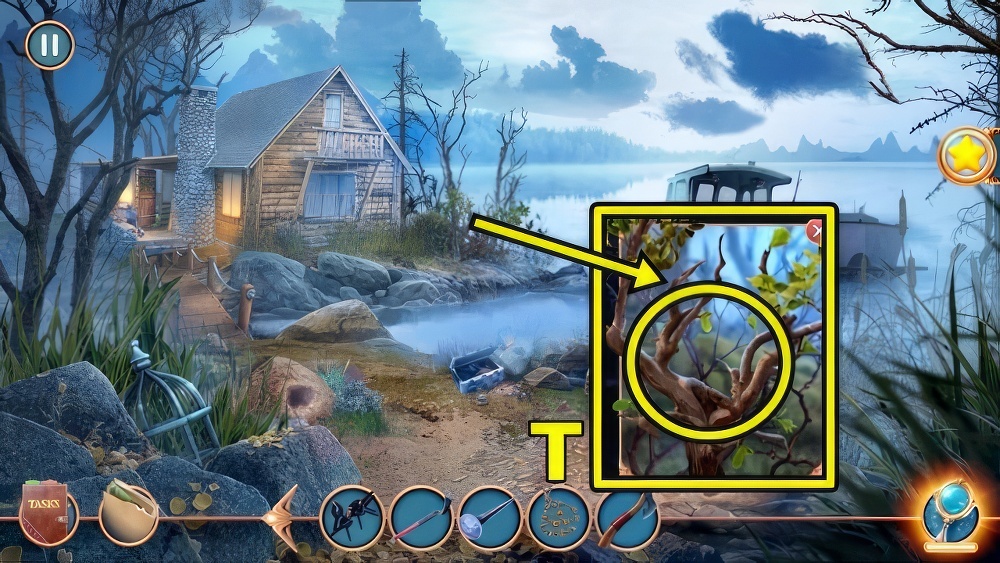
- Add SUCTION CUP (T), read, take WEIRDLY SHAPED TILE.
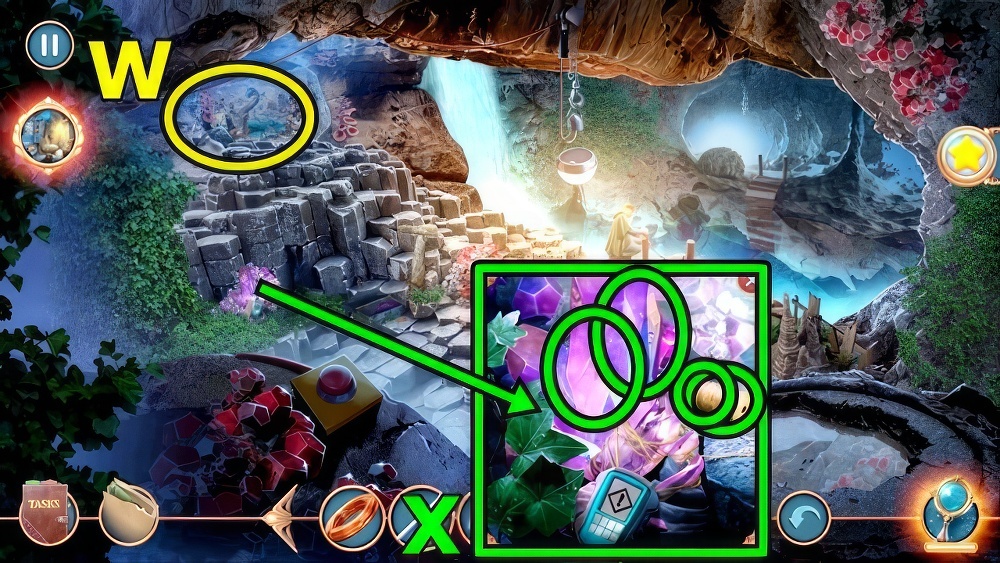
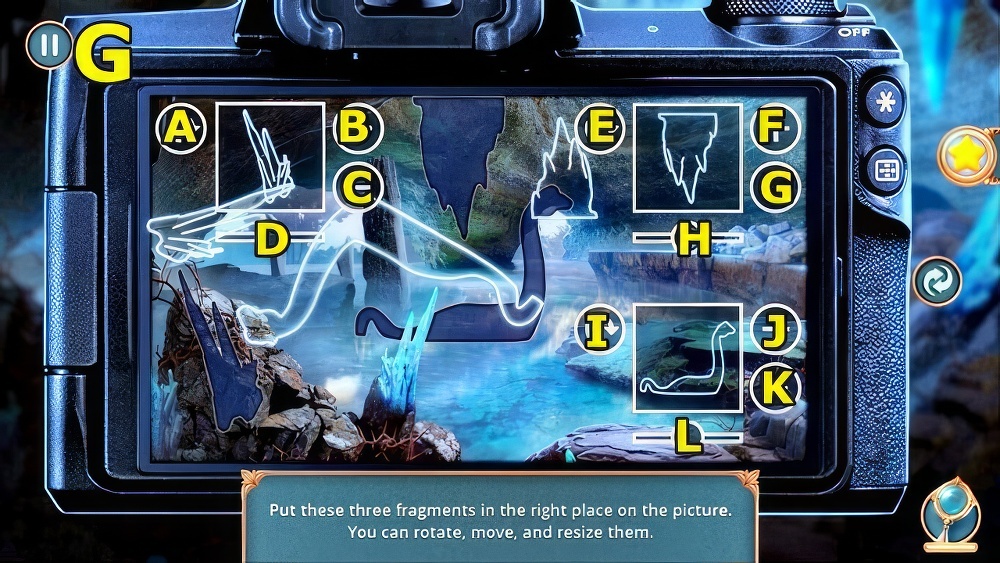
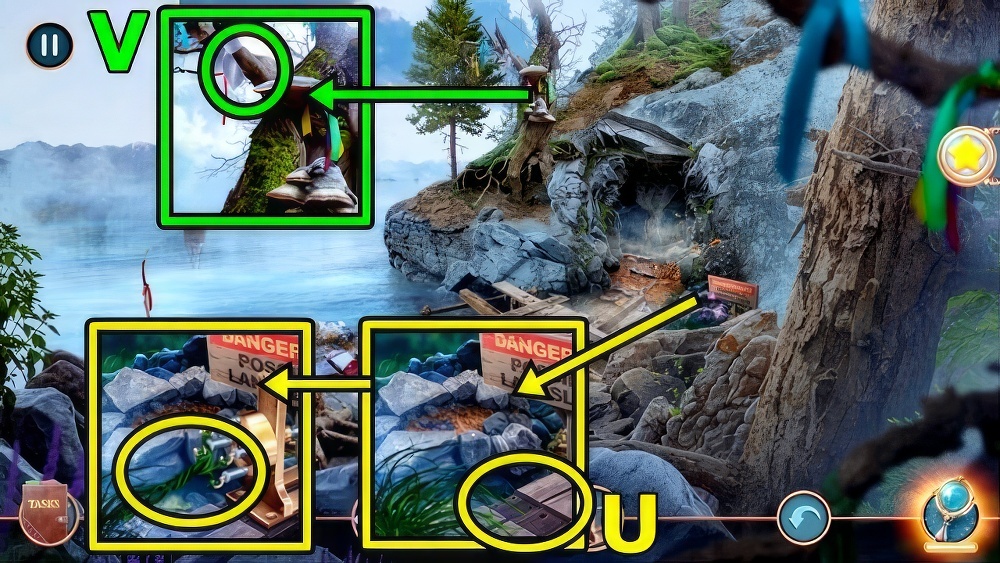
- Add WEIRDLY SHAPED TILE (U).
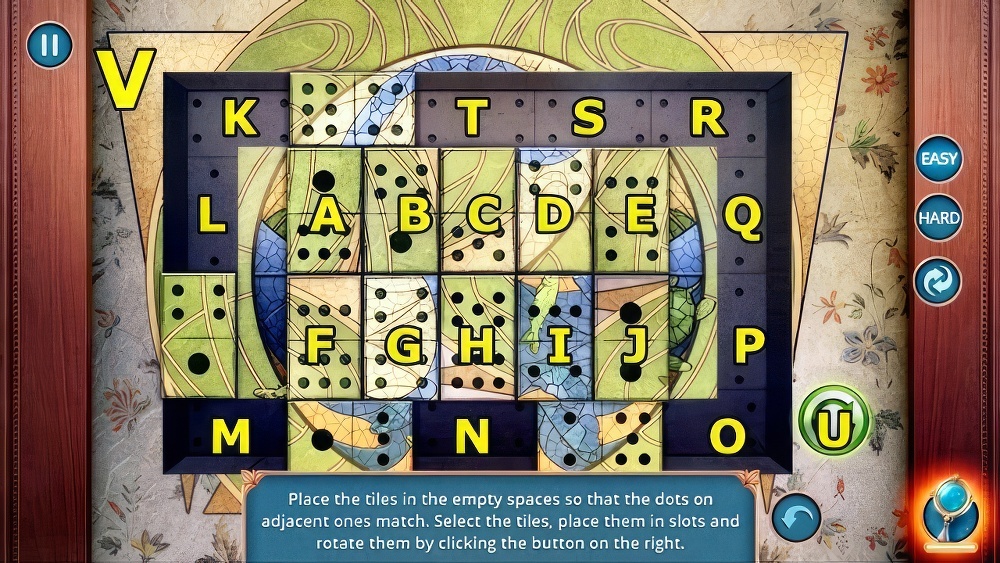
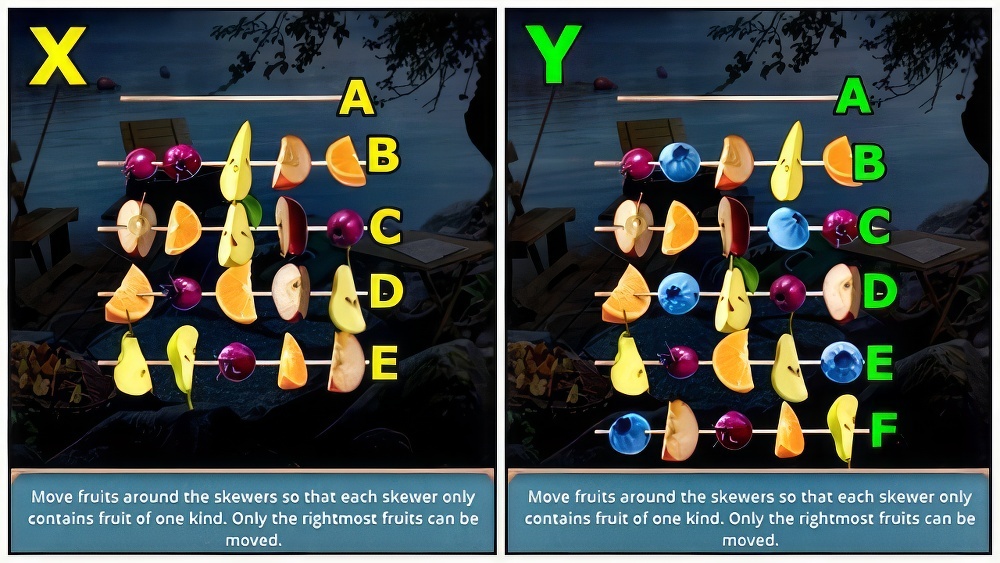
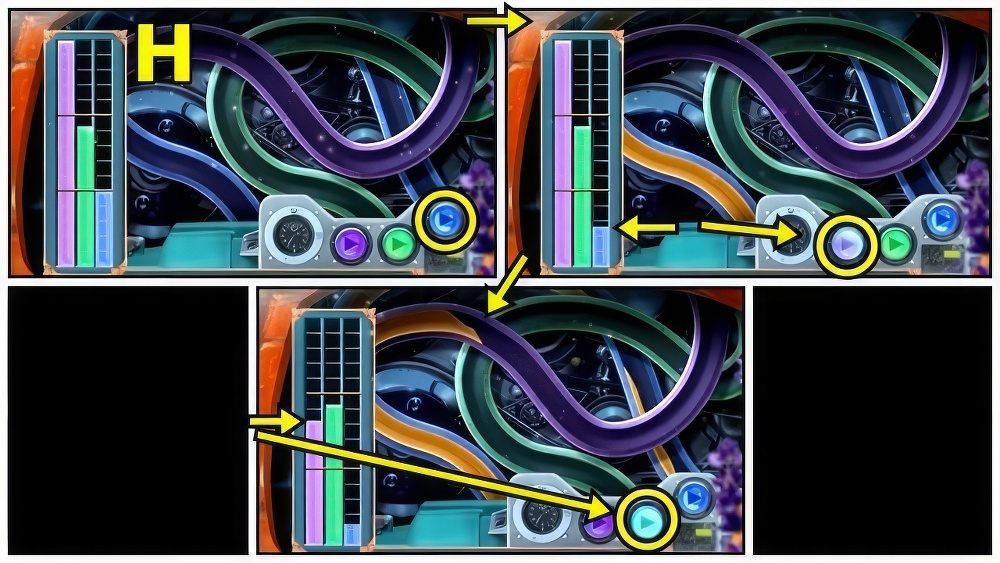
- Place the tiles in the empty spaces so that the dots on adjacent ones match.
- Select the tiles, place them in slots and rotate them by clicking the button on the right.
- Solution: (V) Easy (G-U-T)-(D-Ux3-S)-(C-Ux3-R)-(B-Q)-(A-P).
- (H-Ux3-O)-(I-Ux3-N)-(J-U-M)-(E-L)-(F-Ux3-K).
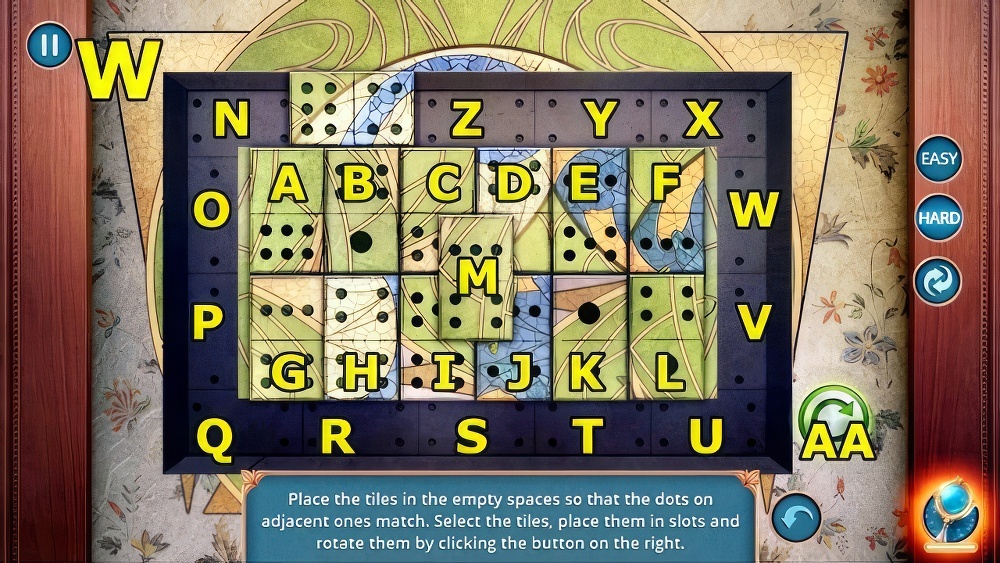
- Solution: (W) Hard (H-AA-Z)-( D-AAx3-Y)-(C-AAx3-X)-(B-W)-(A-V)-(I-AAx3-U).
- (E-AAx3-T)-(J-AAx3-S)-(F-AAx3-R)-(K-AA-Q)-(L-P)-(M-O)-(G-AAx3-N).
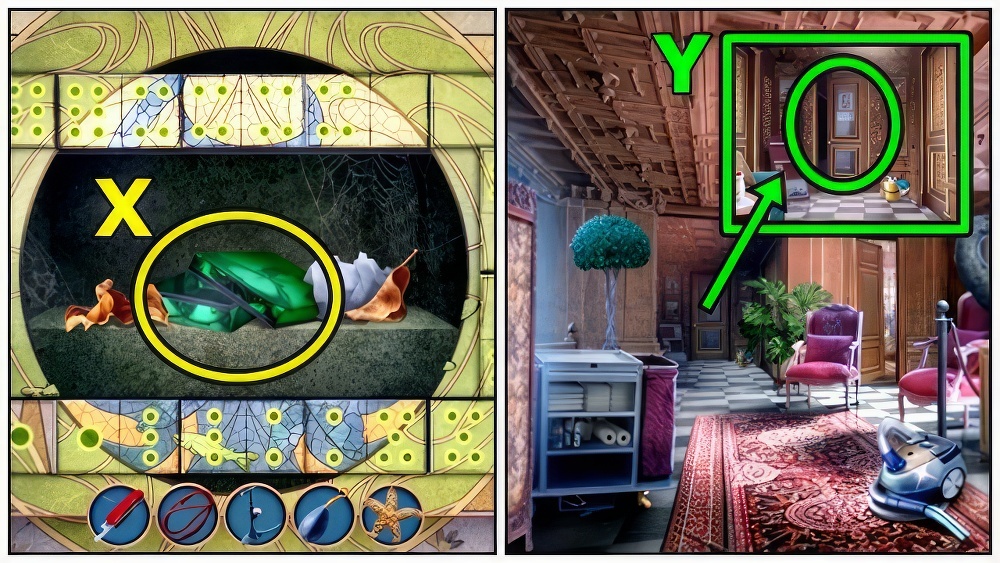
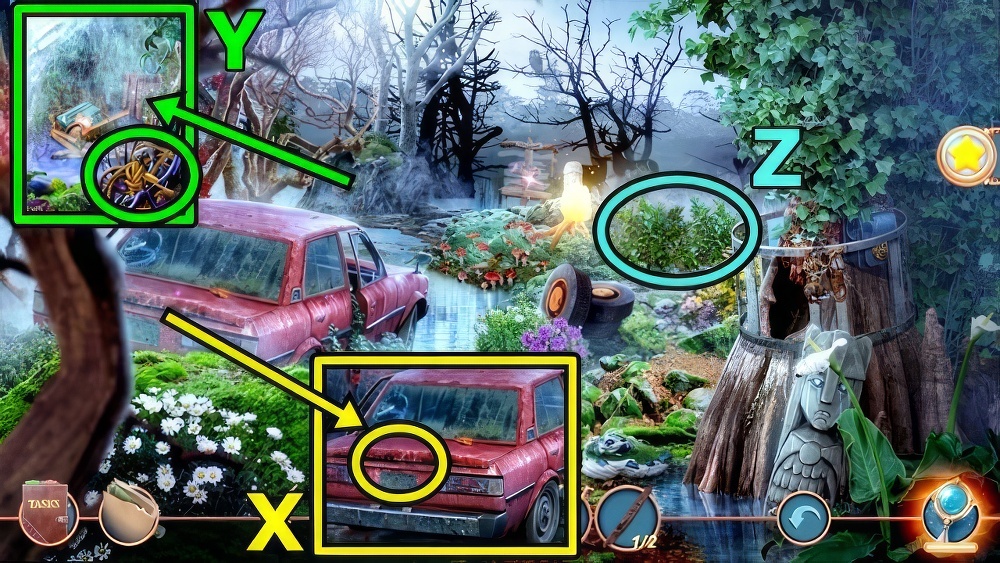
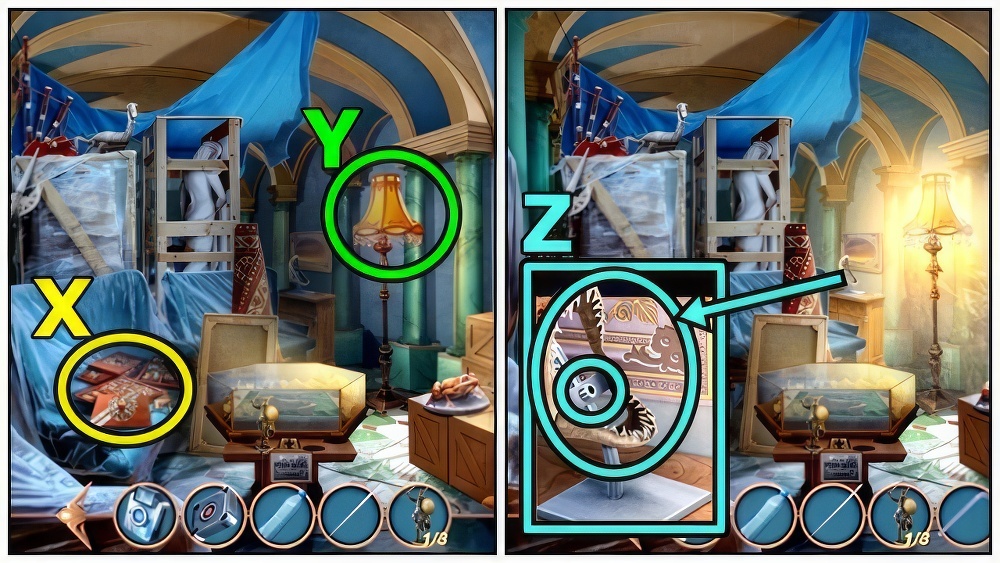
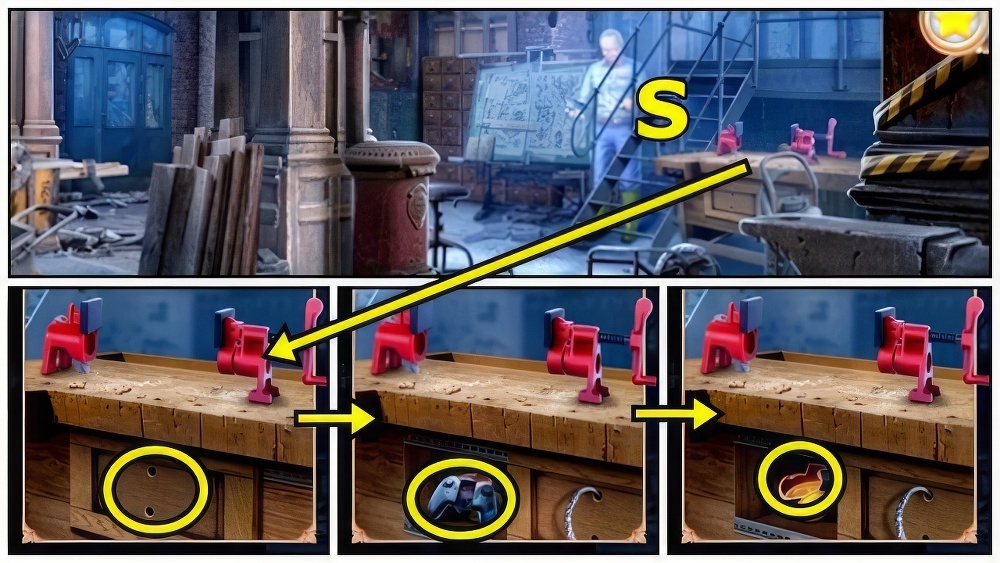
- Take FANCY BOX (X).
- Move down.
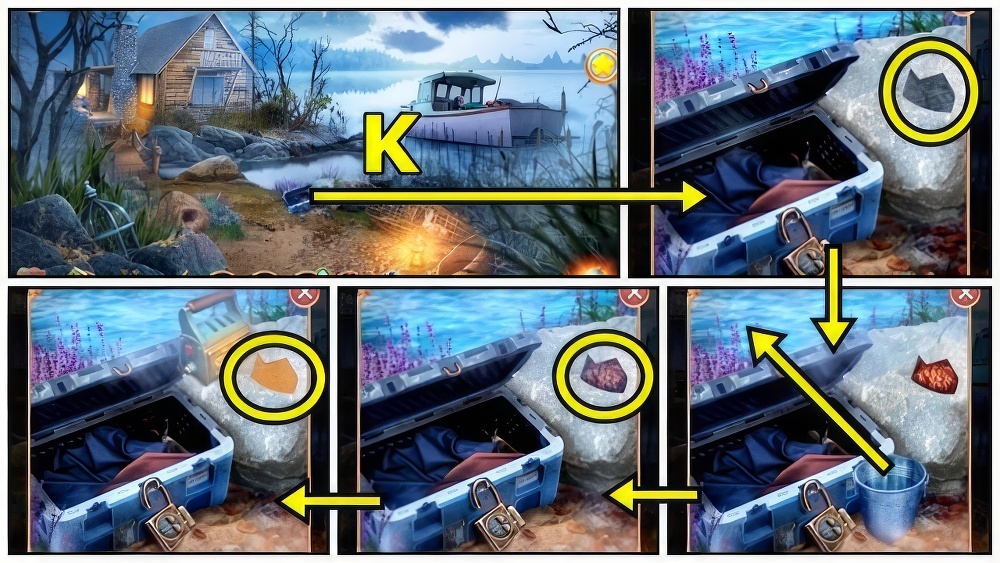
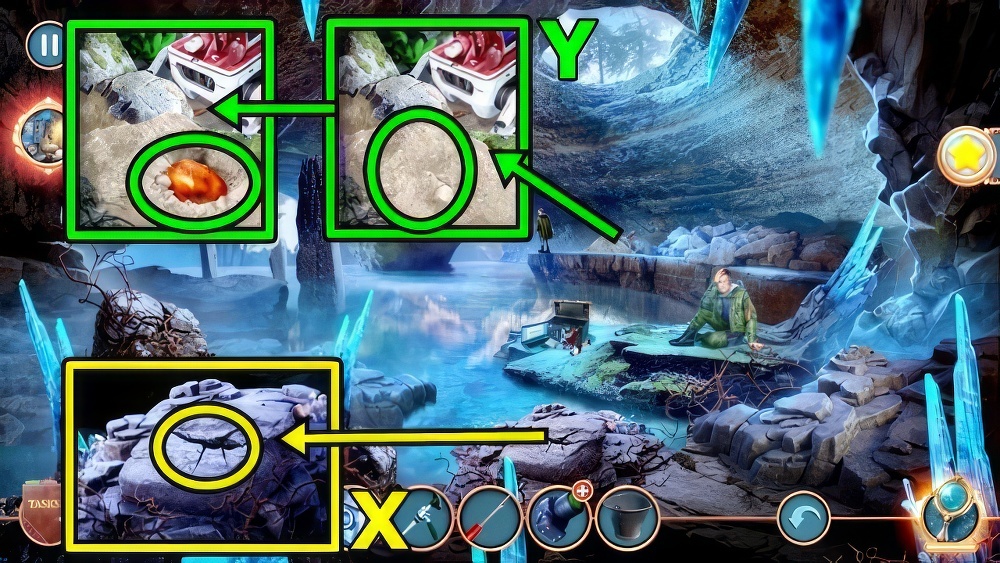
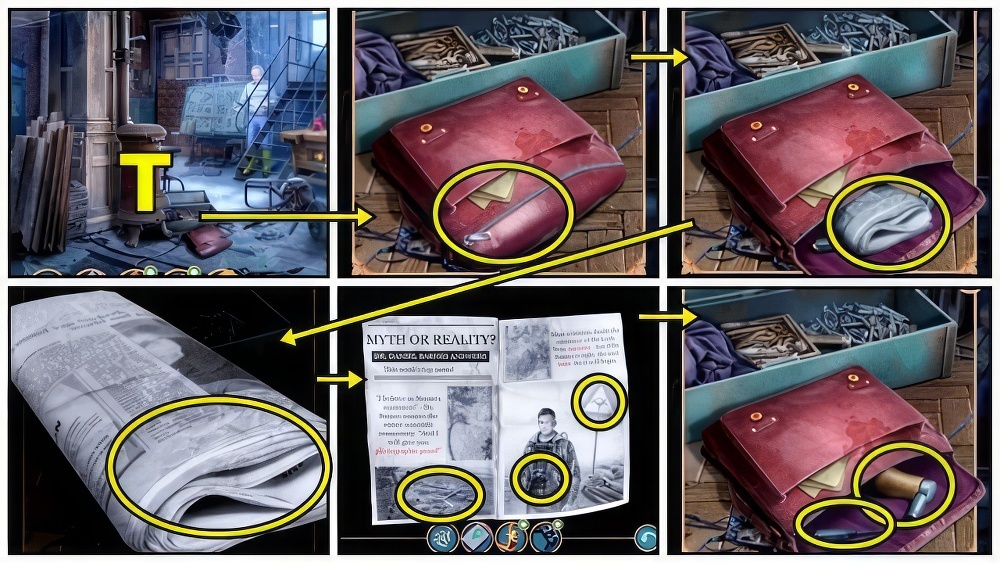
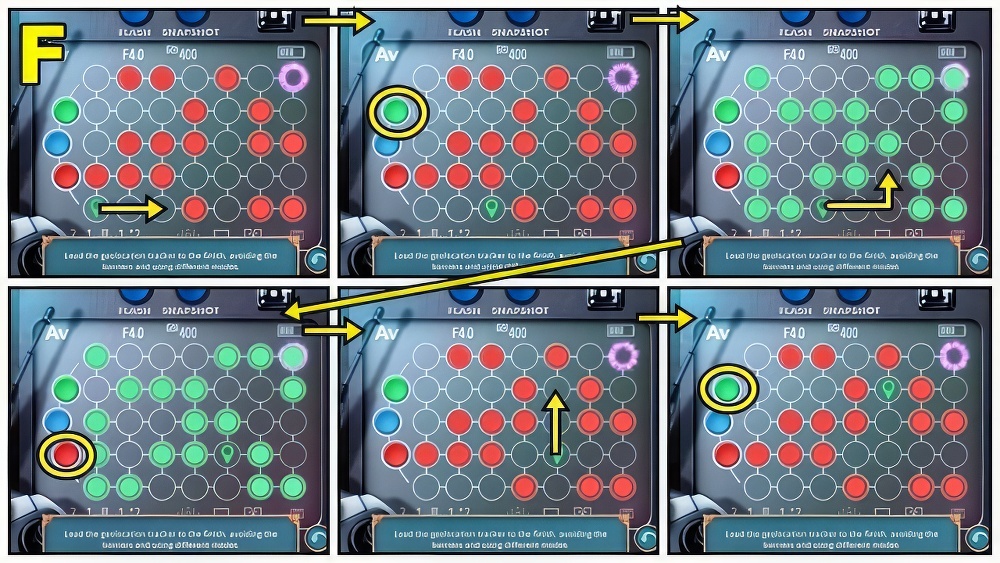
- Go to Pier (Y).
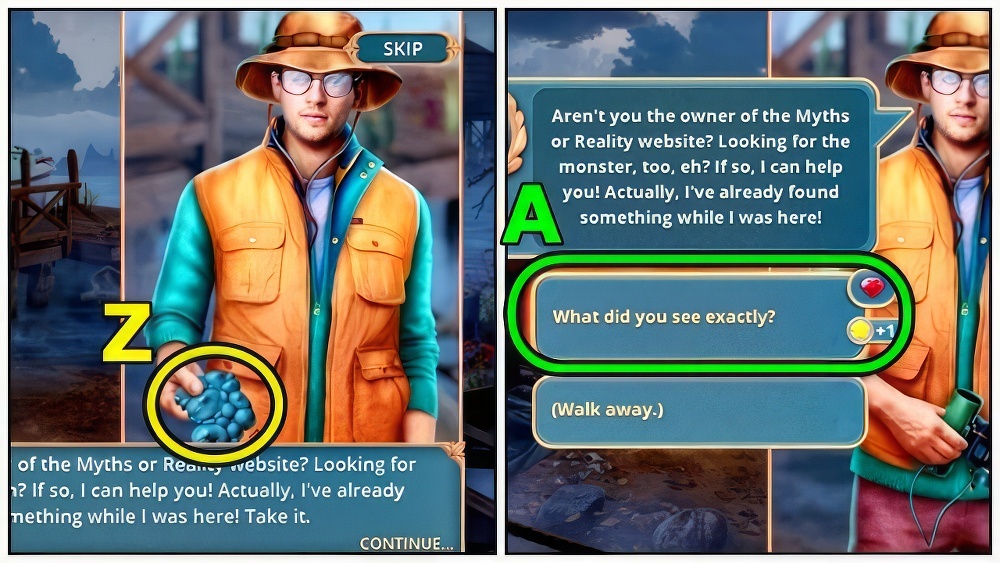
- Take SCALE CLUE (Z).
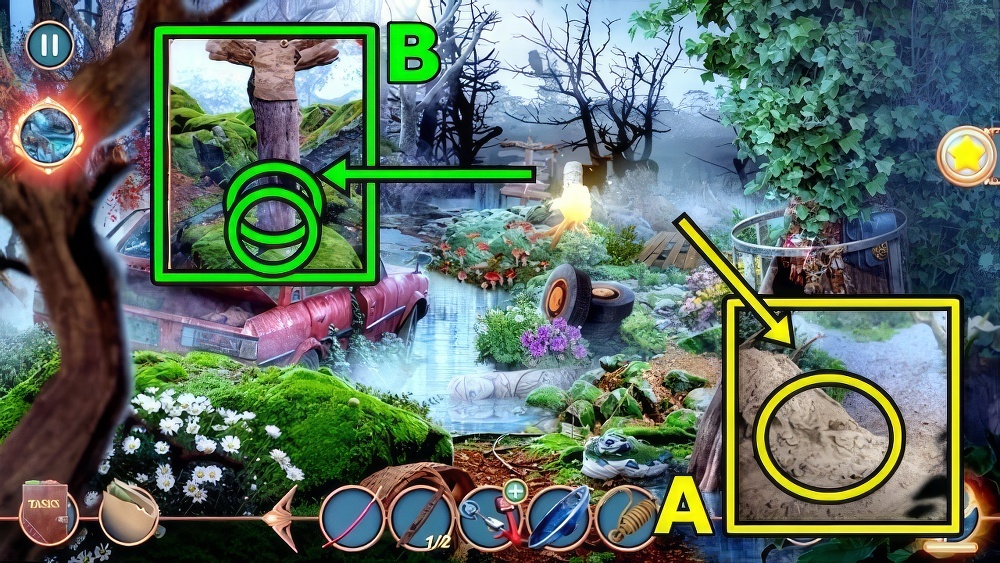
- Select (A).
- Take BOARDS (B).
- Take ROPE (C). Add ROPE and BOARDS, take SAW.
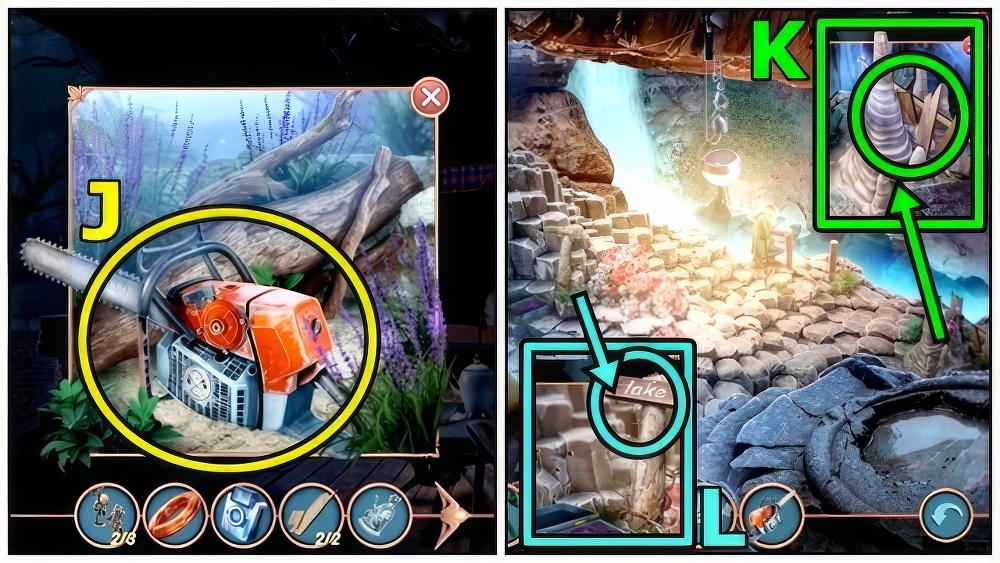
- Take PALLET JACK (D). Use SAW, take BROOM and CLAW CLUE.
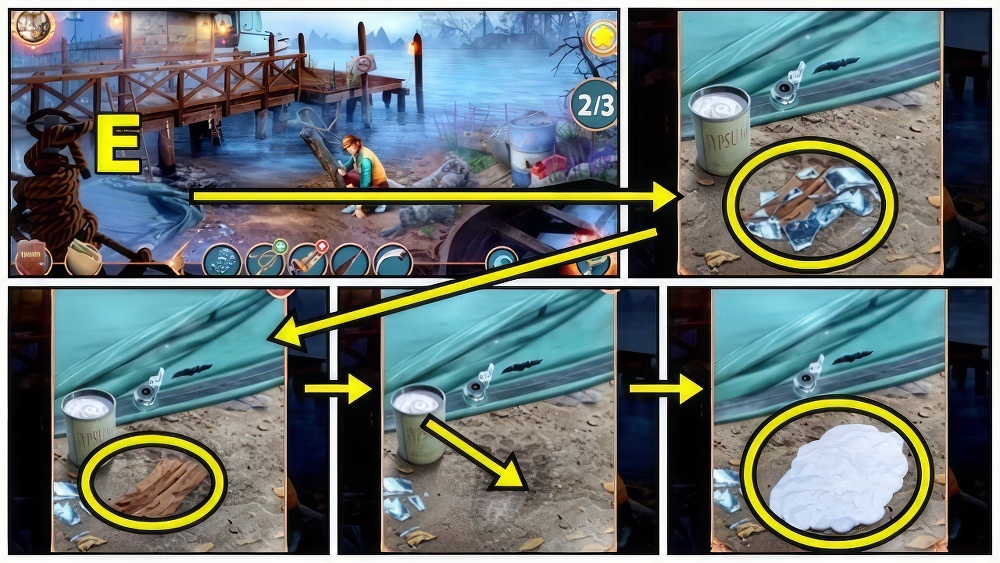
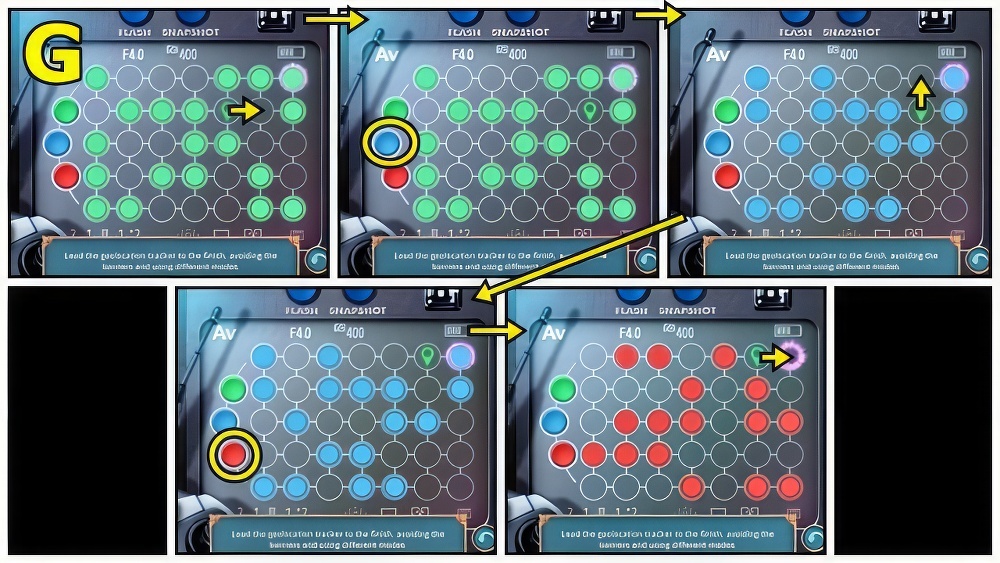
- Use BROOM (E), move. Use Gypsum, take FOOTPRINT CLUE.
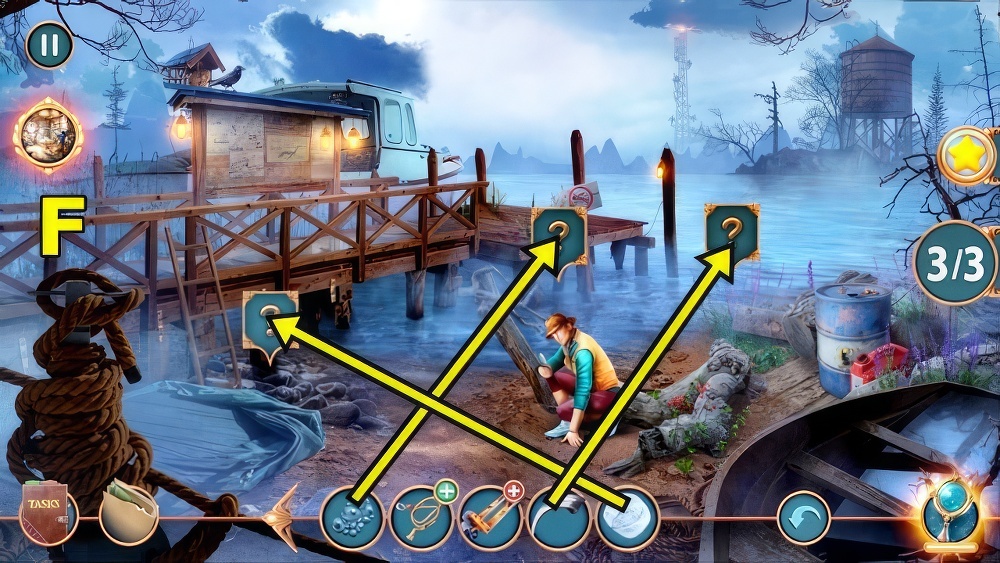
- Add FOOTPRINT CLUE (F), SCALE CLUE and CLAW CLUE.
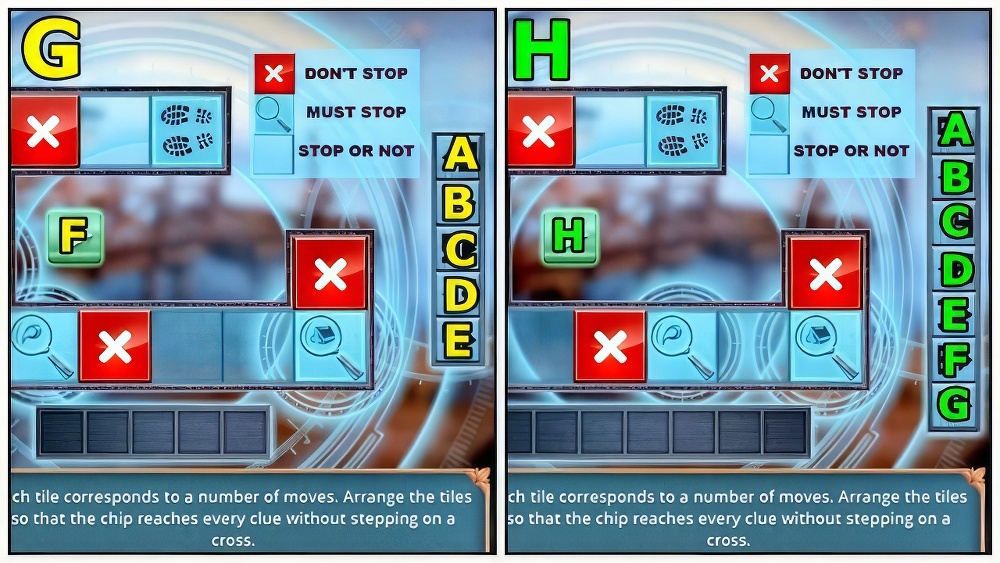
- Arrange the tiles to make a chip reach each clue without stepping on a cross.
- Tiles show the number of moves.
- The left arrow moves the chip back and the right one forward.
- Solution: (G) Easy B-A-E-D-C-F.
- Solution: (H) Hard G-C-F-B-D-E-A-H.
- Read (I).
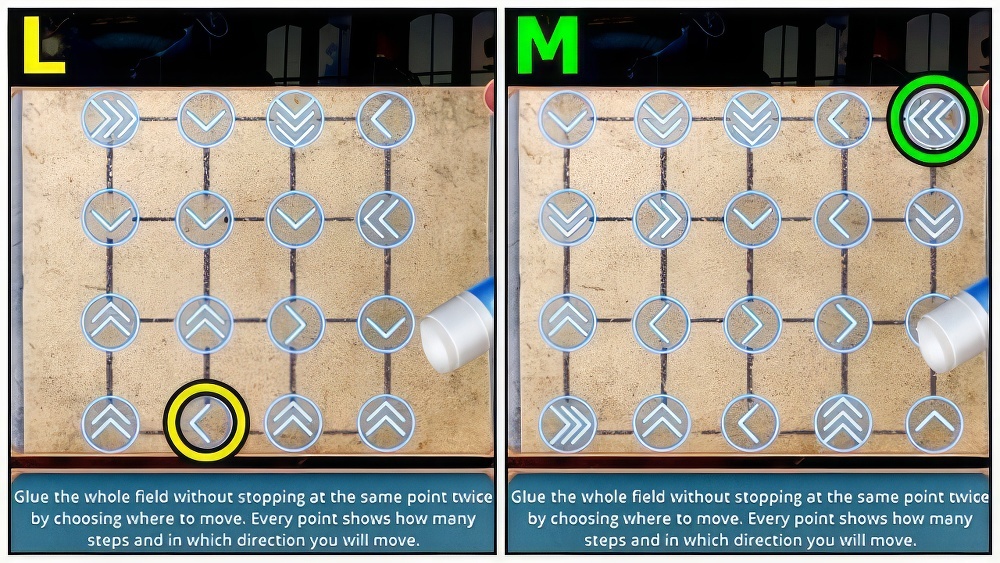
- Take HOTEL BOOKLET (J).
- Return to Loch-Ness Hotel Hall.
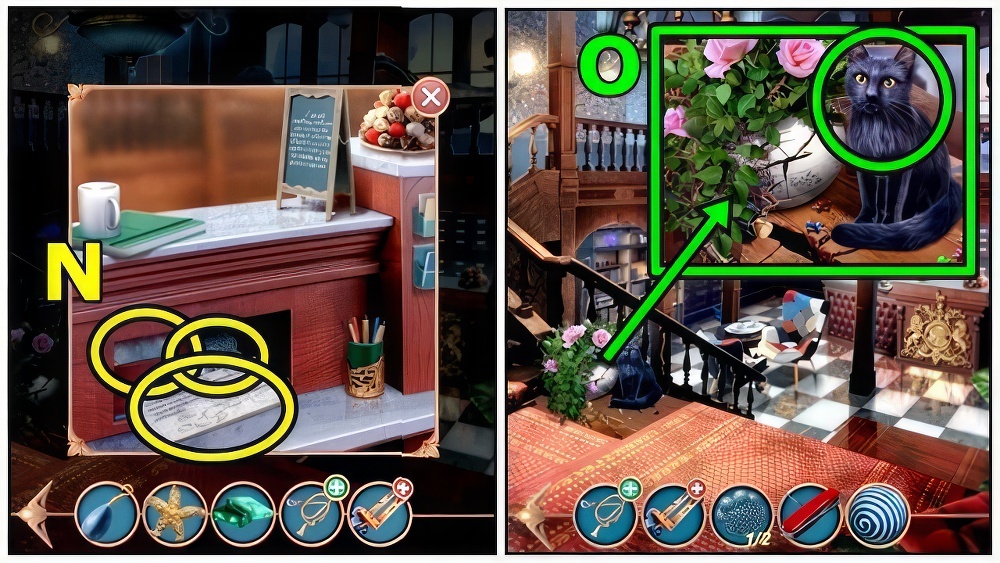
- Use HOTEL BOOKLET (K). Enter code 0-5-1-2-1-9-8-7. Use Glue Stick.
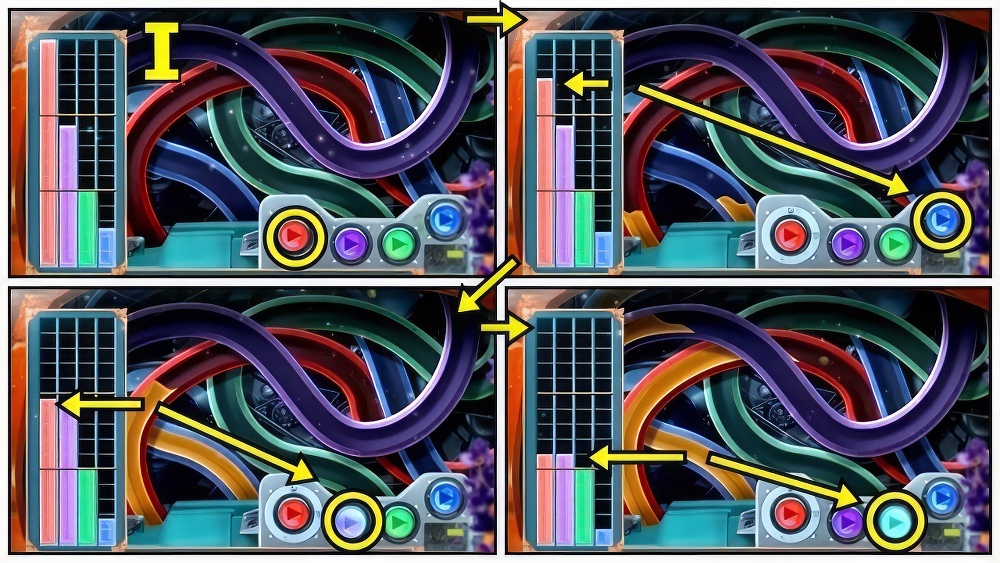
- Glue the whole field without stopping at the same point twice by choosing where to move.
- Every point shows how many steps and in which direction you will move.
- Solution: (L) Easy.
- Solution: (M) Hard.
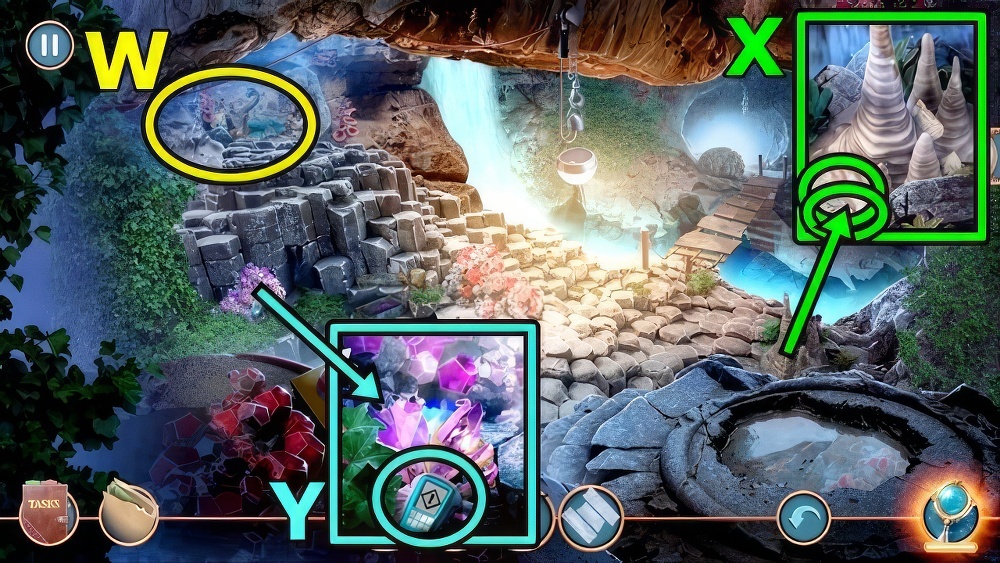
- Read (N), take AMULET 1/2. Use SWISS KNIFE, take BALL.
- Use BALL (O), take FORCEPS and DUCT TAPE. Add FANCY BOX, take THUMBTACKS.
- Return to Mrs. Crossbury’s Museum.
- Add THUMBTACKS (P), use Pen, take PAPER HINT.
- Move (Q), add PAPER HINT.
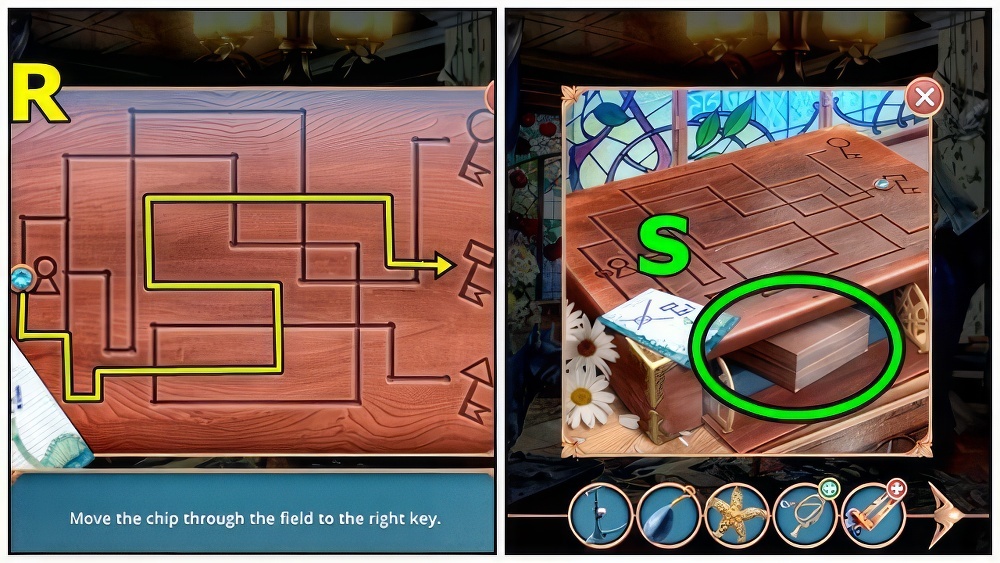
- Move the chip through the field to the right key.
- Solution: (R).
- Take WOOD CARVING KIT (S).
- Return to Pier.
- Add PUMP (T) and DUCT TAPE. Read, take CURTAIN.
- WEIGHT and CURTAIN on ROPE, receive NET.
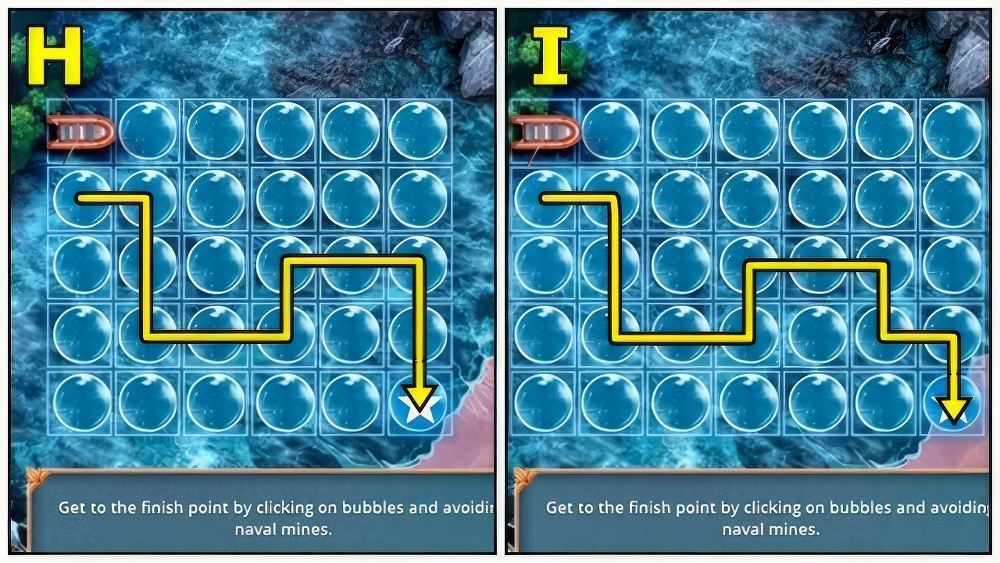
- Use NET (U).

- Clear the way for the net by dragging the rocks.
- Solution: (V) Easy.
- Solution: (W) Easy.
- Solution: (X) Hard.
- Solution: (Y) Hard.

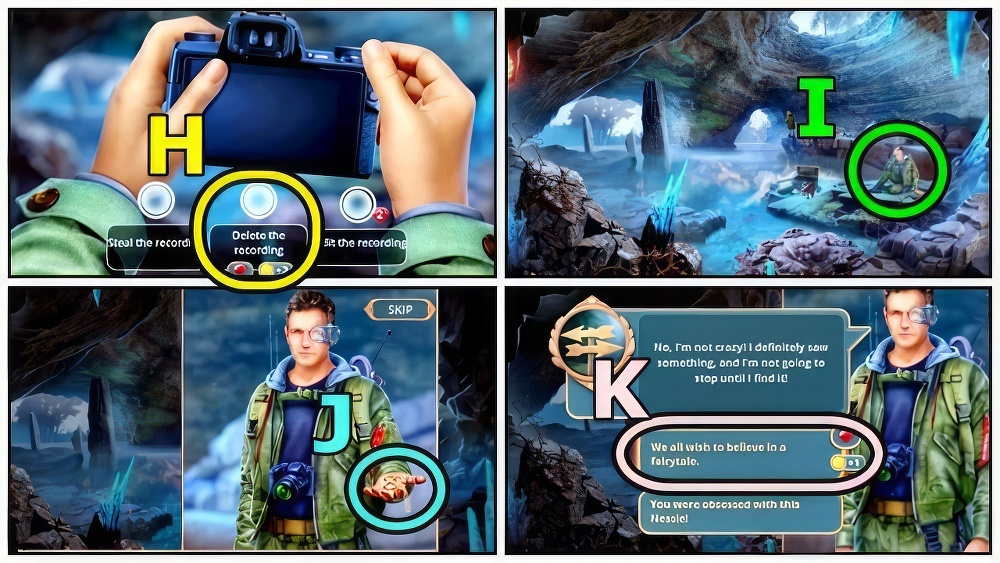
- Take CAMERA (Z).
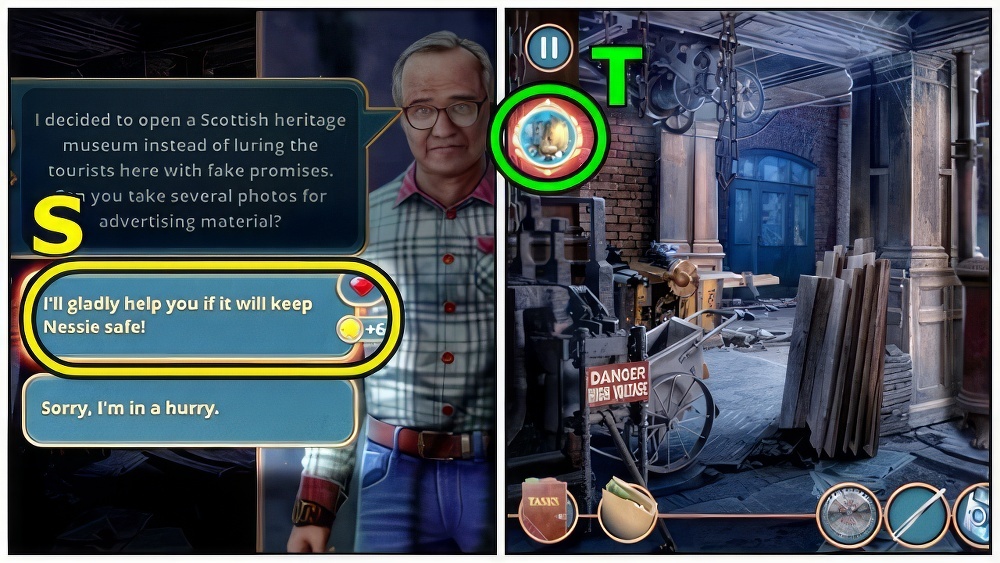
- Give CAMERA (A).
- Select (B).
- Take POUCH (C).
- Move down.
- Open POUCH, read, take GEAR and AMULET 2/2.
- Add AMULET (D).
- Play puzzle (E), take METAL DISK.

- Add METAL DISK (F). Take GLOVE, use WOOD CARVING KIT. Take SEAHORSE FIGURINE.
- Enter Mrs. Crossbury’s Museum.
- Add STARFISH FIGURINE (G) and SEAHORSE FIGURINE, take CARVED KEY.
- Insert CARVED KEY (H).
- Play puzzle (I).
- Return to Loch-Ness Hotel Hall.
- Use GLOVE (J), take LOCK PICKS 1/2. Use SWISS KNIFE, take FASTENING.
- Return to Hotel Corridor.
- Play puzzle (K), take SILVER CRESCENT.
- Use SILVER CRESCENT (L), read, take HOSE.
- Move forward.
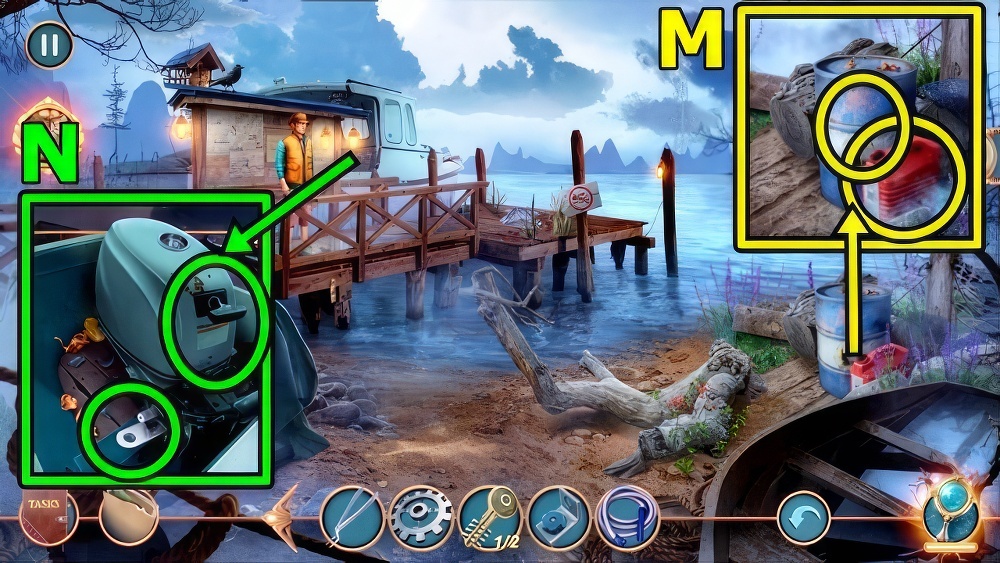
- Add HOSE (M), take FUEL CAN.
- Add FASTENER (N) and FUEL CAN.
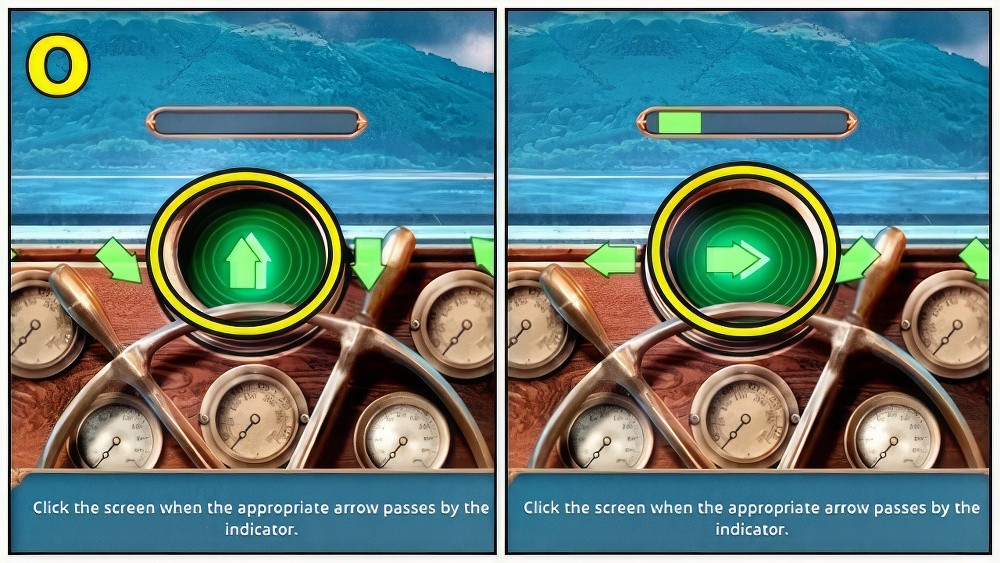
- Click the screen when the appropriate arrow passes by the indicator.
- Solution: (O) Screenshot is an example.

- Take SCREW (P) and NUT.
- Add GEAR (Q) and NUT. Read. Take BUTTONS 1/2 and KNOT MANUAL.
- Use FORCEPS (R) and KNOT MANUAL, receive LASSO.
- Use LASSO (S). Receive ROPE.
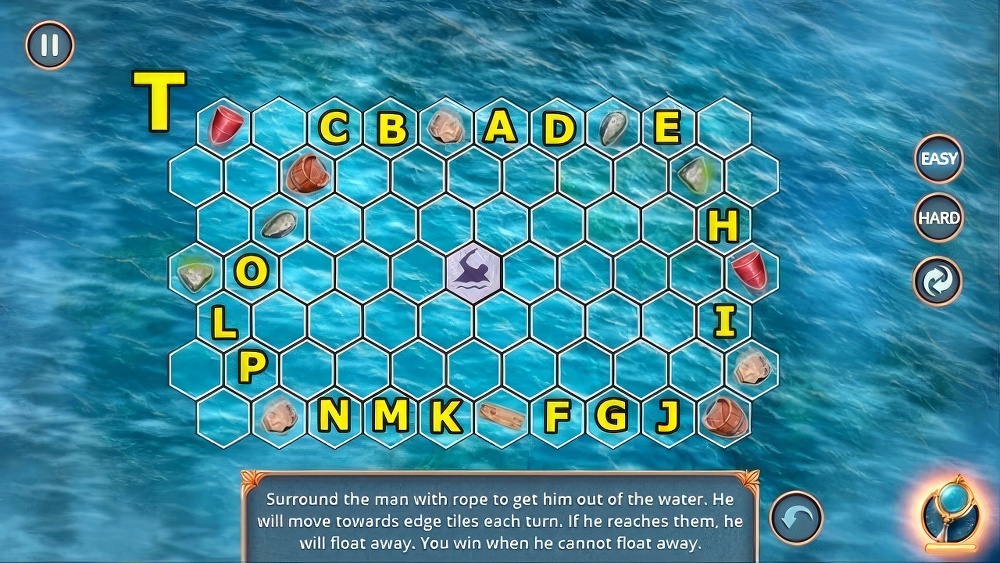
- Surround the man with rope to get him out of the water.
- He will move towards edge tiles each turn. If he reaches them, he will float away.
- You win when he cannot float away.
- Solution: (T) Easy A to P.

- Solution: (U) Hard A to T.
- Select (V).
- Take CAGE (W).
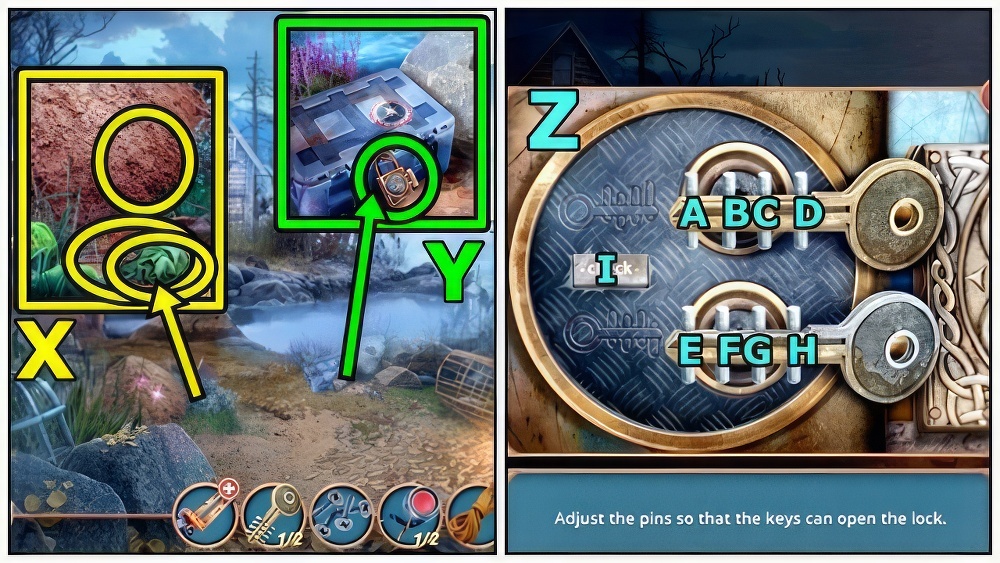
- Take RAGS (X) and BRUSH. Use CAGE, take LOCK PICKS 2/2.
- Add LOCK PICKS (Y).
- Adjust the pins so that the keys can open the lock.
- Solution: (Z) D-Cx4-Bx2-H-Gx4-Fx2-E-I.
- Take PALLET JACK PART (A).
- PALLET JACK PART on PALLET JACK.
- Use PALLET JACK (B).
- Enter Fisherman’s Hut.
- Take HEATER (C) and OIL.
- Add BRUSH (D) and OIL, take SCREWDRIVER.
- Add SCREW (E) and SCREWDRIVER, take SEPTUM RING.
- Use SEPTUM RING (F).
- Play puzzle (G), take DRIED FISH.
- Return to Boat on the Lake.
- Give DRIED FISH (H), take METAL TUBES and BUTTONS 2/2.
- Add BUTTONS (I) and press. Take BATTERY and BUCKET.
- Move down.
- Use BUCKET (J), take CLAY.
- Add CLAY (K), use Bucket, add HEATER, take MURAL PIECE.
- Enter Fisherman’s Hut.
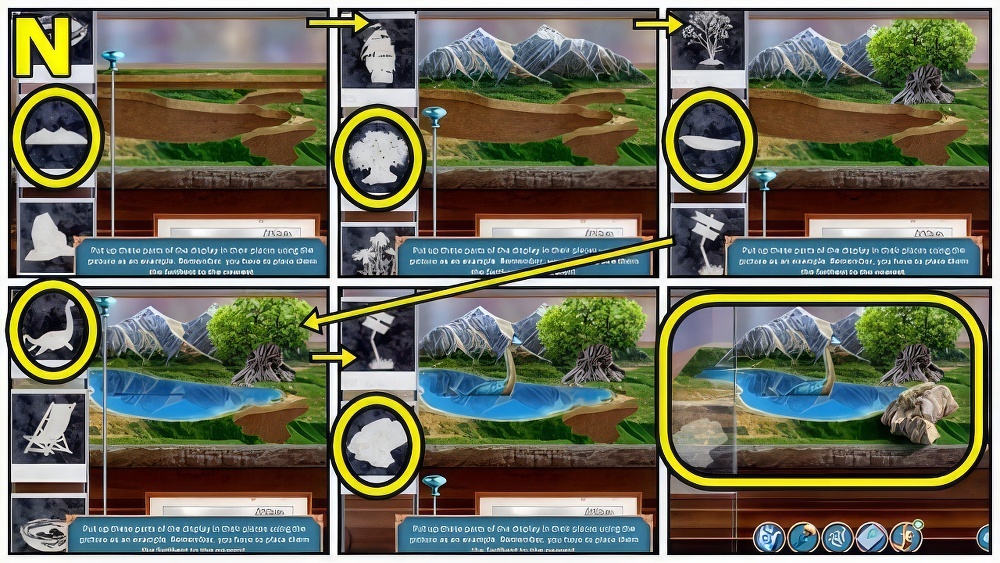
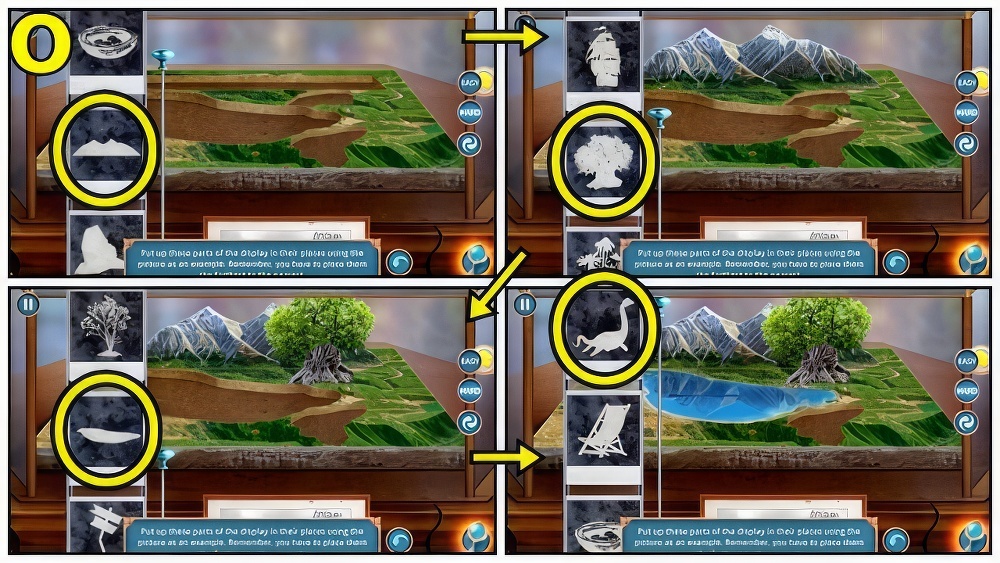
- Add MURAL PIECE (L).

- Fit all of the parts together on the field.
- You can rotate it by using arrows.
- Solution: (M) Easy (E-M)-(G-N)-K-(A-O)-(J-P)-K-(B-Q)-(H-R)-K-(C-S)-(F-T)-K-(D-U)-K-(I-V).
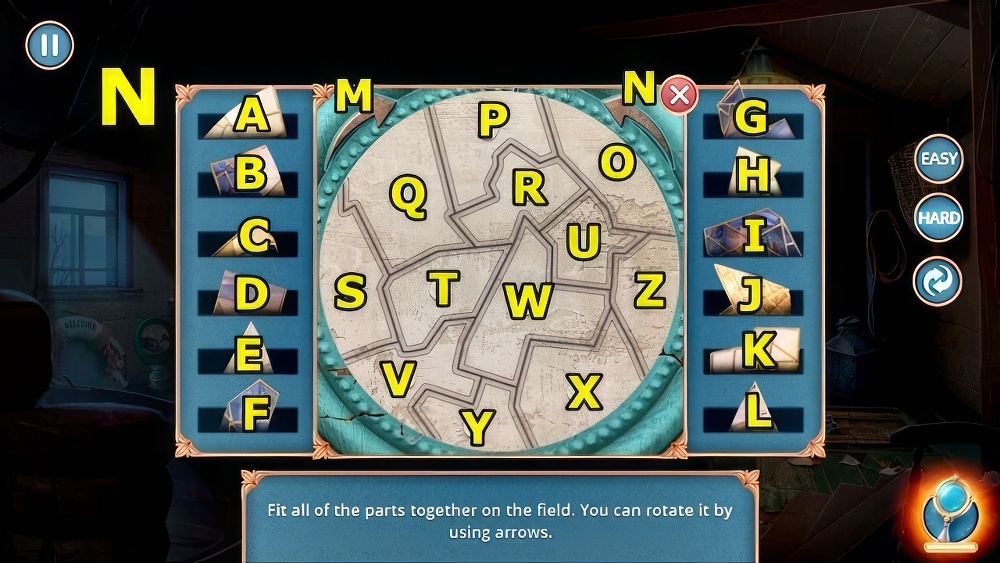
- Solution: (N) Hard (E-O)-(H-P)-M-(A-Q)-(K-R)-M-(B-S)-(I-T)-M-(C-U)-(G-V)-M-(D-W)-(J-X)-M-(F-Y)-(L-Z).
- Take WINE VINEGAR (O).
- Add RAGS (P) and WINE VINEGAR, take TENT PINS and CROWBAR.
- Return to Boat on the Lake.
- Use CROWBAR (Q), take HINGE SCREW.
- Return to Fisherman’s Hut.
- Play puzzle (R), take HOOK.
- Use HOOK (S), take NET. Remove cloth, take AXE.
- Move down.
- Use AXE (T), receive BRANCHES.
- ROPE, TENT PINS, NET and BRANCHES on METAL TUBES.
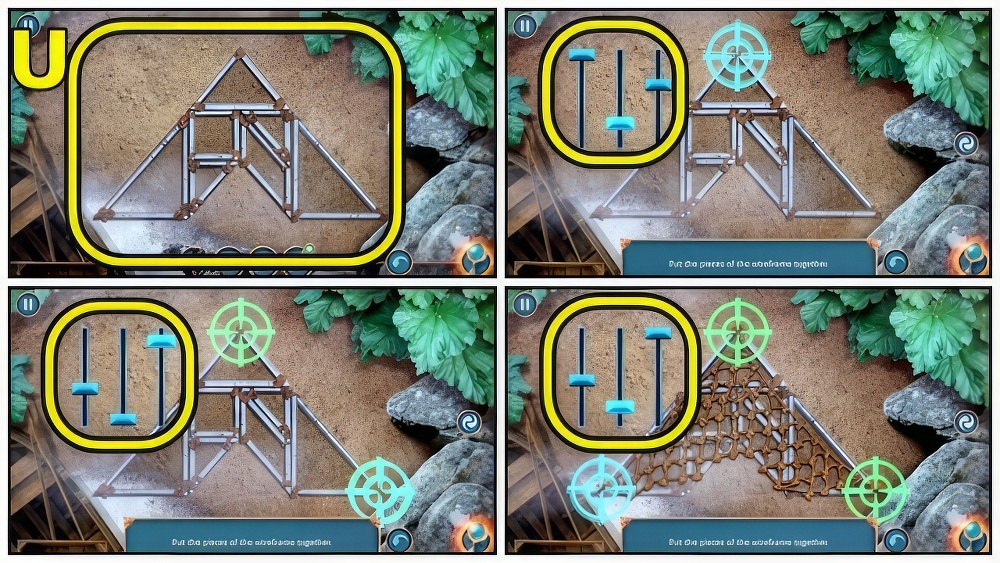
- Put the pieces of the wireframe together.
- Solution: (U).
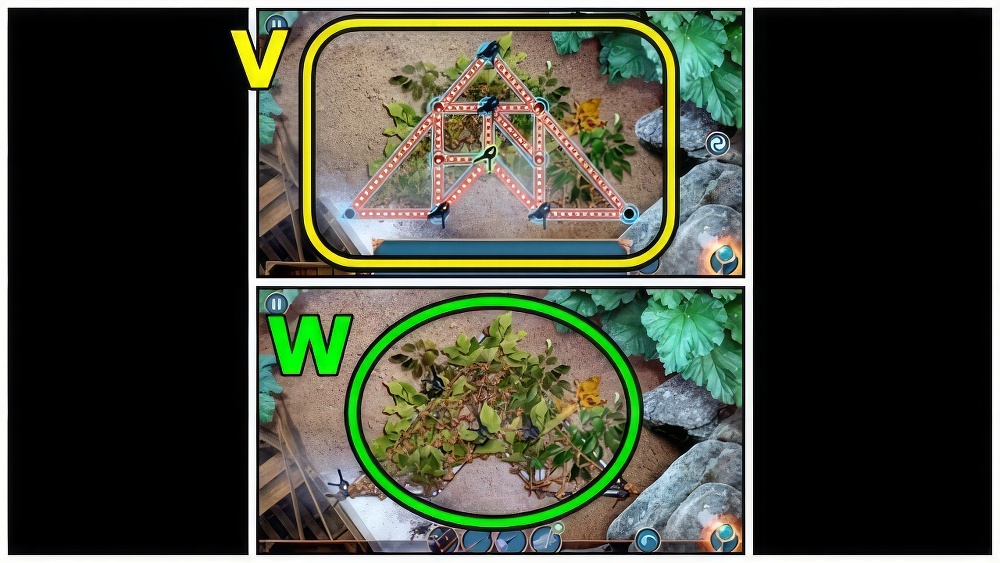
- Adjust the sliders to put the net over the wireframe.
- Solution: (V).
- Take CAMOUFLAGE (W).
- Add CAMOUFLAGE (X).
- Select (Y). Receive ROPE.
- Read (Z). Take JACKHAMMER.
- Take LAMP (A). Add JACKHAMMER and BATTERY, receive STONE.
- Use CROWBAR (B) and STONE.
- Play puzzle (C), take FLINT AND STEEL.
- Use FLINT AND STEEL (D), take MAGNET.
- Move (E), use ROPE and MAGNET, receive METAL KNOB.
- Add HINGE SCREW (F) and METAL KNOB, receive CANE.

- Play puzzle (G), take JAR.
- Use JAR (H), receive GLOWING JAR.
- GLOWING JAR on LAMP.
- Add CANE (I) and LAMP.
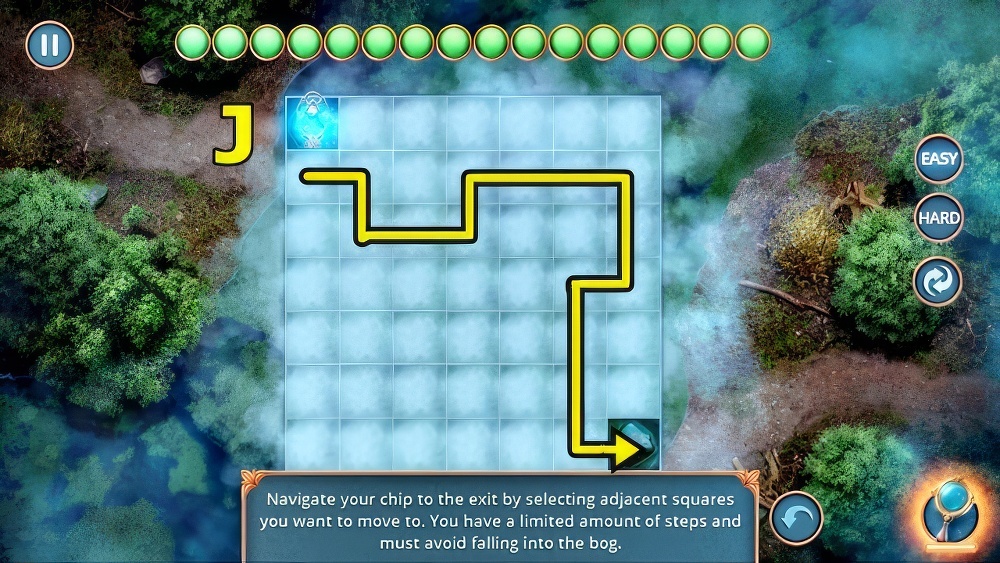
- Navigate your chip to the exit by selecting adjacent squares you want to move to.
- You have a limited amount of steps and must avoid falling into the bog.
- Solution: (J) Easy and Hard.
- Take HEAVY KNIFE (K).
- Use HEAVY KNIFE (L), take CROCHET HOOK and WAX CANDLE.
- Take STONE (M). Use WAX CANDLE, take ANDREW’S NOTEBOOK.
- Take BATTERY (N). Add ANDREW’S NOTEBOOK.
- Play puzzle (O), take GIGLI SAW.
- Select (P).
- Go to Nessie’s Lair (Q).
- Take FLINT AND STEEL (R).
- Use FLINT AND STEEL (S).
- Play puzzle (T), take GOLDEN HORSESHOE.
- Add GOLDEN HORSESHOE (U), take SHORT BELT.
- Move down.
- Use GIGLI SAW (V).
- Go to Forest Path.
- Take WIRE (W) and SIGNS 1/2.
- Use HEAVY KNIFE (X), read, take BROKEN METAL DETECTOR and POT LID.
- Use CROCHET HOOK (Y), receive ROPE.
- Move (Z).
- Use POT LID (A), take SIGNS 2/2.
- Add SIGNS (B) and ROPE.
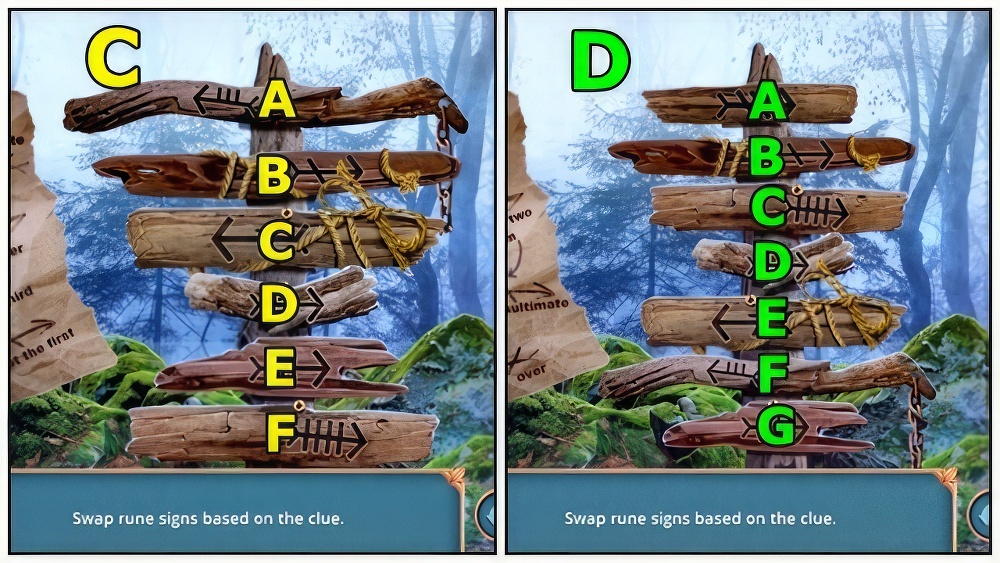
- Swap rune signs based on the clue.
- Solution: (C) Easy (D-A)-(E-C)-(D-B)-(D-F).
- Solution: (D) Hard (D-A)-(D-G)-(B-F)-(C-D).
- Take COIN 1/3 (E) and CHISEL.
- Use CHISEL (F) and STONE, take COIN 2/3, MIRROR and DUCT TAPE.
- BATTERY, WIRE and DUCT TAPE on BROKEN METAL DETECTOR, receive METAL DETECTOR.
- Use METAL DETECTOR (G).
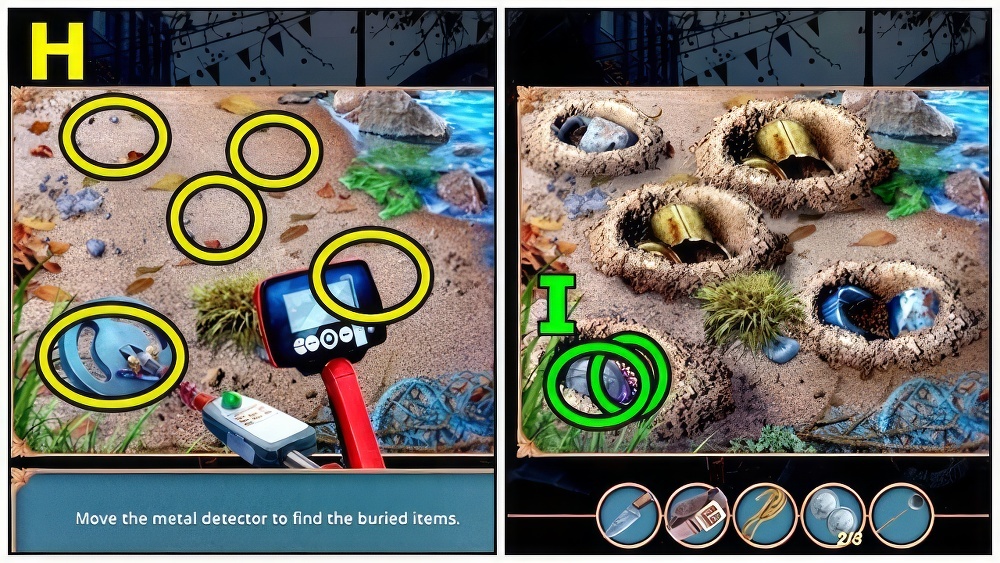
- Move the metal detector to find the buried items.
- Solution: (H).
- Take ANTIQUE RING (I) and COIN 3/3.
- Add COIN (J), take MAP, read.
- Use MAP (K). Play puzzle.
- Select (L).
- Take MOSAIC PIECE 1/3 (M), STURDY BRANCH and WATER.
- Take RAW CLAY (N).
- Move (O), add RAW CLAY, then WATER, stir.
- Use forceps (P), use forceps again. Remove, take PYRAMID.
- Add STURDY BRANCH (Q) and PYRAMID, take MOSAIC PIECE 2/3 and ALICE’S KEY.
- Insert ALICE’S KEY (R).
- Enter Alice’s Pharmacy.
- Take VALVE (S), BOARD 1/3 and EMPTY LIGHTER. Use HEAVY KNIFE, take MOSAIC PIECE 3/3.
- Move (T).
- Add MOSAIC PIECE (U).

- Swap the pieces to restore the picture by clicking on them.
- Press the arrow button to change which pieces you see.
- Solution: (V) Easy (B-C)-(A-B)-(A-D)-(D-E)-F-(H-I)-(H-J)-(G-J)-(G-K).
- Solution: (W) Hard (D-E)-(A-D)-(F-C)-(G-H)-(F-G)-(B-D)-I-(N-O)-(L-O)-(J-L)-(J-K)-(K-M).
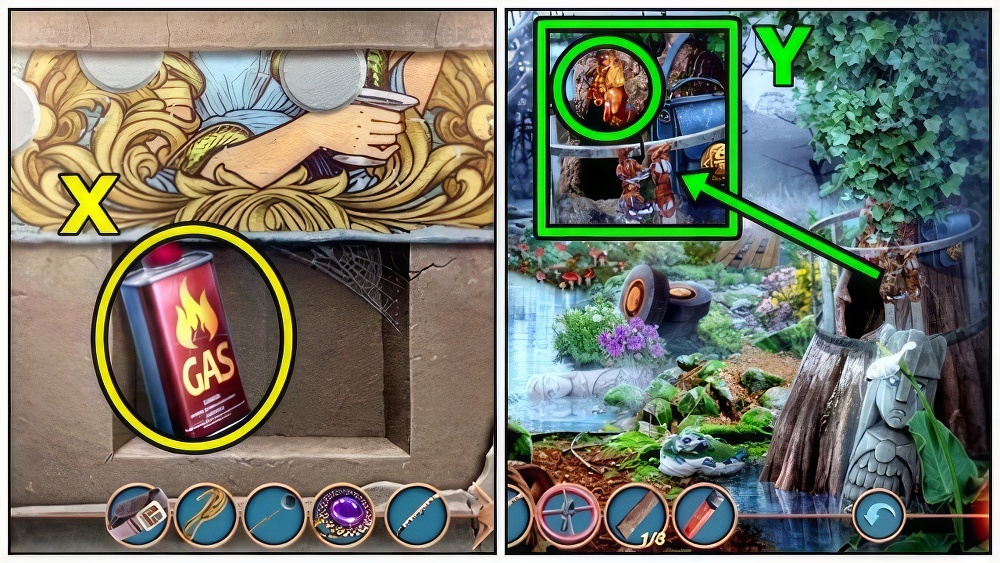
- Take LIGHTER FLUID (X).
- Return to Forest Path.
- LIGHTER FLUID on EMPTY LIGHTER, receive LIGHTER.
- Use LIGHTER (Y), take RULER.
- Return to Alice’s Pharmacy.
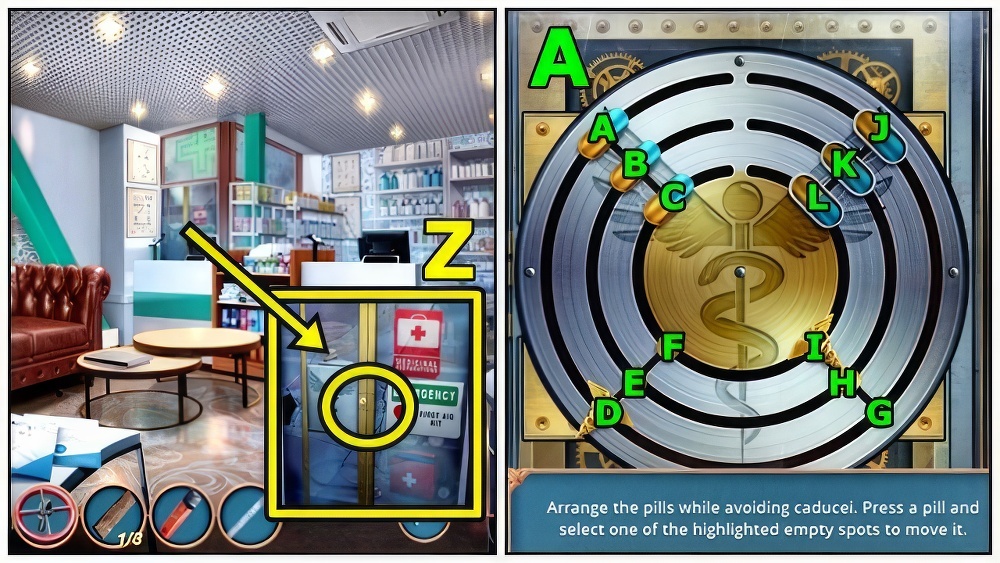
- Add MIRROR (Z), then RULER.
- Arrange the pills while avoiding caducei.
- Press a pill and select one of the highlighted empty spots to move it.
- Solution: (A) Easy (C-F)-(F-I)-(I-L)-(B-C)-(C-F)-(F-I)-(L-K)-(I-L)-(K-J)-(A-D)-(J-K)-(D-G)-(G-J).
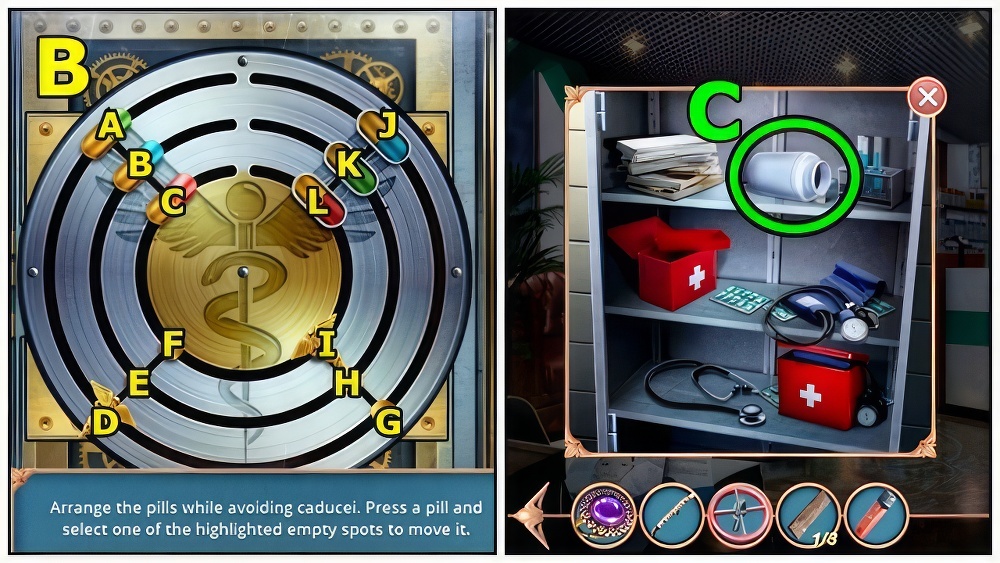
- Solution: (B) Hard (C-F)-(F-C)-(A-D)-(D-G)-(G-J)-(J-K)-(B-A)-(C-B).
- (B-C)-(A-D)-(C-B)-(D-G)-(G-J)-(B-C)-(K-L)-(C-F)-(L-K)-(F-I)-(I-L).
- Take BIG PILL JAR (C).
- Use LIGHTER (D), take METAL BRUSH and MAGNET. Add BIG PILL JAR. Take CLIPPERS, add SHORT BELT and STURDY BRANCH. Take ECHOLOCATOR.
- Move down.
- Use MAGNET (E).
- Play puzzle (F), take LADDER.
- Add LADDER (G).

- Select (H).
- Take UMBRELLA (I).
- Go to Forest Path.
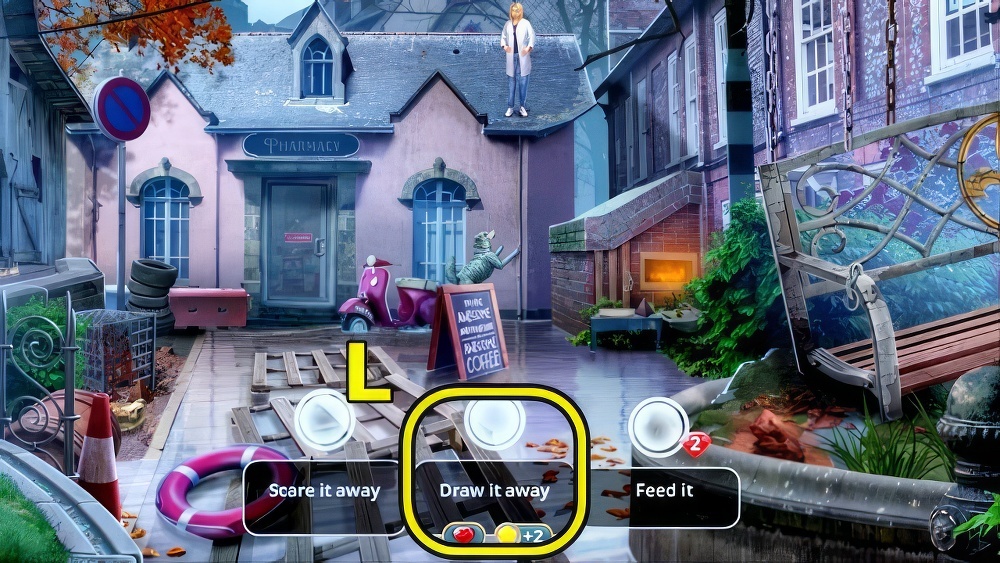
- Use UMBRELLA (J). Take SCOOP, read, move. Use ANTIQUE RING, take EMBROIDERED HANDKERCHIEF and OIL.
- Use METAL BRUSH (K) and OIL. Take HOOKS.
- Return to Nessie’s Lair.
- Play puzzle (L), take FAKE MOUSE.
- Give FAKE MOUSE (M), take JACK HANDLE.
- Move down.
- Use CLIPPERS (N), receive WIRE.
- WIRE and EMBROIDERED HANDKERCHIEF on SCOOP.
- Use SCOOP (O), receive CUFFLINK.
- Play puzzle (P), take SCREWDRIVER.
- Return to Outskirts of the Town.

- Use SCREWDRIVER (Q), remove, take OXYGEN TANK. Use CUFFLINK, take NUT.
- Add VALVE (R) and NUT, take SCUBA GEAR TUBE, BOARD 2/3 and SHOEHORN.
- Return to Alice’s Pharmacy.
- Use SHOEHORN (S), open, examine.

- Find items (T), take LAKE AND RIVERS MAP.
- Give LAKE AND RIVERS MAP (U).
- Select (V).
- Take ALICE’S BAG (W).
- Return to Outskirts of Town.

- Open ALICE’S BAG, take MAP and PERFUME.
- Add PERFUME (X), take BOARD 3/3.
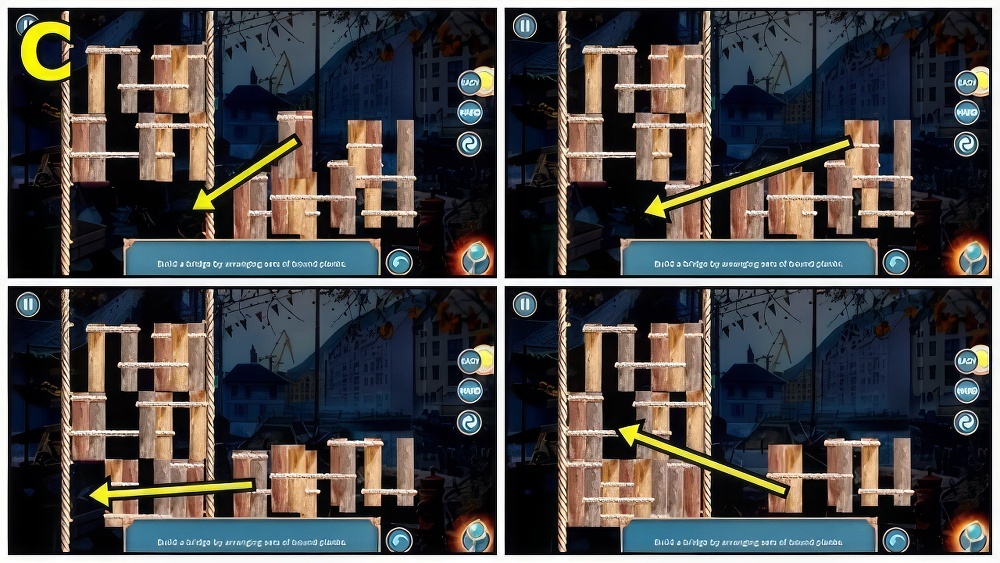
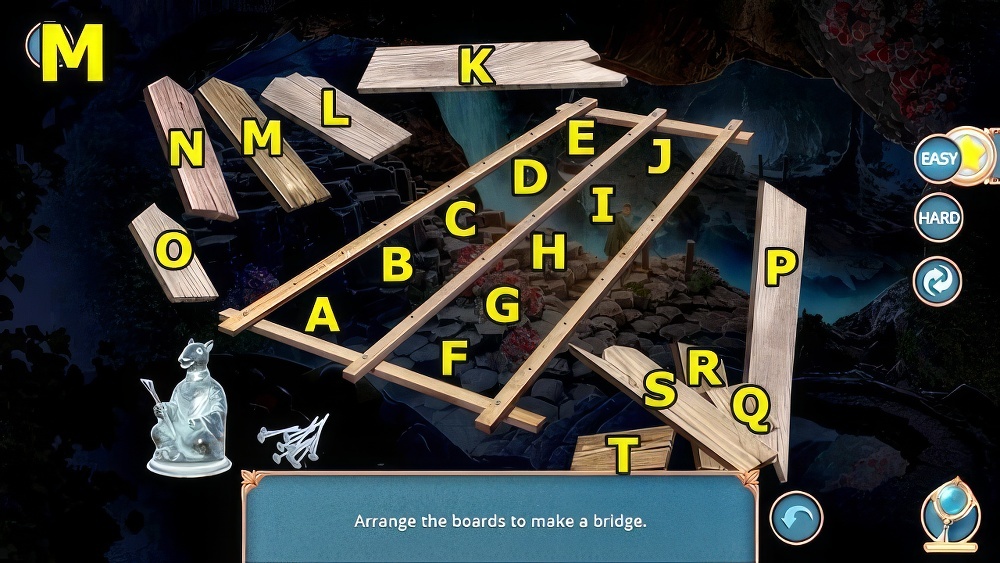
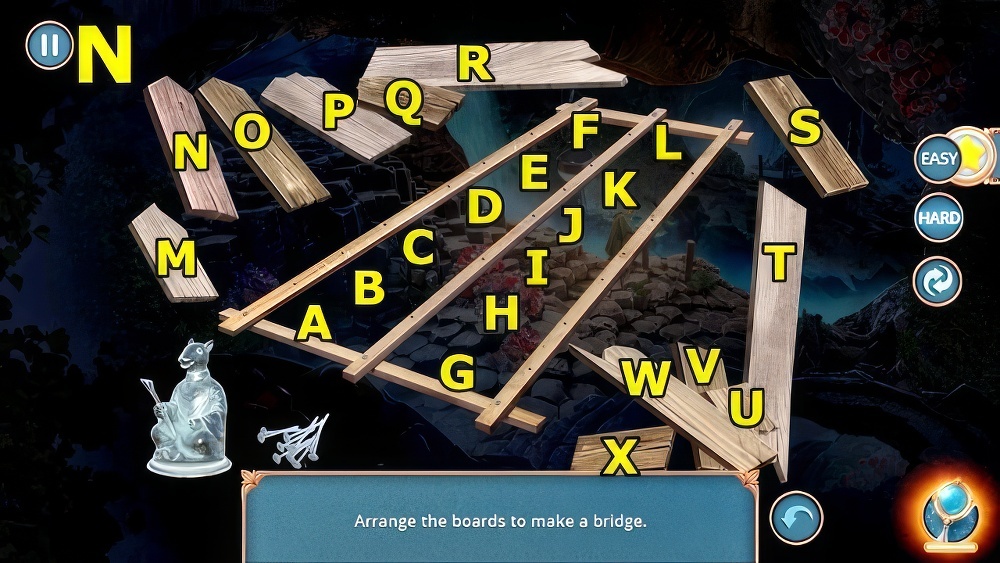
- Add ROPE (Y), HOOKS and BOARD.
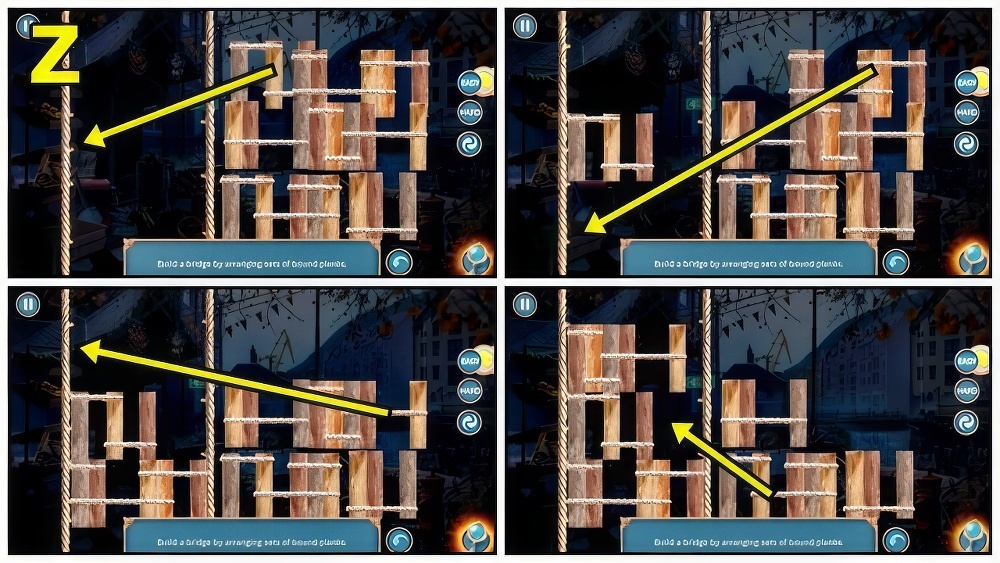
- Build a bridge by arranging sets of bound planks.
- Solution: (Z) Easy.
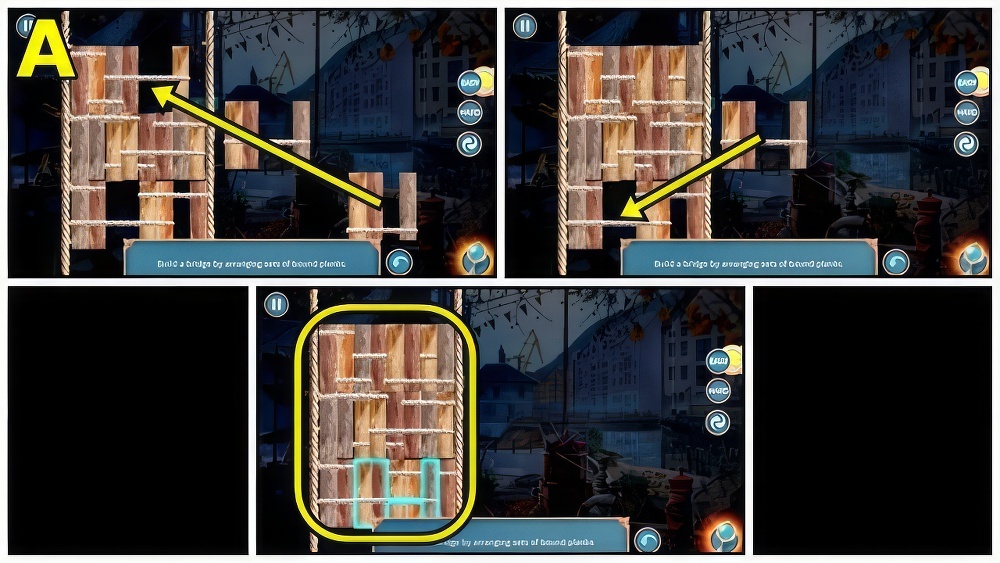
- Solution: (A) Easy.
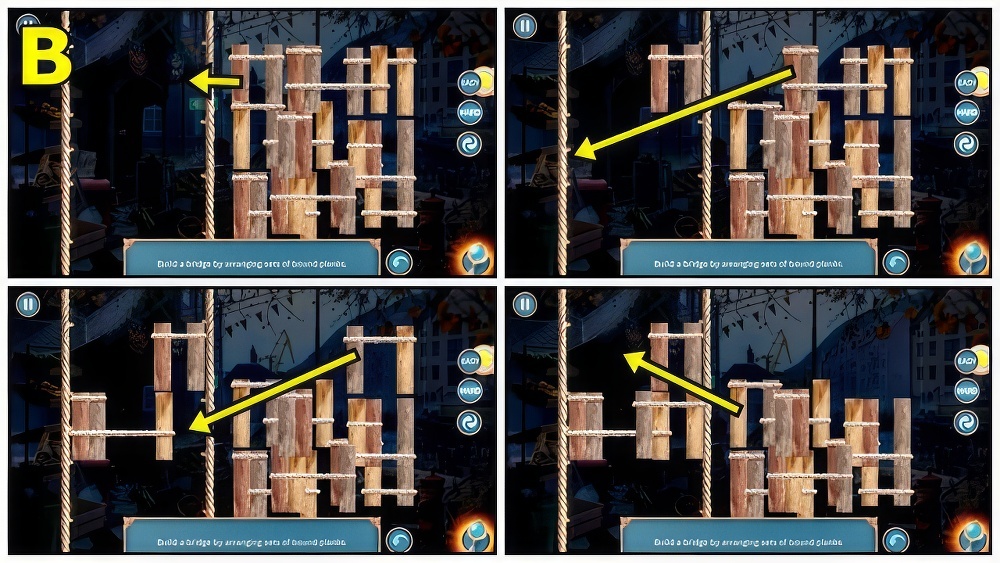
- Solution: (B) Hard.
- Solution: (C) Hard.
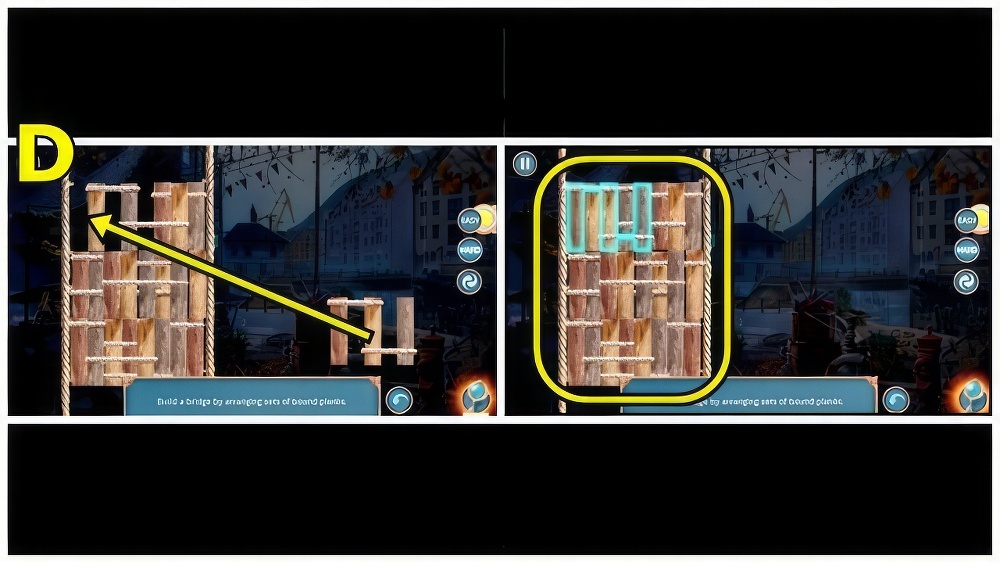
- Solution: (D) Hard.
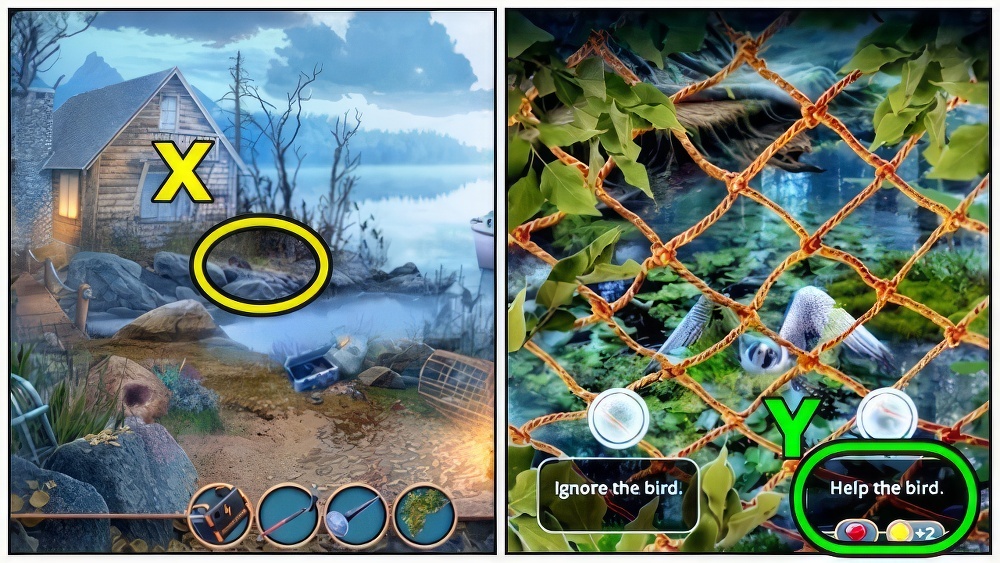
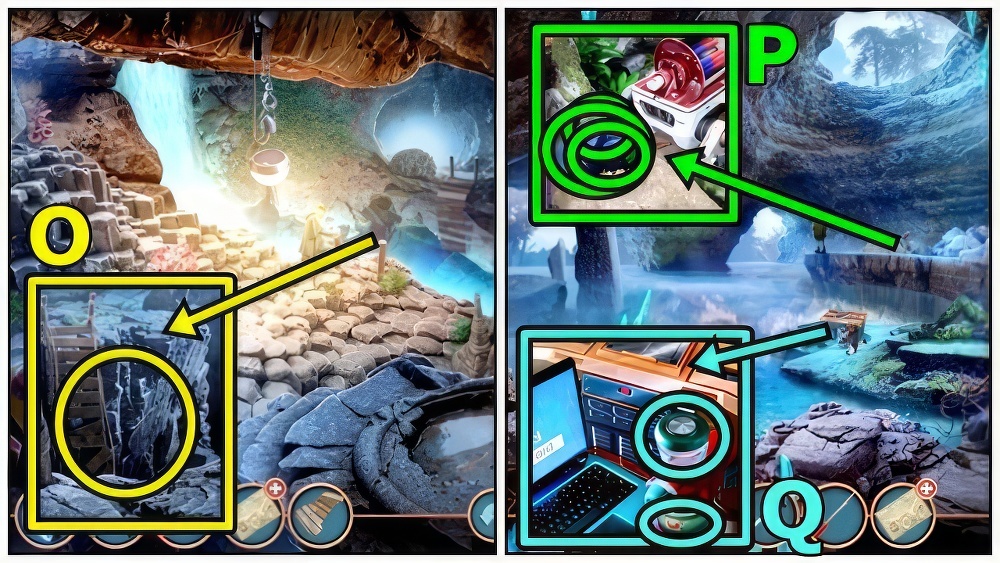
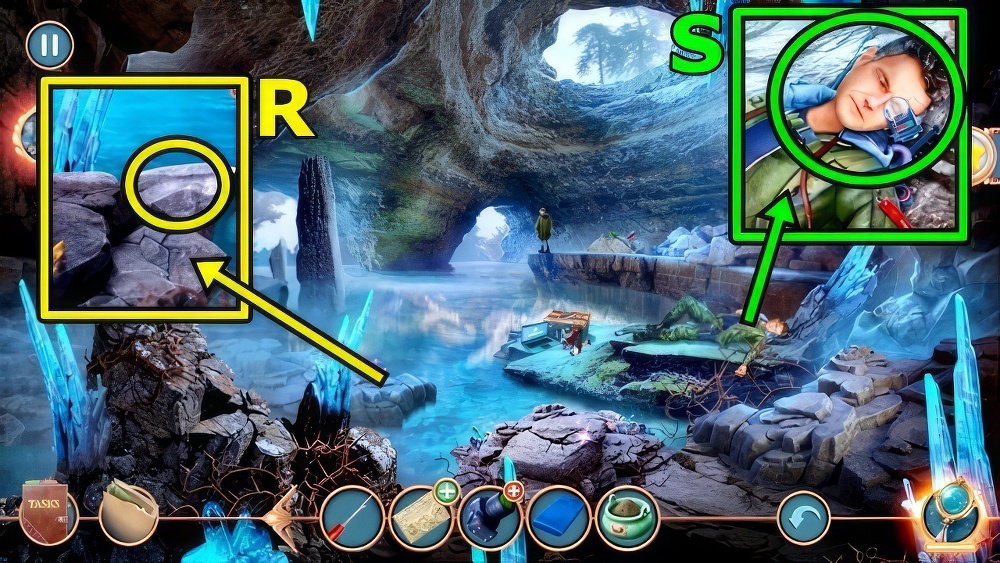
- Go to Lake Shore.
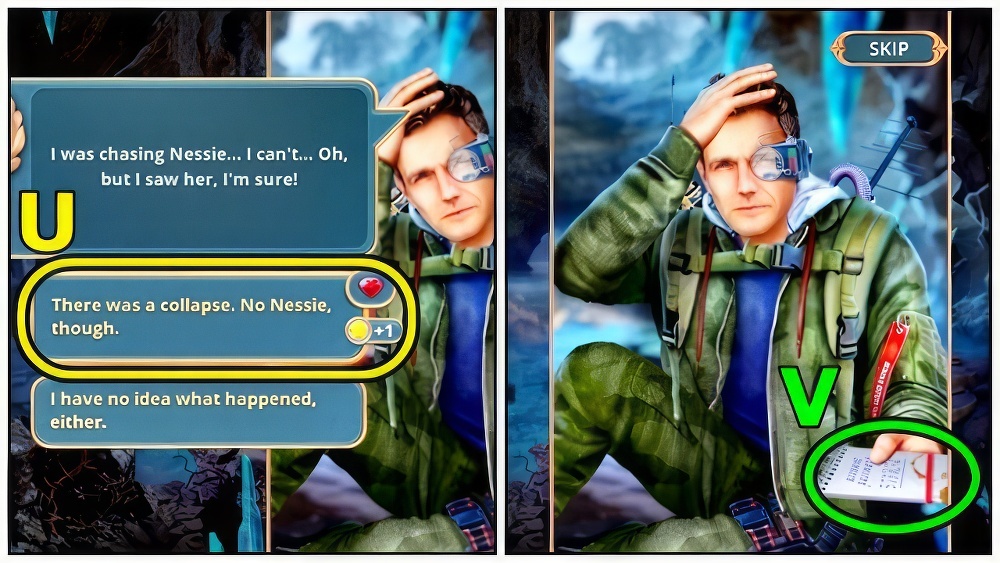
- Read (E), take SLINGSHOT BASE and MASK. Add JACK HANDLE, receive JACK.
- SCUBA GEAR TUBE and MASK on OXYGEN TANK, receive SCUBA GEAR.
- Use SCUBA GEAR (F).
- Play puzzle (G), take DIAMOND TIARA.
- Add DIAMOND TIARA (H).
- Use the symbols to figure out which colors the central symbol is made out of.
- Click the correct stones in the right order.
- Solution: (I) Easy A-C-D, B-E-D, A-E-D. Hard A-C-D, B-E-D, A-E-D, B-C-D, C-E-D.
- Take ACORN (J) and PIN.
- Return to Nessie’s Lair.
- Use JACK (K), add ECHOLOCATOR.
- Choose one of three paths at the right moment.
- If you meet a spider, the game will start over.
- Solution: (L).
- Read (M).
- Return to Forest Path.
- Insert PIN (N), take ORANGE and COMPASS.
- Use MAP (O) and COMPASS.
- Go to Glade Near the Town.
- Use PIN (P), receive GEAR.
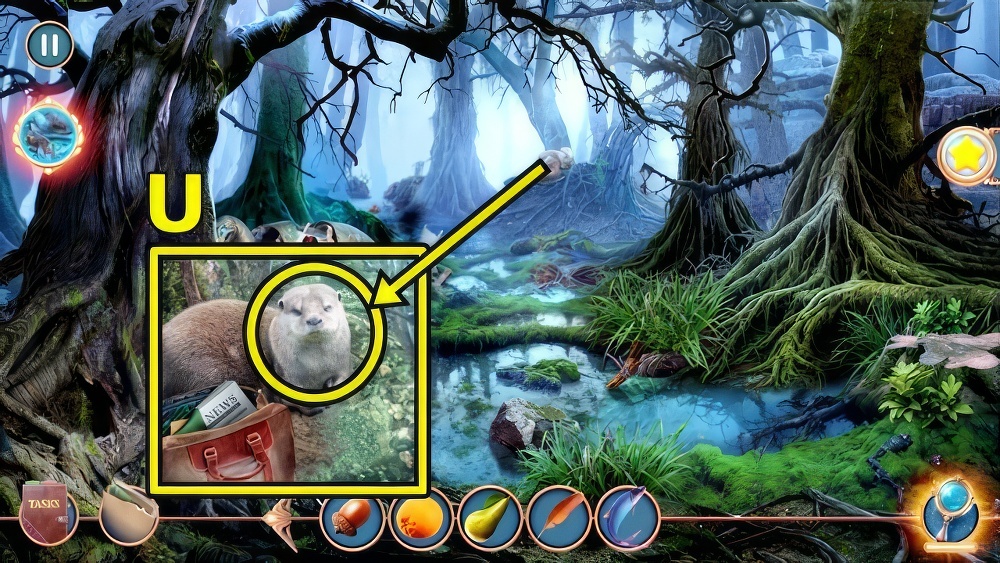
- Take PEAR (Q) and FEATHER, add GEAR.

- Solution: (R) Easy Ax3-F-E-Dx3-Cx3.
- Solution: (S) Hard Cx3-Dx4-Bx2-Ex3-Ax4-Hx4.
- Take FISH (T).
- Return to Swamp.
- Give FISH (U), take BOLT and HAIR BAND.
- Return to Glade Near the Town.

- ACORN and HAIR BAND on SLINGSHOT BASE, receive SLINGSHOT.
- Use SLINGSHOT (V), receive APPLE.
- Add ORANGE (W), PEAR and APPLE.
- Solution: (X) Easy (B-A)-(B-A)-(E-A)-(B-A)-(C-B)-(E-C)-(E-B)-(A-E)-(D-E)-(D-A)-(D-E).
- (D-B)-(E-D)-(C-D)-(C-D)-(C-E)-(C-D)-(A-C)-(A-C)-(A-C)-(D-A)-(D-C)-(A-D)-(A-D).
- Solution: (Y) Hard (D-A)-(C-A)-(D-A)-(E-C)-(D-E)-(D-A)-(B-D)-(F-B)-(F-D)-(E-F)-(E-F).
- (E-D)-(E-D)-(F-E)-(F-E)-(B-E)-(B-E)-(F-B)-(F-B)-(A-F)-(C-F)-(C-F)-(C-A)-(D-F)-(C-D).
- (B-C)-(A-C)-(B-A)-(B-C)-(F-C)-(B-F)-(C-B)-(A-B)-(A-B)-(A-B)-(A-C).
- Select (Z).
- Go to Lake Shore.
- Play puzzle (A), take SAW HANDLE.
- Add BOLT (B) and SAW HANDLE, receive SAW.
- Return to Flooded Street.
- Use SAW (C), receive CHAIN.
- Play puzzle (D), take CARABINE.
- Add CHAIN (E) and CARABINE, take POWDER PUFF.
- Return to Glade Near the Town.
- Add FEATHER (F) and POWDER PUFF, take GASOLINE.
- Return to Lake Shore.
- Add GASOLINE (G).
- Solution: (H) Easy.
- Solution: (I) Hard.
- Take CIRCULAR SAW BLADE (J), TWEEZERS and BROOCH.
- Take GLOVE (K). Use BROOCH, read, take CAMERA and PARCHMENT.
- Use GLOVE (L), receive SHOEHORN and COAL.
- Add PARCHMENT (M) and COAL, receive HEALING POTION RECIPE.
- Use HEALING POTION RECIPE (N). Play puzzle.
- Take BUTTON (O) and WATER. Use SHOEHORN, take BASEMENT KEY.
- Insert BASEMENT KEY (P).
- Solution: (Q) Easy Bx6-Cx3.
- Solution: (R) Hard Ax3-Bx3-Cx9.
- Enter Mr. Crossbury’s Basement.
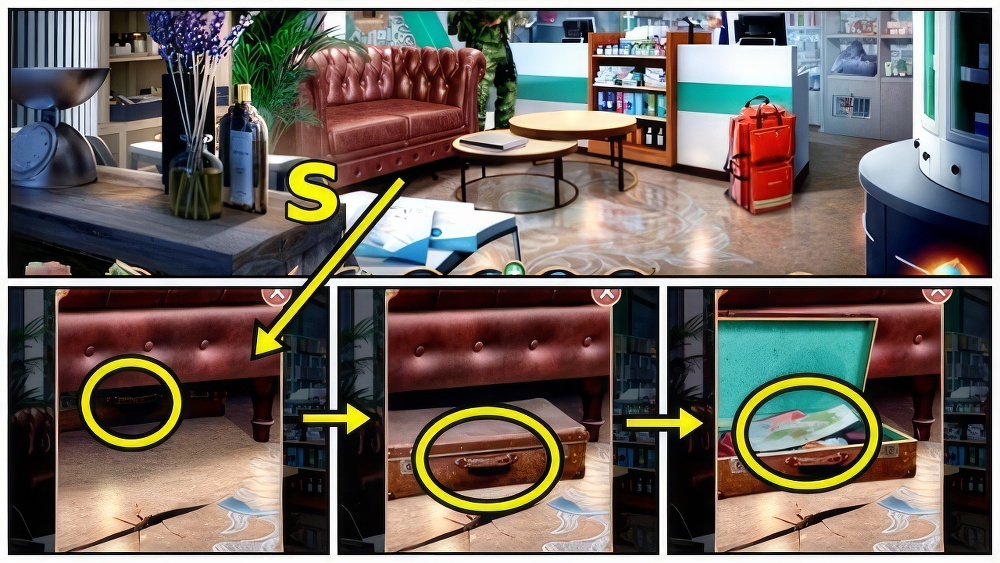
- Select (S).
- Enter Museum Exhibit Store Room (T).

- Take NEEDLE (U), COINS 1/2 and DRAGONFLY AMULET.
- Take WARRIOR FIGURINES 1/3 (V). Add DRAGONFLY AMULET, take COINS 2/2.
- Add COINS (W).
- Play puzzle (X), take HEXAGON WRENCH.
- Examine (Y).
- Use HEXAGON WRENCH (Z), take SHARK JAW.
- Move down.

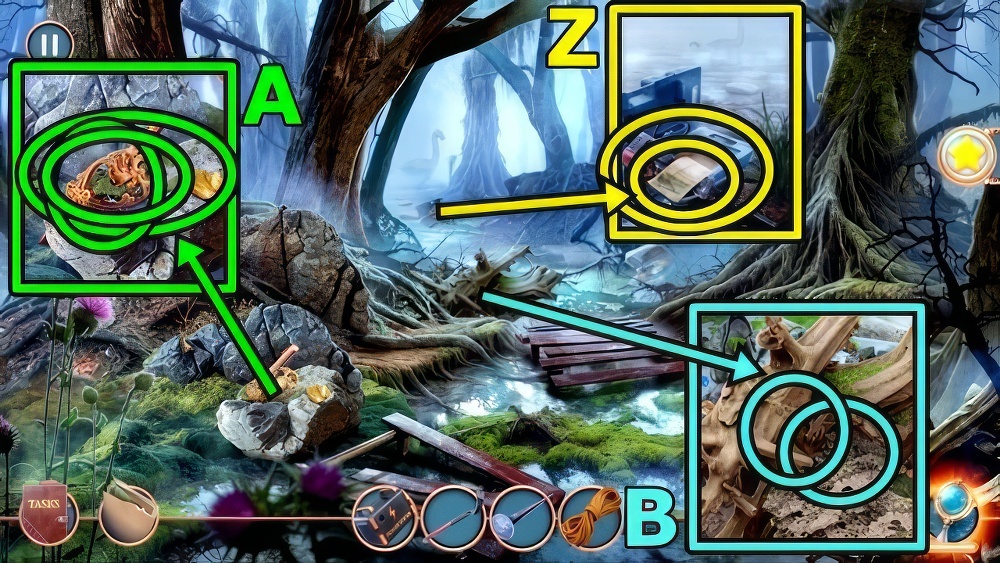
- Read (A), take WIRE PIECE and CUTTERS.
- Take METAL BRUSH (B).
- Use CUTTERS, receive CHAIN.
- Use TWEEZERS, take ELECTRONIC BOARD.
- ADD CIRCULAR SAW BLADE (C), BUTTON, CHAIN and ELECTRONIC BOARD.
- Solution: (D) Easy.
- Solution: (E) Hard.
- Receive CARVED HANDLE.
- Move down.
- Add CARVED HANDLE (F) and WIRE PIECE, take SICKLE.
- Use SICKLE (G).
- Go to Secret Path to the Bog.
- Take GYPSUM (H) and SQUARE MOLD.
- Place SQUARE MOLD (I), GYPSUM and WATER, take INCOMPLETE CAST.
- Add INCOMPLETE CAST (J).
- Play puzzle (K).
- Go to Cave Entrance.
- Select (L).
- Take COMPASS WITH NO ARROW (M).
- Take THICK ROD (N) and COLOR CRAYONS. Use TWEEZERS, receive COMPASS ARROW.
- COMPASS ARROW on COMPASS WITH NO ARROW, receive COMPASS.
- Use COMPASS (O).
- Solution: (P) Easy.
- Solution: (Q) Hard.
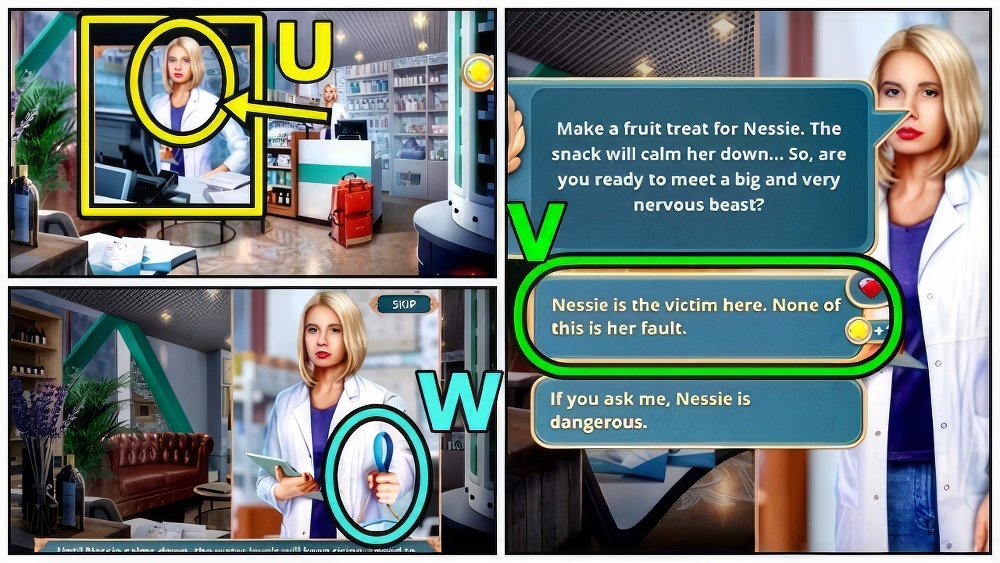
- Use CAMERA (R).
- Press (S).
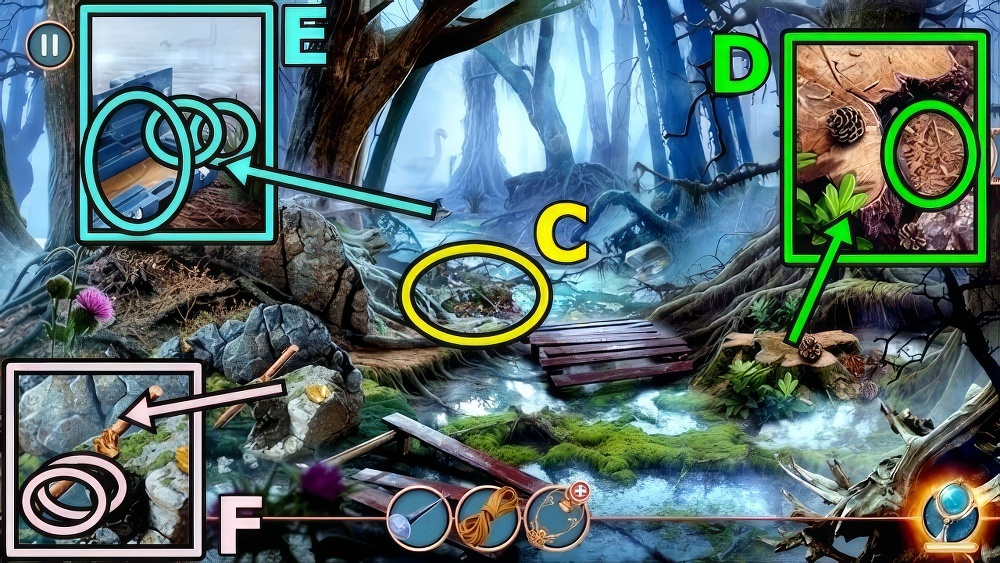
- Take BOARDS 1/2 (T) and OIL.
- Use METAL BRUSH (U) and OIL, read, take HEAVY FIGURINE and DRAWING OUTLINE.
- Add DRAWING OUTLINE (V) and COLOR CRAYONS.
- Play puzzle (W), take MORGENSTERN.
- Use MORGENSTERN (X), receive CRYSTAL. Take BOARDS 2/2.
- Use SHARK JAW, take THREADS.
- Return to Museum Exhibit Store Room.
- Add NEEDLE (Y) and THREADS, take WARRIOR FIGURINES 2/3.
- Play puzzle (Z), take FRAME PART.
- Add FRAME PART (A), take TUBE EXPANDER and UNZIPPER.
- Return to Secret Path to the Bog.
- Add CRYSTAL (B), read.
- Play puzzle (C), take FLIPPER.
- Add FLIPPER (D), use CAMERA. Receive PHOTO OF THE PASSWORD.
- Add PHOTO OF THE PASSWORD (E), adjust.
- Open, take FIRST AID MANUAL, NAILS and APRON.
- Move down.
- Add THICK ROD (F) and APRON, take WINDING MECHANISM PART.
- Add WINDING MECHANISM PART (G).
- Solution: (H) Easy.
- Solution: (I) Hard.
- Take CHAINSAW (J).
- Return to Cave System.
- Take BROKEN BRIDGE (K).
- Use CHAINSAW (L), read, take POINTER.
- BOARDS, HEAVY FIGURINE, NAILS and POINTER on BROKEN BRIDGE.
- Solution: (M) Easy (L-A)-(O-B)-(N-C)-(M-D)-(S-E)-(K-G)-(R-H)-(T-I)-(Q-J)-(P-F).
- Solution: (N) Hard (P-A)-(M-B)-(N-C)-(O-D)-(Q-E)-(W-F)-(T-G)-(R-H)-(V-I)-(X-J)-(S-K)-(L-U).
- Receive BRIDGE PART.
- Add BRIDGE PART (O).
- Go to Underground Lake.
- Take DANIEL’S CAMERA (P), TOWEL and PEPPERCORNS.
- Add PEPPERCORNS (Q), take GROUND PEPPER.
- Add TOWEL (R), take WET TOWEL.
- GROUND PEPPER and WET TOWEL on FIRST AID MANUAL, receive FIRST AID KIT.
- Give FIRST AID KIT (S).

- Solution: (T) B-C-A-G-E-D.
- Select (U).
- Take DANIEL’S CODE (V).
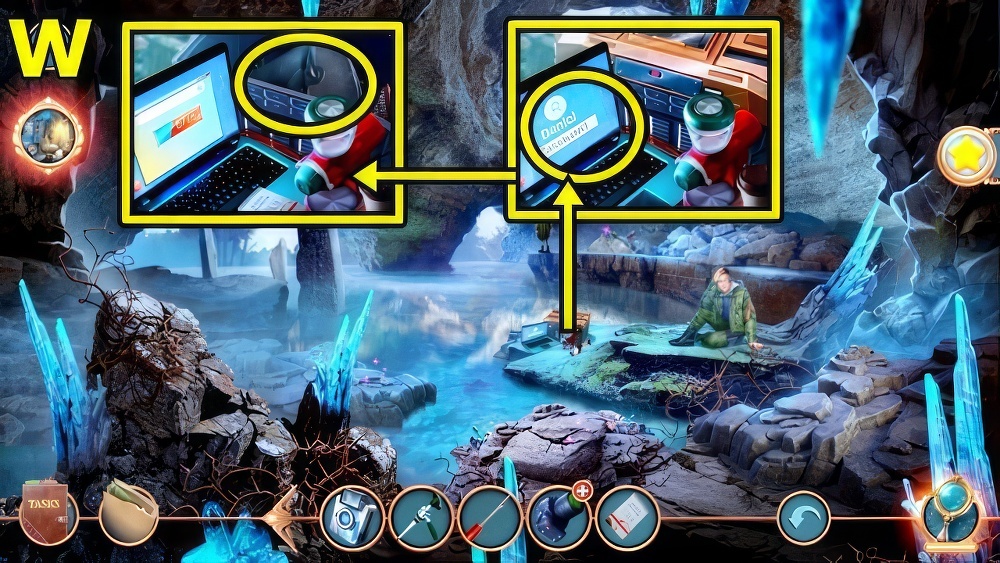
- Add DANIEL’S CODE (W), take BUCKET.
- Use TUBE EXPANDER (X), take HAMMER.
- Use BUCKET (Y), receive BUCKET OF SAND. Use HAMMER, take STATUETTE MODEL.
- Return to Cave Entrance.

- Read (Z), use BUCKET OF SAND. Take AWL.
- Use AWL (A), read. Take CROSSBURY’S NOTES.
- Return to Mr. Crossbury’s Basement.
- Add STATUETTE MODEL (B), take WARRIOR FIGURINES 3/3.
- Add CROSSBURY’S NOTES (C).
- Play puzzle (D), take BROKEN SNAKE FIGURINE.
- Add BROKEN SNAKE FIGURINE (E), take BRUSH, THIN CROSS SCREWDRIVER and MAGNET.
- Return to Underground Lake.
- Add WIRE PIECE (F) and MAGNET, take PINS KIT and NEW BATTERY.
- THIN CROSS SCREWDRIVER on DANIEL’S CAMERA, add NEW BATTERY.
- Solution: (G) (Ix5-Kx2-L-right)-(Ax9-B-D-right)-(Ex6-Fx3-H-left).
- Select (H). Receive MODIFIED CAMERA.
- Give MODIFIED CAMERA (I).
- Take AMULET (J).
- Select (K).
- Return to Secret Path to the Bog.

- Insert AMULET (L), take GEOLOCATION BEACON and INSTRUMENT BASE.
- Use UNZIPPER, take CROSS-SHAPED KEY.
- Return to Museum Exhibit Store Room.
- Add WARRIOR FIGURINES (M) and CROSS-SHAPED KEY. Read.
- Solution: (N) Easy.
- Solution: (O) Hard.
- Solution: (P) Hard.
- Use CAMERA (Q).
- Move down.
- Play puzzle (R), take SEPTUM RING.
- Insert SEPTUM RING (S), take BROKEN REMOTE. Add BRUSH, receive SILICONE LUBRICANT.
- Use SILICONE LUBRICANT (T), read, find items, take ANTENNA and HANDLE.
- Return to Cave Entrance.
- PINS KIT and HANDLE on INSTRUMENT BASE, receive ROPE WEAVING TOOL.
- Add ROPE WEAVING TOOL (U), take LASSO.
- Use LASSO (V), take PAPER RIBBON.
- Enter Cave System.
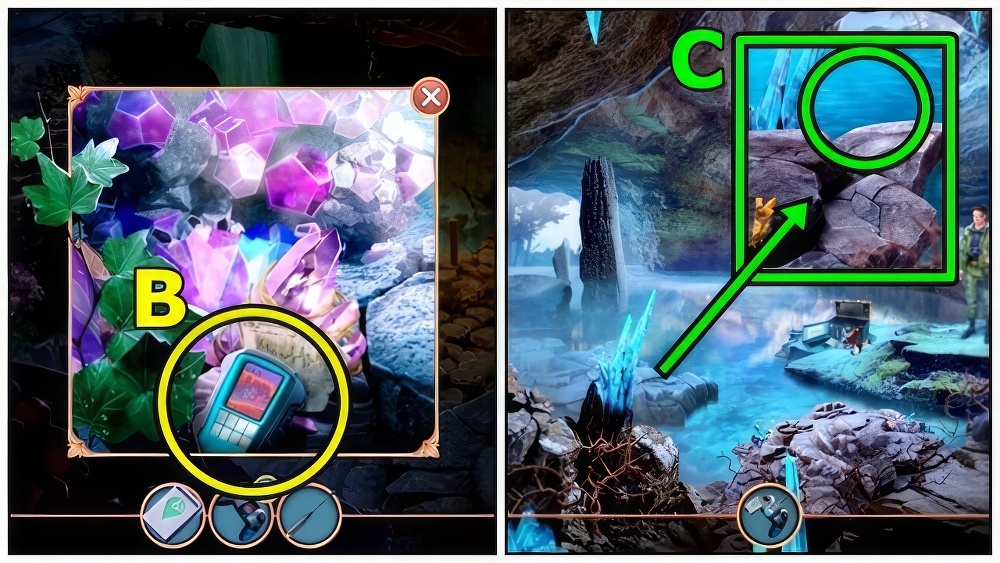
- Play puzzle (W), take RESIN.
- Add PAPER RIBBON (X) and RESIN, take SONAR BLUEPRINT.
- Add SONAR BLUEPRINT (Y).
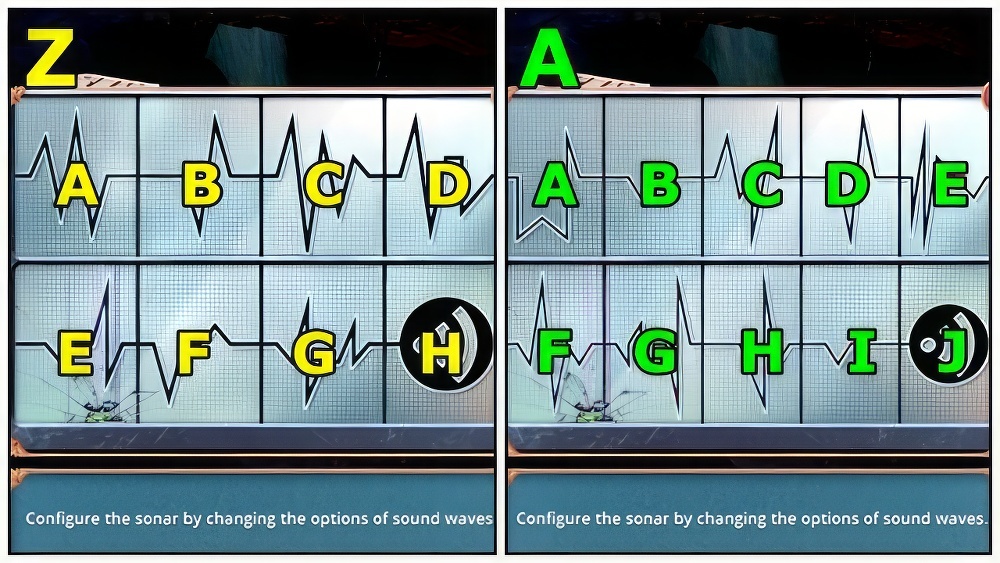
- Solution: (Z) Easy Ax7-B-Cx6-Dx3-Ex7-Fx6-Gx7-H.
- Solution: (A) Hard Ax3-Bx4-Dx5-Ex4-Fx2-Gx7-Hx3-Ix2-J.
- Take SONAR (B).
- Go to Underground Lake.
- GEOLOCATION BEACON, ANTENNA and SONAR on BROKEN REMOTE, receive REMOTE CONTROL.
- Use REMOTE CONTROL (C).
- Solution: (D) Easy.
- Solution: (E) Easy.
- Solution: (F) Hard.
- Solution: (G) Hard.
- Walkthrough Bonus Chapter, at the link below.


I wasn’t given the option to play puzzle P to receive the screwdriver so couldn’t receive the scuba tank and got stuck 🙁 I was playing for free so chose 0 stars each time I don’t know if that was why xx