
Myth or Reality 1: Fairy Lands (Bonus Chapter, Extra) – You will play as Mariam, a girl from the main chapter who is trying to save the missing fairies from the clutches of another villain who uses them for profit. An inquisitive girl Meryem receives a letter from Queen Mab, several of her friends have disappeared and she asks for help. Meryem goes to the fairies and takes up the investigation.
Bonus Chapter, Extra Walkthrough

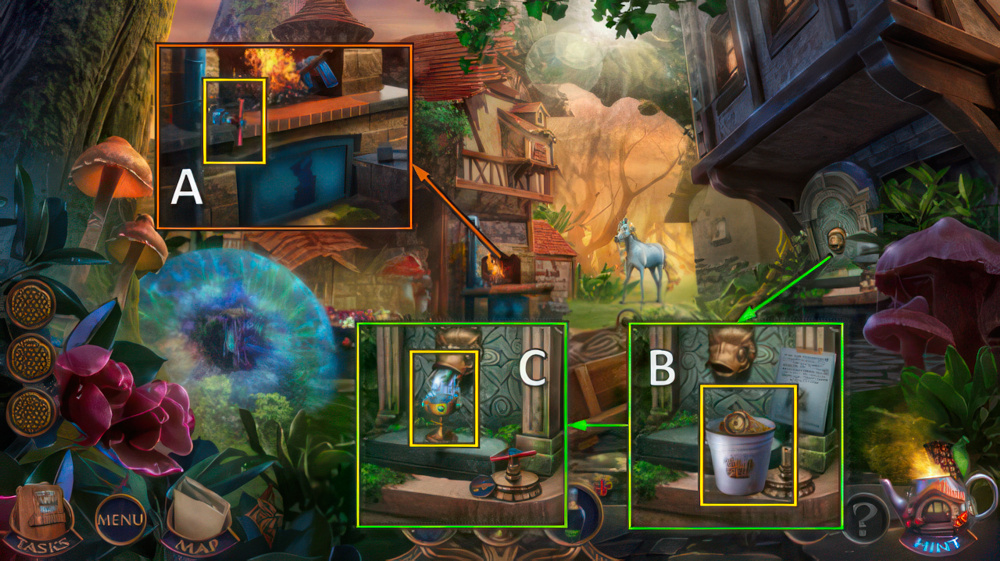
- Take OVEN MITT and INCOMPLETE FISHING ROD (A).
- Take MAGNET, take FAN with OVEN MITT (B).
- Use FAN, take STRING, GLOWING MUSHROOM and note (C).
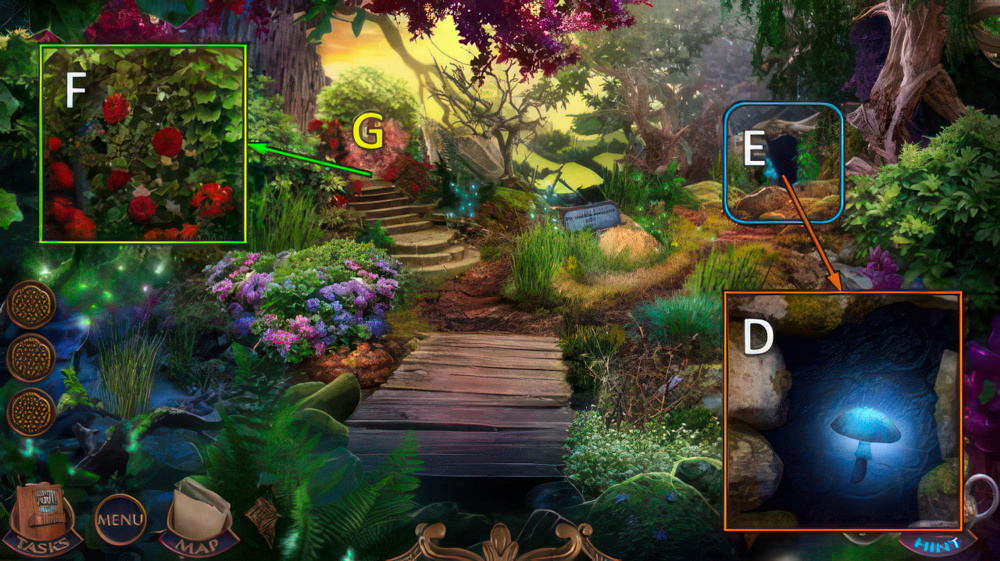
- Place GLOWING MUSHROOM (D).
- Play puzzle (E), receive GLOWING PENDANT.
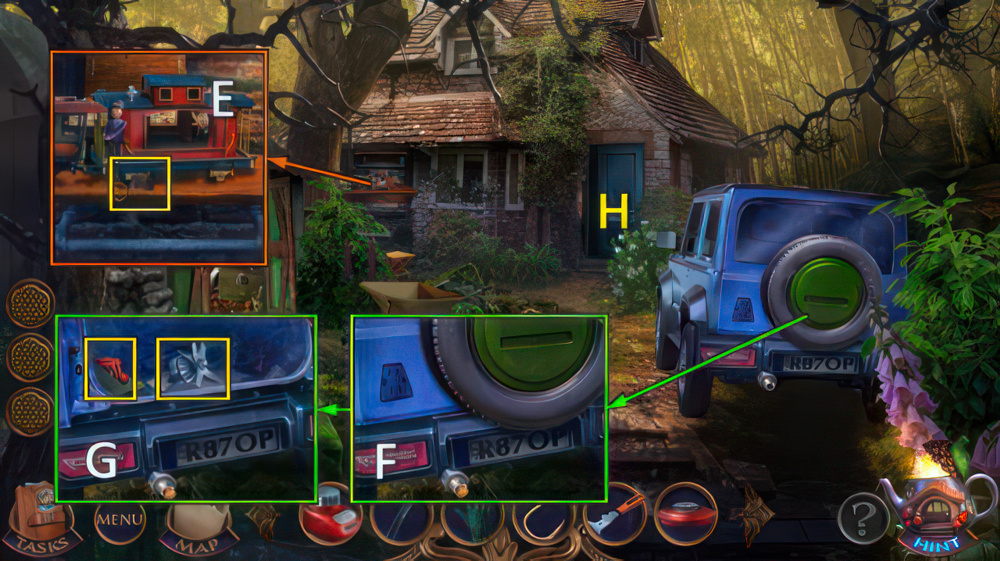
- Use GLOWING PENDANT (F).
- Go (G).

- Take EMBLEMS 1/2 and SEASHELL (H).
- Use SEASHELL, take LEATHER PATCH (I).
- Place LEATHER PATCH and STRING , take EMBLEMS 2/2 (J).

- Place EMBLEMS (K).
- Easy solution (L): Px2-R-Qx6-Nx2-Ox2-Rx2-Qx4.
- Rx2-Qx4-M-O-Nx2-M.
- Hard solution (S): Tx3-Yx2-U-Vx2-Z-Wx6-Ax2.
- Xx3-Ax3-Tx3-X-Vx3-A.
- Take WATERING CAN and DOOR KNOCKER (B).

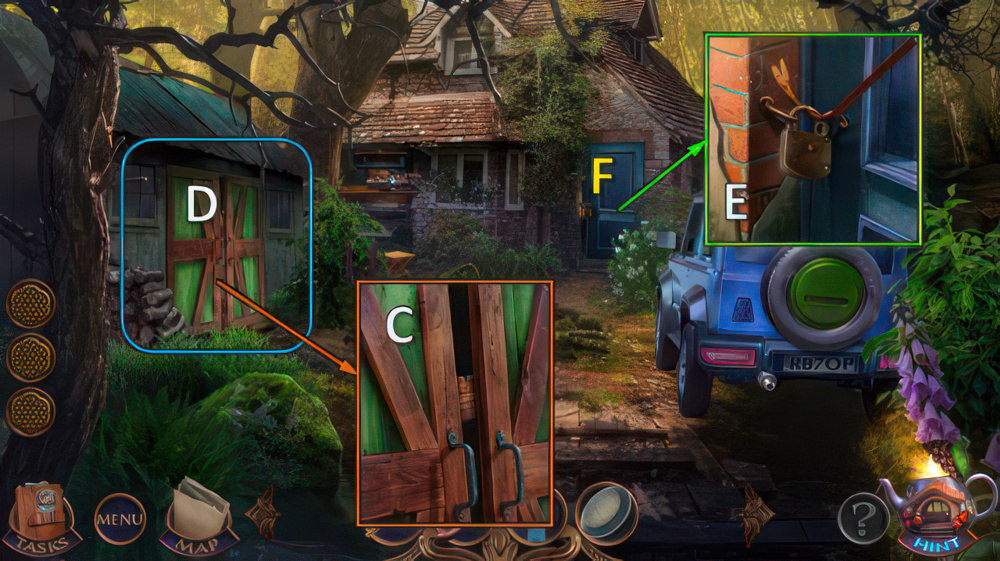
- Place DOOR KNOCKER (C).
- Go (D).
- Talk (E).
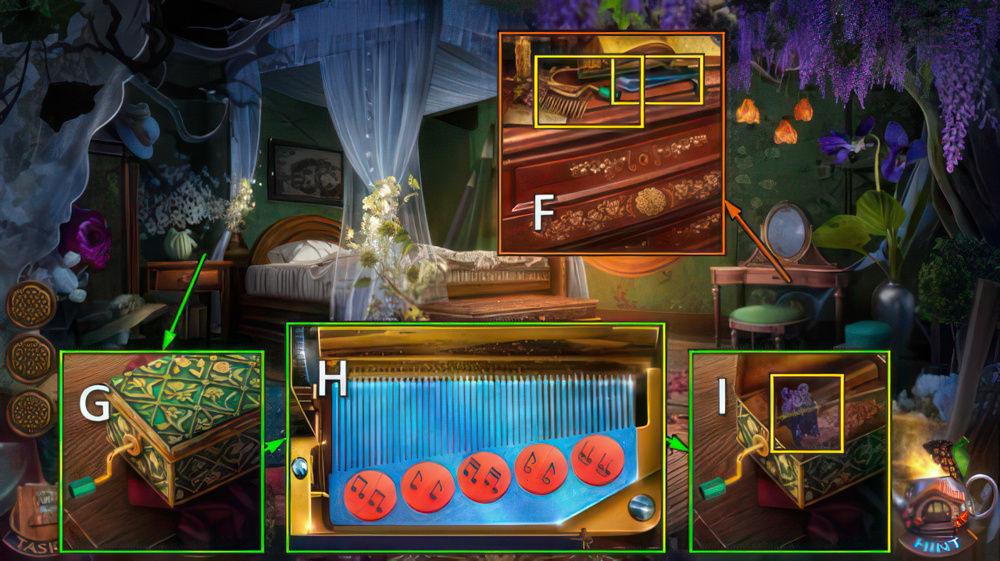
- Take BROKEN NAIL CLIPPER and MUSIC BOX CRANK (F).
- Place MUSIC BOX CRANK (G).
- Easy and hard solution (H).
- Take CHEST KEY (I).

- Use CHEST KEY, take CORKSCREW HANDLE and GOLD RAKE (J).
- Walk down twice.

- Use GOLD RAKE, take FAIRY MEDALLION.
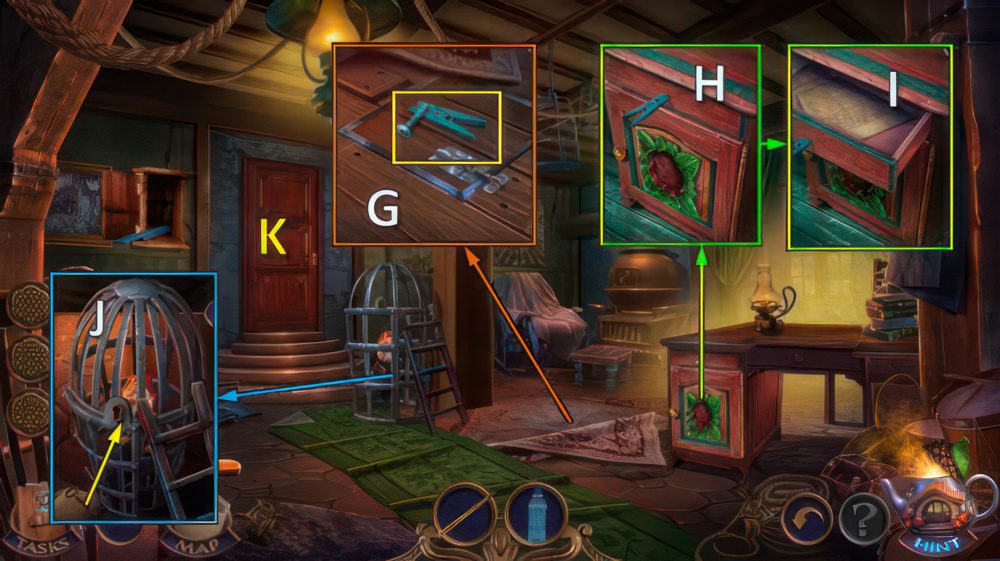
- Take HOOK with MAGNET (K).
- HOOK on INCOMPLETE FISHING ROD, receive FISHING ROD.
- Use FISHING ROD (L), retrieve PRUNER (M).
- Go (N).

- Use PRUNER, take NAIL CLIPPER PART (O).
- Use WATERING CAN, take FLOWER (P).
- Place FLOWER (Q).
- Take note and GOLDEN GOBLET, take CORKSCREW with CORKSCREW HANDLE (R).
- Go (S).

- Use CORKSCREW, take SLEEPING POTION VIAL and SIEVE (T).
- Walk down twice.
- Use SIEVE, take BOLT (U).
- Go to Queen’s House.
- NAIL CLIPPER PART and BOLT on BROKEN NAIL CLIPPER, receive NAIL CLIPPER.

- Use NAIL CLIPPER, take CRYSTAL FLOWER NECTAR and STAR AMULET (V).
- Walk down.
- Place STAR AMULET (W).
- Play puzzle (X), receive MIRROR.
- Place MIRROR (Y).
- Go (Z).
- Take VALVE with FAIRY MEDALLION (A).
- Take note, FRAME INLAYS 1/2 and SAND (B).
- Place GOLDEN GOBLET and VALVE, take MAGIC WATER and OINTMENT (C).

- Use OINTMENT (D), take METAL PIPE (E).
- Place MAGIC WATER (F).
- Receive MAGIC SPELL.
- Use MAGIC SPELL (G).

- Use SAND, take SHOVEL and HANDSAW (H).
- Take OVEN FORK (I).
- Use SHOVEL, take BLUE POWDER (J).
- Walk down.
- CRYSTAL FLOWER NECTAR and BLUE POWDER on SLEEPING POTION VIAL, receive SLEEPING POTION.

- Use SLEEPING POTION, take BELL (K).
- Go (L).

- Use BELL (M).
- Easy solution (N): 1-2-3-4-4.
- Hard solution (O): 1-1-2-3-4-5-5-6-6.
- Take BLACKSMITH FIGURINE (P).

- Place BLACKSMITH FIGURINE (Q), take CORK (R).
- Use OVEN FORK, take FRAME INLAYS 2/2 (S).
- Go to Queen’s House.

- Place FRAME INLAYS, take FILE and LIGHTER (T).
- Use HANDSAW, take FRUIT PEELER (U).
- Use LIGHTER, take CAN OPENER (V).
- Go to Dwarf Settlement.

- Use CAN OPENER (W), take APPLE (X).
- APPLE on FRUIT PEELER, receive PEELED APPLE.
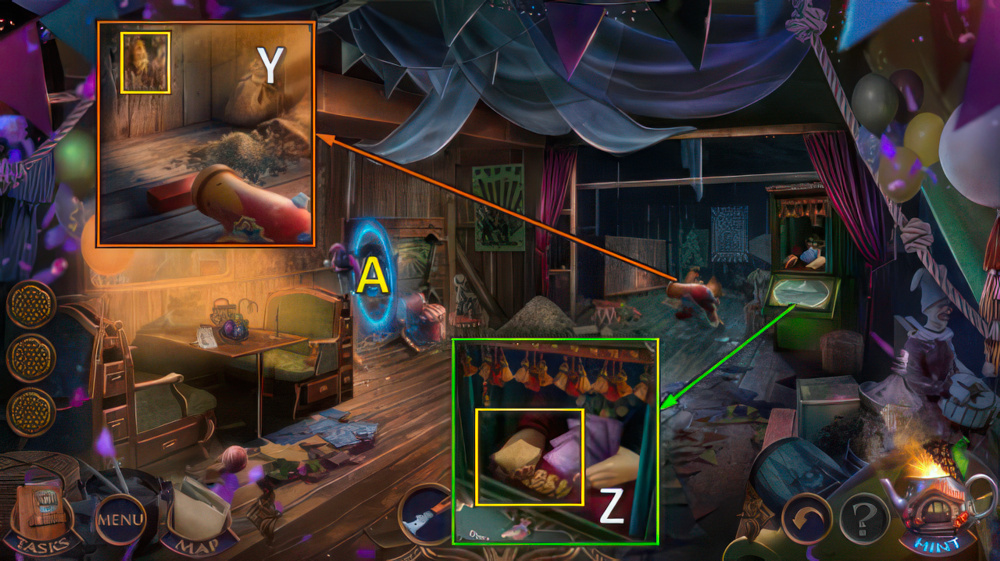
- Offer PEELED APPLE (Y).

- Place CORK, take AXE, WATER and FOLDING CHAIR (Z).
- Place FOLDING CHAIR (A).
- Use FILE, take WHETSTONE (B).
- WHETSTONE on AXE, receive SHARP AXE.
- Use SHARP AXE (C).
- Play puzzle (D), receive CROWBAR.
- Use CROWBAR (E).
- Go (F).
- Move rug, take SCREW and CLOTHESPIN (G).
- Use CLOTHESPIN (H), take NEWSPAPER (I).
- Use NEWSPAPER and METAL PIPE, move key (J).
- Go (K).

- Take JUICER BASE, RAG and TWEEZERS (L).
- Place WATER and RAG (M), take RICHARD’S CANE and ANTLERS (N).

- Place ANTLERS (O), take BATTERY and GLOVE (P).
- Walk down twice.

- Place BATTERY (Q).
- Easy solution (R): 1-2-3-4.
- Hard solution (R): 1-2-3-4-5-8.
- Take PIECE OF PAPER, take HAMMER with SCREW (S).
- Use RICHARD’S CANE (T).
- Take HOOK (U).

- Place HAMMER (V), take CUCKOO BIRD (W).
- Go (X).

- Open, place CUCKOO BIRD (Y).
- Easy solution (Z): (7-8)-(3-4)-(8-7).
- Hard solution (Z): (3-5)-(7-8)-(5-4)-(8-7)
- Take SPELL DECRYPTION (A).
- Go (B).

- Place SPELL DECRYPTION and PIECE OF PAPER.
- Type O-P-E-N, take SPELL SHEET (C).
- Place SPELL SHEET, take SCRAPER and JUICER LID (D).
- Walk down twice.
- Use SCRAPER, take BUTTON (E).
- Place BUTTON (F).
- Take JUICER BLADES and note, take ROSE INLAY with TWEEZERS (G).
- Go (H).

- Place ROSE INLAY (I), take SANDPAPER and LEMON (J).
- Use SANDPAPER, open (K).
- Take AIR PUMP, take CONTAINER with GLOVE (L).
- Go (M).

- JUICER LID, LEMON, CONTAINER and JUICER BLADES, receive LEMON JUICE.
- Use LEMON JUICE (N).
- Play puzzle (O).

- Take PUPPET THEATER FRAME and CHISEL (P).
- Use CHISEL (Q).
- Take CARDBOARD HORSE, take LOCKPICK with HOOK (R).

- Use LOCKPICK (S).
- Easy and hard solution (T): 1-1-3-6-6-10-T.
- Go (V).
- Remove drape,

- take INGREDIENTS 1/3 and WHEEL (W).
- Place WHEEL, take INGREDIENTS 2/3 and HAMMER (X).
- Use AIR PUMP, take PENCIL (Y).
- Use HAMMER, take INGREDIENTS 3/3 and CARDBOARD BIRD (Z).

- Place INGREDIENTS (A).
- Easy solution (B): 1-2-3, 2-1-3, 3-2-1
- Hard solution (C): 2-3-4-1, 3-2-1-4, 1-4-3-2, 4-2-1-3.
- Take MAGIC DUST (D).
- Use MAGIC DUST (E).
- Go (F).

- Take MATCHES, RAG and SAFETY PIN (G).
- Use SAFETY PIN, take OILER and CARBOARD BUTTERFLY (H).
- Walk down twice.
- CARBOARD HORSE, CARDBOARD BIRD and CARDBOARD BUTTERFLY on PUPPET THEATER FRAME.

- Take note, place PUPPET THEATER FRAME (I).
- Play puzzle (J), receive ANCIENT COIN.
- Use ANCIENT COIN, take HAND PUPPET (K).
- Go (L).

- Use HAND PUPPET, take SCREWDRIVER and TAROT CARD (M).
- Place TAROT CARD, take MAGNET (N).
- Use PENCIL, take LOCK COMBINATION (O).
- Go (P).

- Use MAGNET (Q).
- Take FORTUNE INLAYS 1/3.
- Use RAG, take SMOKING PIPE (R).
- Place LOCK COMBINATION (S), enter 8-5-6 (T).
- Walk down twice.
- Use SMOKING PIPE,

- take FORTUNE INLAYS 2/3 (U).
- Use SCREWDRIVER, take SCRUBBING BRUSH (V).
- Use OILER and SCRUBBING BRUSH, turn handle.
- Take STRING BRACELET (W).
- Go (X).
- Use MATCHES and STRING BRACELET, take FORTUNE INLAYS 3/3 (Y).
- Place FORTUNE INLAYS, take AMULET (Z).
- Go (A).

- Use AMULET (B).
- Easy solution (C): E-E-1-2-3-E-1-2-3.
- Hard solution (D): 1-2-3-F-F-F.
Congratulations! You have completed the game Myths or Reality 1: Fairy Lands.


